Riedel Communications and Co KG ACROBATWB2 Wireless Beltpack User Manual Acrobat V3 30 Rev1 0
Riedel Communications GmbH&Co; KG Wireless Beltpack Acrobat V3 30 Rev1 0
UserManual.wiki
>
Riedel Communications and Co KG
>
ACROBATWB2 User Manual
User Manual
Navigation menu
Upload a User Manual
Namespaces
Wiki Guide
HTML
PDF
Info
Views
User Manual
Discussion / Help
Navigation


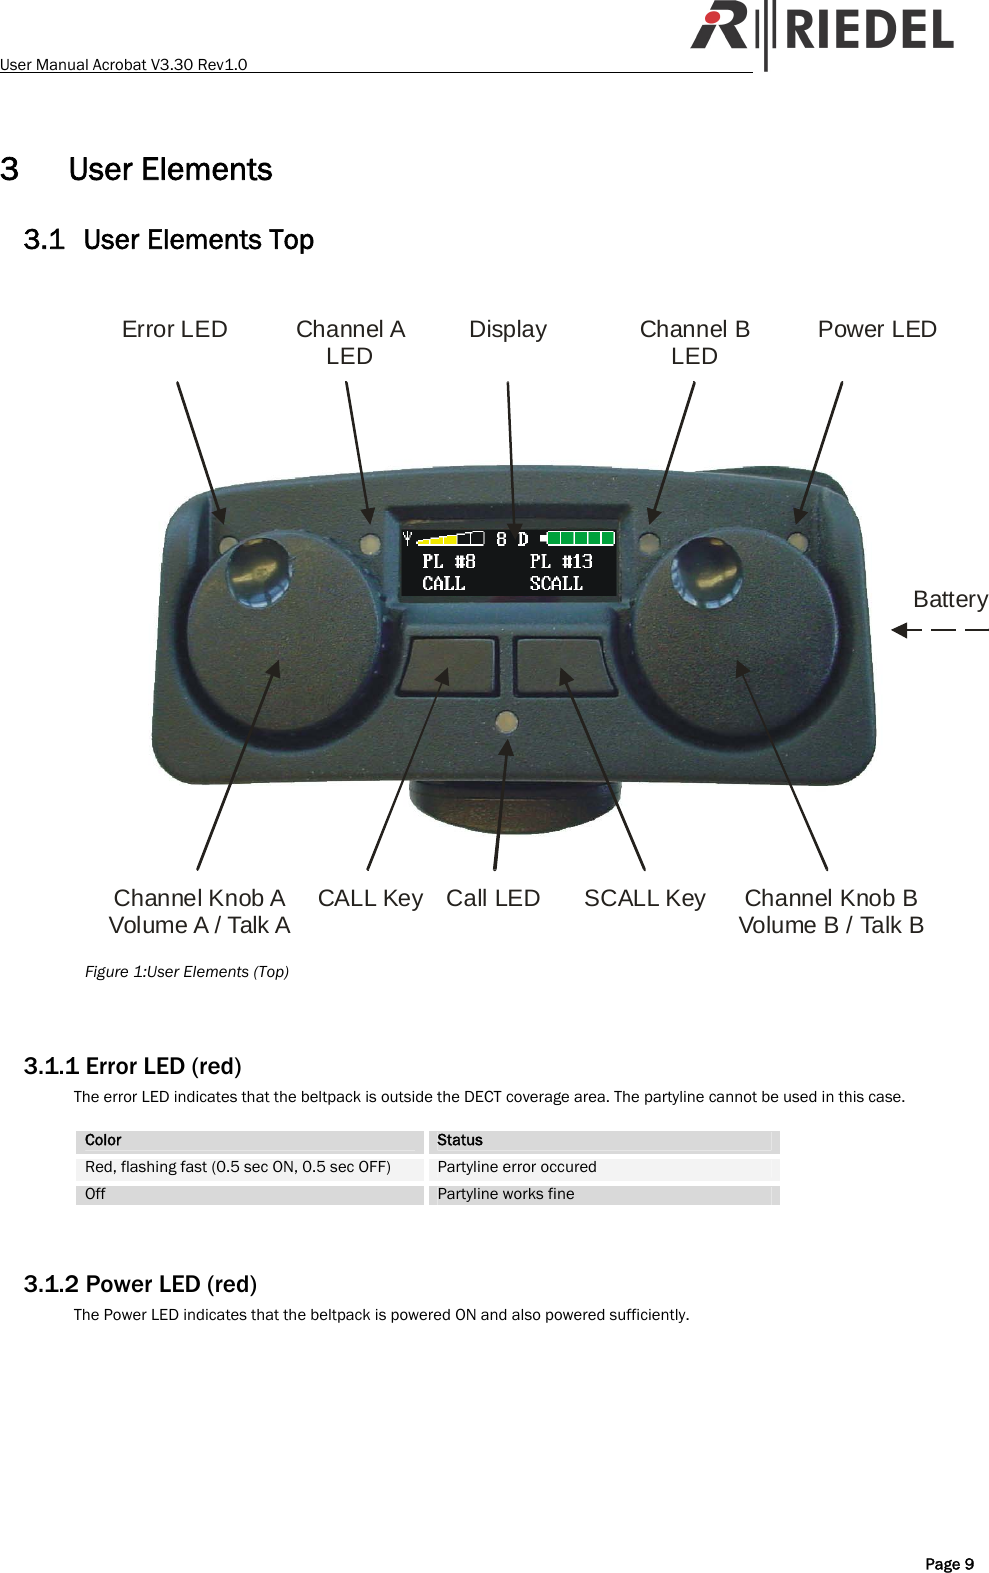
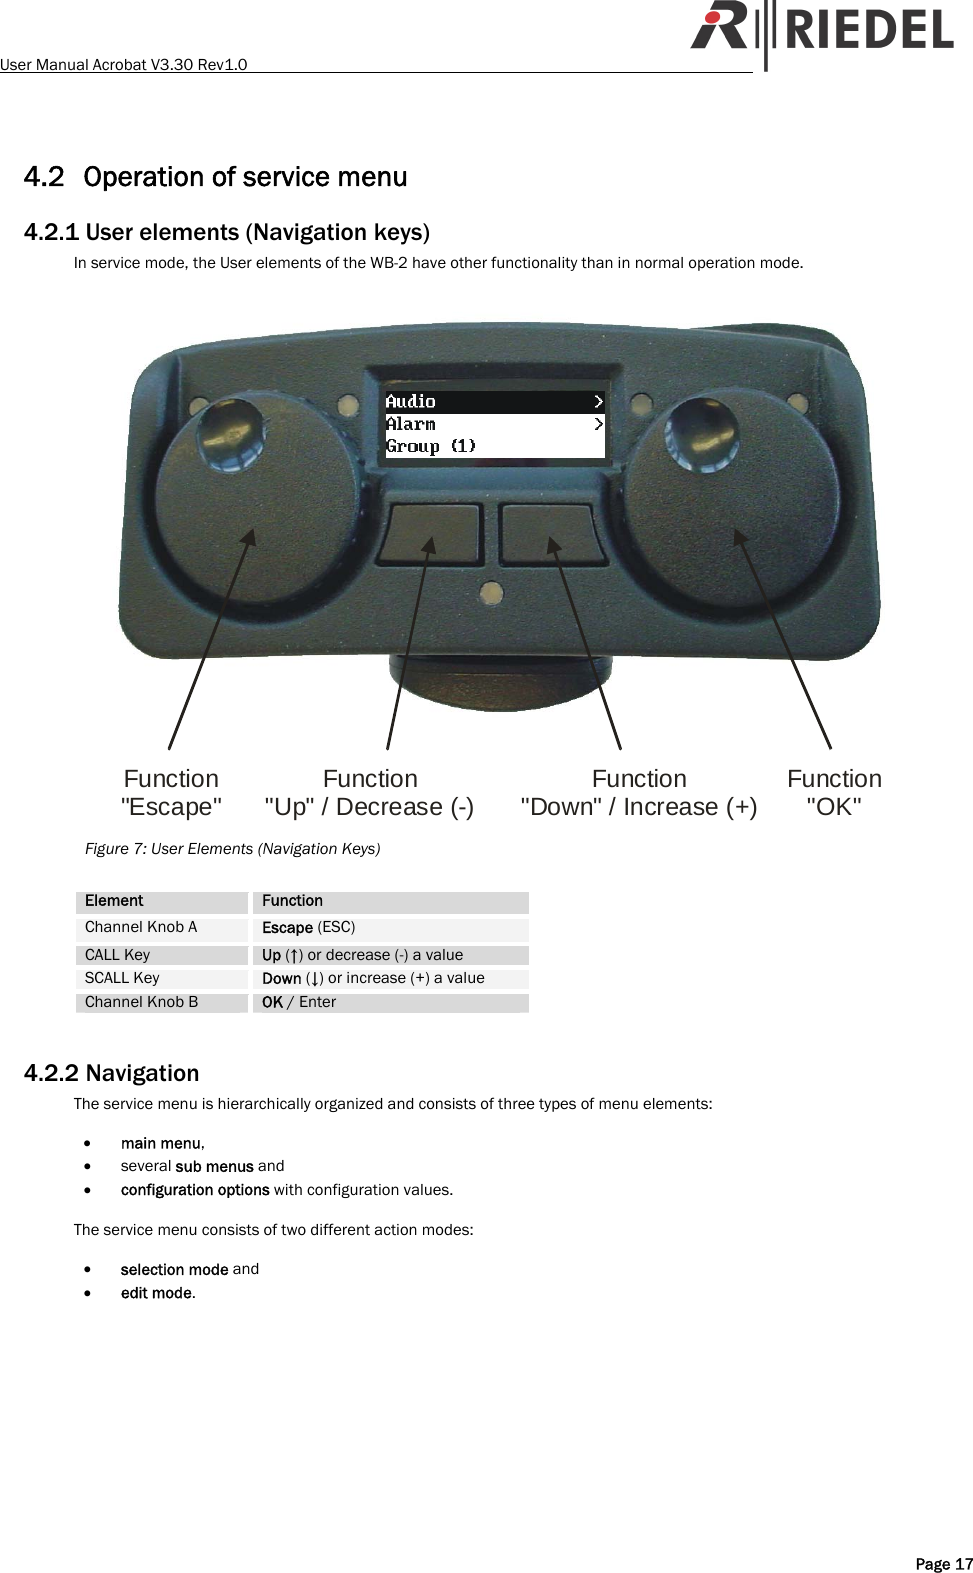
![User Manual Acrobat V3.30 Rev1.0 4.2.2.1 Initial screen After stepping into the service menu, selection mode is active and the first entry in the main menu is selected (and therefore marked inverse). Display Comment Wireless Audio > Alarm > Menu display after invoking menu. The ">" at the right side indicates, that the actual (inverse) marked menu element is a sub menu. 4.2.2.2 Navigating Use the buttons [Up] (CALL) and [Down] (SCALL) to navigate through the service menu. Wireless Audio > Alarm > Menu display after pressing the button [Down]. The ">" at the right side indicates, that the actual (inverse) marked menu element is a sub menu. 4.2.2.3 Stepping inside a sub menu If a sub menu is selected (indicated by a ">" sign at the right side of the selected entry), use the button [Ok] to step inside this sub menu. This example shows the configuration options of the Audio menu. Sideton (on) Sidetonevol. 50% Warntonevol. 10% Menu display after pressing the button [Ok] 4.2.2.4 Changing values of configuration options Sideton (on) Sidetonevol. 50% Warntonevol. 10% Menu display after pressing the button [Down]. To activate the modification of a configuration option you have to switch from selection mode to edit mode. This is accomplished by pressing the [Ok] button for a selected configuration option. Sideton (on) Sidetonevol. 50% * Warntonevol. 10% Menu display after pressing the button [Ok]. The "*" at the right side indicates, that the actual mode is edit mode. To change the value of a configuration option in edit mode, change the values using the [Up] and [Down] buttons once or consecutively. (Hint: Percentage values are changed in 5% steps) Sideton (on) Sidetonevol. 60% * Warntonevol. 10% Menu display after pressing the button [Down] several times. To save the changed value of a configuration option, press the button [OK]. To discard the changes of a changed configuration option, press the button [Escape]. 4.2.2.5 Exiting service menu To exit the edit mode or exit the menu to the upper menu level - or if already in the main menu level - exit the service menu completely - use the [Escape] button once or consecutively. Page 18](https://usermanual.wiki/Riedel-Communications-and-Co-KG/ACROBATWB2/User-Guide-1328409-Page-18.png)
![User Manual Acrobat V3.30 Rev1.0 Display Comment Save changes? No Yes Menu display after pressing the button [Escape]. Pressing the left button (labeled "No") will discard all changed value. Pressing the right button (labeled "Yes") will save all changed value. 4.2.3 Menu structure (Overview) Menu element Possible values ╠══ Wireless ║ ╠═══ Name: BP-041_G2 Displays Beltpackname (WB2) ║ ╠═══ Timeslots (even) Displays timeslot parity (even) ║ ╚═══ ARI. 10-1b-2f-f7-00 Displays ARI ║ ╠══ Audio ║ ║ ║ ╠═══ Sidetone (on) on|off ║ ╠═══ Sidetonevol. 50% Percent (50%) ║ ╠═══ Warntonevol. 10% Percent (10%) ║ ╠═══ Channel A ║ ║ ╠═══ Local talk (on) on|off|dip ║ ║ ╚═══ Btn A (latched) latched|momentary|dip ║ ╠═══ Channel B ║ ║ ╠═══ Local talk (on) on|off|dip ║ ║ ╚═══ Btn B (latched) latched|momentary|dip ║ ╚═══ MicType (dyn) dyn.|elect.|dip ║ ╠══ Alarm ║ ╠═══ low batt (off) on|off ║ ╠═══ low RF (on) on|off ║ ╚═══ out of sync (on) on|off ║ ╠══ Partyline selection ║ ╠═══ ChanA PL # 1 (1, 2, … 18) ║ ╚═══ ChanB PL # 2 (1, 2, … 18) ║ ╠══ Firmware ║ ╠═══ 1 V3.27.2 Jun 17 2009 Version Bootloader 1 ║ ╠═══ 2 V3.28.2 Jul 6 2009 Version Bootloader 2 ║ ╚═══ A V3.28.2 Jul 6 2009 Version Application ║ ╠══ Hardware ║ ╠═══ HW-Rev: 1.0.0 Hardware-Revision ║ ╠═══ IP: 192.168.5.62 IP-Address ║ ╚═══ 00-50-C2-8B-9F-08 MAC-Address ║ ╚══ Default settings The Default settings are marked blue/bold. Page 19](https://usermanual.wiki/Riedel-Communications-and-Co-KG/ACROBATWB2/User-Guide-1328409-Page-19.png)