Riello S p A 20142444 RiCLOUD NA WiFi Thermostat User Manual
Riello S.p.A. RiCLOUD NA WiFi Thermostat
User manual

RiCloud Control System
User Manual
Boiler RF Receiver (20142446)
Thermostat (20142444)
Wifi Box (20142445)

49
ENGLISH
SUMMARY
1 GENERAL INFORMATION ....................................................50
1.1 General notices ..................................................................... 50
1.2 What is the RiCLOUD for? ..........................................................51
1.3 Modes of use .........................................................................52
1.4 Glossary of technical terms .....................................................52
1.5 RiCLOUD control Class Declaration, according to the ErP Directive .. 54
2 INSTALLATION ..................................................................56
2.1 Contents of the package ......................................................... 56
2.2 Practical installation diagramspage ......................................... 58
2.3 Technical Data ....................................................................... 58
2.4 Three-phase installation ........................................................58
3 COMMISSIONING ..............................................................65
3.1 User interface ........................................................................ 65
3.2 Display ................................................................................. 65
3.3 Setting the date and time ....................................................... 65
3.4 Setting the heating/cooling mode ........................................... 66
3.5 Setting the operating mode .....................................................67
3.6 Setting the extra functions ......................................................69
3.7 Setting the heating/cooling time program in automatic
operating mode .....................................................................70
3.8 Setting the DHW time program .................................................72
3.9 Setting the heating/cooling room setpoint temperature ..............73
3.10 Setting the DHW setpoint temperature .....................................75
3.11 Displaying operating information ............................................76
3.12 Technical menu – Advanced programming ............................... 79
3.13 Linking function ....................................................................86
4 ALARMS AND OPERATING STATUSES ..................................... 89
4.1 LED notication lights for the WiFi Box and boiler RF receiver ** ... 89
4.2 Boiler and RiCLOUD alarms ......................................................90

50
1 GENERAL INFORMATION
1.1 General notices
Please read this manual before installing and using the device.
9 Risk of electric shock. This device should be installed by a qualied
professional and in line with the standards in force for electrical
installations. Always disconnect the power supply before installing.
9 Note to the installer:
−Most of the product parameters are factory set. If the device is activated
without a WiFi connection, the date and time should be set on the
thermostat as a minimum (this information is wiped every time the
batteries are removed and if not updated via the web). All other settings
– such as linking the receiver and the transmitter (for the WiFi Box),
usage mode and temperatures – are pre-congured.
9 These instructions must be read together with the sections of the boiler
manual regarding the room thermostat/boiler remote control. It is
recommended that the device be installed by qualied technicians.
9 RiCLOUD should be installed in the most accessible room for you as regards
controlling the room temperature (usually the living room).
9 As per the standards, RiCLOUD should be positioned 1.5 m from the oor to
make sure that you can easily read the display.
9 RiCLOUD is powered by 2 x AA batteries.
9 RiCLOUD must be kept away from sources of heat or air currents as these
may affect the accuracy of the readings from the incorporated room sensor.
9 Do not open RiCLOUD for any reason, unless to replace the batteries; it does
not require any maintenance to operate.
9 Do not press on the liquid crystal display glass as this may damage the
glass and cause problems with reading the display.
9 To clean the display, use a dry cloth only. Any seepage would damage the
liquid crystal display.

51
ENGLISH
9 When the WiFi Box is connected in ON/OFF mode to the boiler or another
device via cable, should all the thermostats be faulty or the batteries at,
the Box will show as OFF (no heating/cooling requests). The Wi-Fi Box relay
can be forced on and off manually using the APP.
9 With the WiFi Box connected in OTBus mode to the boiler via cable, should
all the thermostats be faulty or the batteries at, the Box will remain in
the last operating mode. From the APP, you can manually force the boiler
in heating mode on or off when connected to the internet.
9 With RiCLOUD connected (ON/OFF) to the boiler or another device via cable,
should all the thermostats be faulty or the batteries at, the thermostat
relay will remain in the last operating mode.
9 With the WiFi Box connected in ON/OFF or OTBus mode to the boiler via
cable, should there be a power outage, the WiFi box remains in the last
operating mode.
1.2 What is the RiCLOUD for?
The RiCLOUD allows you to check the temperature in your house and the
operation of your boiler without you needing to access it. For reasons of space
optimisation, your boiler may be located outside (for example, on a terrace or
balcony or in an outdoor space); RiCLOUD, on the other hand, is usually installed
in the largest room in the house, where it can be easily checked and adjusted.
Where installed in systems with a boiler which is not equipped with the
specic communication bus, RiCLOUD allows you to check the temperature
of the room where it is installed and consequently send the heat requests
to the house generator with no boiler remote control (domestic hot water
temperature and boiler settings/alarms cannot be managed).
For both types of installation, the RiCLOUD system allows you to check the
temperature in different zones in your house, where there are zone valves
and each one of these is connected to a single additional RiCLOUD (multi-zone
management).
If
RiCLOUD
is installed together with the WiFi Box and you have a WiFi
internet connection in your home,
RiCLOUD
system allows you to carry out
the same functions available via
RiCLOUD
itself remotely on a smartphone.

52
1.3 Modes of use
RiCLOUD means you can manage your domestic heating in a more
sophisticated way; you can decide how and when the boiler will come on
to heat your living spaces. In addition, it allows you to set the domestic
hot water temperature, without having to access the boiler panel (where
connected to the boiler via OTBus or a specic communication bus). The
purpose of this manual is to explain each of these ways of using the
device and the related functions.
1.4 Glossary of technical terms
Heating water: the water in the radiators that has been heated by the boiler.
Domestic hot water: the water heated by the boiler which is dispensed from
the domestic taps.
Fault code: this code shows on the display to ag any boiler or RiCLOUD
faults.
Original set-up: this is the control panel conguration after turning on the
device for the rst time or after a reset.
Display: this is the liquid crystal panel where each of the symbols corresponding
to the various functions are shown.
Anti-freeze function: this function ensures that any drops in temperature do
not cause the water inside the pipes to freeze and cause damage to the heating
system. This function is activated when the room temperature drops below 5°C
(this value can be changed by the qualied technical service).
NOTE
This function is active only if the boiler is in the correct operating condition (i.e.
powered and not blocked) and no hydraulic system splitting into sections.
Restore factory settings: this restores the control panel to its original set-up,
resetting any user programming excluding the system clock.
Summer: the heating system is not active in this mode (for example, during the
summer).
The boiler can dispense domestic hot water. If correctly connected and
congured (in cooling mode), RiCLOUD can be used to manage a cooling system
in the summer, turning the relay on in ON/OFF mode, in the opposite way to the
winter operating mode. The relay keeps the user request connected (e.g. a zone
valve) until the room temperature falls below a certain level.
The cooling mode requires a specic system and generator for this purpose.

53
ENGLISH
Winter: RiCLOUD dispenses domestic hot water and hot water for heating in this
mode.
T1 anti-freeze temperature: this is the temperature used when the rooms are
not lived in.
T2 economy temperature: this is the temperature used when the rooms are not
lived in during the day, at night or when you are on holiday.
T3 comfort temperature: this is the temperature at which you obtain ideal room
heating during the day.
Room temperature: this is the temperature in the room where RiCLOUD is
installed (see "NOTE 1" page 54).
Room setpoint temperature: this is the desired room temperature.
External temperature: this is the temperature outside, read using an
external probe connected to the boiler or read in another way (see "NOTE
2" page 54).
Heating curve: this is the relationship between the external temperature and
the heating ow temperature. Where external temperature data are available
(via an external probe or other method), the heating ow temperature is
automatically adjusted as the external temperature varies in order to maintain a
constant temperature in the room. The heating curve must be set by the installer
on the basis of the geographical location and type of system.
Connection via OTBus communication bus: this is a communication mode
between RiCLOUD and the boiler, where a series of information is exchanged
between the two electronic systems. This proprietary connection can be used
as opposed to the simple ON/OFF (open/closed contact) and is set by the boiler
manufacturer specically for RiCLOUD
Check the compatibility of your boiler with the OTBus connection rst.
ON/OFF connection (boiler room thermostat): this is the simple communication
method between the RiCLOUD and the boiler (or any other unit capable
of receiving this command), where the relay in RiCLOUD (or on the WiFi Box/
receiver) sends an on/off request via the room thermostat (TA) contact on the
boiler. The ON/OFF connection is also used when a request is made to another
system component such as a zone valve or similar.

54
RiCLOUD ON/OFF contact always maintains the same technical characteristics
(RiCLOUD relay, WiFi Box relay, boiler RF receiver relay) wherever it is positioned
and these must be respected when connecting the relay and the components
it controls via cable. NOTE: Never exceed the maximum electrical loads (see page
211).
NOTE 1
The display range for the room temperature is between -7°C and +50°C.
NOTE 2
The display range for the external temperature is between -40°C and +60°C.
Temperatures outside of these ranges are shown as three dashes “- - -”.
1.5
RiCLOUD control Class Declaration, according to the ErP
Directive
With reference to Delegated Regulation (EU) No. 811/2013, the data in the table
can be used to complete the product data sheets and energy labelling of space
heaters, combination heaters, packages of space heater, temperature control
devices and solar devices.
Manufacturer/Brand Model
RIELLO SpA / RiCLOUD RiCLOUD
Possible RiCLOUD congurations, the relative conguration classes and the
energy contribution to the system.
Boiler
characteristics RiCLOUD conguration
Class and
contribution
Boiler with
xed delivery
temperature (ON/
OFF control)
RiCLOUD ON/OFF connection I = 1%
Boiler with
variable delivery
temperature
(controlled by
communication
bus)
Connection via communication bus to
RiCLOUD. Delivery temperature to the
boiler calculated on the basis of one
room temperature only
V = 3%
Boiler with
variable delivery
temperature
(controlled by
communication
bus)
Connection via communication bus to
RiCLOUD.
Delivery temperature to the
boiler calculated on the basis of the
room temperature and the external
temperature (given by the external
probe or via the web).
VI = 4%
55
ENGLISH
Boiler
characteristics RiCLOUD conguration
Class and
contribution
Boiler with
variable delivery
temperature
(controlled by
communication
bus)
Connection via communication bus to
RiCLOUD.
Delivery temperature to the
boiler calculated on the basis of at least
3 distinct room temperatures. At least 3
RiCLOUDs (sensors) connected to at least
3 zone valves (actuators) are required.
VIII = 5%
Denition of classes
Class I – On/off room thermostat: a room thermostat that controls the on/off
operation of a heater. Performance parameters, including switching differential
and room temperature control accuracy are determined by the thermostat’s
mechanical construction.
Class V – Modulating room thermostat, for use with modulating heaters: an
electronic room thermostat that varies the ow temperature of the water
leaving the heater dependent upon measured room temperature deviation
from room thermostat set point. Control is achieved by modulating the output
of the heater.
Class VI – Weather compensator and room sensor, for use with modulating
heaters: a heater ow temperature control that varies the ow temperature of
water leaving the heater dependent upon prevailing outside temperature and
selected weather compensation curve. A room temperature sensor monitors
room temperature and adjusts the compensation curve parallel displacement
to improve room comfort. Control is achieved by modulating the output of the
heater.
Class VIII – Multi-sensor room temperature control, for use with modulating
heaters: an electronic control, equipped with 3 or more room sensors, that
varies the ow temperature of the water leaving the heater dependent upon
the aggregated measured room temperature deviation from room sensor set
points. Control is achieved by modulating the output of the heater.
56
2 INSTALLATION
2.1 Contents of the package
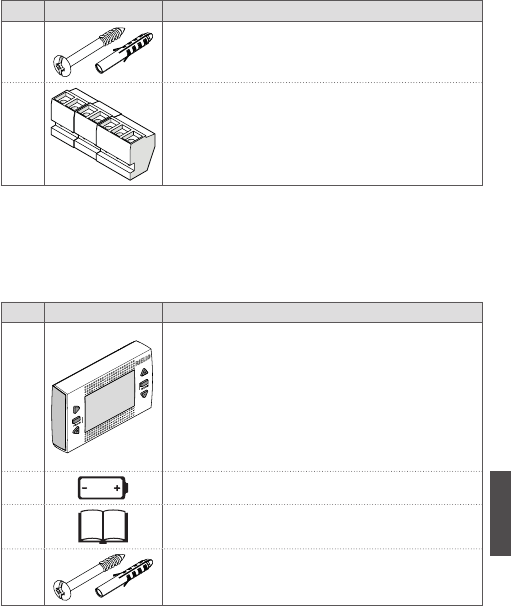
The WiFi RiCLOUD package contains the following components:
Qty Component Description
1
RiCLOUD = boiler remote control with room
programmable thermostat function (*) or room
programmable thermostat (**).
(*) where there is an active OTBus connection in one of
the following congurations: between the WiFi Box
and the boiler, between the RF receiver (optional) and
the boiler, between RiCLOUD and the boiler,
(**) where the TA connection between the WiFi Box and the
boiler is active
1
WPS/Smartlink Outputs Boiler
WiFi Box = device for communicating with
RiCLOUD programmable thermostat. It can operate
with the Boiler RF receiver (optional) via radio
frequency, with the boiler itself via cable (provided
as standard) and with your home router via a
WiFi connection. Magnetic back so that it can be
attached to the boiler’s metal casing.
1USB power adapter
1
USB cable A – USB Mini B = WiFi Box power cable
1USB cable A = cable connecting the WiFi Box and
the boiler
21.5V AA batteries
1Installer/User Manual
57
ENGLISH
Qty Component Description
2Screws with plugs
1
OTBus connector (only for boilers without one)
for an OTBus connection between the WiFi
Box and the boiler or the Boiler RF receiver
(optional) and the boiler or RiCLOUD and the
boiler. It can also be used to connect the
external probe (optional).
9 If installing additional RiCLOUDs or boiler RF receivers, you must follow the
procedure to link them to the WiFi Box (see "3.13 Linking function" page
86).
RiCLOUD package contains the following components:
Qty Component Description
1
RiCLOUD = boiler remote control with room
programmable thermostat function (*) or room
programmable thermostat (**).
(*) where there is an active OTBus connection in one of
the following congurations: between the WiFi Box
(optional) and the boiler, between the RF receiver
(optional) and the boiler, and between RiCLOUD and
the boiler,
(**) where the TA connection between the WiFi Box
(optional) and the boiler is active
21.5V AA batteries
1Installer/User Manual
2Screws with plugs
9
If installing additional RiCLOUDs or boiler RF receivers, you must follow
the procedure to link them to the WiFi Box (see "3.13 Linking function"
page 86).
58
2.2 Practical installation
diagramspage
See practical installation diagrams on
page 192.
2.3 Technical Data
See page 210.
2.4 Three-phase installation
Preparation
Before installing the device
Check that the thermostat is
compatible with the boiler (see boiler
installer manual).
The wireless RiCLOUD thermostat
can be installed anywhere, however
the most suitable place should
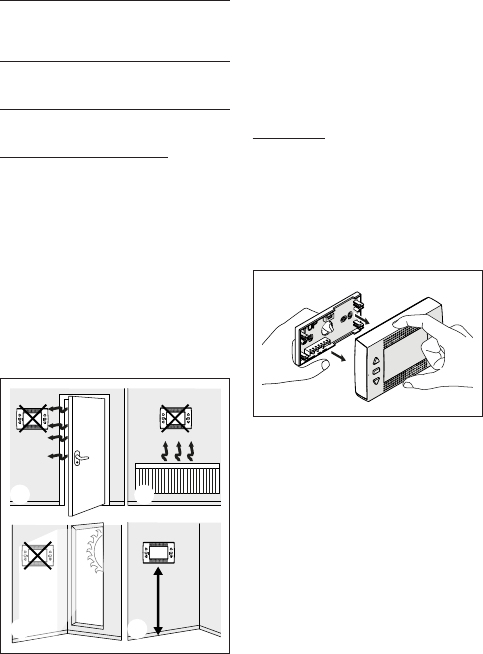
be chosen taking into account the
following:
−Avoid draughts (A).
−Do not install above sources of
heat (B).
−Avoid direct sunlight (C).
−Position at the appropriate
height (D).
1,5m
A B
C D
Wireless installation does not
require any wiring, making the
process very simple.
RiCLOUD thermostat can also be
installed with wiring, to replace
any existing thermostat, provided
compatibility is checked in advance.
Before installing the boiler control
unit (WiFi Box), disconnect the boiler
from the power supply.
Installation
The following tools are required:
−Phillips screwdriver
−Small slotted screwdriver
−Pliers and wire strippers
Installing RiCLOUD
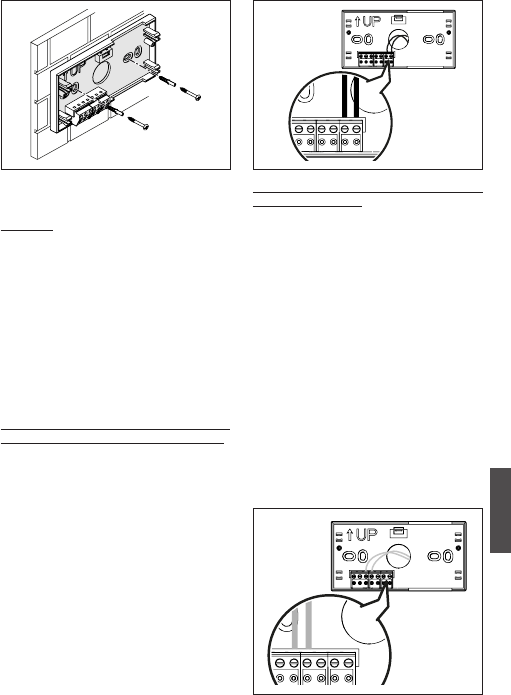
Remove RiCLOUD from its base;
Fix RiCLOUD base to the wall or
electrical box using the screws
provided, use the optics level in the
plastic wrapping to install RiCLOUD
horizontally.
Using screws other than those
PROVIDED may compromise the correct
closure of the plastic. Make sure that
the screw head is correctly inserted in
the hole.
59
ENGLISH
RiCLOUD can be installed in one of the
following ways:
Wireless
No wiring is required.
Please check the maximum open-
eld distances shown in RiCLOUD
thermostat technical data.
Loss of radio frequency
communication is agged with alarm
E82. Distances which exceed the
maximum may occasionally generate
an E82 alarm, causing incorrect
system operation.
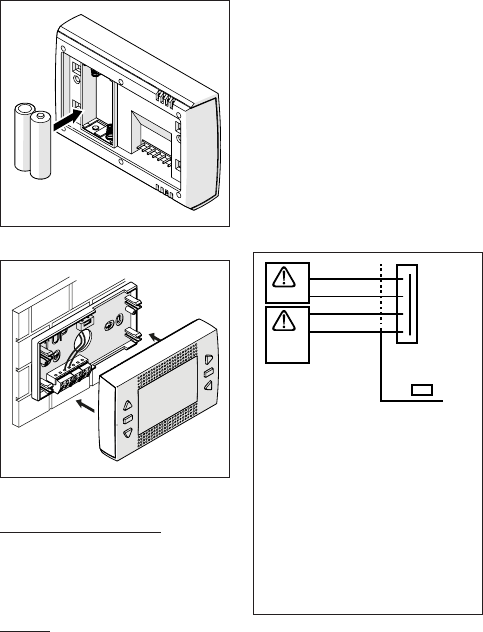
Wired in ON/OFF mode (room
thermostat contact on RiCLOUD base)
When replacing old thermostats or
as a new wired ON/OFF installation.
RiCLOUD can be connected to a
boiler, zone valve or other device.
The electrical load on RiCLOUD room
thermostat contact must not exceed
the specications for the relay itself
(see page 211). Should the electrical
load not be compatible with the
technical characteristics indicated in
RiCLOUD thermostat technical data,
it is recommended that you use an
additional separation relay.
Connect the cables from the boiler
room thermostat terminal or the
power supply for any zone valves to
RiCLOUD room thermostat terminal.
TA
ON/OFF
Wired in OTBus mode (OTBus contact
on RiCLOUD base).
Direct connection via two wires to
the boiler equipped with the same
communication protocol.
We recommend checking the
maximum cable length between
the WiFi Box and the boiler OTBus
terminal or RiCLOUD and the boiler
OTBus terminal (see page 211). For
the electrical connection to the boiler,
please see the boiler manual.
9 A wired connection via OTBus
between the RiCLOUD and the
boiler is recommended in the
absence of a WiFi Box. With
the above connection and a
WiFi Box, only one zone can be
controlled and operation via the
APP is not guaranteed.
OTBus
PROTOCOL
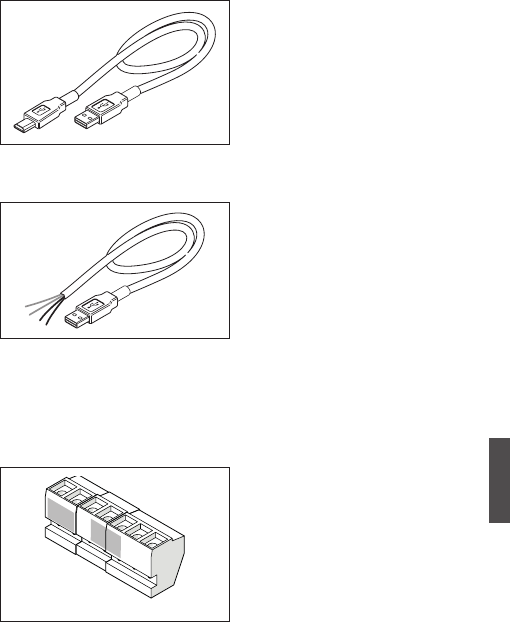
Insert the 2 x AA batteries provided,
with correct polarity.
60
AA
AA
Fit the RiCLOUD onto the base;
Installing the WiFi Box
Description of the WiFi Box
The WiFi Box communicates with
RiCLOUD thermostat or with the boiler
RF receiver only via radio frequency
(wireless).
OUTPUTS
The WiFi Box contains a relay (see
page 211) which replicates RiCLOUD
thermostat relays linked to it. It is ON
if at least 1 of RiCLOUD relays is ON, and
OFF if all of RiCLOUD relays are OFF.
The WiFi Box can be wired to the boiler
OTBus connection. This transforms
the WiFi Box into a wireless receiver
of an OTBus command. All of the
information available in RiCLOUD via
the OTBus connection is repeated
to the receiver which wires it to the
boiler; it is therefore an example
of complex radio frequency
communication.
The relay and OTBus outputs are
identied on the WiFi Box by the term
OUTPUTS and are available via a USB
plug.
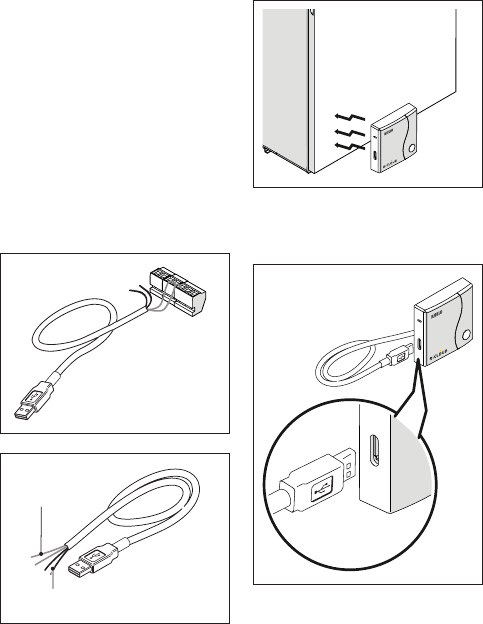
The position and distinction between
the 2 outputs on the USB plug are
given below.
USB
USB
mini B
Black TA
Black TA
Red OT
Red OT
never
120 V
USB Outputs/Boiler:
Dry contact TA
ON/OFF relay
max 2 A at 30 VDC
max 0.5 A at 120 VAC
OTBus protocol contact
Never 120 V
Power supply:
USB mini B 5V - 1A
WiFi: IEEE 802.11 b/g/n - 2.4 GHz
Radio frequency: 915 MHz
Power consumption: 0.5 W
Two USB cables are also supplied, one
to provide power via the USB power
adapter and the other to connect the
WiFi Box to the boiler.
120 V
61
ENGLISH
The cable to connect it to the electrical
power supply is a USB mini.
The USB cable to connect the device
to the boiler has an end with 4
terminals.
The black terminals are for the ON/OFF
connection and are to be connected
to the “boiler room thermostat”
output.
The red terminals are for the
connection via OTBus and are to be
connected to the “OTBus” output on
the boiler.
O T
SE
SE = External sensor
If there is a RF boiler receiver installed
in the system, these do nothing other
than repeat everything that happens
in the WiFi Box on a RF receiver with
the same outputs (ON/OFF and OTBus)
which use the same wiring colours:
Red = OTBus, Black = ON/OFF
WiFi Box connection via OTBus
(only for boilers equipped with a
compatible OTBus protocol)
Connect the red wires of the USB cable
to the boiler OTBus terminal (please
consult the boiler installer manual).
Should the boiler not be equipped
with an OTBus terminal, you can use
an OTBus connector provided in the
WiFi RiCLOUD package (only for boilers
without one).
9 Only one of RiCLOUD system
components (RiCLOUD, WiFi Box
or boiler RF receiver) must be
connected to the boiler via cable
via OTBus.
9 For Family models for interiors
(exterior and recessed versions
are not compatible with this
operating mode), the NEUTRAL
ITRF11 INTERFACE BOARD KIT PART
NO.20047522 must be bought
and the communication
board installed, following the
instructions included in the kit.
62
ON/OFF WiFi Box connection
Connect the black wires of the USB
cable to the boiler room thermostat
terminal (it is recommended that you
consult the boiler installer manual).
9 In the case of RiCLOUD thermostats
wired in ON/OFF mode, or
zone valve microswitches,
it is recommended that you
connect these to the boiler
room thermostat terminal and
wire the WiFi Box to the boiler
via OTBus only (only for boilers
equipped with a compatible
OTBus protocol).
OTBus on the RiCLOUD
OTBus on the boiler
TA
OT
Black cables = TA (ON/OFF)
Red cables = OTBus communication
protocol
Attach the WiFi Box to the boiler
casing using the magnet on the back;
WPS/Smartlink Outputs Boiler
Connect the USB connector on the
previously connected cable to the WiFi
Box OUTPUTS/BOILER output;
WPS/Smartlink Outputs Boiler
USB
Outputs Boiler
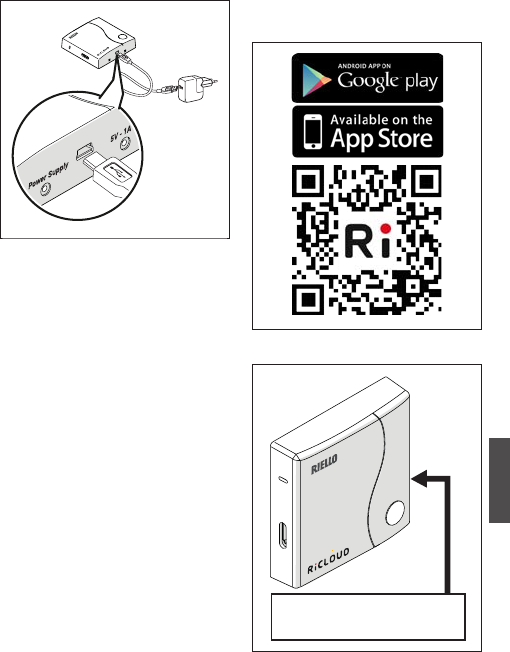
63
ENGLISH
Power the WiFi Box via the relevant
cable and power adapter provided.
Resetting the OTBus connection
auto-conguration function
RiCLOUD is congured to function in
ON/OFF mode.
Should it be connected to an OTBus
communication bus (wired or
wireless/radio frequency), RiCLOUD
auto-congures to the “Boiler remote
control” operating mode.
To restore the thermostat to its original
operating mode (ON/OFF), remove
and then reinsert the batteries.
9 The alarm E82 may be triggered
by a change of operating mode
from OTBus to ON/OFF or vice
versa.
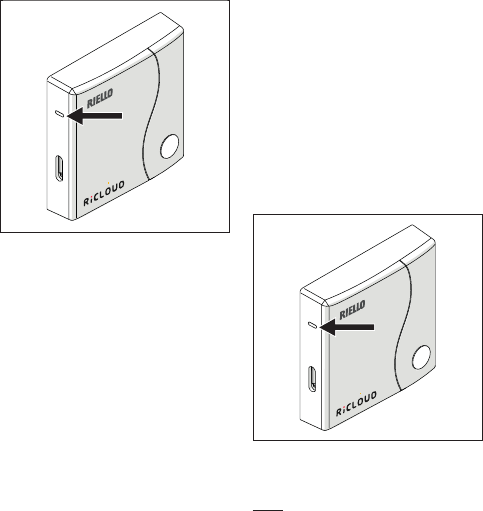
Installing and conguring the
smartphone APP
Download the APP on your
smartphone or tablet;
Create a user account;
MAC: 000000000000
ID WiFi: 0000000000000
WPS/Smartlink Outputs Boiler
Match the WiFi ID of the WiFi Box to
the user account.
64
If you need to link other thermostats
and/or boiler RF receivers to the
WiFi Box via radio frequency, press
the clear button on the WiFi Box for
5 seconds until the LEDs ash at the
same time and set the device to be
linked to the same operating mode
(see "3.13 Linking function" page
86). After making these links, the
system automatically resumes normal
operation.
WPS/Smartlink Outputs Boiler
Link you home modem password to
the WiFi Box via one of the following
methods.
9 Smartphones or tablets must be
connected to the WiFI network
that will be matched to the WiFi
Box.
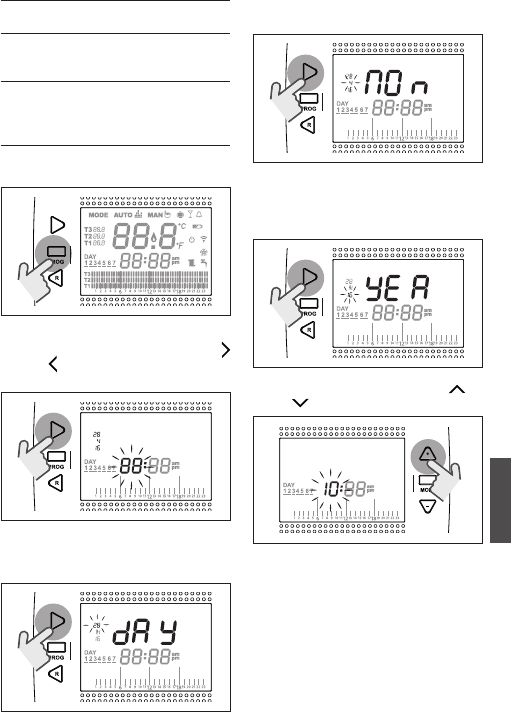
Smart Link
−Press the Smart Link button
on the WiFi Box once with an
appropriate implement.
−The green and red LEDs start
ashing frequently.
−Select the “Congure WiFi”
eld from the drop-down
menu in the APP, insert your
home modem password and
press the “Connect” button.
The process is complete if the APP
displays the message “Connection
complete”.
9
Once online, the system requires
up to 4 minutes to auto-congure.
WPS (only for modems with this
function)
−Set your home modem to
WPS mode.
−Press the WPS button on the
WiFi Box using an appropriate
implement and hold for 5
seconds until the red and
green LEDs ash frequently.
The link has been made if the red LED
on the WiFi Box ashes frequently
after a few seconds.
9
Once online, the system requires
up to 4 minutes to auto-congure.
WPS/Smartlink Outputs Boiler
Restart the WiFi router after the
operation is completed.
NOTE
For further information, please see
RiCLOUD APP manual.
65
ENGLISH
3 COMMISSIONING
3.1 User interface
See page 188.
3.2 Display
See page 191.
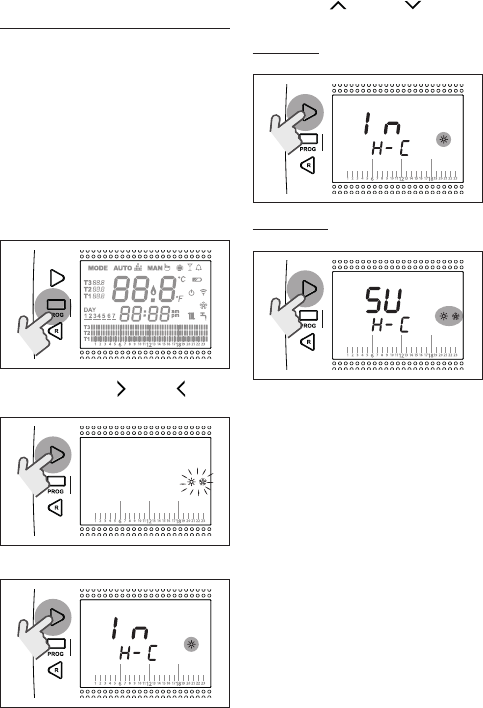
3.3 Setting the date and
time
From the HOME screen, press the SET/
PROGRAM button twice.
Select the desired eld (hours,
minutes or day) using the FORWARD
or BACK button (time, minutes , day,
month and year).
When day is selected, the
corresponding number ashes and
the message dAY is displayed.
When month is selected, the
corresponding number ashes and
the message Non is displayed.
When year is selected, the
corresponding number ashes and
the message YEA is displayed.
Change the value using the UP or
DOWN buttons.
Press the SET/PROG button to save
and return to the programming
menu, press ESC/MODE to save and
exit the programming menu, or wait
30 seconds to automatically save the
value and return to the home screen.
66
3.4 Setting the heating/
cooling mode
RiCLOUD is default set to heating
mode.
In heating mode, RiCLOUD activates
a request for heat when the room
temperature is below the set
temperature.
In cooling mode, RiCLOUD activates an
ON request (where there is a cooling
system) when the room temperature
is above the set temperature.
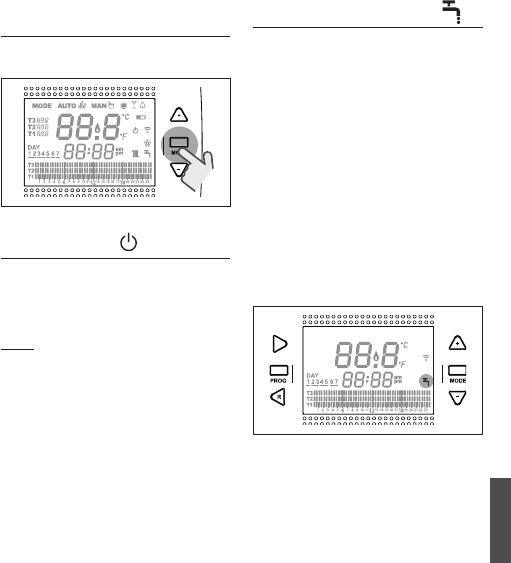
From the HOME screen, press the SET/
PROGRAM button to open the user
menu.
Press the FORWARD or BACK button
to select the eld HEATING/COOLING.
Press the SET/PROG button to set.
Press the UP or DOWN button to
select the desired mode.
IN=WINTER
Heating mode.
SU=SUMMER
Cooling mode.
Press the SET/PROG button to save
and return to the programming
menu, press ESC/MODE to save and
exit the programming menu, or
wait 30 seconds to automatically
save the value and return to the
HOME screen
9 If at least one RiCLOUD
thermostat is in cooling mode,
the heating request via OTBus is
not considered.
67
ENGLISH
3.5
Setting the operating
mode
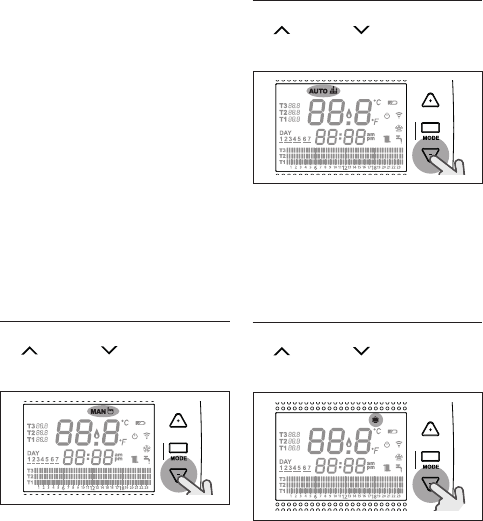
From the HOME screen, press ESC/
MODE repeatedly
to select one of the following modes:
3.5.1 OFF mode
In OFF mode, RiCLOUD
guarantees
the minimum room temperature set
at parameter 01 from the PL technical
menu only.
NOTE
Only if the boiler is in the correct
operating condition (i.e. powered
and not blocked).
In case of an OTBus connection
between the WiFi Box and the boiler
(including other types of connection
via OTBus), the boiler remains OFF if
all RiCLOUD thermostats in the system
are OFF. When the boiler is OFF it does
not provide any heating or domestic
hot water.
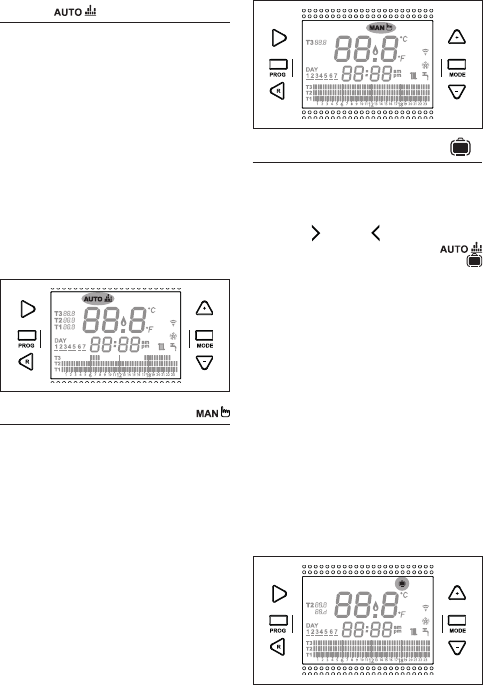
3.5.2 SUMMER/DHW mode
RiCLOUD in SUMMER/DOMESTIC HOT
WATER mode. In this mode, the boiler
provides domestic hot water where
requested (instant boiler).
If the parameter 24 CLOC is set to ON;
RiCLOUD follows the time periods set
in the user-programming menu for
DHW, pre-heating the water in the
storage tank (only for boilers with
integrated tank).
The minimum room temperature set
at parameter 01 from the PL technical
menu is, however, guaranteed.
In case of an OTBus connection
between the WiFi Box and the boiler
(including other types of connection
via OTBus), the boiler remains in
SUMMER mode if at least one of the
thermostats is in summer mode and
the others are OFF.
68
3.5.3 WINTER/AUTOMATIC mode
In Winter/AUTOMATIC mode, RiCLOUD
follows the time program set in the
user-programming menu for heating.
In case of an OTBus connection
between the WiFi Box and the boiler
(including other types of connection
via OTBus), the boiler remains in
Winter/AUTOMATIC mode if at least
one of the thermostats is in heating
mode.
9 For installations with multiple
RiCLOUD thermostats connected
via OTBus, if one of these devices
is in cooling mode, the heating
request to the boiler is not
considered.
3.5.4 WINTER/MANUAL mode
RiCLOUD
in Winter/MANUAL mode,
RiCLOUD
programmable thermostat
takes the T3 room setpoint
temperature (comfort), ignoring the
heating time program.
In case of an
OTBus connection between the WiFi
Box and the boiler (including other
types of connection via OTBus),
the boiler remains in Winter/
MANUAL mode if at least one of the
thermostats is in heating mode.
9 For installations with multiple
RiCLOUD thermostats connected
via OTBus, if one of these devices
is in cooling mode, the heating
request to the boiler is not
considered.
3.5.5 WINTER/HOLIDAY mode
In HOLIDAY mode, RiCLOUD takes
the T2 room setpoint temperature
(economy), ignoring the heating time
program, for the days set with the
FORWARD or BACK buttons.
RiCLOUD returns to AUTO mode
once the days set in HOLIDAY mode
have lapsed.
In case of an OTBus connection
between the WiFi Box and the
boiler (including other types of
connection via OTBus), the boiler
remains in Winter/HOLIDAY mode if
at least one of the thermostats is in
heating mode.
9 Every day, including
programming day, ends at
24h00.
9 For installations with multiple
RiCLOUD thermostats connected
via OTBus, if one of these devices
is in cooling mode, the heating
request to the boiler is not
considered.
69
ENGLISH
3.5.6 WINTER/PARTY mode
In PARTY mode, RiCLOUD takes the T3
room setpoint temperature (comfort),
ignoring the heating time program,
until midnight of the current day, and
then automatically switches back to
AUTO mode .
In case of an OTBus connection
between the WiFi Box and the boiler
(including other types of connection
via OTBus), the boiler remains in
Winter/PARTY mode if at least one of
the thermostats is
in heating mode.
9 For installations with multiple
RiCLOUD thermostats connected
via OTBus, if one of these devices
is in cooling mode, the heating
request to the boiler is not
considered.
3.6 Setting the extra
functions
3.6.1 ADVANCE function for
AUTOMATIC operating mode
The ADVANCE function allows you
to bring forward the next heating/
cooling time period and the relative
room setpoint temperature desired,
or to disable the heating time period
if it is already running.
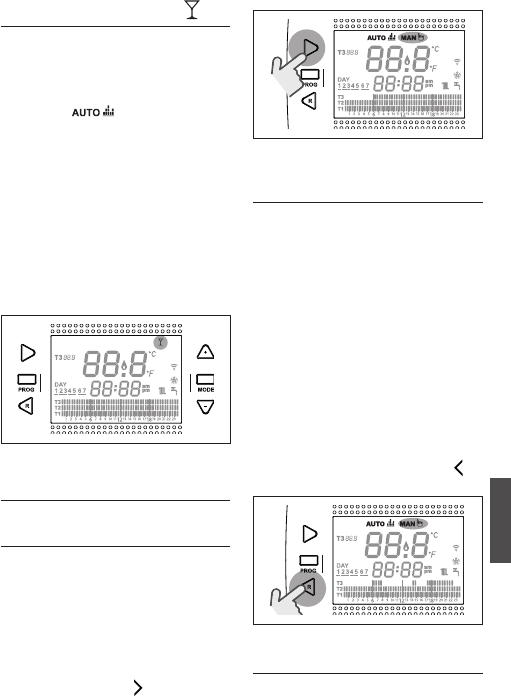
To activate/deactivate the ADVANCE
function, from the HOME screen press
the FORWARD button (if active, the
MAN icon is displayed).
3.6.2 ONE HOUR BOOSTER function
for AUTOMATIC operating
mode
The ONE HOUR BOOSTER function allows
you to activate the heating/cooling
time period and the relative T3 room
temperature (comfort) for 60 minutes,
if it is not already in operation.
9 If the heating time period
relative to the T3 room setpoint
temperature (comfort) is
already running, by activating
the function the time period is
extended by one hour, but not
beyond midnight of the current
day.
To activate/deactivate the ONE HOUR
BOOSTER function, from the HOME
screen press the BACK button (if
active, the MAN icon is displayed).
3.6.3 SEMI-AUTOMATIC FILLING
function
The SEMI-AUTOMATIC FILLING function
allows the correct system pressure to
be restored and is only available for
boilers equipped with the relevant
70
function (if OTBus connection
available between the WiFi Box and
the boiler or the RF receiver and the
boiler or RiCLOUD and the boiler, if
provided for by the OTBus protocol).
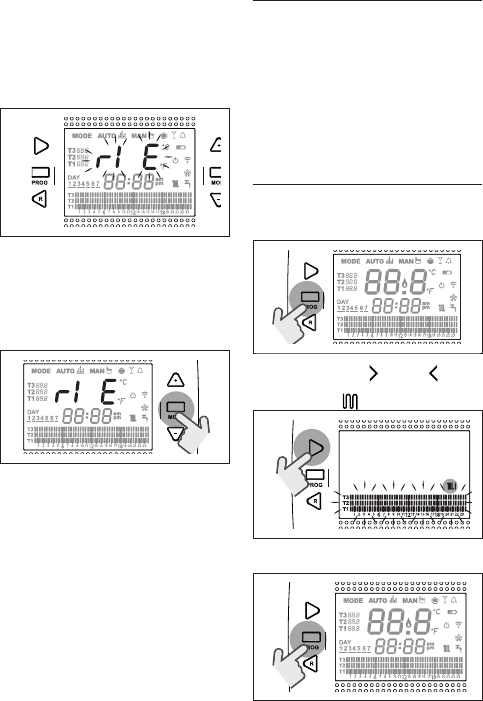
If the rIE alarm is quickly ashing (0,5
sec) on the HOME screen in the room
temperature eld,
press the ESC/MODE button and hold
for 5 seconds to start semi-automatic
lling (the message rIE will stop
ashing and remain on).
When releasing the button ESC/MODE
the rIE message starts ashing slowly
(2 secs) until the end of the function.
Once the system pressure has been
restored, RiCLOUD automatically
returns to the normal HOME screen
display.
9 If the SEMI-AUTOMATIC FILLING
function is not carried out
within 90 seconds, the rIE alarm
ashes quickly (1sec.) and is
displayed on the HOME page
again.
3.6.4 KEY-LOCK function
To enable/disable the KEY-LOCK
function, press the FORWARD > and UP
^ buttons together for 5 seconds from
the HOME page (if enabled, LOC will be
displayed for 5 seconds, if disabled,
UnL will be displayed for 5 seconds).
3.7 Setting the heating/
cooling time program
in automatic operating
mode
From the HOME screen, press the SET/
PROGRAM button to open the user
menu.
Press the FORWARD or BACK button
to select the eld HEATING/COOLING
TIME PROGRAM .
Press the SET/PROG button to set.
71
ENGLISH
Press the FORWARD or BACK button
to select the day or period of the week
to be changed.
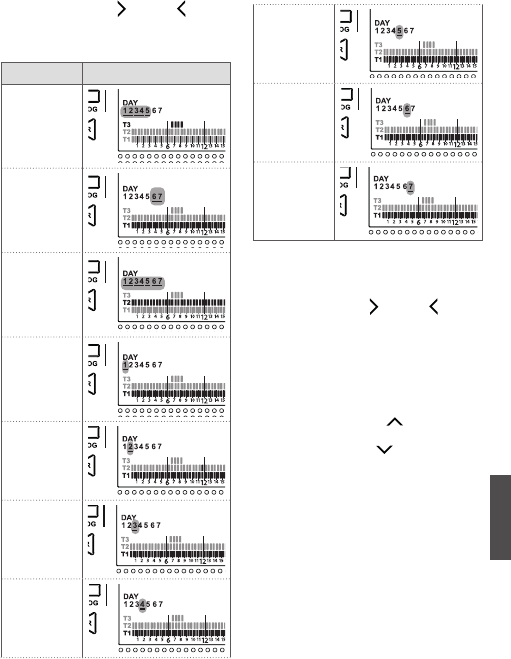
Days Display
Monday
Friday
Saturday
Sunday
Monday
Sunday
Monday
Tuesday
Wednesday
Thursday
Friday
Saturday
Sunday
Press the SET/PROGRAM button to
conrm the day or period of the week
to be changed.
Press the FORWARD or BACK button
to select the time segment to be
changed.
Press the ESC/MODE button to
select the desired room setpoint
temperature (T1, T2, T3).
Press the UP button to copy the
previous setting to the following time
segment (the DOWN button can be
used to go back or copy the setting to
the previous time segment).
Press the SET/PROG button to save
and return to the programming
menu, press ESC/MODE to save and
exit the programming menu, or
wait 30 seconds to automatically
save the value and return to the
HOME screen.
72
3.8 Setting the DHW time
program
This function is available only if the
parameter 24 CLOC is set to ON.
The time periods are default set to
ON (domestic hot water function
active).
From the HOME screen, press the SET/
PROGRAM button to open the user
menu.
Press the FORWARD or BACK button
to select the eld DHW TIME PROGRAM
.
Press the SET/PROG button to set.
Press the FORWARD or BACK button
to select the day or period of the week
to be changed.
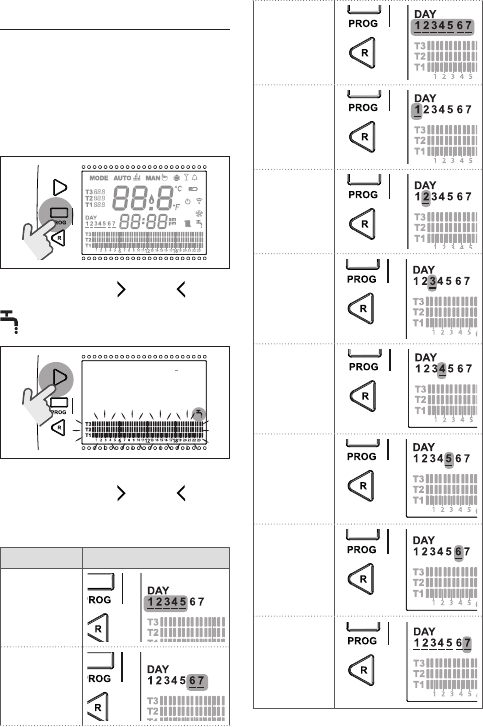
Days Display
Monday
Friday
Saturday
Sunday
Monday
Sunday
Monday
Tuesday
Wednesday
Thursday
Friday
Saturday
Sunday
73
ENGLISH
Press the SET/PROGRAM button to
conrm the day or period of the week
to be changed.
Press the FORWARD or BACK button
to select the time segment to be
changed.
Press the ESC/MODE button to activate
or deactivate the domestic hot water
function.
Press the UP button to copy the
previous setting to the following time
segment (the DOWN button can be
used to go back or copy the setting to
the previous time segment).
Press the SET/PROG button to save
and return to the programming
menu, press ESC/MODE to save and
exit the programming menu, or wait
30 seconds to automatically save the
value and return to the HOME screen.
3.9 Setting the heating/
cooling room setpoint
temperature
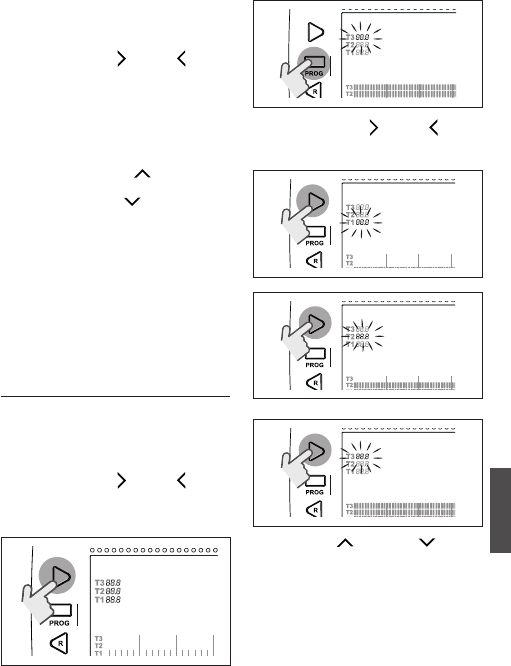
To change the T1/T2/T3 room setpoint
temperature, press the SET/PROGRAM
button from the HOME screen to enter
the user menu.
Press the FORWARD or BACK button
to select the eld HEATING/COOLING
TEMPERATURE.
Press the SET/PROG button to set.
Press the FORWARD or BACK button
to select the temperature to be
changed.
Press the UP or DOWN button
to modify the selected room setpoint
temperature.
9
The T3 temperature (comfort)
cannot be higher than 35°C
or less than or equal to T2
(economy).
9 The T2 temperature (economy)
cannot be higher than or equal
74
to T3 (comfort) or less than or
equal to T1 (anti-freeze).
9 The T1 temperature (anti-freeze)
cannot be higher than or equal
to T2 (economy) or less than 1°C.
Press the SET/PROG button to save
and return to the programming
menu, press ESC/MODE to save and
exit the programming menu, or
wait 30 seconds to automatically
save the value and return to the
HOME screen.
The room setpoint temperatures can
also be modied instantly if RiCLOUD is
in the operating mode corresponding
to the room setpoint temperature to
be modied.
3.9.1 Setting the temperature in
MANUAL mode
From the HOME screen, press the
UP or DOWN button to set the
desired T3 (comfort) room setpoint
temperature.
9 The room setpoint temperature
set cannot be less than or
equal to the T2 temperature
(economy).
Press the SET/PROG button to save
and return to the HOME screen, press
ESC/MODE to save and return to the
HOME screen, or wait 5 seconds to
automatically save the value and
return to the HOME screen.
3.9.2 Setting the temperature in
AUTOMATIC mode
From the HOME screen, press the
UP or DOWN button to set the
desired room setpoint temperature
for the current time period.
Press the SET/PROG button to save
and return to the HOME screen, press
ESC/MODE to save and return to the
HOME screen, or wait 5 seconds to
automatically save the value and
return to the HOME screen.
3.9.3 Setting the temperature in
HOLIDAY mode
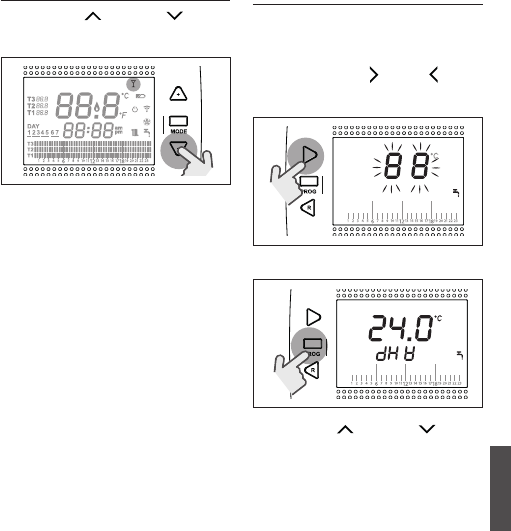
From the HOME screen, press the
UP or DOWN button to set the
desired T2 (economy) room setpoint
temperature.
9
The room setpoint temperature
set cannot be higher than or
equal to T3 (comfort) or less
than or equal to T1 (anti-freeze).
Press the SET/PROG button to save
and return to the HOME screen, press
ESC/MODE to save and return to the
HOME screen, or wait 5 seconds to
automatically save the value and
return to the HOME screen.
75
ENGLISH
3.9.4 Setting the temperature in
PARTY mode
Press the UP or DOWN button
on the HOME screen to set the desired
room setpoint temperature.
The room temperature set cannot
be less than or equal to the
desired T3 (comfort) room setpoint
temperature.
9 The room setpoint temperature
set cannot be less than or
equal to the T2 temperature
(economy).
Press the SET/PROG button to save
and return to the HOME screen, press
ESC/MODE to save and return to the
HOME screen, or wait 5 seconds to
automatically save the value and
return to the HOME screen.
3.10 Setting the DHW setpoint
temperature
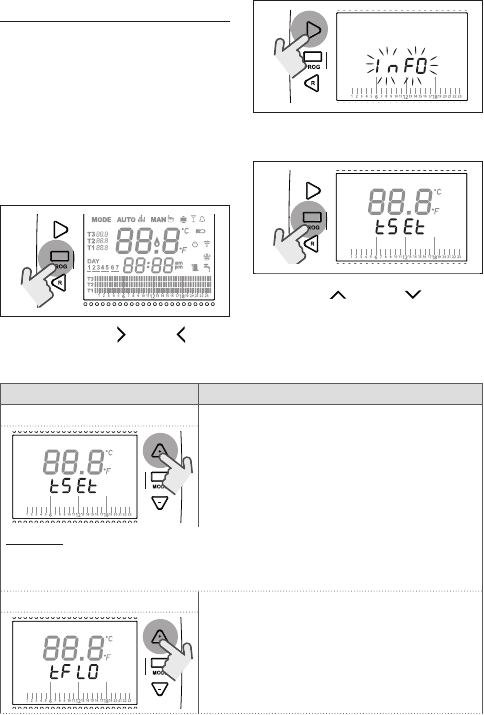
From the HOME screen, press the SET/
PROGRAM button to open the user
menu.
Press the FORWARD or BACK button
to select the eld DOMESTIC HOT WATER
TEMPERATURE.
Press the SET/PROG button to set.
Press the UP or DOWN button
to modify the domestic hot water
setpoint temperature.
Press the SET/PROG button to save
and return to the programming
menu, press ESC/MODE to save and
exit the programming menu, or
wait 30 seconds to automatically
save the value and return to the
HOME screen.
76
3.11 Displaying operating
information
This function (available with OTBus
connection between the WiFi Box
and the boiler or the RF receiver and
the boiler or RiCLOUD and the boiler,
if provided for by the OTBus protocol)
allows you to display the boiler probe
values and some boiler operating
statuses.
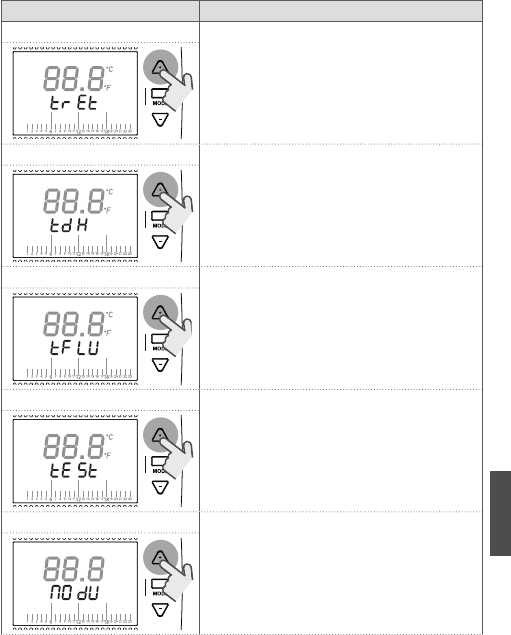
From the HOME screen, press the SET/
PROGRAM button to open the user
menu.
Press the FORWARD or BACK button
to select the eld InFO.
Press the SET/PROGRAM button to
display this eld.
Press the UP or DOWN button to
select the desired parameter and wait
until it is displayed.
Parameter Description
tSEt Heating delivery setpoint calculated by
RiCLOUD (shown only if RiCLOUD has received
a heating request). The value calculated by
RiCLOUD may differ from the real heating
delivery setpoint delivered by the boiler, if the
minimum boiler heating setpoint parameter
is higher than this value.
EXAMPLE:
The heating delivery setpoint calculated by RiCLOUD is 30°C, the minimum
boiler heating setpoint parameter is 40°C, the real heating delivery setpoint
delivered by the boiler is 40°C.
tFLO Temperature read by the boiler heating
delivery probe (available with OTBus
connection between the WiFi Box and the
boiler or the RF receiver and the boiler or
RiCLOUD and the boiler, if provided for by the
OTBus protocol).
77
ENGLISH
Parameter Description
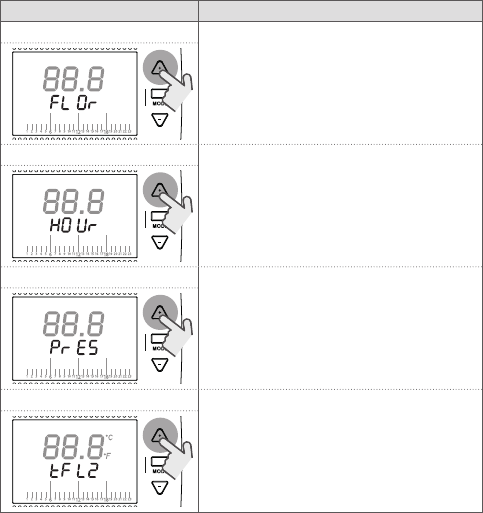
trEt Temperature read by the boiler heating return
probe (available with OTBus connection
between the WiFi Box and the boiler or the
RF receiver and the boiler or RiCLOUD and the
boiler, if provided for by the OTBus protocol).
tdH Temperature read by the boiler DHW probe
(available with OTBus connection between
the WiFi Box and the boiler or the RF receiver
and the boiler or RiCLOUD and the boiler, if
provided for by the OTBus protocol).
tFLU Temperature read by the boiler ue gas probe
(available with OTBus connection between
the WiFi Box and the boiler or the RF receiver
and the boiler or RiCLOUD and the boiler, if
provided for by the OTBus protocol).
tESt Temperature read by the external probe
connected to the boiler or the external
temperature communicated via the APP
(available with OTBus connection between
the WiFi Box and the boiler or the RF receiver
and the boiler or RiCLOUD and the boiler, if
provided for by the OTBus protocol).
MOdU Boiler fan speed percentage (available with
OTBus connection between the WiFi Box and
the boiler or the RF receiver and the boiler or
RiCLOUD and the boiler, if provided for by the
OTBus protocol). The value 0.0 corresponds
to the MINIMUM DOMESTIC HOT WATER POWER;
the value 100 corresponds to the MAXIMUM
DOMESTIC HOT WATER POWER.
78
Parameter Description
FLOr Flow meter rate in litres/minute, where a
ow meter is available (available with OTBus
connection between the WiFi Box and the
boiler or the RF receiver and the boiler or
RiCLOUD and the boiler, if provided for by the
OTBus protocol).
HOUr Number of operating hours in high
condensation mode (available with OTBus
connection between the WiFi Box and the
boiler or the RF receiver and the boiler or
RiCLOUD and the boiler, if provided for by the
OTBus protocol).
PrES
System pressure (available with OTBus
connection between the WiFi Box and the
boiler or the RF receiver and the boiler or
RiCLOUD and the boiler, if provided for by the
OTBus protocol).
tFl2
Temperature read by the delivery probe in
the second heating circuit (available with
OTBus connection between the WiFi Box and
the boiler or the RF receiver and the boiler or
RiCLOUD and the boiler, if provided for by the
OTBus protocol).
Press the SET/PROG button to save and return to the programming menu, press
ESC/MODE to save and exit the programming menu, or wait 180 seconds to
automatically save the value and return to the HOME screen.
79
ENGLISH
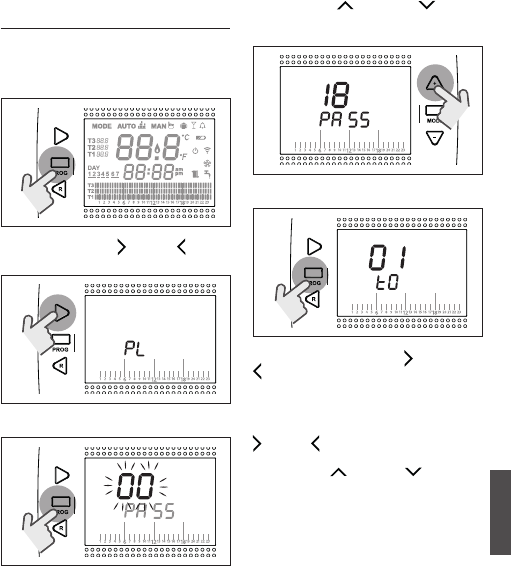
3.12 Technical menu –
Advanced programming
From the HOME screen, press the SET/
PROGRAM button to open the user
menu.
Press the FORWARD or BACK button
to select the eld PL.
Press the SET/PROG button to set.
Press the UP or DOWN button
to insert the installer password
(password = 18).
Press the SET/PROG button to set.
Press the FORWARD or BACK
button to select the desired
parameter.
Press the SET/PROGRAM button to
set the selected parameter. For
parameters 08 to 19, use the FORWARD
or BACK button to select the 2 sub-
parameters.
Press the UP or DOWN button to
modify the selected parameter.
Press the SET/PROG button to save
and return to the technical menu,
press ESC/MODE to save and exit the
technical menu, or wait 120 seconds
to automatically save the value and
return to the HOME screen.
80
Parameter
Description
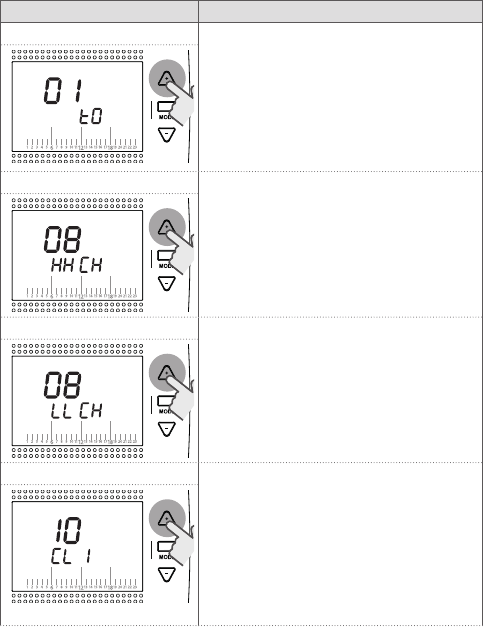
01 t0
Minimum safety temperature. The value can
be set from 1°C to 5°C.
Default set to 3°C.
Should RiCLOUD room probe detect a
temperature below the parameter set, a
heating request is generated – only when
HEATING in operating modes SUMMER/
DOMESTIC HOT WATER and OFF – taking into
account the hysteresis set under the HOn and
HOFF parameters.
08 HHCH
Maximun local central heating temperature
setpoint (available with OTBus connection
between the WiFi Box and the boiler or the
RF receiver and the boiler or RiCLOUD and the
boiler, if provided for by the OTBus protocol).
The value can be set between 80°C and 40°C
(for high temperature heating) or from 45°C
to 20°C (for low temperature heating).
08 LLCH
Minimum heating setpoint temperature
(available with OTBus connection between
the WiFi Box and the boiler or the RF receiver
and the boiler or RiCLOUD and the boiler, if
provided for by the OTBus protocol).
The value can be set from 10°C to HHCH -1°C.
10 CLI
Thermoregulation curve with external probe
connected to the boiler or external web probe
via the APP (available with OTBus connection
between the WiFi Box and the boiler or the
RF receiver and the boiler or RiCLOUD and the
boiler, if provided for by the OTBus protocol).
Default set to 1.2°C.
The value can be set from 0.2°C to 3°C.
The parameter in question affects the
calculation of the heating delivery setpoint
temperature.
81
ENGLISH
Parameter
Description
100
80
60
40
20
20 16 12 8 4 0
3 2,5
2
1,5
1,2
1
0,8
0,6
0,4
0,2
-4 -8 -12 -16
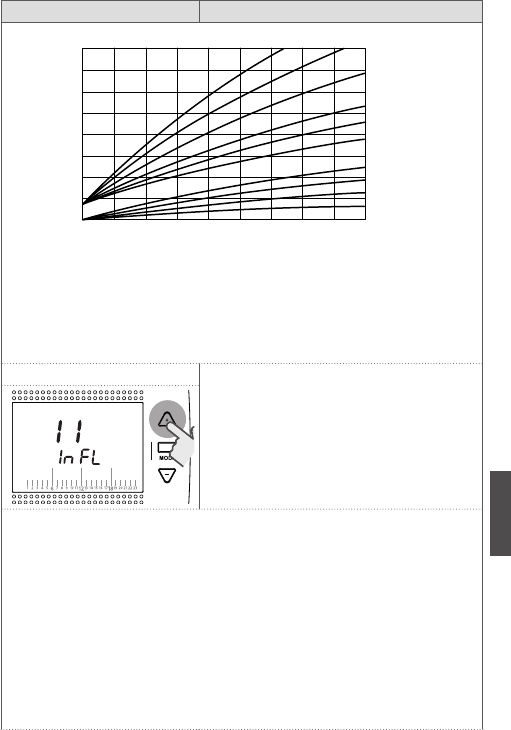
T Mand risc = T Mand Curva + ( CLI * InFL * ΔT Amb)
T Mand Curva = Delivery temperature calculated using the
thermoregulation curve set under parameter CLI
CLI = thermoregulation curve
InFL = room inuence
ΔT Amb = (room temperature set) – (current room temperature)
11 InFL
Inuence of room probe on calculation
of heating delivery setpoint temperature
(available with OTBus connection between
the WiFi Box and the boiler or the RF receiver
and the boiler or RiCLOUD and the boiler, if
provided for by the OTBus protocol).
Default set to 10.
The value can be set from 0°C to 20°C.
T Mand risc= T Mand Curva + ( CLI * InFL * ΔT Amb)
T Mand Curva = Delivery temperature calculated using the
thermoregulation curve set under parameter CLI
CLI = thermoregulation curve
InFL = room inuence
ΔT Amb = (room temperature set) – (current room temperature)
9
Setting the parameter InFL=0, with the external probe disconnected
from the boiler and the web external probe not enabled on the app,
the heating delivery temperature
(per la zona comandata dal RiCLOUD)
is the same as the temperature set under parameter LLCH.
82
Parameter
Description
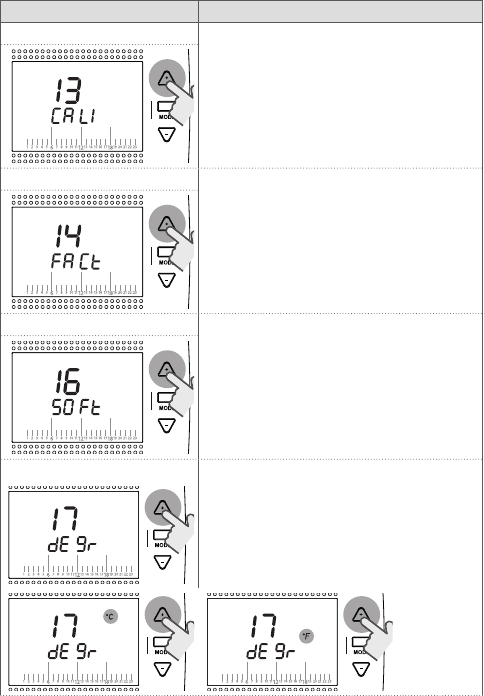
13 CALI
Correction of the temperature detected by
RiCLOUD room probe.
The value can be set with a hysteresis of
+-7°C.
14 FACt
Restore factory settings.
The value can be set from 0 to 1.
By setting this parameter to 1, RiCLOUD values
are restored to the default setting, excluding
the date and time and the domestic hot
water temperature.
16 SOFt
RiCLOUD software version.
Read-only parameter.
17 dEgr
Setting the unit of measure.
The value can be set to °C or °F.
The default setting is °C (degrees Centigrade).
This parameter allows you to set and view
temperatures on the degrees Centigrade or
degrees Fahrenheit scale.
83
ENGLISH
Parameter
Description
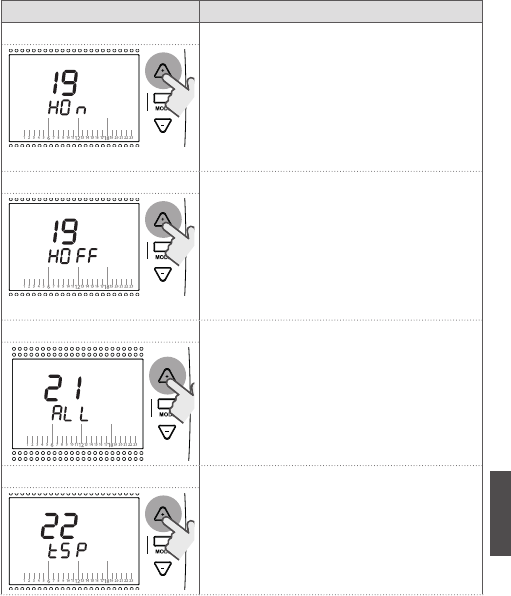
19 HOn
Setting the ON hysteresis for heating or
cooling requests.
The value can be set from 0°C to 2°C; the
default setting is 0.4°C.
RiCLOUD processes an ON request below the
target room temperature set (desired room
setpoint – H On) if the heating mode is active,
or above the target room temperature set
(desired room setpoint + H On) if the cooling
mode is active.
19 HOFF
Setting the OFF hysteresis for heating or
cooling requests.
The value can be set from 0°C to 2°C; the
default setting is 0.1°C.
RiCLOUD processes an OFF request above the
target room temperature set (desired room
setpoint + H OFF) if the heating mode is
active, or below the target room temperature
set (desired room setpoint – H OFF) if the
cooling mode is active.
21 ALL
Alarm history display (available with OTBus
connection between the WiFi Box and the
boiler or the RF receiver and the boiler or
RiCLOUD and the boiler, if provided for by the
OTBus protocol). The last 9 alarms generated
by the boiler and saved by RiCLOUD are
shown.
22 tSP
Setting boiler parameters (available with
OTBus connection between the WiFi Box and
the boiler or the RF receiver and the boiler or
RiCLOUD and the boiler, if provided for by the
OTBus protocol). This parameter is set by the
Authorised Service Centre.
84
Parameter
Description
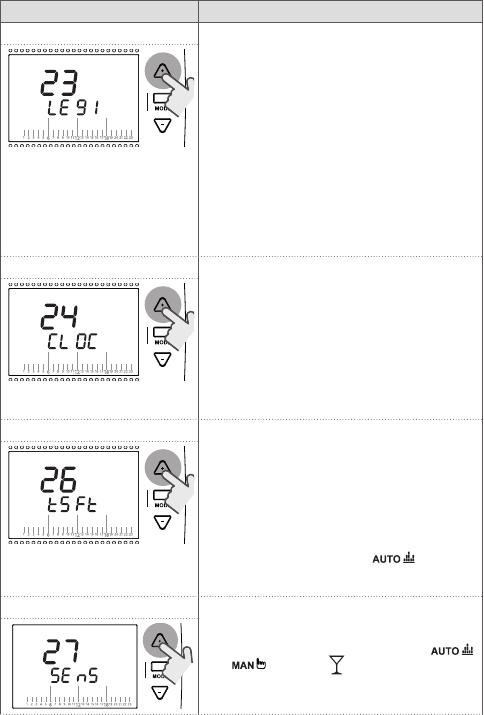
23 LEgI
Enabling the anti-legionella function
for boilers with domestic hot water tank
(available with OTBus connection between
the WiFi Box and the boiler or the RF receiver
and the boiler or RiCLOUD and the boiler, if
provided for by the OTBus protocol). Default
set to OFF.
This value can be set to ON or OFF. By setting
this parameter to ON; every 20 domestic hot
water request cycles a request to replenish
the tank is sent with a domestic hot water
delivery setpoint of 65°C. If the 20 cycles
have not be performed within one week, a
request to replenish the tank is sent with a
domestic hot water delivery setpoint of 65°C
on Saturday at 1.00 a.m.
24 CLOC
Enabling domestic hot water timer for boilers
with domestic hot water tank (available with
OTBus connection between the WiFi Box and
the boiler or the RF receiver and the boiler or
RiCLOUD and the boiler, if provided for by the
OTBus protocol).
Default set to OFF. This value can be set to
ON or OFF. Setting this parameter to ON, the
domestic hot water time periods can be
programmed, as explained in "3.8 Setting
the DHW time program" page 72.
26 tSFt
The parameter will only be shown if the
SEnS parameter is OFF (available with OTBus
connection between the WiFi Box and the
boiler or the RF receiver and the boiler or
RiCLOUD and the boiler, if provided for by
the OTBus protocol). Default set to 10°C. The
value can be set from 1°C to 20°C. The value
set for this parameter will be subtracted from
the heating delivery setpoint calculated by
RiCLOUD (tSEt), only in AUTO operating
mode, during the T2 (economy) or T1 (anti-
freeze) time period.
27 SEnS
Enabling/disabling room sensor to activate
pure climate control (thermoregulation from a
single external probe). Default set to ON. This
value can be set to ON or OFF. In AUTO ,
MAN and PARTY operating modes only,
by setting this parameter to OFF the heating/
cooling request is processed as follows:
85
ENGLISH
Parameter
Description
−In ON/OFF mode, the heating/cooling request is always active (relay closed)
if the T3 (comfort) time period is active.
−In OTBus mode, the heating request is always active (only with the external
probe connected to the boiler or the external web probe via the APP) and
the heating setpoint temperature is calculated using the external probe
value only. The value set for parameter 26 (tSFt) is subtracted from the
heating delivery setpoint calculated by RiCLOUD (tSEt), only in AUTO
operating mode, during the T2 (economy) or T1 (anti-freeze) time period.
9 This function uses one RiCLOUD only.
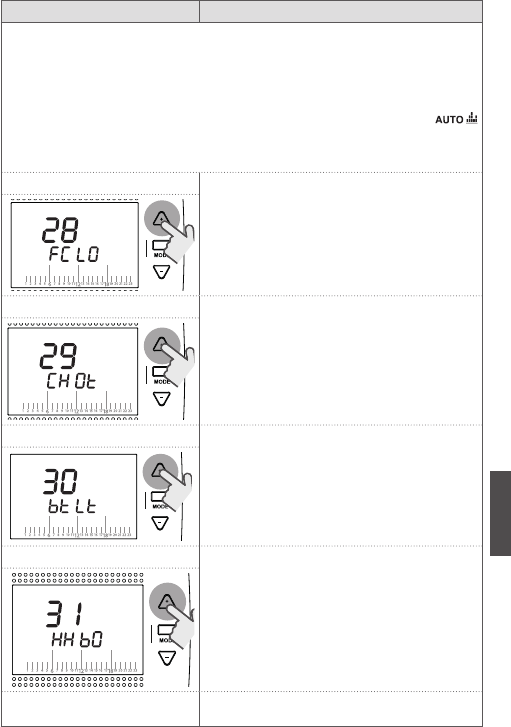
28 FCLO
Time display setting. Default set to 24-hour
clock.
The format can be set to the 12- or 24-hour
clock.
Setting the parameter to 12H, the eld is
display in the 12-hour a.m./p.m. format.
29 CHOt
Enabling/disabling heat request via OTBus
(available with OTBus connection between the
WiFi Box and the boiler or the RF receiver and the
boiler or RiCLOUD and the boiler, if provided for by
the OTBus protocol). Default set to ON. This value
can be set to ON or OFF. Setting this parameter to
OFF, RiCLOUD thermostat does not consider the
heating request via OTBus to the boiler.
30 btLt
Enable/disable backlighting.
ON/OFF Congurable value: set to OFF so that
the backlighting will not switch on at every
operation thus making the batteries last
longer. Press the button SET/PROG or ESC/
MODE to go back to the HOME page.
31 HHbO
Maximun boilerl central heating temperature
setpoint (available with OTBus connection
between the WiFi Box and the boiler or the
RF receiver and the boiler or RiCLOUD and the
boiler, if provided for by the OTBus protocol).
The value can be set between 80°C and 40°C (for
high temperature heating) or from 45°C to 20°C
(for low temperature heating). This parameter
has to be set by the Authorised Service Centre.
00 EHIt
Press the SET/PROG button or ESC/MODE to
return to the HOME screen.
86
3.13 Linking function
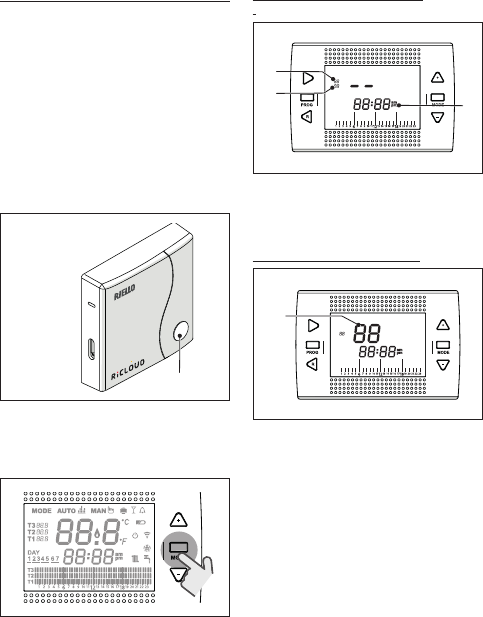
RiCLOUD linking with the WiFi Box
RiCLOUD and the WiFi Box in the WiFi
RiCLOUD package are already linked.
If installing an additional RiCLOUD,
follow the procedure below.
Ensure that RiCLOUD and the WiFi Box
are connected to a power source and
there are no alarms.
Press the prismatic dome clear LED
button (A) and hold for 5 seconds
until the green and red LEDs ash
slow (1 sec) at the same time (once
linked the ash will return to normal).
WPS/Smartlink Outputs Boiler
A
WiFi Box
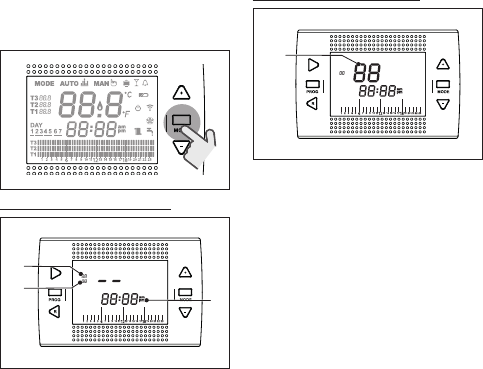
From RiCLOUD HOME screen, press
the ESC/MODE button and hold for
5 seconds to display the following
(alternating) information.
EXAMPLE OF LINKED RICLOUD
1
2
3
1 Radio frequency channel
2 Receiver (WiFi Box) number
3 Radio frequency address
EXAMPLE OF LINKED RICLOUD
4
4 Transmitter number (RiCLOUD)
To complete the link, press the SET/
PROGRAM button or wait for RiCLOUD
to return to the HOME screen.
9 This may take up to 2
minutes, after which RiCLOUD
automatically returns to the
HOME screen.
Should the link not be successful,
please contact the Authorised Service
Centre.
87
ENGLISH
Linking the boiler RF receiver to the
WiFi Box
If installing a boiler RF receiver, please
follow the procedure below.
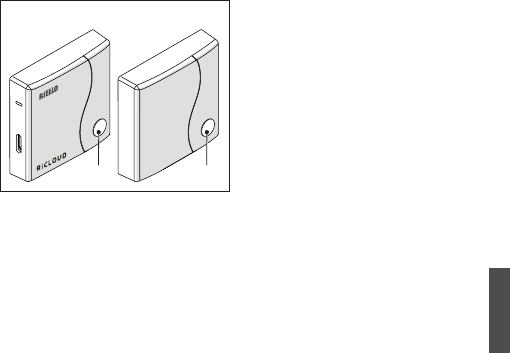
Press the prismatic dome clear LED
button (A) on the WiFi Box and hold
for 5 seconds until the green and red
LEDs ash slow at the same time (1
second).
Press and hold again for 5 seconds
until the green and red LEDs
momentarily switch off and then
ash slowly (every 2 seconds).
WPS/Smartlink Outputs Boiler
B
A
WiFi Box
Ricevitore
RF caldaia
Boiler RF
receiver
Press the prismatic dome clear LED
button (B) on the boiler RF receiver
and hold for 5 seconds until the green
and red LEDs ash frequently (every
0.5 seconds) at the same time.
The WiFi Box ashes frequently (every
0.5 seconds) to show the link has
been made.
Press the button on the WiFi Box again
to conrm.
The boiler RF receiver auto-congures
to normal operating mode.
9 This may take up to 2 minutes,
after which the RiCLOUD
automatically returns to the
HOME screen.
Should the link not be successful,
please contact the Authorised Service
Centre.
Linking the boiler RF receiver to the
RiCLOUD
RiCLOUD programmable thermostat
can be linked to a wireless receiver
if you want to replicate the relay
functionality on the thermostat in a
remote zone (e.g. zone valve), which
is not accessible with a cable (wireless
access).
Follow the procedure below to link
them:
Press the prismatic dome clear LED
button on the boiler RF receiver and
hold for 5 seconds until the green
and red LEDs ash slow (1 seconds) at
the same time (once linked the ash
returns to normal).
88
From RiCLOUD HOME screen, press
the ESC/MODE button and hold for
5 seconds to display the following
(alternating) information:
EXAMPLE OF LINKED RICLOUD
1
2
3
1 Radio frequency channel
2 Receiver (WiFi Box) number
3 Radio frequency address
EXAMPLE OF LINKED RICLOUD
4
4 Transmitter number (RiCLOUD)
To complete the link, press the SET/
PROGRAM button or wait for RiCLOUD
to return to the HOME screen.
9 This may take up to 2
minutes, after which RiCLOUD
automatically returns to the
HOME screen.
Should the link not be successful,
please contact the Authorised Service
Centre.

89
ENGLISH
4 ALARMS AND OPERATING STATUSES
4.1 LED notication lights for the WiFi Box and boiler RF
receiver **
LED
Green LED
Red Status
F05 Relay = closed
(only for ON/OFF connections)
F1 Relay = open
(only for ON/OFF connections)
ON OTBus connection = OK
(for OTBus connection)
ON F01 Boiler alarm
(only for OTBus connection)
F05
F1
ON ON Network or RF error
F05 F05 WPS mode active – Wait for WPS signal
from the router*
F05 WPS signal accepted*
F05 F05 Smartlink mode active*
F1 F1 Encoded RF mode active*
* Only for WiFi Box
** The notication lights on boiler RF receivers may differ with respect to the
table.
LED
ON = remains on
F05 = quick ash (every 0.5 seconds)
F1 = slow ash (every 1 second)
90
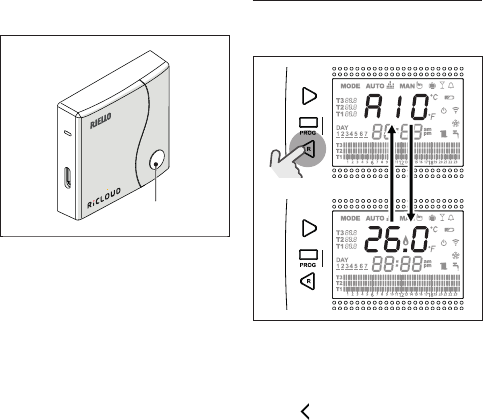
Operation of the prismatic dome
clear LED button on the WiFi Box and
boiler RF receiver
WPS/Smartlink Outputs Boiler
A
WiFi Box
In case of a boiler alarm (available
with OTBus connection between the
WiFi Box and the boiler or the RF
receiver and the boiler or RiCLOUD and
the boiler, if provided for by the OTBus
protocol), the alarm can be reset by
pressing the prismatic dome clear LED
button (A) (for alarm A99, reset from
the boiler).
With an ON/OFF connection, the relay
can be activated or deactivated by
pressing the prismatic dome clear LED
button (A).
4.2
Boiler and RiCLOUD alarms
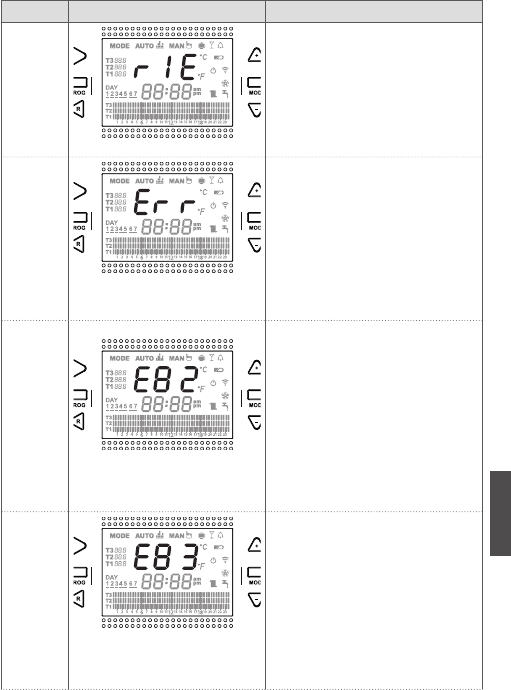
The alarm is shown in alternation
with the room temperature detected
by RiCLOUD on the display.
In case of a boiler alarm (available
with OTBus connection between the
WiFi Box and the boiler, if provided for
by the OTBus protocol), the alarm can
be reset by pressing the BACK/RESET
button (for alarm A99, reset from
the boiler).
9 RiCLOUD alarms (rIE, E82, E83)
and the temporary boiler alarms may
be automatically reset once the fault
has been resolved.
91
ENGLISH
Alarm Description Solution
rIE
Semi-automatic ll function.
−See "3.6.3 SEMI-AUTOMATIC
FILLING function" page 69
−Check the system pressure.
−Should you not be able to
remove the alarm, please
contact the Authorised Service
Centre.
Err
RiCLOUD room temperature
sensor damaged. Cannot be
repaired.
−Replace RiCLOUD
−Contact the Authorised Service
Centre.
E82
Communication failure
between the RiCLOUD and the
WiFi Box.
−Check the distance between
RiCLOUD and the WiFi Box (see
page 211).
−Remove and then reinsert the
batteries.
−Check that the WiFi Box is
connected to a power source.
−Check the coupling between
RiCLOUD and the WiFi Box (see
"3.13 Linking function" page
86).
−Contact the Authorised Service
Centre.
E83
OTBus communication failure
between the WiFi Box and the
boiler or the RiCLOUD and the
boiler.
−Check the OTBus electrical
connection and the maximum
distance between the WiFi Box
and the boiler OTBus terminal or
between RiCLOUD and the boiler
OTBus terminal (see page 211).
−Contact the Authorised Service
Centre.
92
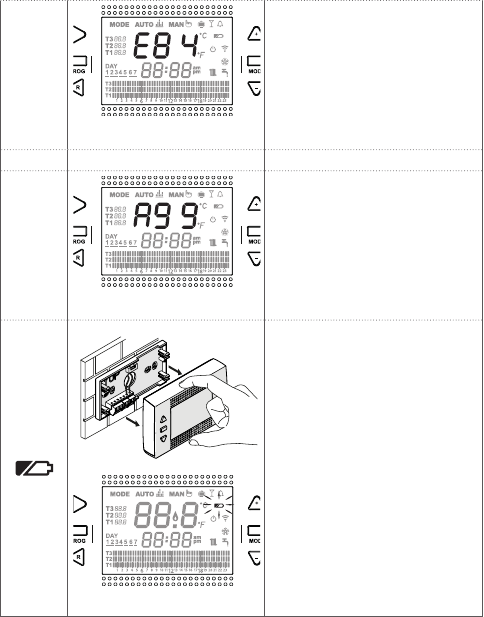
E84
Hardware error RiCLOUD.
Cannot be repaired.
−Replace RiCLOUD.
−Contact the Authorised Service
Centre.
A01….99 Boiler alarm. −See boiler manual.
A99
Too many boiler resets
performed via remote control.
−Reset from the boiler.
Batteries running low
To replace the batteries, remove
RiCLOUD from its base.
−Replace the batteries.
−Check that the contacts are not
rusty.
−Replace RiCLOUD.
−Contact the Authorised Service
Centre.
9
Replace the batteries as
soon as possible. When the
low battery warning is on,
correct operation of
RiCLOUD
and any RF communication
is no longer guaranteed.

93
ENGLISH
Alarm Description
A01-A10
Burner ignition/detection failure after numerous
attempts
A02-A20 Limit thermostat tripped
A03-A30 Flue gas thermostat and/or safety thermostat and/or
air pressure switch and/or fan fault
A04-A40 Primary circuit pressure insufcient
A06-A60 DHW NTC probe anomaly
A07-A70
Alarm relating to heating NTC probe and/or delivery
NTC probe and/or excessive differential between the
delivery and return NTC probes
A08 Alarm relating to return NTC probe and/or excessive
differential between probes
A09-A91 Flue gas NTC probe or dirty exchanger alarm
A77 Low external temperature limit thermostat tripped
A99 Too many resets performed via remote control
The alarm history can be viewed under the parameter ALL from the advanced
programming menu.
For details of boiler alarms, please see the boiler installer manual.
FCC Statement
This device complies with Part 15 of the FCC Rules. Operation is subject to the following two
conditions: (1) this device may not cause harmful interference, and (2) this device must accept
any interference received, including interference that may cause undesired operation.
Changes or modifications not expressly approved by the party responsible for compliance could
void the user's authority to operate the equipment.
NOTE: This equipment has been tested and found to comply with the limits for a Class B digital
device, pursuant to Part 15 of the FCC Rules. These limits are designed to provide reasonable
protection against harmful interference in a residential installation. This equipment generates,
uses instructions, may cause harmful interference to radio communications. However, there is no
guarantee that interference will not occur in a particular installation. If this equipment does cause
harmful interference to radio or television reception, which can be determined by turning the
equipment off and on, the user is encouraged to try to correct the interference by one or more of
the following measures:
-- Reorient or relocate the receiving antenna.
-- Increase the separation between the equipment and receiver.
-- Connect the equipment into an outlet on a circuit different from that to which the receiver is
connected.
-- Consult the dealer or an experienced radio/TV technician for help.
IC Statement
This device complies with Industry Canada’s licence-exempt RSSs. Operation is subject to the
following two conditions:
(1) This device may not cause interference; and
(2) This device must accept any interference, including interference that may cause undesired
operation of the device.
Cet appareil est conforme aux CNR exemptes de licence d'Industrie Canada . Son fonctionnement
est soumis aux deux conditions suivantes :
( 1 ) Ce dispositif ne peut causer d'interférences ; et
( 2 ) Ce dispositif doit accepter toute interférence , y compris les interférences qui peuvent causer
un mauvais fonctionnement de l'appareil