Riitek Technology RT-MWK02 MINI BLUETOOTH KEYBOARD User Manual User manaual
Shenzhen Riitek Technology Co., Ltd MINI BLUETOOTH KEYBOARD User manaual
USERS MANUAL
Mini Bluetooth Keyboard
User’s Manual
Ver:2.0
Table of content
1、Introduction
2、Hardware Installation
3、Software Installation and Use
Microsoft Windows Mobile OS
Google Android OS
Symbian OS
Windows OS with IVT stack
Windows OS with Broadcom
Linux OS
4、Keyboard Compatibility List
5、Product overview
6、Technical parameters
7、Maintenance
1、Introduction
Thank you for purchasing the Mini Bluetooth Keyboard! This
is wonderful combo, Bluetooth Wireless Mini QWERTY
Keyboard & Touch Pad & Presenter Combo, with USB
interface receiver(Optional) .You can use it for emails, chat,
or to enjoy your favorite games. It is compatible with desktop
computers running Windows or Linux but also with
handhelds running Android, Windows Mobile Pocket PCs or
Symbian S60 Operating systems.
It also supports the Sony Playstation3. Use it with your
HTPC on your Sofa or browse the internet in the most
comfortable fashion.
We’re confident you’ll enjoy using the Mini Bluetooth
Keyboard and find it to be quite a useful solution.
Features
The perfect companion for your device
Ideal for typing emails, chat and playing games
Pocket sized, sleek, slim design
Built-in rechargeable more staying power
lithium-ion battery
innovative design of the Navigation keys
One Wireless Laser Pointer, e-Pointer
have a real notebook Touchpad
real QWERTY full-function mini keyboard
Compatible with Bluetooth2.0
Mobile System Requirements
The device must be equipped with a the Bluetooth
module
The mobile Operating System should be one of
the following:
Google Android System
Microsoft Windows Mobile 5.0 or newer
Nokia Symbian S60 System
Desktop Computer
Laptop System Requirements
Bluetooth-enabled PC running Windows 98, Me,
2000, XP or Vista
Bluetooth-enabled Macintosh running Mac OS
10.2.8 or later
2、Hardware Installation
Note: on the first use, the battery might be empty, so you
should recharge it for 20min-30min.
1. Switch the keyboard ON, using the
ON/OFF button:
The blue led will light for 2 seconds
2. Click the PAIR/CONNECT button, at the
left:
The blue led will be blinking intermittently
3. Now the Mini Bluetooth keyboard is under
pairing state and it’s waiting for connecting
with your device
Recharge the battery
Connect the mini Bluetooth keyboard to your computer’s
USB port using the power USB cable (you can find the
cable in the retail box). While charging, the Blue LED
turns on, and gets dimmer as the battery charge
increases.
3、Software Installation And Use
Connect the mini Bluetooth keyboard to your computer’s
USB port use the power USB cable(you can find the cable in
the retail box).while charging,the LED turns on,and gets
dimmer as the battery charge increases.
Microsoft Windows Mobile OS
Installation
Connect your mobile device to your Desktop computer using
the USB port.
On your desktop:
1. Insert Drivers CD and open the CD from “My
computer”.
2. Locate the “Mobile” folder and inside the
“windowsmobile.cab” (Bluetooth input driver) CAB
file.
3. Open ActiveSync on your desktop and Click Explore
4. Copy the CAB file to your mobile device. You can do
this by dragging and dropping the file from the
desktop folder to My Documents folder on your
device.
On your Windows Mobile device:
1. Go to Start > Programs > File Explorer > My
Documents
2. Run the windowsmobile.cab file (tap on it)
The Mini Bluetooth keyboard Driver will now install on your
device.At the end of the installation,the setup will require a to
reset.
Configuration and Troubleshooting
After the software is successfully installed on your device,
you need to pair the Bluetooth mini Keyboard.
(1)Make sure your Bluetooth mini keyboard is in the
pairing state.
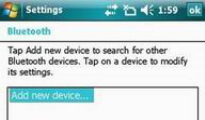
(2)On your device, open Bluetooth Devices, and click
“Add new”
(3)After the keyboard is discovered, select it, and then
tap on “Next”
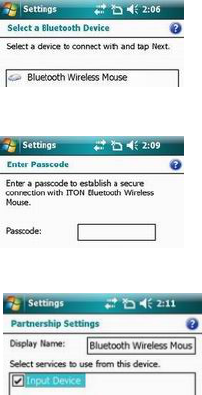
(4)When prompt for passkey, leave the passcode
field blank and tap “Next” (if this fails, enter 0000 as a
passcode and press Next)
(A)At this step select the “Input device” service and
tap “Finish”.
(B)Go to the Software settings Panel, and tap
“Connect”.
Here are a few solutions for the error messages that might
appear in the software:
"The software is not responding. You need to
reinstall this software."
This error is caused by a problem with the
communication between the software components.
You need to check if your Windows Mobile Device is
compatible with the software, and to try to reinstall
the software.
"Bluetooth is turned off. To use the software, please
enable your Bluetooth module!"
Make sure you are using the software on a smart
phone with Windows Mobile (5.0 or newer) and the
Microsoft Bluetooth Stack. Then enable Bluetooth
before using the Software.
"No active Input Device found. You need to pair a
device, using the Bluetooth control panel."
Make sure your Mini Bluetooth keyboard is correctly
paired to your smart phone. If this error appears
while your keyboard is paired, redo the pairing.
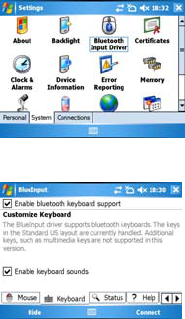
Settings panel
To open the settings panel, go to Start->Settings->System
TAB, and tap the icon named "Bluetooth Input Driver"
The Settings panel displays several pages, for
better access to the software options:
Keyboard Page
This page offers two options: enable / disable the keyboard
functionality and enable / disable keyboard sounds.
Status Page
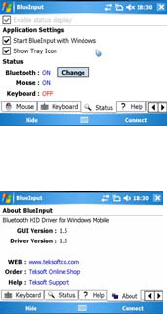
Here you can view the status and configure the driver to start
when Windows Mobile starts (autostart) and you can enable /
disable the Tray icon. The tray icon allows quick access to
the Settings panel.
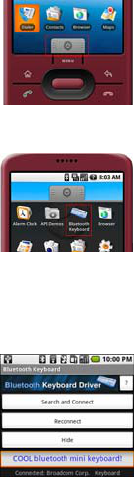
About
The About page displays the software version and some
other useful info.
Google Android OS
Installation
On your desktop:
1. Insert Drivers CD and open the CD from “My
computer”
2. Open “Android” folder and copy the
“android.apk” file into your Android’s
memory card
On your Android device:
1. Open “Market”, and install the “AppManager”
Software , or any other Android manager
software:

2. Open AppManager software and tap the
MENU button
3. Tap Install from SD option
4. Run android.apk file
The first time you install the Bluetooth Keyboard Driver
on your Android device, you’ll see a prompt to activate
the software:
If you press Cancel or if the Internet is not available,
Activation will fail and you won’t be able to use this software.
So please make sure the Android is connected to the internet
and press OK. You only need to do this once, after the
installation.
After the Bluetooth keyboard Driver is successfully
installed you need to pair the Keyboard with the Android
device.
1. Make sure your Bluetooth mini keyboard
is in the pairing state.
2. Slide your Android device’s menu arrow and
open the menu.
3. Locate the Bluetooth Keyboard Driver icon
and tap on it.
4. On your android device make sure Bluetooth
is turned on, then tap “Search and Connect”.
The software automatically finds the Mini
Bluetooth keyboard and connects to it.
When connection is done, you can find your
Mini Bluetooth keyboard’s name at the
bottom:
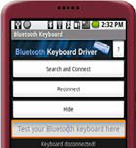
Congratulations! The Mini Bluetooth keyboard is now
connected and you can test it by entering a text in the
test zone as shown in the previous picture.
Other Functions
Reconnect:
If your device loses the connection with the keyboard (the
message “keyboard disconnected” is displayed as in the
picture below), you can reconnect by pressing the interface
Reconnect button.
Hide
Hides the Bluetooth Driver interface, but keeps the program
alive, in the background, so you can continue using the
keyboard
Question mark (?)
Opens the About Dialog where you can see more details on
this software.
Nokia Symbian OS
Installation
On your desktop:
1. Insert Drivers CD and open the CD from “My
computer”
2. Open “Nokia Wireless Keyboard Application”
folder and choose your device model or
Operating system version, copy the .sis file
into your device’s memory card or you can
connect your Nokia device to your computer
USB port and copy the file directly.
On your Symbian device:
1. Find the .sis file (on mobile device or memory
card) and press "OK" button, follow the hints
to finish the installation
2. Run the installed application and search the
nearby Bluetooth Keyboard.
3. After paired and connected, you will have to
set the keyboard layout. If layout is not set
correctly, the keyboard might not function as
expected.
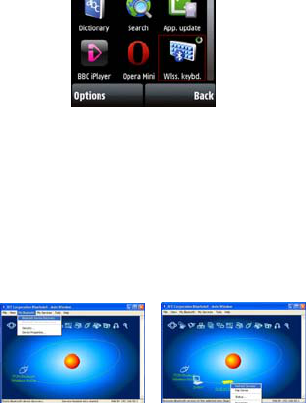
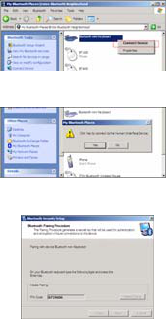
Desktop Windows OS with IVT Bluetooth
stack
Configuration
1. Make sure that the Bluetooth function is
active on your PC. Double click the Bluetooth
Icon, open the Management window, select
“Bluetooth Device discovery” or click the
Round Ball in the middle of the window.
2. Right click the Bluetooth Keyboard found and
select “Refresh Services”.
3. Right click the Bluetooth Keyboard again and
select “Connect-Bluetooth Input Service”.
4. On the popup dialog you’ll see a code. Input
the code with your Bluetooth Keyboard and
press enter or OK.
The system will auto install the HID drivers for the
Bluetooth Keyboard.
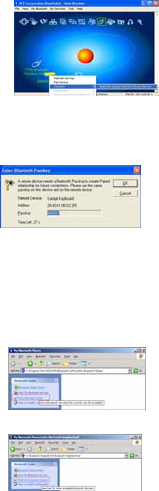
Desktop Windows OS with Broadcom Bluetooth
stack
Configuration
1. Make sure that the Bluetooth function is
active on your PC. Double click the Bluetooth
icon, then click “View devices in range”
2. Click “Search devices in range” and wait until
the Mini Bluetooth keyboard is discovered.
3. Right clicking the detected keyboard
brings a popup menu. Click “Connect
device”.
4. Press YES to connect to the “Human
interface Device”
5. Using the Mini Bluetooth keyboard, type the
number displayed on the screen, then press
enter:
Now the keyboard is connected, you can start using it
with your applications.
Linux OS
Configuration
There are several Linux distributions available. This guide
was designed for Ubuntu linux, but can be easily adapted for
other versions. Your desktop computer must be equipped
with a Bluetooth module (built in, or USB Dongle).
1. Make sure that the Bluetooth function is
active on your PC. Click the Bluetooth icon
and select “Setup new device”
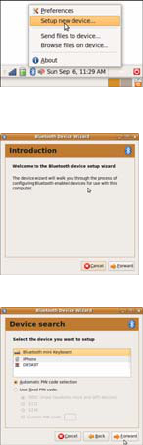
2. A wizard window opens, read the text and
press “Forward”
3. Wait until the keyboard is discovered, then
select it and press “Forward”
4. Type the code display on the Mini Bluetooth
keyboard, then press Enter
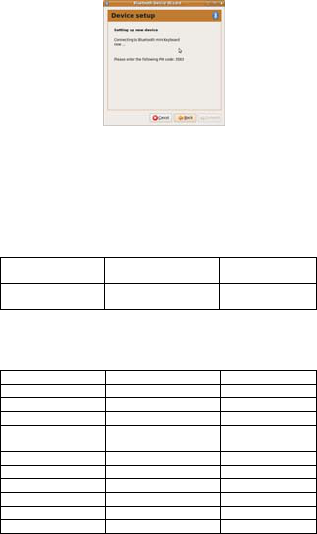
If the code was correctly entered, a confirmation message is
displayed. Now you can start using your bluetooth keyboard.
4、Keyboard Compatibility List
Apple Mac and Sony Playstation3 system
They are same as the Microsoft Windows XP OS.
Google Android OS
HTC Dream –
G1 HTC Hero – G2
Touch HTC Hero
HTC Magic Samsung Galaxy
i7500
Also compatible with newer Google Android smartphone.
Nokia Symbian S60 OS
Nokia 3250 Nokia 5320XM Nokia 5500
Nokia 5700 Nokia 6110N Nokia 6120C
Nokia 6210N Nokia 6220C Nokia 6290
Nokia 6650F Nokia E50 Nokia E51
Nokia E60 Nokia
E61/E61i/E62 Nokia E63
Nokia E65 Nokia E66 Nokia E70
Nokia E71 Nokia E90 Nokia N71
Nokia N73 Nokia N76 Nokia N78
Nokia N79 Nokia N80 Nokia N81
Nokia N82 Nokia N85 Nokia N91
Nokia N93/N93i Nokia N95/N95 Nokia N96

8GB
Samsung
G810/G818 Samsung
i400/i408 Samsung
i450/i458
Samsung
i550/i558 Samsung
i560/i568 Samsung
i7110
Samsung i8510 Samsung
L870/L878
LG KT610
Microsoft Windows Mobile6.0 OS
HTC P3470 HTC TyTN II HTC P3350
HTC P4350 HTC 818Pro HTC 838Pro
HTC C800 HTC D600 HTC D810
HTC D818C HTC P3300 HTC P3400
HTC P3600i HTC M700 HTC P3000
HTC C500 HTC C730 HTC S730
HTC S740 HTC S710 HTC Touch
Diamond2
HTC Touch
Diamond HTC Touch
Cruise HTC Touch HD
HTC Touch 3G HTC Touch
Viva HTC Touch Pro
HTC Touch
Dual HTC Touch
Samsung i710 Samsung i780 Samsung i200
Samsung i900 Samsung
i908E SamsungSGH-i617
LenovoET600e LenovoET880
Motorola Q8 Motorola Q9
ASUS P750 ASUS P526 ASUS P570
HP518 LG KS20
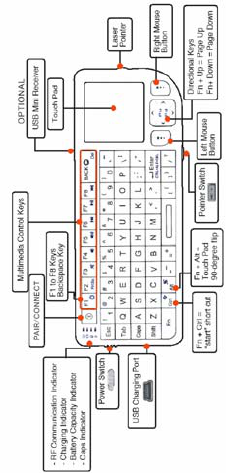
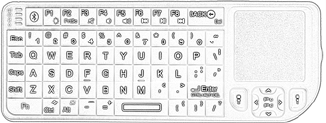
5、Product overview
Basic functions
(1)Primary Key bits
The function printed at each key is defaulted by pressing the
button with one time.
(2)Sub-keys
Press the SHIFT key while using these keys,
including :!,@,#,$,%,^,&,*,(,),~,|,",{,},?,_,+
(3)Deplicate keys
Press the FN key while using these keys,all these
keys were printed in Blue for easy recognize.
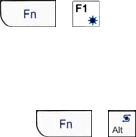
(4)Backlit controlkey
As shown:
is the key for control the backlight.
(5)Touch Pad
The touchpad can be used in a horizontal or vertical position.
To switch between horizontal or vertical mode, hold the Fn
key and hit the Alt key.
(6)Laser Pointer
Using the laser pointer only requires that the keyboard will be
turned on.Press the Laser Switch as long as you want to use
the laser pointer.
6、Technical parameters
Dimension: 151mmX59mmX12.5mm
Weight: 104g
Suitable temperature: -10 to +55 ℃℃
Battery Type: Built-in lithium-ion battery
Operation range: up to 10 meters
Operating Voltage: 3.3V
Operating Current: <80mA
Charge voltage: 4.2V - 5.05V
Charge current: <300mA
7、Maintenance
Do not attempt to disassemble the device or
replace rechargeable battery. Doing so will void
the warranty.
The battery will discharge if stored for a long
period of time without usage.
Use the specified charger. Disconnect the
device after the battery has been fully charged.
Overcharging the battery will shorten the life
span of the battery.
Do not expose the device in extreme heat or
cold. Extreme temperatures will cause the life
span of the battery to shorten.
Use only a damp cloth with mild soap to clean
the device. Solvents and other cleaning agents
may cause damage to the device.
This device complies with part 15 of the FCC rules. Operation is subject to the
following two conditions: (1) this device may not cause harmful interference,
and (2) this device must accept any interference received, including
interference that may cause undesired operation.
NOTE: The manufacturer is not responsible for any radio or TV interference
caused by unauthorized modifications to this equipment. Such modifications
could void the user’s authority to operate the equipment.
NOTE: This equipment has been tested and found to comply with the limits for
a Class B digital device, pursuant to part 15 of the FCC Rules. These limits
are designed to provide reasonable protection against harmful interference in
a residential installation. This equipment generates uses and can radiate
radio frequency energy and, if not installed and used in accordance with the
instructions, may cause harmful interference to radio communications.
However, there is no guarantee that interference will not occur in a particular
installation.
If this equipment does cause harmful interference to radio or television
reception, which can be determined by turning the equipment off and on, the
user is encouraged to try to correct the interference by one or more of the
following measures:
- Reorient or relocate the receiving antenna.
- Increase the separation between the equipment and receiver.
-Connect the equipment into an outlet on a circuit different from that to which
the receiver is connected.
-Consult the dealer or an experienced radio/TV technician for help.