Rimage CDPR23B Printer with RFID User Manual
Rimage Corporation Printer with RFID Users Manual
Rimage >
Contents
- 1. User Manual
- 2. Users Manual
Users Manual
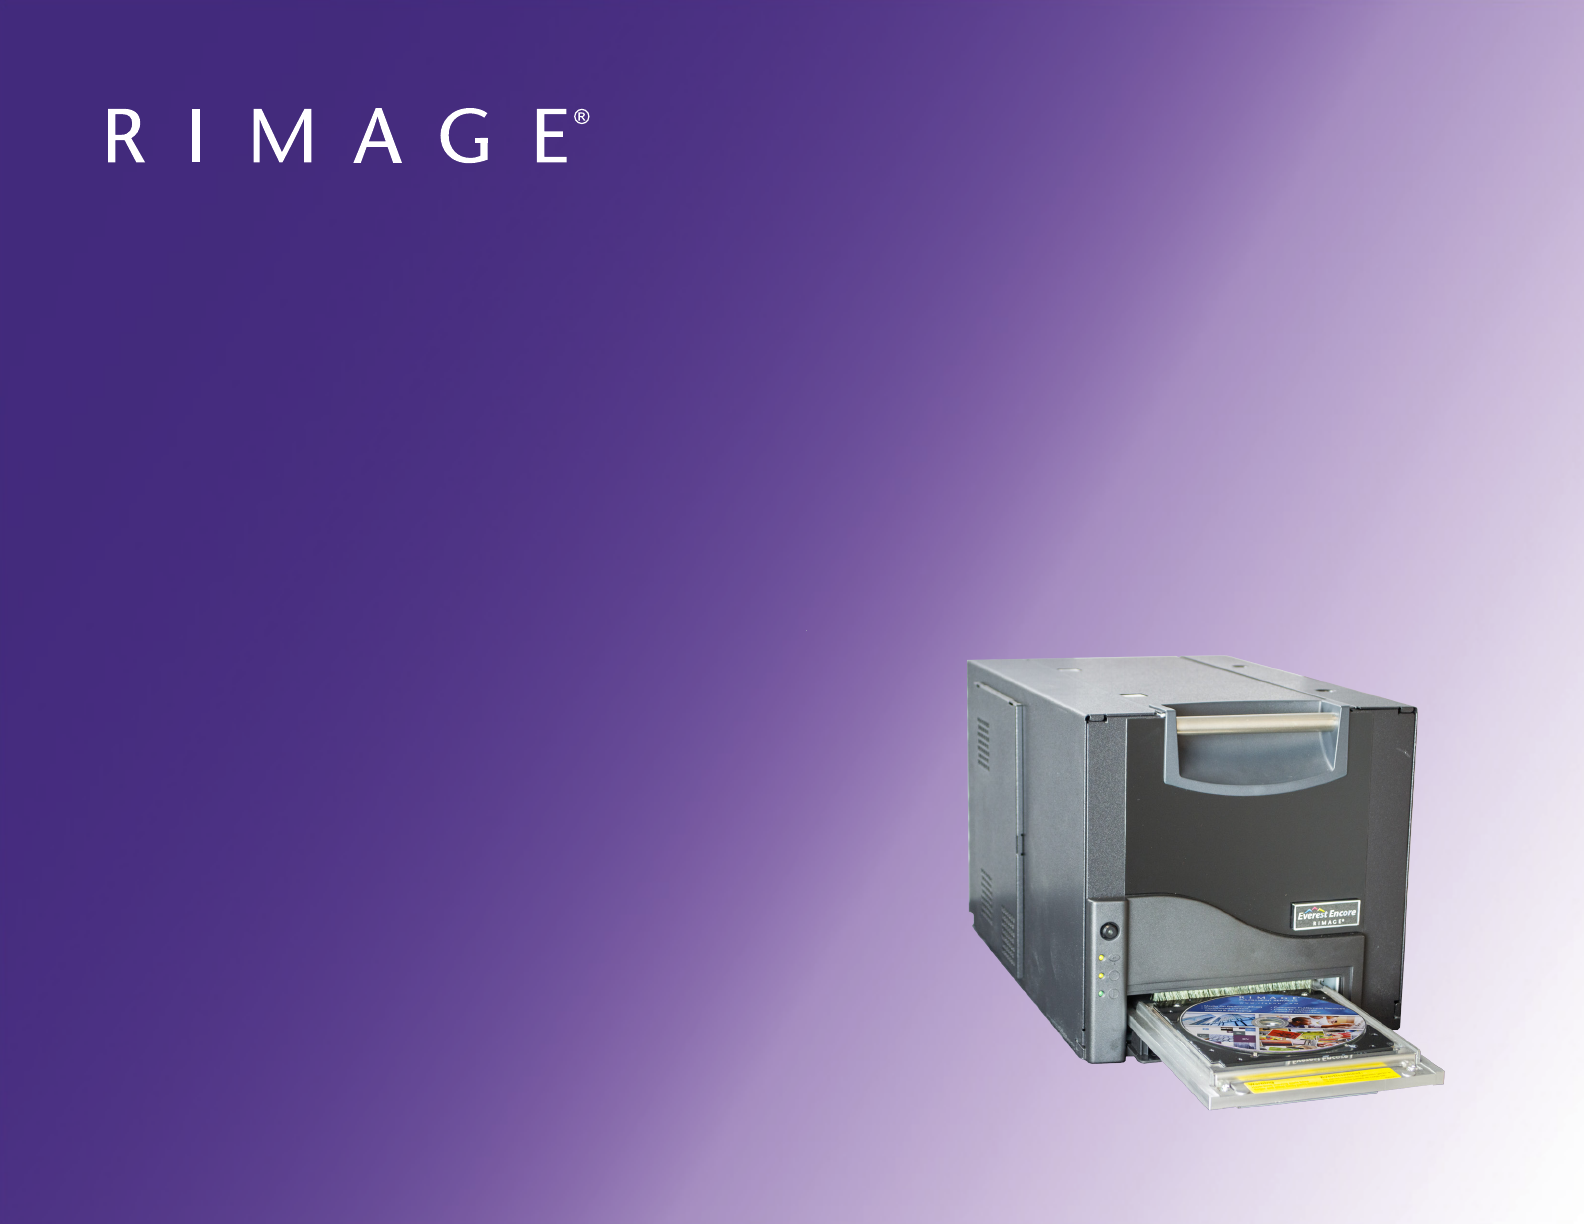
Rimage® Everest Encore Printer User Guide
™

For more information visit rimage.com/supportXXXXXXX_A
Rimage Corporation reserves the right to make improvements to the equipment and software described in this document at any time
without any prior notice. Rimage Corporation reserves the right to revise this publication and to make changes from time to time in the
content hereof without obligation of Rimage Corporation to notify any person or organization of such revisions or changes.
This document may contain links to web sites that were current at the time of publication, but may have moved or become inactive
since. This document may contain links to sites on the Internet that are owned and operated by third parties. Rimage Corporation is not
responsible for the content of any such third-party site.
© 2017, Rimage Corporation
Rimage® and Everest® are registered trademarks of the Rimage Corporation. Rimage Producer™ and Prism™ are trademarks of the Rimage
Corporation. Windows® is a registered trademark of Microsoft Corporation.
All other trademarks and registered trademarks are the property of their respective owners.
The most recent version of this document can be found at www.rimage.com/support.
Rimage Corporation
7725 Washington Avenue South
Minneapolis, Minnesota 55439 USA
Toll Free +1.800.445.8288
Rimage Europe GmbH
Albert-Einstein-Strasse 26
63128 Dietzenbach, GERMANY
Tel +49 (0)6074.8521.0
Rimage Japan Co., Ltd.
4F Arai #38 Bldg.,
2-7-1 Hamamatsu-cho,
Minato-ku, Tokyo 105-0013 Japan
Tel +81.3.6452.8780
Rimage Taiwan
2F.-7, No. 508, Sec. 5,
Zhongxiao East Road., Xinyi Dist.,
Taipei City 110, TAIWAN
Tel +886.2.2726.0100
Rimage Information
Technology (Shanghai)
Co., Ltd.
10B & 10C, World Plaza,
855 South Pudong Road
Shanghai, 200120 CHINA
Tel +86.21.5887.8905

Contents
For more information visit rimage.com/supportXXXXXXX_A
Introducon ............................................................................ 1
About this User Guide ............................................................. 1
About the Everest Encore Printer ...................................................... 1
Unpacking and Setup Instrucons ..................................................... 1
Important Informaon ............................................................ 2
Support Informaon .......................................................................... 2
Learn More Online ............................................................................ 2
Technical Support .............................................................................. 2
Opcal Disc Recording Soware Disclaimer ...................................... 2
Safety and Compliance Informaon .................................................. 3
Safety Precauons ................................................................................................ 3
Compliance Informaon ....................................................................................... 4
Everest Encore Printer Requirements ....................................... 6
Ribbon Requirements ........................................................................ 6
Everest Encore Ribbons ........................................................................................ 6
Label Design Requirements ............................................................... 6
Print Requirements ........................................................................... 7
Idenfying the Parts of the Everest Encore Printer ................... 8
Front View ........................................................................................ 8
Control Panel ..................................................................................... 8
Control Panel Indicators ....................................................................................... 8
Back View .......................................................................................... 8
Switches .......................................................................................... 10
AC Voltage Switch ............................................................................................... 10
Mode Switch ...................................................................................................... 10
Operang the Everest Encore Printer ..................................... 11
Power On or O the Everest Encore Printer .................................... 11
Power On or O a Standalone Printer ................................................................ 11
Power On or O a Printer Connected to an Autoloader or AutoPrinter ............ 11
Place a Disc on the Printer Tray ....................................................... 11
Set your Prinng Preferences................................................. 12
Default Printable Area Sengs ....................................................... 12
Set Your Prinng Preferences on a Windows PC ............................. 12
Access Prinng Preferences (PC) ........................................................................ 12
Access Prinng Preferences through the Windows Start Menu ................................... 12
Access Prinng Preferences through CD Designer ....................................................... 12
Access Prinng Preferences when Prinng PDFs .......................................................... 13
Set the Media Type, Media Size, Orientaon, and Ribbon Type (PC) ................. 13
Set the Print Quality, Color Matching, and Image Adjustments (PC) ................. 13
Set the Printable Area (PC) ................................................................................. 14
Adjust the Print Alignment and Color Density (PC) ............................................ 14
Dene Your Print Sengs on a Macintosh ...................................... 15
Access Print Sengs (Macintosh) ...................................................................... 15
Set the Media Type, Ribbon Type and Print Quality (Macintosh) ...................... 15
Set the Color Matching and Image Adjustments (Macintosh) ........................... 15
Set the Printable Area (Macintosh) .................................................................... 16
Adjust the Print Alignment and Color Density (Macintosh) ............................... 16
Check the Ribbon Remaining........................................................... 16
View the Ribbon Status (PC) ............................................................................... 17
View the Ribbon Status (Macintosh) .................................................................. 17
Maintaining the Everest Encore Printer .................................. 18
Maintenance Schedule .................................................................... 18
Change the Print Ribbon ................................................................. 18
Remove the Print Ribbon ................................................................................... 18
Install the Print Ribbon ....................................................................................... 20
Change the Retransfer Ribbon......................................................... 21
Remove the Retransfer Ribbon .......................................................................... 21
Install the Retransfer Ribbon .............................................................................. 22
Clean the Everest Encore Printer ..................................................... 22
Clean the Print Head .......................................................................................... 22
Clean the Tacky Rollers ....................................................................................... 23
Clean the Rear Air Filter ..................................................................................... 24
Clean the Side Air Filters ................................................................................... 25
Clean the Platen Roller ....................................................................................... 26
Clean the Sensors ............................................................................................... 28

1For more information visit rimage.com/supportXXXXXXX_A
Introduction
This manual provides the informaon needed to operate, congure, and
maintain the Rimage Everest Encore™ printer.
For informaon specic to your autoloader or Rimage AutoPrinter refer to
the product’s User Guide found at www.rimage.com/support.
Important! Your Everest Encore printer may not look exactly like the model
featured in this user guide.
About this User Guide
• While we try to maintain all versions of our manuals and documentaons,
please note that the English version found on our web site always contains the
most up-to-date informaon.
• Unless otherwise indicated, all Windows navigaon statements are Windows 10
paths. Other Windows operang system navigaon may dier slightly.
• These notes and symbols are used throughout the manual to help clarify
informaon:
Tip: A Tip suggests alternave methods that may not be obvious and helps
you understand the benets and capabilies of the product.
Important!
• An Important note provides informaon essenal to the compleon of a
task.
• Important supplemental informaon.
• You can disregard informaon in a Tip and sll complete a task, but do
not disregard an Important note.
ȸCauon: A Cauon indicates that failure to observe this guideline
could result in loss or damage to the equipment, product,
soware, or data.
ȸWarning! A Warning indicates that failure to follow this guideline
could result in bodily injury to personnel operang or maintaining
the equipment.
About the Everest Encore Printer
The Everest Encore printer is part of the Rimage series of printers. The
printer can be used as a stand alone printer, or with a Rimage autoloader or
Rimage AutoPrinter.
Unpacking and Setup Instrucons
Unpacking and installaon instrucons are included with the Everest Encore
printer. Refer to the Rimage Everest Encore Setup and Installaon Guide,
as well as the setup and installaon guide included with your Rimage
autoloader or AutoPrinter.

2For more information visit rimage.com/supportXXXXXXX_A
Important Information
This secon provides support contact informaon, and cauons and
warnings, for the Everest Encore printer.
Technical Specicaons for this product can be found at www.rimage.com/
support.
Support Contact Informaon
US, Canada, Latin America
Rimage Corporation
7725 Washington Avenue South
Minneapolis, MN 55439
USA
Attn: Rimage Services
Email: support@rimage.com
Telephone:
North America: 800-553-8312
Mexico/Latin America: 952-946-0004 option 2
Fax: 952-944-7808
Europe
Rimage Europe GmbH
Albert-Einstein-Straße 26
63128 Dietzenbach
Germany
Email: support@rimage.de
Telephone: +49 6074-8521-14
Fax: +49 6074-8521-100
Asia/Pacic
Rimage Japan Co., Ltd.
4F Arai #38 Bldg., 2-7-1
Hamamatsu-cho,
Minato-ku, Tokyo 105-0013 JAPAN
Email: servicejapan@rimage.co.jp
Telephone: +81-3-6452-8780
Fax: +81-3-6452-8785
Rimage Taiwan
2F-7, No. 508, Sec 5
Zhongxiao East Rd., Xinyi Dist.,
Taipei City 110, TAIWAN
Email: support@rimage.com
Telephone: +886-2-2726-0100
Rimage China
RM # 206, 207, 2F
No.1 FuXing Zhong Road
HuangPu District
ShangHai 200025 CHINA
Email: medical.sales@rimage.cn
enterprise.sales@rimage.cn
Telephone: +86-021-5887-8905
Contact Rimage Services
Website: www.rimage.com/support
When you contact Rimage
Services, please provide:
• System serial number and
software version
• Functional and technical
description of the problem
• Exact error message received
Copy and record the following information
from your Rimage product for future reference.
Note: Make sure you update the Serial
Number anytime you receive a
replacement system.
Serial Number:
Product Name:
Date of Purchase:
Technical Support
Rimage oers a variety of service and support opons for the Everest Encore
printer including Exchange Services. Please contact your Rimage Value
Added Reseller or Rimage for addional informaon and pricing.
Opcal Disc Recording Soware Disclaimer
This Product, Soware, or Documentaon may be designed to assist you
in reproducing material in which you own the copyright or have obtained
permission to copy from the copyright owner. Unless you own the copyright
or have permission to copy from the copyright owner, you may be violang
copyright law and be subject to payment of damages and other remedies. If
you are uncertain about your rights, you should contact your legal advisor. If
you are neither in possession of the copyright nor have authorizaon from
the owner of the copyright, unauthorized copying of copyrighted material
on an opcal disc or any other media violates naonal and internaonal
legislaon and can result in severe penales.

3
Important Information
For more information visit rimage.com/supportXXXXXXX_A
Safety and Compliance Informaon
This manual and the indicaons on the product allow proper and safe
operaon. The indicaon marks below help protect you and other persons
from injury, and equipment from damage.
Refer to the Safety Precauons secon on page 5 and the Compliance
Informaon secon on page 7 for more informaon.
Safety Precauons
To ensure safety, read these precauons and familiarize yourself with their
meaning before using the equipment.
ȸWarning!
• Use of controls or adjustments or performance of procedures other than
those specied herein may result in hazardous radiant exposure.
• Do not disassemble or use tools on the printer. All service procedures should
be performed by a Rimage-authorized technician, or sent in for Rimage-
authorized repair.
• Do not service the printer with the power cord plugged in the AC outlet.
• The interior of the printer contains sharp edges.
• The front bezel of the printer can be opened by hand. Do not insert your
ngers.
• Do not touch the heat roller.
ȸCountry-specic cauons for Wideband Data Transmission
systems: 2400-2483.5 MHz
• France: Do not use outdoors.
• Italy: If used outside of own premises, general authorizaon is required.
• Norway: This subsecon does not apply for the geographical area within a
radius of 20km from the center of NY-Alesund.
ȸCauon:
• All equipment with AC line voltage, or low DC voltages, such as switches,
power supplies, fuses, fans, and non-stepper motors, must be replaced with
Rimage-approved components to maintain the safety approval issued by
UL.
• Use only the supplied AC power cord. Fore more informaon or to order a
new power cord, contact Rimage Customer Service.
• This product is designed for an oce environment.
• Do not use the printer if it is overheang or an abnormal smell is detected.
This may result in a re and an electric shock. In case of heang or
abnormal smell, immediately disconnect the cable from the outlet. Contact
your Rimage-authorized dealer for repairs.
• Allow sucient free space for opening the printer tray. Do not touch the
printer tray while it is in moon.
• If the side cover is opened while power is supplied, the printer will stop. Do
not reach into the printer while it is in operaon. Do not aempt to bypass
the door interlock.
• This printer has no power switch. Power is disconnected completely by
unplugging the cable. Rimage recommends installing the printer in a
posion that allows immediate disconnecon of the power cable. Always
hold the plug when disconnecng the cable from the outlet.
• This printer has a voltage slide switch on the back of the unit. Before use,
check that is set to the correct voltage. Please do not use any voltage other
than 110VAC or 220VAC. This could result in a re and an electric shock.
• This equipment has been tested and found to comply with the limits
for a Class B digital device, pursuant to Part 15 of the FCC Rules. These
limits are designed to provide reasonable protecon against harmful
interference in a residenal installaon. This equipment generates uses
and can radiate radio frequency energy and, if not installed and used in
accordance with the instrucons, may cause harmful interference to radio
communicaons. However, there is no guarantee that interference will
not occur in a parcular installaon. If this equipment does cause harmful
interference to radio or television recepon, which can be determined by
turning the equipment o and on, the user is encouraged to try to correct
the interference by one of the following measures: Reorient or relocate
the receiving antenna. Increase the separaon between the equipment
and receiver. Connect the equipment into an outlet on a circuit dierent
from that to which the receiver is connected. Consult the dealer or an
experienced radio/TV technician for help.

4
Important Information
For more information visit rimage.com/supportXXXXXXX_A
ȸCauon:
• Changes or modicaons not expressly approved by the party responsible
for compliance could void the user’s authority to operate the equipment.
• This device complies with part 15 of the FCC Rules. Operaon is subject
to the following two condions: (1) This device may not cause harmful
interference, and (2) this device must accept any interference received,
including interference that may cause undesired operaon.
• “This device complies with Industry Canada’s licence-exempt RSSs.
Operaon is subject to the following two condions:
(1) This device may not cause interference; and
(2) This device must accept any interference, including interference that
may cause undesired operaon of the device.”
• “Le présent appareil est conforme aux CNR d’Industrie Canada applicables
aux appareils radio exempts de licence. L’exploitaon est autorisée aux
deux condions suivantes :
1) l’appareil ne doit pas produire de brouillage;
2) l’appareil doit accepter tout brouillage radioélectrique subi, même si le
brouillage est suscepble d’en compromere le fonconnement.”

5
Important Information
For more information visit rimage.com/supportXXXXXXX_A
Compliance Informaon
Product Name Rimage Everest Encore Printer
Model CDPR23B
Noce for USA NOTE: This equipment has been tested and found to comply with the limits for a Class B digital device, pursuant to Part 15 of the FCC Rules. These limits are
designed to provide reasonable protecon against harmful interference in a residenal installaon. This equipment generates uses and can radiate radio
frequency energy and, if not installed and used in accordance with the instrucons, may cause harmful interference to radio communicaons. Howev¬er,
there is no guarantee that interference will not occur in a parcular installaon. If this equipment does cause harmful interference to radio or television
recepon, which can be determined by turning the equipment o and on, the user is encouraged to try to correct the interference by one of the following
measures:
• Reorient or relocate the receiving antenna.
• Increase the separaon between the equipment and receiver.
• Connect the equipment into an outlet on a circuit dierent from that to which the receiver is connected.
• Consult the dealer or an experienced radio/TV technician for help.
Noce for Canada This Class A digital apparatus complies with Canadian ICES-003 Issue 6: 2016, updated April 2017. Cet appareil numerigue de la classe A est conforme a la
norme NMB-003 du Canade.
This product complies with CAN/CSA-C22.2 No. 60950-1-03 1st edition.
Noce for Europe This product is in conformity with the EMC Direcve (89/336/EEC) and the Low-Voltage Direcve (73/23/EEC) through compliance with the following
European standards: EN 55022: 1998 + Amd 1: 2000 Class B Limit; EN 55024: 1998; EN 61000-3-2:2000; EN 61000-3-3:1995 + Amd 1: 2001; EN 60950: 2000.
The CE mark has been axed in accordance with the CE Marking Direcve 93/68/EEC.
Noce for Japan This is a Class A product based on the standard of the Voluntary Control Council for Interference by Informaon Technology Equipment (VCCI). If this
equipment is used in a domesc environment, radio interference may occur, in which case, the user may be required to take correcve acon.
Translaon:
この装置は、情報処理装置等電波障害自主規制協議会(VCCI)の基準に基づくクラス
A 情報技術装置です。この装置を家庭環境で使用すると電波妨害を引き起こすことがありま
す。この場合には使用者が適切な対策を講ずるよう要求されることがあります。
Noce for Australia This product complies with AS/NZS CISPR22:2004.
6For more information visit rimage.com/support2001474_A
Everest Encore Printer Requirements
This secon describes ribbon, label design, and print requirements for the
Everest Encore printer.
Ribbon Requirements
Important!
• Rimage only supports the use of Rimage brand ribbons in our printers.
Printer issues that occur as a result of using ribbons from manufacturers
other than Rimage are not included under your Rimage warranty or
maintenance agreement.
• For opmum results, make sure that Everest Encore ribbons are stored
at a temperature between 41° and 95°F (5° to 35°C) and humidity level
between 45% and 85%.
• Avoid moisture and direct sunlight.
• Do not reuse ribbons.
• Use only ribbons designed for the Everest Encore printer. Refer to the
table below.
The Everest Encore printer requires a print ribbon and a retransfer ribbon.
The standard print ribbon has three colors: Cyan, Magenta, and Yellow
(CMY). These three colors combine in prinng to create full-color discs. Print
ribbons are also available in black.
Everest Encore Ribbons
Ribbon Type Number of Discs Printed
3-Color (CMY) 500
Black (monochrome) 1000
Retransfer ribbon (500 prints) 500
Label Design Requirements
The Everest Encore Windows-compable soware ships with the CD
Designer™ label editor soware. This soware is installed on your PC during
a typical installaon of the Rimage soware. If you have a Windows-based
PC, you can use CD Designer to design your labels.
If you are using a Macintosh, or prefer to design labels in a soware
applicaon other than CD Designer, use the following criteria.
Important! CD Designer is not Macintosh-compable and is not installed
with the Macintosh-compable Rimage soware.
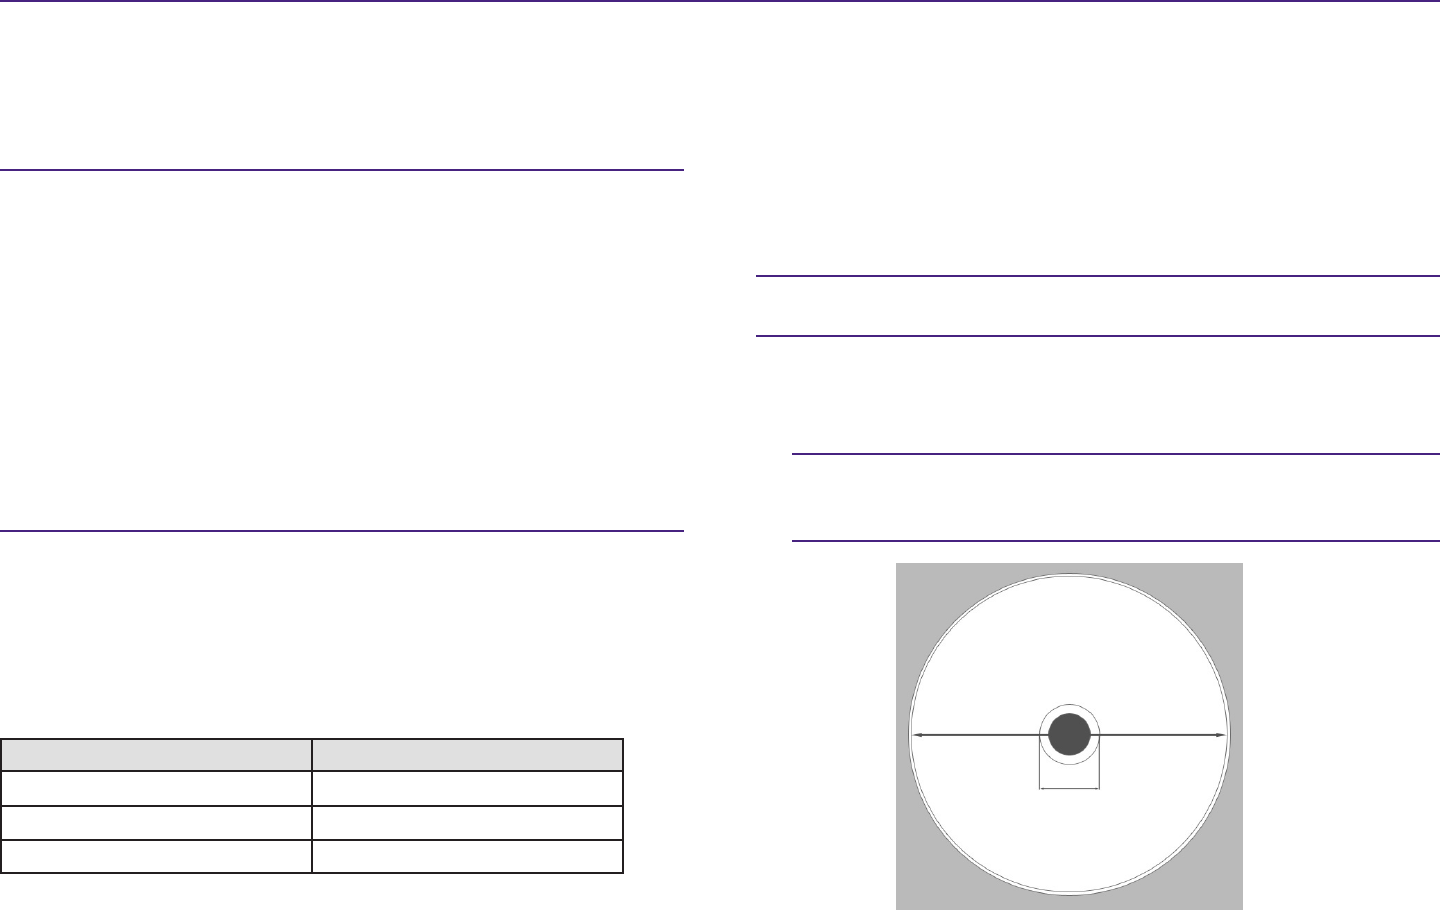
• Label design size – Design labels with a height of 12 cm and width of 12 cm.
A full-size disc is 120 mm (4.723”) in diameter. The hole is 15 mm (0.59”). The
printable area and hub sizes vary depending on the disc manufacturer.
Tip: The media that are in Rimage Media Kits have a printable area of
118-24 mm. On most labels, print sengs of 118 mm and 24 mm are
recommended.
Printable
Area 118 mm
Hub Size
24 mm

7For more information visit rimage.com/support2001474_A
Everest Encore Printer Requirements
• File format – For best results, save your labels as JPEG or TIFF les. However,
if you are using the Everest Encore on a Rimage autoloader, these le formats
must be imported into CD Designer and saved as CD Designer les (.btw) or
converted to PDF les before prinng.
• Color mode – If your Everest Encore is on a Rimage autoloader, convert all
labels to the RGB color mode in order to import them into CD Designer. If the
Everest Encore is a standalone printer or on an AutoEverest AutoPrinter, and
you are prinng directly from an image-eding program, you can work in the
color mode of your choice.
• Resoluon (pixels per inch) – For best results, use images set to a minimum of
300 pixels per inch. You may noce beer results if you use images with 600
pixels per inch or higher.
Print Requirements
Any label you create and save through CD Designer is in the correct le
format (.btw) for prinng to an Everest Encore on a Rimage autoloader. You
can also print labels saved as PDF les if your Everest Encore is on a Rimage
autoloader.
If you are using a standalone Everest Encore printer or an AutoEverest
AutoPrinter, you can print directly from any applicaon with print capability.
8For more information visit rimage.com/supportXXXXXXX_A
Identifying the Parts of the Everest Encore Printer
This secon describes the Everest Encore printer hardware and features.
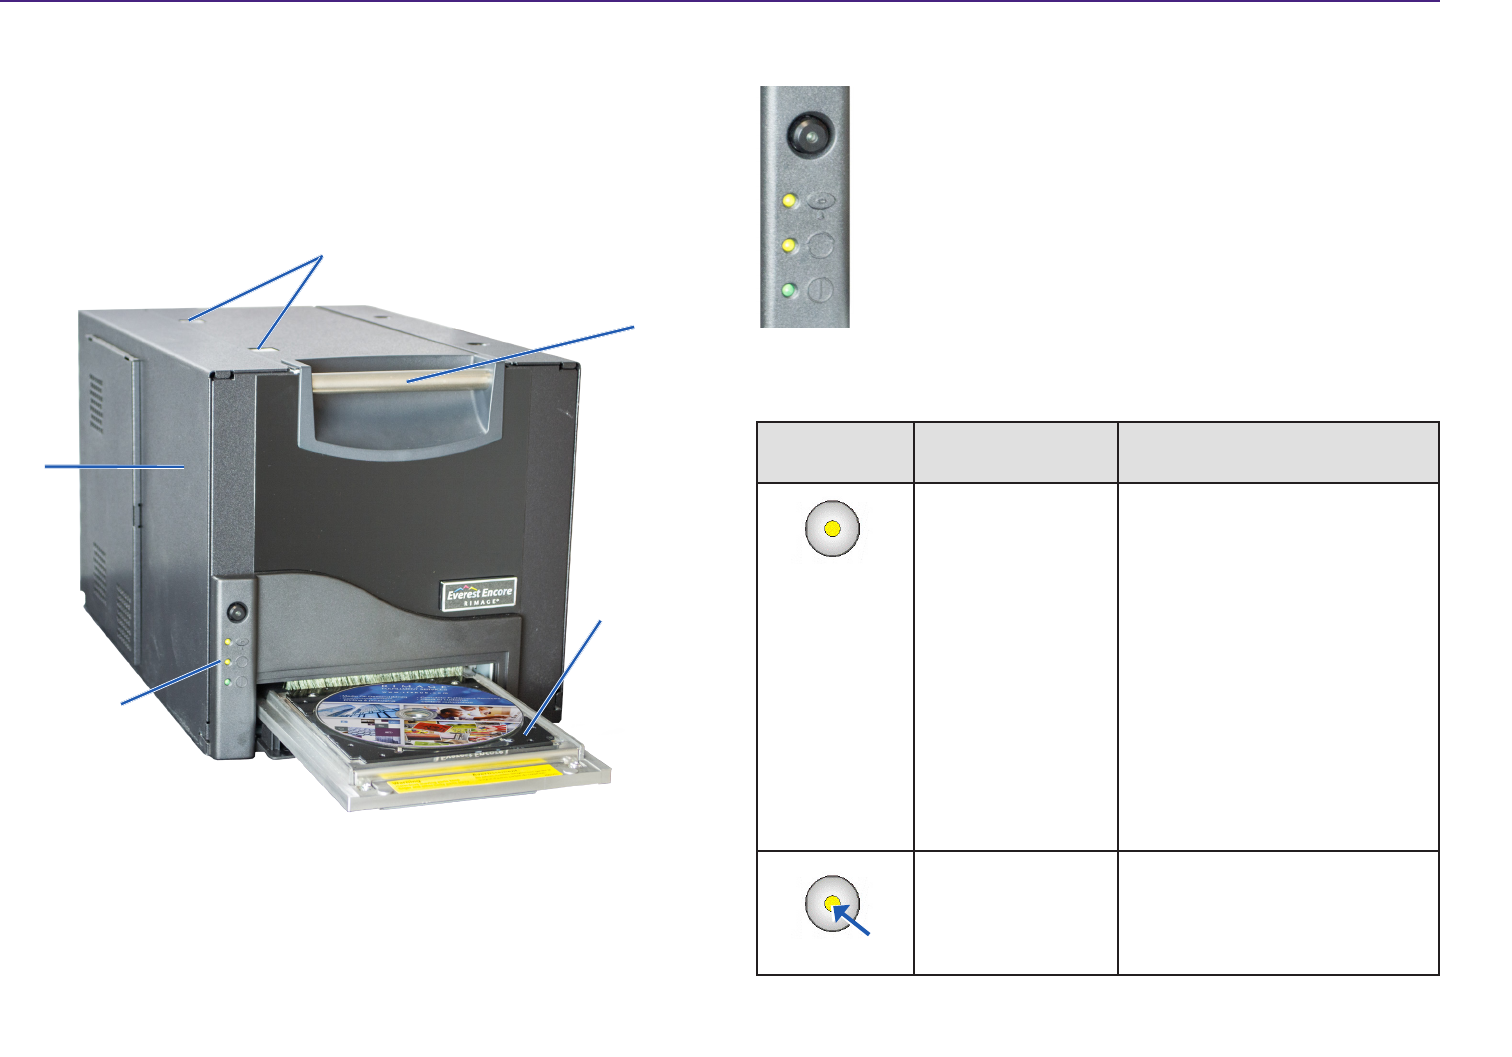
Front View
Control Panel
The control panel is located on the front of the Everest Encore.
It includes an operator buon and four indicator lights. (One
light is on the operator buon.) The control panel allows you to
monitor and control the printer.
The table below idenes the name and funcon of all parts of
the control panel.
Control Panel Indicators
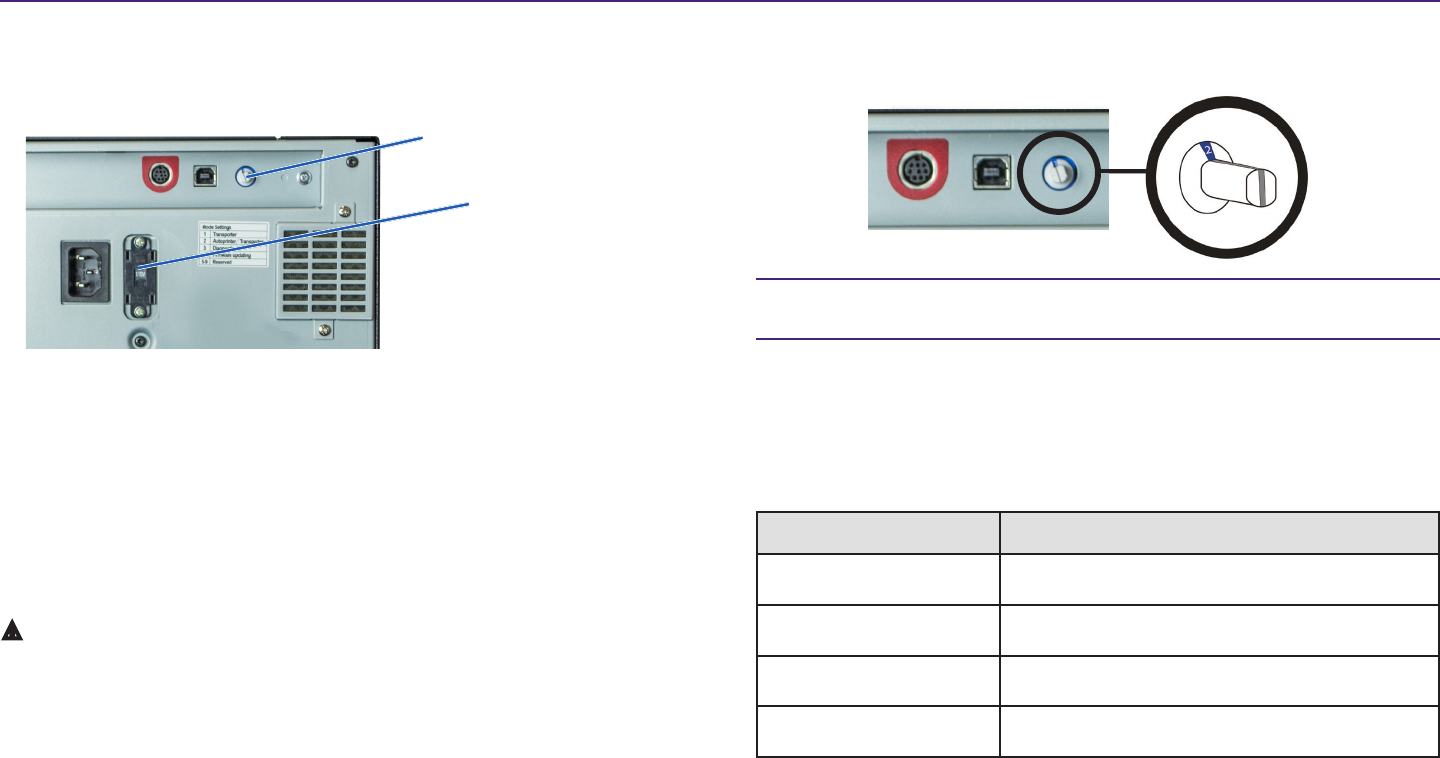
Switches
There are two switches on the rear of the Everest Encore: the AC voltage
switch and the mode switch.
AC Voltage Switch
The AC voltage switch is used to select the AC voltage of the power outlet.
AC Voltage
Switch
Mode Switch
Printer
Tray
Handle
Control
Panel
Side
Cover
Side Cover Latches
Control Panel Indicators
Image Name Funcon
Operator buon The Operator buon is used to
complete the following tasks:
• Open the printer tray
• Close the printer tray
• Reset aer an error
• Put the printer into sleep
mode. To put the printer into
sleep mode, press and hold the
Operator buon for 10 seconds.
To resume normal operaon,
press the Operator buon again.
Error indicator light
(on the operator
buon)
The Error indicator light
illuminates when operator acon
is required.
9For more information visit rimage.com/supportXXXXXXX_A
Identifying the Parts of the Everest Encore Printer
Disc Present
indicator light
The Disc Present indicator light
illuminates when a disc is placed
on the tray or when the disc is
properly clamped.
The Disc Present indicator light
ashes when there is a problem.
The number of ashes in each
cycle indicates the type of
problem.
• 1 ash = Side cover is open or
ribbon latch 1, 2 or 3 is open
• 2 ashes = Print ribbon problem
(incorrect, missing, or depleted
print ribbon)
• 3 ashes = Retransfer ribbon
problem (missing or depleted
retransfer ribbon)
• 4 ashes = Error upon clamping
the disc on the printer tray
Acve indicator
light
The Acve indicator light
illuminates when the printer has
completed inializaon.
The Acve indicator light ashes
when the printer is receiving data
from the host.
Power indicator
light
The Power indicator light
illuminates when the printer is
powered on.
Back View
Mode Switch
USB Connector
Printer Cable
Connector
AC Voltage
Switch
Power
Connector
Original Posion of
Shipping Screw Storage Posion
for Shipping Screw
10
Identifying the Parts of the Everest Printer
For more information visit rimage.com/supportXXXXXXX_A
Switches
There are two switches on the rear of the Everest Encore: the AC voltages
switch and the mode switch.
AC Voltage Switch
The AC voltage switch is used to select the AC voltage of the power outlet.
This switch has two posions: 110V and 220V.
ȸWarning! Set the AC voltage switch to match the voltage of the AC
power outlet.
Mode Switch
Important! You must power o the printer before changing the mode.
Power the printer on when the mode switch is set.
The mode switch is a rotary switch used to set the operaonal mode of the
Everest Encore. The opening at the base of the cap on the switch indicates
the selected mode. When the printer is shipped, it is set to the correct mode
for your operaon. You should not have to change the switch posion unless
you perform diagnosc tests.
Switch Posion Use
0 Standalone printer
2Rimage autoloader or AutoPrinter
3Diagnosc tesng
All others Not used
Mode Switch
AC Voltage Switch
11For more information visit rimage.com/supportXXXXXXX_A
Operating the Everest 600 Printer
This secon provides the informaon needed to operate your Everest Encore
printer.
Power On or O the Everest Encore Printer
The Everest Encore printer does not have a power switch. The printer is
powered on and o according to your system setup. Refer to the secons
below.
Power On or O a Standalone Printer
Follow these steps for a standalone Everest Encore printer:
• To power on the printer, connect the power cord from the printer to a power
outlet.
• To power o the printer, disconnect the power cord from the rear of the
printer.
Power On or O a Printer Connected to an Autoloader or
AutoPrinter
Follow these steps if your Everest Encore is connected to an autoloader or
AutoPrinter:
• To power on the printer, power on the autoloader or AutoPrinter.
• To power o the printer, power o the autoloader or AutoPrinter.
Tip: The printer enters power saving mode if it is idle for more than 30
minutes. When this occurs, the printer takes 2-3 minutes to warm up aer a
job is sent to the printer.
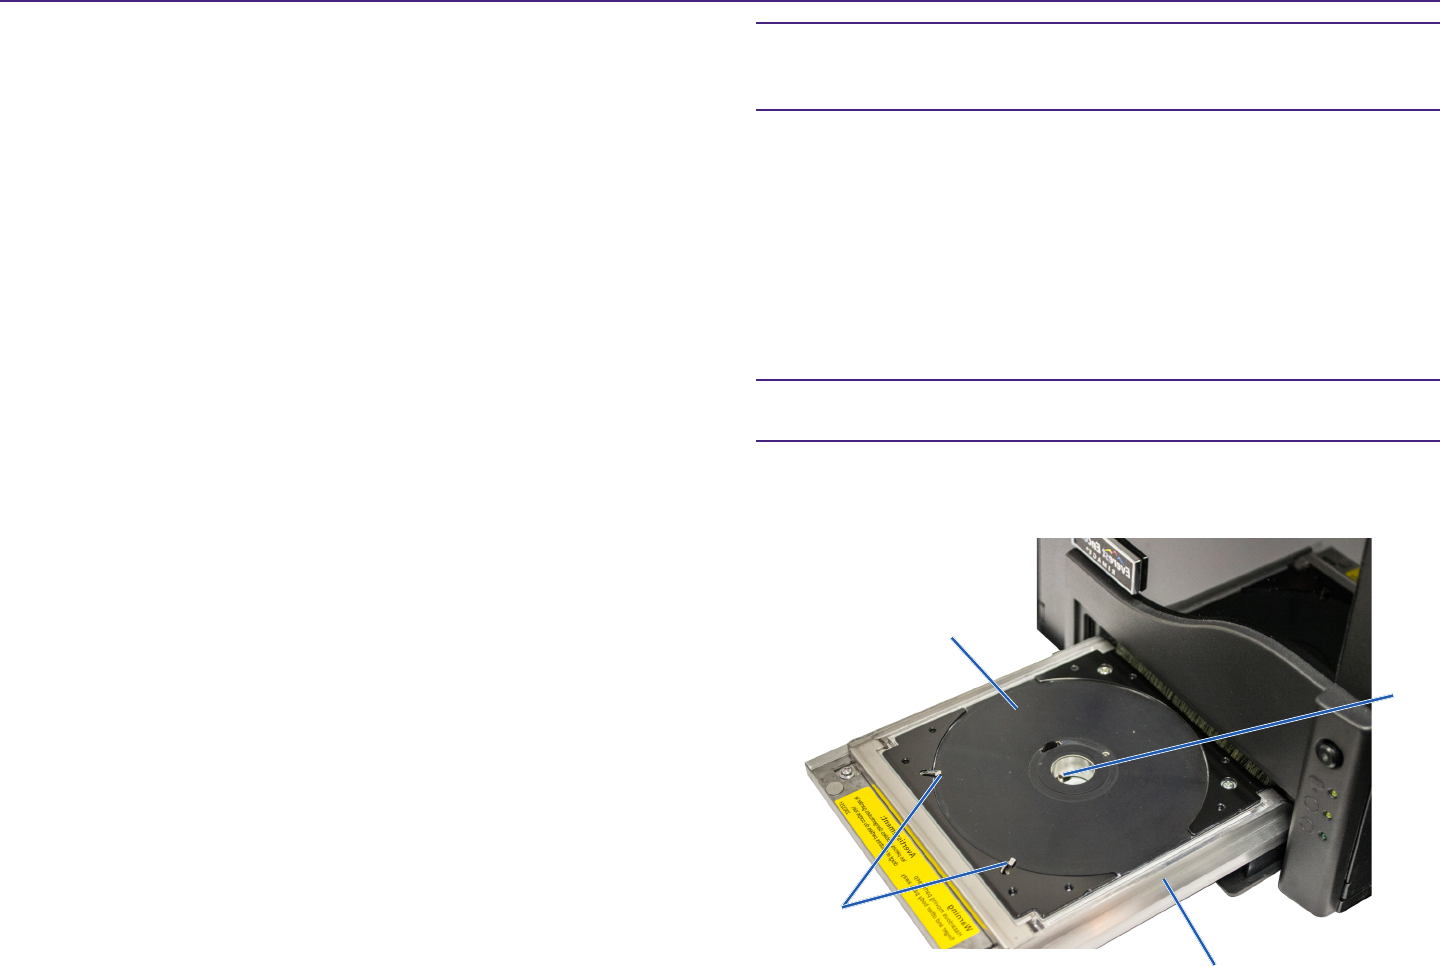
Place a Disc on the Printer Tray
Use this procedure to place a disc on the printer tray.
1. Press the operator buon. The printer tray opens.
2. Place the disc on the print pad. Make sure that the printable surface
faces up, and the stacking ring faces the print pad.
Important! To avoid scratching or damaging the recording surface of the
disc, the disc must not rest on the holding pins or the centering pin.
Centering
Pin
Holding
Pins
Print
Pad
Printer Tray

12For more information visit rimage.com/supportXXXXXXX_A
Set your Printing Preferences
This secon provides the informaon needed to set up your prinng
preferences and check the amount of print and retransfer ribbon remaining
using a Windows PC or a Macintosh.
Default Printable Area Sengs
Most discs have the following printable areas:
Set Your Prinng Preferences on a
Windows PC
Prinng preferences allow you to set up your Everest Encore printer to
produce the best possible labels on your discs.
Important: Unless otherwise indicated, all Windows navigaon statements
are Windows 10 paths. Other Windows operang systems’ navigaon may
dier slightly.
Disc without stacking ring:
• Outer Diameter 118 mm
• Inner Diameter 24 mm
Disc with stacking ring:
Standard Area:
• Outer Diameter 118 mm
• Inner Diameter 38 mm
Hub Area:
• Outer Diameter 35 mm
• Inner Diameter 17 mm
Access Prinng Preferences (PC)
Use one of the procedures below to access the Everest Encore Prinng
Preferences.
Access Prinng Preferences through the Windows Start Menu
Using this method, prinng preferences are saved in the printer driver
sengs and are applied to all newly created labels.
1. Select: Start > Devices and Printers.
2. Right-click the Everest Encore printer. The dropdown menu displays.
3. Select Prinng Preferences. The Rimage Everest Encore Prinng
Preferences dialog box opens.
Access Prinng Preferences through CD Designer
Using this method, prinng preferences are saved with the label le and are
used instead of the printer driver sengs.
1. Open the desired label le in CD Designer.
2. From the File menu, select Print. The Print window opens.
3. From the Name dropdown list, select the Everest Encore printer.
4. Select the Document Properes buon. The Rimage Everest Encore
Properes dialog box opens.

13
Set your Printing Preferences
For more information visit rimage.com/supportXXXXXXX_A
Access Prinng Preferences when Prinng PDFs
Use the procedure below to access prinng preferences for PDF les.
Important! The procedure below applies only if you are prinng PDF labels
using a Rimage autoloader. It does not apply if you are using an AutoEverest
AutoPrinter. When you use this procedure, the changes to the sengs are
global and apply to all PDF labels.
1. Select: Start > Devices and Printers.
2. Right-click on the Everest Encore printer. The dropdown menu displays.
3. From the dropdown menu, select Printer Properes. The Rimage
Everest Encore Properes dialog box opens.
Tip: In Windows XP, select Properes from the dropdown menu.
4. Select the Advanced tab.
5. At the boom of the Advanced tab, select Prinng Defaults… The
Rimage Everest Encore Prinng Defaults dialog box opens.
Set the Media Type, Media Size, Orientaon, and Ribbon
Type (PC)
1. Access Prinng Preferences. Refer to page 14 for instrucons.
2. Select the Main tab.
3. View or change the prinng preferences.
a. Select the appropriate Media Type.
b. Select the appropriate Media Size.
c. Select the desired number of Copies.
d. Select the desired Orientaon.
e. Select the appropriate type of Ribbon.
4. When you have made the desired choices in the Rimage Everest Encore
Prinng Preferences window, select Apply.
5. Select OK to close the Rimage Everest Encore Prinng Preferences
window.
Set the Print Quality, Color Matching, and Image
Adjustments (PC)
1. Access Prinng Preferences. Refer to page 14 for instrucons.
2. Select the Advanced tab.
3. View or change the prinng preferences.
a. Select the desired Print Quality. (The opons are Photo or
Graphics).
b. Select the desired criteria for Color Matching.
Tip: The default seng for color matching is Match for CMYK
prinng.
c. From the Image Adjustments dropdown list, select None, High
contrast, Vivid colors, or Custom.
If you select Custom, the Sengs buon becomes acve:
i. Select the Sengs buon. The Custom Sengs window opens.
ii. Select the desired Print Threshold Sengs.
iii. Move the Contrast Boost slider to adjust the image contrast.
iv. Move the Saturaon Boost slider to adjust the image saturaon.
v. Select OK to close the Custom Sengs window.
Tip: To modify the printable area, refer to the Set the Printable Area
(PC) secon on “Set the Printable Area (PC)” on page 14.
4. Select Apply when you have made the desired choices in the Rimage
Everest Encore Prinng Preferences window.
5. Select OK to close the Rimage Everest Encore Prinng Preferences
window.

14
Set your Printing Preferences
For more information visit rimage.com/supportXXXXXXX_A
Set the Printable Area (PC)
This funconality allows you to adjust the printable area sengs for
standard CD/DVD 120 mm media. These sengs control the outer and inner
diameters so that the label prints on the disc without overlapping the disc
edges.
Tip: Printable Area sengs created within a CD Designer label le will
override the printer and fax sengs in Windows.
1. Access Prinng Preferences. Refer to page 14 for instrucons.
2. Select the Advanced tab.
3. View or change the Printable Area preferences.
a. Select the Modify buon at the boom of the Advanced tab. The
Printable Area Sengs window opens.
b. To modify only Standard Area sengs, select the Standard radio
buon.
i. Enter the desired Outer Diameter.
ii. Enter the desired Inner Diameter.
c. To print on a disc with a stacking ring, select the Advanced radio
buon. The Hub Area sengs display.
i. Enter the desired Outer Diameter for the hub.
ii. Enter the desired Inner Diameter for the hub.
d. Select OK to save the changes. The Printable Area Sengs window
closes.
e. If necessary, select Default to return to the default
f. When you have made the desired choices in the Rimage Everest
Encore Prinng Preferences window, select Apply.
4. Select OK to close the Rimage Everest Encore Prinng Preferences
window.
Adjust the Print Alignment and Color Density (PC)
1. Access Prinng Preferences. Refer to page 14 for instrucons.
2. Select the Ulity tab.
3. Select Status Monitor… buon. The Rimage Everest Encore Status
Monitor window opens with the Status tab acve.
Tip: On the Status tab, you can view the progress of a print job, the type
of print ribbon installed, and the esmated percentages of unused
ribbon for the print and retransfer ribbons. To reset the esmate for the
number of prints remaining on the ribbons, refer to the View the Ribbon
Status (PC) secon on page 15.
4. Select the Printer Informaon tab to view or change the Print Alignment
and Color Density sengs.
Tips:
• The Printer Informaon tab also displays the current rmware
version and serial number of your Everest Encore printer.
• Select Default to return to the default Print Alignment Sengs or
Color Density Sengs.
a. View or change the Print Alignment Sengs.
i. Select the Modify buon from the Print Alignment Sengs
pane. The Print Alignment Sengs window opens.
ii. Select the desired Color/Monochrome seng in the Horizontal
Alignment Sengs pane to modify the horizontal alignment for
all ribbon types.
iii. Select the desired Color seng to modify the vercal alignment
for prints with a CMY ribbon.
iv. Select the desired Monochrome seng to modify the vercal
alignment for prints with a monochrome ribbon.
v. Select OK to save the changes. The Print Alignment Sengs
window closes.

15
Set your Printing Preferences
For more information visit rimage.com/supportXXXXXXX_A
b. View or change the Color Density Sengs.
i. Select the Modify buon from the Color Density Sengs pane.
The Color Density Sengs window opens.
ii. Select the desired Cyan, Magenta and Yellow sengs to modify
the color density.
iii. Select the desired Black seng to modify the density for
monochrome images.
iv. Select OK to save your changes. The Color Density Sengs
window closes.
5. Select Close to close the Status Monitor dialog box.
6. Select OK to close the Rimage Everest Encore Prinng Preferences
window.
Check the Ribbon Remaining
The operator panel on Rimage Producer V and Catalyst autoloaders displays
the esmated number of prints remaining on the print ribbon and the
retransfer ribbon.
For standalone Everest Encore printers and AutoPrinters, you can check the
amount of ribbon remaining using the Status feature of the printer driver.
Use the following procedure to check the amount of ribbon remaining for a
standalone Everest Encore printer or AutoEverest AutoPrinter.
View the Ribbon Status (PC)
The Status tab of the Status Monitor window for Windows allows you to
view the esmated percentage and number of prints remaining on the print
and retransfer ribbons.
1. Access Prinng Preferences. Refer to page 14 for instrucons.
2. Select the Ulity tab.
3. Select Status Monitor… The Status Monitor window opens, with the
Status tab acve.
4. View the ribbon informaon:
• Current printer status.
• Esmated percentage and number of prints remaining on the print and
retransfer ribbons.
Tip: If you remove a ribbon from the Everest Encore printer and reinsert it,
the system recognizes the amount of ribbon remaining in the consumable
monitoring applicaon. Parally used ribbons from other Everest printers
will not display accurately in the consumable monitoring applicaon.
5. Reset the esmate for the number of prints remaining on the retransfer
ribbon.
a. Select Opons. The Reset retransfer prints remaining window
opens.
b. If you are using a 500-print ribbon, check the Use 500 print
retransfer ribbon box.
c. Select Reset prints. The Reset prints window opens.
d. Select Yes to conrm the reset. The Reset prints and Reset retransfer
prints remaining windows close.
e. Select Close to close the Status Monitor window.
f. Select OK to close the Prinng Preferences window.
16For more information visit rimage.com/supportXXXXXXX_A
Maintaining the Everest Encore Printer
You must perform roune maintenance to keep the Everest Encore
operang at opmum performance. The table below lists maintenance
tasks, frequency, and references to cleaning instrucons in this user guide.
Maintenance Schedule
Task Frequency Instrucons
Change the print
ribbon
3-Color
Ribbon (CMY)
Refer to the Change the Print
Ribbon secon on page 16.
Aer 500 discs
Black Ribbon
(monochrome) Aer 1000 discs
Change the retransfer
ribbon Aer 500 discs
Refer to the Change the
Retransfer Ribbon secon on
page 19.
Clean the print head Aer 2000 discs (as needed) or at every
ribbon change
Refer to the Clean the Print Head
secon on page 22.
Clean the tacky rollers Aer 2000 discs or at every ribbon
change
Refer to the Clean the Tacky
Rollers secon on page 23.
Clean the sensors Clean the sensors if:
• You receive any of the following error
messages stang that the:
Printer is not detecng the print
ribbon.
Upper or lower sensor is not
responding.
• The prinng is o center.
Refer to the Clean the Sensors
secon on page 28.
Clean the air lters Monthly Refer to the Clean the Rear Air
Filters and Clean the Side Air
Filters secons on page 24.
Clean the platen roller Important! Clean the platen roller only if
you noce a diminished print quality,
such as white specks, on the printed
disc.
Refer to the Clean the Platen
Roller secon on page 26.
Clean the exterior Weekly Wipe the exterior of the printer
with a lint-free cloth.
Important! For opmum performance, keep the Everest Encore in a clean,
dust-free environment.
Change the Print Ribbon
Before you change or install a new Everest Encore print ribbon, allow me
for the new ribbon to become acclimated to the environment. Allow more
me for greater temperature and humidity dierences.
Important!
• Rimage supports only the use of Rimage brand ribbons in our printers.
Printer issues that occur as a result of using ribbons from manufacturers
other than Rimage are not included under your Rimage warranty or
maintenance agreement.
• For opmum results, make sure that Everest Encore ribbons are stored
at a temperature between 41° and 95°F
(5° to 35°C) and humidity level between 45% and 85%.
• Avoid moisture and direct sunlight.
• Do not reuse ribbons.
• Use only ribbons designed for the Everest Encore printer.
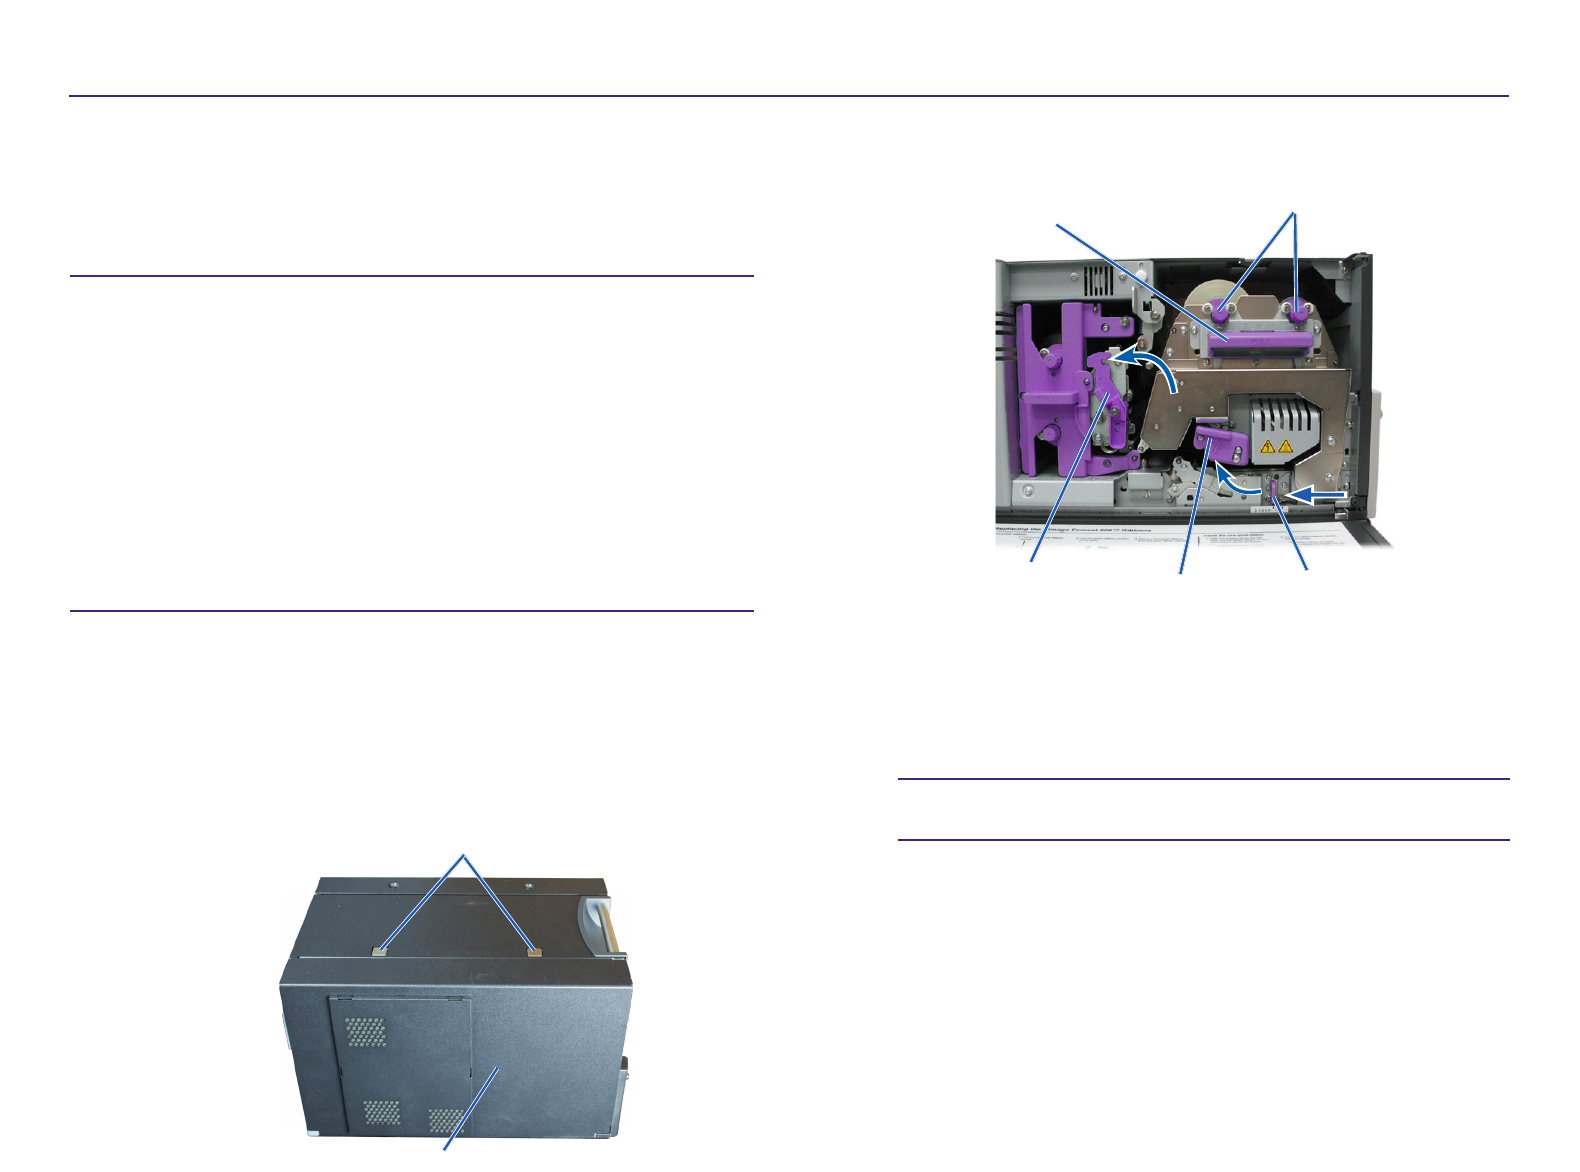
Remove the Print Ribbon
1. Open the side cover.
a. Press the two side cover
latches to release the side
cover.
b. Lower the side cover.
Side Cover
Side Cover Latches

17
For more information visit rimage.com/support
2001474_A
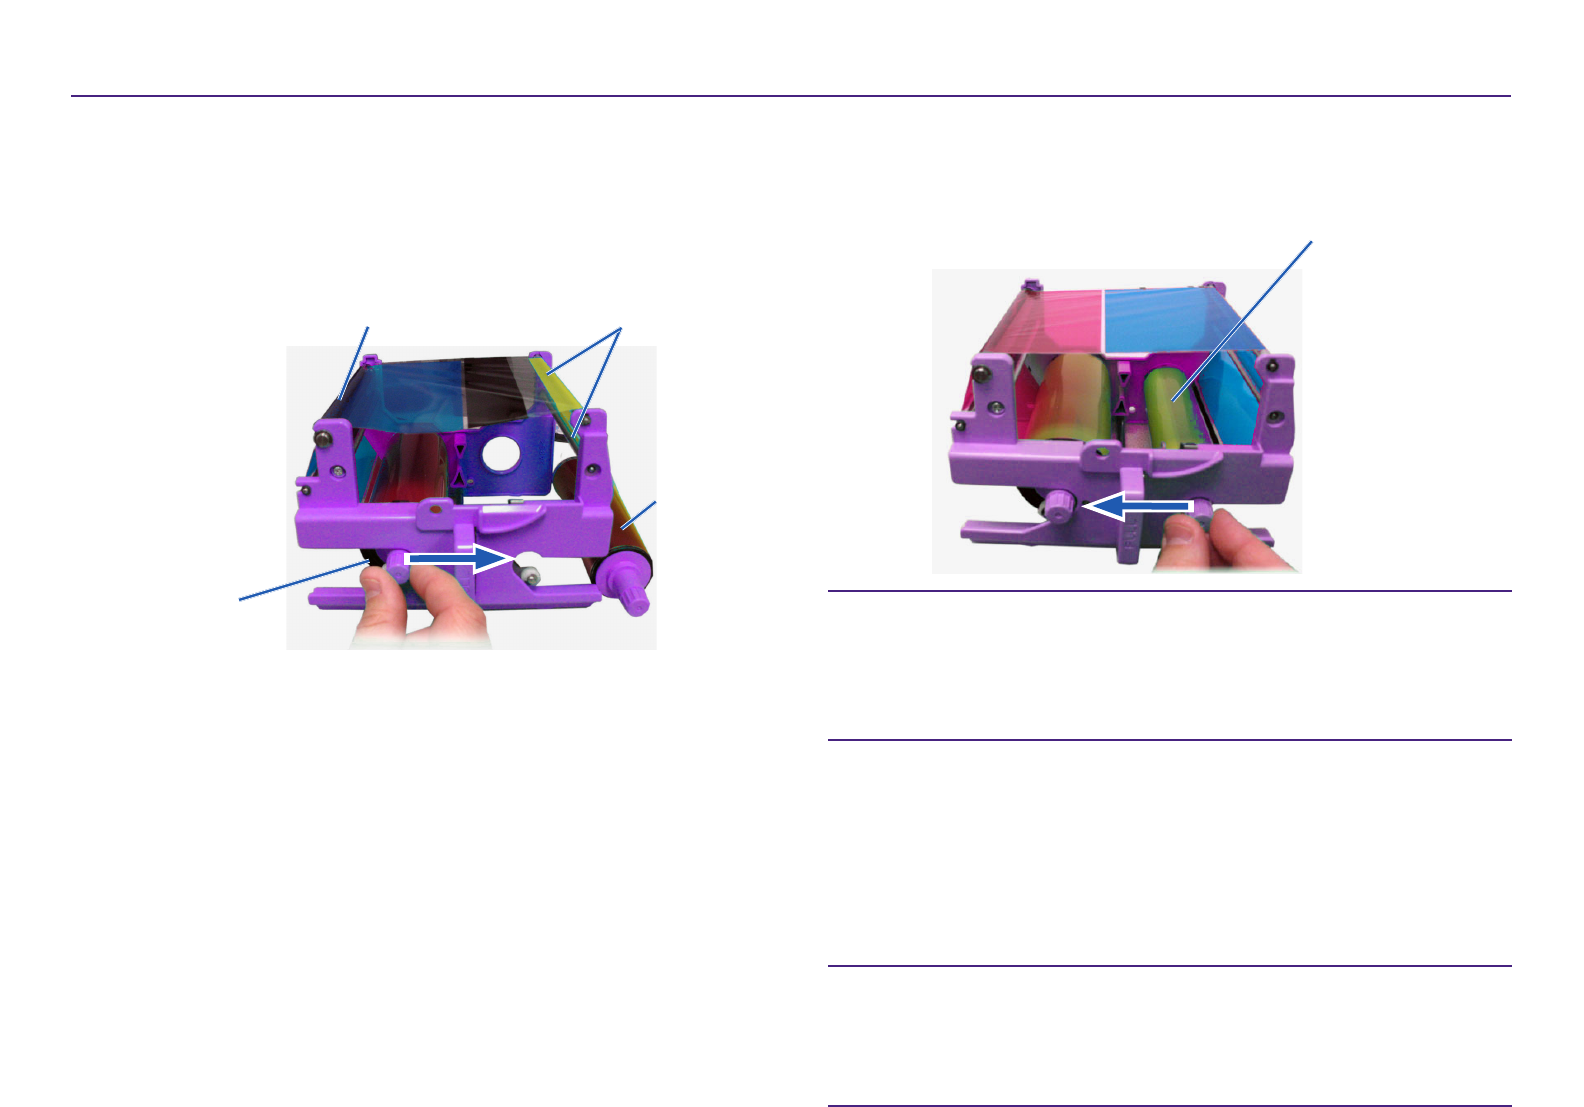
2. Access the print ribbon.
a. Open latch 1.
b. Pull the print ribbon carrier straight out of the printer.
c. Lay the print ribbon carrier on its back.
Print Ribbon
Carrier
Latch 1
Tip: Perform cleaning procedures while the print ribbon is removed. For
more informaon refer to the Clean the Everest Encore Printer secon on
page 18.
3. Remove the print ribbon from the carrier.
a. Slide the supply roll to the le.
b. Slide the take-up roll to the right.
c. Discard the used print ribbon.
Supply Roll
Take-up Roll
Maintaining the Everest Encore Printer
18
Maintaining the Everest 600 Printer
For more information visit rimage.com/supportXXXXXXX_A
Install the Print Ribbon
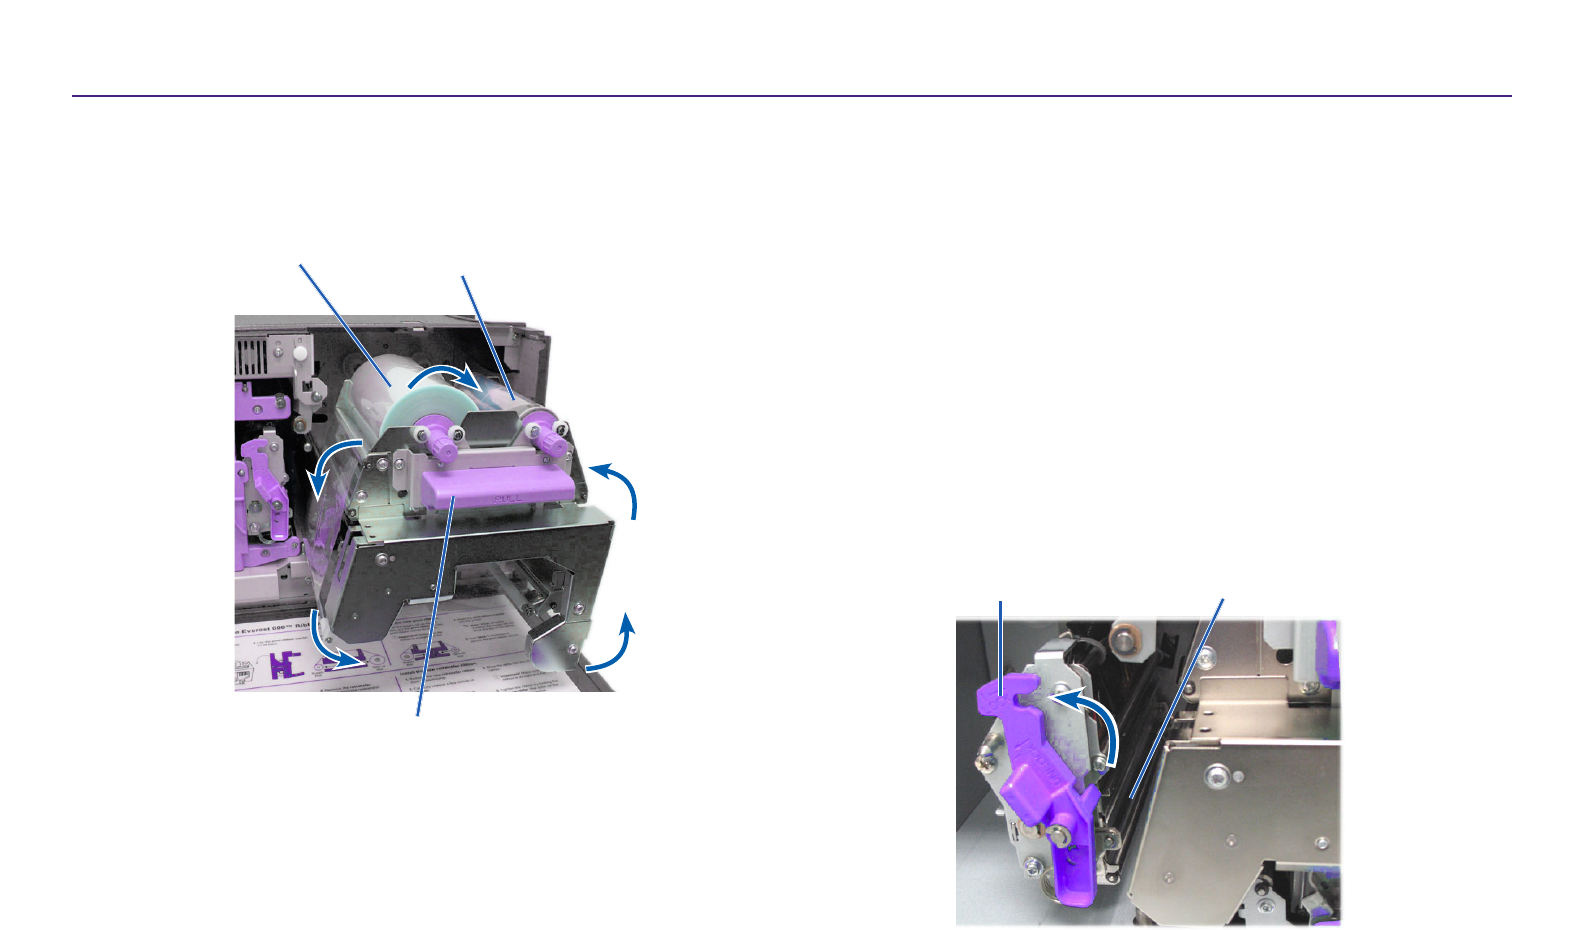
1. Remove the new print ribbon from the packaging.
2. Install the print ribbon on the print ribbon carrier.
a. With the supply roll on the le side, unwind several inches of the
print ribbon.
b. Lay the print ribbon across the tacky roller and guide rollers.
c. Install the supply roll as shown.
d. Install the take-up roll as shown.
Tacky Roller
Supply Roll
Guide Rollers
Take-up Roll
e. Rotate the take-up roll clockwise so the ribbon is aligned and lies
at. You may need to li the ribbon up from the tacky roller to
straighten it.
Important:
• Do not rotate the ribbon past the Cleaning Bars at the front of the
ribbon .
• If you installed a monocolor ribbon, advance the ribbon so the ink
poron of the ribbon is advanced to the take-up roll.
3. Reassemble the printer.
a. Set the print ribbon carrier upright.
b. Slide the print ribbon carrier into the printer.
c. Close latch 1.
d. Close the side cover.
Tip: Ribbon color can vary from lot to lot. Aer you load the new ribbon, you
may need to adjust the density sengs in the printer driver. Refer to the
Adjust the Print Alignment and Color Density (PC) secon on page 14 or
the Adjust the Print Alignment and Color Density (Macintosh) secon on
page 16 for more informaon.
The printer is ready for use.
Take-up Roll
Maintaining the Everest Encore Printer
19
Maintaining the Everest 600 Printer
For more information visit rimage.com/supportXXXXXXX_A
Change the Retransfer Ribbon
Before you change or rst install the Everest Encore retransfer ribbon, allow
me for the new ribbon to become acclimated to the environment. Allow
more me for greater temperature and humidity dierences.
Important!
• Rimage supports only the use of Rimage brand ribbons in our printers.
Printer issues that occur as a result of using ribbons by manufacturers
other than Rimage are not included under your Rimage warranty or
maintenance agreement.
• For opmum results, make sure that Everest Encore ribbons are stored
at a temperature between 41° and 95°F (5° to 35°C) and humidity level
between 45% and 85%.
• Avoid moisture and direct sunlight.
• Do not reuse ribbons.
• Make sure you only use ribbons designed for the Everest Encore printer.
Remove the Retransfer Ribbon
1. Open the side cover.
a. Press the two side cover latches to release the side cover.
b. Lower the side cover.
2. Remove the used retransfer ribbon.
a. Open latches 1, 2, and 3.
b. Grasp the handle to slide the retransfer ribbon carrier out of the
printer.
Tip: The retransfer ribbon carrier cannot be removed from the
printer.
c. Li the retransfer rolls out of the carrier.
d. Carefully slide the retransfer ribbon from the retransfer ribbon
carrier.
e. Discard the used retransfer ribbon.
Retransfer
Ribbon Carrier
Retransfer
Rolls
Latch 1 Latch 2 Latch 3
Side Cover
Side Cover Latches
Maintaining the Everest Encore PrinterMaintaining the Everest Encore Printer
20
Maintaining the Everest 600 Printer
For more information visit rimage.com/supportXXXXXXX_A
Install the Retransfer Ribbon
1. Remove the new retransfer ribbon from the packaging.
2. Posion the retransfer ribbon.
a. With the supply roll on the le side, unwind several inches of the
retransfer ribbon.
b. Slide the retransfer ribbon under the retransfer ribbon carrier.
c. Install the supply roll on the le side of the retransfer ribbon carrier.
Be sure that the ribbon winds under the supply roll.
d. Bring the take-up roll up and around the guide rollers and snap the
roll into place.
Supply Roll Take-up Roll
Retransfer Ribbon Carrier
3. Rotate the take-up roll counterclockwise in order to ghten the
retransfer ribbon.
4. Reassemble the printer.
a. Slide the retransfer carrier into the printer.
b. Close latches 1, 2, and 3.
c. Close the side cover.
The printer is ready for use.
Clean the Everest Encore Printer
Regular cleaning helps to keep your Everest Encore printer in opmal
operang condion.
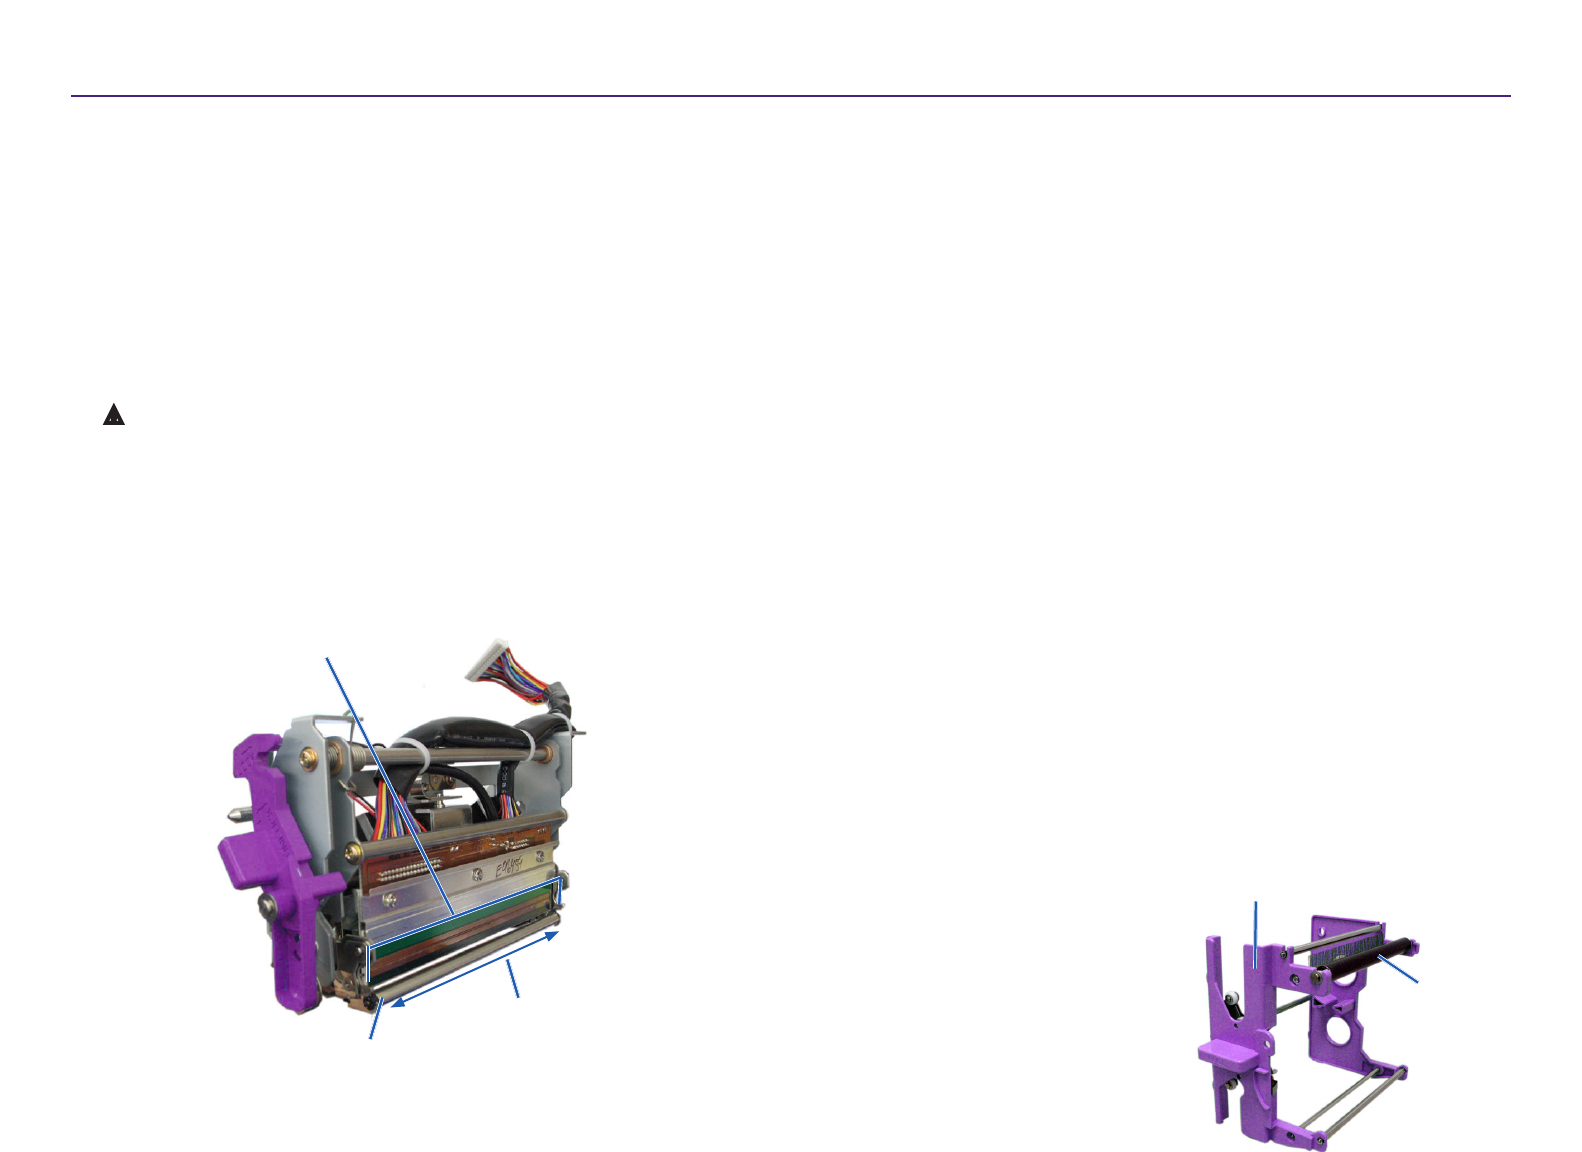
Clean the Print Head
#Tools required:
• Sponge swabs with long handles (included in the Everest cleaning kit)
• 99% Isopropyl alcohol
Latch 1 Print Head
Maintaining the Everest Encore Printer
21
Maintaining the Everest 600 Printer
For more information visit rimage.com/supportXXXXXXX_A
1. Access the print head.
a. Press the two side cover latches to release the side cover.
b. Lower the side cover.
c. Open latch 1.
d. Remove the print ribbon carrier. For specic instrucons, refer to
the Change the Print Ribbon procedure on page 16.
2. Clean the print head.
ȸCauon! Do not scratch the print head. Remember the
following ps:
• Always wipe from one end of the print head to the other without
stopping in the middle.
• Only wipe the area indicated.
a. Apply isopropyl alcohol to the sponge swab.
Wipe
Direcon
Print Head Area to Wipe
Roller
b. Use the sponge swab to wipe across the print head from one end to
the other in the direcon shown.
c. Repeat as needed unl the print head is clean of dust and debris.
d. Use the sponge swab to remove any waxy buildup from the roller
below the print head.
3. Prepare the printer for use.
a. Install the print ribbon. For specic instrucons, refer to the Change
the Print Ribbon procedure on page 16.
b. Install the print ribbon carrier.
c. Close all latches.
d. Close the side cover.
The printer is ready for use.
Clean the Tacky Rollers
#Tools required:
• Sponge swabs with long handles (included in the Everest
cleaning kit)
• 99% Isopropyl alcohol
1. Remove the print ribbon. For specic instrucons, refer to the Change
the Print Ribbon procedure on page 16.
2. Clean tacky roller 1 (on the print ribbon carrier).
Print Ribbon Carrier
Tacky
Roller 1
Maintaining the Everest Encore Printer
22
Maintaining the Everest 600 Printer
For more information visit rimage.com/supportXXXXXXX_A
a. Apply isopropyl alcohol to the sponge swab.
b. Use the sponge swab to clean tacky roller 1.
c. Use the sponge swab to remove any waxy buildup from other parts
of the ribbon carrier.
d. Install the print ribbon on the print ribbon carrier. Refer to the
Change the Print Ribbon procedure on page 16.
3. Inside the printer, use the sponge swab to wipe tacky roller 2.
4. Prepare the printer for use.
a. Install the print ribbon carrier.
b. Close all latches.
c. Close the side cover.
The printer is ready for use.
Tacky
Roller 2
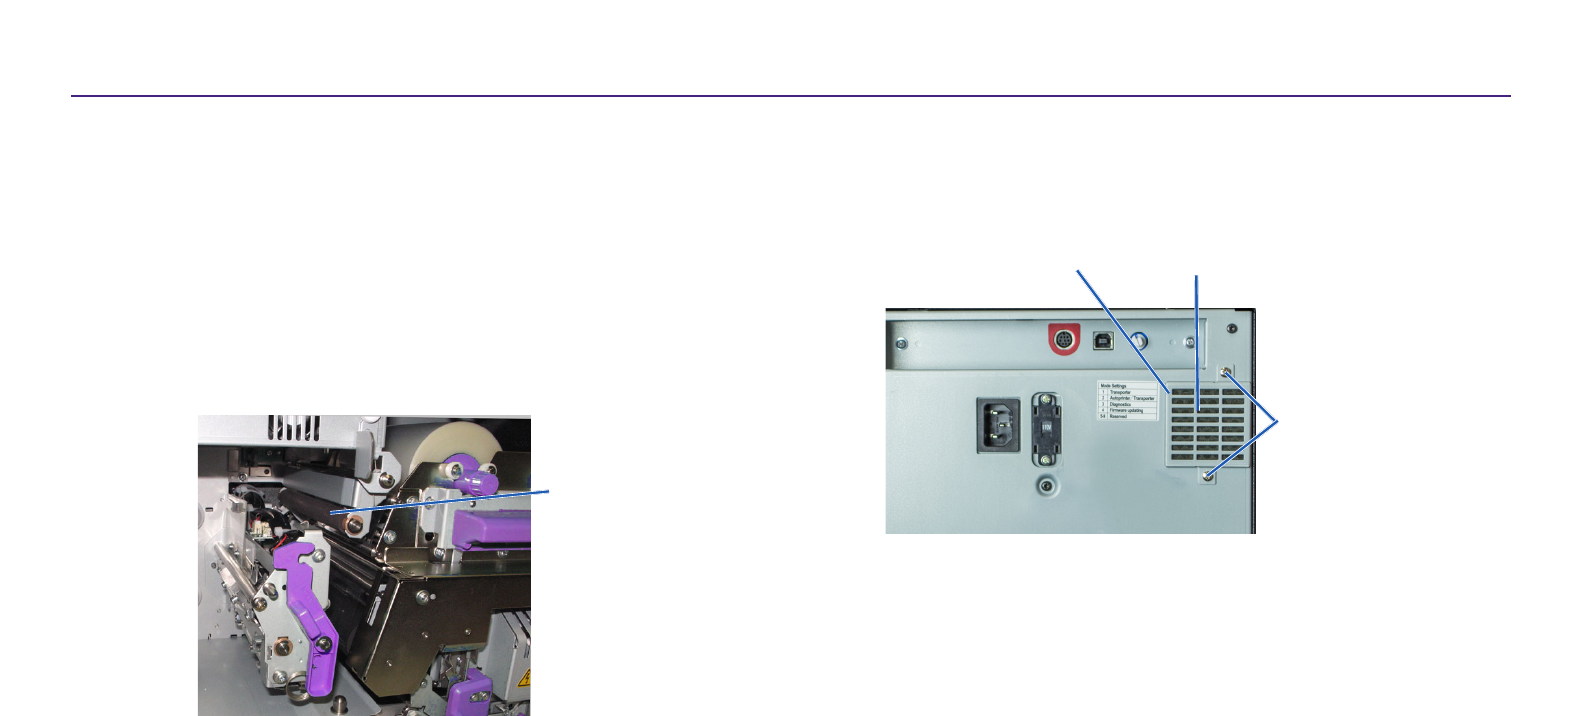
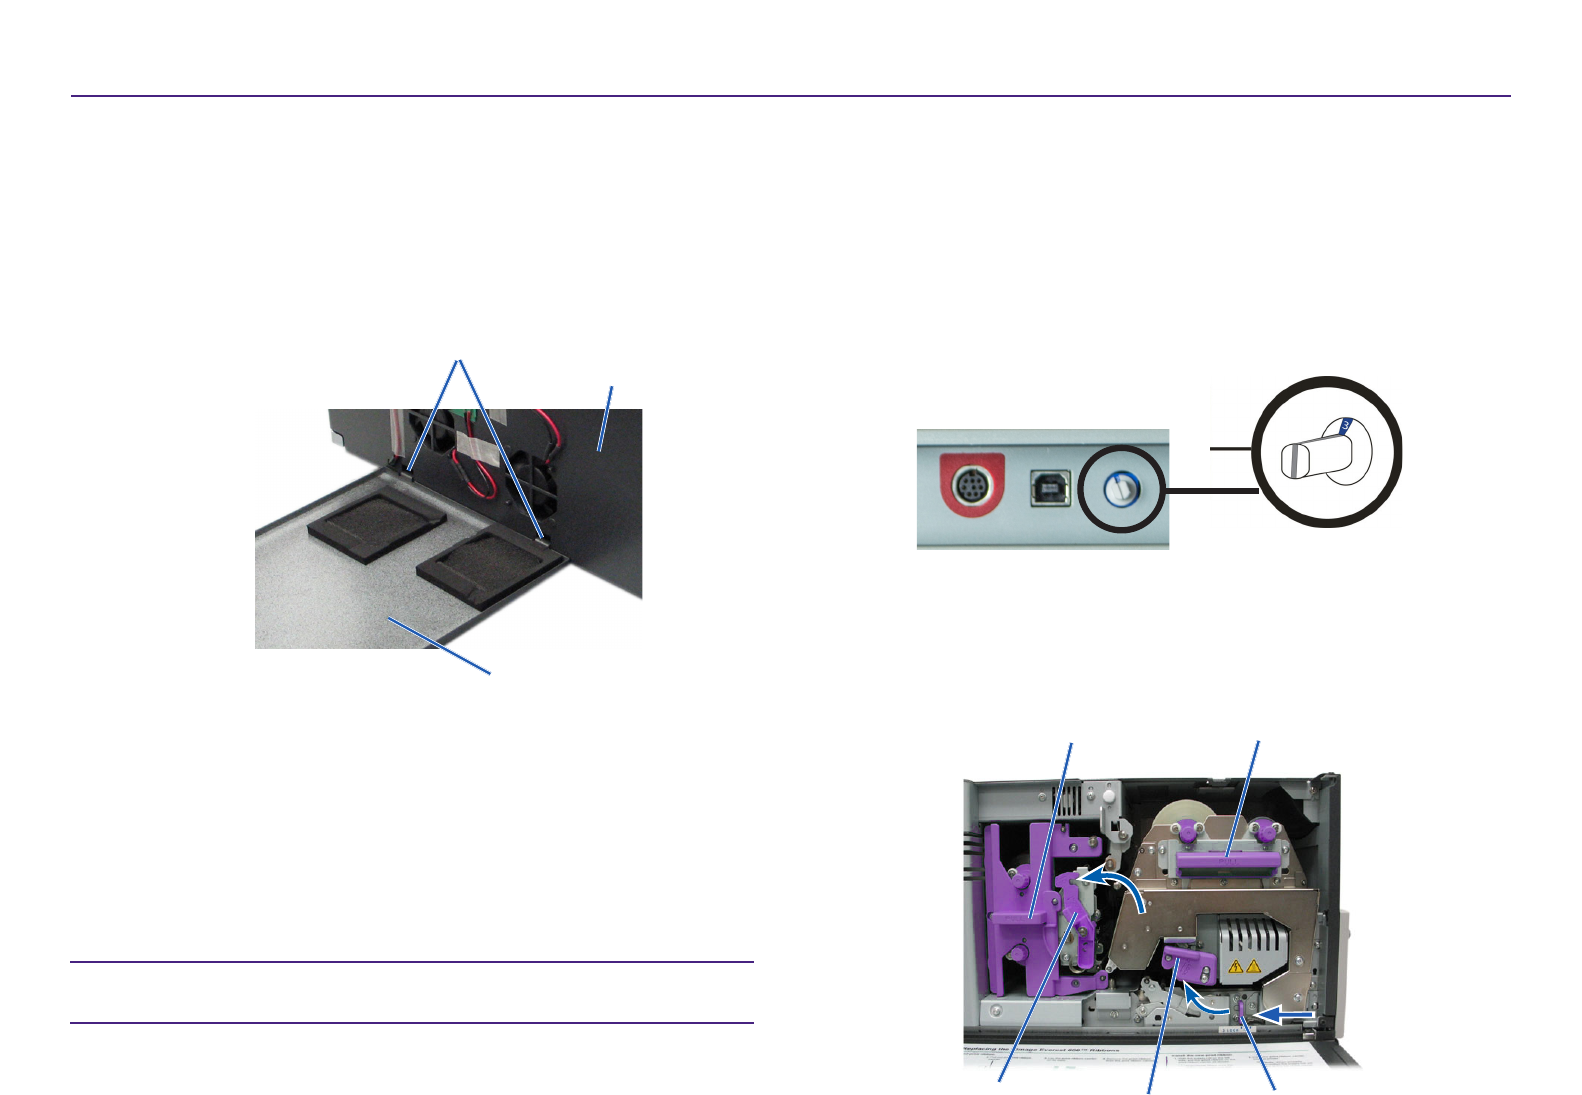
Clean the Rear Air Filter
#Tool Required: Phillips #2 screwdriver
1. Remove the air lter.
a. At the rear of the printer, remove the Phillips screws (Qty. 2) that
secure the fan cover.
b. Remove the fan cover.
c. Remove the air lter.
2. Clean the air lter.
a. Hold the air lter under running water.
b. Allow the air lter to dry.
3. Prepare the printer for use.
a. When the air lter is dry, place it inside the fan cover.
b. Insert the screws (Qty. 2) to secure the fan cover to the back of the
printer.
The printer is ready for use.
Fan Cover Air Filter
Screws
Maintaining the Everest Encore Printer
23
Maintaining the Everest 600 Printer
For more information visit rimage.com/supportXXXXXXX_A
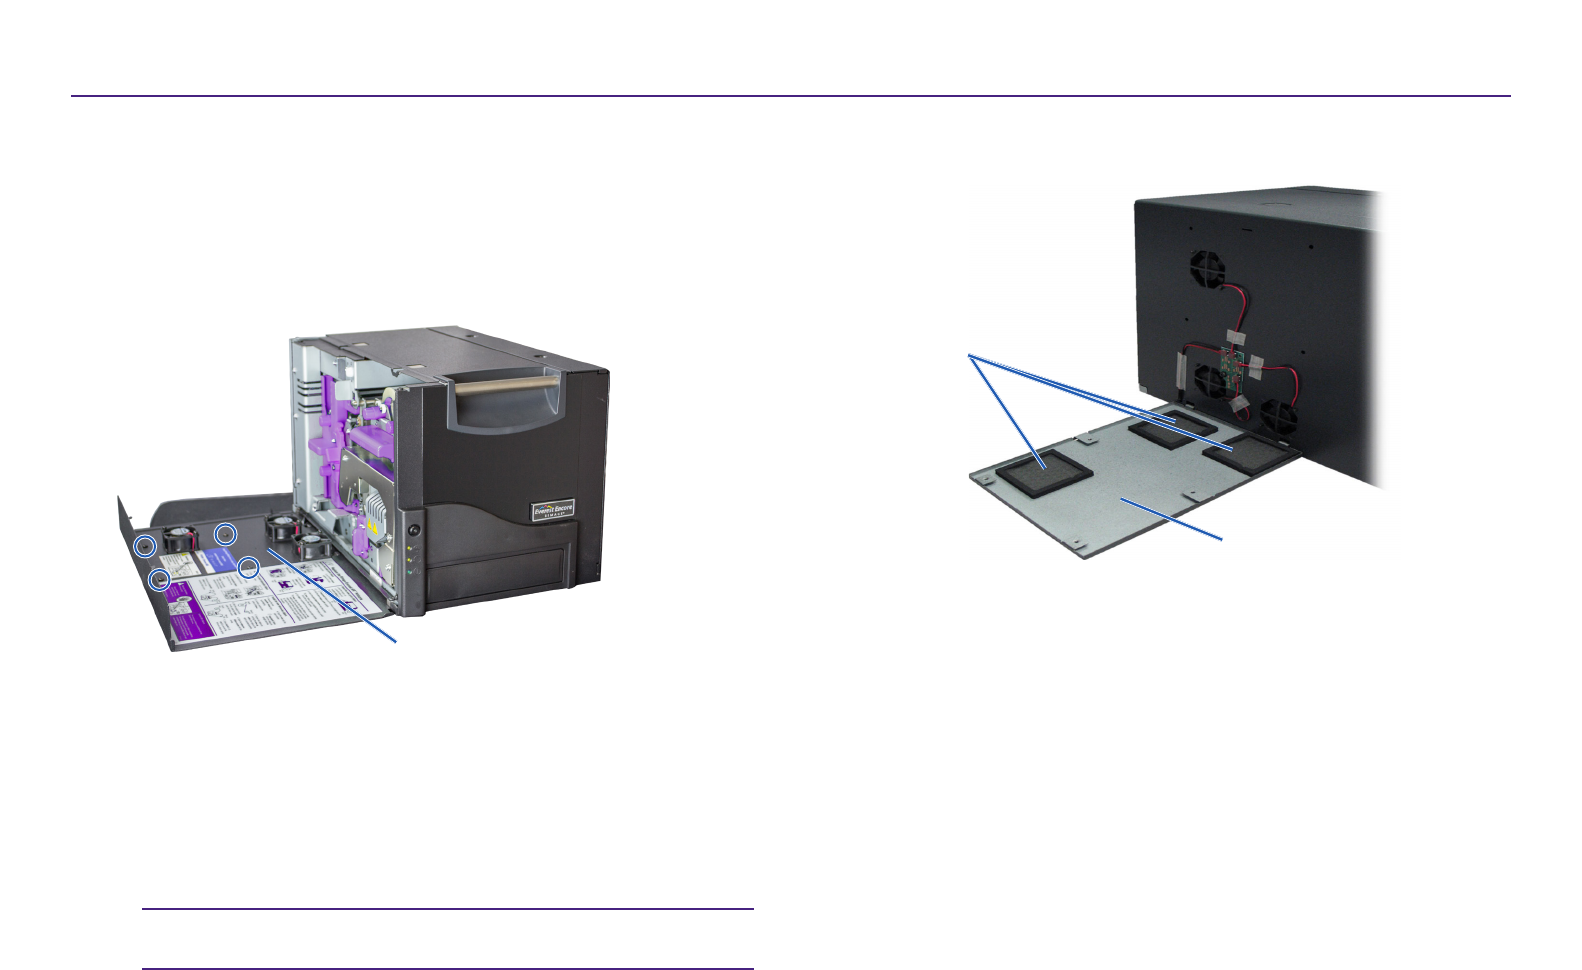
Clean the Side Air Filters
#Tool Required: Torx T10 screwdriver
1. Open the side cover.
a. Press the two side cover latches to release the side cover.
b. Lower the side cover and the aached fan cover.
2. Remove the fan cover from the side cover.
a. Remove the Torx T10 screws (Qty. 4) from the inside of the side
cover.
b. Close the side cover. The fan cover remains on the work surface,
with air lters exposed.
Tip: If the fan cover remains aached to the side cover, gently lower
the fan cover.
Side Cover
3. Remove the three air lters from the fan cover.
4. Clean the air lters.
a. Hold each air lter under running water.
Air Filters
Fan Cover
Maintaining the Everest Encore Printer
24
Maintaining the Everest 600 Printer
For more information visit rimage.com/supportXXXXXXX_A
b. Allow the air lters to dry.
6. Prepare the printer for use.
a. When the air lters are dry, posion them on the inside of the fan
cover.
b. Make sure that the tabs on the fan cover t into the holes in the
side cover.
c. Open the side cover.
d. Insert and ghten the Torx T10 screws (Qty. 4) to secure the fan
cover to the side cover.
e. Close the side cover and the aached fan cover.
The printer is ready for use.
Clean the Platen Roller
Important! Clean the platen roller only if you noce a diminished print
quality, such as white specks on the printed disc.
#Tools required:
Tabs
Side Cover
Fan Cover
• Sponge swabs with long handles (included in the Everest
Cleaning Kit)
• 99% Isopropyl alcohol
1. Prepare to clean the platen roller.
a. Power o the printer.
b. At the back of the printer, turn the mode switch to posion 3
(diagnosc mode).
c. Power on the printer.
2. Access the platen roller.
a. Press the two side cover latches to release the side cover.
Print
Ribbon Carrier
Retransfer
Ribbon Carrier
Latch 1 Latch 2 Latch 3
Maintaining the Everest Encore Printer
25
Maintaining the Everest 600 Printer
For more information visit rimage.com/supportXXXXXXX_A
b. Lower the side cover.
c. Open latches 1, 2, and 3 inside of the printer.
d. Remove the print ribbon carrier. For specic instrucons, refer to
the Change the Print Ribbon procedure on
page 25.
e. Pull out the retransfer ribbon carrier. For specic instrucons, refer
to the Change the Retransfer Ribbon procedure on page 25.
Tip: The retransfer ribbon carrier cannot be removed from
the printer.
3. Press and hold the operator buon for 2 seconds to access Diagnosc
Test 1. The platen roller begins to rotate and the Acve indicator light on
the front panel blinks.
4. Clean the platen roller (to the right of the print head).
Platen
Roller
Print
Head
a. Remove the sponge swab and the swab handle from the Everest
cleaning kit.
b. Insert the sponge swab into the unnotched end of the swab handle.
c. Apply isopropyl alcohol to the sponge swab.
d. As the platen roller rotates, use the sponge swab to wipe the platen
roller.
ȸCauon! Do not apply pressure when cleaning the platen
roller with the sponge swabs. Applying pressure may
damage the platen roller, leaving scratch marks on the
printed disc.
Tip: As you wipe the platen roller, allow it to rotate a full turn before
moving to the next area.
5. Press and release the operator buon to exit diagnoscs mode.
6. Prepare the printer for use.
a. Power o the printer.
b. Install the print ribbon carrier.
Sponge
Swab
Notch
Swab
Handle
Maintaining the Everest Encore Printer
26
Maintaining the Everest 600 Printer
For more information visit rimage.com/supportXXXXXXX_A
c. Install the retransfer ribbon carrier.
d. Close all latches.
e. Close the side cover.
f. Turn the mode switch to the correct operang posion.
For more informaon, refer to the Switches secon on page 10.
g. Power on the printer.
The printer is ready for use.
Clean the Sensors
When should you clean the sensors?
• You receive an error message stang that the printer is not detecng the print
ribbon.
• You receive an error message stang that the upper sensor is not responding.
• You receive an error message stang that the lower sensor is not responding.
• The prinng is o center.
#Tools Required
• Sponge swabs with long
handles (included in the
Everest cleaning kit)
• Can of compressed air
1. Access the sensors.
a. Press the two side cover
latches to release the side
cover.
b. Lower the side cover.
c. Open latch 1.
d. Remove the print ribbon carrier. For specic instrucons, refer to
the Remove the Print Ribbon procedure on page 16.
e. Remove the retransfer ribbon carrier. For specic instrucons, refer
to the Remove the Retransfer Ribbon procedure on page 19.
2. Power o the printer, autoloader or AutoPrinter. Refer to the Power On
and O the Everest Encore Printer secon on page 13 for instrucons.
Important! Do not clean the printer sensors unl the printer is
completely powered o.
Maintaining the Everest Encore Printer
27
Maintaining the Everest 600 Printer
For more information visit rimage.com/supportXXXXXXX_A
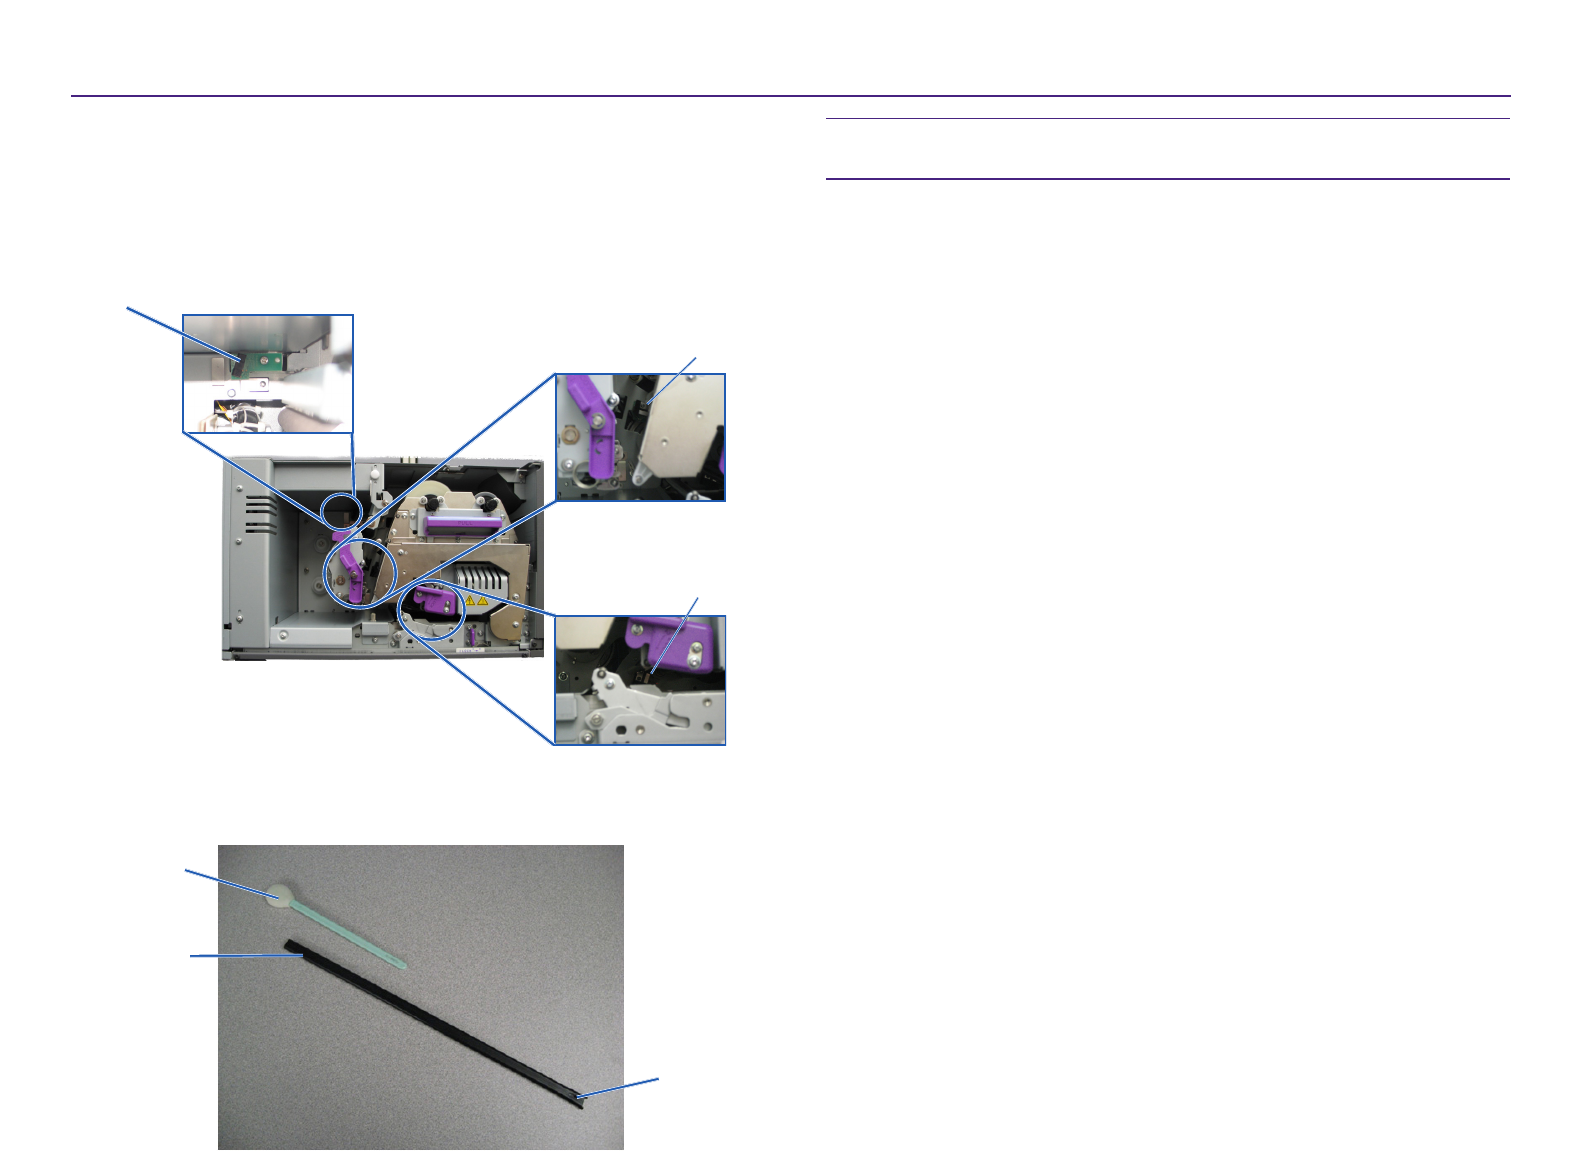
3. Locate the sensors.
• Print ribbon sensor
• Upper sensor
• Lower sensor
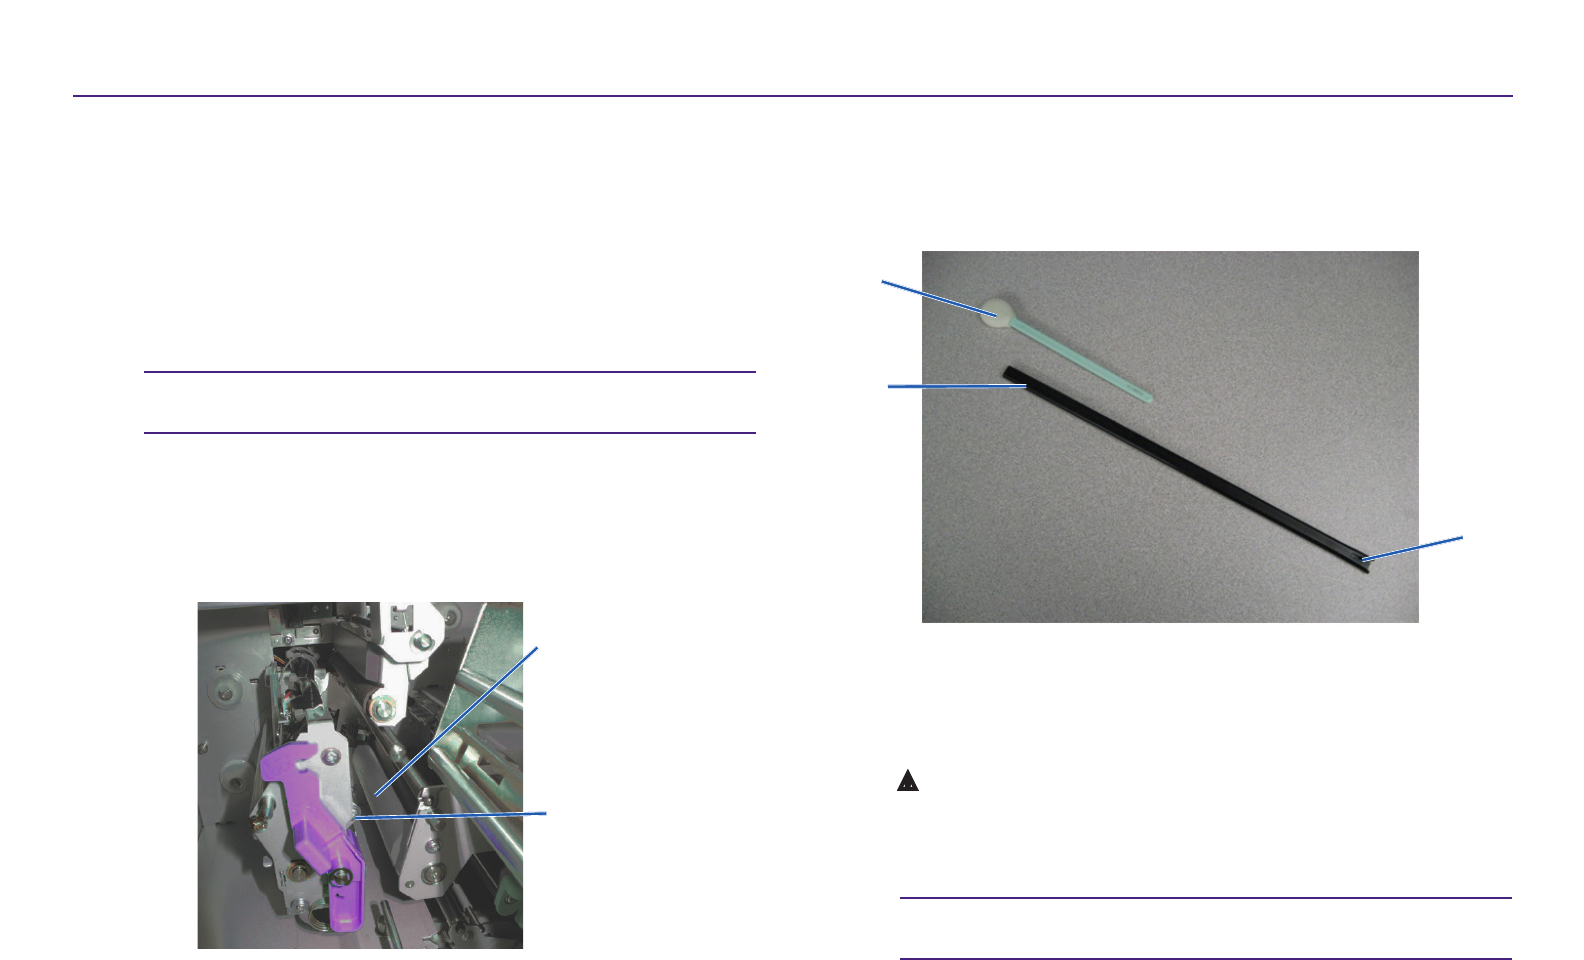
4. Locate the swab handle found in the Everest Cleaning Kit. Remove the
sponge swab from the swab handle if necessary.
Upper
Sensor
Lower
Sensor
Print
Ribbon
Sensor
Sponge
Swab
Notch
Swab
Handle
Tip: One end of the handle has a slot with a notch in it approximately ¼
inches from the end. This is the end that goes into the printer.
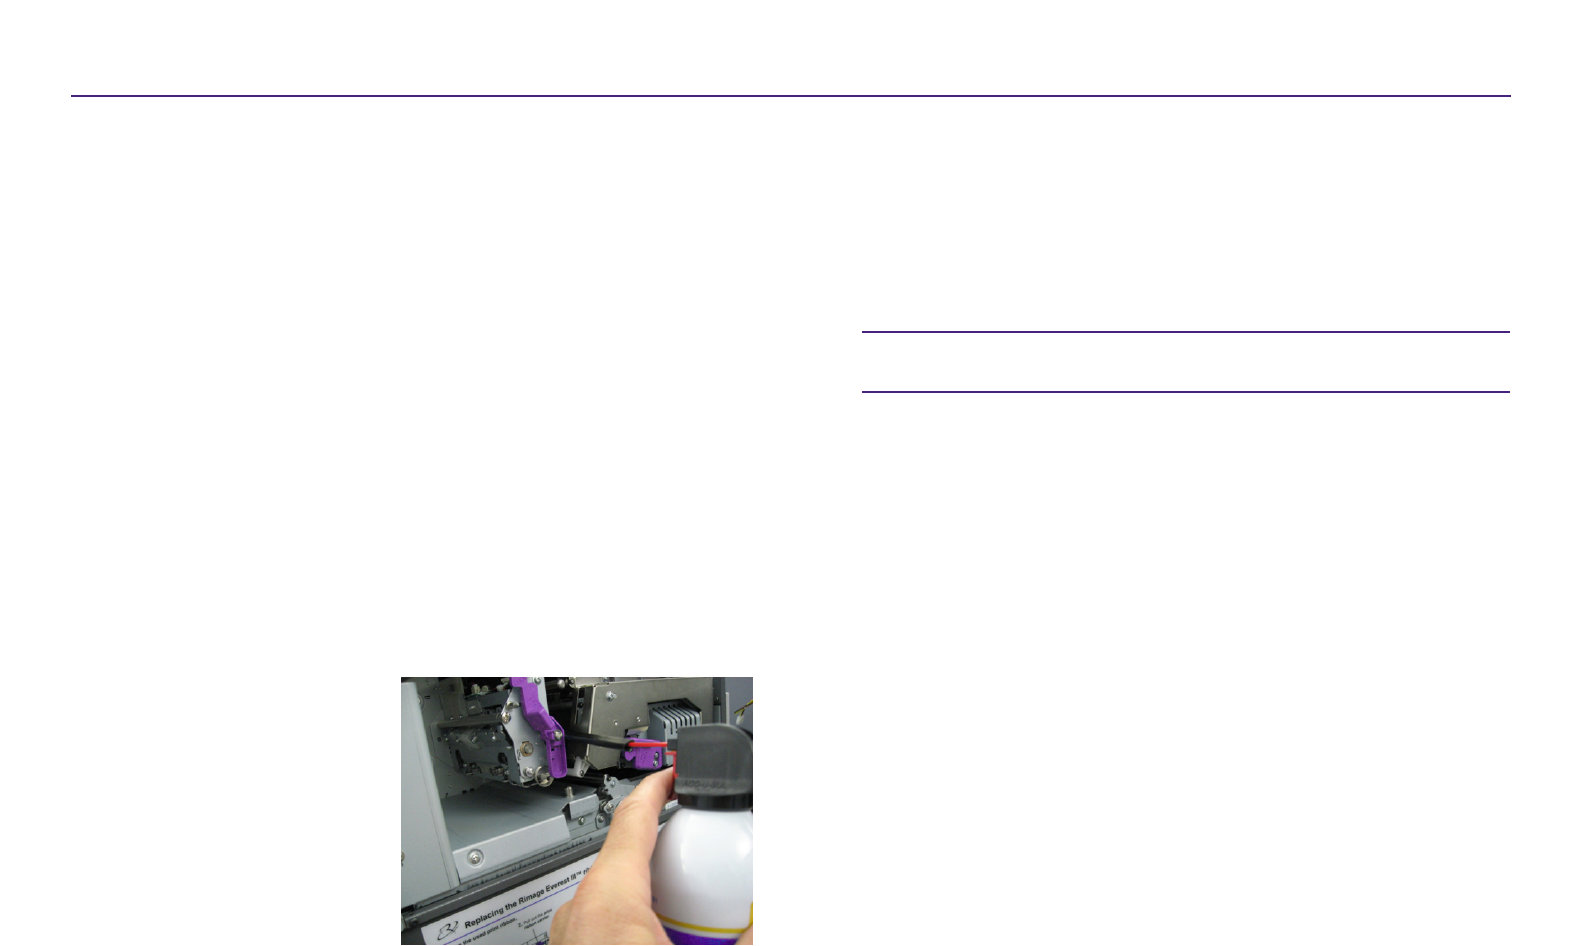
5. Clean the sensors.
a. Posion the sloed end of the swab handle by the sensor. Refer to
page 28 for the sensors’ locaon.
b. Posion the can of compressed air’s nozzle in the unnotched end of
the handle.
c. Blow compressed air in to the end of the handle for one to two
seconds.
d. Repeat two to three mes.
e. Repeat for each of the three sensors.
6. Prepare the Printer for use.
a. Replace the print ribbon carrier.
b. Replace the retransfer ribbon carrier.
c. Close the latches.
d. Close the cover.
The printer is ready for use.
Maintaining the Everest Encore Printer