User Manual

Installing and
Setting Up Your
Ring Floodlight Cam
This is so exciting…
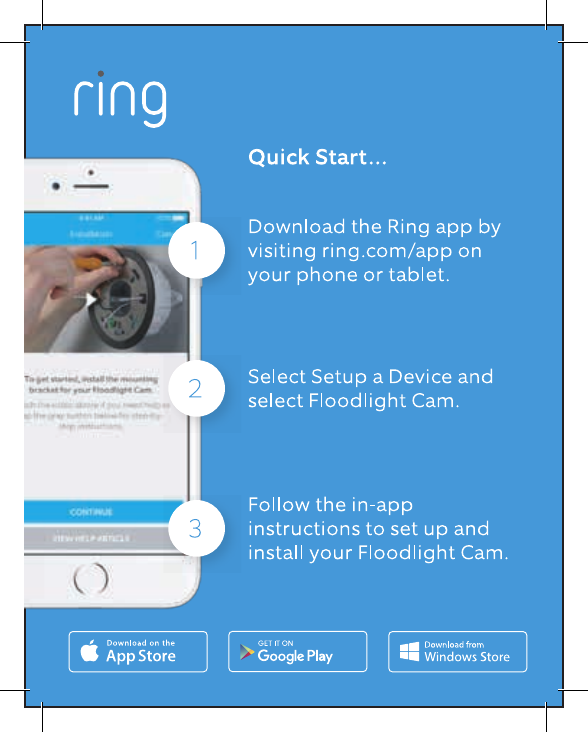
You are about to set up the
world’s most advanced floodlight.
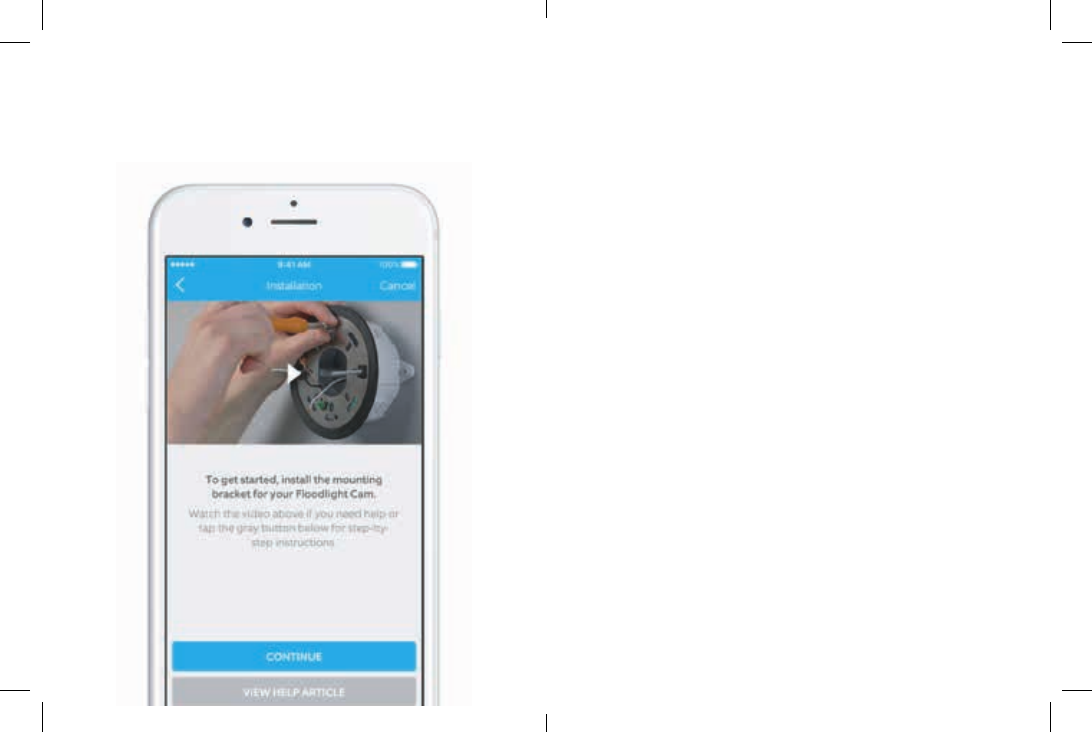
Start by watching the installation
videos in the Ring app.
Next, read this manual and keep it
handy during installation.
This manual is for informational purposes only. Working with electricity can
be dangerous unless proper safety precautions are taken. If you are not
comfortable or are inexperienced with the processes and tools described
in this manual, we recommend that you hire a licensed electrician.
32
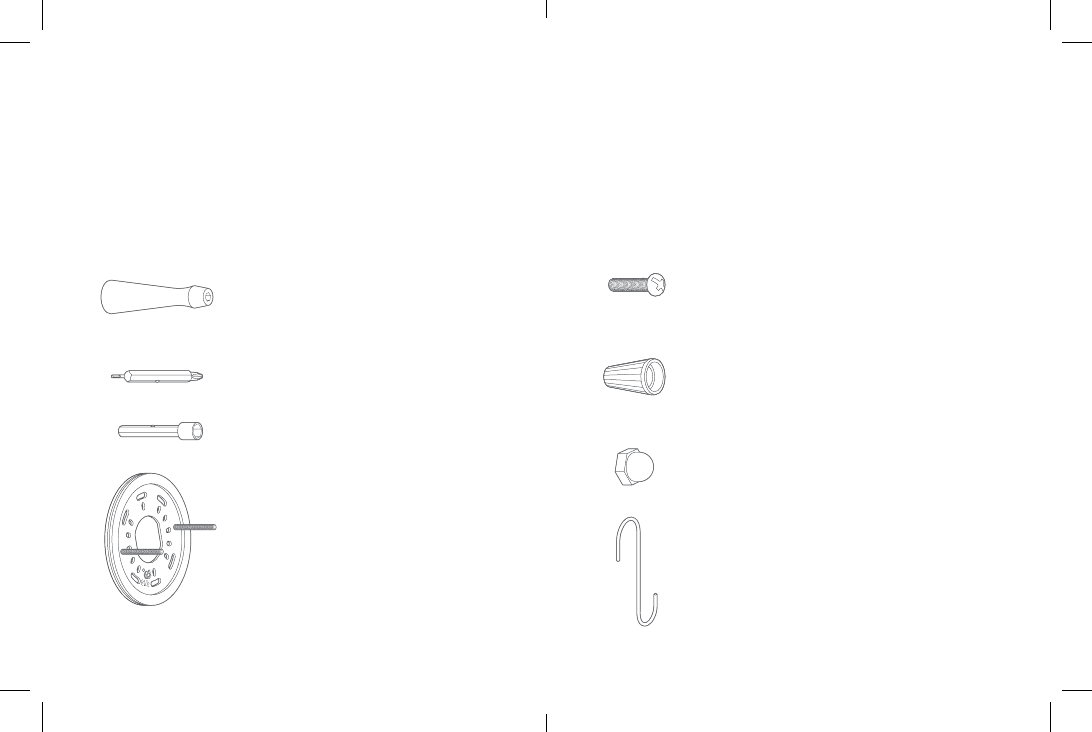
Screwdriver
Use the Phillips bit for installing the
mounting bracket and the socket bit
to tighten the screw cap covers.
Phillips Bit
Socket Bit
Mounting Bracket
This bracket screws into your
junction box before attaching to
your Floodlight Cam.
Before you begin
Check out all the stu in the box.
These instructions assume you’re replacing an existing
floodlight and/or have a junction box where Floodlight
Cam can be mounted. If you don’t have a junction box,
then you’ll need to hire an electrician to install one.
Bracket Screw (5)
Use 2 to 4 of these to attach the supplied
bracket to your junction box.
Wire Nuts (3)
Use these to connect Floodlight Cam’s wires
to your existing wires.
Screw Cap Covers (2)
Use these to cover the ends of the posts on
the mounting bracket after installation.
Hook
Hang your Floodlight Cam while connecting
the wires.
54

How it all fits together
Junction Box
(not included)
Mounting
Bracket
Bracket
Screws
Light
Adjustment
Collar
Mounting
Posts
Wire
Nuts
Light
Adjustment
Knob
Motion Detector
(for lights)
Camera
Adjustment
Collar
Screw
Cap
Covers
76
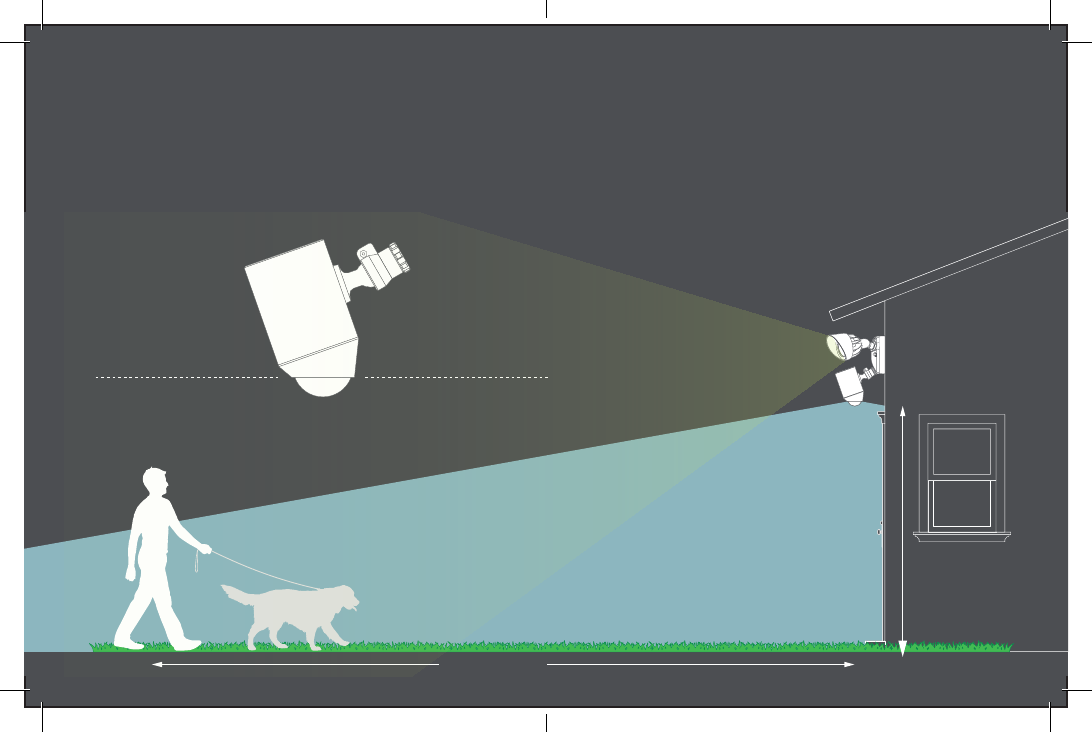
30 feet (10 Meters)
Parallel to ground
9 feet
(3 Meters)
How installation
height aects motion
detection
When mounted at 9 feet o
the ground, with the motion
detector parallel to the ground,
the motion detection range for
activating the floodlights is up to
30 feet.
8 9
WARNING: Risk of electrical shock
• Disconnect power at the fuse or circuit breaker
before installing.
• Verify that the supply voltage is correct. Connect
fixture to a 100 VAC~240 VAC 50/60 Hz power
source.
• Properly ground fixture.
• Always follow code standards when installing wired
connections.
CAUTION: Risk of fire
• Do not install near combustible or flamable surfaces
NOTICE
• Do not connect this light fixture to a dimmer switch
or timer.
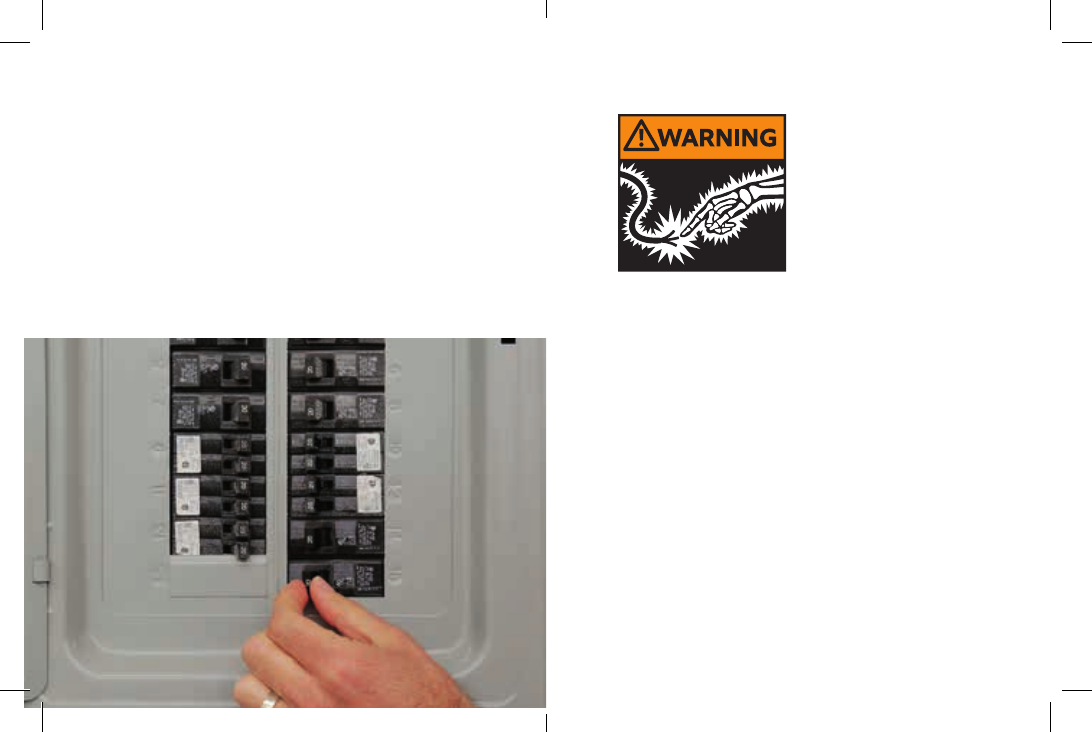
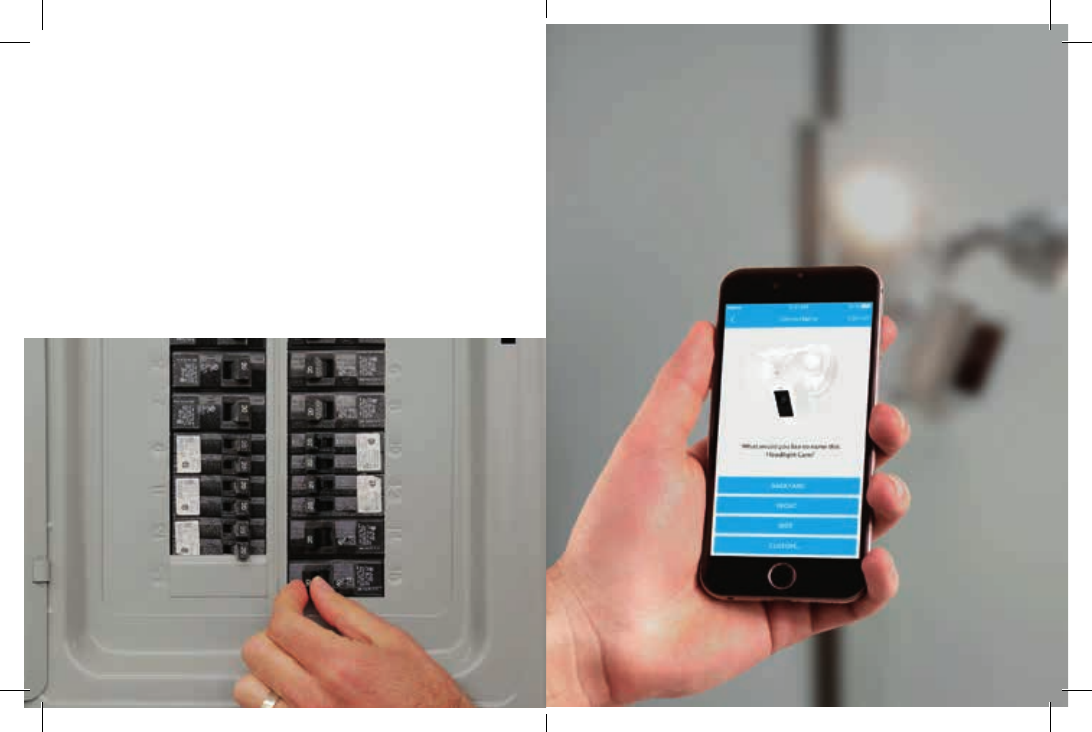
Step 1– Shut power o
at the breaker
If you don’t know where your
breaker is or how to turn o
power to your floodlight circuit,
hire a licensed electrician.
1110
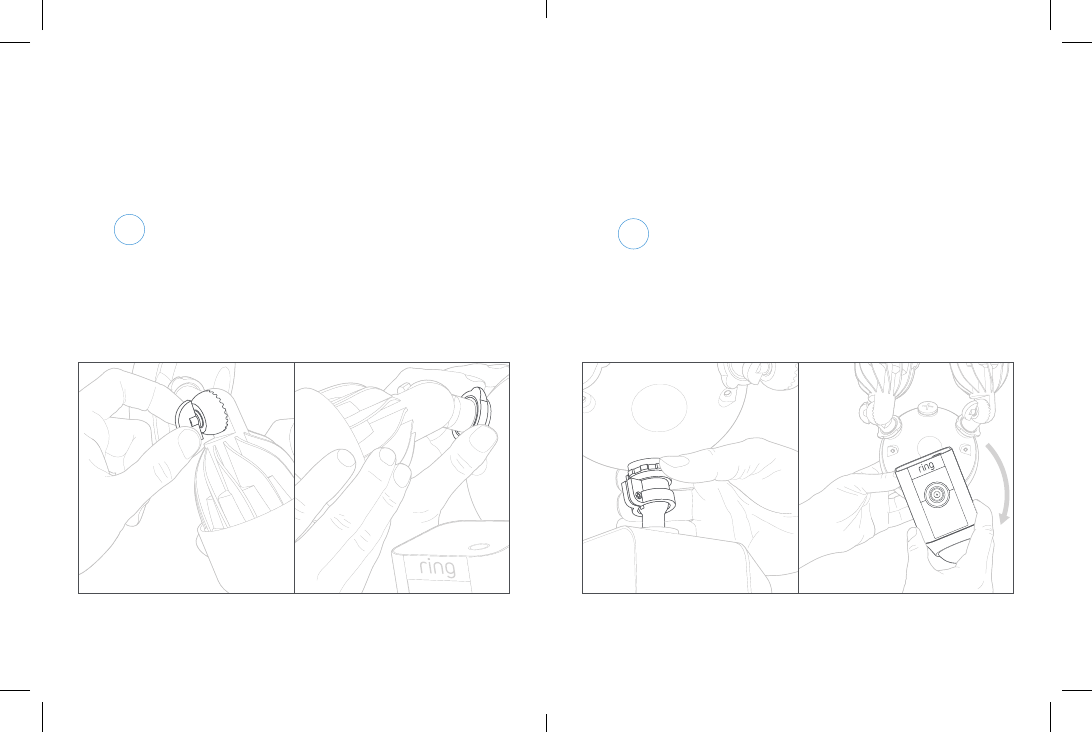
Step 2 - Prep your
Floodlight Cam for
installation
A Loosen the knobs on the light
fixtures to rotate them out of
the way and allow access to
the mounting screws.
B Rotate the camera 180
degrees since Floodlight Cam
ships with the camera upside
down on the fixture.
Do not remove your Floodlight Cam from the ball
socket on the base.
1312
Floodlight Cam must be installed on a junction box. If
you don’t have an existing junction box, you’ll need to
hire a licensed electrician to install one.
Step 3 - Remove your
existing floodlight
A With power o at the
breaker, remove your existing
floodlight from the junction
box it’s attached to and
disconnect the wires.
B If there is a bracket attached
to your junction box, remove
that as well.
Inspect your junction box to
make sure water cannot get
into it.
A
B
1514
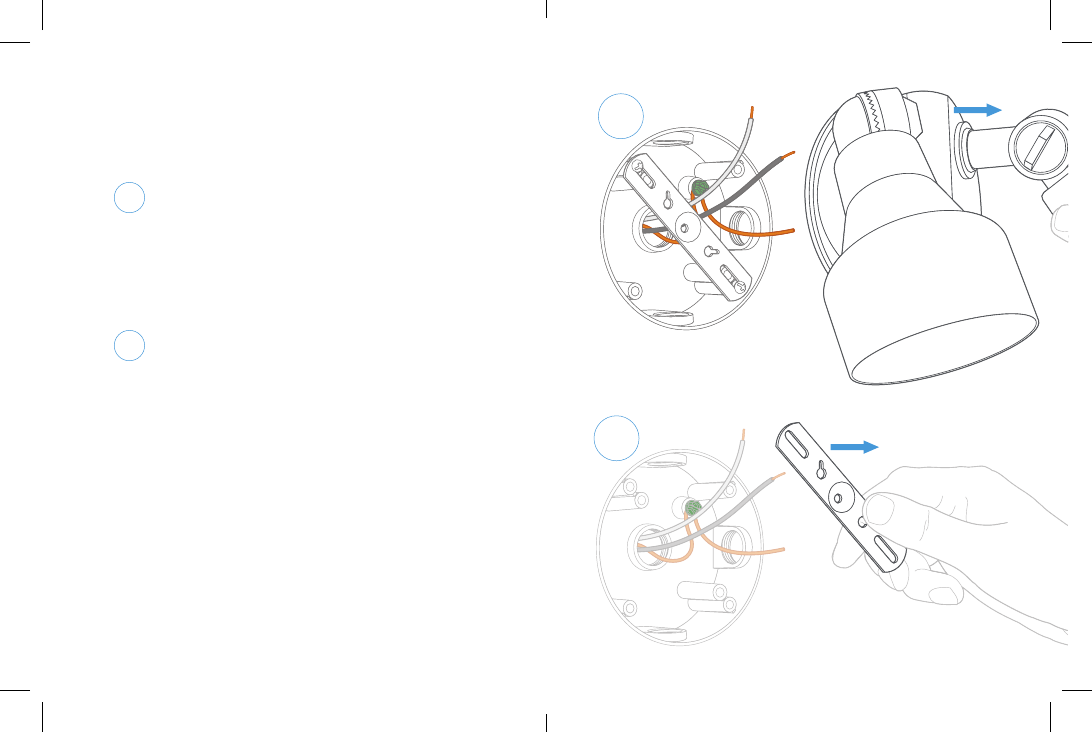
Step 4 - Install the
mounting bracket
Install the mounting bracket
with the two posts level with the
ground (or your wall if mounting
on an overhang).
Make sure your existing wires
come through the middle of the
bracket.
Attach the bracket to your
junction box using at least two
screws.
1716
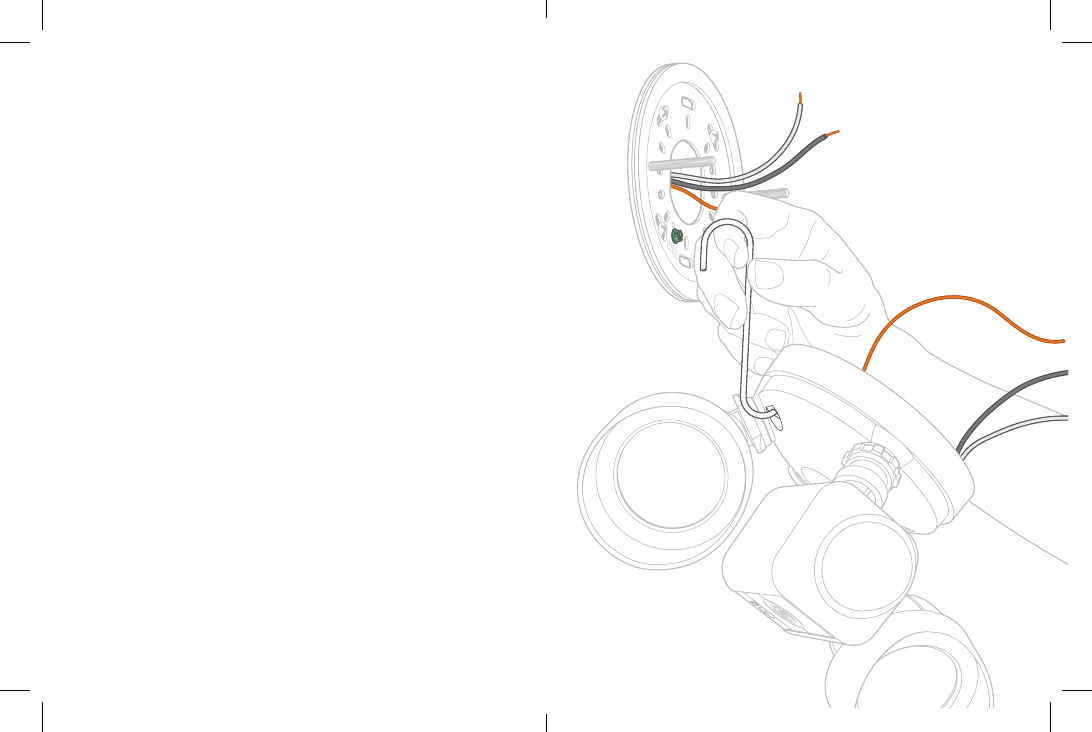
Step 5 - Hang Floodlight
Cam
Use the provided hook to hang
Floodlight Cam from the bracket
while connecting the wires.
Hook one end onto the bracket
and the other end in one of
the mounting holes on your
Floodlight Cam.
1918
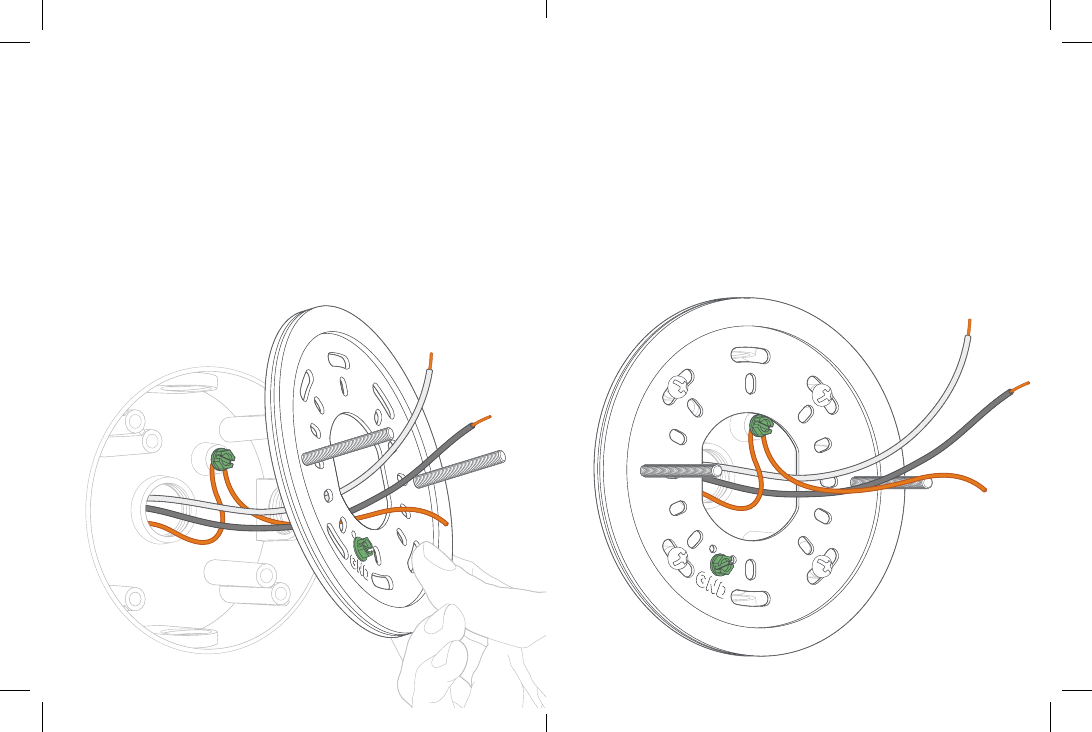
Step 6 - Connect the
ground wire
The copper wire from Floodlight
Cam is a ground.
Connect the ground wire to
the green ground screw on the
bracket and the existing ground
wire inside your junction box.
Use one of the supplied wire nuts
if necessary.
For safety and the proper operation of your Ring
Floodlight Cam, the fixture must be properly
grounded. If you’re not familiar with the methods
for properly grounding this type of fixture, consult a
licensed electrician.
2120
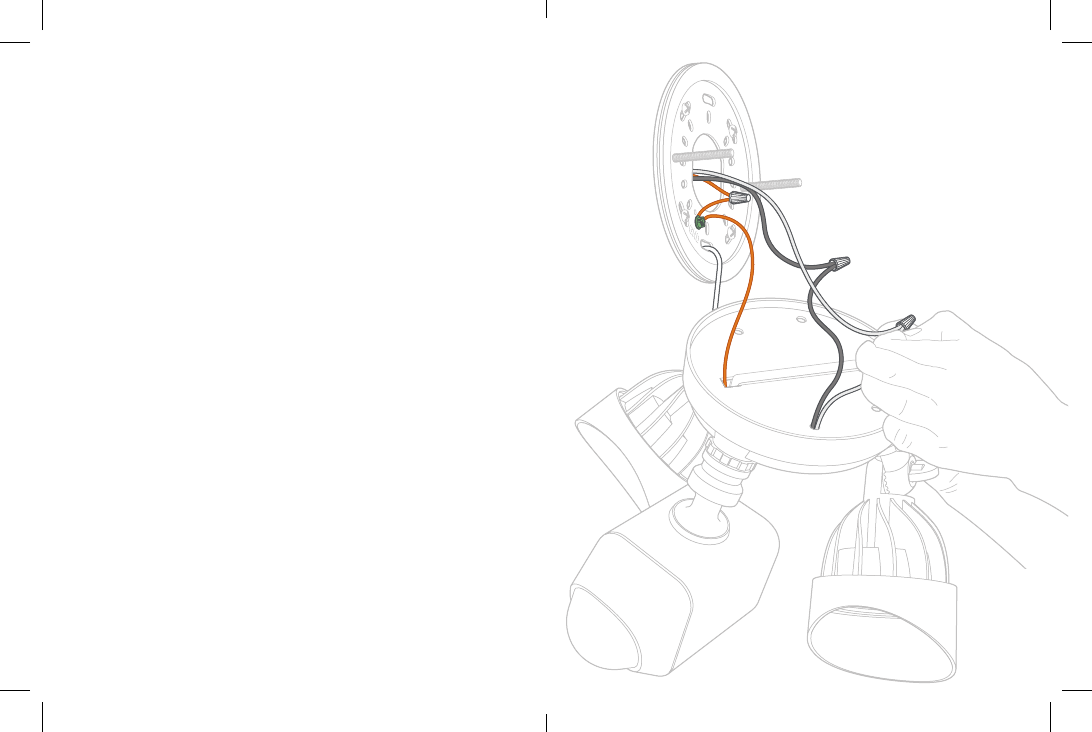
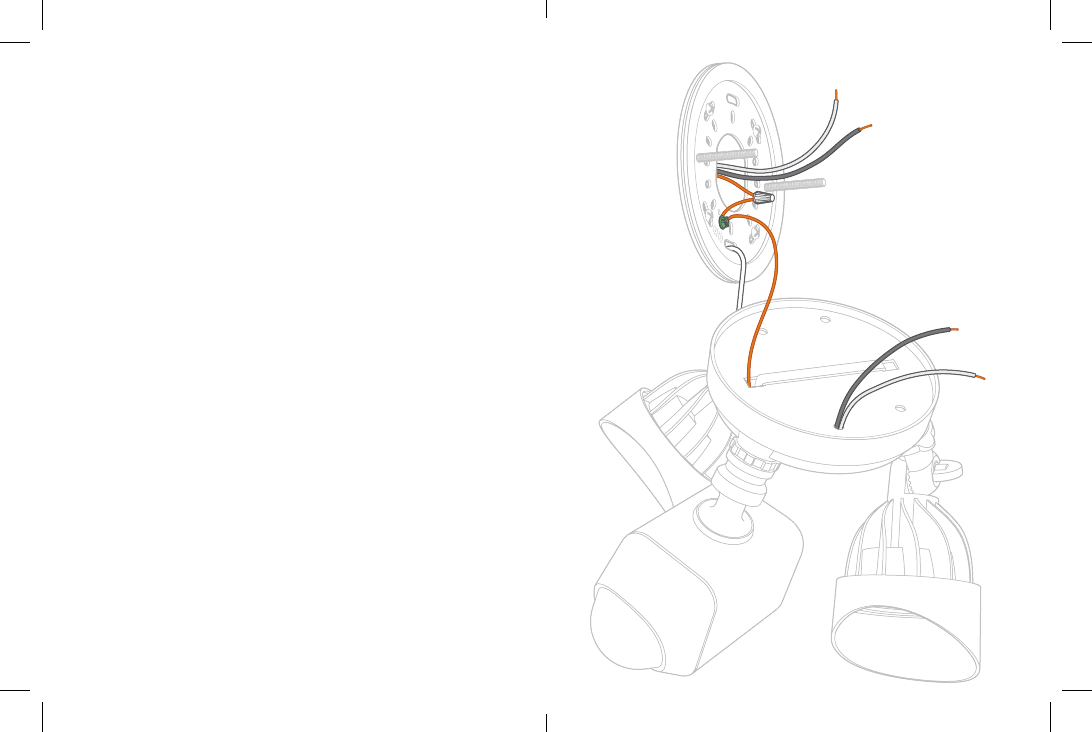
Step 7 - Connect the
power wires
Use a wire nut to connect the
white wire coming out of your
junction box to the white wire on
your Floodlight Cam.
Then, connect the black wire
from your junction box to the
black wire on Floodlight Cam with
another wire nut.
If you don’t have clearly colored black and white wires
coming out of your junction box, consult a licensed
electrician.
2322
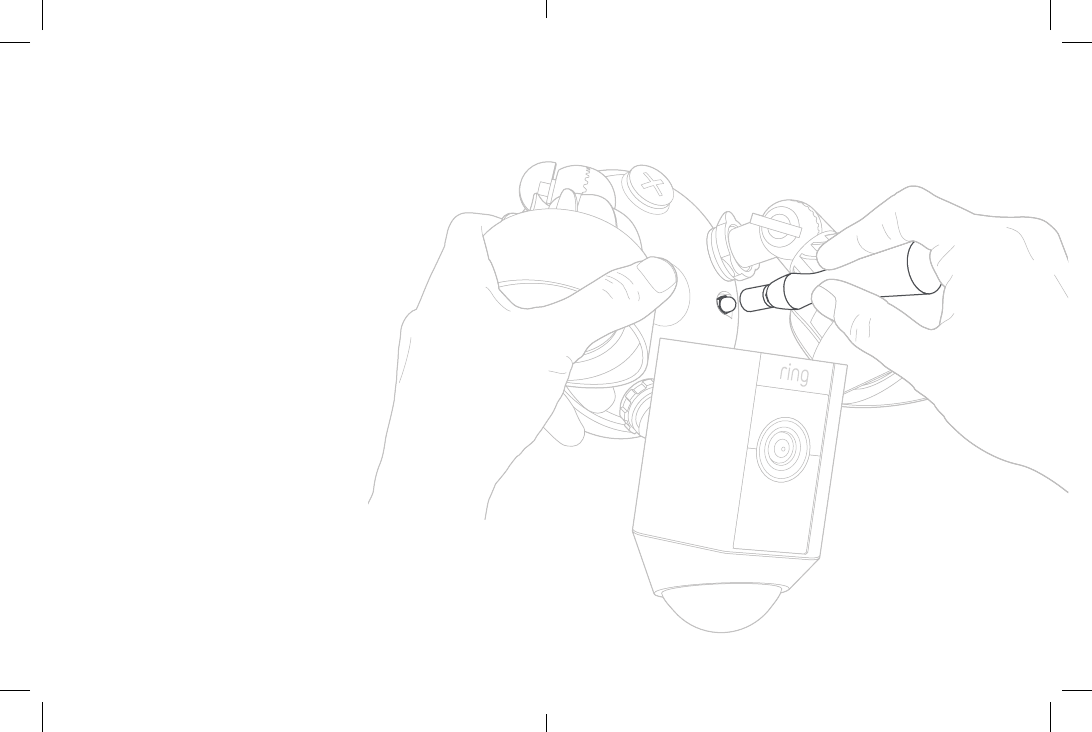
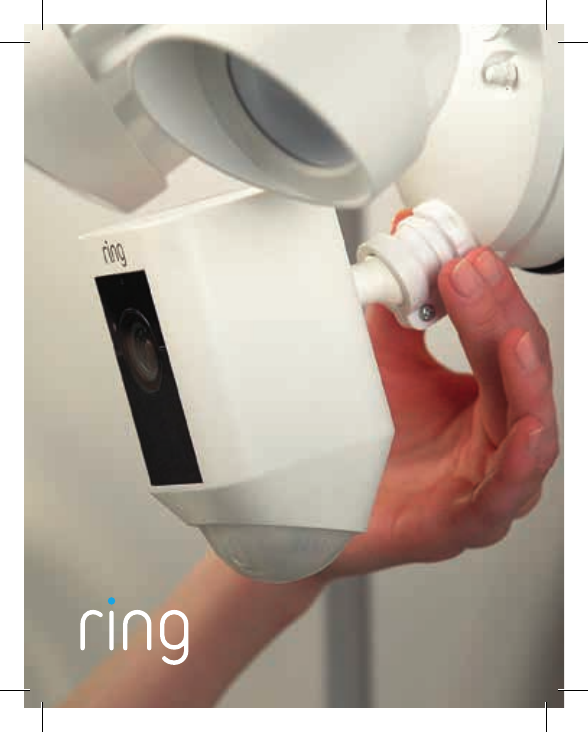
Step 8 - Place Floodlight
Cam on the bracket
Carefully push all the wires
through the large opening in
the bracket.
Align the mounting
posts with the holes on
Floodlight Cam and press
together, securing the
screw cap covers with
the socket bit.
2524
Step 9 - Restore power
at the breaker
After restoring power, the lights
will turn on and your Floodlight
Cam will begin speaking to you to
let you know it’s in setup mode.
Step 10 - Perform the
in-app setup
In the Ring app, select Set Up
a Device and follow the in-app
instructions to connect Floodlight
Cam to your Wi-Fi network.
26 27

© 2017 Bot Home Automation, Inc. RING, ALWAYS HOME, and CHIME are
trademarks of Bot Home Automation, Inc.
Last updated: 03/16/17
Troubleshooting Tips
Floodlight Cam is not lighting up when I
restore power.
See if there is a light switch controlling power
to your floodlight fixture. If so, make sure it
is switched on and stays switched on. If your
fixture is connected to a timer, you’ll need to
turn o the timer functionality.
Floodlight Cam lights up, but I can’t complete
the in-app setup.
First, triple check your Wi-Fi password, since
this is the most common reason Floodlight Cam
can’t complete setup.
Second, check the distance to your Wi-Fi
router or access point. If Floodlight Cam is too
far from your access point, this will prevent
setup from completing. In this instance, our
product Chime Pro can help boost your Wi-Fi
signal and provide audible alerts from your
Floodlight Cam.
Learn more at: ring.com/chime-pro
Using your
Ring Floodlight Cam
3
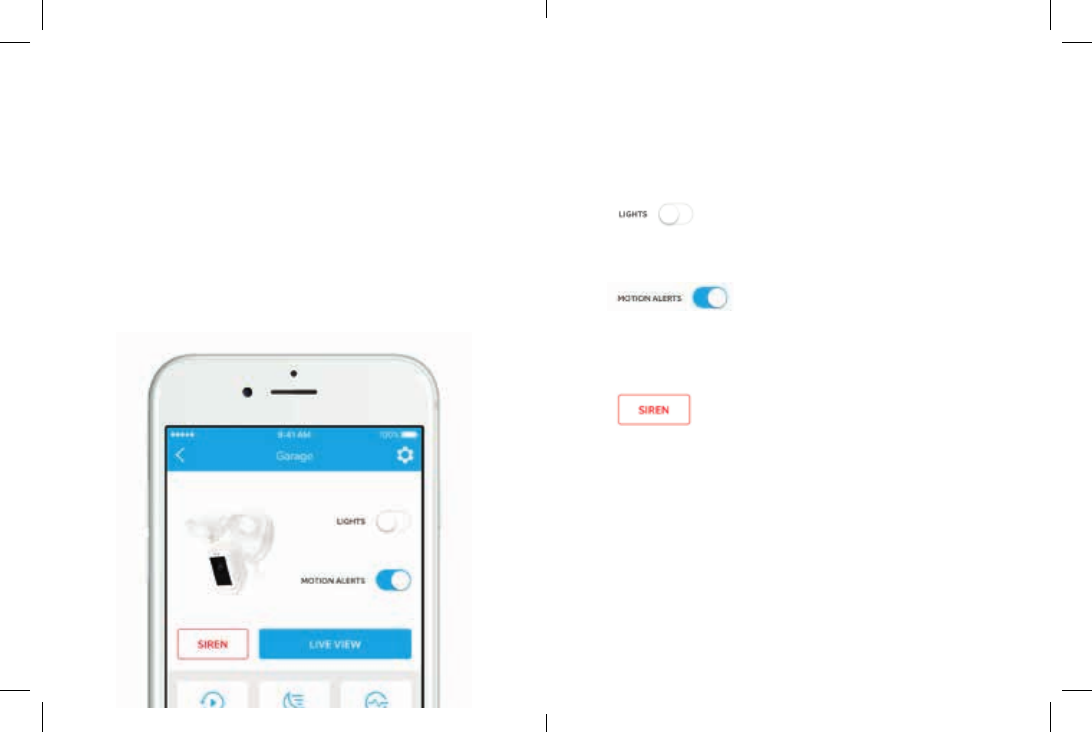
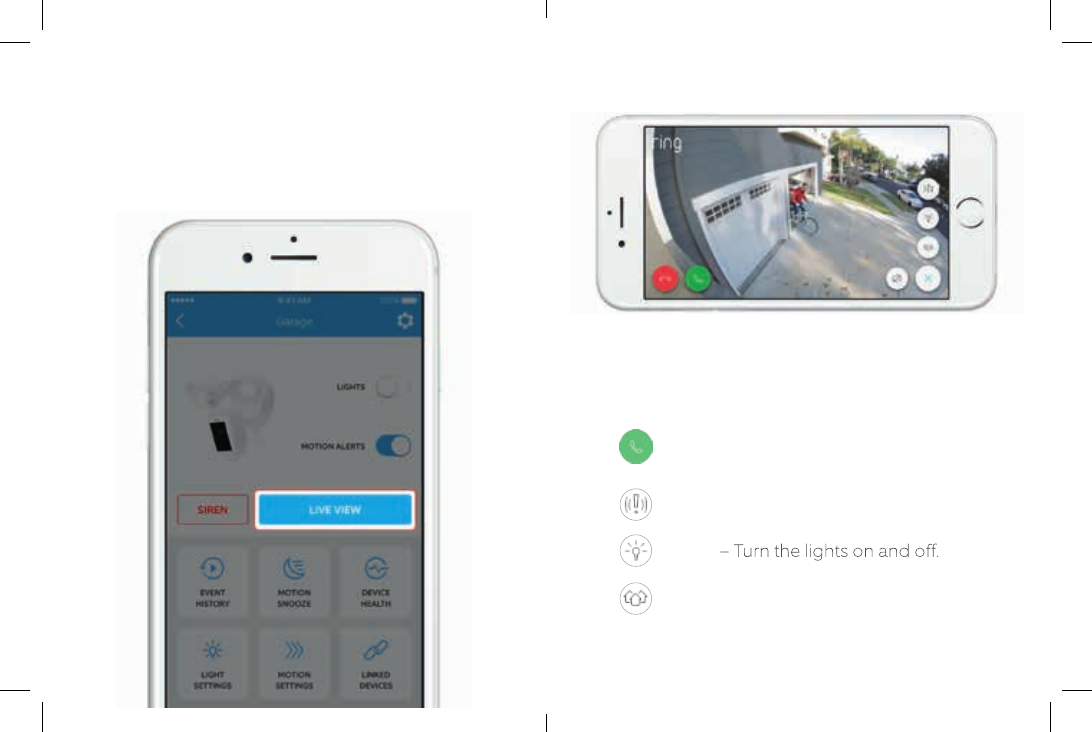
After setup, select your
Floodlight Cam in the
Ring app
This will bring you to the Device
Dashboard, where you can
change settings and access
various features.
Manually control the lights.
Toggle notifications for activity in
any of the camera’s motion zones.
Trigger the 110 decibel siren. It
is loud and will be heard by your
neighbors. Use it with care.
2
5
Two-way Talk – Speak to visitors and
hear what they have to say.
Siren – Activate the 110 decibel siren.
Lights
Ring Neighborhoods – Share
suspicious events with your neighbors.
Select Live View to open
a live video stream
During live video, you can
access these features:
4
7
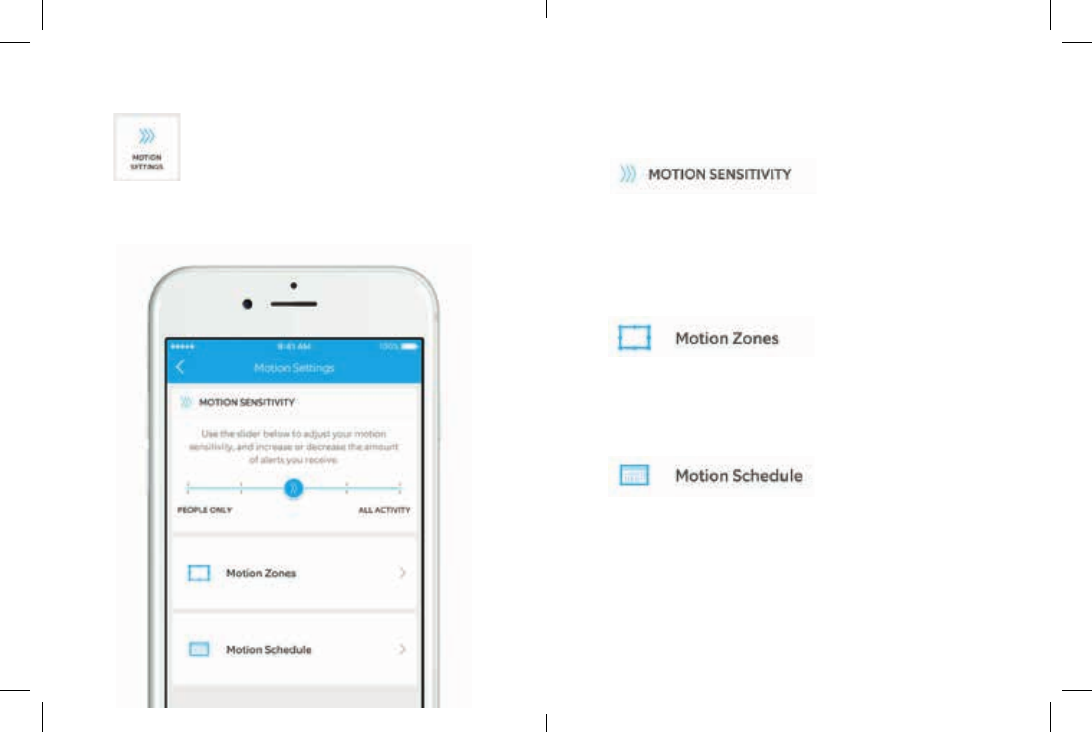
Select Motion
Settings
to customize your motion
preferences
Allows you to adjust the amount of
alerts you receive. Choose People
Only to get motion alerts from
humans only.
Draw up to three custom areas
where you’d like to receive motion
alerts and trigger the lights.
Schedule times when you don’t
want to receive motion alerts.
6
9
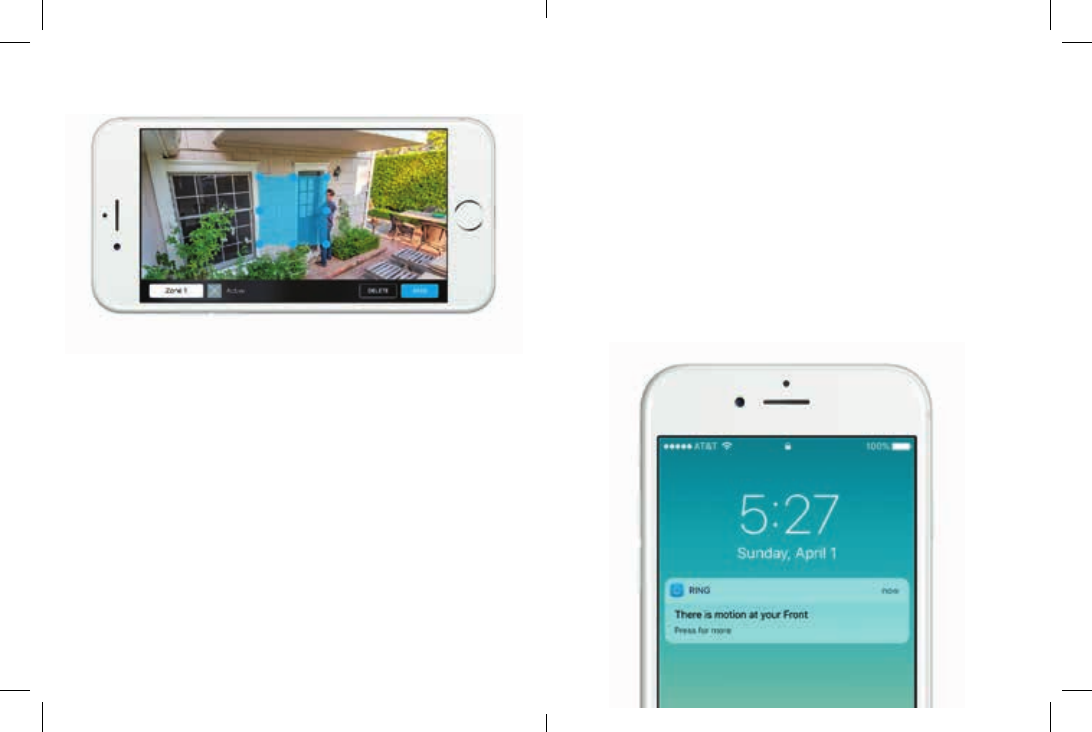
Movement through a motion zone
will trigger the camera to record (if
you have recording enabled) and
send a notification to your mobile
device.
Motion in these zones will also
trigger the lights to turn on at night.
You can further customize the
zones that trigger the lights in Light
Settings.
If your phone is locked when the
camera captures a live event, you
will receive a notification on your
home screen.
If your phone has a passcode,
you’ll need to enter it to access the
live event.
8
11
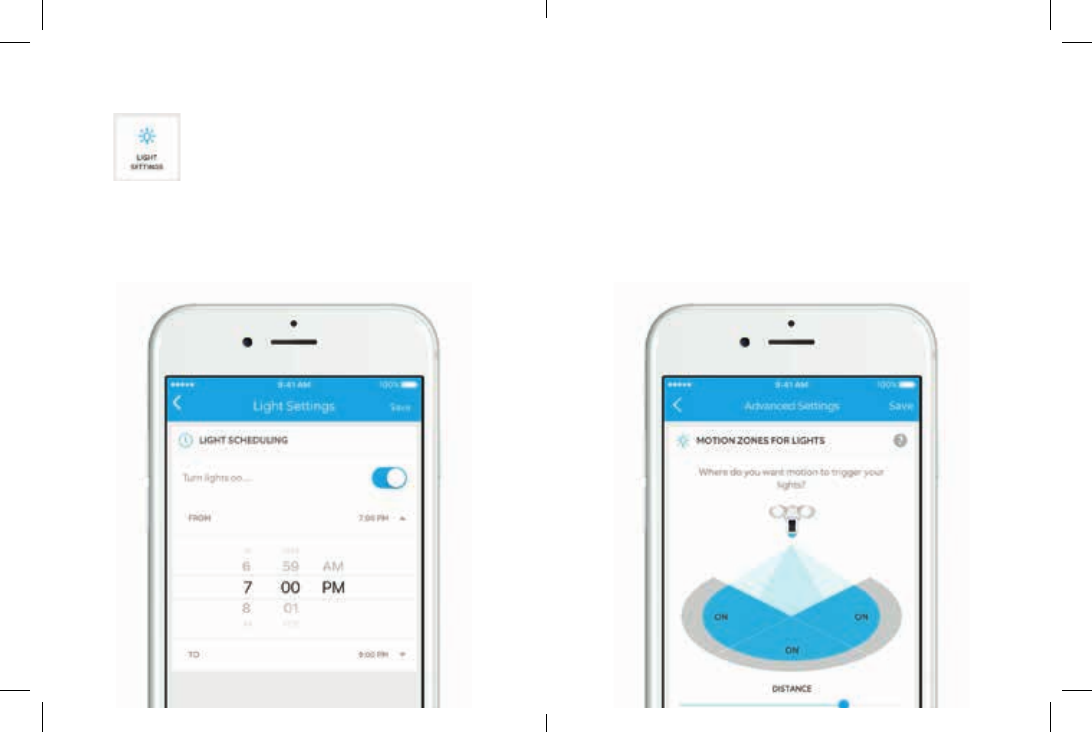
Select Light
Settings
to set a schedule for your
lights to stay on
Select Advanced Settings on
the Light Settings screen to
customize the areas that will
trigger the lights and change how
long they stay on for.
10

Troubleshooting Tips
The picture on my Floodlight Cam is upside
down.
Double check to see if you rotated the camera
on your Floodlight Cam before installing it.
I’m having issues with video/audio quality
and/or load times.
Issues with video and/or audio are usually
related to problems with Wi-Fi signal strength
or Internet speed. For an optimal experience,
we recommend Internet speeds of at least
1Mbps. Check your Internet speed by selecting
Device Health in the Ring app, then selecting
Test Your Wi-Fi.
If your Internet speed is sucient, then look
at Signal Strength in Device Health. If Signal
Strength is not Good, you’ll need to boost the
Wi-Fi signal to your Floodlight Cam, which can
be done with our product, Chime Pro.
Learn more at: ring.com/chime-pro
© 2017 Bot Home Automation, Inc. RING, ALWAYS HOME, and CHIME are
trademarks of Bot Home Automation, Inc.
Last updated: 03/16/17
Hereby, Bot Home Automation, declares that this consumer electronic is in compliance with the essential
requirements and other relevant provisions of Directive 1999/5/EC. The declaration of conformity may be consulted
at www.ring.com/DoC.pdf.
This device complies with Part 15 of the FCC Rules. Operation is subject to the following two conditions: (1) This device
may not cause harmful interference, and (2) this device must accept any interference received, including interference that
may cause undesired operation.
Use this device in dry rooms only. Do not cover the device while operating. Do not open the housing. Protect this
the device if the plug or housing is defective, there is a risk of electric shock.
Warning: Changes or modifications to this unit not expressly approved by the party responsible for compliance could
void the user’s authority to operate the equipment.
This equipment complies with FCC radiation exposure limits set forth for an uncontrolled environment. This equipment
should be installed and operated with minimum distance 20 cm between the radiator & your body.
This equipment complies with IC RSS-102 radiation exposure limits set forth for an uncontrolled environment. This
equipment should be installed and operated with minimum distance 20cm between the radiator & your body.
This device and its antenna(s) must not be co-located or operating in conjunction with any other antenna or transmitter.
For product available in the USA/Canada market, only channel 1~11 can be operated. Selection of other channels is not
possible.
NOTE: This equipment has been tested and found to comply with the limits for a Class B digital device, pursuant to
Part 15 of the FCC Rules. These limits are designed to provide reasonable protection against harmful interference in a
residential installation. This equipment generates, uses and can radiate radio frequency energy and, if not installed
and used in accordance with the instructions, may cause harmful interference to radio communications.
However, there is no guarantee that interference will not occur in a particular installation. If this equipment does cause
the user is encouraged to try to correct the interference by one or more of the following measures:
Reorient or relocate the receiving antenna.
Increase the separation between the equipment and receiver.
Consult the dealer or an experienced radio/TV technician for help.
This Class B digital apparatus complies with Canadian ICES-003.
This device complies with Industry Canada’s licence-exempt RSSs. Operation is subject to the following two
conditions:(1)This device may not cause interference; and (2)This device must accept any interference, including
interference that may cause undesired operation of the device.
Allow fixture to cool before handling.
Do not cut any wires with factory installed wire connectors or remove the wire connectors.
Do not install on circuits feeding motor loads such as kitchen appliances, HVAC equipment, washer/ dryer or garage
door openers.
Do not install when it is raining
Do not stare directly at the LEDs for more than a few seconds to avoid eye injury.
Do we need to include all the electrical qualifications this light meets? Tech Specifications, Guarantee
FIRE RISK: Do not mount near combustible or flamable surfaces.
Floodlight Cam does not serviceable parts or replaceable LEDs
Floodlight Cam should be installed outdoors to a wall or eaves, not the ground.
Instructions do not cover everything
1523 26th St.
Santa Monica, CA 90404

These instructions do not claim to cover all details or variations in equipment or provide every possible contingency
to meet in connection with the installation, operation or maintenance.
Risk of electric shock. Disconnect power at the fuse or circuit breaker before installing.
RISK OF ELECTRICAL SHOCK
- Disconnect power at the fuse or circuit breaker before installing.
- Verify that the supply voltage is correct. Connect fixture to a 100 VAC~240 VAC 50/60 Hz power source.
- Properly ground fixture.
- Always install wiring connections in accordance with local code standards.
© 2016 Bot Home Automation, Inc.
RING, ALWAYS HOME, and CHIME are trademarks of Bot Home Automation, Inc.
Par la présente, Bot Home Automation, déclare que ce consommateur électronique est en conformité avec les
exigences essentielles et autres
Dispositions pertinentes de la directive 1999/5 / CE. La déclaration de conformité peut être consultée à l’adresse
www.ring.com/DoC.pdf.
Le présent appareil est conforme aux CNR d'Industrie Canada applicables aux appareils radio exempts de licence.
L'exploitation est autorisée aux deux conditions suivantes : (1) l'appareil ne doit pas produire de brouillage, et (2)
l'utilisateur de l'appareil doit accepter tout brouillage radioélectrique subi, même si le brouillage est susceptible d'en
compromettre le fonctionnement.
L’automatisation peut annuler son approbation pour l’exploitation.
Utilisez cet appareil uniquement dans des locaux secs. Ne couvrez pas l’appareil en cours de fonctionnement. Ne pas
ouvrir le boîtier. Protégez cet appareil des rayons du soleil. N’utilisez pas ce
Périphérique à l’extérieur. En débranchant la fiche, l’appareil s’éteindra. Ne pas utiliser l ‘appareil si la fiche ou le
boîtier est défectueux, il ya risque de choc électrique.
Avertissement: Les modifications ou modifications apportées à cet appareil qui ne sont pas expressément
approuvées par la partie responsable de la conformité pourraient annuler l’autorisation d’utiliser l’appareil
l’équipement.
Cet équipement est conforme aux limites d’exposition aux rayonnements IC établies pour un environnement non
contr lé. Cet équipement doit être installé et utilisé avec un minimum de 20cm de distance entre la source de
rayonnement et votre corps
REMARQUE: Cet équipement a été testé et reconnu conforme aux limites d’un appareil numérique de classe B,
conformément à la partie 15 des règles de la FCC. Ces limites Sont conçus pour fournir une protection raisonnable
contre les interférences nuisibles dans une installation résidentielle. Cet équipement génère, utilise et peut rayonner
Radiofréquence et, s’il n’est pas installé et utilisé conformément aux instructions, peut causer des interférences
nuisibles aux communications radio.
Cependant, rien ne garantit que des interférences ne se produiront pas dans une installation particulière. Si cet
équipement cause des interférences nuisibles à la radio ou
Réception de télévision, qui peut être déterminée en éteignant et en éteignant l’appareil, l’utilisateur est encouragé à
essayer de corriger Plus de mesures suivantes:
Réorientez ou déplacez l’antenne de réception.
Augmenter la séparation entre l’équipement et le récepteur.
Consultez le revendeur ou un technicien radio / TV expérimenté pour obtenir de l’aide.
Cet appareil numérique de classe B est conforme à la norme ICES-003 du Canada.
Cet appareil est conforme aux normes RSS d’Industrie Canada exemptes de licence.
Le fonctionnement est soumis aux deux conditions suivantes
1) Cet appareil ne doit pas causer d’interférences et
2) Cet appareil doit accepter toute interférence, y compris les interférences pouvant entraîner un fonctionnement
indésirable de l’appareil.
Last updated: 03/16/17