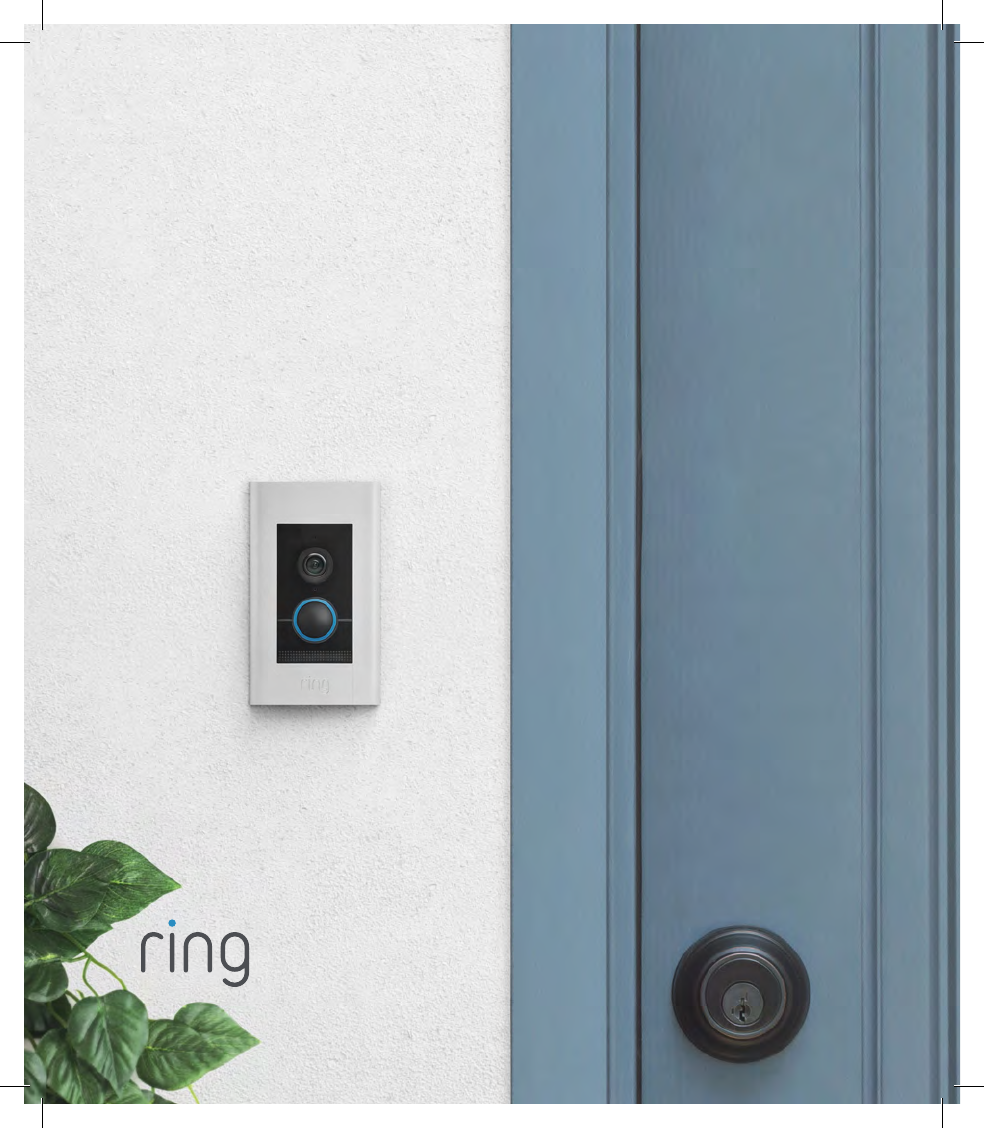
Ring BHAJB001 Video Doorbell Elite User Manual Ring Video Doorbell Setup and Installation Guide
Bot Home Automation, Inc. Video Doorbell Elite Ring Video Doorbell Setup and Installation Guide
Ring >
User Manual
Installing and
Setting Up
Ring Video
Doorbell Elite

Welcome
Congratulations on your new Ring Video
Doorbell Elite.
Ring Doorbell is the foundation of the Ring of
Security around your home.
We hope your Ring Doorbell brings you an
increased sense of security and convenience,
as well as the joy that comes from being
able to connect with visitors when you’re not
home.
Hi,
I’m Rochelle, a Ring Community Support Agent in
Arizona. I’ve set up so many Ring Doorbells, I can
probably do it in my sleep!
We’ve included all the tools you need, so setting it up by
yourself should be a breeze. If you run into any problems,
my colleagues and I can help. Just give us a call.
Don’t feel like calling? Check out our online Help
Center at ring.com/help.
32

Elite Power Kit
Includes power adapter and plugs for
dierent types of outlets
3’ Ethernet Cable
Use this cable to connect the Elite Power
Kit to your internet access point.
50’ Ethernet Cable
Run this cable from the Elite Power Kit to
your Ring Doorbell.
Elite Mounting Bracket (optional)
If installing Ring Elite on an existing
junction box, you don’t need to use this
bracket. If you do use this bracket, you
should remove the existing junction box.
Mounting Screws (5)
Attach Ring Elite to the bracket with two
screws. Use two other screws to attach the
Elite Power Kit to your wall, if you’d like.
Before you begin
Check out all the stuff in the box.
Screwdriver Handle
Screw Bit
Use the Phillips end for installation. If you
are securing existing doorbell wires in the
small connectors on the back of Ring Elite,
use the flathead end.
Flexible Bit
Use it for screwing the security screw into
the bottom of Ring Doorbell Elite after
installing the faceplate.
Security Screws (2)
Use one to secure the faceplate. Put the
other one in your toolbox for the inevitable
moment that the first one gets dropped in
the bushes.
Faceplates (4)
Select the color that best matches your
home…or your mood.
54
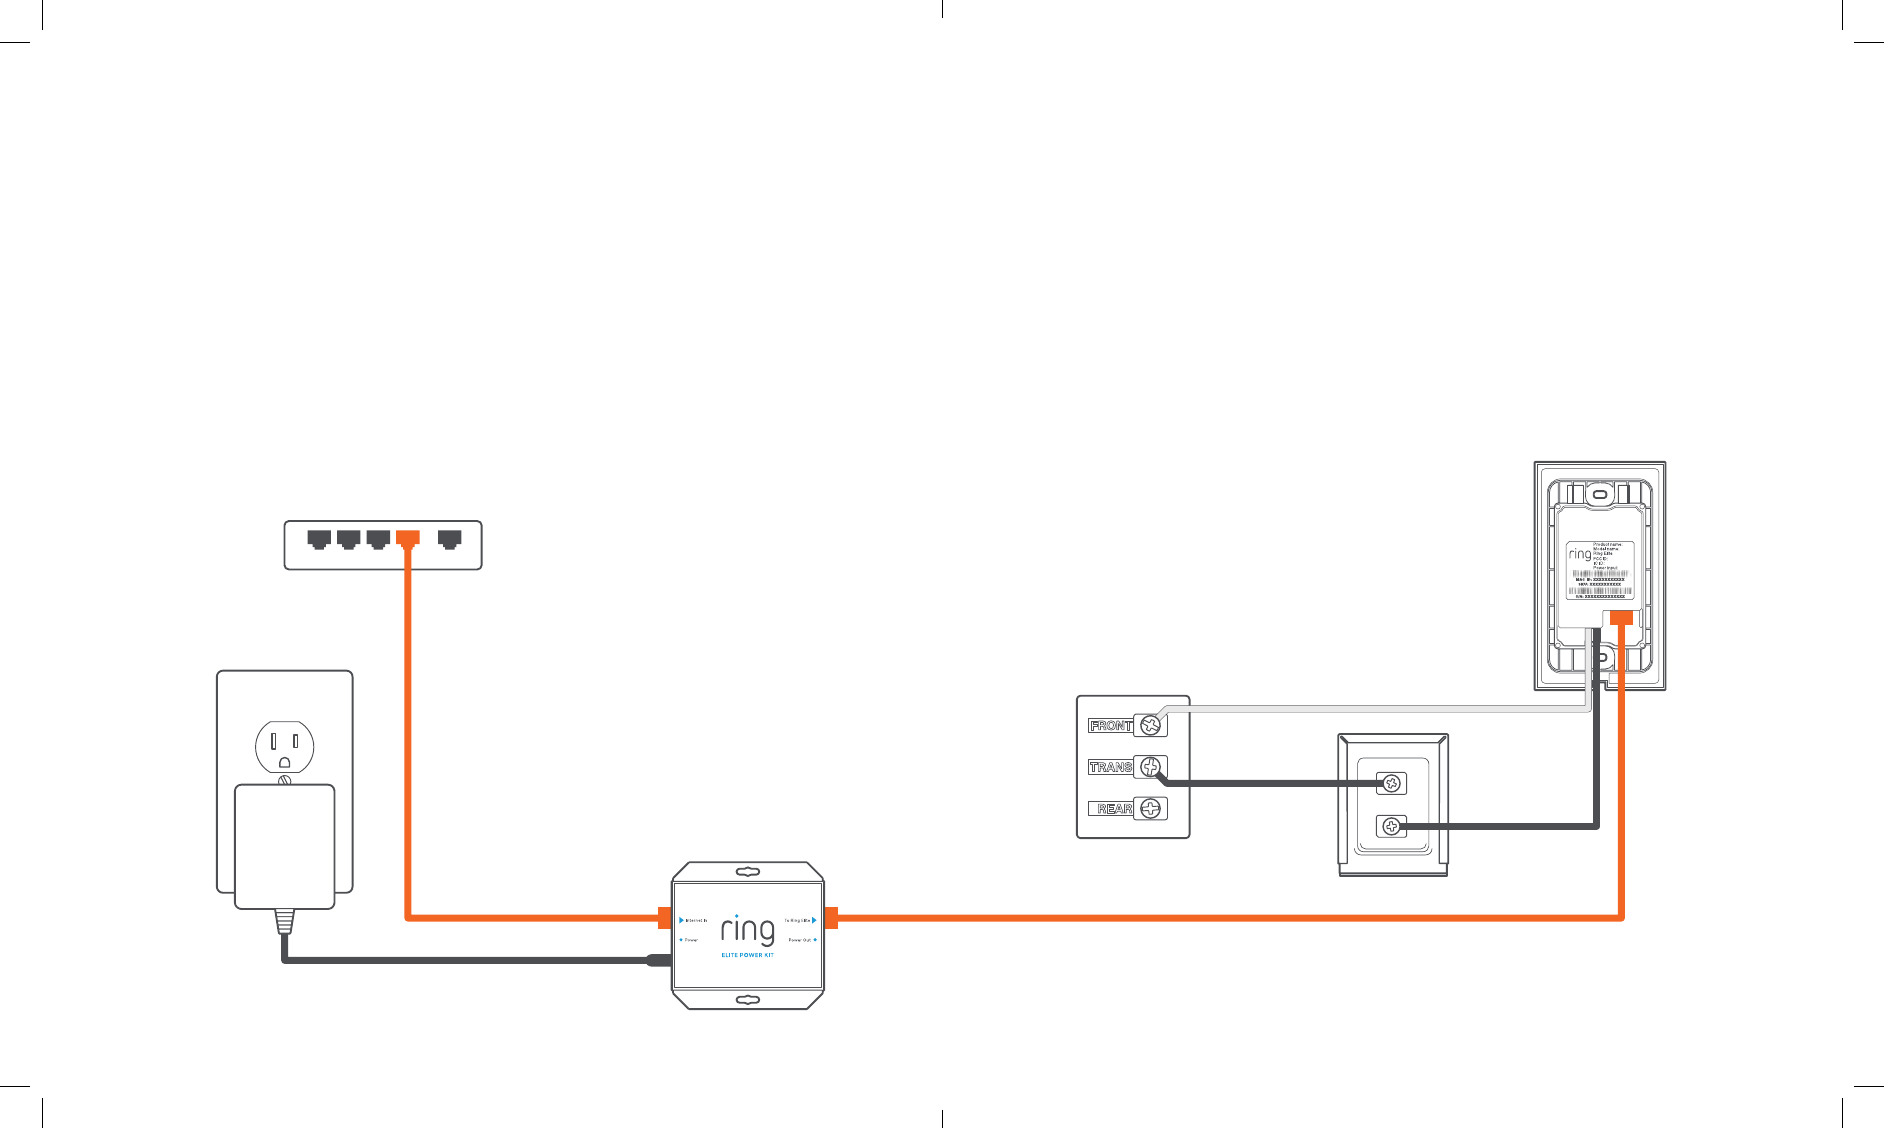
Internal doorbell
Internet
AC adapter
POE
Elite Power Kit
Ring Elite
LAN Transformer
Wiring the Elite Power Kit
The Elite Power Kit is a PoE injector that converts
internet in to Power Over Ethernet out.
To get started, connect the Elite Power Kit to AC,
using the provided adapter.
Then, use the provided 3 foot ethernet cable to
connect your access point to the Internet In port on
the Elite Power Kit.
Run cable to your Ring Elite
Run the 50 foot cable to the location where you’ll be
installing Ring Elite.
Wiring Ring Elite to an internal doorbell is optional.
If you do so, shut off power at the breaker before
connecting your existing doorbell
wires to the small wire terminals
on the back of Ring Elite.
76
How it all fits together
If you need a visual overview, see the diagram to the
right. This is how is all fits together.
Note that as you screw the Elite Mounting Bracket
into your wall, the “wings” will rotate and lock the
bracket into place.
98
55mm
92mm
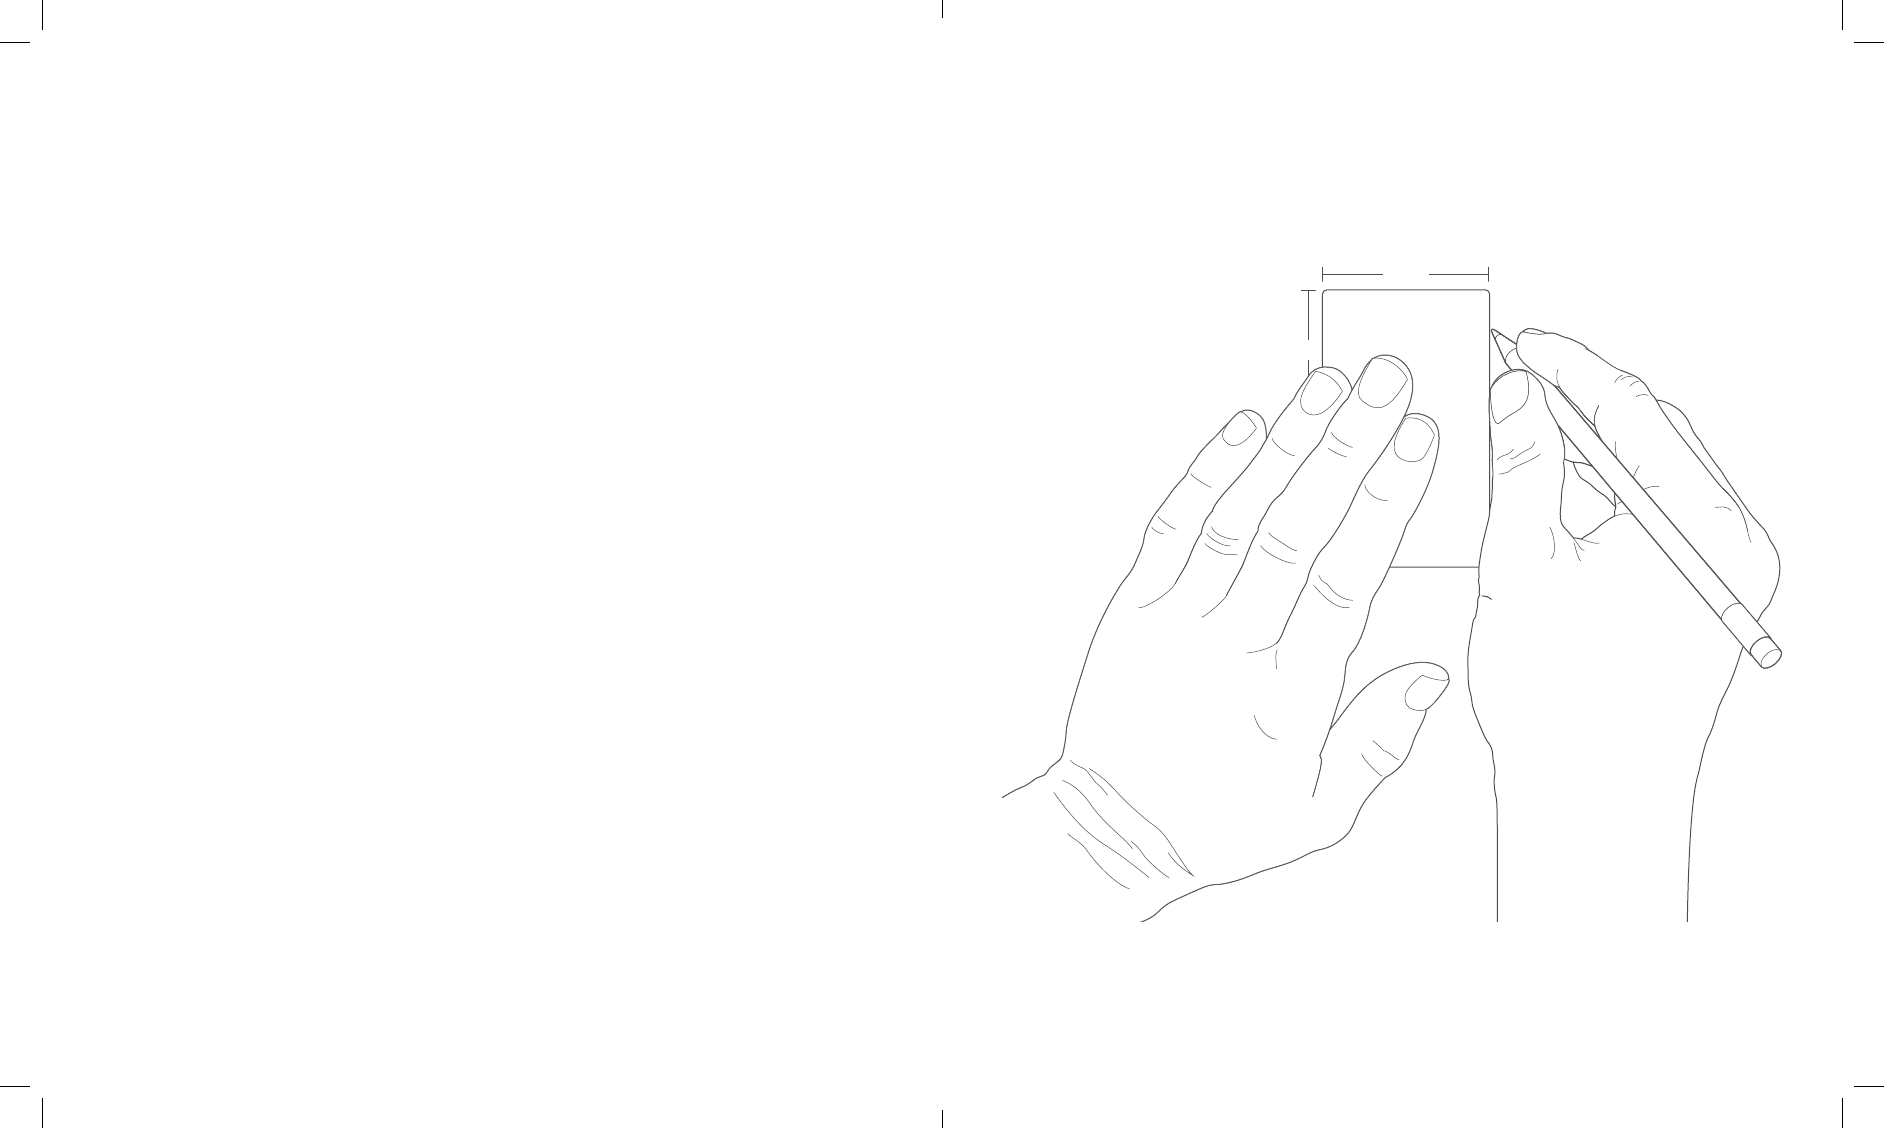
Mark the install location
If you already have a junction box at the location
where you’re installing your Ring Elite, skip the
next couple of steps and screw it directly into that
junction box.
If you don’t have a junction box, trace the outline of
the supplied template, then cut a rectangular hole
in your wall to make room for the Elite Mounting
Bracket.
1110
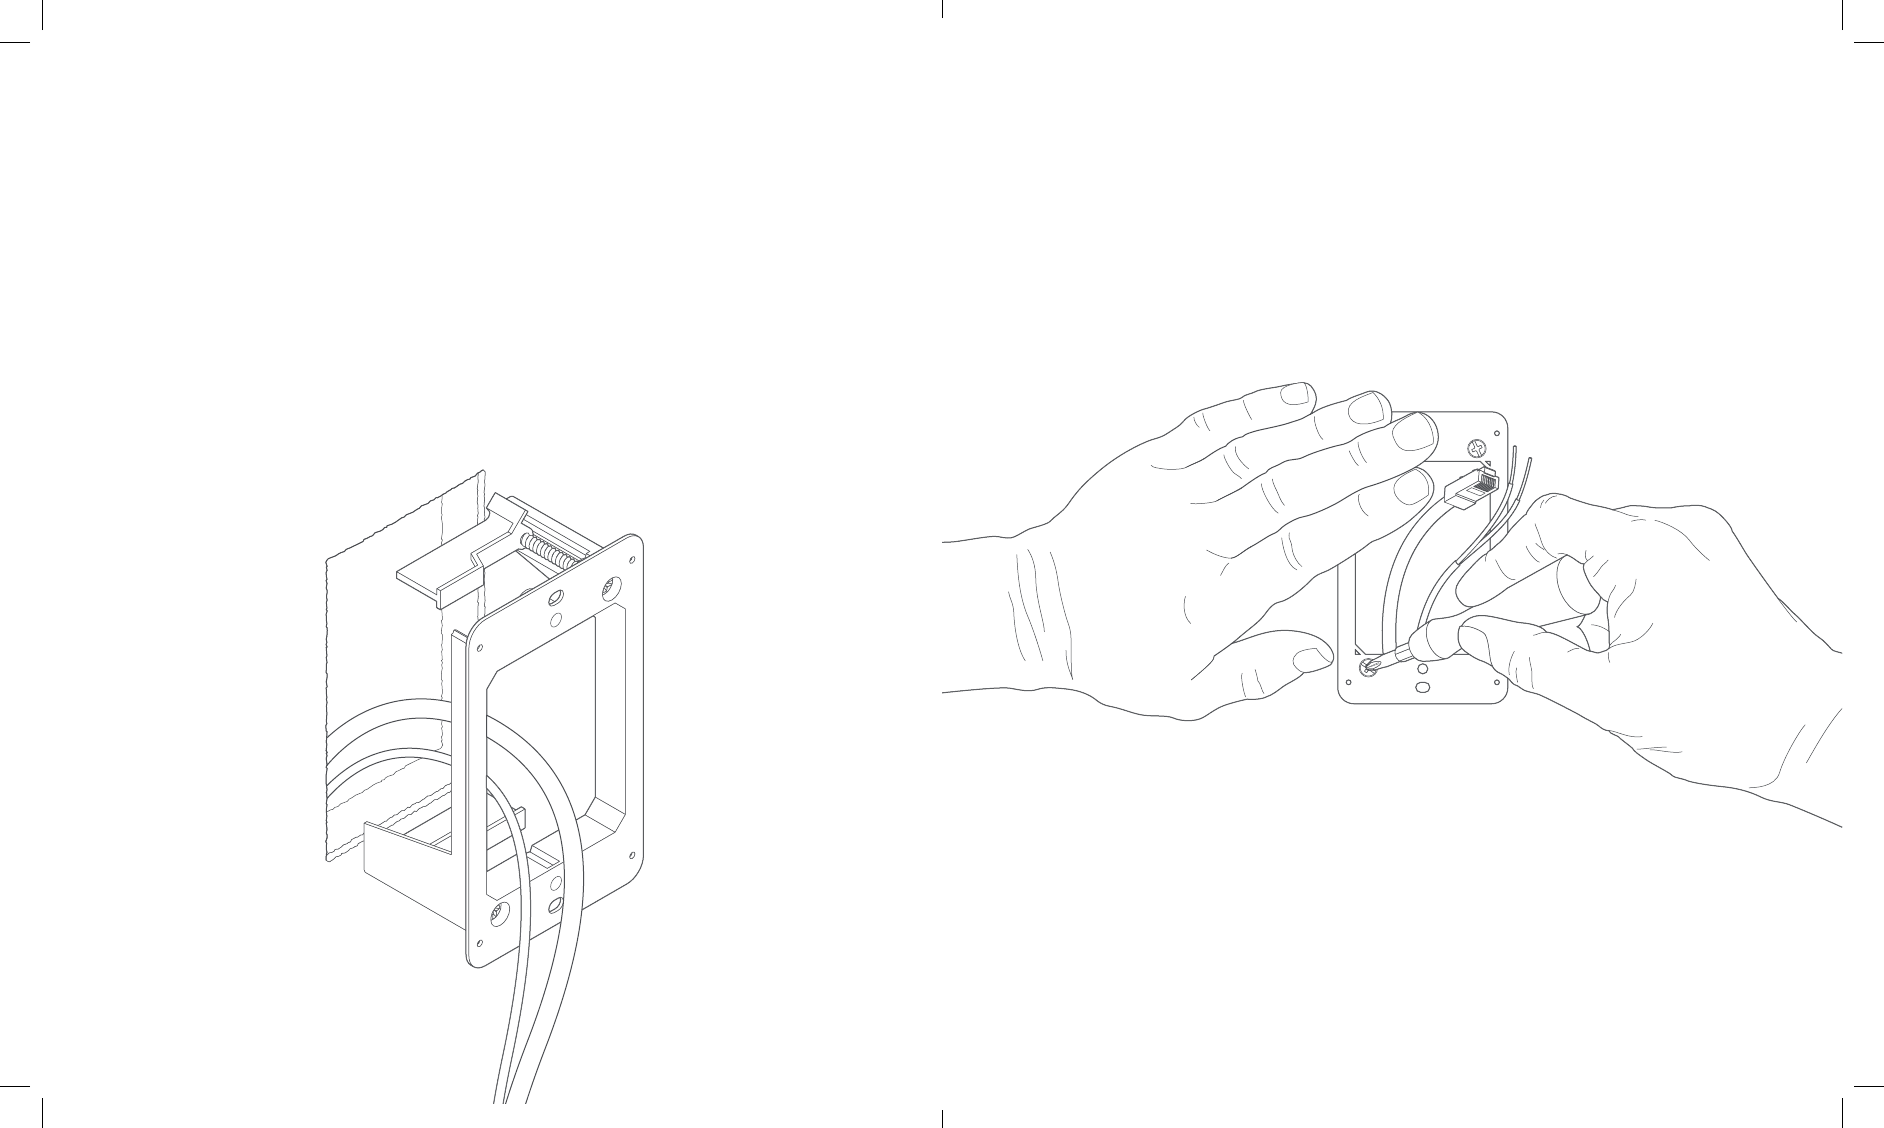
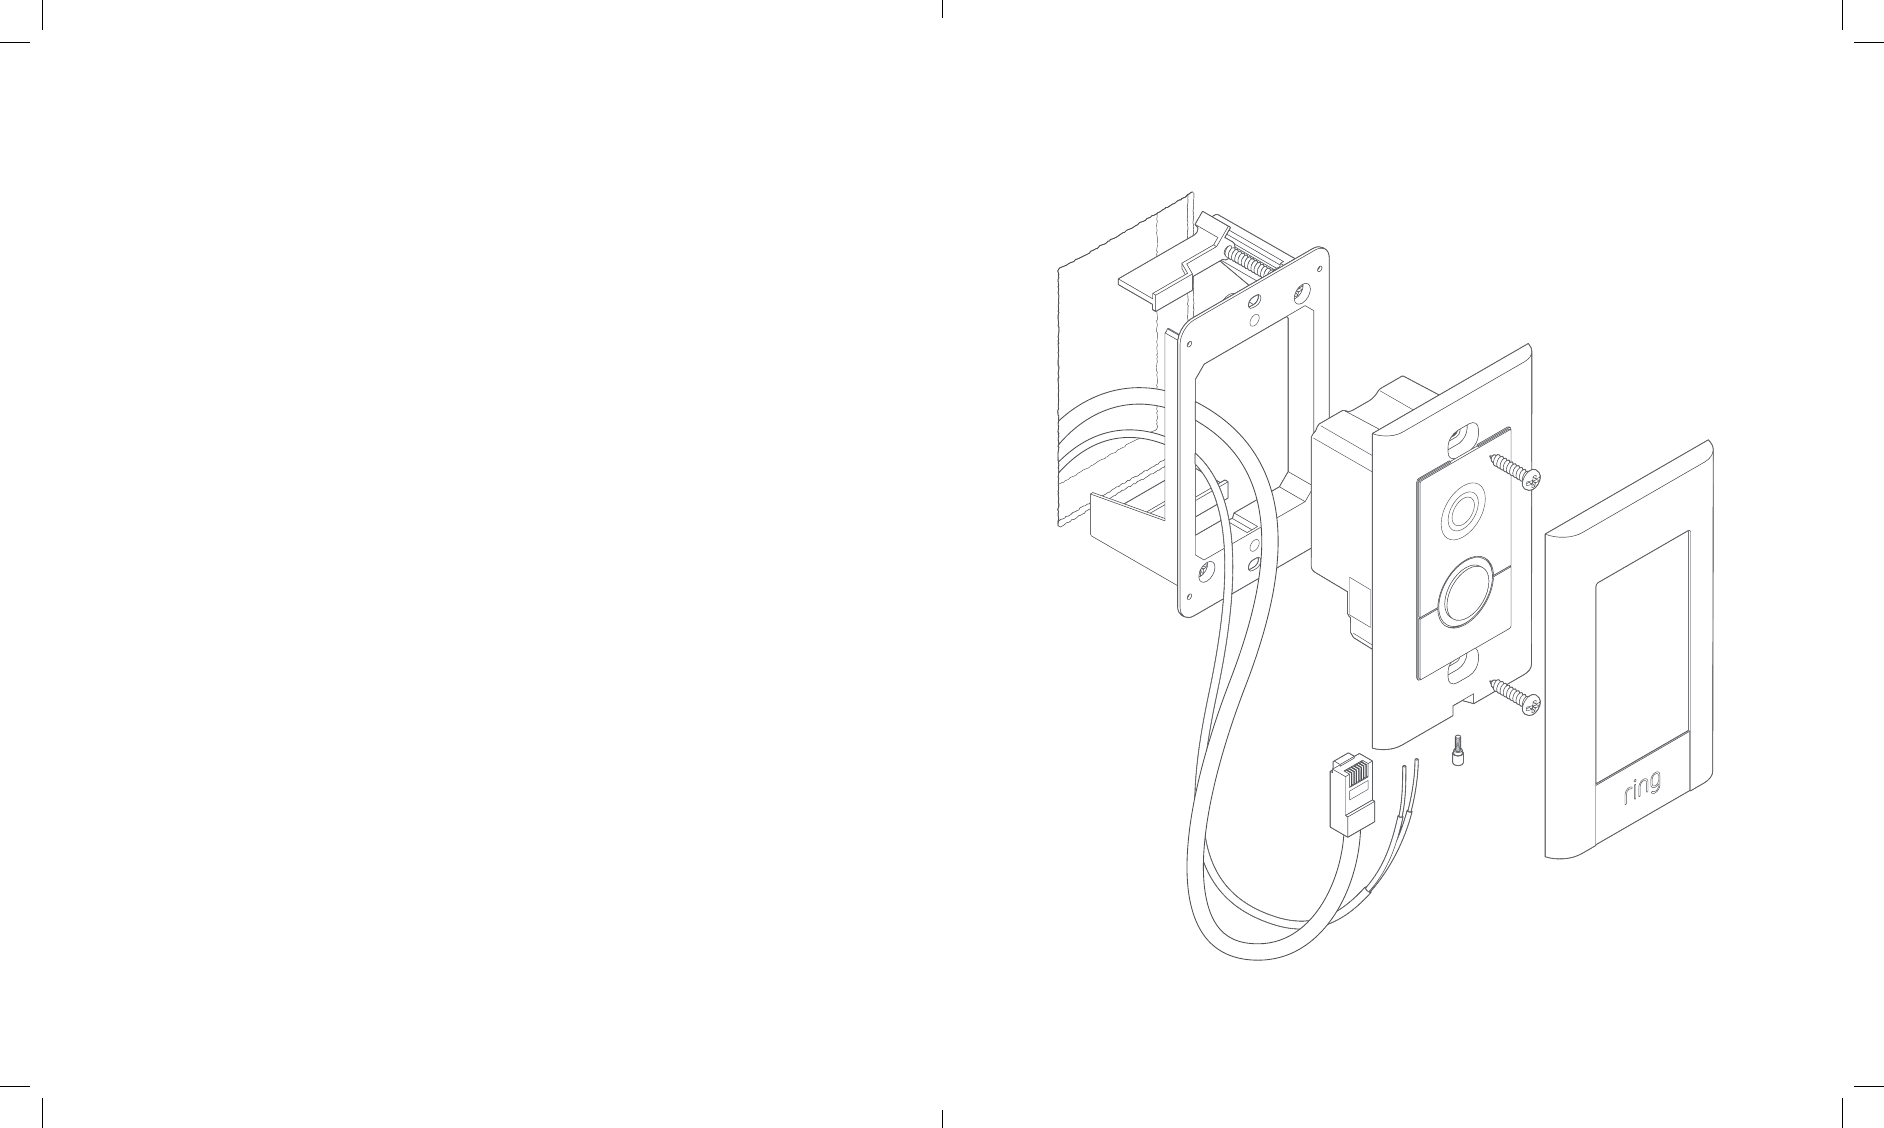
Install the Elite Mounting Bracket
Make sure any wires in your wall come through the
hole in the middle, and screw the bracket in using
the two screws in the corners.
The wing clamps will rotate as the screws turn and
lock the bracket into your wall.
1312
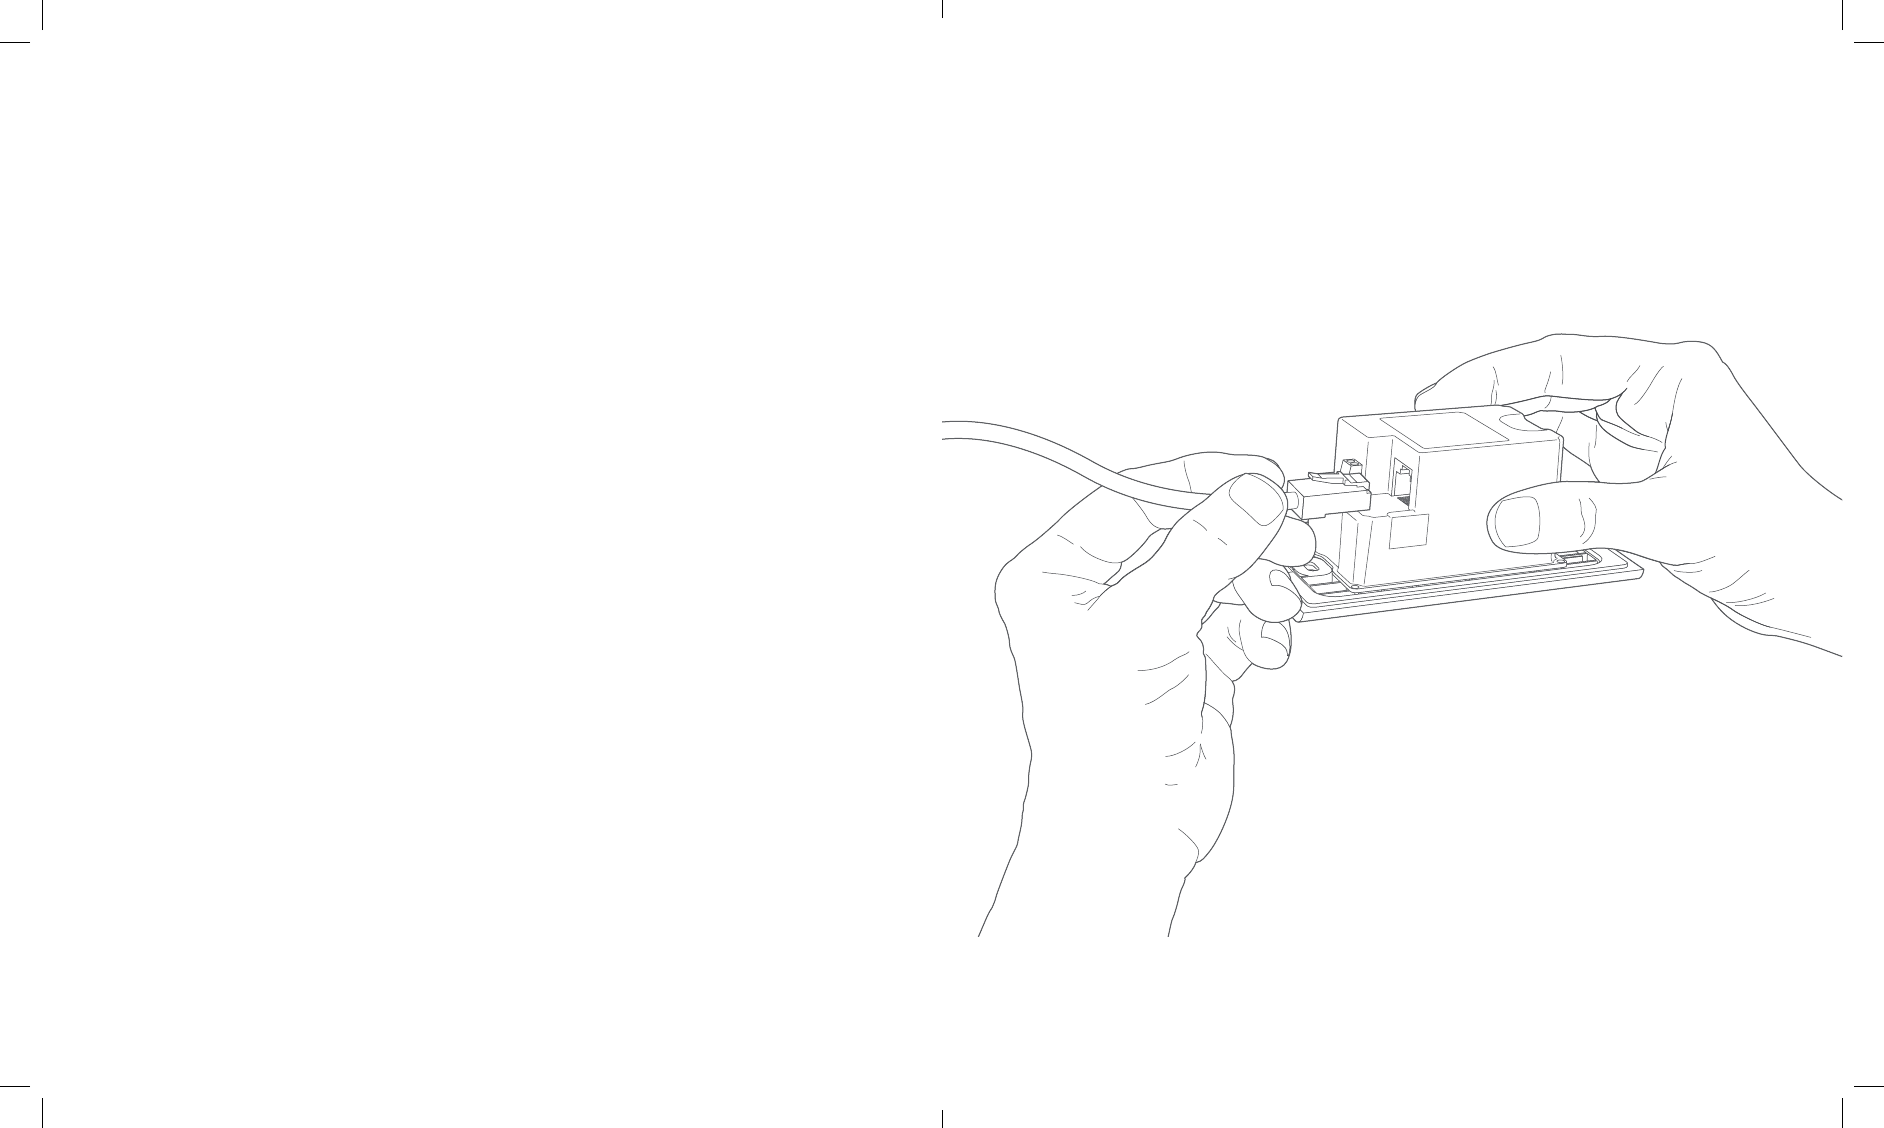
Plug in the ethernet cable
Plug the ethernet cable coming out of your wall into
the ethernet port on the back of Ring Elite.
As long as this cable is connected to power, the
front light on Ring Elite will begin spinning and it will
begin talking to you to let you know that it is ready to
be set up in the Ring app.
1514
Connect doorbell wires (optional)
If wiring Ring Elite to an internal doorbell, first shut
off power at the breaker, then connect your doorbell
wires to the small wire connectors next to the
ethernet port.
Then use the provided flat-head screwdriver to
secure the wires in the screw holes.
1716
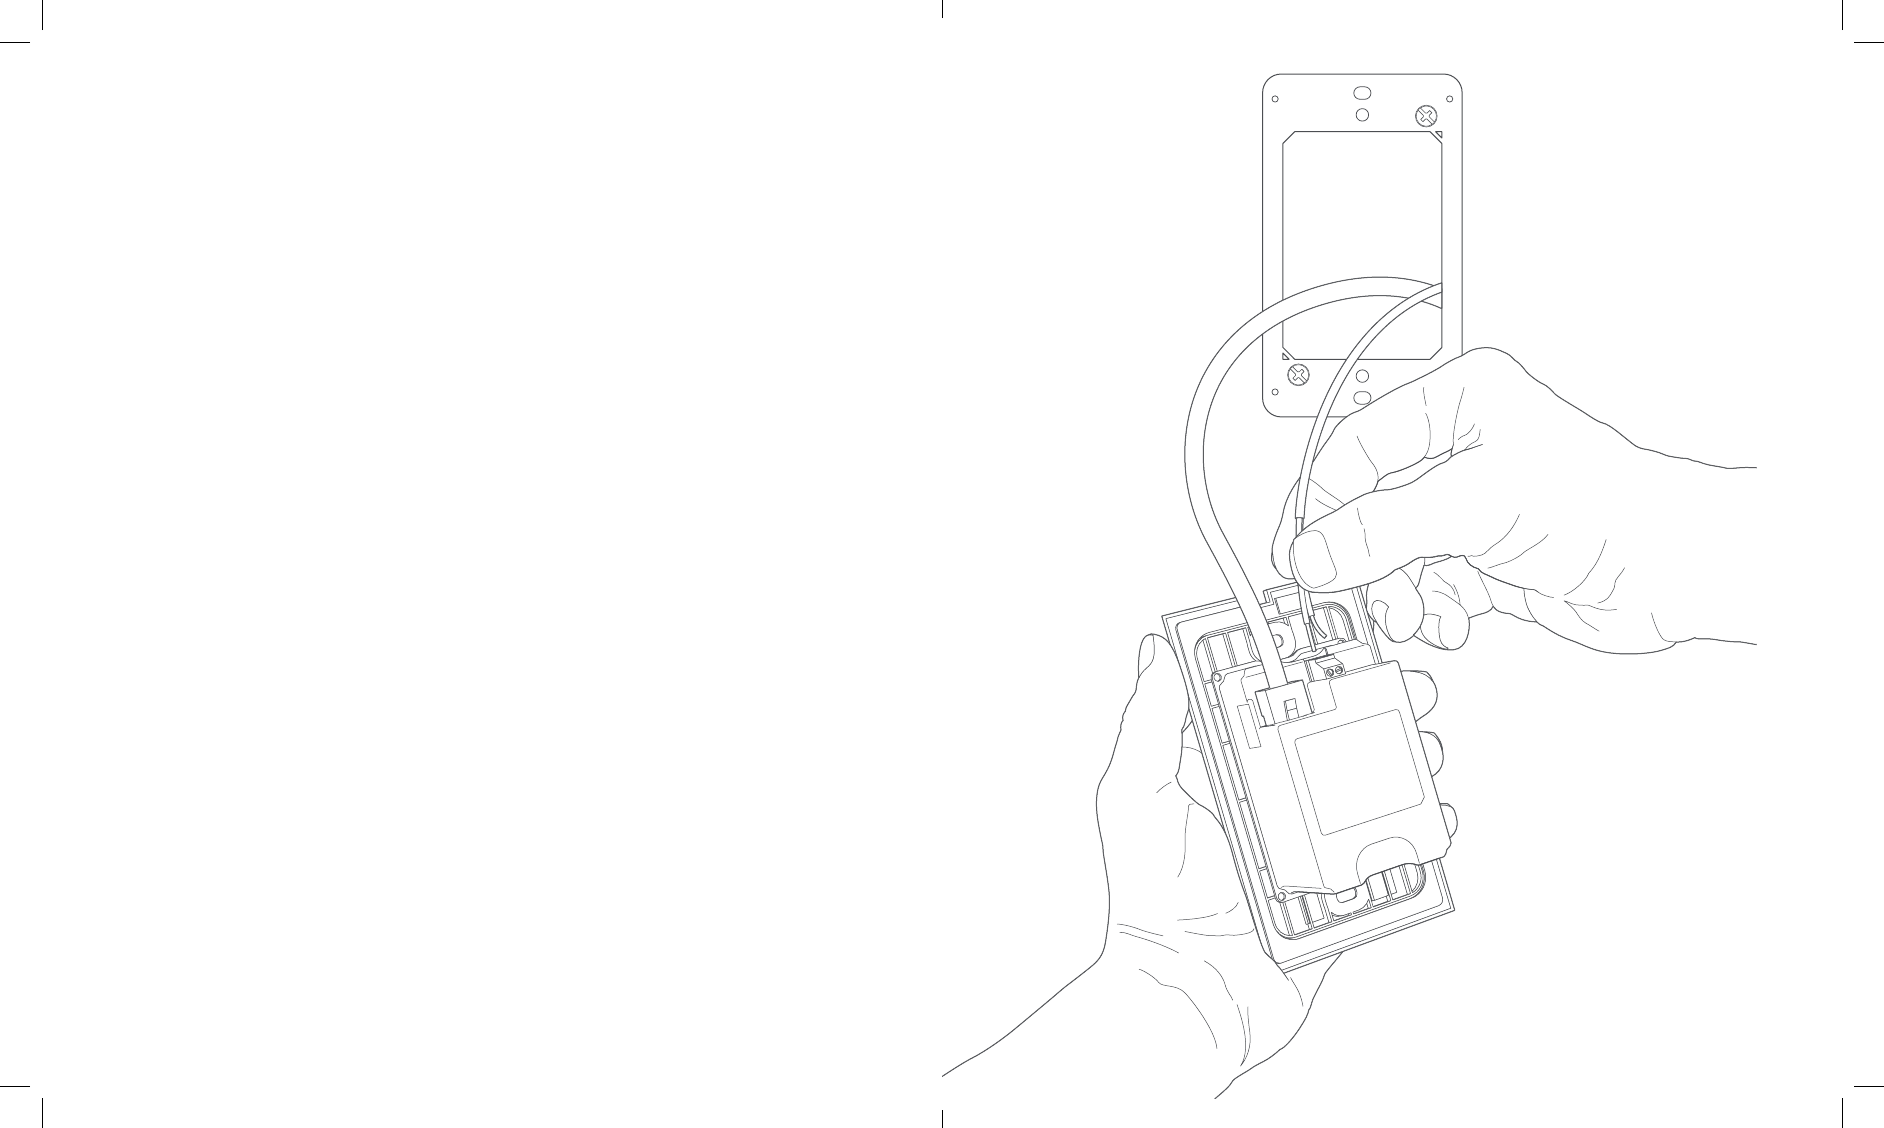
Screw Ring Elite into the bracket
Using two of the provided screws, screw Ring Elite
into the bracket to secure it on your wall.
1918
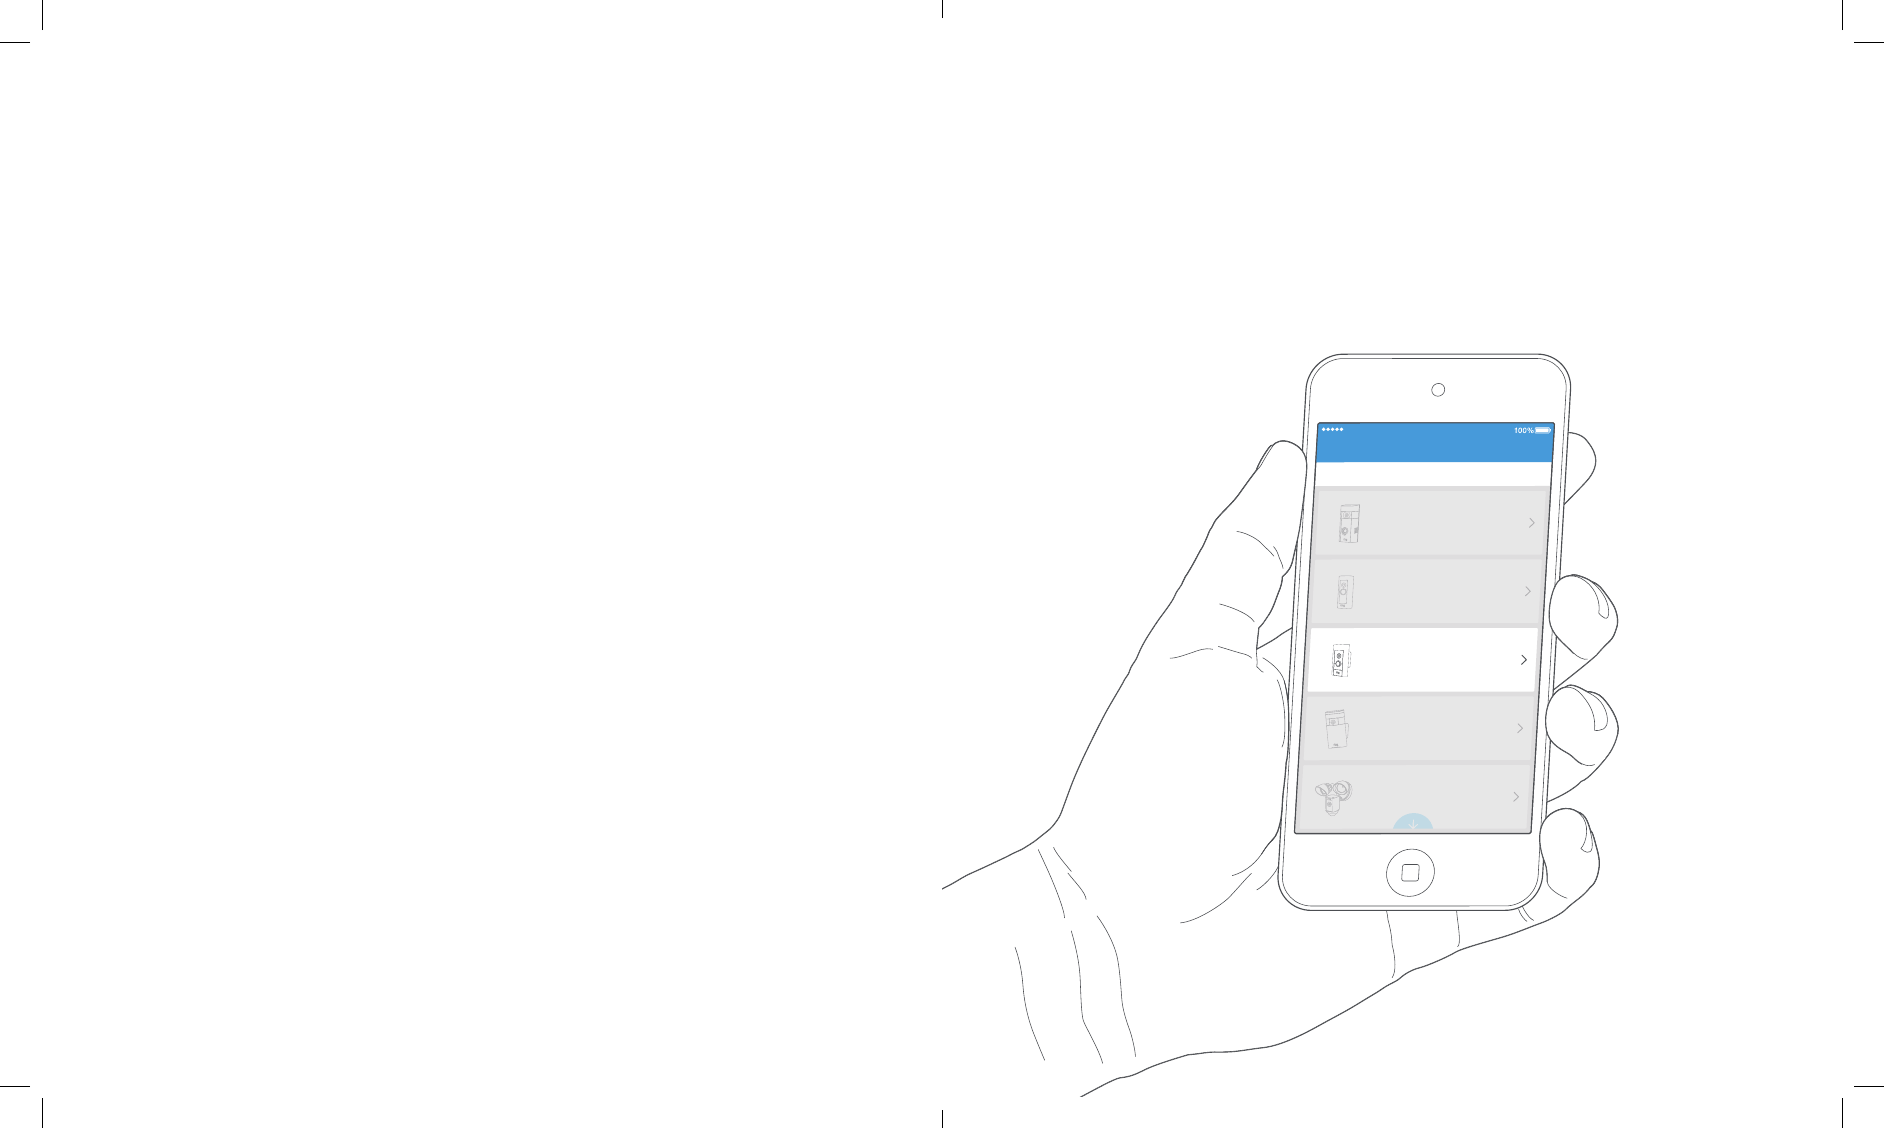
Perform the in-app setup
In the Ring app, select Set Up a Device, and follow
the in-app instructions to connect Ring Elite to your
Wi-Fi network.
When prompted, select ethernet as your connection
method.
9:41 AM
Set Up a Device Cancel
ALL DOORBELLS CAMERAS
Ring Video Doorbell
Ring Video Doorbell Pro
Ring Video Doorbell Elite
Stick Up Cam
Floodlight Cam
CHIMES
2120
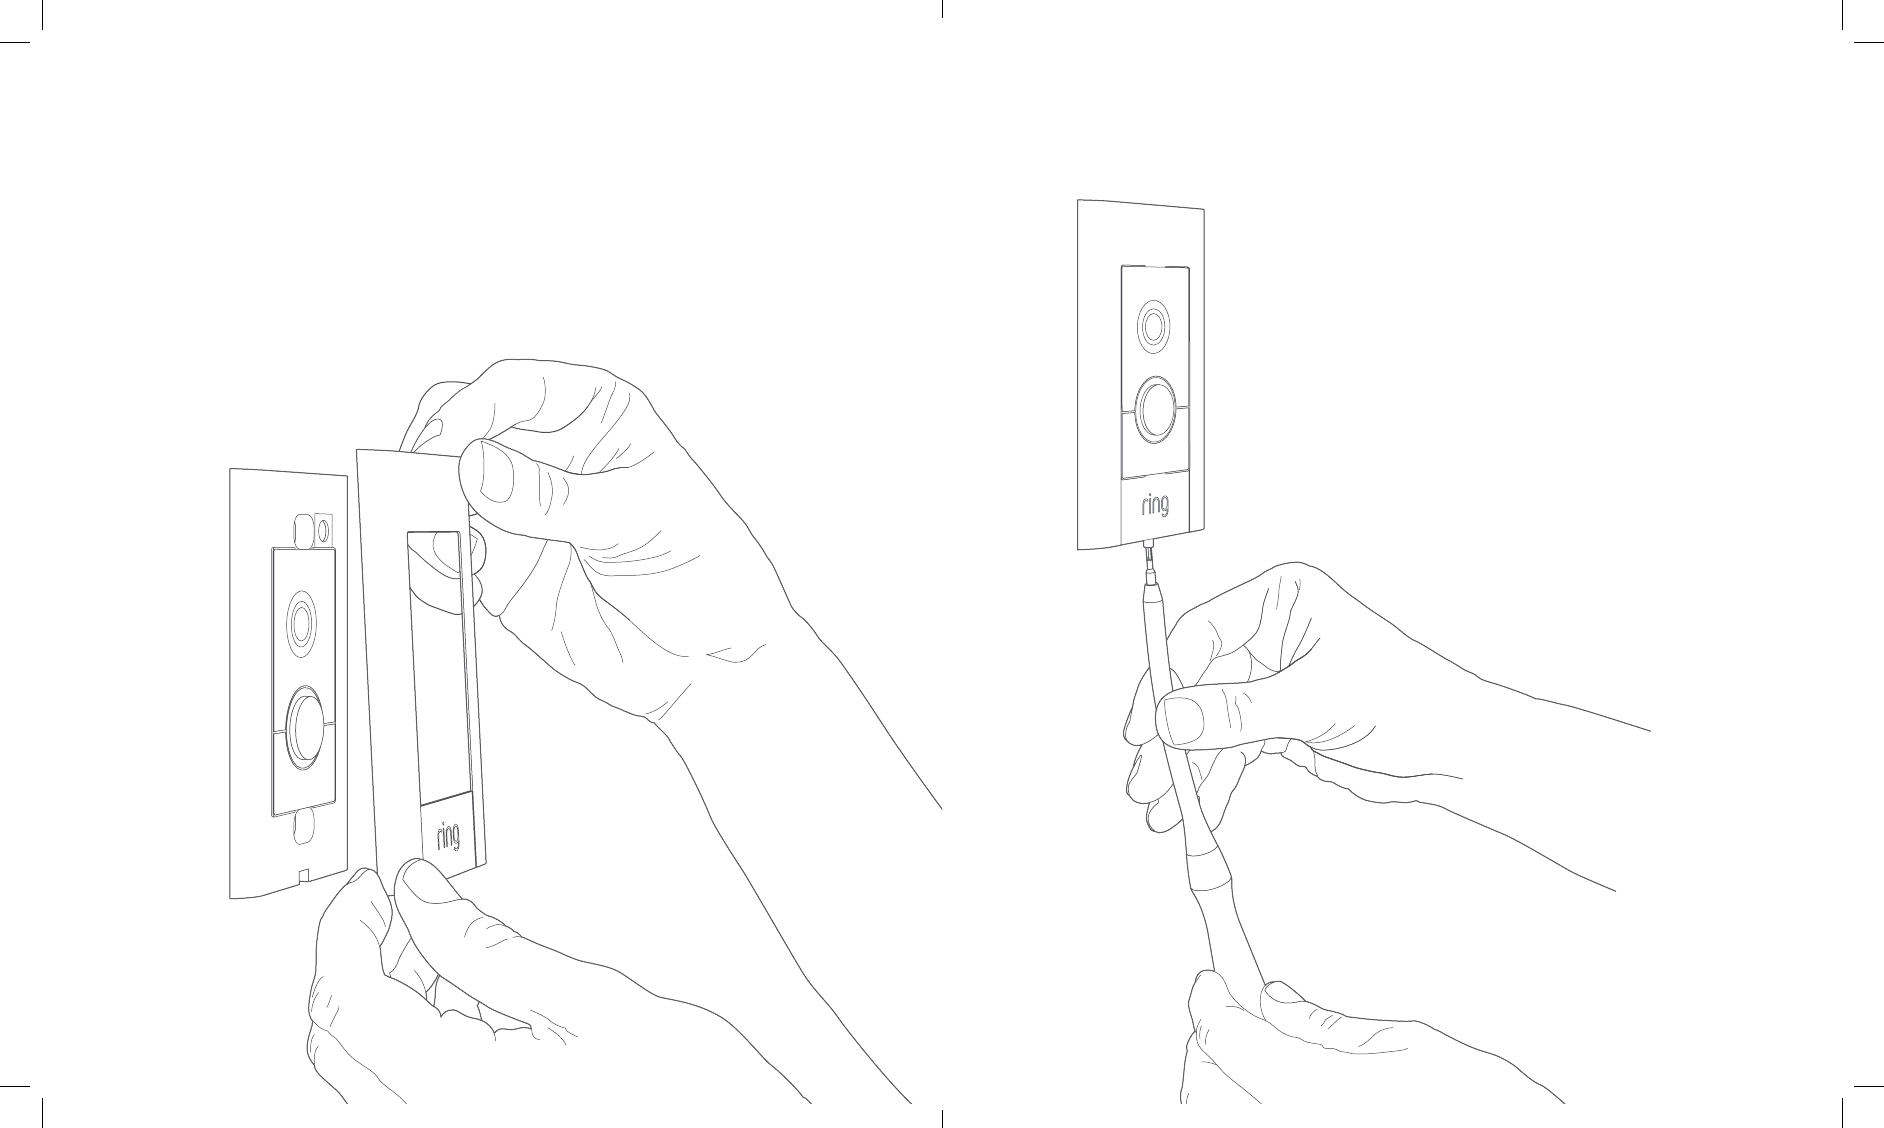
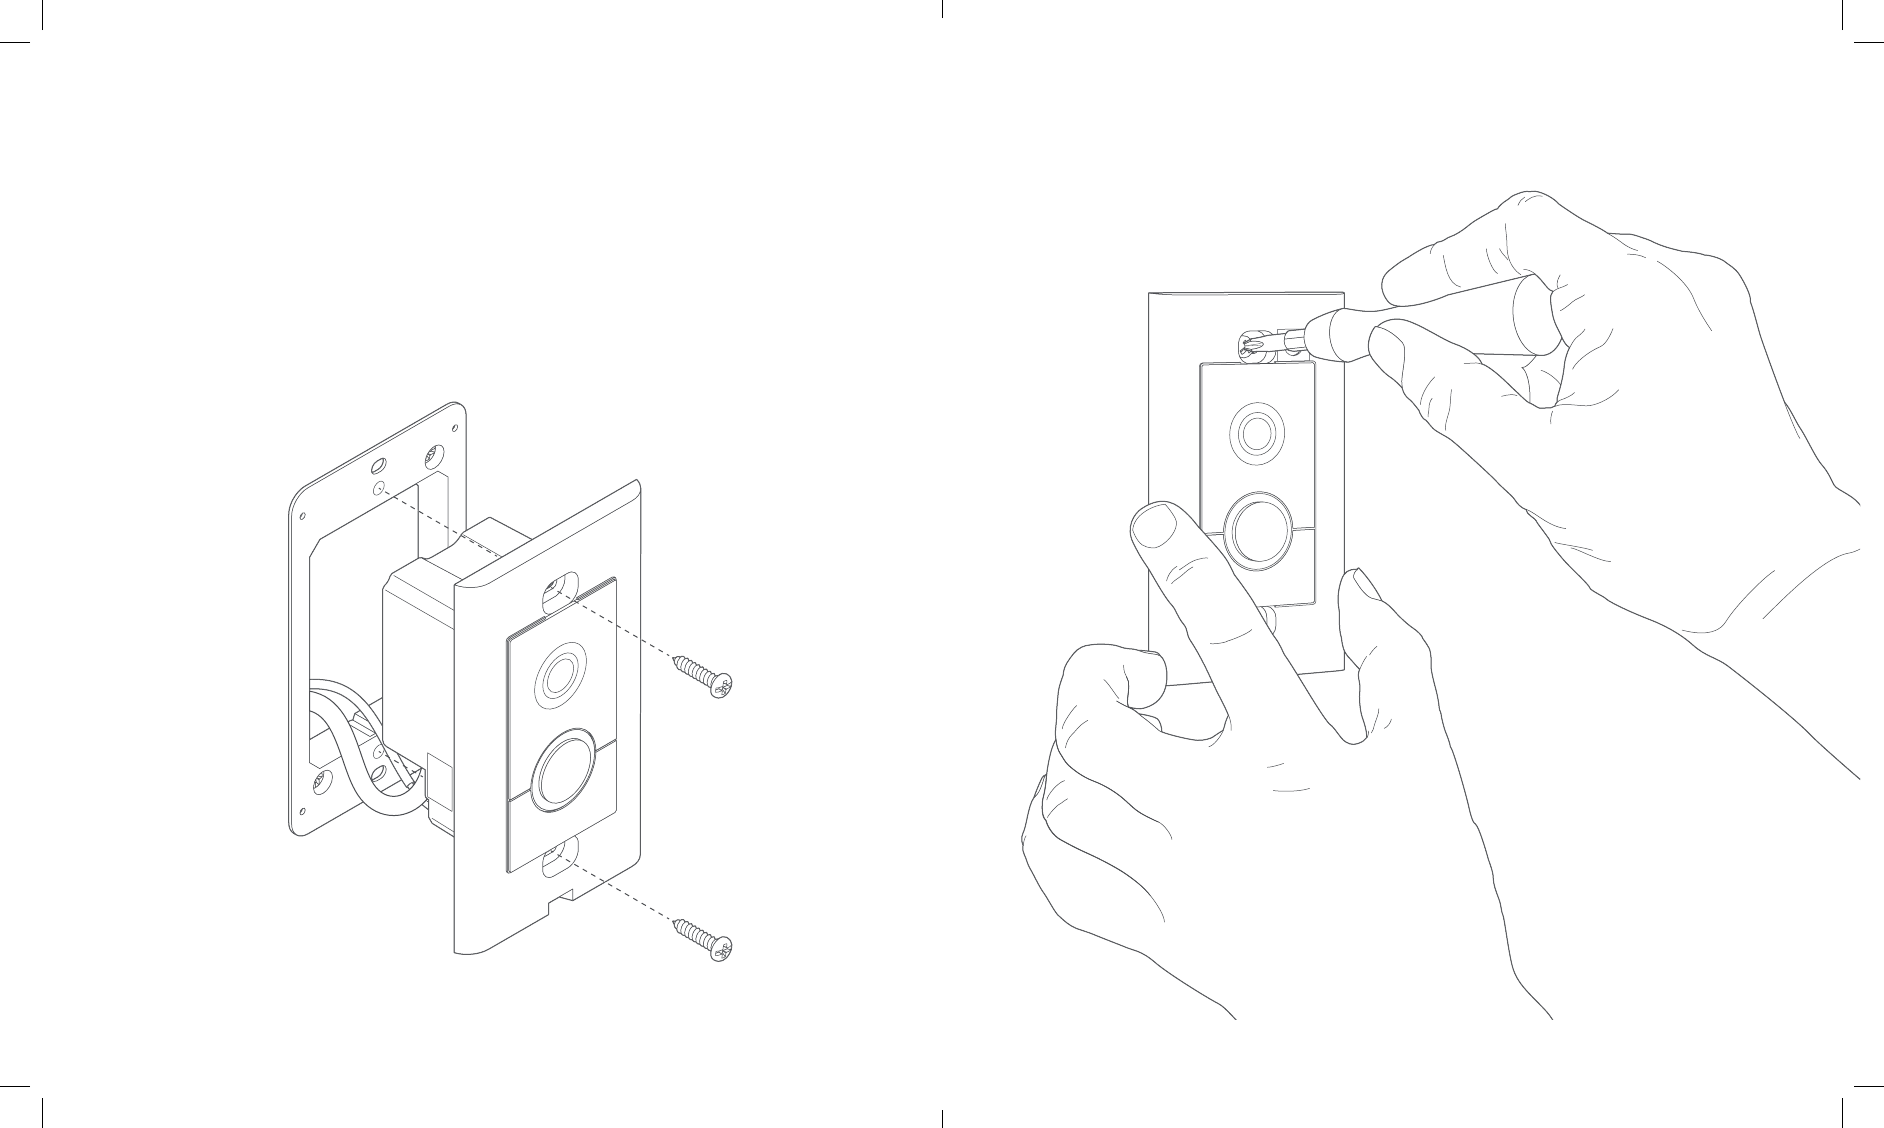
Secure the faceplate
After completing the in-app setup, place one of the
provided faceplates on your Ring Elite.
Then use one of the provided
security screws and the flexible
screwdriver bit to lock it into place.
2322
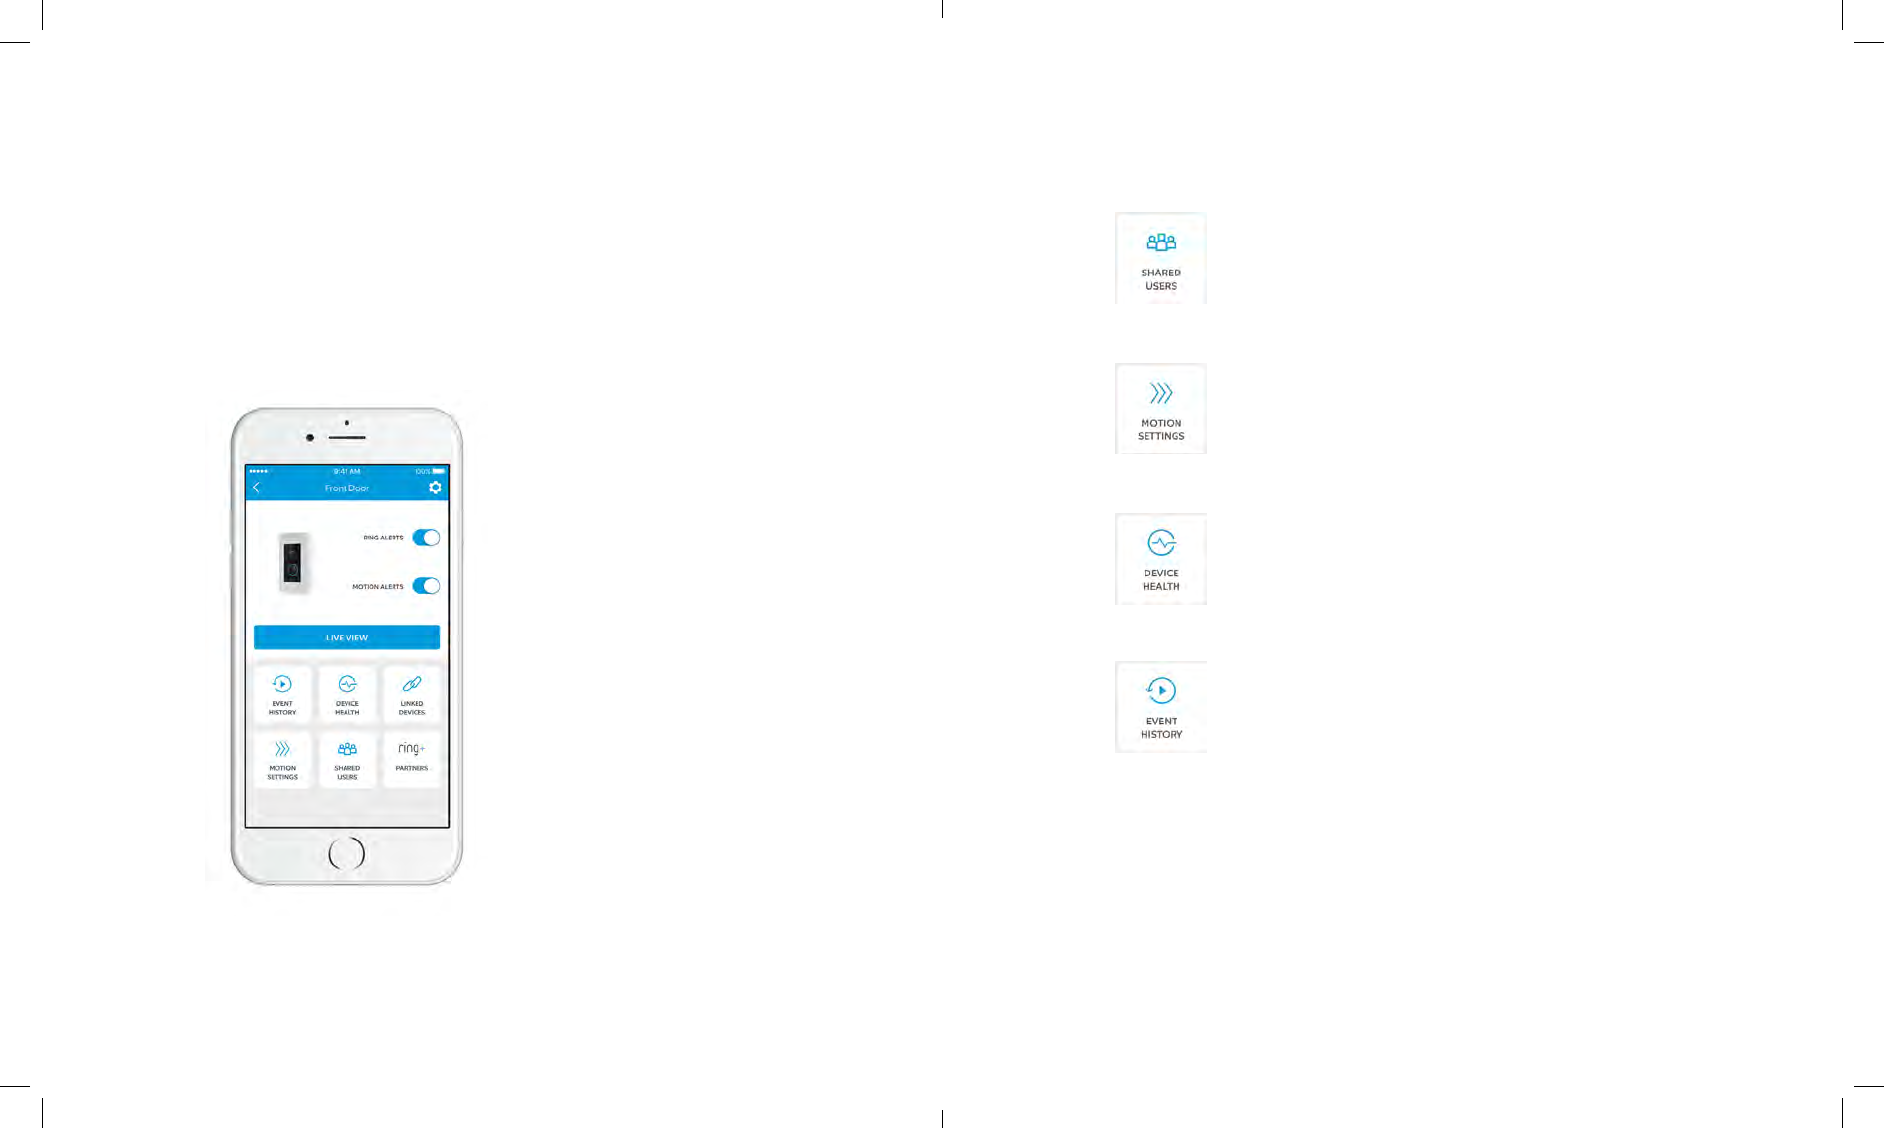
Shared Users
Select Shared Users to let family or
friends answer live events and view
recordings (if recording is enabled).
Motion Settings
Select Motion Settings to enable and
customize your motion detection
settings.
Device Health
If you ever run into a problem with your
Ring Doorbell, visit Device Health to
diagnose the issue.
Event History
View a log of all the events captured by
your Ring Doorbell in Event History.
After setting up Ring Elite in the app,
select it
This will bring you to the Device Dashboard, where
you can change settings and access various features.
Ring Alerts are
notifications you receive
when someone presses
the button on the front of
your Ring Doorbell.
Motion Alerts are
notifications you receive
when movement is
detected within your
Motion Zones.
Switch these alerts on or
off on this screen.
2524
Ring Video Recording
This optional feature saves recordings of
every event your Ring Doorbell captures.
You can access these events on any device
running the Ring app or by logging into
your account at: ring.com/activity
Learn more at: ring.com/video-recording
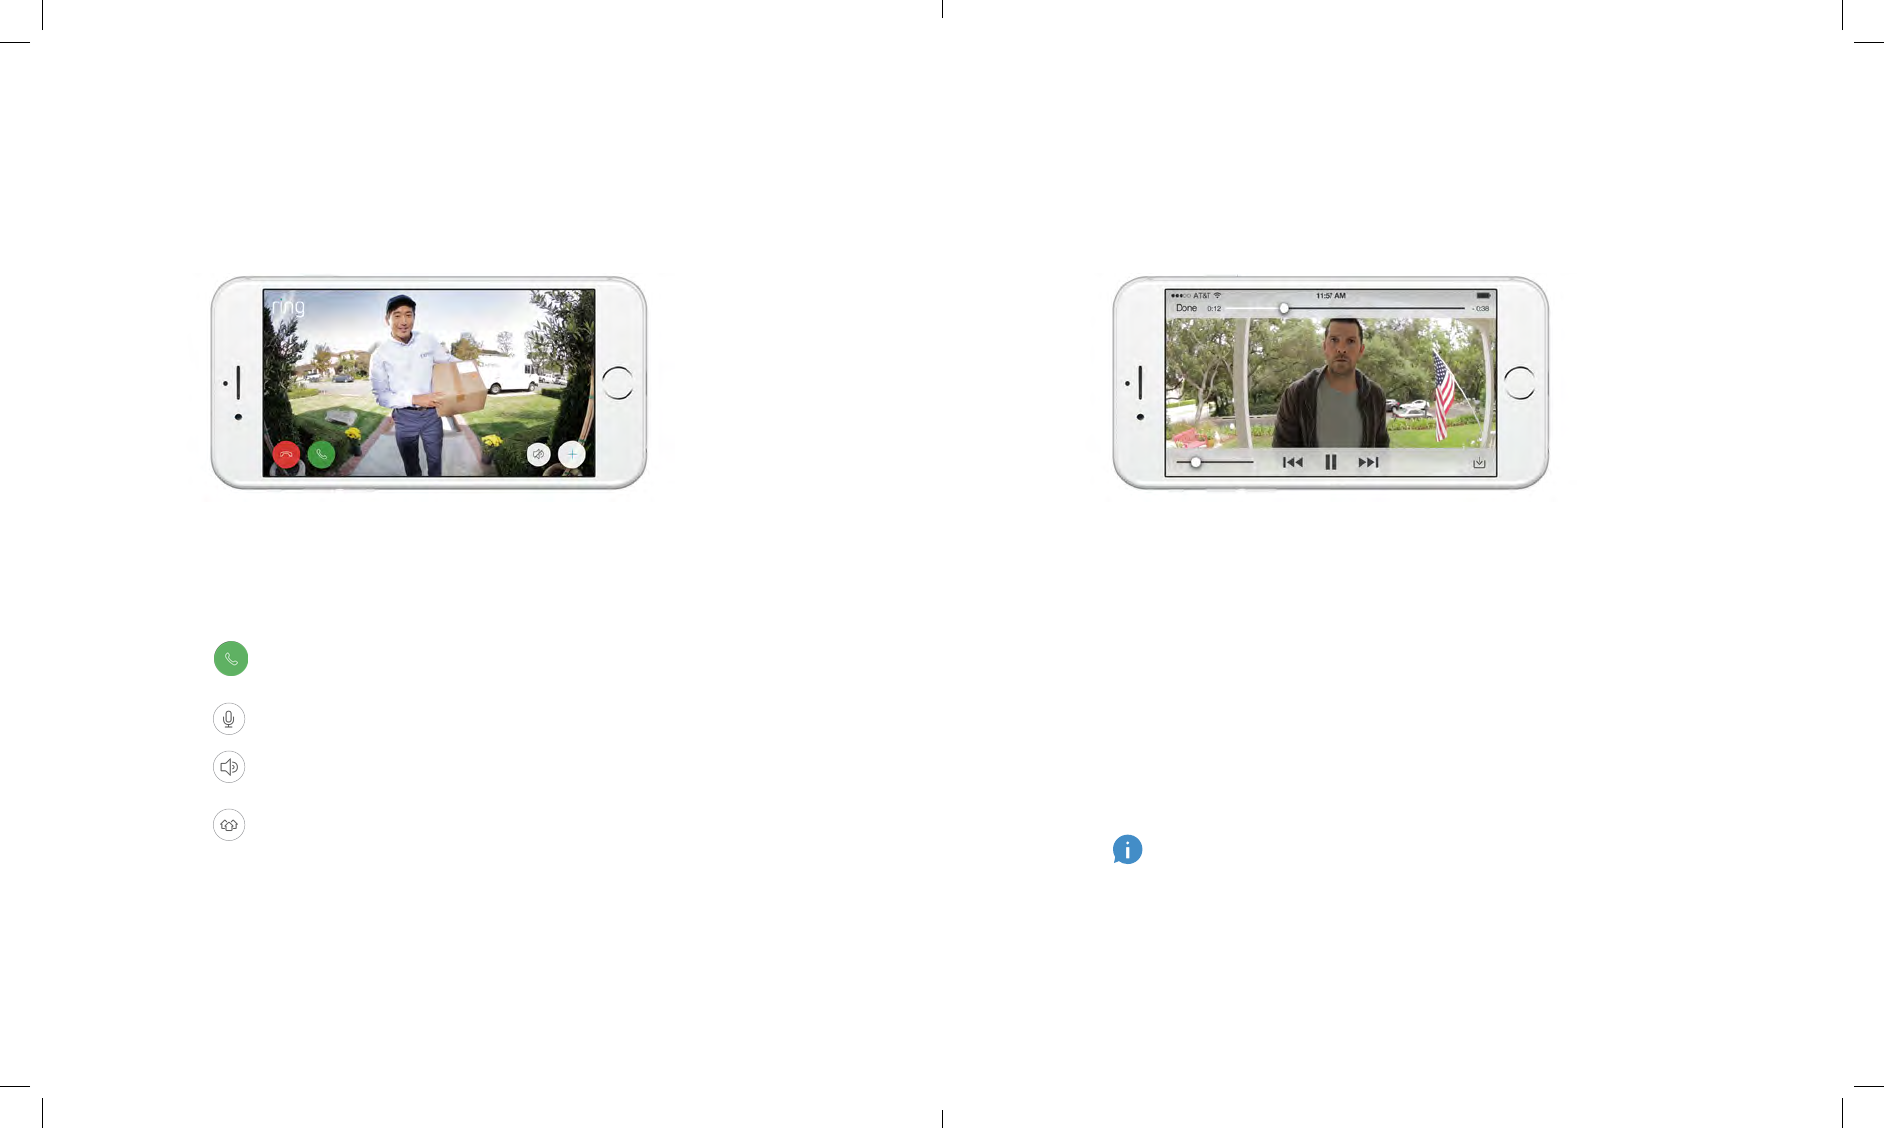
Answering your door
When someone is at your door, you can
access the following features:
Your new Ring Doorbell includes a free trial of Ring
Recording for you to enjoy. Watch your email inbox for
important announcements about this service.
Two-way Talk – Speak to visitors and hear
what they have to say.
Microphone – Mute or unmute your mic.
Speaker – Mute or unmute audio in the app.
Ring Neighborhoods – Share suspicious
events with your neighbors.

Left Flashing White indicates a
possible issue with your internet
connection. Unplug your modem/
router for 40 seconds, plug it back
in and then repeat setup.
Spinning White indicates that
your Ring Doorbell is in setup
mode. You’ll need to follow the
instructions in the Ring app. When
prompted, connect to the Wi-Fi
network being broadcast by your
Ring Doorbell.
Nothing If the front light is not
illuminated at all, check the
connections to your Elite Power Kit,
since it is likely that a cable is not
connected.
Why can’t I find the temporary Ring network
on my phone?
Sometimes your phone fails to pick up the
temporary Ring network. If this happens, go
to your phone settings, turn off your Wi-Fi
connection, wait 30 seconds and turn it back
on. If the Ring network still fails to appear, check
the connections to your Elite Power Kit, and
ensure your Ring Doorbell is in setup mode.
If none of the above
helped…
Perform a hard reset on your Ring Doorbell by
holding down the setup button for 15 seconds,
waiting 30 seconds and repeating the setup
process.
Turn off cellular data and bluetooth on your
mobile device and try again.
Try performing setup on a different mobile
device.
© 2017 Bot Home Automation, Inc. RING, ALWAYS HOME, and CHIME are trademarks of Bot Home Automation, Inc.
Last updated: 04/19/17
I’m having trouble
completing the in-app setup
Ethernet Setup
If you selected Ethernet Setup during the in-
app setup, see the following tips.
Why did my ethernet setup fail?
Check to see that all your wires are securely
connected and try again. Check to see that your
Ring Doorbell has power by making sure that
the light on the front is glowing. Make sure that
your Elite Power Kit is connected correctly - with
the ethernet cable plugged into the proper In
and Out ports, and the power adapter plugged
in and connected to a power outlet.
Wi-Fi Setup
I still can’t set setup to complete. What now?
When prompted to choose your connection
type in the app during setup, select Wi-Fi, and
see if that works.
I’m having trouble with Wi-Fi setup
When Wi-Fi setup fails, look at the front of your
Ring Doorbell. The light indicates the issue.
Top Flashing White means your
Wi-Fi password was entered
incorrectly. Select your Wi-Fi
network in your phone settings,
select the option to forget it,
then reconnect to it again to
confirm that you’re using the
correct password during setup.
Right Flashing White means
your Ring Doorbell may be
too far from your router to
get a decent signal. If you are
unable to connect Ring Elite via
ethernet, then you may need to
get a Chime Pro to boost the Wi-
Fi signal to your Ring Doorbell.
Learn more at: ring.com/chime-pro.
Federal Communication Commission Interference Statement
This equipment has been tested and found to comply with the limits for a Class B digital device, pursuant to Part 15 of the
FCC Rules. These limits are designed to provide reasonable protection against harmful interference in a residential
installation. This equipment generates, uses and can radiate radio frequency energy and, if not installed and used in
accordance with the instructions, may cause harmful interference to radio communications. However, there is no guarantee
that interference will not occur in a particular installation. If this equipment does cause harmful interference to radio or
television reception, which can be determined by turning the equipment off and on, the user is encouraged to try to correct the
interference by one or more of the following measures:
Reorient or relocate the receiving antenna.
Increase the separation between the equipment and receiver.
Connect the equipment into an outlet on a circuit different from that to which the receiver is connected.
Consult the dealer or an experienced radio/TV technician for help.
FCC Caution: Any changes or modifications not expressly approved by the party responsible for compliance could void the
user's authority to operate this equipment.
This device complies with Part 15 of the FCC Rules. Operation is subject to the following two conditions: (1) This device may
not cause harmful interference, and (2) this device must accept any interference received, including interference that may
cause undesired operation.
This device and its antenna(s) must not be co-located or operating in conjunction with any other antenna or transmitter.
For product available in the USA/Canada market, only channel 1~11 can be operated. Selection of other channels is not
possible.
FCC Radiation Exposure Statement:
This equipment complies with FCC radiation exposure limits set forth for an uncontrolled environment. This equipment
should be installed and operated with minimum distance 20cm between the radiator & your body.
IC RSS-GEN
This device complies with Industry Canada’s licence-exempt RSSs. Operation is subject to the following two conditions:
(1) This device may not cause interference; and
(2) This device must accept any interference, including interference that may cause undesired operation of the device.
Le présent appareil est conforme aux CNR d'Industrie Canada applicables aux appareils radio exempts de licence.
L'exploitation est autorisée aux deux conditions suivantes : (1) l'appareil ne doit pas produire de brouillage, et (2) l'utilisateur
de l'appareil doit accepter tout brouillage radioélectrique subi, même si le brouillage est susceptible d'en compromettre le
fonctionnement.
IC Radiation Exposure Statement:
This equipment complies with IC RSS-102 radiation exposure limits set forth for an uncontrolled environment. This equipment
should be installed and operated with minimum distance 20cm between the radiator & your body.
Cet équipement est conforme aux limites d’exposition aux rayonnements IC établies pour un environnement non contrôlé. Cet
équipement doit être installé et utilisé avec un minimum de 20cm de distance entre la source de rayonnement et votre corps
This device and its antenna(s) must not be co-located or operating in conjunction with any other antenna or transmitter.
CAN ICES-3 (B)/NMB-3(B)