Ringway Tech TG8834U DIGITAL PIANO User Manual TG8834U 2
Ringway Tech(Jiangsu) Co.,Ltd. DIGITAL PIANO TG8834U 2
UserManual.wiki
>
Ringway Tech
>
TG8834U User Manual
User Manual
Navigation menu
Upload a User Manual
Namespaces
Wiki Guide
HTML
PDF
Info
Views
User Manual
Discussion / Help
Navigation
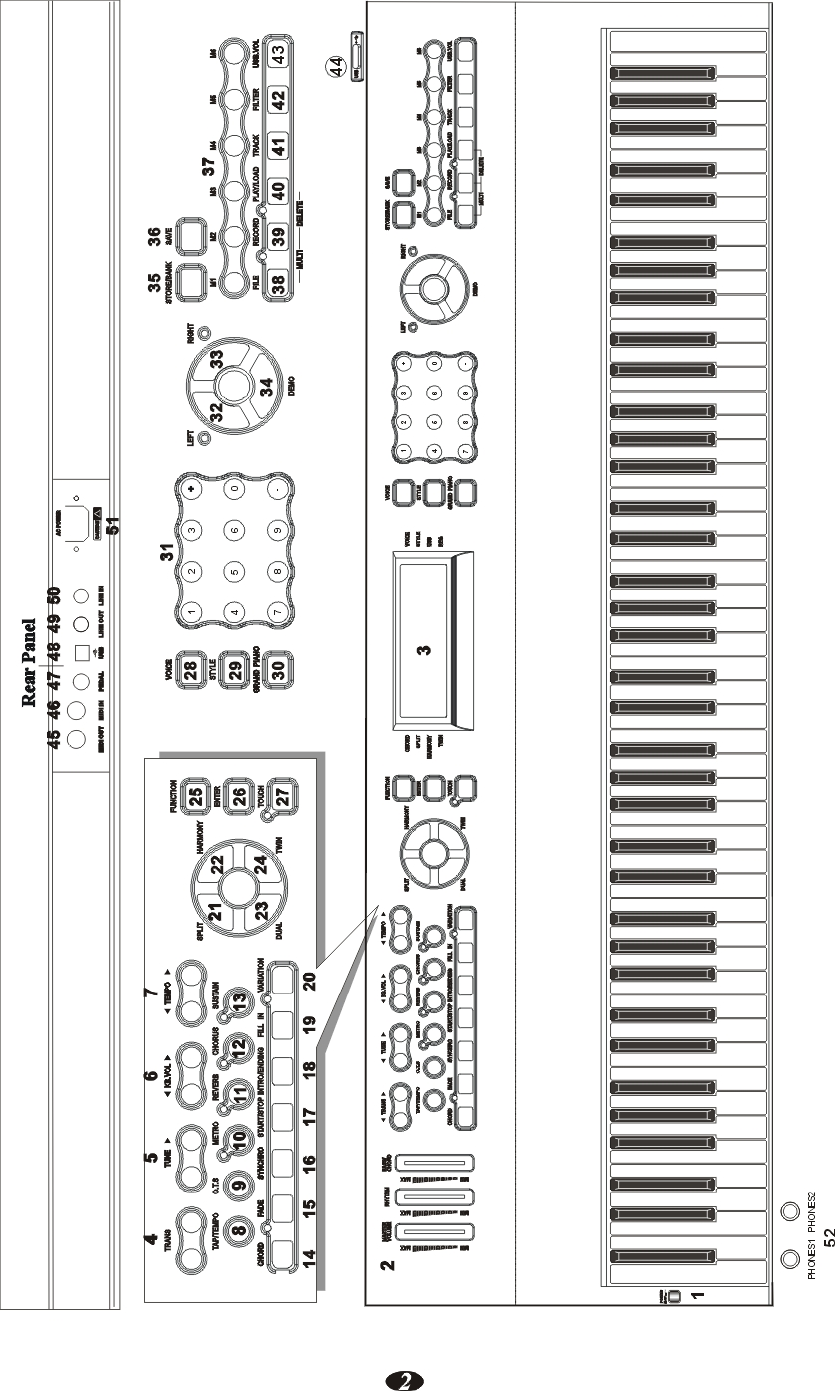
![3 Panel Contents 1. POWER 2. VOLUME CONTROLS MASTER VOLUME RHYTHM BASS/CHORD 3. MULTI DISPLAY 4. [ TRANS ] Button 5. [ TUNE ] Button 6. [ KB.VOL ] Button 7. [ TEMPO ] Button 8. [TAP/TEMPO] Button 9. [O.T.S] Button 10. [METRO] Button 11. [REVERB] Button 12. [CHORUS] Button 13. [SUSTAIN] Button 14. [CHORD] Button 15. [FADE] Button 16. [SYNCHRO] Button 17. [START/STOP] Button 18. [INTRO/ENDING] Button 19. [FILL IN] Button 20. [VARIATION] Button 21. [SPLIT] Button 22. [HARMONY] Button 23. [DUAL] Button 24. [TWIN] Button 25. [FUNCTION] Button 26. [ENTER] Button 27. [TOUCH] Button 28. [VOICE] Button 29. [STYLE] Button 30. [GRAND PIANO] Button 31. Number Buttons [0]-[9] [+] and [-] Buttons 32. [LEFT] Button 33. [RIGHT] Button 34. [DEMO] Button 35. [STORE/BANK] Button 36. [SAVE] Button 37. [M1-M6] Button 38. [FILE] Button 39. [RECORD] Button 40. [PLAY/LOAD] Button 41. [TRACK] Button 42. [FILTER] Button 43. [USB.VOL] Button 44. [USB] Rear Panel 45. [MIDI OUT] Jack 46. [MIDI IN] Jack 47. [PEDAL] Jack 48. [USB] Jack 49. [LINE OUT] Jack 50. [LINE IN] Jack 51. [POWER] Jack 52. [PHONES1] Jack [PHONES2] Jack](https://usermanual.wiki/Ringway-Tech/TG8834U/User-Guide-1732869-Page-7.png)
![8 CHORDMIN II II II II II II II II II II II II II II II II II II II II II II II II II II II °MíAXMIN II II II II II II II II II II II II II II II II II II II II II II II II II II II °MíAXMIN II II II II II II II II II II II II II II II II II II II II II II II II II II II °MíAX Basic Operation Power Switch Turn the power on by pressing the [POWER] switch, the panel LCD display will light. POWER OFF ON RHY1 RHY2 BASS CRD1 CRD2 PAD PHR1 PHR2 Adjust the Volume Use [MASTER VOLUME] control to adjust the volume to your desired level. MASTER VOLUME RHYTHM BASS/ Demo Play There are 3 preset piano songs that you can play individually. Here's how you can select and play the demo songs . 1. Listen to the Demo Song Press [DEMO] button to play the demo songs in sequence. Use [+] and [-] buttons or number [1-3] to select the number of the song you want to play. LEFT RIIGHT RHY1 RHY2 BASS CRD1 CRD2 PAD PHR1 PHR2 DEMO](https://usermanual.wiki/Ringway-Tech/TG8834U/User-Guide-1732869-Page-12.png)
![9 CHORDMIN II II II II II II II II II II II II II II II II II II II II II II II II II II II °MíAXMIN II II II II II II II II II II II II II II II II II II II II II II II II II II II °MíAXMIN II II II II II II II II II II II II II II II II II II II II II II II II II II II °MíAX 2. Stop Playing Press [DEMO] button again to stop playing. LEFT RIIGHT RHY1 RHY2 BASS CRD1 CRD2 PAD PHR1 PHR2 DEMO 3. Adjust Demo Song's Volume Each song has two tracks performance (left hand and right hand). You can use [RHYTHM] control to adjust left hand volume, and use [BASS/CHORD] control to adjust right hand volume. MASTER VOLUME RHYTHM BASS/ While the demo song is playing, you can deactivate the corresponding track by pressing the [LEFT] or [RIGHT] button. LEFT RIIGHT RHY1 RHY2 BASS CRD1 CRD2 PAD PHR1 PHR2 DEMO 4. Adjust the Tempo of the Demo Song When a demo song is playing, you can adjust its tempo by pressing the [TEMPO / ] buttons. TEMPO RHY1 RHY2 BASS CRD1 CRD2 PAD PHR1 PHR2 Tempo Value](https://usermanual.wiki/Ringway-Tech/TG8834U/User-Guide-1732869-Page-13.png)
![10 Tempo Press the [TEMPO ] or [TEMPO ] button to decrease or increase the tempo of songs, metronome and styles. Range: 20-280. Press [TEMPO ] and [TEMPO ] button simultaneously to reset the tempo to default value. TEMPO Tap/Tempo RHY1 RHY2 BASS CRD1 CRD2 PAD PHR1 PHR2 TEMPO This function allows you to set the rhythm tempo by tapping in tempo on [TAP/TEMPO] button. Tap on the button 2 times while rhythm is playing, The rhythm tempo are set as your desired speed. If you want to set the tempo before starting rhythm, you have to tap the button 4 times. TAP/TEMPO RHY1 RHY2 BASS CRD1 CRD2 PAD PHR1 PHR2 TAP/TEMPO Transpose The Transpose function allows you to change the pitch of the instrument in semitone steps, up to a maximum setting of 12 semitones (a maximum of one octave up or down). TRANS RHY1 RHY2 BASS CRD1 CRD2 PAD PHR1 PHR2](https://usermanual.wiki/Ringway-Tech/TG8834U/User-Guide-1732869-Page-14.png)
![11 Use [TRANS / ] button to transpose up or down as required. The transposition range is from -12 (down one octave) through 0 (normal pitch) to 12 (up one octave). TRANS RHY1 RHY2 BASS CRD1 CRD2 PAD PHR1 PHR2 Tune This function makes it possible to tune the pitch of your instrument to match other instruments. The tune range is from -64(down one semitone) through 0 (normal pitch) to 63 (up one semitone). TUNE RHY1 RHY2 BASS CRD1 CRD2 PAD PHR1 PHR2 Reverb The [REVERB] button selects a number of digital reverb effects that you can use for extra depth and expressive power. Press [REVERB] button, use [+] and [-] buttons to select reverb type. No reverb is produced when you select OFF , and the indicator is off. REVERB RHY1 RHY2 BASS CRD1 CRD2 PAD PHR1 PHR2 1 2 3 4 5 6 7 8 Room1 Room2 Room3 Hall1 Hall2 Plate Delay PanDelay NOTE Press [REVERB] button repeatedly to turn on or turn off the reverb effect.](https://usermanual.wiki/Ringway-Tech/TG8834U/User-Guide-1732869-Page-15.png)
![12 Adjusting Reverb Depth Reference: F2 Reverb and Chorus Depth(P.16). Chorus Shimmering, broadening effect. Press [CHORUS] button, use [+] and [-] buttons to select chorus type. No chorus is produced when you select 'OFF', and the indicator is off. CHORUS RHY1 RHY2 BASS CRD1 CRD2 PAD PHR1 PHR2 The chorus types in the list below can be selected from the chorus display. 1 2 3 4 5 6 7 8 Chorus1 Chorus2 Chorus3 Chorus4 Feedback Flanger ShtDelay FbDelay NOTE Press [CHORUS] button repeatedly to turn on or turn off the chorus effect. Adjusting Chorus Depth Reference: F2 Reverb and Chorus Depth(P.16).](https://usermanual.wiki/Ringway-Tech/TG8834U/User-Guide-1732869-Page-16.png)
![13 Metronome Metronome is a convenient feature for practice, and it can also provide a solid rhythmic guide when recording. The metronome sound is alternately turned on and turned off by pressing [METRO] button. The time signature of the metronome can be set by using [+] and [-] buttons while turning on the metronome function. Time signature: 1/4, 2/4, 3/4, 4/4, 6/4, 3/8, 6/8, 9/8. METRO RHY1 RHY2 BASS CRD1 CRD2 PAD PHR1 PHR2 To set the tempo of metronome, please see the details in TEMPO section(P.10). Sustain Press [SUSTAIN] button so that its icon appears to turn sustain on. It can be used as a damper pedal. Turning sustain on to sustain notes after the keys are released. Press [SUSTAIN] button again to turn sustain off. SUSTAIN RHY1 RHY2 BASS CRD1 CRD2 PAD PHR1 PHR2 Sustain Mode](https://usermanual.wiki/Ringway-Tech/TG8834U/User-Guide-1732869-Page-17.png)
![14 Touch The touch function provides four different types of keyboard touch sensitivity that can be selected to match different playing styles. Press the [TOUCH] button, use [+] and [-] buttons to select the touch sensitivity type in the range of 00 to 03. Default: 02 . TOUCH RHY1 RHY2 BASS CRD1 CRD2 PAD PHR1 PHR2 No Name Description 00 Fixed means that regardless of how hard you play, the keyboard will transmit a velocity value of 100. 01 Hard is defined as a curve which makes it easier to play quietly. The curve generates lower velocities for the same force 02 Normal is defined as a curve which will be mid-way between the other two. 03 Soft is defined as a curve which makes it easier to play loudly. The curve generates higher velocities for the same force.](https://usermanual.wiki/Ringway-Tech/TG8834U/User-Guide-1732869-Page-18.png)
![15 Function The [FUNCTION] button provides access to a range of functions that give your instrument extraordinary versatility. The functions are categorized in groups as follows: FF11 ................................................................................ Pan FF22 ...................................................... Reverb and Chorus Depth FF33 ........................................................................... Octave FF44 ......................................................... Split and Chord Point FF55 ............................................ MIDI Reception and Transmission FF66 ................................................................... Local Control FF77 ..................................................................... Auto Track Press [FUNCTION] button repeatedly to select desired function: F1 through F7 FUNCTION RHY1 RHY2 BASS CRD1 CRD2 PAD PHR1 PHR2 FF11 Pan In this function you can set the stereo position of each orchestration part to create a board stereo image of your sound. Press [FUNCTION] button to select M. PAN? , Use [+] and [-] buttons to select S. PAN? and D .PAN? . FUNCTION RHY1 RHY2 BASS CRD1 CRD2 PAD PHR1 PHR2](https://usermanual.wiki/Ringway-Tech/TG8834U/User-Guide-1732869-Page-19.png)
![16 M .PAN-------Main Voice Pan S. PAN--------Split Voice Pan D. PAN-------Dual Voice Pan Press [ENTER] button to confirm, and use [+] and [-] buttons to set the pan value: From -64(Left) to 63(Right). ENTER RHY1 RHY2 BASS CRD1 CRD2 PAD PHR1 PHR2 FF22 Reverb and Chorus Depth In this function you can adjust the reverb and chorus depth for the selected voice. Press [FUNCTION] button to select M. RevVo? , Use [+] and [-] buttons to select S. RevVo? , D. RevVo? , M. ChrVo? , S. ChrVo? , D. ChrVo? FUNCTION RHY1 RHY2 BASS CRD1 CRD2 PAD PHR1 PHR2 M. RevVo?------Main Voice Reverb Depth S. RevVo?------ Split Voice Reverb Depth D. RevVo?------ Dual Voice Reverb Depth M. ChrVo?------ Main Voice Chorus Depth S. ChrVo?------- Split Voice Chorus Depth D. ChrVo?------ Dual Voice Chorus Depth](https://usermanual.wiki/Ringway-Tech/TG8834U/User-Guide-1732869-Page-20.png)
![17 Press [ENTER] button to confirm, use [+] and [-] buttons or number buttons (0-9) to adjust the value: 00-63 ENTER RHY1 RHY2 BASS CRD1 CRD2 PAD PHR1 PHR2 FF33 Octave Press [FUNCTION] button to select M. Octav? , Use [+] and [-] buttons to select S. Octav? and D. Octav? . FUNCTION RHY1 RHY2 BASS CRD1 CRD2 PAD PHR1 PHR2 M. Octav?------Main Voice Octave S. Octav?------ Split Voice Octave D. Octav?------ Dual Voice Octave Press [ENTER] button to confirm, and use [+] and [-] buttons to set the octave value: -2 to 2 ENTER RHY1 RHY2 BASS CRD1 CRD2 PAD PHR1 PHR2](https://usermanual.wiki/Ringway-Tech/TG8834U/User-Guide-1732869-Page-21.png)
![18 FF44 Split and Chord Point In this section, you can set the split or chord point when your keyboard is in Split or Chord mode. Press [FUNCTION] button to select S. Point? , and use [+] and [-] buttons to select C. Point? . FUNCTION RHY1 RHY2 BASS CRD1 CRD2 PAD PHR1 PHR2 S. Point?------Split Point C. Point?------Chord Point Press [ENTER] button to confirm, use [+] and [-] buttons or number buttons (0-9) to set the point. Range: 00-87. ENTER RHY1 RHY2 BASS CRD1 CRD2 PAD PHR1 PHR2 FF55 MIDI Reception and Transmission In this function, you can select MIDI reception and transmission track, and turn on or turn off MIDI IN and MIDI OUT function. Press [FUNCTION] button to select MIDI R0? , Use [+] and [-] buttons to select MIDI R1 ?, MIDI S0 ?, MIDI S1 ?, MIDI S2 ?, MIDI S3 ? . FUNCTION RHY1 RHY2 BASS CRD1 CRD2 PAD PHR1 PHR2](https://usermanual.wiki/Ringway-Tech/TG8834U/User-Guide-1732869-Page-22.png)
![19 MIDI R0------Reception Disabled MIDI R1------Reception Enabled MIDI S0------Transmission Off MIDI S1------Selecting Main Voice Ch MIDI S2------Selecting Split Voice Ch MIDI S3------Selecting Dual Voice Ch Press [ENTER] to confirm, and use [+] and [-] buttons to set the parameters. ENTER RHY1 RHY2 BASS CRD1 CRD2 PAD PHR1 PHR2 NOTE When selecting MIDI S1-S3 mode, the transmission is enabled automatically, and use [+/-] button or number buttons to select MIDI channel(1-16) for which you want to specify a new transmission. FF66 Local Control In this function, you can turn on or turn off the speaker system of your piano. Press [FUNCTION] button to select Local ? FUNCTION RHY1 RHY2 BASS CRD1 CRD2 PAD PHR1 PHR2](https://usermanual.wiki/Ringway-Tech/TG8834U/User-Guide-1732869-Page-23.png)
![20 Press [ENTER] button to confirm, use [+] and [-] buttons to select Local on or local off . ENTER RHY1 RHY2 BASS CRD1 CRD2 PAD PHR1 PHR2 Local on------ Normal operation. Keyboard and Controllers are sent to the Sound Engine. Local off------ There will be no sound produced by the brain's tone generator. MIDI function can work as usual. FF77 Auto Track Here you can turn on or turn off AUTO TRACK function for recording mode. And the setting will be saved automatically when the power is off. Press [FUNCTION] button to select AutoTrk? FUNCTION RHY1 RHY2 BASS CRD1 CRD2 PAD PHR1 PHR2](https://usermanual.wiki/Ringway-Tech/TG8834U/User-Guide-1732869-Page-24.png)
![21 Press [ENTER] button to confirm, and use [+] and [-] buttons to select OnAutoTrk and OffAutoTrk . ENTER RHY1 RHY2 BASS CRD1 CRD2 PAD PHR1 PHR2 OnAutoTrk------when you want to record more tracks data, select OnAutoTrk , the piano brain will assign the next track for you automatically. OffAutoTrk------when you want to select tracks by yourself, here you have to select OffAutoTrk function first, then press [TRACK] button on the panel to select the track you want.](https://usermanual.wiki/Ringway-Tech/TG8834U/User-Guide-1732869-Page-25.png)
![22 Voices Selecting a Voice Your instrument has 128(01-128) GM standard voices. 10(129-138) different drum percussion kits and 1 set of sound effect that you can select and play. Press [VOICE] button, the voice mode is selected and the current voice number and the name will display on the Message Display section. VOICE RHY1 RHY2 BASS CRD1 CRD2 PAD PHR1 PHR2 Use [+] and [-] buttons or number buttons [0-9] to select the desired voice according to the voice list. 1 2 3 4 5 6 0 7 8 9 - RHY1 RHY2 BASS CRD1 CRD2 PAD PHR1 PHR2 NOTE When the keyboard is in Split or/and Dual mode, press [VOICE] button repeatedly can switch Main Voice Mode and Split Voice Mode or/and Dual Voice Mode.](https://usermanual.wiki/Ringway-Tech/TG8834U/User-Guide-1732869-Page-26.png)
![23 Dual Mode Press [DUAL] button to select layer voice mode, two voices will sound simultaneously when you play keyboards. 1. Select Dual Voice Press [DUAL] button, Dual Cursor is flashing, use the number [0]-[9] or [+] and [-] buttons to select the second voice. If you don' t choose the second voice within 4 seconds, the LCD Display will go back to the first voice mode. SPLIT HARMONY DUAL TWIN RHY1 RHY2 BASS CRD1 CRD2 PAD PHR1 PHR2 Dual Mode 2. Setting the Dual Voice Volume Reference: Adjusting Keyboard Volume(P.25). NOTE To change the dual voice Pan, Octave and Reverb/Chorus Depth, please see the details in [FUNCTION] section (P.15). 3. Exit the Dual Mode Press [DUAL] again, the Dual Cursor turns off and the Dual mode is no longer active. SPLIT HARMONY DUAL TWIN RHY1 RHY2 BASS CRD1 CRD2 PAD PHR1 PHR2](https://usermanual.wiki/Ringway-Tech/TG8834U/User-Guide-1732869-Page-27.png)
![24 Split Mode Press [SPLIT] button to select split mode, your keyboard will be split into two sections which means different voices can be played with the left and right hands at the same time. 1. Select Split Voice Press [SPLIT] button, the Split cursor is flashing, and the split voice will appear in the message display for 4 seconds, and use [0-9] buttons to select the left voice. SPLIT HARMONY DUAL TWIN RHY1 RHY2 BASS CRD1 CRD2 PAD PHR1 PHR2 Split Cursor 2. Changing the Split Point Reference: F4 Split and Chord Point(P.18). 3. Setting the Split Voice Volume Reference: Adjusting Keyboard Volume(P.25). NOTE To change the split voice Pan, Octave and Reverb/Chorus Depth, please see the details in [FUNCTION] section (P.15). 4. Exit the Split Mode Press [SPLIT] again, the Split Cursor turns off and the Split mode is no longer active. SPLIT HARMONY RHY1 RHY2 BASS CRD1 CRD2 PAD PHR1 PHR2 DUAL TWIN](https://usermanual.wiki/Ringway-Tech/TG8834U/User-Guide-1732869-Page-28.png)
![25 Adjusting Keyboard Volume Use this function can adjust the Split Voice Volume, Dual Voice Volume and the Main Voice Volume. 1. Split Voice Volume In Split mode, press [KB.VOL / ] button can adjust the split voice volume while the Split Cursor is flashing. KB.VOL 2. Dual Voice Volume RHY1 RHY2 BASS CRD1 CRD2 PAD PHR1 PHR2 In Dual mode, press [KB.VOL / ] button can adjust the Dual voice volume while the Dual Cursor is flashing. KB.VOL RHY1 RHY2 BASS CRD1 CRD2 PAD PHR1 PHR2 3. Main Voice Volume You can adjust the main voice volume by pressing [KB.VOL / ] button when the Dual or Split Cursor does not flash. KB.VOL RHY1 RHY2 BASS CRD1 CRD2 PAD PHR1 PHR2](https://usermanual.wiki/Ringway-Tech/TG8834U/User-Guide-1732869-Page-29.png)
![26 Playing Portable Grand Piano Press [GRAND PIANO] button. This convenient function lets you instantly call up the Grand Piano voice. GRAND PIANO RHY1 RHY2 BASS CRD1 CRD2 PAD PHR1 PHR2 One Touch Setting This function is actually a convenient feature which automatically selects a suitable voice for you when you select a style.In addition, various panel settings (such as voice, effect, Tempo, etc.) that match the selected style can be recalled with just a single button [O.T.S]. Press [O.T.S] button repeatedly can turn on or turn off One Touch Setting. O.T.S RHY1 RHY2 BASS CRD1 CRD2 PAD PHR1 PHR2 Twin Mode Press [TWIN] button to select Twin mode. In this mode, the keyboard will be separated into two play areas. Right: from#C3 to C7 Left: from A-1 to C3 Press [TWIN] button again to exit the Twin mode. SPLIT HARMONY DUAL TWIN RHY1 RHY2 BASS CRD1 CRD2 PAD PHR1 PHR2 Twin Cursor](https://usermanual.wiki/Ringway-Tech/TG8834U/User-Guide-1732869-Page-30.png)
![27 Auto Accompaniment Your instrument has 100 accompaniment styles which can be used to provide Fully-orchestrated Auto Accompaniment. When the Auto Accompaniment function is turned ON, this instrument creates fully-orchestrated rhythm, bass and chord accompaniment based on chords you play with the left hand in the Auto Accompaniment section of the keyboard(i.e. all keys to the left of the Auto Accompaniment split point). The right-hand section of the keyboard is available for normal playing. The default Auto Accompaniment split point is the #F2 key. The Auto Accompaniment section of the keyboard Auto Accompaniment Auto Accompaniment Normal Consists of all keys to its left . Left hand fingering specifies the auto accompaniment chords. The right hand plays normally Using Auto Accompaniment (Only Rhythm Track) 1. Press the [STYLE] Button STYLE RHY1 RHY2 BASS CRD1 CRD2 PAD PHR1 PHR2 Style Cursor 2. Selecting a Style Using [+] and [-] buttons or number buttons [0-9]. When selecting style 100, holding the [1] button till the 1-- is displayed, then you can enter the tens and ones digits. 1 2 3 4 5 6 0 RHY1 RHY2 BASS CRD1 CRD2 PAD PHR1 PHR2 7 8 9 -](https://usermanual.wiki/Ringway-Tech/TG8834U/User-Guide-1732869-Page-31.png)
![28 3. Start Playing the Style Press [START/STOP] button to start the rhythm track of the Auto Accompaniment. Minus the bass and the chord tracks. SYNCHRO START/STOP RHY1 RHY2 BASS CRD1 CRD2 PAD PHR1 PHR2 4. Stop Playing the Style Press the [START/STOP] button again to stop the accompaniment. Using Auto Accompaniment (All Tracks) 1. Press the [STYLE] Button STYLE 2. Selecting a Style RHY1 RHY2 BASS CRD1 CRD2 PAD PHR1 PHR2 Style Cursor Using [+] and [-] buttons or number buttons [0-9]. When selecting style 100, holding the [1] button till the 1-- is displayed, then you can enter the tens and ones digits. 1 2 3 4 5 6 0 7 8 9 - RHY1 RHY2 BASS CRD1 CRD2 PAD PHR1 PHR2](https://usermanual.wiki/Ringway-Tech/TG8834U/User-Guide-1732869-Page-32.png)
![29 3. Turn the Chord Function On Press the [CHORD] button The left hand section of the keyboard becomes the Auto Accompaniment section, and chords played in this section are automatically detected and used as a basis for fully automatic accompaniment which the selected style. CHORD FADE Chord Cursor RHY1 RHY2 BASS CRD1 CRD2 PAD PHR1 PHR2 4. Turn On the Synchronized Start Press [SYNCHRO] button The beat lamp will flash in time with the tempo, it's called synchronized start standby. The auto accompaniment starts as soon as you play a chord with your left hand. CHORD FADE SYNCHRO RHY1 RHY2 BASS CRD1 CRD2 PAD PHR1 PHR2 5. Stop Playing the Style Press the [START/STOP] button again to stop the accompaniment. Use RHYTHM volume control to adjust the rhythm volume of the Auto Accompaniment. Use BASS/CHORD volume control to adjust the chord and bass volume of the Auto Accompaniment.](https://usermanual.wiki/Ringway-Tech/TG8834U/User-Guide-1732869-Page-33.png)
![30 Auto Accompaniment Control Straight Start The [START/STOP] button starts the selected accompaniment style immediately. A different accompaniment style can be selected at any time while the accompaniment is playing. SYNCHRO START/STOP RHY1 RHY2 BASS CRD1 CRD2 PAD PHR1 PHR2 Synchro Start Press the [SYNCHRO] button, then the accompaniment will start when you play the first chord on the AUTO ACCOMPANIMENT section of the keyboard. SYNCHRO START/STOP RHY1 RHY2 BASS CRD1 CRD2 PAD PHR1 PHR2 Starting the Accompaniment with an Introduction Any of your instrument accompaniment patterns can be started with an appropriate introduction by pressing the [INTRO/ENDING] button directly. If you press the [SYNCHRO] button and then press the [INTRO/ENDING] button, the accompaniment will start from the introduction as soon as a chord is detected in the AUTO ACCOMPANIMENT section of the keyboard. SYNCHRO START/STOP INTRO/ENDING RHY1 RHY2 BASS CRD1 CRD2 PAD PHR1 PHR2](https://usermanual.wiki/Ringway-Tech/TG8834U/User-Guide-1732869-Page-34.png)
![31 Adding Fill-In Press the [FILL IN] button at any time while the accompaniment is playing to add a one-measure fill-in. If you press the [SYNCHRO] button and then the [FILL IN] button, the accompaniment will start from the fill-in as soon as a chord is detected in the AUTO ACCOMPANIMENT section of the keyboard. FILL IN VARIATION RHY1 RHY2 BASS CRD1 CRD2 PAD PHR1 PHR2 Stopping the Accompaniment An accompaniment progress can be stopped immediately by pressing the [START/STOP] button and also can be stopped with an appropriate ending by pressing the [INTRO/ENDING] button. SYNCHRO START/STOP INTRO/ENDING Variation While the style is playing, you can add variation in the rhythm/accompaniment by pressing the [VARIATION] button. This switches between the Main A and Main B sections automatically playing a Fill-in pattern to smoothly lead into the next section. FILL IN VARIATION RHY1 RHY2 BASS CRD1 CRD2 PAD PHR1 PHR2](https://usermanual.wiki/Ringway-Tech/TG8834U/User-Guide-1732869-Page-35.png)
![32 Fade Press [FADE] button makes rhythm fade up when starting the rhythm. While rhythm is playing, press [FADE] button to make rhythm fade away. CHORD FADE Harmony The harmony function features a variety of performance effect that enhance the melodies you play when using the accompaniment styles. Press [HARMONY] button, the Harmony Cursor appears on the display. SPLIT HARMONY DUAL TWIN RHY1 RHY2 BASS CRD1 CRD2 PAD PHR1 PHR2 Harmony Cursor The Harmony is derived from the chords you have played if you use Automatic Accompaniment or turn on the Chord function. Chord Function Turn on this mode, the specified left-hand section of the keyboard becomes the Auto Accompaniment section, and chords played in this section are automatically detected and used as a basis for fully automatic accompaniment with the selected style CHORD FADE RHY1 RHY2 BASS CRD1 CRD2 PAD PHR1 PHR2](https://usermanual.wiki/Ringway-Tech/TG8834U/User-Guide-1732869-Page-36.png)
![34 Name Normal Voicing Chord(C) Display[M] 1-3-5 C C[6] 1-(3)-5-6 C6 C6[M7] 1-3-(5)-7or1-(3)-5-7 CM7 CM7 [M7#11] 1-(2)-3-4# - 5-7 or 1-2-3-#4- (5)-7 CM7#11 CM7(#11) [Madd9] 1-2-3-5 CMadd9 C(9)[M9] 1-2-3-(5)-7 CM9 CM7(9)[6 9] 1-2-3-(5)-6C6 9 C6(9)[aug] 1-3-#5 Caug Caug[m] 1-b3-5 Cm Cm[m6] 1-b3-5-6 Cm6 Cm6[m7] 1- b3-(5)- b7Cm7 Cm7[m7b5] 1- b3- b5- b7 b Cm7 5 b Cm7 5[madd9] 1-2- b3-5 Cmadd9 Cm(9)[m9] 1-2- b3-(5)- b7Cm9 Cm7(9)[m11] 1-(2)- b 3-4-5-( b 7) Cm11 Cm7(11)[mM7] 1- b3-(5)-7 CmM7 CmM7[mM9] 1-2- b3-(5)-7 CmM9 CmM7(9)[dim] 1- b3- b5 Cdim Cdim[dim7] 1- b3- b5-6 Cdim7 Cdim7 [7] 1-3-(5)- b7 or 1-(3)-5-b7 C7 C7 [7sus4] 1-4-(5)- b7 C7sus4 C7sus4[7 9] 1-2-3-(5)- b7C7 9 C7(9) [7#11] 1-(2)- 3-#4-5- b7 or 1-2-3-#4-(5)-b7 # C7 11 # C7( 11) [7 13] 1-3-(5)-6- b7C7 13 C7(13)[7b9] 1- b2-3-(5)- b7C7 b9 C7( b 9)[7b13] 1- 3-5- b6 - b7C7 b13 C7(b13 )[7#9] 1- # 2-3-(5)- b 7C79# C7(#9)[M7aug] 1-(3)-#5-7 CM7aug CM7aug[7aug] 1-3-#5- b7 C7aug C7aug[sus4] 1-4-5 Csus4 Csus4[1+2+5] 1-2-5 C1+2+5 C Fingered Mode Fingered Mode is ideal if you already know how to play chords on a keyboard, since it allows you to supply your own chords for the Auto Accompaniment feature. The instrument will recognize the following chord type: Example for c chords C CM 6 CM 7 CM 7# 11 CMadd CM 9 C 6 9 Caug Cm Cm6 Cm7 Cm7 B 5 Cmadd9 Cm9 Cm11 CmM7 CmM9 Cdim Cdim7 C7 C7sus4 C7 9 C 7 # 11 C7 13 C7 B9 C7 B13 C7 # 9 CM7aug C7aug Csus4 C1+2+5 The chord fingerings listed are all in root position, but other inversions can be use with the following exceptions:6, m6, sus4, aug, dim7, 6(9), m7(11), 1+2+5.](https://usermanual.wiki/Ringway-Tech/TG8834U/User-Guide-1732869-Page-38.png)
![35 User Style This digital piano can play RINGWAY Style(*.RTY) and YAMAHA Style(*.STY). Copy the RINGWAY Style(*.RTY) or YAMAHA Style(*.STY) from computer to your USB Disk Insert the USB Disk into the USB terminal. Press [FILE] button, use [+] and [-] buttons to select RINGWAY Style (*.RTY) or YAMAHA Style (*.STY). FILE RECORD PLAY/LOAD MULTI DELETE RHY1 RHY2 BASS CRD1 CRD2 PAD PHR1 PHR2 Press [PLAY/LOAD] button. FILE RECORD PLAY/LOAD MULTI DELETE RHY1 RHY2 BASS CRD1 CRD2 PAD PHR1 PHR2 RHY1 RHY2 BASS CRD1 CRD2 PAD PHR1 PHR2](https://usermanual.wiki/Ringway-Tech/TG8834U/User-Guide-1732869-Page-39.png)
![36 Press [STYLE] button, use number buttons to select 101 USER Rhy . Now the RINGWAY Style or YAMAHA Style can be used as usual by pressing Rhythm Control buttons. STYLE RHY1 RHY2 BASS CRD1 CRD2 PAD PHR1 PHR2 NOTE Some YAMAHA Styles have four variations (Main A, Main B, Main C and Main D), only two variations (Main A and Main B) will be recognized by your instrument. Only one User Style can be loaded once. And the User Style will be lost after playing MIDI file. You need to reload the User Style again when you want to use it.](https://usermanual.wiki/Ringway-Tech/TG8834U/User-Guide-1732869-Page-40.png)
![37 Registration Memory Your instrument registration memory can be used to store six sets of voice and auto accompaniment settings that can be recalled during you playing at the touch of one single button. Memorizing the Settings 1. Select the Desired Bank Press the [STORE/BANK] button repeatedly to select the bank [1MmryBank] -[4MmryBank]. STORE/BANK RHY1 RHY2 BASS CRD1 CRD2 PAD PHR1 PHR2 2. Memorizing the Settings to the Preset [M1]-[M6] While Holding Down the [STORE/BANK], Press [M1]-[M6] Button STORE/BANK M1 M2 M3 M4 M5 M6 RHY1 RHY2 BASS CRD1 CRD2 PAD PHR1 PHR2 NOTE Anytime you store to a REGISTRATION MEMORY button, all settings previously stored in that button will be erased and replaced by the new settings.](https://usermanual.wiki/Ringway-Tech/TG8834U/User-Guide-1732869-Page-41.png)
![38 Recalling the Settings 1. Select the Appropriate Registration Memory Bank Press the [STORE/BANK] button repeatedly to select the bank [1MmryBank]- [4MmryBank]. STORE/BANK RHY1 RHY2 BASS CRD1 CRD2 PAD PHR1 PHR2 2. Press the Desired Registration Memory Preset [M1]-[M6] Button The settings stored to a REGISTRATION MEMORY button can be recalled simply by pressing the appropriate button [M1]-[M6]. M1 M2 M3 M4 M5 M6 RHY1 RHY2 BASS CRD1 CRD2 PAD PHR1 PHR2 Saving the Registration Data to USB Disk Insert the USB Disk into the USB terminal. The USB cursor will appear on the LCD-Display. USB](https://usermanual.wiki/Ringway-Tech/TG8834U/User-Guide-1732869-Page-42.png)
![39 Press [SAVE] button, a message xREGSTxxx (x indicates this file's sequence Num in UDisk. xxx indicates registration file number ) appears, indicating your Registration Memory Settings are saved to USB Disk, with 24 Registrations stored to a single file. SAVE RHY1 RHY2 BASS CRD1 CRD2 PAD PHR1 PHR2 USB Cursor Use Registration Data from USB Insert the USB Disk into the USB terminal. Use [+] and [-] buttons to select REG file, then press [PLAY/LOAD] button, display shows Load OK . FILE RECORD PLAY/LOAD MULTI DELETE RHY1 RHY2 BASS CRD1 CRD2 PAD PHR1 PHR2 24 Registrations will be loaded to the memory store(4*6) on the panel. You can recall the information you have loaded by pressing M1-M6. Delete REG File from USB Insert the USB Disk into the USB terminal. Use [+] and [-] buttons to select REG file you want to delete, then hold down the [RECORD] button and press [PLAY/LOAD] button. LCD shows: FILE RECORD PLAY/LOAD MULTI DELETE RHY1 RHY2 BASS CRD1 CRD2 PAD PHR1 PHR2 Press [+] button to delete the file. Press [-] button to cancel.](https://usermanual.wiki/Ringway-Tech/TG8834U/User-Guide-1732869-Page-43.png)
![40 Song Recording This digital piano lets you record your performances and Registration settings to a USB Disk. Each user song lets you record up to sixteen independent tracks. These include not only the voices for the keyboard performance, but also the auto accompaniment parts. It provides two different ways to record: Quick Recording and Multi Track Recording. (All the recording data will be saved automatically as MIDI Format 0 File to your USB Disk). Quick Recording 1. Insert the USB Disk into the USB Terminal USB 2. Start Recording Press the [RECORD] button to start recording. (The first two measures are tempo prompt only. It cannot record any data). FILE RECORD PLAY/LOAD MULTI DELETE RHY1 RHY2 BASS CRD1 CRD2 PAD PHR1 PHR2](https://usermanual.wiki/Ringway-Tech/TG8834U/User-Guide-1732869-Page-44.png)
![41 3. Stop Recording Press [RECORD] button again to stop recording. Recording stops and your performance is written to the song. The song to which your performance is recorded is automatically named xMUSIC xxx (x indicates this file's sequence Num in UDisk. xxx indicates the recording file number). You can edit the song as desired by computer or midi edit soft. FILE RECORD PLAY/LOAD MULTI DELETE RHY1 RHY2 BASS CRD1 CRD2 PAD PHR1 PHR2 Quick Recording automatically makes track assignments as below: Track 1--------- Main Voice Track 2--------- Split Voice Track 3--------- Dual Voice You also can use accompaniment styles to record. The accompaniment style will be recorded on track9-track16. The quick recording method is different from the multi recording method. In quick recording mode, track4-track8 are not allowed to record. but for multi recording, the recorded data is recorded on tracks 1-16. If you wish to re-record a user song that was originally recorded by the easy recording method, please use Multi Track Recording.](https://usermanual.wiki/Ringway-Tech/TG8834U/User-Guide-1732869-Page-45.png)
![42 Multi Track Recording Multi track recording provides two ways to record: 1.Use Auto Track Assignment. 2.Select Tracks by yourself. 1. Use Auto Track Assignment 1.1 Insert the USB Disk Into the USB Terminal 1.2 Turn the Auto Track On Reference: F7 Auto Track(P.20). USB 1.3 Start Recording Press the [RECORD] button to start recording. (The first two measures are tempo prompt only. It cannot record any data). When the recording is finished, the recording file will be saved with the name 1 MUSIC000 . FILE RECORD PLAY/LOAD MULTI DELETE RHY1 RHY2 BASS CRD1 CRD2 PAD PHR1 PHR2 1.4 To Stop Recording by Pressing [RECORD] Button Again. FILE RECORD PLAY/LOAD MULTI DELETE](https://usermanual.wiki/Ringway-Tech/TG8834U/User-Guide-1732869-Page-46.png)
![43 1.5 Hold Down the [FILE] Button, Then Press [RECORD] Button The next track will be given automatically. The performance will be recorded to the next track on the basic of 1 MUSIC000 . When the recording is finished, the recording file will be saved as a new file named 2 MUSIC001 . FILE RECORD PLAY/LOAD MULTI DELETE RHY1 RHY2 BASS CRD1 CRD2 PAD PHR1 PHR2 1.6 Use the Same Operation as Step 5 to Record More Tracks. The Name of the New File Will be Saved in Sequence. 1.7 To Stop Recording by Pressing [RECORD] Button Again. FILE RECORD PLAY/LOAD MULTI DELETE 2. Select Tracks by Yourself 2.1 Insert the USB Disk Into the USB Terminal USB](https://usermanual.wiki/Ringway-Tech/TG8834U/User-Guide-1732869-Page-47.png)
![44 2.2 Turn the Auto Track Off Reference: F7 Auto Track(P.20). 2.3 Select Recording Track Press [TRACK] button repeatedly can select three voice mode, you can use [+] and [-] buttons to select the track(01-16) in each mode. TRACK FILTER RHY1 RHY2 BASS CRD1 CRD2 PAD PHR1 PHR2 R. RecTrk------to select the Main Voice track(01-16, OFF) L. RecTrk------to select the Split Voice track(01-16, OFF) D. RecTrk------to select the Dual Voice track(01-16, OFF) 2.4 Start Recording Press [RECORD] button to start recording. (The first two measures are tempo prompt only. It cannot record any data). When the recording is finished, the recording file will be saved with the name 1 MUSIC000 . To Stop Recording by Pressing [RECORD] Button Again. FILE RECORD PLAY/LOAD MULTI DELETE RHY1 RHY2 BASS CRD1 CRD2 PAD PHR1 PHR2 ( Please turn the “L.RecTrk” or “D.RecTrk” off without Split or Dual voice recording.)](https://usermanual.wiki/Ringway-Tech/TG8834U/User-Guide-1732869-Page-48.png)
![45 2.5 Repeat Step 3 to Select Next Track 2.6 Hold Down the [FILE] Button, Then Press [RECORD] Button The performance will be recorded to the desired track on the basic of 1 MUSIC000 . When the recording is finished, the recording file will be saved as a new file named 2 MUSIC001 . FILE RECORD PLAY/LOAD MULTI DELETE RHY1 RHY2 BASS CRD1 CRD2 PAD PHR1 PHR2 2.7 Use the Same Operation as Step 3 and Step 6 to Record More Tracks. The Name of the New File Will be Saved in Sequence. 2.8 To Stop Recording by Pressing [RECORD] Button Again. Delete Song Insert the USB Disk into the USB terminal. Use [+] and [-] buttons to select xMUSICxxx file you want to delete, then hold down the [RECORD] button and press [PLAY/LOAD] button. LCD shows: FILE RECORD PLAY/LOAD MULTI DELETE RHY1 RHY2 BASS CRD1 CRD2 PAD PHR1 PHR2 Press [+] button to delete the file. Press [-] button to cancel.](https://usermanual.wiki/Ringway-Tech/TG8834U/User-Guide-1732869-Page-49.png)
![46 File Button Use this button you can switch to USB mode immediately even the keyboard is in any of other mode. FILE RECORD PLAY/LOAD MULTI DELETE RHY1 RHY2 BASS CRD1 CRD2 PAD PHR1 PHR2 Filter Button Use this function you can turn on or turn off any tracks and change the metronome's tempo before song playing or recording. Press [FILTER] button repeatedly to select the track. FILTER USB.VOL RHY1 RHY2 BASS CRD1 CRD2 PAD PHR1 PHR2 Use [+] and [-] buttons to select ON or OFF . 1 2 3 4 5 6 0 RHY1 RHY2 BASS CRD1 CRD2 PAD PHR1 PHR2 7 8 9 - For example: a midi file is prepare for playing, but track 1 or track 2, you would not like to play it with other tracks, so you can press [FILTER] button to select FLtTrk01 or FLtTrk02 , use [+] or [-] button to turn off it. Track 1 or track 2 will be closed. Press [FILTER] button repeatedly to select FltTmp . Use [+] and [-] buttons to select ON or OFF . ON:Whenever you play any songs,the tempo will be not change. OFF:The tempo will be changed by the different songs. NOTE The [FILTER] button is disabled while playing or recording.](https://usermanual.wiki/Ringway-Tech/TG8834U/User-Guide-1732869-Page-50.png)
![47 Adjusting Song's Volume Press [USB.VOL] button while playing song. FILTER USB.VOL RHY1 RHY2 BASS CRD1 CRD2 PAD PHR1 PHR2 Use [+] and [-] buttons or number (0-9) buttons to adjust the song's volume. Range: 00-127 Default: 100 1 2 3 4 5 6 0 RHY1 RHY2 BASS CRD1 CRD2 PAD PHR1 PHR2 7 8 9 -](https://usermanual.wiki/Ringway-Tech/TG8834U/User-Guide-1732869-Page-51.png)
![48 Factory Set 1. Turn off the power. POWER OFF ON 2. Hold down [+] and [-] buttons, then turn the power on, it can restore all internal settings to factory set. 1 2 3 4 5 6 0 7 8 9 - RHY1 RHY2 BASS CRD1 CRD2 PAD PHR1 PHR2](https://usermanual.wiki/Ringway-Tech/TG8834U/User-Guide-1732869-Page-52.png)