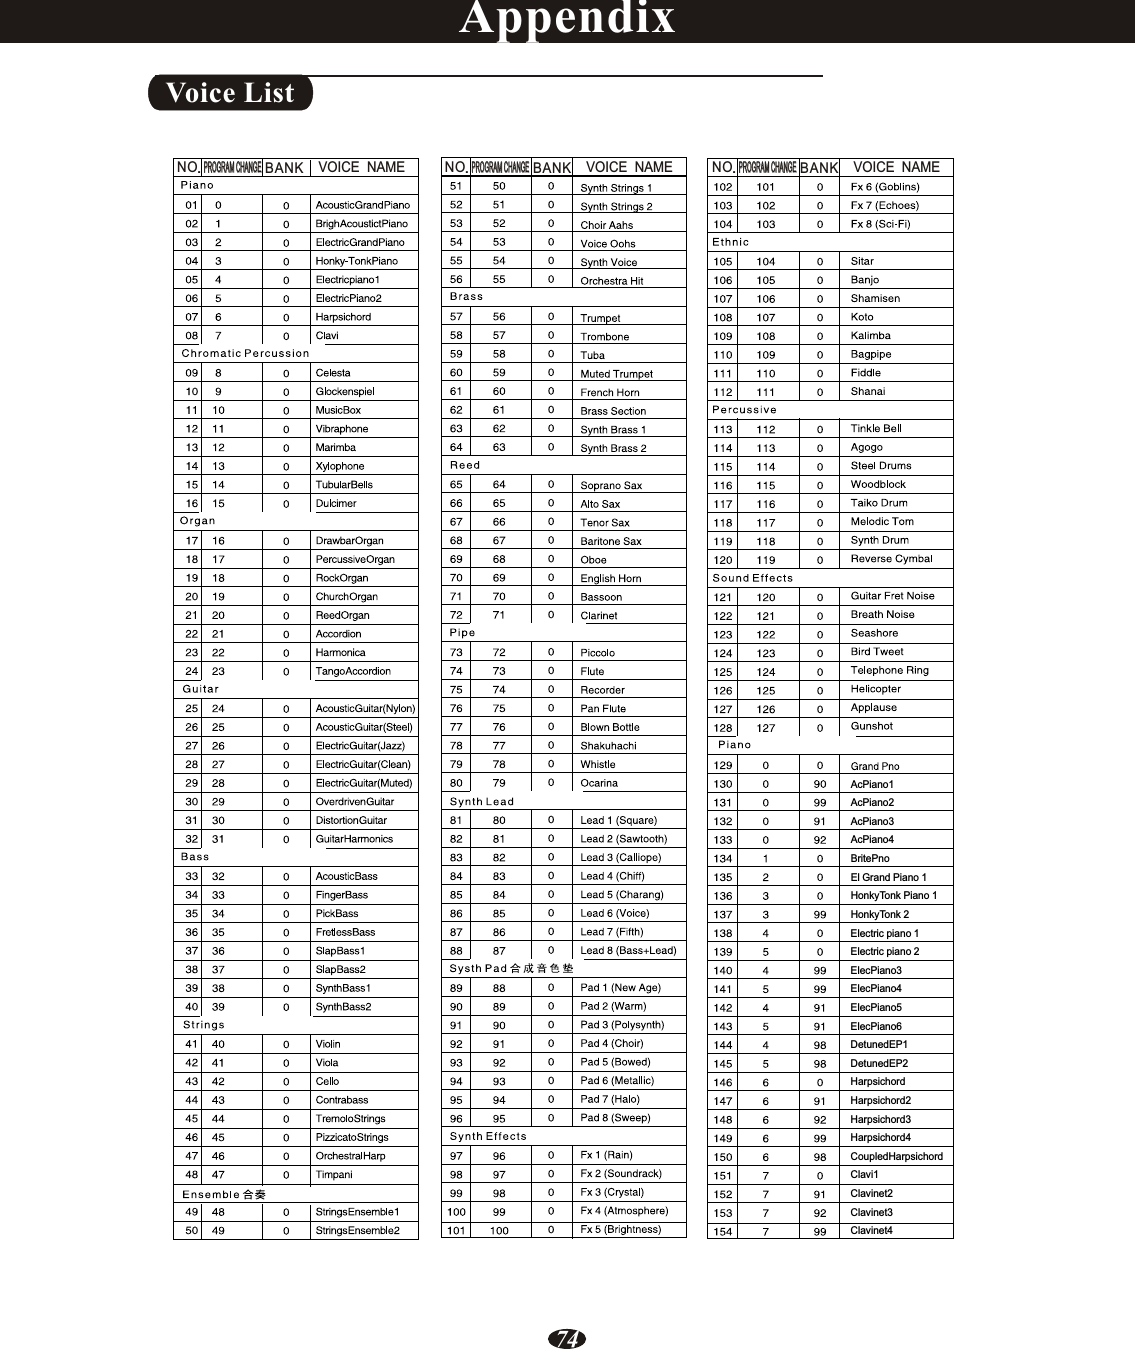
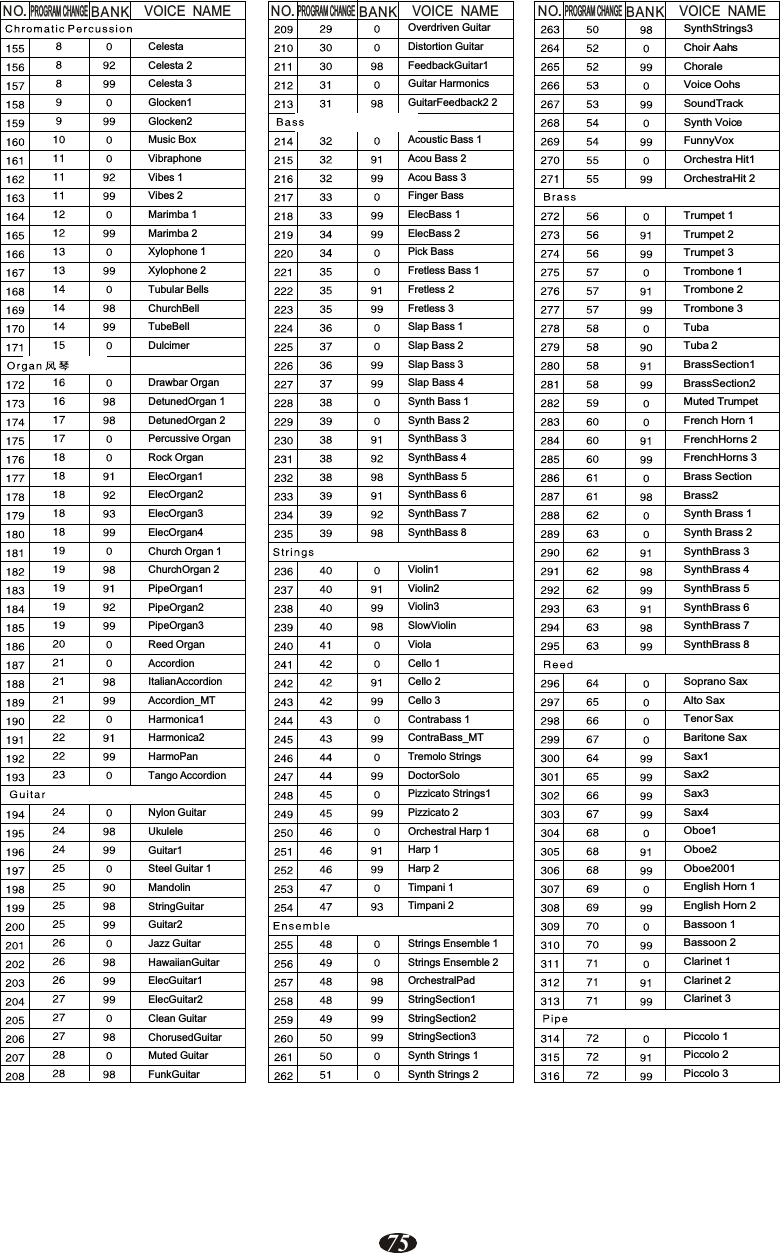
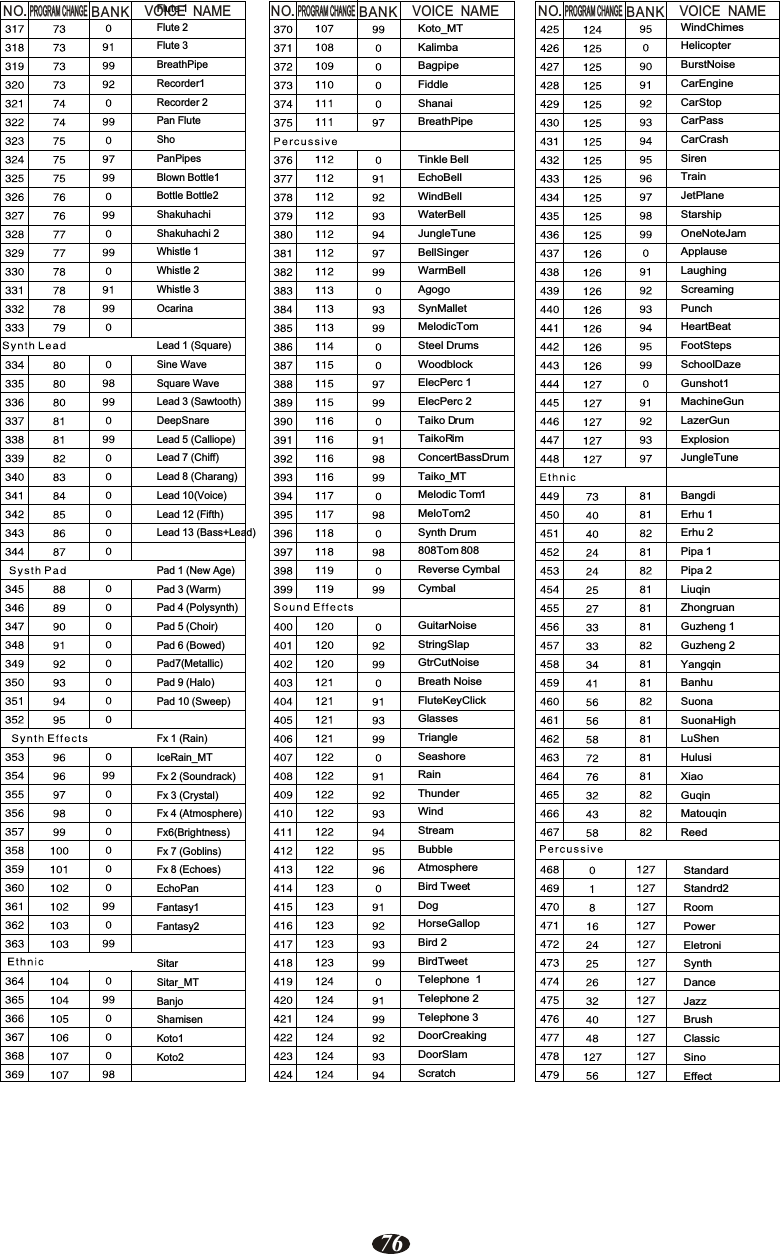
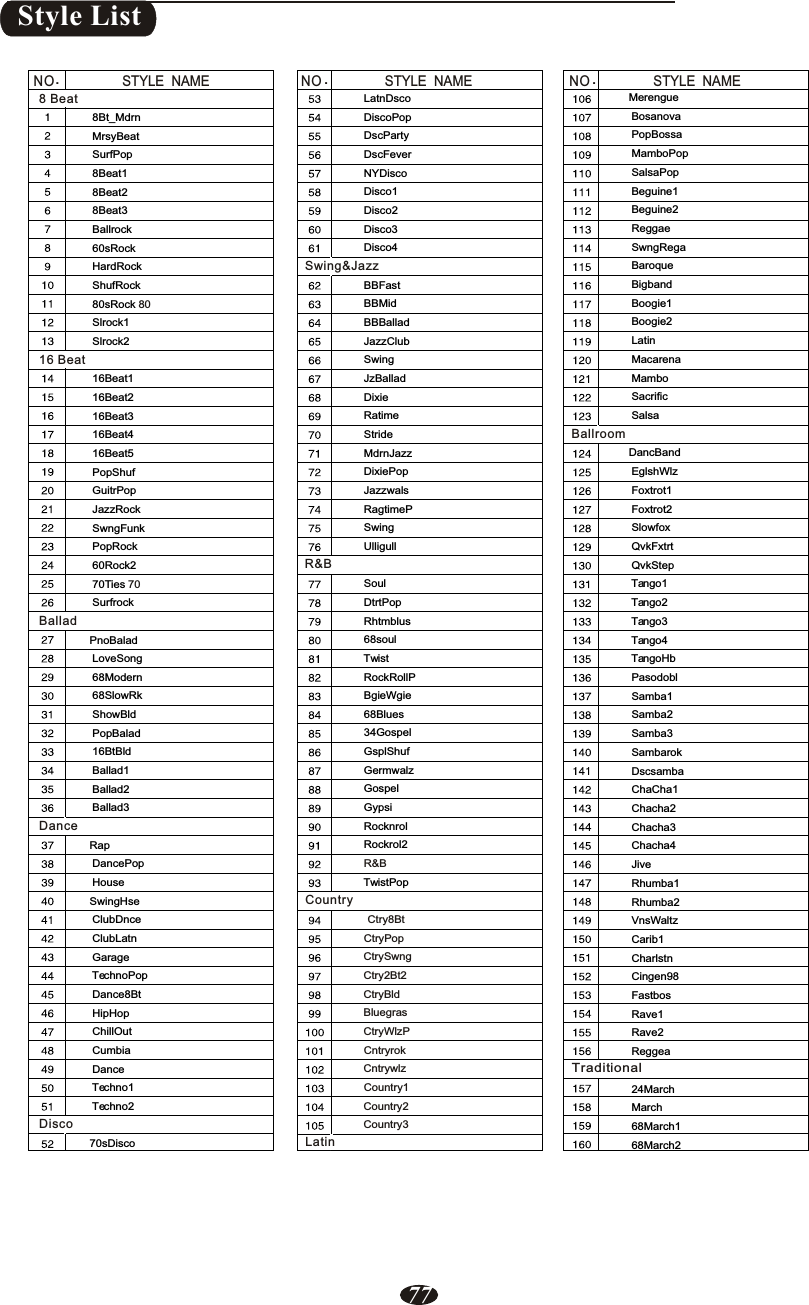
Ringway Tech TG8862 DIGITAL PIANO User Manual
Ringway Tech(Jiangsu) Co.,Ltd. DIGITAL PIANO
UserManual.wiki
>
Ringway Tech
>
TG8862 User Manual
User Manual
Navigation menu
Upload a User Manual
Namespaces
Wiki Guide
HTML
PDF
Info
Views
User Manual
Discussion / Help
Navigation

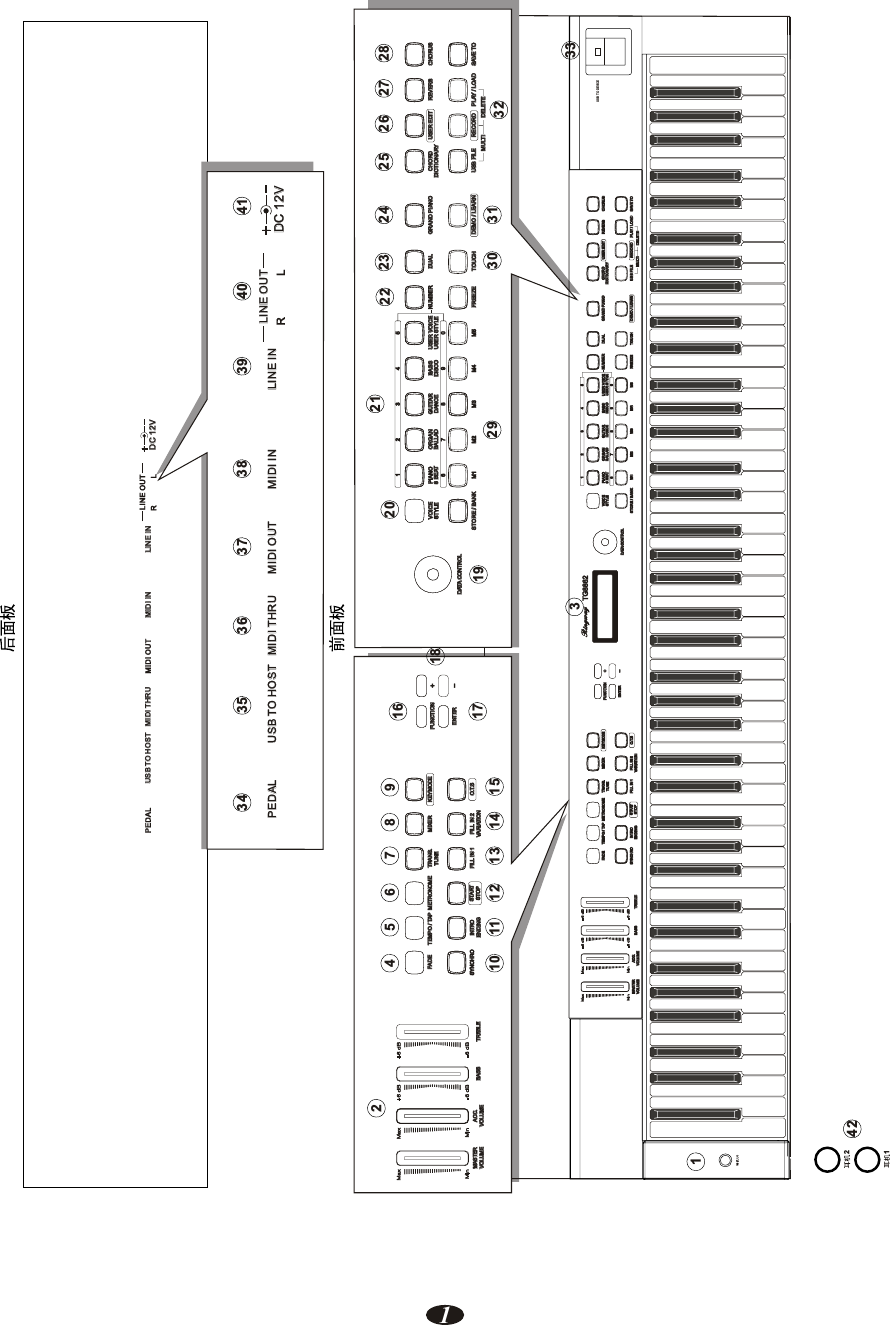
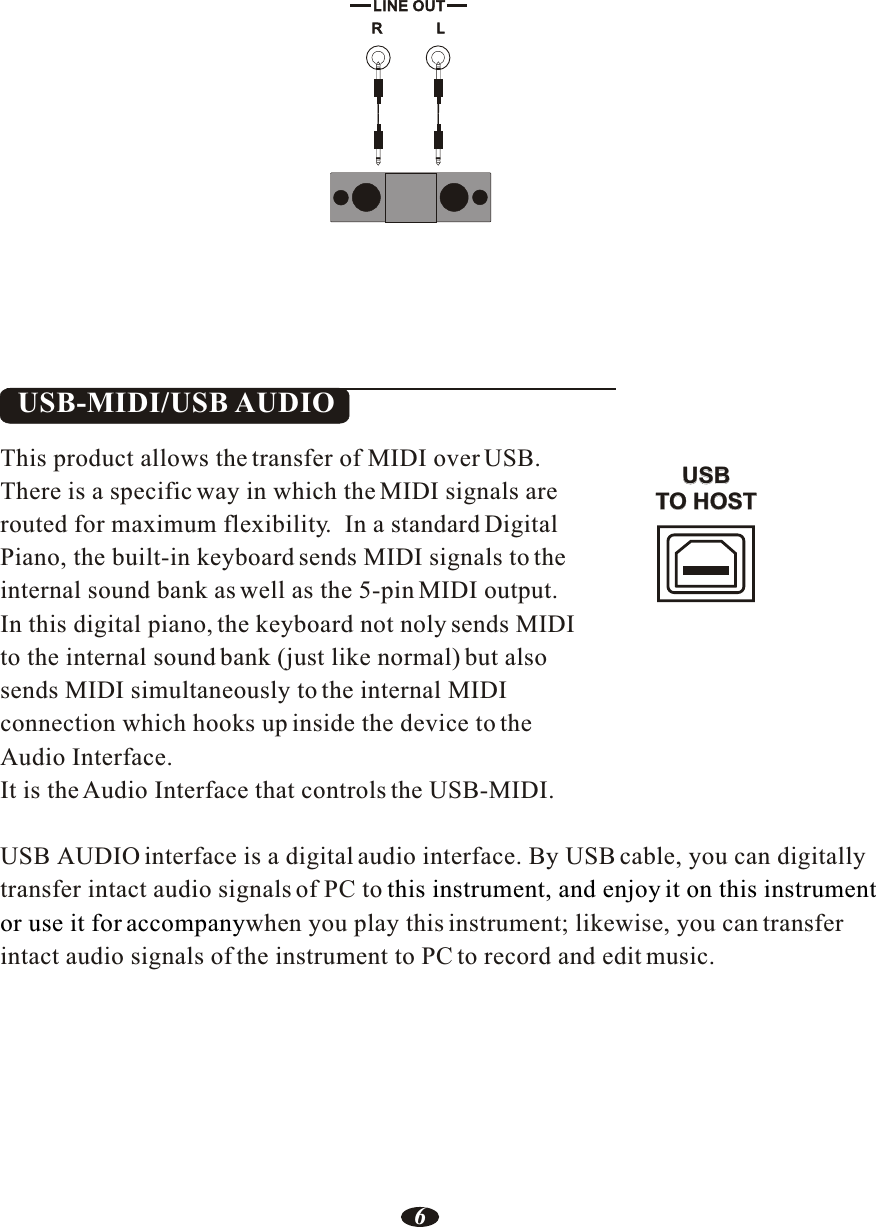
![Panel Contents2Top Panel1. STANDBY/ON2. MASTER VOLUME ACC.VOLUME BASS/TREBLE3. LCD DISPLAY4. [FADE] Button5. [TEMPO/TAP] Button6. [METRONOME] Button7. [TRANS./TUNE] Button8. [MIXER] Button9. [KEYMODE] Button10. [SYNCHRO] Button11. [INTRO/ENDING] Button12. [START/STOP] Button13. [FILL IN 1] Button14. [FILL IN 2/VARIATION] Button15. [O.T.S] Button16. [FUNCTION] Button17. [ENTER] Button18. [+/ -] Button19. [DATA CONTROL] Button20. [VOICE/STYLE] Button21. VOICE and STYLE SELECT/ Number 0~9 Button22. [NUMBER ] Button23. [DUAL ] Button24. [GRAND PIANO] Button25. [CHORD DICTIONARY] Button26. [USER EDIT] Button27. [REVERB] Button28. [CHORUS] Knob29. [STORE/BANK] Buttons [M1~M5] Button [FREEZE] Button30. [TOUCH] Buttons31. [DEMO/LEARN] Button32. [USB FILE] Button [RECORD] Button [PLAY/LOAD] Button [SAVE TO] Button33.USB TO DEVICERear34 Panel. PEDAL Jack35. USB TO HOST Jack36. MIDI THRU Jack37. MIDI OUT Jack38. MIDI IN Jack39. LINE OUT Jack40. LINE IN JACK LINE OUT(R/L)41. DC 12V Jack42. PHONES Jack](https://usermanual.wiki/Ringway-Tech/TG8862/User-Guide-2143919-Page-6.png)
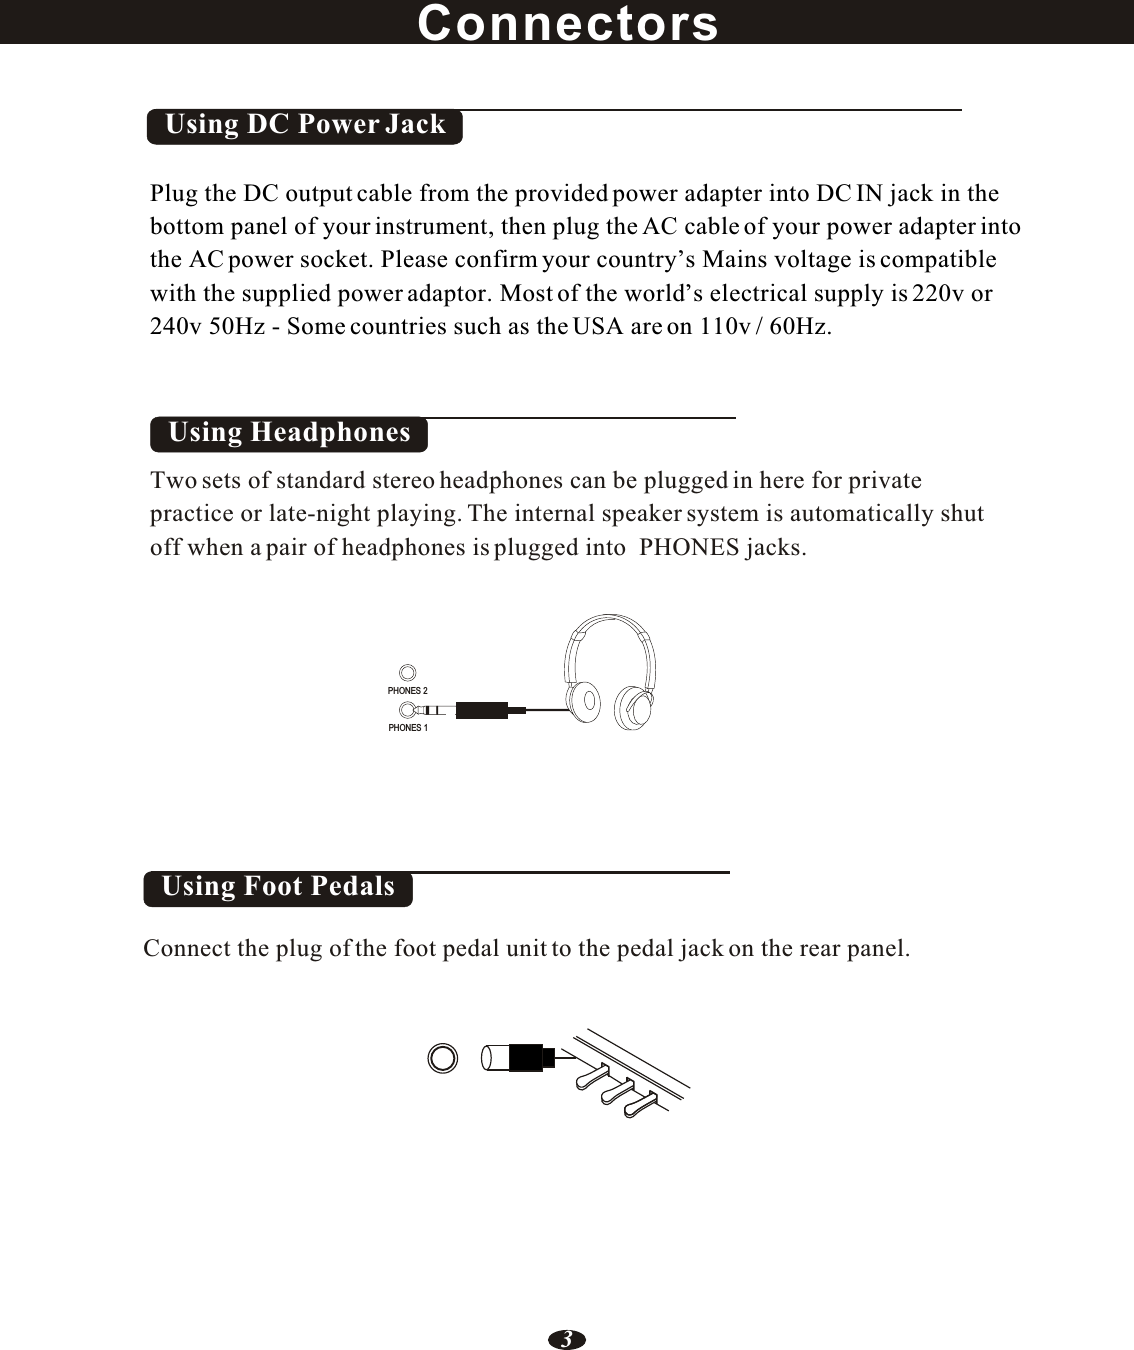

![Basic OperationSTANDBY/ON SwitchAdjust the VolumeTurn the power on by pressing the [STANDBY/ON] switch, the panel LCD display will light.Use [MASTER VOLUME] control to adjust the volume to your desired level.72.Deactivate the AUTO STANDBY functionThis product will switch off automatically in 30 minutes after no any operation on it. In this case, press the [standby/on] button to off mode, and press the[STANDBY/ON] button again to turn the power switch on.Hold the first white key and first black key on the leftside of the keyboard at the same time and then turn onthe unit to deactivate the AUTO STANDBY function.STANDBY/ONACC.ACC.VOLUMEVOLUME BASSTREBLETREBLEMASTERMASTERVOLUMEIIIIIIIIIIIIIIIIIIIIIIIIIIIIIIIIIIIIIIIIIIIIIIIIIIIIIIIIIIIIIIIIIIIIIIIIIIIIIIIIIIIIIIIIIIIIIIIIIIIIIIIIIIIIIIIIIIIIII1.AUTO STANDBY](https://usermanual.wiki/Ringway-Tech/TG8862/User-Guide-2143919-Page-11.png)
![Demo PlayThere are 16 demo songs that you can play individually. Here's how you can select and play the demo songs .1. Listen to the Demo SongPress [DEMO/LEARN] button to play the demo songs in sequence. Use [+/-]buttons or [DATA CONTROL] knob to select the number of the song you want toplay.2. Stop PlayingPress [DEMO/LEARN] button again to stop playing. DEMO / LEARN8](https://usermanual.wiki/Ringway-Tech/TG8862/User-Guide-2143919-Page-12.png)
![2.Use Number Button and [+/-] ButtonsPress the [NUMBER] button, the indicator light color is red. Now you can usenumber 0~9 or [+/-] Buttons to select voice.Voice 01~09 :press number 0 first, then press 1~9Voice 10~99 : press two numeric buttons directly, for example: to select 99 press the number 9 button and then the number 9 to select the sound.Voice 100~479: press the number Press 1 to 4 of a button and hold it until the number appears on the display, then you can enter the tens and ones digits. For example: to select 123 Sea Shore press number 1 button and hold it until 1_ appears, then press the number 2 and the number 3 buttons to select the sound.You also can press the [+/- ] buttons until the desired voice appears on the display.Selecting a VoiceYour instrument has 479 voices,include 128(01-128) GM standard voices. [+] / [-] buttons or [DATA CONTROL] knob You can use the voice button on the panel, use to select voice.1.Selecting Voice Directly When the [VOICE/STYLE] button is unlighted, means your piano is in Voicemode, now you can use the voice button on the panel to select voice directly, the first row of buttons below as the direct sound.VoicesPIANOPIANO8 BEAT8 BEAT8 BEAT8 BEAT1 2 3 4 51 2 3 4 566NUMBERNUMBERNUMBERNUMBERORGANORGANORGANGUITARGUITARGUITARGUITARBASSBASSUSER VOICEUSER VOICEUSER VOICEUSER VOICEBALLADBALLADBALLADBALLADDANCEDANCEDISCODISCOUSER STYLEUSER STYLEUSER STYLEUSER STYLE778899009](https://usermanual.wiki/Ringway-Tech/TG8862/User-Guide-2143919-Page-13.png)
![NOTEWhen [VOICE/STYLE] button is unlighted, it meams the current selection in VOICE mode .When [VOICE/STYLE] button is lighted, it meams the current selection in STYLE mode .When [NUMBER] button is unlighted, it meams the current selection in direct VOICE or STYLE mode.When [NUMBER] button is lighted, it meams the current selection in NUMBER SELECT mode .Dual ModeIn dual mode two voices may be played simultaneously, each at selected volumes.press [DUAL] button and theTo adjust the volume of the Dual Voice, please refer to D.Volume in MIXERfunction. P11to exit. indicator is flashing, then press the voice button to select the second voice.No operation in 4 seconds, the display will be returned to the Main Voice mode.Press [DUAL] button again DUALIn the Voice Mode, clockwise or counterclockwise rotation [DATA CONTROL], can quickly select the Voice.Clockwise rotation is increasing rapidly, counterclockwise rotation for the rapid decline.3.Use Data Control Knob10](https://usermanual.wiki/Ringway-Tech/TG8862/User-Guide-2143919-Page-14.png)
![MixerPress [MIXER]button ,you can select MM.Volume , S.Volume ,D.Volume , Metro Volume , USB VolumeWhen not in Dual mode or Split mode, press the [MIXER] button repeatedly to select .Volume , then use [Data Control] knob to set the Main Volume. Range: 00~127. Default: 127.Press the [MIXER] button repeatedly to select S.Volume , indicatoris flashing, then use [Data Control] knob to set the main volume. Range: 00~127. Default: 127.Press the [MIXER] button Repeatedly to select D.Volume , indicatoris flashing, then use [Data Control] knob to set the Main Volume. Range: 00~127. Default: 127.[+/-] Buttons or the [+/-] Buttons or the [+/-] Buttons or MIXERMIXER1. M.Volume2. S.Volume3. D.Volume11](https://usermanual.wiki/Ringway-Tech/TG8862/User-Guide-2143919-Page-15.png)
![4. Metro VolumePress the [MIXER] button Repeatedly to select Metro.Volume , then use [Data Control] knob to set the Main Volume. Range: 00~127. Default: 100.[+/-]Buttons or5. USB VolumePress the [MIXER] button Repeatedly to select USB Volume , then use [Data Control] knob to set the Main Volume. Range: 00~127. Default: 100.[+/-]Buttons orPlaying Portable Grand Piano Press [GRAND PIANO] button. This convenient function lets you instantly call up the Grand Piano voice.MIXERMIXERMIXERMIXERMIXERGRAND PIANO12](https://usermanual.wiki/Ringway-Tech/TG8862/User-Guide-2143919-Page-16.png)
![KeymodeYou can adjust the chord, pianist, harmony, split piont, twin by pressing [KEYMODE]button.1. Chord modePress [KEYMODE] button, select chord mode, LCD will display C symbol in the upper right corner of the screen. The specified left-hand sectionof the keyboard becomes the Auto Accompaniment section, and chords playedin this section are automatically detected and used as a basis for fully automatic accompaniment with the selected style.(left 34 keys) 2. Chord pointSelect Normal mode at first,and then hold down the [KEYMODE] button until the display shows "C.Point", then use the [+/-] buttons or turn the data to set chord point. Range:00~87.3. Pianist modePress the [KEYMODE] button repeatedly to select keyboard mode, LCD will display P symbol in the upper right corner of the screen.KEYMODEKEYMODEKEYMODE13](https://usermanual.wiki/Ringway-Tech/TG8862/User-Guide-2143919-Page-17.png)
![4. Harmony modePress the [KEYMODE] button repeatedly to select harmony mode, LCD will display H symbol in the upper right corner of the screen.5. Split modePress the [KEYMODE] button repeatedly to select split mode, LCD will displayS symbol in the upper right corner of the screen, your keyboard will be split into sctions which means different voices can be played with the left and right hands at the sanme time.6. Split pointSelect harmony mode at first,and then hold down the [KEYMODE] button untilthe display shows S.Point , then use the [+/-] buttons or turn the data to setsplit point. Range:00~87.KEYMODEKEYMODEKEYMODE14](https://usermanual.wiki/Ringway-Tech/TG8862/User-Guide-2143919-Page-18.png)
![7. Twin modePress the [KEYMODE] button repeatedly to select twin mode, LCD will displayT symbol in the upper right corner of the screen, the keyboard will be separated into two play areas.#Right: from C3 to C7 Left: from A-1 to C3TransposeThe Transpose function allows you to change the pitch of the instrument in semitonesteps, up to a maximum setting of 12 semitones (a maximum of one octave up or down).Press [ Use [+/- ] buttons to transpose up or down as required. The transposition range is from -12 (down one octave) through 0 (normal pitch) to 12 (up one octave).TRANS./TUNE] button ,KEYMODETRANS.TUNE15](https://usermanual.wiki/Ringway-Tech/TG8862/User-Guide-2143919-Page-19.png)
![TuneThe function makes it possible to tune the pitch of your imstrument to match other instruments.Press [ ] button repeatedly, LCD will displayTUNE , use [+/-] buttons to set Tune value:-64-63.TRANS./TUNETempo/TapPress the [TEMPO/TAP] button, use[+/-] buttons or [DATA CONTROL] knob to decrease or increase the tempo, metronome and styles. Range: 20-280.If you want to set the tempo before starting rhythm, you have to tap the button4 times, automatic accompaniment of percussion can start automatically according to the speed of your keys.Tap on the button 2 times while rhythm is playing, the rhythm tempo are set as your desired speed.TEMPO / TAPTEMPO / TAPTEMPO / TAPTRANS.TUNE16](https://usermanual.wiki/Ringway-Tech/TG8862/User-Guide-2143919-Page-20.png)
![MetronomeMetronome is a convenient feature for practice, and it can also provide a solid rhythmic guide when recording.The metronome sound is alternately turned on and turned off by pressing [METRONOME] button. Time signature: 2/2,1/4, 2/4, 3/4, 4/4, 5/4,6/4, 3/8, 6/8, 7/8,9/8,12/8. 4/4MetronomHold the [METRONOME] button to enter the page for selecting the time signature. Then use the [+] and [-] buttons or the [DATA CONTROL] knob to select your desired time signature.(Default: )To adjust the volume of the e, please refer to Metro.Vol in MIXERfunction. P12TouchThe touch function provides three different types of keyboard touch sensitivitythat can be selected to match different playing styles.When turn on the piano, the touch sensitivity default is open. Press [TOUCH] button, the button indicator is unlighted, LCD will displayPress [TOUCH] button again, the button indicator is lighted, use [+/-] button to select 3 type of touch sensitivity: FixTouch 100 . Then Normal, Hard, SoftMETRONOMETOUCH17](https://usermanual.wiki/Ringway-Tech/TG8862/User-Guide-2143919-Page-21.png)
![When touch sensitivity is off, Y use [+/-] buttons or to select the value of Fixtouch volume. the indicator is unlighted. ou can [DATA CONTROL] knob Range:00~127.Default: 100.One Touch SettingThis function is actually a convenient feature which automatically selects a suitable voice for you when you select a style. Press [O.T.S] button repeatedly can turn on or turn off One Touch Setting.In addition, various panel settings (such as voice, effect, Tempo, etc.) that match the selected style can be recalled with just a single button [O.T.S].TOUCHO.T.S18](https://usermanual.wiki/Ringway-Tech/TG8862/User-Guide-2143919-Page-22.png)
![User EditPress [USER EDIT] button to edit the voice that you want, then save the voice tothe voice bank, So that you can easily use it. 1.User voice Contrl[USER EDIT] button repeatedly toselectSelect the voice you want to edit and then press Cut Off , Resonance , Attack , Decay , Release , Vibrate ,Vibdepth , Vibdelay ,then use [+/-] buttons to set these parameters.Cut Off: Is the control parameter to control the variation of audio and change thefilter range of the filter, which may produce the overtone's variation of the sound. Range: 00~127. The default value is the median 64 without any effect. (Hint: Similarto a treble knob on a Hi-Fi system.)Resonance: Sets the volume of the overtone on Cutoff Frequency. Higher resonance value produces higher volume of the overtone near the Cutoff Frequency.Range: 00~127. The default value is the median 64 without any effect. (Hint: Similarin effect to singing into your hands and making the size of your cupped hands bigger and smaller.)The parameters of Envelope' s variations are as follows: AttackDecayReleaseUSER EDIT19](https://usermanual.wiki/Ringway-Tech/TG8862/User-Guide-2143919-Page-23.png)
![2.Save User VoiceYour piano contains 1 banks for saving User Voice. You can modify the voice's Envelope, Vibrato and Filter parameters and then save this New sound oredited Sound to the User Voice Bank.Select a voice as the user voice and then pressou can modify the voice's parametersHold down [ so that you can save the edited voice to the desired User Voice Bank.[USER EDIT] button, the buttonsindicator is lighted, y .USER EDIT] button, LCD will display Save OkYou can only save the VOICE data ( Envelope, Vibrato and Filter settings) to User Voice Banks. Other functions such as Dual Voice,Split Mode and so on, are not sound edits and cannot be stored here.NOTE3.Load User VoicePress [USER EDIT] button directly to load the desired user voice.USER EDIT21](https://usermanual.wiki/Ringway-Tech/TG8862/User-Guide-2143919-Page-25.png)
![EffectThis function allows you to perform the overall sound in a realistic style.The [REVERB] button selects a number of digital reverb effects that you can use for extra depth and expressive power.Press [REVERB] button can turn off or turn on the reverb effect.Press [REVERB] button, use knob to select reverb type. No reverb is produced when you select Rev O ff . Default type: Hall2.[+/-] button or [DATA CONTROL] 1 2 3 4 5 6 7 8 Hall1 Hall2 Room1 Room2 Room3 Stage1 Stage2 Plate Reference: Reverb Type in function menu. P37NOTEThe reverb types in the list below can be selected from the reverb display.Shimmering, broadening effect. Press [CHORUS] button, select chorus type. No chorus is produced when you selectChorsOff , and the indicator is off.use knob to Default type: Chorus3.[+/-] button or [DATA CONTROL]1. ReverbREVERBREVERB2.ChorusCHORUSCHORUS22](https://usermanual.wiki/Ringway-Tech/TG8862/User-Guide-2143919-Page-26.png)
![FuntionRepeatedly press the [ ] button the function to call up the, see the table below:functionFuntion type LCD display Range Default-64~63 000000000000Performance?Main.Pan?Main.Oct?SpiltOct?Dual.Oct?MIDI In?Arpeggio?SplitPan?Dual.Pan?MIDI Out?Local?-64~63-64~63-2~2-2~2-2~201,02,OFFON/OFFON/OFF01~16,OFFOFFONONONMain.PanMain.Oct.SpiltOct.Dual.Oct.MIDI InArpeggioSplitPanDual.PanMIDI OutLocal24](https://usermanual.wiki/Ringway-Tech/TG8862/User-Guide-2143919-Page-28.png)

![M.RecTrk?USBSpeed?PlayMode?Grading?Auto Power Off?01~16,OFF01~16,OFF01~16,OFFLearnHand?Usb.Function?S.RecTrk?D.RecTrk?50~200Single,Chain,RandomON/OFF Left/RightSLEEPMODE:20Min/30Min/40Min/50Min/60Min/OFF010203100Chain30MinLearn?Other.Func?Funtion type LCD display Range DefaultRightONM.RecTrkUSBSpeedPlayModeGradingAuto Power OffLearnHandS.RecTrkD.RecTrk Press [FUNCTION] button, If 5 seconds without any operation, the piano will automatically exit the menu.NOTE26](https://usermanual.wiki/Ringway-Tech/TG8862/User-Guide-2143919-Page-30.png)
![Main Voice PanPress the [+] and [-] buttons simultaneously to restore the default Press [ENTER] button to confirm, LCD will displayPress [ENTER] button to confirm, use [+/-] buttons or to set the main voice pan value.value:00.Main.Pan?the [DATACONTROL] knobPress the [FUNCTION] button, LCD will display Performance?FUNCTIONFUNCTIONFUNCTIONFUNCTIONFUNCTIONENTERENTERENTERENTER+++---27](https://usermanual.wiki/Ringway-Tech/TG8862/User-Guide-2143919-Page-31.png)
![Split Voice PanPress the [+] and [-] buttons simultaneously to restore the default Press [ENTER] button to confirm, LCD will displayse [+/-] buttons or to selectPress [ENTER] button to confirm, use [+/-] buttons or to set the split voice pan value.value:00.Main.Pan?U the [DATA CONTROL] knob SpiltPan?the [DATACONTROL] knobPress the [FUNCTION] button, LCD will display Performance?FUNCTIONFUNCTIONENTERENTER+-FUNCTIONFUNCTIONENTER+-FUNCTIONENTER+-FUNCTIONENTER+-28](https://usermanual.wiki/Ringway-Tech/TG8862/User-Guide-2143919-Page-32.png)
![Dual Voice PanPress the [+] and [-] buttons simultaneously to restore the default Press [ENTER] button to confirm, LCD will displayse [+/-] buttons or to selectPress [ENTER] button to confirm, use [+/-] buttons or to set the dual voice pan value.value:00.Main.Pan?U the [DATA CONTROL] knob SpiltPan?the [DATACONTROL] knobPress the [FUNCTION] button, LCD will display Performance?FUNCTIONFUNCTIONENTERENTER+-FUNCTIONFUNCTIONENTER+-FUNCTIONENTER+-FUNCTIONENTER+-29](https://usermanual.wiki/Ringway-Tech/TG8862/User-Guide-2143919-Page-33.png)
![Main Voice OctavePress the [+] and [-] buttons simultaneously to restore the default Press [ENTER] button to confirm, LCD will displayse [+/-] buttons or to select Main OctPress [ENTER] button to confirm, use [+/-] buttons or to set the main voice octave value.value:00.Main.Pan?U the [DATA CONTROL] knob ?the [DATACONTROL] knobPress the [FUNCTION] button, LCD will display Performance?FUNCTIONFUNCTIONENTERENTER+-FUNCTIONFUNCTIONENTER+-FUNCTIONENTER+-FUNCTIONENTER+-30](https://usermanual.wiki/Ringway-Tech/TG8862/User-Guide-2143919-Page-34.png)
![Split Voice OctavePress the [+] and [-] buttons simultaneously to restore the default Press [ENTER] button to confirm, LCD will displayse [+/-] buttons or to selectPress [ENTER] button to confirm, use [+/-] buttons or to set the Split voice octave value.value:00.Main.Pan?U the [DATA CONTROL] knob Spilt.Oct?the [DATACONTROL] knobPress the [FUNCTION] button, LCD will display Performance?FUNCTIONFUNCTIONENTERENTER+-FUNCTIONFUNCTIONENTER+-FUNCTIONENTER+-FUNCTIONENTER+-31](https://usermanual.wiki/Ringway-Tech/TG8862/User-Guide-2143919-Page-35.png)
![Dual Voice OctavePress the [+] and [-] buttons simultaneously to restore the default Press [ENTER] button to confirm, LCD will displayse [+/-] buttons or to select DualPress [ENTER] button to confirm, use [+/-] buttons or to set the dual voice octave value.value:00.Main.Pan?U the [DATA CONTROL] knob Oct?the [DATACONTROL] knobPress the [FUNCTION] button, LCD will display Performance?FUNCTIONFUNCTIONENTERENTER+-FUNCTIONFUNCTIONENTER+-FUNCTIONENTER+-FUNCTIONENTER+-32](https://usermanual.wiki/Ringway-Tech/TG8862/User-Guide-2143919-Page-36.png)
![ArpeggioPress [ENTER] button to confirm, LCD will displayse [+/-] buttons or to selectPress [ENTER] button to confirm, use [+/-] buttons or to select .Main.Pan?U the [DATA CONTROL] knob Arpeggio?the [DATACONTROL] knob OFF , 01 , 02Press the [FUNCTION] button, LCD will display Performance?FUNCTIONFUNCTIONENTERENTER+-FUNCTIONFUNCTIONENTER+-FUNCTIONENTER+-FUNCTIONENTER+-01~ Press and hold down one key or a plurality of keys , you will hear a continuous and from low to high.02~ Press and hold down one key or a plurality of keys , you will hear a continuous and from high to low .OFF~ The Arpeggio is off.33](https://usermanual.wiki/Ringway-Tech/TG8862/User-Guide-2143919-Page-37.png)
![Midi InPress [ENTER] button to confirm, LCD will displayse [+/-] buttons or to select Midi InPress [ENTER] button to confirm, use [+/-] buttons or to select .Main.Pan?U the [DATA CONTROL] knob ?the [DATACONTROL] knob ON , OFFPress the [FUNCTION] button, LCD will display Performance?FUNCTIONFUNCTIONENTERENTER+-FUNCTIONFUNCTIONENTER+-FUNCTIONENTER+-FUNCTIONENTER+-34](https://usermanual.wiki/Ringway-Tech/TG8862/User-Guide-2143919-Page-38.png)
![Midi OutPress [ENTER] button to confirm, LCD will displayse [+/-] buttons or to select Midi OutPress [ENTER] button to confirm, use [+/-] buttons or to select1~16 .Main.Pan?U the [DATA CONTROL] knob ?the [DATACONTROL] knob ,OFFPress the [FUNCTION] button, LCD will display Performance?FUNCTIONFUNCTIONENTERENTER+-FUNCTIONFUNCTIONENTER+-FUNCTIONENTER+-FUNCTIONENTER+-35](https://usermanual.wiki/Ringway-Tech/TG8862/User-Guide-2143919-Page-39.png)
![LocalPress [ENTER] button to confirm, LCD will displayse [+/-] buttons or to select LocalPress [ENTER] button to confirm, use [+/-] buttons or to select ON .Main.Pan?U the [DATA CONTROL] knob ?the [DATACONTROL] knob , OFFPress the [FUNCTION] button, LCD will display Performance?FUNCTIONFUNCTIONENTERENTER+-FUNCTIONFUNCTIONENTER+-FUNCTIONENTER+-FUNCTIONENTER+-36](https://usermanual.wiki/Ringway-Tech/TG8862/User-Guide-2143919-Page-40.png)
![Reverb TypePress the [+] and [-] buttons simultaneously to restore the default Press [ENTER] button to confirm, LCD will display Rev.TypePress [ENTER] button to confirm, use [+/-] buttons or to select 8 reverb type:reverb type: .?the [DATA CONTROL] knob Hall1, Hall2, Room1, Room2, Room3, Stage1, Stage2, PlateHall2Press the [FUNCTION] button repeatedly, LCD will display Effect?FUNCTIONFUNCTIONENTERENTER+-FUNCTIONFUNCTIONENTER+-FUNCTIONENTER+-37](https://usermanual.wiki/Ringway-Tech/TG8862/User-Guide-2143919-Page-41.png)
![Main voice Reverb LevelPress [ENTER] button to confirm, LCD will display Rev.Type?Use [+/-] buttons or the [DATA CONTROL] knob to select M.RevVol?Press [ENTER] button to confirm, use [+/-] buttons or the [DATA CONTROL] knob to set main voice reverb level value.Press the [+] and [-] buttons simultaneously to restore the default value:32.Press the [FUNCTION] button repeatedly, LCD will display Effect?FUNCTIONFUNCTIONENTERENTER+-FUNCTIONFUNCTIONENTER+-FUNCTIONFUNCTIONENTERENTER++--38](https://usermanual.wiki/Ringway-Tech/TG8862/User-Guide-2143919-Page-42.png)
![Split Voice Reverb LevelPress [ENTER] button to confirm, LCD will display Rev.Type?Use [+/-] buttons or the [DATA CONTROL] knob to select S.RevVol?Press [ENTER] button to confirm, use [+/-] buttons or the [DATA CONTROL] knob to set split voice reverb level value.Press the [+] and [-] buttons simultaneously to restore the default value:32.Press the [FUNCTION] button repeatedly, LCD will display Effect?FUNCTIONFUNCTIONENTERENTER+-FUNCTIONFUNCTIONENTER+-FUNCTIONFUNCTIONENTERENTER++--39](https://usermanual.wiki/Ringway-Tech/TG8862/User-Guide-2143919-Page-43.png)
![Dual Voice Reverb LevelPress [ENTER] button to confirm, LCD will display Rev.Type?Use [+/-] buttons or the [DATA CONTROL] knob to select D.RevVol?Press [ENTER] button to confirm, use [+/-] buttons or the [DATA CONTROL] knob to set dual voice reverb level value.Press the [+] and [-] buttons simultaneously to restore the default value:32.Press the [FUNCTION] button repeatedly, LCD will display Effect?FUNCTIONFUNCTIONENTERENTER+-FUNCTIONFUNCTIONENTER+-FUNCTIONFUNCTIONENTERENTER++--40](https://usermanual.wiki/Ringway-Tech/TG8862/User-Guide-2143919-Page-44.png)
![Chorus TypePress [ENTER] button to confirm, LCD will display Rev.Type?Use [+/-] buttons or the [DATA CONTROL] knob to select Chr.Type?Press [ENTER] button to confirm, use [+/-] buttons or the [DATA CONTROL] knob to select 14 chorus types.reverb type:Chorus3.Press the [+] and [-] buttons simultaneously to restore the default Press the [FUNCTION] button repeatedly, LCD will display Effect?FUNCTIONFUNCTIONENTERENTER+-FUNCTIONFUNCTIONENTER+-FUNCTIONFUNCTIONENTERENTER++--41](https://usermanual.wiki/Ringway-Tech/TG8862/User-Guide-2143919-Page-45.png)
![Main voice Chorus LevelPress [ENTER] button to confirm, LCD will display Rev.Type?Use [+/-] buttons or the [DATA CONTROL] knob to select M.ChrVol?Press [ENTER] button to confirm, use [+/-] buttons or the [DATA CONTROL] knob to set main voice reverb level value.Press the [+] and [-] buttons simultaneously to restore the default value:32.Press the [FUNCTION] button repeatedly, LCD will display Effect?FUNCTIONFUNCTIONENTERENTER+-FUNCTIONFUNCTIONENTER+-FUNCTIONFUNCTIONENTERENTER++--42](https://usermanual.wiki/Ringway-Tech/TG8862/User-Guide-2143919-Page-46.png)
![Split voice Chorus LevelPress [ENTER] button to confirm, LCD will display Rev.Type?Use [+/-] buttons or the [DATA CONTROL] knob to select S.ChrVol?Press [ENTER] button to confirm, use [+/-] buttons or the [DATA CONTROL] knob to set main voice reverb level value.Press the [+] and [-] buttons simultaneously to restore the default value:32.Press the [FUNCTION] button repeatedly, LCD will display Effect?FUNCTIONFUNCTIONENTERENTER+-FUNCTIONFUNCTIONENTER+-FUNCTIONFUNCTIONENTERENTER++--43](https://usermanual.wiki/Ringway-Tech/TG8862/User-Guide-2143919-Page-47.png)
![Dual voice Chorus LevelPress [ENTER] button to confirm, LCD will display Rev.Type?Use [+/-] buttons or the [DATA CONTROL] knob to select D.ChrVol?Press [ENTER] button to confirm, use [+/-] buttons or the [DATA CONTROL] knob to set dual voice reverb level value.Press the [+] and [-] buttons simultaneously to restore the default value:32.Press the [FUNCTION] button repeatedly, LCD will display Effect?FUNCTIONFUNCTIONENTERENTER+-FUNCTIONFUNCTIONENTER+-FUNCTIONFUNCTIONENTERENTER++--44](https://usermanual.wiki/Ringway-Tech/TG8862/User-Guide-2143919-Page-48.png)
![Pedal1 ControlPress [ENTER] button to confirm, LCD will display Pedal 1?Press [ENTER] button to confirm, use [+/-] buttons or the [DATA CONTROL] knob to select Pd1-Fill In1 , Pd1-Fill In2 , Pd1-Tap ,Pd1-MemoryUp , Pd1-Play , Pd1-Null , Pd1-Soft , Pd1-sost ,Pd1-StartStopPress the [FUNCTION] button repeatedly, LCD will display Pedal Assign?FUNCTIONFUNCTIONENTERENTER+-FUNCTIONFUNCTIONENTER+-FUNCTIONENTER+-Pd1-Null------The switch will not control any function.Pd1-Soft------Pd1-Sos------If you play a note or chord on the keyboard and press the sostenuto pedal while the notes are held, those notes will be sustained as long as the pedalis held, but all subsequently played notes will not be sustained.Pd1-StrtStop------This function correspond to the [START] button on the panel.45](https://usermanual.wiki/Ringway-Tech/TG8862/User-Guide-2143919-Page-49.png)
![Switches the rhythm on/off whenever you press the Left Foot-switch.Pd1-Fil1l------This function correspond to the [FILL IN] button on the panel. Let you add dynamic variations and breaks in the rhythm of the accompaniment.Pd1-Fil12------This function correspond to the [FILL IN] button on the panel. Let you add dynamic variations and breaks in the rhythm of the accompaniment.Pd1-Play------USB MIDI PlayPd1-MemoryUp------Anytime you store to a REGISTRATION MEMORY button, all settings previously stored in that button will be erased and replaced by the new settings.Pd1-Tap----Pedal2 ControlPress [ENTER] button to confirm, LCD will display Pedal 2?Press the [FUNCTION] button repeatedly, LCD will display Pedal Assign?FUNCTIONFUNCTIONENTER+-FUNCTIONENTER+-46](https://usermanual.wiki/Ringway-Tech/TG8862/User-Guide-2143919-Page-50.png)
![Press [ENTER] button to confirm, use [+/-] buttons or the [DATA CONTROL] knob to select Pd2-Fill In1 , Pd2-Fill In2 , Pd2-Tap ,Pd2-MemoryUp , Pd2-Play , Pd2-Null , Pd2-Soft , Pd2-sost ,Pd2-StartStopPd1-Null------The switch will not control any function.Pd1-Soft------Pd1-Sos------If you play a note or chord on the keyboard and press the sostenuto pedal while the notes are held, those notes will be sustained as long as the pedalis held, but all subsequently played notes will not be sustained.Pd1-StrtStop------This function correspond to the [START] button on the panel.Switches the rhythm on/off whenever you press the Left Foot-switch.Pd1-Fil1l------This function correspond to the [FILL IN] button on the panel. Let you add dynamic variations and breaks in the rhythm of the accompaniment.Pd1-Fil12------This function correspond to the [FILL IN] button on the panel. Let you add dynamic variations and breaks in the rhythm of the accompaniment.Pd1-Play------USB MIDI PlayPd1-MemoryUp------Anytime you store to a REGISTRATION MEMORY button, all settings previously stored in that button will be erased and replaced by the new settings.Pd1-Tap----FUNCTIONENTER+-47](https://usermanual.wiki/Ringway-Tech/TG8862/User-Guide-2143919-Page-51.png)
![Main voice TrackPress [ENTER] button to confirm, LCD will display M.RecTrk?Press [ENTER] button to confirm, use [+/-] buttons or the [DATA CONTROL] knob to select main voice track 01~16 and Off.Press the [+] and [-] buttons simultaneously to restore the default main voice track: 01.Press the [FUNCTION] button repeatedly, LCD will display Usb.Function?FUNCTIONFUNCTIONENTERENTER+-FUNCTIONFUNCTIONENTER+-FUNCTIONENTER+-48](https://usermanual.wiki/Ringway-Tech/TG8862/User-Guide-2143919-Page-52.png)
![Split voice TrackPress [ENTER] button to confirm, LCD will display M.RecTrk?Use [+/-] buttons or the [DATA CONTROL] knob to select S.RecTrk?Press [ENTER] button to confirm, use [+/-] buttons or the [DATA CONTROL] knob to select split voice track 01~16 and Off.Press the [+] and [-] buttons simultaneously to restore the default main voice track: 02.Press the [FUNCTION] button repeatedly, LCD will display Usb.Function?FUNCTIONFUNCTIONENTERENTER+-FUNCTIONFUNCTIONFUNCTIONFUNCTIONENTERENTERENTER++--FUNCTIONENTER+-49](https://usermanual.wiki/Ringway-Tech/TG8862/User-Guide-2143919-Page-53.png)
![Dual voice TrackPress [ENTER] button to confirm, LCD will display M.RecTrk?Use [+/-] buttons or the [DATA CONTROL] knob to select D.RecTrk?Press [ENTER] button to confirm, use [+/-] buttons or the [DATA CONTROL] knob to select dual voice track 01~16 and Off.Press the [+] and [-] buttons simultaneously to restore the default main voice track: 03.Press the [FUNCTION] button repeatedly, LCD will display Usb.Function?FUNCTIONFUNCTIONENTERENTER+-FUNCTIONFUNCTIONENTER+-FUNCTIONENTER+-FUNCTIONFUNCTIONENTERENTER+-50](https://usermanual.wiki/Ringway-Tech/TG8862/User-Guide-2143919-Page-54.png)
![USB SpeedPress [ENTER] button to confirm, LCD will display M.RecTrk?Use [+/-] buttons or the [DATA CONTROL] knob to select USBSpeed?Press [ENTER] button to confirm, use [+/-] buttons or the [DATA CONTROL] knob to select USB speed.Press the [+] and [-] buttons simultaneously to restore the default value: 100.Press the [FUNCTION] button repeatedly, LCD will display Usb.Function?FUNCTIONFUNCTIONENTERENTER+-FUNCTIONFUNCTIONENTER+-FUNCTIONFUNCTIONFUNCTIONENTERENTERENTER++--51](https://usermanual.wiki/Ringway-Tech/TG8862/User-Guide-2143919-Page-55.png)
![Play MoodPress [ENTER] button to confirm, LCD will display M.RecTrk?Use [+/-] buttons or the [DATA CONTROL] knob to select PlayMode?Press [ENTER] button to confirm, use [+/-] buttons or the [DATA CONTROL] knob to select the play mode: .Press the [+] and [-] buttons simultaneously to restore the default playmode: .Single,Chain,RandomChainPress the [FUNCTION] button repeatedly, LCD will display Usb.Function?FUNCTIONFUNCTIONENTERENTER+-FUNCTIONFUNCTIONENTER+-FUNCTIONFUNCTIONFUNCTIONENTERENTERENTER++--52](https://usermanual.wiki/Ringway-Tech/TG8862/User-Guide-2143919-Page-56.png)
![Single------ Single playChain------Order playRandom------Then playLeft/right HandPress [ENTER] button to confirm, LCD will display ?Use [+/-] buttons or the [DATA CONTROL] knob to select LeftRight .Left Left Hand.Right Right Hand.LearnHandPress the [FUNCTION] button repeatedly, LCD will display Learn?FUNCTIONFUNCTIONENTERENTER+-FUNCTIONFUNCTIONENTER+-FUNCTIONFUNCTIONENTERENTER+-53](https://usermanual.wiki/Ringway-Tech/TG8862/User-Guide-2143919-Page-57.png)
![Auto Power OffPress [ENTER] button to confirm, LCD will displayPress [ENTER] button to confirm, use [+/-] buttons or the[DATA CONTROL] knob to select sleep mode: .Press the [+] and [-] buttons simultaneously to restore the default value: 30Min.Auto Power Off?20Min, 30Min, 40Min, 50Min, 60Min and OFFPress the [FUNCTION] button repeatedly, LCD will display Other Func?FUNCTIONFUNCTIONENTERENTER+-FUNCTIONFUNCTIONENTER+-FUNCTIONFUNCTIONENTERENTER+-54](https://usermanual.wiki/Ringway-Tech/TG8862/User-Guide-2143919-Page-58.png)
![Auto Accompaniment Your instrument has 203 accompaniment styles which can be used to provideFully-orchestrated Auto Accompaniment. When the Auto Accompanimentfunction is turned on, your instrument will create fully-orchestrated rhythm, bass and chord accompaniment based on chords you play with the left hand in the Auto Accompaniment section of the keyboard(i.e. all keys to the left of the AutoAccompaniment split point). The right-hand section of the keyboard is availablefor normal playing. The default Auto Accompaniment split# point is the F2 key. The Auto Accompaniment section of the keyboard Consists of all keys to its left .Auto Accompaniment NormalLeft hand fingering specifies the autoaccompaniment chords.The right hand plays normallyAuto Accompaniment 2.Use Number Button and [+/-] ButtonsPress the [NUMBER] button, the indicator light color is red. Now you can usenumber 0~9 or [+/-] Buttons to select style.Selecting a StylePress [VOICE/STYLE] button, the[+] / [-] buttons or [DATA CONTROL] knob indicator is lighted, you can use the voice button on the panel, use to select the style.1.Selecting Voice Directly When the [VOICE/STYLE] button is lighted, means your piano is in Stylemode, now you can use the voice button on the panel to select voice directly, the second row of buttons below as the direct style.NUMBERPIANO ORGAN GUITAR BASS USER VOICE8 BEAT BALLAD DANCE DISCO USER STYLE1 2 3 4 56 7 8 9 055](https://usermanual.wiki/Ringway-Tech/TG8862/User-Guide-2143919-Page-59.png)
![Style 01~09 :press number 0 first, then press 1~9Style 10~99 : press two numeric buttons directly, for example: to select 99, press the number 9 button and then the number 9 to select the sound.Style 100~203: press the number 1 to 2 of a button and hold it until the number appears on the display, then you can enter the tens and ones digits. For example: to select 123 Sea Shore press number 1 button and hold it until 1_ appears, then press the number 2 and the number 3 buttons to select the sound.You also can press the [+/- ] buttons until the desired voice appears on the display.NOTEWhen [VOICE/STYLE] button is unlighted, it meams the current selection in VOICE mode .When [VOICE/STYLE] button is lighted, it meams the current selection in STYLE mode .When [NUMBER] button is unlighted, it meams the current selection in direct VOICE or STYLE mode.When [NUMBER] button is lighted, it meams the current selection in NUMBER SELECT mode .In the Style Mode, clockwise or counterclockwise rotation [DATA CONTROL], can quickly select the Style.Clockwise rotation is increasing rapidly, counterclockwise rotation for the rapid decline.3.Use Data Control Knob56](https://usermanual.wiki/Ringway-Tech/TG8862/User-Guide-2143919-Page-60.png)
![Start the StlylePress [VOICE/STYLE] button, the[+] / [-] buttons or [DATA CONTROL] knob Reference: Chord in Keymood function. P13indicator is lighted, you can use the voice button on the panel, use to select the style.1. Start ImmediatelyPress [START/STOP] button to start the style.2. Turn the Chord Function On The left hand section of the keyboard becomes the Auto Accompaniment section,and chords played in this section are automatically detected and used as a basis of for fully automatic accompaniment with the selected style.Press the [SYNCHRO] button to enter the sync start waiting mode, then theaccompaniment will start when you play the first chord on the Auto Accompanimentsection of the keyboard.STARTSTOP3. Using Synchro StartFILL IN 2FILL IN 2VARIATIONVARIATIONSYNCHROSYNCHRO INTROENDINGSTARTSTARTSTOPSTOPFILL IN 1FILL IN 157](https://usermanual.wiki/Ringway-Tech/TG8862/User-Guide-2143919-Page-61.png)
![Press the [SYNCHRO] button and then press the [FILL IN 1] or [FILL 2/VARIATION] button, the accompaniment will start from Fill In as soon as a chord is detected in the Auto Accompaniment section of the keyboard.You can do this in one of three ways.a. Stop Immediately The accompaniment can be stopped at any time by pressing the [START/STOP]button.b. Ending StopPress the [INTRO/EDNING] button, the style stops after the ending section isfinished.Any of your instrument accompaniment patterns can be started with an appropriateintroduction by pressing the [INTRO/ENDING] button directly.If you press the [SYNCHRO] button and then press the [INTRO/ENDING] button,the accompaniment will start from the introduction as soon as a chord is detectedin the Auto Accompaniment section of the keyboard.4.Starting the Accompaniment With an Introduction 5. Using Fill In StartStop the StyleFILL IN 2VARIATIONVARIATIONSYNCHROSYNCHROINTROINTROENDINGENDINGSTARTSTARTSTOPFILL IN 1FILL IN 158](https://usermanual.wiki/Ringway-Tech/TG8862/User-Guide-2143919-Page-62.png)
![c. Pressing the [SYNCHRO] ButtonThis immediately stops style and automatically enables Sync Start, letting youre-start the style by simply playing a chord or key in the auto accompaniment areaof the keyboard.FILL IN 2FILL IN 2VARIATIONVARIATIONSYNCHROSYNCHRO INTROENDINGENDINGSTARTSTARTSTOPSTOPFILL IN 1FILL IN 1Hold down the [FILL IN 1] or [ ]button when the style is playing, the selected FILL pattern repeats continuously until button is released.Press the [FILL IN 1] button at any time while the accompaniment is playing toadd a one-measurefill-in.When the accompaniment is playing, press [FILL 2 /VARIATION] button, fill-in accompaniment will immediately start playing, continuing with theFILL 2/ VARIATION Section. FILL 2/VARIATIONFadePress [FADE] button makes rhythm fade up when startingthe rhythm.While rhythm is playing, press [FADE] button to makerhythm fade away.Adding Fill-InFADE59](https://usermanual.wiki/Ringway-Tech/TG8862/User-Guide-2143919-Page-63.png)
![Use the ACC. VOLUME Control to adjust the Accompaniment volume.Adjusting the Accompaniment VolumeUser rhythm recordingSave User Style Press [EDIT] button and [USER STYLE] button at the same time, the LCD willdisplay StyleRec , then press one key to start record.The [START/STOP]button indicator is light, there is 2 section rhythm cycle performance. At the same time start the rhythm, can be arbitrarily added percussion. Press [START/STOP]button to stop the recording.Press the [START/STOP] button to play the recording.At this time,press and hold down the [USER STYLE] button to save the recorded user style, the LCD will display Save Ok .Load User Style Press the [USER STYLE] button, indicator is light, You can load the current recorded user rhythm.USER VOICEUSER STYLEUSER EDIT60](https://usermanual.wiki/Ringway-Tech/TG8862/User-Guide-2143919-Page-64.png)
![Registration Memory The piano can store 5 groups x 6 banks of panel settings. By pressing the memory button, you can recall these settings rapidly. You can preset the panel settings to suitto your performance and store them to the registration memory positions.correspondinga.Pressb.H[STORE/BANK] button repeatedly to select 1MmryBank~6MmryBankold down the [STORE/BANK] button, and then Press the [M1-M5] button, the current panel settings are stored in the memory.StoreLoada.Pressb.[STORE/BANK] button repeatedly to select 1MmryBank~6MmryBankPress the [M1-M6] buttons, can recall the information you have stored. The LCD displays the panel position number.settings as well as memorySTORE / BANKSTORE / BANKSTORE / BANKSTORE / BANKSTORE / BANKM1M1M2M2M3M3M4M4M5M561](https://usermanual.wiki/Ringway-Tech/TG8862/User-Guide-2143919-Page-65.png)
![NOTEAnytime you store to a REGISTRATION MEMORY button, allsettings previously stored in that button will be erased andreplaced by the new settings.Saving the Registration Data to USB DiskInsert the USB Disk into the USB terminal.Press the [SAVE TO] button simultaneously, a message xxREGSTxxx(xx indicates this file's sequence Num in UDisk. xxx indicates registration filenumber ) appears, indicating your Registration Memory Settings are saved to USBDisk, with 8 Registrations stored to a single file.Press the [FREEZE] button to turn ON/OFF the freeze function and its icon. When the freeze function is ON, the memory settings can be recalled with theexception of any accompaniment settings. You can use the registration memoryfunction without affecting the accompaniment.Freeze FunctionFREEZE62](https://usermanual.wiki/Ringway-Tech/TG8862/User-Guide-2143919-Page-66.png)
![Delete REG File from USBInsert the USB Disk into the USB terminal. Use buttons or [DATA CONTROL]knob to select REG file you want to delete, then press the [RECORD] button and press [PLAY/LOAD] button simultaneously. LCD shows:[+/ -] Press [+] button to delete the file. Press [-] button to cancel.Use Registration Data from USBInsert the USB Disk into the USB terminal. Use to select REG file, then press [PLAY/LOAD] button, display showsLoad OK! .[+/-] button or [DATA CONTORL]knob30 Registrations will be loaded to the memory store on the panel. Youcan recall the information you have loaded by pressing M1-M5.USB FILEUSB FILERECORDRECORDMULTIMULTIPLAY / LOADPLAY / LOADSAVE TOSAVE TODELETEDELETE63](https://usermanual.wiki/Ringway-Tech/TG8862/User-Guide-2143919-Page-67.png)
![64Song Recording This digital piano lets you record your performances and Registration settingsto a USB Disk. Each user song lets you record up to sixteen independent tracks. These include not only the voices for the keyboard performance, but also the auto accompaniment parts. It provides two different ways to record: Quick Recording and Multi Track Recording. (All the recording data will be saved automatically as MIDI Format 0 File to your USB Disk).Quick Recording1. Insert the USB Disk into the USB Terminal2. Start Recording Press the [RECORD] button to start recording. (The first one measures are tempo prompt only. It cannot record any data). USB FILE RECORDMULTIPLAY / LOAD SAVE TODELETE](https://usermanual.wiki/Ringway-Tech/TG8862/User-Guide-2143919-Page-68.png)
![653. Stop Recording Press [RECORD] button again to stop recording. Recording stops and your performance is written to the song. The song to which your performance is recorded is automatically named xxxSONG_xxx (xxx indicates this file's sequence Num in UDisk. xxx indicates the recording file number). You can edit the song as desired by computer or midi edit soft.Quick Recording automatically makes track assignments as below:Track 1--------- Main VoiceTrack 2--------- Split VoiceTrack 3--------- Dual Voice You also can use accompaniment styles to record. The accompaniment stylewill be recorded on track9-track16. The quick recording method is different from the multi recording method. In quick recording mode, track4-track8 are not allowed to record. but for multirecording, the recorded data is recorded on tracks 1-16. If you wish to re-record a user song that was originally recorded by the easy recording method, please use Multi Track Recording.USB FILE RECORDMULTIPLAY / LOAD SAVE TODELETE](https://usermanual.wiki/Ringway-Tech/TG8862/User-Guide-2143919-Page-69.png)
![Multi Track Recordinga. Insert the USB Disk Into the USB Terminal b. Press the [RECORD] button to start recording. (The first one measures are tempo prompt only. It cannot record any data). c. Press [RECORD] button again to stop recording. Recording stops and your performance is written to the song. The song to which your performance is recorded is automatically named xxxSONG_ xxx( xxx indicates the song file number. SONG_xxx is the song's name). d. Hold down [USB FILE] button ,then press [RECORD] button Recording. f. to start When the recording is finished, the recording file will be saved as anew file named 002 SONG_001Use the same operation as Step d to record more tracks. The name ofthe new file will be saved in sequence. Multi track recording provides two ways to record.Use Auto Track Assignment.Select Tracks by Yourself. 1. Use Auto Track Assignment.Quick Recording automatically makes track assignments as below:Track 1--------- Main VoiceTrack 2--------- Split VoiceTrack 3--------- Dual Voice66USB FILE RECORDMULTIPLAY / LOADPLAY / LOADSAVE TOSAVE TODELETE](https://usermanual.wiki/Ringway-Tech/TG8862/User-Guide-2143919-Page-70.png)
![67a. Insert the USB Disk Into the USB Terminal2. Select Tracks by Yourself b. Press the [RECORD] button to start recording. (The first one measures are tempo prompt only. It cannot record any data). c. Press [RECORD] button again to stop recording. Recording stops and your performance is written to the song. The song to which your performance is recorded is automatically named xxxSONG_ xxx( xxx indicates the song file number. SONG_xxx is the song's name). d. Press [FUNCTION] button, use [+] or [-] button to selectthen press [ENTER] button, use [+] or [-] button to select Tracks (01-16,Off). Default : 01R. RecTrk------ to select the Main Voice track (01-16, OFF) 02L. RecTrk------ to select the Split Voice track (01-16, OFF) 03D. RecTrk------ to select the Dual Voice track (01-16, OFF)25M.RecTr ,NOTEIf you want to record new files based on the pre-recorded multi-track file, the new recording will begin with the first track. Allthe tracks of the pre-recorded multi-track file will follow thenewly-recorded tracks in sequence.Quick Recording automatically makes track assignments as below:Track 1--------- Main VoiceTrack 2--------- Split VoiceTrack 3--------- Dual VoiceUSB FILE RECORDMULTIPLAY / LOAD SAVE TODELETE](https://usermanual.wiki/Ringway-Tech/TG8862/User-Guide-2143919-Page-71.png)
![Delete Song Insert the USB Disk into the USB terminal. Use [+] and [-] buttons to select xxxSONGxxx file you want to delete, then hold down the [RECORD] button and press [PLAY/LOAD] button. LCD shows:Press [+] button to delete the file.Press [-] button to cancel. e..If you record Main Voice only, please turn off the Split Track and Dual Track.Hold down the [USB FILE] button ,then press [RECORD] button, when the recording is finished, the recording file will be saved as a new file named 002 SONG_001 f Use the same operation as Step d and Step e to record more tracks. The name of the new file will be saved in sequence.USB VolumeReference: USB Volume in function menu. P16USB FILE RECORDMULTIPLAY / LOAD SAVE TODELETEUse this button you can switch to USB mode immediately even the keyboard is in any of other mode.Insert the USB Disk into the USB socket. Press [USB FILES] button, if your disk is locked orno supported files in it, the display will show Not Ready .USB Files Button68](https://usermanual.wiki/Ringway-Tech/TG8862/User-Guide-2143919-Page-72.png)
![69Chord DictionaryThe Chord Dictionary function allows you to look up chords. When you want toquickly learn how to play a certain chord, the Dictionary function will help youto look up the individual note of the chord.Press the [CHORD DICTIONARY] button, the LED will display Chord:C inthe top row. ( C is the chord Root and the chord type ). The LED will displayC1 E1 G1 in the buttom row. ( C1 E1 G1 is the chord Root and the chord type ).Press the root note of the Chord you want to look up. This needs to be in theChord Root section C3~B3 of the keyboard. For examle:After pressing the Chord Root, select the Chord Type you want to look up in theChord Type section C4~B5 of the keyboard. The Chord Type includes Major Triad, Minor Triad and Seventh Chord. Then the LCD will display the Chord Type and key position you currently want to look up. If you press the correctkey as the notes shown on the LCD, the chord will start.Press the [CHORD DICTIONARY] Button again to exit the function.Selecting the Chord RootCDBC#/Db D#/EbEFF#/GbGG#/AbAA#/BbSelecting the Chord TypemM7M7 MM6m(9)6m7(9)m7m7b5m7M(9)MExiting the Chord DictionaryCHORDDICTIONARY](https://usermanual.wiki/Ringway-Tech/TG8862/User-Guide-2143919-Page-73.png)
![70Teaching FunctionYour instrument has an intellective teach function which can lead a beginnerlearn how to play a song.Hold down the [DEMO/LEARN] button,the LCDwill display [DEMO/LEARN] button and There are three teaching steps for you to learn from playing the songs step by step.Song 01then press the [PLAY/LOAD]button, the[PLAY/LOAD]button indicator is flashing. You can playing the song at the sametime.After the song,use the [+/-] button to select other songs that you want.Range: 01~55.The defult song learning is RightReference: Left/right Hand in function menu. P53theLeft/Right Hand3 Steps of Learning FeatureLearn 1:Hold down the [DEMO/LEARN] button, the LCD will display ress the [DEMO/LEARN] button , the LCD will display [DEMO/LEARN] button and hen you press any one key on the keyboard contineously, the teaching song will be played note by note.It will be easy for you to learn.Song 01 .P repeatedly Learn1 01 ,press the [PLAY/LOAD]button , the[PLAY/LOAD] button indicator is flashing. Now wtheDEMO / LEARNDEMO / LEARN](https://usermanual.wiki/Ringway-Tech/TG8862/User-Guide-2143919-Page-74.png)
![Press the [PLAY/LOAD]button again to stop the learning song mode or use [+/-] buttonto select other learning song. Range: 01~80.Learn 2:Hold down the [DEMO/LEARN] button, the LCD will display ress the [DEMO/LEARN] button , the LCD will display [DEMO/LEARN] button and he teaching song willnot go on until you press the correct key on the keyboard.You can learn how to play a song in a very short time.Song 01 .P repeatedly Learn2 01 ,press the [PLAY/LOAD]button , the[PLAY/LOAD] button indicator is flashing. Now tthePress the [PLAY/LOAD]button again to stop the learning song mode or use [+/-] buttonto select other learning song. Range: 01~80.Learn 3:Hold down the [DEMO/LEARN] button, the LCD will display ress the [DEMO/LEARN] button , the LCD will display [DEMO/LEARN] button and ou can play the song with the instrument play.You can play this song by yourself.Song 01 .P repeatedly Learn2 01 ,press the [PLAY/LOAD]button , the [PLAY/LOAD]button indicator is flashing. Now ytheDEMO / LEARNDEMO / LEARNDEMO / LEARN71](https://usermanual.wiki/Ringway-Tech/TG8862/User-Guide-2143919-Page-75.png)
![Press the [PLAY/LOAD]button again to stop the learning song mode or use [+/-] buttonto select other learning song. Range: 01~80.Press and hold down the [DEMO/LEARN] button to exit the Teaching Function.DEMO / LEARNDEMO / LEARNDEMO / LEARN72](https://usermanual.wiki/Ringway-Tech/TG8862/User-Guide-2143919-Page-76.png)
![73Factory Set 1. Turn off the power. 2. Hold down [+] and [-] buttons, then turn the power on, it can restore allinternal settings to factory set.STANDBY/ONSTANDBY/ON+-](https://usermanual.wiki/Ringway-Tech/TG8862/User-Guide-2143919-Page-77.png)