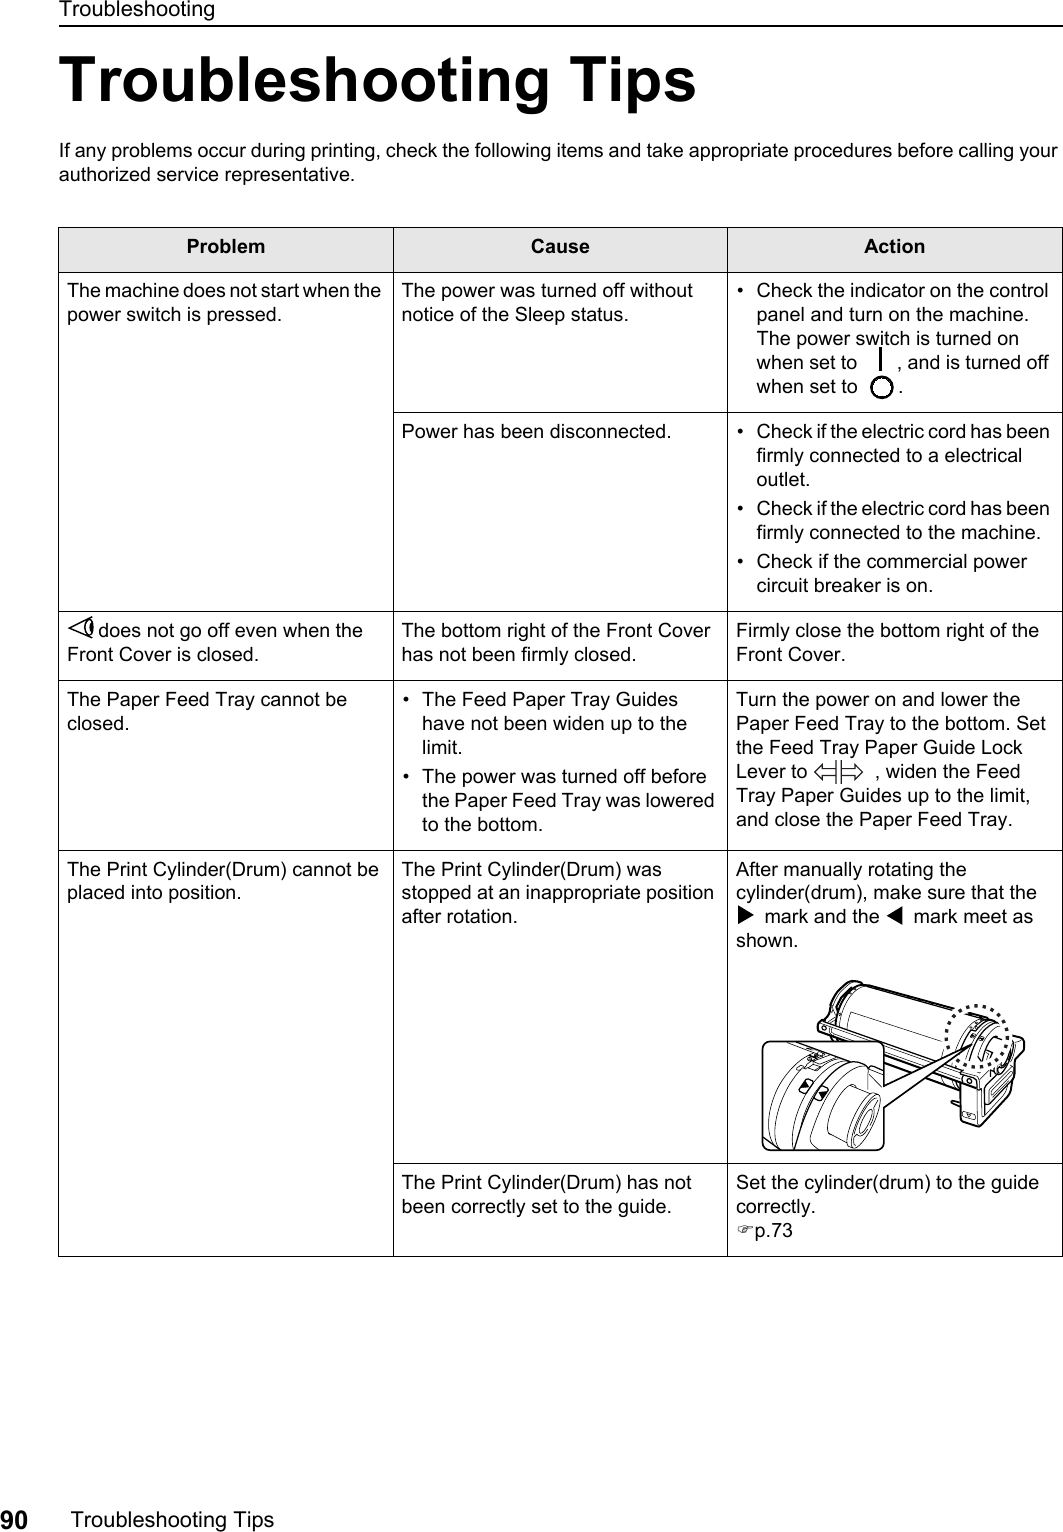
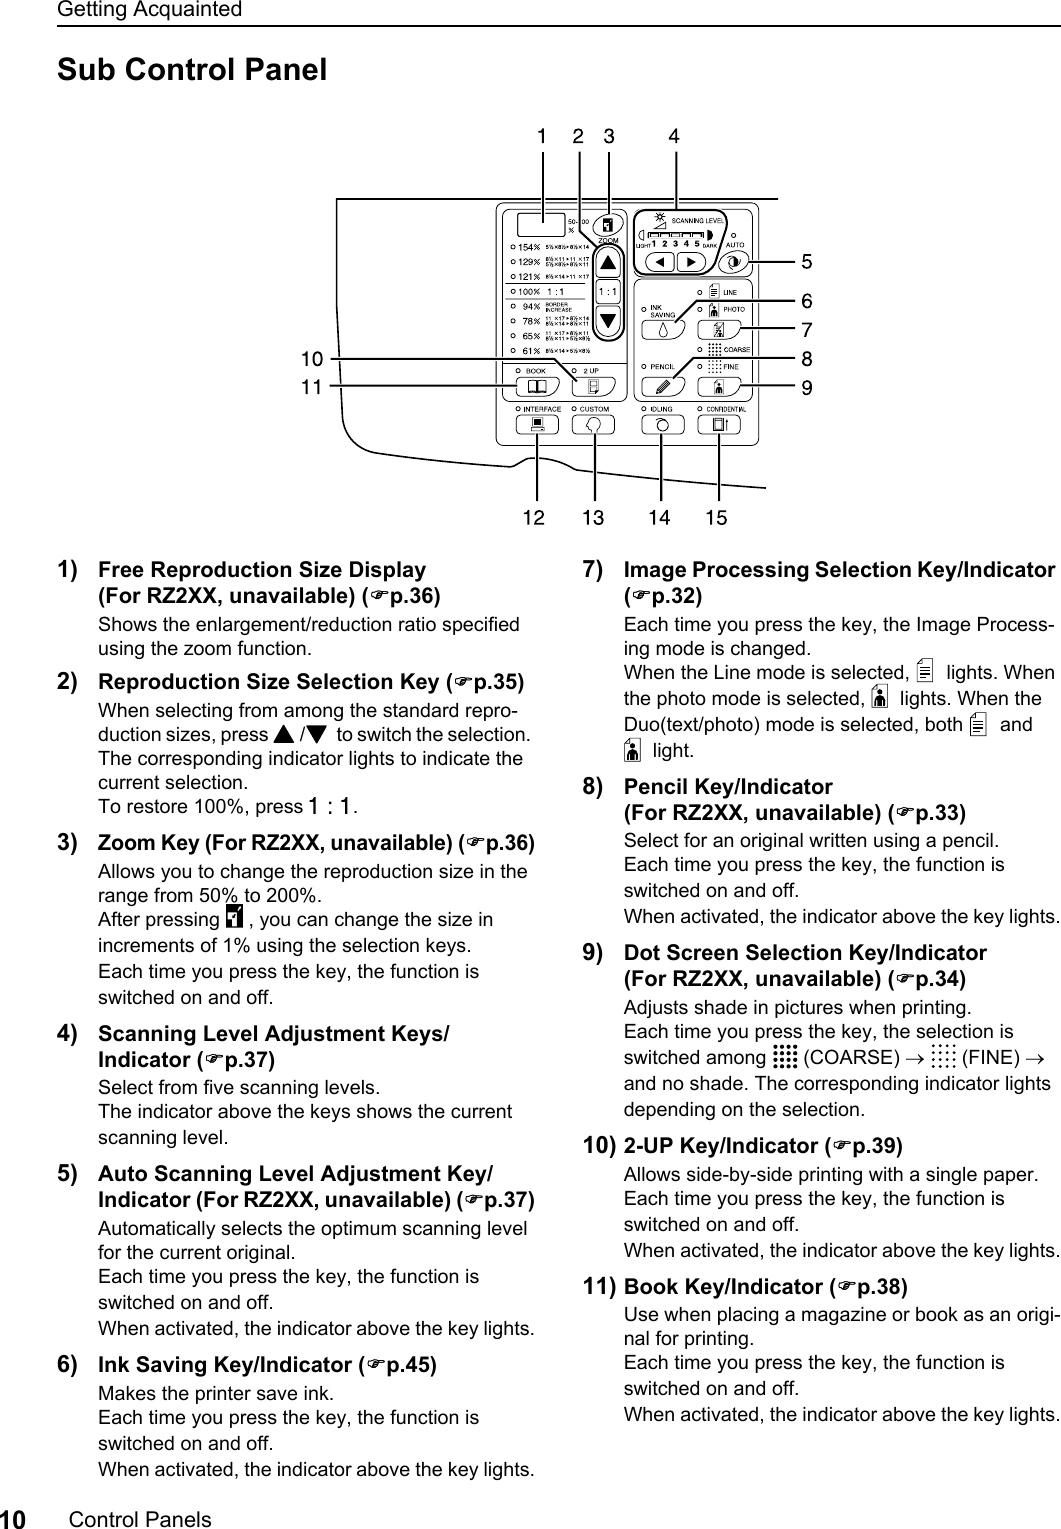
Riso Kagaku RFM3L00 Duplicator with RFID System User Manual 0806 ORCH EN
Riso Kagaku Corporation Duplicator with RFID System 0806 ORCH EN
UserManual.wiki
>
Riso Kagaku
>
RFM3L00 User Manual
User Manual Complete
Navigation menu
Upload a User Manual
Namespaces
Wiki Guide
HTML
PDF
Info
Views
User Manual
Discussion / Help
Navigation
![Contents3Setting up for Scanning Originals 32Selecting the Image Processing Mode [Line, Photo, Duo] ................................................ 32Scanning Originals Written with Pencils [Pencil] (For RZ2XX, unavailable)...................... 33Processing Photos with Dot Screening [Dot Process] (For RZ2XX, unavailable) ............. 34Enlarging and Reducing Originals [Enlargement/Reduction] ............................................ 35Enlarging and Reducing by Standard Ratios [Standard] ....................................................35Enlarging and Reducing with the Zoom Function [Zoom] (For RZ2XX, unavailable) .........36Scanning Originals Having Faint or Dark Contents [Scanning Level Adjustment] ............ 37Reproducing Bound Documents [Book Shadow Edit] ....................................................... 38Printing Originals Side-by-Side [2-Up Printing].................................................................. 39Single-Original Printing and Two-Original Printing .............................................................39Restrictions on 2-Up Printing..............................................................................................40Operational Procedure .......................................................................................................42Automatic Printing [Auto-Process]..................................................................................... 44Saving Ink [Ink Saving] ...................................................................................................... 45Setting up for Printing 46Producing Proof Copies [Proof]......................................................................................... 46Adjusting the Print Density [Print Density Adjustment] (For RZ2XX, unavailable) ............ 47Adjusting the Print Position [Print Position Adjustment] .................................................... 48Adjusting the Vertical Position ............................................................................................48Adjusting the Horizontal Position........................................................................................48Changing the Print Speed [Print Speed Adjustment]......................................................... 49Advanced Features 50Automatic Sorting into Groups [Programmed Printing]...................................................... 50Idling Action [Idling] ........................................................................................................... 53Protecting Confidential Documents [Confidential Mode] ................................................... 54Printing with a Linked Printer (Option) (For RZ2XX, unavailable) ..................................... 55Customizing the Initial Settings [Custom Setting Mode].................................................... 57Changing Procedure...........................................................................................................61IP Address Setting (for RZ2XX, unavailable) .....................................................................63Setting the Link-free volume (for RZ2XX, unavailable) ......................................................65](https://usermanual.wiki/Riso-Kagaku/RFM3L00/User-Guide-389238-Page-3.png)
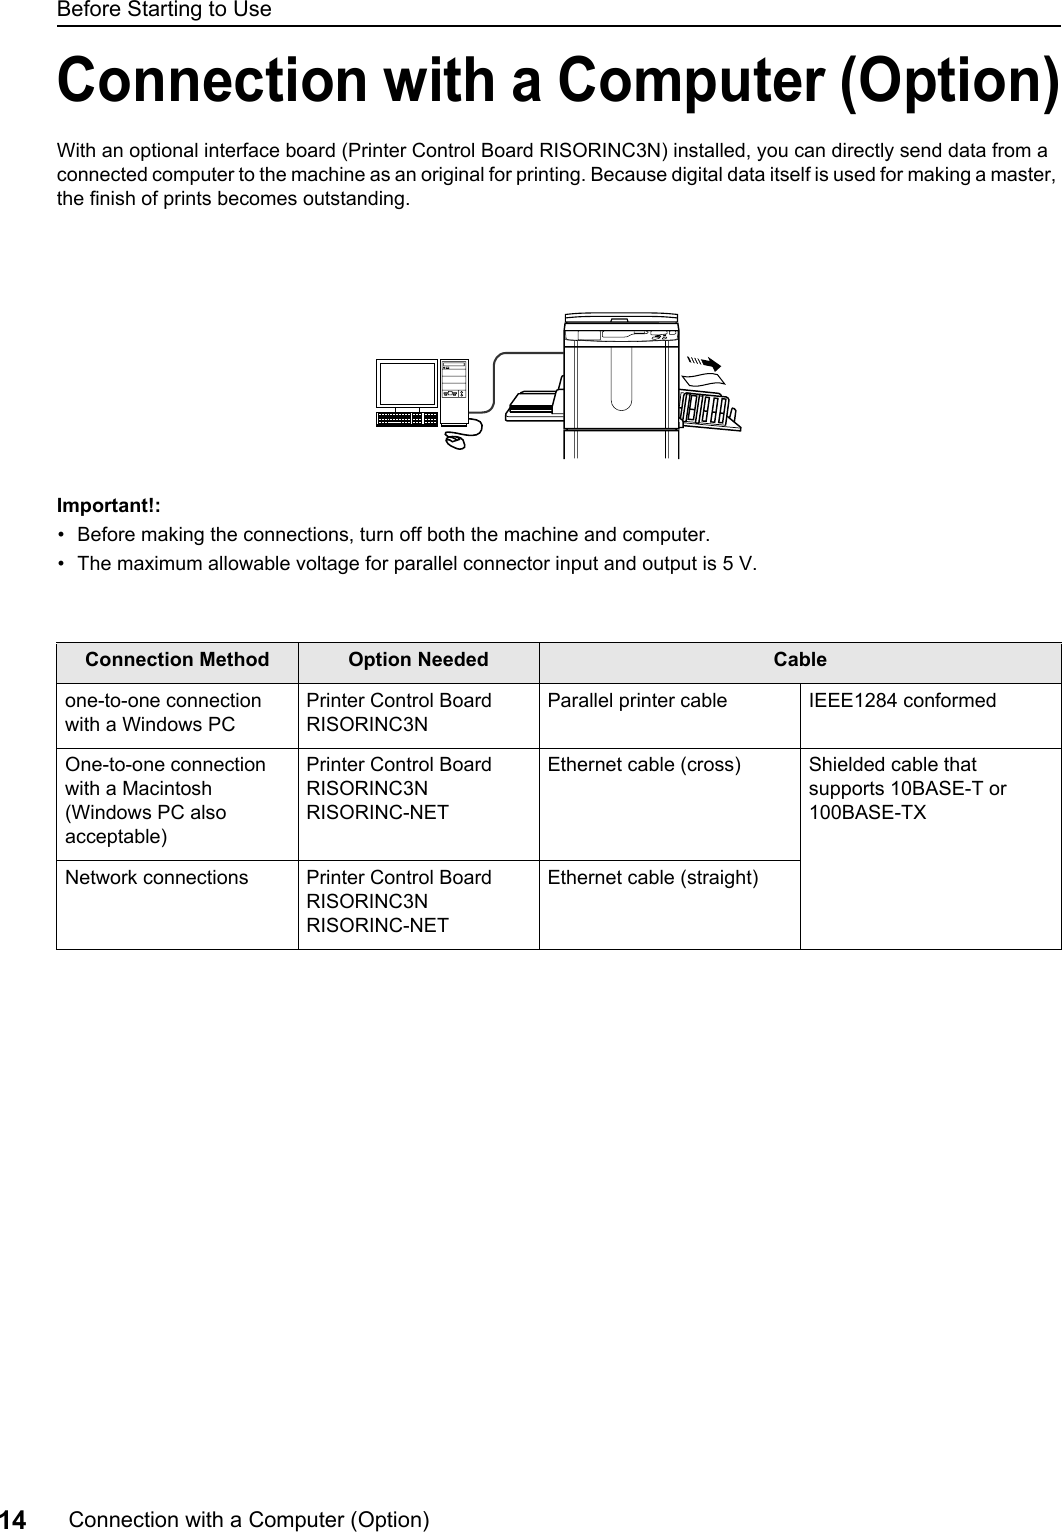


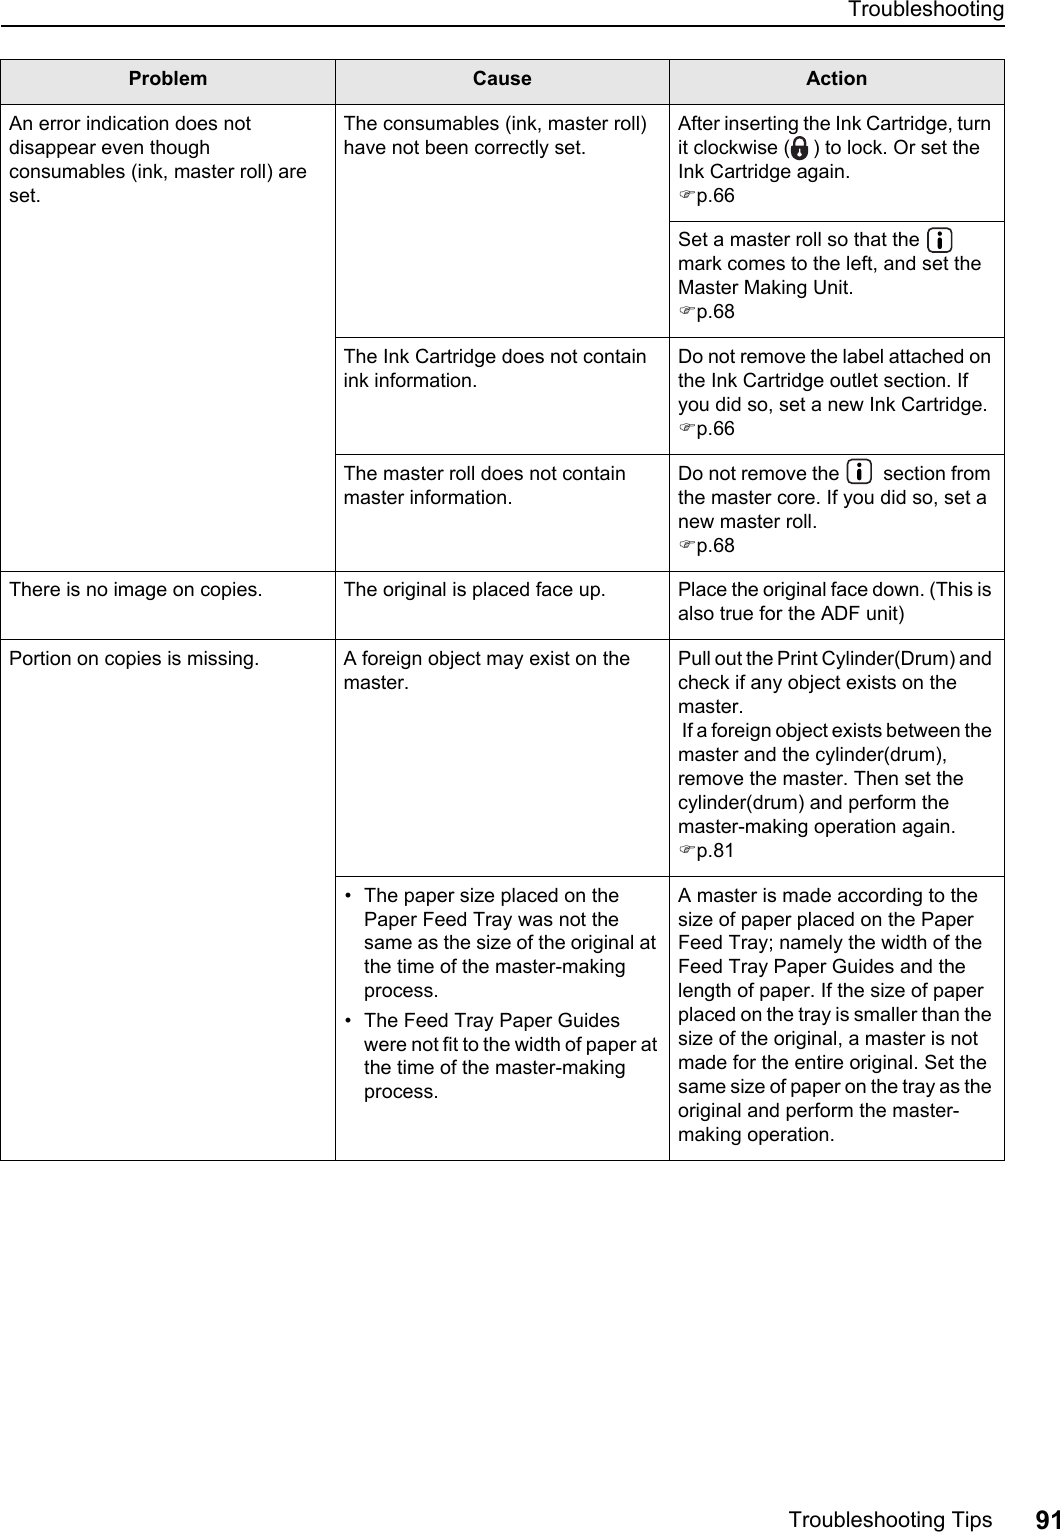
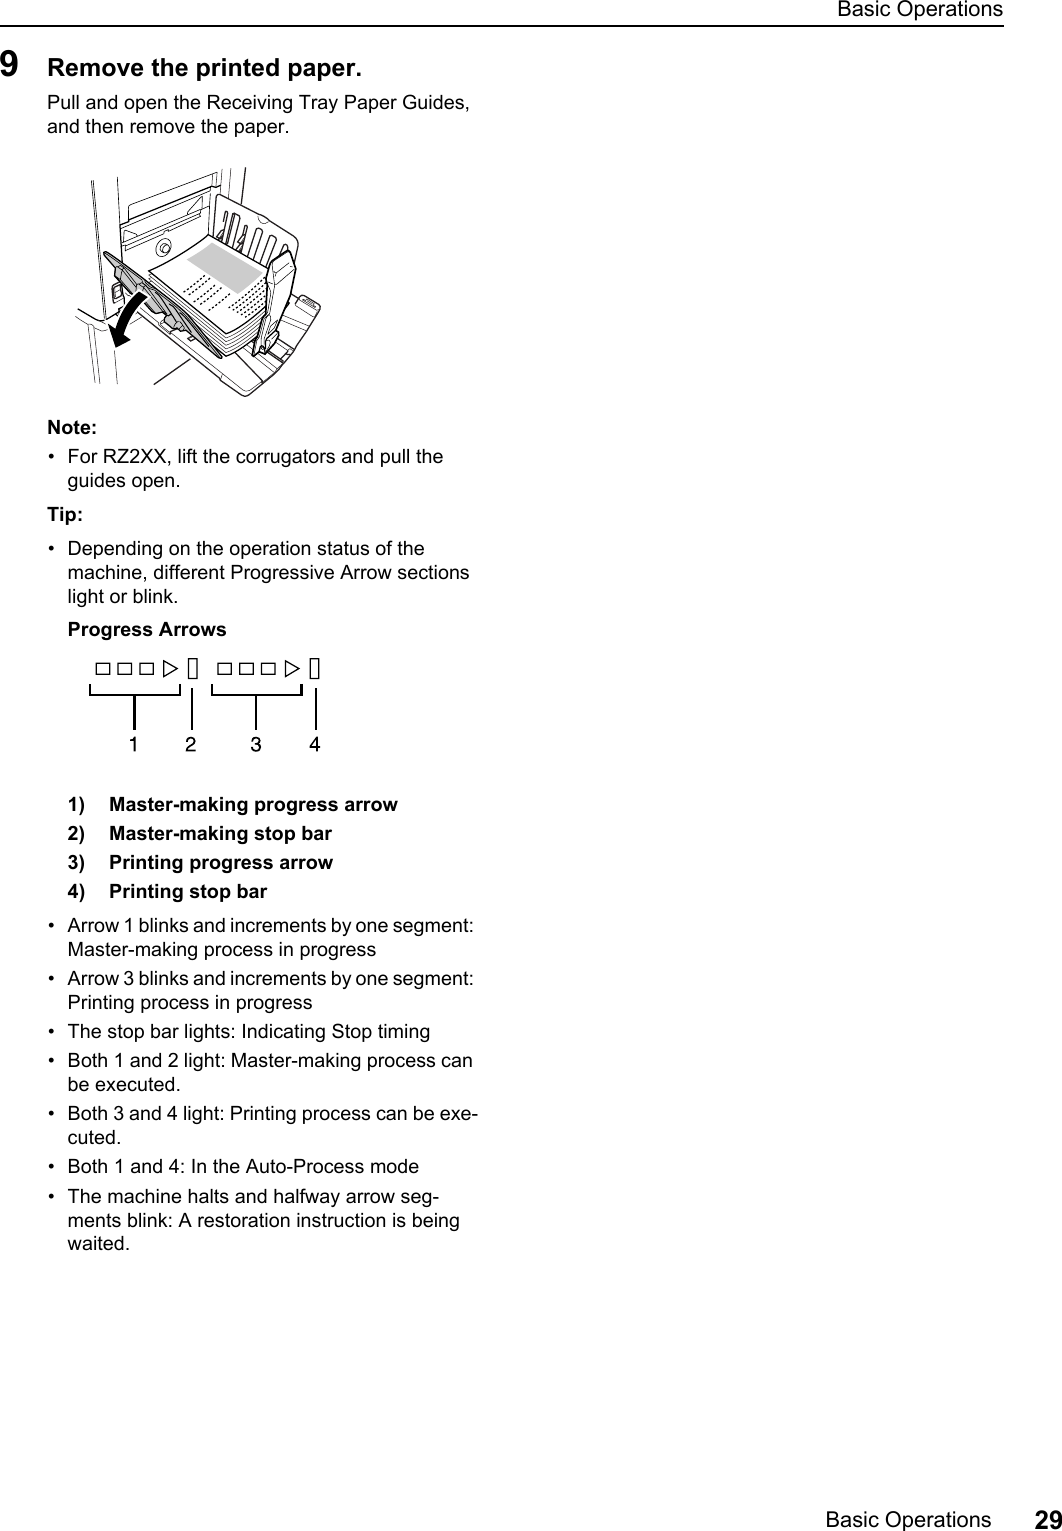
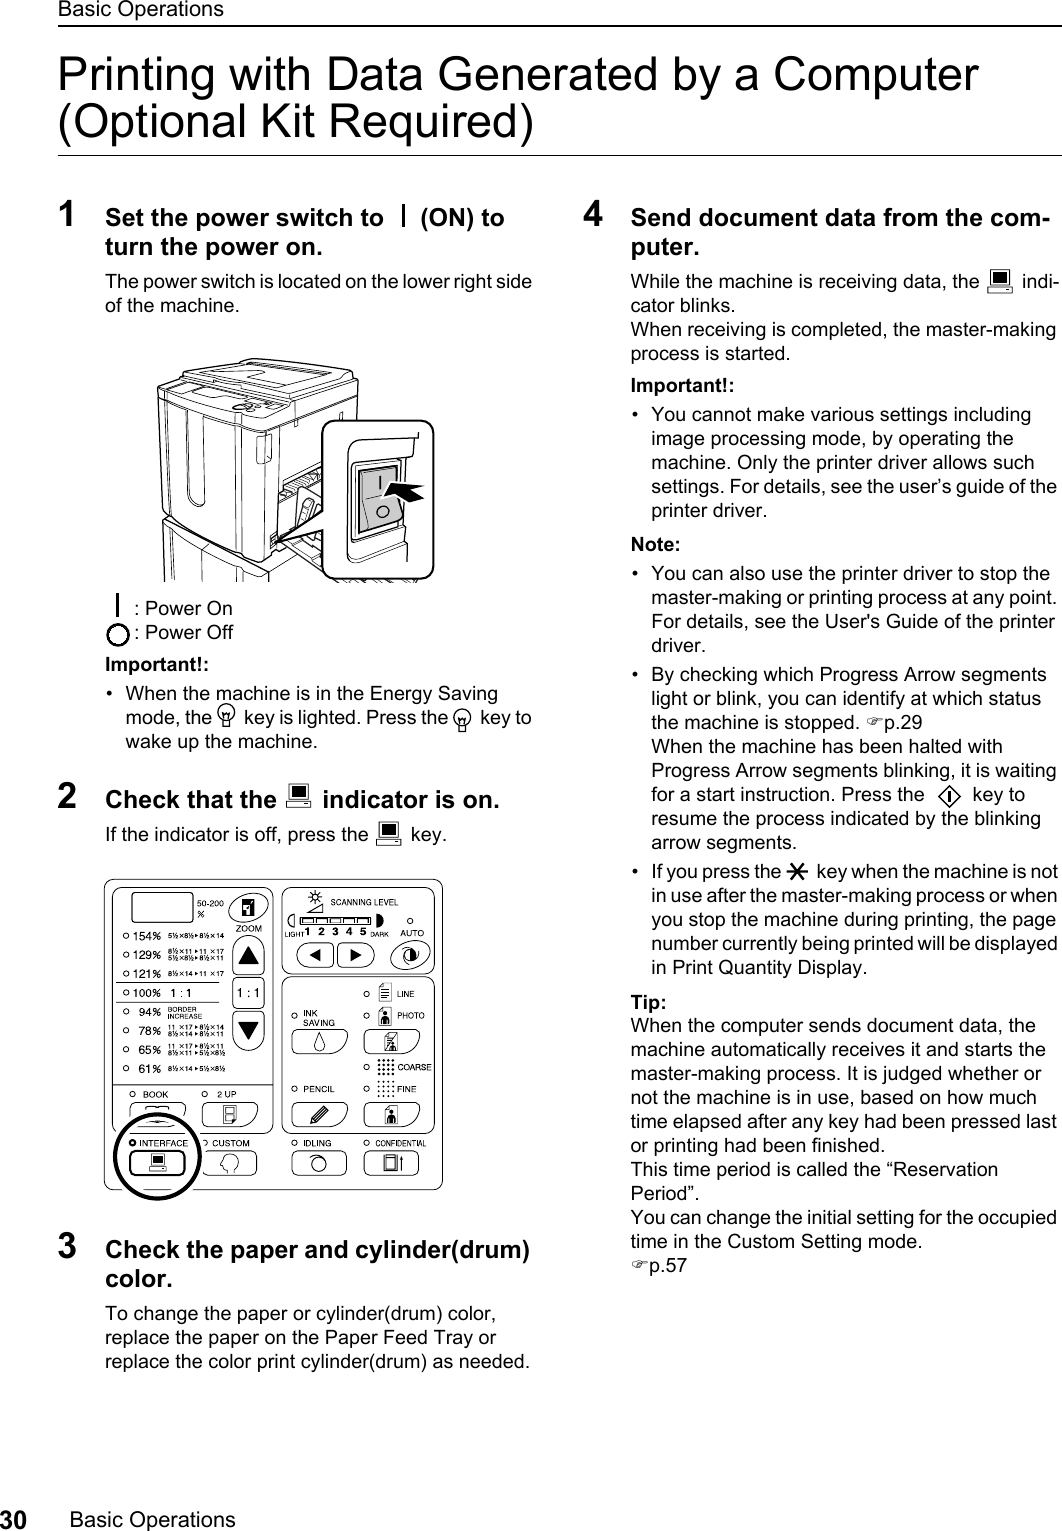
![Basic OperationsBasic Operations28Note:• You can place up to about 50 sheets of orig-inals in the ADF unit.• If using the Custom Setting mode you select ON for Semi-Auto, the next master-making is automatically started and then the machine will stop when the ADF unit con-tains originals. )p.574 Make necessary settings.Make various settings including image processing mode selection.)p.32∼p.455 Enter the number of copies to be printed, using the Print Quantity keys.The specified number is shown on the Print Quan-tity Display.Note:• If you enter an incorrect number, press the [C] key, and then enter the correct number. • If “L” appears at the left end of the Print Quantity Display, printed copies are output from a Linked Printer (option). Go to step 7.)p.55• In order to make a master using the machine when “L” is in display, press the [C] key to reset the Print Quantity Display to zero, and then press the key. The master-making process is started. Check the sample copy result, enter the num-ber of copies to be printed, and then press the key again.6 Press the key.The original is scanned, and a master is made.After a master has been made, a sample copy is printed.Check the sample copy result; e.g., print position and density.Note:• You can change the settings for print position and density. After changing the settings, press , and then check the proof copy result.)p.46∼p.497 Press the key again.The specified number of copies is printed.Note:• You can change the print speed using the Print Speed Adjustment keys.)p.49• If printing is stopped halfway, check the display.)p.80∼p.908 Press the key.After printing has been finished, return the set-tings to the initial settings.](https://usermanual.wiki/Riso-Kagaku/RFM3L00/User-Guide-389238-Page-28.png)
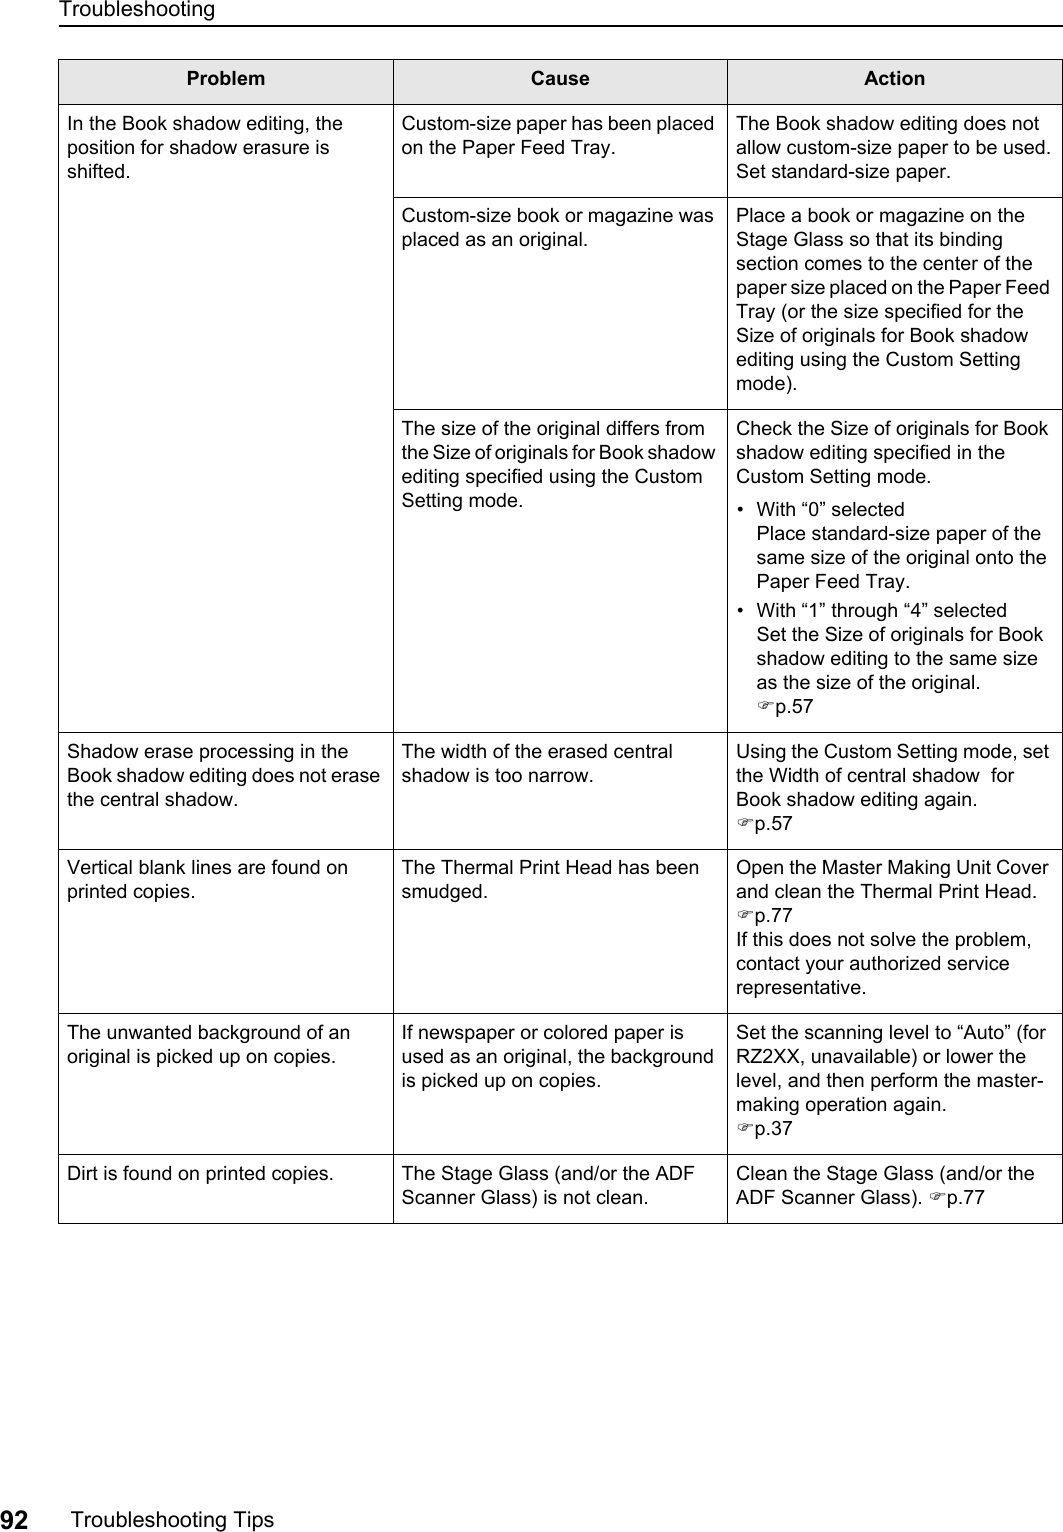
![Selecting the Image Processing Mode [Line, Photo, Duo]32Setting up for Scanning OriginalsSelecting the Image Processing Mode[Line, Photo, Duo]In order to make a quality master, select an appropriate mode depending on whether originals contain only Line(text) or photo or both of them. Press the key to select the Image Pro-cessing mode. Each time you press the key, the indicators light in the order; (Line)→(Photo)→(Duo)The table shows which types of originals are appropri-ate for each mode.Important!:• With the Photo mode or Duo mode selected, you can process images with a dot screening when printing. (For RZ2XX, unavailable))p.34• With the Photo mode or Duo mode selected, you cannot select “Auto” for the scanning level. Perform manual adjustment. )p.37• You cannot use the Image Processing mode and Pencil mode together.Note:• Select the Pencil mode when printing from an original written with a pencil or a stamped original.)p.33• The Custom Setting mode allows you to change the initial setting for the Image Processing mode.)p.57Mode Type of Originals LineOnly text contained; e.g., word processing file printout, newspaper Photo Only photos containedDuo Both text and photos contained](https://usermanual.wiki/Riso-Kagaku/RFM3L00/User-Guide-389238-Page-32.png)
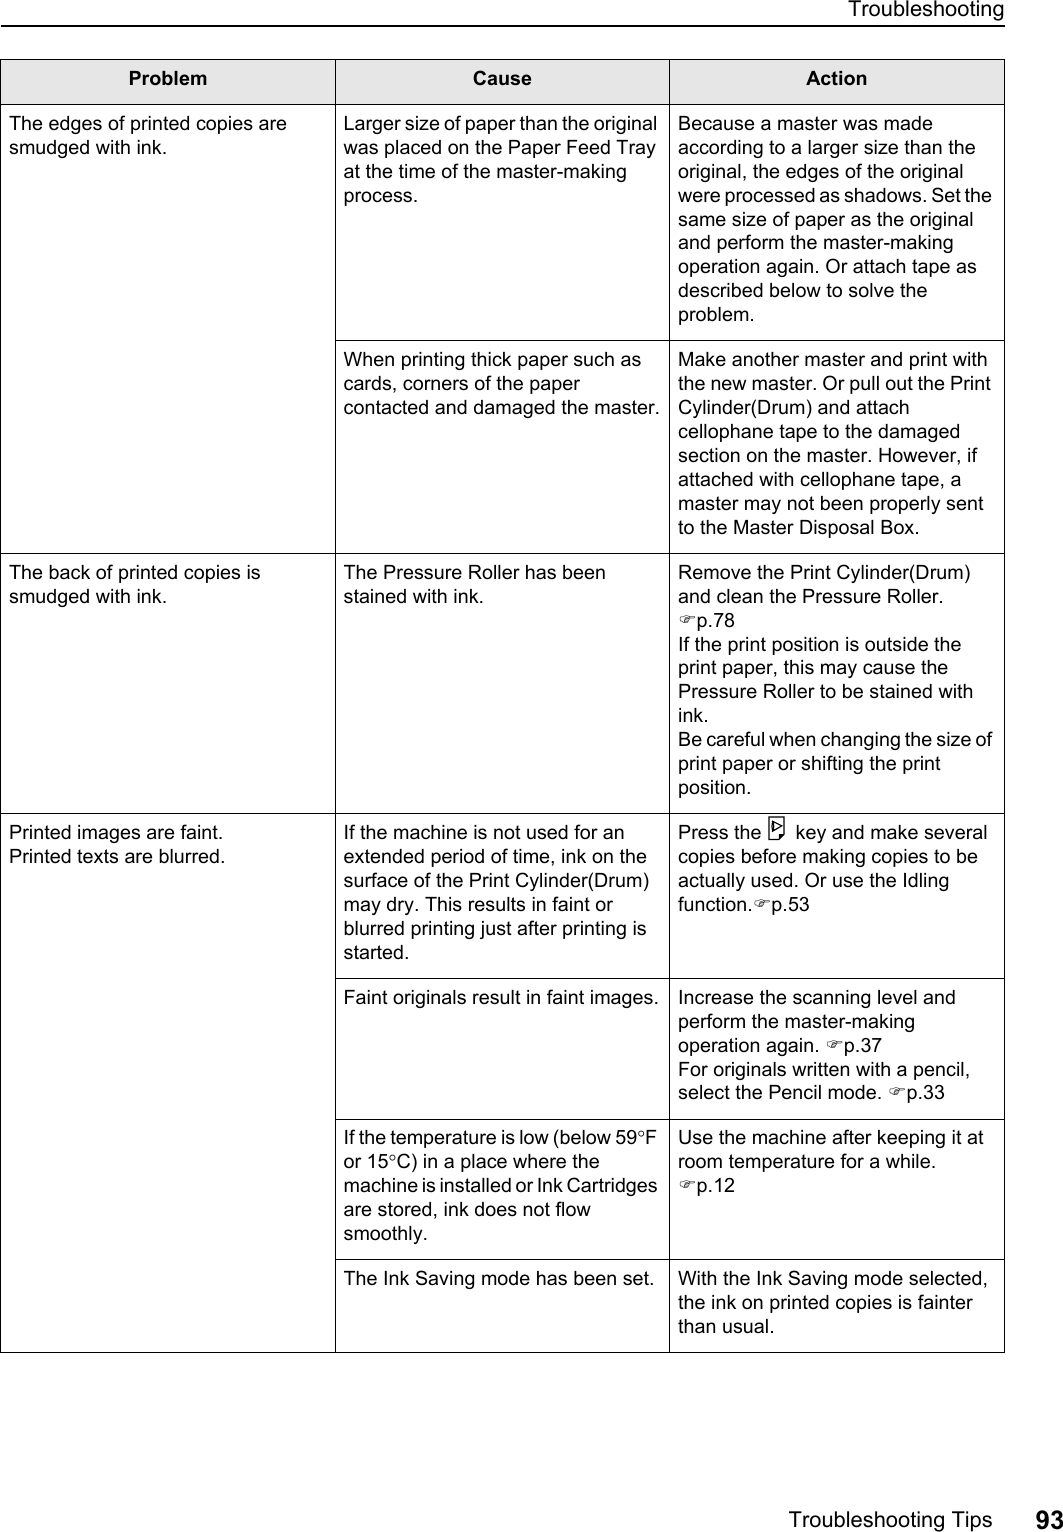
![Setting up for Scanning OriginalsScanning Originals Written with Pencils [Pencil] (For RZ2XX, unavailable) 33Scanning Originals Written with Pencils [Pencil] (For RZ2XX, unavailable)This function allows clearer printing from such originals containing faint contents as those written with pencils.Press the key to turn on its indicator.Important!:• You cannot use the Pencil mode and Image Process-ing mode at the same time.• You cannot use the Pencil mode and Dot Process mode at the same time.• When in the Pencil mode, adjust the scanning level manually. You cannot select “Auto” (for RZ2XX, unavailable). )p.37Note:• To clear the Pencil mode, press the key again to turn off its indicator or select another image process-ing mode.](https://usermanual.wiki/Riso-Kagaku/RFM3L00/User-Guide-389238-Page-33.png)
![Setting up for Scanning OriginalsProcessing Photos with Dot Screening [Dot Process] (For RZ2XX, unavailable)34Processing Photos with Dot Screening [Dot Process] (For RZ2XX, unavailable)This function processes photo originals with dot screening, resulting in clearer printing.You can select the dot screening pattern from two types.Press the key to select the type of a dot screening.Each time you press the key, the indicators light in the order; (COARSE)→ (FINE)→and then OFF.The table shows the equivalent lpi (line per inch) to each mode: Important!:• You cannot use the Dot Process mode and Line mode together.• You cannot use the Dot Process mode and Pencil mode together.Mode Equivalent LpiCOARSE 53FINE 106](https://usermanual.wiki/Riso-Kagaku/RFM3L00/User-Guide-389238-Page-34.png)
![Setting up for Scanning OriginalsEnlarging and Reducing Originals [Enlargement/Reduction] 35Enlarging and Reducing Originals [Enlargement/Reduction]You can enlarge or reduce originals when printing.Specify the enlargement/reduction ratio by selecting the standard ratios; or specify it in increments of 1%.Enlarging and Reducing by Standard Ratios [Standard]Select the standard ratios when enlarging or reducing standard-sized originals to another standard size or when increasing margins around the original. Press the / keys to specify the enlargement/reduction ratio. Each time you press the key, the indicator of the selected ratio lights.To restore 100%, press the key.The standard enlargement/reduction ratios differ among the models.Check the panel on your machine.](https://usermanual.wiki/Riso-Kagaku/RFM3L00/User-Guide-389238-Page-35.png)
![Setting up for Scanning OriginalsEnlarging and Reducing Originals [Enlargement/Reduction]36Enlarging and Reducing with the Zoom Function [Zoom] (For RZ2XX, unavailable)Specify the enlargement/reduction ratio between 50% and 200% in increments of 1%.1 Press the key to select the Zoom mode. The current enlargement/reduction ratio is shown on the display.2 Press the / keys to select the enlargement/reduction ratio. The selected enlargement/reduction ratio is shown on the display. key: Each press increases the ratio by 1%. key: Each press decreases the ratio by 1%.Note:• To restore 100%, press the key or the key.](https://usermanual.wiki/Riso-Kagaku/RFM3L00/User-Guide-389238-Page-36.png)
![Setting up for Scanning OriginalsScanning Originals Having Faint or Dark Contents [Scanning Level Adjustment] 37Scanning Originals Having Faint or Dark Contents[Scanning Level Adjustment]You can adjust the scanning level according to the density of text and images on originals.With “Auto” selected, the density of originals is pre-scanned and the optimum scanning level is automatically set (for RZ2XX, unavailable).Manual adjustment allows you to select from five levels. For originals containing faint text, select a high level (4 or 5). For such colored originals as newspapers, select a low level (1 or 2).Press the key or the / keys under to adjust the scanning level. key: Each press decreases the scanning level. key: Each press increases the scanning level.:Auto (for RZ2XX, unavailable):Lighter:DarkerImportant!:• With the scanning level adjusted, print several copies after remaking masters to check the print result.• You can select “Auto” only for the Line mode. You cannot select “Auto” with the Photo or Duo mode selected.Note:• The Custom Setting mode allows you to change the initial setting for the scanning level.)p.57](https://usermanual.wiki/Riso-Kagaku/RFM3L00/User-Guide-389238-Page-37.png)
![Setting up for Scanning OriginalsReproducing Bound Documents [Book Shadow Edit]38Reproducing Bound Documents [Book Shadow Edit]This function erases the binding “spine” shadow when printing from such bound originals with facing pages as mag-azines and books.Important!:• The initial settings have been made for the size of originals whose masters can be made and the width of shadow to be erased.(Initial settings: for the size of originals, size of paper placed on the Paper Feed Tray; for width of shadow to be erased, 13/16"(20 mm))The Custom Setting mode allows you to change the initial settings for the size of originals and the width of shadow to be erased. )p.57• If using the Custom Setting mode you have selected “Paper” as the Size of originals for Book shadow editing, use regular-sized paper. If you place custom-size paper, shadow erasure is not correctly performed.• The outside of the set original size is not scanned and used for the master-making process.1 Place a book (or a magazine) on the Stage Glass.Make sure to place the original in the orientation below:The shadow within the dotted box is erased.2 Press the key to turn on its indi-cator.Note:• To clear the setting, press the key again to turn off its indicator.](https://usermanual.wiki/Riso-Kagaku/RFM3L00/User-Guide-389238-Page-38.png)
![Setting up for Scanning OriginalsPrinting Originals Side-by-Side [2-Up Printing] 39Printing Originals Side-by-Side [2-Up Printing]The same or different originals can be printed side by side.This is called 2-Up printing.2-Up printing allows you to place a single original or two different originalsImportant!:• With custom size paper placed, you cannot perform 2-Up printing. Quit 2-Up printing or place regular-sized paper. Single-Original Printing and Two-Original Printing1 Single-original printing This prints from the same original and outputs onto a single sheet of paper side by side.2 Two-original printingThis prints from two different originals and outputs onto a single sheet of paper side by side.The center of printed copies will be free from the shade of originals.Important!:• For two-original printing using the Stage Glass, the machine requires a certain period of time before placing the second original. Using the Custom Setting mode, select 15 seconds or 30 seconds for the interval time; the initial setting is 15 seconds.)p.57Note:• When using the ADF unit (option) for two-original printing, you can place two piled originals in the ADF unit. The two originals are continuously scanned for 2-Up printing.](https://usermanual.wiki/Riso-Kagaku/RFM3L00/User-Guide-389238-Page-39.png)
![Setting up for Scanning OriginalsPrinting Originals Side-by-Side [2-Up Printing]40Restrictions on 2-Up Printing2-Up printing restricts the sizes of paper to be used, paper orientations, and the enlargement/reduction ratios.Enlargement/reduction ratioThe table shows enlargement/reduction ratios suitable for 2-Up printing.-RZ370/RZ230/RZ200--RZ390/RZ310/RZ220-:For RZ2XX, you cannot make selections. OriginalA4 B5 A5 B6Print PaperA3 (for RZ2XX, unavailable)100% 116% 141% 163%B4 87% 100% 122% 141%A4 71% 82% 100% 116%B5 61% 71% 87% 100%OriginalLetter StatementPrint PaperLedger (for RZ2XX, unavailable)100% 129%Legal 78% 100%Letter 65% 100%Statement 50% 65%](https://usermanual.wiki/Riso-Kagaku/RFM3L00/User-Guide-389238-Page-40.png)
![Setting up for Scanning OriginalsPrinting Originals Side-by-Side [2-Up Printing] 41Paper orientationBefore printing, check the orientations of the original and print paper.zOrientation of originalsAlways place originals in the orientation below.zOrientation of print paperAlways place print paper in the orientation below. Note:• You can specify the enlargement/reduction ratio by selecting the standard ratios or specify it in increments of 1% using the Zoom function.)p.35• Originals must have sufficient margins. Insufficient margins result in inappropriate page layout.)p.18• Original margins are kept regardless of the enlargement/reduction ratio.• For two-original printing, you can separately select the following functions for each original.Image Processing mode, Pencil, enlargement/reduction ratio, dot process/scanning level](https://usermanual.wiki/Riso-Kagaku/RFM3L00/User-Guide-389238-Page-41.png)
![Setting up for Scanning OriginalsPrinting Originals Side-by-Side [2-Up Printing]42Operational Procedure1 Place an original.zWhen placing on the Stage GlassPlace the original face down in the vertical ori-entation. Position it using the mark on the left-hand side of the glass.zWhen placing in the ADF unit (Option)Place piled originals in the ADF unit. If you want to separately set the type and size of orig-inals for each original, place one original at a time. Important!:• The sizes of originals to be placed in the ADF unit (option) must be 39/16"×51/2"(90 mm × 140 mm) at least. For smaller origi-nals, use the Stage Glass.2 Press the key to turn on its indicator.Note:• To clear the mode, press the key again to turn off its indicator.3 Make necessary settings.As necessary, make various settings including Image Processing mode selection.)p.32∼p.37](https://usermanual.wiki/Riso-Kagaku/RFM3L00/User-Guide-389238-Page-42.png)
![Setting up for Scanning OriginalsPrinting Originals Side-by-Side [2-Up Printing] 434 Start the master-making process.zWhen placing originals on the Stage GlasszSingle-original printingPress the key to start the first scan. After the scan a interval time alarm sounds. Before the alarm stops, press the key again.Important!:• If you do not press the key within the interval time, the half of the print will be blank.Note:• If you select no interval time using the Custom Setting mode, you can complete 2-Up printing by pressing the key only once.)p.57zTwo-original printingPress the key to start the first scan. After the scan a interval time alarm sounds. Before the alarm stops, place the second original, make various settings (if neces-sary), and then press the key again.Important!:• If you do not press the key within the interval time, the half of the print will be blank.zWhen placing originals in the ADF unit (option)zSingle-original printingPress the key to start the first scan. Place the second original within the interval time. Scan of the second original is auto-matically started.Note:• If you don’t select an interval time using the Custom Setting mode, you cannot perform single-original printing with the ADF unit.zTwo-original printingPlace two piled originals in the tray. Press the key to sequentially execute 2-Up printing using the two originals. If you want to make different settings for each original, place only the first original, and then press the key. Within the interval time, change the settings, and then place the second original. Scan of the second original is auto-matically started.5 Enter the number of copies to be printed, using the Print Quantity keys.The specified number is shown on the Print Quan-tity Display.6 Press the key.2-Up printed copies are output.Note:• If there exists an original in the ADF unit when “Auto-Process” is “ON” for two-original printing, 2-Up printing is sequentially executed.](https://usermanual.wiki/Riso-Kagaku/RFM3L00/User-Guide-389238-Page-43.png)
![Setting up for Scanning OriginalsAutomatic Printing [Auto-Process]44Automatic Printing [Auto-Process]With “Auto-Process” selected, enter the number of copies to be printed, and then press the key. The master-mak-ing and printing processes are automatically executed in a sequence.Press the key to turn on its indicator.Note:• When Auto-Process is selected and printing process is finished, Print Quantity Display returns to show the number of copies entered before printing. • To clear the mode, press key again to turn off its indicator. • If you place multiple originals in the ADF unit (option), pressing the key causes the placed originals to be automatically printed for the specified number of copies.• Using the Custom Setting mode, you can make such a setting that “Auto-Process” is always set to “ON” when you reset or start the machine.)p.57](https://usermanual.wiki/Riso-Kagaku/RFM3L00/User-Guide-389238-Page-44.png)
![Setting up for Scanning OriginalsSaving Ink [Ink Saving] 45Saving Ink [Ink Saving]Setting the Ink Saving mode before making masters will allow the machine to save ink when printing. Because of ink consumption save processing, the print density will be lower than usual.Press the key to turn on its indicator.Important!:• When using this mode, you cannot adjust the scan-ning level.• You cannot adjust the print density when printing.• You cannot set this mode to print the data created with a computer.Note:• To clear the mode, press the key again to turn off its indicator.](https://usermanual.wiki/Riso-Kagaku/RFM3L00/User-Guide-389238-Page-45.png)
![Producing Proof Copies [Proof]46Setting up for PrintingProducing Proof Copies [Proof]After adjusting the print position and density, you can produce proof copies to check the print quality.Press the key.Proof copy does not affect the number shown on the Print Quantity Display.Note:• By holding down the keys, you can continuously perform proof copy.](https://usermanual.wiki/Riso-Kagaku/RFM3L00/User-Guide-389238-Page-46.png)
![Setting up for PrintingAdjusting the Print Density [Print Density Adjustment] (For RZ2XX, unavailable) 47Adjusting the Print Density [Print Density Adjustment] (For RZ2XX, unavailable)You can select the print density from five levels.Press the / keys under to adjust the print density. Each time you press the key, the print density is changed by one step.key: Decreases the print density.key: Increases the print density.:Lighter:DarkerImportant!:• With the Ink Saving mode selected, you cannot adjust the print density.Note:• The Custom Setting mode allows you to change the initial setting for the print density. )p.57](https://usermanual.wiki/Riso-Kagaku/RFM3L00/User-Guide-389238-Page-47.png)
![Setting up for PrintingAdjusting the Print Position [Print Position Adjustment]48Adjusting the Print Position [Print Position Adjustment]Use the Vertical Print Position Adjustment keys to adjust the print position in the vertical direction; and use the Hor-izontal Print Position Adjustment Dial to adjust it in the horizontal direction.Adjustment range Vertical direction: ±1/2"(±15mm) Horizontal direction: ±3/8"(±10mm) Important!:• After adjusting the print position, perform proof copies to check the new print position.)p.46Adjusting the Vertical PositionPress the / keys to adjust the vertical position. key: Each press shifts the print position downward in steps of about 1/64"(0.5 mm). key: Each press shifts the print position upward in steps of about 1/64"(0.5 mm). key: Returns the print paper to the original posi-tion.: Shits the print position downward.: Shifts the print position upward. Adjusting the Horizontal Position1 Press the Feed Tray Descent Button to lower the Paper Feed Tray.2 Turn the Horizontal Print Position Adjustment Dial beside the Paper Feed Tray to adjust the horizontal position.Turn the dial upward to shift the print position to the left, and turn the dial downward to shift it to the right.You can check the offset amount from the center, through the scale marks beside the Paper Feed Tray. on the scale indicates the center. Important!:• If you have adjusted the horizontal position, also adjust the Receiving Tray Paper Guides.• If you have adjusted the horizontal position, make sure to reset to the center after printing is finished.](https://usermanual.wiki/Riso-Kagaku/RFM3L00/User-Guide-389238-Page-48.png)
![Setting up for PrintingChanging the Print Speed [Print Speed Adjustment] 49Changing the Print Speed [Print Speed Adjustment]You can select the print speed from five levels; 60 copies per minute to 130 copies per minute.Press the / keys under to select the print speed. Each time you press the key, the print speed is changed by one step. key: Decreases the print speed. key: Increases the print speed.:Slower:FasterThe table shows the relationship between the indicator segment position and print speed.Note:• The Custom Setting mode allows you to change the initial setting for the print speed.)p.57Segment Position 1 2 3 4 5Print Speed (Number of copies per minute)Approx. 60Approx. 80Approx. 100Approx. 120Approx. 130](https://usermanual.wiki/Riso-Kagaku/RFM3L00/User-Guide-389238-Page-49.png)
![Automatic Sorting into Groups [Programmed Printing]50Advanced FeaturesAutomatic Sorting into Groups [Programmed Printing]From a single sheet of original, this function prints and sorts into various groups having different number of copies per set and/or different number of sets.Note:• Up to five groups can be set up, with a maximum of 99 sets and a maximum of 9999 copies in each group.• The Job Separator (option) is useful for Programmed Printing.• If you place more than one original in the ADF unit (option) with “ON” selected for “Auto-Process”, the programmed routine is repeated for each original.](https://usermanual.wiki/Riso-Kagaku/RFM3L00/User-Guide-389238-Page-50.png)
![Advanced FeaturesAutomatic Sorting into Groups [Programmed Printing] 511 Press the [P] key to turn on its indi-cator.The print quantity entry mode is started.Note:• To clear the mode, press the [P] key again to turn off its indicator. If the mode is quitted, the setting is cancelled.2 Enter the number of copies to be printed, using the Print Quantity keys.Enter the number of copies for the first group.Note:• If you enter an incorrect number, press the [C] key to clear the number, and then enter the cor-rect number.3 Press the [ ] key.The set quantity entry mode is started.4 Enter the number of set using the Print Quantity keys.To set the next group, go to step 5. To finish the setting and start printing, go to step 6.Note:• If you enter an incorrect number, press the [C] key to clear the number, and then enter the cor-rect number.• If you do not enter a number, 1 is selected.](https://usermanual.wiki/Riso-Kagaku/RFM3L00/User-Guide-389238-Page-51.png)
![Advanced FeaturesAutomatic Sorting into Groups [Programmed Printing]525 Press the [ ] key.The machine then allows you to enter the number of copies for the second group.Repeat steps 2 through 5 to specify the number of copies and sets for each group.6 Place an original.zWhen placing on the Stage Glass.Place an original on the Stage Glass face down and align its center with the mark on the left-hand side of the glass.zWhen placing in the ADF unit (option)Place originals and adjust the Original Guides to the width of the originals.7 Make necessary settings.Make various settings as necessary.You can set the following functions:• Image Processing mode• Pencil• Dot Process• Scanning level• Enlargement/reduction ratio• Auto-Process8 Press the key.A proof copy is printed.Check the print result; and if necessary adjust the print position and other items.9 Press the key again.Printing is started with the last programmed group.Important!:• When printing is finished for all groups, the pro-grammed content is cleared. However, it is not cleared when “Auto-Process” has been set to “ON”.Note:• Printing is stopped each time a routine for one set is finished. If you do not use the Job Sepa-rator (option), remove printed copies from the Paper Recceiving Tray or put separation paper.• To interrupt printing, press the key. Press the key again to resume printing.](https://usermanual.wiki/Riso-Kagaku/RFM3L00/User-Guide-389238-Page-52.png)
![Advanced FeaturesIdling Action [Idling] 53Idling Action [Idling]Idling action prevents the machine from printing the first several copies with faint ink after the Print Cylinder(Drum) has been exchanged or the machine has not been used for an extended period of time. Idling action before the mas-ter-making process assures consistent print quality from the start.Press the key to turn on its indicator.When the indicator is on, place an original, and then press the key. After idling is executed, the master-making process is started.Note:• To clear the mode, press the key again to turn off its indicator.• Idling setting is not executed if the master-making operation is not performed.Tip:•About Auto Idling Action (For RZ2XX, unavailable) If the machine is not operated for a specified period of time, the indicator is automatically lighted and idling action is automatically executed when the next master-making operation is performed.This function is called Auto Idling Action.The Custom Setting mode allows you to change the initial setting for the above Auto Idling time.)p.57](https://usermanual.wiki/Riso-Kagaku/RFM3L00/User-Guide-389238-Page-53.png)
![Advanced FeaturesProtecting Confidential Documents [Confidential Mode]54Protecting Confidential Documents [Confidential Mode]After printing is complete, the master remains on the Print Cylinder(Drum) and is ready for printing another set of copies.To protect confidential documents from unauthorized duplication, use the Confidential feature to discard the master after printing.1 Confirm that printing has ended.Printing should be completely finished.2 Press the key to turn on its indicator.Note:• To clear the mode, press the key to turn off its indicator.3 Press the key.The current master is discarded and replaced with a blank one.Note:• After the discard and replacement, the Confi-dential mode is cleared.Tip:If you execute the Confidential mode processing when the indicator is on, the machine oper-ates confidential processing and idling action at the same time.](https://usermanual.wiki/Riso-Kagaku/RFM3L00/User-Guide-389238-Page-54.png)
![Advanced FeaturesPrinting with a Linked Printer (Option) (For RZ2XX, unavailable) 55Printing with a Linked Printer (Option) (For RZ2XX, unavailable)With optional Linked Printer connected, an original is scanned by the machine but printed out by the Linked Printer.Important!:• When connecting a Linked Printer, consult your dealer.• Using a Linked Printer needs some settings to be made.)p.63• Only a single preset size of paper can be output from the tray of a Linked Printer. The Custom Setting mode allows you to change the initial setting for this paper size. (Initial setting: Letter(A4)))p.571 Check that the Linked Printer has been correctly connected and that the power switches of the machine and the Linked Printer are ON.2 Press the [ ] key.The output destination is switched to the Linked Printer and “L” is displayed at the left end of the Print Quantity Display.Note:• To switch back to master-making and printing operations with the machine, press the [] key again.• When you press the [] key immediately after the power switch is on, “L” may not appear on the display. In that case, please wait for a while. When “L” appears, move on to the next step.3 Place an original.zWhen placing on the Stage GlassOpen the Stage Cover and place the original face down. Align the center of the original with the mark on the left-hand of the glass.After placing the original, slowly close the Stage Cover.zWhen placing in the ADF unit (option)Place originals face down, and then adjust the Original Guides to the width of the originals.Note:• You can place up to about 50 sheets of orig-inals in the ADF unit.](https://usermanual.wiki/Riso-Kagaku/RFM3L00/User-Guide-389238-Page-55.png)
![Advanced FeaturesPrinting with a Linked Printer (Option) (For RZ2XX, unavailable)564 Make necessary settings.You can set the following functions:• Image Processing mode•Pencil• Enlargement/Reduction ratio• Scanning level5 Enter the number of copies to be printed, using the Print Quantity keys.The specified number is shown on the Print Quan-tity Display.Note:• If you enter an incorrect number, press the [C] key to clear the number, and then enter the cor-rect number.6 Press the key.The original is scanned and the specified number of copies are printed by the Linked Printer.Important!:• You cannot change the settings for the print speed, position, and density.Note:• If an error is shown on the Linked Printer, check if the preset size of paper differs from the paper size set on the Linked Printer.)p.57• If data is received from a computer while you are operating the machine, that data may be given a higher priority for making a master. To give a higher priority to printing with the Linked Printer, press the key to turn off its indicator.Tip:• Because of the Auto Switch function, you do not need to press the [] key every time. If the number of copies to be printed is lower than a certain number, the Linked Printer is automati-cally selected for printing. If it is equal to or larger than the certain number, the machine is automatically selected for printing.The Custom Setting mode allows you to change the initial setting for this Link-free volume. (Ini-tial setting: 20 copies))p.57• Auto Switch function is not activated immedi-ately after the power switch is on. Please wait for 15 to 60 seconds to move on to the next step. (It depends on the settings on Linked Printer.)](https://usermanual.wiki/Riso-Kagaku/RFM3L00/User-Guide-389238-Page-56.png)
![Advanced FeaturesCustomizing the Initial Settings [Custom Setting Mode] 57Customizing the Initial Settings [Custom Setting Mode]You can change the initial settings that are restored when the power is turned on or when the key is pressed. Changed settings are effective until they are changed again.The changeable items and their descriptions are as follows::Initial setting (factory default) Item No. Changeable ItemsParameter Selection01234501 Print speedChange the initial setting for the print speed.1234502 Print density (for RZ2XX, unavailable) Change the initial setting for the print density.1234503 Auto-ProcessChange the initial setting for the Auto-Process.OFF ON04 Scanning levelChange the initial setting for the scanning level.RZ3XX12345AutoRZ2XX 1 2 34505 Image Processing modeChange the initial setting for the Image Processing mode.Important!:• With the Photo mode or Duo mode selected, you cannot select “Auto” for the scanning level.Line Photo Duo06 Size of originals for Book shadow editingChange the initial setting for the size of originals for Book shadow editing.RZ390/RZ310Paper Ledger Legal LetterRZ220 Paper Legal LetterRZ370 Paper A3 B4 A4 B5RZ230/RZ200Paper B4 A4 B507 Width of central shadow for Book shadow editingChange the initial setting for the width of central shadow to be erased in the Book shadow editing.13/16"(20mm)13/16" (30mm)19/16" (40mm)115/16" (50mm)31/8" (80mm)08Auto idling time (for RZ2XX, unavailable)Change the initial setting for the auto idling time.None 6 hours 12 hours](https://usermanual.wiki/Riso-Kagaku/RFM3L00/User-Guide-389238-Page-57.png)
![Advanced FeaturesCustomizing the Initial Settings [Custom Setting Mode]5809 2-Up printing interval timeChange the initial setting for the 2-Up printing interval time.None 15 seconds30 seconds10 Energy Saving modeWhen the machine is not used for a certain period of time, it is automatically turned off or placed into the sleep status.•OFFThe machine remains on until its power switch is turned off.• Auto-SleepThe machine is usually off but switched on when data is received.• Auto-Power OFFThe machine is switched off.Note:• It is recommended to select “Auto-Sleep” with a computer connected to the machine.OFF Auto-SleepAuto-Power OFF11 Energy Saving Mode wait timeSelect the waiting period required to lead the machine into the Energy Saving mode.Approx. 5 minutesApprox. 15 minutesApprox. 30 minutesApprox. 60 minutesApprox. 90 minutes12 Auto clear timeSelect the waiting period required to make the machine automatically clear settings.NoApprox. 3 minutesApprox. 5 minutes13 Paper finishIf paper is not supplied smoothly with “Standard” preset, you can use User 1 through 5 to program the paper supply and output adjustment parameters suitable of paper to be used.For details, contact your dealer.Note:• User 1 through 5 are not programmed when the machine is shipped.StandardUser 1 User 2 User 3 User 4 User 514 Minimum print quantitySpecify the minimum number of copies to be printed from one master.If a number lower than the specified minimum number is entered, the master-making process is not executed.You can lock and prevent this setting from being changed. For more information, consult your dealer.010 copies20 copies30 copies40 copies50 copiesItem No. Changeable ItemsParameter Selection012345](https://usermanual.wiki/Riso-Kagaku/RFM3L00/User-Guide-389238-Page-58.png)
![Advanced FeaturesCustomizing the Initial Settings [Custom Setting Mode] 5915 Beep soundSpecify how an alarm should sound when keys are operated or errors occur.• Level 2A beep sounds at all preset occasions; for example at the time of key operations and event generation/end.• Level 1A beep sounds only at the time of error occurrence, setting completion, pulling-out enabled, and 2-Up printing interval time.• Level 0A beep does not sound at any occasions.Level 2 Level 1 Level 016 Reservation PeriodSpecify the time for restricting document data output from a computer when the machine is not operated.OFF 15 seconds30 seconds60 seconds17 Semi-Auto(ADF unit) (available only with the optional ADF unit)With “ON” selected, if an original exists in the ADF unit after printing, the next master-making process is executed followed by proof copy, and then machine operation is stopped.Important!:• With “ON” selected for Auto-Process, you cannot select “ON” for Semi-Auto.OFF ON18 Job SeparationSelect “ON” when using an Job Separator (option).OFF ON19 Tray paper size for a Linked Printer (for RZ2XX, unavailable)Change the initial setting for the paper size to be output from a Linked Printer (option).RZ390/RZ310Ledger Legal LetterStatementFolioExecutiveRZ370 A3 B4 A4 B520 Print Quantity restoration settingSet the restoration setting for Print Quantity.Select “ON” when you want to restore the Print Quantity after printing is finished.OFF ON21 2-UP printing restoration settingSet the automatic restoration setting for 2-Up printing.Select “ON” when you want to restore the 2-Up printing after 2-Up printing is finished.OFF ONItem No. Changeable ItemsParameter Selection012345](https://usermanual.wiki/Riso-Kagaku/RFM3L00/User-Guide-389238-Page-59.png)
![Advanced FeaturesCustomizing the Initial Settings [Custom Setting Mode]6030 Total Quantity DisplayThe total number of copies printed with the machine is displayed.This number is displayed by two switching screens; a 3-digit number preceded by an under bar and a 4-digit number.Example: For 1,234,567 copies,_123Î4567Î_123Î4567Execute steps 1 through 3 in “Changing Procedure”.)p.61The total number of printed copies is shown on the Total Quantity Display.31 Master Quantity DisplayThe total number of masters generated with the machine is displayed.This number is displayed by two switching screens; a 3-digit number preceded by an under bar and a 4-digit number.Example: For 1,234,567 masters,_123Î4567Î_123Î4567Execute steps 1 through 3 in “Changing Procedure”.)p.61The total number of generated masters is shown on the Total Quantity Display.32 Cylinder(Drum) Print Quantity DisplayThe number of copies printed with the current cylinder(drum) on the machine is displayed.This number is displayed by two switching screens; a 3-digit number preceded by an under bar and a 4-digit number.Example: For 1,234,567 copies,_123Î4567Î_123Î4567Execute steps 1 through 3 in “Changing Procedure”.)p.61The number of copies printed with the cylinder(drum) is shown on the Cylinder(Drum) Print Quantity Display.70 Base IP address setting (for RZ2XX, unavailable)Set an IP address for the machine.)p.6371 Link IP address setting (for RZ2XX, unavailable)Set an IP address for a Linked Printer (option).)p.6372 Link-free volume (for RZ2XX, unavailable)Set the threshold (number of copies) for automatically switching print output between the machine and a Linked Printer.)p.6599 Initial Setting RestorationResets all Custom Setting mode settings to the initial settings (factory default).Item No. Changeable ItemsParameter Selection012345](https://usermanual.wiki/Riso-Kagaku/RFM3L00/User-Guide-389238-Page-60.png)
![Advanced FeaturesCustomizing the Initial Settings [Custom Setting Mode] 61Changing Procedure1 Press the key to turn on its indi-cator.Note:• To clear the mode, press the key again to turn off its indicator.2 Enter an item number to be changed, using the Print Quantity keys.The Print Quantity Display shows the current parameter setting for the selected item number.Note:• For items No. 70 through 72, the operation pro-cedures differ.– Item No.70 and 71:)p.63– Item No.72:)p.65• To restore the initial settings for the Custom Setting mode, enter “99” and press the [+] key, and then press the key.3 Press the [ ] key.Pressing this key allows you to select a parameter number.The currently set parameter number blinks.4 Enter a parameter number using the Print Quantity keys.If there are more than one item to be changed, press the [+] key, and then repeat steps 2 through 4.](https://usermanual.wiki/Riso-Kagaku/RFM3L00/User-Guide-389238-Page-61.png)
![Advanced FeaturesCustomizing the Initial Settings [Custom Setting Mode]625 Press the key to complete the set-tings.The changed contents are programmed and the normal mode is restored.](https://usermanual.wiki/Riso-Kagaku/RFM3L00/User-Guide-389238-Page-62.png)
![Advanced FeaturesCustomizing the Initial Settings [Custom Setting Mode] 63IP Address Setting (for RZ2XX, unavailable)When connecting a Linked Printer (option) or a computer, you need to set IP addresses on the machine and the Linked Printer.1 Press the key to turn on its indi-cator.Note:• To clear the operation, press the key again to turn off its indicator.2 Enter an item number using the Print Quantity keys.The item numbers are as follows :IP address for the machine : 70IP address for the Linked Printer : 713 Enter the first field using the Print Quantity keys.The entered number is shown on the Free Repro-duction Size Display.Note:• The IP address numbers separated by dots are called the first field, second field, and so on in the order.• The initial IP address settings for the machine and a Linked Printer are “0.0.0.0”.4 Press the [ ] key.Continue to the next field. The Print Quantity Dis-play changes.](https://usermanual.wiki/Riso-Kagaku/RFM3L00/User-Guide-389238-Page-63.png)
![Advanced FeaturesCustomizing the Initial Settings [Custom Setting Mode]645 Repeat steps 3 and 4 to enter an IP address up to the fourth field.6 Press the key.The IP address setting is completed.](https://usermanual.wiki/Riso-Kagaku/RFM3L00/User-Guide-389238-Page-64.png)
![Advanced FeaturesCustomizing the Initial Settings [Custom Setting Mode] 65Setting the Link-free volume (for RZ2XX, unavailable)When entered print quantity is smaller than the specified Link-free volume (number of copies), a Linked Printer is automatically selected for printing. If entered print quantity is equal to or larger than the Link-free volume, the machine is selected for printing.1 Press the key to turn on its indicator.Note:• To clear the mode, press the key to turn off its indicator.2 Enter “72” using the Print Quantity keys.3 Enter a Link-free volume number using the Print Quantity keys.The entered number is shown on the Free Repro-duction Size Display.The selectable range is 0 through 99.Note:• If you enter an incorrect number, press the [C] key, and then enter the correct number.• The initial setting is “20 copies”.4 Press the key.The Link-free volume setting is completed.](https://usermanual.wiki/Riso-Kagaku/RFM3L00/User-Guide-389238-Page-65.png)

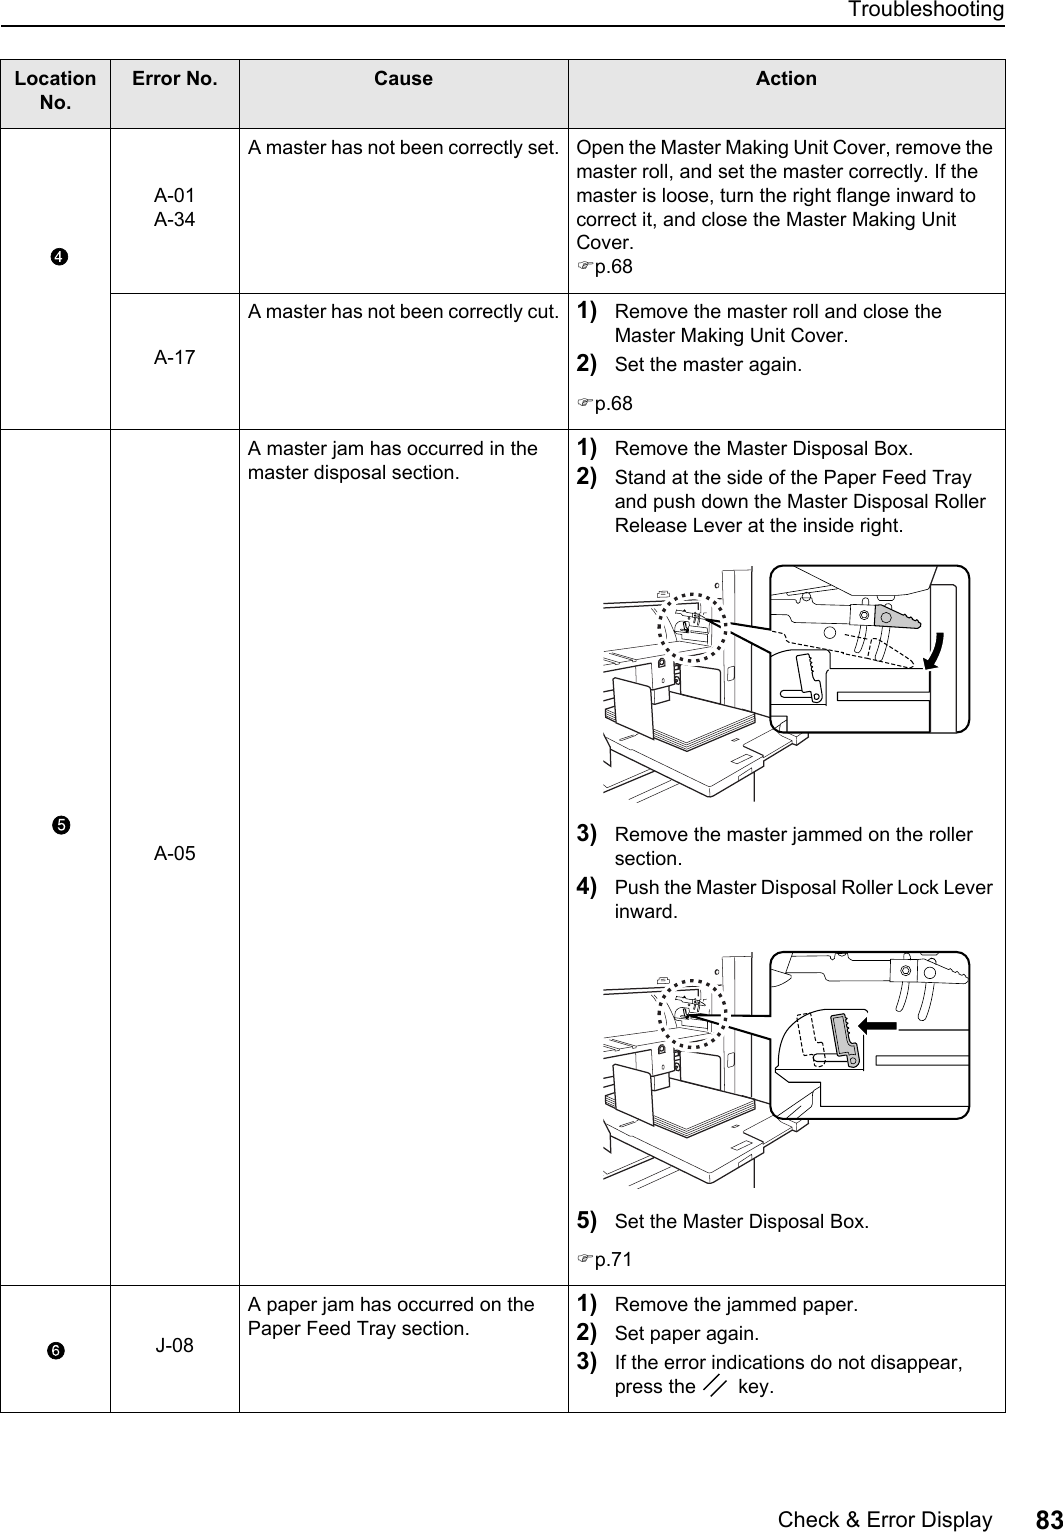
![Check & Error Display80TroubleshootingCheck & Error DisplayWhen an error occurs on the machine or when consumables or other sections are not yet ready, the Check & Error Display shows error locations and numbers indicating error types. For some errors, error numbers are shown on the Error Number Display (Print Quantity Display).Checking with the Check & Error DisplayBesides indicators that show error types, numbers that show error locations light.Check the display and take an appropriate procedure according to the methods described on the subsequent pages.1) Error Location Indicator [*1]Numbers corresponding to error locations light.2) indicator [*2]Lights when the function is in use.)p.883) Error Type Indicator [*3]z(Jam) IndicatorLights when paper jams occur inside the machine or ADF unit (option).z(Check Settings) IndicatorLights when the Print Cylinder(Drum), paper, or other items have not yet set up.z(Call Service) IndicatorLights when such an error occurs that needs advices or supports from service personnel.z(Maintenance Call) IndicatorLights when the time for periodic inspection comes.z(Replace Master Roll) IndicatorBlinks when the remaining master quantity is small and lights up when the entire master is consumed.z(Empty Disposal Box) IndicatorLights when the Master Disposal Box is full.z(Replace Ink Cartridge) IndicatorBlinks when the remaining ink quantity is small and lights up when the entire ink is consumed.4) Error Number Display(Print Quantity Display) [*4]Error numbers appear and blinks on the Print Quantity Display.Error contents are shown with alphabetical charac-ters (single digit) and numeric characters (two digits).](https://usermanual.wiki/Riso-Kagaku/RFM3L00/User-Guide-389238-Page-80.png)
![TroubleshootingCheck & Error Display 81When the indicator [Area *3] blinksCheck error locations and error numbers (Error Number Display) and take the following procedures:Location No.Error No. Cause ActionA-06Any obstacle exists under the Paper Feed Tray or on paper.Check if any obstacle exists under the Paper Feed Tray or on paper. If an obstacle exists, remove it.A-02A master has not been correctly wrapped around the Print Cylinder(Drum).1) Pull out the Print Cylinder(Drum). )p.732) Press the Print Cylinder(Drum) Release Lever ( ), hold the edge of the Print Cylinder(Drum), and turn the Cylinder(Drum) until the clamp plate (metallic plate locking the master) comes to the top ( ).3) Press the Clamp Plate Release Lever ( ) to unlock the clamp plate, hold the edge of the master, and then separate the master while turning the Print Cylinder(Drum) ( ).4) Turn the Print Cylinder(Drum) until the marks meet.5) Set the Print Cylinder(Drum) into the machine.6) Pull out the Master Making Unit and set the master again.7) Place the Master Making Unit into position.8) Perform the master-making operation again.](https://usermanual.wiki/Riso-Kagaku/RFM3L00/User-Guide-389238-Page-81.png)

![TroubleshootingCheck & Error Display 85When the indicator [Area *3] blinksCheck error locations and error numbers (Error Number Display) and take the following procedures.If an error number is not shown, press the [] key.Location No.Error No. Cause Actionc-04 The tray has run out of paper. Place paper on the Paper Feed Tray.F-03Custom-size paper has been placed on the Paper Feed Tray at the time of 2-Up printing.Custom-size paper does not allow 2-Up printing.Press the key and then place regular-sized paper.d-11 The Front Cover is open or has not been completely closed.Close the Front Cover completely.d-01 The Print Cylinder(Drum) has not been set or has not been correctly set.Set the Print Cylinder(Drum) correctly.)p.73d-02An inappropriate Print Cylinder(Drum) has been set.Set an appropriate Print Cylinder(Drum).)p.73Important!:• Use a Print Cylinder(Drum) specific to the machine. Set other cylinders(drums) can result in malfunction or any other troubles.d-03 The Ink Cartridge has not been set or has not been correctly set.Set an Ink Cartridge correctly.)p.66d-04An inappropriate Ink Cartridge has been set.Set an Ink Cartridge specific to the machine.)p.66Important!:• Use an Ink Cartridge specific to the machine.Using other Ink Cartridges can result in malfunction or any other troubles.The label on the Ink Cartridge outlet surface has come off or surface is with dirt.The label on the Ink Cartridge outlet surface contains information needed for printing. If the machine cannot read the information, it does not operate.Set an Ink Cartridge that is specific to the machine and that is with label attachment and free from dirt.](https://usermanual.wiki/Riso-Kagaku/RFM3L00/User-Guide-389238-Page-85.png)
![TroubleshootingCheck & Error Display 87When the indicator [Area *3] lightsBecause the entire master roll has been consumed, set a new master roll.)p.68When the indicator [Area *3] lightsBecause the Master Disposal Box is full, remove the box and discard the ejected masters.)p.71When the indicator [Area *3] lightsBecause the Ink Cartridge becomes empty, replace with a new Ink Cartridge.)p.66When the indicator [Area *3] lightsCheck error numbers shown on the Error Number Display and contact your dealer.When the indicator [Area *3] lightsContact your dealer and take a periodic inspection.b-22Power to the Job Separator (option) is off.Turn on the power to the Job Separator.b-23 The Job Separator (option) has run out of tape.Set new tape to the Job Separator.b-24 A tape jam has occurred in the Job Separator (option).Check the Job Separator and remove the jammed tape.Nonb-31Data send to the Linked Printer (option) has failed.• Check that the cables of the Linked Printer and the machine have been correctly connected to the hub, for example.• If the cable connections are appropriate, check the communication status of the server and/or network.• Check with the manager of the server or network.b-32Power to the Linked Printer (option) is off.Another possible cause is an inappropriate cable connection or cable line disconnection.• Check that the Linked Printer has been switched on.• Connect the cables correctly.b-33An IP address has not been set for the machine.Using the Custom Setting mode, set the IP address for the machine.)p.63F-05An attempt is being made to print a smaller number of copies than the minimum print quantity.Select a larger number of copies than the minimum print quantity.)p.57F-58Because the RISORINC-NET has been initiated, the Linked Printer (option) cannot be used for output.• To output from the machinePress the key, and then press the key.• To output from the Linked Printer.Press the key, wait for a while, and then try again.Location No.Error No. Cause Action](https://usermanual.wiki/Riso-Kagaku/RFM3L00/User-Guide-389238-Page-87.png)
![TroubleshootingCheck & Error Display88When the indicator [*2] is off and “H” is shown on the Print Quantity Display [*4].In order to assure optimum printing, the machine acquires information from the consumables.If acquired matching information is not proper, “H” is shown on the Print Quantity Display.Enter an appropriate parameter.Entering an inappropriate parameter does not affect usual operations but may result in bad print quality.The table shows the “H” numbers to be shown on the Print Quantity Display and the selectable parameters.: For RZ2XX, unavailable Note:• When you perform the following operations, entered H No’s information disappears and thus you need to enter H No’s again.– After the power switch is set to (OFF), the switch is set to (ON) again– After the machine is placed into the Sleep status, the key is pressedLocation No.H No. Description ParameterH1Ink color settingSelect the same color as the currently used for Print Cylinder(Drum).1: black 2: colorH2Print density fine adjustment (ink)Perform fine adjustment to optimize the print density depending on the ink.1 (light) - 5 (dark)H3Sample copy density adjustment (ink)Perform adjustment for print density for test printing depending on the ink.This adjustment is independent of H2.1 (light) - 5 (dark)H4Master-making density settingSet the reference density for the master-making process.1 (light) - 10 (dark)H5Print density fine adjustment (master)Perform fine adjustment to optimize the print density depending on the master.1 (light) - 5 (dark)H6Sample copy density adjustment (master)Perform adjustment for the print density for sample copy depending on the master.This adjustment is independent of H5.1 (light) - 5 (dark)](https://usermanual.wiki/Riso-Kagaku/RFM3L00/User-Guide-389238-Page-88.png)
![TroubleshootingCheck & Error Display 89Use the following procedure to enter necessary information.1 Enter a parameter using the Print Quantity keys.The parameters that can be entered differ among the consumables.2 Press the key to complete the setting.If the next H No. appears, repeat steps 1 and 2.Note:• When necessary entry is completed, the Print Quantity Display restores the normal status and is available for usual operations.When the indicator [*2] is off and Error Type indicator [*4] lightsWhen an Error Type indicator lights, please refer to the following pages.Error Type Error No. Reference paged-04 )p.85d-17 )p.86If an Error No. “d-xx” other than above is displayed, please refer to the reference pages.)p.85∼p.86-)p.68-)p.66](https://usermanual.wiki/Riso-Kagaku/RFM3L00/User-Guide-389238-Page-89.png)