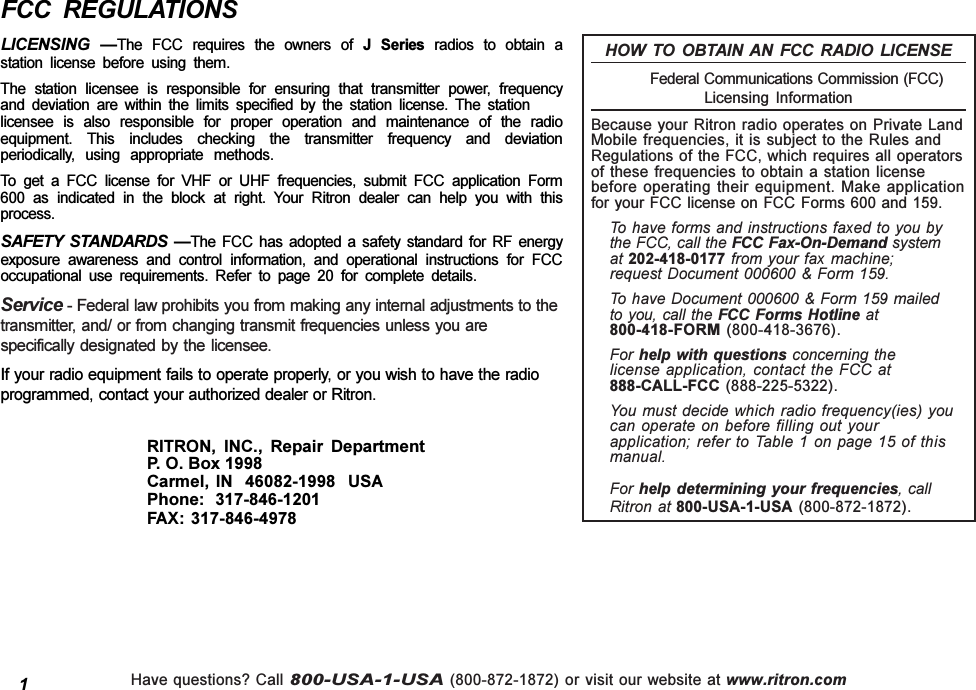
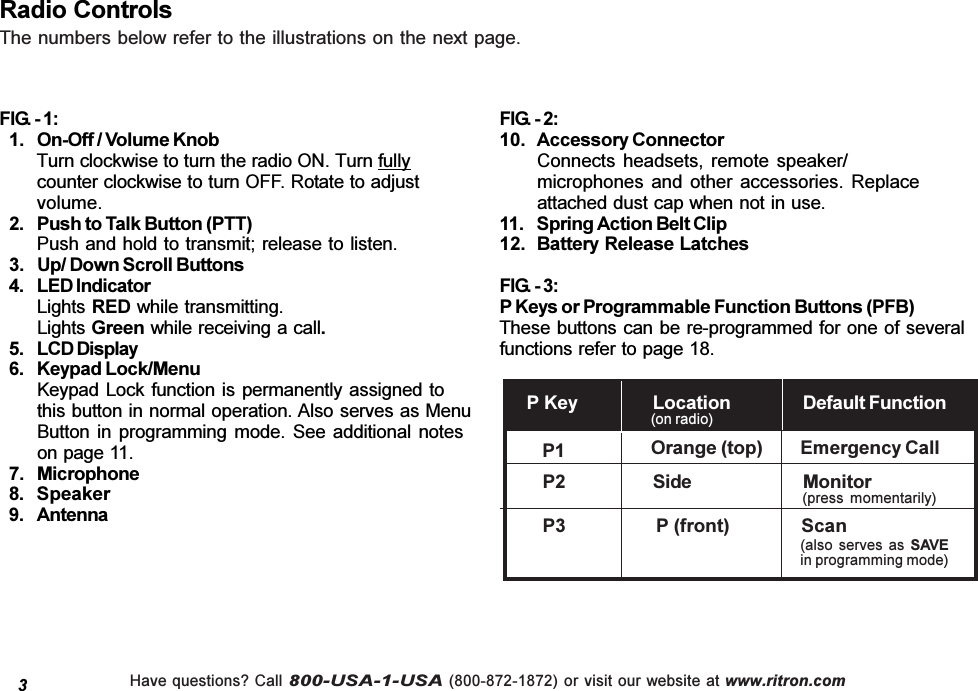
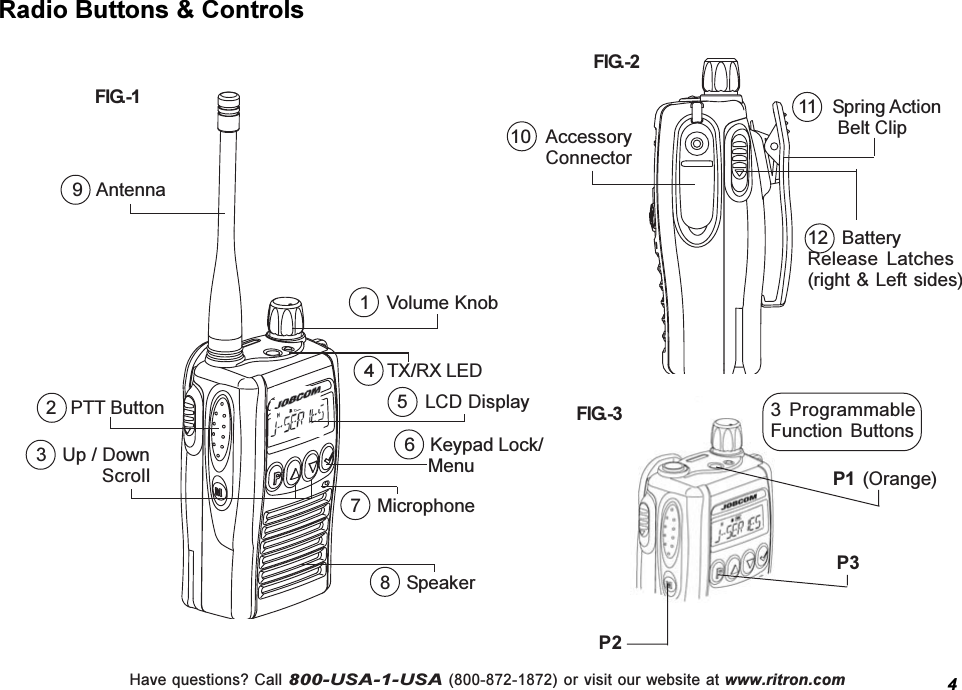
Ritron RIT23-450 UHF-FM PORTABLE TRANSCEIVER User Manual J Series UML 12 23 05
Ritron Inc UHF-FM PORTABLE TRANSCEIVER J Series UML 12 23 05
Ritron >
Contents
- 1. USERS MANUAL
- 2. Users Manual final version
- 3. Users Manual RF Exposure specific instructions
Users Manual final version


![Have questions? Call 800-USA-1-USA (800-872-1872) or visit our website at www.ritron.comNOAA Weather Radio (NWR) Feature12As an added benefit, your J Series radio is capable ofreceiving broadcasts from the National Weather Service.Use this extremely useful feature during times ofhazardous weather or simply to better schedule activitiesthat are weather dependent.The National Weather Service (NWR) broadcasts aretransmitted 24 hours a day, 7 days a week. Your areahas a specific NOAA weather frequency. To find thefrequency for your area go to:http://www.nws.noaa.gov/nwr/nwrbro.htmClick on your state. Then click on the county closest toyou. You will see a frequency listed. Match the frequencyfor your area with 1 of the 7 listed in the table on thispage.Refer to page 17 [NOAA WX] How To Program Radio-Wide Features for details on how to program yourJ Series radio to a National Weather Service frequency.When youve programmed the NOAA WX feature into yourradio, [NOAA WX] will appear as the last channelprogrammed in your radio.You may select from the National Weather Servicefrequencies listed below:NOAA WEATHER BROADCAST FREQUENCY TABLE Code FrequencyW1 162.400W2 162.425W3 162.450W4 162.475W5 162.500W6 162.525W7 162.550](https://usermanual.wiki/Ritron/RIT23-450.Users-Manual-final-version/User-Guide-705235-Page-15.png)
![Have questions? Call 800-USA-1-USA (800-872-1872) or visit our website at www.ritron.com13How To Read-Out Frequency and Tone Code SettingsStep 4. Radio will then display [READY] and return to normal operation.Step 5. To read-out a different channel repeat steps 1-4 for each channel.Step 6. Turn radio OFF then ON again to return to normal operation.Note: If no Tone Code is programmed, the display will read: [ T 4 4 2T X ] 44 = No Tone* If no 2-Tone Code is programmed, display will read: [ 2T X ]. 2-Tone feature not available in all J Series models.This step allows you to read-out on a per-channel-basis what the frequency code and interference eliminatortone code settings are in your radio.Step 1. With radio ON, select the channel # you want to read-out.Step 2. Turn radio OFF,Step 3. HOLD the button and Turn radio ON.Note: Continue to HOLD button until the following appears on the display: Frequency Tone 2-Tone* Ch # Code # Code # Code # Display will read for 3 seconds = [CH _ _ F _ _ ] then . [T _ _ _ 2T _ ]](https://usermanual.wiki/Ritron/RIT23-450.Users-Manual-final-version/User-Guide-705235-Page-16.png)
![Have questions? Call 800-USA-1-USA (800-872-1872) or visit our website at www.ritron.comHow To Program Per-Channel FeaturesTo match other radios, the owner can select from a table of frequency codes and interference eliminator codes. Inorder to talk to other radios, the channel must be programmed to the same frequency and the same tone code.The following list of features can be programmed on a Per-Channel basis.14 Options Description of the feature[FREQ] Codes Select a Frequency code for a channel. Choose from 26 VHF frequencies or 77 UHF frequencies.[TONE] Codes Select a Tone code for channel. Choose from 158 interference eliminator codes. Tone codes screen-outother users not in your group. All radios must be the same code to talk.[CH SCAN] Select ON to mark a channel to be included in the scan list. Select OFF (default) to delete a channelfrom the scan list. Marked channels will be scanned when Scan feature is activated. You mustassign Scan function to a programmable function button (PFB) to activate. See Radio-Wide andPFB Programming.[SCRAMBLE] Select ON to activate Voice Scrambling for a specific channel. If ON, icon will be displayed and radiowill operate in Scramble mode on this channel. To be heard, all radios must have Scramble ON. [VOX] Select ON to activate Hands-Free VOX for a specific channel. No accessory required. If ON, radio willoperate Hands-Free on this channel and icon will be displayed. To adjust level of audio required totrigger radio transmitter refer to page 17 [VOX LEV] How To Program Radio-Wide Features.Step 1. HOLD Push-To-Talk button and turn radio ON.Step 2. Radio will sound triple beep, then [CH PROG] willbe displayed for 3 sec. Then [CH 1] or theprogrammed name will be displayed.Step 3. Use to select the desired channel[CH _ _ ], pick 1-10.Step 4. Press for Per Channel option (see list above).Step 5. Use to go to a specific option; e.g. [FREQ],[TONE], [2-TONE], [CH SCAN], [SCRAMBLE], [VOX].Step 6. Press to select a desired option e.g. [FREQ].Display will then show current setting of theselected option.Step 7. Use Buttons to scroll option sub-list; e.g.[FREQ] codes or [TONE] code lists.Step 8. Press button to SAVE selection. Display willshow selected feature. Example: [FREQ].Step 9. Use to select a different Per-ChannelFeature for the channel; e.g. [TONE] and RepeatSteps 7 8 or...Step10. To select a different channel to program, PRESS theOrange button on top of the radio. Display willshow the last channel programmed; e.g. [CH 1].Repeat Steps 3 8 or...Step11. To return to normal operation turn radio OFF andthen ON.Important: If a Frequency Code is changed you must also reprogram the Tone Code.](https://usermanual.wiki/Ritron/RIT23-450.Users-Manual-final-version/User-Guide-705235-Page-17.png)
![Have questions? Call 800-USA-1-USA (800-872-1872) or visit our website at www.ritron.comHow To Program Radio-Wide FeaturesThe following list of features can be programmed on a Radio-Wide basis. These settings will uniformly affectradio operation on all channels.17Options Description of the feature[VOX LEV] Select VOX Level. 0 to 15, Higher number = Lower level of audio required to key radio transmitter.Ex:15 = whisper trigger. Must also program channel for VOX operation. See page 14.[SQ LEV] Select Squelch Level. 0 to15, Higher number = decreases receiver sensitivity. With higher number theradio will hear only the strongest, closest signals.[EMERGENC] Factory Default = [ON] and feature is by factory default assigned to P2 Key. Can turn feature OFF or ON. IfON, must also assign this feature to one of the Programmable Function Button. See page 18.[P1 Key] Factory Default = [EMERGENC]. Allows access to one specific feature. See page 18 for list.[P2 Key] Factory Default = [MONITOR]. Allows access to one specific feature. See page 18 for list.[P3 Key] Factory Default = [SCAN]. Allows access to one specific feature. See page 18 for list.[ALERTS] Factory Default = [ON]. Select ON for keypad tones when button is pressed. Icon will be displayed whenON. Keypad Tones OFF allows silent operation.[EAR PTT] Select ON if earphone only is used. When earphone only is connected to radio, microphone on radio will beactive when PTT is pressed.[WEATHER] Factory Default = [W7]. Select NONE or choose from 7 National Weather Broadcast RX frequencies. Ifselected, [NOAA WX] will be displayed after last programmed channel. Choose [NONE] to turn feature OFF.Go to www.noaa.nws.gov/nws/nwrbro/htm to find frequency of NOAA Weather Broadcast for your area.To Program Radio-Wide Settings:Step 1. HOLD the MONITOR button and turn radio ON. Radiowill sound triple beep, then [PROGRAM ] will flashon the display for 3 sec. [VOX LEV] will appear firston display.Step 2. Use buttons to scroll to one of the Radio-Wide features. e.g. [VOX LEV], [SQ LEV],[EMERGENC], [P1 KEY], [P2 KEY], [P3 KEY],[ALERTS], [EAR PTT], OR [WEATHER (VHF only)].Step 3. Press for the current setting of the selectedRadio-Wide feature.Step 4. Use buttons to scroll sub-list settingoptions such as; [1-15] Level Settings; ON or OFFSetting; or individual Key function options.Step 5. Press button to SAVE the sub-list settingselection. Display will then return to selectedRadio-Wide feature,Step 6. To program another Radio-Wide setting repeatSteps 2 - 5 or...Step 7. To return to normal operation turn radio OFF andthen ON.VHF models only](https://usermanual.wiki/Ritron/RIT23-450.Users-Manual-final-version/User-Guide-705235-Page-20.png)
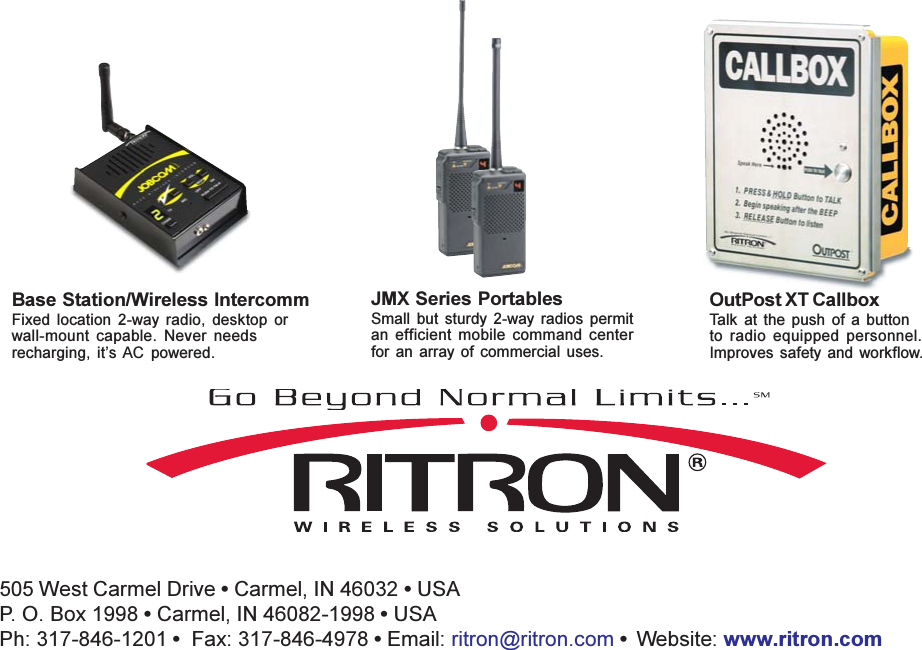
![Have questions? Call 800-USA-1-USA (800-872-1872) or visit our website at www.ritron.comHow To Assign A Function To A P KEY (Programmable Function Button)There are 3 Programmable Function Buttons on the J Series radio (P1, P2 and P3). See FIG 3 below for theirlocation on the radio. You can assign each of these buttons or P keys to perform 1 specific function whenpressed. The functions you may choose from are listed below:18Options Description of the feature[NONE]P KEY will perform no function when pressed.[SCAN KEY] When P KEY pressed, radio will scan markedchannels. Icon will display when ON. See CH SCANon page 14.[EMERGENC] When P KEY pressed, radio sends Emergency signalto other radios on same frequency.[CALL KEY] Press and hold the P KEY to send a unique Call Toneto let others know you are about to talk.[MONITOR] When P KEY pressed, radio will monitor traffic on thechannel without tone.[TX PWR KEY] When P KEY pressed, will toggle* transmit power ofselected channel frequency, between HI and LOWpower. Icon H or L will be displayed.To Program P KEYs :Step 1. HOLD the MONITOR button and turn radio ON. Radiowill sound triple beep, then [PROGRAM] will flashon the display for 3 sec. [VOX LEV] will appear firston display.Step 2. Use buttons to scroll to the PFB you wish toprogram: [P1 KEY], [P2 KEY] or [P3 KEY].Step 3. Press to see current setting of the specificP KEY you have selected.Step 4. Use buttons to scroll sub-list settingoptions listed above.Step 5. Press the button to SAVE your sub-listing option.Display will then show the last P KEY programmed;e.g. [P_ KEY].Step 6. To program another [P_ KEY] repeat Steps 2 - 5or...Step 7. To return to normal operation turn radio OFF andthen ON.P3P2P1 (Orange)3 ProgrammableFunction Buttons* NOTE: Certain frequencies are limited by the FCC to 2 Watt maximum output. See pages 15 &16.](https://usermanual.wiki/Ritron/RIT23-450.Users-Manual-final-version/User-Guide-705235-Page-21.png)
![Have questions? Call 800-USA-1-USA (800-872-1872) or visit our website at www.ritron.comHow To Delete A ChannelTo delete a channel from your channel list, follow these instructions. Deleting a channel will remove that channelnumber from the display. It is not necessary to delete a channel if you merely wish to change the frequency and/or tone settings. To change frequency or tone settings see How To Program Per-Channel Features on page 14.19To Program Channel Delete:Step 1. HOLD Push-To-Talk button and turn radio ON.Step 2. Radio will sound triple beep, then [CH PROG] willflash on display for 3 sec. Then [CH 1] or aprogrammed name will appear on the display.Step 3. Use to select the channel you want todelete [CH _ _], 1-10.Step 4. Press for Per-Channel Feature listStep 5. Display will show [FREQ].Step 6. Press to select [FREQ]. Display will thenshow current frequency code for the channel; e.g.[F C_ _ ].Step 7. Use buttons to scroll to [NONE]Step 8. Press button to SAVE [NONE] selection.Display will show selected feature; e.g. [FREQ].Step 9. To select a different channel, PRESS the P1 Key(orange button) on the top of radio. Display willshow the last channel deleted; e.g. [CH 1].Repeat Steps 3 8 orStep 10. To return to normal operation turn radio OFF andthen ON.Step 11. The channel(s) you deleted will not appear onthe display in normal operation.](https://usermanual.wiki/Ritron/RIT23-450.Users-Manual-final-version/User-Guide-705235-Page-22.png)