Ritron RIT24-460 UHF MOBILE TRANSCEIVER User Manual rpm460userman
Ritron Inc UHF MOBILE TRANSCEIVER rpm460userman
Ritron >
USERS MANUAL
TYPE OF EXHIBIT:USERS MANUAL
FCC PART: 2.1033(c)(3)
IC PART: RSP-100, Section 7.2(b)
MANUFACTURER:RITRON, Inc.
MODEL:RPM-460
TYPE OF UNIT:UHF Mobile Transceiver
FCC ID: AIERIT24-460
IC ID: 1084A-24460
DATE: March 15, 2006
RITRON
RPM “60” SERIES
FM MOBILE RADIO
USER MANUAL

Table of Contents_______________________________________________
INTRODUCTION
OWNER INFORMATION
STANDARD FEATURES
ACCESSORIES
RADIO CONTROLS
OPERATION
WARRANTY

INTRODUCTION___________________________________________________
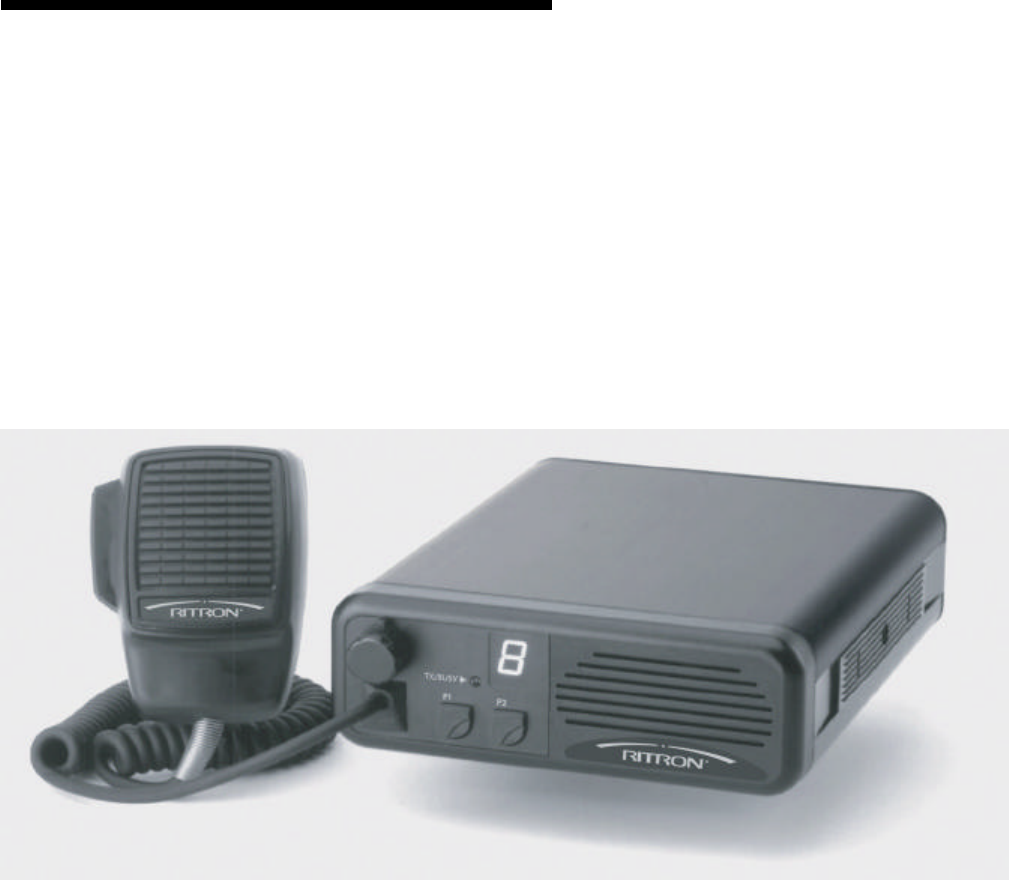
The RPM 60 Series Mobile is a programmable, two-way radio that can transmit and receive on any one of 15
channels in the professional FM communications band (VHF or UHF band). This radio features (2) programmable
front panel buttons and a single digit alpha-numeric LED display. Each channel can be programmed to contain a
unique set of operating frequencies and options. These options include industry standard signaling formats: Quiet
Call, Digital Quiet Call, Selcall(5 Tone/7 Tone), DTMF and 2-Tone.
INSPECTION
The radio package includes a Ritron mobile radio, microphone, and mounting kit. Review the installation
instructions in the mounting kit for a complete list of parts included. Examine all of the equipment immediately after
delivery and report any damages to the shipping company.
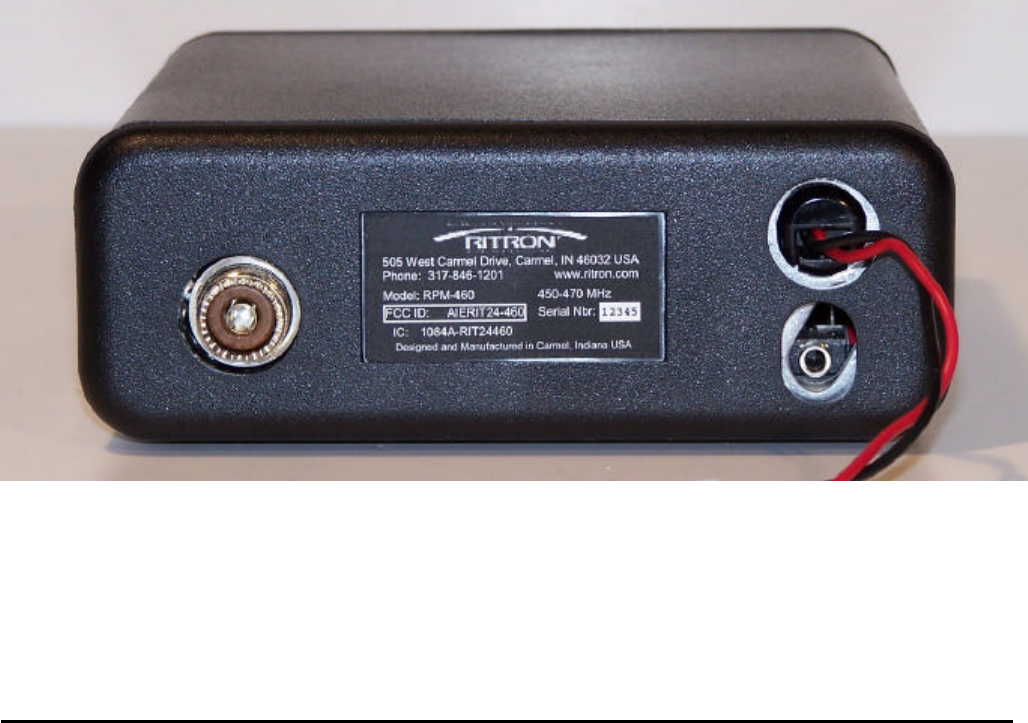
MODEL IDENTIFICATION
RPM-160/RPM-460
The label attached to the back of the mobile includes both the FCC and Canadian identification numbers, radio
serial number, radio model number, and operating frequency range. Ritron’s address, telephone number, and
website are also included on the label.
OWNER INFORMATION_____________________________________________
FCC REGULATIONS
The FCC requires you to obtain a station license for your radios before using the equipment to transmit. The
station licensee is responsible for ensuring that transmitter power, frequency, and deviation are within the limits
specified by the station license. The station licensee is also responsible for proper operation and maintenance of
his radio equipment. This includes checking the transmitter frequency and deviation periodically, using approved
methods.

Your RITRON dealer can help you obtain an FCC license. To receive an FCC license for VHF or UHF frequencies,
you must submit FCC application Form 600.
HOW TO OBTAIN AN FCC RADIO LICENSE
Because your Ritron radio operates on Private Land Mobile frequencies, it is subject to the Rules and Regulations
of the FCC, which requires all operators of these frequencies to obtain a station license before operating their
equipment. Make application for your FCC license on FCC Forms 600 and 159.
To have forms and instructions faxed to you by the FCC, call the FCC Fax-On-Demand system at 202-418-0177
from your fax machine; request Document 000600 & Form 159.
To have Document 000600 & Form 159 mailed to you, call the FCC Forms Hotline at 800-418-FORM (800-418-
3676).
For help with questions concerning the license application, contact the FCC at 888-CALL-FCC (888-225-5322).
You must decide which radio frequency(s) you can operate on before filling out your application.
For help determining your frequencies, call RITRON at 800-USA-1-USA (800-872-1872).
SAFETY STANDARDS
The FCC (with its action in General Docket 79-144, March 13, 1985) has adopted a safety standard for human
exposure to radio frequency electromagnetic energy emitted by FCC regulated equipment. Ritron observes these
guidelines and recommends that you do so also:
• DO NOT operate a mobile radio transmitter when someone outside the vehicle is within two feet of the
antenna.
• DO NOT transmit with a fixed radio(base station, microwave, rural telephone RF equipment) or marine
radio when someone is within two feet of the antenna.
• DO NOT operate any radio transmitter unless all RF connectors are secure and any open connectors are
properly terminated.
• DO NOT operate radio equipment near electrical blasting caps or in an explosive atmosphere.
• GROUND ALL RADIO EQUIPMENT according to RITRON’s installation sheet.
• RITRON products should be repaired only by RITRON authorized personnel.
RF EXPOSURE
The RPM-460 has been evaluated for compliance with the maximum exposure limits for RF energy at the maximum
power rating of the unit with a common unity gain quarterwave magnetic mount mobile antenna. To ensure
compliance with the Occupational/Controlled maximum exposure limits, please observe the following:
When the quarterwave remote magnetic mount antenna is used, mount the antenna in a location that will ensure
that all persons will be at least 12 inches (30 cm) away from the antenna.
Antennas other than a quarterwave magnetic mount antenna must be tested with the RPM-460 for RF exposure
compliance in the environment in which it is to be used per the FCC’s OET Bulletin 65, Edition 97-01 or Industry
Canada RSS-102.
SAFETY PRECAUTIONS
RADIO MOUNTING LOCATION
Consider driver and passenger safety when you choose a location for the radio. Do not mount the unit overhead or
on a sidewall unless you take special precautions, such as securing the radio with a safety strap.
Improper installation increases the possibility that a car accident could dislodge the radio and make it a dangerous
projectile.
VEHICLE OPERATION
• ELECTRONIC SYSTEMS – Check the vehicle’s manual for possible warnings about operating a two-way
radio in a vehicle equipped with an electronic ignition or anti-skid braking system.
• LIQUEFIED PETROLEUM (LP) GAS FUEL SYSTEM – Radio installation in a vehicle fueled by liquefied
petroleum (LP) gas (with the LP gas container stored in a sealed-off space, such as a trunk) must conform
to NFPA (National Fire Protection Association) standard 58.
• BATTERY POWER – Avoid leaving the radio turned on for long periods when the engine is off, as this
could run down the vehicle’s battery.
RADIO CARE
GENERAL
• MOISTURE – The mobile is not waterproof and should not be exposed to rain, or immersed.
• EXTREME HEAT – Like all electronic equipment, the mobile should not be subjected to extreme heat, such
as
• being exposed to direct sunlight in a closed vehicle.
• VIBRATION/SHOCK – Although your Ritron mobile is designed to be rugged, it should not be expected to
survive abuse. Avoid dropping the radio.
• CHEMICALS – Detergents, alcohol, aerosol sprays, and/or petroleum products may damage the front
panel and/or case. Clean the mobile’s exterior using a soft cloth moistened with water.

SERVICE
Federal law prohibits you from making any internal adjustments to the transmitter, and from changing transmit
frequencies unless you are specifically designated by the licensee.
If your equipment fails to operate properly, or you wish to have your mobile programmed, contact your authorized
dealer or RITRON’s Repair Department.
RITRON, INC.
Repair Department
505 West Carmel Drive
Carmel, IN. 46032 USA
Phone: (317)846-1201
Fax: (317)846-4978
www.ritron.com

STANDARD FEATURES_____________________________________________
• 15 Receive/Transmit channels
• 30 watts RF Power output
• High Sensitivity Receiver
• Wideband/narrowband transmit/receive operation
• Rugged aluminum, uni-body construction
• Small, compact size: 2.1”H x 5.8”W x 6.3”L, 2lbs. 4oz.
• Loud 5 watt, front mounted speaker
• External speaker jack
• Large, easy to read LED display
• Dual-color transmit/busy indicator
• Rotary On/Off Volume control
• 2 Dual function programmable front panel buttons
Channel Up
Channel down
On-Hook Monitor
Scan On/Off
Encode Call tone
Encode 2-Tone
Encode 5 or 7 tone(Selcall)
Encode DTMF ANI
NOAA WX Scan(RPM-160 only)
Encode Emergency Call
Talk-around
High/Low Transmit Power
• CTCSS/DCS encode/decode
• 2-Tone encode/decode
• DTMF encode
• Optional MDC1200 encoder available
• Channel scan, normal and priority
• Companding
• Scrambling
• Auxiliary output connector
• Hand microphone, hang-up clip, and hardware
• Mobile mounting bracket and hardware
• DC power cable and in-line fuse

ACCESSORIES____________________________________________________
Contact your dealer or RITRON to purchase the following items:
ITEM___ DESCRIPTION_____________________________________________________
RM-4 Hand microphone, standard
RM-6TT Hand microphone w/12-key DTMF keypad
RM-6 Desktop microphone
RSP-5 External 5 watt speaker w/10ft. cord/3.5mm plug
RAM-1545 Dual-Band(VHF/UHF) magnet-mount antenna w/20ft. RG-58 coax/BNC
RAM-45 UHF ¼ wave whip magnet-mount antenna w/12 ft. RG-58 coax/PL-259
RPMK-12 Installation Kit, includes:
1 – Mobile mounting bracket
1 – 12VDC power cable w/in-line fuse
1 – Microphone hang-up bracket
Hardware and installation instructions
RPM-MRM RPM-160/460 Maintenance/Operating Manual
Factory programming of channels, codes, and features also available.
RADIO CONTROLS – GENERAL______________________________________
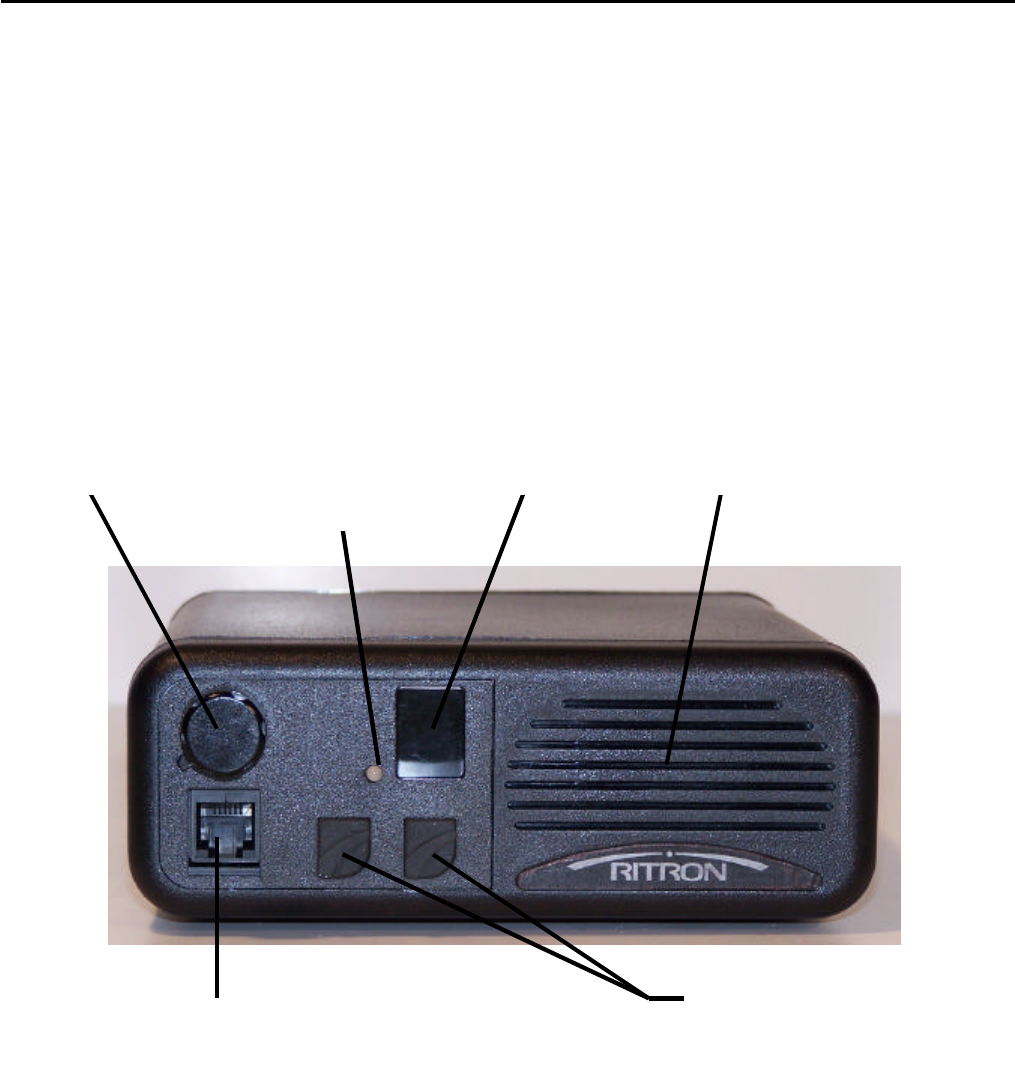
ON/OFF VOLUME CONTROL
The On/Off volume control knob switches the radio on and off, and adjust the volume level. To switch the radio on,
rotate the control knob clockwise. To raise the volume level continue rotating the control clockwise.
To lower the volume level, rotate the control counter-clockwise. To switch the radio off, completely rotate the
control counter-clockwise past the click position.
CHANNEL DISPLAY
The LED display indicates the current channel number the radio is operating.
PROGRAMMABLE FUNCTION BUTTONS
Each of the 2 front panel buttons may be PC programmed to 2 functions from the following list:
Channel Up Encode 5 or 7-Tone(Selcall) High/Low Transmit Power
Channel down Encode DTMF ANI NOAA WX Scan(RPM-160 only)
On-Hook Monitor Encode 2-Tone
Scan On/Off Encode Emergency Call
Nuisance Channel Delete Talk-around
Encode Call tone
On/Off Volume
Control Channel
Display Speaker
Transmit/Busy
Indicator
Programmable
Function Buttons
Microphone
Jack
Each button can be programmed for a function with a momentary press and a function with a longer 2 second press
of the button. TRANSMIT / BUSY INDICATOR
The transmit/busy indicator is a dual color LED. When the operating channel is busy, the TX/Busy LED will flash
green. At any time when the radio is transmitting, the TX/Busy LED will light red continuously.
SPEAKER
An internal 5 watt speaker is mounted behind the front panel for clear, crisp audio. An external speaker(RSP-5)
may be plugged into the rear panel jack, which disconnects audio to the front speaker.
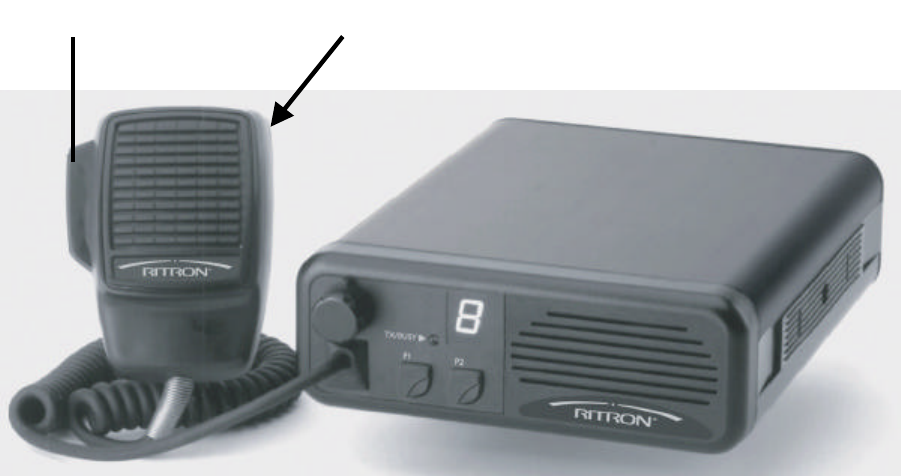
MICROPHONE PTT
Pressing the microphone PTT button on the side of the microphone activates the radio’s transmitter. While
pressing the PTT button, talk directly into the front of the microphone.
MICROPHONE JACK
The microphone is connected to the front of the radio via modular plug. When you insert the plug, align it as shown
below. The cord may be removed by pressing up on the underside of the rubber cover to unseat the plug’s lock-
tab. The rubber cover is attached to the cord and should not be removed.
MICROPHONE HANG-UP
The microphone hang-up controls squelch and monitor functions through a hook-switch circuit inside the
microphone. The microphone is off-hook(monitor/carrier squelch) when it is out of the hang-up clip. The
microphone is on-hook(tone squelch, if programmed with QC/DQC tone) when it is in the hang-up clip.
Microphone PTT
Microphone
Hang-Up Clip
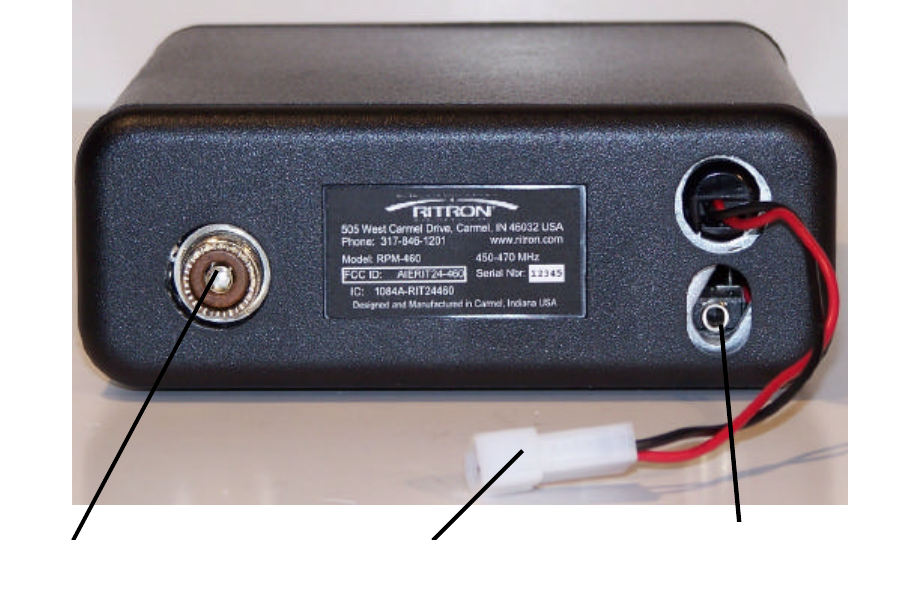
ANTENNA CONNECTOR
The antenna connector is located on the back of the radio. It is a 50 ohm UHF Type connector. The radio is
capable of 40 watts maximum of RF power.
EXTERNAL SPEAKER JACK
The external speaker is also located on the back of the radio. The connector is a 3.5mm stereo type connector.
The connections to the speaker are made from the tip and sleeve of the connector. The internal audio amplifier is
capable of supplying 5 watts of audio power to a 4 ohm speaker.
EXTERNAL DC POWER CONNECTOR
The RPM mobile is powered from the back of the radio through a 2-pin connector. The power source must be
capable of delivering 10 Amps @ 11-16VDC.
Antenna
Connector
External Speaker Jack
External DC Power
Connector

OPERATION______________________________________________________
WHAT THE RADIO TONES MEAN
The RITRON RPM mobile responds to certain instructions by sounding a tone or series of tones. These tones can
tell you whether the radio is working as you expect.
Power On: Single high frequency tone when the radio is turned on.
Programmable Buttons: Single high frequency tone when the button is pressed.
Receive Courtesy Beep: Single high frequency tone at the end of a received call to let the user know when to
reply.
Transmit Clear to Talk: Single high frequency tone after the PTT is pressed to let the user know when to begin
speaking.
Busy Channel Lockout: A repeating single low frequency tone when the PTT is pressed while the channel is
busy.
Transmit Time-Out: A repeating single low frequency tone after the PTT has been pressed longer than the
transmit time-out time period.
2-Tone Decode: A fast alternating high and low frequency tone when the radio has decoded a valid 2-tone signal.
Start/Resume Scan: A single low frequency tone when the radio begins/resumes the channel scan function.
Last Active Channel: A single low frequency tone to alert the user what channel was last received during the
channel scan.
Priority Scan Channel: A single high frequency tone during the channel scan to alert the user the Priority channel
has been received.
Out-Of-Lock: A slow alternating high and low frequency tone to alert the user the radio synthesizer is not
operating correctly.
Low Battery: A short high frequency tone every 20 seconds to alert the user that the supply voltage to the radio
has dropped below the minimum usable voltage.
Channel 1 Marker Tone: When incrementing or decrementing the channels, a long, high frequency tone to alert
the user that the radio display is at Channel 1.
Monitor/Squelch: If one of the programmable buttons is programmed for MONITOR and a channel is
programmed for carrier, tone, or 2-Tone, when the Monitor button is pressed a single, double, or triple high
frequency tone will be heard.
Tone Squelch – single tone
Carrier Squelch – double tone
2-Tone Squelch – triple tone
CHANNEL SELECTION
The RPM mobile provides 15 channels, each of which may be “dealer” programmed. The first nine channels
appear on the display as 1 through 9, and the next six channels are displayed as A through F (with b, c, and d
displayed as lower case letters).
You can move forward or backward through the channels, depending upon the programming of the programmable
buttons. If the buttons are programmed for Channel Up and Channel Down, then pressing and releasing the button
programmed for Channel Up will increment the displayed channel. Pressing and releasing the button programmed
for Channel down will decrement the displayed channel. If only one button is programmed for channel selection,

either Channel Up or Channel Down, then pressing and releasing the button will cause the display to either
increment or decrement the displayed channel. Any time the display is incremented to or decremented to Channel
1, then, a long tone is emitted to let you know you have reached Channel 1. This allows you to change channels
without looking at the display.
OPERATING MODES
You can hear calls with the RPM mobile in receive mode, and broadcast your voice with the RPM mobile in transmit
mode.
RECEIVE
The RPM mobile can receive broadcasts while the microphone PTT button is not being pressed. Whether you hear
these broadcasts depends upon the volume and squelch settings.
VOLUME: You can set the volume by one of two ways.
1. Press and release the programmable buttons while adjusting the volume control, using the tones as a
reference.
2. When a received broadcast is heard, adjust the volume control to a desired level.
SQUELCH: Squelch mutes the speaker so that interference from licensees outside of your group or background
noise does not bother the user. There are three types of squelch in the RPM mobile. First is carrier
squelch, which mutes the speaker if no on-channel transmissions strong enough for the radio to detect
are present. The second is Quiet Call(coded) squelch. This mutes the speaker unless the radio
detects an incoming signal that carries the same Quiet Call(QC) code as programmed for the selected
channel. The third is 2-Tone decode. This mutes the speaker unless the radio detects an incoming
signal that carries the same 2-Tone code as programmed for the selected channel.
When you remove the microphone from the hang-up clip, Quiet Call squelch and 2-Tone decode are
disabled and the radio reverts to carrier squelch, allowing all on-channel transmissions strong enough
for the radio to detect to be heard. (This is true, unless the radio is programmed for Channel Monitor
Lock-Out)
MONITOR: Monitoring lets you hear all on-channel transmissions that are strong enough for the radio to detect.
Monitoring a Channel Programmed with Quiet Call
If the channel is programmed with Quiet Call coded squelch, you can monitor the channel one of two
ways.
`1. Remove the microphone from the hang-up clip, or;
2. Press and release the front panel button that is programmed for the Monitor function.
The Monitor button may be programmed one of two ways; (see your dealer for programming)
1. Toggle - In toggle mode, when the Monitor button is pressed and released, the radio is switched
between coded squelch and carrier squelch. If two beeps are heard when the button is pressed
and released, the radio is in carrier squelch. If only one beep is heard when the button is pressed
and released, the radio is in coded squelch.
2. Momentary – In momentary mode, when the Monitor button is pressed and held, the radio is
switched to carrier squelch. When the button is released, the radio reverts back to coded squelch.
You will hear 2 beeps when the button is pressed, and 1 beep when released.
Monitoring a Channel Programmed with 2-Tone Decode
If the channel is programmed with 2-Tone decode, you can monitor the channel one of two ways.
`1. Remove the microphone from the hang-up clip, or;
2. Press and release the front panel button that is programmed for the Monitor function.

The Monitor button may be programmed one of two ways; (see your dealer for programming)
1. Toggle - In toggle mode, when the Monitor button is pressed and released, the radio is switched
between 2-Tone decode, coded squelch and carrier squelch. If one beep is heard when the button
is pressed and released, the radio is in coded squelch. If only two beeps are heard when the
button is pressed and released, the radio is in carrier squelch. If three beeps are heard, the radio
is in 2-Tone decode squelch.
2. Momentary – In momentary mode, when the Monitor button is pressed and held, the radio is
switched to carrier squelch. When the button is released, the radio reverts back to coded squelch.
Also, you will only hear two beeps when the button is pressed then one beep when the button is
released. To revert the radio back to 2-Tone decode, turn the radio off then back on.
Receiving a 2-Tone Page
To receive a 2-Tone page, select the channel programmed for 2-Tone decode. When the correct
2-Tone signal is received, the RPM mobile will generate a ringing tone and a “C” will be displayed in
the LED display to indicate that a call was received. At this time the radio is in either tone squelch( if
programmed with QC or DQC) or carrier squelch. To reply, remove the microphone from the hang-up
clip and begin speaking into the microphone while pressing and holding the PTT button. When you are
finished transmitting, place the microphone into the hang-up clip. If there is no activity for 16 seconds,
the radio will automatically reset(if Auto Reset is enabled) to 2-Tone decode and alert you with a single
beep. If you do not respond within 16 seconds after the decode ringing tone, the radio will
automatically reset(if Auto Reset is enabled) to 2-Tone decode and generate a single beep.
If Auto Reset is not programmed, you can reset to 2-Tone decode mode by:
1. Turning the radio off then back on.
2. If one of the front panel buttons is programmed for Monitor/Toggle, press and release the button
until you hear three beeps.
SCAN: Scanning allows you to continually check for transmissions on multiple channels over a short amount of
time. The RPM mobile has two types of scanning. For both types of scanning, all channels that are to
be scanned must be marked during programming as a scan channel. Also, in order to enable and
disable scanning, one of the programmable front buttons must be programmed as a SCAN button.
The first type of scan is normal scan. In normal scan, when the SCAN button is pressed and released,
all channels programmed as a scan channel are incrementally checked for a received signal. If no
signal is present, the display is incremented to the next channel and so on. If a signal is present, the
radio stops on the channel until the signal is no longer present, and then resumes scanning.
The second type of scanning is priority scan. In priority scan, when the SCAN button is pressed and
released, all channels programmed as a scan channel are incrementally checked for a received signal.
If no signal is present, the display is incremented to the next channel and so on. If a signal is present,
the radio stops on the channel until the signal is no longer present, and then resumes scanning. Also,
during the time the radio is stopped on a non-priority, the radio will automatically go to the priority
channel and check for a signal. If a signal is present, it will interrupt the non-priority channel and allow
you to hear the broadcast on the priority channel. When that is finished, the radio will return to the non-
priority channel to check for a signal. If no signal, the radio continues with the scanning cycle.
Nuisance Channel Delete – When scanning, if a channel is busy for an abnormal amount of time, the
busy channel can be temporarily deleted from the scan function by pressing and releasing the front
panel button programmed for Nuisance Channel Delete. To add the channel back into the scan, simply
turn the radio off and back on.
NOAA WX: (This feature is only available with the RPM-160) To receive your local NOAA weather broadcast, the
RPM must be programmed to your area NOAA frequency and one of the front panel buttons must be
programmed for NOAA WX. Press and release the button programmed for NOAA WX and the radio
will automatically begin receiving on the pre-programmed NOAA weather frequency for your area.
TRANSMIT
Make sure that the channel is not busy before you begin transmitting. Check the TX/Busy LED, which flashes
green if the channel is busy. This occurs regardless of any code signaling programmed. Normally, you should not
transmit until the channel is clear.
To transmit, remove the microphone from the hang-up clip. Press and hold the PTT switch on the side of the
microphone, and talk in a normal tone with the microphone held two to three inches away from your face. Pressing
the PTT button activates the transmitter and lights the TX/Busy LED a constant red.
If, when pressing the PTT button, error tones are heard in the speaker, check for the following conditions:
1. The channel is programmed as a Receive Only channel.
2. The channel is programmed with Busy Channel Lock-out and the channel is busy.
The front panel buttons can be programmed to automatically transmit various tone signaling formats. The features
available are:
Encode Call tone – When the button is pressed and released, the radio transmits a ringing tone to alert users in
your group that a call is coming through.
Encode 2-Tone - When the button is pressed and released, the radio transmits a pre-programmed 2-Tone signal.
Encode 5 or 7 tone(Selcall) - When the button is pressed and released, the radio transmits a pre-programmed 5 or
7-Tone signal.
Encode DTMF ANI - When the button is pressed and released, the radio transmits a pre-programmed DTMF tone
signal. The RPM mobile may also be programmed to transmit a DTMF signal every time the
PTT button is pressed.
Encode Emergency Call - When the button is pressed and released, the radio transmits a pre-programmed multi-
tone signal to alert all users in your group there is an emergency.
Other functions that the front panel buttons may be programmed for:
Talk-Around - When the button is pressed and released, and if you are operating on a repeater channel, the radio
will transmit on the receive frequency when the PTT button is pressed. This will allow you to talk in
simplex mode rather than occupying the repeater frequency.
High/Low Transmit Power – When the button is pressed and released, the radio’s transmit power will switch from
high to low and vise versa. An “h” or “L” will appear in the display when the button is
pressed to indicate the power level.