Roadmaster VRBCS300WCA Wireless Backup Camera User Manual

Roadmaster (USA) Corp. Wireless Backup Camera

User Manual

These instructions do not apply to all vehicles. They are meant as only
as a general guide due to the number of different makes & models. For

Monitor Installation


depending on the angle.
1. Temporarily place the moni-
tor stand in the location that
you have chosen. Make sure
-


    
    
block/box or cigarette lighter
-
pending on the cable you are
using
      
location of the monitor and
the cable route you have


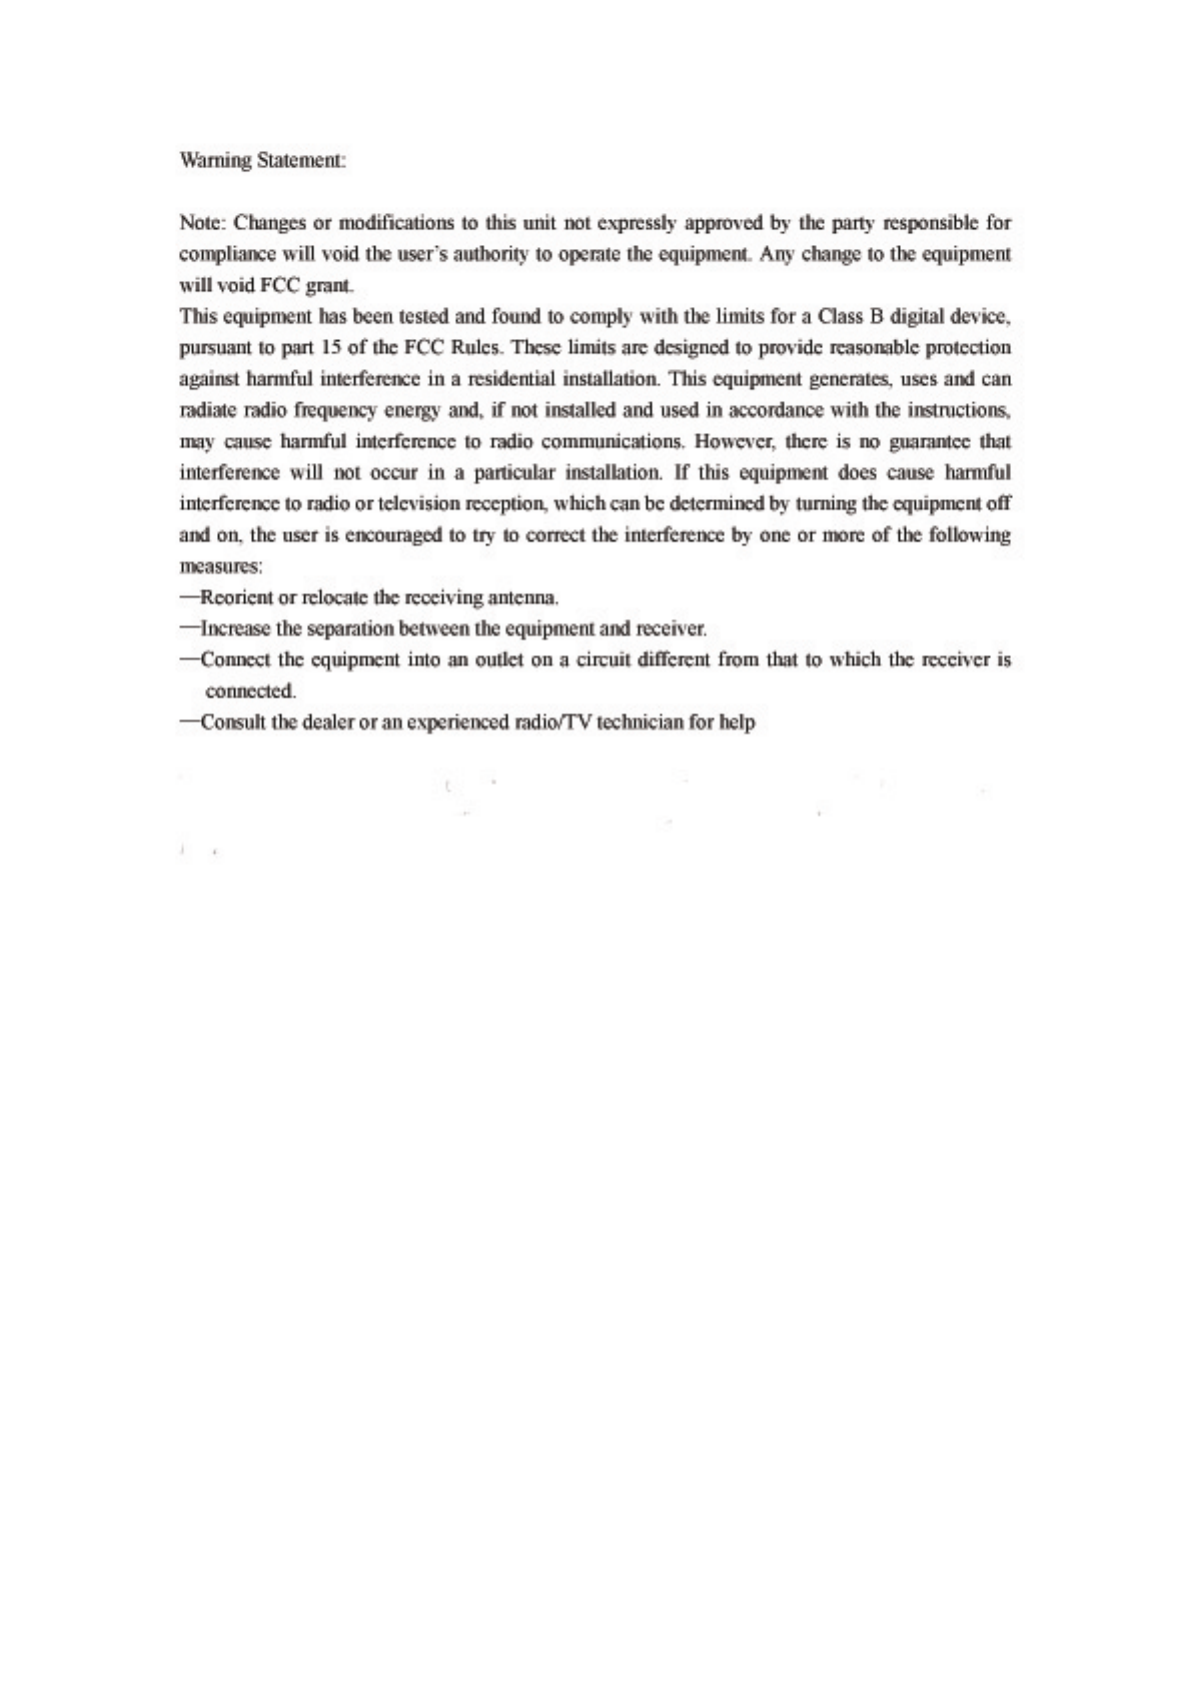
MONITOR POWER CONNECTION
There are two ways to supply the monitor with power, one uses a 12 Volt cigarette lighter
adaptor plugged into the vehicle’s cigarette lighter socket, and the other uses a wiring
harness hard wired to the vehicle’s fuse box.
12 Volt Cigarette Lighter Adaptor Using the Monitor’s ON/OFF Button
1. Choose a route for the cable from the monitor to the cigarette lighter socket. It can be a direct
-


-


3. Plug the 12 Volt cigarette lighter adaptor into the cigarette lighter socket.
4. Press the ON/OFF button to turn the monitor.
Hard Wired to Fuse Box Using the Monitor’s ON/OFF Switch (Fig. 1)
1
2. Remove the fuses from both of the in-line fuse holders.




your chassis ground.
-



8. Press the ON/OFF button to turn the monitor.
     -
       

Toll-Free Help Line 1-800-445-1797 and our in-house technical ser-



VRBCS300W
Back-Up Camera
and Monitor
Before You Install
Parts
Installation Installation
1 - Back Up Camera
1- TFT LCD Monitor





2 - License Plate Bolts & Nuts

4 - In-Line Wire Connectors

1 - Grommet
6 - Cable ties
GIVE US A CALL, WE'LL HELP YOU INSTALL.
1-800-445-1797
PLEASE DO NOT RETURN PRODUCT TO STORE.
Visit us on the WEB
www.vr-3.com
For Information and Technical Assistance,
Call Toll-Free in U.S.A. and Canada.
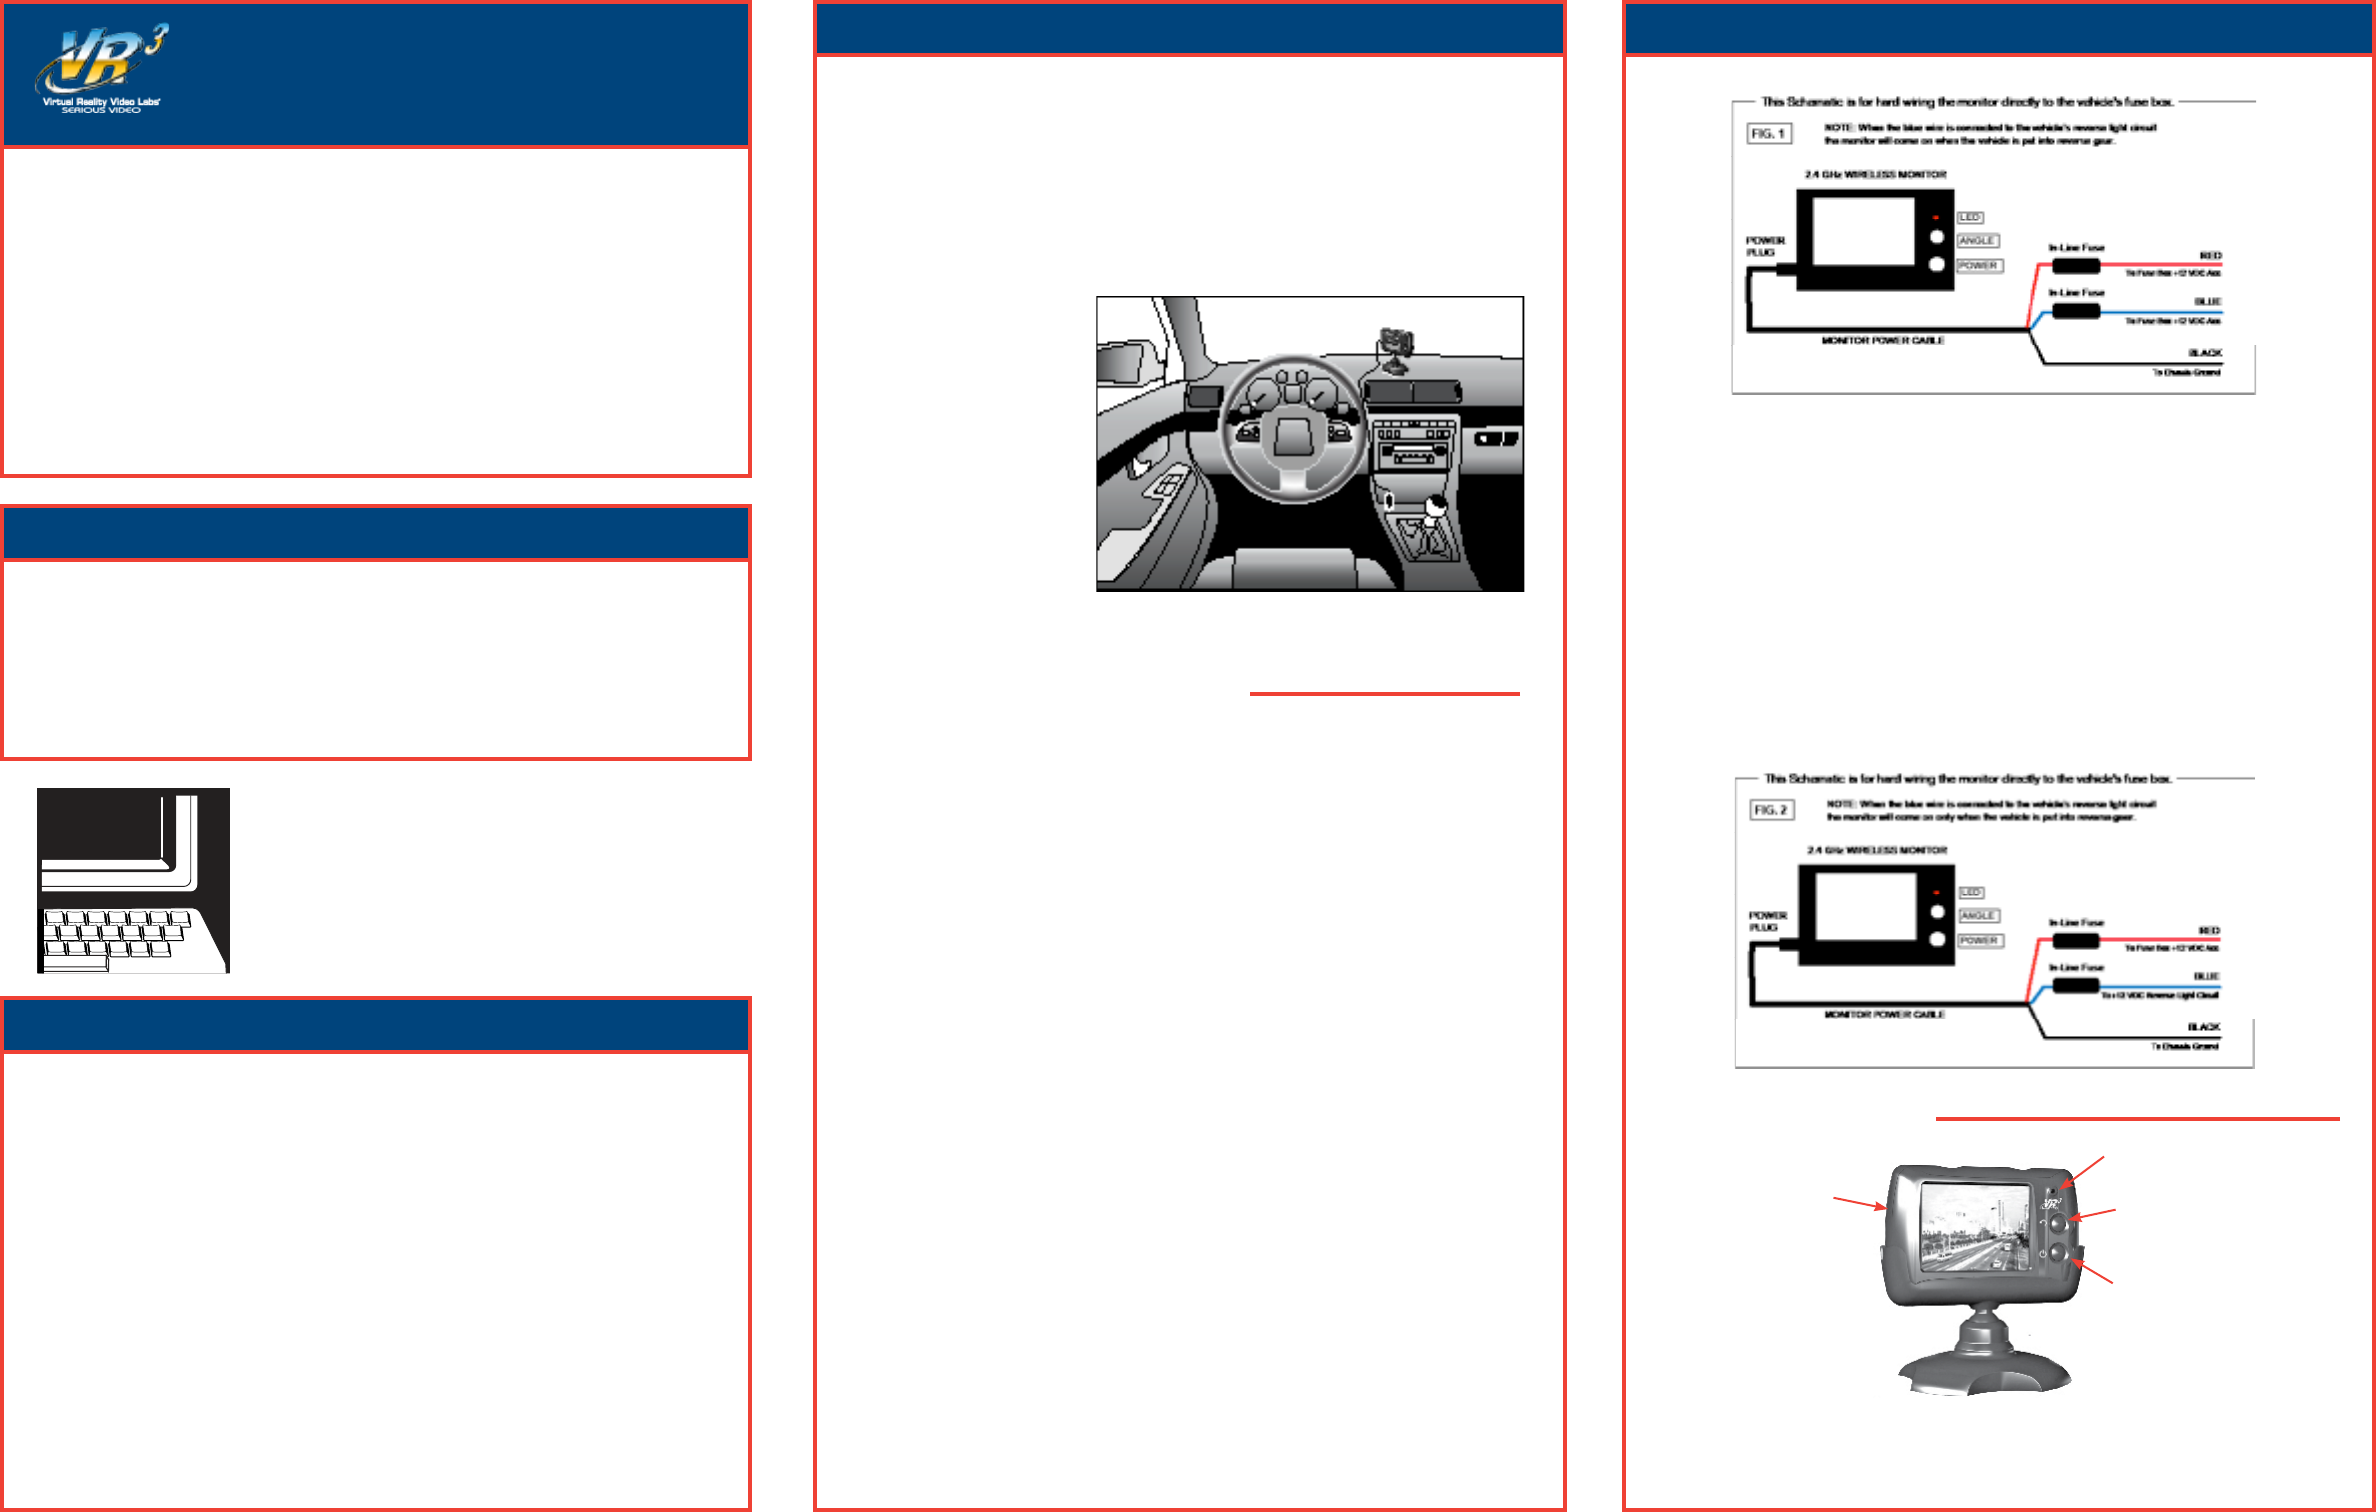
Hard Wired Using Vehicle’s Reverse Light Circuit for ON/OFF (Fig. 2)
1
2. Remove the fuses from both of the in-line fuse holders.




your chassis ground.
-



    

LED Power Indictor
Image Orientation Button
Power ON/OFF Button
Power Input Jack
(on side of monitor)
MONITOR CONTROLS



       
-

DO NOT RETURN





-



 
cable comes out of it. 

.
If there are any vehicles compo-


plate and camera before drilling.
 


®®

10. Once you have located the reverse light circuit


cable to prevent it from being caught on any ve-
hicle component such as the trunk hinge. Never
route the cable on the outside of the vehicle.


       







 -

 ®   
®

fuse holder.
 


2. Reinstall the in-line fuses.


5. Turn the monitor ON by pressing the ON/OFF button on the monitor.

on the monitor to correct the image.

change.



must permanently install it.
Fully tighten the license plate bolts.


+A
Mirror
A+


A+

A+
Mirror

Installation Installation
SCOTCH-LOK® INSTRUCTIONS
Installation
CAMERA WIRING DIAGRAM
       

2. Put the license plate bolts through the holes on the


the bolts through the holes on the license plate



5.

      





to the camera.

CAMERA INSTALLATION
You may mount the camera using the license plate’s top or bottom mounting bolts or
screws. When mounting the camera you must make sure that it’s eld of view is not
obstructed. Depending on the vehicle, you may mount the camera on the top or bottom
of the license plate. To adjust the angle that the camera is mounted to the vehicle use the
supplied wedge shaped shims.
Using an Existing Opening for Access Drilling an Access Hole
6.


 


 

 

Fig.1
Fig.2
Fig.3 Fig.4
Fig.5 Fig.6
TESTING THE SYSTEM
GIVE US A CALL, WE'LL HELP YOU INSTALL.
1-800-445-1797
PLEASE DO NOT RETURN PRODUCT TO STORE.
Visit us on the WEB
www.vr-3.com
For Information and Technical Assistance,
Call Toll-Free in U.S.A. and Canada.
®
® and/or



®

®



®



®

®







3. Please include a detailed explanation of the problem you are having.
®
® li-

® 
®

the use or intended use of the product.




Navigation menu