Roadrover Technology B6241 MULTIFUNCTIONAL NAVIGATION AND ENTERTAINMENT SYSTEM User Manual english
Shenzhen Roadrover Technology Co., Ltd. MULTIFUNCTIONAL NAVIGATION AND ENTERTAINMENT SYSTEM english
USERS MANUAL

Without written consent, any part of this user manual should not be used
or re-published in any way. All the products and companies mentioned in
the use's manual belong to their own proprietor. Specifications are subject
to change without further notice! The user manual is for reference only;
please refer to the product for actual operations.
COPY RIGHTS 2010 ALL RIGHTS ARE RESERVED.
NAV.DVD. RADIO.
MP3/MP4.TV(Optional)
BLUETOOTH.IPOD.AUDIO.
Rev. 2.11
Revision date: 25 Feb,2010
Car Navigator & Entertainment System
Owner's Manual
User's manual

This is a multi-function unit and it consists of Satellite Navigation, DVD
player, In-Car Office and Entertainment Center. In order to operate it
correctly, please read through the user manual thoroughly before using
The Navigation System in this unit adopts advanced navigation technologies,
it provides elaborated navigating data to calculate the most suitable routes
to your destinations. You can discard your traditionalmaps and the old CD
player now, as this unit brings you more functions and conveniences
Thank you for choosing car Navigator & Entertainment System!
SUMMARY
beyond your imagination.
it.
FCC Statement This device complies with Part 15 of the FCC Rules. Operation
is subject to the following two conditions: (1) This device may not cause harmful
interference, and
(2) This device must accept any interference received, including interference that
may cause undesired operation.
Note: The manufacturer is not responsible for ANY interference, for example
RADIO or TV interference, caused by unauthorized modifications to this
equipment. Such modifications could void the user’ authority to operate the
equipment.

SUMMARY
PRODUCT INTRODUCTION.......................................................................1
SAFETY PRECAUTIONS ............................................................................2
FRONT PANEL FEATURES........................................................................3
APPLICATIONS ............................................................................................4
Navigator.................................................................................................4
DVD..........................................................................................................5
Digital TV / Camera ..............................................................................8
Radio.............................................................................................9
Audio Player..........................................................................................11
iPod Player............................................................................................12
Bluetooth................................................................................................13
File Brower.............................................................................................15
Games....................................................................................................17
Notebook................................................................................................17
OPTIONS.............................................................................................18
INSTALLING GPS......................................................................................19
STANDARD ACCESSORIES&BACK PANEL........................................21
MECHANICAL SPECIFICATION..............................................................22
SOLUTIONS OF COMMON PROBLEMS...............................................23
TROUBLE SHOOTING...............................................................................24
.
CONTENT
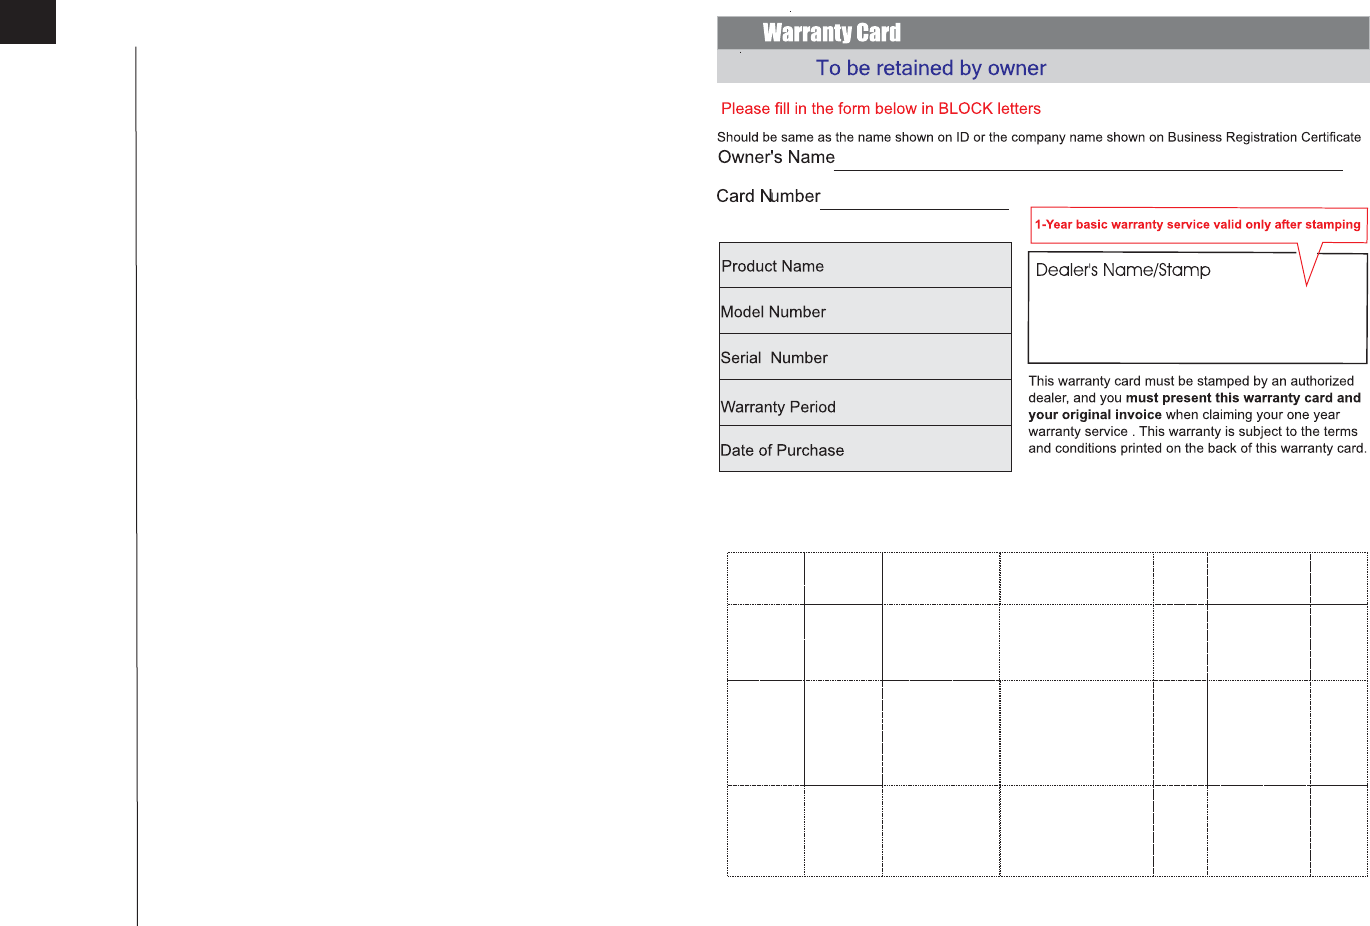
1. You must fill in the warranty card (for corporate user, please stick a business
under these terms and conditions will be available. You must take out the warranty
2. The company warrants that its products are free defects in material and workmanship
for one year. Subject to the conditions and limitations set forth below. The company
will at its option, either repair or replace any part of its products that prove defective
by the company on an exchange basis, and will be either new or refurbished to be
3. This warranty only applies to the product with the model number and serial number
4. During the Warranty Period and provided that the Product was used under normal
replacement of parts arising from defects in the materials and workmanship of the
artificial reasons (including computer virus, operation fault, enter fluid, scratch,
(2) The damage is caused by your negligence and misuse of the Product or incurred
8. This warranty shall not extend to anyone other than original purchaser of this Product.
9. The warranty expressly provided herein is the sole warranty provided in connection
registration copy) after purchasing the product, then the warranty will take effect
conditions. You will be entitled to free repair service of the Product and free
Product(fair wear and tear excepted),excluding (without limitation)repair and/or
(3) The damage cause by use pirate discs or other no authorization software;
(4) The malfunction or the damage caused by natural calamity or other force
(5) The malfunction or the damage caused by some accidental factors or some
carry, clash, not correctly insert or pull out, something fall into machine, rat
10. This warranty Card is your sole responsibility and our company will not replace
majeure (for example: earthquakes, fire, stroke of lightning, other factors
5. This warranty shall be automatically cancelled if the Product or any part(s) are
modified, tampered with, altered, converted or repaired in anyway by anybody
11. Our company reserves the right to terminate the warranty in the event of any
6. Our company is not obliged to maintain or repair any part(s) of the Product if:
with the Product, and no other warranty, expressed or implied, is provided.
(1) Optional units and accessories such as power cable or audio cable
(3) The Product is not supplied by our company or our authorized deals.
uncertainty or doubt as to the applicability of these terms and conditions.
TERMS AND CONDITIONS OF WARRANTY
7. The shipping fee will be beard by each other for 50%.
other than our staff or authorized service providers.
written on the warranty card (the "Product").
replacement and/or cleaning of the following:
this Warranty Card if it is lost or destroyed.
damage, pest damage and so on);
during transportation of the Product.
create traffic accident and so on);
(2) Daily inspection and correction
card when it needs to maintain.
functionally equivalent to new.
(1) Surpassing the valid term
Product Introduction
Features
● Digital touch screen, 800 x 480 High definition resolution
l 1GB NAND Flash
l Navigation Map display with Intelligent Voice Guide, Route
Plan, Advanced POI Management
l iPod driver connectivity
l DVD player, compatible with DVD, DVD-R/RW, DVD+R/RW,
VCD, CD, CD-R/RW, MP3
l Bluetooth hands-free
l Clock and calendar
l Optional Digital TV tuner
1
Interfaces
l MP3/MP4 player(MPEG1/2,MPEG4,WMV9), photo
album, notebook
l Radio AM/FM (Supports U.S., Asia pacific regions and
European regions)
l Reversing camera video input (RCA) x 1
l Video input (RCA) x 1
l DVD video output (RCA) x 1
l 45W x 4 internal digital amplifier
l Preouts x 5 (FL, FR, RL, RR, SUB)
l GPS antenna input x 1
l High speed USB port x 1
l SD card expansion slot x 1
l iPod connectivity input x 1
Return date Completed
date
IMPORTANT: Any alterations will invalidate this warranty
User description
Malfunction description
Number
Maintain record
Stamp
1 Car Navigator & Entertainment System User's Manual

Safety Precautions
Caution
Warning
2
To ensure driver's safety, please do not operate this unit while
the v ehicle i s i n m otion.A llth
es
afety n
otes s
hould b
ere
ad a
nd
understood before operating this product and please retain this
manual in the vehicle for your future references.
l Please ensure that the product is operated under safe
conditions which will not endanger any other road users.
l This is an electronic device, please do not use the device
under hazardous conditions such as in petrol stations,
chemical or electromagnetic radiation areas.
l Satellite navigation system installed in this unit is to be
used for directional reference and guidance only. It does not
Represent traffic rules and does not take the traffic flow into
considerations when the routes are selected.
l Please do not attempt to install, uninstall or repair the unit
with its power turned on as it is dangerous and it might also
damage the unit. Please turn to professional help for installation,
removal or repair services if required.
l Please do not expose this unit to hazardous materials.
l This unit comes with a LCD touch screen monitor, please
do not scratch or press the screen with any hard or sharp
object which might directly or indirectly damage the LCD panel.
l Please do not insert anything other than a standard 12cm
CD/VCD/DVD disc into the disc drive equipped on this unit
as it might damage the disc scanning system.
l If the temperature in the car gets too high under the direct
sun light, please turn on the air conditioning before switching
on the unit to prevent possible unit overheating.
l Please use the clean disc, or it may cause the noise
of DVD
l Please clean the DVD laser with Disc Cleaner periodically
25 Car Navigator & Entertainment System User's Manual Car Navigator & Entertainment System User's Manual 2
Please contact your nearest
product distributor/reseller
for further assistance
re-enter it again. If the system
still cannot locate it, it is most
likely that the map in the system
Try to change the scale of the
map, you should be able to
see the navigation map on
the monitor now. If the map
still hasn't appeared, try to
make a search again and if
the problem persists, please
contact your nearest product
distributor/reseller for further
Please contact your nearest
product distributor/reseller
for further assistance
Future updated maps
might cover those remote
locations.
Confirm the address and
Paire your cellphone with
this Navi system
Possible Solutions
Plug in the GPS antenna
will need to be updated
assistance
GPS antenna is not plugged in
It is possibly that the scale
of the navigation map is
either too small or too large
No GPS reception in the
current location
Some remote areas are
not covered in the maps
loaded in the system
Possible Reasons
Bluetooth device is not
connected
Can't find the bluetooth
serial port
Trouble Shooting
Bluetooth can't work
GPS cannot pin
point the current
location
GPS cannot find
the location that
I am looking for
Map does not
appears on the
monitor
No GPS
reception
Problem
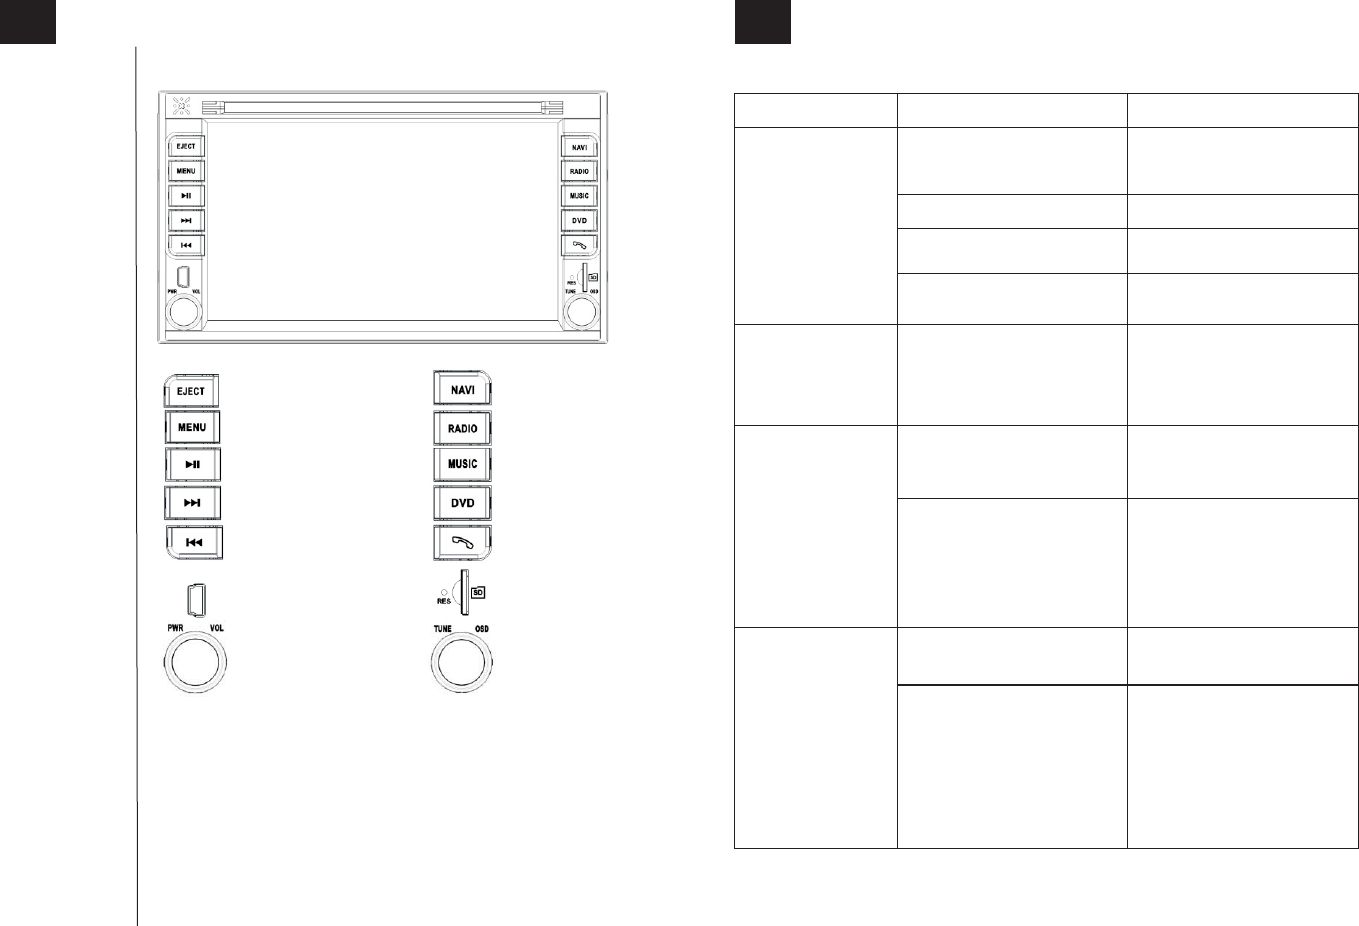
Front Panel Features
Front Panel
Start up
3 10
--SD Card Slot
--POWER/VOLUME(+/-)
--PLAY PREVIOUS
--PLAY NEXT
--PAUSE/PLAY
--MENU
--ADJUST OSD
--EJECT
--NAVIGATION
--MUSIC
--RADIO
--DVD
--BLUETOOTH
--USB
With the key turned to ACC position, press POWER to
switch on the system, it will startup and display the home
interface after 10 seconds. Press POWER button again
to shut down the unit.
The real front plate diagram will differ from each vehicle.
Car Navigator & Entertainment System User's Manual 24 3 Car Navigator & Entertainment System User's Manual
Trouble Shooting
Screen is too dark or
not bright enough
Cannot play DVD
Bad radio reception
and cannot locate
many radio stations
No image from the
reversing camera
Problem
Disc loaded inaccurately
Damaged disc
Dirty disc
Disc does not play at all
Brightness or contrast
adjustment is at the
lowest setting
The radio antenna is not
plugged in correctly
This problem can also relate
to the current position of the
vehicle, especially in the areas
with tall buildings
Reversing camera is not
installed
Reversing camera is installed,
but it is not plugged into the
unit
Possible Reasons
Please load the disc with the
graphic side showing towards
the windscreen
Please try another disc
Please clean the disc before
reloading it again
Please check the disc format
before playing it
Press OSD o n th e re mote “”
controller and re-adjust suitable
brightness, contrast and
chroma settings
Re-plug in the radio antenna
behind the unit
Try it again when the vehicle is
away from the built up areas.
If the problem persists, please
contact your local product
distributor/reseller
Install the PC camera, then
insert the CCD plug
Connect the reverse camera
to the unit, then press the
CDD button on the
remote controller, if it still
doesn't work, please contact
your local product
distributor/reseller
“”
Possible Solutions
23 Car Navigator & Entertainment System User's Manual Car Navigator & Entertainment System User's Manual 4
Interfaces
9 Solutions of Common Problems
Notice:
If you have the following problem in the use, the guide will help you fast to solve
the problem, if the question has not solved, then you will have to consult the
professional or to the sale place consultation. In order to avoid the serious
consequence, you wouldn't open the machine secretly.
Phenomenon Reason Solution
The unit doesn't
start up
The key is not turned to ACC
or IGNITION position
The power cable has not
been connected to the unit
Blown fuse behind the unit
or in the radio system
Flat battery
The remote controller is
running out of the battery
Speakers wires are not
connected to the unit
The unit is on Mute
“”
The volume is excessively low
Front/Rear speaker
Left/Right speaker
No sound
output
Touch panel is
not calibrated
No response
from the
touch screen
Possible that the system
is still processing the
previous task given to it
Turn the vehicle key to ACC
or IGNITION position
Connect the power cable
to the unit
Replace any blown fuse in
the system
Replace or charge up the flat
battery
Change the remote control
battery
Make sure that the speaker
wires are properly connected
behind the unit
Press MUTE key or
VOLUME(+/-)key
“”
Press VOLUME(+) key
Press the remote control
panel OSD or adjust
the Option Audio
“”
“”“”
Press calibration to
calibrate the monitor again
“”
“”“ ”“ ”
“”
Menu Option System
calibration
If there is still no respo nse after
a long period time, please
contact our after-sale service
department to have this issue
looked at
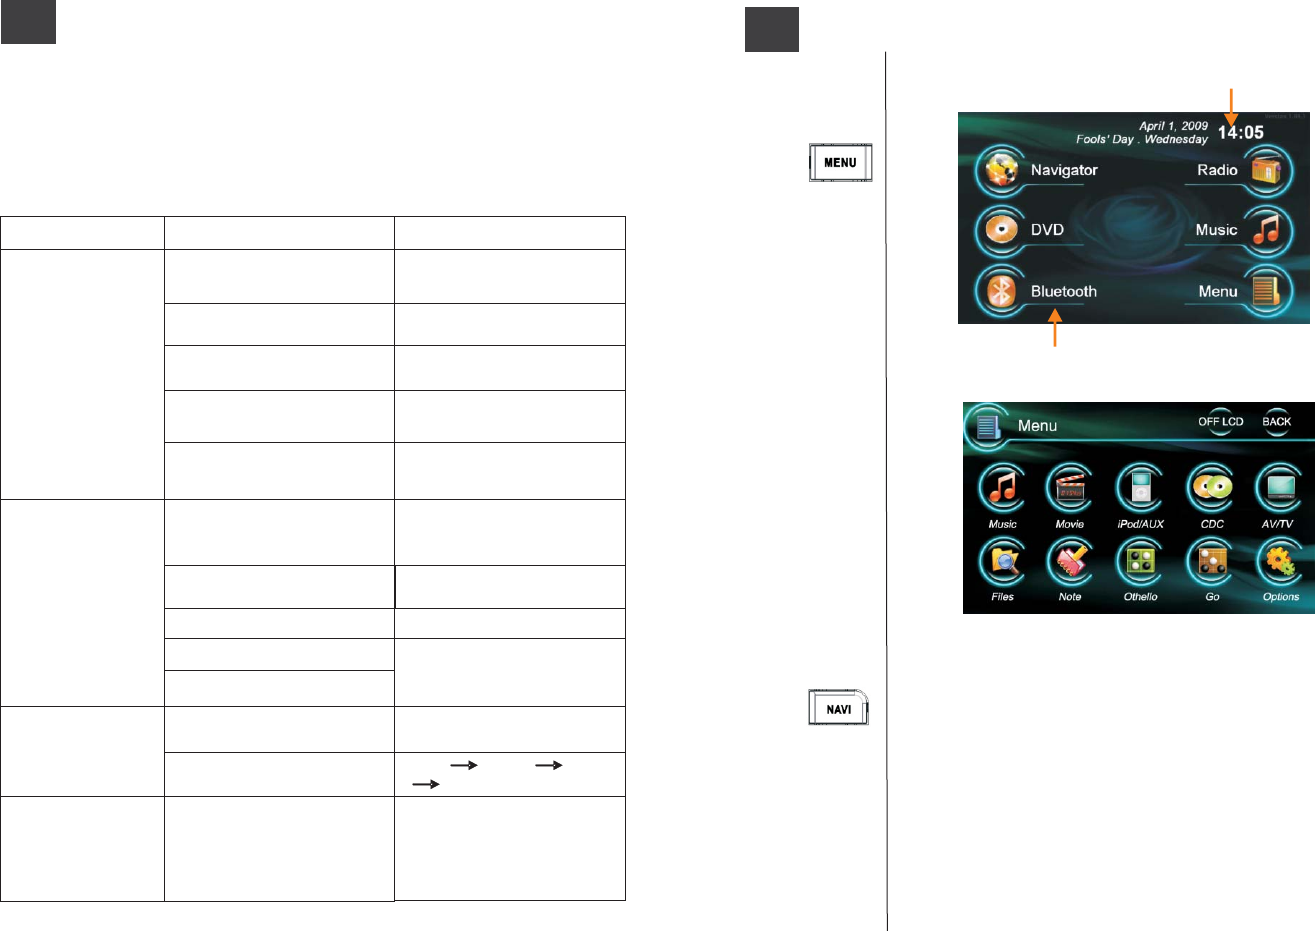
Current Date and Time (Compact Calendar)
In any other mode,when press the“Navi”button on the front
panel or touch“Navigator”icon on the main menu will access
The map software will be preloaded on SD card and run Navi
application from SD card,so don't delete any original file
provided by vendor or it will arise abnormally working.
Application Icons Click to launch
Navigation.
Applications
Navigator
In any other mode
when press the
button on the front
panel, this interface
when you press
button on the front
the navigator.
Home
Menu
will appear.
In any other mode
the
panel, it will launch
4
Car Navigator & Entertainment System User's Manual 22 5 Car Navigator & Entertainment System User's Manual
87.5~108.0MHz (Step:50KHz)
88.1~107.9MHz (Step:200KHz)
87.5~108.0MHz (Step:50KHz)
Built-in NAVI, Bluetooth,iPod, DVD, VCD, MP3, MP4, RADIO,
RDS(optional and priorioty to Europe), TV(optional)
FM Tuning Range
Unit
Dot
Mm
Mm
Mm
Kg
DVD, DVD-R/+R, DVD-RW/+RW, VCD, CD, CD-R/RW
Photo: Jpeg, Gif, PNG, Bmp
Office:Word, Adobe PDF, Excel, PowerPoint, Txt,Exe
CAR NAVIGATOR&ENTERTAINMENT SYSTEM
144.0 (H)x78.24 (V)
0.119 (H)x0.345 (V)
295x145x180(WxHxD)
Remote Control , Front Panel, Touch Panel
800 (H)x480(V)
Video Format: MPEG1/2, MPEG4, WMV,etc
Audio format: MP3,WMA,WAVE
Specifications
NTSC/PAL
530~1710KHz (Step:10KHz)
4.1 Channels
531~1620KHz (Step:9KHz)
531~1620KHz (Step:9KHz)
AM Tuning Range
3.4
45Wx4
Mechanical Specification
4Ù
Speaker Resistance
AM/FM Digital Tune
Outline Dimension
Surface Treatment
Display Format
Amplifier Inside
Parameter
Active Area
Dot Pitch
DC10V~16V
Max Output
Weight
European
-20~60℃
Channel
Local
U.S.
Asia
Run Temperature
DVD Compatible
Mechanical
Specifications
Power Supply
Control Mode
Media Format
Product Name
File Format
Function
Amplifier
Radio
8
Applications: DVD
5
Play disc
Operation
REPEAT
DVD
In any other mode when you press the button on
the front panel will switch to the DVD mode, or click the
DVD icon to startup.
Introduce operating methods about playing discs.
Before playing, please switch the power on and load the
disc into the unit.
DVD repeating Mode:
When playing CD, press REPEAT and it will repeat the current
song again as follow mode:
When playing DVD, press REPEAT and the repeating mode
will be displayed on screen as follow mode:
You can repeat each chapter or title, but this operation
will differ from different types of discs.
The DVD player supports DVD, DVD-R/RW, DVD+R/RW,
VCD, CD,CD-R/RW and MP3 CD
When playing VCD,SVCD discs,the repeating mode will be
displayed when PBC is off
Repeat Single Repeat All Repeat Off
Repeat Chapter Repeat Title Repeat Off
Car Navigator & Entertainment System User's Manual 6 21 Car Navigator & Entertainment System User's Manual
User Manual
Pen
SD Card
Fixing Screws
(M5x4mm)
Steer wheel Cing able GPS Antenna
Special Output pPower Loom AV Connector I od Cable
7Standard Accessories&Back Panel
Back Panel
A. Fan
B. CD/DVD Changer Input
C. Steering Wheel Interface
D. AV Input
E. GPS Antenna Input
F. Power & Fuse
G. Ipod -Bluetooth
Connectivity Input
H. FM/AM Antenna Input
The real accessories will differ from each vehicle.
The real back panel diagram will differ from each vehicle
On the DVD mode,click the icon to display next meun:
Minimize programme
Select ▲ / button display on the right to set language, Audio,
Click icon or press“SETUP”button on remote
control to lauch the DVDsetup.The screen will show
standard setting menu.
Close
Bass, Treble Parameters and so on
Operator icons
Video,Classification,etc.
Applications: DVD
or by using the remote control.
On the main interface, click"DVD" icon to launch DVD,
the follow interface will appear. You will control DVD
player setup by touching the buttons displayed on screen
DVD system
setup

Car Navigator & Entertainment System User's Manual 20 7 Car Navigator & Entertainment System User's Manual
Notice:
● This unit is compatible only for vehicles come with a
● To avoid short circuits in the vehicle electrical system
● Secure all wiring with cable clamps or electrical tapes.
● Make sure that all cables and wires (especially the GPS
● Do not route cables to any high temperatures areas. If the
● Do not cut or extent the GPS antenna cable to make it
● To avoid short circuits, wrap up the disconnected lead with
● When replacing the fuse, be sure to only use a fuse of the
● Never connect speakers with an output rating less than 50
More about installation,please follow up installation manual
and negative grounding. 12-volt battery
during installation, be sure to disconnect the negative
terminal (-) from the battery before the installation.
Do not allow any bare wiring to remain exposed.
antenna cable) are routed and secured so that will not be
caught by any of the vehicle's moving parts. Especially the
steering wheel, shift lever, parking brake, sliding seat tracks,
doors, or any of the vehicle's control mechanisms.
insulation heats up, cables may get damaged and resulting
in a short circuit or malfunction and cause permanent
damages to the unit and the vehicle.
shorter or longer. Altering the antenna cable could result in
a short circuit or malfunction.
insulating tapes.
same type and grade.
W channel or whose impedance are not 4 ohms, otherwise
it may cause the speaker to catch a fire, emitting smoke, or
get damaged.
Applications: DVD
DVD system
setup
3
NOTICE: Some disc may contain only one audio language or subtitling
language.The languages options will depend on the disc.
If the selected language is not record in the disc,the DVD will
The setting of language by DVD menu or AUDIO button can
only work with the current playing program.DVD will play in the
language the DVD system is originally set.
play in its original default language.
Press / button on touch panel to select desired language
and press“OK” button to confirm. The menu of DVD and
system setting will display in the language selected.
When you need to switch to other setting feature, press
direction keys to access.
Setting for other features(e.g.video,audio) is similar. Please
refer to the menu language setting.
Touch to minimize DVD function to access other desired
favourite function.DVD will continue operations when
accessing Navi/Bluetooth/Notebook function.DVD player
will be disabled upon accessing Radio/MP3/MP4/iPod player.
After setting language, press OK and button to enter
into advanced language menu.(refer diagram below)
If you need to continue setup other languages, go back
to language setting interface to choose. Touch SET
again to exit the DVD setting system, DVD will continue
to play automatically after exit setup.
19 Car Navigator & Entertainment System User's Manual Car Navigator & Entertainment System User's Manual 8
The GPS antenna may be installed in the vehicle, for instance
on the meter or on the cloth rack; it also may be installed
outside of the vehicle, for instance on the roof or the boot of
The GPS antenna has to be installed at the area no metal
frame/structure goes over it. If the vehicles windscreen has
installed the anti-explosion tinting film or the insulate tinting,
the intensity of the satellite signal may be weaken, in which
case we will strongly suggest to install the GPS antenna outside
Installation Guide: Installing GPS
the vehicle.
of vehicle.
Install GPS
Antenna
The reversing camera function (a reverse camera must be
installed) is only an aid to reversing the car, and it is not a
As soon as the car is in its reverse gear (with reverse trigger
action) regardless of which interface the system is displaying,
the monitor will switch the display to the reverse camera
channel automatically. As soon as the reverse gear is disengaged,
the display will be switched back to where it was before the
The Unit will adjust the brightness according to the day/night
mode.In daytime,the brightness will be light enough for driver's
sight.In night mode,the brightness will be darker once the car
light is turned on.You also can adjust your suitable brightness
The system can detect whether it has already equipped
with a digital television antenna automatically, if an
antenna is equipped, clicked on “AV/TV”icon to enter
the TV interface,if there is no antenna connected, clicked
Applications: Digital TV/Back-car vision(Optional)
on AV/TV icon to enter the AV interface.“”
substitution to driver's attention and judgment.
Control:Control Stick and Remote Control
which will be saved automaticlly.
If a reverse camera is installed:
Digital TV (DVB-T) is optional
automatic triggering action.
Digital TV
er
mode click
MENU—AV/TV
Icon on the
screen will
switch to the
TV mode
In any oth
Reversing
Camera
with a reverse
trigger action
Day/Night Mode
Screen will get
dimmer
automatically
once car light
is on
6
Options
Options
Click on the
“
Options
”
icon in the ma in
menu. You can
set the
date / time,
switch language,
adjust the audio
parameters,
choose the
language, and
open the touch
panel calibration
page... etc .
Set DATE orTIME, then press Apply icon to confirm
the changes.
“”
The audio parameters:
Bass, Treble
Balance (adjusts the sound to the left or right)
Fade (adjusts the sound to the front or rear)
The system parameters:
Choose the language and the outer appearance (skin) style.
Three buttons to the right of the interface. Update “”
(Upgrade system), Console“”
(Debugs the program, this function only for the maintenance
engineer), Calibration (Calibrates the touch panel). “”
Calibration:
Click "+"on the screen, click on any position on the screen to
exit after "+"
Car Navigator & Entertainment System User's Manual 18 9 Car Navigator & Entertainment System User's Manual
The real languages
will differ from different
counteries
Applications: Radio
Radio
In any other
mode when
press the
button on the
front panel will
display this
interface.
In any other mode,when press the "Radio" button on the front
panel or touch "Radio" icon on the main menu will display the
interface shown below. Our radio supports RDS function, which
will appear the time, name and information of radio stations on
the screen.
The radio functions allows user to seek and save stations
automatically or manually.
Spin up and down current frequency (Manual)
Start
Frequency modulation
Long press the buttons :
The frequency modulation breath of FM is 0.1MHz.
The frequency modulation breath of AM is 10KHz.
Press the buttons :
The frequency modulation breath of FM is 0.1MHz.
The frequency modulation breath of AM is 10KHz.
Note:The station can on file after frequency
modulation.
Pre. Station
Next
scanning;
Minimize application (Not close) Close Application
Station
this will clear all current stations
5
Car Navigator & Entertainment System User's Manual 10 17 Car Navigator & Entertainment System User's Manual
Game
Click the
“Menu” icon to
launch the main
menu interface
and choose the
desired game.
Go
Applications: Game、Notebook
Notebook
Click
“Notebook”
icon in the
main menu to
launch the
notebook
program.
Othello
By using Notebook, you can take down quick notes or make
Double-click .txt document in the file browser, then you can
If there is nothing noted in the current page, you won't be
Upon closing the Notebook program, it will save the changes
it as your personal diary while you are on your trip.
The unit has the following games onboard:
Notebook is a document processing program.
read the document in your notebook program.
on all the Pages automatically.
able to skip to the next page.
NOTICE:
Pre.page Present page Clear Input-M
Please read the Hel p
file in the system for
the gaming rules.
Next
Edit area
Close
Time
(Step:10KHz)
Name as frequency, such as FM 108.00 Mhz“”
You can rename the current station by clicking the
This radio support U.S., Asia Pacific and Europe radio standard:
In radio mode press Scan button to seek station automatically“”
Press and hold Scan button for a few seconds to seek “”
Click Rename station to input desired name and click OK
to save
“” “”
(Step:9KHz)
(Step:9KHz)
Click Options will display different options as follow:
Rename station,Delete Station, Delete All Stations and Local
setting.
“”
Click“Delete Station”to delete a desired station or Click
“Delete All Stations” to clear all saved station
AM
530~1710KHz
531~1620KHz
531~1620KHz
(Step:100KHz)
(Step:200KHz)
(Step:50KHz)
and saved stations automatically.
FM
87.5~108.0MHz
88.1~107.9MHz
87.5~108.0MHz
Display the input panel
Rename but ton.“”
Applications: Radio
Local
U.S.
Asia
Europe
Scan
Automatically
Rename station
Radio Standard
Car Navigator & Entertainment System User's Manual 16
11 Car Navigator & Entertainment System User's Manual
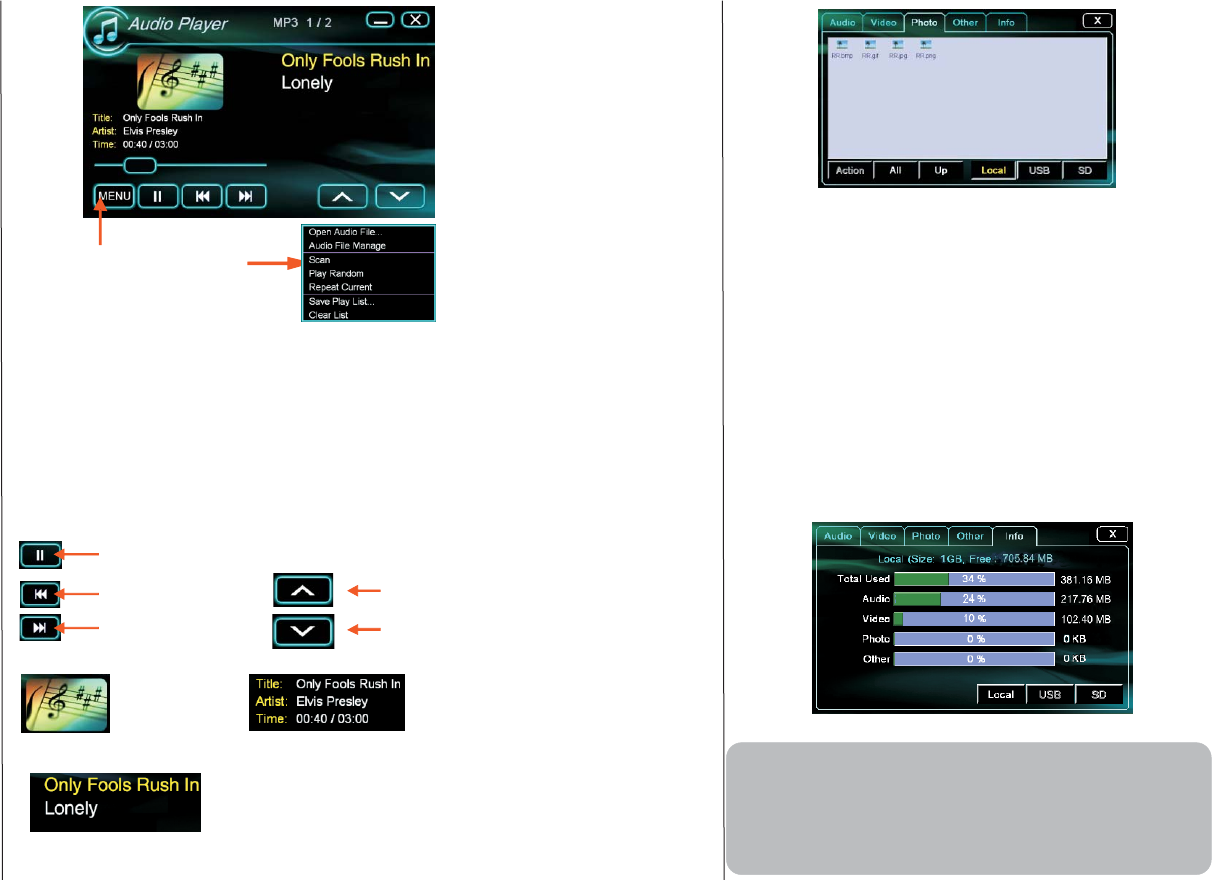
Audio Player
Click“Music”to
launch the Audio
Player;
double-click
an audio file in
“Files”or select
an audio file
and choose
“Play”
Applications: Audio Player
Control Button
Information
Scan: Plays the first 8 seconds of every song. Then when
it's finished, it will play from the first song in normal mode.
Play Random: Play songs randomly
Repeat Current: Repeats the current song
Support Audio Format: MP3,WMA,WAV
Information of t he current playing song
Album Art
Open Audio File: Select desired audio files in Local,USB or
SD card storage in the File browser(refere to ) Page 15
Click Menu an dpo p “”
right menu
Play/pause
Pre
Next
vious
Click on the song
:Play or Pause the current song
Sound Track
track
Information
name to play
Pre
Next Page
vious
Page
Applications: File Browser
surplus capacity
+ other files+ system program +
Aggregate capacity = audio files + video files + picture files
Flash, but it is not showing here.
The system program possesses a certain space in NAND
NOTICE:
pictures and the other files on the Flash memory.
d) The percentage of the audio files, the video files, the
the pictures and the other files.
c) The respective capacity of the audio files, the video files,
b) The capacity of the current files and the surplus capacity
a) The total storage capacity of NAND Flash
Click the "Info." Label to view the capacity of local, USB or
the SD card directory.
Info.
The system supports Word, Adobe PDF, Excel,PowerPoint,
.exe,.txt formats.
Button and then choose "play" to browse the file.
or the SD card. Double-click the file or click "Action"
Click the "Other" label to see the office files in local, USB
Other
Applications: File Browser
15 Car Navigator & Entertainment System User's Manual Car Navigator & Entertainment System User's Manual 12
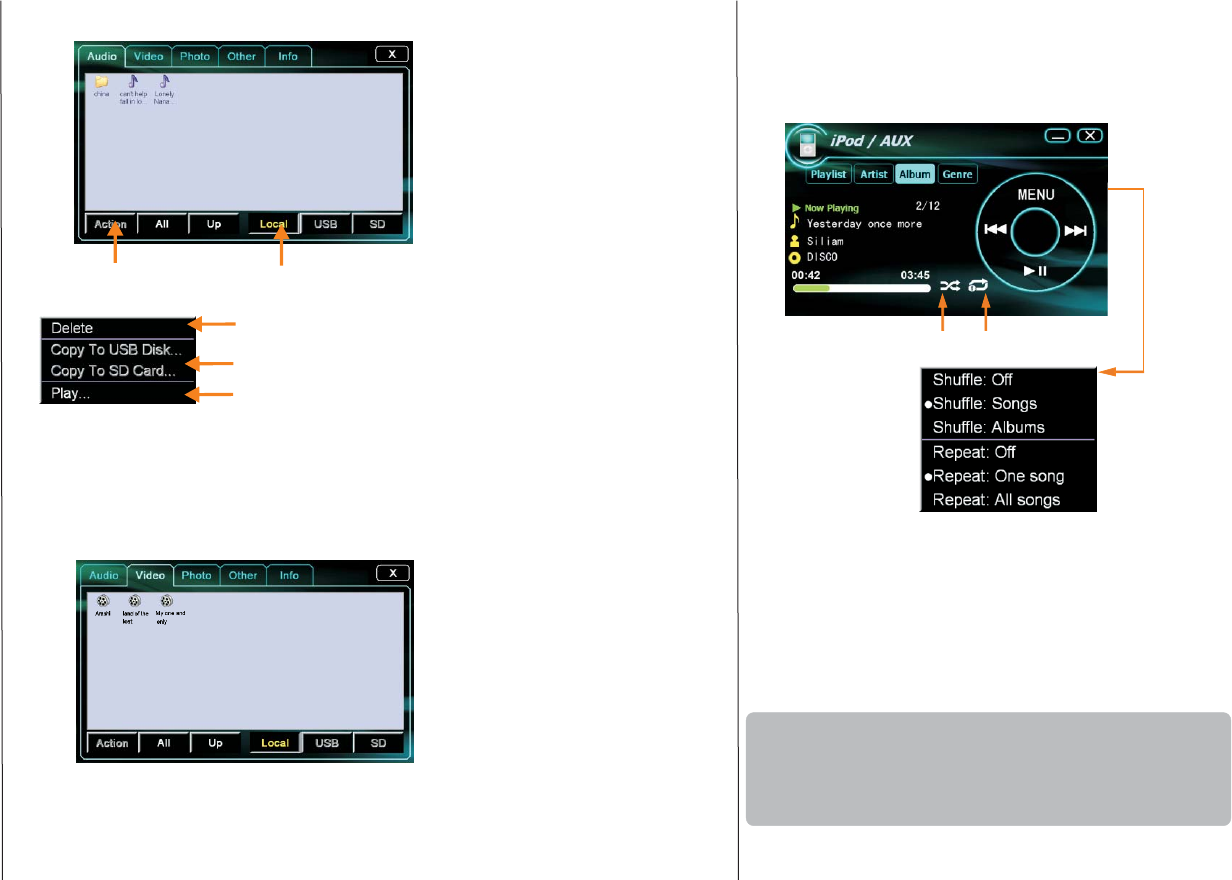
It displays information of Playlist, Artists, Albums, Genres, Song,
Time,etc. You can click Pause/Play/Previous/Next icon to
implement file according to your favourite. You also can drag
1. If there is no any iPod device connected,activating any
function on the iPod application can lead to system hang.
If this happens please restart system.
2. System is compatible to iPod Shuffle 3,iPod NANO ,etc.
Before launching this application,please ensure iPod
device is “iPod”connected. Click icon on main menu to
launch iPod audio player this,interface will appear:
the timer axis to choose player /forward/back.
Repeat Play
Shuffle Play
Applications:iPod PLAYER
NOTICE:
iPod Audio
Player
Click “iPod”
icon in the main
menuto launch
the iPod
program but
iPod device
must be
connected
File Browser
Click“Files”icon
choose the "Open
open file browser.
startup respective
File Viewer
the Files icon to
to launch file
menu item to
Double-click
browser, or
Audio Files"
procedure.
browsing
Click the "Audio" label to see the audio files of l
or the SD card directory.
ocal, USB
Click the Video" label to see the video files of " local, USB
or the SD card directory. Double-click the document or click
"Action" button and then choose "play" to play movie
file.
Tab Select: File types and storage usage
After select file(s), click " Action"
to pop menu
Delete Selected File(s)
Copy to other place, such as
SD card
Play/Open selected file(s)
File Location Select
Photo
picture.The system supports Bmp,JPEG,GIF,PNG formats.
"Action" button and then choose "play" to browse the
or the SD card directory. Double-click the picture or click on
Click the "Photo" label to see the pictures in local, USB
13 Car Navigator & Entertainment System User's Manual Car Navigator & Entertainment System User's Manual 14
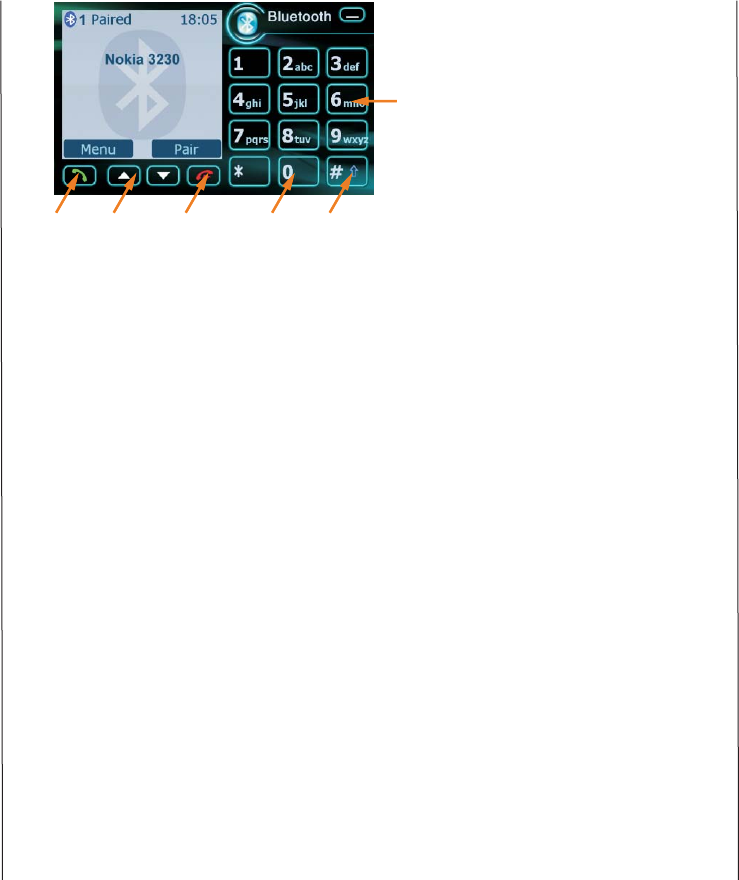
Bluetooth
Click“Bluetooth”
icon to launch
Bluetooth
hand-free
system. Press
“
Pair
”
button
to pair your
mobile phone
device with the
unit or press
“
Menu
”
for more options.
Applications:Bluetooth
“Bluetooth”“-Pair”to p ut this Navi unit in to m atching st andby m ode.
With Bluetooth function, it can be connected with any
Bluetooth mobile phone and provides you with a hand-
free environment to use your mobile phone while you
are on the move.
*supports Bluetooth version 2.0 onwards, if your phone has a previous version of Bluetooth,
please update your handset.
Match the blue tooth device
If you would like to disconnect your mobile phones from Navi unit,
please go into“ Device L ist” via“Menu”-“Bluetooth”-“De vice
List to select the device(s) that you would like to disconnect ”
from and press Disconnect button to complete the action “”
for each device.
1.Click“Pair”button on the Bluetooth menu page or click“Menu”
2. Turn on the Bluetooth communication settings on your mobile phone
3. When Navi is found by your mobile phone device,Choose
4. Input the password “1234” when it is prompted on your mobile
5. Your mobile phone should now be paired with this Navi unit successfully.
6. Once your mobile phone is paired up, you will not need to go through
Dial
Button
device and search for this Navi unit.
corresponding device name(e.g.,D2270) to pair up with your phone.
phone to connect.
this process again in the future, as soon as the Navi is turned on with
your Bluetooth device in the connecting range, both units will be
Paired up automatically.
Next/Prev. Hand up
Page Button
0/ Space Key # Key/ Switch Input Method
Keypad
that the name card was saved in the address
on interface.
you the book
Once the name card is sent to the Navi unit, the unit will also alert
card is sent out successfully.
4. Nokia 3230 will alert “Send out successfully” if the name
3. Choose “Via Bluetooth” option to send the name card
2. Choose a personal name card that you like to transfer over to the Navi unit
1. Open “name card List”
3230 for example, this is how it operates:
to be taken before a name card is transferred, lets take Nokia
Different mobile phones have different operations that need
to select name card list from your mobile phone device.
automatically and at the same time, the program will alter you
your mobile device will be disconnected from this Navi unit
name card transfer, press“ Receive name card”button and
via
“
Menu
”
-
“
Bluetooth
”
-
“
Receiver n amec ard
”
To i nitiate
phone is connected with this Navi unit, go to name card function
If your phone supports name card transport, once your mobile
To receive name card
switch from the car speakers to your mobile handset.
button on the interface when the call comes in and the channel will
3. If you would like to collect a private call, click “Channel Switch”
2. Once the call is completed, press“ Hand u p B utton”to e nd the cal l.
Driver and choose to“ Answer”or “Hand up” from the interface.
speakers and the phone number will appear on the interface.
1. When a call is coming in,the ring tones will come in through car
Receive a call
1. Enter the telephone number that you would like to dial from the
onboard key pad and press “Dial Button” to dial.
2. To finish the call, press “Hand up Button” to end the call.
Dial a call
unit successfully before dialing and receiving phone calls.
Please ensure that the phone has been paired up with the Navi
Dial and Receive calls
Bluetooth
Applications: Bluetooth