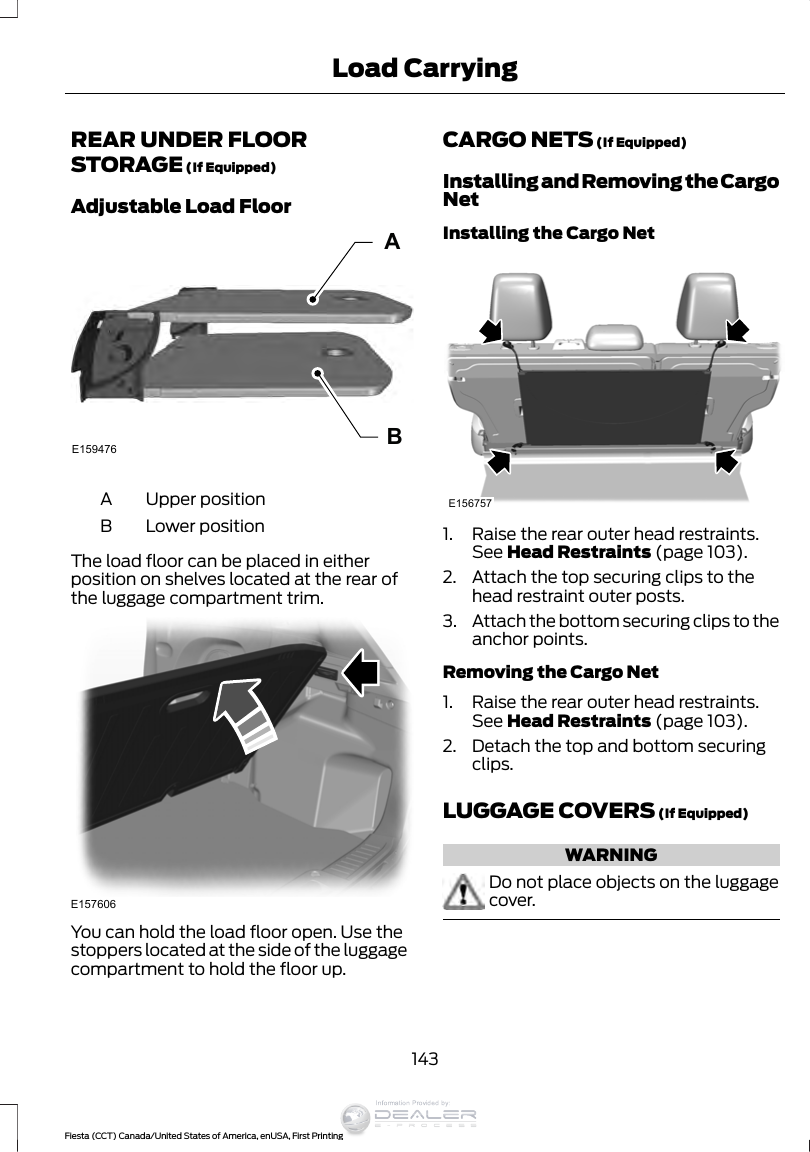
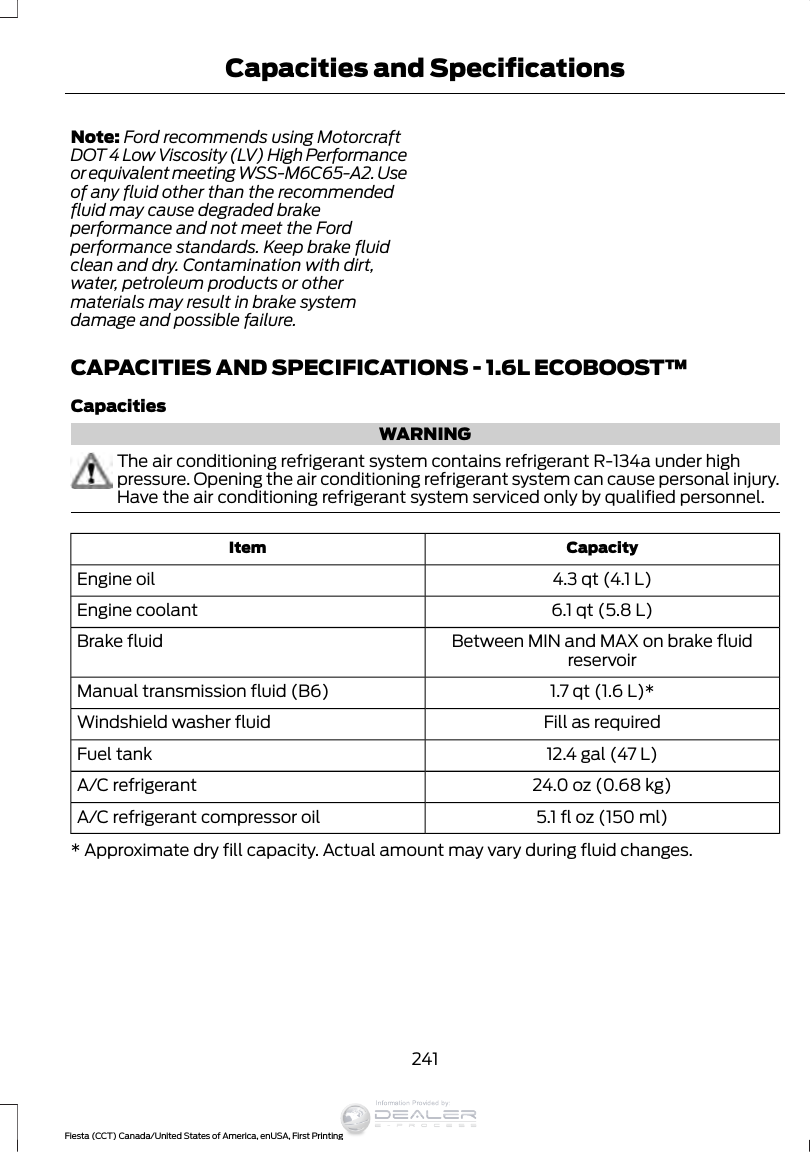
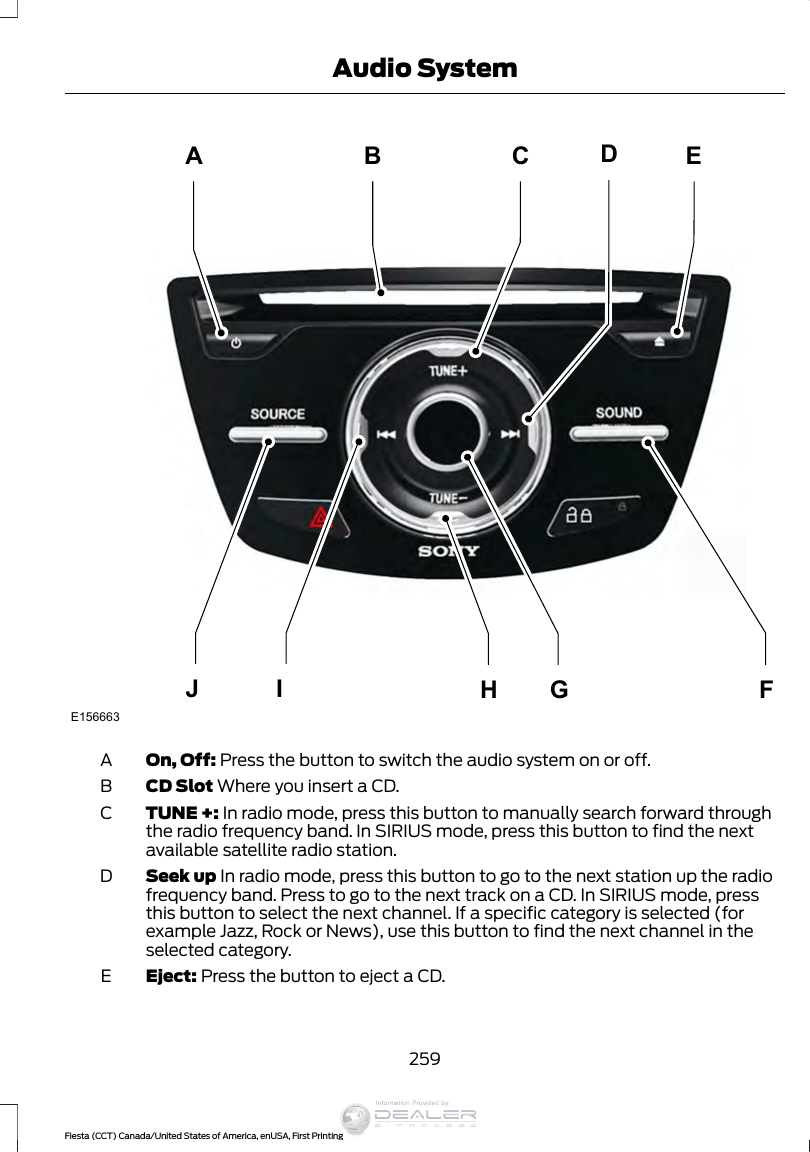
Robert Bosch P002 Automotive Passive Entry Passive Start System User Manual
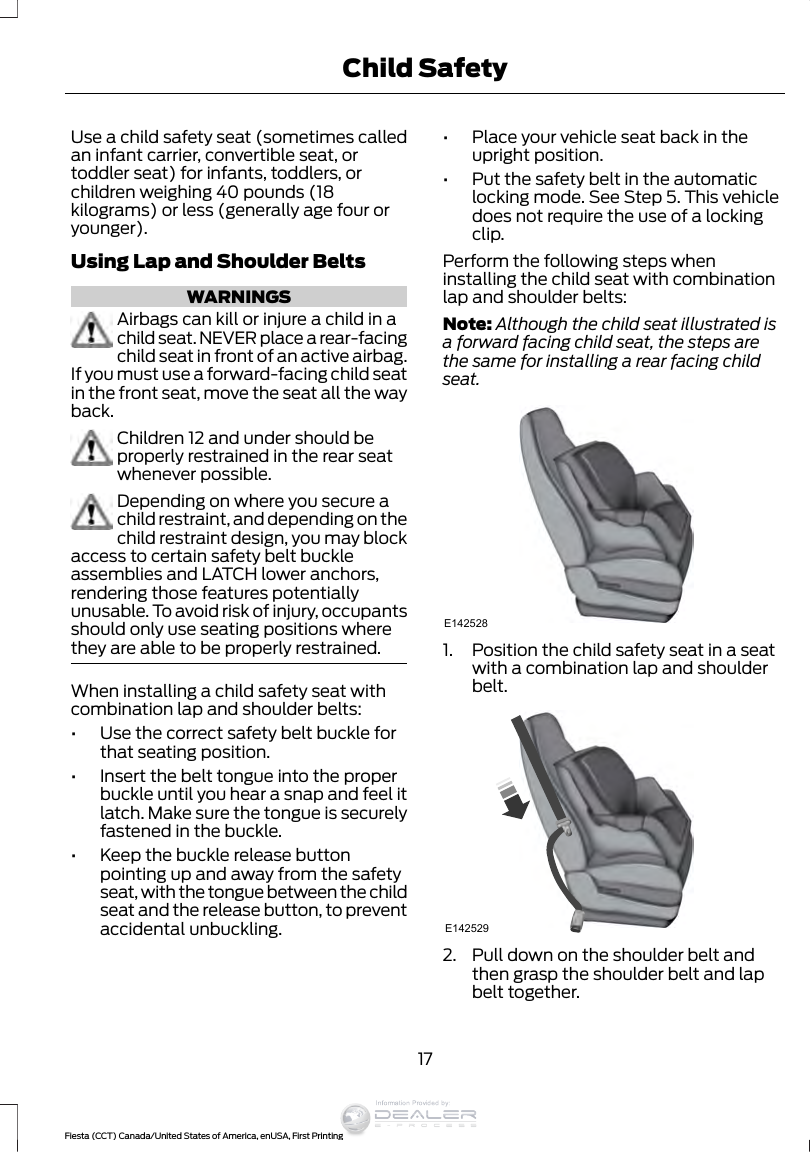
Robert Bosch (Australia) Pty Ltd Automotive Passive Entry Passive Start System
UserManual.wiki
>
Robert Bosch
>
P002 User Manual
User Manual
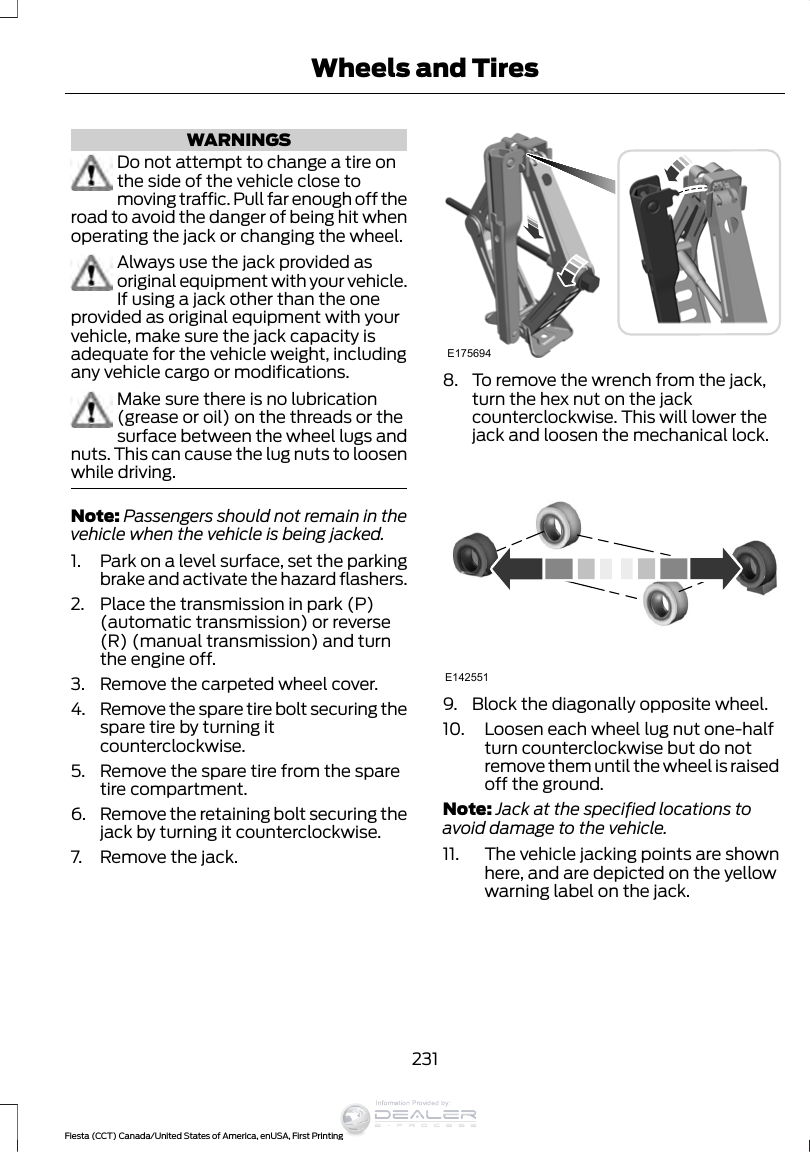
Navigation menu
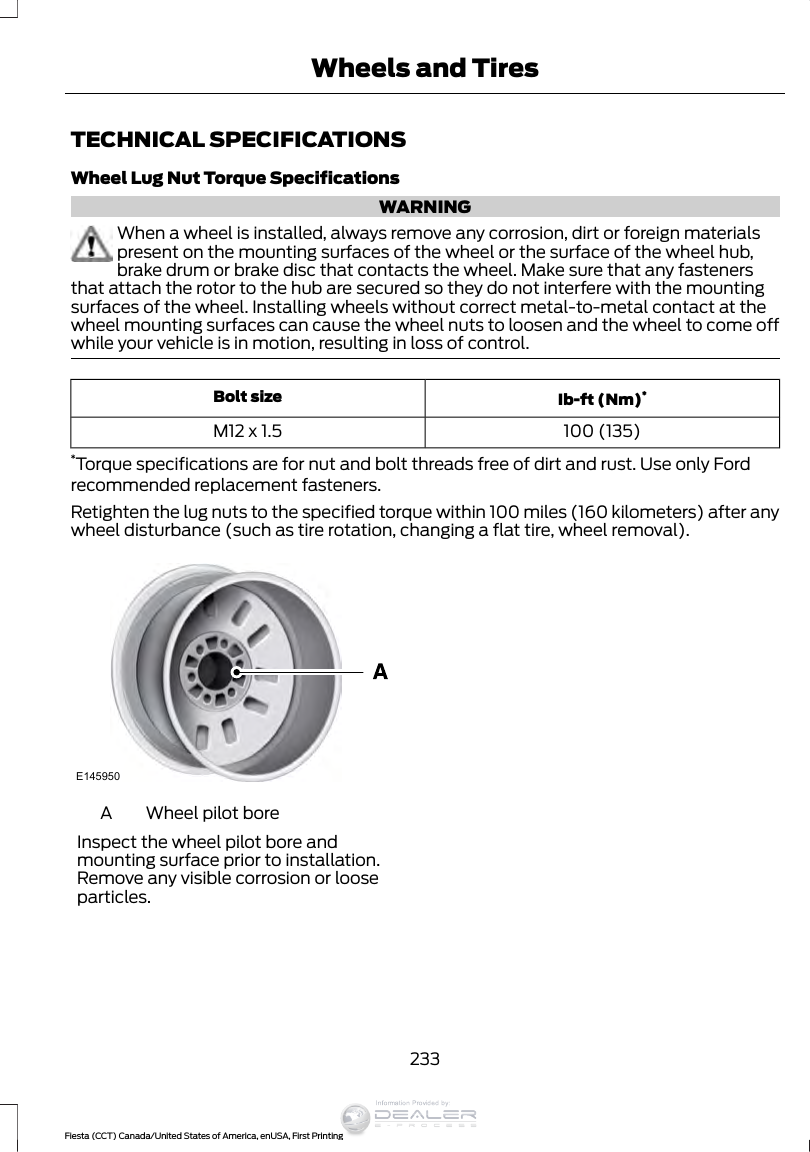
Upload a User Manual
Namespaces
Wiki Guide
HTML
PDF
Info
Views
User Manual
Discussion / Help
Navigation


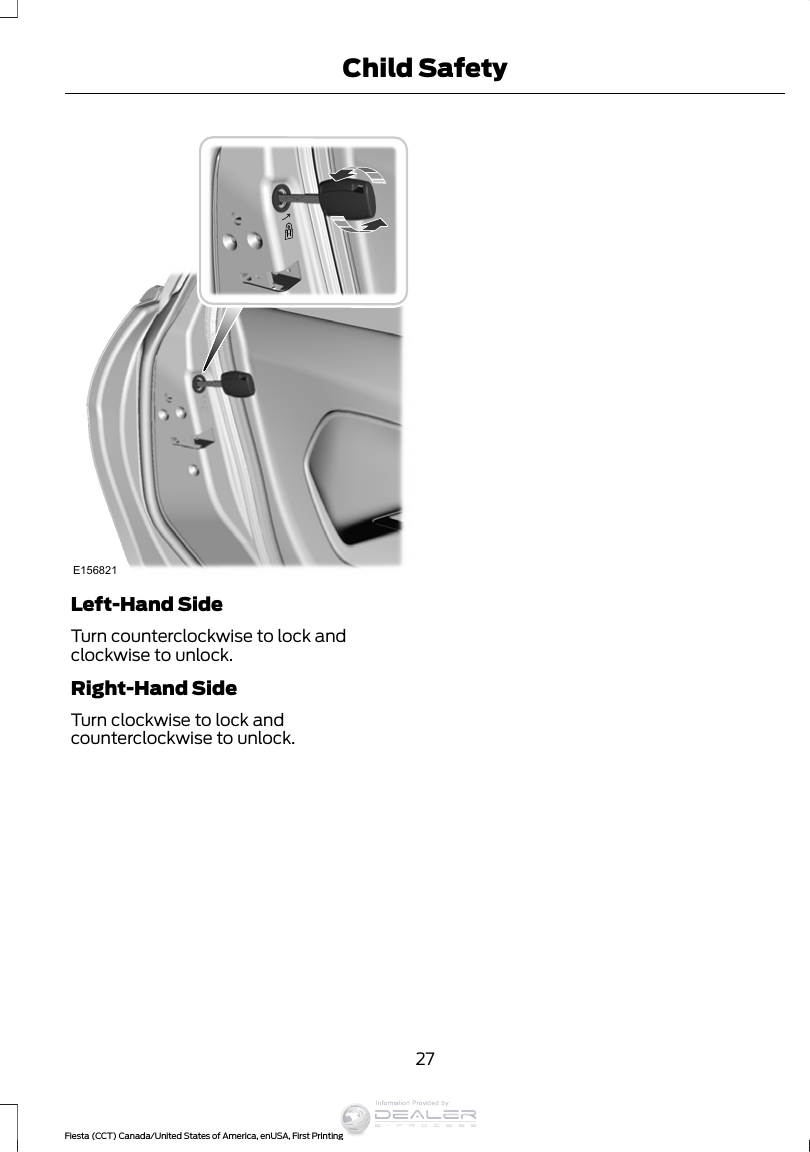


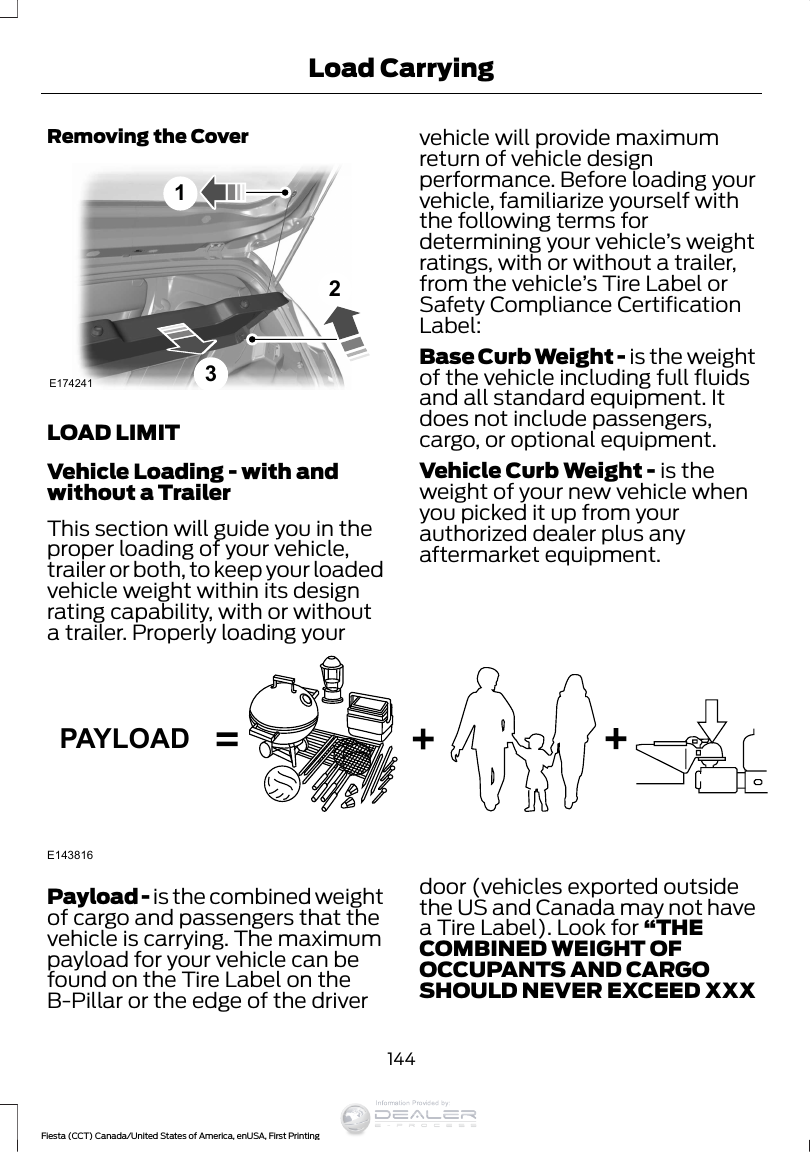
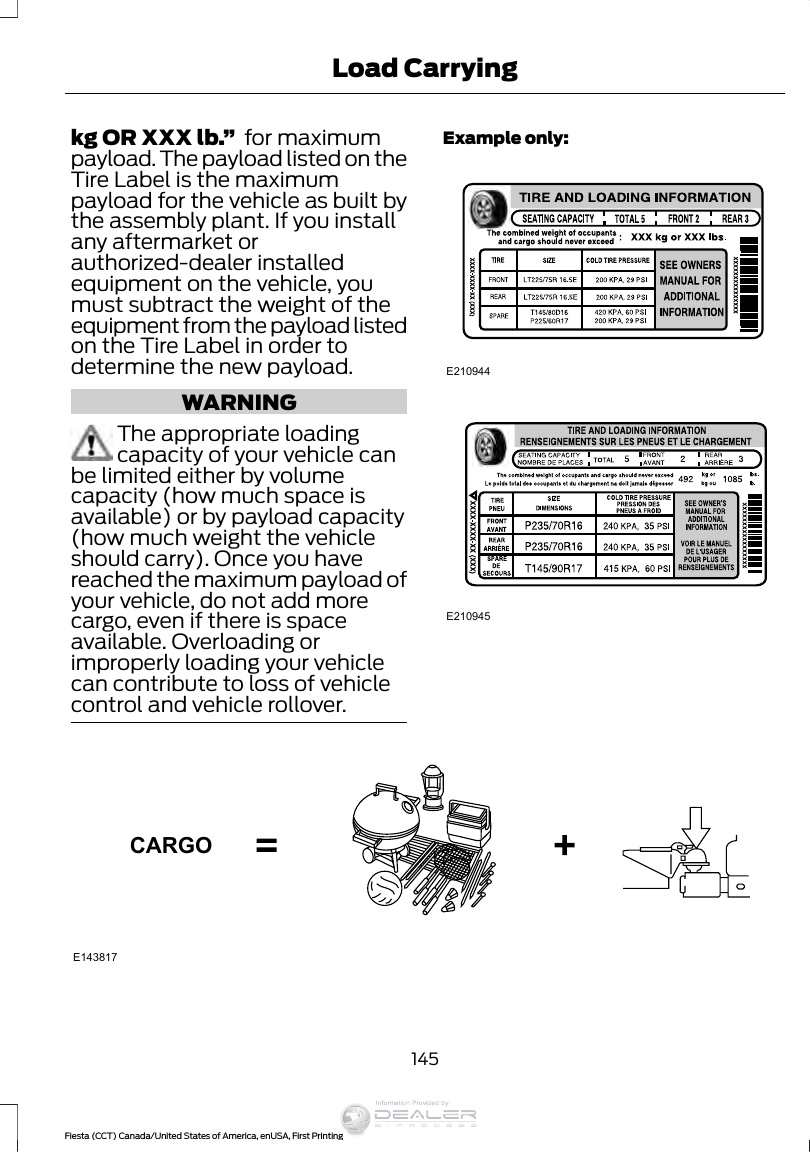

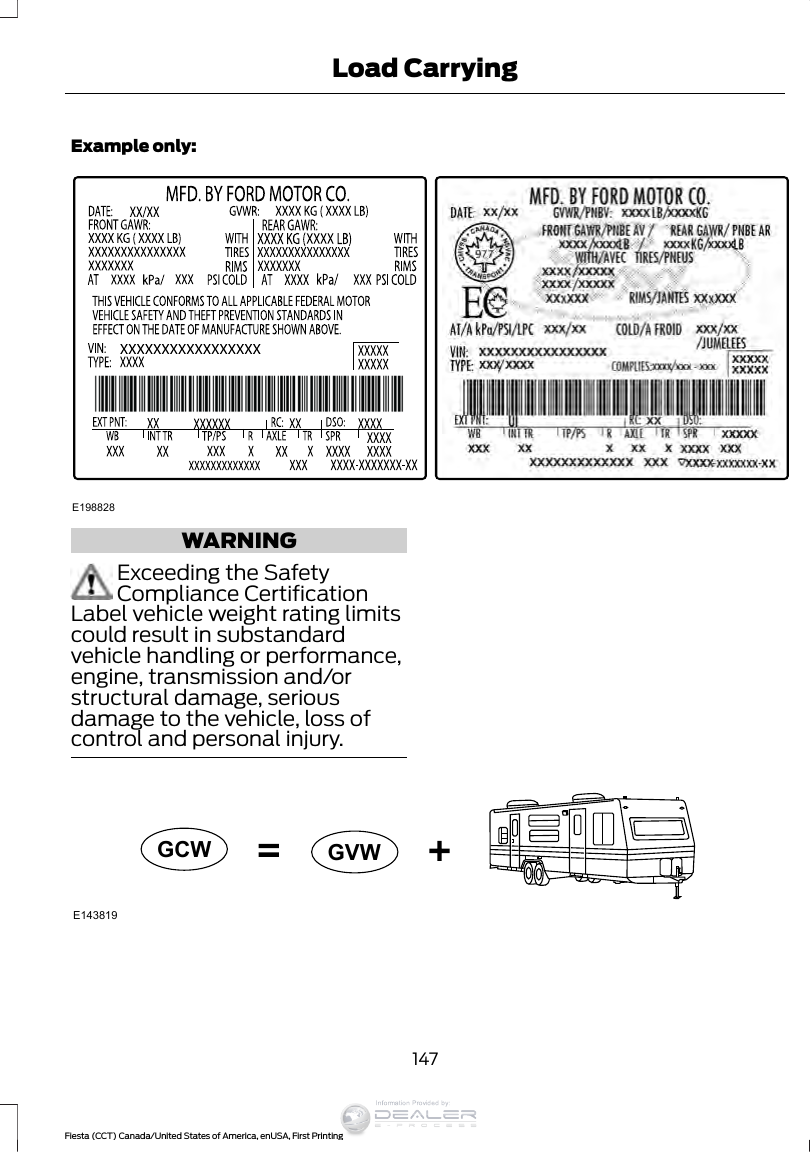
![GCW (Gross Combined Weight)- is the Gross Vehicle Weight plusthe weight of the fully loadedtrailer.GCWR (Gross CombinedWeight Rating) - is the maximumallowable weight of the vehicleand the loaded trailer, includingall cargo and passengers, that thevehicle can handle without riskingdamage. (Important: The towingvehicle’s braking system is ratedfor operation at Gross VehicleWeight Rating, not at GrossCombined Weight Rating.)Separate functional brakes shouldbe used for safe control of towedvehicles and for trailers where theGross Combined Weight of thetowing vehicle plus the trailerexceed the Gross Vehicle WeightRating of the towing vehicle. TheGross Combined Weight mustnever exceed the GrossCombined Weight Rating.Maximum Loaded TrailerWeight - is the highest possibleweight of a fully loaded trailer thevehicle can tow. It assumes avehicle with mandatory options,driver and front passenger weight(150 pounds [68 kilograms]each), no cargo weight (internalor external) and a tongue load of10–15% (conventional trailer) orking pin weight of 15–25% (fifthwheel trailer). Consult anauthorized dealer (or the RV andTrailer Towing Guide available atan authorized dealer) for moredetailed information.Tongue Load or Fifth WheelKing Pin Weight - refers to theamount of the weight that a trailerpushes down on a trailer hitch.Examples: For a 5000 pound(2268 kilogram) conventionaltrailer, multiply 5000 by 0.10 and0.15 to obtain a proper tongueload range of 500 to 750 pounds(227 to 340 kilograms). For an11500 pound (5216 kilogram) fifthwheel trailer, multiply by 0.15 and0.25 to obtain a proper king pinload range of 1725 to 2875 pounds(782 to 1304 kilograms).WARNINGSDo not exceed the GVWR orthe GAWR specified on theSafety Compliance CertificationLabel.Do not use replacement tireswith lower load carryingcapacities than the original tiresbecause they may lower thevehicle’s GVWR and GAWRlimitations. Replacement tireswith a higher limit than the originaltires do not increase the GVWRand GAWR limitations.Exceeding any vehicle weightrating limitation could resultin serious damage to the vehicleand/or personal injury.Steps for determining thecorrect load limit:148Fiesta (CCT) Canada/United States of America, enUSA, First PrintingLoad CarryingInformation Provided by:](https://usermanual.wiki/Robert-Bosch/P002/User-Guide-3261766-Page-151.png)


![CLEANING PRODUCTSFor best results, use the following productsor products of equivalent quality:•Motorcraft Bug and Tar Remover(ZC-42)•Motorcraft Custom Bright MetalCleaner (ZC-15)•Motorcraft Detail Wash (ZC-3-A)•Motorcraft Dusting Cloth (ZC-24)•Motorcraft Engine Shampoo andDegreaser (U.S. only) (ZC-20)•Motorcraft Engine Shampoo (Canadaonly) (CXC-66-A)•Motorcraft Multi-Purpose Cleaner(Canada only) (CXC-101)•Motorcraft Premium Glass Cleaner(Canada only) (CXC-100)•Motorcraft Premium QualityWindshield Washer Fluid (Canadaonly) [CXC-37-(A, B, D or F)]•Motorcraft Premium Windshield WashConcentrate with Bitterant (U.S. only)(ZC-32-B2)•Motorcraft Professional StrengthCarpet & Upholstery Cleaner (ZC-54)•Motorcraft Premium Leather and VinylCleaner (ZC-56)•Motorcraft Spot and Stain Remover(U.S. only) (ZC-14)•Motorcraft Ultra-Clear Spray GlassCleaner (ZC-23)•Motorcraft Wheel and Tire Cleaner(ZC-37-A)CLEANING THE EXTERIORWash your vehicle regularly with cool orlukewarm water and a neutral pHshampoo, we recommend MotorcraftDetail Wash.•Never use strong household detergentsor soap, for example dish washing orlaundry liquid. These products candiscolor and spot painted surfaces.•Never wash your vehicle when is hot tothe touch, or during strong or directsunlight.•Dry your vehicle with a chamois or softterry cloth towel to eliminate waterspotting.•Immediately remove fuel spillages, birddroppings, insect deposits and road tar.These may cause damage to yourvehicle’s paintwork or trim over time.We recommend Motorcraft Bug andTar Remover.•Remove any exterior accessories, forexample antennas, before entering acar wash.Note: Suntan lotions and insect repellentscan damage painted surfaces. If thesesubstances come in contact with yourvehicle, wash the affected area as soon aspossible.Exterior Chrome Parts•Apply a high quality-cleaning productto bumpers and other chrome parts.Follow the manufacturer’s instructions.We recommend Motorcraft CustomBright Metal Cleaner.•Do not apply the cleaning product tohot surfaces. Do not leave the cleaningproduct on chrome surfaces longerthan the time recommended.•Using other non-recommendedcleaners can result in severe andpermanent cosmetic damage.Note: Never use abrasive materials, forexample steel wool or plastic pads as theycan scratch the chrome surface.Note: Do not use chrome cleaner, metalcleaner or polish on wheels or wheel covers.203Fiesta (CCT) Canada/United States of America, enUSA, First PrintingVehicle CareInformation Provided by:](https://usermanual.wiki/Robert-Bosch/P002/User-Guide-3261766-Page-206.png)


![When weather temperaturechanges occur, tire inflationpressures also change. A 10°F(6°C) temperature drop cancause a corresponding drop of 1psi (7 kPa) in inflation pressure.Check your tire pressuresfrequently and adjust them to theproper pressure which can befound on the Safety ComplianceCertification Label or Tire Label.To check the pressure in yourtire(s):1. Make sure the tires are cool,meaning they are not hot fromdriving even a mile.Note: If you are checking tirepressure when the tire is hot, (i.e.driven more than 1 mile [1.6 km]),never bleed or reduce air pressure.The tires are hot from driving andit is normal for pressures toincrease above recommended coldpressures. A hot tire at or belowrecommended cold inflationpressure could be significantlyunder-inflated.Note: If you have to drive adistance to get air for your tire(s),check and record the tire pressurefirst and add the appropriate airpressure when you get to thepump. It is normal for tires to heatup and the air pressure inside to goup as you drive.2. Remove the cap from the valveon one tire, then firmly press thetire gauge onto the valve andmeasure the pressure.3. Add enough air to reach therecommended air pressure.Note: If you overfill the tire, releaseair by pressing on the metal stemin the center of the valve. Thenrecheck the pressure with your tiregauge.4. Replace the valve cap.5. Repeat this procedure for eachtire, including the spare.Note: Some spare tires operate ata higher inflation pressure than theother tires. For T type mini-sparetires (refer to the Dissimilar sparewheel and tire assemblyinformation for a description):Store and maintain at 60 psi (4.15bar). For full-size and dissimilarspare tires (refer to the Dissimilarspare wheel and tire assemblyinformation for a description):Store and maintain at the higher ofthe front and rear inflation pressureas shown on the Tire Label.6. Visually inspect the tires tomake sure there are no nails orother objects embedded thatcould poke a hole in the tire andcause an air leak.7. Check the sidewalls to makesure there are no gouges, cuts orbulges.219Fiesta (CCT) Canada/United States of America, enUSA, First PrintingWheels and TiresInformation Provided by:](https://usermanual.wiki/Robert-Bosch/P002/User-Guide-3261766-Page-222.png)


![System data cannot be accessed withoutspecial equipment and access to thevehicle's SYNC module. Ford MotorCompany and Ford of Canada will notaccess the system data for any purposeother than as described absent consent, acourt order, or where required by lawenforcement, other governmentauthorities, or other third parties actingwith lawful authority. Other parties mayseek to access the informationindependently of Ford Motor Company andFord of Canada. For further privacyinformation, see the sections on 911 Assist,Vehicle Health Report, and Traffic,Directions and Information.USING VOICE RECOGNITIONThis system helps you control manyfeatures using voice commands. Thisallows you to keep your hands on thewheel and focus on what is in front of you.Helpful Hints•Make sure the interior of your vehicle isas quiet as possible. Wind noise fromopen windows and road vibrations mayprevent the system from correctlyrecognizing spoken commands.•After pressing the voice button, waituntil after the tone sounds andListening appears before saying acommand. Any command spokenbefore this does not register with thesystem.•Speak naturally, without long pausesbetween words.•At any time, you can interrupt thesystem while it is speaking by pressingthe voice button.Initiating a Voice SessionE142599Initiate a voice session bypressing the voice button on thesteering wheel controls. SeeVoice Control (page 67).When prompted you can say any of the following:If you want the system to carry out the followingVoice commandStream audio from your phone.Bluetooth AudioCancel the requested action.CancelAccess mobile applications.mobile (apps | applica-tions)Make calls.PhoneAccess the device connected to your USB port.USB [1]Run a vehicle health report.Vehicle Health (Report)269Fiesta (CCT) Canada/United States of America, enUSA, First PrintingSYNC™Information Provided by:](https://usermanual.wiki/Robert-Bosch/P002/User-Guide-3261766-Page-272.png)
![If you want the system to carry out the followingVoice commandAdjust the level of voice interaction and feedback.Voice Settings | VoicePreferencesHear a list of voice commands available in the current mode.HelpYou can say any of the voice commands that appear within open and close brackets thatare separated by |. For example, where (cancel | stop | exit) appears you say; cancel orstop or exit.You must say any of the voice commands that appear outside of open and close brackets.For example, where mobile (apps | applications) appears, you must say mobile followedby either apps or applications.You do not need to say words that appear within square brackets. For example, for where(USB [stick] | iPOD | MP3 [player]) appears, you can say USB or USB stick.Note: SYNC Services and Vehicle health report are only available in the United States ofAmerica.System Interaction and FeedbackThe system provides feedback throughaudible tones, prompts, questions andspoken confirmations depending on thesituation and the chosen level ofinteraction (voice settings). You cancustomize the voice recognition system toprovide more or less instruction andfeedback.The default setting is to a higher level ofinteraction in order to help you learn to usethe system. You can change these settingsat any time.Adjusting the Interaction LevelE142599Initiate a voice session bypressing the voice button on thesteering wheel controls. SeeVoice Control (page 67).When prompted say the following:If you want the system to carry out the followingVoice commandVoice Settings | Voice PreferencesFollowed by either of the following:Provide more detailed interaction and guidance.Interaction ModeStandardProvide less audible interaction and more tone prompts.Interaction ModeAdvancedThe system defaults to the standard interaction mode.270Fiesta (CCT) Canada/United States of America, enUSA, First PrintingSYNC™Information Provided by:](https://usermanual.wiki/Robert-Bosch/P002/User-Guide-3261766-Page-273.png)
![You can also say any of the following:Voice CommandCall ___Call ___ at HomeCall ___ at WorkCall ___ in OfficeCall ___ on MobileCall ___ on OtherDialNone of these commands are availableuntil your cell phone information iscompletely downloaded using Bluetooth.___ is a dynamic listing that should be thename of a contact in your phonebook. Forexample you could say "Call Mom".The following commands are onlyavailable during active calls:Voice CommandsGo To PrivacyHoldJoinPhone Menu CommandsTo access the phone menu with voicecommands, press the voice button andwhen prompted say:Voice Command[Phone] MenuYou can then say any of the following:[Phone] Connections | [Media] Connec-tions | [Bluetooth] ConnectionsVoice Command[Phone] Settings [Message] NotificationOn[Phone] Settings [Message] NotificationOff[Phone] Settings [Set] Phone Ringer[Phone] Settings [Set] Ringer 1[Phone] Settings [Set] Ringer 2[Phone] Settings [Set] Ringer 3[Phone] Settings [Set] Ringer OffBatteryPhone NameSignalText Message InboxSend [New] Text MessageYou do not need to say word containedwithin brackets for the system tounderstand your command.Note: To exit dial mode, press and hold thephone button or press MENU to go to thePHONE menu.Phonebook CommandsWhen you ask SYNC to access content, forexample the phonebook name or number,the requested information appears in thedisplay to view.274Fiesta (CCT) Canada/United States of America, enUSA, First PrintingSYNC™Information Provided by:](https://usermanual.wiki/Robert-Bosch/P002/User-Guide-3261766-Page-277.png)
![If a crash deploys an airbag (excludingknee airbags and rear inflatable safetybelts [if equipped]) or activates the fuelpump shut-off, your SYNC-equippedvehicle may be able to contact emergencyservices by dialing 911 through a paired andconnected Bluetooth-enabled phone. Youcan learn more about the 911 Assistfeature, visit www.SYNCMyRide.com,www.SYNCMyRide.ca orwww.syncmaroute.ca.See Supplementary Restraints System(page 36). Important information aboutairbag deployment is in this chapter.See Roadside Emergencies (page 157).Important information about the fuel pumpshut-off is in this chapter.Switching 911 Assist On or OffPress the phone button to enter the phone menu and scroll to:Action and DescriptionMessagePress the OK button to confirm and enter the 911 Assist menu.911 AssistPress the OK button when the desired option appears in theradio display.OnOffOff selections include:Action and DescriptionMessageProvides a display and voice reminder at phone connectionat vehicle start.Off with reminder:Provides a display reminder only without a voice reminder atphone connection.Off without reminder:To make sure that 911 Assist workscorrectly:•SYNC must be powered and workingproperly at the time of the incident andthroughout feature activation and use.•The 911 Assist feature must be set onbefore the incident.•You must pair and connect aBluetooth-enabled and compatiblecell phone to SYNC.•A connected Bluetooth-enabled phonemust have the ability to make andmaintain an outgoing call at the timeof the incident.•A connected Bluetooth-enabled phonemust have adequate network coverage,battery power and signal strength.•The vehicle must have battery powerand be located in the U.S., Canada orin a territory in which 911 is theemergency number.285Fiesta (CCT) Canada/United States of America, enUSA, First PrintingSYNC™Information Provided by:](https://usermanual.wiki/Robert-Bosch/P002/User-Guide-3261766-Page-288.png)
![Note: When you connect, the service usesGPS technology and advanced vehiclesensors to collect your vehicle's currentlocation, travel direction and speed to helpprovide you with the directions, trafficreports, or business searches you request.Further, to provide the services you request,for continuous improvement, the servicemay collect and record call details and voicecommunications. For more information, seeSYNC Services Terms and Conditions atwww.SYNCMyRide.com. If you do not wantFord or its service providers to collect yourvehicle travel information or otherinformation identified in the Terms andConditions, do not subscribe or use theservice.SYNC Services uses advanced vehiclesensors, integrated GPS technology andcomprehensive map and traffic data, togive you personalized traffic reports,precise turn-by-turn directions, businesssearch, news, sports, weather and more.For a complete list of services, or to learnmore, please visit www.SYNCMyRide.com.Connecting to SYNC Services Using Voice CommandsPress the voice button and when prompted say:Action and DescriptionVoice commandThis initiates an outgoing call to SYNC Services using yourpaired and connected Bluetooth-enabled cellular phone.ServicesOnce you connect to the service, follow the voice promptsto request the desired service, for example traffic or directions.Once you are connected to SYNC Services, you can also say the following:Receive a list of available services from which to choose.(what are my (options |choices) | what can I say| [available] commands)To return to the Services main menu.ServicesReceive system help.HelpYou can say any of the voice commands that appear within open and close brackets thatare separated by |. For example, where (options | choices) appears you say either; optionsor choices.You must say any of the voice commands that appear outside of open and close brackets.For example, where; what are my (options | choices) appears, you must say; what aremy, followed by either, options or choices.You do not need to say words that appear within square brackets. For example, for where(what can I say [available] commands) appears, you can say, what can I say commands.289Fiesta (CCT) Canada/United States of America, enUSA, First PrintingSYNC™Information Provided by:](https://usermanual.wiki/Robert-Bosch/P002/User-Guide-3261766-Page-292.png)
![To Connect Using Voice CommandsPlug the device into the USB port. SeeUSB Port (page 266).E142599Press the voice button and when prompted say:Action and DescriptionVoice commandYou can now play music by saying any of the appropriatevoice commands. See Media voice commands.USB [1]You do not need to say words that appear within square brackets. For example, for whereUSB[1]appears, you can say USB or USB one.To Connect Using the System MenuPlug the device into the USB port. SeeUSB Port (page 266).Press the AUX button, then the Menubutton to enter the Media Menu.You can then scroll to:Action and DescriptionMessagePress the OK button.Select SrcPress the OK button.USBDepending on how many digital media files are on yourconnected device, the following message may appear in theradio display.Indexing…When indexing is complete, the screen returns to the Play menu. You can thenselect one of the following:Play allArtistsAlbumsGenresPlaylistsSongsBrowse USBSimilar musicExit the current menu.Return294Fiesta (CCT) Canada/United States of America, enUSA, First PrintingSYNC™Information Provided by:](https://usermanual.wiki/Robert-Bosch/P002/User-Guide-3261766-Page-297.png)
![What's Playing?When a track is playing, you can ask thesystem to tell you what is currently playing.Press the voice button and when prompted say:Action and DescriptionVoice commandThe system reads the metadata tags of the playing track,and if the metadata tags are populated, the system will tellyou what track is playing.Whats This? | WhatsPlaying?You can say any of the voice commands that appear within open and close brackets thatare separated by |. For example, where; (what's | what is) appears you say; what's orwhat is.You must say any of the voice commands that appear outside of open and close brackets.For example, where text shows: (what's | what is) playing, you must say; "what's playing"or "what is playing".Media Voice CommandsPress the voice button and whenprompted say any of the following:Voice commandUSB [1]You can then say any of the following[Phone] Connections | [Media] Connec-tions | [Bluetooth] ConnectionsPausePlayPlay All1,2Play Artist ___1,2Play Album ___1,2Play Genre ___3[Play] Next Folder[Play] Next Track | [Play] Next SongVoice command1,2Play Playlist ___3[Play] Previous Folder[Play] Previous Track | [Play] PreviousSong1,2[Play] Next Track | [Play] Next SongRepeat [On]Repeat OffShuffle [On]Shuffle Off1,2Search Album ___1,2Search Artist ___295Fiesta (CCT) Canada/United States of America, enUSA, First PrintingSYNC™Information Provided by:](https://usermanual.wiki/Robert-Bosch/P002/User-Guide-3261766-Page-298.png)
![Voice command1,2The system searches allthe data from yourindexed music and, ifavailable, begins to playthe chosen type of music.You can only play genresof music which are presentin the GENRE metadatatags that you have on yourdigital media player.SearchGenre ___1,2The system searches for aspecific artist/track/albumfrom the music indexedthrough the USB port.SearchTrack ___| SearchSong ___1,2This allows you to makeyour previous commandmore specific. By using thiscommand you can filterthough a previous selec-tion, such as an artist toplay only specific album.Refinealbum ___The system compiles aplaylist and then plays similarmusic to what is currentlyplaying from the USB portusing indexed metadatainformation.SimilarMusicVoice commandAutoplay OffTurn autoplay on to listen tomusic processed duringindexing. Turn autoplay off toallow the indexing process tofinish before the system playsany of your music.Autoplay[on]1 ___ is a dynamic listing, meaning that itcould be the name of anything, such as agroup, artist or song. For example youcould say "Play artist The Beatles".2 This voice command is not available untilindexing is complete.3 This voice command is only available infolder mode.Bluetooth Audio Command GuidePress the voice button and say:Voice commandBluetooth AudioYou can then say any of the following:[Phone] Connections | [Media] Connec-tions | [Bluetooth] ConnectionsPausePlay[Play] Next Track | [Play] Next Song[Play] Previous Track | [Play] PreviousSongMedia Menu FeaturesThe media menu allows you to select yourmedia source, how to play your music, forexample by artist, genre, shuffle or repeat,and to add, connect or delete devices.296Fiesta (CCT) Canada/United States of America, enUSA, First PrintingSYNC™Information Provided by:](https://usermanual.wiki/Robert-Bosch/P002/User-Guide-3261766-Page-299.png)


![DAMAGES, DIRECT OR INDIRECT, WHICHMAY RESULT FROM THE USE ORPOSSESSION OF THE INFORMATION; ORFOR ANY LOSS OF PROFIT, REVENUE,CONTRACTS OR SAVINGS, OR ANYOTHER DIRECT, INDIRECT, INCIDENTAL,SPECIAL OR CONSEQUENTIAL DAMAGESARISING OUT OF YOUR USE OF ORINABILITY TO USE THIS INFORMATION,ANY DEFECT IN THE INFORMATION, ORTHE BREACH OF THESE TERMS ORCONDITIONS, WHETHER IN AN ACTIONIN CONTRACT OR TORT OR BASED ON AWARRANTY, EVEN IF TELENAV OR ITSLICENSORS HAVE BEEN ADVISED OF THEPOSSIBILITY OF SUCH DAMAGES. SomeStates, Territories and Countries do notallow certain liability exclusions ordamages limitations, so to that extent theabove may not apply to you.Export Control. You shall not export fromanywhere any part of the Data or any directproduct thereof except in compliance with,and with all licenses and approvalsrequired under, applicable export laws,rules and regulations, including but notlimited to the laws, rules and regulationsadministered by the Office of ForeignAssets Control of the U.S. Department ofCommerce and the Bureau of Industry andSecurity of the U.S. Department ofCommerce. To the extent that any suchexport laws, rules or regulations prohibitHERE from complying with any of itsobligations hereunder to deliver ordistribute Data, such failure shall beexcused and shall not constitute a breachof this Agreement.Entire Agreement. These terms andconditions constitute the entire agreementbetween Telenav (and its licensors,including their licensors and suppliers) andyou pertaining to the subject matter hereof,and supersedes in their entirety any andall written or oral agreements previouslyexisting between us with respect to suchsubject matter.Governing Law. The above terms andconditions shall be governed by the lawsof the State of Illinois [insert “Netherlands”where European HERE Data is used],without giving effect to (i) its conflict oflaws provisions, or (ii) the United NationsConvention for Contracts for theInternational Sale of Goods, which isexplicitly excluded. You agree to submit tothe jurisdiction of the State of Illinois[insert “The Netherlands” where EuropeanHERE Data is used] for any and alldisputes, claims and actions arising fromor in connection with the Data provided toyou hereunder.Government End Users. If the Data isbeing acquired by or on behalf of theUnited States government or any otherentity seeking or applying rights similar tothose customarily claimed by the UnitedStates government, this Data is a“commercial item” as that term is definedat 48 C.F.R. (“FAR”) 2.101, is licensed inaccordance with these End-User Terms,and each copy of Data delivered orotherwise furnished shall be marked andembedded as appropriate with thefollowing “Notice of Use,” and shall betreated in accordance with such Notice:NOTICE OF USECONTRACTOR (MANUFACTURER/SUPPLIER) NAME: HERECONTRACTOR (MANUFACTURER/SUPPLIER) ADDRESS: c/o Nokia, 425West Randolph Street, Chicago, Illinois60606This Data is a commercial item asdefined in FAR 2.101 and is subject tothese End-User Terms under which thisData was provided.© 1987 – 2014 HERE – All rights reserved.347Fiesta (CCT) Canada/United States of America, enUSA, First PrintingAppendicesInformation Provided by:](https://usermanual.wiki/Robert-Bosch/P002/User-Guide-3261766-Page-350.png)