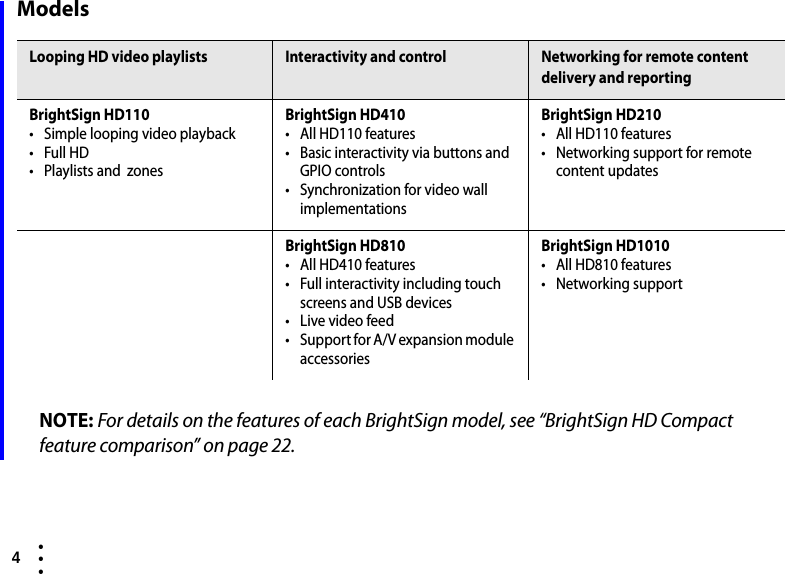
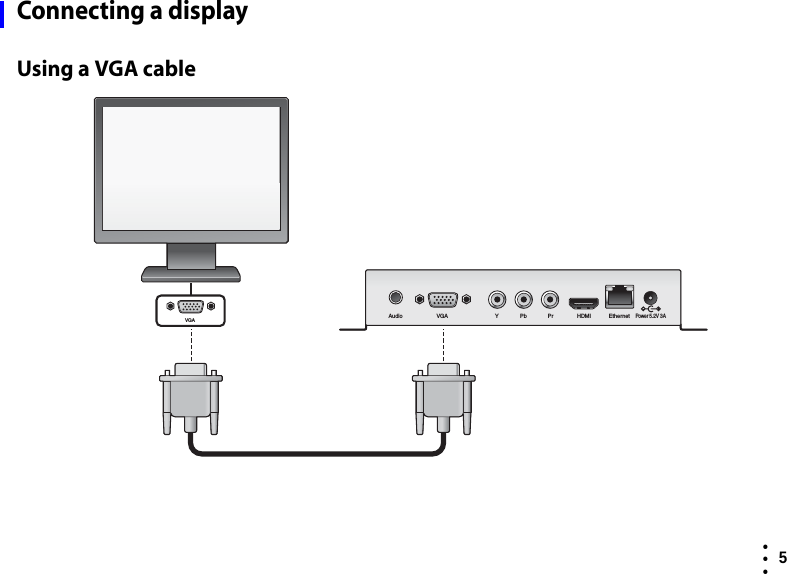
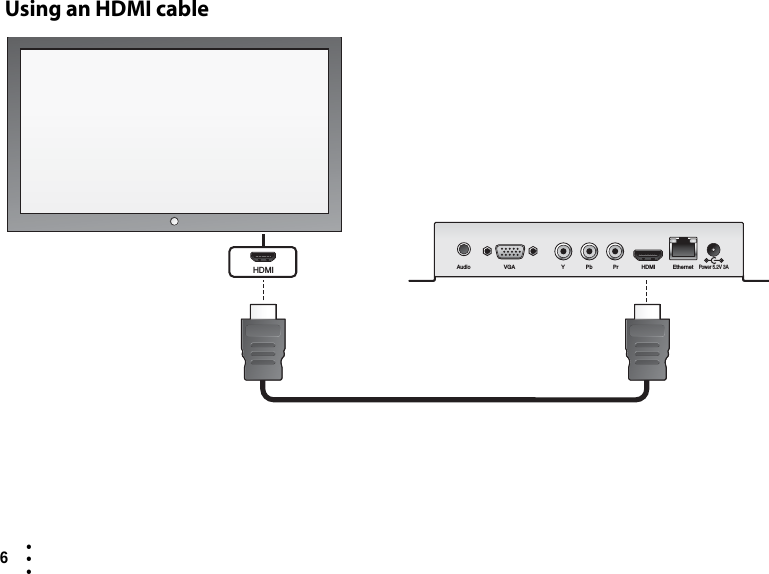
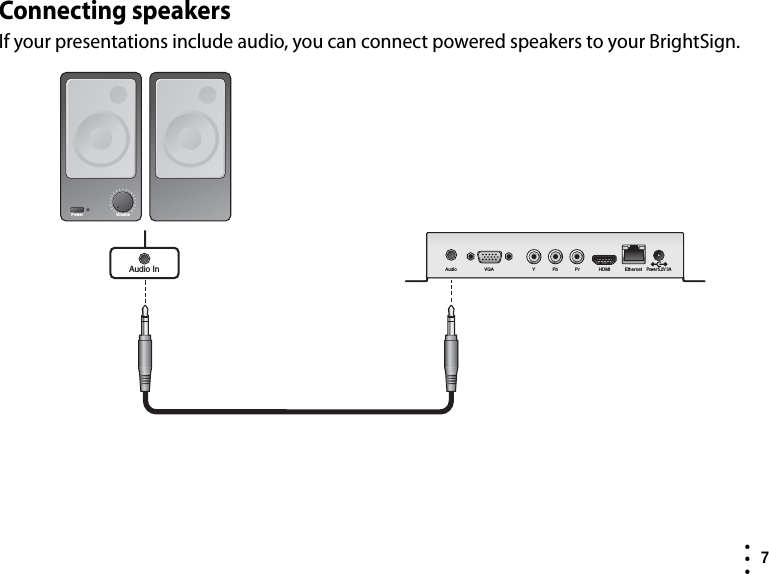
Roku C1000 BrightSign Compact digital sign and kiosk controller User Manual HDCompact QSG

Roku, Inc. BrightSign Compact digital sign and kiosk controller HDCompact QSG

User Manual 20090226

QUICK START GUIDEHD110, HD210, HD410, HD810, and HD1010DOC-005-01Copyright © 2009 by BrightSign, a division of Roku, Inc. All rights reserved. Roku, the Roku logo and the BrightSign logo are trademarks of Roku, Inc. Other brand and product names are trademarks or registered trademarks of their respective holders.BrightSign 12980 Saratoga Ave. Suite D, Saratoga, CA 95070www.brightsign.biz
ContentsWhat’s in the box? . . . . . . . . . . . . . . . . . . . . . . . . . . . . . . . . . . . . . . . . . . . . . . . . . . . . . . . . . . .  1What is BrightSign? . . . . . . . . . . . . . . . . . . . . . . . . . . . . . . . . . . . . . . . . . . . . . . . . . . . . . . . . . .  2Benefits  . . . . . . . . . . . . . . . . . . . . . . . . . . . . . . . . . . . . . . . . . . . . . . . . . . . . . . . . . . . . . . . . .  2Capabilities . . . . . . . . . . . . . . . . . . . . . . . . . . . . . . . . . . . . . . . . . . . . . . . . . . . . . . . . . . . . . .  3Models  . . . . . . . . . . . . . . . . . . . . . . . . . . . . . . . . . . . . . . . . . . . . . . . . . . . . . . . . . . . . . . . . . .  4Connecting a display  . . . . . . . . . . . . . . . . . . . . . . . . . . . . . . . . . . . . . . . . . . . . . . . . . . . . . . . .  5Using a VGA cable  . . . . . . . . . . . . . . . . . . . . . . . . . . . . . . . . . . . . . . . . . . . . . . . . . . . . . . . 5Using an HDMI cable . . . . . . . . . . . . . . . . . . . . . . . . . . . . . . . . . . . . . . . . . . . . . . . . . . . . .  6Connecting speakers  . . . . . . . . . . . . . . . . . . . . . . . . . . . . . . . . . . . . . . . . . . . . . . . . . . . . . . . .  7Playing the demo  . . . . . . . . . . . . . . . . . . . . . . . . . . . . . . . . . . . . . . . . . . . . . . . . . . . . . . . . . . .  8Creating a playlist  . . . . . . . . . . . . . . . . . . . . . . . . . . . . . . . . . . . . . . . . . . . . . . . . . . . . . . . . . . .  8Changing BrightSign settings  . . . . . . . . . . . . . . . . . . . . . . . . . . . . . . . . . . . . . . . . . . . .  12Adding videos to a playlist  . . . . . . . . . . . . . . . . . . . . . . . . . . . . . . . . . . . . . . . . . . . . . . .  13Playing your own presentations . . . . . . . . . . . . . . . . . . . . . . . . . . . . . . . . . . . . . . . . . . . . . .  14Playing a video loop  . . . . . . . . . . . . . . . . . . . . . . . . . . . . . . . . . . . . . . . . . . . . . . . . . . . . .  14Playing a series of files using playlists . . . . . . . . . . . . . . . . . . . . . . . . . . . . . . . . . . . . .  15
Displaying items simultaneously using BrightSign Zones . . . . . . . . . . . . . . . . . .  17Playing an interactive presentation . . . . . . . . . . . . . . . . . . . . . . . . . . . . . . . . . . . . . . .  18Connecting an input device . . . . . . . . . . . . . . . . . . . . . . . . . . . . . . . . . . . . . . . . . . . . . .  19Adding BrightSign to a network . . . . . . . . . . . . . . . . . . . . . . . . . . . . . . . . . . . . . . . . . . . . . .  20Next steps . . . . . . . . . . . . . . . . . . . . . . . . . . . . . . . . . . . . . . . . . . . . . . . . . . . . . . . . . . . . . . . . . . .  21BrightSign HD Compact feature comparison  . . . . . . . . . . . . . . . . . . . . . . . . . . . . . . . . .  22
 1  • ••What’s in the box?TIP: Use the cable mount and cable tie to keep the cables securely attached to your BrightSign.5v SerRS-232ControlErr UpdPwr Bsy SD / MMCUSB ResetGP/012BrightSignRubber feetPower adapterSD slot coverCable mountCable tieSD cardQuick Start GuideInternational prongs
2  • ••What is BrightSign?Roku BrightSign is a standalone digital sign or kiosk controller. Because BrightSign is a non-PC device with no moving parts, it is durable, reliable, and an ideal solution for information kiosks, retail displays, museum exhibits, and other applications. Benefits•Easy to use•Astonishing full HD quality•Reliable solid state platform•Custom interactivity and control•Powerful zones and synchronization•Versatile networking options
 3  • ••CapabilitiesYou can use BrightSign to do any combination of the following:•Play content from a Secure Digital card (SD or SDHC card) or USB Flash drive•Display content on a monitor or TV (standard or high-definition)•Play looping video, images and music in HD•Use zones to divide the display into separate content windows to playback video and images simultaneously•Schedule content to play at a specific time (hour, day, month, year)•Easily create looping displays using text based playlists•Run interactive presentations that playback content based on inputs such as buttons, touch screens, mice, and more•Update software and content remotely with BrightSign networking
4  • ••ModelsNOTE: For details on the features of each BrightSign model, see “BrightSign HD Compact feature comparison” on page 22.Looping HD video playlists Interactivity and control Networking for remote content delivery and reportingBrightSign HD110• Simple looping video playback•Full HD•Playlists and  zonesBrightSign HD410• All HD110 features• Basic interactivity via buttons and GPIO controls• Synchronization for video wall implementationsBrightSign HD210• All HD110 features•Networking support for remote content updatesBrightSign HD810• All HD410 features• Full interactivity including touch screens and USB devices•Live video feed • Support for A/V expansion module accessoriesBrightSign HD1010• All HD810 features•Networking support
 5  • ••Connecting a displayUsing a VGA cable Audio VGAVGA Y Pb Pr HDMI EthernetPower 5.2V 3A
6  • ••Using an HDMI cableAudio VGA Y Pb Pr HDMI EthernetPower 5.2V 3AHDMI
 7  • ••Connecting speakersIf your presentations include audio, you can connect powered speakers to your BrightSign.AudioAudio In VGA Y Pb Pr HDMI EthernetPower 5.2V 3AVol um ePower
8  • ••Playing the demoThe included SD card contains a simple BrightSign demo that you can run on your BrightSign. Follow these steps to play the demo:1Connect a display and speakers to your BrightSign as described earlier in this guide.2Insert the included SD card into your BrightSign. (This SD card contains the demo content.)3Turn on the power.Creating a playlistA playlist enables you to play one or more files in a loop. This section shows you how to create a playlist using the sample files provided with your BrightSign. 1Connect an SD card reader (sold separately) to your computer.2Insert the SD card included with your BrightSign into the card reader.3Make a backup copy of the SD card to preserve the original contents of the card. As you complete steps 4 - 11 you will overwrite the contents of the demo on the SD card.4Open the Sample Playlist Files folder on the SD card, so you can see the names of the files in this folder as shown in Example 1.
 9  • ••EXAMPLE 1: Sample Playlist Files folder (3 JPG images, 2 MPG videos, and 1 AUTORUN.BRS script)
10  • ••5On your computer, open Notepad or a similar text editor.6On the first line of your Notepad file, set the video mode by entering one the following:•If your BrightSign is connected to a VGA display, enter: Videomode 1024x768x75p•If your BrightSign is connected to an HDMI display, enter: Videomode 1280x720x60p7On separate lines, type the name of each JPG file located in the Sample Playlist Files folder, as shown in Example 2.8Save the text file with the name AUTOPLAY.BSP:aClick File > Save As.bIn the Save as type field, select All Files. cIn the File name field, enter AUTOPLAY.BSP.dClick Save. That's it. You just created a simple playlist that loops three images.Example 2a: Playlist for VGA displayExample 2b: Playlist for HDMI display
 11  • ••9Copy the following files to the root directory of the SD card, as shown in Example 3:•Your AUTOPLAY.BSP file•The three sample JPG images (from the Sample Playlist Files folder)•The AUTORUN.BRS file (from the Sample Playlist Files folder)NOTE: Your new AUTORUN.BRS file overwrites the demo’s AUTORUN.BRS file.10Remove the SD card from your card reader and insert the SD card into your BrightSign.11Turn on your BrightSign.EXAMPLE 3: Root of SD card with playlist, 3 JPG images, and AUTORUN.BRS script
12  • ••Changing BrightSign settingsYou can also use a playlist to customize BrightSign settings. Try customizing any of the following settings in your playlist:•Set the delay between images. The default delay between images is 3 seconds. You change this setting by adding one or more Slideinterval keywords followed by the number of seconds you want the image to display. In Example 4, image1 plays for 15 seconds, image2 plays for 10 seconds, and image3 plays for 30 seconds.•Set PowerPoint style image effects. When displaying images, you can choose from 20+ transition effects. To add a transition, insert one or more Transition keywords in your playlist. Insert the keyword before the image to which you want to apply the transition. In Example 4, there is a horizontal venetian blind effect before images 2 and 3, and image 3 fades into image 1. For a full list of transition effects, see theUser Guide at: www.brightsign.biz/support/userguide.php.Example 4: Change settings
 13  • ••Adding videos to a playlistIn addition to playing images, you can use a playlist to play one or more videos. Just add the names of the videos to your playlist. Try adding the two sample videos to your playlist:1Open your AUTOPLAY.BSP file in Notepad or a similar text editor. 2On separate lines, add the names of the 2 MPG files from the Sample Playlist Files folder on the SD card.TIP: The images and videos play in the same order as they appear in the playlist, so enter the video file names where you want them to appear.3(Optional) Set the volume level by entering the Volume keyword followed by a volume setting. The default volume level is 100 (the maximum). 4Save the changes to your AUTOPLAY.BSP file.5Copy your revised AUTOPLAY.BSP file and the two MPG files to the root of the SD card.6Remove the SD card from your card reader and insert the SD card into your BrightSign.7Turn on your BrightSign.Example 5: Change settings
14  • ••Playing your own presentationsPlaying a video loop1Copy your video file (MPEG-1, MPEG-2, H.264) into the root directory of an SD card and name it AUTOPLAY.VOB or AUTOPLAY.MPG.2Copy AUTORUN.BRS from the demo SD card to the root directory of your SD card. 3Insert your SD card into your BrightSign.4Turn on your BrightSign. After a few moments, BrightSign plays the video and repeats it automatically to create a loop.Example 6: SD card with video loop
 15  • ••Playing a series of files using playlistsTo play a series of files one after the other, you need to create a playlist that describes the items you want to play.1Using a text editor, such as Notepad, enter the names of the files you want to play in the order you want them to play. A playlist can include the following types of files:•Video: MPG (MPEG-2 transport streams with MP3 audio)•Image: BMP, PNG, JPG (JPEG)•Audio: MP3NOTE: We’re adding support for more file formats. Visit www.brightsign.biz/support for  a current list of supported file types.2Use the Save As command to name the file AUTOPLAY.BSP. NOTE: Most text editors save files with a TXT extension, so be sure to override the extension.3Copy the following files to the root directory of your SD card:•AUTOPLAY.BSP (the playlist you just created)•Media files referenced in your playlist•AUTORUN.BRS (copy this file from the demo SD card)
16  • ••4Insert your SD card into your BrightSign.5Turn on your BrightSign. After a few moments, BrightSign plays the playlist and repeats it automatically.TIP: You can also add commands to your playlist to control playback of the files or to play the playlist at a scheduled time. For details, see the User Guide at: www.brightsign.biz/support/userguide.php.Example 7: SD card with playlist files
 17  • ••Displaying items simultaneously using BrightSign ZonesWith BrightSign zones you can divide the screen into windows and play different types of content in each window, including video, images, ticker feeds (RSS or text), or a clock. You can also control the background color, background image, font, text color, and transitions. See theUser Guide for details on adding zones to your presentations.Example 8: BrightSign Zones examples
18  • ••Playing an interactive presentationWith BrightSign HD410, HD810, and HD1010 you can create an interactive presentation that responds to user input from buttons or any other GPIO device that is connected to the RS232 port and generating serial commands. The HD 810 and HD1010 also support input for interactivity from USB devices such as touch screens, mice, keyboards, and barcode scanners, and the HD1010 also supports input for interactivity via the Ethernet port.To play an interactive presentation, you need an interactive playlist. An interactive playlist is a spreadsheet file that contains a list of information separated by commas (CSV file). The interactive playlist describes which media files to playback based on the user's input. For a complete list of supported devices and instructions on creating an interactive playlist, see theUser Guide at: www.brightsign.biz/support/userguide.php.NOTE: If you're outside the United States, check the regional settings in Excel and make sure the list separator is a comma and the decimal separator is a period.
 19  • ••Connecting an input deviceTo play interactive presentations, you need to connect an input device to your BrightSign.5v Ser RS-232 ControlErr Upd Pwr BsySD / MMCControl
20  • ••Adding BrightSign to a networkWhen you add your BrightSign HD1010 to a network, you can update your content and the BrightSign software remotely and securely. You can use Simple Networking software to update content from a BrightSign folder on your web server or an RSS feed, or you can use BrightSign Network Manager, a web-based solution that is designed for enterprise environments. For details on adding your BrightSign to a network, see the User Guide at: www.brightsign.biz/support/userguide.php.5v Ser RS-232 ControlErr Upd Pwr BsySD / MMCControl
 21  • ••Next stepsTo get the most from your BrightSign, download the latest software, read the latest documentation, and play other demonstrations.•Documentation: Get the latest User Guides, Release Notes, Scripting references, Hardware reference manuals, and Regulatory Guide at: www.brightsign.biz/support/userguide.php•Demos: Get an overview of what Brightsign is capable of: interactivity, looping, high definition, and multiple content zones on a single screen. Download demos at: www.brightsign.biz/support/demosand use the following login information:•username: brightsign•password: Demos246•Downloads: Get the latest BrightSign software, Autoplay script, scripts for manually setting the date & time, and scripts for testing button boards at: www.brightsign.biz/support/download.php•Support: Get answers to your questions on the support website: www.brightsign.biz/support—or—Contact technical support at: www.brightsign.biz/support/contact_form.php
22  • ••BrightSign HD Compact feature comparisonFeatures HD110 HD210 HD410 HD810 HD1010Looping playlist support X X X X XBasic interactivity (via GPIO port supporting buttons and LEDs) X X XAdvanced interactivity (buttons, touch screens, LEDs, and any USB device such as speakers, keyboards, mice, more)XXPlayback scheduling X X XSynchronization (video sync of multiple displays)GPIO GPIO GPIO or ethernetZones (multiple content windows on single screen) X X X X XText ticker feed and subtitles X X X X XRSS ticker feed X XNetworking for remote content delivery  X XMedia formatsaHD110 HD210 HD410 HD810 HD1010Video: MPEG-2 transport streams with MP3 audio (MPG) X X X X XImage: BMP, PNG, JPEG (JPG) X X X X XAudio: MP3 XXXXXDisplay resolutions HD110 HD210 HD410 HD810 HD10101080p (HDMI) XXXXX1080i, 720p, 576p, 480p (HDMI & component) X X X X X1360x768, 1024x768 (HDMI & VGA) X X X X X
 23  • ••Connectors HD110 HD210 HD410 HD810 HD1010SDHC slot  XXXXXVGA out XXXXXComponent video out XXHDMI out (DVI via adaptor) XXXXXGPIO control port (8 bi-directional) XXXRS232 XXX5V serial mini jack XXXReset button XXUSB host port XXEthernet 10/100 X XAnalog stereo audio out (stereo 1/8” jack line) X X X X XMiscellaneous HD110 HD210 HD410 HD810 HD1010Dimensions (without mounting brackets or connectors) 168mm (W) x 149mm (D) x 30mm (H) or 6.6” (W) x 5.9” (D) x 1.2” (H)Weight 630 grams or 20.3 oz.Power 5V / 3.0AInternational power supply & regulatory approvals XXXXXWall mounting brackets XXXXX1 year warranty (parts and labor) X X X X Xa We’re adding support for more media formats. Visit www.brightsign.biz/support for  a current list of supported formats.
Federal Communications Commission (FCC) Interference Statement The device complies with Part 15 of FCC rules. Operation is subject to the following two Conditions: • This device may not cause harmful interference. • This device must accept any interference received, including interference that may cause undesired operations. This device has been tested and found to comply with the limits for a Class B digital device pursuant to Part 15 of the FCC Rules. These limits are designed to provide reasonable protection against harmful interference in a residential installation. This device generates, uses, and can radiate radio frequency energy, and if not installed and used in accordance with the instructions, may cause harmful interference to radio communications. However, there is no guarantee that interference will not occur in a particular installation. If this device does cause harmful interference to radio/television reception, which can be determined by turning the device off and on, the user is encouraged to try to correct the interference by one or more of the following measures: 1 Reorient or relocate the receiving antenna. 2 Increase the separation between the equipment and the receiver. 3 Connect the equipment into an outlet on a circuit different from that to which the receiver is connected. 4 Consult the dealer or an experienced radio/TV technician for help.  Note: Any changes or modifications not expressly approved by the party responsible for compliance could void the user’s authority to operate this equipment.
QUICK START GUIDEHD110, HD210, HD410, HD810, and HD1010DOC-005-01Copyright © 2009 by BrightSign, a division of Roku, Inc. All rights reserved. Roku, the Roku logo and the BrightSign logo are trademarks of Roku, Inc. Other brand and product names are trademarks or registered trademarks of their respective holders.BrightSign 12980 Saratoga Ave. Suite D, Saratoga, CA 95070www.brightsign.biz

Navigation menu