Roku M1001 Network Music Player User Manual 05 SB00 UG0602 indd
Roku, Inc. Network Music Player 05 SB00 UG0602 indd
UserManual.wiki
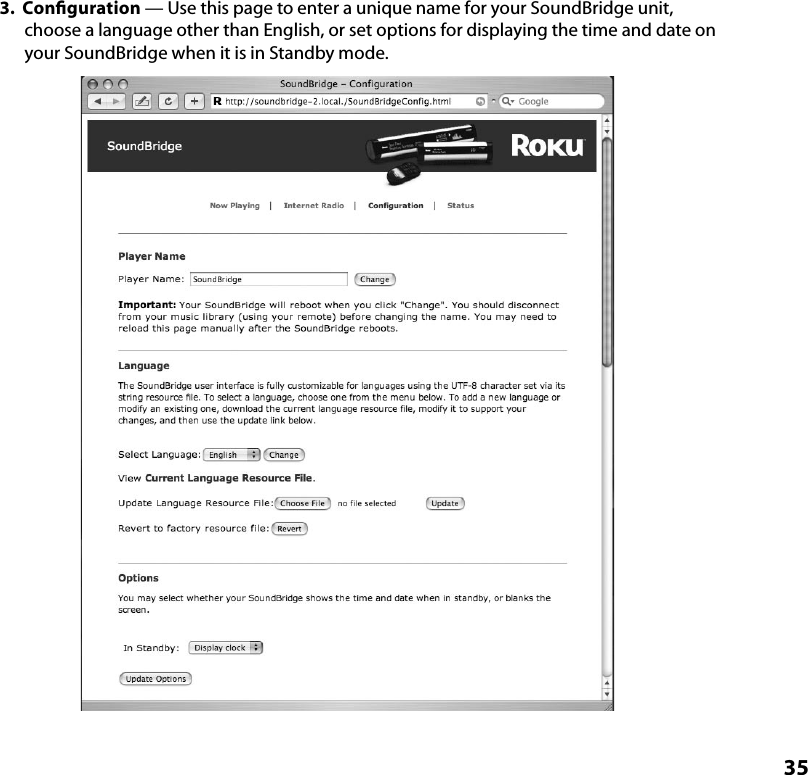
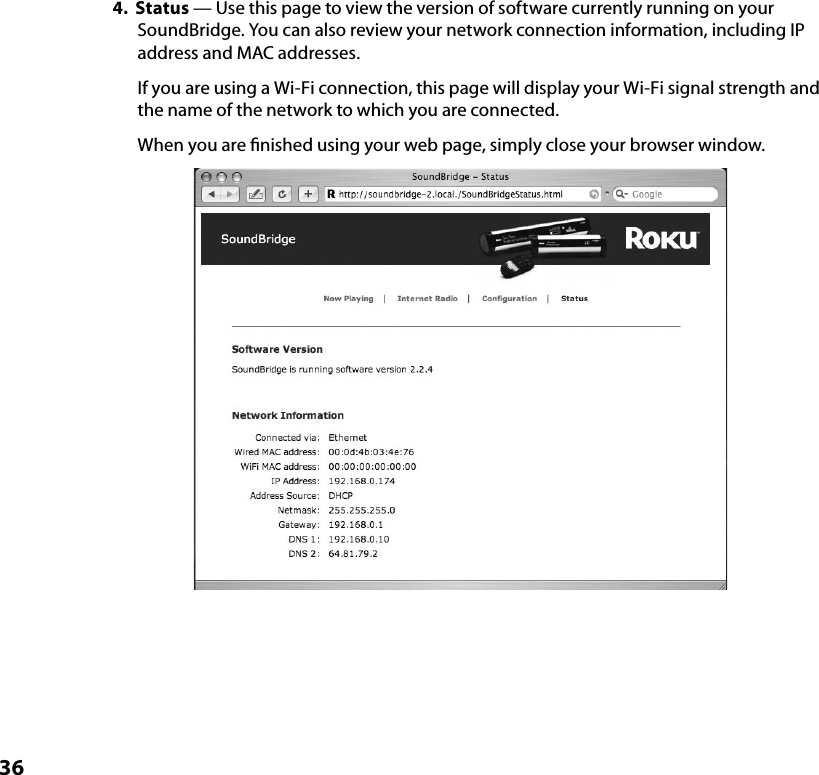
>
Roku
>
M1001 User Manual
User Manual
Navigation menu
Upload a User Manual
Namespaces
Wiki Guide
HTML
PDF
Info
Views
User Manual
Discussion / Help
Navigation

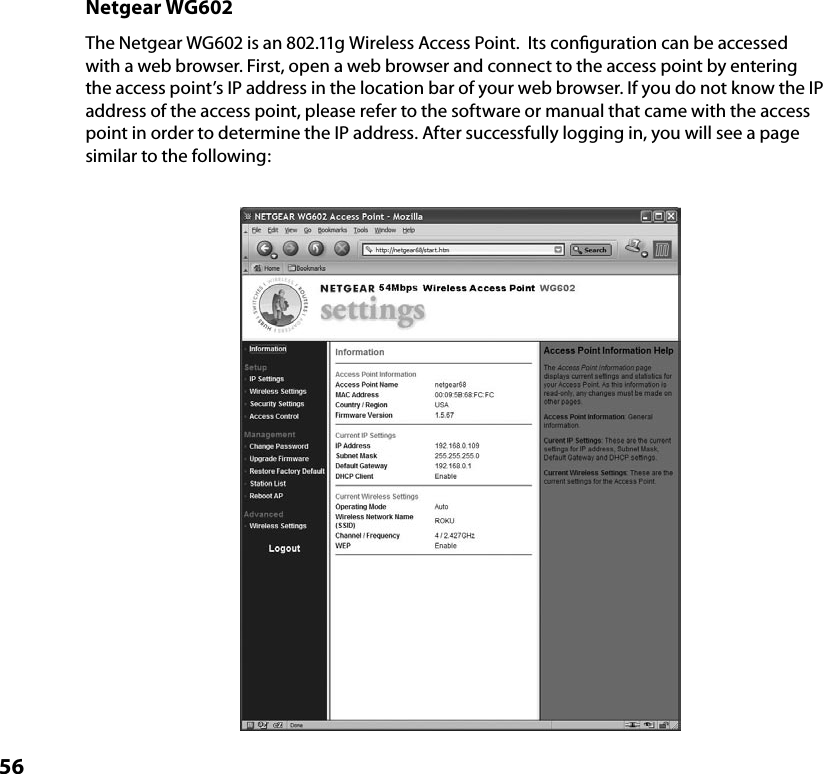
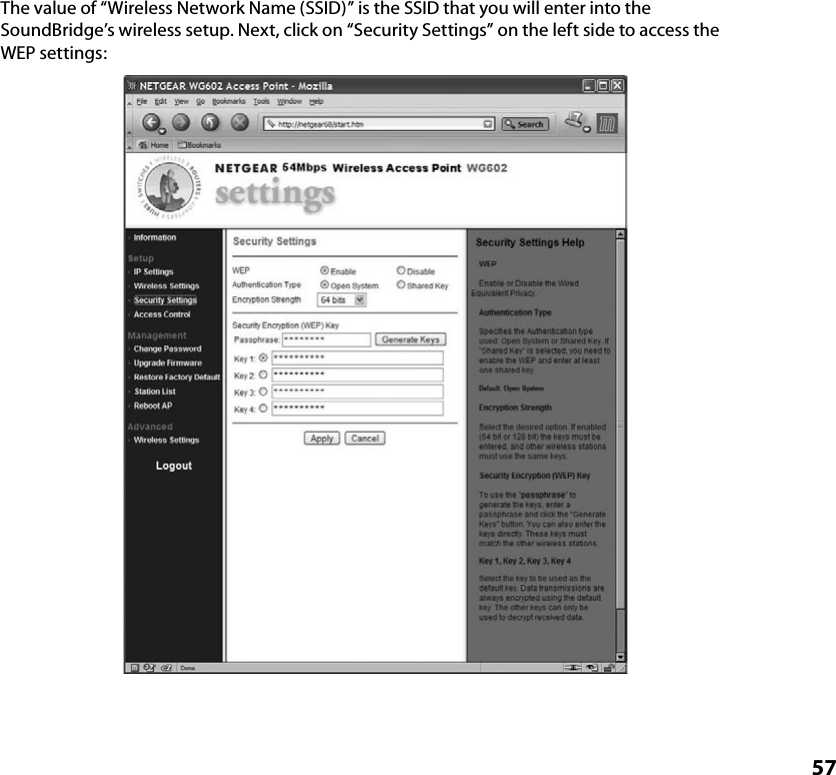
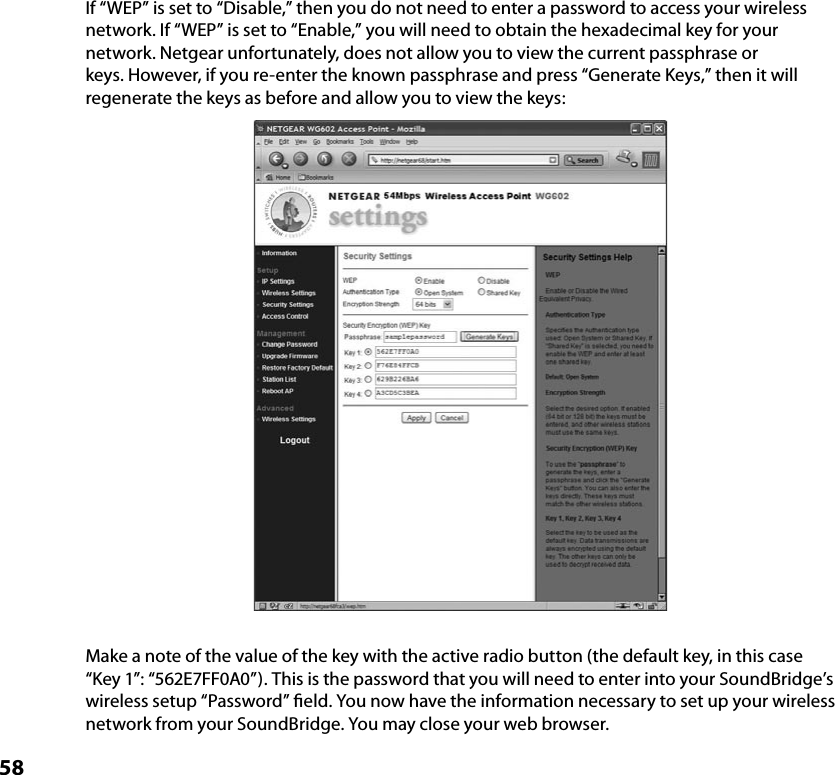
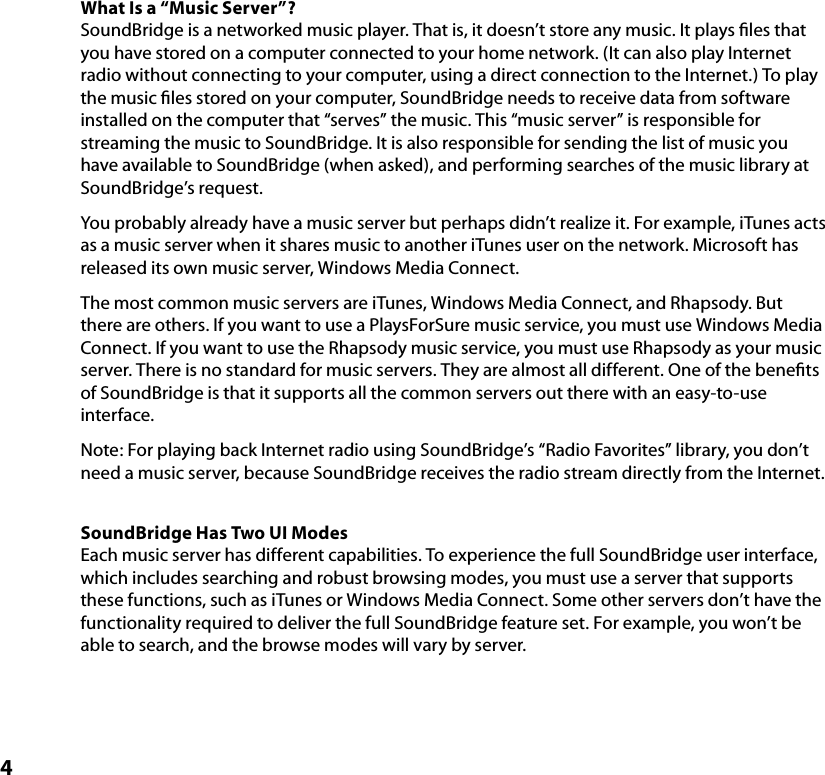
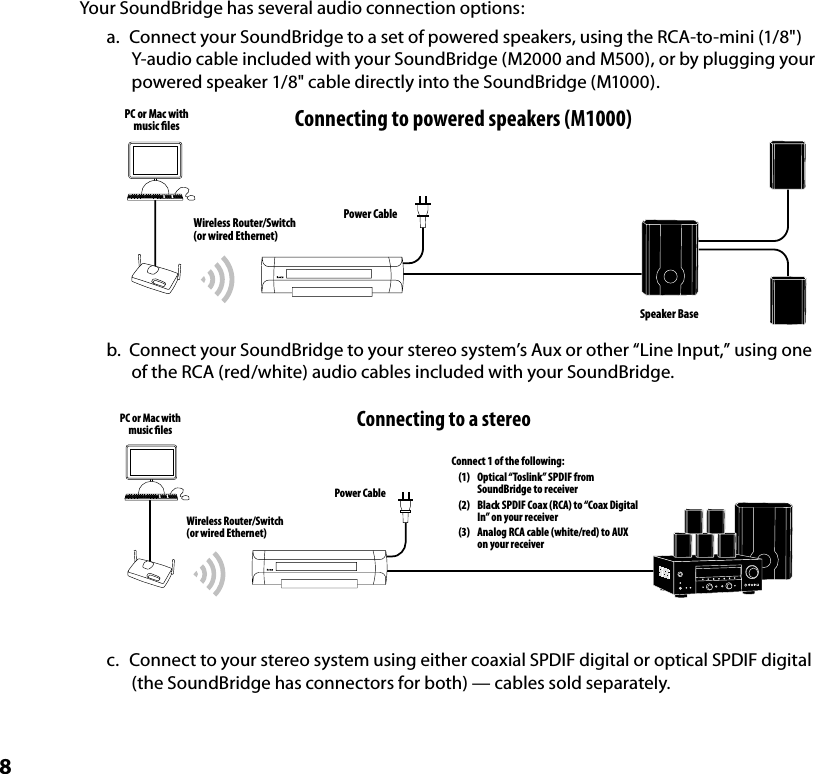
![3GETTING STARTEDTo use SoundBridge you will need to: I. Make sure you have a compatible music server installed. Compatible music servers include iTunes,® Microsoft® Windows® Media Connect, Rhapsody,™ Musicmatch,® and others. II. Connect SoundBridge Ethernet or Wi-Fi network hardware. III. Connect SoundBridge to powered speakers or your home stereo system’s receiver or amplifier. IV. Plug in SoundBridge to AC power (there is no “on/off” switch). V. Put batteries into your SoundBridge remote control. VI. Establish a network connection. If you are using Wi-Fi and have WEP security enabled, you will need to enter your security key with SoundBridge’s remote control. VII. Enable any music sharing options required by your music server: a. Windows Media Connect: authorize SoundBridge as a recognized device. b. iTunes: enable Music Sharing feature in Preferences menu. c. Rhapsody: enable Music Sharing from the UPnP tab in the Options menu. d. Musicmatch: enable Music Sharing feature and UPnP option in Options menu. VIII. Select and connect to your music library. IX. Play music: Using your remote control, find a song you want to play, then press Play [] to play it immediately or Add [+] to add it to the Song Queue.Read on for detailed explanations of the steps above. I. Music Server Software RequirementsRoku SoundBridge is designed to act as a remote client for several kinds of music libraries, including Windows Media Connect, Rhapsody, Musicmatch and iTunes. You can also play WMA and DRM WMA files purchased from popular online music stores such as Napster.™ (Apple’s policy does not allow SoundBridge to support protected AAC files.)](https://usermanual.wiki/Roku/M1001/User-Guide-563493-Page-5.png)
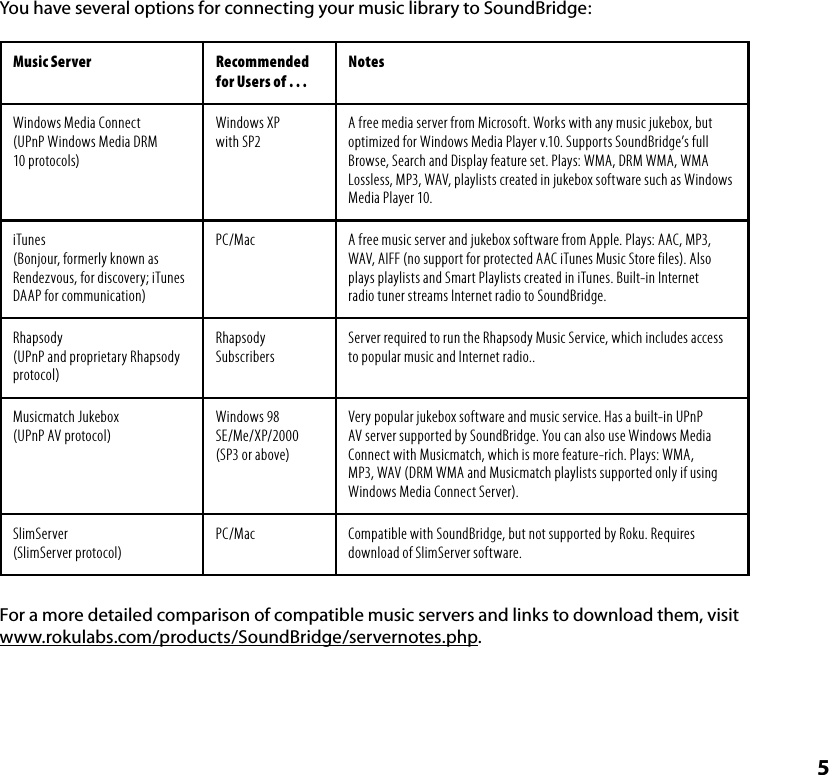
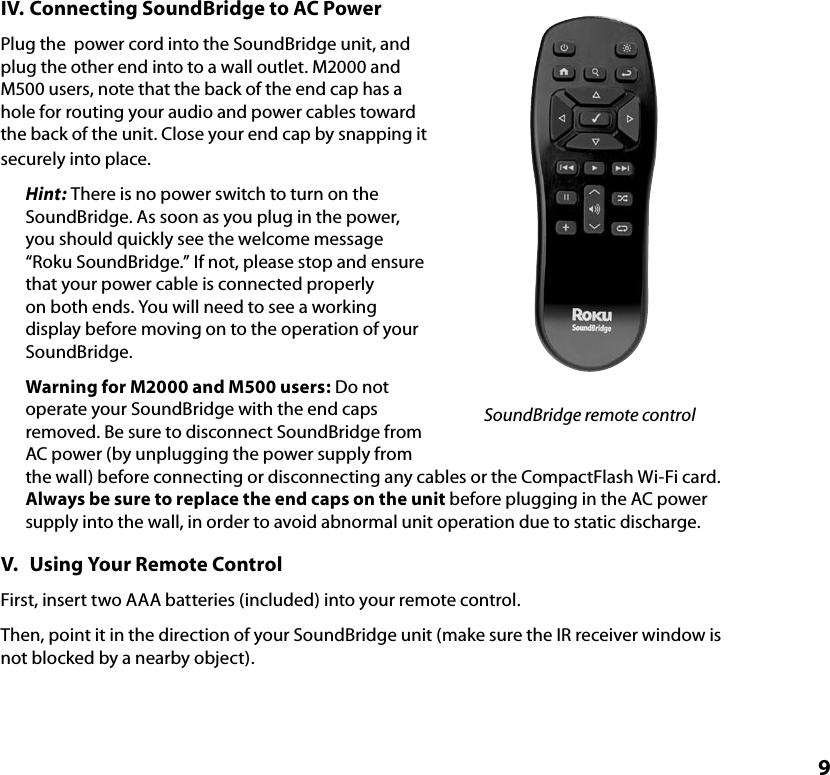
![10 VI. Establishing a Network ConnectionWired Ethernet Network: After you have connected SoundBridge to your computer via a switch/hub/router (or directly to your computer via crossover cable) and powered up the unit, SoundBridge will auto-configure its network settings (using DHCP or AutoIP). There is nothing you need to do. If for some reason you have trouble connecting to your network, select the “SYSTEM CONFIGURATION” option, then select “SHOW WIRED ETHERNET STATUS.”Wireless Network: If you have a Wi-Fi network in your home, with no security keys set, then SoundBridge will also auto-connect to your wireless network. If SoundBridge detects more than one Wi-Fi network (as some advanced users have in their home, or if your neighbor’s signal is leaking over), then you will be asked to select the SSID (network ID) to connect to.If you have a security key, you will need to enter your WEP key manually into SoundBridge. This is the same key you have entered into your Access Point and your computer. Your screen will look something like this:[NO MUSIC LIBRARIES FOUND]SYSTEM CONFIGURATIONScroll down on this screen using your down arrow until the option “SYSTEM CONFIGURATION” is highlighted, and press Select [4] on your remote control. You will see a screen that looks like this:CHECK FOR NEW SOFTWARE-CURRENTLY V1.0.2SHOW WIRED ETHERNET STATUSSHOW WI-FI STATUSSELECT WI-FI SSID & PASSWORDNavigate down to “SELECT WI-FI SSID & PASSWORD” and select your wireless network name and password.For additional help connecting to your network, including password help, see the Wi-Fi setup section on page 45 of this guide.](https://usermanual.wiki/Roku/M1001/User-Guide-563493-Page-12.png)
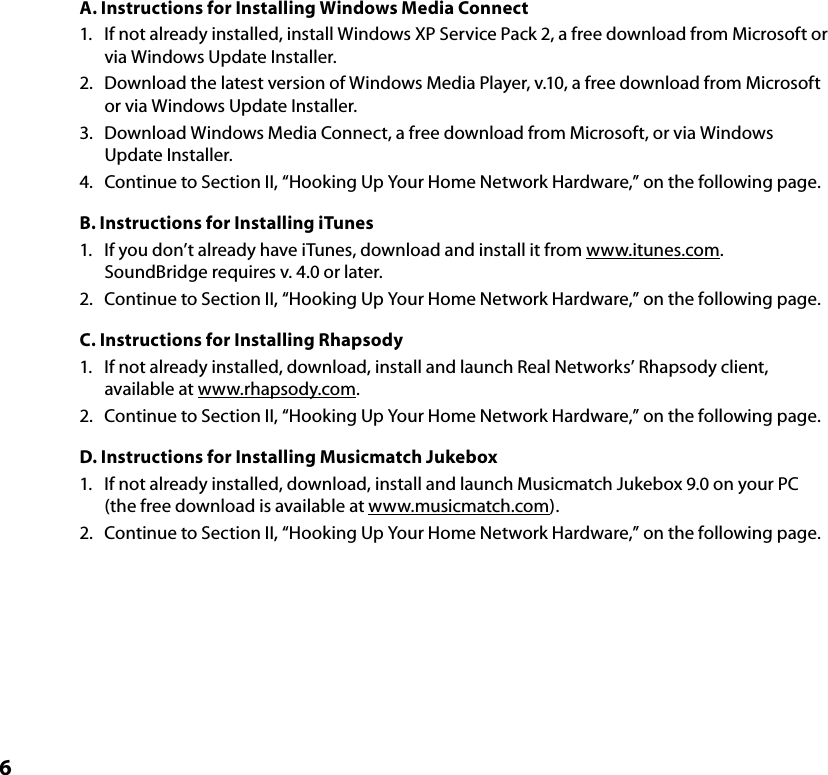
![133. Rhapsody: Make sure the Rhapsody application is running, then select User Settings from the Options menu, navigate to the UPnP tab, and then click the “Start” button to start the server. You will probably also want to check the “Start UPnP server once logged in” option, which makes the server start each time you run the Rhapsody application.Your Rhapsody server should now appear in your list of servers on the SoundBridge, and you will be able to play all your songs and Rhapsody radio stations.4. Musicmatch: Select Options/Settings. Click on the “CD Lookup/Connectivity” tab. Select “Enable Music Server” and then select “Universal. Plug and Play.” You can close Musicmatch if you like — the UPnP server will keep running in the background. VIII. Choosing Your Music LibraryOnce SoundBridge is successfully connected to your network and your server’s music sharing options are enabled, SoundBridge will automatically find your computer’s music server and detect any supported music libraries. After SoundBridge detects your music library, you will be prompted to choose the library you would like to access from a screen that looks something like this:PLAY DAN’S MUSIC LIBRARYPLAY FAVORITE RADIO STATIONSSYSTEM CONFIGURATION Navigate to your preferred library (in this case, “Dan’s music library”) and press Select [4]. You will then see the “Home Menu,” where you can begin browsing and playing your music. If instead you see the message [NO MUSIC LIBRARIES FOUND], your network is not connecting to your computer properly or your music library is not found. Please choose SYSTEM CONFIGURATION for troubleshooting your network connection. (Make sure your computer is turned on, your server is running, and music sharing is enabled.)After you have successfully connected to your music library, SoundBridge will automatically connect to that library upon startup. If you would like to return to the screen that allows you to choose your desired libraries manually, select the “CHANGE LIBRARY OR CONFIGURATION”](https://usermanual.wiki/Roku/M1001/User-Guide-563493-Page-15.png)
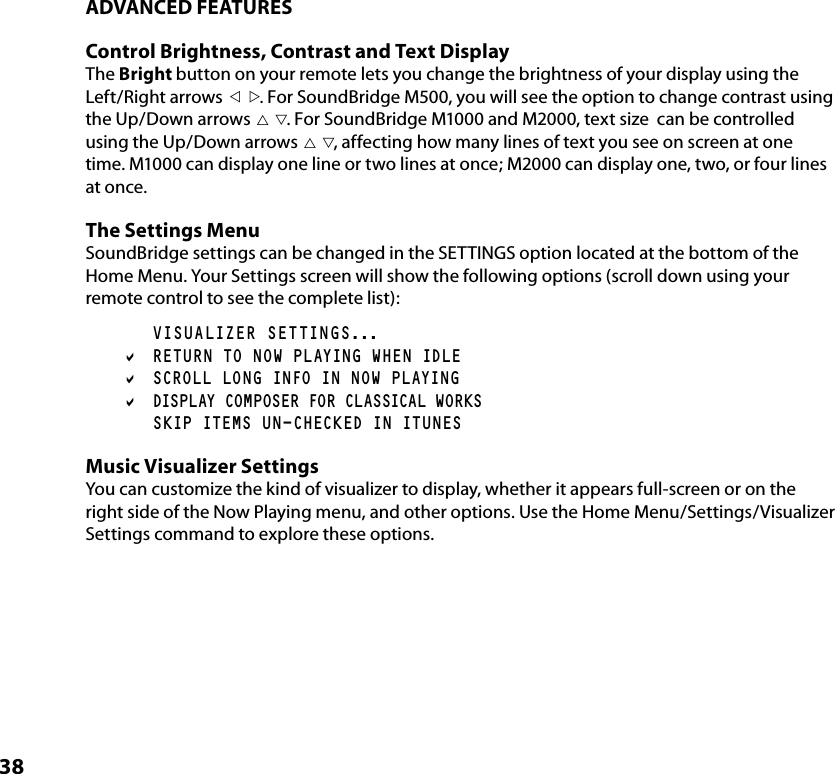
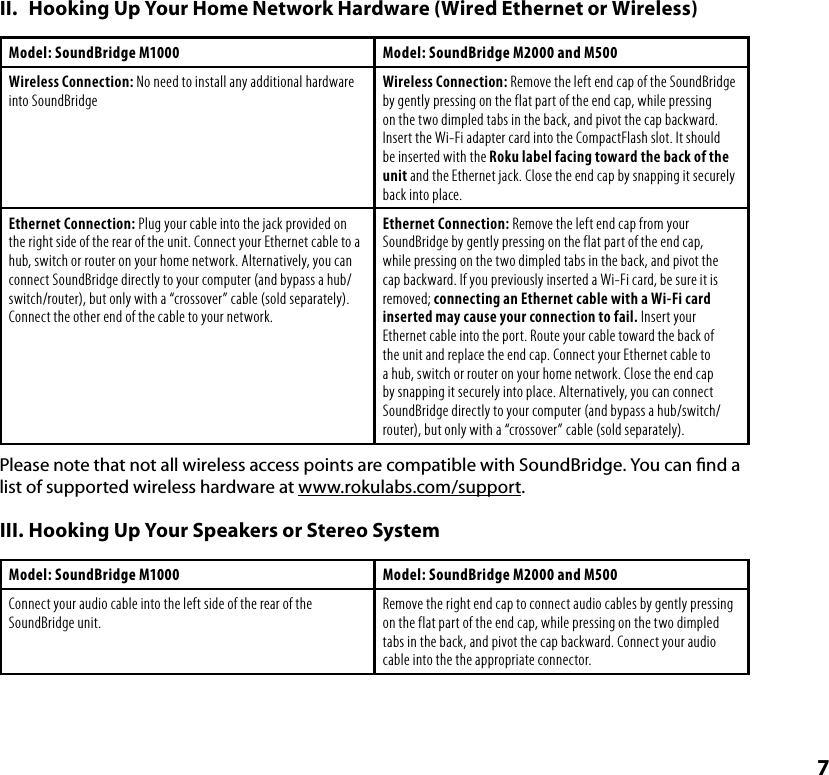
![14option located at the bottom of SoundBridge’s Home Menu (accessible by pressing the Home Menu [ ] button).Visit www.rokulabs.com/support for help if you are still having trouble connecting to your music library. Check to make sure your router is compatible with SoundBridge — a list of compatible wireless access points is available at www.rokulabs.com/support. IX. Playing MusicYou are now ready to begin playing music. Using your remote control, find a song you want to play, then press Play [] to play it immediately. See page 19, “Music Playback,” for more detailed instructions about browsing and playing music. {#} X. Setting Display Preferences (optional)The brightness of your display can be adjusted by pressing the Bright [] button. Text size can also be controlled for the SoundBridge M1000 and M2000’s VFD display by pressing the Bright [] button. Contrast can be controlled this way for models that allow contrast control.Also, from the Home Menu, you can navigate down to the SETTINGS option to change the appearance of the music visualizer, such as whether it appears full screen during playback, and what kind of information is displayed when a song is playing.For a complete list of SoundBridge settings, please see the “Advanced Features” section of this user guide. XI. Checking for the Latest Software (recommended)Updating your software is quick and easy. You’ll need SoundBridge connected to a network which is connected to the Internet via a high-speed connection such as DSL or cable modem. To make sure you have the latest version of SoundBridge software, please follow these instructions:1. Make sure your SoundBridge is connected to a home network with Internet access.2. Press the Home Menu [ ] button on the remote control.3. Navigate down to CHANGE LIBRARY OR CONFIGURATION and press Select [4].4. Navigate down to SYSTEM CONFIGURATION and press Select [4].](https://usermanual.wiki/Roku/M1001/User-Guide-563493-Page-16.png)
![155. Navigate down to SOFTWARE VERSION AND UPDATE and press Select [4]. 6. You will be shown your current software version and be given the option to check for a software update. 7. Choose “Yes” to check for new software updates for your SoundBridge.8. You should see a screen with a progress bar:CONTACTING SERVER[********]9. You will then see one of the following two screens:YOUR SOFTWARE IS UP TO DATEIn that case you don’t need to do anything. Press Select [4] to accept this message and return to the previous “System Configuration” menu. Press Exit [] to return to the “Change Library” menu, navigate to the music library you want to play, and press Select [4].Alternatively, if your software requires updating, you will be prompted to download the update. Select “Yes.” After the above “contacting server” message, you will see the following screen:UPGRADE SUCCESSFULSELECT OK TO REBOOT Select OK and you will see a screen confirming that your unit is rebooting.10. After your software has been updated, you may want to check Roku’s web site for the latest version of the SoundBridge user guide. Roku will release a new version of the user guide for PDF download if new features or functions have been added to the SoundBridge software. Please visit www.rokulabs.com/support for the latest version of the manual. XII. Wall or Under-Cabinet Mounting (optional)Your SoundBridge ships with a portable black rubber table stand which looks great on your shelf or night stand. An optional wall mounting kit is available for sale at www.rokulabs.com/buy. This allows the SoundBridge to be mounted to the wall or under a cabinet using a sleek, hidden bracket which screws into your wall. For more information, please visit Roku’s web site.](https://usermanual.wiki/Roku/M1001/User-Guide-563493-Page-17.png)
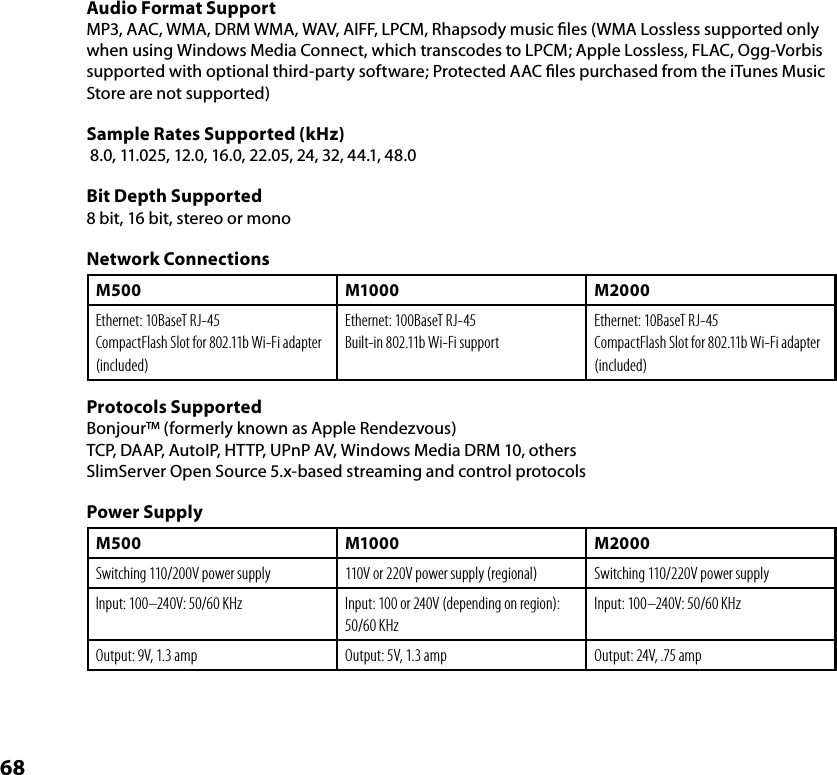
![16MUSIC PLAYBACK — OVERVIEWAudio File Formats SupportedYou are now ready to begin playing music. SoundBridge supports a wide variety of audio formats, including MP3, AAC, WMA, DRM WMA, AIFF, LPCM and WAV. (WMA Lossless is supported only when using Windows Media Connect, which transcodes to LPCM; FLAC and Ogg-Vorbis are supported only with the optional third-party SlimServer software.) Please note that AAC files purchased from the Apple Music Store (also known as DRM AAC files) will appear as menu items with a padlock œ icon, and are not available for playback on SoundBridge at this time.Sample rates supported: (kHz) 8.0, 11.025, 12.0, 16.0, 22.05, 24, 32, 44.1, 48.0 Sample sizes supported: 8 bit, 16 bit Number of channels: mono or stereoNavigation Quick Reference The Up and Down arrow buttons take you through a list item by item. The Left and Right arrow buttons allow you to “fast browse” — either skip to the next (or previous) letter, or if your list is not arranged alphabetically, by about 5% of your list at a time.Ë The arrow icon shows current item highlighted.The Select [4] button takes you one level down into the highlighted item. When you can go no lower in your menu structure, the Select button calls up options to start song playback. (It may help to think of pressing the Select button as clicking on the highlighted item with a mouse.)The Play [] button begins playback of your current selection.The Pause [;] button pauses playback of audio currently playing.The Add [+] button adds your current selection to the end of your Song Queue.: 9 The Next Track and Previous Track buttons advance or retreat playback of your Song Queue one song at a time.](https://usermanual.wiki/Roku/M1001/User-Guide-563493-Page-18.png)
![17The Home Menu [ ] button takes you to the Home Menu.The Search [] button takes you to your text-based search options.The Exit [] button takes you one step backward (think of it as the BACK button on your Internet browser). Pressing the Exit [] button repeatedly will display the “Now Playing” screen, which displays information about the currently playing song.Screen Icons Quick ReferenceOn your “Song Queue” screen: The music note icon denotes a single track (as opposed to a collection of tracks).X)) The speaker with audio waves shows current song playing in the “Song Queue” menu. X The speaker without audio waves shows current song paused in the “Song Queue” menu. The upward facing radio transmission signal indicates an Internet radio station.œ The padlock icon indicates secure AAC songs purchased from the Apple Music Store; these songs are not available for playback by SoundBridge.On your “Now Playing” screen:4The Play icon indicates SoundBridge is in playback mode.; The Pause icon indicates playback has been paused.< The Stop icon indicates playback has been stopped. The Shuffle icon (with two crossed arrows) indicates playback of your Song Queue is happening in random order.q The repeat icon indicates continuous playback of your Song Queue. The repeat single track icon indicates continuous playback of the currently playing track. The “X” icon indicates an unsupported file format.](https://usermanual.wiki/Roku/M1001/User-Guide-563493-Page-19.png)
![18MUSIC PLAYBACK — TUTORIALThe Home MenuTo begin navigating through your music, start on your “Home” menu, by pressing the Home Menu [ ] button. The display on SoundBridge should look something like this: Ë PLAYLISTS BROWSEOnly the first two lines of the Home Menu are displayed at once (or the first four lines, if you are using M2000 with four lines enabled in your display settings, or one line if you are using an M1000 or M2000 with the largest font size enabled), but the scroll bar at the right of the screen shows you where you are in the list, and how much more information is available above and below your current screen view. Use the Up/Down arrow buttons to navigate between the following options on the Home Menu: Ë PLAYLISTS BROWSE SEARCH SHOW SONG QUEUE NOW PLAYING SETTINGS CHANGE LIBRARY OR SYSTEM CONFIGURATIONThe Ë arrow to the left of a menu item denotes the current item.Hint: Because you can’t see the whole list of options at once, use the scroll bar (at the right of your display) to see where you are in your list.](https://usermanual.wiki/Roku/M1001/User-Guide-563493-Page-20.png)
![19Browsing by AlbumPress the Down button until you see the BROWSE option highlighted and press Select [4] on your remote control. You will see a listing of browsing options: Ë BROWSE ALBUMS BROWSE ARTISTSIf you scroll down, you will see the other two browsing options: BROWSE COMPOSERS BROWSE GENRESNow, if you navigate to the BROWSE ALBUMS option and press Select [4], you will see an alphabetical listing of Albums found in your music library. The screen will look something like this:Ë PARACHUTES PAUL’S BOUTIQUENavigate to the album that you want to hear using the Up/Down arrow buttons — in our example, “Parachutes.” When the album you want is selected, press the Select [4] button for a listing of songs found on this album. The music note next to each song name indicates the selection is an individual track (and not a playlist, album or other collection of songs). Please note that songs purchased from the Apple Music Store will be denoted in the display with a padlock œ icon. SoundBridge is not able to play back these “locked” files — they will simply be skipped over during playback. Ë DON’T PANIC SHIVERUse the Up/Down arrows again to highlight the song you want to play. Press the Play [] button to start that song playing. When the song begins playback, the display will switch to the “Now Playing” screen, which looks something like this:DON’T PANIC 0:10/2:17 4COLDPLAY PARACHUTES (2000) (|||------)](https://usermanual.wiki/Roku/M1001/User-Guide-563493-Page-21.png)
![20Please note that the artist and album information may be abbreviated, or appear one line at a time, if the total number of characters exceeds what can be displayed at once. See the “Settings” chapter at the end of this manual for more information on display options.Hint: If you would like to go back to the above “Now Playing” screen at any time in order to know what’s playing, press Exit [] several times until you see this screen. Alternatively, press Home Menu [ ], then scroll down to the NOW PLAYING option and press Select [4]. This screen also appears by default after a few minutes of inactivity on the remote control.If you press Play [] on an album track, that track will play, followed by each track remaining on the album. For example, if you press Play on track 5 on an album with 10 tracks total, then tracks 5–10 will play. (For continuous playback of the entire album, press Repeat [ ] on your remote control — the album will play until the end, then start again at the beginning.)You can also navigate to an album, artist or genre selection while browsing, then press Play [] to start playing the entire contents of the selected category. (Note: This feature will not work if using a non-search-capable UPnP music server.)If you are not sure what you have selected to play, simply press the Down arrow from your “Now Playing” screen (the screen that displays the currently playing song). This will list your upcoming songs, also known as your “Song Queue” (see next section).Press Pause [;] at any time to put playback on hold. Press Play or Pause a second time to resume playback.Hint: If you navigate to a new song and press Play while your original selection is playing, you will “flush” the old selection (called the “Song Queue”) and replace it with your new selection. Therefore you should only press Play when you want to erase your existing Song Queue and start a new one. Use the Add [+] button to add a song to the existing Song Queue.Building a Song QueueLet’s say you would now like to choose several different songs or selections to play in a row. This is called building a “Song Queue.” SoundBridge automatically builds a Song Queue every](https://usermanual.wiki/Roku/M1001/User-Guide-563493-Page-22.png)
![21time you select a song or album to play. You can add to that list by navigating to your preferred music and pressing Add [+]. The selection will be added to the end of the current Song Queue.You may add a single song, an entire album, all songs by an artist, all songs in a genre, or any search result — just browse to the selection you prefer and press Add. For example, if you would like to play all songs by Coldplay, select the BROWSE ARTISTS option from the Home Menu/Browse option. Navigate to COLDPLAY in your artist list, and press Add. All songs on all albums by Coldplay will be played by album, in the order they appear on each album. For more information about browsing and searching options, see the “Browsing” and “Searching” sections later in this user guide.You have several other options for building a Song Queue. After you press Select while browsing on a song, a “Song” menu appears with the following options:1. Play, starting with the selected song (and clear previous Song Queue)2. Get information about the selected song3. Play the selected song only (and clear previous Song Queue)4. Add this song to the Song Queue (same as pressing the Add button)Note that both “play” options 1 and 3 above are “destructive”; they will clear your previously existing Song Queue. The “add” option, however, will add the selected song to the end of your existing queue.The first, “play these songs” option is described in the section above — it starts playing your album (or other browsed list), beginning with the current track. If you choose “Play songs” on any track in your selection, the entire list is added to the Song Queue, but playback starts on the chosen track. If you have the Repeat [ ] option selected, the earlier tracks in the queue will play after the last song (and so on indefinitely). If you have the Shuffle [ ] option selected, then the chosen track will play first, followed by all the other tracks in the list in random order.The “Add song to Song Queue” option behaves similarly to the Add button— it places the current song at the end of your playlist. You can add an almost unlimited number of songs to your Song Queue. Each selection will be played in the order it was entered (unless you have chosen to Shuffle your Song Queue).](https://usermanual.wiki/Roku/M1001/User-Guide-563493-Page-23.png)
![22Hint: After you have selected multiple songs to be played in turn, you can use the “Next Track” : and “Previous Track” 9 buttons to skip from song to song in your Song Queue.Reviewing a Song QueueAt any point, you can review what’s in your Song Queue by pressing the down arrow 6 from the Now Playing screen, which is the default screen that appears while SoundBridge is playing. The Now Playing screen looks something like this:DON’T PANIC 0:10/2:17 4COLDPLAY PARACHUTES (2000) (|||------)You can also press Exit [] several times from any point in your browsing; eventually, the Now Playing screen appears. Alternatively, you can press Home Menu [ ], then select the SHOW SONG QUEUE option. You will see the entire list of songs in your song queue; refer to the scroll bar on the right side of the screen to determine where in the list you are located. Press the Up/Down arrows to see the entire list of selections in your Song Queue. The currently playing selection is indicated by a speaker X icon. You cannot save a Song Queue that you have created — it’s only held in memory temporarily and then erased when you build your next Song Queue. If you would like to build a Song Queue that you can save and recall at will, please build a Playlist in your music jukebox software (see “Playing a Saved Playlist” below).](https://usermanual.wiki/Roku/M1001/User-Guide-563493-Page-24.png)
![23Erasing a Song Queue If you change your mind and decide you don’t want to play the Song Queue you’ve just created, simply select something else to play. Navigate to another selection (song, playlist, etc.) and press Select [4] (not Add). This selection immediately replaces your old Song Queue. Repeat and ShufflePressing Repeat [ ] once makes your Song Queue play continuously. You will see the Repeat icon q displayed on the right side of your “Now Playing” screen below the Play 4 icon. Pressing Repeat again makes the current song play over and over; you will see another Repeat icon, a circle with just one arrow . Press Repeat a third time and you will remove the repeat command altogether.Pressing Shuffle [ ] while playing a Song Queue will give you the following options: Shuffle On — will play everything in your Song Queue in random order. (The shuffled order of songs will be displayed in the Song Queue.) An icon with two crossing arrows will be displayed on your Now Playing screen.Shuffle Off — will play everything in your Song Queue in the original order.You can execute the Repeat and Shuffle command from any menu in SoundBridge. Even though you can only see the mode change on the Now Playing screen, the command is taking effect.Pausing Music PlaybackPress the Pause [;] button to halt music playback. Notice a Pause icon ;is displayed at the top right of your “Now Playing” screen, indicating that you’re in Pause mode. Pressing the Play [] button (or the Pause button again) will resume playback right where you left off.When the Song Queue has played all the way through, it will stop. You will see the Stop icon < on the right side of your display. To start playing your Song Queue again at the beginning, press the Play button.](https://usermanual.wiki/Roku/M1001/User-Guide-563493-Page-25.png)
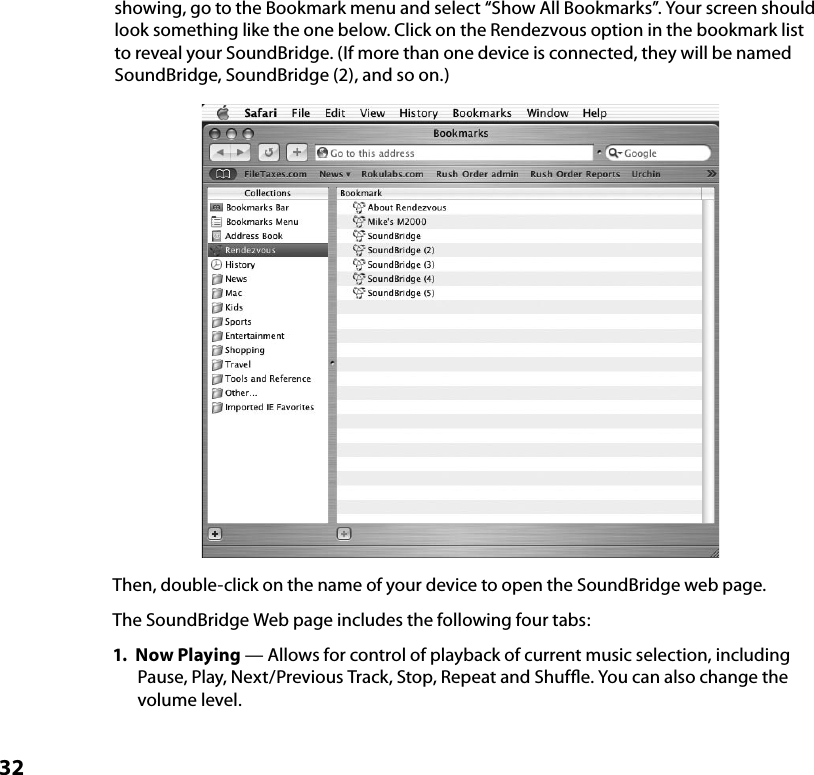
![24Hint: Pressing Pause [;] to stop playback of your Song Queue will only do so temporarily. If you want to clear the memory of your old Song Queue or selection entirely, simply navigate to something else you want to play, and press Play [] to play your new selection, effectively flushing your old selections or Song Queue away, to be replaced by your new selection. Therefore, if you want to build on your existing Song Queue, press Add [+] instead of Select [4] and your prior selections will be preserved.Skipping Tracks During PlaybackIf you’d like to skip a song during playback, press the “Next Track” button : on your remote control. Or, navigate to another song through your browsing options and press Select [4].Playing a PlaylistLet’s say you have created a playlist of your favorite Disco hits in your music jukebox software, and named it DISCO INFERNO. Press the Home Menu [ ] button to go to the Home Menu. Go to the PLAYLISTS option, then press the Select button. Use your Up/Down arrows to browse your playlists one by one, find the one called DISCO INFERNO, then press Play [] to play all songs on the playlist immediately or Add [+] to add the playlist to your Song Queue.Hint: If your playlist was created in Windows Media Player or other software using Windows Media Connect, be sure to save your playlist in the My Music/My Playlist folder on your hard disk.](https://usermanual.wiki/Roku/M1001/User-Guide-563493-Page-26.png)
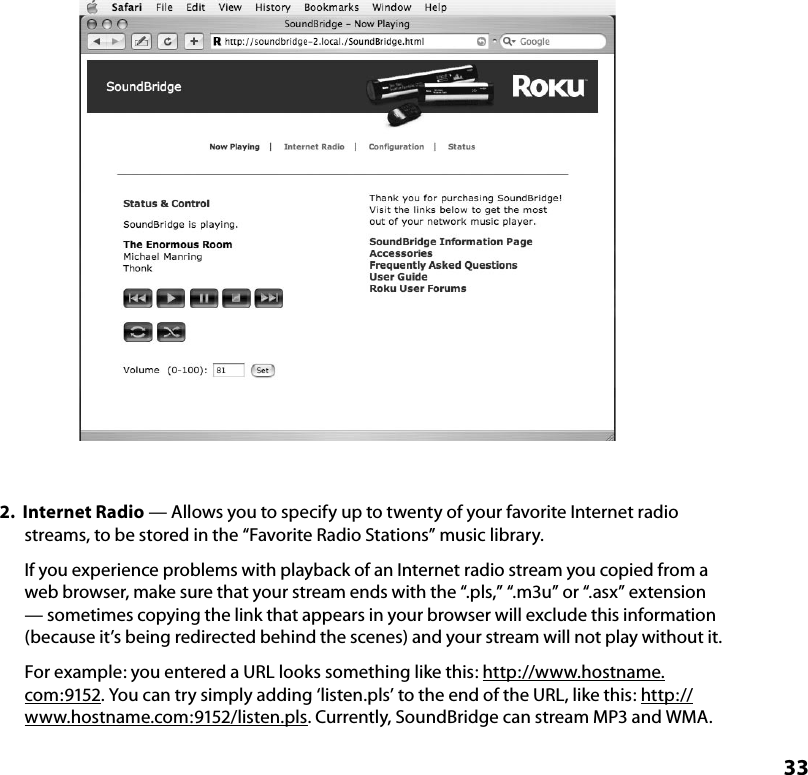
![25Browsing by Artist, Song or ComposerFrom the Home Menu, use the Down arrow to highlight BROWSE and then press Select [4]. Navigate to BROWSE ARTISTS and press Select. Your screen will look something like this: Ë ANNIE LENNOX ^ <A> BEN FOLDS FIVE vFind the artist you would like to play and press Select. You will see a screen that lists the albums available by that artist: Ë <SHOW ALL MATCHING SONGS> MEDUSAWhile the first menu option <ALL MATCHING SONGS> is active, press Add [+] to add this selection to your existing Song Queue, or press Play [] to play all songs by this artist instead and replace your existing Song Queue. (Songs will play in the order they appear on each album, with each album played in alphabetical order). Hint: Artist names starting with “the,” such as the Beatles, will be found under the first letter of the word following “the” — in this case, “B” for “Beatles.”You can choose specific albums or songs to play by navigating down to your desired album and pressing Add to add to an existing Song Queue, or Play to replace an existing Song Queue. Note: if your selected album contains songs by different artists, such as compilation albums or movie soundtracks, only the song(s) by your artist will be played.Hint: To browse faster, instead of browsing up and down one at a time using Up/Down arrows , you can “speed browse” through your lists by pressing the Left/Right arrows . This will skip by the letter of the alphabet. Note that the search function is a string search — “RA” will return not just Radiohead but also other words containing the string, such as Shakira and Franz Ferdinand.Browsing by song or composer works the same way as browsing by artist — see instructions above.](https://usermanual.wiki/Roku/M1001/User-Guide-563493-Page-27.png)
![26Browsing by GenreFrom the Home Menu, navigate down to the BROWSE option and press Select [4]. Scroll down to BROWSE GENRES and press Select. You will see an alphabetical listing of genres that are available in the music library that you are browsing. To add all songs within a Genre to your Song Queue, highlight that Genre and press Add [+] (or Select [✓] to open additional options for playback).To browse within a genre, such as Hip Hop/Rap, press Select on your desired genre. You will have the option to see all available artists in that genre, and a list of individual albums by those artists. At any point, you can press Add to add that selection to your Song Queue or press Select to navigate to the next level of detail. Hint: Information about your music, including Song Name, Artist, Album, and Genre is usually created automatically by the software you used to save your audio CD files on your computer’s hard drive (aka ripping). This process creates data called “ID3 tags” to describe each track. If this data is missing from your audio files, they will not appear when you browse by that data category. If you need to edit your ID3 tags, or if you are not satisfied with the description of genres (or other data) assigned to your music file, it is possible to edit that data in iTunes, Windows Media Player or other supported music jukebox programs. (In iTunes, select the file(s) to edit, click on File/Get info, then click on the Info tab).Search OptionsTo search for a specific selection by spelling it out, you can press the Search [] button on your remote control, or navigate down to the “Search” option from the Home Menu. Either way, you will have the following options:SEARCH FOR ALBUMSSEARCH FOR ARTISTSSEARCH FOR TITLESSEARCH KEYWORDSPress Select on the option you would like to search with. Then, use your Left/Right arrows on the remote control to enter characters for spelling your selection and then pressing Select. When you are done spelling, use the Down button to go to the OK option and press Select. (If you make a mistake, use the Down button to go to the Delete option and press Select.)](https://usermanual.wiki/Roku/M1001/User-Guide-563493-Page-28.png)
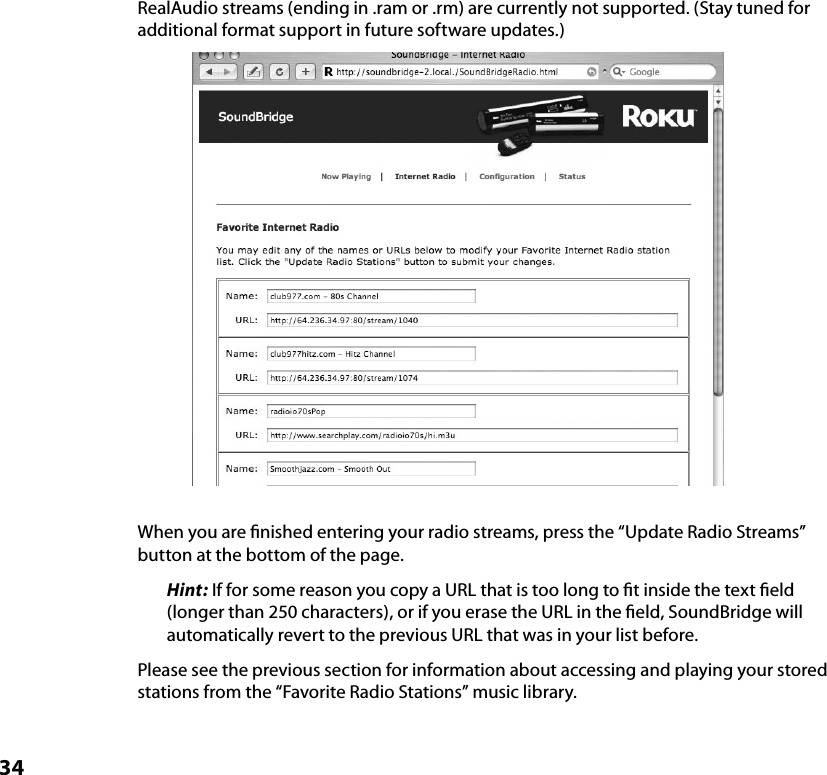
![27Hint: Partial spelling is OK — the Search function searches for letters anywhere in the word, as opposed to just at the beginning. For example, to search for Radiohead, you can enter any combination of letters found in the word (“RA,” “DI,” “HE,” etc.), and the results will return all Artists containing those letters (e.g., if you enter “DI” you’ll get Radiohead, India Arie, and Diana Krall).When you find the music you like, use the Add button to add it to your Song Queue. If searching for albums or artists, you can press Select to navigate down one level to individual tracks.If an exact match is not found, your results will show an empty search. Changing Music LibrariesIf you have multiple music servers running on your network at once, you can easily navigate between them. Press Home Menu [ ]on your remote control. Navigate down to CHANGE LIBRARY OR CONFIGURATION and press Select [4]. All your available libraries will be displayed. Press Select to access your desired music library.Internet RadioOne of SoundBridge’s coolest features is its ability to play Internet radio stations. Currently, there are three ways to listen to Internet radio using SoundBridge: from a playlist created in iTunes; from Windows Media Player; and from the “Favorite Radio Stations” music library, which you can customize and play without the computer on. Hint: it is possible to run iTunes just for playing Internet radio while using Windows Media Connect or another server for playing music.To play Internet radio stations with the iTunes music server, follow these steps:1. Create an iTunes playlist containing your favorite radio stations. In iTunes, create a new playlist (any name is okay, but let’s use “RadioFavorites” for this example). Next, browse the iTunes Internet radio station list by clicking on the Radio button on the Source tray of iTunes:](https://usermanual.wiki/Roku/M1001/User-Guide-563493-Page-29.png)
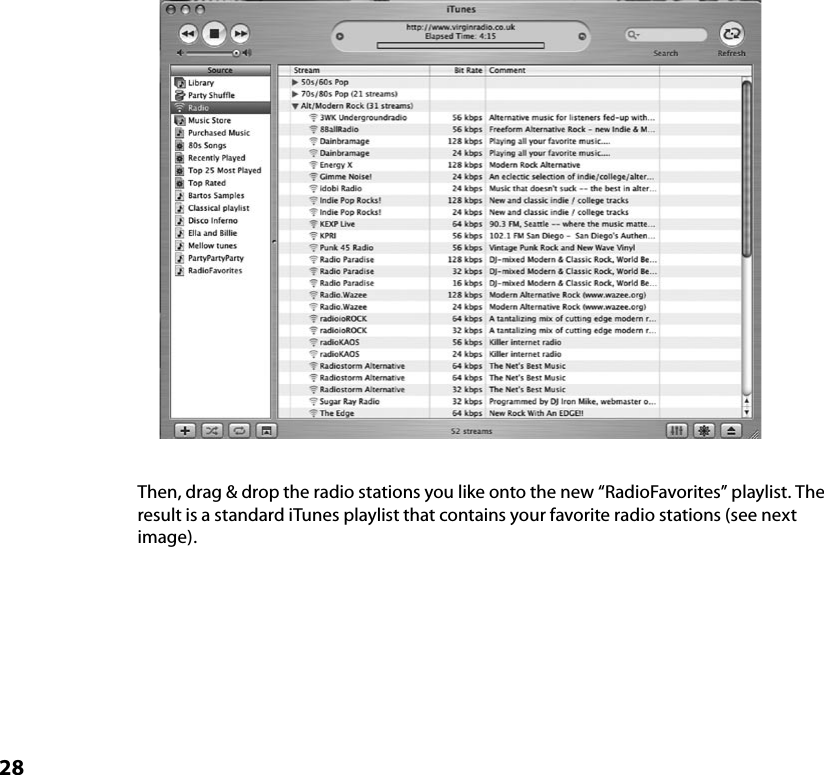
![292. Play your playlist on SoundBridge. From the SoundBridge Home Menu, select “Playlists.” Scroll down until you find the “RadioFavorites” playlist. Select it. You can now scroll through your favorite radio stations. Press Select [4] to start playing your desired station. Use the Up/Down arrows to see the list of available stations, or the Next Track :, Previous Track 9 buttons to switch stations.To play Internet radio with SoundBridge’s “Favorite Radio Stations” Library:With the “Favorite Radio Stations” Library, you can access your favorite Internet radio stations without running your iTunes music server on your computer — in fact, your computer does not even have to be turned on. All you need is an active Internet connection on your home network. To navigate to the “Favorite Radio Stations” Library, follow these steps:](https://usermanual.wiki/Roku/M1001/User-Guide-563493-Page-31.png)
![301. On your SoundBridge remote, press Home Menu [ ]. Navigate down to CHANGE LIBRARY OR CONFIGURATION and press Select [4]. 2. Your available music libraries will be displayed, including the one named “Favorite Radio Stations.” Select that library and you will see a list of twenty stations.3. Press Select to begin playback of your favorite station.When you begin playback, you will see a screen similar to this:Michelle Shocked � Black Widowhttp://www.radioparadise.comRadioParadise.comThe song and artist data is provided by each Internet radio station. Therefore, it may not be available for every Internet radio station, or it may appear in a slightly different format.SoundBridge includes twenty pre-saved radio stations. You can change these stations to your own ten favorites as follows:1. If you are still in the “Favorite Radio Stations” music library, exit it and enter your iTunes library (following steps 1 and 2 above, choosing the name of your iTunes music library in step 2). 2. Create a playlist in iTunes containing your favorite radio stations, as described previously in this section (on page 28). {#}Hint: Your playlist can contain as many radio stations as you like, but only the first twenty will be saved to your favorites. You can rearrange them by dragging and dropping to their desired order inside the iTunes playlist.3. On the SoundBridge Home Menu, select Settings, then Memorize Radio Playlist. 4. You will see the following instructions: “Click on a playlist — the first twenty streams will be saved.” Navigate to the playlist you want to save, in our example “RadioFavorites,” and press OK.5. You will receive a confirmation of what Internet radio streams were saved (up to the first 30 characters of the name will be displayed). You can press Exit [], or navigate to your desired audio stream and press Select [4] to play it immediately.](https://usermanual.wiki/Roku/M1001/User-Guide-563493-Page-32.png)
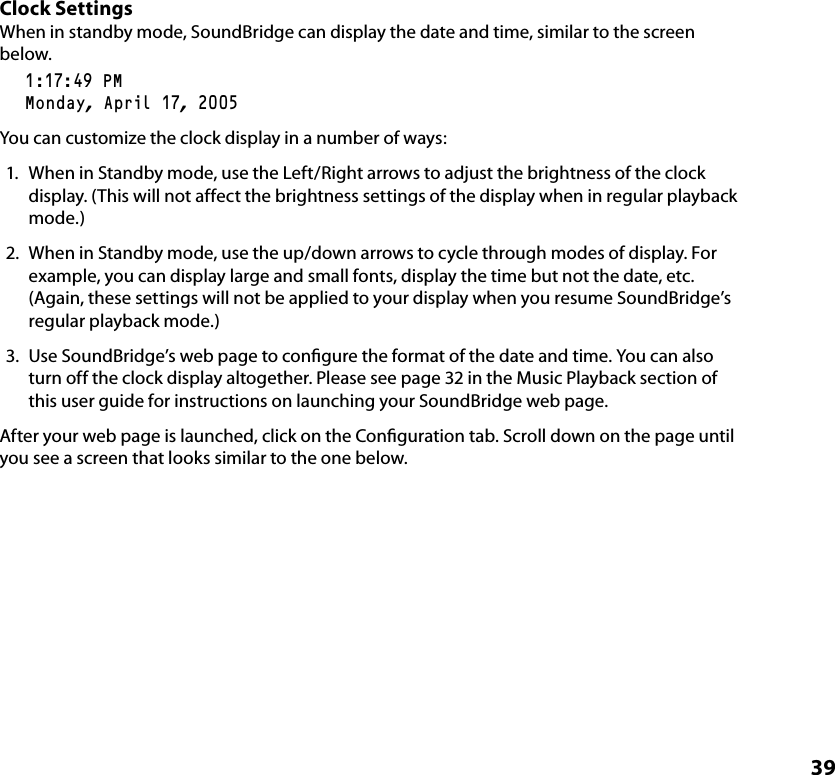
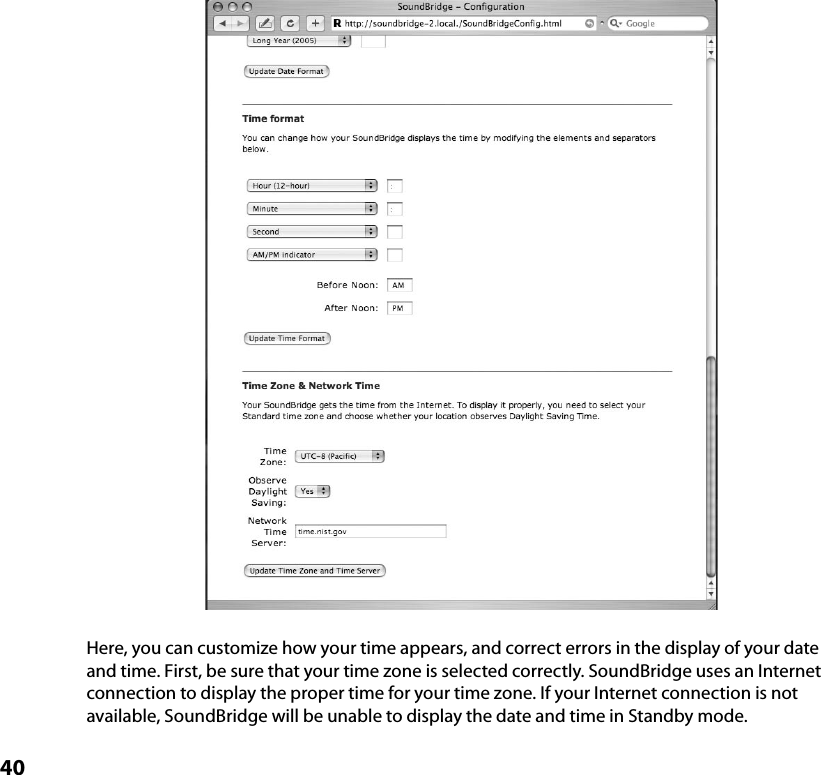
![37When You Are Finished Using SoundBridgeWhen you are finished playing music and using the SoundBridge altogether, just press the Standby [] button on your remote. In Standby mode, SoundBridge can display the date and time or a blank display, depending on your preference. (See page 41 for more information about setting these preferences.)If you were playing Internet radio from your “Favorite Radio Stations” library when you pressed Standby, then pressing Standby again will resume playback of that station. Otherwise it will return you to the music library to which you were most recently connected.If you plan to disconnect the SoundBridge from AC power after you are done using it, be sure to press the Standby button first. This logs you out of the music server software running on your computer.Note: Wait approximately 10 seconds after pressing Standby [] before unplugging SoundBridge; this gives SoundBridge time to flush its settings for a clean reboot.Hint: If you unplug the SoundBridge from AC power five times without pressing Standby [] on your remote first, iTunes may lock you out of connecting to the server. That’s because iTunes allows a maximum of five users to connect at one time, and if you don’t put SoundBridge into standby mode first, iTunes may believe you are still connected. To restore your access to the iTunes server, close iTunes and then restart it. You should then have no trouble connecting to the iTunes server as before.](https://usermanual.wiki/Roku/M1001/User-Guide-563493-Page-39.png)