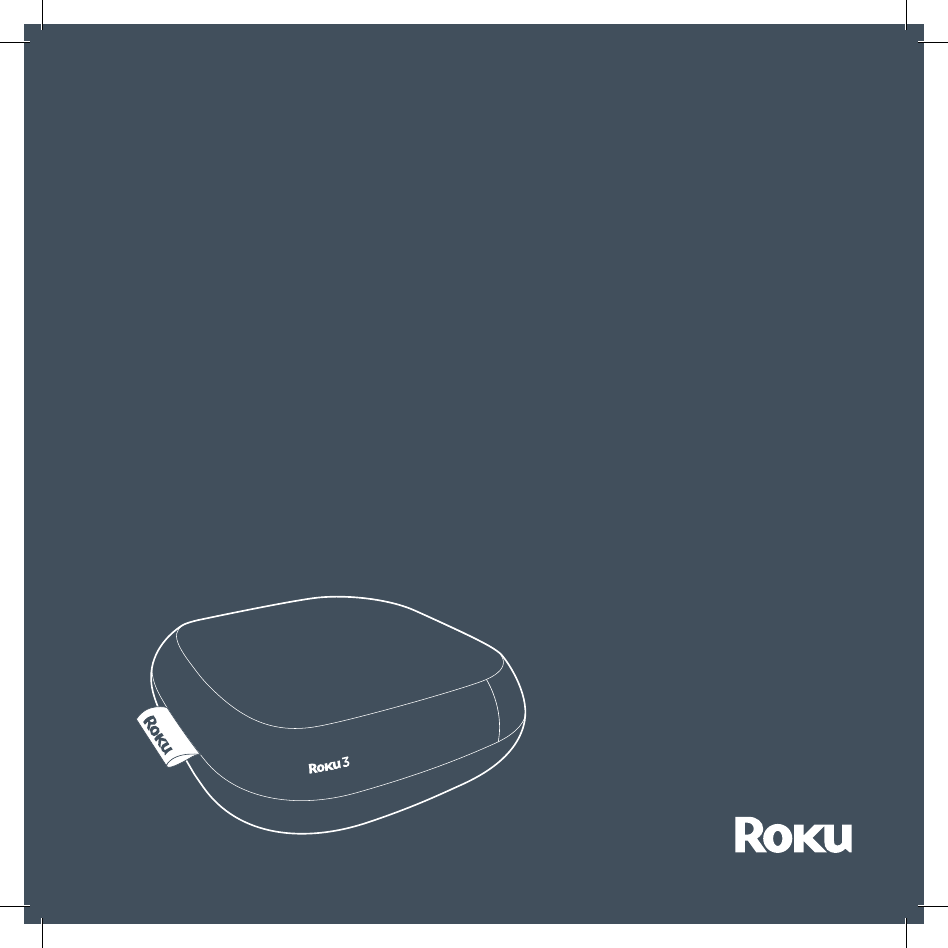
Roku R1004 IP-STB User Manual TempConfidential 4200X
Roku, Inc. IP-STB TempConfidential 4200X
Roku >
TempConfidential_(4200X) user manual
Hi!
Let’s get started.

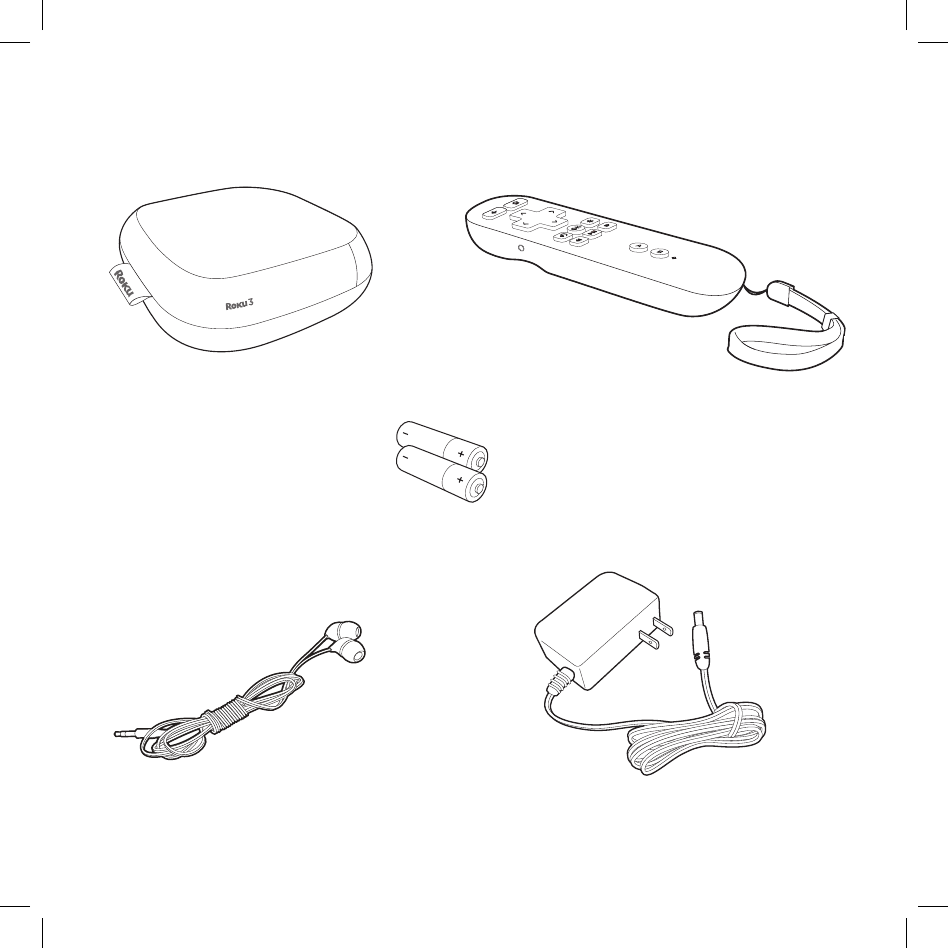
What’s in the box
Roku player
Remote control with
in-ear headphone jack
2 x AA Alkaline
batteries
In-ear headphones Power adapter

D
Get to know your Roku
B
G
F
C
Front view
Back view
A
E

Ethernet port – Connects your Roku player to a wired network with an
Ethernet cable (not included).
HDMI port – Connects your Roku player to an HDTV with an HDMI cable
(not included).
Reset button – Resets your Roku player to its original factory settings
when pressed and held for 10 seconds (a feature you’ll rarely, if ever, use).
Status light – Flashes slowly when the Roku player starts up. Glows when
it’s on. Flashes once with each press of the remote control.
Storage expansion slot – Lets you increase your storage capacity for
Roku channels and games with a microSD card (optional, not included).
Power port – Connects your Roku player to a 120V AC power source with
the included power adapter.
USB port – Plays your home videos, movies, music and photos from
supported USB drives. For supported file types, visit roku.com/usb.
Did you notice? Your Roku player has no on/o switch. It’s simpler that way
and draws very little power—less than a nightlight! Keep it plugged in so that
it can download the latest software updates automatically.
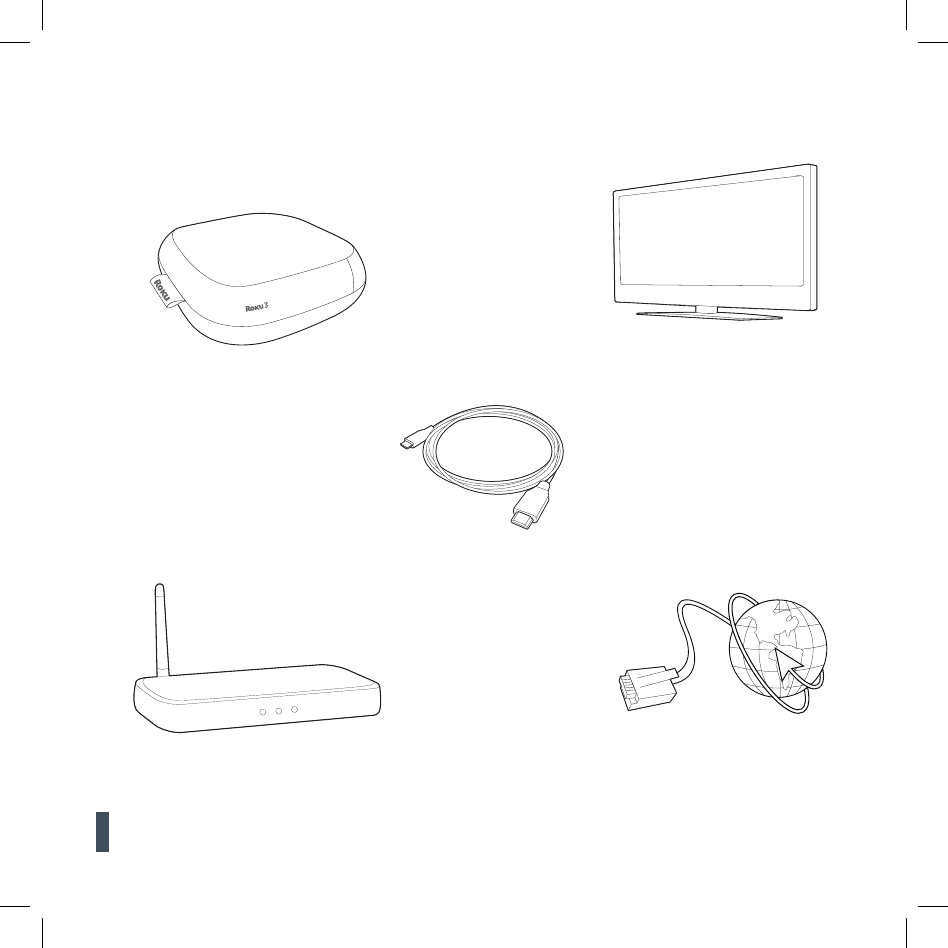
What you need
Roku player
HDTV
High-speed Internet connection
(DSL or cable modem)
Router
HDMI cable
(sold separately)
Pssst! Your router can be wireless (any Wi-Fi) or wired. For wired networks,
you’ll also need an Ethernet cable (not included).
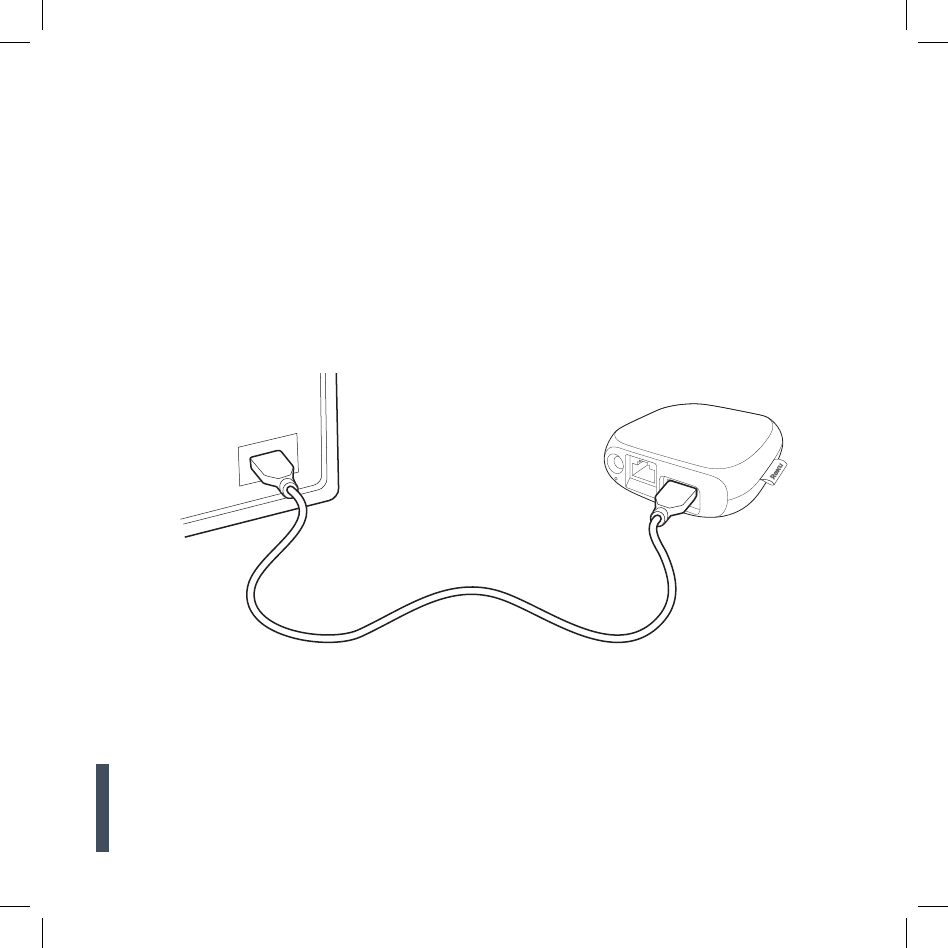
What to do Step 1
Ready for the step-by-step? We’ve only got four…
Connect your player
Use an HDMI cable (not included) to make the connection depicted in the
diagram below:
Did you know? Because HDMI outputs digital video and audio, you don’t
need a separate audio cable. HDMI also supports up to 7.1 surround sound
(where available). Got a receiver? You can also use HDMI to route video and
audio directly through your receiver if it supports HDMI video pass-through.
•Connect one end to the HDMI port on the back of your Roku player.
•Connect the other end to an open HDMI port on your TV.
What to do Step 2
Power up key components
In this step, we’ll make sure all systems are GO!
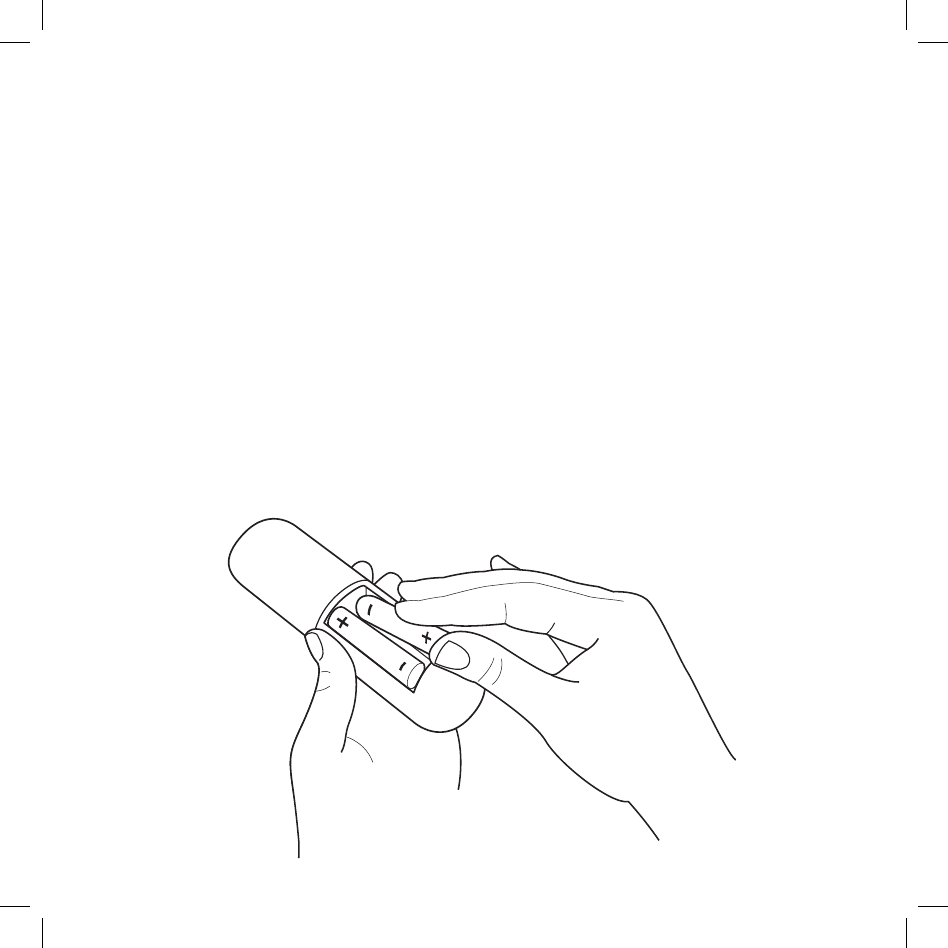
First, power your Roku remote by inserting the included batteries:
•Turn the remote control over and locate the rectangular battery door on the
rear of the unit.
•Press the latch at the top of the battery door down while simultaneously
removing the battery door.
•Insert the batteries into their slots, making sure to match the positive (+) and
negative (-) signs.
•Place the battery door back over the compartment and press it gently down
until the latch snaps securely into place.
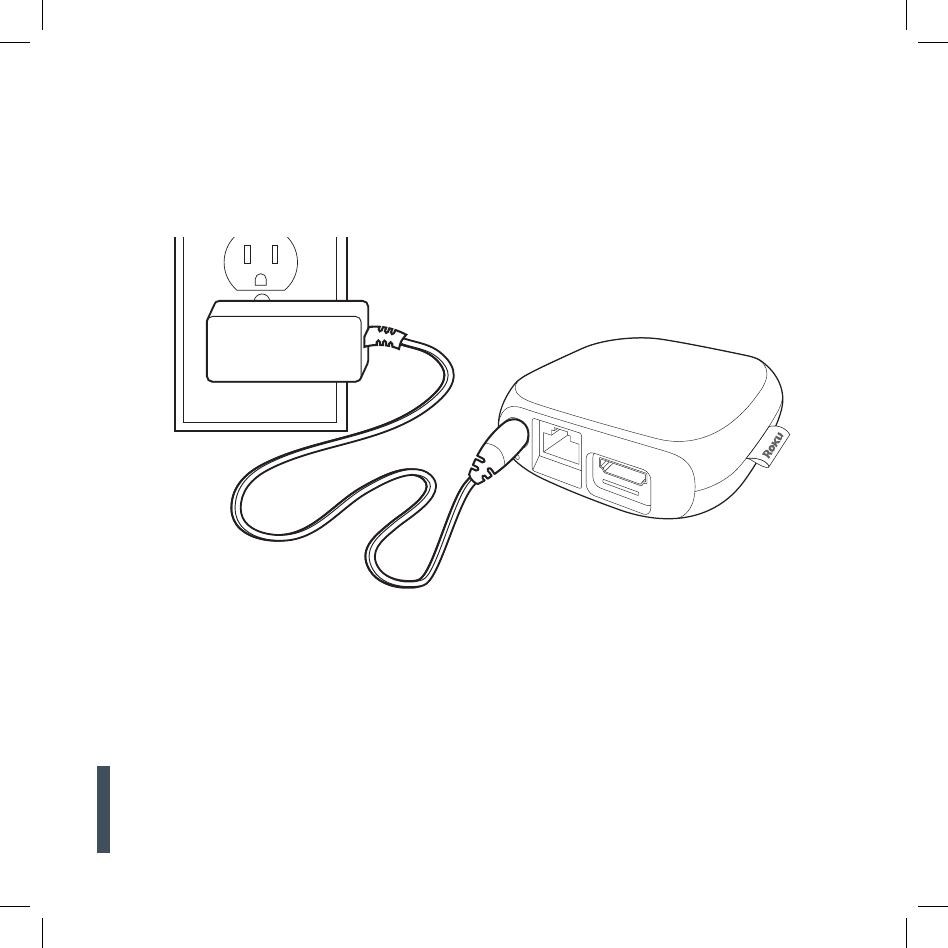
What to do Step 2 (continued)
Next, power on your Roku player by connecting it to a wall outlet using the
included power adapter, like this:
Finally, power on your TV and look for a Roku message to fill the screen.
Blank screen? If your TV does not display a Roku screen, make sure your TV
input matches the physical connection used to connect your Roku player. Press
the Input button (sometimes called Source) on your TV or TV remote to cycle
through the various video inputs available until you see a Roku screen.
What to do Step 3
Configure your network
Step 3 establishes your network connection and brings out your inner geek. You
can do it! Just choose either wireless or wired and read on for instructions:
Wireless: If you use a wireless network, you can grab that Roku remote and jump
right into Guided Setup. When prompted, select “Wireless” as your network
connection and have your network name and password ready. Then:
•Select your network from the list of available networks.
•Enter your network password, if you use one. Remember, network passwords
are case sensitive.
Dos and don’ts on where to place your Roku player:
•DO place your player within range of your wireless network.
•DON’T place your player in an enclosed cabinet; it may interfere with
the wireless signal.
•DON’T place your player beneath anything; it may cause the player to
overheat. Eeeeks.
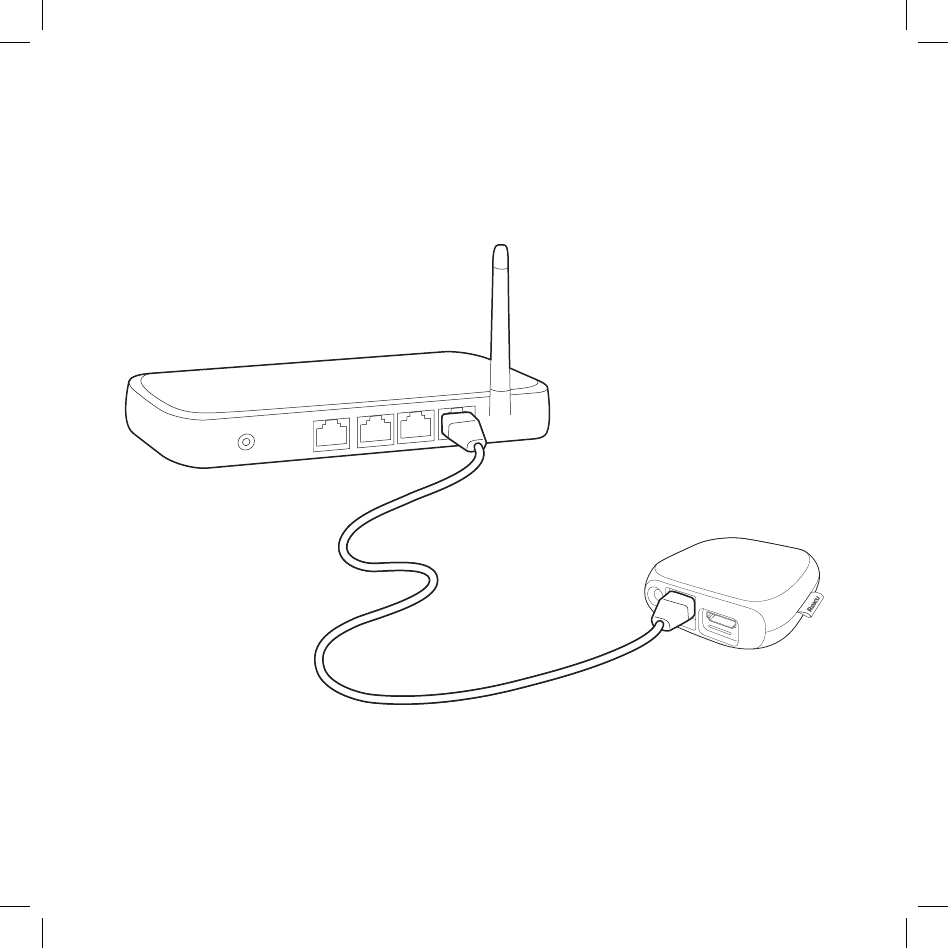
What to do Step 3 (continued)
Wired: If you use a wired network, this step is a snap. Simply make the two
connections depicted in the diagram below, and then use your Roku remote to
select “Wired” from the on-screen network options.
•Connect one end to the Ethernet port on the back of your Roku player.
•Connect the other end to an open Ethernet port on your router.

What to do Step 4
Complete Guided Setup
It’s the final stretch and hooray—it’s a breeze! Continue following the on-screen
instructions and you’ll:
•Get the latest software.
•Select the video output resolution.
•Link the Roku player to your Roku account on your computer.
And setup is done...congratulations! Continue using that Roku remote, which you
can learn more about on the following pages, to personalize your channel line-up,
stream movies or play games. The fun part has just begun, we promise.
Your Roku account: During Guided Setup, you’ll be prompted to create
your Roku account online at roku.com/link. Your Roku player will generate
a unique code that links your player to your new account. Roku accounts
are free and secure. And while a valid credit card number is required to
create your account, rest assured you will only be charged if you authorize
purchases of apps and games from the Roku Channel Store.

Get to know your remote!
First a couple of fun-facts about your Roku enhanced remote.
•It can hush your TV. When you plug headphones into the headphone jack, the
TV is automatically muted. Use the Volume UP and DOWN buttons on the side
of your remote to control the volume of your headphones to your liking.
•It’s sensitive and smart. The Roku 3 remote incorporates motion-sensing
technology, allowing more precise and detailed control of gameplay.
•It comes with an adjustable wrist strap—for good reason. Since some games
make you sweat, sporting the wrist strap is a very good idea. You don’t
want to crack the screen of your beautiful TV—or harm anyone or anything
around you.
Buckle up: Open the lever on the strap lock and place your hand through the
wrist strap. Hold the remote firmly in your hand. Slide the strap lock up so that
the strap will not fall o your wrist. Do not over-tighten the strap lock so that
it’s uncomfortable. It should just be tight enough to hold the wrist strap in place.
Close the lever to hold the strap lock in place.
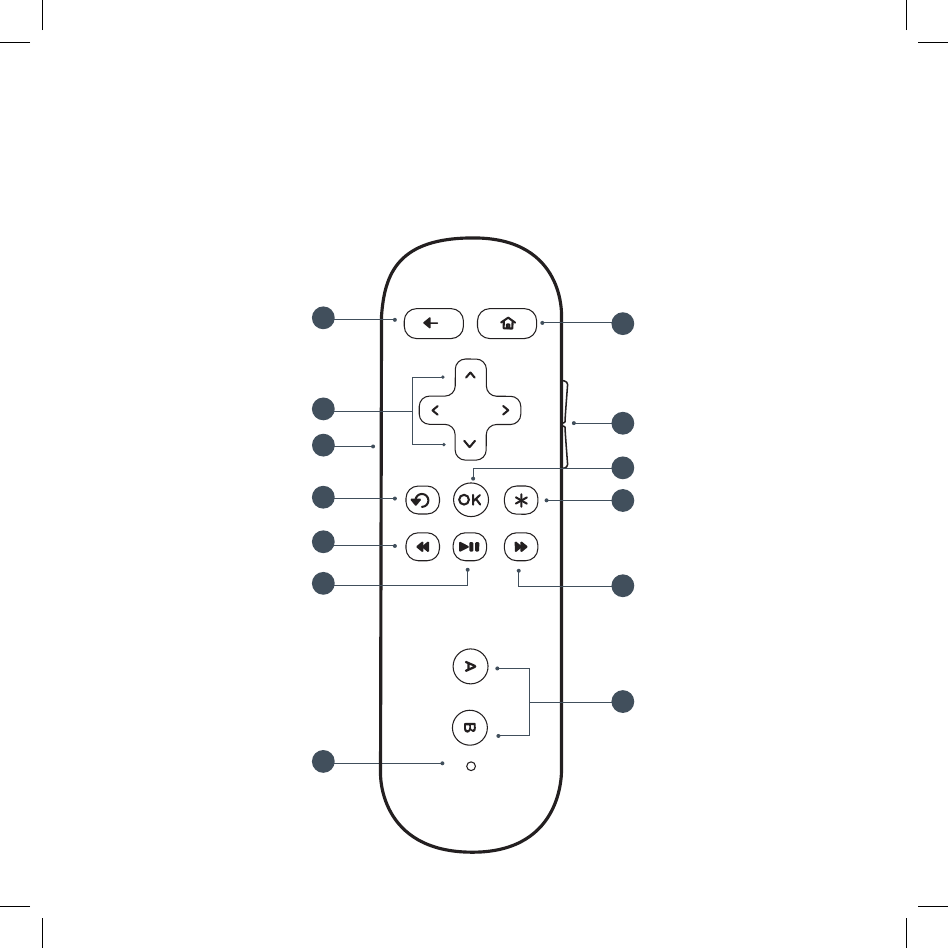
The Roku remote should feel right at home in your hand. We designed it to be
incredibly intuitive for watching TV and great for gaming, too! Plus, this one
includes a headphone jack for the included in-ear headphones!
M
A
J
C
F
D
I
B
L
H
E
G
K
Get to know your remote! (continued)

Cool: Because your enhanced remote uses radio frequency instead of
infrared, you don’t need to have a direct line of sight to your Roku player!
[STATUS LED] Displays remote usage information
[BACK] Return to previous screen
[HOME] Return to Roku home screen
[IN-EAR HEADPHONES JACK] Plug in your in-ear headphones here
[UP] or [DOWN] Move up or down; [LEFT] or [RIGHT] Move left or right
[A & B] Action buttons for gaming
[PLAY/PAUSE] Start or pause playback
[REV SCAN] Rewind, scroll left one page at a time
[OK] Select an option from a menu
[OPTIONS] View more options
[INSTANT REPLAY] Replay last 7 seconds of video
[VOLUME +/-] Increase/Decrease the volume of your headphones
[FWD SCAN] Fast forward, scroll right one page at a time

Get your free Roku app!
Got a smart phone or tablet? With the free Roku app, you can turn your iOS or
Android device into a control center for your Roku streaming player. Launch
channels, use your phone as a remote and find new channels to watch. Plus, you
can even stream music and photos saved on your device right to your TV!
Additional features include:
•Launch or rate any channel with a tap of your finger.
•Use a simple touch and swipe based remote control. Includes instant replay,
back and options buttons.
•Easily browse hundreds of channels in the Roku Channel Store.
•Quickly add and remove channels to/from your Roku player.
•Control and switch between multiple Roku players.
iOS Android

Troubleshooting
Having trouble completing Guided Setup? Don’t worry: It’s usually an easy fix.
If you cannot see a picture on your TV:
•Make sure your TV is turned on. (This tip could save you some embarrassment.)
•Make sure the connectors on the cables between your Roku player and your TV
or home theater receiver are pushed in all the way.
•Make sure the video input on your TV or home theater receiver is set to match
the output (usually HDMI or composite video) used with the Roku player. Most
TVs have an Input button on the remote control to change video inputs.
•Make sure the power cable for the Roku player is connected snugly to the Roku
player on one end and to a working power source on the other end. If the Roku
player is powered, the status light on the front of the unit will be on.
•If you are using HDMI with a home theater receiver, make sure the HDMI
cable from your Roku player is connected to an HDMI-in port on your receiver
and the HDMI cable from an HDMI-out port on your receiver is connected to
your TV.
If you cannot connect to your wireless home network during guided setup:
•If you are not getting 3 or more signal-strength bars above your wireless
network, adjust the location of your Roku player and/or wireless router. (See
tips on DOs and DON’Ts regarding Roku placement in Step 3.)
•Make sure there are no obstructions, like cement walls, between your Roku
player and your wireless router.
•Make sure you select “Wireless” and not “Wired” on the “Network connection
selection” screen.

•Make sure you select the correct wireless router name on the “Choose wireless
network” screen.
•Make sure you input the correct password, if your network is security-enabled
(password is case sensitive).
•If you have turned o SSID broadcasting on your wireless router, you can add
your network by selecting “My network is not shown” from the “Select wireless
network” screen.
If you can’t hear sound:
•Make sure the connectors on the cables between your Roku player and your
TV or home theater receiver are pushed in all the way.
•Make sure the volume on your TV or home theater receiver is turned up and
isn’t on mute.
•If you connected your Roku player to a home theater receiver, make sure you
receiver is turned on.
•Make sure the input on your TV or home theater receiver matches the output
(HDMI or analog audio) used with your Roku player.
If the Roku remote control isn’t functioning:
•Try moving closer to your Roku player.
•Make sure the batteries are working and inserted properly (see Step 2).
•Make sure your remote is paired (see next section) with the Roku player.
•If the status light on the front of your Roku player flashes once each time you
press a remote button, the problem is not with the remote.
Troubleshooting (continued)
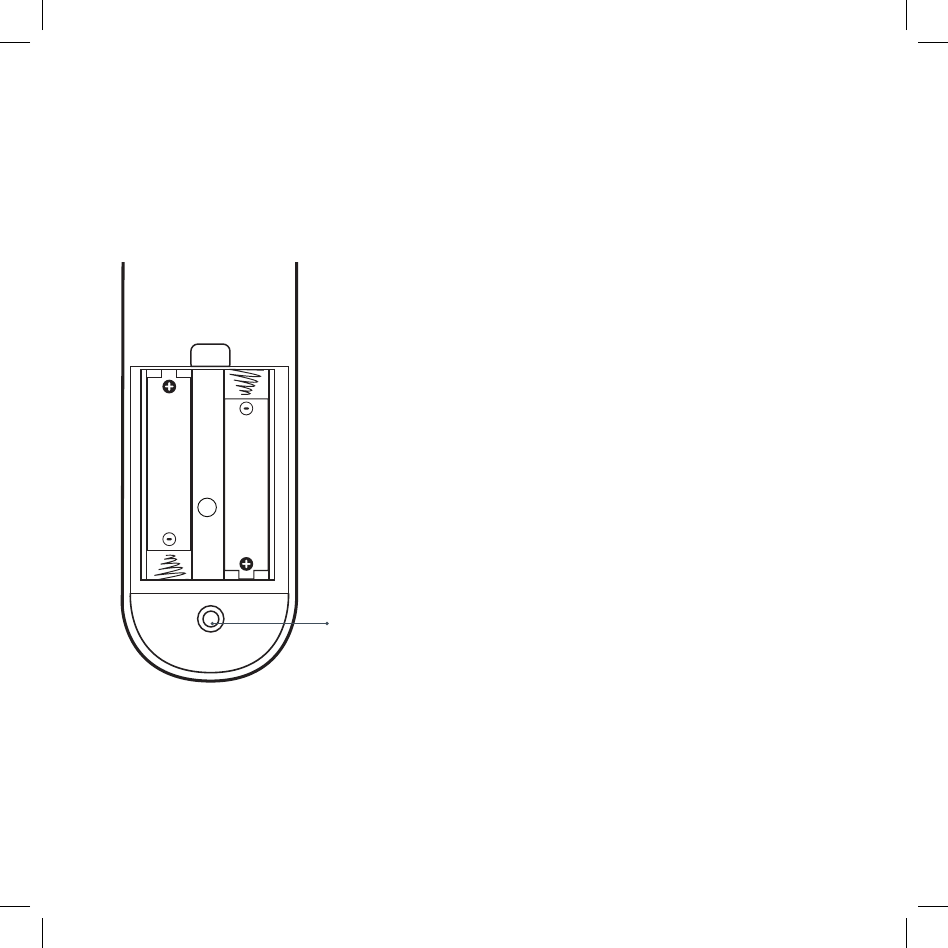
Pairing your remote control:
The Roku remote should automatically pair with your Roku player at the beginning
of Guided Setup. If you are not able to use the remote to navigate through Guided
Setup, you can manually pair the Roku remote by following these steps:
Pairing button
(in battery compartment)
If you couldn’t find what you need:
Visit roku.com/support for more help.
Prepare your Roku player to pair by unplugging the
power adapter and plugging it back in.
Open the Roku remote battery compartment using the
instructions in Step 2.
Place the Roku remote in close proximity with your Roku
player.
Press and hold the pairing button inside the battery
compartment for 3 seconds.
Wait about 10 seconds for the remote LED to stop
flashing.
Try using the Roku remote again.
1
2
3
4
5
6
roku.com/support
Get the most out of your Roku player.
Check out our FAQs, instructional videos and user forums.
© 2009-2012 by Roku, Inc. All rights reserved. Roku and the Roku logo are registered trademarks of Roku, Inc. Other brand and
product names are trademarks or registered trademarks of their respective holders.
Need more help?
©

Roku Player
Important Product Information

The License Agreement
The Roku and third-party software license terms can be found at: www.roku.com/license. Use of the Roku player constitutes
acceptance of as well as agreement to those license terms.
Ninety (90) Day Limited Hardware Warranty
Subject to the additional terms and conditions set forth below, Roku provides this Limited Warranty:
•OnlytothepersonorentitythatoriginallypurchasedthePlayerfromRokuorfromoneofitsauthorizedresellersordistributors;
and
•OnlyforPlayerspurchasedanddeliveredtotheenduserwithintheUnitedStatesandCanada.
Limited Warranty
RokuwarrantstheRokuPlayer(“Player”) hardware against defects in materials and workmanship under normal use for a period of
ninety(90)daysfromthedateofpurchase(“Warranty Period”).IfRokudeterminesthatthePlayer’shardwareisdefective,Roku
willeitherrepairtheunitorreplacetheunitwitheitheraneworrebuiltPlayer,atitsoption.IftheWarrantyPeriodhasexpiredoris
otherwisenotapplicable(seeScope and Limitation on Warrantybelow),wewillreturnthePlayertoyou.Moreinformationabout
this warranty can be found at www.roku.com/support. THE FOREGOING SETS FORTH ROKU’S SOLE OBLIGATION AND YOUR
EXCLUSIVEREMEDYINTHEEVENTOFANYBREACHOFTHISLIMITEDWARRANTY.
Return and Warranty Service Process
Pleaseaccessandreviewtheonlinehelpresourcesatwww.roku.com/supportbeforeseekingwarrantyservice.Toreturnorobtain
warrantyserviceforaPlayer,youmustrstobtainaReturnMerchandiseAuthorization(RMA)numberfromaCustomerSupport
Representative (CSR) at Roku. Customer Support contact information can be found by visiting www.roku.com/support. RMA
numbersexpirethirtydaysfromissuance.Rokumayattempttotroubleshootawarranty-relatedproblempriortoissuinga RMA
number.Pleasebepreparedtoprovideadditionalinformationuponrequest.OnceaRMAnumberisobtained,youmustshipyour
Player,freightprepaid,togetherwithproofofpurchaseandallaccessories,ineithertheoriginalpackagingorpackagingaordingan
equaldegreeofprotection,totheRokuauthorizeddistributionfacilityidentiedbytheCSR.Failuretoreturnanyoftheaccessories
could result in a delay and/or result in an invoice to you or credit to Roku for the missing accessories.
Important:Whenemailingfora RMAnumber,please provide thefollowinginformationwithyourrequest:(a)modelnumber, (b)
serialnumber,(c)problemdescription,(d)softwareversion(locatedintheSystemCongurationmenu),(e)dateofpurchase,(f)
placeofpurchase(reselleroronlineplaceofpurchase),and(g)returnshippingaddress(P.O.boxesarenotaccepted).
Scope of and Limitation on Warranty
ThewarrantyonthePlayerislimitedtotherepairorreplacementofdefectiveunitsasdescribedintheLimited Warranty section above.
This warranty does not cover customer training or education, installation, set up adjustments, or signal reception problems. This warranty
alsodoesnotcoveranyissuerelatedtotheserviceprovidedbyyourServiceProvider,includingbutnotlimitedtoservicedisruption,
changesinserviceterms,changesinoerings,changesinformat,ortechnicalproblems.Thiswarrantydoesnotcoverdamagedueto
actsofGod,accident,misuse,abuse,negligence,commercialuseormodicationof,ortoanypartof,yourPlayer.Thiswarrantydoes
not cover damage due to improper operation or maintenance, connection to improper voltage supply or attempted repair by anyone
otherthanafacilityauthorizedbyRokutoserviceyourPlayer.Thiswarrantydoesnotcoverconsumables(suchasfusesandbatteries).

Legal Notices
Federal Communication Commission Interference Statement
ThisequipmenthasbeentestedandfoundtocomplywiththelimitsforaClassBdigitaldevice,pursuanttoPart15oftheFCCRules.
Theselimitsaredesignedtoprovidereasonableprotectionagainstharmfulinterferenceinaresidentialinstallation.Thisequipment
generates,usesandcanradiateradiofrequencyenergyand,ifnotinstalledandusedinaccordancewiththeinstructions,may
cause harmful interference to radio communications. However, there is no guarantee that interference will not occur in a particular
installation.Ifthisequipmentdoescauseharmfulinterferencetoradioortelevisionreception,whichcanbedeterminedbyturning
theequipmentoandon,theuserisencouragedtotrytocorrecttheinterferencebyoneofthefollowingmeasures:
•Reorientorrelocatethereceivingantenna.
•Increasetheseparationbetweentheequipmentandreceiver.
•Connecttheequipmentintoanoutletonacircuitdierentfromthattowhichthereceiverisconnected.
•Consultthedealeroranexperiencedradio/TVtechnicianforhelp.
ThisdevicecomplieswithPart15oftheFCCRules.Operationissubjecttothefollowingtwoconditions:(1)Thisdevicemaynot
cause harmful interference, and (2) this device must accept any interference received, including interference that may cause
undesired operation.
FCCCaution:Anychangesormodicationsnotexpresslyapprovedbythepartyresponsibleforcompliancecouldvoidtheuser’s
authoritytooperatethisequipment.
IEEE802.11bor802.11goperationofthisproductintheU.S.A.isrmware-limitedtochannels1through11.
Wireless Radio Use:
Thisdeviceisrestrictedtoindoorusewhenoperatinginthe5.15to5.25GHzfrequencyband.
IMPORTANT NOTE:
FCC Radiation Exposure Statement:
ThisequipmentcomplieswithFCCradiationexposurelimitssetforthforanuncontrolledenvironment.Thisequipmentshouldbe
installedandoperatedwithminimumdistance20cmbetweentheradiatorandyourbody.
This transmitter must not be co-located or operating in conjunction with any other antenna or transmitter.
Note to US model owner:
To comply with US FCC regulation, the country selection function has been completely removed from all US models.
Theavailabilityofsomespecicchannelsand/oroperationalfrequencybandsarecountrydependentandarermwareprogrammed
atthefactorytomatchtheintendeddestination.Thermwaresettingisnotaccessiblebytheenduser.
Industry Canada statement
ThisdevicecomplieswithRSS-210oftheIndustryCanadaRules.Operationissubjecttothefollowingtwoconditions:(1)thisdevice
maynotcauseharmfulinterference,and(2)thisdevicemustacceptanyinterferencereceived,includinginterferencethatmaycause
undesired operation.
French translation:
CedispositifestconformeàlanormeCNR-210d’IndustrieCanadaapplicableauxappareilsradioexemptsdelicence.Son
fonctionnementestsujetauxdeuxconditionssuivantes:(1)ledispositifnedoitpasproduiredebrouillagepréjudiciable,et(2)ce
dispositifdoitacceptertoutbrouillagereçu,ycomprisunbrouillagesusceptibledeprovoquerunfonctionnementindésirable.

Safety Precautions
This product has been designed with the highest concern for safety. However, any electrical device, if used improperly, has the
potentialforcausingre,electricalshockorpersonalinjury.Tohelpensureaccident-freeoperation,followtheseguidelines:
•Observeallwarnings,precautionsandinstructions.
•RegularlyinspecttheACpoweradapterfordamage.
•Stopuse,unplugtheACpoweradapterfromtheelectricaloutletanddisconnectanyothercablesimmediatelyifthePlayer
functions in an abnormal manner, produces unusual sounds or smells or becomes too hot to touch.
•Formoreinformationonproductsafetyandtroubleshooting,pleasegotowww.roku.com/support.
CAUTION:
Riskofexplosionifbatteryisreplacedbyanincorrecttype.Disposeofusedbatteriesaccordingtotheinstructions
Use and Handling
•Whenplayingvideogames,useinawell-litareaandstandorsitasfarawayfromthetelevisionscreenaspossible.
•Takea10-15minutebreakeveryhourifplayingvideogamesandavoidprolongeduseoftheremote.
•StopusingthePlayerimmediatelyifyoubegintofeeltiredorifyouexperiencediscomfortorpaininyourhands
orarmswhileoperatingthewirelessremote;iftheconditionpersists,consultadoctor.
•Ifyouexperienceanyofthefollowinghealthproblems,discontinueuseofthePlayerimmediately:
—Dizziness,nausea,fatigueorsymptomssimilartomotionsickness.
—Discomfortorpaininapartofthebody,suchaseyes,ears,hands,orarms.
If symptoms persist, consult your physician.
•KeepthePlayerandaccessories,includingcabletiesandfasteners,outofthereachofsmallchildren.
•DonottouchthePlayerorconnectedcablesduringanelectricalstorm.
•Donotallowliquid,smallparticlesorotherforeignobjectstogetintothePlayeroraccessories.
•DonotexposethePlayertosmokeorsteam.
•DonotexposethePlayeroraccessoriestohigh,temperatures,highhumidityordirectsunlight.
•DonotplacethePlayerortheremoteontheoororinaplacewheretheymaycausesomeonetotriporstumble.
www.roku.com
Copyright © 2012 Roku, Inc. All rights reserved. Roku and the
Roku logo are trademarks or registered trademarks of Roku, Inc. 4100000036-003