Roku R1008 IP-STB User Manual TempConfidential 3500X 2014 3 10
Roku, Inc. IP-STB TempConfidential 3500X 2014 3 10
Roku >
TempConfidential_(3500X) User Manual 2014.3.10
1
Hi! Let’s get started.
Streaming Stick
2
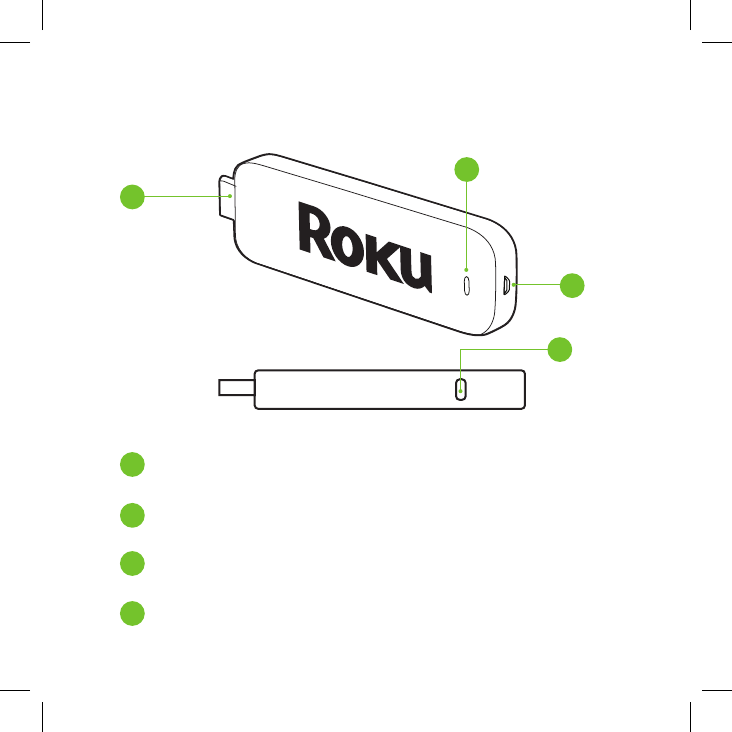
Know your Streaming Stick
[HDMI CONNECTOR] Plugs into the
HDMI port on the back of your TV
[STATUS LIGHT] Indicates it is on when
lit, or activity when flashing
[RESET BUTTON] Used to reset your Streaming
Stick (you probably won’t ever have to use this)
[POWER INPUT] Used to power
your Roku Streaming Stick
1
1
3
2
3
4
2
4
3
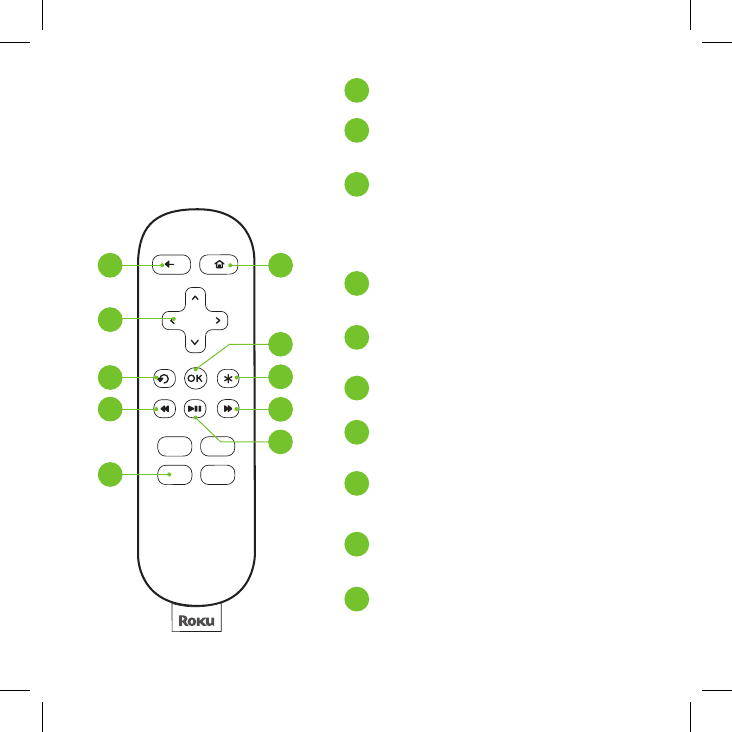
Know your
Roku remote
B
A
F
H
E
G
C
J
D
I
[BACK] Return to previous screen
[HOME] Return to
Roku home screen
[UP] or [DOWN]
Move up or down
[LEFT] or [RIGHT]
Move left or right
[OK] Select an option
from a menu
[INSTANT REPLAY] Replay
last 7 seconds of video
[OPTIONS] View more options
[REV SCAN] Rewind, scroll
left one page at a time
[FWD SCAN] Fast forward,
scroll right one page at a time
[PLAY/PAUSE] Start
or pause playback
[CHANNEL SHORTCUT] Instant
access to favorite channels
A
B
D
C
F
E
G
H
I
J
4
Get Started!
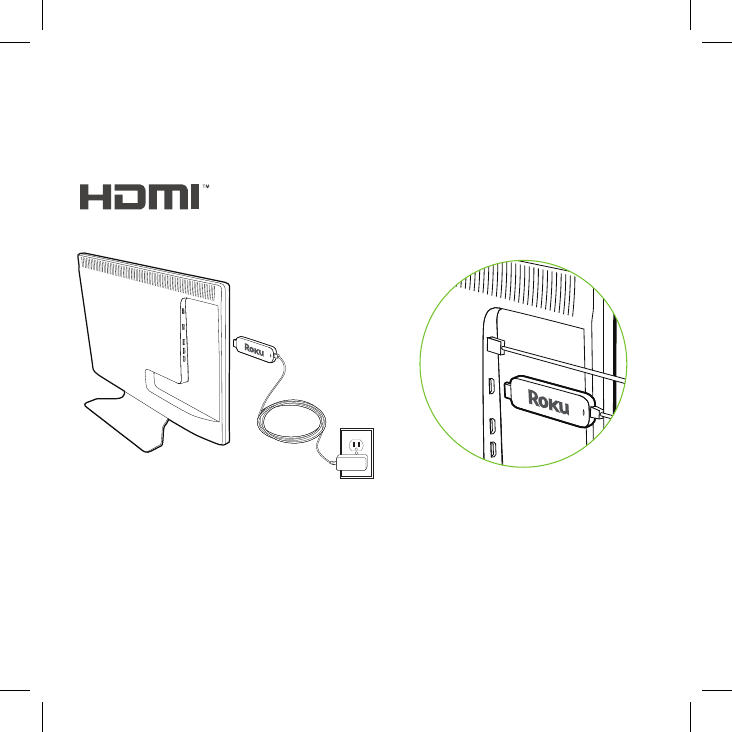
Step 1: Plug it in.
Plug the Streaming Stick into an HDMI port on your TV.
USB
HDMI
Power your Streaming Stick:
Connect the micro-USB cable
(included) between the Stick
and the included power adapter
extension. Plug the power
adapter into an A/C power outlet
for instant-on connectivity.
HIGH-DEFINITION MULTIMEDIA INTERFACE
Or: If your TV has a powered
USB port, you can also plug the
micro-USB cable directly into
the port from the Stick. Note:
Some USB ports do not provide
sucient continuous power.
5
Now turn on the TV. Look for a Roku logo to fill the screen.
Blank screen? Make sure your TV input matches the physical
connection used to connect your Roku player. Press the Input button
(also called Source) on your TV or TV remote to cycle through
the various video inputs available until you see a Roku screen.
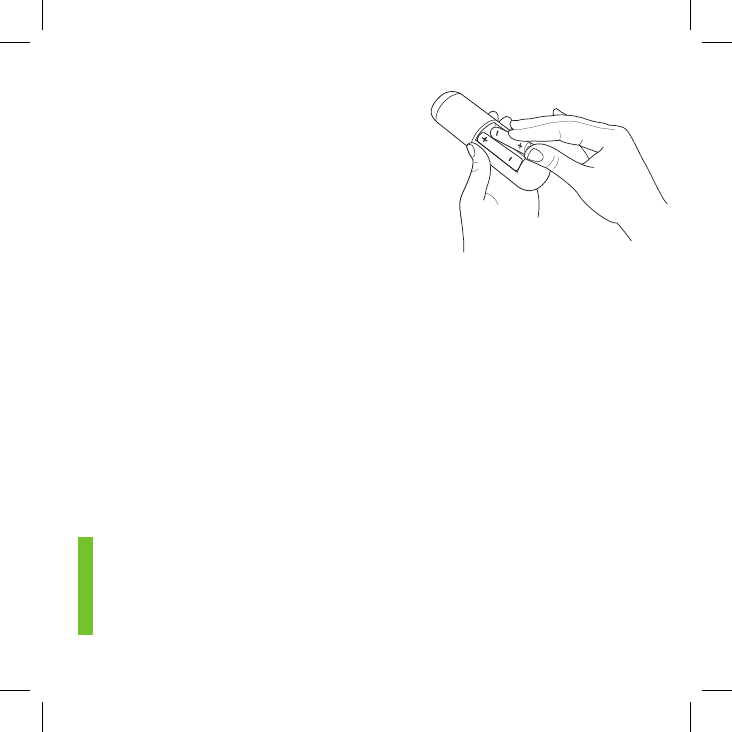
Step 2: Power on your remote.
Power your Roku remote by
inserting the included batteries:
• Locate the battery door on the back of the remote
• Press the battery door latch down to remove the battery door
• Insert each battery negative (-) side first
• Replace the battery door and press gently to secure into place
• Your remote should automatically pair with your Streaming Stick

6
Step 3: Connect to wireless network.
The Roku Streaming Stick will automatically detect wireless
networks in your area. Using your Roku remote:
• Select your network from the list of available networks
• Enter your network password, if you use one.
Remember, network passwords are case sensitive
Step 4: Connect to Roku.
Continue to follow the on-screen instructions and you’ll:
• Get the latest software
• Link the Roku Streaming Stick to your Roku
account from your web browser
And setup is done...congratulations!
Your Roku account You’ll be prompted to create your
Roku account online at Roku.com/link. Your Roku
player will generate a unique code that links your player
to a new or existing account. Roku accounts are free
and secure. And while a valid credit card number is required to
create your account, rest assured you will only be charged if you
authorize purchases of apps from the Roku Channel Store.
7
Got a smartphone or tablet? With the free Roku app,
you can turn your iOS® or Android™ device into a
control center for your Roku Streaming Stick.
Explore your new
Roku Streaming Stick
Feel free to explore the Roku
Channel Store right from the
home screen to see all the
entertainment Roku has to
oer. Or check out www.roku.
com/now-playing to add and
learn about new channels.
iOS® Android™
Features include:
• Browse, add and launch channels
in the Roku Channel Store
• Control your Roku Streaming
Stick from your phone or
tablet. Includes all the play/
pause, forward/back, instant
replay and options buttons
• Play personal videos,
photos and music locally
stored on your smartphone
or tablet with the Play
on Roku feature (video
applies to iOS and select
Android devices only)
Get the Mobile App

8
www.roku.com/setup
Get the most out of your
Roku Streaming Stick.
Check out our FAQs,
instructional videos
and user forums.
Copyright © 2014 by Roku, Inc. All
rights reserved. Roku®, Streaming
Stick™, and the Roku logo are owned
by Roku, Inc. Other brand and
product names are the trademarks
or registered trademarks of their
respective owners.
Need more help?
FCC statement
·This device complies with part 15 of the FCC Rules. Operation is subject to the
following two conditions: (1) This device may not cause harmful interference, and
(2) this device must accept any interference received, including interference that
may cause undesired operation.
·This equipment has been tested and found to comply with the limits for a Class
B digital device, pursuant to part 15 of the FCC Rules.
·These limits are designed to provide reasonable protection against harmful
interference in a residential installation. This equipment generates, uses and can
radiate radio frequency energy and, if not installed and used in accordance with
the instructions, may cause harmful interference to radio communications.
However, there is no guarantee that interference will not occur in a particular
installation.
·If this equipment does cause harmful interference to radio or television
reception, which can be determined by turning the equipment off and on, the
user is encouraged to try to correct the interference by one or more of the
following measures:
—Reorient or relocate the receiving antenna.
—Increase the separation between the equipment and receiver.
—Connect the equipment into an outlet on a circuit different from that to which
the receiver is connected.
—Consult the dealer or an experienced radio/TV technician for help.
RF exposure warning
· This equipment must be installed and operated in accordance with provided
instructions and the antenna(s) used for this transmitter must be installed to
provide a separation distance of at least 20 cm from all persons and must not be
co-located or operating in conjunction with any other antenna or transmitter.
End-users and installers must be provided with antenna installation instructions
and transmitter operating conditions for satisfying RF exposure compliance.
Certification information (SAR)
This device is also designed to meet the requirements for exposure to radio
waves established by the Federal Communications Commission (USA).
The SAR limit adopted by the USA is 1.6 W/kg averaged over one gram of tissue.
The highest SAR value reported to the FCC for this device type complies with this
limit.
NOTE: THE GRANTEE IS NOT RESPONSIBLE FOR ANY CHANGES OR
MODIFICATIONS NOT EXPRESSLY APPROVED BY THE PARTY RESPONSIBLE FOR
COMPLIANCE. SUCH MODIFICATIONS COULD VOID THE USER’S AUTHORITY
TO OPERATE THE EQUIPMENT.
Statement
·This device PA02 doesn’t support the function to modify the country code, and
the channel 12 and 13 are closed in the device PA02.
·This device is for indoor use only when it is operated at 5.15 to 5.25GHz
frequency range.
IC Radiation Exposure Statement for Canada
·This device complies with Industry Canada licence-exempt RSS standard(s).
Operation is subject to the following two conditions: (1) this device may not
cause interference, and (2) this device must accept any interference, including
interference that may cause undesired operation of the device.
Le présent appareil est conforme aux CNR d'Industrie Canada applicables aux
appareils radio exempts de licence. L'exploitation est autorisée aux deux
conditions suivantes : (1) l'appareil ne doit pas produire de brouillage, et (2)
l'utilisateur de l'appareil doit accepter tout brouillage radioélectrique subi, même
si le brouillage est susceptible d'en compromettre le fonctionnement.
·This device complies with Industry Canada licence-exempt RSS standard(s).
Le présent appareil est conforme aux CNR d'Industrie Canada applicables aux
appareils radio exempts de licence.