Roland Fantom G6 Users Manual G_q_e
Roland Corporation Fantom-G7 Quick Start fantom-g_qs Roland Corporation - Fantom-G7 - Quick Start
fantomg8 2af3f5a5-3967-4daf-90a6-936bc29ad465 Roland Musical Instrument Fantom G8 User Guide |
Roland Corporation Fantom-G7 Quick Start fantom-g_qs Roland Corporation - Fantom-G7 - Quick Start
Roland Corporation Fantom-G6 Quick Start fantom-g_qs Roland Corporation - Fantom-G6 - Quick Start
Roland Corporation Fantom-G8 Quick Start fantom-g_qs Roland Corporation - Fantom-G8 - Quick Start
2015-02-02
: Roland Roland-Fantom-G6-Users-Manual-444122 roland-fantom-g6-users-manual-444122 roland pdf
Open the PDF directly: View PDF ![]() .
.
Page Count: 48
- Contents
- Using the Fantom-G Live
- The Basics of Using the Fantom-G Live
- Performing on the Keyboard
- Performing on the Pads
- Creating a Song
- What is the Sequencer?
- Getting Your Equipment Together
- Work Flow for Creating a Song
- Preparations for Song Production
- Realtime-recording the Rhythm Using MIDI
- Realtime-recording the Bass and Piano as MIDI
- Importing Audio Files from Your Computer
- Recording Sound from a Mic or Guitar
- Using Song Edit to Arrange Samples or Phrases
- Adjusting the Overall Balance
- Mastering
- Saving Your Song
- Making a CD from Your Completed Song
04905089 08-02-1N
*04905089- 01*

3
Contents
Using the Fantom-G Live ....................... 5
The Basics of Using the Fantom-G Live.........................................................................6
Performing on the Keyboard.....................................................9
Selecting and Playing a Single Sound (Patch).............................................................10
Playing Two or More Sounds Simultaneously (Layer/Split) ...........................................11
Creating a Set of Sounds for a Live Performance ........................................................14
Performing on the Pads ..........................................................15
Pad Basics .............................................................................................................16
Using the Pads to Play Rhythm Sounds.......................................................................17
Using the Pads to Play Sampled Sounds ....................................................................19
Using the Pads to Play Sequenced Phrases (RPS).........................................................21
Creating a Song................................ 23
What is the Sequencer?...........................................................................................24
Getting Your Equipment Together .............................................................................26
Work Flow for Creating a Song ...............................................................................27
Preparations for Song Production..............................................................................28
Realtime-recording the Rhythm Using MIDI .................................................................31
Realtime-recording the Bass and Piano as MIDI ..........................................................35
Importing Audio Files from Your Computer.................................................................36
Recording Sound from a Mic or Guitar......................................................................38
Using Song Edit to Arrange Samples or Phrases .........................................................41
Adjusting the Overall Balance ..................................................................................42
Mastering ..............................................................................................................43
Saving Your Song...................................................................................................44
Making a CD from Your Completed Song..................................................................45
Fantom-G_q_e.book 3 ページ 2008年2月4日 月曜日 午後2時26分
4
This Quick Guide applies to the Fantom-G6, the Fantom-G7 and the Fantom-G8. The manual uses the term
“Fantom-G” to indicate all these three models.
The explanations in this manual include illustrations that depict what should typically be shown by the display.
Note, however, that your unit may incorporate a newer, enhanced version of the system (e.g., includes newer
sounds), so what you actually see in the display may not always match what appears in the manual.
In the interest of product improvement, the specifications and/or appearance of this unit are subject to change
without prior notice.
Copyright © 2008 ROLAND CORPORATION
All rights reserved. No part of this publication may be reproduced in any form without the
written permission of ROLAND CORPORATION.
Fantom-G_q_e.book 4 ページ 2008年2月4日 月曜日 午後2時26分
Using the Fantom-G Live
Fantom-G_q_e.book 5 ページ 2008年2月4日 月曜日 午後2時26分
6
The Basics of Using the Fantom-G Live
A
patch
is a basic sound on the Fantom-G; it corresponds to an individual instrument such as a piano,
organ, or guitar.
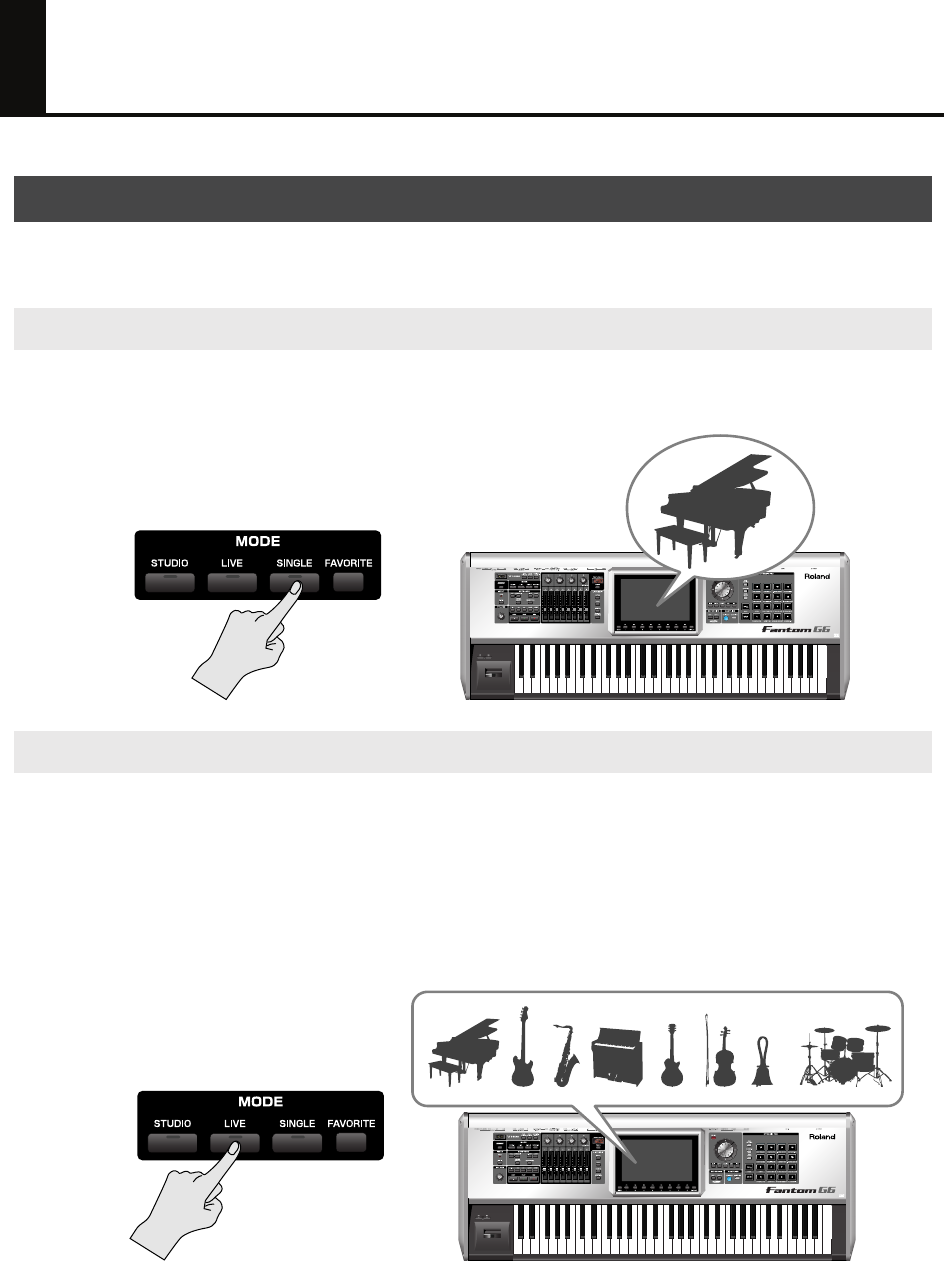
When you play the Fantom-G for the first time, we recommend that you use it in
Single mode
. This is the
simplest and most basic mode in which the Fantom-G can be used, such as playing it as a piano or organ.
fig.0-00a
Live mode lets you play up to eight patches simultaneously. Broadly speaking, there are two ways to use
Live mode
.
One way is for multiple sounds to be heard simultaneously when you press a key. This type of setup is
called a
Layer
.
➝
“Playing Two or More Sounds Simultaneously (Layer/Split)”
(p. 11 of this manual).
The other way is to place different sounds in the left and right areas of the keyboard, allowing you to play
separate instruments with your left and right hand. This type of setup is called a
Split
.
fig.0-00b
What is a Patch?
What is Single Mode?
What is Live Mode?
Fantom-G_q_e.book 6 ページ 2008年2月4日 月曜日 午後2時26分
7
The Basics of Using the Fantom-G Live
Studio mode
is what you’ll use to create songs. It provides sixteen parts, and you can assign a patch to
each part to handle sixteen different sounds simultaneously.
You can use the mixer screen to mix your song by adjusting the level and pan settings etc. for each of the
sixteen parts.
The advantage of Studio mode is that it provides sixteen parts, but you should be aware that the sound of
the effects may be interrupted when you switch sounds. The sound will not be interrupted in this way if
you’re using Single mode or Live mode,
so Single mode or Live mode are the best choices for
live performance
.
fig.0-00b
What is Studio Mode?
Fantom-G_q_e.book 7 ページ 2008年2月4日 月曜日 午後2時26分
8
The Basics of Using the Fantom-G Live
When you’ve created an original patch, you need to save it as a user patch if you want to use it again later.
This action is called “Writing.” The procedure for writing your original patch into memory is shown below.
If you select a different patch before writing your original patch, the changes you
made will be lost.
* User patches have the indication “USER” before their name; e.g., “USER 001: INITIAL PATCH.” User
patches are for storing your own original sounds.
* The writing procedure for a Live Set or Studio Set is the same.
fig.0-000c_e.eps
Saving the settings you’ve made
Specify the writing-destination.
Assign a name for your patch
(or live set or studio set).
The WRITE MENU screen appears.
Fantom-G_q_e.book 8 ページ 2008年2月4日 月曜日 午後2時26分
Performing on the Keyboard
Fantom-G_q_e.book 9 ページ 2008年2月4日 月曜日 午後2時26分
10
Selecting and Playing a Single Sound (Patch)
Here’s how to view a single category of sounds (such as only the piano patches or only the organ patches),
and select one of them.
1. Press the [SINGLE] button.
fig.0-01
2. Press [F1 (Patch List)] to access the Patch List screen.
fig.0-03
3. Use [F1] [F2] to select a category (of sounds such as piano, organ, or bass), and then use
the VALUE dial or [DEC] [INC] to select a patch. When you’ve selected a patch, press [F8
(Select)] to confirm your choice.
fig.0-04
If you press [F7 (Preview)], you’ll hear the selected sound played using a phrase suitable for
the type (category) of patch (Phrase Preview).
You can also use the front panel [Knob 4] to select a category, and use [Slider 8] to scroll the
list.
You can also play rhythm sounds from the keyboard. In the Patch List screen shown above,
press [F4 (Rhythm Set)] to see a list of the rhythm sets.
Adjusting the keyboard touch
You can adjust the way in which the volume responds to your playing dynamics.
➝
“How to Make System Function Settings”
(p. 286) in the Owner’s Manual
➝
“Keyboard Velocity Sens (Keyboard Velocity Sensitivity)”
(p. 288) in the Owner’s Manual
Selecting a sound (Single mode)
Fantom-G_q_e.book 10 ページ 2008年2月4日 月曜日 午後2時26分

11
Playing Two or More Sounds Simultaneously
(Layer/Split)
You can play two or more patches at the same time, for example a piano and bell that sound simultaneously
when you press a key. This is called a
Layer
.
You can also play separate sounds in the left and right regions of the keyboard. For example you might
play a bass sound with your left hand while playing a piano sound with your right hand. This is called a
Split
.
In the illustration below, a piano is joined by a bell only in the high register to produce a sparkling piano
sound.
fig_layer_e.eps
Let’s use a Live Set to create the sound shown above.
1. Press [LIVE] to select Live mode.
2. Press [F5 (LiveSet List)] to view the live set list.
3. Turn the VALUE dial or use [DEC] [INC] to select “PRST 512: Sitar Gliss.” After you’ve
selected a live set, press [F8 (Select)] to confirm your choice.
Procedure
Selecting a live set
Piano Bell
Fantom-G_q_e.book 11 ページ 2008年2月4日 月曜日 午後2時26分
12
Playing Two or More Sounds Simultaneously (Layer/Split)
1. In the Live Play (Layer/Split) screen, press [F2 (Utility)], and then press [F6 (Initialize)].
2. Use / to choose “Default.”
3. Press [F8 (Select)].
A confirmation message appears.
4. Press [F7 (OK)] to execute initialization.
5. Press [F8 (Exit)] to return to the previous screen.
1. In the Live Play (Layer/Split) screen, use the cursor buttons to move the cursor to the KBD
(keyboard switch) indication for part 1.
2. Press [INC] to turn on the keyboard switch for part 1.
3. In the same way, turn on the keyboard switch for part 2 as well.
Parts whose keyboard switch is on can be played by the keyboard. Since you’ve turned on the keyboard
switch for parts 1 and 2, these two parts will sound simultaneously.
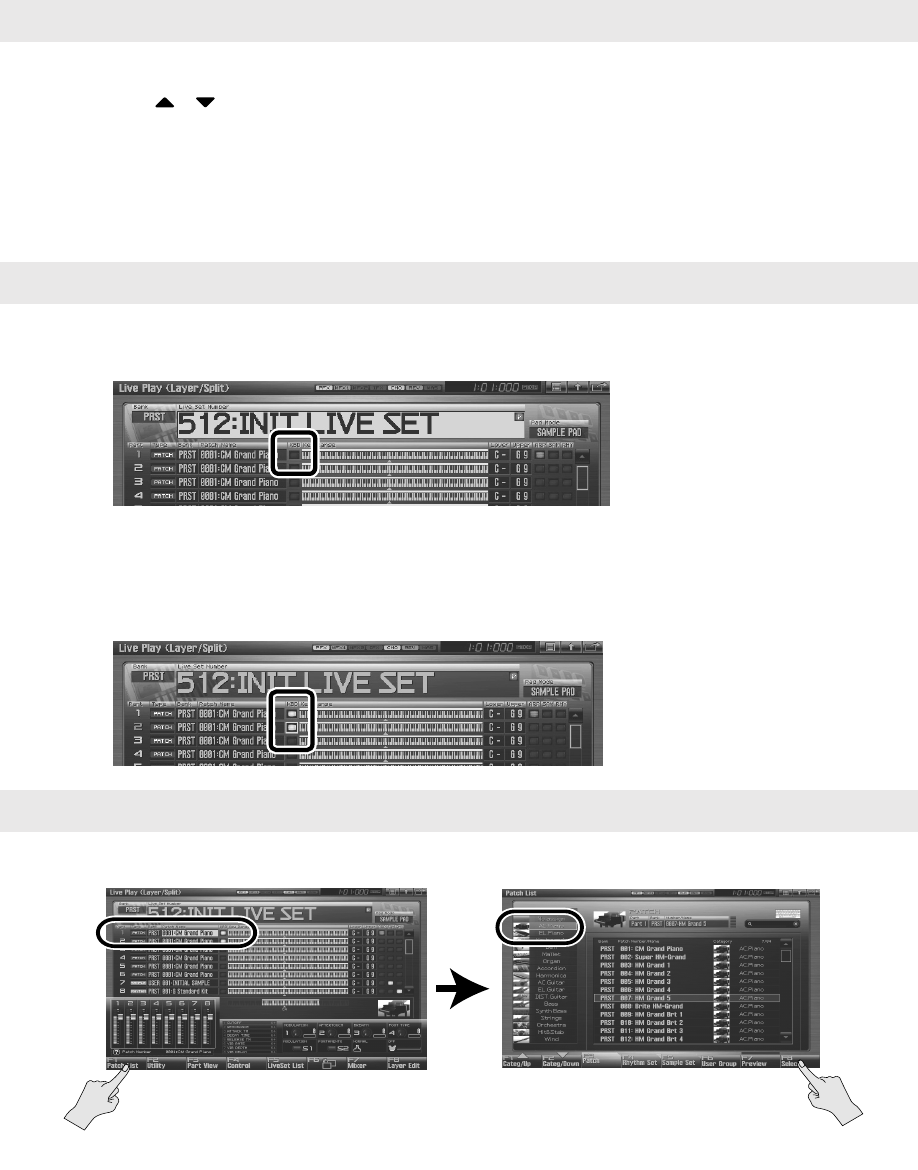
1. Let’s change the patch selection for part 1 so that it will play a piano sound.
fig.0-05d_e.eps
2. In the same way, change the patch selection for part 2 so that it plays a bell sound
(category “Bell”).
Initializing the live set
Turning the Keyboard Switch on for parts 1 and 2
Selecting patches (sounds)
Use the cursor buttons (up/down) to select part 1,
then press [F1 (Patch List)], and ...
Use [F1] [F2] to select “AC.Piano” and use the
VALUE dial to select the desired piano patch. When
you’ve made your choice, press [F8 (Select)] to
confirm it.
Fantom-G_q_e.book 12 ページ 2008年2月4日 月曜日 午後2時26分
13
Playing Two or More Sounds Simultaneously (Layer/Split)
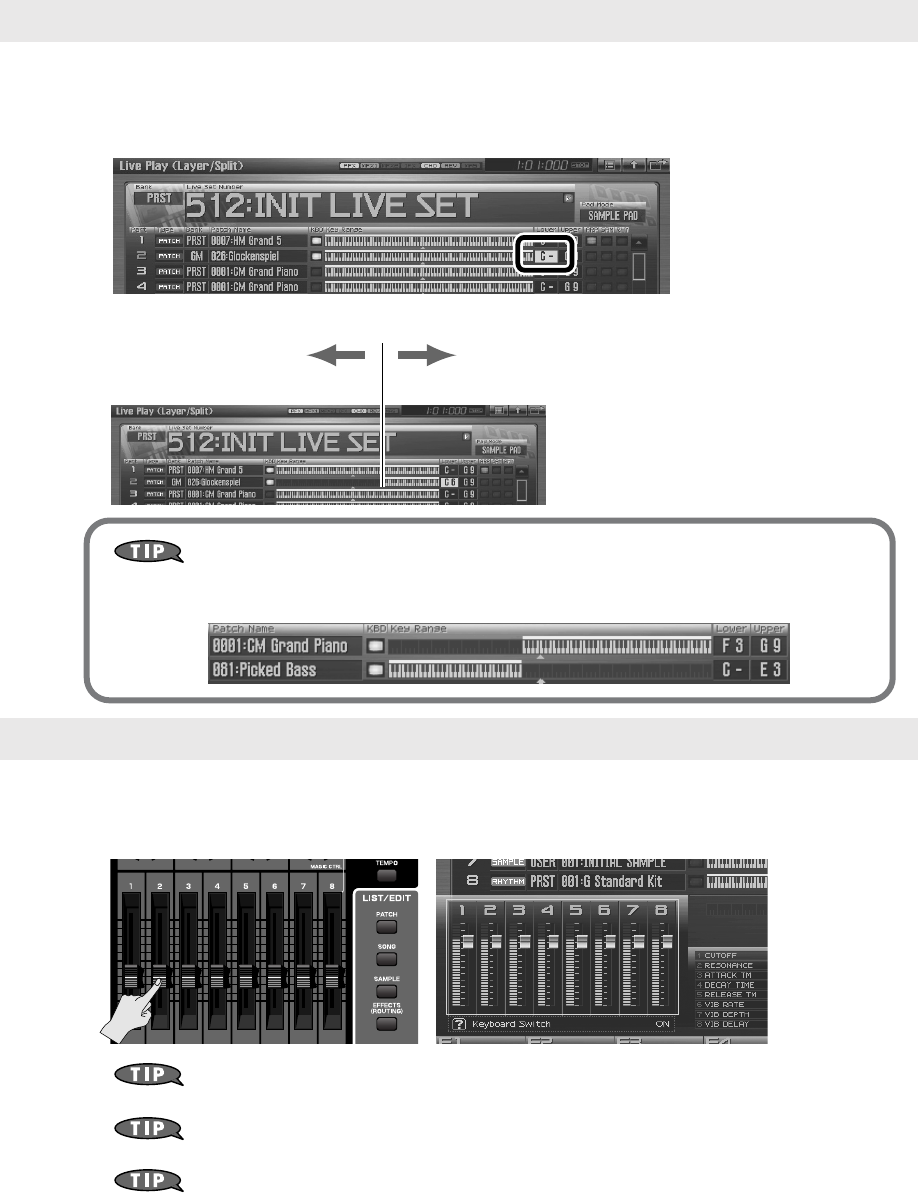
In the Live Play (Layer/Split) screen, we can specify the key range for each part.
1. In the Live Play (Layer/Split) screen, use the cursor buttons to move the cursor to the
“Lower” setting of part 2.
2. Specify the key range. Turn the VALUE dial to specify the value.
fig.0-05b_e
You can also make settings so that the left and right regions of the keyboard play sounds
separately without layering them (for example, bass in the left hand and piano in the right
hand). This type of setup is called a
Split
.
Adjust the balance as desired. For example, you might want mainly the piano to be heard, with just a small
amount of bell. The eight sliders in the Live Play (Layer/Split) screen correspond to the level of the parts. You
can adjust these by moving the eight sliders located on the Fantom-G’s panel.
By pressing [F7 (Mixer)] you can access the mixer screen, where you can adjust the pan (left/
right position) and effect amounts for the parts.
For more about effect settings such as reverb and chorus
➝
“Adding Effects”
(p. 150) in the Owner’s Manual
Changes you make are temporary, and will be lost when you turn off the power, switch the
sound generator mode, or select a different live set. If you want to keep the live set you edited,
you must save the live set as described in
“Saving the settings you’ve made”
(p. 8 of
this manual).
Specifying the key range
Adjusting the volume balance of the piano and bell
Piano only Piano + Bell
Fantom-G_q_e.book 13 ページ 2008年2月4日 月曜日 午後2時26分
14
Creating a Set of Sounds for a Live
Performance
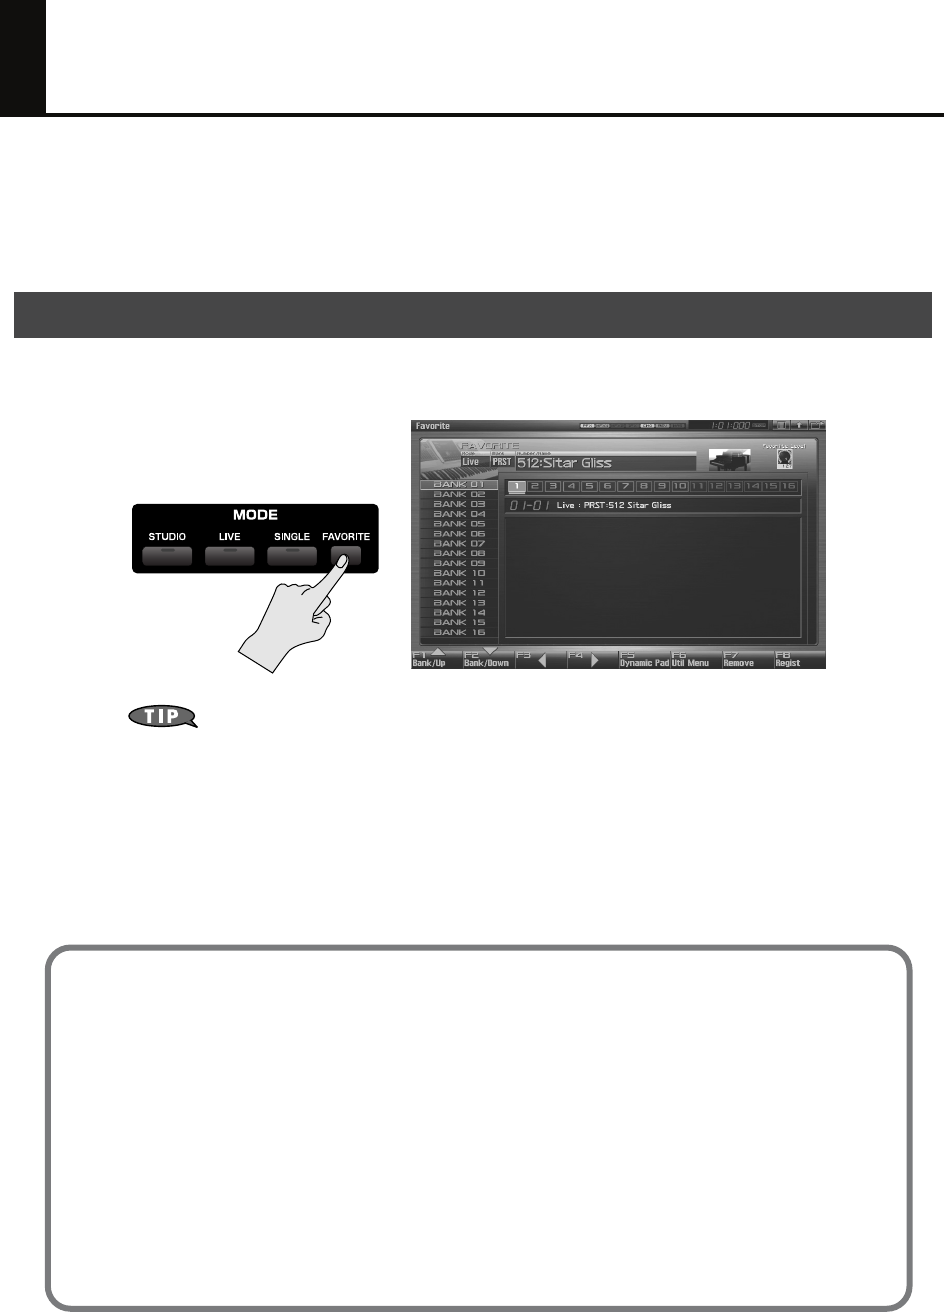
You can create a list of the patches, live sets, studio sets, and songs that you frequently use, and place these
in the order in which they’ll be used in your live show so that the sounds you need can be selected instantly.
This capability is called the
Favorite function
. For example, you could create a list containing the sounds
you’ll be using for the first song of your live performance, and then step through them at a touch.
If you register sounds in the Favorite screen, you’ll be able to select them instantly by pressing a pad. You
can create sixteen such sets of sounds, and each set is called a “bank.”
fig.5-99
For more about using the Favorite function
➝
“Creating a List of Frequently Used Sounds (Favorite)”
(p. 54) in the Owner’s
Manual
Overview
Changing the wallpaper
The Fantom-G lets you change the screen wallpaper. You can personalize your Fantom-G by
choosing a favorite photo as your wallpaper.
➝ “Changing the Wallpaper (Wallpaper)” (p. 299) in the Owner’s Manual
Screen Saver
This feature allows you to have a simple animation be displayed whenever the Fantom-G has
not been operated for a certain period of time.
Because of the characteristics of the TFT liquid crystal display used in the Fantom-G, leaving the
same screen displayed for an extended time may cause that image to be burned into the
screen. To avoid this, we recommend that you use the screen saver.
➝ “How to Make System Function Settings” (p. 286) in the Owner’s Manual
➝ “Screen Saver” (p. 297) in the Owner’s Manual
Fantom-G_q_e.book 14 ページ 2008年2月4日 月曜日 午後2時26分

Performing on the Pads
Fantom-G_q_e.book 15 ページ 2008年2月4日 月曜日 午後2時26分
16
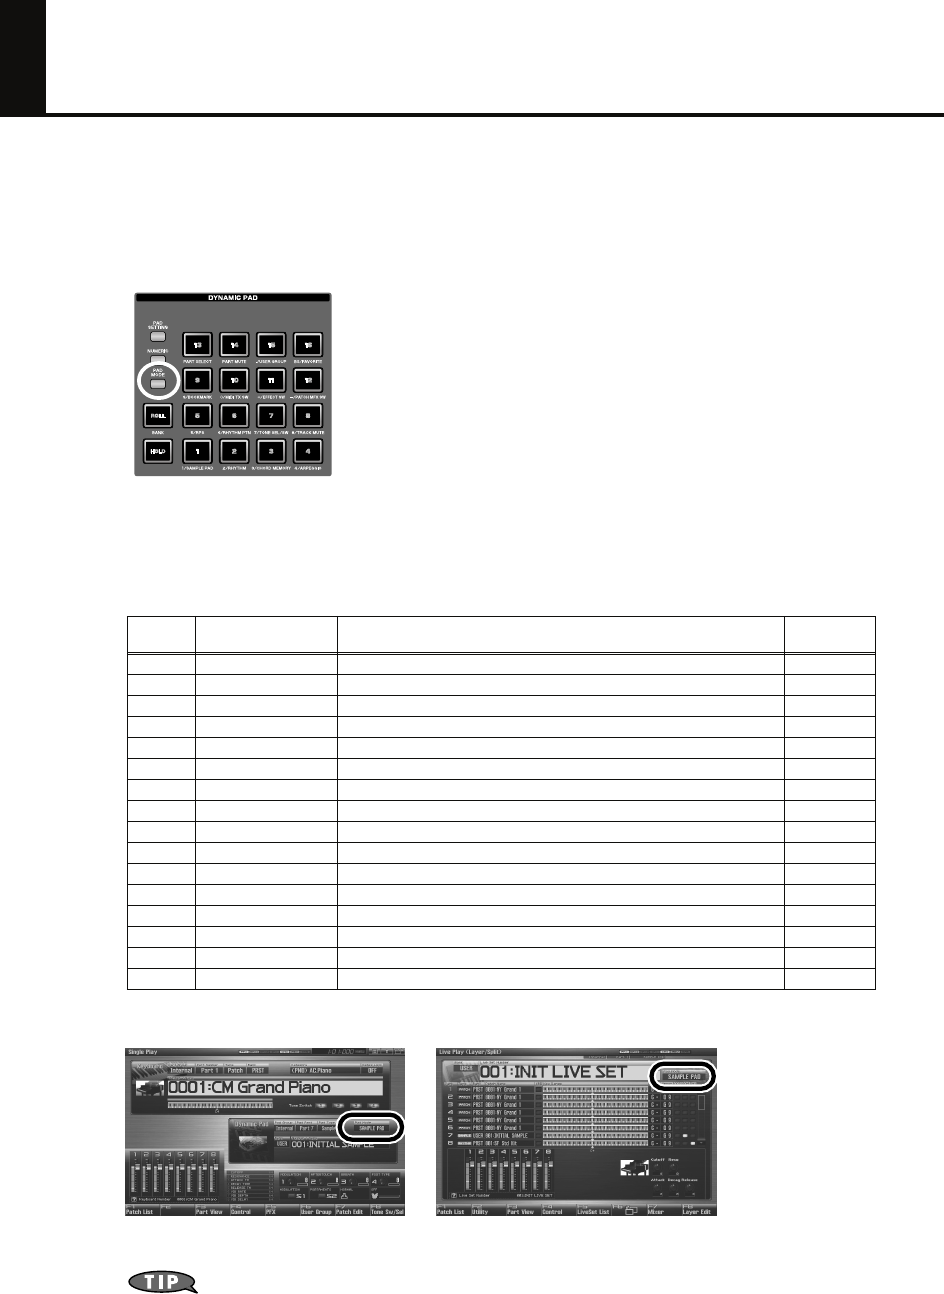
Pad Basics
You can play samples, rhythms, or phrases by striking the Fantom-G’s pads, or you can use them as sixteen
switches to turn various parameters on/off. The pads can function in one of sixteen modes. Press [PAD
MODE] to switch the pad mode.
1. Press [PAD MODE].
[PAD MODE] will blink, and the currently selected pad mode (pad [1]–[16]) will blink.
2. Press a pad [1]–[16].
The pad mode will be switched. See the table below for an explanation of what each pad mode does, and
the Owner’s Manual page reference.
3. The pad mode is indicated in the following screens.
PAD_1_e.EPS
If you switch a Live Set or a Studio Set, the Pad mode will also be switched. If you want the
Pad mode to be fixed, set the “
Pad Assign Source
” in System to “
SYS
. ”
➝
“How to Make System Function Settings”
(p. 286) in the Owner’s Manual
➝
“Pad Assign Source”
(p. 288) in the Owner’s Manual
Pad
number
Pad mode Explanation
Owner’s
Manual page
1SAMPLE PAD The pads will play a sample set. p. 191
2 RHYTHM The pads will play a rhythm set. p. 192
3 CHORD MEMORY The pads will switch chord form the Chord Memory function. p. 193
4 ARPEGGIO The pads will switch arpeggio styles. p. 193
5 RPS The pads will play phrases. p. 194
6 RHYTHM PTN The pads will play rhythm patterns. p. 196
7 TONE SEL/SW The pads will select tones and turn them on/off. p. 197
8 TRACK MUTE The pads will mute (silence) sequencer tracks. p. 197
9 BOOKMARK The pads will register or recall frequently-used screens. p. 198
10 MIDI TX SW The pads will switch external MIDI transmit channels (1–16) on/off. p. 198
11 EFFECT SW The pads will switch effects (other than the patch multi-effect). p. 199
12 PATCH MFX SW The pads will switch the patch multi-effect for each part. p. 199
13 PART SELECT The pads will select parts (1–16) and banks (INT/EXP1/EXP2/EXT). p. 200
14 PART MUTE The pads will mute (silence) parts (1–16) and banks (INT/EXP1/EXP2). p. 200
15 USER GROUP
The pads will register/recall user group patches, live sets, or studio sets.
p. 201
16 FAVORITE The pads will register/recall favorite settings. p. 202
Single mode Live mode
Fantom-G_q_e.book 16 ページ 2008年2月4日 月曜日 午後2時26分
17
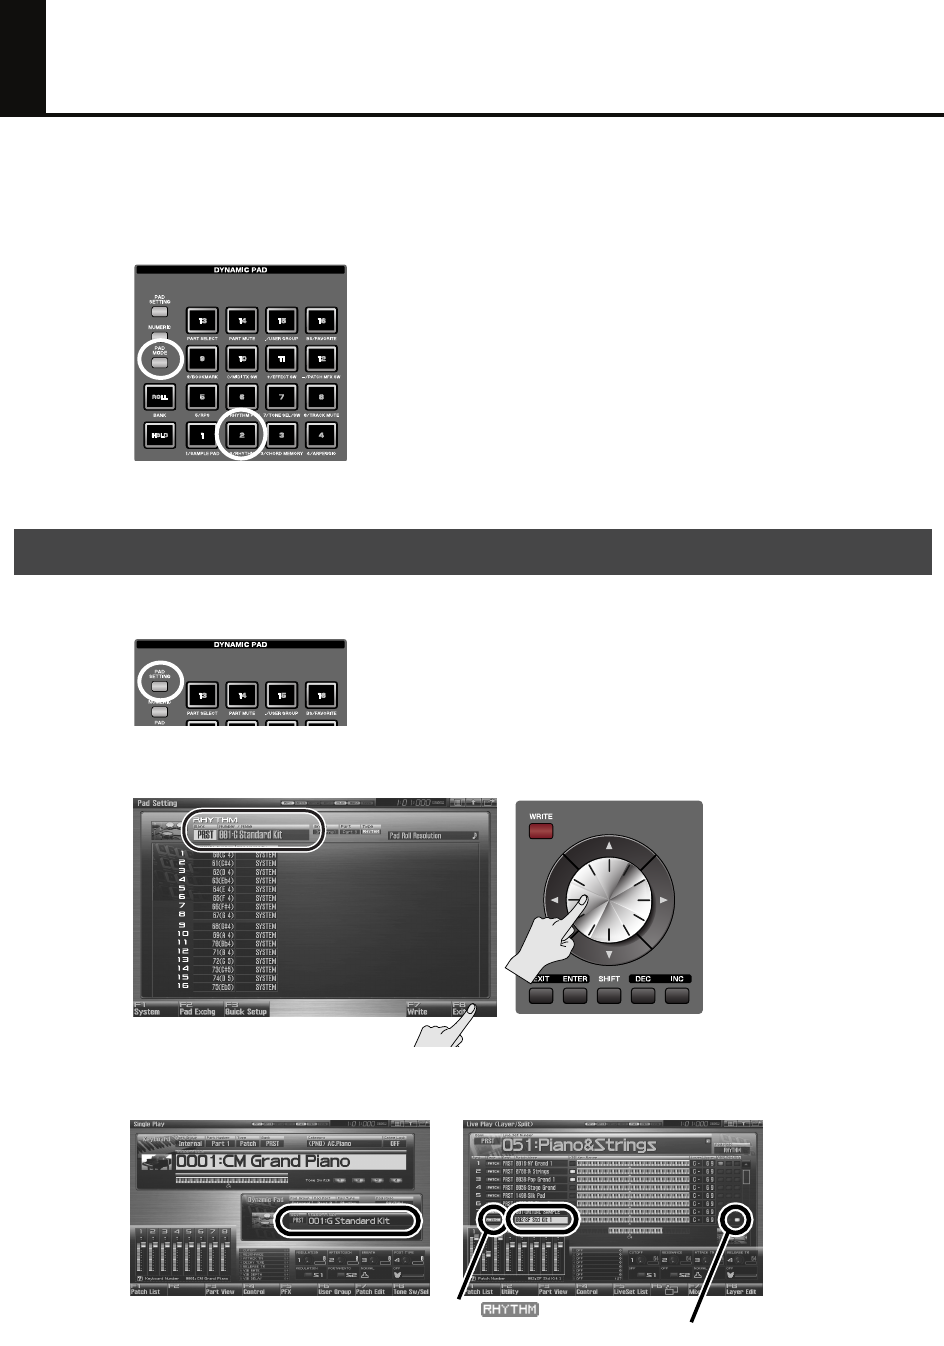
Using the Pads to Play Rhythm Sounds
The pads are an ideal way to play rhythm sounds. You can vary the dynamics of the sound by changing the
force of your strikes on the pads.
1. Press [PAD MODE], and then press pad [2] (RHYTHM).
2. When you press a pad [1]–[16], you’ll hear a rhythm tone.
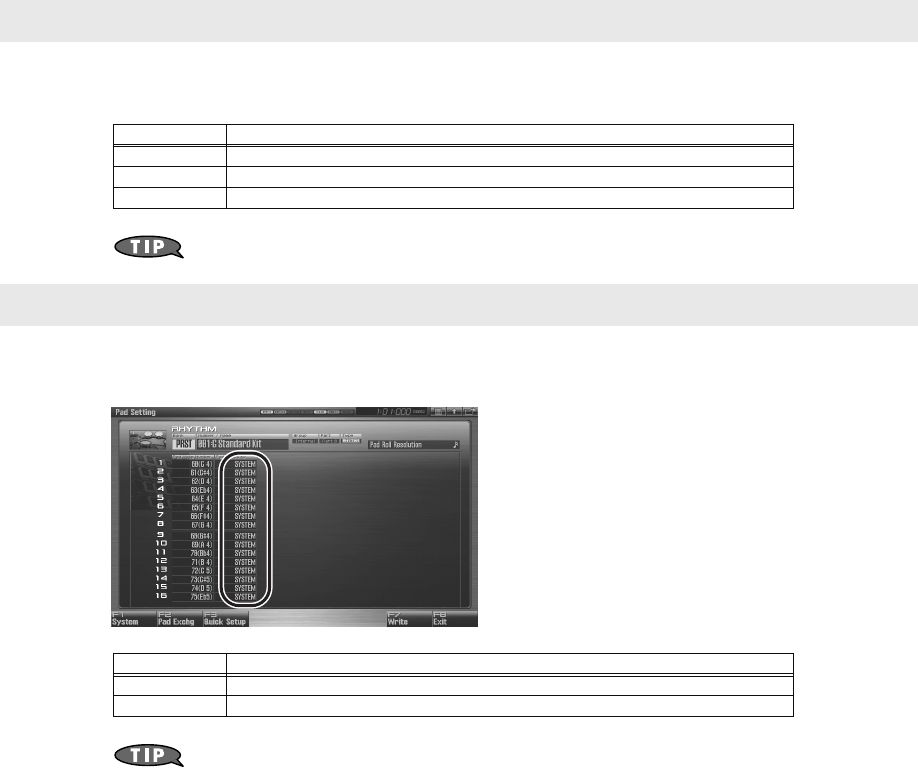
1. Press [PAD SETTING].
2. Use the cursor buttons to select “Bank” or “Number/Name,” and use the VALUE dial to
choose a rhythm set. Press [F8 (Exit)] to return to the previous screen.
fig.1-01
3. You can also view or change the rhythm set sounds in the following screens.
fig.0-02
Selecting sounds
Single mode Live mode
Part whose RHY (Rhythm Pad) switch is on
Type “ ”
Fantom-G_q_e.book 17 ページ 2008年2月4日 月曜日 午後2時26分
18
Using the Pads to Play Rhythm Sounds
You can adjust the way in which the force of your pad strike corresponds to the volume.
Press [PAD SETTING]
➝
[F1 (System)] to access the setting screen, and set “Pad Sens” as desired.
If you want to keep your settings, press [F7 (Sys Write)].
For some sounds, you might prefer that the volume not change.
Press [PAD SETTING] to access the setting screen, and set “Pad Velocity” as desired.
If you want to keep your settings, press [F7 (Write)].
Adjusting the pad sensitivity to your liking
Value Pad response
LIGHT Even light strikes can easily produce high volume.
MEDIUM Between LIGHT and HEAVY sensitivity.
HEAVY Strong strikes are needed to produce high volume.
Fixing the pads at a specified volume
Value Pad volume
SYSTEM The System setting of “Pad Velocity” (Owner’s Manual p. 288) will be used.
1–127 The specified volume will sound regardless of the force of your strike.
Fantom-G_q_e.book 18 ページ 2008年2月4日 月曜日 午後2時26分
19
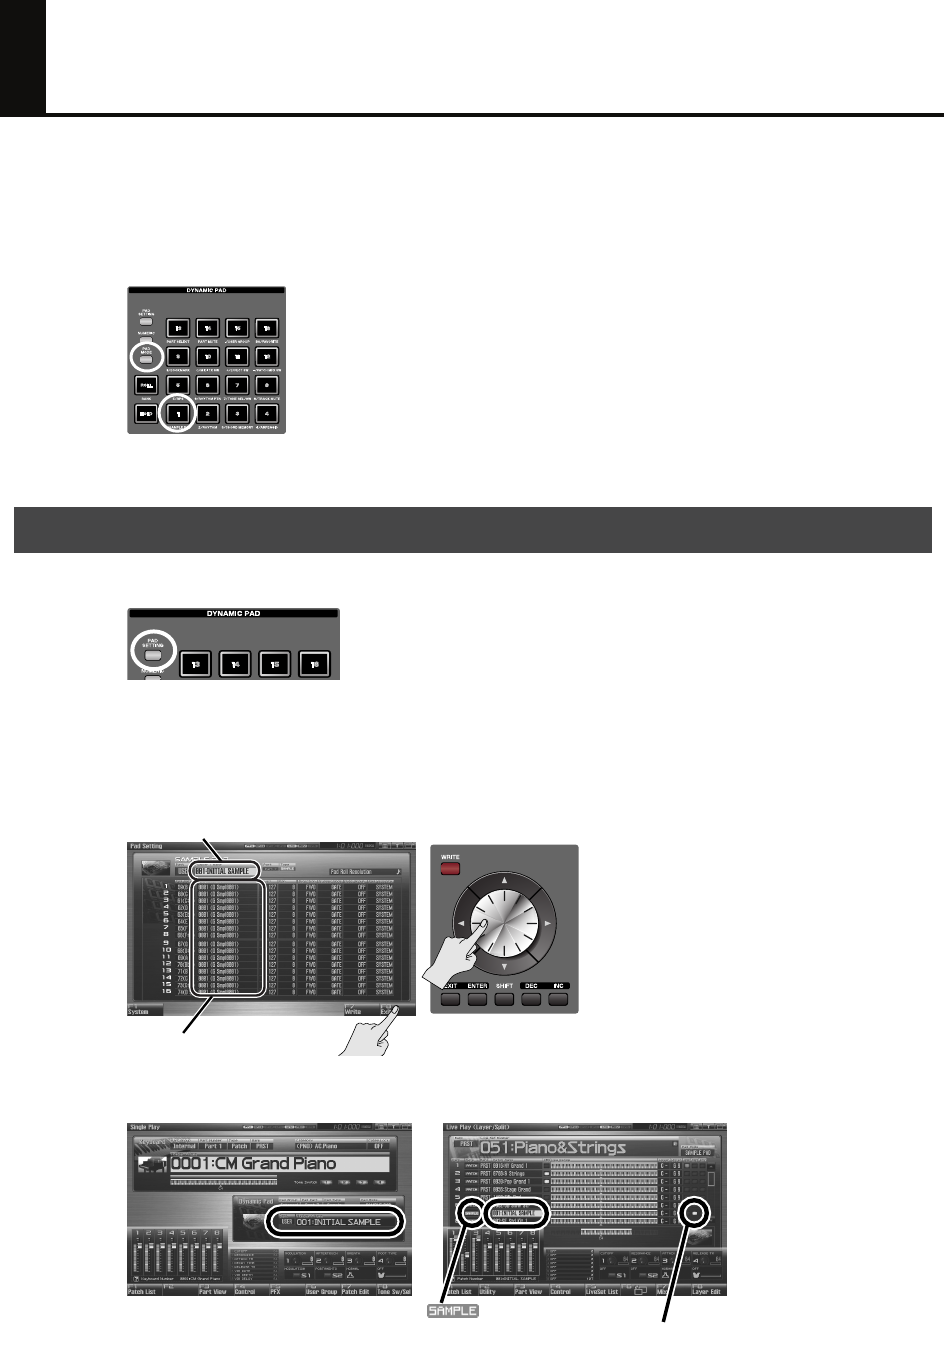
Using the Pads to Play Sampled Sounds
Sounds (samples) you’ve captured by sampling can be quickly and easily played from the pads. You can
sample brief “shots” and play them as percussion instruments. You can also sample entire phrases and play
them back at a single touch.
1. Press [PAD MODE], and then press pad [1] (SAMPLE PAD).
2. Press a pad [1]–[16] to play its sample.
1. Press [PAD SETTING].
2. Use the cursor buttons to select “Number/Name,” and use the VALUE dial to choose the
sample set that you want to play using the pads.
To select the sample played by each pad, use the cursor buttons to select “Sample
Number,” and then turn the VALUE dial to select a sample.
If you want to keep your settings, press [F7 (Write)]. To return to the previous screen, press [F8 (Exit)].
3. You can also view or change the sample set in the following screens.
PAD_3_e.EPS
Selecting the samples
Sample set
Samples for pads 1–16
Single mode Live mode
Part whose RHY (Rhythm Pad) switch is on
TYPE “ ”
Fantom-G_q_e.book 19 ページ 2008年2月4日 月曜日 午後2時26分
20
Using the Pads to Play Sampled Sounds
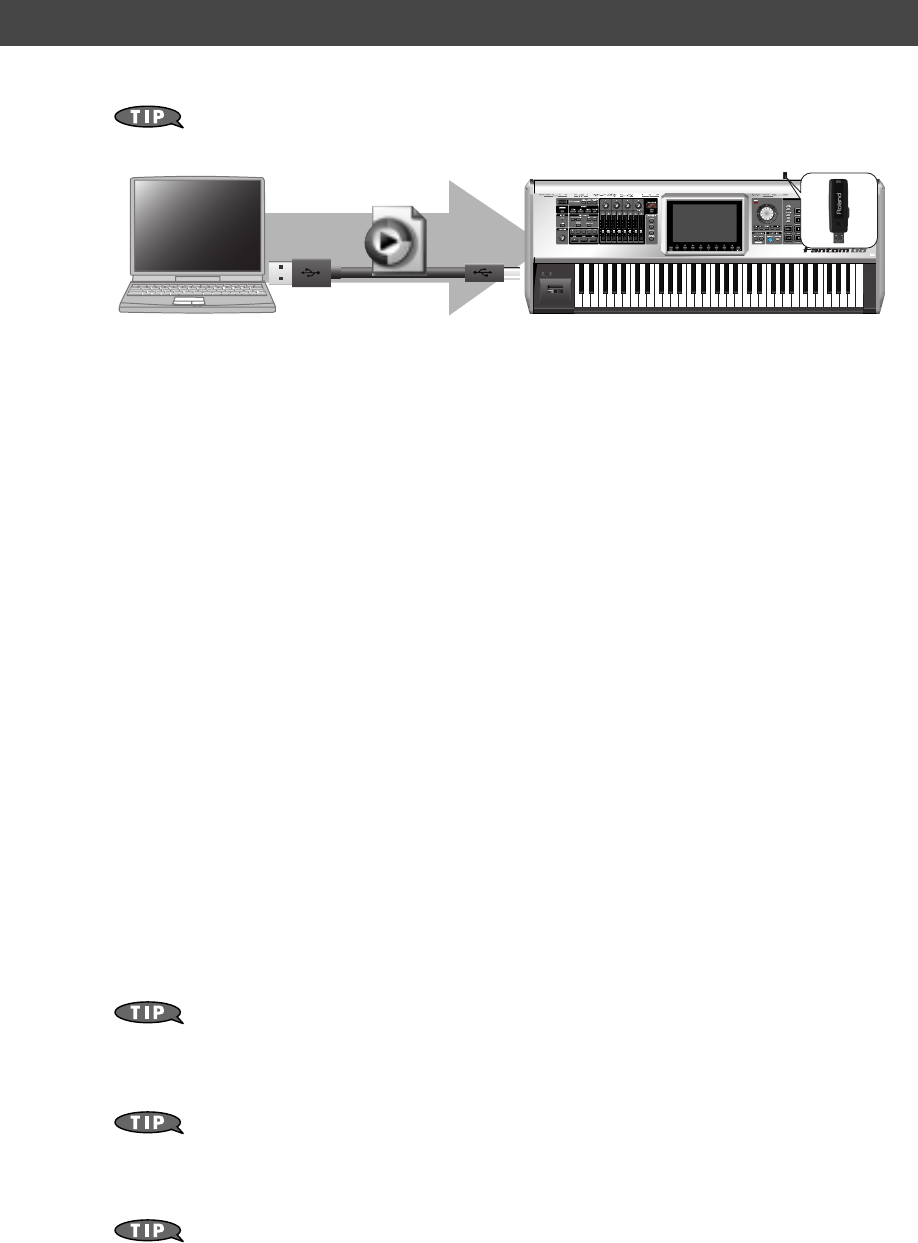
The Fantom-G can import WAV/AIFF format audio files from your computer, and play them as samples.
Here we’ll explain how to import audio files via USB memory (sold separately). Even if you
don’t have USB memory, you can copy audio files to the Fantom-G’s internal memory.
1. On your computer, prepare the audio file (WAV/AIFF format) that you want to import.
2. Use a USB cable (sold separately) to connect the Fantom-G’s USB COMPUTER connector to
your computer.
3. Press [MENU].
4. Turn the VALUE dial to choose “USB Storage,” and press [F8 (Select)].
5. Press [F2 (USB Memory)].
If you are going to use the internal memory of the Fantom-G, press [F1 (Internal)].
6. The USB memory will be mounted on your computer. Create a folder named “IMPORT”
on the USB memory, and copy the audio file (WAV/AIFF format) to that folder.
7. When you are done copying, remove the USB memory on the computer, and then press
[F8 (Exit)] on the Fantom-G.
Windows Vista/XP Users:
In My Computer, right-click the “removable hard disk” icon and execute “Remove.”
Mac OSX Users:
Drag the USB drive icon into the trash.
8. Press [MENU].
9. Turn the VALUE dial to choose “Import Audio,” and press [F8 (Select)].
10. Press [F2 (USB Memory)].
If you are going to use the internal memory of the Fantom-G, press [F1 (Internal)].
11. Press [F8 (Import Audio)].
A confirmation message appears.
12. Press [F7 (OK)].
The file will be imported, and the sample list screen will appear.
The imported file will be added to the sample list as a sample. This sample is temporary, and
will be lost when you turn off the power. If you want to keep it, press [F2 (Save)] to save it in
the sample list screen.
➝
“Saving a Sample (Save)”
(p. 274) in the Owner’s Manual
After you import, erase the contents inside the USB memory’s “IMPORT” folder.
13. If you want to play the imported sample from a pad, select the sample sound that you
want to play for that pad.
➝
“Selecting the samples”
(p. 19 of this manual)
Importing sounds (samples) from your computer
WAV
AIFF
Fantom-G_q_e.book 20 ページ 2008年2月4日 月曜日 午後2時26分
21
Using the Pads to Play Sequenced Phrases
(RPS)
You can use the pads to play sequenced phrases you’ve created. This is called the
RPS (Realtime
Phrase Sequence) function
. For example, simply by specifying that pad number 2 will play phrase
number 0005, you can press that pad to play the assigned phrase.
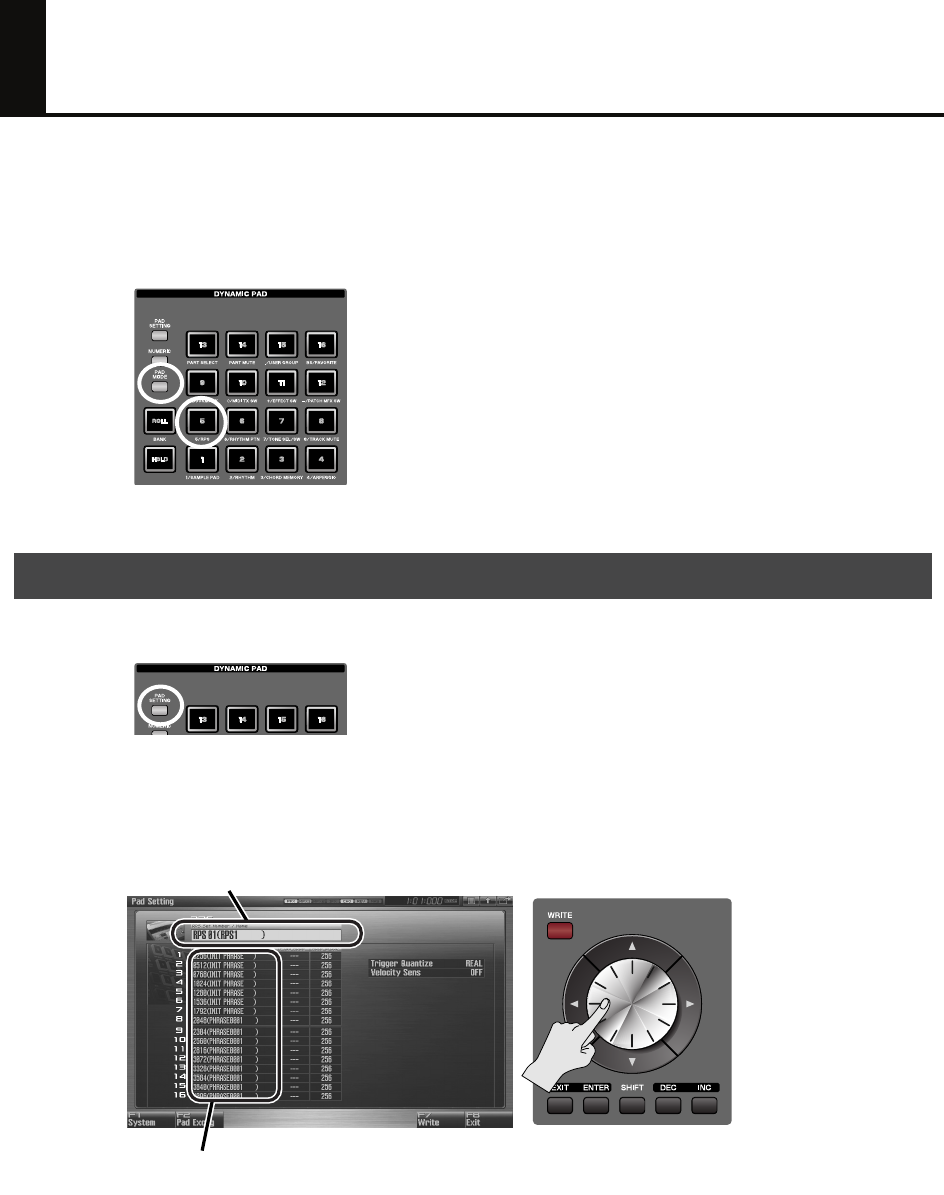
1. Press [PAD MODE], and then press pad [5] (RPS).
2. When you press a pad [1]–[16], the phrase assigned to that pad will play.
1. Press [PAD SETTING].
2. Use the cursor buttons to select “RPS Set Number,” and use the VALUE dial to select the
RPS set that you want to play using the pads.
To select the phrase played by each pad, use the cursor buttons to select “Phrase
Number,” and then use the VALUE dial to make your choice.
If you want to save the settings, press [F7 (Write)]. To return to the previous screen, press [F8 (Exit)].
Selecting a phrase
RPS set
Phrases assigned to pads 1–16
Fantom-G_q_e.book 21 ページ 2008年2月4日 月曜日 午後2時26分
22
Using the Pads to Play Sequenced Phrases (RPS)
1. Use the sequencer to record a phrase.
➝
Owner’s Manual
“Recording into a Phrase”
(p. 220)
2. Save the phrase.
➝
Owner’s Manual
“Saving a Phrase (Save)”
(p. 216)
3. Select the phrases played by each pad.
➝
This manual
“Selecting a phrase”
(p. 21)
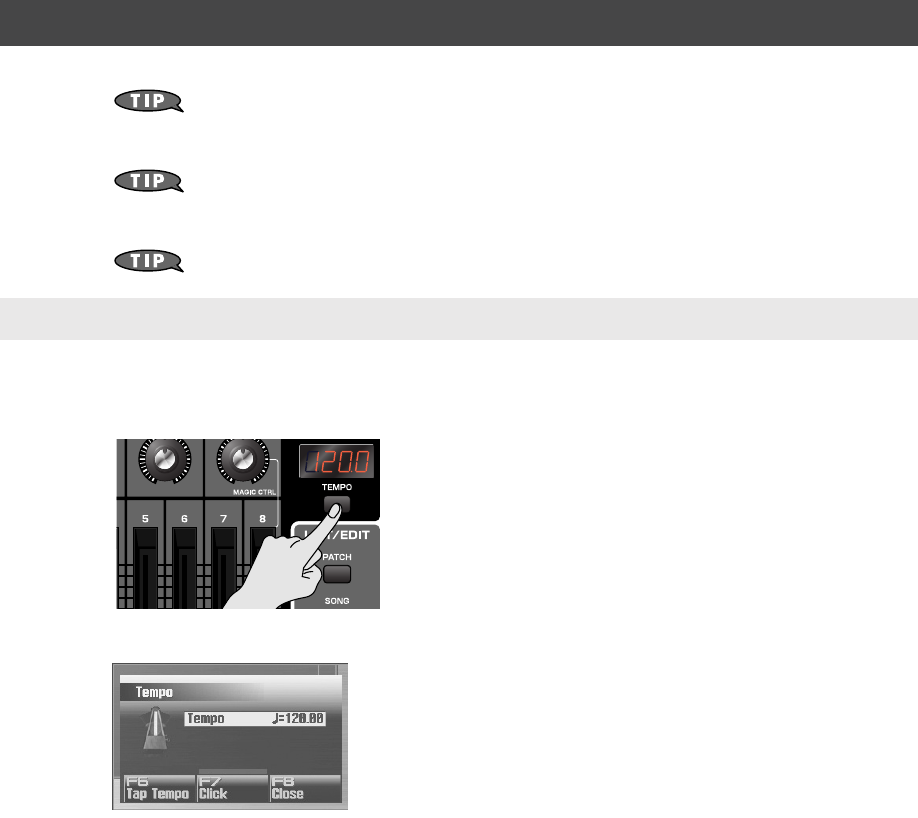
Phrases will play at the same tempo as the song.
1. Press [TEMPO].
The Tempo window appears.
2. Turn the VALUE dial or use [INC] [DEC] to specify the playback tempo.
• By holding down [SHIFT] and turning the VALUE dial you can make fine adjustments below the decimal
point.
• If you press [F7 (Click)] to turn it on, a click will sound at the specified tempo. The click will turn on/off
each time you press the button.
• If you press [F6 (Tap Tempo)], you can specify the tempo by repeatedly pressing the button at the desired
tempo (Tap Tempo). Press the button three times or more at quarter-note intervals of the desired playback
tempo.
3. When you’ve finished making settings, press [F8 (Close)].
Using the pads to play phrases you recorded in the sequencer
Specifying the phrase playback tempo
Fantom-G_q_e.book 22 ページ 2008年2月4日 月曜日 午後2時26分
Creating a Song
Fantom-G_q_e.book 23 ページ 2008年2月4日 月曜日 午後2時26分
24
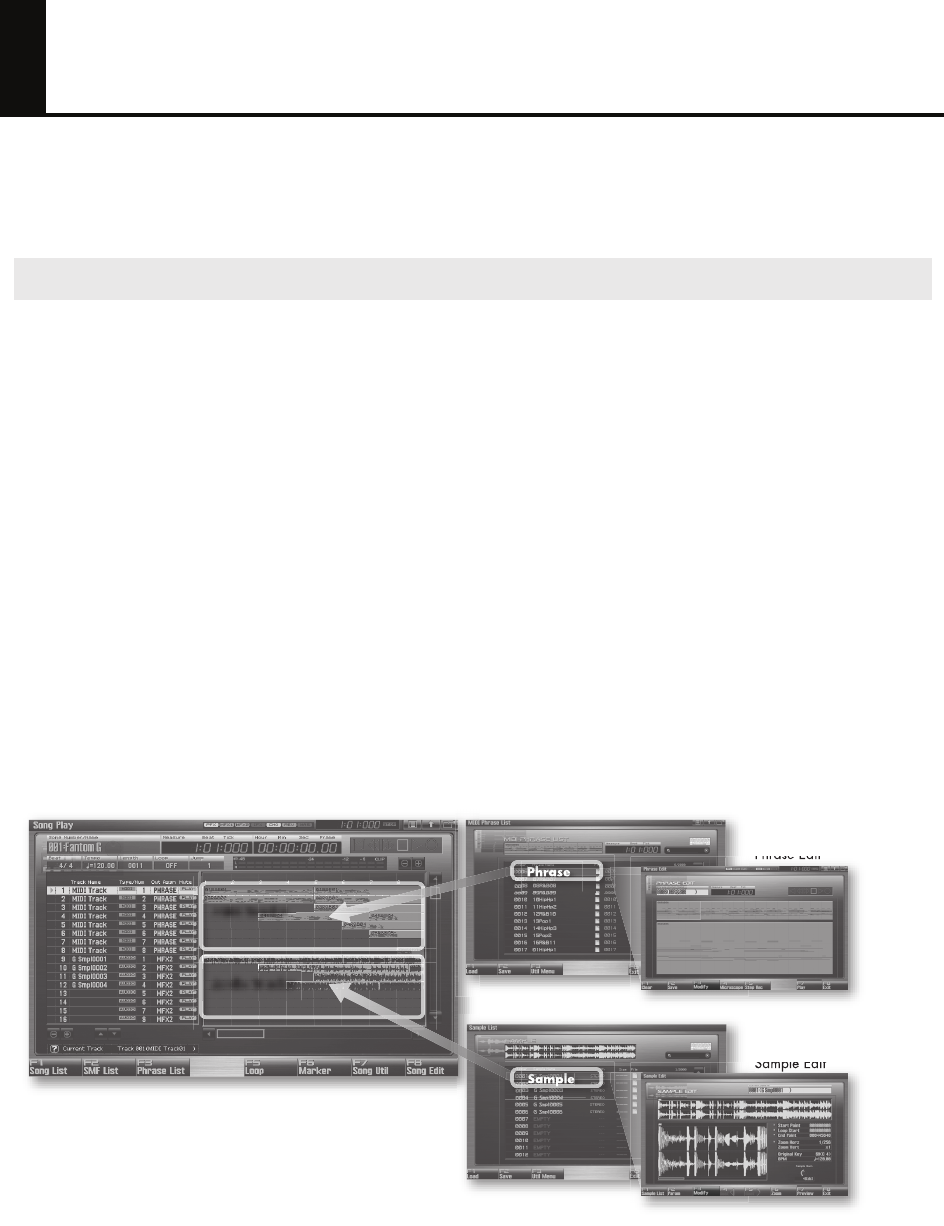
What is the Sequencer?
The sequencer allows you to create a song by recording your performance on the keyboard or pads, or by
recording audio sources such as a mic or guitar connected to the Fantom-G’s input jacks, and then play
back the song you’ve created.
The Fantom-G’s sequencer can record MIDI and audio.
MIDI (phrases)
MIDI records your keyboard and pad performance as performance data. Each sequence of recorded MIDI
data is called a “phrase.” You can create up to 2,000 phrases in a single project, and each phrase can
contain sixteen channels of MIDI data.
There are 128 MIDI tracks in which MIDI performance data can be recorded. You can also create a song
simply by placing phrases in a MIDI track.
Although MIDI is similar to audio in that it is a way to record a performance, MIDI records the “performance
data” rather than the “sound,” and therefore allows you to freely make detailed changes to individual notes
and other data.
Audio (samples)
Audio refers to “sound” that you can record from a mic or guitar connected to the Fantom-G’s input jacks.
Each piece of recorded audio data is called a “sample.” You can create up to 2,000 samples in a single
project. WAV/AIFF format audio files from your computer can also be imported as samples via USB
memory (or by using the USB Storage function). (See
“Importing sounds (samples) from your
computer”
(p. 20 of this manual).)
There are twenty-four audio tracks in which audio (samples) can be recorded. You can also create a song
simply by placing samples in an audio track.
fig.04-009.j
MIDI and Audio
Song
MIDI Phrase List
Phrase Edit
Sample List
Sample Edit
MIDI Tracks
Audio Tracks
Sample
Phrase
Fantom-G_q_e.book 24 ページ 2008年2月4日 月曜日 午後2時26分

25
What is the Sequencer?
Terminology
Song
On the Fantom-G, “song” refers to a composition you created using the sequencer, and
includes the performance data and the sound generator settings all saved together. This means
that a song contains all the material for that composition. When you’ve completed your
composition, you should save the song. The next time you load that song, the phrases of
performance data and the settings for the sound generator and effects will all reproduce the
state in which the song was last saved.
Track
Within the Fantom-G’s sequencer, a track is an area where a performance can be recorded.
There are twenty-four audio tracks for recording audio (samples), and 128 MIDI tracks for
recording MIDI (phrases).
Patch
Patches correspond to instrumental sounds such as bass, piano, and guitar.
Studio Set
A studio set contains settings for sixteen parts, allowing you to use up to sixteen patches
simultaneously.
Part
A studio set contains sixteen parts, and you can control the volume, pan, and other aspects of
the sound independently for each part. For example you can select a piano patch for part 1, a
bass patch for part 2, a drum patch for part 10, etc., and adjust the volume balance for each
instrument.
Fantom-G_q_e.book 25 ページ 2008年2月4日 月曜日 午後2時26分
26
Getting Your Equipment Together
In order to take full advantage of the Fantom-G’s audio recording capability, you’ll need to expand the
memory. By installing expansion DIMM memory you’ll be able to record extended lengths of audio. USB
memory will allow you to save the important data you’ve recorded.
The audio you record from a guitar or mic connected to the Fantom-G
is recorded in this DIMM memory as audio data (samples). The higher
the capacity of the DIMM memory, the more recording time you’ll be
able to use.
The Fantom-G can use up to 512 M bytes of DIMM memory, so we
recommend that you install 512 M bytes to allow the longest possible
recording time. Even without DIMM memory, you’ll be able to record
approximately three minutes of stereo, but installing 512 M bytes of
DIMM memory will allow approximately 54 minutes of stereo recording.
DIMM memory is vulnerable to damage by static electricity discharged through your hands, so
handle it with care. When installing it in the Fantom-G, read the relevant section of the
Owner’s Manual and perform the installation exactly as described.
➝
For details, refer to
“Expanding the DIMM Memory”
(p. 308, p. 310) in the Owner’s
Manual.
The contents of DIMM memory will be lost when you turn off the
power. The Fantom-G contains 50 M bytes of internal flash memory
(internal memory), but if you’ve expanded the DIMM memory, a fully
recorded project will be too large to be saved in internal memory. In
this case, you’ll need to save the data in USB memory. If you’ve used
the Resampling function to turn a completed song into a WAV file,
and want to transfer the WAV file to your computer, you’ll need to
save it to USB memory and then copy it to your computer.
Connect your USB memory to the rear panel USB MEMORY slot. (Owner’s Manual
“USB
MEMORY Slot”
(p. 24))
For details on how to format (initialize) the USB memory, refer to
“Format USB Memory”
(p. 280)
in the Owner’s Manual
.
If your USB memory is formatted in other than FAT, the Fantom-G won’t be able to
recognize it. Use your computer to format the USB memory in the “FAT” or “FAT32”
file system. (If you’re using Mac OS X, format it as “MS-DOS file system (FAT32).”
Saving data to USB memory
To use USB memory, first save the project to USB memory as described in
“Save As Project”
, (p. 277 in
the Owner’s Manual). This way you’ll be able to save the extended audio recordings (samples) you’ve
made using DIMM memory.
The project that you last saved (or loaded) will be automatically loaded when the Fantom-G is powered-on,
so it’s a good idea to leave your USB memory connected.
DIMM memory (sold separately)
USB memory (sold separately)
Fantom-G_q_e.book 26 ページ 2008年2月4日 月曜日 午後2時26分

27
Work Flow for Creating a Song
The general work flow for creating a song is shown below. This manual will explain the process in this order.
1. In the song list, select an empty song (p. 28)
2. In the studio set, select the sounds you’ll use for recording (p. 28)
3. Specify the time signature of the song (p. 30)
4. Specify the tempo of the song (p. 30)
5. (If using MIDI to create a song) Perform realtime recording (p. 31)
6. (If using audio to create a song) Import audio files from your
computer (p. 36)
7. (If using audio to create a song) Record from a mic or guitar
connected to the Fantom-G (p. 38)
8. Use song edit to place samples and phrases in tracks (p. 41)
9. Use the mixer to adjust the balance of the parts (p. 42)
10.Save your song (p. 44)
Fantom-G_q_e.book 27 ページ 2008年2月4日 月曜日 午後2時26分
28
Preparations for Song Production
Here’s how to prepare the sequencer and sound generator for creating a song.
When the Fantom-G starts up, it will load song 001 from the song list, and with the factory settings song
number 001 contains a demo song. If you’re creating a new song, select an empty song from the song list.
1. Press [SONG].
The Song Play screen appears.
2. Press [F1 (Song List)].
The Song List window appears.
3. Use the VALUE dial to select an empty song number, and press [F8 (Load)].
A confirmation message appears.
4. Press [F7 (OK)] to execute.
We recommend that you put the sound generator in
Studio mode
when you’re creating a song.
Studio mode allows you to use up to sixteen different sounds to independently record and play back
performances for each part, making this the best choice for creating a song that contains multiple
instruments such as drums, bass, and piano.
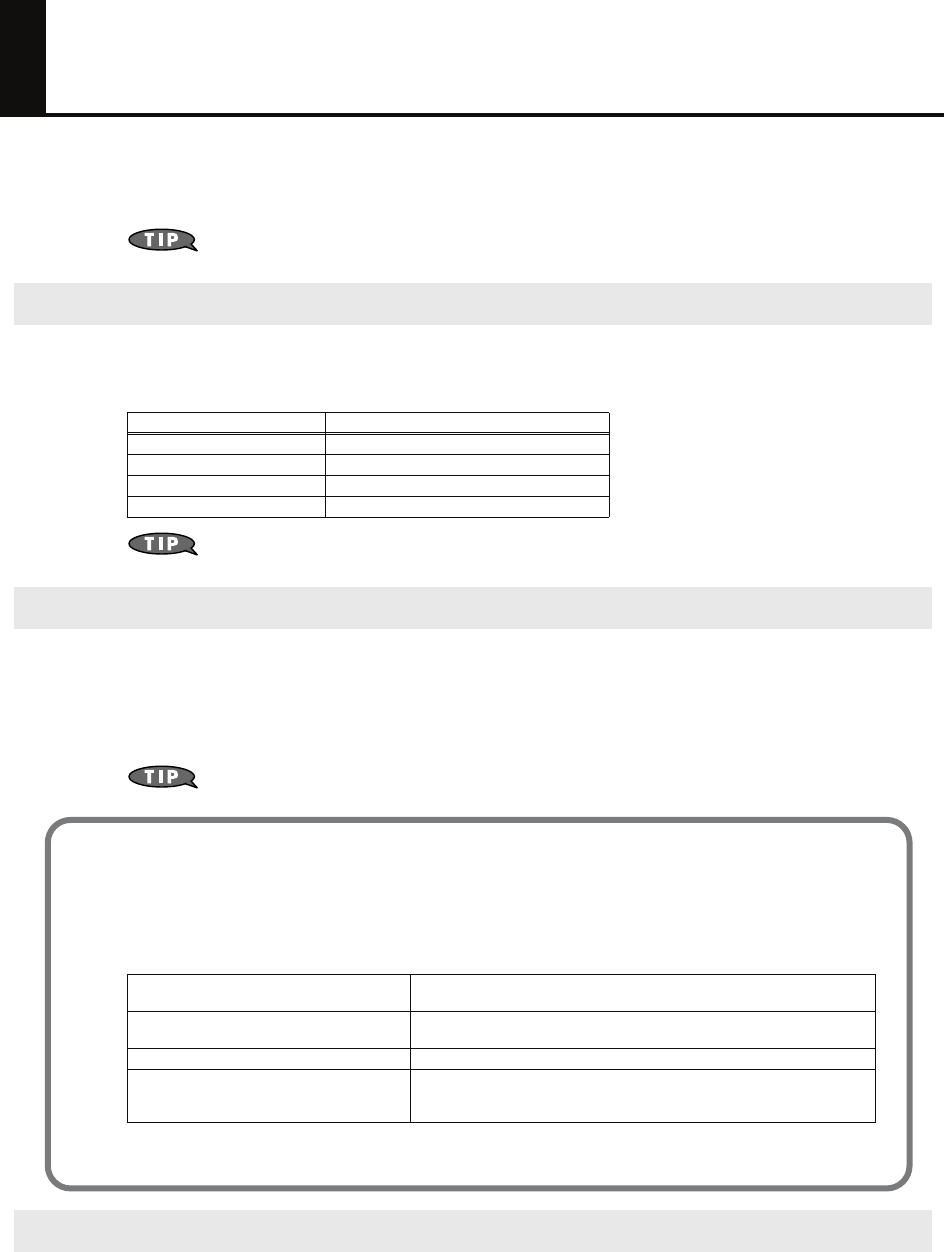
1. Press [STUDIO] to choose Studio mode.
2. Press [F5 (Studio List)] to see the studio set list.
Selecting an empty song in the song list
Selecting sounds in a studio set
Selecting a studio set
Fantom-G_q_e.book 28 ページ 2008年2月4日 月曜日 午後2時26分
29
Preparations for Song Production
3. Turn the VALUE dial or use [DEC] [INC] to choose “PRST 007: Rock Studio Set.” After
you’ve selected a studio set, press [F8 (Select)] to confirm your choice.
“PRST 007: Rock Studio Set”
is a studio set that has suitable sounds and effect settings
prepared beforehand to make a rock song.
1. Select a piano sound for part 1.
2. In the same way, select a bass sound (category “Bass”) for part 2.
3. In the same way, select a rhythm set for part 10.
By default, a rhythm set will be selected for part 10. In the case of a rhythm set, there’s no
need to use the [F1] [F2] keys in the patch list to select a category.
Changes you make are temporary, and will be lost when you turn off the power, switch the
sound generator mode, or select a different studio set. If you want to keep the studio set you
edited, you must save the studio set as described in
“Saving the settings you’ve made”
(p. 8 of this manual).
Selecting patches (sounds)
Use the cursor buttons to
highlight part 1, then press
[F1 (Patch List)], ...
Then use [F1] [F2] to select the category “AC.Piano” and
turn the VALUE dial to select the desired piano patch.
When you’ve made your selection, press [F8 (Select)].
Fantom-G_q_e.book 29 ページ 2008年2月4日 月曜日 午後2時26分
30
Preparations for Song Production
When recording a new song, you’ll need to specify the time signature. However, after you’ve executed
Song Clear or turned the power on, the time signature will always be set to 4/4, so you’ll need to change
this only if your new song uses a time signature that’s different than this. In this example we’ll assume that
you’re recording a 4/4 song, so we won’t change this setting.
If you want to specify a time signature other than 4/4, refer to the Owner’s Manual section
“Specifying the Time Signature (Beat Track)”
(p. 219).
Here’s how to specify the tempo when recording the song.
1. Press [TEMPO].
The Tempo window appears.
2. Use the VALUE dial or use [INC] [DEC] to specify the tempo.
• If you turn the VALUE dial while holding down [SHIFT], you’ll be able to make fine adjustments below the
decimal point.
• If you press [F7 (Click)] to turn it on, a click will sound at the specified tempo. The click will turn on/off
each time you press the button.
• If you press [F6 (Tap Tempo)], you can specify the tempo by repeatedly pressing the button at the desired
tempo (Tap Tempo). Press the button three times or more at quarter-note intervals of the desired playback
tempo.
3. When you’ve finished making settings, press [F8 (Close)].
Specifying the time signature
Specifying the tempo
Fantom-G_q_e.book 30 ページ 2008年2月4日 月曜日 午後2時26分

31
Realtime-recording the Rhythm Using MIDI
Now let’s use MIDI to realtime-record the rhythm part.
The pads are a suitable way to record a percussion instrument performance. Realtime recording is the
method in which your performance is recorded exactly as you strike the pads.
1. Press [PAD MODE] and then press pad [2] (RHYTHM).
2. When you press a pad [1]–[16], you’ll hear a rhythm sound.
If you press [STUDIO] and then press [F6 ( )] to access the mixer screen (Mixer 2), you’ll
be able to see which part plays the pads. By default, part 10 is assigned to be played by the
rhythm pads.
padmode_e.eps
If you want to play the rhythm set from the keyboard, use the cursor buttons to select (highlight)
part 10.
If you want to change the rhythm set sounds, refer to
“Selecting patches (sounds)”
(p.
29) in this manual, and select the desired sound.
Changes you make are temporary, and will be lost when you turn off the power, switch the
sound generator mode, or select a different studio set. If you want to keep the studio set you
edited, you must save the studio set as described in
“Saving the settings you’ve made”
(p. 8 of this manual).
Using the pads to record the rhythm
Setting the pad mode to RHYTHM
The part whose Rhythm Pad Part (RHY) switch is on
Fantom-G_q_e.book 31 ページ 2008年2月4日 月曜日 午後2時26分
32
Realtime-recording the Rhythm Using MIDI
Next you’ll select the MIDI track on which to record, and specify the recording-start measure.
You can record on any track 1–128 that is indicated as “MIDI.” There’s no particular need to record on
track 10 just because you’re playing part 10 of the sound generator part.
In this example, let’s record on track 1.
1. Press [SONG].
The Song Play screen appears.
2. Use the VALUE dial or use / to select the MIDI track on which you’ll record.
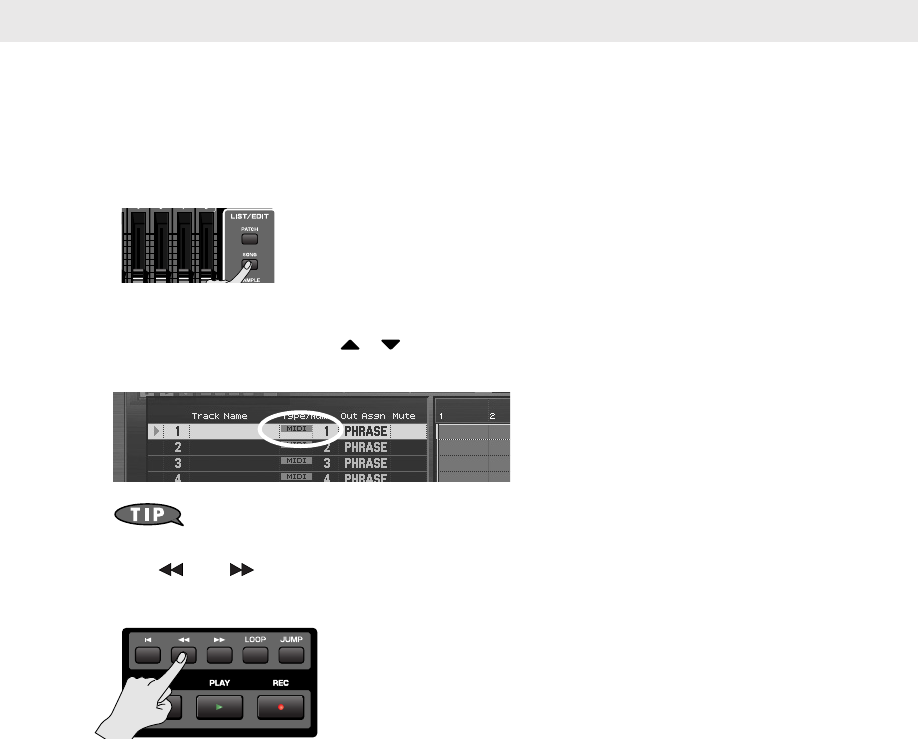
Select the track that’s indicated “MIDI 1”.
If you press [ENTER] at the Track Name field, you’ll be able to enter a track name.
➝
Owner’s Manual
“Naming a Track (Track Name)”
(p. 209)
3. Use [ ] or [ ] to specify the measure at which you’ll start recording. For this
example, specify the beginning of the song.
If a phrase already exists at the recording-start location
The existing phrase will be overwritten by your new recording.
If a phrase exists following the recording-start location
A new phrase will be recorded. You’ll be able to record up to the location of the subsequent phrase.
Selecting a recording track
Fantom-G_q_e.book 32 ページ 2008年2月4日 月曜日 午後2時26分
33
Realtime-recording the Rhythm Using MIDI
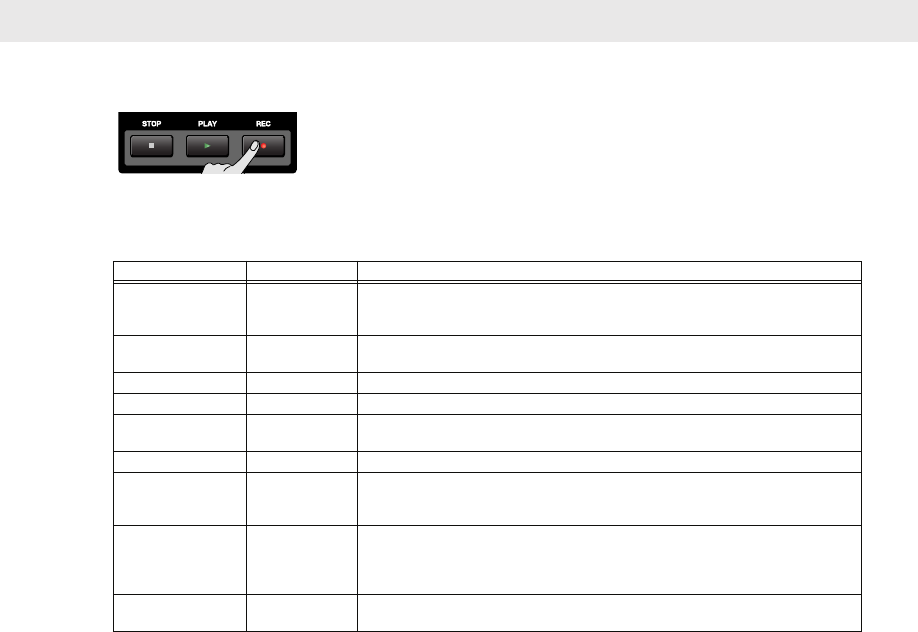
1. Press the [REC] button to enter the record-standby condition.
The [REC] indicator will blink, and the Realtime Rec Standby window appears.
2. Use the cursor buttons to move the cursor to each parameter, and turn the VALUE dial or
use [INC] [DEC] to make settings.
Here we’ll explain how to loop-record repeatedly over a four-measure section.
3. When you’ve finished making settings in the Realtime Rec Standby window, press [PLAY]
or [F8 (Start)].
After a one-measure count, recording will begin.
4. Press the pads to record your performance.
Loop-recording is active, so you’ll be able to layer the notes for bass drum
➝
snare
➝
hi-hat, etc.
If you make a mistake
Even if you make a mistake, you can erase the wrong notes in realtime while you continue to loop-record.
5. While recording, press [F6 (Erase)].
The Realtime Erase window appears.
6. Erase the unwanted data.
• To erase all data, press [F7 (Erase All)]. Data will be erased while you hold down the button.
• To erase the data of a specific key, press that key. The data for that key will be erased while you
hold it down.
• If you hold down multiple keys, the data for the keys between them will also be erased.
* You cannot use the pads to erase data with Realtime Erase.
7. Press [F8 (Close)] to close the Realtime Erase window.
You will return to normal recording.
8. When you’ve finished recording, press [STOP].
The [REC] indicator will go dark, and the recorded phrase will be assigned to the track.
Recording
Parameter Value Explanation
Rec Mode MIX Specifies whether successively recorded passes will be layered with previously-
recorded material (MIX) or will replace the previously-recorded material (RE-
PLACE). For this example choose “MIX.”
Count In 1MEAS Specifies whether a count-in will be used. For this example, choose “1MEAS” so
that a one-measure count will be sounded before recording begins.
Tempo Rec Switch OFF Specifies whether tempo changes will be recorded.
Loop Switch ON Specifies whether loop recording will be used. Turn this “ON.”
Rec Start Point 0001 01 000 Indicates the recording-start location. The beginning of the song is “0001 01
000.”
Rec End Switch ON Specifies whether a recording-end location will be set. Turn this “ON.”
Rec End Point 0005 01 000 Specifies the recording-end location. In this example we’ll record four measures
(record to the beginning of the fifth measure), so set this to “0005 01 000”. The
“Rec Length” below will automatically be set to “0004 00 000” (four measures).
Input Quantize GRID Specifies whether to use the Quantize function, which automatically corrects the
timing of your performance on the keyboard or pads. Choose the “GRID” setting
if you want to input the drums at the precise timing. If you want to record your
performance exactly as you play it, choose “OFF.”
Grid Resolution 1/16 Specifies the note value at which quantization will be applied. For this example
select “1/16” so that notes will be quantized to 1/16th note intervals.
Fantom-G_q_e.book 33 ページ 2008年2月4日 月曜日 午後2時26分
34
Realtime-recording the Rhythm Using MIDI
As an alternative to realtime recording, you can enter performance data one note at a time as though you
were writing notes onto musical staff paper. This method is called “step recording.” This allows you to
create phrases deliberately.
For details, refer to
“Inputting Data One Step at a Time (Step Recording)”
(p. 226)
in the Owner’s Manual.
Using the pads to enter notes one by one
If you’ve made only a minor mistake, just fix the phrase
You can make detailed edits to the phrase you recorded. This process is called Phrase Editing.
For example if you hit just a single wrong note, you can fix just that single note. You can also
delete an individual note, or edit its pitch or volume.
1. Press [SONG] twice to access the Song Edit screen.
Each time you press [SONG], you’ll switch between the Song Play screen and
Song Edit screen.
2. Use the cursor buttons to select the phrase that you want to edit.
3. Press [F4 (Edit)].
The Phrase Edit screen appears.
For details, refer to “Editing a Phrase (Phrase Edit)” (p. 238) in the Owner’s
Manual.
If you’ve made a serious mistake, delete the phrase
You can delete a phrase that’s assigned to a track.
➝ “Deleting a sample/phrase” p. 41 in this manual
A phrase you’ve deleted from the track will still remain in the phrase list, so delete the phrase
from the phrase list as well if desired.
➝“Deleting a Phrase from the Project (Delete Phrase)” (p. 215) in the Owner’s
Manual
Fantom-G_q_e.book 34 ページ 2008年2月4日 月曜日 午後2時26分

35
Realtime-recording the Bass
and Piano as MIDI
Now that we’ve recorded the bass and piano, let’s record the other parts. The process is the same as when
you recorded the rhythm; the only difference is that we’ll use the keyboard instead of the pads. Select a part
in the Studio Play screen, select a track in the Song Play screen, and then record.
1. Press [STUDIO].
2. Use the cursor buttons to select (highlight) part 2.
3. A bass sound will be heard when you play the keyboard.
While listening to the drums you recorded earlier, you’ll play the keyboard to record the bass part.
1. Select the “MIDI 2” track as described in “Selecting a recording track” (p. 32 of this
manual).
2. Play the keyboard to record the bass part as described in “Recording” (p. 33 of this
manual).
When you press [REC], the Recording Standby screen appears. Press [PLAY] to begin recording. Play the
keyboard to record the bass.
1. Press [STUDIO].
2. Use the cursor buttons to select (highlight) part 1.
3. A piano sound will be heard when you play the keyboard.
While listening to the drums and bass you recorded earlier, you’ll play the keyboard to record the piano
part.
1. Select the “MIDI 3” track as described in “Selecting a recording track” (p. 32 of this
manual).
2. Play the keyboard to record the piano part as described in “Recording” (p. 33 of this
manual).
When you press [REC], the Recording Standby screen appears. Press [PLAY] to begin recording. Play the
keyboard to record the piano.
You can freely arrange recorded phrases in the track.
➝
“Using Song Edit to Arrange Samples or Phrases”
(p. 41 of this manual).
Recording the bass
In the Studio Play screen, select the bass part
In the Song Play screen, select a track and record
Recording the piano
In the Studio Play screen, select the piano part
In the Song Play screen, select a track and record
Fantom-G_q_e.book 35 ページ 2008年2月4日 月曜日 午後2時26分
36
Importing Audio Files from Your Computer
The Fantom-G can import audio files (WAV or AIFF format) from your computer and use them as samples.
You can also create a song simply by placing these samples in an audio track.
Audio files can be imported into the Fantom-G.
For the procedure, refer to
“Importing sounds (samples) from your computer”
(p. 20 of this
manual).
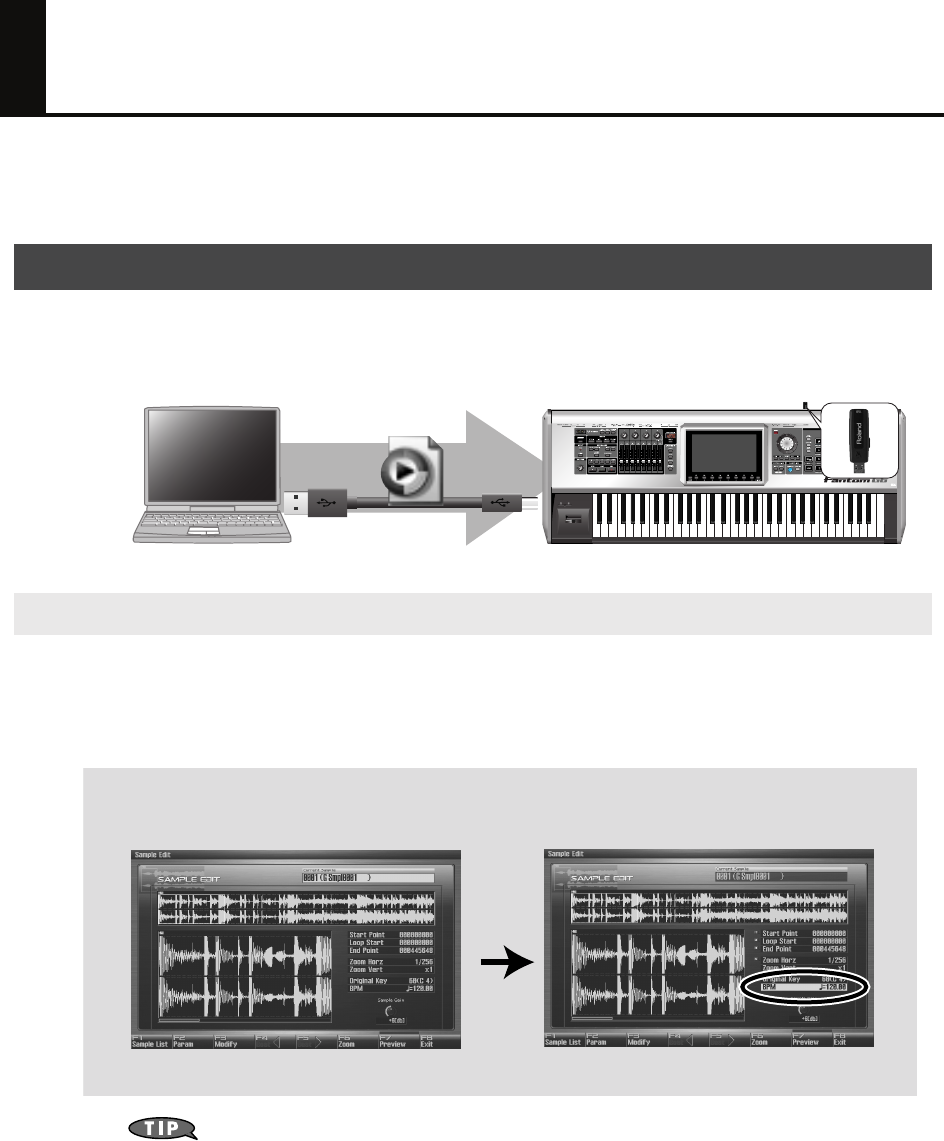
The Fantom-G provides a “realtime time stretch function.”
When using samples in an audio track, this function will keep the samples in synchronization even if you
change the sequencer tempo.
Example: Using samples that were recorded at 120 BPM
If you don’t know the tempo of the sample, use a metronome etc. to determine its tempo.
Importing audio files from your computer
Synchronizing samples to the sequencer tempo
WAV
AIFF
Press [SAMPLE] to open the Sample Edit screen
for the sample you want to edit.
Move the cursor to “BPM,” and set it to 120.
Fantom-G_q_e.book 36 ページ 2008年2月4日 月曜日 午後2時26分
37
Importing Audio Files from Your Computer
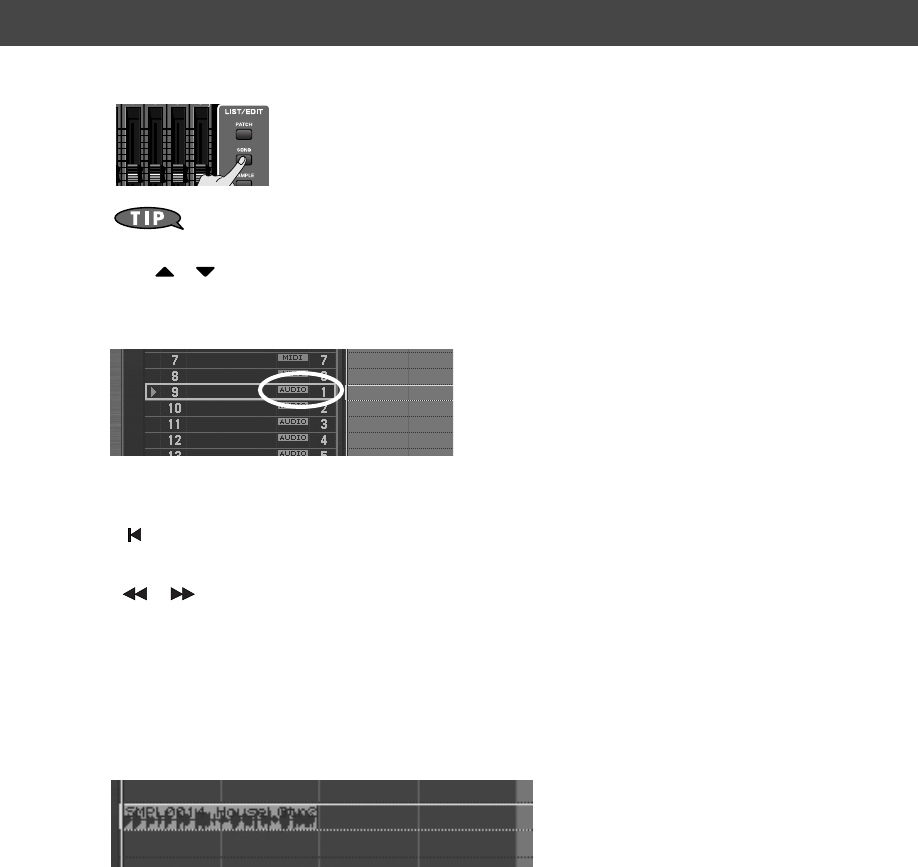
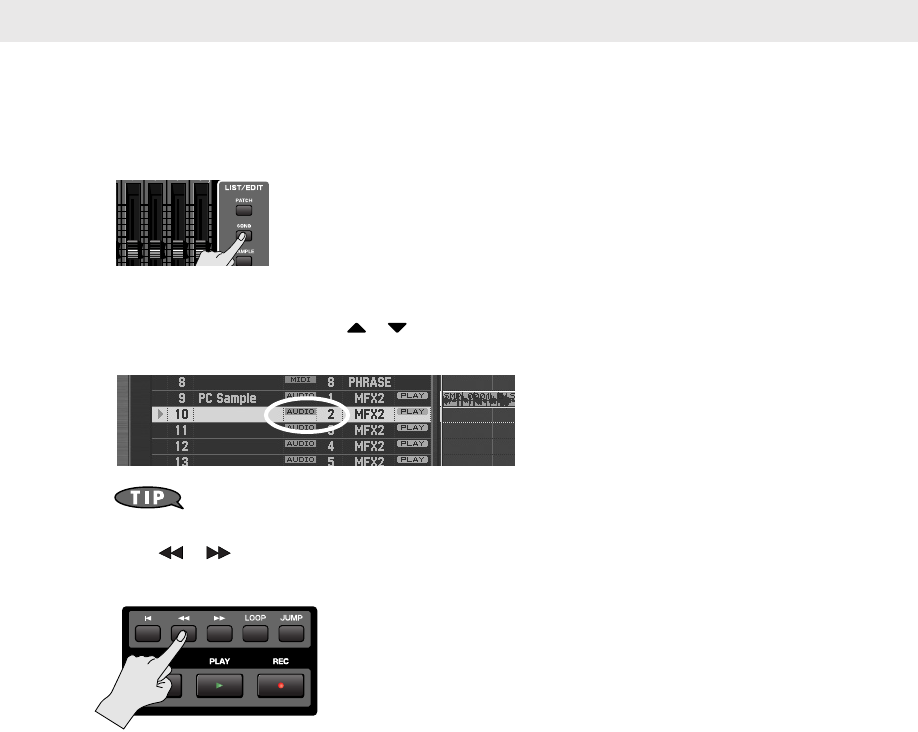
1. Press [SONG] twice to access the Song Edit screen
Each time you press [SONG], you’ll switch between the Song Play screen and Song Edit
screen.
2. Use / to select the audio track in which you want to place a sample.
You can place samples in any track 1–24 that indicates AUDIO.
For this example, select the track marked “AUDIO 1.”
3. Specify the location at which the sample/phrase will be placed.
The buttons have the following operations.
[]
Moves the current location to the beginning of the song.
[INC] [DEC]
Moves the current location in steps of one tick.
[] []
Moves the current location in steps of one measure.
VALUE dial
Moves the current location in steps of one beat.
4. Press [F1 (Insert)].
The Sample Select screen appears.
5. Select the sample that you want to insert, and press [F8 (Select)].
The sample will be inserted at the specified location.
You can freely place inserted samples anywhere in a track.
➝
“Using Song Edit to Arrange Samples or Phrases”
(p. 41 of this manual).
Placing samples in an audio track
Fantom-G_q_e.book 37 ページ 2008年2月4日 月曜日 午後2時26分
38
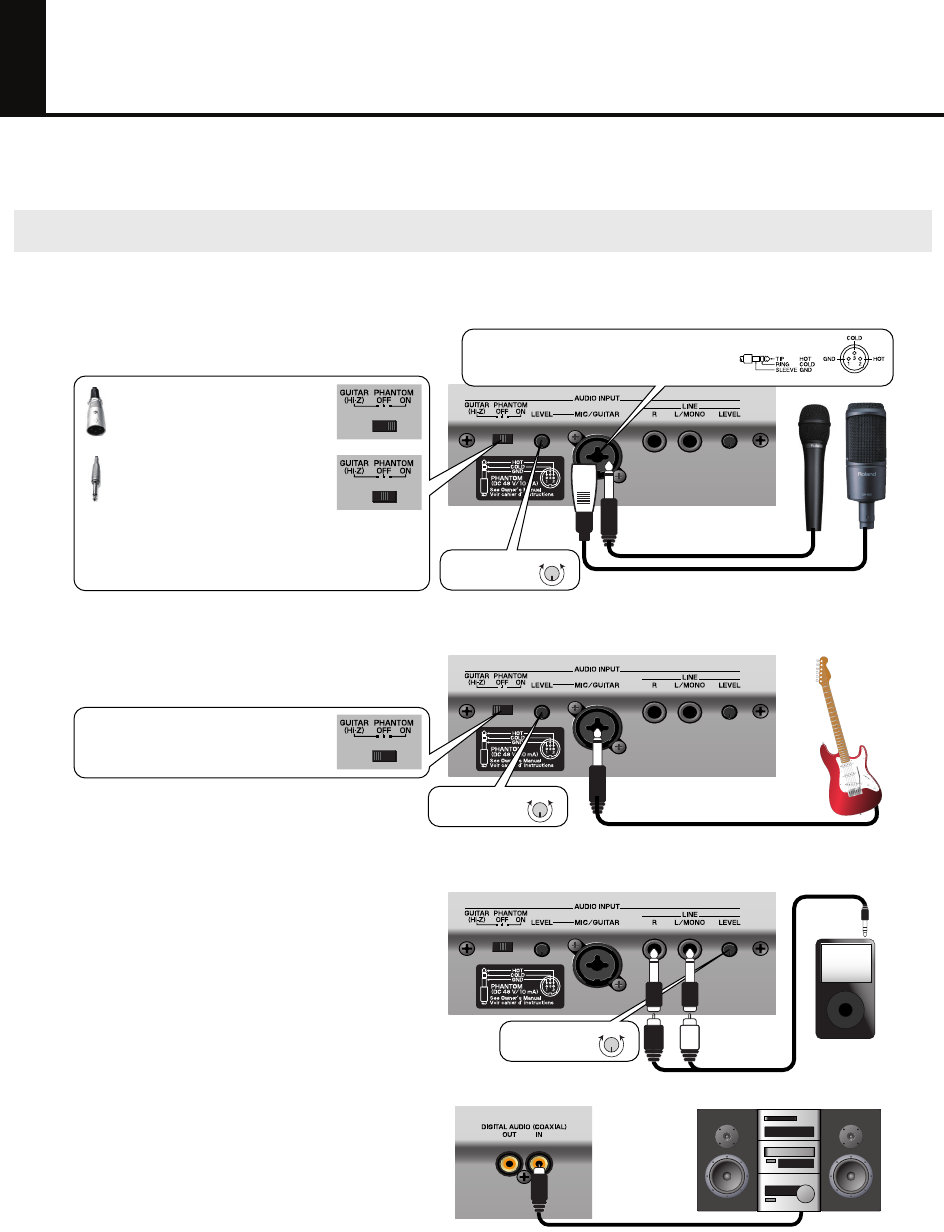
Recording Sound from a Mic or Guitar
Here’s how to record from a mic or guitar connected to the Fantom-G.
Connect your mic, guitar, or portable audio player as shown below.
Connecting your equipment
Connecting a mic
Connecting a guitar or bass
Connecting a portable audio player
When using a condenser mic that
requires a balanced (XLR) connection
that supplies phantom power,
select the “PHANTOM ON” setting.
When using a dynamic mic etc. that
has a phone plug,
select the “PHANTOM OFF” setting.
For a guitar or bass,
select the “GUITAR (Hi-Z)” setting.
When connecting a guitar or bass directly, connect it to the
MIC/GUITAR jack.
When connecting a portable audio player, stereo system, or CD
player, use audio cables to connect its output jacks (LINE OUT
jacks or AUX OUT jacks, etc.) to the Fantom-G’s LINE input jacks.
Connecting a digital audio source
When digitally connecting equipment such as a DAT, use a
coaxial cable to connect its output jack (e.g., DIGITAL OUT
jack) to the Fantom-G’s DIGITAL AUDIO IN jack.
You must leave the phantom power turned off unless you’ve
connected a condenser mic that requires a phantom power supply.
Supplying phantom power to a dynamic mic or audio playback device
will cause malfunctions. For details on the specifications of your mic,
refer to the owner’s manual for your mic. (The Fantom-G’s phantom
power supply is DC 48V, 10 mA maximum.)
You cannot connect a record player (turntable) directly to the Fantom-G.
If you want to connect a record player, you must use an audio amp that’s
equipped with a record player input, or connect a phono equalizer
between the record player and the Fantom-G.
When an external device is connected to the DIGITAL AUDIO IN jack,
and you disconnect the cable or power-off the external device, noise
may subsequently be heard in the input from DIGITAL AUDIO IN. If this
occurs, correctly re-connect your external device, or turn off the
Fantom-G’s [MIX IN] switch.
Mics with phone plugs
Mics with balanced (XLR) plugs
Use this to adjust
the recording level.
MinMax
Use this to adjust
the recording level.
MinMax
Use this to adjust
the recording level.
MinMax
The Fantom-G provides a balanced (XLR/TRS) type
connector that is wired as shown in the illustration.
Check the wiring of your device before connecting it.
Fantom-G_q_e.book 38 ページ 2008年2月4日 月曜日 午後2時26分
39
Recording Sound from a Mic or Guitar
Select the audio track on which you want to record, and specify the recording-start measure.
You can record on any track 1–24 that’s marked “AUDIO.”
For this example let’s record on audio track 2.
1. Press [SONG].
The Song Play screen appears.
2. Turn the VALUE dial or use / to select an audio track.
For this example select the audio track shown as “AUDIO 2.”
By pressing [ENTER] at the track name, you can assign a name to the track.
➝
“Naming a Track (Track Name)”
(p. 209) in the Owner’s Manual
3. Use [ ] [ ] to specify the measure at which you want to start recording. For this
example, specify the beginning of the song.
If there is already a sample at the recording-start location
An audio track can play only one sample at a time. If samples are placed so that they overlap, the latter
sample will take priority for playback.
Selecting the track on which to record audio
Fantom-G_q_e.book 39 ページ 2008年2月4日 月曜日 午後2時26分
40
Recording Sound from a Mic or Guitar
1. Press the [REC] button to enter record-standby mode.
The [REC] indicator will blink, and the Audio Rec Standby window appears.
You can apply effects such as equalizer or compressor to the audio input. To make settings,
press [F7 (Inp Setting)] and then [F7 (Input Effect)] to access the INPUT EFFECT screen. For
details on the parameters that you can set, refer to
“Input Effect Parameters”
(p. 186) in
the Owner’s Manual.
2. Use the cursor buttons to move the cursor to each parameter, and turn the VALUE dial or
use [INC] [DEC] to set its value.
For this example we’ll make settings for using the mic to record in monaural for a length of four measures.
For details on each parameter, refer to
“Audio Rec Standby Parameters”
(p. 230) in
the Owner’s Manual.
3. If you’re using the mic/guitar/line input, use the rear panel LEVEL knob to adjust the
input level from the external source.
• If you’re using DIGITAL IN, this adjustment is not necessary.
• If the volume of the external input is too high, the front panel PEAK indicator will light.
In this case, turn down the LEVEL knob until the PEAK indicator no longer lights.
• If the recording level is too high, the level meter in the screen will indicate “CLIP.”
4. Press [PLAY] or [F8 (Start)].
After a one-measure count, recording will begin.
5. Perform on your mic or guitar.
6. When you’re finished recording, press [STOP].
The [REC] indicator will go dark, and the recorded sample will be assigned to the track.
Recording audio
Parameter Value Explanation
Audio Rec Mode SOLO Selects how recording will occur. With the “SOLO” setting, the internal sound
generator will play as usual, but only the external audio input will be recorded.
Input Select MIC/GUITAR Selects the input source.
DIGITAL IN: DIGITAL AUDIO IN jack
LINE IN L/R: INPUT jacks L/R (stereo)
LINE IN L: INPUT jack L (mono)
MIC/GUITAR: MIC/GUITAR jack
USB AUDIO: USB connector
Audio Rec Channel MONO You can select either stereo or mono for the track to be recorded. Choose “STE-
REO” if you want to record in stereo.
Count In 1MEAS Specifies the count. For this example, choose “1 MEAS” so that recording will
begin after a one-measure count.
Rec Start Point 0001 01 000 Indicates the recording-start location. The beginning of the song is “0001 01
000”.
Rec End Switch ON Specifies whether a record-end location will be specified. Turn this “ON.”
Rec End Point 0005 01 000 Specifies the record-end location. For this example we’re going to record four
measures (i.e., stop at the beginning of the fifth measure), so set this to “0005
01 000.” The “Rec Length” below will automatically be set to “0004 00 000”
(four measures).
Fantom-G_q_e.book 40 ページ 2008年2月4日 月曜日 午後2時26分
41
Using Song Edit to Arrange Samples or
Phrases
You can edit your song by moving or copying samples and phrases.
1. Press [SONG] twice to access the Song Edit screen
Each time you press the [SONG] button, you’ll switch between the Song Play screen and Song
Edit screen.
You can change the location at which a sample/phrase plays back, or move it to a different track.
Use the cursor buttons to select the sample/phrase that you want to move, and perform the following
operations depending on how you want to move it.
If you’re using a USB mouse, you can move a sample/phrase by dragging it with the mouse
(hold down the left mouse button and move it).
You can copy the sample/phrase immediately following its current location in the track.
If you want a phrase loop to play repeatedly for several measures, this provides a way to quickly create
copies of it.
Use the cursor buttons to select the sample/phrase that you want to copy, and press [F3 (Copy)] to copy it to
the immediately following location.
If you’re using a USB mouse, you can copy a sample/phrase by clicking it while holding
down
[SHIFT]
.
You can delete a sample/phrase from the track.
Use the cursor buttons to select the sample/phrase that you want to delete, and press [F2 (Delete)] to delete
the sample/phrase.
Moving a sample/phrase
To move by Button operation
Measures [SHIFT] + cursor (left/right) buttons
16th notes (120 ticks) [SHIFT] + [VALUE] dial
Single tick [SHIFT] + [INC] [DEC]
Between tracks [SHIFT] + cursor (up/down) buttons
Copying a sample/phrase
Deleting a sample/phrase
Editing a copied phrase will modify the content of all copies of that phrase. If you want to edit only a copied
phrase, you should Duplicate it before editing it.
1. In the phrase list, duplicate the phrase that you want to edit.
➝ Owner’s Manual “Duplicating a Phrase (Duplicate)” (p. 215)
2. Edit the duplicated phrase.
3. Assign the edited phrase to the song.
➝ Owner’s Manual “Inserting a Sample/Phrase at a Specified Location (Insert)” (p. 233)
To make detailed edits to the
performance data (MIDI)
Edit it in the Microscope screen (Owner’s Manual p. 250)
To overwrite-record onto a phrase Select the phrase in the phrase list, and press [REC] to overwrite-record
(Owner’s Manual p. 221)
To transpose Use the Transpose function (Owner’s Manual p. 245) to transpose.
To switch the sound (part) of a
phrase, e.g., Piano➝Bass
Use the Change Channel function (Owner’s Manual p. 246) to change
the MIDI channel. Set the Src Channel to “1” (the piano part) and the Dst
Channel to “2” (the bass part), and then execute (F8 Execute).
Fantom-G_q_e.book 41 ページ 2008年2月4日 月曜日 午後2時26分
42
Adjusting the Overall Balance
When you’ve finished recording, you’ll want to adjust
the balance between the various parts. The process of
adjusting the overall sound and clarifying the parts you
want to emphasize is called “mixing.”
Press [STUDIO] to access the Studio Play screen
(mixer), and adjust the various settings.
In the Studio Play screen, you can press the [F7 ] or
[F8 ] keys several times to switch the view between
the internal (internal sound generator) parts, audio
tracks, expansion boards, and external MIDI output parts.
Part group Explanation
Audio Track Audio tracks of the song
Internal Internal (internal sound generator)
EXP 1 Expansion board 1
EXP 2 Expansion board 2
External External MIDI output
About the mixing balance
Volume (Level) and mute (Mute Sw)
Use these to adjust the balance between the instruments. If there are a large number of parts
and you find it difficult to distinguish between them, you may find it useful to mute separate
sounds such as drums, bass, or piano while you make adjustments.
Left/right position (Pan)
It is typical to place the drums and bass in the center. Around these sounds, you can pan the
chordal instruments to left and right to create a stable ensemble. Panning the lead instruments
near the center, but slightly left or right, can enhance their listenability.
Reverb (Reverb Send)
Using reverb will produce the sensation of a performance heard in a studio or hall. However,
excessively deep reverb will blur the acoustical image, making your song less listenable.
Low frequencies will make the reverb sound muddy, so it’s usual to not use any reverb on kick
drum or bass. Conversely, using deep reverb on specific items such as a short piano phrase
played during an interlude can enhance the overall depth of the song.
Chorus (Chorus Send)
Applying chorus will spread the sound between left and right, adding a pleasant depth and
spaciousness to the sound. This effect is commonly applied to guitar and electric piano, so
you’ll often have occasion to use it. However, you’ll achieve the maximum effectiveness if you
keep a distinction between parts that use chorus and parts that don’t use chorus.
For more about effect settings such as reverb and chorus
➝ “Adding Effects” (p. 150) in the Owner’s Manual
Fantom-G_q_e.book 42 ページ 2008年2月4日 月曜日 午後2時26分
43
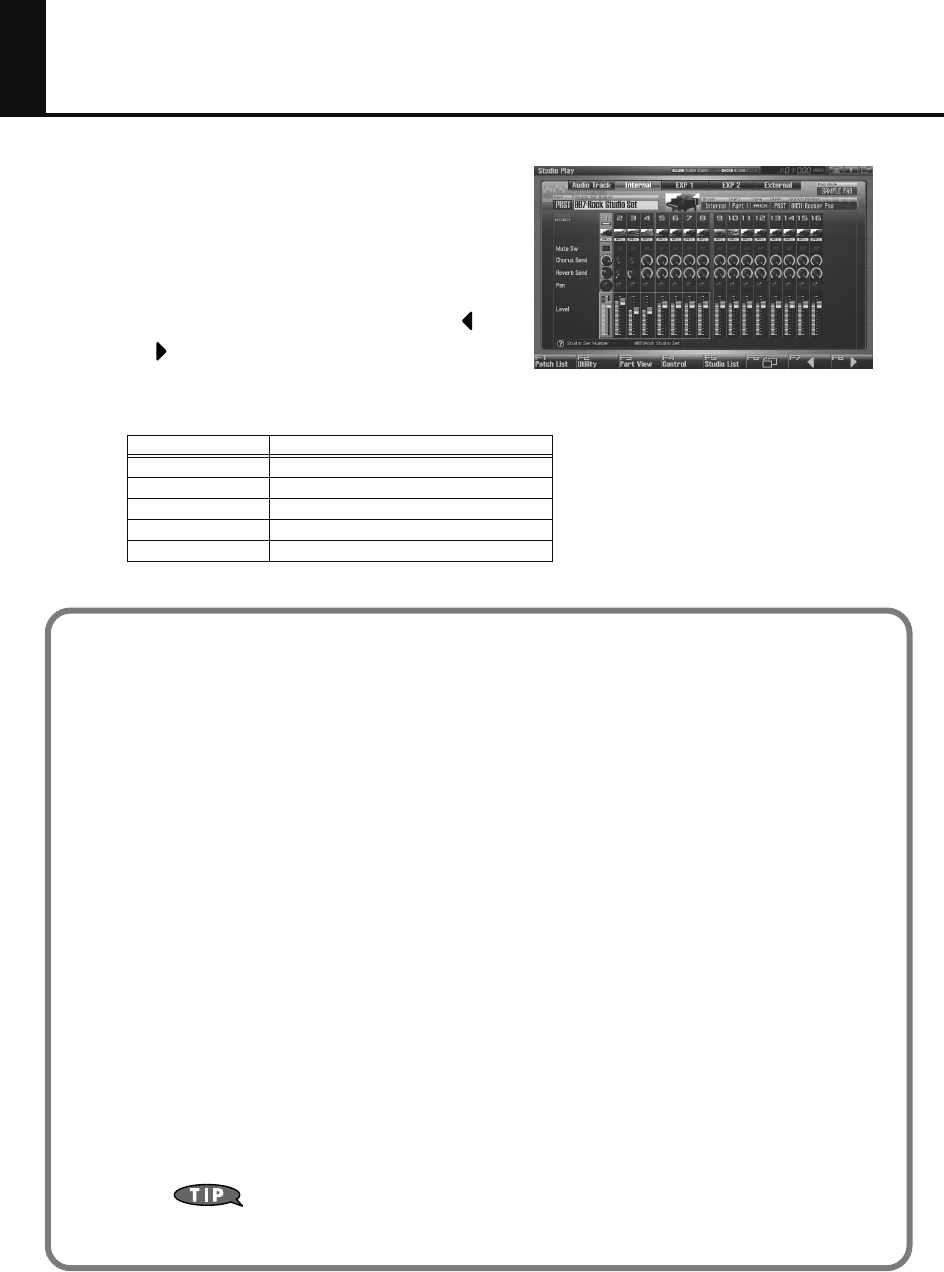
Mastering
Mastering is the final state of song production, in which you apply a compressor and equalizer to add the
final touches to the song. If your completed song is lacking in overall power, or if it sounds quite different
when played back in a different environment, you should pay attention to the adjustments of the mastering
process.
1. Press [EFFECTS (ROUTING)] to access the Effects screen.
2. Press [F7 (Mastering)].
3. Use cursor buttons to move the cursor to the parameter you wish to modify.
4. Turn the VALUE dial or press [INC] [DEC] to get the value you want.
The Fantom-G’s mastering effect provides several preset settings. You can use these to easily try out different
variations of mastering settings.
For more about mastering
➝
“Mastering Effect”
(p. 160) in the Owner’s Manual
Using mastering to complete your song
Hard Comp
Soft Comp
You can select either hard or soft compression. Start by choosing one of these settings as desired,
and then make fine adjustments.
Low Boost
Mid Boost
High Boost
In addition to the compressor effect, these provide variations of output volume for each frequency
band, producing an equalizer-like effect.
On/Off Switch
Mastering Setting
Fantom-G_q_e.book 43 ページ 2008年2月4日 月曜日 午後2時26分
44
Saving Your Song
The song you created will disappear if you turn off the power. Save it as follows.
To save phrases individually
➝
“Saving a Phrase (Save)”
(p. 216) in the Owner’s Manual
To save samples individually
➝
“Saving a Sample (Save)”
(p. 274) in the Owner’s Manual
1. In the Song Play screen or Song Edit screen, press [WRITE].
The Write Menu screen appears.
2. Use / to select “Song,” and then press [F8 (Select)].
The Song Name window appears.
3. Assign a name to the song.
4. When you’ve finished assigning a name to the song, press [F8 (OK)].
A screen appears, allowing you to select the writing-destination song.
5. Turn the VALUE dial or use [INC] [DEC] to select the song number.
6. Press [F8 (Save)].
A confirmation message appears.
* Never turn off the power while writing is in progress.
7. If you’re sure that you want to write the song, press [F7 (OK)].
Fantom-G_q_e.book 44 ページ 2008年2月4日 月曜日 午後2時26分
45
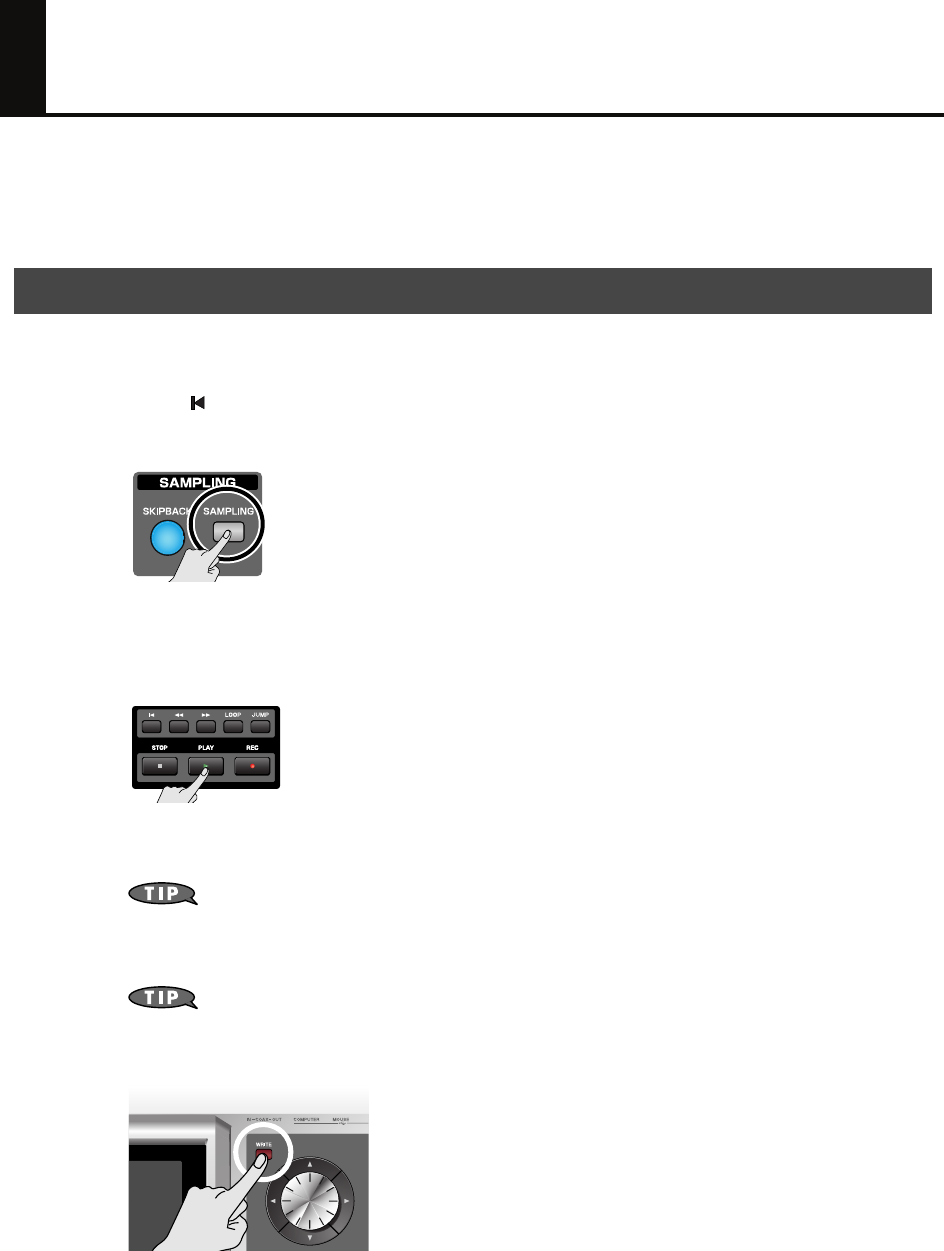
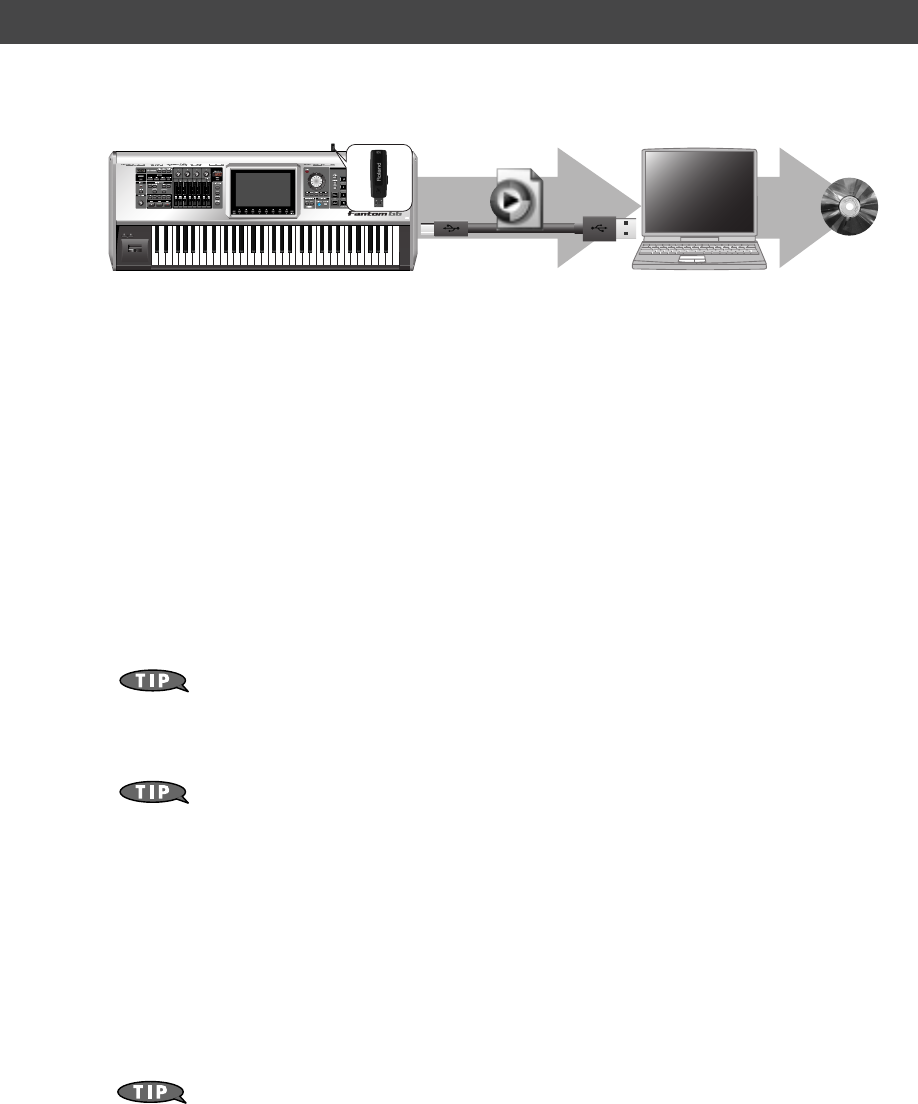
Making a CD from Your Completed Song
The Fantom-G provides a “Resampling” function that renders all of the audio tracks and MIDI tracks in your
song into a single sample. The samples created by this resampling function can be copied to your computer
as WAV files, and used by your computer to create a CD.
Here’s how to combine all audio tracks and MIDI tracks into a single sample. A sample created in this way
can be saved on your computer as a song.
1. Press [ ] to move the song position to the beginning of the song.
2. Press the [SAMPLING] button.
3. Press [F2 (Re-Sampling)].
4. Press [F2 (Auto Trig)].
5. Press [PLAY].
Resampling will begin.
6. When the song ends, press [F7 (STOP)].
If you set
Stop Trigger
(Owner’s Manual p. 260) to “TIME” and set
Sampling Length
(Owner’s Manual p. 261) to the ending time of your song, resampling will stop automatically.
7. The sample created by resampling will open in the Sample Edit screen, (Owner’s Manual
p. 266).
The volume of the resampled phrases may be lower than the original volume of the phrases. If
necessary, use
Normalize
(Owner’s Manual p. 270) to raise the volume.
8. Press [WRITE] to save the sample.
Resampling the contents of all tracks to a single sample
Fantom-G_q_e.book 45 ページ 2008年2月4日 月曜日 午後2時26分
46
Making a CD from Your Completed Song
After resampling, you can copy the resulting sample to your computer. The sample is a WAV file, so you
can use it to create a CD on your computer.
1. Verify the number of the sample you created by resampling (In this example we’ll
assume it is 0001).
2. Use a USB cable (sold separately) to connect the Fantom-G’s USB COMPUTER connector to
your computer.
3. Press [MENU].
4. Turn the VALUE dial to choose “USB Storage,” and press [F8 (Select)].
5. Press [F2 (USB Memory)].
If you saved the samples to a project in internal memory rather than USB memory, press [F1 (Internal)].
6. The USB memory will be mounted on your computer. Copy the following sample from
USB memory to your computer.
“FantomG001.Prj/SMPL/0001.WAV”
(The number of the .WAV file name is the sample number.)
“FantomG001.Prj”
is the folder name of the project.
By default, the project folder names in USB memory will be numbered as
“FantomG001.Prj,”
“FantomG002.Prj,”
etc., but the portion preceding the filename
extension will be the project name you assigned when saving it.
If you saved the samples to a project in internal memory rather than USB memory, use the USB
Storage function (
“Exchanging Files with Your Computer (USB Storage)”
(p. 281)
in the Owner’s Manual) to copy the sample (FantomG.Prj/SMPL/001.WAV) from internal
memory to your computer.
7. When you are done copying, remove the USB memory on the computer, and then press
[F8 (Exit)] on the Fantom-G.
Windows Vista/XP Users:
In My Computer, right-click the “removable hard disk” icon and execute “Remove.”
Mac OSX Users:
Drag the USB drive icon into the trash.
8. Use software such as Windows Media Player or iTunes to burn the copied sample
(0001.WAV) to a CD.
For details on writing to a CD, refer to the Owner’s Manual or help file for the software you’re
using.
Copying the resampled sample to your computer and creating a CD
CD
0001.WAV
(Song)
Fantom-G_q_e.book 46 ページ 2008年2月4日 月曜日 午後2時26分


04905089 08-02-1N
*04905089- 01*
