Rongta Technology RPP200 Mobile Printer User Manual
XIAMEN RONGTA TECHNOLOGY CO.,LTD. Mobile Printer Users Manual
Users Manual
200 Series Printer
User
Manual

2
Catalog
I NOTICE ...............................................................................................................................3
1.1 Safety Notice .................................................................................................................4
1.2 Usage Notice .................................................................................................................4
1.3 Storage Notice ...............................................................................................................5
1.4 Battery Safety Notice .....................................................................................................5
II PRODUCT INTRODUCTION ............................................................................................7
2.1 Printer outer design ........................................................................................................7
2.2 Accessories ....................................................................................................................8
III Performance .......................................................................................................................9
3.1 Print Performance ..........................................................................................................9
3.2 Physics Parameter ..........................................................................................................9
3.3 Environment Parameter .................................................................................................9
3.4 Other Performance .........................................................................................................9
IV Introduction...................................................................................................................... 10
4.1 Preparing before usage ................................................................................................ 10
4.1.1 Battery Installation ................................................................................................ 10
4.1.2 Paper Roll Installation ........................................................................................... 10
4.2 Basic Function ............................................................................................................. 12
4.2.1 Power On .............................................................................................................. 12
4.2.2 Power Off.............................................................................................................. 12
4.2.3 Self-Test ................................................................................................................ 12
4.2.4 Feed (Feed Manually) ........................................................................................... 12
4.2.5 Charge................................................................................................................... 12
4.3 Printer Connecting and Printing ................................................................................... 13
4.3.1 USB Interface Connecting..................................................................................... 13
4.3.3 Bluetooth Matching and Printing........................................................................... 14
4.3.4 Using Bluetooth Interface to Print ......................................................................... 14
4.4 Indicator Light and Buzzer Signal Description ............................................................ 15

3
This equipment has been tested and found to comply with the limits for a Class B
digital device, pursuant to part 15 of the FCC Rules. These limits are designed to prov
ide reasonable protection against harmful interference in a residential installation. Thi
s equipment generates, uses and can radiate radio frequency energy and, if not installe
d and used in accordance with the instructions, may cause harmful interference to radi
o communications. However, there is no guarantee that interference will not occur in a
particular installation. If this equipment does cause harmful interference to radio or te
levision reception, which can be determined by turning the equipment off and on, the
user is encouraged to try to correct the interference by one or more of the following m
easures:
• Reorient or relocate the receiving antenna.
• Increase the separation between the equipment and receiver.
• Connect the equipment into an outlet on a circuit different from that to which the rec
eiver is connected.
• Consult the dealer or an experienced radio/TV technician for help.
Caution: Any changes or modifications to this device not explicitly approved by manu
facturer could void your authority to operate this equipment.This device complies wit
h part 15 of the FCC Rules. Operation is subject to the following two conditions: (1)
This device may not cause harmful interference, and (2) this device must accept any i
nterference received, including interference that may cause undesired operation.
This equipment complies with FCC RF radiation exposure limits set forth for an unco
ntrolled environment. This device and its antenna must not be located or operating in
conjunction with any other antenna or transmitter.

4
I NOTICE
Please read the following information carefully before using the printer!
1.1 Safety Notice
(1) This printer can only use battery and power adapter provided by our
company, or it may cause damage to the printer, battery leakage, fire or
explosion.
(2) Do not put the battery into the fire, not make it short circuit, break up or
heating, otherwise it may cause the battery leakage, fire or explosion.
(3) The battery liquid is corrosive, if the user’s careless operation leads the
battery leakage and the liquid viscosity to the skin or the clothes please use
the clean water for washing immediately, if accidentally into the eyes,
please rinse with plenty of clean water to wash the eyes then goes to the
hospital.
(4) Do not open paper cover and use hand or any part of body to touch the
printer mechanism when printing or printing just end, to avoid the
exorbitant temperature causes Scald.
(5) Do not use the printer when the operation is failed because that would cause
a fire or electric shock. Please turn off and unplug it, then call the dealer.
1.2 Usage Notice
(1) The printer can’t be immerged into the water and not be exposed in the rain
for a long time; otherwise it may lead the damage to the printer.
(2) Do not open the paper cover when printing or it may cause the printer
working improperly.
(3) If use the serial interface to print, do not pull off the serial line when
printing, otherwise it may result in incompletion of the final print data.
(4) When using IR to print, the user should aim the IR windows of main
equipment at the IR windows of printer, the distance between them should
be not more than 50 centimeters, and the angle should not exceed 30
degrees, or it may lead to print garbled or unable to print.

5
(5) The printer could work stably from -10°C to 50°C , but the higher
temperature (>/=45°C ) or lower temperature (</=5°C ) would debase the
print quality. Higher humidity (>/=85%) or lower humidity (</=20%) also
may debase the print quality.
(6) Use the bad print paper or long time storage paper would affect the print
quality, even damage the printer.
(7) When the printer is working in black mark detection mode (when printing
the pre-print receipt with black mark), it requires the black mark that on the
pre-print paper is accord with black mark printing standard (as details in
4.2 Pre-print Black Mark Instruction), otherwise it may lead the printer
disable to detect the black mark accurately. The battery of the printer is
better running out before charging, which could effectively ensure the
lifespan of it.
1.3 Storage Notice
(1) The printer should be stored in the environment where the temperature is
-20°C to 70°C and relative humidity is 5% to 95%.
(2) If the user plan to store the printer for a long time, please be sure to take out
the battery and stored it separately, or it may result in the battery lose
efficacy, even leakage and then damage the printer.
(3) The storage time of common thermal paper is short, if the user need to print
the long-term preservation receipt, please use long-acting thermal paper.
Do not store the thermal paper in a high temperature or direct sunlight
environment, if it has been sealed off, please store it in dark place.
1.4 Battery Safety Notice
Please read this user manual carefully before using the printer. Ignoring the
followings may cause overheating, burning, explosion, damage of the battery and/or
debase the lifespan of the printer.
Warnings:
(1) Do not let water or sea water in or leak into the battery. If the safety device
in it is burned out, any charge of it would lead abnormity current and or

6
voltage and bring unusual chemistry reaction, then cause the overheating,
burning and/ or explosion of it.
(2) Do not use or place the battery near burner or high temperature environment.
Overheating may cause the damage to the resin shell and/or heat insulation
material, and bring the short circuit in the battery then lead the overheating,
burning and/ or explosion of it.
(3) Please use dedicated charger when charging. When charging under the
excluded conditions (such as high temperature, high voltage/current or
using modified charger) may cause excessive battery charging, abnormal
current and/ or voltage, bring unusual chemistry reaction and then may
result in overheating, burning and or explosion of it.
(4) Positive and negative poles are marked clearly on the battery. The user
should make sure the battery position is correct when inserting it in the
charger or product. Reverse insertion would lead reserve charging, may
bring unusual chemistry reaction and then cause overheating, burning
and/or explosion of the battery.
(5) Do not make the battery contact to power socket and/or car cigarette
lighting socket, which may lead high voltage, bring excessive current and
result in overheating, burning and/or explosion of it.
(6) Do not make the battery contact to power socket or car cigarette lighting
socket, which may lead high voltage, bring excessive current and result in
overheating, burning or explosion of it.
(7) Do not heat the battery or put it into the fire that may melt the heat
insulation material or damage the safety device or equipment and make the
electrolytic ignited, then bring overheating, burning and/or explosion of it.
(8) Do not make the battery poles ((+) and (-)) contact to any metal. In addition,
do not take or store it with metal materials, such as necklace, hairpin etc.
Short circuit in the battery may cause excessive current, then bring
overheating, burning and/or explosion of it and overheating of neighboring
metal materials.
7
(9) Do not throw the battery or make it damaged. If the safety device in it is
burned out, any charging of it would bring abnormal current and/or voltage,
bring unusual chemistry reaction, then may lead to overheating, burning
and/or explosion of it.
II PRODUCT INTRODUCTION
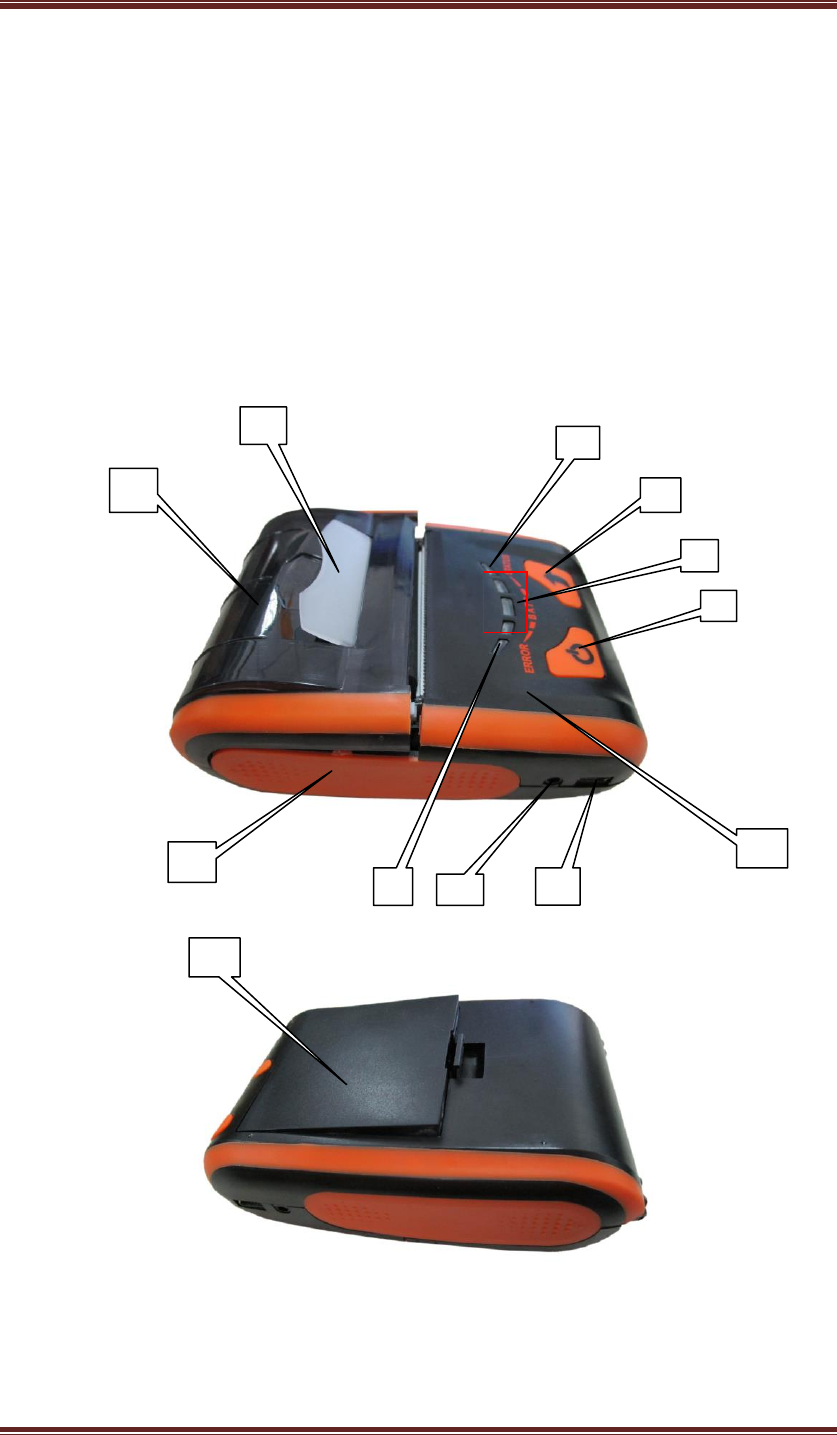
2.1 Printer outer design
1. Feed Key
2. Status Indicator
2
7
1
5
8
6
4
10
3
9
11
12
8
3. Battery indicator
4. Error indicator
5. Power Key
6. Body
7. cover opening button
8. transparent cover
9. Printer Top Cover
10. Power supply interface
11. USB interface
12. Battery Cover
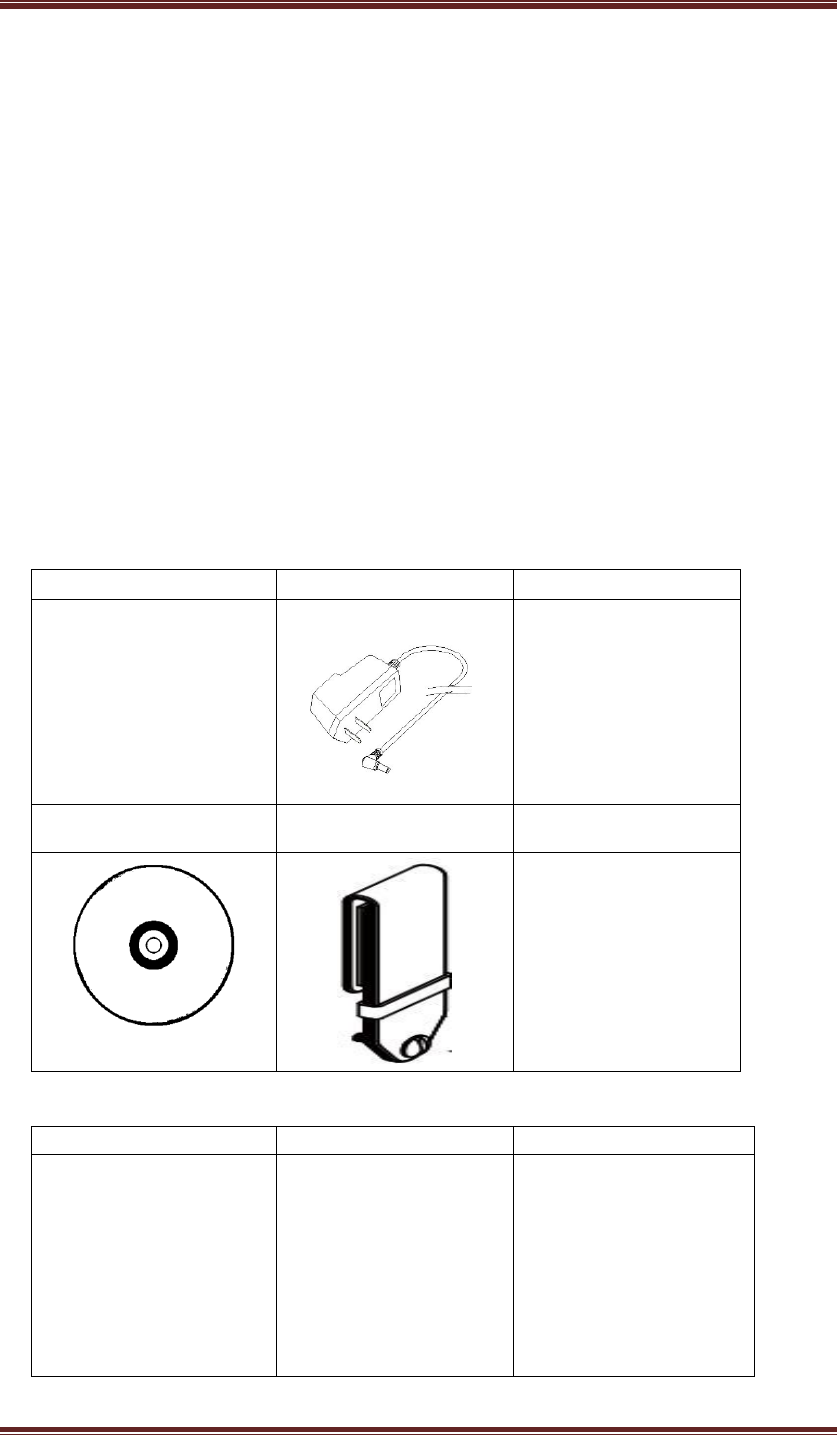
2.2 Accessories
Standard Accessories
Optional Accessories
Leather Sheath
Battery Power Charger Paper Roll
CD-ROM Leather Sheath

9
III Performance
3.1 Print Performance
Printing way: Direct thermal print
Paper width: 58mm
Printing width: 48mm
Resolution: 8dots/mm (203dpi)
Dot/line: 384dots
Printing speed: 80mm/s (Max)
Paper thickness: 60-80μm
Printing Contents: Support all GB 18030 Chinese character, PC437, Katakana,
PC850, PC860,PC863,PC865,WPC1252,PC866,PC852,PC858;
Barcode:CODE39,EAN-13,EAN-8,CODABAR,CODE93,ITF; QR CODE, PDF417.
3.2 Physics Parameter
Outer dimension 112*79*45mm
Gross weight: 260g (Battery and Paper roll included)
Roll Diameter: ≤38mm
USB, Bluetooth, RS232 (custom-made); Interfaces varied with
different models. See the model description.
3.3 Environment Parameter
Working temperature: -10°C ~50°C
Working humidity: 20%~85%
Storing temperature:-20°C ~70°C
Storing humidity:5%~95%
3.4 Other Performance
Paper loading way: Clamshell paper loading (as details 4.1.2 Paper Roll
Installation);
Paper sensor: The red error light and Green indicator light of printer will be on
when come to paper end.
Printing Command: ESC/POS compatible with commands set (see “200
Command Set”), the user could get it from the supplier;
Interface:
10
Power: 1400mAH rechargeable li-ion battery
Power alarm: battery indicator light will be out and Error indicator light (Red)
will be on when printer will run out of power.
Adapter to recharge: battery can be filled with in 3 hours.
USB to recharge: battery can be filled with in 6 hours.
Notice: The battery to recharge can’t use Adapter and USB at the same time.
A charging time available: Normally, The battery could be used for printing 100
meters or 3 hours. The parameter is only for reference; the capacity of the battery
would be decreased after a long time using and could not ensure the actual print time.
IV Introduction
4.1 Preparing before usage
4.1.1 Battery Installation
1. Pull up the buckle, open battery cover;
2. As shown in the picture, put battery into the battery compartment. Please do
not put the negative and positive poles of battery in wrong way;
3. Then closed the battery cover.
4.1.2 Paper Roll Installation
Battery
y

11
Usage Method
1. Poke up the key of opening cover or use fingers to keep pressing the sides of
cover then open it.
2. As shown in picture, please put the paper roll in and do not put it in wrong
direction, otherwise it would lead the printer unable to work.
Transparency
cover
Rubber
roll
Cover button
Pinch both sides

12
3. As shown in picture, pull out part of paper; please make sure to pull the paper
out of the paper roll compartment.
4. Put the paper roll in the right way and then close the cover.
4.2 Basic Function
4.2.1 Power On
Under power off status, keep pressing "POWER" key for two seconds, printer
will be powered on and on working status, then power indicator (green light) lights.
Note: If printer power indicator (blue light) goes out and the error indicator (red
light) lights, it means the printer is going to power off, please change the battery or
charge it. Charging method please refer to (4.2.5 charging).
4.2.2 Power Off
Under power on status, keep pressing "POWER" key for two seconds, then the
printer will be powered off and all indicator lights will be put out.
4.2.3 Self-Test
Once the user receives the printer could do the self-test at any time to check the
setting and status of it.
Self-Test method as follows: Power off(If the printer is power on)the printer,
press "FEED" key and at the same time press "POWER" key to power on it, then the
printer will print out the self-test page, which contains the printer status, setting and
printing sample.
4.2.4 Feed (Feed Manually)
Under printer working status, press "FEED" key, the printer will start feeding
paper.
4.2.5 Charge
When the printer has been working for a long time, the battery will be out of
power, in this case, the printer power indicator (blue lights) will go out , and at the
same time the error indicator (red light) will light, which means it needs charging. If
the printer power off automatically while printing, the user should charge it for
continue working.
by USB port.

14
WPA2-PSK in Wifitool. The setting data of wifitool should keep the same
to route.
4. If the encryption type for route is “WEP”, the setting of wifitool should fit
to the route.
5. After connecting printer with computer by virtual serial connection via
USB port and finish all the wifi parameter, please choose the relevant
serial port in wifitool, for example COM8, and set up the default baud rate
of printer as “19200”(if customers set up baud rate through dial switch,
input the right one),then apply it.
4.3.3 Bluetooth Matching and Printing
200 portable printer should match to the primary device of printer, which initiates
matching.
Matching methods as follows:
Switch on power of printer
Primary device search for the external bluetooth device
If there is more than one bluetooth device around, select the printer which is
corresponding to BDA address (refer to the self-test page).
Input password “0000”
Finish the matching
About matching method details, please refer to primary bluetooth function
description.
During matching, 200 portable mini printer must be power on.
After matching successfully, other PC still can be matched with the printer, and
each printer can be at most matched with 8 PC, if matched with more than eight PC,
the primary printer matched with PC will be deleted automatically, at this time, if this
printer need the PC to drive it, then it need to be re-matched with PC.
4.3.4 Using Bluetooth Interface to Print
For the PC with virtual bluetooth serial port (such as cell phone using the
SMARTPHONE, POCKET PC, PALM, laptops, etc.), after the success of the
matching, you can send printing data through virtual bluetooth serial port to the 200

15
portable mini printer for printing. If the PC doesn’t have virtual bluetooth serial port,
and you want to drive the 200 portable mini printer, please consult your PC supplier.
4.4 Indicator Light and Buzzer Signal Description
Printer has a buzzer and two indicators light that used to prompt the user the
status of the printer, the light is used to represent the current status of the printer, and
buzzer used to prompt the printer status changes. Two indicator lights are respectively
function indicator light and charge indicator.
Feed Paper
Indicator
(green)
Power Indicator
3pcs(blue)
Error
Detection(red)
Printing
Status
Long lighting
3 lightings blink
circularly from left to
right
off
On charge
Long lighting
off
Long
lighting
Low level
Long lighting
Long lighting
(all is on)
off
Finish
charging
Long lighting
Long lighting
(based on electric
quantity)
off
Power on
Long lighting
Long lighting
(based on electric
quantity)
Long lighting
Abnormal
off
off
off
Power off