Rosslare SP-N6G HomeLogiX User Manual HomeLogiX Software Manual
Rosslare Enterprises Ltd HomeLogiX HomeLogiX Software Manual
Rosslare >
Contents
- 1. Users Manual I
- 2. Users Manual II
Users Manual I
Advanced Wireless Security Panel
Software Manual
September 2009
Pursuant to FCC §15.21 [ 54 FR 17714 , Apr. 25, 1989,
as amended at 68 FR 68545 , Dec.9, 2003], changes
or modifications made to equipment, which are not
expressly approved by Rosslare Enterprises, Ltd., may
void the user's authority to operate the equipment.
NOTE: This equipment has been tested and found to
comply with the limits for a Class B digital device,
pursuant to part 15 of the FCC Rules. These limits are
designed to provide reasonable protection against
harmful interference in a residential installation. This
equipment generates, uses and can radiate radio
frequency energy and, if not installed and used in
accordance with the instructions, may cause harmful
interference to radio communications. However,
there is no guarantee that interference will not occur
in a particular installation. If this equipment does
cause harmful interference to radio or television
reception, which can be determined by turning the
equipment off and on, the user is encouraged to try
to correct the interference by one or more of the
following measures:
Reorient or relocate the receiving antenna.
Increase the separation between the
equipment and receiver.
Connect the equipment into an outlet on a
circuit different from that to which the receiver
is connected.
Consult the dealer or an experienced radio/TV
technician for help.

Table of Contents
HomeLogiX Software Manual Page ii
Table of Contents
1. ............................................................................. 4 Introduction
1.1 ........................................................ 4 Remote PC Activities
2. ........................................................ 5 Installing HomeLogiXTM
2.1 ...................................................... 5 System Requirements
2.2 ...................................................... 5 Installing the Software
3. ........................................................................ 7 Getting Started
3.1 ............................................................... 7 Basic Concepts
3.2 ....................................................... 7 Running the Software
3.3 ....................................... 9 The HomeLogiX Main Window
TM
3.4 ...................................................................... 10 Main Tasks
4. ............................ 11 Creating and Managing Panel Accounts
4.1 ................................................. 11 Creating a Panel Group
4.2 ..................................... 12 Creating a New Panel Account
4.3 ............................................... 12 Saving the Configuration
4.4 ............................. 13 Changing an Existing Panel Account
4.5 .............................................. 15 Deleting a Panel Account
5. ....................................................... 16 Editing a Panel Account
5.1 ...................................................... 16 Account Information
5.2 ............................................................................. 17 Zones
5.3 ...................................................................... 17 Enrollment
5.4 .......................................................................... 19 Security
5.5 ........................................................... 21 Communications
5.6 .................................................................... 24 Automation
5.7 ....................................................................... 26 Messages
6. ............................................ 27 Communicating with the Panel
6.1 ............................. 27 Setting the Panel Authorization Code

Table of Contents
HomeLogiX Software Manual
Page iii
6.2 ................................................. 27 Uploading from a Panel
6.3 ................................................ 29 Downloading to a Panel
6.4 ................................................ 30 Refreshing the Properties
6.5 .................. 30 Uploading the Date and Time from a Panel
6.6 .................. 31 Downloading the Date and Time to a Panel
6.7 .......................... 32 Restoring the Panel to Factory Defaults
6.8 ................................................... 32 Disconnecting a Panel
7. ................................................ 33 Viewing System Information
7.1 ............................ 33 Viewing the Panel Account Properties
7.2 ................................................... 33 View the System Status
7.3 ........................................... 34 Applying Actions via the PC
7.4 ....................................... 35 Refreshing the Panel Manually
7.5 ................................ 35 Refreshing the Panel Automatically
7.6 ................................................. 36 Viewing the Events Logs
8. ........................................................ 38 Configuring the System
8.1 ............................................................ 38 General Options
8.2 ............................................... 41 Communication Options
9. .............................................. 43 Performing Database Backup
9.1 .............................................. 43 Backing up the Database
9.2 ................................................. 43 Restoring the Database
Appendix A. .......................................... 45 Technical Support

Introduction
1. Introduction
The HomeLogiXTM Remote Programmer (referred to as HomeLogiXTM) is a
software application designed to support installers of the HomeLogiXTM
Wireless Panel (referred to as wireless panel). HomeLogiXTM allows its users
to define the configuration for a wireless panel, edit the configuration and
download it to the wireless panel. HomeLogiXTM displays currently defined
wireless panels and the properties for each panel.
HomeLogiXTM allows the installer to upload the current wireless panel
configuration and make changes. The installer can then download the
new configuration to the wireless panel.
The wireless panel can be connected to HomeLogiXTM either directly via
an RS-232 cable and Rosslare's MD-14 RS-485 to RS-232 converter or
remotely using a modem. See the HomeLogiXTM Installer Guide for more
details on connecting the wireless panel to HomeLogiXTM.
1.1 Remote PC Activities
The following are remote PC Activities which can be performed via the
HomeLogiXTM PC Software:
• Arming Away
• Arming Home
• Disarming
• Set bypass to zone
• Remove bypass indication from zone
• Turning on or off a PGM device
Note:
HomeLogiXTM now enables remote actions when the
panel is armed.
HomeLogiX Software Manual Page 4

Installing HomeLogiXPTM
HomeLogiX Software Manual Page 5
2. Installing HomeLogiXTM
This chapter describes how to install HomeLogiXTM.
2.1 System Requirements
Hardware Requirements
• Pentium 4 or higher
• Minimum 256MB RAM
• 100MB available Hard Disk space
• One available serial COM port
Software Requirements
• Microsoft Windows 2000, NT , XP
Ancillary equipment
• Rosslare’s MD-N33 or similar third party modem
• Telephone cable (2-wire to RJ-11) for working in remote mode
• Rosslare's MD-14 RS-485 to RS-232 converter
2.2 Installing the Software
The following describes how to install HomeLogiXTM.
To install HomeLogiXTM:
1. From the CD provided, double click on the file HomeLogiXSetup.exe.
The Select Target window is displayed.
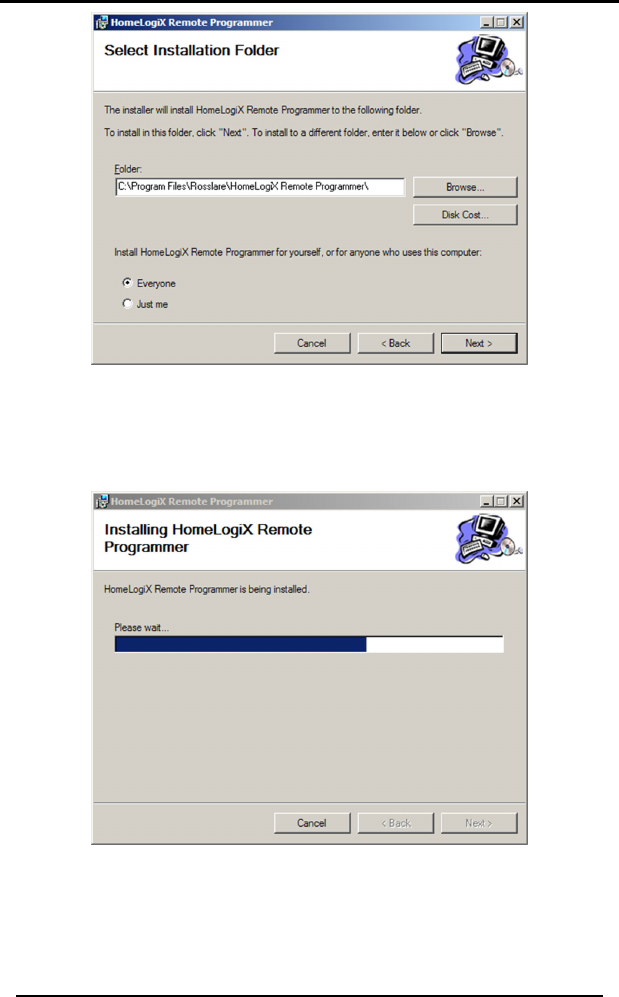
Installing HomeLogiXPTM
Figure 1 - Select Target Window
2. Click Browse to change the destination folder.
3. Click Install to begin the installation.
The installation runs and then the Completed window is displayed.
Figure 2 - Installation Completed Window
4. Click Close to complete the installation.
HomeLogiXTM is successfully installed.
HomeLogiX Software Manual Page 6
Getting Started
3. Getting Started
This chapter explains what you need to know before using HomeLogiXTM.
3.1 Basic Concepts
HomeLogiXTM is a Microsoft Windows application used to manage wireless
panels installed in various locations. The user creates a panel account for
each owner of a wireless panel. The panel account holds all the
configuration information for a specific wireless panel. The configuration
can then be downloaded to the wireless panel via a direct connection to
the PC or remotely using a modem.
The user can also connect to a wireless panel to check its live status,
events log and to make changes to the configuration.
3.2 Running the Software
The following section explains how to run HomeLogiXTM.
To run HomeLogiXTM:
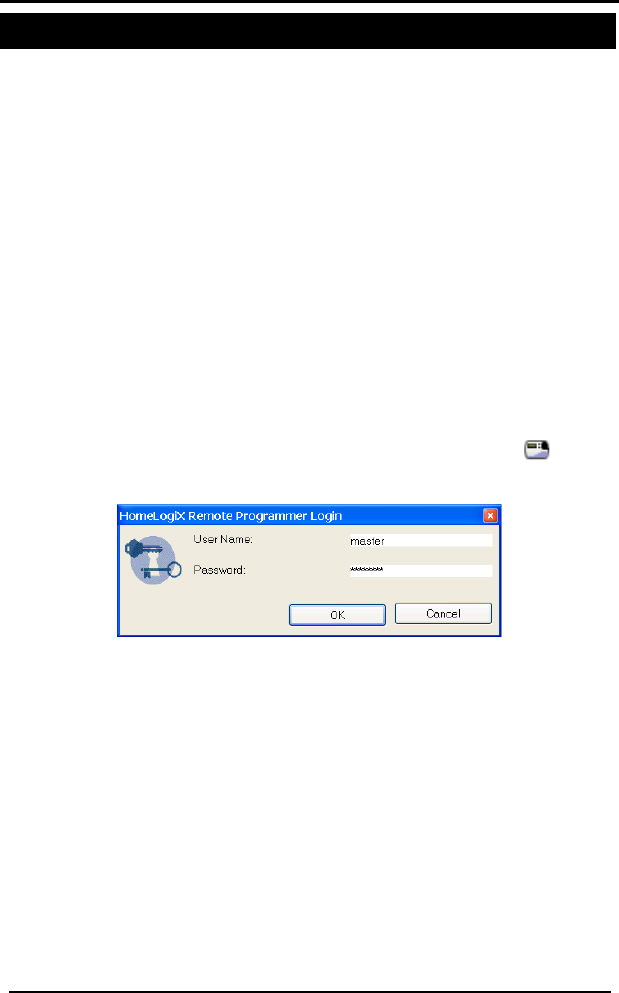
1. From the Start menu, select Programs > Rosslare > HomeLogiXTM
Remote Programmer > HomeLogiXTM Remote Programmer.
The Login window is displayed.
Figure 3 - Login Window
2. The first time you run HomeLogiXTM, the default User Name “master”
and password “xxxxxxxx” are displayed. Click OK.
The first time you run HomeLogiXTM you will be asked to change your
user name and password.
HomeLogiX Software Manual Page 7
Getting Started
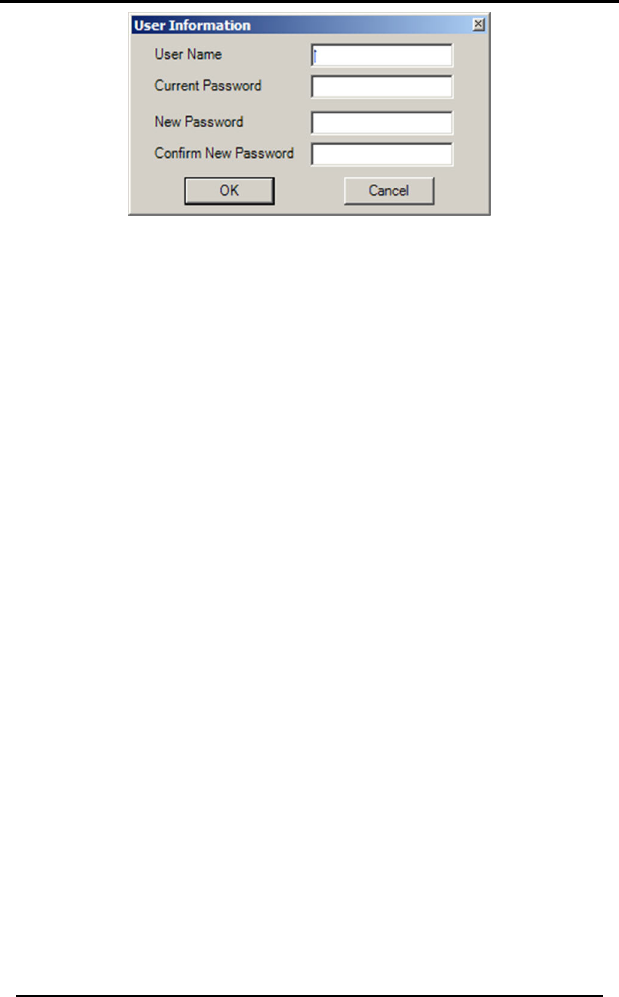
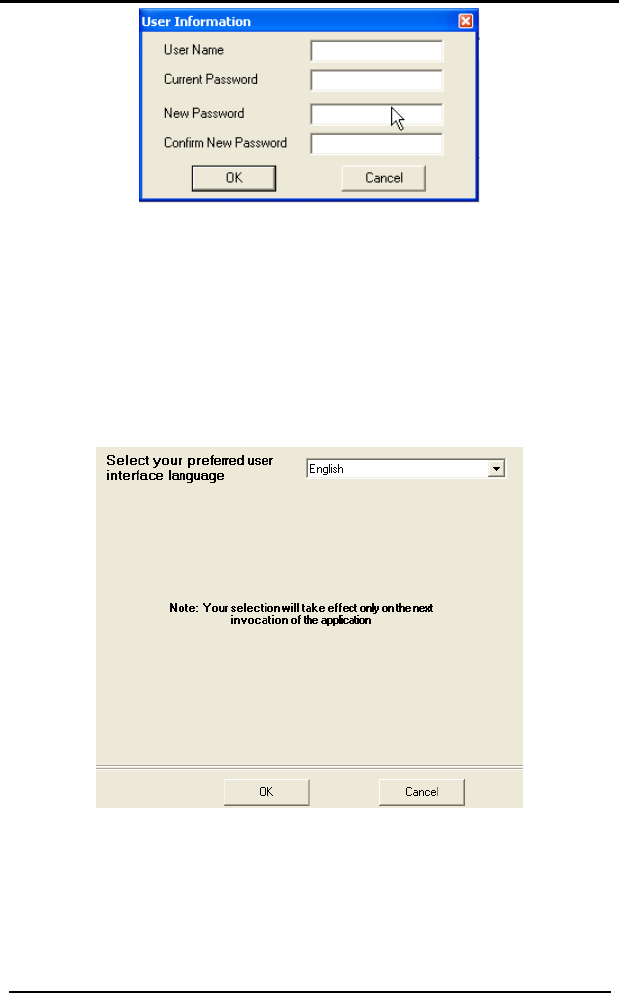
Figure 4: Change Login Details dialog
3. Enter the new user name and new password. Confirm new password
and click OK. Verify that the new user name and password have
been changed successfully.
The application starts up and the HomeLogiXTM Remote Programmer
window appears. See The HomeLogiX Main Window
TM on page 9.
9.
4. After running the HomeLogiXTM Remote Programmer with the
changed user details, enter the User Name and Password and click
OK.
The HomeLogiXTM Remote Programmer window appears. See The
HomeLogiX Main Window
TM on page
HomeLogiX Software Manual Page 8

Getting Started
3.3 The HomeLogiXTM Main Window
HomeLogiX Software Manual Page 9
Figure 5: HomeLogiXTM Remote Programmer Window
The HomeLogiXTM main window is used as a central place for accessing all
the features and options available. The HomeLogiXTM Remote Programmer
window contains the following areas:
1 Menu bar Access main options.
2 Toolbar Quickly access frequently used operations.
3 Panel Tree Contains the panel accounts and groups already defined
the system.
in
4 Properties
Area
Displays properties of the current selection in the left pane.
5 Assistance
bar
Gives assistance by displaying a short description of the field
you are in.
6 Status bar Displays the current communication status of the system.
The example above shows a panel account that has been defined in the
system. Panel accounts are listed in the panel tree on the left. The
Properties Area on the right displays the properties for the selected panel.
X
Y
Z
[
\
]

Getting Started
HomeLogiX Software Manual Page 10
ng
escribed in detail in the chapter Creating and
Managing Panel Accounts on page 11.
o
ts.
l
r
he properties of a panel account.
3.4 Main Tasks
These are the main tasks you need to perform to get started usi
HomeLogiXTM. Each task is d
• Creating a Panel Group (on page 11) – creates a panel group s
you can organize your panel accoun
•reating a New Panel Account (on p Cage 12) – creates a new pane
account for an owner of a wireless panel.
• Saving the Configuration (on page 12) – saves the configuration fo
a panel account.
• Changing an Existing Panel Account (on page 13) – lets you make
changes to t
Creating and Managing Panel Accounts
4. Creating and Managing Panel
Accounts
This chapter describes how to create and manage panel accounts.
4.1
You ing to panel
grou orate panel
Exist nts can be copied into a panel group using the Edit
Menu commands or by right clicking on a panel account and using the
edit commands.
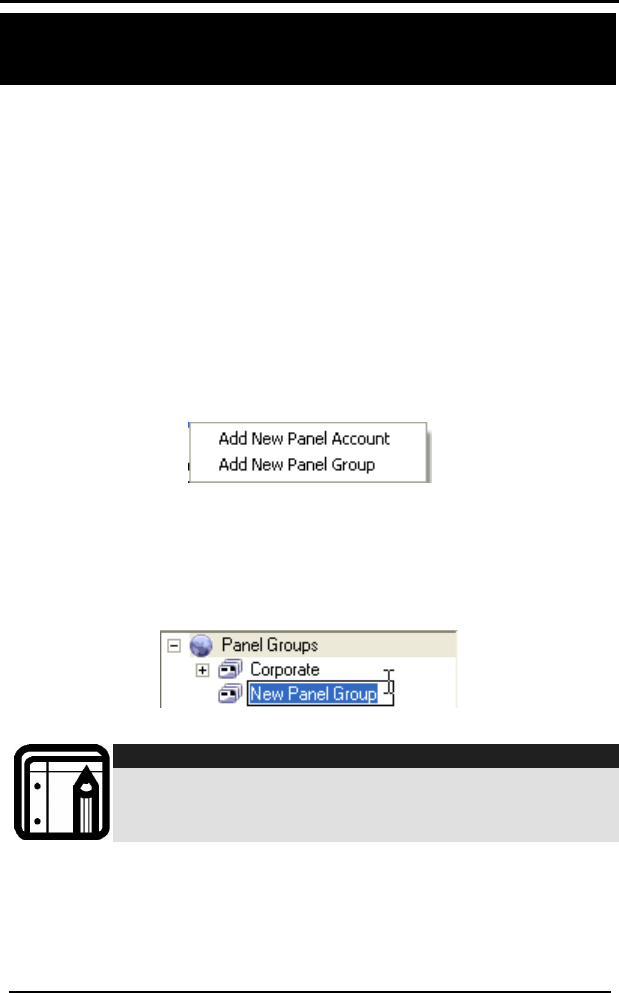
To add a new panel group:
1. In the Panel Tree, right click on the place where you want to add a
panel group.
Creating a Panel Group
can organize panel accounts in the Panel Tree accord
ps. For example, you can create a group for your corp
accounts and another group for your private home panel accounts.
ing panel accou
The right click menu is displayed.
Figure 6 - Right Mouse Menu - Add New Panel Group
3. such
2. Click on Add New Panel Group.
A new panel group is added at the mouse position.
In the edit field that appears, enter the name of the panel group
as Private Homes.
Figure 7 - Add New Panel Group
Note:
You can also change the panel account name at any
time by right clicking on the name of the panel and
choosing Rename.
HomeLogiX Software Manual Page 11
Creating and Managing Panel Accounts
HomeLogiX Software Manual Page 12
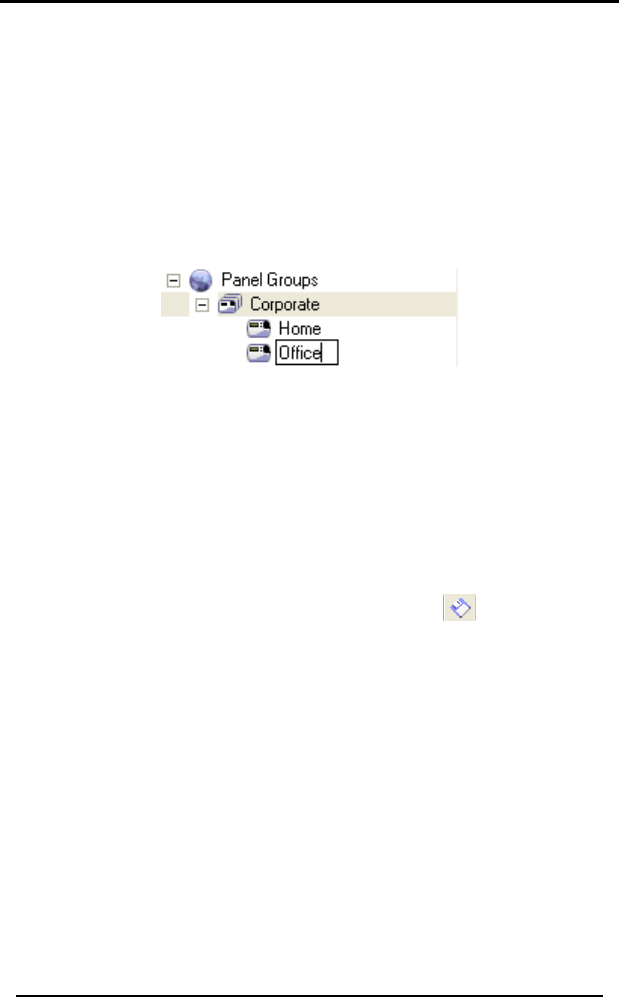
4.2 Creating a New Panel Account
You create a new panel account for every owner of a wireless panel.
To create a new panel account:
1. From the Panel Account menu, select New.
Alternatively, you can right-click on Panel Groups in the Panel Tree
and select Add New Panel Account from the dropdown menu.
Under Panel Groups, a new panel account is added.
2. In the edit field that appears, enter the name of the panel account
such as Office.
Figure 8 - New Panel Account
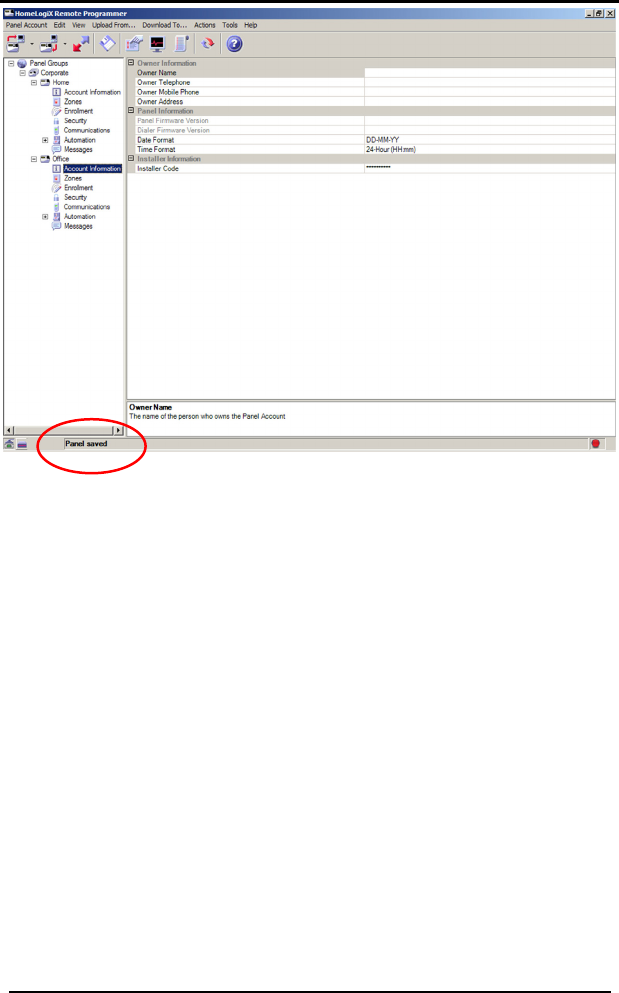
4.3 Saving the Configuration
Saving the configuration, saves any changes made to the selected panel
account.
the panel
ar.
To save changes made to a panel account:
1. In the Panel Tree, select the panel account to save.
2. From the Panel Account menu, click Save Configuration. You can also
save changes in a panel account by right clicking on
account and choosing Save or from the toolb
In the status bar the message “Panel saved” appears.
Creating and Managing Panel Accounts
Figure 9 - Status Bar - Panel Saved
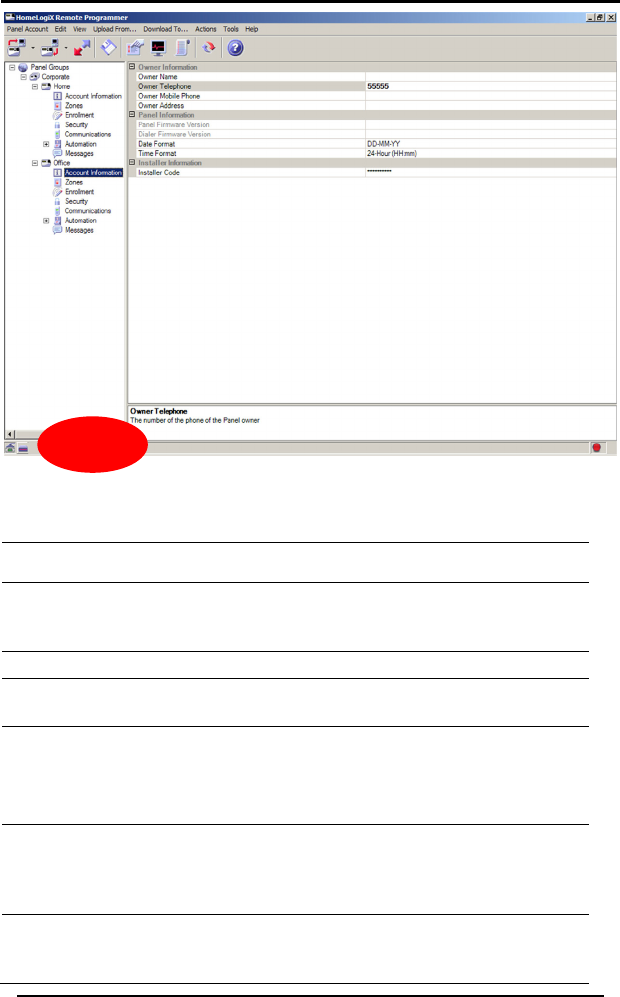
4.4 Changing an Existing Panel Account
You can change the properties for each panel account. This is the main
e applic the behavior of the wireless panel.
change pro
e
Panel Tree, select the panel account to change.
l
In the right pane type the information in the property fields.
e tus bar
displays “Panel m ing
the Configuratio
aspect of th ation and defines
You cannot
To change an
1. In the
perty items that are grayed out.
xisting panel account:
2. Under the pane account name, select the item to change (for
example, Accou
3.
nt Information).
Once you hav made a change to a panel account, the sta
odified” until you save the configuration (see Sav
n on page 12.
HomeLogiX Software Manual Page 13
Creating and Managing Panel Accounts
HomeLogiX Software Manual Page 14
Figure 10 - Status Bar - Panel Modified
These are the panel account properties available for editing. They are
described in further details later in this guide.
Section Description
Account
Information on
Details about the owner of the p
plus information about the wirele
Page 16
anel account
ss panel.
Zones on page 17 Details about the Zone type and description.
Enrollment on page
17
Details about each enrolled detector.
Security on page
19
Settings to automatically arm or disarm the
wireless panel for specific days and times.
Settings for the time delay before activating the
alarm state.
Communications
on page 21
Communication settings between the Central
Station and the wireless panel. Details of private
phone numbers that can be called by the
wireless panel.
Automation on
page 24
Settings for up to two external devices, called
PGMs that can be controlled by the wireless
panel.
Creating and Managing Panel Accounts
Section Description
Messages on page
Settings for the Keypad tone function as well as
26 defining custom zone descriptions
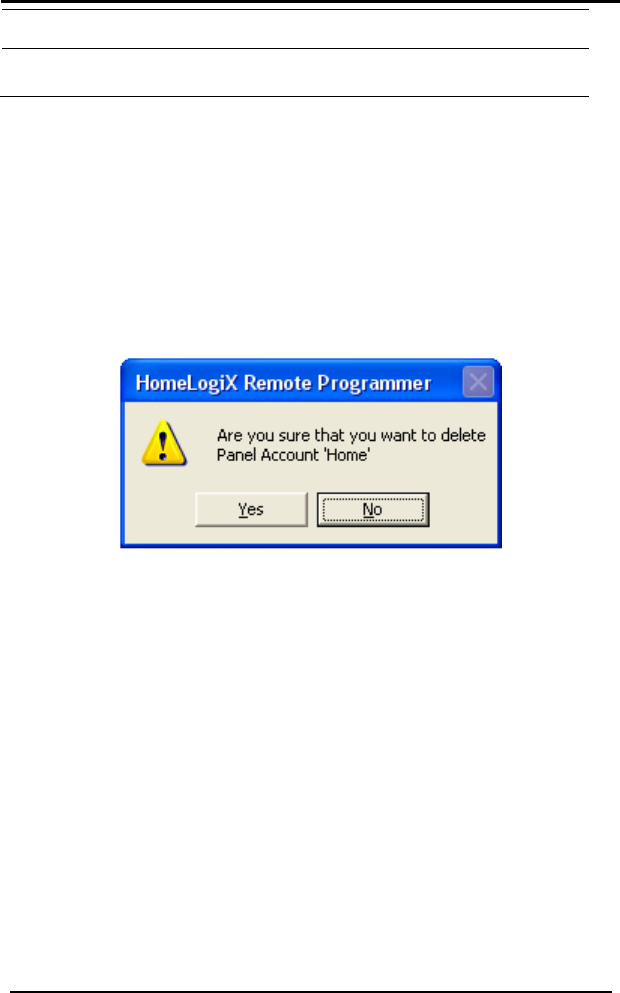
4.5 Deleting a Panel Account
The following describes how to delete a panel account. For example,
need to delete an account when the owner removes the wireless pa
from the premises.
To delete a panel account:
you
nel
ount to delete.
unt
1. In the Panel Tree, select the panel acc
2. From the Edit menu, click Delete or right click on the panel acco
and select Delete from the menu.
The following warning window is displayed.
el Account WarnFigu
. Click Yes t
re 11 - Delete Pan
o delete the select
ing Window
ed panel account. 3
HomeLogiX Software Manual Page 15

Editing a Panel Account
HomeLogiX Software Manual Page 16
5. Edit nel
is chapter d riou
anel account.
5.1 Account Informatio
Account Information contains de
lus in ut th
o et
less panel.
count Information:
Once you have finished modifying
ld also download the latest configuration to the
r Account Information:
ing a Pa Account
Th
p
escribes the va s properties that you can modify for a
n
tails about the owner of the panel
account p
includes the
version of the wire
formation abo
wner’s general d
e wireless panel. Account Information
ails and the hardware and software
To access Ac
• Click on a panel account in the Panel Tree and then click
Account Information below the panel account name.
After modifying the properties, remember to save the configuration (see
on page 12).Saving the Configuration
the properties you shou
wireless panel (see Downloading to a Panel on page 29).
The following properties are available unde
Section Property
Item
Description
Owner Owner Name The name of the person w
Information panel account.
ho owns the
Owner Telephone
The
ow
telephone number of the panel
ner.
Own
Phon
nel
Own ses where the
Information
Pan
Vers panel. This item cannot be changed.
er Mobile
e
The mobile phone number of the pa
owner.
er Address The address of the premi
wireless panel is installed.
el Firmware
ion
The firmware version of the wireless Panel
Diale
Vers component of the wireless panel. This
el.
(01-31), MM =
month (0-12), YY = year (last two digits).
r Firmware
ion
The firmware version of the dialer
item cannot be changed.
Format The date format displayed by the pan
DD = Day of the month
Date

Editing a Panel Account
HomeLogiX Software Manual Page 17
Description Section Property
Item
Time Format The time format displayed by the panel
HH = hours (0-23), hh = hours (00-12), mm
= minutes (00-59).
Note: 00:00 = 12:00AM and 12:00 =
12:00PM.
.
Installer Installer Code The 4 digit access code
Information
of the installer.
5.2 Zon
A zone is an area secured by a se o forty
zones for each panel account. Fo you can specify the type of
ne (for exa im
ion su dro
o access
Click un
belo n
dify
ving the C g
the propertie lso do e
wireless pan nloading to a Panel on page 29).
e following
roperty o
es
nsing device. You can define up t
r each zone
zo
descript
mple, interior, per
ch as attic or be
eter) as well as giving it a meaningful
om.
T Zones:
•
fter mo
on a panel acco
w the panel accou
t in the Panel Tree and then click Zones
t name.
A
Sa
ing the properties, re
onfiguration on pa
s you should a
el (see Dow
member to save the configuration (see
e 12). Once you have finished modifying
wnload the latest configuration to th
Th properties are available under Zones:
P Item Descripti n
Zone Type .
ri r
-Hou
Type of zone
options: Inte
Silent, 24
You can choose from the following
or, Perimeter, Delay, Fire 24-Hour, 24-Hou
r Audible, Chime
Zone
Description
The descriptio
predefined lis
n of the zone. You can choose from a
t or you can create up to five custom
descriptions.
f th
changed.
C
(version 2 and up)
is
and the No A
are p
.3 Enrollment
The installer must enroll every detector using the wireless panel. Once
each detector is enrolled, upload the panel and the enrolled detectors.
The detectors are listed in the Enrollment section.
Chime Type The type o e chime played when zone options are
No Activity hecks The default disabled. If No Activity Checks is enabled
ctivity Timer is enabled, checks for no
activity erformed for this zone.
5

Editing a Panel Account
HomeLogiX Software Manual Page 18
llment:
n (see
page 12). Once you have finished modifying
so download the latest configuration to the
To access Enro
• Click on a panel account in the Panel Tree and then click
Enrollment below the panel account name.
After modifying the properties, remember to save the configuratio
Saving the Configuration on
the properties you should al
wire ss ple anel (see Downloading to a Panel on page 29).
The following properties are available under Enrollment:
Section Property Item Description
Detector Detector # Type The device family type for the detector
of the zone. This item cannot be
changed.
Detector # RF ID The identification number for the wireless
This item cannot be changed.detector.
tor 40 (Wired)Detec
Allows you to enable or disable the use
of a wired detector
Controls
ont Remote Remote C
RF ID
rol # The identification number for the remote
control. This item cannot be changed.
Remote Cont
Panic Butto
Function
r
n
Remote Cont
Fun
Off Button Fun
ont
utto
utton Key
ol # Set the function for the remote con
panic button to activate the PGM.
rol # Set the function for the remote control
trol
On Button
Remote Cont
ction on button to activate the PGM.
rol #
ction
Set the function for the remote control
off button to turn off the PGM.
Remote C
"Home" B
rol #
n
Set the function for the remote control
home (partial) button
Function
siB
iButton Key # n. RF ID The identification number for the iButto
This item cannot be changed.
Remote
Keypads
Keypad # RF or the remote
keypad. This item cannot be changed.
ID The identification number f
Repeaters Repeater # RF ID The identification number for the
repeater. This item cannot be changed.
Wireless
Sirens
RF Siren # ID The identification number for the wireless
siren. This item cannot be changed.

Editing a Panel Account
HomeLogiX Software Manual Page 19
urity
You can set the wireless panel to automatically arm or disarm for specific
nd ti an al
tate er c
activating t tate
o acces
• Click on a panel a nel Tree and then click
Se th
After modi tion (see
ving the
the properties you should st configuration to the
anlo
in r
Section Property
Item
5.4 Sec
days a
alarm s
mes. You c
so the own
he alarm s
so set the time delay before activating the
an enter and exit the premises without
.
T s Security:
ccount in the Pa
curity below
fying the prope
e panel account name.
rties, remember to save the configura
Sa Configuration on page 12). Once you have finished modifying
also download the late
wireless p
The follow
nel (see Dow
g properties a
ading to a Panel on page 29).
e available under Security:
Description
Delays
Exit Delay
(seconds)
During this period (1-99 seconds) after arming,
a zone violation will not set the alarm state.
During this period, a user may exit the premises.
Entry Delay
(seconds)
In the armed mode, this is the delay time
between violation of a zone and an alarm
event. During this period (1-99 seconds) a user
may disarm the panel.
The mode for this auto arming schedule. ThAuto-
rming
ay)
e
A
(D
Arm Mode
options are: Disabled, Home or Away.
Arm Time
The time for automatically arming the wireless
panel for this day of the week.
Disarm Time The time for automatically disarming the
wireless panel for this day of the week. If the
disarm time is prior to the arm time, disarm is
performed on the following day.

Editing a Panel Account
HomeLogiX Software Manual Page 20
Section Property
Item
Description
Sirens
tes)
Siren Time
(Minu
The number of minutes (0-99) to sound the
sirens in case of an alarm.
Relay Polarity ally Closed.
eneral
ecurity
tings
)
be
triggered. The options are: 1, 2, 4, 6, 8, 16, 24,
.
Sirens Mode The sirens will be activated if the specified
arming mode is set. The options are: Away,
Away + Home.
Wired Siren The polarity of the wired siren. The options are:
Normally Opened, Norm
Internal Siren The status of the internal siren. The options are:
Enabled or disabled.
G
S
Set
Supervision
Time (Hours
If this number of hours elapsed and
HomeLogiXTM did not receive any message
from a zone, a zone trouble event will
and 48
Jamming
Detection
Defines the method used to detect attempts to
jam the RF signals from its enrolled detectors.
The options are: Disabled, UL Enabled, and EN
Enabled.
ity If the timer i
ours)
s enabled and there is no activity
for the specified number of hours for any of the
No Activ
Timer (H
(version 2
and up)
zones where no activity check is enabled, a
trouble event is reported. The options are:
Disabled, 1, 2, 5, 10, 15, and 30.
Trouble Beeps
If enabled, beeps are generated during system
trouble. The options are: Enabled or Disabled.
Bypass The method of setting a zone as bypassed. The
: Off, Manual, Force.
Options options are
Quick Arm If enabled, HomeLogiXTM may be armed
without entering a user code. The options are:
Enabled or Disabled.
Panic Button If enabled, pressing the panic button will be
reported (with a chime if the Audible value is
selected). The options are: Disabled, Audible,
and Silent.
Duress Code The duress (forced disarm) code - 4 decimal
digits.
Alarm Cancel
Time (Minutes)
During this time window (0-60 minutes), after an
alarm started, a disarm will result in an Alarm
Cancelled message sent to the Central Station.
Editing a Panel Account
Section Property Description
Item
ort If an alarm is triggered, the alarm message to
the
sec
Alarm Ab
Time
(Seconds)
Central Station is delayed for this number of
onds (0-60) in order to allow the user to
ort it via disarm. This ab
bu
is effective only for
rglar type of zones.
Backlight Time
Tim
Alw
Hide Display
e the backlight remains on. The options are:
ays or 15 seconds.
n, HomeLogiXTM
opt Off.
ps If On, each press of a key on the panel keypad
Communica
You can define the details for
at is monitoring the w less panel itself.
s
alled
If O
arm
hides its status display when
ed and shows only the prompts. The
ions are: On or
Key Bee
will beep. The options are: On or Off.
5.5 tions
the communications between the Central
ireless panel and the wireStation th
ou can al
an be c
Y
c
o define private p
by the wireless
hone numbers and a paging service that
panel.
Note:
The only details o anged by the r settings that can be ch
u aser, and which re almost entirely changed only by the
i re of thenstaller, a following nature. Adding a new
detector, sensor o ting r remote control, or removing an exis
one.
To acces unica
• Cl
o
fter modif
e C
erti ould also
nnload
s Comm tions:
ick on a panel account in the Panel Tree and then click
mmunications below the panel account name.
y
C
A
Sa
ing the properties
onfiguration on p
es you s
, remember to save the configuration (see
age 12). Once you have finished modifying
download the latest c
ving th
e prop
ireless pa
th
w
h
el (see Dow
onfiguration to the
ing to a Panel on page 29).
HomeLogiX Software Manual Page 21
Note:
For the unit to accept the communication changes you
m theust activate installer programming on the panel itself,
then exit to update the dialer with the configuration
changes.
Editing a Panel Account
HomeLogiX Software Manual Page 22
The following properties are a mmunications:
Section Property Description
vailable under Co
Item
Panel
Phone
e Panel Phon The telephone number used to connect to
the wireless panel.
P
R
rivate
eporting
edPrivate Phone 1
Number
The phone number to call when the select
event occurs.
Private Phone 2
Number
The phone number to call when the selected
event occurs.
The phone number to call when the select
Private Phone 3 ed
Number
event occurs.
Note:
When using a PABX type the number for an outside line
then “,” followed by the telephone number.
Private Reportin
Options
g
The list of event types that are reported to
the private phone numbers specified. The
options are: Alarms, Troubles, Alerts, Bypass,
Arm/Disarm, Restore.
Dialing Attempts
The number of attempts (1-5) the panel wil
make in order to connect to a specified
l
ettings
CS Connection
Method
r
the panel uses to connect to the Central
private phone number before trying the next
private phone number.
This option specifies which phone numbeCentral
Station
S) (C
S
Station. The options are: Primary Only,
Alternate, Secondary Only, and Both.
Primary Phone
Number
The primary phone number used for the
panel to connect to the Central Station.
Note:
When using a PA outside line BX type the number for an
then “,” followed by the telephone number.
Secondary
Phone Number
The secondary phone number used for the
panel to connect to the Central Station.
Secondary
Account Code
The account code for the secondary Central
Station connection.
Primary Account
Code
The account code for the primary Central
Station connection.
Primary
Reporting
Options
The list of event types that are reported to
the Central Station using the primary
number. The options are: Alarms, Troubles,
Alerts, Bypass, Arm/Disarm, and Restore.

Editing a Panel Account
HomeLogiX Software Manual Page 23
Section Property
Item
Description
Secondary
Reporting
Options
to
Alerts, Bypass, Arm/Disarm, and Restore.
The list of event types which are reported
the Central Station using the secondary
number. The options are: Alarms, Troubles,
Reporting Mode This mode defines whether a message
a
rted
Attempts
reported to the Central Station will include
single event or multiple events.
Reporting
Protocol
Dialing
Defines the structure of the repo
messages. Current Option is: Contact ID
The number of attempts (1-16) made by t
panel t
he
o connect to the Central Station.
Days Between The number of days (1-30) between tests of
the line connecting to the Central Station.
number of minutes (0-240) after an AC
rted
rn
).
ication
Line Tests
Line Tests Time The time of day for testing the line to the
Central Station.
AC Fail The
Reporting Delay
(Minutes)
power failure before this event is repo
(assuming the AC power did not retu
during this period
Two Way
Voice
(2WV)
Define the way 2-Way Voice commun
is made, and set the preferences for th
feature.
is
Setup
CS 2WV Mode Installer can Enable/Disable the 2-Way Voice
.
panel waits for
Mode of the system in this menu via the PC
Click the drop-down menu and select which
option you want to use.
CS 2WV Timeout The Time that the HomeLogiX
(Seconds) 2WV actions from the CS.
Note:
1. The reporting mode in Central Station (CS) Settings
must be set to: "Multiple Events".
2. After changing any communication parameters via
the PC software, the installer must enter the installer
mode, and then return Normal mode in order for the
new communication parameters to take effect.

Editing a Panel Account
HomeLogiX Software Manual Page 24
Item
Description Section Property
Miscellane Fax Def
ous
Communi
e
Mode
c
tions
Settings
at
ming ring immediately.
a
If enabled, the panel recognizes when a
caller disconnects after one or two rings and
answers the next inco
Number of Rings The number of rings (1-15) detected by a
it answers an incoming call.
ation
ed to authenticate
communications with the panel. This code
u
The wireless panel can c
• Click on a pane
Automation belo l account name.
utomation properties in
• Automation Sett
activated direct the wireless panel.
• PG ber (#
device.
fter modi prop
ving the C ration ying
e proper hould e
wireless panel (see Down
he following propert
panel before
d The code us Up/Downloa
Authoriz
Code must be the same as the Panel’s master
code.
5.6 A tomation
ontrol up to two external devices, called PGMs.
on: To access Automati
l account in the Panel Tree and then click
w the pane
A clude these sections:
ings on page 25– for enabling PGMs to be
ly from
M Num ) on page 25 – the settings for the external
A fying the erties, remember to save the configuration (see
on page 12). Once you have finished modifSa
th
onfigu
ties you s also download the latest configuration to th
loading to a Panel on page 29)
T are the ies available under automation:

Editing a Panel Account
HomeLogiX Software Manual Page 25
Auto ation Settings m
Property Item Description
Panel Keypad PGM
Function
If e
fro
nabled, you can activate the PGMs directly
m the panel keypad.
PGM Number (#)
Section Property
Item
Description
Pulsing Pulse Time The amount of time (1-99) in
(Seco
seconds that the
pnds) PGM erforms pulsing.
Triggers Arm A The act l
s arme ff
Arm H e act panel
arme On, Off
sar The act will execute when the panel
The options are Ignore, On, Off and
Pulse.
Alarm The act alarm
is signal r Disabled.
Panic The ac e panic
is signal ns are Ignore or Pulse.
Trouble The action this PGM will execute when the
trouble is signaled. The options are Ignore or
Pulse.
AC Loss The action this PGM will execute when AC loss is
signaled. The options are Disabled or Enabled.
Remote
Control #
Panic
The action this PGM will execute when this
remote control sends a panic message. The
options are Ignore, On, Off, Pulse and Toggle.
Zone #
Opened or
Detected
The action this PGM will execute when this zone
is either opened or detected. The options are
Ignore, On, Off, Pulse and Toggle. See Zones on
page 17 for a description of Zones.
way ion this PGM will execute when the pane
d away. The options are Ignore, On, O
lse.
ion this PGM will execute when the
d home. The options are Ignore,
i
and Pu
ome Th
is
and Pu
m
is disarmed.
lse.
ion this PGM
Di
ion this PGM will execute when the
ed. The options are Enabled o
tion this PGM will execute when th
ed. The optio

Editing a Panel Account
HomeLogiX Software Manual Page 26
as well as
defining custom zone descriptions. See Zones section on page 17 for more
n click
essages:
5.7 Messages
The messages section allows setting the keypad tone function
information on Zones.
To access Messages:
• Click on a panel account in the Panel Tree and the
Messages below the panel account name.
After modifying the properties, remember to save the configuration (see
Saving the Configuration on page 12). Once you have finished modifying
the properties you should also download the latest configuration to the
wireless panel (see Downloading to a Panel on page 29)
The following properties are available for M
Section Property
Item
Description
Options Panel When enabled,
Keypad
Mute
Funct
acts as a mute button for the system
beeps and voice announcements
ion
the numeric key “5”
when the system is in disarmed
mode.
Custom Zone Custom The
Descriptions Zone
Description
#
re are five custom zones that
can be set.
A customized description may be
assigned to one of the zones
(maximum of 16 printable ASCII
characters).

Communicating with the Panel
6. Communicating with the Panel
This chapter describes how to communicate with a wireless panel and the
actions that can be performed.
6.1 Setting the Panel Authorization Code
The authorization code is used to authenticate communications between
HomeLogiXTM software and the HomeLogiXTM wireless panel. You need to
set the panel authentication code in the panel account before
performing any type of communication between the panel and the PC.
See the Communications section on page 21, specifically Up/Download
Authorization Code paragraph.
6.2 Uploading from a Panel
You can upload the current information defined for a wireless panel in
order to view and modify the existing configuration.
There are two ways of uploading from a panel:
• Uploading from a local panel – the panel is conne ed directly to
the PC.
•Uploading from is connected
To upload
1. Tree, select the panel account from which to upload.
2. From the Upload From menu, choose either Local Panel or Remote
Panel. You can also access Upload from the toolbar button.
ct
remotely via a modem.
a remote panel – the panel
from a panel:
In the Panel
The Upload window is displayed.
HomeLogiX Software Manual Page 27
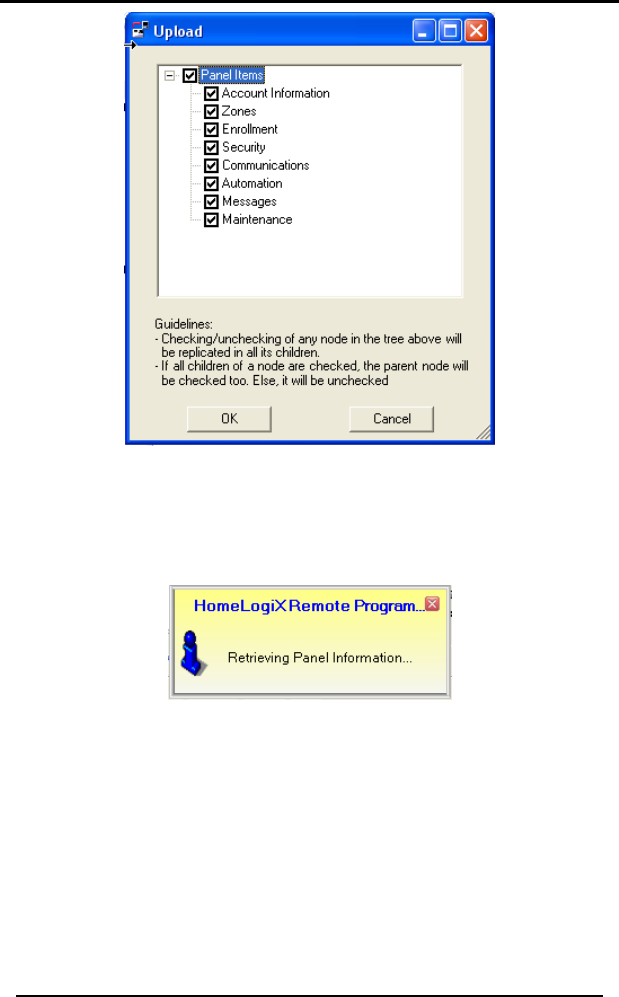
Communicating with the Panel
Figure 12 - Upload Window
3. Check the items to include in the upload and click OK. These are the
same options available in the Panel Tree.
The following is connecting to window is displayed while the software
the panel.
Figure 13 - Retrieving Panel Information Window
HomeLogiX Software Manual Page 28
Communicating with the Panel
HomeLogiX Software Manual Page 29
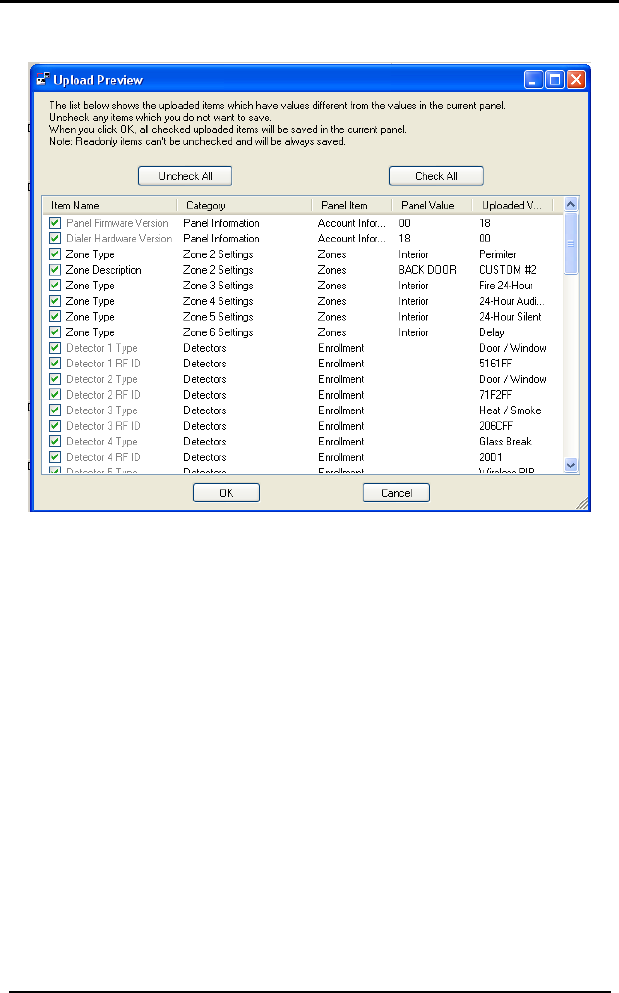
The Upload Preview window is displayed and lists all of the uploaded
items that have different values from the current panel.
Figure 14 - Upload Preview Window
4. Uncheck any items you do n
click OK.
ot wish to save in the current panel and
th the uploaded information.
6.3
You
y
ed to the PC or Remote Panel if the panel is connected via a
The current panel account is updated wi
Downloading to a Panel
can download the information in HomeLogiXTM to a wireless panel.
To download to a panel:
1. From the Download To menu, select Local Panel if the panel is directl
connect
network.
2. The Download window is displayed.
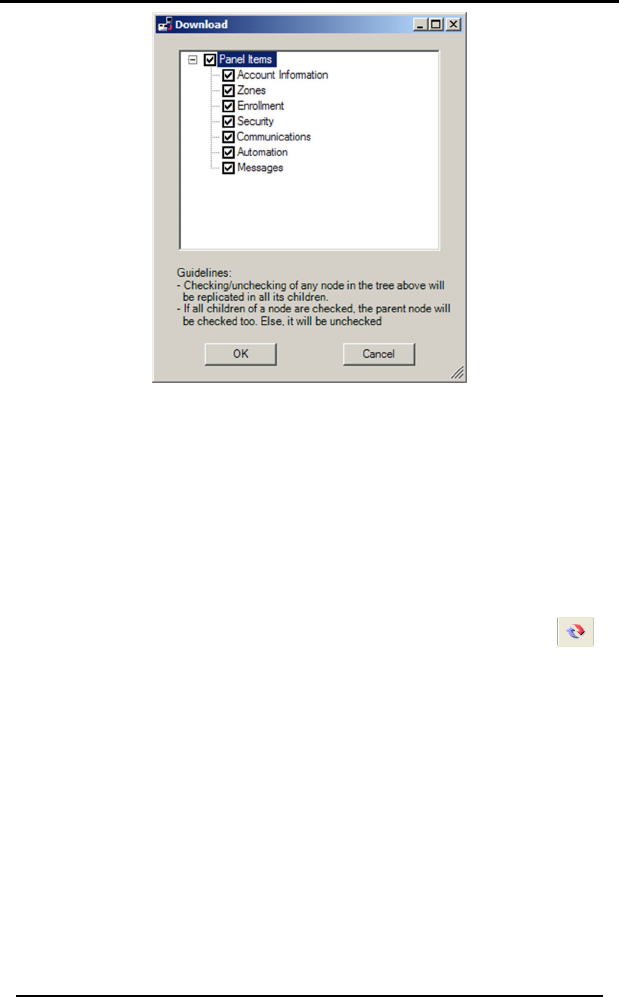
Communicating with the Panel
Figure 15 - Download Window
3. Check t e items to include in the download and click OK.
s updated with the downloaded information.
utton.
h
The panel i
HomeLogiX Software Manual Page 30
6.4
You can refresh the properties in the panel account to ensure they have
been updated from the database.
To refresh the properties:
1. From the Actions menu, select Refresh.
Refreshing the Properties
You can also access Refresh by clicking on the toolbar b
All the properties in all the accounts are refreshed fro
Uploading the Date and Time from a Panel
can upload the date and time from
m the database.
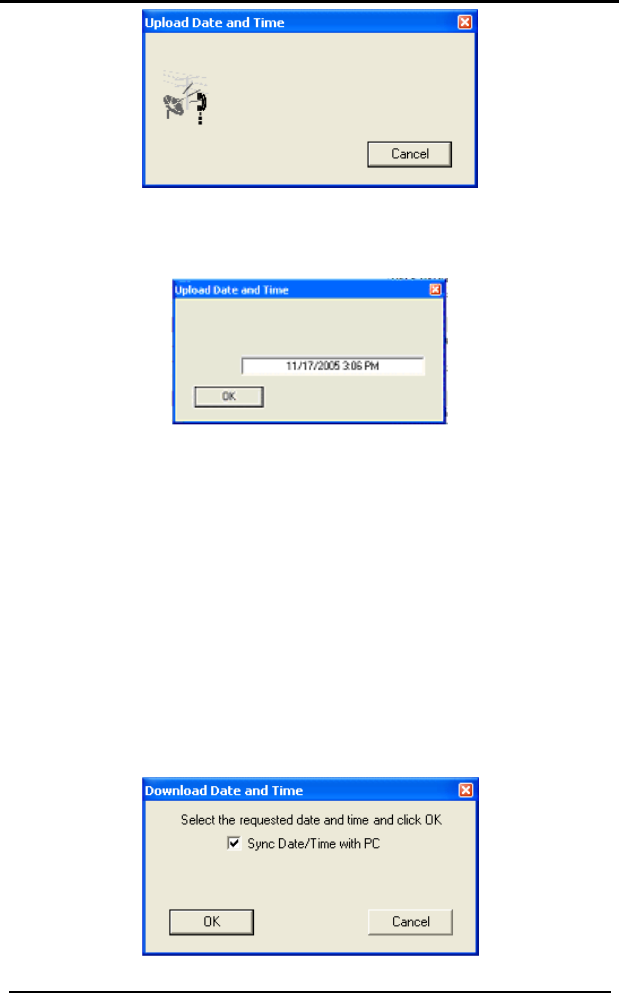
6.5
You a wireless panel to verify if they
are
To upload the date and time from a panel:
1. In the Panel Tree, select the panel account.
2. From the Actions menu, click Upload Date / Time. You can also
activate this command by right-clicking on the panel account and
choosing Upload Date / Time.
The following window appears while connecting to the panel.
correct.
Communicating with the Panel
Figure 16 - Upload Date and Time Window
The following window appears. The date and time from the panel ar
uploaded and the panel account properties updated.
e
3. Click OK.
6.6 Downloading the Date and Time to a Panel
You can download the date and time to a wireless panel. For example if
you previously uploaded the date and time from a wireless panel and
confirme ad a
new dat
dat
To download the date and time from a panel:
d that the date and time were incorrect, you can downlo
e and time to the wireless panel. You can use either the PC clock
e and time or you can choose any other date and time.
1. I the Panel Tree, select the panel an ccount.
2. From the Actions menu, click Download Date / Time. You can also
activate this command by right-clicking on the panel account and
choosing Download Date / Time.
The following window appears.
Figure 17 - Download Date and Time Window
HomeLogiX Software Manual Page 31
Communicating with the Panel
HomeLogiX Software Manual Page 32
e with the PC or
e from the
calendar.
he HomeLogiXTM Remote Programmer
efaults
anel’s settings to the factory defaults. For
To restore t
1. anel Tree, select the account panel.
Panel to Factory Defaults. You
3. You can check the box to synchronize the Date/Tim
you can uncheck this option and select a date/tim
4. Click OK.
The date and time from t
application are downloaded to the wireless panel.
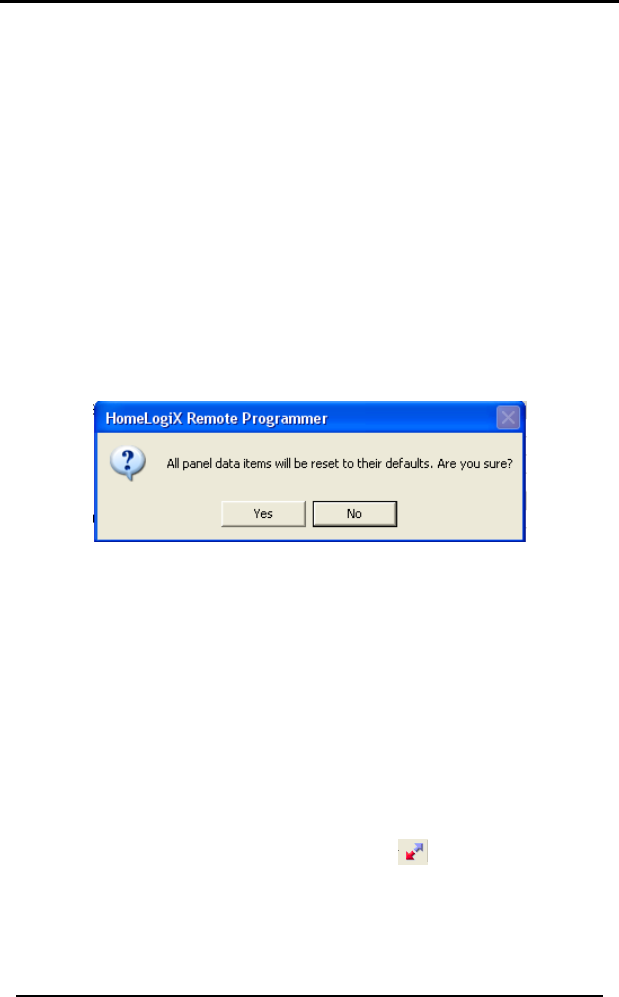
6.7 Restoring the Panel to Factory D
You can restore an account p
example, you can use this feature for troubleshooting, by returning the
panel to the factory defaults and then changing one setting at a time.
he panel to factory defaults:
In the P
2. From the Actions menu click Restore
c n also activate this command bya right-clicking on the panel
account and choosing Restore Panel to Factory Defaults.
Figure 18 - Restore Factory Defaults Warning Window
The account panel properties are returned to their factory default
state.
6.8 Disconnecting a Panel
When the HomeLogiXTM Remote Programmer application has connected
to a wireless panel, most actions are not available until you disconnect
from the wireless panel. Use Disconnect after performing an upload or
download operation.
To disconnect from a panel:
1. In the Panel Tree, select the panel.
2. From the Actions menu, click Disconnect. You can also disconnect by
click the Disconnect button on the toolbar.
The panel is disconnected.
Viewing System Information
7. Viewing System Information
This chapter describes how to view live system information from
Account Properties
isplayed in the Properties
The system status allows you to check the live status of a wireless panel.
e system status for a panel:
ect the account panel.
on an account panel and choosing View
atus or by clicking the button on the toolbar.
a wireless panel.
7.1 Viewing the Panel
You can view the properties of a panel account.
To view the properties:
• In the Panel Tree, select the account panel. Alternatively, from
the View menu, click on Properties.
The properties for the selected panel are d
Area.
7.2 View the System Status
To view th
1. In the Panel Tree, sel
2. From the View menu, click System Status. This action can also be
accessed by right clicking
System St
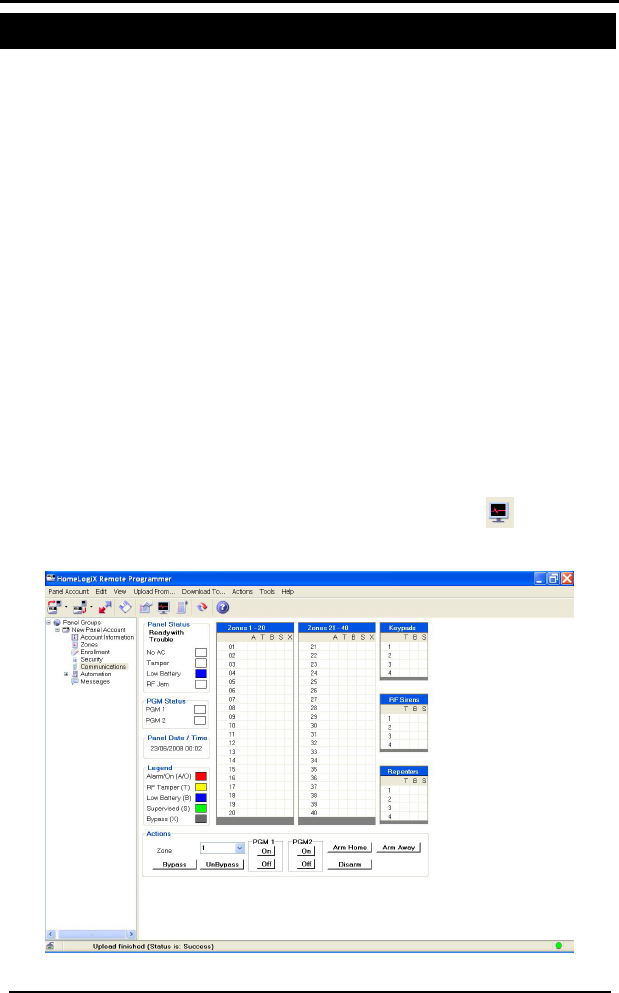
The Properties Area displays the System Status for the panel.
Figure 19 - View System Status
HomeLogiX Software Manual Page 33

Viewing System Information
HomeLogiX Software Manual Page 34
ow includes the following areas:
tus of the panel in text, including
nd RF Jam in the colored check-
colored check-boxes.
Date/Time – Displays the panel date/time.
gend of the mapped system information
ons to be performed on the panel,
such as Arm Home, Arm Away, Disarm.
g Actions via the PC
Software to run actions on the Panel
ons window, click the
iew System Status screen, in Actions window, click the
indow, click the
Bypass Zone
To bypass a zone:
• In View System Status screen, in Actions window, select the zone
number from the drop-down list, and then click Bypass button.
The View System Status wind
• Panel Status – Displays the sta
power, tamper, low battery a
box.
• PGM Status – Displays the PGM status of PGM1 and PGM2 in the
• Panel
• Legend – Displays the Le
as shown in columns A/O, T, B, S and X.
• Actions – Buttons enable acti
7.3 Applyin
You can use the HomeLogiXTM PC
itself (see Figure 19).
Arm Home
To arm home:
• In View System Status screen, in Acti
Arm Home button.
Arm Away
To arm away:
• In V
Arm Away button
Disarm
To disarm:
• In View System Status screen, in Actions w
Disarm button.

Viewing System Information
HomeLogiX Software Manual Page 35
Restore Bypassed Zone
To restore a bypassed zone:
• In View System Status screen, in Actions window, select the zone
number from the drop-down list, and then click UnBypass button.
Turn PGM On
To turn ON a PGM 1 or 2:
• In View System Status screen, in Actions window, click the On
button of the relevant PGM.
Turn PGM OFF
To turn OFF a PGM 1 or 2:
• In View System Status screen, in Actions window, click the Off
button o
Toolbar.
To refresh panel status manually:
• In the
7.5 Refreshing the Panel Automatically
ou can set automatic panel refresh sessions by following the next
ick the Disconnect
f the relevant PGM.
7.4 Refreshing the Panel Manually
You can refresh the panel manual using the System
Toolbar, click the Live System View button.
Y
procedure.
To refresh panel status automatically:
1. In the Toolbar, cl button.
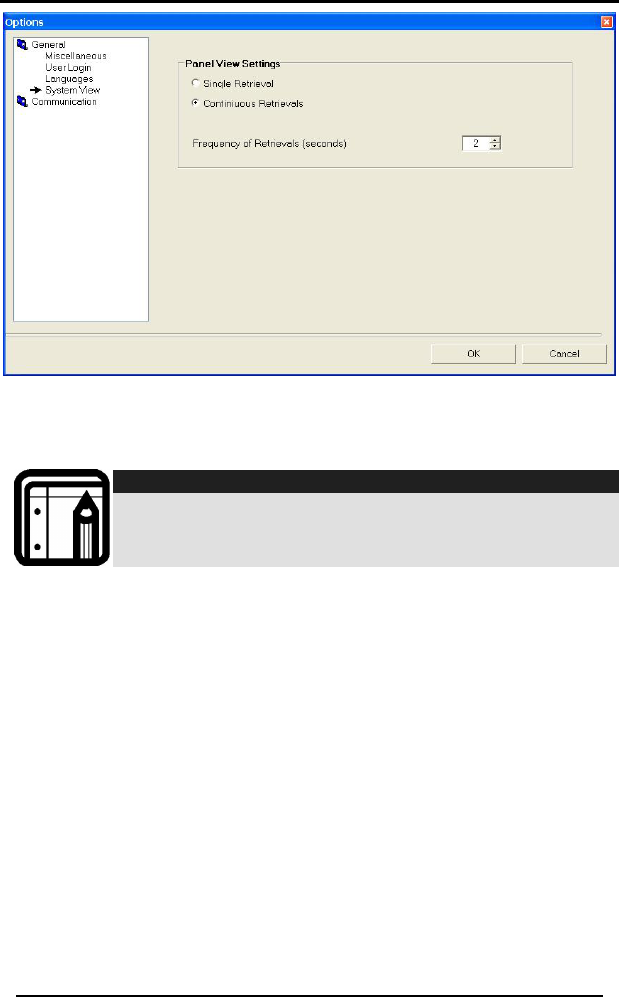
select Options, and then in the General tree
em View.
View window is displayed.
2. In the Tools menu,
view select Syst
The System
Viewing System Information
Figure 20 – Refreshing Automatically
3. Select Continuous Retrievals
4. Select Frequency of Retrievals (seconds).
HomeLogiX Software Manual Page 36
Note:
Please use a "Frequency of Retrievals" value greater
then 3.
7.6 Viewing the Events Logs
All actions that take place in HomeLogiXTM are saved in the Events log.
You can view the Events log for the following:
• Last 20 events
• Last 50 events
• All events
To view the Events Log:
1. From the View menu, click Events Log.
2. Choose the Events log option to display.
The Events log is displayed in the Properties Area.
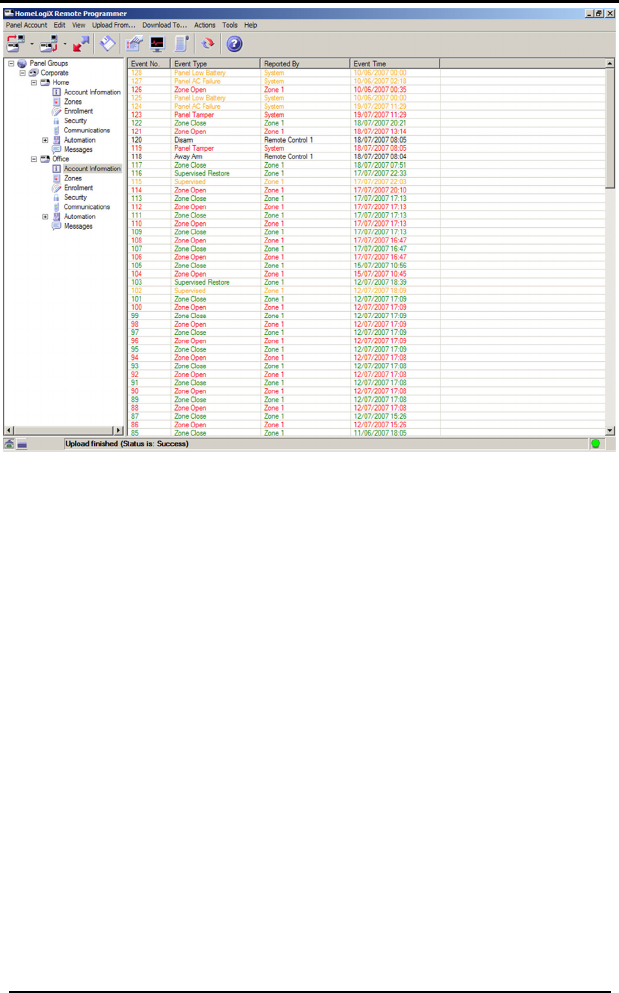
Viewing System Information
Figure 21 - View Events Log
The Event Log window includes the following information:
• Event No. – Displays the event number and the severity level
color.
• Event Type – The event type displays the type of event reported
by the system.
• Reported By – The zone which reported the event is displayed in
this column.
• Event Time – The time the event took place is displayed in this
column.
HomeLogiX Software Manual Page 37
Configuring the System
8. Configuring the System
This chapter describes the options available to configure your
HomeLogiXTM application. You can set the options from the Tools menu by
clicking on Options.
8.1 General Options
The general options include these sections:
• Miscellan
User Login
in options, you can change your user name and password.
eous on page 39
• User Login below
• Languages on page 39
• System View on page 39
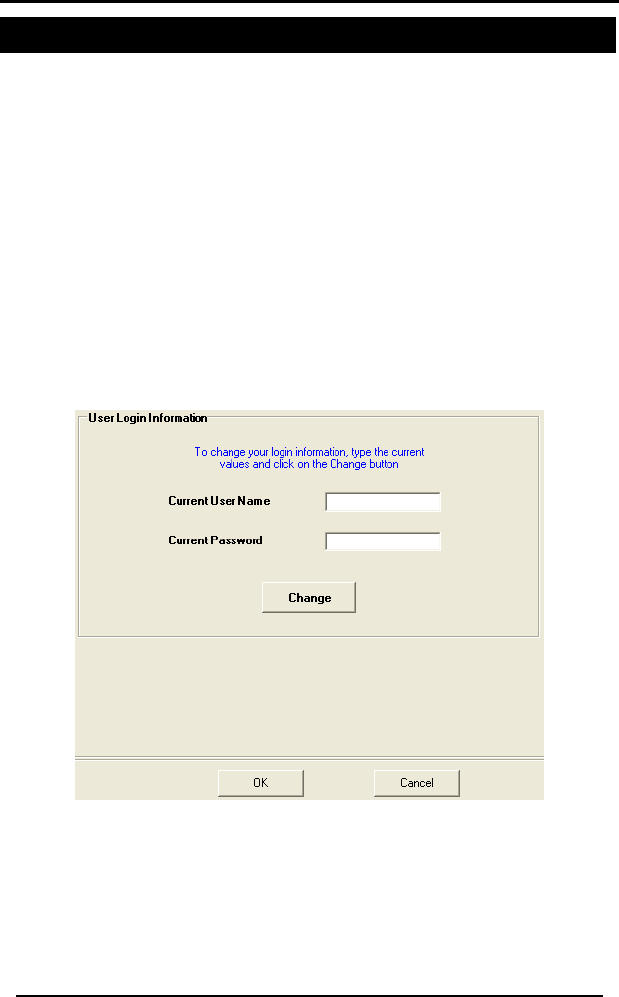
In the User Log
Figure 22 -User Login Options
To change the user login:
Login Information window enter the current user name and 1. In the User
password and click Change.
The User Information window is displayed.
HomeLogiX Software Manual Page 38
Configuring the System
Figure 23 - User Information Window
2. Enter the new user name and password.
3. Confirm the new user name and password and click OK.
The user name and password are changed to the new user name
and password.
Languages
In this version of HomeLogiXTM, English and Turkish are the only supported
languages.
4 - LanguaFigure 2 ges Options
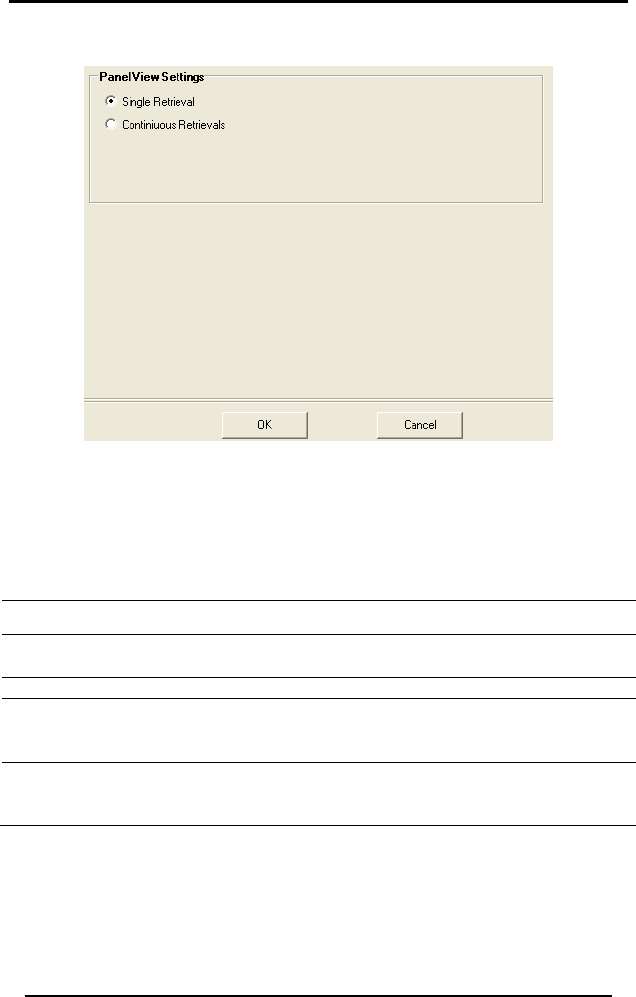
System View
In the System View options you can set whether to update information
continuously from a wireless panel or to perform a single retrieval of
information from the wireless panel. This option is used when a wireless
panel is directly connected to HomeLogiXTM via a cable. If you set the
HomeLogiX Software Manual Page 39
Configuring the System
HomeLogiX Software Manual Page 40
retrieval to be continuous, you can also set the frequency of retrievals in
seconds.
Figure 25 - System View Options
s
llaneous options you can set an automatic save time, enable
logging, set an idle time before logout and set warnings for long
Miscellaneou
In the Misce
session
remote connections.
Option Description
Automatic Save of Panel
Data
Set how often to automatically save the
panel account data.
Session Logging Set whether to enable session logging.
Idle Time Before Logout Set after how much idle time to
automatically logout. This option is only
available under Microsoft Windows 2000/XP.
Warning about long
remote connections
Set the time to warn for a long remote
connection and how often to display a
warning.
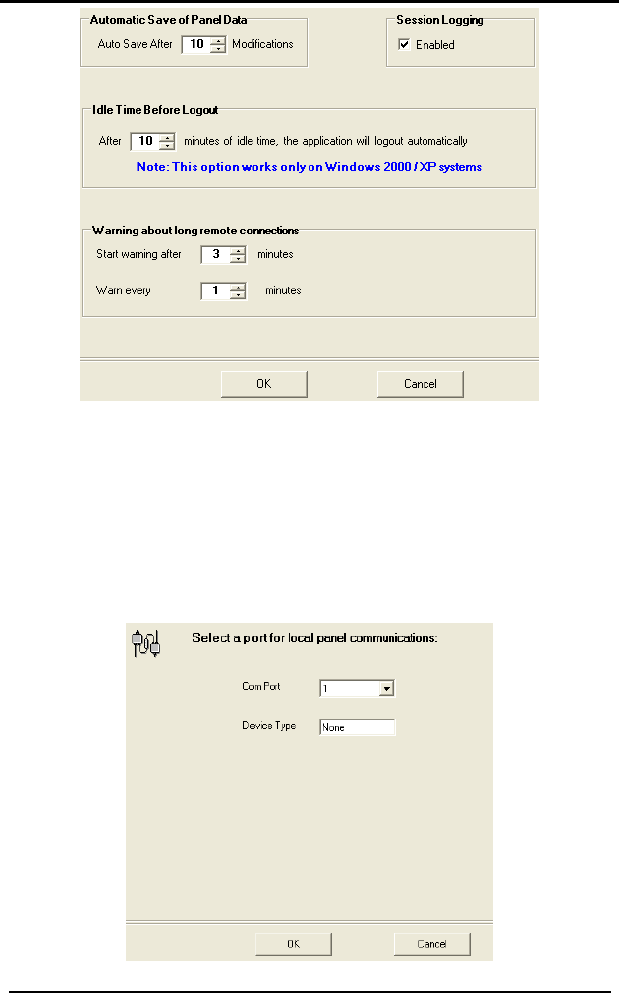
Configuring the System
Figure 26 - Miscellaneous Options
8.2 Communication Options
remote
s.
cal options, you can set the C
for a direct connection with the wirele l.
You can set the communication options for both local and
connection
Local
Under Lo om Port and the Device Type used
ss pane
Figure 27 - Local Communications Options
HomeLogiX Software Manual Page 41
Configuring the System
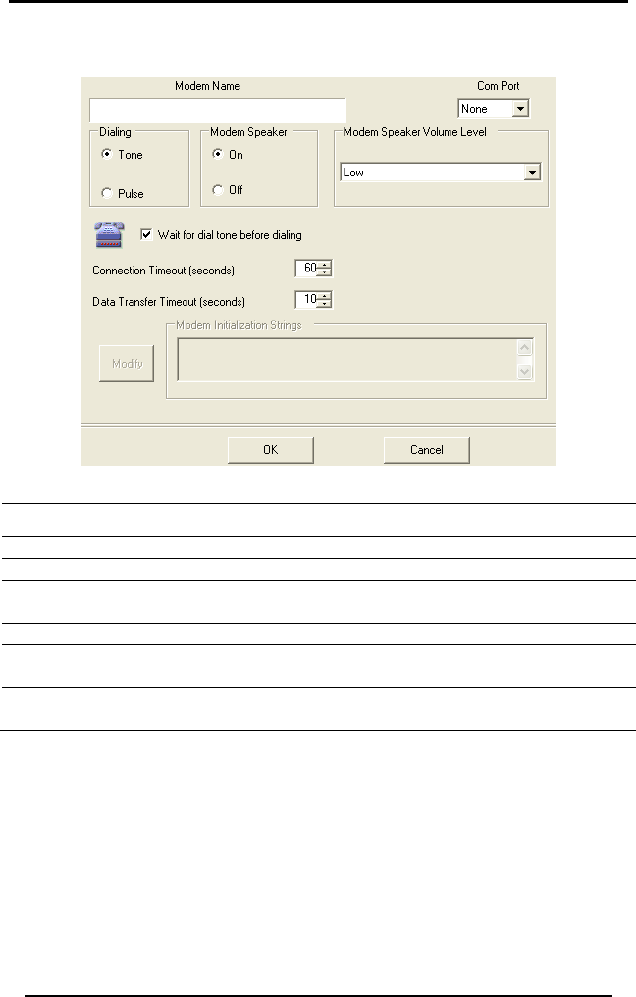
Remote
HomeLogiX Software Manual Page 42
Under Remote options you can change the modem settings.
The following options are available under Remote opti ns:
Option
o
Description
Modem Name Displays the name for your modem.
Com Port Choose a com port.
Dial g mode to be tone or
pulse.
ing Set the dialin
Modem Speaker Turn the modem speaker on or off.
Connection Timeout (seconds) Set the timeout for a connection in
seconds.
Data Transfer Timeout (seconds) Set the timeout for data transfer in
seconds.

Performing Database Backup
9. Perfo rming Database Backup
This chapter describes how to backup and restore the database.
9.1 Backing up the Database
It is recommended to regularly backup your data. Backup Database
creates an Application Backup File in c:\Documents and Settings\All
Users\Application Data\Rosslare\ HomeLogiXTM Remote
Programmer\Backups. Each time you do a backup, a new file is created
in the directory.
To backup the database:
1. In the menu, click Tools – Backup Database.
The following window appears.
Figur dow
ated in
ers\Application Data\Rosslare\
HomeLogiXTM Remote Programmer\Backups.
2. Click OK.
9.2 Restoring the Database
You can restore the database from a backup.
To restore the database:
1. From t
ng warning window appears.
e 28 - Database Backup Successful Win
A zip file containing a backup of the database is cre
c:\Documents and Settings\All Us
he Tools menu, select Restore Database.
The followi
Figure 29 - Restore Backup Warning Window
HomeLogiX Software Manual Page 43
Performing Database Backup
2. Click Yes.
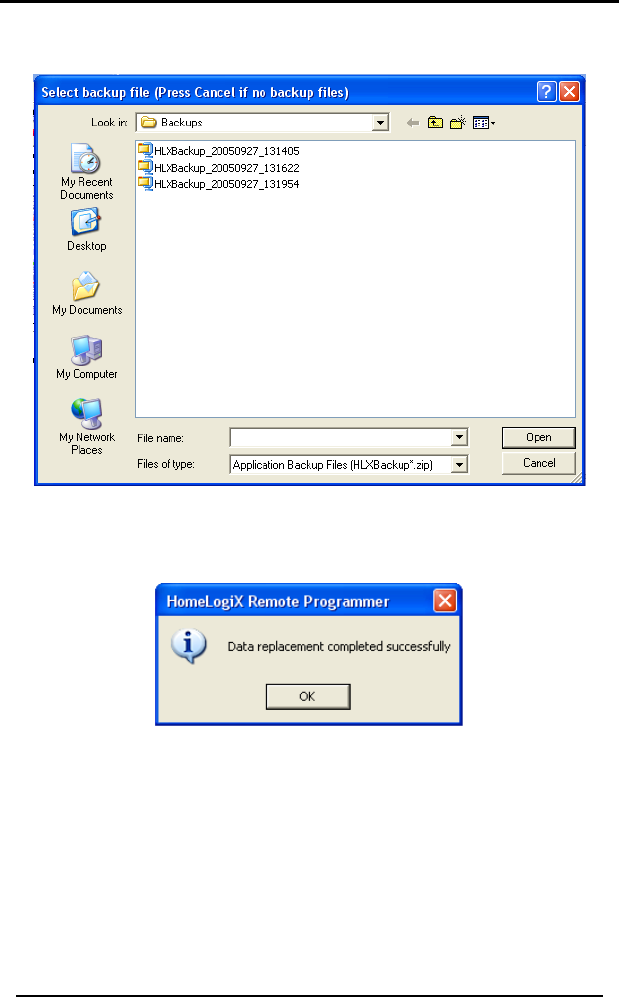
The Select backup file window is displayed.
Figure 30 - Select Backup File Window
3. from the list and click Open. Select the backup file
The following window appears.
Figure 31 - Data Replacement Successful Window
up.
4. Click OK.
The database is now restored from the back
HomeLogiX Software Manual Page 44

Performing Database Backup
HomeLogiX Software Manual Page 45
Appendix A. 64BTechnical Support
Asia Pacific, Middle East, Africa
Rosslare Security Products Headquarters
905-912 Wing Fat Industrial Bldg,
12 Wang Tai Road,
Kowloon Bay Hong Kong
Tel: +852 2795-5630
Fax: +852 2795-1508
E-mail: HTUsupport.apac@rosslaresecurity.comUT
United States and Canada
1600 Hart Court, Suite 103
Southlake, TX, USA 76092
Toll Free:+1-866-632-1101
Local:+1-817-305-0006
Fax: +1-817-305-0069
E-mail: HTUsupport.na@rosslaresecurity.comUT
Europe
Global Technical Support & Training Center
HaMelecha 22
Rosh HaAyin, Israel 48091
Tel: +972 3 938-6838
Fax: +972 3 938-6830
E-mail: HTUsupport.eu@rosslaresecurity.comUT
South America
Pringles 868, 1640 Martinez
Buenos Aires
Argentina
Tel: +54 11 4798-0095
Fax: +54 11 4798-2228
E-mail: HTUsupport.la@rosslaresecurity.comUT
Web Site: HTUwww.rosslaresecurity.comUT

0706-0960146+03
www.rosslaresecurity.com