1 Roush Diagnostic Tool Software Installation
Roush-Diagnostic-Tool-Software-Installation Roush-Diagnostic-Tool-Software-Installation Roush-Diagnostic-Tool-Software-Installation manuals parts rp-web-assets-prod-a
2017-01-16
: Roush Roush-Diagnostic-Tool-Software-Installation Roush-Diagnostic-Tool-Software-Installation pdf
Open the PDF directly: View PDF ![]() .
.
Page Count: 77

Roush Diagnostic Tool Software
Installation
rdt.roush.com
RDT-CALIM (RDT-FLASHIM) 20140109 RLA 1
If you have already installed the RDT software, proceed to the “Retail Flash
Procedure” on page 21.
RDT-CALIM (RDT-FLASHIM) 20140109 RLA
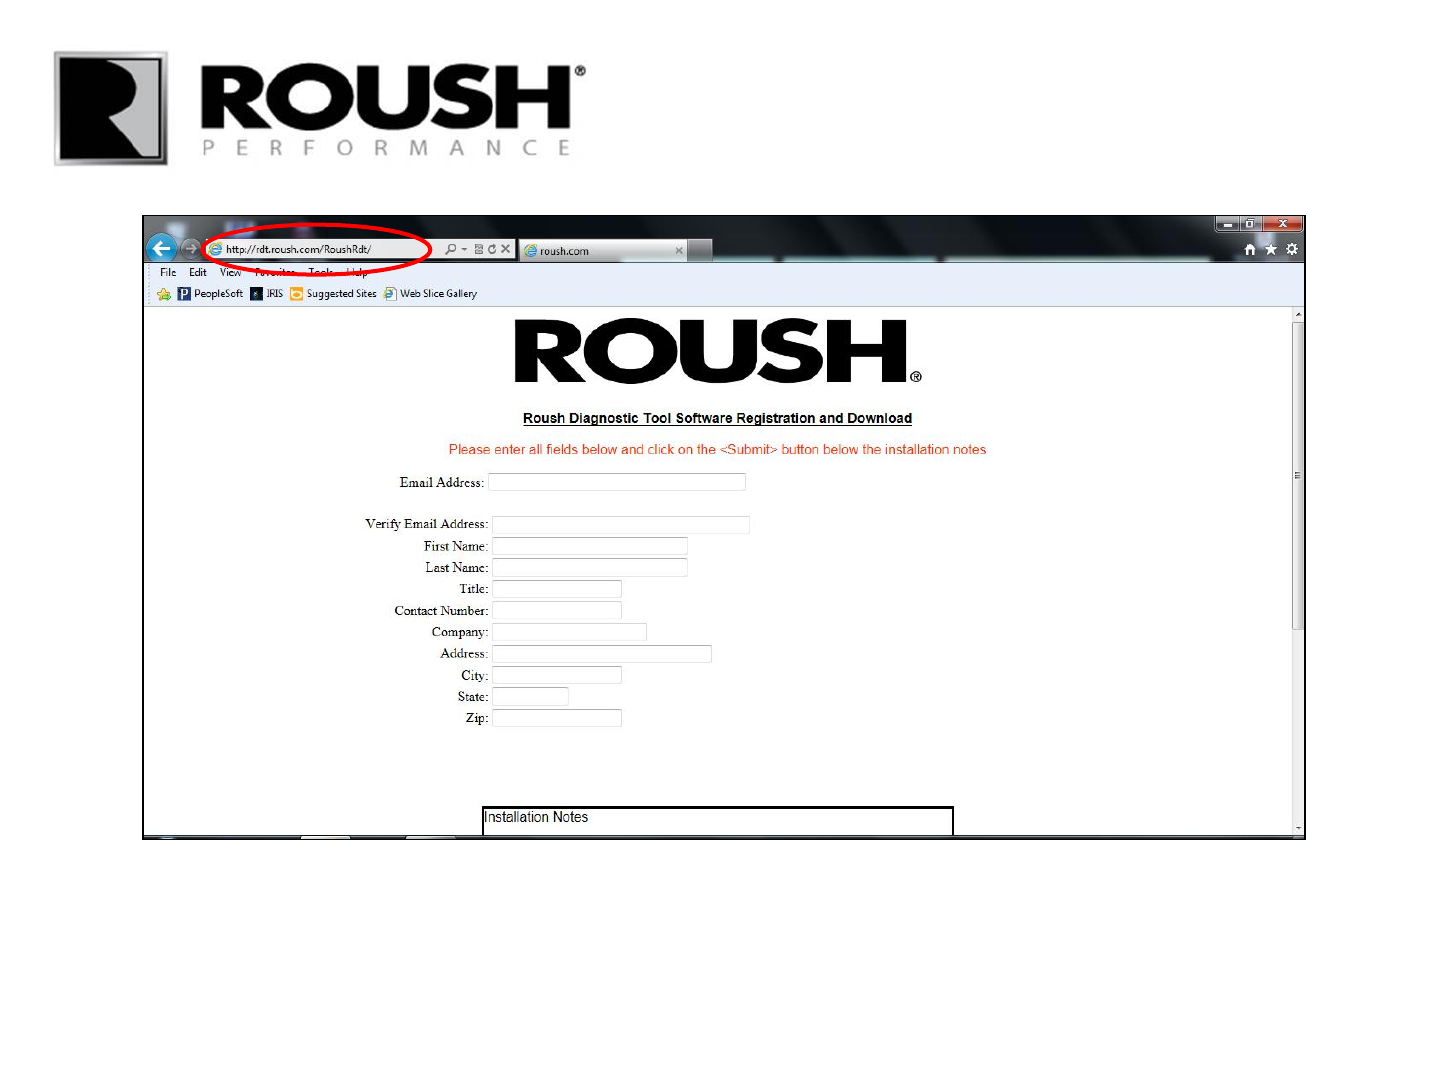
• Enter “rdt.roush.com” into your web browser’s address bar and proceed to the website.
2
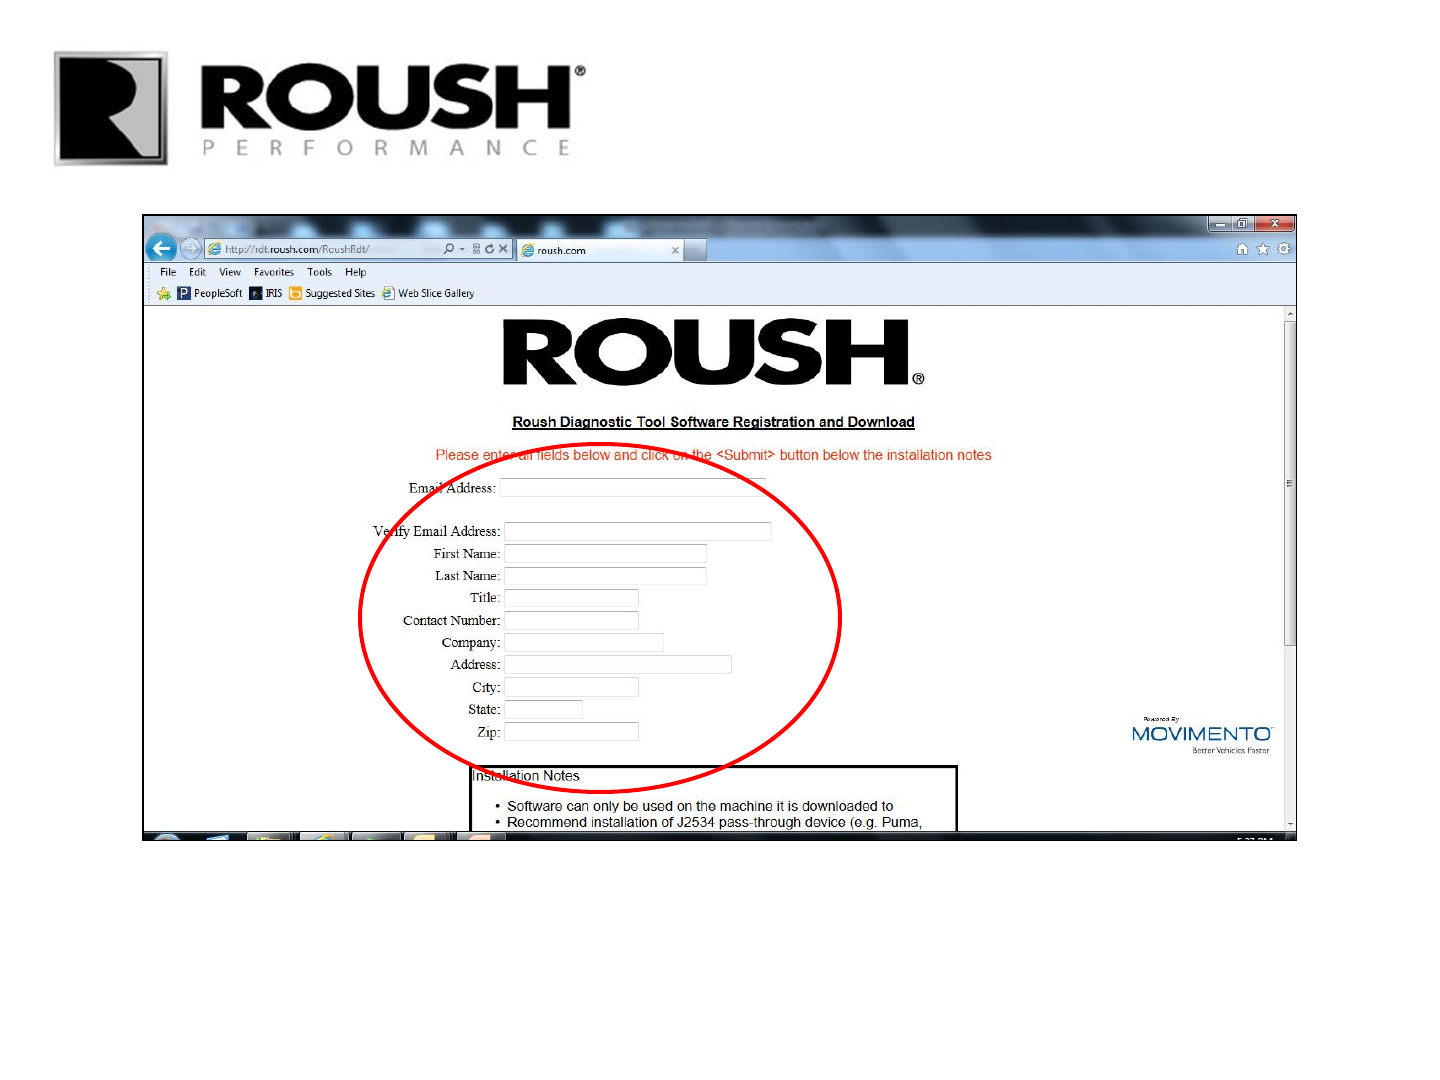
• Enter your personal information into the appropriate fields.
• A unique software activation code will be sent to the email address provided. You may use the same email
address for multiple activation codes.
RDT-CALIM (RDT-FLASHIM) 20140109 RLA 3
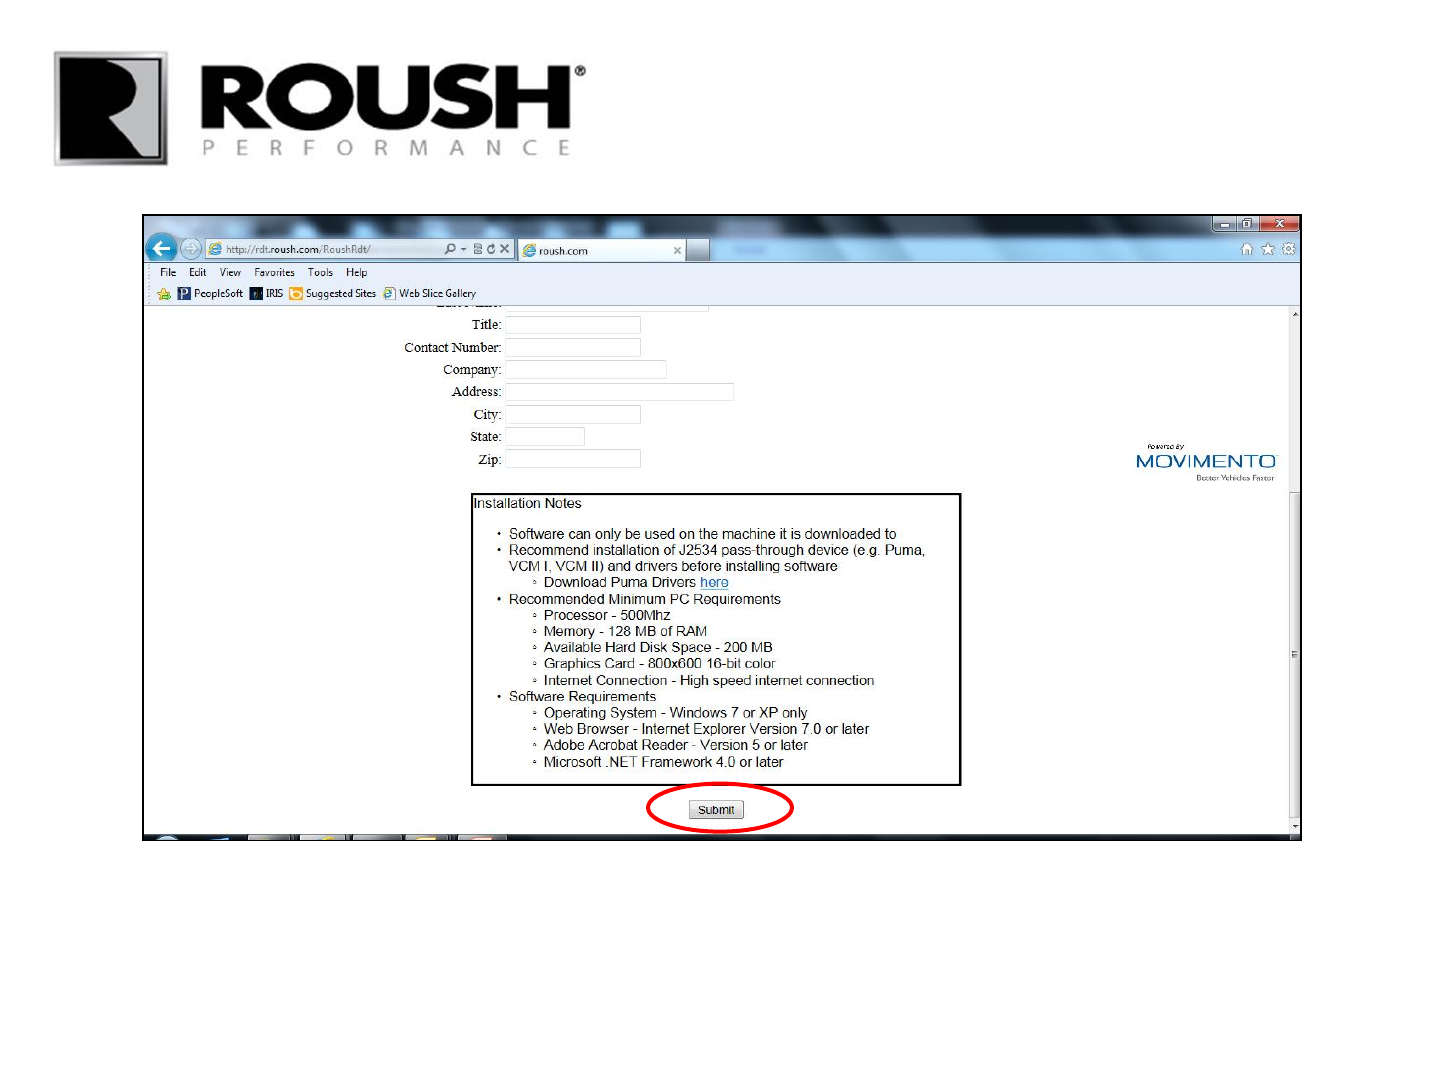
• Scroll down to the installation notes.
• Confirm that your computer meets the system requirements and select “Submit”.
• Note: If you are equipped with a Puma PT J2534 device, drivers are available for download by clicking the “here” link in the
Installation Notes. The drivers are only necessary if you are equipped with the Puma pass through device.
RDT-CALIM (RDT-FLASHIM) 20140109 RLA 4
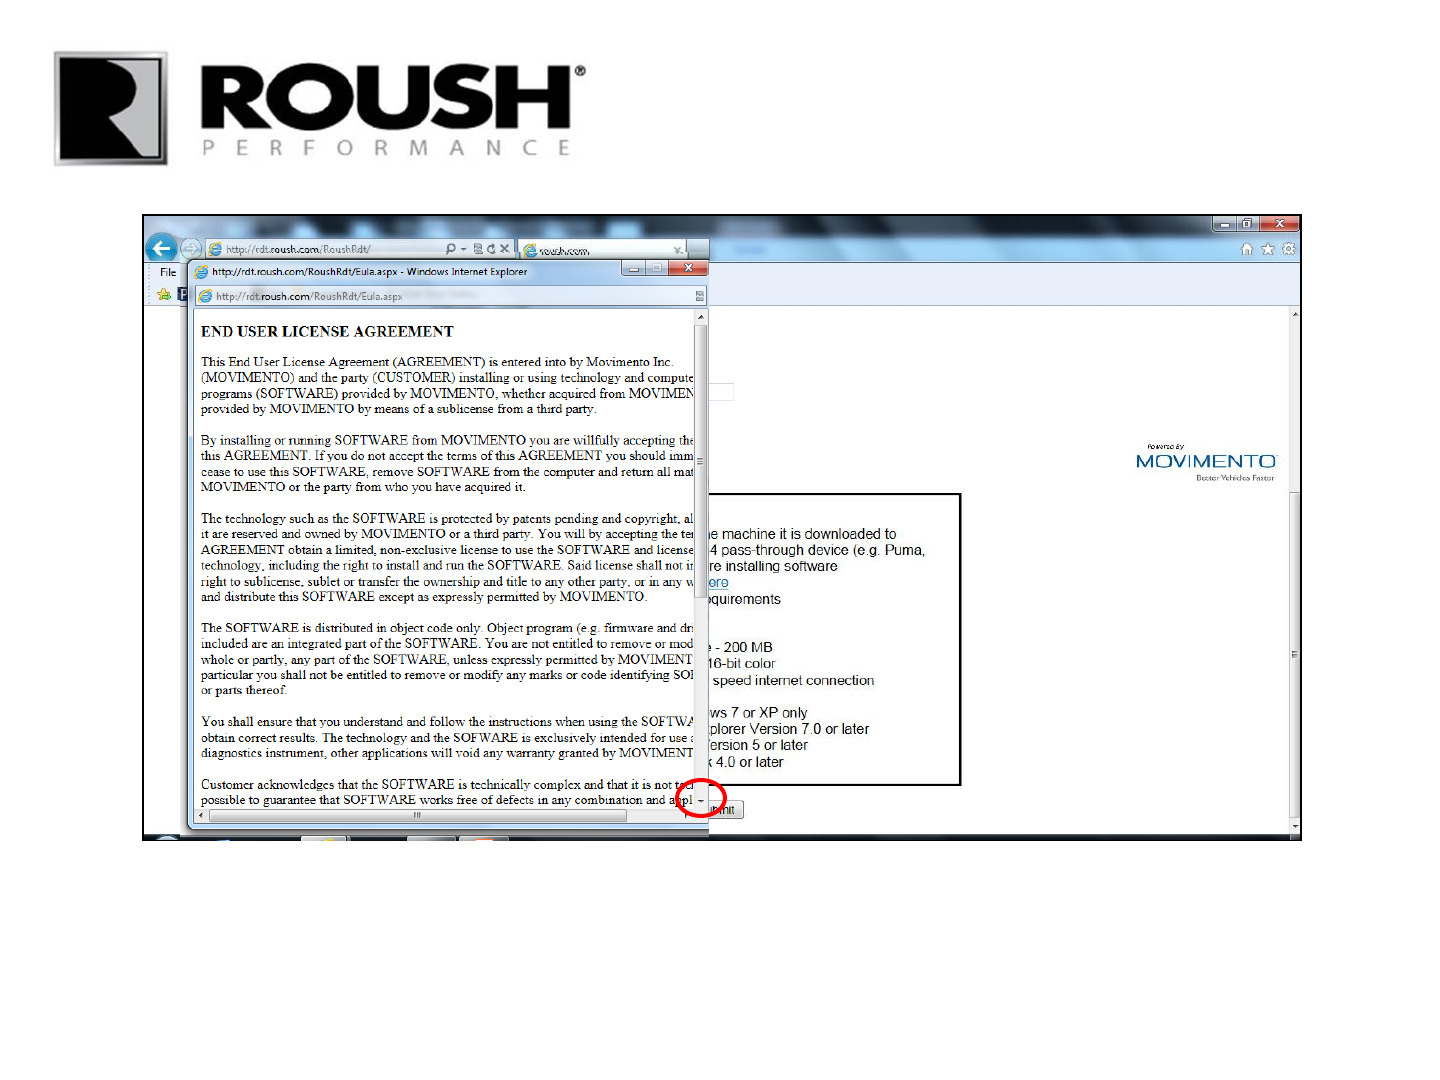
• The END USER LICENSE AGREEEMENT window will pop up.
• Read through the END USER LICENSE AGREEMENT.
• Scroll down to the end of the agreement.
RDT-CALIM (RDT-FLASHIM) 20140109 RLA 5
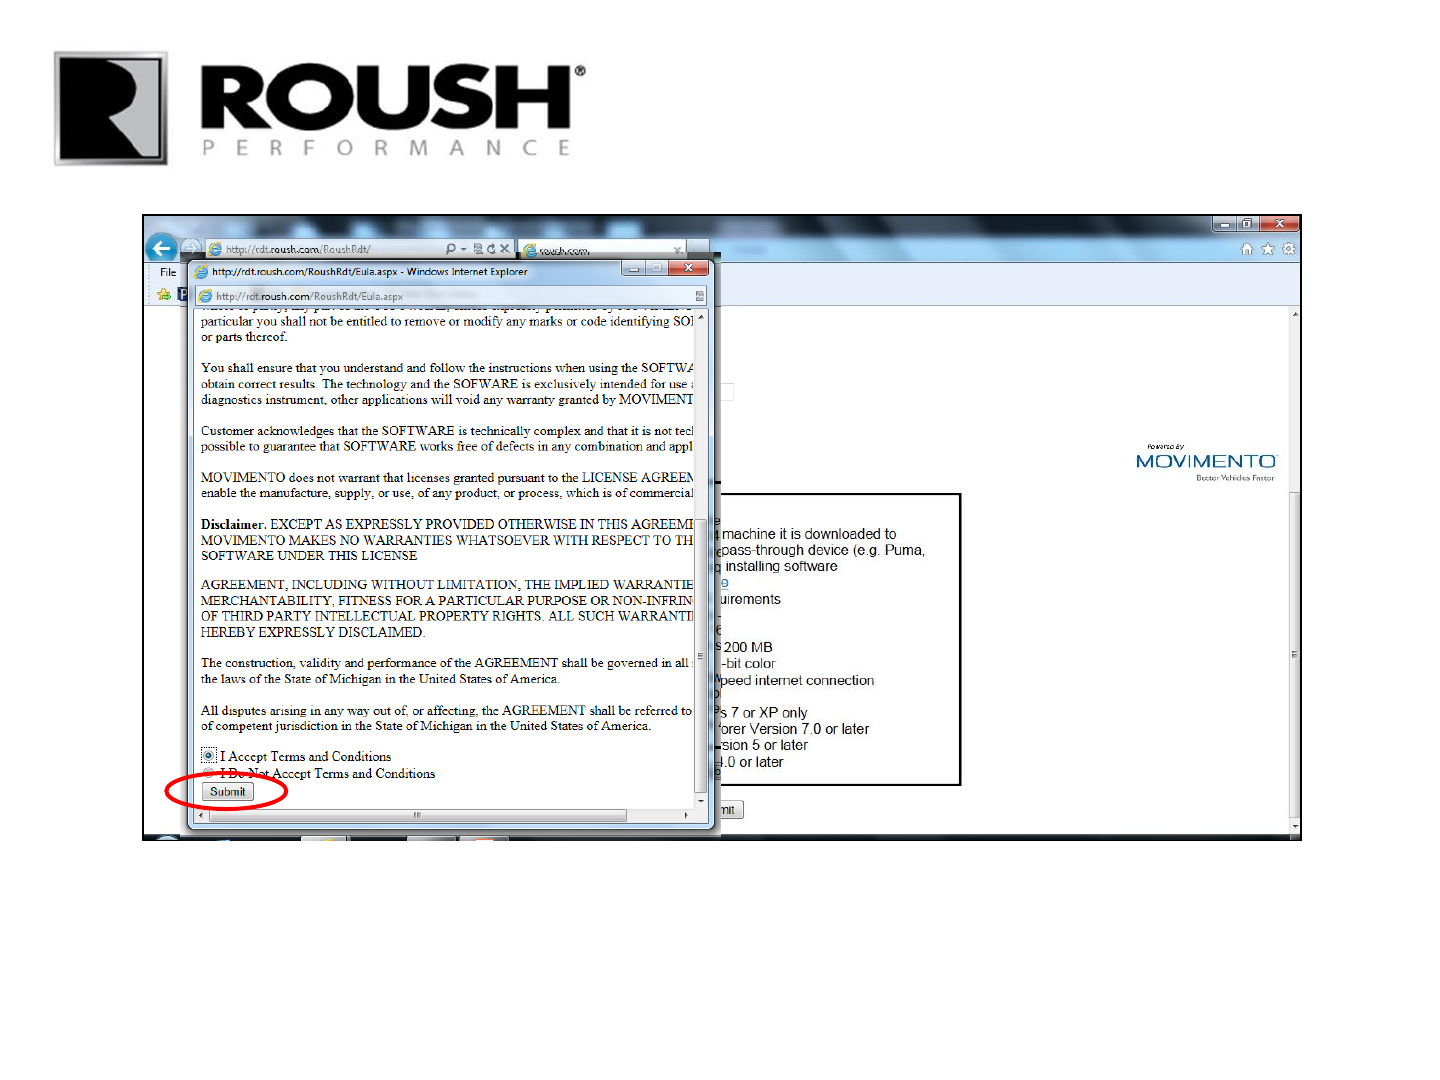
• Select “I Accept Terms and Conditions”.
• Select “Submit”.
RDT-CALIM (RDT-FLASHIM) 20140109 RLA 6
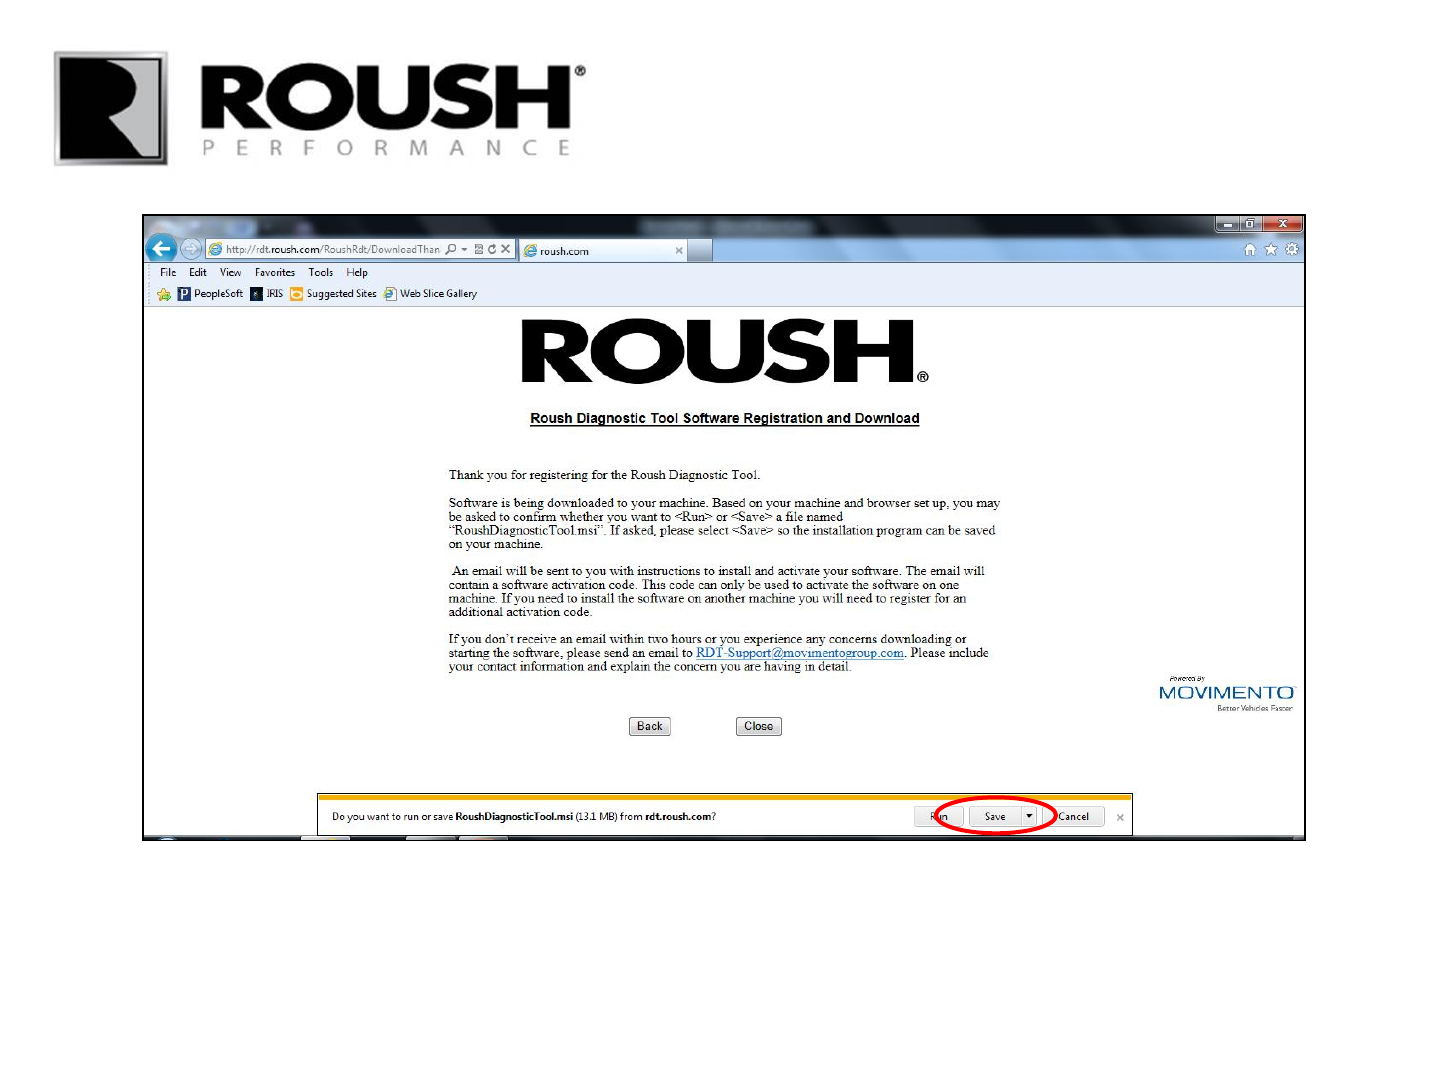
• The RDT software will begin to download.
• Click on the “Save” button. Choose an appropriate location to save the file.
RDT-CALIM (RDT-FLASHIM) 20140109 RLA 7
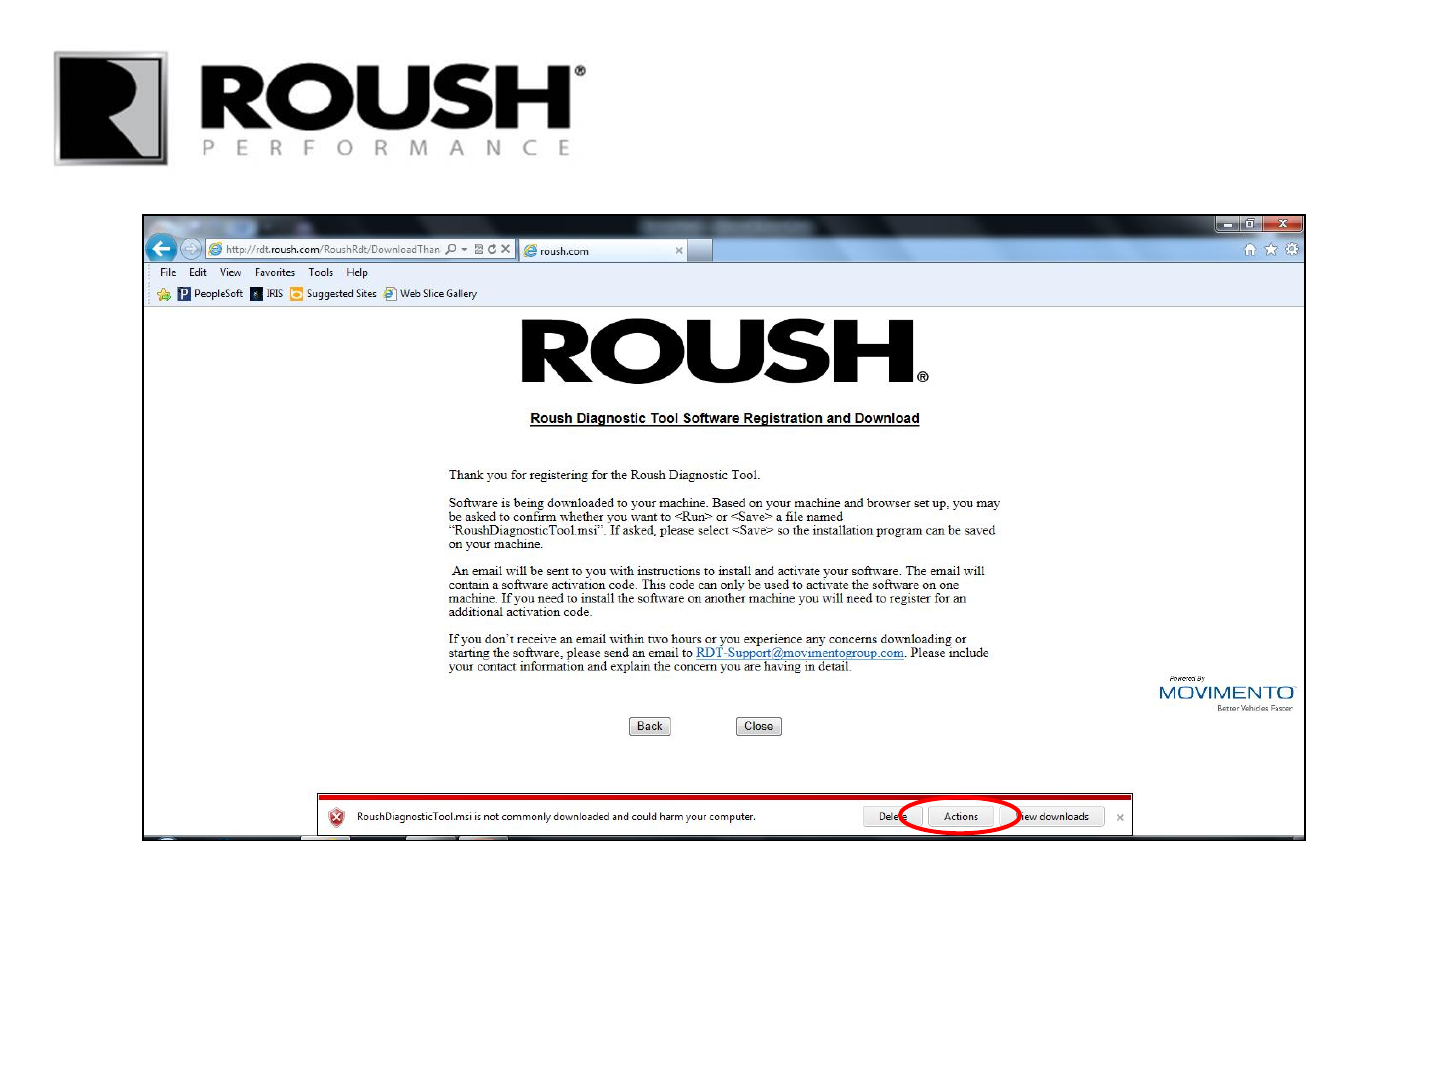
• The following tab may appear. Select “Actions”.
RDT-CALIM (RDT-FLASHIM) 20140109 RLA 8
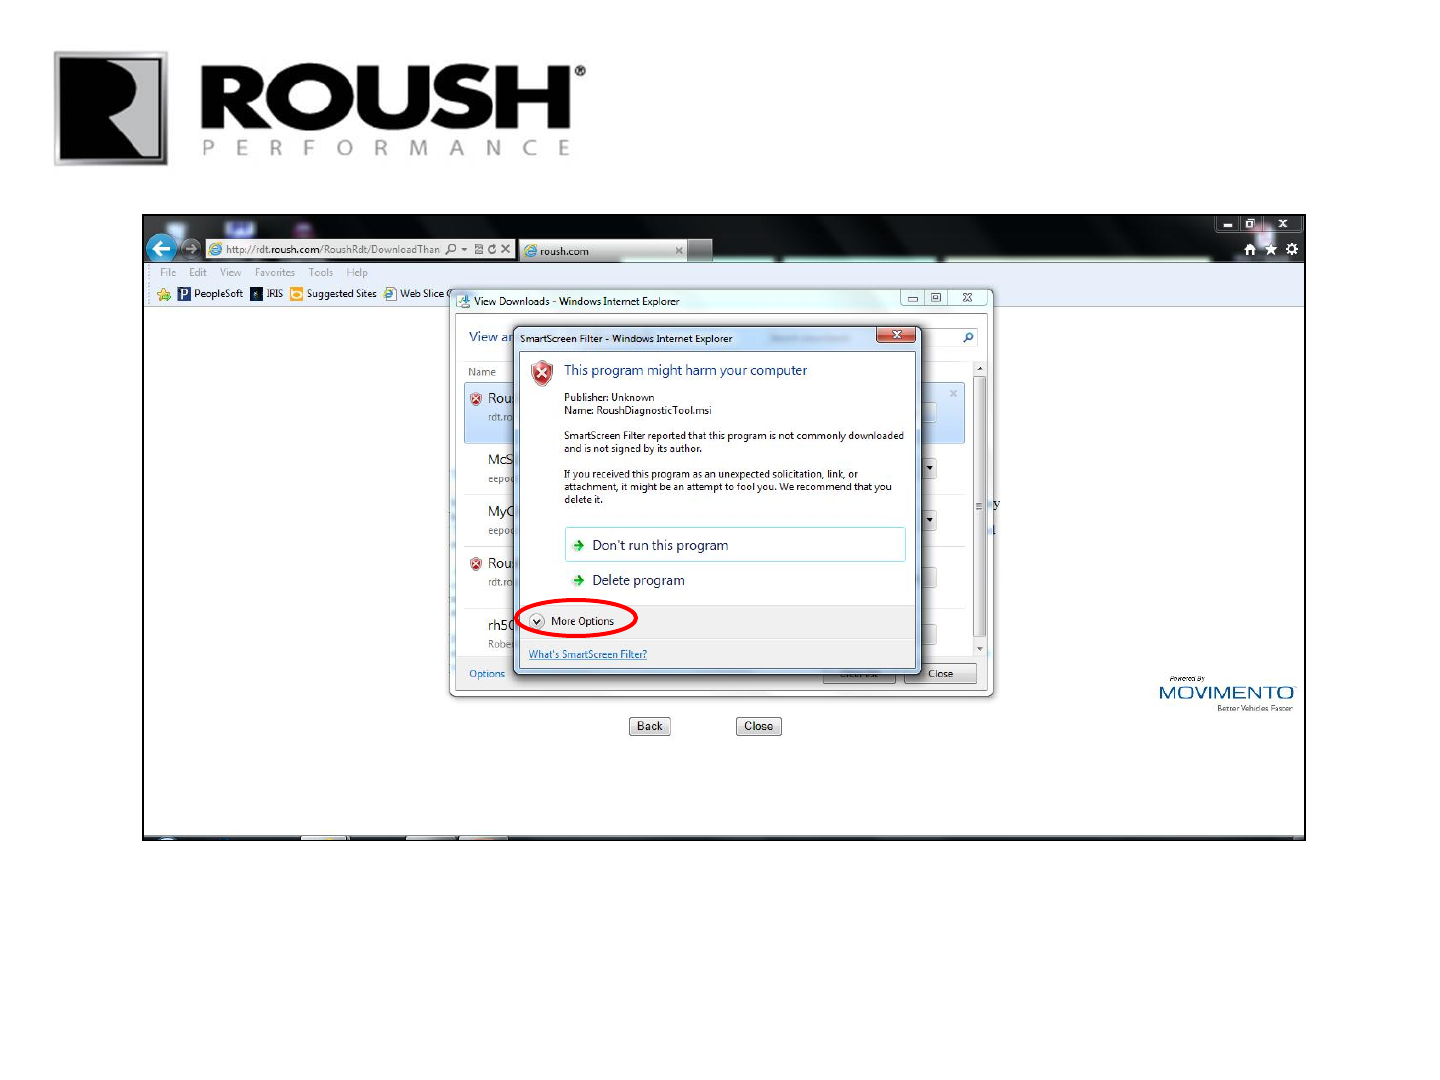
• Select “More Options”.
RDT-CALIM (RDT-FLASHIM) 20140109 RLA 9
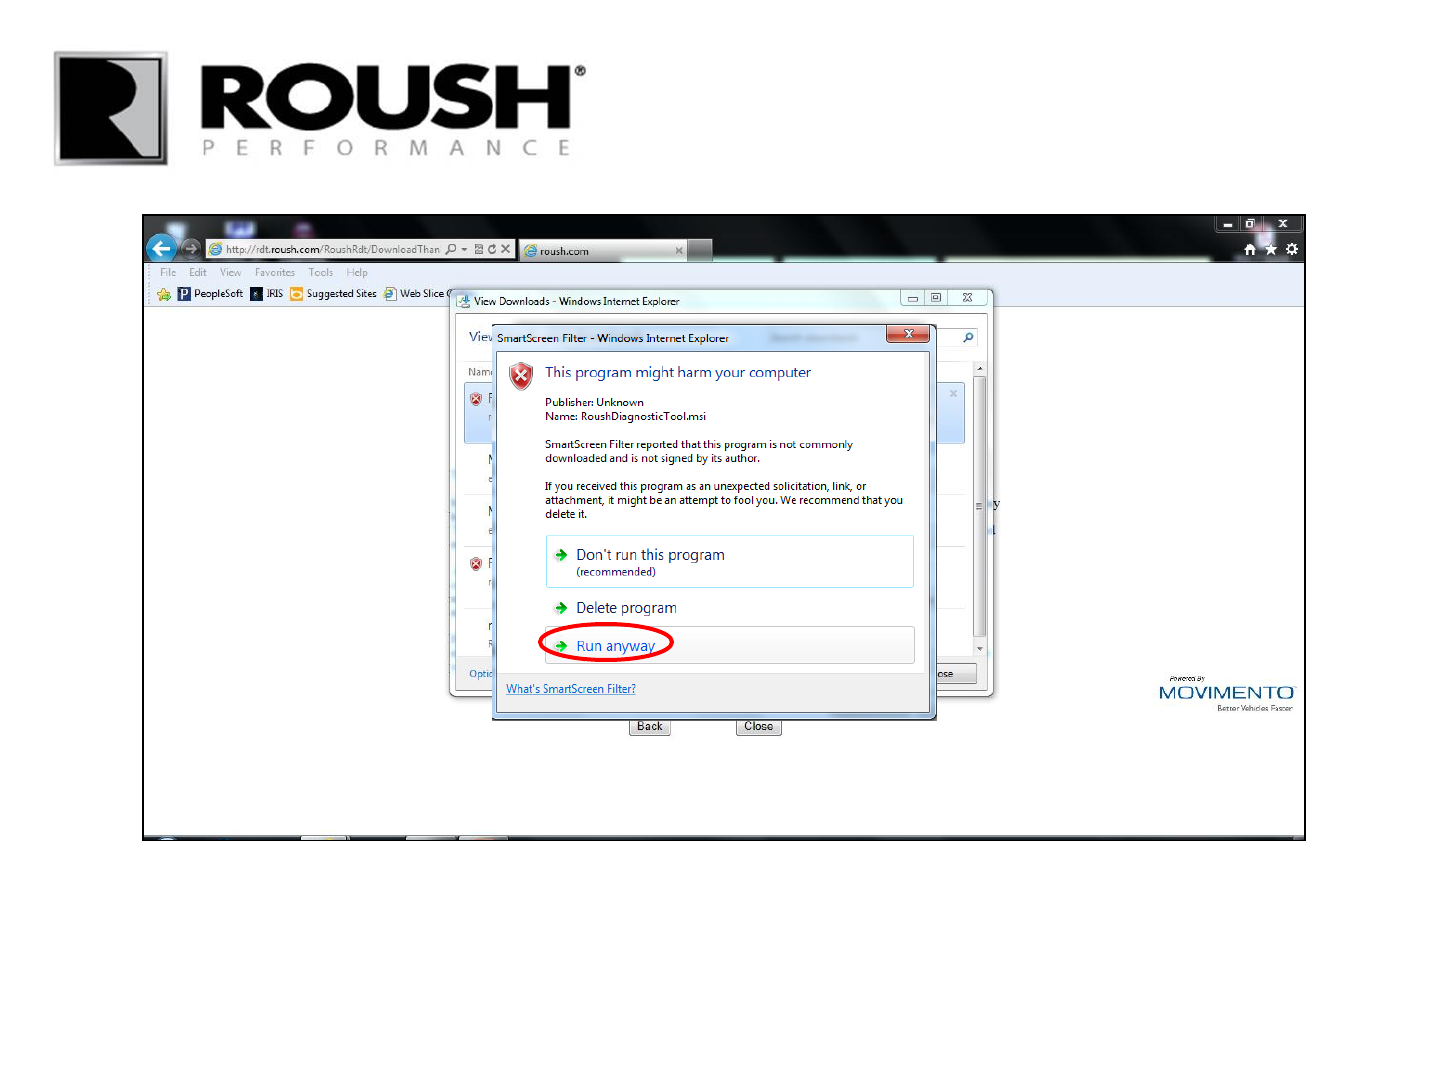
• Select “Run anyway”.
RDT-CALIM (RDT-FLASHIM) 20140109 RLA 10
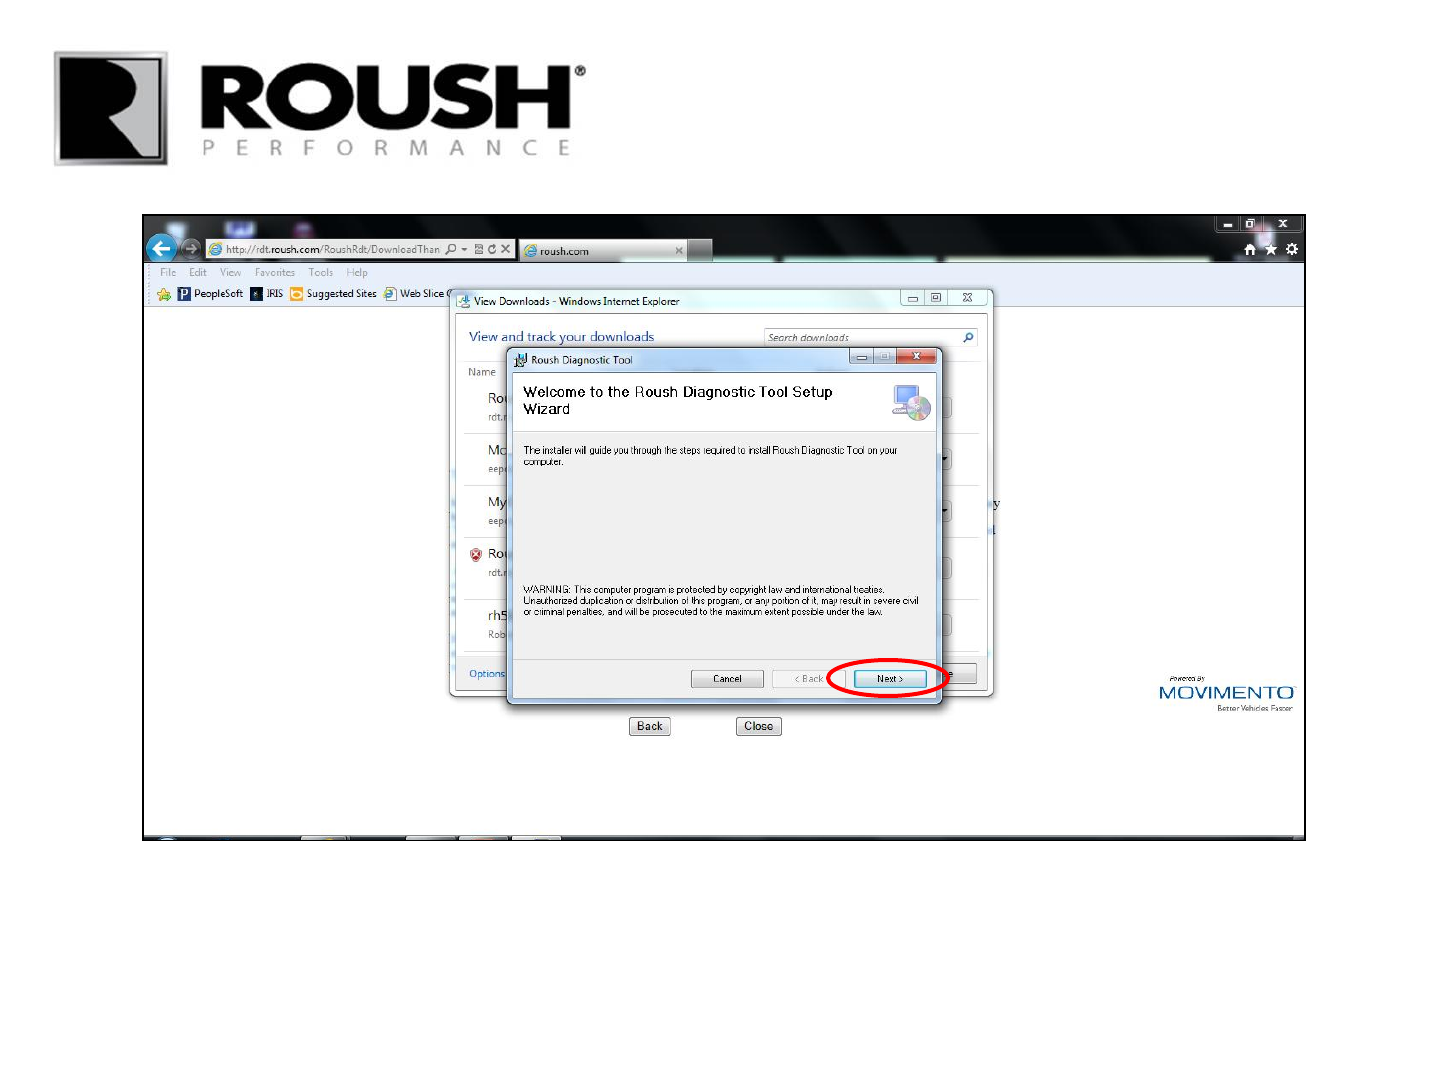
• The Tool Setup Wizard will appear.
• Select “Next”.
• If the Setup Wizard did not automatically start, access the file where the Roush Diagnostic Tool program was
saved and open the Roush Diagnostic Tool software.
RDT-CALIM (RDT-FLASHIM) 20140109 RLA 11
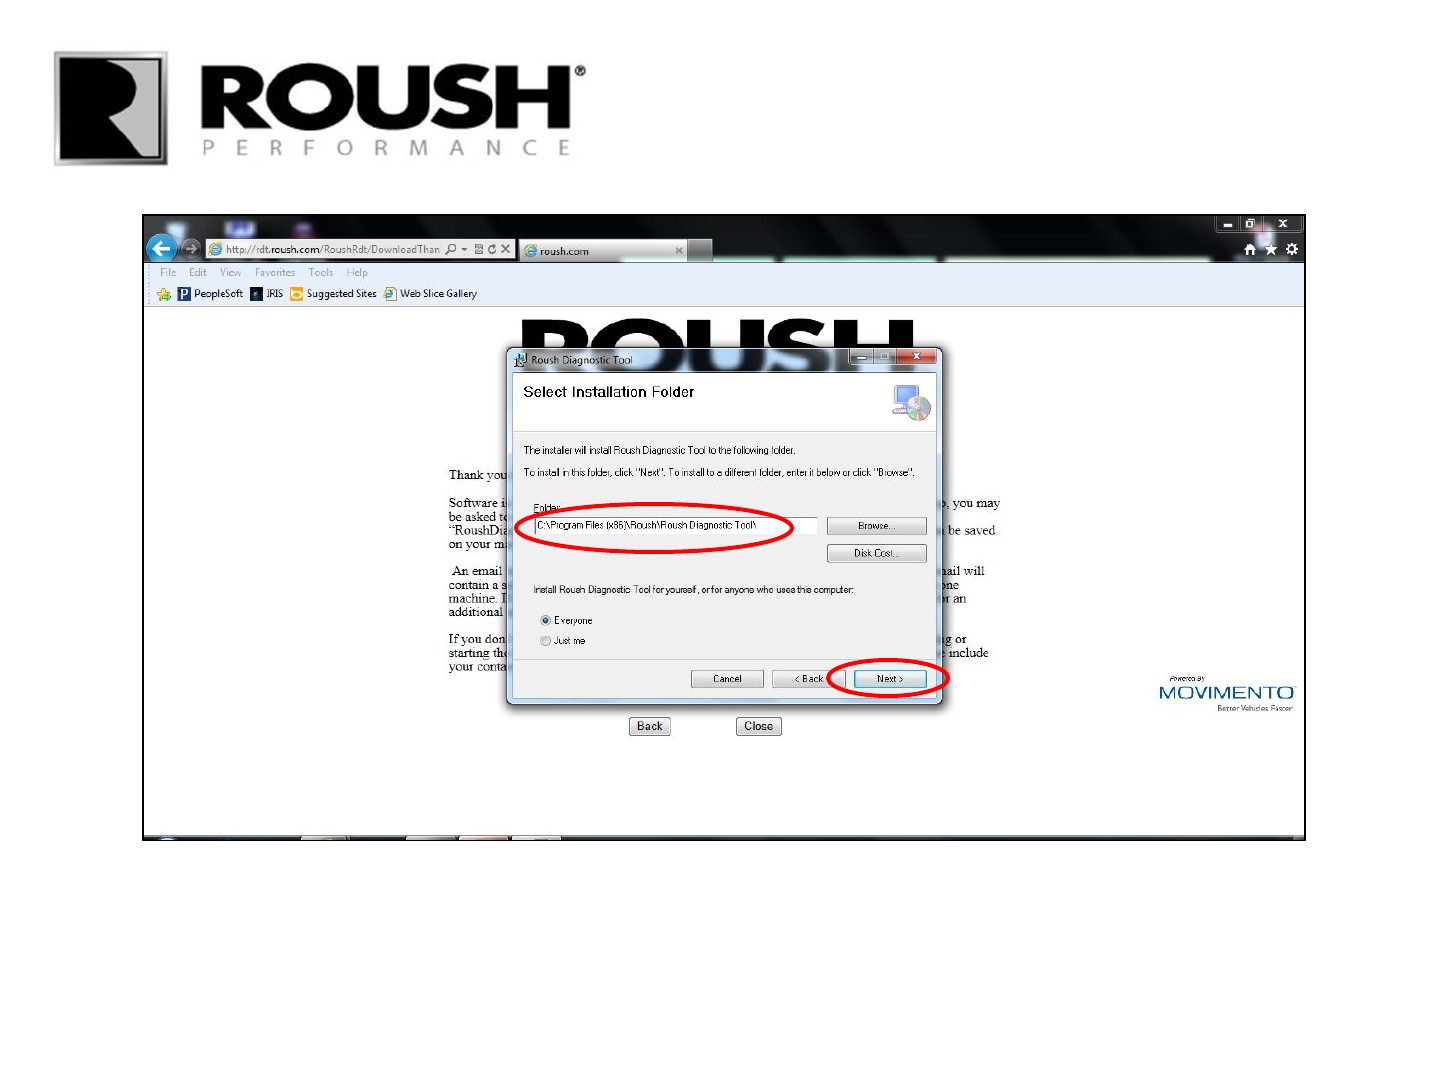
• Verify the installation directory.
• Select “Next”.
RDT-CALIM (RDT-FLASHIM) 20140109 RLA 12
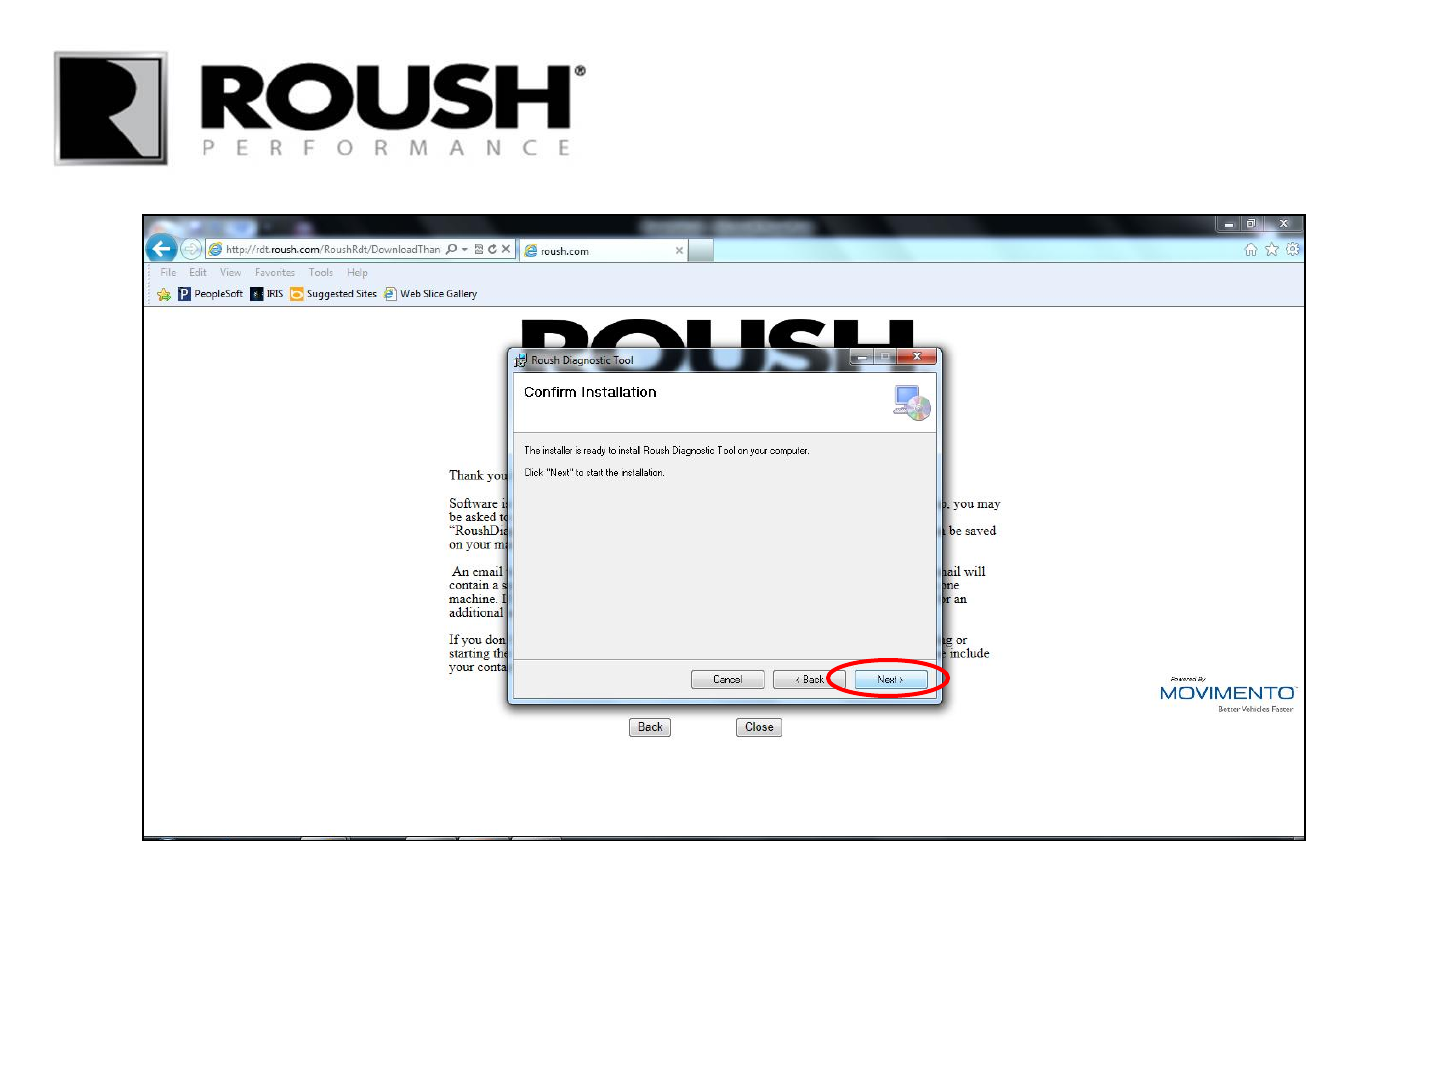
• Select “Next” to install.
RDT-CALIM (RDT-FLASHIM) 20140109 RLA 13
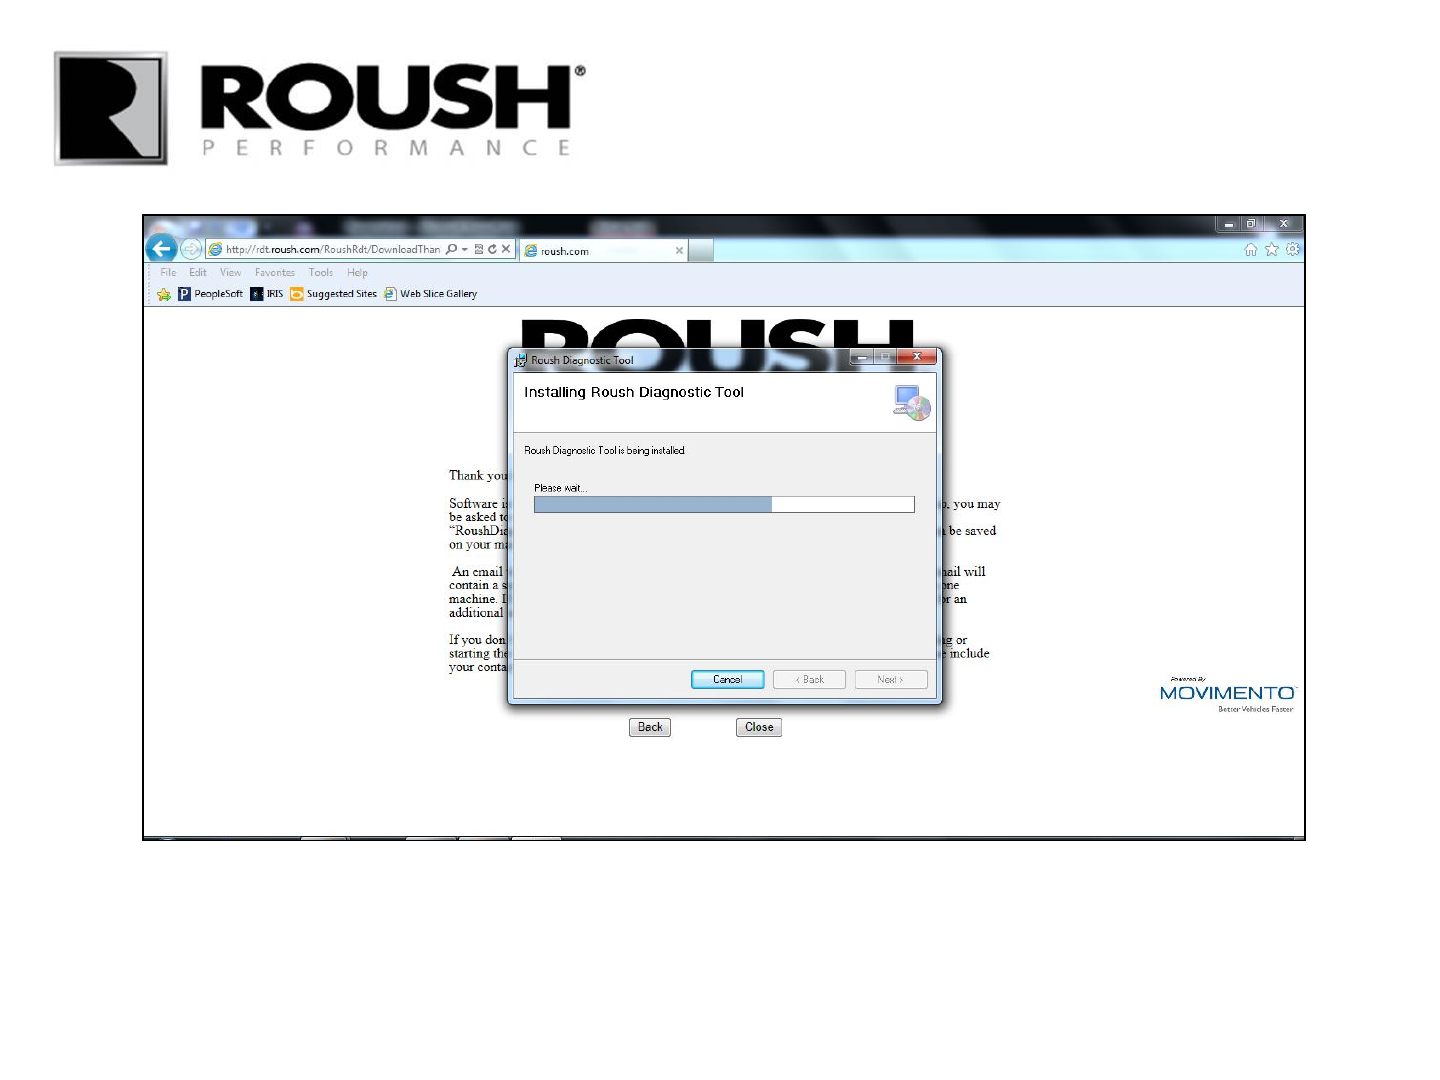
• The Roush Diagnostic Tool will begin to install.
RDT-CALIM (RDT-FLASHIM) 20140109 RLA 14

• Once the Roush Diagnostic Tool has installed, select “Close”.
RDT-CALIM (RDT-FLASHIM) 20140109 RLA 15
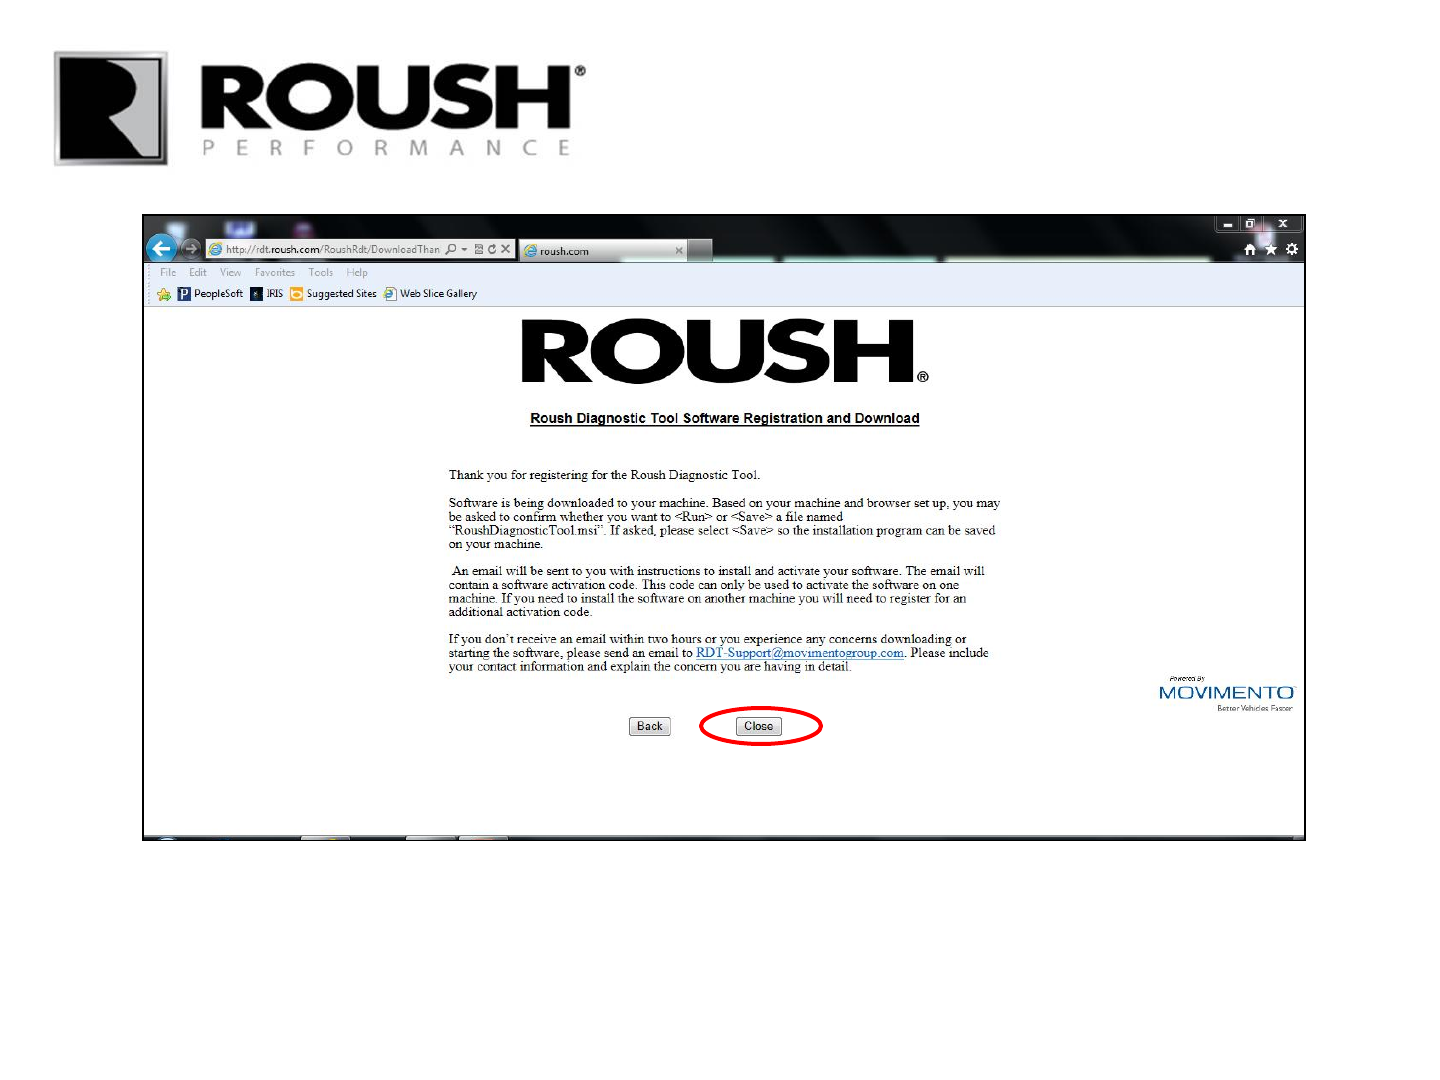
• Select “Close”.
RDT-CALIM (RDT-FLASHIM) 20140109 RLA 16

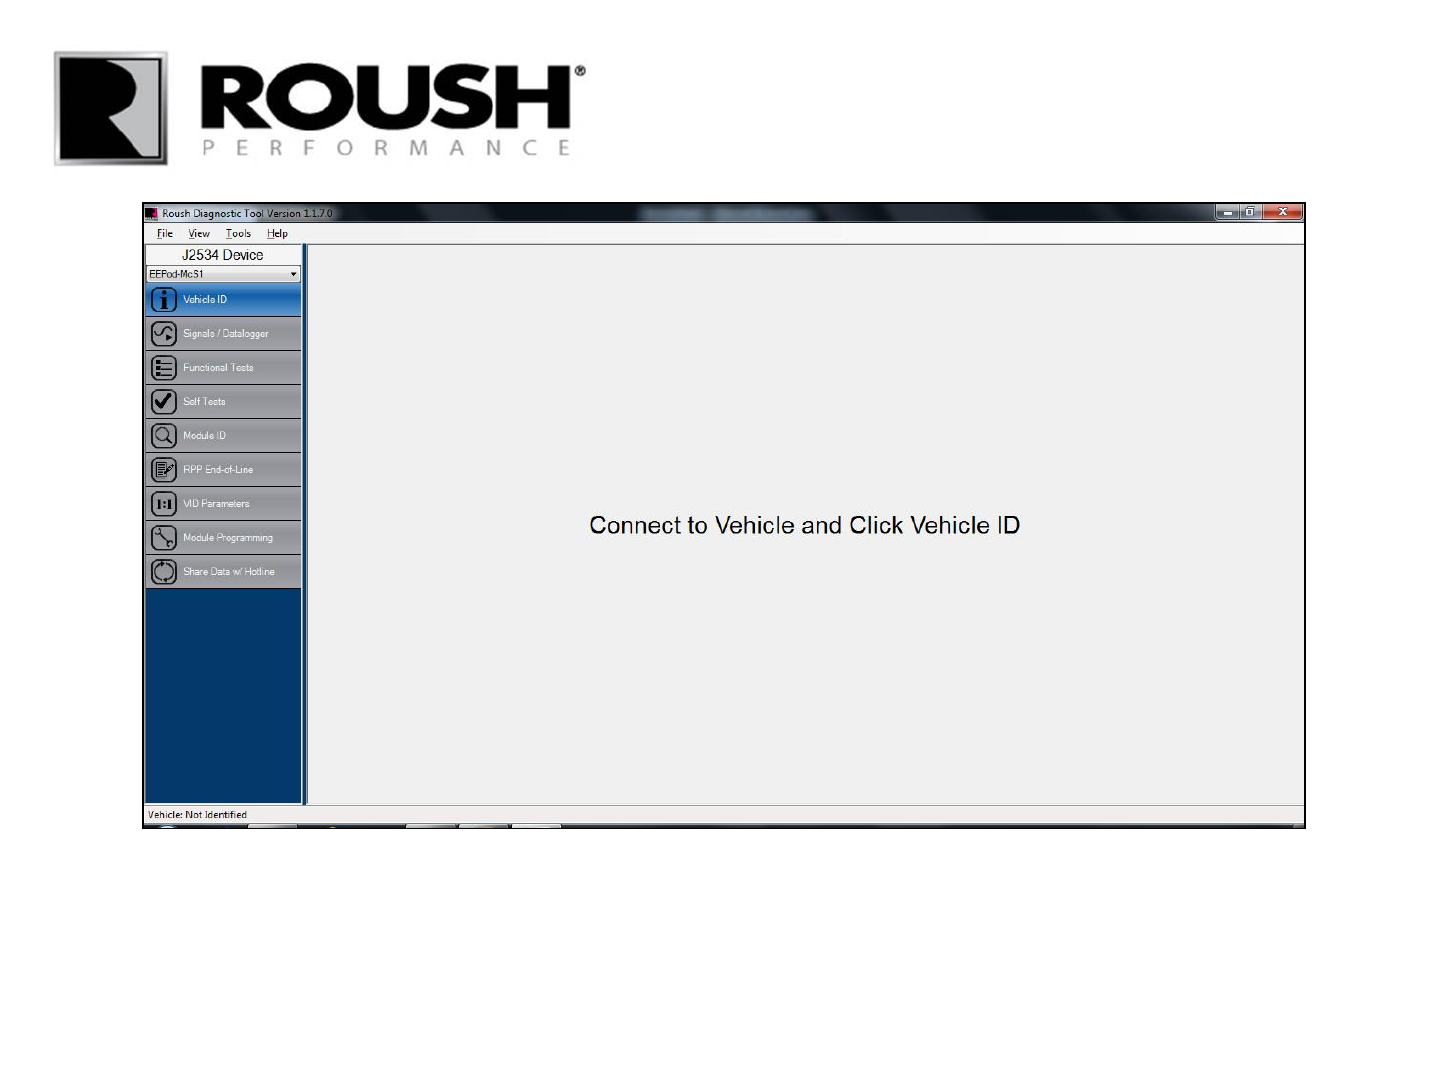
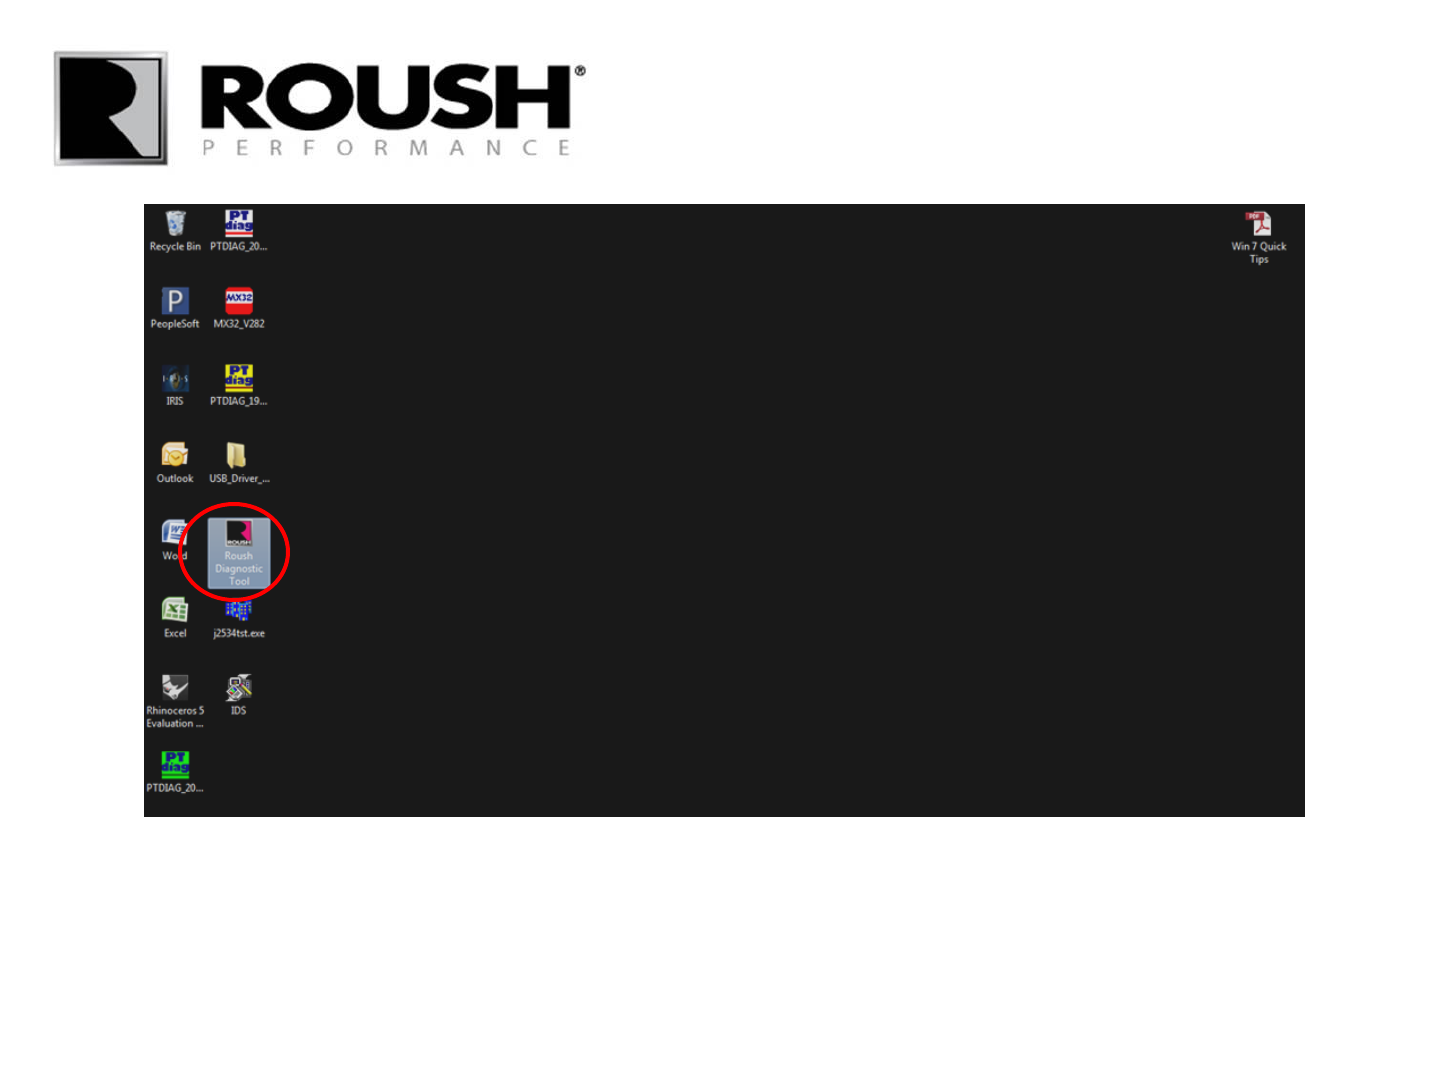
• Select the Roush Diagnostic Tool Icon to open the software.
RDT-CALIM (RDT-FLASHIM) 20140109 RLA 17
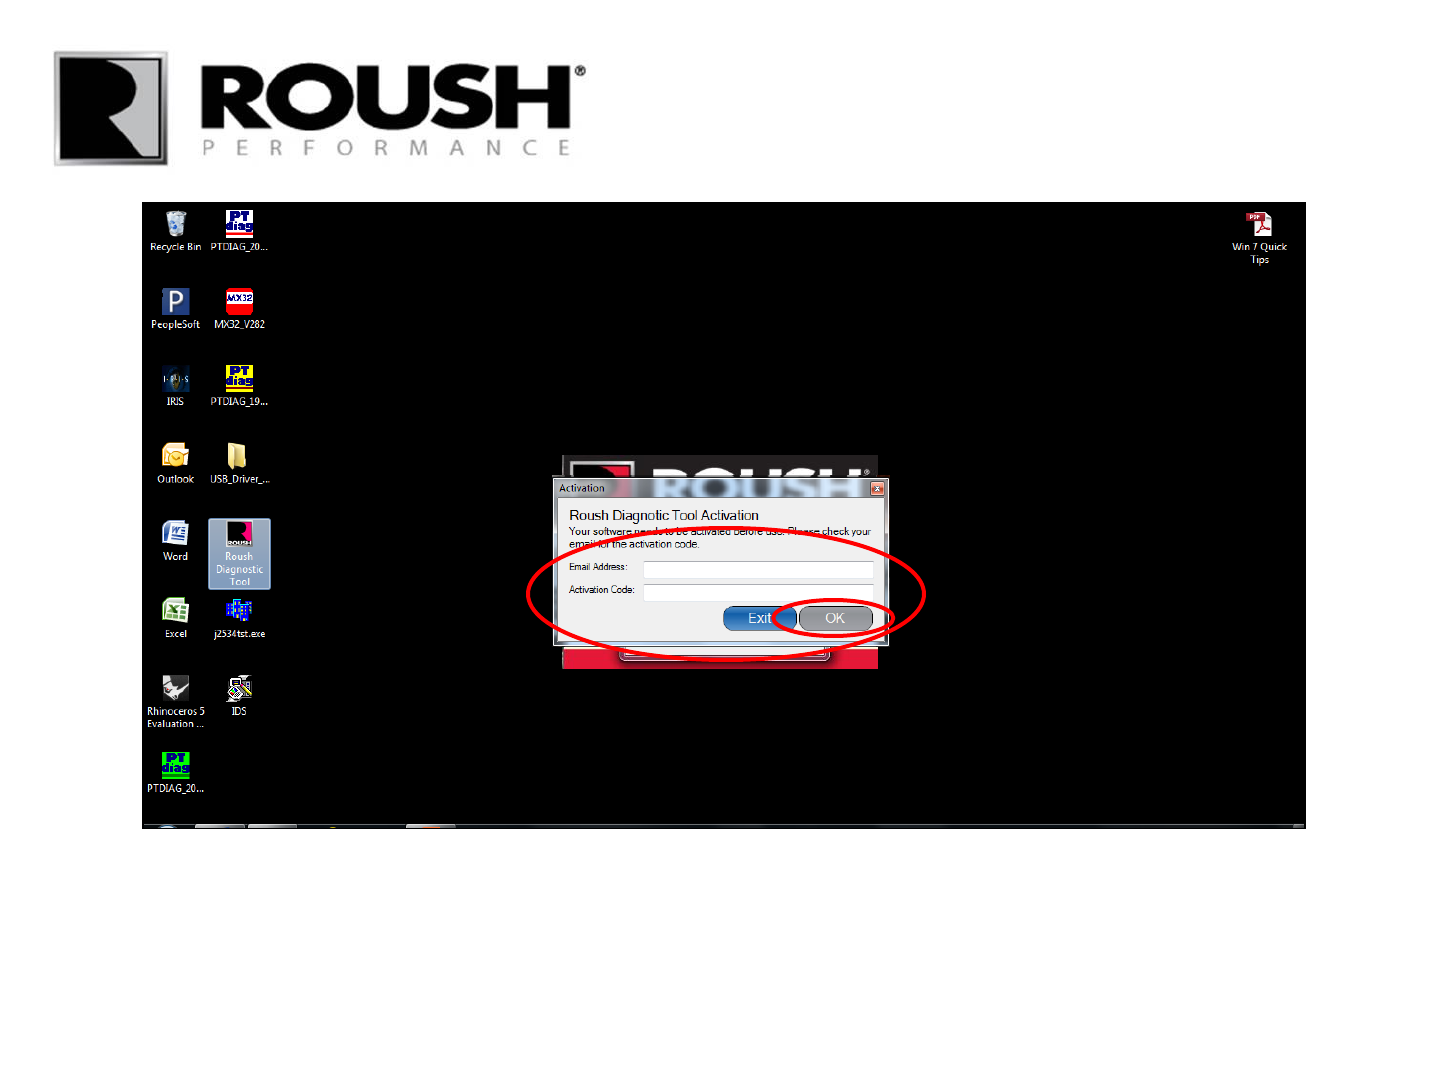
• Access your email account for the software activation code.
• Enter your email address and activation code in the respective fields and select “OK”.
RDT-CALIM (RDT-FLASHIM) 20140109 RLA 18
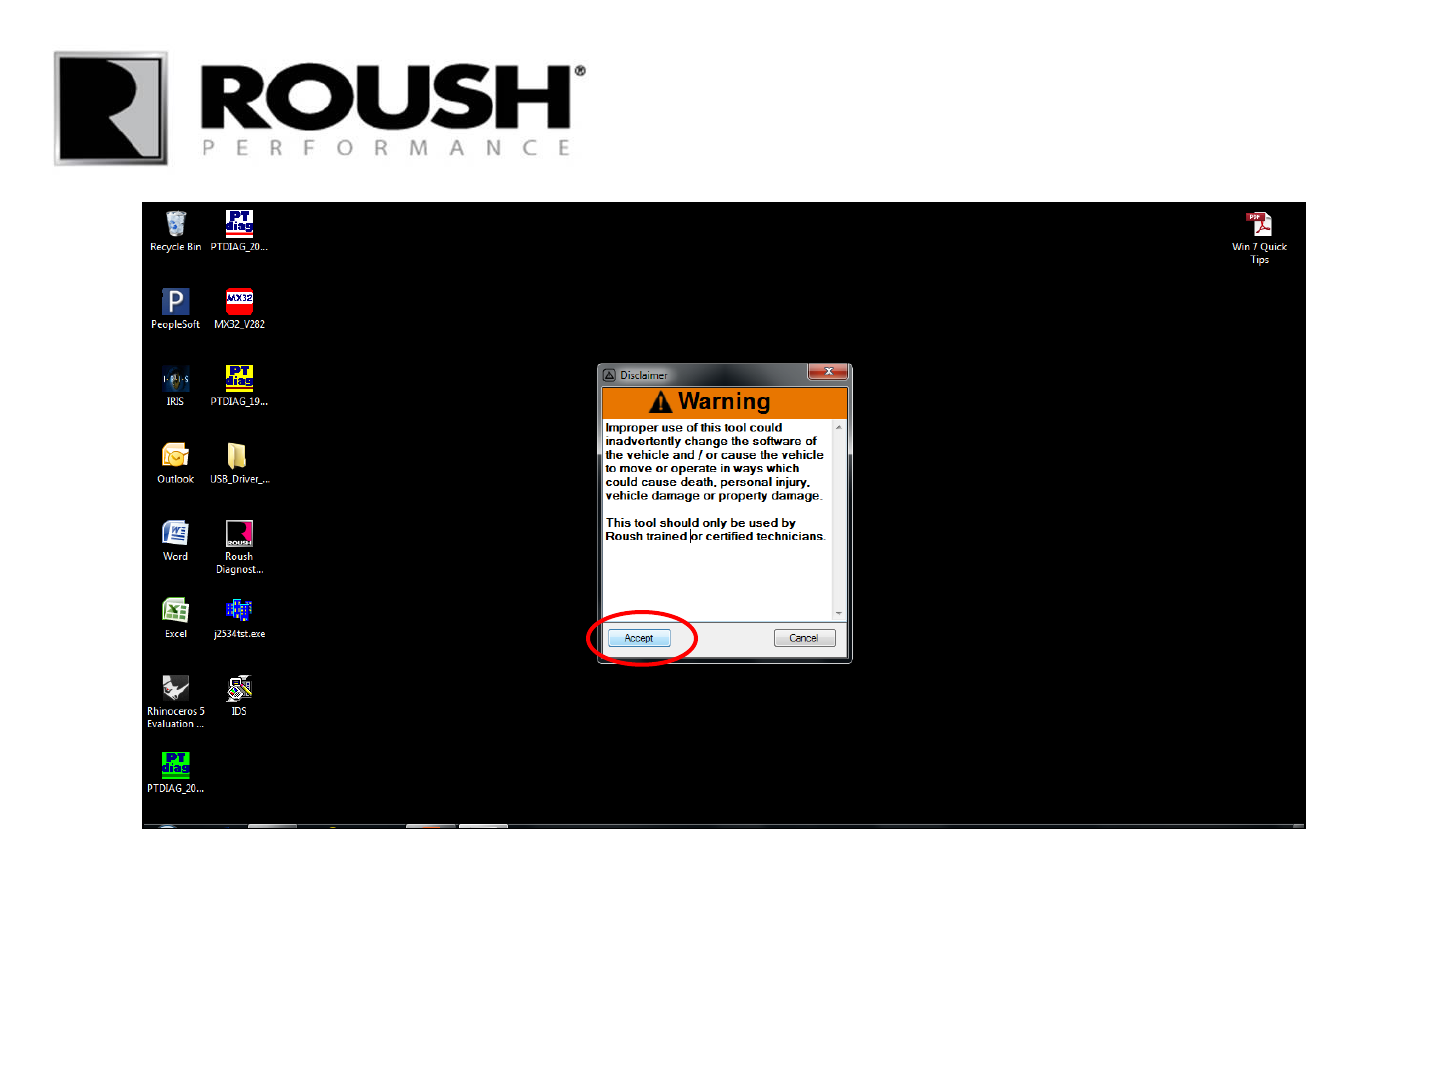
• When prompted with the software warning, click accept.
RDT-CALIM (RDT-FLASHIM) 20140109 RLA 19
• You are now ready to use your Roush Diagnostic Tool Software.
RDT-CALIM (RDT-FLASHIM) 20140109 RLA 20

Roush Diagnostic Tool
Retail Flash Procedure
rdt.roush.com
Note: RDT software requires an internet connection to flash the vehicle.
21 RDT-CALIM (RDT-FLASHIM) 20140109 RLA
• Select the Roush Diagnostic Tool Icon to begin the flash procedure.
22 RDT-CALIM (RDT-FLASHIM) 20140109 RLA
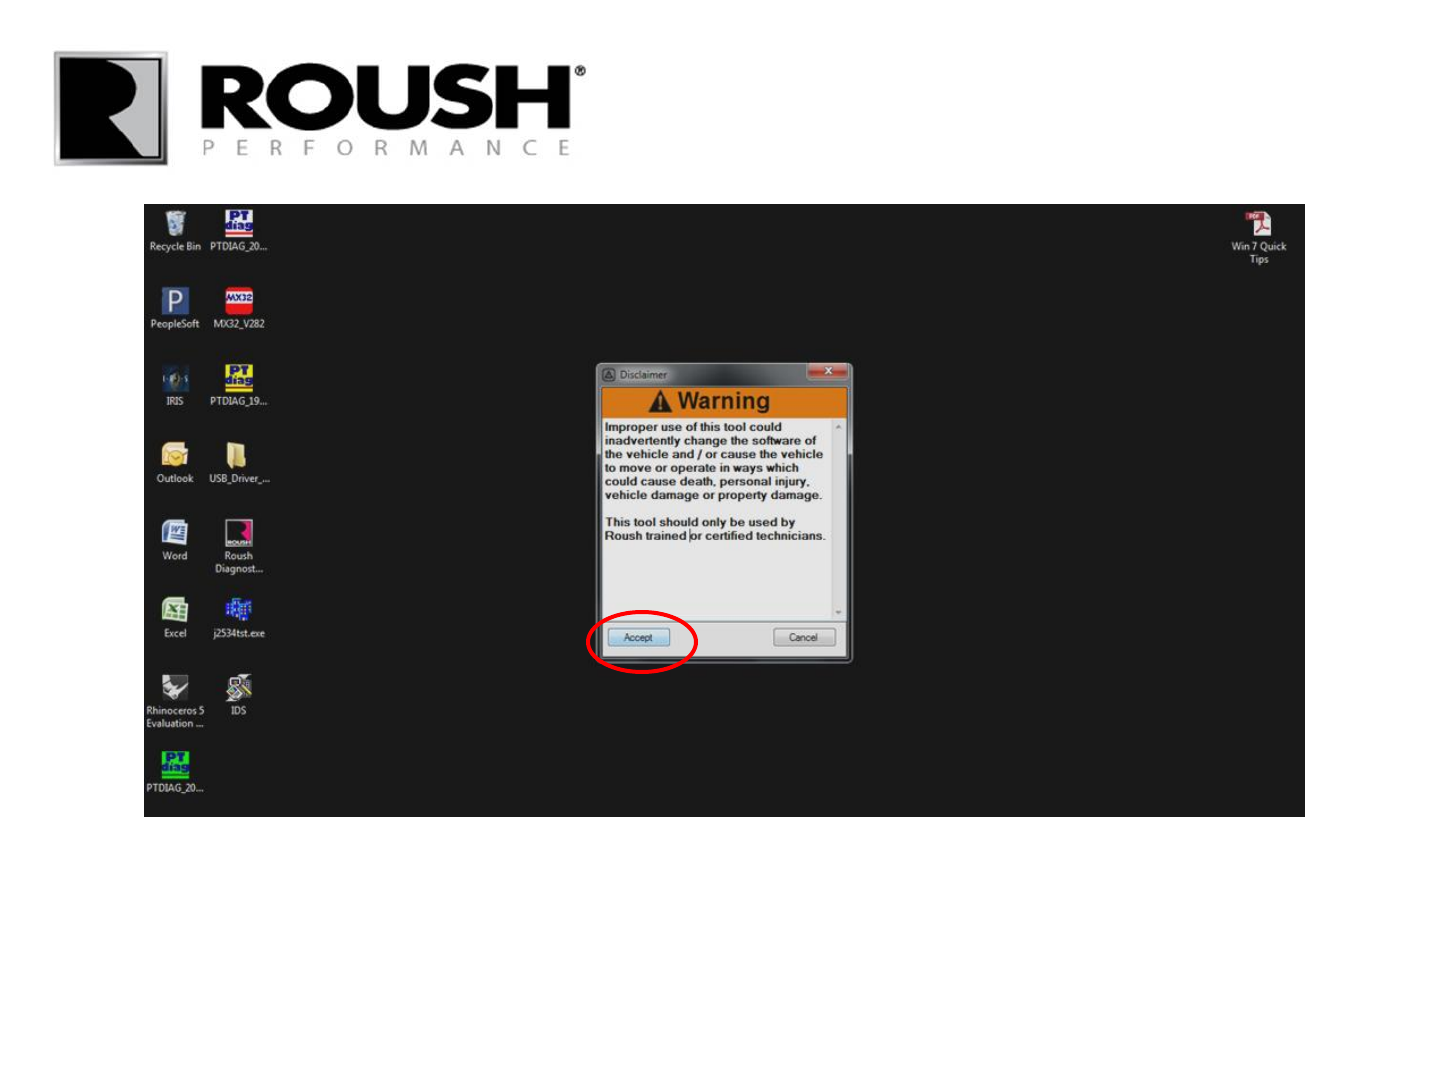
• When prompted with the software warning, click accept.
23 RDT-CALIM (RDT-FLASHIM) 20140109 RLA
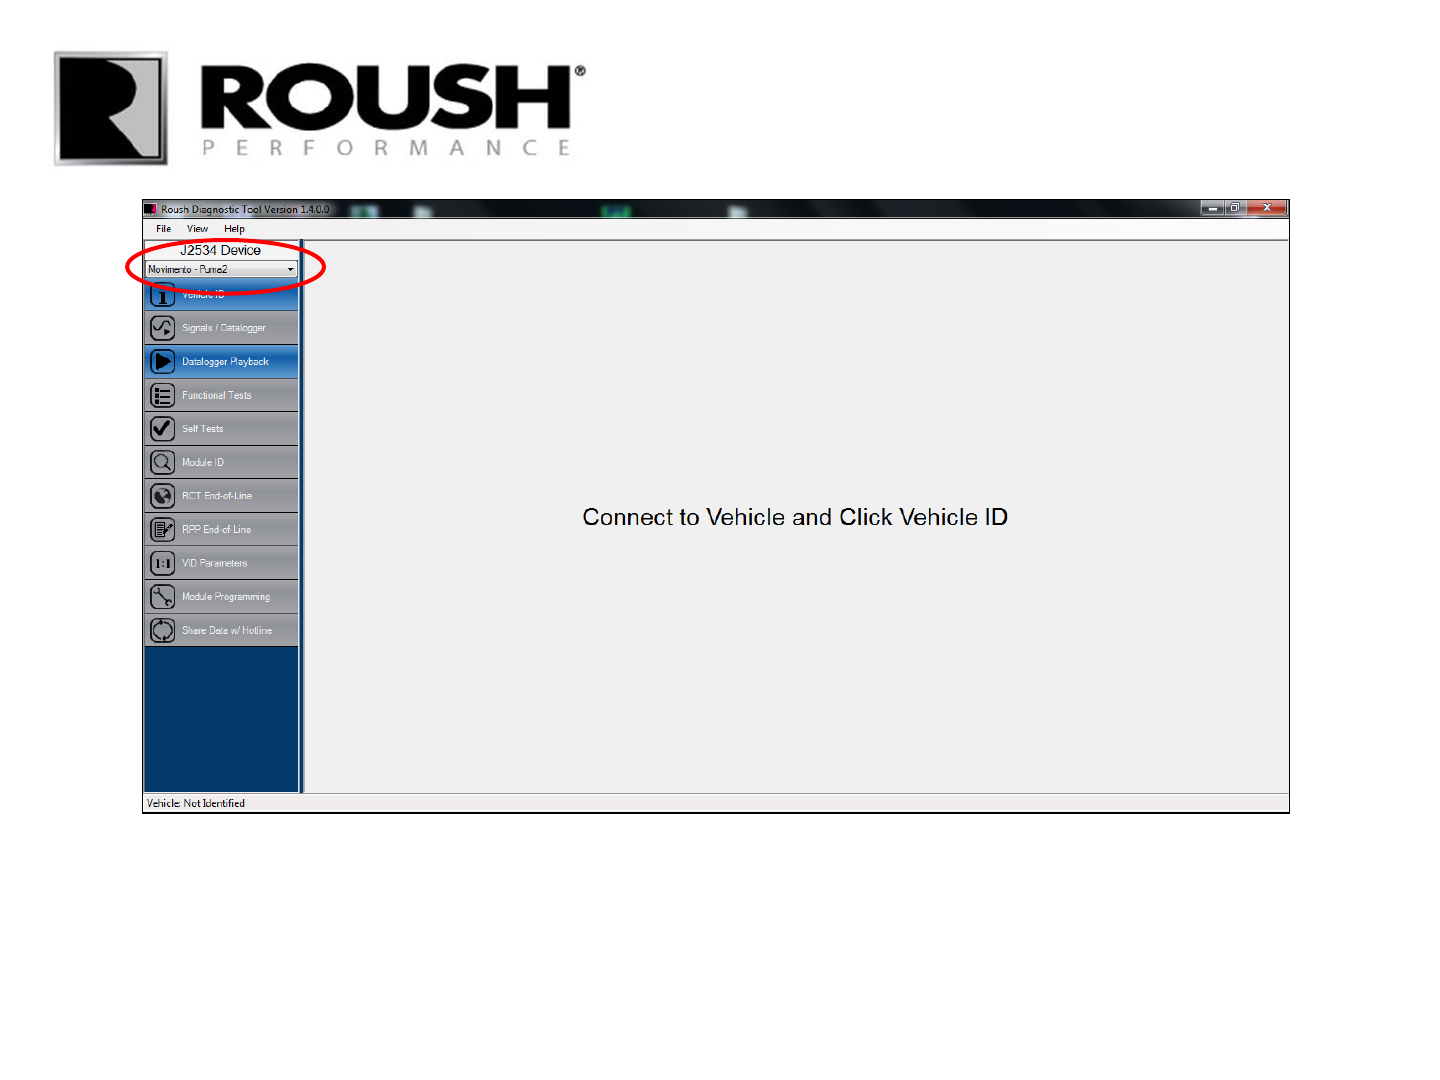
• Click on the drop down menu in the upper left corner to select the appropriate SAE J2534 vehicle
communication device.
24 RDT-CALIM (RDT-FLASHIM) 20140109 RLA

• If using the VCM 1, select the Teradyne- GNA600 from the drop down menu.
• If using the VCM 2, select the Bosch- Ford-VCM-2.
25 RDT-CALIM (RDT-FLASHIM) 20140109 RLA
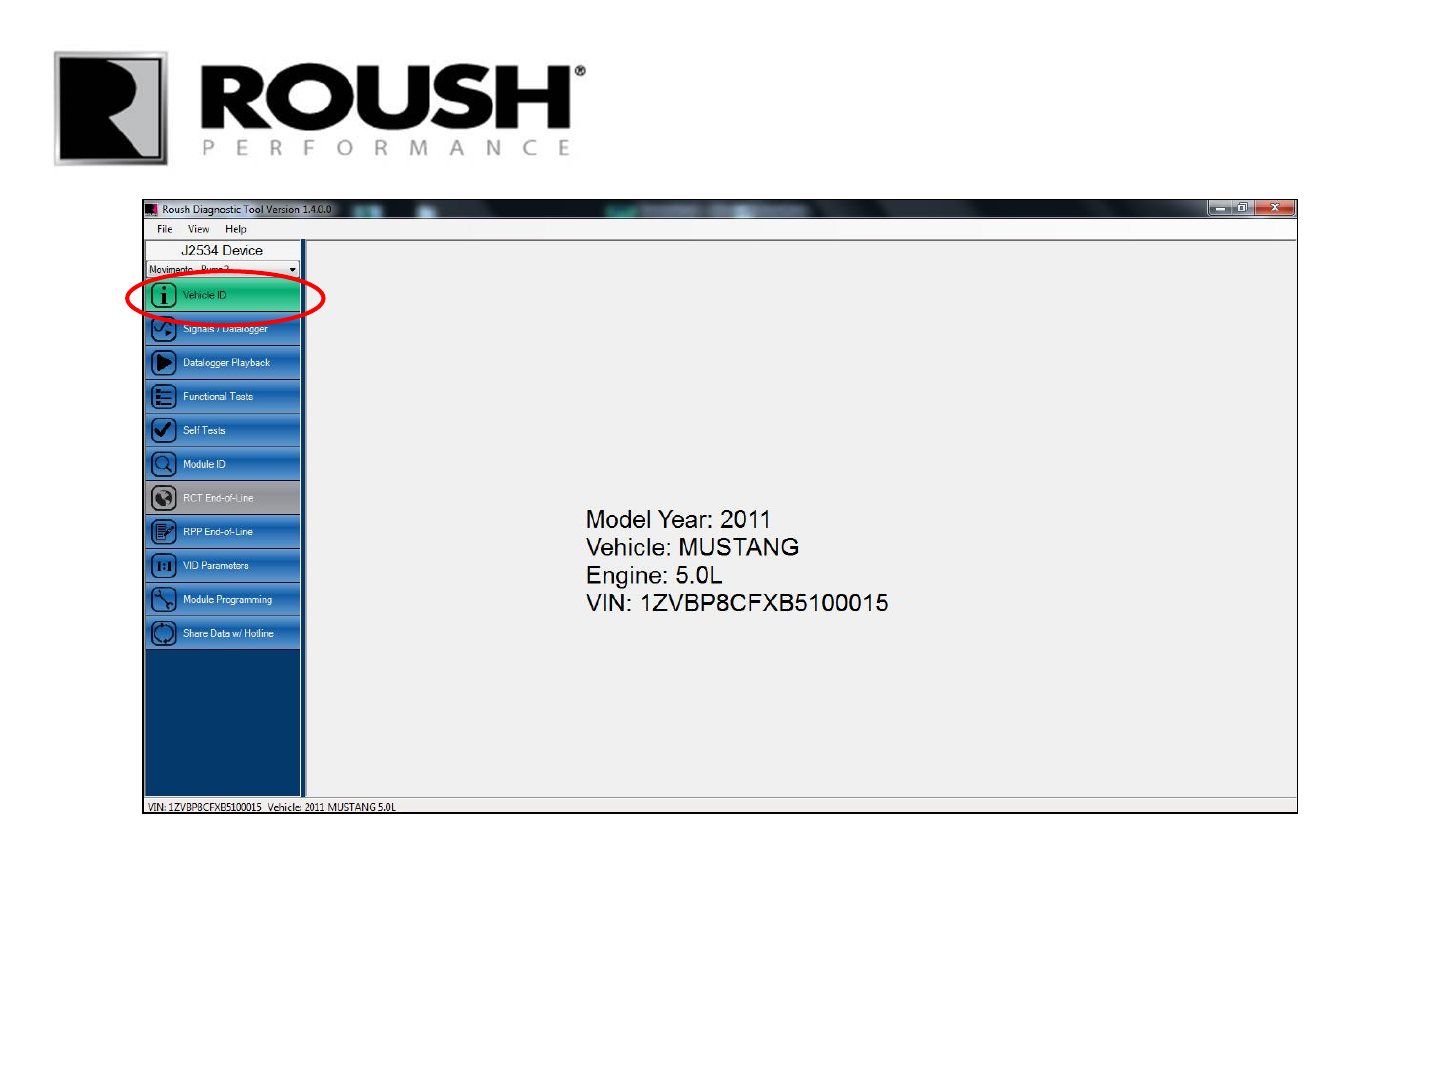
• With the vehicle in the Key On, Engine Off position and the VCM 1 or VCM 2 connected to the vehicle
and a USB port on the computer, select “Vehicle ID”.
26 RDT-CALIM (RDT-FLASHIM) 20140109 RLA
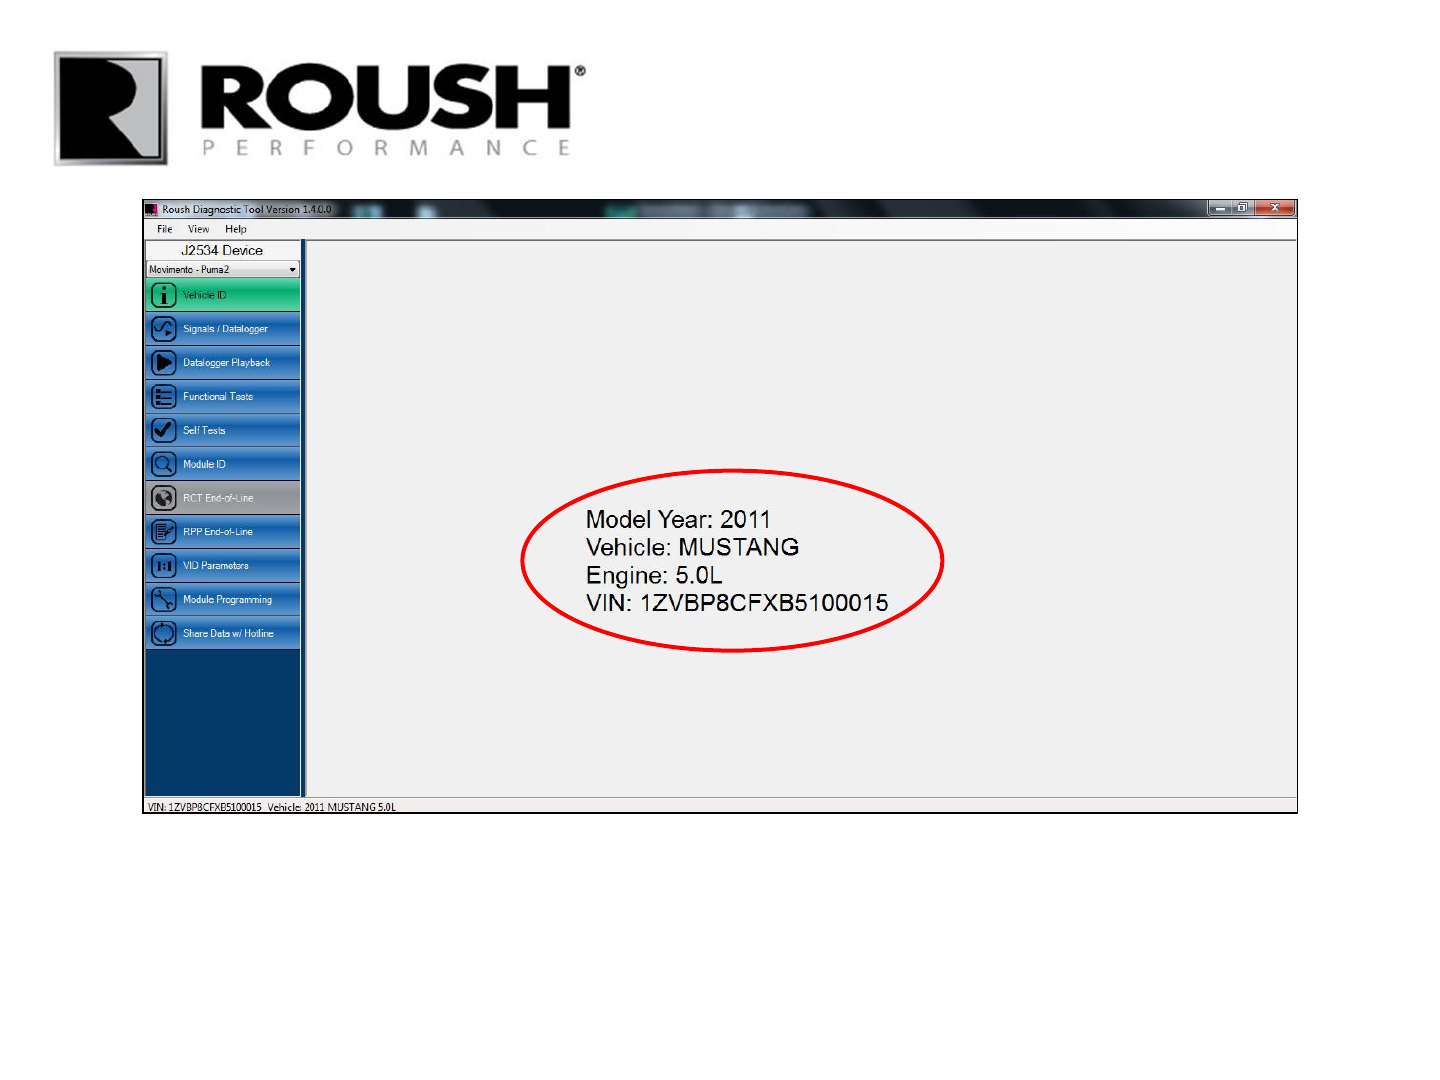
• Once the vehicle is identified, the vehicle information will be displayed as shown above.
• If the vehicle cannot be identified, close the tool, be sure the VCM 1 or VCM 2 is connected and the vehicle ignition
is in the Key On, Engine Off position. Open the tool and restart the procedure.
27 RDT-CALIM (RDT-FLASHIM) 20140109 RLA
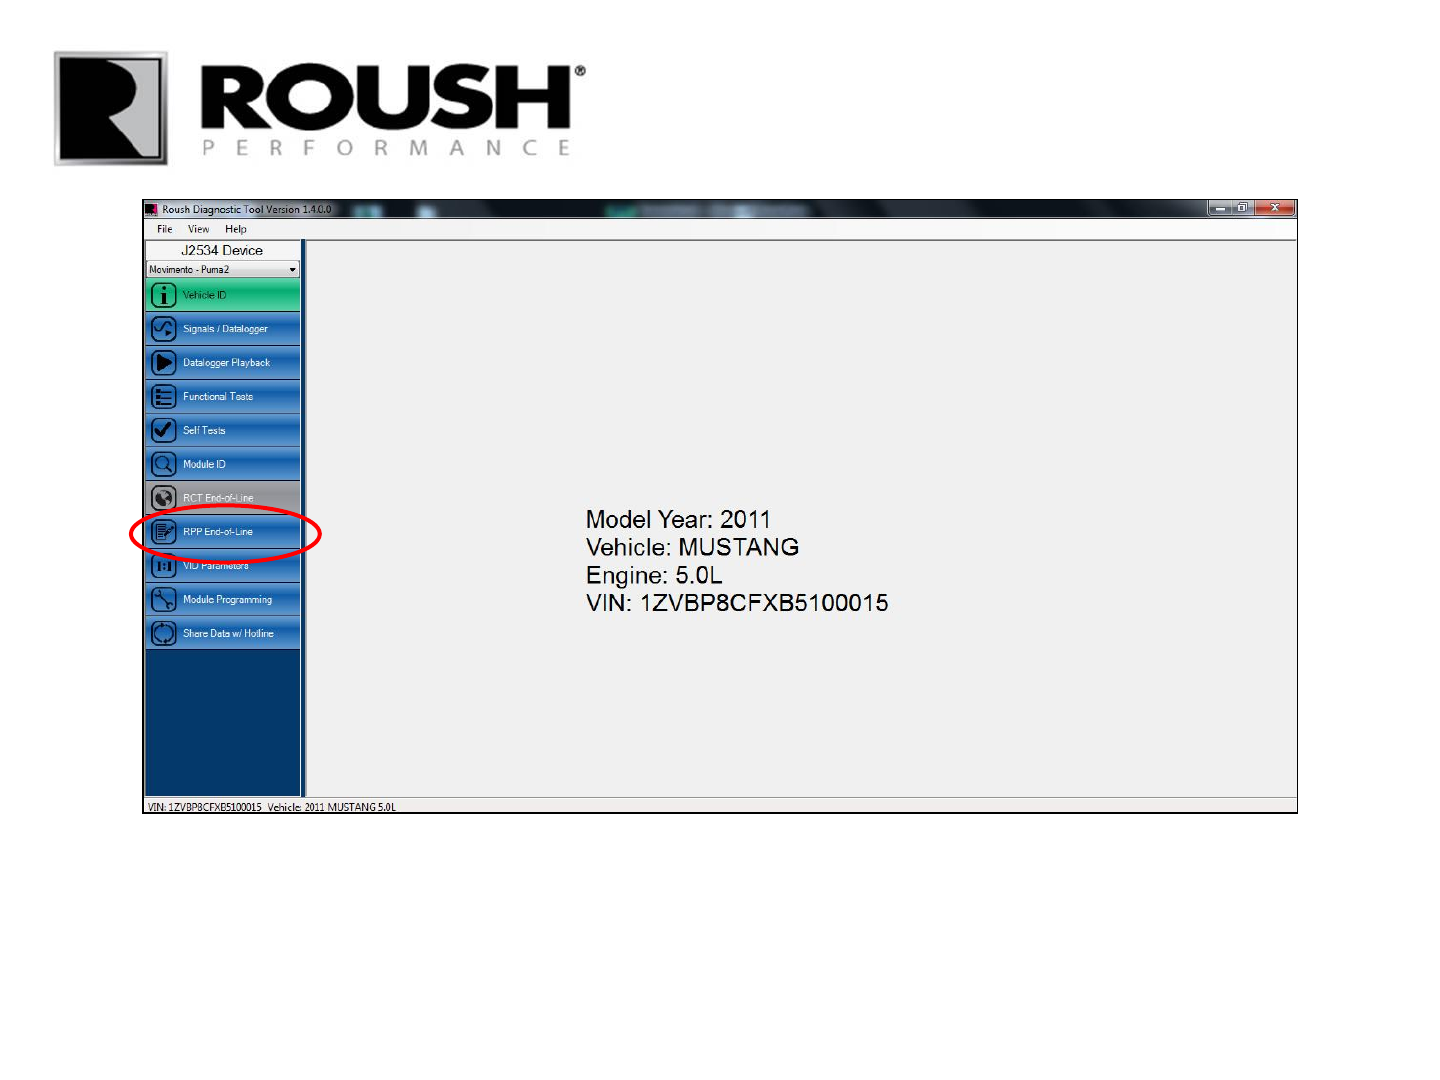
• Once the vehicle is identified, select “RPP End-of-Line” from the menu on the left.
28 RDT-CALIM (RDT-FLASHIM) 20140109 RLA
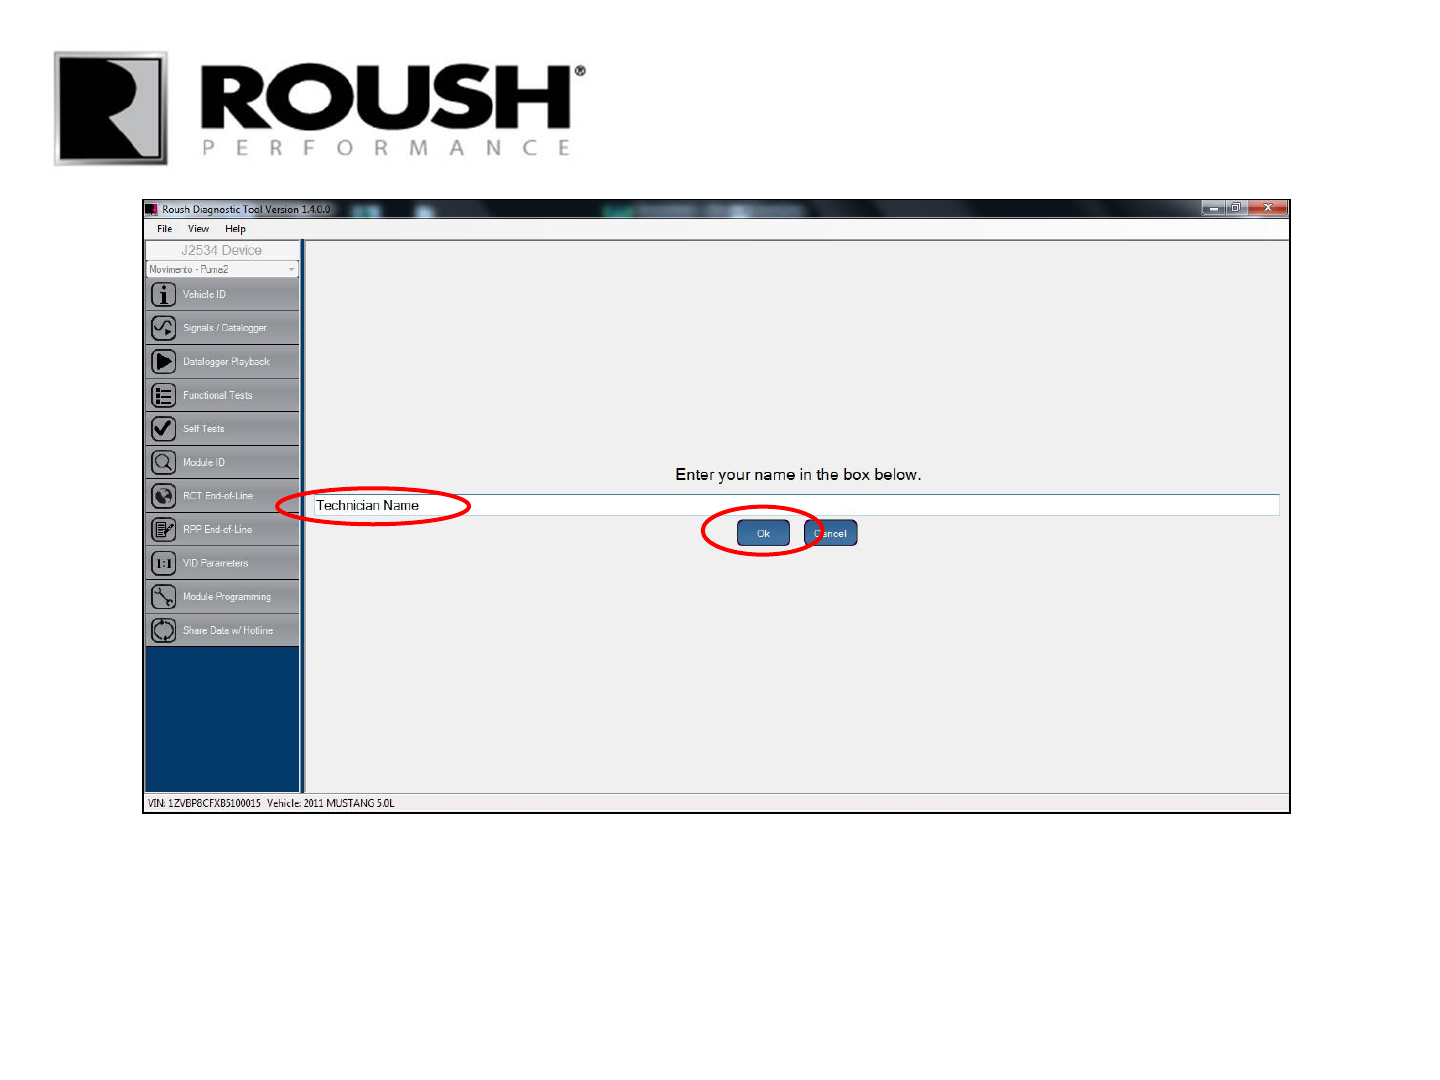
• Once prompted, enter your name and select “Ok”.
29 RDT-CALIM (RDT-FLASHIM) 20140109 RLA

30
• Once the engine oil, engine radiator coolant, AND intercooler coolant levels are verified, select “Ok”.
RDT-CALIM (RDT-FLASHIM) 20140109 RLA
31
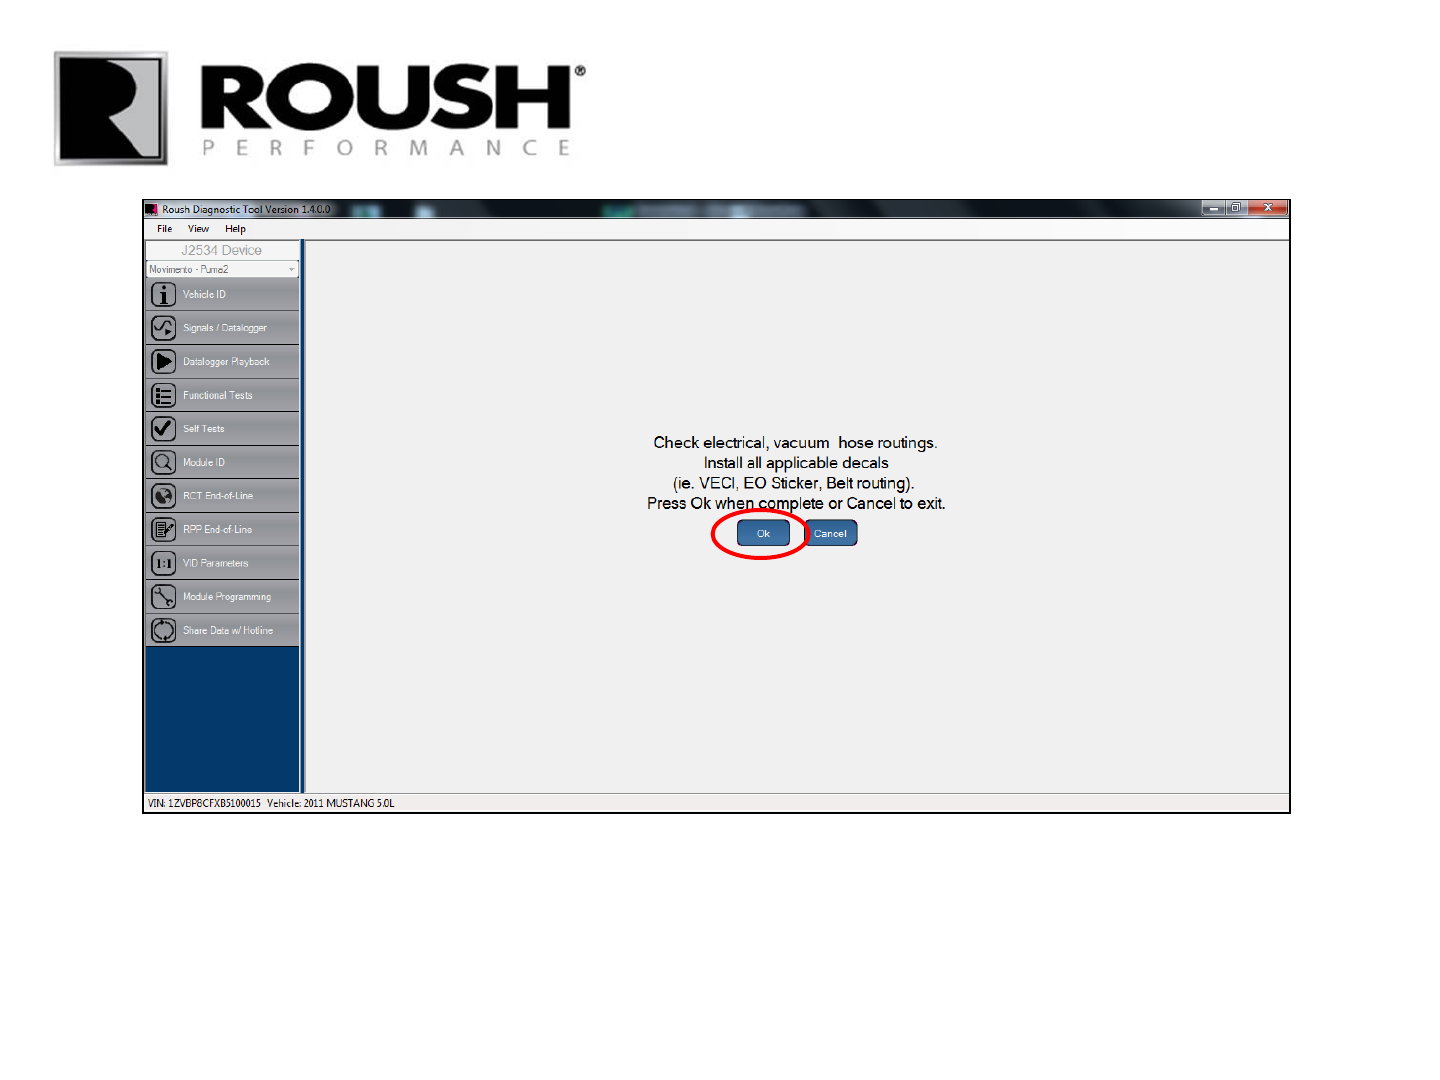
• Perform the above check.
• Click “Ok” once the routings have been verified and the decals installed.
RDT-CALIM (RDT-FLASHIM) 20140109 RLA
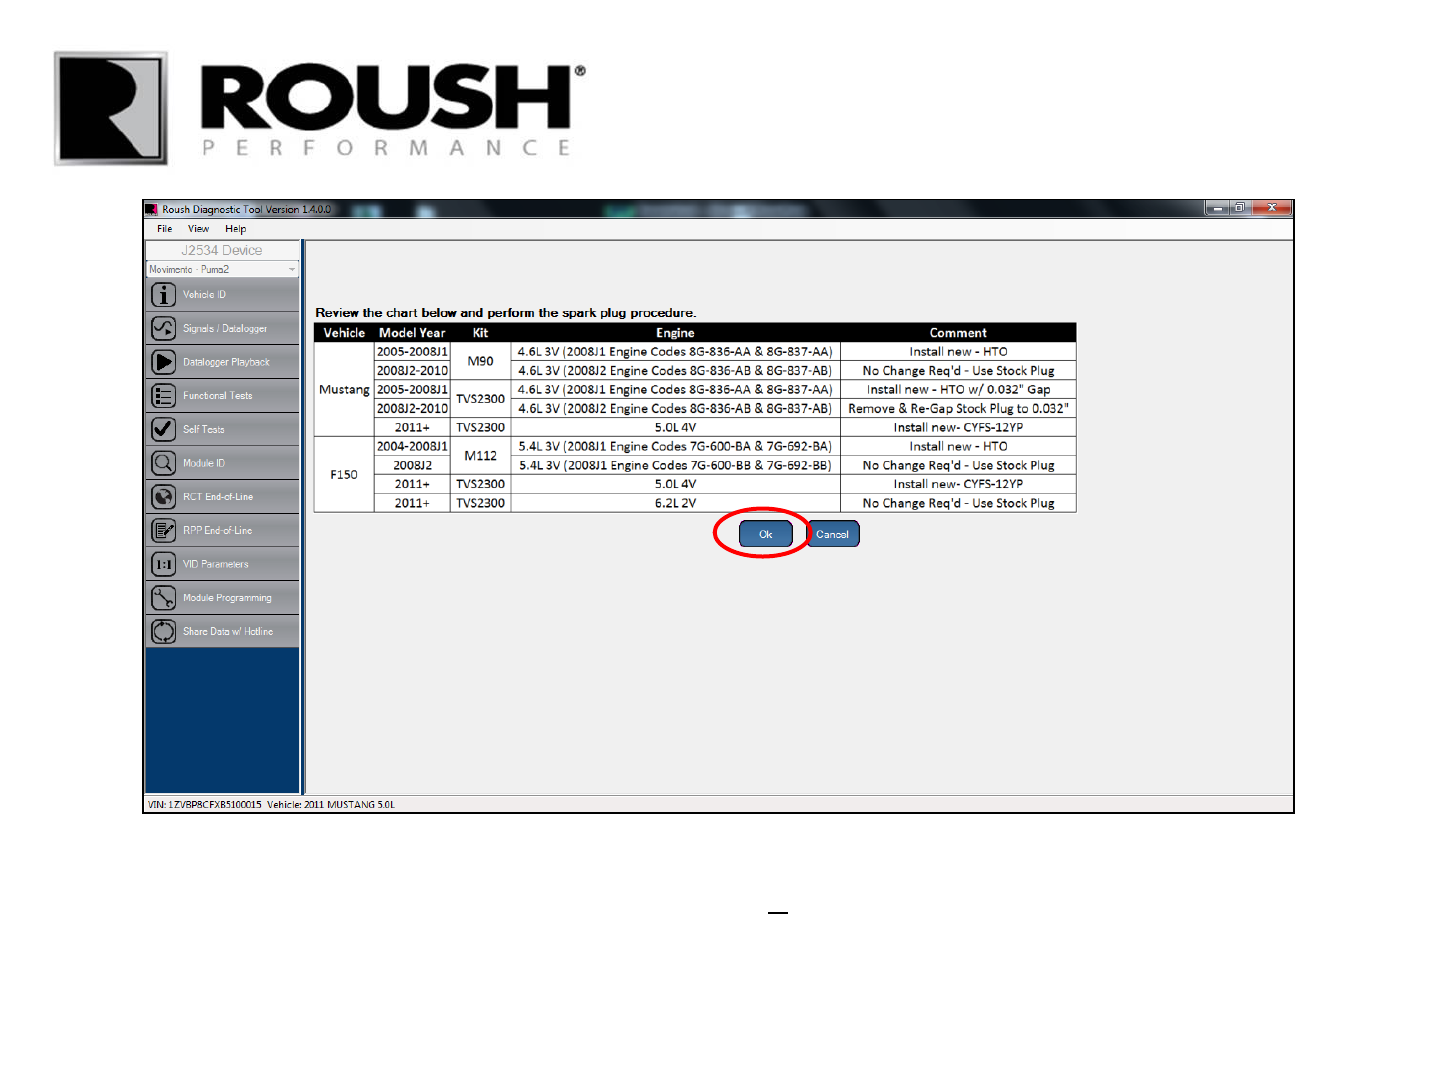
• Review the spark plug table for your specific application. IF applicable, install new spark plugs or re-gap the
factory spark plugs to the specification provided on the chart.
• Select “Ok” once this step is complete.
32 RDT-CALIM (RDT-FLASHIM) 20140109 RLA

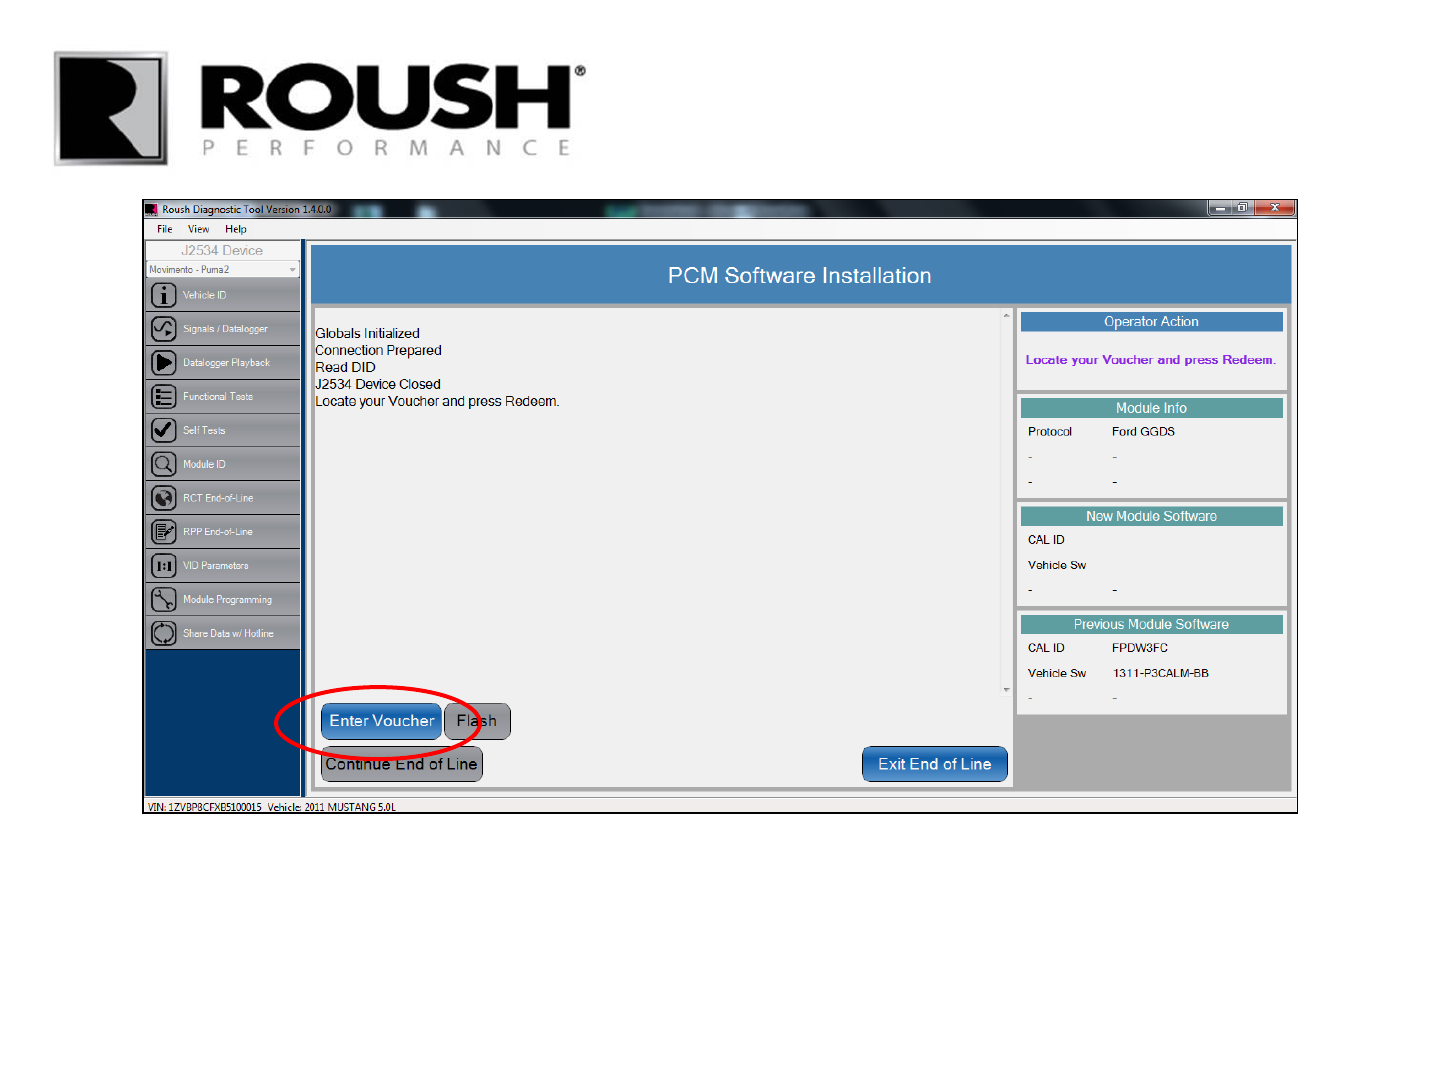
• If you have not yet flashed the vehicle module, select “Flash” and continue with the next step.
• If you have already flashed the module, select “Skip” and proceed to page 47.
33 RDT-CALIM (RDT-FLASHIM) 20140109 RLA
• Select “Enter Voucher”.
RDT-CALIM (RDT-FLASHIM) 20140109 RLA 34
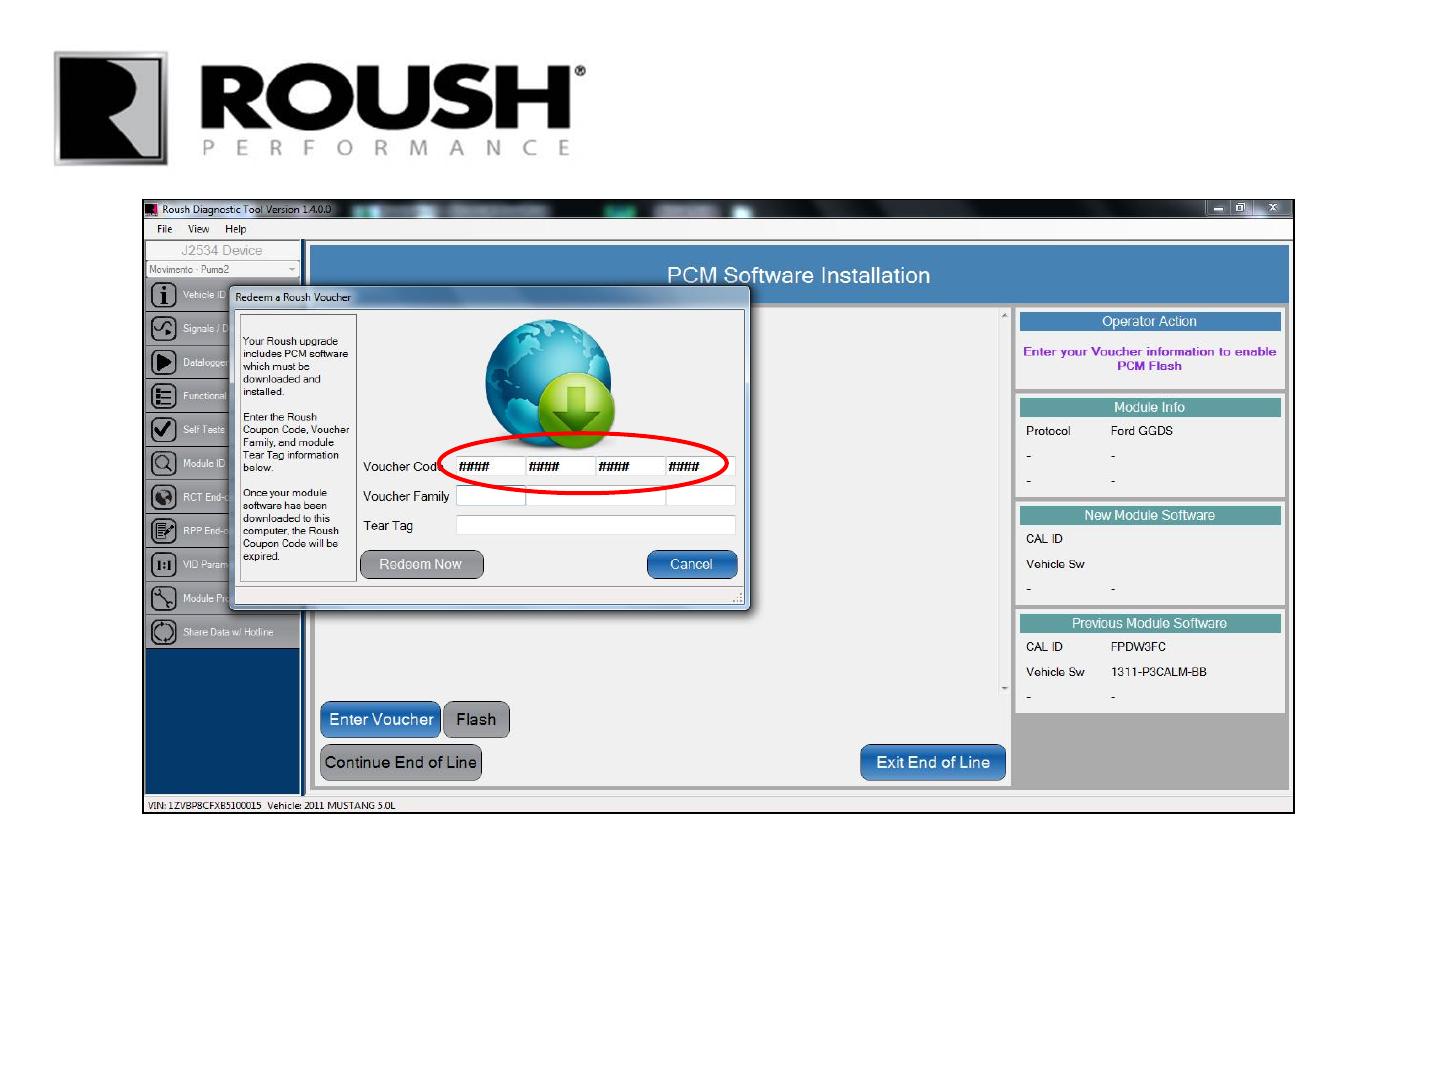
• Retrieve the 16 digit alphanumeric Voucher Code included in your kit and enter it into the appropriate field.
RDT-CALIM (RDT-FLASHIM) 20140109 RLA 35
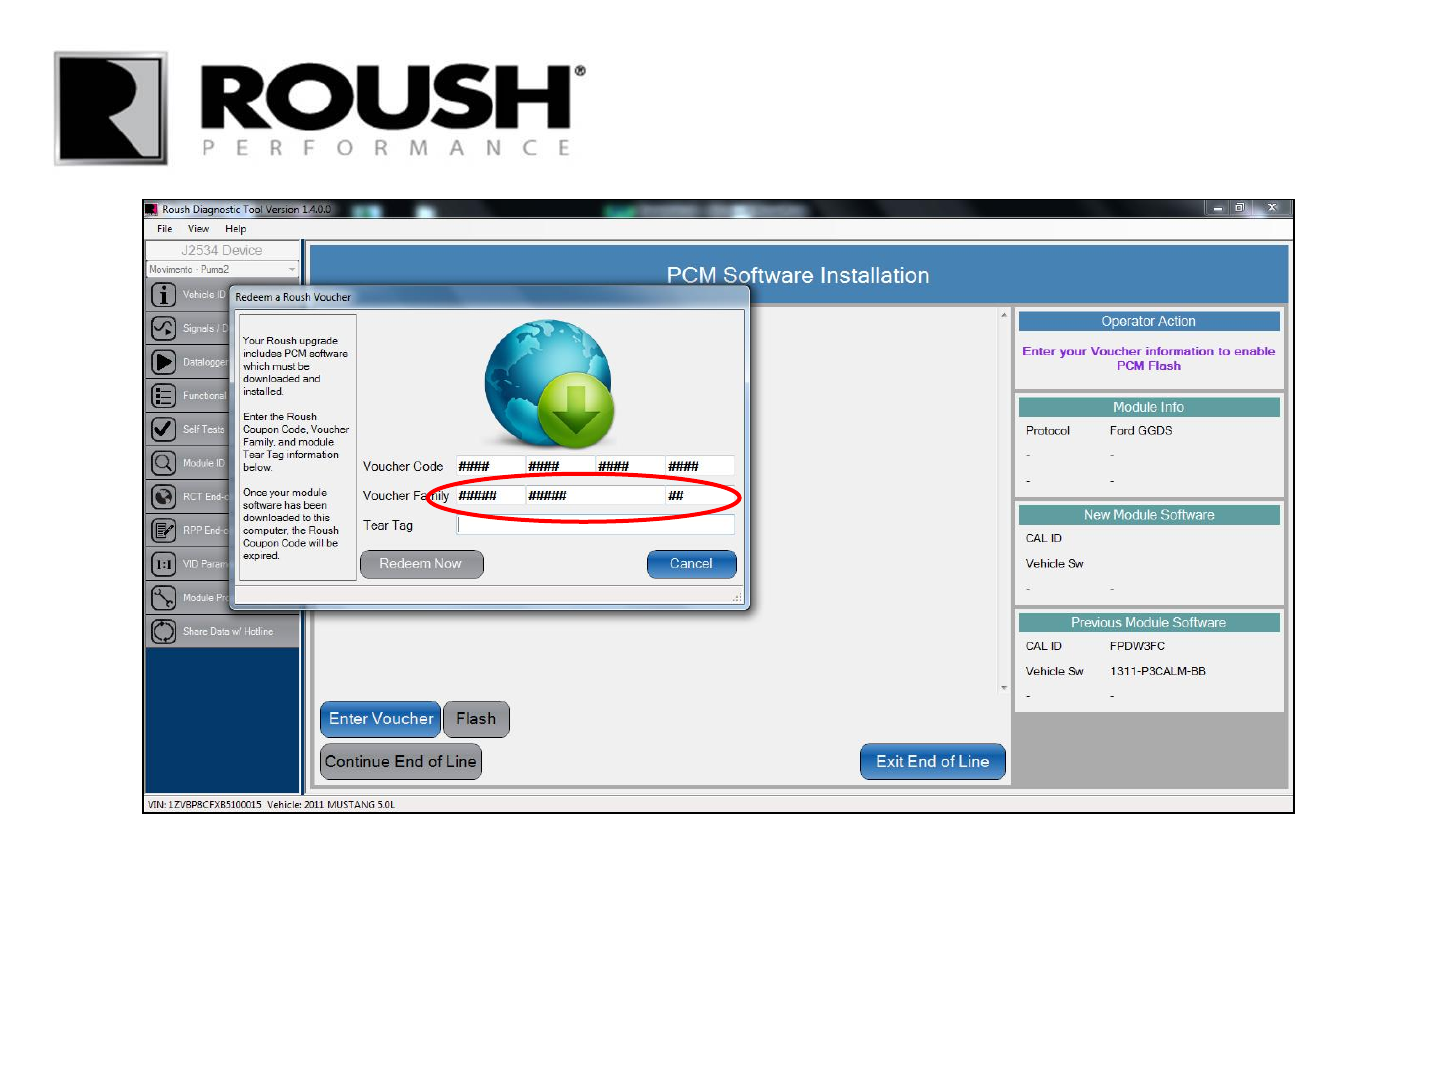
• Retrieve the Voucher Family included in your kit and enter it into the appropriate field.
RDT-CALIM (RDT-FLASHIM) 20140109 RLA 36
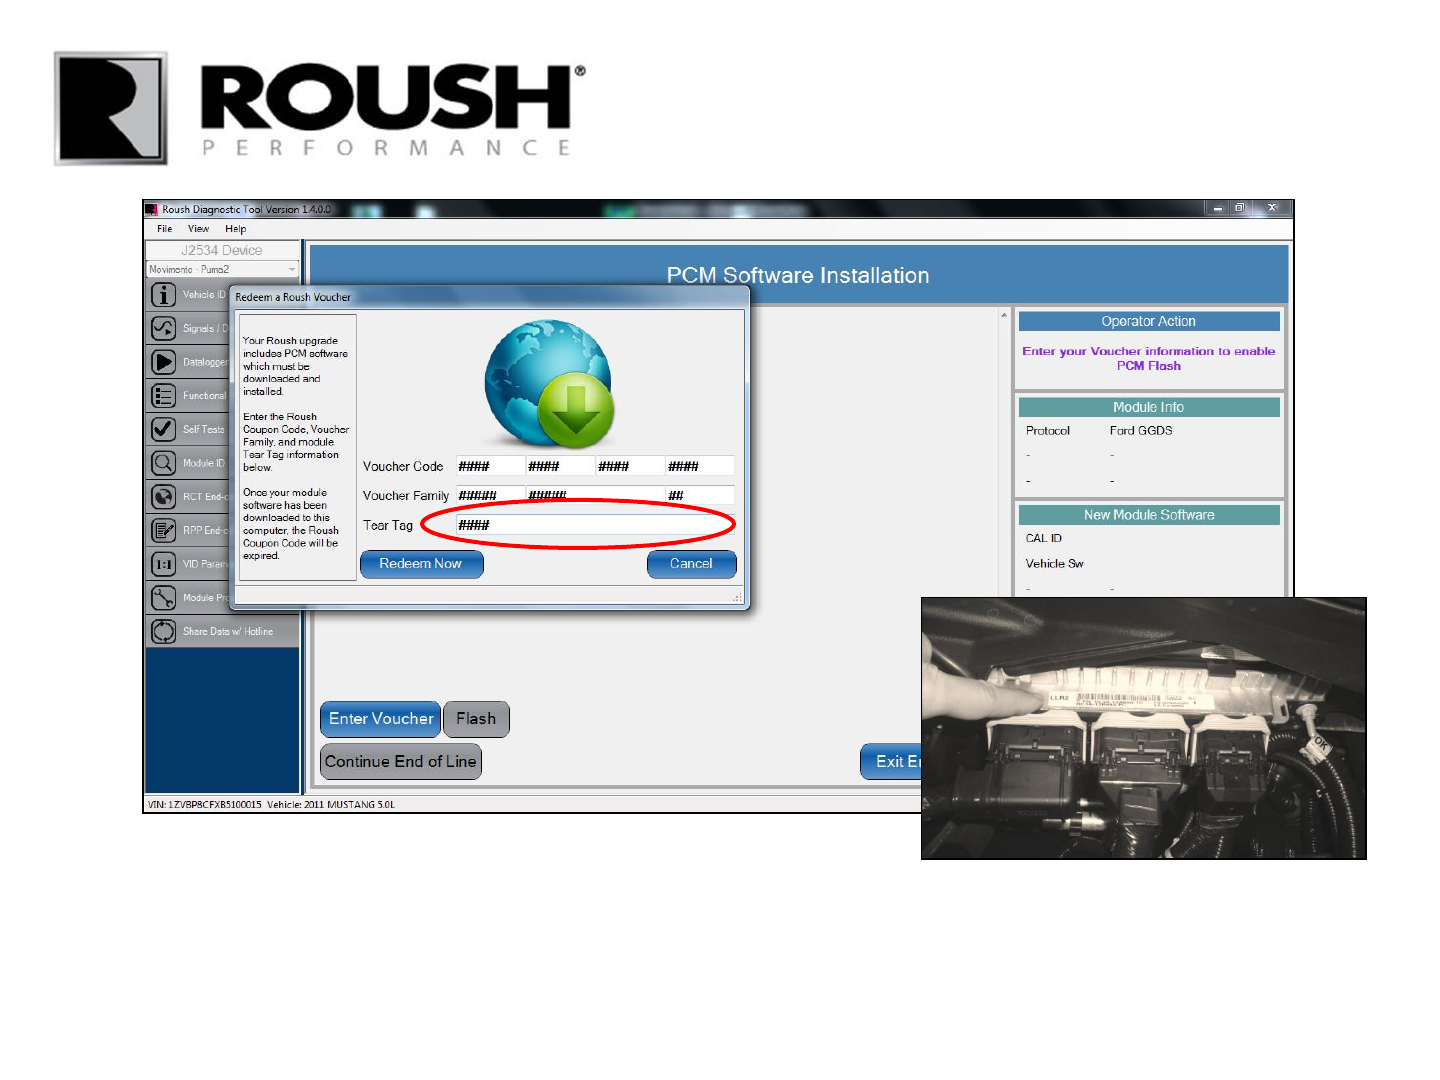
• Retrieve the (4) digit alphanumeric Tear Tag code from the sticker on the vehicle PCM and enter it into
the appropriate field.
RDT-CALIM (RDT-FLASHIM) 20140109 RLA 37
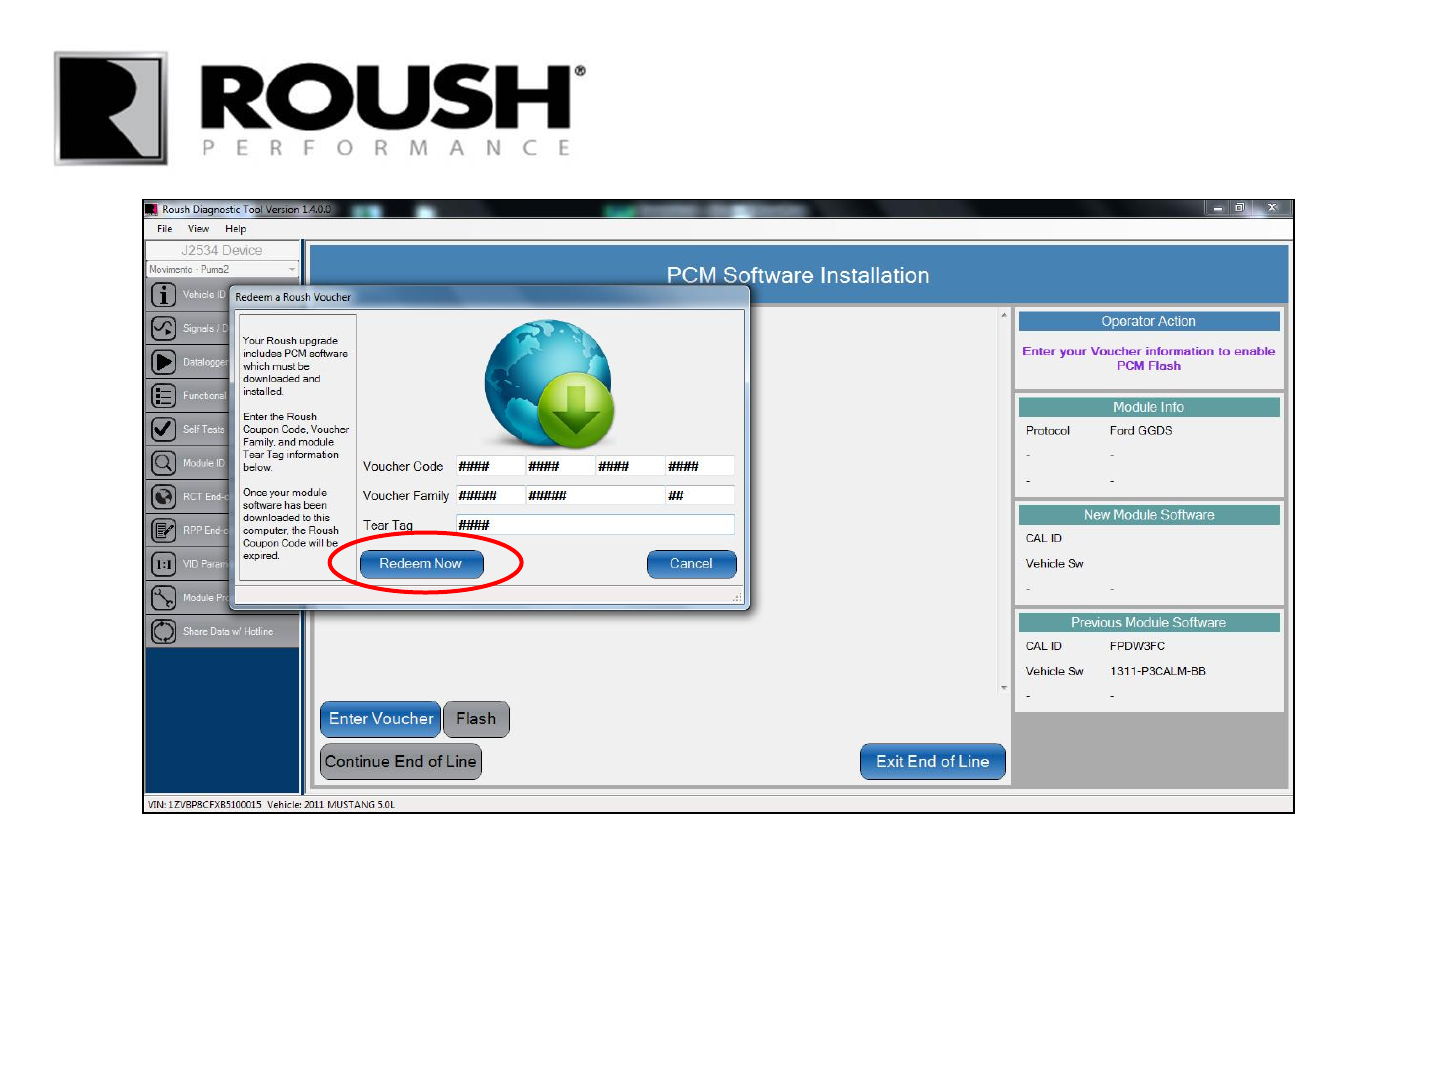
• Select “Redeem Now”.
• The software will attempt to communicate with the server and auto load the calibration file for programming.
RDT-CALIM (RDT-FLASHIM) 20140109 RLA 38
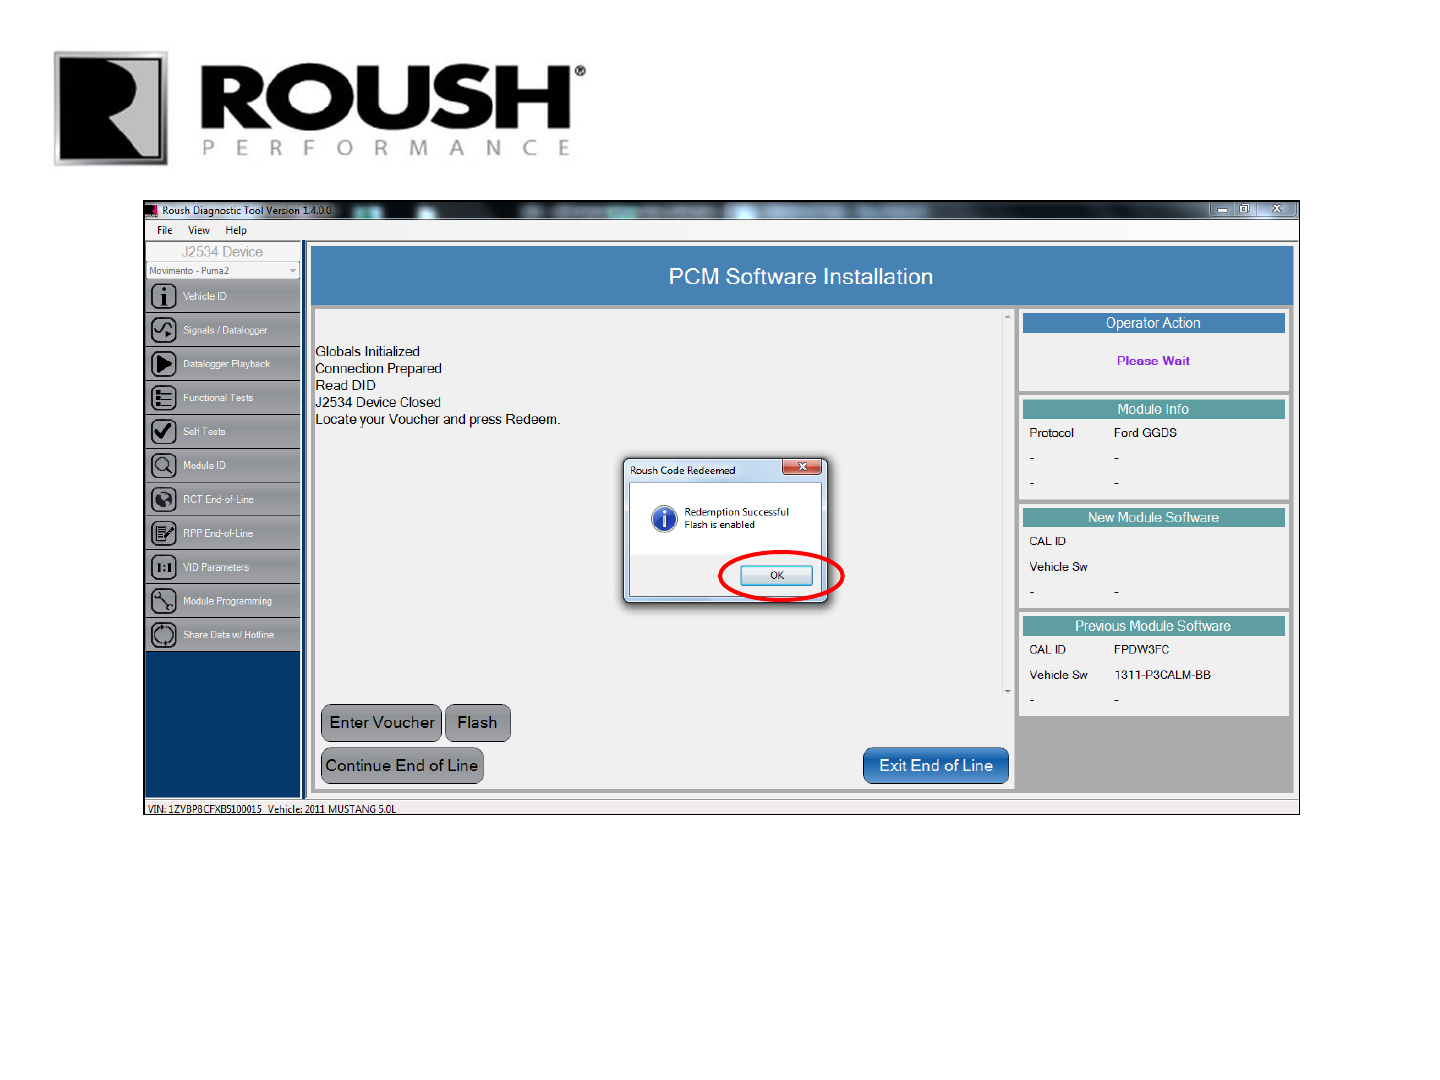
• Select “OK” once the Flash is enabled.
RDT-CALIM (RDT-FLASHIM) 20140109 RLA 39

• Select “Flash” to begin module programming.
RDT-CALIM (RDT-FLASHIM) 20140109 RLA 40
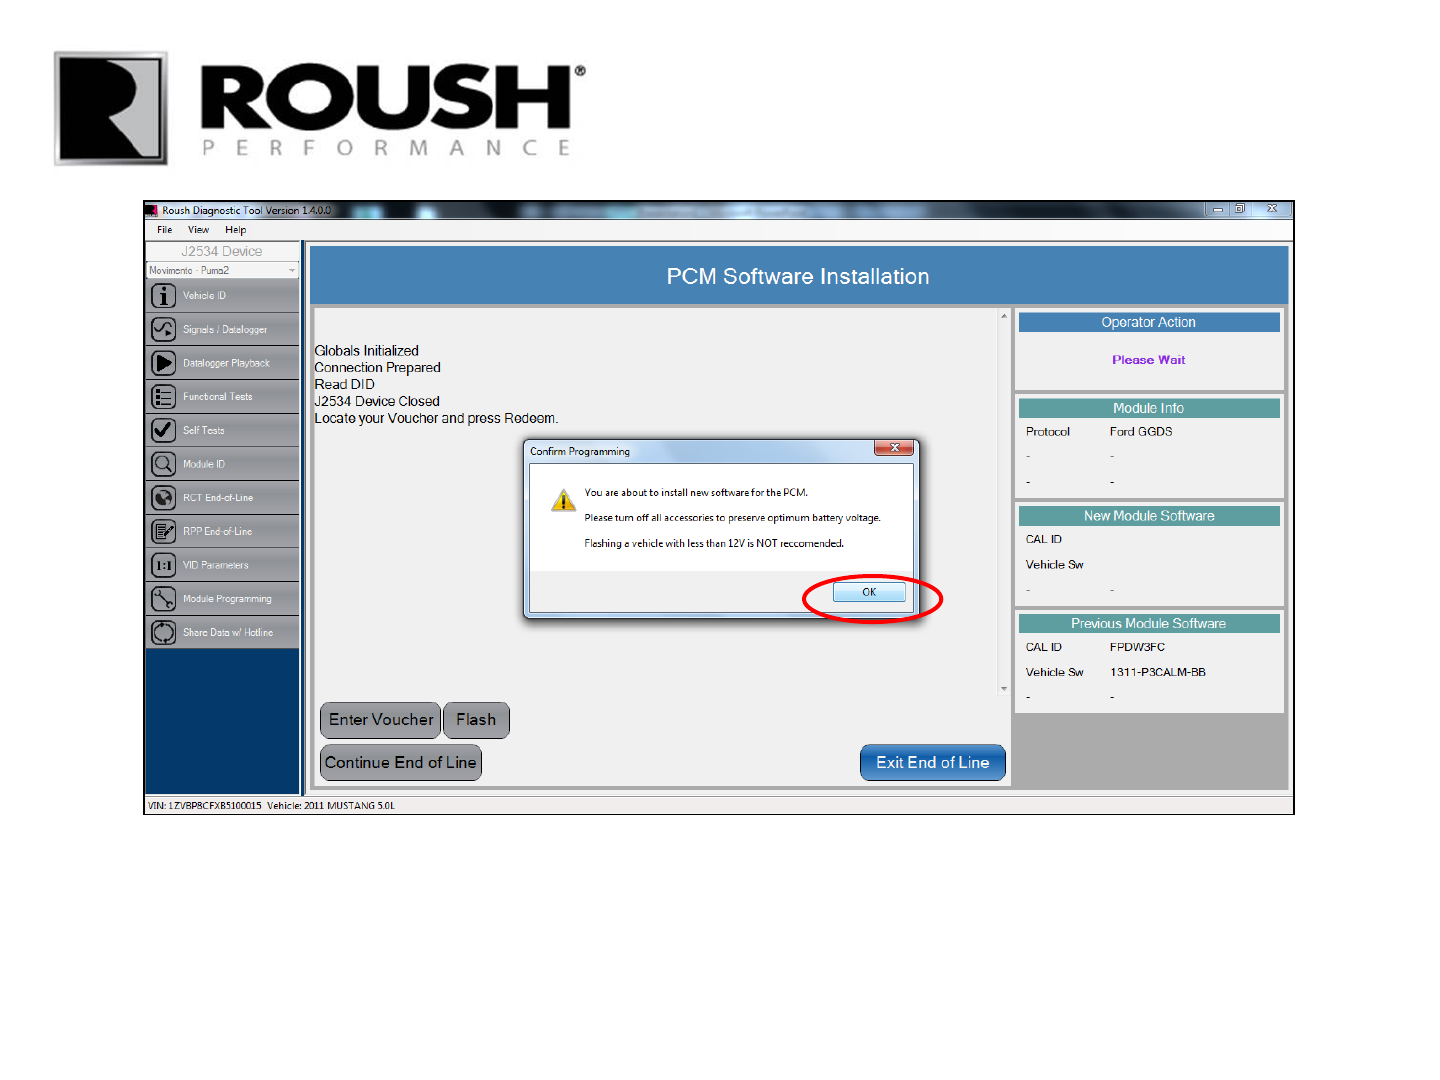
• Confirm that all accessories are off and place the vehicle on a charger if the battery voltage is below 12V.
• Select “OK” to continue flashing.
RDT-CALIM (RDT-FLASHIM) 20140109 RLA 41
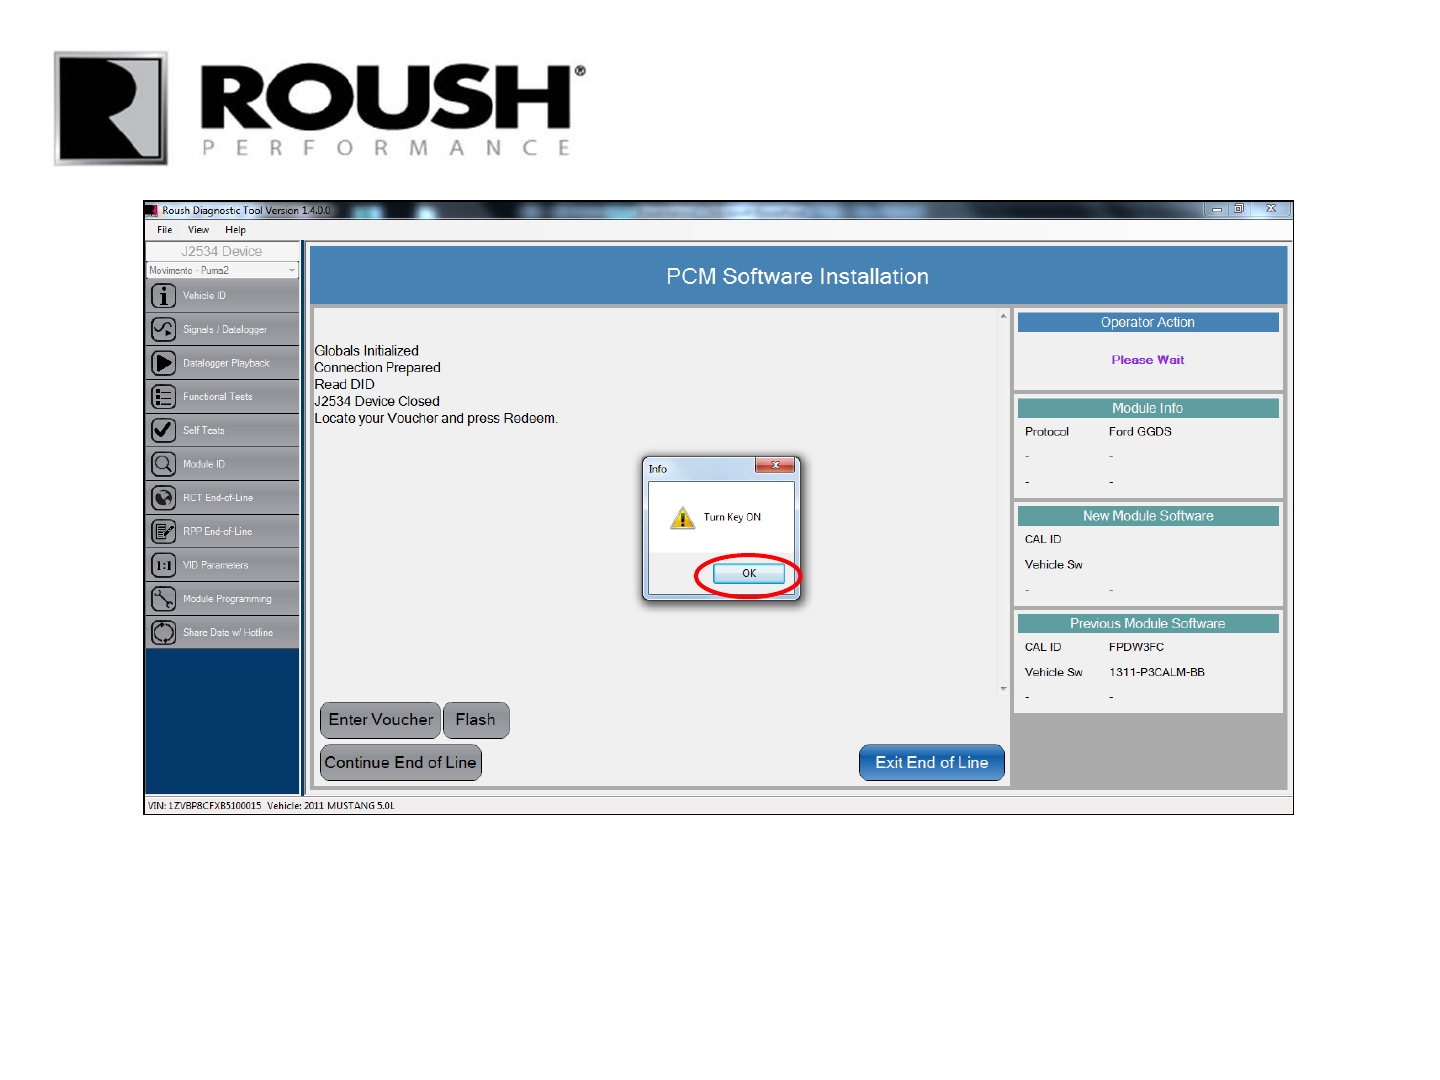
• Check that the vehicle key is in the Key On Engine Off position.
• Select “OK”.
RDT-CALIM (RDT-FLASHIM) 20140109 RLA 42
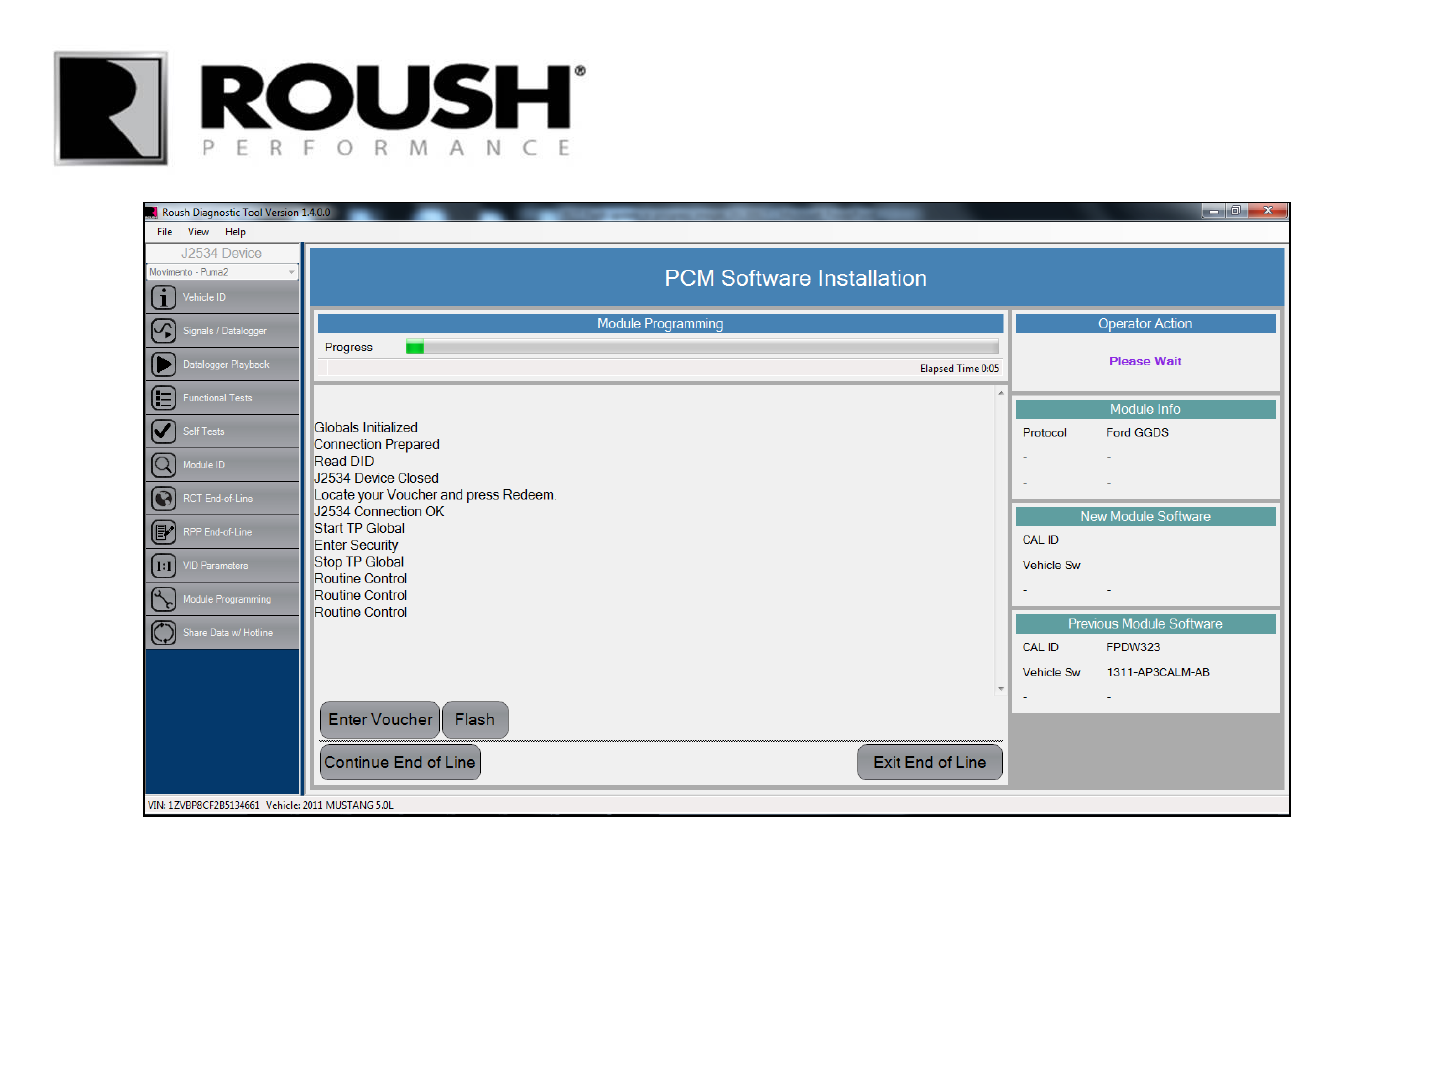
• The vehicle module will begin flashing.
• This may take 3-14 minutes depending on the speed of the vehicle communication device selected.
43 RDT-CALIM (RDT-FLASHIM) 20140109 RLA
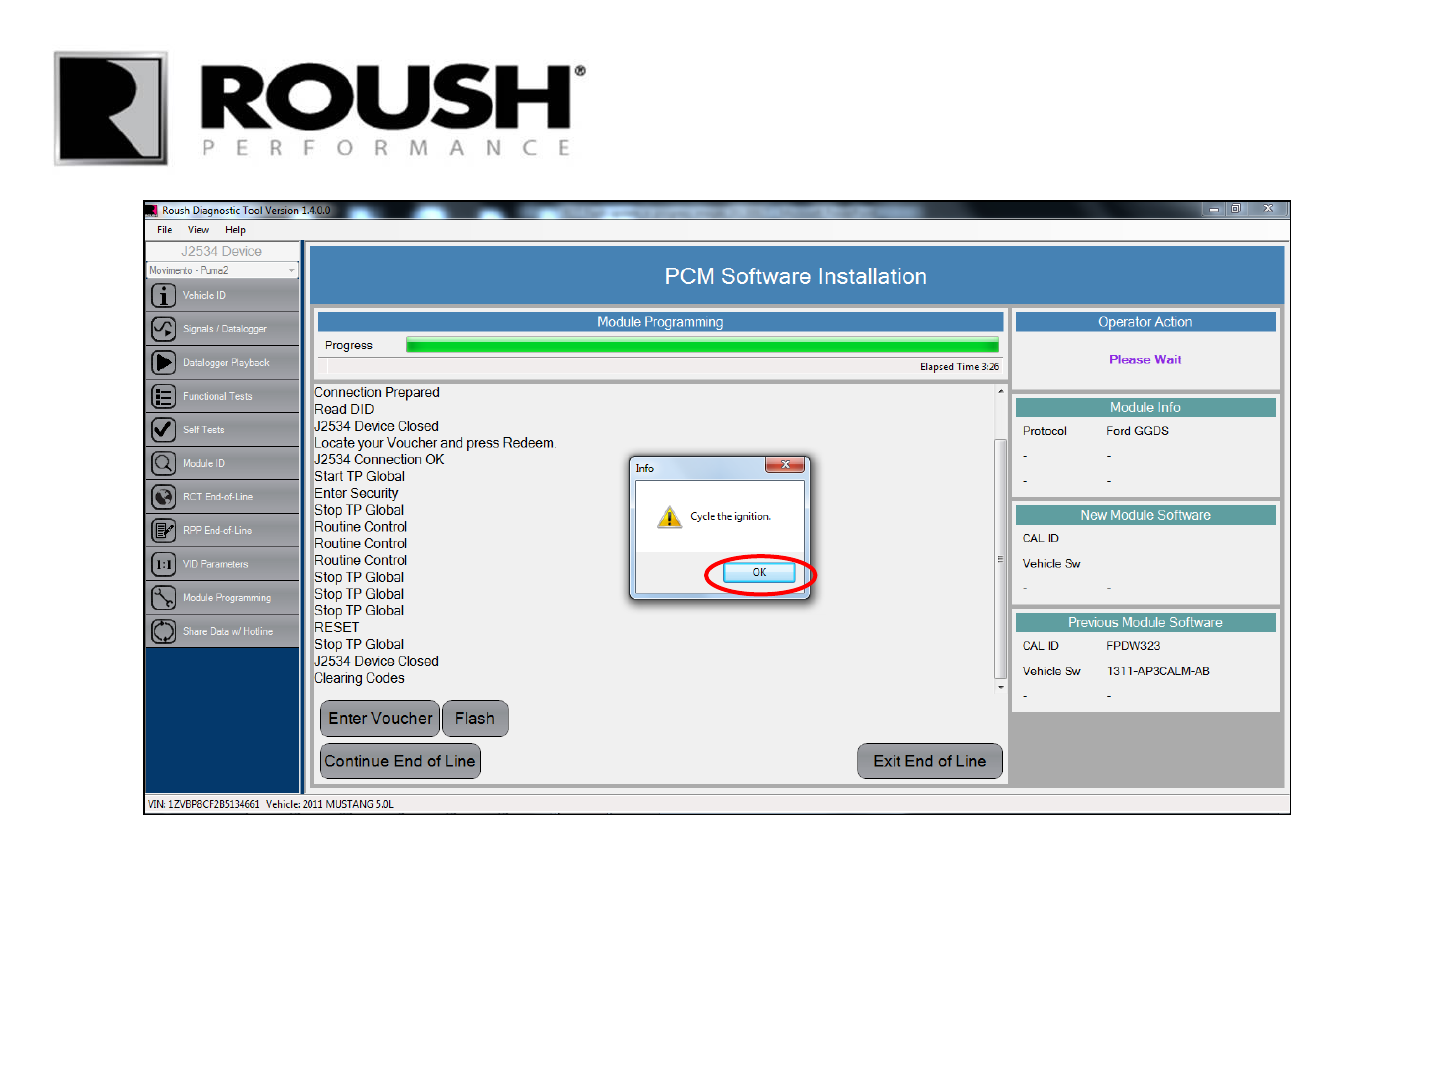
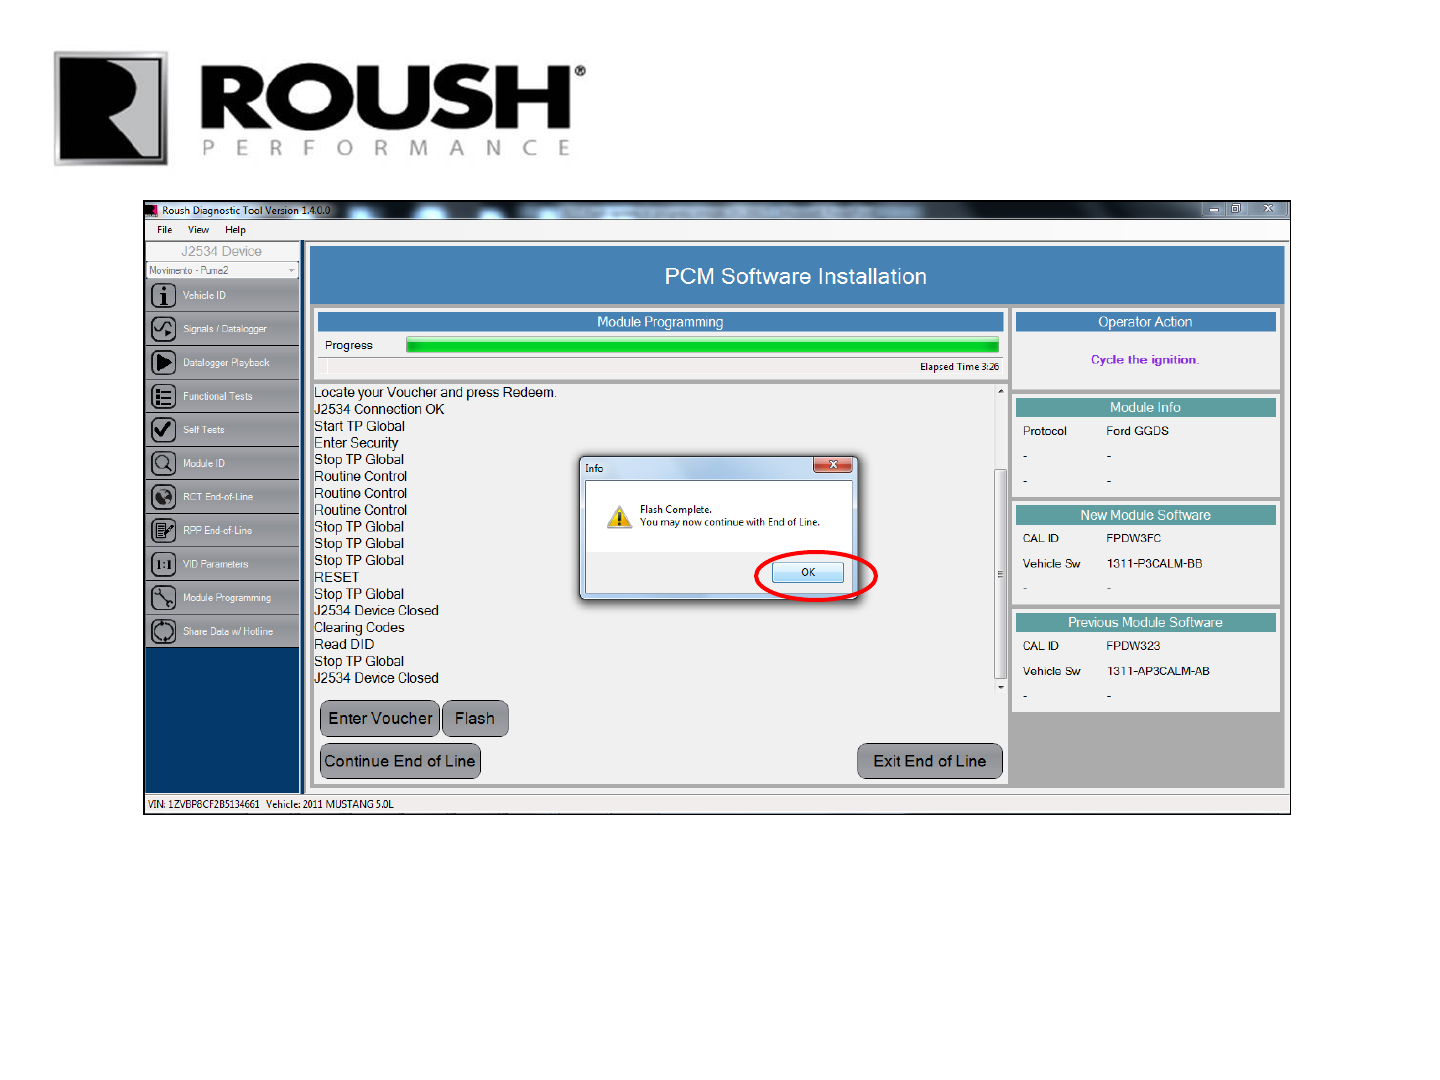
• Once flashing is complete, you will be prompted to cycle the ignition.
• Cycle the ignition key from Key On Engine Off to Key Off, back to Key On Engine Off and select “OK”.
44 RDT-CALIM (RDT-FLASHIM) 20140109 RLA
• Select “OK”.
45 RDT-CALIM (RDT-FLASHIM) 20140109 RLA
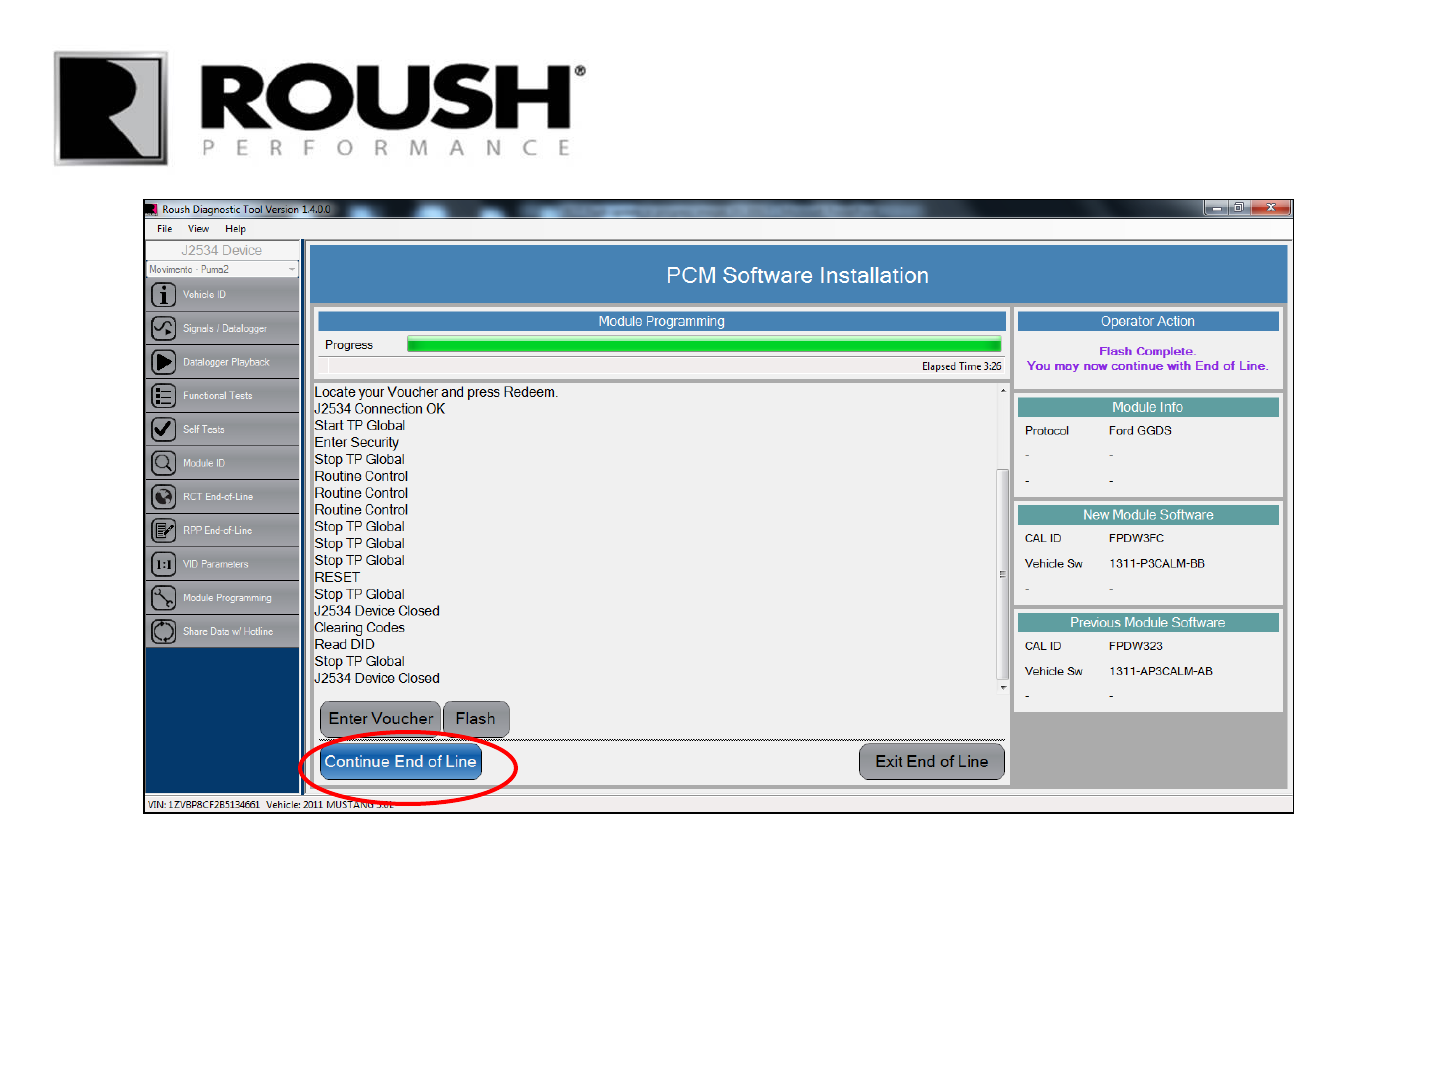
• Continue to clear DTC’s and module self tests by selecting “Continue End of Line”.
46 RDT-CALIM (RDT-FLASHIM) 20140109 RLA

• You will be prompted for Tire/Axle Size Modification
• If installing a new axle or aftermarket tire size, select “Modify.”
• If not installing a new axle or tire size, select “Skip” and proceed to page 52.
47 RDT-CALIM (RDT-FLASHIM) 20140109 RLA
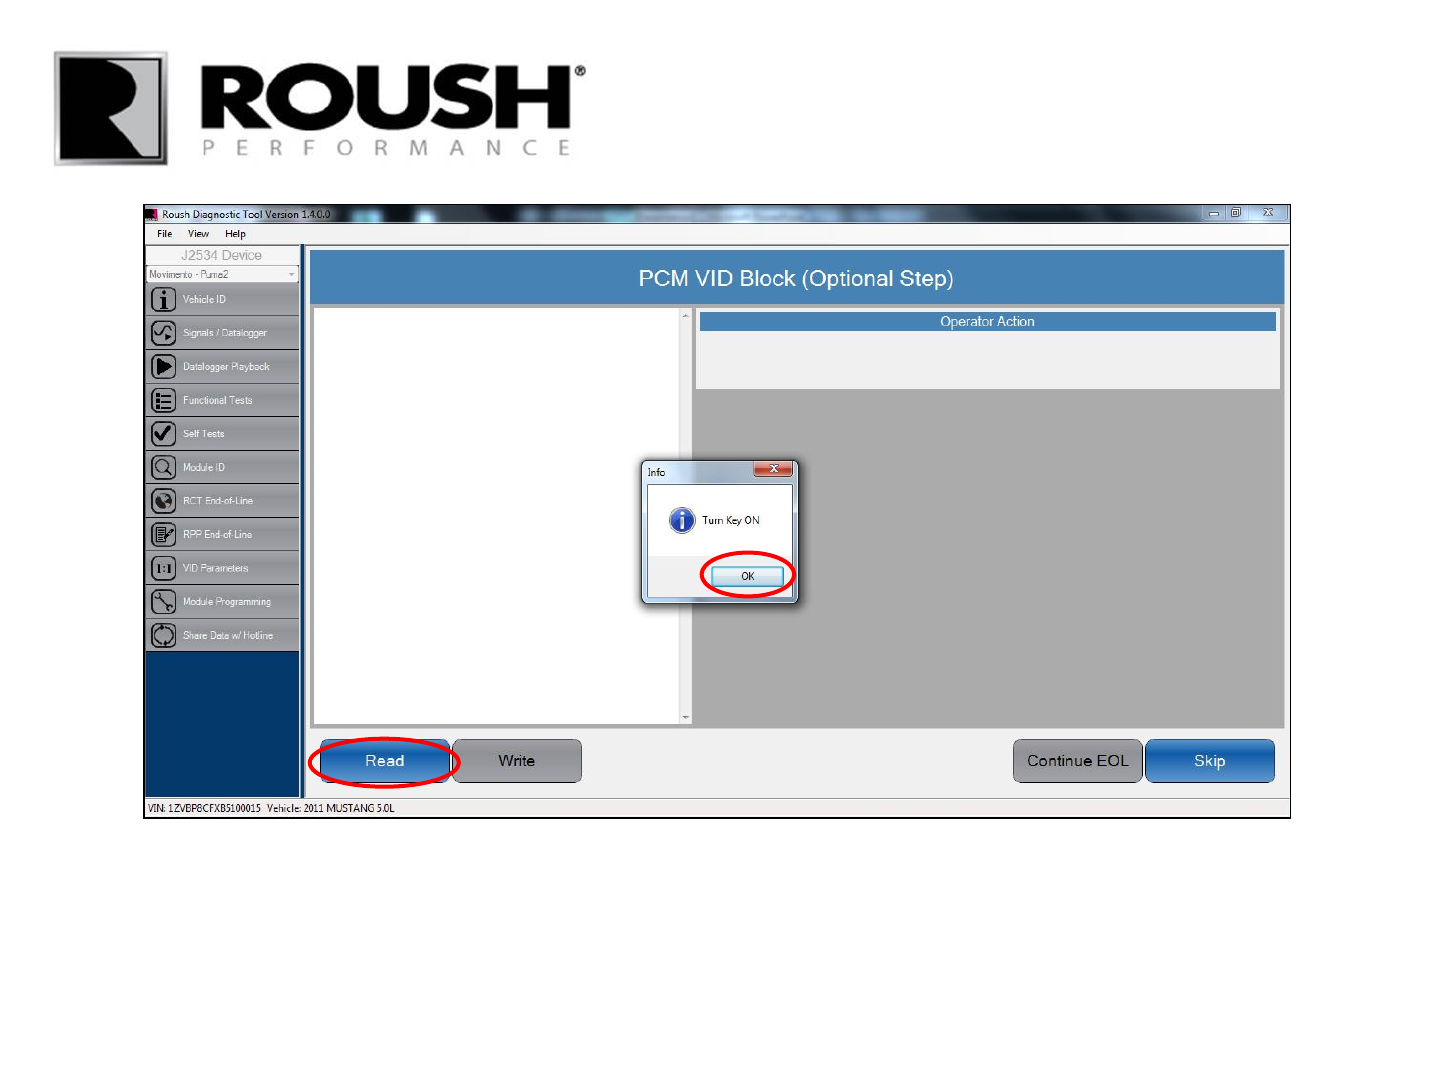
• Select “Read” to proceed with Tire Size/Axle Ratio modification.
• Turn the ignition key to the on position.
• Select “OK”.
48 RDT-CALIM (RDT-FLASHIM) 20140109 RLA
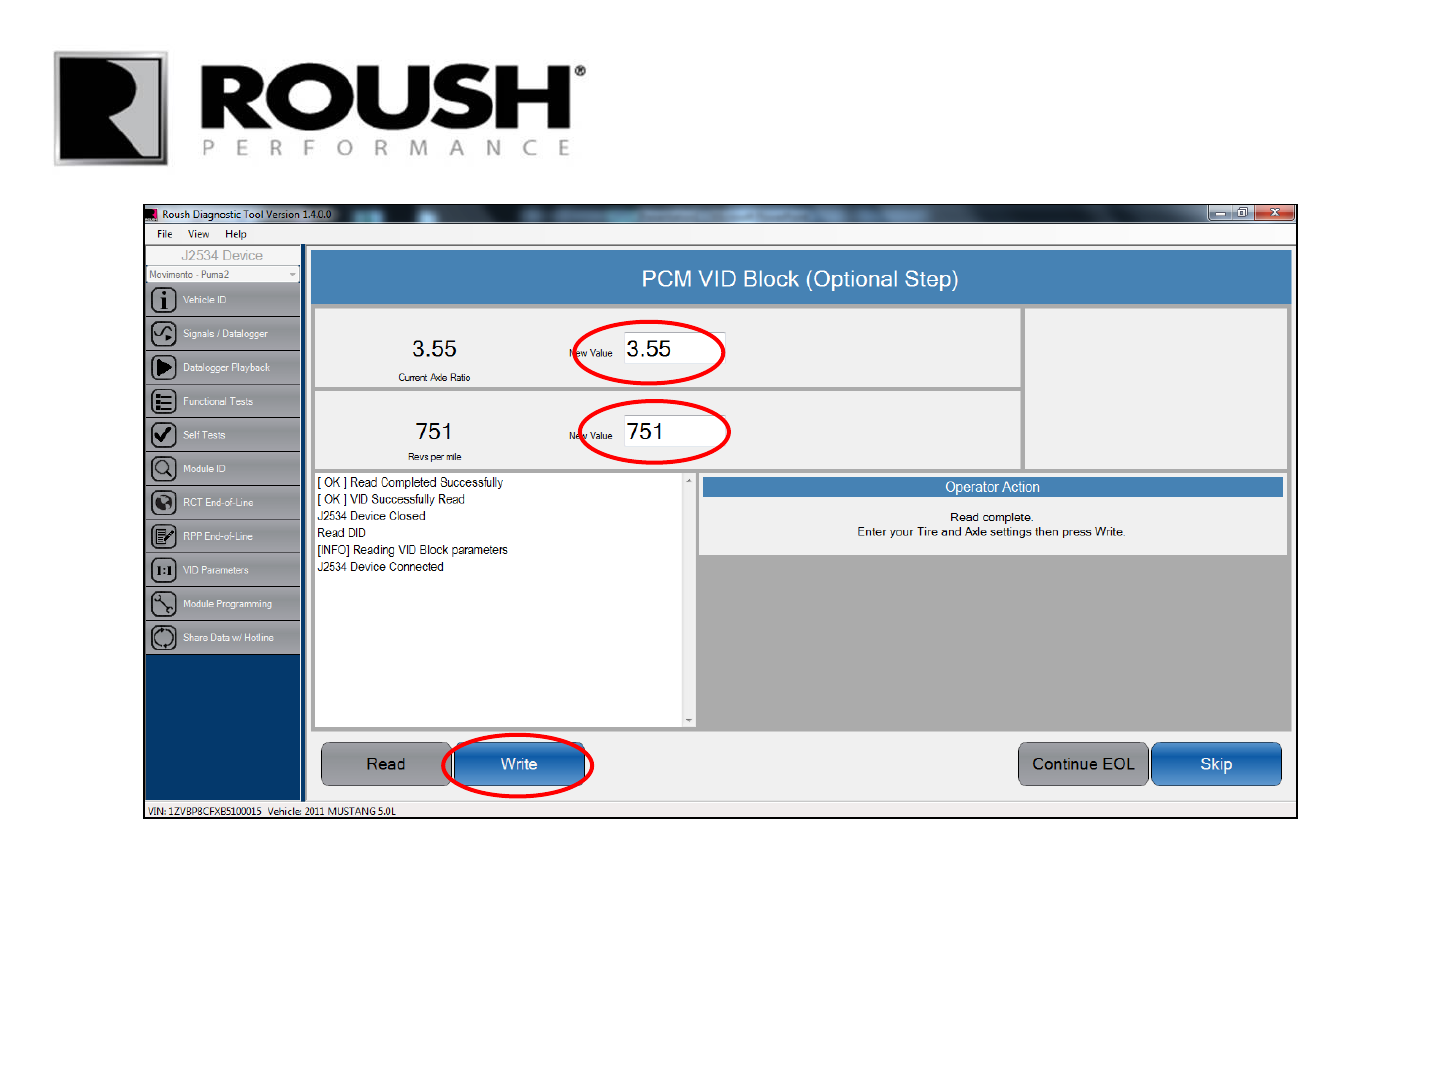
• Once the current Tire Size/Axle Ratio values are displayed, enter the appropriate axle ratio value and/or
the manufacturer recommended tire revs per mile to proceed with Tire Size/Axle Ratio modification.
• Select “Write” once the values have been entered.
• If no modifications have been performed, leave the values and select “Skip”.
49 RDT-CALIM (RDT-FLASHIM) 20140109 RLA

• Once the values have been written to the module, verify the values are correct and select “OK”.
• If the values are incorrect, proceed with the EOL process and return to the VID Parameters procedure by
selecting the VID Parameters tab on the left.
50 RDT-CALIM (RDT-FLASHIM) 20140109 RLA
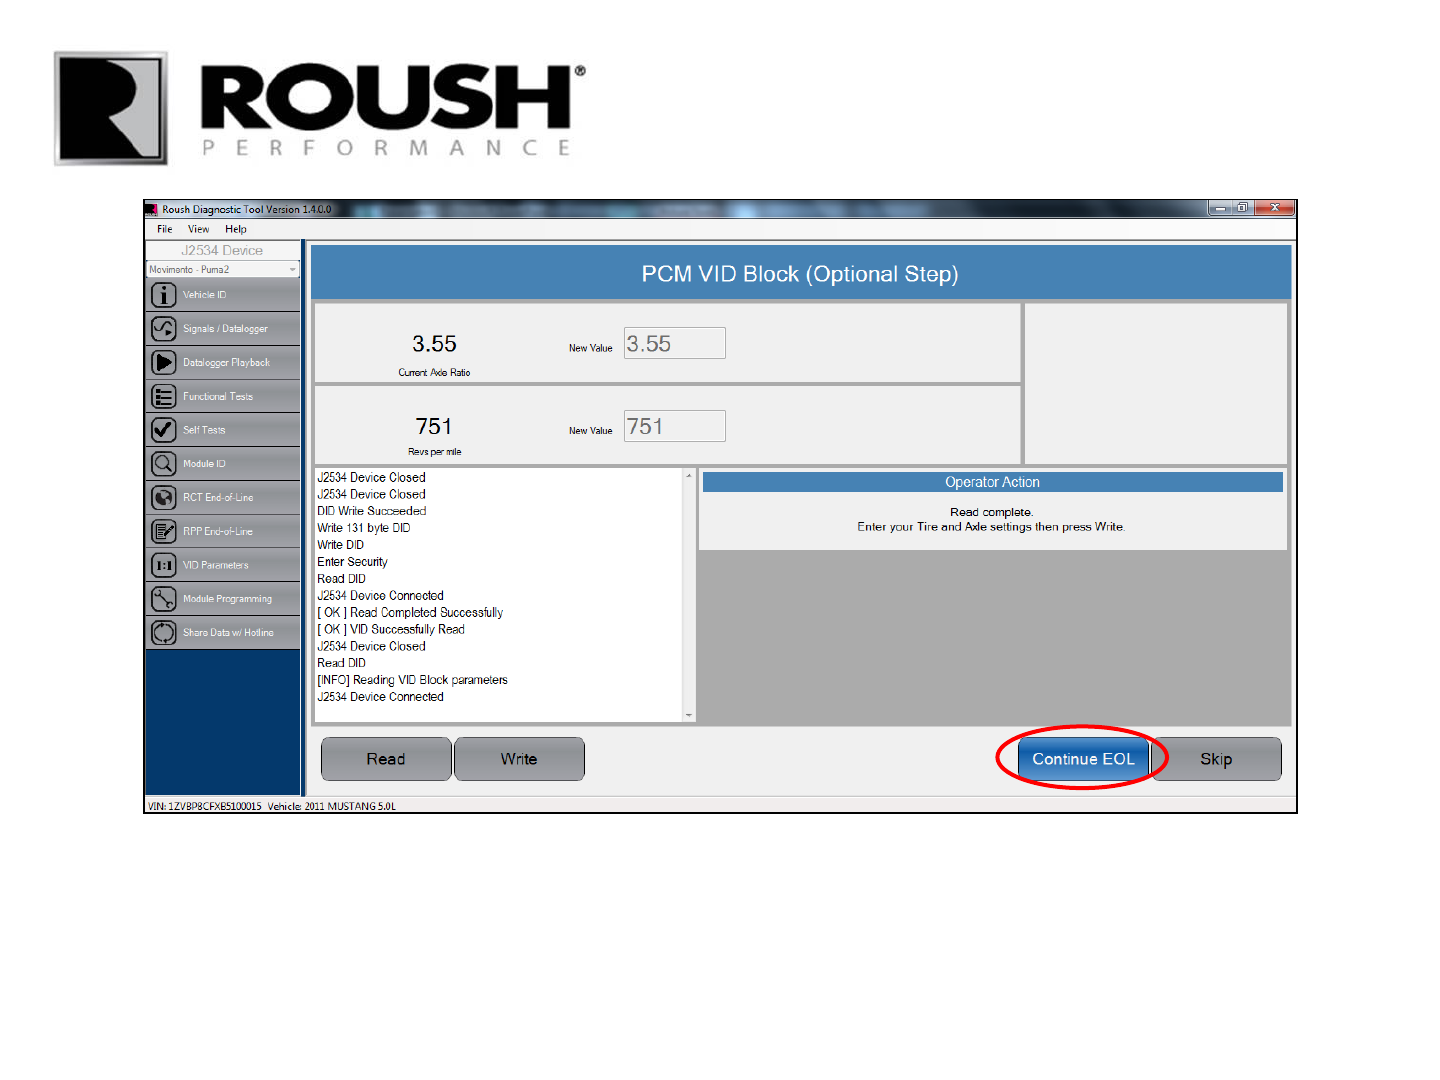
• Select “Continue EOL”.
51 RDT-CALIM (RDT-FLASHIM) 20140109 RLA

• Verify the ignition is in the Key On, Engine Off position. Select “Ok”.
52 RDT-CALIM (RDT-FLASHIM) 20140109 RLA
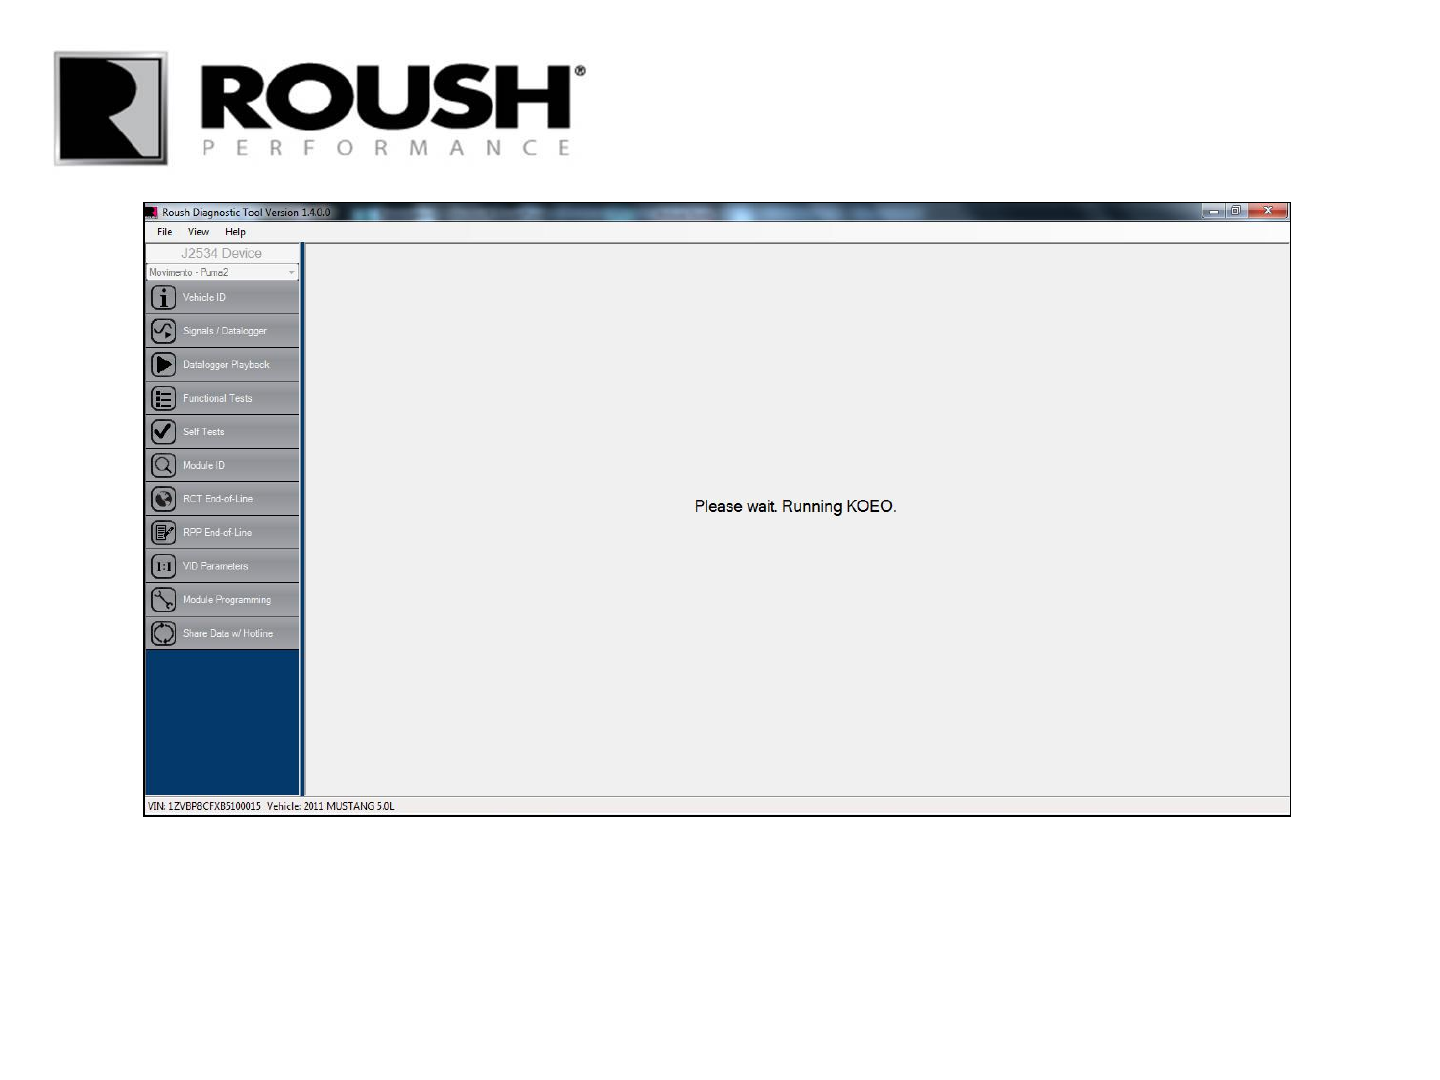
• The vehicle will perform a Key On, Engine Off test.
53 RDT-CALIM (RDT-FLASHIM) 20140109 RLA

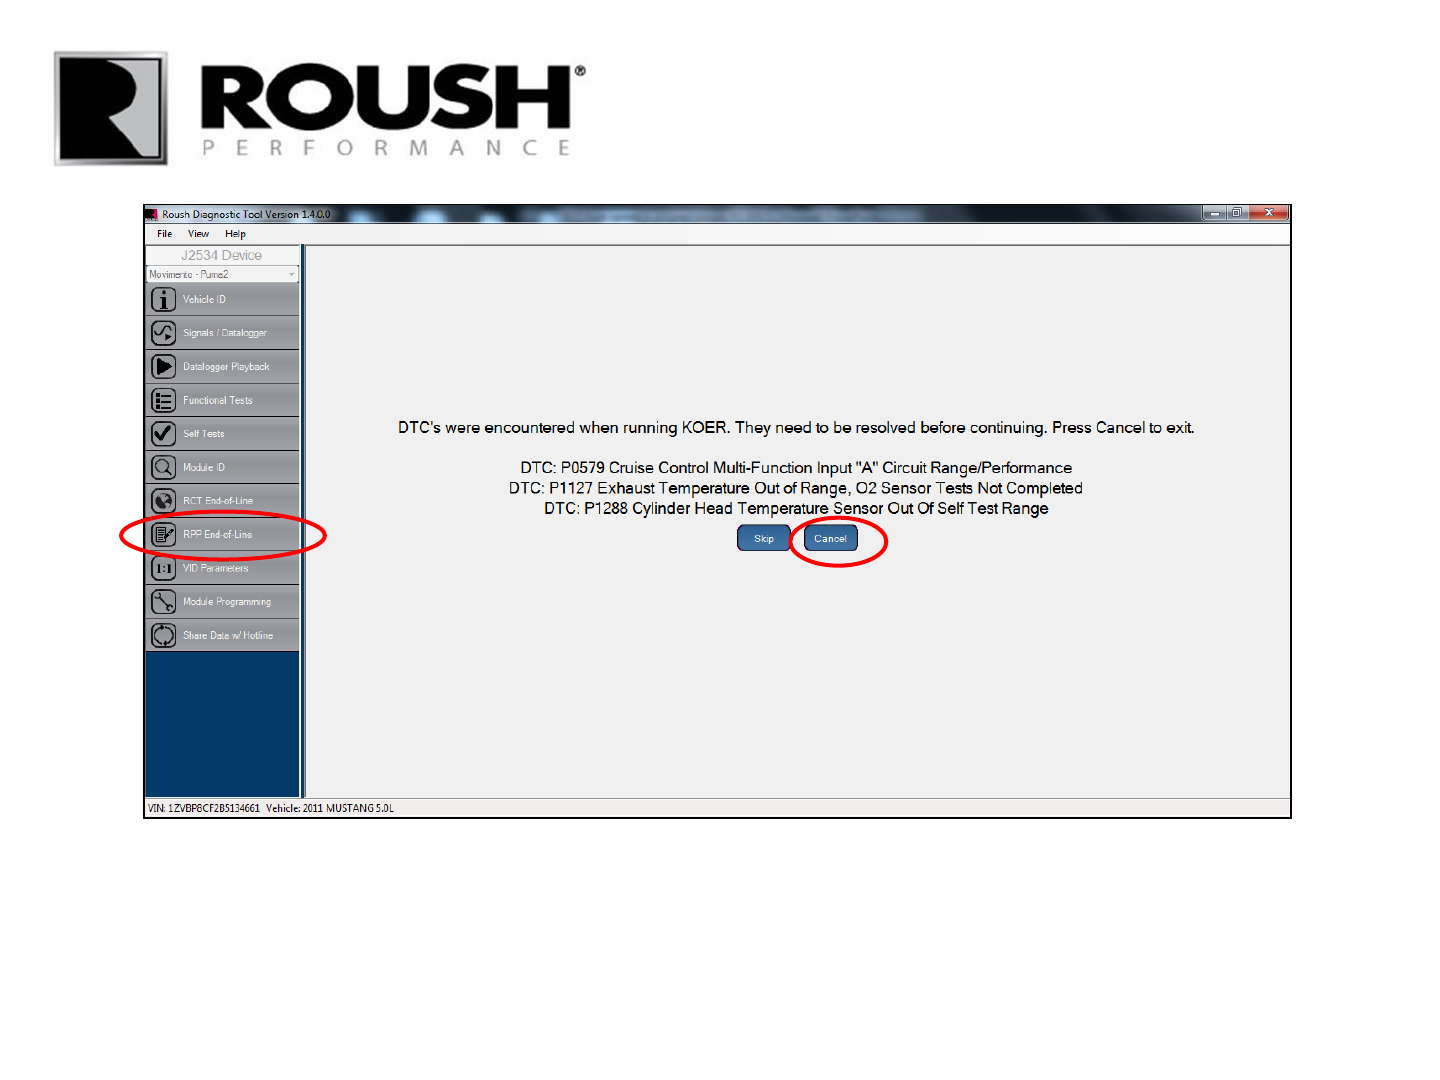
• If any Diagnostic Trouble Codes (DTC’s) are present, record the DTC and select “Cancel”.
• Diagnose and repair the issue, then restart the End of Line (EOL) procedure by selecting the “RPP End-of-
Line” tab on the left to pass the EOL process. (Refer to page 8 to restart the EOL process)
• If no codes are present, continue to the next page.
54 RDT-CALIM (RDT-FLASHIM) 20140109 RLA
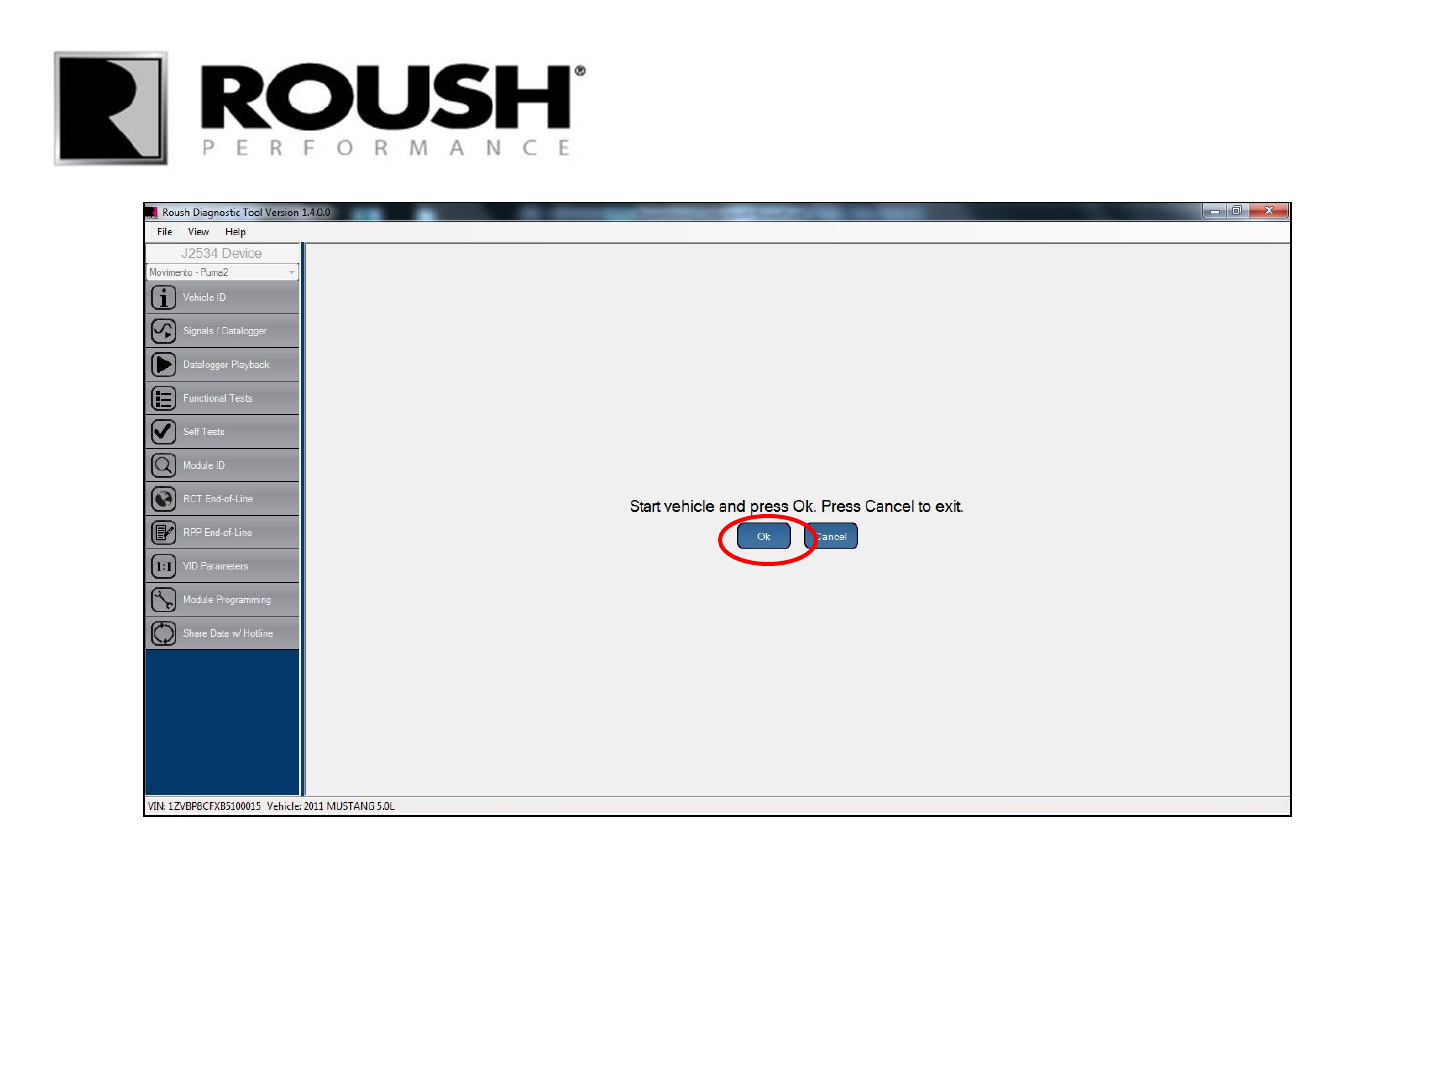
• Start the vehicle and press “Ok”.
55 RDT-CALIM (RDT-FLASHIM) 20140109 RLA

• Verify the MIL and/or Wrench light have not been set, if no MIL or Wrench light have been set, select
“None”.
• If a MIL and/or Wrench light have been set, select “Set”, then proceed with normal diagnosis to repair the
issue. Once the issue has been resolved, restart this procedure.
56 RDT-CALIM (RDT-FLASHIM) 20140109 RLA
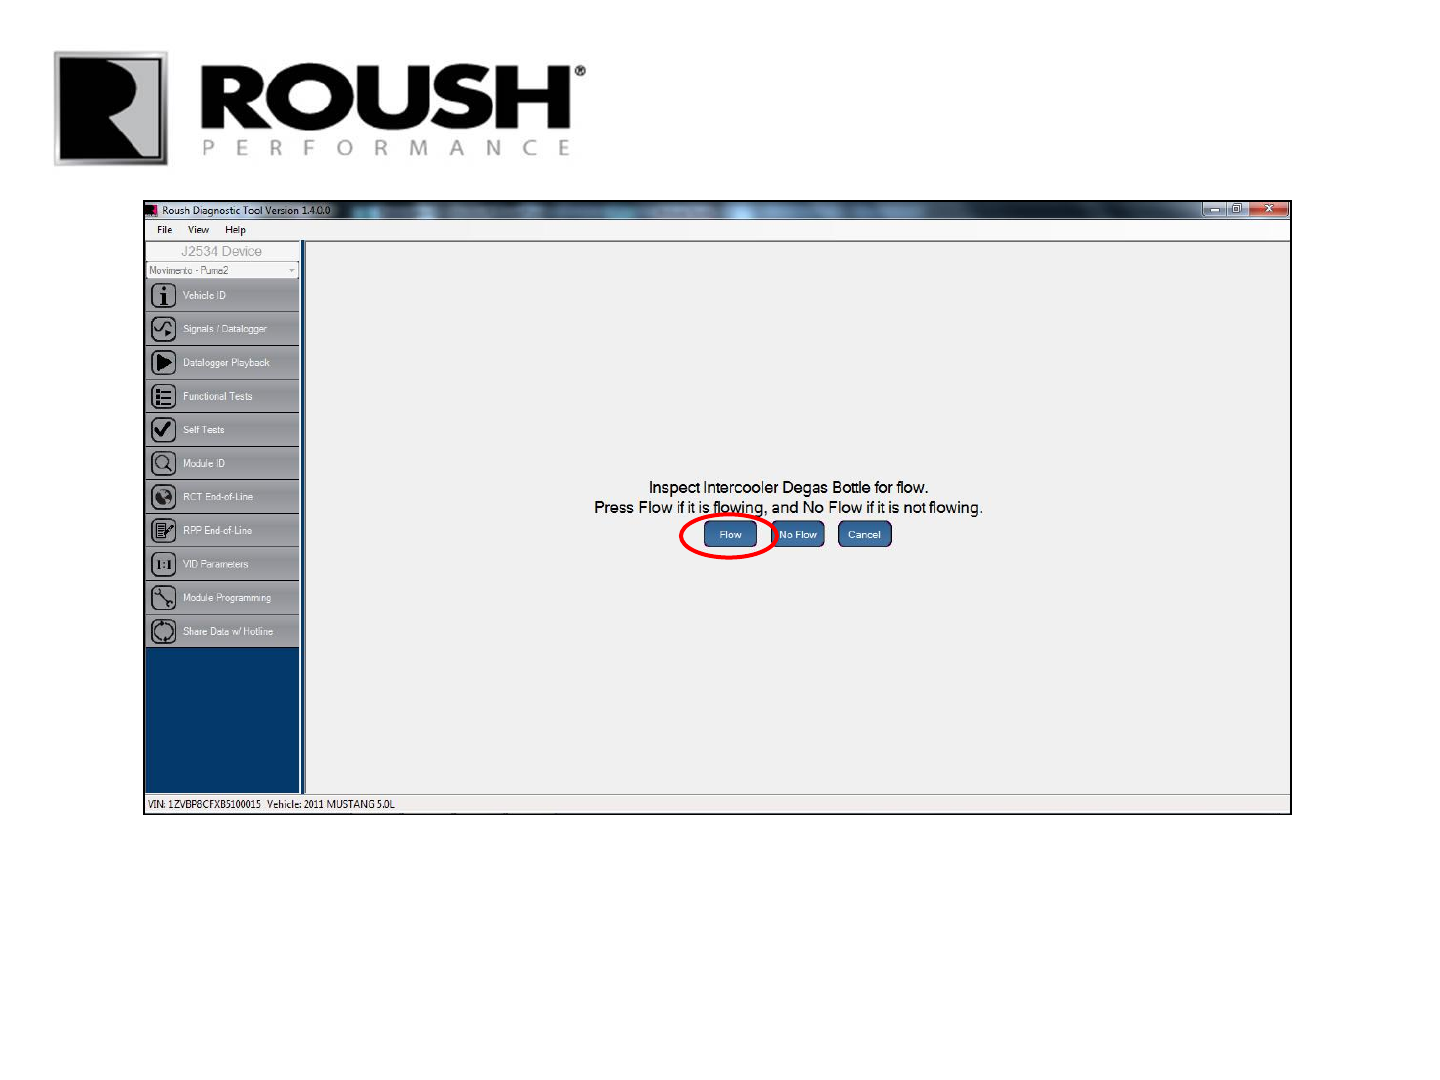
• Inspect the supercharger intercooler degas bottle for flow.
• If the coolant is flowing, select “Flow”. If the coolant is not flowing, you will have to diagnose and correct
the problem before completing the procedure.
57 RDT-CALIM (RDT-FLASHIM) 20140109 RLA

• The vehicle will now perform a Key On, Engine Running test.
• Depress the brake pedal
• If the vehicle is equipped with a power steering pump, turn the steering wheel ¼ turn.
• Cycle the Traction Control Switch switch on and off.
58 RDT-CALIM (RDT-FLASHIM) 20140109 RLA
• If any Diagnostic Trouble Codes (DTC’s) are present, record the DTC and select “Cancel”.
• Diagnose and repair the issue, then restart the End of Line (EOL) procedure by selecting the “RPP End-of-
Line” tab on the left to pass the EOL process. (Refer to page 8 to restart the EOL process)
• If no codes are present, continue to the next page.
59 RDT-CALIM (RDT-FLASHIM) 20140109 RLA
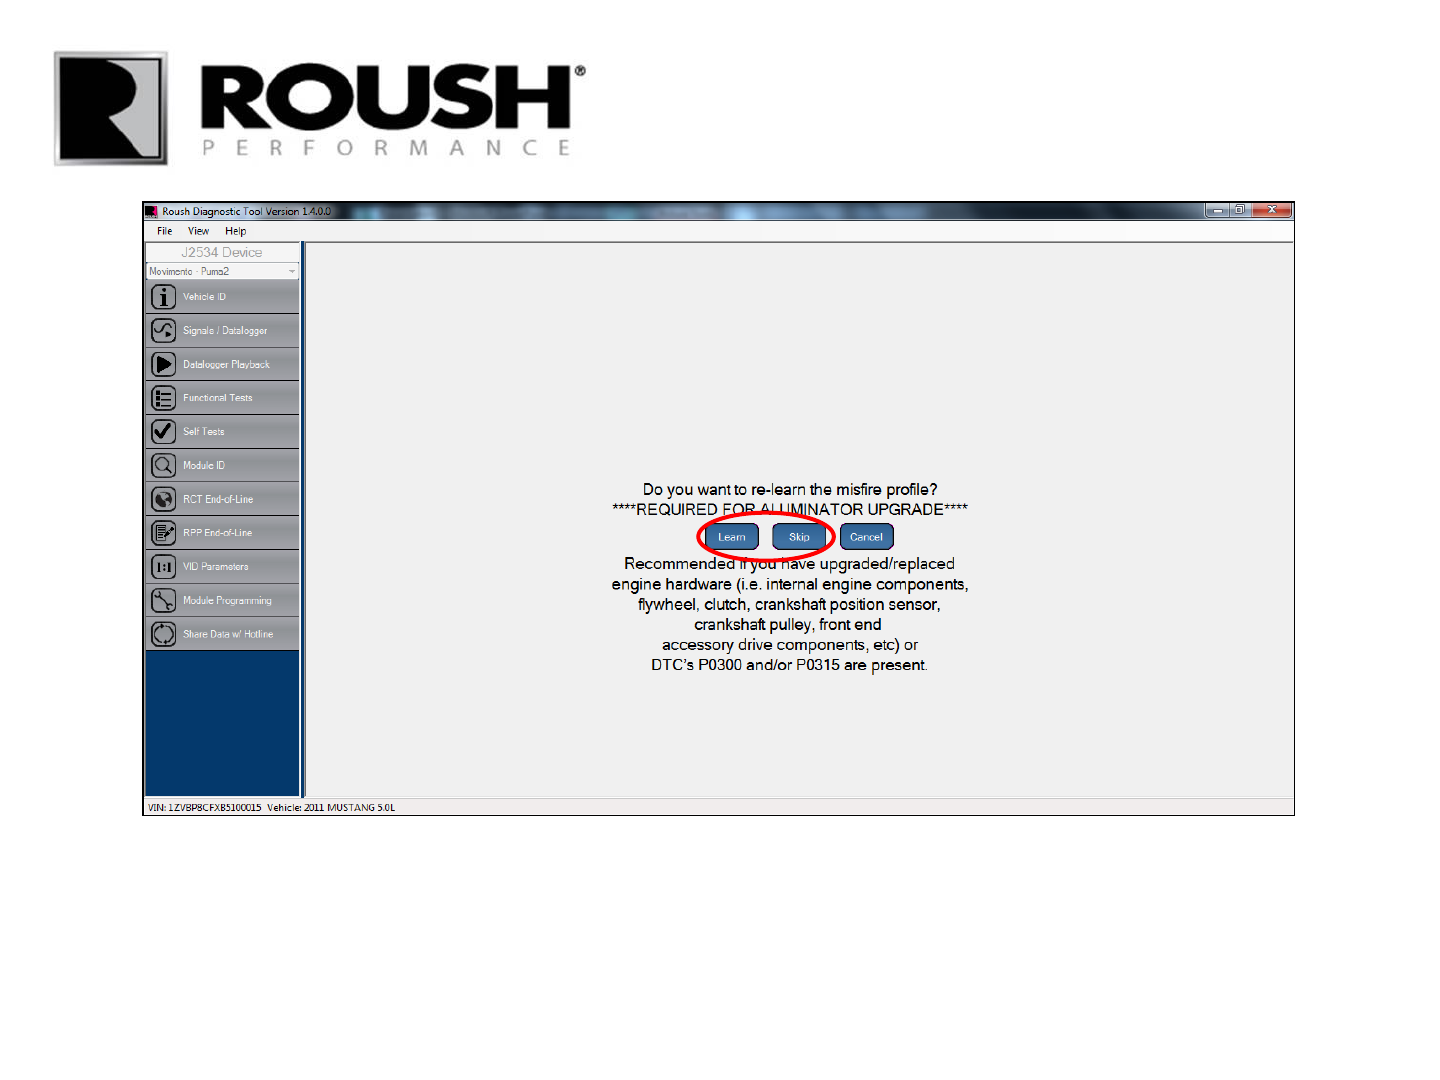
• RDT software includes the re-learn misfire profile procedure. If you have replaced any internal engine
hardware, select “Learn”.
• If you have not replaced any of the engine hardware noted above, select “Skip” and proceed to slide 67.
60 RDT-CALIM (RDT-FLASHIM) 20140109 RLA
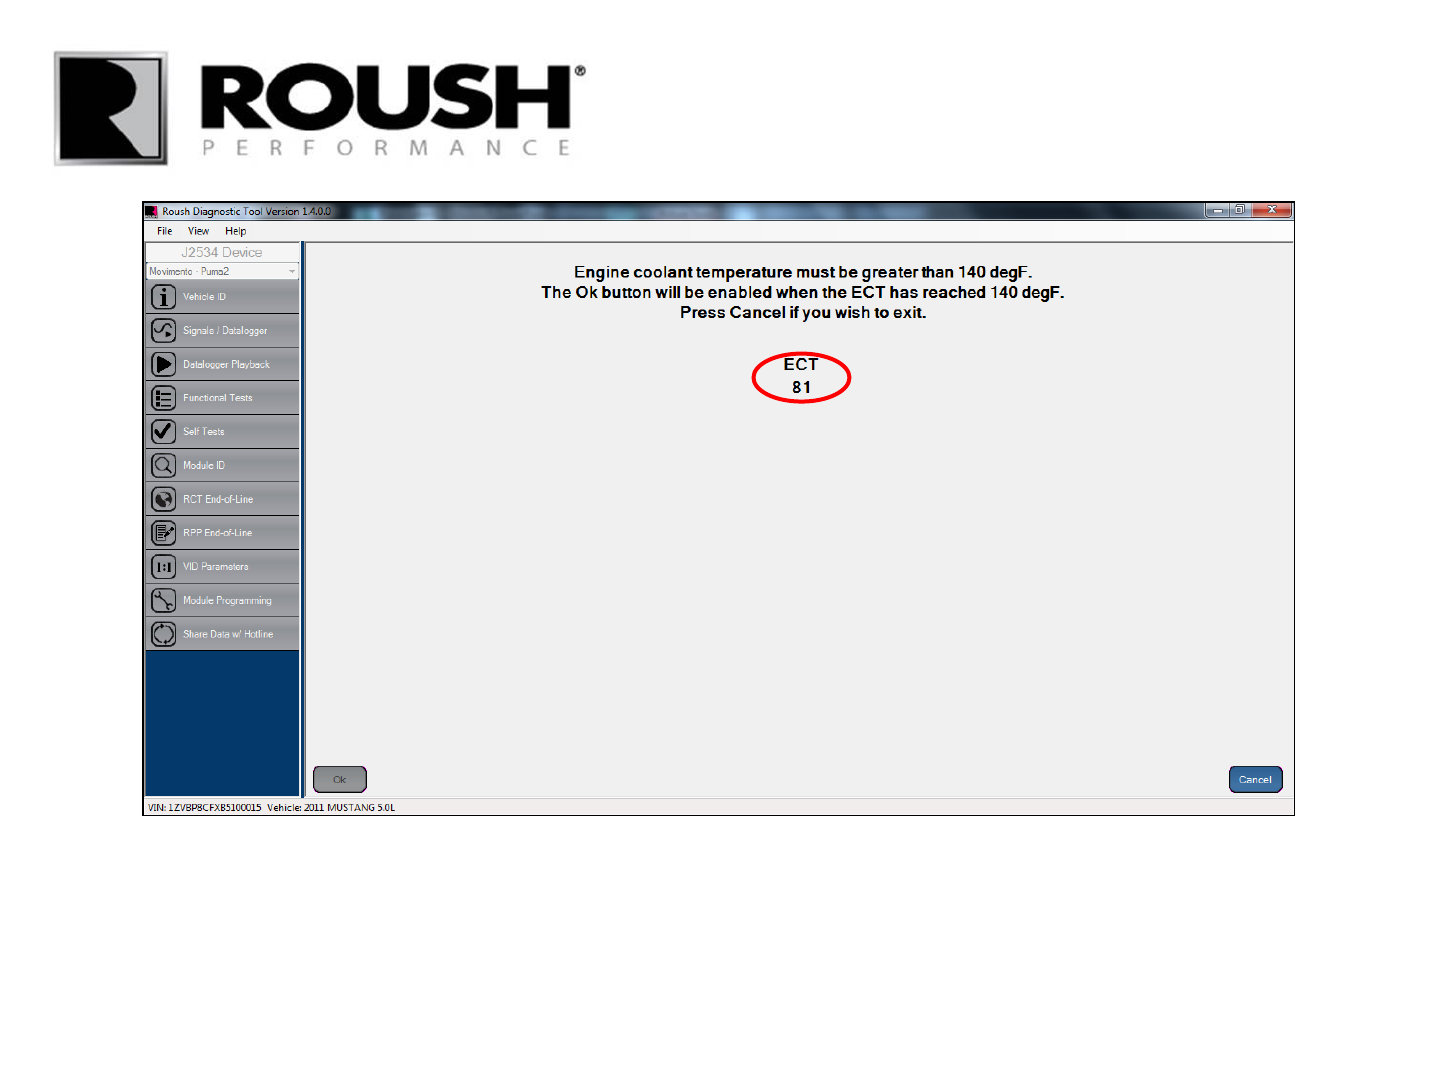
• To proceed, your Engine Coolant Temperature must be greater than 140 degrees Fahrenheit. If your ECT
is below 140, start the vehicle and monitor the value on the screen until it reaches a value greater than
140.
61 RDT-CALIM (RDT-FLASHIM) 20140109 RLA
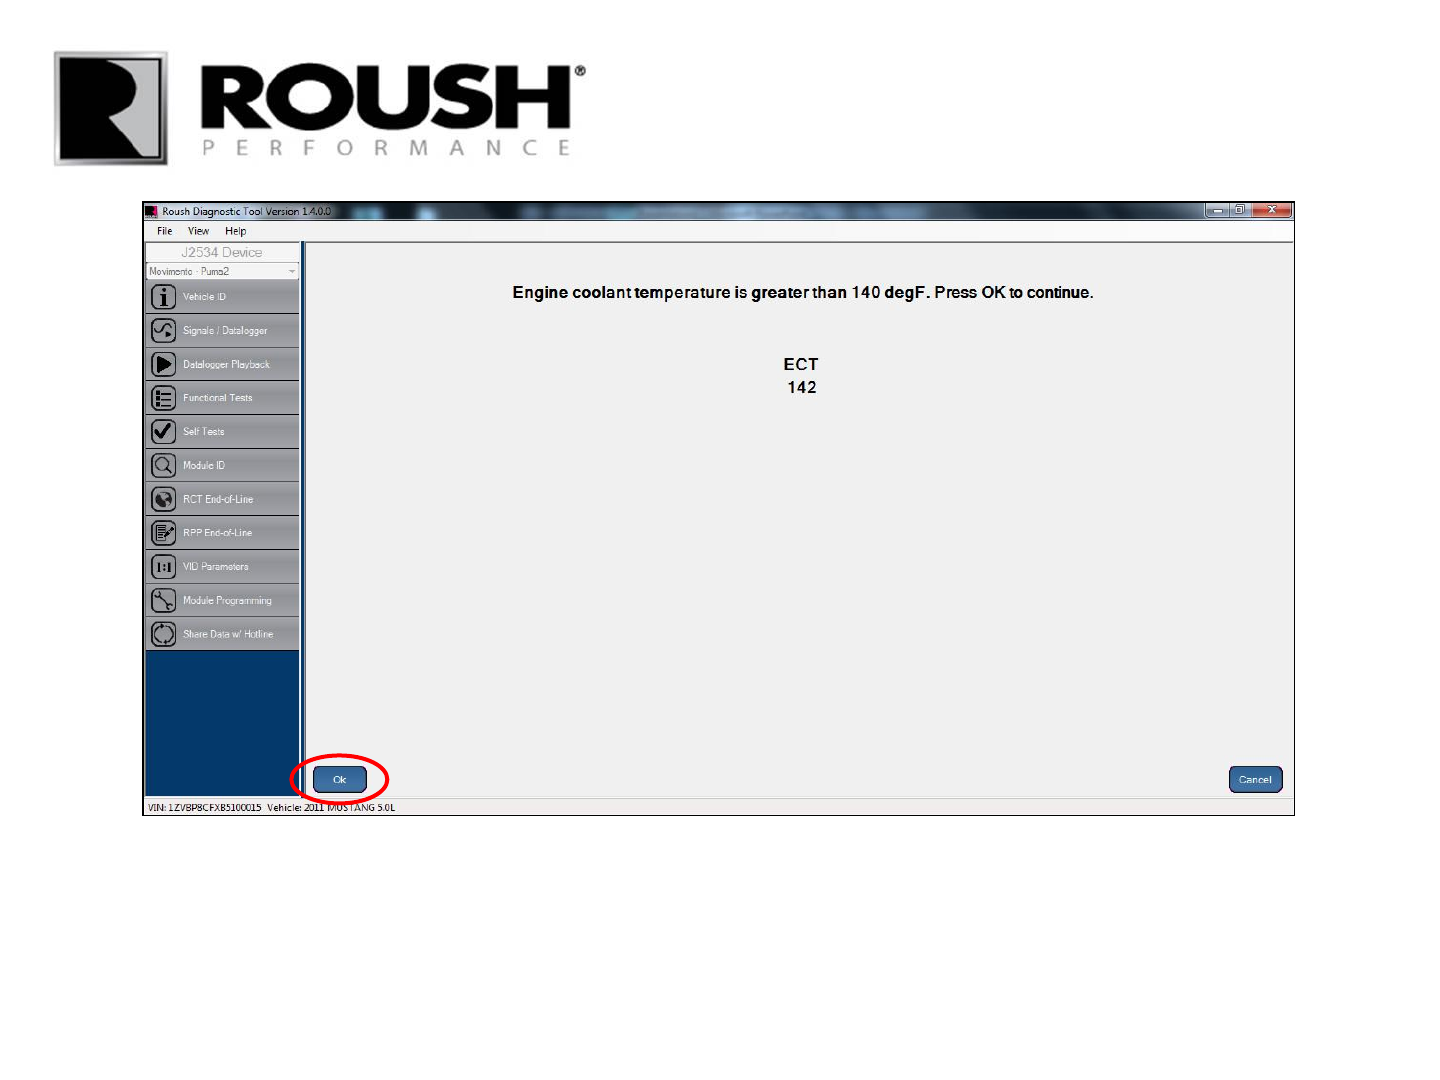
• Once the ECT is above 140, the Ok button will become available for selection, select “Ok”.
62 RDT-CALIM (RDT-FLASHIM) 20140109 RLA

• Select “Yes”.
63 RDT-CALIM (RDT-FLASHIM) 20140109 RLA
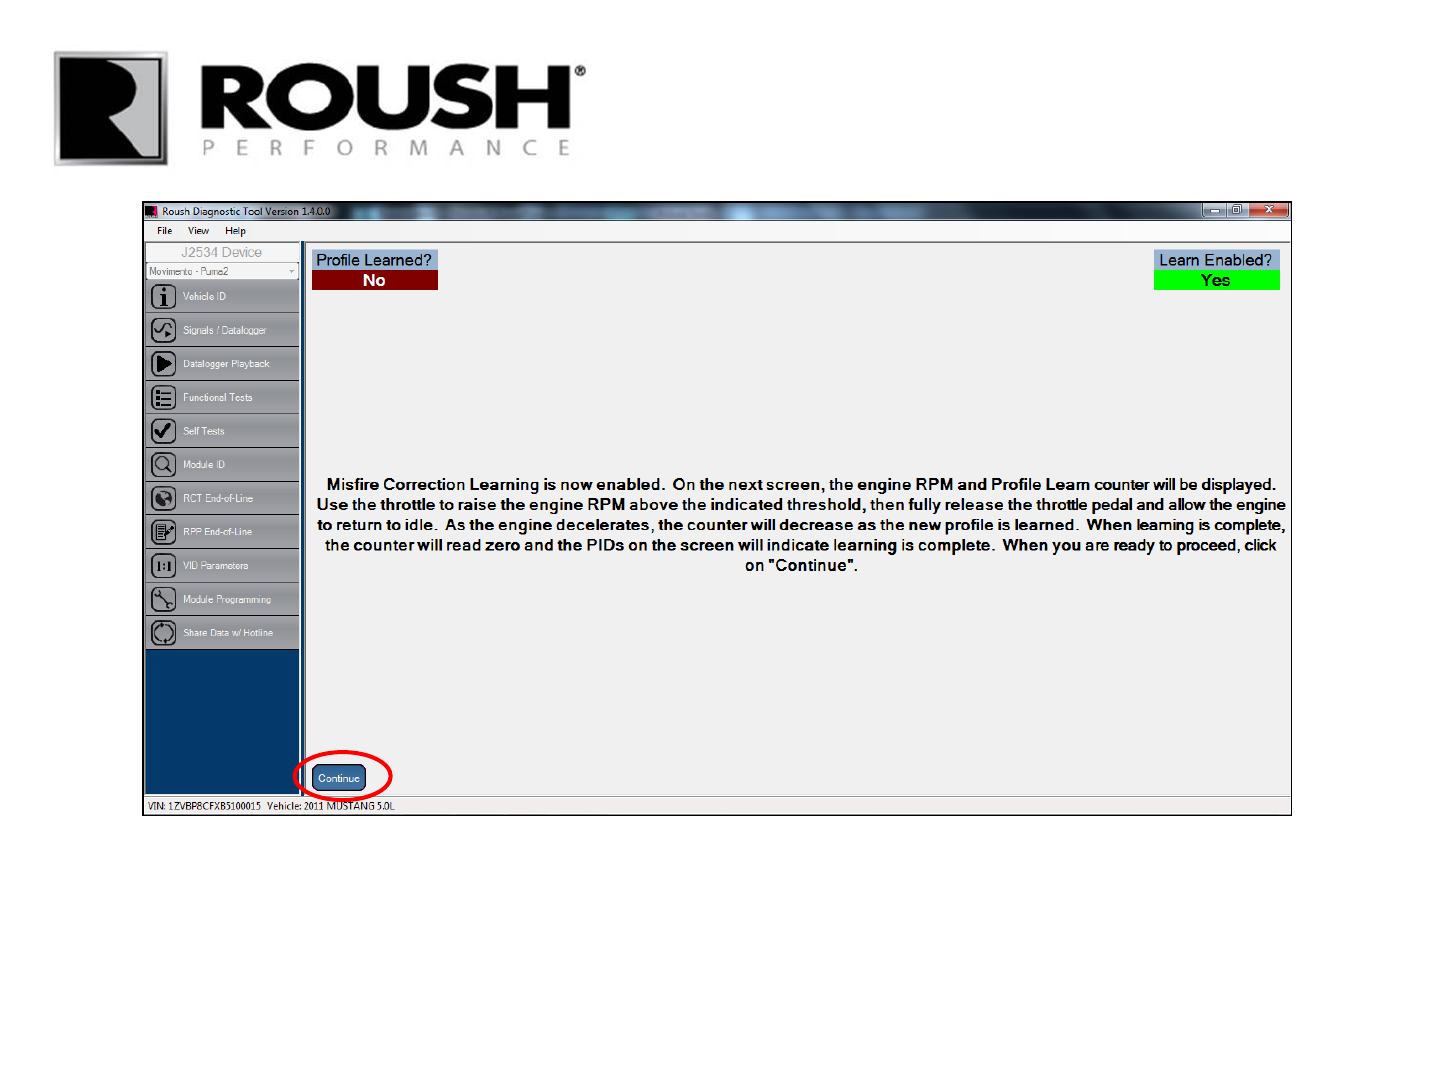
• Read the on screen description and select “Continue”.
64 RDT-CALIM (RDT-FLASHIM) 20140109 RLA
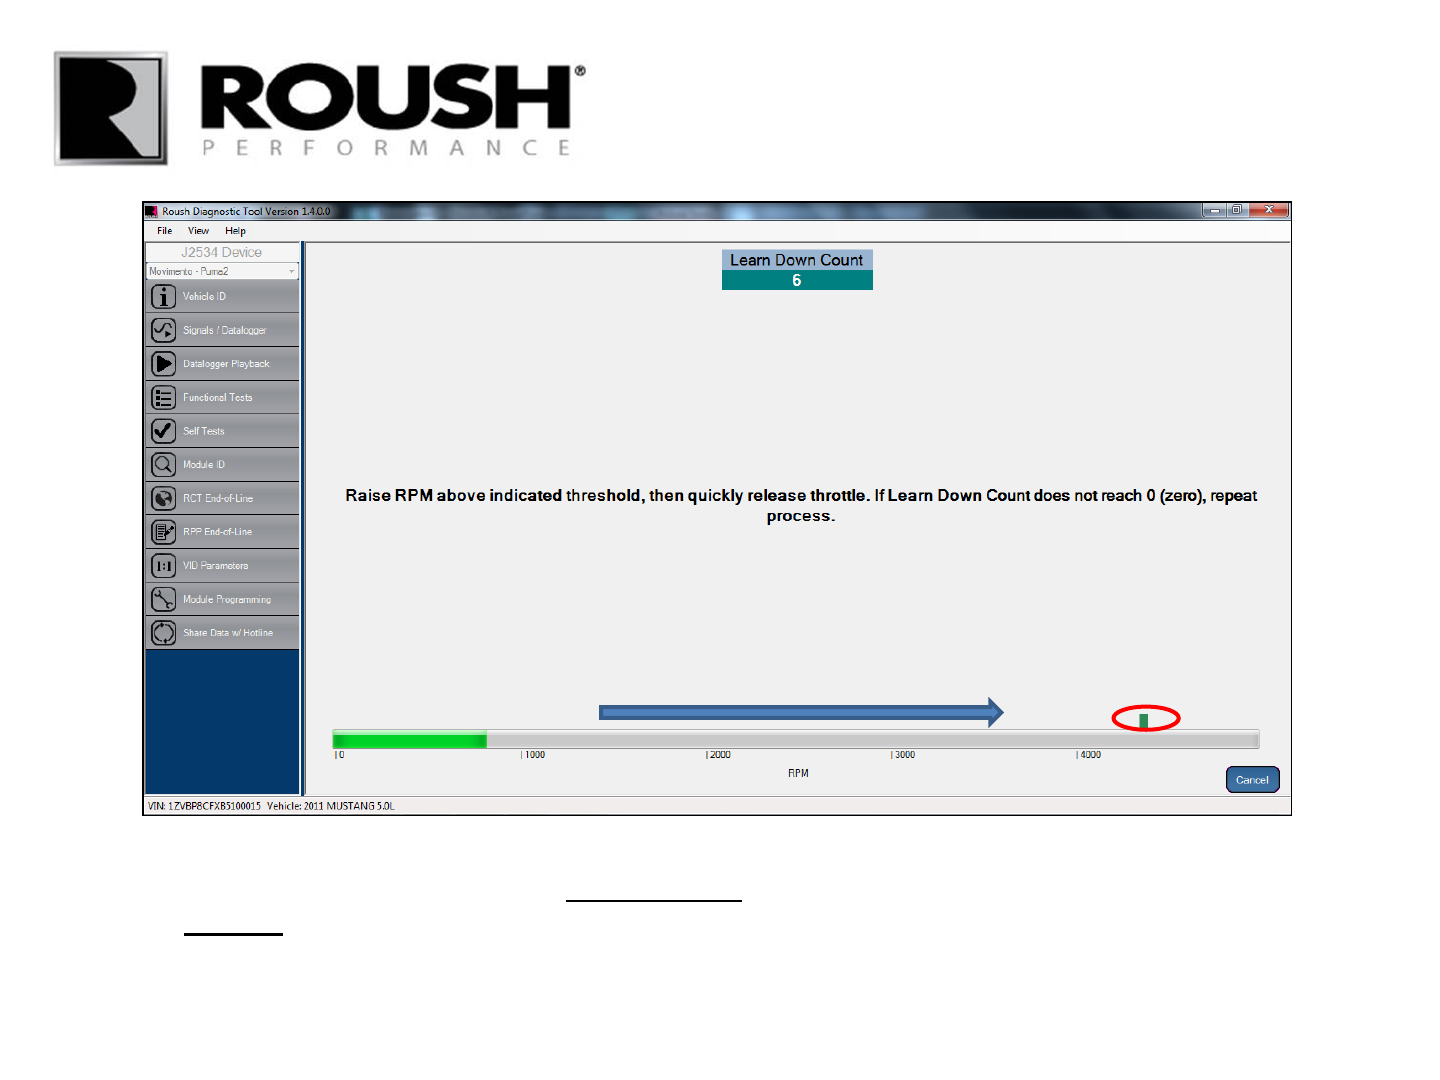
• Raise the engine RPM so that the value MOMENTARILY exceeds the indicated point (about 4250), then
quickly RELEASE the accelerator.
• Continue to the next page for a screen capture.
65 RDT-CALIM (RDT-FLASHIM) 20140109 RLA
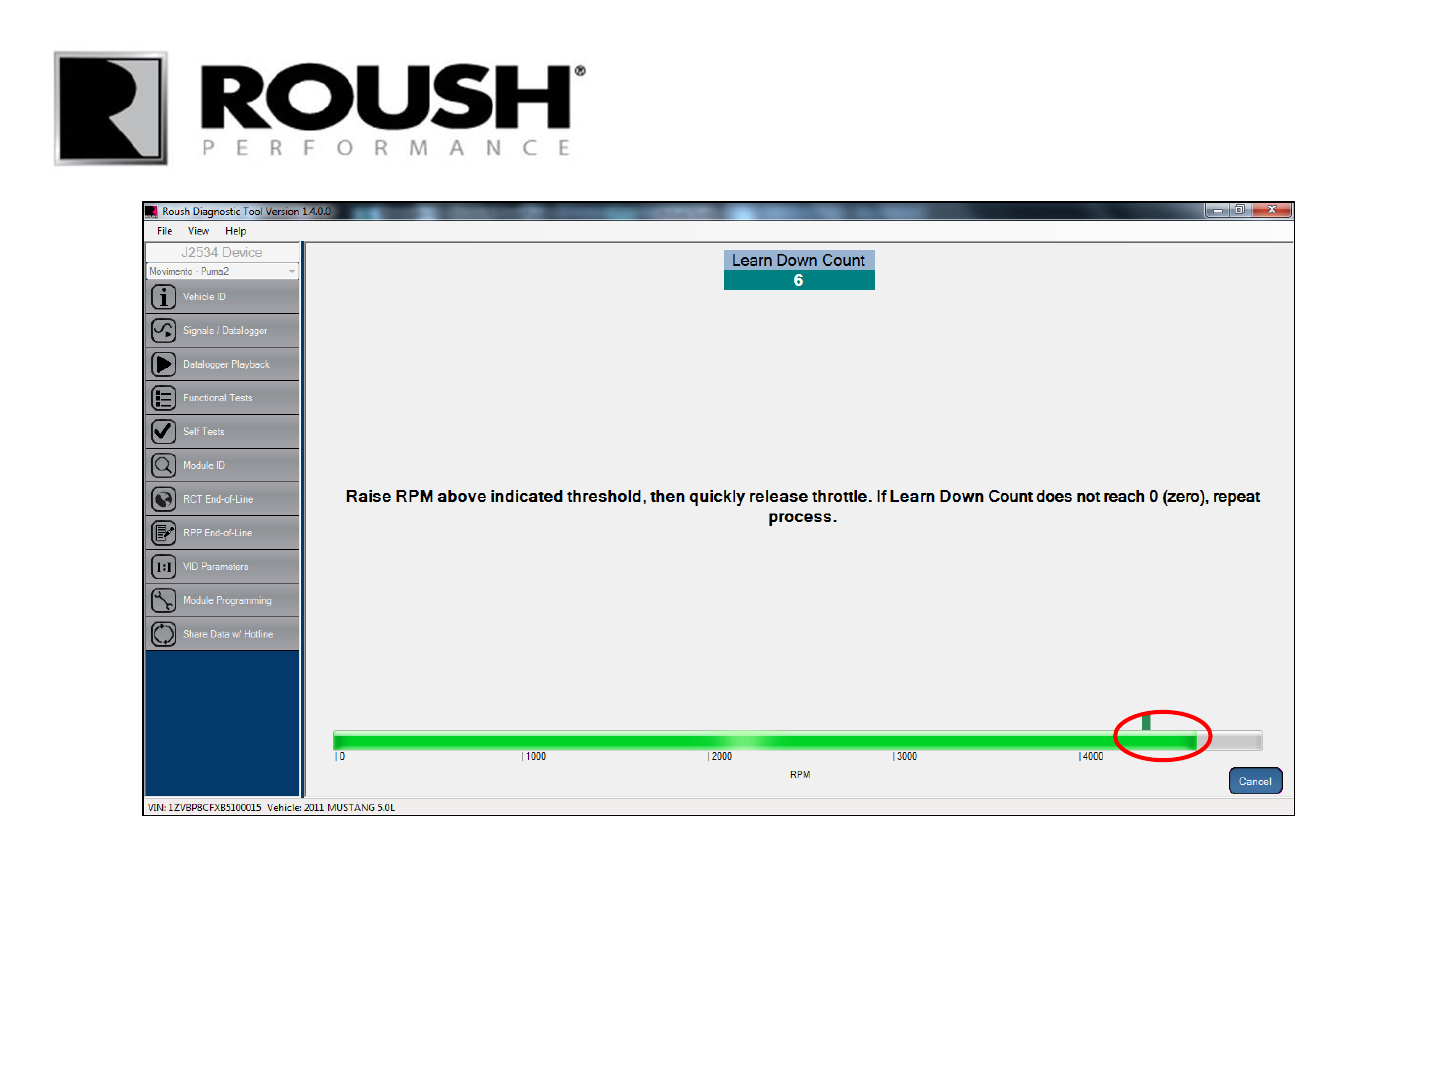
• Continue to the next page.
66 RDT-CALIM (RDT-FLASHIM) 20140109 RLA

• Turn the ignition to the Engine Off position and select “Ok”.
67 RDT-CALIM (RDT-FLASHIM) 20140109 RLA

• Start the vehicle and select “Ok”.
68 RDT-CALIM (RDT-FLASHIM) 20140109 RLA
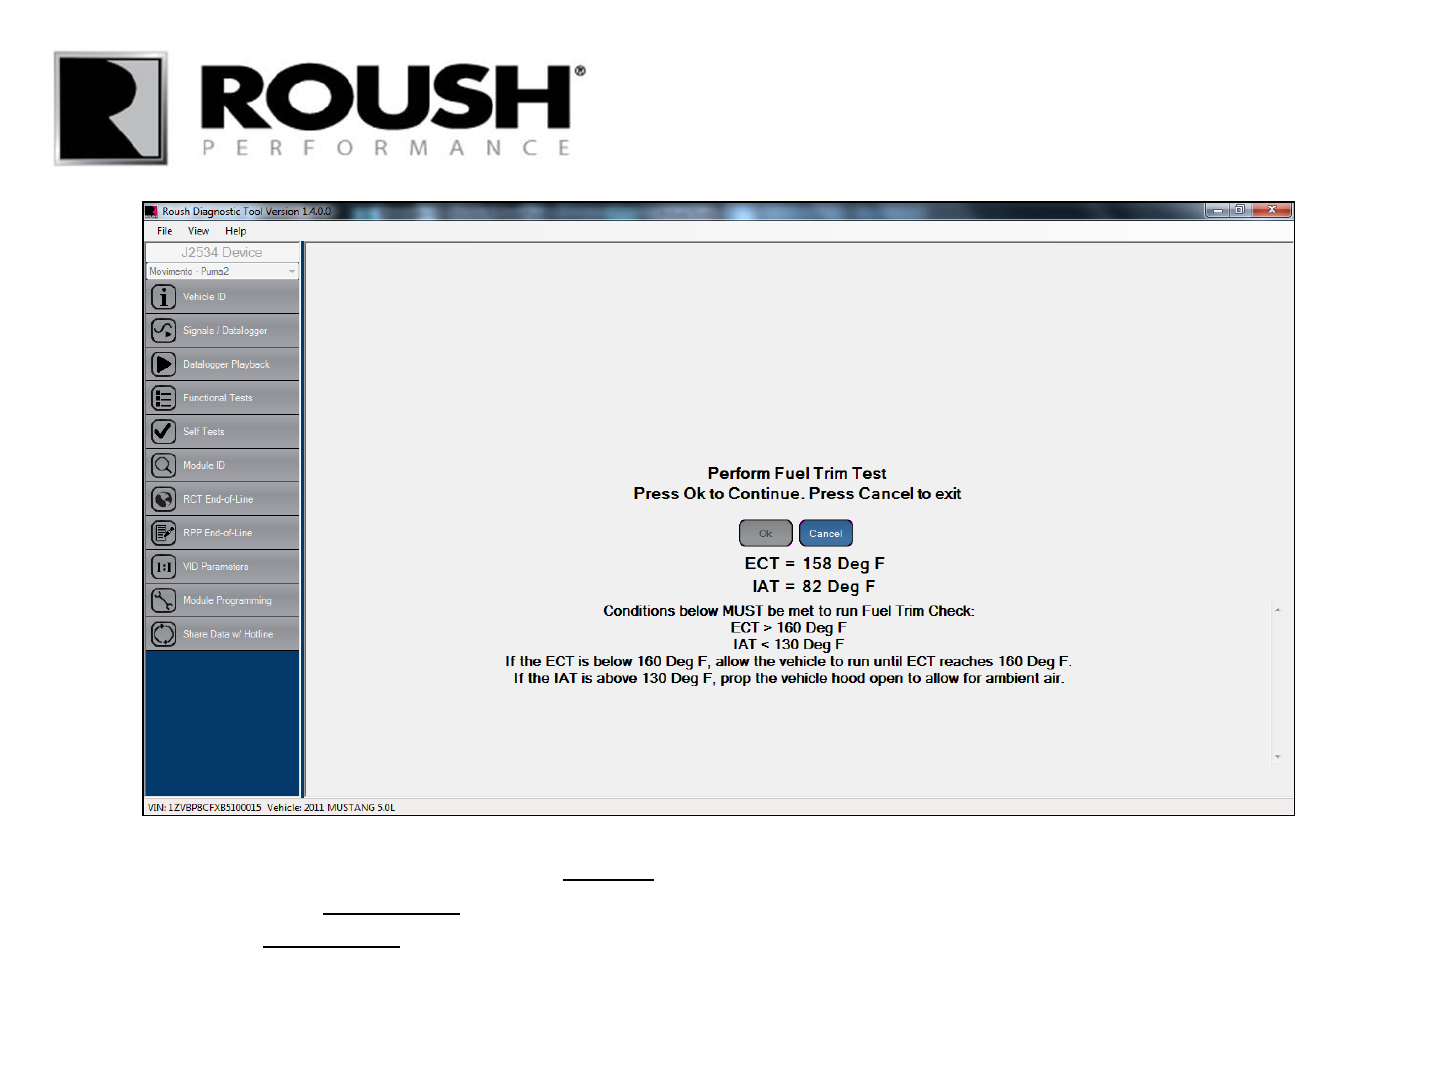
• Verify that the values displayed are all “in range”. If the values are in range, continue to the next page.
• If the IAT value is “not in range”, open the hood to decrease the temperature of the IAT.
• If the ECT is “not in range”, let the engine run until the operating temperature is in range.
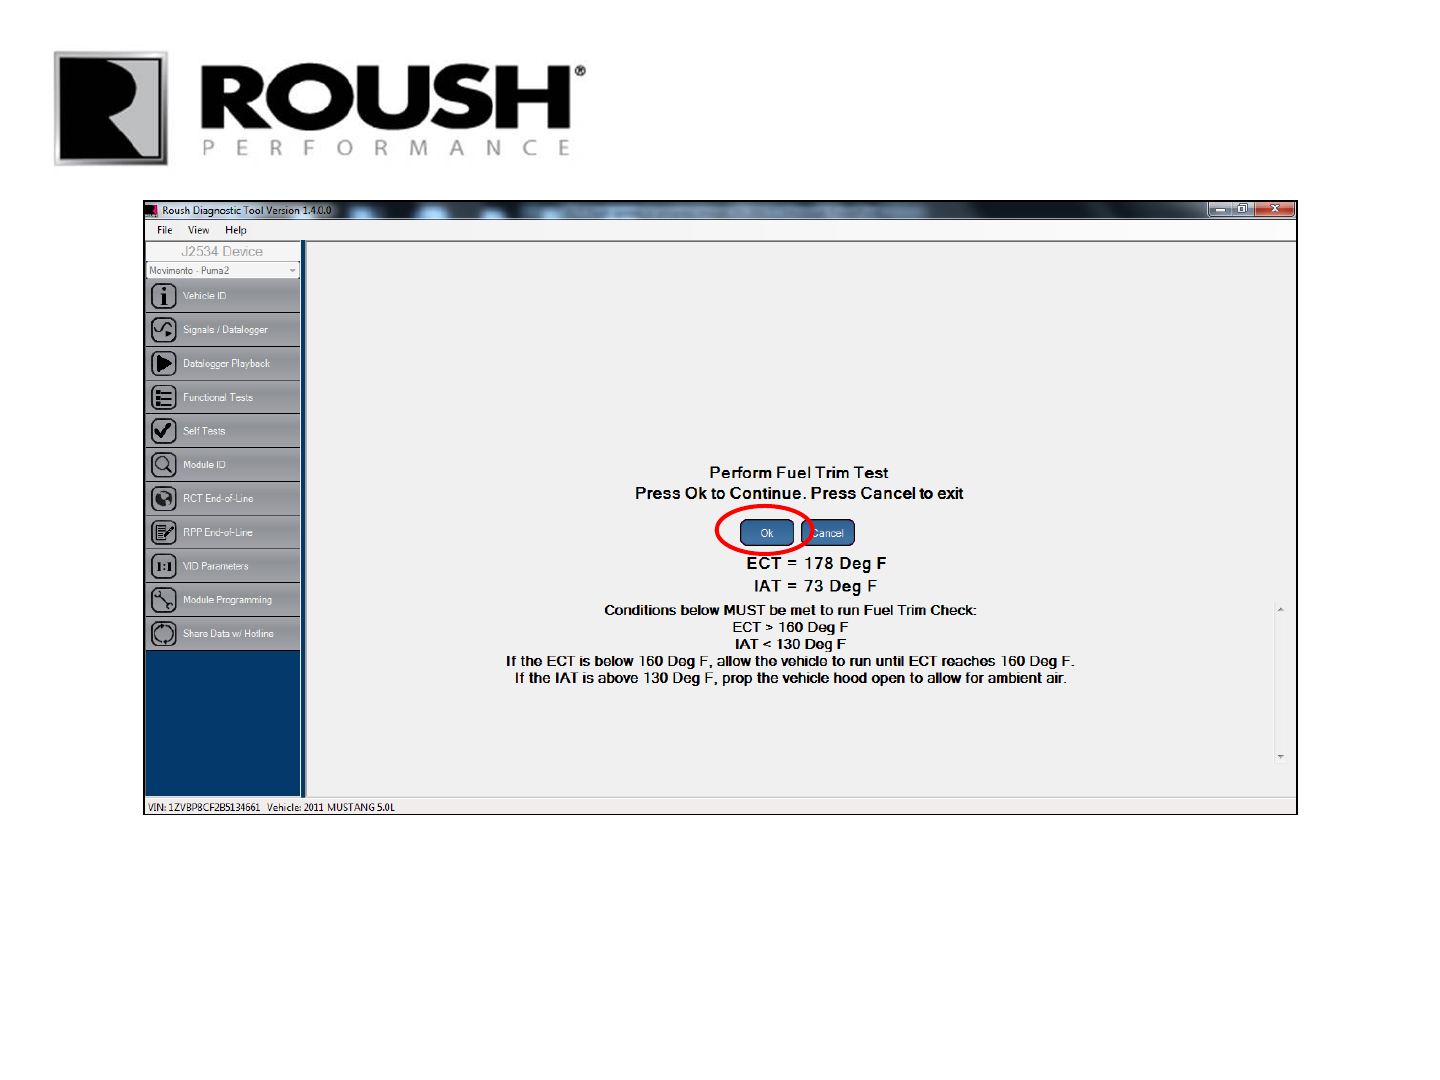
• If neither ECT or IAT change to an acceptable value, turn the engine off and diagnose the concern.
69 RDT-CALIM (RDT-FLASHIM) 20140109 RLA
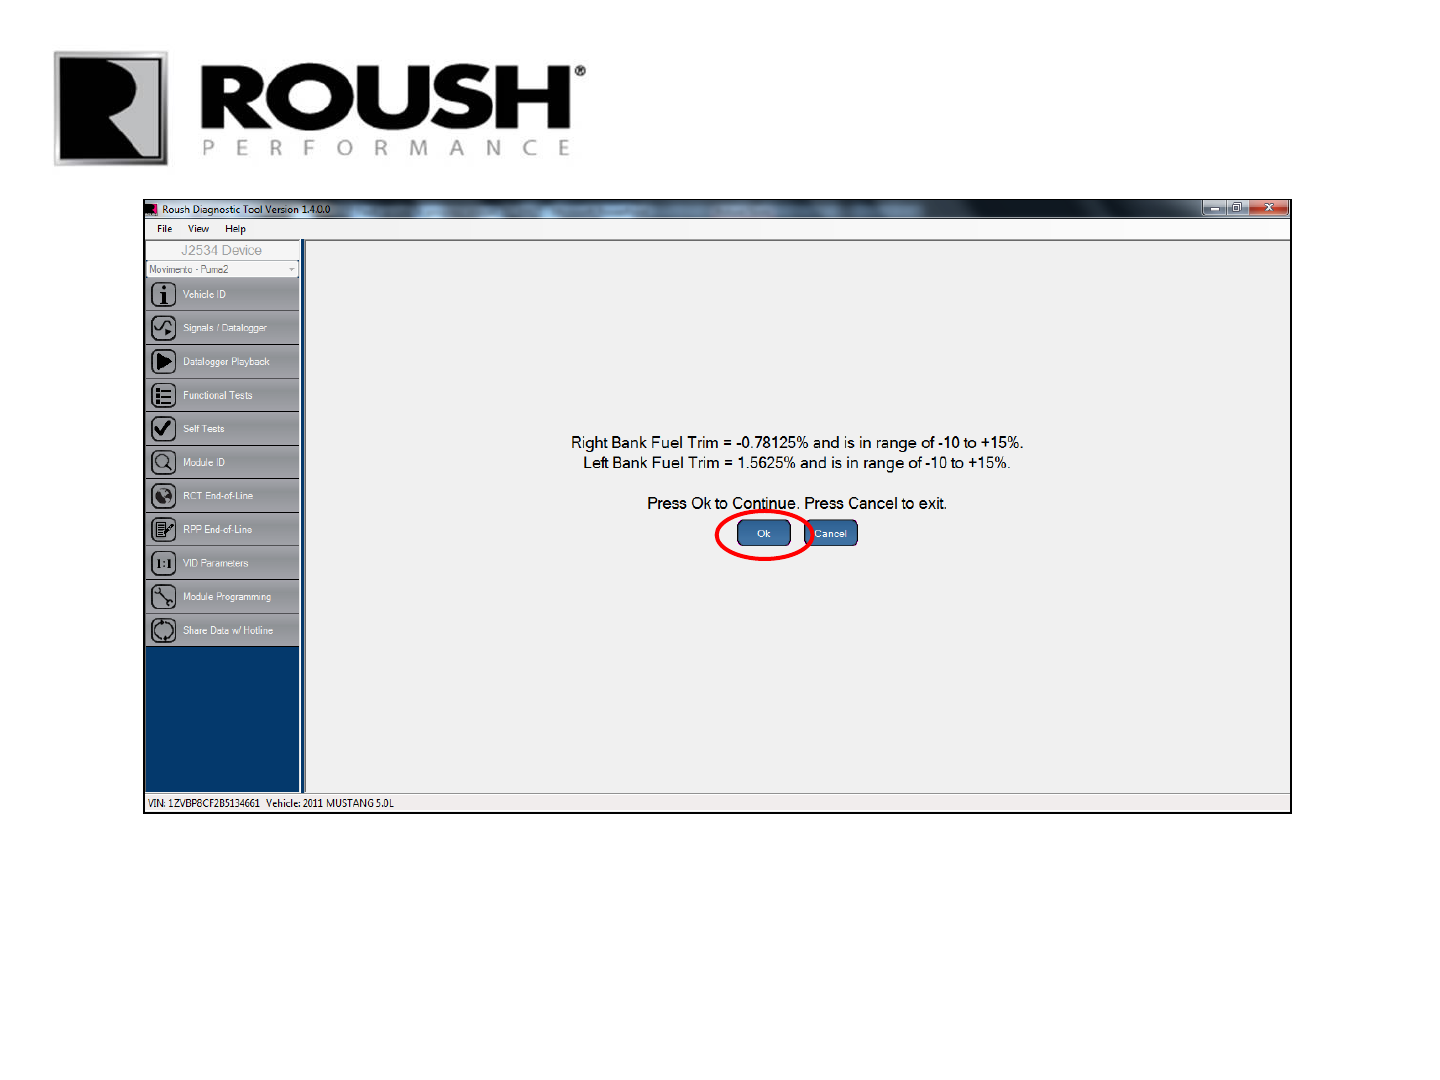
• Once the values are in range, select “Ok”.
70 RDT-CALIM (RDT-FLASHIM) 20140109 RLA
• If the values are in range, select “Ok”.
• If the values are not in range, diagnose the concern and repeat the EOL procedure (refer to page 28).
71 RDT-CALIM (RDT-FLASHIM) 20140109 RLA
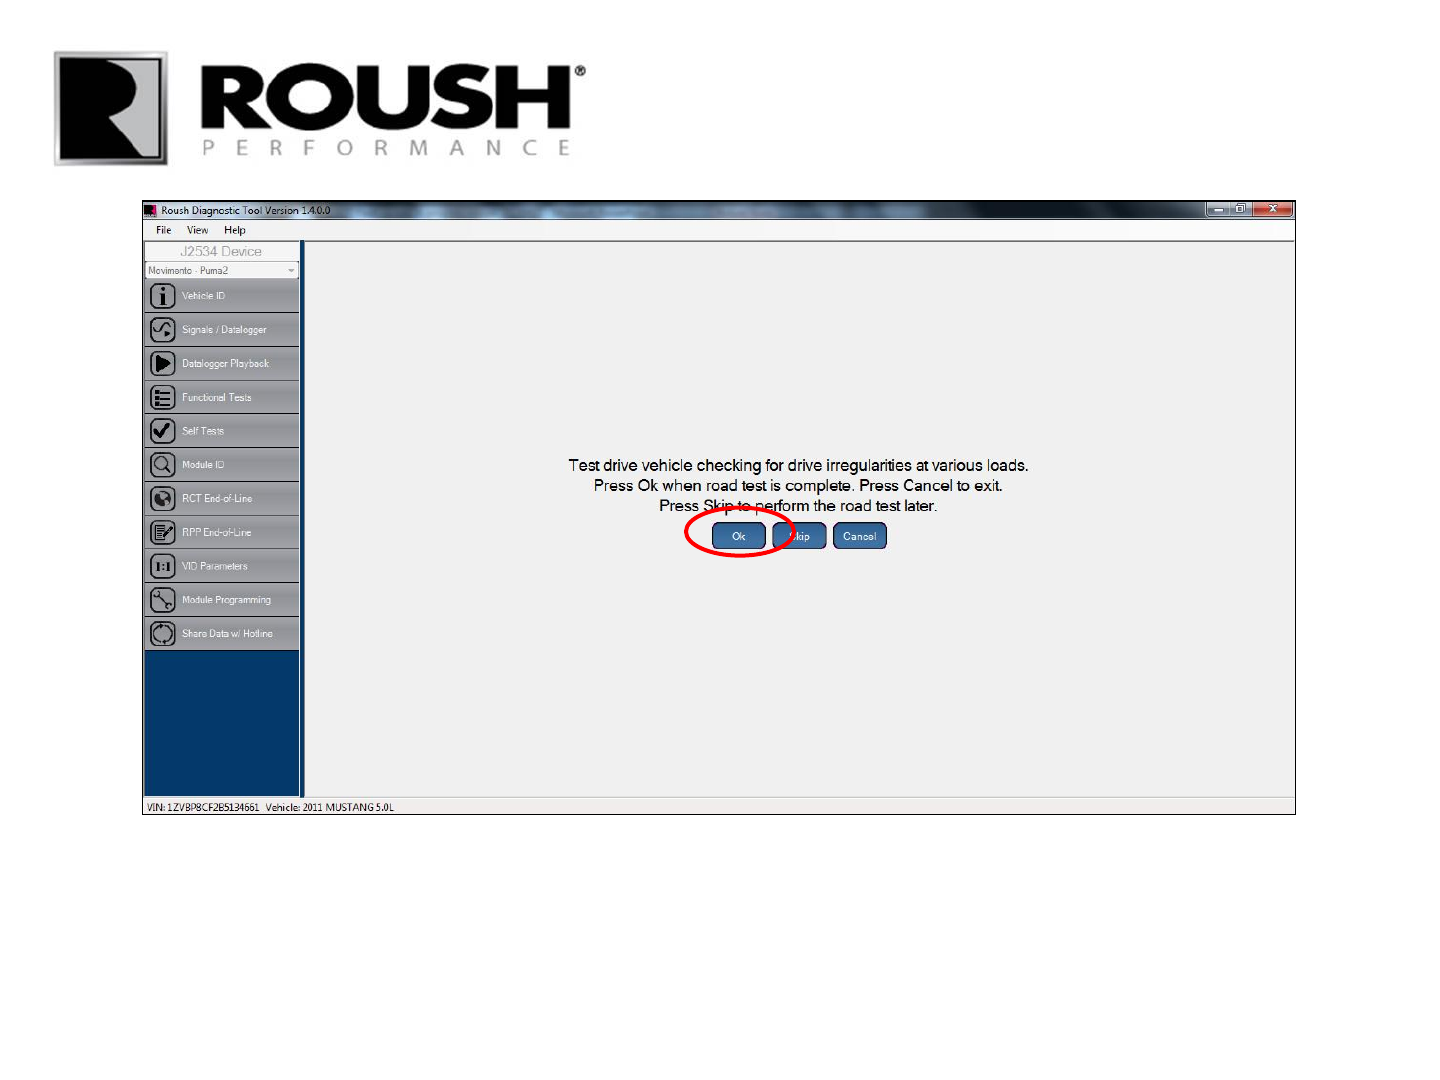
• ROUSH recommends disconnecting the laptop/VCM from the vehicle while test driving. The program
must be left open to continue.
• Once a test drive is complete, connect the laptop/VCM back to the DLC and select “Ok”.
72 RDT-CALIM (RDT-FLASHIM) 20140109 RLA

• Verify no codes are present, select “Ok”.
• If any codes are present, diagnose and repair the concern.
73 RDT-CALIM (RDT-FLASHIM) 20140109 RLA

• Enter any comments relating to the procedure.
• Select “Ok”.
74 RDT-CALIM (RDT-FLASHIM) 20140109 RLA
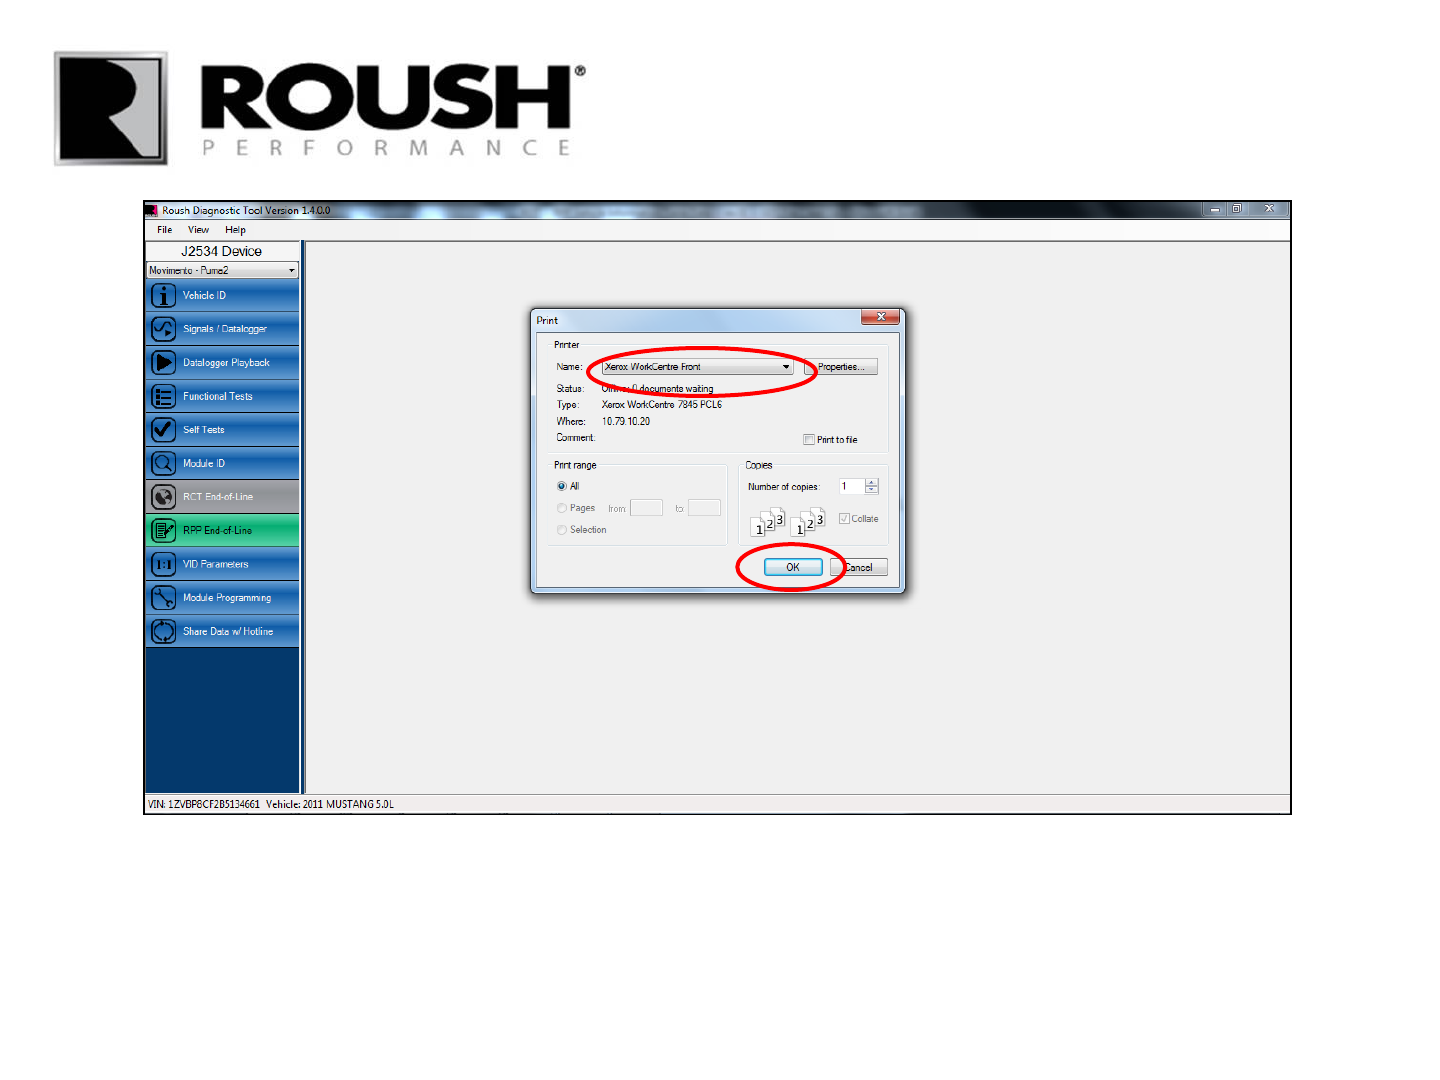
• You will be prompted with a print window to print the session file.
• Select an appropriate printer from the drop down and select “OK” to print a file for your records.
75 RDT-CALIM (RDT-FLASHIM) 20140109 RLA
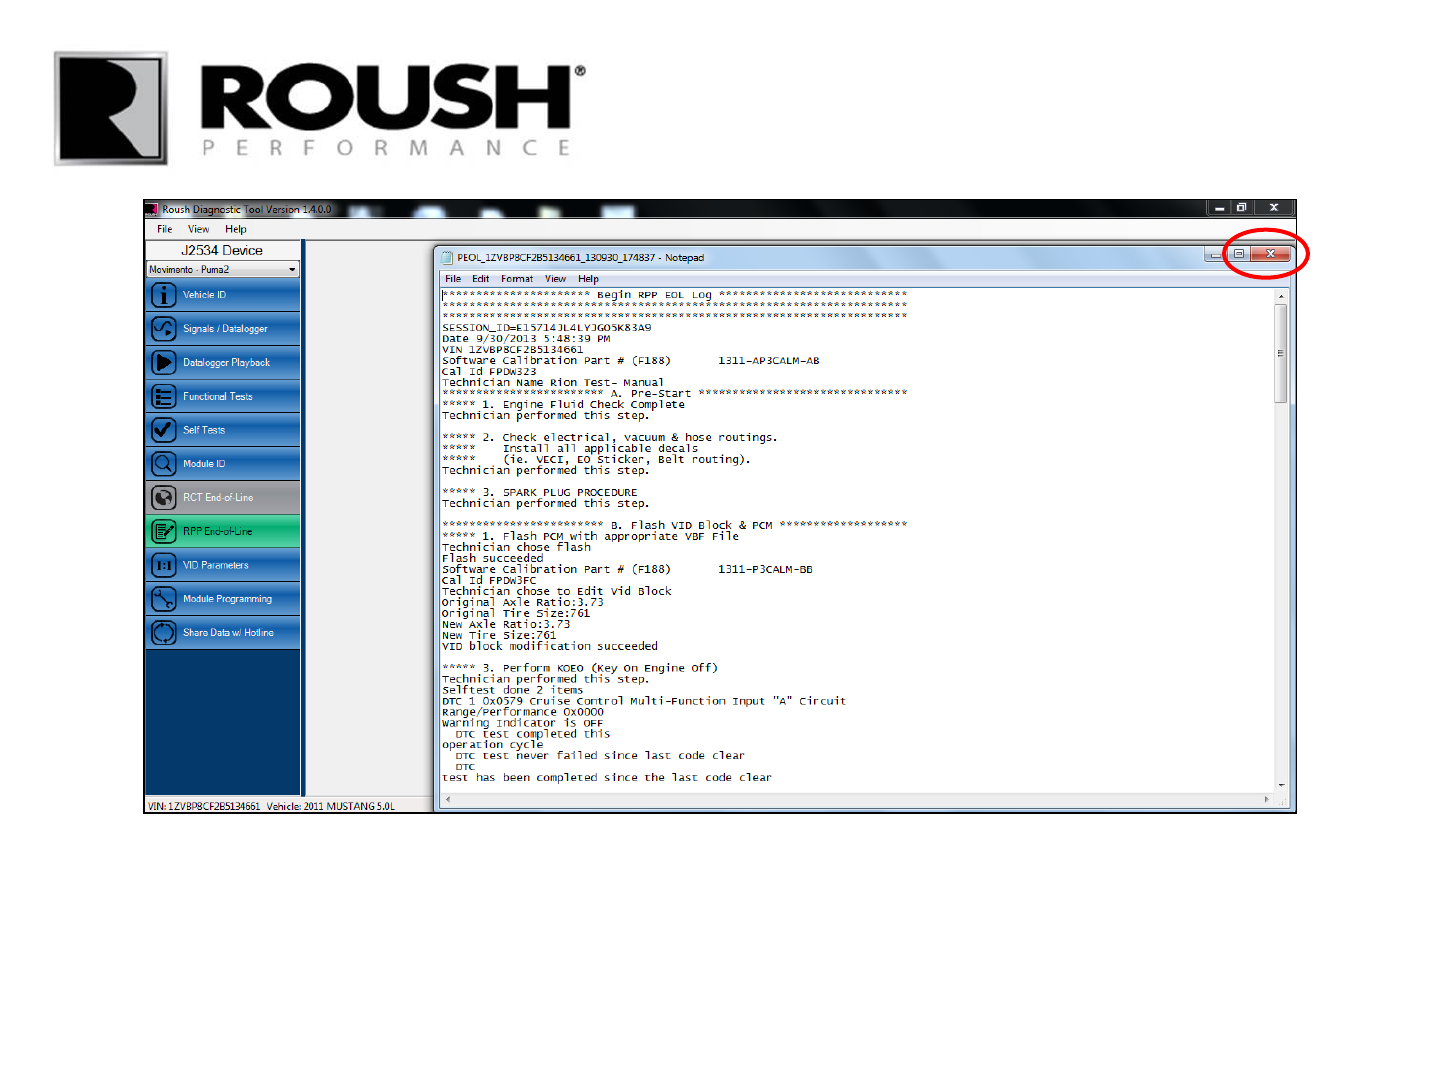
• The session log will be displayed. Select the “X” to close it.
76 RDT-CALIM (RDT-FLASHIM) 20140109 RLA
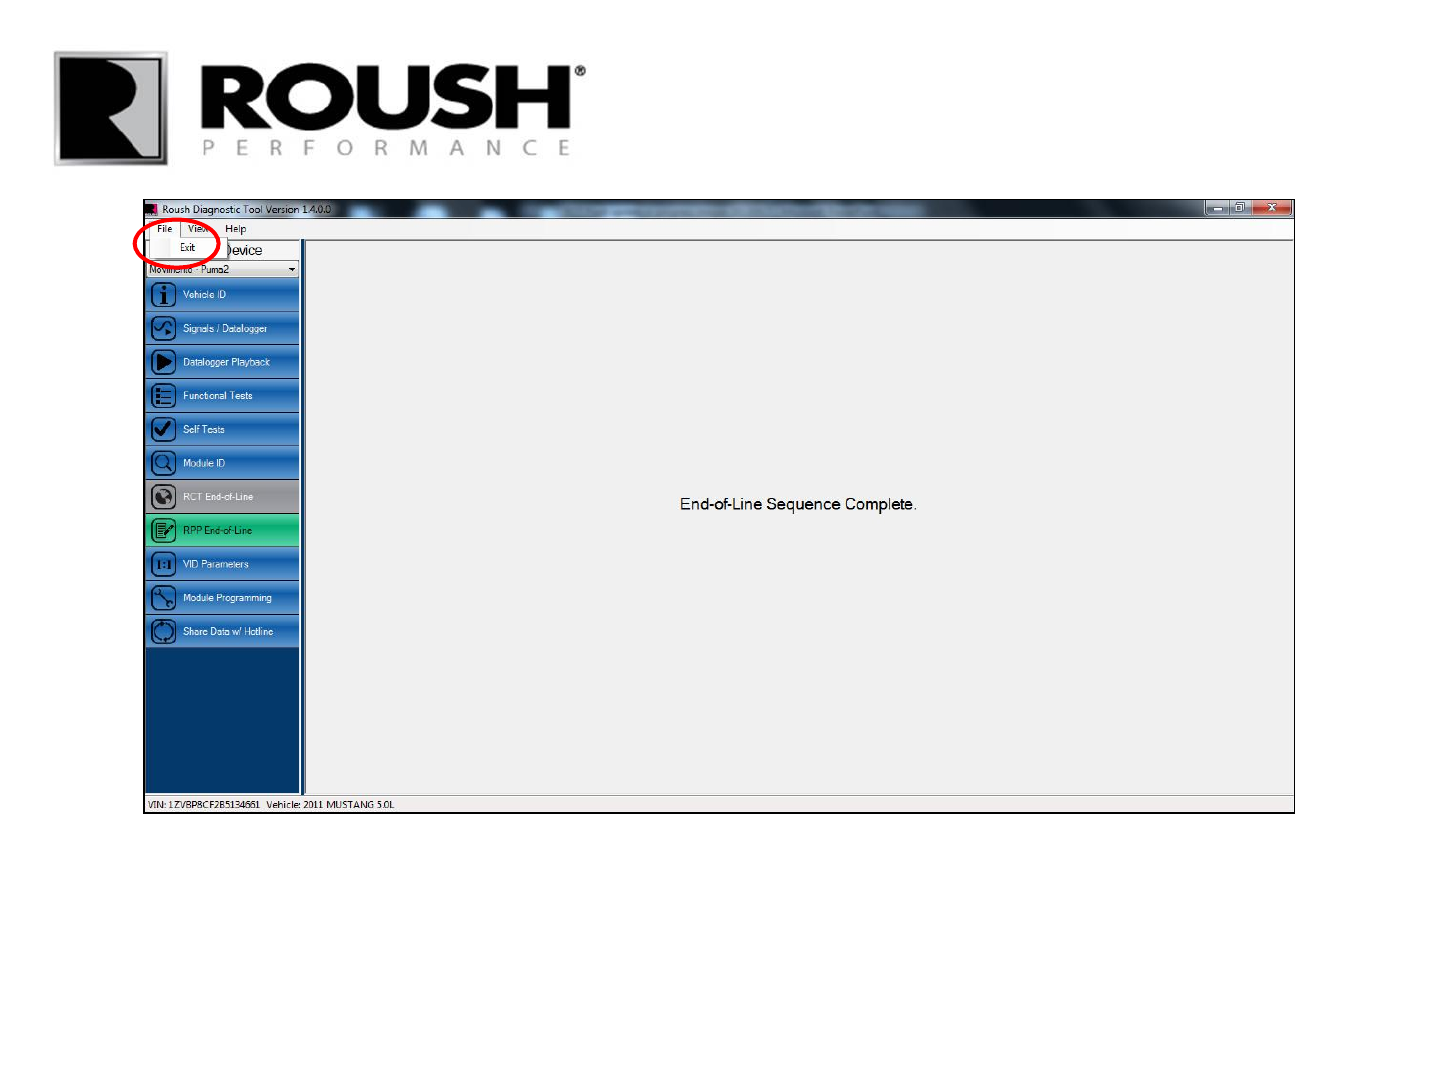
• The End of Line quality verification procedure and module flashing process are now complete. Select the
“File” tab from the menu bar and select “Exit” from the drop down menu to close the program.
77 RDT-CALIM (RDT-FLASHIM) 20140109 RLA
