Ruckus Wireless MP2N33A 802.11b/g/n module User Manual Users Guide
Ruckus Wireless, Inc. 802.11b/g/n module Users Manual Users Guide
UserManual.wiki
>
Ruckus Wireless
>
MP2N33A User Manual
>
Users Manual Users Guide
Contents
1.
Users Manual Regulatory Flyer
2.
Users Manual Users Guide
Users Manual Users Guide
Navigation menu
Upload a User Manual
Namespaces
Wiki Guide
HTML
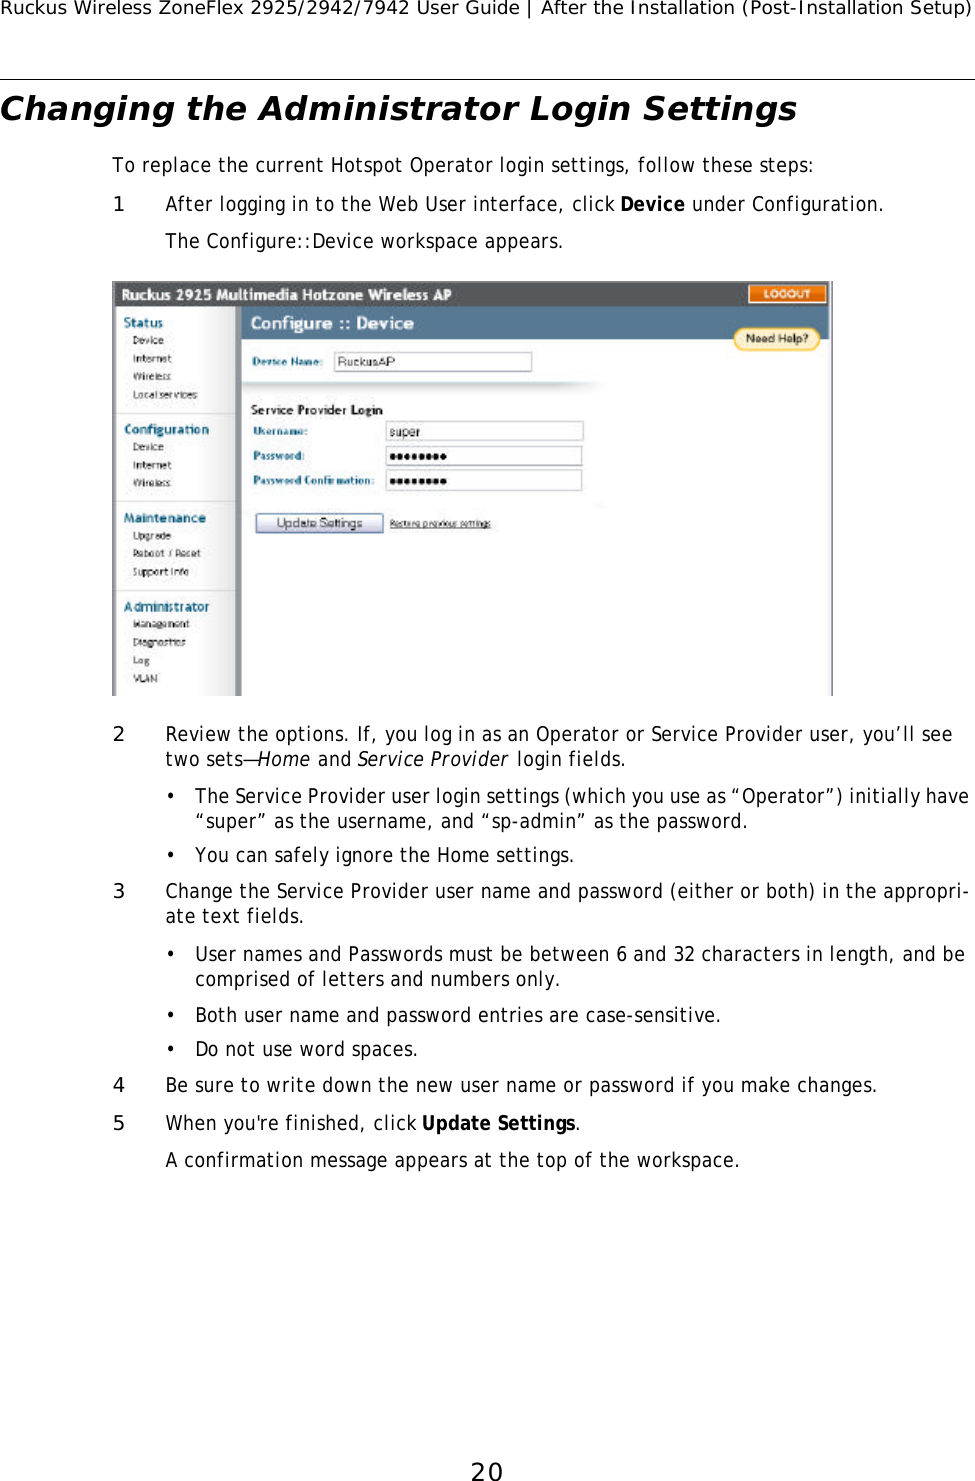
PDF
Info
Views
User Manual
Discussion / Help
Navigation
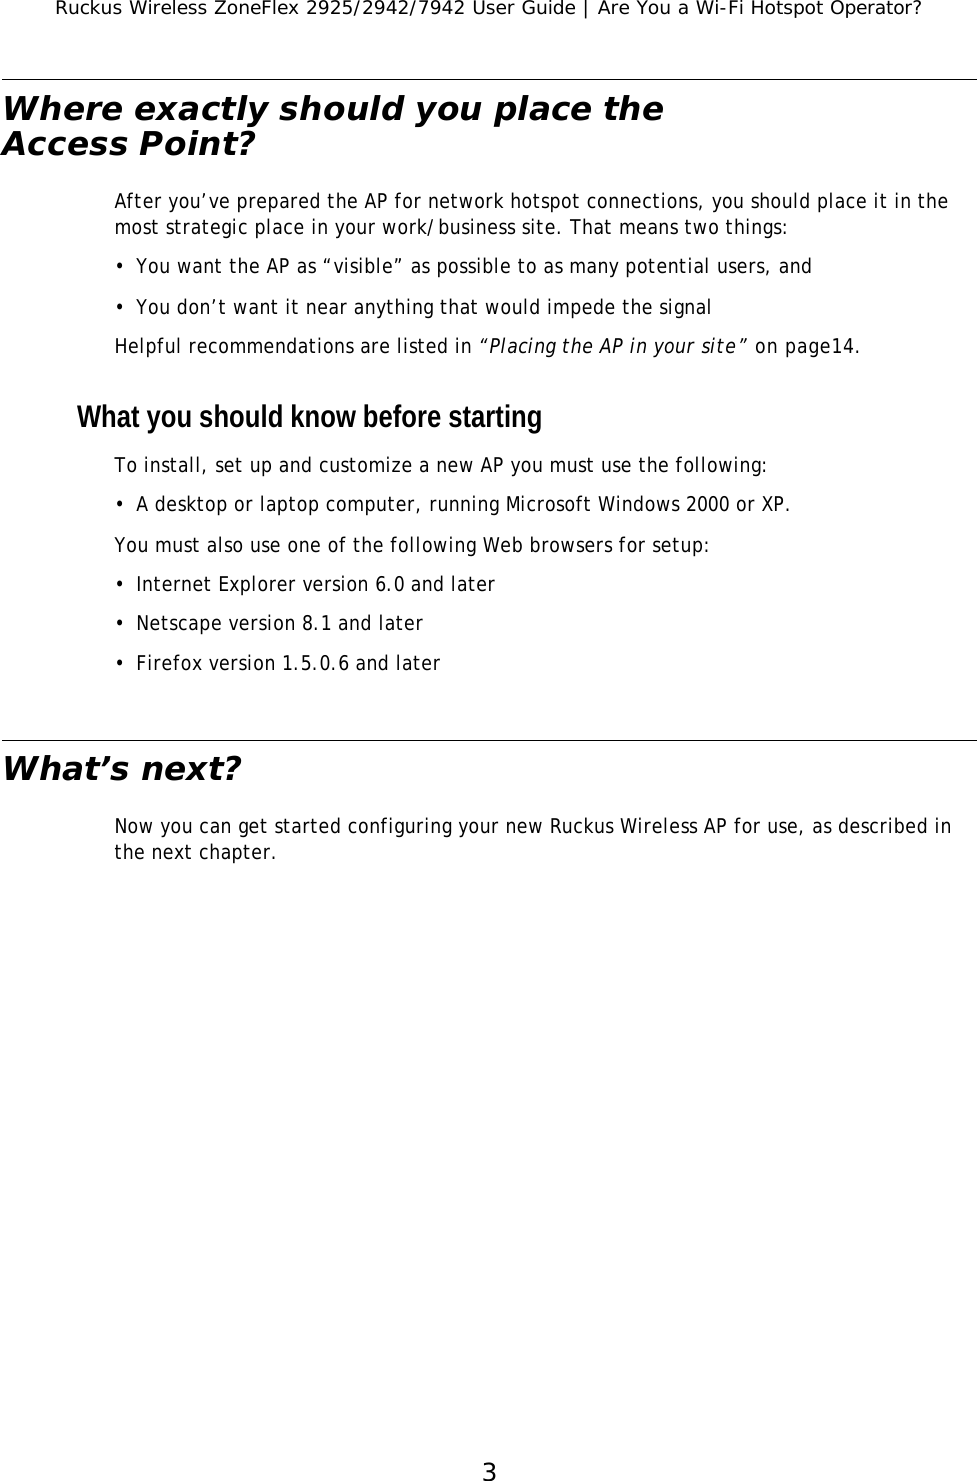
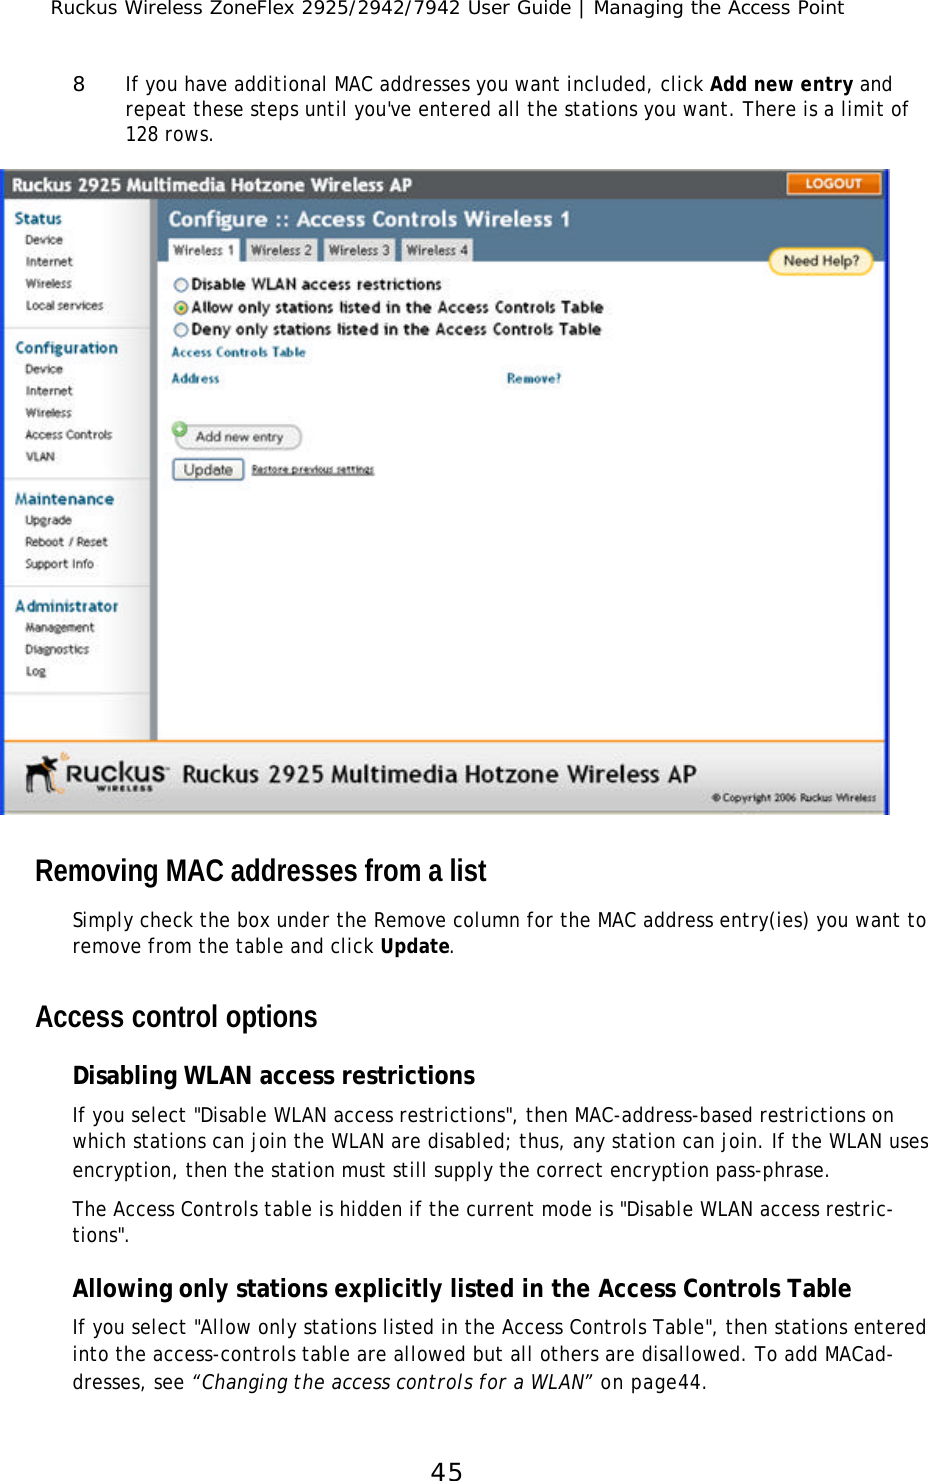
![Ruckus Wireless ZoneFlex 2925/2942/7942 User Guide | Installation, Setup, and Placementof the AP5What’s in the PackageWhen you first open the package, you should find one of each of the following:•A Ruckus Wireless ZoneFlex 2925, 2942 or 7942 Access Point•A 3-foot (0.9 meter) Cat5 Ethernet cable •A power supply adapter•A wall mounting kit, plus printed instructionsBefore proceeding, review the following section to familiarize yourself with the physical features of the access point (AP).Features of the Access PointZF2925 FeaturesThe following illustration shows the front view of a ZF2925 AP, highlighting the four LED indicators that can be used to assess both device and network status. FIGURE 2-1: Front view[1] Power[2] WAN Connectivity[3] Wireless Device Association[4] Signal QualityFor more information on what each LED’s lights may indicate, see the “LED” table on the next page.12 34](https://usermanual.wiki/Ruckus-Wireless/MP2N33A.Users-Manual-Users-Guide/User-Guide-889888-Page-9.png)
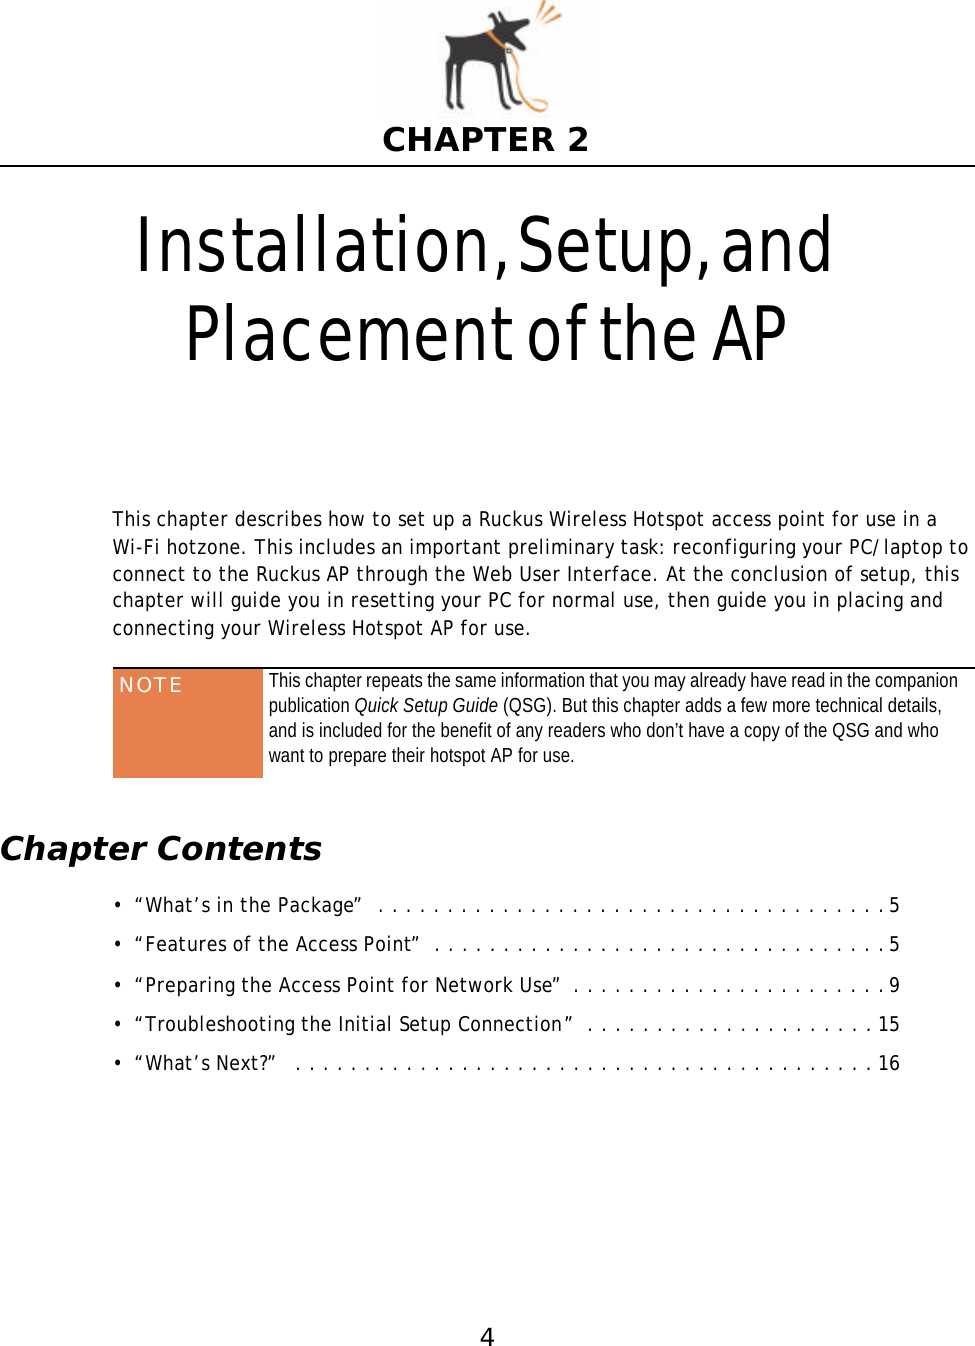
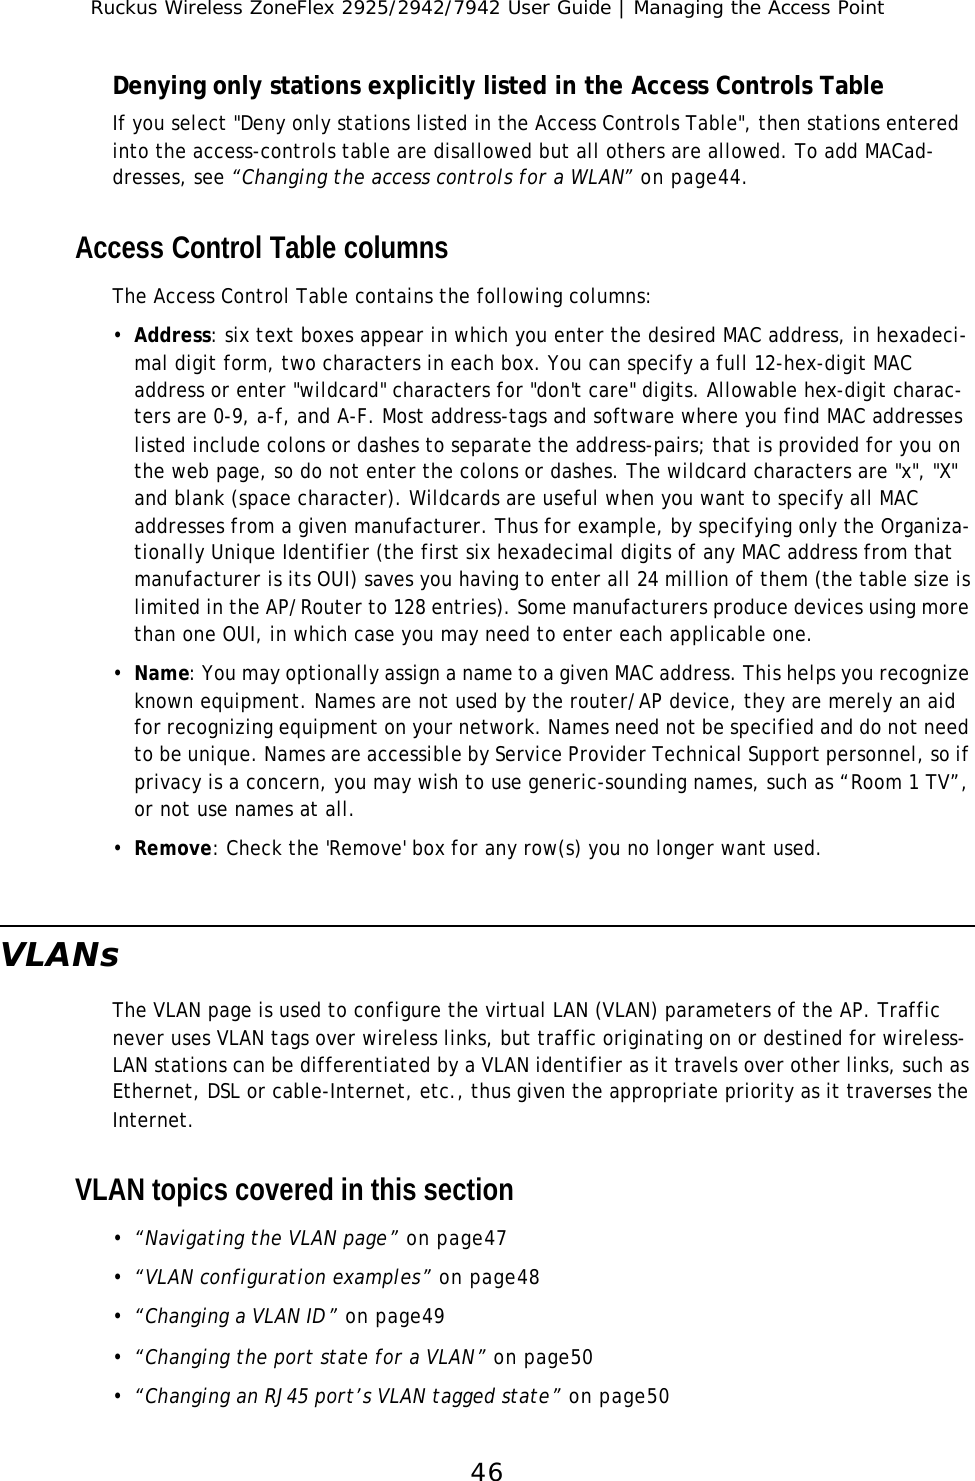
![Ruckus Wireless ZoneFlex 2925/2942/7942 User Guide | Installation, Setup, and Placementof the AP6The following illustration shows the rear view of the ZF2925 AP and its major features. LED If you see this... This is happening...•If this LED is dark. . . . . . . . . . . . •If green . . . . . . . . . . . . . . . . . . . . •No power is available, or the AP is not connected to a power source.•Power is available.•If this LED is dark. . . . . . . . . . . . •If steady yellow. . . . . . . . . . . . . . •If flashing yellow. . . . . . . . . . . . . •If steady green . . . . . . . . . . . . . . •If flashing green . . . . . . . . . . . . . •No link activity is detected•A 10Mbps-capable device has been detected.•Data is being exchanged through the WAN port at 10Mbps.•A 100Mbps-capable device has been detected.•Data is being exchanged through the WAN port at 100Mbps.•If this LED is dark. . . . . . . . . . . . •If amber . . . . . . . . . . . . . . . . . . . •If green . . . . . . . . . . . . . . . . . . . . •No WLAN is enabled.•One of the WLANs is enabled, but no wireless client has associated.•At least one wireless client has associated.•If this LED is dark. . . . . . . . . . . . •If red . . . . . . . . . . . . . . . . . . . . . . •If blinking red/green alternately . •If flashing green . . . . . . . . . . . . . •If steady green . . . . . . . . . . . . . . •There is no network activity; no station detected at the WLAN port•There is a hardware problem affecting the WLAN port.•A signal is being detected at the WLAN port, but at the lowest level.•A moderate signal is being detected at the WLAN port.•A strong signal is being detected at the WLAN port.FIGURE 2-2: Rear view[1] Power Adapter plugConnect the power adapter to this socket. (Input 12V 1.0A DC or 5V 2.0A DC)[2] LAN portsFour RJ-45 ports, supporting 10/100 Mbps connections [3] WAN Network portOne RJ-45 port, dedicated to ISP/broadband source connection [4] “OTA” (Over the air) buttonNot active in this model at this time [5] Reset button[-IF NEEDED-] Use to reset AP to “factory default” state12345](https://usermanual.wiki/Ruckus-Wireless/MP2N33A.Users-Manual-Users-Guide/User-Guide-889888-Page-10.png)
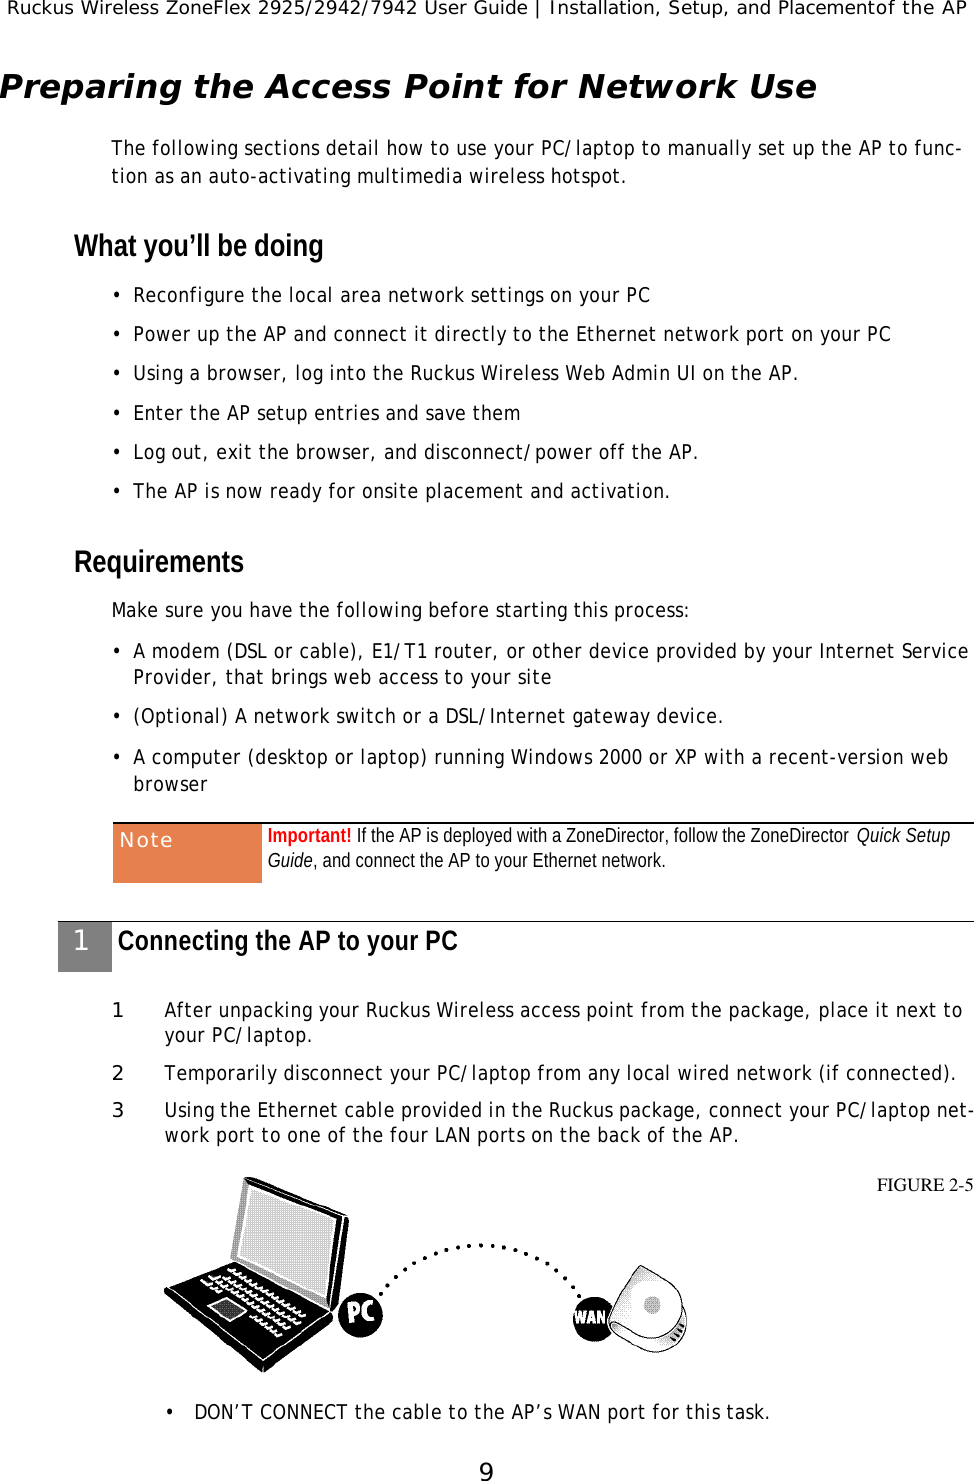
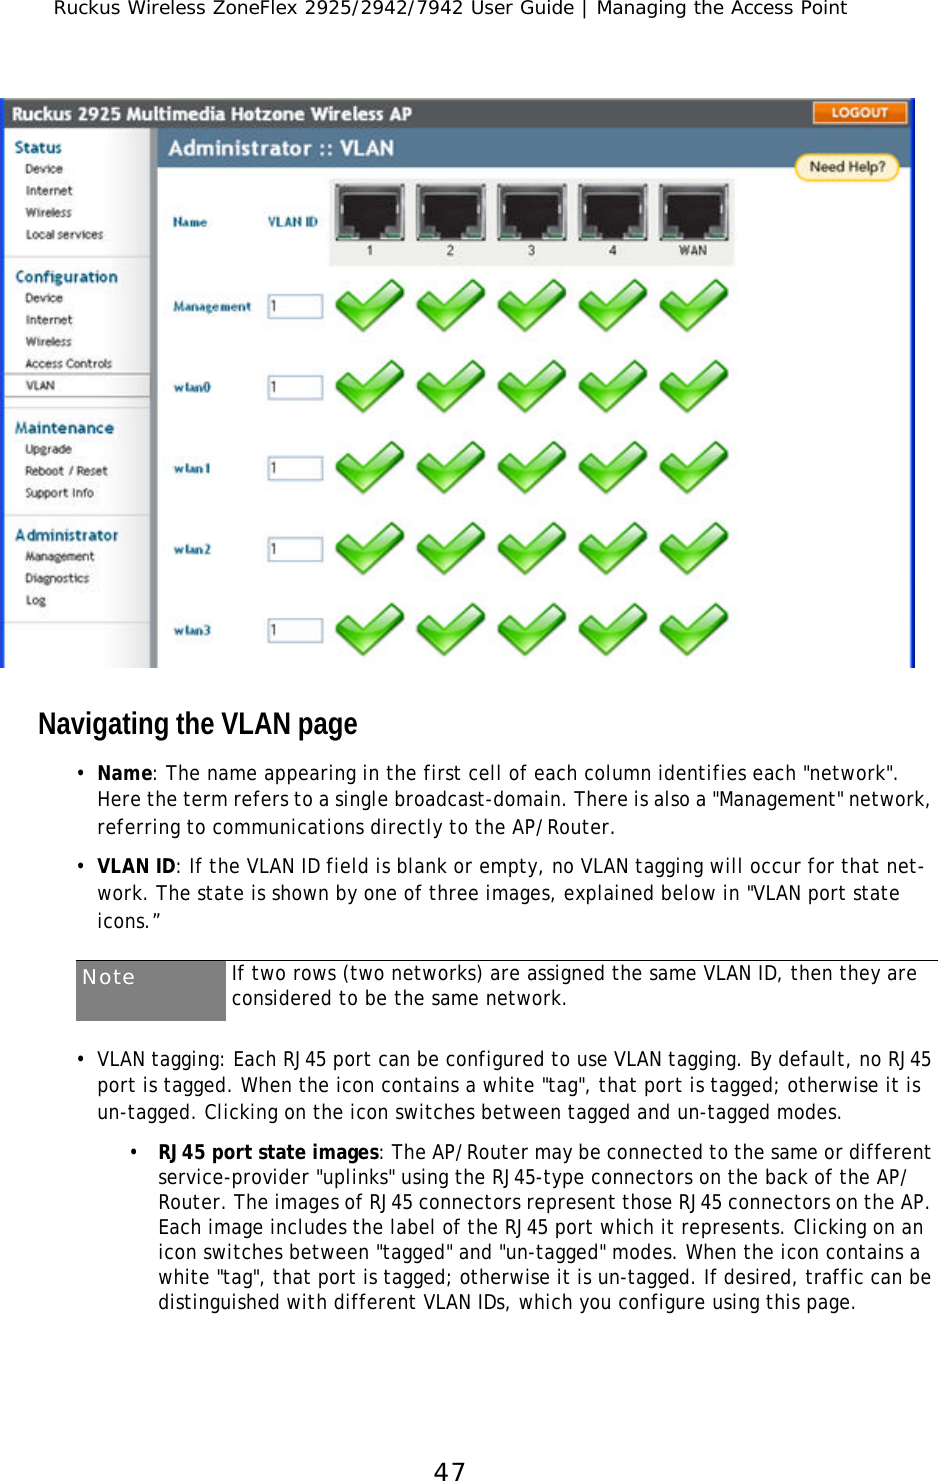
![Ruckus Wireless ZoneFlex 2925/2942/7942 User Guide | Installation, Setup, and Placementof the AP72942/7942 FeaturesThe following illustration shows the side view of a ZF2942/ZF7942 AP, highlighting the four LED indicators that can be used to assess both device and network status. FIGURE 2-3: Side view[1] OPT[2] DIR[3] AIR[4] WLAN[5] Hard Reset: Pushing this internal but-ton and releasing quickly reboots the AP. Holding it for 6 seconds resets the AP to factory defaults.For more information on what each LED’s lights may indicate, see the “LED” table below.LED If you see this... This is happening...Power •If this LED is steady green . . . . . •If off . . . . . . . . . . . . . . . . . . . . . . •Power is ON.•No power is connected.OPT N/A Optional feature. Not active in this model at this time.DIR •If this LED is steady green . . . . . •If this LED is steady green for 2-3 seconds . . . . . . . . . . . . . . . . . . . •If flashing green . . . . . . . . . . . . . •If off . . . . . . . . . . . . . . . . . . . . . . •Communication between Director and AP is up.•The AP is booting up.•Communication between Director and AP is down.•AP is not under Director control.AIR •If off . . . . . . . . . . . . . . . . . . . . . . •If blinking red/amber alternately . •If blinking red/green alternately . •If flashing green . . . . . . . . . . . . . •If steady green . . . . . . . . . . . . . . •There is no station associated.•AP is booting up.•Wireless data traffic is unreachable.•Wireless data traffic is reachable.•Good air quality.12345](https://usermanual.wiki/Ruckus-Wireless/MP2N33A.Users-Manual-Users-Guide/User-Guide-889888-Page-11.png)
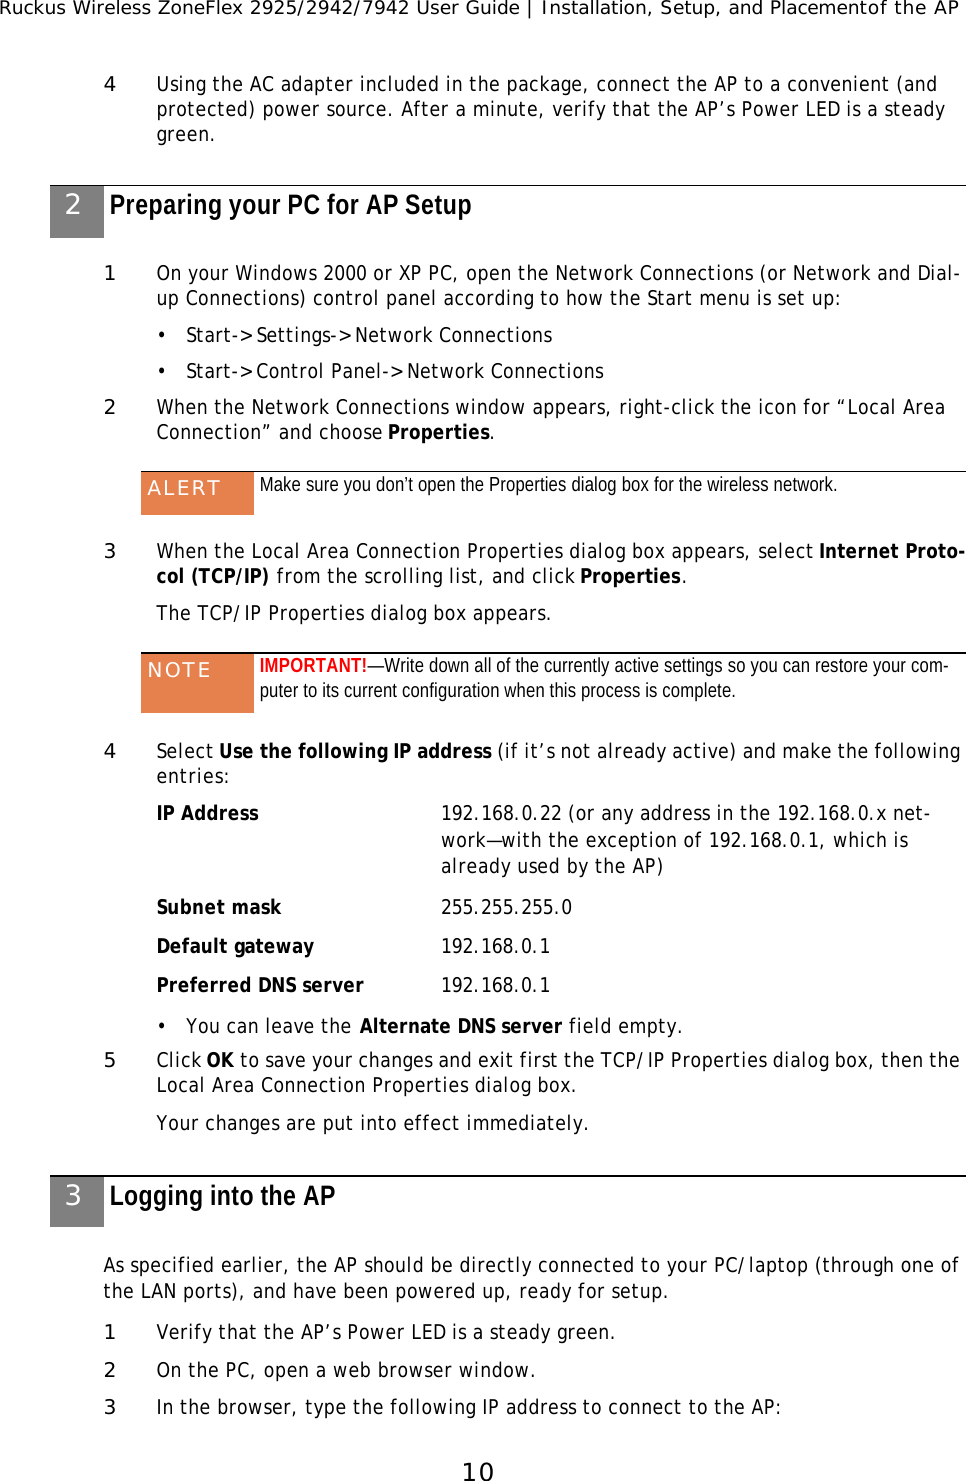
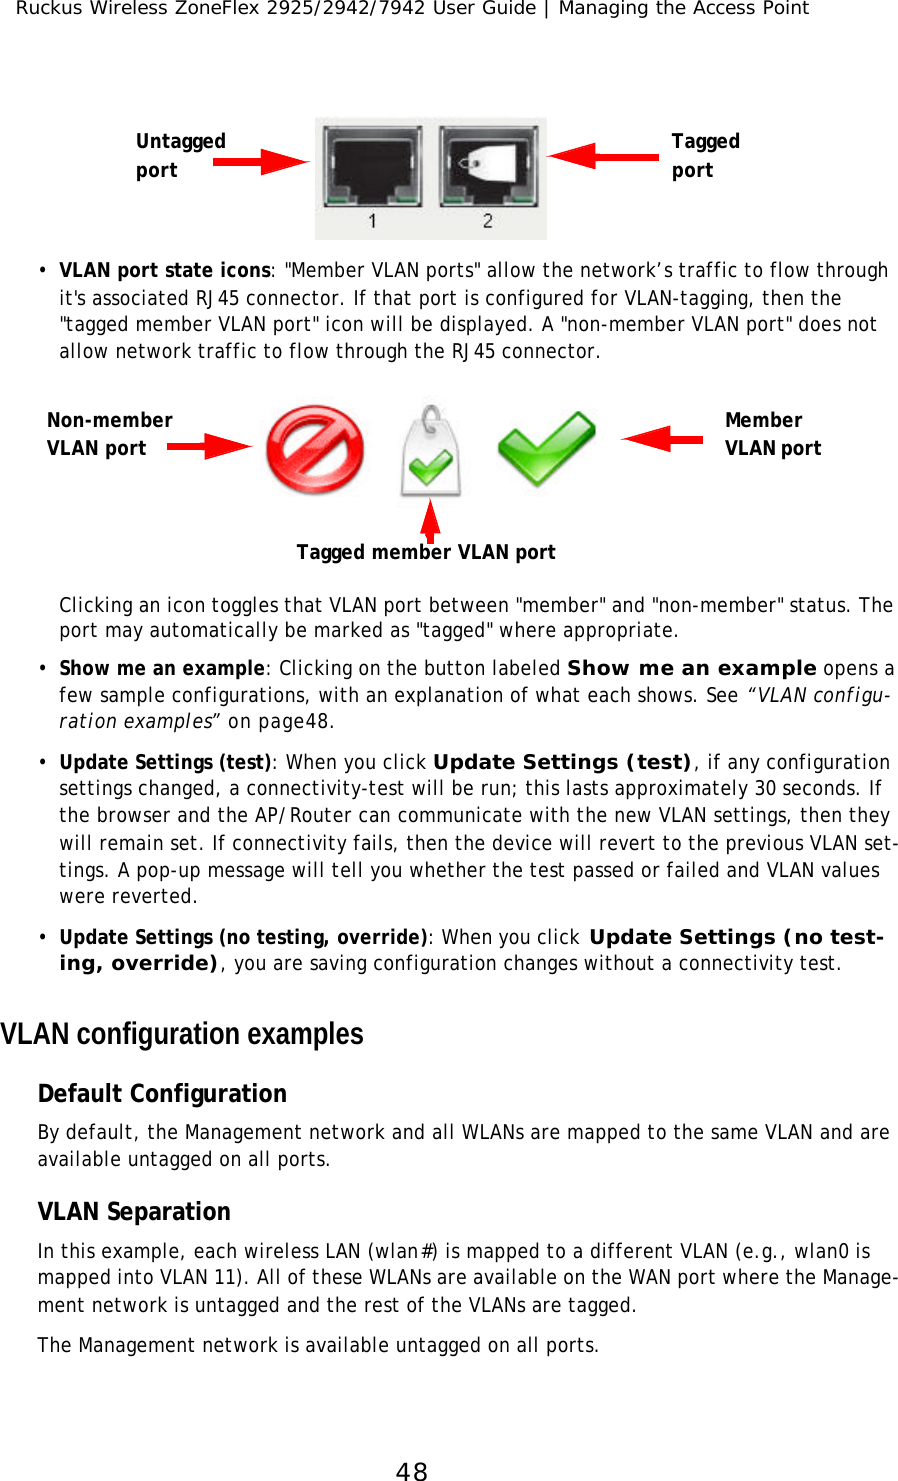
![Ruckus Wireless ZoneFlex 2925/2942/7942 User Guide | Installation, Setup, and Placementof the AP8The following illustration shows the rear view of the ZF2942/ZF7942 AP and its major fea-tures. WLAN •If steady yellow. . . . . . . . . . . . . . •If steady green . . . . . . . . . . . . . . •No wireless client are associated.•At least one wireless station is associated. Also steady green during boot up.10/100 POE•If off . . . . . . . . . . . . . . . . . . . . . . •If steady amber. . . . . . . . . . . . . . •If flashing amber. . . . . . . . . . . . . •If steady green . . . . . . . . . . . . . . •If flashing grren. . . . . . . . . . . . . . •Port is not connected.•Ethernet port is connected to 10Mbs Layer 2 device.•Ethernet port is passing traffic to a 10Mbs Layer 2 device.Ethernet port is connected to 100Mbs Layer 2 device.•Ethernet port is passing traffic to a 100Mbs Layer 2 device.10/100 •If off . . . . . . . . . . . . . . . . . . . . . . •If steady amber. . . . . . . . . . . . . . •If flashing amber. . . . . . . . . . . . . •If steady green . . . . . . . . . . . . . . •If flashing grren. . . . . . . . . . . . . . •Port is not connected.•Ethernet port is connected to 10Mbs Layer 2 device.•Ethernet port is passing traffic to a 10Mbs Layer 2 device.Ethernet port is connected to 100Mbs Layer 2 device.•Ethernet port is passing traffic to a 100Mbs Layer 2 device.FIGURE 2-4: Rear view[1] Power Adapter plugConnect the power adapter to this socket. (Input 110-240V AC, Output 12V 1.0A DC)Power can also be supplied via 10/100 POE port.[2] External RP-SMA connectorOptional external antenna connector.[3] LAN portsTwo RJ-45 ports, supporting 10/100 POE (Power over Ethernet) and 10/100 Mbps connections.[4] Optional buttonNot active in this model at this time.[5] Soft Reset button[-IF NEEDED-] Use to reset AP. This is a normal reset and does not set AP back to factory defaults.LED If you see this... This is happening...13452](https://usermanual.wiki/Ruckus-Wireless/MP2N33A.Users-Manual-Users-Guide/User-Guide-889888-Page-12.png)
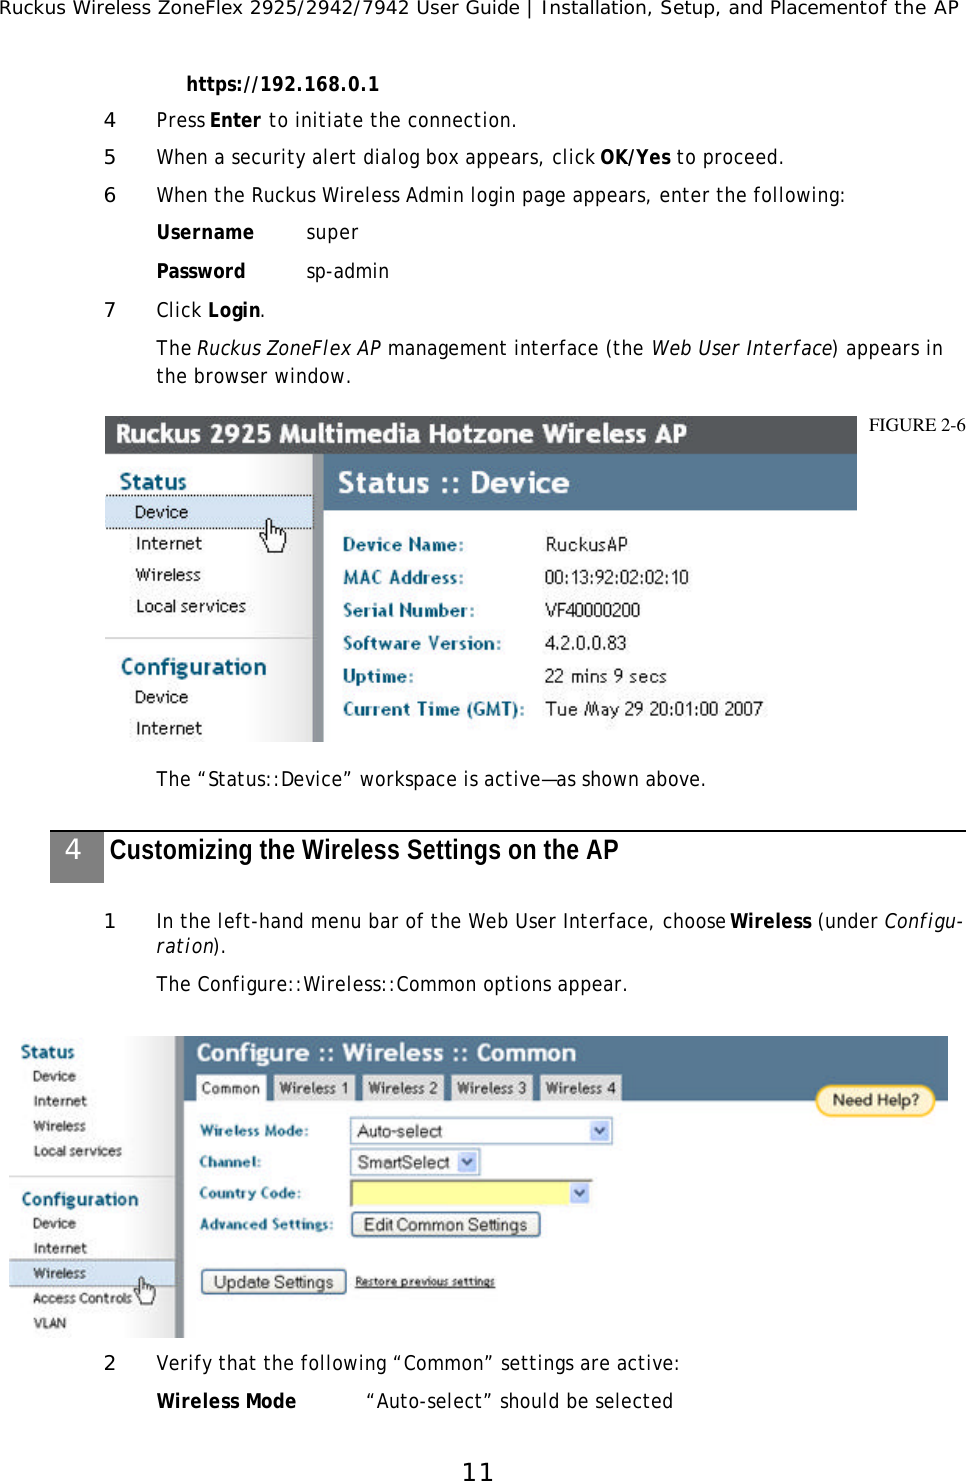
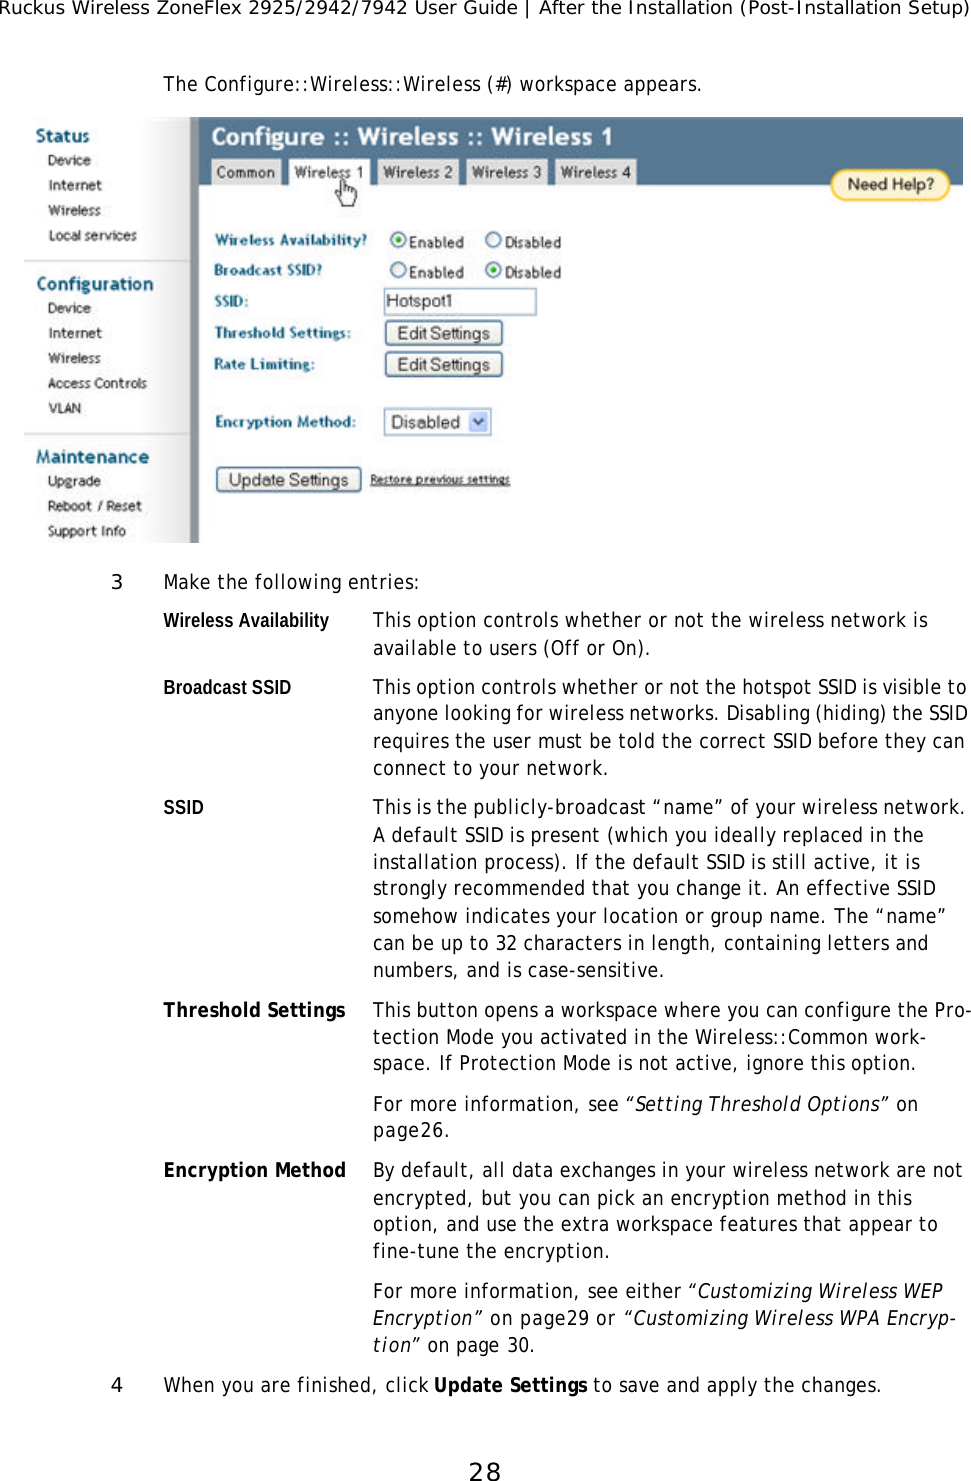
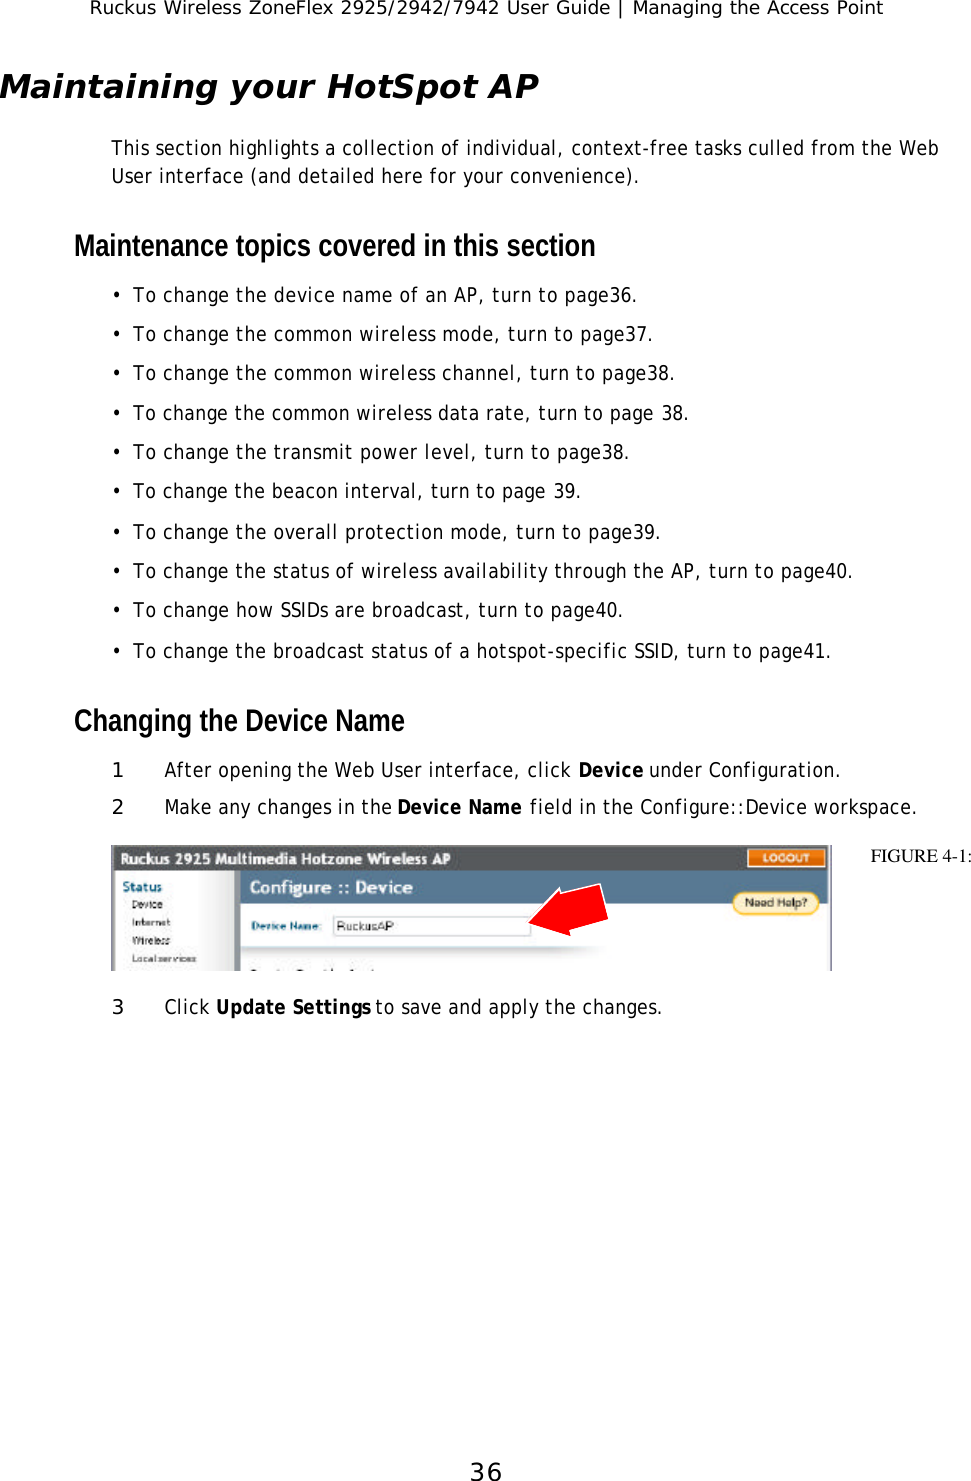
![Ruckus Wireless ZoneFlex 2925/2942/7942 User Guide | Installation, Setup, and Placementof the AP12Channel “SmartSelect” should be selectedCountry Code If you are not in the United States, open this menu and choose the country.3Click Update Settings if you made any changes.4Click any of the four “Wireless” tabs.The Configure::Wireless::Wireless [#] options appear.5Delete the text in the SSID field and type the name of your network. (If your network doesn’t have a “name”, type a short name that relates to your site, plus a number. This will help your users identify the Wi-Fi network in their wireless network connection application.)Each WLAN (e.g., Wireless 1, Wireless 2, etc.) should have its own unique SSID.6Click Update Settings.7Repeat the preceding steps with each Wireless tab. 8[-Steps 8-12 Optional-] To switch from DHCP (the default) to Static IP, choose Internet (under Configuration).Important!If you anticipate logging into the AP to regularly perform monitoring or maintenance (once it is in place), you may want to consider assigning a static IP address to the AP. This would simplify connections made to the AP for all post-installation maintenance.In a default configuration, the AP uses a DHCP-assigned IP address. Any post-installation connections require (1) a reverse ARP lookup or (2) logging into the DHCP server, to determine which IP address is in effect in the AP. If the AP is not assigned an IP address by a DHCP server, it will automatically revert to an IP address of 192.168.0.1.](https://usermanual.wiki/Ruckus-Wireless/MP2N33A.Users-Manual-Users-Guide/User-Guide-889888-Page-16.png)
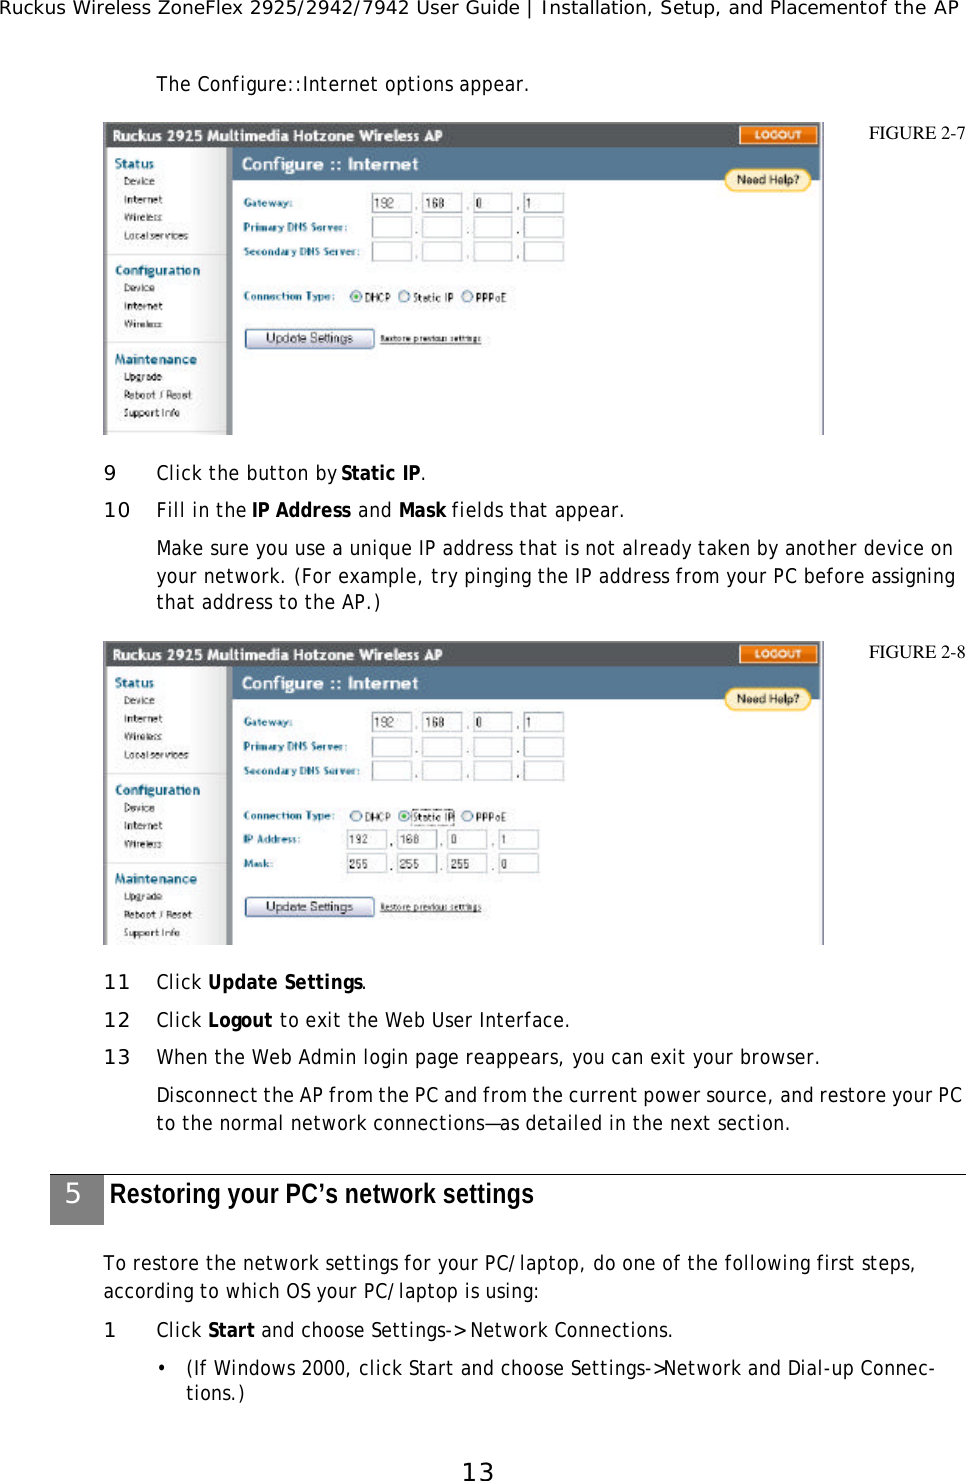
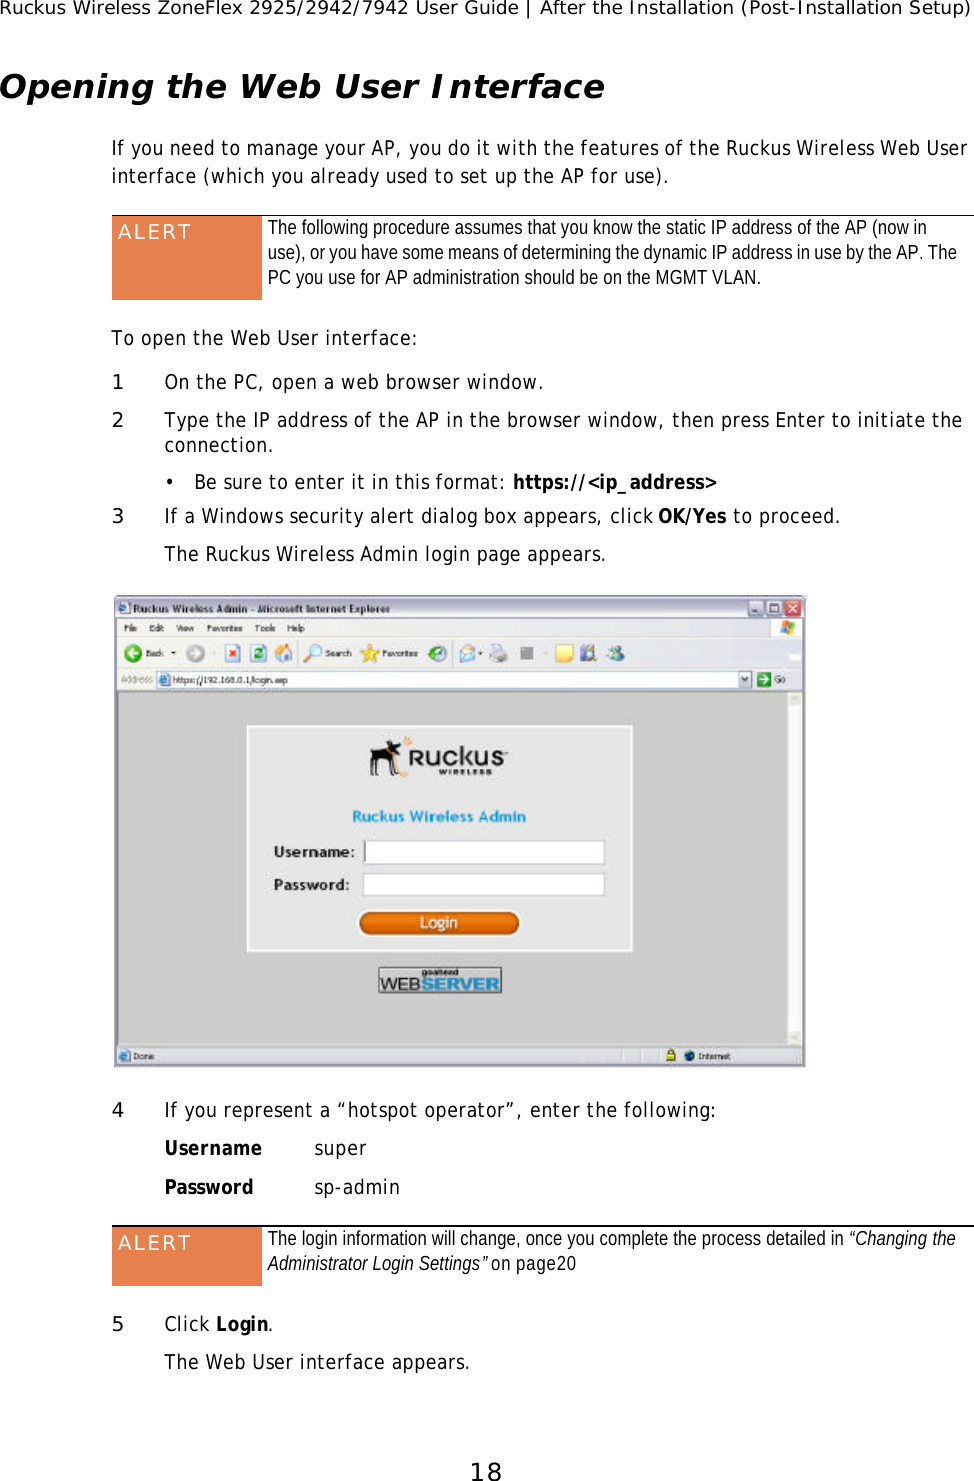
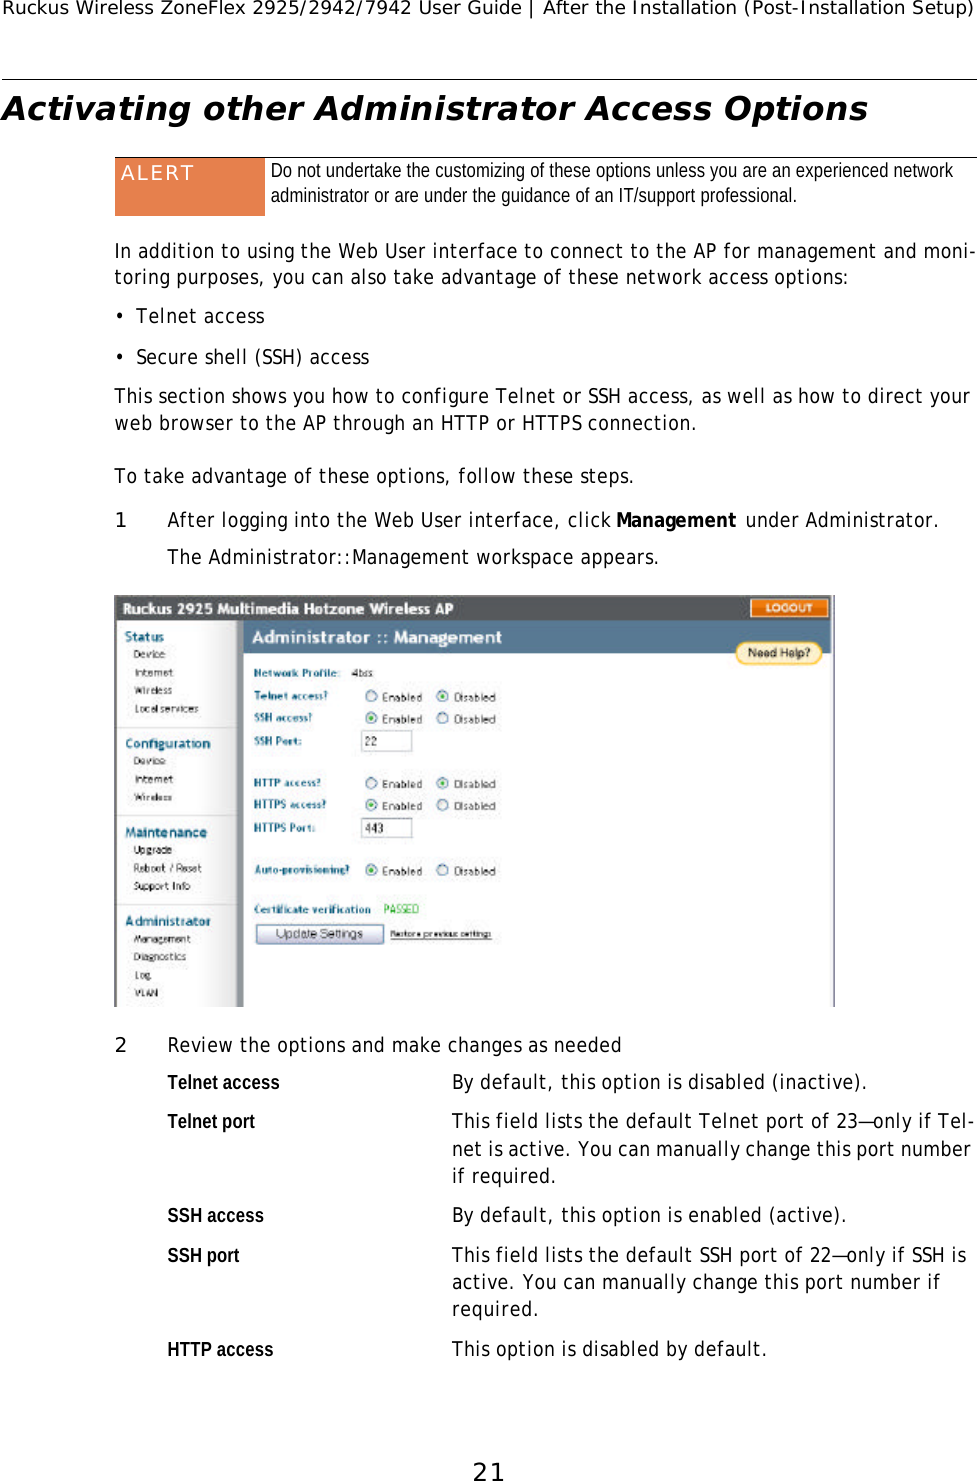
![Ruckus Wireless ZoneFlex 2925/2942/7942 User Guide | After the Installation (Post-Installation Setup)19Key features of the Web User interfaceThe Wireless Web User interface has been organized into the following collections of fea-tures.Menu bar [1] Under each category (Status, Configuration, etc.) are options that, when clicked, open related workspaces in the area to the right.Workspace [2] This large area displays features, options and indicators relevant to your menu bar choices.Logout [3] Click this button to log out of the AP.Need help? [4] Click this button to open a help window with information related specifically to the options currently displayed in the workspace.1234](https://usermanual.wiki/Ruckus-Wireless/MP2N33A.Users-Manual-Users-Guide/User-Guide-889888-Page-23.png)

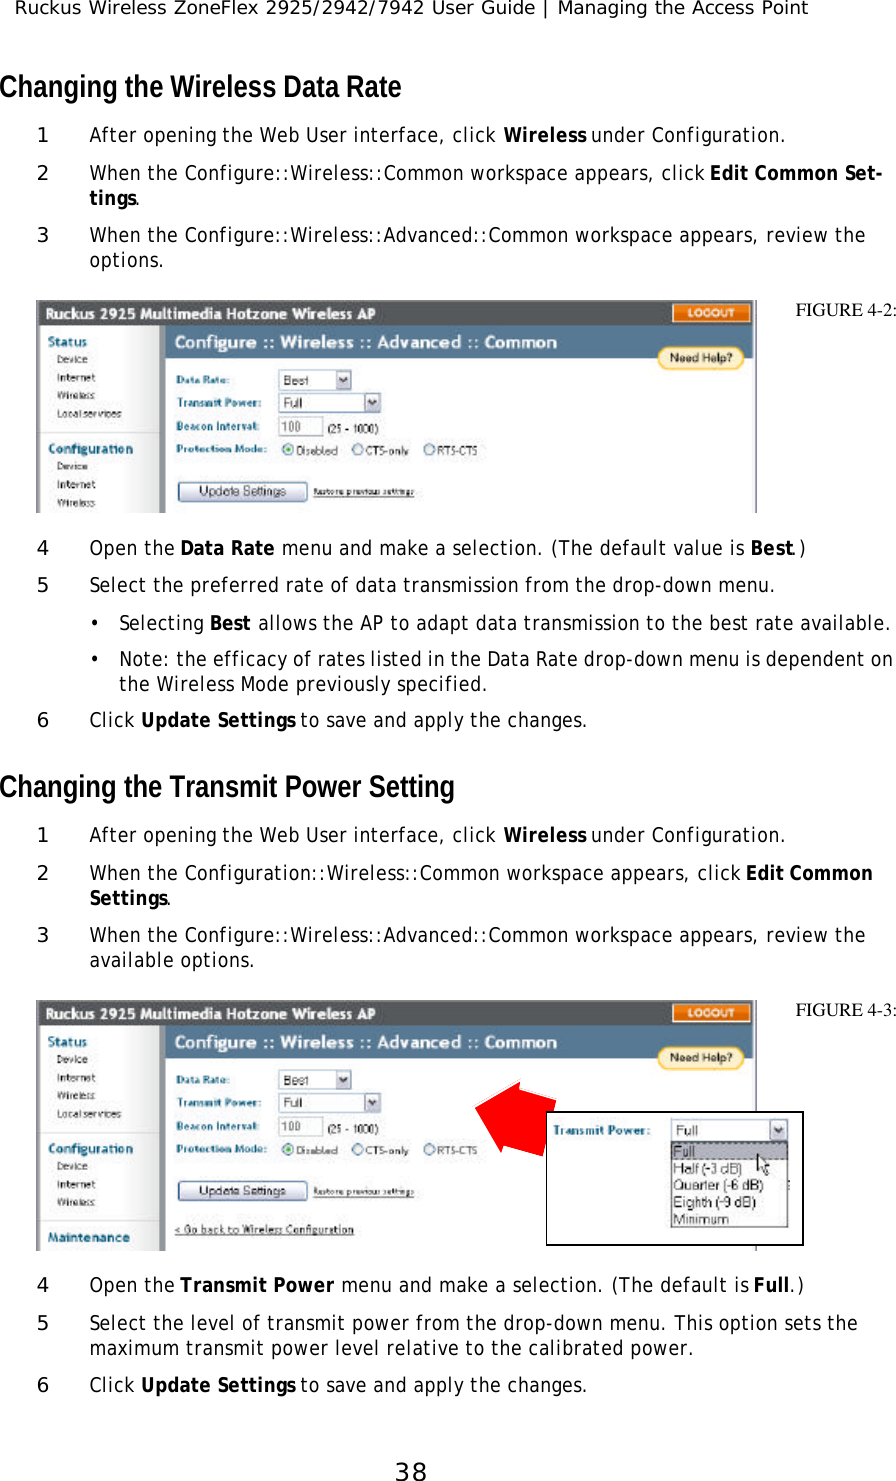
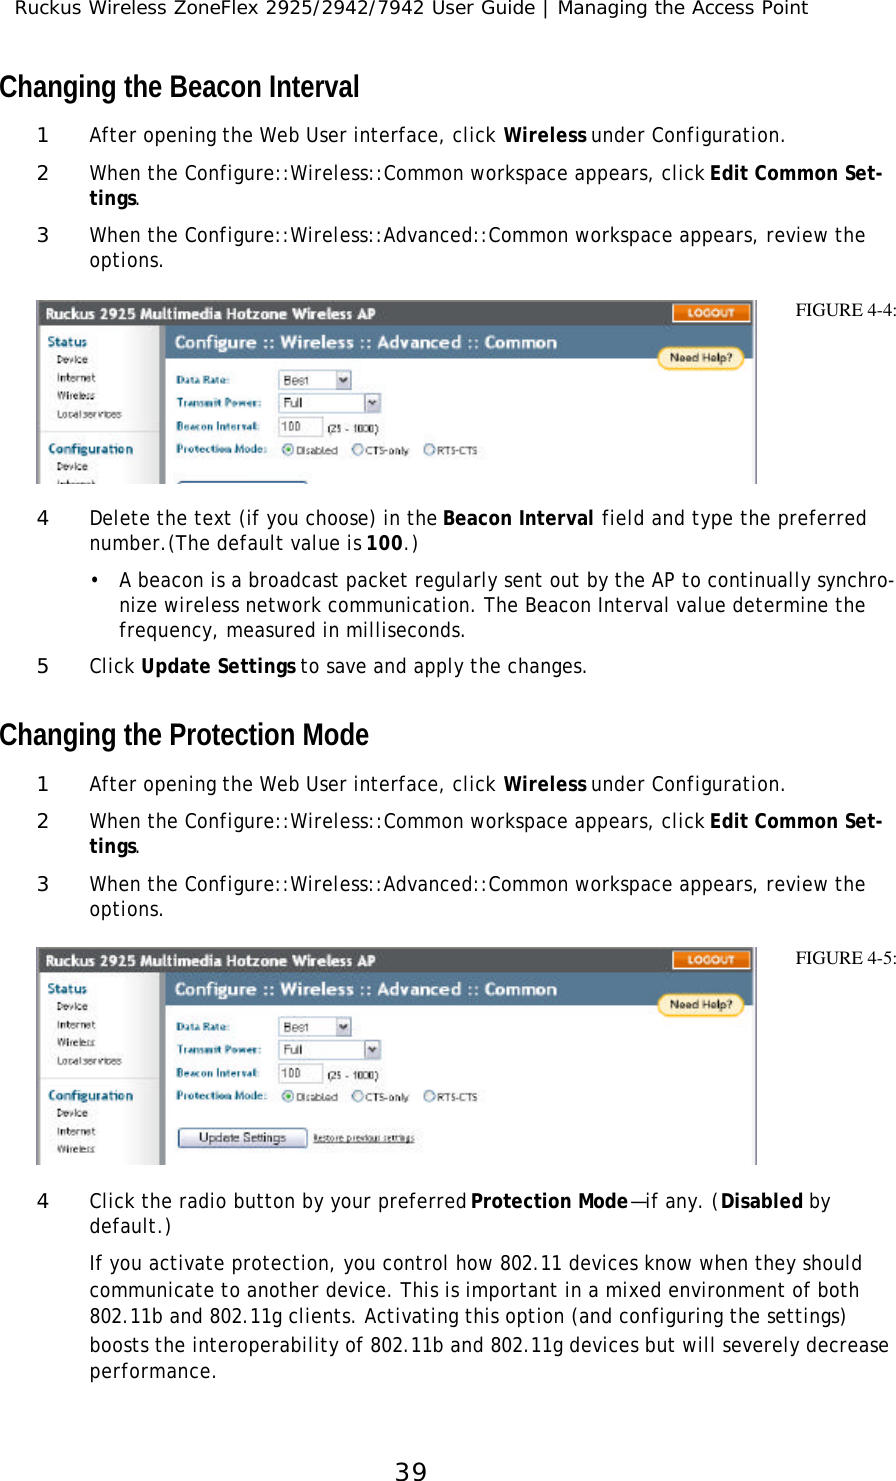
![Ruckus Wireless ZoneFlex 2925/2942/7942 User Guide | After the Installation (Post-Installation Setup)253[-Optional-] Click Update Settings before reviewing the “common” advanced options.Reviewing the Advanced::Common OptionsThis workspace permits access to advanced wireless functions. These settings should only be changed by an experienced administrator. Incorrect settings can severely impact wireless performance. It is recommended that the default settings be retained for best performance.1In the Configure::Wireless::Common workspace, click Edit Common Settings.The Configure::Wireless::Advanced::Common workspace appears. 2Make the following entries, as needed:Data Rate (The default value is Best.) Select the preferred rate of data transmis-sion from the drop-down menu. Selecting Best allows the AP to adapt data transmission to the best rate available. The efficacy of rates listed in the Data Rate drop-down menu is dependent on the Wireless Mode previously specified. WARNING—In order to fully benefit from the Ruckus AP’s capabilities, it is advisable not to change this value unless absolutely necessary.Transmit Power (The default is Full.) Select the level of transmit power from the drop-down menu. This option sets the maximum transmit power level rela-tive to the pre-defined power (this value differs according to the cur-rent country code). Beacon Interval (The default value is 100.) A beacon is a broadcast packet regularly sent out by the AP to continually synchronize wireless network com-munication. The Beacon Interval value determine the frequency, mea-sured in milliseconds. Protection Mode (Inactive by default.) If you activate protection, you control how 802.11 devices know when they should communicate to another device. This is important in a mixed environment of both 802.11b and 802.11g clients. WARNING: Activating this option (and configuring the settings) boosts the interoperability of 802.11b and 802.11g devices but will severely decrease performance.](https://usermanual.wiki/Ruckus-Wireless/MP2N33A.Users-Manual-Users-Guide/User-Guide-889888-Page-29.png)
![Ruckus Wireless ZoneFlex 2925/2942/7942 User Guide | After the Installation (Post-Installation Setup)26CTS-only Choose this option to force all destination devices to acknowledge their ability to receive data when a transmission is initiated.RTS/CTS Choose this option to force both sending and receiv-ing devices to confirm a data exchange on both ends before proceeding.For information on “Protection Mode”-specific Threshold options and how they can be customized on an individual hotspot basis, see the following section, “Setting Threshold Options”.3Click Update Settings to save and apply the changes.Setting Threshold Options The following options allow you to fine-tune the “Protection Mode” behavior, set previously in the Wireless::Common workspace. After activating a Protection Mode, you can open each Wireless tab and customize the threshold settings, that determine what is put in effect and when. To customize Protection Mode (Threshold) settings, follow these steps:1Open the Web User interface, and click Wireless under Configuration.2When the Configure::Wireless::Common workspace appears, click a hotspot-specific tab.The Configure::Wireless::Wireless [#] workspace appears.3Look for Threshold Settings and click Edit Settings. The Configure::Wireless::Advanced::Wireless [#] workspace appears. ALERT Do not undertake the customizing of these options unless you are an experienced network administrator or are under the guidance of an IT/support professional.](https://usermanual.wiki/Ruckus-Wireless/MP2N33A.Users-Manual-Users-Guide/User-Guide-889888-Page-30.png)
![Ruckus Wireless ZoneFlex 2925/2942/7942 User Guide | After the Installation (Post-Installation Setup)29A confirmation message appears at the top of this workspace. 5Click Go back to Wireless Configuration to reopen the previous workspace.Customizing Wireless WEP Encryption To configure hotspot-specific WEP encryption settings, follow these steps:1Open the Web User interface, and click Wireless under Configuration.2When the Configure::Wireless::Common workspace appears, click a hotspot-specific tab.3When the Configure::Wireless::Wireless [#] workspace appears, open the Encryption Method menu and choose WEP.An additional set of WEP-specific encryption options appear in this workspace. 4You can make the following changes:Authentication Mode Your options include — Open: No security measure is enforced.Shared Key: The selected Default Shared Key is used.Auto: Automatically-selected authentication mode.ALERT Do not undertake the customizing of these options unless you are an experienced network administrator or are under the guidance of an IT/support professional.](https://usermanual.wiki/Ruckus-Wireless/MP2N33A.Users-Manual-Users-Guide/User-Guide-889888-Page-33.png)
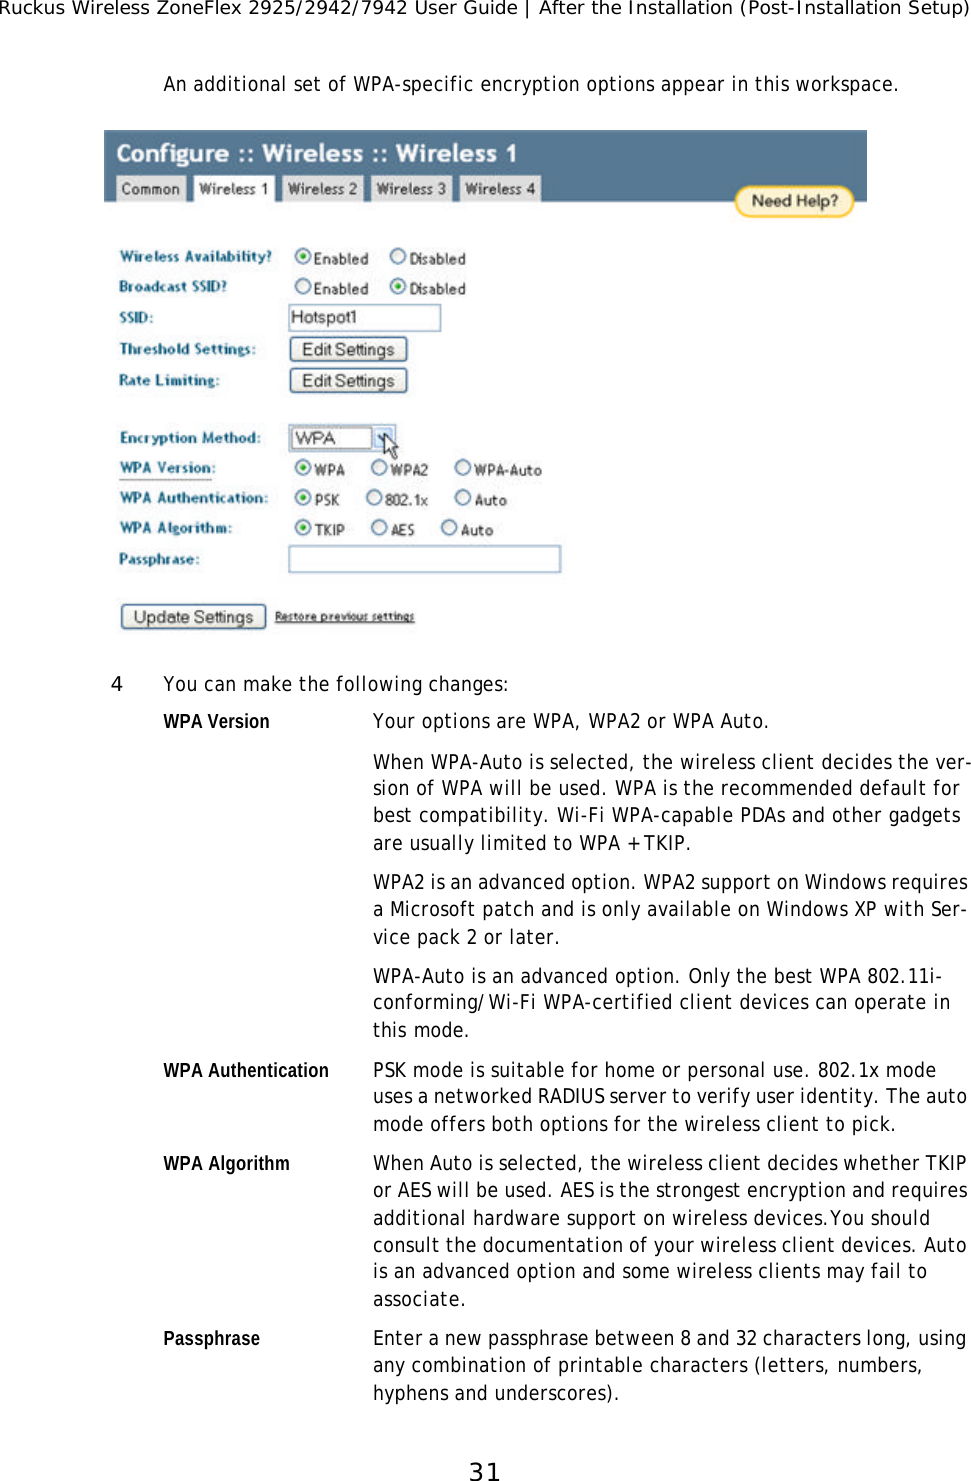
![Ruckus Wireless ZoneFlex 2925/2942/7942 User Guide | After the Installation (Post-Installation Setup)30Encryption Strength 64 bit: Specify the key with 10 hexadecimal digits or 5 ASCII characters. 128 bit: Specify the key with 26 hexadecimal digits or 13 ASCII characters. The 128-bit cryptography is stronger privacy protec-tion for your network and is recommended if you use WEP.Key Entry Method Hexadecimal: The encryption key only accepts hexadecimal characters (0-9, A-F). ASCII Text: The encryption key accepts ASCII characters.Passphrase This assists in automatic key generation. Enter some text and click the Generate button. The system will generate the WEP key automatically. You may specify a passphrase up to 32 char-acters. Please note that the algorithm used for key generation may vary from system to system. Checking the WEP keys used between wireless stations and the AP is recommended.WEP Key Enter the key manually according to the Key Entry Method and Encryption Strength settings.Key Index Choose the index, from “1” to “4”, that the WEP key is to be stored in.5Click Update Settings to save and apply the changes.A confirmation message appears at the top of this workspace. 6Click Go back to Wireless Configuration to reopen the previous workspace.Customizing Wireless WPA Encryption Use of WPA PSK allows automatic key generation based on a single passphrase. WPA-PSK provides very strong security, but may not be supported on older wireless devices. In some cases, the older devices can be upgraded with adapters to take advantage of WPA-PSK. If you configure the hotspot AP with WPA-PSK, some network users will not be able to con-nect to your hotspot WLAN unless their devices are manually set to WPA-PSK and configured with the same passphrase.To configure hotspot-specific WPA encryption settings, follow these steps:1Open the Web User interface, and click Wireless under Configuration.2When the Configure::Wireless::Common workspace appears, click a hotspot-specific tab.3When the Configure::Wireless::Wireless[#] workspace appears, open the Encryption Method menu and choose WPA. ALERT Do not undertake the customizing of these options unless you are an experienced network administrator or are under the guidance of an IT/support professional.](https://usermanual.wiki/Ruckus-Wireless/MP2N33A.Users-Manual-Users-Guide/User-Guide-889888-Page-34.png)
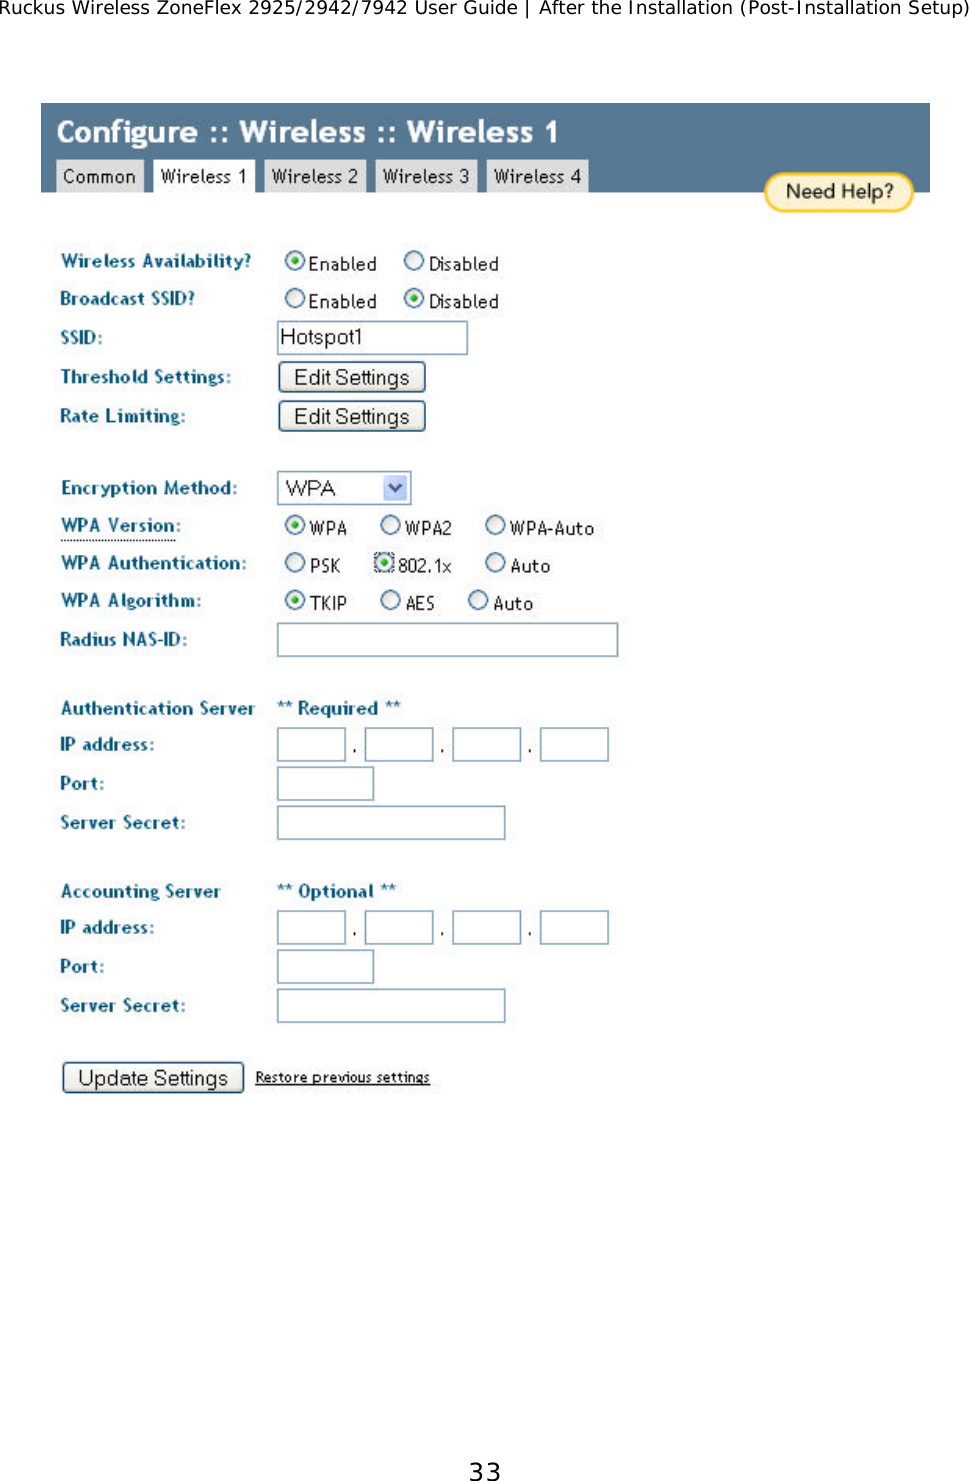
![Ruckus Wireless ZoneFlex 2925/2942/7942 User Guide | After the Installation (Post-Installation Setup)325Click Update Settings to save and apply the changes.A confirmation message appears at the top of this workspace. 6Click Go back to Wireless Configuration to reopen the previous workspace.Customizing 802.1x (Settings)If you choose “WPA” as the encryption method, you have the option to set up the AP to act as an 802.1x proxy, utilizing external authentication sources such as a RADIUS server. This provides a higher level of security, when compared to the static security process in a WEP configuration.)Using 802.1x lets a device complete authentication prior to the exchange of data, as in a DHCP environment. Another benefit: each BSSID can be individually configured to forward all authentication requests to its own server.To configure hotspot-specific 802.1x authentication settings, follow these steps:1Open the Web User interface, and click Wireless under Configuration.2When the Configure::Wireless::Common workspace appears, click a hotspot-specific tab.3When the Configure::Wireless::Wireless[#] workspace appears, open the Encryption Method menu and choose WPA. The basic set of WPA-specific encryption options appear in this workspace.4Select 802.1x as the WPA Authentication mode.5Additional options appear, that you can use to customize your 802.1x authentication.RADIUS NAS-ID Enter the network ID assigned to your RADIUS server.Authentication Server [-Required-] Enter the information needed to establish a con-nection between the AP and the RADIUS server. Accounting Server [-Optional-] Enter the information needed to establish this con-nection. 6Click Update Settings to save and apply the changes.A confirmation message appears at the top of this workspace. 7Click Go back to Wireless Configuration to reopen the previous workspace.ALERT Do not undertake the customizing of these options unless you are an experienced network administrator or are under the guidance of an IT/support professional.](https://usermanual.wiki/Ruckus-Wireless/MP2N33A.Users-Manual-Users-Guide/User-Guide-889888-Page-36.png)
![Ruckus Wireless ZoneFlex 2925/2942/7942 User Guide | Managing the Access Point40CTS-only Choose this option to force all destination devices to acknowledge their ability to receive data when a transmission is initiated.RTS/CTS Choose this option to force both sending and receiving devices to con-firm a data exchange on both ends before proceeding.For information on “Protection Mode”-specific Threshold options and how they can be customized on an individual hotspot basis, see “Setting Threshold Options” on page26.5Click Update Settings to save and apply the changes.Changing the Wireless Availability SettingThis controls whether or not a hotspot is active. To deactivate a hotspot, use this feature.1Open the Web User interface, and click Wireless under Configuration.2When the Configure::Wireless::Common workspace appears, click the relevant hotspot-specific tab. 3When the Configure::Wireless::Wireless [#] workspace appears, click one of two Wire-less Availability options for this hotspot.4Repeat the previous step with the remaining hotspot tabs, as needed.5Click Update Settings to save and apply the changes.Changing the Broadcast SSID settingThis controls whether or not a hotspot sends out an SSID to any nearby wireless devices. If you deactivate it, you control access to a hotspot to those people who “know the hotspot name”.1Open the Web User interface, and click Wireless under Configuration.2When the Configure::Wireless::Common workspace appears, click a hotspot-specific tab.](https://usermanual.wiki/Ruckus-Wireless/MP2N33A.Users-Manual-Users-Guide/User-Guide-889888-Page-44.png)
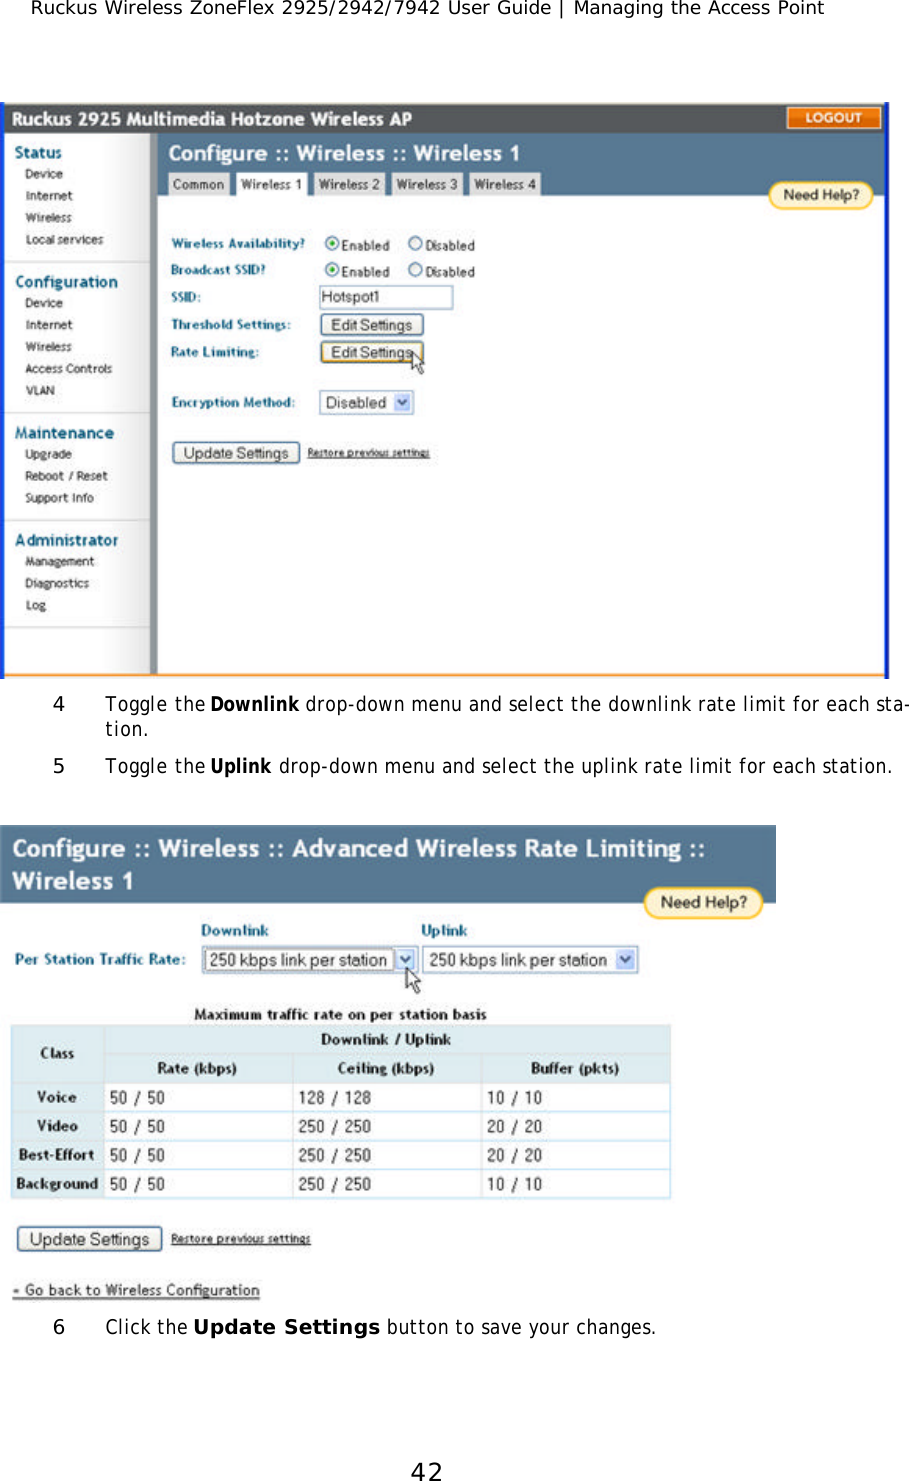
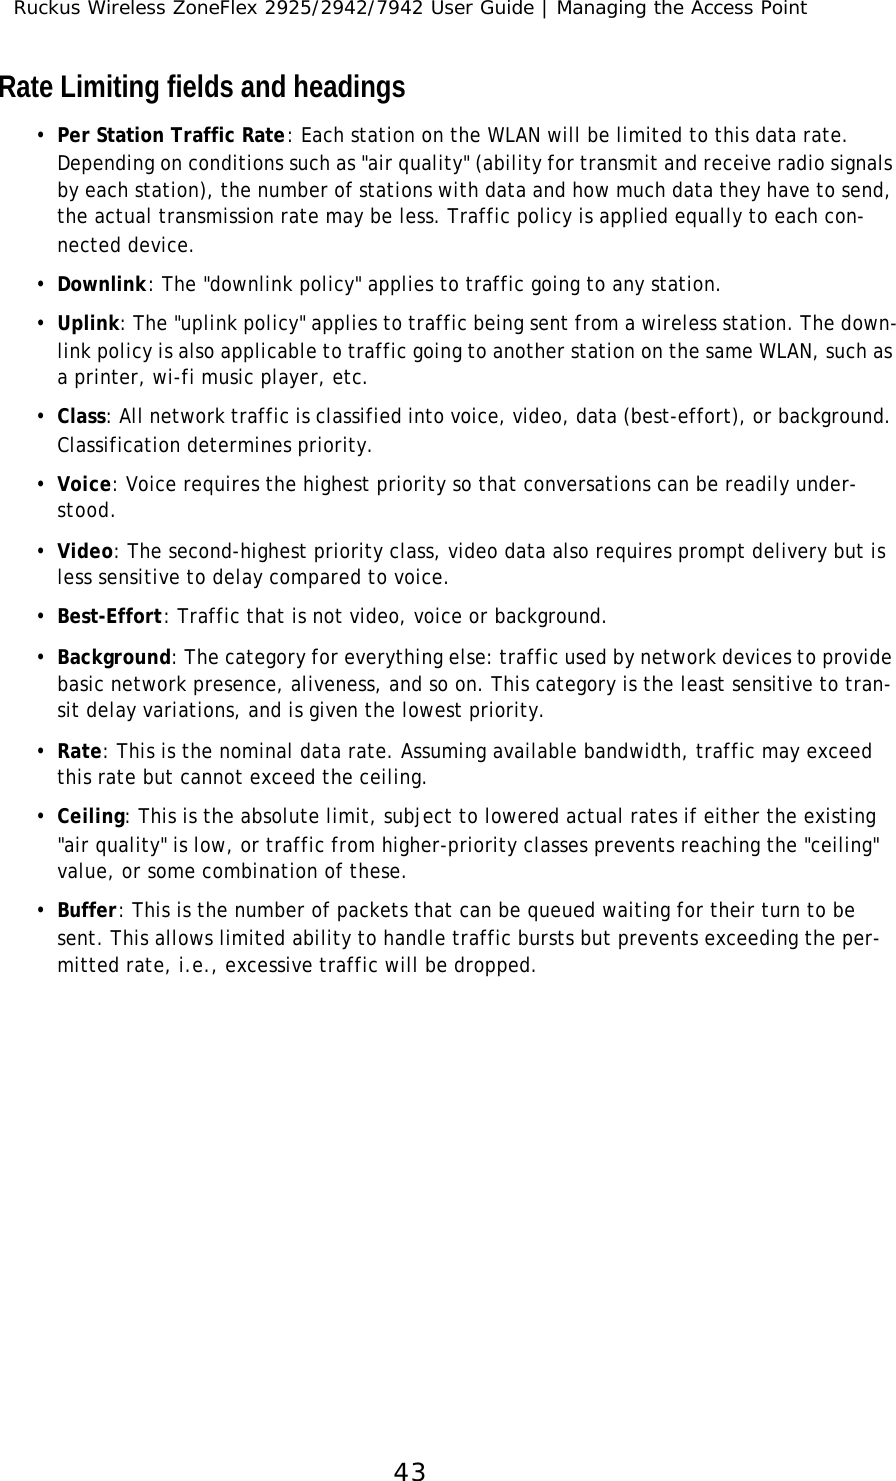
![Ruckus Wireless ZoneFlex 2925/2942/7942 User Guide | Managing the Access Point413When the Configure::Wireless::Wireless [#] workspace appears, click one of two Broadcast SSID options for this hotspot.4Repeat the previous step with the remaining hotspot tabs.5Click Update Settings to save and apply the changes.Changing a Hotspot-specific SSIDThis affects how a specific wi-fi hotspot is “identified” in a user’s wireless device.1Open the Web User interface, and click Wireless under Configuration.2When the Configure::Wireless::Common workspace appears, click a hotspot-specific tab.3When the Configure::Wireless::Wireless [#] workspace appears, delete the text in the SSID field that represents this hotspot.4Type a new SSID.5Repeat the previous two steps with the remaining hotspot tabs.6Click Update Settings to save and apply the changes.Rate Limiting HotSpotsRate limiting controls fair access to the network. When enabled, the network traffic throughput of each network device is limited to the rate specified in the traffic policy, and that policy can be applied on either the uplink or downlink. Rate limiting is restricted to Super User access only.Rate limiting topics covered in this section•“Enabling rate limiting” on page41•“Rate Limiting fields and headings” on page43Enabling rate limiting1Open the Web User interface, and click Wireless under Configuration.2When the Configure::Wireless::Common workspace appears, click a hotspot-specific tab, such as Wireless 1.3When the Configure::Wireless::Wireless [#] workspace appears, click the Edit Set-tings button next to “Rate Limiting”.](https://usermanual.wiki/Ruckus-Wireless/MP2N33A.Users-Manual-Users-Guide/User-Guide-889888-Page-45.png)

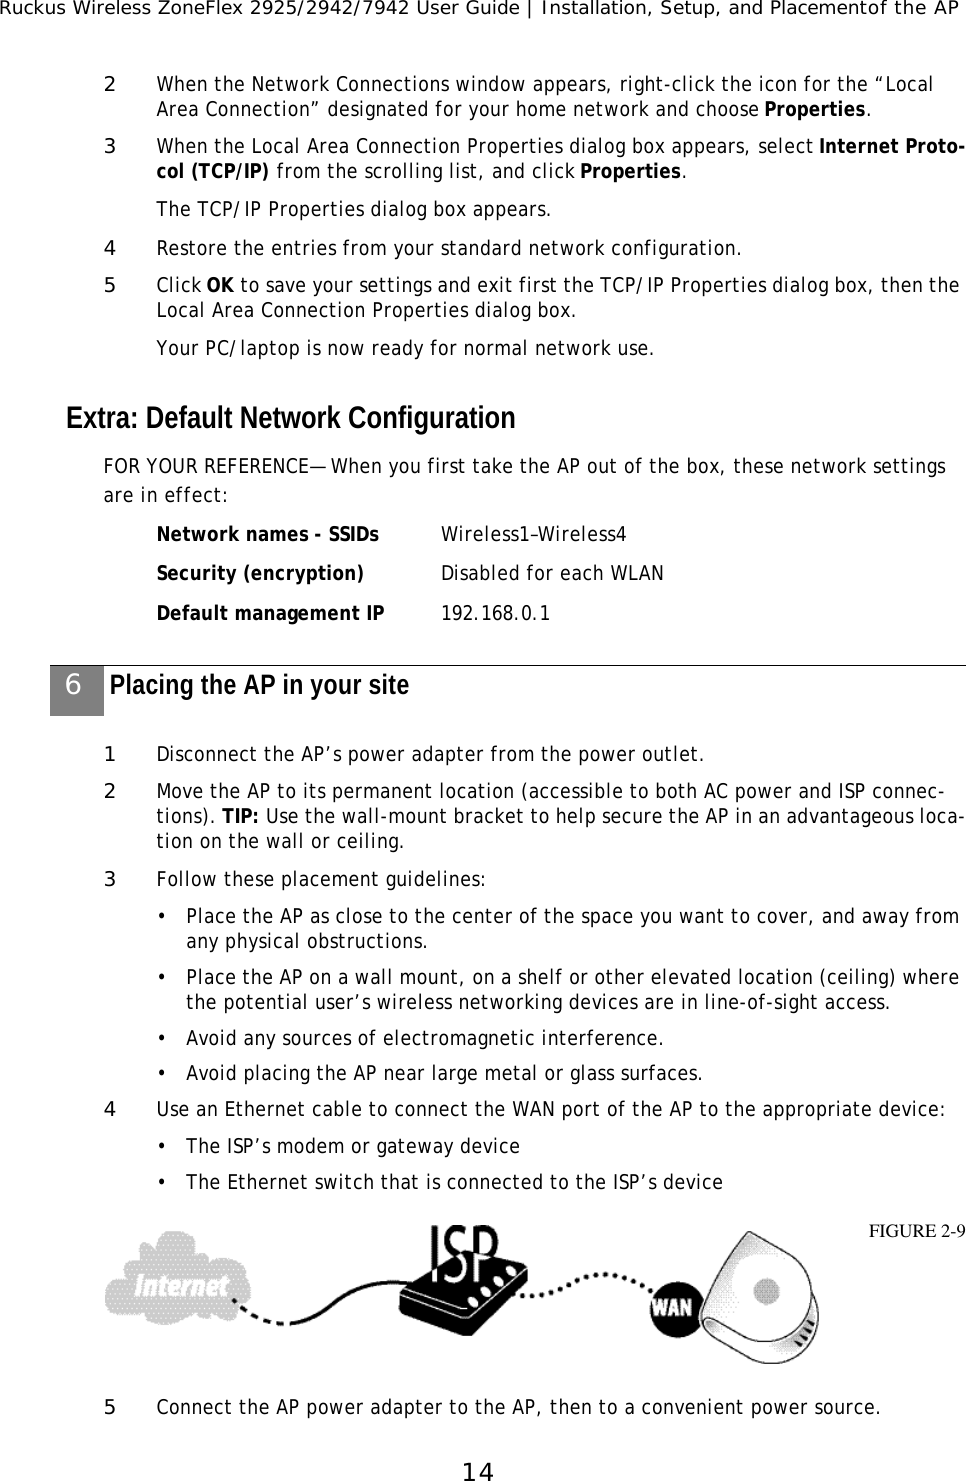
![Ruckus Wireless ZoneFlex 2925/2942/7942 User Guide | Managing the Access Point51Renewing or Releasing DHCPThis task should be performed only with guidance from your ISP. It serves as a troubleshoot-ing technique when DHCP addresses to one or more networked devices prove to be unusable or in conflict with others.1After logging in to the Web User interface, click Internet under Status.2Review the current settings. 3If the current Connection Type is DHCP, you will be able to see the currently-assigned IP address and subnet mask listed below.•To force the DHCP server to assign a new IP address to this AP, click Renew DHCP. This will cause a slight interruption in network service until the new IP address has been put in use. •To force the DHCP server to assign new IP addresses to all networked devices at the same time (including this AP), click Release DHCP. This will cause a temporary interruption in overall network service.Upgrading the AP Firmware You can use the Web User interface to check for software updates/upgrades for the firm-ware built into the AP. You can then apply these updates to the device in one of two ways: [1] manual updating on an as-needed basis or [2] automating a regularly scheduled update.Before starting, decide which option you want to take:•Automate a regularly scheduled update•Run a one-time manual update right now. By default, the automatic upgrade option is active, and will check the Ruckus Wireless update server every 12 hours.1After logging into the Web User interface, click Upgrade under Maintenance. FIGURE 4-6](https://usermanual.wiki/Ruckus-Wireless/MP2N33A.Users-Manual-Users-Guide/User-Guide-889888-Page-55.png)
![Ruckus Wireless ZoneFlex 2925/2942/7942 User Guide | Managing the Access Point52The Maintenance::Upgrade options appear. 2Each of the three upgrade options listed in this workspace are described in separate sections following.[-1-] Running a manual upgrade through the Web1In the Upgrade Method options, click Web.2Click in the Web Options URL field and type the URL of the download web site. •Remember to start the URL with http://3You can change the Image control file filename extension as noted here:•Replace any file names ending in .rcks with the .html extension•Replace any file names ending in .fI7 with the .html extension4Do not change the Username or Password entries.5Click Perform Upgrade. A status bar appears during the upgrade process.6When the upgrade is complete, you must manually reboot the AP.[-2-] Running a manual upgrade through an FTP/TFTP server1In the Upgrade Method options, click FTP or TFTP.2Click on the host name field and type the URL of the server, or click on the IP address field and type the IP address of the server. (Remember to start the URL with FTP://)3Do not change any of the Image control file, Username, or Password entries.4Click Perform Upgrade. A status bar appears during the upgrade process.FIGURE 4-7:](https://usermanual.wiki/Ruckus-Wireless/MP2N33A.Users-Manual-Users-Guide/User-Guide-889888-Page-56.png)
![Ruckus Wireless ZoneFlex 2925/2942/7942 User Guide | Managing the Access Point535When the upgrade is complete, you must manually reboot the AP.[-3-] Scheduling an automatic upgrade1In the Upgrade Method options, click the button by your preferred choice.2Enter the appropriate information in the Host name field or IP address field.3Do not change any of the Image control file, Username, or Password entries.4Make sure that the Auto upgrade enables option is checked (active).5Open the Interval to check menu and select your preferred interval.6You have two options at this point:•Click Perform Upgrade, which will start the process and the clock. The next upgrade will occur at the selected interval.•Click Save parameters only. The clock starts right away, and the actual upgrade will occur at the first effective interval. A status bar appears during the upgrade process.When the upgrade is complete, the AP will reboot automatically.Rebooting the APYou can use the Web User interface to prompt the AP to reboot, which simply restarts the AP without changing any of the current settings. Please note that this will disrupt network communications in any currently active hotspots.1After logging into the Web User interface, click Reboot/Reset under MaintenanceThe Maintenance::Reboot/Reset workspace appears. 2Review the options.3Click Reboot now.After a brief pause, you will be automatically logged out of the AP. 4After a minute or so, you should be able to log back into the AP—which verifies that the reboot was successful. (Viewing the activity lights on the front of the AP also veri-fies the current status of the deviceFIGURE 4-8:](https://usermanual.wiki/Ruckus-Wireless/MP2N33A.Users-Manual-Users-Guide/User-Guide-889888-Page-57.png)
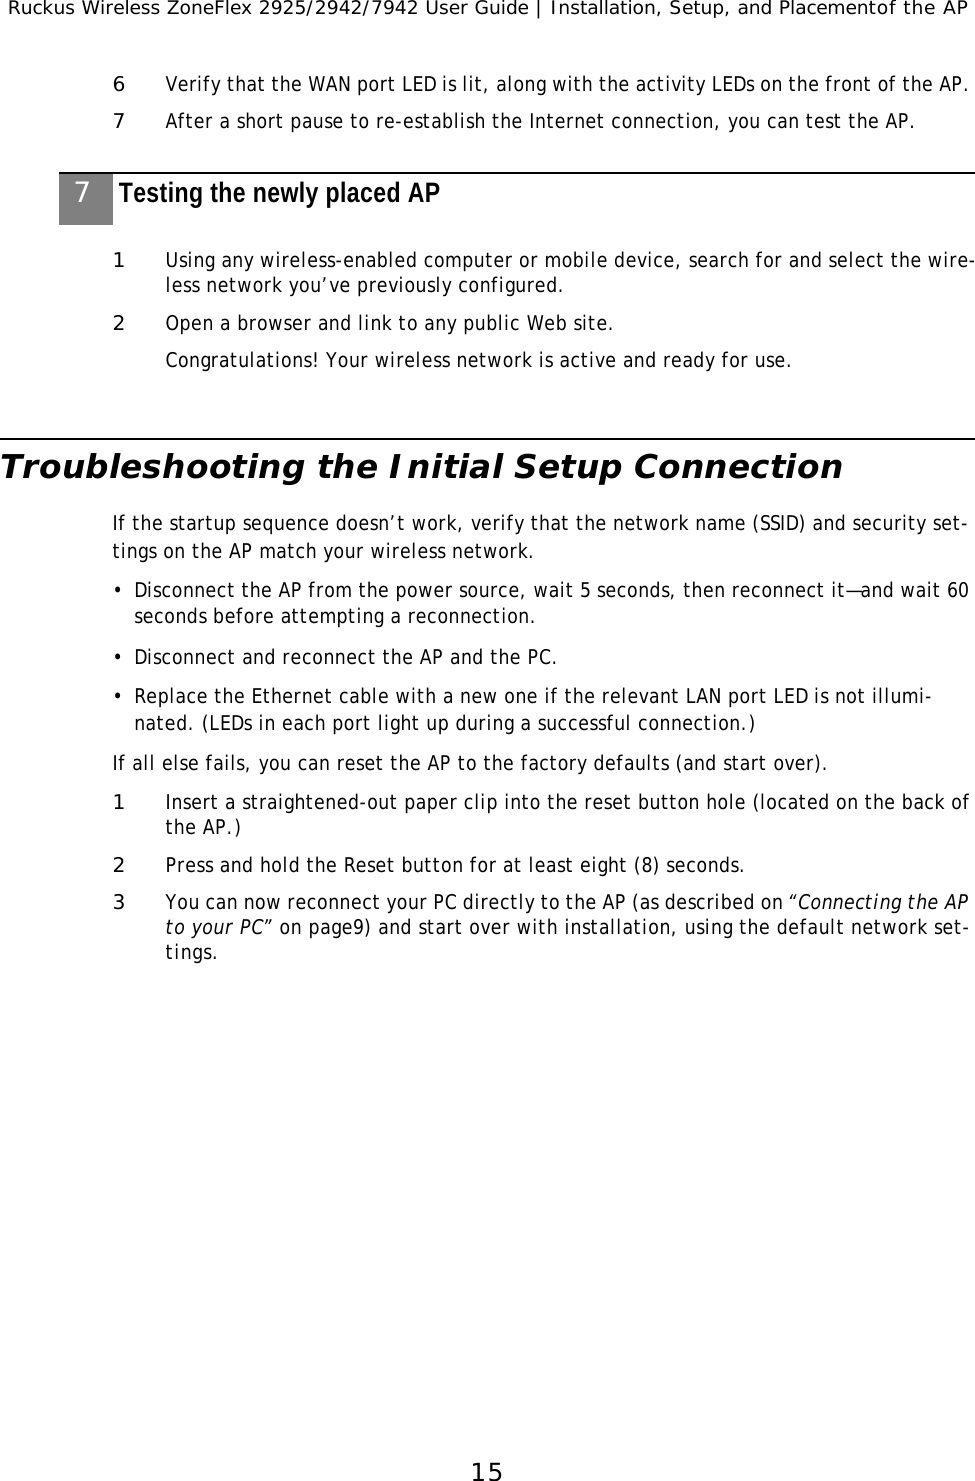
![Ruckus Wireless ZoneFlex 2925/2942/7942 User Guide | Monitoring Activity in the Access Point57Activating the AP Log and Sending the Log to a Syslog Server1After logging in to the Web User interface, click Log under Administrator.The Administrator::Log workspace appears.2Look for Log status and click Enabled. (By default the log is disabled.)3After enabling the log, you can make the following changes:Syslog server address [Optional] To enable the AP to send messages to a sys-log server as they appear, enter the IP address for the server in this field.Syslog server port By default the port number is 514. If the syslog server watches a different port, enter that port number in this field.4Click Update Settings to save and apply your changes.FIGURE 5-2](https://usermanual.wiki/Ruckus-Wireless/MP2N33A.Users-Manual-Users-Guide/User-Guide-889888-Page-61.png)