Ruckus Wireless™ ZoneDirector™ Command Line Interface Zone Director Release 9.1 CLI User Guide 800 70258 001 Rev C
2012-05-27
User Manual: Ruckus ZoneDirector Release 9.1 CLI User Guide
Open the PDF directly: View PDF ![]() .
.
Page Count: 224 [warning: Documents this large are best viewed by clicking the View PDF Link!]
- Contents
- About This Guide
- Understanding the ZoneDirector Command Line Interface
- Viewing Current Configuration
- Show Commands Overview
- Show AAA Commands
- Show Access Point Commands
- Show L2 Access Control List Commands
- Show L3 Access Control List Commands
- Show Hotspot Commands
- Show Role Commands
- Show User Commands
- Show Currently Active Clients Commands
- Show Mesh Commands
- Show Dynamic PSK Commands
- Show Dynamic Certificate Commands
- Show Guest Pass Commands
- Show Rogue Device Commands
- Show Events and Activities Commands
- Show Alarm Commands
- Show License Commands
- Show System Configuration Commands
- Show System Information Commands
- Show Technical Support Commands
- Show WLAN Commands
- Show WLAN Group Commands
- Configuring Controller Settings
- Configuration Commands Overview
- Configure AAA Server Settings
- Configure Administration Preferences
- Configure Device’s System Information
- Configure the 2.4GHz Radio Commands
- Configure the 5GHz Radio Commands
- Configure Management VLAN Commands
- Configure Layer 2 Access Control Commands
- Configure Layer 3 Access Control Commands
- Configure Role Commands
- Configure User Commands
- Configure Guest Access Commands
- Configure Hotspot Commands
- Configure Certificate Commands
- Configure Mesh Commands
- Configure Alarm Commands
- Configure Services Commands
- Configure Load Balancing Commands
- Configure System Commands
- Configure Syslog Settings Commands
- Configure WLAN Group Settings Commands
- Using Debug Commands
- Deauthorizing a Device
- Restarting a Device
- A
- C
- D
- delete station, 212
- description, 67, 93, 180, 208
- devname, 67
- disabling NTP client, 163
- disabling SNMP agent, 168 – 169
- disabling SNMP traps, 169
- displaying interface settings, 179
- dot11-country-code, 177
- dot1x, 194
- dot1x authentication encryption wep-64 auth-server, 194
- dot1x authentication encryption wpa algorithm AES auth-server, 192
- dot1x authentication encryption wpa algorithm TKIP auth-server, 192
- dot1x authentication encryption wpa2 algorithm AES auth-server, 193
- E
- G
- H
- I
- L
- M
- mac authentication encryption none auth- server, 186
- mac authentication encryption wep-128 key key-id auth-server, 190
- mac authentication encryption wep-64 key key-id auth-server, 189
- mac authentication encryption wpa passphrase algorithm AES auth-server, 187
- mac authentication encryption wpa passphrase algorithm TKIP auth-server, 187
- mac authentication encryption wpa2 passphrase algorithm AES auth-server, 188
- mac authentication encryption wpa2 passphrase algorithm TKIP auth-server, 188
- max clients, 203
- mode allow, 94
- mode deny, 94
- N
- name, 63, 207
- name password, 64
- no acct-server, 196
- no acl, 90
- no auth-server, 64
- no client isolation, 195
- no hide ssid, 202
- no l2 access control, 200
- no l3 access control, 200
- no mac, 95
- no ntp, 163
- no snmp-agent, 168 – 169
- no snmp-trap, 169
- no syslog, 176
- no tunnel mode, 199
- no vlan, 196
- no web authentication, 195
- ntp, 163
- O
- open authentication encryption wep-128 key key-id, 186
- open authentication encryption wep-64 key key-id, 185
- open authentication encryption wpa passphrase {passphrase} algorithm AES, 182
- open authentication encryption wpa passphrase {passphrase} algorithm TKIP, 184
- open authentication encryption wpa passphrase algorithm AES, 182
- open authentication encryption wpa passphrase algorithm TKIP, 184
- open authentication encryption wpa2 passphrase algorithm AES, 184
- open authentication encryption wpa2 passphrase algorithm TKIP, 185
- open none, 182
- Q
- R
- radio 2.4 channel, 82
- radio 2.4 channel auto, 82
- radio 2.4 tx-power, 83
- radio 2.4 tx-power auto, 83
- radio 2.4 wlan-group, 83
- radio 5 channel, 84
- radio 5 channel auto, 84
- radio 5 tx-power, 85
- radio 5 tx-power auto, 85
- radio 5 wlan-group, 86
- radius-secret, 60
- read-only community, 170
- read-write community, 170
- restart, 213
- ro-community, 170
- rw-community, 170
- S
- shared authentication encryption wep-128 key key-id, 191
- shared authentication encryption wep-64 key key-id, 190
- show, 89, 97, 179, 204
- SNMP agent contact, 169
- SNMP agent location, 170
- SNMP RO, 170
- SNMP RW, 170
- snmp-trap, 171
- ssid, 182
- sysinfo, 35
- syslog, 176
- syslog notifications, 176
- syslog server address, 176
- sysstats, 41
- T
- V
- W
- Z
- Index

Ruckus Wireless™ ZoneDirector™
Command Line Interface
Reference Guide
Part Number 800-70258-001 Rev C
Published March 2011
www.ruckuswireless.com

i
About This Guide
Conventions . . . . . . . . . . . . . . . . . . . . . . . . . . . . . . . . . . . . . . . . . . . . . . . . . . . . . . . . . . . i
Documentation Comments . . . . . . . . . . . . . . . . . . . . . . . . . . . . . . . . . . . . . . . . . . . . . .ii
1
Understanding the ZoneDirector Command Line Interface
What Is the CLI? . . . . . . . . . . . . . . . . . . . . . . . . . . . . . . . . . . . . . . . . . . . . . . . . . . . . . . . .2
Accessing the Command Line Interface . . . . . . . . . . . . . . . . . . . . . . . . . . . . . . . . . . . .2
Requirements . . . . . . . . . . . . . . . . . . . . . . . . . . . . . . . . . . . . . . . . . . . . . . . . . . . . . . . 2
Step 1: Connecting the Administrative Computer to ZoneDirector . . . . . . . . . . . 2
Step 2: Start and Configure the Telnet/SSH Client . . . . . . . . . . . . . . . . . . . . . . . . . 3
Step 3: Log Into the CLI . . . . . . . . . . . . . . . . . . . . . . . . . . . . . . . . . . . . . . . . . . . . . . . 6
Using the Help Command . . . . . . . . . . . . . . . . . . . . . . . . . . . . . . . . . . . . . . . . . . . . . . .7
Using the ? Command . . . . . . . . . . . . . . . . . . . . . . . . . . . . . . . . . . . . . . . . . . . . . . . . . .8
2
Viewing Current Configuration
Show Commands Overview . . . . . . . . . . . . . . . . . . . . . . . . . . . . . . . . . . . . . . . . . . . . .10
Show AAA Commands . . . . . . . . . . . . . . . . . . . . . . . . . . . . . . . . . . . . . . . . . . . . . . . . .10
Show Access Point Commands. . . . . . . . . . . . . . . . . . . . . . . . . . . . . . . . . . . . . . . . . . .11
Show L2 Access Control List Commands. . . . . . . . . . . . . . . . . . . . . . . . . . . . . . . . . . .18
Show L3 Access Control List Commands. . . . . . . . . . . . . . . . . . . . . . . . . . . . . . . . . . .20
Show Hotspot Commands . . . . . . . . . . . . . . . . . . . . . . . . . . . . . . . . . . . . . . . . . . . . . .23
Show Role Commands. . . . . . . . . . . . . . . . . . . . . . . . . . . . . . . . . . . . . . . . . . . . . . . . . .25
Show User Commands. . . . . . . . . . . . . . . . . . . . . . . . . . . . . . . . . . . . . . . . . . . . . . . . . .27
Show Currently Active Clients Commands . . . . . . . . . . . . . . . . . . . . . . . . . . . . . . . . .28
Show Mesh Commands. . . . . . . . . . . . . . . . . . . . . . . . . . . . . . . . . . . . . . . . . . . . . . . . .30
Show Dynamic PSK Commands . . . . . . . . . . . . . . . . . . . . . . . . . . . . . . . . . . . . . . . . . .31
Show Dynamic Certificate Commands. . . . . . . . . . . . . . . . . . . . . . . . . . . . . . . . . . . . .32
Show Guest Pass Commands . . . . . . . . . . . . . . . . . . . . . . . . . . . . . . . . . . . . . . . . . . . .32
Show Rogue Device Commands . . . . . . . . . . . . . . . . . . . . . . . . . . . . . . . . . . . . . . . . .33
Show Events and Activities Commands . . . . . . . . . . . . . . . . . . . . . . . . . . . . . . . . . . . .33
Show Alarm Commands . . . . . . . . . . . . . . . . . . . . . . . . . . . . . . . . . . . . . . . . . . . . . . . .34
Show License Commands . . . . . . . . . . . . . . . . . . . . . . . . . . . . . . . . . . . . . . . . . . . . . . .35
Contents

ii
Show System Configuration Commands . . . . . . . . . . . . . . . . . . . . . . . . . . . . . . . . . . .35
Show System Information Commands . . . . . . . . . . . . . . . . . . . . . . . . . . . . . . . . . . . . .41
Show Technical Support Commands . . . . . . . . . . . . . . . . . . . . . . . . . . . . . . . . . . . . . .43
Show WLAN Commands . . . . . . . . . . . . . . . . . . . . . . . . . . . . . . . . . . . . . . . . . . . . . . . .49
Show WLAN Group Commands. . . . . . . . . . . . . . . . . . . . . . . . . . . . . . . . . . . . . . . . . .54
3
Configuring Controller Settings
Configuration Commands Overview . . . . . . . . . . . . . . . . . . . . . . . . . . . . . . . . . . . . . .57
Configure AAA Server Settings. . . . . . . . . . . . . . . . . . . . . . . . . . . . . . . . . . . . . . . . . . .57
Configure AAA Server Type Commands . . . . . . . . . . . . . . . . . . . . . . . . . . . . . . . . 57
Configure AAA Network Addressing Commands . . . . . . . . . . . . . . . . . . . . . . . . 59
Configure AAA RADIUS Commands . . . . . . . . . . . . . . . . . . . . . . . . . . . . . . . . . . . 60
Miscellaneous AAA Commands . . . . . . . . . . . . . . . . . . . . . . . . . . . . . . . . . . . . . . . 61
Configure Administration Preferences. . . . . . . . . . . . . . . . . . . . . . . . . . . . . . . . . . . . .63
Configure Admin Login Commands . . . . . . . . . . . . . . . . . . . . . . . . . . . . . . . . . . . 63
Configure Admin Authentication Commands . . . . . . . . . . . . . . . . . . . . . . . . . . . . 64
Display Administrator Account Settings . . . . . . . . . . . . . . . . . . . . . . . . . . . . . . . . 66
Configure Device’s System Information. . . . . . . . . . . . . . . . . . . . . . . . . . . . . . . . . . . .66
Configure Device Policy Commands . . . . . . . . . . . . . . . . . . . . . . . . . . . . . . . . . . . 69
Configure Device Port State Commands . . . . . . . . . . . . . . . . . . . . . . . . . . . . . . . . 77
Configure Device Network Addressing Commands . . . . . . . . . . . . . . . . . . . . . . . 80
Configure the 2.4GHz Radio Commands. . . . . . . . . . . . . . . . . . . . . . . . . . . . . . . . . . .82
Configure the 5GHz Radio Commands . . . . . . . . . . . . . . . . . . . . . . . . . . . . . . . . . . . .84
Configure Management VLAN Commands. . . . . . . . . . . . . . . . . . . . . . . . . . . . . . . . .86
Configure Layer 2 Access Control Commands . . . . . . . . . . . . . . . . . . . . . . . . . . . . . .88
Configure Layer 3 Access Control Commands . . . . . . . . . . . . . . . . . . . . . . . . . . . . . .96
Configure Layer 3 Access Control Rule Commands . . . . . . . . . . . . . . . . . . . . . . 101
Configure Role Commands. . . . . . . . . . . . . . . . . . . . . . . . . . . . . . . . . . . . . . . . . . . . .104
Configure User Commands. . . . . . . . . . . . . . . . . . . . . . . . . . . . . . . . . . . . . . . . . . . . .110
Configure Guest Access Commands . . . . . . . . . . . . . . . . . . . . . . . . . . . . . . . . . . . . .114
Configure Guest Access Restriction Commands . . . . . . . . . . . . . . . . . . . . . . . . 120
Configure Hotspot Commands. . . . . . . . . . . . . . . . . . . . . . . . . . . . . . . . . . . . . . . . . .124
Configure Hotspot Access Restriction Commands . . . . . . . . . . . . . . . . . . . . . . . 136
Configure Certificate Commands. . . . . . . . . . . . . . . . . . . . . . . . . . . . . . . . . . . . . . . .139
Configure Mesh Commands . . . . . . . . . . . . . . . . . . . . . . . . . . . . . . . . . . . . . . . . . . . .141
Configure Alarm Commands . . . . . . . . . . . . . . . . . . . . . . . . . . . . . . . . . . . . . . . . . . .145

iii
Configure Services Commands. . . . . . . . . . . . . . . . . . . . . . . . . . . . . . . . . . . . . . . . . .151
Configure Load Balancing Commands . . . . . . . . . . . . . . . . . . . . . . . . . . . . . . . . . . .159
Configure System Commands . . . . . . . . . . . . . . . . . . . . . . . . . . . . . . . . . . . . . . . . . .163
Configure Management ACL Commands . . . . . . . . . . . . . . . . . . . . . . . . . . . . . . 171
Configure Syslog Settings Commands . . . . . . . . . . . . . . . . . . . . . . . . . . . . . . . . . . .176
Configure Controller’s Country Setting Command . . . . . . . . . . . . . . . . . . . . . . 177
Configure Controlller’s IP Address Commands . . . . . . . . . . . . . . . . . . . . . . . . . 178
Configure WLAN Settings Commands . . . . . . . . . . . . . . . . . . . . . . . . . . . . . . . . 180
Configure WLAN Group Settings Commands . . . . . . . . . . . . . . . . . . . . . . . . . . . . .205
4
Using Debug Commands
Deauthorizing a Device . . . . . . . . . . . . . . . . . . . . . . . . . . . . . . . . . . . . . . . . . . . . . . . .212
Restarting a Device . . . . . . . . . . . . . . . . . . . . . . . . . . . . . . . . . . . . . . . . . . . . . . . . . . .213
Index
i
About This Guide
This Ruckus Wireless ZoneDirector Command Line Interface Reference Guide
contains the syntax and commands for configuring and managing ZoneDirector from
a command line interface.
This guide is written for service operators and system administrators who are respon-
sible for managing, configuring, and troubleshooting Ruckus Wireless devices.
Consequently, it assumes a basic working knowledge of local area networks, wireless
networking, and wireless devices.
NOTE: If a release note is shipped with ZoneDirector your Ruckus Wireless product
and the information there differs from the information in this guide, follow the
instructions in the release note.
Most user guides and release notes are available in Adobe Acrobat Reader Portable
Document Format (PDF) or HTML on the Ruckus Wireless Support Web site at:
http://support.ruckuswireless.com/
Conventions
Tabl e 1 and Table 2 list the text and notice conventions that are used throughout this
guide.
Tabl e 1. Text Con vent ions
Convention Description Example
monospace Represents information as it
appears on screen
[Device name]>
monospace bold Represents information that
you enter
[Device name]> set
ipaddr 10.0.0.12
default font bold Keyboard keys, software
buttons, and field names
On the Start menu, click All
Programs.
italics Screen or page names Click Advanced Settings.
The Advanced Settings page
appears.
ii
About This Guide
Documentation Comments
Ruckus Wireless is interested in improving its documentation and welcomes your
comments and suggestions. You can email your comments to Ruckus Wireless at:
docs@ruckuswireless.com
When contacting us, please include the following information:
■Document title
■Document part number (on the cover page)
■Page number (if appropriate)
For example:
■Ruckus Wireless ZoneDirector Command Line Interface Reference Guide
■Part number: 800-70258-001
■Page 88
Please note that we can only respond to comments and questions about Ruckus
Wireless product documentation at this email address. Questions related to technical
support or sales should be directed in the first instance to your network supplier.
Table 2. Notice Conventions
Icon Notice Type Description
Information Information that describes
important features or
instructions
Caution Information that alerts you to
potential loss of data or
potential damage to an
application, system, or device
Warning Information that alerts you to
potential personal injury

1
1
Understanding the ZoneDirector
Command Line Interface
In This Chapter
What Is the CLI?. . . . . . . . . . . . . . . . . . . . . . . . . . . . . . . . . . . . . . . . . . . . . . . . . . . . . . . . . . . . . 2
Accessing the Command Line Interface . . . . . . . . . . . . . . . . . . . . . . . . . . . . . . . . . . . . . . . . . 2
Using the Help Command . . . . . . . . . . . . . . . . . . . . . . . . . . . . . . . . . . . . . . . . . . . . . . . . . . . . 7
Using the ? Command . . . . . . . . . . . . . . . . . . . . . . . . . . . . . . . . . . . . . . . . . . . . . . . . . . . . . . . 8
2
Understanding the ZoneDirector Command Line Interface
What Is the CLI?
What Is the CLI?
The Ruckus Wireless ZoneDirector command line interface (CLI) is a software tool that
enables you to configure and manage ZoneDirector, Ruckus Wireless’s wireless LAN
controller.
Using the command line interface, you can issue commands from an operating system
prompt, such as the Microsoft Windows command prompt (C:\) or a Linux operating
system terminal. Each command performs a specific action for configuring device
settings or returning information about the status of a specific device feature.
Accessing the Command Line Interface
This section describes the requirements and the procedure for accessing the Zone-
Director CLI.
Requirements
To access the ZoneDirector CLI, you will need the following:
■A computer that you want to designate as administrative computer
■An RS-232 cable (type depends on the ZoneDirector model):
• If you are using ZoneDirector 3000, you need an RS-232 to Ethernet cable.
• If you are using ZoneDirector 1000, you need an RS-232 to RS-232 cable.
■A Telnet or SSH (secure shell) client program
Step 1: Connecting the Administrative Computer to
ZoneDirector
The steps for connecting the administrative computer to ZoneDirector depend on
the ZoneDirector model that you are using. Refer to the relevant section below.
■Connecting ZoneDirector 1000
■Connecting ZoneDirector 3000
NOTE: Before continuing, make sure that both the administrative computer and
ZoneDirector are both powered on.
Connecting ZoneDirector 1000
1. Connect one end of the RS-232 cable to the port labeled Console on ZoneDirector.
2. Connect the other end to the RS-232 cable to a COM port on the administrative
computer.

3
Understanding the ZoneDirector Command Line Interface
Accessing the Command Line Interface
Connecting ZoneDirector 3000
1. Connect the RS-232 end of the cable to the port labeled Console on ZoneDirector.
2. Connect the Ethernet end of the cable to an Ethernet port on the administrative
computer.
Step 2: Start and Configure the Telnet/SSH Client
Before starting this procedure, make sure that you Telnet/SSH is already installed on
the administrative computer.
NOTE: The following procedure uses PuTTY, a free and open source Telnet/SSH
client, for accessing the ZoneDirector CLI. If you are using a different Telnet/SSH client,
the procedure may be slightly different (although the connection settings should be
the same). For more information on PuTTY, visit www.putty.org.
To start and configure the Telnet/SSH client
1. Start PuTTY. The PuTTY Configuration dialog box appears, showing the Session
screen.
2. In Connection type, click Serial.
Figure 1. Click Serial as the connection type
3. Under Category, click Connection > Serial. The serial connection options appear
on the right side of the dialog box, displaying PuTTY’s default serial connection
settings.
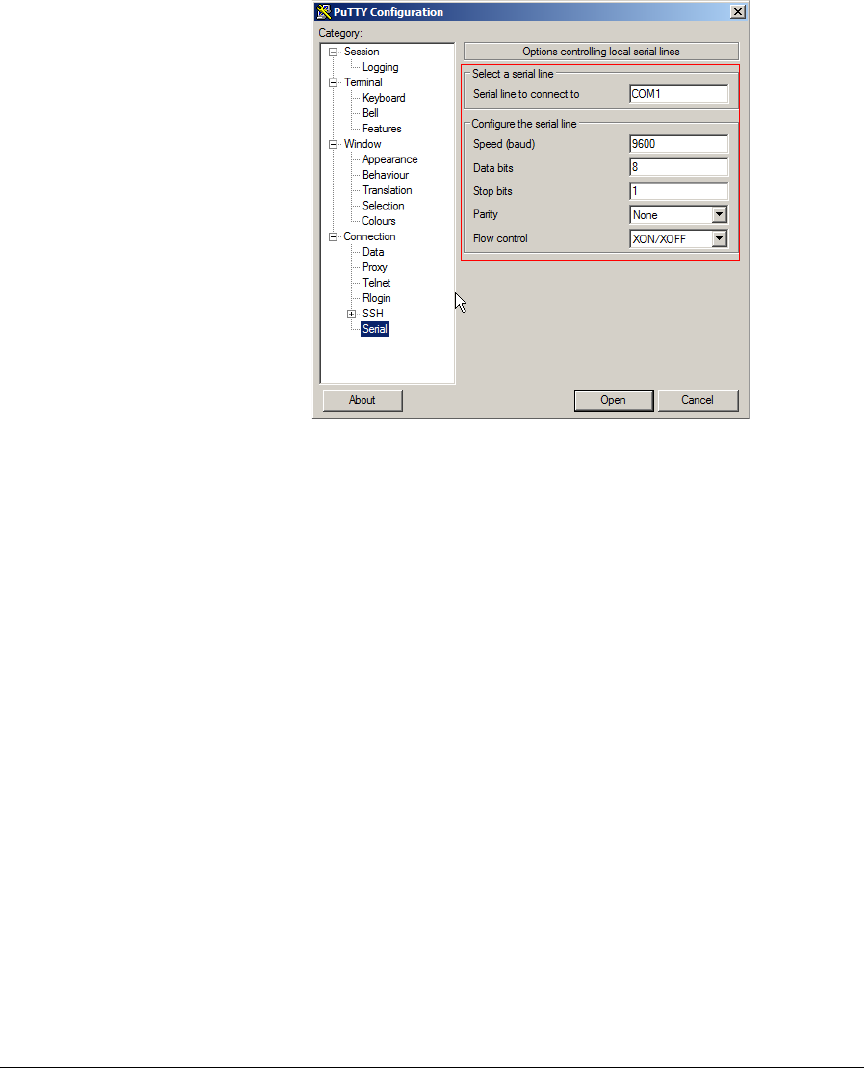
4
Understanding the ZoneDirector Command Line Interface
Accessing the Command Line Interface
Figure 2. PuTTY’s default serial connection settings
5
Understanding the ZoneDirector Command Line Interface
Accessing the Command Line Interface
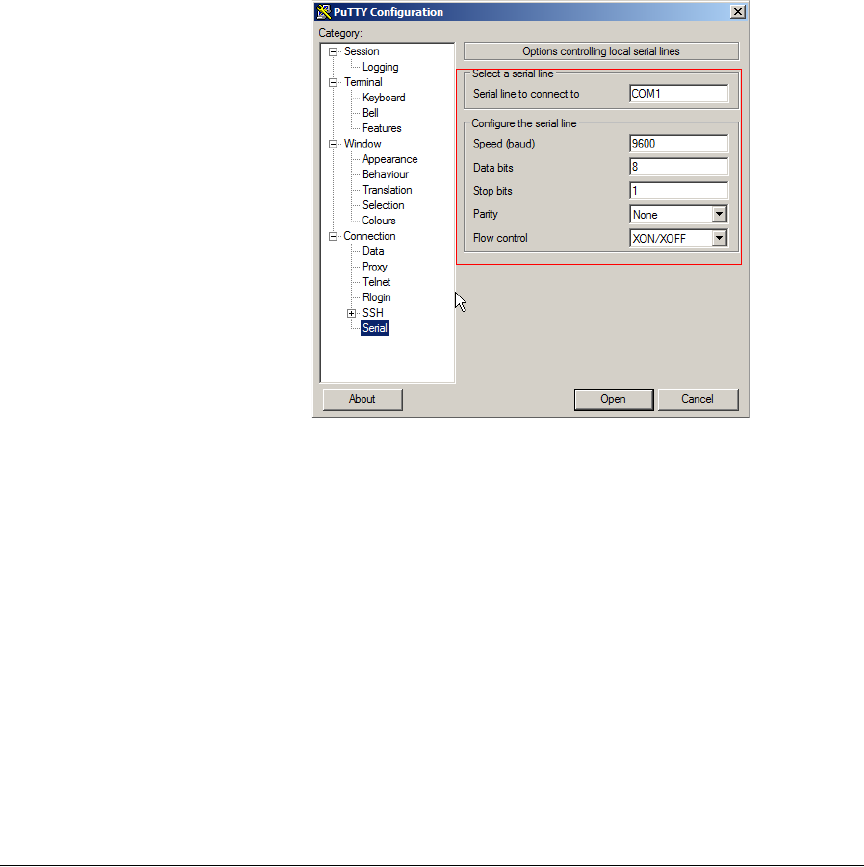
4. Configure the serial connection settings as follows:
•Serial line to connect to: Type the COM port name to which you connected
the RS-232 cable.
•Bits per second: 115200
•Data bits: 8
•Parity: None
•Stop bits: 1
•Flow control: None
Figure 3. PuTTY’s serial connection settings for connecting to ZoneDirector
5. Click Open. The PuTTY console appears and displays the login prompt.
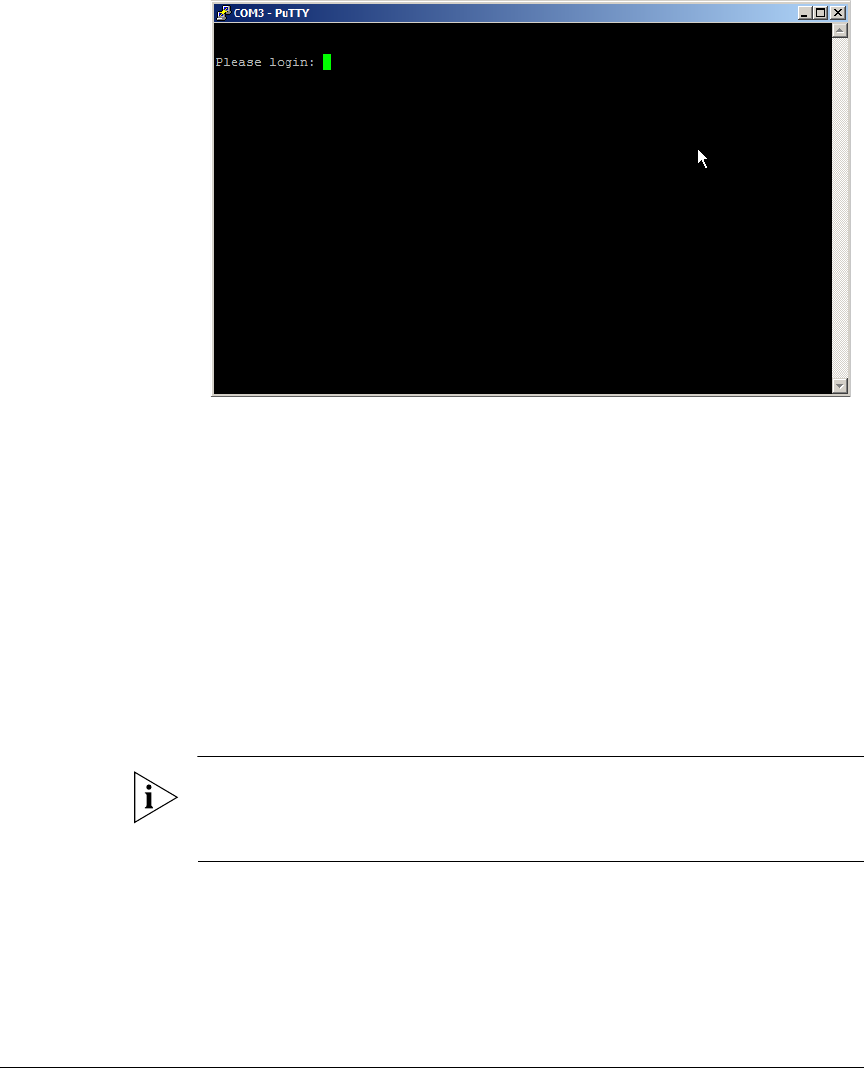
6
Understanding the ZoneDirector Command Line Interface
Accessing the Command Line Interface
Figure 4. The PuTTY console displaying the login prompt
You have completed configuring the Telnet/SSH client to connect to ZoneDirector.
Step 3: Log Into the CLI
1. At the Please login prompt, type admin, and then press <Enter>.
2. At the Password prompt, type admin, and then press <Enter>. The Ruckus
Wireless ZoneDirector CLI welcome message and the ruckus prompt appears.
You are now logged into the ZoneDirector CLI as a user with limited privileges. As a
user with limited privileges, view a history of commands that were previously executed
and ping a device. If you want to run more commands, you can switch to privileged
mode by entering enable at the root prompt.
To view a list of commands that are available at the root level, enter help or?.
NOTE: You can tell if you logged into the CLI in limited or privileged mode by looking
at the ruckus prompt. If you are in limited mode, the prompt appears as ruckus>
(with a greater than sign). If you are in privileged mode, the prompt appears as
ruckus# (with a pound sign).

7
Understanding the ZoneDirector Command Line Interface
Using the Help Command
Using the Help Command
To display all commands that the Ruckus Wireless CLI supports, use the help
command.
CAUTION: Entering the help command into the CLI prints a long list of commands
on the screen. If you only want to view the commands that are available from within
a specific context, use the ? command. See “Using the ? Command” below for more
information.

8
Understanding the ZoneDirector Command Line Interface
Using the ? Command
Using the ? Command
To display commands that are available within a specific context, use the ? command.
Example To display commands within the debug context, enter the following command:
ruckus# debug
ruckus(debug)# ?
help Shows available commands.
history Shows a list of previously run commands.
quit Exits the debug context.
delete Contains commands that can be executed from
within the context.
restart Contains commands that can be executed from
within the context.

9
2
Viewing Current Configuration
In This Chapter
Show Commands Overview . . . . . . . . . . . . . . . . . . . . . . . . . . . . . . . . . . . . . . . . . . . . . . . . . . 10
Show AAA Commands . . . . . . . . . . . . . . . . . . . . . . . . . . . . . . . . . . . . . . . . . . . . . . . . . . . . . . 10
Show Access Point Commands . . . . . . . . . . . . . . . . . . . . . . . . . . . . . . . . . . . . . . . . . . . . . . . 11
Show L2 Access Control List Commands . . . . . . . . . . . . . . . . . . . . . . . . . . . . . . . . . . . . . . . 18
Show L3 Access Control List Commands . . . . . . . . . . . . . . . . . . . . . . . . . . . . . . . . . . . . . . . 20
Show Hotspot Commands . . . . . . . . . . . . . . . . . . . . . . . . . . . . . . . . . . . . . . . . . . . . . . . . . . . 23
Show Role Commands . . . . . . . . . . . . . . . . . . . . . . . . . . . . . . . . . . . . . . . . . . . . . . . . . . . . . . 25
Show User Commands . . . . . . . . . . . . . . . . . . . . . . . . . . . . . . . . . . . . . . . . . . . . . . . . . . . . . . 27
Show Currently Active Clients Commands . . . . . . . . . . . . . . . . . . . . . . . . . . . . . . . . . . . . . . 28
Show Role Commands . . . . . . . . . . . . . . . . . . . . . . . . . . . . . . . . . . . . . . . . . . . . . . . . . . . . . . 25
Show Mesh Commands . . . . . . . . . . . . . . . . . . . . . . . . . . . . . . . . . . . . . . . . . . . . . . . . . . . . . 30
Show Dynamic PSK Commands. . . . . . . . . . . . . . . . . . . . . . . . . . . . . . . . . . . . . . . . . . . . . . . 31
Show Dynamic Certificate Commands . . . . . . . . . . . . . . . . . . . . . . . . . . . . . . . . . . . . . . . . . 32
Show Guest Pass Commands. . . . . . . . . . . . . . . . . . . . . . . . . . . . . . . . . . . . . . . . . . . . . . . . . 32
Show Rogue Device Commands . . . . . . . . . . . . . . . . . . . . . . . . . . . . . . . . . . . . . . . . . . . . . . 33
Show Events and Activities Commands . . . . . . . . . . . . . . . . . . . . . . . . . . . . . . . . . . . . . . . . 33
Show Alarm Commands . . . . . . . . . . . . . . . . . . . . . . . . . . . . . . . . . . . . . . . . . . . . . . . . . . . . . 34
Show License Commands. . . . . . . . . . . . . . . . . . . . . . . . . . . . . . . . . . . . . . . . . . . . . . . . . . . . 35
Show System Configuration Commands . . . . . . . . . . . . . . . . . . . . . . . . . . . . . . . . . . . . . . . 35
Show System Information Commands . . . . . . . . . . . . . . . . . . . . . . . . . . . . . . . . . . . . . . . . . 41
Show Technical Support Commands. . . . . . . . . . . . . . . . . . . . . . . . . . . . . . . . . . . . . . . . . . . 43
Show WLAN Commands . . . . . . . . . . . . . . . . . . . . . . . . . . . . . . . . . . . . . . . . . . . . . . . . . . . . 49
Show WLAN Group Commands . . . . . . . . . . . . . . . . . . . . . . . . . . . . . . . . . . . . . . . . . . . . . . 54
10
Viewing Current Configuration
Show Commands Overview
Show Commands Overview
Show commands display the controller’s current settings, including its status and
system settings, and those of its AAA servers, access points, WLANs, and WLAN
groups.
NOTE: You can only run show commands at the root prompt.
Show AAA Commands
Use the show aaa commands to display information about the authentication and
accounting servers (AAA) servers that have been added to the controller.
show aaa all
To display a list of all AAA servers that have been added to the controller, use the
following command:
show aaa all
Syntax Description
Defaults None.
Example ruckus# show aaa all
AAA Servers
========================================================
ID: 1
Name: Local Database
Type: local
--------------------------------------------------------
ID: 2
Name: Guest Accounts
Type: guestpass
--------------------------------------------------------
show Display information
aaa Display AAA server information
all All AAA servers

11
Viewing Current Configuration
Show Access Point Commands
show aaa name
To display information about a specific AAA server that has been added to the
controller, use the following command:
show aaa name {AAA server name}
Syntax Description
Defaults None.
Example ruckus()# show aaa name Ruckus-RADIUS
ID: 3
Name: Ruckus-RADIUS
Type: radius-auth
RADIUS Server IP Address: 192.168.0.33
RADIUS Server Port: 1812
RADIUS Server Shared Secret: testing123
--------------------------------------------------------
Show Access Point Commands
Use the show ap commands to display the current settings of managed devices,
including their network address settings, device names, radio settings, and others.
show ap all
To display a summary of all devices that have been approved, use the following
command:
show ap all
Syntax Description
Defaults None.
Example ruckus# show ap all
show Display information
aaa name Display information about the specified AAA server name
{AAA server name} Name of the AAA server
show Display information
ap Show device information
all All devices that have been approved by the controller

12
Viewing Current Configuration
Show Access Point Commands
AP List
========================================================
AP
========================================================
Name: 00:13:92:EA:43:01
ID: 1
MAC Address: 00:13:92:EA:43:01
Device Name: RuckusAP
Model: zf7962
Description: Warehouse NE
Location: Living Room
GPS Coordinates: 37.3881398,-122.0258633
--------------------------------------------------------
Radio a/n (5GHz)
Channelization: 20
Radio Channel: 149
TX Power: Auto
WLAN Group Name: Default
--------------------------------------------------------
Radio b/g/n (2.4GHz)
Channelization: 20
Radio Channel: 11
TX Power: Auto
WLAN Group Name: Default
--------------------------------------------------------
Management IP Address: DHCP
IP Address:
Netmask:
Gateway:
Primary DNS Server:
Secondary DNS Server:
--------------------------------------------------------
Mesh Status: Enabled
Mesh Mode: Auto (Mesh role is automatically assigned)
Uplink Selection: Smart (Mesh APs will automatically select the
best uplink)
========================================================
AP
========================================================
Name: 00:13:92:EA:43:04

13
Viewing Current Configuration
Show Access Point Commands
ID: 2
MAC Address: 00:13:92:EA:43:04
Device Name: RuckusAP
Model: zf7962
Description: Warehouse NW
Location:
GPS Coordinates:
--------------------------------------------------------
Radio a/n (5GHz)
Channelization: 20
Radio Channel: 149
TX Power: Auto
WLAN Group Name: Default
--------------------------------------------------------
Radio b/g/n (2.4GHz)
Channelization: 20
Radio Channel: 11
TX Power: Auto
WLAN Group Name: Default
--------------------------------------------------------
Management IP Address: Keep AP's Setting
IP Address:
Netmask:
Gateway:
Primary DNS Server:
Secondary DNS Server:
--------------------------------------------------------
Mesh Status: Enabled
Mesh Mode: Auto (Mesh role is automatically assigned)
Uplink Selection: Smart (Mesh APs will automatically select the
best uplink)
========================================================
show ap devname
To display information about a specific device using its device name, use the following
command:
show ap devname {device name}
Syntax Description show Display information
ap devname Show information about the specified device name
{device name} The name of the device

14
Viewing Current Configuration
Show Access Point Commands
Defaults None.
Example ruckus# show ap devname RuckusAP
AP
========================================================
Name: 00:13:92:EA:43:01
ID: 1
MAC Address: 00:13:92:EA:43:01
Device Name: RuckusAP
Model: zf7962
Description: Warehouse NE
Location: Living Room
GPS Coordinates: 37.3881398,-122.0258633
--------------------------------------------------------
Radio a/n (5GHz)
Channelization: 20
Radio Channel: 149
TX Power: Auto
WLAN Group Name: Default
--------------------------------------------------------
Radio b/g/n (2.4GHz)
Channelization: 20
Radio Channel: 11
TX Power: Auto
WLAN Group Name: Default
--------------------------------------------------------
Management IP Address: DHCP
IP Address:
Netmask:
Gateway:
Primary DNS Server:
Secondary DNS Server:
--------------------------------------------------------
Mesh Status: Enabled
Mesh Mode: Auto (Mesh role is automatically assigned)
Uplink Selection: Smart (Mesh APs will automatically select the
best uplink)
========================================================
AP
========================================================
Name: 00:13:92:EA:43:04

15
Viewing Current Configuration
Show Access Point Commands
ID: 2
MAC Address: 00:13:92:EA:43:04
Device Name: RuckusAP
Model: zf7962
Description: Warehouse NW
Location:
GPS Coordinates:
--------------------------------------------------------
Radio a/n (5GHz)
Channelization: 20
Radio Channel: 149
TX Power: Auto
WLAN Group Name: Default
--------------------------------------------------------
Radio b/g/n (2.4GHz)
Channelization: 20
Radio Channel: 11
TX Power: Auto
WLAN Group Name: Default
--------------------------------------------------------
Management IP Address: Keep AP's Setting
IP Address:
Netmask:
Gateway:
Primary DNS Server:
Secondary DNS Server:
--------------------------------------------------------
Mesh Status: Enabled
Mesh Mode: Auto (Mesh role is automatically assigned)
Uplink Selection: Smart (Mesh APs will automatically select the
best uplink)
========================================================
AP
========================================================
Name: 00:13:92:EA:43:07
ID: 3
MAC Address: 00:13:92:EA:43:07
Device Name: RuckusAP
Model: zf7962
Description: Warehouse SE
Location:
GPS Coordinates:

16
Viewing Current Configuration
Show Access Point Commands
--------------------------------------------------------
Radio a/n (5GHz)
Channelization: 20
Radio Channel: 149
TX Power: Auto
WLAN Group Name: Default
--------------------------------------------------------
Radio b/g/n (2.4GHz)
Channelization: 20
Radio Channel: 11
TX Power: Auto
WLAN Group Name: Default
--------------------------------------------------------
Management IP Address: Manual
IP Address: 10.10.1.2
Netmask: 255.255.255.0
Gateway: 10.10.1.254
Primary DNS Server: 29.13.12.10
Secondary DNS Server: 29.13.13.10
--------------------------------------------------------
Mesh Status: Enabled
Mesh Mode: Auto (Mesh role is automatically assigned)
Uplink Selection: Manual (Only selected APs can be used for uplink)
AP MAC Address: 00:13:92:EA:43:01
AP MAC Address: 00:13:92:EA:43:04
========================================================
AP
========================================================
Name: 00:13:92:EA:43:0A
ID: 4
MAC Address: 00:13:92:EA:43:0A
Device Name: RuckusAP
Model: zf7942
Description: Warehouse SW
Location:
GPS Coordinates:
--------------------------------------------------------
Radio b/g/n (2.4GHz)
Channelization: Auto
Radio Channel: 11
TX Power: Auto
17
Viewing Current Configuration
Show Access Point Commands
WLAN Group Name: Default
--------------------------------------------------------
Management IP Address: Keep AP's Setting
IP Address:
Netmask:
Gateway:
Primary DNS Server:
Secondary DNS Server:
--------------------------------------------------------
Mesh Status: Enabled
Mesh Mode: Auto (Mesh role is automatically assigned)
Uplink Selection: Smart (Mesh APs will automatically select the
best uplink)
========================================================
show ap mac
To search for the device that matches the specified MAC address, use the following
command:
show ap mac {mac address}
Syntax Description
Defaults None.
Example ruckus# show
ruckus(show)# ap mac 00:13:92:EA:43:01
AP
========================================================
Name: 00:13:92:EA:43:01
ID: 1
MAC Address: 00:13:92:EA:43:01
Device Name: RuckusAP
Model: zf7962
Description: Warehouse NE
Location: Living Room
GPS Coordinates: 37.3881398,-122.0258633
--------------------------------------------------------
show Display information
ap mac Display information about the device with the specified
MAC address
{mac address} The MAC address of the device

18
Viewing Current Configuration
Show L2 Access Control List Commands
Radio a/n (5GHz)
Channelization: 20
Radio Channel: 149
TX Power: Auto
WLAN Group Name: Default
--------------------------------------------------------
Radio b/g/n (2.4GHz)
Channelization: 20
Radio Channel: 11
TX Power: Auto
WLAN Group Name: Default
--------------------------------------------------------
Management IP Address: DHCP
IP Address:
Netmask:
Gateway:
Primary DNS Server:
Secondary DNS Server:
--------------------------------------------------------
Mesh Status: Enabled
Mesh Mode: Auto (Mesh role is automatically assigned)
Uplink Selection: Smart (Mesh APs will automatically select the
best uplink)
========================================================
Show L2 Access Control List Commands
Use the show l2acl commands to display Layer 2 access control list rules that have
been added to the controller.
show l2acl all
To display all Layer 2 access control list (ACL) rules that have been added to the
controller and their settings, use the following command:
show l2acl all
Syntax Description
Defaults None.
show Display information
l2acl Display L2 ACL information
all All L2 ACL

19
Viewing Current Configuration
Show L2 Access Control List Commands
Example ruckus# show l2acl all
L2/MAC ACL:
ID:
1:
Name= System
Description= System
Restriction: Deny only the stations listed below
Stations:
2:
Name= blocked-sta-list
Description=
Restriction: Deny only the stations listed below
Stations:
show l2acl name
To display the settings of a specific L2 ACL rule that has been added to the controller,
use the following command:
show l2acl name {L2ACL-NAME}
Syntax Description
Defaults None.
Example ruckus# show l2acl name 1
L2/MAC ACL:
ID:
2:
Name= 1
Description=
Restriction: Deny only the stations listed below
Stations:
MAC Address= 00:33:22:45:34:88
show Display information
l2acl Display L2 ACL information
name Display information about the specified L2 ACL rule name
{L2ACL-NAME} Name of the L2 ACL rule

20
Viewing Current Configuration
Show L3 Access Control List Commands
Show L3 Access Control List Commands
Use the show l3acl commands to display Layer 3 access control list rules that have
been added to the controller.
show l3acl all
To display all Layer 3 access control list (ACL) rules that have been added to the
controller and their settings, use the following command:
show l3acl all
Syntax Description
Defaults None.
Example ruckus# show l3acl all
L3/L4/IP ACL:
ID:
4:
Name= test2
Description= test2
Default Action if no rule is matched= Deny all by default
Rules:
Order= 1
Description=
Type= Allow
Destination Address= Any
Destination Port= 53
Protocol= Any
Order= 2
Description=
Type= Allow
Destination Address= Any
Destination Port= 67
Protocol= Any
Order= 3
Description=
Type= Allow
Destination Address= 8.8.8.8/24
show Display information
l3acl Display L3 ACL information
all All L3 ACL
21
Viewing Current Configuration
Show L3 Access Control List Commands
Destination Port= 25
Protocol= 6
show l3acl name
To display the settings of a specific L3 ACL rule that has been added to the controller,
use the following command:
show l3acl name <l3_acl_name>
Syntax Description
Defaults None.
Example ruckus# show l3acl name test2
L3/L4/IP ACL:
ID:
4:
Name= test2
Description= test2
Default Action if no rule is matched= Allow all by default
Rules:
Order= 1
Description=
Type= Allow
Destination Address= Any
Destination Port= 53
Protocol= Any
Order= 2
Description=
Type= Allow
Destination Address= Any
Destination Port= 67
Protocol= Any
Order= 3
Description=
Type= Allow
show Display information
l3acl Display L3 ACL information
name Display information about the specified L3 ACL rule name
{L3 ACL rule name} Name of the L3 ACL rule

22
Viewing Current Configuration
Show L3 Access Control List Commands
Destination Address= 8.8.8.8/24
Destination Port= 25
Protocol= 6
23
Viewing Current Configuration
Show Hotspot Commands
Show Hotspot Commands
Use the show hotspot commands to display the controller’s hotspot configuration
settings.
show hotspot all
To display a list of all hotspots that have been created on the controller, use the
following command:
show hotspot all
Syntax Description
Defaults None.
Example ruckus# show hotspot all
Hotspot:
ID:
1:
Name= New Name
Login Page Url= myhotspot.com
Start Page= redirect to the URL that the user intends to visit.
Session Timeout= Disabled
Idle Timeout= Disabled
Authentication Server= Local Database
Accounting Server= Disabled
Location ID=
Location Name=
Walled Garden 1=
Walled Garden 2=
Walled Garden 3=
Walled Garden 4=
Walled Garden 5=
IPv4 Rules:
IPv6 Rules:
ID:
2:
show Display information
hotspot Display hotspot information
all All available hotspots
24
Viewing Current Configuration
Show Hotspot Commands
Name= New name2
Login Page Url= myhotspot.com
Start Page= redirect to the URL that the user intends to visit.
Session Timeout= Disabled
Idle Timeout= Disabled
Authentication Server= Local Database
Accounting Server= Disabled
Location ID=
Location Name=
Walled Garden 1=
Walled Garden 2=
Walled Garden 3=
Walled Garden 4=
Walled Garden 5=
IPv4 Rules:
Order= 1
Description= 10.9.5.55
Type= Deny
Destination Address= Any
Destination Port= Any
Protocol= Any
IPv6 Rules:
show hotspot name
To display information about the specific hotspot, use the following command:
show hotspot name <hotspot_name>
If the hotspot name includes a space, you must put the name in quotation marks (for
example, “hotspot name”.
Syntax Description
Defaults None.
Example ruckus# show hotspot name “New name2”
Hotspot:
ID:
2:
show Display information
hotspot name Display hotspot information
<hotspot_name> The name of the hotspot

25
Viewing Current Configuration
Show Role Commands
Name= New name2
Login Page Url= myhotspot.com
Start Page= redirect to the URL that the user intends to visit.
Session Timeout= Disabled
Idle Timeout= Disabled
Authentication Server= Local Database
Accounting Server= Disabled
Location ID=
Location Name=
Walled Garden 1=
Walled Garden 2=
Walled Garden 3=
Walled Garden 4=
Walled Garden 5=
IPv4 Rules:
Order= 1
Description= 10.9.5.55
Type= Deny
Destination Address= Any
Destination Port= Any
Protocol= Any
IPv6 Rules:
Show Role Commands
Use the show role commands to display details about roles that have been created
on the controller.
show role all
To display a list of all roles that have been created on the controller, use the following
command:
show role all
Syntax Description
Defaults None.
show Display information
role Display role information
all All roles that have been created

26
Viewing Current Configuration
Show Role Commands
Example ruckus# show role all
Role:
ID:
1:
Name= Default
Description= Allow Access to All WLANs
Group Attributes=
Guest Pass Generation= Allowed
ZoneDirector Administration= Disallowed
Allow All WLANs= Allow access to all WLANs.
ruckus# show role name Default
Role:
ID:
1:
Name= Default
Description= Allow Access to All WLANs
Group Attributes=
Guest Pass Generation= Allowed
ZoneDirector Administration= Disallowed
Allow All WLANs= Allow access to all WLANs.
show role name
To display information about the specific role, use the following command:
show role name <role_name>
Syntax Description
Defaults None.
show Display information
role Display role information
<role_name> The name of the role

27
Viewing Current Configuration
Show User Commands
Show User Commands
Use the show user commands to display details about user accounts that exist on
the controller.
show user all
To display a list of all existing user accounts, use the following command:
show user all
Syntax Description
Defaults None.
Example ruckus# show user all
User:
ID:
1:
User Name= test22
Full Name= test11
Password= test1234
Role= Default
show user name
To display information about the specific user, use the following command:
show user name <user_name>
Syntax Description
Defaults None.
Example ruckus# show user name test22
User:
ID:
1:
show Display information
user Display user information
all All existing user accounts
show Display information
user Display user information
<user_name> The name of the user
28
Viewing Current Configuration
Show Currently Active Clients Commands
User Name= test22
Full Name= test11
Password= test1234
Role= Default
Show Currently Active Clients Commands
Use the show current-active-clients commands to display a list of wireless
clients that are associated with the APs that the controller manages.
show current-active-clients all
To display a list of all existing user accounts, use the following command:
show current-active-clients all
Syntax Description
Defaults None.
Example ruckus# show current-active-clients all
Current Active Clients:
Clients:
Mac Address= 00:22:fb:5c:e2:32
User/IP= 172.18.30.2
User/IPv6=
Access Point= 04:4f:aa:13:30:f0
BSSID= 04:4f:aa:13:30:fa
Connect Since=2011/03/01 02:48:22
Auth Method= OPEN
WLAN= 11jojoe
VLAN= None
Channel= 6
Radio= 802.
Signal= 0
Status= Authorized
Last 300 Events/Activities:
Activity:
show Display information
current-active-
clients
Display currently active wireless clients
all All active wireless clients

29
Viewing Current Configuration
Show Currently Active Clients Commands
Date/Time= 2011/03/01 02:49:05
Severity= Low
User=
Activities= User[00:22:fb:5c:e2:32] joins WLAN[11jojoe] from
AP[04:4f:aa:13:30:f0]
Activity:
Date/Time= 2011/03/01 02:48:22
Severity= Low
User=
Activities= User[00:22:fb:5c:e2:32] joins WLAN[11jojoe] from
AP[04:4f:aa:13:30:f0]
show current-active-clients
To display information about the specific active client, use the following command:
show current-active-clients name <client_mac>
Syntax Description
Defaults None.
Example ruckus# show current-active-clients name 00:22:fb:5c:e2:32
Current Active Clients:
Clients:
Mac Address= 00:22:fb:5c:e2:32
User/IP= 172.18.30.2
User/IPv6=
Access Point= 04:4f:aa:13:30:f0
BSSID= 04:4f:aa:13:30:fa
Connect Since=2011/03/01 02:48:22
Auth Method= OPEN
WLAN= 11jojoe
VLAN= None
Channel= 6
Radio= 802.
Signal= 29
Status= Authorized
Received from client= 32 pkts / 3233 bytes
Transmitted to client= 283 pkts / 65010 bytes
show Display information
current-active-
clients name
Display currently active wireless clients
<client_mac> The MAC address of the wireless client
30
Viewing Current Configuration
Show Mesh Commands
TX drops due to retry failure= 264 pkts
Last 300 Events/Activities:
Activity:
Date/Time= 2011/02/21 03:13:11
Severity= Low
User=
Activities= User[00:22:fb:5c:e2:32] disconnects from
WLAN[joejo8] at AP[04:4f:aa:13:30:f0]
Activity:
Date/Time= 2011/02/21 03:12:54
Severity= Low
User=
Activities= User[00:22:fb:5c:e2:32] joins WLAN[joejo8] from
AP[04:4f:aa:13:30:f0]
Show Mesh Commands
Use the show mesh commands to display the controller’s mesh network configuration
and topology.
show mesh info
To display a list of all mesh networks that have been formed, use the following
command:
show mesh info
Syntax Description
Defaults None.
Example ruckus# show mesh info
Mesh Settings:
Mesh Status= Disabled
Mesh Name(ESSID)= Mesh-137903000198
Mesh Passphrase= 6vAD_BDsbgkPkrxfuedshh38UGVSz-
eyO71aEpcqJf3OCo6vsbvZfUbp8aSi8PI
Mesh Hop Detection= Disabled
Mesh Downlinks Detection= Disabled
Tx. Rate of Management Frame= 2Mbps
show Display information
mesh Display mesh network information
info Show mesh information

31
Viewing Current Configuration
Show Dynamic PSK Commands
Beacon Interval= 200ms
show mesh topology
To display the topology of existing mesh networks, use the following command:
show mesh topology
Syntax Description
Defaults None.
Example ruckus# show mesh topology
Mesh Topology(Mesh-137903000198):
Show Dynamic PSK Commands
Use the show dynamic-psks commands to display information about Dynamic
PSKs that have been generated. Use the following command:
show dynamic-psks
Syntax Description
Defaults None.
Example ruckus# show dynamic-psks
Generated Dynamic PSKs:
DPSK:
User= BatchDPSK_User_1
Mac Address= 00:00:00:00:00:00
Created= 2011/03/01 03:30:01
Expired= Unlimited
DPSK:
User= BatchDPSK_User_2
Mac Address= 00:00:00:00:00:00
Created= 2011/03/01 03:30:02
Expired= Unlimited
show Display information
mesh Display mesh network information
topology Show mesh topology
show Display information
dynamic-psks Display dynamic PSKs that have been generated

32
Viewing Current Configuration
Show Dynamic Certificate Commands
DPSK:
User= DPSK-User-2
Mac Address= 00:11:22:33:44:55
Created= 2011/03/01 03:30:47
Expired= Unlimited
Show Dynamic Certificate Commands
Use the show dynamic-certs commands to display information about Dynamic
certificates that have been generated. Use the following command:
show dynamic-certs
Syntax Description
Defaults None.
Example ruckus# show dynamic-certs
Generated Dynamic Certs:
Show Guest Pass Commands
Use the show guest-passes commands to display information about guest passes
that have been generated. Use the following command:
show guest-passes
Syntax Description
Defaults None.
Example ruckus# show guest-passes
Generated Guest Passes:
ID:
Guest Name= ruckus1
Remarks= testforCLI
Expires= 2011/03/02 01:55:40
Re-auth=
Creator= test22
show Display information
dynamic-psks Display dynamic certificates that have been generated
show Display information
guest-passes Display guest passes that have been generated

33
Viewing Current Configuration
Show Rogue Device Commands
Sharable= No
Wlan= joejoe988
Show Rogue Device Commands
Use the show rogue-devices commands to display information about rogue
devices that the controller has detected on the network. Use the following command:
show rogue-devices
Syntax Description
Defaults None.
Example ruckus# show rogue-devices
Current Active Rogue Devices:
Rogue Devices:
Mac Address= 00:25:c4:52:1c:a1
Channel= 6
Radio= 802.11bg
Type= AP
Encryption= Open
SSID= V54-HOME001
Last Detected= 2011/03/01 02:03:43
Known/Recognized Rogue Devices:
Show Events and Activities Commands
Use the show events-activities commands to display information events and
network activities that have been recorded by the controller. Use the following
command:
show events-activities
Syntax Description
Defaults None.
show Display information
rogue-devices Display rogues devices that have been detected on the
network
show Display information
rogue-devices Display a list of events and activities records by the
controller
34
Viewing Current Configuration
Show Alarm Commands
Example ruckus# show events-activities
Last 300 Events/Activities:
Activity:
Date/Time= 2011/03/01 02:02:03
Severity= High
User=
Activities= A new Rogue[04:4f:aa:42:b6:49] with SSID[W2] is
detected
Activity:
Date/Time= 2011/03/01 02:02:03
Severity= High
User=
Activities= A new Rogue[ac:67:06:1b:df:29] with SSID[Martin-
Wireless-1] is detected
Show Alarm Commands
Use the show alarm commands to display alarms that have been generated by the
controller. Use the following command:
show alarm
Syntax Description
Defaults None.
Example ruckus# show alarm
Last 300 Alarms:
Alarms:
Date/Time= 2011/03/01 02:05:43
Name= Rogue AP Detected
Severity= High
Activities= A new Rogue[ac:67:06:33:28:99] with SSID[Ruckus-
Wireless-1] is detected
Alarms:
Date/Time= 2011/03/01 02:05:43
Name= Rogue AP Detected
Severity= High
Activities= A new Rogue[00:24:82:25:6a:4e] with SSID[island-
256A40] is detected
show Display information
alarm Display a list of alarms that have been generated by the
controller

35
Viewing Current Configuration
Show License Commands
Show License Commands
Use the show license commands to display the controller’s license information,
including the model number, the maximum number of APs that it can support, and
the maximum number of wireless clients that managed APs can support. Use the
following command:
show license
Syntax Description
Defaults None.
Example ruckus# show license
License:
Model= ZD1006
Max AP Number= 6
Max Client Number= 1250
Show System Configuration Commands
Use the show config commands to display the controller’s system configuration
settings.
show config
To display the current system configuration settings, including network addressing,
management VLAN, country code, logging, AAA servers, WLAN services, WLAN
groups, AP list, SNMP, and ACLs, use the following command:
show config
Syntax Description
Defaults None.
Example ruckus# show config
Mode: Manual
IP Address: 192.168.122.1
show Display information
license Display the controller’s license information
show Display information
config Display system configuration settings

36
Viewing Current Configuration
Show System Configuration Commands
Netmask: 255.255.255.0
Gateway Address: 172.17.16.1
Primary DNS: 172.17.17.5
Secondary DNS: 192.168.0.107
Management VLAN
========================================================
Status: disabled
VLAN ID:
Country Code
========================================================
Country Code: United States
NTP
========================================================
Status: disabled
Address: 192.168.0.2
Log Settings
========================================================
Status: disabled
Address: 192.168.0.101
AAA Servers
========================================================
ID: 1
Name: Local Database
Type: local
--------------------------------------------------------
ID: 2
Name: Guest Accounts
Type: guestpass
--------------------------------------------------------
ID: 3
Name: Ruckus-Acct-01

37
Viewing Current Configuration
Show System Configuration Commands
Type: radius-acct
RADIUS Server IP Address: 192.168.0.123
RADIUS Server Port: 18130
RADIUS Server Shared Secret: vguvkpi345
--------------------------------------------------------
ID: 4
Name: Ruckus-Auth-01
Type: radius-auth
RADIUS Server IP Address: 192.168.0.123
RADIUS Server Port: 18120
RADIUS Server Shared Secret: testing123
--------------------------------------------------------
ID: 5
Name: Ruckus-Auth-02
Type: ad
Server IP Address: 192.168.0.3
Server Port: 18123
--------------------------------------------------------
WLAN Service
========================================================
ID: 1
Name: corporate
Description:
Authentication: open
Encryption: wpa
Algorithm: aes
Passphrase: test1234
Authentication Server: Disabled
Accounting Server: Disabled
Tunnel Mode: Disabled
Max Clients: 100
Web Authentication: Disabled
Client Isolation: Disabled
VLAN: Disabled
Closed System: Disabled (Broadcast SSID)
L2/MAC: No ACLS
L3/L4/IP address: No ACLS
--------------------------------------------------------

38
Viewing Current Configuration
Show System Configuration Commands
ID: 2
Name: guest
Description:
Authentication: open
Encryption: none
Authentication Server: Disabled
Accounting Server: Disabled
Tunnel Mode: Disabled
Max Clients: 100
Web Authentication: Disabled
Client Isolation: Enabled
VLAN: Disabled
Closed System: Disabled (Broadcast SSID)
L2/MAC: No ACLS
--------------------------------------------------------
ID: 3
Name: lobby
Description:
Authentication: open
Encryption: wpa
Algorithm: aes
Passphrase: test1234
Authentication Server: Disabled
Accounting Server: Disabled
Tunnel Mode: Disabled
Max Clients: 100
Web Authentication: Disabled
Client Isolation: Disabled
VLAN: Disabled
Closed System: Disabled (Broadcast SSID)
L2/MAC: No ACLS
L3/L4/IP address: No ACLS
--------------------------------------------------------
ID: 4
Name: kitchen
Description:
Authentication: open
Encryption: wpa
Algorithm: aes

39
Viewing Current Configuration
Show System Configuration Commands
Passphrase: test1234
Authentication Server: Disabled
Accounting Server: Disabled
Tunnel Mode: Disabled
Max Clients: 100
Web Authentication: Disabled
Client Isolation: Disabled
VLAN: Disabled
Closed System: Disabled (Broadcast SSID)
L2/MAC: No ACLS
L3/L4/IP address: No ACLS
--------------------------------------------------------
ID: 5
Name: randy-wlansvc-01
Description: Randall Tsao Test WLAN
Authentication: 802.1x-eap
Encryption: wpa
Algorithm: aes
Passphrase:
Authentication Server: Ruckus-Auth-01
Accounting Server: Ruckus-Acct-01 Interim-Update: 5
Tunnel Mode: Disabled
Max Clients: 100
Web Authentication: Enabled
Client Isolation: Enabled
VLAN: Enabled (ID=12)
Closed System: Enabled (Hide SSID)
L2/MAC: No ACLS
--------------------------------------------------------
WLAN Group List
========================================================
WLAN Group
========================================================
ID: 1
Name: Default
Has-VLAN: true
WLAN Service: randy-wlansvc-01 (VLAN=)
--------------------------------------------------------

40
Viewing Current Configuration
Show System Configuration Commands
AP List
========================================================
AP
========================================================
Name: 00:13:92:EA:43:01
ID: 1
MAC Address: 00:13:92:EA:43:01
Device Name: RuckusAP
Model: zf7962
Description: Warehouse NE
Location: Living Room
GPS Coordinates: 37.3881398,-122.0258633
--------------------------------------------------------
Radio a/n (5GHz)
Channelization: 20
Radio Channel: 149
TX Power: 0
WLAN Group Name: Default
--------------------------------------------------------
Radio b/g/n (2.4GHz)
Channelization: 20
Radio Channel: 11
TX Power: 0
WLAN Group Name: Default
--------------------------------------------------------
Management IP Address: DHCP
IP Address:
Netmask:
Gateway:
Primary DNS Server:
Secondary DNS Server:
========================================================
AP
========================================================
Name: 00:13:92:EA:43:04
ID: 2
MAC Address: 00:13:92:EA:43:04
41
Viewing Current Configuration
Show System Information Commands
Device Name: RuckusAP
Model: zf7962
Description: Warehouse NW
Location:
GPS Coordinates:
--------------------------------------------------------
Radio a/n (5GHz)
Channelization: 20
Radio Channel
Show System Information Commands
Use the show sysinfo commands to display the controller’s system information.
show sysinfo
To display an overview of the system status, including system, devices, usage
summary, user activities, system activities, used access points, and support informa-
tion, use the following command:
show sysinfo
Syntax Description
Defaults None.
Example ruckus# show sysinfo
System Overview
========================================================
System Name: airespider
IP Address: 192.168.0.1
MAC Address: 00:23:AE:8F:1C:0B
Uptime: 019d 14h 01m
Model: ZD3025
Licensed APs: 25
Serial Number: SN-cygwin
Version: 8.2.0.0 build 1111
Devices Overview
========================================================
# of APs: 5
show Display information
sysinfo Display an overview of various system statuses

42
Viewing Current Configuration
Show System Information Commands
# of Client Devices: 73
# of Rogue Devices: 5
Usage Summary
========================================================
1 hr
Max Concurrent Users: 73
Bytes Transmitted: 15
# of Rogue Devices: 5
--------------------------------------------------------
24 hr
Max Concurrent Users: 103
Bytes Transmitted: 148
# of Rogue Devices: 0
User Activities
========================================================
Date/Time Severity User Activities
--------------------------------------------------------
System Activities
========================================================
Date/Time Severity Activities
--------------------------------------------------------
2009/10/29 19:01:52 High A new Rogue[00:1E:2D:55:FF:20] with
SSID[unknown] is detected
2009/10/29 19:01:51 High A new Rogue[00:1E:2D:55:FF:19] with
SSID[unknown] is detected
2009/10/29 19:01:50 High A new Rogue[00:1E:2D:55:FF:18] with
SSID[unknown] is detected
2009/10/29 19:01:49 Low WLAN[corporate] with
BSSID[00:1F:41:22:C2:D9] configuration has been updated on radio
[11g/n] of AP[Warehouse NW@00:13:92:EA:43:04]
2009/10/29 19:01:47 High A new Rogue[00:1E:2D:55:FF:88] with
SSID[data] is detected
2009/10/29 19:01:46 Low WLAN[corporate] with
BSSID[00:24:82:22:52:A9] configuration has been updated on radio
[11g/n] of AP[Warehouse NE@00:13:92:EA:43:01]
2009/10/29 19:01:45 High A new Rogue[00:13:92:EA:43:01] with
SSID[unknown] is detected
2009/10/29 19:01:44 High AP[Warehouse SE@00:13:92:EA:43:07]
fails to join
2009/10/29 19:01:43 Low AP[Warehouse NE@00:13:92:EA:43:04]
joins
43
Viewing Current Configuration
Show Technical Support Commands
2009/10/29 19:01:42 Low AP[Warehouse NE@00:13:92:EA:43:01]
joins
2009/10/29 19:01:41 Low System restarted
Used Access Points
========================================================
MAC Address IP Address Description Model Clients
--------------------------------------------------------
00:13:92:EA:43:01 10.1.0.10 Warehouse NE zf7962 31
00:13:92:EA:43:07 10.1.0.12 Warehouse SE zf7962 21
00:13:92:EA:43:04 10.1.0.11 Warehouse NW zf7962 8
00:13:92:EA:43:0D 10.1.0.14 AP5 zf2741 6
00:13:92:EA:43:0A 10.1.0.13 Warehouse SW zf7942 0
Support
========================================================
Company: Ruckus Wireless
Email: support@ruckuswireless.com
Support Website: http://support.ruckuswireless.com/
Show Technical Support Commands
Use the following commands to display information that Ruckus Wireless may need
when providing technical support.
show techsupport
To display system information required by Technical Support, use the following
command:
show techsupport
Syntax Description
Defaults None.
Example ruckus# show techsupport
System Overview
========================================================
System Name: airespider
show Display information
techsupport Display information about the controller that may be
required by Ruckus Wireless Technical Support

44
Viewing Current Configuration
Show Technical Support Commands
IP Address: 192.168.0.1
MAC Address: 00:23:AE:8F:1C:0B
Uptime: 019d 14h 01m
Model: ZD3025
Licensed APs: 25
Serial Number: SN-cygwin
Version: 8.2.0.0 build 1111
Devices Overview
========================================================
# of APs: 5
# of Client Devices: 73
# of Rogue Devices: 5
Usage Summary
========================================================
1 hr
Max Concurrent Users: 73
Bytes Transmitted: 38
# of Rogue Devices: 5
--------------------------------------------------------
24 hr
Max Concurrent Users: 103
Bytes Transmitted: 69
# of Rogue Devices: 0
User Activities
========================================================
Date/Time Severity User Activities
--------------------------------------------------------
System Activities
========================================================
Date/Time Severity Activities
--------------------------------------------------------
2009/10/29 19:01:52 High A new Rogue[00:1E:2D:55:FF:20] with
SSID[unknown] is detected
2009/10/29 19:01:51 High A new Rogue[00:1E:2D:55:FF:19] with
SSID[unknown] is detected
2009/10/29 19:01:50 High A new Rogue[00:1E:2D:55:FF:18] with
SSID[unknown] is detected

45
Viewing Current Configuration
Show Technical Support Commands
2009/10/29 19:01:49 Low WLAN[corporate] with
BSSID[00:1F:41:22:C2:D9] configuration has been updated on radio
[11g/n] of AP[Warehouse NW@00:13:92:EA:43:04]
2009/10/29 19:01:47 High A new Rogue[00:1E:2D:55:FF:88] with
SSID[data] is detected
2009/10/29 19:01:46 Low WLAN[corporate] with
BSSID[00:24:82:22:52:A9] configuration has been updated on radio
[11g/n] of AP[Warehouse NE@00:13:92:EA:43:01]
2009/10/29 19:01:45 High A new Rogue[00:13:92:EA:43:01] with
SSID[unknown] is detected
2009/10/29 19:01:44 High AP[Warehouse SE@00:13:92:EA:43:07]
fails to join
2009/10/29 19:01:43 Low AP[Warehouse NE@00:13:92:EA:43:04]
joins
2009/10/29 19:01:42 Low AP[Warehouse NE@00:13:92:EA:43:01]
joins
2009/10/29 19:01:41 Low System restarted
Used Access Points
========================================================
MAC Address IP Address Description Model Clients
--------------------------------------------------------
00:13:92:EA:43:01 10.1.0.10 Warehouse NE zf7962 31
00:13:92:EA:43:07 10.1.0.12 Warehouse SE zf7962 21
00:13:92:EA:43:04 10.1.0.11 Warehouse NW zf7962 8
00:13:92:EA:43:0D 10.1.0.14 AP5 zf2741 6
00:13:92:EA:43:0A 10.1.0.13 Warehouse SW zf7942 0
Support
========================================================
Company: Ruckus Wireless
Email: support@ruckuswireless.com
Support Website: http://support.ruckuswireless.com/
Mode: Manual
IP Address: 192.168.122.1
Netmask: 255.255.255.0
Gateway Address: 172.17.16.1
Primary DNS: 172.17.17.5
Secondary DNS: 192.168.0.107
Management VLAN
========================================================

46
Viewing Current Configuration
Show Technical Support Commands
Status: disabled
VLAN ID:
Country Code
========================================================
Country Code: United States
NTP
========================================================
Status: disabled
Address: 192.168.0.2
Log Settings
========================================================
Status: disabled
Address: 192.168.0.101
AAA Servers
========================================================
ID: 1
Name: Local Database
Type: local
--------------------------------------------------------
ID: 2
Name: Guest Accounts
Type: guestpass
--------------------------------------------------------
ID: 3
Name: Ruckus-Acct-01
Type: radius-acct
RADIUS Server IP Address: 192.168.0.123
RADIUS Server Port: 18130
RADIUS Server Shared Secret: vguvkpi345
--------------------------------------------------------
ID: 4
Name: Ruckus-Auth-01

47
Viewing Current Configuration
Show Technical Support Commands
Type: radius-auth
RADIUS Server IP Address: 192.168.0.123
RADIUS Server Port: 18120
RADIUS Server Shared Secret: testing123
--------------------------------------------------------
ID: 5
Name: Ruckus-Auth-02
Type: ad
Server IP Address: 192.168.0.3
Server Port: 18123
--------------------------------------------------------
WLAN Service
========================================================
ID: 1
Name: corporate
Description:
Authentication: open
Encryption: wpa
Algorithm: aes
Passphrase: test1234
Authentication Server: Disabled
Accounting Server: Disabled
Tunnel Mode: Disabled
Max Clients: 100
Web Authentication: Disabled
Client Isolation: Disabled
VLAN: Disabled
Closed System: Disabled (Broadcast SSID)
L2/MAC: No ACLS
L3/L4/IP address: No ACLS
--------------------------------------------------------
ID: 2
Name: guest
Description:
Authentication: open
Encryption: none
Authentication Server: Disabled

48
Viewing Current Configuration
Show Technical Support Commands
Accounting Server: Disabled
Tunnel Mode: Disabled
Max Clients: 100
Web Authentication: Disabled
Client Isolation: Enabled
VLAN: Disabled
Closed System: Disabled (Broadca
49
Viewing Current Configuration
Show WLAN Commands
Show WLAN Commands
Use the following commands to display information about available WLANs on the
controller.
show wlan all
To display all available WLAN services (SSIDs), use the following command:
show wlan all
Syntax Description
Defaults None.
Example ruckus# show wlan all
WLAN Service
========================================================
ID: 1
Name: corporate
Description:
Authentication: open
Encryption: wpa
Algorithm: aes
Passphrase: test1234
Authentication Server: Disabled
Accounting Server: Disabled
Tunnel Mode: Disabled
Max Clients: 100
Web Authentication: Disabled
Client Isolation: Disabled
VLAN: Disabled
Closed System: Disabled (Broadcast SSID)
L2/MAC: No ACLS
L3/L4/IP address: No ACLS
--------------------------------------------------------
ID: 2
Name: guest
show Display information
wlan Display WLAN services (SSIDs) settings
all All available WLANs/SSIDs

50
Viewing Current Configuration
Show WLAN Commands
Description:
Authentication: open
Encryption: none
Authentication Server: Disabled
Accounting Server: Disabled
Tunnel Mode: Disabled
Max Clients: 100
Web Authentication: Disabled
Client Isolation: Enabled
VLAN: Disabled
Closed System: Disabled (Broadcast SSID)
L2/MAC: No ACLS
--------------------------------------------------------
ID: 3
Name: lobby
Description:
Authentication: open
Encryption: wpa
Algorithm: aes
Passphrase: test1234
Authentication Server: Disabled
Accounting Server: Disabled
Tunnel Mode: Disabled
Max Clients: 100
Web Authentication: Disabled
Client Isolation: Disabled
VLAN: Disabled
Closed System: Disabled (Broadcast SSID)
L2/MAC: No ACLS
L3/L4/IP address: No ACLS
--------------------------------------------------------
ID: 4
Name: kitchen
Description:
Authentication: open
Encryption: wpa
Algorithm: aes
Passphrase: test1234
Authentication Server: Disabled
Accounting Server: Disabled
51
Viewing Current Configuration
Show WLAN Commands
Tunnel Mode: Disabled
Max Clients: 100
Web Authentication: Disabled
Client Isolation: Disabled
VLAN: Disabled
Closed System: Disabled (Broadcast SSID)
L2/MAC: No ACLS
L3/L4/IP address: No ACLS
--------------------------------------------------------
ID: 5
Name: randy-wlansvc-01
Description: Randall Tsao Test WLAN
Authentication: 802.1x-eap
Encryption: wpa
Algorithm: aes
Passphrase:
Authentication Server: Ruckus-Auth-01
Accounting Server: Ruckus-Acct-01 Interim-Update: 5
Tunnel Mode: Disabled
Max Clients: 100
Web Authentication: Enabled
Client Isolation: Enabled
VLAN: Enabled (ID=12)
Closed System: Enabled (Hide SSID)
L2/MAC: No ACLS
--------------------------------------------------------
show wlan name
To display information about the specified WLAN service (SSID), use the following
command:
show wlan name {WLAN name}
Syntax Description
Defaults None.
Example ruckus# show wlan name corporate
show Display information
wlan name Display information about the specified WLAN name
{WLAN name} The name of the WLAN
52
Viewing Current Configuration
Show WLAN Commands
ID: 1
Name: corporate
Description:
Authentication: open
Encryption: wpa
Algorithm: aes
Passphrase: test1234
Authentication Server: Disabled
Accounting Server: Disabled
Tunnel Mode: Disabled
Max Clients: 100
Web Authentication: Disabled
Client Isolation: Disabled
VLAN: Disabled
Closed System: Disabled (Broadcast SSID)
L2/MAC: No ACLS
L3/L4/IP address: No ACLS
--------------------------------------------------------
show wlan name stations
To display a list of wireless stations associated with the specified WLAN service, use
the following command:
show wlan name {WLAN name} stations
Syntax Description
Defaults None.
Example ruckus# show wlan name corporate station
Clients
========================================================
MAC Address: 00:10:77:01:00:01
User/IP Address: jyang
Access Point: 00:13:92:EA:43:01
WLAN: corporate
Channel: 64
Signal (%): 11
show Display information
wlan name Display information about the specified WLAN name
{WLAN name} The name of the WLAN
stations Display stations associated with the WLAN

53
Viewing Current Configuration
Show WLAN Commands
--------------------------------------------------------
MAC Address: 00:10:77:01:00:02
User/IP Address: bob
Access Point: 00:13:92:EA:43:01
WLAN: corporate
Channel: 60
Signal (%): 26
--------------------------------------------------------
MAC Address: 00:D4:05:01:03:03
User/IP Address: user0001
Access Point: 00:13:92:EA:43:01
WLAN: corporate
Channel: 48
Signal (%): 42
--------------------------------------------------------
MAC Address: 00:10:77:01:00:01
User/IP Address: jyang
Access Point: 00:13:92:EA:43:01
WLAN: corporate
Channel: 11
Signal (%): 22
--------------------------------------------------------
MAC Address: 00:10:77:01:00:02
User/IP Address: bob
Access Point: 00:13:92:EA:43:01
WLAN: corporate
Channel: 1
Signal (%): 40
--------------------------------------------------------
MAC Address: 00:C9:21:01:01:03
User/IP Address: user0002
Access Point: 00:13:92:EA:43:01
WLAN: corporate
Channel: 1
Signal (%): 33
--------------------------------------------------------
MAC Address: 00:0D:E5:01:01:04
User/IP Address: user0003
Access Point: 00:13:92:EA:43:01
WLAN: corporate
Channel: 1
Signal (%): 18
54
Viewing Current Configuration
Show WLAN Group Commands
--------------------------------------------------------
MAC Address: 00:C2:7D:01:01:05
User/IP Address: user0004
Access Point: 00:13:92:EA:43:01
WLAN: corporate
Channel: 6
Signal (%): 32
--------------------------------------------------------
MAC Address: 00:F5:35:02:03:01
User/IP Address: user0005
Access Point: 00:13:92:EA:43:04
WLAN: corporate
Channel: 52
Signal (%): 22
--------------------------------------------------------
MAC Address: 00:75:28:03:03:01
User/IP Address: user0006
Access Point: 00:13:92:EA:43:07
WLAN: corporate
Channel: 52
Signal (%): 34
--------------------------------------------------------
Show WLAN Group Commands
Use the following commands to display information about the WLAN groups that exist
on the controller.
show wlan-group all
To display a list of existing WLAN groups, use the following command:
show wlan-group all
Syntax Description
Defaults None.
Example ruckus# show wlan-group all
WLAN Group List
show Display information
wlan-group Display information about the specified WLAN group
all Show all WLAN groups

55
Viewing Current Configuration
Show WLAN Group Commands
========================================================
WLAN Group
========================================================
ID: 1
Name: Default
Has-VLAN: true
WLAN Service: randy-wlansvc-01 (VLAN=)
--------------------------------------------------------
show wlan-group name
To display information about the specified WLAN group name, use the following
command:
show wlan-group name {WLAN group name}
Syntax Description
Defaults None.
Example ruckus# show wlan-group name Default
WLAN Group
========================================================
ID: 1
Name: Default
Has-VLAN: true
WLAN Service: randy-wlansvc-01 (VLAN=)
--------------------------------------------------------
show Display information
wlan-group name Display information about the specified WLAN group name
{WLAN group name} The name of the WLAN group

56
3
Configuring Controller Settings
In This Chapter
Configuration Commands Overview. . . . . . . . . . . . . . . . . . . . . . . . . . . . . . . . . . . . . . . . . . . 57
Configure AAA Server Settings . . . . . . . . . . . . . . . . . . . . . . . . . . . . . . . . . . . . . . . . . . . . . . . 57
Configure Administration Preferences . . . . . . . . . . . . . . . . . . . . . . . . . . . . . . . . . . . . . . . . . 63
Configure Device’s System Information . . . . . . . . . . . . . . . . . . . . . . . . . . . . . . . . . . . . . . . . 66
Configure the 2.4GHz Radio Commands . . . . . . . . . . . . . . . . . . . . . . . . . . . . . . . . . . . . . . . 82
Configure the 5GHz Radio Commands. . . . . . . . . . . . . . . . . . . . . . . . . . . . . . . . . . . . . . . . . 84
Configure Management VLAN Commands . . . . . . . . . . . . . . . . . . . . . . . . . . . . . . . . . . . . . 86
Configure Layer 2 Access Control Commands. . . . . . . . . . . . . . . . . . . . . . . . . . . . . . . . . . . 88
Configure Layer 3 Access Control Commands. . . . . . . . . . . . . . . . . . . . . . . . . . . . . . . . . . . 96
Configure Role Commands . . . . . . . . . . . . . . . . . . . . . . . . . . . . . . . . . . . . . . . . . . . . . . . . . 104
Configure User Commands . . . . . . . . . . . . . . . . . . . . . . . . . . . . . . . . . . . . . . . . . . . . . . . . . 110
Configure Guest Access Commands. . . . . . . . . . . . . . . . . . . . . . . . . . . . . . . . . . . . . . . . . . 114
Configure Hotspot Commands . . . . . . . . . . . . . . . . . . . . . . . . . . . . . . . . . . . . . . . . . . . . . . 124
Configure Certificate Commands . . . . . . . . . . . . . . . . . . . . . . . . . . . . . . . . . . . . . . . . . . . . 139
Configure Mesh Commands . . . . . . . . . . . . . . . . . . . . . . . . . . . . . . . . . . . . . . . . . . . . . . . . 141
Configure Alarm Commands . . . . . . . . . . . . . . . . . . . . . . . . . . . . . . . . . . . . . . . . . . . . . . . . 145
Configure Services Commands . . . . . . . . . . . . . . . . . . . . . . . . . . . . . . . . . . . . . . . . . . . . . . 151
Configure Load Balancing Commands . . . . . . . . . . . . . . . . . . . . . . . . . . . . . . . . . . . . . . . . 159
Configure System Commands . . . . . . . . . . . . . . . . . . . . . . . . . . . . . . . . . . . . . . . . . . . . . . . 163
Configure Syslog Settings Commands . . . . . . . . . . . . . . . . . . . . . . . . . . . . . . . . . . . . . . . . 176
Configure WLAN Group Settings Commands . . . . . . . . . . . . . . . . . . . . . . . . . . . . . . . . . . 205

57
Configuring Controller Settings
Configuration Commands Overview
Configuration Commands Overview
This chapter describes the commands that you can use to configure the different
settings on the controller. Commands are divided into sections, including:
■Configure AAA Server Settings
■Configure Administration Preferences
■Configure Device’s System Information
Configure AAA Server Settings
The config aaa context contains commands for configure the AAA server settings.
AAA server settings are classified into the following command types:
■Configure AAA Server Type Commands
■Configure AAA Network Addressing Commands
■Configure AAA RADIUS Commands
Configure AAA Server Type Commands
Use the aaa-type commands to set the type of AAA server that is used by the
controller for authentication purposes.
type ad
To set the AAA server type to Active Directory', use the following command:
type ad
Syntax Description
Defaults None.
Example ruckus# config aaa Ruckus-Auth-02
The AAA server 'Ruckus-Auth-02' has been updated. To save the AAA
server, type end or exit.
ruckus(config-aaa-Ruckus-Auth-02)# type ad
The command was executed successfully.
type ldap
To set the AAA server type to 'LDAP', use the following command:
type ldap
type ad Set the AAA server type to ActiveDirectory

58
Configuring Controller Settings
Configure AAA Server Settings
Syntax Description
Defaults None.
Example ruckus# config
ruckus(config)# aaa Ruckus-Auth-02
The AAA server 'Ruckus-Auth-02' has been updated. To save the AAA
server, type end or exit.
ruckus(config-aaa-Ruckus-Auth-02)# type ldap
The command was executed successfully.
type radius
To set the AAA server type to 'RADIUS', use the following command
type radius
Syntax Description
Defaults None.
Example ruckus# config
ruckus(config)# aaa Ruckus-Auth-02
The AAA server 'Ruckus-Auth-02' has been updated. To save the AAA
server, type end or exit.
ruckus(config-aaa-Ruckus-Auth-02)# type radius
The command was executed successfully.
type radius-acct
To set the AAA server type to 'RADIUS Accounting', use the following command:
type radius-acct
Syntax Description
Defaults None.
Example ruckus# config
type ldap Set the AAA server type to LDAP
type radius Set the AAA server type to RADIUS
type radius-acct Set the AAA server type to RADIUS Accounting

59
Configuring Controller Settings
Configure AAA Server Settings
ruckus(config)# aaa Ruckus-Auth-02
The AAA server 'Ruckus-Auth-02' has been updated. To save the AAA
server, type end or exit.
ruckus(config-aaa-Ruckus-Auth-02)# type radius-acct
The command was executed successfully.
Configure AAA Network Addressing Commands
Use the ip-addr commands to set the network address settings of AAA servers that
the controller is using.
ip-addr
To set the AAA server's IP address, use the following command:
ip-addr {IP address}
Syntax Description
Defaults None.
Example ruckus# config
ruckus(config)# aaa Ruckus-Auth-02
The AAA server 'Ruckus-Auth-02' has been updated. To save the AAA
server, type end or exit.
ruckus(config-aaa-Ruckus-Auth-02)# ip-addr 192.168.0.2
The command was executed successfully.
ip-addr port
To set the AAA server's IP address and port number, use the following command:
ip-addr {IP address} port {port number}
Syntax Description
Defaults None.
ip-addr Set the AAA server IP address
{IP address} Set to this IP address
ip-addr {IP
address}
Set the AAA server IP address to this IP address
port {port number} Set the AAA server to this port number to this port
60
Configuring Controller Settings
Configure AAA Server Settings
Example ruckus# config
ruckus(config)# aaa Ruckus-Auth-02
The AAA server 'Ruckus-Auth-02' has been updated. To save the AAA
server, type end or exit.
ruckus(config-aaa-Ruckus-Auth-02)# ip-addr 192.168.0.2 port
1812
The command was executed successfully.
Configure AAA RADIUS Commands
Use the radius commands to configure additional RADIUS server settings.
radius-secret
To set the AAA server's shared secret, use the following command:
radius-secret {RADIUS secret}
Syntax Description
Defaults None.
Example ruckus# config
ruckus(config)# aaa Ruckus-Auth-02
The AAA server 'Ruckus-Auth-02' has been updated. To save the AAA
server, type end or exit.
ruckus(config-aaa-Ruckus-Auth-02)# type radius
The command was executed successfully.
ruckus(config-aaa-Ruckus-Auth-02)# radius-secret testing123
The command was executed successfully.
radius-secret RADIUS server secret
{RADIUS secret} Set the RADIUS server secret to this secret

61
Configuring Controller Settings
Configure AAA Server Settings
Miscellaneous AAA Commands
This section lists miscellaneous AAA commands.
domain-name
To set the Windows/Base domain name, use the following command:
domain-name <domain_name>
Syntax Description
Defaults None.
Example ruckus(config-aaa)# domain-name company.com
The command was executed successfully. To save the changes, type
'end' or 'exit'.
no ad-global-catalog
To disable Global Catalog support, use the following command:
no ad-global-catalog
Syntax Description
Defaults None.
Example ruckus(config-aaa)# no ad-global-catalog
The command was executed successfully. To save the changes, type
'end' or 'exit'.
ad-global-catalog
To enable Global Catalog support, use the following command:
ad-global-catalog
Syntax Description
Defaults None.
domain-name Configure the Windows/Base domain name
<domain_name> Set the Windows/Base domain name to this domain name
no ad-global-
catalog
Disable Global Catalog support
ad-global-catalog Enable Global Catalog support

62
Configuring Controller Settings
Configure AAA Server Settings
Example ruckus(config-aaa)# ad-global-catalog
The command was executed successfully. To save the changes, type
'end' or 'exit'.
admin-dn
To set the admin domain name, use the following command:
admin-dn <admin_dn_name>
Syntax Description
Defaults None.
Example ruckus(config-aaa)# admin-dn domain_of_admin
The command was executed successfully. To save the changes, type
'end' or 'exit'.
admin-password
To set the admin password, use the following command:
admin-password <admin_password>
Syntax Description
Defaults None.
Example ruckus(config-aaa)# admin-password test1234
The command was executed successfully. To save the changes, type
'end' or 'exit'.
key-attribute
To set the LDAP key attribute, use the following command:
key-attribute <attribute>
Syntax Description
admin-dn Set the admin domain name
<admin_dn_name> Set to this domain name
admin-password Set the admin password
<admin_password> Set to this password
key-attribute Set the LDAP key attribute
<attribute> Set to this attribute

63
Configuring Controller Settings
Configure Administration Preferences
Defaults None.
Example ruckus(config-aaa)# key-attribute mycompany
The command was executed successfully. To save the changes, type
'end' or 'exit'.
search-filter
To set the LDAP search filter, use the following command:
search-filter <filter_name>
Syntax Description
Defaults None.
Example ruckus(config-aaa)# search-filter stringofsearch
The command was executed successfully. To save the changes, type
'end' or 'exit'.
Configure Administration Preferences
The config admin context contains commands for configuring and viewing
administrator login and authentication settings.
■Configure Admin Login Commands
■Configure Admin Authentication Commands
■Display Administrator Account Settings
Configure Admin Login Commands
Use the admin-name commands to set the admin user name and password.
name
To set the administrator user name, use the following command:
name {admin name}
Syntax Description
search-filter Set the LDAP search filter
<filter_name> Set to this filter
name Configure the admin name setting
{admin name} Set the admin name to this name

64
Configuring Controller Settings
Configure Administration Preferences
Defaults admin
Example ruckus(config)# admin
ruckus(config-admin)# name admin
The command was executed successfully.
name password
To set the admin name and password at the same time, use the following command:
name {admin name} password {password}
Syntax Description
Defaults admin
Example ruckus(config)# admin
ruckus(config-admin)# name admin password admin
The command was executed successfully.
Configure Admin Authentication Commands
Use the auth-server commands to set the administrator authentication options
with an external authentication server.
no auth-server
To disable administrator authentication with a remote server, use the following
command:
no auth-server
Syntax Description
Defaults None.
Example ruckus(config-admin)# no auth-server
The command was executed successfully.
name Configure the admin name setting
{admin name} Set the admin name to this name
password Configure the admin password
{password} Set the admin password to this password
no auth-server Disable admin authentication with an external server

65
Configuring Controller Settings
Configure Administration Preferences
auth-server
To enable administrator authentication with a remote server and set the
authentication server, use the following command:
auth-server {server name}
Syntax Description
Defaults None.
Example ruckus(config-admin)# auth-server s
The AAA server 's' could not be found. Please check the spelling,
and then try again.
Invalid command
ruckus(config-admin)# auth-server Ruckus-Auth-02
The command was executed successfully.
auth-server with fallback
To enable fallback authentication (for use when the remote server is unavailable), use
the following command:
auth-server with fallback
Syntax Description
Defaults None.
Example ruckus(config-admin)# auth-server Ruckus-Auth-02 with fallback
The command was executed successfully.
auth-server Admin authentication with an external server
{server name} Set the authentication server to this server
auth-server Admin authentication with an external server
{server name} Set the auth-server to this server
with fallback Enable fallback authentication if the remote authentication
server is unavailable

66
Configuring Controller Settings
Configure Device’s System Information
Display Administrator Account Settings
Use the admin show command to display the administrator account settings.
admin show
To display the current admin user name and password, use the following command:
admin show
Syntax Description
Defaults None.
Example ruckus(config-admin)# show
Administrator Info
========================================================
Admin Name: admin
Password: admin
x-Password: benjo
Auth Mode: Authenticate using the admin user name and password
Configure Device’s System Information
Use the ap commands to configure the device’s system information, including the
device name, description, and location.
ap
Setting the device’s system information requires that first enter the config-ap
context. To enter the config-ap context, enter the following command:
ap {MAC address}
Syntax Description
Defaults None.
Example To configure the device with the specified MAC address, run this command:
ruckus# conf ap 00:13:92:00:33:1C
admin Admin setting
show Show current adminiatrator settings
ap Access point
{MAC address} MAC address of the access point for configuration

67
Configuring Controller Settings
Configure Device’s System Information
devname
To set the device name, use the following command:
devname {device name}
Syntax Description
Defaults None.
Example ruckus# conf ap 00:13:92:00:33:1C
ruckus(config-ap-00:13:92:00:33:1C)# devname Ruckus-AP-1C
The command was executed successfully.
description
To set the device description, use the following command:
description {description}
Syntax Description
Defaults None.
Example ruckus# config
ruckus(config)# ap 00:13:92:00:33:1C
ruckus(config-ap-00:13:92:00:33:1C)# description this-is-the-
device-description
The command was executed successfully.
location
To set the device location, use the following command:
location {location}
Syntax Description
devname Device name
{device name} Set the device name to this name
description Device description
{description} Set the device description to this text
location Device location
{location} Set the device location to this address

68
Configuring Controller Settings
Configure Device’s System Information
Defaults None.
Example To set the device location to Sunnyvale-Office, run this command:
ruckus# config
ruckus(config)# ap 00:13:92:00:33:1C
ruckus(config-ap-00:13:92:00:33:1C)# location Sunnyvale-Office
The command was executed successfully.

69
Configuring Controller Settings
Configure Device’s System Information
Configure Device Policy Commands
Use the ap-policy commands to configure the device’s radio, heater, LED, and port
state settings. To run these commands, you must first enter the config-ap-policy
context.
For example, to configure a ZoneFlex 7762 AP, enter the following command:
ruckus(config-ap-policy)# ap-model zf7762
ruckus(config-ap-model)#
show
To display the current device policy, use the following command:
show
Syntax Description
Defaults None.
Example ruckus(config-ap-policy)# show
AP Policy:
Automatically approve all join requests from APs= Disabled
Limited ZD Discovery= Enabled
Primary ZoneDirector IP= 172.18.30.12
Secondary ZoneDirector IP= 172.18.30.28
Management VLAN Mode= Enabled
VLAN ID= 60
limited-zd-discovery zd-ip
To configure devices to connect to a specific ZoneDirector and to set the primary and
secondary ZoneDirector’s IP addresses, use the following command:
limited-zd-discovery zd-ip [<primary_ip_addr> |
<secondary_ip_addr>]
Syntax Description
Defaults None.
show Display the current device policy
limited-zd-
discovery zd-ip
Configure devices to connect to a specific ZoneDirector
<primary_ip_addr> IP address of the primary ZoneDirector
<secondary_ip_add
r>
IP address of the secondary ZoneDirector

70
Configuring Controller Settings
Configure Device’s System Information
ap-max-clients
To set the maximum number of wireless clients that can associate with each device,
use the following command:
ap-max-clients {NUMBER}
Syntax Description
Defaults None.
Example ruckus(config-ap-policy)# ap-max-clients 99
The Max clients of AP management has been updated.
ap-radio 2.4 tx-power [Auto | Full|1/2|1/4|1/8|Min]
To set the TX power of the device’s 2.4GHz radio, use the following command:
ap-radio 2.4 tx-power [Auto | Full|1/2|1/4|1/8|Min]
Syntax Description
Defaults None.
Example ruckus(config-ap-policy)# ap-radio 2.4 tx-power 1/4
The command was executed successfully.
ap-radio 2.4 11n-only [Auto | N-only]
To set the 11n mode of the 2.4GHz radio, use the following command:
ap-radio 2.4 11n-only [Auto|N-only]
Syntax Description
ap-max-clients Set the maximum number of clients per AP
{NUMBER} Set to this number
ap-radio 2.4 tx-
power
Set the TX power of the 2.4GHz radio
[Auto|Full|1/2|1/
4|1/8|Min]
Set to this value
ap-radio 2.4 11n-
only
Set the 802.11n mode of 2.4GHz radio
Auto Set to auto mode
N-only Set to 11n only mode

71
Configuring Controller Settings
Configure Device’s System Information
Defaults None.
Example ruckus(config-ap-policy)# ap-radio 2.4 11n-only Auto
The command was executed successfully.
ap-radio 5 tx-power
To set the TX power of the 5GHz radio, use the following command:
ap-radio 5 tx-power [Auto | Full|1/2|1/4|1/8|Min]
Syntax Description
Defaults None.
Example ruckus(config-ap-policy)# ap-radio 5 tx-power 1/4
The command was executed successfully.
ap-radio 5 11n-only
To set the 11n mode of the 5GHz radio, use the following command:
ap-radio 5 11n-only [Auto|N-only]
Syntax Description
Defaults None.
Example ruckus(config-ap-policy)# ap-radio 5 11n-only N-only
The command was executed successfully.
ap-radio 5 tx-
power
Set the TX power of the 5GHz radio
[Auto|Full|1/2|1/
4|1/8|Min]
Set to this value
ap-radio 5 11n-
only
Set the 802.11n mode of 5GHz radio
Auto Set to auto mode
N-only Set to 11n only mode

72
Configuring Controller Settings
Configure Device’s System Information
ap-internal-heater
To enable the internal heater on ZoneFlex 7762 devices, use the following command:
ap-internal-heater
Syntax Description
Defaults None.
Example ruckus(config-ap-policy)# ap-internal-heater
The command was executed successfully.
ap-poe-port
To enable the PoE-Out port on ZoneFlex 7762 devices, use the following command:
ap-poe-port
Syntax Description
Defaults None.
Example ruckus(config-ap-policy)# ap-poe-port
The command was executed successfully.
led
To enable the Status LED on ZF 7343/7363/ZF7341/ZF 7762/7762-S/7762-T devices,
use the following command:
led [ all | zf7343/7363/7341 |zf7762/7762-s/7762-t]
Syntax Description
Defaults None.
Example ruckus(config-ap-policy)# led zf7343/7363/7341
ap-internal-
heater
Enable the internal heater on ZoneFlex 7762 devices
ap-poe-port Enable the PoE-OUT port on ZoneFlex 7762 devices
led Enable the Status LED
[ all|zf7343/
7363/7341|zf7762/
7762-s/7762-t]
Enable on these devices

73
Configuring Controller Settings
Configure Device’s System Information
The command was executed successfully.
ap-management-vlan
To enable and configure the device policy management VLAN, use the following
command:
ap-management-vlan {NUMBER}
Syntax Description
Defaults None.
Example ruckus(config-ap-policy)# ap-management-vlan 60
The command was executed successfully.
no ap-management-vlan
To disable the device policy management VLAN, use the following command:
no ap-management-vlan
Syntax Description
Defaults None.
ap-auto-approve
To enable the automatic approval of join requests from devices, use the following
command:
ap-auto-approve
Syntax Description
Defaults None.
Example ruckus(config-ap-policy)# ap-auto-approve
The AP automatically approve policy has been updated.
ap-management-
vlan
Enable and configure the device policy management VLAN
{NUMBER} Set the management VLAN ID to this
no ap-management-
vlan
Disable the device policy management VLAN
ap-auto-approve Enable the automatic approval of join requests from
devices

74
Configuring Controller Settings
Configure Device’s System Information
no ap-auto-approve
To disable the automatic approval of join requests from devices, use the following
command:
no ap-auto-approve
Syntax Description
Defaults None.
limited-zd-discovery
To specify the ZoneDirectors that devices can join, use the following command:
limited-zd-discovery zd-ip [<primary_ip_addr> |
<secondary_ip_addr>]
Syntax Description
Defaults None.
Example ruckus(config-ap-policy)#limited-zd-discovery zd-ip
172.18.30.12 172.18.30.28
The Limited ZoneDirector discovery function has been updated.
no limited-zd-discovery
To allow devices to join any available ZoneDirector devices on the network, use the
following command:
no limited-zd-discovery
Syntax Description
Defaults None.
no ap-auto-
approve
Disable the automatic approval of join requests from
devices
limited-zd-
discovery zd-ip
Specify the ZoneDirectors that devices can join
<primary_ip_addr> IP address of the primary ZoneDirector
<secondary_ip_add
r>
IP address of the secondary ZoneDirector
no limited-zd-
discovery
Allow devices to join any available ZoneDirector devices on
the network

75
Configuring Controller Settings
Configure Device’s System Information
no ap-internal-heater
To disable the internal heater on ZoneFlex 7762 devices, use the following command:
no ap-internal-heater
Syntax Description
Defaults None.
no ap-poe-port
To disable the PoE-Out port on ZoneFlex 7762 devices, use the following command:
no ap-poe-port
Syntax Description
Defaults None.
no led
To disable the Status LED on ZF 7343/7363/ZF7341/ZF 7762/7762-S/7762-T devices,
use the following command:
no led [ all | zf7343/7363/7341 |zf7762/7762-s/7762-t]
Syntax Description
Defaults None.
ap_model
To configure the port state of supported devices, use the following command:
ap_model [zf7025|zf7942|zf7962|zf7762|zf7762-s|zf7762-
t|zf7343|zf7363|zf2942|zf2741]
Entering the above command enable you to enter the ruckus(config-ap-
model)# context. See “Configure Device Port State Commands” on page 77 for
commands that you can execute within that context.
no ap-internal-
heater
Disable the internal heater on ZoneFlex 7762 devices
no ap-poe-port Disable the PoE-OUT port on ZoneFlex 7762 devices
no led Disable the Status LED
[ all|zf7343/
7363/7341|zf7762/
7762-s/7762-t]
Disable on these devices

76
Configuring Controller Settings
Configure Device’s System Information
Syntax Description
Defaults None.
ap_model Configure the port state of supported devices
[ all|zf7343/
7363/7341|zf7762/
7762-s/7762-t]
Configure these devices

77
Configuring Controller Settings
Configure Device’s System Information
Configure Device Port State Commands
Use the config-ap-model commands to configure the port state of supported
devices.
abort
To exit the config-ap-model context without saving changes, use the following
command:
abort
Syntax Description
Defaults None.
Example ruckus(config-ap-model)# abort
No changes have been saved.
ruckus(config-ap-policy)#
end
To save changes, and then exit the config-ap-model context, use the following
command:
end
Syntax Description
Defaults None.
Example ruckus(config-ap-model)# end
Your changes have been saved.
exit
To save changes, and then exit the config-ap-model context, use the following
command:
exit
Syntax Description
abort Exit the context without saving changes
end Save changes, and then exit the context
exit Save changes, and then exit the context

78
Configuring Controller Settings
Configure Device’s System Information
Defaults None.
Example ruckus(config-ap-model)# exit
Your changes have been saved.
ruckus(config-ap-policy)#
quit
To exit the config-ap-model context without saving changes, use the following
command:
quit
Syntax Description
Defaults None.
Example ruckus(config-ap-model)# quit
No changes have been saved.
ruckus(config-ap-policy)#
show
To show a device’s port state, use the following command:
show
Syntax Description
Defaults None.
Example ruckus(config-ap-model)# show
Model= zf2942
PORT_STATUS PORT_TYPE VLAN_ID
LAN 1 Enable Trunk Port 23
LAN 2 Enable Trunk Port 20
no lan
To disable a specific port on devices, use the following command:
no lan <port_number>
quit Exit the context without saving changes
show Display the device’s port state

79
Configuring Controller Settings
Configure Device’s System Information
Syntax Description
Defaults None.
Example ruckus(config-ap-model)# no lan 2
ruckus(config-ap-model)#
lan
To enable a specific port on devices, use the following command:
lan <port_number>[ access-port |trunk-port] [NO_VLAN | vlan_id
<ap_vlan_id>]
Syntax Description
Defaults None.
Example ruckus(config-ap-model)# lan 2
ruckus(config-ap-model)#
ruckus(config-ap-model)# lan 2 access-port vlan-id 20
The command was executed successfully.
ruckus(config-ap-model)# lan 1 trunk-port vlan-id 22
The command was executed successfully.
no lan Disable a specific port on devices
<port_number> Disable this port
lan Disable a specific port on devices
<port_number> Disable this port
[ access-port
|trunk-port]
Set the port type
NO_VLAN Disable VLAN
vlan_id
<ap_vlan_id>
Enable VLAN and set the VLAN ID

80
Configuring Controller Settings
Configure Device’s System Information
Configure Device Network Addressing Commands
Use the config ap ip-addr commands to configure the device’s IP address,
netmask, gateway, and IP addressing mode.
ip addr
To set the device's IP address and netmask, use the following command:
ip addr {IP address} {netmask}
Use a space ( ) to separate the IP address and netmask.
Syntax Description
Defaults None.
Example ruckus# config
ruckus(config)# ap 00:13:92:00:33:1C
ruckus(config-ap-00:13:92:00:33:1C)# ip addr 192.168.0.33
255.255.255.0
The command was executed successfully.
ip addr gateway
To set the device's IP address, netmask, and gateway IP address at the same time, use
the following command:
ip addr {IP address} {netmask} gateway {gateway IP address}
Syntax Description
Defaults None.
Example ruckus# config
ruckus(config)# ap 00:13:92:00:33:1C
ip addr IP address
{IP address} Set the IP address to this address
{netmask} Set the netmask to this address
ip addr IP address
{IP address} Set the IP address to this address
{netmask} Set the netmask to this address
gateway Gateway IP address
{gateway IP address} Set the gateway IP address to this address

81
Configuring Controller Settings
Configure Device’s System Information
ruckus(config-ap-00:13:92:00:33:1C)# ip addr 192.168.0.33
255.255.255.0 gateway 192.168.0.1
The command was executed successfully.
ip mode
To set the device's IP address mode setting, use the following command:
ip mode {dhcp | static | keep}
Syntax Description
Defaults None.
Example To set the device’s IP address mode to ‘static’, run this command:
ruckus# config
ruckus(config)# ap 00:13:92:00:33:1C
ruckus(config-ap-00:13:92:00:33:1C)# ip mode static
The command was executed successfully.
ip name-server
To set the device's DNS servers, use the following command:
ip name-server {NS1} {NS2}
Use a space ( ) to separate the primary and secondary DNS servers.
Syntax Description
Defaults None.
Example ruckus# config
ruckus(config)# ap 00:13:92:00:33:1C
ruckus(config-ap-00:13:92:00:33:1C)# ip name-server 192.168.0.2
192.168.0.3
The command was executed successfully.
ip mode IP address mode
{dhcp} Set the device’s IP address mode to DHCP
{static} Set the device’s IP address mode to static
{keep} Leave the IP address mode unchanged
ip name-server Nameserver IP addresses
{NS1} Set the primary nameserver to this IP address
{NS2} Set the secondary nameserver to this IP address

82
Configuring Controller Settings
Configure the 2.4GHz Radio Commands
Configure the 2.4GHz Radio Commands
Use the radio 2.4 commands to configure the 2.4GHz radio settings of a device.
To run these commands, you must first enter the config-ap context.
radio 2.4 channel
To set the 2.4GHz radio to use a specific channel, use the following command:
radio 2.4 channel {channel number}
Syntax Description
Defaults None.
Example To set the 2.4Ghz radio to channel 1, enter this command:
ruckus# config
ruckus(config)# ap 00:13:92:00:33:1C
ruckus(config-ap-00:13:92:00:33:1C)# radio 2.4 channel 1
The command was executed successfully.
radio 2.4 channel auto
To set the 2.4GHz radio to use 'Auto' channel, use the following command:
radio 2.4 channel auto
Syntax Description
Defaults None.
Example ruckus# config
ruckus(config)# ap 00:13:92:00:33:1C
ruckus(config-ap-00:13:92:00:33:1C)# radio 2.4 channel auto
The command was executed successfully.
radio 2.4 2.4GHz radio settings
channel Radio channel
{channel number} Set the radio channel to this number
radio 2.4 2.4GHz radio settings
channel Radio channel
auto Set the radio channel to ‘auto’

83
Configuring Controller Settings
Configure the 2.4GHz Radio Commands
radio 2.4 tx-power
To set the 2.4GHz radio to use a specific TX power setting, use the following command:
radio 2.4 tx-power {TX power}
Syntax Description
Defaults None.
Example To set the TX power to 1, run this command:
ruckus# config
ruckus(config)# ap 00:13:92:00:33:1C
ruckus(config-ap-00:13:92:00:33:1C)# radio 2.4 tx-power 1
The command was executed successfully.
radio 2.4 tx-power auto
To set the 2.4GHz radio to use auto TX power setting, use the following command:
radio 2.4 tx-power auto
Syntax Description
Defaults None.
Example ruckus# config
ruckus(config)# ap 00:13:92:00:33:1C
ruckus(config-ap-00:13:92:00:33:1C)# radio 2.4 tx-power auto
The command was executed successfully.
radio 2.4 wlan-group
To asssign the 2.4GHz radio to the specific WLAN group, use the following command:
radio 2.4 wlan-group {WLAN group name}
Syntax Description
radio 2.4 2.4GHz radio settings
tx-power TX power setting
{TX power} Set the TX power to this number
radio 2.4 2.4GHz radio settings
tx-power TX power setting
auto Set the TX power to auto
radio 2.4 2.4GHz radio settings

84
Configuring Controller Settings
Configure the 5GHz Radio Commands
Defaults None.
Example To assign the 2.4GHz radio to a WLAN group named Default, run this command:
ruckus# config
ruckus(config)# ap 00:13:92:00:33:1C
ruckus(config-ap-00:13:92:00:33:1C)# radio 2.4 wlan-group Default
The command was executed successfully.
Configure the 5GHz Radio Commands
Use the radio 5 commands to configure the 5GHz radio settings
of a device. To run these commands, you must first enter the config-ap context.
radio 5 channel
To set the 5GHz radio to a specific channel, use the following command:
radio 5 channel {channel number}
Syntax Description
Defaults None.
Example To set the 5GHz channel to 100, run this command:
ruckus# config
ruckus(config)# ap 00:13:92:00:33:1C
ruckus(config-ap-00:13:92:00:33:1C)# radio 5 channel 100
The command was executed successfully.
radio 5 channel auto
To set the 5GHz radio to use 'Auto' channel, use the following command:
radio 5 channel auto
Syntax Description
wlan-group WLAN group
{WLAN group name} Assign the radio to this WLAN group
radio 5 5GHz radio settings
channel Radio channel
{channel number} Set the radio channel to this number
radio 5 5GHz radio settings

85
Configuring Controller Settings
Configure the 5GHz Radio Commands
Defaults None.
Example ruckus# config
ruckus(config)# ap 00:13:92:00:33:1C
ruckus(config-ap-00:13:92:00:33:1C)# radio 5 channel auto
The command was executed successfully.
radio 5 tx-power
To set the 5GHz radio to use a specific TX power setting, use the following command:
radio 5 tx-power {TX power}
Syntax Description
Defaults None.
Example To set the 5GHz radio TX power to 1, enter this command:
ruckus# config
ruckus(config)# ap 00:13:92:00:33:1C
ruckus(config-ap-00:13:92:00:33:1C)# radio 5 tx-power 1
The command was executed successfully.
radio 5 tx-power auto
To set the 5GHz radio to use auto TX power setting, use the following command:
radio 5 tx-power auto
Syntax Description
Defaults None.
channel Radio channel
auto Set the radio channel to ‘auto’
radio 5 5GHz radio settings
tx-power TX power settings
{TX power} Set the TX power to this number
radio 5 5GHz radio settings
tx-power TX power settings
auto Set the TX power to auto

86
Configuring Controller Settings
Configure Management VLAN Commands
Example ruckus# config
ruckus(config)# ap 00:13:92:00:33:1C
ruckus(config-ap-00:13:92:00:33:1C)# radio 5 tx-power auto
The command was executed successfully.
radio 5 wlan-group
To asssign the 5GHz radio to the specific WLAN group, use the following command:
radio 5 wlan-group {WLAN group name}
Syntax Description
Defaults None.
Example To assign the 5GHz radio to a WLAN group named Default, enter this command:
ruckus# config
ruckus(config)# ap 00:13:92:00:33:1C
ruckus(config-ap-00:13:92:00:33:1C)# radio 5 wlan-group Default
The command was executed successfully.
Configure Management VLAN Commands
Use the config ap management vlan commands to configure and display the
management VLAN settings.
ap-management-vlan
To enable the device's policy VLAN and update the VLAN ID to the specified ID
number, use the following command:
ap-management-vlan {vlan id}
Syntax Description
Defaults Disabled.
Example ruckus(config)# ap-management-vlan 3
radio 5 Configure the 5GHz radio settings
wlan-group WLAN group settings
{WLAN group name} Assign the radio to this WLAN group
ap-management-vlan Management VLAN settings
{vlan id} Set the management VLAN ID to this value

87
Configuring Controller Settings
Configure Management VLAN Commands
The AP management VLAN has been updated.
ruckus(config)#

88
Configuring Controller Settings
Configure Layer 2 Access Control Commands
Configure Layer 2 Access Control Commands
Use the layer2 access control commands to configure the Layer 2 Access
Control List settings. To run these commands, you must first enter the config-l2acl
context.
To enter the config-l2acl context, run this command:
ruckus# config
ruckus(config)# l2acl L2ACL-policy
ruckus(config-l2acl-L2ACL-policy)#
abort
To exit the config-l2acl context without saving changes, use the following
command:
abort
Syntax Description
Defaults None.
Example ruckus(config-l2-acl)# abort
No changes have been saved.
ruckus(config)#
end
To save changes, and then exit the config-l2acl context, use the following
command:
end
Syntax Description
Defaults None.
Example ruckus(config-l2-acl)# end
The L2 ACL entry has saved successfully.
Your changes have been saved.
ruckus(config)#
abort Exit the config-l2acl context without saving changes
end Save changes and exit the config-l2acl context

89
Configuring Controller Settings
Configure Layer 2 Access Control Commands
exit
To save changes, and then exit the config-l2acl context, use the following
command:
exit
Syntax Description
Defaults None.
Example ruckus(config-l2-acl)# exit
The L2 ACL entry has saved successfully.
Your changes have been saved.
ruckus(config)#
quit
To exit the config-l2acl context without saving changes, use the following
command:
quit
Syntax Description
Defaults None.
Example ruckus(config-l2-acl)# abort
No changes have been saved.
ruckus(config)#
show
To displays the L2 ACL settings, use the show command. You must run this command
from within the config-l2acl context.
show
Syntax Description
Defaults None.
exit Save changes and exit the config-l2acl context
quit Exit the config-l2acl context without saving changes
show Display the Layer 2 access control list settings

90
Configuring Controller Settings
Configure Layer 2 Access Control Commands
Example ruckus(config-l2-acl)# show
L2/MAC ACL:
ID:
3:
Name= test
Description=
Restriction: Deny only the stations listed below
Stations:
MAC Address= 00:01:02:34:44:55
MAC Address= 00:01:02:34:44:56
no acl
To delete an L2 ACL, use the following command:
no acl {ACL name}
Syntax Description
Defaults None.
Example ruckus# config
ruckus(config)# no acl L2_ACL_NAME
The L2 ACL 'L2_ACL_NAME' has been deleted.
acl
To create a new L2 ACL entry or update an existing entry, use the following command:
acl {ACL name}
Syntax Description
Defaults None.
Example ruckus# config
ruckus(config)# l2acl L2_ACL_NAME
The L2 ACL entry 'L2_ACL_NAME' has been created.
ruckus(config-l2acl-L2_ACL_NAME)#
no acl Delete an existing ACL
{ACL name} Delete this ACL
acl Create a new ACL
{ACL name} Assign this name to the new ACL

91
Configuring Controller Settings
Configure Layer 2 Access Control Commands
abort
To exit the config-l2acl-{ACL name} context without saving changes, use the
following command:
acl {ACL name} abort
Syntax Description
Defaults None.
Example ruckus# config
ruckus(config)# l2acl L2_ACL_NAME
The L2 ACL entry 'L2_ACL_NAME' has been created.
ruckus(config-l2acl-L2_ACL_NAME)# abort
No changes have been saved.
end
To save changes, and then exite the config-l2acl-{ACL name} context, use the
following command:
acl {ACL name} end
Syntax Description
Defaults None.
Example ruckus# config
ruckus(config)# l2acl L2_ACL_NAME
The L2 ACL entry 'L2_ACL_NAME' has been created.
ruckus(config-l2acl-L2_ACL_NAME)# end
Your changes have been saved.
exit
To save changes, and then exit the config-l2acl-{ACL name} context, use the
following command:
acl ACL context
{ACL name} Name of the ACL context
abort Exit the context without saving changes
acl ACL context
{ACL name} Name of the ACL context
end Exit the context without saving changes

92
Configuring Controller Settings
Configure Layer 2 Access Control Commands
acl {ACL name} exit
Syntax Description
Defaults None.
Example ruckus# config
ruckus(config)# l2acl L2_ACL_NAME
The L2 ACL entry 'L2_ACL_NAME' has been created.
ruckus(config-l2acl-L2_ACL_NAME)# exit
Your changes have been saved.
quit
To exit the config-l2acl-{ACL name} context without saving changes, use the
following command:
acl {ACL name} quit
Syntax Description
Defaults None.
Example ruckus# config
ruckus(config)# l2acl L2_ACL_NAME
The L2 ACL entry 'L2_ACL_NAME' has been created.
ruckus(config-l2acl-L2_ACL_NAME)# quit
Your changes have been saved.
acl name
To rename an L2 ACL entry, use the following command:
acl {ACL name} name
Syntax Description
acl ACL context
{ACL name} Name of the ACL context
exit Exit the context without saving changes
acl ACL context
{ACL name} Name of the ACL context
quit Exit the context without saving changes
acl ACL context

93
Configuring Controller Settings
Configure Layer 2 Access Control Commands
Defaults None.
Example ruckus# config
ruckus(config)# l2acl L2_ACL_NAME
The L2 ACL entry 'L2_ACL_NAME' has been created.
ruckus(config-l2acl-L2_ACL_NAME)# name L2_ACL_New_Name
The command was executed successfully.
acl description
To set the description of an L2 ACL entry, use the following command:
description {description}
Syntax Description
Defaults None.
Example ruckus# config
ruckus(config)# l2acl L2_ACL_NAME
The L2 ACL entry 'L2_ACL_NAME' has been created.
ruckus(config-l2acl-L2_ACL_NAME)# description Description-123
The command was executed successfully.
add mac
To add a MAC address to the L2 ACL, use the following command:
add mac {MAC address}
Syntax Description
Defaults None.
Example ruckus# config
ruckus(config)# l2acl L2_ACL_NAME
The L2 ACL entry 'L2_ACL_NAME' has been created.
{ACL name} Name of the ACL context
name {new name} Rename the ACL to {new name}
description {description} Set the L2 ACL description to {description}
add mac Add a MAC address to the ACL
{MAC address} Add this MAC address

94
Configuring Controller Settings
Configure Layer 2 Access Control Commands
ruckus(config-l2acl-L2_ACL_NAME)# add mac 00:11:22:33:44:55
The station '00:11:22:33:44:55' has been added to the ACL.
add-mac
To add a MAC address to the L2 ACL, use the following command:
add-mac {MAC}
Syntax Description
Defaults None.
Example ruckus(config-l2-acl)# add-mac 00:01:02:34:44:55
The station '00:01:02:34:44:55' has been added to the ACL.
ruckus(config-l2-acl)# add-mac 00:01:02:34:44:55
The station '00:01:02:34:44:55' already exists in the list.
mode allow
To set the ACL mode to 'allow', use the following command:
mode allow
Syntax Description
Defaults None.
Example ruckus# config
ruckus(config)# l2acl L2_ACL_NAME
The L2 ACL entry 'L2_ACL_NAME' has been created.
ruckus(config-l2acl-L2_ACL_NAME)# mode allow
The command was executed successfully.
mode deny
To set the ACL mode to 'deny', use the following command:
mode deny
Syntax Description
add-mac Add a MAC address to the L2 ACL
{MAC} Add this MAC address
mode allow Set the ACL mode to allow
mode allow Set the ACL mode to deny

95
Configuring Controller Settings
Configure Layer 2 Access Control Commands
Defaults None.
Example ruckus# config
ruckus(config)# l2acl L2_ACL_NAME
The L2 ACL entry 'L2_ACL_NAME' has been created.
ruckus(config-l2acl-L2_ACL_NAME)# mode deny
The command was executed successfully.
no-mac
To delete a MAC address from an L2 ACL, use the following command:
no-mac {MAC address}
Syntax Description
Defaults None.
Example ruckus(config-l2-acl)# no-mac 00:01:02:34:44:55
The station '00:01:02:34:44:55' has been removed from the ACL.
ruckus(config-l2-acl)# no-mac 00:01:02:34:44:55
The station '00:01:02:34:44:55' could not be found. Please check
the spelling, and then try again.
no-mac Delete a MAC address from the ACL
{MAC address} Delete this {MAC address}

96
Configuring Controller Settings
Configure Layer 3 Access Control Commands
Configure Layer 3 Access Control Commands
Use the l3acl commands to configure the Layer 3 Access Control List settings. To
run these commands, you must first enter the config-l2acl context.
To enter the config-l3acl context, run this command:
ruckus# config
ruckus(config)# l3acl
ruckus(config-l3acl)#
abort
To exit the config-l3acl-{ACL name} context without saving changes, use the
following command:
abort
Syntax Description
Defaults None.
Example ruckus(config-l3acl)# abort
No changes have been saved.
ruckus(config)#
end
To save changes, and then exit the config-l3acl-{ACL name} context, use the
following command:
end
Syntax Description
Defaults None.
Example ruckus(config-l3acl)# end
The L3/L4/IP ACL entry has saved successfully.
Your changes have been saved.
ruckus(config)#
abort Exit the context without saving changes
end Exit the context without saving changes

97
Configuring Controller Settings
Configure Layer 3 Access Control Commands
exit
To save changes, and then exit the config-l3acl context, use the following
command:
exit
Syntax Description
Defaults None.
Example ruckus# config-l3acl
ruckus(config-l3acl)# exit
Your changes have been saved.
quit
To exit the config-l3acl context without saving changes, use the following
command:
quit
Syntax Description
Defaults None.
Example ruckus(config-l3acl)# quit
No changes have been saved.
ruckus(config)#
show
To display the L3ACL settings, use the show command. You must run this command
from within the config-l3acl context.
show
Syntax Description
Defaults None.
Example ruckus(config-l3acl)# show
L3/L4/IP ACL:
exit Save changes and exit the config-l3acl context
quit Exit the context without saving changes
show Display the Layer 3 access control list settings
98
Configuring Controller Settings
Configure Layer 3 Access Control Commands
ID:
3:
Name= test_newname
Description= justfortestCLI
Default Action if no rule is matched= Deny all by default
Rules:
Order= 1
Description=
Type= Allow
Destination Address= Any
Destination Port= 53
Protocol= Any
Order= 2
Description=
Type= Allow
Destination Address= Any
Destination Port= 67
Protocol= Any
name
To set the name of an L3/L4/IP ACL entry, use the following command:
name {L3ACL-NAME}
Syntax Description
Defaults None.
Example ruckus(config-l3acl)# name test_newname
The command was executed successfully. To save the changes, type
'end' or 'exit'.
name Set the name of an L3/L4/IP ACL entry
{L3ACL-NAME} Name of the L3/L4/IP ACL entry

99
Configuring Controller Settings
Configure Layer 3 Access Control Commands
description
To set the description of an L3/L4/IP ACL entry, use the following command:
description {DESCRIPTION}
Syntax Description
Defaults None.
Example ruckus(config-l3acl)# description justfortestCLI
The command was executed successfully. To save the changes, type
'end' or 'exit'.
mode allow
To set the ACL mode to ‘allow’, use the following command:
mode allow
Syntax Description
Defaults None.
Example ruckus(config-l3acl)# mode allow
The command was executed successfully. To save the changes, type
'end' or 'exit'.
mode deny
To set the ACL mode to ‘deny’, use the following command:
mode allow
Syntax Description
Defaults None.
Example ruckus(config-l3acl)# mode deny
description Set the L3/L4/IP ACL entry description
{DESCRIPTION} Set to this description
mode Set the ACL mode
allow Set the mode to ‘allow’
mode Set the ACL mode
deny Set the mode to ‘deny’

100
Configuring Controller Settings
Configure Layer 3 Access Control Commands
The command was executed successfully. To save the changes, type
'end' or 'exit'.
no rule-order
To delete a rule from the L3/L4/IP ACL, use the following command:
no rule-order <rule_order_id>
Syntax Description
Defaults None.
Example For example, to delete rule 3 from the ACL, use the following command:
ruckus(config-l3acl)# no rule-order 3
The rule '3' has been removed from the ACL.
rule-order
To create or modify a rule in the L3/L4/IP ACL, use the following command:
rule-order <rule_order_id>
Syntax Description
Defaults None.
Example For example, to set the current rule as the third ACL rule to apply, use the following
command:
ruckus(config-l3acl)# rule-order 3
ruckus(config-l3acl-rule)#
no rule-order Delete a rule from the L3/L4/IP ACL
<rule_order_id> Delete this rule ID
rule-order Create a new rule or modify an existing one
<rule_order_id> Create or modify this rule ID

101
Configuring Controller Settings
Configure Layer 3 Access Control Commands
Configure Layer 3 Access Control Rule Commands
Use the l3acl-rule commands to configure the Layer 3 Access Control List rules.
To run these commands, you must first enter the config-l3acl-rule context.
To enter the config-l3acl-rule context, run this command:
ruckus# config
ruckus(config)# l3acl-rule
ruckus(config-l3acl-rule)#
end
To save changes, and then exit the config-l3acl-{ACL name} context, use the
following command:
end
Syntax Description
Defaults None.
Example ruckus(config-l3acl-rule)# end
ruckus(config-l3acl)#
exit
To save changes, and then exit the config-l3acl-{ACL name} context, use the
following command:
exit
Syntax Description
Defaults None.
Example ruckus(config-l3acl-rule)# exit
ruckus(config-l3acl)#
order
To set the order of an L3/L4/IP ACL rule, use the following command:
order <rule_order_id>
end Save changes, and then exit the context
exit Save changes, and then exit the context

102
Configuring Controller Settings
Configure Layer 3 Access Control Commands
Syntax Description
Defaults None.
Example ruckus(config-l3acl-rule)# order 3
The command was executed successfully. To save the changes, type
'end' or 'exit'.
description
To set the description of an L3/L4/IP ACL rule, use the following command:
description {DESCRIPTION}
Syntax Description
Defaults None.
Example ruckus(config-l3acl-rule)# description thirdl3rule
The command was executed successfully. To save the changes, type
'end' or 'exit'.
type allow
To set the ACL rule type to ‘allow’, use the following command:
type allow
Syntax Description
Defaults None.
Example ruckus(config-l3acl-rule)# type allow
The command was executed successfully. To save the changes, type
'end' or 'exit'.
order Set the order of a rule
<rule_order_id> Set the rule to this order
description Set the L3/L4/IP ACL rule description
{DESCRIPTION} Set to this description
type Set the ACL rule type
allow Set the rule type to ‘allow’

103
Configuring Controller Settings
Configure Layer 3 Access Control Commands
type deny
To set the ACL rule type to ‘deny’, use the following command:
type deny
Syntax Description
Defaults None.
Example ruckus(config-l3acl-rule)# type deny
The command was executed successfully. To save the changes, type
'end' or 'exit'.
destination address
To set the destination address of the rule, use the following command:
destination address <IP-ADDR/WORD>
Syntax Description
Defaults None.
Example ruckus(config-l3acl-rule)# destination address 192.168.1.22
The destination IP address is invalid. Please enter 'Any' or check
the IP address(for example:192.168.0.1/24), and then please try
again.
ruckus(config-l3acl-rule)# destination address 192.168.1.22/24
The command was executed successfully. To save the changes, type
'end' or 'exit'.
destination port
To set the destination port of the rule, use the following command:
destination port <NUMBER/WORD>
Syntax Description
type Set the ACL rule type
deny Set the rule type to ‘deny’
destination address Set the destination address of the rule
IP-ADDR/WORD Set the destination to this IP address
destination port Set the destination port of the rule
<NUMBER/WORD> Set the destination to this port number

104
Configuring Controller Settings
Configure Role Commands
Defaults None.
Example ruckus(config-l3acl-rule)# destination port 580
The command was executed successfully. To save the changes, type
'end' or 'exit'.
protocol
To set the protocol for the rule, use the following command:
protocol <NUMBER/WORD>
Syntax Description
Defaults None.
Example ruckus(config-l3acl-rule)# protocol tcp
The protocol must be a number between 0 and 254.
ruckus(config-l3acl-rule)# protocol Any
The command was executed successfully. To save the changes, type
'end' or 'exit'.
Configure Role Commands
Use the role commands to configure user roles on the controller. To run these
commands, you must first enter the config-role context.
abort
To e x it t he config-role context without saving changes, use the abort command.
Enter this command from within the context of the role that you are configuring.
abort
Syntax Description
Defaults None.
Example ruckus(config-role)# abort
No changes have been saved.
ruckus(config)#
protocol Set the protocol for the rule
<NUMBER/WORD> Set to this protocol
abort Exit the role without saving changes

105
Configuring Controller Settings
Configure Role Commands
end
To save changes, and then exit the config-role context, use the following
command:
end
Syntax Description
Defaults None.
Example ruckus(config-role)# end
The Role entry has saved successfully.
Your changes have been saved.
ruckus(config)#
exit
To save changes, and then exit the config-role context, use the following
command:
exit
Syntax Description
Defaults None.
Example ruckus(config-role)# exit
The Role entry has saved successfully.
Your changes have been saved.
ruckus(config)#
quit
To e x it t he config-role context without saving changes, use the quit command.
Enter this command from within the context of the role that you are configuring.
quit
Syntax Description
Defaults None.
end Save changes, and then exit the context
exit Save changes, and then exit the context
quit Exit the role without saving changes

106
Configuring Controller Settings
Configure Role Commands
Example ruckus(config-role)# quit
No changes have been saved.
ruckus(config)#
name
To set the name of a user role, use the following command:
name <role_name>
Syntax Description
Defaults None.
Example ruckus(config-role)# name guest33
The command was executed successfully. To save the changes, type
'end' or 'exit'.
description
To set the description for a user role, use the following command:
description <description>
Syntax Description
Defaults None.
Example ruckus(config-role)# description testforCLI
The command was executed successfully. To save the changes, type
'end' or 'exit'.
group-attributes
To set the group attributes of a user role, use the following command:
group-attributes <attributes>
Syntax Description
name Set the name of a user role
<role_name> Set to this role
description Set the description of a user role
<description> Set to this description
group-attributes Set the attributes of a user role
<attributes> Set to this attribute

107
Configuring Controller Settings
Configure Role Commands
Defaults None.
Example ruckus(config-role)# group-attributes ruckus1
The command was executed successfully. To save the changes, type
'end' or 'exit'.
wlan-allowed
To set the WLANs to which a user role will have access, use the following command:
wlan-allowed [all | specify-wlan]
Syntax Description
Defaults None.
Example ruckus(config-role)# wlan-allowed all
The command was executed successfully. To save the changes, type
'end' or 'exit'.
ruckus(config-role)# wlan-allowed specify-wlan
The command was executed successfully. To save the changes, type
'end' or 'exit'.
no specify-wlan-access
To remove a particular WLAN from the list of WLANs that a user role can access, use
the following command:
no specify-wlan-access <wlan_ssid>
Syntax Description
Defaults None.
Example ruckus(config-role)# no specify-wlan-access joejoe98
The wlan 'joejoe98' has been removed from the Role.
wlan-allowed Set the WLANs to which a role will have access
all Grant access to all WLANs
specify-wlan Grant access to a specific WLAN
no specify-wlan-access Remove access to a WLAN by a user role
<wlan_ssid> Remove access to this WLAN

108
Configuring Controller Settings
Configure Role Commands
specify-wlan-access
To add a particular WLAN to the list of WLANs that a user role can access, use the
following command:
specify-wlan-access <wlan_ssid>
Syntax Description
Defaults None.
Example ruckus(config-role)# specify-wlan-access joejoe98
The wlan 'joejoe98' has been added to the Role.
no guest-pass-generation
To remove guest pass generation privileges from a user role, use the following
command:
no guest-pass-generation
Syntax Description
Defaults None.
Example ruckus(config-role)# no guest-pass-generation
The command was executed successfully. To save the changes, type
'end' or 'exit'.
guest-pass-generation
To add guest pass generation privileges to a user role, use the following command:
guest-pass-generation
Syntax Description
Defaults None.
specify-wlan-access Add access to a WLAN by a user role
<wlan_ssid> Add access to this WLAN
no guest-pass-generation Remove guest pass generation privileges from a
user role
guest-pass-generation Add guest pass generation privileges to a user
role

109
Configuring Controller Settings
Configure Role Commands
Example ruckus(config-role)# guest-pass-generation
The command was executed successfully. To save the changes, type
'end' or 'exit'.
no adminn
To remove ZoneDirector administration privileges from a user role, use the following
command:
no admin
Syntax Description
Defaults None.
Example ruckus(config-role)# no admin
The command was executed successfully. To save the changes, type
'end' or 'exit'.
admin [super|operator|monitoring]
To add ZoneDirector administration privileges to a user role, use the following
command:
admin [super|operator|monitoring]
Syntax Description
Defaults None.
Example ruckus(config-role)# admin super
The command was executed successfully. To save the changes, type
'end' or 'exit'.
show
To display the settings of a role, use the following command:
show
no admin Remove ZoneDirector administration privileges
from a user role
admin Add ZoneDirector administration privileges to a
user role
[super|operator|monitoring] Set administration privileges

110
Configuring Controller Settings
Configure User Commands
Syntax Description
Defaults None.
Example ruckus(config-role)# show
Role:
ID:
2:
Name= guest
Description=
Group Attributes=
Guest Pass Generation= Disallowed
ZoneDirector Administration= Allowed
Allow ZoneDirector Administration:Super Admin
Allow All WLANs= Specify WLAN access
Configure User Commands
Use the user commands to configure a user’s name, password, and role.To run these
commands, you must first enter the config-user context.
abort
To e x it t he config-user context without saving changes, use the abort command.
Enter this command from within the context of the user that you are configuring.
abort
Syntax Description
Defaults None.
Example ruckus(config-user)# abort
No changes have been saved.
ruckus(config)#
end
To save changes, and then exit the config-user context, use the following
command:
end
show Display the settings of a role
abort Exit the user settings without saving changes

111
Configuring Controller Settings
Configure User Commands
Syntax Description
Defaults None.
Example ruckus(config-user)# end
The User entry has saved successfully.
Your changes have been saved.
ruckus(config)#
exit
To save changes, and then exit the config-user context, use the following
command:
exit
Syntax Description
Defaults None.
Example ruckus(config-user)# exit
The User entry has saved successfully.
Your changes have been saved.
ruckus(config)#
quit
To e x it t he config-user context without saving changes, use the quit command.
Enter this command from within the context of the user that you are configuring.
quit
Syntax Description
Defaults None.
Example ruckus(config-role)# quit
No changes have been saved.
ruckus(config)#
end Save changes, and then exit the context
exit Save changes, and then exit the context
quit Exit the user settings without saving changes

112
Configuring Controller Settings
Configure User Commands
user-name
To set the name of a user, use the following command:
user-name <user_name>
Syntax Description
Defaults None.
Example ruckus(config-user)# user-name joe1
The command was executed successfully. To save the changes, type
'end' or 'exit'.
full-name <full_name>
To set the full name of a user, use the following command:
full-name <full_name>
Syntax Description
Defaults None.
Example ruckus(config-user)# full-name joejoe
The command was executed successfully. To save the changes, type
'end' or 'exit'.
password <password>
To set the password of a user, use the following command:
password <password>
Syntax Description
Defaults None.
Example ruckus(config-user)# password 1234
user-name Set the name of a user
<user_name> Set to this user name
full-name Set the full name of a user
<full_name> Set to this full name
password Set the password of a user
<password> Set to this password

113
Configuring Controller Settings
Configure User Commands
The command was executed successfully. To save the changes, type
'end' or 'exit'.
role
To assign a role to a user, use the following command:
role <role_name>
Syntax Description
Defaults None.
Example ruckus(config-user)# role guest
The command was executed successfully. To save the changes, type
'end' or 'exit'.
show
To display the settings of a user, use the following command:
show
Syntax Description
Defaults None.
Example ruckus(config-user)# show
User:
ID:
:
User Name= joe1
Full Name= joejoe
Password= 1234
Role= guest
role Assign a role to a user
<role_name> Assign this role
show Show user settings

114
Configuring Controller Settings
Configure Guest Access Commands
Configure Guest Access Commands
Use the guest-access commands to configure the guest access settings. To run
these commands, you must first enter the config-guest-access context.
abort
To exit the config-guest-access context without saving changes, use the abort
command.
abort
Syntax Description
Defaults None.
Example ruckus(config-guest-access)# abort
No changes have been saved.
ruckus(config)#
end
To save changes, and then exit the config-guest-access context, use the
following command:
end
Syntax Description
Defaults None.
Example ruckus(config-guest-access)# end
Your changes have been saved.
ruckus(config)#
exit
To save changes, and then exit the config-guest-access context, use the
following command:
exit
abort Exit the guest access settings without saving
changes
end Save changes, and then exit the context

115
Configuring Controller Settings
Configure Guest Access Commands
Syntax Description
Defaults None.
Example ruckus(config-guest-access)# exit
Your changes have been saved.
ruckus(config)#
quit
To exit the config-guest-access context without saving changes, use the quit
command.
quit
Syntax Description
Defaults None.
Example ruckus(config-guest-access)# quit
No changes have been saved.
ruckus(config)#
no authentication
To disable guest access authentication, use the following command:
no authentication
Syntax Description
Defaults None.
Example ruckus(config-guest-access)# no authentication
The command was executed successfully.
authentication guest-pass
To allow multiple users to share a single guest pass, use the following command:
authentication guest-pass [shared | no-shared]
exit Save changes, and then exit the context
quit Exit the guest access settings without saving
changes
exit Disable guest access authentication

116
Configuring Controller Settings
Configure Guest Access Commands
Syntax Description
Defaults None.
Example ruckus(config-guest-access)# authentication guest-pass shared
The command was executed successfully.
no term-of-use
To hide the Terms of Use text on the guest pass access page, use the following
command:
no term-of-use
Syntax Description
Defaults None.
Example ruckus(config-guest-access)# no term-of-use
The command was executed successfully.
term-of-use
To display and specify the Terms of Use text on the guest pass access page, use the
following command:
term-of-use <term_of_use_text>
Syntax Description
Defaults None.
Example ruckus(config-guest-access)# term-of-use test.guest
The command was executed successfully.
authentication guest-
pass
Configure guest pass authentication
shared Allow multiple users to share a single guest pass
no-shared Allow only a single user to use a guest pass
no term-of-use Hide Terms of Use
term-of-use Display Terms of Use
<term_of_use_text> Use this text

117
Configuring Controller Settings
Configure Guest Access Commands
redirect
To set the URL to which to redirect a guest user after passing authentication, use the
following command:
redirect [original | url <start_page_url>]
Syntax Description
Defaults original
Example ruckus(config-guest-access)# redirect url
http://www.ruckuswireless.com
The command was executed successfully.
auth-server
To set the authentication server for guest user authentication, use the following
command:
auth-server [local | name <auth_server_name>]
Syntax Description
Defaults local
Example ruckus(config-guest-access)# auth-server local
The command was executed successfully.
guestpass-effective
To set the duration during which the guest pass will be effective, use the following
command:
guestpass-effective [now | first_use_expired <days>]
Syntax Description
redirect Set the URL to which the guest user will be redirected
original Redirect user to the original page that he intended to visit
url <start_page_url> Redirect user to a different URL. Specify the URL in
<start_page_url>.
auth-server Set the authentication server for guest users
local Use the controller as the authentication server
name
<auth_server_name>
Use an external authentication server. Specify the
authentication server name in <auth_server_name>.
guestpass-effective Set the guest pass effectivity period

118
Configuring Controller Settings
Configure Guest Access Commands
Defaults now
Example ruckus(config-guest-access)# guestpass-effective first-use-
expired 4
The command was executed successfully.
welcome-text
To configure the text to display when a guest user accesses the network, use the
following command:
welcome-text <welcome_text>
Syntax Description
Defaults Welcome to the Guest Access login page.
Example ruckus(config-guest-access)# welcome-text welcome.txt
The command was executed successfully.
show
To display the guest pass settings, use the following command:
show
Syntax Description
Defaults None.
Example ruckus(config-guest-access)# show
Guest Access:
Authentication= Use guest pass authentication.
Multiple users to share a single guest pass= Allowed
Terms of Use= Enabled
now Set the guest pass effective as soon as it is generated
first_use_expired
<days>
Set the guest pass to be effective upon first use and to
expire after a specified number of days. Set the number of
days in <days>.
welcome-text Configure the welcome message
<welcome_text> Use this as the welcome message
show Display the guest pass settings

119
Configuring Controller Settings
Configure Guest Access Commands
Terms= test.guest
Redirection= To the following URL.
URL= http://ruckuswireless.com
Validity Period= Effective from first use.
Expire Days= 4
Title= welcome.txt
Restricted Subnet Access:
Name= Guest
Description=
Default Action if no rule is matched= Deny all by default
Rules:
Order= 1
Description=
Type= Deny
Destination Address= local
Destination Port= Any
Protocol= Any
Order= 2
Description=
Type= Deny
Destination Address= 10.0.0.0/8
Destination Port= Any
Protocol= Any
Order= 3
Description=
Type= Deny
Destination Address= 172.16.0.0/12
Destination Port= Any
Protocol= Any
Order= 4
Description=
Type= Deny
Destination Address= 192.168.0.0/16
Destination Port= Any
Protocol= Any
no restrict-access-order <order_id>
To delete a restrict access order, use the following command:
no restrict-access-order <order_id>
Syntax Description no restrict-access-order Delete a restrict access order

120
Configuring Controller Settings
Configure Guest Access Commands
Defaults None.
Example ruckus(config-guest-access)# no restrict-access-order 4
The Restricted Subnet Access entry has been removed from the Guest
Access.
restrict-access-order <order_id>
To add a restrict access order, use the following command:
restrict-access-order <order_id>
Syntax Description
Defaults None.
Example ruckus(config-guest-access)# restrict-access-order 5
Sorry,please enter the order 4 if you want to add a new one.
ruckus(config-guest-access)# restrict-access-order 3
ruckus(config-guest-restrict-access)#
Configure Guest Access Restriction Commands
Use the guest-restrict-access commands to configure network segments to
which guest access will be blocked. To run these commands, you must first enter the
config-guest-restrict-access context.
abort
To exit the config-guest-restrict-access context without saving changes,
use the abort command.
abort
Syntax Description
Defaults None.
<order_id> Delete this order ID
restrict-access-order Add a restrict access order
<order_id> Add this order ID
abort Exit the guest access restriction settings without
saving changes

121
Configuring Controller Settings
Configure Guest Access Commands
Example ruckus(config-guest-restrict-access)# abort
No changes have been saved.
ruckus(config-guest-access)#
end
To save changes, and then exit the config-guest-restrict-access context,
use the following command:
end
Syntax Description
Defaults None.
Example ruckus(config-guest-restrict-access)# end
The Restricted Subnet Access entry has been added to the Guest
Access.
Your changes have been saved.
ruckus(config-guest-access)#
exit
To save changes, and then exit the config-guest-restrict-access context,
use the following command:
exit
Syntax Description
Defaults None.
Example ruckus(config-guest-restrict-access)# exit
The Restricted Subnet Access entry has been added to the Guest
Access.
Your changes have been saved.
ruckus(config-guest-access)#
quit
To exit the config-guest-restrict-access context without saving changes,
use the quit command.
quit
end Save changes, and then exit the context
exit Save changes, and then exit the context

122
Configuring Controller Settings
Configure Guest Access Commands
Syntax Description
Defaults None.
Example ruckus(config-guest-restrict-access)# quit
No changes have been saved.
ruckus(config-guest-access)#
show
To display guest access restriction settings, use the following command:
show
Syntax Description
Defaults None.
order
To configure the guest access rule order, use the following command:
order <rule_order_id>
Syntax Description
Defaults None.
Example ruckus(config-guest-restrict-access)# order 3
The command was executed successfully.
description
To set the description of a guest access rule, use the following command:
description <description>
Syntax Description
quit Exit the guest access restriction settings without
saving changes
show Display guest access restriction settings
order Set the order of a guest access rule
<rule_order_id> Assign the rule this order
description Set the description of a guest access rule
<description> Set this as description

123
Configuring Controller Settings
Configure Guest Access Commands
Defaults None.
Example ruckus(config-guest-restrict-access)# description guestd3
The command was executed successfully.
type allow
To set the guest access rule type to ‘allow’, use the following command:
type allow
Syntax Description
Defaults None.
Example ruckus(config-guest-restrict-access)# type allow
The command was executed successfully.
type deny
To set the guest access rule type to ‘deny’, use the following command:
type deny
Syntax Description
Defaults None.
Example ruckus(config-guest-restrict-access)# type deny
The command was executed successfully.
destination address
To set the destination address of the rule, use the following command:
destination address <IP-ADDR/WORD>
Syntax Description
type Set the guest access rule type
allow Set the rule type to ‘allow’
type Set the guest access rule type
deny Set the rule type to ‘deny’
destination address Set the destination address of the rule
IP-ADDR/WORD Set the destination to this IP address

124
Configuring Controller Settings
Configure Hotspot Commands
Defaults None.
Example ruckus(config-guest-restrict-access)# destination address
192.168.0.20/24
The command was executed successfully.
destination port
To set the destination port of the rule, use the following command:
destination port <NUMBER/WORD>
Syntax Description
Defaults None.
Example ruckus(config-guest-restrict-access)# destination port 562
The command was executed successfully.
protocol
To set the protocol for the rule, use the following command:
protocol <NUMBER/WORD>
Syntax Description
Defaults None.
Example ruckus(config-guest-restrict-access)# protocol 69
The command was executed successfully.
Configure Hotspot Commands
Use the hotspot commands to configure the controller’s hotspot settings. To run
these commands, you must first enter the config-hotspot context.
destination port Set the destination port of the rule
<NUMBER/WORD> Set the destination to this port number
protocol Set the protocol for the rule
<NUMBER/WORD> Set to this protocol

125
Configuring Controller Settings
Configure Hotspot Commands
abort
To exit the config-hotspot context without saving changes, use the abort
command.
abort
Syntax Description
Defaults None.
Example ruckus(config-hotspot)# abort
No changes have been saved.
ruckus(config)#
end
To save changes, and then exit the config-hotspot context, use the following
command:
end
Syntax Description
Defaults None.
Example ruckus(config-hotspot)# end
The login page url can't be empty.
ruckus(config-hotspot)# end
The Hotspot entry has saved successfully.
Your changes have been saved.
ruckus(config)#
exit
To save changes, and then exit the config-hotspot context, use the following
command:
exit
Syntax Description
Defaults None.
abort Exit the hotspot settings without saving changes
end Save changes, and then exit the context
exit Save changes, and then exit the context

126
Configuring Controller Settings
Configure Hotspot Commands
Example ruckus(config-hotspot)# exit
The login page url can't be empty
ruckus(config-hotspot)# exit
The Hotspot entry has saved successfully.
Your changes have been saved.
quit
To exit the config-hotspot context without saving changes, use the quit
command.
quit
Syntax Description
Defaults None.
Example ruckus(config-hotspot)# quit
No changes have been saved.
ruckus(config)#
show
To display the current hotspot settings, use the following command:
show
Syntax Description
Defaults None.
Example ruckus(config-hotspot)# show
Hotspot:
ID:
1:
Name= h1
Login Page Url= http://172.18.110.122
Start Page= redirect to the URL that the user intends to visit.
Session Timeout= Disabled
Idle Timeout= Enabled
Timeout= 60 Minutes
Authentication Server= Local Database
quit Exit the hotspot settings without saving changes
show Display the current hotspot settings

127
Configuring Controller Settings
Configure Hotspot Commands
Accounting Server= Disabled
Location ID=
Location Name=
Walled Garden 1=
Walled Garden 2=
Walled Garden 3=
Walled Garden 4=
Walled Garden 5=
Rules:
Order= 1
Description= h1_order1
Type= Deny
Destination Address= 192.168.20.20/24
Destination Port= 920
Protocol= 58
name
To set the hotspot name, use the following command
name <hotspot_name>
Syntax Description
Defaults None.
Example ruckus(config-hotspot)# name ruckus1
The command was executed successfully. To save the changes, type
'end' or 'exit'.
login-page
To set the URL of the hotspot login, use the following command:
login-page <login_page_url>
Syntax Description
Defaults None.
name Set the hotspot name
<hotspot_name> Set to this name
login-page Set the URL of the hotspot login
<login_page_url> Set to this URL

128
Configuring Controller Settings
Configure Hotspot Commands
Example ruckus(config-hotspot)# login-page http://ruckuswireless.com
The command was executed successfully. To save the changes, type
'end' or 'exit'.
start-page
To set the URL or page to which the user will be redirected after logging into the
hotspot, use the following command:
start-page [original | url <start_page_url>]
Syntax Description
Defaults original
Example ruckus(config-hotspot)# start-page url
http://www.ruckuswireless.com
The command was executed successfully. To save the changes, type
'end' or 'exit'.
no session-timeout
To disable the session timeout for hotspot usage, use the following command:
no session-timeout
Syntax Description
Defaults None.
Example ruckus(config-hotspot)# no session-timeout
The command was executed successfully. To save the changes, type
'end' or 'exit'.
start-page Set the URL or page to which the user will be
redirected after logging into the hotspot
original Redirect user to the original page he or she
intended to visit
url <start_page_url> Redirect use to another page. Set the URL of the
page in <start_page_url>.
no session-timeout Disable the session timeout for hotspot usage

129
Configuring Controller Settings
Configure Hotspot Commands
session-timeout
To enable and set the session timeout for hotspot usage, use the following command:
session-timeout <minutes>
Syntax Description
Defaults 1440 minutes
Example ruckus(config-hotspot)# session-timeout 20
The command was executed successfully. To save the changes, type
'end' or 'exit'.
no grace-period
To disable the grace period (idle timeout) for hotspot users, use the following
command:
no grace-period
Syntax Description
Defaults None.
Example ruckus(config-hotspot)# no grace-period
The command was executed successfully. To save the changes, type
'end' or 'exit'.
grace-period
To enable and set the grace period (idle timeout) for hotspot users, use the following
command:
grace-period <minutes>
Syntax Description
Defaults 60 minutes
session-timeout Disable the session timeout for hotspot usage
<minutes> Set the session timeout to this value (in minutes)
no grace-period Disable the idle timeout for hotspot users
grace-period Set the idle timeout for hotspot users
<minutes> Set the idle timeout to this value (in minutes)

130
Configuring Controller Settings
Configure Hotspot Commands
Example ruckus(config-hotspot)# grace-period 20
The command was executed successfully. To save the changes, type
'end' or 'exit'.
auth-server local
To use ZoneDirector as the authentication server for hotspot users, use the following
command:
auth-server local
Syntax Description
Defaults local
Example ruckus(config-hotspot)# auth-server local
The command was executed successfully. To save the changes, type
'end' or 'exit'.
auth-server name
To use an external server for authenticating hotspot users, use the following
command:
auth-server name <auth_server_name> [no-mac-bypass | mac-
bypass]
Syntax Description
Defaults None.
Example ruckus(config-hotspot)# auth-server name rad1
The AAA server 'rad1' could not be found. Please check the spelling,
and then try again.
auth-server Set an authentication server for hotspot users
local Use ZoneDirector as the authentication server
auth-server name Set an external authentication server for hotspot
users
<auth_server_name> Use this server as the authentication server
no-mac-bypass Disable MAC bypass
mac-bypass Enable MAC bypass

131
Configuring Controller Settings
Configure Hotspot Commands
no acct-server
To disable the accounting server for hotspot usage, use the following command:
no acct-server
Syntax Description
Defaults None.
Example ruckus(config-hotspot)# no acct-server
The command was executed successfully. To save the changes, type
'end' or 'exit'.
acct-server interim-update
To enable and set the accounting server for hotspot usage, use the following
command:
acct-server <acct_server_name> interim-update <minutes>
Syntax Description
Defaults 5 minutes
Example ruckus(config-hotspot)# acct-server asd interim-update 10
The AAA server 'asd' could not be found. Please check the spelling,
and then try again.
ruckus(config-hotspot)# acct-server acct1 interim-update 20
The command was executed successfully. To save the changes, type
'end' or 'exit'.
no acct-server Disable the accounting server for hotspot usage
no acct-server Enable and set the accounting server for hotspot
usage
<acct_server_name> Set to this accounting server
interim-update Set the interim update interval
<minutes> Set to this interval (in minutes)

132
Configuring Controller Settings
Configure Hotspot Commands
location-id
To set the location ID of the hotspot, use the following command:
location-id <location-id>
Syntax Description
Defaults None.
Example ruckus(config-hotspot)# location-id us
The command was executed successfully. To save the changes, type
'end' or 'exit'.
location-name
To set the location name of the hotspot, use the following command:
location-name <location-name>
Syntax Description
Defaults None.
Example ruckus(config-hotspot)# location-name shenzhen
The command was executed successfully. To save the changes, type
'end' or 'exit'.
wall-garden url1
To set the walled garden URL number 1, use the following command:
wall-garden url1 <url1>
Syntax Description
Defaults None.
Example ruckus(config-hotspot)# wall-garden url1 http://www.yahoo.com
location-id Set the location ID of the hotspot
<location-id> Set to this location ID
location-name Set the location name of the hotspot
<location-name> Set to this location name
wall-garden url1 Set the walled garden URL number 1
<url1> Set to this URL

133
Configuring Controller Settings
Configure Hotspot Commands
The command was executed successfully. To save the changes, type
'end' or 'exit'.
wall-garden url2
To set the walled garden URL number 2, use the following command:
wall-garden url2 <url2>
Syntax Description
Defaults None.
Example ruckus(config-hotspot)# wall-garden url2 http://www.yahoo.com
The command was executed successfully. To save the changes, type
'end' or 'exit'.
wall-garden url3
To set the walled garden URL number 3, use the following command:
wall-garden url3 <url3>
Syntax Description
Defaults None.
Example ruckus(config-hotspot)# wall-garden url3 http://www.sohu.com
The command was executed successfully. To save the changes, type
'end' or 'exit'.
wall-garden url4
To set the walled garden URL number 4, use the following command:
wall-garden url4 <url4>
Syntax Description
wall-garden url2 Set the walled garden URL number 2
<url2> Set to this URL
wall-garden url3 Set the walled garden URL number 3
<url3> Set to this URL
wall-garden url4 Set the walled garden URL number 4
<url4> Set to this URL

134
Configuring Controller Settings
Configure Hotspot Commands
Defaults None.
Example ruckus(config-hotspot)# wall-garden url4 http://www.sohu.com
The command was executed successfully. To save the changes, type
'end' or 'exit'.
wall-garden url5
To set the walled garden URL number 5, use the following command:
wall-garden url5 <url5>
Syntax Description
Defaults None.
Example ruckus(config-hotspot)# wall-garden url5 http://www.sohu.com
The command was executed successfully. To save the changes, type
'end' or 'exit'.
no restrict-access-order
To delete a restrict access order, use the following command:
no restrict-access-order <order_id>
Syntax Description
Defaults None.
Example ruckus(config-hotspot)# no restrict-access-order 1
The rule '1' has been removed from the Hotspot.
wall-garden url5 Set the walled garden URL number 5
<url5> Set to this URL
no restrict-access-order Delete a restrict access order
<order_id> Delete this order ID

135
Configuring Controller Settings
Configure Hotspot Commands
restrict-access-order
To add a restrict access order, use the following command:
restrict-access-order <order_id>
Syntax Description
Defaults None.
Example ruckus(config-hotspot)# restrict-access-order 3
Sorry,please enter the order 1 if you want to add a new one.
ruckus(config-hotspot)# restrict-access-order 1
ruckus(config-hotspot-restrict-access)#
restrict-access-order Add a restrict access order
<order_id> Add this order ID

136
Configuring Controller Settings
Configure Hotspot Commands
Configure Hotspot Access Restriction Commands
Use the hotspot-restrict-access commands to configure network segments
to which hotspot access will be blocked. To run these commands, you must first enter
the config-hotspot-restrict-access context.
end
To save changes, and then exit the config-hotspot-restrict-access context,
use the following command:
end
Syntax Description
Defaults None.
Example ruckus(config-hotspot-restrict-access)# end
ruckus(config-hotspot)#
exit
To save changes, and then exit the config-hotspot-restrict-access context,
use the following command:
exit
Syntax Description
Defaults None.
Example ruckus(config-hotspot-restrict-access)# exit
ruckus(config-hotspot)#
show
To display hotspot access restriction settings, use the following command:
show
Syntax Description
Defaults None.
end Save changes, and then exit the context
exit Save changes, and then exit the context
show Display the hotspot access restriction settings

137
Configuring Controller Settings
Configure Hotspot Commands
order
To configure the hotspot access rule order, use the following command:
order <rule_order_id>
Syntax Description
Defaults None.
Example ruckus(config-hotspot-restrict-access)# order 1
The command was executed successfully. To save the changes, type
'end' or 'exit'.
description
To set the description of a hotspot access rule, use the following command:
description <description>
Syntax Description
Defaults None.
Example ruckus(config-hotspot-restrict-access)# description h1_order1
The command was executed successfully. To save the changes, type
'end' or 'exit'.
type allow
To set the hotspot access rule type to ‘allow’, use the following command:
type allow
Syntax Description
Defaults None.
Example ruckus(config-hotspot-restrict-access)# type allow
order Set the order of a hotspot access rule
<rule_order_id> Assign the rule this order
description Set the description of a hotspot access rule
<description> Set this as description
type Set the hotspot access rule type
allow Set the rule type to ‘allow’

138
Configuring Controller Settings
Configure Hotspot Commands
The command was executed successfully. To save the changes, type
'end' or 'exit'.
type deny
To set the hotspot access rule type to ‘deny’, use the following command:
type deny
Syntax Description
Defaults None.
Example ruckus(config-hotspot-restrict-access)# type deny
The command was executed successfully. To save the changes, type
'end' or 'exit'.
destination address
To set the destination address of the rule, use the following command:
destination address <IP-ADDR/WORD>
Syntax Description
Defaults None.
Example ruckus(config-hotspot-restrict-access)# destination address
192.168.20.20/24
The command was executed successfully. To save the changes, type
'end' or 'exit'.
destination port
To set the destination port of the rule, use the following command:
destination port <NUMBER/WORD>
Syntax Description
type Set the hotspot access rule type
deny Set the rule type to ‘deny’
destination address Set the destination address of the rule
IP-ADDR/WORD Set the destination to this IP address
destination port Set the destination port of the rule
<NUMBER/WORD> Set the destination to this port number

139
Configuring Controller Settings
Configure Certificate Commands
Defaults None.
Example ruckus(config-hotspot-restrict-access)# destination port 920
The command was executed successfully. To save the changes, type
'end' or 'exit'.
protocol
To set the protocol for the rule, use the following command:
protocol <NUMBER/WORD>
Syntax Description
Defaults None.
Example ruckus(config-hotspot-restrict-access)# protocol 58
The command was executed successfully. To save the changes, type
'end' or 'exit'.
Configure Certificate Commands
Use the config-certificate commands to restore the default ZoneDirector
certificate or to regenerate the private key. To run these commands, you must first
enter the config-certificate context.
quit
To exit the config-certificate context without saving changes, use the quit
command.
quit
Syntax Description
Defaults None.
Example ruckus(config-certificate)# quit
No changes have been saved.
protocol Set the protocol for the rule
<NUMBER/WORD> Set to this protocol
quit Exit the certificate settings without saving
changes

140
Configuring Controller Settings
Configure Certificate Commands
restore
To restore the default ZoneDirector certificate and private key, use the following
command.
restore
Syntax Description
Defaults None.
Example ruckus(config-certificate)# restore
ZoneDirector will restart now to apply the changes in the certificate
settings. If you want to configure other settings, log in again
after ZoneDirector has completed restarting.
re-generate-private-key
To regenerate the ZoneDirector private key, use the following command:
re-generate-private-key {1024|2048}
Syntax Description
Defaults None.
Example ruckus(config-certificate)# re-generate-private-key 1024
ZoneDirector will restart now to apply the changes in the certificate
settings. If you want to configure other settings, log in again
after ZoneDirector has completed restarting.
The operation doesn't execute successfully. Please try again.
restore Restore the default ZoneDirectory certificate and
private key. The restore process will be completed
after ZoneDirector is rebooted.
re-generate-private-key Regenerate the ZoneDirector private key
{1024|2048} Specify the length of the private key as either
1024 or 2048.

141
Configuring Controller Settings
Configure Mesh Commands
Configure Mesh Commands
Use the mesh commands to configure the controller’s mesh networking settings. To
run these commands, you must first enter the config-mesh context.
abort
To exit the config-mesh context without saving changes, use the abort command.
abort
Syntax Description
Defaults None.
Example ruckus(config-mesh)# abort
No changes have been saved.
ruckus(config)#
end
To save changes, and then exit the config-mesh context, use the following
command:
end
Syntax Description
Defaults None.
Example ruckus(config-mesh)# end
Your changes have been saved.
ruckus(config)#
exit
To save changes, and then exit the config-mesh context, use the following
command:
exit
Syntax Description
abort Exit the mesh settings without saving changes
end Save changes, and then exit the context
exit Save changes, and then exit the context

142
Configuring Controller Settings
Configure Mesh Commands
Defaults None.
Example ruckus(config-mesh)# exit
Your changes have been saved.
ruckus(config)#
quit
To exit the config-mesh context without saving changes, use the quit command.
quit
Syntax Description
Defaults None.
Example ruckus(config-mesh)# quit
No changes have been saved.
ruckus(config)#
show
To display the current mesh settings, use the following command:
show
Syntax Description
Defaults None.
Example ruckus(config-mesh)# show
Mesh Settings:
Mesh Status= Disabled
Mesh Name(ESSID)= rks_mesh
Mesh Passphrase= test123456
Mesh Hop Detection= Enabled
Mesh Hops Threshold= 6
Mesh Downlinks Detection= Enabled
Mesh Downlinks Threshold= 8
quit Exit the mesh settings without saving changes
show Display the current mesh settings

143
Configuring Controller Settings
Configure Mesh Commands
no mesh
To disable mesh networking on the controller, use the following command:
no mesh
Syntax Description
Defaults None.
ssid
To set the SSID of the mesh network, use the following command:
ssid <ssid>
Syntax Description
Defaults None.
Example ruckus(config-mesh)# ssid rks_mesh
The command was executed successfully. To save the changes, type
'end' or 'exit'.
passphrase
To set the passphrase that allows access to the mesh network, use the following
command:
passphrase <passphrase>
Syntax Description
Defaults None.
Example ruckus(config-mesh)# passphrase test123456
The command was executed successfully. To save the changes, type
'end' or 'exit'.
no mesh Disable mesh networking on the controller
ssid Set the SSID of the mesh network
<ssid> Set to this SSID
passphrase Set the passphrase that allows access to the mesh
network
<passphrase> Set to this passphrase

144
Configuring Controller Settings
Configure Mesh Commands
hops-warn-threshold
To enable and configure the mesh hop threshold, use the following command:
hops-warn-threshold <threshold>
Syntax Description
Defaults 5
Example ruckus(config-mesh)# hops-warn-threshold 6
The command was executed successfully. To save the changes, type
'end' or 'exit'.
no detect-hops
To disable the mesh hop threshold, use the following command:
no detect-hops
Syntax Description
Defaults None.
Example ruckus(config-mesh)# no detect-hops
The command was executed successfully. To save the changes, type
'end' or 'exit'.
fan-out-threshold
To enable and configure the mesh downlink threshold, use the following command:
fan-out-threshold <threshold>
Syntax Description
Defaults 5
Example ruckus(config-mesh)# fan-out-threshold 8
hops-warn-threshold Set the mesh hop threshold (max hops)
<threshold> Set to this threshold value
no detect-hops Disable the mesh hop threshold
fan-out-threshold Set the mesh downlink threshold (max downlinks)
<threshold> Set to this threshold value

145
Configuring Controller Settings
Configure Alarm Commands
The command was executed successfully. To save the changes, type
'end' or 'exit'.
no detect-fanout
To disable the mesh downlink threshold, use the following command:
no detect-fanout
Syntax Description
Defaults None.
Example ruckus(config-mesh)# no detect-fanout
The command was executed successfully. To save the changes, type
'end' or 'exit'.
Configure Alarm Commands
Use the alarm commands to configure the controller’s alarm notification settings. To
run these commands, you must first enter the config-alarm context.
abort
To exit the config-alarm context without saving changes, use the abort
command.
abort
Syntax Description
Defaults None.
Example ruckus(config-alarm)# abort
No changes have been saved.
ruckus(config)#
end
To save changes, and then exit the config-alarm context, use the following
command:
end
no detect-fanout Disable the mesh downlink threshold
abort Exit the alarm settings without saving changes

146
Configuring Controller Settings
Configure Alarm Commands
Syntax Description
Defaults None.
Example ruckus(config-alarm)# end
The Email Address and SMTP server port cannot be empty.
ruckus(config-alarm)# end
The Alarm settings have been updated.
Your changes have been saved.
ruckus(config)#
exit
To save changes, and then exit the config-alarm context, use the following
command:
exit
Syntax Description
Defaults None.
Example ruckus(config-alarm)# exit
The Alarm settings have been updated.
Your changes have been saved.
quit
To exit the config-alarm context without saving changes, use the quit command.
quit
Syntax Description
Defaults None.
Example ruckus(config-alarm)# quit
No changes have been saved.
ruckus(config)#
end Save changes, and then exit the context
exit Save changes, and then exit the context
quit Exit the alarm settings without saving changes

147
Configuring Controller Settings
Configure Alarm Commands
show
To display the current alarm settings, use the following command:
show
Syntax Description
Defaults None.
Example ruckus(config-alarm)# show
Alarm Status= Enabled
Email Address= joe@163.com
SMTP Server Name= smtp.163.com
SMTP Server Port= 1217
SMTP Authentication Username= joe
SMTP Authentication Password= 123456
Encryption Options,TLS:Disabled
e-mail
To set the email address to which alarm notifications will be sent, use the following
command:
e-mail <e-mail_addr>
Syntax Description
Defaults None.
Example ruckus(config-alarm)# e-mail joe@163.com
The command was executed successfully. To save the changes, type
'end' or 'exit'.
smtp-server-name
To set the SMTP server that ZoneDirector uses to send alarm notifications, use the
following command:
smtp-server-name <smtp_server_name>
show Display the current alarm settings
e-mail Set the email address to which alarm notifications
will be sent
<e-mail_addr> Send alarm notifications to this email address

148
Configuring Controller Settings
Configure Alarm Commands
Syntax Description
Defaults None.
Example ruckus(config-alarm)# smtp-server-name smtp.163.com
The command was executed successfully. To save the changes, type
'end' or 'exit'.
smtp-server-port
To set the SMTP server port that ZoneDirector uses to send alarm notifications, use
the following command:
smtp-server-name <port>
Syntax Description
Defaults 587
Example ruckus(config-alarm)# smtp-server-port 1217
The command was executed successfully. To save the changes, type
'end' or 'exit'.
smtp-auth-name
To set the user name that ZoneDirector uses to authenticate with the SMTP server,
use the following command:
smtp_auth_name <smtp_auth_name>
Syntax Description
Defaults None.
smtp-server-name Set the SMTP server that ZoneDirector uses to
send alarm notifications
<smtp_server_name> Set to this SMTP server name
smtp-server-name Set the SMTP server that ZoneDirector uses to
send alarm notifications
<port> Set to this SMTP server port
smtp_auth_name Set the user name that ZoneDirector uses to
authenticate with the SMTP server
<smtp_auth_name> Set to this user name

149
Configuring Controller Settings
Configure Alarm Commands
Example ruckus(config-alarm)# smtp-auth-name joe
The command was executed successfully. To save the changes, type
'end' or 'exit'.
smtp-auth-password
To set the password that ZoneDirector uses to authenticate with the SMTP server, use
the following command:
smtp-auth-password <password>
Syntax Description
Defaults None.
Example ruckus(config-alarm)# smtp-auth-password 123456
The command was executed successfully. To save the changes, type
'end' or 'exit'.
tls-smtp-encryption
To enable TLS for SMTP encryption of alarm notifications, use the following command:
tls-smtp-encryption
Syntax Description
Defaults None.
Example ruckus(config-alarm)# tls-smtp-encryption
The command was executed successfully. To save the changes, type
'end' or 'exit'.
no tls-smtp-encryption
To disable TLS for SMTP encryption of alarm notifications, use the following
command:
no tls-smtp-encryption
smtp-auth-password Set the password that ZoneDirector uses to
authenticate with the SMTP server
<password> Set to this password
tls-smtp-encryption Enable TLS for SMTP encryption of alarm
notifications

150
Configuring Controller Settings
Configure Alarm Commands
Syntax Description
Defaults None.
Example ruckus(config-alarm)# no tls-smtp-encryption
The command was executed successfully. To save the changes, type
'end' or 'exit'.
starttls-smtp-encryption
To enable STARTTLS for SMTP encryption of alarm notifications, use the following
command:
starttls-smtp-encryption
Syntax Description
Defaults None.
Example ruckus(config-alarm)# starttls-smtp-encryption
Should enable TLS of SMTP Encryption firstly, then try it again.
no starttls-smtp-encryption
To disable STARTTLS for SMTP encryption of alarm notifications, use the following
command:
no starttls-smtp-encryption
Syntax Description
Defaults None.
Example ruckus(config-alarm)# no starttls-smtp-encryption
Should enable TLS of SMTP Encryption firstly, then try it again.
tls-smtp-encryption Disable TLS for SMTP encryption of alarm
notifications
starttls-smtp-encryption Enable STARTTLS for SMTP encryption of alarm
notifications
no starttls-smtp-encryption Disable STARTTLS for SMTP encryption of alarm
notifications
151
Configuring Controller Settings
Configure Services Commands
Configure Services Commands
Use the services commands to configure miscellaneous service settings, such as
AP power, channel, background scanning, etc. To run these commands, you must first
enter the config-services context.
abort
To exit the config-services context without saving changes, use the abort
command.
abort
Syntax Description
Defaults None.
Example ruckus(config-services)# abort
No changes have been saved.
ruckus(config)#
end
To save changes, and then exit the config-services context, use the following
command:
end
Syntax Description
Defaults None.
Example ruckus(config-services)# end
Your changes have been saved.
ruckus(config)#
exit
To save changes, and then exit the config-services context, use the following
command:
exit
abort Exit the service settings without saving changes
end Save changes, and then exit the context

152
Configuring Controller Settings
Configure Services Commands
Syntax Description
Defaults None.
Example ruckus(config-services)# exit
Your changes have been saved.
ruckus(config)#
quit
To exit the config-services context without saving changes, use the quit
command.
quit
Syntax Description
Defaults None.
Example ruckus(config-services)# quit
No changes have been saved.
ruckus(config)#
show
To display the current service settings, use the following command:
show
Syntax Description
Defaults None.
Example ruckus(config-services)# show
Services:
Automatically adjust ap radio power= Disabled
Automatically adjust ap channel= Disabled
Protect my wireless network against excessive wireless requests=
Disabled
Temporarily block wireless clients with repeated authentication
failures= Disabled
exit Save changes, and then exit the context
quit Exit the service settings without saving changes
show Display the current service settings

153
Configuring Controller Settings
Configure Services Commands
Run a background scan on 2.4GHz radio= Enabled
Time= 20 seconds
Run a background scan on 5GHz radio= Disabled
Report rogue devices in ZD event log= Disabled
Rogue DHCP server detection= Disabled
AeroScout RFID tag detection= Disabled
no auto-adjust-ap-power
To disable the auto adjustment of the AP radio power, which helps optimize radio
coverage when radio interference is present, use the following command:
no auto-adjust-ap-power
Syntax Description
Defaults None.
Example ruckus(config-services)# no auto-adjust-ap-power
The command was executed successfully.
auto-adjust-ap-power
To enable the auto adjustment of the AP radio power, which helps optimize radio
coverage when radio interference is present, use the following command:
auto-adjust-ap-power
Syntax Description
Defaults None.
Example ruckus(config-services)# auto-adjust-ap-power
The command was executed successfully.
no auto-adjust-ap-channel
To disable the auto adjustment of the AP radio channel when radio interference is
present, use the following command:
no auto-adjust-ap-channel
no auto-adjust-ap-power Disable the auto adjustment of the AP radio
power
auto-adjust-ap-power Enable the auto adjustment of the AP radio
power

154
Configuring Controller Settings
Configure Services Commands
Syntax Description
Defaults None.
Example ruckus(config-services)# no auto-adjust-ap-channel
The command was executed successfully.
auto-adjust-ap-channel
To enable the auto adjustment of the AP radio channel when radio interference is
present, use the following command:
auto-adjust-ap-channel
Syntax Description
Defaults None.
Example ruckus(config-services)# auto-adjust-ap-channel
The command was executed successfully.
no protect-excessive-wireless-request
To disable protection of the wireless network against excessive wireless requests, use
the following command:
no protect-excessive-wireless-request
Syntax Description
Defaults None.
Example ruckus(config-services)# no protect-excessive-wireless-request
The command was executed successfully.
no auto-adjust-ap-channel Disable the auto adjustment of the AP radio
channel
auto-adjust-ap-channel Enable the auto adjustment of the AP radio
channel
no protect-excessive-wireless-
request
Disable protection of the wireless network against
excessive wireless requests

155
Configuring Controller Settings
Configure Services Commands
protect-excessive-wireless-request
To enable protection of the wireless network against excessive wireless requests, use
the following command:
protect-excessive-wireless-request
Syntax Description
Defaults Enabled
Example ruckus(config-services)# protect-excessive-wireless-request
The command was executed successfully.
no temp-block-auth-failed-client
To allow wireless clients that repeatedly fail to authenticate with APs to continue their
authentication attempt, use the following command:
no temp-block-auth-failed-client
Syntax Description
Defaults None
Example ruckus(config-services)# no temp-block-auth-failed-client
The command was executed successfully.
temp-block-auth-failed-client time
To temporarily block wireless clients that repeatedly fail to authenticate with APs, use
the following command:
temp-block-auth-failed-client time <seconds>
Syntax Description
Defaults 30 seconds
protect-excessive-wireless-
request
Enable protection of the wireless network against
excessive wireless requests
no temp-block-auth-failed-client Allow wireless clients that repeatedly fail to
authenticate with AP to continue their
authentication attempt
temp-block-auth-failed-client
time
Temporarily block wireless clients that repeatedly
fail to authenticate with APs
<seconds> Block for this number of seconds

156
Configuring Controller Settings
Configure Services Commands
Example ruckus(config-services)# temp-block-auth-failed-client time 9
The Block Time must be a number between 10 and 1200.
ruckus(config-services)# temp-block-auth-failed-client time 99
The command was executed successfully.
no background-scan radio-2.4
To disable background scanning on the 2.4GHz radio, use the following command:
no background-scan radio-2.4
Syntax Description
Defaults None
Example ruckus(config-services)# no background-scan radio-2.4
The command was executed successfully.
background-scan radio-2.4-interval
To enable background scanning on the 2.4GHz radio and configure the scan interval,
use the following command:
background-scan radio-2.4-interval <seconds>
Syntax Description
Defaults 20 seconds
Example ruckus(config-services)# background-scan radio-2.4-interval 6
The command was executed successfully.
no background-scan radio-5
To disable background scanning on the 5GHz radio, use the following command:
no background-scan radio-5
no background-scan radio-2.4 Disable background scanning on the 2.4GHz
radio
background-scan radio-2.4-
interval
Enable background scanning on the 2.4GHz radio
and configure the scan interval
<seconds> Perform background scan at this interval (in
seconds)

157
Configuring Controller Settings
Configure Services Commands
Syntax Description
Defaults None
Example ruckus(config-services)# no background-scan radio-5
The command was executed successfully.
background-scan radio-5-interval
To enable background scanning on the 5GHz radio and configure the scan interval,
use the following command:
background-scan radio-5-interval <seconds>
Syntax Description
Defaults 20 seconds
Example ruckus(config-services)# background-scan radio-5-interval 16
The command was executed successfully.
rogue-report
To enable recording of detected rogue devices in the Event logs, use the following
command:
rogue-report
Syntax Description
Defaults None
Example ruckus(config-services)# rogue-report
Should enable running a background scan on 2.4/5GHz radio firstly,
then try it again.
ruckus(config-services)# rogue-report
The command was executed successfully.
no background-scan radio-5 Disable background scanning on the 5GHz radio
background-scan radio-5-
interval
Enable background scanning on the 5GHz radio
and configure the scan interval
<seconds> Perform background scan at this interval (in
seconds)
rogue-report Enable recording of detected rogue devices in the
Event logs

158
Configuring Controller Settings
Configure Services Commands
no rogue-report
To disable recording of detected rogue devices in the Event logs, use the following
command:
no rogue-report
Syntax Description
Defaults None
Example ruckus(config-services)# no rogue-report
The command was executed successfully.
no rogue-dhcp-detection
To disable recording of detected rogue DHCP servers in the Event logs, use the
following command:
no rogue-dhcp-detection
Syntax Description
Defaults None
Example ruckus(config-services)# no rogue-dhcp-detection
The command was executed successfully.
rogue-dhcp-detection
To enable recording of detected rogue DHCP servers in the Event logs, use the
following command:
rogue-dhcp-detection
Syntax Description
Defaults None
Example ruckus(config-services)# rogue-dhcp-detection
no rogue-report Disable recording of detected rogue devices in
the Event logs
no rogue-dhcp-detection Disable recording of detected rogue DHCP
servers in the Event logs
rogue-dhcp-detection Enable recording of detected rogue DHCP
servers in the Event logs

159
Configuring Controller Settings
Configure Load Balancing Commands
The command was executed successfully.
no aeroscout-detection
To disable detection of AeroScout RFID Tags by APs that are managed by
ZoneDirertor, use the following command:
no aeroscout-detection
Syntax Description
Defaults None
Example ruckus(config-services)# no aeroscout-detection
The command was executed successfully.
aeroscout-detection
To enable detection of AeroScout RFID Tags by APs that are managed by
ZoneDirertor, use the following command:
aeroscout-detection
Syntax Description
Defaults None
Example ruckus(config-services)# aeroscout-detection
The command was executed successfully.
Configure Load Balancing Commands
Use the load-balancing commands to configure the controller’s load balancing
settings. To run these commands, you must first enter the config-load-
balancing context.
abort
To exit the config-load-balancing context without saving changes, use the
abort command.
abort
no aeroscout-detection Disable detection of AeroScout RFID Tags by APs
aeroscout-detection Enable detection of AeroScout RFID Tags by APs

160
Configuring Controller Settings
Configure Load Balancing Commands
Syntax Description
Defaults None.
end
To save changes, and then exit the config-load-balancing context, use the
following command:
end
Syntax Description
Defaults None.
exit
To save changes, and then exit the config-load-balancing context, use the
following command:
exit
Syntax Description
Defaults None.
quit
To exit the config-load-balancing context without saving changes, use the quit
command.
quit
Syntax Description
Defaults None.
adj-threshold
To configure the adjustment threshold for load balancing, use the following
command:
adj-threshold {RADIO-INTERFACE} {NUMBER}
abort Exit the service settings without saving changes
end Save changes, and then exit the context
exit Save changes, and then exit the context
quit Exit the service settings without saving changes

161
Configuring Controller Settings
Configure Load Balancing Commands
Syntax Description
Defaults None.
weak-bypass
To configure the weak bypass for load balancing, use the following command:
weak-bypass {RADIO-INTERFACE} {NUMBER}
Syntax Description
Defaults None.
strong-bypass
To configure the strong bypass for load balancing, use the following command:
strong-bypass {RADIO-INTERFACE} {NUMBER}
Syntax Description
Defaults None.
act-threshold
To configure the activation threshold for load balancing, use the following command:
act-threshold {RADIO-INTERFACE} {NUMBER}
Syntax Description
adj-threshold Configure the adjustment threshold for load
balancing
{RADIO-INTERFACE} Configure this interface
{NUMBER} Set the adjust value to this
weak-bypass Configure the weak bypass for load balancing
{RADIO-INTERFACE} Configure this interface
{NUMBER} Set the adjust value to this
strong-bypass Configure the strong bypass for load balancing
{RADIO-INTERFACE} Configure this interface
{NUMBER} Set the adjust value to this
act-threshold Configure the activation threshold for load
balancing
{RADIO-INTERFACE} Configure this interface
162
Configuring Controller Settings
Configure Load Balancing Commands
Defaults None.
show
To display the current service settings, use the following command:
show
Syntax Description
Defaults None.
Example ruckus(config-load-balancing)# show
Load Balancing:
Status= Disabled
Radio:
0:
AdjacentThreshold= 38
WeakBypass= 20
StrongBypass= 50
ActivationThreshold= 1
NewTrigger= 50
Headroom= 30
1:
AdjacentThreshold= 45
WeakBypass= 20
StrongBypass= 50
ActivationThreshold= 1
NewTrigger= 1
Headroom= 1
{NUMBER} Set the adjust value to this
show Display the current service settings

163
Configuring Controller Settings
Configure System Commands
Configure System Commands
Use the sys command to configure the controller’s system settings, including its host
name, FlexMaster server, NTP server, SNMP, and QoS settings. To run these
commands, you must first enter the config-sys context.
hostname
To set the system hostname, use the following command:
hostname
Syntax Description
Defaults None
Example ruckus(config-sys)# hostname ruckus-xjoe
The system identity/hostname settings have been updated.
ruckus(config-sys)# hostname ruckus-xjoe&
The host name must be between 1 and 32 characters and must consist
only of alphanumeric characters, underscores (_), and hyphens (-).
no ntp
To disable the NTP client, use the following command:
no ntp
Syntax Description
Defaults Enabled. The default NTP server addresss is ntp.ruckuswireless.com.
Example ruckus(config-sys)# no ntp
The NTP settings have been updated.
ntp
To enable the NTP client, use the following command:
ntp {NTP server address}
Syntax Description
hostname Set the controller’s system hostname
no ntp Disable the NTP client on the controller.
ntp Enable the NTP client
{NTP server} Set the NTP server address to this IP address

164
Configuring Controller Settings
Configure System Commands
Defaults None.
Example ruckus(config-sys)# ntp 192.168.2.21
The NTP settings have been updated.
ruckus(config-sys)# ntp sohu.com
The NTP settings have been updated.
mgmt-acl
To create or configure a management ACL, use the following command:
mgmt-acl <WORD>
Executing this command enters the config-mgmt-acl context.
For the commands that you can execute within the config-mgmt-acl context, refer
to “Configure Management ACL Commands” on page 171.
Syntax Description
Defaults None.
Example ruckus(config-sys)# mgmt-acl macl1
The management ACL 'macl1' has been created. To save the Management
ACL, type 'end' or 'exit'.
ruckus(config-mgmt-acl)#
flexmaster
To set the FlexMaster service URL and the periodic inform interval, use the following
command:
flexmaster <flexmaster_url> interval <inform_interval>
Syntax Description
Defaults None.
mgmt-acl Create or configure a management ACL
<WORD> Create or configure this management ACL
flexmaster Configure the FlexMaster server settings
<flexmaster_url> Set to this URL or IP address
interval Configure the periodic inform interval
<inform_interval> Set to this interval (in minutes)

165
Configuring Controller Settings
Configure System Commands
Example ruckus(config-sys)# flexmaster http://172.18.30.118 interval 30
The FlexMaster Management settings have been updated.
snmpv2
To configure the SNMPv2 settings, use the following command:
snmpv2
Executing this command enters the config-sys-snmpv2 context.
Syntax Description
Defaults ruckus(config-sys)# snmpv2
ruckus(config-sys-snmpv2)#
snmpv3
To configure the SNMPv3 settings, use the following command:
snmpv3
Executing this command enters the config-sys-snmpv3 context.
Syntax Description
Defaults ruckus(config-sys)# snmpv3
ruckus(config-sys-snmpv2)#
snmp-trap-format
To set the SNMP trap format to SNMPV2 or SNMPV3, use the following command:
snmp-trap-format [SNMPv2 | SNMPv3]
Syntax Description
Defaults None
Example ruckus(config-sys)# snmp-trap-format SNMPV2
The SNMP trap settings have been updated.
snmpv2 Configure the SNMPv2 settings
snmpv3 Configure the SNMPv3 settings
snmp-trap-format Set the SNMP trap format
[SNMPv2 | SNMPv3] Set to either SNMPv2 or SNMPv3

166
Configuring Controller Settings
Configure System Commands
snmpv2-trap
To enable the SNMPv2 trap and set the IP address of the trap server, use the following
command:
snmpv2-trap {IP-ADDR}
Syntax Description
Defaults None
Example ruckus(config-sys)# snmpv2-trap 192.168.10.22
The SNMP trap settings have been updated.
snmpv3-trap
To enable and configure the SNMPv3 trap parameters, use the following command:
snmpv3-trap <user_name> <snmp_trap_server_ip> [MD5 | SHA]
<auth_pass_phrase> [DES <privacy_phrase>|AES <privacy_phrase>|
None]
Syntax Description
Defaults None
Example ruckus(config-sys)#snmpv3-trap test1234 192.168.0.22 MD5
test1234 DES test4321
The command was executed successfully.
snmpv2-trap Enable the SNMPv2 trap and set the trap server’s IP address
{IP-ADDR} Set to this IP address
snmpv3-trap Enable the SNMPv3 trap and configure the trap parameters
<user_name> Trap user name
<snmp_trap_server
_ip>
Trap server IP address
[MD5 | SHA]
<auth_pass_phrase
>
[DES
<privacy_phrase>|
AES
<privacy_phrase>|
None]

167
Configuring Controller Settings
Configure System Commands
no flexmaster
To disable FlexMaster management of the controller, use the following command:
no flexmaster
Syntax Description
Defaults None
Example ruckus(config-sys)# no flexmaster
FlexMaster Management has been disabled.
qos
To enable and configure QoS on the controller, use the following command:
qos
Executing this command enters the config-sys-qos context.
Syntax Description
Defaults None.
Example ruckus(config-sys)# qos
ruckus(config-sys-qos)#
no qos
To disabl QoS on the controller, use the following command:
no qos
Syntax Description
Defaults None.
Example ruckus(config-sys)# no qos
Changes are saved!
System QoS function has been disabled.
no flexmaster Disable FlexMaster management of the controller
qos Enable and configure QoS on the controller
qos Disable QoS on the controller

168
Configuring Controller Settings
Configure System Commands
mgmt-if
To configure the management interface settings, use the following command:
mgmt-if
Executing this command enters the config-sys-mgmt-if context.
Syntax Description
Defaults None.
Example ruckus(config-sys)# mgmt-if
ruckus(config-sys-mgmt-if)#
no mgmt-if
To disable the management interface, use the following command:
no mgmt-if
Syntax Description
Defaults None.
Example ruckus(config-sys)# no mgmt-if
The management interface has been updated.
no snmpv2
To disable the SNMPv2 agent, use the following command:
no snmpv2
Syntax Description
Defaults None.
Example ruckus(config-sys)# no snmpv2
The SNMP v2 agent settings have been updated.
no snmpv3
To disable the SNMPv3 agent, use the following command:
mgmt-if Configure the management interface settings
no mgmt-if Disable the management interface
no snmpv2 Disables the SNMPv3 agent

169
Configuring Controller Settings
Configure System Commands
no snmpv3
Syntax Description
Defaults None.
Example ruckus(config-sys)# no snmpv3
The SNMP v3 agent settings have been updated.
no snmp-trap
To disable the SNMP trap notifications, use the following command:
no snmp-trap
Syntax Description
Defaults None.
Example ruckus(config-sys)# no snmp-trap
The SNMP trap settings have been updated.
contact
To enable SNMP trap notification and set the system contact, use the following
command:
contact {contact name}
This command must be entered from within the snmp-agent context.
Syntax Description
Defaults None.
Example ruckus# config
ruckus(config)# system
ruckus(config-sys)# snmp-agent
ruckus(config-sys-snmp-agent)# contact Joe-User
The command was executed successfully.
no snmpv3 Disables the SNMPv3 agent
no snmp-trap Disables SNMP trap notifications
contact Configure the SNMP contact
{contact name} Set the SNMP contact to this value

170
Configuring Controller Settings
Configure System Commands
location
To set the system location, use the following command:
location {location name}
This command must be entered from within the snmp-agent context.
Syntax Description
Defaults None.
Example ruckus# config
ruckus(config)# system
ruckus(config-sys)# snmp-agent
ruckus(config-sys-snmp-agent)# location Sunnyvale
The command was executed successfully.
ro-community
To set the read-only (RO) community name, use the following command:
ro-community {RO community}
This command must be entered from within the snmp-agent context.
Syntax Description
Defaults None.
Example ruckus(config-sys-snmp-agent)# ro-community private-123
The command was executed successfully
rw-community
To set the read-write (RW) community name, use the following command:
rw-community {RW community}
This command must be entered from within the snmp-agent context.
Syntax Description
location Configure the SNMP location
{location name} Set the SNMP location to this value
ro-community Configure the read-only community name
{RO community} Set the read-only community name to this value
rw-community Configure the read-write community name
{RW community} Set the read-write community name to this value

171
Configuring Controller Settings
Configure System Commands
Defaults None.
Example ruckus(config-sys-snmp-agent)# rw-community public-123
The command was executed successfully
snmp-trap
To enable SNMP trap notification and set the trap server address, use the following
command:
snmp-trap {trap server address}
Syntax Description
Defaults None.
Example ruckus# config
ruckus(config)# system
ruckus(config-sys)# snmp-trap 192.168.0.3
Configure Management ACL Commands
Use the mgmt-acl commands to configure the management ACL settings. To run
these commands, you must first enter the config-mgmt-acl context.
abort
To exit the config-mgmt-acl context without saving changes, use the abort
command.
abort
Syntax Description
Defaults Disabled.
Example ruckus(config-mgmt-acl)# abort
No changes have been saved.
ruckus(config-sys)#
snmp-trap Enable SNMP trap notifications
{trap server address} Set the trap server address to this IP address or host name
abort Exit the context without saving changes

172
Configuring Controller Settings
Configure System Commands
end
To save changes, and then exit the config-services context, use the following
command:
end
Syntax Description
Defaults Disabled.
Example ruckus(config-mgmt-acl)# end
The management ACL 'macl2' has been updated and saved.
Your changes have been saved.
ruckus(config-sys)#
exit
To save changes, and then exit the config-services context, use the following
command:
exit
Syntax Description
Defaults Disabled.
Example ruckus(config-mgmt-acl)# exit
The management ACL 'macl2' has been updated and saved.
Your changes have been saved.
ruckus(config-sys)#
quit
To exit the config-mgmt-acl context without saving changes, use the abort
command.
quit
Syntax Description
Defaults Disabled.
end Save changes, and then exit the context
exit Save changes, and then exit the context
quit Exit the context without saving changes
173
Configuring Controller Settings
Configure System Commands
Example ruckus(config-mgmt-acl)# quit
No changes have been saved.
ruckus(config-sys)#
name
To set the management ACL name, use the following command:
name <WORD>
Syntax Description
Defaults Disabled.
Example ruckus(config-mgmt-acl)# name macl2
The command was executed successfully. To save the changes, type
'end' or 'exit'.
restrict-type single ip-addr
To set the management ACL restriction type to a single IP address, use the following
command:
restrict-type single ip-addr <ip_address>
Syntax Description
Defaults Disabled.
Example ruckus(config-mgmt-acl)# restrict-type single ip-addr
192.168.110.22
The command was executed successfully. To save the changes, type
'end' or 'exit'.
restrict-type subnet ip-subnet
To set the management ACL restriction type to certain subnets, use the following
command:
restrict-type subnet ip-subnet <IP-SUBNET> <IP-SUBNET>
name Set the management ACL name
<WORD> Set to this name
restrict-type
single ip-addr
Set the management ACL restriction type to a single IP
address
<ip_address> Set to this IP address only

174
Configuring Controller Settings
Configure System Commands
Syntax Description
Defaults Disabled.
Example ruckus(config-mgmt-acl)#restrict-type subnet ip-subnet
172.30.110.26 255.255.254.0
The command was executed successfully. To save the changes, type
'end' or 'exit'.
restrict-type range ip-range
To set the management ACL restriction type to an IP address range, use the following
command:
restrict-type range ip-range <ip_address> <ip_address>
Syntax Description
Defaults Disabled.
Example ruckus(config-mgmt-acl)#restrict-type range ip-range
172.30.110.28 172.30.110.39
The command was executed successfully. To save the changes, type
'end' or 'exit'.
show
To display the current management ACL settings, use the following command:
show
Syntax Description
Defaults Disabled.
Example ruckus(config-mgmt-acl)# show
restrict-type
subnet ip-subnet
Set the management ACL restriction type to a single IP
address
<IP-SUBNET> Set to this subnet
restrict-type range
ip-range
Set the management ACL restriction type to a single IP
address
<ip_address>
<ip_address>
Set to this IP address range. The first <ip_address> is for
the startui
show Display the current management ACL settings

175
Configuring Controller Settings
Configure System Commands
Management ACL:
ID:
:
Name= macl2
Restriction Type= range
IP range= 172.30.110.28-172.30.110.39

176
Configuring Controller Settings
Configure Syslog Settings Commands
Configure Syslog Settings Commands
Use the syslog commands to configure the controller’s syslog notification settings.
To run these commands, you must first enter the config-sys context.
no syslog
To disable syslog notification, use the following command:
no syslog
Syntax Description
Defaults Disabled.
Example ruckus# config
ruckus(config)# system
ruckus(config-sys)# no syslog
The command was executed successfully.
syslog
To enable syslog notifications and set the syslog server address, use the following
command:
syslog {syslog address}
Syntax Description
Defaults Disabled.
Example ruckus# config
ruckus(config)# system
ruckus(config-sys)# syslog 192.168.0.1
The command was executed successfully.
no syslog Disable syslog notification
syslog Enable syslog notification
{syslog IP address} Send syslog notifications to this IP address or host name

177
Configuring Controller Settings
Configure Syslog Settings Commands
Configure Controller’s Country Setting Command
Use the dot11-country-code commands to configure the controller’s country
settings. To run these commands, you must first enter the config-sys context.
dot11-country-code
To set the controller’s country code, use the following command:
dot11-country-code {country code}
Syntax Description
Defaults None.
Example To set the country code to US, enter the following command:
ruckus# config
ruckus(config)# system
ruckus(config-sys)# dot11-country-code US
The command was executed successfully.
dot11-country-
code
Configure the controller’s country code setting
{country code} Set the country code to this value

178
Configuring Controller Settings
Configure Syslog Settings Commands
Configure Controlller’s IP Address Commands
Use the ip commands to configure the controller’s IP address settings. To run these
commands, you must first enter the config-sys-if context.
ip route gateway
To set the controller's gateway IP address, use the following command:
ip route gateway {gateway IP address}
Syntax Description
Defaults None.
Example ruckus# config
ruckus(config)# system
ruckus(config-sys)# interface
ruckus(config-sys-if)# ip route gateway 192.168.0.1
The command was executed successfully.
ip name-server
To set the controller's DNS servers, use the ip name-server command. Use a space to
separate the primary and secondary DNS servers.
ip name-server {DNS server}
Syntax Description
Defaults None.
Example ruckus# config
ruckus(config)# system
ruckus(config-sys)# interface
ruckus(config-sys-if)# ip name-server 192.168.0.1
The command was executed successfully.
ip route gateway Configure the controller’s gateway IP address
{gateway IP address} Set the controller’ gateway IP address to this value
ip name-server Configure the controller’s DNS server address or addresses
{DNS server} Set the DNS server address to this value. If entering primary
and secondary DNS server addresses, use a space to
separate the two addresses.

179
Configuring Controller Settings
Configure Syslog Settings Commands
ip addr
To set the controller's IP address and netmask, use the following command:
ip addr {IP address} {netmask}
Use a space to separate the IP address and netmask.
Syntax Description
Defaults None.
Example ruckus# config
ruckus(config)# system
ruckus(config-sys)# interface
ruckus(config-sys-if)# ip addr 192.168.0.1 255.255.255.0
The command was executed successfully.
ip mode
To set the controller's IP address mode, use the following command:
ip mode {dhcp | static}
Syntax Description
Defaults None.
Example To set the controller’s IP address mode to DHCP, enter the following command:
ruckus# config
ruckus(config)# system
ruckus(config-sys)# interface
ruckus(config-sys-if)# ip mode dhcp
The command was executed successfully.
show
To display the current management interface settings, use the following command:
show
ip addr Configure the controller’s IP address and netmask
{IP address} Set the controller’s IP address to this value
{netmask} Set the controller’s netmask to this value
ip mode Configure the controller’s IP address mode
{dhcp} Set the controller’s IP address mode to DHCP
{static} Set the controller’s IP address mode to static

180
Configuring Controller Settings
Configure Syslog Settings Commands
Syntax Description
Defaults None.
Example ruckus# config
ruckus(config)# system
ruckus(config-sys)# interface
ruckus(config-sys-if)# show
Mode: Manual
IP Address: 192.168.122.1
Netmask: 255.255.255.0
Gateway Address: 172.17.16.1
Primary DNS: 172.17.17.5
Secondary DNS: 192.168.0.107
Management VLAN
========================================================
Status: disabled
VLAN ID:
ruckus(config-if)#
Configure WLAN Settings Commands
Use the config wlan commands to configure the WLAN settings, including the
WLAN’s description, SSID, and its security settings. To run these commands, you must
first enter the config-wlan context.
description
To set the WLAN service description, use the following command:
description {WLAN description}
Syntax Description
Defaults None.
Example ruckus# config
ruckus(config)# wlan randy-wlansvc-01-open
The WLAN service 'randy-wlansvc-01-open' has been created. To save
the WLAN service, type end or exit.
show Display the current management interface settings
description Configure the WLAN description
{WLAN description} Set the WLAN description this value

181
Configuring Controller Settings
Configure Syslog Settings Commands
ruckus(config-wlan-randy-wlansvc-01-open)#

182
Configuring Controller Settings
Configure Syslog Settings Commands
ssid
To set the WLAN service’s SSID or network name, use the following command:
ssid {SSID}
Syntax Description
Defaults None.
Example ruckus# config
ruckus(config)# wlan randy-wlansvc-01-open
The WLAN service 'randy-wlansvc-01-open' has been created. To save
the WLAN service, type end or exit.
ruckus(config-wlan-randy-wlansvc-01-open)# description Auth-
open-ENc-None
The command was executed successfully.
ruckus(config-wlan-randy-wlansvc-01-open)#
open none
To set the authentication method to 'open' and encryption method to 'none', use the
following command:
open none
Syntax Description
Defaults None.
Example ruckus(config)# wlan randy-wlansvc-01-open
The WLAN service 'randy-wlansvc-01-open' has been created. To save
the WLAN service, type end or exit.
ruckus(config-wlan-randy-wlansvc-01-open)# open none
The command was executed successfully.
open wpa passphrase {PASSPHRASE} algorithm AES
To set the authentication method to 'open', encryption method to 'WPA', and
algorithm to 'AES', use the following command:
open wpa passphrase {passphrase} algorithm AES
ssid Configure the WLAN service’s SSID
{SSID} Set the SSID to this value
open Set the authentication method to 'open'
none Set the encryption method to 'none'

183
Configuring Controller Settings
Configure Syslog Settings Commands
Syntax Description
Defaults None.
Example ruckus(config)# wlan randy-wlansvc-01-open
The WLAN service 'randy-wlansvc-01-open' has been created. To save
the WLAN service, type end or exit.
ruckus(config-wlan-randy-wlansvc-01-open)# open wpa passphrase
12345678 algorithm AES
The command was executed successfully.
open Set the authentication method to open
wpa Set the encryption method to WPA
passphrase
{passphrase}
Set the WPA passphrase to {passphrase}
algorithm AES Set the encryption algorithm to AES

184
Configuring Controller Settings
Configure Syslog Settings Commands
open wpa passphrase {PASSPHRASE} algorithm TKIP
To set the authentication method to 'open', encryption method to 'WPA', and
algorithm to 'TKIP', use the following command:
open wpa passphrase {passphrase} algorithm TKIP
Syntax Description
Defaults None.
Example ruckus(config)# wlan randy-wlansvc-01-open
The WLAN service 'randy-wlansvc-01-open' has been created. To save
the WLAN service, type end or exit.
ruckus(config-wlan-randy-wlansvc-01-open)# open wpa passphrase
12345678 algorithm TKIP
The command was executed successfully.
open wpa2 passphrase {PASSPHRASE} algorithm
AES
To set the authentication method to 'open', encryption method to 'WPA2', and
algorithm to 'AES', use the following command:
open wpa2 passphrase {passphrase} algorithm AES
Syntax Description
Defaults None.
Example ruckus(config)# wlan randy-wlansvc-01-open
The WLAN service 'randy-wlansvc-01-open' has been created. To save
the WLAN service, type end or exit.
open Set the authentication method to open
wpa Set the encryption method to WPA
passphrase
{passphrase}
Set the WPA passphrase to {passphrase}
algorithm TKIP Set the encryption algorithm to TKIP
open Set the authentication method to open
wpa2 Set the encryption method to WPA2
passphrase
{passphrase}
Set the WPA2 passphrase to {passphrase}
algorithm AES Set the encryption algorithm to AES

185
Configuring Controller Settings
Configure Syslog Settings Commands
ruckus(config-wlan-randy-wlansvc-01-open)# open wpa2 passphrase
12345678 algorithm AES
The command was executed successfully.
open wpa2 passphrase {PASSPHRASE} algorithm
TKIP
To set the authentication method to 'open', encryption method to 'WPA2', and
algorithm to 'TKIP', use the following command:
open wpa2 passphrase {passphrase} algorithm TKIP
Syntax Description
Defaults None.
Example ruckus(config)# wlan randy-wlansvc-01-open
The WLAN service 'randy-wlansvc-01-open' has been created. To save
the WLAN service, type end or exit.
ruckus(config-wlan-randy-wlansvc-01-open)# open wpa2 passphrase
12345678 algorithm TKIP
The command was executed successfully.
open wep-64 key {KEY} key-id {KEY-ID}
To set the authentication method to 'open', encryption method to 'WEP-64', key
index, and WEP key, use the following command:
open wep-64 key {key} key-id {key ID}
Syntax Description
Defaults None.
open Set the authentication method to open
wpa2 Set the encryption method to WPA2
passphrase
{passphrase}
Set the WPA2 passphrase to {passphrase}
algorithm TKIP Set the encryption algorithm to TKIP
open Set the authentication method to open
wep-64 Set the encryption method to WEP 64-bit
key {key} Set the WEP key to {key}
key-id {key ID} Set the WEP key ID to {key ID}

186
Configuring Controller Settings
Configure Syslog Settings Commands
Example ruckus(config)# wlan randy-wlansvc-01-open
The WLAN service 'randy-wlansvc-01-open' has been created. To save
the WLAN service, type end or exit.
ruckus(config-wlan-randy-wlansvc-01-open)# open wep-64 key
1234567890 key-id 1
The command was executed successfully.
open wep-128 key {KEY} key-id {KEY-ID}
To set the authentication method to 'open', encryption method to 'WEP-128', key
index, and WEP key, use the following command:
open wep-128 key {key} key-id {key ID}
Syntax Description
Defaults None.
Example ruckus(config)# wlan randy-wlansvc-01-open
The WLAN service 'randy-wlansvc-01-open' has been created. To save
the WLAN service, type end or exit.
ruckus(config-wlan-randy-wlansvc-01-open)# open wep-128 key
12345678901234567890123456 key-id 1
The command was executed successfully.
mac none auth-server
To set the authentication method to 'MAC Address' and encryption method to 'none',
use the following command:
mac none auth-server {auth server}
Syntax Description
Defaults None.
open Set the authentication method to open
wep-128 Set the encryption method to WEP 128-bit
key {key} Set the WEP key to {key}
key-id {key ID} Set the WEP key ID to {key ID}
mac Set the authentication method to 'MAC Address'
none Set the encryption method to 'none'
auth-server {auth
server}
Set the authorization server address to {auth server}

187
Configuring Controller Settings
Configure Syslog Settings Commands
Example ruckus(config-wlan-randall-wlansvc-01)# mac none auth-server
Ruckus-Auth-01
The command was executed successfully.
mac wpa passphrase {PASSPHRASE} alogrithm AES
auth-server {AUTHSVR-NAME}
To set the authentication method to 'MAC Address', encryption method to 'WPA',
and algorithm to 'AES', use the following command:
mac wpa passphrase {passphrase} algorithm AES auth-server
{AUTHSVR-NAME}
Syntax Description
Defaults None.
Example ruckus(config-wlan-randall-wlansvc-01)# mac wpa passphrase
12345678 algorithm AES auth-server Ruckus-Auth-01
The command was executed successfully.
mac wpa passphrase {PASSPHRASE} alogrithm TKIP
auth-server {AUTHSVR-NAME}
To set the authentication method to 'MAC Address', encryption method to 'WPA',
and algorithm to 'TKIP’, use the following command:
mac wpa passphrase {PASSPHRASE} alogrithm TKIP auth-server
{AUTHSVR-NAME}
Syntax Description
mac Set the authentication method to 'MAC Address'
wpa Set the encryption method to 'WPA'
passphrase
{passphrase}
Set the WPA passphrase to {passphrase}
algorithm AES Set the encryption algorithm to ‘AES’
auth-server {AUTHSVR-
NAME}
Set the authorization server address to {AUTHSVR-NAME}
mac wpa Set the authentication method to 'MAC Address' and
encryption method to 'WPA'
passphrase
{passphrase}
Set the WPA passphrase to {passphrase}
algorithm TKIP Set the encryption algorithm to ‘TKIP’

188
Configuring Controller Settings
Configure Syslog Settings Commands
Defaults None.
Example ruckus(config-wlan-randall-wlansvc-01)# mac wpa passphrase
12345678 algorithm TKIP auth-server Ruckus-Auth-01
The command was executed successfully.
mac wpa2 passphrase {PASSPHRASE} alogrithm AES
auth-server {AUTHSVR-NAME}
To set the authentication method to 'MAC Address', encryption method to 'WPA2',
and algorithm to 'AES', use the following command:
mac wpa2 passphrase {PASSPHRASE} alogrithm AES auth-server
{AUTHSVR-NAME}
Syntax Description
Defaults None.
Example ruckus(config-wlan-randall-wlansvc-01)# mac wpa2 passphrase
12345678 algorithm AES auth-server Ruckus-Auth-01
The command was executed successfully.
mac wpa2 passphrase {PASSPHRASE} alogrithm TKIP
auth-server {AUTHSVR-NAME}
To set the authentication method to 'MAC Address', encryption method to 'WPA2',
and algorithm to 'TKIP’, use the following command:
mac wpa2 passphrase {PASSPHRASE} alogithm TKIP auth-server
{AUTHSVR-NAME}
auth-server {AUTHSVR-
NAME}
Set the authorization server address to {AUTHSVR-NAME}
mac wpa2 Set the authentication method to 'MAC Address' and
encryption method to 'WPA2'
passphrase
{PASSPHRASE}
Set the WPA2 passphrase to {passphrase}
algorithm AES Set the encryption algorithm to ‘AES’
auth-server {AUTHSVR-
NAME}
Set the authorization server address to {AUTHSVR-NAME}

189
Configuring Controller Settings
Configure Syslog Settings Commands
Syntax Description
Defaults None.
Example ruckus(config-wlan-randall-wlansvc-01)# mac wpa2 passphrase
12345678 algorithm TKIP auth-server Ruckus-Auth-01
The command was executed successfully.
mac wep-64 key {KEY} key-id {KEY-ID} auth-server
{AUTHSVR-NAME}
To set the authentication method to 'MAC Address', encryption method to 'WEP-64',
key index, and WEP key, use the following command:
mac wep-64 key {KEY} key-id {KEY-ID} auth-server {AUTHSVR-NAME}
Syntax Description
Defaults None.
Example ruckus(config-wlan-randy-wlansvc-01-wpa2)# mac wep-64 key
15791BD8F2 key-id 2 auth-server Ruckus-Auth-01
The command was executed successfully.
mac wpa2 Set the authentication method to 'MAC Address' and
encryption method to 'WPA2'
passphrase
{PASSPHRASE}
Set the WPA2 passphrase to {passphrase}
algorithm TKIP Set the encryption algorithm to ‘TKIP’
auth-server {AUTHSVR-
NAME}
Set the authorization server address to {AUTHSVR-NAME}
mac Set the authentication method to MAC address
wep-64 Set the encryption method to WEP 64-bit
key {KEY} Set the WEP key to {KEY}
key-id {KEY-ID} Set the WEP key ID to {KEY-ID}
auth-server {AUTHSVR-
NAME}
Set the authorization server address to {AUTHSVR-NAME}

190
Configuring Controller Settings
Configure Syslog Settings Commands
mac wep-128 key {KEY} key-id {KEY-ID} auth-server
{AUTHSVR-NAME}
To set the authentication method to 'MAC Address', encryption method to 'WEP-128',
key index, and WEP key, use the following command:
mac wep-128 key {KEY} key-id {KEY-ID} auth-server {AUTHSVR-NAME}
Syntax Description
Defaults None.
Example ruckus(config-wlan-randy-wlansvc-01-wpa2)# mac wep-128 key
15715791BD8F212345691BD8F2 key-id 2 auth-server Ruckus-Auth-01
The command was executed successfully.
shared wep-64 key {KEY} key-id {KEY-ID}
To set the authentication method to 'Shared', encryption method to 'WEP-64', key
index, and WEP key, use the following command:
shared wep-64 key {KEY} key-id {KEY-ID}
Syntax Description
Defaults None.
Example ruckus(config-wlan-randy-wlansvc-01-wpa2)# shared authentication
encryption wep-64 key 15791BD8F2 key-id 2
The command was executed successfully.
mac Set the authentication method to MAC address
wep-128 Set the encryption method to WEP 128-bit
key {KEY} Set the WEP key to {key}
key-id {KEY-ID} Set the WEP key ID to {key ID}
auth-server {AUTHSVR-
NAME}
Set the authorization server address to {AUTHSVR-NAME}
shared Set the authentication method to ‘Shared’
wep-64 Set the encryption method to WEP 64-bit
key {KEY} Set the WEP key to {key}
key-id {KEY-ID} Set the WEP key ID to {KEY-ID}

191
Configuring Controller Settings
Configure Syslog Settings Commands
shared wep-128 key {KEY} key-id {KEY-ID}
To set the authentication method to 'Shared', encryption method to 'WEP-128', key
index, and WEP key, use the following command:
shared wep-128 key {KEY} key-id {KEY-ID}
Syntax Description
Defaults None.
Example ruckus(config-wlan-randy-wlansvc-01-wpa2)# shared wep-128 key
15791B15791BD8F2123456D8F2 key-id 2
The command was executed successfully.
dot1x eap-type EAP-SIM auth-server
To set the authentication method to 'EAP-SIM', use the following command:
dot1x eap-type EAP-SIM auth-server [local | name {AUTHSVR-NAME}]
Syntax Description
Defaults None.
Example ruckus(config-wlan)# dot1x eap-type EAP-SIM auth-server local
The command was executed successfully. To save the changes, type
'end' or 'exit'.
dot1x eap-type PEAP auth-server
To set the authentication method to 'PEAP', use the following command:
dot1x eap-type PEAP auth-server [local | name {AUTHSVR-NAME}]
Syntax Description
shared Set the authentication method to ‘Shared’
wep-128 Set the encryption method to WEP 128-bit
key {KEY} Set the WEP key to {key}
key-id {KEY-ID} Set the WEP key ID to {KEY-ID}
dot1x Set the authentication method to ‘802.11x’
EAP-SIM Set the EAP type
auth-server
{AUTHSVR-NAME} Set the auth server to {AUTHSVR-NAME}
dot1x Set the authentication method to ‘802.11x’
PEAP Set the EAP type

192
Configuring Controller Settings
Configure Syslog Settings Commands
Defaults None.
Example ruckus(config-wlan)# dot1x eap-type PEAP auth-server local
The command was executed successfully. To save the changes, type
'end' or 'exit'.
dot1x wpa algorithm AES auth-server
To set the authentication method to '802.1x EAP', encryption method to 'WPA', and
algorithm to 'AES', use the following command:
dot1x wpa algorithm AES auth-server {AUTHSVR-NAME}
Syntax Description
Defaults None.
Example ruckus(config-wlan-wlansvc-012)# dot1x wpa algorithm AES auth-
server Ruckus-Auth-01
The command was executed successfully.
dot1x wpa algorithm TKIP auth-server {AUTHSVR-
NAME}
To set the authentication method to '802.1x EAP', encryption method to 'WPA', and
algorithm to 'TKIP', use the following command:
dot1x wpa algorithm TKIP auth-server {AUTHSVR-NAME}
Syntax Description
auth-server
{AUTHSVR-NAME} Set the auth server to {AUTHSVR-NAME}
dot1x Set the authentication method to ‘802.11x’
wpa Set the encryption method to WPA
algorithm AES Set the algorithm to AES
auth-server
{AUTHSVR-NAME} Set the auth server to {AUTHSVR-NAME}
dot1x Set the authentication method to ‘802.11x’
wpa Set the encryption method to WPA
algorithm TKIP Set the algorithm to TKIP
auth-server
{AUTHSVR-NAME} Set the auth server to {AUTHSVR-NAME}

193
Configuring Controller Settings
Configure Syslog Settings Commands
Defaults None.
Example ruckus(config-wlan-wlansvc-012)# dot1x wpa algorithm TKIP auth-
server Ruckus-Auth-01
The command was executed successfully.
dot1x wpa2 algorithm AES auth-server {AUTHSVR-
NAME}
To set the authentication method to '802.1x EAP', encryption method to 'WPA2', and
algorithm to 'AES', use the following command:
dot1x wpa2 algorithm AES auth-server {AUTHSVR-NAME}
Syntax Description
Defaults None.
Example ruckus(config-wlan-randy-wlansvc-01-open)# dot1x wpa2 algorithm
AES auth-server Ruckus-RADIUS
The command was executed successfully.
dot1x wpa2 algorithm TKIP auth-server {AUTHSVR-
NAME}
To set the authentication method to '802.1x EAP', encryption method to 'WPA2', and
algorithm to 'TKIP', use the following command:
dot1x wpa2 algorithm TKIP auth-server {AUTHSVR-NAME}
Syntax Description
Defaults None.
dot1x Set the authentication method to ‘802.11x’
wpa2 Set the encryption method to WPA2
algorithm AES Set the algorithm to AES
auth-server
{AUTHSVR-NAME} Set the auth server to {AUTHSVR-NAME}
dot1x Set the authentication method to ‘802.11x’
wpa2 Set the encryption method to WPA2
algorithm TKIP Set the algorithm to TKIP
auth-server
{AUTHSVR-NAME} Set the auth server to {AUTHSVR-NAME}

194
Configuring Controller Settings
Configure Syslog Settings Commands
Example ruckus(config-wlan-wlansvc-012)# dot1x authentication encryption
wpa2 algorithm TKIP auth-server Ruckus-Auth-01
The command was executed successfully.
dot1x authentication encryption wep-64 auth-server
To set the authentication method to '802.1x EAP', encryption method to 'WEP-64',
key index, and WEP key, use the following command:
dot1x authentication encryption wep-64 auth-server {auth server}
Syntax Description
Defaults None.
Example ruckus(config-wlan-wlansvc-012)# dot1x authentication encryption
wep-64 auth-server Ruckus-Auth-01
The command was executed successfully.
dot1x authentication encryption wep-128 auth-
server
To set the authentication method to '802.1x EAP', encryption method to 'WEP-128',
key index, and WEP key, use the following command:
dot1x authentication encryption wep-128 auth-server
Syntax Description
Defaults None.
Example ruckus(config-wlan-wlansvc-012)# dot1x authentication encryption
wep-128 auth-server Ruckus-Auth-01
The command was executed successfully.
dot1x authentication Set the authentication method to ‘802.11x’
encryption wep-64 Set the encryption method to WEP 64-bit
auth-server {auth
server} Set the auth server to {auth server}
dot1x authentication Set the authentication method to ‘802.11x’
encryption wep-128 Set the encryption method to WEP 128-bit
auth-server {auth
server} Set the auth server to {auth server}

195
Configuring Controller Settings
Configure Syslog Settings Commands
client isolation
To enable wireless client isolation, use the following command:
client isolation
Syntax Description
Defaults None.
Example ruckus(config-wlan-randy-wlansvc-01-open)# client isolation
The command was executed successfully.
no client-isolation
To disable wireless client isolation, use the following command:
no client-isolation
Syntax Description
Defaults None.
Example ruckus# config
ruckus(config)# wlan wlan-123
ruckus(config-wlan-wlan-123)# no client-isolation
The command was executed successfully.
no web-auth
To disable Web authentication, use the following command:
no web-auth
Syntax Description
Defaults None.
Example ruckus# config
ruckus(config)# wlan wlan-123
ruckus(config-wlan-wlan-123)# no web-auth
The command was executed successfully.
client isolation Enable client isolation
no client-isolation Disable client isolation
no web-auth Disable Web authentication

196
Configuring Controller Settings
Configure Syslog Settings Commands
no acct-server
To disable the AAA server, use the following command:
no acct-server
Syntax Description
Defaults None.
Example ruckus# config
ruckus(config)# wlan wlan-123
ruckus(config-wlan-wlan-123)# no acct-server
The command was executed successfully.
no vlan
To disable the management VLAN, use the following command:
no vlan
Syntax Description
Defaults None.
Example ruckus# config
ruckus(config)# wlan wlan-123
ruckus(config-wlan-wlan-123)# no vlan
The command was executed successfully.
no dynamic-vlan
To disable dynamic VLAN, use the following command:
no dynamic-vlan
Syntax Description
Defaults None.
Example ruckus(config-wlan)# no dynamic-vlan
no acct-server Disable AAA server authentication
no vlan Disable the management VLAN
no dynamic-vlan Disable dynamic VLAN

197
Configuring Controller Settings
Configure Syslog Settings Commands
The dynamic vlan can't be enabled or disabled when the authentication
method is not '802.1x-EAP' or 'MAC Address' and Encryption method
is not WPA,WPA2,WPA mixed,or none.
ruckus(config-wlan)# no dynamic-vlan
The command was executed successfully. To save the changes, type
'end' or 'exit'.
dynamic-vlan
To enable dynamic VLAN, use the following command:
dynamic-vlan
Syntax Description
Defaults None.
Example ruckus(config-wlan)# dynamic-vlan
The command was executed successfully. To save the changes, type
'end' or 'exit'
no zero-it-activation
To disable Zero-IT activation, use the following command:
no zero-it-activation
Syntax Description
Defaults None.
Example ruckus(config-wlan)# no zero-it-activation
The command was executed successfully. To save the changes, type
'end' or 'exit'.
zero-it-activation
To enable Zero-IT activation, use the following command:
zero-it-activation
Syntax Description
dynamic-vlan Enable dynamic VLAN
no zero-it-activation Disable Zero-IT activation
zero-it-activation Enable Zero-IT activation

198
Configuring Controller Settings
Configure Syslog Settings Commands
Defaults None.
Example ruckus(config-wlan)# zero-it-activation
The Zero-IT Activation can't be enabled or disabled when the wlan
type is Guest Access or Hotspot Service Or Encryption method is
WPA-Mixed Or Authentication method is 802.1x EAP + MAC Address Or
Authentication method is 802.1x EAP and Authentication Server is
Local Database Or Encryption Algorithm is Auto.
ruckus(config-wlan)# zero-it-activation
The command was executed successfully. To save the changes, type
'end' or 'exit'.
rate-limit-uplink
To set the uplink rate limit, use the following command:
rate-limit-uplink [disabled |100K | 250K |500K |1M |2M |5M |10M
|20M |50M]
Syntax Description
Defaults None.
no rate-limit-uplink
To disable the uplink rate limit, use the following command:
no rate-limit-uplink
Syntax Description
Defaults None.
Example ruckus(config-wlan)# rate-limit-uplink disabled
The command was executed successfully. To save the changes, type
'end' or 'exit'.
rate-limit-downlink
To set the downlink rate limit, use the following command:
rate-limit-uplink Set the uplink rate limit
disabled Disable uplink rate limiting
100K | 250K |500K |1M
|2M |5M |10M |20M |50M
Enable uplink rate limiting and set it to this value
no rate-limit-uplink Disable the downlink rate limit

199
Configuring Controller Settings
Configure Syslog Settings Commands
rate-limit-uplink [disabled |100K | 250K |500K |1M |2M |5M |10M
|20M |50M]
Syntax Description
Defaults None.
no rate-limit-downlink
To disable the downlink rate limit, use the following command:
no rate-limit-downlink
Syntax Description
Defaults None.
Example ruckus(config-wlan)# rate-limit-downlink disabled
The command was executed successfully. To save the changes, type
'end' or 'exit'.
no tunnel-mode
To disable the tunnel mode, use the following command:
no tunnel-mode
Syntax Description
Defaults None.
Example ruckus# config
ruckus(config)# wlan wlan-123
ruckus(config-wlan-wlan-123)# no tunnel-mode
The command was executed successfully.
no l2 access control
To disable the L2 ACL, use the following command:
rate-limit-downlink Set the downlink rate limit
disabled Disable downlink rate limiting
100K | 250K |500K |1M
|2M |5M |10M |20M |50M
Enable downlink rate limiting and set it to this value
no rate-limit-downlink Disable the downlink rate limit
no tunnel-mode Disable the tunnel mode

200
Configuring Controller Settings
Configure Syslog Settings Commands
no l2 access control
Syntax Description
Defaults None.
Example ruckus# config
ruckus(config)# wlan wlan-123
ruckus(config-wlan-wlan-123)# no l2 access control
The command was executed successfully.
no l3 access control
To disable the L3/L4/IP ACL, use the following command:
no l3 access control
Syntax Description
Defaults None.
Example ruckus# config
ruckus(config)# wlan wlan-123
ruckus(config-wlan-wlan-123)# no l3 access control
The command was executed successfully.
web authentication
To enable Web authentication, use the following command:
web-auth {AUTHSVR-NAME}
Syntax Description
Defaults None.
Example ruckus# config
ruckus(config)# wlan wlan-123
ruckus(config-wlan-wlan-123)# web authentication Ruckus-RADIUS
The command was executed successfully.
no l2 access control Disable L2 access control
no l3 access control Disable L3 access control
web-auth Enable Web authentication
{AUTHSVR-NAME} The AAA server to use for Web authentication

201
Configuring Controller Settings
Configure Syslog Settings Commands
ruckus(config-wlan-wlan-123)#
acct-server
To set the AAA server, use the following command:
acct-server {AAA server}
Syntax Description
Defaults None.
Example ruckus# config
ruckus(config)# wlan wlan-123
ruckus(config-wlan-wlan-123)# acct-server Ruckus-Acct-01
The command was executed successfully.
acct-server interim-update
To configure the interim update frequency (in minutes) of the AAA server, use the
following command:
acct-server {AAA name} interim-update {minutes}
Syntax Description
Defaults 5 (minutes)
Example ruckus# config
ruckus(config)# wlan wlan-123
ruckus(config-wlan-wlan-123)# acct-server Ruckus-Acct-01 intrim-
update 5
The command was executed successfully.
acct-server Configure the AAA server
{AAA server} Set the AAA server to this address
acct-server {AAA name} Confgure the interim update frequency of the AAA server
interim-update
{minutes}
Set the update frequency to this value (in minutes)

202
Configuring Controller Settings
Configure Syslog Settings Commands
vlan
To enable the management VLAN and set the VLAN ID, use the following command:
vlan {VLAN ID}
Syntax Description
Defaults None.
Example ruckus# config
ruckus(config)# wlan wlan-123
ruckus(config-wlan-wlan-123)# vlan 12
The command was executed successfully.
hide-ssid
To hide an SSID from wireless users, use the following command. Wireless users who
know the SSID will still be able to connect to the WLAN service.
hide-ssid
Syntax Description
Defaults None.
Example ruckus# config
ruckus(config)# wlan wlan-123
ruckus(config-wlan-wlan-123)# hide-ssid
The command was executed successfully.
no hide-ssid
To unhide or broadcast an SSID to wireless users, use the following command:
no hide-ssid
Syntax Description
Defaults None.
vlan Enable management VLAN
{VLAN ID} Set the VLAN ID to this value
hide-ssid Hide SSID from wireless users
no hide-ssid Broadcast SSID to wireless users

203
Configuring Controller Settings
Configure Syslog Settings Commands
Example ruckus# config
ruckus(config)# wlan wlan-123
ruckus(config-wlan-wlan-123)# no hide-ssid
The command was executed successfully
tunnel-mode
To enable tunnel mode, use the following command:
tunnel-mode
Syntax Description
Defaults None.
Example ruckus# config
ruckus(config)# wlan wlan-123
ruckus(config-wlan-wlan-123)# tunnel-mode
The command was executed successfully.
max-clients
To set the maximum number of clients for a specific WLAN, use the following
command:
max-clients {NUMBER}
Syntax Description
Defaults None.
Example To set the maximum number of clients on WLAN-123 to 50, enter this command:
ruckus# config
ruckus(config)# wlan wlan-123
ruckus(config-wlan-wlan-123)# max-clients 50
The command was executed successfully.
tunnel-mode Enable tunnel mode
max-clients Configure the maximum number of clients that the WLAN
can support
{NUMBER} Set the maximum clients to this value

204
Configuring Controller Settings
Configure Syslog Settings Commands
acl l2
To configure the L2 ACL, use the following command:
acl l2 {L2ACL-NAME}
Syntax Description
Defaults None.
Example ruckus# config
ruckus(config)# wlan wlan-123
ruckus(config-wlan-wlan-123)# acl l2 L2-ACL-name
The command was executed successfully.
acl l3
To configure the L3/L4/IP ACL, use the following command:
acl l3 {L2ACL-NAME}
Syntax Description
Defaults None.
Example ruckus# config
ruckus(config)# wlan wlan-123
ruckus(config-wlan-wlan-123)# acl l3 L3-ACL-name
The command was executed successfully.
show
To display the WLAN settings, use the following command:
show
Syntax Description
Defaults None.
acl l2 Configure the L2 ACL
{L2ACL-NAME} The name of the L2 ACL that you want to configure
acl l3 Configure the L3 ACL
{L2ACL-NAME} The name of the L3 ACL that you want to configure
show Display WLAN settings

205
Configuring Controller Settings
Configure WLAN Group Settings Commands
Example ruckus> en
ruckus# conf wlan show
WLAN Service
========================================================
ID: 1
Name: corporate
Description:
Authentication: open
Encryption: wpa
Algorithm: aes
Passphrase: test1234
Authentication Server: Disabled
Accounting Server: Disabled
Tunnel Mode: Disabled
Max Clients: 100
Web Authentication: Disabled
Client Isolation: Disabled
VLAN: Disabled
Closed System: Disabled (Broadcast SSID)
L2/MAC: No ACLS
L3/L4/IP address: No ACLS
--------------------------------------------------------
Configure WLAN Group Settings Commands
Use the wlan-group commands to configure the settings of a particular WLAN
group.
wlan-group
To create a new WLAN group or update an existing WLAN group, use the following
command:
wlan-group {WLAN group name}
Syntax Description
Defaults None.
wlan-group Configure the WLAN group
{WLAN group name} Create or edit this WLAN group

206
Configuring Controller Settings
Configure WLAN Group Settings Commands
Example ruckus# config
ruckus(config)# wlan-group wlangrp-01
The WLAN group has been created. To save the WLAN group, type end
or exit.
abort
To exit the wlan-group context without saving changes, use the abort command.
Enter this command from within the context of the WLAN group that you are
configuring.
abort
Syntax Description
Defaults None.
Example ruckus# config
ruckus(config)# wlan-group wlangrp-01
ruckus(config-wlangrp-wlangrp-01)# abort
No changes have been saved.
end
To save changes to the WLAN group settings and exit the wlan-group context, use
the following command. Enter this command from within the context of the WLAN
group that you are configuring.
end
Syntax Description
Defaults None.
Example ruckus# config
ruckus(config)# wlan-group wlangrp-01
ruckus(config-wlangrp-wlangrp-01)# end
The WLAN group 'hello-wlangrp' has been updated.
Your changes have been saved.
abort Exit the WLAN group without saving changes
end Save changes, and then exit the WLAN group

207
Configuring Controller Settings
Configure WLAN Group Settings Commands
exit
To save changes to the WLAN group settings and exit the wlan-group context, use
the exit command. Enter this command from within the context of the WLAN group
that you are configuring.
exit
Syntax Description
Defaults None.
Example ruckus# config
ruckus(config)# wlan-group wlangrp-01
ruckus(config-wlangrp-wlangrp-01)# exit
The WLAN group 'hello-wlangrp' has been updated.
Your changes have been saved.
quit
To e xi t t he wlan-group context without saving changes, use the following command.
Enter this command from within the context of the WLAN group that you are
configuring.
quit
Syntax Description
Defaults None.
Example ruckus# config
ruckus(config)# wlan-group wlangrp-01
ruckus(config-wlangrp-wlangrp-01)# quit
No changes have been saved.
name
To set the WLAN group name, use the following command. Enter this command from
within the context of the WLAN group that you are configuring.
name {WLAN group name}
Syntax Description
exit Save changes, and then exit the WLAN group
quit Exit the WLAN group without saving changes
name Configure the WLAN group name

208
Configuring Controller Settings
Configure WLAN Group Settings Commands
Defaults None.
Example ruckus# config
ruckus(config)# wlan-group wlangrp-01
ruckus(config-wlangrp-wlangrp-01)# name hello-wlangrp
The command was executed successfully.
description
To set the WLAN group description, use the following command. Enter this command
from within the context of the WLAN group that you are configuring.
description {WLAN group description}
Syntax Description
Defaults None.
Example ruckus# config
ruckus(config)# wlan-group wlangrp-01
ruckus(config-wlangrp-wlangrp-01)# description my-description-
123
The command was executed successfully.
no wlan
To delete a WLAN service, use the following command. Enter this command from
within the context of the WLAN group that you are configuring.
no wlan {WLAN name to be deleted}
Syntax Description
Defaults None.
{WLAN group name} Set the WLAN group name to this value
description Configure the WLAN group description
{WLAN group
description}
Set the WLAN group description to this value
no wlan Delete an existing WLAN service
{WLAN name to be
deleted}
Delete the WLAN service with this name

209
Configuring Controller Settings
Configure WLAN Group Settings Commands
Example ruckus# config
ruckus(config)# wlan-group wlangrp-01
ruckus(config-wlangrp-wlangrp-01)# no wlan wlansvc-012
The command was executed successfully.
wlan
To add a WLAN service to the WLAN group, use the following command. Enter this
command from within the context of the WLAN group that you are configuring.
wlan {WLAN name to be created}
Syntax Description
Defaults None.
Example ruckus# config
ruckus(config)# wlan-group wlangrp-01
ruckus(config-wlangrp-wlangrp-01)# wlan wlansvc-012
The command was executed successfully.
wlan vlan override none
To add a WLAN service to the WLAN group and set the VLAN tag to 'No Change',
use the following command. Enter this command from within the context of the WLAN
group that you are configuring.
wlan {WLAN name} vlan override none
Syntax Description
Defaults None.
Example ruckus# config
ruckus(config)# wlan-group wlangrp-01
ruckus(config-wlangrp-wlangrp-01)# wlan wlansvc-012 vlan override
none
The command was executed successfully.
wlan Create a WLAN service
{WLAN name to be
created}
Name of the new WLAN
wlan {WLAN name} Add the {WLAN name} to the WLAN group
vlan override none Set the VLAN tag of {WLAN name} to No Change

210
Configuring Controller Settings
Configure WLAN Group Settings Commands
wlan vlan override untag
To add a WLAN service to the WLAN group and set the VLAN tag to 'Untag', use the
following command:
wlan {WLAN name} vlan override untag
Syntax Description
Defaults None.
Example ruckus# config
ruckus(config)# wlan-group wlangrp-01
ruckus(config-wlangrp-wlangrp-01)# wlan wlansvc-012 vlan override
untag
The command was executed successfully.
wlan vlan override tag
To add a WLAN service to the WLAN group and set the VLAN tag to 'Tag', use the
following command:
wlan {WLAN name} vlan override tag {vlan ID}
Syntax Description
Defaults None.
Example ruckus# config
ruckus(config)# wlan-group RW-group
The WLAN group 'RW-group' has been created. To save the WLAN
group, type end or exit.
ruckus(config-wlangrp-RW-group)# wlan corporate vlan override
tag 33
The WLAN service (SSID) 'corporate' has been added.
ruckus(config-wlangrp-RW-group)#
wlan {WLAN name} Add the {WLAN name} to the WLAN group
vlan override untage Set the VLAN tag of {WLAN name} to Untagged
wlan {WLAN name} Add the {WLAN name} to the WLAN group
vlan override tag {vlan
ID}
Set the VLAN tag of {WLAN name} to Tagged for {vlan ID}

211
4
Using Debug Commands
In This Chapter
Deauthorizing a Device . . . . . . . . . . . . . . . . . . . . . . . . . . . . . . . . . . . . . . . . . . . . . . . . . . . . 212
Restarting a Device . . . . . . . . . . . . . . . . . . . . . . . . . . . . . . . . . . . . . . . . . . . . . . . . . . . . . . . . 213

212
Using Debug Commands
Deauthorizing a Device
Deauthorizing a Device
Deauthorizing a device refers to removing it from the list of devices that have been
approved to join the controller.
delete-station {MAC address}
To deauthorize the station with the specified MAC address, use the following
command.
delete-station {MAC address}
Syntax Description
Defaults None.
Example ruckus# debug
ruckus(debug)# delete-station 00:10:77:01:00:01
The command was executed successfully.
delete-station Delete the station with the specified MAC address
{MAC address} The MAC address of the station that will be deleted
213
Using Debug Commands
Restarting a Device
Restarting a Device
Use the restart command to restart a device that is reporting to the controller.
restart-ap {MAC address}
To restart the device with the specified MAC address, use the restart ap command.
restart-ap {MAC address}
Syntax Description
Defaults None.
Example ruckus# debug
ruckus(debug)# restart-ap 00:13:92:EA:43:01
The command was executed successfully.
restart-ap Restart the device with the specified MAC address
{MAC address} The MAC address of the device to be restarted

214
A
aaa all, 10
aaa name, 11
abort, 206
access control l2, 204
access control l3, 204
acct-server, 201
acct-server interim-update, 201
acl, 90
acl abort, 91
acl end, 91, 96
acl exit, 92
acl name, 92
acl quit, 92, 97
add mac, 93
admin show, 66
ap all, 11
ap devname, 13
ap mac, 17
ap-management-vlan, 86
auth-server, 65
C
client isolation, 195
config wlan dot1x authentication encryp-
tion wpa2 algorithm TKIP auth-server,
193
contact, 169
country code, 177
creating a WLAN, 209
D
delete station, 212
description, 67, 93, 180, 208
devname, 67
disabling NTP client, 163
disabling SNMP agent, 168–169
disabling SNMP traps, 169
displaying interface settings, 179
dot11-country-code, 177
dot1x, 194
dot1x authentication encryption wep-64
auth-server, 194
dot1x authentication encryption wpa algo-
rithm AES auth-server, 192
dot1x authentication encryption wpa algo-
rithm TKIP auth-server, 192
dot1x authentication encryption wpa2 al-
gorithm AES auth-server, 193
E
enabling NTP client, 163
end, 206
exit, 89, 97, 207
G
gateway, 178
H
hide ssid, 202
I
ip addr, 80, 179
ip addr gateway, 80
IP address, 179
IP address mode, 179
ip mode, 81, 179
ip name-server, 81, 178
ip route gateway, 178
ip-addr, 59
ip-addr port, 59
L
location, 67, 170
Index

215
M
mac authentication encryption none auth-
server, 186
mac authentication encryption wep-128
key key-id auth-server, 190
mac authentication encryption wep-64 key
key-id auth-server, 189
mac authentication encryption wpa pass-
phrase algorithm AES auth-server, 187
mac authentication encryption wpa pass-
phrase algorithm TKIP auth-server, 187
mac authentication encryption wpa2 pass-
phrase algorithm AES auth-server, 188
mac authentication encryption wpa2 pass-
phrase algorithm TKIP auth-server, 188
max clients, 203
mode allow, 94
mode deny, 94
N
name, 63, 207
name password, 64
no acct-server, 196
no acl, 90
no auth-server, 64
no client isolation, 195
no hide ssid, 202
no l2 access control, 200
no l3 access control, 200
no mac, 95
no ntp, 163
no snmp-agent, 168–169
no snmp-trap, 169
no syslog, 176
no tunnel mode, 199
no vlan, 196
no web authentication, 195
ntp, 163
O
open authentication encryption wep-128
key key-id, 186
open authentication encryption wep-64
key key-id, 185
open authentication encryption wpa pass-
phrase {passphrase} algorithm AES, 182
open authentication encryption wpa pass-
phrase {passphrase} algorithm TKIP,
184
open authentication encryption wpa pass-
phrase algorithm AES, 182
open authentication encryption wpa pass-
phrase algorithm TKIP, 184
open authentication encryption wpa2
passphrase algorithm AES, 184
open authentication encryption wpa2
passphrase algorithm TKIP, 185
open none, 182
Q
quit, 207
R
radio 2.4 channel, 82
radio 2.4 channel auto, 82
radio 2.4 tx-power, 83
radio 2.4 tx-power auto, 83
radio 2.4 wlan-group, 83
radio 5 channel, 84
radio 5 channel auto, 84
radio 5 tx-power, 85
radio 5 tx-power auto, 85
radio 5 wlan-group, 86
radius-secret, 60
read-only community, 170
read-write community, 170
restart, 213
ro-community, 170
rw-community, 170
S
shared authentication encryption wep-128
key key-id, 191
shared authentication encryption wep-64
key key-id, 190
show, 89, 97, 179, 204
SNMP agent contact, 169
SNMP agent location, 170
SNMP RO, 170
SNMP RW, 170
snmp-trap, 171

216
ssid, 182
sysinfo, 35
syslog, 176
syslog notifications, 176
syslog server address, 176
sysstats, 41
T
techsupport, 43
trap server, 171
tunnel mode, 203
type ad, 57
type ldap, 57
type radius, 58
type radius-acct, 58
V
vlan, 202
W
web authentication, 200
wlan, 209
wlan all, 49
WLAN description, 180
wlan name, 51
WLAN SSID, 182
wlan vlan override none, 209
wlan vlan override tag, 210
wlan vlan override untag, 210
wlan-group, 205
wlan-group all, 54
wlan-group name, 55
Z
ZoneDirector
gateway, 178
IP address, 179
IP address mode, 179
name server, 178

217
