Ruckus FastIron Ethernet Switch Layer 3 Routing Configuration Guide, 08.0.30mb Fast Iron 08.0.30 Guide 08030mb L3guide
2017-12-14
User Manual: Ruckus FastIron 08.0.30 Layer 3 Routing Configuration Guide
Open the PDF directly: View PDF ![]() .
.
Page Count: 593 [warning: Documents this large are best viewed by clicking the View PDF Link!]
- FastIron Ethernet Switch Layer 3 Routing Configuration Guide, 08.0.30mb
- Preface
- About This Document
- IP Configuration
- Basic IP configuration
- IP configuration overview
- Basic IP parameters and defaults - Layer 3 switches
- Basic IP parameters and defaults - Layer 2 switches
- Configuring IP parameters - Layer 3 switches
- Configuring IP addresses
- Configuring 31-bit subnet masks on point-to-point networks
- Configuring DNS resolver
- Configuring packet parameters
- Changing the router ID
- Specifying a single source interface for specified packet types
- Configuring delay time for notifying VE down event
- ARP parameter configuration
- Configuring forwarding parameters
- Disabling ICMP messages
- Enabling ICMP redirect messages
- Static routes configuration
- Static route types
- Static IP route parameters
- Multiple static routes to the same destination provide load sharing and redundancy
- Static route states follow port states
- Configuring a static IP route
- Configuring a "Null" route
- Naming a static IP route
- Configuring load balancing and redundancy using multiple static routes to the same destination
- Configuring standard static IP routes and interface or null static routes to the same destination
- Configuring a default network route
- Configuring IP load sharing
- ECMP load sharing for IPv6
- ICMP Router Discovery Protocol configuration
- IRDP parameters
- Reverse Address Resolution Protocol configuration
- Configuring UDP broadcast and IP helper parameters
- BootP and DHCP relay parameter configuration
- DHCP server
- Configuration notes for DHCP servers
- DHCP option 82 support
- DHCP server options
- Configuring DHCP server on a device
- Default DHCP server settings
- DHCP server CLI commands
- Removing DHCP leases
- Enabling DHCP server
- Disabling DHCP server on the management port
- Setting the wait time for ARP-ping response
- Creating an address pool
- Enabling relay agent echo (option 82)
- Configuring the IP address of the DHCP server
- Configuring the boot image
- Deploying an address pool configuration to the server
- Specifying default routers available to the client
- Specifying DNS servers available to the client
- Configuring the domain name for the client
- Configuring the lease duration for the address pool
- Specifying addresses to exclude from the address pool
- Configuring the NetBIOS server for DHCP clients
- Configuring the subnet and mask of a DHCP address pool
- Configuring a next-bootstrap server
- Configuring the TFTP server
- Configuring DHCP option 43 and option 60
- Configuring X Window System Display Manager IP addresses (Option 49)
- Enabling static IP to MAC address mapping
- Displaying DHCP server information
- Configuring IP parameters - Layer 2 switches
- IPv4 point-to-point GRE tunnels
- IPv4 GRE tunnel overview
- GRE packet structure and header format
- Path MTU Discovery support
- Configuration considerations for PMTUD support
- Tunnel loopback ports for GRE tunnels
- Support for IPv4 multicast routing over GRE tunnels
- GRE support with other features
- Configuration considerations for GRE IP tunnels
- Configuration tasks for GRE tunnels
- Creating a tunnel interface
- Assigning a VRF routing instance to a GRE tunnel interface
- Configuring the source address or source interface for a tunnel interface
- Deleting an IP address from an interface configured as a tunnel source
- Configuring the destination address for a tunnel interface
- Enabling GRE encapsulation on a tunnel interface
- Configuring a tunnel loopback port for a tunnel interface
- Applying an ACL or PBR to a tunnel interface on a FastIron X Series module
- Applying an ACL or PBR to a tunnel interface on the SX-FI48GPP interface module
- Configuring an IP address for a tunnel interface
- Configuring a static route to a tunnel destination
- Changing the MTU value for a tunnel interface
- Changing the maximum number of tunnels supported
- Configuring GRE link keepalive
- Configuring Path MTU Discovery (PMTUD)
- Enabling IPv4 multicast routing over a GRE tunnel
- Example point-to-point GRE tunnel configuration
- Displaying GRE tunneling information
- Clearing GRE statistics
- Bandwidth for IP interfaces
- Displaying IP configuration information and statistics
- Disabling IP checksum check
- Layer 3 Routing Protocols
- IPv6 Configuration on FastIron X Series, FCX, and ICX Series Switches
- Full Layer 3 IPv6 feature support
- IPv6 addressing overview
- IPv6 CLI command support
- IPv6 host address on a Layer 2 switch
- Configuring the management port for an IPv6 automatic address configuration
- Configuring basic IPv6 connectivity on a Layer 3 switch
- IPv6 management (IPv6 host support)
- Configuring IPv6 management ACLs
- Restricting SNMP access to an IPv6 node
- Specifying an IPv6 SNMP trap receiver
- Configuring SNMP V3 over IPv6
- Secure Shell, SCP, and IPv6
- IPv6 Telnet
- IPv6 traceroute
- IPv6 Web management using HTTP and HTTPS
- Restricting Web management access
- Restricting Web management access by specifying an IPv6 ACL
- Restricting Web management access to an IPv6 host
- Configuring name-to-IPv6 address resolution using IPv6 DNS resolver
- Defining an IPv6 DNS entry
- Pinging an IPv6 address
- Configuring an IPv6 Syslog server
- Viewing IPv6 SNMP server addresses
- Disabling router advertisement and solicitation messages
- Disabling IPv6 on a Layer 2 switch
- IPv6 ICMP feature configuration
- IPv6 neighbor discovery configuration
- IPv6 neighbor discovery configuration notes
- Neighbor solicitation and advertisement messages
- Router advertisement and solicitation messages
- Neighbor redirect messages
- Setting neighbor solicitation parameters for duplicate address detection
- Setting IPv6 router advertisement parameters
- Prefixes advertised in IPv6 router advertisement messages
- Setting flags in IPv6 router advertisement messages
- Enabling and disabling IPv6 router advertisements
- IPv6 router advertisement preference support
- Configuring reachable time for remote IPv6 nodes
- IPv6 MTU
- Static neighbor entries configuration
- Limiting the number of hops an IPv6 packet can traverse
- IPv6 source routing security enhancements
- TCAM space on FCX device configuration
- Clearing global IPv6 information
- Displaying global IPv6 information
- DHCP relay agent for IPv6
- DHCPv6 Relay Agent Prefix Delegation Notification
- RIP
- RIP overview
- RIP parameters and defaults
- Configuring RIP parameters
- Enabling RIP
- Configuring route costs
- Changing the administrative distance
- Configuring redistribution
- Configuring route learning and advertising parameters
- Changing the route loop prevention method
- Suppressing RIP route advertisement on a VRRP or VRRPE backup interface
- Configuring RIP route filters using prefix-lists and route maps
- Setting RIP timers
- Displaying RIP Information
- Displaying CPU utilization statistics
- RIPng
- RIPng Overview
- Configuring RIPng
- Clearing RIPng routes from IPv6 route table
- Displaying RIPng information
- OSPFv2
- OSPF overview
- OSPF point-to-point links
- Designated routers in multi-access networks
- Designated router election in multi-access networks
- OSPF RFC 1583 and 2328 compliance
- Reduction of equivalent AS external LSAs
- Support for OSPF RFC 2328 Appendix E
- OSPF graceful restart
- Configuring OSPF
- Configuration rules
- OSPF parameters
- Enable OSPF on the device
- Assign OSPF areas
- Assign a totally stubby area
- Assigning an area range (optional)
- Assigning an area cost (optional parameter)
- Assigning interfaces to an area
- Setting all OSPFv2 interfaces to the passive state
- Modify interface defaults
- Changing the timer for OSPF authentication changes
- Block flooding of outbound LSAs on specific OSPF interfaces
- Assign virtual links
- Modify virtual link parameters
- Changing the reference bandwidth for the cost on OSPF interfaces
- Define redistribution filters
- Modify default metric for redistribution
- Enable route redistribution
- Disable or re-enable load sharing
- Configure external route summarization
- Configure default route origination
- Supported match and set conditions
- OSPF non-stop routing
- Synchronization of critical OSPF elements
- Standby module operations
- Enabling and disabling NSR
- Disabling configuration
- OSPF distribute list
- Configuring an OSPF distribution list using ACLs
- Configuring an OSPF distribution list using route maps
- Modify SPF timers
- Modify redistribution metric type
- Modify administrative distance
- Configure OSPF group LSA pacing
- Modify OSPF traps generated
- Modify exit overflow interval
- Specify types of OSPF Syslog messages to log
- Configuring an OSPF network type
- Configuring OSPF Graceful Restart
- Configuring OSPF router advertisement
- Configuring OSPF shortest path first throttling
- Displaying OSPF information
- Displaying general OSPF configuration information
- Displaying OSPF area information
- Displaying OSPF neighbor information
- Displaying OSPF interface information
- Displaying OSPF interface brief information
- Displaying OSPF route information
- Displaying OSPF database information
- Displaying OSPF external link state information
- Displaying OSPF database-summary information
- Displaying OSPF database link state information
- Displaying OSPF ABR and ASBR information
- Displaying OSPF trap status
- Viewing Configured OSPF point-to-point links
- Displaying OSPF virtual neighbor and link information
- Clearing OSPF neighbors
- Displaying OSPF Graceful Restart information
- Displaying OSPF Router Advertisement information
- Clearing OSPF information
- OSPFv3
- OSPFv3 overview
- LSA types for OSPFv3
- Configuring OSPFv3
- Enabling OSPFv3
- Assigning OSPFv3 areas
- Assigning an area cost for OSPFv3 (optional parameter)
- Specifying a network type
- Configuring virtual links
- Changing the reference bandwidth for the cost on OSPFv3 interfaces
- Redistributing routes into OSPFv3
- Filtering OSPFv3 routes
- Configuring default route origination
- Modifying Shortest Path First timers
- Modifying administrative distance
- Configuring the OSPFv3 LSA pacing interval
- Modifying exit overflow interval
- Modifying external link state database limit
- Setting all OSPFv3 interfaces to the passive state
- Modifying OSPFv3 interface defaults
- Disabling or re-enabling event logging
- IPsec for OSPFv3
- Configuring IPsec for OSPFv3
- IPsec for OSPFv3 considerations
- Interface and area IPsec considerations
- Considerations for IPsec on virtual links
- Specifying the key rollover timer
- Specifying the key add remove timer
- Configuring IPsec on a interface
- Configuring IPsec for an area
- Configuring IPsec for a virtual link
- Disabling IPsec on an interface
- Changing the key rollover timer
- Clearing IPsec statistics
- Configuring OSPFv3 Graceful Restart Helper mode
- Configuring OSPFv3 Non-stop routing (NSR)
- Displaying OSPFv3 information
- General OSPFv3 configuration information
- Displaying OSPFv3 area information
- Displaying OSPFv3 database information
- Displaying IPv6 interface information
- Displaying IPv6 OSPFv3 interface information
- Displaying OSPFv3 memory usage
- Displaying OSPFv3 neighbor information
- Displaying routes redistributed into OSPFv3
- Displaying OSPFv3 route information
- Displaying OSPFv3 SPF information
- Displaying OSPFv3 GR Helper mode information
- Displaying OSPFv3 NSR information
- Displaying IPv6 OSPF virtual link information
- Displaying OSPFv3 virtual neighbor information
- IPsec examples
- OSPFv3 clear commands
- Configuring BGP4 (IPv4)
- BGP4 overview
- Implementation of BGP4
- BGP4 restart
- Basic configuration and activation for BGP4
- BGP4 parameters
- Memory considerations
- Basic configuration tasks required for BGP4
- Optional BGP4 configuration tasks
- Changing the Keep Alive Time and Hold Time
- Changing the BGP4 next-hop update timer
- Enabling fast external fallover
- Changing the maximum number of paths for BGP4 Multipath load sharing
- Customizing BGP4 Multipath load sharing
- Specifying a list of networks to advertise
- Changing the default local preference
- Using the IP default route as a valid next-hop for a BGP4 route
- Changing the default MED (Metric) used for route redistribution
- Enabling next-hop recursion
- Changing administrative distances
- Requiring the first AS to be the neighbor AS
- Disabling or re-enabling comparison of the AS-Path length
- Enabling or disabling comparison of device IDs
- Configuring the device to always compare Multi-Exit Discriminators
- Treating missing MEDs as the worst MEDs
- Configuring route reflection parameters
- Configuring confederations
- Aggregating routes advertised to BGP4 neighbors
- Configuring BGP4 restart
- Modifying redistribution parameters
- Filtering
- AS-path filtering
- BGP4 filtering communities
- Defining and applying IP prefix lists
- Defining neighbor distribute lists
- Defining route maps
- Using a table map to set the tag value
- Configuring cooperative BGP4 route filtering
- Four-byte Autonomous System Numbers (AS4)
- BGP4 AS4 attribute errors
- Configuring route flap dampening
- Generating traps for BGP4
- Configuring BGP4
- Entering and exiting the address family configuration level
- BGP route reflector
- Specifying a maximum AS path length
- BGP4 max-as error messages
- Originating the default route
- Changing the default metric used for route cost
- Configuring a static BGP4 network
- Generalized TTL Security Mechanism support
- Displaying BGP4 information
- Displaying summary BGP4 information
- Displaying the active BGP4 configuration
- Displaying summary neighbor information
- Displaying BGP4 neighbor information
- Displaying peer group information
- Displaying summary route information
- Displaying VRF instance information
- Displaying the BGP4 route table
- Displaying BGP4 route-attribute entries
- Displaying the routes BGP4 has placed in the IP route table
- Displaying route flap dampening statistics
- Displaying the active route map configuration
- Displaying BGP4 graceful restart neighbor information
- Displaying AS4 details
- Updating route information and resetting a neighbor session
- Using soft reconfiguration
- Dynamically requesting a route refresh from a BGP4 neighbor
- Closing or resetting a neighbor session
- Clearing and resetting BGP4 routes in the IP route table
- Clearing traffic counters
- Clearing diagnostic buffers
- Configuring BGP4+
- BGP4+ overview
- BGP global mode
- IPv6 unicast address family
- BGP4+ neighbors
- BGP4+ peer groups
- BGP4+ next hop recursion
- BGP4+ NLRIs and next hop attributes
- BGP4+ route reflection
- BGP4+ route aggregation
- BGP4+ multipath
- Route maps
- BGP4+ outbound route filtering
- BGP4+ confederations
- BGP4+ extended community
- BGP4+ graceful restart
- Configuring BGP4+
- Configuring BGP4+ neighbors using global IPv6 addresses
- Configuring BGP4+ neighbors using link-local addresses
- Configuring BGP4+ peer groups
- Configuring a peer group with IPv4 and IPv6 peers
- Importing routes into BGP4+
- Advertising the default BGP4+ route
- Advertising the default BGP4+ route to a specific neighbor
- Using the IPv6 default route as a valid next hop for a BGP4+ route
- Enabling next-hop recursion
- Configuring a cluster ID for a route reflector
- Configuring a route reflector client
- Aggregating routes advertised to BGP neighbors
- Enabling load-balancing across different paths
- Configuring a route map for BGP4+ prefixes
- Redistributing prefixes into BGP4+
- Configuring BGP4+ outbound route filtering
- Configuring BGP4+ confederations
- Defining a community ACL
- Applying a BGP extended community filter
- Disabling BGP4+ graceful restart
- Re-enabling BGP4+ graceful restart
- Disabling the BGP AS_PATH check function
- Displaying BGP4+ statistics
- Displaying BGP4+ neighbor statistics
- Clearing BGP4+ dampened paths
- VRRP and VRRP-E
- Overview
- VRRP and VRRP-E overview
- VRRP overview
- Virtual router ID
- Virtual router MAC address
- Virtual router IP address
- Master negotiation
- Hello messages
- Master and Owner backup routers
- Track ports and track priority
- Suppression of RIP advertisements for backed-up interfaces
- Authentication
- Independent operation of VRRP alongside RIP, OSPF, and BGP4
- Dynamic VRRP configuration
- VRRP-E overview
- ARP behavior with VRRP-E
- VRRP overview
- Comparison of VRRP and VRRP-E
- VRRP and VRRP-E parameters
- Basic VRRP parameter configuration
- Configuration rules for VRRP
- Enabling an owner VRRP device
- Enabling an IPv6 VRRPv3 owner device
- Enabling a backup VRRP device
- Enabling an IPv6 VRRPv3 backup device
- Assigning an auto-generated link-local IPv6 address for a VRRPv3 cluster
- Enabling the v2 checksum computation method in a VRRPv3 IPv4 session
- Enabling accept mode in VRRP non-Owner Master router
- Configuration considerations for IPv6 VRRP and IPv6 VRRP-E support on Brocade devices
- Basic VRRP-E parameter configuration
- Additional VRRP and VRRP-E parameter configuration
- VRRP and VRRP-E authentication types
- VRRP router type
- Suppression of RIP advertisements
- Hello interval configuration
- Dead interval configuration
- Backup Hello message state and interval
- Track port configuration
- Track priority configuration
- Backup preempt configuration
- Changing the timer scale
- VRRP-E slow start timer
- VRRP-E Extension for Server Virtualization
- Suppressing default interface-level RA messages on an IPv6 VRRP or VRRP-E interface
- Forcing a Master router to abdicate to a Backup router
- Accept mode for backup VRRP devices
- Displaying VRRP and VRRP-E information
- Configuration examples
- Multi-VRF
- Multi-VRF overview
- Configuring Multi-VRF
- Configuring VRF system-max values
- Creating VLANs as links on a tagged port for security
- Configuring a VRF instance
- Starting a routing process for a VRF
- Assigning a Layer 3 interface to a VRF
- Assigning a loopback interface to a VRF
- Verifying a Multi-VRF configuration
- Removing a VRF configuration
- Configuring static ARP for Multi-VRF
- Configuring additional ARP features for Multi-VRF
- Multi-Chassis Trunking
- Layer 3 behavior with MCT
- Layer 3 unicast forwarding over MCT
- VRRP or VRRP-E over an MCT-enabled network
- VRRP-E short-path forwarding and revertible option
- OSPF and BGP over an MCT-enabled network
- Layer 3 with MCT configuration considerations
- MCT configuration examples
- PIM over MCT intermediate router functionality
- Layer 3 behavior with MCT
- Unicast Reverse Path Forwarding

Supporting FastIron Software Release 08.0.30mb
CONFIGURATION GUIDE
FastIron Ethernet Switch Layer 3 Routing
Conguration Guide, 08.0.30mb
53-1003627-06
24 February 2017
© 2017, Brocade Communications Systems, Inc. All Rights Reserved.
Brocade, the B-wing symbol, and MyBrocade are registered trademarks of Brocade Communications Systems, Inc., in the United States and in other
countries. Other brands, product names, or service names mentioned of Brocade Communications Systems, Inc. are listed at www.brocade.com/en/legal/
brocade-Legal-intellectual-property/brocade-legal-trademarks.html. Other marks may belong to third parties.
Notice: This document is for informational purposes only and does not set forth any warranty, expressed or implied, concerning any equipment,
equipment feature, or service oered or to be oered by Brocade. Brocade reserves the right to make changes to this document at any time, without
notice, and assumes no responsibility for its use. This informational document describes features that may not be currently available. Contact a Brocade
sales oce for information on feature and product availability. Export of technical data contained in this document may require an export license from the
United States government.
The authors and Brocade Communications Systems, Inc. assume no liability or responsibility to any person or entity with respect to the accuracy of this
document or any loss, cost, liability, or damages arising from the information contained herein or the computer programs that accompany it.
The product described by this document may contain open source software covered by the GNU General Public License or other open source license
agreements. To nd out which open source software is included in Brocade products, view the licensing terms applicable to the open source software, and
obtain a copy of the programming source code, please visit http://www.brocade.com/support/oscd.
FastIron Ethernet Switch Layer 3 Routing Conguration Guide, 08.0.30mb
2 53-1003627-06

Contents
Preface................................................................................................................................................................................................................................15
Document conventions.........................................................................................................................................................................................................................15
Notes, cautions, and warnings..................................................................................................................................................................................................15
Text formatting conventions......................................................................................................................................................................................................15
Command syntax conventions.................................................................................................................................................................................................16
Brocade resources..................................................................................................................................................................................................................................16
Document feedback.............................................................................................................................................................................................................................. 16
Contacting Brocade Technical Support......................................................................................................................................................................................... 17
Brocade customers.......................................................................................................................................................................................................................17
Brocade OEM customers.......................................................................................................................................................................................................... 17
About This Document..................................................................................................................................................................................................... 19
Supported hardware and software................................................................................................................................................................................................... 19
What’s new in this document............................................................................................................................................................................................................. 19
IP Conguration................................................................................................................................................................................................................21
Basic IP conguration........................................................................................................................................................................................................................... 21
IP conguration overview.....................................................................................................................................................................................................................21
Full Layer 3 support..................................................................................................................................................................................................................... 21
IP interfaces......................................................................................................................................................................................................................................22
IP packet ow through a Layer 3 switch.............................................................................................................................................................................. 23
IP route exchange protocols......................................................................................................................................................................................................26
IP multicast protocols...................................................................................................................................................................................................................27
IP interface redundancy protocols..........................................................................................................................................................................................27
ACLs and IP access policies.....................................................................................................................................................................................................27
Basic IP parameters and defaults - Layer 3 switches.............................................................................................................................................................28
When parameter changes take eect....................................................................................................................................................................................28
IP global parameters - Layer 3 switches.............................................................................................................................................................................28
IP interface parameters - Layer 3 switches........................................................................................................................................................................32
Basic IP parameters and defaults - Layer 2 switches.............................................................................................................................................................33
IP global parameters - Layer 2 switches.............................................................................................................................................................................33
Interface IP parameters - Layer 2 switches........................................................................................................................................................................35
Conguring IP parameters - Layer 3 switches...........................................................................................................................................................................35
Conguring IP addresses...........................................................................................................................................................................................................35
Conguring 31-bit subnet masks on point-to-point networks..................................................................................................................................38
Conguring DNS resolver.......................................................................................................................................................................................................... 40
Conguring packet parameters................................................................................................................................................................................................43
Changing the router ID................................................................................................................................................................................................................ 46
Specifying a single source interface for specied packet types.................................................................................................................................47
Conguring delay time for notifying VE down event......................................................................................................................................................50
ARP parameter conguration...................................................................................................................................................................................................51
Conguring forwarding parameters....................................................................................................................................................................................... 57
Disabling ICMP messages........................................................................................................................................................................................................ 59
Enabling ICMP redirect messages.........................................................................................................................................................................................60
Static routes conguration......................................................................................................................................................................................................... 61
Conguring a default network route.......................................................................................................................................................................................69
Conguring IP load sharing.......................................................................................................................................................................................................70
FastIron Ethernet Switch Layer 3 Routing Conguration Guide, 08.0.30mb
53-1003627-06 3
ECMP load sharing for IPv6..................................................................................................................................................................................................... 73
ICMP Router Discovery Protocol conguration................................................................................................................................................................75
IRDP parameters........................................................................................................................................................................................................................... 75
Reverse Address Resolution Protocol conguration.......................................................................................................................................................76
Conguring UDP broadcast and IP helper parameters.................................................................................................................................................78
BootP and DHCP relay parameter conguration.............................................................................................................................................................81
DHCP server....................................................................................................................................................................................................................................83
Displaying DHCP server information....................................................................................................................................................................................93
Conguring IP parameters - Layer 2 switches...........................................................................................................................................................................95
Conguring the management IP address and specifying the default gateway................................................................................................... 95
Conguring Domain Name System resolver.....................................................................................................................................................................96
Changing the TTL threshold.....................................................................................................................................................................................................98
DHCP Assist conguration........................................................................................................................................................................................................99
IPv4 point-to-point GRE tunnels .................................................................................................................................................................................................103
IPv4 GRE tunnel overview......................................................................................................................................................................................................103
GRE packet structure and header format.........................................................................................................................................................................104
Path MTU Discovery support................................................................................................................................................................................................104
Conguration considerations for PMTUD support .....................................................................................................................................................105
Tunnel loopback ports for GRE tunnels............................................................................................................................................................................105
Support for IPv4 multicast routing over GRE tunnels.................................................................................................................................................106
GRE support with other features .........................................................................................................................................................................................107
Conguration considerations for GRE IP tunnels......................................................................................................................................................... 107
Conguration tasks for GRE tunnels.................................................................................................................................................................................. 109
Example point-to-point GRE tunnel conguration.......................................................................................................................................................116
Displaying GRE tunneling information...............................................................................................................................................................................118
Clearing GRE statistics.............................................................................................................................................................................................................122
Bandwidth for IP interfaces..............................................................................................................................................................................................................122
Limitations and pre-requisites...............................................................................................................................................................................................123
OSPF cost calculation with interface bandwidth........................................................................................................................................................... 123
Setting the bandwidth value for an Ethernet interface.................................................................................................................................................124
Setting the bandwidth value for a VE interface.............................................................................................................................................................. 124
Setting the bandwidth value for a tunnel interface........................................................................................................................................................125
Displaying IP conguration information and statistics..........................................................................................................................................................126
Changing the network mask display to prex format.................................................................................................................................................. 126
Displaying IP information - Layer 3 switches.................................................................................................................................................................126
Displaying IP information - Layer 2 switches.................................................................................................................................................................138
Disabling IP checksum check.........................................................................................................................................................................................................141
Layer 3 Routing Protocols........................................................................................................................................................................................... 143
Adding a static IP route......................................................................................................................................................................................................................143
Conguring a "null" route.........................................................................................................................................................................................................144
Static route next hop resolution............................................................................................................................................................................................ 145
Static route recursive lookup..................................................................................................................................................................................................145
Static route resolve by default route....................................................................................................................................................................................145
Adding a static ARP entry................................................................................................................................................................................................................ 146
Modifying and displaying Layer 3 system parameter limits..............................................................................................................................................146
Layer 3 conguration notes................................................................................................................................................................................................... 146
FastIron second generation modules.................................................................................................................................................................................146
FastIron third generation modules.......................................................................................................................................................................................147
Displaying Layer 3 system parameter limits...................................................................................................................................................................147
Enabling or disabling routing protocols...................................................................................................................................................................................... 147
FastIron Ethernet Switch Layer 3 Routing Conguration Guide, 08.0.30mb
4 53-1003627-06
Enabling or disabling Layer 2 switching.....................................................................................................................................................................................148
Conguration notes and feature limitations for Layer 2 switching.........................................................................................................................148
Command syntax for Layer 2 switching........................................................................................................................................................................... 148
Conguring a Layer 3 Link Aggregration Group (LAG)....................................................................................................................................................... 149
IPv6 Conguration on FastIron X Series, FCX, and ICX Series Switches..........................................................................................................151
Full Layer 3 IPv6 feature support................................................................................................................................................................................................. 151
IPv6 addressing overview................................................................................................................................................................................................................ 152
IPv6 address types....................................................................................................................................................................................................................152
IPv6 stateless auto-conguration........................................................................................................................................................................................154
IPv6 CLI command support ..........................................................................................................................................................................................................155
IPv6 host address on a Layer 2 switch.......................................................................................................................................................................................157
Conguring a global or site-local IPv6 address with a manually congured interface ID............................................................................157
Conguring a link-local IPv6 address as a system-wide address for a switch.................................................................................................157
Conguring the management port for an IPv6 automatic address conguration....................................................................................................158
Conguring basic IPv6 connectivity on a Layer 3 switch................................................................................................................................................... 158
Enabling IPv6 routing............................................................................................................................................................................................................... 158
IPv6 conguration on each router interface.................................................................................................................................................................... 158
Conguring IPv4 and IPv6 protocol stacks.....................................................................................................................................................................161
IPv6 management (IPv6 host support)......................................................................................................................................................................................162
Conguring IPv6 management ACLs............................................................................................................................................................................... 162
Restricting SNMP access to an IPv6 node..................................................................................................................................................................... 162
Specifying an IPv6 SNMP trap receiver........................................................................................................................................................................... 162
Conguring SNMP V3 over IPv6........................................................................................................................................................................................162
Secure Shell, SCP, and IPv6..................................................................................................................................................................................................163
IPv6 Telnet.....................................................................................................................................................................................................................................163
IPv6 traceroute............................................................................................................................................................................................................................ 163
IPv6 Web management using HTTP and HTTPS.......................................................................................................................................................164
Restricting Web management access................................................................................................................................................................................164
Restricting Web management access by specifying an IPv6 ACL....................................................................................................................... 164
Restricting Web management access to an IPv6 host...............................................................................................................................................165
Conguring name-to-IPv6 address resolution using IPv6 DNS resolver..........................................................................................................165
Dening an IPv6 DNS entry.................................................................................................................................................................................................. 165
Pinging an IPv6 address......................................................................................................................................................................................................... 165
Conguring an IPv6 Syslog server......................................................................................................................................................................................166
Viewing IPv6 SNMP server addresses............................................................................................................................................................................. 167
Disabling router advertisement and solicitation messages.......................................................................................................................................167
Disabling IPv6 on a Layer 2 switch.................................................................................................................................................................................... 167
IPv6 ICMP feature conguration...................................................................................................................................................................................................168
Conguring ICMP rate limiting..............................................................................................................................................................................................168
Enabling IPv6 ICMP redirect messages...........................................................................................................................................................................169
IPv6 neighbor discovery conguration.......................................................................................................................................................................................169
IPv6 neighbor discovery conguration notes.................................................................................................................................................................170
Neighbor solicitation and advertisement messages....................................................................................................................................................170
Router advertisement and solicitation messages......................................................................................................................................................... 170
Neighbor redirect messages..................................................................................................................................................................................................171
Setting neighbor solicitation parameters for duplicate address detection.......................................................................................................... 171
Setting IPv6 router advertisement parameters..............................................................................................................................................................172
Prexes advertised in IPv6 router advertisement messages...................................................................................................................................173
Setting ags in IPv6 router advertisement messages................................................................................................................................................ 174
Enabling and disabling IPv6 router advertisements.................................................................................................................................................... 174
FastIron Ethernet Switch Layer 3 Routing Conguration Guide, 08.0.30mb
53-1003627-06 5
IPv6 router advertisement preference support..............................................................................................................................................................174
Conguring reachable time for remote IPv6 nodes.....................................................................................................................................................175
IPv6 MTU............................................................................................................................................................................................................................................... 175
Conguration notes and feature limitations for IPv6 MTU....................................................................................................................................... 175
Changing the IPv6 MTU......................................................................................................................................................................................................... 176
Static neighbor entries conguration........................................................................................................................................................................................... 176
Limiting the number of hops an IPv6 packet can traverse.................................................................................................................................................177
IPv6 source routing security enhancements............................................................................................................................................................................ 177
TCAM space on FCX device conguration...............................................................................................................................................................................177
Allocating TCAM space for IPv4 routing information................................................................................................................................................. 178
Allocating TCAM space for GRE tunnel information...................................................................................................................................................178
Clearing global IPv6 information...................................................................................................................................................................................................178
Clearing the IPv6 cache...........................................................................................................................................................................................................178
Clearing IPv6 neighbor information....................................................................................................................................................................................179
Clearing IPv6 routes from the IPv6 route table.............................................................................................................................................................179
Clearing IPv6 trac statistics................................................................................................................................................................................................ 180
Displaying global IPv6 information.............................................................................................................................................................................................. 180
Displaying IPv6 cache information..................................................................................................................................................................................... 180
Displaying IPv6 interface information................................................................................................................................................................................181
Displaying IPv6 neighbor information...............................................................................................................................................................................182
Displaying the IPv6 route table ............................................................................................................................................................................................183
Displaying local IPv6 routers.................................................................................................................................................................................................185
Displaying IPv6 TCP information........................................................................................................................................................................................ 186
Displaying IPv6 trac statistics............................................................................................................................................................................................188
DHCP relay agent for IPv6..............................................................................................................................................................................................................191
Conguring DHCP for IPv6 relay agent........................................................................................................................................................................... 191
Enabling the interface-ID on the DHCPv6 relay agent messages........................................................................................................................ 192
Displaying DHCPv6 relay agent information..................................................................................................................................................................192
Displaying the DHCPv6 Relay congured destinations.............................................................................................................................................192
Displaying the DHCPv6 Relay information for an interface.....................................................................................................................................193
DHCPv6 Relay Agent Prex Delegation Notication...........................................................................................................................................................193
DHCPv6 Relay Agent Prex Delegation Notication limitations............................................................................................................................194
Upgrade and downgrade considerations..........................................................................................................................................................................195
Conguring DHCPv6 Relay Agent Prex Delegation Notication........................................................................................................................ 195
Displaying the DHCPv6 Relay Agent Prex Delegation Notication information...........................................................................................196
RIP.....................................................................................................................................................................................................................................201
RIP overview.......................................................................................................................................................................................................................................... 201
RIP parameters and defaults...........................................................................................................................................................................................................201
RIP global parameters..............................................................................................................................................................................................................201
RIP interface parameters.........................................................................................................................................................................................................203
Conguring RIP parameters............................................................................................................................................................................................................203
Enabling RIP.................................................................................................................................................................................................................................203
Conguring route costs............................................................................................................................................................................................................204
Changing the administrative distance................................................................................................................................................................................ 204
Conguring redistribution........................................................................................................................................................................................................204
Conguring route learning and advertising parameters............................................................................................................................................. 206
Changing the route loop prevention method.................................................................................................................................................................. 207
Suppressing RIP route advertisement on a VRRP or VRRPE backup interface.............................................................................................208
Conguring RIP route lters using prex-lists and route maps...............................................................................................................................208
Setting RIP timers.......................................................................................................................................................................................................................210
FastIron Ethernet Switch Layer 3 Routing Conguration Guide, 08.0.30mb
6 53-1003627-06
Displaying RIP Information..............................................................................................................................................................................................................210
Displaying CPU utilization statistics............................................................................................................................................................................................. 212
RIPng................................................................................................................................................................................................................................215
RIPng Overview....................................................................................................................................................................................................................................215
Conguring RIPng............................................................................................................................................................................................................................... 215
Enabling RIPng............................................................................................................................................................................................................................215
Conguring RIPng timers........................................................................................................................................................................................................216
Conguring route learning and advertising parameters............................................................................................................................................. 217
Redistributing routes into RIPng...........................................................................................................................................................................................218
Controlling distribution of routes through RIPng...........................................................................................................................................................219
Conguring poison reverse parameters............................................................................................................................................................................219
Clearing RIPng routes from IPv6 route table...........................................................................................................................................................................220
Displaying RIPng information.........................................................................................................................................................................................................220
Displaying RIPng conguration............................................................................................................................................................................................ 220
Displaying RIPng routing table..............................................................................................................................................................................................221
OSPFv2........................................................................................................................................................................................................................... 223
OSPF overview.....................................................................................................................................................................................................................................223
OSPF point-to-point links................................................................................................................................................................................................................225
Designated routers in multi-access networks.......................................................................................................................................................................... 225
Designated router election in multi-access networks........................................................................................................................................................... 225
OSPF RFC 1583 and 2328 compliance................................................................................................................................................................................ 227
Reduction of equivalent AS external LSAs................................................................................................................................................................................227
Algorithm for AS external LSA reduction......................................................................................................................................................................... 229
Support for OSPF RFC 2328 Appendix E..............................................................................................................................................................................229
OSPF graceful restart........................................................................................................................................................................................................................ 230
OSPF stub router advertisement.........................................................................................................................................................................................230
OSPF Shortest Path First throttling....................................................................................................................................................................................231
IETF RFC and internet draft support..................................................................................................................................................................................231
Dynamic OSPF activation and conguration................................................................................................................................................................. 231
Conguring OSPF...............................................................................................................................................................................................................................232
Conguration rules.....................................................................................................................................................................................................................232
OSPF parameters...................................................................................................................................................................................................................... 232
Enable OSPF on the device...................................................................................................................................................................................................233
Assign OSPF areas................................................................................................................................................................................................................... 234
Assign a totally stubby area....................................................................................................................................................................................................235
Assigning an area range (optional) ..................................................................................................................................................................................... 238
Assigning an area cost (optional parameter) .................................................................................................................................................................. 238
Assigning interfaces to an area.............................................................................................................................................................................................239
Setting all OSPFv2 interfaces to the passive state.......................................................................................................................................................239
Modify interface defaults......................................................................................................................................................................................................... 240
Changing the timer for OSPF authentication changes...............................................................................................................................................242
Block ooding of outbound LSAs on specic OSPF interfaces............................................................................................................................ 243
Assign virtual links......................................................................................................................................................................................................................243
Modify virtual link parameters............................................................................................................................................................................................... 245
Changing the reference bandwidth for the cost on OSPF interfaces................................................................................................................... 246
Dene redistribution lters...................................................................................................................................................................................................... 248
Modify default metric for redistribution............................................................................................................................................................................. 250
Enable route redistribution......................................................................................................................................................................................................250
Disable or re-enable load sharing........................................................................................................................................................................................251
FastIron Ethernet Switch Layer 3 Routing Conguration Guide, 08.0.30mb
53-1003627-06 7
Congure external route summarization...........................................................................................................................................................................253
Congure default route origination......................................................................................................................................................................................254
Supported match and set conditions................................................................................................................................................................................. 255
OSPF non-stop routing.................................................................................................................................................................................................................... 256
Synchronization of critical OSPF elements.............................................................................................................................................................................. 256
Link state database synchronization...................................................................................................................................................................................256
Neighbor router synchronization..........................................................................................................................................................................................257
Interface synchronization.........................................................................................................................................................................................................257
Standby module operations............................................................................................................................................................................................................ 257
Neighbor database.....................................................................................................................................................................................................................258
LSA database...............................................................................................................................................................................................................................258
Enabling and disabling NSR............................................................................................................................................................................................................258
Limitations of NSR.....................................................................................................................................................................................................................258
Disabling conguration......................................................................................................................................................................................................................259
OSPF distribute list.............................................................................................................................................................................................................................260
Conguring an OSPF distribution list using ACLs ......................................................................................................................................................260
Conguring an OSPF distribution list using route maps ..........................................................................................................................................261
Modify SPF timers.....................................................................................................................................................................................................................262
Modify redistribution metric type......................................................................................................................................................................................... 263
Modify administrative distance............................................................................................................................................................................................. 263
Congure OSPF group LSA pacing...................................................................................................................................................................................264
Modify OSPF traps generated..............................................................................................................................................................................................265
Modify exit overow interval...................................................................................................................................................................................................265
Specify types of OSPF Syslog messages to log..........................................................................................................................................................266
Conguring an OSPF network type....................................................................................................................................................................................266
Conguring OSPF Graceful Restart................................................................................................................................................................................... 267
Conguring OSPF router advertisement..........................................................................................................................................................................269
Conguring OSPF shortest path rst throttling............................................................................................................................................................. 270
Displaying OSPF information.........................................................................................................................................................................................................271
Displaying general OSPF conguration information...................................................................................................................................................271
Displaying OSPF area information..................................................................................................................................................................................... 273
Displaying OSPF neighbor information............................................................................................................................................................................274
Displaying OSPF interface information.............................................................................................................................................................................276
Displaying OSPF interface brief information.................................................................................................................................................................. 278
Displaying OSPF route information....................................................................................................................................................................................279
Displaying OSPF database information............................................................................................................................................................................281
Displaying OSPF external link state information...........................................................................................................................................................281
Displaying OSPF database-summary information......................................................................................................................................................282
Displaying OSPF database link state information........................................................................................................................................................ 283
Displaying OSPF ABR and ASBR information............................................................................................................................................................. 284
Displaying OSPF trap status................................................................................................................................................................................................. 284
Viewing Congured OSPF point-to-point links.............................................................................................................................................................285
Displaying OSPF virtual neighbor and link information.............................................................................................................................................286
Clearing OSPF neighbors.......................................................................................................................................................................................................288
Displaying OSPF Graceful Restart information.............................................................................................................................................................288
Displaying OSPF Router Advertisement information................................................................................................................................................. 289
Clearing OSPF information............................................................................................................................................................................................................. 289
Clearing OSPF neighbors.......................................................................................................................................................................................................290
Disabling and re-enabling the OSPF process................................................................................................................................................................290
Clearing OSPF routes...............................................................................................................................................................................................................290
FastIron Ethernet Switch Layer 3 Routing Conguration Guide, 08.0.30mb
8 53-1003627-06
OSPFv3........................................................................................................................................................................................................................... 291
OSPFv3 overview................................................................................................................................................................................................................................291
LSA types for OSPFv3..................................................................................................................................................................................................................... 291
Conguring OSPFv3..........................................................................................................................................................................................................................292
Enabling OSPFv3...................................................................................................................................................................................................................... 292
Assigning OSPFv3 areas........................................................................................................................................................................................................293
Assigning an area cost for OSPFv3 (optional parameter).........................................................................................................................................297
Specifying a network type.......................................................................................................................................................................................................298
Conguring virtual links............................................................................................................................................................................................................298
Changing the reference bandwidth for the cost on OSPFv3 interfaces..............................................................................................................300
Redistributing routes into OSPFv3.....................................................................................................................................................................................301
Filtering OSPFv3 routes..........................................................................................................................................................................................................304
Conguring default route origination.................................................................................................................................................................................. 307
Modifying Shortest Path First timers..................................................................................................................................................................................308
Modifying administrative distance.......................................................................................................................................................................................309
Conguring the OSPFv3 LSA pacing interval............................................................................................................................................................... 309
Modifying exit overow interval............................................................................................................................................................................................ 310
Modifying external link state database limit.....................................................................................................................................................................310
Setting all OSPFv3 interfaces to the passive state.......................................................................................................................................................310
Modifying OSPFv3 interface defaults............................................................................................................................................................................... 311
Disabling or re-enabling event logging..............................................................................................................................................................................311
IPsec for OSPFv3......................................................................................................................................................................................................................312
Conguring IPsec for OSPFv3.............................................................................................................................................................................................313
Conguring OSPFv3 Graceful Restart Helper mode..................................................................................................................................................318
Conguring OSPFv3 Non-stop routing (NSR)..............................................................................................................................................................319
Displaying OSPFv3 information................................................................................................................................................................................................... 319
General OSPFv3 conguration information....................................................................................................................................................................320
Displaying OSPFv3 area information................................................................................................................................................................................ 320
Displaying OSPFv3 database information...................................................................................................................................................................... 321
Displaying IPv6 interface information................................................................................................................................................................................325
Displaying IPv6 OSPFv3 interface information............................................................................................................................................................ 326
Displaying OSPFv3 memory usage.................................................................................................................................................................................. 330
Displaying OSPFv3 neighbor information.......................................................................................................................................................................331
Displaying routes redistributed into OSPFv3................................................................................................................................................................. 334
Displaying OSPFv3 route information.............................................................................................................................................................................. 334
Displaying OSPFv3 SPF information................................................................................................................................................................................336
Displaying OSPFv3 GR Helper mode information .................................................................................................................................................... 339
Displaying OSPFv3 NSR information...............................................................................................................................................................................339
Displaying IPv6 OSPF virtual link information...............................................................................................................................................................339
Displaying OSPFv3 virtual neighbor information.........................................................................................................................................................340
IPsec examples............................................................................................................................................................................................................................341
OSPFv3 clear commands ..............................................................................................................................................................................................................347
Clearing all OSPFv3 data........................................................................................................................................................................................................347
Clearing OSPFv3 data in a VRF..........................................................................................................................................................................................347
Clearing all OSPFv3 packet counters................................................................................................................................................................................348
Scheduling Shortest Path First (SPF) calculation..........................................................................................................................................................348
Clearing all redistributed routes from OSPFv3..............................................................................................................................................................348
Clearing OSPFv3 neighbors................................................................................................................................................................................................. 348
Conguring BGP4 (IPv4).............................................................................................................................................................................................351
BGP4 overview.....................................................................................................................................................................................................................................351
FastIron Ethernet Switch Layer 3 Routing Conguration Guide, 08.0.30mb
53-1003627-06 9
Relationship between the BGP4 route table and the IP route table......................................................................................................................352
How BGP4 selects a path for a route (BGP best path selection algorithm)...................................................................................................... 353
BGP4 message types.............................................................................................................................................................................................................. 354
Grouping of RIB-out peers.....................................................................................................................................................................................................356
Implementation of BGP4................................................................................................................................................................................................................. 356
BGP4 restart..........................................................................................................................................................................................................................................356
BGP4 Peer notication during a management module switchover......................................................................................................................357
BGP4 neighbor local AS.........................................................................................................................................................................................................358
Basic conguration and activation for BGP4...........................................................................................................................................................................360
Disabling BGP4.......................................................................................................................................................................................................................... 361
BGP4 parameters................................................................................................................................................................................................................................361
Parameter changes that take eect immediately..........................................................................................................................................................363
Parameter changes that take eect after resetting neighbor sessions.................................................................................................................363
Parameter changes that take eect after disabling and re-enabling redistribution.........................................................................................364
Memory considerations.....................................................................................................................................................................................................................364
Memory conguration options obsoleted by dynamic memory............................................................................................................................ 364
Basic conguration tasks required for BGP4...........................................................................................................................................................................364
Enabling BGP4 on the device...............................................................................................................................................................................................365
Changing the device ID............................................................................................................................................................................................................365
Setting the local AS number.................................................................................................................................................................................................. 365
Adding a loopback interface...................................................................................................................................................................................................366
Adding BGP4 neighbors.........................................................................................................................................................................................................367
Adding a BGP4 peer group................................................................................................................................................................................................... 374
Optional BGP4 conguration tasks............................................................................................................................................................................................. 377
Changing the Keep Alive Time and Hold Time..............................................................................................................................................................377
Changing the BGP4 next-hop update timer...................................................................................................................................................................377
Enabling fast external fallover................................................................................................................................................................................................378
Changing the maximum number of paths for BGP4 Multipath load sharing...................................................................................................378
Customizing BGP4 Multipath load sharing.....................................................................................................................................................................380
Specifying a list of networks to advertise......................................................................................................................................................................... 380
Changing the default local preference................................................................................................................................................................................381
Using the IP default route as a valid next-hop for a BGP4 route...........................................................................................................................382
Changing the default MED (Metric) used for route redistribution...........................................................................................................................382
Enabling next-hop recursion..................................................................................................................................................................................................382
Changing administrative distances......................................................................................................................................................................................385
Requiring the rst AS to be the neighbor AS..................................................................................................................................................................386
Disabling or re-enabling comparison of the AS-Path length...................................................................................................................................387
Enabling or disabling comparison of device IDs...........................................................................................................................................................387
Conguring the device to always compare Multi-Exit Discriminators.................................................................................................................. 387
Treating missing MEDs as the worst MEDs....................................................................................................................................................................388
Conguring route reection parameters........................................................................................................................................................................... 388
Conguring confederations.................................................................................................................................................................................................... 391
Aggregating routes advertised to BGP4 neighbors.....................................................................................................................................................394
Conguring BGP4 restart.................................................................................................................................................................................................................395
Conguring BGP4 Restart for the global routing instance....................................................................................................................................... 395
Conguring BGP4 Restart for a VRF................................................................................................................................................................................ 395
Conguring timers for BGP4 Restart (optional).............................................................................................................................................................395
BGP4 null0 routing....................................................................................................................................................................................................................396
Conguring BGP4 null0 routing.......................................................................................................................................................................................... 397
Modifying redistribution parameters............................................................................................................................................................................................400
FastIron Ethernet Switch Layer 3 Routing Conguration Guide, 08.0.30mb
10 53-1003627-06
Redistributing connected routes...........................................................................................................................................................................................401
Redistributing RIP routes.........................................................................................................................................................................................................401
Redistributing OSPF external routes..................................................................................................................................................................................401
Redistributing static routes......................................................................................................................................................................................................402
Redistributing IBGP routes.....................................................................................................................................................................................................402
Filtering.....................................................................................................................................................................................................................................................402
AS-path ltering.......................................................................................................................................................................................................................... 403
BGP4 ltering communities.................................................................................................................................................................................................. 405
Dening and applying IP prex lists....................................................................................................................................................................................407
Dening neighbor distribute lists..........................................................................................................................................................................................408
Dening route maps..................................................................................................................................................................................................................408
Using a table map to set the tag value...............................................................................................................................................................................415
Conguring cooperative BGP4 route ltering................................................................................................................................................................ 416
Four-byte Autonomous System Numbers (AS4).................................................................................................................................................................. 418
Enabling AS4 numbers............................................................................................................................................................................................................419
BGP4 AS4 attribute errors.............................................................................................................................................................................................................. 423
Error logs........................................................................................................................................................................................................................................423
Conguring route ap dampening................................................................................................................................................................................................424
Globally conguring route ap dampening......................................................................................................................................................................424
Using a route map to congure route ap dampening for a specic neighbor................................................................................................ 425
Removing route dampening from a route........................................................................................................................................................................426
Displaying and clearing route ap dampening statistics............................................................................................................................................ 426
Generating traps for BGP4..............................................................................................................................................................................................................428
Conguring BGP4...............................................................................................................................................................................................................................428
Entering and exiting the address family conguration level............................................................................................................................................... 429
BGP route reector............................................................................................................................................................................................................................. 430
Conguring BGP route reector...........................................................................................................................................................................................430
Specifying a maximum AS path length...................................................................................................................................................................................... 432
Setting a global maximum AS path limit.......................................................................................................................................................................... 433
Setting a maximum AS path limit for a peer group or neighbor.............................................................................................................................433
BGP4 max-as error messages......................................................................................................................................................................................................434
Maximum AS path limit error.................................................................................................................................................................................................434
Memory limit error......................................................................................................................................................................................................................434
Originating the default route............................................................................................................................................................................................................434
Changing the default metric used for route cost.....................................................................................................................................................................434
Conguring a static BGP4 network ............................................................................................................................................................................................ 435
Setting an administrative distance for a static BGP4 network.................................................................................................................................435
Limiting advertisement of a static BGP4 network to selected neighbors.......................................................................................................... 436
Dynamic route lter update.................................................................................................................................................................................................... 436
Generalized TTL Security Mechanism support...................................................................................................................................................................... 438
Displaying BGP4 information.........................................................................................................................................................................................................438
Displaying summary BGP4 information.......................................................................................................................................................................... 438
Displaying the active BGP4 conguration.......................................................................................................................................................................441
Displaying summary neighbor information..................................................................................................................................................................... 441
Displaying BGP4 neighbor information............................................................................................................................................................................443
Displaying peer group information......................................................................................................................................................................................451
Displaying summary route information............................................................................................................................................................................. 451
Displaying VRF instance information.................................................................................................................................................................................452
Displaying the BGP4 route table......................................................................................................................................................................................... 452
Displaying BGP4 route-attribute entries.......................................................................................................................................................................... 459
FastIron Ethernet Switch Layer 3 Routing Conguration Guide, 08.0.30mb
53-1003627-06 11
Displaying the routes BGP4 has placed in the IP route table..................................................................................................................................460
Displaying route ap dampening statistics...................................................................................................................................................................... 460
Displaying the active route map conguration............................................................................................................................................................... 461
Displaying BGP4 graceful restart neighbor information............................................................................................................................................462
Displaying AS4 details............................................................................................................................................................................................................. 462
Updating route information and resetting a neighbor session.................................................................................................................................469
Using soft reconguration.......................................................................................................................................................................................................469
Dynamically requesting a route refresh from a BGP4 neighbor............................................................................................................................ 471
Closing or resetting a neighbor session............................................................................................................................................................................473
Clearing and resetting BGP4 routes in the IP route table..........................................................................................................................................474
Clearing trac counters.....................................................................................................................................................................................................................474
Clearing diagnostic buers.............................................................................................................................................................................................................. 475
Conguring BGP4+.......................................................................................................................................................................................................477
BGP4+ overview.................................................................................................................................................................................................................................. 477
BGP global mode ...............................................................................................................................................................................................................................477
IPv6 unicast address family.............................................................................................................................................................................................................478
BGP4+ neighbors................................................................................................................................................................................................................................479
BGP4+ peer groups............................................................................................................................................................................................................................479
BGP4+ next hop recursion.............................................................................................................................................................................................................. 480
BGP4+ NLRIs and next hop attributes.......................................................................................................................................................................................480
BGP4+ route reection......................................................................................................................................................................................................................481
BGP4+ route aggregation................................................................................................................................................................................................................ 481
BGP4+ multipath................................................................................................................................................................................................................................. 481
Route maps............................................................................................................................................................................................................................................ 482
BGP4+ outbound route ltering.................................................................................................................................................................................................... 482
BGP4+ confederations......................................................................................................................................................................................................................482
BGP4+ extended community.........................................................................................................................................................................................................483
BGP4+ graceful restart......................................................................................................................................................................................................................483
Conguring BGP4+............................................................................................................................................................................................................................ 483
Conguring BGP4+ neighbors using global IPv6 addresses..................................................................................................................................484
Conguring BGP4+ neighbors using link-local addresses.......................................................................................................................................484
Conguring BGP4+ peer groups.........................................................................................................................................................................................485
Conguring a peer group with IPv4 and IPv6 peers................................................................................................................................................... 486
Importing routes into BGP4+................................................................................................................................................................................................487
Advertising the default BGP4+ route................................................................................................................................................................................. 488
Advertising the default BGP4+ route to a specic neighbor....................................................................................................................................488
Using the IPv6 default route as a valid next hop for a BGP4+ route....................................................................................................................489
Enabling next-hop recursion..................................................................................................................................................................................................489
Conguring a cluster ID for a route reector................................................................................................................................................................... 490
Conguring a route reector client.......................................................................................................................................................................................490
Aggregating routes advertised to BGP neighbors........................................................................................................................................................491
Enabling load-balancing across dierent paths.............................................................................................................................................................491
Conguring a route map for BGP4+ prexes.................................................................................................................................................................492
Redistributing prexes into BGP4+.....................................................................................................................................................................................493
Conguring BGP4+ outbound route ltering..................................................................................................................................................................494
Conguring BGP4+ confederations................................................................................................................................................................................... 495
Dening a community ACL....................................................................................................................................................................................................495
Applying a BGP extended community lter....................................................................................................................................................................496
Disabling BGP4+ graceful restart........................................................................................................................................................................................ 497
Re-enabling BGP4+ graceful restart..................................................................................................................................................................................498
FastIron Ethernet Switch Layer 3 Routing Conguration Guide, 08.0.30mb
12 53-1003627-06
Disabling the BGP AS_PATH check function................................................................................................................................................................ 500
Displaying BGP4+ statistics...................................................................................................................................................................................................500
Displaying BGP4+ neighbor statistics...............................................................................................................................................................................503
Clearing BGP4+ dampened paths......................................................................................................................................................................................505
VRRP and VRRP-E....................................................................................................................................................................................................... 507
Overview..................................................................................................................................................................................................................................................507
VRRP and VRRP-E overview.........................................................................................................................................................................................................507
VRRP overview............................................................................................................................................................................................................................507
VRRP-E overview.......................................................................................................................................................................................................................512
ARP behavior with VRRP-E...................................................................................................................................................................................................513
Comparison of VRRP and VRRP-E............................................................................................................................................................................................ 513
VRRP...............................................................................................................................................................................................................................................513
VRRP-E..........................................................................................................................................................................................................................................514
Architectural dierences between VRRP and VRRP-E..............................................................................................................................................514
VRRP and VRRP-E parameters....................................................................................................................................................................................................514
Note regarding disabling VRRP or VRRP-E...................................................................................................................................................................518
Basic VRRP parameter conguration......................................................................................................................................................................................... 518
Conguration rules for VRRP................................................................................................................................................................................................518
Enabling an owner VRRP device......................................................................................................................................................................................... 519
Enabling an IPv6 VRRPv3 owner device.........................................................................................................................................................................520
Enabling a backup VRRP device......................................................................................................................................................................................... 521
Enabling an IPv6 VRRPv3 backup device...................................................................................................................................................................... 523
Assigning an auto-generated link-local IPv6 address for a VRRPv3 cluster................................................................................................... 524
Enabling the v2 checksum computation method in a VRRPv3 IPv4 session.................................................................................................525
Enabling accept mode in VRRP non-Owner Master router..................................................................................................................................... 525
Conguration considerations for IPv6 VRRP and IPv6 VRRP-E support on Brocade devices...............................................................526
Basic VRRP-E parameter conguration.................................................................................................................................................................................... 526
Conguration rules for VRRP-E...........................................................................................................................................................................................526
Conguring IPv4 VRRP-E......................................................................................................................................................................................................527
Conguring IPv6 VRRP-E......................................................................................................................................................................................................527
Additional VRRP and VRRP-E parameter conguration.................................................................................................................................................... 528
VRRP and VRRP-E authentication types.........................................................................................................................................................................529
VRRP router type........................................................................................................................................................................................................................530
Suppression of RIP advertisements................................................................................................................................................................................... 531
Hello interval conguration..................................................................................................................................................................................................... 532
Dead interval conguration.....................................................................................................................................................................................................533
Backup Hello message state and interval........................................................................................................................................................................ 533
Track port conguration........................................................................................................................................................................................................... 533
Track priority conguration..................................................................................................................................................................................................... 534
Backup preempt conguration............................................................................................................................................................................................. 534
Changing the timer scale.........................................................................................................................................................................................................535
VRRP-E slow start timer......................................................................................................................................................................................................... 536
VRRP-E Extension for Server Virtualization................................................................................................................................................................... 536
Suppressing default interface-level RA messages on an IPv6 VRRP or VRRP-E interface......................................................................539
Forcing a Master router to abdicate to a Backup router...................................................................................................................................................... 539
Accept mode for backup VRRP devices....................................................................................................................................................................................540
Enabling accept mode on a backup VRRP device.......................................................................................................................................................540
Displaying VRRP and VRRP-E information.............................................................................................................................................................................542
Displaying summary information.........................................................................................................................................................................................543
Displaying detailed information............................................................................................................................................................................................ 544
FastIron Ethernet Switch Layer 3 Routing Conguration Guide, 08.0.30mb
53-1003627-06 13
Displaying statistics....................................................................................................................................................................................................................550
Clearing VRRP or VRRP-E statistics................................................................................................................................................................................. 553
Conguration examples.....................................................................................................................................................................................................................554
VRRP example............................................................................................................................................................................................................................ 554
VRRP-E example....................................................................................................................................................................................................................... 555
Multi-VRF........................................................................................................................................................................................................................ 557
Multi-VRF overview............................................................................................................................................................................................................................ 557
FastIron considerations for Multi-VRF...............................................................................................................................................................................559
VRF-related system-max values......................................................................................................................................................................................... 559
Additional features to support Multi-VRF........................................................................................................................................................................ 561
Conguring Multi-VRF...................................................................................................................................................................................................................... 563
Conguring VRF system-max values ...............................................................................................................................................................................563
Creating VLANs as links on a tagged port for security...............................................................................................................................................564
Conguring a VRF instance................................................................................................................................................................................................... 565
Starting a routing process for a VRF..................................................................................................................................................................................565
Assigning a Layer 3 interface to a VRF.............................................................................................................................................................................566
Assigning a loopback interface to a VRF..........................................................................................................................................................................567
Verifying a Multi-VRF conguration................................................................................................................................................................................... 567
Removing a VRF conguration............................................................................................................................................................................................ 568
Conguring static ARP for Multi-VRF............................................................................................................................................................................... 569
Conguring additional ARP features for Multi-VRF.....................................................................................................................................................569
Multi-Chassis Trunking.................................................................................................................................................................................................571
Layer 3 behavior with MCT............................................................................................................................................................................................................. 571
Layer 3 unicast forwarding over MCT............................................................................................................................................................................... 572
VRRP or VRRP-E over an MCT-enabled network.......................................................................................................................................................573
VRRP-E short-path forwarding and revertible option.................................................................................................................................................574
OSPF and BGP over an MCT-enabled network...........................................................................................................................................................574
Layer 3 with MCT conguration considerations............................................................................................................................................................575
MCT conguration examples ............................................................................................................................................................................................... 576
PIM over MCT intermediate router functionality........................................................................................................................................................... 581
Unicast Reverse Path Forwarding.............................................................................................................................................................................. 589
Unicast Reverse Path Forwarding.................................................................................................................................................................................................589
Conguration considerations for uRPF...................................................................................................................................................................................... 589
ICX 6610 considerations........................................................................................................................................................................................................590
ICX 7750 considerations........................................................................................................................................................................................................590
Unicast Reverse Path Forwarding feasibility.............................................................................................................................................................................590
System-max changes and uRPF..................................................................................................................................................................................................591
Enabling unicast Reverse Path Forwarding...............................................................................................................................................................................592
Conguring unicast Reverse Path Forwarding modes.........................................................................................................................................................592
FastIron Ethernet Switch Layer 3 Routing Conguration Guide, 08.0.30mb
14 53-1003627-06

Preface
• Document conventions...................................................................................................................................................................................15
• Brocade resources............................................................................................................................................................................................ 16
• Document feedback.........................................................................................................................................................................................16
• Contacting Brocade Technical Support....................................................................................................................................................17
Document conventions
The document conventions describe text formatting conventions, command syntax conventions, and important notice formats used in
Brocade technical documentation.
Notes, cautions, and warnings
Notes, cautions, and warning statements may be used in this document. They are listed in the order of increasing severity of potential
hazards.
NOTE
A Note provides a tip, guidance, or advice, emphasizes important information, or provides a reference to related information.
ATTENTION
An Attention statement indicates a stronger note, for example, to alert you when trac might be interrupted or the device might
reboot.
CAUTION
A Caution statement alerts you to situations that can be potentially hazardous to you or cause damage to hardware,
rmware, software, or data.
DANGER
A Danger statement indicates conditions or situations that can be potentially lethal or extremely hazardous to you. Safety
labels are also attached directly to products to warn of these conditions or situations.
Text formatting conventions
Text formatting conventions such as boldface, italic, or Courier font may be used to highlight specic words or phrases.
Format Description
bold text Identies command names.
Identies keywords and operands.
Identies the names of GUI elements.
Identies text to enter in the GUI.
italic text Identies emphasis.
Identies variables.
Identies document titles.
Courier font Identies CLI output.
FastIron Ethernet Switch Layer 3 Routing Conguration Guide, 08.0.30mb
53-1003627-06 15
Format Description
Identies command syntax examples.
Command syntax conventions
Bold and italic text identify command syntax components. Delimiters and operators dene groupings of parameters and their logical
relationships.
Convention Description
bold text Identies command names, keywords, and command options.
italic text Identies a variable.
value In Fibre Channel products, a xed value provided as input to a command option is printed in plain text, for
example, --show WWN.
[ ] Syntax components displayed within square brackets are optional.
Default responses to system prompts are enclosed in square brackets.
{ x | y | z } A choice of required parameters is enclosed in curly brackets separated by vertical bars. You must select
one of the options.
In Fibre Channel products, square brackets may be used instead for this purpose.
x | yA vertical bar separates mutually exclusive elements.
< > Nonprinting characters, for example, passwords, are enclosed in angle brackets.
... Repeat the previous element, for example, member[member...].
\ Indicates a “soft” line break in command examples. If a backslash separates two lines of a command
input, enter the entire command at the prompt without the backslash.
Brocade resources
Visit the Brocade website to locate related documentation for your product and additional Brocade resources.
White papers, data sheets, and the most recent versions of Brocade software and hardware manuals are available at www.brocade.com.
Product documentation for all supported releases is available to registered users at MyBrocade.
Click the Support tab and select Document Library to access product documentation on MyBrocade or www.brocade.com. You can
locate documentation by product or by operating system.
Release notes are bundled with software downloads on MyBrocade. Links to software downloads are available on the MyBrocade landing
page and in the Document Library.
Document feedback
Quality is our rst concern at Brocade, and we have made every eort to ensure the accuracy and completeness of this document.
However, if you nd an error or an omission, or you think that a topic needs further development, we want to hear from you. You can
provide feedback in two ways:
• Through the online feedback form in the HTML documents posted on www.brocade.com
• By sending your feedback to documentation@brocade.com
Provide the publication title, part number, and as much detail as possible, including the topic heading and page number if applicable, as
well as your suggestions for improvement.
Brocade resources
FastIron Ethernet Switch Layer 3 Routing Conguration Guide, 08.0.30mb
16 53-1003627-06

Contacting Brocade Technical Support
As a Brocade customer, you can contact Brocade Technical Support 24x7 online or by telephone. Brocade OEM customers should
contact their OEM/solution provider.
Brocade customers
For product support information and the latest information on contacting the Technical Assistance Center, go to www.brocade.com and
select Support.
If you have purchased Brocade product support directly from Brocade, use one of the following methods to contact the Brocade
Technical Assistance Center 24x7.
Online Telephone
Preferred method of contact for non-urgent issues:
• Case management through the MyBrocade portal.
• Quick Access links to Knowledge Base, Community, Document
Library, Software Downloads and Licensing tools
Required for Sev 1-Critical and Sev 2-High issues:
• Continental US: 1-800-752-8061
• Europe, Middle East, Africa, and Asia Pacic: +800-AT FIBREE
(+800 28 34 27 33)
•Toll-free numbers are available in many countries.
• For areas unable to access a toll-free number:
+1-408-333-6061
Brocade OEM customers
If you have purchased Brocade product support from a Brocade OEM/solution provider, contact your OEM/solution provider for all of
your product support needs.
• OEM/solution providers are trained and certied by Brocade to support Brocade® products.
• Brocade provides backline support for issues that cannot be resolved by the OEM/solution provider.
• Brocade Supplemental Support augments your existing OEM support contract, providing direct access to Brocade expertise.
For more information, contact Brocade or your OEM.
• For questions regarding service levels and response times, contact your OEM/solution provider.
Contacting Brocade Technical Support
FastIron Ethernet Switch Layer 3 Routing Conguration Guide, 08.0.30mb
53-1003627-06 17
FastIron Ethernet Switch Layer 3 Routing Conguration Guide, 08.0.30mb
18 53-1003627-06

About This Document
• Supported hardware and software..............................................................................................................................................................19
• What’s new in this document........................................................................................................................................................................19
Supported hardware and software
This guide supports the following product families for FastIron release 08.0.30:
• FastIron X Series devices (chassis models):
– FastIron SX 800
– FastIron SX 1600
• Brocade FCX Series (FCX) Switch
• Brocade ICX™ 6610 (ICX 6610) Switch
• Brocade ICX 6430 Series (ICX 6430)
• Brocade ICX 6450 Series (ICX 6450)
• Brocade ICX 6650 Series (ICX 6650)
• Brocade ICX 7250 Series (ICX 7250)
• Brocade ICX 7450 Series (ICX 7450)
• Brocade ICX 7750 Series (ICX 7750)
For information about the specic models and modules supported in a product family, refer to the hardware installation guide for that
product family.
NOTE
The Brocade ICX 6430-C switch supports the same feature set as the Brocade ICX 6430 switch unless otherwise noted.
NOTE
The Brocade ICX 6450-C12-PD switch supports the same feature set as the Brocade ICX 6450 switch unless otherwise
noted.
What’s new in this document
The following table describes information added to this guide for FastIron software releases 08.0.30mb.
TABLE 1 Summary of enhancements in FastIron release 08.0.30mb
Feature Description Location
DHCP option 43 and option 60 Brocade devices running as DHCP servers can be
congured with Option 43 and Option 60.
IP Conguration
Static MAC address to IP address mapping Based on the client MAC address you can statically
congure the IP address to the MAC-address in the
DHCP server.
IP Conguration
FastIron Ethernet Switch Layer 3 Routing Conguration Guide, 08.0.30mb
53-1003627-06 19
FastIron Ethernet Switch Layer 3 Routing Conguration Guide, 08.0.30mb
20 53-1003627-06

IP Conguration
• Basic IP conguration......................................................................................................................................................................................21
• IP conguration overview...............................................................................................................................................................................21
• Basic IP parameters and defaults - Layer 3 switches........................................................................................................................28
• Basic IP parameters and defaults - Layer 2 switches........................................................................................................................33
•Conguring IP parameters - Layer 3 switches..................................................................................................................................... 35
•Conguring IP parameters - Layer 2 switches..................................................................................................................................... 95
• IPv4 point-to-point GRE tunnels ........................................................................................................................................................... 103
• Bandwidth for IP interfaces........................................................................................................................................................................ 122
• Displaying IP conguration information and statistics.................................................................................................................... 126
• Disabling IP checksum check................................................................................................................................................................... 141
Basic IP conguration
IP is enabled by default. Basic conguration consists of adding IP addresses for Layer 3 switches, enabling a route exchange protocol,
such as the Routing Information Protocol (RIP).
NOTE
The terms Layer 3 switch and router are used interchangeably in this chapter and mean the same.
NOTE
References to chassis-based Layer 3 switches apply to the FSX 800 and FSX 1600.
If you are conguring a Layer 3 switch, refer to Conguring IP addresses on page 35 to add IP addresses, then enable and congure
the route exchange protocols, as described in other chapters of this guide.
If you are conguring a Layer 2 switch, refer to Conguring the management IP address and specifying the default gateway on page
95 to add an IP address for management access through the network and to specify the default gateway.
The rest of this chapter describes IP and how to congure it in more detail. Use the information in this chapter if you need to change
some of the IP parameters from their default values or you want to view conguration information or statistics.
IP conguration overview
Brocade Layer 2 switches and Layer 3 switches support Internet Protocol version 4 (IPv4) and IPv6. IP support on Brocade Layer 2
switches consists of basic services to support management access and access to a default gateway.
Full Layer 3 support
IP support on Brocade full Layer 3 switches includes all of the following, in addition to a highly congurable implementation of basic IP
services including Address Resolution Protocol (ARP), ICMP Router Discovery Protocol (IRDP), and Reverse ARP (RARP):
• Route exchange protocols:
– Routing Information Protocol (RIP)
– Open Shortest Path First (OSPF)
– Border Gateway Protocol version 4 (BGP4)
FastIron Ethernet Switch Layer 3 Routing Conguration Guide, 08.0.30mb
53-1003627-06 21
• Multicast protocols:
– Internet Group Management Protocol (IGMP)
– Protocol Independent Multicast Dense (PIM-DM)
– Protocol Independent Multicast Sparse (PIM-SM)
• Router redundancy protocols:
– Virtual Router Redundancy Protocol Extended (VRRP-E)
– Virtual Router Redundancy Protocol (VRRP)
IP interfaces
NOTE
This section describes IPv4 addresses. For information about IPv6 addresses on FastIron X Series devices, refer to the "IPv6
addressing overview" section in the FastIron Ethernet Switch Administration Guide .
Brocade Layer 3 switches and Layer 2 switches allow you to congure IP addresses. On Layer 3 switches, IP addresses are associated
with individual interfaces. On Layer 2 switches, a single IP address serves as the management access address for the entire device.
All Brocade Layer 3 switches and Layer 2 switches support conguration and display of IP addresses in classical subnet format (for
example, 192.168.1.1 255.255.255.0) and Classless Interdomain Routing (CIDR) format (for example, 192.168.1.1/24). You can use
either format when conguring IP address information. IP addresses are displayed in classical subnet format by default but you can
change the display format to CIDR. Refer to Changing the network mask display to prex format on page 126.
Layer 3 switches
Brocade Layer 3 switches allow you to congure IP addresses on the following types of interfaces:
• Ethernet ports
• Virtual routing interfaces (used by VLANs to route among one another)
• Loopback interfaces
• GRE tunnels
Each IP address on a Layer 3 switch must be in a dierent subnet. You can have only one interface that is in a given subnet. For example,
you can congure IP addresses 192.168.1.1/24 and 192.168.2.1/24 on the same Layer 3 switch, but you cannot congure
192.168.1.1/24 and 192.168.1.2/24 on the same Layer 3 switch.
You can congure multiple IP addresses on the same interface.
The number of IP addresses you can congure on an individual interface depends on the Layer 3 switch model. To display the maximum
number of IP addresses and other system parameters you can congure on a Layer 3 switch, refer to "Displaying and modifying system
parameter default settings" section in the FastIron Ethernet Switch Platform and Layer 2 Switching Conguration Guide .
You can use any of the IP addresses you congure on the Layer 3 switch for Telnet, Web management, or SNMP access.
Layer 2 switches
You can congure an IP address on a Brocade Layer 2 switch for management access to the Layer 2 switch. An IP address is required
for Telnet access, Web management access, and SNMP access.
You also can specify the default gateway for forwarding trac to other subnets.
IP conguration overview
FastIron Ethernet Switch Layer 3 Routing Conguration Guide, 08.0.30mb
22 53-1003627-06
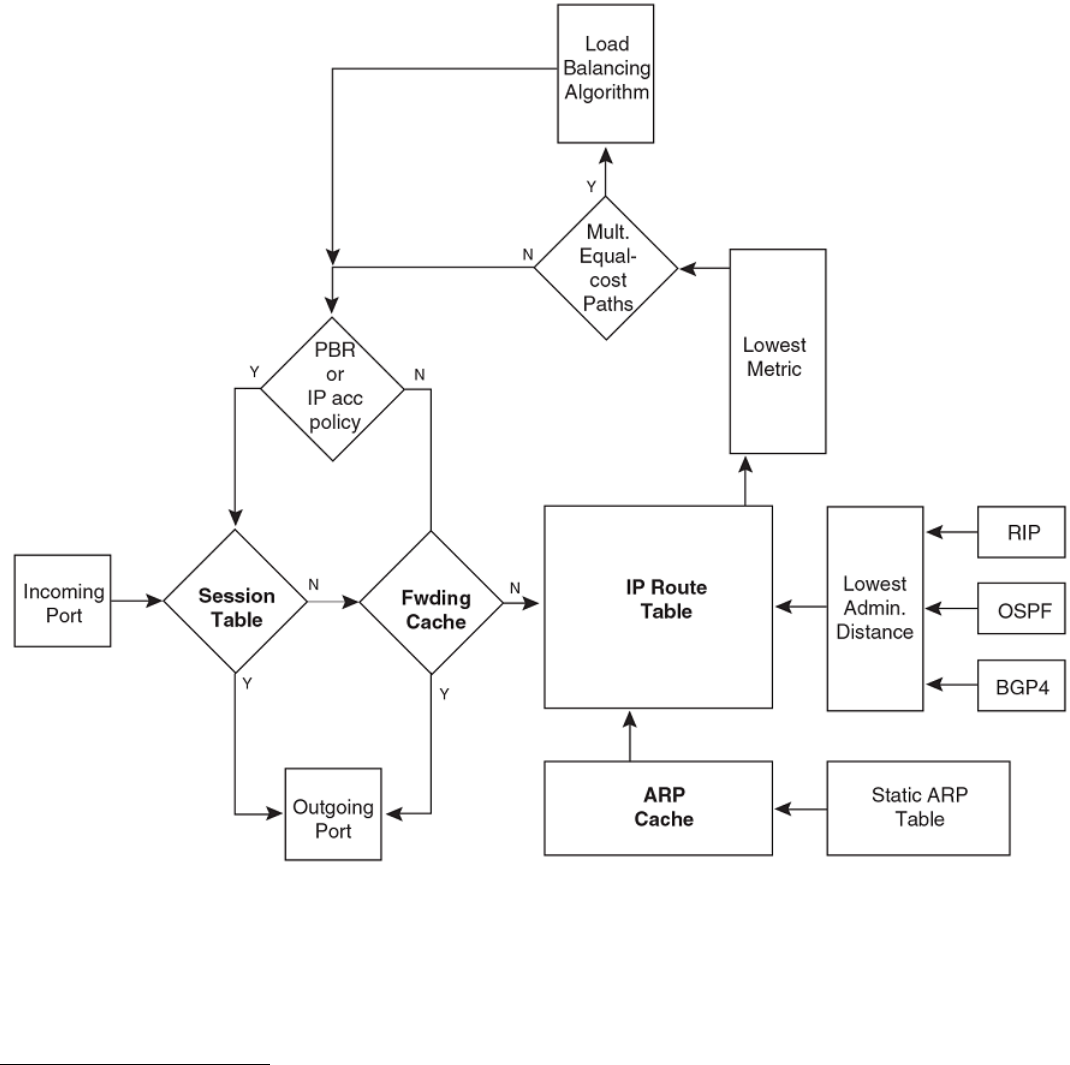
IP packet ow through a Layer 3 switch
FIGURE 1 IP Packet ow through a Brocade Layer 3 switch
1. When the Layer 3 switch receives an IP packet, the Layer 3 switch checks for lters on the receiving interface.1 If a deny lter on
the interface denies the packet, the Layer 3 switch discards the packet and performs no further processing, except generating a
Syslog entry and SNMP message, if logging is enabled for the lter.
1The lter can be an Access Control List (ACL) or an IP access policy.
IP conguration overview
FastIron Ethernet Switch Layer 3 Routing Conguration Guide, 08.0.30mb
53-1003627-06 23
2. If the packet is not denied at the incoming interface, the Layer 3 switch looks in the session table for an entry that has the same
source IP address and TCP or UDP port as the packet. If the session table contains a matching entry, the Layer 3 switch
immediately forwards the packet, by addressing it to the destination IP address and TCP or UDP port listed in the session table
entry and sending the packet to a queue on the outgoing ports listed in the session table. The Layer 3 switch selects the queue
based on the Quality of Service (QoS) level associated with the session table entry.
3. If the session table does not contain an entry that matches the packet source address and TCP or UDP port, the Layer 3 switch
looks in the IP forwarding cache for an entry that matches the packet destination IP address. If the forwarding cache contains a
matching entry, the Layer 3 switch forwards the packet to the IP address in the entry. The Layer 3 switch sends the packet to a
queue on the outgoing ports listed in the forwarding cache. The Layer 3 switch selects the queue based on the Quality of
Service (QoS) level associated with the forwarding cache entry.
4. If the IP forwarding cache does not have an entry for the packet, the Layer 3 switch checks the IP route table for a route to the
packet destination. If the IP route table has a route, the Layer 3 switch makes an entry in the session table or the forwarding
cache, and sends the route to a queue on the outgoing ports:
• – If the running-cong contains an IP access policy for the packet, the software makes an entry in the session table. The
Layer 3 switch uses the new session table entry to forward subsequent packets from the same source to the same
destination.
– If the running-cong does not contain an IP access policy for the packet, the software creates a new entry in the
forwarding cache. The Layer 3 switch uses the new cache entry to forward subsequent packets to the same
destination.
The following sections describe the IP tables and caches:
• ARP cache and static ARP table
• IP route table
• IP forwarding cache
• Layer 4 session table
The software enables you to display these tables. You also can change the capacity of the tables on an individual basis if
needed by changing the memory allocation for the table.
ARP cache and static ARP table
The ARP cache contains entries that map IP addresses to MAC addresses. Generally, the entries are for devices that are directly attached
to the Layer 3 switch.
An exception is an ARP entry for an interface-based static IP route that goes to a destination that is one or more router hops away. For
this type of entry, the MAC address is either the destination device MAC address or the MAC address of the router interface that
answered an ARP request on behalf of the device, using proxy ARP.
ARP cache
The ARP cache can contain dynamic (learned) entries and static (user-congured) entries. The software places a dynamic entry in the
ARP cache when the Layer 3 switch learns a device MAC address from an ARP request or ARP reply from the device.
The software can learn an entry when the Layer 2 switch or Layer 3 switch receives an ARP request from another IP forwarding device or
an ARP reply. Here is an example of a dynamic entry:
IP Address MAC Address Type Age Port
1 10.95.6.102 0000.00fc.ea21 Dynamic 0 6
Each entry contains the destination device IP address and MAC address.
IP conguration overview
FastIron Ethernet Switch Layer 3 Routing Conguration Guide, 08.0.30mb
24 53-1003627-06
Static ARP table
In addition to the ARP cache, Layer 3 switches have a static ARP table. Entries in the static ARP table are user-congured. You can add
entries to the static ARP table regardless of whether or not the device the entry is for is connected to the Layer 3 switch.
NOTE
Layer 3 switches have a static ARP table. Layer 2 switches do not.
The software places an entry from the static ARP table into the ARP cache when the entry interface comes up.
Here is an example of a static ARP entry.
Index IP Address MAC Address Port
1 10.95.6.111 0000.003b.d210 1/1/1
Each entry lists the information you specied when you created the entry.
IP route table
The IP route table contains paths to IP destinations.
NOTE
Layer 2 switches do not have an IP route table. A Layer 2 switch sends all packets addressed to another subnet to the default
gateway, which you specify when you congure the basic IP information on the Layer 2 switch.
The IP route table can receive the paths from the following sources:
• A directly-connected destination, which means there are no router hops to the destination
• A static IP route, which is a user-congured route
• A route learned through RIP
• A route learned through OSPF
• A route learned through BGP4
The IP route table contains the best path to a destination:
• When the software receives paths from more than one of the sources listed above, the software compares the administrative
distance of each path and selects the path with the lowest administrative distance. The administrative distance is a protocol-
independent value from 1 through 255.
• When the software receives two or more best paths from the same source and the paths have the same metric (cost), the
software can load share trac among the paths based on destination host or network address (based on the conguration and
the Layer 3 switch model).
Here is an example of an entry in the IP route table.
Destination NetMask Gateway Port Cost Type
10.1.0.0 255.255.0.0 10.1.1.2 1/1/1 2 R
Each IP route table entry contains the destination IP address and subnet mask and the IP address of the next-hop router interface to the
destination. Each entry also indicates the port attached to the destination or the next-hop to the destination, the route IP metric (cost), and
the type. The type indicates how the IP route table received the route.
To increase the size of the IP route table for learned and static routes, refer to the section "Displaying and modifying system parameter
default settings" in the FastIron Ethernet Switch Platform and Layer 2 Switching Conguration Guide:
• For learned routes, modify theip-route parameter.
• For static routes, modify the ip-static-route parameter.
IP conguration overview
FastIron Ethernet Switch Layer 3 Routing Conguration Guide, 08.0.30mb
53-1003627-06 25
IP forwarding cache
The IP forwarding cache provides a fast-path mechanism for forwarding IP packets. The cache contains entries for IP destinations. When
a Brocade Layer 3 switch has completed processing and addressing for a packet and is ready to forward the packet, the device checks
the IP forwarding cache for an entry to the packet destination:
• If the cache contains an entry with the destination IP address, the device uses the information in the entry to forward the packet
out the ports listed in the entry. The destination IP address is the address of the packet nal destination. The port numbers are
the ports through which the destination can be reached.
• If the cache does not contain an entry and the trac does not qualify for an entry in the session table instead, the software can
create an entry in the forwarding cache.
Each entry in the IP forwarding cache has an age timer. If the entry remains unused for ten minutes, the software removes the entry. The
age timer is not congurable.
Here is an example of an entry in the IP forwarding cache.
IP Address Next Hop MAC Type Port Vlan Pri
1 192.168.1.11 DIRECT 0000.0000.0000 PU n/a 0
Each IP forwarding cache entry contains the IP address of the destination, and the IP address and MAC address of the next-hop router
interface to the destination. If the destination is actually an interface congured on the Layer 3 switch itself, as shown here, then next-hop
information indicates this. The port through which the destination is reached is also listed, as well as the VLAN and Layer 4 QoS priority
associated with the destination if applicable.
NOTE
You cannot add static entries to the IP forwarding cache, although you can increase the number of entries the cache can
contain. Refer to the section "Displaying and modifying system parameter default settings" in the FastIron Ethernet Switch
Platform and Layer 2 Switching Conguration Guide.
Layer 4 session table
The Layer 4 session provides a fast path for forwarding packets. A session is an entry that contains complete Layer 3 and Layer 4
information for a ow of trac. Layer 3 information includes the source and destination IP addresses. Layer 4 information includes the
source and destination TCP and UDP ports. For comparison, the IP forwarding cache contains the Layer 3 destination address but does
not contain the other source and destination address information of a Layer 4 session table entry.
The Layer 2 switch or Layer 3 switch selects the session table instead of the IP forwarding table for fast-path forwarding for the following
features:
• Layer 4 Quality-of-Service (QoS) policies
• IP access policies
To increase the size of the session table, refer to the section "Displaying and modifying system parameter default settings" in the FastIron
Ethernet Switch Platform and Layer 2 Switching Conguration Guide . The ip-qos-session parameter controls the size of the session
table.
IP route exchange protocols
Brocade Layer 3 switches support the following IP route exchange protocols:
• Routing Information Protocol (RIP)
• Open Shortest Path First (OSPF)
• Border Gateway Protocol version 4 (BGP4)
IP conguration overview
FastIron Ethernet Switch Layer 3 Routing Conguration Guide, 08.0.30mb
26 53-1003627-06
All these protocols provide routes to the IP route table. You can use one or more of these protocols, in any combination. The protocols
are disabled by default.
IP multicast protocols
Brocade Layer 3 switches also support the following Internet Group Membership Protocol (IGMP) based IP multicast protocols:
• Protocol Independent Multicast - Dense mode (PIM-DM)
• Protocol Independent Multicast - Sparse mode (PIM-SM)
For conguration information, refer to "IP Multicast Protocols" in the FastIron Ethernet Switch IP Multicast Conguration Guide.
NOTE
Brocade Layer 3 switches support IGMP and can forward IP multicast packets. Refer to the "IP Multicast Trac Reduction"
chapter in the FastIron Ethernet Switch IP Multicast Conguration Guide.
IP interface redundancy protocols
You can congure a Brocade Layer 3 switch to back up an IP interface congured on another Brocade Layer 3 switch. If the link for the
backed up interface becomes unavailable, the other Layer 3 switch can continue service for the interface. This feature is especially useful
for providing a backup to a network default gateway.
Brocade Layer 3 switches support the following IP interface redundancy protocols:
• Virtual Router Redundancy Protocol (VRRP) - A standard router redundancy protocol based on RFC 2338. You can use VRRP
to congure Brocade Layer 3 switches and third-party routers to back up IP interfaces on other Brocade Layer 3 switches or
third-party routers.
• Virtual Router Redundancy Protocol Extended (VRRP-E) - A Brocade extension to standard VRRP that adds additional features
and overcomes limitations in standard VRRP. You can use VRRP-E only on Brocade Layer 3 switches.
ACLs and IP access policies
Brocade Layer 3 switches provide two mechanisms for ltering IP trac:
• Access Control Lists (ACLs)
• IP access policies
Both methods allow you to lter packets based on Layer 3 and Layer 4 source and destination information.
ACLs also provide great exibility by providing the input to various other ltering mechanisms such as route maps, which are used by
BGP4.
IP access policies allow you to congure QoS based on sessions (Layer 4 trac ows).
Only one of these ltering mechanisms can be enabled on a Brocade device at a time. Brocade devices can store forwarding information
for both methods of ltering in the session table.
For conguration information, refer to the chapter "Rule-Based IP ACLs" in the FastIron Ethernet Switch Security Conguration Guide .
IP conguration overview
FastIron Ethernet Switch Layer 3 Routing Conguration Guide, 08.0.30mb
53-1003627-06 27

Basic IP parameters and defaults - Layer 3 switches
IP is enabled by default. The following IP-based protocols are all disabled by default:
• Routing protocols:
– Routing Information Protocol (RIP)
– Open Shortest Path First (OSPF)
– Border Gateway Protocol version 4 (BGP4)
• Multicast protocols:
– Internet Group Membership Protocol (IGMP)
– Protocol Independent Multicast Dense (PIM-DM)
– Protocol Independent Multicast Sparse (PIM-SM)
• Router redundancy protocols:
– Virtual Router Redundancy Protocol Extended (VRRP-E)
– Virtual Router Redundancy Protocol (VRRP)
When parameter changes take eect
Most IP parameters described in this chapter are dynamic. They take eect immediately, as soon as you enter the CLI command or
select the Web Management Interface option. You can verify that a dynamic change has taken eect by displaying the running-cong. To
display the running-cong, enter the show running-cong or write terminal command at any CLI prompt. (You cannot display the
running-cong from the Web Management Interface.)
To save a conguration change permanently so that the change remains in eect following a system reset or software reload, save the
change to the startup-cong le:
• To save conguration changes to the startup-cong le, enter the write memory command from the Privileged EXEC level of
any conguration level of the CLI.
• To save the conguration changes using the Web Management Interface, select the Save link at the bottom of the dialog. Select
Yes when prompted to save the conguration change to the startup-cong le on the device ash memory. You also can access
the dialog for saving conguration changes by clicking on Command in the tree view, then clicking on Save to Flash.
Changes to memory allocation require you to reload the software after you save the changes to the startup-cong le. When reloading
the software is required to complete a conguration change described in this chapter, the procedure that describes the conguration
change includes a step for reloading the software.
IP global parameters - Layer 3 switches
TABLE 2 IP global parameters - Layer 3 switches
Parameter Description Default
IP state The Internet Protocol, version 4 Enabled
NOTE
You cannot disable IP.
IP address and mask notation Format for displaying an IP address and its
network mask information. You can enable one
of the following:
• Class-based format; example:
192.168.1.1 255.255.255.0
Class-based
Basic IP parameters and defaults - Layer 3 switches
FastIron Ethernet Switch Layer 3 Routing Conguration Guide, 08.0.30mb
28 53-1003627-06

TABLE 2 IP global parameters - Layer 3 switches (continued)
Parameter Description Default
• Classless Interdomain Routing (CIDR)
format; example: 192.168.1.1/24 NOTE
Changing this parameter aects the
display of IP addresses, but you can
enter addresses in either format
regardless of the display setting.
Router ID The value that routers use to identify themselves
to other routers when exchanging route
information. OSPF and BGP4 use router IDs to
identify routers. RIP does not use the router ID.
The IP address congured on the lowest-
numbered loopback interface.
If no loopback interface is congured, then the
lowest-numbered IP address congured on the
device.
Maximum Transmission Unit (MTU) The maximum length an Ethernet packet can be
without being fragmented.
1500 bytes for Ethernet II encapsulation
1492 bytes for SNAP encapsulation
Address Resolution Protocol (ARP) A standard IP mechanism that routers use to
learn the Media Access Control (MAC) address
of a device on the network. The router sends the
IP address of a device in the ARP request and
receives the device MAC address in an ARP
reply.
Enabled
ARP rate limiting You can specify a maximum number of ARP
packets the device will accept each second. If the
device receives more ARP packets than you
specify, the device drops additional ARP packets
for the remainder of the one-second interval.
Disabled
ARP age The amount of time the device keeps a MAC
address learned through ARP in the device ARP
cache. The device resets the timer to zero each
time the ARP entry is refreshed and removes the
entry if the timer reaches the ARP age.
NOTE
You also can change the ARP age on
an individual interface basis.
10 minutes
Proxy ARP An IP mechanism a router can use to answer an
ARP request on behalf of a host by replying with
the router's own MAC address instead of the
host.
Disabled
Static ARP entries An ARP entry you place in the static ARP table.
Static entries do not age out.
No entries
Time to Live (TTL) The maximum number of routers (hops) through
which a packet can pass before being discarded.
Each router decreases a packet TTL by 1 before
forwarding the packet. If decreasing the TTL
causes the TTL to be 0, the router drops the
packet instead of forwarding it.
64 hops
Directed broadcast forwarding A directed broadcast is a packet containing all
ones (or in some cases, all zeros) in the host
portion of the destination IP address. When a
router forwards such a broadcast, it sends a copy
of the packet out each of its enabled IP
interfaces.
Disabled
Basic IP parameters and defaults - Layer 3 switches
FastIron Ethernet Switch Layer 3 Routing Conguration Guide, 08.0.30mb
53-1003627-06 29

TABLE 2 IP global parameters - Layer 3 switches (continued)
Parameter Description Default
NOTE
You also can enable or disable this
parameter on an individual interface
basis.
Directed broadcast mode The packet format the router treats as a directed
broadcast. The following formats can be directed
broadcasts:
• All ones in the host portion of the
packet destination address.
• All zeroes in the host portion of the
packet destination address.
All ones
NOTE
If you enable all-zeroes directed
broadcasts, all-ones directed
broadcasts remain enabled.
Source-routed packet forwarding A source-routed packet contains a list of IP
addresses through which the packet must pass
to reach its destination.
Enabled
Internet Control Message Protocol (ICMP)
messages
The Brocade Layer 3 switch can send the
following types of ICMP messages:
• Echo messages (ping messages)
• Destination Unreachable messages
Enabled
ICMP Router Discovery Protocol (IRDP) An IP protocol a router can use to advertise the
IP addresses of its router interfaces to directly
attached hosts. You can enable or disable the
protocol, and change the following protocol
parameters:
• Forwarding method (broadcast or
multicast)
• Hold time
• Maximum advertisement interval
• Minimum advertisement interval
• Router preference level
NOTE
You also can enable or disable IRDP
and congure the parameters on an
individual interface basis.
Disabled
Reverse ARP (RARP) An IP mechanism a host can use to request an
IP address from a directly attached router when
the host boots.
Enabled
Static RARP entries An IP address you place in the RARP table for
RARP requests from hosts.
NOTE
You must enter the RARP entries
manually. The Layer 3 switch does
not have a mechanism for learning or
dynamically generating RARP
entries.
No entries
Maximum BootP relay hops The maximum number of hops away a BootP
server can be located from a router and still be
used by the router clients for network booting.
Four
Domain name for Domain Name Server (DNS)
resolver
A domain name (for example,
brocade.router.com) you can use in place of an
None congured
Basic IP parameters and defaults - Layer 3 switches
FastIron Ethernet Switch Layer 3 Routing Conguration Guide, 08.0.30mb
30 53-1003627-06

TABLE 2 IP global parameters - Layer 3 switches (continued)
Parameter Description Default
IP address for certain operations such as IP
pings, trace routes, and Telnet management
connections to the router.
DNS default gateway addresses A list of gateways attached to the router through
which clients attached to the router can reach
DNSs.
None congured
IP load sharing A Brocade feature that enables the router to
balance trac to a specic destination across
multiple equal-cost paths.
IP load sharing uses a hashing algorithm based
on the source IP address, destination IP address,
protocol eld in the IP header, TCP, and UDP
information.
You can specify the number of load-sharing
paths depending on the device you are
conguring. The maximum number of paths the
device supports is a value from 2 through 8. The
default value is 4. On the Brocade ICX 7750,
the value range for the maximum number of
load-sharing paths is from 2 through 32 which
is controlled by the system-max max-ecmp
command.
NOTE
Load sharing is sometimes called
equal-cost multi-path (ECMP).
Enabled
Maximum IP load sharing paths The maximum number of equal-cost paths
across which the Layer 3 switch is allowed to
distribute trac.
Four
Origination of default routes You can enable a router to originate default
routes for the following route exchange
protocols, on an individual protocol basis:
• OSPF
• BGP4
Disabled
Default network route The router uses the default network route if the
IP route table does not contain a route to the
destination and also does not contain an explicit
default route (0.0.0.0 0.0.0.0 or 0.0.0.0/0).
None congured
Static route An IP route you place in the IP route table. No entries
Source interface The IP address the router uses as the source
address for Telnet, RADIUS, or TACACS/
TACACS+ packets originated by the router. The
router can select the source address based on
either of the following:
• The lowest-numbered IP address on
the interface the packet is sent on.
• The lowest-numbered IP address on a
specic interface. The address is used
as the source for all packets of the
specied type regardless of interface
the packet is sent on.
The lowest-numbered IP address on the
interface the packet is sent on.
Basic IP parameters and defaults - Layer 3 switches
FastIron Ethernet Switch Layer 3 Routing Conguration Guide, 08.0.30mb
53-1003627-06 31

IP interface parameters - Layer 3 switches
TABLE 3 IP interface parameters - Layer 3 switches
Parameter Description Default
IP state The Internet Protocol, version 4 Enabled
NOTE
You cannot disable IP.
IP address A Layer 3 network interface address
NOTE
Layer 2 switches have a single IP
address used for management
access to the entire device. Layer 3
switches have separate IP addresses
on individual interfaces.
None congured
NOTE
Some devices have a factory default,
such as 10.157.22.154, used for
troubleshooting during installation.
For Layer 3 switches, the address is
on unit 1/slot 1/ port 1 (or 1/1/1).
Encapsulation type The format of the packets in which the router
encapsulates IP datagrams. The encapsulation
format can be one of the following:
• Ethernet II
• SNAP
Ethernet II
Maximum Transmission Unit (MTU) The maximum length (number of bytes) of an
encapsulated IP datagram the router can
forward.
1500 for Ethernet II encapsulated packets
1492 for SNAP encapsulated packets
Delay L3 notications When all ports in the VLAN go into the non-
forwarding state, the device waits for the
congured time before notifying the Layer 3
protocols of the VE down event.
NOTE
Available on the VE interface only.
Delay time is not congured
ARP age Locally overrides the global setting. Ten minutes
Directed broadcast forwarding Locally overrides the global setting. Disabled
ICMP Router Discovery Protocol (IRDP) Locally overrides the global IRDP settings. Disabled
DHCP gateway stamp The router can assist DHCP/BootP Discovery
packets from one subnet to reach DHCP/BootP
servers on a dierent subnet by placing the IP
address of the router interface that receives the
request in the request packet Gateway eld.
You can override the default and specify the IP
address to use for the Gateway eld in the
packets.
NOTE
UDP broadcast forwarding for client
DHCP/BootP requests (bootps)
must be enabled (this is enabled by
default) and you must congure an
IP helper address (the server IP
address or a directed broadcast to
the server subnet) on the port
connected to the client.
The lowest-numbered IP address on the
interface that receives the request
Basic IP parameters and defaults - Layer 3 switches
FastIron Ethernet Switch Layer 3 Routing Conguration Guide, 08.0.30mb
32 53-1003627-06

TABLE 3 IP interface parameters - Layer 3 switches (continued)
Parameter Description Default
DHCP Client-Based Auto-Conguration Allows the switch to obtain IP addresses from a
DHCP host automatically, for either a specied
(leased) or innite period of time.
Enabled
DHCP Server All FastIron devices can be congured to
function as DHCP servers.
Disabled
UDP broadcast forwarding The router can forward UDP broadcast packets
for UDP applications such as BootP. By
forwarding the UDP broadcasts, the router
enables clients on one subnet to nd servers
attached to other subnets.
NOTE
To completely enable a client UDP
application request to nd a server
on another subnet, you must
congure an IP helper address
consisting of the server IP address or
the directed broadcast address for
the subnet that contains the server.
Refer to the next row.
The router helps forward broadcasts for the
following UDP application protocols:
• bootps
• dns
• netbios-dgm
• netbios-ns
• tacacs
• tftp
• time
IP helper address The IP address of a UDP application server
(such as a BootP or DHCP server) or a directed
broadcast address. IP helper addresses allow the
router to forward requests for certain UDP
applications from a client on one subnet to a
server on another subnet.
None congured
Basic IP parameters and defaults - Layer 2 switches
IP is enabled by default. The following tables list the Layer 2 switch IP parameters, their default values, and where to nd conguration
information.
NOTE
Brocade Layer 2 switches also provide IP multicast forwarding, which is enabled by default. For information about this feature,
refer to "IP Multicast Trac Reduction" in the FastIron Ethernet Switch IP Multicast Conguration Guide.
IP global parameters - Layer 2 switches
TABLE 4 IP global parameters - Layer 2 switches
Parameter Description Default
IP address and mask notation Format for displaying an IP address and its
network mask information. You can enable one
of the following:
• Class-based format; example:
192.168.1.1 255.255.255.0
• Classless Interdomain Routing (CIDR)
format; example: 192.168.1.1/24
Class-based
NOTE
Changing this parameter aects the
display of IP addresses, but you can
enter addresses in either format
regardless of the display setting.
IP address A Layer 3 network interface address None congured
Basic IP parameters and defaults - Layer 2 switches
FastIron Ethernet Switch Layer 3 Routing Conguration Guide, 08.0.30mb
53-1003627-06 33

TABLE 4 IP global parameters - Layer 2 switches (continued)
Parameter Description Default
NOTE
Layer 2 switches have a single IP
address used for management
access to the entire device. Layer 3
switches have separate IP addresses
on individual interfaces.
NOTE
Some devices have a factory default,
such as 10.157.22.154, used for
troubleshooting during installation.
For Layer 3 switches, the address is
on port 1 (or 1/1/1).
Default gateway The IP address of a locally attached router (or a
router attached to the Layer 2 switch by bridges
or other Layer 2 switches). The Layer 2 switch
and clients attached to it use the default gateway
to communicate with devices on other subnets.
None congured
Address Resolution Protocol (ARP) A standard IP mechanism that networking
devices use to learn the Media Access Control
(MAC) address of another device on the network.
The Layer 2 switch sends the IP address of a
device in the ARP request and receives the
device MAC address in an ARP reply.
Enabled
NOTE
You cannot disable ARP.
ARP age The amount of time the device keeps a MAC
address learned through ARP in the device ARP
cache. The device resets the timer to zero each
time the ARP entry is refreshed and removes the
entry if the timer reaches the ARP age.
Ten minutes
NOTE
You cannot change the ARP age on
Layer 2 switches.
Time to Live (TTL) The maximum number of routers (hops) through
which a packet can pass before being discarded.
Each router decreases a packet TTL by 1 before
forwarding the packet. If decreasing the TTL
causes the TTL to be 0, the router drops the
packet instead of forwarding it.
64 hops
Domain name for Domain Name Server (DNS)
resolver
A domain name (example: brocade.router.com)
you can use in place of an IP address for certain
operations such as IP pings, trace routes, and
Telnet management connections to the router.
None congured
DNS default gateway addresses A list of gateways attached to the router through
which clients attached to the router can reach
DNSs.
None congured
Source interface The IP address the Layer 2 switch uses as the
source address for Telnet, RADIUS, or TACACS/
TACACS+ packets originated by the router. The
Layer 2 switch uses its management IP address
as the source address for these packets.
The management IP address of the Layer 2
switch.
NOTE
This parameter is not congurable on
Layer 2 switches.
DHCP gateway stamp The device can assist DHCP/BootP Discovery
packets from one subnet to reach DHCP/BootP
servers on a dierent subnet by placing the IP
address of the router interface that forwards the
packet in the packet Gateway eld.
You can specify up to 32 gateway lists. A
gateway list contains up to eight gateway IP
addresses. You activate DHCP assistance by
associating a gateway list with a port.
When you congure multiple IP addresses in a
gateway list, the Layer 2 switch inserts the
None congured
Basic IP parameters and defaults - Layer 2 switches
FastIron Ethernet Switch Layer 3 Routing Conguration Guide, 08.0.30mb
34 53-1003627-06

TABLE 4 IP global parameters - Layer 2 switches (continued)
Parameter Description Default
addresses into the DHCP Discovery packets in a
round robin fashion.
DHCP Client-Based Auto-Conguration Allows the switch to obtain IP addresses from a
DHCP host automatically, for either a specied
(leased) or innite period of time.
Enabled
Interface IP parameters - Layer 2 switches
TABLE 5 Interface IP parameters - Layer 2 switches
Parameter Description Default
DHCP gateway stamp You can congure a list of DHCP stamp
addresses for a port. When the port receives a
DHCP/BootP Discovery packet from a client,
the port places the IP addresses in the gateway
list into the packet Gateway eld.
None congured
Conguring IP parameters - Layer 3 switches
The following sections describe how to congure IP parameters. Some parameters can be congured globally while others can be
congured on individual interfaces. Some parameters can be congured globally and overridden for individual interfaces.
Conguring IP addresses
You can congure an IP address on the following types of Layer 3 switch interfaces:
• Ethernet port
• Virtual routing interface (also called a Virtual Ethernet or "VE")
• Loopback interface
• GRE tunnels
By default, you can congure up to 24 IP addresses on each interface.
You can increase this amount to up to 128 IP subnet addresses per port by increasing the size of the ip-subnet-port table.
Refer to the section "Displaying system parameter default values" in the FastIron Ethernet Switch Platform and Layer 2 Switching
Conguration Guide.
NOTE
Once you congure a virtual routing interface on a VLAN, you cannot congure Layer 3 interface parameters on individual
ports. Instead, you must congure the parameters on the virtual routing interface itself.
Brocade devices support both classical IP network masks (Class A, B, and C subnet masks, and so on) and Classless Interdomain
Routing (CIDR) network prex masks:
• To enter a classical network mask, enter the mask in IP address format. For example, enter "10.157.22.99 255.255.255.0" for
an IP address with a Class-C subnet mask.
• To enter a prex network mask, enter a forward slash ( / ) and the number of bits in the mask immediately after the IP address.
For example, enter "10.157.22.99/24" for an IP address that has a network mask with 24 signicant bits (ones).
Conguring IP parameters - Layer 3 switches
FastIron Ethernet Switch Layer 3 Routing Conguration Guide, 08.0.30mb
53-1003627-06 35
By default, the CLI displays network masks in classical IP address format (for example, 255.255.255.0). You can change the display to
prex format.
Assigning an IP address to an Ethernet port
To assign an IP address to port 1/1/1, enter the following commands.
device(config)# interface ethernet 1/1/1
device(config-if-1/1/1)# ip address 10.45.6.1 255.255.255.0
You also can enter the IP address and mask in CIDR format, as follows.
device(config-if-1/1/1)# ip address 10.45.6.1/24
Syntax: no ip address ip- addr ip-mask [ ospf-ignore | ospf-passive | secondary ]
or
Syntax: no ip address ip-addr/mask-bits [ ospf-ignore | ospf-passive | secondary ]
The ospf-ignore and ospf-passive parameters modify the Layer 3 switch defaults for adjacency formation and interface advertisement.
Use one of these parameters if you are conguring multiple IP subnet addresses on the interface but you want to prevent OSPF from
running on some of the subnets:
•ospf-passive - This option disables adjacency formation with OSPF neighbors. By default, when OSPF is enabled on an
interface, the software forms OSPF router adjacencies between each primary IP address on the interface and the OSPF
neighbor attached to the interface.
•ospf-ignore - This option disables OSPF adjacency formation and also disables advertisement of the interface into OSPF. The
subnet is completely ignored by OSPF.
NOTE
The ospf-passive option disables adjacency formation but does not disable advertisement of the interface into OSPF. To
disable advertisement in addition to disabling adjacency formation, you must use the ospf-ignore option.
Use the secondary parameter if you have already congured an IP address within the same subnet on the interface.
NOTE
When you congure more than one address in the same subnet, all but the rst address are secondary addresses and do not
form OSPF adjacencies.
NOTE
All physical IP interfaces on Brocade FastIron Layer 3 devices share the same MAC address. For this reason, if more than one
connection is made between two devices, one of which is a Brocade FastIron Layer 3 device, Brocade recommends the use of
virtual interfaces. It is not recommended to connect two or more physical IP interfaces between two routers.
Assigning an IP address to a loopback interface
Loopback interfaces are always up, regardless of the states of physical interfaces. They can add stability to the network because they are
not subject to route ap problems that can occur due to unstable links between a Layer 3 switch and other devices. You can congure up
to eight loopback interfaces on a chassis Layer 3 switch devices. You can congure up to four loopback interfaces on a compact Layer 3
switch.
You can add up to 24 IP addresses to each loopback interface.
Conguring IP parameters - Layer 3 switches
FastIron Ethernet Switch Layer 3 Routing Conguration Guide, 08.0.30mb
36 53-1003627-06
NOTE
If you congure the Brocade Layer 3 switch to use a loopback interface to communicate with a BGP4 neighbor, you also must
congure a loopback interface on the neighbor and congure the neighbor to use that loopback interface to communicate with
the Brocade Layer 3 switch. Refer to Assigning an IP address to a loopback interface.
To add a loopback interface, enter commands such as those shown in the following example.
device(config-bgp-router)# exit
device(config)# interface loopback 1
device(config-lbif-1)# ip address 10.0.0.1/24
Syntax: interface loopback num
The num parameter species the virtual interface number. You can specify from 1 to the maximum number of virtual interfaces
supported on the device. To display the maximum number of virtual interfaces supported on the device, enter the show default values
command. The maximum is listed in the System Parameters section, in the Current column of the virtual-interface row.
Assigning an IP address to a virtual interface
A virtual interface is a logical port associated with a Layer 3 Virtual LAN (VLAN) congured on a Layer 3 switch. You can congure
routing parameters on the virtual interface to enable the Layer 3 switch to route protocol trac from one Layer 3 VLAN to the other,
without using an external router.
You can congure IP routing interface parameters on a virtual interface. This section describes how to congure an IP address on a
virtual interface. Other sections in this chapter that describe how to congure interface parameters also apply to virtual interfaces.
NOTE
The Layer 3 switch uses the lowest MAC address on the device (the MAC address of port 1 or 1/1/1) as the MAC address for
all ports within all virtual interfaces you congure on the device.
To add a virtual interface to a VLAN and congure an IP address on the interface, enter commands such as the following.
device(config)# vlan 2 name IP-Subnet_10.1.2.0/24
device(config-vlan-2)# untag ethernet 1 to 4
device(config-vlan-2)# router-interface ve 1
device(config-vlan-2)# interface ve 1
device(config-vif-1)# ip address 10.1.2.1/24
The rst two commands in this example create a Layer 3 protocol-based VLAN name "IP-Subnet_10.1.2.0/24" and add a range of
untagged ports to the VLAN. The router-interface command creates virtual interface 1 as the routing interface for the VLAN.
Syntax: router-interface ve num
The num variable species the virtual interface number. You can enter a number from 1 through 4095.
When conguring virtual routing interfaces on a device, you can specify a number from 1 through 4095. However, the total number of
virtual routing interfaces that are congured must not exceed the system-max limit of 512 (or 255 for the ICX 6450 and ICX 7250). For
more information on the number of virtual routing interfaces supported, refer to "Allocating memory for more VLANs or virtual routing
interfaces" in the FastIron Ethernet Switch Platform and Layer 2 Switching Conguration Guide.
The last two commands change to the interface conguration level for the virtual interface and assign an IP address to the interface.
Syntax: interface ve num
Conguring IP parameters - Layer 3 switches
FastIron Ethernet Switch Layer 3 Routing Conguration Guide, 08.0.30mb
53-1003627-06 37
Conguring IP follow on a virtual routing interface
IP Follow allows multiple virtual routing interfaces to share the same IP address. With this feature, one virtual routing interface is
congured with an IP address, while the other virtual routing interfaces are congured to use that IP address, thus, they "follow" the virtual
routing interface that has the IP address. This feature is helpful in conserving IP address space.
Conguration limitations and feature limitations for IP Follow on a virtual routing interface
• When conguring IP Follow, the primary virtual routing interface should not have ACL or DoS Protection congured. It is
recommended that you create a dummy virtual routing interface as the primary and use the IP-follow virtual routing interface for
the network.
• Global Policy Based Routing is not supported when IP Follow is congured.
• IPv6 is not supported with IP Follow.
• FastIron devices support IP Follow with OSPF and VRRP protocols only.
Conguration syntax for IP Follow on a virtual routing interface
Congure IP Follow by entering commands such as the following.
device(config)# vlan 2 name IP-Subnet_10.1.2.0/24
device(config-vlan-2)# untag ethernet 1 to 4
device(config-vlan-2)# router-interface ve 1
device(config-vlan-2)# interface ve 1
device(config-vif-1)# ip address 10.10.2.1/24
device(config-vif-1)# interface ve 2
device(config-vif-2)# ip follow ve 1
device(config-vif-2)# interface ve 3
device(config-vif-3)# ip follow ve 1
Syntax:[no] ip follow ve number
For number, enter the ID of the virtual routing interface.
Use the no form of the command to disable the conguration.
Virtual routing interface 2 and 3 do not have their own IP subnet addresses, but share the IP address of virtual routing interface 1.
Deleting an IP address
To delete an IP address, enter the no ip address command.
device(config-if-e1000-1)# no ip address 10.1.2.1
This command deletes IP address 10.1.2.1. You do not need to enter the subnet mask.
To delete all IP addresses from an interface, enter the no ip address * command.
device(config-if-e1000-1)# no ip address *
Syntax: [no] ip address ip-addr | *
Conguring 31-bit subnet masks on point-to-point networks
NOTE
31-bit subnet masks are supported on FSX, FCX, ICX 6450, ICX 6610, ICX 7250, ICX 7450, and ICX 7750 devices running
the full Layer 3 image.
Conguring IP parameters - Layer 3 switches
FastIron Ethernet Switch Layer 3 Routing Conguration Guide, 08.0.30mb
38 53-1003627-06
To conserve IPv4 address space, a 31-bit subnet mask can be assigned to point-to-point networks. Support for an IPv4 address with a
31-bit subnet mask is described in RFC 3021.
With IPv4, four IP addresses with a 30-bit subnet mask are allocated on point-to-point networks. In contrast, a 31-bit subnet mask uses
only two IP addresses: all zero bits and all one bits in the host portion of the IP address. The two IP addresses are interpreted as host
addresses, and do not require broadcast support because any packet that is transmitted by one host is always received by the other host
at the receiving end. Therefore, directed broadcast on a point-to-point interface is eliminated.
IP-directed broadcast CLI conguration at the global level, or the per interface level, is not applicable on interfaces congured with a 31-
bit subnet mask IP address.
When the 31-bit subnet mask address is congured on a point-to-point link, using network addresses for broadcast purposes is not
allowed. For example, in an IPV4 broadcast scheme, the following subnets can be congured:
• 10.10.10.1 - Subnet for directed broadcast: {Network-number , -1}
• 10.10.10.0 - Subnet for network address: {Network-number , 0}
In a point-to-point link with a 31-bit subnet mask, the previous two addresses are interpreted as host addresses and packets are not
rebroadcast.
Conguring an IPv4 address with a 31-bit subnet mask
To congure an IPv4 address with a 31-bit subnet mask, enter the following commands.
You can congure an IPv4 address with a 31-bit subnet mask on any interface (for example, Ethernet, loopback, VE, or tunnel interfaces).
device(config)# interface ethernet 1/1/5
device(config-if-e1000-1/1/5)# ip address 10.9.9.9 255.255.255.254
You can also enter the IP address and mask in the Classless Inter-domain Routing (CIDR) format, as follows.
device(config-if-e1000-1/1/5)# ip address 10.9.9.9/31
Syntax: [no] ip address ip-address ip-mask
Syntax: [no] ip address ip-address/subnet-mask-bits
The ip-address variable species the host address. The ip-mask variable species the IP network mask. The subnet -mask-bits variable
species the network prex mask.
To disable conguration for an IPv4 address with a 31-bit subnet mask on any interface, use the no form of the command.
You cannot congure a secondary IPv4 address with a 31-bit subnet mask on any interface. The following error message is displayed
when a secondary IPv4 address with a 31-bit subnet mask is congured.
Error: Cannot assign /31 subnet address as secondary
Conguring IP parameters - Layer 3 switches
FastIron Ethernet Switch Layer 3 Routing Conguration Guide, 08.0.30mb
53-1003627-06 39

Conguration example
FIGURE 2 Congured 31- bit and 24-bit subnet masks
Router A is connected to Router B as a point-to-point link with 10.1.1.0/31 subnet. There are only two available addresses in this
subnet, 10.1.1.0 on Router A and 10.1.1.1 on Router B,
Routers B and C are connected by a regular 24-bit subnet. Router C can either be a switch with many hosts belonging to the
10.2.2.2/24 subnet connected to it, or it can be a router.
Router A
RouterA(config)# interface ethernet 1/1/1
RouterA(config-if-e1000-1/1/1)# ip address 10.1.1.0/31
Router B
RouterB(config)# interface ethernet 1/1/1
RouterB(config-if-e1000-1/1/1)# ip address 10.1.1.1/31
RouterB(config-if-e1000-1/1/1)# exit
RouterB(config# interface ethernet 1/3/1
RouterB(config-if-e1000-1/3/1)# ip address 10.2.2.1/24
Router C
RouterC(config# interface ethernet 1/3/1
RouterC(config-if-e1000-1/3/1)# ip address 10.2.2.2/24
Displaying information for a 31-bit subnet mask
Use the following commands to display information for the 31-bit subnet mask:
•show run interface
•show ip route
•show ip cache
Conguring DNS resolver
The Domain Name System (DNS) resolver is a feature in a Layer 2 or Layer 3 switch that sends and receives queries to and from the
DNS server on behalf of a client.
You can create a list of domain names that can be used to resolve host names. This list can have more than one domain name. When a
client sends a DNS query, all hosts within the domains in the list can be recognized and queries can be sent to any domain on the list.
Conguring IP parameters - Layer 3 switches
FastIron Ethernet Switch Layer 3 Routing Conguration Guide, 08.0.30mb
40 53-1003627-06
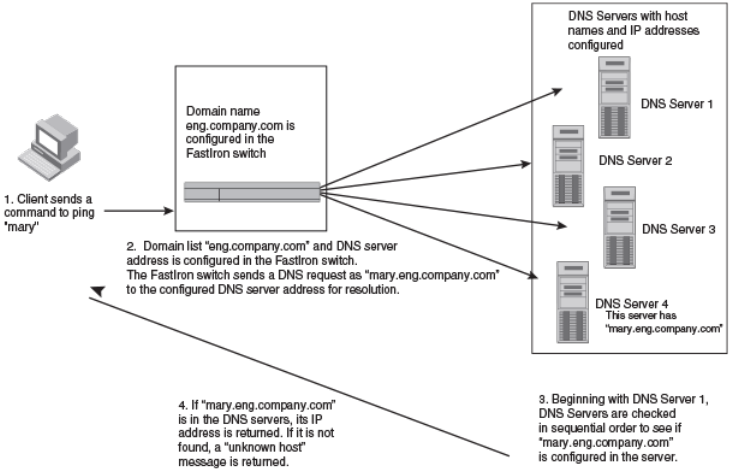
After you dene a domain name, the Brocade device automatically appends the appropriate domain to a host and forwards it to the DNS
servers for resolution.
For example, if the domain "ds.company.com" is dened on a Layer 2 or Layer 3 switch and you want to initiate a ping to "mary", you
must reference only the host name instead of the host name and its domain name. For example, you could use the following command
to initiate the ping.
Brocade:> ping mary
The Layer 2 or Layer 3 switch qualies the host name by appending a domain name (for example, mary.ds1.company.com). This
qualied name is sent to the DNS server for resolution. If there are four DNS servers congured, it is sent to the rst DNS server. If the
host name is not resolved, it is sent to the second DNS server. If a match is found, a response is sent back to the client with the host IP
address. If no match is found, an "unknown host" message is returned.
FIGURE 3 DNS resolution with one domain name
Conguring DNS server addresses in a Brocade device
You can congure the Brocade device to recognize up to four DNS servers. The rst entry serves as the primary default address. If a
query to the primary address fails to be resolved after three attempts, the next DNS address is queried (also up to three times). This
process continues for each dened DNS address until the query is resolved. The order in which the default DNS addresses are polled is
the same as the order in which you enter them.
Use the ip dns server-address command to congure DNS servers.
device(config)# ip dns server-address 10.157.22.199 10.96.7.15 10.95.7.25 10.98.7.15
Alternatively, you can congure DNS servers one after the other.
device(config)# ip dns server-address 10.157.22.199
device(config)# ip dns server-address 10.96.7.15
device(config)# ip dns server-address 10.95.7.25
device(config)# ip dns server-address 10.98.7.15
Conguring IP parameters - Layer 3 switches
FastIron Ethernet Switch Layer 3 Routing Conguration Guide, 08.0.30mb
53-1003627-06 41
In this example, the rst IP address entered becomes the primary DNS address and all others are secondary addresses. Because IP
address 10.98.7.15 is the last address listed, it is also the last address consulted to resolve a query.
Conguring DNS domain list on a Brocade device
If you want to use more than one domain name to resolve host names, you can create a list of domain names. Use the ip dns domain-
list command to create a domain list.
device(config)# ip dns domain-list mycompany.com
device(config)# ip dns domain-list ds.company.com
device(config)# ip dns domain-list hw_company.com
device(config)# ip dns domain-list qa_company.com
The domain names are tried in the order you enter them.
Using a DNS name to initiate a trace route
Suppose you want to trace the route from a Brocade Layer 3 switch to a remote server identied as NYC02 on domain newyork.com.
Because the NYC02@ds1.newyork.com domain is already dened on the Layer 3 switch, you need to enter only the host name,
NYC02, as noted in the following example.
device# traceroute nyc02
The only required parameter is the IP address of the host at the other end of the route.
After you enter the traceroute command, a message indicating that the DNS query is in process and the current gateway address (IP
address of the domain name server) being queried appear on the screen. When traceroute fails, an error occurs as shown in the last two
lines in the following example.
Type Control-c to abort
Sending DNS Query to 10.157.22.199
Tracing Route to IP node 10.157.22.80
To ABORT Trace Route, Please use stop-traceroute command.
Traced route to target IP node 10.157.22.80:
IP Address Round Trip Time1 Round Trip Time2
10.95.6.30 93 msec 121 msec
Trace route to target IP node 10.157.22.80 failed.
IP: Errno(9) No response from target or intermediate node
NOTE
In the example, 10.157.22.199 is the IP address of the domain name server (default DNS gateway address), and
10.157.22.80 represents the IP address of the NYC02 host.
Displaying DNS conguration
Use the following show commands to display the DNS conguration-related information.
1. Use the show running-conguration command to display the congured DNS server address and domain list in running
conguration.
device# show running-configuration
ip dns domain-list 2222
ip dns server-address 10.157.22.199 10.96.7.15 10.95.7.25 10.98.7.15
Conguring IP parameters - Layer 3 switches
FastIron Ethernet Switch Layer 3 Routing Conguration Guide, 08.0.30mb
42 53-1003627-06
2. Use the show ip dns-server server-address command to display the list of DNS server address congured on the device.
device# show ip dns-server server-address
IPV4 DNS server address:
1. 10.157.22.199
2. 10.96.7.15
3. 10.95.7.25
4. 10.98.7.15
3. Use the show ip dns-server domain-list command to display the domain list.
device# show ip dns-server domain-list
DNS Domain-list
1 mycompany.com
4. Use the show ip dns-server command to display the DNS server information.
switch(mode)# show ip dns-server
dns-server Show DNS Server info
DNS Server information
DNS Domain-list
1 mycompany.com
IPV4 DNS server address:
1. 10.157.22.199
2. 10.96.7.15
3. 10.95.7.25
4. 10.98.7.15
IPV6 DNS server address:
NO ipv6 DNS server address is not configured
Conguring packet parameters
You can congure the following packet parameters on Layer 3 switches. These parameters control how the Layer 3 switch sends IP
packets to other devices on an Ethernet network. The Layer 3 switch always places IP packets into Ethernet packets to forward them on
an Ethernet port.
• Encapsulation type - The format for the Layer 2 packets within which the Layer 3 switch sends IP packets.
• Maximum Transmission Unit (MTU) - The maximum length of IP packet that a Layer 2 packet can contain. IP packets that are
longer than the MTU are fragmented and sent in multiple Layer 2 packets. You can change the MTU globally or an individual
ports:
– Global MTU - The default MTU value depends on the encapsulation type on a port and is 1500 bytes for Ethernet II
encapsulation and 1492 bytes for SNAP encapsulation.
– Port MTU - A port default MTU depends on the encapsulation type enabled on the port.
Changing the encapsulation type
The Layer 3 switch encapsulates IP packets into Layer 2 packets, to send the IP packets on the network. (A Layer 2 packet is also called
a MAC layer packet or an Ethernet frame.) The source address of a Layer 2 packet is the MAC address of the Layer 3 switch interface
sending the packet. The destination address can be one of the following:
• The MAC address of the IP packet destination. In this case, the destination device is directly connected to the Layer 3 switch.
• The MAC address of the next-hop gateway toward the packet destination.
• An Ethernet broadcast address.
The entire IP packet, including the source and destination address and other control information and the data, is placed in the data
portion of the Layer 2 packet. Typically, an Ethernet network uses one of two dierent formats of Layer 2 packet:
• Ethernet II
Conguring IP parameters - Layer 3 switches
FastIron Ethernet Switch Layer 3 Routing Conguration Guide, 08.0.30mb
53-1003627-06 43
• Ethernet SNAP (also called IEEE 802.3)
The control portions of these packets dier slightly. All IP devices on an Ethernet network must use the same format. Brocade Layer 3
switches use Ethernet II by default. You can change the IP encapsulation to Ethernet SNAP on individual ports if needed.
NOTE
All devices connected to the Layer 3 switch port must use the same encapsulation type.
To change the IP encapsulation type on interface 5 to Ethernet SNAP, enter the following commands.
device(config)# interface ethernet 5
device(config-if-e1000-5)# ip encapsulation snap
Syntax: ip encapsulation { snap | ethernet_ii }
Changing the MTU
The Maximum Transmission Unit (MTU) is the maximum length of IP packet that a Layer 2 packet can contain. IP packets that are longer
than the MTU are fragmented and sent in multiple Layer 2 packets. You can change the MTU globally or on individual ports.
The default MTU is 1500 bytes for Ethernet II packets and 1492 for Ethernet SNAP packets.
MTU enhancements
Brocade devices contain the following enhancements to jumbo packet support:
• Hardware forwarding of Layer 3 jumbo packets - Layer 3 IP unicast jumbo packets received on a port that supports the frame
MTU size and forwarded to another port that also supports the frame MTU size are forwarded in hardware. Previous releases
support hardware forwarding of Layer 2 jumbo frames only.
• ICMP unreachable message if a frame is too large to be forwarded - If a jumbo packet has the Do not Fragment (DF) bit set,
and the outbound interface does not support the packet MTU size, the Brocade device sends an ICMP unreachable message to
the device that sent the packet.
NOTE
These enhancements apply only to transit trac forwarded through the Brocade
device.
Conguration considerations for increasing the MTU
• The MTU command is applicable to VEs and physical IP interfaces. It applies to trac routed between networks.
• For ICX 7250, ICX 7450, and ICX 7750 devices, the IPv4 and IPv6 MTU values are the same. Modifying one also changes
the value of the other.
• For ICX 7250, ICX 7450, and ICX 7750 devices, the minimum IPv4 and IPv6 MTU values for both physical and virtual
interfaces are 1280.
• You cannot use this command to set Layer 2 maximum frame sizes per interface. The global jumbo command causes all
interfaces to accept Layer 2 frames.
• When you increase the MTU size of a port, the increase uses system resources. Increase the MTU size only on the ports that
need it. For example, if you have one port connected to a server that uses jumbo frames and two other ports connected to
clients that can support the jumbo frames, increase the MTU only on those three ports. Leave the MTU size on the other ports
at the default value (1500 bytes). Globally increase the MTU size only if needed.
Conguring IP parameters - Layer 3 switches
FastIron Ethernet Switch Layer 3 Routing Conguration Guide, 08.0.30mb
44 53-1003627-06
Forwarding trac to a port with a smaller MTU size
NOTE
Forwarding trac to a port with a smaller MTU size is not supported on the FastIron X
Series.
In order to forward trac from a port with 1500 MTU congured to a port that has a smaller MTU (for example, 750) size, you must
apply the mtu-exceed forward global command. To remove this setting, enter the mtu-exceed hard-drop command. The hard-drop
option is enabled by default on the router.
Syntax: mtu-exceed { forward | hard-drop }
•forward - Fragments and forwards a packet from a port with a larger MTU to a port with a smaller MTU.
•hard-drop - Resets to default and removes the forward function.
Globally changing the Maximum Transmission Unit
The Maximum Transmission Unit (MTU) is the maximum size an IP packet can be when encapsulated in a Layer 2 packet. If an IP packet
is larger than the MTU allowed by the Layer 2 packet, the Layer 3 switch fragments the IP packet into multiple parts that will t into the
Layer 2 packets, and sends the parts of the fragmented IP packet separately, in dierent Layer 2 packets. The device that receives the
multiple fragments of the IP packet reassembles the fragments into the original packet.
You can increase the MTU size to accommodate jumbo packet sizes up to 10,200 bytes.
To globally enable jumbo support on all ports of a FastIron device, enter commands such as the following.
device(config)# jumbo
device(config)# write memory
device(config)# end
device# reload
Syntax: [no] jumbo
NOTE
You must save the conguration change and then reload the software to enable jumbo
support.
Changing the MTU on an individual port
By default, the maximum Ethernet MTU sizes are as follows:
• 1500 bytes - The maximum for Ethernet II encapsulation
• 1492 bytes - The maximum for SNAP encapsulation
When jumbo mode is enabled, the maximum Ethernet MTU sizes are as follows:
• For ICX 6610 devices
– 10,200 bytes - The maximum for Ethernet II encapsulation (Default MTU: 9216)
– 10,174 bytes - The maximum for SNAP encapsulation (Default MTU: 9216)
• For ICX 6430, ICX 6430-C12, and ICX 6450 devices
– 10,178 bytes - The maximum for Ethernet II encapsulation (Default MTU: 9216)
– 10,174 bytes - The maximum for SNAP encapsulation (Default MTU: 9216)
• For other devices
– 10,218 bytes - The maximum for Ethernet II encapsulation (Default MTU: 9216)
– 10,214 bytes - The maximum for SNAP encapsulation (Default MTU: 9216)
Conguring IP parameters - Layer 3 switches
FastIron Ethernet Switch Layer 3 Routing Conguration Guide, 08.0.30mb
53-1003627-06 45
NOTE
If you set the MTU of a port to a value lower than the global MTU and from 576 through 1499, the port fragments the packets.
However, if the port MTU is exactly 1500 and this is larger than the global MTU, the port drops the packets. For ICX 7250, ICX
7450, and ICX 7750 devices, the minimum IPv4 and IPv6 MTU values for both physical and virtual interfaces are 1280.
NOTE
You must save the conguration change and then reload the software to enable jumbo
support.
To change the MTU for interface 1/1/5 to 1000, enter the following commands.
device(config)# interface ethernet 1/1/5
device(config-if-1/1/5)# ip mtu 1000
device(config-if-1/1/5)# write memory
device(config-if-1/1/5)# end
device# reload
Syntax: [no] ip mtu num
The num variable species the MTU. Ethernet II packets can hold IP packets from 576 through 1500 bytes long. If jumbo mode is
enabled, Ethernet II packets can hold IP packets up to 10,218 bytes long. Ethernet SNAP packets can hold IP packets from 576
through 1492 bytes long. If jumbo mode is enabled, SNAP packets can hold IP packets up to 10,214 bytes long. The default MTU for
Ethernet II packets is 1500. The default MTU for SNAP packets is 1492.
Path MTU discovery (RFC 1191) support
FastIron X Series devices support the path MTU discovery method described in RFC 1191. When the Brocade device receives an IP
packet that has its Do not Fragment (DF) bit set, and the packet size is greater than the MTU value of the outbound interface, then the
Brocade device returns an ICMP Destination Unreachable message to the source of the packet, with the Code indicating "fragmentation
needed and DF set". The ICMP Destination Unreachable message includes the MTU of the outbound interface. The source host can use
this information to help determine the maximum MTU of a path to a destination.
RFC 1191 is supported on all interfaces.
Changing the router ID
In most congurations, a Layer 3 switch has multiple IP addresses, usually congured on dierent interfaces. As a result, a Layer 3 switch
identity to other devices varies depending on the interface to which the other device is attached. Some routing protocols, including Open
Shortest Path First (OSPF) and Border Gateway Protocol version 4 (BGP4), identify a Layer 3 switch by just one of the IP addresses
congured on the Layer 3 switch, regardless of the interfaces that connect the Layer 3 switches. This IP address is the router ID.
NOTE
Routing Information Protocol (RIP) does not use the router ID.
NOTE
If you change the router ID, all current BGP4 sessions are cleared.
By default, the router ID on a Brocade Layer 3 switch is one of the following:
• If the router has loopback interfaces, the default router ID is the IP address congured on the lowest numbered loopback
interface congured on the Layer 3 switch. For example, if you congure loopback interfaces 1, 2, and 3 as follows, the default
router ID is 10.9.9.9/24:
– Loopback interface 1, 10.9.9.9/24
– Loopback interface 2, 10.4.4.4/24
Conguring IP parameters - Layer 3 switches
FastIron Ethernet Switch Layer 3 Routing Conguration Guide, 08.0.30mb
46 53-1003627-06
– Loopback interface 3, 10.1.1.1/24
• If the device does not have any loopback interfaces, the default router ID is the lowest numbered IP interface congured on the
device.
If you prefer, you can explicitly set the router ID to any valid IP address. The IP address cannot be in use on another device in the
network.
NOTE
Brocade Layer 3 switches use the same router ID for both OSPF and BGP4. If the router is already congured for OSPF, you
may want to use the router ID that is already in use on the router rather than set a new one. To display the router ID, enter the
show ip command at any CLI level or select the IP->General links from the Congure tree in the Web Management Interface.
To change the router ID, enter a command such as the following.
device(config)# ip router-id 10.157.22.26
Syntax: ip router-id ip-addr
The ip-addr variable can be any valid, unique IP address.
NOTE
You can specify an IP address used for an interface on the Brocade Layer 3 switch, but do not specify an IP address in use by
another device.
Specifying a single source interface for specied packet types
NOTE
This feature is supported on Brocade FCX Series switches, FastIron X Series Layer 3 switches, ICX 6610, ICX 6430, and ICX
6450 switches.
When the Layer 3 switch originates a packet of one of the following types, the source address of the packet is the lowest-numbered IP
address on the interface that sends the packet:
• Telnet
• TACACS/TACACS+
• TFTP
• RADIUS
• Syslog
• SNTP
• SNMP traps
You can congure the Layer 3 switch to always use the lowest-numbered IP address on a specic Ethernet, loopback, or virtual interface
as the source addresses for these packets. When congured, the Layer 3 switch uses the same IP address as the source for all packets
of the specied type, regardless of the ports that actually sends the packets.
Identifying a single source IP address for specied packets provides the following benets:
• If your server is congured to accept packets only from specic IP addresses, you can use this feature to simplify conguration
of the server by conguring the Brocade device to always send the packets from the same link or source address.
• If you specify a loopback interface as the single source for specied packets, servers can receive the packets regardless of the
states of individual links. Thus, if a link to the server becomes unavailable but the client or server can be reached through
another link, the client or server still receives the packets, and the packets still have the source IP address of the loopback
interface.
Conguring IP parameters - Layer 3 switches
FastIron Ethernet Switch Layer 3 Routing Conguration Guide, 08.0.30mb
53-1003627-06 47
The software contains separate CLI commands for specifying the source interface for specic packets. You can congure a source
interface for one or more of these types of packets separately.
The following sections show the syntax for specifying a single source IP address for specic packet types.
Telnet packets
To specify the lowest-numbered IP address congured on a virtual interface as the device source for all Telnet packets, enter commands
such as the following.
device(config)# interface loopback 2
device(config-lbif-2)# ip address 10.0.0.2/24
device(config-lbif-2)# exit
device(config)# ip telnet source-interface loopback 2
The commands in this example congure loopback interface 2, assign IP address 10.0.0.2/24 to the interface, then designate the
interface as the source for all Telnet packets from the Layer 3 switch.
The following commands congure an IP interface on an Ethernet port and designate the address port as the source for all Telnet
packets from the Layer 3 switch.
device(config)# interface ethernet 1/1/4
device(config-if-1/1/4)# ip address 10.157.22.110/24
device(config-if-1/1/4)# exit
device(config)# ip telnet source-interface ethernet 1/1/4
Syntax: [no] ip telnet source-interface { ethernet unit / slot / port | loopback num | management num |venum }
TACACS/TACACS+ packets
To specify the lowest-numbered IP address congured on a virtual interface as the device source for all TACACS/TACACS+ packets,
enter commands such as the following.
device(config)# interface ve 1
device(config-vif-1)# ip address 10.0.0.3/24
device(config-vif-1)# exit
device(config)# ip tacacs source-interface ve 1
The commands in this example congure virtual interface 1, assign IP address 10.0.0.3/24 to the interface, then designate the interface
as the source for all TACACS/TACACS+ packets from the Layer 3 switch.
Syntax: [no] ip tacacs source-interface { ethernet unit / slot / port | loopback num | management num |venum }
RADIUS packets
To specify the lowest-numbered IP address congured on a virtual interface as the device source for all RADIUS packets, enter
commands such as the following.
device(config)# interface ve 1
device(config-vif-1)# ip address 10.0.0.3/24
device(config-vif-1)# exit
device(config)# ip radius source-interface ve 1
The commands in this example congure virtual interface 1, assign IP address 10.0.0.3/24 to the interface, then designate the interface
as the source for all RADIUS packets from the Layer 3 switch.
Syntax: [no] ip radius source-interface { ethernet unit / slot / port | loopback num | management num |venum }
Conguring IP parameters - Layer 3 switches
FastIron Ethernet Switch Layer 3 Routing Conguration Guide, 08.0.30mb
48 53-1003627-06
TFTP packets
To specify the lowest-numbered IP address congured on a virtual interface as the device source for all TFTP packets, enter commands
such as the following.
device(config)# interface ve 1
device(config-vif-1)# ip address 10.0.0.3/24
device(config-vif-1)# exit
device(config)# ip tftp source-interface ve 1
The commands in this example congure virtual interface 1, assign IP address 10.0.0.3/24 to the interface, then designate the
interface's address as the source address for all TFTP packets.
Syntax: [no] ip tftp source-interface { ethernet unit / slot / port | loopback num | management num |venum }
The default is the lowest-numbered IP address congured on the port through which the packet is sent. The address therefore changes,
by default, depending on the port.
Syslog packets
To specify the lowest-numbered IP address congured on a virtual interface as the device source for all Syslog packets, enter commands
such as the following.
device(config)# interface ve 1
device(config-vif-1)# ip address 10.0.0.4/24
device(config-vif-1)# exit
device(config)# ip syslog source-interface ve 1
The commands in this example congure virtual interface 1, assign IP address 10.0.0.4/24 to the interface, then designate the
interface's address as the source address for all Syslog packets.
Syntax: [no] ip syslog source-interface { ethernet unit / slot / port | loopback num | management num |venum }
The default is the lowest-numbered IP or IPv6 address congured on the port through which the packet is sent. The address therefore
changes, by default, depending on the port.
SNTP packets
To specify the lowest-numbered IP address congured on a virtual interface as the device source for all SNTP packets, enter commands
such as the following.
device(config)# interface ve 1
device(config-vif-1)# ip address 10.0.0.5/24
device(config-vif-1)# exit
device(config)# ip sntp source-interface ve 1
The commands in this example congure virtual interface 1, assign IP address 10.0.0.5/24 to the interface, then designate the
interface's address as the source address for all SNTP packets.
Syntax: [no] ip sntp source-interface { ethernet unit / slot / port | loopback num | management num |venum }
The default is the lowest-numbered IP or IPv6 address congured on the port through which the packet is sent. The address therefore
changes, by default, depending on the port.
SNMP packets
To specify a loopback interface as the SNMP single source trap, enter commands such as the following.
device(config)# interface loopback 1
device(config-lbif-1)# ip address 10.0.0.1/24
Conguring IP parameters - Layer 3 switches
FastIron Ethernet Switch Layer 3 Routing Conguration Guide, 08.0.30mb
53-1003627-06 49
device(config-lbif-1)# exit
device(config)# snmp-server trap-source loopback 1
The commands in this example congure loopback interface 1, assign IP address 10.00.1/24 to the loopback interface, then designate
the interface as the SNMP trap source for this device. Regardless of the port the Brocade device uses to send traps to the receiver, the
traps always arrive from the same source IP address.
Syntax: [no] snmp-server trap-source { ethernet unit / slot / port | loopback num | venum }
Conguring delay time for notifying VE down event
When all the ports in the VLAN go into an inactive state (for example, the non-forwarding state), the device noties the Layer 3 protocols
of the VE down event only after the congured timer expires. Once the timer expires, the device checks if any of the ports is in the
forwarding state. If no ports are in the forwarding state, the device noties the Layer 3 protocols of the VE down event. If any of the ports
is in the forwarding state, the device ignores the down event.
While the timer is running, if any of the ports comes into forwarding state, the device cancels the timer and does not notify the VE down
event to the protocols.
NOTE
In the case of multiple aps, if any of the ports comes into forwarding state before the delay notication timer expiry then the
device cancels the timer and a fresh timer is started during port down event. Incase of continuous aps where ap time is less
than delay notication timer, the aps can be detected by other methods like port statistics or drop in trac or by the
convergence logs of layer2 loop detection protocols.
Suppressing the link status notication allows a quick port status change and recovery to occur without triggering any of the changes that
are necessary when a port stays down.
By default, the delay time is not congured.
NOTE
Conguring delayed Layer 3 notications on the VE feature is supported on ICX 7250, ICX 7450, and ICX 7750. product
families from Brocade.
Conguring VE down time notication
Perform the following steps to congure the delay time for notifying the Layer 3 protocols of the VE down event.
1. From global conguration mode, enter VE interface conguration mode.
device(config)# interface ve 50
2. Congure the delay notications time value.
device(config-vif-50)# delay-notifications 20
3. Use the show ip interface ve command to conrm the conguration.
The following example shows how to congure the delay time for notifying the Layer 3 protocols of the VE down event.
device(config)# interface ve 50
device(config-vif-50)# delay-notifications 20
Conguring IP parameters - Layer 3 switches
FastIron Ethernet Switch Layer 3 Routing Conguration Guide, 08.0.30mb
50 53-1003627-06
ARP parameter conguration
Address Resolution Protocol (ARP) is a standard IP protocol that enables an IP Layer 3 switch to obtain the MAC address of another
device interface when the Layer 3 switch knows the IP address of the interface. ARP is enabled by default and cannot be disabled.
NOTE
Brocade Layer 2 switches also support ARP. However, the conguration options described later in this section apply only to
Layer 3 switches, not to Layer 2 switches.
How ARP works
A Layer 3 switch needs to know a destination MAC address when forwarding trac, because the Layer 3 switch encapsulates the IP
packet in a Layer 2 packet (MAC layer packet) and sends the Layer 2 packet to a MAC interface on a device directly attached to the
Layer 3 switch. The device can be the packet nal destination or the next-hop router toward the destination.
The Layer 3 switch encapsulates IP packets in Layer 2 packets regardless of whether the ultimate destination is locally attached or is
multiple router hops away. Because the Layer 3 switch IP route table and IP forwarding cache contain IP address information but not
MAC address information, the Layer 3 switch cannot forward IP packets based solely on the information in the route table or forwarding
cache. The Layer 3 switch needs to know the MAC address that corresponds with the IP address of either the packet locally attached
destination or the next-hop router that leads to the destination.
For example, to forward a packet whose destination is multiple router hops away, the Layer 3 switch must send the packet to the next-
hop router toward its destination, or to a default route or default network route if the IP route table does not contain a route to the packet
destination. In each case, the Layer 3 switch must encapsulate the packet and address it to the MAC address of a locally attached device,
the next-hop router toward the IP packet destination.
To obtain the MAC address required for forwarding a datagram, the Layer 3 switch rst looks in the ARP cache (not the static ARP table)
for an entry that lists the MAC address for the IP address. The ARP cache maps IP addresses to MAC addresses. The cache also lists the
port attached to the device and, if the entry is dynamic, the age of the entry. A dynamic ARP entry enters the cache when the Layer 3
switch receives an ARP reply or receives an ARP request (which contains the sender IP address and MAC address). A static entry enters
the ARP cache from the separate static ARP table when the interface for the entry comes up.
To ensure the accuracy of the ARP cache, each dynamic entry has its own age timer. The timer is reset to zero each time the Layer 3
switch receives an ARP reply or ARP request containing the IP address and MAC address of the entry. If a dynamic entry reaches its
maximum allowable age, the entry times out and the software removes the entry from the table. Static entries do not age out and can be
removed only by you.
If the ARP cache does not contain an entry for the destination IP address, the Layer 3 switch broadcasts an ARP request out all its IP
interfaces. The ARP request contains the IP address of the destination. If the device with the IP address is directly attached to the Layer 3
switch, the device sends an ARP response containing its MAC address. The response is a unicast packet addressed directly to the Layer
3 switch. The Layer 3 switch places the information from the ARP response into the ARP cache.
ARP requests contain the IP address and MAC address of the sender, so all devices that receive the request learn the MAC address and
IP address of the sender and can update their own ARP caches accordingly.
NOTE
The ARP request broadcast is a MAC broadcast, which means the broadcast goes only to devices that are directly attached to
the Layer 3 switch. A MAC broadcast is not routed to other networks. However, some routers, including Brocade Layer 3
switches, can be congured to reply to ARP requests from one network on behalf of devices on another network.
Conguring IP parameters - Layer 3 switches
FastIron Ethernet Switch Layer 3 Routing Conguration Guide, 08.0.30mb
53-1003627-06 51
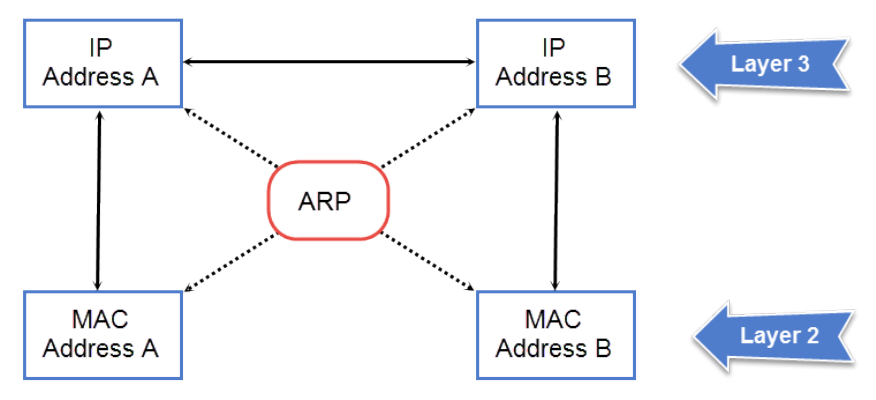
NOTE
If the router receives an ARP request packet that it is unable to deliver to the nal destination because of the ARP timeout and
no ARP response is received (the Layer 3 switch knows of no route to the destination address), the router sends an ICMP Host
Unreachable message to the source.
FIGURE 4 ARP supplies the MAC address corresponding to an IP address
If Device A wants to communicate with Device B, knowing the IP address of Device B is not sucient; the MAC address is also required.
ARP supplies the MAC address.
Rate limiting ARP packets
You can limit the number of ARP packets the Brocade device accepts during each second. By default, the software does not limit the
number of ARP packets the device can receive. Since the device sends ARP packets to the CPU for processing, if a device in a busy
network receives a high number of ARP packets in a short period of time, some CPU processing might be deferred while the CPU
processes the ARP packets.
To prevent the CPU from becoming ooded by ARP packets in a busy network, you can restrict the number of ARP packets the device
will accept each second. When you congure an ARP rate limit, the device accepts up to the maximum number of packets you specify,
but drops additional ARP packets received during the one-second interval. When a new one-second interval starts, the counter restarts at
zero, so the device again accepts up to the maximum number of ARP packets you specied, but drops additional packets received within
the interval.
To limit the number of ARP packets the device will accept each second, enter the rate-limit-arp command at the global CONFIG level of
the CLI.
device(config)# rate-limit-arp 100
This command congures the device to accept up to 100 ARP packets each second. If the device receives more than 100 ARP packets
during a one-second interval, the device drops the additional ARP packets during the remainder of that one-second interval.
Syntax:[no] rate-limit-arp num
The num variable species the number of ARP packets and can be from 0 through 100. If you specify 0, the device will not accept any
ARP packets.
Conguring IP parameters - Layer 3 switches
FastIron Ethernet Switch Layer 3 Routing Conguration Guide, 08.0.30mb
52 53-1003627-06
NOTE
If you want to change a previously congured the ARP rate limiting policy, you must remove the previously congured policy
using the no rate-limit-arp command before entering the new policy.
Changing the ARP aging period
When the Layer 3 switch places an entry in the ARP cache, the Layer 3 switch also starts an aging timer for the entry. The aging timer
ensures that the ARP cache does not retain learned entries that are no longer valid. An entry can become invalid when the device with the
MAC address of the entry is no longer on the network.
The ARP age aects dynamic (learned) entries only, not static entries. The default ARP age is ten minutes. On Layer 3 switches, you can
change the ARP age to a value from 0 through 240 minutes. You cannot change the ARP age on Layer 2 switches. If you set the ARP
age to zero, aging is disabled and entries do not age out.
NOTE
Host devices connected to an ICX 7750 that also have a valid IP address and reply periodically to the arp request are not timed
out, even if no trac is destined for the device. This behavior is restricted to only ICX 7750 devices.
To globally change the ARP aging parameter to 20 minutes, enter the ip arp-age command.
device(config)# ip arp-age 20
Syntax: [no] ip arp-age num
The num parameter species the number of minutes, which can be from 0 through 240. The default is 10. If you specify 0, aging is
disabled.
To override the globally congured IP ARP age on an individual interface, enter the ip arp-age command followed by the new value at
the interface conguration level.
device(config-if-e1000-1/1/1)# ip arp-age 30
Enabling proxy ARP
Proxy ARP allows a Layer 3 switch to answer ARP requests from devices on one network on behalf of devices in another network.
Because ARP requests are MAC-layer broadcasts, they reach only the devices that are directly connected to the sender of the ARP
request. Thus, ARP requests do not cross routers.
For example, if Proxy ARP is enabled on a Layer 3 switch connected to two subnets, 10.10.10.0/24 and 10.20.20.0/24, the Layer 3
switch can respond to an ARP request from 10.10.10.69 for the MAC address of the device with IP address 10.20.20.69. In standard
ARP, a request from a device in the 10.10.10.0/24 subnet cannot reach a device in the 10.20.20.0 subnet if the subnets are on
dierent network cables, and thus is not answered.
NOTE
An ARP request from one subnet can reach another subnet when both subnets are on the same physical segment (Ethernet
cable), because MAC-layer broadcasts reach all the devices on the segment.
Proxy ARP is disabled by default on Brocade Layer 3 switches. This feature is not supported on Brocade Layer 2 switches.
You can enable proxy ARP at the Interface level, as well as at the Global CONFIG level, of the CLI.
NOTE
Conguring proxy ARP at the Interface level overrides the global
conguration.
Conguring IP parameters - Layer 3 switches
FastIron Ethernet Switch Layer 3 Routing Conguration Guide, 08.0.30mb
53-1003627-06 53
Enabling proxy ARP globally
To enable IP proxy ARP on a global basis, enter the ip proxy-arp command.
device(config)# ip proxy-arp
To again disable IP proxy ARP on a global basis, enter the no ip proxy-arp command.
device(config)# no ip proxy-arp
Syntax: [no] ip proxy-arp
Enabling IP ARP on an interface
NOTE
Conguring proxy ARP at the Interface level overrides the global
conguration.
To enable IP proxy ARP on an interface, enter the following commands.
device(config)# interface ethernet 5
device(config-if-e1000-5)# ip proxy-arp enable
To again disable IP proxy ARP on an interface, enter the following command.
device(config)# interface ethernet 5
device(config-if-e1000-5)# ip proxy-arp disable
Syntax: [no] ip proxy-arp { enable | disable }
NOTE
By default, gratuitous ARP is disabled for local proxy ARP.
Creating static ARP entries
Brocade Layer 3 switches have a static ARP table, in addition to the regular ARP cache. The static ARP table contains entries that you
congure.
Static entries are useful in cases where you want to pre-congure an entry for a device that is not connected to the Layer 3 switch, or you
want to prevent a particular entry from aging out. The software removes a dynamic entry from the ARP cache if the ARP aging interval
expires before the entry is refreshed. Static entries do not age out, regardless of whether the Brocade device receives an ARP request
from the device that has the entry address.
NOTE
You cannot create static ARP entries on a Layer 2 switch.
The maximum number of static ARP entries you can congure depends on the software version running on the device.
To create a static ARP entry, enter a command such as the following.
device(config)# arp 1 10.53.4.2 0000.0054.2348 ethernet 1/1/2
Syntax: arp num ip-addr mac-addr ethernet port
The num variable species the entry number. You can specify a number from 1 up to the maximum number of static entries allowed on
the device.
The ip-addr variable species the IP address of the device that has the MAC address of the entry.
The mac-addr variable species the MAC address of the entry.
Conguring IP parameters - Layer 3 switches
FastIron Ethernet Switch Layer 3 Routing Conguration Guide, 08.0.30mb
54 53-1003627-06

Changing the maximum number of entries the static ARP table can hold
NOTE
The basic procedure for changing the static ARP table size is the same as the procedure for changing other congurable cache
or table sizes. Refer to the section "Displaying system parameter default values" in the FastIron Ethernet Switch Platform and
Layer 2 Switching Conguration Guide.
To increase the maximum number of static ARP table entries you can congure on a Brocade Layer 3 switch, enter commands such as
the following at the global CONFIG level of the CLI.
device(config)# system-max ip-static-arp 1000
device(config)# write memory
device(config)# end
device# reload
NOTE
You must save the conguration to the startup-cong le and reload the software after changing the static ARP table size to
place the change into eect.
Syntax: system-max ip-static-arp num
The num variable indicates the maximum number of static ARP entries and can be within one of these ranges, depending on the
software version running on the device.
TABLE 6 Static ARP entry support
Default maximum Congurable minimum Congurable maximum
FastIron X Series and Brocade FCX Series devices
512 512 6000
ICX 6430 and ICX 6450 devices
256 64 1024
ICX 6610
512 512 6000
Enabling learning gratuitous ARP
Learning gratuitous ARP enables Brocade Layer 3 devices to learn ARP entries from incoming gratuitous ARP packets from the hosts
which are directly connected. This help achieve faster convergence for the hosts when they are ready to send trac.
A new ARP entry is created when a gratuitous ARP packet is received. If the ARP is already existing, it will be updated with the new
content.
To enable learning gratuitous ARP, enter the following command at the device conguration level.
Brocade (config)# ip arp learn-gratuitous-arp
Syntax: [no] ip arp learn-gratuitous-arp
The no form of the command disables learning gratuitous ARP from the device.
Use the show run command to see whether ARP is enabled or disabled. Use the show arp command to see the newly learned ARP
entries.
Conguring IP parameters - Layer 3 switches
FastIron Ethernet Switch Layer 3 Routing Conguration Guide, 08.0.30mb
53-1003627-06 55
ARP Packet Validation
Validates ARP packets to avoid trac interruption or loss.
To avoid trac interruption or loss, ARP Packet Validation allows the user to detect and drop ARP packets that do not pass the ARP
validation process. ARP Packet Validation is disabled by default and can be enabled at the global conguration level. This functionality
can be congured for the destination MAC address, the IP address and the source MAC address or with a combination of these
parameters. The Ethernet header contains the destination MAC address and source MAC address, while the ARP packet contains the
sender hardware address and target hardware address.
Follow these steps to perform checks on the incoming ARP packets.
1. Enter the global conguration mode.
2. Run the ip arp inspection validate [dst-mac | ip | src-mac] command to perform a check on any incoming ARP packets. Use
one of the following parameters to run the validation check:
•dst-mac
The destination MAC address in the Ethernet header must be the same as the target hardware address in the ARP body.
This validation is performed for the ARP response packet. When the destination MAC address validation is enabled, the
packets with dierent MAC addresses are classied as invalid and are dropped.
•src-mac
The source MAC address in the Ethernet header and the sender hardware address in the ARP body must be the same. This
validation is performed for the ARP request and response packets. When the source MAC validation is enabled, the packets
with dierent MAC addresses are classied as invalid and are dropped.
•ip
Each ARP packet has a sender IP address and target IP address. The target IP address cannot be invalid or an unexpected
IP address in the ARP response packet. The sender IP address cannot be an invalid or an unexpected IP address in the
ARP request and response packets. Addresses include 0.0.0.0, 255.255.255.255, and all IP multicast addresses. When
the IP address validation is enabled, the packets with invalid and unexpected IP addresses are classied as invalid and are
dropped.
The following example shows ARP packets being validated for the destination MAC address.
device(config)# configuration terminal
device(config)#ip arp inspection validate dst-mac
Ingress ARP packet priority
You can congure the priority of the ingress ARP packets to an optimum value that depends on your network conguration and trac
volume. Ingress ARP packets have a default priority value of 4. At the default priority value, ingress ARP packets may get dropped
because of high trac volume or non-ARP packets with higher priority values. This can cause devices to become unreachable. If the
ingress ARP packets have higher priority values than the default priority value, a high volume of ARP trac may lead to drops in control
trac. This may cause trac loops in the network.
NOTE
You cannot change the priority of the ingress ARP packets on the management port.
Conguring the priority of ingress ARP packets
To congure the priority of ingress ARP packets, use the arp-internal-priority priority-value command in global conguration
mode.
Conguring IP parameters - Layer 3 switches
FastIron Ethernet Switch Layer 3 Routing Conguration Guide, 08.0.30mb
56 53-1003627-06
The following example shows the priority of ingress ARP packets set to level 7.
Brocade(config)# arp-internal-priority 7
Conguring forwarding parameters
The following congurable parameters control the forwarding behavior of Brocade Layer 3 switches:
• Time-To-Live (TTL) threshold
• Forwarding of directed broadcasts
• Forwarding of source-routed packets
• Ones-based and zero-based broadcasts
All these parameters are global and thus aect all IP interfaces congured on the Layer 3 switch.
Changing the TTL threshold
The time to live (TTL) threshold prevents routing loops by specifying the maximum number of router hops an IP packet originated by the
Layer 3 switch can travel through. Each device capable of forwarding IP that receives the packet decrements (decreases) the packet TTL
by one. If a device receives a packet with a TTL of 1 and reduces the TTL to zero, the device drops the packet.
The default value for the TTL threshold is 64. You can change the TTL threshold to a value from 1 through 255.
To modify the TTL threshold to 25, enter the ip ttl command.
device(config)# ip ttl 25
Syntax: ip ttl ttl-threshold
Enabling forwarding of directed broadcasts
A directed broadcast is an IP broadcast to all devices within a single directly-attached network or subnet. A net-directed broadcast goes
to all devices on a given network. A subnet-directed broadcast goes to all devices within a given subnet.
NOTE
A less common type, the all-subnets broadcast, goes to all directly-attached subnets. Forwarding for this broadcast type also is
supported, but most networks use IP multicasting instead of all-subnet broadcasting.
Forwarding for all types of IP directed broadcasts is disabled by default. You can enable forwarding for all types if needed. You cannot
enable forwarding for specic broadcast types.
To enable forwarding of IP directed broadcasts, enter the ip directed-broadcast command in device conguration mode.
device # configure terminal
device(config)# ip directed-broadcast
Syntax: [no] ip directed-broadcast
Brocade software makes the forwarding decision based on the router's knowledge of the destination network prex. Routers cannot
determine that a message is unicast or directed broadcast apart from the destination network prex. The decision to forward or not
forward the message is by denition only possible in the last hop router.
To disable the directed broadcasts, enter the no ip directed-broadcast command in device conguration mode.
device # configure terminal
device(config)# no ip directed-broadcast
Conguring IP parameters - Layer 3 switches
FastIron Ethernet Switch Layer 3 Routing Conguration Guide, 08.0.30mb
53-1003627-06 57
To enable directed broadcasts on an individual interface instead of globally for all interfaces, enter the ip directed-broadcast command at
the interface conguration level as shown in the following example.
device # configure terminal
device(config)# interface ethernet 1/1/1
device(config-if-1/1/1 # ip directed-broadcast
Disabling forwarding of IP source-routed packets
A source-routed packet species the exact router path for the packet. The packet species the path by listing the IP addresses of the
router interfaces through which the packet must pass on its way to the destination. The Layer 3 switch supports both types of IP source
routing:
• Strict source routing - Requires the packet to pass through only the listed routers. If the Layer 3 switch receives a strict source-
routed packet but cannot reach the next hop interface specied by the packet, the Layer 3 switch discards the packet and sends
an ICMP Source-Route-Failure message to the sender.
NOTE
The Layer 3 switch allows you to disable sending of the Source-Route-Failure messages.
• Loose source routing - Requires that the packet pass through all of the listed routers but also allows the packet to travel through
other routers, which are not listed in the packet.
The Layer 3 switch forwards both types of source-routed packets by default. To disable the feature, use either of the following methods.
You cannot enable or disable strict or loose source routing separately.
To disable forwarding of IP source-routed packets, enter the no ip source-route command.
device # configure terminal
device(config)# no ip source-route
Syntax: [no] ip source-route
To re-enable forwarding of source-routed packets, enter the ip source-route command.
device # configure terminal
device(config)# ip source-route
Enabling support for zero-based IP subnet broadcasts
By default, the Layer 3 switch treats IP packets with all ones in the host portion of the address as IP broadcast packets. For example, the
Layer 3 switch treats IP packets with 10.157.22.255/24 as the destination IP address as IP broadcast packets and forwards the
packets to all IP hosts within the 10.157.22.x subnet (except the host that sent the broadcast packet to the Layer 3 switch).
Most IP hosts are congured to receive IP subnet broadcast packets with all ones in the host portion of the address. However, some
older IP hosts instead expect IP subnet broadcast packets that have all zeros instead of all ones in the host portion of the address. To
accommodate this type of host, you can enable the Layer 3 switch to treat IP packets with all zeros in the host portion of the destination
IP address as broadcast packets.
NOTE
When you enable the Layer 3 switch for zero-based subnet broadcasts, the Layer 3 switch still treats IP packets with all ones
the host portion as IP subnet broadcasts too. Thus, the Layer 3 switch can be congured to support all ones only (the default) or
all ones and all zeroes.
NOTE
This feature applies only to IP subnet broadcasts, not to local network broadcasts. The local network broadcast address is still
expected to be all ones.
Conguring IP parameters - Layer 3 switches
FastIron Ethernet Switch Layer 3 Routing Conguration Guide, 08.0.30mb
58 53-1003627-06
To enable the Layer 3 switch for zero-based IP subnet broadcasts in addition to ones-based IP subnet broadcasts, enter the following
command.
device(config)# ip broadcast-zero
device(config)# write memory
device(config)# end
device# reload
NOTE
You must save the conguration and reload the software to place this conguration change into
eect.
Syntax: [no] ip broadcast-zero
Disabling ICMP messages
Brocade devices are enabled to reply to ICMP echo messages and send ICMP Destination Unreachable messages by default.
You can selectively disable the following types of Internet Control Message Protocol (ICMP) messages:
• Echo messages (ping messages) - The Layer 3 switch replies to IP pings from other IP devices.
• Destination Unreachable messages - If the Layer 3 switch receives an IP packet that it cannot deliver to its destination, the
Layer 3 switch discards the packet and sends a message back to the device that sent the packet to the Layer 3 switch. The
message informs the device that the destination cannot be reached by the Layer 3 switch.
Disabling replies to broadcast ping requests
By default, Brocade devices are enabled to respond to broadcast ICMP echo packets, which are ping requests.
To disable response to broadcast ICMP echo packets (ping requests), enter the following command.
device(config)# no ip icmp echo broadcast-request
Syntax: [no] ip icmp echo broadcast-request
If you need to re-enable response to ping requests, enter the following command.
device(config)# ip icmp echo broadcast-request
Disabling ICMP destination unreachable messages
By default, when a Brocade device receives an IP packet that the device cannot deliver, the device sends an ICMP Unreachable message
back to the host that sent the packet. You can selectively disable a Brocade device response to the following types of ICMP Unreachable
messages:
•Host - The destination network or subnet of the packet is directly connected to the Brocade device, but the host specied in the
destination IP address of the packet is not on the network.
•Protocol - The TCP or UDP protocol on the destination host is not running. This message is dierent from the Port
Unreachable message, which indicates that the protocol is running on the host but the requested protocol port is unavailable.
•Administration - The packet was dropped by the Brocade device due to a lter or ACL congured on the device.
•Fragmentation-needed - The packet has the Do not Fragment bit set in the IP Flag eld, but the Brocade device cannot
forward the packet without fragmenting it.
•Port - The destination host does not have the destination TCP or UDP port specied in the packet. In this case, the host sends
the ICMP Port Unreachable message to the Brocade device, which in turn sends the message to the host that sent the packet.
Conguring IP parameters - Layer 3 switches
FastIron Ethernet Switch Layer 3 Routing Conguration Guide, 08.0.30mb
53-1003627-06 59
•Source-route-fail - The device received a source-routed packet but cannot locate the next-hop IP address indicated in the
packet Source-Route option.
You can disable the Brocade device from sending these types of ICMP messages on an individual basis. To do so, use the following CLI
method.
NOTE
Disabling an ICMP Unreachable message type does not change the Brocade device ability to forward packets. Disabling ICMP
Unreachable messages prevents the device from generating or forwarding the Unreachable messages.
To disable all ICMP Unreachable messages, enter the no ip icmp unreachable command.
device(config)# no ip icmp unreachable
Syntax: [no] ip icmp unreachable { host | protocol | administration | fragmentation-needed | port | source-route-fail }
• If you enter the command without specifying a message type (as in the example above), all types of ICMP Unreachable
messages listed above are disabled. If you want to disable only specic types of ICMP Unreachable messages, you can specify
the message type. To disable more than one type of ICMP message, enter the no ip icmp unreachable command for each
messages type.
• The host parameter disables ICMP Host Unreachable messages.
• The protocol parameter disables ICMP Protocol Unreachable messages.
• The administration parameter disables ICMP Unreachable (caused by Administration action) messages.
• The fragmentation-needed parameter disables ICMP Fragmentation-Needed But Do not-Fragment Bit Set messages.
• The port parameter disables ICMP Port Unreachable messages.
• The source-route-fail parameter disables ICMP Unreachable (caused by Source-Route-Failure) messages.
To disable ICMP Host Unreachable messages but leave the other types of ICMP Unreachable messages enabled, enter the following
commands instead of the command shown above.
device(config)# no ip icmp unreachable host
If you have disabled all ICMP Unreachable message types but you want to re-enable certain types, for example ICMP Host Unreachable
messages, you can do so by entering the following command.
device(config)# ip icmp unreachable host
Enabling ICMP redirect messages
You can enable and disable IPv4 ICMP redirect messages globally or on individual Virtual Ethernet (VE) interfaces but not on individual
physical interfaces.
NOTE
Some FSX devices do not generate ICMP redirect and network unreachable messages.
NOTE
The device forwards misdirected trac to the appropriate router, even if you disable the redirect
messages.
By default, IP ICMP redirect over global level is disabled and a Brocade Layer 3 switch does not send an ICMP redirect message to the
source of a misdirected packet in addition to forwarding the packet to the appropriate router. To enable ICMP redirect messages globally,
enter the following command at the global CONFIG level of the CLI:
device(config)# ip icmp redirect
Conguring IP parameters - Layer 3 switches
FastIron Ethernet Switch Layer 3 Routing Conguration Guide, 08.0.30mb
60 53-1003627-06
Syntax: [no] ip icmp redirect
To disable ICMP redirect messages on a specic virtual interface, enter the following command at the conguration level for the virtual
interface:
Brocade(config-vlan-10)# interface ve 10
Brocade(config-vif-10)# no ip redirect
Syntax: [no] ip redirect
Static routes conguration
The IP route table can receive routes from the following sources:
•Directly-connected networks - When you add an IP interface, the Layer 3 switch automatically creates a route for the network
the interface is in.
•RIP - If RIP is enabled, the Layer 3 switch can learn about routes from the advertisements other RIP routers send to the Layer
3 switch. If the route has a lower administrative distance than any other routes from dierent sources to the same destination,
the Layer 3 switch places the route in the IP route table.
•OSPF - Refer to RIP, but substitute "OSPF" for "RIP".
•BGP4 - Refer to RIP, but substitute "BGP4" for "RIP".
•Default network route - A statically congured default route that the Layer 3 switch uses if other default routes to the
destination are not available.
•Statically congured route - You can add routes directly to the route table. When you add a route to the IP route table, you are
creating a static IP route. This section describes how to add static routes to the IP route table.
Static route types
You can congure the following types of static IP routes:
•Standard - The static route consists of the destination network address and network mask, and the IP address of the next-hop
gateway. You can congure multiple standard static routes with the same metric for load sharing or with dierent metrics to
provide a primary route and backup routes.
•Interface-based - The static route consists of the destination network address and network mask, and the Layer 3 switch
interface through which you want the Layer 3 switch to send trac for the route. Typically, this type of static route is for directly
attached destination networks.
•Null - The static route consists of the destination network address and network mask, and the "null0" parameter. Typically, the
null route is congured as a backup route for discarding trac if the primary route is unavailable.
Static IP route parameters
When you congure a static IP route, you must specify the following parameters:
• The IP address and network mask for the route destination network.
• The route path, which can be one of the following:
– The IP address of a next-hop gateway
– An Ethernet port
– A virtual interface (a routing interface used by VLANs for routing Layer 3 protocol trac among one another)
– A "null" interface. The Layer 3 switch drops trac forwarded to the null interface.
Conguring IP parameters - Layer 3 switches
FastIron Ethernet Switch Layer 3 Routing Conguration Guide, 08.0.30mb
53-1003627-06 61

You also can specify the following optional parameters:
• The metric for the route - The value the Layer 3 switch uses when comparing this route to other routes in the IP route table to
the same destination. The metric applies only to routes that the Layer 3 switch has already placed in the IP route table. The
default metric for static IP routes is 1.
• The administrative distance for the route - The value that the Layer 3 switch uses to compare this route with routes from other
route sources to the same destination before placing a route in the IP route table. This parameter does not apply to routes that
are already in the IP route table. The default administrative distance for static IP routes is 1.
The default metric and administrative distance values ensure that the Layer 3 switch always prefers static IP routes over routes from
other sources to the same destination.
Multiple static routes to the same destination provide load sharing and redundancy
You can add multiple static routes for the same destination network to provide one or more of the following benets:
•IP load balancing - When you add multiple IP static routes for the same destination to dierent next-hop gateways, and the
routes each have the same metric and administrative distance, the Layer 3 switch can load balance trac to the routes’
destination.
•Path redundancy - When you add multiple static IP routes for the same destination, but give the routes dierent metrics or
administrative distances, the Layer 3 switch uses the route with the lowest administrative distance by default, but uses another
route to the same destination if the rst route becomes unavailable.
Static route states follow port states
IP static routes remain in the IP route table only so long as the port or virtual interface used by the route is available. If the port or virtual
routing interface becomes unavailable, the software removes the static route from the IP route table. If the port or virtual routing interface
becomes available again later, the software adds the route back to the route table.
This feature allows the Layer 3 switch to adjust to changes in network topology. The Layer 3 switch does not continue trying to use
routes on unavailable paths but instead uses routes only when their paths are available.
The static route is congured on Switch A, as shown in the CLI example following the gure.
FIGURE 5 Example of a static route
The following command congures a static route to 10.95.7.0, using 10.95.6.157 as the next-hop gateway.
device(config)# ip route 10.95.7.0/24 10.95.6.157
When you congure a static IP route, you specify the destination address for the route and the next-hop gateway or Layer 3 switch
interface through which the Layer 3 switch can reach the route. The Layer 3 switch adds the route to the IP route table. In this case,
Switch A knows that 10.95.6.157 is reachable through port 1/1/2, and also assumes that local interfaces within that subnet are on the
same port. Switch A deduces that IP interface 10.95.7.188 is also on port 1/1/2.
The software automatically removes a static IP route from the IP route table if the port used by that route becomes unavailable. When the
port becomes available again, the software automatically re-adds the route to the IP route table.
Conguring IP parameters - Layer 3 switches
FastIron Ethernet Switch Layer 3 Routing Conguration Guide, 08.0.30mb
62 53-1003627-06
Conguring a static IP route
To congure an IP static route with a destination address of 10.0.0.0 255.0.0.0 and a next-hop router IP address of 10.1.1.1, enter a
command such as the following.
device(config)# ip route 10.0.0.0 255.0.0.0 10.1.1.1
To congure a static IP route with an Ethernet port instead of a next-hop address, enter a command such as the following.
device(config)# ip route 10.128.2.69 255.255.255.0 ethernet 1/4/1
The command in the previous example congures a static IP route for destination network 10.128.2.69/24. Since an Ethernet port is
specied instead of a gateway IP address as the next hop, the Layer 3 switch always forwards trac for the 10.128.2.69/24 network to
port 1/4/1. The command in the following example congures an IP static route that uses virtual interface 3 as its next hop.
device(config)# ip route 10.128.2.71 255.255.255.0 ve 3
Syntax: ip route dest-ip-addr dest-mask { next-hop-ip-addr | ethernet unit / slot / port | ve num } [ metric ] [ distance num ] [ name
static-route-name ] [ tag tag-num ]
or
Syntax: ip route dest-ip-addr / mask-bits { next-hop-ip-addr | ethernet unit / slot / port | ve num } [ metric ] [ distance num ] [ name
static-route-name ] [ tag tag-num ]
The dest-ip-addr variable is the route destination. The dest-mask variable is the network mask for the route destination IP address.
Alternatively, you can specify the network mask information by entering a forward slash followed by the number of bits in the network
mask. For example, you can enter 10.0.0.0 255.255.255.0 as 10.0.0.0/.24.
The next-hop-ip-addr variable is the IP address of the next-hop router (gateway) for the route.
If you do not want to specify a next-hop IP address, you can instead specify a port or interface number. The num variable is a virtual
interface number. You can instead specify an Ethernet port. In this case, a Layer 3 switch forwards packets destined for the static route
destination network to the specied Layer 3 switch interface. Conceptually, this feature makes the destination network like a directly
connected network, associated with a specic Layer 3 switch interface.
NOTE
The port or virtual interface you use for the static route next hop must have at least one IP address congured on it. The address
does not need to be in the same subnet as the destination network.
The metric variable can be a number from 1 through 16. The default is 1.
NOTE
If you specify 16, RIP considers the metric to be innite and thus also considers the route to be
unreachable.
The distance num variable species the administrative distance of the route. When comparing otherwise equal routes to a destination,
the Layer 3 switch prefers lower administrative distances over higher ones, so make sure you use a low value for your default route. The
default is 1.
NOTE
The Layer 3 switch will replace the static route if the it receives a route with a lower administrative distance.
NOTE
You can also assign the default router as the destination by entering 0.0.0.0 0.0.0.0 xxx.xxx.xxx.xxx.
Conguring IP parameters - Layer 3 switches
FastIron Ethernet Switch Layer 3 Routing Conguration Guide, 08.0.30mb
53-1003627-06 63
Conguring a "Null" route
You can congure the Layer 3 switch to drop IP packets to a specic network or host address by conguring a "null" (sometimes called
"null0") static route for the address. When the Layer 3 switch receives a packet destined for the address, the Layer 3 switch drops the
packet instead of forwarding it.
To congure a null static route, use the following CLI method.
To congure a null static route to drop packets destined for network 10.157.22.x, enter the following commands.
device(config)# ip route 10.157.22.0 255.255.255.0 null0
device(config)# write memory
Syntax: ip route ip-addr ip-mask null0 [ metric ] [ distance num ]
or
Syntax: ip route ip-addr /mask-bits null0 [ metric ] [ distance num ]
To display the maximum value for your device, enter the show default values command. The maximum number of static IP routes the
system can hold is listed in the ip-static-route row in the System Parameters section of the display. To change the maximum value, use
the system-max ip-static-route command at the global CONFIG level.
The ip-addr variable species the network or host address. The Layer 3 switch will drop packets that contain this address in the
destination eld instead of forwarding them.
The ip-mask variable species the network mask. Ones are signicant bits and zeros allow any value. For example, the mask
255.255.255.0 matches on all hosts within the Class C subnet address specied by ip-addr . Alternatively, you can specify the number
of bits in the network mask. For example, you can enter 10.157.22.0/24 instead of 10.157.22.0 255.255.255.0.
The null0 variable indicates that this is a null route. You must specify this parameter to make this a null route.
The metric variable adds a cost to the route. You can specify from 1 through 16. The default is 1.
The distance num variable congures the administrative distance for the route. You can specify a value from 1 through 255. The default
is 1. The value 255 makes the route unusable.
NOTE
The last two variables are optional and do not aect the null route, unless you congure the administrative distance to be 255. In
this case, the route is not used and the trac might be forwarded instead of dropped.
Naming a static IP route
You can assign a name to a static IP route. A static IP route name serves as a description of the route. The name can be used to more
readily reference or identify the associated static route.
NOTE
The static route name is an optional feature. It does not aect the selection of static
routes.
The Brocade device does not check for the uniqueness of names assigned to static routes. Static routes that have the same or dierent
next hops can have the same or dierent names. Due to this, the same name can be assigned to multiple static routes to group them.
The name is then used to reference or identify a group of static routes.
The option to assign a name to a static route is displayed after you select either an outgoing interface type or congure the next hop
address.
To assign a name to a static route, enter commands such as the following.
device(config)# ip route 10.22.22.22 255.255.255.255 eth 1/1/1 name abc
Conguring IP parameters - Layer 3 switches
FastIron Ethernet Switch Layer 3 Routing Conguration Guide, 08.0.30mb
64 53-1003627-06
OR
device(config)# ip route 10.22.22.22 255.255.255.255 10.1.1.1 name abc
Syntax: [no] ip route dest-ip-addr dest-mask { next-hop-ip-addr | ethernet unit / slot / port | ve num } [ metric ] [ distance num ] [ name
static-route-name ] [ tag tag-num ]
Enter the static route name for name string. The maximum length of the name is 128 bytes.
The output of the show commands displays the name of a static IP route if there is one assigned.
The show run command displays the entire name of the static IP route. The show ip static route command displays an asterisk (*) after
the rst twelve characters if the assigned name is thirteen characters or more. The show ipv6 static route command displays an asterisk
after the rst two characters if the assigned name is three characters or more.
When displayed in show run, a static route name with a space in the name will appear within quotation marks (for example, "brcd route").
Changing the name of a static IP route
To change the name of a static IP route, enter the static route as congured. Proceed to enter the new name instead of the previous
name. Refer to the following example.
Static IP route with the original name "abc":
device(config)# ip route 10.22.22.22 255.255.255.255 10.1.1.1 name abc
Change the name of "abc" to "xyz":
device(config)# ip route 10.22.22.22 255.255.255.255 10.1.1.1 name xyz
In this example, "xyz" is set as the new name of the static IP route.
Deleting the name of a static IP route
To delete the name of a static IP route, use the no command. See the example below.
Static IP route with the name "xyz":
device(config)# ip route 10.22.22.22 255.255.255.255 10.1.1.1 name xyz
To remove the name "xyz" from the static IP route, specify both "name" and the string, in this case "xyz".
device(config)#no ip route 10.22.22.22 255.255.255.255 10.1.1.1 name xyz
The static route no longer has a name assigned to it.
Conguring load balancing and redundancy using multiple static routes to the same destination
You can congure multiple static IP routes to the same destination, for the following benets:
•IP load sharing - If you congure more than one static route to the same destination, and the routes have dierent next-hop
gateways but have the same metrics, the Layer 3 switch load balances among the routes using basic round-robin. For example,
if you congure two static routes with the same metrics but to dierent gateways, the Layer 3 switch alternates between the two
routes.
•Backup Routes - If you congure multiple static IP routes to the same destination, but give the routes dierent next-hop
gateways and dierent metrics, the Layer 3 switch will always use the route with the lowest metric. If this route becomes
unavailable, the Layer 3 switch will fail over to the static route with the next-lowest metric, and so on.
Conguring IP parameters - Layer 3 switches
FastIron Ethernet Switch Layer 3 Routing Conguration Guide, 08.0.30mb
53-1003627-06 65
NOTE
You also can bias the Layer 3 switch to select one of the routes by conguring them with dierent administrative distances.
However, make sure you do not give a static route a higher administrative distance than other types of routes, unless you want
those other types to be preferred over the static route.
The steps for conguring the static routes are the same as described in the previous section. The following sections provide examples.
To congure multiple static IP routes, enter commands such as the following.
device(config)# ip route 10.128.2.69 255.255.255.0 10.157.22.1
device(config)# ip route 10.128.2.69 255.255.255.0 10.111.10.1
The commands in the previous example congure two static IP routes. The routes go to dierent next-hop gateways but have the same
metrics. These commands use the default metric value (1), so the metric is not specied. These static routes are used for load sharing
among the next-hop gateways.
The following commands congure static IP routes to the same destination, but with dierent metrics. The route with the lowest metric is
used by default. The other routes are backups in case the rst route becomes unavailable. The Layer 3 switch uses the route with the
lowest metric if the route is available.
device(config)# ip route 10.128.2.69 255.255.255.0 10.157.22.1
device(config)# ip route 10.128.2.69 255.255.255.0 10.111.10.1 2
device(config)# ip route 10.128.2.69 255.255.255.0 10.1.1.1 3
In this example, each static route has a dierent metric. The metric is not specied for the rst route, so the default (1) is used. A metric is
specied for the second and third static IP routes. The second route has a metric of two and the third route has a metric of 3. Thus, the
second route is used only of the rst route (which has a metric of 1) becomes unavailable. Likewise, the third route is used only if the rst
and second routes (which have lower metrics) are both unavailable.
Conguring standard static IP routes and interface or null static routes to the same destination
You can congure a null0 or interface-based static route to a destination and also congure a normal static route to the same destination,
so long as the route metrics are dierent.
When the Layer 3 switch has multiple routes to the same destination, the Layer 3 switch always prefers the route with the lowest metric.
Generally, when you congure a static route to a destination network, you assign the route a low metric so that the Layer 3 switch prefers
the static route over other routes to the destination.
This feature is especially useful for the following congurations. These are not the only allowed congurations but they are typical uses of
this enhancement:
• When you want to ensure that if a given destination network is unavailable, the Layer 3 switch drops (forwards to the null
interface) trac for that network instead of using alternate paths to route the trac. In this case, assign the normal static route to
the destination network a lower metric than the null route.
• When you want to use a specic interface by default to route trac to a given destination network, but want to allow the Layer 3
switch to use other interfaces to reach the destination network if the path that uses the default interface becomes unavailable. In
this case, give the interface route a lower metric than the normal static route.
NOTE
You cannot add a null or interface-based static route to a network if there is already a static route of any type with the same
metric you specify for the null or interface-based route.
In the example, two static routes congured for the same destination network. One of the routes is a standard static route and has a
metric of 1. The other static route is a null route and has a higher metric than the standard static route. The Layer 3 switch always prefers
the static route with the lower metric. In this example, the Layer 3 switch always uses the standard static route for trac to destination
network 192.168.7.0/24, unless that route becomes unavailable, in which case the Layer 3 switch sends trac to the null route instead.
Conguring IP parameters - Layer 3 switches
FastIron Ethernet Switch Layer 3 Routing Conguration Guide, 08.0.30mb
66 53-1003627-06
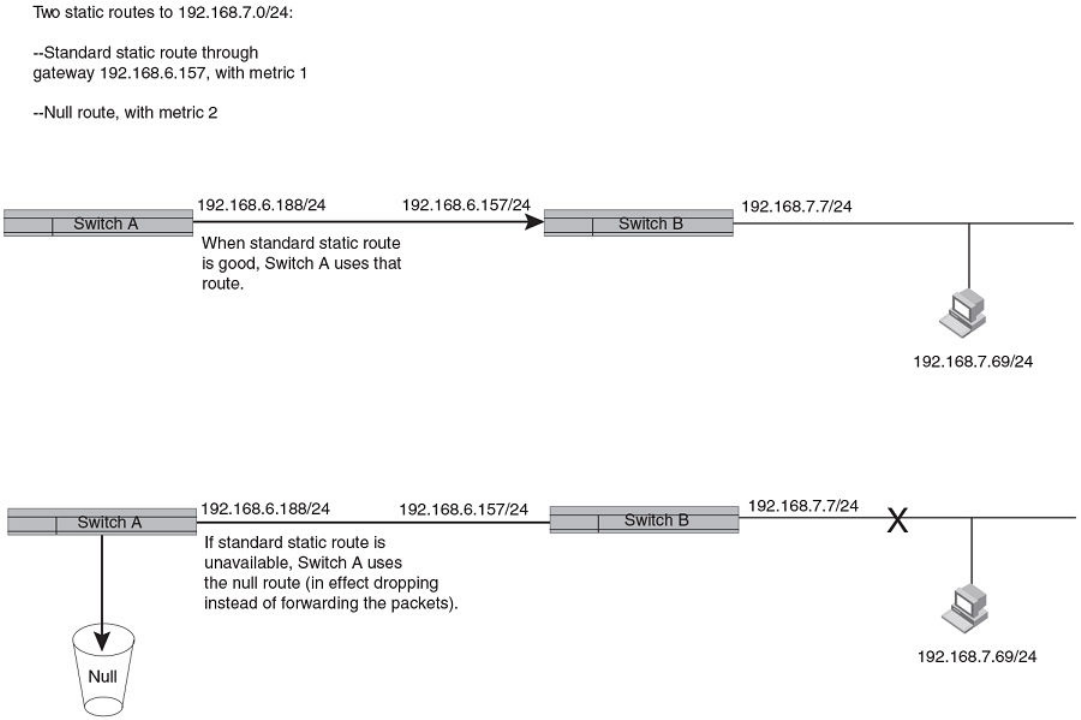
FIGURE 6 Standard and null static routes to the same destination network
The next example shows another example of two static routes. In this example, a standard static route and an interface-based static route
are congured for destination network 192.168.6.0/24. The interface-based static route has a lower metric than the standard static
route. As a result, the Layer 3 switch always prefers the interface-based route when the route is available. However, if the interface-based
route becomes unavailable, the Layer 3 switch still forwards the trac toward the destination using an alternate route through gateway
192.168.8.11/24.
Conguring IP parameters - Layer 3 switches
FastIron Ethernet Switch Layer 3 Routing Conguration Guide, 08.0.30mb
53-1003627-06 67
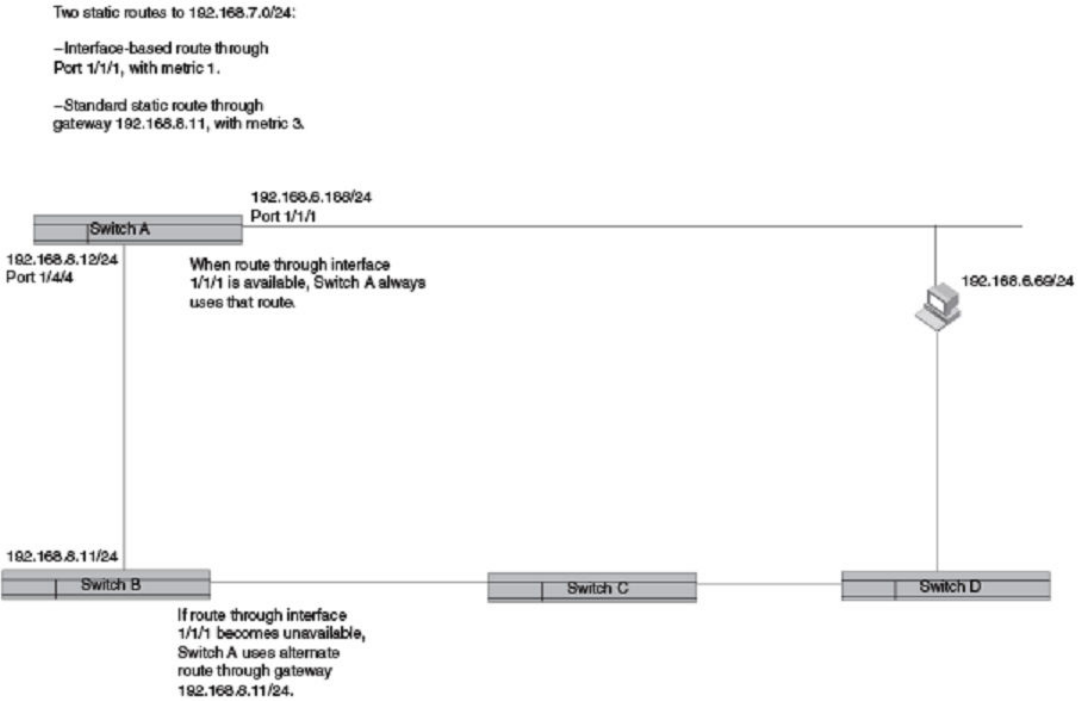
FIGURE 7 Standard and interface routes to the same destination network
To congure a standard static IP route and a null route to the same network, enter commands such as the following.
device(config)# ip route 192.168.7.0/24 192.168.6.157/24 1
device(config)# ip route 192.168.7.0/24 null0 3
The rst command congures a standard static route, which includes specication of the next-hop gateway. The command also gives the
standard static route a metric of 1, which causes the Layer 3 switch to always prefer this route when the route is available.
The second command congures another static route for the same destination network, but the second route is a null route. The metric
for the null route is 3, which is higher than the metric for the standard static route. If the standard static route is unavailable, the software
uses the null route.
To congure a standard static route and an interface-based route to the same destination, enter commands such as the following.
device(config)# ip route 192.168.6.0/24 ethernet 1/1/1 1
device(config)# ip route 192.168.6.0/24 192.168.8.11/24 3
The rst command congured an interface-based static route through Ethernet port 1/1/1. The command assigns a metric of 1 to this
route, causing the Layer 3 switch to always prefer this route when it is available. If the route becomes unavailable, the Layer 3 switch uses
an alternate route through the next-hop gateway 192.168.8.11/24.
Conguring IP parameters - Layer 3 switches
FastIron Ethernet Switch Layer 3 Routing Conguration Guide, 08.0.30mb
68 53-1003627-06
Conguring a default network route
The Layer 3 switch enables you to specify a candidate default route without the need to specify the next hop gateway. If the IP route table
does not contain an explicit default route (for example, 0.0.0.0/0) or propagate an explicit default route through routing protocols, the
software can use the default network route as a default route instead.
When the software uses the default network route, it also uses the default network route's next hop gateway as the gateway of last resort.
This feature is especially useful in environments where network topology changes can make the next hop gateway unreachable. This
feature allows the Layer 3 switch to perform default routing even if the default network route's default gateway changes.
The feature thus diers from standard default routes. When you congure a standard default route, you also specify the next hop
gateway. If a topology change makes the gateway unreachable, the default route becomes unusable.
For example, if you congure 10.10.10.0/24 as a candidate default network route, if the IP route table does not contain an explicit
default route (0.0.0.0/0), the software uses the default network route and automatically uses that route's next hop gateway as the default
gateway. If a topology change occurs and as a result the default network route's next hop gateway changes, the software can still use the
default network route. To congure a default network route, use the following CLI method.
If you congure more than one default network route, the Layer 3 switch uses the following algorithm to select one of the routes.
1. Use the route with the lowest administrative distance.
2. If the administrative distances are equal:
• Are the routes from dierent routing protocols (RIP, OSPF, or BGP4)? If so, use the route with the lowest IP address.
• If the routes are from the same routing protocol, use the route with the best metric. The meaning of "best" metric depends
on the routing protocol:
•RIP - The metric is the number of hops (additional routers) to the destination. The best route is the route with the fewest
hops.
•OSPF - The metric is the path cost associated with the route. The path cost does not indicate the number of hops but is
instead a numeric value associated with each route. The best route is the route with the lowest path cost.
•BGP4 - The metric is the Multi-exit Discriminator (MED) associated with the route. The MED applies to routes that have
multiple paths through the same Autonomous System. The best route is the route with the lowest MED.
Example of conguring a default network route
You can congure up to four default network routes.
To congure a default network route, enter commands such as the following.
device(config)# ip default-network 10.157.22.0
device(config)# write memory
Syntax: ip default-network ip-addr
The ip-addr variable species the network address.
To verify that the route is in the route table, enter the following command at any level of the CLI.
device# show ip route
Total number of IP routes: 2
Start index: 1 B:BGP D:Connected R:RIP S:Static O:OSPF *:Candidate default
Destination NetMask Gateway Port Cost Type
1 10.157.20.0 255.255.255.0 0.0.0.0 lb1 1 D
2 10.157.22.0 255.255.255.0 0.0.0.0 1/4/11 1 *D
This example shows two routes. Both of the routes are directly attached, as indicated in the Type column. However, one of the routes is
shown as type "*D", with an asterisk (*). The asterisk indicates that this route is a candidate for the default network route.
Conguring IP parameters - Layer 3 switches
FastIron Ethernet Switch Layer 3 Routing Conguration Guide, 08.0.30mb
53-1003627-06 69
Conguring IP load sharing
The IP route table can contain more than one path to a given destination. When this occurs, the Layer 3 switch selects the path with the
lowest cost as the path for forwarding trac to the destination. If the IP route table contains more than one path to a destination and the
paths each have the lowest cost, then the Layer 3 switch uses IP load sharing to select a path to the destination.
IP load sharing uses a hashing algorithm based on the source IP address, destination IP address, and protocol eld in the IP header, TCP,
and UDP information.
NOTE
IP load sharing is also called "Equal-Cost Multi-Path (ECMP) load sharing or just ECMP.
NOTE
IP load sharing is based on next-hop routing, and not on source routing.
NOTE
The term "path" refers to the next-hop router to a destination, not to the entire route to a destination. Thus, when the software
compares multiple equal-cost paths, the software is comparing paths that use dierent next-hop routers, with equal costs, to the
same destination.In many contexts, the terms "route" and "path" mean the same thing. The term "path" is used in this section to
refer to an individual next-hop router to a destination, while the term "route" refers collectively to the multiple paths to the
destination. Load sharing applies when the IP route table contains multiple, equal-cost paths to a destination.
NOTE
Brocade devices also perform load sharing among the ports in aggregate links. Refer to "Trunk group load sharing" in the
FastIron Ethernet Switch Platform and Layer 2 Switching Conguration Guide.
How multiple equal-cost paths enter the IP route table
IP load sharing applies to equal-cost paths in the IP route table. Routes that are eligible for load sharing can enter the routing table from
any of the following routing protocols:
• IP static routes
• Routes learned through OSPF
• Routes learned through BGP4
Administrative distance for each IP route
The administrative distance is a unique value associated with each type (source) of IP route. Each path has an administrative distance.
The administrative distance is not used when performing IP load sharing, but the administrative distance is used when evaluating multiple
equal-cost paths to the same destination from dierent sources, such as between static IP routes, OSPF, and BGP4.
The value of the administrative distance is determined by the source of the route. The Layer 3 switch is congured with a unique
administrative distance value for each IP route source.
When the software receives multiple paths to the same destination and the paths are from dierent sources, the software compares the
administrative distances of the paths and selects the path with the lowest administrative distance. The software then places the path with
the lowest administrative distance in the IP route table. For example, if the Layer 3 switch has a path learned from OSPF and a path
learned from IBGP for a given destination, only the path with the lower administrative distance enters the IP route table.
Here are the default administrative distances on the Brocade Layer 3 switch:
• Directly connected - 0 (this value is not congurable)
• Static IP route - 1 (applies to all static routes, including default routes and default network routes)
Conguring IP parameters - Layer 3 switches
FastIron Ethernet Switch Layer 3 Routing Conguration Guide, 08.0.30mb
70 53-1003627-06
• Exterior Border Gateway Protocol (EBGP) - 20
• OSPF - 110
• Interior Gateway Protocol (IBGP) - 200
• Local BGP - 200
• Unknown - 255 (the router will not use this route)
Lower administrative distances are preferred over higher distances. For example, if the router receives routes for the same network from
OSPF and from IBGP, the router will prefer the OSPF route by default.
NOTE
You can change the administrative distances individually. Refer to the conguration chapter for the route source for
information.
Since the software selects only the path with the lowest administrative distance, and the administrative distance is determined by the path
source. IP load sharing applies only when the IP route table contains multiple paths to the same destination, from the same IP route
source.
IP load sharing does not apply to paths that come from dierent sources.
Path cost
The cost parameter provides a common basis of comparison for selecting from among multiple paths to a given destination. Each path
in the IP route table has a cost. When the IP route table contains multiple paths to a destination, the Layer 3 switch chooses the path with
the lowest cost. When the IP route table contains more than one path with the lowest cost to a destination, the Layer 3 switch uses IP
load sharing to select one of the lowest-cost paths.
The source of a path cost value depends on the source of the path:
•IP static route - The value you assign to the metric parameter when you congure the route. The default metric is 1.
•OSPF - The Path Cost associated with the path. The paths can come from any combination of inter-area, intra-area, and
external Link State Advertisements (LSAs).
•BGP4 - The path Multi-Exit Discriminator (MED) value.
NOTE
If the path is redistributed between two or more of the above sources before entering the IP route table, the cost can increase
during the redistribution due to settings in redistribution lters.
Static route, OSPF, and BGP4 load sharing
IP load sharing and load sharing for BGP4 routes are individually congured. Multiple equal-cost paths for a destination can enter the IP
route table only if the source of the paths is congured to support multiple equal-cost paths. For example, if BGP4 allows only one path
with a given cost for a given destination, the BGP4 route table cannot contain equal-cost paths to the destination. Consequently, the IP
route table will not receive multiple equal-cost paths from BGP4.
The load sharing state for all the route sources is based on the state of IP load sharing. Since IP load sharing is enabled by default on all
Brocade Layer 3 switches, load sharing for static IP routes, OSPF routes, and BGP4 routes also is enabled by default.
Conguring IP parameters - Layer 3 switches
FastIron Ethernet Switch Layer 3 Routing Conguration Guide, 08.0.30mb
53-1003627-06 71
TABLE 7 Default load sharing parameters for route sources
Route source Default maximum number
of paths
Maximum number of paths
FSX FCX / ICX 6450 / ICX 6610 /
ICX 6650 / ICX 7450 / ICX
7250
ICX 7750
Static IP route 436383323
OSPF 436383323
BGP441 4 4 32
How IP load sharing works
When ECMP is enabled, multiple equal-cost paths for the destination IP is installed in the hardware Layer 3 routing table. When an
ingress Layer 3 IP trac matches with the entry in the hardware for Layer 3 routing, one of the paths is selected based on the internal
Hardware hashing logic and the packet gets forwarded on that path.
Disabling IP load sharing
To disable IP load sharing, enter the following commands.
device(config)# no ip load-sharing
Syntax: no ip load-sharing
Changing the maximum number of ECMP (load sharing) paths
You can change the maximum number of paths the Layer 3 switch supports to a value from 2 through 8. On the Brocade ICX 7750, the
value range for the maximum number of load-sharing paths is from 2 through 32.
TABLE 8 Maximum number of ECMP load sharing paths per device
FSX 800 / FSX 1600 FCX ICX 6450 / ICX 6610 / ICX
6650 / ICX 7250 / ICX 7450
ICX 7750
68832
For optimal results, set the maximum number of paths to a value at least as high as the maximum number of equal-cost paths your
network typically contains. For example, if the Layer 3 switch you are conguring for IP load sharing has six next-hop routers, set the
maximum paths value to six.
To change the number of IP load sharing paths, enter a command such as the following.
device(config)# ip load-sharing 6
Syntax: [no] ip load-sharing [ num ]
The num variable species the number of paths and can be from 2 through 8, depending on the device you are conguring. On the
Brocade ICX 7750, the value of the num variable can be from 2 through 32.
3This value depends on the value for IP load sharing, and is not separately congurable.
4Not applicable for Brocade ICX 6450 and Brocade ICX 7250.
Conguring IP parameters - Layer 3 switches
FastIron Ethernet Switch Layer 3 Routing Conguration Guide, 08.0.30mb
72 53-1003627-06
The conguration of the maximum number of IP load sharing paths to a value more than 8 is determined by the maximum number of
ECMP paths dened at the system level using the system-max max-ecmp command. You cannot congure the maximum number of IP
load sharing paths higher than the value dened at the system level. Also, you cannot congure the maximum number of ECMP paths at
the system level to a value less than the congured IP load sharing value.
To dene the maximum number of ECMP paths at the system level, enter a command such as the following.
device(config)# system-max max-ecmp 20
device(config)# write memory
device(config)# exit
device# reload
Syntax: [no] system-max max-ecmp [ num ]
The num variable species the maximum number of ECMP paths and the value range can be from 8 through 32. This command is
supported only on the Brocade ICX 7750.
You must save the conguration and reload the device for the maximum ECMP value change to take eect.
ECMP load sharing for IPv6
The IPv6 route table selects the best route to a given destination from among the routes in the tables maintained by the congured
routing protocols (BGP4, OSPF, static, and so on). The IPv6 route table can contain more than one path to a given destination. When this
occurs, the Brocade device selects the path with the lowest cost for insertion into the routing table. If more than one path with the lowest
cost exists, all of these paths are inserted into the routing table, subject to the congured maximum number of load sharing paths (by
default 4). The device uses Equal-Cost Multi-Path (ECMP) load sharing to select a path to a destination.
When a route is installed by routing protocols or congured static route for the rst time, and the IPv6 route table contains multiple,
equal-cost paths to that route, the device checks the IPv6 neighbor for each next hop. Every next hop where the link layer address has
been resolved will be stored in hardware. The device will initiate neighbor discovery for the next hops whose link layer addresses are not
resolved. The hardware will hash the packet and choose one of the paths. The number of paths would be updated in hardware as the link
layer gets resolved for a next hop.
If the path selected by the device becomes unavailable, the IPv6 neighbor should change state and trigger the update of the destination
path in the hardware.
Brocade FastIron devices support network-based ECMP load-sharing methods for IPv6 trac. The Brocade device distributes trac
across equal-cost paths based on a XOR of some bits from the MAC source address, MAC destination address, IPv6 source address,
IPv6 destination address, IPv6 ow label, IPv6 next header. The software selects a path based on a calculation involving the maximum
number of load-sharing paths allowed and the actual number of paths to the destination network. This is the default ECMP load-sharing
method for IPv6.
You can manually disable or enable ECMP load sharing for IPv6 and specify the number of equal-cost paths the device can distribute
trac across. In addition, you can display information about the status of ECMP load-sharing on the device.
Disabling or re-enabling ECMP load sharing for IPv6
ECMP load sharing for IPv6 is enabled by default. To disable the feature, enter the following command.
device(config)#no ipv6 load-sharing
If you want to re-enable the feature after disabling it, you must specify the number of load-sharing paths. By entering a command such
as the following, iPv6 load-sharing will be re-enabled.
device(config)#ipv6 load-sharing 4
Syntax: [no] ipv6 load-sharing num
Conguring IP parameters - Layer 3 switches
FastIron Ethernet Switch Layer 3 Routing Conguration Guide, 08.0.30mb
53-1003627-06 73
The num variable species the number of paths and can be from 2-8. The default is 4. On the ICX 7750 device, the value of the num
variable can be from 2 through 32.
The conguration of the maximum number of IP load sharing paths to a value more than 8 is determined by the maximum number of
ECMP paths dened at the system level using the system-max max-ecmp command. You cannot congure the maximum number of IP
load sharing paths higher than the value dened at the system level.
To dene the maximum number of ECMP paths at the system level, enter a command such as the following.
device(config)# system-max max-ecmp 20
device(config)# write memory
device(config)# exit
device# reload
Syntax: [no] system-max max-ecmp [ num ]
The num variable species the maximum number of ECMP paths and the value range can be from 8 through 32. This is supported only
on the ICX 7750 device.
Changing the maximum load sharing paths for IPv6
By default, IPv6 ECMP load sharing allows trac to be balanced across up to four equal paths.
To change the number of ECMP load sharing paths for IPv6, enter a command such as the following.
device(config)#ipv6 load-sharing 6
Syntax: [no] ipv6 load-sharing [ num ]
The num variable species the number of paths and can be from 2 through 8, depending on the device you are conguring. On the
Brocade ICX 7750, the value of the num variable can be from 2 through 32.
The conguration of the maximum number of IP load sharing paths to a value more than 8 is determined by the maximum number of
ECMP paths dened at the system level using the system-max max-ecmp command. You cannot congure the maximum number of IP
load sharing paths higher than the value dened at the system level. Also, you cannot congure the maximum number of ECMP paths at
the system level to a value less than the congured IP load sharing value.
To dene the maximum number of ECMP paths at the system level, enter a command such as the following.
device(config)# system-max max-ecmp 20
device(config)# write memory
device(config)# exit
device# reload
Syntax: [no] system-max max-ecmp [ num ]
The num variable species the maximum number of ECMP paths and the value range can be from 8 through 32. This command is
supported only on the Brocade ICX 7750.
You must save the conguration and reload the device for the maximum ECMP value change to take eect.
Displaying ECMP load-sharing information for IPv6
To display the status of ECMP load sharing for IPv6, enter the following command.
device#show ipv6
Global Settings
unicast-routing enabled, hop-limit 64
No IPv6 Domain Name Set
No IPv6 DNS Server Address set
Prefix-based IPv6 Load-sharing is Enabled, Number of load share paths: 4
Conguring IP parameters - Layer 3 switches
FastIron Ethernet Switch Layer 3 Routing Conguration Guide, 08.0.30mb
74 53-1003627-06
Syntax: show ipv6
ICMP Router Discovery Protocol conguration
The ICMP Router Discovery Protocol (IRDP) is used by Brocade Layer 3 switches to advertise the IP addresses of its router interfaces to
directly attached hosts. IRDP is disabled by default. You can enable the feature on a global basis or on an individual port basis:
• If you enable the feature globally, all ports use the default values for the IRDP parameters.
• If you leave the feature disabled globally but enable it on individual ports, you also can congure the IRDP parameters on an
individual port basis.
NOTE
You can congure IRDP parameters only an individual port basis. To do so, IRDP must be disabled globally and enabled only
on individual ports. You cannot congure IRDP parameters if the feature is globally enabled.
When IRDP is enabled, the Layer 3 switch periodically sends Router Advertisement messages out the IP interfaces on which the feature
is enabled. The messages advertise the Layer 3 switch IP addresses to directly attached hosts who listen for the messages. In addition,
hosts can be congured to query the Layer 3 switch for the information by sending Router Solicitation messages.
Some types of hosts use the Router Solicitation messages to discover their default gateway. When IRDP is enabled on the Brocade
Layer 3 switch, the Layer 3 switch responds to the Router Solicitation messages. Some clients interpret this response to mean that the
Layer 3 switch is the default gateway. If another router is actually the default gateway for these clients, leave IRDP disabled on the
Brocade Layer 3 switch.
IRDP parameters
IRDP uses the following parameters. If you enable IRDP on individual ports instead of enabling the feature globally, you can congure
these parameters on an individual port basis:
•Packet type - The Layer 3 switch can send Router Advertisement messages as IP broadcasts or as IP multicasts addressed to
IP multicast group 224.0.0.1. The packet type is IP broadcast.
•Maximum message interval and minimum message interval - When IRDP is enabled, the Layer 3 switch sends the Router
Advertisement messages every 450 - 600 seconds by default. The time within this interval that the Layer 3 switch selects is
random for each message and is not aected by trac loads or other network factors. The random interval minimizes the
probability that a host will receive Router Advertisement messages from other routers at the same time. The interval on each
IRDP-enabled Layer 3 switch interface is independent of the interval on other IRDP-enabled interfaces. The default maximum
message interval is 600 seconds. The default minimum message interval is 450 seconds.
•Hold time - Each Router Advertisement message contains a hold time value. This value species the maximum amount of time
the host should consider an advertisement to be valid until a newer advertisement arrives. When a new advertisement arrives,
the hold time is reset. The hold time is always longer than the maximum advertisement interval. Therefore, if the hold time for an
advertisement expires, the host can reasonably conclude that the router interface that sent the advertisement is no longer
available. The default hold time is three times the maximum message interval.
•Preference - If a host receives multiple Router Advertisement messages from dierent routers, the host selects the router that
sent the message with the highest preference as the default gateway. The preference can be a number from 0-4294967296.
The default is 0.
Conguring IP parameters - Layer 3 switches
FastIron Ethernet Switch Layer 3 Routing Conguration Guide, 08.0.30mb
53-1003627-06 75
Enabling IRDP globally
To globally enable IRDP, enter the following command.
device(config)# ip irdp
This command enables IRDP on the IP interfaces on all ports. Each port uses the default values for the IRDP parameters. The
parameters are not congurable when IRDP is globally enabled.
Enabling IRDP on an individual port
To enable IRDP on an individual interface and change IRDP parameters, enter commands such as the following.
device(config)# interface ethernet 1/1/3
device(config-if-1/1/3)# ip irdp maxadvertinterval 400
This example shows how to enable IRDP on a specic port and change the maximum advertisement interval for Router Advertisement
messages to 400 seconds.
NOTE
To enable IRDP on individual ports, you must leave the feature globally disabled.
Syntax: [no] ip irdp { broadcast | multicast } [ holdtime seconds ] [ maxadvertinterval seconds ] [ minadvertinterval seconds ]
[ preference number ]
The broadcast and multicast parameters specify the packet type the Layer 3 switch uses to send Router Advertisement:
•broadcast - The Layer 3 switch sends Router Advertisement as IP broadcasts. This is the default.
•multicast - The Layer 3 switch sends Router Advertisement as multicast packets addressed to IP multicast group 224.0.0.1.
The holdtime seconds parameter species how long a host that receives a Router Advertisement from the Layer 3 switch should
consider the advertisement to be valid. When a host receives a new Router Advertisement message from the Layer 3 switch, the host
resets the hold time for the Layer 3 switch to the hold time specied in the new advertisement. If the hold time of an advertisement
expires, the host discards the advertisement, concluding that the router interface that sent the advertisement is no longer available. The
value must be greater than the value of the maxadvertinterval parameter and cannot be greater than 9000. The default is three times the
value of the maxadvertinterval parameter.
The maxadvertinterval parameter species the maximum amount of time the Layer 3 switch waits between sending Router
Advertisements. You can specify a value from 1 to the current value of the holdtime parameter. The default is 600 seconds.
The minadvertinterval parameter species the minimum amount of time the Layer 3 switch can wait between sending Router
Advertisements. The default is three-fourths (0.75) the value of the maxadvertinterval parameter. If you change the maxadvertinterval
parameter, the software automatically adjusts the minadvertinterval parameter to be three-fourths the new value of the
maxadvertinterval parameter. If you want to override the automatically congured value, you can specify an interval from 1 to the current
value of the maxadvertinterval parameter.
The preference number parameter species the IRDP preference level of this Layer 3 switch. If a host receives Router Advertisements
from multiple routers, the host selects the router interface that sent the message with the highest interval as the host default gateway. The
valid range is from 0 to 4294967296. The default is 0.
Reverse Address Resolution Protocol conguration
The Reverse Address Resolution Protocol (RARP) provides a simple mechanism for directly-attached IP hosts to boot over the network.
RARP allows an IP host that does not have a means of storing its IP address across power cycles or software reloads to query a directly-
attached router for an IP address.
Conguring IP parameters - Layer 3 switches
FastIron Ethernet Switch Layer 3 Routing Conguration Guide, 08.0.30mb
76 53-1003627-06
RARP is enabled by default. However, you must create a RARP entry for each host that will use the Layer 3 switch for booting. A RARP
entry consists of the following information:
• The entry number - The entry sequence number in the RARP table.
• The MAC address of the boot client.
• The IP address you want the Layer 3 switch to give to the client.
When a client sends a RARP broadcast requesting an IP address, the Layer 3 switch responds to the request by looking in the RARP
table for an entry that contains the client MAC address:
• If the RARP table contains an entry for the client, the Layer 3 switch sends a unicast response to the client that contains the IP
address associated with the client MAC address in the RARP table.
• If the RARP table does not contain an entry for the client, the Layer 3 switch silently discards the RARP request and does not
reply to the client.
How RARP Diers from BootP and DHCP
RARP and BootP and DHCP are dierent methods for providing IP addresses to IP hosts when they boot. These methods dier in the
following ways:
• Location of congured host addresses:
– RARP requires static conguration of the host IP addresses on the Layer 3 switch. The Layer 3 switch replies directly to a
host request by sending an IP address you have congured in the RARP table.
– The Layer 3 switch forwards BootP and DHCP requests to a third-party BootP/DHCP server that contains the IP
addresses and other host conguration information.
• Connection of host to boot source (Layer 3 switch or BootP/DHCP server):
– RARP requires the IP host to be directly attached to the Layer 3 switch.
– An IP host and the BootP/DHCP server can be on dierent networks and on dierent routers, so long as the routers are
congured to forward ("help") the host boot request to the boot server.
– You can centrally congure other host parameters on the BootP/DHCP server, in addition to the IP address, and supply
those parameters to the host along with its IP address.
To congure the Layer 3 switch to forward BootP/DHCP requests when boot clients and the boot servers are on dierent subnets on
dierent Layer 3 switch interfaces, refer to BootP and DHCP relay parameter conguration on page 81.
Disabling RARP
RARP is enabled by default. To disable RARP, enter the following command at the global CONFIG level.
device(config)# no ip rarp
Syntax: [no] ip rarp
To re-enable RARP, enter the following command.
device(config)# ip rarp
Creating static RARP entries
You must congure the RARP entries for the RARP table. The Layer 3 switch can send an IP address in reply to a client RARP request
only if create a RARP entry for that client.
Conguring IP parameters - Layer 3 switches
FastIron Ethernet Switch Layer 3 Routing Conguration Guide, 08.0.30mb
53-1003627-06 77
To assign a static IP RARP entry for static routes on a Brocade router, enter a command such as the following.
device(config)# rarp 1 0000.0054.2348 10.53.4.2
This command creates a RARP entry for a client with MAC address 0000.0054.2348. When the Layer 3 switch receives a RARP
request from this client, the Layer 3 switch replies to the request by sending IP address 192.53.4.2 to the client.
Syntax: rap number mac-addr ip-addr
The number parameter identies the RARP entry number. You can specify an unused number from 1 to the maximum number of RARP
entries supported on the device. To determine the maximum number of entries supported on the device, refer to the section "Displaying
and modifying system parameter default settings" in the FastIron Ethernet Switch Platform and Layer 2 Switching Conguration Guide.
The mac-addr parameter species the MAC address of the RARP client.
The ip-addr parameter species the IP address the Layer 3 switch will give the client in response to the client RARP request.
Changing the maximum number of static RARP entries supported
The number of RARP entries the Layer 3 switch supports depends on how much memory the Layer 3 switch has. To determine how
many RARP entries your Layer 3 switch can have, display the system default information using the procedure in the section "Displaying
system parameter default values" in the FastIron Ethernet Switch Platform and Layer 2 Switching Conguration Guide.
If your Layer 3 switch allows you to increase the maximum number of RARP entries, you can use a procedure in the same section to do
so.
NOTE
You must save the conguration to the startup-cong le and reload the software after changing the RARP cache size to place
the change into eect.
Conguring UDP broadcast and IP helper parameters
Some applications rely on client requests sent as limited IP broadcasts addressed to the UDP application port. If a server for the
application receives such a broadcast, the server can reply to the client. Routers do not forward subnet directed broadcasts, so the client
and server must be on the same network for the broadcast to reach the server. If the client and server are on dierent networks (on
opposite sides of a router), the client request cannot reach the server.
You can congure the Layer 3 switch to forward clients‘ requests to UDP application servers. To do so:
• Enable forwarding support for the UDP application port, if forwarding support is not already enabled.
•Congure a helper adders on the interface connected to the clients. Specify the helper address to be the IP address of the
application server or the subnet directed broadcast address for the IP subnet the server is in. A helper address is associated with
a specic interface and applies only to client requests received on that interface. The Layer 3 switch forwards client requests for
any of the application ports the Layer 3 switch is enabled to forward to the helper address.
Forwarding support for the following application ports is enabled by default:
• dns (port 53)
• tftp (port 69)
• time (port 37)
• tacacs (port 65)
Conguring IP parameters - Layer 3 switches
FastIron Ethernet Switch Layer 3 Routing Conguration Guide, 08.0.30mb
78 53-1003627-06
NOTE
The application names are the names for these applications that the Layer 3 switch software recognizes, and might not match
the names for these applications on some third-party devices. The numbers listed in parentheses are the UDP port numbers for
the applications. The numbers come from RFC 1340.
NOTE
Forwarding support for BootP/DHCP is enabled by default.
You can enable forwarding for other applications by specifying the application port number.
You also can disable forwarding for an application.
NOTE
If you disable forwarding for a UDP application, forwarding of client requests received as broadcasts to helper addresses is
disabled. Disabling forwarding of an application does not disable other support for the application. For example, if you disable
forwarding of Telnet requests to helper addresses, other Telnet support on the Layer 3 switch is not also disabled.
Enabling forwarding for a UDP application
If you want the Layer 3 switch to forward client requests for UDP applications that the Layer 3 switch does not forward by default, you
can enable forwarding support for the port. To enable forwarding support for a UDP application, use the following method. You also can
disable forwarding for an application using this method.
NOTE
You also must congure a helper address on the interface that is connected to the clients for the application. The Layer 3 switch
cannot forward the requests unless you congure the helper address.
To enable the forwarding of NTP broadcasts, enter the following command.
device(config)# ip forward-protocol udp ntp
Syntax: [no] ip forward-protocol {udp udp-port-name | udp-port-num }
The udp-port-name parameter can have one of the following values. For reference, the corresponding port numbers from RFC 1340
are shown in parentheses. If you specify an application name, enter the name only, not the parentheses or the port number shown here:
• bootpc (port 68)
• bootps (port 67)
• discard (port 9)
• dns (port 53)
• dnsix (port 90)
• echo (port 7)
• mobile-ip (port 434)
• netbios-dgm (port 138)
• netbios-ns (port 137)
• ntp (port 123)
• tacacs (port 65)
• talk (port 517)
• time (port 37)
• tftp (port 69)
Conguring IP parameters - Layer 3 switches
FastIron Ethernet Switch Layer 3 Routing Conguration Guide, 08.0.30mb
53-1003627-06 79
In addition, you can specify any UDP application by using the application UDP port number.
The udp-port-num parameter species the UDP application port number. If the application you want to enable is not listed above, enter
the application port number. You also can list the port number for any of the applications listed above.
To disable forwarding for an application, enter a command such as the following.
device(config)# no ip forward-protocol udp ntp
This command disables forwarding of SNMP requests to the helper addresses congured on Layer 3 switch interfaces.
Conguring an IP helper address
To forward a client broadcast request for a UDP application when the client and server are on dierent networks, you must congure a
helper address on the interface connected to the client. Specify the server IP address or the subnet directed broadcast address of the IP
subnet the server is in as the helper address.
You can congure up to 16 helper addresses on each interface. You can congure a helper address on an Ethernet port or a virtual
interface.
To congure a helper address on unit 1, slot 1, port 2, enter the following commands.
device(config)# interface ethernet 1/1/2
device(config-if-1/1/2)# ip helper-address 1 10.95.7.6
The commands in this example change the CLI to the conguration level for port 1/1/2, then add a helper address for server 10.95.7.6
to the port. If the port receives a client request for any of the applications that the Layer 3 switch is enabled to forward, the Layer 3 switch
forwards the client request to the server.
By default, IP helper does not forward client broadcast request to a server within the network.
To forward a client broadcast request when the client and server are on the same network, congure an IP helper with unicast option on
the interface connected to the client.
To congure an IP helper unicast option on unit 1, slot 1, port 2, enter the following commands:
device(config)# interface 1/1/2
device(config-if-1/1/2)# ip helper-address 1 10.10.10.1 unicast
The IP helper with unicast parameter forwards the client request to the server 10.10.10.1 which is within the network.
Syntax: ip helper-address num ip-addr [unicast]
The num variable species the helper address number and can be from 1 through 16.
The ip-addr variable species the server IP address or the subnet directed broadcast address of the IP subnet the server is in.
The unicast parameter species that the client request must be forwarded to the server that is on the same network.
Conguring IP parameters - Layer 3 switches
FastIron Ethernet Switch Layer 3 Routing Conguration Guide, 08.0.30mb
80 53-1003627-06
Conguring the source IP address of a DHCP client packet on the DHCP relay agent
Enables the DHCP server to know the source subnet or network of a DHCP-client packet.
By default, a DHCP relay agent forwards a DHCP client packet with the source IP address set to the IP address of the outgoing interface
to the DHCP server. You can congure ACLs on a DHCP server to provide or block DHCP services to particular subnets or networks.
The ip bootp-use-intf-ip command congures a DHCP relay agent to set the source IP address of a DHCP client packet with the IP
address of the incoming interface for the packet. This reveals the source subnet or network of a DHCP client packet to the DHCP server
and enables the DHCP server to process or discard the DHCP trac according to the congured ACLs.
Enter the ip bootp-use-intf-ip command in global conguration mode of the DHCP relay agent.
device(config)# ip bootp-use-intf-ip
BootP and DHCP relay parameter conguration
A host on an IP network can use BootP or DHCP to obtain its IP address from a BootP/DHCP server. To obtain the address, the client
sends a BootP or DHCP request. The request is a subnet directed broadcast and is addressed to UDP port 67. A limited IP broadcast is
addressed to IP address 255.255.255.255 and is not forwarded by the Brocade Layer 3 switch or other IP routers.
When the BootP or DHCP client and server are on the same network, the server receives the broadcast request and replies to the client.
However, when the client and server are on dierent networks, the server does not receive the client request, because the Layer 3 switch
does not forward the request.
You can congure the Layer 3 switch to forward BootP/DHCP requests. To do so, congure a helper address on the interface that
receives the client requests, and specify the BootP/DHCP server IP address as the address you are helping the BootP/DHCP requests
to reach. Instead of the server IP address, you can specify the subnet directed broadcast address of the IP subnet the server is in.
BootP and DHCP relay parameters
The following parameters control the Layer 3 switch forwarding of BootP and DHCP requests:
•Helper address - The BootP/DHCP server IP address. You must congure the helper address on the interface that receives the
BootP/DHCP requests from the client. The Layer 3 switch cannot forward a request to the server unless you congure a helper
address for the server.
•Gateway address - The Layer 3 switch places the IP address of the interface that received the BootP/DHCP request in the
request packet Gateway Address eld (sometimes called the Router ID eld). When the server responds to the request, the
server sends the response as a unicast packet to the IP address in the Gateway Address eld. (If the client and server are directly
attached, the Gateway ID eld is empty and the server replies to the client using a unicast or broadcast packet, depending on
the server.)
By default, the Layer 3 switch uses the lowest-numbered IP address on the interface that receives the request as the Gateway address.
You can override the default by specifying the IP address you want the Layer 3 switch to use.
•Hop count - Each router that forwards a BootP/DHCP packet increments the hop count by 1. Routers also discard a forwarded
BootP/DHCP request instead of forwarding the request if the hop count is greater than the maximum number of BootP/DHCP
hops allows by the router. By default, a Brocade Layer 3 switch forwards a BootP/DHCP request if its hop count is four or less,
but discards the request if the hop count is greater than four. You can change the maximum number of hops the Layer 3 switch
will allow to a value from 1 through 15.
NOTE
The BootP/DHCP hop count is not the TTL parameter.
Conguring IP parameters - Layer 3 switches
FastIron Ethernet Switch Layer 3 Routing Conguration Guide, 08.0.30mb
53-1003627-06 81
Conguring an IP helper address
The procedure for conguring a helper address for BootP/DHCP requests is the same as the procedure for conguring a helper address
for other types of UDP broadcasts. Refer to Conguring an IP helper address on page 80.
Conguring the BOOTP and DHCP reply source address
You can congure the Brocade device so that a BOOTP/DHCP reply to a client contains the server IP address as the source address
instead of the router IP address. To do so, enter the following command at the Global CONFIG level of the CLI.
device(config)# ip helper-use-responder-ip
Syntax: [no] ip helper-use-responder-ip
Changing the IP address used for stamping BootP and DHCP requests
When the Layer 3 switch forwards a BootP/DHCP request, the Layer 3 switch "stamps" the Gateway Address eld. The default value the
Layer 3 switch uses to stamp the packet is the lowest-numbered IP address congured on the interface that received the request. If you
want the Layer 3 switch to use a dierent IP address to stamp requests received on the interface, use either of the following methods to
specify the address.
The BootP/DHCP stamp address is an interface parameter. Change the parameter on the interface that is connected to the BootP/
DHCP client.
To change the IP address used for stamping BootP/DHCP requests received on interface 1/1/1, enter commands such as the following.
device(config)# interface ethernet 1/1/1
device(config-if-1/1/1)# ip bootp-gateway 10.157.22.26
These commands change the CLI to the conguration level for port 1/1/1, then change the BootP/DHCP stamp address for requests
received on port 1/1/1 to 10.157.22.26. The Layer 3 switch will place this IP address in the Gateway Address eld of BootP/DHCP
requests that the Layer 3 switch receives on port 1/1/1 and forwards to the BootP/DHCP server.
Syntax: ip bootp-gateway ip-addr
Changing the maximum number of hops to a BootP relay server
Each BootP or DHCP request includes a eld Hop Count eld. The Hop Count eld indicates how many routers the request has passed
through. When the Layer 3 switch receives a BootP/DHCP request, the Layer 3 switch looks at the value in the Hop Count eld:
• If the hop count value is equal to or less than the maximum hop count the Layer 3 switch allows, the Layer 3 switch increments
the hop count by one and forwards the request.
• If the hop count is greater than the maximum hop count the Layer 3 switch allows, the Layer 3 switch discards the request.
To change the maximum number of hops the Layer 3 switch allows for forwarded BootP/DHCP requests, use either of the following
methods.
NOTE
The BootP and DHCP hop count is not the TTL parameter.
To modify the maximum number of BootP/DHCP hops, enter the following command.
device(config)# bootp-relay-max-hops 10
Conguring IP parameters - Layer 3 switches
FastIron Ethernet Switch Layer 3 Routing Conguration Guide, 08.0.30mb
82 53-1003627-06
This command allows the Layer 3 switch to forward BootP/DHCP requests that have passed through ten previous hops before reaching
the Layer 3 switch. Requests that have traversed 11 hops before reaching the switch are dropped. Since the hop count value initializes at
zero, the hop count value of an ingressing DHCP Request packet is the number of Layer 3 routers that the packet has already traversed.
Syntax: bootp-relay-max-hops max-hops
The max-hops parameter value can be 1 through 15.
DHCP server
All FastIron devices can be congured to function as DHCP servers.
Dynamic Host Conguration Protocol (DHCP) is a computer networking protocol used by devices (DHCP clients) to obtain leased (or
permanent) IP addresses. DHCP is an extension of the Bootstrap Protocol (BootP). The dierences between DHCP and BootP are the
address allocation and renewal process.
DHCP introduces the concept of a lease on an IP address. The DHCP server can allocate an IP address for a specied amount of time or
can extend a lease for an indenite amount of time. DHCP provides greater control of address distribution within a subnet. This feature is
crucial if the subnet has more devices than available IP addresses. In contrast to BootP, which has two types of messages that can be
used for leased negotiation, DHCP provides seven types of messages.
DHCP allocates temporary or permanent network IP addresses to clients. When a client requests the use of an address for a time
interval, the DHCP server guarantees not to reallocate that address within the requested time and tries to return the same network
address each time the client makes a request. The period of time for which a network address is allocated to a client is called a lease. The
client may extend the lease through subsequent requests. When the client is done with the address, they can release the address back to
the server. By asking for an indenite lease, clients may receive a permanent assignment.
In some environments, it may be necessary to reassign network addresses due to exhaustion of the available address pool. In this case,
the allocation mechanism reuses addresses with expired leases.
Conguration notes for DHCP servers
• The DHCP server is supported in the Layer 2 and Layer 3 software images.
• The management VLAN or the management port must be enabled for a device to receive IP addresses from a DHCP server.
• In the event of a controlled or forced switchover, a DHCP client will request from the DHCP server the same IP address and
lease assignment that it had before the switchover. After the switchover, the DHCP Server will be automatically re-initialized on
the new active controller or management module.
• For DHCP client hitless support in an IronStack, the stack mac command must be used to congure the IronStack MAC
address, so that the MAC address does not change in the event of a switchover or failover. If stack mac is not congured, the
MAC address/IP address pair assigned to a DHCP client will not match after a switchover or failover. Furthermore, in the Layer
3 router image, if the stack mac conguration is changed or removed and the management port has a dynamic IP address,
when a DHCP client tries to renew its lease from the DHCP server, the DHCP server will assign a dierent IP address.
• If any address from the congured DHCP pool is used, for example by the DHCP server or TFTP server, you must exclude the
address from the network pool. For conguration instructions, refer to Specifying addresses to exclude from the address pool
on page 90.
• Ensure that DHCP clients do not send DHCP request packets with a Maximum Transmission Unit (MTU) larger than 1500
bytes. Brocade devices do not support DHCP packets with an MTU larger than 1500 bytes.
Conguring IP parameters - Layer 3 switches
FastIron Ethernet Switch Layer 3 Routing Conguration Guide, 08.0.30mb
53-1003627-06 83
DHCP option 82 support
The DHCP relay agent information option (DHCP option 82) enables a DHCP relay agent to include information about itself when
forwarding client-originated DHCP packets to a DHCP server. The DHCP server uses this information to implement IP address or other
parameter-assignment policies.
In a metropolitan Ethernet-access environment, the DHCP server can centrally manage IP address assignments for a large number of
subscribers. If DHCP option 82 is disabled, a DHCP policy can only be applied per subnet, rather than per physical port. When DHCP
option 82 is enabled, a subscriber is identied by the physical port through which it connects to the network.
DHCP server options
A FastIron congured as a DHCP server can support up to 1000 DHCP clients, oering them the following options:
•NetBIOS over TCP/IP Name Server - Species a list of RFC1001/1002 NBNS name servers listed in order of preference.
•Domain Name Server - Species a list of Domain Name System (RFC 1035) name servers available to the client. Servers are
listed in order of preference.
•Domain Name - Species the domain name the client should use when resolving host names using the Domain Name
System.
•Router Option - species a list of IP addresses for routers on the client subnet. Routers are listed in order of preference.
•Subnet Mask - Species the client subnet mask (per RFC 950).
•Vendor Specic Information - Allows clients and servers to exchange vendor-specic information.
•Boot File - Species a boot image to be used by the client
•Next Bootstrap Server - Congures the IP address of the next server to be used for startup by the client.
•TFTP Server - Congures the address or name of the TFTP server available to the client.
A DHCP server assigns and manages IPv4 addresses from multiple address pools, using dynamic address allocation. The DHCP server
also contains the relay agent to forward DHCP broadcast messages to network segments that do not support these types of messages.
Conguring IP parameters - Layer 3 switches
FastIron Ethernet Switch Layer 3 Routing Conguration Guide, 08.0.30mb
84 53-1003627-06
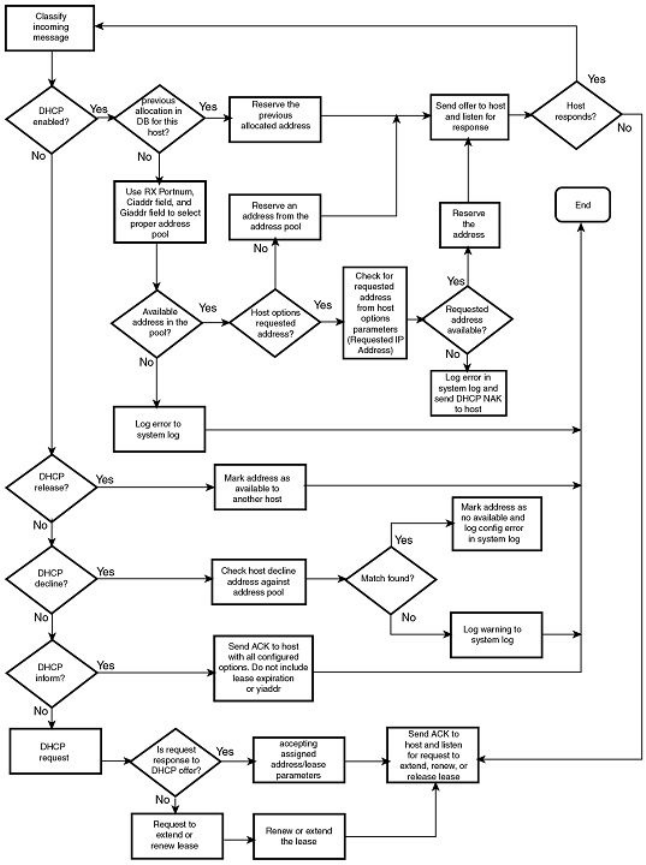
FIGURE 8 DHCP server conguration ow chart
Conguring DHCP server on a device
Perform the following steps to congure the DHCP server feature on your FastIron device:
1. Enable DHCP server by entering a command similar to the following.
device(config)# ip dhcp-server enable
2. Create a DHCP server address pool by entering a command similar to the following.
device(config)# ip dhcp-server pool cabo
Conguring IP parameters - Layer 3 switches
FastIron Ethernet Switch Layer 3 Routing Conguration Guide, 08.0.30mb
53-1003627-06 85

3. Congure the DHCP server address pool by entering commands similar to the following.
device(config-dhcp-cabo)# network 172.16.1.0/24
device(config-dhcp-cabo)# domain-name brocade.com
device(config-dhcp-cabo)# dns-server 172.16.1.2 172.16.1.3
device(config-dhcp-cabo)# netbios-name-server 172.16.1.2
device(config-dhcp-cabo)# lease 0 0 5
4. To disable DHCP, enter a command similar to the following.
device(config)# no ip dhcp-server enable
The following sections describe the default DHCP settings, CLI commands and the options you can congure for the DHCP
server feature.
Default DHCP server settings
TABLE 9 DHCP server default settings
Parameter Default Value
DHCP server Disabled
Lease database expiration time 86400 seconds
The duration of the lease for an assigned IP address 43200 seconds (one day)
Maximum lease database expiration time 86400 seconds
DHCP server with option 82 Disabled
DHCP server unknown circuit-ID for option 82 Permit range lookup
IP distribution mechanism Linear
DHCP server CLI commands
TABLE 10 DHCP server optional parameters
Command options Description
domain-name Species the domain name for the DHCP clients.
domain-name-servers Species the Domain Name System (DNS) IP servers that are available to
the DHCP clients.
merit-dump Species the path name of a le into which the client’s core image should
be placed in the event that the client crashes (the DHCP application issues
an exception in case of errors such as division by zero).
root-path Species the name of the path that contains the client’s root lesystem in
NFS notation.
router Adds the default router and gateway for the DHCP clients.
subnet-mask Denes the subnet mask for the network.
broadcast-address Denes a broadcast address for the network.
wins-server Denes the NetBIOS Windows Internet Naming Service (WINS) name
servers that are available to Microsoft DHCP clients.
log-servers Denes a list of log servers available to the client.
bootstrap-server Species the IP address of the bootstrap server (the command lls the
"siaddr" eld in the DHCP packet).
Conguring IP parameters - Layer 3 switches
FastIron Ethernet Switch Layer 3 Routing Conguration Guide, 08.0.30mb
86 53-1003627-06

TABLE 11 DHCP server CLI commands
Command Description
dbexpire command Species how long, in seconds, the DHCP server should wait before
aborting a database transfer.
ip dhcp-server arp-ping-timeout Species the time (in seconds) the server will wait for a response to an
arp-ping packet before deleting the client from the binding database. The
minimum setting is 5 seconds and the maximum time is 30 seconds.
NOTE
Do not alter the default value unless it is necessary. Increasing
the value of this timer may increase the time to get console
access after a reboot.
clear ip dhcp-server binding Deletes a specic, or all leases from the binding database.
ip dhcp-server enable Enables the DHCP server feature.
no ip dhcp-server mgmt Disables DHCP server on the management port.
ip dhcp-server pool Switches to pool conguration mode (cong-dhcp-name# prompt) and
creates an address pool.
ip dhcp-server relay-agent-echo enable Enables relay agent echo (Option 82).
ip dhcp-server Species the IP address of the selected DHCP server.
show ip dhcp-server binding Displays a specic lease entry, or all lease entries.
show ip dhcp-server Displays a specic address pool or all address pools.
show ip dhcp-server ash Displays the lease binding database that is stored in ash memory.
show ip dhcp-server summary Displays a summary of active leases, deployed address pools, undeployed
address pools, and server uptime.
bootle Species a boot image to be used by the client.
deploy Deploys an address pool conguration to the server.
dhcp-default-router Species the IP address of the default router or routers for a client.
dns-server Species the IP addresses of a DNS server or servers available to the
client.
domain-name Congures the domain name for the client.
lease Species the lease duration for an address pool. The default is a one-day
lease.
excluded-address Species an address or range of addresses to be excluded from the
address pool.
netbios-name-server Species the IP address of a NetBIOS WINS server or servers that are
available to Microsoft DHCP clients.
network Congures the subnet network and mask of the DHCP address pool.
next-bootstrap-server Congures the IP address of the next server to be used for startup by the
client.
tftp-server Congures the address or name of the TFTP server available to the client.
vendor-class Species the vendor type and conguration value for the DHCP client.
Removing DHCP leases
The clear ip dhcp-server binding command can be used to delete a specic lease, or all lease entries from the lease binding database.
device(config)# clear ip dhcp-server binding *
Conguring IP parameters - Layer 3 switches
FastIron Ethernet Switch Layer 3 Routing Conguration Guide, 08.0.30mb
53-1003627-06 87
Syntax: clear ip dhcp-server binding { address | * }
•address - The IP address to be deleted
• The wildcard ( *) clears all IP addresses.
Enabling DHCP server
The ip dhcp-server enable command enables DHCP server, which is disabled by default.
Syntax: [no] ip dhcp-server enable
The no version of this command disables DHCP server.
Disabling DHCP server on the management port
By default, when DHCP server is enabled, it responds to DHCP client requests received on the management port. If desired, you can
prevent the response to DHCP client requests received on the management port, by disabling DHCP server support on the port. When
disabled, DHCP client requests that are received on the management port are silently discarded.
To disable DHCP server on the management port, enter the following command at the global conguration level of the CLI.
device(config)# no ip dhcp-server mgmt
To re-enable DHCP server on the management port after it has been disabled, enter the ip dhcp-server mgmt command:
device(config)# ip dhcp-server mgmt
Syntax: [no] ip dhcp-server mgmt
Setting the wait time for ARP-ping response
At startup, the server reconciles the lease-binding database by sending an ARP-ping packet out to every client. If there is no response to
the ARP-ping packet within a set amount of time (set in seconds), the server deletes the client from the lease-binding database. The
minimum setting is 5 seconds and the maximum is 30 seconds.
Syntax: ip dhcp-server arp-ping-timeout num
•num - The number of seconds to wait for a response to an ARP-ping packet.
NOTE
Do not alter the default value unless it is necessary. Increasing the value of this timer may increase the time to get console
access after a reboot.
Creating an address pool
The ip dhcp-server pool command puts you in pool conguration mode, and allows you to create an address pool.
device(config)# ip dhcp-server pool
device(config-dhcp-name)# ip dhcp-server pool monterey
device(config-dhcp-monterey)#
These commands create an address pool named "monterey".
Syntax: ip dhcp-server pool name
Conguring IP parameters - Layer 3 switches
FastIron Ethernet Switch Layer 3 Routing Conguration Guide, 08.0.30mb
88 53-1003627-06
Conguration notes for creating an address pool
• If the DHCP server address is part of a congured DHCP address pool, you must exclude the DHCP server address from the
network pool. Refer to Specifying addresses to exclude from the address pool on page 90.
• While in DHCP server pool conguration mode, the system will place the DHCP server pool in pending mode and the DHCP
server will not use the address pool to distribute information to clients. To activate the pool, use the deploy command. Refer to
Deploying an address pool conguration to the server on page 89.
Enabling relay agent echo (option 82)
The ip dhcp-server relay-agent-echo enable command activates DHCP option 82, and enables the DHCP server to echo relay agent
information in all replies.
device(config)# ip dhcp-server relay-agent-echo enable
Syntax: ip dhcp-server relay-agent-echo enable
Conguring the IP address of the DHCP server
The ip dhcp-server command species the IP address of the selected DHCP server, as shown in this example:
device(config)# ip dhcp-server 10.1.1.144
Syntax: ip dhcp-server server-identier
•server-identier - The IP address of the DHCP server
This command assigns an IP address to the selected DHCP server.
Conguring the boot image
The bootle command species a boot image name to be used by the DHCP client.
device(config-dhcp-cabo)# bootfile foxhound
In this example, the DHCP client should use the boot image called "foxhound".
Syntax: bootle name
Deploying an address pool conguration to the server
The deploy command sends an address pool conguration to the DHCP server.
device(config-dhcp-cabo)# deploy
Syntax: deploy
Specifying default routers available to the client
The dhcp-default-router command species the IP addresses of the default routers for a client.
Syntax: dhcp-default-router address [address, address]
Conguring IP parameters - Layer 3 switches
FastIron Ethernet Switch Layer 3 Routing Conguration Guide, 08.0.30mb
53-1003627-06 89
Specifying DNS servers available to the client
The dns-server command species DNS servers that are available to DHCP clients.
device(config-dhcp-cabo)# dns-server 10.2.1.143, 10.2.2.142
Syntax: dns-server address [ address, address ]
Conguring the domain name for the client
The domain-name command congures the domain name for the client.
device(config-dhcp-cabo)# domain-name sierra
Syntax: domain-name domain
Conguring the lease duration for the address pool
The lease command species the lease duration for the address pool. The default is a one-day lease.
device(config-dhcp-cabo)# lease 1 4 32
In this example, the lease duration has been set to one day, four hours, and 32 minutes. You can set a lease duration for just days, just
hours, or just minutes, or any combination of the three.
Syntax: lease days hours minutes
Specifying addresses to exclude from the address pool
The excluded-address command species either a single address, or a range of addresses that are to be excluded from the address
pool.
device(config-dhcp-cabo)# excluded-address 10.2.3.44
Syntax: excluded-address { address | address-low address-high }
•address - Species a single address
•address-low address-high - Species a range of addresses
Conguring the NetBIOS server for DHCP clients
The netbios-name-server command species the IP address of a NetBIOS WINS server or servers that are available to Microsoft
DHCP clients.
device(config-dhcp-cabo)# netbios-name-server 192.168.1.55
Syntax: netbios-name-server address [ ,address2,address3 ]
Conguring the subnet and mask of a DHCP address pool
This network command congures the subnet network and mask of the DHCP address pool.
device(config-dhcp-cabo)# network 10.2.3.44/24
Syntax: network subnet/mask
Conguring IP parameters - Layer 3 switches
FastIron Ethernet Switch Layer 3 Routing Conguration Guide, 08.0.30mb
90 53-1003627-06
Conguring a next-bootstrap server
The next-bootstrap-server command species the IP address of the next server the client should use for boot up.
device(config-dhcp-cabo)# next-bootstrap-server 10.2.5.44
Syntax: next-bootstrap-server address
Conguring the TFTP server
The tftp-server command species the address or name of the TFTP server to be used by the DHCP clients.
To congure a TFTP server by specifying its IP address, enter a command similar to the following.
device(config-dhcp-cabo)# tftp-server 10.7.5.48
To congure a TFTP server by specifying its server name, enter a command similar to the following.
device(config-dhcp-cabo)# tftp-server tftp.domain.com
Syntax:tftp-server { address | name server-name }
•address is the IP address of the TFTP server.
•name congures the TFTP server specied by server-name.
If DHCP options 66 (TFTP server name) and 150 (TFTP server IP address) are both congured, the DHCP client ignores option 150
and tries to resolve the TFTP server name (option 66) using DNS.
Conguring DHCP option 43 and option 60
Brocade devices running as DHCP servers can be congured with option 43 and option 60.
Conguring the DHCP option 60 helps in identifying the incoming DHCP client. If the vendor class identier (VCI) advertised by the
DHCP client matches with the DHCP server, the server makes a decision to exchange the vendor-specic information (VSI) congured
as part of DHCP option 43.
The Brocade ICX DHCP server can recognize the DHCP client device using the VCI (option 60) and pass specic information to this
device type only (using option 43). However, the DHCP server can be congured to always pass additional information using option 43
(regardless of the client ).
1. Enter global conguration mode.
device# configure terminal
device(config)#
2. Create a DHCP server pool.
device(config)# ip dhcp-server pool ruckus
NOTE
Save the conguration to retain the conguration through warm or cold
reboots.
3. Add option 60 using the vendor-class command.
device(ip dhcp-server pool ruckus)# vendor-class ascii “Ruckus CPE”
NOTE
If the ascii option contains a space, you must enter it with double quotes as shown in the previous example.
Conguring IP parameters - Layer 3 switches
FastIron Ethernet Switch Layer 3 Routing Conguration Guide, 08.0.30mb
53-1003627-06 91
4. Add the option 43 line using the option command.
device(ip dhcp-server pool ruckus)# option 43 ascii 192.168.10.1,192.168.20.01,192.168.30.1
or
device(ip dhcp-server pool ruckus)# option 43 hex 0108c0a80a01c0a81401
5. Deploy the conguration using the deploy command.
device(ip dhcp-server pool ruckus)# deploy
The following example congures option 60 and option 43 (hex) for a Ruckus Access Point (AP).
device# configure terminal
device(config)# ip dhcp-server pool ruckus
device(ip dhcp-server pool ruckus)# vendor-class ascii “Ruckus CPE”
device(ip dhcp-server pool ruckus)# option 43 hex 010cc0a80a01c0a81401c0a81e01
device(ip dhcp-server pool ruckus)# deploy
The following example congures option 60 and option 43 (ASCII) for a Ruckus AP.
device# configure terminal
device(config)# ip dhcp-server pool ruckus
device(ip dhcp-server pool ruckus)# vendor-class ascii “Ruckus CPE”
device(ip dhcp-server pool ruckus)# option 43 ascii 192.168.10.1,192.168.20.01,192.168.30.1
device(ip dhcp-server pool ruckus)# deploy
Conguring X Window System Display Manager IP addresses (Option 49)
Option 49 species a list of IP addresses of systems that are running the X Window System Display Manager and are available to the
client.
Option 49 is described in RFC 2132. The X Window client is a DHCP client in a network that solicits conguration information by
broadcasting a DHCP discovery packet on bootup or when the DHCP client is enabled. The DHCP server provides the IP addresses of
systems running the X Window System Display Managers available in the network in their preferred order as part of the DHCP oer
message.
On receipt of a discovery packet from the client, a DHCP oer must be sent back. Option 49 must be added with the IP addresses of
systems running the X Window System Display Manager in the network, along with other mandatory options. You can congure a
maximum of three IP addresses in a DHCP server pool.
NOTE
Option 49 is ignored if the client is a non-X Window client.
1. Enter global conguration mode.
2. Enter the DHCP server pool conguration mode.
3. Enter the xwindow-manager command along with the IP addresses of the X Window Display Manager separated by spaces.
The following example congures the IP addresses of systems running the X Window Display Manager in the DHCP conguration pool.
device# configure terminal
device# ip dhcp-server pool cabo
device(config-dhcp-cabo)# xwindow-manager 10.38.12.1 10.38.12.3 10.38.12.5
Conguring IP parameters - Layer 3 switches
FastIron Ethernet Switch Layer 3 Routing Conguration Guide, 08.0.30mb
92 53-1003627-06

Enabling static IP to MAC address mapping
Based on the client MAC address, you can statically congure the IP address to the MAC address in the DHCP server.
This conguration is useful when you want to have selected clients assigned with particular IP addresses from the server. Whenever a
DHCP discover message is received from these clients, based on the static conguration, the IP address will be assigned with the other
required parameters.
1. Enter global conguration mode.
device# configure terminal
device(config)#
2. Create a DHCP server pool.
device(config)# ip dhcp-server pool cabo
3. Enter the static-mac-ip-mapping command followed by the IP address and MAC address for mapping.
device(config-dhcp-cabo)# static-mac-ip-mapping 10.10.10.29 0010.9400.0005
The following example enables the static MAC address to IP address mapping.
device# configure terminal
device(config)# ip dhcp-server pool cabo
device(config-dhcp-cabo)# static-mac-ip-mapping 10.10.10.29 0010.9400.0005
Displaying DHCP server information
The following DHCP show commands can be entered from any level of the CLI.
Displaying active lease entries
The show ip dhcp-server binding command displays a specic active lease, or all active leases, as shown in the following example:
device# show ip dhcp-server binding
The following output is displayed:
device# show ip dhcp-server binding
Bindings from all pools:
IP Address Client-ID/ Lease expiration Type
Hardware address
192.168.1.2 0000.005d.a440 0d:0h:29m:31s Automatic
192.168.1.3 0000.00e1.26c0 0d:0h:29m:38s Automatic
Syntax: show ip dhcp-server binding [ address ]
•address - Displays entries for this address only
TABLE 12 show ip dhcp-server binding output descriptions
Field Description
IP address The IP addresses currently in the binding database
Client ID/Hardware address The hardware address for the client
Lease expiration The time when this lease will expire
Type The type of lease
Conguring IP parameters - Layer 3 switches
FastIron Ethernet Switch Layer 3 Routing Conguration Guide, 08.0.30mb
53-1003627-06 93

Displaying address-pool information
This show ip dhcp-server address-pool command displays information about a specic address pool, or for all address pools.
device# show ip dhcp-server address-pools
Showing all address pool(s):
Pool Name: one
Time elapsed since last save: 0d:0h:6m:52s
Total number of active leases: 2
Address Pool State: active
IP Address Exclusions: 192.168.1.45
IP Address Exclusions: 192.168.1.99 192.168.1.103
Pool Configured Options:
bootfile: example.bin
dhcp-default-router: 192.168.1.1
dns-server: 192.168.1.100
domain-name: example.com
lease: 0 0 30
netbios-name-server: 192.168.1.101
network: 192.168.1.0 255.255.255.0
next-bootstrap-server: 192.168.1.102
tftp-server: 192.168.1.103
Syntax: show ip dhcp-server [ address-pool name | address-pools ]
•address-pools - If you enter address-pools, the display shows all address pools
•address-pool name - Displays information about a specic address pool
TABLE 13 show ip dhcp-server address-pools output descriptions
Field Description
Pool name The name of the address pool
Time elapsed since last save The time that has elapsed since the last save.
Total number of active leases The number of leases that are currently active.
Address pool state The state of the address pool (active or inactive).
IP Address exclusions IP addresses that are not included in the address pool
Pool congured options (as described below)
bootle The name of the bootle
dhcp-server-router The address of the DHCP server router
dns-server The address of the dns server
domain-name The name of the domain
lease The identier for the lease
netbios-name server The address of the netbios name server
network The address of the network
next-bootstrap-server The address of the next-bootstrap server
tftp-server The address of the TFTP server
Displaying lease-binding information in ash memory
The show ip dhcp-server ash command displays the lease-binding database that is stored in ash memory.
device# show ip dhcp-server flash
device# show ip dhcp-server flash
Address Pool Binding:
IP Address Client-ID/ Lease expiration Type
Hardware address
Conguring IP parameters - Layer 3 switches
FastIron Ethernet Switch Layer 3 Routing Conguration Guide, 08.0.30mb
94 53-1003627-06

192.168.1.2 0000.005d.a440 0d:0h:18m:59s Automatic
192.168.1.3 0000.00e1.26c0 0d:0h:19m:8s Automatic
Syntax:show ip dhcp-server ash
TABLE 14 show ip dhcp-server ash output descriptions
Field Description
IP address The IP address of the ash memory lease-binding database
Client-ID/Hardware address The address of the client
Lease expiration The time when the lease will expire
Type The type of lease
Displaying summary DHCP server information
The show ip dhcp-server summary command displays information about active leases, deployed address-pools, undeployed address-
pools, and server uptime.
device# show ip dhcp-server summary
DHCP Server Summary:
Total number of active leases: 2
Total number of deployed address-pools: 1
Total number of undeployed address-pools: 0
Server uptime: 0d:0h:8m:27s
Syntax: show ip dhcp-server summary
TABLE 15 show ip dhcp-server summary output descriptions
Field Description
Total number of active leases Indicates the number of leases that are currently active
Total number of deployed address-pools The number of address pools currently in use.
Total number of undeployed address-pools The number of address-pools being held in reserve.
Server uptime The amount of time that the server has been active.
Conguring IP parameters - Layer 2 switches
The following sections describe how to congure IP parameters on a Brocade Layer 2 switch.
Conguring the management IP address and specifying the default
gateway
To manage a Layer 2 switch using Telnet or Secure Shell (SSH) CLI connections or the Web Management Interface, you must congure
an IP address for the Layer 2 switch. Optionally, you also can specify the default gateway.
Brocade devices support both classical IP network masks (Class A, B, and C subnet masks, and so on) and Classless Interdomain
Routing (CIDR) network prex masks:
• To enter a classical network mask, enter the mask in IP address format. For example, enter "10.157.22.99 255.255.255.0" for
an IP address with a Class-C subnet mask.
Conguring IP parameters - Layer 2 switches
FastIron Ethernet Switch Layer 3 Routing Conguration Guide, 08.0.30mb
53-1003627-06 95
• To enter a prex network mask, enter a forward slash ( / ) and the number of bits in the mask immediately after the IP address.
For example, enter "10.157.22.99/24" for an IP address that has a network mask with 24 signicant bits (ones).
By default, the CLI displays network masks in classical IP address format (example: 255.255.255.0). You can change the display to
prex format.
Assigning an IP address to a Brocade Layer 2 switch
To assign an IP address to a Brocade Layer 2 switch, enter a command such as the following at the global CONFIG level.
device(config)# ip address 10.45.6.110 255.255.255.0
Syntax: ip address ip-add rip-mask
or
Syntax: ip address ip-addr/mask-bits
You also can enter the IP address and mask in CIDR format, as follows.
device(config)# ip address 10.45.6.1/24
To specify the Layer 2 switch default gateway, enter a command such as the following.
device(config)# ip default-gateway 10.45.6.1
Syntax: ip default-gateway ip-addr
NOTE
When conguring an IP address on a Layer 2 switch that has multiple VLANs, make sure the conguration includes a
designated management VLAN that identies the VLAN to which the global IP address belongs. Refer to "Designated VLAN
for Telnet management sessions to a Layer 2 Switch" in the FastIron Ethernet Switch Security Conguration Guide.
Conguring Domain Name System resolver
The Domain Name System (DNS) resolver feature lets you use a host name to perform Telnet, ping, and traceroute commands. You can
also dene a DNS domain on a Brocade Layer 2 switch or Layer 3 switch and thereby recognize all hosts within that domain. After you
dene a domain name, the Brocade Layer 2 switch or Layer 3 switch automatically appends the appropriate domain to the host and
forwards it to the domain name server.
For example, if the domain "newyork.com" is dened on a Brocade Layer 2 switch or Layer 3 switch and you want to initiate a ping to
host "NYC01" on that domain, you need to reference only the host name in the command instead of the host name and its domain
name. For example, you could enter either of the following commands to initiate the ping.
device# ping nyc01
device# ping nyc01.newyork.com
Dening a DNS entry
You can dene up to four DNS servers for each DNS entry. The rst entry serves as the primary default address. If a query to the primary
address fails to be resolved after three attempts, the next gateway address is queried (also up to three times). This process continues for
each dened gateway address until the query is resolved. The order in which the default gateway addresses are polled is the same as the
order in which you enter them.
To dene four possible default DNS gateway addresses, enter command such as the following:
device(config)# ip dns server-address 10.157.22.199 10.96.7.15 10.95.7.25 10.98.7.15
Conguring IP parameters - Layer 2 switches
FastIron Ethernet Switch Layer 3 Routing Conguration Guide, 08.0.30mb
96 53-1003627-06
Syntax: ip dns server-address ip-addr [ ip-addr ] [ ip-addr ] [ ip-addr ]
In this example, the rst IP address in the ip dns server-address command becomes the primary gateway address and all others are
secondary addresses. Because IP address 10.98.7.15 is the last address listed, it is also the last address consulted to resolve a query.
Using a DNS name to initiate a trace route
Suppose you want to trace the route from a Brocade Layer 2 switch to a remote server identied as NYC02 on domain newyork.com.
Because the newyork.com domain is already dened on the Layer 2 switch, you need to enter only the host name, NYC02, as noted in
the following command.
device# traceroute nyc02
Syntax: traceroute host-ip-addr [ maxttl value ] [ minttl value ] [ numeric ] [ timeout value ] [ source-ip ip-addr ]
The only required parameter is the IP address of the host at the other end of the route.
After you enter the command, a message indicating that the DNS query is in process and the current gateway address (IP address of the
domain name server) being queried appear on the screen.
Type Control-c to abort
Sending DNS Query to 10.157.22.199
Tracing Route to IP node 10.157.22.80
To ABORT Trace Route, Please use stop-traceroute command.
Traced route to target IP node 10.157.22.80:
IP Address Round Trip Time1 Round Trip Time2
10.95.6.30 93 msec 121 msec
NOTE
In the previous example, 10.157.22.199 is the IP address of the domain name server (default DNS gateway address), and
10.157.22.80 represents the IP address of the NYC02 host.
Conguring IP parameters - Layer 2 switches
FastIron Ethernet Switch Layer 3 Routing Conguration Guide, 08.0.30mb
53-1003627-06 97
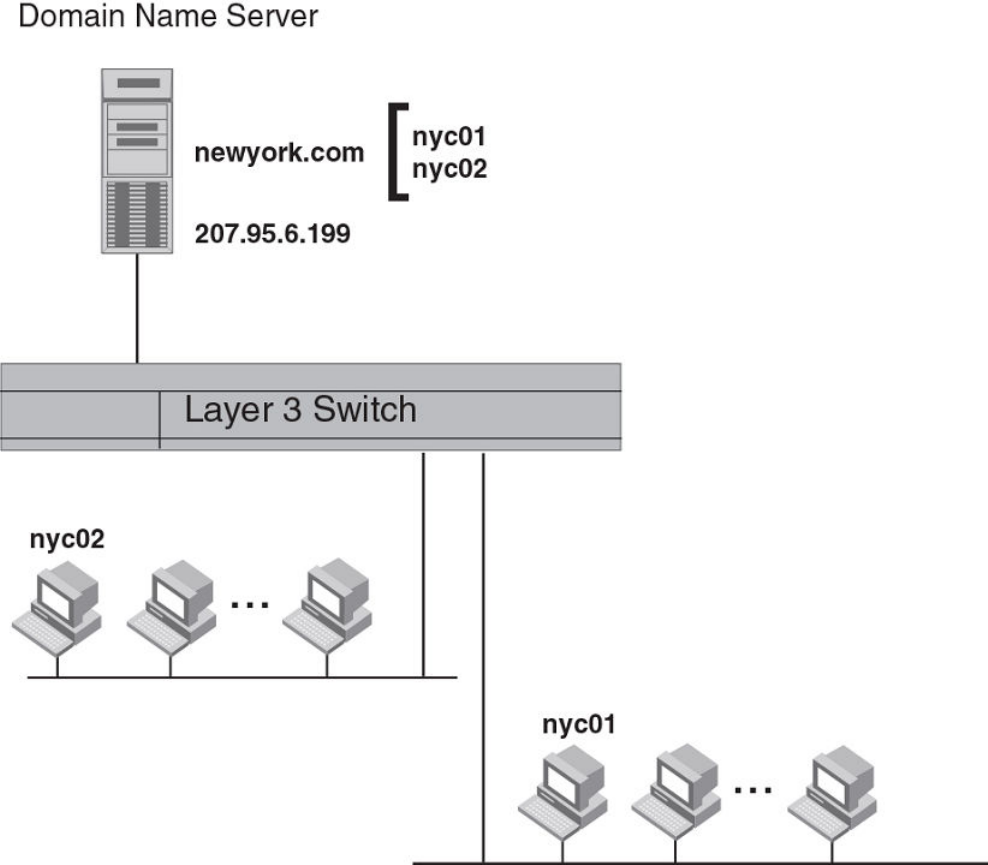
FIGURE 9 Querying a host on the newyork.com domain
Changing the TTL threshold
The time to live (TTL) threshold prevents routing loops by specifying the maximum number of router hops an IP packet originated by the
Layer 2 switch can travel through. Each device capable of forwarding IP that receives the packet decrements (decreases) the packet TTL
by one. If a router receives a packet with a TTL of 1 and reduces the TTL to zero, the router drops the packet.
The default TTL is 64. You can change the ttl-threshold to a value from 1 through 255.
To modify the TTL threshold to 25, enter the following commands.
device(config)# ip ttl 25
device(config)# exit
Syntax: ip ttl ttl-threshold
Conguring IP parameters - Layer 2 switches
FastIron Ethernet Switch Layer 3 Routing Conguration Guide, 08.0.30mb
98 53-1003627-06
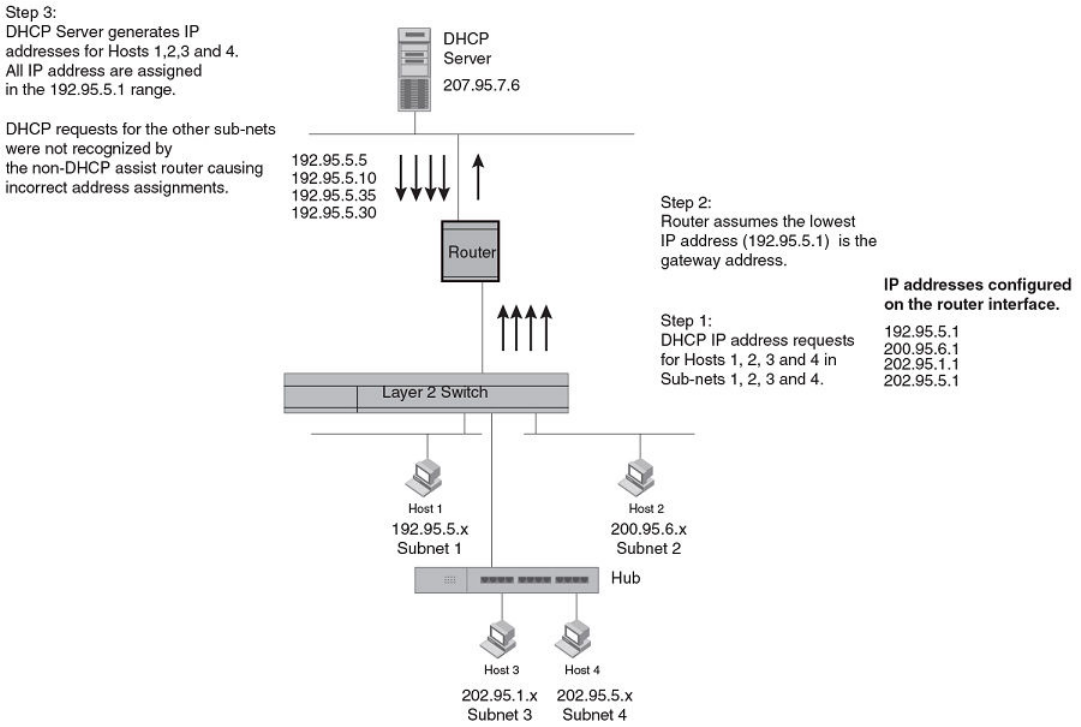
DHCP Assist conguration
DHCP Assist allows a Brocade Layer 2 switch to assist a router that is performing multi-netting on its interfaces as part of its DHCP
relay function.
DHCP Assist ensures that a DHCP server that manages multiple IP subnets can readily recognize the requester IP subnet, even when
that server is not on the client local LAN segment. The Brocade Layer 2 switch does so by stamping each request with its IP gateway
address in the DHCP discovery packet.
NOTE
Brocade Layer 2 switches provide BootP/DHCP assistance by default on an individual port basis. Refer to Changing the IP
address used for stamping BootP and DHCP requests on page 82.
By allowing multiple subnet DHCP requests to be sent on the same wire, you can reduce the number of router ports required to support
secondary addressing as well as reduce the number of DHCP servers required, by allowing a server to manage multiple subnet address
assignments.
FIGURE 10 DHCP requests in a network without DHCP Assist on the Layer 2 switch
In a network operating without DHCP Assist, hosts can be assigned IP addresses from the wrong subnet range because a router with
multiple subnets congured on an interface cannot distinguish among DHCP discovery packets received from dierent subnets.
Conguring IP parameters - Layer 2 switches
FastIron Ethernet Switch Layer 3 Routing Conguration Guide, 08.0.30mb
53-1003627-06 99
In the example depicted, a host from each of the four subnets supported on a Layer 2 switch requests an IP address from the DHCP
server. These requests are sent transparently to the router. Because the router is unable to determine the origin of each packet by subnet,
it assumes the lowest IP address or the "primary address" is the gateway for all ports on the Layer 2 switch and stamps the request with
that address.
When the DHCP request is received at the server, it assigns all IP addresses within that range only.
With DHCP Assist enabled on a Brocade Layer 2 switch, correct assignments are made because the Layer 2 switch provides the
stamping service.
How DHCP Assist works
Upon initiation of a DHCP session, the client sends out a DHCP discovery packet for an address from the DHCP server. When the
DHCP discovery packet is received at a Brocade Layer 2 switch with the DHCP Assist feature enabled, the gateway address congured
on the receiving interface is inserted into the packet. This address insertion is also referred to as stamping.
Conguring IP parameters - Layer 2 switches
FastIron Ethernet Switch Layer 3 Routing Conguration Guide, 08.0.30mb
100 53-1003627-06
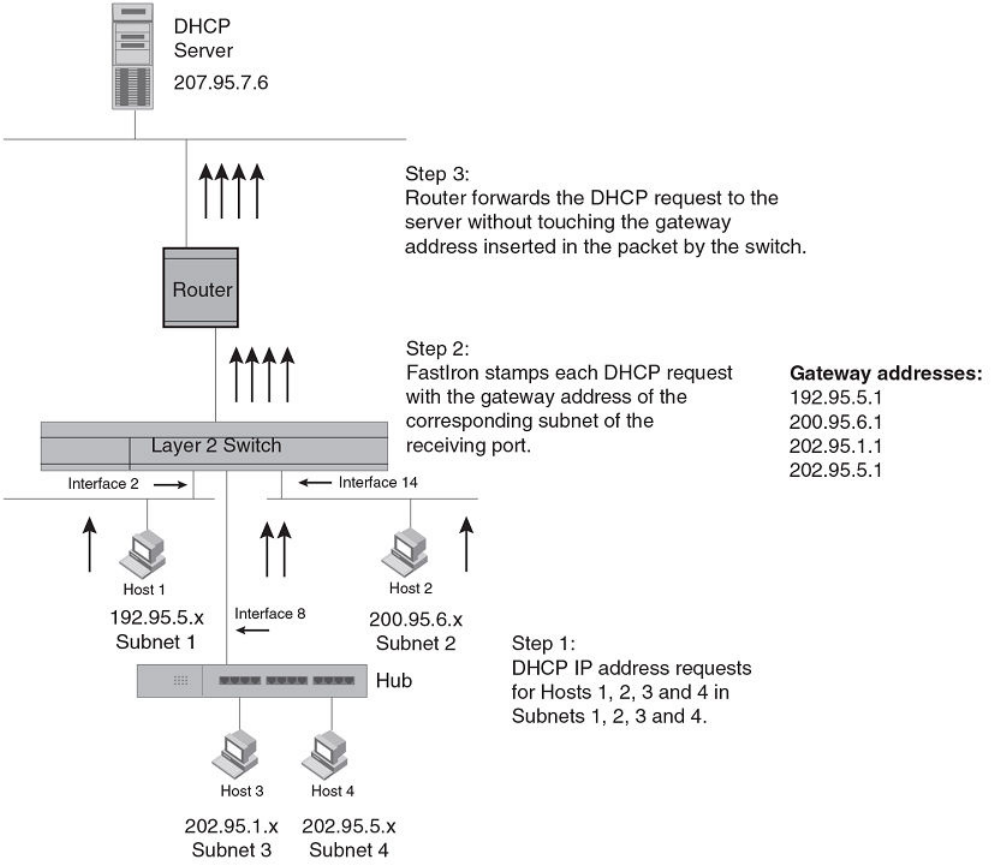
FIGURE 11 DHCP requests in a network with DHCP Assist operating on a FastIron switch
When the stamped DHCP discovery packet is then received at the router, it is forwarded to the DHCP server. The DHCP server then
extracts the gateway address from each request and assigns an available IP address within the corresponding IP subnet. The IP address
is then forwarded back to the workstation that originated the request.
NOTE
When DHCP Assist is enabled on any port, Layer 2 broadcast packets are forwarded by the CPU. Unknown unicast and
multicast packets are still forwarded in hardware, although selective packets such as IGMP, are sent to the CPU for analysis.
When DHCP Assist is not enabled, Layer 2 broadcast packets are forwarded in hardware.
NOTE
The DHCP relay function of the connecting router must be turned on.
Conguring IP parameters - Layer 2 switches
FastIron Ethernet Switch Layer 3 Routing Conguration Guide, 08.0.30mb
53-1003627-06 101
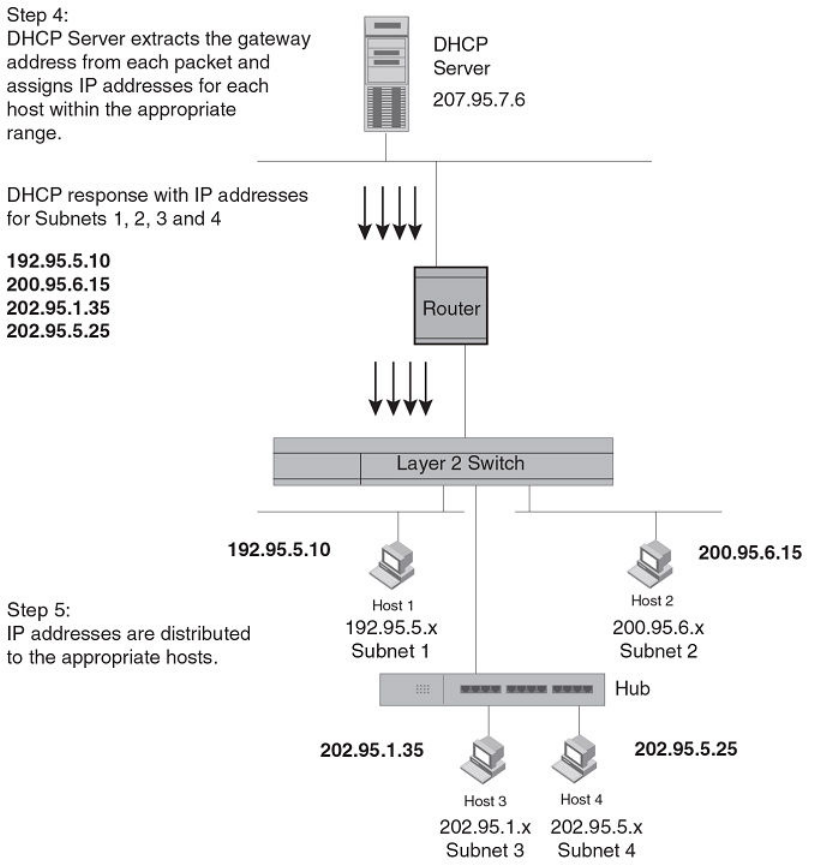
FIGURE 12 DHCP oers are forwarded back toward the requestors
NOTE
When DHCP Assist is enabled on any port, Layer 2 broadcast packets are forwarded by the CPU. Unknown unicast and
multicast packets are still forwarded in hardware, although selective packets such as IGMP are sent to the CPU for analysis.
When DHCP Assist is not enabled, Layer 2 broadcast packets are forwarded in hardware.
Conguring DHCP Assist
You can associate a gateway list with a port. You must congure a gateway list when DHCP Assist is enabled on a Brocade Layer 2
switch. The gateway list contains a gateway address for each subnet that will be requesting addresses from a DHCP server. The list
allows the stamping process to occur. Each gateway address dened on the Layer 2 switch corresponds to an IP address of the Brocade
router interface or other router involved.
Conguring IP parameters - Layer 2 switches
FastIron Ethernet Switch Layer 3 Routing Conguration Guide, 08.0.30mb
102 53-1003627-06
Up to eight addresses can be dened for each gateway list in support of ports that are multi-homed. When multiple IP addresses are
congured for a gateway list, the Layer 2 switch inserts the addresses into the discovery packet in a round robin fashion.
Up to 32 gateway lists can be dened for each Layer 2 switch.
To create the conguration indicated in How DHCP Assist works on page 100, enter commands such as the following.
device(config)# dhcp-gateway-list 1 10.95.5.1
device(config)# dhcp-gateway-list 2 10.95.6.1
device(config)# dhcp-gateway-list 3 10.95.1.1 10.95.5.1
device(config)# interface ethernet 2
device(config-if-e1000-2)# dhcp-gateway-list 1
device(config-if-e1000-2)# interface ethernet 8
device(config-if-e1000-8)# dhcp-gateway-list 3
device(config-if-e1000-8)# interface ethernet 14
device(config-if-e1000-14)# dhcp-gateway-list 2
Syntax: dhcp-gateway-list num ip-addr
IPv4 point-to-point GRE tunnels
NOTE
This feature is supported on FCX , ICX 6610, ICX 6450, ICX 6650, ICX 7250, ICX 7450, ICX 7750, and FastIron SX devices
only.
This section describes support for point-to-point Generic Routing Encapsulation (GRE) tunnels and how to congure them on a Brocade
device.
GRE tunnels support includes the following:
• IPv4 over GRE tunnels. IPv6 over GRE tunnels is not supported.
• Static and dynamic unicast routing over GRE tunnels
• Multicast routing over GRE tunnels
• Hardware forwarding of IP data trac across a GRE tunnel.
• Path MTU Discovery (PMTUD)
IPv4 GRE tunnel overview
Generic Routing Encapsulation is described in RFC 2784. Generally, GRE provides a way to encapsulate arbitrary packets (payload
packet) inside of a transport protocol, and transmit them from one tunnel endpoint to another. The payload is encapsulated in a GRE
packet. The resulting GRE packet is then encapsulated in a delivery protocol, then forwarded to the tunnel destination. At the tunnel
destination, the packet is decapsulated to reveal the payload. The payload is then forwarded to its nal destination.
Brocade devices allow the tunneling of packets of the following protocols over an IPv4 network using GRE:
• OSPF V2
• BGP4
• RIP V1 and V2
NOTE
This is not supported on ICX 6450 devices.
IPv4 point-to-point GRE tunnels
FastIron Ethernet Switch Layer 3 Routing Conguration Guide, 08.0.30mb
53-1003627-06 103
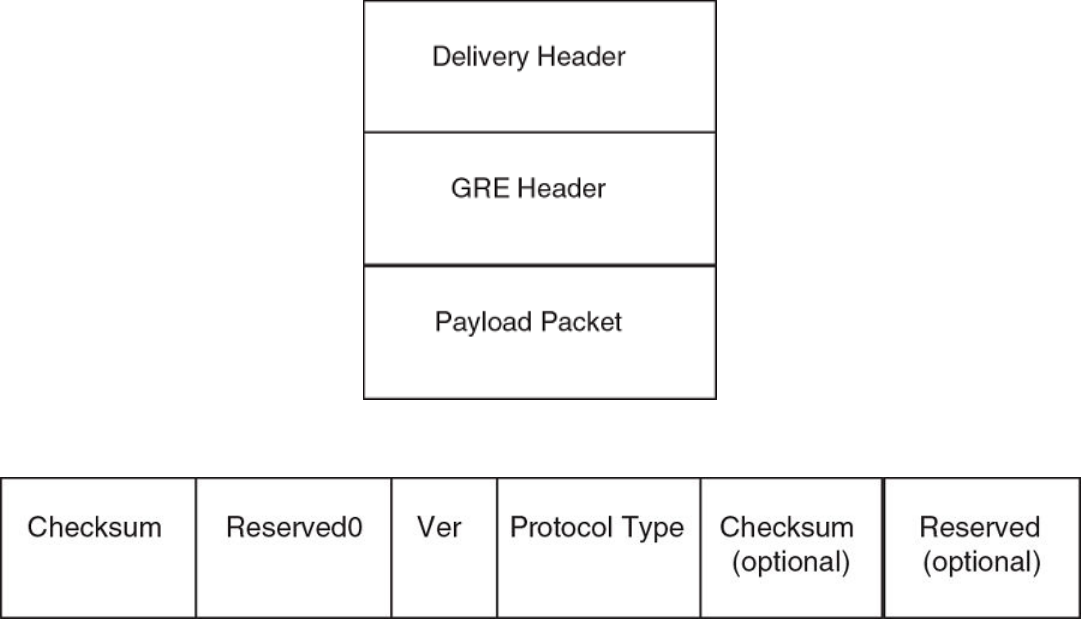
GRE packet structure and header format
FIGURE 13 GRE encapsulated packet structure
FIGURE 14 GRE header format
The GRE header has the following elds:
• Checksum - 1 bit. This eld is assumed to be zero in this version. If set to 1, this means that the Checksum (optional) and
Reserved (optional) elds are present and the Checksum (optional) eld contains valid information.
• Reserved0 - 12 bits. If bits 1 - 5 are non-zero, then a receiver must discard the packet unless RFC 1701 is implemented. Bits
6 - 12 are reserved for future use and must be set to zero in transmitted packets. This eld is assumed to be zero in this
version.
• Ver - 3 bits. The GRE protocol version. This eld must be set to zero in this version.
• Protocol Type - 16 bits. The Ethernet protocol type of the packet, as dened in RFC 1700.
• Checksum (optional) - 16 bits. This eld is optional. It contains the IP checksum of the GRE header and the payload packet.
• Reserved (optional) - 16 bits. This eld is optional. It is reserved for Brocade internal use.
Path MTU Discovery support
Brocade IronWare software supports the following RFCs for handling large packets over a GRE tunnel:
• RFC 1191, Path MTU Discovery
• RFC 4459, MTU and Fragmentation Issues with In-the-Network Tunneling
IPv4 point-to-point GRE tunnels
FastIron Ethernet Switch Layer 3 Routing Conguration Guide, 08.0.30mb
104 53-1003627-06
RFC 1191 describes a method for dynamically discovering the maximum transmission unit (MTU) of an arbitrary internet path. When a
FastIron device receives an IP packet that has its Do not Fragment (DF) bit set, and the packet size is greater than the MTU value of the
outbound interface, then the FastIron device returns an ICMP Destination Unreachable message to the source of the packet, with the
code indicating "fragmentation needed and DF set". The ICMP Destination Unreachable message includes the MTU of the outbound
interface. The source host can use this information to help determine the minimum MTU of a path to a destination.
RFC 4459 describes solutions for issues with large packets over a tunnel. The following methods, from RFC 4459, are supported in
Brocade IronWare software:
• If a source attempts to send packets that are larger than the lowest MTU value along the path, Path MTU Discovery (PMTUD)
can signal to the source to send smaller packets. This method is described in Section 3.2 of RFC 4459.
• Inner packets can be fragmented before encapsulation, in such a manner that the encapsulated packet ts in the tunnel path
MTU, which is discovered using PMTUD. This method is described in Section 3.4 of RFC 4459.
By default, PMTUD is enabled.
Conguration considerations for PMTUD support
Consider the following when conguring PMTUD support.
• On FCX devices, only eight dierent MTU values can be congured over the whole system. When the SX-FI48GPP module is
installed in the FastIron SX device, the maximum number of dierent MTU values that can be congured is 16.
• On both FCX devices, and the SX-FI-24GPP, SX-FI48GPP, SX-FI-24HF, SX-FI-2XG, and SX-FI-8XG modules, PMTUD will
not be enabled on the device if the maximum number of MTU values has already been congured in the system.
– When a new PMTUD value is discovered, and the maximum number of dierent MTU values for the system is already
congured , the new value will search for the nearest, but smallest MTU value relative to its own value in the system. For
example, in a FCX system, the new PMTUD value is 800, and the eight dierent MTU values congured in the system are
600, 700, 820, 1000, 1100, 1200, 1300, and 1500. The range of MTU values that can be congured is from 576
through 1500. The new PMTUD value 800 cannot be added to the system so the nearest, but smallest MTU value is
used. In this example, the MTU value of 700 is considered as the nearest MTU value already congured in the system.
– When the new PMTUD value is smaller than all of the eight MTU values congured in the system, the PMTUD feature is
disabled for the tunnel, and the value is not added to the system. For example, the new PMTUD value is 620 which is
smaller in value than all of the eight, dierent MTU path values congured in the system. The following warning message is
displayed on the CLI:
Warning - All MTU profiles us
ed, disabling PMTU for tunnel
tunnel_id
; new PMTU was
new pmtu discovered
Tunnel loopback ports for GRE tunnels
For SX-FI624C, SX-FI624P, SX-FI624HF, and SX-FI62XG modules a physical tunnel loopback port is required for routing a
decapsulated packet. When a GRE-encapsulated packet is received on a tunnel interface, and the packet needs to be decapsulated, the
packet is decapsulated and sent to the tunnel loopback port. The packet is then looped back and forwarded based on the payload
packets.
If a tunnel loopback port is not congured, tunnel termination is performed by the CPU. Each GRE tunnel interface can have one
assigned tunnel loopback port and the same tunnel loopback port can be used for multiple tunnels.
IPv4 point-to-point GRE tunnels
FastIron Ethernet Switch Layer 3 Routing Conguration Guide, 08.0.30mb
53-1003627-06 105
Tunnel loopback ports for GRE tunnels are supported on:
• Untagged ports
• Ports that are enabled by default
• 10 Gbps and 1 Gbps copper and ber ports
Note the following hardware limitations for these port types:
• On 10 Gbps ports, the port LEDs will be ON (green) when the ports are congured as tunnel loopback ports for GRE tunnels.
Also, the LEDs will blink when data packets are forwarded.
• On 1 Gbps ber and copper ports, port LEDs will not be ON when the ports are congured as tunnel loopback ports for GRE
tunnels, nor will the LEDs blink when data packets are forwarded.
Tunnel loopback ports for GRE tunnels are not applicable on:
• Tagged ports
• Trunk ports
• Ports that are members of a VE
• Ports that are disabled
• Ports that have an IP address
• Flow control
• The SX-FI48GPP module
Support for IPv4 multicast routing over GRE tunnels
PIM-DM and PIM-SM Layer 3 multicast protocols and multicast data trac are supported over GRE tunnels. When a multicast protocol
is enabled on both ends of a GRE tunnel, multicast packets can be sent from one tunnel endpoint to another. To accomplish this, the
packets are encapsulated using the GRE unicast tunneling mechanism and forwarded like any other IPv4 unicast packet to the
destination endpoint of the tunnel. The router that terminates the tunnel (i.e., the router where the tunnel endpoint is an ingress interface)
de-encapsulates the GRE tunneled packet to retrieve the native multicast data packets. After de-encapsulation, data packets are
forwarded in the direction of its receivers, and control packets may be consumed. This creates a PIM-enabled virtual or logical link
between the two GRE tunnel endpoints.
Strict RPF check for multicast protocols
IronWare software enforces strict Reverse Path Forwarding (RPF) check rules on an (s,g) entry on a GRE tunnel interface. The (s,g) entry
uses the GRE tunnel as an RPF interface. During unicast routing transit, GRE tunnel packets may arrive at dierent physical interfaces.
The strict RPF check limits GRE PIM tunnel interfaces to accept the (s,g) GRE tunnel trac.
NOTE
For the SX-FI624C, SX-FI624P, SX-FI624HF, and the SX-FI62XG modules loopback ports are required for de-encapsulating
the GRE tunneled packet. On these hardware devices, when the GRE-encapsulated multicast packet is received, the unicast
GRE mechanism takes care of de-encapsulating the packet. The packet then egresses and re-ingresses the tunnel interface
loopback port as the native multicast packet. The hardware RPF check is done, not on the tunnel interface directly, but on the
loopback port - the hardware compares this port number with the port number congured in the Multicast table (s,g) entry. If
they match, the packet is routed. Otherwise it is sent to the CPU for error processing. In unicast, it is permissible for multiple
tunnel interfaces to use a single loopback port. However, in multicast, this will not allow the hardware to determine the tunnel
interface that the packet was received on in order to do an RPF check. Therefore, when IPv4 Multicast Routing is enabled on a
GRE tunnel, the tunnel interface must have a dedicated loopback port.
IPv4 point-to-point GRE tunnels
FastIron Ethernet Switch Layer 3 Routing Conguration Guide, 08.0.30mb
106 53-1003627-06
GRE support with other features
This section describes how GRE tunnels may aect other features on FSX, FCX, and ICX6610 devices.
Support for ECMP for routes through a GRE tunnel
Equal-Cost Multi-Path (ECMP) load sharing allows for load distribution of trac among available routes. When GRE is enabled, a mix of
GRE tunnels and normal IP routes is supported. If multiple routes are using GRE tunnels to a destination, packets are automatically load-
balanced between tunnels, or between tunnels and normal IP routes.
ACL, QoS, and PBR support for trac through a GRE tunnel
NOTE
PBR and ACL ltering for packets terminating on a GRE tunnel is not supported on FCX devices. However, PBR can be used to
map IP trac into a GRE tunnel, but it cannot be used to route GRE trac. On FCX devices, QoS support for GRE
encapsulated packets is limited to copying DSCP values from the inner header onto the outer header.
For FastIron SX devices only, trac coming from a tunnel can be ltered by an ACL both before and after the tunnel is terminated and
also redirected by PBR after tunnel is terminated. An ACL classies and sets QoS for GRE trac. If the ACL or PBR is applied to the
tunnel loopback port, it would apply to the inner IP packet header (the payload packet) after the tunnel is terminated. If the ACL is applied
to the tunnel ingress port, then the delivery header (outer header) would be classied or ltered before the tunnel is terminated.
NOTE
Restrictions for using ACLs in conjunction with GRE are noted in the section Conguration considerations for GRE IP tunnels
on page 107. PBR can be congured on tunnel loopback ports for tunnel interfaces with no restrictions. PBR with GRE tunnel
is not supported on FSX 800 and FSX 1600 with the SX-FI48GPP module.
Syslog messages related to GRE IP tunnels
Syslog messages provide management applications with information related to GRE IP tunnels. The following Syslog message is
supported.
Tunnel: TUN-RECURSIVE-DOWN tnnl 1, Tnl disabled due to recursive routing
Conguration considerations for GRE IP tunnels
Before conguring GRE tunnels and tunnel options, consider the conguration notes in this section.
• When GRE is enabled on a Layer 3 switch, the following features are not supported on Virtual Ethernet (VE) ports, VE member
ports (ports that have IP addresses), and GRE tunnel loopback ports:
– ACL logging
– ACL statistics (also called ACL counting)
– MAC address lters
– IPv6 lters
NOTE
The above features are supported on VLANs that do not have VE ports.
• Whenever multiple IP addresses are congured on a tunnel source, the primary address of the tunnel is always used for forming
the tunnel connections. Therefore, carefully check the congurations when conguring the tunnel destination.
IPv4 point-to-point GRE tunnels
FastIron Ethernet Switch Layer 3 Routing Conguration Guide, 08.0.30mb
53-1003627-06 107
• When a GRE tunnel is congured, you cannot congure the same routing protocol on the tunnel through which you learn the
route to the tunnel destination. For example, if the FastIron learns the tunnel destination route through the OSPF protocol, you
cannot congure the OSPF protocol on the same tunnel and vice-versa. When a tunnel has OSPF congured, the FastIron
cannot learn the tunnel destination route through OSPF. This could cause the system to become unstable.
• The tunnel destination cannot be resolved to the tunnel itself or any other local tunnel. This is called recursive routing. This
scenario would cause the tunnel interface to ap and the Syslog message TUN-RECURSIVE-DOWN to be logged. To resolve
this issue, create a static route for the tunnel destination.
Conguration considerations for tunnel loopback ports
NOTE
The conguration considerations for tunnel loopback ports are only required for Generation 2 modules supported on FSX
devices.
NOTE
When a tunnel loopback port is congured, it is automatically added to the default
vrf.
Consider the following when conguring tunnel loopback ports for GRE tunnels:
• For multicast trac over a GRE tunnel, each PIM-enabled tunnel interface must have a dedicated tunnel loopback port.
• For unicast trac, a tunnel loopback port can be oversubscribed, meaning multiple GRE tunnels (up to the maximum
supported) can use the same tunnel loopback port for trac. When oversubscribed, proper trac classication on the tunnel
loopback port is necessary in order to avoid trac congestion. In this case, Brocade recommends that you congure the trust
level at the DSCP level for QoS by adding an ACL that maps DSCP 46 to priority 5. Otherwise, loss of loopback packets may
ap the tunnel interface.
• By default, when you create a tunnel loopback port for a GRE tunnel on a port that is part of the default VLAN, the port will stay
in the default VLAN. Before conguring a port as a tunnel loopback port for a GRE tunnel, if the port is in the default VLAN
(VLAN 1), rst create a VLAN, then add the port to the VLAN. Otherwise, an error message such as the following will appear on
the console when you attempt to congure a router interface for the default VLAN.
ERROR: Router-interface cannot be applied because of GRE loopback port 1/1/2
•Conguration of tunnel loopback ports are not applicable on the SX-FI48GPP interface module.
GRE MTU conguration considerations
When jumbo is enabled, the default Ethernet MTU size is 9216 bytes. The maximum Ethernet MTU size is 10200 bytes for ICX 6610
devices, 10178 bytes for ICX 6450 devices and 10218 bytes for other devices. The MTU of the GRE tunnel is compared with the
outgoing packet before the packet is encapsulated. After encapsulation, the packet size increases by 24 bytes. Therefore, when changing
the GRE tunnel MTU, set the MTU to at least 24 bytes less than the IP MTU of the outgoing interface. If the MTU is not set to at least
24 bytes less than the IP MTU, the size of the encapsulated packet will exceed the IP MTU of the outgoing interface. This will cause the
packet to either be sent to the CPU for fragmentation, or the packet will be dropped if the DF (Do-Not-Fragment) bit is set in the original
IP packet, and an ICMP message is sent.
NOTE
The fragmentation behavior depends on the mtu-exceed setting on the router. This feature is not supported on FSX devices.
IPv4 point-to-point GRE tunnels
FastIron Ethernet Switch Layer 3 Routing Conguration Guide, 08.0.30mb
108 53-1003627-06

Conguration tasks for GRE tunnels
Perform the conguration tasks in the order listed.
TABLE 16 Conguration tasks for GRE tunnels
Conguration tasks Default behavior
Required tasks
Create a tunnel interface. Not assigned
Congure the source address or source interface for the tunnel interface. Not assigned
Congure the destination address of the tunnel interface. Not assigned
Enable GRE encapsulation on the tunnel interface.
NOTE
Step 4 must be performed before step 6.
Disabled
If packets need to be terminated in hardware, congure a tunnel loopback
port for the tunnel interface.
NOTE
Step 5 is not applicable to FCX devices.
Not assigned
Congure an IP address for the tunnel interface. Not assigned
If a route to the tunnel destination does not already exist, create a static
route and specify that the route is through the tunnel interface.
Not assigned
Optional tasks
Change the maximum transmission unit (MTU) value for the tunnel
interface.
1476 bytes or
9192 bytes (jumbo mode)
Change the number of GRE tunnels supported on the device. Support for 32 GRE tunnels
Enable and congure GRE link keepalive on the tunnel interface. Disabled
Change the Path MTU Discovery (PMTUD) conguration on the GRE
tunnel interface.
Enabled
Enable support for IPv4 multicast routing. Disabled
The following features are also supported on GRE tunnel interfaces:
• Naming the tunnel interface (CLI command port-name ).
• Changing the Maximum Transmission Unit (MTU) (CLI command ip mtu ).
• Increasing the cost of routes learned on the port (CLI command ip metric ).
After conguring GRE tunnels, you can view the GRE conguration and observe the routes that use GRE tunnels.
Creating a tunnel interface
To create a tunnel interface, enter the following command at the Global CONFIG level of the CLI.
device(config)# interface tunnel 1
device(config-tnif-1)#
Syntax: [no] interface tunnel tunnel-number
The tunnel-number is a numerical value that identies the tunnel being congured.
IPv4 point-to-point GRE tunnels
FastIron Ethernet Switch Layer 3 Routing Conguration Guide, 08.0.30mb
53-1003627-06 109
NOTE
You can also use the port-name command to name the tunnel. To do so, follow the conguration instructions in "Assigning a
port name" section in the FastIron Ethernet Switch Administration Guide .
Assigning a VRF routing instance to a GRE tunnel interface
A GRE tunnel interface can be assigned to an existing user dened VRF. When the VRF is congured on a tunnel, all IPv4 and IPv6
addresses are removed. The tunnel loopback conguration is removed.
To assign the VRF named VRF1 to tunnel 1, enter the following commands.
Brocade(config)# interface tunnel 1
Brocade(config-tnif-l)# vrf forwarding VRF1
Syntax: [no] vrf forwarding vrf-name
The vrf-name variable is the name of the VRF that the interface is being assigned to.
Conguring the source address or source interface for a tunnel interface
To congure the source for a tunnel interface, specify either a source address or a source interface.
NOTE
If the destination address for a tunnel interface is not resolved, Brocade recommends that you either congure the source
interface (instead of the source address ) as the source for a tunnel interface, or enable GRE link keepalive on the tunnel
interface.
The tunnel source address should be one of the router IP addresses congured on a physical, loopback, or VE interface, through which
the other end of the tunnel is reachable.
To congure the source address for a specic tunnel interface, enter commands such as the following.
device(config)# interface tunnel 1
device(config-tnif-1)# tunnel source 10.0.8.108
The source interface should be the port number of the interface congured on a physical, loopback, or VE interface. The source interface
should have at least one IP address congured on it. Otherwise, the interface will not be added to the tunnel conguration and an error
message similar to the following will be displayed:
ERROR - Tunnel source interface 1/3/1 has no configured IP address.
To congure the source interface for a specic tunnel interface, enter commands such as the following.
device(config)# interface tunnel 1
device(config-tnif-1)# tunnel source ethernet 1/3/1
Syntax: [no] tunnel source { ip-address | ethernet unit / slot / port | ve number | loopback number }
The ip-address variable is the source IP address being congured for the specied tunnel.
The ethernet unit / slot / port parameter identies a physical interface being congured for the specied tunnel, for example 1/3/1.
The ve number variable is the VE interface number being congured for the specied tunnel.
IPv4 point-to-point GRE tunnels
FastIron Ethernet Switch Layer 3 Routing Conguration Guide, 08.0.30mb
110 53-1003627-06
Deleting an IP address from an interface congured as a tunnel source
To delete an IP address from an interface that is congured as a tunnel source, rst remove the tunnel source from the tunnel interface
then delete the IP address, as shown in the following example.
device(config-if-e1000-1/1/3)# interface tunnel 8
device(config-tnif-8)# no tunnel source 10.1.83.15
device(config-tnif-8)# interface ethernet 1/1/3
device(config-if-e1000-1/1/3)# no ip address 10.1.83.15/24
If you attempt to delete an IP address without rst removing the tunnel source, the console will display an error message, as shown in the
following example.
device# config terminal
device(config)# interface ethernet 1/1/3
device(config-if-e1000-1/1/3)# no ip address 10.1.83.15/24
Error - Please remove tunnel source from tnnl 8 before removing IP address
NOTE
The previous error message will also display on the CLI when an interface is part of a VLAN. A VLAN cannot be deleted until
the tunnel source is rst removed.
Conguring the destination address for a tunnel interface
The destination address should be the address of the IP interface of the device on the other end of the tunnel.
To congure the destination address for a specic tunnel interface, enter commands such as the following.
device(config)# interface tunnel 1
device(config-tnif-1)# tunnel destination 131.108.5.2
Syntax: [no] tunnel destination ip-address
The ip-address variable is the destination IP address being congured for the specied tunnel.
NOTE
Ensure a route to the tunnel destination exists on the tunnel source device. Create a static route if necessary.
Enabling GRE encapsulation on a tunnel interface
To enable GRE encapsulation on a tunnel interface, enter commands such as the following.
device(config)# interface tunnel 1
device(config-tnif-1)# tunnel mode gre ip
Syntax: [no] tunnel mode gre ip
•gre species that the tunnel will use GRE encapsulation (IP protocol 47).
•ip species that the tunneling protocol is IPv4.
NOTE
Before conguring a new GRE tunnel, the system should have at least one slot available for adding the default tunnel MTU
value to the system tables. Depending on the conguration, the default tunnel MTU range is ((1500 or 10218) - 24) . To check
for slot availability, or to see if the MTU value is already congured in the IP table, use the show ip mtu command.
IPv4 point-to-point GRE tunnels
FastIron Ethernet Switch Layer 3 Routing Conguration Guide, 08.0.30mb
53-1003627-06 111
Conguring a tunnel loopback port for a tunnel interface
NOTE
Conguring a tunnel loopback port for a tunnel interface is not applicable on ICX6610, FCX devices, and SX-FI-24GPP, SX-
FI48GPP, SX-FI-24HF, SX-FI-2XG, and SX-FI-8XG modules.
For details and important conguration considerations regarding tunnel loopback ports for GRE tunnels, refer to Tunnel loopback ports
for GRE tunnels on page 105 and Conguration considerations for tunnel loopback ports on page 108.
To congure a tunnel loopback port, enter commands such as the following:
device(config)# interface tunnel 1
device(config-tnif-1)# tunnel loopback 1/3/1
Syntax: [no] tunnel loopback unit / slot / port
The unit / slot / port parameter identies the tunnel loopback port for the specied tunnel interface, for example 1/3/1.
Applying an ACL or PBR to a tunnel interface on a FastIron X Series module
To apply an ACL or PBR policy to a tunnel interface on a FastIron X Series module other than the SX-FI48GPP (48-port 10/100/1000
Mbps Ethernet POE interface module), enter commands such as the following:
Applying a PBR policy to a tunnel interface
device(config)# interface tunnel 1
device(config-tnif-1)# tunnel mode gre ip
device(config-tnif-1)# tunnel loopback 3
device(config-tnif-1)# interface ethernet 3
device(config-if-e1000-3)# ip policy route-map test-route
Applying an ACL policy to a tunnel interface
device(config)# interface tunnel 1
device(config-tnif-1)# tunnel mode gre ip
device(config-tnif-1)# tunnel loopback 3
device(config-tnif-1)# interface ethernet 3
device(config-if-e1000-3)# ip access-group 10 in
Applying an ACL or PBR to a tunnel interface on the SX-FI48GPP interface module
To apply an ACL or PBR policy to a tunnel interface on the SX-FI48GPP interface module, enter commands such as the following:
NOTE
Conguration of tunnel loopback ports are not applicable on the SX-FI48GPP interface
module.
Applying a PBR policy to a tunnel interface
device(config)# interface tunnel 1
device(config-tnif-1)# tunnel mode gre ip
device(config-tnif-1)# ip policy route-map test-route
IPv4 point-to-point GRE tunnels
FastIron Ethernet Switch Layer 3 Routing Conguration Guide, 08.0.30mb
112 53-1003627-06
Applying an ACL policy to a tunnel interface
device(config)# interface tunnel 1
device(config-tnif-1)# tunnel mode gre ip
device(config-tnif-1)# ip access-group 10 in
Conguring an IP address for a tunnel interface
An IP address sets a tunnel interface as an IP port and allows the conguration of Layer 3 protocols, such as OSPF, BGP, and Multicast
(PIM-DM and PIM-SM) on the port. Note that the subnet cannot overlap other subnets congured on other routing interfaces, and both
ends of the tunnel should be in the same subnet.
To congure an IP address for a specied tunnel interface, enter commands such as the following.
device(config)# interface tunnel 1
device(config-tnif-1)# ip address 10.10.3.1/24
Syntax: [no] ip address ip-address
The ip-address is the IP address being congured for the specied tunnel interface.
Conguring a static route to a tunnel destination
If a route to the tunnel destination does not already exist on the tunnel source, create a static route and set the route to go through the
tunnel interface.
device(config)# ip route 131.108.5.0/24 10.0.8.1
device(config)# ip route 10.10.2.0/24 tunnel 1
Syntax: [no] ip route ip-address tunnel tunnel-ID
• The ip-address variable is the IP address of the tunnel interface.
• The tunnel-ID variable is a valid tunnel number or name.
Changing the MTU value for a tunnel interface
For important conguration considerations regarding this feature, refer to GRE MTU conguration considerations on page 108.
You can set an MTU value for packets entering the tunnel. Packets that exceed either the default MTU value of 1476/9192 bytes (for
jumbo case) or the value that you set using this command, are fragmented and encapsulated with IP/GRE headers for transit through the
tunnel (if they do not have the DF bit set in the IP header). All fragments will carry the same DF bit as the incoming packet. Jumbo
packets are supported, although they may be fragmented based on the congured MTU value.
NOTE
For the SX-FI8GMR6, SX-FI2XGMR6, SX-FI624HF, SX-FI624C, SX-FI624P, and the SX-FI62XG modules, all fragments will
carry the same DF bit as the incoming packet. For the SX-FI-24GPP, SX-FI48GPP, SX-FI-24HF, SX-FI-2XG, and SX-FI-8XG
modules and the FCX modules, the DF bit on the outer IP header after encapsulation will be set if the PMTU is enabled. If
PMTU is disabled, the DF bit will be unset irrespective of the DF bit of the incoming packet.
The following command allows you to change the MTU value for packets transiting "tunnel 1":
device(config)# interface tunnel 1
device(config-tnif-1)# ip mtu 1200
Syntax: ip mtu packet-size
The packet-size variable species the maximum size in bytes for the packets transiting the tunnel. Enter a value from 576 through
1476. The default value is 1476.
IPv4 point-to-point GRE tunnels
FastIron Ethernet Switch Layer 3 Routing Conguration Guide, 08.0.30mb
53-1003627-06 113
NOTE
To prevent packet loss after the 24 byte GRE header is added, make sure that any physical interface that is carrying GRE tunnel
trac has an IP MTU setting at least 24 bytes greater than the tunnel MTU setting. This conguration is only allowed on the
system if the tunnel mode is set to GRE.
Changing the maximum number of tunnels supported
By default, FastIron X Series IPv6 devices support up to 32 GRE tunnels. You can congure the device to support 16 - 64 GRE tunnels.
To change the maximum number of tunnels supported, enter commands such as the following.
device(config)# system-max gre-tunnels 16
Reload required. Please write memory and then reload or power cycle.
device(config)# write memory
device(config)# exit
device# reload
NOTE
You must save the conguration (write memory) and reload the software to place the change into
eect.
Syntax: system-max gre-tunnels number
The number variable species the number of GRE tunnels that can be supported on the device. The permissible range is 16 - 64. The
system-max gre-tunnels command determines the interface range that is supported for an interface tunnel. For example, if the system-
max value is reduced, it is possible that the congured interfaces may be rejected after a system reload.
Conguring GRE link keepalive
When GRE tunnels are used in combination with static routing or policy-based routing, and a dynamic routing protocol such as RIP, BGP,
or OSPF is not deployed over the GRE tunnel, a congured tunnel does not have the ability to bring down the line protocol of either
tunnel endpoint, if the far end becomes unreachable. Trac sent on the tunnel cannot follow alternate paths because the tunnel is always
UP. To avoid this scenario, enable GRE link keepalive, which will maintain or place the tunnel in an UP or DOWN state based upon the
periodic sending of keepalive packets and the monitoring of responses to the packets. If the packets fail to reach the tunnel far end more
frequently than the congured number of retries, the tunnel is placed in the DOWN state.
To enable GRE link keepalive, congure it on one end of the tunnel and ensure the other end of the tunnel has GRE enabled.
NOTE
Keepalives are not supported when a tunnel interface is not within the default-VRF.
To congure GRE link keepalive, enter commands such as the following.
device(config)# interface tunnel 1
device(config-tnif-1)# keepalive 12 4
These commands congure the device to wait for 4 consecutive lost keepalive packets before bringing the tunnel down. There will be a
12 second interval between each packet. Note that when the tunnel comes up, it would immediately (within one second) send the rst
keepalive packet.
Syntax: [no] keepalive seconds retries
Use the no form of the command to disable the keepalive option.
The seconds variable species the number of seconds between each initiation of a keepalive message. The range for this interval is 2 -
32767 seconds. The default value is 10 seconds.
IPv4 point-to-point GRE tunnels
FastIron Ethernet Switch Layer 3 Routing Conguration Guide, 08.0.30mb
114 53-1003627-06
The retries variable species the number of times that a packet is sent before the system places the tunnel in the DOWN state. Possible
values are from 1 through 255. The default number of retries is 3.
Use the show interface tunnel and show ip tunnel trac commands to view the GRE link keepalive conguration.
Conguring Path MTU Discovery (PMTUD)
PMTUD is enabled by default on tunnel interfaces. This section describes how to disable and re-enable PMTUD on a tunnel interface,
change the PMTUD age timer, manually clear the tunnel PMTUD, and view the PMTUD conguration.
NOTE
For the SX-FI8GMR6, SX-FI2XGMR6, SX-FI624HF, SX-FI624C, SX-FI624P, and the SX-FI62XG modules, all fragments will
carry the same DF bit as the incoming packet. For the SX-FI-24GPP, SX-FI48GPP, SX-FI-24HF, SX-FI-2XG, and SX-FI-8XG
modules and the FCX modules, the DF bit on the outer IP header after encapsulation will be set if the PMTU is enabled. If
PMTU is disabled, the DF bit will be unset irrespective of the DF bit of the incoming packet.
Disabling and re-enabling PMTUD
PMTUD is enabled by default. To disable it, enter the following command:
device(config-tnif-1)# tunnel path-mtu-discovery disable
To re-enable PMTUD after it has been disabled, enter the following command:
device(config-tnif-1)# no tunnel path-mtu-discovery disable
Syntax: [no] tunnel path-mtu-discovery disable
Changing the age timer for PMTUD
By default, when PMTUD is enabled on a tunnel interface, the path MTU is reset to its original value every 10 minutes. If desired, you
can change the reset time (default age timer) to a value of up to 30 minutes. To do so, enter a command such as the following on the
GRE tunnel interface.
device(config-tnif-1)# tunnel path-mtu-discovery age-timer 20
This command congures the device to wait for 20 minutes before resetting the path MTU to its original value.
Syntax:[no] tunnel path-mtu-discovery { age-timer minutes | innite }
For minutes , enter a value from 10 to 30.
Enter innite to disable the timer.
Clearing the PMTUD dynamic value
To reset a dynamically-congured MTU on a tunnel Interface back to the congured value, enter the following command.
device(config)# clear ip tunnel pmtud 1
Syntax: clear ip tunnel pmtud tunnel-ID
The tunnel-ID variable is a valid tunnel number or name.
IPv4 point-to-point GRE tunnels
FastIron Ethernet Switch Layer 3 Routing Conguration Guide, 08.0.30mb
53-1003627-06 115
Viewing PMTUD conguration details
Use the show interface tunnel command to view the PMTUD conguration and to determine whether PMTUD has reduced the size of
the MTU.
Enabling IPv4 multicast routing over a GRE tunnel
This section describes how to enable IPv4 multicast protocols, PIM Sparse (PIM-SM) and PIM Dense (PIM-DM), on a GRE tunnel.
Perform the procedures in this section after completing the required tasks in Enabling IPv4 multicast routing over a GRE tunnel.
For an overview of multicast routing support over a GRE tunnel, refer to Support for IPv4 multicast routing over GRE tunnels on page
106. To view information about multicast protocols and GRE tunnel-specic information, refer to Displaying multicast protocols and
GRE tunneling information on page 120.
NOTE
For the SX-FI624C, SX-FI624P, SX-FI624HF, and the SX-FI62XG modules, each PIM-enabled tunnel interface must have a
dedicated tunnel loopback port. This diers from GRE tunnels that support unicast trac only. For unicast trac, multiple GRE
tunnels can use the same tunnel loopback port for trac.
Enabling PIM-SM on a GRE tunnel
To enable PIM-SM on a GRE tunnel interface, enter commands such as the following:
device(config)# interface tunnel 10
device(config-tnif-10)# ip pim-sparse
Syntax: [no] ip pim-sparse
Use the no form of the command to disable PIM-SM on the tunnel interface.
Enabling PIM-DM on a GRE tunnel interface
To enable PIM-DM on a GRE tunnel interface, enter commands such as the following:
device(config)# interface tunnel 10
device(config-tnif-10)# ip pim
Syntax: [no] ip pim
Use the no form of the command to disable PIM-DM on the tunnel interface.
Example point-to-point GRE tunnel conguration
A GRE Tunnel is congured between FastIron A and device B. Trac between networks 10.10.1.0/24 and 10.10.2.0/24 is
encapsulated in a GRE packet sent through the tunnel on the 10.10.3.0 network, and unpacked and sent to the destination network. A
static route is congured at each Layer 3 switch to go through the tunnel interface to the target network.
IPv4 point-to-point GRE tunnels
FastIron Ethernet Switch Layer 3 Routing Conguration Guide, 08.0.30mb
116 53-1003627-06
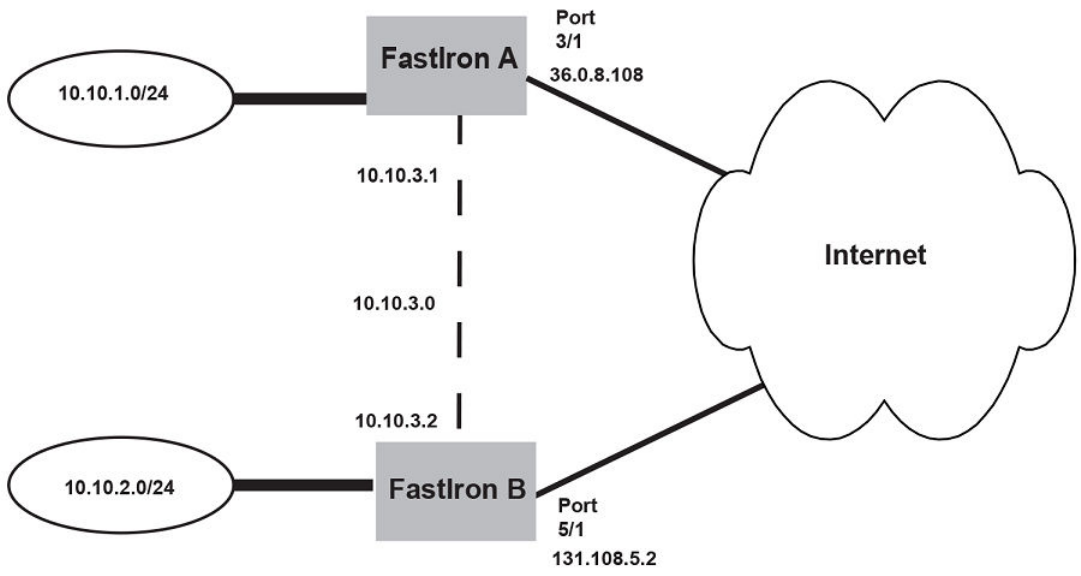
FIGURE 15 Point-to-point GRE tunnel conguration example
The following shows the conguration commands for this example.
NOTE
The conguration examples for FastIron A and FastIron B applies only to FastIron SX
devices.
Conguring point-to-point GRE tunnel for FastIron A
device (config)# interface ethernet 3/1
device (config-if-e1000-3/1)# ip address 10.0.8.108/24
device (config)# exit
device (config)# interface tunnel 1
device(config-tnif-1)# tunnel source 10.0.8.108
device(config-tnif-1)# tunnel destination 131.108.5.2
device(config-tnif-1)# tunnel mode gre ip
device(config-tnif-1)# tunnel loopback 4/1
device(config-tnif-1)# ip address 10.10.3.1/24
device(config-tnif-1)# exit
device (config)# ip route 131.108.5.0/24 10.0.8.1
device(config)# ip route 10.10.2.0/24 tunnel 1
Conguring point-to-point GRE tunnel for FastIron B
device(config)# interface ethernet 5/1
device(config-if-e1000-5/1)# ip address 131.108.5.2/24
device(config)# exit
device(config)# interface tunnel 1
device(config-tnif-1)# tunnel source 131.108.5.2
device(config-tnif-1)# tunnel destination 10.0.8.108
IPv4 point-to-point GRE tunnels
FastIron Ethernet Switch Layer 3 Routing Conguration Guide, 08.0.30mb
53-1003627-06 117
device(config-tnif-1)# tunnel mode gre ip
device(config-tnif-1)# tunnel loopback 1/1
device(config-tnif-1)# ip address 10.10.3.2/24
device(config-tnif-1)# exit
device(config)# ip route 10.0.8.0/24 131.108.5.1
device(config)# ip route 10.10.1.0/24 tunnel
Displaying GRE tunneling information
This section describes the show commands that display the GRE tunnels conguration, the link status of the GRE tunnels, and the routes
that use GRE tunnels.
To display GRE tunneling Information, use the following commands:
•show ip interface
•show ip route
•show ip interface tunnel
•show ip tunnel trac
•show interface tunnel
•show statistics tunnel
The following shows an example output of the show ip interface command, which includes information about GRE tunnels.
device# show ip interface
Interface IP-Address OK? Method Status Protocol
VRF
Tunnel 1 101.1.1.1 YES NVRAM up up
red
Tunnel 3 89.1.1.1 YES NVRAM up up
default-vrf
For eld denitions, refer to Displaying IP interface information on page 128.
Syntax: show ip interface
The show ip route command displays routes that are pointing to a GRE tunnel as shown in the following example.
device# show ip route
Total number of IP routes: 3, avail: 79996 (out of max 80000)
B:BGP D:Connected R:RIP S:Static O:OSPF *:Candidate default
Destination NetMask Gateway Port Cost Type
1 10.1.1.0 255.255.255.0 0.0.0.0 7 1 D
2 10.1.2.0 255.255.255.0 10.1.1.3 7 1 S
3 10.34.3.0 255.255.255.0 0.0.0.0 tn3 1 D
For eld denitions, refer to Displaying the IP route table on page 133.
Syntax: show ip route
The show ip interface tunnel command displays the link status and IP address conguration for an IP tunnel interface as shown in the
following example.
device# show ip interface tunnel 64
Interface Tunnel 64
port enabled
port state: UP
ip address: 223.224.64.0/31
Port belongs to VRF: default-vrf
encapsulation: GRE, mtu: 1476, metric: 1
directed-broadcast-forwarding: disabled
proxy-arp: disabled
ip arp-age: 10 minutes
No Helper Addresses are configured.
IPv4 point-to-point GRE tunnels
FastIron Ethernet Switch Layer 3 Routing Conguration Guide, 08.0.30mb
118 53-1003627-06

No inbound ip access-list is set
No outgoing ip access-list is set
Syntax: show ip interface tunnel [ tunnel-ID ]
The tunnel-ID variable is a valid tunnel number between 1 and 72.
The show interface tunnel command displays the GRE tunnel conguration and the pmtd aging timer information.
device# show interface tunnel 10
Tunnel10 is up, line protocol is up
Hardware is Tunnel
Tunnel source 1.1.41.10
Tunnel destination is 1.1.14.10
Tunnel mode gre ip
Port name is GRE_10_to_VR1_on_FCX_STACK
Internet address is 223.223.1.1/31, MTU 1476 bytes, encapsulation GRE
Keepalive is not Enabled
Path MTU Discovery: Enabled, MTU is 1428 bytes, age-timer: 10 minutes
Path MTU will expire in 0 minutes 50 secs
Syntax: show interface tunnel [ tunnel-ID ]
TABLE 17 show interface tunnel output descriptions
Field Denition
Hardware is Tunnel The interface is a tunnel interface.
Tunnel source The source address for the tunnel.
Tunnel destination The destination address for the tunnel.
Tunnel mode The tunnel mode. The gre species that the tunnel will use GRE
encapsulation (IP protocol 47).
Port name The port name (if applicable).
Internet address The internet address.
MTU The congured path maximum transmission unit.
encapsulation GRE GRE encapsulation is enabled on the port.
Keepalive Indicates whether or not GRE link keepalive is enabled.
Path MTU Discovery Indicates whether or not PMTUD is enabled. If PMTUD is enabled, the
MTU value is also displayed.
Path MTU The PMTU that is dynamically learned.
Age-timer Indicates the pmtd aging timer conguration in minutes.The default is 10.
The range is from 10 - 30.
Path MTU will expire Indicates the time after which the learned PMTU expires. This line is
displayed only when a PMTU is dynamically learned.
The show ip tunnel trac command displays the link status of the tunnel and the number of keepalive packets received and sent on the
tunnel.
device# show ip tunnel traffic
IP GRE Tunnels
Tunnel Status Packet Received Packet Sent KA recv KA sent
1 up/up 362 0 362 362
3 up/up 0 0 0 0
10 down/down 0 0 0 0
Syntax: show ip tunnel trac
IPv4 point-to-point GRE tunnels
FastIron Ethernet Switch Layer 3 Routing Conguration Guide, 08.0.30mb
53-1003627-06 119

The show statistics tunnel command displays GRE tunnel statistics for a specic tunnel ID number. The following shows an example
output for tunnel ID 1.
device(config-tnif-10)#show statistics tunnel 1
IP GRE Tunnels
Tunnel Status Packet Received Packet Sent KA recv KA sent
1 up/up 87120 43943 43208 43855
RFC 2784 supports GRE tunnel ports. The show statistics tunnel command output now includes information from the hardware
counters for each tunnel. For example:
IP GRE Tunnel 1 HW Counters:
InOctets 0 OutOctets 0
InPkts 0 OutPkts 0
NOTE
This CLI enhancement is supported only on FCX devices.
Syntax: show statistics tunnel [ tunnel-ID ]
The tunnel-ID variable species the tunnel ID number.
TABLE 18 show ip tunnel trac output descriptions
Field Description
Tunnel Status Indicates whether the tunnel is up or down. Possible values are:
• Up/Up - The tunnel and line protocol are up.
• Up/Down - The tunnel is up and the line protocol is down.
• Down/Up - The tunnel is down and the line protocol is up.
• Down/Down - The tunnel and line protocol are down.
Packet Received The number of packets received on the tunnel since it was last cleared by
the administrator.
Packet Sent The number of packets sent on the tunnel since it was last cleared by the
administrator.
KA recv The number of keepalive packets received on the tunnel since it was last
cleared by the administrator.
KA sent The number of keepalive packets sent on the tunnel since it was last
cleared by the administrator.
Displaying multicast protocols and GRE tunneling information
The following show commands display information about multicast protocols and GRE tunnels:
•show ip pim interface
•show ip pim nbr
•show ip pim mcache
•show ip pim ow
•show statistics
•show ip mtu
NOTE
All other show commands that are supported currently for Ethernet, VE, and IP loopback interfaces, are also supported for
tunnel interfaces. To display information for a tunnel interface, specify the tunnel in the format tn num . For example, show
interface tn 1. In some cases, the Ethernet port that the tunnel is using will be displayed in the format tnnum:eport .
IPv4 point-to-point GRE tunnels
FastIron Ethernet Switch Layer 3 Routing Conguration Guide, 08.0.30mb
120 53-1003627-06
The following shows an example output of the show ip pim interface command.
device# show ip pim interface
Interface e1
PIM Dense: V2
TTL Threshold: 1, Enabled, DR: itself
Local Address: 10.10.10.10
Interface tn1
PIM Dense: V2
TTL Threshold: 1, Enabled, DR: 10.1.1.20 on tn1:e2
Local Address: 10.1.1.10
Neighbor:
10.1.1.20
Syntax:show ip pim interface
The following shows an example output of the show ip pim nbr command.
device# show ip pim nbr
Total number of neighbors: 1 on 1 ports
Port Phy_p Neighbor Holdtime Age UpTime
tn1 tn1:e2 10.1.1.20 180 60 1740
Syntax: show ip pim nbr
The following shows an example output of the show ip pim mcache command.
device# show ip pim mcache 230.1.1.1
1 (10.10.10.1 230.1.1.1) in e1 (e1), cnt=629
Source is directly connected
L3 (HW) 1: tn1:e2(VL1)
fast=1 slow=0 pru=1 graft
age=120s up-time=8m HW=1 L2-vidx=8191 has mll
Syntax:show ip pim mcache ip-address
The following shows an example output of the show ip pim ow command.
device# show ip pim flow 230.1.1.1
Multicast flow (10.10.10.1 230.1.1.1):
Vidx for source vlan forwarding: 8191 (Blackhole, no L2 clients)
Hardware MC Entry hit on devices: 0 1 2 3
MC Entry[0x0c008040]: 00014001 000022ee 0ffc0001 00000000
--- MLL contents read from Device 0 ---
MLL Data[0x018c0010]: 0021ff8d 00000083 00000000 00000000
First : Last:1, outlif:60043ff1 00000000, TNL:1(e2)
1 flow printed
Syntax: show ip pim ow
The following shows an example output of the show statistics command. The following statistics demonstrate an example where the
encapsulated multicast trac ingresses a tunnel endpoint on port e 2, egresses and re-ingresses as native multicast trac on the
loopback port e 4, and is then forwarded to the outbound interface e 1.
device# show statistics
Port In Packets Out Packets In Errors Out Errors
1 0 1670 0 0
2 1668 7 0 0
3 0 0 0 0
4 1668 1668 0 0
Syntax: show statistics
IPv4 point-to-point GRE tunnels
FastIron Ethernet Switch Layer 3 Routing Conguration Guide, 08.0.30mb
53-1003627-06 121
The show ip mtu command can be used to see if there is space available for the ip_default_mtu_24 value in the system, or if the MTU
value is already congured in the IP table. The following shows an example output of the show ip mtu command.
device(config-tnif-10)#show ip mtu
idx size usage ref-count
0 10218 1 default
1 800 0 1
2 900 0 1
3 750 0 1
4 10194 1 1
5 10198 0 1
Syntax:show ip mtu
Clearing GRE statistics
Use the clear ip tunnel command to clear statistics related to GRE tunnels.
To clear GRE tunnel statistics, enter a command such as the following.
device(config)# clear ip tunnel stat 3
To reset a dynamically-congured MTU on a tunnel Interface back to the congured value, enter a command such as the following.
device(config)#clear ip tunnel pmtud 3
Syntax: clear ip tunnel { pmtud tunnel-ID | stat tunnel-ID }
Use the pmtud option to reset a dynamically-congured MTU on a tunnel Interface back to the congured value.
Use the stat option to clear tunnel statistics.
The tunnel-ID variable is a valid tunnel number or name.
Use the clear statistics tunnel command to clear GRE tunnel statistics for a specic tunnel ID number. To clear GRE tunnel statistics for
tunnel ID 3, enter a command such as the following.
device(config)# clear statistics tunnel 3
Syntax: clear statistics tunnel [ tunnel-ID ]
The tunnel-ID variable species the tunnel ID number.
Bandwidth for IP interfaces
The bandwidth for an IP interface can be specied so that higher level protocols, such as OSPFv2 and OSPFv3, can use this setting to
inuence the routing cost for routes learned on these interfaces.
When the interface bandwidth is congured, the number of network and router link state advertisement generation is reduced during an
operation down or a shutdown of one or more of the associated interfaces of the VE interface. For OSPF, when the dynamic cost feature
is enabled, the bandwidth for a VE interface is the sum of bandwidth for either all associated ports or all active associated ports. However,
when the interface bandwidth is congured on the VE interface itself, the bandwidth of the associated ports are not used in the OSPF
cost calculation. This means that even when one of the associated ports of the VE interface goes down, there is no OSPF cost
recalculation.
The bandwidth for IP interfaces feature can be congured for a physical interface, Link aggregation (LAG) groups, a VE interface, and a
tunnel interface.
Bandwidth for IP interfaces
FastIron Ethernet Switch Layer 3 Routing Conguration Guide, 08.0.30mb
122 53-1003627-06
The bandwidth for IP interfaces feature can be used to:
• Query the bandwidth for an interface.
• Help OSPF avoid generating numerous LSAs while updating the cost value for a VE interface due to changes in associated
physical interfaces.
•Inuence the cost on OSPF interfaces for specic tunnels, VE interfaces, and physical interfaces.
The bandwidth for IP interfaces feature enables OSPF to calculate its interface metric cost more precisely, based on the specied
interface bandwidth. If the interface bandwidth feature is disabled, OSPF calculates the cost as the reference-bandwidth divided by the
xed port bandwidth, as outlined in the Changing the reference bandwidth for the cost on OSPF interfaces on page 246 section. When
the interface bandwidth feature is enabled, OSPF calculates the cost as the reference-bandwidth divided by the interface bandwidth. For
a physical interface, the interface bandwidth is assigned by default to the port speed.
The interface bandwidth feature also enables OSPF to use the congured interface bandwidth for a VE interface to calculate its routing
metric, without considering the bandwidth of the associated physical ports. When this feature is enabled, the bandwidth for a VE interface
is the interface bandwidth value if it is congured under the VE. Alternatively, it is the sum of the interface bandwidth for all associated
ports or all active ports when OSPF dynamic cost is enabled.
The bandwidth of a trunk port for OSPF is, by default, the sum of either all the associated ports or all active associated ports when OSPF
dynamic cost is enabled. The interface bandwidth of the primary port is used if the interface bandwidth is congured; otherwise it reverts
to the default behavior.
NOTE
If the interface bandwidth conguration of the primary port is dierent to any of the secondary ports, then the LAG is not
deployed. When the LAG is undeployed, the interface bandwidth value for all secondary ports is reset to the port speed.
The congured value is exposed in SNMP via ifSpeed (in ifTable) and ifHighSpeed (in ifXTable) objects.
NOTE
GRE or IPv6 tunnel bandwidth may limit routing protocol trac propagating through the tunnel. For example, if the tunnel
defaults to 8kbps , OSPF uses 50% of the tunnel bandwidth for Hello and update trac. Therefore, it is good practice to
increase the tunnel bandwidth when a routing protocol runs over it to eliminate apping, and give the routing protocol more
capacity to send its update and Hello messages.
From FastIron Release 08.0.30, this feature is supported on all platforms.
Limitations and pre-requisites
• The bandwidth for IP interfaces feature does not support setting and adjusting GRE or IPv6 receiving and transmission
bandwidth.
• SNMP does not support any IP interface bandwidth related congurations.
OSPF cost calculation with interface bandwidth
OSPF uses a formula to calculate a path cost when interface bandwidth is available.
If the interface bandwidth feature is disabled, OSPF calculates the cost as the reference-bandwidth divided by the xed port bandwidth,
as outlined in the Changing the reference bandwidth for the cost on OSPF interfaces on page 246 section. When the interface
bandwidth feature is enabled, OSPF calculates the cost as the reference-bandwidth divided by the interface bandwidth.
OSPF uses the following formula to calculate the path cost when interface bandwidth is available:
• OSPF path cost = ((auto-cost × reference-bandwidth + interface bandwidth) -1) / interface bandwidth.
Bandwidth for IP interfaces
FastIron Ethernet Switch Layer 3 Routing Conguration Guide, 08.0.30mb
53-1003627-06 123
In the above formula, the cost is calculated in megabits per second (Mbps). The auto-cost is congured using the auto-cost reference-
bandwidth command in OSPF router conguration mode or OSPFv3 router conguration mode. For more information on changing the
OSPF auto-cost reference-bandwidth, refer to the Changing the reference bandwidth on page 247 section.
Setting the bandwidth value for an Ethernet interface
The current bandwidth value for an Ethernet interface can be set and communicated to higher-level protocols such as OSPF.
1. Enter the congure terminal command to access global conguration mode.
device# configure terminal
2. Enter the interface ethernet command to congure an Ethernet interface and enter interface conguration mode.
device(config)# interface ethernet 1/1/1
3. Enter the bandwidth command and specify a value to set the bandwidth value on the interface.
device(config-if-e1000-1/1/1)# bandwidth 2000
This example sets the bandwidth to 2000 kbps on a specic Ethernet interface.
device# configure terminal
device(config)# interface ethernet 1/1/1
device(config-if-e1000-1/1/1)# bandwidth 2000
The bandwidth specied in this example results in the following OSPF cost, assuming the auto-cost is 100:
• OSPF cost is equal to ((100 * 1000) + (2000 - 1)/ 2000) = 50
Setting the bandwidth value for a VE interface
The current bandwidth value for a VE interface can be set and communicated to higher-level protocols such as OSPF.
1. Enter the congure terminal command to access global conguration mode.
device# configure terminal
2. Enter the vlan command and specify a value to congure a VLAN.
device(config)# vlan 10
3. Enter the tagged ethernet command and specify an interface to add a port that is connected to the device and host in the same
port-based VLAN.
device(config-vlan-10)# tagged ethernet 1/1/1
4. Enter the router-interface ve command and specify a value to create a virtual interface as the routing interface for the VLAN.
device(config-vlan-10)# router-interface ve 10
Creates VE 10 as the routing interface for the VLAN.
5. Enter the interface ve command and specify a value.
device(config-vlan-10)# interface ve 10
Creates a VE interface with the VLAN ID of 10.
Bandwidth for IP interfaces
FastIron Ethernet Switch Layer 3 Routing Conguration Guide, 08.0.30mb
124 53-1003627-06
6. Enter the bandwidth command and specify a value to set the bandwidth value on the interface.
device(config-vif-10)# bandwidth 2000
This example sets the bandwidth to 2000 kbps on a specic VE interface .
device# configure terminal
device(config)# vlan 10
device(config-vlan-10)# tagged ethernet 1/1/1
device(config-vlan-10)# router-interface ve 10
device(config-vlan-10)# interface ve 10
device(config-vif-10)# bandwidth 2000
The bandwidth specied in this example results in the following OSPF cost, assuming the auto-cost is 100:
• OSPF cost is equal to ((100 * 1000) + (2000 - 1)/ 2000) = 50
Setting the bandwidth value for a tunnel interface
The current bandwidth value for a tunnel interface can be set and communicated to higher-level protocols such as OSPF.
1. Enter the congure terminal command to access global conguration mode.
device# configure terminal
2. Enter the interface tunnel command and specify a value to congure a tunnel interface.
device(config)# interface tunnel 2
3. Enter the tunnel mode gre ip command to enable GRE IP encapsulation on the tunnel interface.
device(config-tnif-2)# tunnel mode gre ip
4. Enter the tunnel source command and specify an IP address to congure the source address for the tunnel interface.
device(config-tnif-2)# tunnel source 10.0.0.1
5. Enter the tunnel destination command and specify an IP address to congure the destination address for the tunnel interface.
device(config-tnif-2)# tunnel destination 10.10.0.1
6. Enter the ip address command and specify an IP address and a network mask to assign an IP address to the tunnel interface.
device(config-tnif-2)# ip address 10.0.0.1/24
7. Enter the bandwidth command and specify a value to set the bandwidth value on the interface.
device(config-tnif-2)# bandwidth 2000
Bandwidth for IP interfaces
FastIron Ethernet Switch Layer 3 Routing Conguration Guide, 08.0.30mb
53-1003627-06 125
This example sets the bandwidth to 2000 kbps on a specic tunnel interface .
device# configure terminal
device(config)# interface tunnel 2
device(config-tnif-2)# tunnel mode gre ip
device(config-tnif-2)# tunnel source 10.0.0.1
device(config-tnif-2)# tunnel destination 10.10.0.1
device(config-tnif-2)# ip address 10.0.0.1/24
device(config-tnif-2)# bandwidth 2000
The bandwidth specied in this example results in the following OSPF interface costs, assuming the auto-cost is 100:
• OSPF Interface Cost for the Trunk Group is equal to ((100 * 1000) + (2000 - 1)÷ 2000) = 50
• OSPF Interface Cost for the GRE/IPv6 tunnel is equal to ((100 * 1000) + (2000 - 1)÷ 2000) = 50
Displaying IP conguration information and statistics
The following sections describe IP display options for Layer 3 switches and Layer 2 switches.
Changing the network mask display to prex format
By default, the CLI displays network masks in classical IP address format (example: 255.255.255.0). You can change the displays to
prex format (example: /18) on a Layer 3 switch or Layer 2 switch using the following CLI method.
NOTE
This option does not aect how information is displayed in the Web Management
Interface.
To enable CIDR format for displaying network masks, entering the following command at the global CONFIG level of the CLI.
device(config)# ip show-subnet-length
Syntax: [no] ip show-subnet-length
Displaying IP information - Layer 3 switches
You can display the following IP conguration information statistics on Layer 3 switches:
• Global IP parameter settings and IP access policies
• CPU utilization statistics
• IP interfaces
• ARP entries
• Static ARP entries
• IP forwarding cache
• IP route table
• IP trac statistics
Displaying IP conguration information and statistics
FastIron Ethernet Switch Layer 3 Routing Conguration Guide, 08.0.30mb
126 53-1003627-06

Displaying global IP conguration information
To display IP conguration information, enter the following command at any CLI level.
device# show ip
Global Settings
ttl: 64, arp-age: 10, bootp-relay-max-hops: 4
router-id : 10.95.11.128
enabled : UDP-Broadcast-Forwarding Source-Route Load-Sharing RARP OSPF VRRP-Extended VSRP
disabled: Route-Only Directed-Broadcast-Forwarding BGP4 IRDP Proxy-ARP RIP VRRP ICMP-Redirect
Static Routes
Index IP Address Subnet Mask Next Hop Router Metric Distance
1 0.0.0.0 0.0.0.0 10.157.23.2 1 1
Policies
Index Action Source Destination Protocol Port Operator
1 deny 10.157.22.34 10.157.22.26 tcp http =
64 permit any any
Syntax: show ip
NOTE
This command has additional options, which are explained in other sections in this guide, including the sections following this
one.
This display shows the following information.
TABLE 19 CLI display of global IP conguration information - Layer 3 switch
Field Description
Global settings
ttl The Time-To-Live (TTL) for IP packets. The TTL species the maximum
number of router hops a packet can travel before reaching the Brocade
router. If the packet TTL value is higher than the value specied in this
eld, the Brocade router drops the packet.
arp-age The ARP aging period. This parameter species how many minutes an
inactive ARP entry remains in the ARP cache before the router ages out
the entry.
bootp-relay-max-hops The maximum number of hops away a BootP server can be located from
the Brocade router and still be used by the router clients for network
booting.
router-id The 32-bit number that uniquely identies the Brocade router.
By default, the router ID is the numerically lowest IP interface congured
on the router.
enabled The IP-related protocols that are enabled on the router.
disabled The IP-related protocols that are disabled on the router.
Static routes
Index The row number of this entry in the IP route table.
IP Address The IP address of the route destination.
Subnet Mask The network mask for the IP address.
Next Hop Router The IP address of the router interface to which the Brocade router sends
packets for the route.
Metric The cost of the route. Usually, the metric represents the number of hops to
the destination.
Distance The administrative distance of the route. The default administrative
distance for static IP routes in Brocade routers is 1.
Policies
Displaying IP conguration information and statistics
FastIron Ethernet Switch Layer 3 Routing Conguration Guide, 08.0.30mb
53-1003627-06 127

TABLE 19 CLI display of global IP conguration information - Layer 3 switch (continued)
Field Description
Index The policy number. This is the number you assigned the policy when you
congured it.
Action The action the router takes if a packet matches the comparison values in
the policy. The action can be one of the following:
• deny - The router drops packets that match this policy.
• permit - The router forwards packets that match this policy.
Source The source IP address the policy matches.
Destination The destination IP address the policy matches.
Protocol The IP protocol the policy matches. The protocol can be one of the
following:
• ICMP
• IGMP
• IGRP
• OSPF
• TCP
• UDP
Port The Layer 4 TCP or UDP port the policy checks for in packets. The port
can be displayed by its number or, for port types the router recognizes, by
the well-known name. For example, TCP port 80 can be displayed as
HTTP.
NOTE
T his eld applies only if the IP protocol is TCP or
UDP.
Operator The comparison operator for TCP or UDP port names or numbers.
NOTE
This eld applies only if the IP protocol is TCP or
UDP.
Displaying IP interface information
To display IP interface information, enter the following command at any CLI level.
device# show ip interface
Interface IP-Address OK? Method Status Protocol
Ethernet 1/1/1 10.95.6.173 YES NVRAM up up
Ethernet 1/1/2 10.3.3.3 YES manual up up
Loopback 1 10.2.3.4 YES NVRAM down down
Syntax: show ip interface [ ethernet unit / slot / port | loopback num | tunnel num | venum ]
This display shows the following information.
TABLE 20 CLI display of interface IP conguration information
Field Description
Interface The type and the slot and port number of the interface.
IP-Address The IP address of the interface.
Displaying IP conguration information and statistics
FastIron Ethernet Switch Layer 3 Routing Conguration Guide, 08.0.30mb
128 53-1003627-06

TABLE 20 CLI display of interface IP conguration information (continued)
Field Description
NOTE
If an "s" is listed following the address, this is a secondary
address. When the address was congured, the interface
already had an IP address in the same subnet, so the software
required the "secondary" option before the software could add
the interface.
OK? Whether the IP address has been congured on the interface.
Method Whether the IP address has been saved in NVRAM. If you have set the IP
address for the interface in the CLI or Web Management Interface, but
have not saved the conguration, the entry for the interface in the Method
eld is "manual".
Status The link status of the interface. If you have disabled the interface with the
disable command, the entry in the Status eld will be "administratively
down". Otherwise, the entry in the Status eld will be either "up" or "down".
Protocol Whether the interface can provide two-way communication. If the IP
address is congured, and the link status of the interface is up, the entry in
the protocol eld will be "up". Otherwise the entry in the protocol eld will
be "down".
To display detailed IP information for a specic interface, enter a command such as the following.
device# show ip interface ve 1
Interface Ve 1
members: ethe 1/1/4 to 1/1/24 ethe 1/1/27 to 1/1/48 ethe 1/2/1 to 1/2/2 ethe 2/1/1 to 2/1/2
ethe 2/1/4 to 2/1/12 ethe 2/1/15 to 2/1/24 ethe 2/2/1 to 2/2/2 ethe 3/1/1 to 3/1/2 ethe 3/1/4 to 3/1/12
ethe 3/1/14 to 3/1/24 ethe 3/2/3 to 3/2/4 ethe 4/1/1 to 4/1/12 ethe 4/1/15 to 4/1/24 ethe 4/2/3 to 4/2/4
ethe 5/1/1 to 5/1/12 ethe 5/1/14 to 5/1/24 ethe 5/2/3
active: ethe 4/2/4
port enabled
port state: UP
ip address: 66.66.66.66 subnet mask: 255.255.255.0
Port belongs to VRF: default-vrf
encapsulation: ETHERNET, mtu: 9216, metric: 1
directed-broadcast-forwarding: disabled
ICMP redirect: enabled
proxy-arp: disabled
ip arp-age: 10 minutes
No Helper Addresses are configured.
No inbound ip access-list is set
No outgoing ip access-list is set
Displaying ARP entries
You can display the ARP cache and the static ARP table. The ARP cache contains entries for devices attached to the Layer 3 switch. The
static ARP table contains the user-congured ARP entries. An entry in the static ARP table enters the ARP cache when the entry
interface comes up.
The tables require separate display commands or Web management options.
Displaying the ARP cache
To display the contents of the ARP cache, enter the following command at any CLI level.
Brocade# show arp
Total number of ARP entries: 70
Entries in default routing instance:
Displaying IP conguration information and statistics
FastIron Ethernet Switch Layer 3 Routing Conguration Guide, 08.0.30mb
53-1003627-06 129
No. IP Address MAC Address Type Age Port Status
1 10.63.61.2 000c.000c.000c Dynamic 0 1/1/16-1/1/17 Valid
2 10.63.53.2 000c.000c.000c Dynamic 0 1/1/16-1/1/17 Valid
3 10.63.45.2 000c.000c.000c Dynamic 0 1/1/16-1/1/17 Valid
4 10.63.37.2 000c.000c.000c Dynamic 0 1/1/16-1/1/17 Valid
5 10.63.29.2 000c.000c.000c Dynamic 0 1/1/16-1/1/17 Valid
6 10.63.21.2 000c.000c.000c Dynamic 0 1/1/16-1/1/17 Valid
7 10.63.13.2 000c.000c.000c Dynamic 0 1/1/16-1/1/17 Valid
8 10.63.0.1 000c.000c.000c Dynamic 0 1/1/16-1/1/17 Valid
9 10.63.5.2 000c.000c.000c Dynamic 0 1/1/16-1/1/17 Valid
10 10.63.62.2 000c.000c.000c Dynamic 0 1/1/16-1/1/17 Valid
11 10.63.54.2 000c.000c.000c Dynamic 0 1/1/16-1/1/17 Valid
--More--
To display the contents of the ARP cache when a VRF is congured, enter the following command at any CLI level.
Brocade# show arp vrf one
Total number of ARP entries: 1
Entries in VRF one:
No. IP Address MAC Address Type Age Port Status
1 10.65.0.2 000c.000c.000c Dynamic 1 1/1/16-1/1/17 Valid
Syntax: show arp [ ip-addr [ ip-mask ] | num-entries-to-skip | ethernet unit / slot / port | inspect | mac-address xxxx.xxxx.xxxx [ MAC-
mask ] | management man-port | resource | vrf vrf-name ]
The ip-addr and ip-mask parameters let you restrict the display to entries for a specic IP address and network mask. Specify the IP
address masks in standard decimal mask format (for example, 255.255.0.0).
The mac-address xxxx.xxxx.xxxx parameter lets you restrict the display to entries for a specic MAC address.
The MAC-mask parameter lets you specify a mask for the mac-address xxxx.xxxx.xxxx parameter, to display entries for multiple MAC
addresses. Specify the MAC address mask as "f"s and "0"s, where "f"s are signicant bits.
NOTE
The ip-mask parameter and mask parameter perform dierent operations. The ip-mask parameter species the network mask
for a specic IP address, whereas the mask parameter provides a lter for displaying multiple MAC addresses that have specic
values in common.
The vrf vrf-name parameter lets you restrict the display to entries for a specic VRF.
The num-entries-to-skipparameter lets you display the table beginning with a specic entry number.
NOTE
The entry numbers in the ARP cache are not related to the entry numbers for static ARP table entries.
This display shows the following information. The number in the left column of the CLI display is the row number of the entry in the ARP
cache. This number is not related to the number you assign to static MAC entries in the static ARP table.
TABLE 21 CLI display of ARP cache
Field Description
Total number of ARP Entries The number of entries in the ARP cache.
Entries in default routing instance The total number of ARP entries supported on the device.
Entries in VRF vrf-name The total number of ARP entries for the specied VRF.
IP Address The IP address of the device.
MAC Address The MAC address of the device.
Type The ARP entry type, which can be one of the following:
• Dynamic - The Layer 3 switch learned the entry from an
incoming packet.
Displaying IP conguration information and statistics
FastIron Ethernet Switch Layer 3 Routing Conguration Guide, 08.0.30mb
130 53-1003627-06

TABLE 21 CLI display of ARP cache (continued)
Field Description
• Static - The Layer 3 switch loaded the entry from the static ARP
table when the device for the entry was connected to the Layer
3 switch.
• DHCP - The Layer 3 Switch learned the entry from the DHCP
binding address table.
NOTE
If the type is DHCP, the port number will not be available until
the entry gets resolved through ARP.
Age The number of minutes before which the ARP entry was refreshed. If this
value reaches the ARP aging period, the entry is removed from the table.
NOTE
Static entries do not age out.
Port The port on which the entry was learned.
NOTE
If the ARP entry type is DHCP, the port number will not be
available until the entry gets resolved through ARP.
Status The status of the entry, which can be one of the following:
• Valid - This a valid ARP entry.
• Pend - The ARP entry is not yet resolved.
Displaying the static ARP table
To display the static ARP table instead of the ARP cache, enter the following command at any CLI level.
device# show ip static-arp
Static ARP table size: 512, configurable from 512 to 1024
Index IP Address MAC Address Port
1 10.95.6.111 0000.003b.d210 1/1/1
3 10.95.6.123 0000.003b.d211 1/1/1
This example shows two static entries. Note that because you specify an entry index number when you create the entry, it is possible for
the range of index numbers to have gaps, as shown in this example.
NOTE
The entry number you assign to a static ARP entry is not related to the entry numbers in the ARP cache.
Syntax: show ip static-arp [ ip-addr [ ip-mask ] | num-entries-to-skip | ethernet unit / slot / port | mac-address xxxx.xxxx.xxxx [ MAC-
mask ] ]
The ip-addr and ip-mask parameters let you restrict the display to entries for a specic IP address and network mask. Specify the IP
address masks in standard decimal mask format (for example, 255.255.0.0).
The mac-addressxxxx.xxxx.xxxx parameter lets you restrict the display to entries for a specic MAC address.
The mask parameter lets you specify a mask for the mac-addressxxxx.xxxx.xxxx parameter, to display entries for multiple MAC
addresses. Specify the MAC address mask as "f"s and "0"s, where "f"s are signicant bits.
NOTE
The ip-mask parameter and mask parameter perform dierent operations. The ip-mask parameter species the network mask
for a specic IP address, whereas the mask parameter provides a lter for displaying multiple MAC addresses that have specic
values in common.
Displaying IP conguration information and statistics
FastIron Ethernet Switch Layer 3 Routing Conguration Guide, 08.0.30mb
53-1003627-06 131

The num-entries-to-skip parameter lets you display the table beginning with a specic entry number.
TABLE 22 CLI display of static ARP table
Field Description
Static ARP table size The maximum number of static entries that can be congured on the
device using the current memory allocation. The range of valid memory
allocations for static ARP entries is listed after the current allocation.
Index The number of this entry in the table. You specify the entry number when
you create the entry.
IP Address The IP address of the device.
MAC Address The MAC address of the device.
Port The port attached to the device the entry is for.
Displaying the forwarding cache
To display the IP forwarding cache, enter the following command at any CLI level.
device# show ip cache
Total number of cache entries: 3
D:Dynamic P:Permanent F:Forward U:Us C:Complex Filter
W:Wait ARP I:ICMP Deny K:Drop R:Fragment S:Snap Encap
IP Address Next Hop MAC Type Port Vlan Pri
1 192.168.1.11 DIRECT 0000.0000.0000 PU n/a 0
2 192.168.1.255 DIRECT 0000.0000.0000 PU n/a 0
3 255.255.255.255 DIRECT 0000.0000.0000 PU n/a 0
Syntax: show ip cache [ ip-addr | num ]
The ip-addr parameter displays the cache entry for the specied IP address.
The num parameter displays the cache beginning with the row following the number you enter. For example, to begin displaying the
cache at row 10, enter the following command.
device# show ip cache 9
The show ip cache command displays the following information.
TABLE 23 CLI display of IP forwarding cache - Layer 3 switch
Field Description
IP Address The IP address of the destination.
Next Hop The IP address of the next-hop router to the destination. This eld
contains either an IP address or the value DIRECT. DIRECT means the
destination is either directly attached or the destination is an address on
this Brocade device. For example, the next hop for loopback addresses
and broadcast addresses is shown as DIRECT.
MAC The MAC address of the destination.
NOTE
If the entry is type U (indicating that the destination is this
Brocade device), the address consists of zeroes.
Type The type of host entry, which can be one or more of the following:
• D - Dynamic
• P - Permanent
• F - Forward
• U - Us
Displaying IP conguration information and statistics
FastIron Ethernet Switch Layer 3 Routing Conguration Guide, 08.0.30mb
132 53-1003627-06

TABLE 23 CLI display of IP forwarding cache - Layer 3 switch (continued)
Field Description
• C - Complex Filter
• W - Wait ARP
• I - ICMP Deny
• K - Drop
• R - Fragment
• S - Snap Encap
Port The port through which this device reaches the destination. For
destinations that are located on this device, the port number is shown as
"n/a".
VLAN Indicates the VLANs the listed port is in.
Pri The QoS priority of the port or VLAN.
Displaying the IP route table
To display the IP route table, enter the show ip route command at any CLI level.
device# show ip route
Total number of IP routes: 514
Start index: 1 B:BGP D:Connected R:RIP S:Static O:OSPF *:Candidate default
Destination NetMask Gateway Port Cost Type
10.1.0.0 255.255.0.0 10.1.1.2 1/1/1 2 R
10.2.0.0 255.255.0.0 10.1.1.2 1/1/1 2 R
10.3.0.0 255.255.0.0 10.1.1.2 1/1/1 2 R
10.4.0.0 255.255.0.0 10.1.1.2 1/1/1 2 R
10.5.0.0 255.255.0.0 10.1.1.2 1/1/1 2 R
10.6.0.0 255.255.0.0 10.1.1.2 1/1/1 2 R
10.7.0.0 255.255.0.0 10.1.1.2 1/1/1 2 R
10.8.0.0 255.255.0.0 10.1.1.2 1/1/1 2 R
10.9.0.0 255.255.0.0 10.1.1.2 1/1/1 2 R
10.10.0.0 255.255.0.0 10.1.1.2 1/1/1 2 S
Syntax: show ip route [ ip-addr [ip-mask ] [longer ] [none-bgp ] ] {num | bgp | direct | ospf | rip | static }
The ip-addr parameter displays the route to the specied IP address.
The ip-mask parameter lets you specify a network mask or, if you prefer CIDR format, the number of bits in the network mask. If you use
CIDR format, enter a forward slash immediately after the IP address, then enter the number of mask bits (for example: 10.157.22.0/24
for 10.157.22.0 255.255.255.0).
The longer parameter applies only when you specify an IP address and mask. This option displays only the routes for the specied IP
address and mask. Refer to the following example.
The none-bgp parameter displays only the routes that did not come from BGP4.
The num option display the route table entry whose row number corresponds to the number you specify. For example, if you want to
display the tenth row in the table, enter "10".
The bgp option displays the BGP4 routes.
The direct option displays only the IP routes that are directly attached to the Layer 3 switch.
The ospf option displays the OSPF routes.
The rip option displays the RIP routes.
The static option displays only the static IP routes.
The default routes are displayed rst.
Displaying IP conguration information and statistics
FastIron Ethernet Switch Layer 3 Routing Conguration Guide, 08.0.30mb
53-1003627-06 133

Here is an example of how to use the direct option. To display only the IP routes that go to devices directly attached to the Layer 3
switch, enter the following command.
device# show ip route direct
Start index: 1 B:BGP D:Connected R:RIP S:Static O:OSPF *:Candidate default
Destination NetMask Gateway Port Cost Type
10.157.22.0 255.255.255.0 0.0.0.0 1/4/11 1 D
Notice that the route displayed in this example has "D" in the Type eld, indicating the route is to a directly connected device.
Here is an example of how to use the static option. To display only the static IP routes, enter the following command.
device# show ip route static
Start index: 1 B:BGP D:Connected R:RIP S:Static O:OSPF *:Candidate default
Destination NetMask Gateway Port Cost Type
10.144.33.11 255.255.255.0 10.157.22.12 1/1/1 2 S
Notice that the route displayed in this example has "S" in the Type eld, indicating the route is static.
Here is an example of how to use the longer option. To display only the routes for a specied IP address and mask, enter a command
such as the following.
device# show ip route 10.159.0.0/16 longer
Starting index: 1 B:BGP D:Directly-Connected R:RIP S:Static O:OSPF
Destination NetMask Gateway Port Cost Type
52 10.159.38.0 255.255.255.0 10.95.6.101 1/1/1 1 S
53 10.159.39.0 255.255.255.0 10.95.6.101 1/1/1 1 S
54 10.159.40.0 255.255.255.0 10.95.6.101 1/1/1 1 S
55 10.159.41.0 255.255.255.0 10.95.6.101 1/1/1 1 S
56 10.159.42.0 255.255.255.0 10.95.6.101 1/1/1 1 S
57 10.159.43.0 255.255.255.0 10.95.6.101 1/1/1 1 S
58 10.159.44.0 255.255.255.0 10.95.6.101 1/1/1 1 S
59 10.159.45.0 255.255.255.0 10.95.6.101 1/1/1 1 S
60 10.159.46.0 255.255.255.0 10.95.6.101 1/1/1 1 S
This example shows all the routes for networks beginning with 10.159. The mask value and longer parameter specify the range of
network addresses to be displayed. In this example, all routes within the range 10.159.0.0 - 10.159.255.255 are listed.
The summary option displays a summary of the information in the IP route table. The following is an example of the output from this
command.
device# show ip route summary
IP Routing Table - 35 entries:
6 connected, 28 static, 0 RIP, 1 OSPF, 0 BGP, 0 ISIS, 0 MPLS
Number of prefixes:
/0: 1 /16: 27 /22: 1 /24: 5 /32: 1
Syntax: show ip route summary
In this example, the IP route table contains 35 entries. Of these entries, 6 are directly connected devices, 28 are static routes, and 1 route
was calculated through OSPF. One of the routes has a zero-bit mask (this is the default route), 27 have a 22-bit mask, 5 have a 24-bit
mask, and 1 has a 32-bit mask.
The following table lists the information displayed by the show ip route command.
TABLE 24 CLI display of IP route table
Field Description
Destination The destination network of the route.
NetMask The network mask of the destination address.
Gateway The next-hop router.
Port The port through which this router sends packets to reach the route's
destination.
Displaying IP conguration information and statistics
FastIron Ethernet Switch Layer 3 Routing Conguration Guide, 08.0.30mb
134 53-1003627-06

TABLE 24 CLI display of IP route table (continued)
Field Description
Cost The route's cost.
Type The route type, which can be one of the following:
• B - The route was learned from BGP.
• D - The destination is directly connected to this Layer 3 switch.
• R - The route was learned from RIP.
• S - The route is a static route.
• * - The route and next-hop gateway are resolved through the ip
default-network setting.
• O - The route is an OSPF route. Unless you use the ospf option
to display the route table, "O" is used for all OSPF routes. If you
do use the ospf option, the following type codes are used:
• O - OSPF intra area route (within the same area).
• IA - The route is an OSPF inter area route (a route that passes
from one area into another).
• E1 - The route is an OSPF external type 1 route.
• E2 - The route is an OSPF external type 2 route.
Clearing IP routes
If needed, you can clear the entire route table or specic individual routes.
To clear all routes from the IP route table, enter the following command.
device# clear ip route
To clear route 10.157.22.0/24 from the IP routing table, enter the clear ip route command.
device# clear ip route 10.157.22.0/24
Syntax: clear ip route [ ip-addr ip-mask ]
or
Syntax: clear ip route [ ip-addr/mask-bits ]
Displaying IP trac statistics
To display IP trac statistics, enter the show ip trac command at any CLI level.
device# show ip traffic
IP Statistics
139 received, 145 sent, 0 forwarded
0 filtered, 0 fragmented, 0 reassembled, 0 bad header
0 no route, 0 unknown proto, 0 no buffer, 0 other errors
ICMP Statistics
Received:
0 total, 0 errors, 0 unreachable, 0 time exceed
0 parameter, 0 source quench, 0 redirect, 0 echo,
0 echo reply, 0 timestamp, 0 timestamp reply, 0 addr mask
0 addr mask reply, 0 irdp advertisement, 0 irdp solicitation
Sent:
0 total, 0 errors, 0 unreachable, 0 time exceed
0 parameter, 0 source quench, 0 redirect, 0 echo,
0 echo reply, 0 timestamp, 0 timestamp reply, 0 addr mask
0 addr mask reply, 0 irdp advertisement, 0 irdp solicitation
UDP Statistics
1 received, 0 sent, 1 no port, 0 input errors
Displaying IP conguration information and statistics
FastIron Ethernet Switch Layer 3 Routing Conguration Guide, 08.0.30mb
53-1003627-06 135

TCP Statistics
0 active opens, 0 passive opens, 0 failed attempts
0 active resets, 0 passive resets, 0 input errors
138 in segments, 141 out segments, 4 retransmission
RIP Statistics
0 requests sent, 0 requests received
0 responses sent, 0 responses received
0 unrecognized, 0 bad version, 0 bad addr family, 0 bad req format
0 bad metrics, 0 bad resp format, 0 resp not from rip port
0 resp from loopback, 0 packets rejected
The show ip trac command displays the following information.
TABLE 25 CLI display of IP trac statistics - Layer 3 switch
Field Description
IP statistics
received The total number of IP packets received by the device.
sent The total number of IP packets originated and sent by the device.
forwarded The total number of IP packets received by the device and forwarded to
other devices.
ltered The total number of IP packets ltered by the device.
fragmented The total number of IP packets fragmented by this device to
accommodate the MTU of this device or of another device.
reassembled The total number of fragmented IP packets that this device re-assembled.
bad header The number of IP packets dropped by the device due to a bad packet
header.
no route The number of packets dropped by the device because there was no
route.
unknown proto The number of packets dropped by the device because the value in the
Protocol eld of the packet header is unrecognized by this device.
no buer This information is used by Brocade customer support.
other errors The number of packets dropped due to error types other than those listed
above.
ICMP statistics
The ICMP statistics are derived from RFC 792, "Internet Control Message Protocol", RFC 950, "Internet Standard Subnetting Procedure", and RFC
1256, "ICMP Router Discovery Messages". Statistics are organized into Sent and Received. The eld descriptions below apply to each.
total The total number of ICMP messages sent or received by the device.
errors This information is used by Brocade customer support.
unreachable The number of Destination Unreachable messages sent or received by the
device.
time exceed The number of Time Exceeded messages sent or received by the device.
parameter The number of Parameter Problem messages sent or received by the
device.
source quench The number of Source Quench messages sent or received by the device.
redirect The number of Redirect messages sent or received by the device.
echo The number of Echo messages sent or received by the device.
echo reply The number of Echo Reply messages sent or received by the device.
timestamp The number of Timestamp messages sent or received by the device.
timestamp reply The number of Timestamp Reply messages sent or received by the
device.
Displaying IP conguration information and statistics
FastIron Ethernet Switch Layer 3 Routing Conguration Guide, 08.0.30mb
136 53-1003627-06

TABLE 25 CLI display of IP trac statistics - Layer 3 switch (continued)
Field Description
addr mask The number of Address Mask Request messages sent or received by the
device.
addr mask reply The number of Address Mask Replies messages sent or received by the
device.
irdp advertisement The number of ICMP Router Discovery Protocol (IRDP) Advertisement
messages sent or received by the device.
irdp solicitation The number of IRDP Solicitation messages sent or received by the device.
UDP statistics
received The number of UDP packets received by the device.
sent The number of UDP packets sent by the device.
no port The number of UDP packets dropped because they did not have a valid
UDP port number.
input errors This information is used by Brocade customer support.
TCP statistics
The TCP statistics are derived from RFC 793, "Transmission Control Protocol".
active opens The number of TCP connections opened by sending a TCP SYN to
another device.
passive opens The number of TCP connections opened by this device in response to
connection requests (TCP SYNs) received from other devices.
failed attempts This information is used by Brocade customer support.
active resets The number of TCP connections this device reset by sending a TCP
RESET message to the device at the other end of the connection.
passive resets The number of TCP connections this device reset because the device at
the other end of the connection sent a TCP RESET message.
input errors This information is used by Brocade customer support.
in segments The number of TCP segments received by the device.
out segments The number of TCP segments sent by the device.
retransmission The number of segments that this device retransmitted because the
retransmission timer for the segment had expired before the device at the
other end of the connection had acknowledged receipt of the segment.
RIP statistics
The RIP statistics are derived from RFC 1058, "Routing Information Protocol".
requests sent The number of requests this device has sent to another RIP router for all
or part of its RIP routing table.
requests received The number of requests this device has received from another RIP router
for all or part of this device RIP routing table.
responses sent The number of responses this device has sent to another RIP router
request for all or part of this device RIP routing table.
responses received The number of responses this device has received to requests for all or
part of another RIP router routing table.
unrecognized This information is used by Brocade customer support.
bad version The number of RIP packets dropped by the device because the RIP
version was either invalid or is not supported by this device.
bad addr family The number of RIP packets dropped because the value in the Address
Family Identier eld of the packet header was invalid.
Displaying IP conguration information and statistics
FastIron Ethernet Switch Layer 3 Routing Conguration Guide, 08.0.30mb
53-1003627-06 137

TABLE 25 CLI display of IP trac statistics - Layer 3 switch (continued)
Field Description
bad req format The number of RIP request packets this router dropped because the
format was bad.
bad metrics This information is used by Brocade customer support.
bad resp format The number of responses to RIP request packets dropped because the
format was bad.
resp not from rip port This information is used by Brocade customer support.
resp from loopback The number of RIP responses received from loopback interfaces.
packets rejected This information is used by Brocade customer support.
Displaying IP information - Layer 2 switches
You can display the following IP conguration information statistics on Layer 2 switches:
• Global IP settings
• ARP entries
• IP trac statistics
Displaying global IP conguration information
To display the Layer 2 switch IP address and default gateway, enter the show ip command.
device# show ip
Switch IP address: 192.168.1.2
Subnet mask: 255.255.255.0
Default router address: 192.168.1.1
TFTP server address: None
Configuration filename: None
Image filename: None
Syntax: show ip
This display shows the following information.
TABLE 26 CLI display of global IP conguration information - Layer 2 switch
Field Description
IP conguration
Switch IP address The management IP address congured on the Layer 2 switch. Specify
this address for Telnet access or Web management access.
Subnet mask The subnet mask for the management IP address.
Default router address The address of the default gateway, if you specied one.
Most recent TFTP access
TFTP server address The IP address of the most-recently contacted TFTP server, if the switch
has contacted a TFTP server since the last time the software was reloaded
or the switch was rebooted.
Conguration lename The name under which the Layer 2 switch startup-cong le was
uploaded or downloaded during the most recent TFTP access.
Image lename The name of the Layer 2 switch ash image (system software le) that was
uploaded or downloaded during the most recent TFTP access.
Displaying IP conguration information and statistics
FastIron Ethernet Switch Layer 3 Routing Conguration Guide, 08.0.30mb
138 53-1003627-06

Displaying ARP entries
To display the entries the Layer 2 switch has placed in its ARP cache, enter the show arp command from any level of the CLI. This
command shows the total number of ARPs for the default VRF instance.
NOTE
To display the ARP maximum capacity for your device, enter the show default values command.
device# show arp
Total Arp Entries : 1
No.
1 IP Mac Port Age VlanId
192.168.1.170 0000.0011.d042 7 0 1
Syntax: show arp
TABLE 27 CLI display of ARP cache
Syntax: show arp
Field
Description
Total ARP Entries The number of entries in the ARP cache.
IP The IP address of the device.
Mac The MAC address of the device.
NOTE
If the MAC address is all zeros, the entry is for the default
gateway, but the Layer 2 switch does not have a link to the
gateway.
Port The port on which the entry was learned.
Age The number of minutes the entry has remained unused. If this value
reaches the ARP aging period, the entry is removed from the cache.
VlanId The VLAN the port that learned the entry is in.
NOTE
If the MAC address is all zeros, this eld shows a random
VLAN ID, since the Layer 2 switch does not yet know which
port the device for this entry is attached to.
Displaying IP trac statistics
To display IP trac statistics on a Layer 2 switch, enter the show ip trac command at any CLI level.
device# show ip traffic
IP Statistics
27 received, 24 sent
0 fragmented, 0 reassembled, 0 bad header
0 no route, 0 unknown proto, 0 no buffer, 0 other errors
ICMP Statistics
Received:
0 total, 0 errors, 0 unreachable, 0 time exceed
0 parameter, 0 source quench, 0 redirect, 0 echo,
0 echo reply, 0 timestamp, 0 timestamp rely, 0 addr mask
0 addr mask reply, 0 irdp advertisement, 0 irdp solicitation
Sent:
0 total, 0 errors, 0 unreachable, 0 time exceed
0 parameter, 0 source quench, 0 redirect, 0 echo,
0 echo reply, 0 timestamp, 0 timestamp rely, 0 addr mask
0 addr mask reply, 0 irdp advertisement, 0 irdp solicitation
UDP Statistics
0 received, 0 sent, 0 no port, 0 input errors
Displaying IP conguration information and statistics
FastIron Ethernet Switch Layer 3 Routing Conguration Guide, 08.0.30mb
53-1003627-06 139

TCP Statistics
1 current active tcbs, 4 tcbs allocated, 0 tcbs freed 0 tcbs protected
0 active opens, 0 passive opens, 0 failed attempts
0 active resets, 0 passive resets, 0 input errors
27 in segments, 24 out segments, 0 retransmission
Syntax: show ip trac
The show ip trac command displays the following information.
TABLE 28 CLI display of IP trac statistics - Layer 2 switch
Field Description
IP statistics
received The total number of IP packets received by the device.
sent The total number of IP packets originated and sent by the device.
fragmented The total number of IP packets fragmented by this device to
accommodate the MTU of this device or of another device.
reassembled The total number of fragmented IP packets that this device re-assembled.
bad header The number of IP packets dropped by the device due to a bad packet
header.
no route The number of packets dropped by the device because there was no
route.
unknown proto The number of packets dropped by the device because the value in the
Protocol eld of the packet header is unrecognized by this device.
no buer This information is used by Brocade customer support.
other errors The number of packets that this device dropped due to error types other
than the types listed above.
ICMP statistics
The ICMP statistics are derived from RFC 792, "Internet Control Message Protocol", RFC 950, "Internet Standard Subnetting Procedure", and RFC
1256, "ICMP Router Discovery Messages". Statistics are organized into Sent and Received. The eld descriptions below apply to each.
total The total number of ICMP messages sent or received by the device.
errors This information is used by Brocade customer support.
unreachable The number of Destination Unreachable messages sent or received by the
device.
time exceed The number of Time Exceeded messages sent or received by the device.
parameter The number of Parameter Problem messages sent or received by the
device.
source quench The number of Source Quench messages sent or received by the device.
redirect The number of Redirect messages sent or received by the device.
echo The number of Echo messages sent or received by the device.
echo reply The number of Echo Reply messages sent or received by the device.
timestamp The number of Timestamp messages sent or received by the device.
timestamp reply The number of Timestamp Reply messages sent or received by the
device.
addr mask The number of Address Mask Request messages sent or received by the
device.
addr mask reply The number of Address Mask Replies messages sent or received by the
device.
irdp advertisement The number of ICMP Router Discovery Protocol (IRDP) Advertisement
messages sent or received by the device.
Displaying IP conguration information and statistics
FastIron Ethernet Switch Layer 3 Routing Conguration Guide, 08.0.30mb
140 53-1003627-06

TABLE 28 CLI display of IP trac statistics - Layer 2 switch (continued)
Field Description
irdp solicitation The number of IRDP Solicitation messages sent or received by the device.
UDP statistics
received The number of UDP packets received by the device.
sent The number of UDP packets sent by the device.
no port The number of UDP packets dropped because the packet did not contain
a valid UDP port number.
input errors This information is used by Brocade customer support.
TCP statistics
The TCP statistics are derived from RFC 793, "Transmission Control Protocol".
current active tcbs The number of TCP Control Blocks (TCBs) that are currently active.
tcbs allocated The number of TCBs that have been allocated.
tcbs freed The number of TCBs that have been freed.
tcbs protected This information is used by Brocade customer support.
active opens The number of TCP connections opened by this device by sending a TCP
SYN to another device.
passive opens The number of TCP connections opened by this device in response to
connection requests (TCP SYNs) received from other devices.
failed attempts This information is used by Brocade customer support.
active resets The number of TCP connections this device reset by sending a TCP
RESET message to the device at the other end of the connection.
passive resets The number of TCP connections this device reset because the device at
the other end of the connection sent a TCP RESET message.
input errors This information is used by Brocade customer support.
in segments The number of TCP segments received by the device.
out segments The number of TCP segments sent by the device.
retransmission The number of segments that this device retransmitted because the
retransmission timer for the segment had expired before the device at the
other end of the connection had acknowledged receipt of the segment.
Disabling IP checksum check
The disable-hw-ip-checksum-check command traps a packet with bad checksum to the CPU. Previously, if the packet processor
detected a packet with, for example, the checksum 0xFFFF, it would treat it as a bad checksum even if it was correct and it would drop
the packet. Now, the command disable-hw-ip-checksum-check traps the packet at the CPU and if the checksum is correct, it forwards
the packet.
To set disable hardware ip checksum check for all ports, enter the following command.
device# disable-hw-ip-checksum-check
disable-ip-header-check set for all ports
To clear disable hardware ip checksum check on all ports, enter the following command.
device# no disable-hw-ip-checksum-check ethernet 13
disable-hw-ip-checksum-check cleared for ports the 13 to 24
Disabling IP checksum check
FastIron Ethernet Switch Layer 3 Routing Conguration Guide, 08.0.30mb
53-1003627-06 141
To set disable hardware ip checksum check on for example, port range 0-12, enter the following command.
device# disable-hw-ip-checksum-check ethernet 2
disable-ip-header-check set for ports ethe 1 to 12
To set disable hardware ip checksum check on, for example, port range 13-24, enter the following command.
device# disable-hw-ip-checksum-check ethernet 22
disable-ip-header-check set for ports ethe 13 to 24
To clear disable hardware ip checksum check on, for example, port range 13-24, enter the following command.
device# no disable-hw-ip-checksum-check ethernet 13
disable-hw-ip-checksum-check cleared for ports the 13 to 24
NOTE
The port range could be any consecutive range, it may not necessarily be a decimal number.
Syntax: [no] disable-hw-ip-checksum-check ethernet portnum
NOTE
This command only functions on the IPv4 platform.
Disabling IP checksum check
FastIron Ethernet Switch Layer 3 Routing Conguration Guide, 08.0.30mb
142 53-1003627-06

Layer 3 Routing Protocols
• Adding a static IP route................................................................................................................................................................................ 143
• Adding a static ARP entry...........................................................................................................................................................................146
• Modifying and displaying Layer 3 system parameter limits.........................................................................................................146
• Enabling or disabling routing protocols.................................................................................................................................................147
• Enabling or disabling Layer 2 switching............................................................................................................................................... 148
•Conguring a Layer 3 Link Aggregration Group (LAG)..................................................................................................................149
Adding a static IP route
To congure an IP static route with a destination address of 192.0.0.0 255.0.0.0 and a next-hop router IP address of 195.1.1.1, enter
the following.
device(config)# ip route 192.0.0.0 255.0.0.0 195.1.1.1
To congure a default route, enter the following.
device(config)# ip route 0.0.0.0 0.0.0.0
To congure a static IP route with an Ethernet port instead of a next-hop address, enter a command such as the following.
device(config)# ip route 192.128.2.69 255.255.255.0 ethernet 1/4/1
The command congures a static IP route for destination network 192.128.2.69/24. Since an Ethernet port is specied instead of a
gateway IP address as the next hop, the Brocade device always forwards trac for the 192.128.2.69/24 network to port 1/4/1.
To congure an IP static route that uses virtual interface 3 as its next hop, enter a command such as the following.
device(config)# ip route 192.128.2.71 255.255.255.0 ve 3
Syntax: [no] ip route dest-ip-addr dest-mask | dest-ip-addr/mask-bits next-hop-ip-addr | ethernet unit/ slot/port | ve num [ metric ]
[ tag num ] [ distance num ] [ name string ]
NOTE
Using the no form of the command only removes the name if congured. Another no command must be issued to remove the
actual Static Route.
The dest-ip-addr is the route’s destination. The dest-mask is the network mask for the route’s destination IP address. Alternatively, you
can specify the network mask information by entering / followed by the number of bits in the network mask. For example, you can enter
192.0.0.0 255.255.255.0 as 192.0.0.0/.24.
The next-hop-ip-addr is the IP address of the next-hop router (gateway) for the route.
For a default route, enter 0.0.0.0 0.0.0.0 xxx.xxx.xxx.xxx (use 0 for the mask-bits if you specify the address in CIDR format).
If you do not want to specify a next-hop IP address, you can instead specify a port or interface number on the Brocade device. The num
parameter is a virtual interface number. The unit/slot/port is the port’s number of the Brocade device. If you specify an Ethernet port, the
Brocade device forwards packets destined for the static route’s destination network to the specied interface. Conceptually, this feature
makes the destination network like a directly connected network, associated with a Brocade device interface.
NOTE
The port or virtual interface you use for the static route’s next hop must have at least one IP address congured on it. The
address does not need to be in the same subnet as the destination network.
FastIron Ethernet Switch Layer 3 Routing Conguration Guide, 08.0.30mb
53-1003627-06 143
The metric parameter species the cost of the route and can be a number from 1 - 16. The default is 1.
NOTE
If you specify 16, RIP considers the metric to be innite and thus also considers the route to be
unreachable.
The tag num parameter species the tag value of the route. Possible values: 0 - 4294967295. Default: 0.
The distance num parameter species the administrative distance of the route. When comparing otherwise equal routes to a destination,
the Brocade device prefers lower administrative distances over higher ones, so make sure you use a low value for your default route.
Possible values: 1 - 255. Default: 1.
NOTE
The Brocade device will replace the static route if it receives a route with a lower administrative distance.
The name string parameter species the name assigned to a route. The static route name is descriptive and an optional feature. It does
not aect the selection of static routes.
Conguring a "null" route
You can congure the Brocade device to drop IP packets to a specic network or host address by conguring a "null" (sometimes called
"null0") static route for the address. When the Brocade device receives a packet destined for the address, the Brocade device drops the
packet instead of forwarding it.
To congure a null static route to drop packets destined for network 209.157.22.x, enter the following commands.
device(config)# ip route 209.157.22.0 255.255.255.0 null0
device(config)# write memory
Syntax: [no] ip route { ip-addr ip-mask | dest-ip-addr /mask-bits } null0 [ metric ] [ tag num ] [ distance num ]
To display the maximum value for your device, enter the show default values command. The maximum number of static IP routes the
system can hold is listed in the ip-static-route row in the System Parameters section of the display. To change the maximum value, use
the system-max ip-static-route command at the global CONFIG level.
The ip-addr parameter species the network or host address. The Brocade device will drop packets that contain this address in the
destination eld instead of forwarding them.
The ip-mask parameter species the network mask. Ones are signicant bits and zeros allow any value. For example, the mask
255.255.255.0 matches on all hosts within the Class C subnet address specied by ip-addr . Alternatively, you can specify the number
of bits in the network mask. For example, you can enter 209.157.22.0/24 instead of 209.157.22.0 255.255.255.0.
The null0 parameter indicates that this is a null route. You must specify this parameter to make this a null route.
The metric parameter adds a cost to the route. You can specify from 1 - 16. The default is 1.
The tag num parameter species the tag value of the route. Possible values: 0 - 4294967295. Default: 0.
The distancenum parameter congures the administrative distance for the route. You can specify a value from 1 - 255. The default is 1.
The value 255 makes the route unusable.
The last three parameters are optional and do not aect the null route, unless you congure the administrative distance to be 255. In this
case, the route is not used and the trac might be forwarded instead of dropped.
Adding a static IP route
FastIron Ethernet Switch Layer 3 Routing Conguration Guide, 08.0.30mb
144 53-1003627-06
Static route next hop resolution
This feature enables the Brocade device to use routes from a specied protocol to resolve a congured static route. By default this is
disabled.
To congure static route next hop resolution with OSPF routes, use the following command.
device(config)# ip route next-hop ospf
Syntax: [no] ip route next-hop [ bgp | ospf | rip ]
NOTE
This command can be independently applied on a per-VRF basis.
This command causes the resolution of static route next hop using routes learned from one of the following protocols:
• bgp - both iBGP and eBGP routes are used to resolve static routes.
• ospf
• rip
NOTE
Connected routes are always used to resolve static routes.
Static route recursive lookup
This feature enables the Brocade device to use static routes to resolve another static route. The recursive static route next hop lookup
level can be congured. By default, this feature is disabled.
To congure static route next hop recursive lookup by other static routes, use the following command.
device(config)# ip route next-hop-recursion 5
Syntax: [no] ip route next-hop-recursion level
The level available species the numbers of level of recursion allowed. Acceptable values are 1-10. The default value is 3.
NOTE
This command can be independently applied on a per-VRF basis.
Static route resolve by default route
This feature enables the Brocade device to use the default route (0.0.0.0/0) to resolve a static route. By default, this feature is disabled.
Use the following command to congure static route resolve by default route.
device(config)# ip route next-hop-enable-default
Syntax: [no] ip route next-hop-enable-default
NOTE
This command can be independently applied on a per-VRF basis.
This command works independently with the ip route next-hop-recursion and ip route next-hop commands. If the default route is a
protocol route, that protocol needs to be enabled to resolve static routes using the ip route next-hop command in order for static routes
to resolve by this default route. If the default route itself is a static route, you must congure the ip route next-hop-recursion command
to resolve other static routes by this default route.
Adding a static IP route
FastIron Ethernet Switch Layer 3 Routing Conguration Guide, 08.0.30mb
53-1003627-06 145
Adding a static ARP entry
NOTE
Adding a static ARP entry is supported on FastIron X Series, Brocade FCX Series, ICX 6610 and ICX 6450 devices.
Static entries are useful in cases where you want to pre-congure an entry for a device that is not connected to the Brocade device, or
you want to prevent a particular entry from aging out. The software removes a dynamic entry from the ARP cache if the ARP aging
interval expires before the entry is refreshed. Static entries do not age out, regardless of whether the Brocade device receives an ARP
request from the device that has the entry address. The software places a static ARP entry into the ARP cache as soon as you create the
entry.
To add a static ARP entry, enter a command such as the following at the global CONFIG level of the CLI.
device(config)#arp 10.157.22.3 0000.00bb.cccc ethernet 3
This command adds a static ARP entry that maps IP address 10.157.22.3 to MAC address 0000.00bb.cccc. The entry is for a MAC
address connected to device port 3.
Syntax: [no] arp ip-addrmac-addr ethernet port
The ip-addr variable species the IP address of the device that has the MAC address of the entry.
The mac-addr variable species the MAC address of the entry.
The ethernet port parameter species the port number attached to the device that has the MAC address of the entry. Specify the port
variable in one of the following formats:
The clear arp command clears learned ARP entries but does not remove any static ARP entries.
Modifying and displaying Layer 3 system parameter
limits
This section shows how to view and congure some of the Layer 3 system parameter limits.
Layer 3 conguration notes
• Changing the system parameters recongures the device memory. Whenever you recongure the memory on a Brocade
device, you must save the change to the startup-cong le, and then reload the software to place the change into eect.
• The Layer 3 system parameter limits for FastIron IPv6 models are automatically adjusted by the system and cannot be
manually modied.
FastIron second generation modules
FastIron IPv6 models support the same Layer 3 system parameters that use hardware memory as do FastIron IPv4 models. However,
there are some conguration dierences between second generation modules and rst generation modules. The dierences are as
follows:
• Number of IP next hops - 6144 maximum and default value.
• Number of multicast output interfaces (clients) - 3072 maximum. This value is xed in second generation modules and cannot
be modied. This system parameter occupies its own hardware memory space.
To display the current settings for the Layer 3 system parameters, use the show default value command.
Adding a static ARP entry
FastIron Ethernet Switch Layer 3 Routing Conguration Guide, 08.0.30mb
146 53-1003627-06
FastIron third generation modules
The default value of next hop entries on FastIron X Series devices with the following third generation modules installed is 16384. This
value is predened and not editable.
• SX-FI48GPP
• SX-FI-2XG
• SX-FI-8XG
• SX-FI-24HF
• SX-FI-24GPP
If the FastIron X Series device is installed with rst generation or second generation modules, the system automatically calculates the
default value for these modules.
Displaying Layer 3 system parameter limits
To display the Layer 3 system parameter defaults, maximum values, and current values, enter the show default value command at any
level of the CLI.
The following example shows output on a FastIron X Series with second generation modules.
device#show default value
sys log buffers:50 mac age time:300 sec telnet sessions:5
ip arp age:10 min bootp relay max hops:4 ip ttl:64 hops
ip addr per intf:24
igmp group memb.:140 sec igmp query:60 sec
ospf dead:40 sec ospf hello:10 sec ospf retrans:5 sec
ospf transit delay:1 sec
System Parameters Default Maximum Current
ip-arp 4000 64000 4000
ip-static-arp 512 1024 512
some lines omitted for brevity....
hw-traffic-condition 50 1024 50
The following example shows output on a FastIron X Series with third generation modules.
device#show default value
sys log buffers:50 mac age time:300 sec telnet sessions:5
ip arp age:10 min bootp relay max hops:4 ip ttl:64 hops
ip addr per intf:24
igmp group memb.:140 sec igmp query:60 sec
ospf dead:40 sec ospf hello:10 sec ospf retrans:5 sec
ospf transit delay:1 sec
System Parameters Default Maximum Current
ip-arp 4000 64000 4000
ip-static-arp 512 1024 512
some lines omitted for brevity....
hw-traffic-condition 50 1024 50
Enabling or disabling routing protocols
This section describes how to enable or disable routing protocols. For complete conguration information about the routing protocols,
refer to the respective chapters in this guide.
The Layer 3 code supports the following protocols:
• BGP4
• IGMP
Enabling or disabling routing protocols
FastIron Ethernet Switch Layer 3 Routing Conguration Guide, 08.0.30mb
53-1003627-06 147
• IP
• IP multicast (PIM-SM, PIM-DM)
• OSPF
• PIM
• RIPV1 and V2
• VRRP
• VRRP-E
• VSRP
• IPv6 Routing
• IPv6 Multicast
IP routing is enabled by default on devices running Layer 3 code. All other protocols are disabled, so you must enable them to congure
and use them.
To enable a protocol on a device running Layer 3 code, enter router at the global CONFIG level, followed by the protocol to be enabled.
The following example shows how to enable OSPF.
device(config)#router ospf
Syntax: router bgp | igmp | ip | ospf | pim | rip | vrrp | vrrp-e | vsrp
Enabling or disabling Layer 2 switching
By default, Brocade Layer 3 switches support Layer 2 switching. These devices modify the routing protocols that are not supported on
the devices. If you want to disable Layer 2 switching, you can do so globally or on individual ports, depending on the version of software
your device is running.
NOTE
Consult your reseller or Brocade to understand the risks involved before disabling all Layer 2 switching operations.
Conguration notes and feature limitations for Layer 2 switching
• Enabling or disabling Layer 2 switching is supported in Layer 3 software images only.
• FastIron X Series,Brocade FCX Series, and ICX devices support disabling Layer 3 switching at the interface conguration level
as well as the global CONFIG level.
• Enabling or disabling Layer 2 switching is not supported on virtual interfaces.
Command syntax for Layer 2 switching
To globally disable Layer 2 switching on a Layer 3 switch, enter commands such as the following.
device(config)#route-only
device(config)#exit
device#write memory
device#reload
To re-enable Layer 2 switching on a Layer 3 switch, enter the following commands.
device(config)#no route-only
device(config)#exit
Enabling or disabling Layer 2 switching
FastIron Ethernet Switch Layer 3 Routing Conguration Guide, 08.0.30mb
148 53-1003627-06
device#write memory
device#reload
Syntax: [no] route-only
To disable Layer 2 switching only on a specic interface, go to the interface conguration level for that interface, and then disable the
feature. The following commands show how to disable Layer 2 switching on port 2.
device(config)#interface ethernet 2
device(config-if-e1000-2)#route-only
Conguring a Layer 3 Link Aggregration Group (LAG)
Conguring a Layer 3 Link Aggregration Group (LAG)
FastIron devices with Layer 3 images support Layer 3 LAGs, which are used for routing and not switching. For details on how to create a
LAG, refer to Link Aggregation in the FastIron Ethernet Switch Platform and Layer 2 Switching Conguration Guide. Perform the
following steps to enable routing on a LAG:
1. In the global conguration mode, run the interface ethernet command to enter the interface conguration mode of the primary
port of the LAG.
Brocade(config)# interface ethernet 4/1/4
2. Run the route-only command to disable switching and enable routing on the LAG.
Brocade(config-if-e1000-4/1/4)# route-only
3. Run the ip address command to assign an IP address for the LAG.
Brocade(config-if-e1000-4/1/4)# ip address 25.0.0.2/24
The following example shows the creation and deployment of a dynamic LAG that is used for routing on a FastIron device with Layer 3
image.
Brocade(config)# lag “brocade-LAG” dynamic id 55
Brocade(config-lag- brocade-LAG)# ports ethernet 1/1/1 ethernet 2/1/3 ethernet 3/1/4 ethernet 4/1/4
Brocade(config-lag- brocade-LAG)# primary-port 4/1/4
Brocade(config-lag- brocade-LAG)# deploy
Brocade(config-lag- brocade-LAG)# exit
Brocade(config)# interface ethernet 4/1/4
Brocade(config-if-e1000-4/1/4)# route-only
Brocade(config-if-e1000-4/1/4)# ip address 25.0.0.2/24
Conguring a Layer 3 Link Aggregration Group (LAG)
FastIron Ethernet Switch Layer 3 Routing Conguration Guide, 08.0.30mb
53-1003627-06 149
FastIron Ethernet Switch Layer 3 Routing Conguration Guide, 08.0.30mb
150 53-1003627-06

IPv6 Conguration on FastIron X Series,
FCX, and ICX Series Switches
• Full Layer 3 IPv6 feature support............................................................................................................................................................151
• IPv6 addressing overview...........................................................................................................................................................................152
• IPv6 CLI command support .....................................................................................................................................................................155
• IPv6 host address on a Layer 2 switch.................................................................................................................................................157
•Conguring the management port for an IPv6 automatic address conguration...............................................................158
•Conguring basic IPv6 connectivity on a Layer 3 switch..............................................................................................................158
• IPv6 management (IPv6 host support).................................................................................................................................................162
• IPv6 ICMP feature conguration............................................................................................................................................................. 168
• IPv6 neighbor discovery conguration..................................................................................................................................................169
• IPv6 MTU..........................................................................................................................................................................................................175
• Static neighbor entries conguration......................................................................................................................................................176
• Limiting the number of hops an IPv6 packet can traverse...........................................................................................................177
• IPv6 source routing security enhancements.......................................................................................................................................177
• TCAM space on FCX device conguration......................................................................................................................................... 177
• Clearing global IPv6 information............................................................................................................................................................. 178
• Displaying global IPv6 information.........................................................................................................................................................180
• DHCP relay agent for IPv6.........................................................................................................................................................................191
• DHCPv6 Relay Agent Prex Delegation Notication......................................................................................................................193
Full Layer 3 IPv6 feature support
The following IPv6 Layer 3 features are supported only with the IPv6 Layer 3 PROM, Software-based Licensing, IPv6-series hardware,
and the full Layer 3 image:
• OSPF V3
• RIPng
• IPv6 ICMP redirect messages
• IPv6 route redistribution
• IPv6 over IPv4 tunnels in hardware
• IPv6 Layer 3 forwarding
• BGP4+
• IPv6 Multicast routing
• DHCPv6 Relay Agent
NOTE
IPv6 static routes and IPv6 unicast routing (multicast routing is not supported) are not supported in the base Layer 3 software
images.
FastIron Ethernet Switch Layer 3 Routing Conguration Guide, 08.0.30mb
53-1003627-06 151
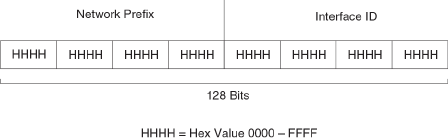
IPv6 addressing overview
IPv6 was designed to replace IPv4, the Internet protocol that is most commonly used currently throughout the world. IPv6 increases the
number of network address bits from 32 (IPv4) to 128 bits, which provides more than enough unique IP addresses to support all of the
network devices on the planet into the future. IPv6 is expected to quickly become the network standard.
An IPv6 address is composed of 8 elds of 16-bit hexadecimal values separated by colons (:). The following gure shows the IPv6
address format.
FIGURE 16 IPv6 address format
As shown in the above gure, HHHH is a 16-bit hexadecimal value, while H is a 4-bit hexadecimal value. The following is an example of
an IPv6 address.
2001:0000:0000:0200:002D:D0FF:FE48:4672
Note that this IPv6 address includes hexadecimal elds of zeros. To make the address less cumbersome, you can do the following:
• Omit the leading zeros; for example, 2001:0:0:200:2D:D0FF:FE48:4672.
• Compress the successive groups of zeros at the beginning, middle, or end of an IPv6 address to two colons (::) once per
address; for example, 2001::200:2D:D0FF:FE48:4672.
When specifying an IPv6 address in a command syntax, keep the following in mind:
• You can use the two colons (::) only once in the address to represent the longest successive hexadecimal elds of zeros
• The hexadecimal letters in IPv6 addresses are not case-sensitive
As shown in Figure 16, the IPv6 network prex is composed of the left-most bits of the address. As with an IPv4 address, you can
specify the IPv6 prex using the prex / prex-length format, where the following applies.
The prex parameter is specied as 16-bit hexadecimal values separated by a colon.
The prex-length parameter is specied as a decimal value that indicates the left-most bits of the IPv6 address.
The following is an example of an IPv6 prex.
2001:DB8:49EA:D088::/64
IPv6 address types
As with IPv4 addresses, you can assign multiple IPv6 addresses to a switch interface. IPv6 address types presents the three major types
of IPv6 addresses that you can assign to a switch interface.
A major dierence between IPv4 and IPv6 addresses is that IPv6 addresses support scope , which describes the topology in which the
address may be used as a unique identier for an interface or set of interfaces.
IPv6 addressing overview
FastIron Ethernet Switch Layer 3 Routing Conguration Guide, 08.0.30mb
152 53-1003627-06

Unicast and multicast addresses support scoping as follows:
• Unicast addresses support two types of scope: global scope and local scope. In turn, local scope supports site-local addresses
and link-local addresses. IPv6 address types describes global, site-local, and link-local addresses and the topologies in which
they are used.
• Multicast addresses support a scope eld, which IPv6 address types describes.
TABLE 29 IPv6 address types
Address type Description Address structure
Unicast An address for a single interface. A packet sent
to a unicast address is delivered to the interface
identied by the address.
Depends on the type of the unicast address:
• Aggregatable global address--An
address equivalent to a global or
public IPv4 address. The address
structure is as follows: a xed prex of
2000::/3 (001), a 45-bit global
routing prex, a 16-bit subnet ID, and
a 64-bit interface ID.
• Site-local address--An address used
within a site or intranet. (This address
is similar to a private IPv4 address.) A
site consists of multiple network links.
The address structure is as follows: a
xed prex of FEC0::/10 (1111
1110 11), a 16-bit subnet ID, and a
64-bit interface ID.
• Link-local address--An address used
between directly connected nodes on
a single network link. The address
structure is as follows: a xed prex of
FE80::/10 (1111 1110 10) and a
64-bit interface ID.
• IPv4-compatible address--An
address used in IPv6 transition
mechanisms that tunnel IPv6 packets
dynamically over IPv4 infrastructures.
The address embeds an IPv4 address
in the low-order 32 bits and the high-
order 96 bits are zeros. The address
structure is as follows:
0:0:0:0:0:0:A.B.C.D.
• Loopback address--An address
(0:0:0:0:0:0:0:1 or ::1) that a switch
can use to send an IPv6 packet to
itself. You cannot assign a loopback
address to a physical interface.
•Unspecied address--An address
(0:0:0:0:0:0:0:0 or ::) that a node can
use until you congure an IPv6
address for it.
Multicast An address for a set of interfaces belonging to
dierent nodes. Sending a packet to a multicast
address results in the delivery of the packet to all
interfaces in the set.
A multicast address has a xed prex of
FF00::/8 (1111 1111). The next 4 bits dene
the address as a permanent or temporary
address. The next 4 bits dene the scope of the
address (node, link, site, organization, global).
Anycast An address for a set of interfaces belonging to
dierent nodes. Sending a packet to an anycast
address results in the delivery of the packet to
the closest interface identied by the address.
An anycast address looks similar to a unicast
address, because it is allocated from the unicast
address space. If you assign a unicast address to
multiple interfaces, it is an anycast address. An
IPv6 addressing overview
FastIron Ethernet Switch Layer 3 Routing Conguration Guide, 08.0.30mb
53-1003627-06 153

TABLE 29 IPv6 address types (continued)
Address type Description Address structure
interface assigned an anycast address must be
congured to recognize the address as an
anycast address.
An anycast address can be assigned to a switch
only.
An anycast address must not be used as the
source address of an IPv6 packet.
A switch automatically congures a link-local unicast address for an interface by using the prex of FE80::/10 (1111 1110 10) and a
64-bit interface ID. The 128-bit IPv6 address is then subjected to duplicate address detection to ensure that the address is unique on
the link. If desired, you can override this automatically congured address by explicitly conguring an address.
NOTE
Brocade FastIron devices support RFC 2526, which requires that within each subnet, the highest 128 interface identier values
reserved for assignment as subnet anycast addresses. Thus, if you assign individual IPv6 addresses within a subnet, the second
highest IPv6 address in the subnet does not work.
IPv6 stateless auto-conguration
Brocade routers use the IPv6 stateless autoconguration feature to enable a host on a local link to automatically congure its interfaces
with new and globally unique IPv6 addresses associated with its location. The automatic conguration of a host interface is performed
without the use of a server, such as a Dynamic Host Conguration Protocol (DHCP) server, or manual conguration.
The automatic conguration of a host interface works in the following way: a switch on a local link periodically sends switch
advertisement messages containing network-type information, such as the 64-bit prex of the local link and the default route, to all
nodes on the link. When a host on the link receives the message, it takes the local link prex from the message and appends a 64-bit
interface ID, thereby automatically conguring its interface. (The 64-bit interface ID is derived from the MAC address of the host’s NIC.)
The 128-bit IPv6 address is then subjected to duplicate address detection to ensure that the address is unique on the link.
The duplicate address detection feature veries that a unicast IPv6 address is unique before it is assigned to a host interface by the
stateless auto conguration feature. Duplicate address detection uses neighbor solicitation messages to verify that a unicast IPv6
address is unique.
NOTE
For the stateless auto conguration feature to work properly, the advertised prex length in switch advertisement messages
must always be 64 bits.
The IPv6 stateless autoconguration feature can also automatically recongure a host’s interfaces if you change the ISP for the host’s
network. (The host’s interfaces must be renumbered with the IPv6 prex of the new ISP.)
The renumbering occurs in the following way: a switch on a local link periodically sends advertisements updated with the prex of the
new ISP to all nodes on the link. (The advertisements still contain the prex of the old ISP.) A host can use the addresses created from the
new prex and the existing addresses created from the old prex on the link. When you are ready for the host to use the new addresses
only, you can congure the lifetime parameters appropriately using the ipv6 nd prex-advertisement command. During this transition,
the old prex is removed from the switch advertisements. At this point, only addresses that contain the new prex are used on the link.
IPv6 addressing overview
FastIron Ethernet Switch Layer 3 Routing Conguration Guide, 08.0.30mb
154 53-1003627-06

IPv6 CLI command support
IPv6 CLI command support lists the IPv6 CLI commands supported.
TABLE 30 IPv6 CLI command support
IPv6 command Description Switch code Router code
clear ipv6 cache Deletes all entries in the dynamic
host cache.
X
clear ipv6 mld-snooping Deletes MLD-snooping-related
counters or cache entries.
X X
clear ipv6 neighbor Deletes all dynamic entries in the
IPv6 neighbor table.
X X
clear ipv6 ospf Clears OSPF-related entries. X
clear ipv6 rip Clears RIP-related entries. X
clear ipv6 route Deletes all dynamic entries in the
IPv6 route table.
X
clear ipv6 trac Resets all IPv6 packet counters. X X
clear ipv6 tunnel Clears statistics for IPv6 tunnels X
copy tftp Downloads a copy of a Brocade
software image from a TFTP server
into the system ash using IPv6.
X X
debug ipv6 Displays IPv6 debug information. X X
ipv6 access-class Congures access control for IPv6
management trac.
X X
ipv6 access-list Congures an IPv6 access control
list for IPv6 access control.
X X
ipv6 address Congures an IPv6 address on an
interface (router) or globally (switch)
X X
ipv6 debug Enables IPv6 debugging. X X
ipv6 dns domain-name Congures an IPv6 domain name. X X
ipv6 dns server-address Congures an IPv6 DNS server
address.
X X
ipv6 enable Enables IPv6 on an interface. X X
ipv6 hop-limit Sets the IPv6 hop limit. X
ipv6 icmp Congures IPv6 ICMP parameters X
Ipv6 load-sharing Enables IPv6 load sharing X
Ipv6 mld-snooping Congures MLD snooping X X
ipv6 mtu Congures the maximum length of
an IPv6 packet that can be
transmitted on a particular interface.
X
ipv6 nd Congures neighbor discovery. X
ipv6 neighbor Maps a static IPv6 address to a
MAC address in the IPv6 neighbor
table.
X
ipv6 ospf Congures OSPF V3 parameters
on an interface.
X
ipv6 prex-list Builds an IPv6 prex list. X
ipv6 redirects Enables the sending of ICMP
redirect messages on an interface.
X
IPv6 CLI command support
FastIron Ethernet Switch Layer 3 Routing Conguration Guide, 08.0.30mb
53-1003627-06 155

TABLE 30 IPv6 CLI command support (continued)
IPv6 command Description Switch code Router code
ipv6 rip Congures RIPng parameters on an
interface
X
ipv6 route Congures an IPv6 static route. X
ipv6 router Enables an IPv6 routing protocol. X
ipv6 trac-lter Applies an IPv6 ACL to an
interface.
X X
ipv6 unicast-routing Enables IPv6 unicast routing. X
log host ipv6 Congures the IPv6 Syslog server. X X
ping ipv6 Performs an ICMP for IPv6 echo
test.
X X
show ipv6 Displays some global IPv6
parameters, such IPv6 DNS server
address.
X X
show ipv6 access-list Displays congured IPv6 access
control lists.
X X
show ipv6 cache Displays the IPv6 host cache. X
show ipv6 interface Displays IPv6 information for an
interface.
X
show ipv6 mld-snooping Displays information about MLD
snooping.
X X
show ipv6 neighbor Displays the IPv6 neighbor table. X X
show ipv6 ospf Displays information about OSPF
V3.
X
show ipv6 prex-lists Displays the congured IPv6 prex
lists.
X
show ipv6 rip Displays information about RIPng. X
show ipv6 route Displays IPv6 routes. X
show ipv6 router Displays IPv6 local routers. X
show ipv6 tcp Displays information about IPv6
TCP sessions.
X X
show ipv6 trac Displays IPv6 packet counters. X X
show ipv6 tunnel Displays information about IPv6
tunnels
X X
snmp-client ipv6 Restricts SNMP access to a certain
IPv6 node.
X X
snmp-server host ipv6 Species the recipient of SNMP
notications.
X X
telnet Enables a Telnet connection from
the Brocade device to a remote
IPv6 host using the console.
X X
traceroute ipv6 Traces a path from the Brocade
device to an IPv6 host.
X X
web access-group ipv6 Restricts Web management access
to certain IPv6 hosts as determined
by IPv6 ACLs.
X X
web client ipv6 Restricts Web management access
to certain IPv6 hosts.
X X
IPv6 CLI command support
FastIron Ethernet Switch Layer 3 Routing Conguration Guide, 08.0.30mb
156 53-1003627-06
IPv6 host address on a Layer 2 switch
In a Layer 3 (router) conguration, each port can be congured separately with an IPv6 address. This is accomplished using the interface
conguration process that is described in IPv6 conguration on each router interface on page 158.
There is support for conguring an IPv6 address on the management port as described in Conguring the management port for an IPv6
automatic address conguration on page 158, and for conguring a system-wide IPv6 address on a Layer 2 switch. Conguration of
the system-wide IPv6 address is exactly like conguration of an IPv6 address in router mode, except that the IPv6 conguration is at the
Global CONFIG level instead of at the Interface level.
The process for dening the system-wide interface for IPv6 is described in the following sections:
•Conguring a global or site-local IPv6 address with a manually congured interface ID on page 157
•Conguring a link-local IPv6 address as a system-wide address for a switch on page 157
NOTE
When conguring an Ipv6 host address on a Layer 2 switch that has multiple VLANs, make sure the conguration includes a
designated management VLAN that identies the VLAN to which the global IP address belongs. Refer to "Designated VLAN
for Telnet management sessions to a Layer 2 Switch" section in the FastIron Ethernet Switch Security Conguration Guide .
Conguring a global or site-local IPv6 address with a manually congured
interface ID
To congure a global or site-local IPv6 address with a manually-congured interface ID, such as a system-wide address for a switch,
enter a command similar to the following at the Global CONFIG level.
device(config)# ipv6 address 2001:DB8:12D:1300:240:D0FF:FE48:4000:1/64
Syntax: ipv6 address ipv6-prex/prex-length
You must specify the ipv6-prex parameter in hexadecimal using 16-bit values between colons as documented in RFC 2373.
You must specify the prex-length parameter in decimal value. A slash mark (/) must follow the ipv6-prex parameter and precede the
prex-length parameter.
Conguring a link-local IPv6 address as a system-wide address for a
switch
To enable IPv6 and automatically congure a global interface enter commands such as the following.
device(config)#ipv6 enable
This command enables IPv6 on the switch and species that the interface is assigned an automatically computed link-local address.
Syntax: [no] ipv6 enable
To override a link-local address that is automatically computed for the global interface with a manually congured address, enter a
command such as the following.
device(config)#ipv6 address FE80::240:D0FF:FE48:4672 link-local
This command explicitly congures the link-local address FE80::240:D0FF:FE48:4672 for the global interface.
Syntax: ipv6 address ipv6-address link-local
You must specify the ipv6-address parameter in hexadecimal using 16-bit values between colons as documented in RFC 2373.
IPv6 host address on a Layer 2 switch
FastIron Ethernet Switch Layer 3 Routing Conguration Guide, 08.0.30mb
53-1003627-06 157
The link-local keyword indicates that the router interface should use the manually congured link-local address instead of the
automatically computed link-local address.
Conguring the management port for an IPv6
automatic address conguration
You can have the management port congured to automatically obtain an IPv6 address. This process is the same for any other port and
is described in detail in the section Conguring a global or site-local IPv6 address on an interface on page 159
Conguring basic IPv6 connectivity on a Layer 3
switch
To congure basic IPv6 connectivity on a Brocade Layer 3 Switch, you must do the following:
• Enable IPv6 routing globally on the switch
•Congure an IPv6 address or explicitly enable IPv6 on each router interface over which you plan to forward IPv6 trac
•Congure IPv4 and IPv6 protocol stacks. (This step is mandatory only if you want a router interface to send and receive both
IPv4 and IPv6 trac.)
All other conguration tasks in this chapter are optional.
Enabling IPv6 routing
By default, IPv6 routing is disabled. To enable the forwarding of IPv6 trac globally on the Layer 3 switch, enter the following command.
device(config)#ipv6 unicast-routing
Syntax: [no] ipv6 unicast-routing
To disable the forwarding of IPv6 trac globally on the Brocade device, enter the no form of this command.
IPv6 conguration on each router interface
To forward IPv6 trac on a router interface, the interface must have an IPv6 address, or IPv6 must be explicitly enabled. By default, an
IPv6 address is not congured on a router interface.
If you choose to congure a global or site-local IPv6 address for an interface, IPv6 is also enabled on the interface. Further, when you
congure a global or site-local IPv6 address, you must decide on one of the following in the low-order 64 bits:
• A manually congured interface ID.
• An automatically computed EUI-64 interface ID.
If you prefer to assign a link-local IPv6 address to the interface, you must explicitly enable IPv6 on the interface, which causes a link-local
address to be automatically computed for the interface. If preferred, you can override the automatically congured link-local address with
an address that you manually congure.
This section provides the following information:
•Conguring a global or site-local address with a manually congured or automatically computed interface ID for an interface.
Conguring the management port for an IPv6 automatic address conguration
FastIron Ethernet Switch Layer 3 Routing Conguration Guide, 08.0.30mb
158 53-1003627-06
• Automatically or manually conguring a link-local address for an interface.
•Conguring IPv6 anycast addresses
Conguring a global or site-local IPv6 address on an interface
Conguring a global or site-local IPv6 address on an interface does the following:
• Automatically congures an interface ID (a link-local address), if specied.
• Enables IPv6 on that interface.
Additionally, the congured interface automatically joins the following required multicast groups for that link:
• Solicited-node multicast group FF02:0:0:0:0:1:FF00::/104 for each unicast address assigned to the interface.
• Solicited-node for subnet anycast address for each unicast assigned address
• Solicited-node for anycast address FF02:0:0:0:0:1:FF00::0000
• All-nodes link-local multicast group FF02::1
• All-routers link-local multicast group FF02::2
The neighbor discovery feature sends messages to these multicast groups. For more information, refer to IPv6 neighbor discovery
conguration on page 169.
Conguring a global or site-local IPv6 address with a manually congured interface ID
To congure a global or site-local IPv6 address, including a manually congured interface ID, for an interface, enter commands such as
the following.
device(config)#interface ethernet 1/3/1
device(config-if-e1000-1/3/1)#ipv6 address 2001:DB8:12D:1300:240:D0FF:
FE48:4672:/64
These commands congure the global prex 2001:DB8:12d:1300::/64 and the interface ID ::240:D0FF:FE48:4672, and enable IPv6
on Ethernet interface 1/3/1.
Syntax: ipv6 address ipv6-prex/prex-length
You must specify the ipv6-prex parameter in hexadecimal using 16-bit values between colons as documented in RFC 2373.
You must specify the prex-length parameter as a decimal value. A slash mark (/) must follow the ipv6-prex parameter and precede the
prex-length parameter.
To congure a /122 address on a VE enter commands similar to the following.
device(config-vlan-11)#int ve11
device(config-vif-11)#ipv6 add 2001:DB8::1/122
device(config-vif-11)#sh ipv6 int
Routing Protocols : R - RIP O - OSPF
Interface Status Routing Global Unicast Address
VE 11 up/up 2001:DB8::1/122
device(config-vif-11)#sh ipv6 route
IPv6 Routing Table - 1 entries:
Type Codes: C - Connected, S - Static, R - RIP, O - OSPF, B - BGP
OSPF Sub Type Codes: O - Intra, Oi - Inter, O1 - Type1 external, O2 - Type2 external
Type IPv6 Prefix Next Hop Router Interface Dis/Metric
C 2001:DB8::/122 :: ve 11 0/0
Conguring basic IPv6 connectivity on a Layer 3 switch
FastIron Ethernet Switch Layer 3 Routing Conguration Guide, 08.0.30mb
53-1003627-06 159
Conguring a global IPv6 address with an automatically computed EUI-64 interface ID
To congure a global IPv6 address with an automatically computed EUI-64 interface ID in the low-order 64-bits, enter commands such
as the following.
device(config)#interface ethernet 1/3/1
device(config-if-e1000-1/3/1)#ipv6 address 2001:DB8:12D:1300::/64 eui-64
These commands congure the global prex 2001:DB8:12d:1300::/64 and an interface ID, and enable IPv6 on Ethernet interface
1/3/1.
Syntax: ipv6 address ipv6-prex/prex-length eui-64
You must specify the ipv6-prex parameter in hexadecimal using 16-bit values between colons as documented in RFC 2373.
You must specify the prex-length parameter as a decimal value. A slash mark (/) must follow the ipv6-prex parameter and precede the
prex-length parameter.
The eui-64 keyword congures the global address with an EUI-64 interface ID in the low-order 64 bits. The interface ID is automatically
constructed in IEEE EUI-64 format using the interface’s MAC address.
Conguring a link-local IPv6 address on an interface
To explicitly enable IPv6 on a router interface without conguring a global or site-local address for the interface, enter commands such as
the following.
device(config)#interface ethernet 1/3/1
device(config-if-e1000-1/3/1)#ipv6 enable
These commands enable IPv6 on Ethernet interface 1/3/1 and specify that the interface is assigned an automatically computed link-
local address.
Syntax: [no] ipv6 enable
NOTE
When conguring VLANs that share a common tagged interface with a physical or Virtual Ethernet (VE) interface, Brocade
recommends that you override the automatically computed link-local address with a manually congured unique address for
the interface. If the interface uses the automatically computed address, which in the case of physical and VE interfaces is
derived from a global MAC address, all physical and VE interfaces will have the same MAC address.
To override a link-local address that is automatically computed for an interface with a manually congured address, enter commands
such as the following.
device(config)#interface ethernet 1/3/1
device(config-if-e1000-1/3/1)#ipv6 address FE80::240:D0FF:FE48:4672 link-local
These commands explicitly congure the link-local address FE80::240:D0FF:FE48:4672 for Ethernet interface 1/3/1.
Syntax: ipv6 address ipv6-address link-local
You must specify the ipv6-address parameter in hexadecimal using 16-bit values between colons as documented in RFC 2373.
The link-local keyword indicates that the router interface should use the manually congured link-local address instead of the
automatically computed link-local address.
Conguring an IPv6 anycast address on an interface
In IPv6, an anycast address is an address for a set of interfaces belonging to dierent nodes. Sending a packet to an anycast address
results in the delivery of the packet to the closest interface congured with the anycast address.
Conguring basic IPv6 connectivity on a Layer 3 switch
FastIron Ethernet Switch Layer 3 Routing Conguration Guide, 08.0.30mb
160 53-1003627-06
An anycast address looks similar to a unicast address, because it is allocated from the unicast address space. If you assign an IPv6
unicast address to multiple interfaces, it is an anycast address. On the Brocade device, you congure an interface assigned an anycast
address to recognize the address as an anycast address.
For example, the following commands congure an anycast address on interface 1/2/1.
device(config)#int e 1/2/1
device(config-if-e1000-1/2/1)#ipv6 address 2001:DB8::/64 anycast
Syntax: ipv6 address ipv6-prex/prex-length [ anycast ]
IPv6 anycast addresses are described in detail in RFC 1884. Refer to RFC 2461 for a description of how the IPv6 Neighbor Discovery
mechanism handles anycast addresses.
Conguring IPv4 and IPv6 protocol stacks
One situation in which you must congure a router to run both IPv4 and IPv6 protocol stacks is if it is deployed as an endpoint for an
IPv6 over IPv4 tunnel.
Each router interface that will send and receive both IPv4 and IPv6 trac must be congured with an IPv4 address and an IPv6 address.
(An alternative to conguring a router interface with an IPv6 address is to explicitly enable IPv6 using the ipv6 enable command. For
more information about using this command, refer to Conguring a link-local IPv6 address on an interface on page 160.)
To congure a router interface to support both the IPv4 and IPv6 protocol stacks, use commands such as the following.
device(config)#ipv6 unicast-routing
device(config)#interface ethernet 1/3/1
device(config-if-e1000-1/3/1)#ip address 10.168.1.1 255.255.255.0
device(config-if-e1000-1/3/1)#ipv6 address 2001:DB8:12d:1300::/64 eui-64
These commands globally enable IPv6 routing and congure an IPv4 address and an IPv6 address for Ethernet interface 1/3/1.
Syntax: [no] ipv6 unicast-routing
To disable IPv6 trac globally on the router, enter the no form of this command.
Syntax: ip address ip-address sub-net-mask [ secondary ]
You must specify the ip-address parameter using 8-bit values in dotted decimal notation.
You can specify the sub-net-mask parameter in either dotted decimal notation or as a decimal value preceded by a slash mark (/).
The secondary keyword species that the congured address is a secondary IPv4 address.
To remove the IPv4 address from the interface, enter the no form of this command.
Syntax: ipv6 address ipv6-prex /prex-length [ eui-64 ]
This syntax species a global or site-local IPv6 address. For information about conguring a link-local IPv6 address, refer to Conguring
a link-local IPv6 address on an interface on page 160.
You must specify the ipv6-prex parameter in hexadecimal using 16-bit values between colons as documented in RFC 2373.
You must specify the prex-length parameter as a decimal value. A slash mark (/) must follow the ipv6-prex parameter and precede the
prex-length parameter.
The eui-64 keyword congures the global address with an EUI-64 interface ID in the low-order 64 bits. The interface ID is automatically
constructed in IEEE EUI-64 format using the interface’s MAC address. If you do not specify the eui-64 keyword, you must manually
congure the 64-bit interface ID as well as the 64-bit network prex. For more information about manually conguring an interface ID,
refer to Conguring a global or site-local IPv6 address on an interface on page 159.
Conguring basic IPv6 connectivity on a Layer 3 switch
FastIron Ethernet Switch Layer 3 Routing Conguration Guide, 08.0.30mb
53-1003627-06 161
IPv6 management (IPv6 host support)
You can congure a FastIron X Series, FCX, or ICX switch to serve as an IPv6 host in an IPv6 network. An IPv6 host has IPv6 addresses
on its interfaces, but does not have full IPv6 routing enabled on it.
This section describes the IPv6 host features supported on FastIron X Series devices.
Conguring IPv6 management ACLs
When you enter the ipv6 access-list command, the Brocade device enters the IPv6 Access List conguration level, where you can
access several commands for conguring IPv6 ACL entries. After conguring the ACL entries, you can apply them to network
management access features such as Telnet, SSH, Web, and SNMP.
NOTE
Unlike IPv4, there is no distinction between standard and extended ACLs in IPv6.
FastIron(config)#ipv6 access-list netw
FastIron(config-ipv6-access-list-netw)#
Syntax: [no] ipv6 access-list ACL-name
The ACL-name variable species a name for the IPv6 ACL. An IPv6 ACL name cannot start with a numeral, for example, 1access. Also,
an IPv4 ACL and an IPv6 ACL cannot share the same name.
Restricting SNMP access to an IPv6 node
You can restrict SNMP access to the device to the IPv6 host whose IP address you specify. To do so, enter a command such as the
following.
device(config)#snmp-client ipv6 2001:DB8:89::23
Syntax: snmp-client ipv6 ipv6-address
The ipv6-address you specify must be in hexadecimal format using 16-bit values between colons as documented in RFC 2373.
Specifying an IPv6 SNMP trap receiver
You can specify an IPv6 host as a trap receiver to ensure that all SNMP traps sent by the device will go to the same SNMP trap receiver
or set of receivers, typically one or more host devices on the network. To do so, enter a command such as the following.
device(config)#snmp-server host ipv6 2001:DB8:89::13
Syntax: snmp-server host ipv6 ipv6-address
The ipv6-address you specify must be in hexadecimal format using 16-bit values between colons as documented in RFC 2373.
Conguring SNMP V3 over IPv6
Brocade FastIron X Series, FCX, and ICX devices support IPv6 for SNMP version 3. For more information about how to congure
SNMP, refer to FastIron Ethernet Switch Security Conguration Guide .
IPv6 management (IPv6 host support)
FastIron Ethernet Switch Layer 3 Routing Conguration Guide, 08.0.30mb
162 53-1003627-06
Secure Shell, SCP, and IPv6
Secure Shell (SSH) is a mechanism that allows secure remote access to management functions on the Brocade device. SSH provides a
function similar to Telnet. You can log in to and congure the Brocade device using a publicly or commercially available SSH client
program, just as you can with Telnet. However, unlike Telnet, which provides no security, SSH provides a secure, encrypted connection to
the Brocade device.
To open an SSH session between an IPv6 host running an SSH client program and the Brocade device, open the SSH client program
and specify the IPv6 address of the device. For more information about conguring SSH on the Brocade device, refer to "SSH2 and
SCP" chapter in the FastIron Ethernet Switch Security Conguration Guide .
IPv6 Telnet
Telnet sessions can be established between a Brocade device to a remote IPv6 host, and from a remote IPv6 host to the Brocade device
using IPv6 addresses.
The telnet command establishes a Telnet connection from a Brocade device to a remote IPv6 host using the console. Up to ve read-
access Telnet sessions are supported on the router at one time. Write-access through Telnet is limited to one session, and only one
outgoing Telnet session is supported on the router at one time. To see the number of open Telnet sessions at any time, enter the show
telnet command.
To establish a Telnet connection to a remote host with the IPv6 address of 2001:DB8:3de2:c37::6, enter the following command.
device#telnet 2001:DB8:3de2:c37::6
Syntax: telnet ipv6-address [ port-number | outgoing-interface ethernet port | ve number ]
The ipv6-address parameter species the address of a remote host. You must specify this address in hexadecimal using 16-bit values
between colons as documented in RFC 2373.
The port-number parameter species the port number on which the Brocade device establishes the Telnet connection. You can specify a
value between 1 - 65535. If you do not specify a port number, the Brocade device establishes the Telnet connection on port 23.
If the IPv6 address you specify is a link-local address, you must specify the outgoing-interface ethernet port | ve number parameter.
This parameter identies the interface that must be used to reach the remote host. If you specify an Ethernet interface, you must also
specify the port number associated with the interface. If you specify a VE interface, also specify the VE number.
Establishing a Telnet session from an IPv6 host
To establish a Telnet session from an IPv6 host to the Brocade device, open your Telnet application and specify the IPv6 address of the
Layer 3 Switch.
IPv6 traceroute
NOTE
This section describes the IPv6traceroute command. For details about IPv4 traceroute , refer to FastIron Ethernet Switch
Administration Guide .
The traceroute command allows you to trace a path from the Brocade device to an IPv6 host.
The CLI displays trace route information for each hop as soon as the information is received. Traceroute requests display all responses to
a minimum TTL of 1 second and a maximum TTL of 30 seconds. In addition, if there are multiple equal-cost routes to the destination,
the Brocade device displays up to three responses.
IPv6 management (IPv6 host support)
FastIron Ethernet Switch Layer 3 Routing Conguration Guide, 08.0.30mb
53-1003627-06 163
For example, to trace the path from the Brocade device to a host with an IPv6 address of 2001:DB8:349e:a384::34, enter the following
command:
device#traceroute ipv6 2001:DB8:349e:a384::34
Syntax: traceroute ipv6 ipv6-address
The ipv6-address parameter species the address of a host. You must specify this address in hexadecimal using 16-bit values between
colons as documented in RFC 2373.
IPv6 Web management using HTTP and HTTPS
When you have an IPv6 management station connected to a switch with an IPv6 address applied to the management port, you can
manage the switch from a Web browser by entering one of the following in the browser address eld.
http://[<ipv6 address>]
or
https://[<ipv6 address>]
NOTE
You must enclose the IPv6 address with square brackets [ ] in order for the Web browser to work.
Restricting Web management access
You can restrict Web management access to include only management functions on a Brocade device that is acting as an IPv6 host, or
restrict access so that the Brocade host can be reached by a specied IPv6 device.
Restricting Web management access by specifying an IPv6 ACL
You can specify an IPv6 ACL that restricts Web management access to management functions on the device that is acting as the IPv6
host.
Example
Brocade(config)# access-list 12 deny host 2000:2383:e0bb::2/128 log
Brocade(config)# access-list 12 deny 30ff:3782::ff89/128 log
Brocade(config)# access-list 12 deny 3000:4828::fe19/128 log
Brocade(config)# access-list 12 permit any
Brocade(config)# web access-group ipv6 12
Syntax: web access-group ipv6 ipv6 -ACL-name
where ipv6-ACL-name is a valid IPv6 ACL.
IPv6 management (IPv6 host support)
FastIron Ethernet Switch Layer 3 Routing Conguration Guide, 08.0.30mb
164 53-1003627-06
Restricting Web management access to an IPv6 host
You can restrict Web management access to the device to the IPv6 host whose IP address you specify. No other device except the one
with the specied IPv6 address can access the Web Management Interface.
Example
Brocade(config)#web client ipv6 3000:2383:e0bb::2/128
Syntax: web client ipv6 ipv6-address
the ipv6-address you specify must be in hexadecimal format using 16-bit values between colons as documented in RFC 2373.
Conguring name-to-IPv6 address resolution using IPv6 DNS resolver
The Domain Name Server (DNS) resolver feature lets you use a host name to perform Telnet and ping commands. You can also dene a
DNS domain on a Brocade device and thereby recognize all hosts within that domain. After you dene a domain name, the Brocade
device automatically appends the appropriate domain to the host and forwards it to the domain name server.
For example, if the domain "newyork.com" is dened on a Brocade device, and you want to initiate a ping to host "NYC01" on that
domain, you need to reference only the host name in the command instead of the host name and its domain name. For example, you
could enter either of the following commands to initiate the ping.
device#ping ipv6 nyc01
device#ping ipv6 nyc01.newyork.com
Dening an IPv6 DNS entry
IPv6 denes new DNS record types to resolve queries for domain names to IPv6 addresses, as well as IPv6 addresses to domain
names. Brocade devices running IPv6 software support AAAA DNS records, which are dened in RFC 1886.
AAAA DNS records are analogous to the A DNS records used with IPv4. They store a complete IPv6 address in each record. AAAA
records have a type value of 28.
To dene an IPv6 DNS server address, enter command such as the following:
device(config)#ipv6 dns server-address 2001:DB8::1
Syntax: [no] ipv6 dns server-address ipv6-addr [ ipv6-addr ] [ ipv6-addr ] [ ipv6-addr ]
The ipv6 dns server-address parameter sets IPv6 DNS server addresses.
As an example, in a conguration where ftp6.companynet.com is a server with an IPv6 protocol stack, when a user pings
ftp6.companynet.com, the Brocade device attempts to resolve the AAAA DNS record. In addition, if the DNS server does not have an
IPv6 address, as long as it is able to resolve AAAA records, it can still respond to DNS queries.
Pinging an IPv6 address
NOTE
This section describes the IPv6ping command. For details about IPv4 ping , refer to the FastIron Ethernet Switch Layer 3
Routing Conguration Guide.
The ping command allows you to verify the connectivity from a Brocade device to an IPv6 device by performing an ICMP for IPv6 echo
test.
IPv6 management (IPv6 host support)
FastIron Ethernet Switch Layer 3 Routing Conguration Guide, 08.0.30mb
53-1003627-06 165
For example, to ping a device with the IPv6 address of 2001:DB8:847f:a385:34dd::45 from the Brocade device, enter the following
command.
device#ping ipv6 2001:DB8:847f:a385:34dd::45
Syntax: ping ipv6 ipv6-address [ outgoing-interface [ port | venumber ]] [ source ipv6-address ] [ count number ] [ timeout
milliseconds ] [ ttl number ] [ size bytes ] [ quiet ] [ numeric ] [ no-fragment ] [ verify ] [ data 1-to-4-byte-hex ] [ brief ]
• The ipv6-address parameter species the address of the router. You must specify this address in hexadecimal using 16-bit
values between colons as documented in RFC 2373.
• The outgoing-interface keyword species a physical interface over which you can verify connectivity. If you specify a physical
interface, such as an Ethernet interface, you must also specify the port number of the interface. If you specify a virtual interface,
such as a VE, you must specify the number associated with the VE.
• The source ipv6-address parameter species an IPv6 address to be used as the origin of the ping packets.
• The count number parameter species how many ping packets the router sends. You can specify from 1 - 4294967296. The
default is 1.
• The timeout milliseconds parameter species how many milliseconds the router waits for a reply from the pinged device. You
can specify a timeout from 1 - 4294967296 milliseconds. The default is 5000 (5 seconds).
• The ttl number parameter species the maximum number of hops. You can specify a TTL from 1 - 255. The default is 64.
• The size bytes parameter species the size of the ICMP data portion of the packet. This is the payload and does not include the
header. You can specify from 0 - 10000. The default is 16.
• The no-fragment keyword turns on the "do not fragment" bit in the IPv6 header of the ping packet. This option is disabled by
default.
• The quiet keyword hides informational messages such as a summary of the ping parameters sent to the device, and instead
only displays messages indicating the success or failure of the ping. This option is disabled by default.
• The verify keyword veries that the data in the echo packet (the reply packet) is the same as the data in the echo request (the
ping). By default the device does not verify the data.
• The data 1 - 4 byte hex parameter lets you specify a specic data pattern for the payload instead of the default data pattern,
"abcd", in the packet's data payload. The pattern repeats itself throughout the ICMP message (payload) portion of the packet.
NOTE
For parameters that require a numeric value, the CLI does not check that the value you enter is within the allowed range. Instead,
if you do exceed the range for a numeric value, the software rounds the value to the nearest valid value.
• The brief keyword causes ping test characters to be displayed. The following ping test characters are supported.
! Indicates that a reply was received.
. Indicates that the network server timed out while waiting for a reply.
U Indicates that a destination unreachable error PDU was received.
I Indicates that the user interrupted ping.
Conguring an IPv6 Syslog server
To enable IPv6 logging, specify an IPv6 Syslog server. Enter a command such as the following.
device(config)#log host ipv6 2000:2383:e0bb::4/128
Syntax: log host ipv6 ipv6-address [ udp-port-num ]
IPv6 management (IPv6 host support)
FastIron Ethernet Switch Layer 3 Routing Conguration Guide, 08.0.30mb
166 53-1003627-06
The ipv6-address must be in hexadecimal using 16-bit values between colons as documented in RFC 2373.
The udp-port-num optional parameter species the UDP application port used for the Syslog facility.
Viewing IPv6 SNMP server addresses
Some of the show commands display IPv6 addresses for IPv6 SNMP servers. The following shows an example output for the show
snmp server command.
device#show snmp server
Contact:
Location:
Community(ro): .....
Traps
Warm/Cold start: Enable
Link up: Enable
Link down: Enable
Authentication: Enable
Locked address violation: Enable
Power supply failure: Enable
Fan failure: Enable
Temperature warning: Enable
STP new root: Enable
STP topology change: Enable
vsrp: Enable
Total Trap-Receiver Entries: 4
Trap-Receiver IP-Address Port-Number Community
1 10.147.201.100
162 .....
2 2001:DB8::200
162 .....
3 10.147.202.100
162 .....
4 2001:DB8::200
162 .....
Disabling router advertisement and solicitation messages
Router advertisement and solicitation messages enable a node on a link to discover the routers on the same link. By default, router
advertisement and solicitation messages are permitted on the device. To disable these messages, congure an IPv6 access control list
that denies them. The following shows an example conguration.
device(config)#ipv6 access-list rtradvert
device(config)#deny icmp any any router-advertisement
device(config)#deny icmp any any router-solicitation
device(config)#permit ipv6 any any
Disabling IPv6 on a Layer 2 switch
IPv6 is enabled by default in the Layer 2 switch code. If desired, you can disable IPv6 on a global basis on a device running the switch
code. To do so, enter the following command at the Global CONFIG level of the CLI.
device(config)#no ipv6 enable
IPv6 management (IPv6 host support)
FastIron Ethernet Switch Layer 3 Routing Conguration Guide, 08.0.30mb
53-1003627-06 167
Syntax: no ipv6 enable
To re-enable IPv6 after it has been disabled, enter ipv6 enable .
NOTE
IPv6 is disabled by default in the router code and must be congured on each interface that will support
IPv6.
IPv6 ICMP feature conguration
As with the Internet Control Message Protocol (ICMP) for IPv4, ICMP for IPv6 provides error and informational messages.
Implementation of the stateless auto conguration, neighbor discovery, and path MTU discovery features use ICMP messages.
This section explains how to congure following IPv6 ICMP features:
• ICMP rate limiting
• ICMP redirects
Conguring ICMP rate limiting
You can limit the rate at which IPv6 ICMP error messages are sent out on a network. IPv6 ICMP implements a token bucket algorithm.
To illustrate how this algorithm works, imagine a virtual bucket that contains a number of tokens. Each token represents the ability to send
one ICMP error message. Tokens are placed in the bucket at a specied interval until the maximum number of tokens allowed in the
bucket is reached. For each error message that ICMP sends, a token is removed from the bucket. If ICMP generates a series of error
messages, messages can be sent until the bucket is empty. If the bucket is empty of tokens, error messages cannot be sent until a new
token is placed in the bucket.
You can adjust the following elements related to the token bucket algorithm:
• The interval at which tokens are added to the bucket. The default is 100 milliseconds.
• The maximum number of tokens in the bucket. The default is 10 tokens.
For example, to adjust the interval to 1000 milliseconds and the number of tokens to 100 tokens, enter the following command.
device(config)# ipv6 icmp error-interval 1000 100
Syntax: ipv6 icmp error-interval interval [ number-of-tokens ]
The interval in milliseconds at which tokens are placed in the bucket can range from 0 - 2147483647. The maximum number of tokens
stored in the bucket can range from 1 - 200.
NOTE
If you retain the default interval value or explicitly set the value to 100 milliseconds, output from the show run command does
not include the setting of the ipv6 icmp error-interval command because the setting is the default.Also, if you congure the
interval value to a number that does not evenly divide into 100000 (100 milliseconds), the system rounds up the value to a
next higher value that does divide evenly into 100000. For example, if you specify an interval value of 150, the system rounds
up the value to 200.
ICMP rate limiting is enabled by default. To disable ICMP rate limiting, set the interval to zero.
IPv6 ICMP feature conguration
FastIron Ethernet Switch Layer 3 Routing Conguration Guide, 08.0.30mb
168 53-1003627-06
Enabling IPv6 ICMP redirect messages
You can enable a Layer 3 switch to send an IPv6 ICMP redirect message to a neighboring host to inform it of a better rst-hop router on
a path to a destination. By default, the sending of IPv6 ICMP redirect messages by a Layer 3 switch is disabled. (For more information
about how ICMP redirect messages are implemented for IPv6, refer to IPv6 neighbor discovery conguration on page 169.)
NOTE
This feature is supported on Virtual Ethernet (VE) interfaces only.
For example, to enable the sending of IPv6 ICMP redirect messages on VE 2, enter the following commands.
device(config)#interface ve2
device(config-vif-2)#ipv6 redirects
To disable the sending of IPv6 ICMP redirect messages after it has been enabled on VE 2, enter the following commands.
device(config)#interface ve2
device(config-vif-2)#no ipv6 redirects
Syntax: [no] ipv6 redirects
Use the show ipv6 interface command to verify that the sending of IPv6 ICMP redirect messages is enabled on a particular interface.
IPv6 neighbor discovery conguration
The neighbor discovery feature for IPv6 uses IPv6 ICMP messages to do the following tasks:
• Determine the link-layer address of a neighbor on the same link.
• Verify that a neighbor is reachable.
• Track neighbor routers.
An IPv6 host is required to listen for and recognize the following addresses that identify itself:
• Link-local address.
• Assigned unicast address.
• Loopback address.
• All-nodes multicast address.
• Solicited-node multicast address.
• Multicast address to all other groups to which it belongs.
You can adjust the following IPv6 neighbor discovery features:
• Neighbor solicitation messages for duplicate address detection.
• Router advertisement messages:
– Interval between router advertisement messages.
– Value that indicates a router is advertised as a default router (for use by all nodes on a given link).
–Prexes advertised in router advertisement messages.
– Flags for host stateful autoconguration.
• Amount of time during which an IPv6 node considers a remote node reachable (for use by all nodes on a given link).
IPv6 neighbor discovery conguration
FastIron Ethernet Switch Layer 3 Routing Conguration Guide, 08.0.30mb
53-1003627-06 169
IPv6 neighbor discovery conguration notes
NOTE
For all solicitation and advertisement messages, Brocade uses seconds as the unit of measure instead of milliseconds.
• If you add a port to a port-based VLAN, and the port has IPv6 neighbor discovery conguration, the system will clean up the
neighbor discovery conguration from the port and display the following message on the console.
ND6 port config on the new member ports removed
• Neighbor discovery is not supported on tunnel interfaces.
Neighbor solicitation and advertisement messages
Neighbor solicitation and advertisement messages enable a node to determine the link-layer address of another node (neighbor) on the
same link. (This function is similar to the function provided by the Address Resolution Protocol [ARP] in IPv4.) For example, node 1 on a
link wants to determine the link-layer address of node 2 on the same link. To do so, node 1, the source node, multicasts a neighbor
solicitation message. The neighbor solicitation message, which has a value of 135 in the Type eld of the ICMP packet header, contains
the following information:
• Source address: IPv6 address of node 1 interface that sends the message.
• Destination address: solicited-node multicast address (FF02:0:0:0:0:1:FF00::/104) that corresponds the IPv6 address of node
2.
• Link-layer address of node 1.
• A query for the link-layer address of node 2.
After receiving the neighbor solicitation message from node 1, node 2 replies by sending a neighbor advertisement message, which has
a value of 136 in the Type eld of the ICMP packet header. The neighbor solicitation message contains the following information:
• Source address: IPv6 address of the node 2 interface that sends the message.
• Destination address: IPv6 address of node 1.
• Link-layer address of node 2.
After node 1 receives the neighbor advertisement message from node 2, nodes 1 and 2 can now exchange packets on the link.
After the link-layer address of node 2 is determined, node 1 can send neighbor solicitation messages to node 2 to verify that it is
reachable. Also, nodes 1, 2, or any other node on the same link can send a neighbor advertisement message to the all-nodes multicast
address (FF02::1) if there is a change in their link-layer address.
Router advertisement and solicitation messages
Router advertisement and solicitation messages enable a node on a link to discover the routers on the same link.
Each congured router interface on a link sends out a router advertisement message, which has a value of 134 in the Type eld of the
ICMP packet header, periodically to the all-nodes link-local multicast address (FF02::1).
A congured router interface can also send a router advertisement message in response to a router solicitation message from a node on
the same link. This message is sent to the unicast IPv6 address of the node that sent the router solicitation message.
At system startup, a host on a link sends a router solicitation message to the all-routers multicast address (FF01). Sending a router
solicitation message, which has a value of 133 in the Type eld of the ICMP packet header, enables the host to automatically congure
its IPv6 address immediately instead of awaiting the next periodic router advertisement message.
IPv6 neighbor discovery conguration
FastIron Ethernet Switch Layer 3 Routing Conguration Guide, 08.0.30mb
170 53-1003627-06
Because a host at system startup typically does not have a unicast IPv6 address, the source address in the router solicitation message is
usually the unspecied IPv6 address (0:0:0:0:0:0:0:0). If the host has a unicast IPv6 address, the source address is the unicast IPv6
address of the host interface sending the router solicitation message.
Entering the ipv6 unicast-routing command automatically enables the sending of router advertisement messages on all congured
router Ethernet interfaces. You can congure several router advertisement message parameters. For information about disabling the
sending of router advertisement messages and the router advertisement parameters that you can congure, refer to Enabling and
disabling IPv6 router advertisements on page 174 and Setting IPv6 router advertisement parameters on page 172.
Neighbor redirect messages
After forwarding a packet, by default, a router can send a neighbor redirect message to a host to inform it of a better rst-hop router. The
host receiving the neighbor redirect message will then readdress the packet to the better router.
A router sends a neighbor redirect message only for unicast packets, only to the originating node, and to be processed by the node.
A neighbor redirect message has a value of 137 in the Type eld of the ICMP packet header.
Setting neighbor solicitation parameters for duplicate address detection
Although the stateless auto conguration feature assigns the 64-bit interface ID portion of an IPv6 address using the MAC address of
the host’s NIC, duplicate MAC addresses can occur. Therefore, the duplicate address detection feature veries that a unicast IPv6
address is unique before it is assigned to a host interface by the stateless auto conguration feature. Duplicate address detection veries
that a unicast IPv6 address is unique.
If duplicate address detection identies a duplicate unicast IPv6 address, the address is not used. If the duplicate address is the link-local
address of the host interface, the interface stops processing IPv6 packets.
NOTE
Duplicate Address Detection (DAD) is not currently supported with IPv6 tunnels. Make sure tunnel endpoints do not have
duplicate IP addresses.
You can congure the following neighbor solicitation message parameters that aect duplicate address detection while it veries that a
tentative unicast IPv6 address is unique:
• The number of consecutive neighbor solicitation messages that duplicate address detection sends on an interface. By default,
duplicate address detection sends three neighbor solicitation messages without any follow-up messages.
• The interval in seconds at which duplicate address detection sends a neighbor solicitation message on an interface. By default,
duplicate address detection sends a neighbor solicitation message every 1000 milliseconds.
For example, to change the number of neighbor solicitation messages sent on Ethernet interface 1/3/1 to two and the interval between
the transmission of the two messages to 9 seconds, enter the following commands.
device(config)#interface ethernet 1/3/1
device(config-if-e1000-1/3/1)#ipv6 nd dad attempt 2
device(config-if-e1000-1/3/1)#ipv6 nd ns-interval 9000
Syntax: [no] ipv6 nd dad attempt number
Syntax: [no] ipv6 nd ns-interval number
For the number of neighbor solicitation messages, specify a number from 0 - 255. The default is 3. Conguring a value of 0 disables
duplicate address detection processing on the specied interface. To restore the number of messages to the default value, use the no
form of this command.
IPv6 neighbor discovery conguration
FastIron Ethernet Switch Layer 3 Routing Conguration Guide, 08.0.30mb
53-1003627-06 171
For the interval between neighbor solicitation messages and the value for the retrans timer in router advertisements, specify a number
from 0 - 4294967295 milliseconds. The default value for the interval between neighbor solicitation messages is 1000 milliseconds.
The default value for the retrans timer is 0. Brocade does not recommend very short intervals in normal IPv6 operation. When a non-
default value is congured, the congured time is both advertised and used by the router itself. To restore the default interval, use the no
form of this command.
Setting IPv6 router advertisement parameters
You can adjust the following parameters for router advertisement messages:
• The interval (in seconds) at which an interface sends router advertisement messages. By default, an interface sends a router
advertisement message every 200 seconds.
• The "router lifetime" value, which is included in router advertisements sent from a particular interface. The value (in seconds)
indicates if the router is advertised as a default router on this interface. If you set the value of this parameter to 0, the router is
not advertised as a default router on an interface. If you set this parameter to a value that is not 0, the router is advertised as a
default router on this interface. By default, the router lifetime value included in router advertisement messages sent from an
interface is 1800 seconds.
• The hop limit to be advertised in the router advertisement.
When adjusting these parameter settings, Brocade recommends that the interval between router advertisement transmission be less than
or equal to the router lifetime value if the router is advertised as a default router. For example, to adjust the interval of router
advertisements to 300 seconds and the router lifetime value to 1900 seconds on Ethernet interface 1/3/1, enter the following
commands.
device(config)#interface ethernet 1/3/1
device(config-if-e1000-1/3/1)#ipv6 nd ra-interval 300
device(config-if-e1000-1/3/1)#ipv6 nd ra-lifetime 1900
device(config-if-e1000-1/3/1)#ipv6 nd ra-hop-limit 1
Here is another example with a specied range.
device(config)#interface ethernet 1/3/1
device(config-if-e1000-1/3/1)#ipv6 nd ra-interval range 33 55
device(config-if-e1000-1/3/1)#ipv6 nd ra-lifetime 1900
device(config-if-e1000-1/3/1)#ipv6 nd ra-hop-limit 1
Syntax: [no] ipv6 nd ra-interval number | min-range-value max-range-value
Syntax: [no] ipv6 nd ra-lifetime number
Syntax: ipv6 nd ra-hop-limit number
number is a value from 0 - 255. The default is 64.
The ipv6 nd ra-interval number can be a value between 3 - 1800 seconds. The default is 200 seconds. The actual RA interval will be
from .5 to 1.5 times the congured or default value. For example, in the above conguration, for ipv6 nd ra-interval 300 , the range
would be 150 - 450. To restore the default interval of 200 seconds, use the no form of the command.
The ipv6 nd ra-interval range min range value max range value command lets you specify a range of values instead of a single value.
The min-range-value species the minimum number of seconds allowed between sending unsolicited multicast router advertisements
from the interface. The default is 0.33 times the max-range-value if the max-range-value is greater than or equal to 9 seconds.
Otherwise, the default is the value specied by the max-range-value . The min-range-value can be a number between -3 - (.75 x max
range value ).
IPv6 neighbor discovery conguration
FastIron Ethernet Switch Layer 3 Routing Conguration Guide, 08.0.30mb
172 53-1003627-06
The max-range-value parameter species the maximum number of seconds allowed between sending unsolicited multicast router
advertisements from the interface. This number can be between 4 - 1800 seconds and must be greater than the min-range-value x
1.33. The default is 600 seconds.
The ipv6 nd ra-lifetime number is a value between 0 - 9000 seconds. To restore the router lifetime value of 1800 seconds, use the no
form of the command.
The ipv6 nd ra-hop-limit number is a value from 0 - 255. The default is 64.
NOTE
By default, router advertisements will always have the MTU option. To suppress the MTU option, use the following command at
the Interface level of the CLI: ipv6 nd suppress-mtu-option .
Prexes advertised in IPv6 router advertisement messages
By default, router advertisement messages include prexes congured as addresses on router interfaces using the ipv6 address
command. You can use the ipv6 nd prex-advertisement command to control exactly which prexes are included in router
advertisement messages. Along with which prexes the router advertisement messages contain, you can also specify the following
parameters:
•Valid lifetime --(Mandatory) The time interval (in seconds) in which the specied prex is advertised as valid. The default is
2592000 seconds (30 days). When the timer expires, the prex is no longer considered to be valid.
•Preferred lifetime --(Mandatory) The time interval (in seconds) in which the specied prex is advertised as preferred. The
default is 604800 seconds (7 days). When the timer expires, the prex is no longer considered to be preferred.
•Onlink ag --(Optional) If this ag is set, the specied prex is assigned to the link upon which it is advertised. Nodes sending
trac to addresses that contain the specied prex consider the destination to be reachable on the local link.
•Autoconguration ag --(Optional) If this ag is set, the stateless auto conguration feature can use the specied prex in the
automatic conguration of 128-bit IPv6 addresses for hosts on the local link, provided the specied prex is aggregatable, as
specied in RFC 2374.
For example, to advertise the prex 2001:DB8:a487:7365::/64 in router advertisement messages sent out on Ethernet interface 1/3/1
with a valid lifetime of 1000 seconds, a preferred lifetime of 800 seconds, and the Onlink and Autocong ags set, enter the following
commands.
device(config)#interface ethernet 1/3/1
device(config-if-e1000-1/3/1)#ipv6 nd prefix-advertisement 2001:DB8:a487:7365::/64 1000 800 onlink
autoconfig
Syntax: [no] ipv6 nd prex-advertisement ipv6-prex/prex-length valid-lifetime preferred-lifetime [ autocong ] [ onlink ]
You must specify the ipv6-prex parameter in hexadecimal using 16-bit values between colons as documented in RFC 2373.
You must specify the prex-length parameter as a decimal value. A slash mark (/) must follow the ipv6-prex parameter and precede the
prex-length parameter.
The valid lifetime and preferred lifetime is a numerical value between 0 - 4294967295 seconds. The default valid lifetime is 2592000
seconds (30 days), while the default preferred lifetime is 604800 seconds (7 days).
To remove a prex from the router advertisement messages sent from a particular interface, use the no form of this command.
IPv6 neighbor discovery conguration
FastIron Ethernet Switch Layer 3 Routing Conguration Guide, 08.0.30mb
53-1003627-06 173
Setting ags in IPv6 router advertisement messages
An IPv6 router advertisement message can include the following ags:
• Managed Address Conguration--This ag indicates to hosts on a local link if they should use the stateful autoconguration
feature to get IPv6 addresses for their interfaces. If the ag is set, the hosts use stateful autoconguration to get addresses as
well as non-IPv6-address information. If the ag is not set, the hosts do not use stateful autoconguration to get addresses and
if the hosts can get non-IPv6-address information from stateful autoconguration is determined by the setting of the Other
Stateful Conguration ag.
• Other Stateful Conguration--This ag indicates to hosts on a local link if they can get non-IPv6 address autoconguration
information. If the ag is set, the hosts can use stateful autoconguration to get non-IPv6-address information.
NOTE
When determining if hosts can use stateful autoconguration to get non-IPv6-address information, a set Managed Address
Conguration ag overrides an unset Other Stateful Conguration ag. In this situation, the hosts can obtain nonaddress
information. However, if the Managed Address Conguration ag is not set and the Other Stateful Conguration ag is set, then
the setting of the Other Stateful Conguration ag is used.
By default, the Managed Address Conguration and Other Stateful Conguration ags are not set in router advertisement messages. For
example, to set these ags in router advertisement messages sent from Ethernet interface 1/3/1, enter the following commands.
device(config)#interface ethernet 1/3/1
device(config-if-e1000-1/3/1)#ipv6 nd managed-config-flag
device(config-if-e1000-1/3/1)#ipv6 nd other-config-flag
Syntax: [no] ipv6 nd managed-cong-ag
Syntax: [no] ipv6 nd other-cong-ag
To remove either ag from router advertisement messages sent on an interface, use the no form of the respective command.
Enabling and disabling IPv6 router advertisements
If IPv6 unicast routing is enabled on an Ethernet interface, by default, this interface sends IPv6 router advertisement messages. However,
by default, non-LAN interface types, for example, tunnel interfaces, do not send router advertisement messages.
To disable the sending of router advertisement messages on an Ethernet interface, enter commands such as the following.
device(config)#interface ethernet 1/3/1
device(config-if-e1000-1/3/1)#ipv6 nd suppress-ra
To enable the sending of router advertisement messages on a tunnel interface, enter commands such as the following.
device(config)#interface tunnel 1
device(config-tnif-1)#no ipv6 nd suppress-ra
Syntax: [no] ipv6 nd suppress-ra
IPv6 router advertisement preference support
IPv6 router advertisement (RA) preference enables IPv6 RA messages to communicate default router preferences from IPv6 routers to
IPv6 hosts in network topologies where the host has multiple routers on its Default Router List. This improves the ability of the IPv6
hosts to select an appropriate router for an o-link destination.
IPv6 neighbor discovery conguration
FastIron Ethernet Switch Layer 3 Routing Conguration Guide, 08.0.30mb
174 53-1003627-06
Conguring IPv6 RA preference
Conguring IPv6 RA preference
If IPv6 unicast routing is enabled on an Ethernet interface, by default, this interface sends IPv6 router advertisement messages. The IPv6
router sets the preference eld based on the congured value on IPv6 RA and sends it periodically to the IPv6 host or as a response to
the router solicitations.
To congure IPv6 RA preference for the IPv6 router, use the ipv6 nd router-preference in the interface conguration mode.
The following example shows the router preference congured for interface 1/2/3 with the preference value "low".
device(config)#interface ethernet 1/2/3
device(config-if-e1000-1/2/3)#ipv6 nd router-preference low
Conguring reachable time for remote IPv6 nodes
You can congure the duration (in seconds) that a router considers a remote IPv6 node reachable. By default, a router interface uses the
value of 30 seconds.
The router advertisement messages sent by a router interface include the amount of time specied by the ipv6 nd reachable-time
command so that nodes on a link use the same reachable time duration. By default, the messages include a default value of 0.
Brocade does not recommend conguring a short reachable time duration, because a short duration causes the IPv6 network devices to
process the information at a greater frequency.
For example, to congure the reachable time of 40 seconds for Ethernet interface 1/3/1, enter the following commands.
device(config)#interface ethernet 1/3/1
device(config-if-e1000-1/3/1)#ipv6 nd reachable-time 40
Syntax: [no] ipv6 nd reachable-time seconds
For the seconds variable, specify a number from 0 through 3600 seconds. To restore the default time, use the no form of this
command.
NOTE
The actual reachable time will be from 0.5 to 1.5 times the congured or default
value.
IPv6 MTU
The IPv6 maximum transmission unit (MTU) is the maximum length of an IPv6 packet that can be transmitted on a particular interface. If
an IPv6 packet is longer than an MTU, the host that originated the packet fragments the packet and transmits its contents in multiple
packets that are shorter than the congured MTU.
By default, in non-jumbo mode, the default and maximum Ethernet MTU size is 1500 bytes. When jumbo mode is enabled, the default
Ethernet MTU size is 9216. The maximum Ethernet MTU size is 10200 for Brocade ICX 6610 devices, 10178 for Brocade ICX 6450
devices, and 10218 for other devices.
Conguration notes and feature limitations for IPv6 MTU
• The IPv6 MTU functionality is applicable to VEs and physical IP interfaces. It applies to trac routed between networks.
• For ICX 7250, ICX 7450, and ICX 7750 devices, the IPv4 and IPv6 MTU values are the same. Modifying one also changes
the value of the other.
IPv6 MTU
FastIron Ethernet Switch Layer 3 Routing Conguration Guide, 08.0.30mb
53-1003627-06 175
• For ICX 7250, ICX 7450, and ICX 7750 devices, the minimum IPv4 and IPv6 MTU values for both physical and virtual
interfaces are 1280.
• You cannot use IPv6 MTU to set Layer 2 maximum frame sizes per interface. Enabling global jumbo mode causes all
interfaces to accept Layer 2 frames.
Changing the IPv6 MTU
You can congure the IPv6 MTU on individual interfaces. For example, to congure the MTU on Ethernet interface 1/3/1 as 1280
bytes, enter the following commands.
device(config)#interface ethernet 1/3/1
device(config-if-e1000-1/3/1)#ipv6 mtu 1280
Syntax: [no] ipv6 mtu bytes
For bytes, specify a value between 1280 - 1500, or 1280 - 10218 if jumbo mode is enabled. For ICX 6610 and ICX 6450 devices,
you can specify a value between 1280 and 10200.If a non-default value is congured for an interface, router advertisements include an
MTU option.
NOTE
IPv6 MTU cannot be congured globally. It is supported only on devices running Layer 3
software.
Static neighbor entries conguration
In some special cases, a neighbor cannot be reached using the neighbor discovery feature. In this situation, you can add a static entry to
the IPv6 neighbor discovery cache, which causes a neighbor to be reachable at all times without using neighbor discovery. (A static entry
in the IPv6 neighbor discovery cache functions like a static ARP entry in IPv4.)
NOTE
A port that has a statically assigned IPv6 entry cannot be added to a VLAN.
NOTE
Static neighbor congurations will be cleared on secondary ports when a LAG is
formed.
For example, to add a static entry for a neighbor with the IPv6 address 2001:DB8:2678:47b and link-layer address 0000.002b.8641
that is reachable through Ethernet interface 1/3/1, enter the ipv6 neighbor command.
device(config)# ipv6 neighbor 2001:DB8:2678:47b ethernet 1/3/1 0000.002b.8641
Syntax: [no] ipv6 neighbor ipv6-address ethernet port | veve-number [ ethernet port ] link-layer-address
The ipv6-address parameter species the address of the neighbor.
The ethernet | ve parameter species the interface through which to reach a neighbor. If you specify an Ethernet interface, specify the
port number of the Ethernet interface. If you specify a VE, specify the VE number and then the Ethernet port numbers associated with
the VE. The link-layer address is a 48-bit hardware address of the neighbor.
If you attempt to add an entry that already exists in the neighbor discovery cache, the software changes the already existing entry to a
static entry.
To remove a static IPv6 entry from the IPv6 neighbor discovery cache, use the no form of this command.
Static neighbor entries conguration
FastIron Ethernet Switch Layer 3 Routing Conguration Guide, 08.0.30mb
176 53-1003627-06

Limiting the number of hops an IPv6 packet can
traverse
By default, the maximum number of hops an IPv6 packet can traverse is 64. You can change this value to between 0 - 255 hops. For
example, to change the maximum number of hops to 70, enter the following command.
device(config)#ipv6 hop-limit 70
Syntax: [no] ipv6 hop-limit number
Use the no form of the command to restore the default value.
hop-limit 0 will transmit packets with default (64) hop limit.
number can be from 0 - 255.
IPv6 source routing security enhancements
The IPv6 specication (RFC 2460) species support for IPv6 source-routed packets using a type 0 Routing extension header, requiring
device and host to process the type 0 routing extension header. However, this requirement may leave a network open to a DoS attack.
A security enhancement disables sending IPv6 source-routed packets to IPv6 devices. (This enhancement conforms to RFC 5095.)
By default, when the router drops a source-routed packet, it sends an ICMP Parameter Problem (type 4), Header Error (code 0) message
to the packet's source address, pointing to the unrecognized routing type. To disable these ICMP error messages, enter the following
command:
device(config)# no ipv6 icmp source-route
Syntax: [no] ipv6 icmp source-route
Use the ipv6 icmp source-route form of the command to enable the ICMP error messages.
TCAM space on FCX device conguration
FCX devices store routing information for IPv4 and IPv6 and GRE tunnel information in the same TCAM table. You can congure the
amount of TCAM space to allocate for IPv4 routing information and GRE tunnels. The remaining space is allocated automatically for
IPv6 routing information.
FCX devices have TCAM space to store 16,000 IPv4 route entries. Each IPv6 route entry and GRE tunnel use as much storage space
as four IPv4 route entries. The default, maximum, and minimum allocation values for each type of data are shown in TCAM space on
FCX device conguration.
TABLE 31 TCAM space allocation on FCX and ICX devices (except ICX 6450)
Default Maximum Minimum
IPv4 route entries 12000 15168 4096
IPv6 route entries 908 2884 68
GRE tunnels 16 64 16
TCAM space on FCX device conguration
FastIron Ethernet Switch Layer 3 Routing Conguration Guide, 08.0.30mb
53-1003627-06 177
Allocating TCAM space for IPv4 routing information
For example, to allocate 13,512 IPv4 route entries, enter the following command:
device(config)# system-max ip-route 13512
Syntax: system-max ip-route routes
The routes parameter species how many IPv4 route entries get allocated. The command output shows the new space allocations for
IPv4 and IPv6. You must save the running conguration to the startup conguration and reload the device for the changes to take eect.
After the device reloads, the space allocated for IPv4 and IPv6 routing information appears in the device running conguration in this
format:
system-max ip-route 13512
system-max ip6-route 514
NOTE
If you disable IPv6 routing, the TCAM space allocations do not change. If you want to allocate the maximum possible space for
IPv4 routing information, you must congure the TCAM space manually.
Allocating TCAM space for GRE tunnel information
For example, to allocate space for 64 GRE tunnels, enter the following command at the Privileged EXEC level:
device#system-max gre-tunnels 64
Syntax: system-max gre-tunnels tunnels
The tunnels parameter species the number of GRE tunnels to allocate.
Clearing global IPv6 information
You can clear the following global IPv6 information:
• Entries from the IPv6 cache.
• Entries from the IPv6 neighbor table.
• IPv6 routes from the IPv6 route table.
• IPv6 trac statistics.
Clearing the IPv6 cache
You can remove all entries from the IPv6 cache or specify an entry based on the following:
• IPv6 prex.
• IPv6 address.
• Interface type.
For example, to remove entries for IPv6 address 2000:e0::1, enter the following command at the Privileged EXEC level or any of the
Cong levels of the CLI.
device#clear ipv6 cache 2000:e0ff::1
Syntax: clear ipv6 cache [ ipv6-prex/prex-length |ipv6-address | ethernet port | tunnel number | ve number | vrf vrf-name ]
Clearing global IPv6 information
FastIron Ethernet Switch Layer 3 Routing Conguration Guide, 08.0.30mb
178 53-1003627-06
You must specify the ipv6-prex parameter in hexadecimal using 16-bit values between colons as documented in RFC 2373. You must
specify the prex-length parameter as a decimal value. A slash mark (/) must follow the ipv6-prex parameter and precede the prex-
length parameter.
You must specify the ipv6-address parameter in hexadecimal using 16-bit values between colons as documented in RFC 2373.
The ethernet | tunnel | ve | vrf parameter species the interfaces for which you can remove cache entries. If you specify an Ethernet
interface, also specify the port number associated with the interface. If you specify a VE, VRF, or tunnel interface, also specify the VE,
VRF name, or tunnel number, respectively.
Clearing IPv6 neighbor information
You can remove all entries from the IPv6 neighbor table or specify an entry based on the following:
• IPv6 prex
• IPv6 address
• Interface type
For example, to remove entries for Ethernet interface 1/3/1, enter the following command at the Privileged EXEC level or any of the
CONFIG levels of the CLI.
device#clear ipv6 neighbor ethernet 1/3/1
Syntax: clear ipv6 neighbor [ ipv6-prex / prex-length | ipv6-address | ethernet port | ve number | vrf vrf-name ]
You must specify the ipv6-prex parameter in hexadecimal using 16-bit values between colons as documented in RFC 2373. You must
specify the prex-length parameter as a decimal value. A slash mark (/) must follow the ipv6-prex parameter and precede the prex-
length parameter.
You must specify the ipv6-address parameter in hexadecimal using 16-bit values between colons as documented in RFC 2373.
The ethernet | ve | vrf parameter species the interfaces for which you can remove cache entries. If you specify an Ethernet interface,
also specify the port number associated with the interface. If you specify a VRF or VE, also specify the VRF name or VE number
respectively.
Clearing IPv6 routes from the IPv6 route table
You can clear all IPv6 routes or only those routes associated with a particular IPv6 prex from the IPv6 route table and reset the routes.
For example, to clear IPv6 routes associated with the prex 2000:7838::/32, enter the following command at the Privileged EXEC level
or any of the Cong levels of the CLI.
device#clear ipv6 route 2000:7838::/32
Syntax: clear ipv6 route [ ipv6-prex/prex-length | vrf vrf-name ]
The ipv6-prex / prex-length parameter clears routes associated with a particular IPv6 prex. You must specify the ipv6-prex
parameter in hexadecimal using 16-bit values between colons as documented in RFC 2373. You must specify the prex-length
parameter as a decimal value. A slash mark (/) must follow the ipv6-prex parameter and precede the prex-length parameter. If you
specify a VRF parameter, specify the VRF name.
Clearing global IPv6 information
FastIron Ethernet Switch Layer 3 Routing Conguration Guide, 08.0.30mb
53-1003627-06 179
Clearing IPv6 trac statistics
To clear all IPv6 trac statistics (reset all elds to zero), enter the following command at the Privileged EXEC level or any of the Cong
levels of the CLI.
device(config)#clear ipv6 traffic
Syntax: clear ipv6 trac
Displaying global IPv6 information
You can display output for the following global IPv6 parameters:
• IPv6 cache
• IPv6 interfaces
• IPv6 neighbors
• IPv6 route table
• Local IPv6 routers
• IPv6 TCP connections and the status of individual connections
• IPv6 trac statistics
Displaying IPv6 cache information
The IPv6 cache contains an IPv6 host table that has indices to the next hop gateway and the router interface on which the route was
learned.
To display IPv6 cache information, enter the following command at any CLI level.
device# show ipv6 cache
Total number of cache entries: 10
IPv6 Address Next Hop Port
1 2001:DB8::2 LOCAL tunnel 2
2 2001:DB8::106 LOCAL ethe 1/3/2
3 2001:DB8::110 DIRECT ethe 1/3/2
4 2001:DB8:46a::1 LOCAL ethe 1/3/2
5 2001:DB8::2e0:52ff:fe99:9737 LOCAL ethe 1/3/2
6 2001:DB8::ffff:ffff:feff:ffff LOCAL loopback 2
7 2001:DB8::c0a8:46a LOCAL tunnel 2
8 2001:DB8::c0a8:46a LOCAL tunnel 6
9 2001:DB8::1 LOCAL loopback 2
10 2001:DB8::2e0:52ff:fe99:9700 LOCAL ethe 1/3/1
Syntax: show ipv6 cache [ index-number | ipv6-prex/prex-length | ipv6-address | ethernet unit / slot / port | venumber | tunnel
number ]
The index-number parameter restricts the display to the entry for the specied index number and subsequent entries.
The ipv6-prex/prex-length parameter restricts the display to the entries for the specied IPv6 prex. You must specify the ipv6-prex
parameter in hexadecimal using 16-bit values between colons as documented in RFC 2373. You must specify the prex-length
parameter as a decimal value. A slash mark (/) must follow the ipv6-prex parameter and precede the prex-length parameter.
The ethernet | ve | tunnel parameter restricts the display to the entries for the specied interface. The ipv6-address parameter restricts
the display to the entries for the specied IPv6 address. You must specify this parameter in hexadecimal using 16-bit values between
colons as documented in RFC 2373.
Displaying global IPv6 information
FastIron Ethernet Switch Layer 3 Routing Conguration Guide, 08.0.30mb
180 53-1003627-06

If you specify an Ethernet interface, also specify the unit / slot / port number associated with the interface. If you specify a VE interface,
also specify the VE number. If you specify a tunnel interface, also specify the tunnel number.
This display shows the following information.
TABLE 32 IPv6 cache information elds
Field Description
Total number of cache entries The number of entries in the cache table.
IPv6 Address The host IPv6 address.
Next Hop The next hop, which can be one of the following:
• Direct - The next hop is directly connected to the router.
• Local - The next hop is originated on this router.
• ipv6 address - The IPv6 address of the next hop.
Port The port on which the entry was learned.
Displaying IPv6 interface information
To display IPv6 interface information, enter the following command at any CLI level.
device#show ipv6 interface
Routing Protocols : R - RIP O - OSPF
Interface Status Routing Global Unicast Address
Ethernet 1/3/3 down/down R
Ethernet 1/3/5 down/down
Ethernet 1/3/17 up/up 2017::c017:101/64
Ethernet 1/3/19 up/up 2019::c019:101/64
VE 4 down/down
VE 14 up/up 2024::c060:101/64
Loopback 1 up/up ::1/128
Loopback 2 up/up 2005::303:303/128
Loopback 3 up/up
Syntax: show ipv6 interface [ interface [ unit / slot / port | number ] ]
The interface parameter displays detailed information for a specied interface. For the interface, you can specify the Ethernet , loopback ,
tunnel , or VE keywords. If you specify an Ethernet interface, also specify unit / slot / port . If you specify a loopback, tunnel, or VE
interface, also specify the number associated with the interface.
This display shows the following information.
TABLE 33 General IPv6 interface information elds
Field Description
Routing protocols A one-letter code that represents a routing protocol that can be enabled
on an interface.
Interface The interface type, and the port number or number of the interface.
Status The status of the interface. The entry in the Status eld will be either
"up/up" or "down/down".
Routing The routing protocols enabled on the interface.
Global Unicast Address The global unicast address of the interface.
To display detailed information for a specic interface, enter a command such as the following at any CLI level.
device#show ipv6 interface ethernet 1/3/1
Interface Ethernet 1/3/1 is up, line protocol is up
IPv6 is enabled, link-local address is fe80::2e0:52ff:fe99:97
Displaying global IPv6 information
FastIron Ethernet Switch Layer 3 Routing Conguration Guide, 08.0.30mb
53-1003627-06 181

Global unicast address(es):
Joined group address(es):
ff02::9
ff02::1:ff99:9700
ff02::2
ff02::1
MTU is 1500 bytes
ICMP redirects are enabled
ND DAD is enabled, number of DAD attempts: 3
ND reachable time is 30 seconds
ND advertised reachable time is 0 seconds
ND retransmit interval is 1 seconds
ND advertised retransmit interval is 0 seconds
ND router advertisements are sent every 200 seconds
ND router advertisements live for 1800 seconds
No Inbound Access List Set
No Outbound Access List Set
RIP enabled
This display shows the following information.
TABLE 34 Detailed IPv6 interface information elds
Field Description
Interface/line protocol status The status of interface and line protocol. If you have disabled the interface
with the disable command, the status will be "administratively down".
Otherwise, the status is either "up" or "down".
IPv6 status/link-local address The status of IPv6. The status is either "enabled" or "disabled".
Displays the link-local address, if one is congured for the interface.
Global unicast address(es) Displays the global unicast address(es), if one or more are congured for
the interface.
Joined group address(es) The multicast address(es) that a router interface listens for and recognizes.
MTU The setting of the maximum transmission unit (MTU) congured for the
IPv6 interface. The MTU is the maximum length an IPv6 packet can have
to be transmitted on the interface. If an IPv6 packet is longer than an MTU,
the host that originated the packet fragments the packet and transmits its
contents in multiple packets that are shorter than the congured MTU.
ICMP The setting of the ICMP redirect parameter for the interface.
ND The setting of the various neighbor discovery parameters for the interface.
Access List The inbound and outbound access control lists applied to the interface.
Routing protocols The routing protocols enabled on the interface.
Displaying IPv6 neighbor information
You can display the IPv6 neighbor table, which contains an entry for each IPv6 neighbor with which the router exchanges IPv6 packets.
To display the IPv6 neighbor table, enter the following command at any CLI level.
device(config)# show ipv6 neighbor
Total number of Neighbor entries: 3
IPv6 Address LinkLayer-Addr State Age Port vlan IsR
2001:DB8::55 0000.0002.0002 *REACH 0 e 1/3/11 - 0
2000:4::110 0000.0091.bb37 REACH 20 e 1/3/1 5 1
fe80::2e0:52ff:fe91:bb37 0000.0091.bb37 DELAY 1 e 1/3/2 4 1
fe80::2e0:52ff:fe91:bb40 0000.0091.bb40 STALE 5930 e 1/3/3 5 1
Syntax: show ipv6 neighbor [ ipv6-prex/prex-length | ipv6-address | interface [ unit / slot / port | number ] ]
Displaying global IPv6 information
FastIron Ethernet Switch Layer 3 Routing Conguration Guide, 08.0.30mb
182 53-1003627-06

The ipv6-prex / prex-length parameters restrict the display to the entries for the specied IPv6 prex. You must specify the ipv6-prex
parameter in hexadecimal using 16-bit values between colons as documented in RFC 2373. You must specify the prex-length
parameter as a decimal value. A slash mark (/) must follow the ipv6-prex parameter and precede the prex-length parameter.
The ipv6-address parameter restricts the display to the entries for the specied IPv6 address. You must specify this parameter in
hexadecimal using 16-bit values between colons as documented in RFC 2373.
The interface parameter restricts the display to the entries for the specied router interface. For this parameter, you can specify the
ethernet or ve keywords. If you specify an Ethernet interface, also specify unit / slot / port. If you specify a VE interface, also specify the
VE number.
This display shows the following information.
TABLE 35 IPv6 neighbor information elds
Field Description
Total number of neighbor entries The total number of entries in the IPv6 neighbor table.
IPv6 Address The 128-bit IPv6 address of the neighbor.
Link-Layer Address The 48-bit interface ID of the neighbor.
State The current state of the neighbor. Possible states are as follows:
• INCOMPLETE - Address resolution of the entry is being
performed.
• *REACH - The static forward path to the neighbor is functioning
properly.
• REACH - The forward path to the neighbor is functioning
properly.
• STALE - This entry has remained unused for the maximum
interval. While stale, no action takes place until a packet is sent.
• DELAY - This entry has remained unused for the maximum
interval, and a packet was sent before another interval elapsed.
• PROBE - Neighbor solicitation are transmitted until a
reachability conrmation is received.
Age The number of seconds the entry has remained unused. If this value
remains unused for the number of seconds specied by the ipv6 nd
reachable-time command (the default is 30 seconds), the entry is
removed from the table.
Port The physical port on which the entry was learned.
vlan The VLAN on which the entry was learned.
IsR Determines if the neighbor is a router or host:
0 - Indicates that the neighbor is a host.
1 - Indicates that the neighbor is a router.
Displaying the IPv6 route table
To display the IPv6 route table, enter the following command at any CLI level.
device# show ipv6 route
IPv6 Routing Table - 7 entries:
Type Codes: C - Connected, S - Static, R - RIP, O - OSPF, B - BGP
OSPF Sub Type Codes: O - Intra, Oi - Inter, O1 - Type1 external, O2 - Type2 external
Type IPv6 Prefix Next Hop Router Interface Dis/Metric
C 2000:4::/64 :: ethe 1/3/2 0/0
S 2001:DB8::/16 :: tunnel 6 1/1
S 2001:DB8:1234::/32 :: tunnel 6 1/1
C 2001:DB8:46a::/64 :: ethe 1/3/2 0/0
Displaying global IPv6 information
FastIron Ethernet Switch Layer 3 Routing Conguration Guide, 08.0.30mb
53-1003627-06 183

C 2001:DB8::1/128 :: loopback 2 0/0
O 2001:DB8::2/128 fe80::2e0:52ff:fe91:bb37 ethe 1/3/2 110/1
C 2001:DB8::/64 :: tunnel 2 0/0
Syntax: show ipv6 route [ ipv6-address | ipv6-prex/prex-length | bgp | connect | ospf | rip | static | summary ]
The ipv6-address parameter restricts the display to the entries for the specied IPv6 address. You must specify the ipv6-address
parameter in hexadecimal using 16-bit values between colons as documented in RFC 2373.
The ipv6-prex / prex-length parameters restrict the display to the entries for the specied IPv6 prex. You must specify the ipv6-prex
parameter in hexadecimal using 16-bit values between colons as documented in RFC 2373. You must specify the prex-length
parameter as a decimal value. A slash mark (/) must follow the ipv6-prex parameter and precede the prex-length parameter.
The bgp keyword restricts the display to entries for BGP4 routes.
The connect keyword restricts the display to entries for directly connected interface IPv6 routes.
The ospf keyword restricts the display to entries for OSPFv3 routes.
The rip keyword restricts the display to entries for RIPng routes.
The static keyword restricts the display to entries for static IPv6 routes.
The summary keyword displays a summary of the prexes and dierent route types.
The following table lists the information displayed by the show ipv6 route command.
TABLE 36 IPv6 route table elds
Field Description
Number of entries The number of entries in the IPv6 route table.
Type The route type, which can be one of the following:
• C - The destination is directly connected to the router.
• S - The route is a static route.
• R - The route is learned from RIPng.
• O - The route is learned from OSPFv3.
• B - The route is learned from BGP4.
IPv6 Prex The destination network of the route.
Next-Hop Router The next-hop router.
Interface The interface through which this router sends packets to reach the route's
destination.
Dis/Metric The route’s administrative distance and metric value.
To display a summary of the IPv6 route table, enter the following command at any CLI level.
device#show ipv6 route summary
IPv6 Routing Table - 7 entries:
4 connected, 2 static, 0 RIP, 1 OSPF, 0 BGP
Number of prefixes:
/16: 1 /32: 1 /64: 3 /128: 2
The following table lists the information displayed by the show ipv6 route summary command.
TABLE 37 IPv6 route table summary elds
Field Description
Number of entries The number of entries in the IPv6 route table.
Number of route types The number of entries for each route type.
Displaying global IPv6 information
FastIron Ethernet Switch Layer 3 Routing Conguration Guide, 08.0.30mb
184 53-1003627-06

TABLE 37 IPv6 route table summary elds (continued)
Field Description
Number of prexes A summary of prexes in the IPv6 route table, sorted by prex length.
Displaying local IPv6 routers
The Brocade device can function as an IPv6 host, instead of an IPv6 router, if you congure IPv6 addresses on its interfaces but do not
enable IPv6 routing using the ipv6 unicast-routing command.
From the IPv6 host, you can display information about IPv6 routers to which the host is connected. The host learns about the routers
through their router advertisement messages. To display information about the IPv6 routers connected to an IPv6 host, enter the
following command at any CLI level.
device#show ipv6 router
Router fe80::2e0:80ff:fe46:3431 on Ethernet 50, last update 0 min
Hops 64, Lifetime 1800 sec
Reachable time 0 msec, Retransmit time 0 msec
Syntax: show ipv6 router
If you congure your Brocade device to function as an IPv6 router (you congure IPv6 addresses on its interfaces and enable IPv6
routing using the ipv6 unicast-routing command) and you enter the show ipv6 router command , you will receive the following output.
No IPv6 router in table
Meaningful output for this command is generated for Brocade devices congured to function as IPv6 hosts only.
This display shows the following information.
TABLE 38 IPv6 local router information elds
Field Description
Router ipv6 address on interface port The IPv6 address for a particular router interface.
Last update The amount of elapsed time (in minutes) between the current and previous
updates received from a router.
Hops The default value that should be included in the Hop Count eld of the
IPv6 header for outgoing IPv6 packets. The hops value applies to the
router for which you are displaying information and should be followed by
IPv6 hosts attached to the router. A value of 0 indicates that the router
leaves this eld unspecied.
Lifetime The amount of time (in seconds) that the router is useful as the default
router.
Reachable time The amount of time (in milliseconds) that a router assumes a neighbor is
reachable after receiving a reachability conrmation. The reachable time
value applies to the router for which you are displaying information and
should be followed by IPv6 hosts attached to the router. A value of 0
indicates that the router leaves this eld unspecied.
Retransmit time The amount of time (in milliseconds) between retransmissions of neighbor
solicitation messages. The retransmit time value applies to the router for
which you are displaying information and should be followed by IPv6
hosts attached to the router. A value of 0 indicates that the router leaves
this eld unspecied.
Displaying global IPv6 information
FastIron Ethernet Switch Layer 3 Routing Conguration Guide, 08.0.30mb
53-1003627-06 185

Displaying IPv6 TCP information
You can display the following IPv6 TCP information:
• General information about each TCP connection on the router, including the percentage of free memory for each of the internal
TCP buers.
• Detailed information about a specied TCP connection.
To display general information about each TCP connection on the router, enter the following command at any CLI level.
device#show ipv6 tcp connections
Local IP address:port <-> Remote IP address:port TCP state
10.168.182.110:23 <-> 10.168.8.186:4933 ESTABLISHED
10.168.182.110:8218 <-> 10.168.182.106:179 ESTABLISHED
10.168.182.110:8039 <-> 10.168.2.119:179 SYN-SENT
10.168.182.110:8159 <-> 10.168.2.102:179 SYN-SENT
2000:4::110:179 <-> 2000:4::106:8222 ESTABLISHED (1440)
Total 5 TCP connections
TCP MEMORY USAGE PERCENTAGE
FREE TCP = 98 percent
FREE TCP QUEUE BUFFER = 99 percent
FREE TCP SEND BUFFER = 97 percent
FREE TCP RECEIVE BUFFER = 100 percent
FREE TCP OUT OF SEQUENCE BUFFER = 100 percent
Syntax: show ipv6 tcp connections
This display shows the following information.
TABLE 39 General IPv6 TCP connection elds
Field Description
Local IP address:port The IPv4 or IPv6 address and port number of the local router interface
over which the TCP connection occurs.
Remote IP address:port The IPv4 or IPv6 address and port number of the remote router interface
over which the TCP connection occurs.
TCP state The state of the TCP connection. Possible states include the following:
• LISTEN - Waiting for a connection request.
• SYN-SENT - Waiting for a matching connection request after
having sent a connection request.
• SYN-RECEIVED - Waiting for a conrming connection request
acknowledgment after having both received and sent a
connection request.
• ESTABLISHED - Data can be sent and received over the
connection. This is the normal operational state of the
connection.
• FIN-WAIT-1 - Waiting for a connection termination request
from the remote TCP, or an acknowledgment of the connection
termination request previously sent.
• FIN-WAIT-2 - Waiting for a connection termination request
from the remote TCP.
• CLOSE-WAIT - Waiting for a connection termination request
from the local user.
• CLOSING - Waiting for a connection termination request
acknowledgment from the remote TCP.
• LAST-ACK - Waiting for an acknowledgment of the connection
termination request previously sent to the remote TCP (which
includes an acknowledgment of its connection termination
request).
Displaying global IPv6 information
FastIron Ethernet Switch Layer 3 Routing Conguration Guide, 08.0.30mb
186 53-1003627-06

TABLE 39 General IPv6 TCP connection elds (continued)
Field Description
• TIME-WAIT - Waiting for enough time to pass to be sure the
remote TCP received the acknowledgment of its connection
termination request.
• CLOSED - There is no connection state.
FREE TCP = percentage The percentage of free TCP control block (TCP) space.
FREE TCP QUEUE BUFFER = percentage The percentage of free TCP queue buer space.
FREE TCP SEND BUFFER = percentage The percentage of free TCP send buer space.
FREE TCP RECEIVE BUFFER = percentage The percentage of free TCP receive buer space.
FREE TCP OUT OF SEQUENCE BUFFER = percentage The percentage of free TCP out of sequence buer space.
To display detailed information about a specied TCP connection, enter a command such as the following at any CLI level.
device#show ipv6 tcp status 2000:4::110 179 2000:4::106 8222
TCP: TCP = 0x217fc300
TCP: 2000:4::110:179 <-> 2000:4::106:8222: state: ESTABLISHED Port: 1
Send: initial sequence number = 242365900
Send: first unacknowledged sequence number = 242434080
Send: current send pointer = 242434080
Send: next sequence number to send = 242434080
Send: remote received window = 16384
Send: total unacknowledged sequence number = 0
Send: total used buffers 0
Receive: initial incoming sequence number = 740437769
Receive: expected incoming sequence number = 740507227
Receive: received window = 16384
Receive: bytes in receive queue = 0
Receive: congestion window = 1459
Syntax: show ipv6 tcp status local-ip-address local-port-number remote-ip-address remote-port-number
The local-ip-address parameter can be the IPv4 or IPv6 address of the local interface over which the TCP connection is taking place.
The local-port-number parameter is the local port number over which a TCP connection is taking place.
The remote-ip-address parameter can be the IPv4 or IPv6 address of the remote interface over which the TCP connection is taking
place.
The remote-port-number parameter is the local port number over which a TCP connection is taking place.
This display shows the following information.
TABLE 40 Specic IPv6 TCP connection elds
Field Description
TCP = location The location of the TCP.
local-ip-address local-port-number remote-ip-address remote-port-
number state port
This eld provides a general summary of the following:
• The local IPv4 or IPv6 address and port number.
• The remote IPv4 or IPv6 address and port number.
• The state of the TCP connection. For information on possible
states, refer to Displaying IPv6 TCP information.
• The port numbers of the local interface.
Send: initial sequence number = number The initial sequence number sent by the local router.
Send: rst unacknowledged sequence number = number The rst unacknowledged sequence number sent by the local router.
Send: current send pointer = number The current send pointer.
Send: next sequence number to send = number The next sequence number sent by the local router.
Displaying global IPv6 information
FastIron Ethernet Switch Layer 3 Routing Conguration Guide, 08.0.30mb
53-1003627-06 187

TABLE 40 Specic IPv6 TCP connection elds (continued)
Field Description
Send: remote received window = number The size of the remote received window.
Send: total unacknowledged sequence number = number The total number of unacknowledged sequence numbers sent by the local
router.
Send: total used buers number The total number of buers used by the local router in setting up the TCP
connection.
Receive: initial incoming sequence number = number The initial incoming sequence number received by the local router.
Receive: expected incoming sequence number = number The incoming sequence number expected by the local router.
Receive: received window = number The size of the local router’s receive window.
Receive: bytes in receive queue = number The number of bytes in the local router’s receive queue.
Receive: congestion window = number The size of the local router’s receive congestion window.
Displaying IPv6 trac statistics
To display IPv6 trac statistics, enter the following command at any CLI level.
device#show ipv6 traffic
IP6 Statistics
36947 received, 66818 sent, 0 forwarded, 36867 delivered, 0 rawout
0 bad vers, 23 bad scope, 0 bad options, 0 too many hdr
0 no route, 0 can not forward, 0 redirect sent
0 frag recv, 0 frag dropped, 0 frag timeout, 0 frag overflow
0 reassembled, 0 fragmented, 0 ofragments, 0 can not frag
0 too short, 0 too small, 11 not member
0 no buffer, 66819 allocated, 21769 freed
0 forward cache hit, 46 forward cache miss
ICMP6 Statistics
Received:
0 dest unreach, 0 pkt too big, 0 time exceeded, 0 param prob
2 echo req, 1 echo reply, 0 mem query, 0 mem report, 0 mem red
0 router soli, 2393 router adv, 106 nei soli, 3700 nei adv, 0 redirect
0 bad code, 0 too short, 0 bad checksum, 0 bad len
0 reflect, 0 nd toomany opt, 0 badhopcount
Sent:
0 dest unreach, 0 pkt too big, 0 time exceeded, 0 param prob
1 echo req, 2 echo reply, 0 mem query, 0 mem report, 0 mem red
0 router soli, 2423 router adv, 3754 nei soli, 102 nei adv, 0 redirect
0 error, 0 can not send error, 0 too freq
Sent Errors:
0 unreach no route, 0 admin, 0 beyond scope, 0 address, 0 no port
0 pkt too big, 0 time exceed transit, 0 time exceed reassembly
0 param problem header, 0 nextheader, 0 option, 0 redirect, 0 unknown
UDP Statistics
470 received, 7851 sent, 6 no port, 0 input errors
TCP Statistics
57913 active opens, 0 passive opens, 57882 failed attempts
159 active resets, 0 passive resets, 0 input errors
565189 in segments, 618152 out segments, 171337 retransmission
Syntax: show ipv6 trac
This show ipv6 trac command displays the following information.
Field Description
IPv6 statistics
received The total number of IPv6 packets received by the router.
sent The total number of IPv6 packets originated and sent by the router.
Displaying global IPv6 information
FastIron Ethernet Switch Layer 3 Routing Conguration Guide, 08.0.30mb
188 53-1003627-06

Field Description
forwarded The total number of IPv6 packets received by the router and forwarded to
other routers.
delivered The total number of IPv6 packets delivered to the upper layer protocol.
rawout This information is used by Brocade Technical Support.
bad vers The number of IPv6 packets dropped by the router because the version
number is not 6.
bad scope The number of IPv6 packets dropped by the router because of a bad
address scope.
bad options The number of IPv6 packets dropped by the router because of bad
options.
too many hdr The number of IPv6 packets dropped by the router because the packets
had too many headers.
no route The number of IPv6 packets dropped by the router because there was no
route.
can not forward The number of IPv6 packets the router could not forward to another
router.
redirect sent This information is used by Brocade Technical Support.
frag recv The number of fragments received by the router.
frag dropped The number of fragments dropped by the router.
frag timeout The number of fragment timeouts that occurred.
frag overow The number of fragment overows that occurred.
reassembled The number of fragmented IPv6 packets that the router reassembled.
fragmented The number of IPv6 packets fragmented by the router to accommodate
the MTU of this router or of another device.
ofragments The number of output fragments generated by the router.
can not frag The number of IPv6 packets the router could not fragment.
too short The number of IPv6 packets dropped because they are too short.
too small The number of IPv6 packets dropped because they do not have enough
data.
not member The number of IPv6 packets dropped because the recipient is not a
member of a multicast group.
no buer The number of IPv6 packets dropped because there is no buer available.
forward cache miss The number of IPv6 packets received for which there is no corresponding
cache entry.
ICMP6 statistics
Some ICMP statistics apply to both Received and Sent, some apply to Received only, some apply to Sent only, and some apply to Sent Errors only.
Applies to received and sent
dest unreach The number of Destination Unreachable messages sent or received by the
router.
pkt too big The number of Packet Too Big messages sent or received by the router.
time exceeded The number of Time Exceeded messages sent or received by the router.
param prob The number of Parameter Problem messages sent or received by the
router.
echo req The number of Echo Request messages sent or received by the router.
echo reply The number of Echo Reply messages sent or received by the router.
Displaying global IPv6 information
FastIron Ethernet Switch Layer 3 Routing Conguration Guide, 08.0.30mb
53-1003627-06 189

Field Description
mem query The number of Group Membership Query messages sent or received by
the router.
mem report The number of Membership Report messages sent or received by the
router.
mem red The number of Membership Reduction messages sent or received by the
router.
router soli The number of Router Solicitation messages sent or received by the
router.
router adv The number of Router Advertisement messages sent or received by the
router.
nei soli The number of Neighbor Solicitation messages sent or received by the
router.
nei adv The number of Router Advertisement messages sent or received by the
router.
redirect The number of redirect messages sent or received by the router.
Applies to received only
bad code The number of Bad Code messages received by the router.
too short The number of Too Short messages received by the router.
bad checksum The number of Bad Checksum messages received by the router.
bad len The number of Bad Length messages received by the router.
nd toomany opt The number of Neighbor Discovery Too Many Options messages
received by the router.
badhopcount The number of Bad Hop Count messages received by the router.
Applies to sent only
error The number of Error messages sent by the router.
can not send error The number of times the node encountered errors in ICMP error
messages.
too freq The number of times the node has exceeded the frequency of sending
error messages.
Applies to sent errors only
unreach no route The number of Unreachable No Route errors sent by the router.
admin The number of Admin errors sent by the router.
beyond scope The number of Beyond Scope errors sent by the router.
address The number of Address errors sent by the router.
no port The number of No Port errors sent by the router.
pkt too big The number of Packet Too Big errors sent by the router.
time exceed transit The number of Time Exceed Transit errors sent by the router.
time exceed reassembly The number of Time Exceed Reassembly errors sent by the router.
param problem header The number of Parameter Problem Header errors sent by the router.
nextheader The number of Next Header errors sent by the router.
option The number of Option errors sent by the router.
redirect The number of Redirect errors sent by the router.
unknown The number of Unknown errors sent by the router.
UDP statistics
received The number of UDP packets received by the router.
Displaying global IPv6 information
FastIron Ethernet Switch Layer 3 Routing Conguration Guide, 08.0.30mb
190 53-1003627-06

Field Description
sent The number of UDP packets sent by the router.
no port The number of UDP packets dropped because the packet did not contain
a valid UDP port number.
input errors This information is used by Brocade Technical Support.
TCP statistics
active opens The number of TCP connections opened by the router by sending a TCP
SYN to another device.
passive opens The number of TCP connections opened by the router in response to
connection requests (TCP SYNs) received from other devices.
failed attempts This information is used by Brocade Technical Support.
active resets The number of TCP connections the router reset by sending a TCP
RESET message to the device at the other end of the connection.
passive resets The number of TCP connections the router reset because the device at
the other end of the connection sent a TCP RESET message.
input errors This information is used by Brocade Technical Support.
in segments The number of TCP segments received by the router.
out segments The number of TCP segments sent by the router.
retransmission The number of segments that the router retransmitted because the
retransmission timer for the segment had expired before the device at the
other end of the connection had acknowledged receipt of the segment.
DHCP relay agent for IPv6
A client locates a DHCP server using a reserved, link-scoped multicast address. Direct communication between the client and server
requires that they are attached by the same link. In some situations where ease-of-management, economy, and scalability are concerns,
you can allow a DHCPv6 client to send a message to a DHCP server using a DHCPv6 relay agent.
A DHCPv6 relay agent, which may reside on the client link, but is transparent to the client, relays messages between the client and the
server. Multiple DHCPv6 relay agents can exist between the client and server. DHCPv6 relay agents can also receive relay-forward
messages from other relay agents; these messages are forwarded to the DHCP server specied as the destination.
When the relay agent receives a message, it creates a new relay-forward message, inserts the original DHCPv6 message, and sends the
relay-forward message as the DHCP server.
Conguring DHCP for IPv6 relay agent
To enable the DHCPv6 relay agent function and specify the relay destination (the DHCP server) address on an interface, enter the
following command at the interface level:
device(config)# interface ethernet 1/2/3
device(config-if-e10000-1/2/3)#ipv6 dhcp-relay destination 2001::2
deviceconfig-if-e10000-1/2/3)#ipv6 dhcp-relay destination fe80::224:38ff:febb:e3c0 outgoing-interface
ethernet 1/2/5
Syntax: [no] ipv6 dhcp-relay destination ipv6-address [ outgoing-interface interface-type port-num ]
Specify the ipv6-address as a destination address to which client messages are forwarded and which enables DHCPv6 relay service on
the interface. You can congure up to 16 relay destination addresses on an interface. The outgoing-interface parameter is used when the
destination relay address is a link-local or multicast address. Specify the interface-type as ethernet interface, tunnel interface, or VE
interface. Specify the port-num as the port number.
DHCP relay agent for IPv6
FastIron Ethernet Switch Layer 3 Routing Conguration Guide, 08.0.30mb
53-1003627-06 191

Use the no version of the command to remove a DHCPv6 relay agent from the interface.
Enabling the interface-ID on the DHCPv6 relay agent messages
The interface-id parameter on the DHCPv6 relay forward message is used to identify the interface on which the client message is
received. By default, this parameter is included only when the client message is received with the link-local source address.
To include the interface-id parameter on the DHCPv6 relay agent messages, enter the ipv6 dhcp-relay include-options command at the
interface level.
device(config-if-eth-1/2/3)# ipv6 dhcp-relay include-options interface-id
Syntax: [no] ipv6 dhcp-relay include-options interface-id
Displaying DHCPv6 relay agent information
The show ipv6 dhcp-relay command displays the DHCPv6 relay agent information congured on the device:
device(config)#show ipv6 dhcp-relay
Current DHCPv6 relay agent state: Enabled
DHCPv6 enabled interface(s): e 1/2/3
DHCPv6 Relay Agent Statistics:
Total DHCPv6 Packets, Received:0, Transmitted:0
Received DHCPv6 Packets: RELEASE:0,RELAY_FORWARD:0,RELAY_REPLY:0
OtherServertoClient:0,OtherClinettoServer:0
Syntax: show ipv6 dhcp-relay
Displaying the DHCPv6 Relay congured destinations
Enter the show ipv6 dhcp-relay destinations command to display information about the dhcpv6 relay agent congured destinations.
device#show ipv6 dhcp-relay destinations
DHCPv6 Relay Destinations:
Interface e 1/2/3:
Destination OutgoingInterface
2001::2 NA
fe80::224:38ff:febb:e3c0 e 1/2/5
Syntax: show ipv6 dhcp-relay destination
Displaying the DHCPv6 Relay congured destinations describes the elds from the output of show ipv6 dhcp-relay destinations
command.
TABLE 41 DHCPv6 relay congured destination information
Field Description
DHCPv6 relay destination The DHCPv6 relay agent congured destination information
Interface The interface specied (ethernet, tunnel, or VE interface)
Destination The congured destination IPv6 address.
OutgoingInterface The interface on which packets are relayed if the destination relay address
is a local link or multicast address.
DHCP relay agent for IPv6
FastIron Ethernet Switch Layer 3 Routing Conguration Guide, 08.0.30mb
192 53-1003627-06

Displaying the DHCPv6 Relay information for an interface
Enter the show ipv6 dhcp-relay interface command to display the DHCPv6 relay information for a specic interface.
device#show ipv6 dhcp-relay interface ethernet 1/2/3
DHCPv6 Relay Information for interface e 1/2/3:
Destinations:
Destination OutgoingInterface
2001::2 NA
fe80::224:38ff:febb:e3c0 e 1/2/5
Options:
Interface-Id: Yes
Syntax: show ipv6 dhcp-relay interface interface-type port-num
Specify the interface-type as ethernet interface, tunnel interface, or VE interface. Specify the port-num as the port number.
The following table describes the elds from the output of the show ipv6 dhcp-relay interface command.
TABLE 42 DHCPv6 relay information for an interface
Field Description
DHCPv6 Relay Information for interface interface-type port-num The DHCPv6 relay information for the specic interface.
Destination The congured destination IPv6 address.
OutgoingInterface The interface on which the packet will be relayed if the destination relay
address is a link local or multicast address.
Options The current information about the DHCPv6 relay options for the interface
Interface-Id The interface ID option indicating if the option is used or not.
DHCPv6 Relay Agent Prex Delegation Notication
DHCPv6 Relay Agent Prex Delegation Notication feature allows a DHCPv6 server to dynamically delegate IPv6 prexes to a
DHCPv6 client using the DHCPv6 Prex Delegation (PD) option. DHCPv6 prex delegation enables an Internet service provider (ISP) to
automate the process of assigning prexes to a customer premises equipment (CPE) network. The CPE then assigns IPv6 subnets from
the delegated IPv6 prex to its downstream customer interfaces.
This feature description is shown in Figure 17.
DHCPv6 Relay Agent Prex Delegation Notication
FastIron Ethernet Switch Layer 3 Routing Conguration Guide, 08.0.30mb
53-1003627-06 193
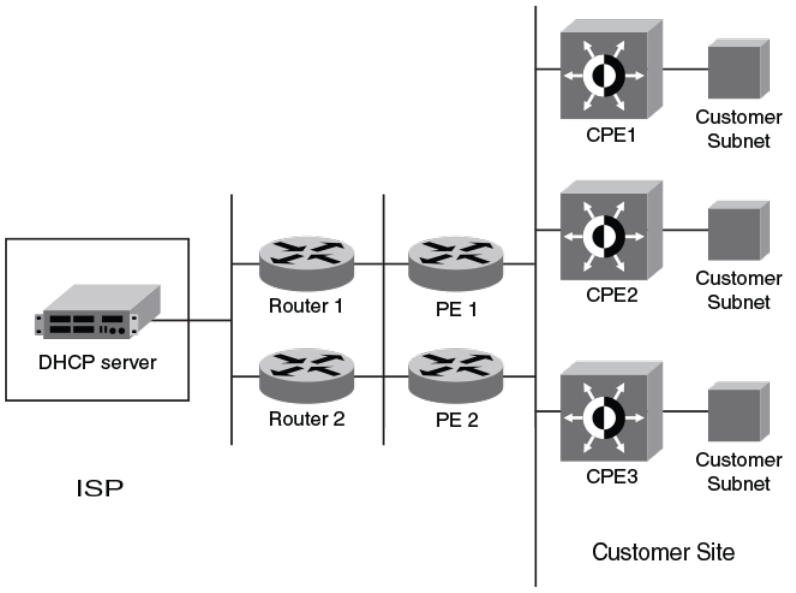
FIGURE 17 DHCPv6 Relay Agent Prex Delegation Notication
A route is added to the IPv6 route table on the provider edge router (PE) for the delegated prex to be delegated to requesting routers.
The DHCP server chooses a prex for delegation and responds with it to the CPEx. to the external network and to enable the correct
forwarding of the IPv6 packets for the delegated IPv6 prex. Adding the delegated prex to the IPv6 route table ensures that the unicast
Reverse Path Forwarding (uRPF) works correctly.
Since the PE is also a DHCPv6 relay agent (it relays DHCPv6 messages between the CPE and the DHCP server), it examines all
DHCPv6 messages relayed between the CPE and the DHCP server and gathers information about a delegated prex and then manages
the advertisement of this delegated prex to the external network.
DHCPv6 Relay Agent Prex Delegation Notication limitations
The following limitations apply to the DHCPv6 Relay Agent Prex Delegation Notication.
• The PD notication fails when the DHCPv6 messages between a DHCPv6 server and a DHCPv6 client containing the PD
option are not relayed via the DHCPv6 relay agent.
• If the delegated prex is released or renewed by the client at the time when the DHCPv6 relay agent is down or rebooting, then
this release or renewal of the delegated prex will not be detected by the relay agent. In such a condition, there could be stale
static routes in the routing table. You must clear the stale routes.
• If there is no sucient disk space on a ash disk, then the system may not store all the delegated prexes in the IPv6 route
table.
• The DHCPv6 PD ash operation will depend on the NTP clock synchronization. During system boot up, if the NTP is
congured, the ash operation (dhcp6_delegated_prexes_data ash le read/write) is delayed till the NTP is synchronized. The
DHCPv6 Relay Agent Prex Delegation Notication
FastIron Ethernet Switch Layer 3 Routing Conguration Guide, 08.0.30mb
194 53-1003627-06
NTP synchronization is needed for the correct updation of prex age. If the NTP is not congured, then the DHCP prex
delegation will still read the ash, but the prex age may not be correct.
Upgrade and downgrade considerations
• When a router is upgraded to the version of software that supports this feature, the saved information about delegated prexes
will be examined and if the delegated prex lifetime is not expired, then the prex will be added to the IPv6 static route table.
• When a router is downgraded to the version of software that does not support this feature, the saved information about
delegated prexes is retained and it cannot be used.
Conguring DHCPv6 Relay Agent Prex Delegation Notication
To set the number of delegated prexes that can be learned at the global system level, use the ipv6 dhcp-relay maximum-delegated-
prexes command.
By default, the DHCPv6 Relay Agent Prex Delegation Notication is enabled when the DHCPv6 relay agent feature is enabled on an
interface. User can disable the DHCPv6 Relay Agent Prex Delegation Notication at the system or the interface level by setting ipv6
dhcp-relay maximum-delegated-prexes to 0 at the system or interface level as required.
NOTE
Make sure that there is enough free space in the ash memory to save information about delegated prexes in ash on both the
Active and Standby management processor
device(config)# ipv6 dhcp-relay maximum-delegated-prefixes 500
The value parameter is used to limit the maximum number of prexes that can be learned at the global level. The range is from 0 to 512.
The default value is 500.
Syntax: [no] ipv6 dhcp-relay maximum-delegated-prexes value
The value parameter is used to limit the maximum number of prexes that can be learned at the global level. The range is from 0 to 512.
The default value is 500.
Use the no ipv6 dhcp-relay maximum-delegated-prexes command to set the parameter to the default value of the specied platform.
Refer to Enabling DHCPv6 Relay Agent Prex Delegation notication on an interface on page 195 for more information.
NOTE
The DHCPv6 prex delegation default for ICX 7750 is
50.
Enabling DHCPv6 Relay Agent Prex Delegation notication on an interface
To set the number of delegated prexes that can be learned at the interface level, use the ipv6 dhcp-relay maximum-delegated-prexes
command. This command limits the maximum number of prexes that can be learned on the interface.
device(config-if-eth 1/2/1)# ipv6 dhcp-relay maximum-delegated-prefixes 100
Syntax: [no] ipv6 dhcp-relay maximum-delegated-prexes value
The value parameter is used to limit the maximum number of prexes that can be delegated. The range is from 0 to 512. The default
value is 100. The sum of all the delegated prexes that can be learned at the interface level is limited by the system max.
Use the no ipv6 dhcp-relay maximum-delegated-prexes command to set the parameter to the default value of the specied platform.
DHCPv6 Relay Agent Prex Delegation Notication
FastIron Ethernet Switch Layer 3 Routing Conguration Guide, 08.0.30mb
53-1003627-06 195

Assigning the administrative distance to DHCPv6 static routes
To assign the administrative distance to DHCPv6 static routes installed in IPv6 route table for the delegated prexes on the interface, use
the ipv6 dhcp-relay distance command at the interface level. The administrative distance value has to be set so that it does not replace
the same IPv6 static route congured by the user.
device(config-if-eth-1/2/1)# ipv6 dhcp-relay distance 25
Syntax: [no] ipv6 dhcp-relay distance value
The value parameter is used to assign the administrative distance to DHCPv6 static routes on the interface. The range is from 1 to 255.
The default value is 10. If the value is set to 255, then the delegated prexes for this interface will not be installed in the IPv6 static route
table.
Use the no ipv6 dhcp-relay distance command to set the parameter to a default value of 10.
Displaying the DHCPv6 Relay Agent Prex Delegation Notication
information
Enter the show ipv6 dhcp-relay delegated-prexes command to display information about the delegated prexes.
device# show ipv6 dhcp-relay delegated-prefixes interface ethernet 1/1/45
Prefix Client Interface ExpireTime
fc00:2000:6:7:1::/96 fe80::210:94ff:fe00:e 1/1/45 29d23h53m0s
Syntax: show ipv6 dhcp-relay delegated-prexes vrf vrf-name } { X:X::X:X/M | client-id client ipv6 address | interface interface-id }
The vrf vrf-name parameter is used to display the DHCPv6 delegated prexes for a specic VRF.
The X:X::X:X/M parameter is used to display the specied delegated prex information.
The client-idclient ipv6 address parameter is used to display the delegated prex for the specic client.
The interfaceinterface-id parameter is used to display delegated prexes for the specied outgoing interface.
Table 43 describes the elds from the output of show ipv6 dhcp-relay delegated-prexes command.
TABLE 43 Output from the show ipv6 dhcp-relay delegated-prexes command
Field Description
IPv6 Prex The IPv6 prex delegated to the client.
Client The IPv6 address of the client.
Interface The interface on which the DHCPv6 messages are relayed to the client.
ExpireTime The remaining lifetime of the delegated prex.
Displaying the DHCPv6 Relay congured destinations
Enter the show ipv6 dhcp-relay destinations command to display information about the delegated prexes’ congured destinations for a
specic interface.
device#show ipv6 dhcp-relay destinations
DHCPv6 Relay Destinations:
Interface ve 100:
Destination OutgoingInterface
2001:db8:1::39 NA
Interface ve 101:
Destination OutgoingInterface
2001:db8:1::39 NA
Interface ve 102:
DHCPv6 Relay Agent Prex Delegation Notication
FastIron Ethernet Switch Layer 3 Routing Conguration Guide, 08.0.30mb
196 53-1003627-06

Destination OutgoingInterface
2001:db8:1::39 NA
Syntax: show ipv6 dhcp-relay destinations
Table 44 describes the elds from the output of show ipv6 dhcp-relay destinations command.
TABLE 44 Output from the show ipv6 dhcp-relay destinations command
Field Description
Destination The congured destination IPv6 address.
OutgoingInterface The interface on which packets will be relayed if the destination relay
address is local link or multicast.
Displaying the DHCPv6 Relay Agent options
Enter the show ipv6 dhcp-relay options command to display information about the relay options available to the prexed delegates for a
specic interface.
device# show ipv6 dhcp-relay options
DHCPv6 Relay Options Information:
Interface Interface-Id Remote-Id
ve 100 No No
ve 101 Yes No
ve 102 No Yes
Syntax: show ipv6 dhcp-relay options
Table 45 describes the elds from the output of show ipv6 dhcp-relay options command.
TABLE 45 Output from the show ipv6 dhcp-relay options command
Field Description
Interface The interface name.
Interface-Id The interface ID option. Yes or No indicates if the option is used or not.
Remote-Id The remote ID option. Yes or No indicates if the option is used or not.
Displaying the DHCPv6 Relay prex delegation information
Enter the show ipv6 dhcp-relay prex-delegation-information command to display additional information about the DHCPv6 prex
delegation.
device# show ipv6 dhcp-relay prefix-delegation-information
DHCPv6 Relay Prefix Delegation Notification Information:
Interface Current Maximum AdminDistance
ve 100 20 20000 10
ve 101 4000 20000 10
ve 102 0 20000 10
ve 103 0 20000 10
ve 104 0 20000 10
ve 105 0 20000 10
Syntax: show ipv6 dhcp-relay prex-delegation-information
Table 46 describes the elds from the output of the show ipv6 dhcp-relay prex-delegation-information command.
TABLE 46 Output from the show ipv6 dhcp-relay prex-delegation-information command
Field Description
Interface The interface name.
DHCPv6 Relay Agent Prex Delegation Notication
FastIron Ethernet Switch Layer 3 Routing Conguration Guide, 08.0.30mb
53-1003627-06 197

TABLE 46 Output from the show ipv6 dhcp-relay prex-delegation-information command (continued)
Field Description
Current The number of delegated prexes currently learned on the interface.
Maximum The maximum number of delegated prexes that can be learned on the interface.
AdminDistance The current administrative distance used for prexes learned on this interface when added to the
IPv6 static route table.
Displaying the DHCPv6 Relay information for an interface
Enter the show ipv6 dhcp-relay interface command to display DHCPv6 relay information for a specic interface.
device#show ipv6 dhcp-relay interface ve 100
DHCPv6 Relay Information for interface ve 100:
Destinations:
Destination OutgoingInterface
2001:db8:1::39 NA
Options:
Interface-Id: No Remote-Id:No
Prefix Delegation Notification:
Current:0 Maximum:20000 AdminDistance:10
Syntax: show ipv6 dhcp-relay interface interface type
The interface type is interface type such as ethernet, POS (Point of Service), or VE and the specic port number.
Table 47 describes the elds from the output of the show ipv6 dhcp-relay interface command.
TABLE 47 Output from the show ipv6 dhcp-relay interface command
Field Description
Destinations The DHCPv6 relay destination congured on the interface.
•Destination : The congured destination IPv6 address.
•OutgoingInterface : The interface on which packet will be
relayed if the destination relay address is link local or multicast.
Options The current information about DHCPv6 relay options for the interface.
•Interface-Id : The interface ID option indicating if the option is
used or not.
•Remote-Id : The remote ID option indicating if the option is
used or not.
Prex Delegation Notication This current information about the DHCPv6 Prex Delegation for the
interface.
•Interface: The name of the interface.
•Current - The number of delegated prexes currently learned on
the interface.
•Maximum - The maximum number of delegated prexes that
can be learned on the interface.
•AdminDistance - The administrative distance used for prexes
learned on the specic interface when added to IPv6 Static
Route table.
Clearing the DHCPv6 delegated prexes
To clear the DHCPv6 delegated prexes for specic VRFs, use the clear ipv6 dhcp-relay delegated-prexes command at the privilege
level.
device# clear ipv6 dhcp-relay delegated-prefixes vrf VRF1
DHCPv6 Relay Agent Prex Delegation Notication
FastIron Ethernet Switch Layer 3 Routing Conguration Guide, 08.0.30mb
198 53-1003627-06
Syntax: clear ipv6 dhcp-relay delegated-prexes { vrf vrf-name } { X:X::X:X/M | all | interface interface-id }
The vrfvrf-name parameter is used to clear the DHCPv6 delegated prexes for a specic VRF. If this parameter is not provided, then the
information for the default VRF is cleared.
The X:X::X:X/M parameter is used to clear the specied delegated prex and remove the corresponding route permanently from the
router.
The all parameter is used to clear all the delegated prexes and remove the corresponding routes permanently from the router for the
VRF.
The interfaceinterface-id parameter is used to clear all the delegated prexes and remove the corresponding routes permanently from
the router for the specied outgoing interface.
Clearing the DHCPv6 packet counters
To clear all DHCPv6 packet counters, use the clear ipv6 dhcp-relay statistics command at the privilege level.
device# clear ipv6 dhcp-relay statistics
Syntax: clear ipv6 dhcp-relay statistics
DHCPv6 Relay Agent Prex Delegation Notication
FastIron Ethernet Switch Layer 3 Routing Conguration Guide, 08.0.30mb
53-1003627-06 199
FastIron Ethernet Switch Layer 3 Routing Conguration Guide, 08.0.30mb
200 53-1003627-06

RIP
• RIP overview.....................................................................................................................................................................................................201
• RIP parameters and defaults..................................................................................................................................................................... 201
•Conguring RIP parameters...................................................................................................................................................................... 203
• Displaying RIP Information.........................................................................................................................................................................210
• Displaying CPU utilization statistics........................................................................................................................................................212
RIP overview
Routing Information Protocol (RIP) is an IP route exchange protocol that uses a distance vector (a number representing distance) to
measure the cost of a given route. The cost is a distance vector because the cost often is equivalent to the number of router hops
between the Brocade device and the destination network.
A Brocade device can receive multiple paths to a destination. The software evaluates the paths, selects the best path, and saves the path
in the IP route table as the route to the destination. Typically, the best path is the path with the fewest hops. A hop is another router
through which packets must travel to reach the destination. If a RIP update is received from another router that contains a path with fewer
hops than the path stored in the Brocade device route table, the older route is replaced with the newer one. The new path is then included
in the updates sent to other RIP routers, including Brocade devices.
RIP routers, including Brocade devices, also can modify a route cost, generally by adding to it, to bias the selection of a route for a given
destination. In this case, the actual number of router hops may be the same, but the route has an administratively higher cost and is thus
less likely to be used than other, lower-cost routes.
A RIP route can have a maximum cost of 15. Any destination with a higher cost is considered unreachable. Although limiting to larger
networks, the low maximum hop count prevents endless loops in the network.
Brocade devices support the following RIP versions:
• Version 1 (v1)
• Version 2 (v2, the default)
• V1 compatible with v2
RIP parameters and defaults
You can congure global RIP parameters for the protocol and interface RIP parameters on those interfaces that send and receive RIP
information.
RIP global parameters
TABLE 48 RIP global parameters
Parameter Description Default
RIP state The global state of the protocol. Disabled
FastIron Ethernet Switch Layer 3 Routing Conguration Guide, 08.0.30mb
53-1003627-06 201

TABLE 48 RIP global parameters (continued)
Parameter Description Default
NOTE
You also must enable the protocol on
individual interfaces. Globally
enabling the protocol does not allow
interfaces to send and receive RIP
information.
Administrative distance The administrative distance is a numeric value
assigned to each type of route on the device.
When the device is selecting from among
multiple routes (sometimes of dierent origins)
to the same destination, the device compares
the administrative distances of the routes and
selects the route with the lowest administrative
distance.
This parameter applies to routes originated by
RIP. The administrative distance stays with a
route when it is redistributed into other routing
protocols.
120
Redistribution RIP can redistribute routes from other routing
protocols such as OSPF and BGP4 into RIP. A
redistributed route is one that a router learns
through another protocol, and then distributes
into RIP.
Disabled
Redistribution metric RIP assigns a RIP metric (cost) to each external
route redistributed from another routing protocol
into RIP.
An external route is a route with at least one hop
(packets must travel through at least one other
router to reach the destination). This parameter
applies to routes that are redistributed from
other protocols into RIP.
1
Update Interval How often the router sends route updates to its
RIP neighbors.
30 seconds
Learning default routes The device can learn default routes from its RIP
neighbors.
NOTE
You also can enable or disable this
parameter on an individual interface
basis.
Disabled
Advertising and learning with specic neighbors The device learns and advertises RIP routes with
all its neighbors by default. You can prevent the
device from advertising routes to specic
neighbors or learning routes from specic
neighbors.
Learning and advertising permitted for all
neighbors
RIP parameters and defaults
FastIron Ethernet Switch Layer 3 Routing Conguration Guide, 08.0.30mb
202 53-1003627-06

RIP interface parameters
TABLE 49 RIP interface parameters
Parameter Description Default
RIP state and version The state of the protocol and the version that is
supported on the interface. The version can be
one of the following:
• Version 1 only
• Version 2 only
• Version 1, but also compatible with
version 2
NOTE
You also must enable RIP globally.
Disabled
Metric A numeric cost the device adds to RIP routes
learned on the interface. This parameter applies
only to RIP routes.
1
Learning default routes Locally overrides the global setting. Disabled
Loop prevention The method a device uses to prevent routing
loops caused by advertising a route on the same
interface as the one on which the device learned
the route.
• Split horizon - The device does not
advertise a route on the same
interface as the one on which the
device learned the route.
• Poison reverse - The device assigns a
cost of 16 ("innite" or "unreachable")
to a route before advertising it on the
same interface as the one on which
the device learned the route.
NOTE
Enabling poison reverse disables
split horizon on the interface.
Split horizon
Advertising and learning specic routes You can control the routes that a device learns or
advertises.
The device learns and advertises all RIP routes
on all interfaces.
Conguring RIP parameters
Enabling RIP
RIP is disabled by default. To enable RIP, you must enable it globally and also on individual interfaces on which you want to advertise RIP.
Globally enabling the protocol does not enable it on individual interfaces. When you enable RIP on a port, you also must specify the
version (version 1 only, version 2 only, or version 1 compatible with version 2).
To enable RIP globally, enter the router rip command.
device(config)# router rip
Syntax: [no] router rip
Conguring RIP parameters
FastIron Ethernet Switch Layer 3 Routing Conguration Guide, 08.0.30mb
53-1003627-06 203
After globally enabling the protocol, you must enable it on individual interfaces. You can enable the protocol on physical interfaces as well
as virtual routing interfaces. To enable RIP on an interface, enter commands such as the following.
device(config)# interface ethernet 1/1/1
device(config-if-e1000-1/1/1)# ip rip v1-only
Syntax: [no] ip rip {v1-only | v1-compatible-v2 | v2-only}
Conguring route costs
By default, a Brocade device port increases the cost of a RIP route that is learned on the port. The Brocade device increases the cost by
adding one to the route metric before storing the route.
You can change the amount that an individual port adds to the metric of RIP routes learned on the port.
To increase the metric for learned routes, enter the ip rip metric-oset command.
device(config-if-e1000-1/1/1)# ip rip metric-offset 5 in
In the above example, the ip rip metric-oset command congures the port to add 5 to the cost of each route it learns.
Syntax: [no] ip rip metric-oset num {in | out}
The num variable species a range from 1 through 16.
NOTE
RIP considers a route with a metric of 16 to be unreachable. You can prevent the device from using a specic port for routes
learned though that port by setting its metric to 16.
The in keyword applies to routes the port learns from RIP neighbors.
The out keyword applies to routes the port advertises to its RIP neighbors.
Changing the administrative distance
By default, the Brocade device assigns the default RIP administrative distance (120) to RIP routes. When comparing routes based on
administrative distance, the Brocade device selects the route with the lower distance. You can change the administrative distance for RIP
routes.
To change the administrative distance for RIP routes, enter the distance command.
device(config-rip-router)# distance 140
In the above example, the distance command changes the administrative distance to 140 for all RIP routes.
Syntax: [no] distance number
The number variable species a range from 1 through 255.
Conguring redistribution
You can congure the Brocade device to redistribute routes learned through Open Shortest Path First (OSPF) or Border Gateway
Protocol version 4 (BGP4), connected into RIP, or static routes. When you redistribute a route from one of these other protocols into RIP,
the Brocade device can use RIP to advertise the route to its RIP neighbors.
Conguring RIP parameters
FastIron Ethernet Switch Layer 3 Routing Conguration Guide, 08.0.30mb
204 53-1003627-06
To congure redistribution, perform the following tasks.
1. Congure redistribution lters (optional). You can congure lters to permit or deny redistribution for a route based on its origin
(OSPF, BGP4, and so on), the destination network address, and the route’s metric. You also can congure a lter to set the
metric based on these criteria.
2. Change the default redistribution metric (optional). The Brocade device assigns a RIP metric of 1 to each redistributed route by
default. You can change the default metric to a value up to 15.
3. Enable redistribution.
NOTE
Do not enable redistribution until you congure the other redistribution
parameters.
Conguring redistribution lters
RIP redistribution lters apply to all interfaces. Use route maps to dene how you want to deny or permit redistribution.
NOTE
The default redistribution action is permit, even after you congure and apply redistribution lters to the virtual routing interface.
If you want to tightly control redistribution, apply a lter to deny all routes as the last lter (the lter with the highest ID), and then
apply lters to allow specic routes.
A route map is a named set of match conditions and parameter settings that the Brocade device can use to modify route attributes and
to control redistribution of the routes into other protocols. A route map consists of a sequence of up to 50 instances. The Brocade device
evaluates a route according to a route map’s instances in ascending numerical order. The route is rst compared against instance 1, then
against instance 2, and so on. If a match is found, the Brocade device stops evaluating the route against the route map instances.
Route maps can contain match statements and set statements. Each route map contains a permit or deny action for routes that match
the match statements:
• If the route map contains a permit action, a route that matches a match statement is permitted; otherwise, the route is denied.
• If the route map contains a deny action, a route that matches a match statement is denied.
• If a route does not match any match statements in the route map, the route is denied. This is the default action. To change the
default action, congure the last match statement in the last instance of the route map to "permit any any".
• If there is no match statement, the route is considered to be a match.
• For route maps that contain address lters, AS-path lters, or community lters, if the action specied by a lter conicts with
the action specied by the route map, the route map’s action takes precedence over the individual lter’s action.
If the route map contains set statements, routes that are permitted by the route map’s match statements are modied according to the
set statements.
In RIP, the match statements are based on prex lists and access control lists. Set statements are based on tag values and metric values.
To congure redistribution lters, enter the following command.
device(config-rip-router)# redistribute connected route-map routemap1
Syntax: [no] redistribute {connected | bgp | ospf | static [metric value | route-map name]}
The connected keyword applies redistribution to connected types.
The bgp keyword applies redistribution to BGP4 routes.
The ospf keyword applies redistribution to OSPF routes.
Conguring RIP parameters
FastIron Ethernet Switch Layer 3 Routing Conguration Guide, 08.0.30mb
53-1003627-06 205
The static keyword applies redistribution to IP static routes.
The metric value parameter sets the RIP metric value from 1 through 15 that will be applied to the routes imported into RIP.
The route-map name parameter indicates the route map’s name.
Matching based on RIP protocol type
The match option has been added to the route-map command that allows statically congured routes or the routes learned from the IGP
protocol RIP.
To congure the route map to match to RIP, enter the match protocol rip command.
device(config-routemap test)# match protocol rip
Syntax: [no] match protocol rip
Changing the default redistribution metric
When the Brocade device redistributes a route into RIP, the software assigns a RIP metric (cost) to the route. By default, the software
assigns a metric of 1 to each route that is redistributed into RIP. You can increase the metric that the Brocade device assigns, up to 15.
To change the RIP metric the Brocade device assigns to redistributed routes, enter a command such as the following.
device(config-rip-router)# default-metric 10
This command assigns a RIP metric of 10 to each route that is redistributed into RIP.
Syntax: [no] default-metric 1-15
Conguring route learning and advertising parameters
By default, a Brocade device learns routes from all its RIP neighbors and advertises RIP routes to those neighbors.
You can congure the following learning and advertising parameters:
• Update interval - The update interval species how often the device sends RIP route advertisements to its neighbors You can
change the interval to a value from 3 through 65535 seconds. The default is 30 seconds.
• Learning and advertising of RIP default routes - The Brocade device can learn and advertise RIP default routes. You can disable
learning and advertising of default routes on a global or individual interface basis.
• Learning of standard RIP routes - By default, the Brocade device can learn RIP routes from all its RIP neighbors. You can
congure RIP neighbor lters to explicitly permit or deny learning from specic neighbors.
Changing the update interval for route advertisements
The update interval species how often the device sends route advertisements to its RIP neighbors. You can specify an interval from 3
through 21,845 seconds. The default is 30 seconds.
To change the RIP update interval, enter the update-time command.
device(config-rip-router)# update-time 120
This command congures the device to send RIP updates every 120 seconds.
Syntax: update-time value
Conguring RIP parameters
FastIron Ethernet Switch Layer 3 Routing Conguration Guide, 08.0.30mb
206 53-1003627-06
Enabling learning of RIP default routes
By default, the Brocade device does not learn default RIP routes. You can enable learning of RIP default routes on a global or interface
basis.
To enable learning of default RIP routes on a global basis, enter the following command.
device(config-rip-router)# learn-default
Syntax: [no] learn-default
To enable learning of default RIP routes on an interface, enter the ip rip learn-default command.
device(config)# interface ethernet 1/1/1
device(config-if-e10000-1/1/1)# ip rip learn-default
Syntax: [no] ip rip learn-default
Conguring a RIP neighbor lter
By default, a Brocade device learns RIP routes from all its RIP neighbors. Neighbor lters allow you to specify the neighbor routers from
which the Brocade device can receive RIP routes. Neighbor lters apply globally to all ports.
To congure a RIP neighbor lters, enter the neighbor command.
device(config-rip-router)# neighbor 1 deny any
This command congures the Brocade device so that the device does not learn any RIP routes from any RIP neighbors.
Syntax: [no] neighbor lter-num {permit | deny} {source-ip-address | any}
The following commands congure the Brocade device to learn routes from all neighbors except 10.70.12.104. Once you dene a RIP
neighbor lter, the default action changes from learning all routes from all neighbors to denying all routes from all neighbors except the
ones you explicitly permit. Thus, to deny learning from a specic neighbor but allow all other neighbors, you must add a lter that allows
learning from all neighbors. Make sure you add the lter to permit all neighbors as the last lter (the one with the highest lter number).
Otherwise, the software can match on the permit all lter before a lter that denies a specic neighbor, and learn routes from that
neighbor.
device(config-rip-router)# neighbor 2 deny 10.70.12.104
device(config-rip-router)# neighbor 64 permit any
Changing the route loop prevention method
RIP uses the following methods to prevent routing loops:
• Split horizon - The device does not advertise a route on the same interface as the one on which the Brocade device learned the
route. This is the default.
• Poison reverse - The device assigns a cost of 16 ("innite" or "unreachable") to a route before advertising it on the same
interface as the one on which the Brocade device learned the route.
These loop prevention methods are congurable on a global basis as well as on an individual interface basis. One of the methods is
always in eect on an interface enabled for RIP. Thus, if you disable one method, the other method is enabled.
NOTE
These methods are in addition to RIP’s maximum valid route cost of 15.
To disable poison reverse and enable split horizon on a global basis, enter the following command.
device(config-rip-router)# no poison-reverse
Conguring RIP parameters
FastIron Ethernet Switch Layer 3 Routing Conguration Guide, 08.0.30mb
53-1003627-06 207
Syntax: [no] poison-reverse
To disable poison reverse and enable split horizon on an interface, enter commands such as the following.
device(config)#interface ethernet 1/1/1
device(config-if-e10000-1/1/1)# no ip rip poison-reverse
Syntax: [no] ip rip poison-reverse
To disable split horizon and enable poison reverse on an interface, enter commands such as the following.
device(config)#interface ethernet 1/1/1
device(config-if-e10000-1/1/1)# ip rip poison-reverse
You can congure the Brocade device to avoid routing loops by advertising local RIP routes with a cost of 16 ("innite" or "unreachable")
when these routes go down.
device(config-rip-router)# poison-local-routes
Syntax: [no] poison-local-routes
Suppressing RIP route advertisement on a VRRP or VRRPE backup
interface
NOTE
This section applies only if you congure the device for Virtual Router Redundancy Protocol (VRRP) or VRRP Extended
(VRRPE).
Normally, a VRRP or VRRPE Backup includes route information for the virtual IP address (the backed up interface) in RIP
advertisements. As a result, other routers receive multiple paths for the backed up interface and might sometimes unsuccessfully use the
path to the Backup rather than the path to the Master.
You can prevent the backups from advertising route information for the backed up interface by enabling suppression of the
advertisements.
To suppress RIP advertisements for the backed up interface, enter the following commands.
device(config)# router rip
device(config-rip-router)# use-vrrp-path
Syntax: [no] use-vrrp-path
The syntax is the same for VRRP and VRRP-E.
Conguring RIP route lters using prex-lists and route maps
You can congure prex lists to permit or deny specic routes, then apply them globally or to individual interfaces and specify whether
the lists apply to learned routes (in) or advertised routes (out).
You can congure route maps to permit or deny specic routes, then apply a route map to an interface, and specify whether the map
applies to learned routes (in) or advertised routes (out).
NOTE
A route is dened by the destination’s IP address and network
mask.
Conguring RIP parameters
FastIron Ethernet Switch Layer 3 Routing Conguration Guide, 08.0.30mb
208 53-1003627-06
NOTE
By default, routes that do not match a prex list are learned or advertised. To prevent a route from being learned or advertised,
you must congure a prex list to deny the route.
To congure a prex list, enter commands such as the following.
device(config)# ip prefix-list list1 permit 10.53.4.1 255.255.255.0
device(config)# ip prefix-list list2 permit 10.53.5.1 255.255.255.0
device(config)# ip prefix-list list3 permit 10.53.6.1 255.255.255.0
device(config)# ip prefix-list list4 deny 10.53.7.1 255.255.255.0
The prex lists permit routes to three networks, and deny the route to one network.
Because the default action is permit, all other routes (routes not explicitly permitted or denied by the lters) can be learned or advertised.
Syntax: [no] ip prex-list name {permit | deny} {source-ip-address | any source-mask | any}
To apply a prex list at the global level of RIP, enter commands such as the following.
device(config-rip-router)# prefix-list list1 in
Syntax: no prex-list name {in | out}
To apply prex lists to a RIP interface, enter commands such as the following.
device(config-if-e1000-1/1/2)# ip rip prefix-list list2 in
device(config-if-e1000-1/1/2)# ip rip prefix-list list3 out
Syntax: no ip rip prex-list name {in | out}
In is for Inbound ltering. It applies the prex list to routes the Brocade device learns from its neighbor on the interface.
Out is for Outbound ltering. It applies the prex list to routes the Brocade device advertises to its neighbor on the interface.
The commands apply RIP list2 route lters to all routes learned from the RIP neighbor on the port and applies the lists to all routes
advertised on the port.
To congure a route-map, enter commands such as the following.
device(config)#access-list 21 deny 160.1.0.0 0.0.255.255
device(config)#access-list 21 permit any
device(config)# route-map routemap1 permit 21
device(config-routemap routemap1)# match ip address 21
device(config)# route-map routemap2 permit 22
The route-map permit routes to two networks, and denies the route to one network.
Syntax: [no] route-map map-name {permit | deny} num
To apply a route map to a RIP interface, enter commands such as the following.
device(config-if-e1000-1/1/2)# ip rip route-map map1 in
Syntax: [no] ip rip route-map name {in | out}
The route-map can be a prex list or an ACL. Setting this command can change the metric.
In applies the route map to routes the Brocade device learns from its neighbor on the interface.
Out applies the route map to routes the Brocade device advertises to its neighbor on the interface.
The commands apply route map map1 as route lters to routes learned from the RIP neighbor on the port.
Conguring RIP parameters
FastIron Ethernet Switch Layer 3 Routing Conguration Guide, 08.0.30mb
53-1003627-06 209

Setting RIP timers
You can set basic update timers for the RIP protocol. The protocol must be enabled in order to set the timers. The timers command
species how often RIP update messages are sent.
To set the timers, enter the following commands.
device(config) router rip
device(config-rip-router)# timer 30 180 180 120
Syntax: [no] timers update-timer timeout-timer hold-down-timer garbage-collection-timer
The update-timer parameter sets the amount of time between RIP routing updates. The possible value ranges from 3 - 21845. The
default is 30 seconds.
The timeout-timer parameter sets the amount of time after which a route is considered unreachable. The possible value ranges from 9 -
65535. The default is 180 seconds.
The hold-down-timer parameter sets the amount of time during which information about other paths is ignored. The possible value
ranges from 0 - 65535. The default is 180 seconds.
The garbage-collection-timer sets the amount of time after which a route is removed from the rip routing table. The possible value
ranges from 0 - 65535. The default is 120 seconds.
Displaying RIP Information
To display RIP lters, enter the following command at any CLI level.
device# show ip rip
RIP Summary
Default port 520
Administrative distance is 120
Updates every 30 seconds, expire after 180
Holddown lasts 180 seconds, garbage collect after 120
Last broadcast 29, Next Update 27
Need trigger update 0, Next trigger broadcast 1
Minimum update interval 25, Max update Offset 5
Split horizon is on; poison reverse is off
Import metric 1
Prefix List, Inbound : block_223
Prefix List, Outbound : block_223
Route-map, Inbound : Not set
Route-map, Outbound : Not set
Redistribute: CONNECTED Metric : 0 Routemap : Not Set
No Neighbors are configured in RIP Neighbor Filter Table
Syntax: show ip rip
TABLE 50 CLI display of neighbor lter information
Field. Deinition
RIP Summary area Shows the current conguration of RIP on the device.
Static metric Shows the static metric conguration. ".not dened" means the route map
has not been distributed.
OSPF metric Shows what OSPF route map has been applied.
Neighbor Filter Table area
Index The lter number. You assign this number when you congure the lter.
Displaying RIP Information
FastIron Ethernet Switch Layer 3 Routing Conguration Guide, 08.0.30mb
210 53-1003627-06

TABLE 50 CLI display of neighbor lter information (continued)
Field. Deinition
Action The action the Brocade device takes for RIP route packets to or from the
specied neighbor:
• deny - If the lter is applied to an interface’s outbound lter
group, the lter prevents the Brocade device from advertising
RIP routes to the specied neighbor on that interface. If the lter
is applied to an interface’s inbound lter group, the lter
prevents the Brocade device from receiving RIP updates from
the specied neighbor.
• permit - If the lter is applied to an interface’s outbound lter
group, the lter allows the Brocade device to advertise RIP
routes to the specied neighbor on that interface. If the lter is
applied to an interface’s inbound lter group, the lter allows the
Brocade device to receive RIP updates from the specied
neighbor.
Neighbor IP Address The IP address of the RIP neighbor.
To display RIP lters for a specic interface, enter the following command.
device# show ip rip interface ethernet 1/1/1
Interface e 1/1/1
RIP Mode : Version2 Running: TRUE
Route summarization disabled
Split horizon is on; poison reverse is off
Default routes not accepted
Metric-offset, Inbound 1
Metric-offset, Outbound 0
Prefix List, Inbound : Not set
Prefix List, Outbound : Not set
Route-map, Inbound : Not set
Route-map, Outbound : Not set
RIP Sent/Receive packet statistics:
Sent : Request 2 Response 34047
Received : Total 123473 Request 1 Response 123472 UnRecognised 0
RIP Error packet statistics:
Rejected 0 Version 0 RespFormat 0 AddrFamily 0
Metric 0 ReqFormat 0
Syntax: show ip rip interface ifName
To display RIP route information, enter the following command.
device# show ip rip route
RIP Routing Table - 474 entries:
1.1.1.1/32, from 169.254.30.1, e 1/1/23 (820)
RIP, metric 4, tag 0, timers: aging 13
1.1.2.1/32, from 169.254.50.1, e 1/3/1 (482)
RIP, metric 3, tag 0, timers: aging 42
1.1.6.1/32, from 169.254.100.1, ve 101 (413)
RIP, metric 2, tag 0, timers: aging 42
169.254.40.0/24, from 192.168.1.2, e 1/1/1 (1894)
RIP, metric 3, tag 0, timers: aging 14
169.254.50.0/24, from 192.168.1.2, e 1/1/1 (1895)
RIP, metric 4, tag 0, timers: aging 14
169.254.100.0/24, from 192.168.1.2, e 1/1/1 (2040)
RIP, metric 2, tag 0, timers: aging 14
169.254.101.0/30, from 192.168.1.2, e 1/1/1 (2105)
223.229.32.0/31, from 169.254.50.1, e 1/3/1 (818)
RIP, metric 2, tag 0, timers: aging 21
Syntax: show ip rip route
Displaying RIP Information
FastIron Ethernet Switch Layer 3 Routing Conguration Guide, 08.0.30mb
53-1003627-06 211
To display current running conguration for interface 1/1/1, enter the following command.
device# show running-config interface ethernet 1/1/1
interface ethernet 1/1/1
enable
ip ospf area 0
ip ospf priority 0
ip rip v2-only
ip address 10.1.1.2/24
ipv6 address 2000::1/32
ipv6 enable
!
To display current running conguration for ve 10, enter the following command.
device# show running-config interface ve 10
interface ve 10
ip ospf area 2
ip rip v1-compatible-v2
ip rip poison-reverse
ip address 10.1.0.1/24
ipv6 address 2001:db8:1::14/64
!
To display current running conguration for ve 20, enter the following command.
device# show running-config interface ve 20
interface ve 20
ip ospf area 1
ip rip v1-only
ip rip poison-reverse
ip address 10.2.0.1/24
!
Displaying CPU utilization statistics
You can display CPU utilization statistics for RIP and other IP protocols. To display CPU utilization statistics for RIP, enter the show cpu-
utilization tasks command at any level of the CLI.
device#show cpu-utilization tasks
Current total CPU utilization = 89%
... Usage average for all tasks in the last 1 second ...
==========================================================
Name %
idle 11
con 0
mon 0
flash 0
dbg 0
boot 0
main 0
stkKeepAliveTsk 0
keygen 0
itc 0
poeFwdfsm 0
tmr 0
scp 0
appl 89
snms 0
rtm 0
rtm6 0
rip 0
bgp 0
bgp_io 0
(Output truncated)
Displaying CPU utilization statistics
FastIron Ethernet Switch Layer 3 Routing Conguration Guide, 08.0.30mb
212 53-1003627-06
Syntax: show cpu-utilization tasks
The command lists the usage statistics for the previous ve-second, one-minute, ve-minute, and fteen-minute intervals.
Displaying CPU utilization statistics
FastIron Ethernet Switch Layer 3 Routing Conguration Guide, 08.0.30mb
53-1003627-06 213
FastIron Ethernet Switch Layer 3 Routing Conguration Guide, 08.0.30mb
214 53-1003627-06

RIPng
• RIPng Overview.............................................................................................................................................................................................. 215
•Conguring RIPng..........................................................................................................................................................................................215
• Clearing RIPng routes from IPv6 route table......................................................................................................................................220
• Displaying RIPng information....................................................................................................................................................................220
RIPng Overview
Routing Information Protocol (RIP) is an IP route exchange protocol that uses a distance vector (a number representing a distance) to
measure the cost of a given route. RIP uses a hop count as its cost or metric.
IPv6 RIP, known as Routing Information Protocol Next Generation or RIPng , functions similarly to IPv4 RIP version 2. RIPng supports
IPv6 addresses and prexes.
In addition, some new commands that are specic to RIPng have been implemented. This chapter describes the commands that are
specic to RIPng. This section does not describe commands that apply to both IPv4 RIP and RIPng.
RIPng maintains a Routing Information Database (RIB), which is a local route table. The local RIB contains the lowest-cost IPv6 routes
learned from other RIP routers. In turn, RIPng attempts to add routes from its local RIB into the main IPv6 route table.
NOTE
Brocade IPv6 devices support up to 10,000 RIPng routes. ICX 6650 IPv6 devices support up to 2000 RIPng routes.
Conguring RIPng
To congure RIPng, you must enable RIPng globally on the Brocade device and on individual device interfaces. The following
conguration tasks are optional:
• Change the default settings of RIPng timers
•Congure how the Brocade device learns and advertises routes
•Congure which routes are redistributed into RIPng from other sources
•Congure how the Brocade device distributes routes through RIPng
•Congure poison reverse parameters
Enabling RIPng
Before conguring the device to run RIPng, you must do the following:
• Enable the forwarding of IPv6 trac on the device using the ipv6 unicast-routing command.
• Enable IPv6 on each interface over which you plan to enable RIPng. You enable IPv6 on an interface by conguring an IPv6
address or explicitly enabling IPv6 on that interface.
By default, RIPng is disabled. To enable RIPng, you must enable it globally on the Brocade device and also on individual device
interfaces.
NOTE
Enabling RIPng globally on the Brocade device does not enable it on individual device interfaces.
FastIron Ethernet Switch Layer 3 Routing Conguration Guide, 08.0.30mb
53-1003627-06 215

To enable RIPng globally, enter the following command.
device(config-rip-router)#ipv6 router rip
device(config-ripng-router)#
After you enter this command, the device enters the RIPng conguration level, where you can access several commands that allow you
to congure RIPng.
Syntax: [no] ipv6 router rip
To disable RIPng globally, use the no form of this command.
After enabling RIPng globally, you must enable it on individual Brocade device interfaces. You can enable it on physical as well as virtual
routing interfaces. For example, to enable RIPng on Ethernet interface 1/3/1, enter the following commands.
device(config)# interface ethernet 1/3/1
device(config-if-e100-1/3/1)# ipv6 rip enable
Syntax: [no] ipv6 rip enable
To disable RIPng on an individual device interface, use the no form of this command.
Conguring RIPng timers
TABLE 51 RIPng timers
Timer Description Default
Update Amount of time (in seconds) between RIPng
routing updates.
30 seconds.
Timeout Amount of time (in seconds) after which a route
is considered unreachable.
180 seconds.
Hold-down Amount of time (in seconds) during which
information about other paths is ignored.
180 seconds.
Garbage-collection Amount of time (in seconds) after which a route
is removed from the routing table.
120 seconds.
You can adjust these timers for RIPng. Before doing so, keep the following caveats in mind:
• If you adjust these RIPng timers, Brocade strongly recommends setting the same timer values for all routers and access servers
in the network.
• Setting the update timer to a shorter interval can cause the devices to spend excessive time updating the IPv6 route table.
• Brocade recommends setting the timeout timer value to at least three times the value of the update timer.
• Brocade recommends a shorter hold-down timer interval, because a longer interval can cause delays in RIPng convergence.
The following example sets updates to be advertised every 45 seconds. If a route is not heard from in 135 seconds, the route is declared
unusable. Further information is suppressed for an additional 10 seconds. Assuming no updates, the route is ushed from the routing
table 20 seconds after the end of the hold-down period.
device(config)# ipv6 router rip
device(config-ripng-router)# timers 45 135 10 20
Syntax: [no] timersupdate-timer timeout-timer hold-down-timer garbage-collection-timer
Possible values for the timers are as follows:
• Update timer: 3 through 65535 seconds.
• Timeout timer: 9 through 65535 seconds.
Conguring RIPng
FastIron Ethernet Switch Layer 3 Routing Conguration Guide, 08.0.30mb
216 53-1003627-06
• Hold-down timer: 9 through 65535 seconds.
• Garbage-collection timer: 9 through 65535 seconds.
NOTE
You must enter a value for each timer, even if you want to retain the current setting of a particular timer.
To return to the default values of the RIPng timers, use the no form of this command.
Conguring route learning and advertising parameters
You can congure the following learning and advertising parameters:
• Learning and advertising of RIPng default routes.
• Advertising of IPv6 address summaries.
• Metric of routes learned and advertised on a Brocade device interface.
Conguring default route learning and advertising
By default, the device does not learn IPv6 default routes (::/0). You can originate default routes into RIPng, which causes individual
Brocade device interfaces to include the default routes in their updates. When conguring the origination of the default routes, you can
also do the following:
• Suppress all other routes from the updates.
• Include all other routes in the updates.
For example, to originate default routes in RIPng and suppress all other routes in updates sent from Ethernet interface 1/3/1, enter the
following commands.
device(config)# interface ethernet 1/3/1
device(config-if-e100-1/3/1)# ipv6 rip default-information only
To originate IPv6 default routes and include all other routes in updates sent from Ethernet interface 1/3/1, enter the following
commands.
device(config)# interface ethernet 1/3/1
device(config-if-e100-1/3/1)# ipv6 rip default-information originate
Syntax: [no] ipv6 rip default-information { only | originate }
The only keyword originates the default routes and suppresses all other routes from the updates.
The originate keyword originates the default routes and includes all other routes in the updates.
To remove the explicit default routes from RIPng and suppress advertisement of these routes, use the no form of this command.
Advertising IPv6 address summaries
You can congure RIPng to advertise a summary of IPv6 addresses from a Brocade device interface and to specify an IPv6 prex that
summarizes the routes.
If a route’s prex length matches the value specied in the ipv6 rip summary-address command, RIPng advertises the prex specied in
the ipv6 rip summary-address command instead of the original route.
Conguring RIPng
FastIron Ethernet Switch Layer 3 Routing Conguration Guide, 08.0.30mb
53-1003627-06 217
For example, to advertise the summarized prex 2001:db8::/36 instead of the IPv6 address 2001:db8:0:ad:8935:e838:78:e0 with
a prex length of 64 bits from Ethernet interface 1/3/1, enter the following commands.
device(config)# interface ethernet 1/3/1
device(config-if-e100-1/3/1)# ipv6 address 2001:db8:0:adff:8935:e838:78:
e0ff /64
device(config-if-e100-1/3/1)# ipv6 rip summary-address 2001:db8::/36
Syntax: [no] ipv6 rip summary-address ipv6-prex/prex-length
You must specify the ipv6-prex parameter in hexadecimal using 16-bit values between colons as documented in RFC 2373.
You must specify the prex-length parameter as a decimal value. A slash mark (/) must follow the ipv6-prex parameter and precede the
prex-length parameter.
To stop the advertising of the summarized IPv6 prex, use the no form of this command.
Changing the metric of routes learned and advertised on an interface
A device interface increases the metric of an incoming RIPng route it learns by an oset (the default is one). The device then places the
route in the route table. When the device sends an update, it advertises the route with the metric plus the default oset of zero in an
outgoing update message.
You can change the metric oset an individual interface adds to a route learned by the interface or advertised by the interface. For
example, to change the metric oset for incoming routes learned by Ethernet interface 1/3/1 to one and the metric oset for outgoing
routes advertised by the interface to three, enter the following commands.
device(config)# interface ethernet 1/3/1
device(config-if-e100-1/3/1)# ipv6 rip metric-offset 2
device(config-if-e100-1/3/1)# ipv6 rip metric-offset out 3
In this example, if Ethernet interface 1/3/1 learns about an incoming route, it will increase the incoming metric by two. if the interface
1/3/1 advertises an outgoing route, it will increase the metric oset by 3 as specied in the example. Conguring the default metric (1
for incoming, 0 for outgoing) will be allowed but will not be visible in the show run output for the interface.
Syntax: [no] ipv6 rip metric-oset 1-16
Syntax: [no] ipv6 rip metric-oset out 0-15
To return the metric oset to its default value, use the no form of this command.
Redistributing routes into RIPng
You can congure the Brocade device to redistribute routes from the following sources into RIPng:
• IPv6 static routes
• Directly connected IPv6 networks
• BGP4+
• OSPFv3
When you redistribute a route from BGP4+ or OSPFv3 into RIPng, the device can use RIPng to advertise the route to its RIPng
neighbors.
When conguring the Brocade device to redistribute routes, such as BGP4+ routes, you can optionally specify a metric for the
redistributed routes. If you do not explicitly congure a metric, the default metric value of one is used.
Conguring RIPng
FastIron Ethernet Switch Layer 3 Routing Conguration Guide, 08.0.30mb
218 53-1003627-06
For example, to redistribute OSPFv3 routes into RIPng, enter the following command.
device(config)# ipv6 router rip
device(config-ripng-router)# redistribute ospf
Syntax: [no] redistribute{ bgp | connected | ospf | static [ metric number ] }
For the metric, specify a numerical value that is consistent with RIPng.
Controlling distribution of routes through RIPng
You can create a prex list and then apply it to RIPng routing updates that are received or sent on a device interface. Performing this task
allows you to control the distribution of routes through RIPng.
For example, to permit the inclusion of routes with the prex 2001:db8::/32 in RIPng routing updates sent from Ethernet interface
1/3/1, enter the following commands.
device(config)# ipv6 prefix-list routesfor2001 permit 2001:db8::/32
device(config)# ipv6 router rip
device(config-ripng-router)# distribute-list prefix-list routesfor2001 out
To deny prex lengths greater than 64 bits in routes that have the prex 2001:db8::/64 and allow all other routes received on tunnel
interface 1/3/1, enter the following commands.
device(config)# ipv6 prefix-list 2001routes deny 2001:db8::/64 le 128
device(config)# ipv6 prefix-list 2001routes permit ::/0 ge 0 le 128
device(config)# ipv6 router rip
device(config-ripng-router)# distribute-list prefix-list 2001routes in
Syntax: [no] distribute-list prex-list name { in | out }
The name parameter indicates the name of the prex list generated using the ipv6 prex-list command.
The in keyword indicates that the prex list is applied to incoming routing updates on the specied interface.
The out keyword indicates that the prex list is applied to outgoing routing updates on the specied interface.
To remove the distribution list, use the no form of this command.
Conguring poison reverse parameters
By default, poison reverse is disabled on a RIPng Brocade device. If poison reverse is enabled, RIPng advertises routes it learns from a
particular interface over that same interface with a metric of 16, which means that the route is unreachable.
Enabling poison reverse on the RIPng Brocade device disables split-horizon and vice versa. By default, split horizon will be enabled.
To enable poison reverse on the RIPng Brocade device, enter the following commands.
device(config)# ipv6 router rip
device(config-ripng-router)# poison-reverse
Syntax:[no] poison-reverse
To disable poison-reverse, use the no form of this command.
By default, if a RIPng interface goes down, the Brocade device does not send a triggered update for the interface’s IPv6 networks.
Conguring RIPng
FastIron Ethernet Switch Layer 3 Routing Conguration Guide, 08.0.30mb
53-1003627-06 219

To better handle this situation, you can congure a RIPng Brocade device to send a triggered update containing the local routes of the
disabled interface with an unreachable metric of 16 to the other RIPng routers in the routing domain. You can enable the sending of a
triggered update by entering the following commands.
device(config)# ipv6 router rip
device(config-ripng-router)# poison-local-routes
Syntax: [no] poison-local-routes
To disable the sending of a triggered update, use the no form of this command.
Clearing RIPng routes from IPv6 route table
To clear all RIPng routes from the RIPng route table and the IPv6 main route table and reset the routes, enter the following command at
the Privileged EXEC level or any of the Cong levels of the CLI.
device# clear ipv6 rip route
Syntax: clear ipv6 rip route
Displaying RIPng information
You can display the following RIPng information:
• RIPng conguration
• RIPng routing table
Displaying RIPng conguration
To display RIPng conguration information, enter the show ipv6 rip command at any CLI level.
device# show ipv6 rip
IPv6 rip enabled, port 521
Administrative distance is 120
Updates every 30 seconds, expire after 180
Holddown lasts 180 seconds, garbage collect after 120
Split horizon is on; poison reverse is off
Default routes are not generated
Periodic updates 5022, trigger updates 10
Distribute List, Inbound : Not set
Distribute List, Outbound : Not set
Redistribute: CONNECTED
Syntax: show ipv6 rip
TABLE 52 show ipv6 rip output descriptions
Field Description
IPv6 RIP status/port The status of RIPng on the device. Possible status is "enabled" or
"disabled."
The UDP port number over which RIPng is enabled.
Administrative distance The setting of the administrative distance for RIPng.
Updates/expiration The settings of the RIPng update and timeout timers.
Holddown/garbage collection The settings of the RIPng hold-down and garbage-collection timers.
Clearing RIPng routes from IPv6 route table
FastIron Ethernet Switch Layer 3 Routing Conguration Guide, 08.0.30mb
220 53-1003627-06

TABLE 52 show ipv6 rip output descriptions (continued)
Field Description
Split horizon/poison reverse The status of the RIPng split horizon and poison reverse features. Possible
status is "on" or "o."
Default routes The status of RIPng default routes.
Periodic updates/trigger updates The number of periodic updates and triggered updates sent by the RIPng
Brocade device.
Distribution lists The inbound and outbound distribution lists applied to RIPng.
Redistribution The types of IPv6 routes redistributed into RIPng. The types can include
the following:
• STATIC - IPv6 static routes are redistributed into RIPng.
• CONNECTED - Directly connected IPv6 networks are
redistributed into RIPng.
• BGP - BGP4+ routes are redistributed into RIPng.
• OSPF - OSPFv3 routes are redistributed into RIPng.
Displaying RIPng routing table
To display the RIPng routing table, enter the following command at any CLI level.
device# show ipv6 rip route
IPv6 RIP Routing Table - 4 entries:
ada::1:1:1:2/128, from fe80::224:38ff:fe8f:3000, e 1/3/4
RIP, metric 2, tag 0, timers: aging 17
2001:db8::/64, from fe80::224:38ff:fe8f:3000, e 1/3/4
RIP, metric 3, tag 0, timers: aging 17
bebe::1:1:1:4/128, from ::, null (0)
CONNECTED, metric 1, tag 0, timers: none
cccc::1:1:1:3/128, from fe80::768e:f8ff:fe94:2da, e 2/1/23
RIP, metric 2, tag 0, timers: aging 50
Syntax: show ipv6 rip route [ ipv6-prex/prex-length | ipv6-address ]
The ipv6-prex/prex-length parameters restrict the display to the entries for the specied IPv6 prex. You must specify the ipv6-prex
parameter in hexadecimal using 16-bit values between colons as documented in RFC 2373. You must specify the prex-length
parameter as a decimal value. A slash mark (/) must follow the ipv6-prex parameter and precede the prex-length parameter.
The ipv6-address parameter restricts the display to the entries for the specied IPv6 address. You must specify this parameter in
hexadecimal using 16-bit values between colons as documented in RFC 2373.
TABLE 53 show ipv6 rip route output descriptions
Field Description
IPv6 RIP Routing Table entries The total number of entries in the RIPng routing table.
ipv6-prex /prex-length
ipv6-address
The IPv6 prex and prex length.
The IPv6 address.
Next-hop router The next-hop router for this Brocade device. If :: appears, the route is
originated locally.
Interface The interface name. If "null" appears, the interface is originated locally.
Source of route The source of the route information. The source can be one of the
following:
• RIP - routes learned by RIPng.
• CONNECTED - IPv6 routes redistributed from directly
connected networks.
Displaying RIPng information
FastIron Ethernet Switch Layer 3 Routing Conguration Guide, 08.0.30mb
53-1003627-06 221

TABLE 53 show ipv6 rip route output descriptions (continued)
Field Description
• STATIC - IPv6 static routes are redistributed into RIPng.
• BGP - BGP4+ routes are redistributed into RIPng.
• OSPF - OSPFv3 routes are redistributed into RIPng.
Metric number The cost of the route. The number parameter indicates the number of
hops to the destination.
Tag number The tag value of the route.
Timers Indicates if the hold-down timer or the garbage-collection timer is set.
Displaying RIPng information
FastIron Ethernet Switch Layer 3 Routing Conguration Guide, 08.0.30mb
222 53-1003627-06

OSPFv2
• OSPF overview............................................................................................................................................................................................... 223
• OSPF point-to-point links.......................................................................................................................................................................... 225
• Designated routers in multi-access networks.....................................................................................................................................225
• Designated router election in multi-access networks......................................................................................................................225
• OSPF RFC 1583 and 2328 compliance...........................................................................................................................................227
• Reduction of equivalent AS external LSAs.......................................................................................................................................... 227
• Support for OSPF RFC 2328 Appendix E.........................................................................................................................................229
• OSPF graceful restart...................................................................................................................................................................................230
•Conguring OSPF......................................................................................................................................................................................... 232
• OSPF non-stop routing...............................................................................................................................................................................256
• Synchronization of critical OSPF elements.........................................................................................................................................256
• Standby module operations.......................................................................................................................................................................257
• Enabling and disabling NSR...................................................................................................................................................................... 258
• Disabling conguration.................................................................................................................................................................................259
• OSPF distribute list........................................................................................................................................................................................260
• Displaying OSPF information................................................................................................................................................................... 271
• Clearing OSPF information........................................................................................................................................................................289
OSPF overview
OSPF is a link-state routing protocol. The protocol uses link-state advertisements (LSA) to update neighboring routers regarding its
interfaces and information on those interfaces. The router oods these LSAs to all neighboring routers to update them regarding the
interfaces. Each router maintains an identical database that describes its area topology to help a router determine the shortest path
between it and any neighboring router.
The Brocade device supports the following types of LSAs, which are described in RFC 2328 and 3101:
• Router link
• Network link
• Summary link
• Autonomous system (AS) summary link
• AS external link
• Not-So-Stubby Area (NSSA) external link
• Grace LSAs
OSPF is built upon a hierarchy of network components. The highest level of the hierarchy is the Autonomous System (AS) . An
autonomous system is dened as a number of networks, all of which share the same routing and administration characteristics.
An AS can be divided into multiple areas. Each area represents a collection of contiguous networks and hosts. Areas limit the area to
which link-state advertisements are broadcast, thereby limiting the amount of ooding that occurs within the network. An area is
represented in OSPF by either an IP address or a number.
You can further limit the broadcast area of ooding by dening an area range. The area range allows you to assign an aggregate value to
a range of IP addresses. This aggregate value becomes the address that is advertised instead all of the individual addresses it represents
being advertised. You can assign up to 32 ranges in an OSPF area.
FastIron Ethernet Switch Layer 3 Routing Conguration Guide, 08.0.30mb
53-1003627-06 223
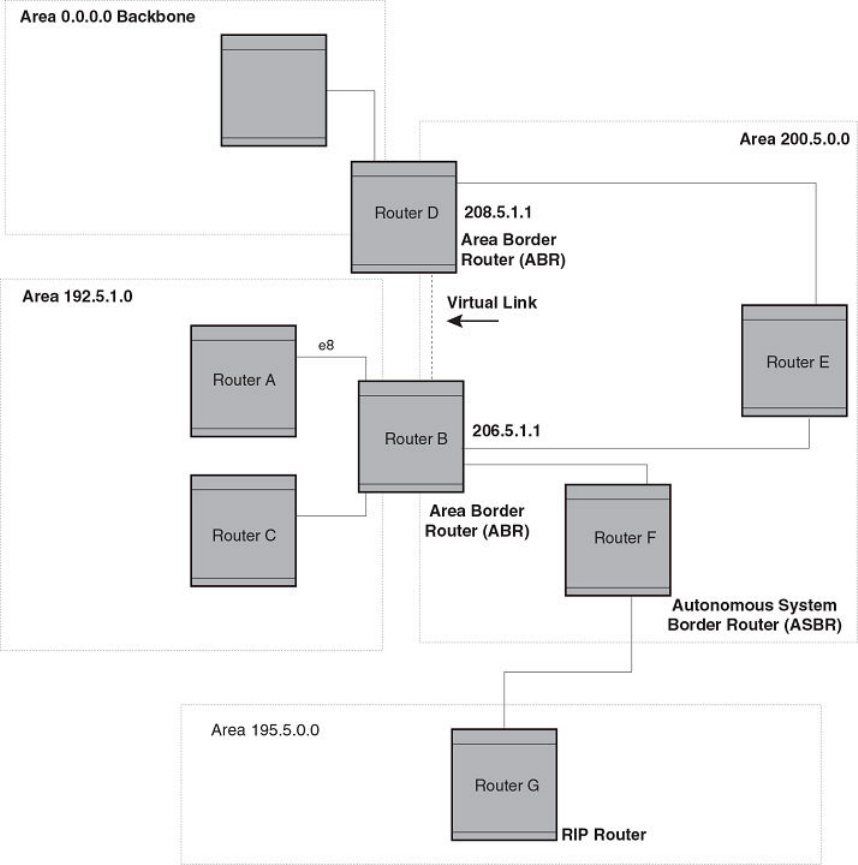
An OSPF router can be a member of multiple areas. Routers with membership in multiple areas are known as Area Border Routers
(ABRs) . Each ABR maintains a separate topological database for each area the router is in. Each topological database contains all of the
LSA databases for each router within a given area. The routers within the same area have identical topological databases. The ABR is
responsible for forwarding routing information or changes between its border areas.
An Autonomous System Boundary Router (ASBR) is a router that is running multiple protocols and serves as a gateway to routers
outside an area and those operating with dierent protocols. The ASBR is able to import and translate dierent protocol routes into
OSPF through a process known as redistribution .
FIGURE 18 OSPF operating in a network
OSPF overview
FastIron Ethernet Switch Layer 3 Routing Conguration Guide, 08.0.30mb
224 53-1003627-06
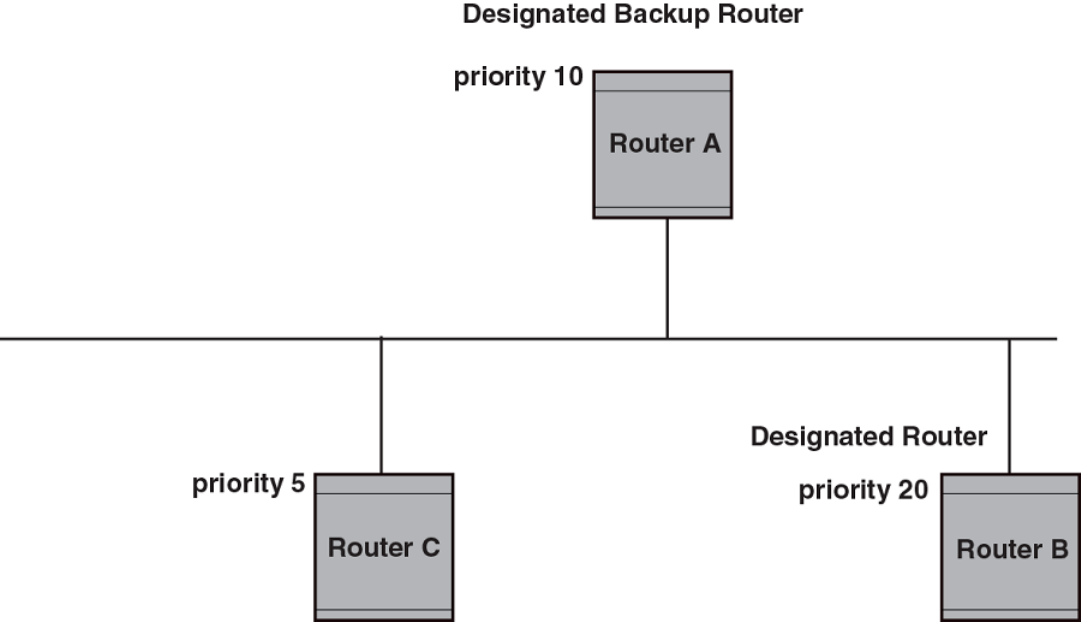
OSPF point-to-point links
In an OSPF point-to-point network, where a direct Layer 3 connection exists between a single pair of OSPF routers, there is no need for
Designated and Backup Designated Routers, as is the case in OSPF multi-access networks. Without the need for Designated and
Backup Designated routers, a point-to-point network establishes adjacency and converges faster. The neighboring routers become
adjacent whenever they can communicate directly. In contrast, in broadcast and non-broadcast multi-access (NBMA) networks, the
Designated Router and Backup Designated Router become adjacent to all other routers attached to the network.
Designated routers in multi-access networks
In a network that has multiple routers attached, OSPF elects one router to serve as the designated router (DR) and another router on the
segment to act as the backup designated router (BDR). This arrangement minimizes the amount of repetitive information that is
forwarded on the network by forwarding all messages to the designated router and backup designated routers responsible for forwarding
the updates throughout the network.
Designated router election in multi-access networks
In a network with no designated router and no backup designated router, the neighboring router with the highest priority is elected as the
DR, and the router with the next largest priority is elected as the BDR.
FIGURE 19 Designated and backup router election
Designated router election in multi-access networks
FastIron Ethernet Switch Layer 3 Routing Conguration Guide, 08.0.30mb
53-1003627-06 225
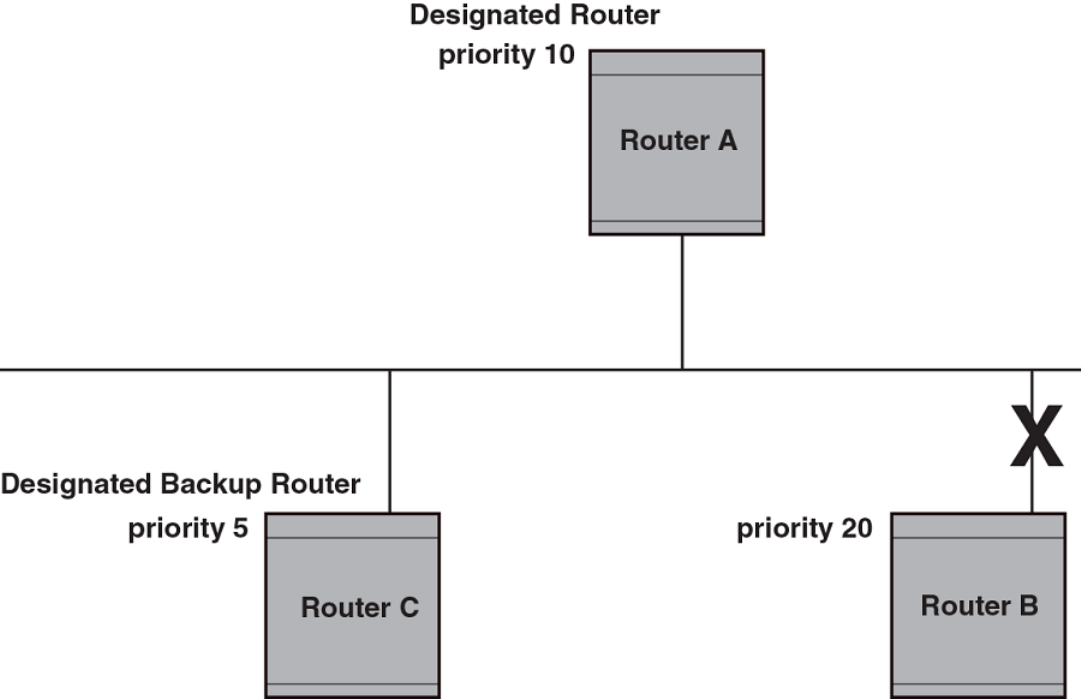
If the DR goes o-line, the BDR automatically becomes the DR. The router with the next highest priority becomes the new BDR.
NOTE
Priority is a congurable option at the interface level. You can use this parameter to help bias one router as the
DR.
FIGURE 20 Backup designated router becomes designated router
If two neighbors share the same priority, the router with the highest router ID is designated as the DR. The router with the next highest
router ID is designated as the BDR.
NOTE
By default, the Brocade device’s router ID is the IP address congured on the lowest numbered loopback interface. If the device
does not have a loopback interface, the default router ID is the lowest numbered IP address congured on the device.
When multiple routers on the same network are declaring themselves as DRs, then both priority and router ID are used to select the
designated router and backup designated routers.
When only one router on the network claims the DR role despite neighboring routers with higher priorities or router IDs, this router
remains the DR. This is also true for BDRs.
The DR and BDR election process is performed when one of the following events occurs:
• an interface is in a waiting state and the wait time expires
Designated router election in multi-access networks
FastIron Ethernet Switch Layer 3 Routing Conguration Guide, 08.0.30mb
226 53-1003627-06
• an interface is in a waiting state and a hello packet is received that addresses the BDR
• a change in the neighbor state occurs, such as:
– a neighbor state transitions from ATTEMPT state to a higher state
– communication to a neighbor is lost
– a neighbor declares itself to be the DR or BDR for the rst time
OSPF RFC 1583 and 2328 compliance
Brocade devices are congured, by default, to be compliant with the RFC 1583 OSPF V2 specication. Brocade devices can also be
congured to operate with the latest OSPF standard, RFC 2328.
Reduction of equivalent AS external LSAs
An OSPF ASBR uses AS External link advertisements (AS External LSAs) to originate advertisements of a route learned from another
routing domain, such as a BGP4 or RIP domain. The ASBR advertises the route to the external domain by ooding AS External LSAs to
all the other OSPF routers (except those inside stub networks) within the local OSPF Autonomous System (AS).
In some cases, multiple ASBRs in an AS can originate equivalent LSAs. The LSAs are equivalent when they have the same cost, the
same next hop, and the same destination. The device optimizes OSPF by eliminating duplicate AS External LSAs in this case. The device
with the lower router ID ushes the duplicate External LSAs from its database and thus does not ood the duplicate External LSAs into
the OSPF AS. AS External LSA reduction therefore reduces the size of the link state database on the device. The AS External LSA
reduction is described in RFC 2328
In this example, Routers D and E are OSPF ASBRs, and thus communicate route information between the OSPF AS, which contains
Routers A, B, and C, and another routing domain, which contains Router F. The other routing domain is running another routing protocol,
such as BGP4 or RIP. Routers D, E, and F, therefore, are each running both OSPF and either BGP4 or RIP.
Reduction of equivalent AS external LSAs
FastIron Ethernet Switch Layer 3 Routing Conguration Guide, 08.0.30mb
53-1003627-06 227
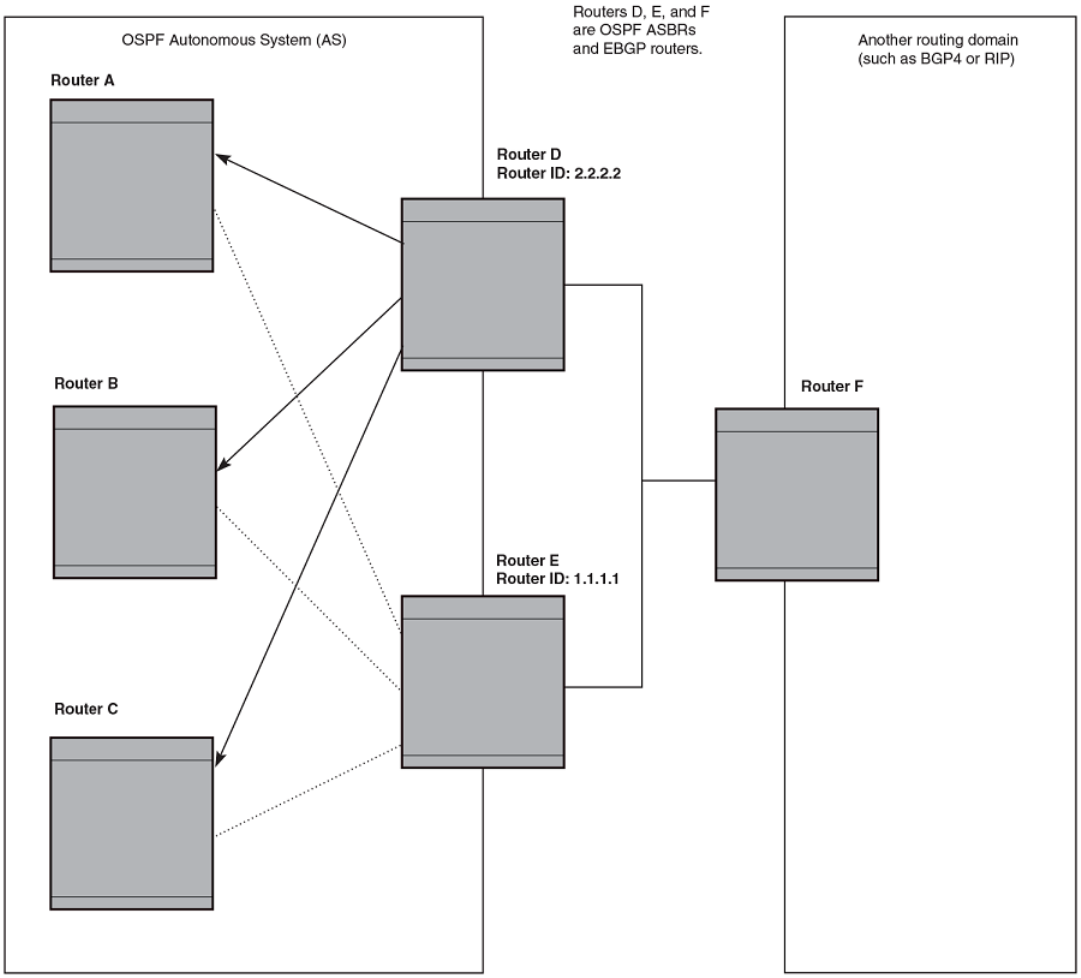
FIGURE 21 AS external LSA reduction
Notice that both Router D and Router E have a route to the other routing domain through Router F.
OSPF eliminates the duplicate AS External LSAs. When two or more devices are congured as ASBRs have equal-cost routes to the
same next-hop router in an external routing domain, the ASBR with the highest router ID oods the AS External LSAs for the external
domain into the OSPF AS, while the other ASBRs ush the equivalent AS External LSAs from their databases. As a result, the overall
volume of route advertisement trac within the AS is reduced and the devices that ush the duplicate AS External LSAs have more
memory for other OSPF data. Because Router D has a higher router ID than Router E, Router D oods the AS External LSAs for Router
F to Routers A, B, and C. Router E ushes the equivalent AS External LSAs from its database.
Reduction of equivalent AS external LSAs
FastIron Ethernet Switch Layer 3 Routing Conguration Guide, 08.0.30mb
228 53-1003627-06
Algorithm for AS external LSA reduction
The AS external LSA reduction example shows the normal AS External LSA reduction feature. The behavior changes under the following
conditions:
• There is one ASBR advertising (originating) a route to the external destination, but one of the following happens:
– A second ASBR comes on-line
– A second ASBR that is already on-line begins advertising an equivalent route to the same destination.
In either case above, the router with the higher router ID oods the AS External LSAs and the other router ushes its equivalent AS
External LSAs. For example, if Router D is oine, Router E is the only source for a route to the external routing domain. When Router D
comes on-line, it takes over ooding of the AS External LSAs to Router F, while Router E ushes its equivalent AS External LSAs to
Router F.
• One of the ASBRs starts advertising a route that is no longer equivalent to the route the other ASBR is advertising. In this case,
the ASBRs each ood AS External LSAs. Since the LSAs either no longer have the same cost or no longer have the same next-
hop router, the LSAs are no longer equivalent, and the LSA reduction feature no longer applies.
• The ASBR with the higher router ID becomes unavailable or is recongured so that it is no longer an ASBR. In this case, the
other ASBR oods the AS External LSAs. For example, if Router D goes o-line, then Router E starts ooding the AS with AS
External LSAs for the route to Router F.
Support for OSPF RFC 2328 Appendix E
Brocade devices support Appendix E in OSPF RFC 2328. Appendix E describes a method to ensure that an OSPF router generates
unique link state IDs for type-5 (External) link state advertisements (LSAs) in cases where two networks have the same network address
but dierent network masks.
NOTE
Support for Appendix E of RFC 2328 is enabled automatically and cannot be disabled. No user conguration is
required.
Normally, an OSPF router uses the network address alone for the link state ID of the link state advertisement (LSA) for the network. For
example, if the router needs to generate an LSA for network 10.1.2.3 255.0.0.0, the router generates ID 10.1.2.3 for the LSA.
However, suppose that an OSPF router needs to generate LSAs for all the following networks:
• 10.0.0.0 255.0.0.0
• 10.0.0.0 255.255.0.0
• 10.0.0.0 255.255.255.0
All three networks have the same network address, 10.0.0.0. Without support for RFC 2328 Appendix E, an OSPF router uses the
same link state ID, 10.0.0.0, for the LSAs for all three networks. For example, if the router generates an LSA with ID 10.0.0.0 for network
10.0.0.0 255.0.0.0, this LSA conicts with the LSA generated for network 10.0.0.0 255.255.0.0 or 10.0.0.0 255.255.255.0. The
result is multiple LSAs that have the same ID but that contain dierent route information.
When appendix E is supported, the router generates the link state ID for a network as the following steps.
1. Does an LSA with the network address as its ID already exist?
• – No - Use the network address as the ID.
– Yes - Go to "Support for OSPF RFC 2328 Appendix E".
Support for OSPF RFC 2328 Appendix E
FastIron Ethernet Switch Layer 3 Routing Conguration Guide, 08.0.30mb
53-1003627-06 229
2. Compare the networks that have the same network address, to determine which network is more specic. The more specic
network is the one that has more contiguous one bits in its network mask. For example, network 10.0.0.0 255.255.0.0 is more
specic than network 10.0.0.0 255.0.0.0, because the rst network has 16 ones bits (255.255.0.0) whereas the second
network has only 8 ones bits (255.0.0.0).
• – For the less specic network, use the networks address as the ID.
– For the more specic network, use the network’s broadcast address as the ID. The broadcast address is the network
address, with all ones bits in the host portion of the address. For example, the broadcast address for network 10.0.0.0
255.255.0.0 is 10.0.255.255.
If this comparison results in a change to the ID of an LSA that has already been generated, the router generates a new LSA to
replace the previous one. For example, if the router has already generated an LSA for network with ID 10.0.0.0 for network
10.0.0.0 255.255.255.0, the router must generate a new LSA for the network, if the router needs to generate an LSA for
network 10.0.0.0 255.255.0.0 or 10.0.0.0 255.0.0.0.
OSPF graceful restart
The OSPF Graceful Restart feature provides support for high-availability routing. With this feature enabled, disruptions in forwarding are
minimized and route apping diminished to provide continuous service during times when a router experiences a restart.
With OSPF graceful restart enabled, a restarting router sends special LSAs to its neighbors called grace LSAs. These LSAs are sent to
neighbors either before a planned OSPF restart or immediately after an unplanned restart. The grace LSA species a grace period for
the neighbors of the restarting router to continue using the existing routes to and through the router after a restart. The restarting router
comes up, it continues to use its existing OSPF routes as if nothing has occurred. In the background, the router re-acquires its neighbors
prior to the restart and recalculates its OSPF routes and replaces them with new routes as necessary. Once the grace period has passed,
the adjacent routers return to normal operation.
NOTE
By default, graceful restart is enabled.
NOTE
If a Brocade ICX 6650 device is congured for OSPF graceful restart and is intended to be used in switch over, the OSPF
dead-interval should be changed to 60 seconds on OSPF interfaces to ensure that the graceful restart process succeeds
without a timeout.
OSPF stub router advertisement
OSPFv2 stub router advertisement is an open standard based feature and it is specied in RFC 3137. This feature provides a user with
the ability to gracefully introduce and remove an OSPFv2 router from the network by controlling when the data trac can start and stop
owing through the router in case where there are other OSPFv2 routers present on the network providing alternative paths for the trac.
This feature does not work if there is no alternative for the trac through other OSPFv2 routers. The router can control the data trac
owing through it by changing the cost of the paths passing through the congured router. By setting the path cost high the trac will be
redirected to other OSPFv2 routers providing a lower cost path. This change in path cost is accomplished by setting the metric of the
links advertised in the Router LSA to a maximum value. When the OSPFv2 router is ready to forward the trac the links are advertised
with the real metric value instead of the maximum value.
The feature is useful for avoiding a loss of trac during short periods when adjacency failures are detected and trac is rerouted. Using
this feature, trac can be rerouted before an adjacency failure occurs due to common services interruptions such as a router being
shutdown for maintenance.
OSPF graceful restart
FastIron Ethernet Switch Layer 3 Routing Conguration Guide, 08.0.30mb
230 53-1003627-06
The feature is also useful during router startup because it gives the router enough time to build up its routing table before forwarding
trac. This can be useful where BGP is enabled on the router because it takes time for the BGP routing table to converge.
You can also congure and set a metric value for the following LSA types:
• Summary (type 3 and type 4)
• External (type 5 and type 7)
• Opaque (type 10, TE link)
OSPF Shortest Path First throttling
Rapid triggering of SPF calculations with exponential back-o to oer the advantages of rapid convergence without sacricing stability.
As the delay increases, multiple topology changes can occur within a single SPF. This dampens network activity due to frequent topology
changes.
This scheduling method starts with an initial value after which a congured delay time is followed. If a topology change event occurs the
SPF is schedule after the time specied by the initial value, the router starts a timer for the time period specied by a congured hold
time value. If no topology events occur during this hold time, the router returns to using the initial delay time.
If a topology event occurs during the hold time period, the next hold time period is recalculated to a value that is double the initial value. If
no topology events occur during this extended hold time, the router resets to its initial value. If an event occurs during this extended hold
time, the next hold time is doubled again. The doubling occurs as long as topology events occur during the calculated hold times until a
congured maximum delay time value is reached or no event occurs (which resets the router to the initial hold time). The maximum value
is then held until the hold time expires without a topology change event occurring. At any time that a hold time expires without a topology
change event occurring, the router reverts to the initial hold value and begins the process all over again.
For example if you set the initial delay timer to 100 milliseconds, the hold timer to 300 and the maximum hold timer to 2000
milliseconds, the following would occur:
If a topology change occurs the initial delay of 100 milliseconds will be observed. If a topology change occurs during the hold time of
300 milliseconds the hold time is doubled to 600 milliseconds. If a topology change event occurs during the 600 millisecond period,
the hold time is doubled again to 1200 milliseconds. If a topology change event occurs during the 1200 millisecond period, the hold
time is doubled to 2400 milliseconds. Because the maximum hold time is specied as 2000, the value will be held at 2000. This 2000
millisecond period will then repeat as long as topology events occur within the maximum 2000 millisecond hold time. When a maximum
hold time expires without a topology event occurring, the router reverts to the initial delay time and the cycle repeats as described.
The purpose of this feature is to use longer SPF scheduling values during network topology instability.
IETF RFC and internet draft support
The implementation of OSPF Graceful Restart supports the following IETF RFC:
• RFC 3623: Graceful OSPF Restart
NOTE
A secondary management module must be installed for the device to function as a graceful restart device. If the device
functions as a graceful restart helper device only, there is no requirement for a secondary management module.
Dynamic OSPF activation and conguration
OSPF is automatically activated when you enable it. The protocol does not require a software reload.
OSPF graceful restart
FastIron Ethernet Switch Layer 3 Routing Conguration Guide, 08.0.30mb
53-1003627-06 231
You can congure and save the following OSPF changes without resetting the system:
• All OSPF interface-related parameters (for example: area, hello timer, router dead time cost, priority, re-transmission time,
transit delay)
• All area parameters
• All area range parameters
• All virtual-link parameters
• All global parameters
• creation and deletion of an area, interface or virtual link
• Changes to address ranges
• Changes to global values for redistribution
• Addition of new virtual links
Conguring OSPF
1. Enable OSPF on the router.
2. Assign the areas to which the router will be attached.
3. Assign individual interfaces to the OSPF areas.
4. Congure route map for route redistribution, if desired.
5. Enable redistribution, if desired.
6. Modify default global and port parameters as required.
7. Modify OSPF standard compliance, if desired.
Conguration rules
The conguration rules are as follows:
• Brocade ICX 6650 devices support a maximum of 676 OSPF interfaces.
• If a router is to operate as an ASBR, you must enable the ASBR capability at the system level.
• Redistribution must be enabled on routers congured to operate as ASBRs.
• All router ports must be assigned to one of the dened areas on an OSPF router. When a port is assigned to an area, all
corresponding subnets on that port are automatically included in the assignment.
OSPF parameters
You can modify or set the following global and interface OSPF parameters.
Global parameters
The global OSPF parameters are as follows:
• Modify OSPF standard compliance setting.
• Assign an area.
•Dene an area range.
Conguring OSPF
FastIron Ethernet Switch Layer 3 Routing Conguration Guide, 08.0.30mb
232 53-1003627-06
•Dene the area virtual link.
• Set global default metric for OSPF.
• Change the reference bandwidth for the default cost of OSPF interfaces.
• Disable or re-enable load sharing.
• Enable or disable default-information-originate.
• Modify Shortest Path First (SPF) timers
•Dene external route summarization
•Dene redistribution metric type.
•Dene redistribution route maps.
• Enable redistribution.
• Change the LSA pacing interval.
• Modify OSPF Traps generated.
• Modify database overow interval.
• Stub Router advertisement
• Set all the OSPFv2 interfaces to the passive state.
Interface parameters
The interface OSPF parameters are as follows:
• Assign interfaces to an area.
•Dene the authentication key for the interface.
• Change the authentication-change interval
• Modify the cost for a link.
• Modify the dead interval.
• Modify MD5 authentication key parameters.
• Modify the priority of the interface.
• Modify the retransmit interval for the interface.
• Modify the transit delay of the interface.
NOTE
You set global level parameters at the OSPF CONFIG Level of the CLI. To reach that level, enter router ospf at the global
CONFIG Level. Interface parameters for OSPF are set at the interface CONFIG Level using the CLI command ip ospf.
When using the Web Management Interface, you set OSPF global parameters using the OSPF conguration panel. All other parameters
are accessed through links accessed from the OSPF conguration sheet.
Enable OSPF on the device
When you enable OSPF on the device, the protocol is automatically activated. To enable OSPF on the device, use the following method.
device(config)# router ospf
device(config-ospf-router)#
This command launches you into the OSPF router level where you can assign areas and modify OSPF global parameters.
Conguring OSPF
FastIron Ethernet Switch Layer 3 Routing Conguration Guide, 08.0.30mb
53-1003627-06 233
Note regarding disabling OSPF
If you disable OSPF, the device removes all the conguration information for the disabled protocol from the running conguration.
Moreover, when you save the conguration to the startup conguration le after disabling one of these protocols, all the conguration
information for the disabled protocol is removed from the startup conguration le.
The CLI displays a warning message such as the following.
device(config-ospf-router)# no router ospf
router ospf mode now disabled. All ospf config data will be lost when writing to flash!
The Web Management Interface does not display a warning message.
If you have disabled the protocol but have not yet saved the conguration to the startup conguration le and reloaded the software, you
can restore the conguration information by re-entering the router ospf command or by selecting the Web management option to
enable the protocol. If you have already saved the conguration to the startup conguration le and reloaded the software, the
information is gone.
If you are testing an OSPF conguration and are likely to disable and re-enable the protocol, you might want to make a backup copy of
the startup conguration le containing the protocol’s conguration information. This way, if you remove the conguration information by
saving the conguration after disabling the protocol, you can restore the conguration by copying the backup copy of the startup
conguration le onto the ash memory.
Assign OSPF areas
Once OSPF is enabled on the system, you can assign areas. Assign an IP address or number as the area ID for each area. The area ID is
representative of all IP addresses (subnets) on a router port. Each port on a router can support one area.
An area can be normal, a stub, or a Not-So-Stubby Area (NSSA) :
• Normal - OSPF routers within a normal area can send and receive External Link State Advertisements (LSAs).
• Stub - OSPF routers within a stub area cannot send or receive External LSAs. In addition, OSPF routers in a stub area must use
a default route to the area’s Area Border Router (ABR) or Autonomous System Boundary Router (ASBR) to send trac out of
the area.
• NSSA - The ASBR of an NSSA can import external route information into the area.
– ASBRs redistribute (import) external routes into the NSSA as type 7 LSAs. Type-7 External LSAs are a special type of LSA
generated only by ASBRs within an NSSA, and are ooded to all the routers within only that NSSA.
– ABRs translate type 7 LSAs into type 5 External LSAs, which can then be ooded throughout the AS. You can congure
address ranges on the ABR of an NSSA so that the ABR converts multiple type-7 External LSAs received from the NSSA
into a single type-5 External LSA.
When an NSSA contains more than one ABR, OSPF elects one of the ABRs to perform the LSA translation for NSSA. OSPF elects the
ABR with the highest router ID. If the elected ABR becomes unavailable, OSPF automatically elects the ABR with the next highest router
ID to take over translation of LSAs for the NSSA. The election process for NSSA ABRs is automatic.
To set up the OSPF areas use the following method.
device(config-ospf-router)# area 192.5.1.0
device(config-ospf-router)# area 200.5.0.0
device(config-ospf-router)# area 195.5.0.0
device(config-ospf-router)# area 0.0.0.0
device(config-ospf-router)# write memory
Syntax: [no] area { num | ip-addr }
The num and ip-addr parameters specify the area number, which can be a number or in IP address format. If you specify a number, the
number can be from 0 - 2,147,483,647.
Conguring OSPF
FastIron Ethernet Switch Layer 3 Routing Conguration Guide, 08.0.30mb
234 53-1003627-06
Assign a totally stubby area
By default, the device sends summary LSAs (LSA type 3) into stub areas. You can further reduce the number of link state
advertisements (LSA) sent into a stub area by conguring the device to stop sending summary LSAs (type 3 LSAs) into the area. You can
disable the summary LSAs when you are conguring the stub area or later after you have congured the area.
This feature disables origination of summary LSAs, but the device still accepts summary LSAs from OSPF neighbors and oods them to
other neighbors. The device can form adjacencies with other routers regardless of whether summarization is enabled or disabled for
areas on each router.
When you enter a command or apply a Web management option to disable the summary LSAs, the change takes eect immediately. If
you apply the option to a previously congured area, the device ushes all of the summary LSAs it has generated (as an ABR) from the
area.
NOTE
This feature applies only when the device is congured as an Area Border Router (ABR) for the area. To completely prevent
summary LSAs from being sent to the area, disable the summary LSAs on each OSPF router that is an ABR for the area.
To disable summary LSAs for a stub area, enter commands such as the following.
device(config-ospf-router)# area 40 stub 99 no-summary
Syntax: [no] area { num | ip-addr stub cost [ no-summary ] }
The num and ip-addr parameters specify the area number, which can be a number or in IP address format. If you specify a number, the
number can be from 0 - 2,147,483,647.
The stub cost parameter species an additional cost for using a route to or from this area and can be from 1 - 16777215. There is no
default. Normal areas do not use the cost parameter.
The no-summary parameter applies only to stub areas and disables summary LSAs from being sent into the area.
Assign a Not-So-Stubby Area (NSSA)
The OSPF Not So Stubby Area (NSSA) feature enables you to congure OSPF areas that provide the benets of stub areas, but that also
are capable of importing external route information. OSPF does not ood external routes from other areas into an NSSA, but does
translate and ood route information from the NSSA into other areas such as the backbone.
NSSAs are especially useful when you want to summarize Type-5 External LSAs (external routes) before forwarding them into an OSPF
area. The OSPF specication (RFC 2328) prohibits summarization of Type-5 LSAs and requires OSPF to ood Type-5 LSAs
throughout a routing domain. When you congure an NSSA, you can specify an address range for aggregating the external routes that
the NSSA's ABR exports into other areas.
The implementation of NSSA is based on RFC 1587.
Conguring OSPF
FastIron Ethernet Switch Layer 3 Routing Conguration Guide, 08.0.30mb
53-1003627-06 235
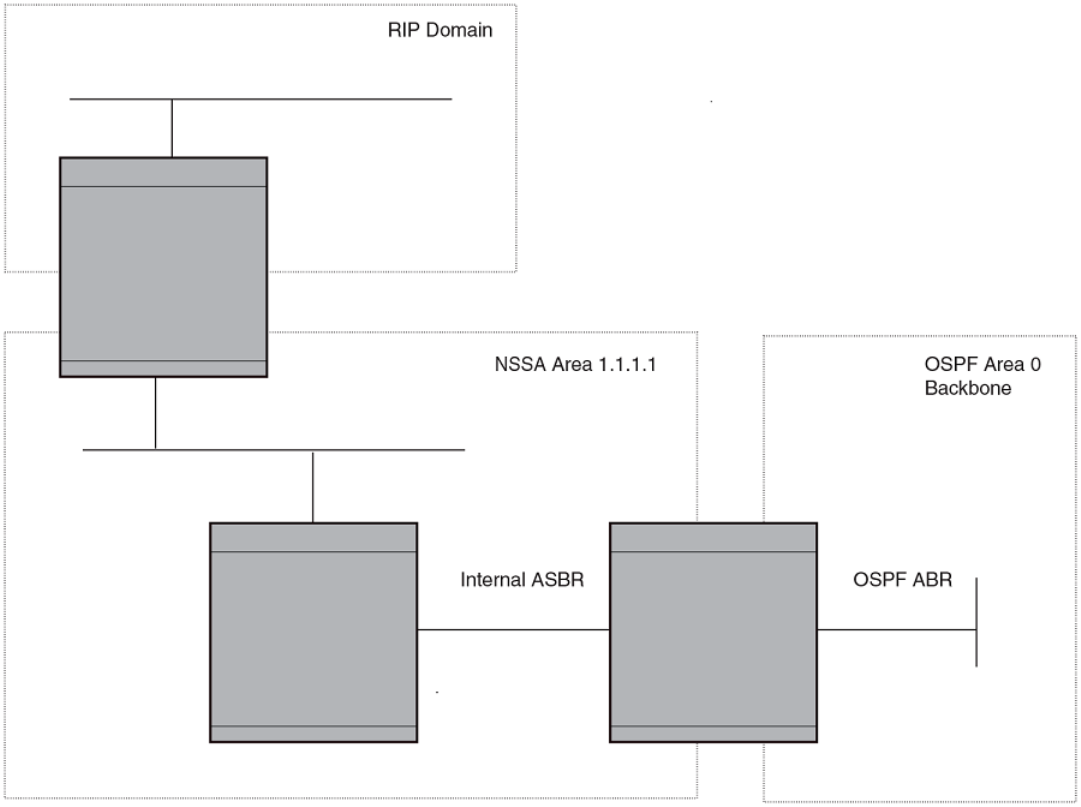
FIGURE 22 OSPF network containing an NSSA
This example shows two routing domains, a RIP domain and an OSPF domain. The ASBR inside the NSSA imports external routes from
RIP into the NSSA as Type-7 LSAs, which the ASBR oods throughout the NSSA.
The ABR translates the Type-7 LSAs into Type-5 LSAs. If an area range is congured for the NSSA, the ABR also summarizes the
LSAs into an aggregate LSA before ooding the Type-5 LSAs into the backbone.
Since the NSSA is partially "stubby" the ABR does not ood external LSAs from the backbone into the NSSA. To provide access to the
rest of the Autonomous System (AS), the ABR generates a default Type-7 LSA into the NSSA.
Conguring an NSSA
To congure OSPF area 1.1.1.1 as an NSSA, enter the following commands.
device(config)# router ospf
device(config-ospf-router)# area 1.1.1.1 nssa 1
device(config-ospf-router)# write memory
Conguring OSPF
FastIron Ethernet Switch Layer 3 Routing Conguration Guide, 08.0.30mb
236 53-1003627-06
Syntax: [no] area { num | ip-addr nssa cost [ no-summary ] | default-information-originate }
The num and ip-addr parameters specify the area number, which can be a number or in IP address format. If you specify a number, the
number can be from 0 - 2,147,483,647.
The nssa cost and default-information-originate parameters specify that this is a Not-So-Stubby-Area (NSSA). The cost species an
additional cost for using a route to or from this NSSA and can be from 1 - 16777215. There is no default. Normal areas do not use the
cost parameter. Alternatively, you can use the default-information-originate parameter causes the device to inject the default route into
the NSSA.
Specifying the no-summary option directs the router to not import type 3 summary LSAs into the NSSA area. The default operation is to
import summary LSAs into an NSSA area.
NOTE
The device does not inject the default route into an NSSA by default.
To congure additional parameters for OSPF interfaces in the NSSA, use the ip ospf area command at the interface level of the CLI.
Disabling the router to perform translations for NSSA LSAs
The no nssa-translator command allows you to disable the router to perform translations for NSSA LSAs. When this command is used,
type 7 NSSA external LSAs are not translated into type 5 external LSAs. This command is useful when the router is an area border router
with many NSSA areas, and does not need to export the NSSA external routes into the backbone.
The following command enables this feature.
device(config)# router ospf
device(config-ospf-router)# no nssa-translator
Syntax: [no] nssa-translator
Conguring an address range for the NSSA
If you want the ABR that connects the NSSA to other areas to summarize the routes in the NSSA before translating them into Type-5
LSAs and ooding them into the other areas, congure an address range. The ABR creates an aggregate value based on the address
range. The aggregate value becomes the address that the ABR advertises instead of advertising the individual addresses represented by
the aggregate. You can congure up to 32 ranges in an OSPF area.
To congure an address range in NSSA 1.1.1.1, enter the following commands. This example assumes that you have already congured
NSSA 1.1.1.1.
device(config)# router ospf
device(config-ospf-router)# area 1.1.1.1 range 209.157.22.1 255.255.0.0
device(config-ospf-router)# write memory
Syntax: [no] area { num | ip-addr range ip-addr ip-mask [ advertise | not-advertise ] }
The num and ip-addr parameters specify the area number, which can be in IP address format. If you specify a number, the number can
be from 0 - 2,147,483,647.
The range ip-addr parameter species the IP address portion of the range. The software compares the address with the signicant bits in
the mask. All network addresses that match this comparison are summarized in a single route advertised by the router.
The ip-mask parameter species the portions of the IP address that a route must contain to be summarized in the summary route. In the
example above, all networks that begin with 209.157 are summarized into a single route.
The advertise and not-advertise parameters specify whether you want the device to send type 3 LSAs for the specied range in this
area. The default is advertise .
Conguring OSPF
FastIron Ethernet Switch Layer 3 Routing Conguration Guide, 08.0.30mb
53-1003627-06 237
Assigning an area range (optional)
You can assign a range for an area, but it is not required. Ranges allow a specic IP address and mask to represent a range of IP
addresses within an area, so that only that reference range address is advertised to the network, instead of all the addresses within that
range. Each area can have up to 32 range addresses.
To dene an area range for subnets on 10.45.5.1 and 10.45.6.2, enter the following command.
device(config)# router ospf
device(config-ospf-router)# area 10.45.5.1 range 10.45.0.0 255.255.0.0
device(config-ospf-router)# area 10.45.6.2 range 10.45.0.0 255.255.0.0
Syntax: [no] area { num | ip-addr } range ip-addr ip-mask
The num and ip-addr parameters specify the area number, which can be in IP address format.
The range ip-addr parameter species the IP address portion of the range. The software compares the address with the signicant bits in
the mask. All network addresses that match this comparison are summarized in a single route advertised by the router.
The ip-mask parameter species the portions of the IP address that a route must contain to be summarized in the summary route. In the
example above, all networks that begin with 10.45 are summarized into a single route.
Assigning an area cost (optional parameter)
You can assign a cost for an area, but it is not required. To consolidate and summarize routes at an area boundary, use the area range
cost command in router conguration mode.
If the cost parameter is specied, it will be used (overriding the computed cost) to generate the summary LSA. If the cost parameter is
not specied, then the existing range metric computation max or min cost of routes falling under this range will be used to generate
summary LSA.
NOTE
The area should be already congured before using this
command.
Creates an area range entry with ip address 10.1.1.1 and network mask 255.255.255.0 with the area-id 10.
device(config)# router ospf
device(config-ospf-router)# area 10 range 10.1.1.1 255.255.255.0
Modies the address range status to DoNotAdvertise . Neither the individual intra-area routes falling under range nor the ranged prex is
advertised as summary LSA.
device(config)# router ospf
device(config-ospf-router)# area 10 range 10.1.1.1 255.255.255.0 not-advertise
Modies the address range status to advertise and a Type 3 summary link-state advertisement (LSA) can be generated for this address
range.
device(config)# router ospf
device(config-ospf-router)# area 10 range 10.1.1.1 255.255.255.0 advertise
Modies the address range status to advertise and assign cost for this area range to 10.
device(config)# router ospf
device(config-ospf-router)# area 10 range 10.1.1.1 255.255.255.0 advertise cost 10
Modies the address range status to not-advertise and cost from 10 to 5.
device(config)# router ospf
device(config-ospf-router)# area 10 range 10.1.1.1 255.255.255.0 not-advertise cost 5
Conguring OSPF
FastIron Ethernet Switch Layer 3 Routing Conguration Guide, 08.0.30mb
238 53-1003627-06
Removes the cost from the area range. The area range will be advertised with computed cost which is the max/min(based on RFC 1583
compatibility) of all individual intra-area routes falling under this range.
device(config)# router ospf
device(config-ospf-router)# no area 10 range 10.1.1.1 255.255.255.0 cost 5
Removes the area range.
device(config)# router ospf
device(config-ospf-router)# no area 10 range 10.1.1.1 255.255.255.0
NOTE
This command does not work in incremental fashion. So both the optional parameters have to be congured each time.
Otherwise it will take the default value.
Syntax: no area { num | ip-addr range ip-addr ip-mask [ advertise | not-advertise ] cost cost-value }
The num and ip-addr parameters specify the area number, which can be in IP address format.
The range ip-addr parameter species the IP address portion of the range. The software compares the address with the signicant bits in
the mask. All network addresses that match this comparison are summarized in a single route advertised by the router.
The ip-mask parameter species the portions of the IP address that a route must contain to be summarized in the summary route.
The advertise parameter sets the address range status to advertise and generates a Type 3 summary link-state advertisement (LSA). If
at least a single route falls under the range, a ranged LSA will be advertised.
The not-advertise parameter sets the address range status to DoNotAdvertise. Neither the individual intra-area routes falling under range
nor the ranged prex is advertised as summary LSA.
The cost cost-value parameter species the cost-value to be used while generating type-3 summary LSA. If the cost value is congured,
then congured cost is used while generating the summary LSA. If the cost value is not congured, then computed range cost will be
used. The cost-value ranges from 1 - 16777215.
To disable this function, use the no form of this command.
Assigning interfaces to an area
Once you dene OSPF areas, you can assign interfaces to the areas. All router ports must be assigned to one of the dened areas on an
OSPF router. When a port is assigned to an area, all corresponding subnets on that port are automatically included in the assignment.
To assign interface 1/1/8 of Router A to area 10.5.0.0 and then save the changes, enter the following commands.
RouterA(config)# interface ethernet 1/1/8
RouterA(config-if-e10000-1/1/8)# ip ospf area 10.5.0.0
RouterA(config-if-e10000-1/1/8)# write memory
Setting all OSPFv2 interfaces to the passive state
You can set all the Open Shortest Path First Version 2 (OSPFv2) interfaces to the default passive state using the default-passive-
interface command. When you congure the interfaces as passive, the interfaces drop all the OSPFv2 control packets.
To set all the OSPFv2 interfaces to passive, enter the following command.
device# configure terminal
device(config)# router ospf vrf A
device(config-ospf-router-vrf-A)# default-passive-interface
Syntax: [no] default-passive-interface
Conguring OSPF
FastIron Ethernet Switch Layer 3 Routing Conguration Guide, 08.0.30mb
53-1003627-06 239
Modify interface defaults
OSPF has interface parameters that you can congure. For simplicity, each of these parameters has a default value. No change to these
default values is required except as needed for specic network congurations.
Port default values can be modied using the following CLI commands at the interface conguration level of the CLI:
•ip ospf area
•ip ospf auth-change-wait-time
•ip ospf authentication-key
•ip ospf cost
•ip ospf database-lter all out
•ip ospf dead-interval
•ip ospf hello-interval
•ip ospf md5-authentication key-activation-wait-time
•ip ospf mtu-ignore
•ip ospf passive
•ip ospf active
•ip ospf priority
•ip ospf retransmit-interval
•ip ospf transmit-delay
OSPF interface parameters
The following parameters apply to OSPF interfaces:
• area—Assigns an interface to a specic area. You can assign either an IP address or number to represent an OSPF Area ID. If
you assign a number, it can be any value from 0 - 2,147,483,647.
• auth-change-wait-time—OSPF gracefully implements authentication changes to allow all routers to implement the change and
thus prevent disruption to neighbor adjacencies. During the authentication-change interval, both the old and new authentication
information is supported. The default authentication-change interval is 300 seconds (5 minutes). You change the interval to a
value from 0 - 14400 seconds.
• authentication-key string—
By default, the authentication key is encrypted. If you want the authentication key to be in clear text, insert a 0 between
authentication-key and string. For example:
device(config-if-e10000-1/1/8)# ip ospf authentication-key 0 morningadmin
The software adds a prex to the authentication key string in the conguration. For example, the following portion of the code
has the encrypted code "2".
ip ospf authentication-key 2 $on-o
The prex can be one of the following:
– 0 = the key string is not encrypted and is in clear text.
– 1 = the key string uses proprietary simple cryptographic 2-way algorithm.
• cost—Indicates the overhead required to send a packet across an interface. You can modify the cost to dierentiate between
100 Mbps, 1 Gbps, and 10 Gbps. The default cost is calculated by dividing 100 million by the bandwidth. For 10 Mbps links,
Conguring OSPF
FastIron Ethernet Switch Layer 3 Routing Conguration Guide, 08.0.30mb
240 53-1003627-06
the cost is 10. The cost for 100 Mbps, 1 Gbps, and 10 Gbps links is 1, because the speed of 100 Mbps and 10 Gbps was not
in use at the time the OSPF cost formula was devised.
•database-lter—Blocks all outbound LSAs on the OSPF interface.
• dead-interval— Indicates the number of seconds that a neighbor router waits for a hello packet from the current router before
declaring the router down. The value can be from 1 - 65535 seconds. The default is 40 seconds.
• hello-interval—Represents the length of time between the transmission of hello packets. The value can be from 1 - 65535
seconds. The default is 10 seconds.
• MD5-authentication activation wait time—The number of seconds the device waits until placing a new MD5 key into eect. The
wait time provides a way to gracefully transition from one MD5 key to another without disturbing the network. The wait time can
be from 0 - 14400 seconds. The default is 300 seconds (5 minutes).
• MD5-authentication key string—The MD5 authentication-key is a number from 1 - 255 and identies the MD5 key that is
being used. This parameter is required to dierentiate among multiple keys dened on a router.
By default, the authentication key is encrypted. If you want the authentication key to be in clear text, insert a 0 between
authentication-key and string. For example,
device(config-if-e10000-1/1/8)# ip ospf 1 md-5-authentication key-id 5 key 2 morningadmin
The software adds a prex to the authentication key string in the conguration. For example, the following portion of the code
has the encrypted code "2".
ip ospf 1 md-5-authentication key-id 5 key 2 $on-o
The prex can be one of the following:
– 0 = the key string is not encrypted and is in clear text.
– 1 = the key string uses proprietary simple cryptographic 2-way algorithm.
• mtu-ignore—A database description packet is rejected if the interface MTU specied in the DBD packet is greater than the MTU
of the interface shared between the neighbors. To disable the mismatch condition set "mtu-ignore". By default, the mismatch
detection is enabled.
• passive—When you congure an OSPF interface to be passive, that interface does not send or receive OSPF route updates. By
default, all OSPF interfaces are active and thus can send and receive OSPF route information. Since a passive interface does
not send or receive route information, the interface is in eect a stub network. OSPF interfaces are active by default.
NOTE
This option aects all IP subnets congured on the interface. If you want to disable OSPF updates only on some of the
IP subnets on the interface, use the ospf-ignore or ospf-passive parameter with the ip address command.
• active—When you congure an OSPFv2 interface to be active, that interface sends or receives all the control packets and forms
the adjacency. By default, the ip ospf active command is disabled. Whenever you congure the OSPF interfaces to be passive
using the default-passive-interface command, all the OSPF interfaces stop sending and receiving control packets. To send and
receive packets over specic interfaces, you can use the ip ospf active command.
• priority—Allows you to modify the priority of an OSPF router. The priority is used when selecting the designated router (DR) and
backup designated routers (BDRs). The value can be from 0 - 255. The default is 1. If you set the priority to 0, the device does
not participate in DR and BDR election.
• retransmit-interval—The time between retransmissions of link-state advertisements (LSAs) to adjacent routers for this interface.
The value can be from 0 - 3600 seconds. The default is 5 seconds.
• transit-delay—The time it takes to transmit Link State Update packets on this interface. The value can be from 0 - 3600
seconds. The default is 1 second.
Conguring OSPF
FastIron Ethernet Switch Layer 3 Routing Conguration Guide, 08.0.30mb
53-1003627-06 241
Rules for OSPF dead interval and hello interval timers
The following rules apply regarding these timers:
• If both the hello-interval and dead-interval parameters are congured, they will each be set to the values that you have
congured.
• If the hello-interval parameter is congured, but not the dead-interval parameter, the dead-interval parameter will be set to a
value that is 4 times the value set for the hello-interval.
• If the dead-interval parameter is congured, but not the hello-interval parameter, the hello-interval parameter will be set to a
value that is 1/4 the value set for the dead-interval. The minimum value for the hello-interval is 1.
The recommended setting is that:
• The dead interval is four times that of the hello interval.
• The hello interval is ¼ times that of the dead interval.
• If the OSPF hello interval and dead interval are set to more aggressive levels than 1:4 seconds respectively, the OSPF protocol
might ap when the write memory command is used or in the case of any high CPU.
Changing the timer for OSPF authentication changes
When you make an OSPF authentication change, the software uses the authentication-change timer to gracefully implement the change.
The software implements the change in the following ways:
• Outgoing OSPF packets - After you make the change, the software continues to use the old authentication to send packets,
during the remainder of the current authentication-change interval. After this, the software uses the new authentication for
sending packets.
• Inbound OSPF packets - The software accepts packets containing the new authentication and continues to accept packets
containing the older authentication for two authentication-change intervals. After the second interval ends, the software accepts
packets only if they contain the new authentication key.
The default authentication-change interval is 300 seconds (5 minutes). You change the interval to a value from 0 - 14400 seconds.
OSPF provides graceful authentication change for all the following types of authentication changes in OSPF:
• Changing authentication methods from one of the following to another of the following:
– Simple text password
– MD5 authentication
– No authentication
•Conguring a new simple text password or MD5 authentication key
• Changing an existing simple text password or MD5 authentication key
To change the authentication-change interval, enter a command such as the following at the interface conguration level of the CLI.
device(config-if-e10000-1/2/5)# ip ospf auth-change-wait-time 400
Syntax: [no] ip ospf auth-change-wait-time secs
The secs parameter species the interval and can be from 0 - 14400 seconds. The default is 300 seconds (5 minutes).
NOTE
For backward compatibility, the ip ospf md5-authentication key-activation-wait-time command is still supported.
Conguring OSPF
FastIron Ethernet Switch Layer 3 Routing Conguration Guide, 08.0.30mb
242 53-1003627-06
Block ooding of outbound LSAs on specic OSPF interfaces
By default, the device oods all outbound LSAs on all the OSPF interfaces within an area. You can congure a lter to block outbound
LSAs on an OSPF interface. This feature is particularly useful when you want to block LSAs from some, but not all, of the interfaces
attached to the area.
This command blocks all outbound LSAs to provide options for selective blocking of LSAs.
After you apply lters to block the outbound LSAs, the ltering occurs during the database synchronization and ooding. When a ltering
conguration is changed on a interface, all adjacencies on the interface are set to the Extstart state to restart the database exchange
process. In cases where an LSA has already been ooded on an interface prior to application of the LSA lter, the LSA will not be ushed
out from the remote neighbors. In this situation the user must clear the link state database and the adjacencies on all remote neighbors to
ush out the leaked LSAs or wait for the LSAs to be aged out.
If you remove the lters, the blocked LSAs are automatically re-ooded. You do not need to reset OSPF to re-ood the LSAs.
NOTE
You cannot block LSAs on virtual links, and LSA ltering is not supported on sham
links.
To apply a lter to an OSPF interface to block ooding of outbound LSAs on the interface, enter the following command at the Interface
conguration level for that interface.
device(config-if-e10000-1/1/1)# ip ospf database-filter all out
The command in this example blocks all outbound LSAs on the OSPF interface congured on port 1/1/1.
Syntax: [no] ip ospf database-lter { all | all-external [ allow-default | allow-default-and-type4 ] | all-summary-external [ allow-default
| allow-default-and-type4 ] } out
The all parameter directs the router to block all outbound LSAs on the OSPF interface.
The all-external option directs the router to allow the following LSAs: Router, Network, Opq-Area-TE, Opq-Link-Graceful and Type-3
Summary while it blocks all Type-4 and Type-5 LSAs unless directed by one of the following keywords:
allow-default - allows only Type-5 default LSAs.
allow-default-and-type4 - allows Type-5 default LSAs and all Type 4 LSAs.
The all-summary-external option directs the router to allow the following LSAs: Router, Network, Opq-Area-TE and Opq-Link-Graceful
while it blocks all Type-3, Type-4 and Type-5 LSAs unless directed by one of the following keywords:
allow-default - allows only Type-3 or Type-5 default LSAs.
allow-default-and-type4 - allows Type-3 or Type-5 default LSAs and all Type 4 LSAs.
All Type-7 LSAs are always ltered if the ip ospf database-lter command is enabled.
By default, OSPF LSA ltering is disabled on all interfaces.
To remove the lter, enter a command such as the following.
device(config-if-e10000-1/1/1)# no ip ospf database-filter all out
Assign virtual links
All ABRs (area border routers) must have either a direct or indirect link to the OSPF backbone area (0.0.0.0 or 0). If an ABR does not
have a physical link to the area backbone, the ABR can congure a virtual link to another router within the same area, which has a
physical connection to the area backbone.
Conguring OSPF
FastIron Ethernet Switch Layer 3 Routing Conguration Guide, 08.0.30mb
53-1003627-06 243
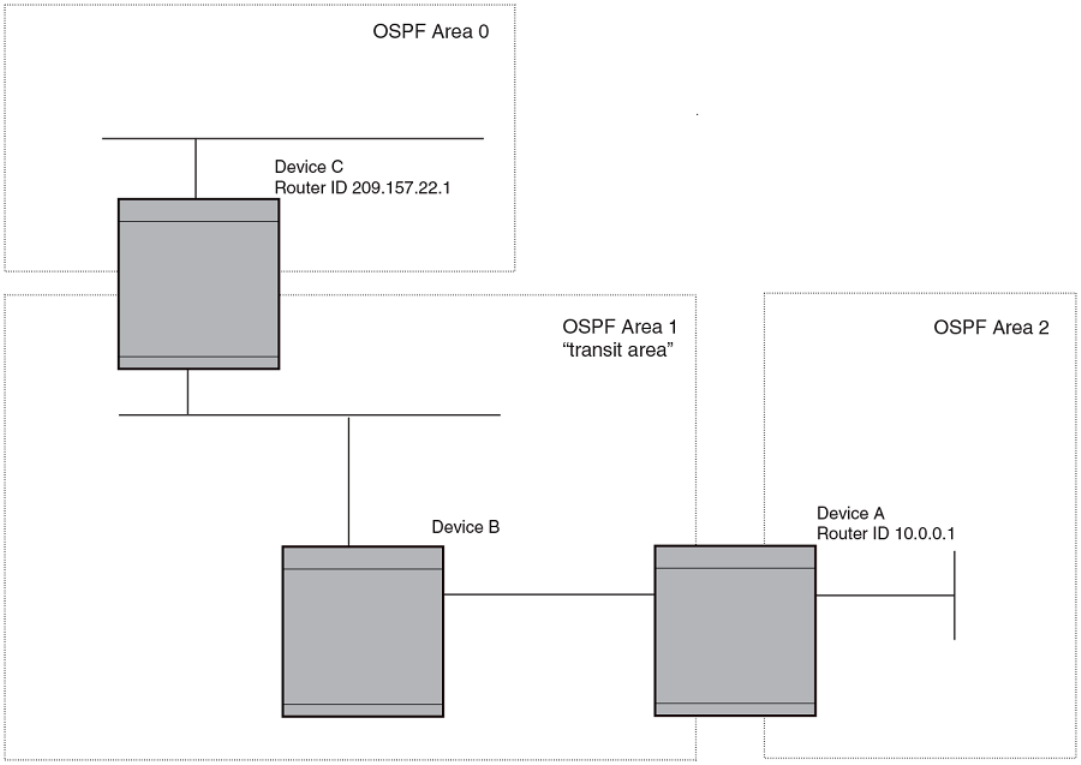
The path for a virtual link is through an area shared by the neighbor ABR (router with a physical backbone connection), and the ABR
requiring a logical connection to the backbone.
Two parameters elds must be dened for all virtual links--transit area ID and neighbor router:
• The transit area ID represents the shared area of the two ABRs and serves as the connection point between the two routers. This
number should match the area ID value.
• The neighbor router eld is the router ID (IP address) of the router that is physically connected to the backbone, when assigned
from the router interface requiring a logical connection. When assigning the parameters from the router with the physical
connection, the router ID is the IP address of the router requiring a logical connection to the backbone.
NOTE
By default, the Brocade device’s router ID is the IP address congured on the lowest numbered loopback interface. If the device
does not have a loopback interface, the default router ID is the lowest numbered IP address congured on the device. When you
establish an area virtual link, you must congure it on both of the routers (both ends of the virtual link).
FIGURE 23 Dening OSPF virtual links within a network
Conguring OSPF
FastIron Ethernet Switch Layer 3 Routing Conguration Guide, 08.0.30mb
244 53-1003627-06

The example shows an OSPF area border router, Device A, that is cut o from the backbone area (area 0). To provide backbone access
to Device A, you can add a virtual link between Device A and Device C using area 1 as a transit area. To congure the virtual link, you
dene the link on the router that is at each end of the link. No conguration for the virtual link is required on the routers in the transit area.
To dene the virtual link on Device A, enter the following commands.
device A(config)# router ospf
device A(config-ospf-router)# area 2
device A(config-ospf-router)# area 1
device A(config-ospf-router)# area 1 virtual-link 209.157.22.1
device A(config-ospf-router)# write memory
Enter the following commands to congure the virtual link on Device C.
device C(config)# router ospf
device C(config-ospf-router)# area 0
device C(config-ospf-router)# area 1
device C(config-ospf-router)# area 1 virtual-link 10.0.0.1
Syntax: [no] area { ip-addr | num } [ virtual-link router-id [ authentication-key string | dead-interval num | hello-interval num |
retransmit-interval num | transmit-delay num | md5-authentication key-activation-wait-time num | md5-authentication key-id num
key [ 0 | 1 ] string ] ]
The area ip-addr and num parameters specify the transit area.
The virtual-link router-id parameter species the router ID of the OSPF router at the remote end of the virtual link. To display the router
ID on a device, enter the show ip command.
Modify virtual link parameters
OSPF has some parameters that you can modify for virtual links. Notice that these are the same parameters as the ones you can modify
for physical interfaces.
You can modify default values for virtual links using the following CLI command at the OSPF router level of the CLI, as shown in the
following syntax:
Syntax: [no] area { ip-addr | num } [virtual-link router-id dead-interval num | hello-interval num | retransmit-interval num | transmit-
delay num | authentication-key string | md5-authentication key key-string | md5-authentication key-activation-wait-time num ]
Virtual link parameter descriptions
You can modify the following virtual link interface parameters:
area ip-addr | num The IP address or number of the transit area.
virtual-link router-id The router ID of the OSPF router at the remote end of the virtual link.
dead-interval num The number of seconds that a neighbor router waits for a hello packet from the current router before declaring the router
down. The value can be from 1 - 65535 seconds. The default is 40 seconds.
hello-interval num The length of time between the transmission of hello packets. The range is 1 - 65535 seconds. The default is 10 seconds.
retransmit-interval num The interval between the re-transmission of link state advertisements to router adjacencies for this interface. The range is 0 -
3600 seconds. The default is 5 seconds.
transmit-delay num The period of time it takes to transmit Link State Update packets on the interface. The range is 0 - 3600 seconds. The
default is 1 second.
authentication-key string This parameter allows you to assign dierent authentication encryption methods on a port-by-port basis. OSPF supports
three methods of authentication for each interface: none, simple encryption, and base 64 encryption. Only one encryption
method can be active on an interface at a time.
Conguring OSPF
FastIron Ethernet Switch Layer 3 Routing Conguration Guide, 08.0.30mb
53-1003627-06 245

The simple encryption and base 64 encryption methods requires you to congure an alphanumeric password on an
interface. The password can be up to eight characters long. All OSPF packets transmitted on the interface contain this
password. All OSPF packets received on the interface are checked for this password. If the password is not present, then the
packet is dropped.
By default, the authentication key is encrypted. If you want the authentication key to be in clear text, insert a 0 between key
and string. For example,
device C(config-ospf-router)# area 1 virtual-link 10.0.0.1 authentication-key 0
afternoon
The software adds a prex to the authentication key string in the conguration. For example, the following portion of the
code has the encrypted code "2".
area 1 virtual-link 12.12.12.25 authentication-key 2 $on-o
The prex can be one of the following:
• 0 = the key string is not encrypted and is in clear text
• 1 = the key string uses proprietary simple cryptographic 2-way algorithm
md5-authentication key
string
The MD5 key is a number from 1 - 255 and identies the MD5 key that is being used. This parameter is required to
dierentiate among multiple keys dened on a router.
When MD5 is enabled, the key-string is an alphanumeric password of up to 16 characters that is later encrypted and
included in each OSPF packet transmitted. You must enter a password in this eld when the system is congured to operate
with either simple or MD5 authentication.
By default, the MD5 authentication key is encrypted. If you want the authentication key to be in clear text, insert a 0 between
key and string. For example,
device(config-ospf-router)# area 1 virtual-link 10.0.0.1 md-5-authentication key-id 5
key evening
The software adds a prex to the authentication key string in the conguration. For example, the following portion of the
code has the encrypted code "2".
device(config-ospf-router)# area 1 virtual-link 12.12.12.25 md-5-authentication key-id
5 key 2 $on-o
The prex can be one of the following:
• 0 = the key string is not encrypted and is in clear text
• 1 = the key string uses proprietary simple cryptographic 2-way algorithm
md5-authentication wait
time
This parameter determines when a newly congured MD5 authentication key is valid. This parameter provides a graceful
transition from one MD5 key to another without disturbing the network. All new packets transmitted after the key activation
wait time interval use the newly congured MD5 Key. OSPF packets that contain the old MD5 key are accepted for up to
ve minutes after the new MD5 key is in operation.
The range for the key activation wait time is from 0 - 14400 seconds. The default value is 300 seconds.
Changing the reference bandwidth for the cost on OSPF interfaces
Each interface on which OSPF is enabled has a cost associated with it. The device advertises its interfaces and their costs to OSPF
neighbors. For example, if an interface has an OSPF cost of ten, the device advertises the interface with a cost of ten to other OSPF
routers.
By default, an interface’s OSPF cost is based on the port speed of the interface. The cost is calculated by dividing the reference
bandwidth by the port speed. The default reference bandwidth is 100 Mbps, which results in the following default costs:
• 10 Mbps port - 10
• All other port speeds - 1
You can change the reference bandwidth, to change the costs calculated by the software.
Conguring OSPF
FastIron Ethernet Switch Layer 3 Routing Conguration Guide, 08.0.30mb
246 53-1003627-06
The software uses the following formula to calculate the cost:
Cost = reference-bandwidth/interface-speed
If the resulting cost is less than 1, the software rounds the cost up to 1. The default reference bandwidth results in the following costs:
• 10 Mbps port’s cost = 100/10 = 10
• 100 Mbps port’s cost = 100/100 = 1
• 1000 Mbps port’s cost = 100/1000 = 0.10, which is rounded up to 1
• 10 Gbps port’s cost = 100/10000 = 0.01, which is rounded up to 1
The bandwidth for interfaces that consist of more than one physical port is calculated as follows:
• LAG group - The combined bandwidth of all the ports.
• Virtual interface - The combined bandwidth of all the ports in the port-based VLAN that contains the virtual interface.
The default reference bandwidth is 100 Mbps. You can change the reference bandwidth to a value from 1 - 4294967.
If a change to the reference bandwidth results in a cost change to an interface, the device sends a link-state update to update the costs of
interfaces advertised by the device.
NOTE
If you specify the cost for an individual interface, the cost you specify overrides the cost calculated by the software.
Interface types to which the reference bandwidth does not apply
Some interface types are not aected by the reference bandwidth and always have the same cost regardless of the reference bandwidth
in use:
• The cost of a loopback interface is always 1.
• The cost of a virtual link is calculated using the Shortest Path First (SPF) algorithm and is not aected by the auto-cost feature.
• The bandwidth for tunnel interfaces is 9 Kbps and is also subject to the auto-cost reference bandwidth setting.
Changing the reference bandwidth
To change the reference bandwidth, enter a command such as the following at the OSPF conguration level of the CLI.
device(config)# router ospf
device(config-ospf-router)# auto-cost reference-bandwidth 500
The reference bandwidth specied in this example results in the following costs:
• 10 Mbps port’s cost = 500/10 = 50
• 100 Mbps port’s cost = 500/100 = 5
• 1000 Mbps port’s cost = 500/1000 = 0.5, which is rounded up to 1
The costs for 10 Mbps and 100 Mbps ports change as a result of the changed reference bandwidth. Costs for higher-speed interfaces
remain the same.
Syntax: [no] auto-cost { reference-bandwidth num | use-active-ports }
The num parameter species the reference bandwidth and can be a value from 1 - 4294967. The default is 100.
To restore the reference bandwidth to its default value and thus restore the default costs of interfaces to their default values, enter the
following command.
device(config-ospf-router)# no auto-cost reference-bandwidth
Conguring OSPF
FastIron Ethernet Switch Layer 3 Routing Conguration Guide, 08.0.30mb
53-1003627-06 247
Determining cost calculation for active ports only on LAG and VE interfaces
The default operation is for cost calculation of OSPF interfaces to be based upon all congured ports. There is also an option for the
auto-cost reference-bandwidth command for the calculation of OSPF costs on active ports of LAG and VE interfaces. This option
allows you to calculate cost based on the ports that are currently active. The following example enables cost calculation for currently
active ports.
device(config-ospf-router)# auto-cost use-active-ports
The use-active-ports option enables cost calculation for currently active ports only. This option does not have any eect on non-VE or
non-LAG interfaces. The default operation is for costs to be based on congured ports.
Dene redistribution lters
Route redistribution imports and translates dierent protocol routes into a specied protocol type. On the device, redistribution is
supported for static routes, OSPF, RIP, and BGP4. OSPF redistribution supports the import of static, RIP, and BGP4 routes into OSPF
routes.
NOTE
The device advertises the default route into OSPF even if redistribution is not enabled, and even if the default route is learned
through an IBGP neighbor. IBGP routes (including the default route) are not redistributed into OSPF by OSPF redistribution (for
example, by the OSPF redistribute command).
In this example, an administrator wants to congure the device acting as the ASBR (Autonomous System Boundary Router) between the
RIP domain and the OSPF domain to redistribute routes between the two domains.
NOTE
The ASBR must be running both RIP and OSPF protocols to support this activity.
Conguring OSPF
FastIron Ethernet Switch Layer 3 Routing Conguration Guide, 08.0.30mb
248 53-1003627-06
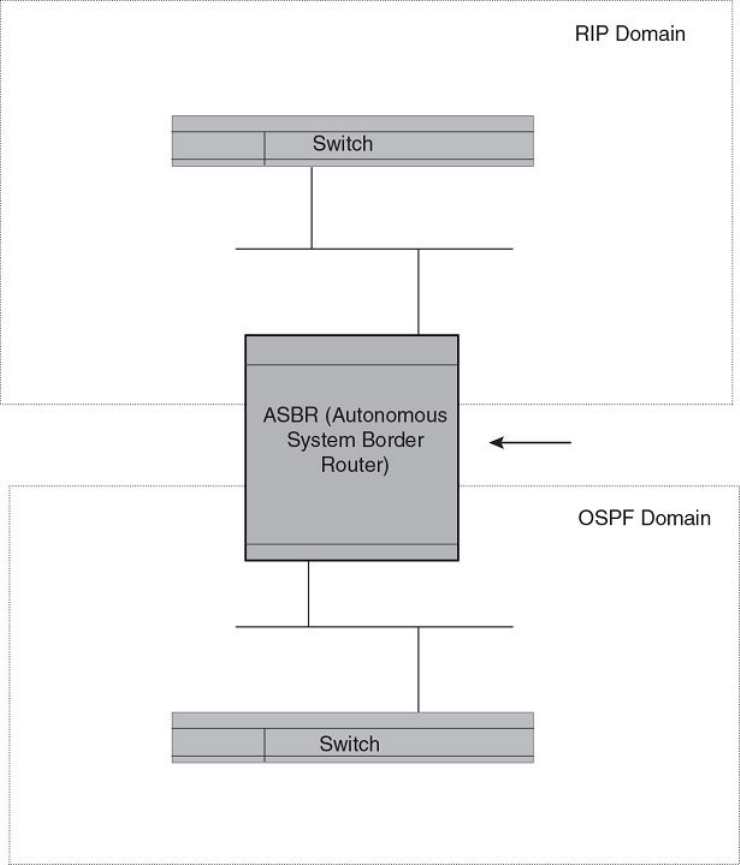
FIGURE 24 Redistributing OSPF and static routes to RIP routes
You also have the option of specifying import of just RIP, OSPF, BGP4, or static routes, as well as specifying that only routes for a
specic network or with a specic cost (metric) be imported, as shown in the command syntax below.
Syntax: [no] redistribute { bgp | connected | rip | static [ route-map map-name ] }
NOTE
Prior to software release 04.1.00, the redistribution command is used instead of redistribute .
For example, to enable redistribution of RIP and static IP routes into OSPF, enter the following commands.
device(config)# router ospf
device(config-ospf-router)# redistribute rip
device(config-ospf-router)# redistribute static
device(config-ospf-router)# write memory
Conguring OSPF
FastIron Ethernet Switch Layer 3 Routing Conguration Guide, 08.0.30mb
53-1003627-06 249
Modify default metric for redistribution
The default metric is a global parameter that species the cost applied to all OSPF routes by default. The default value is 10. You can
assign a cost from 1 - 65535.
NOTE
You also can dene the cost on individual interfaces. The interface cost overrides the default
cost.
To assign a default metric of 4 to all routes imported into OSPF, enter the following commands.
device(config)# router ospf
device(config-ospf-router)# default-metric 4
Syntax: default-metric value
The value can be from 1 - 15. The default is 10.
Enable route redistribution
NOTE
Do not enable redistribution until you have congured the redistribution route map. Otherwise, you might accidentally overload
the network with routes you did not intend to redistribute.
To enable redistribution of RIP and static IP routes into OSPF, enter the following commands.
device(config)# router ospf
device(config-ospf-router)# redistribute rip
device(config-ospf-router)# redistribute static
device(config-ospf-router)# write memory
Example using a route map
To congure a route map and use it for redistribution of routes into OSPF, enter commands such as the following.
device(config)# ip route 1.1.0.0 255.255.0.0 10.95.7.30
device(config)# ip route 1.2.0.0 255.255.0.0 10.95.7.30
device(config)# ip route 1.3.0.0 255.255.0.0 10.95.7.30
device(config)# ip route 4.1.0.0 255.255.0.0 10.95.6.30
device(config)# ip route 4.2.0.0 255.255.0.0 10.95.6.30
device(config)# ip route 4.3.0.0 255.255.0.0 10.95.6.30
device(config)# ip route 4.4.0.0 255.255.0.0 10.95.6.30 5
device(config)# route-map abc permit 1
device(config-routemap abc)# match metric 5
device(config-routemap abc)# set metric 8
device(config-routemap abc)# router ospf
device(config-ospf-router)# redistribute static route-map abc
The commands in this example congure some static IP routes, then congure a route map and use the route map for redistributing
static IP routes into OSPF.
The ip route commands congure the static IP routes. The route-map command begins conguration of a route map called "abc". The
number indicates the route map entry (called the "instance") you are conguring. A route map can contain multiple entries. The software
compares routes to the route map entries in ascending numerical order and stops the comparison once a match is found.
The match command in the route map matches on routes that have 5 for their metric value (cost). The set command changes the metric
in routes that match the route map to 8.
Conguring OSPF
FastIron Ethernet Switch Layer 3 Routing Conguration Guide, 08.0.30mb
250 53-1003627-06
The redistribute static command enables redistribution of static IP routes into OSPF, and uses route map "abc" to control the routes that
are redistributed. In this example, the route map allows a static IP route to be redistributed into OSPF only if the route has a metric of 5,
and changes the metric to 8 before placing the route into the OSPF route table.
The following command shows the result of the redistribution. Since only one of the static IP routes congured above matches the route
map, only one route is redistributed. Notice that the route’s metric is 5 before redistribution but is 8 after redistribution.
device# show ip ospf database external
Index Aging LS ID Router Netmask Metric Flag
1 2 4.4.0.0 10.10.10.60 ffff0000 80000008 0000
Syntax: [no] redistribute { bgp | connected | rip | isis [ level-1 | level-1-2 | level-2 ] | static [ route-map map-name ] }
The bgp, connected, rip, and static parameters specify the route source.
The route-map map-name parameter species the route map name. The following match parameters are valid for OSPF redistribution:
•match ip address | next-hop acl-num
•match metric num
•match tag tag-value
NOTE
A match tag can take up to 16 tags. During the execution of a route-map a match on any tag value in the list is considered a
successful match.
The following set parameters are valid for OSPF redistribution:
•set ip next hop ip-addr
•set metric [+ | - ] num | none
•set metric-type type-1 type-1 | type-2
•set tag tag-value
NOTE
You must congure the route map before you congure a redistribution that uses the route
map.
NOTE
When you use a route map for route redistribution, the software disregards the permit or deny action of the route map.
NOTE
For an external route that is redistributed into OSPF through a route map, the metric value of the route remains the same unless
the metric is set by a set metric command inside the route map. The default-metric num command has no eect on the route.
This behavior is dierent from a route that is redistributed without using a route map. For a route redistributed without using a
route map, the metric is set by the default-metric command.
Disable or re-enable load sharing
Brocade devices can load share among up to eight equal-cost IP routes to a destination. By default, IP load sharing is enabled. The
default is 4 equal-cost paths but you can specify from 2 - 8 paths. On the ICX 7750 device, the value range for the maximum number
of load-sharing paths is from 2 through 32 which is controlled by the system-max max-ecmp command. The router software can use
the route information it learns through OSPF to determine the paths and costs.
Conguring OSPF
FastIron Ethernet Switch Layer 3 Routing Conguration Guide, 08.0.30mb
53-1003627-06 251
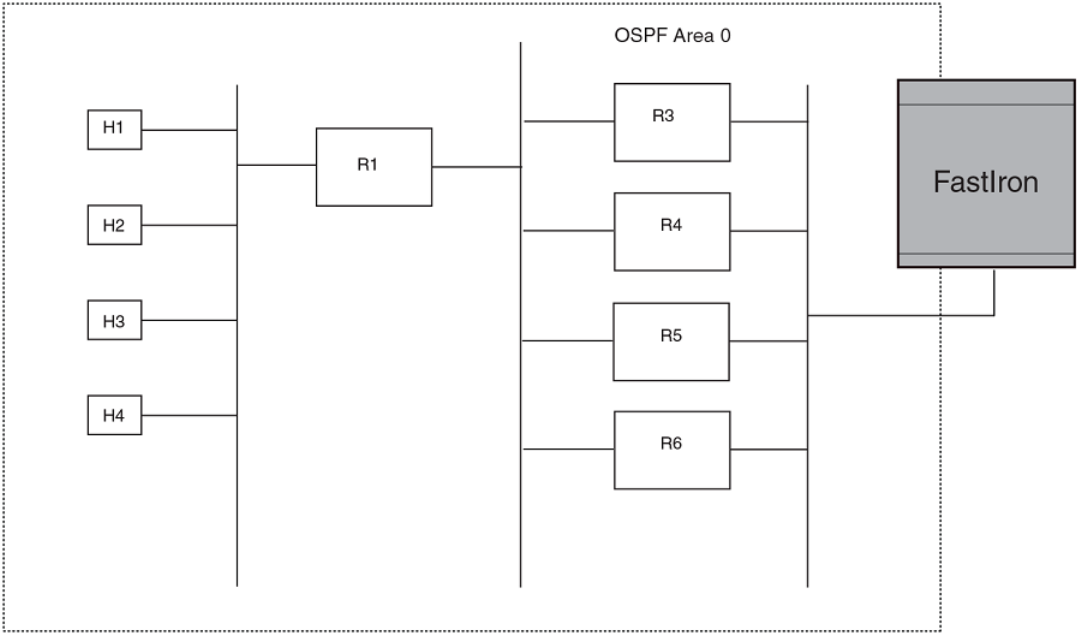
FIGURE 25 Example OSPF network with four equal-cost paths
The device has four paths to R1:
• Router ->R3
• Router ->R4
• Router ->R5
• Router ->R6
Normally, the device will choose the path to the R1 with the lower metric. For example, if the metric for R3 is 1400 and the metric for R4
is 600, the device will always choose R4.
However, suppose the metric is the same for all four routers in this example. If the costs are the same, the router now has four equal-cost
paths to R1. To allow the router to load share among the equal cost routes, enable IP load sharing. The software supports four equal-cost
OSPF paths by default when you enable load sharing.
NOTE
The device is not source routing in these examples. The device is concerned only with the paths to the next-hop routers, not the
entire paths to the destination hosts.
OSPF load sharing is enabled by default when IP load sharing is enabled.
Conguring OSPF
FastIron Ethernet Switch Layer 3 Routing Conguration Guide, 08.0.30mb
252 53-1003627-06
Congure external route summarization
When the device is an OSPF Autonomous System Boundary Router (ASBR), you can congure it to advertise one external route as an
aggregate for all redistributed routes that are covered by a specied address range.
When you congure an address range, the range takes eect immediately. All the imported routes are summarized according to the
congured address range. Imported routes that have already been advertised and that fall within the range are ushed out of the AS and
a single route corresponding to the range is advertised.
If a route that falls within a congured address range is imported by the device, no action is taken if the device has already advertised the
aggregate route; otherwise the device advertises the aggregate route. If an imported route that falls with in a congured address range is
removed by the device, no action is taken if there are other imported routes that fall with in the same address range; otherwise the
aggregate route is ushed.
You can congure up to 32 address ranges. The device sets the forwarding address of the aggregate route to zero and sets the tag to
zero.
If you delete an address range, the advertised aggregate route is ushed and all imported routes that fall within the range are advertised
individually.
If an external LSDB overow condition occurs, all aggregate routes are ushed out of the AS, along with other external routes. When the
device exits the external LSDB overow condition, all the imported routes are summarized according to the congured address ranges.
NOTE
If you use redistribution lters in addition to address ranges, the device applies the redistribution lters to routes rst, then
applies them to the address ranges.
NOTE
If you disable redistribution, all the aggregate routes are ushed, along with other imported
routes.
NOTE
This option aects only imported, type 5 external routes. A single type 5 LSA is generated and ooded throughout the AS for
multiple external routes. Type 7-route redistribution is not aected by this feature. All type 7 routes will be imported (if
redistribution is enabled). To summarize type 7 LSAs or exported routes, use NSSA address range summarization.
To congure a summary address for OSPF routes, enter commands such as the following.
device(config-ospf-router)# summary-address 10.1.0.0 255.255.0.0
The command in this example congures summary address 10.1.0.0, which includes addresses 10.1.1.0, 10.1.2.0, 10.1.3.0, and so
on. For all of these networks, only the address 10.1.0.0 is advertised in external LSAs.
Syntax: summary-address ip-addr ip-mask
The ip-addr parameter species the network address.
The ip-mask parameter species the network mask.
To display the congured summary addresses, enter the following command at any level of the CLI.
device# show ip ospf config
Router OSPF: Enabled
Nonstop Routing: Disabled
Graceful Restart: Disabled
Graceful Restart Helper: Enabled
Graceful Restart Time: 120
Graceful Restart Notify Time: 0
Redistribution: Disabled
Conguring OSPF
FastIron Ethernet Switch Layer 3 Routing Conguration Guide, 08.0.30mb
53-1003627-06 253
Default OSPF Metric: 50
OSPF Auto-cost Reference Bandwidth: Disabled
Default Passive Interface: Enabled
OSPF Redistribution Metric: Type2
OSPF External LSA Limit: 1447047
OSPF Database Overflow Interval: 0
RFC 1583 Compatibility: Enabled
Router id: 207.95.11.128
Interface State Change Trap: Enabled
Virtual Interface State Change Trap: Enabled
Neighbor State Change Trap: Enabled
Virtual Neighbor State Change Trap: Enabled
Interface Configuration Error Trap: Enabled
Virtual Interface Configuration Error Trap: Enabled
Interface Authentication Failure Trap: Enabled
Virtual Interface Authentication Failure Trap: Enabled
Interface Receive Bad Packet Trap: Enabled
Virtual Interface Receive Bad Packet Trap: Enabled
Interface Retransmit Packet Trap: Disabled
Virtual Interface Retransmit Packet Trap: Disabled
Originate LSA Trap: Disabled
Originate MaxAge LSA Trap: Disabled
Link State Database Overflow Trap: Disabled
Link State Database Approaching Overflow Trap: Disabled
OSPF Area currently defined:
Area-ID Area-Type Cost
0 normal 0
OSPF Interfaces currently defined:
Ethernet Interface: 1/3/1-1/3/2
ip ospf md5-authentication-key-activation-wait-time 300
ip ospf cost 0
Syntax: show ip ospf cong
Congure default route origination
When the device is an OSPF Autonomous System Boundary Router (ASBR), you can congure it to automatically generate a default
external route into an OSPF routing domain. This feature is called "default route origination" or "default information origination".
By default, the device does not advertise the default route into the OSPF domain. If you want the device to advertise the OSPF default
route, you must explicitly enable default route origination.
When you enable OSPF default route origination, the device advertises a type 5 default route that is ooded throughout the AS (except
stub areas and NSSAs). In addition, internal NSSA ASBRs advertise their default routes as translatable type 7 default routes.
The device advertises the default route into OSPF even if OSPF route redistribution is not enabled, and even if the default route is
learned through an IBGP neighbor.
NOTE
The device never advertises the OSPF default route, regardless of other conguration parameters, unless you explicitly enable
default route origination using the following method.
If the device is an ASBR, you can use the "always" option when you enable the default route origination. The always option causes the
ASBR to create and advertise a default route if it does not already have one congured.
If default route origination is enabled and you disable it, the default route originated by the device is ushed. Default routes generated by
other OSPF routers are not aected. If you re-enable the feature, the feature takes eect immediately and thus does not require you to
reload the software.
Conguring OSPF
FastIron Ethernet Switch Layer 3 Routing Conguration Guide, 08.0.30mb
254 53-1003627-06

NOTE
The ABR (device) will not inject the default route into an NSSA by default and the command described in this section will not
cause the device to inject the default route into the NSSA. To inject the default route into an NSSA, use the area nssa default-
information-originate command.
To enable default route origination, enter the following command.
device(config-ospf-router)# default-information-originate
-ospf-router)# default-information-originate
To disable the feature, enter the following command.
device(config
-ospf-router)# no default-information-originate
Syntax: [no] default-information-originate [ always ] [ metric value ] [ metric-type type ]
The always parameter advertises the default route regardless of whether or not the router has a default route. This option is disabled by
default.
NOTE
The always parameter is not necessary pre-FastIron 8.0 releases.
The metric value parameter species a metric for the default route. If this option is not used, the default metric is used for the route.
The metric-type type parameter species the external link type associated with the default route advertised into the OSPF routing
domain. The type can be one of the following:
• type1 - Type 1 external route
• type2 - Type 2 external route
If you do not use this option, the default redistribution metric type is used for the route type.
The route-map parameter overrides other options. If set commands for metric and metric-type are specied in the route-map, the
command-line values of metric and metric-type if specied, are “ignored” for clarication.
The route-map rmap parameter species the route map reference.
The corresponding route-map should be created before conguring the route-map option along with the default-information-originate
command . If the corresponding route-map was not been created beforehand, then the an error message will be displayed stating that
the route-map must be created.
NOTE
The route-map option cannot be used with a non-default address in the match conditions. The default-route LSA shall not be
generated if a default route is not present in the routing table and a match ip address condition for an existing non-default route
is congured in the route-map. The match ip-address command in the route-map is a no-op operation for the default
information originate command.
Supported match and set conditions
The supported match and set conditions of a normal route-map conguration are as follows:
Match Conditions
ip nexthop prex-list prexList
ip nexthop accessList
Conguring OSPF
FastIron Ethernet Switch Layer 3 Routing Conguration Guide, 08.0.30mb
53-1003627-06 255

interface interfaceName
metric metricValue
tag routeTagValue
protocol-type protocol route type and (or) sub-type value
route-type route type (IS-IS sub-type values)
Set Conditions:
metric metricValue
metric-type type1/type2
tag routeTagValue
OSPF non-stop routing
The graceful restart feature supported by open shortest path rst (OSPF) maintains area topology and dataow. Though the network
requires neighboring routers to support graceful restart and perform hitless failover, the graceful restart feature may not be supported by
all routers in the network. To eliminate this dependency, the non-stop routing (NSR) feature is supported on Brocade devices. NSR does
not require support from neighboring routers to perform hitless failover. NSR does not support virtual link, so trac loss is expected
while performing hitless failover.
NSR does not require support from neighboring
routers to perform hitless failover.
If the active management module fails, the standby management module takes over and maintains the current OSPF routes, link-state
advertisements (LSAs), and neighbor adjacencies, so that there is no loss of existing trac to the OSPF destination.
Synchronization of critical OSPF elements
All types of LSAs and the neighbor information are synchronized to the standby module using the NSR synchronization library and IPC
mechanism to transmit and receive packets.
Link state database synchronization
When the active management module fails, the standby management module takes over from the active management module with the
identical OSPF link state database it had before the failure to ensure non-stop routing. The next shortest path rst (SPF) run after
switchover yields the same result in routes as the active module had before the failure and OSPF protocol requires that all routers in the
network to have identical databases.
LSA delayed acknowledging
When an OSPF router receives LSAs from its neighbor, it acknowledges the LSAs. After the acknowledgement is received, the neighbor
removes this router from its retransmission list and stops resending the LSAs.
In the case of NSR, the router fails after receiving the LSA from its neighbor and has acknowledged that neighbor upon receipt of an
LSA, and the LSA synchronization to the standby module is completed. In this case, the standby module when taking over from the
active module does not have that LSA in its database and the already acknowledged neighbor does not retransmit that LSA. For this
OSPF non-stop routing
FastIron Ethernet Switch Layer 3 Routing Conguration Guide, 08.0.30mb
256 53-1003627-06
reason, the NSR-capable router waits for LSA synchronization of the standby module to complete (Sync-Ack) and then acknowledges
the neighbor that sent the LSA.
LSA syncing and packing
When the LSA processing is completed on the active management module and the decision is made to install the LSA in its link state
database (LSDB), OSPF synchronizes that LSA to the standby module. OSPF checks the current state of the database entry whether or
not it is marked for deletion. After checking the database state, OSPF packs the LSA status and other necessary information needed for
direct installation in the standby OSPF LSDB along with the LSA portion. When the LSA reaches the standby module, OSPF checks the
database entry state in the buer and takes appropriate action, such as adding, overwriting, updating, or deleting the LSA from the LSDB.
Neighbor router synchronization
When the neighbor router is added in the active management module, it is synchronized and added to the standby module. When the
neighbor is deleted in the active module, it is synchronized to the standby and deleted in the standby. When the neighbor router state
becomes 2WAY or FULL, the neighbor router is synchronized to the standby module.The following attributes of the neighbor router is
synchronized to the standby module:
• Neighbor router id
• Neighbor router ip address
• Destination router or backup destination router information
• Neighbor state 2WAY or FULL
• MD5 information
• Neighbor priority
Limitations
• If a neighbor router is inactive for 30 seconds, and if the standby module takes over in another 10 seconds, the neighbor router
cannot be dropped. The inactivity timer starts again and takes another 40 seconds to drop the neighbor router.
• In standby module, the valid neighbor states are LOADING, DOWN, 2WAY, and FULL. If the active management processor
(MP) fails when the neighbor state is LOADING, the standby module cannot continue from LOADING, but the standby can
continue from 2WAY and tries to establish adjacency between the neighboring routers.
• The minimum OSPF dead-interval timer value is 40 seconds (default dead-interval value). When the dead-interval value is
congured less than this minimum value, OSPF NSR cannot be supported.
Interface synchronization
Interface information is synchronized for interfaces such as PTPT, broadcast, and non-broadcast. Interface wait time is not synchronized
to the standby module. If an interface waits for 30 seconds to determine the identity of designated router (DR) or backup designated
router (BDR), and if the standby module takes over, the wait timer starts again and takes another 40 seconds for the interface state to
change from waiting to BDR, DR, or DROther.
Standby module operations
The standby management module with OSPF conguration performs the following functions.
Standby module operations
FastIron Ethernet Switch Layer 3 Routing Conguration Guide, 08.0.30mb
53-1003627-06 257
Neighbor database
Neighbor information is updated in the standby module based on updates from the active module. Certain neighbor state and interface
transitions are synchronized to the standby module. By default, the neighbor timers on the standby module are disabled.
LSA database
The standby module processes LSA synchronization events from the active module and unpacks the LSA synchronization information to
directly install it in its LSDB as the LSA has already been processed on the active module. The information required to install all types of
LSAs (and special LSAs such as Grace LSAs) is packed by OSPF on the active module in the synchronization buer, so that you can
directly install LSAs on the standby module without extra processing.
The standby module is not allowed to originate any LSAs of its own. This is to maintain all information consistently from the active
module. The active module synchronizes self-originated LSAs to the standby module.
LSA aging is not applicable on the standby module. During synchronization from the active, the current LSA age is recorded and the new
database timestamp is created on the standby to later derive the LSA age as needed.
When the active module sends the LSAs to the standby module, based on the message, the standby module deletes or updates its link
state database with the latest information.
LSA acknowledging or ooding are not done on the standby module. When the LSA synchronization update arrives from the active
module, it will be directly installed into the LSDB.
Enabling and disabling NSR
To enable NSR for OSPF, enter the following commands:
device(config)# router ospf
device(config-ospf-router)# nonstop-routing
To disable NSR for OSPF, enter the following commands:
device(config)# router ospf
device(config-ospf-router)# no nonstop-routing
Syntax: [no] nonstop-routing
If you enter the graceful-restart command when NSR is already enabled, the command is rejected with the following message: “Error -
Please disable NSR before enabling Graceful Restart.”
Similarly, if you enter the nonstop-routing command when graceful restart is already enabled, the command is rejected and the following
message is displayed: “Error - Please disable Graceful Restart before enabling NSR.”
To disable graceful-restart command, the following commands:
Brocade (config)# router ospf
Brocade (config-ospf-router)# no graceful-restart
Limitations of NSR
Following are the limitations of NSR:
•Congurations that occur before the switchover are lost due to the CLI synchronization.
• NSR does not support virtual link.
Enabling and disabling NSR
FastIron Ethernet Switch Layer 3 Routing Conguration Guide, 08.0.30mb
258 53-1003627-06
• Changes in the neighbor state or interface state before or during a switchover do not take eect.
•Trac counters are not synchronized because the neighbor and LSA database counters are recalculated on the standby module
during synchronization.
• LSA acknowledging is delayed because it has to wait until standby acknowledging occurs.
• Depending on the sequence of redistribution or new LSAs (from neighbors), the LSAs accepted within the limits of the database
may change after switchover.
• In NSR hitless failover, after switchover, additional ooding-related protocol trac is generated to the directly connected
neighbors.
• OSPF startup timers, database overow, and max-metric, are not applied during NSR switchover.
• Brocade NetIron devices may generate OSPF log messages or OSPF neighbor timers are reset but these issues do not cause
any OSPF or trac disruption.
Disabling conguration
To disable the route-map parameter from the conguration, enter the following command:
device(config-ospf-router)# no default-information-originate route-map defaultToOspf
The above CLI would retain the conguration with default-information-originate alone and the route-map option would get reset or
removed.
The following commands with any or all of the options will remove the options from the default-information-originate command if any
of the options are congured:
device(config-ospf-router)# no default-information-originate always
device(config-ospf-router)# no default-information-originate always route-map test
device(config-ospf-router)# no default-information-originate always route-map test metric 200
device(config-ospf-router)# no default-information-originate always route-map test metric 200 metric-type
type1
In the following example, the parameters of the default-information-originate command are reset if they are congured and if none of
the parameters are congured then, these commands will have no eect.
To disable the origination of default route, issue the command with no option and without any other options. This would remove the
conguration of the default information origination even if any of the above mentioned options are congured.
Syntax: [no] default-information-originate [ always ] [ metric metricvalue ] [ metric-type metric-type ] [ route-map rmap-name ]
The always parameter advertises the default route regardless of whether the router has a default route. This option is disabled by default.
The metric value parameter species a metric for the default route. If this option is not used, the default metric is used for the route.
The metric-type type parameter species the external link type associated with the default route advertised into the OSPF routing
domain. The type can be one of the following:
• type1 - Type 1 external route
• type2 - Type 2 external route
If you do not use this option, the default redistribution metric type is used for the route type.
Disabling conguration
FastIron Ethernet Switch Layer 3 Routing Conguration Guide, 08.0.30mb
53-1003627-06 259
NOTE
If you specify a metric and metric type, the values you specify are used even if you do not use the always option.
The route-map parameter overrides other options. If set commands for metric and metric-type are specied in the route-map, the
command-line values of metric and metric-type if specied, are ignored for clarication.
The route-map rmap parameter species the route map reference.
The corresponding route-map should be created before conguring the route-map option along with the default-information-originate.
If the corresponding route-map was not been created beforehand, then the an error message will be displayed stating that the route-map
must be created.
OSPF distribute list
This feature congures a distribution list to explicitly deny specic routes from being eligible for installation in the IP route table. By
default, all OSPF routes in the OSPF route table are eligible for installation in the IP route table. This feature does not block receipt of
LSAs for the denied routes. The device still receives the routes and installs them in the OSPF database. The feature only prevents the
software from installing the denied OSPF routes into the IP route table.
The OSPF distribution list can be managed using ACLs or Route Maps to identify routes to be denied as described in the following
sections:
•Conguring an OSPF Distribution List using ACLs
•Conguring an OSPF Distribution List using Route Maps
Conguring an OSPF distribution list using ACLs
To congure an OSPF distribution list using ACLs:
•Congure an ACL that identies the routes you want to deny. Using a standard ACL lets you deny routes based on the
destination network, but does not lter based on the network mask. To also lter based on the destination network's network
mask, use an extended ACL.
•Congure an OSPF distribution list that uses the ACL as input.
Examples
In the following example, the rst three commands congure a standard ACL that denies routes to any 10.x.x.x destination network and
allows all other routes for eligibility to be installed in the IP route table. The last three commands change the CLI to the OSPF
conguration level and congure an OSPF distribution list that uses the ACL as input. The distribution list prevents routes to any 10.x.x.x
destination network from entering the IP route table. The distribution list does not prevent the routes from entering the OSPF database.
device(config)# ip access-list standard no_ip
device(config-std-nacl)# deny 10.0.0.0 0.255.255.255
device(config-std-nacl)# permit any
device(config)# router ospf
device(config-ospf-router) # area 0
device(config-ospf-router) # distribute-list no_ip in
In the following example, the rst three commands congure an extended ACL that denies routes to any 10.31.39.x destination network
and allows all other routes for eligibility to be installed in the IP route table. The last three commands change the CLI to the OSPF
conguration level and congure an OSPF distribution list that uses the ACL as input. The distribution list prevents routes to any
OSPF distribute list
FastIron Ethernet Switch Layer 3 Routing Conguration Guide, 08.0.30mb
260 53-1003627-06
10.31.39.x destination network from entering the IP route table. The distribution list does not prevent the routes from entering the OSPF
database.
device(config)# ip access-list extended DenyNet39
device(config-ext-nacl)# deny ip 10.31.39.0 0.0.0.255 any
device(config-ext-nacl)# permit ip any any
device(config)# router ospf
device(config-ospf-router) # area 0
device(config-ospf-router) # distribute-list DenyNet39 in
In the following example, the rst command congures a numbered ACL that denies routes to any 10.31.39.x destination network and
allows all other routes for eligibility to be installed in the IP route table. The last three commands change the CLI to the OSPF
conguration level and congure an OSPF distribution list that uses the ACL as input. The distribution list prevents routes to any
10.31.39.x destination network from entering the IP route table. The distribution list does not prevent the routes from entering the OSPF
database.
device(config)# ip access-list 100 deny ip 10.31.39.0 0.0.0.255 any
device(config)# ip access-list 100 permit ip any any
device(config)# router ospf
device(config-ospf-router) # area 0
device(config-ospf-router) # distribute-list 100 in
Syntax: [no] distribute-list { acl-name | acl-number } in
The distribute-list command is applied globally to all interfaces on the router where it is executed.
Conguring an OSPF distribution list using route maps
You can manage an OSPF distribution list using route maps that apply match operations as dened by an ACL or an IP prex list. You
can also use other options available within the route maps and ACLs to further control the contents of the routes that OSPF provides to
the IP route table. This section describes an example of an OSPF distribution list using a route map to specify an OSPF administrative
distance for routes identied by an IP prex list.
To congure an OSPF distribution list using route maps:
•Congure a route map that identies the routes you want to manage
• Optionally congure an OSPF administrative distance to apply to the OSPF routes
•Congure an OSPF distribution list that uses the route map as input
In the following example, the rst two commands identify two routes using the ip prex-list test1 command. Next, a route map is created
that uses the prex-list test1 command to identify the two routes and the set distance command to set the OSPF administrative
distance of those routes to 200. A distribution list is then congured under the OSPF conguration that uses the route map named
“setdistance” as input.
device(config)# ip prefix-list test1 seq 5 permit 10.0.0.2/32
device(config)# ip prefix-list test1 seq 10 permit 10.102.1.0/24
device(config)# route-map setdistance permit 1
device(config-routemap setdistance)# match ip address prefix-list test1
device(config-routemap setdistance)# set distance 200
device(config-routemap setdistance)# exit
device(config)# route-map setdistance permit 2
device(config-routemap setdistance)# exit
device(config)# router ospf
device(config-ospf-router)# area 0
device(config-ospf-router)# area 1
device(config-ospf-router)# distribute-list route-map setdistance in
device(config-ospf-router)# exit
OSPF distribute list
FastIron Ethernet Switch Layer 3 Routing Conguration Guide, 08.0.30mb
53-1003627-06 261
Once this conguration is implemented, the routes identied by the ip prex-list command and matched in the route map will have their
OSPF administrative distance to 200. This is displayed in the output from the show ip route command, as shown in the following.
device# show ip route
Total number of IP routes: 4
Type Codes - B:BGP D:Connected O:OSPF R:RIP S:Static; Cost - Dist/Metric
BGP Codes - i:iBGP e:eBGP
OSPF Codes - i:Inter Area 1:External Type 1 2:External Type 2
Destination Gateway Port Cost Type Uptime
1 10.0.0.2/32 10.1.1.2 ve 100 200/501 O 1h3m
2 10.102.1.0/24 10.1.1.2 ve 100 200/2 O 1h3m
3 10.102.6.0/24 10.1.1.2 ve 100 110/2 O 1h3m
4 10.102.8.0/30 DIRECT ve 100 0/0 D 1h4m
Routes 1 and 2 demonstrate the actions of the example conguration as both display an OSPF administrative distance value of 200.
Note that the value is applied to both OSPF learned routes that match the route-map instance containing the set distance clause. The
other OSPF route (route 3), which does not match the relevant instance, continues to have the default OSPF administrative distance of
110.
The following is an example of the distribute-list command applied with route-map “setdistance” set as the input.
device(config-ospf-router)# distribute-list route-map setdistance in
Syntax: [no] distribute-list route-map routemap-name in
The routemap-name variable species the name of the route map being used to dene the OSPF distribute list.
The distribute-list command is applied to all OSPF LSAs on the router where it is executed.
NOTE
A route map used with the distribute-list command can use either the ip prex-list command (as shown in the example) or an
ACL to dene the routes.
The set distance command is used in association with a route map conguration.
Modify SPF timers
The device uses the following timers when calculating the shortest path for OSPF routes:
•SPF delay - When the device receives a topology change, the software waits before it starts a Shortest Path First (SPF)
calculation. By default, the software waits 0 (zero) seconds. You can congure the SPF delay to a value from 0 - 65535
seconds. If you set the SPF delay to 0 seconds, the software immediately begins the SPF calculation after receiving a topology
change.
• SPF hold time - The device waits for a specic amount of time between consecutive SPF calculations. By default, the device
waits zero seconds. You can congure the SPF hold time to a value from 0 - 65535 seconds. If you set the SPF hold time to 0
seconds, the software does not wait between consecutive SPF calculations.
You can set the delay and hold time to lower values to cause the device to change to alternate paths more quickly in the event of a route
failure. Note that lower values require more CPU processing time.
You can change one or both of the timers.
To change the SPF delay and hold time, enter commands such as the following.
device(config-ospf-router)# timers spf 10 20
The command in this example changes the SPF delay to 10 seconds and changes the SPF hold time to 20 seconds.
OSPF distribute list
FastIron Ethernet Switch Layer 3 Routing Conguration Guide, 08.0.30mb
262 53-1003627-06
To set the timers back to their default values, enter a command such as the following.
device(config-ospf-router)# no timers spf 10 20
Syntax: [no] timers spf delay hold-time
The delay parameter species the SPF delay.
The hold-time parameter species the SPF hold time.
NOTE
OSPF incrementally updates the OSPF routing table when new Type-3 or Type-4 Summary, Type-5 External, or Type-7
External NSSA LSAs are received.
Modify redistribution metric type
The redistribution metric type is used by default for all routes imported into OSPF unless you specify dierent metrics for individual
routes using redistribution lters. Type 2 species a big metric (three bytes). Type 1 species a small metric (two bytes). The default value
is type 2.
To modify the default value to type 1, enter the following command.
device(config-ospf-router)# metric-type type1
Syntax: [no] metric-type type1 | type2
The default is type2.
Modify administrative distance
The device can learn about networks from various protocols, including Border Gateway Protocol version 4 (BGP4), RIP, and OSPF.
Consequently, the routes to a network may dier depending on the protocol from which the routes were learned. The default
administrative distance for OSPF routes is 110.
The router selects one route over another based on the source of the route information. To do so, the router can use the administrative
distances assigned to the sources. You can bias the decision the device makes by changing the default administrative distance for OSPF
routes.
Conguring administrative distance based on route type
You can congure a unique administrative distance for each type of OSPF route. For example, you can use this feature to prefer a static
route over an OSPF inter-area route but you also want to prefer OSPF intra-area routes to static routes.
The distance you specify inuences the choice of routes when the device has multiple routes for the same network from dierent
protocols. The device prefers the route with the lower administrative distance.
You can specify unique default administrative distances for the following route types:
• Intra-area routes
• Inter-area routes
• External routes
The default for all these OSPF route types is 110.
OSPF distribute list
FastIron Ethernet Switch Layer 3 Routing Conguration Guide, 08.0.30mb
53-1003627-06 263
NOTE
This feature does not inuence the choice of routes within OSPF. For example, an OSPF intra-area route is always preferred
over an OSPF inter-area route, even if the intra-area route’s distance is greater than the inter-area route’s distance.
To change the default administrative distances for inter-area routes, intra-area routes, and external routes, enter the following command.
device(config-ospf-router)# distance external 100
device(config-ospf-router)# distance inter-area 90
device(config-ospf-router)# distance intra-area 80
Syntax: [no] distance { external | inter-area | intra-area } distance
The distance external, inter-area , and intra-area parameters specify the route type for which you are changing the default administrative
distance.
The distance parameter species the new distance for the specied route type. Unless you change the distance for one of the route
types using commands such as those shown above, the default is 110.
To reset the administrative distance to its system default (110), enter a command such as the following.
device(config-ospf-router)# no distance external 100
Congure OSPF group LSA pacing
The device paces Link State Advertisement (LSA) refreshes by delaying the refreshes for a specied time interval instead of performing a
refresh each time an individual LSA refresh timer expires. The accumulated LSAs constitute a group, which the device refreshes and
sends out together in one or more packets.
The pacing interval, which is the interval at which the device refreshes an accumulated group of LSAs, is congurable to a range from 10
- 1800 seconds (30 minutes). The default is 240 seconds (four minutes). Thus, every four minutes, the device refreshes the group of
accumulated LSAs and sends the group together in the same packets.
Usage guidelines
The pacing interval is inversely proportional to the number of LSAs the device is refreshing and aging. For example, if you have
approximately 10,000 LSAs, decreasing the pacing interval enhances performance. If you have a very small database (40 - 100 LSAs),
increasing the pacing interval to 10 - 20 minutes might enhance performance slightly.
Changing the LSA pacing interval
To change the LSA pacing interval, use the following CLI method.
To change the LSA pacing interval to two minutes (120 seconds), enter the following command.
device(config-ospf-router)# timers lsa-group-pacing 120
Syntax: [no] timers lsa-group-pacing secs
The secs parameter species the number of seconds and can be from 10 - 1800 (30 minutes). The default is 240 seconds (four
minutes).
To restore the pacing interval to its default value, enter the following command.
device(config-ospf-router)# no timers lsa-group-pacing
OSPF distribute list
FastIron Ethernet Switch Layer 3 Routing Conguration Guide, 08.0.30mb
264 53-1003627-06
Modify OSPF traps generated
OSPF traps as dened by RFC 1850 are supported on device.
You can disable all or specic OSPF trap generation by entering the following CLI command.
device(config)# no snmp-server trap ospf
To later re-enable the trap feature, enter snmp-server trap ospf .
To disable a specic OSPF trap, enter the command as no snmp-server trap ospf ospf-trap.
These commands are at the OSPF router Level of the CLI.
Here is a summary of OSPF traps supported on device, their corresponding CLI commands, and their associated MIB objects from RFC
1850. The rst list are traps enabled by default:
•interface-state-change-trap - [MIB object: OspfIfstateChange]
•virtual-interface-state-change-trap - [MIB object: OspfVirtIfStateChange
•neighbor-state-change-trap - [MIB object:ospfNbrStateChange]
•virtual-neighbor-state-change-trap - [MIB object: ospfVirtNbrStateChange]
•interface-cong-error-trap - [MIB object: ospfIfCongError]
•virtual-interface-cong-error-trap - [MIB object: ospfVirtIfCongError]
•interface-authentication-failure-trap - [MIB object: ospfIfAuthFailure]
•virtual-interface-authentication-failure-trap - [MIB object: ospfVirtIfAuthFailure]
•interface-receive-bad-packet-trap - [MIB object: ospfIfrxBadPacket]
•virtual-interface-receive-bad-packet-trap - [MIB object: ospfVirtIfRxBadPacket]
The following traps are disabled by default.
•interface-retransmit-packet-trap - [MIB object: ospfTxRetransmit]
•virtual-interface-retransmit-packet-trap - [MIB object: ospfVirtIfTxRetransmit]
•originate-lsa-trap - [MIB object: ospfOriginateLsa]
•originate-maxage-lsa-trap - [MIB object: ospfMaxAgeLsa]
•link-state-database-overow-trap - [MIB object: ospfLsdbOverow]
•link-state-database-approaching-overow-trap - [MIB object: ospfLsdbApproachingOverow
To stop an OSPF trap from being collected, use the CLI command: no trap ospf-trap at the Router OSPF level of the CLI. To disable
reporting of the neighbor-state-change-trap, enter the following command.
device(config-ospf-router)# no trap neighbor-state-change-trap
To reinstate the trap, enter the following command.
device(config-ospf-router)# trap neighbor-state-change-trap
Syntax: [no] trap ospf-trap
Modify exit overow interval
If a database overow condition occurs on a router, the router eliminates the condition by removing entries that originated on the router.
The exit overow interval allows you to set how often a device checks to see if the overow condition has been eliminated. The default
value is 0. The range is 0 - 86400 seconds (24 hours). If the congured value of the database overow interval is zero, then the router
never leaves the database overow condition.
OSPF distribute list
FastIron Ethernet Switch Layer 3 Routing Conguration Guide, 08.0.30mb
53-1003627-06 265
To modify the exit overow interval to 60 seconds, enter the following command.
device(config-ospf-router)# database-overflow-interval 60
Syntax: [no] database-overow-interval value
The value can be from 0 - 86400 seconds. The default is 0 seconds.
Specify types of OSPF Syslog messages to log
You can specify which kinds of OSPF-related Syslog messages are logged. By default, the only OSPF messages that are logged are
those indicating possible system errors. If you want other kinds of OSPF messages to be logged, you can congure the device to log
them.
For example, to specify that all OSPF-related Syslog messages be logged, enter the following commands.
device(config)# router ospf
device(config-ospf-router)# log all
Syntax: [no] log { all | adjacency [ dr-only ] | bad_packet [ checksum ] | database | memory | retransmit }
The log command has the following options:
The all option causes all OSPF-related Syslog messages to be logged. If you later disable this option with the no log all command, the
OSPF logging options return to their default settings.
The adjacency option logs essential OSPF neighbor state changes, especially on error cases. This option is disabled by default. The dr-
only sub-option only logs essential OSPF neighbor state changes where the interface state is designated router (DR).
NOTE
For interfaces where the designated router state is not applicable, such as point-to-point and virtual links, OSPF neighbor state
changes will always be logged irrespective of the setting of the dr-only sub-option.
NOTE
A limitation with the dr-only sub-option is that when a DR/BDR election is underway, OSPF neighbor state changes pertaining
to non-DR/BDR routers are not logged. Logging resumes once a DR is elected on that network.
The bad_packet checksum option logs all OSPF packets that have checksum errors. This option is enabled by default.
The bad_packet option logs all other bad OSPF packets. This option is disabled by default.
The database option logs OSPF LSA-related information. This option is disabled by default.
The memory option logs abnormal OSPF memory usage. This option is enabled by default.
The retransmit option logs OSPF retransmission activities. This option is disabled by default.
Conguring an OSPF network type
To congure an OSPF network, enter commands such as the following.
device(config)# interface ethernet 1/1/5
device(config-if-1/1/5)# ip ospf network point-to-point
This command congures an OSPF point-to-point link on Interface 5 in slot 1 in unit 1.
Syntax: [no] ip ospf network { point-to-point | broadcast | non-broadcast }
The point-to-point option congures the network type as a point to point connection. This is the default option for tunnel interfaces.
OSPF distribute list
FastIron Ethernet Switch Layer 3 Routing Conguration Guide, 08.0.30mb
266 53-1003627-06
NOTE
Brocade devices support numbered point-to-point networks, meaning the OSPF router must have an IP interface address
which uniquely identies the router over the network. Brocade devices do not support unnumbered point-to-point networks.
The broadcast option congures the network type as a broadcast connection. This is the default option for Ethernet, VE and Loopback
interfaces.
The non-broadcast option congures the network type as a non-broadcast connection. This allows you to congure the interface to send
OSPF trac to its neighbor as unicast packets rather than multicast packets. This can be useful in situations where multicast trac is not
feasible (for example when a rewall does not allow multicast packets).
On a non-broadcast interface, the routers at either end of this interface must congure non-broadcast interface type and the neighbor IP
address. There is no restriction on the number of routers sharing a non-broadcast interface (for example, through a hub/switch).
To congure an OSPF interface as a non-broadcast interface, you enable the feature on a physical interface or a VE, following the ip ospf
area statement, and then specify the IP address of the neighbor in the OSPF conguration. The non-broadcast interface conguration
must be done on the OSPF routers at either end of the link.
For example, the following commands congure VE 20 as a non-broadcast interface.
device(config)# interface ve 20
device(config-vif-20)# ip address 10.1.20.4/24
device(config-vif-20)# ip ospf area 0
device(config-vif-20)# ip ospf network non-broadcast
The following commands specify 10.1.20.1 as an OSPF neighbor address. The address specied must be in the same sub-net as the
non-broadcast interface.
device(config)# router ospf
device(config-ospf-router)# neighbor 10.1.20.1
For example, to congure the feature in a network with three routers connected by a hub or switch, each router must have the linking
interface congured as a non-broadcast interface, and the two other routers must be specied as neighbors.
Conguring OSPF Graceful Restart
OSPF Graceful Restart can be enabled in the following congurations:
•Conguring OSPF Graceful Restart for the Global Instance - In this conguration all OSPF neighbors other than those used
by VRFs are made subject to the Graceful Restart capability. The restart timer set globally does not apply to Graceful Restart on
a congured VRF.
•Conguring OSPF Graceful Restart per VRF - In this conguration all OSPF neighbors for the specied VRF are made
subject to the Graceful Restart capability. The restart timer set for a specic VRF only applies to that VRF.
Conguring OSPF Graceful Restart for the global instance
OSPF Graceful restart can be congured for the global instance or for a specied Virtual Routing and Forwarding (VRF) instance.
Conguring OSPF Graceful restart for the global instance does not congure it for any VRFs. The following sections describe how to
enable the OSPF graceful restart feature for the global instance on a device.
Use the following command to enable the graceful restart feature for the global instance on a device.
device(config)# router ospf
device(config-ospf-router)# graceful-restart
Syntax: [no] graceful-restart
OSPF distribute list
FastIron Ethernet Switch Layer 3 Routing Conguration Guide, 08.0.30mb
53-1003627-06 267
Conguring OSPF Graceful Restart time for the global instance
Use the following command to specify the maximum amount of time advertised to a neighbor router to maintain routes from and
forward trac to a restarting router.
device(config)# router ospf
device(config-ospf-router)# graceful-restart restart-time 120
Syntax: [no] graceful-restart restart-time seconds
The seconds variable sets the maximum restart wait time advertised to neighbors.
Possible values are 10 - 1800 seconds.
The default value is 120 seconds.
Disabling OSPF Graceful Restart helper mode for the global instance
By default, a router supports other restarting routers as a helper. You can prevent your router from participating in OSPF Graceful Restart
by using the following command.
device(config)# router ospf
device(config-ospf-router)# graceful-restart helper-disable
Syntax: [no] graceful-restart helper-disable
This command disables OSPF Graceful Restart helper mode.
The default behavior is to help the restarting neighbors.
Conguring OSPF Graceful Restart per VRF
The following sections describe how to enable the OSPF Graceful Restart feature on a specied VRF.
Use the following command to enable the graceful restart feature on a specied VRF.
device(config)# router ospf vrf blue
device(config-ospf-router)# graceful-restart
Syntax: [no] graceful-restart
NOTE
By default, graceful restart is enabled.
Conguring OSPF Graceful Restart time per VRF
Use the following command to specify the maximum amount of time advertised to an OSPF neighbor router to maintain routes from
and forward trac to a restarting router.
device(config)# router ospf vrf blue
device(config-ospf-router)# graceful-restart restart-time 120
Syntax: [no] graceful-restart restart-time seconds
The seconds variable sets the maximum restart wait time advertised to OSPF neighbors of the VRF.
Possible values are 10 - 1200 seconds.
The default value is 60 seconds.
OSPF distribute list
FastIron Ethernet Switch Layer 3 Routing Conguration Guide, 08.0.30mb
268 53-1003627-06
Disabling OSPF Graceful Restart helper mode per VRF
You can prevent your router from participating in OSPF Graceful Restart with VRF neighbors by using the following command.
device(config)# router ospf vrf blue
device(config-ospf-router)# graceful-restart helper-disable
Syntax: [no] graceful-restart helper-disable
This command disables OSPF Graceful Restart helper mode.
The default behavior is to help the restarting neighbors.
Conguring OSPF router advertisement
You can congure OSPF router advertisement in the router ospf mode orrouter ospf vrf mode as shown in the following examples.
device(config)# router ospf
device(config-ospf-router)# max-metric router-lsa all-vrfs on-startup 30 link all
device(config)# router ospf vrf blue
device(config-ospf-router)# max-metric router-lsa on-startup 30 link all
Syntax: [no] max-metric router-lsa [ all-vrfs ] [ on-startup { time | wait-for-bgp } ] [ summary-lsa metric-value ] [ external-lsa metric-
value ] [ te-lsa metric-value ] [ all-lsas ] [ link { ptp | stub | transit | all } ]
The all-vrfs parameter species that the command will be applied to all VRF instances of OSPFv2.
NOTE
This command is supported only for VRFs that are already congured when the max-metric router-lsa all-vrfs command is
issued.
Any new OSPF instance congured after the max-metric conguration is completed requires that the max-metric command be
congured again to take in the new OSPF instance.
The on-startup parameter species that the OSPF router advertisement be performed at the next system startup. This is an optional
parameter.
When using the on-startup option you can set a time in seconds for which the specied links in Router LSA will be advertised with the
metric set to a maximum value of 0xFFFF. Optional values for time are 5 to 86400 seconds. There is no default value for time.
The wait-for-bgp option for the on-startup parameter directs OSPF to wait for either 600 seconds or until BGP has nished route table
convergence (whichever event happens rst), before advertising the links with the normal metric.
Using the link parameter you can specify the type of links for which the maximum metric is to be advertised. The default value is for
maximum metric to be advertised for transit links only. This is an optional parameter.
Additional options are supported that allow you to select the following LSA types and set the required metric:
The summary-lsa option species that the metric for all summary type 3 and type 4 LSAs will be modied to the specied metric-value
or the default value. The range of possible values for the metric-value variable are 1 to 16777214 (Hex: 0x00001 to 0x00FFFFFE).
The default value is 16711680 (Hex: 0x00FF0000).
The external-lsa option species that the metric for all external type 5 and type 7 LSAs will be modied to the specied metric-value or
a default value. The range of possible values for the metric-value variable are 1 to 16777214 (Hex: 0x00001 to 0x00FFFFFE). The
default value is 16711680 (Hex: 0x00FF0000).
The te-lsa option species that the TE metric eld in the TE metric sub tlv for all type 10 Opaque LSAs LINK TLV originated by the
router will be modied to the specied metric-value or a default value. The range of possible values for the metric-value variable are 1 to
4294967295 (Hex: 0x00001 to 0xFFFFFFFF). The default value is 4294967295 (Hex: 0xFFFFFFFF). This parameter only applies
to the default instance of OSPF.
OSPF distribute list
FastIron Ethernet Switch Layer 3 Routing Conguration Guide, 08.0.30mb
53-1003627-06 269
Examples
The following examples of the command max-metric router-lsa command demonstrate how it can be used:
The following command indicates that OSPF is being shutdown and that all links in the router LSA should be advertised with the value
0xFFFF and the metric value for all external and summary LSAs is set to 0xFF0000 until OSPF is restarted. This conguration will not
be saved.
device(config)# router ospf
device(config-ospf-router)# max-metric router-lsa external-lsa summary-lsa link all
The following command indicates that OSPF is being shutdown and that all links in the router LSA should be advertised with the value
0xFFFF and the metric value for all external and summary LSAs should be set to 0xFF0000 until OSPF is restarted. Also, if OSPF TE
is enabled then all LINK TLVs advertised by the router in Opaque LSAs should be updated with the TE Metric set to 0xFFFFFFFF and
the available bandwidth set to 0. This conguration will not be saved.
device(config)# router ospf
device(config-ospf-router)# max-metric router-lsa all-lsas link all
The following command indicates that OSPF is being shutdown and that all links in the router LSA should be advertised with the value
0xFFFF and the metric value for all summary LSAs should be set to 0xFFFFFE until OSPF is restarted. This conguration will not be
saved.
device(config)# router ospf
device(config-ospf-router)# max-metric router-lsa summary-lsa 16777214 link all
The following command turns o the advertisement of special metric values in all Router, Summary, and External LSAs.
device(config)# router ospf
device(config-ospf-router)# no max-metric router-lsa
Conguring OSPF shortest path rst throttling
To set OSPF shortest path rst throttling to the values in the previous example, use the following command.
device(config-ospf-router)# timer throttle spf 200 300 2000
Syntax: [no] timer throttle spf initial-delay hold-time max-hold-time
The initial-delay variable sets the initial value for the SPF delay in milliseconds. Possible values are between 0 and 65535 milliseconds.
The hold-time variable sets the minimum hold time between SPF calculations after the initial delay. This value will be doubled after hold-
time expires until the max-hold-time is reached. Possible values are between 0 and 65535 milliseconds.
The max-hold-time variable sets the maximum hold time between SPF calculations Possible values are between 0 and 65535
milliseconds.
NOTE
The hold time values that you specify are rounded up to the next highest 100 ms value. For example, any value between 0 and
99 will be congured as 100 ms.
Command replacement
This command overlaps in functionality with the timer throttle spf command which will be phased out. To use this command to replicate
the exact functionality of the timer throttle spf command congure it as shown in the following.
device(config-ospf-router)# timer throttle spf 1000 5000 5000
OSPF distribute list
FastIron Ethernet Switch Layer 3 Routing Conguration Guide, 08.0.30mb
270 53-1003627-06
Displaying OSPF Router Advertisement
Using the show ip ospf command you can display the current OSPF Router Advertisement conguration.
device# show ip ospf
OSPF Version Version 2
Router Id 192.168.98.213
ASBR Status Yes
ABR Status Yes (1)
Redistribute Ext Routes from Connected RIP
Initial SPF schedule delay 0 (msecs)
Minimum hold time for SPFs 0 (msecs)
Maximum hold time for SPFs 0 (msecs)
External LSA Counter 2
External LSA Checksum Sum 000104fc
Originate New LSA Counter 737
Rx New LSA Counter 1591
External LSA Limit 6990506
Database Overflow Interval 0
Database Overflow State : NOT OVERFLOWED
RFC 1583 Compatibility : Enabled
NSSA Translator: Enabled
Nonstop Routing: Disabled
Graceful Restart: Enabled, timer 120
Graceful Restart Helper: Enabled O 35m5s
Displaying OSPF information
You can use CLI commands and Web management options to display the following OSPF information:
• Trap, area, and interface information
• CPU utilization statistics
• Area information
• Neighbor information
• Interface information
• Route information
• External link state information
• Database Information
• Link state information
• Virtual Neighbor information
• Virtual Link information
• ABR and ASBR information
• Trap state information
• OSPF Point-to-Point Links
• OSPF Graceful Restart information
• OSPF Router Advertisement information
Displaying general OSPF conguration information
To display general OSPF conguration information, enter the following command at any CLI level.
device# show ip ospf config
Router OSPF: Enabled
Displaying OSPF information
FastIron Ethernet Switch Layer 3 Routing Conguration Guide, 08.0.30mb
53-1003627-06 271

Nonstop Routing: Disabled
Graceful Restart: Disabled
Graceful Restart Helper: Enabled
Graceful Restart Time: 120
Graceful Restart Notify Time: 0
Redistribution: Disabled
Default OSPF Metric: 50
OSPF Auto-cost Reference Bandwidth: Disabled
Default Passive Interface: Enabled
OSPF Redistribution Metric: Type2
OSPF External LSA Limit: 1447047
OSPF Database Overflow Interval: 0
RFC 1583 Compatibility: Enabled
Router id: 10.95.11.128
Interface State Change Trap: Enabled
Virtual Interface State Change Trap: Enabled
Neighbor State Change Trap: Enabled
Virtual Neighbor State Change Trap: Enabled
Interface Configuration Error Trap: Enabled
Virtual Interface Configuration Error Trap: Enabled
Interface Authentication Failure Trap: Enabled
Virtual Interface Authentication Failure Trap: Enabled
Interface Receive Bad Packet Trap: Enabled
Virtual Interface Receive Bad Packet Trap: Enabled
Interface Retransmit Packet Trap: Disabled
Virtual Interface Retransmit Packet Trap: Disabled
Originate LSA Trap: Disabled
Originate MaxAge LSA Trap: Disabled
Link State Database Overflow Trap: Disabled
Link State Database Approaching Overflow Trap: Disabled
OSPF Area currently defined:
Area-ID Area-Type Cost
0 normal 0
OSPF Interfaces currently defined:
Ethernet Interface: 1/3/1-1/3/2
ip ospf md5-authentication-key-activation-wait-time 300
ip ospf cost 0
ip ospf area 0
Ethernet Interface: v1
ip ospf md5-authentication-key-activation-wait-time 300
ip ospf cost 0
ip ospf area 0
Syntax: show ip ospf cong
The information related to the OSPF interface state is shown in bold text in the previous output.
TABLE 56 show ip ospf cong output descriptions
Field Description
Router OSPF Shows whether or not the router OSPF is enabled.
Nonstop Routing Shows whether or not the non-stop routing is enabled.
Graceful Restart Shows whether or not the graceful restart is enabled.
Graceful Restart Helper Shows whether or not the OSPF graceful restart helper mode is enabled.
Graceful Restart Time Shows the maximum restart wait time advertised to neighbors.
Graceful Restart Notify Time Shows the graceful restart notication time.
Redistribution Shows whether or not the redistribution is enabled.
Default OSPF Metric Shows the default OSPF metric value.
OSPF Auto-cost Reference Bandwidth Shows whether or not the auto-cost reference bandwidth option is
enabled.
Default Passive Interface Shows whether or not the default passive interface state is enabled.
Displaying OSPF information
FastIron Ethernet Switch Layer 3 Routing Conguration Guide, 08.0.30mb
272 53-1003627-06

TABLE 56 show ip ospf cong output descriptions (continued)
Field Description
OSPF Redistribution Metric Shows the OSPF redistribution metric type, which can be one of the
following:
• Type1
• Type2
OSPF External LSA Limit Shows the external LSA limit value.
OSPF Database Overow Interval Shows the database overow interval value.
RFC 1583 Compatibility Shows whether or not the RFC 1583 compatibility is enabled.
Router id Shows the ID of the OSPF router.
OSPF traps Shows whether or not the following OSPF traps generation is enabled.
• Interface State Change Trap
• Virtual Interface State Change Trap
• Neighbor State Change Trap
• Virtual Neighbor State Change Trap
• Interface Conguration Error Trap
• Virtual Interface Conguration Error Trap
• Interface Authentication Failure Trap
• Virtual Interface Authentication Failure Trap
• Interface Receive Bad Packet Trap
• Virtual Interface Receive Bad Packet Trap
• Interface Retransmit Packet Trap
• Virtual Interface Retransmit Packet Trap
• Originate LSA Trap
• Originate MaxAge LSA Trap
• Link State Database Overow Trap
• Link State Database Approaching Overow Trap
Area-ID Shows the area ID of the interface.
Area-Type Shows the area type, which can be one of the following:
• nssa
• normal
• stub
Cost Shows the cost of the area.
Ethernet Interface Shows the OSPF interface.
ip ospf md5-authentication-key-activation-wait-time Shows the wait time of the device until placing a new MD5 key into eect.
ip ospf area Shows the area of the interface.
ip ospf cost Shows the overhead required to send a packet across an interface.
Displaying OSPF area information
To display OSPF area information, enter the following command at any CLI level.
device# show ip ospf area
Indx Area Type Cost SPFR ABR ASBR LSA Chksum(Hex)
1 0.0.0.0 normal 0 1 0 0 1 0000781f
2 10.147.60.0 normal 0 1 0 0 1 0000fee6
3 10.147.80.0 stub 1 1 0 0 2 000181cd
Syntax: show ip ospf area [ area-id ] [ num ]
Displaying OSPF information
FastIron Ethernet Switch Layer 3 Routing Conguration Guide, 08.0.30mb
53-1003627-06 273

The area-id parameter shows information for the specied area.
The num parameter identies the position of the entry number in the area table.
TABLE 57 show ip ospf area output descriptions
This eld Displays
Index The row number of the entry in the router’s OSPF area table.
Area The area number.
Type The area type, which can be one of the following:
• nssa
• normal
• stub
Cost The area’s cost.
SPFR The SPFR value.
ABR The ABR number.
ASBR The ABSR number.
LSA The LSA number.
Chksum(Hex) The checksum for the LSA packet. The checksum is based on all the elds
in the packet except the age eld. The device uses the checksum to verify
that the packet is not corrupted.
Displaying OSPF neighbor information
To display OSPF neighbor information, enter the following command at any CLI level.
device# show ip ospf neighbor
Port Address Pri State Neigh Address Neigh ID Ev Op Cnt
v10 10.1.10.1 1 FULL/DR 10.1.10.2 10.65.12.1 5 2 0
v11 10.1.11.1 1 FULL/DR 10.1.11.2 10.65.12.1 5 2 0
v12 10.1.12.1 1 FULL/DR 10.1.12.2 10.65.12.1 5 2 0
v13 10.1.13.1 1 FULL/DR 10.1.13.2 10.65.12.1 5 2 0
v14 10.1.14.1 1 FULL/DR 10.1.14.2 10.65.12.1 5 2 0
Syntax: show ip ospf neighbor [ router-id ip-addr | num | extensive ]
The router-id ip-addr parameter displays only the neighbor entries for the specied router.
The num parameter displays only the entry in the specied index position in the neighbor table. For example, if you enter "1", only the rst
entry in the table is displayed.
The extensive option displays detailed information about the neighbor.
TABLE 58 show ip ospf neighbor output descriptions
Field Description
Port The port through which the device is connected to the neighbor.
Address The IP address of the port on which this device is connected to the
neighbor.
Pri The OSPF priority of the neighbor.
• For multi-access networks, the priority is used during election of
the Designated Router (DR) and Backup designated Router
(BDR).
• For point-to-point links, this eld shows one of the following
values:
Displaying OSPF information
FastIron Ethernet Switch Layer 3 Routing Conguration Guide, 08.0.30mb
274 53-1003627-06

TABLE 58 show ip ospf neighbor output descriptions (continued)
Field Description
• 1 = point-to-point link
• 3 = point-to-point link with assigned subnet
State The state of the conversation between the device and the neighbor. This
eld can have one of the following values:
• Down - The initial state of a neighbor conversation. This value
indicates that there has been no recent information received
from the neighbor.
• Attempt - This state is only valid for neighbors attached to non-
broadcast networks. It indicates that no recent information has
been received from the neighbor.
• Init - A Hello packet has recently been seen from the neighbor.
However, bidirectional communication has not yet been
established with the neighbor. (The router itself did not appear in
the neighbor's Hello packet.) All neighbors in this state (or
higher) are listed in the Hello packets sent from the associated
interface.
• 2-Way - Communication between the two routers is
bidirectional. This is the most advanced state before beginning
adjacency establishment. The Designated Router and Backup
Designated Router are selected from the set of neighbors in the
2-Way state or greater.
• ExStart - The rst step in creating an adjacency between the two
neighboring routers. The goal of this step is to decide which
router is the master, and to decide upon the initial Database
Description (DD) sequence number. Neighbor conversations in
this state or greater are called adjacencies.
• Exchange - The router is describing its entire link state database
by sending Database Description packets to the neighbor. Each
Database Description packet has a DD sequence number, and
is explicitly acknowledged. Only one Database Description
packet can be outstanding at any time. In this state, Link State
Request packets can also be sent asking for the neighbor's
more recent advertisements. All adjacencies in Exchange state
or greater are used by the ooding procedure. In fact, these
adjacencies are fully capable of transmitting and receiving all
types of OSPF routing protocol packets.
• Loading - Link State Request packets are sent to the neighbor
asking for the more recent advertisements that have been
discovered (but not yet received) in the Exchange state.
• Full - The neighboring routers are fully adjacent. These
adjacencies will now appear in router links and network link
advertisements.
Neigh Address The IP address of the neighbor.
For point-to-point links, the value is as follows:
• If the Pri eld is "1", this value is the IP address of the neighbor
router’s interface.
• If the Pri eld is "3", this is the subnet IP address of the neighbor
router’s interface.
Neigh ID The neighbor router’s ID.
Ev The number of times the neighbor’s state changed.
Opt The sum of the option bits in the Options eld of the Hello packet. This
information is used by Brocade technical support. Refer to Section A.2 in
RFC 2178 for information about the Options eld in Hello packets.
Displaying OSPF information
FastIron Ethernet Switch Layer 3 Routing Conguration Guide, 08.0.30mb
53-1003627-06 275

TABLE 58 show ip ospf neighbor output descriptions (continued)
Field Description
Cnt The number of LSAs that were retransmitted.
Displaying OSPF interface information
To display OSPF interface information, enter the following command at any CLI level. The details of interface options are highlighted in
the output.
device# show ip ospf interface ethernet 1/1/11
Ethernet 1/1/11 admin up, oper up
IP Address 15.1.1.15, Area 0
Database Filter: Not Configured
State active(default passive), Pri 1, Cost 1, Options 2,Type broadcast Events 2
Timers(sec): Transmit 1, Retrans 5, Hello 10, Dead 40
DR: Router ID 192.168.254.1 Interface Address 15.1.1.1
BDR: Router ID 10.0.0.15 Interface Address 15.1.1.15
Neighbor Count = 1, Adjacent Neighbor Count= 1
Neighbor: 15.1.1.1 (DR)
Authentication-Key: None
MD5 Authentication: Key None, Key-Id None, Auth-change-wait-time 300
If you specify an interface that is not congured within a specied VRF, then the following error message will display as shown in the
example below:
device# show ip ospf vrf one interface ethernet 1/1/1
Error: Interface(eth 1/1/1) not part of VRF(one)
NOTE
You cannot display multiple ports for any interfaces. For example, when displaying OSPF interface information on ethernet
1/1/1 only one port can displayed at a given time.
Syntax: show ip ospf [ vrf vrf-name ] interface [ ip-addr ] [ brief ] [ ethernet unit/slot/port | loopback number | tunnel number | ve
number ]
The vrf vrf-name parameter displays information for VRF, or a specic vrf-name.
The ip-addr parameter displays the OSPF interface information for the specied IP address.
The brief parameter displays interface information in the brief mode.
The ethernet, loopback, tunnel, and ve parameters to specify the interface for which to display information. If you specify an Ethernet
interface, you can also specify the unit, slot and port number associated with the interface. If you specify a loopback, tunnel, or VE
interface, you can also specify the number associated with the interface.
TABLE 59 show ip ospf interface output descriptions
This eld Displays
Interface The type of interface type and the port number or number of the interface.
IP Address The IP address of the interface.
Area The OSPF area congured on the interface
Database Filter The router’s conguration for blocking outbound LSAs on an OSPF
interface.
If Not Congured is displayed, there is no outbound LSA lter congured.
This is the default condition.
Displaying OSPF information
FastIron Ethernet Switch Layer 3 Routing Conguration Guide, 08.0.30mb
276 53-1003627-06

TABLE 59 show ip ospf interface output descriptions (continued)
This eld Displays
State The state of the interface. Possible states include the following:
• DR - The interface is functioning as the Designated Router for
OSPFv2.
• BDR - The interface is functioning as the Backup Designated
Router for OSPFv2.
• Loopback - The interface is functioning as a loopback interface.
• P2P - The interface is functioning as a point-to-point interface.
• Passive - The interface is up but it does not take part in forming
an adjacency.
• Waiting - The interface is trying to determine the identity of the
BDR for the network.
• None - The interface does not take part in the OSPF interface
state machine.
• Down - The interface is unusable. No protocol trac can be sent
or received on such a interface.
• DR other - The interface is a broadcast or NBMA network on
which another router is selected to be the DR.
• Active - The interface sends or receives all the OSPFv2 control
packets and forms the adjacency.
default Shows whether or not the default passive state is set.
Pri The interface priority.
Cost The congured output cost for the interface.
Options OSPF Options (Bit7 - Bit0):
• unused:1
• opaque:1
• summary:1
• dont_propagate:1
• nssa:1
• multicast:1
• external route capable:1
• tos:1
Type The area type, which can be one of the following:
• Broadcast
• Point to Point
• non-broadcast
• Virtual Link
Events OSPF Interface Event:
• Interface_Up = 0x00
• Wait_Timer = 0x01
• Backup_Seen = 0x02
• Neighbor_Change = 0x03
• Loop_Indication = 0x04
• Unloop_Indication = 0x05
• Interface_Down = 0x06
• Interface_Passive = 0x07
Timer intervals The interval, in seconds, of the transmit-interval, retransmit-interval, hello-
interval, and dead-interval timers.
Displaying OSPF information
FastIron Ethernet Switch Layer 3 Routing Conguration Guide, 08.0.30mb
53-1003627-06 277

TABLE 59 show ip ospf interface output descriptions (continued)
This eld Displays
DR The router ID (IPv4 address) of the DR.
BDR The router ID (IPv4 address) of the BDR.
Neighbor Count The number of neighbors to which the interface is connected.
Adjacent Neighbor Count The number of adjacent neighbor routers.
Neighbor: The IP address of the neighbor.
Displaying OSPF interface brief information
The following command displays the OSPF database brief information.
device# show ip ospf interface brief
Number of Interfaces is 1
Interface Area IP Addr/Mask Cost State Nbrs(F/C)
eth 1/1/2 0 10.1.1.2/24 1 down 0/0
TABLE 60 show ip ospf interface brief output descriptions
This eld Displays
Interface The interface through which the router is connected to the neighbor.
Area The OSPF Area that the interface is congured in.
IP Addr/Mask The IP address and mask of the interface.
Cost The congured output cost for the interface.
State The state of the conversation between the router and the neighbor. This
eld can have one of the following values:
• Down - The initial state of a neighbor conversation. This value
indicates that there has been no recent information received
from the neighbor.
• Attempt - This state is only valid for neighbors attached to non-
broadcast networks. It indicates that no recent information has
been received from the neighbor.
• Init - A Hello packet has recently been seen from the neighbor.
However, bidirectional communication has not yet been
established with the neighbor. (The router itself did not appear in
the neighbor's Hello packet.) All neighbors in this state (or
higher) are listed in the Hello packets sent from the associated
interface.
• 2-Way - Communication between the two routers is
bidirectional. This is the most advanced state before beginning
adjacency establishment. The Designated Router and Backup
Designated Router are selected from the set of neighbors in the
2-Way state or greater.
• ExStart - The rst step in creating an adjacency between the two
neighboring routers. The goal of this step is to decide which
router is the master, and to decide upon the initial Database
Description (DD) sequence number. Neighbor conversations in
this state or greater are called adjacencies.
• Exchange - The router is describing its entire link state database
by sending Database Description packets to the neighbor. Each
Database Description packet has a DD sequence number, and
is explicitly acknowledged. Only one Database Description
packet can be outstanding at any time. In this state, Link State
Request packets can also be sent asking for the neighbor's
more recent advertisements. All adjacencies in Exchange state
Displaying OSPF information
FastIron Ethernet Switch Layer 3 Routing Conguration Guide, 08.0.30mb
278 53-1003627-06

TABLE 60 show ip ospf interface brief output descriptions (continued)
This eld Displays
or greater are used by the ooding procedure. In fact, these
adjacencies are fully capable of transmitting and receiving all
types of OSPF routing protocol packets.
• Loading - Link State Request packets are sent to the neighbor
asking for the more recent advertisements that have been
discovered (but not yet received) in the Exchange state.
• Full - The neighboring routers are fully adjacent. These
adjacencies will now appear in router links and network link
advertisements.
Nbrs(F/C) The number of adjacent neighbor routers. The number to the left of the "/"
are the neighbor routers that are fully adjacent and the number to the right
represents all adjacent neighbor routers.
Displaying OSPF route information
To display OSPF route information, enter the following command at any CLI level.
device# show ip ospf route
OSPF Area 0x00000000 ASBR Routes 1:
Destination Mask Path_Cost Type2_Cost Path_Type
10.65.12.1 255.255.255.255 1 0 Intra
Adv_Router Link_State Dest_Type State Tag Flags
10.65.12.1 10.65.12.1 Asbr Valid 0 6000
Paths Out_Port Next_Hop Type State
1 v49 10.1.49.2 OSPF 21 01
2 v12 10.1.12.2 OSPF 21 01
3 v11 10.1.11.2 OSPF 21 01
4 v10 10.1.10.2 OSPF 00 00
OSPF Area 0x00000041 ASBR Routes 1:
Destination Mask Path_Cost Type2_Cost Path_Type
10.65.12.1 255.255.255.255 1 0 Intra
Adv_Router Link_State Dest_Type State Tag Flags
10.65.12.1 10.65.12.1 Asbr Valid 0 6000
Paths Out_Port Next_Hop Type State
1 v204 10.65.5.251 OSPF 21 01
2 v201 10.65.2.251 OSPF 20 d1
3 v202 10.65.3.251 OSPF 20 cd
4 v205 10.65.6.251 OSPF 00 00
OSPF Area Summary Routes 1:
Destination Mask Path_Cost Type2_Cost Path_ Type
10.65.0.0 255.255.0.0 0 0 Inter
Adv_Router Link_State Dest_Type State Tag Flags
10.1.10.1 0.0.0.0 Network Valid 0 0000
Paths Out_Port Next_Hop Type State
1 1/1 0.0.0.0 DIRECT 00 00
OSPF Regular Routes 208:
Destination Mask Path_Cost Type2_Cost Path_Type
10.1.10.0 255.255.255.252 1 0 Intra
Adv_Router Link_State Dest_Type State Tag Flags
10.1.10.1 10.1.10.2 Network Valid 0 0000
Paths Out_Port Next_Hop Type State
1 v10 0.0.0.0 OSPF 00 00
Destination Mask Path_Cost Type2_Cost Path_Type
10.1.11.0 255.255.255.252 1 0 Intra
Adv_Router Link_State Dest_Type State Tag Flags
10.1.10.1 10.1.11.2 Network Valid 0 0000
Paths Out_Port Next_Hop Type State
1 v11 0.0.0.0 OSPF 00 00
Syntax: show ip ospf routes [ ip-addr ]
The ip-addr parameter species a destination IP address. If you use this parameter, only the route entries for that destination are shown.
Displaying OSPF information
FastIron Ethernet Switch Layer 3 Routing Conguration Guide, 08.0.30mb
53-1003627-06 279

TABLE 61 show ip ospf routes output descriptions
This eld Displays
Destination The IP address of the route's destination.
Mask The network mask for the route.
Path_Cost The cost of this route path. (A route can have multiple paths. Each path
represents a dierent exit port for the device.)
Type2_Cost The type 2 cost of this path.
Path_Type The type of path, which can be one of the following:
• – Inter - The path to the destination passes into another area.
– Intra - The path to the destination is entirely within the local
area.
– External1 - The path to the destination is a type 1 external
route.
– External2 - The path to the destination is a type 2 external
route.
Adv_Router The OSPF router that advertised the route to this device.
Link-State The link state from which the route was calculated.
Dest_Type The destination type, which can be one of the following:
• – ABR - Area Border Router
– ASBR - Autonomous System Boundary Router
– Network - the network
State The route state, which can be one of the following:
• – Changed
– Invalid
– Valid
This information is used by Brocade technical support.
Tag The external route tag.
Flags State information for the route entry. This information is used by Brocade
technical support.
Paths The number of paths to the destination.
Out_Port The router port through which the device reaches the next hop for this
route path.
Next_Hop The IP address of the next-hop router for this path.
Type The route type, which can be one of the following:
• – OSPF
– Static Replaced by OSPF
State State information for the path. This information is used by Brocade
technical support.
Displaying the routes that have been redistributed into OSPF
You can display the routes that have been redistributed into OSPF. To display the redistributed routes, enter the following command at
any level of the CLI.
device# show ip ospf redistribute route
4.3.0.0 255.255.0.0 static
3.1.0.0 255.255.0.0 static
10.11.61.0 255.255.255.0 connected
4.1.0.0 255.255.0.0 static
In this example, four routes have been redistributed. Three of the routes were redistributed from static IP routes and one route was
redistributed from a directly connected IP route.
Displaying OSPF information
FastIron Ethernet Switch Layer 3 Routing Conguration Guide, 08.0.30mb
280 53-1003627-06

Syntax: show ip ospf redistribute route [ ip-addr ip-mask ]
The ip-addr ip-mask parameter species a network prex and network mask. Here is an example.
Brocade# show ip ospf redistribute route 192.213.1.0 255.255.255.254
192.213.1.0 255.255.255.254 fwd 0.0.0.0 (0) metric 10 connected
Displaying OSPF database information
The following command displays the OSPF database.
device# show ip ospf database
Index Area ID Type LS ID Adv Rtr Seq(Hex) Age
Cksum SyncState
1 0.0.0.200 Rtr 192.168.98.111 192.168.98.111 8000003b 626 0xf885 Done
2 0.0.0.200 Rtr 192.168.98.213 192.168.98.213 800000c9 963 0x209c Done
3 0.0.0.200 Rtr 192.168.98.113 192.168.98.113 80000028 169 0x0275 Done
4 0.0.0.200 Rtr 192.168.98.112 192.168.98.112 8000002d 226 0x1c03 Done
5 0.0.0.200 Net 193.113.111.113 192.168.98.113 8000001f 1132 0x353d Done
6 0.0.0.200 Net 192.213.111.213 192.168.98.213 8000002d 1683 0x17bc Done
Syntax: show ip ospf database
TABLE 62 show ip ospf databaseoutput descriptions
This eld Displays
Index ID of the entry
Area ID ID of the OSPF area
Type Link state type of the route.
LS ID The ID of the link-state advertisement from which the router learned this
route.
Adv Rtr ID of the advertised route.
Seq(Hex) The sequence number of the LSA. The OSPF neighbor that sent the LSA
stamps the LSA with a sequence number. This number enables the device
and other OSPF routers to determine which LSA for a given route is the
most recent.
Age The age of the LSA in seconds.
Chksum The checksum for the LSA packet. The checksum is based on all the elds
in the packet except the age eld. The device uses the checksum to verify
that the packet is not corrupted.
SyncState This eld indicates whether the synchronization is complete or not.
Displaying OSPF external link state information
To display external link state information, enter the following command at any CLI level.
device# show ip ospf database external-link-state
Index Age LS ID Router Netmask Metric Flag Fwd Address
SyncState
1 591 10.65.13.0 10.65.12.1 ffffff00 8000000a 0000 0.0.0.0 Done
2 591 10.65.16.0 10.65.12.1 ffffff00 8000000a 0000 0.0.0.0 Done
3 591 10.65.14.0 10.65.12.1 ffffff00 8000000a 0000 0.0.0.0 Done
4 591 10.65.17.0 10.65.12.1 ffffff00 8000000a 0000 0.0.0.0 Done
5 592 10.65.12.0 10.65.12.1 ffffff00 8000000a 0000 0.0.0.0 Done
6 592 10.65.15.0 10.65.12.1 ffffff00 8000000a 0000 0.0.0.0 Done
7 592 10.65.18.0 10.65.12.1 ffffff00 8000000a 0000 0.0.0.0 Done
Displaying OSPF information
FastIron Ethernet Switch Layer 3 Routing Conguration Guide, 08.0.30mb
53-1003627-06 281

Syntax:show ip ospf [vrf vrf-name] database external-link-state [ advertise num | extensive | link-state-id A.B.C.D | router-id A.B.C.D |
sequence-number num(Hex)]
The vrf vrf-name parameter displays information for a VRF, or a specic vrf-name.
The advertise num parameter displays the decoded data in the specied LSA packet. The num parameter identies the LSA packet by
its position in the router’s External LSA table. To determine an LSA packet’s position in the table, enter the show ip ospf external-link-
state command to display the table.
The extensive option displays the LSAs in the decoded format.
NOTE
You cannot use the extensive option in combination with other display options. The entire database is displayed.
The link-state-id A.B.C.D parameter displays the External LSAs for the LSA source specied by A.B.C.D (link state ID).
The router-id A.B.C.D (advertising router ID) parameter shows the External LSAs for the specied OSPF router.
The sequence-number num(Hex) parameter displays the External LSA entries for the specied hexadecimal LSA sequence number.
TABLE 63 show ip ospf database external-link-state output descriptions
This eld Displays
Index ID of the entry
Age The age of the LSA in seconds.
LS ID The ID of the link-state advertisement.
Router The router IP address.
Netmask The subnet mask of the network.
Metric The cost (value) of the route.
Flag State information for the route entry. This information is used by Brocade
technical support.
Displaying OSPF database-summary information
To display database-summary information, enter the following command at any CLI level.
device# show ip ospf database database-summary
Area ID Router Network Sum-Net Sum-ASBR NSSA-Ext Opq-Area Subtotal
0.0.0.0 104 184 19 42 0 0 349
AS External 308
Total 104 184 19 42 0 0 657
Syntax: show ip ospf database database-summary
TABLE 64 show ip ospf database database-summary output descriptions
This eld Displays
Area ID The area number.
Router The number of router link state advertisements in that area.
Network The number of network link state advertisements in that area.
Sum-Net The number of summary link state advertisements in that area.
Sum-ASBR The number of summary autonomous system boundary router (ASBR)
link state advertisements in that area
Displaying OSPF information
FastIron Ethernet Switch Layer 3 Routing Conguration Guide, 08.0.30mb
282 53-1003627-06

TABLE 64 show ip ospf database database-summary output descriptions (continued)
This eld Displays
NSSA-Ext The number of not-so-stubby
Opq-area the number of Type-10 (area-scope) Opaque LSA.s
Displaying OSPF database link state information
To display database link state information, enter the following command at any CLI level.
device# show ip ospf database link-state
Index Area ID Type LS ID Adv Rtr Seq(Hex) Age Cksum SyncState
1 0 Rtr 10.1.10.1 10.1.10.1 800060ef 3 0x4be2 Done
2 0 Rtr 10.65.12.1 10.65.12.1 80005264 6 0xc870 Done
3 0 Net 10.1.64.2 10.65.12.1 8000008c 1088 0x06b7 Done
4 0 Net 10.1.167.2 10.65.12.1 80000093 1809 0x86c8 Done
5 0 Net 10.1.14.2 10.65.12.1 8000008c 1088 0x2ec1 Done
6 0 Net 10.1.117.2 10.65.12.1 8000008c 1087 0xbccb Done
7 0 Net 10.1.67.2 10.65.12.1 8000008c 1088 0xe4d5 Done
8 0 Net 10.1.170.2 10.65.12.1 80000073 604 0xa5c6 Done
9 0 Net 10.1.17.2 10.65.12.1 8000008c 1088 0x0ddf Done
10 0 Net 10.1.120.2 10.65.12.1 8000008c 1087 0x9be9 Done
11 0 Net 10.1.70.2 10.65.12.1 8000008c 1088 0xc3f3 Done
12 0 Net 10.1.173.2 10.65.12.1 80000017 1087 0x3d88 Done
13 0 Net 10.1.20.2 10.65.12.1 8000008c 1088 0xebfd Done
14 0 Net 10.1.123.2 10.65.12.1 8000008c 1087 0x7a08 Done
15 0 Net 10.1.73.2 10.65.12.1 8000008c 1088 0xa212 Done
16 0 Net 10.1.176.2 10.65.12.1 80000025 1087 0xffb4 Done
17 0 Net 10.1.23.2 10.65.12.1 8000008c 1088 0xca1c Done
18 0 Net 10.1.126.2 10.65.12.1 8000008c 1087 0x5926 Done
Syntax:show ip ospf [ vrf vrf-name] database link-state [ advertise num | asbr [ ip-addr ] [ adv-router ip-addr ] | extensive |link-state-
id ip-addr | network [ ip-addr ] [ adv-router ip-addr ] | nssa [ ip-addr ] [ adv-router ip-addr ] | router [ ip-addr ] [ adv-router ip-addr ] |
router-id ip-addr | self-originate I sequence-number num(Hex) | summary [ ip-addr ] [ adv-router ip-addr ]
The vrf vrf-name parameter displays information for a VRF, or a specic vrf-name.
The advertise num parameter displays the decoded data in the specied LSA packet. The num parameter identies the LSA packet by
its position in the router’s LSA table. To determine an LSA packet’s position in the table, enter the show ip ospf link-state command to
display the table.
The asbr option shows ASBR LSAs.
The extensive option displays the LSAs in the decoded format.
NOTE
You cannot use the extensive option in combination with other display options. The entire database is displayed.
The link-state-id A.B.C.D parameter displays the LSAs for the LSA source specied by A.B.C.D (link state ID).
The network option shows network LSAs.
The nssa option shows NSSA LSAs.
The router-id A.B.C.D (advertising router ID) parameter shows the LSAs for the specied OSPF router.
The sequence-number num parameter displays the LSA entries for the specied hexadecimal LSA sequence number.
Displaying OSPF information
FastIron Ethernet Switch Layer 3 Routing Conguration Guide, 08.0.30mb
53-1003627-06 283

The self-originate option shows self-originated LSAs.
TABLE 65 show ip ospf database link-state output descriptions
This eld Displays
Index ID of the entry
Area ID ID of the OSPF area
Type LS ID Type and ID of the link state advertisement.
Adv Rtr ID of the advertising router.
Seq(Hex) The sequence number of the LSA. The OSPF neighbor that sent the LSA
stamps the LSA with a sequence number. This number enables the device
and other OSPF routers to determine which LSA for a given route is the
most recent.
Age The age of the LSA in seconds.
Cksum The checksum for the LSA packet. The checksum is based on all the elds
in the packet except the age eld. The device uses the checksum to verify
that the packet is not corrupted.
Displaying OSPF ABR and ASBR information
To display OSPF ABR and ASBR information, enter the following command at any CLI level.
device# show ip ospf border-routers 192.168.98.111
router ID router type next hop router outgoing interface Area
192.168.98.111 ABR 193.213.111.111 4/3/1*8/3/1 0
Syntax: show ip ospf border-routers [ ip-addr ]
The ip-addrip-addr parameter displays the ABR and ASBR entries for the specied IP address.
device# show ip ospf border-routers
router ID router type next hop router outgoing interface Area
1 10.65.12.1 ABR 10.1.49.2 v49 0
1 10.65.12.1 ASBR 10.1.49.2 v49 0
1 10.65.12.1 ABR 10.65.2.251 v201 65
1 10.65.12.1 ASBR 10.65.2.251 v201 65
Syntax: show ip ospf border-routers
TABLE 66 show ip ospf border-routersoutput descriptions
This eld Displays
(Index) Displayed index number of the border router.
Router ID ID of the OSPF router
Router type Type of OSPF router: ABR or ASBR
Next hop router ID of the next hop router
Outgoing interface ID of the interface on the router for the outgoing route.
Area ID of the OSPF area to which the OSPF router belongs
Displaying OSPF trap status
All traps are enabled by default when you enable OSPF.
Displaying OSPF information
FastIron Ethernet Switch Layer 3 Routing Conguration Guide, 08.0.30mb
284 53-1003627-06

To display the state of each OSPF trap, enter the following command at any CLI level.
device# show ip ospf trap
Interface State Change Trap: Enabled
Virtual Interface State Change Trap: Enabled
Neighbor State Change Trap: Enabled
Virtual Neighbor State Change Trap: Enabled
Interface Configuration Error Trap: Enabled
Virtual Interface Configuration Error Trap: Enabled
Interface Authentication Failure Trap: Enabled
Virtual Interface Authentication Failure Trap: Enabled
Interface Receive Bad Packet Trap: Enabled
Virtual Interface Receive Bad Packet Trap: Enabled
Interface Retransmit Packet Trap: Disabled
Virtual Interface Retransmit Packet Trap: Disabled
Originate LSA Trap: Disabled
Originate MaxAge LSA Trap: Disabled
Link State Database Overflow Trap: Disabled
Link State Database Approaching Overflow Trap: Disabled
Syntax: show ip ospf trap
Viewing Congured OSPF point-to-point links
You can use the show ip ospf interface command to display OSPF point-to-point information. Enter the following command at any CLI
level.
device# show ip ospf interface 192.168.1.1
Ethernet 1/2/1,OSPF enabled
IP Address 192.168.1.1, Area 0
OSPF state ptr2ptr, Pri 1, Cost 1, Options 2, Type pt-2-pt Events 1
Timers(sec): Transit 1, Retrans 5, Hello 10, Dead 40
DR: Router ID 0.0.0.0 Interface Address 0.0.0.0
BDR: Router ID 0.0.0.0 Interface Address 0.0.0.0
Neighbor Count = 0, Adjacent Neighbor Count= 1
Neighbor: 2.2.2.2
Authentication-Key:None
MD5 Authentication: Key None, Key-Id None, Auth-change-wait-time 300
Syntax: show ip ospf interface [ ip-addr ]
The ip-addr parameter displays the OSPF interface information for the specied IP address.
TABLE 67 show ip ospf interfaceoutput descriptions
This eld Displays
IP Address The IP address of the interface.
OSPF state The OSPF state of the interface.
Pri The router priority.
Cost The congured output cost for the interface.
Options OSPF Options (Bit7 - Bit0):
• unused:1
• opaque:1
• summary:1
• dont_propagate:1
• nssa:1
• multicast:1
• externals:1
• tos:1
Displaying OSPF information
FastIron Ethernet Switch Layer 3 Routing Conguration Guide, 08.0.30mb
53-1003627-06 285

TABLE 67 show ip ospf interfaceoutput descriptions (continued)
This eld Displays
Type The area type, which can be one of the following:
• Broadcast = 0x01
• NBMA = 0x02
• Point to Point = 0x03
• Virtual Link = 0x04
• Point to Multipoint = 0x05
Events OSPF Interface Event:
• Interface_Up = 0x00
• Wait_Timer = 0x01
• Backup_Seen = 0x02
• Neighbor_Change = 0x03
• Loop_Indication = 0x04
• Unloop_Indication = 0x05
• Interface_Down = 0x06
• Interface_Passive = 0x07
Adjacent Neighbor Count The number of adjacent neighbor routers.
Neighbor: The IP address of the neighbor.
Displaying OSPF virtual neighbor and link information
You can display OSPF virtual neighbor and virtual link information.
# show run
Current configuration:
!
ver V2.2.1T143
module 1 rx-bi-1g-24-port-fiber
module 2 rx-bi-10g-4-port
module 6 rx-bi-10g-4-port
module 7 rx-bi-1g-24-port-copper
!
!
no spanning-tree
!
vlan 1 name DEFAULT-VLAN
!
!
clock summer-time
clock timezone us Pacific
hostname R11-RX8
router ospf
area 2
area 1
area 1 virtual-link 10.1.1.10
Displaying OSPF information
FastIron Ethernet Switch Layer 3 Routing Conguration Guide, 08.0.30mb
286 53-1003627-06
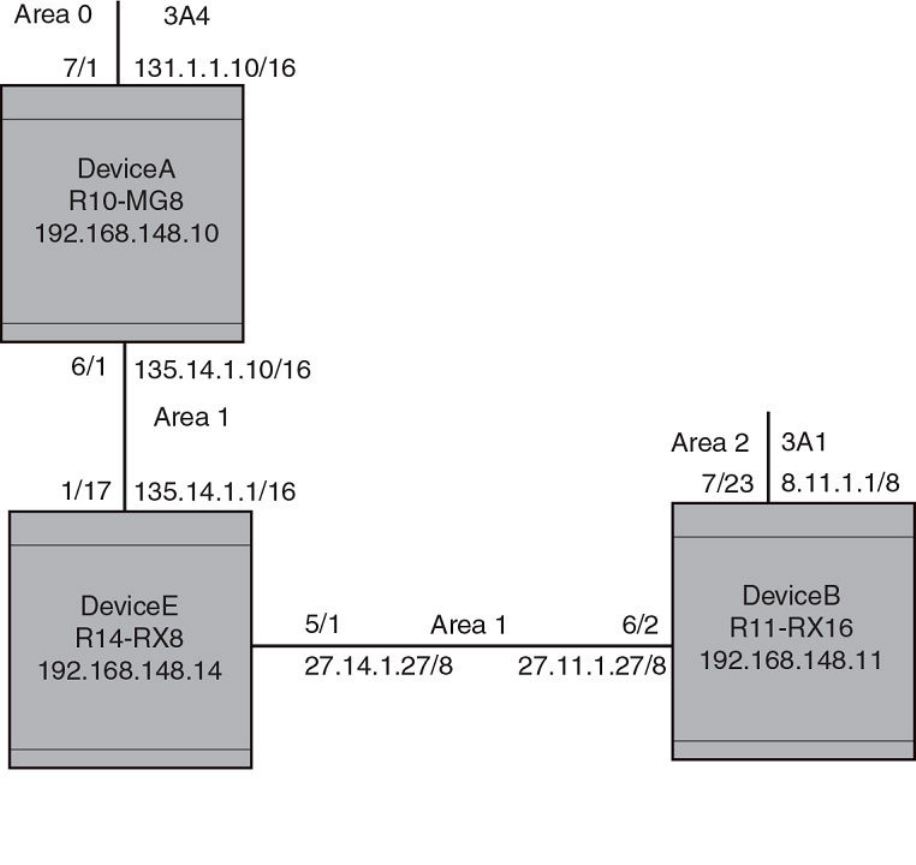
FIGURE 26 OSPF virtual neighbor and virtual link example
Displaying OSPF virtual neighbor
Use the show ip ospf virtual neighbor command to display OSPF virtual neighbor information.
device# show ip ospf virtual neighbor
Indx Transit Area Router ID Neighbor address options
1 1 131.1.1.10 135.14.1.10 2
Port Address state events count
6/2/3 27.11.1.27 FULL 5 0
Syntax: show ip ospf virtual neighbor [ num ]
The num parameter displays the table beginning at the specied entry number.
Displaying OSPF information
FastIron Ethernet Switch Layer 3 Routing Conguration Guide, 08.0.30mb
53-1003627-06 287

Displaying OSPF virtual link information
Use the show ip ospf virtual link command to display OSPF virtual link information.
device# show ip ospf virtual link
Indx Transit Area Router ID Transit(sec) Retrans(sec) Hello(sec)
1 1 131.1.1.10 1 5 10
Dead(sec) events state Authentication-Key
40 1 ptr2ptr None
MD5 Authentication-Key: None
MD5 Authentication-Key-Id: None
MD5 Authentication-Key-Activation-Wait-Time: 300
Syntax: show ip ospf virtual link [ num ]
The num parameter displays the table beginning at the specied entry number.
Clearing OSPF neighbors
You can clear all OSPF neighbors or a specied OSPF neighbor using the following command.
device# clear ip ospf neighbor all
Syntax: clear ip ospf neighbor { all | ip-address }
Selecting the all option clears all of the OSPF neighbors on the router.
The ip-address variable allows you to clear a specic OSPF neighbor.
Displaying OSPF Graceful Restart information
To display OSPF Graceful Restart information for OSPF neighbors use the show ip ospf neighbors command as shown in the following.
device# show ip ospf neighbors
Port Address Pri State Neigh Address Neigh ID Ev Opt Cnt
2/7 50.50.50.10 0 FULL/OTHER 50.50.50.1 10.10.10.30 21 66 0
< in graceful restart state, helping 1, timer 60 sec >
Use the following command to display Type 9 Graceful LSAs on a router.
device# show ip ospf database grace-link-state
Graceful Link States
Area Interface Adv Rtr Age Seq(Hex) Prd Rsn Nbr Intf IP
0 eth 1/1/2 2.2.2.2 7 80000001 60 SW 6.1.1.2
TABLE 68 show ip ospf database grace-link-state output descriptions
This eld Displays
Area The OSPF area that the interface congured for OSPF graceful restart is
in.
Interface The interface that is congured for OSPF graceful restart.
Adv Rtr ID of the advertised route.
Age The age of the LSA in seconds.
Seq(Hex) The sequence number of the LSA. The OSPF neighbor that sent the LSA
stamps the LSA with a sequence number. This number enables the device
and other OSPF routers to determine which LSA for a given route is the
most recent.
Prd Grace Period: The number of seconds that the router's neighbors should
continue to advertise the router as fully adjacent, regardless of the state of
database synchronization between the router and its neighbors. Since this
Displaying OSPF information
FastIron Ethernet Switch Layer 3 Routing Conguration Guide, 08.0.30mb
288 53-1003627-06

TABLE 68 show ip ospf database grace-link-state output descriptions (continued)
This eld Displays
time period began when grace-LSA's LS age was equal to 0, the grace
period terminates when either:
• the LS age of the grace-LSA exceeds the value of a Grace
Period
• the grace-LSA is ushed.
Rsn Graceful restart reason: The reason for the router restart dened as one of
the following:
• UK - unknown
• RS - software restart
• UP - software upgrade or reload
• SW - switch to redundant control processor
Nbr Intf IP The IP address of the OSPF graceful restart neighbor.
Displaying OSPF Router Advertisement information
Using the show ip ospf command you can display the current OSPF Router Advertisement conguration. The text show below in bold is
displayed for an OSPF Router Advertisement conguration.
device# show ip ospf
OSPF Version Version 2
Router Id 10.10.10.10
ASBR Status No
ABR Status No (0)
Redistribute Ext Routes from
External LSA Counter 5
External LSA Checksum Sum 0002460e
Originate New LSA Counter 5
Rx New LSA Counter 8
External LSA Limit 14447047
Database Overflow Interval 0
Database Overflow State : NOT OVERFLOWED
RFC 1583 Compatibility : Enabled
Originating router-LSAs with maximum metric
Condition: Always Current State: Active
Link Type: PTP STUB TRANSIT
Additional LSAs originated with maximum metric:
LSA Type Metric Value
AS-External 16711680
Type 3 Summary 16711680
Type 4 Summary 16711680
Opaque-TE 4294967295
The show ip ospf command displays LSAs that have been congured with a maximum metric.
Clearing OSPF information
You can use the clear ip ospf commands to clear OSPF data on an router as described in the following:
• Neighbor information
• Reset the OSPF process
• Clear and re-add OSPF routes
Clearing OSPF information
FastIron Ethernet Switch Layer 3 Routing Conguration Guide, 08.0.30mb
53-1003627-06 289
Clearing OSPF neighbors
You can use the following command to delete and relearn all OSPF neighbors, all OSPF neighbors for a specied interface or a specied
OSPF neighbor.
device# clear ip ospf neighbor all
Syntax: clear ip ospf [ vrf vrf-name ] neighbor all [ interface ] | interface | ip-address [ interface ]
Selecting the all option without specifying an interface clears all of the OSPF neighbors on the router.
The interface variable species the interface that you want to clear all of the OSPF neighbors on. The following types of interfaces can be
specied:
•ethernet unit/slot/port
•tunnel tunnel-ID
•veve-ID
The ip-address variable allows you to clear a specic OSPF neighbor.
Disabling and re-enabling the OSPF process
You can use the following command to disable and re-enable the OSPF process on a router.
device# clear ip ospf all
Syntax: clear ip ospf [ vrf vrf-name ] all
This command resets the OSPF process and brings it back up after releasing all memory used while retaining all congurations.
Clearing OSPF routes
You can use the following command to clear all OSPF routes or to clear a specic OSPF route.
device# clear ip ospf routes all
Syntax: clear ip ospf [ vrf vrf-name ] routes { all | ip-address/prex-length }
Selecting the all option resets the OSPF routes including external routes, and OSPF internal routes.
The ip-address and prex-length variables specify a particular route to delete and then reschedules the SPF calculation.
Clearing OSPF information
FastIron Ethernet Switch Layer 3 Routing Conguration Guide, 08.0.30mb
290 53-1003627-06

OSPFv3
• OSPFv3 overview.......................................................................................................................................................................................... 291
• LSA types for OSPFv3................................................................................................................................................................................291
•Conguring OSPFv3....................................................................................................................................................................................292
• Displaying OSPFv3 information..............................................................................................................................................................319
• OSPFv3 clear commands .........................................................................................................................................................................347
OSPFv3 overview
IPv6 supports OSPF Version 3 (OSPFv3). OSPFv3 functions similarly to OSPF Version 2 (OSPFv2), with several enhancements.
Open Shortest Path First (OSPF) is a link-state routing protocol. OSPF uses link-state advertisements (LSAs) to update neighboring
routers about its interfaces and information on those interfaces. A device oods LSAs to all neighboring routers to update them about the
interfaces. Each router maintains an identical database that describes its area topology to help a router determine the shortest path
between it and any neighboring router.
IPv6 supports OSPF Version 3 (OSPFv3), which functions similarly to OSPF Version 2 (OSPFv2), the version that IPv4 supports,
except for the following enhancements:
• Support for IPv6 addresses and prexes.
• Ability to congure several IPv6 addresses on a device interface. (While OSPFv2 runs per IP subnet, OSPFv3 runs per link. In
general, you can congure several IPv6 addresses on a router interface, but OSPFv3 forms one adjacency per interface only,
using the interface associated link-local address as the source for OSPF protocol packets. On virtual links, OSPFv3 uses the
global IP address as the source. OSPFv3 imports all or none of the address prexes congured on a router interface. You
cannot select the addresses to import.)
• Ability to run one instance of OSPFv2 and one instance of OSPFv3 concurrently on a link.
• Support for IPv6 link-state advertisements (LSAs).
NOTE
Although OSPFv2 and OSPFv3 function in a similar manner, Brocade has implemented the user interface for each version
independently of the other. Therefore, any conguration of OSPFv2 features will not aect the conguration of OSPFv3
features and vice versa.
NOTE
You are required to congure a router ID when running only IPv6 routing
protocols.
LSA types for OSPFv3
Communication among OSPFv3 areas is provided by means of link state advertisements (LSAs). OSPFv3 supports a number of types
of LSAs.
• Router LSAs (Type 1)
• Network LSAs (Type 2)
•Interarea-prex LSAs for ABRs (Type 3)
• Interarea-router LSAs for ASBRs (Type 4)
FastIron Ethernet Switch Layer 3 Routing Conguration Guide, 08.0.30mb
53-1003627-06 291
• Autonomous system External LSAs (Type 5)
• Group Membership LSA (Type 6)
• NSSA External LSAs (Type 7)
• Link LSAs (Type 8)
•Intra-area-prex LSAs (Type 9)
For more information about these LSAs, refer to RFC 5340.
Conguring OSPFv3
To congure OSPFv3, you must perform the following steps.
• Enable OSPFv3 globally.
• Assign OSPFv3 areas.
• Assign device interfaces to an OSPF area.
The following conguration tasks are optional:
•Congure a virtual link between an Area Border Router (ABR) without a physical connection to a backbone area and the device
in the same area with a physical connection to the backbone area.
• Change the reference bandwidth for the cost on OSPFv3 interfaces.
•Congure the redistribution of routes into OSPFv3.
•Congure default route origination.
• Modify the shortest path rst (SPF) timers.
• Modify the administrative distances for OSPFv3 routes.
•Congure the OSPFv3 LSA pacing interval.
• Modify how often the Brocade device checks on the elimination of the database overow condition.
• Modify the external link state database limit.
• Modify the default values of OSPFv3 parameters for device interfaces.
• Disable or re-enable OSPFv3 event logging.
• Set all the OSPFv3 interfaces to the passive state.
Enabling OSPFv3
Before enabling the device to run OSPFv3, you must perform the following steps.
• Enable the forwarding of IPv6 trac on the device using the ipv6 unicast-routing command.
• Enable IPv6 on each interface over which you plan to enable OSPFv3. You enable IPv6 on an interface by conguring an IPv6
address or explicitly enabling IPv6 on that interface.
By default, OSPFv3 is disabled. To enable OSPFv3 for a default Virtual Routing and Forwarding (VRF), you must enable it globally.
To enable OSPFv3 globally, enter the following command.
device(config)# ipv6 router ospf
device(config-ospf6-router)#
After you enter this command, the Brocade device enters the IPv6 OSPF conguration level, where you can access several commands
that allow you to congure OSPFv3.
Conguring OSPFv3
FastIron Ethernet Switch Layer 3 Routing Conguration Guide, 08.0.30mb
292 53-1003627-06
Enabling OSPFv3 in a VRF
To enable OSPFv3 for a default Virtual Routing and Forwarding (VRF), enter a command such as the following.
device(config-ospf6-router)# ipv6 router ospf vrf red
Syntax: [no] ipv6 router ospf vrf vrf-name
The vrf-name parameter species the name of the VRF in which OSPFv3 is being initiated.
Disabling OSPFv3 in a VRF
To disable OSPFv3 for a default Virtual Routing and Forwarding (VRF), enter a command such as the following.
device(cong-ospf6-router)# no ipv6 router ospf vrf red
Syntax: [no] ipv6 router ospf vrf vrf-name
The vrf-name parameter species the name of the VRF in which OSPFv3 is being initiated.
If you disable OSPFv3, the device removes all the conguration information for the disabled protocol from the running-conguration le.
Moreover, when you save the conguration to the startup-cong le after disabling one of these protocols, all the conguration
information for the disabled protocol is removed from the startup-cong le.
When you disable OSPFv3, the following warning message is displayed on the console.
device(config-ospf6-router)# no ipv6 router ospf
ipv6 router ospf mode now disabled. All ospf config data will be lost when writing to flash!
If you have disabled the protocol but have not yet saved the conguration to the startup-cong le and reloaded the software, you can
restore the conguration information by re-entering the command to enable the protocol (for example, ipv6 router ospf). If you have
already saved the conguration to the startup-cong le and reloaded the software, the conguration information is gone. If you are
testing an OSPF conguration and are likely to disable and re-enable the protocol, you should make a backup copy of the startup-cong
le containing the protocol conguration information. This way, if you remove the conguration information by saving the conguration
after disabling the protocol, you can restore the conguration by copying the backup copy of the startup-cong le onto the ash
memory.
NOTE
All the conguration examples below are applicable for OSPFv3 conguration mode in VRFs as
well.
Assigning OSPFv3 areas
After OSPFv3 is enabled, you can assign OSPFv3 areas. You can assign an IPv4 address or a number as the area ID for each area. The
area ID is representative of all IPv4 addresses (subnets) on a device interface. Each device interface can support one area.
An area can be normal, a stub, or a Not-So-Stubby Area (NSSA) :
• Normal - OSPFv3 devices within a normal area can send and receive External Link State Advertisements (LSAs).
• Stub - OSPFv3 devices within a stub area cannot send or receive External LSAs. In addition, OSPF devices in a stub area must
use a default route to the area’s Area Border Router (ABR) or Autonomous System Boundary Router (ASBR) to send trac out
of the area.
• NSSA - The ASBR of an NSSA can import external route information into the area.
– ASBRs redistribute (import) external routes into the NSSA as type 7 LSAs. Type-7 External LSAs are a special type of LSA
generated only by ASBRs within an NSSA, and are ooded to all the routers within only that NSSA.
Conguring OSPFv3
FastIron Ethernet Switch Layer 3 Routing Conguration Guide, 08.0.30mb
53-1003627-06 293
– ABRs translate type 7 LSAs into type 5 External LSAs, which can then be ooded throughout the AS. You can congure
address ranges on the ABR of an NSSA so that the ABR converts multiple type-7 External LSAs received from the NSSA
into a single type-5 External LSA.
When an NSSA contains more than one ABR, OSPFv3 elects one of the ABRs to perform the LSA translation for NSSA. OSPF elects
the ABR with the highest router ID. If the elected ABR becomes unavailable, OSPFv3 automatically elects the ABR with the next highest
router ID to take over translation of LSAs for the NSSA. The election process for NSSA ABRs is automatic.
For example, to set up OSPFv3 areas 10.70.12.10, 10.70.12.11, 10.70.12.12, and 10.70.12.13, enter the following commands.
device(config-ospf6-router)# area 10.70.12.10
device(config-ospf6-router)# area 10.70.12.11
device(config-ospf6-router)# area 10.70.12.12
device(config-ospf6-router)# area 10.70.12.13
Syntax: [no] area {number | ipv4-address}
The number and ipv4-address parameters specify the area number, which can be a number or in IPv4 address format.
NOTE
You can assign only one area on a device interface.
Assigning a totally stubby area
By default, the device sends summary LSAs (type 3 LSAs) into stub areas. You can reduce the number of LSAs sent into a stub area by
conguring the device to stop sending summary LSAs into the area. You can disable the summary LSAs when you are conguring the
stub area or later after you have congured the area.
This feature disables origination of summary LSAs into a stub area, but the device still accepts summary LSAs from OSPF neighbors
and oods them to other areas. The device can form adjacencies with other routers regardless of whether summarization is enabled or
disabled for areas on each router.
When you disable the summary LSAs, the change takes eect immediately. If you apply the option to a previously congured area, the
device ushes all of the summary LSAs it has generated (as an ABR) from the area.
NOTE
This feature applies only when the Brocade device is congured as an Area Border Router (ABR) for the area. To completely
prevent summary LSAs from being sent to the area, disable the summary LSAs on each OSPF router that is an ABR for the
area.
For example, to disable summary LSAs for stub area 40 and specify an additional metric of 99, enter the following command.
device(config-ospf6-router)# area 40 stub 99 no-summary
Syntax: [no] area {number | ipv4-address} stub metric [no-summary]
The number and ipv4-address parameters specify the area number, which can be a number or in IPv4 address format. If you specify a
number, the number can be from 0 through 2,147,483,647.
The stub metric parameter species an additional cost for using a route to or from this area and can be from 1 through 16777215.
There is no default. Normal areas do not use the cost parameter.
The no-summary parameter applies only to stub areas and disables summary LSAs from being sent into the area.
Conguring OSPFv3
FastIron Ethernet Switch Layer 3 Routing Conguration Guide, 08.0.30mb
294 53-1003627-06
Assign a Not-So-Stubby Area (NSSA)
The OSPF Not So Stubby Area (NSSA) feature enables you to congure OSPF areas that provide the benets of stub areas, but that also
are capable of importing external route information. OSPF does not ood external routes from other areas into an NSSA, but does
translate and ood route information from the NSSA into other areas such as the backbone.
NSSAs are especially useful when you want to summarize Type-5 External LSAs (external routes) before forwarding them into an OSPF
area. The OSPF specication (RFC 2740) prohibits summarization of Type-5 LSAs and requires OSPF to ood Type-5 LSAs
throughout a routing domain. When you congure an NSSA, you can specify an address range for aggregating the external routes that
the NSSAs ABR exports into other areas.
Since the NSSA is partially "stubby" the ABR does not ood external LSAs from the backbone into the NSSA. To provide access to the
rest of the Autonomous System (AS), the ABR generates a default Type-7 LSA into the NSSA.
Conguring an NSSA
Using the area nssa command, you can block the generation of type-3 and type-7 LSAs into an NSSA. This command also provides an
option to congure the NSSA translator role.
Conguration examples
The following example creates an NSSA area with an area-id 100. If the router is an ABR then a type-3 summary LSA will be originated
into the NSSA area and if the router is an ASBR then type-7 NSSA external LSA will be generated into NSSA area with a default external
metric value of 10. The routers NSSA translator role will be set to candidate and it will participate in NSSA translation election.
device(config-ospf6-router)# area 100 nssa
The following example modies the NSSA area 100 wherein type-7 NSSA external LSA will not be originated into NSSA area. But the
type-3 summary LSAs will still be originated into NSSA area.
device(config-ospf6-router)# area 100 nssa no-redistribution
The following example modies the NSSA area 100 wherein origination of type-3 summary LSAs (apart from type-3 default summary)
will be blocked into NSSA area. The CLI works in incremental fashion and the origination of type-7 LSA will be continued to be blocked
as 'no-redistribution' option was enabled in the previous command.
device(config-ospf6-router)# area 100 nssa no-summary
The following example modies the NSSA area 100 wherein origination of the self-router acts as NSSA translator. The generation of
type-3 & type-7 LSA will still be blocked into NSSA area.
device(config-ospf6-router)# area 100 nssa translator-always
The following example modies the NSSA area 100 wherein origination of type-3 summary will be allowed, but origination of type-7
LSA will still be blocked. Also the self-router will still act as NSSA translator-always.
device(config-ospf6-router)# no area 100 nssa no-summary
Although the NSSA conguration can be done in an incremental fashion during show-run, all the conguration options will be displayed
in just one line. For example, the output of the show run would be:
device(config-ospf6-router)# area 100 nssa no-redistribution translator-always
The following example deletes the NSSA area 100.
device(config-ospf6-router)# no area 100
Syntax: [no] area area-id nssa [[stub-metric] [default-information-originate [metric metric-value | metric-type type-value]] [no-
summary] [no-redistribution] [translator-always] [translator-interval stability-interval]]
Conguring OSPFv3
FastIron Ethernet Switch Layer 3 Routing Conguration Guide, 08.0.30mb
53-1003627-06 295
The area-id parameter species the area number, which can be a number or in IP address format. If you specify a number, the number
can be from 0 to 2,147,483,647.
The nssa stub-metric parameter congures an area as a not-so-stubby-area (NSSA). The stub-metric will be the metric used for
generating default LSA in a NSSA. The range of the value is 1 to 1048575. The default value is 10.
The default-information-originate parameter generates a default route into an NSSA. If no-summary option is enabled then a type-3
default LSA will be generated into NSSA else a type-7 LSA will be generated into NSSA. By default the default-information-origiante
parameter is not set.
The metric metric-value parameter species the cost of the default LSA originated into the NSSA area. The range is 1 to 1048575.
There is no default
The metric-type type-value parameter species the type of the default external LSA originated into the NSSA area. It can be either
type-1 or type-2. The default is type-1.
The no-summary parameter prevents an NSSA ABR from generating a type-3 summary into an NSSA. By default the summary LSA is
originated into NSSA.
The no-redistribution parameter prevents an NSSA ABR from generating external (type-7) LSA into an NSSA area. This is used in the
case where an ASBR should generate type-5 LSA into normal areas and should not generate type-7 LSA into NSSA area. By default,
redistribution is enabled in a NSSA.
The translator-always parameter congures the translator-role. When congured on an ABR, this causes the router to unconditionally
assume the role of an NSSA translator. By default, translator-always is not set, the translator role by default is candidate.
The translator-interval stability-interval parameter congures the time interval for which an elected NSSA translator continues to
perform its duties even after its NSSA translator role has been disposed by another router. By default the stability-interval is 40 seconds
and its range will be 10 to 60 seconds.
Conguring an address range for the NSSA
If you want the ABR that connects the NSSA to other areas to summarize the routes in the NSSA before translating them into Type-5
LSAs and ooding them into the other areas, congure an address range. The ABR creates an aggregate value based on the address
range. The aggregate value becomes the address that the ABR advertises instead of advertising the individual addresses represented by
the aggregate. You can congure up to 32 ranges in an OSPF area.
To congure an address range in NSSA 10.1.1.1, enter the following commands. This example assumes that you have already
congured NSSA 10.1.1.1.
device(config)# router ospf
device(config-ospf6-router)# area 10.1.1.1 range 2001:DB8::/32
device(config-ospf6-router)# write memory
Syntax: [no] area {num | ip-addr} {range ipv6-addr/ipv6-subnet-mask} [advertise | not-advertise]
The num and ip-addr parameters specify the area number, which can be in IP address format. If you specify a number, the number can
be from 0 - 2,147,483,647.
The range ipv6-addr parameter species the IP address portion of the range. The software compares the address with the signicant
bits in the mask. All network addresses that match this comparison are summarized in a single route advertised by the router.
The ipv6-subnet-mask parameter species the portions of the IPv6 address that a route must contain to be summarized in the
summary route. In the example above, all networks that begin with 2001:DB8:: are summarized into a single route.
The advertise and not-advertise parameters specify whether you want the device to send type 3 LSAs for the specied range in this
area. The default is advertise.
Conguring OSPFv3
FastIron Ethernet Switch Layer 3 Routing Conguration Guide, 08.0.30mb
296 53-1003627-06
Assigning an area cost for OSPFv3 (optional parameter)
You can assign a cost for an area, but it is not required. To consolidate and summarize routes at an area boundary, use the area range
cost command in router conguration mode.
If the cost parameter is specied, it will be used (overriding the computed cost) to generate the summary LSA. If the cost parameter is
not specied, then the existing range metric computation max or min cost of routes falling under this range will be used to generate
summary LSA.
NOTE
The area should be already congured before using this
command.
Creates an area range entry with prex 2001:db8::1/64 with the area-id 10.
device(config)# ipv6 router ospf
device(config-ospf6-router)# area 10 range 2001:db8::1/64
Modies the address range status to DoNotAdvertise. Neither the individual intra-area routes falling under range nor the ranged prex is
advertised as summary LSA.
device(config)# ipv6 router ospf
device(config-ospf6-router)# area 10 range 2001:db8::1/64 not-advertise
Modies the address range status to advertise and a Type 3 summary link-state advertisement (LSA) can be generated for this address
range.
device(config)# ipv6 router ospf
device(config-ospf6-router)# area 10 range 2001:db8::1/64 advertise
Modies the address range status to advertise and assign cost for this area range to 10.
device(config)# ipv6 router ospf
device(config-ospf6-router)# area 10 range 2001:db8::1/64 advertise cost 10
Modies the address range status to not-advertise and cost from 10 to 5.
device(config)# ipv6 router ospf
device(config-ospf6-router)# area 10 range 2001:db8::1/64 not-advertise cost 5
Removes the cost from the area range. The area range will be advertised with computed cost which is the max/min (based on RFC
1583 compatibility) of all individual intra-area routes falling under this range.
device(config)# ipv6 router ospf
device(config-ospf6-router)# no area 10 range 2001:db8::1/64 cost 5
Removes the area range.
device(config)# ipv6 router ospf
device(config-ospf6-router)# no area 10 range 2001:db8::1/64
NOTE
This command does not work in incremental fashion. So both the optional parameters have to be congured each time.
Otherwise it will take the default value.
Syntax: [no] area {num | ipv6-addr} range ipv6-addr/ipv6-subnet-mask [advertise | not-advertise] [cost cost-value]
The num and ipv6-addr parameters specify the area number, which can be in IP address format.
The range ipv6-addr parameter species the IP address portion of the range. The software compares the address with the signicant
bits in the mask. All network addresses that match this comparison are summarized in a single route advertised by the router.
Conguring OSPFv3
FastIron Ethernet Switch Layer 3 Routing Conguration Guide, 08.0.30mb
53-1003627-06 297
The ipv6-subnet-mask parameter species the portions of the IPv6 address that a route must contain to be summarized in the
summary route. In the example above, all networks that begin with 193.45 are summarized into a single route.
The advertise parameter sets the address range status to advertise and generates a Type 3 summary link-state advertisement (LSA). If
at least a single route falls under the range, a ranged LSA will be advertised.
The not-advertise parameter sets the address range status to DoNotAdvertise. Neither the individual intra-area routes falling under range
nor the ranged prex is advertised as summary LSA.
The cost cost-value parameter species the cost-value to be used while generating type-3 summary LSA. If the cost value is congured,
then congured cost is used while generating the summary LSA. If the cost value is not congured, then computed range cost will be
used. The cost-value ranges from 1 to 16777215.
To disable this function, use the no form of this command.
Assigning interfaces to an area
After you dene OSPFv3 areas, you must assign device interfaces to the areas. All device interfaces must be assigned to one of the
dened areas on an OSPF router. When an interface is assigned to an area, all corresponding subnets on that interface are automatically
included in the assignment.
For example, to assign Ethernet interface 1/3/1 to area 10.5.0.0, enter the following commands.
device(config)# interface Ethernet 1/3/1
device(config-if-e100-1/3/1)# ipv6 ospf area 10.5.0.0
Syntax: [no] ipv6 ospf area {number | ipv4-address}
The number and ipv4-address parameters specify the area number, which can be a number or in IPv4 address format. If you specify a
number, the number can be from 0 through 2,147,483,647.
To remove the interface from the specied area, use the no form of this command.
Specifying a network type
You can specify a point-to-point or broadcast network type for any OSPF interface of the following types: Ethernet, or VE interface. To
specify the network type for an OSPF interface, use the following commands.
device(config)# interface ethernet 1/3/1
device(config-if-e100-1/3/1)# ipv6 ospf network broadcast
Syntax: [no] ipv6 ospf network {point-to-point | broadcast}
The point-to-point parameter species that the OSPF interface will support point-to-point networking. This is the default setting for
tunnel interfaces.
The broadcast parameter species that the OSPF interface will support broadcast networking. This is the default setting for Ethernet and
VE interfaces.
The no form of the command disables the command conguration.
Conguring virtual links
All ABRs must have either a direct or indirect link to an OSPF backbone area (0.0.0.0 or 0). If an ABR does not have a physical link to a
backbone area, you can congure a virtual link from the ABR to another router within the same area that has a physical connection to the
backbone area.
Conguring OSPFv3
FastIron Ethernet Switch Layer 3 Routing Conguration Guide, 08.0.30mb
298 53-1003627-06
The path for a virtual link is through an area shared by the neighbor ABR (router with a physical backbone connection) and the ABR
requiring a logical connection to the backbone.
Two parameters must be dened for all virtual links -- transit area ID and neighbor router:
• The transit area ID represents the shared area of the two ABRs and serves as the connection point between the two routers. This
number should match the area ID value.
• The neighbor router is the router ID (IPv4 address) of the router that is physically connected to the backbone when assigned
from the router interface requiring a logical connection. The neighbor router is the router ID (IPv4 address) of the router requiring
a logical connection to the backbone when assigned from the router interface with the physical connection.
NOTE
By default, the router ID is the IPv4 address congured on the lowest-numbered loopback interface. If the device does not have
a loopback interface, the default router ID is the lowest-numbered IPv4 address congured on the device.
When you establish an area virtual link, you must congure it on both ends of the virtual link. For example, imagine that ABR1 in areas 1
and 2 is cut o from the backbone area (area 0). To provide backbone access to ABR1, you can add a virtual link between ABR1 and
ABR2 in area 1 using area 1 as a transit area. To congure the virtual link, you dene the link on the router that is at each end of the link.
No conguration for the virtual link is required on the routers in the transit area.
To dene the virtual link on ABR1, enter the following command on ABR1.
device(config-ospf6-router)# area 1 virtual-link 10.157.22.1
To dene the virtual link on ABR2, enter the following command on ABR2.
device(config-ospf6-router)# area 1 virtual-link 10.0.0.1
Syntax: [no] area {number | ipv4-address} virtual-link router-id
The number and ipv4-address parameters specify the transit area ID, area number, which can be a number, or in IPv4 address format. If
you specify a number, the number can be from 0 through 2,147,483,647.
The router-id parameter species the router ID of the OSPF router at the remote end of the virtual link. To display the router ID on a
router, enter the show ip command.
Modifying virtual link parameters
You can modify the following virtual link parameters:
• Dead-interval: The number of seconds that a neighbor router waits for a hello packet from the device before declaring the router
is down. The range is from 1 through 65535 seconds. The default is 40 seconds.
• Hello-interval: The length of time between the transmission of hello packets. The range is from 1 through 65535 seconds. The
default is 10 seconds.
• Retransmit-interval: The interval between the retransmission of link state advertisements to router adjacencies for this interface.
The range is from 0 through 3600 seconds. The default is 5 seconds.
• Transmit-delay: The period of time it takes to transmit Link State Update packets on the interface. The range is from 0 through
3600 seconds. The default is 1 second.
NOTE
The values of the dead-interval and hello-interval parameters must be the same at both ends of a virtual link. Therefore, if you
modify the values of these parameters at one end of a virtual link, you must make the same modications on the other end of
the link.The values of the other virtual link parameters do not require synchronization.
Conguring OSPFv3
FastIron Ethernet Switch Layer 3 Routing Conguration Guide, 08.0.30mb
53-1003627-06 299
For example, to change the dead-interval parameter to 60 seconds on the virtual links dened on ABR1 and ABR2, enter the following
command on ABR1.
device(config-ospf6-router)# area 1 virtual-link 10.157.22.1
dead-interval 60
Enter the following command on ABR2.
device(config-ospf6-router)# area 1 virtual-link 10.0.0.1 dead-interval 60
Syntax: [no] area {number | ipv4-address} virtual-link router-id [dead-interval seconds | hello-interval seconds | retransmit-interval
seconds | transmit-delay seconds]
The area number and ipv4-address parameters specify the transit area ID.
The router-id parameter species the router ID of the OSPF router at the remote end of the virtual link. To display the router ID on a
device, enter the show ip command.
The dead-interval, hello-interval, retransmit-interval, and transmit-delay parameters are described earlier in this section.
Changing the reference bandwidth for the cost on OSPFv3 interfaces
Each interface on which OSPFv3 is enabled has a cost associated with it. The device advertises its interfaces and their costs to OSPFv3
neighbors. For example, if an interface has an OSPF cost of 10, the device advertises the interface with a cost of 10 to other OSPF
routers.
By default, OSPF cost of an interface is based on the port speed of the interface. The software uses the following formula to calculate the
cost.
Cost = reference-bandwidth/interface-speed
By default, the reference bandwidth is 100 Mbps. If the resulting cost is less than 1, the software rounds the cost up to 1. The default
reference bandwidth results in the following costs:
• 10 Mbps port cost = 100/10 = 10
• 100 Mbps port cost = 100/100 = 1
• 1000 Mbps port cost = 100/1000 = 0.10, which is rounded up to 1
• 155 Mbps port cost = 100/155 = 0.65, which is rounded up to 1
• 622 Mbps port cost = 100/622 = 0.16, which is rounded up to 1
• 2488 Mbps port cost = 100/2488 = 0.04, which is rounded up to 1
The interfaces that consist of more than one physical port is calculated as follows:
• LAG group- The combined bandwidth of all the ports.
• Virtual (Ethernet) interface - The combined bandwidth of all the ports in the port-based VLAN that contains the virtual interface.
You can change the default reference bandwidth from 100 Mbps to a value from 1 through 4294967.
If a change to the reference bandwidth results in a cost change to an interface, the Brocade device sends a link-state update to update
the costs of interfaces advertised by the Brocade device.
NOTE
If you specify a cost for an interface, your specied cost overrides the cost that the software
calculates.
Conguring OSPFv3
FastIron Ethernet Switch Layer 3 Routing Conguration Guide, 08.0.30mb
300 53-1003627-06
Some interface types are not aected by the reference bandwidth and always have the same cost regardless of the reference bandwidth
in use:
• The cost of a loopback interface is always 1.
• The cost of a virtual link is calculated using the Shortest Path First (SPF) algorithm and is not aected by the auto-cost feature.
• The bandwidth for tunnel interfaces is 9 Kbps and is subject to the auto-cost feature.
For example, to change the reference bandwidth to 500, enter the following command.
device(config-ospf6-router)# auto-cost reference-bandwidth 500
The reference bandwidth specied in this example results in the following costs:
• 10 Mbps port cost = 500/10 = 50
• 100 Mbps port cost = 500/100 = 5
• 1000 Mbps port cost = 500/1000 = 0.5, which is rounded up to 1
• 155 Mbps port cost = 500/155 = 3.23, which is rounded up to 4
• 622 Mbps port cost = 500/622 = 0.80, which is rounded up to 1
• 2488 Mbps port cost = 500/2488 = 0.20, which is rounded up to 1
The costs for 10 Mbps, 100 Mbps, and 155 Mbps ports change as a result of the changed reference bandwidth. Costs for higher-speed
interfaces remain the same.
Syntax: [no] auto-cost reference-bandwidth number
The number parameter species the reference bandwidth in the range from 1 through 4294967. The default is 100.
To restore the reference bandwidth to its default value and thus restore the default costs of the interfaces to their default values, enter the
no form of this command.
Redistributing routes into OSPFv3
In addition to specifying which routes are redistributed into OSPFv3, you can congure the following aspects related to route
redistribution:
• Default metric.
• Metric type.
• Advertisement of an external aggregate route.
Conguring route redistribution into OSPFv3
You can congure the device to redistribute routes from the following sources into OSPFv3:
• IPv6 static routes
• Directly connected IPv6 networks
• BGP4+
• RIPng
You can redistribute routes in the following ways:
• By route types, for example, the Brocade device redistributes all IPv6 static and RIPng routes.
• By using a route map to lter which routes to redistribute, for example, the device redistributes specied IPv6 static and RIPng
routes only.
Conguring OSPFv3
FastIron Ethernet Switch Layer 3 Routing Conguration Guide, 08.0.30mb
53-1003627-06 301
For example, to congure the redistribution of all IPv6 static and RIPng, enter the following commands.
device(config-ospf6-router)# redistribute static
device(config-ospf6-router)# redistribute rip
Syntax: [no] redistribute {bgp | connected | rip | static [metric number | metric-type type]}
The bgp, connected, rip, and static keywords specify the route source.
The metric number parameter species the metric used for the redistributed route. If a value is not specied for this option, and the value
for the default-metric command is set to 0, its default metric, then routes redistributed from the various routing protocols will have the
metric value of the protocol from which they are redistributed.
The metric-type type parameter species an OSPF metric type for the redistributed route. You can specify external type 1 or external
type 2. If a value is not specied for this option, the device uses the value specied by the metric-type command.
For example, to congure a route map and use it for redistribution of routes into OSPFv3, enter commands such as the following.
device(config)# ipv6 route 2001:db8:1::/32 2001:db8:343e::23
device(config)# ipv6 route 2001:db8:2::/32 2001:db8:343e::23
device(config)# ipv6 route 2001:db8:3::/32 2001:db8:343e::23 metric 5
device(config)# route-map abc permit 1
device(config-routemap abc)# match metric 5
device(config-routemap abc)# set metric 8
device(config-routemap abc)# ipv6 router ospf
device(config-ospf6-router)# redistribute static route-map abc
The commands in this example congure some static IPv6 routes and a route map, and use the route map for redistributing the static
IPv6 routes into OSPFv3.
The ipv6 route commands congure the static IPv6 routes.
The route-map command begins conguration of a route map called "abc". The number indicates the route map entry (called the
"instance") you are conguring. A route map can contain multiple entries. The software compares packets to the route map entries in
ascending numerical order and stops the comparison once a match is found.
NOTE
The default action rule for route-map is to deny all routes that are not explicitly permitted.
The match command in the route map matches on routes that have 5 for their metric value (cost). The set command changes the metric
in routes that match the route map to 8.
The redistribute command congures the redistribution of static IPv6 routes into OSPFv3, and uses route map "abc" to control the
routes that are redistributed. In this example, the route map allows a static IPv6 route to be redistributed into OSPF only if the route has a
metric of 5, and changes the metric to 8 before placing the route into the OSPF route redistribution table.
Syntax: [no] redistribute {bgp | connected | rip | static [route-map map-name]}
The bgp, connected, isis, ip, and static keywords specify the route source.
The route-map map-name parameter species the route map name. The following match parameters are valid for OSPFv3
redistribution:
•match ipv6 address | next-hopacl-number
•match metric number
•match tag tag-value
The following set parameters are valid for OSPFv3 redistribution:
•set ipv6 next-hop ipv6 address
•set metric [+ | - ] number | none
Conguring OSPFv3
FastIron Ethernet Switch Layer 3 Routing Conguration Guide, 08.0.30mb
302 53-1003627-06
•set metric-type type-1 | type-2
•set tag tag-value
NOTE
You must congure the route map before you congure a redistribution lter that uses the route
map.
NOTE
When you use a route map for route redistribution, the software disregards the permit or deny action of the route map.
NOTE
For an external route that is redistributed into OSPFv3 through a route map, the metric value of the route remains the same
unless the metric is set by a set metric command inside the route map or the default-metric command. For a route
redistributed without using a route map, the metric is set by the metric parameter if set or the default-metric command if the
metric parameter is not set.
Modifying default metric for routes redistributed into OSPF Version 3
The default metric is a global parameter that species the cost applied by default to routes redistributed into OSPFv3. The default value
is 0.
If the metric parameter for the redistribute command is not set and the default-metric command is not set, the metric is set to 1, its
default value, then routes redistributed from the various routing protocols will have the metric value of the protocol from which they are
redistributed.
NOTE
You also can dene the cost on individual interfaces. The interface cost overrides the default
cost.
To assign a default metric of 4 to all routes imported into OSPFv3, enter the following command.
device(config-ospf6-router)# default-metric 4
Syntax: [no] default-metric number
You can specify a value from 0 - 65535. The default is 0.
To restore the default metric to the default value, use the no form of this command.
Modifying metric type for routes redistributed into OSPFv3
The device uses the metric-type parameter by default for all routes redistributed into OSPFv3 unless you specify a dierent metric type
for individual routes using the redistribute command.
A type 1 route species a small metric (two bytes), while a type 2 route species a big metric (three bytes). The default value is type 2.
To modify the default value of type 2 to type 1, enter the following command.
device(config-ospf6-router)# metric-type type1
Syntax: [no] metric-type {type1 | type2}
To restore the metric type to the default value, use the no form of this command.
Conguring OSPFv3
FastIron Ethernet Switch Layer 3 Routing Conguration Guide, 08.0.30mb
53-1003627-06 303
Conguring external route summarization
When the Brocade device is an OSPF Autonomous System Boundary Router (ASBR), you can congure it to advertise one external
route as an aggregate for all redistributed routes that are covered by a specied IPv6 address range.
When you congure an address range, the range takes eect immediately. All the imported routes are summarized according to the
congured address range. Imported routes that have already been advertised and that fall within the range are ushed out of the AS and
a single route corresponding to the range is advertised.
If a route that falls within a congured address range is imported by the device, no action is taken if the device has already advertised the
aggregate route; otherwise, the device advertises the aggregate route. If an imported route that falls within a congured address range is
removed by the device, no action is taken if there are other imported routes that fall with in the same address range; otherwise the
aggregate route is ushed.
You can congure up to 32 address ranges. The device sets the forwarding address of the aggregate route to zero and sets the tag to
zero.
If you delete an address range, the advertised aggregate route is ushed and all imported routes that fall within the range are advertised
individually.
If an external link state database overow (LSDB) condition occurs, all aggregate routes are ushed out of the AS, along with other
external routes. When the device exits the external LSDB overow condition, all the imported routes are summarized according to the
congured address ranges.
NOTE
If you use redistribution lters in addition to address ranges, the Brocade device applies the redistribution lters to routes rst,
then applies them to the address ranges.
NOTE
If you disable redistribution, all the aggregate routes are ushed, along with other imported
routes.
NOTE
This option aects only imported, type 5 external routes. A single type 5 LSA is generated and ooded throughout the AS for
multiple external routes.
To congure the summary address 2001:db8::/24 for routes redistributed into OSPFv3, enter the following command.
device(config-ospf6-router)# summary-address 2001:db8::/24
In this example, the summary prex 2001:db8::/24 includes addresses 2001:db8::/1 through 2001:db8::/24. Only the address
FEC0::/24 is advertised in an external link-state advertisement.
Syntax: summary-address { ipv6-prex/prex-length}
You must specify the ipv6-prex parameter in hexadecimal using 16-bit values between colons as documented in RFC 2373.
You must specify the prex-length parameter as a decimal value. A slash mark (/) must follow the ipv6-prex parameter and precede the
prex-length parameter.
Filtering OSPFv3 routes
You can lter the routes to be placed in the OSPFv3 route table by conguring distribution lists. OSPFv3 distribution lists can be applied
globally or to an interface.
The functionality of OSPFv3 distribution lists is similar to that of OSPFv2 distribution lists.
Conguring OSPFv3
FastIron Ethernet Switch Layer 3 Routing Conguration Guide, 08.0.30mb
304 53-1003627-06
However, unlike OSPFv2 distribution lists, which lter routes based on criteria specied in an Access Control List (ACL), OSPFv3
distribution lists can lter routes using information specied in an IPv6 prex list or a route map.
Conguration examples
The following sections show examples of ltering OSPFv3 routes using prex lists globally and for a specic interface, as well as ltering
OSPFv3 routes using a route map.
You can congure the device to use all three types of ltering. When you do this, ltering using route maps has higher priority over
ltering using global prex lists. Filtering using prex lists for a specic interface has lower priority than the other two ltering methods.
The examples in this section assume the following routes are in the OSPFv3 route table.
device# show ipv6 ospf route
Current Route count: 5
Intra: 3 Inter: 0 External: 2 (Type1 0/Type2 2)
Equal-cost multi-path: 0
Destination Options Area Cost Type2 Cost
Next Hop Router Outgoing Interface
*IA 2001:db8:1::/64 --------- 10.0.0.1 0 0
:: ve 10
*E2 2001:db8:2::/64 --------- 0.0.0.0 10 0
fe80::2e0:52ff:fe00:10 ve 10
*IA 2001:db8:3::/64 V6E---R-- 0.0.0.0 11 0
fe80::2e0:52ff:fe00:10 ve 10
*IA 2001:db8:4::/64 --------- 0.0.0.0 10 0
:: ve 11
*E2 2001:db8:5::/64 --------- 0.0.0.0 10 0
fe80::2e0:52ff:fe00:10 ve 10
Conguring an OSPFv3 distribution list using an IPv6 prex list as input
The following example illustrates how to use an IPv6 prex list to lter OSPFv3 routes.
To specify an IPv6 prex list called lterOspfRoutes that denies route 2001:db8:2::/64, enter the following commands.
device(config)# ipv6 prefix-list filterOspfRoutes seq 5 deny 2001:db8:2::/64
device(config)# ipv6 prefix-list filterOspfRoutes seq 7 permit ::/0 ge 1 le 128
Syntax: ipv6 prex-list name [seq seq-value] [description string] {deny | permit} ipv6-addr/mask-bits [ge ge-value] [ le le-value]
To congure a distribution list that applies the lterOspfRoutes prex list globally.
device(config)# ipv6 router ospf
device(config-ospf6-router)# distribute-list prefix-list filterOspfRoutes in
Syntax: [no] distribute-list prex-list name in [ethernet unit/slot/port | ve num | loopback num]
After this distribution list is congured, route 2001:db8:2::/64 would be omitted from the OSPFv3 route table.
device# show ipv6 ospf route
Current Route count: 4
Intra: 3 Inter: 0 External: 1 (Type1 0/Type2 1)
Equal-cost multi-path: 0
Destination Options Area Cost Type2 Cost
Next Hop Router Outgoing Interface
*IA 2001:db8:1::/64 --------- 10.0.0.1 0 0
:: ve 10
*IA 2001:db8:3::/64 V6E---R-- 0.0.0.0 11 0
fe80::2e0:52ff:fe00:10 ve 10
*IA 2001:db8:4::/64 --------- 0.0.0.0 10 0
:: ve 11
*E2 2001:db8:5::/64 --------- 0.0.0.0 10 0
fe80::2e0:52ff:fe00:10 ve 10
Conguring OSPFv3
FastIron Ethernet Switch Layer 3 Routing Conguration Guide, 08.0.30mb
53-1003627-06 305
The following commands specify an IPv6 prex list called lterOspfRoutesVe that denies route 2001:db8:3::/64.
device(config)# ipv6 prefix-list filterOspfRoutesVe seq 5 deny 2001:db8:3::/64
device(config)# ipv6 prefix-list filterOspfRoutesVe seq 10 permit ::/0 ge 1 le 128
The following commands congure a distribution list that applies the lterOspfRoutesVe prex list to routes pointing to virtual interface
10.
device(config)# ipv6 router ospf
device(config-ospf6-router)# distribute-list prefix-list filterOspfRoutesVe in ve 10
After this distribution list is congured, route 2001:db8:3::/64, pointing to virtual interface 10, would be omitted from the OSPFv3 route
table.
device# show ipv6 ospf route
Current Route count: 4
Intra: 3 Inter: 0 External: 1 (Type1 0/Type2 1)
Equal-cost multi-path: 0
Destination Options Area Cost Type2 Cost
Next Hop Router Outgoing Interface
*IA 2001:db8:1::/64 --------- 10.0.0.1 0 0
:: ve 10
*E2 2001:db8:2::/64 --------- 0.0.0.0 10 0
fe80::2e0:52ff:fe00:10 ve 10
*IA 2001:db8:4::/64 --------- 0.0.0.0 10 0
:: ve 11
*E2 2001:db8:5::/64 --------- 0.0.0.0 10 0
fe80::2e0:52ff:fe00:10 ve 10
Conguring an OSPFv3 distribution list using a route map as input
The following commands congure a route map that matches internal routes.
device(config)# route-map allowInternalRoutes permit 10
device(config-routemap allowInternalRoutes)# match route-type internal
The following commands congure a distribution list that applies the allowInternalRoutes route map globally to OSPFv3 routes.
device(config)# ipv6 router ospf
device(config-ospf6-router)# distribute-list route-map allowinternalroutes in
Syntax: [no] distribute-list route-map name in
After this distribution list is congured, the internal routes would be included, and the external routes would be omitted from the OSPFv3
route table.
device# show ipv6 ospf route
Current Route count: 3
Intra: 3 Inter: 0 External: 0 (Type1 0/Type2 0)
Equal-cost multi-path: 0
Destination Options Area Cost Type2 Cost
Next Hop Router Outgoing Interface
*IA 2001:db8:3001::/64 --------- 10.0.0.1 0 0
:: ve 10
*IA 2001:db8:3015::/64 V6E---R-- 0.0.0.0 11 0
fe80::2e0:52ff:fe00:10 ve 10
*IA 2001:db8:3020::/64 --------- 0.0.0.0 10 0
:: ve 11
Conguring OSPFv3
FastIron Ethernet Switch Layer 3 Routing Conguration Guide, 08.0.30mb
306 53-1003627-06
Conguring an OSPFv3 distribution list using a route map that uses a prex list
When you congure route redistribution into OSPFv3 using a route map that uses a prex list, the device supports both permit and deny
statements in the route map and permit statements only in the prex list. Therefore, the action to permit or deny is determined by the
route map, and the conditions for the action are contained in the prex list. The following shows an example conguration.
device(config)# route-map v64 deny 10
device(config-routemap v64)# match ipv6 next-hop prefix-list ospf-filter5
device(config-routemap v64)# route-map v64 deny 11
device(config-routemap v64)# match ipv6 address prefix-list ospf-filter2
device(config-routemap v64)# route-map v64 permit 12
device(config-routemap v64)# exit
device(config)# ipv6 prefix-list ospf-filter2 seq 15 permit 2001:DB8:2001:102::/64 ge 65 le 96
device(config)# ipv6 prefix-list ospf-filter5 seq 15 permit fe80::2e0:52ff:fe00:100/128
In this example the prex lists, ospf-lter2 and ospf-lter5 , contain a range of IPv6 routes and one host route to be denied, and the route
map v64 denes the deny action.
NOTE
The default action rule for route-map is to deny all routes that are not explicitly permitted. If you congure a "deny" route map
but want to permit other routes that do not match the rule, congure an "empty" permit route map. For example.
device(config)# route-map abc deny 10
device(config-routemap abc)# match metric 20
device(config-routemap abc)# route-map abc permit 20
Without the last line in the above example, all routes would be denied.
Conguring default route origination
When the Brocade device is an OSPFv3 Autonomous System Boundary Router (ASBR), you can congure it to automatically generate a
default external route into an OSPFv3 routing domain. This feature is called "default route origination" or "default information origination."
By default, the Brocade device does not advertise the default route into the OSPFv3 domain. If you want the device to advertise the
OSPF default route, you must explicitly enable default route origination.
When you enable OSPFv3 default route origination, the device advertises a type 5 default route that is ooded throughout the AS
(except stub areas).
The device advertises the default route into OSPF even if OSPF route redistribution is not enabled, and even if the default route is
learned through an IBGP neighbor. The router will not, however, originate default if the active default route is learned from an OSPF
router in the same domain.
NOTE
The Brocade device does not advertise the OSPFv3 default route, regardless of other conguration parameters, unless you
explicitly enable default route origination.
If default route origination is enabled and you disable it, the default route originated by the device is ushed. Default routes generated by
other OSPFv3 routers are not aected. If you re-enable the feature, the feature takes eect immediately and thus does not require you to
reload the software.
For example, to create and advertise a default route with a metric of 2 and as a type 1 external route, enter the following command.
device(config-ospf6-router)# default-information-originate always metric 2 metric-type type1
Syntax: [no] default-information-originate [always] [metric value ] [ metric-type type]
Conguring OSPFv3
FastIron Ethernet Switch Layer 3 Routing Conguration Guide, 08.0.30mb
53-1003627-06 307
The always keyword originates a default route regardless of whether the device has learned a default route. This option is disabled by
default.
The metric value parameter species a metric for the default route. If this option is not used, the value of the default-metric command is
used for the route.
The metric-type type parameter species the external link type associated with the default route advertised into the OSPF routing
domain. The type can be one of the following:
• 1 - Type 1 external route
• 2 - Type 2 external route
If you do not use this option, the default redistribution metric type is used for the route type.
NOTE
If you specify a metric and metric type, the values are used even if you do not use the always option.
To disable default route origination, enter the no form of the command.
Modifying Shortest Path First timers
The Brocade device uses the following timers when calculating the shortest path for OSPFv3 routes:
• SPF delay - When the Brocade device receives a topology change, the software waits before it starts a Shortest Path First (SPF)
calculation. By default, the software waits 5 seconds. You can congure the SPF delay to a value from 0 through 65535
seconds. If you set the SPF delay to 0 seconds, the software immediately begins the SPF calculation after receiving a topology
change.
• SPF hold time - The device waits a specic amount of time between consecutive SPF calculations. By default, it waits 10
seconds. You can congure the SPF hold time to a value from 0 through 65535 seconds. If you set the SPF hold time to 0
seconds, the software does not wait between consecutive SPF calculations.
You can set the SPF delay and hold time to lower values to cause the device to change to alternate paths more quickly if a route fails.
Note that lower values for these parameters require more CPU processing time.
You can change one or both of the timers.
NOTE
If you want to change only one of the timers, for example, the SPF delay timer, you must specify the new value for this timer as
well as the current value of the SPF hold timer, which you want to retain. The device does not accept only one timer value.
NOTE
If you congure SPF timers between 0-100, they will default to 0 and be displayed incorrectly in the running
conguration.
To change the SPF delay to 10 seconds and the SPF hold to 20 seconds, enter the following command.
device(config-ospf6-router)# timers spf 10 20
Syntax: [no] timers spf delay hold-time
For the delay and hold-time parameters, specify a value from 0 through 65535 seconds.
To set the timers back to their default values, enter the no version of this command.
Conguring OSPFv3
FastIron Ethernet Switch Layer 3 Routing Conguration Guide, 08.0.30mb
308 53-1003627-06
Modifying administrative distance
The Brocade device can learn about networks from various protocols, including BGP4+, RIPng, and OSPFv3. Consequently, the routes
to a network may dier depending on the protocol from which the routes were learned. By default, the administrative distance for
OSPFv3 routes is 110.
The device selects one route over another based on the source of the route information. To do so, the device can use the administrative
distances assigned to the sources. You can inuence the device’s decision by changing the default administrative distance for OSPFv3
routes.
Conguring administrative distance based on route type
You can congure a unique administrative distance for each type of OSPFv3 route. For example, you can use this feature to inuence the
Brocade device to prefer a static route over an OSPF inter-area route and to prefer OSPF intra-area routes to static routes.
The distance you specify inuences the choice of routes when the device has multiple routes to the same network from dierent
protocols. The device prefers the route with the lower administrative distance.
You can specify unique default administrative distances for the following OSPFv3 route types:
• Intra-area routes
• Inter-area routes
• External routes
The default for all of these OSPFv3 route types is 110.
NOTE
This feature does not inuence the choice of routes within OSPFv3. For example, an OSPF intra-area route is always preferred
over an OSPF inter-area route, even if the intra-area route’s distance is greater than the inter-area route’s distance.
For example, to change the default administrative distances for intra-area routes to 80, inter-area routes to 90, and external routes to
100, enter the following commands.
device(config-ospf6-router)# distance intra-area 80
device(config-ospf6-router)# distance inter-area 90
device(config-ospf6-router)# distance external 100
Syntax: [no] distance {external | inter-area | intra-area} distance
The external, inter-area, and intra-area keywords specify the route type for which you are changing the default administrative distance.
The distance parameter species the new distance for the specied route type. You can specify a value from 1 through 255.
To reset the administrative distance of a route type to its system default, enter the no form of this command.
Conguring the OSPFv3 LSA pacing interval
The Brocade device paces OSPFv3 LSA refreshes by delaying the refreshes for a specied time interval instead of performing a refresh
each time an individual LSA’s refresh timer expires. The accumulated LSAs constitute a group, which the device refreshes and sends out
together in one or more packets.
The pacing interval, which is the interval at which the Brocade device refreshes an accumulated group of LSAs, is congurable to a range
from 10 through 1800 seconds (30 minutes). The default is 240 seconds (four minutes). Thus, every four minutes, the device refreshes
the group of accumulated LSAs and sends the group together in the same packets.
Conguring OSPFv3
FastIron Ethernet Switch Layer 3 Routing Conguration Guide, 08.0.30mb
53-1003627-06 309
The pacing interval is inversely proportional to the number of LSAs the Brocade device is refreshing and aging. For example, if you have
approximately 10,000 LSAs, decreasing the pacing interval enhances performance. If you have a very small database (40 - 100 LSAs),
increasing the pacing interval to 10 - 20 minutes might enhance performance only slightly.
To change the OSPFv3 LSA pacing interval to two minutes (120 seconds), enter the following command.
device(config)# ipv6 router ospf
device(config-ospf6-router)# timers lsa-group-pacing 120
Syntax: [no] timers lsa-group-pacing seconds
The seconds parameter species the number of seconds and can be from 10 through 1800 (30 minutes). The default is 240 seconds
(four minutes).
To restore the pacing interval to its default value, use the no form of the command.
Modifying exit overow interval
If a database overow condition occurs on the Brocade device, the device eliminates the condition by removing entries that originated on
the device. The exit overow interval allows you to set how often a device checks to see if the overow condition has been eliminated.
The default value is 0. If the congured value of the database overow interval is 0, then the device never leaves the database overow
condition.
For example, to modify the exit overow interval to 60 seconds, enter the following command.
device(config-ospf6-router)# database-overflow-interval 60
Syntax: database-overow-interval seconds
The seconds parameter can be a value from 0 through 86400 seconds (24 hours).
To reset the exit overow interval to its system default, enter the no form of this command.
Modifying external link state database limit
By default, the link state database can hold a maximum of 2000 entries for external (type 5) LSAs. You can change the maximum
number of entries from 500 - 8000. After changing this limit, make sure to save the running-cong le and reload the software. The
change does not take eect until you reload or reboot the software.
For example, to change the maximum number entries from the default of 2000 to 3000, enter the following command.
device(config-ospf6-router)# external-lsdb-limit 3000
Syntax: external-lsdb-limit entries
The entries parameter can be a numerical value from 500 through 8000 seconds.
To reset the maximum number of entries to its system default, enter the no form of this command.
Setting all OSPFv3 interfaces to the passive state
You can set all the Open Shortest Path First Version 3 (OSPFv3) interfaces to the default passive state using the default-passive-
interface command. When you congure the interfaces as passive, the interfaces drop all the OSPFv3 control packets.
To set all the OSPFv3 interfaces to passive, enter the following commands.
device# configure terminal
device(config)# ipv6 router ospf vrf A
device(config-ospf6-router-vrf-A)# default-passive-interface
Conguring OSPFv3
FastIron Ethernet Switch Layer 3 Routing Conguration Guide, 08.0.30mb
310 53-1003627-06
Syntax: [no] default-passive-interface
Modifying OSPFv3 interface defaults
OSPFv3 has interface parameters that you can congure. For simplicity, each of these parameters has a default value. No change to
these default values is required except as needed for specic network congurations.
You can modify the default values for the following OSPF interface parameters:
•cost: Indicates the overhead required to send a packet across an interface. You can modify the cost to dierentiate between
100 Mbps and 1000 Mbps (1 Gbps) links. The command syntax is ipv6 ospf cost number. The default cost is calculated by
dividing 100 million by the bandwidth. For 10 Mbps links, the cost is 10. The cost for both 100 Mbps and 1000 Mbps links is
1, because the speed of 1000 Mbps was not in use at the time the OSPF cost formula was devised.
•dead-interval: Indicates the number of seconds that a neighbor router waits for a hello packet from the device before declaring
the router down. The command syntax is ipv6 ospf dead-interval seconds. The value can be from 1 through 2147483647
seconds. The default is 40 seconds.
•hello-interval: Represents the length of time between the transmission of hello packets. The command syntax is ipv6 ospf
hello-interval seconds. The value can be from 1 through 65535 seconds. The default is 10 seconds.
•instance: Indicates the number of OSPFv3 instances running on an interface. The command syntax is ipv6 ospf instance
number. The value can be from 0 through 255. The default is 1.
•MTU-ignore: Allows you to disable a check that veries the same MTU is used on an interface shared by neighbors. The
command syntax is ipv6 ospf mtu-ignore. By default, the mismatch detection is enabled.
•network: Allows you to congure the OSPF network type. The command syntax is ipv6 ospf network [point-to-multipoint ].
The default setting of the parameter depends on the network type.
•passive: When you congure an OSPF interface to be passive, that interface does not send or receive OSPF route updates.
This option aects all IPv6 subnets congured on the interface. The command syntax is ipv6 ospf passive. By default, all OSPF
interfaces are active and thus can send and receive OSPF route information. Since a passive interface does not send or receive
route information, the interface is in eect a stub network.
•active: When you congure an OSPFv3 interface to be active, that interface sends or receives all the control packets and forms
the adjacency. By default, the ipv6 ospf active command is disabled. Whenever you congure the OSPFv3 interfaces to be
passive using the default-passive-interface command, all the OSPFv3 interfaces stop sending and receiving control packets.
To send and receive packets over specic interfaces, you can use the ipv6 ospf active command.
•priority: Allows you to modify the priority of an OSPF router. The priority is used when selecting the designated router (DR) and
backup designated routers (BDRs). The command syntax is ipv6 ospf priority number. The value can be from 0 through 255.
The default is 1. If you set the priority to 0, the router does not participate in DR and BDR election.
•retransmit-interval: The time between retransmissions of LSAs to adjacent routers for an interface. The command syntax is
ipv6 ospf retransmit-interval seconds . The value can be from 0 through 3600 seconds. The default is 5 seconds.
•Transmit-delay: The time it takes to transmit Link State Update packets on this interface. The command syntax is ipv6 ospf
transmit-delayseconds. The range is 0 through 3600 seconds. The default is 1 second.
Disabling or re-enabling event logging
OSPFv3 supports the logging of OSPFv3 events. The log-status change command controls the generation of all OSPFv3 logs. You can
disable or re-enable the logging of events related to OSPFv3, such as neighbor state changes and database overow conditions. By
default, the Brocade device does not logs these events.
Conguring OSPFv3
FastIron Ethernet Switch Layer 3 Routing Conguration Guide, 08.0.30mb
53-1003627-06 311
To disable the logging of events, enter the following command.
device(config-ospf6-router)# no log-status-change
Syntax: [no] log-status-change
To re-enable the logging of events, enter the following command.
device(config-ospf6-router)# log-status-change
IPsec for OSPFv3
IPSec secures OSPFv3 communications by authenticating and encrypting each IP packet of a communication session.
IPsec is available for OSPFv3 trac only and only for packets that are “for-us”. A for-us packet is addressed to one of the IPv6
addresses on the device or to an IPv6 multicast address. Packets that are just forwarded by the line card do not receive IPsec scrutiny.
Brocade devices support the following components of IPsec for IPv6-addressed packets:
• Authentication through Encapsulating Security Payload (ESP) in transport mode
• HMAC-SHA1-96 as the authentication algorithm
• Manual conguration of keys
•Congurable rollover timer
IPsec can be enabled on the following logical entities:
• Interface
• Area
• Virtual link
With respect to trac classes, this implementation of IPSec uses a single security association (SA) between the source and destination to
support all trac classes and so does not dierentiate between the dierent classes of trac that the DSCP bits dene.
IPsec on a virtual link is a global conguration. Interface and area IPsec congurations are more granular.
Among the entities that can have IPsec protection, the interfaces and areas can overlap. The interface IPsec conguration takes
precedence over the area IPsec conguration when an area and an interface within that area use IPsec. Therefore, if you congure IPsec
for an interface and an area conguration also exists that includes this interface, the interface’s IPsec conguration is used by that
interface. However, if you disable IPsec on an interface, IPsec is disabled on the interface even if the interface has its own, specic
authentication.
For IPsec, the system generates two types of databases. The security association database (SAD) contains a security association for
each interface or one global database for a virtual link. Even if IPsec is congured for an area, each interface that uses the area’s IPsec still
has its own security association in the SAD. Each SA in the SAD is a generated entry that is based on your specications of an
authentication protocol (ESP in the current release), destination address, and a security policy index (SPI). The SPI number is user-
specied according to the network plan. Consideration for the SPI values to specify must apply to the whole network.
The system-generated security policy databases (SPDs) contain the security policies against which the system checks the for-us packets.
For each for-us packet that has an ESP header, the applicable security policy in the security policy database (SPD) is checked to see if
this packet complies with the policy. The IPsec task drops the non-compliant packets. Compliant packets continue on to the OSPFv3
task.
Conguring OSPFv3
FastIron Ethernet Switch Layer 3 Routing Conguration Guide, 08.0.30mb
312 53-1003627-06
Conguring IPsec for OSPFv3
This section describes how to congure IPsec for an interface, area, and virtual link. It also describes how to change the key rollover timer
if necessary and how to disable IPsec on a particular interface for special purposes.
By default, OSPFv3 IPsec authentication is disabled. The following IPsec parameters are congurable:
• ESP security protocol
• Authentication
• HMAC-SHA1-96 authentication algorithm
• Security parameter index (SPI)
• A 40-character key using hexadecimal characters
• An option for not encrypting the keyword when it appears in show command output
• Key rollover timer
• Specifying the key add remove timer
NOTE
In the current release, certain keyword parameters must be entered even though only one keyword choice is possible for that
parameter. For example, the only authentication algorithm in the current release is HMAC-SHA1-96, but you must nevertheless
enter the keyword for this algorithm. Also, ESP currently is the only authentication protocol, but you must still enter the esp
keyword. This section describes all keywords.
IPsec for OSPFv3 considerations
The IPsec component generates security associations and security policies based on certain user-specied parameters. The parameters
are described with the syntax of each command in this section. User-specied parameters and their relation to system-generated values
are as follows:
•Security association: based on your entries for security policy index (SPI), destination address, and security protocol (currently
ESP), the system creates a security association for each interface or virtual link.
•Security policy database: based on your entries for SPI, source address, destination addresses, and security protocol , the
system creates a security policy database for each interface or virtual link.
• You can congure the same SPI and key on multiple interfaces and areas, but they still have unique IPsec congurations
because the SA and policies are added to each separate security policy database (SPD) that is associated with a particular
interface. If you congure an SA with the same SPI in multiple places, the rest of the parameters associated with the SA—such
as key, cryptographic algorithm, and security protocol, and so on—must match. If the system detects a mismatch, it displays an
error message.
• IPsec authentication for OSPFv3 requires the use of multiple SPDs, one for each interface. A virtual link has a separate, global
SPD. The authentication conguration on a virtual link must be dierent from the authentication conguration for an area or
interface, as required by RFC4552. The interface number is used to generate a non-zero security policy database identier
(SPDID), but for the global SPD for a virtual link, the system-generated SPDID is always zero. As a hypothetical example, the
SPD for interface eth 1/1/1 might have the system-generated SPDID of 1, and so on.
• If you change an existing key, you must also specify a dierent SPI value. For example, in an interface context where you intend
to change a key, you must type a dierent SPI value—which occurs before the key parameter on the command line—before you
type the new key.
• The old key is active for twice the current congured key-rollover-interval for the inbound direction. In the outbound direction,
the old key remains active for a duration equal to the key-rollover-interval. If the key-rollover-interval is set to 0, the new key
immediately takes eect for both directions.
Conguring OSPFv3
FastIron Ethernet Switch Layer 3 Routing Conguration Guide, 08.0.30mb
53-1003627-06 313
Interface and area IPsec considerations
This section describes the precedence of interface and area IPsec congurations.
If you congure an interface IPsec by using the ipv6 ospf authentication command in the context of a specic interface, that interface’s
IPsec conguration overrides the area conguration of IPsec.
If you congure IPsec for an area, all interfaces that utilize the area-wide IPsec (where interface-specic IPsec is not congured)
nevertheless receive an SPD entry (and SPDID number) that is unique for the interface.
The area-wide SPI that you specify is a constant for all interfaces in the area that use the area IPsec, but the use of dierent interfaces
results in an SPDID and an SA that are unique to each interface. The security policy database depends partly on the source IP address,
so a unique SPD for each interface results.
Considerations for IPsec on virtual links
The IPsec conguration for a virtual link is global, so only one security association database and one security policy database exist for
virtual links if you choose to congure IPsec for virtual links.
The virtual link IPsec SAs and policies are added to all interfaces of the transit area for the outbound direction. For the inbound direction,
IPsec SAs and policies for virtual links are added to the global database.
NOTE
The security association (SA), security protocol index (SPI), security protocol database (SPD), and key have mutual
dependencies, as the subsections that follow describe.
Specifying the key rollover timer
Conguration changes for authentication takes eect in a controlled manner through the key rollover procedure as specied in RFC
4552, Section 10.1. The key rollover timer controls the timing of the existing conguration changeover. The key rollover timer can be
congured in the IPv6 router OSPF context, as the following example illustrates.
device(config-ospf6-router)# key-rollover-interval 200
Syntax: key-rollover-interval time
The range for the key-rollover-interval is 0 through 14400 seconds. The default is 300 seconds.
Specifying the key add remove timer
The key-add-remove timer is used in an environment where interoperability with other vendors is required on a specic interface. This
parameter is used to determine the interval time when authentication addition and deletion will take eect.
The key-add-remove-interval timer can be used to set the required value globally, or on a specic interface as needed. Interface
conguration takes preference over system level conguration.
By default, the key-add-remove-interval is set to 300 seconds to smoothly interoperate with Brocade routers.
To set the key-add-remove-interval globally to 100 seconds, enter the following commands:
device(config-ospf6-router)# key-add-remove-interval 100
To set the key-add-remove-interval to 100 seconds on a specic interface, enter the following command:
device(config-if-e1000-1/1/10)#ipv6 ospf authentication ipsec key-add-remove-interval 100
Syntax: [no] ipv6 ospf authentication ipsec key-add-remove-interval range
Conguring OSPFv3
FastIron Ethernet Switch Layer 3 Routing Conguration Guide, 08.0.30mb
314 53-1003627-06
The no form of this command sets the key-add-remove-interval back to a default of 300 seconds.
The ipv6 command is available in the conguration interface context for a specic interface.
The ospf keyword identies OSPFv3 as the protocol to receive IPsec security.
The authentication keyword enables authentication.
The ipsec keyword species IPsec as the authentication protocol.
The range is a value between 0 and 14400 seconds.
This command is not set by default and key-add-remove-interval is set to the same value as key-rollover-interval.
NOTE
This command will not resolve the issue completely on a network where Brocade Routers running software that does not
support key-add-remove-interval (earlier versions of NetIron R05.3.00) and other vendor’s routers are present. In this case,
disabling and enabling the interface or setting key-rollover-interval to 0 will resolve the issue.
Conguring IPsec on a interface
For IPsec to work, the IPsec conguration must be the same on all the routers to which an interface connects.
For multicast, IPsec does not need or use a specic destination address, the destination address is "do not care," and this status is
reected by the lone pair of colons (::) for destination address in the show command output.
To congure IPsec on an interface, proceed as in the following example.
NOTE
The IPsec conguration for an interface applies to the inbound and outbound directions. Also, the same authentication
parameters must be used by all devices on the network to which the interface is connected, as described in section 7 of RFC
4552.
device(config-if-e10000-1/1/2)# ipv6 ospf auth ipsec spi 429496795 esp sha1
abcdef12345678900987654321fedcba12345678
Syntax: [no] ipv6 ospf authentication ipsec spi spi-num esp sha1 [no-encrypt] key
The no form of this command deletes IPsec from the interface.
The ipv6 command is available in the conguration interface context for a specic interface.
The ospf keyword identies OSPFv3 as the protocol to receive IPsec security.
The authentication keyword enables authentication.
The ipsec keyword species IPsec as the authentication protocol.
The spi keyword and the spi-num variable specify the security parameter that points to the security association. The near-end and far-
end values for spi-num must be the same. The range for spi-num is decimal 256 through 4294967295.
The mandatory esp keyword species ESP (rather than authentication header) as the protocol to provide packet-level security. In the
current release, this parameter can be esp only.
The sha1 keyword species the HMAC-SHA1-96 authentication algorithm. This mandatory parameter can be only the sha1 keyword in
the current release.
Including the optional no-encrypt keyword means that when you display the IPsec conguration, the key is displayed in its unencrypted
form and also saved as unencrypted.
Conguring OSPFv3
FastIron Ethernet Switch Layer 3 Routing Conguration Guide, 08.0.30mb
53-1003627-06 315
The key variable must be 40 hexadecimal characters. To change an existing key, you must also specify a dierent SPI value. You cannot
just change the key without also specifying a dierent SPI, too. For example, in an interface context where you intend to change a key,
you must type a dierent SPI value -- which occurs before the key parameter on the command line -- before you type the new key.
If no-encrypt is not entered, then the key will be encrypted. This is the default. The system adds the following in the conguration to
indicate that the key is encrypted:
• encrypt = the key string uses proprietary simple cryptographic 2-way algorithm
• encryptb64 = the key string uses proprietary base64 cryptographic 2-way algorithm
This example results in the conguration shown in the screen output that follows. Note that because the optional no-encrypt keyword
was omitted, the display of the key has the encrypted form by default.
interface ethernet 1/1/2
enable
ip address 10.3.3.1/8
ipv6 address 2001:db8:3::1/64
ipv6 ospf area 1
ipv6 ospf authentication ipsec spi 429496795 esp sha1 encryptb64 $ITJkQG5HWnw4M09tWVd
Conguring IPsec for an area
This application of the area command (for IPsec) applies to all of the interfaces that belong to an area unless an interface has its own
IPsec conguration. The interface IPsec can be operationally disabled if necessary.) To congure IPsec for an area in the IPv6 router
OSPF context, proceed as in the following example.
device(config-ospf6-router)# area 2 auth ipsec spi 400 esp sha1 abcef12345678901234fedcba098765432109876
Syntax: [no] area area-id authentication ipsec spi spi-num esp sha1 [no-encrypt] key
The no form of this command deletes IPsec from the area.
The area command and the area-id variable specify the area for this IPsec conguration. The area-id can be an integer in the range 0
through 2,147,483,647 or have the format of an IP address.
The authentication keyword species that the function to specify for the area is packet authentication.
The ipsec keyword species that IPsec is the protocol that authenticates the packets.
The spi keyword and the spi-num variable specify the index that points to the security association. The near-end and far-end values for
spi-num must be the same. The range for spi-num is decimal 256 through 4294967295.
The mandatory esp keyword species ESP (rather than authentication header) as the protocol to provide packet-level security. In the
current release, this parameter can be esp only.
The sha1 keyword species the HMAC-SHA1-96 authentication algorithm. This mandatory parameter can be only the sha1 keyword in
the current release.
Including the optional no-encrypt keyword means that the 40-character key is not encrypted upon either its entry or its display. The key
must be 40 hexadecimal characters.
If no-encrypt is not entered, then the key will be encrypted. This is the default. The system adds the following in the conguration to
indicate that the key is encrypted:
• encrypt = the key string uses proprietary simple cryptographic 2-way algorithm
• encryptb64 = the key string uses proprietary base64 cryptographic 2-way algorithm
The conguration in the preceding example results in the conguration for area 2 that is illustrated in the following.
ipv6 router ospf
area 0
area 1
Conguring OSPFv3
FastIron Ethernet Switch Layer 3 Routing Conguration Guide, 08.0.30mb
316 53-1003627-06
area 2
area 2 auth ipsec spi 400 esp sha1 abcef12345678901234fedcba098765432109876
Conguring IPsec for a virtual link
IPsec on a virtual link has a global conguration.
To congure IPsec on a virtual link, enter the IPv6 router OSPF context of the CLI and proceed as the following example illustrates. (Note
the no-encrypt option in this example.)
device(config-ospf6-router)# area 1 vir 10.2.2.2 auth ipsec spi 360 esp sha1 no-encrypt
1234567890098765432112345678990987654321
Syntax: [no] area area-id virtual nbr-id authentication ipsec spi spi-num esp sha1 [no-encrypt] key
The no form of this command deletes IPsec from the virtual link.
The area command and the area-id variable specify the area is to be congured. The area-id can be an integer in the range 0 through
2,147,483,647 or have the format of an IP address.
The virtual keyword indicates that this conguration applies to the virtual link identied by the subsequent variable nbr-id. The variable
nbr-id is in dotted decimal notation of an IP address.
The authentication keyword species that the function to specify for the area is packet authentication.
The ipsec keyword species that IPsec is the protocol that authenticates the packets.
The spi keyword and the spi-num variable specify the index that points to the security association. The near-end and far-end values for
spi-num must be the same. The range for spi-num is decimal 256 through 4294967295.
The mandatory esp keyword species ESP (rather than authentication header) as the protocol to provide packet-level security. In the
current release, this parameter can be esp only.
The sha1 keyword species the HMAC-SHA1-96 authentication algorithm. This mandatory parameter can be only the sha1 keyword in
the current release.
Including the optional no-encrypt keyword means that the 40-character key is not encrypted in show command displays. If no-encrypt
is not entered, then the key will be encrypted. This is the default. The system adds the following in the conguration to indicate that the
key is encrypted:
• encrypt = the key string uses proprietary simple cryptographic 2-way algorithm
• encryptb64 = the key string uses proprietary base64 cryptographic 2-way algorithm
This example results in the following conguration.
area 1 virtual-link 10.2.2.2
area 1 virtual-link 10.2.2.2 authentication ipsec spi 360 esp sha1 no-encrypt 12
34567890098765432112345678990987654321
Disabling IPsec on an interface
For the purpose of troubleshooting, you can operationally disable IPsec on an interface by using the ipv6 ospf authentication ipsec
disable command in the CLI context of a specic interface. This command disables IPsec on the interface whether its IPsec conguration
is the area’s IPsec conguration or is specic to that interface. The output of the show ipv6 ospf interface command shows the current
setting for the disable command.
To disable IPsec on an interface, go to the CLI context of the interface and proceed as in the following example.
device(config-if-e10000-1/1/2)# ipv6 ospf auth ipsec disable
Syntax: [no] ipv6 ospf authentication ipsec disable
Conguring OSPFv3
FastIron Ethernet Switch Layer 3 Routing Conguration Guide, 08.0.30mb
53-1003627-06 317
The no form of this command restores the area and interface-specic IPsec operation.
Changing the key rollover timer
Conguration changes for authentication takes eect in a controlled manner through the key rollover procedure as specied in RFC
4552, Section 10.1. The key rollover timer controls the timing of the conguration changeover. The key rollover timer can be congured
in the IPv6 router OSPF context, as the following example illustrates.
device(config-ospf6-router)# key-rollover-interval 200
Syntax: key-rollover-interval time
The range for the key-rollover-interval is 0 through 14400 seconds. The default is 300 seconds.
Clearing IPsec statistics
This section describes the clear ipsec statistics command for clearing statistics related to IPsec. The command resets to 0 the counters
(which you can view as a part of IP Security Packet Statistics). The counters hold IPsec packet statistics and IPsec error statistics. The
following example illustrates the show ipsec statistics output.
device# show ipsec statistics
IPSecurity Statistics
secEspCurrentInboundSAs 1 ipsecEspTotalInboundSAs: 2
secEspCurrentOutboundSA 1 ipsecEspTotalOutboundSAs: 2
IPSecurity Packet Statistics
secEspTotalInPkts: 20 ipsecEspTotalInPktsDrop: 0
secEspTotalOutPkts: 84
IPSecurity Error Statistics
secAuthenticationErrors 0
secReplayErrors: 0 ipsecPolicyErrors: 13
secOtherReceiveErrors: 0 ipsecSendErrors: 0
secUnknownSpiErrors: 0
To clear the statistics, enter the clear ipsec statistics command as in the following example.
device# clear ipsec statistics
Syntax: clear ipsec statistics
This command takes no parameters.
Conguring OSPFv3 Graceful Restart Helper mode
To enable the graceful restart (GR) helper capability, use the graceful-restart helper command in the OSPFv6 interface mode. Graceful
restart for OSPFv3 helper mode is enabled by default.
device(config-ospf6-router)# graceful-restart helper strict-lsa-checking
Syntax: [no] graceful-restart helper {disable | strict-lsa-checking}
The disable keyword is used to disable the graceful-restart helper capability. By default, it is enabled.
The strict-lsa-checking keyword is used to enable the graceful-restart helper device to terminate restart supporting any topology
change. By default, it is disabled.
Conguring OSPFv3
FastIron Ethernet Switch Layer 3 Routing Conguration Guide, 08.0.30mb
318 53-1003627-06

TABLE 69 OSPFv3 area information elds
Task Conguration example
Disabling graceful-restart-helper on a device device(config-ospf6-router)#graceful-restart
helper disable
NOTE
Graceful restart for OSPFv3 helper mode is enabled by
default.
Enabling graceful-restart-helper on a device device(config-ospf6-router)#no graceful-restart
helper disable
Enabling LSA checking option on the helper device(config-ospf6-router)#graceful-restart
helper strict-lsa-checking
Enabling graceful-restart-helper per VRF
NOTE
Graceful-restart-helper option can be enabled or disabled per
VRF in OSPFv3. If congured outside VRF, then it is
applicable to the default VRF instance of OSPFv3.
device(config-ospf6-router-vrf-red)#graceful-
restart helper strict-lsa-checking
Conguring OSPFv3 Non-stop routing (NSR)
In graceful restart, the restarting neighbors need to help build the routing information during the failover, but the graceful restart helper
may not be supported by all devices in a network. Hence to eliminate this dependency, the non-stop routing (NSR) feature is supported
on Brocade devices. NSR does not require support from neighboring devices to perform hitless failover. NSR does not support IPv6-
over-IPv4 tunnel and vitual link, so trac loss is expected while performing hitless failover.
To enable NSR for OSPFv3, use the nonstop-routing command in the OSPFv6 interface mode.
device(config)# ipv6 router ospf
device(config-ospf6-router)# nonstop-routing
To disable NSR for OSPFv3, use the no form of the nonstop-routing command.
Syntax: [no] nonstop-routing
Displaying OSPFv3 information
You can display the information for the following OSPFv3 parameters:
• Areas
• Link state databases
• Interfaces
• Memory usage
• Neighbors
• Redistributed routes
• Routes
• SPF
• Virtual links
Displaying OSPFv3 information
FastIron Ethernet Switch Layer 3 Routing Conguration Guide, 08.0.30mb
53-1003627-06 319

• Virtual neighbors
• IPsec
• key-add-remove interval
General OSPFv3 conguration information
To indicate whether the Brocade device is operating as ASBR or not, enter the following command at any CLI level.
device# show ipv6 ospf
OSPFv3 Process number 0 with Router ID 0xc0a862d5(192.168.98.213)
Running 0 days 2 hours 55 minutes 36 seconds
Number of AS scoped LSAs is 4
Sum of AS scoped LSAs Checksum is 18565
External LSA Limit is 250000
Database Overflow Interval is 10
Database Overflow State is NOT OVERFLOWED
Route calculation executed 15 times
Pending outgoing LSA count 0
Authentication key rollover interval 300 seconds
Number of areas in this router is 3
Router is operating as ABR
Router is operating as ASBR, Redistribute: CONNECTED RIP
High Priority Message Queue Full count: 0
Graceful restart helper is enabled, strict lsa checking is disabled
Nonstop Routing is disabled
The output of the show ipv6 ospf command indicates if the Brocade device is operating as ASBR. If the device is not operating as
ASBR, then there is no information about redistribution in the output.
Displaying OSPFv3 area information
To display global OSPFv3 area information for the device, enter the following command at any CLI level.
device# show ipv6 ospf area 400
Area 400:
Authentication: Not Configured
Active interface(s)attached to this area: None
Inactive interface(s)attached to this area: ve 20 ve 30
Number of Area scoped LSAs is 311
Sum of Area LSAs Checksum is 9e8fff
Statistics of Area 400:
SPF algorithm executed 10 times
SPF last updated: 5920 sec ago
Current SPF node count: 1
Router: 1 Network: 0
Maximum of Hop count to nodes: 0
Syntax: show ipv6 ospf area [area-id]
You can specify the area-id parameter in the following formats:
• As an IPv4 address, for example, 192.168.1.1.
• As a numerical value from 0 through 2,147,483,647.
The area-id parameter restricts the display to the specied OSPF area.
TABLE 70 show ipv6 ospf area output descriptions
This eld Displays
Area The area number.
Interface attached to this area The device interfaces attached to the area.
Displaying OSPFv3 information
FastIron Ethernet Switch Layer 3 Routing Conguration Guide, 08.0.30mb
320 53-1003627-06
TABLE 70 show ipv6 ospf area output descriptions (continued)
This eld Displays
Number of Area scoped LSAs is NNumber of LSAs (N ) with a scope of the specied area.
SPF algorithm executed is NThe number of times (N ) the OSPF Shortest Path First (SPF) algorithm is
executed within the area.
SPF last updated The interval in seconds that the SPF algorithm was last executed within
the area.
Current SPF node count The current number of SPF nodes in the area.
Router Number of router LSAs in the area.
Network Number of network LSAs in the area.
Indx The row number of the entry in the routers’s OSPF area table.
Statistics of Area The number of the area whose statistics are displayed.
Maximum hop count to nodes. The maximum number of hop counts to an SPF node within the area.
Displaying OSPFv3 database information
You can display a summary of the device’s link state database or detailed information about a specied LSA type.
To display a summary of a device’s link state database, enter the following command at any CLI level.
device# show ipv6 ospf database
LSA Key - Rtr:Router Net:Network Inap:InterPrefix Inar:InterRouter
Extn:ASExternal Grp:GroupMembership Typ7:Type7 Link:Link
Iap:IntraPrefix Grc:Grace
Area ID Type LSID Adv Rtr Seq(Hex) Age Cksum Len Sync
0.0.0.200 Link 897 192.168.98.213 80000007 1277 9044 64 Yes
0.0.0.200 Link 136 192.168.98.111 80000007 582 fb0b 64 Yes
0.0.0.200 Link 2049 192.168.98.213 80000006 1277 381a 64 Yes
0.0.0.200 Link 1156 192.168.98.111 80000007 582 cf38 64 Yes
0.0.0.200 Link 2052 192.168.98.213 80000004 799 5b06 64 Yes
0.0.0.200 Rtr 0 192.168.98.111 800002ea 823 cb7b 56 Yes
0.0.0.200 Rtr 0 192.168.98.213 800001c7 799 8402 56 Yes
0.0.0.200 Net 1156 192.168.98.111 80000004 823 b2d2 32 Yes
0.0.0.200 Net 136 192.168.98.111 80000008 823 aed2 32 Yes
N/A Extn 0000021d 10.223.223.223 800000a8 1319 441e 32 Yes
Syntax: show ipv6 ospf database [advrtr ipv4-address | as-external [advrtr ipv4-address | link-id number] | extensive | inter-prex
[advrtr ipv4-address | link-id number] | inter-router [advrtr ipv4-address | link-id number] | intra-prex [advrtr ipv4-address | link-id
number] | link [advrtr ipv4-address | link-id number] | link-id number | network [advrtr ipv4-address | link-id number] | router [advrtr
ipv4-address | link-id number]]
The advrtr ipv4-address parameter displays detailed information about the LSAs for a specied advertising router only.
The as-external keyword displays detailed information about the AS externals LSAs only.
The extensive keyword displays detailed information about all LSAs in the database.
The inter-prex keyword displays detailed information about the inter-area prex LSAs only.
The inter-router keyword displays detailed information about the inter-area router LSAs only.
The intra-prex keyword displays detailed information about the intra-area prex LSAs only.
The link keyword displays detailed information about the link LSAs only.
The link-id number parameter displays detailed information about the specied link LSAs only.
The network number displays detailed information about the network LSAs only.
The router number displays detailed information about the router LSAs only.
Displaying OSPFv3 information
FastIron Ethernet Switch Layer 3 Routing Conguration Guide, 08.0.30mb
53-1003627-06 321

The scope area-id parameter displays detailed information about the LSAs for a specied area, AS, or link.
TABLE 71 show ipv6 ospf database output descriptions
This eld Displays
Area ID The OSPF area in which the device resides.
Type Type of LSA. LSA types can be the following:
• Rtr - Router LSAs (Type 1).
• Net - Network LSAs (Type 2).
• Inap - Inter-area prex LSAs for ABRs (Type 3).
• Inar - Inter-area router LSAs for ASBRs (Type 4).
• Extn - AS external LSAs (Type 5).
• Link - Link LSAs (Type 8).
• Iap - Intra-area prex LSAs (Type 9).
LS ID The ID of LSA in Decimal.
Adv Rtr The device that advertised the route.
Seq(Hex) The sequence number of the LSA. The OSPF neighbor that sent the LSA stamps it with a
sequence number to enable the device and other OSPF routers to determine which LSA for a
given route is the most recent.
Age The age of the LSA, in seconds.
Chksum A checksum for the LSA packet. The checksum is based on all the elds in the packet except the
age eld. The device uses the checksum to verify that the packet is not corrupted.
Len The length, in bytes, of the LSA.
Sync Sync status with the slave management processor (MP).
To display the show ipv6 ospf database advr command output, enter the following command at any CLI level.
device# show ipv6 ospf database advr 192.168.98.111
LSA Key - Rtr:Router Net:Network Inap:InterPrefix Inar:InterRouter
Extn:ASExternal Grp:GroupMembership Typ7:Type7 Link:Link
Iap:IntraPrefix Grc:Grace
Area ID Type LSID Adv Rtr Seq(Hex) Age Cksum Len Sync
0.0.0.200 Link 136 192.168.98.111 80000007 634 fb0b 64 Yes
Router Priority: 1
Options: V6E---R--
LinkLocal Address: fe80::768e:f8ff:fe3e:1800
Number of Prefix: 1
Prefix Options:
Prefix: 5100::193:213:111:0/112
To display the show ipv6 ospf database as-external command output, enter the following command at any CLI level.
device# show ipv6 ospf database as-external
LSA Key - Rtr:Router Net:Network Inap:InterPrefix Inar:InterRouter
Extn:ASExternal Grp:GroupMembership Typ7:Type7 Link:Link
Iap:IntraPrefix Grc:Grace
Area ID Type LSID Adv Rtr Seq(Hex) Age Cksum Len Sync
N/A Extn 2 192.168.98.213 80000004 895 6e5e 44 Yes
Bits: E--
Metric: 0
Prefix Options:
Referenced LSType: 0
Prefix: 5100:213:213:0:192:213:1:0/112
LSA Key - Rtr:Router Net:Network Inap:InterPrefix Inar:InterRouter
Extn:ASExternal Grp:GroupMembership Typ7:Type7 Link:Link
Iap:IntraPrefix Grc:Grace
Area ID Type LSID Adv Rtr Seq(Hex) Age Cksum Len Sync
N/A Extn 1 192.168.98.190 80001394 643 1cc9 28 Yes
Bits: E--
Metric: 1
Displaying OSPFv3 information
FastIron Ethernet Switch Layer 3 Routing Conguration Guide, 08.0.30mb
322 53-1003627-06

Prefix Options:
Referenced LSType: 0
Prefix: ::/0
LSA Key - Rtr:Router Net:Network Inap:InterPrefix Inar:InterRouter
Extn:ASExternal Grp:GroupMembership Typ7:Type7 Link:Link
Iap:IntraPrefix Grc:Grace
Area ID Type LSID Adv Rtr Seq(Hex) Age Cksum Len Sync
N/A Extn 2 192.168.98.71 80000258 132 a3ff 32 Yes
Bits: E-T
Metric: 1
Prefix Options:
Referenced LSType: 0
Prefix: ::/0
Tag: 1
To display detailed information about all LSAs in the database, enter the following command at any CLI level.
device# show ipv6 ospf database extensive
LSA Key - Rtr:Router Net:Network Inap:InterPrefix Inar:InterRouter
Extn:ASExternal Grp:GroupMembership Typ7:Type7 Link:Link
Iap:IntraPrefix Grc:Grace
Area ID Type LS ID Adv Rtr Seq(Hex) Age Cksum Len Sync
0.0.0.200 Link 897 192.168.98.213 80000007 1432 9044 64 Yes
Router Priority: 1
Options: V6E---R--
LinkLocal Address: fe80::214:ff:fe77:96ff
Number of Prefix: 1
Prefix Options:
Prefix: 5100::193:213:111:0/112
LSA Key - Rtr:Router Net:Network Inap:InterPrefix Inar:InterRouter
Extn:ASExternal Grp:GroupMembership Typ7:Type7 Link:Link
Iap:IntraPrefix Grc:Grace
Area ID Type LSID Adv Rtr Seq(Hex) Age Cksum Len Sync
0.0.0.200 Link 136 192.168.98.111 80000007 737 fb0b 64 Yes
Router Priority: 1
Options: V6E---R--
LinkLocal Address: fe80::768e:f8ff:fe3e:1800
--More--, next page: Space, next line: Return key, quit: Control-c
NOTE
Portions of this display are truncated for brevity. The purpose of this display is to show all possible elds that might display
rather than to show complete output.
The elds that display depend upon the LSA type as shown in the following.
TABLE 72 OSPFv3 detailed database information elds
This eld Displays
Router LSA (Type 1) (Rtr) Fields
Capability Bits A bit that indicates the capability of the device. The bit can be set to one of the following:
B - The device is an area border router.
E - The device is an AS boundary router.
V - The device is a virtual link endpoint.
W - The device is a wildcard multicast receiver.
Options A 24-bit eld that enables IPv6 OSPF routers to support the optional capabilities. When set, the
following bits indicate the following:
V6 - The device should be included in IPv6 routing calculations.
E - The device oods AS-external-LSAs as described in RFC 2740.
MC - The device forwards multicast packets as described in RFC 1586.
N - The device handles type 7 LSAs as described in RFC 1584.
Displaying OSPFv3 information
FastIron Ethernet Switch Layer 3 Routing Conguration Guide, 08.0.30mb
53-1003627-06 323

TABLE 72 OSPFv3 detailed database information elds (continued)
This eld Displays
R - The originator is an active router.
DC -The device handles demand circuits.
Type The type of interface. Possible types can be the following:
Point-to-point - A point-to-point connection to another router.
Transit - A connection to a transit network.
Virtual link - A connection to a virtual link.
Metric The cost of using this router interface for outbound trac.
Interface ID The ID assigned to the router interface.
Neighbor Interface ID The interface ID that the neighboring router has been advertising in hello packets sent on the
attached link.
Neighbor Router ID The router ID (IPv4 address) of the neighboring router that advertised the route. (By default, the
router ID is the IPv4 address congured on the lowest numbered loopback interface. If the device
does not have a loopback interface, the default router ID is the lowest numbered IPv4 address
congured on the device.)
Network LSA (Type 2) (Net) Fields
Options A 24-bit eld that enables IPv6 OSPF routers to support the optional capabilities. When set, the
following bits indicate the following:
V6 - The device should be included in IPv6 routing calculations.
E - The device oods AS-external-LSAs as described in RFC 2740.
MC - The device forwards multicast packets as described in RFC 1586.
N - The device handles type 7 LSAs as described in RFC 1584.
R - The originator is an active router.
DC -The device handles demand circuits.
Attached Router The address of the neighboring router that advertised the route.
Inter-Area Prex LSA (Type 3) (Inap) Fields
Metric The cost of the route.
Prex Options An 8-bit eld describing various capabilities associated with the prex.
Prex The IPv6 prex included in the LSA.
Inter-Area Router LSA (Type 4) (Inar) Fields
Options A 24-bit eld that enables IPv6 OSPF routers to support the optional capabilities. When set, the
following bits indicate the following:
V6 - The device should be included in IPv6 routing calculations.
E - The device oods AS-external-LSAs as described in RFC 2740.
MC - The device forwards multicast packets as described in RFC 1586.
N - The device handles type 7 LSAs as described in RFC 1584.
R - The originator is an active router.
DC -The device handles demand circuits.
Metric The cost of the route.
Destination Router ID The ID of the router described in the LSA.
AS External LSA (Type 5) (Extn) Fields
Displaying OSPFv3 information
FastIron Ethernet Switch Layer 3 Routing Conguration Guide, 08.0.30mb
324 53-1003627-06

TABLE 72 OSPFv3 detailed database information elds (continued)
This eld Displays
Bits The bit can be set to one of the following:
• E - If bit E is set, a Type 2 external metric. If bit E is zero, a Type 1 external metric.
• F - A forwarding address is included in the LSA.
• T - An external route tag is included in the LSA.
Metric The cost of this route, which depends on bit E.
Prex Options An 8-bit eld describing various capabilities associated with the prex.
Referenced LS Type If non-zero, an LSA with this LS type is associated with the LSA.
Prex The IPv6 prex included in the LSA.
Link LSA (Type 8) (Link) Fields
Router Priority The router priority of the interface attaching the originating router to the link.
Options The set of options bits that the router would like set in the network LSA that will be originated for the
link.
Link Local Address The originating router’s link-local interface address on the link.
Number of Prex The number of IPv6 address prexes contained in the LSA.
Prex Options An 8-bit eld of capabilities that serve as input to various routing calculations:
• NU - The prex is excluded from IPv6 unicast calculations.
• LA - The prex is an IPv6 interface address of the advertising router.
• MC - The prex is included in IPv6 multicast routing calculations.
• P - NSSA area prexes are readvertised at the NSSA area border.
Prex The IPv6 prex included in the LSA.
Intra-Area Prex LSAs (Type 9) (Iap) Fields
Number of Prex The number of prexes included in the LSA.
Referenced LS Type, Referenced LS ID Identies the router-LSA or network-LSA with which the IPv6 address prexes are associated.
Referenced Advertising Router The address of the neighboring router that advertised the route.
Prex Options An 8-bit eld describing various capabilities associated with the prex.
Metric The cost of using the advertised prex.
Prex The IPv6 prex included in the LSA.
Number of Prex The number of prexes included in the LSA.
Displaying IPv6 interface information
You can use the following command to display a summary of IPv6 Interface information.
device# show ipv6 interface
Type Codes - I:ISIS O:OSPF R:RIP
Interface Stat/Prot IGPs IPv6 Address VRF
eth 1/3/20 up/up fe80::2c0:12ff:fe34:5073 default-vrf
2001:db8:1000::1/64
2001:db8:1000::/64[Anycast]
Syntax: show ipv6 interface [ethernet unit/slot/port | loopback number | tunnel number | ve number]
The ethernet, loopback, tunnel, and ve parameters specify the interface for which to display information.
If you specify an Ethernet interface, also specify the unit, slot and port numbers associated with the interface. If you specify a loopback,
tunnel, or VE interface, also specify the number associated with the interface.
Displaying OSPFv3 information
FastIron Ethernet Switch Layer 3 Routing Conguration Guide, 08.0.30mb
53-1003627-06 325

TABLE 73 show ipv6 interface output descriptions
Field Description
Type Codes Shows the routing protocol enabled on the interface. The routing protocol
can be one of the following:
• R - RIP
• O - OSPF
Interface Shows the type, unit, slot, and port number of the interface.
Stat/Port Shows the status of the link and the protocol for the interface. The status
can be one of the following:
• Up
• Down
IGPs Shows the type of the Interior Gateway Protocols (IGPs) enabled on the
interface.
IPv6 Address Shows the link local IPv6 address congured for the interface.
VRF Species the VRF to which the interface belongs.
Displaying IPv6 OSPFv3 interface information
IPv6 Interface information can be displayed in either a brief or full mode. The following sections describe the command to display these
modes and the resulting output:
• Displaying IPv6 OSPFv3 Interface Information in Brief Mode
• Displaying IPv6 OSPFv3 Interface Information in Full Mode
Displaying IPv6 OSPFv3 interface information in brief mode
You can use the following command to display a summary of IPv6 Interface information.
device# show ipv6 ospf interface brief
Interface Area Status Type Cost State Nbrs (F/C)
eth 1/1/1 0 up BCST 1 DROther 1/1
loopback 1 0 up BCST 1 Loopback 0/0
Syntax: show ipv6 ospf interface brief
TABLE 74 show ipv6 ospf interface brief output descriptions
This eld Displays
Number of Interfaces Number of OSPFv3-enabled interfaces.
Interface The interface type, and the unit, slot, and port number or number of the
interface.
Area The OSPF area congured on the interface.
Status The status of the link and the protocol. Possible status include the
following:
• Up.
• Down.
Type The type of OSPFv3 circuit running on the interface. Possible types
include the following:
• BCST- Broadcast interface type
• P2P- Point-to-point interface type
• UNK- The interface type is not known at this time
Displaying OSPFv3 information
FastIron Ethernet Switch Layer 3 Routing Conguration Guide, 08.0.30mb
326 53-1003627-06

TABLE 74 show ipv6 ospf interface brief output descriptions (continued)
This eld Displays
Cost The overhead required to send a packet across an interface.
State The state of the interface. Possible states include the following:
• DR - The interface is functioning as the Designated Router for
OSPFv3.
• BDR - The interface is functioning as the Backup Designated
Router for OSPFv3.
• Loopback - The interface is functioning as a loopback interface.
• P2P - The interface is functioning as a point-to-point interface.
• Passive - The interface is up but it does not take part in forming
an adjacency.
• Waiting - The interface is trying to determine the identity of the
BDR for the network.
• None - The interface does not take part in the OSPF interface
state machine.
• Down - The interface is unusable. No protocol trac can be sent
or received on such a interface.
• DR other - The interface is a broadcast or NBMA network on
which another router is selected to be the DR.
Nbrs (F/C) The number of adjacent neighbor routers. The number to the left of the "/"
are the neighbor routers that are fully adjacent and the number to the right
represents all adjacent neighbor routers.
Displaying IPv6 OSPFv3 interface information in full mode
You can display detailed information about all OSPFv3 interfaces by using the show ipv6 ospf interface command, as the following
truncated example illustrates.
device# show ipv6 ospf interface
e 2/3/1 admin down, oper down, IPv6 enabled
IPv6 Address:
Area ID 0.0.0.200, Cost 1, Type BROADCAST
MTU: 10178
State DOWN, Transmit Delay 1 sec, Priority 1
Timer intervals :
Hello 10, Hello Jitter 10 Dead 40, Retransmit 5
e 4/3/1 admin up, oper up, IPv6 enabled
IPv6 Address:
fe80::214:ff:fe77:96ff
5100::193:213:111:213/112
5100::193:213:111:0/112
Instance ID 0, Router ID 192.168.98.213
Area ID 0.0.0.200, Cost 1, Type BROADCAST
MTU: 10178
State BDR, Transmit Delay 1 sec, Priority 1, Link-LSA Tx not suppressed
Timer intervals :
Hello 10, Hello Jitter 10 Dead 40, Retransmit 5
Authentication Use: Enabled
KeyRolloverTime(sec): Configured: 300 Current: 0
KeyRolloverState: NotActive
Outbound: None
Inbound: None
DR:192.168.98.111 BDR:192.168.98.213 Number of I/F scoped LSAs is 2
DRElection: 1 times, DelayedLSAck: 23 times
Neighbor Count = 1, Adjacent Neighbor Count= 1
Neighbor:
192.168.98.111 (DR)
Statistics of interface e 4/3/1:
Type tx rx tx-byte rx-byte
Unknown 0 0 0 0
Displaying OSPFv3 information
FastIron Ethernet Switch Layer 3 Routing Conguration Guide, 08.0.30mb
53-1003627-06 327

Hello 739 738 29556 29520
DbDesc 2 2 236 2536
LSReq 1 1 1444 88
LSUpdate 344 258 71464 23256
LSAck 30 291 6780 11396
OSPF messages dropped,no authentication: 0
ve 17 admin up, oper up, IPv6 enabled
IPv6 Address:
fe80::214:ff:fe77:96ff
5100::192:213:111:213/112
5100::192:213:111:0/112
Instance ID 0, Router ID 192.168.98.213
Area ID 0.0.0.200, Cost 1, Type BROADCAST
MTU: 10178
State BDR, Transmit Delay 1 sec, Priority 1, Link-LSA Tx not suppressed
Timer intervals :
Hello 10, Hello Jitter 10 Dead 40, Retransmit 5
Authentication Use: Enabled
KeyRolloverTime(sec): Configured: 300 Current: 0
KeyRolloverState: NotActive
Outbound: None
Inbound: None
DR:192.168.98.111 BDR:192.168.98.213 Number of I/F scoped LSAs is 2
DRElection: 1 times, DelayedLSAck: 7 times
Neighbor Count = 1, Adjacent Neighbor Count= 1
Neighbor:
192.168.98.111 (DR)
Statistics of interface ve 17 :
Type tx rx tx-byte rx-byte
You can display detailed OSPFv3 information about a specic interface using the following command at any level of the CLI.
Syntax: show ipv6 ospf interface [ brief ] [ ethernet unit/slot/port ] [ loopback number ] [tunnel number ] [ ve number ]
The ethernet, loopback , tunnel, and ve parameter specify the interface for which to display information. If you specify an Ethernet
interface, also specify the port number associated with the interface. If you specify a loopback, tunnel, or VE interface, also specify the
number associated with the interface.
TABLE 75 show ipv6 ospf interface output descriptions
This eld Displays
Interface status The status of the interface. Possible status includes the following:
• Up.
• Down.
Type The type of OSPFv3 circuit running on the interface. Possible types
include the following:
• BROADCAST
• POINT TO POINT UNKNOWN
• POINT TO POINT
IPv6 Address The IPv6 address assigned to the interface.
Instance ID An identier for an instance of OSPFv3.
Router ID The IPv4 address of the device. By default, the router ID is the IPv4
address congured on the lowest numbered loopback interface. If the
device does not have a loopback interface, the default router ID is the
lowest numbered IPv4 address congured on the device.
Area ID The IPv4 address or numerical value of the area in which the interface
belongs.
Cost The overhead required to send a packet through the interface.
default Shows whether or not the default passive state is set.
Displaying OSPFv3 information
FastIron Ethernet Switch Layer 3 Routing Conguration Guide, 08.0.30mb
328 53-1003627-06

TABLE 75 show ipv6 ospf interface output descriptions (continued)
This eld Displays
State The state of the interface. Possible states include the following:
• DR - The interface is functioning as the Designated Router for
OSPFv3.
• BDR - The interface is functioning as the Backup Designated
Router for OSPFv3.
• Loopback - The interface is functioning as a loopback interface.
• P2P - The interface is functioning as a point-to-point interface.
• Passive - The interface is up but it does not take part in forming
an adjacency.
• Waiting - The interface is trying to determine the identity of the
BDR for the network.
• None - The interface does not take part in the OSPF interface
state machine.
• Down - The interface is unusable. No protocol trac can be sent
or received on such a interface.
• DR other - The interface is a broadcast or NBMA network on
which another router is selected to be the DR.
• Active - The interface sends or receives all the OSPFv3 control
packets, and forms the adjacency.
Transmit delay The amount of time, in seconds, it takes to transmit Link State Updates
packets on the interface.
Priority The priority used when selecting the DR and the BDR. If the priority is 0,
the interface does not participate in the DR and BDR election.
Timer intervals The interval, in seconds, of the hello-interval, dead-interval, and
retransmit-interval timers.
DR The router ID (IPv4 address) of the DR.
BDR The router ID (IPv4 address) of the BDR.
Number of I/F scoped LSAs The number of interface LSAs scoped for a specied area, AS, or link.
DR Election The number of times the DR election occurred.
Delayed LSA Ack The number of the times the interface sent a delayed LSA
acknowledgement.
Neighbor Count The number of neighbors to which the interface is connected.
Adjacent Neighbor Count The number of neighbors with which the interface has formed an active
adjacency.
Neighbor The router ID (IPv4 address) of the neighbor. This eld also identies the
neighbor as a DR or BDR, if appropriate.
Interface statistics The following statistics are provided for the interface:
• Unknown - The number of Unknown packets transmitted and
received by the interface. Also, the total number of bytes
associated with transmitted and received Unknown packets.
• Hello - The number of Hello packets transmitted and received
by the interface. Also, the total number of bytes associated with
transmitted and received Hello packets.
• DbDesc - The number of Database Description packets
transmitted and received by the interface. Also, the total number
of bytes associated with transmitted and received Database
Description packets.
• LSReq - The number of link-state requests transmitted and
received by the interface. Also, the total number of bytes
associated with transmitted and received link-state requests.
Displaying OSPFv3 information
FastIron Ethernet Switch Layer 3 Routing Conguration Guide, 08.0.30mb
53-1003627-06 329

TABLE 75 show ipv6 ospf interface output descriptions (continued)
This eld Displays
• LSUpdate - The number of link-state updates transmitted and
received by the interface. Also, the total number of bytes
associated with transmitted and received link-state requests.
• LSAck - The number of link-state acknowledgements
transmitted and received by the interface. Also, the total number
of bytes associated with transmitted and received link-state
acknowledgements.
Displaying OSPFv3 memory usage
To display information about OSPFv3 memory usage, enter the following command at any level of the CLI.
device# show ipv6 ospf memory
Total Dynamic Memory Allocated for this instance : 4296579 bytes
Memory Type Size Allocated Max-alloc Alloc-Fails
MTYPE_OSPF6_AREA 471191 1 4 0
MTYPE_OSPF6_AREA_RANGE 29 0 16 0
MTYPE_OSPF6_SUMMARY_ADDRE 25 0 16 0
MTYPE_OSPF6_IF 280 1 64 0
MTYPE_OSPF6_NEIGHBOR 12502 1 32 0
MTYPE_OSPF6_ROUTE_NODE 21 1 4096 0
MTYPE_OSPF6_ROUTE_INFO 35 1 4096 0
MTYPE_OSPF6_PREFIX 20 0 16 0
MTYPE_OSPF6_LSA 129 3 4096 0
MTYPE_OSPF6_VERTEX 166 1 64 0
MTYPE_OSPF6_SPFTREE 44 1 2 0
MTYPE_OSPF6_NEXTHOP 28 2 256 0
MTYPE_OSPF6_EXTERNAL_INFO 40 0 4096 0
MTYPE_THREAD 32 5 1024 0
MTYPE_OSPF6_LINK_LIST 20 3098 20480 0
MTYPE_OSPF6_LINK_NODE 12 19 20480 0
MTYPE_OSPF6_LSA_RETRANSMI 6 3 8192 0
global memory pool for all instances
Memory Type Size Allocated Max-alloc Alloc-Fails
MTYPE_OSPF6_TOP 61475 1 1 0
MTYPE_OSPF6_LSA_HDR 56 3 4 0
MTYPE_OSPF6_RMAP_COMPILED 0 0 0 0
MTYPE_OSPF6_OTHER 0 0 0 0
MTYPE_THREAD_MASTER 84 1 1 0
Syntax: show ipv6 ospf memory
TABLE 76 show ipv6 ospf memory output descriptions
This eld Displays
Total Dynamic Memory Allocated A summary of the amount of dynamic memory allocated, in bytes, to
OSPFv3.
Memory Type The type of memory used by OSPFv3. (This information is for use by
Brocade technical support in case of a problem.)
Size The size of a memory type.
Allocated The amount of memory currently allocated to a memory type.
Max-alloc The maximum amount of memory that was allocated to a memory type.
Alloc-Fails The number of times an attempt to allocate memory to a memory type
failed.
Global memory pool for all instances A summary of the amount of memory allocated from heap.
Displaying OSPFv3 information
FastIron Ethernet Switch Layer 3 Routing Conguration Guide, 08.0.30mb
330 53-1003627-06

Displaying OSPFv3 neighbor information
You can display a summary of OSPFv3 neighbor information for the device or detailed information about a specied neighbor.
To display a summary of OSPFv3 neighbor information for the device, enter the following command at any CLI level.
device# show ipv6 ospf neighbor
Total number of neighbors in all states: 2
Number of neighbors in state Full : 2
RouterID Pri State DR BDR Interface [State]
192.168.98.111 1 Full 192.168.98.111 192.168.98.213 e 4/3/1 [BDR]
192.168.98.111 1 Full 192.168.98.111 192.168.98.213 ve 17 [BDR]
Syntax: show ipv6 ospf neighbor [router-id ipv4-address]
The router-id ipv4-address parameter displays only the neighbor entries for the specied router.
TABLE 77 show ipv6 ospf neighbor output descriptions
Field Description
Router ID The IPv4 address of the neighbor. By default, the router ID is the IPv4
address congured on the lowest numbered loopback interface. If the
device does not have a loopback interface, the default router ID is the
lowest numbered IPv4 address congured on the device.
Pri The OSPFv3 priority of the neighbor. The priority is used during election
of the DR and BDR.
State The state between the device and the neighbor. The state can be one of
the following:
• Down
• Attempt
• Init
• 2-Way
• ExStart
• Exchange
• Loading
• Full
DR The router ID (IPv4 address) of the DR.
BDR The router ID (IPv4 address) of the BDR.
Interface [State] The interface through which the router is connected to the neighbor. The
state of the interface can be one of the following:
• DR - The interface is functioning as the Designated Router for
OSPFv3.
• BDR - The interface is functioning as the Backup Designated
Router for OSPFv3.
• Loopback - The interface is functioning as a loopback interface.
• P2P - The interface is functioning as a point-to-point interface.
• Passive - The interface is up but it does not take part in forming
an adjacency.
• Waiting - The interface is trying to determine the identity of the
BDR for the network.
• None - The interface does not take part in the OSPF interface
state machine.
• Down - The interface is unusable. No protocol trac can be sent
or received on such an interface.
• DR other - The interface is a broadcast or NBMA network on
which another router is selected to be the DR.
Displaying OSPFv3 information
FastIron Ethernet Switch Layer 3 Routing Conguration Guide, 08.0.30mb
53-1003627-06 331

For example, to display detailed information about a neighbor with the router ID of 10.1.1.1, enter the show ipv6 ospf neighbor router-
id command at any CLI level.
device# show ipv6 ospf neighbor router-id 1192.168.98.111
RouterID Pri State DR BDR Interface [State]
192.168.98.111 1 Full 192.168.98.111 192.168.98.213 e 4/3/1 [BDR]
Option: 00-00-13 QCount: 0 Timer: 73
DbDesc bit for this neighbor: --m
Nbr Ifindex of this router: 136
Nbr DRDecision: DR 192.168.98.111, BDR 192.168.98.213
Last received DbDesc: opt:xxx ifmtu:0 bit:--s seqnum:0
Number of LSAs in DbDesc retransmitting: 0
Number of LSAs in SummaryList: 0
Number of LSAs in RequestList: 0
Number of LSAs in RetransList: 0
SeqnumMismatch 0 times, BadLSReq 0 times
OnewayReceived 0 times, InactivityTimer 0 times
DbDescRetrans 0 times, LSReqRetrans 0 times
LSUpdateRetrans 11 times
LSAReceived 379 times, LSUpdateReceived 258 times
RouterID Pri State DR BDR Interface [State]
192.168.98.111 1 Full 192.168.98.111 192.168.98.213 ve 17 [BDR]
Option: 00-00-13 QCount: 0 Timer: 44
DbDesc bit for this neighbor: --m
Nbr Ifindex of this router: 1156
Nbr DRDecision: DR 192.168.98.111, BDR 192.168.98.213
Last received DbDesc: opt:xxx ifmtu:0 bit:--s seqnum:0
Number of LSAs in DbDesc retransmitting: 0
Number of LSAs in SummaryList: 0
Number of LSAs in RequestList: 0
Number of LSAs in RetransList: 0
SeqnumMismatch 0 times, BadLSReq 0 times
OnewayReceived 0 times, InactivityTimer 0 times
DbDescRetrans 0 times, LSReqRetrans 0 times
LSUpdateRetrans 3 times
LSAReceived 317 times, LSUpdateReceived 262 times
TABLE 78 show ipv6 ospf neighbor router-id output descriptions
Field Description
Router ID The IPv4 address of the neighbor. By default, the router ID is the IPv4
address congured on the lowest numbered loopback interface. If the
device does not have a loopback interface, the default router ID is the
lowest numbered IPv4 address congured on the device.
Pri The OSPFv3 priority of the neighbor. The priority is used during election
of the DR and BDR.
State The state between the device and the neighbor. The state can be one of
the following:
• Down
• Attempt
• Init
• 2-Way
• ExStart
• Exchange
• Loading
• Full
DR The router ID (IPv4 address) of the DR.
BDR The router ID (IPv4 address) of the BDR.
Displaying OSPFv3 information
FastIron Ethernet Switch Layer 3 Routing Conguration Guide, 08.0.30mb
332 53-1003627-06

TABLE 78 show ipv6 ospf neighbor router-id output descriptions (continued)
Field Description
Interface [State] The interface through which the router is connected to the neighbor. The
state of the interface can be one of the following:
• DR - The interface is functioning as the Designated Router for
OSPFv3.
• BDR - The interface is functioning as the Backup Designated
Router for OSPFv3.
• Loopback - The interface is functioning as a loopback interface.
• P2P - The interface is functioning as a point-to-point interface.
• Passive - The interface is up but it does not take part in forming
an adjacency.
• Waiting - The interface is trying to determine the identity of the
BDR for the network.
• None - The interface does not take part in the OSPF interface
state machine.
• Down - The interface is unusable. No protocol trac can be sent
or received on such a interface.
• DR other - The interface is a broadcast or NBMA network on
which another router is selected to be the DR.
DbDesc bit The Database Description packet, which includes 3 bits of information:
• The rst bit can be "i" or "-". "i" indicates the inet bit is set. "-"
indicates the inet bit is not set.
• The second bit can be "m" or "-". "m" indicates the more bit is
set. "-" indicates the more bit is not set.
• The third bit can be "m" or "s". An "m" indicates the master. An
"s" indicates standby.
Index The ID of the LSA from which the neighbor learned of the router.
DR Decision The router ID (IPv4 address) of the neighbor’s elected DR and BDR.
Last Received Db Desc The content of the last database description received from the specied
neighbor.
Number of LSAs in Db Desc retransmitting The number of LSAs that need to be retransmitted to the specied
neighbor.
Number of LSAs in Summary List The number of LSAs in the neighbor’s summary list.
Number of LSAs in Request List The number of LSAs in the neighbor’s request list.
Number of LSAs in Retransmit List The number of LSAs in the neighbor’s retransmit list.
Seqnum Mismatch The number of times sequence number mismatches occurred.
BadLSReq The number of times the neighbor received a bad link-state request from
the device.
One way received The number of times a hello packet, which does not mention the router, is
received from the neighbor. This omission in the hello packet indicates that
the communication with the neighbor is not bidirectional.
Inactivity Timer The number of times that the neighbor’s inactivity timer expired.
Db Desc Retransmission The number of times sequence number mismatches occurred.
LSReqRetrans The number of times the neighbor retransmitted link-state requests to the
device.
LSUpdateRetrans The number of times the neighbor retransmitted link-state updates to the
device.
LSA Received The number of times the neighbor received LSAs from the device.
Displaying OSPFv3 information
FastIron Ethernet Switch Layer 3 Routing Conguration Guide, 08.0.30mb
53-1003627-06 333

TABLE 78 show ipv6 ospf neighbor router-id output descriptions (continued)
Field Description
LS Update Received The number of times the neighbor received link-state updates from the
device.
Displaying routes redistributed into OSPFv3
You can display all IPv6 routes or a specied IPv6 route that the device has redistributed into OSPFv3.
To display all IPv6 routes that the device has redistributed into OSPFv3, enter the following command at any level of the CLI.
device# show ipv6 ospf redistribute route
Id Prefix Protocol Metric Type Metric
1 5100::192:213:163:0/112 Connect Type-2 0
2 5100:213:213:0:192:213:1:0/112 Connect Type-2 0
Syntax: show ipv6 ospf redistribute route [ipv6-prex]
The ipv6-prex parameter species an IPv6 network prex. (You do not need to specify the length of the prex.)
For example, to display redistribution information for the prex 2001:db8::, enter the following command at any level of the CLI.
device# show ipv6 ospf redistribute route 2001:db8::
Id Prefix Protocol Metric Type Metric
1 2001:db8::/32 Static Type-2 1
TABLE 79 show ipv6 ospf redistribute route output descriptions
This eld Displays
ID An ID for the redistributed route.
Prex The IPv6 routes redistributed into OSPFv3.
Protocol The protocol from which the route is redistributed into OSPFv3.
Redistributed protocols can be the following:
• BGP - BGP4+.
• RIP - RIPng.
• Static - IPv6 static route table.
• Connected - A directly connected network.
Metric Type The metric type used for routes redistributed into OSPFv3. The metric
type can be the following:
• Type-1 - Species a small metric (2 bytes).
• Type-2 - Species a big metric (3 bytes).
Metric The value of the default redistribution metric, which is the OSPF cost of
redistributing the route into OSPFv3.
Displaying OSPFv3 route information
You can display the entire OSPFv3 route table for the device or only the route entries for a specied destination.
To display the entire OSPFv3 route table for the device, enter the following command at any level of the CLI.
device# show ipv6 ospf route
Current Route count: 309
Intra: 304 Inter: 4 External: 1 (Type1 0/Type2 1)
Equal-cost multi-path: 56
OSPF Type: IA- Intra, OA - Inter, E1 - External Type1, E2 - External Type2
Destination Cost E2Cost Tag Flags Dis
E2 ::/0 2 1 0 00000003 110
Next_Hop_Router Outgoing_Interface Adv_Router
Displaying OSPFv3 information
FastIron Ethernet Switch Layer 3 Routing Conguration Guide, 08.0.30mb
334 53-1003627-06

fe80::768e:f8ff:fe3e:1800 e 4/3/1 192.168.98.111
fe80::768e:f8ff:fe3e:1800 ve 17 192.168.98.111
Destination Cost E2Cost Tag Flags Dis
IA 5100::192:61:1001:0/112 3 0 0 00000007 110
Next_Hop_Router Outgoing_Interface Adv_Router
fe80::768e:f8ff:fe3e:1800 e 4/3/1 192.168.98.111
fe80::768e:f8ff:fe3e:1800 ve 17 192.168.98.111
Destination Cost E2Cost Tag Flags Dis
IA 5100::192:111:2:111/128 1 0 0 00000007 110
Next_Hop_Router Outgoing_Interface Adv_Router
fe80::768e:f8ff:fe3e:1800 e 4/3/1 192.168.98.111
fe80::768e:f8ff:fe3e:1800 ve 17 192.168.98.111
Destination Cost E2Cost Tag Flags Dis
IA 5100::192:111:3:111/128 1 0 0 00000007 110
Next_Hop_Router Outgoing_Interface Adv_Router
fe80::768e:f8ff:fe3e:1800 e 4/3/1 192.168.98.111
--More--, next page: Space, next line: Return key, quit: Control-c
Syntax: show ipv6 ospf routes [ipv6-prex]
The ipv6-prex parameter species a destination IPv6 prex. (You do not need to specify the length of the prex.) If you use this
parameter, only the route entries for this destination are shown.
For example, to display route information for the destination prex 2000::, enter the following command at any level of the CLI.
device# show ipv6 ospf routes 5100::192:111:42:111
Destination Cost E2Cost Tag Flags Dis
IA 5100::192:111:42:111/128 1 0 0 00000007 110
Next_Hop_Router Outgoing_Interface Adv_Router
fe80::768e:f8ff:fe3e:1800 e 4/3/1 192.168.98.111
fe80::768e:f8ff:fe3e:1800 ve 17 192.168.98.111
TABLE 80 OSPFv3 route information
This eld Displays
Current Route Count (Displays with the entire OSPFv3 route table only) The number of route entries currently in the OSPFv3 route table.
Intra/Inter/External (Type1/Type2) (Displays with the entire OSPFv3 route
table only)
The breakdown of the current route entries into the following route types:
• Inter - The number of routes that pass into another area.
• Intra - The number of routes that are within the local area.
• External1 - The number of type 1 external routes.
• External2 - The number of type 2 external routes.
Equal-cost multi-path (Displays with the entire OSPFv3 route table only) The number of equal-cost routes to the same destination in the OSPFv3
route table. If load sharing is enabled, the device equally distributes trac
among the routes.
Destination The IPv6 prexes of destination networks to which the device can forward
IPv6 packets. "*IA" indicates the next router is an intra-area router.
Cost The type 1 cost of this route.
E2 Cost The type 2 cost of this route.
Tag The route tag for this route.
Flags Flags associated with this route.
Dis Administrative Distance for this route.
Next-Hop Router The IPv6 address of the next router a packet must traverse to reach a
destination.
Outgoing Interface The router interface through which a packet must traverse to reach the
next-hop router.
Adv_Router The IP address of the advertising router.
Displaying OSPFv3 information
FastIron Ethernet Switch Layer 3 Routing Conguration Guide, 08.0.30mb
53-1003627-06 335
Displaying OSPFv3 SPF information
You can display the following OSPFv3 SPF information:
• SPF node information
• SPF node information for a specied area.
• SPF table for a specied area.
• SPF tree for a specied area.
Enter the command at any level of the CLI to display SPF information in a node.
device# show ipv6 ospf spf node
SPF node for Area 0.0.0.200
SPF node 192.168.98.213, cost: 0, hops: 0
nexthops to node:
parent nodes:
child nodes: 192.168.98.111:136 192.168.98.111:1156
SPF node 192.168.98.111:136, cost: 1, hops: 1
nexthops to node: :: e 4/3/1
parent nodes: 192.168.98.213
child nodes: 192.168.98.111:0
SPF node 192.168.98.111:1156, cost: 1, hops: 1
nexthops to node: :: ve 17
parent nodes: 192.168.98.213
child nodes: 192.168.98.111:0
SPF node 192.168.98.111:0, cost: 1, hops: 2
nexthops to node: fe80::768e:f8ff:fe3e:1800 e 4/3/1
fe80::768e:f8ff:fe3e:1800 ve 17
parent nodes: 192.168.98.111:136 192.168.98.111:1156
child nodes:
SPF node for Area 400
SPF node 192.168.98.213, cost: 0, hops: 0
nexthops to node:
parent nodes:
child nodes:
SPF node for Area 0.0.0.0
SPF node 192.168.98.213, cost: 0, hops: 0
nexthops to node:
parent nodes:
child nodes: 192.168.98.111:0
SPF node 192.168.98.111:0, cost: 1, hops: 1
nexthops to node: 5100::192:113:111:111 VLink 1
parent nodes: 192.168.98.213
child nodes: 192.168.98.61:5 192.168.98.190:1551 192.168.98.112:643
SPF node 192.168.98.61:5, cost: 2, hops: 2
nexthops to node: 5100::192:113:111:111 VLink 1
parent nodes: 192.168.98.111:0
child nodes: 192.168.98.61:0
SPF node 192.168.98.190:1551, cost: 2, hops: 2
nexthops to node: 5100::192:113:111:111 VLink 1
--More--, next page: Space, next line: Return key,
For example, to display information about SPF nodes in area 0, enter the show ipv6 ospf spf node area command at any level of the
CLI.
device# show ipv6 ospf spf node area 0
SPF node for Area 0
SPF node 10.223.223.223, cost: 0, hops: 0
nexthops to node:
parent nodes:
child nodes: 10.223.223.223:88
SPF node 10.223.223.223:88, cost: 1, hops: 1
nexthops to node: :: ethe 1/3/2
parent nodes: 10.223.223.223
child nodes: 10.1.1.1:0
SPF node 10.1.1.1:0, cost: 1, hops: 2
nexthops to node: fe80::2e0:52ff:fe91:bb37 ethe 1/3/2
Displaying OSPFv3 information
FastIron Ethernet Switch Layer 3 Routing Conguration Guide, 08.0.30mb
336 53-1003627-06

parent nodes: 10.223.223.223:88
child nodes:
Syntax: show ipv6 ospf spf node area [area-id]
The node keyword displays SPF node information.
The area area-id parameter species a particular area. You can specify the area-id in the following formats:
• As an IPv4 address; for example, 192.168.1.1.
• As a numerical value from 0 through 2,147,483,647.
TABLE 81 show ipv6 ospf spf node area output descriptions
This eld Displays
SPF node Each SPF node is identied by its device ID (IPv4 address). If the node is a
child node, it is additionally identied by an interface on which the node
can be reached appended to the router ID in the format router-
id :interface-id .
Cost The cost of traversing the SPF node to reach the destination.
Hops The number of hops needed to reach the parent SPF node.
Next Hops to Node The IPv6 address of the next hop-router or the router interface through
which to access the next-hop router.
Parent Nodes The SPF node’s parent nodes. A parent node is an SPF node at the
highest level of the SPF tree, which is identied by its router ID.
Child Nodes The SPF node’s child nodes. A child node is an SPF node at a lower level
of the SPF tree, which is identied by its router ID and interface on which
the node can be reached.
For example, to display the SPF table for area 0, enter the following command at any level of the CLI.
device# show ipv6 ospf spf table area 0
SPF table for Area 0.0.0.200
Destination Bits Options Cost Nexthop Interface
R 192.168.98.111 --V-B V6E---R- 1 fe80::768e:f8ff:fe3e:1800 e 4/3/1
R 192.168.98.111 --V-B V6E---R- 1 fe80::768e:f8ff:fe3e:1800 ve 17
N 192.168.98.111[136] ----- V6E---R- 1 :: e 4/3/1
N 192.168.98.111[1156 ----- V6E---R- 1 :: ve 17
SPF table for Area 400
Destination Bits Options Cost Nexthop Interface
SPF table for Area 0.0.0.0
Destination Bits Options Cost Nexthop Interface
R 192.168.98.71 ---E- V6E---RD 4 fe80::768e:f8ff:fe3e:1800 e 4/3/1
R 192.168.98.71 ---E- V6E---RD 4 fe80::768e:f8ff:fe3e:1800 ve 17
R 192.168.98.190 ---E- V6E---R- 2 fe80::768e:f8ff:fe3e:1800 e 4/3/1
R 192.168.98.190 ---E- V6E---R- 2 fe80::768e:f8ff:fe3e:1800 ve 17
Syntax: show ipv6 opsf spf table area area-id
The table parameter displays the SPF table.
The area area-id parameter species a particular area. You can specify the area-id in the following formats:
• As an IPv4 address, for example, 192.168.1.1.
• As a numerical value from 0 through 2,147,483,647.
Displaying OSPFv3 information
FastIron Ethernet Switch Layer 3 Routing Conguration Guide, 08.0.30mb
53-1003627-06 337

TABLE 82 show ipv6 ospf spf table area output descriptions
This eld Displays
Destination The destination of a route, which is identied by the following:
• "R", which indicates the destination is a router. "N", which
indicates the destination is a network.
• An SPF node’s device ID (IPv4 address). If the node is a child
node, it is additionally identied by an interface on which the
node can be reached appended to the router ID in the format
router-id :interface-id .
Bits A bit that indicates the capability of the device. The bit can be set to one of
the following:
• B - The device is an area border router.
• E - The device is an AS boundary router.
• V - The device is a virtual link endpoint.
• W - The device is a wildcard multicast receiver.
Options A 24-bit eld that enables IPv6 OSPF routers to support the optional
capabilities. When set, the following bits indicate the following:
V6 - The router should be included in IPv6 routing calculations.
E - The router oods AS-external-LSAs as described in RFC 2740.
MC - The router forwards multicast packets as described in RFC 1586.
N - The router handles type 7 LSAs as described in RFC 1584.
R - The originator is an active router.
DC -The router handles demand circuits.
Cost The cost of traversing the SPF node to reach the destination.
Next hop The IPv6 address of the next hop-router.
Interface The router interface through which to access the next-hop router.
For example, to display the SPF tree for area 0, enter the following command at any level of the CLI.
device# show ipv6 ospf spf tree area 0
SPF tree for Area 0
+- 10.223.223.223 cost 0
+- 10.223.223.223:88 cost 1
+- 10.1.1.1:0 cost 1
Syntax: show ipv6 opsf spf tree area area-id
The tree keyword displays the SPF table.
The area area-id parameter species a particular area. You can specify the area-id in the following formats:
• As an IPv4 address; for example, 192.168.1.1.
• As a numerical value from 0 through 2,147,483,647.
In this sample output, consider the SPF node with the router ID 10.223.223.223 to be the top (root) of the tree and the local router.
Consider all other layers of the tree (10.223.223.223:88 and 10.1.1.1:0) to be destinations in the network. Therefore, trac destined
from router 10.223.223.223 to router 10.1.1.1:0 must rst traverse router 10.223.223.223:88.
Displaying OSPFv3 information
FastIron Ethernet Switch Layer 3 Routing Conguration Guide, 08.0.30mb
338 53-1003627-06
Displaying OSPFv3 GR Helper mode information
Run the show ipv6 ospf command to display information about the graceful restart helper mode
device# (config-ospf6-router)#show ipv6 ospf
OSPFv3 Process number 0 with Router ID 0xa19e0eb(10.25.224.235)
Running 0 days 0 hours 0 minutes 26 seconds
Number of AS scoped LSAs is 0
Sum of AS scoped LSAs Checksum is 0
External LSA Limit is 250000
Database Overflow Interval is 10
Database Overflow State is NOT OVERFLOWED
Route calculation executed 0 times
Pending outgoing LSA count 0
Authentication key rollover interval 300 seconds
Number of areas in this router is 0
High Priority Message Queue Full count: 0
Graceful restart helper is enabled, strict lsa checking is disabled
Nonstop-routing is ENABLED
Displaying OSPFv3 NSR information
Run the show ipv6 ospf command to display information about the NSR support.
device# (config-ospf6-router)#show ipv6 ospf
OSPFv3 Process number 0 with Router ID 0xa19e0eb(10.25.224.235)
Running 0 days 0 hours 0 minutes 26 seconds
Number of AS scoped LSAs is 0
Sum of AS scoped LSAs Checksum is 0
External LSA Limit is 250000
Database Overflow Interval is 10
Database Overflow State is NOT OVERFLOWED
Route calculation executed 0 times
Pending outgoing LSA count 0
Authentication key rollover interval 300 seconds
Number of areas in this router is 0
High Priority Message Queue Full count: 0
Graceful restart helper is enabled, strict lsa checking is disabled
Nonstop-routing is ENABLED
Displaying IPv6 OSPF virtual link information
To display OSPFv3 virtual link information on a Brocade device, enter the show ipv6 ospf virtual-link command at any level of the CLI.
device# show ipv6 ospf virtual-link
Transit Area ID Router ID Interface Address State
0.0.0.200 192.168.98.111 5100::192:213:111:213 P2P
Timer intervals(sec) :
Hello 10, Hello Jitter 10, Dead 40, Retransmit 5, TransmitDelay 1
DelayedLSAck: 65 times
Authentication: Not Configured
Statistics:
Type tx rx tx-byte rx-byte
Unknown 0 0 0 0
Hello 819 816 32760 32640
DbDesc 10 11 300 11008
LSReq 6 0 6492 0
LSUpdate 1579 1161 138284 101488
LSAck 65 52 29340 29532
OSPF messages dropped,no authentication: 0
Neighbor: State: Full Address: 5100::192:113:111:111 Interface: e 4/3/1
Syntax: show ipv6 opsf virtual-link
Displaying OSPFv3 information
FastIron Ethernet Switch Layer 3 Routing Conguration Guide, 08.0.30mb
53-1003627-06 339

TABLE 83 show ipv6 ospf virtual-link output descriptions
This eld Displays
Index An index number associated with the virtual link.
Transit Area ID The ID of the shared area of two ABRs that serves as a connection point
between the two routers.
Router ID Router ID of the router at the other end of the virtual link (virtual neighbor).
Interface Address The local address used to communicate with the virtual neighbor.
State The state of the virtual link. Possible states include the following:
• P2P - The link is functioning as a point-to-point interface.
• DOWN - The link is down.
Displaying OSPFv3 virtual neighbor information
To display OSPFv3 virtual neighbor information for the device, enter the following command at the enabled level of the CLI.
device# show ipv6 ospf virtual-neighbor
Index Router ID Address State Interface
1 10.14.14.14 2001:db8:44:44::4 Full eth 1/1/8
Option: 00-00-00 QCount: 0 Timer: 408
2 10.14.14.14 2001:db8:44:44::4 Full tunnel 256
Option: 00-00-00 QCount: 0 Timer: 43
Syntax: show ipv6 ospf virtual-neighbor [brief]
The brief option results in an output that omits the Option, QCount, and Timer elds.
TABLE 84 show ipv6 ospf virtual-neighbor output descriptions
This eld Displays
Index An index number associated with the virtual neighbor.
Router ID IPv4 address of the virtual neighbor.
Address The IPv6 address to be used for communication with the virtual neighbor.
State The state between the device and the virtual neighbor. The state can be
one of the following:
• Down
• Attempt
• Init
• 2-Way
• ExStart
• Exchange
• Loading
• Full
Interface The interface type.
Option The bits set in the virtual-link hello or database descriptors.
QCount The number of packets that are in the queue and ready for transmission. If
the system is stable, this number should always be 0.
Timer A timer that counts down until a hello packet should arrive. If "timers"
elapses and a hello packet has not arrived, the VL neighbor is declared to
be down.
Displaying OSPFv3 information
FastIron Ethernet Switch Layer 3 Routing Conguration Guide, 08.0.30mb
340 53-1003627-06
IPsec examples
This section contains examples of IPsec conguration and the output from the IPsec-specic show commands. In addition, IPsec-related
information appears in general show command output for interfaces and areas.
The show commands that are specic to IPsec are:
•show ipsec sa
•show ipsec policy
•show ipsec statistics
The other show commands with IPsec-related information are:
•show ipv6 ospf area
•show ipv6 ospf interface
•show ipv6 ospf vrf
Showing IPsec security association information
The show ipsec sa command displays the IPSec security association databases, as follows.
device# show ipsec sa
IPSEC Security Association Database(Entries:8)
SPDID(vrf:if) Dir Encap SPI Destination AuthAlg EncryptAlg
1:ALL in ESP 512 2001:db8:1::1 sha1 Null
1:e1/1/1 out ESP 302 :: sha1 Null
1:e1/1/1 in ESP 302 FE80:: sha1 Null
1:e1/1/1 out ESP 512 2001:db8:1::2 sha1 Null
2:ALL in ESP 512 2001:db8:1::1 sha1 Null
2:e1/1/2 out ESP 302 :: sha1 Null
2:e1/1/2 in ESP 302 FE80:: sha1 Null
2:e1/1/2 out ESP 512 2001:db8:1::2 sha1 Null
Syntax: show ipsec sa
Showing IPsec policy
The show ipsec policy command displays the database for the IPsec security policies. The elds for this show command output appear
in the screen output example that follows. However, you should understand the layout and column headings for the display before trying
to interpret the information in the example screen.
Each policy entry consists of two categories of information:
• The policy information
• The SA used by the policy
The policy information line in the screen begins with the heading Ptype and also has the headings Dir, Proto, Source (Prex:TCP.UDP
Port), and Destination (Prex:TCP/UDPPort). The SA line contains the SPDID, direction, encapsulation (always ESP in the current
release), the user-specied SPI.
device# show ipsec policy
IPSEC Security Policy Database(Entries:8)
PType Dir Proto Source(Prefix:TCP/UDP Port)
Destination(Prefix:TCP/UDPPort)
SA: SPDID(vrf:if) Dir Encap SPI Destination
use in OSPF FE80::/10:any
::/0:any
SA: 2:e1/1/2 in ESP 302 FE80::
use out OSPF FE80::/10:any
::/0:any
SA: 2:e1/1/2 out ESP 302 ::
Displaying OSPFv3 information
FastIron Ethernet Switch Layer 3 Routing Conguration Guide, 08.0.30mb
53-1003627-06 341

use in OSPF FE80::/10:any
::/0:any
SA: 1:e1/1/1 in ESP 302 FE80::
use out OSPF FE80::/10:any
::/0:any
SA: 1:e1/1/1 out ESP 302 ::
use in OSPF 2001:db8:1:1::1/128:any
2001:db8:1:1::2/128:any
SA: 1:ALL in ESP 512 2001:db8:1:1::2
use out OSPF 2001:db8:1:1::2/128:any
2001:db8:1:1::1/128:any
SA: 1:e1/1/1 out ESP 512 2001:db8:1:1::1
use in OSPF 35:1:1::1/128:any
10:1:1::2/128:any
SA: 2:ALL in ESP 512 10:1:1::2
Syntax: show ipsec policy
TABLE 85 show ipsec policy output descriptions
This eld Displays
PType This eld contains the policy type. Of the existing policy types, only the
"use" policy type is supported, so each entry can have only "use."
Dir The direction of trac ow to which the IPsec policy is applied. Each
direction has its own entry.
Proto The only possible routing protocol for the security policy in the current
release is OSPFv3.
Source The source address consists of the IPv6 prex and the TCP or UDP port
identier.
Destination The destination address consists of the IPv6 prex. Certain logical
elements have a bearing on the meaning of the destination address and its
format, as follows:
For IPsec on an interface or area, the destination address is shown as a
prex of 0xFE80 (link local). The solitary "::" (no prex) indicates a "do not-
care" situation because the connection is multicast. In this case, the
security policy is enforced without regard for the destination address.
For a virtual link (SPDID = 0), the address is required.
TABLE 86 SA used by the policy
This eld Displays
SA This heading points at the SA-related headings for information used by
the security policy. Thereafter, on each line of this part of the IPsec entry
(which alternates with lines of policy information, "SA:" points at the elds
under those SA-related headings. The remainder of this table describes
each of the SA-related items.
SPDID The security policy database identier (SPDID) consists of two parts; the
rst part is an VRF id and the second part is an interface ID. The SPDID
0/ALL is a global database for the default VRF that applies to all
interfaces.
Dir The Dir eld is either ‘in" for inbound or "out" for outbound.
Encap The type of encapsulation in the current release is ESP.
SPI Security parameter index.
Destination The IPv6 address of the destination endpoint. From the standpoint of the
near interface and the area, the destination is not relevant and therefore
appears as ::/0:any.
Displaying OSPFv3 information
FastIron Ethernet Switch Layer 3 Routing Conguration Guide, 08.0.30mb
342 53-1003627-06

TABLE 86 SA used by the policy (continued)
This eld Displays
For a virtual link, both the inbound and outbound destination addresses
are relevant.
Showing IPsec statistics
The show ipsec statistics command displays the error and other counters for IPsec, as this example shows.
device# show ipsec statistics
IPSecurity Statistics
secEspCurrentInboundSAs 1 ipsecEspTotalInboundSAs: 2
secEspCurrentOutboundSA 1 ipsecEspTotalOutboundSAs: 2
IPSecurity Packet Statistics
secEspTotalInPkts: 19 ipsecEspTotalInPktsDrop: 0
secEspTotalOutPkts: 83
IPSecurity Error Statistics
secAuthenticationErrors 0
secReplayErrors: 0 ipsecPolicyErrors: 13
secOtherReceiveErrors: 0 ipsecSendErrors: 0
secAuthenticationErrors 0
secReplayErrors: 0 ipsecPolicyErrors: 13
secOtherReceiveErrors: 0 ipsecSendErrors: 0
secUnknownSpiErrors: 0
Syntax: show ipsec statistics
This command takes no parameters.
Displaying IPsec conguration for an area
The show ipv6 ospf area command includes information about IPsec for one area or all areas. In the following example, the IPsec
information is in bold. IPsec is enabled in the rst area (area 0) in this example but not in area 3. Note that in area 3, the IPsec key was
specied as not encrypted.
device(config-ospf6-router)# show ipv6 ospf area
Authentication: Configured
KeyRolloverTime(sec): Configured: 25 Current: 20
KeyRolloverState: Active,Phase1
Current: None
New: SPI:400, ESP, SHA1
Key:$Z|83OmYW{QZ|83OmYW{QZ|83OmYW{QZ|83OmYW{Q
Interface attached to this area: eth 1/1/1
Number of Area scoped LSAs is 6
Sum of Area LSAs Checksum is 0004f7de
Statistics of Area 0:
SPF algorithm executed 6 times
SPF last updated: 482 sec ago
Current SPF node count: 1
Router: 1 Network: 0
Maximum of Hop count to nodes: 0
Area 3:
Authentication: Not Configured
Interface attached to this area:
Number of Area scoped LSAs is 3
Syntax: show ipv6 ospf area [area-id]
The area-id parameter restricts the display to the specied OSPF area. You can specify the area-id parameter in the following formats:
• An IPv4 address
• A numerical value in the range 0 through 2,147,483,647
Displaying OSPFv3 information
FastIron Ethernet Switch Layer 3 Routing Conguration Guide, 08.0.30mb
53-1003627-06 343

TABLE 87 show ipv6 ospf area output descriptions
This eld Displays
Authentication This eld shows whether or not authentication is congured. If this eld
says "Not Congured," the IPsec-related elds (bold in example screen
output) are not displayed at all.
KeyRolloverTime The number of seconds between each initiation of a key rollover. This eld
shows the congured and current times.
KeyRolloverState Can be:
Not active: key rollover is not active.
Active phase 1: rollover is in its rst interval.
Active phase 2: rollover is in its second interval.
Current Shows current SPI, authentication algorithm (currently ESP only),
encryption algorithm (currently SHA1 only), and the current key.
New Shows new SPI (if changed), authentication algorithm (currently ESP only),
encryption algorithm (currently SHA1 only), and the new key.
Old Shows old SPI (if changed), authentication algorithm (currently ESP only),
encryption algorithm (currently SHA1 only), and the old key.
Displaying IPsec for an interface
To see IPsec conguration for a particular interface or all interfaces, use the show ipv6 ospf interface command as in the following
example. IPsec information appears in bold.
device# show ipv6 ospf interface
eth 1/1/3 is down, type BROADCAST
Interface is disabled
eth 1/1/8 is up, type BROADCAST
IPv6 Address:
2001:db8:18:18:18::1/64
2001:db8:18:18::/64
Instance ID 255, Router ID 10.1.1.1
Area ID 1, Cost 1
State BDR, Transmit Delay 1 sec, Priority 1
Timer intervals :
Hello 10, Hello Jitter 10 Dead 40, Retransmit 5
Authentication: Enabled
KeyRolloverTime(sec): Configured: 30 Current: 0
KeyRolloverState: NotActive
Outbound: SPI:121212, ESP, SHA1
Key:1234567890123456789012345678901234567890
Inbound: SPI:121212, ESP, SHA1
Key:1234567890123456789012345678901234567890
DR:10.2.2.2 BDR:10.1.1.1 Number of I/F scoped LSAs is 2
DRElection: 1 times, DelayedLSAck: 83 times
Neighbor Count = 1, Adjacent Neighbor Count= 1
Neighbor:
10.2.2.2 (DR)
Statistics of interface eth 1/1/8:
Type tx rx tx-byte rx-byte
Unknown 0 0 0 0
Hello 1415 1408 56592 56320
DbDesc 3 3 804 804
LSReq 1 1 28 28
LSUpdate 193 121 15616 9720
LSAck 85 109 4840 4924
OSPF messages dropped,no authentication: 0
Syntax: show ipv6 ospf interface [ethernet unit/slot/port | loopback number | tunnel number | ve number]
Displaying OSPFv3 information
FastIron Ethernet Switch Layer 3 Routing Conguration Guide, 08.0.30mb
344 53-1003627-06
TABLE 88 show ipv6 ospf interface output descriptions
This eld Displays
Authentication This eld shows whether or not authentication is congured. If this eld
says "Not Congured," the IPsec-related elds (bold in example screen
output) are not displayed at all.
KeyRolloverTime The number of seconds between each initiation of a key rollover. This eld
shows the congured and current times.
KeyRolloverState Can be:
Not active: key rollover is not active.
Active phase 1: rollover is in its rst interval.
Active phase 2: rollover is in its second interval.
Current Shows current SPI, authentication algorithm (currently ESP only),
encryption algorithm (currently SHA1 only), and the current key.
New (Inbound or Outbound) Shows new SPI (if changed), authentication algorithm (currently ESP only),
encryption algorithm (currently SHA1 only), and the new key.
Old (Inbound or Outbound) Shows old SPI (if changed), authentication algorithm (currently ESP only),
encryption algorithm (currently SHA1 only), and the old key.
OSPF messages dropped Shows the number of packets dropped because the packets failed
authentication (for any reason).
Displaying IPsec for a virtual link
To display IPsec for a virtual link, run the show ipv6 ospf virtual-link brief or show ipv6 ospf virtual-link command, as the following
examples illustrate.
device# show ipv6 ospf virtual-link brief
Index Transit Area ID Router ID Interface Address State
1 1 10.14.14.14 2001:db8::1:1:1::1 P2P
device# show ipv6 ospf virtual-link
Transit Area ID Router ID Interface Address State
1 10.14.14.14 2001:db8:1:1:1::1 P2P
Timer intervals(sec) :
Hello 10, Hello Jitter 10, Dead 40, Retransmit 5, TransmitDelay 1
DelayedLSAck: 5 times
Authentication: Configured
KeyRolloverTime(sec): Configured: 10 Current: 0
KeyRolloverState: NotActive
Outbound: SPI:100004, ESP, SHA1
Key:1234567890123456789012345678901234567890
Inbound: SPI:100004, ESP, SHA1
Key:1234567890123456789012345678901234567890
Statistics:
Type tx rx tx-byte rx-byte
Unknown 0 0 0 0
Hello 65 65 2600 2596
DbDesc 4 4 2752 2992
LSReq 1 1 232 64
LSUpdate 11 5 1040 1112
LSAck 5 8 560 448
OSPF messages dropped,no authentication: 0
Neighbor: State: Full Address: 2001:db8:44:44::4 Interface: eth 1/2/2
Syntax: show ipv6 ospf virtual-link [brief]
The optional brief keyword limits the display to the Transit, Area ID, Router ID, Interface Address, and State elds for each link.
Displaying OSPFv3 information
FastIron Ethernet Switch Layer 3 Routing Conguration Guide, 08.0.30mb
53-1003627-06 345
Changing a key
In this example, the key is changed. Note that the SPI value is changed from 300 to 310 to comply with the requirement that the SPI is
changed when the key is changed.
Initial conguration command.
device(config-if-e10000-1/1/3)# ipv6 ospf auth ipsec spi 300 esp sha1
no-encrypt 12345678900987655431234567890aabbccddef
Command for changing the key.
device(config-if-e10000-1/1/3)# ipv6 ospf auth ipsec spi 310 esp sha1
no-encrypt 989898989009876554321234567890aabbccddef
Displaying IPv6 OSPF information for a VRF
To display IPv6 OSPF information for a VRF or all VRF interfaces, use the show ipv6 ospf vrf command as in the following example.
device# show ipv6 ospf vrf red
OSPF V3 Process number 0 with Router ID 0x10020202(10.2.2.2)
Running 0 days 0 hours 5 minutes 49 seconds
Number of AS scoped LSAs is 0
Sum of AS scoped LSAs Checksum is 00000000
External LSA Limit is 250000
Database Overflow Interval is 10
Database Overflow State is NOT OVERFLOWED
Route calculation executed 0 times
Pending outgoing LSA count 0
Authentication key rollover interval 30 seconds
Number of areas in this router is 4
High Priority Message Queue Full count: 0
Graceful restart helper is enabled, strict lsa checking is disabled
Nonstop Routing is enabled
Syntax: show ipv6 ospf vrf vrf-name [area area-id | virtual-links]
The vrf-name parameter species the VRF that you want the OSPF area information for.
The area-id parameter shows information for the specied area.
The virtual-link parameter displays the entry that corresponds to the IP address you enter.
Use the show ipv6 ospf vrf command to display the currently selected IPv6 global address for use by the Virtual Links in each transit
area.
device# show ipv6 ospf vrf red area
Area 3:
Authentication: Not Configured
Interface attached to this area:
Number of Area scoped LSAs is 3
Sum of Area LSAs Checksum is 0001a6c4
Statistics of Area 3:
SPF algorithm executed 3 times
SPF last updated: 302 sec ago
Current SPF node count: 1
Router: 1 Network: 0
Maximum of Hop count to nodes: 0
Area 2:
Authentication: Not Configured
Interface attached to this area:
Number of Area scoped LSAs is 3
Sum of Area LSAs Checksum is 000192d6
Statistics of Area 2:
SPF algorithm executed 3 times
SPF last updated: 302 sec ago
Current SPF node count: 1
Router: 1 Network: 0
Displaying OSPFv3 information
FastIron Ethernet Switch Layer 3 Routing Conguration Guide, 08.0.30mb
346 53-1003627-06
Maximum of Hop count to nodes: 0
Area 1:
Authentication: Not Configured
Interface attached to this area: eth 1/1/1
Number of Area scoped LSAs is 6
Sum of Area LSAs Checksum is 00046630
Statistics of Area 1:
SPF algorithm executed 3 times
SPF last updated: 302 sec ago
Current SPF node count: 3
Router: 2 Network: 1
Maximum of Hop count to nodes: 2
Global IPv6 Address used by Virtual Links in this area:10:1:1::2
Area 0.0.0.0 :
Authentication: Not Configured
Interface attached to this area: VLink 1
Number of Area scoped LSAs is 6
Sum of Area LSAs Checksum is 0002cc53
Statistics of Area 0.0.0.0:
SPF algorithm executed 3 times
SPF last updated: 302 sec ago
Current SPF node count: 2
Router: 2 Network: 0
Maximum of Hop count to nodes: 1
Syntax: show ipv6 ospf vrf vrf-name [area area-id | virtual-links]
Use the show ipv6 ospf vrf vrf-name neighbor command to display the currently selected neighbor for use by the Virtual Links in each
transit area.
device# show ipv6 ospf vrf red neighbor
Total number of neighbors in all states: 1
Number of neighbors in state Full : 1
Type tx rx tx-byte rx-byte
Unknown 0 0 0 0
Hello 32 32 1276 1280
DbDesc 2 2 116 116
LSReq 1 1 52 52
LSUpdate 2 2 184 200
LSAck 2 2 112 112
OSPF messages dropped,no authentication: 0
Neighbor: State: Full Address: 2001:db8:1::1 Interface: eth 1/1/1
OSPFv3 clear commands
The following OSPFv3 clear commands are supported.
Clearing all OSPFv3 data
You can use the clear ipv6 ospf all command to clear all OSPF data by disabling and enabling the OSPFv3 processes as shown in the
following.
device# clear ipv6 ospf all
Syntax: clear ipv6 ospf all
Clearing OSPFv3 data in a VRF
You can use the clear ipv6 ospf vrf command to clear anything in a specic vrf as shown in the following.
device# clear ipv6 ospf vrf abc all
device# clear ipv6 ospf vrf abc traffic
OSPFv3 clear commands
FastIron Ethernet Switch Layer 3 Routing Conguration Guide, 08.0.30mb
53-1003627-06 347
Syntax: clear ipv6 ospf vrf vrfname
Clearing all OSPFv3 packet counters
You can use the clear ipv6 ospf trac command to clear all OSPFv3 packet counters as shown in the following.
device# clear ipv6 ospf traffic
Syntax: clear ipv6 ospf trac
Scheduling Shortest Path First (SPF) calculation
You can use the clear ipv6 ospf force-spf command to perform the SPF calculation without clearing the OSPF database, as shown in
the following.
device# clear ipv6 ospf force-spf
Syntax: clear ipv6 ospf force-spf
Clearing all redistributed routes from OSPFv3
You can use the clear ipv6 ospf redistribution command to clear all redistributed routes from OSPF, as shown in the following.
device# clear ipv6 ospf redistribution
Syntax: clear ipv6 ospf redistribution
Clearing OSPFv3 neighbors
You can use the clear ipv6 ospf neighbor command to delete and relearn OSPF neighbors, as shown in the following:
• Clearing all OSPF Neighbors
• Clearing OSPF Neighbors Attached to a Specied Interface
Clearing all OSPF neighbors
You can use the clear ipv6 ospf neighbor all command to delete and relearn all OSPF neighbors, as shown in the following.
device# clear ipv6 ospf neighbor all
Syntax: clear ipv6 ospf neighborall
Clearing OSPF neighbors attached to a specied interface
You can use the clear ipv6 ospf neighbor interface command to delete and relearn the OSPF neighbors attached to a specied
interface, as shown in the following.
device# clear ipv6 ospf neighbor interface ethernet 1/1/1
Syntax: clear ipv6 ospf neighbor interface [ethernet unit/slot/port | ve port-no | tunnel tunnel-port] [nbr-id]
Specify the interface options as shown in the following options.
ethernet unit/slot/port - clears OSPF neighbors on the specied Ethernet interface.
OSPFv3 clear commands
FastIron Ethernet Switch Layer 3 Routing Conguration Guide, 08.0.30mb
348 53-1003627-06
ve port-no - clears OSPF neighbors on the specied virtual interface.
tunnel tunnel-port - clears OSPF neighbors on the specied tunnel interface.
Specifying the nbr-id variable limits the clear ipv6 ospf neighbor command to an individual OSPF neighbor attached to the interface.
Clearing OSPFv3 counters
You can use the ospf counts command to clear OSPF neighbor’s counters as described in the following:
• Clearing all OSPF Counters
• Clearing the OSPF Counters for a Specied Neighbor
• Clearing the OSPF Counters for a Specied Interface
Clearing all OSPFv3 counters
You can clear all OSPF counters using the clear ipv6 ospf counts command, as shown in the following.
device# clear ipv6 ospf counts
Syntax: clear ipv6 ospf counts
Clearing OSPFv3 counters for a specied neighbor
You can clear all OSPF counters for a specied neighbor using the clear ipv6 counts neighbor command, as shown in the following.
device# clear ipv6 ospf counts neighbor 10.10.10.1
Syntax: clear ipv6 ospf counts neighbor nbr-id
The nbr-id variable species the neighbor ID of the OSPF neighbor whose counters you want to clear.
Clearing OSPFv3 counters for a specied interface
You can clear all OSPFv3 counters for a specied interface using the clear ipv6 counts neighbor interface command, as shown in the
following.
device# clear ipv6 ospf counts interface ethernet 1/3/1
Syntax: clear ipv6 ospf counts neighbor [interface ethernet unit/slot/port | ve port-no | tunnel tunnel-port] [nbr-id]
Specify the interface options as shown in the following options.
ethernet unit/slot/port - clears OSPFv3 counters for OSPFv3 neighbors on the specied Ethernet interface.
ve port-no - clears OSPFv3 counters for OSPFv3 neighbors on the specied virtual interface.
tunnel tunnel-port - clears OSPFv3 counters for OSPFv3 neighbors on the specied tunnel interface.
Using an nbr-id value limits the displayed output to an individual OSPFv3 neighbor attached to the interface.
OSPFv3 clear commands
FastIron Ethernet Switch Layer 3 Routing Conguration Guide, 08.0.30mb
53-1003627-06 349
FastIron Ethernet Switch Layer 3 Routing Conguration Guide, 08.0.30mb
350 53-1003627-06

Conguring BGP4 (IPv4)
• BGP4 overview............................................................................................................................................................................................... 351
• Implementation of BGP4............................................................................................................................................................................356
• BGP4 restart.................................................................................................................................................................................................... 356
• Basic conguration and activation for BGP4..................................................................................................................................... 360
• BGP4 parameters..........................................................................................................................................................................................361
• Memory considerations............................................................................................................................................................................... 364
• Basic conguration tasks required for BGP4..................................................................................................................................... 364
• Optional BGP4 conguration tasks........................................................................................................................................................377
•Conguring BGP4 restart........................................................................................................................................................................... 395
• Modifying redistribution parameters.......................................................................................................................................................400
• Filtering............................................................................................................................................................................................................... 402
• Four-byte Autonomous System Numbers (AS4).............................................................................................................................418
• BGP4 AS4 attribute errors.........................................................................................................................................................................423
•Conguring route ap dampening...........................................................................................................................................................424
• Generating traps for BGP4........................................................................................................................................................................ 428
•Conguring BGP4......................................................................................................................................................................................... 428
• Entering and exiting the address family conguration level..........................................................................................................429
• BGP route reector........................................................................................................................................................................................430
• Specifying a maximum AS path length.................................................................................................................................................432
• BGP4 max-as error messages.................................................................................................................................................................434
• Originating the default route.......................................................................................................................................................................434
• Changing the default metric used for route cost...............................................................................................................................434
•Conguring a static BGP4 network .......................................................................................................................................................435
• Generalized TTL Security Mechanism support.................................................................................................................................438
• Displaying BGP4 information................................................................................................................................................................... 438
• Clearing trac counters............................................................................................................................................................................... 474
• Clearing diagnostic buers.........................................................................................................................................................................475
BGP4 overview
BGP4 is the standard Exterior Gateway Protocol (EGP) used on the Internet to route trac between Autonomous Systems (AS) and to
maintain loop-free routing. An AS is a collection of networks that share the same routing and administration characteristics. For example,
a corporate Intranet consisting of several networks under common administrative control might be considered an AS. The networks in an
AS can but do not need to run the same routing protocol to be in the same AS, nor do they need to be geographically close.
Devices within an AS can use dierent Interior Gateway Protocols (IGPs) such as RIP and OSPF to communicate with one another.
However, for devices in dierent autonomous systems to communicate, they need to use an EGP. BGP4 is the standard EGP used by
Internet devices and therefore is the EGP implemented on Brocade devices.
This is a simple example of two BGP4 ASs. Each AS contains three BGP4 devices. All of the BGP4 devices within an AS communicate
using IBGP. BGP4 devices communicate with other autonomous systems using EBGP. Notice that each of the devices also is running
an Interior Gateway Protocol (IGP). The devices in AS1 are running OSPF and the devices in AS2 are running RIP. The device can be
congured to redistribute routes among BGP4, RIP, and OSPF. They also can redistribute static routes.
FastIron Ethernet Switch Layer 3 Routing Conguration Guide, 08.0.30mb
53-1003627-06 351

FIGURE 27 Example BGP4 autonomous systems
Relationship between the BGP4 route table and the IP route table
The device BGP4 route table can have multiple routes or paths to the same destination, which are learned from dierent BGP4
neighbors. A BGP4 neighbor is another device that also is running BGP4. BGP4 neighbors communicate using Transmission Control
Protocol (TCP) port 179 for BGP4 communication. When you congure the device for BGP4, one of the conguration tasks you
perform is to identify the device’s BGP4 neighbors.
Although a device’s BGP4 route table can have multiple routes to the same destination, the BGP4 protocol evaluates the routes and
chooses only one to send to the IP route table. The route that BGP4 chooses and sends to the IP route table is the preferred route . This
route is what the device advertises to other BGP4 neighbors. If the preferred route goes down, BGP4 updates the route information in
the IP route table with a new BGP4 preferred route.
NOTE
If IP load sharing is enabled and you enable multiple equal-cost paths for BGP4, BGP4 can select more than one equal-cost
path to a destination.
A BGP4 route consists of the following information:
• Network number (prex) - A value made up of the network mask bits and an IP address; for example, 10.215.129.0/18
indicates a network mask of 18 bits applied to the IP address 10.215.129.0. When a BGP4 device advertises a route to one of
its neighbors, it uses this format.
• AS-path - A list of the other autonomous systems through which a route passes. BGP4 devices can use the AS-path to detect
and eliminate routing loops. For example, if a route received by a BGP4 device contains the AS that the device is in, the device
does not add the route to its own BGP4 table. (The BGP4 RFCs refer to the AS-path as "AS_PATH", and RFC 4893 uses
"AS4_PATH" in relation to AS4s.)
• Additional path attributes - A list of additional parameters that describe the route. The route MED and next hop are examples of
these additional path attributes.
NOTE
The device re-advertises a learned best BGP4 route to the device’s neighbors even when the software does not select that
route for installation in the IP route table. This can happen if a route from another protocol, for example, OSPF, is preferred. The
best BGP4 route is the route that BGP4 selects based on comparison of the BGP4 route path’s attributes.
BGP4 overview
FastIron Ethernet Switch Layer 3 Routing Conguration Guide, 08.0.30mb
352 53-1003627-06
After a device successfully negotiates a BGP4 session with a neighbor (a BGP4 peer), the device exchanges complete BGP4 route
tables with the neighbor. After this initial exchange, the device and all other RFC 1771-compliant BGP4 devices send UPDATE
messages to inform neighbors of new, changed, or no longer feasible routes. BGP4 devices do not send regular updates. However, if
congured to do so, a BGP4 device does regularly send KEEPALIVE messages to its peers to maintain BGP4 sessions with them if the
device does not have any route information to send in an UPDATE message.
How BGP4 selects a path for a route (BGP best path selection algorithm)
When multiple paths for the same route prex are known to a BGP4 device, the device uses the following algorithm to weigh the paths
and determine the optimal path for the route. The optimal path depends on various parameters, which can be modied.
1. Is the next hop accessible through an Interior Gateway Protocol (IGP) route? If not, ignore the route.
NOTE
The device does not use the default route to resolve BGP4 next hop.
2. Use the path with the largest weight.
3. If the weights are the same, prefer the path with the largest local preference.
4. Prefer the route that was originated locally (by this BGP4 device).
5. If the local preferences are the same, prefer the path with the shortest AS-path. An AS-SET counts as 1. A confederation path
length, if present, is not counted as part of the path length.
NOTE
This step can be skipped if BGP4-as-path-ignore is congured.
6. If the AS-path lengths are the same, prefer the path with the lowest origin type. From low to high, route origin types are valued
as follows:
• IGP is lowest.
• EGP is higher than IGP but lower than INCOMPLETE.
• INCOMPLETE is highest.
7. If the paths have the same origin type, prefer the path with the lowest MED.
If the routes were learned from the same neighboring AS, BGP4 compares the MEDs of two otherwise equivalent paths. This
behavior is called deterministic MED. Deterministic MED is always enabled and cannot be disabled. You can also enable the
device to always compare the MEDs, regardless of the AS information in the paths. To enable this comparison, enter the
always-compare-med command at the BGP4 conguration level of the CLI. This option is disabled by default.
NOTE
By default, value 0 (most favorable) is used in MED comparison when the MED attribute is not present. The default
MED comparison results in the device favoring the route paths that are missing their MEDs. You can use the med-
missing-as-worst command to make the device regard a BGP4 route with a missing MED attribute as the least
favorable path, when comparing the MEDs of the route paths.
NOTE
MED comparison is not performed for internal routes originated within the local AS or confederation unless the
compare-med-empty-aspath command is congured.
8. Prefer routes in the following order:
• Routes received through EBGP from a BGP4 neighbor outside of the confederation
• Routes received through EBGP from a BGP4 device within the confederation OR Routes received through IBGP.
BGP4 overview
FastIron Ethernet Switch Layer 3 Routing Conguration Guide, 08.0.30mb
53-1003627-06 353
9. If all the comparisons above are equal, prefer the route with the lowest IGP metric to the BGP4 next hop. This is the closest
internal path inside the AS to reach the destination.
10. If the internal paths also are the same and BGP4 load sharing is enabled, load share among the paths. Otherwise prefer the
route that comes from the BGP4 device with the lowest device ID.
NOTE
Brocade devices support BGP4 load sharing among multiple equal-cost paths. BGP4 load sharing enables the device
to balance trac across the multiple paths instead of choosing just one path based on device ID. For EBGP routes,
load sharing applies only when the paths are from neighbors within the same remote AS. EBGP paths from neighbors
in dierent autonomous systems are not compared, unless multipath multi-as is enabled.
11. If the compare-router ID is enabled, prefer the path that comes from the BGP4 device with the lowest device ID. If a path
contains originator ID attributes, then originator ID is substituted for the ROUTER ID in the decision.
12. Prefer the path with the minimum cluster list length.
13. Prefer the route that comes from the lowest BGP4 neighbor address.
BGP4 message types
BGP4 devices communicate with neighbors (other BGP4 devices) using the following types of messages:
• OPEN
• UPDATE
• KEEPALIVE
• NOTIFICATION
• ROUTE REFRESH
OPEN message
After a BGP4 device establishes a TCP connection with a neighboring BGP4 device, the devices exchange OPEN messages. An open
message indicates the following:
• BGP4 version - Indicates the version of the protocol that is in use on the device. BGP4 version 4 supports Classless
Interdomain Routing (CIDR) and is the version most widely used in the Internet. Version 4 also is the only version supported on
devices.
• AS number - An autonomous system number (ASN) identies the AS to which the BGP4 device belongs. The number can be
up to four bytes.
• Hold Time - The number of seconds a BGP4 device will wait for an UPDATE or KEEPALIVE message (described below) from
a BGP4 neighbor before assuming that the neighbor is not operational. BGP4 devices exchange UPDATE and KEEPALIVE
messages to update route information and maintain communication. If BGP4 neighbors are using dierent Hold Times, the
lowest Hold Time is used by the neighbors. If the Hold Time expires, the BGP4 device closes the TCP connection to the
neighbor and clears any information it has learned and cached from the neighbor.
You can congure the Hold Time to be 0, in which case a BGP4 device will consider neighbors to always be up. For directly-
attached neighbors, you can congure the device to immediately close the TCP connection to the neighbor and clear entries
learned from an EBGP neighbor if the interface to that neighbor goes down. This capability is provided by the fast external fail
over feature, which is disabled by default.
• BGP4 Identier - The device ID. The BGP4 Identier (device ID) identies the BGP4 device to other BGP4 devices. The device
use the same device ID for OSPF and BGP4. If you do not set a device ID, the software uses the IP address on the lowest
BGP4 overview
FastIron Ethernet Switch Layer 3 Routing Conguration Guide, 08.0.30mb
354 53-1003627-06
numbered loopback interface congured on the device. If the device does not have a loopback interface, the default device ID is
the lowest numbered IP address congured on the device.
• Parameter list - An optional list of additional parameters used in peer negotiation with BGP4 neighbors.
UPDATE message
After BGP4 neighbors establish a BGP4 connection over TCP and exchange their BGP4 routing tables, they do not send periodic
routing updates. Instead, a BGP4 neighbor sends an update to a neighbor when it has a new route to advertise or routes have changed
or become unfeasible. An UPDATE message can contain the following information:
• Network Layer Reachability Information (NLRI) - The mechanism by which BGP4 supports Classless Interdomain Routing
(CIDR). An NLRI entry consists of an IP prex that indicates a network being advertised by the UPDATE message. The prex
consists of an IP network number and the length of the network portion of the number. For example, an UPDATE message with
the NLRI entry 10.215.129.0/18 indicates a route to IP network 10.215.129.0 with network mask 255.255.192.0. The
binary equivalent of this mask is 18 consecutive one bits, thus "18" in the NLRI entry.
• Path attributes - Parameters that indicate route-specic information such as Autonomous System path information, route
preference, next hop values, and aggregation information. BGP4 uses path attributes to make ltering and routing decisions.
• Unreachable routes - A list of routes that have been in the sending device BGP4 table but are no longer feasible. The UPDATE
message lists unreachable routes in the same format as new routes: IP address and CIDR prex .
KEEPALIVE message
BGP4 devices do not regularly exchange UPDATE messages to maintain BGP4 sessions. For example, if a device congured to
perform BGP4 routing has already sent the latest route information to peers in UPDATE messages, the device does not send more
UPDATE messages. Instead, BGP4 devices send KEEPALIVE messages to maintain BGP4 sessions. KEEPALIVE messages are 19
bytes long and consist only of a message header. They do not contain routing data.
BGP4 devices send KEEPALIVE messages at a regular interval, called the Keep Alive Time. The default Keep Alive Time is 60 seconds.
A parameter related to the Keep Alive Time is the Hold Time. The Hold Time for a BGP4 device determines how many seconds the
device waits for a KEEPALIVE or UPDATE message from a BGP4 neighbor before deciding that the neighbor is not operational. The
Hold Time is negotiated when BGP4 devices exchange OPEN messages, the lower Hold Time is then used by both neighbors. For
example, if BGP4 device A sends a Hold Time of 5 seconds and BGP4 device B sends a Hold Time of 4 seconds, both devices use 4
seconds as the Hold Time for their BGP4 session. The default Hold Time is 180 seconds. Generally, the Hold Time is congured to
three times the value of the Keep Alive Time.
If the Hold Time is 0, a BGP4 device assumes that a neighbor is alive regardless of how many seconds pass between receipt of
UPDATE or KEEPALIVE messages.
NOTIFICATION message
When you close the BGP4 session with a neighbor, the device detects an error in a message received from the neighbor, or an error
occurs on the device, the device sends a NOTIFICATION message to the neighbor. No further communication takes place between the
BGP4 device that sent the NOTIFICATION and the neighbors that received the NOTIFICATION.
REFRESH message
BGP4 sends a REFRESH message to a neighbor to request that the neighbor resend route updates. This type of message can be useful
if an inbound route ltering policy has been changed.
BGP4 overview
FastIron Ethernet Switch Layer 3 Routing Conguration Guide, 08.0.30mb
53-1003627-06 355
Grouping of RIB-out peers
To improve eciency in the calculation of outbound route lters, the device groups BGP4 peers together based on their outbound
policies. To reduce RIB-out memory usage, the device then groups the peers within an outbound policy group according to their RIB-out
routes. All peers sharing a single RIB-out route (up to 32 peers per group) also share a single physical RIB-out entry, resulting in as
much as a 30-fold memory usage reduction.
NOTE
RIB-out peer grouping is not shared between dierent VRFs or address
families.
Implementation of BGP4
BGP4 is described in RFC 1771 and the latest BGP4 drafts. The Brocade BGP4 implementation fully complies with RFC 1771.
Brocade BGP4 implementation also supports the following RFCs:
• RFC 1745 (OSPF Interactions)
• RFC 1997 (BGP Communities Attributes)
• RFC 2385 (TCP MD5 Signature Option)
• RFC 2439 (Route Flap Dampening)
• RFC 2796 (Route Reection)
• RFC 2842 (Capability Advertisement)
• RFC 3065 (BGP4 Confederations)
• RFC 2858 (Multiprotocol Extensions)
• RFC 2918 (Route Refresh Capability)
• RFC 3392 (BGP4 Capability Advertisement)
• RFC 4893 BGP Support for Four-octet AS Number Space
• RFC 3682 Generalized TTL Security Mechanism, for eBGP Session Protection
BGP4 restart
BGP4 restart is a high-availability routing feature that minimizes disruption in trac forwarding, diminishes route apping, and provides
continuous service during a system restart, switchover, failover, or hitless OS upgrade. During such events, routes remain available
between devices. BGP4 restart operates between a device and its peers, and must be congured on each participating device.
Under normal operation, when a BGP4 device is restarted, the network is automatically recongured. Routes available through the
restarting device are deleted when the device goes down, and are then rediscovered and added back to the routing tables when the
device is back up and running. In a network with devices that regularly restart, performance can degrade signicantly and limit the
availability of network resources. BGP4 restart dampens the network response and limits route apping by allowing routes to remain
available between devices during a restart. BGP4 restart operates between a device and peers, and must be congured on each
participating device.
BGP4 restart is enabled globally by default.
A BGP4 restart-enabled device advertises the capability to establish peering relationships with other devices. When a restart begins,
neighbor devices mark all of the routes from the restarting device as stale, but continue to use the routes for the length of time specied
by the restart timer. After the device is restarted, it begins to receive routing updates from the peers. When it receives the end-of-RIB
Implementation of BGP4
FastIron Ethernet Switch Layer 3 Routing Conguration Guide, 08.0.30mb
356 53-1003627-06
marker that indicates it has received all of the BGP4 route updates, it recomputes the new routes and replaces the stale routes in the
route map with the newly computed routes. If the device does not come back up within the time congured for the purge timer, the stale
routes are removed.
NOTE
BGP4 restart is supported in FSX 800, FSX 1600 devices with dual management modules, FCX switches in a stack and ICX
switches in a stack. If the switch will function as a restart helper device only, a secondary management module is not required.
NOTE
A second management module must be installed for the device to function as a restart device. If the device functions as a
restart helper device only, there is no requirement for a secondary management module.
The implementation of BGP4 Restart supports the following Internet Draft:
• Draft-ietf-idr-restart-10.txt: restart mechanism for BGP4
BGP4 Peer notication during a management module switchover
The BGP4 Peer notication process restores BGP4 adjacency quickly and allows packet forwarding between the newly active
management module and the BGP4 peers. The handling of TCP packets with an MD5 digest prevents the silent dropping of TCP
packets without triggering a RESET packet.
The BGP4 peer notication process operates eectively when implemented for the following processes that involve the intentional
switching of the active status from one management module to another:
• System Reload - When a device undergoes the reload process, both management modules and all interface modules are
rebooted. All BGP4 sessions are terminated BEFORE the system triggers the hardware reset.
• Switchover Requested by User - Switching over to a standby management module can be triggered by the switchover , reset ,
reload , and hitless-reload commands. When these commands are executed, the active management module resets the
BGP4/TCP sessions with BGP4 neighbors before transferring control to the standby management module.
NOTE
Restart-enabled BGP4 sessions are not reset. The BGP4 restart protocol allows a BGP4 session to reconnect gracefully
without going through the normal process.
This example describes the procedure used between the management modules in a device and a BGP4 neighbor device.
BGP4 restart
FastIron Ethernet Switch Layer 3 Routing Conguration Guide, 08.0.30mb
53-1003627-06 357
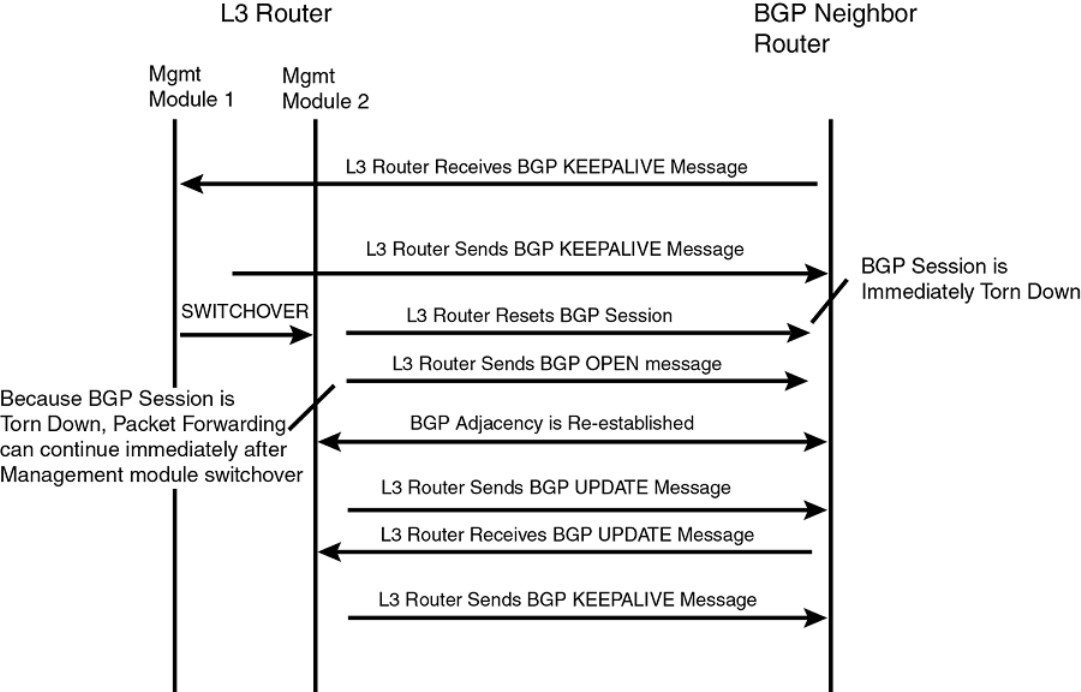
FIGURE 28 Management module switchover behavior for BGP4 peer notication
If the active management module fails due to a fault, the management module does not have the opportunity to reset BGP4 sessions
with neighbors as described for intentional failovers. In this situation the management module will reboot, or the standby management
module becomes the new active management module. Since the new active management module does not have the TCP/BGP4
information needed to reset the previous sessions, a remote BGP4 peer session is only reset when it sends a BGP4/TCP keep-alive
packet to this device, or when the BGP4 hold-time expires.
To help reduce the reconnection time after a management module failover or system reload, if an incoming TCP packet contains an
MD5 digest, and no matching TCP session is found, the device attempts to nd a matching BGP4 peer based on the IP address. If a
BGP4 peer conguration can be found, the device looks up the MD5 password congured for the peer, and uses it to send a RESET
packet.
BGP4 neighbor local AS
This feature allows you to congure a device so that it adds a peer to an AS that is dierent from the AS to which it actually belongs. This
feature is useful when an ISP is acquired by another ISP. In this situation, customers of the acquired ISP might not want to (or might not
be able to) adjust their conguration to connect to the AS of the acquiring provider.
In this example, Customer C is connected to ISP-A which is in AS 100 and ISP-B which is in AS 200.
BGP4 restart
FastIron Ethernet Switch Layer 3 Routing Conguration Guide, 08.0.30mb
358 53-1003627-06
FIGURE 29 Example of customer connected to two ISPs
In the next example, ISP-A has purchased ISP-B. The AS associated with ISP-B changes to AS 100. If Customer C cannot or does not
want to change their conguration or peering relationship with ISP-B, a peer with Local-AS congured with the value 200 can be
established on ISP-B.
BGP4 restart
FastIron Ethernet Switch Layer 3 Routing Conguration Guide, 08.0.30mb
53-1003627-06 359
FIGURE 30 Example of Local AS congured on ISP-B
A Local AS is congured using the BGP4 neighbor command. To conrm that a Local AS has been congured, use the show ip bgp
neighbors command.
Basic conguration and activation for BGP4
BGP4 is disabled by default. Follow the steps below to enable BGP4.
1. Enable the BGP4 protocol.
2. Set the local AS number.
NOTE
You must specify the local AS number for BGP4 to become functional.
3. Add each BGP4 neighbor (peer BGP4 device) and identify the AS the neighbor is in.
Basic conguration and activation for BGP4
FastIron Ethernet Switch Layer 3 Routing Conguration Guide, 08.0.30mb
360 53-1003627-06
4. Save the BGP4 conguration information to the system conguration le.
For example, enter commands such as the following.
device> enable
device# configure terminal
device(config)# router bgp
BGP4: Please configure 'local-as' parameter in order to enable BGP4.
device(config-bgp)# local-as 10
device(config-bgp-router)#neighbor 10.157.23.99 remote-as 100
device(config-bgp)# write memory
Syntax: router bgp
The router bgp command enables the BGP4 protocol.
NOTE
By default, the Brocade device ID is the IP address congured on the lowest numbered loopback interface. If the
device does not have a loopback interface, the default device ID is the lowest numbered IP interface address
congured on the device. If you change the device ID, all current BGP4 sessions, OSPF adjacencies, and OSPFv3
adjacencies are cleared.
NOTE
When BGP4 is enabled on a Brocade device, you do not need to reset the system. The protocol is activated as soon
as you enable it. The device begins a BGP4 session with a BGP4 neighbor when you add the neighbor.
Disabling BGP4
If you disable BGP4, the device removes all the running conguration information for the disabled protocol from the running
conguration. To restore the BGP4 conguration, you must reload the software to load the BGP4 conguration from the startup
conguration. When you save the startup conguration le after disabling the protocol, all of the BGP4 conguration information for the
disabled protocol is removed from the startup conguration le.
The CLI displays a warning message such as the following.
device(config-bgp-router)# no router bgp
router bgp mode now disabled and runtime configuration is erased. All bgp config data will be lost when
writing to flash!
The Web Management Interface does not display a warning message.
If you are testing a BGP4 conguration and need to disable and re-enable the protocol, you should make a backup copy of the startup
conguration le containing the BGP4 conguration information. If you remove the conguration information by saving the conguration
after disabling the protocol, you can restore the BGP4 conguration by copying the backup copy of the startup conguration le onto the
ash memory.
NOTE
To disable BGP4 without losing the BGP4 conguration information, remove the local AS (for example, by entering the no
local-as command). When you remove the local AS, BGP4 retains the other conguration information but will not become
operational until you reset the local AS.
BGP4 parameters
You can modify or set the following BGP4 parameters:
• Optional - Dene the router ID. (The same router ID also is used by OSPF.)
BGP4 parameters
FastIron Ethernet Switch Layer 3 Routing Conguration Guide, 08.0.30mb
53-1003627-06 361
• Required - Specify the local AS number.
• Optional - Add a loopback interface for use with neighbors.
• Required - Identify BGP4 neighbors.
• Optional - Change the Keep Alive Time and Hold Time.
• Optional - Change the update timer for route changes.
• Optional - Enable fast external fallover.
• Optional - Specify a list of individual networks in the local AS to be advertised to remote autonomous systems using BGP4.
• Optional - Change the default local preference for routes.
• Optional - Enable the default route (default-information-originate).
• Optional - Enable use of a default route to resolve a BGP4 next-hop route.
• Optional - Change the default MED (metric).
• Optional - Enable next-hop recursion.
• Optional - Change the default administrative distances for EBGP, IBGP, and locally originated routes.
• Optional - Require the rst AS in an Update from an EBGP neighbor to be the neighbor AS.
• Optional - Change MED comparison parameters.
• Optional - Disable comparison of the AS-Path length.
• Optional - Enable comparison of the device ID.
• Optional - Enable auto summary to summarize routes at an IP class boundary (A, B, or C).
• Optional - Aggregate routes in the BGP4 route table into CIDR blocks.
• Optional - Congure the device as a BGP4 route reector.
• Optional - Congure the device as a member of a BGP4 confederation.
• Optional - Change the default metric for routes that BGP4 redistributes into RIP or OSPF.
• Optional - Change the parameters for RIP, OSPF, or static routes redistributed into BGP4.
• Optional - Change the number of paths for BGP4 load sharing.
• Optional - Change other load-sharing parameters
• Optional - Dene BGP4 address lters.
• Optional - Dene BGP4 AS-path lters.
• Optional - Dene BGP4 community lters.
• Optional - Dene IP prex lists.
• Optional - Dene neighbor distribute lists.
• Optional - Dene BGP4 route maps for ltering routes redistributed into RIP and OSPF.
• Optional - Dene route ap dampening parameters.
NOTE
When using the CLI, you set global level parameters at the BGP CONFIG level of the CLI. You can reach the BGP CONFIG
level by entering the router bgp command at the global CONFIG level.
Some parameter changes take eect immediately while others do not take full eect until the device sessions with its neighbors are reset.
Some parameters do not take eect until the device is rebooted.
BGP4 parameters
FastIron Ethernet Switch Layer 3 Routing Conguration Guide, 08.0.30mb
362 53-1003627-06
Parameter changes that take eect immediately
The following parameter changes take eect immediately:
• Enable or disable BGP4.
• Set or change the local AS.
• Add neighbors.
• Change the update timer for route changes.
• Disable or enable fast external failover.
• Specify individual networks that can be advertised.
• Change the default local preference, default information originate setting, or administrative distance.
• Enable or disable use of a default route to resolve a BGP4 next-hop route.
• Enable or disable MED (metric) comparison.
• Require the rst AS in an update from an EBGP neighbor to be the neighbor AS.
• Change MED comparison parameters.
• Disable comparison of the AS-Path length.
• Enable comparison of the device ID.
• Enable next-hop recursion.
• Change the default metric.
• Disable or re-enable route reection.
•Congure confederation parameters.
• Disable or re-enable load sharing.
• Change the maximum number of load sharing paths.
• Change other load-sharing parameters.
•Dene route ap dampening parameters.
• Add, change, or negate redistribution parameters (except changing the default MED as described in Changing the default MED
(Metric) used for route redistribution on page 382).
• Add, change, or negate route maps (when used by the network command or a redistribution command).
• Aggregate routes.
• Apply maximum AS path limit settings for UPDATE messages.
Parameter changes that take eect after resetting neighbor sessions
The following parameter changes take eect only after the BGP4 sessions on the device are cleared, or reset using the "soft" clear
option:
• Change the Hold Time or Keep Alive Time.
• Aggregate routes
• Add, change, or negate lter tables that aect inbound and outbound route policies.
• Apply maximum AS path limit settings to the RIB.
BGP4 parameters
FastIron Ethernet Switch Layer 3 Routing Conguration Guide, 08.0.30mb
53-1003627-06 363

Parameter changes that take eect after disabling and re-enabling
redistribution
The following parameter change takes eect only after you disable and then re-enable redistribution:
• Change the default MED (metric).
Memory considerations
BGP4 can handle a very large number of routes and therefore requires a lot of memory. For example, in a typical conguration with a
single BGP4 neighbor, receiving a full internet route table, a BGP4 device may need to hold over a million routes. Many congurations,
especially those involving more than one neighbor, can require the device to hold even more routes. Brocade devices provide dynamic
memory allocation for BGP4 data. BGP4 devices automatically allocate memory when needed to support BGP4 neighbors, routes and
route attribute entries. Dynamic memory allocation is performed automatically by the software and does not require a reload.
The following table lists the maximum total amount of system memory (DRAM) BGP4 can use. The maximum depends on the total
amount of system memory on the device.
TABLE 89 Maximum memory usage
Platform Maximum memory BGP4 can use
FSX with Management module with 1536 MB 1336 MB
The memory amounts listed in the table are for all BGP4 data, including routes received from neighbors, BGP route advertisements
(routes sent to neighbors), and BGP route attribute entries. The routes sent to and received from neighbors use the most BGP4 memory.
Generally, the actual limit to the number of neighbors, routes, or route attribute entries the device can accommodate depends on how
many routes the device sends to and receives from the neighbors.
In some cases, where most of the neighbors do not send or receive a full BGP route table (about 80,000 routes), the memory can
support a larger number of BGP4 neighbors. However, if most of the BGP4 neighbors send or receive full BGP route tables, the number
of BGP neighbors the memory can support is less than in congurations where the neighbors send smaller route tables.
Memory conguration options obsoleted by dynamic memory
Devices that support dynamic BGP4 memory allocation do not require or even support static conguration of memory for BGP4
neighbors, routes, or route attributes. Consequently, the following CLI commands and equivalent Web management options are not
supported on these devices:
•max-neighbors num
•max-routes num
•max-attribute-entries num
If you boot a device that has a startup-cong le that contains these commands, the software ignores the commands and uses dynamic
memory allocation for BGP4. The rst time you save the device running conguration (running-cong) to the startup-cong le, the
commands are removed from the le.
Basic conguration tasks required for BGP4
The following sections describe how to perform the conguration tasks that are required to use BGP4 on the Brocade device.
Memory considerations
FastIron Ethernet Switch Layer 3 Routing Conguration Guide, 08.0.30mb
364 53-1003627-06
Enabling BGP4 on the device
When you enable BGP4 on the device, BGP4 is automatically activated. To enable BGP4 on the device, enter the following commands.
device# configure terminal
device(config)# router bgp
BGP4: Please configure 'local-as' parameter in order to enable BGP4.
device(config-bgp-router)# local-as 10
device(config-bgp-router)# neighbor 10.157.23.99 remote-as 100
device(config-bgp-router)# write memory
Changing the device ID
The OSPF and BGP4 protocols use device IDs to identify devices that are running the protocols. A device ID is a valid, unique IP
address and sometimes is an IP address congured on the device. The device ID cannot be an IP address in use by another device.
By default, the device ID on a Brocade device is one of the following:
• If the device has loopback interfaces, the default device ID is the IP address on the lowest numbered loopback interface
congured on the Brocade device. For example, if you congure loopback interfaces 1, 2, and 3 as follows, the default device
ID is 10.9.9.9/24:
– Loopback interface 1, 10.9.9.9/24
– Loopback interface 2, 10.4.4.4/24
– Loopback interface 3, 10.1.1.1/24
• If the device does not have any loopback interfaces, the default device ID is the lowest numbered IP interface address
congured on the device.
NOTE
Brocade devices use the same device ID for both OSPF and BGP4. If the device is already congured for OSPF, you may want
to use the device ID already assigned to the device rather than set a new one. To display the current device ID, enter the show ip
command at any CLI level.
To change the device ID, enter a command such as the following.
device(config)# ip router-id 10.157.22.26
Syntax: [no] ip router-id ip-addr
The ip-addr can be any valid, unique IP address.
NOTE
You can specify an IP address used for an interface on the Brocade device, but do not specify an IP address that is being used
by another device.
Setting the local AS number
The local autonomous system number (ASN) identies the AS in which the Brocade BGP4 device resides.
To set the local AS number, enter commands such as the following.
device(config)# router bgp
BGP4: Please configure 'local-as' parameter in order to enable BGP4.
device(config-bgp)# local-as 10
device(config-bgp)# write memory
Syntax: [no] local-as num
Basic conguration tasks required for BGP4
FastIron Ethernet Switch Layer 3 Routing Conguration Guide, 08.0.30mb
53-1003627-06 365
The num parameter species a local AS number in the range 1 through 4294967295. It has no default. AS numbers 64512 - 65535
are the well-known private BGP4 AS numbers and are not advertised to the Internet community.
Setting the local AS number for VRF instances
The local autonomous system (AS) number identies the AS in which the BGP4 device resides.
You can assign dierent BGP AS numbers for each VRF instance. If you do not assign an AS number, the BGP VRF instances use the
default BGP AS number, as in previous releases.
The local-as command is available under the "global BGP" CLI level and "address- family ipv4 unicast vrf" CLI level.
To set the local as number for a VRF, enter commands such as the following.
device(config-bgp)# address-family ipv4 unicast vrf vrf-name
device(config-bgp)# local-as num
Syntax: [no] local-as num
The num parameter species a local AS number in the range 1 - 4294967295. It has no default. AS numbers 64512 - 65535 are the
well-known private BGP4 AS numbers and are not advertised to the Internet community.
The conguration takes eect immediately and the BGP VRF instance is reset. All BGP peering within the VRF is reset, and take the new
AS number.
The local AS number for the VRF instance, if congured, is displayed in the show running-cong and show ip bgp cong command
output.
Enter the show ip bgp cong command:
device# show ip bgp config
Current BGP configuration:
router bgp
local-as 100
neighbor 10.10.10.10 remote-as 200
address-family ipv4 unicast
exit-address-family
address-family ipv6 unicast
exit-address-family
address-family ipv4 unicast vrf vrf_a
local-as 300
neighbor 10.111.111.111 remote-as 400
exit-address-family
Adding a loopback interface
You can congure the device to use a loopback interface instead of a specic port or virtual routing interface to communicate with a
BGP4 neighbor. A loopback interface adds stability to the network by working around route ap problems that can occur due to unstable
links between the device and neighbors.
Loopback interfaces are always up, regardless of the states of physical interfaces. Loopback interfaces are especially useful for IBGP
neighbors (neighbors in the same AS) that are multiple hops away from the device. When you congure a BGP4 neighbor on the device,
you can specify whether the device uses the loopback interface to communicate with the neighbor. As long as a path exists between the
device and the neighbor, BGP4 information can be exchanged. The BGP4 session is not associated with a specic link, but is instead
associated with the virtual interfaces.
Basic conguration tasks required for BGP4
FastIron Ethernet Switch Layer 3 Routing Conguration Guide, 08.0.30mb
366 53-1003627-06
NOTE
If you congure the Brocade device to use a loopback interface to communicate with a BGP4 neighbor, the peer IP address on
the remote device pointing to your loopback address must be congured.
To add a loopback interface, enter commands such as the following.
device(config-bgp)# exit
device(config)# int loopback 1
device(config-lbif-1)# ip address 10.0.0.1/24
Syntax: [no] interface loopback num
The num value can be from 1 through the maximum number of loopback interfaces supported on the device.
Adding BGP4 neighbors
Because BGP4 does not contain a peer discovery process, for each BGP4 neighbor (peer), you must indicate the IP address and the AS
number of each neighbor. Neighbors that are in dierent autonomous systems communicate using EBGP. Neighbors within the same
AS communicate using IBGP.
NOTE
If the device has multiple neighbors with similar attributes, you can simplify conguration by conguring a peer group, then
adding individual neighbors to it. The conguration steps are similar, except you specify a peer group name instead of a
neighbor IP address when conguring the neighbor parameters, then add individual neighbors to the peer group.
NOTE
The device attempts to establish a BGP4 session with a neighbor as soon as you enter a command specifying the IP address
of the neighbor. If you want to completely congure the neighbor parameters before the device establishes a session with the
neighbor, you can administratively shut down the neighbor.
To add a BGP4 neighbor with an IP address 10.157.22.26, enter the following command.
device(config-bgp-router)# neighbor 10.157.22.26 remote-as 100
The neighbor ip-addr must be a valid IP address.
The neighbor command has additional parameters, as shown in the following syntax:
Syntax: no neighbor {ip-addr | peer-group-name} {[activate] [advertisement-interval seconds [allowas-in num] [capability as4 [enable |
disable]] [capability orf prexlist [send | receive]] [default-originate [route-map map-name]] [description string] [distribute-list in | out
num,num,... | ACL-num localin | out] [ebgp-btsh] [ebgp-multihop [num]] [enforce-rst-as] [lter-list access-list-name [in | out]] [local-
as as-num [no-prepend]] [maxas-limit in [num | disable] [maximum-prex num [threshold] [teardown] [next-hop-self] [password
string] [peer-group group-name] [prex-list string in | out] [remote-as as-number] [remove-private-as] [route-map in | out map-
name] [route-reector-client] [send-community] [shutdown [generate-rib-out]] [soft-reconguration inbound] [timers keep-alive
num hold-time num] [unsuppress-map map-name] [update-source ip-addr | ethernet unit / slot / portnum | loopback num | ve num]
[weight num] [send-label]}
The ip-addr and peer-group-name parameters indicate whether you are conguring an individual neighbor or a peer group. If you
specify a neighbor IP address, you are conguring that individual neighbor. If you specify a peer group name, you are conguring a peer
group.
activate allows exchange of routes in the current family mode.
advertisement-interval seconds congures an interval in seconds over which the specied neighbor or peer group will hold all route
updates before sending them. At the expiration of the timer, the routes are sent as a batch. The default value for this parameter is zero.
Acceptable values are 0 to 3600 seconds.
Basic conguration tasks required for BGP4
FastIron Ethernet Switch Layer 3 Routing Conguration Guide, 08.0.30mb
53-1003627-06 367
NOTE
The device applies the advertisement interval only under certain conditions. The device does not apply the advertisement
interval when sending initial updates to a BGP4 neighbor. As a result, the device sends the updates one immediately after
another, without waiting for the advertisement interval.
allowas-in num disables the AS_PATH check function for routes learned from a specied location. BGP4 usually rejects routes that
contain an AS number within an AS_PATH attribute to prevent routing loops.
capability as4 [enable | disable ] enables the capability of processing AS4s. The optional keywords enable and disable specify whether
the feature should be changed from its current state. For example, if this neighbor belongs to a peer group that is enabled for AS4s but
you want to disable it on the current interface, use the command and include the disable keyword.
capability orf prexlist [send | receive ] congures cooperative device ltering. The send and receive parameters specify the support you
are enabling:
•send - The device sends the IP prex lists as Outbound Route Filters (ORFs) to the neighbor.
•receive - The device accepts lters as Outbound Route Filters (ORFs) from the neighbor.
If you do not specify either send or receive , both capabilities are enabled. The prexlist parameter species the type of lter you want to
send to the neighbor.
NOTE
The current release supports cooperative ltering only for lters congured using IP prex
lists.
default-originate [route-mapmap-name ] congures the device to send the default route 0.0.0.0 to the neighbor. If you use the route-
map map-name parameter, the route map injects the default route conditionally, based on the match conditions in the route map.
description string species a name for the neighbor. You can enter an alphanumeric text string up to 80 characters long.
distribute-list in | out num,num,... species a distribute list to be applied to updates to or from the specied neighbor. The in and out
keywords specify whether the list is applied on updates received from the neighbor, or sent to the neighbor. The num,num,... parameter
species the list of address-list lters. The device applies the lters in the order in which you list them and stops applying the lters in the
distribute list when a match is found.
To use an IP ACL instead of a distribute list, you can specify distribute-listACL-numin | out . In this case, ACL-num is an IP ACL.
NOTE
By default, if a route does not match any of the lters, the device denies the route. To change the default behavior, congure the
last lter as permit any any .
NOTE
The address lter must already be
congured.
ebgp-btsh enables GTSM protection for the specied neighbor.
ebgp-multihop [num ] species that the neighbor is more than one hop away and that the session type with the neighbor is EBGP-
multihop. This option is disabled by default. The num parameter species the TTL you are adding for the neighbor. You can specify a
number from 0 through 255. The default is 0. If you leave the EBGP TTL value set to 0, the software uses the IP TTL value.
enforce-rst-as ensures, for this neighbor, that the rst AS listed in the AS_SEQUENCE eld of an AS path update message from
EBGP neighbors is the AS of the neighbor that sent the update.
lter-list in | out num,num,.. species an AS-path lter list or a list of AS-path ACLs. The in and out keywords specify whether the list is
applied on updates received from the neighbor or sent to the neighbor. If you specify in or out, the num,num,... parameter species the
Basic conguration tasks required for BGP4
FastIron Ethernet Switch Layer 3 Routing Conguration Guide, 08.0.30mb
368 53-1003627-06
list of AS-path lters. The device applies the lters in the order in which you list them and stops applying the lters in the AS-path lter
list when a match is found.
weight num species a weight that the device applies to routes received from the neighbor. You can specify a number from 0 through
65535.
Alternatively, you can specify lter-list acl-num in | out | weight to use an AS-path ACL instead of an AS-path lter list. In this case, acl-
num is an AS-path ACL.
NOTE
By default, if an AS-path does not match any of the lters or ACLs, the device denies the route. To change the default behavior,
congure the last lter or ACL as permit any any .
NOTE
The AS-path lter or ACL must already be
congured.
local-as as-num assigns a local AS number with the value specied by the as-num variable to the neighbor being congured. The as-
num has no default value. Its range is 1 - 4294967295.
NOTE
When the local-as option is used, the device automatically prepends the local AS number to the routes that are received from
the EBGP peer; to disable this behavior, include the no-prepend keyword.
maxas-limit in num |disable species that the device discard routes that exceed a maximum AS path length received in UPDATE
messages. You can specify a value from 0 - 300. The default value is 300. The disable keyword is used to stop a neighbor from
inheriting the conguration from the peer-group or global and to the use system default value.
maximum-prex num species the maximum number of IP network prexes (routes) that can be learned from the specied neighbor or
peer group . You can specify a value from 0 through 4294967295. The default is 0 (unlimited).
• The num parameter species the maximum number. The range is 0 through 4294967295. The default is 0 (unlimited).
• The threshold parameter species the percentage of the value you specied for the maximum-prex num , at which you want
the software to generate a Syslog message. You can specify a value from 1 (one percent) to 100 (100 percent). The default is
100.
• The teardown parameter tears down the neighbor session if the maximum-prex limit is exceeded. The session remains
shutdown until you clear the prexes using the clear ip bgp neighbor all or clear ip bgp neighbor command, or change the
maximum prex conguration for the neighbor. The software also generates a Syslog message.
next-hop-self species that the device should list itself as the next hop in updates sent to the specied neighbor. This option is disabled
by default.
password string species an MD5 password for securing sessions between the device and the neighbor. You can enter a string up to 80
characters long. The string can contain any alphanumeric characters and spaces if the words in the password are placed inside quotes.
NOTE
If you want the software to assume that the value you enter is the clear-text form, and to encrypt display of that form, do not
enter 0 or 1. Instead, omit the encryption option and allow the software to use the default behavior. If you specify encryption
option 1, the software assumes that you are entering the encrypted form of the password or authentication string. In this case,
the software decrypts the password or string you enter before using the value for authentication. If you accidentally enter option
1 followed by the clear-text version of the password or string, authentication will fail because the value used by the software will
not match the value you intended to use.
Basic conguration tasks required for BGP4
FastIron Ethernet Switch Layer 3 Routing Conguration Guide, 08.0.30mb
53-1003627-06 369
The system creates an MD5 hash of the password and uses it for securing sessions between the device and its neighbors. To display the
conguration, the system uses a 2-way encoding scheme to be able to retrieve the original password that was entered.
By default, the password is encrypted. If you want the password to appear in clear text, insert a 0 between the password and the string.
device(config-bgp)# neighbor 10.157.22.26 password 0 marmalade
The system adds an encryption code followed by the encrypted text of the original password. For example, the following portion of the
code has the encrypted code “2”.
password 2 $IUA2PWc9LW9VIW9zVQ=="
One of the following may be displayed:
• 0 = the password is not encrypted and is in clear text
• 2 = the password uses proprietary base64 cryptographic 2-way algorithm
peer-group group-name assigns the neighbor to the specied peer group.
prex-list string in |out species an IP prex list. You can use IP prex lists to control routes to and from the neighbor. IP prex lists are
an alternative method to AS-path lters. The in and out keywords specify whether the list is applied on updates received from the
neighbor or sent to the neighbor. The lters can use the same prex list or dierent prex lists.
You must specify a prex-list that matches an existing prex-list entry. An implicit deny is applied to trac that does not match any
prex-list entry. Use the show ip prex-list command to view information about congured prex-lists.
remote-as as-number species the AS in which the remote neighbor resides. The as-number has no default value. The range is 1 -
4294967295.
remove-private-as congures the device to remove private AS numbers from update messages the device sends to this neighbor. The
device will remove AS numbers 64512 through 65535 (the well-known BGP4 private AS numbers) from the AS-path attribute in
update messages the device sends to the neighbor. This option is disabled by default.
route-map in | out map-name species a route map the device will apply to updates sent to or received from the specied neighbor. The
in and out keywords specify whether the list is applied on updates received from the neighbor or sent to the neighbor.
NOTE
The route map must already be
congured.
route-reector-client species that this neighbor is a route-reector client of the device. Use the parameter only if this device is going to
be a route reector. This option is disabled by default.
send-community enables sending the community attribute in updates to the specied neighbor. By default, the device does not send
the community attribute.
shutdown administratively shuts down the session with this neighbor. Shutting down the session lets you congure the neighbor and
save the conguration without actually establishing a session with the neighbor.
When a peer is put into the shutdown state, ribout routes are not produced for that peer. You can elect to produce ribout routes using the
generate-rib-out option. This option is disabled by default.
soft-reconguration inbound enables the soft reconguration feature, which stores all the route updates received from the neighbor. If
you request a soft reset of inbound routes, the software performs the reset by comparing the policies against the stored route updates,
instead of requesting the neighbor BGP4 route table or resetting the session with the neighbor.
timers keep-alive num hold-time num overrides the global settings for the Keep Alive Time and Hold Time. For the Keep Alive Time,
you can specify 0 - 65535 seconds. For the Hold Time, you can specify 0 or a number in the range 3 through 65535 (1 and 2 are not
Basic conguration tasks required for BGP4
FastIron Ethernet Switch Layer 3 Routing Conguration Guide, 08.0.30mb
370 53-1003627-06
allowed). If you set the Hold Time to 0, the device waits indenitely for messages from a neighbor without concluding that the neighbor is
non-operational. The defaults for these parameters are the currently congured global Keep Alive Time and Hold Time.
unsuppress-map map-name removes route suppression from neighbor routes when those routes have been dampened due to
aggregation.
update-source ip-addr | ethernetunit/slot/portnum | loopbacknum | venum congures the device to communicate with the neighbor
through the specied interface. There is no default.
weight num species a weight a device will add to routes received from the specied neighbor. BGP4 prefers larger weights over smaller
weights. The default weight is 0.
The send-label keyword enables IPv6 label capability for the IPv4 peers.
Removing route dampening from suppressed routes
You can selectively un-suppress specic routes that have been suppressed due to aggregation, and allow these routes to be advertised
to a specic neighbor or peer group.
device(config-bgp)# aggregate-address 10.1.0.0 255.255.0.0 summary-only
device(config-bgp)# show ip bgp route 10.1.0.0/16 longer
Number of BGP Routes matching display condition : 2
Status A:AGGREGATE B:BEST b:NOT-INSTALLED-BEST C:CONFED_EBGP D:DAMPED
E:EBGP H:HISTORY I:IBGP L:LOCAL M:MULTIPATH S:SUPPRESSED F:FILTERED
Prefix Next Hop Metric LocPrf Weight Status
1 10.1.0.0/16 0.0.0.0 101 32768 BAL
AS_PATH:
2 10.1.44.0/24 10.2.0.1 1 101 32768 BLS
AS_PATH:
In this example, the aggregate-address command congures an aggregate address of 10.1.0.0 255.255.0.0. and the summary-only
parameter prevents the device from advertising more specic routes contained within the aggregate route.
Entering a show ip bgp route command for the aggregate address 10.1.0.0/16 shows that the more specic routes aggregated into
10.1.0.0/16 have been suppressed. In this case, the route to 10.1.44.0/24 has been suppressed. If you enter this command, the
display shows that the route is not being advertised to the BGP4 neighbors.
device(config-bgp)# show ip bgp route 10.1.44.0/24
Number of BGP Routes matching display condition : 1
Status A:AGGREGATE B:BEST b:NOT-INSTALLED-BEST C:CONFED_EBGP D:DAMPED
E:EBGP H:HISTORY I:IBGP L:LOCAL M:MULTIPATH S:SUPPRESSED F:FILTERED
Prefix Next Hop Metric LocPrf Weight Status
1 10.1.44.0/24 10.2.0.1 1 101 32768 BLS
AS_PATH:
Route is not advertised to any peers
To override the summary-only parameter and allow a specic route to be advertised to a neighbor, enter commands such as the
following
device(config)# ip prefix-list Unsuppress1 permit 10.1.44.0/24
device(config)# route-map RouteMap1 permit 1
device(config-routemap RouteMap1)# exit
device(config)# router bgp
device(config-bgp)# neighbor 10.1.0.2 unsuppress-map RouteMap1
device(config-bgp)# clear ip bgp neighbor 10.1.0.2 soft-out
The ip prex-list command congures an IP prex list for network 10.1.44.0/24, which is the route you want to unsuppress. The next
two commands congure a route map that uses the prex list as input. The neighbor command enables the device to advertise the
routes specied in the route map to neighbor 10.1.0.2. The clear command performs a soft reset of the session with the neighbor so
that the device can advertise the unsuppressed route.
Syntax: [no] neighbor { ip-addr | peer-group-name } unsuppress-map map-name
Basic conguration tasks required for BGP4
FastIron Ethernet Switch Layer 3 Routing Conguration Guide, 08.0.30mb
53-1003627-06 371
The show ip bgp route command veries that the route has been unsuppressed.
device(config-bgp)# show ip bgp route 10.1.44.0/24
Number of BGP Routes matching display condition : 1
Status A:AGGREGATE B:BEST b:NOT-INSTALLED-BEST C:CONFED_EBGP D:DAMPED
E:EBGP H:HISTORY I:IBGP L:LOCAL M:MULTIPATH S:SUPPRESSED F:FILTERED
Prefix Next Hop MED LocPrf Weight Status
1 10.1.44.0/24 10.2.0.1 1 101 32768 BLS
AS_PATH:
Route is advertised to 1 peers:
10.1.0.2(4)
Encrypting BGP4 MD5 authentication keys
When you congure a BGP4 neighbor or neighbor peer group, you can specify an MD5 authentication string to authenticate packets
exchanged with the neighbor or peer group of neighbors.
For added security, by default, the software encrypts the display of the authentication string. The software also provides an optional
parameter to disable encryption of the authentication string, on an individual neighbor or peer group basis. By default, MD5
authentication strings are displayed in encrypted format in the output of the following commands:
•show running-cong (or write terminal )
•show conguration
•show ip bgp cong
When encryption of the authentication string is enabled, the string is encrypted in the CLI regardless of the access level you are using.
When you save the conguration to the startup conguration le, the le contains the new BGP4 command syntax and encrypted
passwords or strings.
NOTE
Brocade recommends that you save a copy of the startup conguration le for each device you plan to
upgrade.
Encryption example
The following commands congure a BGP4 neighbor and a peer group, and specify MD5 authentication strings (passwords) to
authenticate packets exchanged with the neighbor or peer group.
device(config-bgp)# local-as 2
device(config-bgp)# neighbor xyz peer-group
device(config-bgp)# neighbor xyz password abc
device(config-bgp)# neighbor 10.10.200.102 peer-group xyz
device(config-bgp)# neighbor 10.10.200.102 password test
The BGP4 conguration commands appear in the following format as a result of the show ip bgp conguration command.
device# show ip bgp configuration
Current BGP configuration:
router bgp
local-as 2
neighbor xyz peer-group
neighbor xyz password $b24tbw==
neighbor 10.10.200.102 peer-group xyz
neighbor 10.10.200.102 remote-as 1
neighbor 10.10.200.102 password $on-o
In this output, the software has converted the commands that specify an authentication string into the new syntax (described below), and
has encrypted display of the authentication strings.
Basic conguration tasks required for BGP4
FastIron Ethernet Switch Layer 3 Routing Conguration Guide, 08.0.30mb
372 53-1003627-06
Since the default behavior does not aect the BGP4 conguration itself but does encrypt display of the authentication string, the CLI
does not list the encryption options.
Syntax: [no] neighbor { ip-addr | peer-group-name } password string
The ip-addr | peer-group-name parameter indicates whether you are conguring an individual neighbor or a peer group. If you specify
the IP address of a neighbor, you are conguring that individual neighbor. If you specify a peer group name, you are conguring a peer
group.
If you want the software to assume that the value you enter is the clear-text form and to encrypt the display of that form, do not enter 0 or
1. Instead, omit the encryption option and allow the software to use the default behavior. If you specify encryption option 1, the software
assumes that you are entering the encrypted form of the password or authentication string. In this case, the software decrypts the
password or string you enter before using the value for authentication. If you accidentally enter option 1 followed by the clear-text version
of the password or string, authentication will fail because the value used by the software will not match the value you intended to use.
The password string parameter species an MD5 authentication string to secure sessions between the device and the neighbor. You can
enter a string of up to 80 characters. The string can contain any alphanumeric characters, but must be placed inside quotes if it contains
a space.
The system creates an MD5 hash of the password and uses it to secure sessions between the device and the neighbors. To display the
conguration, the system uses a 2-way encoding scheme to retrieve the original password.
By default, password is encrypted. If you want the password to be in clear text, insert a 0 between password and string.
device(config-bgp)# neighbor 10.157.22.26 password admin
Displaying the authentication string
To display the authentication string, enter the following commands.
device(config)# enable password-display
device(config)# show ip bgp neighbors
The enable password-display command enables display of the authentication string, but only in the output of the show ip bgp
neighbors command. String display is still encrypted in the startup conguration le and running conguration. Enter the command at
the global CONFIG level of the CLI.
NOTE
The command also displays SNMP community strings in clear text, in the output of the show snmp server command.
Displaying neighbor information
To display IPv6 unicast route summary information, enter the show ip bgp ipv6 summary command:
device(config-bgp)# show ip bgp ipv6 summary
BGP4 Summary
Router ID: 10.1.1.1 Local AS Number: 1
Confederation Identifier: not configured
Confederation Peers:
Maximum Number of IP ECMP Paths Supported for Load Sharing: 1
Number of Neighbors Configured: 1, UP: 1
Number of Routes Installed: 1, Uses 86 bytes
Number of Routes Advertising to All Neighbors: 0 (0 entries)
Number of Attribute Entries Installed: 1, Uses 90 bytes
Neighbor Address AS# State Time Rt:Accepted Filtered Sent ToSend
192.168.1.2 2 ESTAB 0h 1m51s 1 0 0 0
Syntax: show ip bgp ipv6 summary
Basic conguration tasks required for BGP4
FastIron Ethernet Switch Layer 3 Routing Conguration Guide, 08.0.30mb
53-1003627-06 373
To display IPv6 unicast device information with respect to the IPv4 neighbor, enter the show ip bgp ipv6 neighbors command:
device(config-bgp)# show ip bgp ipv6 neighbors
Total number of BGP Neighbors: 1
1 IP Address: 192.168.1.2, AS: 2 (EBGP), RouterID: 10.1.1.2, VRF: default-vrf
State: ESTABLISHED, Time: 0h8m33s, KeepAliveTime: 60, HoldTime: 180
KeepAliveTimer Expire in 17 seconds, HoldTimer Expire in 135 seconds
UpdateSource: Loopback 1
RefreshCapability: Received
.......
Neighbor NLRI Negotiation:
Peer Negotiated IPV6 unicast capability
Peer configured for IPV6 unicast Routes
Neighbor AS4 Capability Negotiation:
TCP Connection state: ESTABLISHED, flags:00000033 (0,0)
Syntax: show ip bgp ipv6 neighbors [last-packet-with-error] [routes-summary] [ip-address]
The neighbors parameter provides details on TCP and BGP neighbor connections. The last-packet-with-error parameter displays the
last packet received with error. The routes-summary parameter displays the routes summary.
The ip-address parameter is the neighbor IP address. The following sub-parameters are available for the ip-address parameter:
[advertised routes} [ap-statistics] [last-packet-with-error] [received] [received-routes] [rib-out-routes] [routes][routes-summary]
The advertised-routes parameter displays routes advertised to a neighbor. The ap-statistics parameter displays ap statistics for a
neighbor. The last-packet-with-error parameter displays the last packet received with error. The received parameter displays the
received ORF from neighbor. The received-routes parameter displays the received routes from neighbor. The rib-out-routes parameter
displays RIB-out routes for a neighbor.The routes parameter displays routes learned from neighbor. The routes-summary parameter
displays routes summary for a neighbor.
Clearing IPv6 route information
To clear IPv6 unicast route information with respect to IPv4 neighbors, enter the clear ip bgp ipv6 neighbor command.
Syntax: clear ip bgp ipv6 [neighbor ] [as-number | ipaddress | peer-group-name | all]
The dampening parameter clears route ap dampening information. The ap-statistics parameter clears route ap statistics.
The local parameter clears local information. The routes parameter clears BGP routes. The trac parameter clears BGP trac counters.
The ipv6 parameter clears information for ipv6 address family. The vpnv4 parameter clears information for VPNV4 address family. The
vrf parameter clears information for a VRF instance.
The neighbor parameter has the following sub-parameters:
as-number identies neighbors with the specied AS number, 1-4294967295. ipaddress identies the neighbor IP address. peer-
group-name clears the peer group name identied using ASCII string. all clears all BGP neighbors.
Adding a BGP4 peer group
A peer group is a set of BGP4 neighbors that share common parameters. The benets of peer groups are:
•Simplied neighbor conguration - You can congure a set of neighbor parameters and then apply them to multiple neighbors.
You do not need to congure the common parameters individually on each neighbor.
• Flash memory conservation - Using peer groups instead of individually conguring all the parameters for each neighbor
requires fewer conguration commands in the startup conguration le.
You can perform the following tasks on a peer-group basis:
• Reset neighbor sessions
Basic conguration tasks required for BGP4
FastIron Ethernet Switch Layer 3 Routing Conguration Guide, 08.0.30mb
374 53-1003627-06
• Perform soft-outbound resets (the device updates outgoing route information to neighbors but does not entirely reset the
sessions with those neighbors)
• Clear BGP4 message statistics
• Clear error buers
Peer group parameters
You can set all neighbor parameters in a peer group. When you add a neighbor to the peer group, the neighbor receives all the parameter
settings you set in the group, except parameter values you have explicitly congured for the neighbor. If you do not set a neighbor
parameter in the peer group and the parameter also is not set for the individual neighbor, the neighbor uses the default value.
Peer group conguration rules
The following rules apply to peer group conguration:
• You must congure a peer group before you can add neighbors to the peer group.
• If you remove a parameter from a peer group, the value for that parameter is reset to the default for all the neighbors within the
peer group, unless you have explicitly set that parameter on individual neighbors. In this case, the value you set on the individual
neighbors applies to those neighbors, while the default value applies to neighbors for which you have not explicitly set the value.
NOTE
If you enter a command to remove the remote AS parameter from a peer group, the software makes sure that the peer group
does not contain any neighbors. If the peer group contains neighbors, the software does not allow you to remove the remote AS
so that the neighbors in the peer group that are using the remote AS do not lose connectivity to the device.
You can override neighbor parameters that do not aect outbound policy on an individual neighbor basis:
• If you do not specify a parameter for an individual neighbor, the neighbor uses the value in the peer group.
• If you set the parameter for the individual neighbor, that value overrides the value you set in the peer group.
• If you add a parameter to a peer group that already contains neighbors, the parameter value is applied to neighbors that do not
already have the parameter explicitly set. If a neighbor has the parameter explicitly set, the explicitly set value overrides the value
you set for the peer group.
• If you remove the setting for a parameter from a peer group, the value for that parameter changes to the default value for all the
neighbors in the peer group that do not have that parameter individually set.
Conguring a peer group
To congure a peer group, enter commands such as the following at the BGP4 conguration level.
device(config-bgp-router)# neighbor PeerGroup1 peer-group
device(config-bgp-router)# neighbor PeerGroup1 description "EastCoast Neighbors"
device(config-bgp-router)# neighbor PeerGroup1 remote-as 100
device(config-bgp-router)# neighbor PeerGroup1 distribute-list out 1
device(config-bgp-router)# neighbor PeerGroup1 capability as4 enable|disable
The commands in this example congure a peer group called "PeerGroup1" and set the following parameters for the peer group:
• A description, "EastCoast Neighbors"
• A remote AS number, 100
• A distribute list for outbound trac
• The capability of PeerGroup1 to utilize a four-byte AS number
Basic conguration tasks required for BGP4
FastIron Ethernet Switch Layer 3 Routing Conguration Guide, 08.0.30mb
53-1003627-06 375
The software applies these parameters to each neighbor you add to the peer group. You can override the description parameter for
individual neighbors. If you set the description parameter for an individual neighbor, the description overrides the description congured
for the peer group.
Syntax: neighbor peer-group-name peer-group
The peer-group-name parameter species the name of the group and can be up to 80 characters long. The name can contain special
characters and internal blanks. If you use internal blanks, you must use quotation marks around the name. For example, the command
neighbor "My Three Peers" peer-group is valid, but the command neighbor My Three Peers peer-group is not valid.
Syntax: [no] neighbor ip-addr | peer-group-name [ advertisement-interval num ] [ default-originate [ route-map map-name ]]
[ description string ] [ distribute-list { in | out } num,num... | ACL-num in | out ] [ ebgp-multihop [ num ]] [ lter-list in | out num,num,... |
acl-num | out | weight ] [ maxas-limit in [ num | disable ] [ maximum-prex num [ threshold ] [ teardown ]] [ next-hop-self ] [ password
string ] [ prex-list string in | out ] remote-as as-number ] [ remove-private-as ] [ route-map-in | out map-name ] [ route-reector-
client ] [ send-community ] [ soft-reconguration inbound ] [ shutdown ] [ timers keep-alive num hold-time num ] [ update-source
loopback num ethernet unit/slot/port | loopback num | ve num ] [ weight num ] [ local-as as-num ]
The ip-addr and peer-group-name parameters indicate whether you are conguring a peer group or an individual neighbor. You can
specify a peer group name or IP address with the neighbor command. If you specify a peer group name, you are conguring a peer
group. If you specify a neighbor IP address, you are conguring that individual neighbor. Use the ip-addr parameter if you are conguring
an individual neighbor instead of a peer group.
The remaining parameters are the same ones supported for individual neighbors.
Applying a peer group to a neighbor
After you congure a peer group, you can add neighbors to the group. When you add a neighbor to a peer group, you are applying all the
neighbor attributes specied in the peer group to the neighbor.
To add neighbors to a peer group, enter commands such as the following.
device(config-bgp-router)# neighbor 192.168.1.12 peer-group PeerGroup1
device(config-bgp-router)# neighbor 192.168.2.45 peer-group PeerGroup1
device(config-bgp-router)# neighbor 192.168.3.69 peer-group PeerGroup1
The commands in this example add three neighbors to the peer group "PeerGroup1". As members of the peer group, the neighbors
automatically receive the neighbor parameter values congured for the peer group. You also can override the parameters on an individual
neighbor basis. For neighbor parameters not specied for the peer group, the neighbors use the default values.
Syntax: [no] neighbor ip-addr peer-group peer-group-name
The ip-addr parameter species the IP address of the neighbor.
The peer-group-name parameter species the peer group name.
NOTE
You must add the peer group before you can add neighbors to it.
Administratively shutting down a session with a BGP4 neighbor
You can prevent the device from starting a BGP4 session with a neighbor by administratively shutting down the neighbor. This option is
very useful for situations in which you want to congure parameters for a neighbor, but are not ready to use the neighbor. You can shut
the neighbor down as soon as you have added it to the device, congure the neighbor parameters, then allow the device to reestablish a
session with the neighbor by removing the shutdown option from the neighbor.
When you apply the option to shut down a neighbor, the option takes place immediately and remains in eect until you remove it. If you
save the conguration to the startup conguration le, the shutdown option remains in eect even after a software reload.
Basic conguration tasks required for BGP4
FastIron Ethernet Switch Layer 3 Routing Conguration Guide, 08.0.30mb
376 53-1003627-06
The software also contains an option to end the session with a BGP4 neighbor and clear the routes learned from the neighbor. Unlike
this clear option, the option for shutting down the neighbor can be saved in the startup conguration le and can prevent the device from
establishing a BGP4 session with the neighbor even after reloading the software.
NOTE
If you notice that a particular BGP4 neighbor never establishes a session with the device, check the running conguration and
startup conguration les for that device to see whether the conguration contains a command that is shutting down the
neighbor. The neighbor may have been shut down previously by an administrator.
To shut down a BGP4 neighbor, enter commands such as the following.
device(config)# router bgp
device(config-bgp-router)# neighbor 10.157.22.26 shutdown
device(config-bgp-router)# write memory
Syntax: [no] neighbor ip-addr shutdown [ generate-rib-out ]
The ip-addr parameter species the IP address of the neighbor.
Optional BGP4 conguration tasks
The following sections describe how to perform optional BGP4 conguration tasks.
Changing the Keep Alive Time and Hold Time
The Keep Alive Time species how frequently the device will send KEEPALIVE messages to its BGP4 neighbors. The Hold Time
species how long the device will wait for a KEEPALIVE or UPDATE message from a neighbor before concluding that the neighbor is
dead. When the device concludes that a BGP4 neighbor is dead, the device ends the BGP4 session and closes the TCP connection to
the neighbor.
The default Keep Alive time is 60 seconds. The default Hold Time is 180 seconds.
NOTE
Generally, you should set the Hold Time to three times the value of the Keep Alive Time.
NOTE
You can override the global Keep Alive Time and Hold Time on individual neighbors.
To change the Keep Alive Time to 30 and Hold Time to 90, enter the following command.
device(config-bgp-router)# timers keep-alive 30 hold-time 90
Syntax: [no] timers keep-alive num hold-time num
For each keyword, num indicates the number of seconds. The Keep Alive Time can be 0 - 65535. The Hold Time can be 0 or 3 -
65535 (1 and 2 are not allowed). If you set the Hold Time to 0, the device waits indenitely for messages from a neighbor without
concluding that the neighbor is dead.
Changing the BGP4 next-hop update timer
By default, the device updates the BGP4 next-hop tables and aected BGP4 routes ve seconds after IGP route changes. You can
change the update timer to a value from 1 through 30 seconds.
Optional BGP4 conguration tasks
FastIron Ethernet Switch Layer 3 Routing Conguration Guide, 08.0.30mb
53-1003627-06 377
To change the BGP4 update timer value to 15 seconds, for example, enter the update-time command at the BGP conguration level of
the CLI.
device(config-bgp-router)# update-time 15
Syntax: [no] update-time secs
The secs parameter species the number of seconds and can be from 0 through 30. The default is 5. The value of 0 permits fast BGP4
convergence for situations such as link-failure or IGP route changes. Setting the value to 0 starts the BGP4 route calculation in sub-
second time. All other values from 1 through 30 are still calculated in seconds.
Enabling fast external fallover
BGP4 devices rely on KEEPALIVE and UPDATE messages from neighbors to signify that the neighbors are alive. For BGP4 neighbors
that are two or more hops away, such messages are the only indication that the BGP4 protocol has concerning the alive state of the
neighbors. As a result, if a neighbor becomes non-operational, the device waits until the Hold Time expires or the TCP connection fails
before concluding that the neighbor is not operational and closing its BGP4 session and TCP connection with the neighbor.
The device waits for the Hold Time to expire before ending the connection to a directly-attached BGP4 neighbor that becomes non-
operational.
For directly-attached neighbors, the device immediately senses loss of a connection to the neighbor from a change of state of the port or
interface that connects the device to the neighbor. For directly-attached EBGP neighbors, the device uses this information to
immediately close the BGP4 session and TCP connection to locally attached neighbors that become non-operational.
NOTE
The fast external failover feature applies only to directly attached EBGP neighbors. The feature does not apply to IBGP
neighbors.
To enable fast external fallover, enter the following command.
device(config-bgp-router)# fast-external-fallover
To disable fast external fallover again, enter the following command.
device(config-bgp-router)# no fast-external-fallover
Syntax: [no] fast-external-fallover
Changing the maximum number of paths for BGP4 Multipath load sharing
Multipath load sharing enables the device to balance trac to a route across multiple equal-cost paths of the same route type (EBGP or
IBGP).
To congure the device to perform BGP4 Multipath load sharing:
• Enable IP load sharing if it is disabled.
• Set the maximum number of BGP4 load sharing paths. The default maximum number is 1, which means no BGP4 load
sharing takes place by default.
NOTE
The maximum number of BGP4 load sharing paths cannot be greater than the maximum number of IP load sharing paths.
Optional BGP4 conguration tasks
FastIron Ethernet Switch Layer 3 Routing Conguration Guide, 08.0.30mb
378 53-1003627-06
How Multipath load sharing aects route selection
During evaluation of multiple paths to select the best path to a given destination (for installment in the IP route table), the device performs
a nal comparison of the internal paths. The following events occur when load sharing is enabled or disabled:
• When load sharing is disabled, the device prefers the path with the lower device ID if the compare-routerid command is
enabled.
• When load sharing and BGP4 Multipath load sharing are enabled, the device balances the trac across multiple paths instead
of choosing just one path based on device ID.
Refer to How BGP4 selects a path for a route (BGP best path selection algorithm) on page 353 for a description of the BGP4 algorithm.
When you enable IP load sharing, the device can load-balance BGP4 or OSPF routes across up to four equal paths by default. You can
change the number load sharing paths to a value from 2 through 8.
How Multipath load sharing works
Multipath load sharing is performed in round-robin fashion and is based on the destination IP address only. The rst time the device
receives a packet destined for a specic IP address, the device uses a round-robin algorithm to select the path that was not used for the
last newly learned destination IP address. Once the device associates a path with a particular destination IP address, the device will
always use that path as long as the device contains the destination IP address in its cache.
NOTE
The device does not perform source routing. The device is concerned only with the paths to the next-hop devices, not the entire
paths to the destination hosts.
A BGP4 destination can be learned from multiple BGP4 neighbors, leading to multiple BGP4 paths to reach the same destination. Each
of the paths may be reachable through multiple IGP paths (multiple OSPF or RIP paths). In this case, the software installs all the multiple
equal-cost paths in the BGP4 route table, up to the maximum number of BGP4 equal-cost paths allowed. The IP load sharing feature
then distributes trac across the equal-cost paths to the destination.
If an IGP path used by a BGP4 next-hop route path installed in the IP route table changes, then the BGP4 paths and IP paths are
adjusted accordingly. For example, if one of the OSPF paths to reach the BGP4 next hop goes down, the software removes this path
from the BGP4 route table and the IP route table. Similarly, if an additional OSPF path becomes available to reach the BGP4 next-hop
device for a particular destination, the software adds the additional path to the BGP4 route table and the IP route table.
Changing the maximum number of shared BGP4 paths
To change the maximum number of BGP4 shared paths, enter commands such as the following.
device(config)# router bgp
device(config-bgp-router)# maximum-paths 4
device(config-bgp-router)# write memory
Syntax: [no] maximum-paths num | use-load-sharing
The number parameter species the maximum number of paths across which the device can balance trac to a given BGP4 destination.
The number value range is 2 through 8 and the default is 1.
When the use-load-sharing option is used in place of the number variable, the maximum IP ECMP path value is determined solely by
the value congured using theip load-sharing command.
Optional BGP4 conguration tasks
FastIron Ethernet Switch Layer 3 Routing Conguration Guide, 08.0.30mb
53-1003627-06 379
Customizing BGP4 Multipath load sharing
By default, when BGP4 Multipath load sharing is enabled, both IBGP and EBGP paths are eligible for load sharing, while paths from
dierent neighboring autonomous systems are not eligible. You can change load sharing to apply only to IBGP or EBGP paths, or to
support load sharing among paths from dierent neighboring autonomous systems.
To enable load sharing of IBGP paths only, enter the following command at the BGP4 conguration level of the CLI.
device(config-bgp-router)# multipath ibgp
To enable load sharing of EBGP paths only, enter the following command at the BGP4 conguration level of the CLI.
device(config-bgp-router)# multipath ebgp
To enable load sharing of paths from dierent neighboring autonomous systems, enter the following command at the BGP4
conguration level of the CLI.
device(config-bgp)# multipath multi-as
Syntax: [no] multipath ebgp | ibgp | multi-as
The ebgp, bgp, and multi-as parameters specify the change you are making to load sharing:
•ebgp - Multipath load sharing applies only to EBGP paths. Multipath load sharing is disabled for IBGP paths.
•ibgp - Multipath load sharing applies only to IBGP paths. Multipath load sharing is disabled for EBGP paths.
•multi-as - Multipath load sharing is enabled for paths from dierent autonomous systems.
By default, load sharing applies to EBGP and IBGP paths, and does not apply to paths from dierent neighboring autonomous systems.
Enhancements to BGP4 Multipath load sharing
Enhancements to BGP4 Multipath load sharing allows support for load sharing of BGP4 routes in IP ECMP even if the BGP4 Multipath
load sharing feature is not enabled through the use-load-sharing option to the maximum-paths command. Using the following
commands, you can also set separate values for IBGP and EBGP multipath load sharing.
To set the number of equal-cost multipath IBGP routes or paths that will be selected, enter commands such as the following.
device(config)# router bgp
device(config-bgp)# maximum-paths ibgp
Syntax: [no] maximum-paths ibgp number
The number variable species the number of equal-cost multipath IBGP routes that will be selected. The range is 2 to 8. If the value is
set to 1, BGP4 level equal-cost multipath is disabled for IBGP routes.
To set the number of equal-cost multipath EBGP routes or paths that will be selected, enter commands such as the following.
device(config)# router bgp
device(config-bgp)# maximum-paths ebgp
Syntax: [no] maximum-paths ebgp num
The number variable species the number of equal-cost multipath EBGP routes that will be selected. The range is 2 to 8. If the value is
set to 1, BGP4 level equal-cost multipath is disabled for EBGP routes.
Specifying a list of networks to advertise
By default, the device sends BGP4 routes only for the networks you either identify with the network command or are redistributed into
BGP4 from OSPF, RIP, or connected routes.
Optional BGP4 conguration tasks
FastIron Ethernet Switch Layer 3 Routing Conguration Guide, 08.0.30mb
380 53-1003627-06
NOTE
The exact route must exist in the IP route table before the device can create a local BGP4 route.
To congure the device to advertise network 10.157.22.0/24, enter the following command.
device(config-bgp-router)# network 10.157.22.0 255.255.255.0
Syntax: [no] network ip-addr ip-mask [route-map map-name] | [weight num] | [backdoor]
The ip-addr is the network number and the ip-mask species the network mask.
The route-map map-name parameter species the name of the route map you want to use to set or change BGP4 attributes for the
network you are advertising. The route map must already be congured. If it is not, the default action is to deny redistribution.
The weight num parameter species a weight to be added to routes to this network.
The backdoor parameter changes the administrative distance of the route to this network from the EBGP administrative distance (20 by
default) to the Local BGP4 weight (200 by default), tagging the route as a backdoor route. Use this parameter when you want the device
to prefer IGP routes such as RIP or OSPF routes over the EBGP route for the network.
Specifying a route map when conguring BGP4 network advertising
You can specify a route map when you congure a BGP4 network to be advertised. The device uses the route map to set or change
BGP4 attributes when creating a local BGP4 route.
NOTE
You must congure the route map before you can specify the route map name in a BGP4 network conguration; otherwise, the
route is not imported into BGP4.
To congure a route map, and use it to set or change route attributes for a network you dene for BGP4 to advertise, enter commands
such as the following.
device(config)# route-map set_net permit 1
device(config-routemap set_net)# set community no-export
device(config-routemap set_net)# exit
device(config)# router bgp
device(config-bgp)# network 10.100.1.0/24 route-map set_net
The rst two commands in this example create a route map named "set_net" that sets the community attribute for routes that use the
route map to "NO_EXPORT". The next two commands change the CLI to the BGP4 conguration level. The last command congures a
network for advertising from BGP4, and associates the "set_net" route map with the network. When BGP4 originates the
10.100.1.0/24 network, BGP4 also sets the community attribute for the network to "NO_EXPORT".
Changing the default local preference
When the device uses the BGP4 algorithm to select a route to send to the IP route table, one of the parameters the algorithm uses is the
local preference. Local preference indicates a degree of preference for a route relative to other routes. BGP4 neighbors can send the local
preference value as an attribute of a route in an UPDATE message.
Local preference applies only to routes within the local AS. BGP4 devices can exchange local preference information with neighbors who
also are in the local AS, but BGP4 devices do not exchange local preference information with neighbors in remote autonomous systems.
The default local preference is 100. For routes learned from EBGP neighbors, the default local preference is assigned to learned routes.
For routes learned from IBGP neighbors, the local preference value is not changed for the route.
When the BGP4 algorithm compares routes on the basis of local preferences, the route with the higher local preference is chosen.
Optional BGP4 conguration tasks
FastIron Ethernet Switch Layer 3 Routing Conguration Guide, 08.0.30mb
53-1003627-06 381
NOTE
To set the local preference for individual routes, use route maps.
To change the default local preference to 200, enter the following command.
device(config-bgp)# default-local-preference 200
Syntax: [no] default-local-preference num
The num parameter indicates the preference and can be a value from 0 - 4294967295.
Using the IP default route as a valid next-hop for a BGP4 route
By default, the device does not use a default route to resolve a BGP4 next-hop route. If the IP route lookup for the BGP4 next-hop does
not result in a valid IGP route (including static or direct routes), the BGP4 next-hop is considered to be unreachable and the BGP4 route
is not used.
In some cases, such as when the device is acting as an edge device, you can allow the device to use the default route as a valid next-hop.
To do so, enter the following command at the BGP4 conguration level of the CLI.
device(config-bgp)# next-hop-enable-default
Syntax: [no] next-hop-enable-default
Changing the default MED (Metric) used for route redistribution
The Brocade device can redistribute directly connected routes, static IP routes, RIP routes, and OSPF routes into BGP4. The MED
(metric) is a global parameter that species the cost that will be applied to all routes by default when they are redistributed into BGP4.
When routes are selected, lower metric values are preferred over higher metric values. The default BGP4 MED value is 0 and can be
assigned a value from 0 through 4294967295.
NOTE
RIP and OSPF also have default metric parameters. The parameters are set independently for each protocol and have dierent
ranges.
To change the default metric to 40, enter the following command.
device(config-bgp-router)# default-metric 40
Syntax: default-metric num
The num indicates the metric and can be a value from 0 through 4294967295.
Enabling next-hop recursion
For each BGP4 route learned, the device performs a route lookup to obtain the IP address of the next-hop for the route. A BGP4 route is
eligible for addition in the IP route table only if the following conditions are true:
• The lookup succeeds in obtaining a valid next-hop IP address for the route.
• The path to the next-hop IP address is an IGP path or a static route path.
By default, the software performs only one lookup for the next-hop IP address for the BGP4 route. If the next-hop lookup does not result
in a valid next-hop IP address, or the path to the next-hop IP address is a BGP4 path, the software considers the BGP4 route destination
to be unreachable. The route is not eligible to be added to the IP route table.
Optional BGP4 conguration tasks
FastIron Ethernet Switch Layer 3 Routing Conguration Guide, 08.0.30mb
382 53-1003627-06
The BGP4 route table can contain a route with a next-hop IP address that is not reachable through an IGP route, even though the device
can reach a hop farther away through an IGP route. This can occur when the IGPs do not learn a complete set of IGP routes, so the
device learns about an internal route through IBGP instead of through an IGP. In this case, the IP route table will not contain a route that
can be used to reach the BGP4 route destination.
To enable the device to nd the IGP route to the next-hop gateway for a BGP4 route, enable recursive next-hop lookups. With this
feature enabled, if the rst lookup for a BGP4 route results in an IBGP path that originated within the same AS, rather than an IGP path or
static route path, the device performs a lookup on the next-hop IP address for the next-hop gateway. If this second lookup results in an
IGP path, the software considers the BGP4 route to be valid and adds it to the IP route table. Otherwise, the device performs another
lookup on the next-hop IP address of the next-hop for the next-hop gateway, and so on, until one of the lookups results in an IGP route.
NOTE
You must congure a static route or use an IGP to learn the route to the EBGP multihop
peer.
Enabling recursive next-hop lookups
The recursive next-hop lookups feature is disabled by default. To enable recursive next-hop lookups, enter the following command at the
BGP4 conguration level of the CLI.
device(config-bgp-router)# next-hop-recursion
Syntax: [no] next-hop-recursion
Example when recursive route lookups are disabled
The output here shows the results of an unsuccessful next-hop lookup for a BGP4 route. In this case, next-hop recursive lookups are
disabled. This example is for the BGP4 route to network 10.0.0.0/24.
device# show ip bgp route
Total number of BGP Routes: 5
Status A:AGGREGATE B:BEST b:NOT-INSTALLED-BEST C:CONFED_EBGP D:DAMPED
E:EBGP H:HISTORY I:IBGP L:LOCAL M:MULTIPATH m:NOT-INSTALLED-MULTIPATH
S:SUPPRESSED F:FILTERED s:STALE
Prefix Next Hop MED LocPrf Weight Status
1 0.0.0.0/0 10.1.0.2 0 100 0 BI
AS_PATH: 65001 4355 701 80
2 10.10.0.0/24 10.0.0.1 1 100 0 BI
AS_PATH: 65001 4355 1
3 10.40.0.0/24 10.1.0.2 0 100 0 BI
AS_PATH: 65001 4355 701 1 189
4 10.0.0.0/24 10.0.0.1 1 100 0 I
AS_PATH: 65001 4355 3356 7170 1455
5 10.25.0.0/24 10.157.24.1 1 100 0 I
AS_PATH: 65001 4355 701
In this example, the device cannot reach 10.0.0.0/24, because the next-hop IP address for the route is an IBGP route instead of an IGP
route, and is considered unreachable by the device. The IP route table entry for the next-hop gateway for the BGP4 route’s next-hop
gateway (10.0.0.1/24) is shown here.
device# show ip route 10.0.0.1
Total number of IP routes: 37
Network Address NetMask Gateway Port Cost Type
10.0.0.0 10.255.255.255 10.0.0.1 1/1 1 B
Optional BGP4 conguration tasks
FastIron Ethernet Switch Layer 3 Routing Conguration Guide, 08.0.30mb
53-1003627-06 383
Since the route to the next-hop gateway is a BGP4 route, and not an IGP route, it cannot be used to reach 10.0.0.0/24. In this case, the
device tries to use the default route, if present, to reach the subnet that contains the BGP4 route next-hop gateway.
device# show ip route 10.0.0.0/24
Total number of IP routes: 37
Network Address NetMask Gateway Port Cost Type
0.0.0.0 0.0.0.0 10.0.0.202 1/1 1 S
Example when recursive route lookups are enabled
When recursive next-hop lookups are enabled, the device continues to look up the next-hop gateways along the route until the device
nds an IGP route to the BGP4 route destination.
device# show ip bgp route
Total number of BGP Routes: 5
Status A:AGGREGATE B:BEST b:NOT-INSTALLED-BEST C:CONFED_EBGP D:DAMPED
E:EBGP H:HISTORY I:IBGP L:LOCAL M:MULTIPATH m:NOT-INSTALLED-MULTIPATH
S:SUPPRESSED F:FILTERED s:STALE
Prefix Next Hop MED LocPrf Weight Status
1 0.0.0.0/0 10.1.0.2 0 100 0 BI
AS_PATH: 65001 4355 701 80
2 10.10.0.0/24 10.0.0.1 1 100 0 BI
AS_PATH: 65001 4355 1
3 10.40.0.0/24 10.1.0.2 0 100 0 BI
AS_PATH: 65001 4355 701 1 189
4 10.0.0.0/24 10.0.0.1 1 100 0 BI
AS_PATH: 65001 4355 3356 7170 1455
5 10.25.0.0/24 10.157.24.1 1 100 0 I
AS_PATH: 65001 4355 701
The rst lookup results in an IBGP route, to network 10.0.0.0/24.
device# show ip route 10.0.0.1
Total number of IP routes: 38
Network Address NetMask Gateway Port Cost Type
10.0.0.0 255.255.255.0 10.0.0.1 1/1 1 B
AS_PATH: 65001 4355 1
Since the route to 10.0.0.1/24 is not an IGP route, the device cannot reach the next hop through IP, and so cannot use the BGP4 route.
In this case, since recursive next-hop lookups are enabled, the device next performs a lookup for the next-hop gateway to 10.0.0.1’s
next-hop gateway, 10.0.0.1.
device# show ip bgp route 10.0.0.0
Number of BGP Routes matching display condition : 1
Status A:AGGREGATE B:BEST b:NOT-INSTALLED-BEST C:CONFED_EBGP D:DAMPED
E:EBGP H:HISTORY I:IBGP L:LOCAL M:MULTIPATH m:NOT-INSTALLED-MULTIPATH
S:SUPPRESSED F:FILTERED s:STALE
Prefix Next Hop Metric LocPrf Weight Status
1 10.0.0.0/24 10.0.0.1 1 100 0 BI
AS_PATH: 65001 4355 1
The next-hop IP address for 10.0.0.1 is not an IGP route, which means the BGP4 route destination still cannot be reached through IP.
The recursive next-hop lookup feature performs a lookup on the next-hop gateway for 10.0.0.1
device# show ip route 10.0.0.1
Total number of IP routes: 38
Network Address NetMask Gateway Port Cost Type
10.0.0.0 255.255.255.0 0.0.0.0 1/1 1 D
AS_PATH: 65001 4355 1 1
Optional BGP4 conguration tasks
FastIron Ethernet Switch Layer 3 Routing Conguration Guide, 08.0.30mb
384 53-1003627-06
This lookup results in an IGP route that is a directly-connected route. As a result, the BGP4 route destination is now reachable through
IGP, which means the BGP4 route can be added to the IP route table. The IP route table with the BGP4 route is shown here.
device# show ip route 10.0.0.0/24
Total number of IP routes: 38
Network Address NetMask Gateway Port Cost Type
10.0.0.0 255.255.255.0 10.0.0.1 1/1 1 B
AS_PATH: 65001 4355 1
The device can use this route because it has an IP route to the next-hop gateway. Without recursive next-hop lookups, this route would
not be in the IP route table.
Changing administrative distances
BGP4 devices can learn about networks from various protocols, including the EBGP portion of BGP4, and IGPs such as OSPF and RIP,
the routes to a network may dier depending on the protocol from which the routes were learned.
To select one route over another based on the source of the route information, the device can use the administrative distances assigned
to the sources. The administrative distance is a protocol-independent metric that IP devices use to compare routes from dierent
sources.
The device re-advertises a learned best BGP4 route to neighbors even when the route table manager does not also select that route for
installation in the IP route table. The best BGP4 route is the BGP4 path that BGP4 selects based on comparison of the paths’ BGP4
route parameters.
When selecting a route from among dierent sources (BGP4, OSPF, RIP, static routes, and so on), the software compares the routes on
the basis of the administrative distance for each route. If the administrative distance of the paths is lower than the administrative distance
of paths from other sources (such as static IP routes, RIP, or OSPF), the BGP4 paths are installed in the IP route table.
The default administrative distances on the device are:
• Directly connected - 0 (this value is not congurable)
• Static - 1 is the default and applies to all static routes, including default routes. This can be assigned a dierent value.
• EBGP - 20
• OSPF - 110
• RIP - 120
• IBGP - 200
• Local BGP4 - 200
• Unknown - 255 (the device will not use this route)
Lower administrative distances are preferred over higher distances. For example, if the device receives routes for the same network from
OSPF and from RIP, the device will prefer the OSPF route by default. The administrative distances are congured in dierent places in
the software. The device re-advertises a learned best BGP4 route to neighbors by default, regardless of whether the administrative
distance for the route is lower than the administrative distances of other routes from dierent route sources to the same destination:
• To change the EBGP, IBGP, and Local BGP4 default administrative distances, refer to the instructions in this section.
• To change the default administrative distance for OSPF, RIP, refer to Conguring a static BGP4 network on page 435.
• To change the administrative distance for static routes, refer to the instructions in this section.
To change the default administrative distances for EBGP, IBGP, and Local BGP4, enter a command such as the following.
device(config-bgp-router)# distance 200 200 200
Syntax: [no] distance external-distance internal-distance local-distance
Optional BGP4 conguration tasks
FastIron Ethernet Switch Layer 3 Routing Conguration Guide, 08.0.30mb
53-1003627-06 385
The external-distance sets the EBGP distance and can be a value from 1 through 255.
The internal-distance sets the IBGP distance and can be a value from 1 through 255.
The local-distance sets the Local BGP4 distance and can be a value from 1 through 255.
Requiring the rst AS to be the neighbor AS
By default, the Brocade device does not require the rst AS listed in the AS_SEQUENCE eld of an AS path update message from
EBGP neighbors to be the AS of the neighbor that sent the update. However, you can enable the Brocade device to have this
requirement. You can enable this requirement globally for the device, or for a specic neighbor or peer group. This section describes how
to enable this requirement.
When you congure the device to require that the AS an EBGP neighbor is in be the same as the rst AS in the AS_SEQUENCE eld of
an update from the neighbor, the device accepts the update only if the AS numbers match. If the AS numbers do not match, the Brocade
device sends a notication message to the neighbor and closes the session. The requirement applies to all updates received from EBGP
neighbors.
The hierarchy for enforcement of this feature is: a neighbor will try to use the enforce-rst-as value if one is congured; if none is
congured, the neighbor will try to use the congured value for a peer group. If neither conguration exists, enforcement is simply that of
the global conguration (which is disabled by default).
To enable this feature globally, enter the enforce-rst-as command at the BGP4 conguration level of the CLI.
device(config-bgp-router)# enforce-first-as
Syntax: [no] enforce-rst-as
To enable this feature for a specic neighbor, enter the following command at the BGP4 conguration level.
device(config-bgp)# neighbor 10.1.1.1 enforce-first-as enable
Syntax: [no] neighbor ip-address enforce-rst-as [ enable | disable ]
The ip-address value is the IP address of the neighbor.
When the rst-as requirement is enabled, its status appears in the output of the show running conguration command. The optional last
keyword choice of enable or disable lets you specify whether the output of the show running conguration command includes the
conguration of the rst-as requirement. This option allows the show running conguration command output to show what is actually
congured.
To enable this feature for a peer group, enter the following command at the BGP4 conguration level.
device(config-bgp)# neighbor Peergroup1 enforce-first-as enable
Syntax: [no] neighbor peer-group-name enforce-rst-as [ enable | disable ]
The peer-group-name value is the name of the peer group.
When the rst-as requirement is enabled, its status appears in the output of the show running conguration command. The optional last
keyword choice, that of enable or disable , lets you specify whether the output of the show running conguration command includes the
conguration of the rst-as requirement: this option helps the show running command output to show what you have actually congured.
The following example shows a running conguration with the rst-as enforcement items (for global, peer group, and neighbor) in bold.
device(config)# router bgp
BGP4: Please configure 'local-as' parameter in order to enable BGP4.
device(config-bgp)# local-as 1
device(config-bgp)# enforce-first-as
device(config-bgp)# neighbor abc peer-group
Optional BGP4 conguration tasks
FastIron Ethernet Switch Layer 3 Routing Conguration Guide, 08.0.30mb
386 53-1003627-06
device(config-bgp)# neighbor abc remote-as 2
device(config-bgp)# neighbor abc enforce-first-as disable
device(config-bgp)# neighbor 192.168.1.2 peer-group abc
device(config-bgp)# neighbor 192.168.1.2 enforce-first-as enable
Disabling or re-enabling comparison of the AS-Path length
AS-Path comparison is Step 5 in the algorithm that BGP4 uses to select the next path for a route. Comparison of the AS-Path length is
enabled by default. To disable it, enter the following command at the BGP4 conguration level of the CLI.
device(config-bgp)# as-path-ignore
Syntax: [no] as-path-ignore
This command disables comparison of the AS-Path lengths of otherwise equal paths. When you disable AS-Path length comparison, the
BGP4 algorithm shown in How BGP4 selects a path for a route (BGP best path selection algorithm) on page 353 skips from Step 4 to
Step 6.
Enabling or disabling comparison of device IDs
Device ID comparison is Step 10 in the algorithm BGP4 uses to select the next path for a route.
NOTE
Comparison of device IDs is applicable only when BGP4 load sharing is disabled.
When device ID comparison is enabled, the path comparison algorithm compares the device IDs of the neighbors that sent the otherwise
equal paths:
• If BGP4 load sharing is disabled (maximum-paths 1), the instructions in this section selects the path that came from the
neighbor with the lower device ID.
• If BGP4 load sharing is enabled, the device load shares among the remaining paths. In this case, the device ID is not used to
select a path.
NOTE
Device ID comparison is disabled by default.
To enable device ID comparison, enter the compare-routerid command at the BGP4 conguration level of the CLI.
device(config-bgp-router)# compare-routerid
Syntax: [no] compare-routerid
Conguring the device to always compare Multi-Exit Discriminators
A Multi-Exit Discriminator (MED) is a value that the BGP4 algorithm uses when it compares multiple paths received from dierent BGP4
neighbors in the same AS for the same route. In BGP4, a MED for a route is equivalent to its metric.
BGP4 compares the MEDs of two otherwise equivalent paths if and only if the routes were learned from the same neighboring AS. This
behavior is called deterministic MED. Deterministic MED is always enabled and cannot be disabled.
You can enable the device to always compare the MEDs, regardless of the AS information in the paths. For example, if the device
receives UPDATES for the same route from neighbors in three autonomous systems, the device can compare the MEDs of all the paths
together instead of comparing the MEDs for the paths in each autonomous system individually.
Optional BGP4 conguration tasks
FastIron Ethernet Switch Layer 3 Routing Conguration Guide, 08.0.30mb
53-1003627-06 387
To enable this comparison, enter the always-compare-med command at the BGP4 conguration level of the CLI. This option is disabled
by default.
NOTE
By default, value 0 (most favorable) is used in MED comparison when the MED attribute is not present. The default MED
comparison results in the device favoring route paths that do not have their MEDs. Use the med-missing-as-worst command
to force the device to regard a BGP4 route with a missing MED attribute as the least favorable route, when comparing the
MEDs of the routes.
NOTE
MED comparison is not performed for internal routes originated within the local AS or confederation unless the compare-med-
empty-aspath command is congured.
To congure the device to always compare MEDs, enter the following command.
device(config-bgp-router)# always-compare-med
Syntax: [no] always-compare-med
The following BGP4 command directs BGP4 to take the MED value into consideration even if the route has an empty as-path path
attribute.
device(config)# router bgp
device(config-bgp-router)# compare-med-empty-aspath
Syntax: [no] compare-med-empty-aspath
Treating missing MEDs as the worst MEDs
By default, the device favors a lower MED over a higher MED during MED comparison. Since the device assigns the value 0 to a route
path MED if the MED value is missing, the default MED comparison results in the device favoring the route paths that are missing their
MEDs.
To change this behavior so that the device favors a route that has a MED over a route that is missing its MED, enter the following
command at the BGP4 conguration level of the CLI.
device(config-bgp-router)# med-missing-as-worst
Syntax: [no] med-missing-as-worst
NOTE
This command aects route selection only when route paths are selected based on MED comparison. It is still possible for a
route path that is missing its MED to be selected based on other criteria. For example, a route path with no MED can be
selected if its weight is larger than the weights of the other route paths.
Conguring route reection parameters
Normally, all the BGP4 devices within an AS are fully meshed. Since each device has an IBGP session with each of the other BGP4
devices in the AS, each IBGP device has a route for each IBGP neighbor. For large autonomous systems containing many IBGP devices,
the IBGP route information in each fully-meshed IBGP device may introduce too much administrative overhead.
To avoid this overhead, you can organize your IGP devices into clusters:
• A cluster is a group of IGP devices organized into route reectors and route reector clients. You congure the cluster by
assigning a cluster ID on the route reector and identifying the IGP neighbors that are members of that cluster. All conguration
Optional BGP4 conguration tasks
FastIron Ethernet Switch Layer 3 Routing Conguration Guide, 08.0.30mb
388 53-1003627-06
for route reection takes place on the route reectors. Clients are unaware that they are members of a route reection cluster. All
members of the cluster must be in the same AS. The cluster ID can be any number from 1 - 4294967295, or an IP address.
The default is the device ID expressed as a 32-bit number.
NOTE
If the cluster contains more than one route reector, you need to congure the same cluster ID on all the route reectors in the
cluster. The cluster ID helps route reectors avoid loops within the cluster.
• A route reector is an IGP device congured to send BGP4 route information to all the clients (other BGP4 devices) within the
cluster. Route reection is enabled on all BGP4 devices by default but does not take eect unless you add route reector clients
to the device.
• A route reector client is an IGP device identied as a member of a cluster. You identify a device as a route reector client on the
device that is the route reector, not on the client. The client itself requires no additional conguration. In fact, the client does not
know that it is a route reector client. The client just knows that it receives updates from its neighbors and does not know
whether one or more of those neighbors are route reectors.
NOTE
Route reection applies only among IBGP devices within the same AS. You cannot congure a cluster that spans multiple
autonomous systems.
This is an example of a route reector conguration. In this example, two devices are congured as route reectors for the same cluster,
which provides redundancy in case one of the reectors becomes unavailable. Without redundancy, if a route reector becomes
unavailable, the clients for that device are cut o from BGP4 updates.
AS1 contains a cluster with two route reectors and two clients. The route reectors are fully meshed with other BGP4 devices, but the
clients are not fully meshed and rely on the route reectors to propagate BGP4 route updates.
Optional BGP4 conguration tasks
FastIron Ethernet Switch Layer 3 Routing Conguration Guide, 08.0.30mb
53-1003627-06 389
FIGURE 31 A route reector conguration
Support for RFC 4456
Route reection on Brocade devices is based on RFC 4456. This updated RFC helps eliminate routing loops that are possible in some
implementations of the older specication, RFC 1966. These instances include:
• The device adds the route reection attributes only if it is a route reector, and only when advertising IBGP route information to
other IBGP neighbors. The attributes are not used when communicating with EBGP neighbors.
• A device congured as a route reector sets the ORIGINATOR_ID attribute to the device ID of the device that originated the
route. The route reector sets this attribute only if this is the rst time the route is being reected (sent by a route reector).
• If a device receives a route with an ORIGINATOR_ID attribute value that is the same as the ID of the device, the device discards
the route and does not advertise it. By discarding the route, the device prevents a routing loop.
• The rst time a route is reected by a device congured as a route reector, the route reector adds the CLUSTER_LIST
attribute to the route. Other route reectors that receive the route from an IBGP neighbor add their cluster IDs to the front of the
routes CLUSTER_LIST. If the route reector does not have a cluster ID congured, the device adds its device ID to the front of
the CLUSTER_LIST.
• If a device congured as a route reector receives a route with a CLUSTER_LIST that contains the cluster ID of the route
reector, the route reector discards the route.
Conguration procedures for BGP4 route reector
To congure a Brocade device to be a BGP4 route reector, use either of the following methods.
Optional BGP4 conguration tasks
FastIron Ethernet Switch Layer 3 Routing Conguration Guide, 08.0.30mb
390 53-1003627-06
NOTE
All conguration for route reection takes place on the route reectors, not on the
clients.
Enter the following commands to congure a Brocade device as route reector 1. To congure route reector 2, enter the same
commands on the device that will be route reector 2. The clients require no conguration for route reection.
device(config-bgp)# cluster-id 1
Syntax: [no] cluster-id num | ip-addr
The num and ip-addr parameters specify the cluster ID and can be a number from 1 - 4294967295, or an IP address. The default is
the device ID. You can congure one cluster ID on the device. All route-reector clients for the device are members of the cluster.
NOTE
If the cluster contains more than one route reector, you need to congure the same cluster ID on all the route reectors in the
cluster. The cluster ID helps route reectors avoid loops within the cluster.
To add an IBGP neighbor to the cluster, enter the following command:
device(config-bgp)# neighbor 10.0.1.0 route-reflector-client
Syntax: [no] neighbor ip-addr route-reector-client
Disabling or re-enabling client-to-client route reection
By default, the clients of a route reector are not required to be fully meshed. Routes from a client are reected to other clients. However,
if the clients are fully meshed, route reection is not required between clients.
If you need to disable route reection between clients, enter the no client-to-client-reection command. When this feature is disabled,
route reection does not occur between clients does still occur between clients and non-clients.
device(config-bgp-router)# no client-to-client-reflection
Enter the following command to re-enable the feature.
device(config-bgp)# client-to-client-reflection
Syntax: [no] client-to-client-reection
Conguring confederations
A confederation is a BGP4 Autonomous System (AS) that has been subdivided into multiple, smaller autonomous systems. Subdividing
an AS into smaller autonomous systems simplies administration and reduces BGP4-related trac, which in turn reduces the complexity
of the Interior Border Gateway Protocol (IBGP) mesh among the BGP4 devices in the AS.
The Brocade implementation of this feature is based on RFC 3065.
Normally, all BGP4 devices within an AS must be fully meshed, so that each BGP4 device has BGP4 sessions to all the other BGP4
devices within the AS. This is feasible in smaller autonomous systems, but becomes unmanageable in autonomous systems containing
many BGP4 devices.
When you congure BGP4 devices into a confederation, all the devices within a sub-AS (a subdivision of the AS) use IBGP and must be
fully meshed. However, devices use EBGP to communicate between dierent sub-autonomous systems.
Optional BGP4 conguration tasks
FastIron Ethernet Switch Layer 3 Routing Conguration Guide, 08.0.30mb
53-1003627-06 391
NOTE
Another way to reduce the complexity of an IBGP mesh is to use route reection. However, if you want to run dierent Interior
Gateway Protocols (IGPs) within an AS, you must congure a confederation. You can run a separate IGP within each sub-AS.
To congure a confederation, congure groups of BGP4 devices into sub-autonomous systems. A sub-AS is simply an AS. The term
"sub-AS" distinguishes autonomous systems within a confederation from autonomous systems that are not in a confederation. For the
viewpoint of remote autonomous systems, the confederation ID is the AS ID. Remote autonomous systems do not know that the AS
represents multiple sub-autonomous systems with unique AS IDs.
NOTE
You can use any valid AS numbers for the sub-autonomous systems. If your AS is connected to the Internet, Brocade
recommends that you use numbers from within the private AS range (64512 through 65535). These are private autonomous
system numbers and BGP4 devices do not propagate these AS numbers to the Internet.
FIGURE 32 Example BGP4 confederation
In this example, four devices are congured into two sub-autonomous systems, each containing two of the devices. The sub-
autonomous systems are members of confederation 10. Devices within a sub-AS must be fully meshed and communicate using IBGP.
In this example, devices A and B use IBGP to communicate. devices C and D also use IBGP. However, the sub-autonomous systems
communicate with one another using EBGP. For example, device A communicates with device C using EBGP. The devices in the
confederation communicate with other autonomous systems using EBGP.
Devices in other autonomous systems are unaware that devices A through D are congured in a confederation. In fact, when devices in
confederation 10 send trac to devices in other autonomous systems, the confederation ID is the same as the AS number for the
Optional BGP4 conguration tasks
FastIron Ethernet Switch Layer 3 Routing Conguration Guide, 08.0.30mb
392 53-1003627-06
devices in the confederation. Thus, devices in other autonomous systems see trac as coming from AS 10 and are unaware that the
devices in AS 10 are subdivided into sub-autonomous systems within a confederation.
Conguring a BGP4 confederation
To congure a BGP4 conguration, perform these conguration tasks on each BGP4 device within the confederation:
•Congure the local AS number. The local AS number indicates membership in a sub-AS. All BGP4 devices with the same local
AS number are members of the same sub-AS. BGP4 devices use the local AS number when communicating with other BGP4
devices in the confederation.
•Congure the confederation ID. The confederation ID is the AS number by which BGP4 devices outside the confederation
recognize the confederation. A BGP4 device outside the confederation is not aware of, and does not care that BGP4 devices
are in multiple sub-autonomous systems. A BGP4 device uses the confederation ID to communicate with devices outside the
confederation. The confederation ID must dier from the sub-AS numbers.
•Congure the list of the sub-AS numbers that are members of the confederation. All devices within the same sub-AS use IBGP
to exchange device information. Devices in dierent sub-autonomous systems within the confederation use EBGP to exchange
device information.
To congure four devices to be members of confederation 10 (consisting of sub-autonomous systems 64512 and 64513), enter
commands such as the following.
Commands for device A
deviceA(config)# router bgp
deviceA(config-bgp-router)# local-as 64512
deviceA(config-bgp-router)# confederation identifier 10
deviceA(config-bgp-router)# confederation peers 64512 64513
deviceA(config-bgp-router)# write memory
Syntax: [no] local-as num
The num parameter with the local-as command indicates the AS number for the BGP4 devices within the sub-AS. You can specify a
number in the range 1 - 4294967295. I Brocade recommends that you use a number within the range of well-known private
autonomous systems, 64512 through 65535.
Syntax: [no] confederation identier num
The num parameter with the confederation identier command indicates the confederation number. The confederation ID is the AS
number by which BGP4 devices outside the confederation recognize the confederation. A BGP4 device outside the confederation is not
aware of, and does not care that your BGP4 devices are in multiple sub-autonomous systems. BGP4 devices use the confederation ID
when communicating with devices outside the confederation. The confederation ID must be dierent from the sub-AS numbers. For the
num parameter, you can specify a number in the range 1 - 4294967295.
Syntax: [no] confederation peers num [num ...]
The num parameter with the confederation peers command indicates the sub-AS numbers for the sub-autonomous systems in the
confederation. You can list all sub-autonomous systems in the confederation. You must specify all the sub-autonomous systems with
which this device has peer sessions in the confederation. All the devices within the same sub-AS use IBGP to exchange device
information. Devices in dierent sub-autonomous systems within the confederation use EBGP to exchange device information. The num
is a number in the range 1 - 4294967295.
Commands for device B
deviceB(config)# router bgp
deviceB(config-bgp-router)# local-as 64512
Optional BGP4 conguration tasks
FastIron Ethernet Switch Layer 3 Routing Conguration Guide, 08.0.30mb
53-1003627-06 393
deviceB(config-bgp-router)# confederation identifier 10
deviceB(config-bgp-router)# confederation peers 64512 64513
deviceB(config-bgp-router)# write memory
Commands for device C
deviceC(config)# router bgp
deviceC(config-bgp-router)# local-as 64513
deviceC(config-bgp-router)# confederation identifier 10
deviceC(config-bgp-router)# confederation peers 64512 64513
deviceC(config-bgp-router)# write memory
Commands for device D
deviceD(config)# router bgp
deviceD(config-bgp-router)# local-as 64513
deviceD(config-bgp-router)# confederation identifier 10
deviceD(config-bgp-router)# confederation peers 64512 64513
deviceD(config-bgp-router)# write memory
Aggregating routes advertised to BGP4 neighbors
By default, the device advertises individual routes for all networks. The aggregation feature allows you to congure the device to
aggregate routes from a range of networks into a single network prex. For example, without aggregation, the device will individually
advertise routes for networks 10.95.1.0/24, 10.95.2.0/24, and 10.95.3.0/24. You can congure the device to end a single, aggregate
route for the networks instead. The aggregate route can be advertised as 10.95.0.0/16.
To aggregate routes for 10.157.22.0/24, 10.157.23.0/24, and 10.157.24.0/24, enter the following command.
device(config-bgp)# aggregate-address 10.157.0.0 255.255.0.0
Syntax: [no] aggregate-address ip-addr ip-mask [ as-set ] [ summary-only ] [ suppress-map map-name ] [ advertise-map map-
name ] [ attribute-map map-name ]
The ip-addr and ip-mask parameters specify the aggregate value for the networks. Specify 0 for the host portion and for the network
portion that diers among the networks in the aggregate. For example, to aggregate 10.0.1.0/24, 10.0.2.0/24, and 10.0.3.0/24, enter
the IP address 10.0.0.0 and the network mask 255.255.0.0.
The as-set parameter causes the device to aggregate AS-path information for all the routes in the aggregate address into a single AS-
path.
The summary-only parameter prevents the device from advertising more specic routes contained within the aggregate route.
The suppress-map map-name parameter prevents the more specic routes contained in the specied route map from being advertised.
The advertise-map map-name parameter congures the device to advertise the more specic routes in the specied route map.
The attribute-map map-name parameter congures the device to set attributes for the aggregate routes based on the specied route
map.
NOTE
For the suppress-map , advertise-map , and attribute-map parameters, the route map must already be
dened.
Optional BGP4 conguration tasks
FastIron Ethernet Switch Layer 3 Routing Conguration Guide, 08.0.30mb
394 53-1003627-06
Conguring BGP4 restart
BGP4 restart can be congured for a global routing instance or for a specied Virtual Routing and Forwarding (VRF) instance. The
following sections describe how to enable the BGP4 restart feature.
BGP4 restart is enabled by default.
Conguring BGP4 Restart for the global routing instance
Use the following command to enable the BGP4 Restart feature globally on a device.
device(config)# router bgp
device(config-bgp-router)# graceful-restart
Syntax: [no] graceful-restart
Conguring BGP4 Restart for a VRF
Use the following command to enable the BGP4 Restart feature for a specied VRF.
device(config)# router bgp
device(config-bgp-router)# address-family ipv4 unicast vrf blue
device(config-bgp-ipv4u-vrf)# graceful-restart
Syntax: [no] graceful-restart
Conguring timers for BGP4 Restart (optional)
You can optionally congure the following timers to change their values from the default values:
• Restart Timer
• Stale Routes Timer
• Purge Timer
The seconds variable sets the maximum restart wait time advertised to neighbors. Possible values are 1- 3600 seconds. The default
value is 120 seconds.
Conguring the restart timer for BGP4 Restart
Use the following command to specify the maximum amount of time a device will maintain routes from and forward trac to a restarting
device.
device(config-bgp)# graceful-restart restart-time 150
Syntax: [no] graceful-restart restart-time seconds
The seconds variable sets the maximum restart wait time advertised to neighbors. Possible values are 1 through 3600 seconds. The
default value is 120 seconds.
Conguring BGP4 restart
FastIron Ethernet Switch Layer 3 Routing Conguration Guide, 08.0.30mb
53-1003627-06 395
Conguring BGP4 Restart stale routes timer
Use the following command to specify the maximum amount of time a helper device will wait for an end-of-RIB message from a peer
before deleting routes from that peer.
device(config-bgp)# graceful-restart stale-routes-time 120
Syntax: [no] graceful-restart stale-routes-time seconds
The seconds variable sets the maximum time before a helper device cleans up stale routes. Possible values are 1 through 3600
seconds. The default value is 360 seconds.
Conguring BGP4 Restart purge timer
Use the following command to specify the maximum amount of time a device will maintain stale routes in its routing table before purging
them.
device(config-bgp)# graceful-restart purge-time 900
Syntax: [no] graceful-restart purge-time seconds
The seconds variable sets the maximum time before a restarting device cleans up stale routes. Possible values are 1 - 3600 seconds.
The default value is 600 seconds.
BGP4 null0 routing
BGP4 considers the null0 route in the routing table (for example, static route) as a valid route, and can use the null0 route to resolve the
next hop. If the next hop for BGP4 resolves into a null0 route, the BGP4 route is also installed as a null0 route in the routing table.
The null0 routing feature allows network administrators to block certain network prexes using null0 routes and route-maps, directing a
remote device to drop all trac for a network prex by redistributing a null0 route into BGP4.
This example shows a topology for a null0 routing application example.
Conguring BGP4 restart
FastIron Ethernet Switch Layer 3 Routing Conguration Guide, 08.0.30mb
396 53-1003627-06
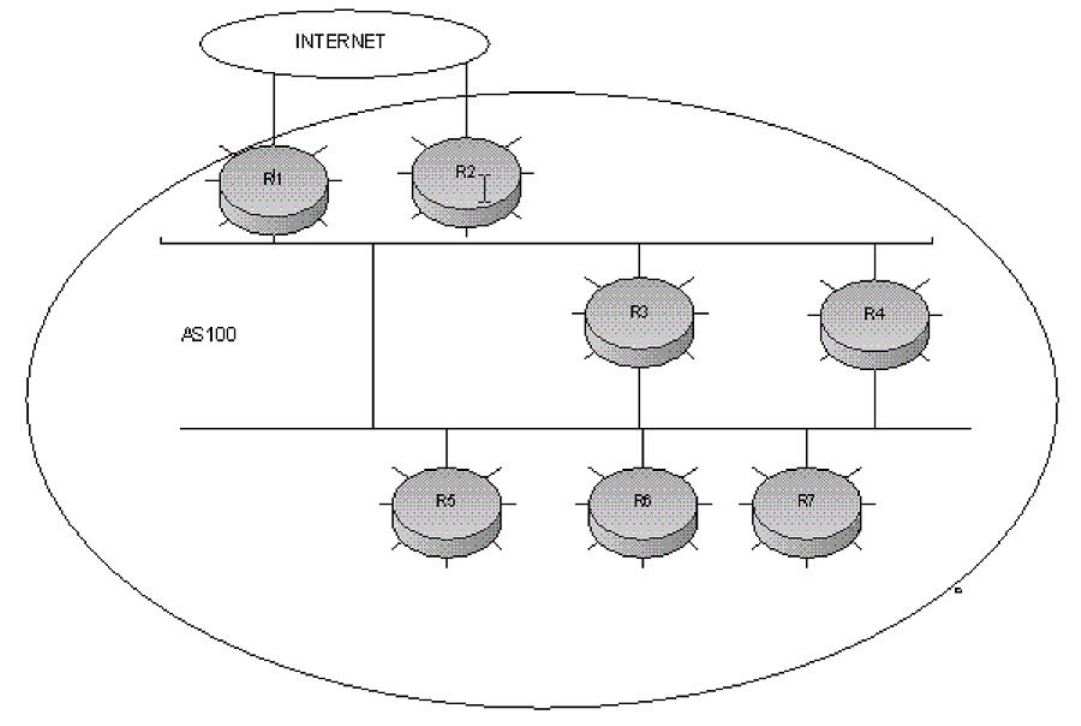
FIGURE 33 SAMPLE null0 routing application
Conguring BGP4 null0 routing
The following example congures a null0 routing application to stop denial of service attacks from remote hosts on the Internet.
1. Select a device, for example, device 6, to distribute null0 routes throughout the BGP4 network.
2. To congure a route-map perform the following step.
•Congure a route-map to match a particular tag (50) and set the next-hop address to an unused network address
(10.199.1.1).
3. Set the local-preference to a value higher than any possible internal or external local-preference (50).
4. Complete the route map by setting origin to IGP.
5. On device 6, redistribute the static routes into BGP4, using route-map route-map-name (redistribute static route-map block
user).
6. To congure a route-map perform the following step.
• On device 1, (the device facing the Internet), congure a null0 route matching the next-hop address in the route-map (ip
route 10.199.1.1/32 null0).
Conguring BGP4 restart
FastIron Ethernet Switch Layer 3 Routing Conguration Guide, 08.0.30mb
53-1003627-06 397
7. Repeat step 3 for all devices interfacing with the Internet (edge corporate devices). In this case, device 2 has the same null0
route as device 1.
8. On device 6, congure the network prexes associated with the trac you want to drop. The static route IP address references a
destination address. You must point the static route to the egress port, (for example, Ethernet 1/3/7), and specify the tag 50,
matching the route-map conguration.
Conguration examples
Device 6
The following conguration denes specic prexes to lter:
device(config)# ip route 10.0.0.40/29 ethernet 1/3/7 tag 50
device(config)# ip route 10.0.0.192/27 ethernet 1/3/7 tag 50
device(config)# ip route 10.014.0/23 ethernet 1/3/7 tag 50
The following conguration redistributes routes into BGP4.
device(config)# router bgp
device(config-bgp-router)# local-as 100
device(config-bgp-router)# neighbor router1_int_ip address remote-as 100
device(config-bgp-router)# neighbor router2_int_ip address remote-as 100
device(config-bgp-router)# neighbor router3_int_ip address remote-as 100
device(config-bgp-router)# neighbor router4_int_ip address remote-as 100
device(config-bgp-router)# neighbor router5_int_ip address remote-as 100
device(config-bgp-router)# neighbor router7_int_ip address remote-as 100
device(config-bgp-router)# redistribute static route-map blockuser
device(config-bgp-router)# exit
The following conguration denes the specic next hop address and sets the local preference to preferred.
device(config)# route-map blockuser permit 10
device(config-routemap blockuser)# match tag 50
device(config-routemap blockuser)# set ip next-hop 10.199.1.1
device(config-routemap blockuser)# set local-preference 1000000
device(config-routemap blockuser)# set origin igp
device(config-routemap blockuser)# exit
NOTE
A match tag can take up to 16 tags. During the execution of a route-map, a match on any tag value in the list is considered a
successful match.
Device 1
The following conguration denes the null0 route to the specic next hop address. The next hop address 10.199.1.1 points to the null0
route.
device(config)# ip route 10.199.1.1/32 null0
device(config)# router bgp
device(config-bgp-router)# local-as 100
device(config-bgp-router)# neighbor router2_int_ip address remote-as 100
device(config-bgp-router)# neighbor router3_int_ip address remote-as 100
device(config-bgp-router)# neighbor router4_int_ip address remote-as 100
device(config-bgp-router)# neighbor router5_int_ip address remote-as 100
device(config-bgp-router)# neighbor router6_int_ip address remote-as 100
device(config-bgp-router)# neighbor router7_int_ip address remote-as 100
Device 2
Conguring BGP4 restart
FastIron Ethernet Switch Layer 3 Routing Conguration Guide, 08.0.30mb
398 53-1003627-06
The following conguration denes a null0 route to the specic next hop address. The next hop address 10.199.1.1 points to the null0
route, which gets blocked.
device(config)# ip route 10.199.1.1/32 null0
device(config)# router bgp
device(config-bgp-router)# local-as 100
device(config-bgp-router)# neighbor router1_int_ip address remote-as 100
device(config-bgp-router)# neighbor router3_int_ip address remote-as 100
device(config-bgp-router)# neighbor router4_int_ip address remote-as 100
device(config-bgp-router)# neighbor router5_int_ip address remote-as 100
device(config-bgp-router)# neighbor router6_int_ip address remote-as 100
device(config-bgp-router)# neighbor router7_int_ip address remote-as 100
Show commands for BGP4 null 0 routing
After conguring the null0 application, you can display the output using show commands.
Device 6
Show ip route static output for device 6.
device# show ip route static
Type Codes - B:BGP D:Connected S:Static R:RIP O:OSPF; Cost - Dist/Metric
Destination Gateway Port Cost Type
1 10.0.0.40/29 DIRECT eth 1/3/7 1/1 S
2 10.0.0.192/27 DIRECT eth 1/3/7 1/1 S
3 10.0.14.0/23 DIRECT eth 1/3/7 1/1 S
device#
Device 1 and 2
Show ip route static output for device 1 and device 2.
device# show ip route static
Type Codes - B:BGP D:Connected S:Static R:RIP O:OSPF; Cost - Dist/Metric
Destination Gateway Port Cost Type
1 10.199.1.1/32 DIRECT drop 1/1 S
device#
Device 6
The following is the show ip bgp route output for Device-6
device# show ip bgp route
Total number of BGP Routes: 126
Status A:AGGREGATE B:BEST b:NOT-INSTALLED-BEST C:CONFED_EBGP D:DAMPED
E:EBGP H:HISTORY I:IBGP L:LOCAL M:MULTIPATH m:NOT-INSTALLED-MULTIPATH
S:SUPPRESSED F:FILTERED s:STALE
Prefix Next Hop MED LocPrf Weight Status
1 10.0.1.0/24 10.0.1.3 0 100 0 BI
AS_PATH:
. .. . . . .
9 10.0.0.16/30 10.0.1.3 100 0 I
AS_PATH: 85
10 10.0.0.40/29 10.199.1.1/32 1 1000000 32768 BL
AS_PATH:
11 10.0.0.80/28 10.0.1.3 100 0 I
. .. . . . .
. .. . . . .
36 10.0.0.96/28 10.0.1.3 100 0 I
AS_PATH: 50
37 10.0.0.192/27 10.199.1.1/32 1 10000000 32768 BL
AS_PATH:
. .. . . . .
64 10.0.7.0/24 10.0.1.3 100 0 I
AS_PATH: 10
65 10.0.14.0/23 10.199.1.1/32 1 1000000 32768 BL
AS_PATH: .. . . . .
Conguring BGP4 restart
FastIron Ethernet Switch Layer 3 Routing Conguration Guide, 08.0.30mb
53-1003627-06 399
Device 1 and 2
The show ip route output for device 1 and device 2 shows "drop" under the Port column for the network prexes you congured with
null0 routing
device# show ip route
Total number of IP routes: 133
Type Codes - B:BGP D:Connected S:Static R:RIP O:OSPF; Cost - Dist/Metric
Destination Gateway Port Cost Type
1 10.0.1.24/32 DIRECT loopback 1 0/0 D
2 10.0.1.0/24 DIRECT eth 1/2/7 0/0 D
3 10.0.1.1/24 DIRECT eth 1/2/1 0/0 D
.
13 10.0.0.6/31 10.0.1.3 eth 1/2/2 20/1 B
14 10.0.0.16/30 10.0.1.3 eth 1/2/2 20/1 B
15 10.0.0.40/29 DIRECT drop
200/0 B
. .. . . . .
42 10.0.0.192/27 DIRECT drop
200/0 B
43 10.0.1.128/26 10.0.1.3 eth 1/2/7 20/1 B
. .. . . . .
69 10.0.7.0/24 10.0.1.3 eth 1/2/10 20/1 B
70 10.0.14.0/23 DIRECT drop 200/0 B
. .. . . . .
. .. . . . .
131 10.144.0.0/12 10.0.1.3 eth 1/3/4 20/1 B
132 10.199.1.1/32 DIRECT drop
1/1
Modifying redistribution parameters
By default, the route information between BGP4 and the IP IGPs (RIP and OSPF) is not redistributed. You can congure the device to
redistribute OSPF routes, RIP routes, directly connected routes, or static routes into BGP4.
To enable redistribution of all OSPF routes and directly attached routes into BGP4, enter the following commands.
device(config)# router bgp
device(config-bgp-router)# redistribute ospf
device(config-bgp-router)# redistribute connected
device(config-bgp-router)# write memory
Syntax: [no] redistribute connected | ospf | rip | static
The connected parameter indicates that you are redistributing routes to directly attached devices into BGP4.
The ospf parameter indicates that you are redistributing OSPF routes into BGP4.
NOTE
Entering redistribute ospf simply redistributes internal OSPF routes. To redistribute external OSPF routes also, use the
redistribute ospf match external command.
The rip parameter indicates that you are redistributing RIP routes into BGP4.
The isis parameter indicates that you are redistributing IS-IS routes into BGP4.
The static parameter indicates that you are redistributing static routes into BGP4.
Modifying redistribution parameters
FastIron Ethernet Switch Layer 3 Routing Conguration Guide, 08.0.30mb
400 53-1003627-06
Redistributing connected routes
To congure BGP4 to redistribute directly connected routes, enter the following command.
device(config-bgp-router)# redistribute connected
Syntax: [no] redistribute connected [metric num] [route-map map-name]
The connected parameter indicates that you are redistributing routes to directly attached devices into BGP4.
The metric num parameter changes the metric. You can specify a value from 0 through 4294967295. The default is not assigned.
The route-map map-name parameter species a route map to be consulted before adding the RIP route to the BGP4 route table.
NOTE
The route map you specify must already be congured on the
device.
Redistributing RIP routes
To congure BGP4 to redistribute RIP routes and add a metric of 10 to the redistributed routes, enter the following command.
device(config-bgp-router)# redistribute rip metric 10
Syntax: [no] redistribute rip [metric num] [route-map map-name]
The rip parameter indicates that you are redistributing RIP routes into BGP4.
The metric num parameter changes the metric. You can specify a value from 0 - 4294967295. The default is not assigned.
The route-map map-name parameter species a route map to be consulted before adding the RIP route to the BGP4 route table.
NOTE
The route map you specify must already be congured on the
device.
Redistributing OSPF external routes
To congure the device to redistribute OSPF external type 1 routes, enter the following command.
device(config-bgp-router)# redistribute ospf match external1
Syntax: [no] redistribute ospf [match internal | external1 | external2] [metric num] [route-map map-name]
The ospf parameter indicates that you are redistributing OSPF routes into BGP4.
The match internal, external1, and external2 parameters apply only to OSPF. These parameters specify the types of OSPF routes to be
redistributed into BGP4. The default is internal.
NOTE
If you do not enter a value for the match parameter, (for example, you enter redistribute ospf only) then only internal OSPF
routes will be redistributed.
The metric num parameter changes the metric. You can specify a value from 0 through 4294967295. The default is not assigned.
The route-map map-name parameter species a route map to be consulted before adding the OSPF route to the BGP4 route table.
Modifying redistribution parameters
FastIron Ethernet Switch Layer 3 Routing Conguration Guide, 08.0.30mb
53-1003627-06 401
NOTE
The route map you specify must already be congured on the
device.
NOTE
If you use both the redistribute ospf route-map command and the redistribute ospf match internal command, the software
uses only the route map for ltering.
Redistributing static routes
To congure the device to redistribute static routes, enter the following command.
device(config-bgp)# redistribute static
Syntax: [no] redistribute static [ metric num ] [ route-map map-name ]
The static parameter indicates that you are redistributing static routes into BGP4.
The metricnum parameter changes the metric. You can specify a value from 0 - 4294967295. The default is 0.
The route-map map-name parameter species a route map to be consulted before adding the static route to the BGP4 route table.
NOTE
The route map you specify must already be congured on the
device.
Redistributing IBGP routes
By default, the device does not allow redistribute IBGP routes from BGP4 into RIP, or OSPF. This behavior helps eliminate routing loops.
In non-default VRF instances, by default, the device does allow redistribution IBGP routes from BGP4 into RIP, OSPF.
To enable the device to redistribute BGP4 routes into OSPF and RIP, enter the following command.
device(config-bgp-router)# bgp-redistribute-internal
Syntax: [no] bgp-redistribute-internal
To disable redistribution of IBGP routes into RIP, IS-IS, and OSPF, enter the bgp-redistribute-internal command.
Filtering
This section describes the following:
• AS-path ltering
•Dening and applying IP prex lists
•Dening neighbor distribute lists
•Dening route maps
•Conguring cooperative BGP4 route ltering
Filtering
FastIron Ethernet Switch Layer 3 Routing Conguration Guide, 08.0.30mb
402 53-1003627-06
AS-path ltering
You can lter updates received from BGP4 neighbors based on the contents of the AS-path list accompanying the updates. For
example, to deny routes that have the AS 10.3.2.1 in the AS-path from entering the BGP4 route table, you can dene a lter.
The device provides the following methods for ltering on AS-path information:
• AS-path lters
• AS-path ACLs
NOTE
The device cannot support AS-path lters and AS-path ACLs at the same time. Use one method or the other, but do not mix
methods.
NOTE
Once you dene a lter or ACL, the default action for updates that do not match a lter is deny . To change the default action to
permit , congure the last lter or ACL as permit any any .
AS-path lters or AS-path ACLs can be referred to by the lter list number of a BGP4 neighbor as well as by match clauses in a route
map.
Dening an AS-path ACL
To congure an AS-path list that uses "acl 1", enter a command such as the following.
device(config)# ip as-path access-list acl1 permit 100
device(config)# router bgp
device(config-bgp-router)# neighbor 10.10.10.1 filter-list acl1 in
Syntax: [no] ip as-path access-list string [ seq s eq-value ] deny | permit regular-expression
The ip as-path command congures an AS-path ACL that permits routes containing AS number 100 in their AS paths. The neighbor
command then applies the AS-path ACL to advertisements and updates received from neighbor 10.10.10.1. In this example, the only
routes the device permits from neighbor 10.10.10.1 are those whose AS-paths contain AS-path number 100.
The string parameter species the ACL name. (If you enter a number, the CLI interprets the number as a text string.)
The seqseq-value parameter is optional and species the sequence number for the AS-path list. If you do not specify a sequence
number, the software numbers in increments of 5, beginning with number 5. The software interprets the entries in an AS-path list in
numerical order, beginning with the lowest sequence number.
The deny and permit parameters specify the action the software takes if the AS-path list for a route matches a match clause in this ACL.
To congure the AS-path match clauses in a route map, use the match as-path command.
The regular-expression parameter species the AS path information you want to permit or deny to routes that match any of the match
clauses within the ACL. You can enter a specic AS number or use a regular expression.
The neighbor command uses the lter-list parameter to apply the AS-path ACL to the neighbor.
Using regular expressions
Use a regular expression for the as-path parameter to specify a single character or multiple characters as a lter pattern. If the AS-path
matches the pattern specied in the regular expression, the lter evaluation is true; otherwise, the evaluation is false.
You can also include special characters that inuence the way the software matches the AS-path against the lter value.
Filtering
FastIron Ethernet Switch Layer 3 Routing Conguration Guide, 08.0.30mb
53-1003627-06 403

To lter on a specic single-character value, enter the character for the as-path parameter. For example, to lter on AS-paths that contain
the letter "z", enter the following command:
device(config-bgp-router)# ip as-path access-list acl1 permit z
To lter on a string of multiple characters, enter the characters in brackets. For example, to lter on AS-paths that contain "x", "y", or "z",
enter the following command.
device(config-bgp-router)# ip as-path access-list acl1 permit [xyz]
BGP4 Special characters
When you enter a single-character expression or a list of characters, you also can use the special characters listed in "Using regular
expressions." The description for each character includes an example. Some special characters must be placed in front of the characters
they control and others must be placed after the characters they control. The examples show where to place the special character.
TABLE 90 BGP4 special characters for regular expressions
Character Operation
. The period matches on any single character, including a blank space. For
example, the following regular expression matches for "aa", "ab", "ac", and
so on, but not just "a".
a.
* The asterisk matches on zero or more sequences of a pattern. For
example, the following regular expression matches on an AS-path that
contains the string "1111" followed by any value:
1111*
+ The plus sign matches on one or more sequences of a pattern. For
example, the following regular expression matches on an AS-path that
contains a sequence of "g"s, such as "deg", "degg", "deggg", and so on:
deg+
? The question mark matches on zero occurrences or one occurrence of a
pattern. For example, the following regular expression matches on an AS-
path that contains "dg" or "deg":
de?g
^ A caret (when not used within brackets) matches on the beginning of an
input string. For example, the following regular expression matches on an
AS-path that begins with "3":
^3
$ A dollar sign matches on the end of an input string. For example, the
following regular expression matches on an AS-path that ends with "deg":
deg$
_ An underscore matches on one or more of the following:
• , (comma)
• { (left curly brace)
• } (right curly brace)
• ( (left parenthesis)
• ) (right parenthesis)
• The beginning of the input string
• The end of the input string
• A blank space
Filtering
FastIron Ethernet Switch Layer 3 Routing Conguration Guide, 08.0.30mb
404 53-1003627-06

TABLE 90 BGP4 special characters for regular expressions (continued)
Character Operation
For example, the following regular expression matches on "100" but not
on "1002", "2100", and so on.
_100_
[ ] Square brackets enclose a range of single-character patterns. For
example, the following regular expression matches on an AS-path that
contains "1", "2", "3", "4", or "5":
[1-5]
You can use the following expression symbols within the brackets. These
symbols are allowed only inside the brackets:
• ^ - The caret matches on any characters except the ones in the
brackets. For example, the following regular expression matches
on an AS-path that does not contain "1", "2", "3", "4", or "5":
[^1-5]
• - The hyphen separates the beginning and ending of a range of
characters. A match occurs if any of the characters within the
range is present. Refer to the example above.
| A vertical bar (sometimes called a pipe or a "logical or") separates two
alternative values or sets of values. The AS-path can match one or the
other value. For example, the following regular expression matches on an
AS-path that contains either "abc" or "defg":
(abc)|(defg)
NOTE
The parentheses group multiple characters to be treated as
one value. Refer to the following row for more information
about parentheses.
( ) Parentheses allow you to create complex expressions. For example, the
following complex expression matches on "abc", "abcabc", or
"abcabcabcdefg", but not on "abcdefgdefg":
((abc)+)|((defg)?)
To lter for a special character instead of using the special character as described in "Using regular expressions," enter "\" (backslash) in
front of the character. For example, to lter on AS-path strings containing an asterisk, enter the asterisk portion of the regular expression
as "\*".
device(config-bgp-router)# ip as-path access-list acl2 deny \*
To use the backslash as a string character, enter two slashes. For example, to lter on AS-path strings containing a backslash, enter the
backslash portion of the regular expression as "\\".
device(config-bgp-router)# ip as-path access-list acl2 deny \\
BGP4 ltering communities
You can lter routes received from BGP4 neighbors based on community names.
A community is an optional attribute that identies the route as a member of a user-dened class of routes. Community names are
arbitrary values made of two ve-digit integers joined by a colon. You determine what the name means when you create the community
name as a route attribute. Each string in the community name can be a number from 0 through 65535.
Filtering
FastIron Ethernet Switch Layer 3 Routing Conguration Guide, 08.0.30mb
53-1003627-06 405
This format allows you to easily classify community names. For example, a common convention used in community naming is to
congure the rst string as the local AS and the second string as the unique community within that AS. Using this convention,
communities 1:10, 1:20, and 1:30 can be easily identied as member communities of AS 1.
The device provides the following methods for ltering on community information.
• Community lters
• Community list ACLs
NOTE
The device cannot actively support community lters and community list ACLs at the same time. Use one method or the other
but do not mix methods.
NOTE
Once you dene a lter or ACL, the default action for communities that do not match a lter or ACL is deny . To change the
default action to permit , congure the last lter or ACL entry as permit any any .
Community lters or ACLs can be referred to by match clauses in a route map.
Dening a community ACL
To congure community ACL 1, enter a command such as the following. This command congures a community ACL that permits
routes that contain community 123:2.
device(config)# ip community-list 1 permit 123:2
Syntax: no ip community-list standard string [ seq seq-value ] deny | permit community-num
The string parameter species the ACL name. (If you enter a number, the CLI interprets the number as a text string.)
The standard parameter species whether you are conguring a standard community ACL.
The seq seq-value parameter is optional and species the sequence number for the community list. You can congure up to 199 entries
in a community list. If you do not specify a sequence number, the software numbers the entries in increments of 5, beginning with
number 5. The software interprets the entries in a community list in numerical order, beginning with the lowest sequence number.
The deny and permit parameters specify the action the software takes if a route community list matches a match clause in this ACL. To
congure the community-list match clauses in a route map, use the match community command.
The community-num parameter species the community type or community number. This parameter can have the following values:
•num:num - A specic community number
•internet - The Internet community
•no-export - The community of sub-autonomous systems within a confederation. Routes with this community can be exported
to other sub-autonomous systems within the same confederation but cannot be exported outside the confederation to other
autonomous systems or otherwise sent to EBGP neighbors.
•local-as - The local sub-AS within the confederation. Routes with this community can be advertised only within the local subAS.
•no-advertise - Routes with this community cannot be advertised to any other BGP4 devices at all.
The regular-expression parameter species a regular expression for matching on community names.
To use a community-list lter, use route maps with the match community parameter.
Filtering
FastIron Ethernet Switch Layer 3 Routing Conguration Guide, 08.0.30mb
406 53-1003627-06
Dening and applying IP prex lists
An IP prex list species a list of networks. When you apply an IP prex list to a neighbor, the device sends or receives only a route
whose destination is in the IP prex list. The software interprets the prex lists in order, beginning with the lowest sequence number.
To congure an IP prex list and apply it to a neighbor, enter commands such as the following.
device(config)# ip prefix-list Routesfor20 permit 10.20.0.0/24
device(config)# router bgp
device(config-bgp-router)# neighbor 10.10.10.1 prefix-list Routesfor20 out
These commands congure an IP prex list named Routesfor20, which permits routes to network 10.20.0.0/24. The neighbor
command congures the device to use IP prex list Routesfor20 to determine which routes to send to neighbor 10.10.10.1. The device
sends routes that go to 10.20.x.x to neighbor 10.10.10.1 because the IP prex list explicitly permits these routes to be sent to the
neighbor.
Syntax: [no] ip prex-list name [ seq seq-value ] [ description string ] deny | permit network-addr / mask-bits [ ge ge-value ] [ le le-
value ]
The name parameter species the prex list name. Use this name when applying the prex list to a neighbor.
The description string parameter is a text string describing the prex list.
The seq seq-value parameter is optional and species the sequence number of the IP prex list. If you do not specify a sequence
number, the software numbers the entries in increments of 5, beginning with prex list entry 5. The software interprets the prex list
entries in numerical order, beginning with the lowest sequence number.
The deny and permit parameters specify the action the software takes if a neighbor route is in this prex list.
The network-addr and mask-bits parameters specify the network number and the number of bits in the network mask.
You can specify a range of prex length for prexes that are more specic than network-addr and mask-bits .
The prex-list matches only on this network unless you use the ge ge-value or le le-value parameters.
• If you specify only ge ge-value, the mask-length range is from ge-value to 81.
• If you specify only le le-value, the mask-length range is from length to le-value .
The ge-value or le-value you specify must meet the following condition:
length < ge-value <= le-value <= 81
If you do not specify ge ge-value or le le-value , the prex list matches only on the exact network prex you specied with the network-
addr and mask-bits parameters.
In the following example, only default routes are allowed:
device(config)# ip prefix-list match-default-routes permit 0.0.0.0/0
In the following example, only default routes are denied:
device(config)# ip prefix-list match-default-routes deny 0.0.0.0/0
In the following example, all routes are allowed, including all subnet masks and all prexes:
device(config)# ip prefix-list match-all-routes permit 0.0.0.0/0 le 32
NOTE
Be careful to determine exactly which routes you want to allow using a prex
list.
Filtering
FastIron Ethernet Switch Layer 3 Routing Conguration Guide, 08.0.30mb
53-1003627-06 407
Dening neighbor distribute lists
A neighbor distribute list is a list of BGP4 address lters or ACLs that lter the trac to or from a neighbor.
To congure a distribute list that uses ACL 1, enter a command such as the following.
device(config-bgp)# neighbor 10.10.10.1 distribute-list 1 in
This command congures the device to use ACL 1 to select the routes that the device will accept from neighbor 10.10.10.1.
Syntax: [no] neighbor ip-addr distribute-list name-or-num in | out
The ip-addr parameter species the neighbor.
The name-or-num parameter species the name or number of a standard or named ACL.
The in and out parameters specify whether the distribute list applies to inbound or outbound routes:
•in - controls the routes the device will accept from the neighbor.
•out - controls the routes sent to the neighbor.
Dening route maps
A route map is a named set of match conditions and parameter settings that the device can use to modify route attributes and to control
redistribution of the routes into other protocols. A route map consists of a sequence of instances . If you think of a route map as a table,
an instance is a row in that table. The device evaluates a route according to route map instances in ascending numerical order. The route
is rst compared against instance 1, then against instance 2, and so on. When a match is found, the device stops evaluating the route.
Route maps can contain match clauses and set statements. Each route map contains a permit or deny action for routes that match the
match clauses:
• If the route map contains a permit action, a route that matches a match statement is permitted; otherwise, the route is denied.
• If the route map contains a deny action, a route that matches a match statement is denied.
• If a route does not match any match statements in the route map, the route is denied. This is the default action. To change the
default action, congure the last match statement in the last instance of the route map to permit any any .
• If there is no match statement, the software considers the route to be a match.
• For route maps that contain address lters, AS-path lters, or community lters, if the action specied by a lter conicts with
the action specied by the route map, the route map action takes precedence over the lter action.
If the route map contains set clauses, routes that are permitted by the route map match statements are modied according to the set
clauses.
Match statements compare the route against one or more of the following:
• The route BGP4 MED (metric)
• A sequence of AS-path lters
• A sequence of community lters
• A sequence of address lters
• The IP address of the next hop device
• The route tag
• For OSPF routes only, the route type (internal, external type-1, or external type-2)
• An AS-path ACL
• A community ACL
Filtering
FastIron Ethernet Switch Layer 3 Routing Conguration Guide, 08.0.30mb
408 53-1003627-06
• An IP prex list
• An IP ACL
For routes that match all of the match statements, the route map set clauses can perform one or more of the following modications to
the route attributes:
• Prepend AS numbers to the front of the route AS-path. By adding AS numbers to the AS-path, you can cause the route to be
less preferred when compared to other routes based on the length of the AS-path.
• Add a user-dened tag an automatically calculated tag to the route.
• Set the community attributes.
• Set the local preference.
• Set the MED (metric).
• Set the IP address of the next-hop device.
• Set the origin to IGP or INCOMPLETE.
• Set the weight.
• Set a BGP4 static network route.
When you congure parameters for redistributing routes into BGP4, one of the optional parameters is a route map. If you specify a route
map as one of the redistribution parameters, the device matches the route against the match statements in the route map. If a match is
found and if the route map contains set clauses, the device sets the attributes in the route according to the set clauses.
To create a route map, you dene instances of the map by a sequence number.
To dene a route map, use the procedures in the following sections.
Entering the route map into the software
To add instance 1 of a route map named "GET_ONE" with a permit action, enter the following command.
device(config)# route-map GET_ONE permit 1
device(config-routemap GET_ONE)#
Syntax: [no] route-map map-name permit | deny num
As shown in this example, the command prompt changes to the route map level. You can enter the match and set clauses at this level.
The map-name is a string of characters that names the map. Map names can be up to 80 characters in length.
The permit and deny parameters specify the action the device will take if a route matches a match statement:
• If you specify deny, the device does not advertise or learn the route.
• If you specify permit, the device applies the match and set clauses associated with this route map instance.
The num parameter species the instance of the route map you are dening.
To delete a route map, enter a command such as the following. When you delete a route map, all the permit and deny entries in the route
map are deleted.
device(config)# no route-map Map1
This command deletes a route map named Map1. All entries in the route map are deleted.
To delete a specic instance of a route map without deleting the rest of the route map, enter a command such as the following.
device(config)# no route-map Map1 permit 10
This command deletes the specied instance from the route map but leaves the other instances of the route map intact.
Filtering
FastIron Ethernet Switch Layer 3 Routing Conguration Guide, 08.0.30mb
53-1003627-06 409
Specifying the match conditions
Use the following command to dene the match conditions for instance 1 of the route map GET_ONE. This instance compares the route
updates against BGP4 address lter 11.
device(config-routemap GET_ONE)# match address-filters 11
Syntax: [no] match [ as-path name ] [ community acl exact-match ] | [ ip address acl | prx-list string ] | [ ip route-source acl | prex
name ] [ metric num ] | [ next-hop address-lter-list ] | [ route-type internal | external-type1 | external-type2 ] [ tag tag-value ] |
interface interface interface interface .. protocol bgp static-networkprotocol bgp externalprotocol bgp internal
The as-pathnum parameter species an AS-path ACL. You can specify up to ve AS-path ACLs. To congure an AS-path ACL, use the
ip as-path access-list command.
The community num parameter species a community ACL.
NOTE
The ACL must already be
congured.
The communityaclexact-match parameter matches a route if (and only if) the route community attributes eld contains the same
community numbers specied in the match statement.
The ip address, next-hop acl-num, prex-list, and string parameters specify an ACL or IP prex list. Use this parameter to match based
on the destination network or next-hop gateway. To congure an IP ACL for use with this command, use the ip access-list command. To
congure an IP prex list, use the ip prex-list command.
The ip route-sourceacl and prexname parameters match based on the source of a route (the IP address of the neighbor from which
the device learned the route).
The metricnum parameter compares the route MED (metric) to the specied value.
The next-hop address-lter-list parameter compares the IP address of the route next-hop to the specied IP address lters. The lters
must already be congured.
The route-type internal, external-type1, and external-type2 parameters apply only to OSPF routes. These parameters compare the
route type to the specied value.
The tagtag-value parameter compares the route tag to the specied tag value.
The protocol bgp static-network parameter matches on BGP4 static network routes.
The protocol bgp external parameter matches on eBGP (external) routes.
The protocol bgp internal parameter matches on iBGP (internal) routes.
Match examples using ACLs
The following sections contain examples of how to congure route maps that include match statements that match on ACLs.
Matching based on AS-path ACL
To construct a route map that matches based on AS-path ACL 1, enter the following commands.
device(config)# route-map PathMap permit 1
device(config-routemap PathMap)# match as-path 1
Syntax: [no] match as-path string
The string parameter species an AS-path ACL and can be a number from 1 through 199. You can specify up to ve AS-path ACLs.
Filtering
FastIron Ethernet Switch Layer 3 Routing Conguration Guide, 08.0.30mb
410 53-1003627-06
Matching based on community ACL
To construct a route map that matches based on community ACL 1, enter the following commands.
device(config)# ip community-list 1 permit 123:2
device(config)# route-map CommMap permit 1
device(config-routemap CommMap)# match community 1
Syntax: [no] match community string
The string parameter species a community list ACL. To congure a community list ACL, use the ip community-list command.
Matching based on destination network
You can use the results of an IP ACL or an IP prex list as the match condition.
To construct a route map that matches based on destination network, enter commands such as the following.
device(config)# route-map NetMap permit 1
device(config-routemap NetMap)# match ip address 1
Syntax: [no] match ip address ACL-name-or-num
Syntax: [no] match ip address prex-list name
The ACL-name-or-num parameter with the rst command species an IP ACL and can be a number from 1 through 199 or the ACL
name if it is a named ACL. Multiple ACLs may be added when seperated by spaces. To congure an IP ACL, use the ip access-list or
access-list command.
The name parameter with the second command species an IP prex list name.
Matching based on next-hop device
You can use the results of an IP ACL or an IP prex list as the match condition.
To construct a route map that matches based on the next-hop device, enter commands such as the following.
device(config)# route-map HopMap permit 1
device(config-routemap HopMap)# match ip next-hop 2
Syntax: [no] match ip next-hop string
Syntax: [no] match ip next-hop prex-list name
The string parameter with the rst command species an IP ACL and can be a number from 1 through 199 or the ACL name if it is a
named ACL. To congure an IP ACL, use the ip access-list or access-list command.
The name parameter with the second command species an IP prex list name.
Matching based on the route source
To match a BGP4 route based on its source, use the match ip route-source command.
device(config)# access-list 10 permit 192.168.6.0 0.0.0.255
device(config)# route-map bgp1 permit 1
device(config-routemap bgp1)# match ip route-source 10
The rst command congures an IP ACL that matches on routes received from 192.168.6.0/24. The remaining commands congure a
route map that matches on all BGP4 routes advertised by the BGP4 neighbors whose addresses match addresses in the IP prex list.
You can add a set clause to change a route attribute in the routes that match. You also can use the route map as input for other
commands, such as the neighbor and network commands and some show commands.
Filtering
FastIron Ethernet Switch Layer 3 Routing Conguration Guide, 08.0.30mb
53-1003627-06 411
Syntax: [no] match ip route-source ACL | prex-list name
The acl and prex-list name parameters specify the name or ID of an IP ACL, or an IP prex list.
Matching on routes containing a specic set of communities
The device can match routes based on the presence of a community name or number in a route. To match based on a set of
communities, congure a community ACL that lists the communities, then compare routes against the ACL.
device(config)# ip community-list standard std_1 permit 12:34 no-export
device(config)# route-map bgp2 permit 1
device(config-routemap bgp2)# match community std_1 exact-match
The rst command congures a community ACL that contains community number 12:34 and community name no-export. The
remaining commands congure a route map that matches the community attributes eld in BGP4 routes against the set of communities
in the ACL. A route matches the route map only if the route contains all the communities in the ACL and no other communities.
Syntax: [no] match community ACL exact-match
The ACL parameter species the name of a community list ACL. You can specify up to ve ACLs. Separate the ACL names or IDs with
spaces.
Here is another example.
device(config)# ip community-list standard std_2 permit 23:45 56:78
device(config)# route-map bgp3 permit 1
device(config-routemap bgp3)# match community std_1 std_2 exact-match
These commands congure an additional community ACL, std_2, that contains community numbers 23:45 and 57:68. Route map
bgp3 compares each BGP4 route against the sets of communities in ACLs std_1 and std_2. A BGP4 route that contains either but not
both sets of communities matches the route map. For example, a route containing communities 23:45 and 57:68 matches. However, a
route containing communities 23:45, 57:68 and 12:34, or communities 23:45, 57:68, 12:34, and no-export does not match. To
match, the route communities must be the same as those in exactly one of the community ACLs used by the match community
statement.
Matching based on BGP4 static network
Thematch option has been added to the route-map command that allows you to match on a BGP4 static network. In the following
example, the route-map is congured to match on the BGP4 static network. The device is then congured to advertise to the core BGP4
peer (IP address 192.168.6.0) only the BGP4 static routes and nothing else.
device(config)# route-map policygroup3 permit 10
device(config-routemap policygroup3)# match protocol bgp static-network
device(config-routemap policygroup3)# set local-preference 150
device(config-routemap policygroup3)# set community no-export
device(config-routemap policygroup3)# exit
device(config)# router bgp
device(config-bgp)# neighbor 192.168.6.0 route-map out policymap3
Syntax: [no] match protocol bgp [ external | internal | static-network ]
The match protocol bgp external option will match the eBGP routes.
The match protocol bgp internal option will match the iBGP routes.
The match protocol bgp static-network option will match the static-network BGP4 route, applicable at BGP4 outbound policy only.
Filtering
FastIron Ethernet Switch Layer 3 Routing Conguration Guide, 08.0.30mb
412 53-1003627-06
Matching based on interface
The match option has been added to the route-map command that distributes any routes that have their next hop out one of the
interfaces specied. This feature operates with the following conditions:
• The match interface option can only use the interface name (for example ethernet 1/1/2) and not the IP address as an
argument.
• The match interface option is only eective during redistribution and does not apply for other route map usage such as: bgp
outbound route update policy.
• The match interface option can be applied to other types of redistribution such as redistributing OSPF routes to BGP4, or
ltering out all OSPF routes that point to a specic interface.
To congure the match-interface option, use the following command.
device(config)# route-map test-route permit 99
device(config-routemap test-route)# match interface ethernet 1/1/1 ethernet 1/3/2
device(config-routemap test-route)# exit
Syntax: [no] match interface interface interface ...
The interface variable species the interface that you want to use with the match interface command. Up to 5 interfaces of the following
types can be specied:
•ethernet unit/slot/port
•loopback loopback-number
•null0
•tunnel tunnel-ID
•ve ve-ID
Setting parameters in the routes
Use the following command to dene a set clause that prepends an AS number to the AS path on each route that matches the
corresponding match statement.
device(config-routemap GET_ONE)# set as-path prepend 65535
Syntax: [no] set [ as-path [ prepend as-num,as-num,... ] ] | [ automatic-tag ] | [ comm-list acl delete ] | [ community num : num | num |
additive | local-as | no-advertise | no-export ] | [ dampening [ half-life reuse suppress max-suppress-time ] ] [ ip next hop ip-addr ] [ ip
next-hop peer-address ] | [ local-preference num ] | [ metric [ + | - ] num | none ] | [ metric-type type-1 | type-2 ] | external [ metric-
type internal ] | [ next-hop ip-addr ] | [ origin igp | incomplete ] | [ tag ] | [ weight num ]
The as-path prependnum,num,... parameter adds the specied AS numbers to the front of the AS-path list for the route. The range of
num values is 1 - 65535 for two-byte ASNs and 1 - 4294967295 if AS4s have been enabled.
The automatic-tag parameter calculates and sets an automatic tag value for the route.
NOTE
This parameter applies only to routes redistributed into OSPF.
The comm-list parameter deletes a community from the community attributes eld for a BGP4 route.
The community parameter sets the community attribute for the route to the number or well-known type you specify.
The dampening [half-life reuse suppress max-suppress-time ] parameter sets route dampening parameters for the route. The half-life
parameter species the number of minutes after which the route penalty becomes half its value. The reuse parameter species how low a
route penalty must become before the route becomes eligible for use again after being suppressed. The suppress parameter species
Filtering
FastIron Ethernet Switch Layer 3 Routing Conguration Guide, 08.0.30mb
53-1003627-06 413
how high a route penalty can become before the device suppresses the route. The max-suppress-time parameter species the
maximum number of minutes that a route can be suppressed regardless of how unstable it is.
The ip next hop ip-addr parameter sets the next-hop IP address for route that matches a match statement in the route map.
The ip next-hop peer-address parameter sets the BGP4 next hop for a route to the neighbor address.
The local-preference num parameter sets the local preference for the route. You can set the preference to a value from 0 through
4294967295.
The metric [ + | - ] num | none parameter sets the MED (metric) value for the route. The default MED value is 0. You can set the
preference to a value from 0 through 4294967295.
•set metric num - Sets the metric for the route to the number you specify.
•set metric + num - Increases route metric by the number you specify.
•set metric - num - Decreases route metric by the number you specify.
•set metric none - Removes the metric from the route (removes the MED attribute from the BGP4 route).
The metric-type type-1 and type-2 parameters change the metric type of a route redistributed into OSPF.
The metric-type internal parameter sets the route MED to the same value as the IGP metric of the BGP4 next-hop route. The parameter
does this when advertising a BGP4 route to an EBGP neighbor.
The next-hop ip-addr parameter sets the IP address of the route next-hop device.
The origin igp incomplete parameter sets the route origin to IGP or INCOMPLETE.
The tagtag-value parameter sets the route tag. You can specify a tag value from 0 through 4294967295.
NOTE
This parameter applies only to routes redistributed into OSPF.
NOTE
You also can set the tag value using a table map. The table map changes the value only when the device places the route in the
IP route table instead of changing the value in the BGP4 route table.
The weight num parameter sets the weight for the route. The range for the weight value is 0 through 4294967295.
Setting a BGP4 route MED to equal the next-hop route IGP metric
To set a route's MED to the same value as the IGP metric of the BGP4 next-hop route, when advertising the route to a neighbor, enter
commands such as the following.
device(config)# access-list 1 permit 192.168.9.0 0.0.0.255
device(config)# route-map bgp4 permit 1
device(config-routemap bgp4)# match ip address 1
device(config-routemap bgp4)# set metric-type internal
The rst command congures an ACL that matches on routes with destination network 192.168.9.0. The remaining commands
congure a route map that matches on the destination network in ACL 1, then sets the metric type for those routes to the same value as
the IGP metric of the BGP4 next-hop route.
Syntax: no set metric-type internal
Filtering
FastIron Ethernet Switch Layer 3 Routing Conguration Guide, 08.0.30mb
414 53-1003627-06
Setting the next-hop of a BGP4 route
To set the next-hop address of a BGP4 route to a neighbor address, enter commands such as the following.
device(config)# route-map bgp5 permit 1
device(config-routemap bgp5)# match ip address 1
device(config-routemap bgp5)# set ip next-hop peer-address
These commands congure a route map that matches on routes whose destination network is specied in ACL 1, and sets the next hop
in the routes to the neighbor address (inbound ltering) or the local IP address of the BGP4 session (outbound ltering).
Syntax: [no] set ip next-hop peer-address
The value that the software substitutes for peer-address depends on whether the route map is used for inbound ltering or outbound
ltering:
• When you use the set ip next-hop peer-address command in an inbound route map lter, peer-address substitutes for the
neighbor IP address.
• When you use the set ip next-hop peer-address command in an outbound route map lter, peer-address substitutes for the
local IP address of the BGP4 session.
NOTE
You can use this command for a peer group
conguration.
Deleting a community from a BGP4 route
To delete a community from a BGP4 route’s community attributes eld, enter commands such as the following.
device(config)# ip community-list standard std_3 permit 12:99 12:86
device(config)# route-map bgp6 permit 1
device(config-routemap bgp6)# match ip address 1
device(config-routemap bgp6)# set comm-list std_3 delete
The rst command congures a community ACL containing community numbers 12:99 and 12:86. The remaining commands
congure a route map that matches on routes whose destination network is specied in ACL 1, and deletes communities 12:99 and
12:86 from those routes. The route does not need to contain all the specied communities in order for them to be deleted. For example,
if a route contains communities 12:86, 33:44, and 66:77, community 12:86 is deleted.
Syntax: [no] set comm-list ACL delete
The ACL parameter species the name of a community list ACL.
Using a table map to set the tag value
Route maps that contain set statements change values in routes when the routes are accepted by the route map. For inbound route
maps (route maps that lter routes received from neighbors), the routes are changed before they enter the BGP4 route table.
For tag values, if you do not want the value to change until a route enters the IP route table, you can use a table map to change the value.
A table map is a route map that you have associated with the IP routing table. The device applies the set statements for tag values in the
table map to routes before adding them to the route table.
To congure a table map, you rst congure the route map, then identify it as a table map. The table map does not require separate
conguration. You can have one table map.
NOTE
Use table maps only for setting the tag value. Do not use table maps to set other attributes. To set other route attributes, use
route maps or lters.
Filtering
FastIron Ethernet Switch Layer 3 Routing Conguration Guide, 08.0.30mb
53-1003627-06 415
To create a route map and identify it as a table map, enter commands such as following. These commands create a route map that uses
an address lter. For routes that match the IP prex list lter, the route map changes the tag value to 100 and is then considered as a
table map. This route map is applied only to routes the device places in the IP route table. The route map is not applied to all routes. This
example assumes that IP prex list p11 has already been congured.
device(config)# route-map TAG_IP permit 1
device(config-routemap TAG_IP)# match ip address prefix-list p11
device(config-routemap TAG_IP)# set tag 100
device(config-routemap TAG_IP)# router bgp
device(config-bgp)# table-map TAG_IP
Conguring cooperative BGP4 route ltering
By default, the device performs all ltering of incoming routes locally, on the device itself. You can use cooperative BGP4 route ltering
to cause the ltering to be performed by a neighbor before it sends the routes to the device. Cooperative ltering conserves resources by
eliminating unnecessary route updates and lter processing. For example, the device can send a deny lter to a neighbor, which the
neighbor uses to lter out updates before sending them to the device. The neighbor saves the resources it would otherwise use to
generate the route updates, and the device saves the resources it would use to lter out the routes.
When you enable cooperative ltering, the device advertises this capability in its Open message to the neighbor when initiating the
neighbor session. The Open message also indicates whether the device is congured to send lters, receive lters, or both, and the types
of lters it can send or receive. The device sends the lters as Outbound Route Filters (ORFs) in route refresh messages.
To congure cooperative ltering, perform the following tasks on the device and on the BGP4 neighbor:
•Congure the lter.
NOTE
Cooperative ltering is currently supported only for lters congured using IP prex
lists.
• Apply the lter as an inbound lter to the neighbor.
• Enable the cooperative route ltering feature on the device. You can enable the device to send ORFs to the neighbor, to receive
ORFs from the neighbor, or both. The neighbor uses the ORFs you send as outbound lters when it sends routes to the device.
Likewise, the device uses the ORFs it receives from the neighbor as outbound lters when sending routes to the neighbor.
• Reset the BGP4 neighbor session to send and receive ORFs.
• Perform these steps on the other device.
NOTE
If the device has inbound lters, the lters are still processed even if equivalent lters have been sent as ORFs to the
neighbor.
Enabling cooperative ltering
To congure cooperative ltering, enter commands such as the following.
device(config)# ip prefix-list Routesfrom10234 deny 10.20.0.0/24
device(config)# ip prefix-list Routesfrom10234 permit 0.0.0.0/0 le 32
device(config)# router bgp
device(config-bgp-router)# neighbor 10.2.3.4 prefix-list Routesfrom1234 in
device(config-bgp-router)# neighbor 10.2.3.4 capability orf prefixlist send
Filtering
FastIron Ethernet Switch Layer 3 Routing Conguration Guide, 08.0.30mb
416 53-1003627-06
The rst two commands congure statements for the IP prex list Routesfrom1234. The rst command congures a statement that
denies routes to 10.20.20./24. The second command congures a statement that permits all other routes. Once you congure an IP
prex list statement, all routes not explicitly permitted by statements in the prex list are denied.
The next two commands change the CLI to the BGP4 conguration level, then apply the IP prex list to neighbor 10.2.3.4. The last
command enables the device to send the IP prex list as an ORF to neighbor 10.2.3.4. When the device sends the IP prex list to the
neighbor, the neighbor lters out the 10.20.0.x routes from its updates to the device. This assumes that the neighbor is also congured
for cooperative ltering.
Syntax: [no] neighbor ip-addr | peer-group-name capability orf prexlist [ send | receive ]
The ip-addr | peer-group-name parameters specify the IP address of a neighbor or the name of a peer group of neighbors.
The send and receive parameters specify the support you are enabling:
•send - The device sends the IP prex lists to the neighbor.
•receive - The device accepts lters from the neighbor.
If you do not specify the capability, both capabilities are enabled.
The prexlist parameter species the type of lter you want to send to the neighbor.
NOTE
The current release supports cooperative ltering only for lters congured using IP prex
lists.
Sending and receiving ORFs
Cooperative ltering aects neighbor sessions that start after the ltering is enabled, but do not aect sessions that are already
established.
To activate cooperative ltering, reset the session with the neighbor. This is required because the cooperative ltering information is
exchanged in Open messages during the start of a session.
To place a prex-list change into eect after activating cooperative ltering, perform a soft reset of the neighbor session. A soft reset
does not end the current session, but sends the prex list to the neighbor in the next route refresh message.
NOTE
Make sure cooperative ltering is enabled on the device and on the neighbor before you send the
lters.
To reset a neighbor session and send ORFs to the neighbor, enter a command such as the following.
device# clear ip bgp neighbor 10.2.3.4
This command resets the BGP4 session with neighbor 10.2.3.4 and sends the ORFs to the neighbor. If the neighbor sends ORFs to the
device, the device accepts them if the send capability is enabled.
To perform a soft reset of a neighbor session and send ORFs to the neighbor, enter a command such as the following.
device# clear ip bgp neighbor 10.2.3.4 soft in prefix-list
Syntax: clear ip bgp neighbor ip-addr [ soft in prex-lter | soft in prex-list ]
If you use the soft in prex-lter parameter, the device sends the updated IP prex list to the neighbor as part of its route refresh
message to the neighbor.
Filtering
FastIron Ethernet Switch Layer 3 Routing Conguration Guide, 08.0.30mb
53-1003627-06 417
NOTE
If the device or the neighbor is not congured for cooperative ltering, the command sends a normal route refresh
message.
Displaying cooperative ltering information
You can display the following cooperative ltering information:
• The cooperative ltering conguration on the device.
• The ORFs received from neighbors.
To display the cooperative ltering conguration on the device, enter a command such as the following.
device# show ip bgp neighbor 10.10.10.1
1 IP Address: 10.10.10.1, AS: 65200 (IBGP), RouterID: 10.10.10.1
State: ESTABLISHED, Time: 0h0m7s, KeepAliveTime: 60, HoldTime: 180
RefreshCapability: Received
CooperativeFilteringCapability: Received
Messages: Open Update KeepAlive Notification Refresh-Req
Sent : 1 0 1 0 1
Received: 1 0 1 0 1
Last Update Time: NLRI Withdraw NLRI Withdraw
Tx: --- --- Rx: --- ---
Last Connection Reset Reason:Unknown
Notification Sent: Unspecified
Notification Received: Unspecified
TCP Connection state: ESTABLISHED
Byte Sent: 110, Received: 110
Local host: 10.10.10.2, Local Port: 8138
Remote host: 10.10.10.1, Remote Port: 179
ISentSeq: 460 SendNext: 571 TotUnAck: 0
TotSent: 111 ReTrans: 0 UnAckSeq: 571
IRcvSeq: 7349 RcvNext: 7460 SendWnd: 16384
TotalRcv: 111 DupliRcv: 0 RcvWnd: 16384
SendQue: 0 RcvQue: 0 CngstWnd: 5325
Syntax: show ip bgp neighbor ip-addr
To display the ORFs received from a neighbor, enter a command such as the following:
device# show ip bgp neighbor 10.10.10.1 received prefix-filter
ip prefix-list 10.10.10.1: 4 entries
seq 5 permit 10.10.0.0/16 ge 18 le 28
seq 10 permit 10.20.10.0/24
seq 15 permit 10.0.0.0/8 le 32
seq 20 permit 10.10.0.0/16 ge 18
Syntax: show ip bgp neighbor ip-addr received prex-lter
Four-byte Autonomous System Numbers (AS4)
This section describes the reasons for enabling four-byte autonomous system numbers (AS4s). AS4s are supported by default. You can
specify and view AS4s by default and using the enable facility described in this section. However, not all devices in a network are always
capable of utilizing AS4s. The act of enabling them on the local device initiates a facility for announcing the capability and negotiating its
use with neighbors. If you do not enable AS4s on a device, other devices do not know that this device is sending them.
Four-byte Autonomous System Numbers (AS4)
FastIron Ethernet Switch Layer 3 Routing Conguration Guide, 08.0.30mb
418 53-1003627-06
The system uses a hierarchy to prioritize the utilization of the AS4 capability. The prioritization depends on the CLI conguration
commands. AS4s can be enabled and congured at the level of a neighbor, a peer group, or globally for the entire device, according to
the following bottom-up hierarchy:
• If a neighbor has no conguration for AS4s but it belongs to a peer group, the neighbor uses the conguration from the peer
group. For example, if you congure a neighbor but do not include a specication for AS4s, one of the following applies:
– The neighbor uses the AS4 conguration for a peer group if it belongs to a peer group.
– The neighbor uses the device conguration if it does not belong to a peer group or the peer group has no AS4
conguration.
• If a peer group has no conguration for AS4s, it can use the global conguration of the device. If the device has no conguration
for AS4s, then a neighbor or peer group without a conguration for AS4s use the device default--no announcement or
negotiation of AS4s.
• If a neighbor belongs to peer group with an AS4 conguration but you want that neighbor to be disabled or have a dierent AS4
conguration, the neighbor AS4 conguration overrides the peer group conguration. For example, you can ensure that
neighbor has no AS4 announcement and negotiation activity even though the peer group is enabled for AS4 capability.
NOTE
The conguration for AS4 can be enabled, disabled, or can have no explicit
conguration.
CLI commands allow you to disable AS4s on an entity whose larger context has AS4s enabled. For example, you can use a CLI
command to disable AS4s on a neighbor that is a member of a peer group that is enabled for AS4s.
Normally, AS4s are sent only to a device, peer group, or neighbor that is similarly congured for AS4s. If a AS4 is congured for a local-
autonomous systemS, the system signals this conguration by sending AS_TRANS in the My Autonomous System eld of the OPEN
message. However, if the AS4 capability for a neighbor is disabled, the local device does not send the four-byte Autonomous System
number capability to the neighbor.
Enabling AS4 numbers
This section describes how to enable the announcement and negotiation of AS4s and describes the dierent types of notation that you
can use to represent a AS4.
You can enable AS4s on a device, a peer group, and a neighbor. For global conguration, the capability command in the BGP4
conguration context enables or disables AS4 support. For a peer group or a neighbor, capability is a keyword for the neighbor
command. In addition to enabling AS4s for a neighbor or a peer group, you can also use the combination of the capability keyword and
the optional enable or disable keyword to disable this feature in a specic case where the AS4s are enabled for a larger context. The
Neighbor conguration of AS4s section illustrates this capability.
Global AS4 conguration
To enable AS4s globally, use the capability command in the BGP4 conguration context as shown.
device(config-bgp)# capability as4 enable
Syntax: [no] capability as4 enable | disable
The no form of the capability command deletes the announcement and negotiation conguration of AS4s (if it has been enabled) at the
global level. Using the regular form of the command with the disable keyword has the same eect on the global conguration. Disabling
or using the no form of the command does not aect the conguration at the level of a peer or neighbor.
Four-byte Autonomous System Numbers (AS4)
FastIron Ethernet Switch Layer 3 Routing Conguration Guide, 08.0.30mb
53-1003627-06 419
The consequences of choosing between the enable or disable keyword are reected in the output of the show running conguration
command.
Peer group conguration of AS4s
To enable AS4s for a peer group, use the capability keyword with the neighbor command in the BGP4 conguration context, as the
following example for the Peergroup_1 peer group illustrates.
device(config-bgp)# neighbor Peergroup_1 capability as4 enable
Syntax: [no] neighbor peer-group-name capability as4 enable | disable
The no form of the neighbor command along with the capability and as4 keywords disables the announcement and negotiation of AS4s
in the named peer group. Using the regular form of the command with the disable keyword has the same eect on the neighbor
conguration.
The consequences using the enable or disable keywords are reected in the output of the show running conguration command.
However, if the peer group conguration omits an explicit AS4 argument, the show running conguration output will not contain AS4
information.
Neighbor conguration of AS4s
To enable AS4s for a neighbor, use the capability and as4 keywords with the neighbor command in the BGP4 conguration context, as
the following example for IP address 1.1.1.1 illustrates.
device(config-bgp)# neighbor 1.1.1.1 capability as4 enable
Syntax: [no] neighbor IPaddress capability as4 enable | disable
The no form of the neighbor command with the capability and as4 keywords deletes the neighbor-enable for AS4s.
The consequences of using the enable or disable keywords are reected in the output of the show running conguration command.
However, if the neighbor conguration omits an explicit AS4 argument, the show running conguration output will not contain AS4
information.
To disable AS4s on a particular neighbor within a peer group that is enabled for AS4s, enter a command similar to the following.
device(config-bgp)# neighbor 1.1.1.1 capability as4 disable
Specifying the local AS number
The local autonomous system number (ASN) identies the autonomous system where the BGP4 device resides.
Normally, AS4s are sent only to a device, peer group, or neighbor that is similarly congured for AS4s. Typically, if you try to set up a
connection from an AS4-enabled device to a device that processes only two-byte ASNs, the connection fails to come up unless you
specify the reserved ASN 23456 as the local ASN to send to the far-end device.
To set the local autonomous system number, enter commands such as the following.
device(config)# router bgp
BGP4: Please configure 'local-as' parameter in order to enable BGP4.
device(config-bgp)# local-as 100000
device(config-bgp)# write memory
Syntax: [no] local-as num
The num parameter species a local ASN in the range 1 - 4294967295. No default exists for num . ASNs 64512 - 65535 are the
well-known private BGP4 autonomous system numbers and are not advertised to the Internet community.
Four-byte Autonomous System Numbers (AS4)
FastIron Ethernet Switch Layer 3 Routing Conguration Guide, 08.0.30mb
420 53-1003627-06
Route-map set commands and AS4s
You can prepend an AS4 number to an autonomous system path or make the autonomous system number a tag attribute for a route
map as shown here.
device(config-routemap test)# set as-path prepend 7701000
Syntax: [no] set as-path prepend num,num , ... | tag
Use the no form of this command to remove the conguration.
NOTE
If the autononous system path for a route map has prepended ASNs and you want to use the no form of the command to
delete the conguration, you must include the prepended ASNs in the no set as-path entry. For example, if 70000 and 70001
have been prepended to a route map, enter no set as-path prepend 70000 70001 . As a shortcut, in the conguration context
of a particular route map, you can also copy and paste ASNs from the output of show commands, such as show route-map or
show ip bgp route .
Use the prepend keyword to prepend one or more ASNs. The maximum number of ASNs that you can prepend is 16. The range for
each ASN is 1 - 4294967295.
Entering the tag keyword sets the tag as an AS-path attribute.
Clearing BGP4 routes to neighbors
You can clear BGP4 connections using the AS4 as an argument with the clear ip bgp neighbor command in the conguration context
level of the CLI. as shown.
device(config)# clear ip bgp neighbor 80000
Syntax: clear ip bgp neighbor all | ip-addr | peer-group-name | as-num [ last-packet-with-error | notication-errors | [ soft [ in | out ] |
soft-outbound ]
The neighbor specication is either all, ip-addr , peer-group-name , or as-num . The all parameter species all neighbors. The ip-addr
parameter species a neighbor by its IP interface with the device. The peer-group-name species all neighbors in a specic peer group.
The as-num parameter species all neighbors within the specied AS. After choosing one mandatory parameter, you can choose an
optional parameter.
The soft in and soft out parameters determine whether to refresh the routes received from the neighbor or the routes sent to the
neighbor. If you do not specify in or out , the device performs a soft refresh in both options:
•soft in performs one of the following actions on inbound routes, according to other conguration settings:
– If you enabled soft reconguration for the neighbor or peer group, soft in updates the routes by comparing the route
policies against the route updates that the device has stored. Soft reconguration does not request additional updates from
the neighbor or otherwise aect the session with the neighbor.
– If you did not enable soft reconguration, soft in requests the entire BGP4 route table on the neighbor (Adj-RIB-Out), then
applies the lters to add, change, or exclude routes.
– If a neighbor does not support dynamic refresh, soft in resets the neighbor session.
•soft out updates all outbound routes and then sends the entire BGP4 route table for the device (Adj-RIB-Out) to the neighbor
after the device changes or excludes the routes aected by the lters.
• The soft-outbound parameter updates all outbound routes by applying the new or changed lters, but sends only the existing
routes aected by the new or changed lters to the neighbor.
Four-byte Autonomous System Numbers (AS4)
FastIron Ethernet Switch Layer 3 Routing Conguration Guide, 08.0.30mb
53-1003627-06 421
NOTE
Use soft-outbound only if the outbound policy is changed. The soft-outbound parameter updates all outbound routes by
applying the new or changed lters. However, the device sends to the neighbor only the existing routes that are aected by the
new or changed lters.The soft out parameter updates all outbound routes and then sends the entire BGP4 route table on the
device to the neighbor after the device changes or excludes the routes aected by the lters.
AS4 notation
A AS4 can appear in either a plain or a dot notation format in the output of show commands. To select one of these formats, specify the
format before entering the show command. This section denes these formats and describes how to select a format. The following
notations are currently supported:
• With the default asplain , the ASN is a decimal integer in the range 1 - 4294967295.
• With asdot +, all ASNs are two integer values joined by a period character in the following format:
<high order 16-bit value in decimal>.<low order 16-bit value in decimal>
Using the asdot+ notation, an autonomous system number of value 65526 is represented as the string "0.65526," and an autonomous
system number of value 65546 is represented as the string "1.10."
• With asdot, an ASN less than 65536 uses the asplain notation (and represents autonomous system number values equal to or
greater than 65536 using the asdot+ notation). Using the asdot notation, ASN 65526 is represented as the string "65526,"
and ASN 65546 is represented as the string "1.10".
NOTE
You can enter autonomous system numbers in any format. However, if you want the asdot or the asdot+ format to appear in the
output of a show command, you must specify these in the CLI.
NOTE
Remember that autonomous system path matching that uses regular expression is based on the congured autonomous
system format.
The following command sequences show how to enable the dierent notations for AS4s and how these notations appear in the output
display.
To see ASNs in asplain, use the show ip bgp command.
device(config)# show ip bgp
Total number of BGP Routes: 1
Status codes:s suppressed, d damped, h history, * valid, > best, i internal, S stale
Origin codes: i - IGP, e - EGP,? - incomplete
Network Next Hop Metric LocPrf Weight Path
*> 47.1.1.0/24 192.168.1.5 1 100 0 90000 100 200 65535 65536 65537 65538 65539 75000 ?
To specify asdot notation before displaying IP BGP4 information, use the as-format command.
device(config)# as-format asdot
device(config)# show ip bgp
Total number of BGP Routes: 1
Status codes: s suppressed, d damped, h history, * valid, > best, i internal, S stale
Origin codes: i - IGP, e - EGP, ? - incomplete
Network Next Hop Metric LocPrf Weight Path
*> 10.1.1.0/24 192.168.1.5 1 100 0 1.24464 100 200 65535
1.0 1.1 1.2 1.3 1.9464 ?
Syntax: [no] as-format asplain | asdot | asdot+
The default is asplain and can be restored using the no version of the command, if the CLI is currently using asdot or asdot+ .
Four-byte Autonomous System Numbers (AS4)
FastIron Ethernet Switch Layer 3 Routing Conguration Guide, 08.0.30mb
422 53-1003627-06
To activate asdot+ notation, enter as-format asdot+ in the CLI.
device(config)# as-format asdot+
device(config)# show ip bgp
Total number of BGP Routes: 1
Status codes: s suppressed, d damped, h history, * valid, > best, i internal, S stale
Origin codes: i - IGP, e - EGP,? - incomplete
Network Next Hop Metric LocPrf Weight Path
*> 10.1.1.0/24 192.168.1.5 1 100 0 1.24464 0.100 0.200
0.65535 1.0 1.1 1.2 1.3 1.9464 ?
BGP4 AS4 attribute errors
This section describes the handling of the confederation path segments in the AS4_PATH attribute, and also species the error handling
for the new attributes.
To support AS4, the following attributes: AS4_PATH and AS4_Aggregator were specied in RFC 4893. Confederation path segments
in an AS4_PATH are discarded and if there are any other errors such as: attribute length , ag , confederation segments after AS_SEQ/
AS_SET, Invalid segment types and More than one AS4_PATH in these new attributes, the attribute is discarded and the error is logged.
Error logs
The device generates a log when it encounters attribute errors in AS4_PATH and AS4_AGGREGATOR.
NOTE
Logging of errors is rate-limited to not more than one message for every two minutes. Some errors may be lost due to this
rate-limiting.
Sample log messages for various attribute errors are shown here.
Attribute length error (ignore the AS4_PATH)
SYSLOG: Sep 9 19:02:03:<11>mu2, BGP: From Peer 192.168.1.1 received invalid AS4_PATH attribute length (3)
- entire AS4_PATH ignored
Attribute ag error (ignore the AS4_PATH)
SYSLOG: Sep 9 19:02:03:<11>mu2, BGP: From Peer 192.168.1.1 received invalid AS4_PATH attribute flag (0x40)
- entire AS4_PATH ignored
Confederation segments after AS_SEQ/AS_SET (ignore the AS4_PATH)
SYSLOG: Sep 9 19:02:03:<11>mu2, BGP: From Peer 192.168.1.1 received invalid Confed info in AS4_PATH (@byte
43) - entire AS4_PATH not ignored
Invalid segment types (ignore the AS4_ PATH)
SYSLOG: Sep 9 19:02:03:<11>mu2, BGP: From Peer 192.168.1.1 received incorrect Seq type/len in AS4_PATH
(@byte 41) - entire AS4_PATH ignored
More than one AS4_PATH (Use the rst one and ignore the others)
SYSLOG: Sep 9 19:02:03:<11>mu2, BGP: From Peer 192.168.1.1 received multiple AS4_PATH attributes - used
first AS4_PATH attribute only
BGP4 AS4 attribute errors
FastIron Ethernet Switch Layer 3 Routing Conguration Guide, 08.0.30mb
53-1003627-06 423
Conguring route ap dampening
A route ap is a change in the state of a route, from up to down or down to up. A route state change causes changes in the route tables
of the devices that support the route. Frequent route state changes can cause Internet instability and add processing overhead to the
devices that support the route.
Route ap dampening helps reduce the impact of route ap by changing the way a BGP4 device responds to route state changes. When
route ap dampening is congured, the device suppresses unstable routes until the number of route state changes drops enough to
meet an acceptable degree of stability. The Brocade implementation of route ap dampening is based on RFC 2439.
Route ap dampening is disabled by default. You can enable the feature globally or on an individual route basis using route maps.
NOTE
The device applies route ap dampening only to routes learned from EBGP
neighbors.
The route ap dampening mechanism is based on penalties. When a route exceeds a congured penalty value, the device stops using
that route and stops advertising it to other devices. The mechanism also allows route penalties to reduce over time if route stability
improves.
The route ap dampening mechanism uses the following parameters:
• Suppression threshold - Species the penalty value at which the device stops using the route. Each time a route becomes
unreachable or is withdrawn by a BGP4 UPDATE from a neighbor, the route receives a penalty of 1000. By default, when a
route penalty is greater than 2000, the device stops using the route. By default, if a route goes down more than twice, the
device stops using the route. You can set the suppression threshold to a value from 1 through 20000. The default is 2000.
• Half-life - Once a route has been assigned a penalty, the penalty decreases exponentially and decreases by half after the half-
life period. The default half-life period is 15 minutes. The software reduces route penalties every ve seconds. For example, if a
route has a penalty of 2000 and does not receive any more penalties during the half-life, the penalty is reduced to 1000 after
the half-life expires. You can congure the half-life to be from 1 - 45 minutes. The default is 15 minutes.
• Reuse threshold - Species the minimum penalty a route can have and still be suppressed by the device. If the route penalty
falls below this value, the device un-suppresses the route and can use it again. The software evaluates the dampened routes
every ten seconds and un-suppresses the routes that have penalties below the reuse threshold. You can set the reuse threshold
to a value from 1 through 20000. The default is 750.
• Maximum suppression time - Species the maximum number of minutes a route can be suppressed regardless of how
unstable the route has been before this time. You can set the parameter to a value from 1 through 20000 minutes. The default
is four times the half-life. When the half-life value is set to its default (15 minutes), the maximum suppression time defaults to
60 minutes.
You can congure route ap dampening globally or for individual routes using route maps. If you congure route ap dampening
parameters globally and also use route maps, the settings in the route maps override the global values.
Globally conguring route ap dampening
Route ap dampening reduces the amount of route state changes propagated by BGP4 due to unstable routes. This in turn reduces
processing requirements.
To enable route ap dampening using the default values, enter the following command.
device(config-bgp-router)# dampening
Syntax: [no] dampening [ half-life reuse suppress max-suppress-time ]
Conguring route ap dampening
FastIron Ethernet Switch Layer 3 Routing Conguration Guide, 08.0.30mb
424 53-1003627-06
The half-life parameter species the number of minutes after which the penalty for a route becomes half its value. The route penalty
allows routes that have remained stable for a period despite earlier instability to eventually become eligible for use again. The decay rate
of the penalty is proportional to the value of the penalty. After the half-life expires, the penalty decays to half its value. A dampened route
that is no longer unstable can eventually again become eligible for use. You can congure the half-life to be from 1 through 45 minutes.
The default is 15 minutes.
The reuse parameter species how low a penalty for a route must be before the route becomes eligible for use again, after being
suppressed. You can set the reuse threshold to a value from 1 through 20000. The default is 750 (0.75, or three-fourths, of the penalty
assessed for a one ap).
The suppress parameter species how high the penalty for a route can be before the device suppresses the route. You can set the
suppression threshold to a value from 1 through 20000. The default is 2000 (more than two aps).
The max-suppress-time parameter species the maximum number of minutes that a route can be suppressed regardless of how
unstable it is. You can set the maximum suppression time to a value from 1 through 255 minutes. The default is 40 minutes.
This example shows how to change the dampening parameters.
device(config-bgp-router)# dampening 20 200 2500 40
This command changes the half-life to 20 minutes, the reuse threshold to 200, the suppression threshold to 2500, and the maximum
number of minutes a route can be dampened to 40.
NOTE
To change any of the parameters, you must specify all the parameters with the command. To want to leave any parameters
unchanged, enter their default values.
Using a route map to congure route ap dampening for a specic
neighbor
You can use a route map to congure route ap dampening for a specic neighbor by performing the following tasks:
•Congure an empty route map with no match or set clauses. This route map does not specify particular routes for dampening
but does allow you to enable dampening globally when you refer to this route map from within the BGP4 conguration level.
•Congure another route map that explicitly enables dampening. Use a set clause within the route map to enable dampening.
When you associate this route map with a specic neighbor, the route map enables dampening for all routes associated with the
neighbor. You also can use match clauses within the route map to selectively perform dampening on some routes from the
neighbor.
NOTE
You still need to congure the rst route map to enable dampening globally. The second route map does not enable dampening
by itself; it just applies dampening to a neighbor.
• Apply the route map to the neighbor.
To enable route ap dampening for a specic BGP4 neighbor, enter commands such as the following.
device(config)# route-map DAMPENING_MAP_ENABLE permit 1
device(config-routemap DAMPENING_MAP_ENABLE)# exit
device(config)# route-map DAMPENING_MAP_NEIGHBOR_A permit 1
device(config-routemap DAMPENING_MAP_NEIGHBOR_A)# set dampening
device(config-routemap DAMPENING_MAP_NEIGHBOR_A)# exit
device(config)# router bgp
device(config-bgp)# dampening route-map DAMPENING_MAP_ENABLE
device(config-bgp)# neighbor 10.10.10.1 route-map in DAMPENING_MAP_NEIGHBOR_A
Conguring route ap dampening
FastIron Ethernet Switch Layer 3 Routing Conguration Guide, 08.0.30mb
53-1003627-06 425
In this example, the rst command globally enables route ap dampening. This route map does not contain any match or set clauses. At
the BGP4 conguration level, the dampening route-map command refers to the DAMPENING_MAP_ENABLE route map created by
the rst command, thus enabling dampening globally.
The third and fourth commands congure a second route map that explicitly enables dampening. Notice that the route map does not
contain a match clause. The route map implicitly applies to all routes. Since the route map will be applied to a neighbor at the BGP4
conguration level, the route map will apply to all routes associated with the neighbor.
Although the second route map enables dampening, the rst route map is still required. The second route map enables dampening for
the neighbors to which the route map is applied. However, unless dampening is already enabled globally by the rst route map, the
second route map has no eect.
The last two commands apply the route maps. The dampening route-map command applies the rst route map, which enables
dampening globally. The neighbor command applies the second route map to neighbor 10.10.10.1. Since the second route map does
not contain match clauses for specic routes, the route map enables dampening for all routes received from the neighbor.
Removing route dampening from a route
You can un-suppress routes by removing route ap dampening from the routes. The device allows you to un-suppress all routes at once
or un-suppress individual routes.
To un-suppress all the suppressed routes, enter the following command at the Privileged EXEC level of the CLI.
device# clear ip bgp dampening
Syntax: clear ip bgp dampening [ ip-addr ip-mask ]
The ip-addr parameter species a particular network.
The ip-mask parameter species the network mask.
To un-suppress a specic route, enter a command such as the following.
device# clear ip bgp dampening 10.157.22.0 255.255.255.0
This command un-suppresses only the routes for network 10.157.22.0/24.
Displaying and clearing route ap dampening statistics
The software provides many options for displaying and clearing route ap statistics.
Displaying route ap dampening statistics
To display route dampening statistics or all the dampened routes, enter the following command at any CLI level.
device# show ip bgp flap-statistics
Total number of flapping routes: 414
Status Code >:best d:damped h:history *:valid
Network From Flaps Since Reuse Path
h> 10.50.206.0/23 10.90.213.77 1 0 :0 :13 0 :0 :0 65001 4355 1 701
h> 10.255.192.0/20 10.90.213.77 1 0 :0 :13 0 :0 :0 65001 4355 1 7018
h> 10.252.165.0/24 10.90.213.77 1 0 :0 :13 0 :0 :0 65001 4355 1 7018
h> 10.50.208.0/23 10.90.213.77 1 0 :0 :13 0 :0 :0 65001 4355 1 701
h> 10.33.0.0/16 10.90.213.77 1 0 :0 :13 0 :0 :0 65001 4355 1 701
*> 10.17.220.0/24 10.90.213.77 1 0 :1 :4 0 :0 :0 65001 4355 701 62
Syntax: show ip bgp ap-statistics [ regular-expression regular-expression | address mask [ longer-prexes ] | neighbor ip-addr ] as-
path-lter num
Conguring route ap dampening
FastIron Ethernet Switch Layer 3 Routing Conguration Guide, 08.0.30mb
426 53-1003627-06
The regular-expression regular-expression parameter is a regular expression. Regular expressions are the same ones supported for
BGP4 AS-path lters.
The address mask parameters specify a particular route. If you also use the optional longer-prexes parameter, all statistics for routes
that match the specied route or have a longer prex than the specied route are displayed. For example, if you specify 10.157.0.0
longer , all routes with the prex 10.157. or longer (such as 10.157.22.) are displayed.
The neighborip-addr parameter displays route ap dampening statistics only for routes learned from the specied neighbor. You also
can display route ap statistics for routes learned from a neighbor by entering the following command: show ip bgp neighbor ap-
statistics .
The as-path-lter num parameter species one or more lters. Only the routes that have been dampened and that match the specied
lter or lters are displayed.
TABLE 91 show ip bgp ap-statistics output descriptions
This eld Displays
Total number of apping routes The total number of routes in the BGP4 route table that have changed
state and have been marked as apping routes.
Status code Indicates the dampening status of the route, which can be one of the
following:
• > - This is the best route among those in the BGP4 route table
to the route destination.
• d - This route is currently dampened, and unusable.
• h - The route has a history of apping and is unreachable now.
• * - The route has a history of apping but is currently usable.
Network The destination network of the route.
From The neighbor that sent the route to the device.
Flaps The number of aps the route has experienced.
Since The amount of time since the rst ap of this route.
Reuse The amount of time remaining until this route will be un-suppressed and
can be used again.
Path Shows the AS-path information for the route.
You also can display all dampened routes by entering the show ip bgp dampened-paths command.
Clearing route ap dampening statistics
Clearing the dampening statistics for a route does not change the dampening status of the route. To clear all the route dampening
statistics, enter the following command at any level of the CLI.
device# clear ip bgp flap-statistics
Syntax: clear ip bgp ap-statistics [ regular-expression regular-expression | address mask | neighbor ip-addr ]
The parameters are the same as those for the show ip bgp ap-statistics command (except the longer-prexes option is not
supported).
NOTE
The clear ip bgp dampening command not only clears statistics but also un-suppresses the routes.
Conguring route ap dampening
FastIron Ethernet Switch Layer 3 Routing Conguration Guide, 08.0.30mb
53-1003627-06 427

Generating traps for BGP4
You can enable and disable SNMP traps for BGP4. BGP4 traps are enabled by default.
To enable BGP4 traps after they have been disabled, enter the following command.
device(config)# snmp-server enable traps bgp
Syntax: [no] snmp-server enable traps bgp
Use the no form of the command to disable BGP4 traps.
Conguring BGP4
Once you activate BGP4, you can congure the BGP4 options. There are two conguration levels: global and address family.
At the global level , all BGP4 congurations apply to IPv4 and IPv6. Enter this layer using the device BGP4 command
Under the global level, you specify an address family . Address families separate IPv4 and IPv6 BGP4 congurations. Go to this level by
entering the address-family command at the device BGP4 level. The command requires you to specify the IPv4 or IPv6 network
protocol.
The address-family command also requires you to select a sub-address family, which is the type of routes for the conguration. Specify
unicast routes.
TABLE 92 IPv4 BGP4 commands for dierent conguration levels
Command Global (iPv4 and IPv6) IPv4 address family unicast
address-family x x
aggregate-address x
always-compare-med x
always-propagate x
as-path-ignore x
bgp-redistribute-internal x
client-to-client-reection x x
cluster-id x
compare-med-empty-aspath x
compare-routerid x
confederation x
dampening x
default-information-originate x
default-local-preference x
default-metric x
distance x
enforce-rst-as x
exit-address-family x x
fast-external-fallover x
graceful-restart x
install-igp-cost x
local-as x
Generating traps for BGP4
FastIron Ethernet Switch Layer 3 Routing Conguration Guide, 08.0.30mb
428 53-1003627-06

TABLE 92 IPv4 BGP4 commands for dierent conguration levels (continued)
Command Global (iPv4 and IPv6) IPv4 address family unicast
log-dampening-debug x
maxas-limit x
maximum-paths x
med-missing-as-worst x
multipath x
neighbor x x
network x
next-hop-enable-default x
next-hop-recursion x
redistribute x
rib-route-limit x
show x x
static-network
table-map x
timers x
update-time x
Entering and exiting the address family conguration
level
The BGP4 address family contains a unicast sub-level.
To go to the IPv4 BGP4 unicast address family conguration level, enter the following command.
device(config-bgp)# address-family ipv4 unicast
device(config-bgp)#
NOTE
The CLI prompt for the global BGP4 level and the BGP4 address-family IPv4 unicast level is the same.
Syntax: [no] address-family ipv4 unicast [ vrf vrf-name ]
The default is the IPv4 unicast address family level.
The vrf option allows you to congure a unicast instance for the VRF specied by the vrf-name variable.
To exit an address family conguration level, enter the following command.
device(config-bgp)# exit-address-family
device(config-bgp)#
Syntax: [no] exit-address-family
Entering and exiting the address family conguration level
FastIron Ethernet Switch Layer 3 Routing Conguration Guide, 08.0.30mb
53-1003627-06 429
BGP route reector
A BGP device selects a preferred BGP4 route for a specic prex learned from multiple peers by using the BGP best path selection
algorithm, and installs the BGP4 route in the Routing Table Manager (RTM). The BGP device marks the preferred BGP4 route as the
best route, and advertises the route to other BGP4 neighbors. Generally, the RTM route table size is larger than the number of unique
BGP4 routes in the BGP4 route table. All preferred BGP4 routes are installed in RTM and are marked as the best BGP4 routes.
However, in certain congurations it is possible that the total number of preferred BGP4 routes may exceed the RTM route table size
limit. Therefore, some preferred BGP4 routes may not be installed in the RTM, and the BGP device is not able to forward trac correctly
for those BGP4 routes. Those BGP4 routes are not considered as the best BGP4 routes, and are not advertised to other BGP4
neighbors because trac miss-forwarding or packet drop can occur.
When a BGP device is congured as only a route reector server, and is not placed directly in the forwarding path, it is possible to mark
all preferred BGP4 routes as the best routes to be advertised to other BGP4 neighbors even if the routes are not installed in the RTM. To
support the behavior of a BGP device as a route reector server in such a scenario, use the always-propagate command and the rib-
route-limit command.
NOTE
The always-propagate command and the rib-route-limit command are supported.
Conguring BGP route reector
The always-propagate command enables a device to mark a preferred BGP4 route not installed in the RTM as the best route, and
advertise the route to other BGP4 neighbors. The same process for outbound route policy continues to apply to all best BGP4 routes.
The rib-route-limit command limits the number of BGP4 Routing Information Base (RIB) routes that can be installed in the RTM. The
RTM must be able to reserve enough entries for Interior Gateway Protocol (IGP) routes because the IGP routes are required by BGP4 to
resolve BGP4 next-hop entries. If the RTM is not able to reserve enough entries for IGP routes, BGP4 RIB routes can ll the entire RTM
with only BGP4 route entries. The rib-route-limit command enables IGP and BGP4 route entries to be installed in the RTM.
NOTE
The always-propagate command and the rib-route-limit command are congurable in any order under the BGP4 address
family conguration level.
Perform the following steps to advertise a preferred BGP4 route not installed in the RTM.
1. Congure a BGP4 unicast route. Enter a command such as the following.
device(config-bgp)# address-family ipv4 unicast
Syntax: address-family ipv4 unicast [ vrf vrf-name ] | ipv6 unicast
NOTE
To congure a BGP4 unicast route for a specied VRF instance, use the vrf vrf-name parameter. The vrfvrf-name
parameter allows you to create a VPN routing or forwarding instance specied by the vrf-name variable. The vrf-name
variable species the name of the VRF instance you want to create.
2. Enter the always-propagate command to enable a preferred BGP4 route (not installed in the RTM) to be advertised to other
BGP4 neighbors.
device(config-bgp)# always-propagate
Syntax: always-propagate
BGP route reector
FastIron Ethernet Switch Layer 3 Routing Conguration Guide, 08.0.30mb
430 53-1003627-06
3. Enter the rib-route-limit command to set the maximum number of BGP4 rib routes that can be installed in the RTM.
device(config-bgp)# rib-route-limit 500
Syntax: rib-route-limit decimal
The decimal variable species the maximum number of BGP4 rib routes that can be installed in the RTM. The user may enter
any number for the decimal variable for the rib-route-limit command. By default, there is no limit. If the rib-route-limit
command is set to 0, no BGP4 routes are installed in the RTM. If a BGP4 route is not installed in the RTM because of the
conguration set by the rib-route-limit command, the always-propagate command must be enabled for preferred BGP4
routes to be advertised to the BGP4 neighbors.
If the rib-route-limit command is congured to a value that is below the number of BGP4 routes already installed in the RTM,
the following warning message is displayed on the console.
device(config-bgp)# rib-route-limit 250
The new limit is below the current bgp rib route count. Please use Clear ip bgp routes command to
remove bgp rib routes.
You can only use one of the following commands to clear all BGP4 routes in the RTM, and reset the routes for preferred BGP4
routes to be reinstalled in the RTM. Depending on the type of route the rib-route-limit command is used for, select from one of
the following commands:
•clear ip bgp routes command. This command is used to clear IPv4 BGP unicast routes.
•clear ipv6 bgp routes command. This command is used to clear IPv6 BGP unicast routes.
NOTE
It is not guaranteed that the same number of preferred BGP4 routes will be reinstalled in the RTM.
4. Perform the following step to:
• exit the BGP4 unicast family conguration.
device(config-bgp-ipv4u)# exit-address-family
Syntax: exit-address-family
When you enter the exit-address-family command at the address family conguration level, you return to the BGP4 unicast
address family conguration level (the default BGP4 level).
Displaying conguration for BGP route reector
To display the conguration for preferred BGP4 routes not installed in the RTM, use the show ip bgp route command as shown in the
following example.
device(config-bgp)# show ip bgp route
Total number of BGP Routes: 333422
Status A:AGGREGATE B:BEST b:NOT-INSTALLED-BEST C:CONFED_EBGP D:DAMPED
E:EBGP H:HISTORY I:IBGP L:LOCAL M:MULTIPATH m:NOT-INSTALLED-MULTIPATH
S:SUPPRESSED F:FILTERED s:STALE
Prefix Next Hop MED LocPrf Weight Status
...5 10.12.0.0/24 10.100.100.4 100 0 E
AS_PATH:48 1994 65148 21948 6461 1239 4837 4808 17431 18245...
Syntax: show ip bgp route
In the previous output, BGP4 receives 333,422 routes and the rib-route-limit command is congured to 300,000 routes. The always-
propagate command has not been enabled. However, because the rib-route-limit command is congured to allow for 300,000 routes
in the RTM, BGP4 installs only 300,000 routes of the 333,422 routes received in the RTM. When the always-propagate command is
enabled, a preferred BGP4 route not installed in the RTM is now considered as the best BGP4 route to be advertised to other peers. The
route is identied by the letter "b" (for NOT-INSTALLED-BEST) in the Status eld. However, when the always-propagate command is
BGP route reector
FastIron Ethernet Switch Layer 3 Routing Conguration Guide, 08.0.30mb
53-1003627-06 431
not enabled, the status eld displays only the default letter "E", as displayed for BGP4 route 10.12.0.0/24. The letter "B" or "b" is missing
from the Status eld.
NOTE
The description of the status "b: NOT-INSTALLED-BEST" has changed. The status description for "b: NOT-INSTALLED-
BEST" is now: The routes received from the neighbor are the best BGP4 routes to their destinations, but were nonetheless not
installed in the IP route table due to the rib-route-limit option (or RTM route table size limit), and the always-propagate option
to allow the propagating of those best BGP routes.
NOTE
Trac loss on a BGP4 route occurs when a device is advertising preferred BGP4 routes not installed in the RTM as part of the
forwarding path.
Because the BGP4 route 10.12.0.0/24 is not considered as the best BGP4 route, the route is not advertised to other BGP4 neighbors.
device(config-bgp)# show ip bgp route 10.12.0.0/24
Number of BGP Routes matching display condition : 1
Status A:AGGREGATE B:BEST b:NOT-INSTALLED-BEST C:CONFED_EBGP D:DAMPED
E:EBGP H:HISTORY I:IBGP L:LOCAL M:MULTIPATH m:NOT-INSTALLED-MULTIPATH
S:SUPPRESSED F:FILTERED s:STALE
Prefix Next Hop MED LocPrf Weight Status
1 10.12.0.0/24 10.100.100.4 100 0 E
AS_PATH: 48 1994 65148 21948 6461 1239 4837 4808 17431 18245
Last update to IP routing table: 0h16m2s
No path is selected as BEST route
Syntax: show ip bgp route ip-address/prex
After enabling the always-propagate command, the BGP4 route is now considered the best BGP4 route, even though the route is not
installed in the RTM. Because the rib-route-limit command was congured to allow for only 300,000 routes in the RTM some preferred
BGP4 routes are not installed in the RTM, and are not advertised to other BGP4 neighbors. By enabling the always-propagate
command, the device is now able to advertise those preferred BGP4 routes to other BGP4 neighbors. In the following example, the
Status eld displays "bE" indicating that the route is now considered the best BGP4 route for forwarding and will be advertised to other
BGP4 neighbors.
device(config-bgp)# show ip bgp route 10.12.0.0/24
Number of BGP Routes matching display condition : 1
Status A:AGGREGATE B:BEST b:NOT-INSTALLED-BEST C:CONFED_EBGP D:DAMPED
E:EBGP H:HISTORY I:IBGP L:LOCAL M:MULTIPATH m:NOT-INSTALLED-MULTIPATH
S:SUPPRESSED F:FILTERED s:STALE
Prefix Next Hop MED LocPrf Weight Status
1 10.12.0.0/24 10.100.100.4 100 0 bE
AS_PATH: 48 1994 65148 21948 6461 1239 4837 4808 17431 18245
Last update to IP routing table: 0h12m53s
Route is to be sent to 1 peers:
10.0.0.14(6)
For an explanation of the elds displayed in the output of the show ip bgp route command, refer to Displaying information for a specic
route on page 455.
Specifying a maximum AS path length
You can use the maxas-limit in command to congure a device running BGP4 to discard routes that exceed a specied AS path limit.
This limit can be congured globally, for peer groups, and for BGP neighbors.
Specifying a maximum AS path length
FastIron Ethernet Switch Layer 3 Routing Conguration Guide, 08.0.30mb
432 53-1003627-06
When you congure maxas-limit in , the behavior of the device changes to rst check the length of the AS paths in the UPDATE
messages and then to apply the inbound policy. If the AS path exceeds the congured length, then the device performs the following
actions:
• Does not store the route in the RIB and does not forward the NLRIs and attributes contained in the UPDATE message for that
route
• Logs an error
• Processes the withdrawn NLRIs in the same update message
If a route from a peer exceeds the congured Maximum AS path limit, the device also removes the same route from that peer, if it exists,
from its own RIB.
After a maximum AS path length is congured, the maximum AS path limit applies to all new inbound routes. To update previously
stored routes, you must perform an inbound soft reset for all of the address families activated for that particular BGP neighbor session.
NOTE
If the neighbor soft-reconguration feature is enabled, you must perform a hard reset on the device to impose the maximum
length limit.
NOTE
maxas-limit in is checked against the received AS_PATH and AS4_PATH attributes.
BGP devices check for and, if congured, apply maxas-limit in in the following order:
1. Neighbor value
2. Peer group value
3. Global value
In a case where a neighbor has no maximum AS limit, a peer group has a value of 3 congured, and the system has a value of
9 congured, all of the devices in the peer group will only use the peer group value; the global value will never be used.
Setting a global maximum AS path limit
The syntax for the global maximum AS path limit command is:
Syntax: [no] maxas-limit in num
The maxas-limit keyword species the limit on the AS numbers in the as-path attribute. The in keyword allows the as-path attribute from
any neighbor imposing a limit on AS numbers received. The default maximum length for the global system is 300. The range is 0 - 300.
The no keyword removes the conguration at the global level.
NOTE
The device applies the BGP4 maximum AS path limit on a per virtual device basis.
To congure the global Maximum AS path limit to 15, enter the following command:
device(config-bgp)# maxas-limit in 15
Setting a maximum AS path limit for a peer group or neighbor
To set maximum AS path limit for a peer group or a neighbor, the syntax is:
Syntax: neighbor { ip-addr | peer-group-name } maxas-limit in [ num | disable ]
Specifying a maximum AS path length
FastIron Ethernet Switch Layer 3 Routing Conguration Guide, 08.0.30mb
53-1003627-06 433
By default, neighbors or peer groups have no congured maximum values. The range is 0 - 300. The disable keyword is used to stop a
neighbor from inheriting the conguration from the peer-group or global and to the use system default value.
To congure a peer group named "PeerGroup1" and set a maximum AS path value of 7, enter the following commands:
device(config-bgp)# neighbor PeerGroup1 peer-group
device(config-bgp)# neighbor PeerGroup1 maxas-limit in 7
BGP4 max-as error messages
This section lists error log messages that you might see when the device receives routes that exceed the congured AS segment limit or
the internal memory limit. The log messages can contain a maximum of 30 ASNs. If a message contains more than 30 ASNs, the
message is truncated and an ellipsis appears.
Maximum AS path limit error
SYSLOG: <11>Jan 1 00:00:00 mu1, BGP: From Peer 192.168.1.2 received Long AS_PAT H= AS_CONFED_SET(4) 1 2 3
AS_CONFED_SEQUENCE(3) 4 AS_SET(1) 5 6 7 AS_SEQ(2) 8 9 attribute length (9) More than configured MAXAS-LIMIT
7
Memory limit error
SYSLOG: <11>Jan 1 00:00:00 mu1, BGP: From Peer 192.168.1.2 received Long AS_PAT H= AS_CONFED_SET(4) 1 2 3
AS_CONFED_SEQUENCE(3) 4 AS_SET(1) 5 6 7 AS_SEQ(2) 8 9 attribute length (9) Exceeded internal memory limit
NOTE
The device generates a log message one time every two minutes. Because of this rate limit, it is possible that some errors might
not appear in the log. In this case, you can use the debug ip bgp events command to view errors pertaining to the maxas-limit
value and the actual AS path attributes received.
Originating the default route
By default, the device does not originate and advertise a default route using BGP4. A BGP4 default route is the IP address 0.0.0.0 and
the route prex 0 or network mask 0.0.0.0. For example, 0.0.0.0/0 is a default route.
NOTE
The device checks for the existence of an IGP route for 0.0.0.0/0 in the IP route table before creating a local BGP4 route for
0.0.0.0/0.
To congure the device to originate and advertise a default BGP4 route, enter this command.
device(config-bgp)# default-information-originate
Syntax: [no] default-information-originate
Changing the default metric used for route cost
By default, BGP4 uses the BGP MED value as the route cost when adding the route to the RTM. However, you can congure BGP4 to
use the IGP cost instead.
BGP4 max-as error messages
FastIron Ethernet Switch Layer 3 Routing Conguration Guide, 08.0.30mb
434 53-1003627-06
NOTE
It is recommended that you change the default to IGP cost only in mixed-vendor environments, and that you change it on all
Brocade devices in the environment.
To change the route cost default from BGP MED to IGP cost, enter a command such as the following:
device(config-bgp)# install-igp-cost
Syntax: [no] install-igp-cost
Use the no form of the command to revert to the default of BGP MED.
Conguring a static BGP4 network
This feature allows you to congure a static network in BGP4, creating a stable BGP4 network in the core. While a route congured with
this feature will never ap unless it is manually deleted, a "static" BGP4 network will not interrupt the normal BGP4 decision process on
other learned routes being installed into the RTM (Routing Table Manager). Consequently, when there is a route that can be resolved, it
will be installed into the RTM.
To congure a static BGP4 network, enter commands such as the following.
device(config)# router bgp
device(config-bgp)# static-network 10.157.22.26/16
Syntax: [no] static-network ipAddressPrex/mask
The ipAddress and mask variables are the IPv4 address prex and mask of the static BGP4 network you are creating.
Using the no option uninstalls a route (that was previously installed) from BGP4 RIB-IN and removes the corresponding drop route from
the RTM. If there is a new best route, it is advertised to peers if necessary. Otherwise, a withdraw message is sent.
NOTE
The BGP4 network route and the BGP4 static network route are mutually exclusive. They cannot be congured with the same
prex and mask.
When you congure a route using the static-network command, BGP4 automatically generates a local route in BGP4 RIB-IN, and
installs a NULL0 route in the RTM if there is no other valid route with the same prex/mask learned from any peer. Otherwise, the
learned BGP4 route will be installed in the RTM. In either situation, the new locally generated route will be the best route in RIB-IN and
will be advertised to peers if it passes the per-peer outbound policies.
Setting an administrative distance for a static BGP4 network
When a static BGP4 network route is congured, its type is local BGP4 route and has a default administrative distance value of 200. To
change the administrative distance value, change the value of all local BGP4 routes using the distance command at the router bgp level
of the CLI, and set a new value for local routes. You can also assign a specic administrative distance value for each static network using
the distance option as shown.
device(config)# router bgp
device(config-bgp)# static-network 10.157.22.26/16 distance 100
Syntax: [no] static-network ipAddressPrex/mask distance distance-value
The ipAddress and mask variables are the IPv4 address prex and mask of the static BGP4 network for which you are setting an
administrative distance.
The distance-value sets the administrative distance of the static BGP4 network route. The range for this value is 1 - 255.
Conguring a static BGP4 network
FastIron Ethernet Switch Layer 3 Routing Conguration Guide, 08.0.30mb
53-1003627-06 435

Limiting advertisement of a static BGP4 network to selected neighbors
You can control the advertisement of a static BGP4 network to BGP4 neighbors that are congured as Service Edge Devices. When this
feature is congured for a BGP4 neighbor, static BGP4 network routes that are installed in the routing table as DROP routes are not
advertised to that neighbor. When this feature is congured, the route is only advertised to identied Service Edge devices if it is installed
as a forward route, such as the routes described in these steps.
1. There is a learned route from a customer BGP4 peering.
2. There is a valid learned route from another Services Edge device as a result of a customer route present on that device.
To congure a BGP4 neighbor to limit the advertisement of Static BGP4 Network routes, enter the static-network-edge
command as shown.
device(config)# router bgp
device(config-bgp)# neighbor 10.2.3.4 static-network-edge
Syntax: [no] neighbor ip-address | peer-group-name static-network-edge
The ip-addr and peer-group-name variables indicate whether you are conguring an individual neighbor or a peer group. If you
specify a neighbor IP address, you are conguring that individual neighbor. If you specify a peer group name, you are
conguring a peer group.
Dynamic route lter update
Routing protocols use various route lters to control the distribution of routes. Route lters are used to lter routes received from and
advertised to other devices. Protocols also use route-map policies to control route redistribution from other routing protocols. In addition,
route lter policies are used to select routes to be installed in the routing tables, and used by forwarding engine to forward trac.
There are currently 5 dierent types of route lters dened for use in a device:
• Access List (ACL)
•Prex-List
• BGP4 as-path Access-list
• BGP4 community-list
• Route-map
Not every protocol uses all of these route lters. A protocol will usually use two or three lter types.
TABLE 93 Route lters used by each protocol
Protocol Route map Prex list Community- list As-path access- list ACL
BGP4 X X BGP4 does not use
Community- List lters
directly. It does use
them indirectly through
route-map lters that
contain Community-
List lters.
X X
OSPF X X X X X
RIP X X X X
RIPng X
OSPFv3 X X X X
MSDP X
MCast X
Conguring a static BGP4 network
FastIron Ethernet Switch Layer 3 Routing Conguration Guide, 08.0.30mb
436 53-1003627-06
When a route lter is changed (created, modied or deleted) by a user, the lter change notication will be sent to all relevant protocols, so
that protocols can take appropriate actions. For example if BGP4 is using a route-map (say MapX) to control the routes advertised to a
particular peer, the change of route-map (MapX) will cause BGP4 to re-evaluate the advertised routes, and make the appropriate
advertisements or withdrawals according to the new route-map policy.
A route lter change action can happen in three ways.
1. A new lter is dened (created).
This lter name may be already referenced by an application. The application needs to be notied of the addition of the new
lter, and will bind to and use the new lter. In general, if a lter name is referenced by an application, but is not actually dened,
the application assumes the default deny action for the lter.
2. An existing lter is undened (removed).
If the deleted lter is already used and referenced by an application, the application will unbind itself from the deleted lter.
3. An existing lter is modied (updated).
If the lter is already used and referenced by an application, the application will be notied.
Protocols are automatically notied when a route lter is created, deleted or modied. In addition, when a protocol is notied of a
lter change, appropriate steps are taken to apply the new or updated lter to existing routes.
Filter update delay and BGP
The lter-changes-update-delay command applies (remove only) to changes of lters that are already used or referenced by
applications. If the content of a lter is changed, the new lter action takes eect after lter-changes-update-delay for existing routes.
The notication delay also applies to situations where the usage or reference of a lter is changed in BGP.
For example, the following BGP neighbor command sets or changes the route-map lter on a neighbor:
device(config-bgp)# neighbor x.x.x.x route-map map_abc out
In this case, the device applies the route-map "map_abc" to the peer, and updates the neighbor out-bound routes after a delay.
If the delay-time is 0, BGP does not start peer out-bound policy updates immediately.
Use the clear lter-change-update or clear ip bgp neighbor soft-out commands to trigger BGP policy updates.
Similarly, the lter-changes-update-delay command also applies to the neighbor in-bound policy change.
NOTE
The auto-update action for a BGP peer lter is newly introduced in release 08.0.01. In previous releases, a user needs to
manually issue the clear ip bgp neighbor soft out command to cause the device to apply the new route-map retroactively to
existing routes.
The general guideline is to dene a policy rst , then apply it to a BGP peer.
BGP4 policy processing order
The order of application of policies when processing inbound and outbound route advertisements on the device is:
1. lp prex-list
2. Outbound Ip prex-list ORF, if negotiated
3. Filter-list (using As-path access-list)
4. Distribute list (using IP ACL - IPv4 unicast only)
5. Route-map
Conguring a static BGP4 network
FastIron Ethernet Switch Layer 3 Routing Conguration Guide, 08.0.30mb
53-1003627-06 437
Generalized TTL Security Mechanism support
The device supports the Generalized TTL Security Mechanism (GTSM) as dened in RFC 3682. GTSM protects the device from attacks
of invalid BGP4 control trac that is sent to overload the CPU or hijack the BGP4 session. GTSM protection applies to EBGP neighbors
only.
When GTSM protection is enabled, BGP4 control packets sent by the device to a neighbor have a Time To Live (TTL) value of 255. In
addition, the device expects the BGP4 control packets received from the neighbor to have a TTL value of either 254 or 255. For
multihop peers (where the ebgp-multihop option is congured for the neighbor), the device expects the TTL for BGP4 control packets
received from the neighbor to be greater than or equal to 255, minus the congured number of hops to the neighbor. If the BGP4
control packets received from the neighbor do not have the anticipated value, the device drops them.
For more information on GTSM protection, refer to RFC 3682.
To enable GTSM protection for neighbor 192.168.9.210 (for example), enter the following command.
device(config-bgp-router)# neighbor 192.168.9.210 ebgp-btsh
Syntax: [no] neighbor ip-addr | peer-group-name ebgp-btsh
NOTE
For GTSM protection to work properly, it must be enabled on both the device and the neighbor.
Displaying BGP4 information
You can display the following conguration information and statistics for BGP4 protocol:
• Summary BGP4 conguration information for the device
• Active BGP4 conguration information (the BGP4 information in the running conguration)
• Neighbor information
• Peer-group information
• Information about the paths from which BGP4 selects routes
• Summary BGP4 route information
• Virtual Routing and Forwarding (VRF) instance information
• The device’s BGP4 route table
• Route ap dampening statistics
• Active route maps (the route map conguration information in the running conguration)
• BGP4 graceful restart neighbor Information
• AS4 support and asdot notation
Displaying summary BGP4 information
You can display the local AS number, the maximum number of routes and neighbors supported, and some BGP4 statistics. You can also
display BGP4 memory usage for:
• BGP4 routes installed
• Routes advertising to all neighbors (aggregated into peer groups)
• Attribute entries installed
Generalized TTL Security Mechanism support
FastIron Ethernet Switch Layer 3 Routing Conguration Guide, 08.0.30mb
438 53-1003627-06

The show ip bgp summary command output has the following limitations:
• If a BGP4 peer is not congured for an address-family, the peer information is not displayed.
• If a BGP4 peer is congured for an address-family but not negotiated for an address-family after the BGP4 peer is in the
established state, the show ip bgp summary command output shows (NoNeg ) at the end of the line for this peer.
• If a BGP4 peer is congured and negotiated for that address-family, its display is the same as in previous releases.
To view summary BGP4 information for the device, enter the following command at any CLI prompt
device# show ip bgp summary
BGP4 Summary
Router ID: 10.10.1.14 Local AS Number: 100
Confederation Identifier: not configured
Confederation Peers:
Maximum Number of IP ECMP Paths Supported for Load Sharing: 1
Number of Neighbors Configured: 67, UP: 67
Number of Routes Installed: 258088, Uses 22195568 bytes
Number of Routes Advertising to All Neighbors:17,035844(3,099146 entries),
Uses 192,147052 bytes
Number of Attribute Entries Installed: 612223, Uses 55100070 bytes
Neighbor Address AS# State Time Rt:Accepted Filtered Sent ToSend
10.0.100.2 100 ESTABp 0h28m24s 0 0 258087 0
10.0.101.2 100 ESTAB 0h28m24s 0 0 258087 0
10.2.3.4 200 ADMDN 0h44m56s 0 0 0 2
Syntax: show ip bgp summary
TABLE 94 show ip bgp summary output descriptions
This eld Displays
Router ID The device ID.
Local AS Number The BGP4 AS number for the device.
Confederation Identier The AS number of the confederation in which the device resides.
Confederation Peers The numbers of the local autonomous systems contained in the
confederation. This list matches the confederation peer list you congure
on the device.
Maximum Number of Paths Supported for Load Sharing The maximum number of route paths across which the device can balance
trac to the same destination. The feature is enabled by default but the
default number of paths is 1. You can increase the number from 2 through
8 paths.
Number of Neighbors Congured The number of BGP4 neighbors congured on this device, and currently
in established state.
Number of Routes Installed The number of BGP4 routes in the device BGP4 route table and the route
or path memory usage.
Number of Routes Advertising to All Neighbors The total of the RtSent and RtToSend columns for all neighbors, the total
number of unique ribout group entries, and the amount of memory used
by these groups.
Number of Attribute Entries Installed The number of BGP4 route-attribute entries in the device route-attributes
table and the amount of memory used by these entries.
Neighbor Address The IP addresses of the BGP4 neighbors for this device.
AS# The AS number.
State The state of device sessions with each neighbor. The states are from this
perspective of the device, not the neighbor. State values are based on the
BGP4 state machine values described in RFC 1771 and can be one of
the following for each device:
• IDLE - The BGP4 process is waiting to be started. Usually,
enabling BGP4 or establishing a neighbor session starts the
Displaying BGP4 information
FastIron Ethernet Switch Layer 3 Routing Conguration Guide, 08.0.30mb
53-1003627-06 439

TABLE 94 show ip bgp summary output descriptions (continued)
This eld Displays
BGP4 process. A minus sign (-) indicates that the session has
gone down and the software is clearing or removing routes.
• ADMND - The neighbor has been administratively shut down.
• CONNECT - BGP4 is waiting for the connection process for
the TCP neighbor session to be completed.
• ACTIVE - BGP4 is waiting for a TCP connection from the
neighbor. Note : If the state frequently changes between
CONNECT and ACTIVE, there may be a problem with the TCP
connection.
• OPEN SENT - BGP4 is waiting for an Open message from the
neighbor.
• OPEN CONFIRM - BGP4 has received an Open message
from the neighbor and is now waiting for either a KEEPALIVE or
NOTIFICATION message. If the device receives a KEEPALIVE
message from the neighbor, the state changes to Established. If
the message is a NOTIFICATION, the state changes to Idle.
• ESTABLISHED - BGP4 is ready to exchange UPDATE packets
with the neighbor.
Operational States:
Additional information regarding the operational states of the BGP4 states
described above may be added as described in the following:
•(+) - is displayed if there is more BGP4 data in the TCP receiver
queue. Note : If you display information for the neighbor using
the show ip bgp neighborip-addr command, the TCP receiver
queue value will be greater than 0.
•(-) - indicates that the session has gone down and the software
is clearing or removing routes.
•(*) - indicates that the inbound or outbound policy is being
updated for the peer.
•(s) - indicates that the peer has negotiated restart, and the
session is in a stale state.
•(r) - indicates that the peer is restarting the BGP4 connection,
through restart.
•(^) - on the standby MP indicates that the peer is in the
ESTABLISHED state and has received restart capability (in the
primary MP).
•(<) - indicates that the device is waiting to receive the "End of
RIB" message the peer.
• (p) - indicates that the neighbor ribout group membership
change is pending or in progress
• () - indicates that the device is waiting to receive the "End of
RIB" message the peer
Time The time that has passed since the state last changed.
Accepted The number of routes received from the neighbor that this device installed
in the BGP4 route table. Usually, this number is lower than the
RoutesRcvd number. The dierence indicates that this device ltered out
some of the routes received in the UPDATE messages.
Filtered The routes or prexes that have been ltered out:
• If soft reconguration is enabled, this eld shows how many
routes were ltered out (not placed in the BGP4 route table) but
retained in memory.
Displaying BGP4 information
FastIron Ethernet Switch Layer 3 Routing Conguration Guide, 08.0.30mb
440 53-1003627-06

TABLE 94 show ip bgp summary output descriptions (continued)
This eld Displays
• If soft reconguration is not enabled, this eld shows the
number of BGP4 routes that have been ltered out.
Sent The number of BGP4 routes the device has sent to the neighbor.
ToSend The number of routes the device has queued to advertise and withdraw to
a neighbor.
Displaying the active BGP4 conguration
To view the active BGP4 conguration information contained in the running conguration without displaying the entire running
conguration, enter the following command at any level of the CLI.
device# show ip bgp config
router bgp
local-as 200
neighbor 10.102.1.1 remote-as 200
neighbor 10.102.1.1 ebgp-multihop
neighbor 10.102.1.1 update-source loopback 1
neighbor 192.168.2.1 remote-as 100
neighbor 10.200.2.2 remote-as 400
neighbor 2001:db8::1:1 remote-as 200
neighbor 2001:db8::1:2 remote-as 400
neighbor 2001:db8::1 remote-as 300
address-family ipv4 unicast
no neighbor 2001:db8::1:1 activate
no neighbor 2001:db8::1:2 activate
no neighbor 2001:db8::1 activate
exit-address-family
address-family ipv6 unicast
redistribute static
neighbor 2001:db8::1:1 activate
neighbor 2001:db8::1:2 activate
neighbor 2001:db8::1 activate
exit-address-family
end of BGP configuration
Syntax: show ip bgp cong
Displaying summary neighbor information
The show ip bgp neighbor command output has the following limitations.
1. If BGP4 peer is not congured for an address-family, the peer information will NOT be displayed.
Displaying BGP4 information
FastIron Ethernet Switch Layer 3 Routing Conguration Guide, 08.0.30mb
53-1003627-06 441

2. If BGP4 peer is congured for an address-family, it will display the same as in previous releases.
To display summary neighbor information, enter a command such as the following at any level of the CLI.
device# show ip bgp neighbor 192.168.4.211 routes-summary
1 IP Address: 192.168.4.211
Routes Accepted/Installed:1, Filtered/Kept:11, Filtered:11
Routes Selected as BEST Routes:1
BEST Routes not Installed in IP Forwarding Table:0
Unreachable Routes (no IGP Route for NEXTHOP):0
History Routes:0
NLRIs Received in Update Message:24, Withdraws:0 (0), Replacements:1
NLRIs Discarded due to
Maximum Prefix Limit:0, AS Loop:0
Invalid Nexthop:0, Invalid Nexthop Address:0.0.0.0
Duplicated Originator_ID:0, Cluster_ID:0
Routes Advertised:0, To be Sent:0, To be Withdrawn:0
NLRIs Sent in Update Message:0, Withdraws:0, Replacements:0
Peer Out of Memory Count for:
Receiving Update Messages:0, Accepting Routes(NLRI):0
Attributes:0, Outbound Routes(RIB-out):0
Syntax: show ip bgp neighbors [ ip-addr ] | [ route-summary ]
TABLE 95 show ip bgp neighbors route-summary output descriptions
This eld Displays
IP Address The IP address of the neighbor.
Routes Received How many routes the device has received from the neighbor during
the current BGP4 session:
• Accepted or Installed - Number of received routes the device
accepted and installed in the BGP4 route table.
• Filtered or Kept - Number of routes that were ltered out, but
were retained in memory for use by the soft reconguration
feature.
• Filtered - Number of received routes ltered out.
Routes Selected as BEST Routes The number of routes that the device selected as the best routes to
their destinations.
BEST Routes not Installed in IP Forwarding Table The number of routes received from the neighbor that are the best
BGP4 routes to their destinations, but were not installed in the IP
route table because the device received better routes from other
sources (such as OSPF, RIP, or static IP routes).
Unreachable Routes The number of routes received from the neighbor that are
unreachable because the device does not have a valid RIP, OSPF, or
static route to the next-hop.
History Routes The number of routes that are down but are being retained for route
ap dampening purposes.
NLRIs Received in Update Message The number of routes received in Network Layer Reachability (NLRI)
format in UPDATE messages:
• Withdraws - Number of withdrawn routes the device has
received.
• Replacements - Number of replacement routes the device has
received.
NLRIs Discarded due to Indicates the number of times the device discarded an NLRI for the
neighbor due to the following reasons:
• Maximum Prex Limit - The congured maximum prex
amount had been reached.
Displaying BGP4 information
FastIron Ethernet Switch Layer 3 Routing Conguration Guide, 08.0.30mb
442 53-1003627-06

TABLE 95 show ip bgp neighbors route-summary output descriptions (continued)
This eld Displays
• AS Loop - An AS loop occurred. An AS loop occurs when the
BGP4 AS-path attribute contains the local AS number.
• maxas-limit aspath - The number of route entries discarded
because the AS path exceeded the congured maximum length
or exceeded the internal memory limits.
• Invalid Nexthop - The next-hop value was not acceptable.
• Duplicated Originator_ID - The originator ID was the same as
the local device ID.
• Cluster_ID - The cluster list contained the local cluster ID, or the
local device ID if the cluster ID is not congured.
Routes Advertised The number of routes the device has advertised to this neighbor:
• To be Sent - The number of routes queued to send to this
neighbor.
• To be Withdrawn - The number of NLRIs for withdrawing routes
the device has queued to send to this neighbor in UPDATE
messages.
NLRIs Sent in Update Message The number of NLRIs for new routes the device has sent to this
neighbor in UPDATE messages:
• Withdraws - Number of routes the device has sent to the
neighbor to withdraw.
• Replacements - Number of routes the device has sent to the
neighbor to replace routes the neighbor already has.
Peer Out of Memory Count for Statistics for the times the device has run out of BGP4 memory for
the neighbor during the current BGP4 session:
• Receiving Update Messages - The number of times UPDATE
messages were discarded because there was no memory for
attribute entries.
• Accepting Routes (NLRI) - The number of NLRIs discarded
because there was no memory for NLRI entries. This count is
not included in the Receiving Update Messages count.
• Attributes - The number of times there was no memory for
BGP4 attribute entries.
• Outbound Routes (RIB-out) - The number of times there was
no memory to place a "best" route into the neighbor route
information base (Adj-RIB-Out) for routes to be advertised.
Displaying BGP4 neighbor information
You can display conguration information and statistics for BGP4 neighbors of the device.
To view BGP4 neighbor information, including the values for all the congured parameters, enter the following command.
NOTE
The display shows all the congured parameters for the neighbor. Only the parameters that have values dierent from their
defaults are shown.
device(config-bgp)# show ip bgp neighbors 10.4.0.2
Total number of BGP neighbors:
1 IP Address: 10.4.0.2, AS: 5 (EBGP), RouterID: 10.0.0.1
Description: neighbor 10.4.0.2
Local AS: 101
State: ESTABLISHED, Time: 0h1m0s, KeepAliveTime: 0, HoldTime: 0
PeerGroup: pg1
Multihop-EBGP: yes, ttl: 1
Displaying BGP4 information
FastIron Ethernet Switch Layer 3 Routing Conguration Guide, 08.0.30mb
53-1003627-06 443
RouteReflectorClient: yes
SendCommunity: yes
NextHopSelf: yes
DefaultOriginate: yes (default sent)
MaximumPrefixLimit: 90000
RemovePrivateAs: : yes
RefreshCapability: Received
Route Filter Policies:
Distribute-list: (out) 20
Filter-list: (in) 30
Prefix-list: (in) pf1
Route-map: (in) setnp1 (out) setnp2
Messages: Open Update KeepAlive Notification Refresh-Req
Sent : 1 1 1 0 0
Received: 1 8 1 0 0
Last Update Time: NLRI Withdraw NLRI Withdraw
Tx: 0h0m59s --- Rx: 0h0m59s ---
Last Connection Reset Reason:Unknown
Notification Sent: Unspecified
Notification Received: Unspecified
TCP Connection state: ESTABLISHED
Local host: 10.4.0.1, Local Port: 179
Remote host: 10.4.0.2, Remote Port: 8053
ISentSeq: 52837276 SendNext: 52837392 TotUnAck: 0
TotSent: 116 ReTrans: 0 UnAckSeq: 52837392
IRcvSeq: 2155052043 RcvNext: 2155052536 SendWnd: 16384
TotalRcv: 493 DupliRcv: 0 RcvWnd: 16384
SendQue: 0 RcvQue: 0 CngstWnd: 1460
This example shows how to display information for a specic neighbor, by specifying the neighbor’s IP address with the command. Since
none of the other display options are used, all of the information is displayed for the neighbor. The number in the far left column indicates
the neighbor for which information is displayed. When you list information for multiple neighbors, this number makes the display easier
to read.
The TCP statistics at the end of the display show status for the TCP session with the neighbor. Most of the elds show information stored
in the Transmission Control Block (TCB) for the TCP session between the device and the neighbor. These elds are described in detail in
section 3.2 of RFC 793, "Transmission Control Protocol Functional Specication".
Syntax: show ip bgp neighbors [ ip-addr [ advertised-routes [ detail [ ip-add [ / mask-bits ] ] ] ] | [ attribute-entries [ detail ] ] | [ ap-
statistics ] | [ last-packet-with-error ] | [ received prex-lter ] | [ received-routes ] | [ routes [ best ] | [ detail [ best ] | [ not-installed-
best ] | [ unreachable ] ] | [ rib-out-routes [ ip-addr/mask-bits | ip-addr net-mask | detail ] ] | [ routes-summary ] ]
The ip-addr option lets you narrow the scope of the command to a specic neighbor.
The advertised-routes option displays only the routes that the device has advertised to the neighbor during the current BGP4 session.
The attribute-entries option shows the attribute-entries associated with routes received from the neighbor.
The ap-statistics option shows the route ap statistics for routes received from or sent to the neighbor.
The last-packet-with-error option displays the last packet from the neighbor that contained an error. The packet contents are displayed
in decoded (human-readable) format.
The received prex-lter option shows the Outbound Route Filters (ORFs) received from the neighbor. This option applies to
cooperative route ltering.
The received-routes option lists all the route information received in route updates from the neighbor since the soft reconguration
feature was enabled.
The routes option lists the routes received in UPDATE messages from the neighbor. You can specify the following additional options:
•best - Displays the routes received from the neighbor that the device selected as the best routes to their destinations.
Displaying BGP4 information
FastIron Ethernet Switch Layer 3 Routing Conguration Guide, 08.0.30mb
444 53-1003627-06

•not-installed-best - Displays the routes received from the neighbor that are the best BGP4 routes to their destinations, but
were not installed in the IP route table because the device received better routes from other sources (such as OSPF, RIP, or
static IP routes).
•unreachable - Displays the routes that are unreachable because the device does not have a valid RIP, OSPF, or static route to
the next hop.
•detail - Displays detailed information for the specied routes. You can rene your information request by also specifying one of
the options (best , not-installed-best , or unreachable ).
The rib-out-routes option lists the route information base (RIB) for outbound routes. You can display all routes or specify a network
address.
The routes-summary option displays a summary of the following information:
• Number of routes received from the neighbor
• Number of routes accepted by this device from the neighbor
• Number of routes this device ltered out of the UPDATES received from the neighbor and did not accept
• Number of routes advertised to the neighbor
• Number of attribute entries associated with routes received from or advertised to the neighbor.
TABLE 96 show ip bgp neighbor output descriptions
Field Information displayed
Total Number of BGP4 Neighbors The number of BGP4 neighbors congured.
IP Address The IP address of the neighbor.
AS The AS the neighbor is in.
EBGP or IBGP Whether the neighbor session is an IBGP session, an EBGP session, or a
confederation EBGP session:
• EBGP - The neighbor is in another AS.
• EBGP_Confed - The neighbor is a member of another sub-AS
in the same confederation.
• IBGP - The neighbor is in the same AS.
RouterID The neighbor device ID.
Description The description you gave the neighbor when you congured it on the
device.
Local AS The value (if any) of the Local AS congured.
State The state of the session with the neighbor. The states are from the device
perspective, not the neighbor perspective. The state values are based on
the BGP4 state machine values described in RFC 1771 and can be one
of the following for each device:
• IDLE - The BGP4 process is waiting to be started. Usually,
enabling BGP4 or establishing a neighbor session starts the
BGP4 process. A minus sign (-) indicates that the session has
gone down and the software is clearing or removing routes.
• ADMND - The neighbor has been administratively shut down.
Refer to Administratively shutting down a session with a BGP4
neighbor on page 376. A minus sign (-) indicates that the
session has gone down and the software is clearing or removing
routes.
• CONNECT - BGP4 is waiting for the connection process for
the TCP neighbor session to be completed.
• ACTIVE - BGP4 is waiting for a TCP connection from the
neighbor.
Displaying BGP4 information
FastIron Ethernet Switch Layer 3 Routing Conguration Guide, 08.0.30mb
53-1003627-06 445

TABLE 96 show ip bgp neighbor output descriptions (continued)
Field Information displayed
NOTE
If the state frequently changes between CONNECT and
ACTIVE, there may be a problem with the TCP connection.
• OPEN SENT - BGP4 is waiting for an Open message from the
neighbor.
• OPEN CONFIRM - BGP4 has received an OPEN message
from the neighbor and is now waiting for either a KEEPALIVE or
NOTIFICATION message. If the device receives a KEEPALIVE
message from the neighbor, the state changes to Established. If
the message is a NOTIFICATION, the state changes to Idle.
• ESTABLISHED - BGP4 is ready to exchange UPDATE
messages with the neighbor.
If there is more BGP4 data in the TCP receiver queue, a plus sign (+) is
also displayed.
NOTE
If you display information for the neighbor using the show ip
bgp neighborip-addr command, the TCP receiver queue value
will be greater than 0.
Time The amount of time this session has been in the current state.
KeepAliveTime The keep alive time, which species how often this device sends keepalive
messages to the neighbor.
HoldTime The hold time, which species how many seconds the device will wait for a
keepalive or update message from a BGP4 neighbor before deciding that
the neighbor is not operational.
PeerGroup The name of the peer group the neighbor is in, if applicable.
Multihop-EBGP Whether this option is enabled for the neighbor.
RouteReectorClient Whether this option is enabled for the neighbor.
SendCommunity Whether this option is enabled for the neighbor.
NextHopSelf Whether this option is enabled for the neighbor.
DefaultOriginate Whether this option is enabled for the neighbor.
MaximumPrexLimit Maximum number of prexes the device will accept from this neighbor.
RemovePrivateAs Whether this option is enabled for the neighbor.
RefreshCapability Whether this device has received conrmation from the neighbor that the
neighbor supports the dynamic refresh capability.
CooperativeFilteringCapability Whether the neighbor is enabled for cooperative route ltering.
Distribute-list Lists the distribute list parameters, if congured.
Filter-list Lists the lter list parameters, if congured.
Prex-list Lists the prex list parameters, if congured.
Route-map Lists the route map parameters, if congured.
Messages Sent The number of messages this device has sent to the neighbor. The display
shows statistics for the following message types:
• Open
• Update
• KeepAlive
•Notication
• Refresh-Req
Displaying BGP4 information
FastIron Ethernet Switch Layer 3 Routing Conguration Guide, 08.0.30mb
446 53-1003627-06

TABLE 96 show ip bgp neighbor output descriptions (continued)
Field Information displayed
Messages Received The number of messages this device has received from the neighbor. The
message types are the same as for the Message Sent eld.
Last Update Time Lists the last time updates were sent and received for the following:
• NLRIs
• Withdraws
Last Connection Reset Reason The reason the previous session with this neighbor ended. The reason can
be one of the following:
Reasons described in the BGP4 specications:
• Message Header Error
• Connection Not Synchronized
• Bad Message Length
• Bad Message Type
• OPEN Message Error
• Unsupported Version Number
• Bad Peer AS Number
• Bad BGP4 Identier
• Unsupported Optional Parameter
• Authentication Failure
• Unacceptable Hold Time
• Unsupported Capability
• UPDATE Message Error
• Malformed Attribute List
• Unrecognized Well-known Attribute
• Missing Well-known Attribute
• Attribute Flags Error
• Attribute Length Error
• Invalid ORIGIN Attribute
• Invalid NEXT_HOP Attribute
• Optional Attribute Error
• Invalid Network Field
• Malformed AS_PATH
• Hold Timer Expired
• Finite State Machine Error
• Rcv Notication
Last Connection Reset Reason (cont.) Reasons specic to the Brocade implementation:
• Reset All Peer Sessions
• User Reset Peer Session
• Port State Down
• Peer Removed
• Peer Shutdown
• Peer AS Number Change
• Peer AS Confederation Change
• TCP Connection KeepAlive Timeout
• TCP Connection Closed by Remote
• TCP Data Stream Error Detected
Displaying BGP4 information
FastIron Ethernet Switch Layer 3 Routing Conguration Guide, 08.0.30mb
53-1003627-06 447

TABLE 96 show ip bgp neighbor output descriptions (continued)
Field Information displayed
Notication Sent If the device receives a NOTIFICATION message from the neighbor, the
message contains an error code corresponding to one of the following
errors. Some errors have subcodes that clarify the reason for the error.
Where applicable, the subcode messages are listed underneath the error
code messages.
• Message Header Error:
– Connection Not Synchronized
– Bad Message Length
– Bad Message Type
–Unspecied
• Open Message Error:
– Unsupported Version
– Bad Peer As
– Bad BGP4 Identier
– Unsupported Optional Parameter
– Authentication Failure
– Unacceptable Hold Time
–Unspecied
• Update Message Error:
– Malformed Attribute List
– Unrecognized Attribute
– Missing Attribute
– Attribute Flag Error
– Attribute Length Error
– Invalid Origin Attribute
– Invalid NextHop Attribute
– Optional Attribute Error
– Invalid Network Field
– Malformed AS Path
–Unspecied
• Hold Timer Expired
• Finite State Machine Error
• Cease
•Unspecied
Notication Received Refer to details for the eld Notication Sent.
TCP Connection state The state of the connection with the neighbor. The connection can have
one of the following states:
• LISTEN - Waiting for a connection request.
• SYN-SENT - Waiting for a matching connection request after
having sent a connection request.
• SYN-RECEIVED - Waiting for a conrming connection request
acknowledgment after having both received and sent a
connection request.
• ESTABLISHED - Data can be sent and received over the
connection. This is the normal operational state of the
connection.
• FIN-WAIT-1 - Waiting for a connection termination request
from the remote TCP, or an acknowledgment of the connection
termination request previously sent.
• FIN-WAIT-2 - Waiting for a connection termination request
from the remote TCP.
• CLOSE-WAIT - Waiting for a connection termination request
from the local user.
Displaying BGP4 information
FastIron Ethernet Switch Layer 3 Routing Conguration Guide, 08.0.30mb
448 53-1003627-06

TABLE 96 show ip bgp neighbor output descriptions (continued)
Field Information displayed
• CLOSING - Waiting for a connection termination request
acknowledgment from the remote TCP.
• LAST-ACK - Waiting for an acknowledgment of the connection
termination request previously sent to the remote TCP (which
includes an acknowledgment of its connection termination
request).
• TIME-WAIT - Waiting for enough time to pass to be sure the
remote TCP received the acknowledgment of its connection
termination request.
• CLOSED - There is no connection state.
Byte Sent The number of bytes sent.
Byte Received The number of bytes received.
Local host The IP address of the device.
Local port The TCP port the device is using for the BGP4 TCP session with the
neighbor.
Remote host The IP address of the neighbor.
Remote port The TCP port the neighbor is using for the BGP4 TCP session with the
device.
ISentSeq The initial send sequence number for the session.
SendNext The next sequence number to be sent.
TotUnAck The number of sequence numbers sent by the device that have not been
acknowledged by the neighbor.
TotSent The number of sequence numbers sent to the neighbor.
ReTrans The number of sequence numbers that the device retransmitted because
they were not acknowledged.
UnAckSeq The current acknowledged sequence number.
IRcvSeq The initial receive sequence number for the session.
RcvNext The next sequence number expected from the neighbor.
SendWnd The size of the send window.
TotalRcv The number of sequence numbers received from the neighbor.
DupliRcv The number of duplicate sequence numbers received from the neighbor.
RcvWnd The size of the receive window.
SendQue The number of sequence numbers in the send queue.
RcvQue The number of sequence numbers in the receive queue.
CngstWnd The number of times the window has changed.
Displaying route information for a neighbor
You can display routes based on the following criteria:
• A summary of the routes for a specic neighbor.
• Routes received from the neighbor that the device selected as the best routes to their destinations.
• Routes received from the neighbor that are the best BGP4 routes to their destinations, but were not installed in the IP route
table because the device received better routes from other sources (such as OSPF, RIP, or static IP routes).
• Routes that are unreachable because the device does not have a valid RIP, OSPF, or static route to the next hop.
• Routes for a specic network advertised by the device to the neighbor.
Displaying BGP4 information
FastIron Ethernet Switch Layer 3 Routing Conguration Guide, 08.0.30mb
53-1003627-06 449
• The Routing Information Base (RIB) for a specic network advertised to the neighbor. You can display the RIB regardless of
whether the device has already sent it to the neighbor.
Displaying advertised routes
To display the routes the device has advertised to a specic neighbor for a specic network, enter a command such as the following at
any level of the CLI.
device# show ip bgp neighbors 192.168.4.211 advertised-routes
There are 2 routes advertised to neighbor 192.168.4.211
Status A:AGGREGATE B:BEST b:NOT-INSTALLED-BEST C:CONFED_EBGP D:DAMPED
E:EBGP H:HISTORY I:IBGP L:LOCAL M:MULTIPATH m:NOT-INSTALLED-MULTIPATH
S:SUPPRESSED F:FILTERED s:STALE
Network Next Hop Metric LocPrf Weight Status
1 10.102.0.0/24 192.168.2.102 12 32768 BL
2 10.200.1.0/24 192.168.2.102 0 32768 BL
You also can enter a specic route.
device# show ip bgp neighbors 192.168.4.211 advertised 10.1.1.0/24
Status A:AGGREGATE B:BEST b:NOT-INSTALLED-BEST I:IBGP L:LOCAL
Network Next Hop Metric LocPrf Weight Status
1 10.200.1.0/24 192.168.2.102 0 32768 BL
Syntax: show ip bgp neighbor ip-addr advertised-routes [ ip-addr/prex ]
For information about the elds in this display, refer to Displaying summary route information on page 451. The elds in this display
also appear in the show ip bgp display.
Displaying the best routes
To display the routes received from a specic neighbor that are the "best" routes to their destinations, enter a command such as the
following at any level of the CLI.
device#show ip bgp neighbors 192.168.4.211 routes best
Syntax: show ip bgp neighbors ip-addr routes best
For information about the elds in this display, refer to Displaying information for a specic route on page 455. The elds in this display
also appear in the show ip bgp display.
Displaying the routes with destinations that are unreachable
To display BGP4 routes with destinations that are unreachable using any of the BGP4 paths in the BGP4 route table, enter a command
such as the following at any level of the CLI:
device(config-bgp)# show ip bgp neighbor 192.168.4.211 routes unreachable
Syntax: show ip bgp neighbor ip-addr routes unreachable
For information about the elds in this display, refer to Displaying summary route information on page 451. The elds in this display
also appear in the show ip bgp display.
Displaying BGP4 information
FastIron Ethernet Switch Layer 3 Routing Conguration Guide, 08.0.30mb
450 53-1003627-06
Displaying the Adj-RIB-Out for a neighbor
To display the current BGP4 Routing Information Base (Adj-RIB-Out) for a specic neighbor and a specic destination network, enter a
command such as the following at any level of the CLI.
device# show ip bgp neighbor 192.168.4.211 rib-out-routes 192.168.1.0/24
Status A:AGGREGATE B:BEST b:NOT-INSTALLED-BEST C:CONFED_EBGP D:DAMPED
E:EBGP H:HISTORY I:IBGP L:LOCAL M:MULTIPATH m:NOT-INSTALLED-MULTIPATH
S:SUPPRESSED F:FILTERED s:STALE
Prefix Next Hop Metric LocPrf Weight Status
1 10.200.1.0/24 0.0.0.0 0 101 32768 BL
The Adj-RIB-Out contains the routes that the device either has most recently sent to the neighbor or is about to send to the neighbor.
Syntax: show ip bgp neighbor ip-addr rib-out-routes [ ip-addr/prex ]
For information about the elds in this display, refer to Displaying summary route information on page 451. The elds in this display
also appear in the show ip bgp display.
Displaying peer group information
To display peer-group information, enter a command such as the following at the Privileged EXEC level of the CLI.
device# show ip bgp peer-group STR
1 BGP peer-group is STR
Address family : IPV4 Unicast
activate
Address family : IPV4 Multicast
no activate
Address family : IPV6 Unicast
no activate
Address family : IPV6 Multicast
no activate
Address family : VPNV4 Unicast
no activate
Address family : L2VPN VPLS
no activate
Members:
IP Address: 10.1.1.1, AS: 5
Syntax: show ip bgp peer-group [ peer-group-name ]
Only the parameters that have values dierent from their defaults are listed.
Displaying summary route information
To display summary statistics for all the routes in the device’s BGP4 route table, enter a command such as the following at any level of
the CLI.
device# show ip bgp routes summary
Total number of BGP routes (NLRIs) Installed : 20
Distinct BGP destination networks : 20
Filtered BGP routes for soft reconfig : 100178
Routes originated by this router : 2
Routes selected as BEST routes : 19
BEST routes not installed in IP forwarding table : 1
Unreachable routes (no IGP route for NEXTHOP) : 1
IBGP routes selected as best routes : 0
EBGP routes selected as best routes : 17
Syntax: show ip bgp routes summary
Displaying BGP4 information
FastIron Ethernet Switch Layer 3 Routing Conguration Guide, 08.0.30mb
53-1003627-06 451
TABLE 97 show ip bgp routes output descriptions
This eld Displays
Total number of BGP4 routes (NLRIs) Installed Number of BGP4 routes the device has installed in the BGP4 route table.
Distinct BGP4 destination networks Number of destination networks the installed routes represent. The BGP4
route table can have multiple routes to the same network.
Filtered BGP4 routes for soft recong Number of route updates received from soft-recongured neighbors or
peer groups that have been ltered out but retained.
Routes originated by this device Number of routes in the BGP4 route table that this device originated.
Routes selected as BEST routes Number of routes in the BGP4 route table that this device has selected as
the best routes to the destinations.
BEST routes not installed in IP forwarding table Number of BGP4 routes that are the best BGP4 routes to their
destinations but were not installed in the IP route table because the device
received better routes from other sources (such as OSPF, RIP, or static IP
routes).
Unreachable routes (no IGP route for NEXTHOP) Number of routes in the BGP4 route table whose destinations are
unreachable because the next-hop is unreachable.
IBGP routes selected as best routes Number of "best" routes in the BGP4 route table that are IBGP routes.
EBGP routes selected as best routes Number of "best" routes in the BGP4 route table that are EBGP routes.
Displaying VRF instance information
To display VRF instance information, enter a command such as the following at the Privileged EXEC level of the CLI.
device# show ip bgp vrf red
Total number of BGP Routes: 2
Status codes: s suppressed, d damped, h history, * valid, > best, i internal, S stale
Origin codes: i - IGP, e - EGP, ? - incomplete
Network Next Hop RD MED LocPrf Weight Path
*> 10.14.14.0/24 0.0.0.0 0 100 32768 ?
*> 10.11.11.11/32 0.0.0.0 0 100 32768 ?
Displaying the BGP4 route table
BGP4 uses lters that you dene as well as the algorithm described in How BGP4 selects a path for a route (BGP best path selection
algorithm) on page 353 to determine the preferred route to a destination. BGP4 sends only the preferred route to the IP table. To view all
the learned BGP4 routes, you can display the BGP4 table.
To view the BGP4 route table, enter the following command.
device# show ip bgp routes
Total number of BGP Routes: 97371
Status A:AGGREGATE B:BEST b:NOT-INSTALLED-BEST C:CONFED_EBGP D:DAMPED
E:EBGP H:HISTORY I:IBGP L:LOCAL M:MULTIPATH m:NOT-INSTALLED-MULTIPATH
S:SUPPRESSED F:FILTERED s:STALE
Prefix Next Hop MED LocPrf Weight Status
1 10.3.0.0/8 192.168.4.106 100 0 BE
AS_PATH: 65001 4355 701 80
2 10.4.0.0/8 192.168.4.106 100 0 BE
AS_PATH: 65001 4355 1
3 10.60.212.0/22 192.168.4.106 100 0 BE
AS_PATH: 65001 4355 701 1 189
4 10.6.0.0/8 192.168.4.106 100 0 BE
AS_PATH: 65001 4355 3356 7170 1455
5 10.8.1.0/24 192.168.4.106 0 100 0 BE
AS_PATH: 65001
Displaying BGP4 information
FastIron Ethernet Switch Layer 3 Routing Conguration Guide, 08.0.30mb
452 53-1003627-06
Syntax: show ip bgp routes [ [ network ] ip-addr ] | num | [ age secs ] | [ as-path-access-list num ] | [ best ] | [ cidr-only ] | [ community
num | no-export | no-advertise | internet | local-as ] | [ community-access-list num ] | [ community-list num | [ detail option ] | [ lter-
list num,num,.. ] | [ next-hop ip-addr ] | [ no-best ] | [ not-installed-best ] | [ prex-list string ] | [ regular-expression regular-expression ]
| [ route-map map-name ] | [ summary ] | [ unreachable ]
The ip-addr option displays routes for a specic network. The network keyword is optional. You can enter the network address without
entering network in front of it.
The num option species the table entry with which you want the display to start. For example, if you want to list entries beginning with
table entry 100, specify 100.
The age secs parameter displays only the routes that have been received or updated more recently than the number of seconds you
specify.
The as-path-access-listnum parameter lters the display using the specied AS-path ACL.
The best parameter displays the routes received from the neighbor that the device selected as the best routes to their destinations.
The cidr-only option lists only the routes whose network masks do not match their class network length.
The community option lets you display routes for a specic community. You can specify local-as , no-export , no-advertise , internet ,
or a private community number. You can specify the community number as either two ve-digit integer values of up to 1 through
65535, separated by a colon (for example, 12345:6789) or a single long integer value.
The community-access-list num parameter lters the display using the specied community ACL.
The community-list option lets you display routes that match a specic community lter.
The detail option lets you display more details about the routes. You can rene your request by also specifying one of the other display
options after the detail keyword.
The lter-list option displays routes that match a specic address lter list.
The next-hop ip-addr option displays the routes for a given next-hop IP address.
The no-best option displays the routes for which none of the routes to a given prex were selected as the best route. The IP route table
does not contain a BGP4 route for any of the routes listed by the command.
The not-installed-best option displays the routes received from the neighbor that are the best BGP4 routes to their destinations, but
were not installed in the IP route table because the device received better routes from other sources (such as OSPF, RIP, or static IP
routes).
The prex-list string parameter lters the display using the specied IP prex list.
The regular-expression regular-expression option lters the display based on a regular expression. Refer to Using regular expressions on
page 403.
The route-map map-name parameter lters the display by using the specied route map. The software displays only the routes that
match the match clauses in the route map. Software disregards the route map’s set clauses.
The summary option displays summary information for the routes.
The unreachable option displays the routes that are unreachable because the device does not have a valid RIP, OSPF, or static route to
the next-hop.
Displaying BGP4 information
FastIron Ethernet Switch Layer 3 Routing Conguration Guide, 08.0.30mb
53-1003627-06 453
Displaying the best BGP4 routes
To display all the BGP4 routes in the device’s BGP4 route table that are the best routes to their destinations, enter a command such as
the following at any level of the CLI
device# show ip bgp routes best
Searching for matching routes, use ^C to quit...
Status A:AGGREGATE B:BEST b:NOT-INSTALLED-BEST C:CONFED_EBGP D:DAMPED
E:EBGP H:HISTORY I:IBGP L:LOCAL M:MULTIPATH m:NOT-INSTALLED-MULTIPATH
S:SUPPRESSED F:FILTERED s:STALE
Prefix Next Hop MED LocPrf Weight Status
1 10.3.0.0/8 192.168.4.106 100 0 BE
AS_PATH: 65001 4355 701 80
2 10.4.0.0/8 192.168.4.106 100 0 BE
AS_PATH: 65001 4355 1
3 10.60.212.0/22 192.168.4.106 100 0 BE
AS_PATH: 65001 4355 701 1 189
4 10.6.0.0/8 192.168.4.106 100 0 BE
AS_PATH: 65001 4355 3356 7170 1455
5 10.2.0.0/16 192.168.4.106 100 0 BE
AS_PATH: 65001 4355 701
Syntax: show ip bgp routes best
Displaying the best BGP4 routes that are not in the IP route table
When the device has multiple routes to a destination from dierent sources (such as BGP4, OSPF, RIP, or static routes), the device
selects the route with the lowest administrative distance as the best route, and installs that route in the IP route table.
To display the BGP4 routes that are the "best" routes to their destinations but are not installed in the device IP route table, enter a
command such as the following at any level of the CLI.
device#show ip bgp routes not-installed-best
Searching for matching routes, use ^C to quit...
Status A:AGGREGATE B:BEST b:NOT-INSTALLED-BEST C:CONFED_EBGP D:DAMPED
E:EBGP H:HISTORY I:IBGP L:LOCAL M:MULTIPATH m:NOT-INSTALLED-MULTIPATH
S:SUPPRESSED F:FILTERED s:STALE
Prefix Next Hop Metric LocPrf Weight Status
1 192.168.4.0/24 192.168.4.106 0 100 0 bE
AS_PATH: 65001
Each of the displayed routes is a valid path to its destination, but the device received another path from a dierent source (such as OSPF,
RIP, or a static route) that has a lower administrative distance. The device always selects the path with the lowest administrative distance
to install in the IP route table.
Notice that the route status in this example is the new status, "b".
Syntax: show ip bgp routes not-installed-best
NOTE
To display the routes that the device has selected as the best routes and installed in the IP route table, display the IP route table
using the show ip route command.
Displaying BGP4 routes whose destinations are unreachable
To display BGP4 routes whose destinations are unreachable using any of the BGP4 paths in the BGP4 route table, enter a command
such as the following at any level of the CLI.
device# show ip bgp routes unreachable
Searching for matching routes, use ^C to quit...
Status A:AGGREGATE B:BEST b:NOT-INSTALLED-BEST C:CONFED_EBGP D:DAMPED
E:EBGP H:HISTORY I:IBGP L:LOCAL M:MULTIPATH m:NOT-INSTALLED-MULTIPATH
Displaying BGP4 information
FastIron Ethernet Switch Layer 3 Routing Conguration Guide, 08.0.30mb
454 53-1003627-06

S:SUPPRESSED F:FILTERED s:STALE
Prefix Next Hop Metric LocPrf Weight Status
1 10.8.8.0/24 192.168.5.1 0 101 0
AS_PATH: 65001 4355 1
Syntax: show ip bgp routes unreachable
Displaying information for a specic route
To display BGP4 network information by specifying an IP address within the network, enter a command such as the following at any level
of the CLI.
device# show ip bgp 10.3.4.0
Number of BGP Routes matching display condition : 1
Status codes: s suppressed, d damped, h history, * valid, > best, i internal
Origin codes: i - IGP, e - EGP, ? - incomplete
Network Next Hop Metric LocPrf Weight Path
*> 10.3.4.0/24 192.168.4.106 100 0 65001 4355 1 1221 ?
Last update to IP routing table: 0h11m38s, 1 path(s) installed:
Gateway Port
192.168.2.1 1/2/1
Route is advertised to 1 peers:
10.20.20.2(65300)
Syntax: show ip bgp [ route ] ip-addr/prex [ longer-prexes ] | ip-addr
If you use the route option, the display for the information is dierent, as shown in the following example.
device# show ip bgp route 10.3.4.0
Number of BGP Routes matching display condition : 1
Status A:AGGREGATE B:BEST b:NOT-INSTALLED-BEST C:CONFED_EBGP D:DAMPED
E:EBGP H:HISTORY I:IBGP L:LOCAL M:MULTIPATH m:NOT-INSTALLED-MULTIPATH S:SUPPRESSED F:FILTERED s:STALE
Prefix Next Hop MED LocPrf Weight Status
1 10.3.4.0/24 192.168.4.106 100 0 BE
AS_PATH: 65001 4355 1 1221
Last update to IP routing table: 0h12m1s, 1 path(s) installed:
Gateway Port
192.168.2.1 1/2/1
Route is advertised to 1 peers:
10.20.20.2(65300)
TABLE 98 show ip bgp route output descriptions
This eld Displays
Number of BGP4 Routes matching display condition The number of routes that matched the display parameters you entered.
This is the number of routes displayed by the command.
Status codes A list of the characters the display uses to indicate the route’s status. The
status code appears in the left column of the display, to the left of each
route. The status codes are described in the command’s output.
NOTE
This eld appears only if you do not enter the route
option.
Prex The network address and prex.
Next Hop The next-hop device for reaching the network.
Metric The value of the route’s MED attribute. If the route does not have a metric,
this eld is blank.
LocPrf The degree of preference for this route relative to other routes in the local
AS. When the BGP4 algorithm compares routes on the basis of local
preferences, the route with the higher local preference is chosen. The
preference can have a value from 0 - 4294967295.
Displaying BGP4 information
FastIron Ethernet Switch Layer 3 Routing Conguration Guide, 08.0.30mb
53-1003627-06 455

TABLE 98 show ip bgp route output descriptions (continued)
This eld Displays
Weight The value that this device associates with routes from a specic neighbor.
For example, if the device receives routes to the same destination from
two BGP4 neighbors, the device prefers the route from the neighbor with
the larger weight.
Path The route AS path.
NOTE
This eld appears only if you do not enter the route
option.
Origin code A character that indicates the route origin. The origin code appears to the
right of the AS path (Path eld). The origin codes are described in the
command output.
NOTE
This eld appears only if you do not enter the route
option.
Status The route status, which can be one or more of the following:
• A - AGGREGATE.The route is an aggregate route for multiple
networks.
• B - BEST. BGP4 has determined that this is the optimal route
to the destination.
NOTE
If the "b" is lowercase, the software was not able to install the
route in the IP route table.
• b - NOT-INSTALLED-BEST. The routes received from the
neighbor are the best BGP4 routes to their destinations, but
were not installed in the IP route table because the device
received better routes from other sources (such as OSPF, RIP,
or static IP routes).
• C - CONFED_EBGP. The route was learned from a neighbor in
the same confederation and AS, but in a dierent sub-AS within
the confederation.
• D - DAMPED. This route has been dampened (by the route
dampening feature), and is currently unusable.
• H - HISTORY. Route dampening is congured for this route,
and the route has a history of apping and is unreachable now.
• I - INTERNAL. The route was learned through BGP4.
• L - LOCAL. The route originated on this device.
• M - MULTIPATH. BGP4 load sharing is enabled and this route
was selected as one of the best ones to the destination. The
best route among the multiple paths also is marked with "B".
NOTE
If the "m" is lowercase, the software was not able to install the
route in the IP route table.
• S - SUPPRESSED. This route was suppressed during
aggregation and thus is not advertised to neighbors.
NOTE
This eld appears only if you enter the route
option.
Displaying BGP4 information
FastIron Ethernet Switch Layer 3 Routing Conguration Guide, 08.0.30mb
456 53-1003627-06

Displaying route details
This example shows the information displayed when you use the detail option. In this example, the information for one route is shown.
device# show ip bgp routes detail 2
Number of BGP Routes matching display condition : 1
Status A:AGGREGATE B:BEST b:NOT-INSTALLED-BEST C:CONFED_EBGP D:DAMPED
E:EBGP H:HISTORY I:IBGP L:LOCAL M:MULTIPATH m:NOT-INSTALLED-MULTIPATH
S:SUPPRESSED F:FILTERED s:STALE
1 Prefix: 10.5.5.5/32, Status: BE, Age: 0h2m10s
NEXT_HOP: 10.0.0.1, Metric: 0, Learned from Peer: 10.0.0.1 (3)
LOCAL_PREF: 100, MED: none, ORIGIN: igp, Weight: 0
AS_PATH: 3
Adj_RIB_out count: 2, Admin distance 20
Last update to IP routing table: 0h2m10s, 1 path(s) installed:
Route is advertised to 2 peers:
10.0.0.3(65002) 10.0.0.5(65002)
Syntax: show ip bgp routes detail
TABLE 99 show ip bgp routes detail output descriptions
This eld Displays
Total number of BGP4 Routes The number of BGP4 routes.
Status codes A list of the characters that indicate route status. The status code is
appears in the left column of the display, to the left of each route. The
status codes are described in the command’s output.
Prex The network prex and mask length.
Status The route status, which can be one or more of the following:
• A - AGGREGATE.The route is an aggregate route for multiple
networks.
• B - BEST. BGP4 has determined that this is the optimal route
to the destination.
NOTE
If the "b" is lowercase, the software was not able to install the
route in the IP route table.
• b - NOT-INSTALLED-BEST. The routes received from the
neighbor are the best BGP4 routes to their destinations, but
were not installed in the IP route table because the device
received better routes from other sources (such as OSPF, RIP,
or static IP routes).
• C - CONFED_EBGP. The route was learned from a neighbor in
the same confederation and AS, but in a dierent sub-AS within
the confederation.
• D - DAMPED. This route has been dampened (by the route
dampening feature), and is currently unusable.
• H - HISTORY. Route dampening is congured for this route,
and the route has a history of apping and is unreachable now.
• I - INTERNAL. The route was learned through BGP4.
• L - LOCAL. The route originated on this device.
• M - MULTIPATH. BGP4 load sharing is enabled and this route
was selected as one of the best ones to the destination. The
best route among the multiple paths also is marked with "B".
Displaying BGP4 information
FastIron Ethernet Switch Layer 3 Routing Conguration Guide, 08.0.30mb
53-1003627-06 457

TABLE 99 show ip bgp routes detail output descriptions (continued)
This eld Displays
NOTE
If the "m" is lowercase, the software was not able to install the
route in the IP route table.
• S - SUPPRESSED. This route was suppressed during
aggregation and thus is not advertised to neighbors.
Age The last time an update occurred.
Next_Hop The next-hop device for reaching the network.
Learned from Peer The IP address of the neighbor that sent this route.
Local_Pref The degree of preference for this route relative to other routes in the local
AS. When the BGP4 algorithm compares routes on the basis of local
preferences, the route with the higher local preference is chosen. The
preference can have a value from 0 through 4294967295.
MED The route metric. If the route does not have a metric, this eld is blank.
Origin The source of the route information. The origin can be one of the
following:
• EGP - The routes with these attributes came to BGP4 through
EGP.
• IGP - The routes with these attributes came to BGP4 through
IGP.
• INCOMPLETE - The routes came from an origin other than one
of the above. For example, they may have been redistributed
from OSPF or RIP.
When BGP4 compares multiple routes to select the best route, IGP is
preferred over EGP and both are preferred over INCOMPLETE.
Weight The value this device associates with routes from a specic neighbor. For
example, if the device receives routes to the same destination from two
BGP4 neighbors, the device prefers the route from the neighbor with the
larger weight.
Atomic Whether network information in this route has been aggregated and this
aggregation has resulted in information loss.
NOTE
Information loss under these circumstances is a normal part of
BGP4 and does not indicate an error.
Aggregation ID The device that originated this aggregation.
Aggregation AS The AS in which the network information was aggregated. This value
applies only to aggregated routes and is otherwise 0.
Originator The originator of the route in a route reector environment.
Cluster List The route-reector clusters through which this route has passed.
Learned From The IP address of the neighbor from which the device learned the route.
Admin Distance The administrative distance of the route.
Adj_RIB_out The number of neighbors to which the route has been or will be
advertised. This is the number of times the route has been selected as the
best route and placed in the Adj-RIB-Out (outbound queue) for a BGP4
neighbor.
Communities The communities the route is in.
Displaying BGP4 information
FastIron Ethernet Switch Layer 3 Routing Conguration Guide, 08.0.30mb
458 53-1003627-06

Displaying BGP4 route-attribute entries
The route-attribute entries table lists the sets of BGP4 attributes stored in device memory. Each set of attributes is unique and can be
associated with one or more routes. In fact, the device typically has fewer route attribute entries than routes.
To display the IP route table, enter the following command.
device# show ip bgp attribute-entries
Syntax: show ip bgp attribute-entries
This example shows the information displayed by this command. A zero value indicates that the attribute is not set.
device# show ip bgp attribute-entries
Total number of BGP Attribute Entries: 7753
1 Next Hop :192.168.11.1 MED :0 Origin:IGP
Originator:0.0.0.0 Cluster List:None
Aggregator:AS Number :0 Router-ID:0.0.0.0 Atomic:FALSE
Local Pref:100 Communities:Internet
AS Path :(65002) 65001 4355 2548 3561 5400 6669 5548
2 Next Hop :192.168.11.1 Metric :0 Origin:IGP
Originator:0.0.0.0 Cluster List:None
Aggregator:AS Number :0 Router-ID:0.0.0.0 Atomic:FALSE
Local Pref:100 Communities:Internet
AS Path :(65002) 65001 4355 2548
TABLE 100 show ip bgp attribute-entries output descriptions
This eld Displays
Total number of BGP4 Attribute Entries The number of routes contained in this BGP4 route table.
Next Hop The IP address of the next-hop device for routes that have this set of
attributes.
Metric The cost of the routes that have this set of attributes.
Origin The source of the route information. The origin can be one of the
following:
• EGP - The routes with these attributes came to BGP4 through
EGP.
• IGP - The routes with these attributes came to BGP4 through
IGP.
• INCOMPLETE - The routes came from an origin other than one
of the above. For example, they may have been redistributed
from OSPF or RIP.
When BGP4 compares multiple routes to a destination to select the best
route, IGP is preferred over EGP and both are preferred over
INCOMPLETE.
Originator The originator of the route in a route reector environment.
Cluster List The route-reector clusters through which this set of attributes has
passed.
Aggregator Aggregator information:
• AS Number shows the AS in which the network information in
the attribute set was aggregated. This value applies only to
aggregated routes and is otherwise 0.
• Router-ID shows the device that originated this aggregator.
Atomic Whether the network information in this set of attributes has been
aggregated and this aggregation has resulted in information loss.
• TRUE - Indicates information loss has occurred
• FALSE - Indicates no information loss has occurred
Displaying BGP4 information
FastIron Ethernet Switch Layer 3 Routing Conguration Guide, 08.0.30mb
53-1003627-06 459

TABLE 100 show ip bgp attribute-entries output descriptions (continued)
This eld Displays
NOTE
Information loss under these circumstances is a normal part of
BGP4 and does not indicate an error.
Local Pref The degree of preference for routes that use these attributes relative to
other routes in the local AS.
Communities The communities to which routes with these attributes belong.
AS Path The autonomous systems through which routes with these attributes have
passed. The local AS is shown in parentheses.
Displaying the routes BGP4 has placed in the IP route table
The IP route table indicates the routes it has received from BGP4 by listing "BGP" as the route type.
To display the IP route table, enter the following command.
device# show ip route
Syntax: show ip route [ ip-addr | num | bgp | ospf | rip ]
This example shows the information displayed by this command. Notice that most of the routes in this example have type "B", indicating
that their source is BGP4.
device# show ip route
Total number of IP routes: 50834
B:BGP D:Directly-Connected O:OSPF R:RIP S:Static
Network Address NetMask Gateway Port Cost Type
10.0.0.1 255.0.0.0 192.168.13.2 1/1/1 0 B
10.0.0.2 255.0.0.0 192.168.13.2 1/1/1 0 B
10.0.1.1 255.255.128.0 192.168.13.2 1/1/1 0 B
10.1.0.0 255.255.0.0 0.0.0.0 1/1/1 1 D
10.10.11.0 255.255.255.0 0.0.0.0 1/2/24 1 D
10.2.97.0 255.255.255.0 192.168.13.2 1/1/1 0 B
10.3.63.0 255.255.255.0 192.168.13.2 1/1/1 0 B
10.3.123.0 255.255.255.0 192.168.13.2 1/1/1 0 B
10.5.252.0 255.255.254.0 192.168.13.2 1/1/1 0 B
10.6.42.0 255.255.254.0 192.168.13.2 1/1/1 0 B
remaining 50824 entries not shown...
Displaying route ap dampening statistics
To display route dampening statistics or all the dampened routes, enter the following command at any level of the CLI.
device# show ip bgp flap-statistics
Total number of flapping routes: 414
Status Code >:best d:damped h:history *:valid
Network From Flaps Since Reuse Path
h> 10.50.206.0/23 10.90.213.77 1 0 :0 :13 0 :0 :0 65001 4355 1 701
h> 10.255.192.0/20 10.90.213.77 1 0 :0 :13 0 :0 :0 65001 4355 1 7018
h> 10.252.165.0/24 10.90.213.77 1 0 :0 :13 0 :0 :0 65001 4355 1 7018
h> 10.50.208.0/23 10.90.213.77 1 0 :0 :13 0 :0 :0 65001 4355 1 701
h> 10.33.0.0/16 10.90.213.77 1 0 :0 :13 0 :0 :0 65001 4355 1 701
*> 10.17.220.0/24 10.90.213.77 1 0 :1 :4 0 :0 :0 65001 4355 701 62
Syntax: show ip bgp ap-statistics [ regular-expression regular-expression | address mask [ longer-prexes ] | neighbor ip-addr |
lter-list num ... ]
Displaying BGP4 information
FastIron Ethernet Switch Layer 3 Routing Conguration Guide, 08.0.30mb
460 53-1003627-06
The regular-expressionregular-expression parameter is a regular expression. The regular expressions are the same ones supported for
BGP4 AS-path lters.
The address mask parameters specify a particular route. If you also use the optional longer-prexes parameter, all statistics for routes
that match the specied route or have a longer prex than the specied route are displayed. For example, if you specify 10.157.0.0
longer , all routes with the prex 10.157 or that have a longer prex (such as 10.157.22) are displayed.
The neighborip-addr parameter displays route ap dampening statistics only for routes learned from the specied neighbor. You can
also display route ap statistics for routes learned from a neighbor by entering the show ip bgp neighbor ap-statistics command.
The lter-listnum parameter species one or more lters. Only routes that have been dampened and that match the specied lters are
displayed.
TABLE 101 show ip bgp ap-statistics output descriptions
This eld Displays
Total number of apping routes The total number of routes in the BGP4 route table that have changed
state and have been marked as apping routes.
Status code The dampening status of the route, which can be one of the following:
• > - This is the best route among those in the BGP4 route table
to the route destination.
• d - This route is currently dampened, and thus unusable.
• h - The route has a history of apping and is unreachable now.
• * - The route has a history of apping but is currently usable.
Network The destination network of the route.
From The neighbor that sent the route to this device.
Flaps The number of aps (state changes) the route has experienced.
Since The amount of time since the rst ap of this route.
Reuse The amount of time remaining until this route will be un-suppressed and
thus be usable again.
Path The AS-path information for the route.
You can display all dampened routes by entering the show ip bgp dampened-paths command.
Displaying the active route map conguration
You can view the active route map conguration (contained in the running conguration) without displaying the entire running
conguration by entering the following command at any level of the CLI.
device# show route-map
route-map permitnet4 permit 10
match ip address prefix-list plist1
route-map permitnet1 permit 1
match ip address prefix-list plist2
route-map setcomm permit 1
set community 1234:2345 no-export
route-map test111 permit 111
match address-filters 11
set community 11:12 no-export
route-map permit1122 permit 12
match ip address 11
route-map permit1122 permit 13
match ip address std_22
Displaying BGP4 information
FastIron Ethernet Switch Layer 3 Routing Conguration Guide, 08.0.30mb
53-1003627-06 461
This example shows that the running conguration contains six route maps. Notice that the match and set statements within each route
map are listed beneath the command for the route map itself. In this simplied example, each route map contains only one match or set
statement.
To display the active conguration for a specic route map, enter a command such as the following, which species a route map name.
device# show route-map setcomm
route-map setcomm permit 1
set community 1234:2345 no-export
This example shows the active conguration for a route map named "setcomm".
Syntax: show route-map [ map-name ]
Displaying BGP4 graceful restart neighbor information
To display BGP4 restart information for BGP4 neighbors, enter the show ip bgp neighbors command.
device# show ip bgp neighbors
Total number of BGP Neighbors: 6
1 IP Address: 10.50.50.10, AS: 20 (EBGP), RouterID: 10.10.10.20, VRF: default
State: ESTABLISHED, Time: 0h0m18s, KeepAliveTime: 60, HoldTime: 180
KeepAliveTimer Expire in 34 seconds, HoldTimer Expire in 163 seconds
Minimum Route Advertisement Interval: 0 seconds
RefreshCapability: Received
GracefulRestartCapability: Received
Restart Time 120 sec, Restart bit 0
afi/safi 1/1, Forwarding bit 0
GracefulRestartCapability: Sent
Restart Time 120 sec, Restart bit 0
afi/safi 1/1, Forwarding bit 1
Messages: Open Update KeepAlive Notification Refresh-Req
....
Displaying AS4 details
This section describes the use of the following show commands, which produce output that includes information about AS4s.
•show ip bgp neighbor shows whether the AS4 capability is enabled.
•show ip bgp attribute-entries shows AS4 path values.
•show ip bgp shows the route entries with two and AS4 path information.
•show route-map shows the presence of any AS4 conguration data.
•show ip as-path-access-lists shows the presence of any AS4 conguration data.
•show ip bgp cong shows the presence of any AS4 conguration data.
Route entries with four-byte path information
The show ip bgp command without of any optional parameters display AS4 path information.
device# show ip bgp
Total number of BGP Routes: 1
Status codes: s suppressed, d damped, h history, * valid, > best, i internal, S
stale
Origin codes: i - IGP, e - EGP, ? - incomplete
Network Next Hop Metric LocPrf Weight Path
*> 10.1.1.0/24 192.168.1.5 1 100 0 90000 100 200 65535
Displaying BGP4 information
FastIron Ethernet Switch Layer 3 Routing Conguration Guide, 08.0.30mb
462 53-1003627-06
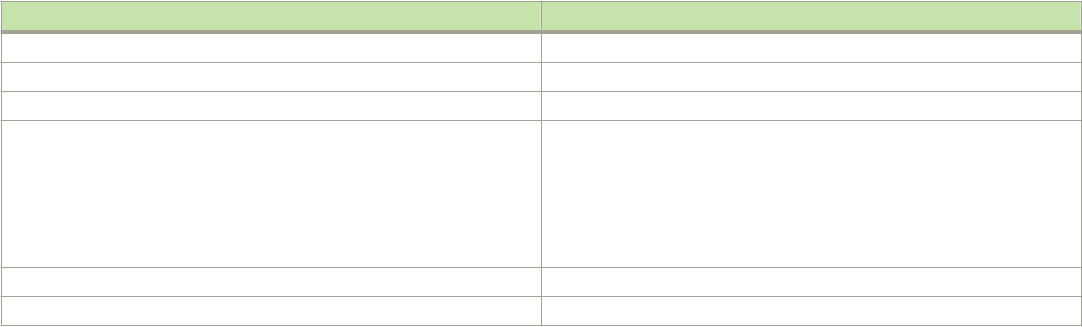
65536 65537 65538 65539 75000
Syntax: show ip bgp
Current AS numbers
To display current AS numbers, use the show ip bgp neighbors command at any level of the CLI.
device# show ip bgp neighbors
neighbors Details on TCP and BGP neighbor connections
Total number of BGP Neighbors: 1
1 IP Address: 192.168.1.1, AS: 7701000 (IBGP), RouterID: 192.168.1.1, VRF: default-vrf
State: ESTABLISHED, Time: 0h3m33s, KeepAliveTime: 60, HoldTime: 180
KeepAliveTimer Expire in 49 seconds, HoldTimer Expire in 177 seconds
Minimal Route Advertisement Interval: 0 seconds
RefreshCapability: Received
Messages: Open Update KeepAlive Notification Refresh-Req
Sent : 1 0 5 0 0
Received: 1 1 5 0 0
Last Update Time: NLRI Withdraw NLRI Withdraw
Tx: --- --- Rx: 0h3m33s ---
Last Connection Reset Reason:Unknown
Notification Sent: Unspecified
Notification Received: Unspecified
Neighbor NLRI Negotiation:
Peer Negotiated IPV4 unicast capability
Peer configured for IPV4 unicast Routes
Neighbor AS4 Capability Negotiation:
Peer Negotiated AS4 capability
Peer configured for AS4 capability
As-path attribute count: 1
Outbound Policy Group:
ID: 1, Use Count: 1
TCP Connection state: ESTABLISHED, flags:00000044 (0,0)
Maximum segment size: 1460
TTL check: 0, value: 0, rcvd: 64
Byte Sent: 148, Received: 203
Local host: 192.168.1.2, Local Port: 179
Remote host: 192.168.1.1, Remote Port: 8041
ISentSeq: 1656867 SendNext: 1657016 TotUnAck: 0
TotSent: 149 ReTrans: 19 UnAckSeq: 1657016
IRcvSeq: 1984547 RcvNext: 1984751 SendWnd: 64981
TotalRcv: 204 DupliRcv: 313 RcvWnd: 65000
SendQue: 0 RcvQue: 0 CngstWnd: 5840
Syntax: show ip bgp neighbors
TABLE 102 show ip bgp neighbors output descriptions
Field Description
Total number of BGP Neighbors Shows the total number of BGP neighbors.
IP Address Shows the IPv4 address of the neighbor.
AS Shows the Autonomous System (AS) in which the neighbor resides.
EBGP or IBGP Shows whether the neighbor session is an IBGP session, an EBGP
session, or a confederation EBGP session:
• EBGP - The neighbor is in another AS.
• EBGP_Confed - The neighbor is a member of another sub-AS
in the same confederation.
• IBGP - The neighbor is in the same AS.
RouterID Shows the device ID of the neighbor.
VRF Shows the status of the VRF instance.
Displaying BGP4 information
FastIron Ethernet Switch Layer 3 Routing Conguration Guide, 08.0.30mb
53-1003627-06 463

TABLE 102 show ip bgp neighbors output descriptions (continued)
Field Description
State Shows the state of the device session with the neighbor. The states are
from the device’s perspective of the session, not the neighbor’s
perspective. The state can be one of the following values:
• IDLE - The BGP4 process is waiting to be started. Usually,
enabling BGP4 or establishing a neighbor session starts the
BGP4 process. A minus sign (-) indicates that the session has
gone down and the software is clearing or removing routes.
• ADMND - The neighbor has been administratively shut down. A
minus sign (-) indicates that the session has gone down and the
software is clearing or removing routes.
• CONNECT - BGP4 is waiting for the connection process for
the TCP neighbor session to be completed.
• ACTIVE - BGP4 is waiting for a TCP connection from the
neighbor.
NOTE
If the state frequently changes between CONNECT and
ACTIVE, there may be a problem with the TCP connection.
• OPEN SENT - BGP4 is waiting for an Open message from the
neighbor.
• OPEN CONFIRM - BGP4 has received an Open message
from the neighbor and is now waiting for either a KeepAlive or
Notication message. If the device receives a KeepAlive
message from the neighbor, the state changes to
ESTABLISHED. If the message is a Notication, the state
changes to IDLE.
• ESTABLISHED - BGP4 is ready to exchange Update
messages with the neighbor.
If there is more BGP data in the TCP receiver queue, a plus sign (+) is also
displayed.
Time Shows the amount of time this session has been in its current state.
KeepAliveTime Shows the keepalive time, which species how often this device sends
KeepAlive messages to the neighbor.
HoldTime Shows the hold time, which species how many seconds the device will
wait for a KeepAlive or Update message from a BGP4 neighbor before
deciding that the neighbor is dead.
KeepAliveTimer Expire Shows the time when the keepalive timer is set to expire.
HoldTimer Expire Shows the time when the hold timer is set to expire.
Minimal Route Advertisement Interval Shows the minimum time elapsed between the route advertisements to
the same neighbor.
RefreshCapability Shows whether the device has received conrmation from the neighbor
that the neighbor supports the dynamic refresh capability.
Messages Sent and Received Shows the number of messages this device has sent to and received from
the neighbor. The display shows statistics for the following message types:
• Open
• Update
• KeepAlive
•Notication
• Refresh-Req
Displaying BGP4 information
FastIron Ethernet Switch Layer 3 Routing Conguration Guide, 08.0.30mb
464 53-1003627-06

TABLE 102 show ip bgp neighbors output descriptions (continued)
Field Description
Last Update Time Shows the list of last time updates were sent and received for the
following:
• NLRIs
• Withdraws
Last Connection Reset Reason Shows the reason for ending the previous session with this neighbor. The
reason can be one of the following:
• No abnormal error has occurred.
• Reasons described in the BGP specications:
– Message Header Error
– Connection Not Synchronized
– Bad Message Length
– Bad Message Type
– OPEN Message Error
– Unsupported Version Number
– Bad Peer AS Number
– Bad BGP Identier
– Unsupported Optional Parameter
– Authentication Failure
– Unacceptable Hold Time
– Unsupported Capability
– UPDATE Message Error
– Malformed Attribute List
– Unrecognized Well-known Attribute
– Missing Well-known Attribute
– Attribute Flags Error
– Attribute Length Error
– Invalid ORIGIN Attribute
– Invalid NEXT_HOP Attribute
Last Connection Reset Reason
(continued)
• Reasons described in the BGP specications (continued):
– Optional Attribute Error
– Invalid Network Field
– Malformed AS_PATH
– Hold Timer Expired
– Finite State Machine Error
– Rcv Notication
– Reset All Peer Sessions
– User Reset Peer Session
– Port State Down
– Peer Removed
– Peer Shutdown
– Peer AS Number Change
– Peer AS Confederation Change
– TCP Connection KeepAlive Timeout
– TCP Connection Closed by Remote
TCP Data Stream Error Detected
Notication Sent Shows an error code corresponding to one of the following errors if the
device sends a Notication message from the neighbor. Some errors have
subcodes that clarify the reason for the error. The subcode messages are
listed underneath the error code messages, wherever applicable.
• Message Header Error
– Connection Not Synchronized
– Bad Message Length
– Bad Message Type
–Unspecied
Displaying BGP4 information
FastIron Ethernet Switch Layer 3 Routing Conguration Guide, 08.0.30mb
53-1003627-06 465

TABLE 102 show ip bgp neighbors output descriptions (continued)
Field Description
• Open Message Error
– Unsupported Version
– Bad Peer AS
– Bad BGP Identier
– Unsupported Optional Parameter
– Authentication Failure
– Unacceptable Hold Time
–Unspecied
• Update Message Error
– Malformed Attribute List
– Unrecognized Attribute
– Missing Attribute
– Attribute Flag Error
– Attribute Length Error
– Invalid Origin Attribute
– Invalid NextHop Attribute
– Optional Attribute Error
– Invalid Network Field
– Malformed AS Path
–Unspecied
• Hold Timer Expired
• Finite State Machine Error
• Cease
•Unspecied
Notication Received Shows an error code corresponding to one of the listed errors in the
Notication Sent eld if the device receives a Notication message from
the neighbor.
Neighbor NLRI Negotiation Shows the state of the device’s NLRI negotiation with the neighbor. The
states can be one of the following:
• Peer negotiated IPV4 unicast capability
• Peer negotiated IPV6 unicast capability
• Peer congured for IPV4 unicast routes
• Peer congured for IPV6 unicast routes
Neighbor AS4 Capability Negotiation Shows the state of the device’s AS4 capability negotiation with the
neighbor. The states can be one of the following:
• Peer negotiated AS4 capability
• Peer congured for AS4 capability
As-path attribute count Shows the count of the AS-path attribute.
Outbound Policy Group Shows the ID and the count used in the outbound policy group.
TCP Connection state Shows the state of the connection with the neighbor. The connection can
have one of the following states:
• LISTEN - Waiting for a connection request.
• SYN-SENT - Waiting for a matching connection request after
having sent a connection request.
• SYN-RECEIVED - Waiting for a conrming connection request
acknowledgment after having both received and sent a
connection request.
• ESTABLISHED - Data can be sent and received over the
connection. This is the normal operational state of the
connection.
Displaying BGP4 information
FastIron Ethernet Switch Layer 3 Routing Conguration Guide, 08.0.30mb
466 53-1003627-06

TABLE 102 show ip bgp neighbors output descriptions (continued)
Field Description
• FIN-WAIT-1 - Waiting for a connection termination request
from the remote TCP, or an acknowledgment of the connection
termination request previously sent.
• FIN-WAIT-2 - Waiting for a connection termination request
from the remote TCP.
• CLOSE-WAIT - Waiting for a connection termination request
from the local user.
• CLOSING - Waiting for a connection termination request
acknowledgment from the remote TCP.
• LAST-ACK - Waiting for an acknowledgment of the connection
termination request previously sent to the remote TCP (which
includes an acknowledgment of its connection termination
request).
• TIME-WAIT - Waiting for the specic time to ensure that the
remote TCP received the acknowledgment of its connection
termination request.
• CLOSED - There is no connection state.
Maximum segment size Shows the TCP maximum segment size.
TTL check Shows the TCP TTL check.
Byte Sent Shows the number of bytes sent.
Byte Received Shows the number of bytes received.
Local host Shows the IPv4 address of the device.
Local port Shows the TCP port that the device is using for the BGP4 TCP session
with the neighbor.
Remote host Shows the IPv4 address of the neighbor.
Remote port Shows the TCP port the neighbor is using for the BGP4 TCP session with
the device.
ISentSeq Shows the initial send sequence number for the session.
SendNext Shows the next sequence number to be sent.
TotUnAck Shows the count of sequence numbers sent by the device that have not
been acknowledged by the neighbor.
TotSent Shows the count of the sequence numbers sent to the neighbor.
ReTrans Shows the count of the sequence numbers that the device retransmitted
because they were not acknowledged.
UnAckSeq Shows the current acknowledged sequence number.
IRcvSeq Shows the initial receive sequence number for the session.
RcvNext Shows the next sequence number expected from the neighbor.
SendWnd Shows the size of the send window.
TotalRcv Shows the count of the sequence numbers received from the neighbor.
DupliRcv Shows the count of the duplicate sequence numbers received from the
neighbor.
RcvWnd Shows the size of the receive window.
SendQue Shows the count of the sequence numbers in the send queue.
RcvQue Shows the count of the sequence numbers in the receive queue.
CngstWnd Shows the number of times the window has changed.
Displaying BGP4 information
FastIron Ethernet Switch Layer 3 Routing Conguration Guide, 08.0.30mb
53-1003627-06 467
Attribute entries
Use the show ip bgp attribute-entries command to see AS4 path values, as the following example illustrates.
device# show ip bgp attribute-entries
Total number of BGP Attribute Entries: 18 (0)
1 Next Hop :192.168.1.6 MED :1 Origin:INCOMP
Originator:0.0.0.0 Cluster List:None
Aggregator:AS Number :0 Router-ID:0.0.0.0 Atomic:None
Local Pref:100 Communities:Internet
AS Path :90000 80000 (length 11
)
Address: 0x10e4e0c4 Hash:489 (0x03028536), PeerIdx 0
Links: 0x00000000, 0x00000000, nlri: 0x10f4804a
Reference Counts: 1:0:1, Magic: 51
2 Next Hop :192.168.1.5 Metric :1 Origin:INCOMP
Originator:0.0.0.0 Cluster List:None
Aggregator:AS Number :0 Router-ID:0.0.0.0 Atomic:None
Local Pref:100 Communities:Internet
AS Path :90000 75000 (length 11)
Address: 0x10e4e062 Hash:545 (0x0301e8f6), PeerIdx 0
Links: 0x00000000, 0x00000000, nlri: 0x10f47ff0
Reference Counts: 1:0:1, Magic: 49
Syntax: show ip bgp attribute-entries
Running conguration
AS4s appear in the display of a running conguration, as shown.
device# show ip bgp config
Current BGP configuration:
router bgp
local-as 7701000
confederation identifier 120000
confederation peers 80000
neighbor 192.168.1.2 remote-as 80000
Access lists that contain AS4s
AS4s that exist in access lists are displayed by the command, as shown.
device# show ip as-path-access-lists
ip as-path access list abc: 1 entries
seq 10 permit _75000_
ip as-path access list def: 1 entries
seq 5 permit _80000_
Formats of AS4s in show command output
To display the asdot and asdot+ notation for AS4s, enter the as-format asdot or as-format asdot+ commands before you enter the
show ip bgp command.
device# as-format asdot
device-mu2(config)# show ip bgp
Total number of BGP Routes: 1
Status codes: s suppressed, d damped, h history, * valid, > best, i internal, S stale
Origin codes: i - IGP, e - EGP,? - incomplete
Network Next Hop Metric LocPrf Weight Path
*> 10.1.1.0/24 192.168.1.5 1 100 0 1.24464 100 200 655
5 1.0 1.1 1.2 1.3 1.9464 ?
Displaying BGP4 information
FastIron Ethernet Switch Layer 3 Routing Conguration Guide, 08.0.30mb
468 53-1003627-06
Syntax: as-format asdot
device# as-format asdot+
device# show ip bgp
Total number of BGP Routes: 1
Status codes: s suppressed, d damped, h history, * valid, > best, i internal, S stale
Origin codes: i - IGP, e - EGP, ? - incomplete
Network Next Hop Metric LocPrf Weight Path
*> 10.1.1.0/24 192.168.1.5 1 100 0 1.24464 0.100 0.200
0.65535 1.0 1.1 1.2 1.3 1.9464?
Syntax: as-format asdot+
Updating route information and resetting a neighbor session
The following sections describe how to update route information with a neighbor, reset a session with a neighbor, and close a session
with a neighbor.
Any change to a policy (ACL, route map, and so on) is automatically applied to outbound routes that are learned from a BGP4 neighbor
or peer group after the policy change occurs. However, you must reset the neighbor to update existing outbound routes.
Any change to a policy is automatically applied to inbound routes that are learned after the policy change occurs. However, to apply the
changes to existing inbound routes (those inbound routes that were learned before the policy change), you must reset the neighbors to
update the routes using one of the following methods:
• Request the complete BGP4 route table from the neighbor or peer group. You can use this method if the neighbor supports the
refresh capability (RFCs 2842 and 2858). Most devices today support this capability.
• Clear (reset) the session with the neighbor or peer group. This is the only method you can use if soft reconguration is enabled
for the neighbor.
You also can clear and reset the BGP4 routes that have been installed in the IP route table.
Using soft reconguration
The soft reconguration feature applies policy changes without resetting the BGP4 session. Soft reconguration does not request the
neighbor or group to send the entire BGP4 table, nor does the feature reset the session with the neighbor or group. Instead, soft
reconguration stores all the route updates received from the neighbor or group. When you request a soft reset of inbound routes, the
software performs route selection by comparing the policies against the stored route updates, instead of requesting the neighbor BGP4
route table or resetting the session with the neighbor.
When you enable the soft reconguration feature, it sends a refresh message to the neighbor or group if the neighbor or group supports
dynamic refresh. Otherwise, the feature resets the neighbor session. This step is required to ensure that the soft reconguration feature
has a complete set of updates to use, and occurs only once, when you enable the feature. The feature accumulates all the route updates
from the neighbor, eliminating the need for additional refreshes or resets when you change policies in the future.
To use soft reconguration:
• Enable the feature.
• Make the policy changes.
• Apply the changes by requesting a soft reset of the inbound updates from the neighbor or group.
Enabling soft reconguration
To congure a neighbor for soft reconguration, enter a command such as the following.
device(config-bgp)# neighbor 10.10.200.102 soft-reconfiguration inbound
Displaying BGP4 information
FastIron Ethernet Switch Layer 3 Routing Conguration Guide, 08.0.30mb
53-1003627-06 469
This command enables soft reconguration for updates received from 10.10.200.102. The software dynamically resets the session with
the neighbor, then retains all route updates from the neighbor following the reset.
Syntax: [no] neighbor ip-addr | peer-group-name soft-reconguration inbound
NOTE
The syntax related to soft reconguration is
shown.
Placing a policy change into eect
To place policy changes into eect, enter a command such as the following.
device(config-bgp)# clear ip bgp neighbor 10.10.200.102 soft in
This command updates the routes by comparing the route policies against the route updates that the device has stored. The command
does not request additional updates from the neighbor or otherwise aect the session with the neighbor.
Syntax: clear ip bgp neighbor ip-addr | peer-group-name soft in
NOTE
If you do not specify in , the command applies to both inbound and outbound updates.
NOTE
The syntax related to soft reconguration is
shown.
Displaying the ltered routes received from the neighbor or peer group
When you enable soft reconguration, the device saves all updates received from the specied neighbor or peer group, including updates
that contain routes that are ltered out by the BGP4 route policies in eect on the device. To display the routes that have been ltered
out, enter the following command at any level of the CLI.
device# show ip bgp filtered-routes
Searching for matching routes, use ^C to quit...
Status A:AGGREGATE B:BEST b:NOT-INSTALLED-BEST C:CONFED_EBGP D:DAMPED
E:EBGP H:HISTORY I:IBGP L:LOCAL M:MULTIPATH m:NOT-INSTALLED-MULTIPATH
S:SUPPRESSED F:FILTERED s:STALE
Prefix Next Hop MED LocPrf Weight Status
1 10.3.0.0/8 192.168.4.106 100 0 EF
AS_PATH: 65001 4355 701 80
2 10.4.0.0/8 192.168.4.106 100 0 EF
AS_PATH: 65001 4355 1
3 10.60.212.0/22 192.168.4.106 100 0 EF
AS_PATH: 65001 4355 701 1 189
The routes displayed are the routes that were ltered out by the BGP4 policies on the device. The device did not place the routes in the
BGP4 route table, but did keep the updates. If a policy change causes these routes to be permitted, the device does not need to request
the route information from the neighbor, but instead uses the information in the updates.
Syntax: show ip bgp ltered-routes [ ip-addr ] | [ as-path-access-list num ] | [ detail ] | [ prex-list string ] [ longer-prexes ]
The ip-addr parameter species the IP address of the destination network.
The as-path-access-list num parameter species an AS-path ACL. Only the routes permitted by the AS-path ACL are displayed.
The detail parameter displays detailed information for the routes. (The example shows summary information.) You can specify any of the
other options after detail to further rene the display request.
The prex-list string parameter species an IP prex list. Only routes permitted by the prex list are displayed.
Displaying BGP4 information
FastIron Ethernet Switch Layer 3 Routing Conguration Guide, 08.0.30mb
470 53-1003627-06
If you also use the optional longer-prexes parameter, then all statistics for routes that match the specied route or have a longer prex
than the specied route are displayed. For example, if you specify 10.157.0.0 longer, then all routes with the prex 10.157 or that have
a longer prex (such as 10.157.22) are displayed.
Displaying all the routes received from the neighbor
To display all the route information received in route updates from a neighbor since you enabled soft reconguration, enter a command
such as the following at any level of the CLI.
device# show ip bgp neighbor 192.168.4.106 routes
There are 97345 received routes from neighbor 192.168.4.106
Searching for matching routes, use ^C to quit...
Status A:AGGREGATE B:BEST b:NOT-INSTALLED-BEST C:CONFED_EBGP D:DAMPED
E:EBGP H:HISTORY I:IBGP L:LOCAL M:MULTIPATH m:NOT-INSTALLED-MULTIPATH
S:SUPPRESSED F:FILTERED s:STALE
Prefix Next Hop MED LocPrf Weight Status
1 10.3.0.0/8 192.168.4.106 100 0 BE
AS_PATH: 65001 4355 701 80
2 10.4.0.0/8 192.168.4.106 100 0 BE
AS_PATH: 65001 4355 1
3 10.60.212.0/22 192.168.4.106 100 0 BE
AS_PATH: 65001 4355 701 1 189
4 10.6.0.0/8 192.168.4.106 0 BE
device# show ip bgp neighbor 192.168.4.106 routes
There are 97345 received routes from neighbor 192.168.4.106
Searching for matching routes, use ^C to quit...
tatus A:AGGREGATE B:BEST b:NOT-INSTALLED-BEST C:CONFED_EBGP D:DAMPED
E:EBGP H:HISTORY I:IBGP L:LOCAL M:MULTIPATH S:SUPPRESSED F:FILTEREDtatus A:AGGREGATE B:BEST b:NOT-
INSTALLED-BEST C:CONFED_EBGP D:DAMPED
E:EBGP H:HISTORY I:IBGP L:LOCAL M:MULTIPATH S:SUPPRESSED F:FILTERED
Prefix Next Hop MED LocPrf Weight Status
1 10.3.0.0/8 192.168.4.106 100 0 BE
AS_PATH: 65001 4355 701 8
2 10.4.0.0/8 192.168.4.106 100 0 BE
AS_PATH: 65001 4355 1
3 10.60.212.0/22 192.168.4.106 100 0 BE
AS_PATH: 65001 4355 701 1 189
4 10.6.0.0/8 192.168.4.106 100 0 BE
Syntax: show ip bgp neighbors ip-addr received-routes [ detail ]
The detail parameter displays detailed information for the routes. This example shows summary information.
NOTE
The syntax for displaying received routes is shown. For complete command syntax, refer to Displaying BGP4 neighbor
information on page 443.
Dynamically requesting a route refresh from a BGP4 neighbor
You can easily apply changes to lters that control BGP4 routes received from or advertised to a neighbor, without resetting the BGP4
session between the device and the neighbor. For example, if you add, change, or remove a BGP4 IP prex list that denies specic
routes received from a neighbor, you can apply the lter change by requesting a route refresh from the neighbor. If the neighbor also
supports dynamic route refreshes, the neighbor resends its Adj-RIB-Out, its table of BGP4 routes. Using the route refresh feature, you
do not need to reset the session with the neighbor.
The route refresh feature is based on the following specications:
• RFC 2842. This RFC species the Capability Advertisement, which a BGP4 device uses to dynamically negotiate a capability
with a neighbor.
• RFC 2858 for Multi-protocol Extension.
Displaying BGP4 information
FastIron Ethernet Switch Layer 3 Routing Conguration Guide, 08.0.30mb
53-1003627-06 471
• RFC 2918, which describes the dynamic route refresh capability
The dynamic route refresh capability is enabled by default and cannot be disabled. When the device sends a BGP4 OPEN message to a
neighbor, the device includes a Capability Advertisement to inform the neighbor that the device supports dynamic route refresh.
NOTE
The option for dynamically refreshing routes received from a neighbor requires the neighbor to support dynamic route refresh. If
the neighbor does not support this feature, the option does not take eect and the software displays an error message. The
option for dynamically re-advertising routes to a neighbor does not require the neighbor to support dynamic route refresh.
Dynamically refreshing routes
The following sections describe how to refresh BGP4 routes dynamically to put new or changed lters into eect.
To request a dynamic refresh of all routes from a neighbor, enter a command such as the following.
device(config-bgp-router)# clear ip bgp neighbor 192.168.1.170 soft in
This command asks the neighbor to send its BGP4 table (Adj-RIB-Out) again. The device applies its lters to the incoming routes and
adds, modies, or removes BGP4 routes as necessary.
Syntax: clear ip bgp neighbor all | ip-addr | peer-group-name | as-num [ soft-outbound | soft [ in | out ] ]
The all , ip-addr , peer-group-name , and as-num parameters specify the neighbor. The ip-addr parameter species a neighbor by its IP
interface with the device. The peer-group-name species all neighbors in a specic peer group. The as-num parameter species all
neighbors within the specied AS. The all parameter species all neighbors.
The soft-outbound parameter updates all outbound routes by applying the new or changed lters, but sends only the existing routes
aected by the new or changed lters to the neighbor.
The soft in and soft out parameters specify whether you want to refresh the routes received from the neighbor or sent to the neighbor:
•soft in does one of the following:
– If you enabled soft reconguration for the neighbor or peer group, soft in updates the routes by comparing the route
policies against the route updates that the device has stored. Soft reconguration does not request additional updates from
the neighbor or otherwise aect the session with the neighbor.
– If you did not enable soft reconguration, soft in requests the entire BGP4 route table for the neighbor (Adj-RIB-Out), then
applies the lters to add, change, or exclude routes.
– If a neighbor does not support dynamic refresh, soft in resets the neighbor session.
•soft out updates all outbound routes, then sends the entire BGP4 router table for the device (Adj-RIB-Out) to the neighbor,
after changing or excluding the routes aected by the lters.
If you do not specify in or out , the device performs both options.
NOTE
The soft-outbound parameter updates all outbound routes by applying the new or changed lters, but sends only the existing
routes aected by the new or changed lters to the neighbor. The soft out parameter updates all outbound routes, then sends
the entire BGP4 route table for the device (Adj-RIB-Out) to the neighbor, after changing or excluding the routes aected by the
lters. Use soft-outbound if only the outbound policy is changed.
To dynamically resend all the device BGP4 routes to a neighbor, enter a command such as the following.
device(config-bgp)# clear ip bgp neighbor 192.168.1.170 soft out
This command applies lters for outgoing routes to the device BGP4 route table (Adj-RIB-Out), changes or excludes routes accordingly,
then sends the resulting Adj-RIB-Out to the neighbor.
Displaying BGP4 information
FastIron Ethernet Switch Layer 3 Routing Conguration Guide, 08.0.30mb
472 53-1003627-06
NOTE
The Brocade device does not automatically update outbound routes using a new or changed outbound policy or lter when a
session with the neighbor goes up or down. Instead, the device applies a new or changed policy or lter when a route is placed
in the outbound queue (Adj-RIB-Out).To place a new or changed outbound policy or lter into eect, you must enter a clear ip
bgp neighbor command regardless of whether the neighbor session is up or down. You can enter the command without
optional parameters or with the soft out or soft-outbound option. Either way, you must specify a parameter for the neighbor
(ip-addr, as-num , peer-group-name, or all ).
Displaying dynamic refresh information
You can use the show ip bgp neighbors command to display information for dynamic refresh requests. For each neighbor, the display
lists the number of dynamic refresh requests the device has sent to or received from the neighbor and indicates whether the device
received conrmation from the neighbor that the neighbor supports dynamic route refresh.
The RefreshCapability eld indicates whether this device has received conrmation from the neighbor that the neighbor supports the
dynamic refresh capability. The statistics in the Message Sent and Message Received rows under Refresh-Req indicate how many
dynamic refreshes have been sent to and received from the neighbor. The statistic is cumulative across sessions.
device(config-bgp)# show ip bgp neighbor 10.4.0.2
1 IP Address: 10.4.0.2, AS: 5 (EBGP), RouterID: 100.0.0.1
Description: neighbor 10.4.0.2
State: ESTABLISHED, Time: 0h1m0s, KeepAliveTime: 0, HoldTime: 0
PeerGroup: pg1
Mutihop-EBGP: yes, ttl: 1
RouteReflectorClient: yes
SendCommunity: yes
NextHopSelf: yes
DefaultOriginate: yes (default sent)
MaximumPrefixLimit: 90000
RemovePrivateAs: : yes
RefreshCapability: Received
Route Filter Policies:
Distribute-list: (out) 20
Filter-list: (in) 30
Prefix-list: (in) pf1
Route-map: (in) setnp1 (out) setnp2
Messages: Open Update KeepAlive Notification Refresh-Req
Sent : 1 1 1 0 0
Received: 1 8 1 0 0
Last Update Time: NLRI Withdraw NLRI Withdraw
Tx: 0h0m59s --- Rx: 0h0m59s ---
Last Connection Reset Reason:Unknown
Notification Sent: Unspecified
Notification Received: Unspecified
TCP Connection state: ESTABLISHED
Byte Sent: 115, Received: 492
Local host: 10.4.0.1, Local Port: 179
Remote host: 10.4.0.2, Remote Port: 8053
ISentSeq: 52837276 SendNext: 52837392 TotUnAck: 0
TotSent: 116 ReTrans: 0 UnAckSeq: 52837392
IRcvSeq: 2155052043 RcvNext: 2155052536 SendWnd: 16384
TotalRcv: 493 DupliRcv: 0 RcvWnd: 16384
SendQue: 0 RcvQue: 0 CngstWnd: 1460
Closing or resetting a neighbor session
You can close a neighbor session or resend route updates to a neighbor.
Displaying BGP4 information
FastIron Ethernet Switch Layer 3 Routing Conguration Guide, 08.0.30mb
53-1003627-06 473
If you make changes to lters or route maps and the neighbor does not support dynamic route refresh, use the following methods to
ensure that neighbors contain only the routes you want them to contain:
• If you close a neighbor session, the device and the neighbor clear all the routes they learned from each other. When the device
and neighbor establish a new BGP4 session, they exchange route tables again. Use this method if you want the device to
relearn routes from the neighbor and resend its own route table to the neighbor.
• If you use the soft-outbound option, the device compiles a list of all the routes it would normally send to the neighbor at the
beginning of a session. However, before sending the updates, the device also applies the lters and route maps you have
congured to the list of routes. If the lters or route maps result in changes to the list of routes, the device sends updates to
advertise, change, or even withdraw routes on the neighbor as needed. This ensures that the neighbor receives only the routes
you want it to contain. Even if the neighbor already contains a route learned from the device that you later decided to lter out,
using the soft-outbound option removes that route from the neighbor.
You can specify a single neighbor or a peer group.
To close a neighbor session and thus ush all the routes exchanged by the device and the neighbor, enter the following command.
device# clear ip bgp neighbor all
Syntax: clear ip bgp neighbor all | ip-addr | peer-group-name | as-num [ soft-outbound | soft [ in | out ] ]
The all , ip-addr , peer-group-name , and as-num parameters specify the neighbor. The ip-addr parameter species a neighbor by its IP
interface with the device. The peer-group-name species all neighbors in a specic peer group. The as-num parameter species all
neighbors within an AS and has a range of 1 through 4294967295. The all keyword species all neighbors.
To resend routes to a neighbor without closing the neighbor session, enter a command such as the following.
device# clear ip bgp neighbor 10.0.0.1 soft out
Clearing and resetting BGP4 routes in the IP route table
To clear BGP4 routes from the IP route table and reset the routes, enter a command such as the following.
device# clear ip bgp routes
Syntax: clear ip bgp routes [ ip-addr/prex-length ]
Clearing trac counters
You can clear the counters (reset them to 0) for BGP4 messages.
To clear the BGP4 message counter for all neighbors, enter the following command.
device# clear ip bgp traffic
Syntax: clear ip bgp trac
To clear the BGP4 message counter for a specic neighbor, enter a command such as the following.
device# clear ip bgp neighbor 10.0.0.1 traffic
To clear the BGP4 message counter for all neighbors within a peer group, enter a command such as the following.
device# clear ip bgp neighbor PeerGroup1 traffic
Syntax: clear ip bgp neighbor all | ip-addr | peer-group-name | as-num trac
Clearing trac counters
FastIron Ethernet Switch Layer 3 Routing Conguration Guide, 08.0.30mb
474 53-1003627-06
The all , ip-addr , peer-group-name , and as-num parameters specify the neighbor. The ip-addr parameter species a neighbor by its IP
interface with the device. The peer-group-name species all neighbors in a specic peer group. The as-num parameter species all
neighbors within the specied AS. The all parameter species all neighbors.
Clearing diagnostic buers
The device stores the following BGP4 diagnostic information in buers:
• The rst 400 bytes of the last packet received that contained an error
• The last NOTIFICATION message either sent or received by the device
To display these buers, use options with the show ip bgp neighbors command.
This information can be useful if you are working with Brocade Technical Support to resolve a problem. The buers do not identify the
system time when the data was written to the buer. If you want to ensure that diagnostic data in a buer is recent, you can clear the
buers. You can clear the buers for a specic neighbor or for all neighbors.
If you clear the buer containing the rst 400 bytes of the last packet that contained errors, all the bytes are changed to zeros. The Last
Connection Reset Reason eld of the BGP4 neighbor table also is cleared.
If you clear the buer containing the last NOTIFICATION message sent or received, the buer contains no data.
You can clear the buers for all neighbors, for an individual neighbor, or for all the neighbors within a specic peer group.
To clear these buers for neighbor 10.0.0.1, enter the following commands.
device# clear ip bgp neighbor 10.0.0.1 last-packet-with-error
device# clear ip bgp neighbor 10.0.0.1 notification-errors
Syntax: clear ip bgp neighbor all | ip-addr | peer-group-name | as-num last-packet-with-error | notication-errors
The The all , ip-addr , peer-group-name , and as-num parameters specify the neighbor. The ip-addr parameter species a neighbor by
its IP interface with the device. The peer-group-name species all neighbors in a specic peer group. The as-num parameter species all
neighbors within the specied AS. The all parameter species all neighbors.
Clearing diagnostic buers
FastIron Ethernet Switch Layer 3 Routing Conguration Guide, 08.0.30mb
53-1003627-06 475
FastIron Ethernet Switch Layer 3 Routing Conguration Guide, 08.0.30mb
476 53-1003627-06

Conguring BGP4+
• BGP4+ overview.............................................................................................................................................................................................477
• BGP global mode ......................................................................................................................................................................................... 477
• IPv6 unicast address family....................................................................................................................................................................... 478
• BGP4+ neighbors.......................................................................................................................................................................................... 479
• BGP4+ peer groups......................................................................................................................................................................................479
• BGP4+ next hop recursion.........................................................................................................................................................................480
• BGP4+ NLRIs and next hop attributes..................................................................................................................................................480
• BGP4+ route reection................................................................................................................................................................................ 481
• BGP4+ route aggregation...........................................................................................................................................................................481
• BGP4+ multipath............................................................................................................................................................................................481
• Route maps.......................................................................................................................................................................................................482
• BGP4+ outbound route ltering...............................................................................................................................................................482
• BGP4+ confederations.................................................................................................................................................................................482
• BGP4+ extended community................................................................................................................................................................... 483
• BGP4+ graceful restart................................................................................................................................................................................ 483
•Conguring BGP4+.......................................................................................................................................................................................483
BGP4+ overview
The implementation of IPv6 supports multiprotocol BGP (MBGP) extensions that allow Border Gateway Protocol version 4 plus
(BGP4+) to distribute routing information. BGP4+ supports all of the same features and functionality as IPv4 BGP (BGP4).
IPv6 MBGP enhancements include:
• An IPv6 unicast address family and network layer reachability information (NLRI)
• Next hop attributes that use IPv6 addresses
NOTE
The implementation of BGP4+ supports the advertising of routes among dierent address families. However, it supports
BGP4+ unicast routes only; it does not currently support BGP4+ multicast routes.
BGP global mode
Congurations that are not specic to address family conguration are available in the BGP global conguration mode.
device(config-bgp-router)# ?
Possible completions:
address-family Enter Address Family command mode
address-filter Configure IP address filters
aggregate-address Configure BGP aggregate entries
always-compare-med Allow comparing MED from different neighbors
always-propagate Allow readvertisement of best BGP routes not in
IP forwarding table
as-path-filter Configure autonomous system path filters
as-path-ignore Ignore AS_PATH length info for best route
selection
bgp-redistribute-internal Allow redistribution of iBGP routes into IGPs
capability Set capability
clear Clear table/statistics/keys
FastIron Ethernet Switch Layer 3 Routing Conguration Guide, 08.0.30mb
53-1003627-06 477
client-to-client-reflection Configure client to client route reflection
cluster-id Configure Route-Reflector Cluster-ID
community-filter Configure community list filters
compare-routerid Compare router-id for identical BGP paths
confederation Configure AS confederation parameters
dampening Enable route-flap dampening
default-information-originate
default-local-preference Configure default local preference value
default-metric Set metric of redistributed routes
distance Define an administrative distance
enforce-first-as Enforce the first AS for EBGP routes
fast-external-fallover Reset session if link to EBGP peer goes down
graceful-restart Enables the BGP graceful restart capability
local-as Configure local AS number
maximum-paths Forward packets over multiple paths
med-missing-as-worst Consider routes missing MED attribute as least
desirable
multipath Enable multipath for ibgp or ebgp neighbors only
neighbor Specify a neighbor router
network Specify a network to announce via BGP
next-hop-enable-default Enable default route for BGP next-hop lookup
next-hop-recursion Perform next-hop recursive lookup for BGP route
readvertise Allow readvertisement of best BGP routes not in
IP forwarding table
redistribute Redistribute information from another routing
protocol
table-map Map external entry attributes into routing table
timers Adjust routing timers
update-time Configure igp route update interval
IPv6 unicast address family
The IPv6 unicast address family conguration level provides access to commands that allow you to congure BGP4+ unicast routes. The
commands that you enter at this level apply only to the IPv6 unicast address family.
BGP4+ supports the IPv6 address family conguration level.
You can generate a conguration for BGP4+ unicast routes that is separate and distinct from congurations for IPv4 unicast routes.
The commands that you can access while at the IPv6 unicast address family conguration level are also available at the IPv4 unicast
address family conguration levels. Each address family conguration level allows you to access commands that apply to that particular
address family only.
Where relevant, this chapter discusses and provides IPv6-unicast-specic examples. You must rst congure IPv6 unicast routing for
any IPv6 routing protocol to be active.
The following congurations are allowed under BGP IPv6 address family unicast mode:
device(config-bgp-ipv6u)# ?
Possible completions:
aggregate-address Configure BGP aggregate entries
always-propagate Allow readvertisement of best BGP routes not
in IP Forwarding table
bgp-redistribute-internal Allow redistribution of iBGP routes into IGPs
client-to-client-reflection Configure client to client route reflection
dampening Enable route-flap dampening
default-information-originate Originate Default Information
default-metric Set metric of redistributed routes
graceful-restart Enables the BGP graceful restart capability
maximum-paths Forward packets over multiple paths
multipath Enable multipath for ibgp or ebgp neighbors
only
neighbor Specify a neighbor router
IPv6 unicast address family
FastIron Ethernet Switch Layer 3 Routing Conguration Guide, 08.0.30mb
478 53-1003627-06
network Specify a network to announce via BGP
next-hop-enable-default Enable default route for BGP next-hop lookup
next-hop-recursion Perform next-hop recursive lookup for BGP
route
redistribute Redistribute information from another
routing protocol
table-map Map external entry attributes into routing
table
update-time Configure igp route update interval
BGP4+ neighbors
BGP4+ neighbors can be congured using link-local addresses or global addresses.
BGP4+ neighbors can be created using link-local addresses for peers in the same link. For link-local peers, the neighbor interface over
which the neighbor and local device exchange prexes is specied through the neighbor update-source command, and a route map is
congured to set up a global next hop for packets destined for the neighbor.
To congure BGP4+ neighbors that use link-local addresses, you must do the following:
• Add the IPv6 address of a neighbor in a remote autonomous system (AS) to the BGP4+ neighbor table of the local device.
• Identify the neighbor interface over which the neighbor and local device will exchange prexes using the neighbor update-
source command.
•Congure a route map to set up a global next hop for packets destined for the neighbor.
The neighbor should be activated in the IPv6 address family conguration mode using the neighbor activate command.
BGP4+ neighbors can also be congured using a global address. The global IPv6 address of a neighbor in a remote AS must be added,
and the neighbor should be activated in the IPv6 address family conguration mode using the neighbor activate command.
BGP4+ peer groups
Neighbors having the same attributes and parameters can be grouped together by means of the peer-group command.
You must rst create a peer group, after which you can associate neighbor IPv6 addresses with the peer group. All of the attributes that
are allowed on a neighbor are allowed on a peer group as well.
BGP4+ peers and peer groups are activated in the IPv6 address family conguration mode to establish the BGP4+ peering sessions.
An attribute value congured explicitly for a neighbor takes precedence over the attribute value congured on the peer group. In the case
where neither the peer group nor the individual neighbor has the attribute congured, the default value for the attribute is used.
NOTE
BGP4 neighbors are established and the prexes are advertised using the neighbor IP address remote-as command in router
BGP mode. However, when establishing BGP4+ peer sessions and exchanging IPv6 prexes, neighbors must also be activated
using the neighbor IPv6 address activate command in IPv6 address family conguration mode.
NOTE
You can add IPv6 neighbors only to an IPv6 peer group. You cannot add an IPv4 neighbor to an IPv6 peer group and vice
versa. IPv4 and IPv6 peer groups must remain separate.
BGP4+ peer groups
FastIron Ethernet Switch Layer 3 Routing Conguration Guide, 08.0.30mb
53-1003627-06 479
BGP4+ next hop recursion
A device can nd the IGP route to the next-hop gateway for a BGP4+ route.
For each BGP4+ route learned, the device performs a route lookup to obtain the IPv6 address of the next hop for the route. A BGP4+
route is eligible for addition in the IPv6 route table only if the following conditions are true:
• The lookup succeeds in obtaining a valid next-hop IPv6 address for the route.
• The path to the next-hop IPv6 address is an IGP path or a static route path.
By default, the software performs only one lookup for the next-hop IPv6 address for the BGP4+ route. If the next hop lookup does not
result in a valid next hop IPv6 address, or the path to the next hop IPv6 address is a BGP4+ path, the BGP4+ route destination is
considered unreachable. The route is not eligible to be added to the IPv6 route table.
The BGP4+ route table can contain a route with a next hop IPv6 address that is not reachable through an IGP route, even though the
device can reach a hop farther away through an IGP route. This can occur when the IGPs do not learn a complete set of IGP routes, so
the device learns about an internal route through IBGP instead of through an IGP. In this case, the IPv6 route table will not contain a route
that can be used to reach the BGP4+ route destination.
To enable the device to nd the IGP route to the next-hop gateway for a BGP4+ route, enable recursive next-hop lookups. With this
feature enabled, if the rst lookup for a BGP4+ route results in an IBGP path that originated within the same AS, rather than an IGP path
or static route path, the device performs a lookup on the next hop IPv6 address for the next hop gateway. If this second lookup results in
an IGP path, the software considers the BGP4+ route to be valid and adds it to the IPv6 route table. Otherwise, the device performs
another lookup on the next hop IPv6 address of the next hop for the next hop gateway, and so on, until one of the lookups results in an
IGP route.
You must congure a static route or use an IGP to learn the route to the EBGP multihop peer.
BGP4+ NLRIs and next hop attributes
BGP4+ introduces new attributes to handle multiprotocol extensions for BGP.
Multiprotocol BGP (MBGP) is an extension to BGP that enables BGP to carry routing information for multiple address families.
BGP4+ introduces new attributes to handle multiprotocol extensions for BGP:
• Multiprotocol reachable Network Layer Reachability Information (MP_REACH_NLRI): Used to carry the set of reachable
destinations, together with the next hop information, to be used for forwarding to these destinations.
• Multiprotocol unreachable NLRI (MP_UNREACH_NLRI): Used to carry the set of unreachable destinations.
MP_REACH_NLRI and MP_UNREACH_NLRI are optional and non-transitive, so that a BGP4+ speaker that does not support the
multiprotocol capabilities ignores the information carried in these attributes, and does not pass it to other BGP4+ speakers. A BGP
speaker that uses multiprotocol extensions for IPv6 uses the capability advertisement procedures to determine whether the speaker can
use multiprotocol extensions with a particular peer.
The next hop information carried in the MP_REACH_NLRI path attribute denes the network layer address of the border router that will
be used as the next hop to the destinations listed in the MP_NLRI attribute in the UPDATE message.
MP_REACH_NLRI and MP_UNREACH_NLRI carry IPv6 prexes.
BGP4+ next hop recursion
FastIron Ethernet Switch Layer 3 Routing Conguration Guide, 08.0.30mb
480 53-1003627-06
BGP4+ route reection
A BGP device can act as a route-reector client or as a route reector. You can congure a BGP peer as a route-reector client from the
device that is going to reect the routes and act as the route reector using the neighbor route-reector-client command.
When there is more than one route reector, they should all belong to the same cluster. By default, the value for cluster-id is used as the
device ID. The device ID can be changed using the cluster-id command.
The route-reector server reects the routes as follows:
• Routes from the client are reected to the client as well as to nonclient peers.
• Routes from nonclient peers are reected only to client peers.
If route-reector clients are connected in a full IBGP mesh, you can disable client-to-client reection on the route reector using the no
client-to-client-reection command.
A BGP device advertises only those routes that are preferred ones and are installed into the Routing Table Manager (RTM). When a route
cannot be installed into the RTM because the routing table is full, the route reector may not reect that route. In cases where the route
reector is not placed directly in the forwarding path, you can congure the route reector to reect routes even though those routes are
not in the RTM using the always-propagate command.
BGP4+ route aggregation
A device can be congured to aggregate routes in a range of networks into a single IPv6 prex.
By default, a device advertises individual BGP4+ routes for all the networks. The aggregation feature allows you to congure a device to
aggregate routes in a range of networks into a single IPv6 prex. For example, without aggregation, a device will individually advertise
routes for networks 2001:db8:0001:0000::/64, 2001:db8:0002:0000::/64, 2001:db8:0003:0000::/64, and so on. You can
congure the device to send a single, aggregate route for the networks instead so that the aggregate route would be advertised as
2001:db8::/32 to BGP4 neighbors.
BGP4+ multipath
The BGP4+ multipath feature can be used to enable load-balancing across dierent paths.
BGP4+ selects only one best path for each IPv6 prex it receives before installing it in the IP routing table. If you need load-balancing
across dierent paths, you must enable BGP4+ multipath using the maximum-paths command under IPv6 address family conguration
mode.
IBGP paths and EBGP paths can be exclusively selected, or a combination of IBGP and EBGP paths can be selected.
The following attributes of parallel paths must match for them to be considered for multipathing:
• Weight
• Local Preference
• Origin
• AS-Path Length
• MED
• Neighbor AS (EBGP multipath)
• AS-PATH match (for IBGP multipath)
BGP4+ multipath
FastIron Ethernet Switch Layer 3 Routing Conguration Guide, 08.0.30mb
53-1003627-06 481
• IGP metric to BGP next hop
Route maps
Route maps must be applied to IPv6 unicast address prexes in IPv6 address family conguration mode.
By default, route maps that are applied under IPv4 address family conguration mode using the neighbor route-map command are
applied to only IPv4 unicast address prexes. To apply route maps to IPv6 unicast address prexes, the neighbor route-map command
must be used in IPv6 address family conguration mode. The route maps are applied as the inbound or outbound routing policy for
neighbors under the specied address family. Conguring separate route maps under each address family type simplies managing
complicated or dierent policies for each address family.
BGP4+ outbound route ltering
The BGP4+ Outbound Route Filtering Capability (ORF) feature is used to minimize the number of BGP updates sent between BGP
peers.
When the ORF feature is enabled, unwanted routing updates are ltered out, reducing the amount of system resources required for
generating and processing routing updates. The ORF feature is enabled through the advertisement of ORF capabilities to peer routers.
The locally congured BGP4+ inbound prex lters are sent to the remote peer so that the remote peer applies the lter as an outbound
lter for the neighbor.
The ORF feature can be congured with send and receive ORF capabilities. The local peer advertises the ORF capability in send mode,
indicating that it will accept a prex list from a neighbor and apply the prex list to locally congured ORFs. The local peer exchanges the
ORF capability in send mode with a remote peer for a prex list that is congured as an inbound lter for that peer locally. The remote
peer only sends the rst update once it receives a ROUTEREFRESH request or BGP ORF with IMMEDIATE from the peer. The local
and remote peers exchange updates to maintain the ORF on each router.
BGP4+ confederations
A large autonomous system (AS) can be divided into multiple subautonomous systems and grouped into a single BGP4+ confederation.
Each subautonomous system must be uniquely identied within the confederation AS by a subautonomous system number. Within each
subautonomous system, all the rules of internal BGP (IBGP) apply. For example, all BGP routers inside the subautonomous system must
be fully meshed. Although EBGP is used between subautonomous systems, the subautonomous systems within the confederation
exchange routing information like IBGP peers. Next hop, Multi Exit Discriminator (MED), and local preference information is preserved
when crossing subautonomous system boundaries. To the outside world, a confederation looks like a single AS.
The AS path list is a loop-avoidance mechanism used to detect routing updates leaving one subautonomous system and attempting to
re-enter the same subautonomous system. A routing update attempting to re-enter a subautonomous system it originated from is
detected because the subautonomous system sees its own subautonomous system number listed in the update's AS path.
Route maps
FastIron Ethernet Switch Layer 3 Routing Conguration Guide, 08.0.30mb
482 53-1003627-06
BGP4+ extended community
The BGP4+ extended community feature lters routes based on a regular expression specied when a route has multiple community
values in it.
A BGP community is a group of destinations that share a common property. Community information identifying community members is
included as a path attribute in BGP UPDATE messages. You can perform actions on a group using community and extended
community attributes to trigger routing decisions. All communities of a particular type can be ltered out, or certain values can be
specied for a particular type of community. You can also specify whether a particular community is transitive or non-transitive across an
autonomous system (AS) boundary.
An extended community is an 8-octet value and provides a larger range for grouping or categorizing communities. BGP extended
community attributes are specied in RFC 4360.
You dene the extended community list using the ip extcommunity-list command. The extended community can then be matched or
applied to the neighbor through the route map. The route map must be applied on the neighbor to which routes need to carry the
extended community attributes. The "send-community" should be enabled for the neighbor conguration to start including the attributes
while sending updates to the neighbor.
BGP4+ graceful restart
BGP4+ graceful restart (GR) allows for restarts where neighboring devices participate in the restart, helping to ensure that no route and
topology changes occur in the network for the duration of the restart.
The GR feature provides a routing device with the capability to inform its neighbors and peers when it is performing a restart.
When a BGP session is established, GR capability for BGP is negotiated by neighbors and peers through the BGP OPEN message. If
the neighbor also advertises support for GR, GR is activated for that neighbor session. If both peers do not exchange the GR capability,
the session is not GR-capable. If the BGP session is lost, the BGP peer router, known as a GR helper, marks all routes associated with
the device as “stale” but continues to forward packets to these routes for a set period of time. The restarting device also continues to
forward packets for the duration of the graceful restart. When the graceful restart is complete, routes are obtained from the helper so that
the device is able to quickly resume full operation.
When the GR feature is congured on a device, both helper router and restarting router functionalities are supported. It is not possible to
disable helper functionality explicitly.
GR is enabled by default in both IPv4 and IPv6 address families.
NOTE
BGP4 GR can be congured for a global routing instance or for a specied VRF
instance.
NOTE
BGP4 GR is supported in FSX 800 and FSX 1600 devices with dual management modules, FCX switches in a stack, and ICX
switches in a stack. If the switch functions as a restart helper device only, a secondary management module and stacking are
not required.
Conguring BGP4+
Conguring BGP4+
FastIron Ethernet Switch Layer 3 Routing Conguration Guide, 08.0.30mb
53-1003627-06 483
Conguring BGP4+ neighbors using global IPv6 addresses
BGP4+ neighbors can be congured using global IPv6 addresses.
1. Enter the congure terminal command to access global conguration mode.
device# configure terminal
2. Enter the router bgp command to enable BGP routing.
device(config)# router bgp
3. Enter the local-as command to congure the autonomous system number (ASN) in which your device resides.
device(config-bgp-router)# local-as 1000
4. Enter the neighbor ipv6-address remote-as command to specify the ASN in which the remote neighbor resides.
device(config-bgp-router)# neighbor 2001:db8:93e8:cc00::1 remote-as 1001
5. Enter the address family command and specify the ipv6 and unicast keywords to enter IPv6 address family conguration
mode.
device(config-bgp-router)# address-family ipv6 unicast
6. Enter the neighbor ipv6-address activate command to enable the exchange of information with the neighbor.
device(config-bgp-ipv6u)# neighbor 2001:db8:93e8:cc00::1 activate
The following example congures a neighbor using a global IPv6 address.
device# configure terminal
device(config)# router bgp
device(config-bgp-router)# local-as 1000
device(config-bgp-router)# neighbor 2001:db8:93e8:cc00::1 remote-as 1001
device(config-bgp-router)# address-family ipv6 unicast
device(config-bgp-ipv6u)# neighbor 2001:db8:93e8:cc00::1 activate
Conguring BGP4+ neighbors using link-local addresses
BGP4+ neighbors can be congured using link-local addresses.
1. Enter the congure terminal command to access global conguration mode.
device# configure terminal
2. Enter the router bgp command to enable BGP routing.
device(config)# router bgp
3. Enter the local-as command to congure the autonomous system number (ASN) in which your device resides.
device(config-bgp-router)# local-as 1000
4. Enter the neighbor ipv6-address remote-as command to specify the ASN in which the remote neighbor resides.
device(config-bgp-router)# neighbor fe80:4398:ab30:45de::1 remote-as 1001
Conguring BGP4+
FastIron Ethernet Switch Layer 3 Routing Conguration Guide, 08.0.30mb
484 53-1003627-06
5. Enter the neighbor ipv6-address update-source command to specify an interface.
device(config-bgp-router)# neighbor fe80:4398:ab30:45de::1 update-source ethernet 1/3/1
6. Enter the address-family command and specify the ipv6 and unicast keywords to enter IPv6 address family conguration
mode.
device(config-bgp-router)# address-family ipv6 unicast
7. Enter the neighbor ipv6-address activate command to enable the exchange of information with the neighbor.
device(config-bgp-ipv6u)# neighbor fe80:4398:ab30:45de::1 activate
8. Enter the neighbor ipv6-address route-map command and specify the out keyword to apply a route map to outgoing routes.
device(config-bgp-ipv6u)# neighbor fe80:4398:ab30:45de::1 route-map out myroutemap
9. Enter the exit command until you return to global conguration mode.
device(config-bgp-ipv6u)# exit
10. Enter the route-map name permit command to dene the route map and enter route map conguration mode.
device(config)# route-map myroutemap permit 10
11. Enter the set ipv6 next-hop command and specify an IPv6 address to set the IPv6 address of the next hop.
device(config-routemap myroutemap)# set ipv6 next-hop 2001::10
The following example congures a neighbor using a link-local address and congures a route map to set up a global next hop for
packets destined for the neighbor.
device# configure terminal
device(config)# router bgp
device(config-bgp-router)# local-as 1000
device(config-bgp-router)# neighbor fe80:4398:ab30:45de::1 remote-as 1001
device(config-bgp-router)# neighbor fe80:4398:ab30:45de::1 update-source ethernet 1/3/1
device(config-bgp-router)# address-family ipv6 unicast
device(config-bgp-ipv6u)# neighbor fe80:4398:ab30:45de::1 activate
device(config-bgp-ipv6u)# neighbor fe80:4398:ab30:45de::1 route-map out myroutemap
device(config-bgp-ipv6u)# exit
device(config)# route-map myroutemap permit 10
device(config-route-mapmyroutemap)# set ipv6 next-hop 2001::10
Conguring BGP4+ peer groups
A peer group can be created and neighbor IPv6 addresses can be associated with the peer group. The peer group is then activated in the
IPv6 address family conguration mode.
1. Enter the congure terminal command to access global conguration mode.
device# configure terminal
2. Enter the router bgp command to enable BGP routing.
device(config)# router bgp
3. Enter the local-as command to congure the autonomous system number (ASN) in which your device resides.
device(config-bgp-router)# local-as 1000
Conguring BGP4+
FastIron Ethernet Switch Layer 3 Routing Conguration Guide, 08.0.30mb
53-1003627-06 485
4. Enter the neighbor peer-group-name peer-group command to create a peer group.
device(config-bgp-router)# neighbor mypeergroup1 peer-group
5. Enter the neighbor peer-group-name remote-as command to specify the ASN of the peer group.
device(config-bgp-router)# neighbor mypeergroup1 remote-as 11
6. Enter the neighbor ipv6-address peer-group command to associate a neighbor with the peer group.
device(config-bgp-router)# neighbor 2001:2018:8192::125 peer-group mypeergroup1
7. Enter the neighbor ipv6-address peer-group command to associate a neighbor with the peer group.
device(config-bgp-router)# neighbor 2001:2018:8192::124 peer-group mypeergroup1
8. Enter the address-family command and specify the ipv6 and unicast keywords to enter IPv6 address family conguration
mode.
device(config-bgp-router)# address-family ipv6 unicast
9. Enter the neighbor peer-group-name activate command to establish an IPv6 BGP session with the peer group.
device(config-bgp-ipv6u)# neighbor mypeergroup1 activate
The following example creates a peer group, specifying two neighbors to belong to the peer group, and activates the peer group.
device# configure terminal
device(config)# router bgp
device(config-bgp-router)# local-as 1000
device(config-bgp-router)# neighbor mypeergroup1 peer-group
device(config-bgp-router)# neighbor mypeergroup1 remote-as 11
device(config-bgp-router)# neighbor 2001:2018:8192::125 peer-group mypeergroup1
device(config-bgp-router)# neighbor 2001:2018:8192::124 peer-group mypeergroup1
device(config-bgp-router)# address-family ipv6 unicast
device(config-bgp-ipv6u)# neighbor mypeergroup1 activate
Conguring a peer group with IPv4 and IPv6 peers
A peer group that contains both IPv4 and IPv6 peers can be congured.
1. Enter the congure terminal command to access global conguration mode.
device# configure terminal
2. Enter the router bgp command to enable BGP routing.
device(config)# router bgp
3. Enter the local-as command to congure the autonomous system number (ASN) in which your device resides.
device(config-bgp-router)# local-as 1000
4. Enter the neighbor peer-group-name peer-group command to create a peer group.
device(config-bgp-router)# neighbor p1 peer-group
5. Enter the neighbor peer-group-name remote-as command to specify the ASN of the peer group.
device(config-bgp-router)# neighbor p1 remote-as 11
Conguring BGP4+
FastIron Ethernet Switch Layer 3 Routing Conguration Guide, 08.0.30mb
486 53-1003627-06
6. Enter the neighbor ipv6-address peer-group command to associate a neighbor with the peer group.
device(config-bgp-router)# neighbor 2001:2018:8192::124 peer-group p1
7. Enter the neighbor ip address peer-group command to associate a neighbor with the peer group.
device(config-bgp-router)# neighbor 10.0.0.1 peer-group p1
8. Enter the address-family command and specify the ipv6 and unicast keywords to enter IPv6 address family conguration
mode.
device(config-bgp-router)# address-family ipv6 unicast
9. Enter the neighbor peer-group-name activate command to establish an IPv6 BGP session with the peer group.
device(config-bgp-ipv6u)# neighbor p1 activate
The following example creates a peer group with both IPv6 and IPv4 peers and activates the peer group in the IPv6 address family.
device# configure terminal
device(config)# router bgp
device(config-bgp-router)# local-as 1000
device(config-bgp-router)# neighbor p1 peer-group
device(config-bgp-router)# neighbor p1 remote-as 11
device(config-bgp-router)# neighbor 2001:2018:8192::124 peer-group p1
device(config-bgp-router)# neighbor 10.0.0.1 peer-group p1
device(config-bgp-router)# address-family ipv6 unicast
device(config-bgp-ipv6u)# neighbor p1 activate
Importing routes into BGP4+
Routes can be explicitly specied for advertisement by BGP.
The routes imported into BGP4+ must rst exist in the IPv6 unicast route table.
1. Enter the congure terminal command to access global conguration mode.
device# configure terminal
2. Enter the router bgp command to enable BGP routing.
device(config)# router bgp
3. Enter the address-family command and specify the ipv6 and unicast keywords to enter IPv6 address family conguration
mode.
device(config-bgp-router)# address-family ipv6 unicast
4. Enter the network command and specify a network/mask to import the specied prex into the BGP4+ database.
device(config-bgp-ipv6u)# network 2001:db8::/32
The following example imports the 2001:db8::/32 prex in to the BGP4+ database for advertising.
device# configure terminal
device(config)# router bgp
device(config-bgp-router)# neighbor fe80:4398:ab30:45de::1 remote-as 1001
device(config-bgp-router)# address-family ipv6 unicast
device(config-bgp-ipv6u)# network 2001:db8::/32
Conguring BGP4+
FastIron Ethernet Switch Layer 3 Routing Conguration Guide, 08.0.30mb
53-1003627-06 487
Advertising the default BGP4+ route
A BGP device can be congured to advertise the default IPv6 route to all BGP4+ neighbors and to install that route in the local BGP4+
route table.
The default route must be present in the local IPv6 route table.
1. Enter the congure terminal command to access global conguration mode.
device# configure terminal
2. Enter the router bgp command to enable BGP routing.
device(config)# router bgp
3. Enter the address-family command and specify the ipv6 and unicast keywords to enter IPv6 address family conguration
mode.
device(config-bgp-router)# address-family ipv6 unicast
4. Enter the default-information-originate command to advertise the default IPv6 route to all BGP4+ neighbors and to install that
route in the local BGP4+ route table.
device(config-bgp-ipv6u)# default-information-originate
The following example enables a BGP4+ device to advertise the default IPv6 route to all BGP4+ neighbors and to install that route in the
local BGP4+ route table.
device# configure terminal
device(config)# router bgp
device(config-bgp-router)# address-family ipv6 unicast
device(config-bgp-ipv6u)# default-information-originate
Advertising the default BGP4+ route to a specic neighbor
A BGP device can be congured to advertise the default IPv6 route to a specic neighbor.
1. Enter the congure terminal command to access global conguration mode.
device# configure terminal
2. Enter the router bgp command to enable BGP routing.
device(config)# router bgp
3. Enter the local-as command to congure the autonomous system number (ASN) in which your device resides.
device(config-bgp-router)# local-as 1000
4. Enter the address-family command and specify the ipv6 and unicast keywords to enter IPv6 address family conguration
mode.
device(config-bgp-router)# address-family ipv6 unicast
5. Enter the neighbor default-originate command and specify an IPv6 address to enable the BGP4+ device to advertise the
default IPv6 route to a specic neighbor.
device(config-bgp-ipv6u)# neighbor 2001:db8:93e8:cc00::1 default-originate
Conguring BGP4+
FastIron Ethernet Switch Layer 3 Routing Conguration Guide, 08.0.30mb
488 53-1003627-06
The following example enables a BGP4+ device to advertise the default IPv6 route to a specic neighbor.
device# configure terminal
device(config)# router bgp
device(config-bgp-router)# local-as 1000
device(config-bgp-router)# address-family ipv6 unicast
device(config-bgp-ipv6u)# neighbor 2001:db8:93e8:cc00::1 default-originate
Using the IPv6 default route as a valid next hop for a BGP4+ route
In certain cases, such as when a device is acting as an edge device, it can be congured to use the default route as a valid next hop.
By default, a device does not use a default route to resolve a BGP4+ next-hop route. If the IPv6 route lookup for the BGP4+ next-hop
does not result in a valid IGP route (including static or direct routes), the BGP4+ next-hop is considered to be unreachable and the
BGP4+ route is not used. You can congure the device to use the default route as a valid next hop.
1. Enter the congure terminal command to access global conguration mode.
device# configure terminal
2. Enter the router bgp command to enable BGP routing.
device(config)# router bgp
3. Enter the address-family command and specify the ipv6 and unicast keywords to enter IPv6 address family conguration
mode.
device(config-bgp-router)# address-family ipv6 unicast
4. Enter the next-hop-enable-default command to congure the device to use the default route as a valid next hop.
device(config-bgp-ipv6u)# next-hop-enable-default
The following example congures a BGP4+ device to use the default route as a valid next hop.
device# configure terminal
device(config)# router bgp
device(config-bgp-router)# address-family ipv6 unicast
device(config-bgp-ipv6u)# next-hop-enable-default
Enabling next-hop recursion
Next hop recursion can be enabled so that a device can nd the IGP route to the next hop gateway for a BGP4+ route.
1. Enter the congure terminal command to access global conguration mode.
device# configure terminal
2. Enter the router bgp command to enable BGP routing.
device(config)# router bgp
3. Enter the address-family command and specify the ipv6 and unicast keywords to enter IPv6 address family conguration
mode.
device(config-bgp-router)# address-family ipv6 unicast
Conguring BGP4+
FastIron Ethernet Switch Layer 3 Routing Conguration Guide, 08.0.30mb
53-1003627-06 489
4. Enter the next-hop-recursion command to enable recursive next hop lookups.
device(config-bgp-ipv6u)# next-hop-recursion
The following example enables recursive next hop lookups.
device# configure terminal
device(config)# router bgp
device(config-bgp-router)# address-family ipv6 unicast
device(config-bgp-ipv6u)# next-hop-recursion
Conguring a cluster ID for a route reector
The cluster ID can be changed if there is more than one route reector, so that all route reectors belong to the same cluster.
1. Enter the congure terminal command to access global conguration mode.
device# configure terminal
2. Enter the router bgp command to enable BGP routing.
device(config)# router bgp
3. Enter the local-as command to congure the autonomous system number (ASN) in which your device resides.
device(config-bgp-router)# local-as 1000
4. Enter the cluster-id command and specify a value to change the cluster ID of a device from the default device ID.
device(config-bgp-router)# cluster-id 321
The following example changes the cluster ID of a device from the default device ID to 321.
device# configure terminal
device(config)# router bgp
device(config-bgp-router)# cluster-id 321
Conguring a route reector client
A BGP peer can be congured as a route reector client.
1. Enter the congure terminal command to access global conguration mode.
device# configure terminal
2. Enter the router bgp command to enable BGP routing.
device(config)# router bgp
3. Enter the local-as command to congure the autonomous system number (ASN) in which your device resides.
device(config-bgp-router)# local-as 1000
4. Enter the address-family command and specify the ipv6 and unicast keywords to enter IPv6 address family conguration
mode.
device(config-bgp-router)# address-family ipv6 unicast
Conguring BGP4+
FastIron Ethernet Switch Layer 3 Routing Conguration Guide, 08.0.30mb
490 53-1003627-06
5. Enter the neighbor ipv6-address route-reector-client command to congure a specied neighbor to be a route reector
client.
device(config-bgp-ipv6u)# neighbor 2001:db8:e0ff:783a::4 route-reflector-client
The following example congures a neighbor with the IPv6 address 2001:db8:e0:783a::4 to be a route reector client.
device# configure terminal
device(config)# router bgp
device(config-bgp-router)# local-as 1000
device(config-bgp-router)# address-family ipv6 unicast
device(config-bgp-ipv6u)# neighbor 2001:db8:e0ff:783a::4 route-reflector-client
Aggregating routes advertised to BGP neighbors
A device can be congured to aggregate routes in a range of networks into a single IPv6 prex.
The route-map should already be dened.
You can aggregate BGP4+ routes, for example 2001:db8:0001:0000::/64, 2001:db8:0002:0000::/64, 2001:db8:0003:0000::/64
into a single network prex: 2001:db8::/24.
1. Enter the congure terminal command to access global conguration mode.
device# configure terminal
2. Enter the router bgp command to enable BGP routing.
device(config)# router bgp
3. Enter the address-family command and specify the ipv6 and unicast keywords to enter IPv6 address family conguration
mode.
device(config-bgp-router)# address-family ipv6 unicast
4. Enter the aggregate-address command to aggregate the routes from a range of networks into a single network prex.
device(config-bgp-ipv6u)# aggregate-address 2001:db8::/32
The following example enables a BGP4+ device to advertise the default route and send the default route to a specied neighbor.
device# configure terminal
device(config)# router bgp
device(config-bgp-router)# address-family ipv6 unicast
device(config-bgp-ipv6u)# aggregate-address 2001:db8::/32
Enabling load-balancing across dierent paths
The BGP4+ multipath feature can be congured, enabling load-balancing across dierent paths.
1. Enter the congure terminal command to access global conguration mode.
device# configure terminal
2. Enter the router bgp command to enable BGP routing.
device(config)# router bgp
Conguring BGP4+
FastIron Ethernet Switch Layer 3 Routing Conguration Guide, 08.0.30mb
53-1003627-06 491
3. Enter the address-family command and specify the ipv6 and unicast keywords to enter IPv6 address family conguration
mode.
device(config-bgp-router)# address-family ipv6 unicast
4. Do one of the following:
• Enter the maximum-paths command and specify a value to set the maximum number of BGP4+ shared paths.
• Enter the maximum-paths command using the use-load-sharing keyword to set the maximum number of BGP4+ shared
paths to that of the value already congured by means of the ip load-sharing command.
device(config-bgp-ipv6u)# maximum-paths 8
or
device(config-bgp-ipv6u)# maximum-paths use-load-sharing
The following example sets the maximum number of BGP4+ shared paths to 8.
device# configure terminal
device(config)# router bgp
device(config-bgp-router)# address-family ipv6 unicast
device(config-bgp-ipv6u)# maximum-paths 8
The following example sets the maximum number of BGP4+ shared paths to that of the value already congured using the ip load-
sharing command.
device# configure terminal
device(config)# router bgp
device(config-bgp-router)# address-family ipv6 unicast
device(config-bgp-ipv6u)# maximum-paths use-load-sharing
Conguring a route map for BGP4+ prexes
Route maps can be applied to IPv6 unicast address prexes either as the inbound or outbound routing policy for neighbors under the
specied address family.
1. Enter the congure terminal command to access global conguration mode.
device# configure terminal
2. Enter the ipv6 prex-list command and enter a name to congure an IPv6 prex list.
device(config)# ipv6 prefix-list myprefixlist seq 10 permit 2001:db8::/32
The prex list name, sequence number, and permits packets are specied.
3. Enter the route-map name permit command to dene the route map and enter route map conguration mode.
device(config)# route-map myroutemap permit 10
4. Enter the match ipv6 address command and specify the name of a prex list.
device(config-route-map-myroutemap)# match ipv6 address prefix-list myprefixlist
5. Enter the exit command to return to global conguration mode.
device(config-route-map-myroutemap)# exit
Conguring BGP4+
FastIron Ethernet Switch Layer 3 Routing Conguration Guide, 08.0.30mb
492 53-1003627-06
6. Enter the router bgp command to enable BGP routing.
device(config)# router bgp
7. Enter the local-as command to congure the autonomous system number (ASN) in which your device resides.
device(config-bgp-router)# local-as 1000
8. Enter the neighbor ipv6-address remote-as command to specify the ASN in which the remote neighbor resides.
device(config-bgp-router)# neighbor fe80:4398:ab30:45de::1 remote-as 1001
9. Enter the address-family command and specify the ipv6 and unicast keywords to enter IPv6 address family conguration
mode.
device(config-bgp-router)# address-family ipv6 unicast
10. Enter the neighbor ipv6-address activate command to enable the exchange of information with the neighbor.
device(config-bgp-ipv6u)# neighbor fe80:4398:ab30:45de::1 activate
11. Enter the neighbor ipv6-address route-map command and specify the out keyword to apply a route map to outgoing routes.
device(config-bgp-ipv6u)# neighbor fe80:4398:ab30:45de::1 route-map out myroutemap
The following example applies a route map, “myroutemap”, as the outbound routing policy for a neighbor.
device# configure terminal
device(config)# ipv6 prefix-list myprefixlist seq 10 permit 2001:db8::/32
device(config)# route-map myroutemap permit 10
device(config-route-map-myroutemap)# match ipv6 address prefix-list myprefixlist
device(config-route-map-myroutemap)# exit
device(config)# router bgp
device(config-bgp-router)# local-as 1000
device(config-bgp-router)# neighbor fe80:4398:ab30:45de::1 remote-as 1001
device(config-bgp-router)# address-family ipv6 unicast
device(config-bgp-ipv6u)# neighbor fe80:4398:ab30:45de::1 activate
device(config-bgp-ipv6u)# neighbor fe80:4398:ab30:45de::1 route-map out myroutemap
Redistributing prexes into BGP4+
Various routes can be redistributed into BGP.
Static, connected, OSPF, and RIPng routes can be redistributed into BGP. This task redistributes RIPng routes into BGP4+.
1. Enter the congure terminal command to access global conguration mode.
device# configure terminal
2. Enter the router bgp command to enable BGP routing.
device(config)# router bgp
3. Enter the address-family unicast command and specify the ipv6 and unicast keywords to enter IPv6 address family
conguration mode.
device(config-bgp-router)# address-family ipv6 unicast
4. Enter the redistribute command using the rip keyword to redistribute IPv6 RIP routes.
device(config-bgp-ipv6u)# redistribute rip
Conguring BGP4+
FastIron Ethernet Switch Layer 3 Routing Conguration Guide, 08.0.30mb
53-1003627-06 493
The following example redistributes RIPng prexes into BGP4+.
device# configure terminal
device(config)# router bgp
device(config-bgp-router)# address-family ipv6 unicast
device(config-bgp-ipv6u)# redistribute rip
Conguring BGP4+ outbound route ltering
The BGP4+ Outbound Route Filtering (ORF) prex list capability can be congured in receive mode, send mode, or both send and
receive modes, minimizing the number of BGP updates exchanged between BGP peers.
1. Enter the congure terminal command to access global conguration mode.
device# configure terminal
2. Enter the router bgp command to enable BGP routing.
device(config)# router bgp
3. Enter the address-family command and specify the ipv6 and unicast keywords to enter IPv6 address family conguration
mode.
device(config-bgp-router)# address-family ipv6 unicast
4. Enter the neighbor ipv6-address activate command to add a neighbor.
device(config-bgp-ipv6u)# neighbor 2001:db8:e0ff:783a::4 activate
5. Enter the neighbor ipv6-address prex-list command and specify the in keyword to lter the incoming route updates from a
specied BGP neighbor.
device(config-bgp-ipv6u)# neighbor 2001:db8:e0ff:783a::4 prefix-list myprefixlist in
6. Do one of the following:
• Enter the neighbor capability orf prexlist command and specify the send keyword to advertise ORF send capabilities.
device(config-bgp-ipv6u)# neighbor 2001:db8:e0ff:783a::4 capability orf prefixlist send
• Enter the neighbor capability orf prexlist command and specify the receive keyword to advertise ORF receive
capabilities.
device(config-bgp-ipv6u)# neighbor 2001:db8:e0ff:783a::4 capability orf prefixlist receive
• Enter the neighbor capability orf prexlist command to congure ORF capability in both send and receive modes.
device(config-bgp-ipv6u)# neighbor 2001:db8:e0ff:783a::4 capability orf prefixlist
The following example congures ORF in receive mode.
device# configure terminal
device(config)# router bgp
device(config-bgp-router)# address-family ipv6 unicast
device(config-bgp-ipv6u)# neighbor 2001:db8:e0ff:783a::4 activate
device(config-bgp-ipv6u)# neighbor 2001:db8:e0ff:783a::4 capability orf prefixlist receive
Conguring BGP4+
FastIron Ethernet Switch Layer 3 Routing Conguration Guide, 08.0.30mb
494 53-1003627-06
The following example congures ORF in send mode.
device# configure terminal
device(config)# router bgp
device(config-bgp-router)# address-family ipv6 unicast
device(config-bgp-ipv6u)# neighbor 2001:db8:e0ff:783a::4 activate
device(config-bgp-ipv6u)# neighbor 2001:db8:e0ff:783a::4 prefix-list myprefixlist in
device(config-bgp-ipv6u)# neighbor 2001:db8:e0ff:783a::4 capability orf prefixlist send
The following example congures ORF in both send and receive modes.
device# configure terminal
device(config)# router bgp
device(config-bgp-router)# address-family ipv6 unicast
device(config-bgp-ipv6u)# neighbor 2001:db8:e0ff:783a::4 activate
device(config-bgp-ipv6u)# neighbor 2001:db8:e0ff:783a::4 prefix-list myprefixlist in
device(config-bgp-ipv6u)# neighbor 2001:db8:e0ff:783a::4 capability orf prefixlist
Conguring BGP4+ confederations
BGP4+ confederations, composed of multiple subautonomous systems, can be created.
1. Enter the congure terminal command to access global conguration mode.
device# configure terminal
2. Enter the router bgp command to enable BGP routing.
device(config)# router bgp
3. Enter the local-as command to congure the autonomous system number (ASN) in which your device resides.
device(config-bgp-router)# local-as 65520
4. Enter the confederation identier command and specify an ASN to congure a BGP confederation identier.
device(config-bgp-router)# confederation identifier 100
5. Enter the confederation peers command and specify as many ASNs as needed to list all BGP peers that will belong to the
confederation.
device(config-bgp-router)# confederation peers 65520 65521 65522
The following example creates a confederation with the confederation ID “100” and adds three subautonomous systems to the
confederation.
device# configure terminal
device(config)# router bgp
device(config-bgp-router)# local-as 65520
device(config-bgp-router)# confederation identifier 100
device(config-bgp-router)# confederation peers 65520 65521 65522
Dening a community ACL
A BGP community ACL can be congured, and BGP community attributes set in a route map instance.
1. Enter the congure terminal command to access global conguration mode.
device# configure terminal
Conguring BGP4+
FastIron Ethernet Switch Layer 3 Routing Conguration Guide, 08.0.30mb
53-1003627-06 495
2. Enter the ip community-list extended command using the permit keyword to congure a BGP community ACL.
device(config)# ip community-list extended 1 permit ^[1-2]23
3. Enter the route-map name command to create and dene a route map and enter route map conguration mode.
device(config)# route-map ComRmap permit 10
4. Enter the match community command and specify a community list name.
device(config-route-map-ComRmap)# match community 1
5. Enter the set community command to set the BGP community attributes.
device(config-route-map-ComRmap)# set community 323:1 additive
6. Enter the exit command to return to global conguration mode.
device(config-route-map-ComRmap)# exit
7. Enter the route-map name command to dene a route map and enter route map conguration mode.
device(config)# route-map sendComRmap permit 10
8. Enter the set community command to set the BGP community attributes.
device(config-route-map-sendComRmap)# set community 3:3
The following example congures a BGP community ACL and sets the BGP community attributes in a route map instance.
device# configure terminal
device(config)# ip community-list extended 1 permit ^[1-2]23
device(config)# route-map ComRmap permit 10
device(config-route-map-ComRmap)# match community 1
device(config-route-map-ComRmap)# set community 323:1 additive
device(config-route-map-ComRmap)# exit
device(config)# route-map sendComRmap permit 10
device(config-route-map-sendComRmap)# set community 3:3
Applying a BGP extended community lter
A BGP extended community lter can be applied.
1. Enter the congure terminal command to access global conguration mode.
device# configure terminal
2. Enter the ip community-list extended command using the permit keyword to congure a BGP community ACL.
device(config)# ip community-list extended 1 permit ^[1-2]23
3. Enter the route-map name command to create and dene a route map and enter route map conguration mode.
device(config)# route-map ComRmap permit 10
4. Enter the match community command and specify a community list name.
device(config-route-map-ComRmap)# match community 1
Conguring BGP4+
FastIron Ethernet Switch Layer 3 Routing Conguration Guide, 08.0.30mb
496 53-1003627-06
5. Enter the set local-preference command and specify a value to set a BGP local-preference path attribute.
device(config-route-map-ComRmap)# set local-preference 200
6. Enter the router bgp command to enable BGP routing.
device(config)# router bgp
7. Enter the local-as command to congure the autonomous system number (ASN) in which your device resides.
device(config-bgp-router)# local-as 1000
8. Enter the neighbor ipv6-address remote-as command to specify the ASN in which the remote neighbor resides.
device(config-bgp-router)# neighbor fe80:4398:ab30:45de::1 remote-as 1001
9. Enter the neighbor ipv6-address update-source command to specify an interface.
device(config-bgp-router)# neighbor fe80:4398:ab30:45de::1 update-source ve 1000
10. Enter the address-family command and specify the ipv6 and unicast keywords to enter IPv6 address family conguration
mode.
device(config-bgp-router)# address-family ipv6 unicast
11. Enter the neighbor ipv6-address activate command to enable the exchange of information with the neighbor.
device(config-bgp-ipv6u)# neighbor fe80:4398:ab30:45de::1 activate
12. Enter the neighbor ipv6-address route-map command and specify the in keyword to apply a route map to incoming routes.
device(config-bgp-ipv6u)# neighbor fe80:4398:ab30:45de::1 route-map in ComRmap
13. Enter the neighbor ipv6-address send-community command to enable the sending of standard and extended attributes in
updates to the specied BGP neighbor.
device(config-bgp-ipv6u)# neighbor fe80:4398:ab30:45de::1 send-community
The following example applies a BGP extended community lter.
device# configure terminal
device(config)# ip community-list extended 1 permit ^[1-2]23
device(config)# route-map ComRmap permit 10
device(config-route-map-ComRmap)# match community 1
device(config-route-map-ComRmap)# set local-preference 200
device(config)# router bgp
device(config-bgp-router)# local-as 1000
device(config-bgp-router)# neighbor fe80:4398:ab30:45de::1 remote-as 1001
device(config-bgp-router)# neighbor fe80:4398:ab30:45de::1 update-source ve 1000
device(config-bgp-router)# address-family ipv6 unicast
device(config-bgp-ipv6u)# neighbor fe80:4398:ab30:45de::1 activate
device(config-bgp-ipv6u)# neighbor fe80:4398:ab30:45de::1 route-map in ComRmap
device(config-bgp-ipv6u)# neighbor fe80:4398:ab30:45de::1 send-community
Disabling BGP4+ graceful restart
The BGP4+ graceful restart (GR) feature is enabled by default, and can be disabled on a routing device.
1. Enter the congure terminal command to access global conguration mode.
device# configure terminal
Conguring BGP4+
FastIron Ethernet Switch Layer 3 Routing Conguration Guide, 08.0.30mb
53-1003627-06 497
2. Enter the router bgp command to enable BGP routing.
device(config)# router bgp
3. (Optional) Enter the address-family command and specify the ipv6 and unicast keywords to enter IPv6 address family
conguration mode.
device(config-bgp-router)# address-family ipv6 unicast
4. Enter the no graceful restart command to disable graceful restart at the IPv6 address family conguration level.
device(config-bgp-ipv6u))# no graceful-restart
In the following example, the graceful restart feature is disabled at the IPv6 address family conguration level.
device# configure terminal
device(config)# router bgp
device(config-bgp-router)# address-family ipv4 unicast
device(config-bgp-ipv6u))# no graceful-restart
Re-enabling BGP4+ graceful restart
If the BGP4+ graceful restart (GR) feature is disabled on a routing device, it can be re-enabled, providing it with the capability to inform its
neighbors and peers when it is performing a restart.
1. Enter the congure terminal command to access global conguration mode.
device# configure terminal
2. Enter the router bgp command to enable BGP routing.
device(config)# router bgp
3. Enter the local-as command to congure the autonomous system number (ASN) in which your device resides.
device(config-bgp-router)# local-as 1000
4. Enter the neighbor ipv6-address remote-as command to specify the autonomous system ASN in which the remote neighbor
resides.
device(config-bgp-router)# neighbor 1000::1 remote-as 2
5. Enter the address-family command and specify the ipv6 and unicast keywords to enter IPv6 address family conguration
mode.
device(config-bgp-router)# address-family ipv6 unicast
6. Enter the neighbor ipv6-address activate command to add a neighbor.
device(config-bgp-ipv6u)# neighbor 1000::1 activate
7. Enter the graceful-restart command to enable the graceful restart feature.
device(config-bgp-ipv6u)# graceful-restart
Conguring BGP4+
FastIron Ethernet Switch Layer 3 Routing Conguration Guide, 08.0.30mb
498 53-1003627-06
8. Do any of the following:
• Enter the graceful-restart command using the purge-time keyword to overwrite the default purge-time value.
device(config-bgp-ipv6u)# graceful-restart purge-time 300
• Enter the graceful-restart command using the restart-time keyword to overwrite the default restart-time advertised to
graceful restart-capable neighbors.
device(config-bgp-ipv6u)# graceful-restart restart-time 180
• Enter the graceful-restart command using the stale-routes-time keyword to overwrite the default amount of time that a
helper device will wait for an EOR message from a peer.
device(config-bgp-ipv6u)# graceful-restart stale-routes-time 100
The following example re-enables the graceful restart feature.
device# configure terminal
device(config)# router bgp
device(config-bgp-router)# local-as 1
device(config-bgp-router)# neighbor 1000::1 remote-as 2
device(config-bgp-router)# address-family ipv6 unicast
device(config-bgp-ipv6u)# neighbor 1000::1 activate
device(config-bgp-ipv6u)# graceful-restart
The following example re-enables the graceful restart feature and sets the purge time to 300 seconds, overwriting the default value.
device# configure terminal
device(config)# router bgp
device(config-bgp-router)# local-as 1
device(config-bgp-router)# neighbor 1000::1 remote-as 2
device(config-bgp-router)# address-family ipv6 unicast
device(config-bgp-ipv6u)# neighbor 1000::1 activate
device(config-bgp-ipv6u)# graceful-restart purge-time 300
The following example re-enables the graceful restart feature and sets the restart time to 180 seconds, overwriting the default value.
device# configure terminal
device(config)# router bgp
device(config-bgp-router)# local-as 1
device(config-bgp-router)# neighbor 1000::1 remote-as 2
device(config-bgp-router)# address-family ipv6 unicast
device(config-bgp-ipv6u)# neighbor 1000::1 activate
device(config-bgp-ipv6u)# graceful-restart restart-time 180
The following example re-enables the graceful restart feature and sets the stale-routes time to 100 seconds, overwriting the default
value.
device# configure terminal
device(config)# router bgp
device(config-bgp-router)# local-as 1
device(config-bgp-router)# neighbor 1000::1 remote-as 2
device(config-bgp-router)# address-family ipv6 unicast
device(config-bgp-ipv6u)# neighbor 1000::1 activate
device(config-bgp-ipv6u)# graceful-restart stale-routes-time 100
Use the clear ipv6 bgp neighbor command with the all parameter for the changes to the graceful restart parameters to take eect
immediately.
Conguring BGP4+
FastIron Ethernet Switch Layer 3 Routing Conguration Guide, 08.0.30mb
53-1003627-06 499
Disabling the BGP AS_PATH check function
A device can be congured so that the AS_PATH check function for routes learned from a specic location is disabled, and routes that
contain the recipient BGP speaker's AS number are not rejected.
1. Enter the congure terminal command to access global conguration mode.
device# configure terminal
2. Enter the router bgp command to enable BGP routing.
device(config)# router bgp
3. Enter the address-family command and specify the ipv6 and unicast keywords to enter IPv6 address family conguration
mode.
device(config-bgp-router)# address-family ipv6 unicast
4. Enter the neighbor ipv6-address allowas-in command and specify a number to disable the BGP AS_PATH check function,
and specify the number of times that the AS path of a received route may contain the recipient BGP speaker's AS number and
still be accepted.
device(config-bgp-ipv6u)# neighbor 2001:db8:e0ff:783a::4 allowas-in 3
This example species that the AS path of a received route may contain the recipient BGP speaker's AS number three times and still be
accepted.
device# configure terminal
device(config)# router bgp
device(config-bgp-router)# address-family ipv6 unicast
device(config-bgp-ipv6u)# neighbor 2001:db8:e0ff:783a::4 allowas-in 3
Displaying BGP4+ statistics
Various show ipv6 bgp commands verify information about BGP4+ congurations.
Use one or more of the following commands to verify BGP4+ information. The commands do not have to be entered in this order.
1. Enter the show ipv6 bgp summary command.
device# show ipv6 bgp summary
BGP4 Summary
Router ID: 122.122.122.122 Local AS Number: 122
Confederation Identifier: not configured
Confederation Peers:
Cluster ID: 122
Maximum Number of IP ECMP Paths Supported for Load Sharing: 1
Number of Neighbors Configured: 20, UP: 15
Number of Routes Installed: 219, Uses 20805 bytes
Number of Routes Advertising to All Neighbors: 2802 (440 entries), Uses 26400 bytes
Number of Attribute Entries Installed: 31, Uses 2852 bytes
Neighbor Address AS# State Time Rt:Accepted Filtered Sent ToSend
2001:54:54::54 122 ESTAB 0h19m58s 0 0 146 0
2001:55:55::55 122 ESTAB 0h19m54s 1 0 146 0
2001:122:53::53 6000 ESTAB 0h22m39s 50 0 147 0
2001:122:534:2::534
534 ESTAB 0h 3m20s 10 0 137 0
2001:125:125::125 122 CONN 0h11m33s 0 0 0 -
This example output gives summarized BGP4+ information.
Conguring BGP4+
FastIron Ethernet Switch Layer 3 Routing Conguration Guide, 08.0.30mb
500 53-1003627-06
2. Enter the show ipv6 bgp attribute-entries command.
device# show ipv6 bgp attribute-entries
Total number of BGP Attribute Entries: 2
1 Next Hop : 2001::1 MED :1 Origin:IGP
Originator:0.0.0.0 Cluster List:None
Aggregator:AS Number :0 Router-ID:0.0.0.0 Atomic:None
Local Pref:1 Communities:Internet
AS Path : (length 0)
Address: 0x1205c75c Hash:268 (0x01000000)
Links: 0x00000000, 0x00000000
Reference Counts: 2:0:0, Magic: 1
2 Next Hop : :: MED :1 Origin:IGP
Originator:0.0.0.0 Cluster List:None
Aggregator:AS Number :0 Router-ID:0.0.0.0 Atomic:None
Local Pref:100 Communities:Internet
AS Path : (length 0)
AsPathLen: 0 AsNum: 0, SegmentNum: 0, Neighboring As: 0, Source As 0
Address: 0x1205c7cc Hash:365 (0x01000000)
Links: 0x00000000, 0x00000000
Reference Counts: 1:0:1, Magic: 2
This example shows information about two route-attribute entries that are stored in device memory.
3. Enter the show ipv6 bgp peer-group command.
device# show ipv6 bgp peer-group
1 BGP peer-group is P1, Remote AS: 1
Address family : IPV4 Unicast
activate
Address family : IPV4 Multicast
no activate
Address family : IPV6 Unicast
activate
Address family : IPV6 Multicast
no activate
Address family : VPNV4 Unicast
no activate
Address family : L2VPN VPLS
no activate
Members:
IP Address: 2001::1
IP Address: 2001:0:0:1::1
IP Address: 10.1.0.1
This example shows output for a peer group called “P1”.
Conguring BGP4+
FastIron Ethernet Switch Layer 3 Routing Conguration Guide, 08.0.30mb
53-1003627-06 501
4. Enter the show ipv6 bgp routes command.
device# show ipv6 bgp routes
Total number of BGP Routes: 6
Status A:AGGREGATE B:BEST b:NOT-INSTALLED-BEST C:CONFED_EBGP D:DAMPED
E:EBGP H:HISTORY I:IBGP L:LOCAL M:MULTIPATH m:NOT-INSTALLED-MULTIPATH
S:SUPPRESSED F:FILTERED s:STALE
Prefix Next Hop MED LocPrf Weight Status
1 57:7000:3:22:abc:1::/128 2001:700:122:57::57
100 0 BE
AS_PATH: 7000 322
2 57:7000:3:22:abc:1:0:2/128 2001:700:122:57::57
100 0 BE
AS_PATH: 7000 322
3 57:7000:3:22:abc:1:0:4/128 2001:700:122:57::57
100 0 BE
AS_PATH: 7000 322
4 57:7000:3:22:abc:1:0:6/128 2001:700:122:57::57
100 0 BE
AS_PATH: 7000 322
5 57:7000:3:22:abc:1:0:8/128 2001:700:122:57::57
100 0 BE
AS_PATH: 7000 322
6 57:7000:3:22:abc:1:0:a/128 2001:700:122:57::57
100 0 BE
AS_PATH: 7000 322
This example shows general BGP4+ route information.
5. Enter the show ipv6 bgp routes command, using the summary keyword.
device# show ipv6 bgp routes summary
Total number of BGP routes (NLRIs) Installed : 558
Distinct BGP destination networks : 428
Filtered bgp routes for soft reconfig : 0
Routes originated by this router : 19
Routes selected as BEST routes : 417
BEST routes not installed in IP forwarding table : 0
Unreachable routes (no IGP route for NEXTHOP) : 22
IBGP routes selected as best routes : 102
EBGP routes selected as best routes : 296
This example shows summarized BGP4+ route information.
Conguring BGP4+
FastIron Ethernet Switch Layer 3 Routing Conguration Guide, 08.0.30mb
502 53-1003627-06
6. Enter the show ipv6 bgp routes command, using the local keyword.
device# show ipv6 bgp routes local
Status A:AGGREGATE B:BEST b:NOT-INSTALLED-BEST C:CONFED_EBGP D:DAMPED
E:EBGP H:HISTORY I:IBGP L:LOCAL M:MULTIPATH m:NOT-INSTALLED-MULTIPATH
S:SUPPRESSED F:FILTERED s:STALE
Prefix Next Hop MED LocPrf Weight Status
1 131::1/128 :: 1 100 32768 BL
AS_PATH:
2 2001:107:6133:2007:1::/112 2001:2007::201
107 100 32768 BL
AS_PATH:
3 2001:107:6133:2007:2::/112 2001:2007::202
107 100 32768 BL
AS_PATH:
4 2001:107:6133:2007:3::/112 2001:2007::203
107 100 32768 BL
AS_PATH:
5 2001:107:6133:2007:4::/112 2001:2007::204
107 100 32768 BL
AS_PATH:
6 2001:107:6133:2007:5::/112 2001:2007::205
107 100 32768 BL
AS_PATH:
7 2001:107:6133:2007:6::/112 2001:2007::206
107 100 32768 BL
This example shows information about local routes.
Displaying BGP4+ neighbor statistics
Various show ipv6 bgp neighbor commands verify information about BGP4+ neighbor congurations.
Use one or more of the following commands to verify BGP4+ neighbor information. The commands do not have to be entered in this
order.
1. Enter the show ipv6 bgp neighbors command.
device# show ipv6 bgp neighbors
Total number of BGP Neighbors: 2
IP Address: 2001::1, AS: 2 (EBGP), RouterID: 192.0.0.1, VRF: default-vrf
State: ESTABLISHED, Time: 0h0m27s, KeepAliveTime: 30, HoldTime: 90
KeepAliveTimer Expire in 3 seconds, HoldTimer Expire in 62 seconds
Minimal Route Advertisement Interval: 0 seconds
Messages: Open Update KeepAlive Notification Refresh-Req
Sent : 5 2 7 3 0
Received: 5 4 11 1 0
Last Update Time: NLRI Withdraw NLRI Withdraw
Tx: 0h0m23s --- Rx: 0h0m27s ---
Last Connection Reset Reason:Rcv Notification
Notification Sent: Cease/CEASE Message
Notification Received: Cease/CEASE Message
Neighbor NLRI Negotiation:
Peer Negotiated IPV6 unicast capability
Peer configured for IPV6 unicast Routes
Neighbor ipv6 MPLS Label Capability Negotiation:
Neighbor AS4 Capability Negotiation:
Outbound Policy Group:
ID: 2, Use Count: 2
Update running at: 0.0.0.0/0
Last update time was 104 sec ago
Byte Sent: 158, Received: 0
Local host: 2001::2, Local Port: 8168
Remote host: 2001::1, Remote Port: 179
This example output gives summarized information about BGP4+ neighbors.
Conguring BGP4+
FastIron Ethernet Switch Layer 3 Routing Conguration Guide, 08.0.30mb
53-1003627-06 503
2. Enter the show ipv6 bgp neighbors advertised-routes command.
device# show ipv6 bgp neighbor 2001:db8::10 advertised-routes
There are 7 routes advertised to neighbor 2001:db8::10
Status A:AGGREGATE B:BEST b:NOT-INSTALLED-BEST E:EBGP I:IBGP L:LOCAL
Prefix Next Hop MED LocPrf Weight Status
1 fd80:122:122:122:101:101:0:122/128 2001:122:122::122
0 100 101 BL
AS_PATH:
2 fd80:122:122:122:103:103:0:122/128 2001:122:122::122
0 100 103 BL
AS_PATH:
3 fd80:122:122:122:105:105:0:122/128 2001:122:122::122
0 100 105 BL
AS_PATH:
4 131::1/128 2001:122:122::122
1 100 32768 BL
AS_PATH:
5 2001:122:131:125:131:1::/96 2001:3002::732
1 100 0 BE
AS_PATH: 65530
6 2001:abcd:1234:1234:1:2:1:0/112 2001:3002::733
1 100 0 BE
AS_PATH: 65530
7 2001:abcd:1234:1234:1:2:2:0/112 2001:3002::733
1 100 0 BE
This example shows information about all the routes the BGP4+ networking device advertised to the neighbor.
3. Enter the show ipv6 bgp neighbors last-packet-with-error command.
device# show ipv6 bgp neighbor last-packet-with-error
Total number of BGP Neighbors: 67
1 IP Address: 153::2
Last error:
BGP4: 0 bytes hex dump of packet that contains error
This example shows information about the last packet that contained an error from any of a device’s neighbors.
4. Enter the show ipv6 bgp neighbors received-routes command.
device# show ipv6 bgp neighbor 2001:db8::10 received-routes
There are 4 received routes from neighbor 2001:db8::10
Searching for matching routes, use ^C to quit...
Status A:AGGREGATE B:BEST b:NOT-INSTALLED-BEST C:CONFED_EBGP D:DAMPED
E:EBGP H:HISTORY I:IBGP L:LOCAL M:MULTIPATH S:SUPPRESSED F:FILTERED
Prefix Next Hop Metric LocPrf Weight Status
1 2001:db8:2002::/64 2001:db8::10 0 100 0 BE
AS_PATH: 400
2 2001:db8:2003::/64 2001:db8::10 1 100 0 BE
AS_PATH: 400
3 2001:db8:2004::/64 2001:db8::10 1 100 0 BE
AS_PATH: 400
4 2001:db8:2005::/64 2001:db8::10 1 100 0 BE
AS_PATH: 400
This example lists all route information received in route updates from BGP4+ neighbors of the device since the soft-
reconguration feature was enabled.
Conguring BGP4+
FastIron Ethernet Switch Layer 3 Routing Conguration Guide, 08.0.30mb
504 53-1003627-06
5. Enter the show ipv6 bgp neighbors rib-out-routes command.
device# show ipv6 bgp neighbors 2001:db8::10 rib-out-routes
There are 150 RIB_out routes for neighbor 2001:db8::10
Status A:AGGREGATE B:BEST b:NOT-INSTALLED-BEST E:EBGP I:IBGP L:LOCAL
Prefix Next Hop MED LocPrf Weight Status
1 fd80:122:122:122:101:101:0:122/128 ::
0 100 101 BL
AS_PATH:
2 fd80:122:122:122:103:103:0:122/128 ::
0 100 103 BL
AS_PATH:
3 fd80:122:122:122:105:105:0:122/128 ::
0 100 105 BL
AS_PATH:
4 131::1/128 :: 1 100 32768 BL
AS_PATH:
5 2001:122:131:125:131:1::/96 2001:3002::732
1 100 0 BE
AS_PATH: 65530
6 2001:abcd:1234:1234:1:2:1:0/112 2001:3002::733
1 100 0 BE
AS_PATH: 65530
7 2001:abcd:1234:1234:1:2:2:0/112 2001:3002::733
1 100 0 BE
AS_PATH: 65530
This example shows information about BGP4+ outbound RIB routes.
Clearing BGP4+ dampened paths
BGP4+ suppressed routes can be reactivated using a CLI command.
The show ipv6 bgp dampened-paths command is entered to verify that there are BGP4+ dampened routes. The clear ipv6 bgp
dampening command is entered to reactivate all suppressed BGP4+ routes. The show ipv6 bgp dampened-paths command is re-
entered to verify that the suppressed BGP4+ routes have been reactivated.
1. Enter the exit command until you return to Privileged EXEC mode.
device(config)# exit
2. Enter the show ipv6 bgp dampened-paths command to display all BGP4+ dampened routes.
device# show ipv6 bgp dampened-paths
Network From Flaps Since Reuse Path
*d 2001:db8:8::/45 2001:db8:1::1 1 0 :1 :14 0 :2 :20 100 1002 1000
*d 2001:db8:1::/48 2001:db8:1::1 1 0 :1 :14 0 :2 :20 100 1002 1000
*d 2001:db8:4::/46 2001:db8:1::1 1 0 :1 :14 0 :2 :20 100 1002 1000
*d 2001:db8:2::/47 2001:db8:1::1 1 0 :1 :14 0 :2 :20 100 1002 1000
*d 2001:db8:0:8000::/49 2001:db8:1::1 1 0 :1 :14 0 :2 :20 100 1002 1000
*d 2001:db8:17::/64 2001:db8:1::1 1 0 :1 :18 0 :2 :20 100
3. Enter the clear ipv6 bgp dampening command to reactivate all suppressed BGP4+ routes.
device# clear ipv6 bgp dampening
4. Enter the show ipv6 bgp dampened-paths command to verify that there are no BGP4+ dampened routes.
device# show ipv6 bgp dampened-paths
device#
Conguring BGP4+
FastIron Ethernet Switch Layer 3 Routing Conguration Guide, 08.0.30mb
53-1003627-06 505
The following example reactivates all suppressed BGP4+ routes and veries that there are no suppressed routes.
device(config-bgp-router)# exit
device(config)# exit
device# show ipv6 bgp dampened-paths
device# clear ipv6 bgp dampening
device# show ipv6 bgp dampened-paths
Conguring BGP4+
FastIron Ethernet Switch Layer 3 Routing Conguration Guide, 08.0.30mb
506 53-1003627-06

VRRP and VRRP-E
• Overview.............................................................................................................................................................................................................507
• VRRP and VRRP-E overview....................................................................................................................................................................507
• Comparison of VRRP and VRRP-E.......................................................................................................................................................513
• VRRP and VRRP-E parameters.............................................................................................................................................................. 514
• Basic VRRP parameter conguration....................................................................................................................................................518
• Basic VRRP-E parameter conguration...............................................................................................................................................526
• Additional VRRP and VRRP-E parameter conguration...............................................................................................................528
• Forcing a Master router to abdicate to a Backup router.................................................................................................................539
• Accept mode for backup VRRP devices.............................................................................................................................................. 540
• Displaying VRRP and VRRP-E information........................................................................................................................................542
•Conguration examples............................................................................................................................................................................... 554
Overview
This chapter describes how to congure Brocade Layer 3 switch with the following router redundancy protocols:
• Virtual Router Redundancy Protocol (VRRP) - The standard router redundancy protocol described in RFC 2338. The FastIron
devices support VRRP version 2 (v2) and VRRP version 3 (v3). VRRP v2 supports the IPv4 environment, and VRRP v3
supports the IPv4 and IPv6 environments. Conguring VRRPv3 for IPv4 enables the code for a version compatible with RFC
5798. VRRPv3 has no authentication mechanism and the advertisement interval uses dierent metrics and range.
• VRRP Extended (VRRP-E) - An enhanced version of VRRP that overcomes limitations in the standard protocol. The FastIron
devices support VRRP-E v2 and VRRP-E v3. VRRP-E v2 supports the IPv4 environment, and VRRP-E v3 supports the IPv6
environment.
NOTE
VRRP and VRRP-E are separate protocols. You cannot use them together.
NOTE
You can use a Brocade Layer 3 switch congured for VRRP with another Brocade device or a third-party router that is also
congured for VRRP. However, you can use a Brocade device congured for VRRP-E only with another Brocade Layer 3
switch that also is congured for VRRP-E.
NOTE
The maximum number of supported VRRP or VRRP-E router instances is 255 for IPv4 environments. The maximum number
of supported VRRP or VRRP-E router instances is 128 for IPv6 environments.
VRRP and VRRP-E overview
The following sections describe VRRP and VRRP-E. The protocols both provide redundant paths for IP addresses. However, the
protocols dier in a few important ways. For clarity, each protocol is described separately.
VRRP overview
Virtual Router Redundancy Protocol (VRRP) provides redundancy to routers within a LAN. VRRP allows you to provide alternate router
paths for a host without changing the IP address or MAC address by which the host knows its gateway.
FastIron Ethernet Switch Layer 3 Routing Conguration Guide, 08.0.30mb
53-1003627-06 507
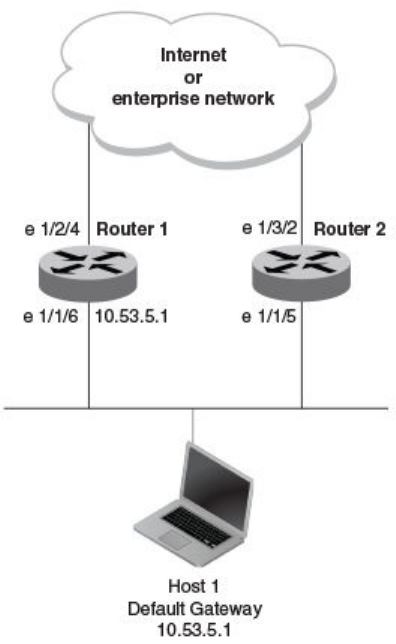
FIGURE 34 Router 1 is the Host1 default gateway but is a single point of failure
Router 1 is the host default gateway out of the subnet. If this interface goes down, Host1 is cut o from the rest of the network. Router 1
is thus a single point of failure for Host1’s access to other networks.
If Router 1 fails, you could congure Host1 to use Router 2. Conguring one host with a dierent default gateway might not require too
much extra administration. However, consider a more realistic network with dozens or even hundreds of hosts per subnet; reconguring
the default gateways for all the hosts is impractical. It is much simpler to congure a VRRP virtual router on Router 1 and Router 2 to
provide a redundant path for the hosts.
The examples show the same sample networks, but a VRRP virtual router is congured on Router 1 and Router 2 in the second
example.
VRRP and VRRP-E overview
FastIron Ethernet Switch Layer 3 Routing Conguration Guide, 08.0.30mb
508 53-1003627-06
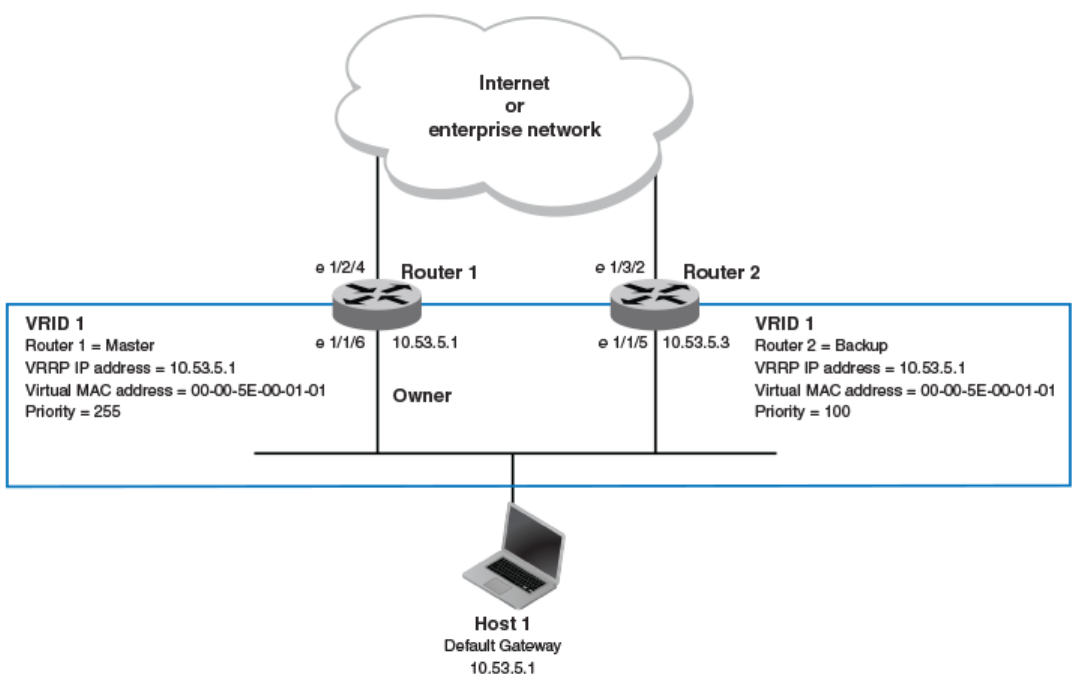
FIGURE 35 Router 1 and Router 2 congured as VRRP virtual routers for redundant network access for Host1
The dashed box represents a VRRP virtual router. When you congure a virtual router, one of the conguration parameters is the virtual
router ID (VRID), which can be a number from 1 through 255. In this example, the VRID is 1.
NOTE
You can provide more redundancy by also conguring a second VRID with Router 2 as the Owner and Router 1 as the Backup.
This type of conguration is sometimes called Multigroup VRRP.
Virtual router ID
A virtual router ID ( VRID) consists of one Master router and one or more Backup routers. The Master router is the router that owns the IP
addresses you associate with the VRID. For this reason, the Master router is sometimes called the "Owner". Congure the VRID on the
router that owns the default gateway interface. The other router in the VRID does not own the IP addresses associated with the VRID but
provides the backup path if the Master router becomes unavailable.
Virtual router MAC address
Notice the MAC address associated with VRID1 in VRRP overview on page 507. The rst ve octets of the address are the standard
MAC prex for VRRP packets, as described in RFC 2338. The last octet is the VRID. The VRID number becomes the nal octet in the
virtual MAC address associated with the virtual router.
VRRP and VRRP-E overview
FastIron Ethernet Switch Layer 3 Routing Conguration Guide, 08.0.30mb
53-1003627-06 509
When you congure a VRID, the software automatically assigns its MAC address. When a VRID becomes active, the Master router
broadcasts a gratuitous ARP request containing the virtual router MAC address for each IP address associated with the virtual router. In
VRRP overview on page 507, Switch 1 sends a gratuitous ARP request with MAC address 00-00-5E-00-01-01 and IP address
192.53.5.1. Hosts use the virtual router MAC address in routed trac they send to their default IP gateway (in this example,
192.53.5.1).
Virtual router IP address
VRRP does not use virtual IP addresses. Thus, there is no virtual IP address associated with a virtual router. Instead, you associate the
virtual router with one or more real interface IP addresses congured on the router that owns the real IP addresses. In VRRP overview on
page 507, the virtual router with VRID1 is associated with real IP address 192.53.5.1, which is congured on interface e1/1/6 on
Switch 1. VRIDs are interface-level parameters, not system-level parameters, so the IP address you associate with the VRID must
already be a real IP address congured on the Owner interface.
NOTE
You can associate a virtual router with a virtual interface. A virtual interface is a named set of physical interfaces.
When you congure the Backup router for the VRID, specify the same IP address as the one you specify on the Owner. This is the IP
address used by the host as its default gateway. The IP address cannot also exist on the Backup router. The interface on which you
congure the VRID on the Backup router must have an IP address in the same subnet.
NOTE
If you delete a real IP address used by a VRRP entry, the VRRP entry also is deleted automatically.
NOTE
When a Backup router takes over forwarding responsibilities from a failed Master router, the Backup forwards trac addressed
to the VRID MAC address, which the host believes is the MAC address of the router interface for its default gateway. However,
the Backup router cannot reply to IP pings sent to the IP addresses associated with the VRID. Because the IP addresses are
owned by the Owner, if the Owner is unavailable, the IP addresses are unavailable as packet destinations.
Master negotiation
The routers within a VRID use the VRRP priority values associated with each router to determine which router becomes the Master.
When you congure the VRID on a router interface, you specify whether the router is the Owner of the IP addresses you plan to
associate with the VRID or a Backup router. If you indicate that the router is the Owner of the IP addresses, the software automatically
sets the router VRRP priority for the VRID to 255, the highest VRRP priority. The router with the highest priority becomes the Master.
Backup routers can have a priority from 3 through 254, which you assign when you congure the VRID on the Backup router interfaces.
The default VRRP priority for Backup routers is 100.
Because the router that owns the IP addresses associated with the VRID always has the highest priority, when all the routers in the virtual
router are operating normally, the negotiation process results in the Owner of the VRID IP addresses becoming the Master router. Thus,
the VRRP negotiation results in the normal case, in which the host’s path to the default route is to the router that owns the interface for
that route.
Hello messages
Virtual routers use Hello messages for negotiation to determine the Master router. Virtual routers send Hello messages to IP Multicast
address 224.0.0.18. The frequency with which the Master sends Hello messages is the Hello interval. Only the Master sends Hello
messages. However, a Backup router uses the Hello interval you congure for the Backup router if it becomes the Master.
VRRP and VRRP-E overview
FastIron Ethernet Switch Layer 3 Routing Conguration Guide, 08.0.30mb
510 53-1003627-06
The Backup routers wait for a period of time called the dead interval for a Hello message from the Master. If a Backup router does not
receive a Hello message by the time the dead interval expires, the Backup router assumes that the Master router is dead and negotiates
with the other Backup routers to select a new Master router. The Backup router with the highest priority becomes the new Master.
Master and Owner backup routers
If the Owner becomes unavailable, but then comes back online, the Owner again becomes the Master router. The Owner becomes the
Master router again because it has the highest priority. The Owner always becomes the Master again when the Owner comes back
online.
NOTE
If you congure a track port on the Owner and the track port is down, the Owner priority is changed to the track priority. In this
case, the Owner does not have a higher priority than the Backup router that is acting as the Master router and the Owner
therefore does not resume its position as the Master router.
By default, if a Backup is acting as the Master, and the original Master is still unavailable, another Backup can "preempt" the Backup that
is acting as the Master. This can occur if the new Backup router has a higher priority than the Backup router that is acting as the Master.
You can disable this behavior. When you disable preemption, a Backup router that has a higher priority than the router that is currently
acting as the Master does not preempt the new Master by initiating a new Master negotiation.
NOTE
Regardless of the setting for the preempt parameter, the Owner always becomes the Master again when it comes back online.
Track ports and track priority
The Brocade implementation of VRRP enhances the protocol by giving a VRRP router the capability to monitor the state of the
interfaces on the other end of the route path through the router. For example, in VRRP overview on page 507, interface e1/1/6 on
Switch 1 owns the IP address to which Host1 directs route trac on its default gateway. The exit path for this trac is through the Switch
1 e1/2/4 interface.
Suppose interface e1/2/4 goes down. Even if interface e1/1/6 is still up, Host1 is cut o from other networks. In conventional VRRP,
Switch 1 would continue to be the Master router despite the unavailability of the exit interface for the path the router is supporting.
However, if you congure interface e1/1/6 to track the state of interface e1/2/4, if e1/2/4 goes down, interface e1/1/6 responds by
changing the Switch 1 VRRP priority to the value of the track priority. In the conguration shown in VRRP overview on page 507, the
Switch 1 priority changes from 255 to 20. One of the parameters contained in the Hello messages the Master router sends to its
Backup routers is the Master router priority. If the track port feature results in a change in the Master router priority, the Backup routers
quickly become aware of the change and initiate a negotiation to become the Master router.
In VRRP overview on page 507, the track priority results in the Switch 1 VRRP priority becoming lower than the Switch 2 VRRP priority.
As a result, when Switch 2 learns that it now has a higher priority than Switch 1, Switch 2 initiates negotiation to become the Master
router and becomes the new Master router, thus providing an open path for the Host1 trac. To take advantage of the track port feature,
make sure the track priorities are always lower than the VRRP priorities. The default track priority for the router that owns the VRID IP
addresses is 2. The default track priority for Backup routers is 1. If you change the track port priorities, make sure you assign a higher
track priority to the Owner of the IP addresses than the track priority you assign on the Backup routers.
VRRP and VRRP-E overview
FastIron Ethernet Switch Layer 3 Routing Conguration Guide, 08.0.30mb
53-1003627-06 511
Suppression of RIP advertisements for backed-up interfaces
The Brocade implementation also enhances VRRP by allowing you to congure the protocol to suppress RIP advertisements for the
backed-up paths from Backup routers. Normally, a VRRP Backup router includes route information for the interface it is backing up in
RIP advertisements. As a result, other routers receive multiple paths for the interface and might sometimes unsuccessfully use the path
to the Backup router rather than the path to the Master router. If you enable the Brocade implementation of VRRP to suppress the VRRP
Backup routers from advertising the backed-up interface in RIP, other routers learn only the path to the Master router for the backed-up
interface.
Authentication
The Brocade implementations of VRRP and VRRP-E can use simple passwords to authenticate VRRP and VRRP-E packets. VRRP-E
can also use HMAC-MD5-96 to authenticate VRRP-E packets.
VRRP and VRRP-E authentication is congured on the router interfaces. The VRRP authentication conguration of every router interface
must match. For example, if you want to use simple passwords to authenticate VRRP trac within a router, you must congure VRRP
simple password authentication with the same password on all of the participating router interfaces.
NOTE
The HMAC-MD5-96 authentication type is supported for VRRP-E, but not supported for VRRP.
NOTE
Authentication is not supported for VRRP v3.
Independent operation of VRRP alongside RIP, OSPF, and BGP4
VRRP operation is independent of RIP, OSPF, and BGP4; therefore, RIP, OSPF, and BGP4 are not aected if VRRP is enabled on one
of these interfaces.
Dynamic VRRP conguration
All VRRP global and interface parameters take eect immediately. You do not need to reset the system to place VRRP conguration
parameters into eect.
VRRP-E overview
The most important dierence between VRRP and VRRP-E is that all VRRP-E routers are Backup routers; there is no Owner router.
VRRP-E overcomes the limitations in standard VRRP by removing the Owner.
The following points explain how VRRP-E diers from VRRP:
• Owners and Backup routers
– VRRP has an Owner and one or more Backup routers for each VRID. The Owner is the router on which the VRID's IP
address is also congured as a real address. All the other routers supporting the VRID are Backup routers.
– VRRP-E does not use Owners. All routers are Backup routers for a given VRID. The router with the highest priority
becomes the Master. If there is a tie for highest priority, the router with the highest IP address becomes the Master. The
elected Master owns the virtual IP address and answers pings and ARP requests.
• VRID's IP address
– VRRP requires that the VRID’s IP address also be a real IP address congured on the VRID's interface on the Owner.
– VRRP-E requires only that the VRID be in the same subnet as an interface congured on the VRID's interface. VRRP-E
does not allow you to specify a real IP address congured on the interface as the VRID IP address.
VRRP and VRRP-E overview
FastIron Ethernet Switch Layer 3 Routing Conguration Guide, 08.0.30mb
512 53-1003627-06
• VRID's MAC address
– VRRP uses the source MAC address as a virtual MAC address dened as 00-00-5E-00-01--vrid , where vrid is the
VRID. The Master owns the virtual MAC address.
– VRRP-E uses the MAC address of the interface as the source MAC address. The MAC address is hash-value-vrid , where
hash-value is a two-octet hashed value for the IP address and vrid is the VRID.
• Hello packets
– VRRP sends Hello messages to IP Multicast address 224.0.0.18.
– VRRP-E uses UDP to send Hello messages in IP multicast messages. The Hello packets use the MAC address of the
interface and the IP address as the source addresses. The destination MAC address is 01-00-5E-00-00-02, and the
destination IP address is 224.0.0.2 (the well-known IP multicast address for "all routers"). Both the source and destination
UDP port number is 8888. VRRP-E messages are encapsulated in the data portion of the packet.
• Track ports and track priority
– VRRP changes the priority of the VRID to the track priority, which typically is lower than the VRID priority and lower than
the VRID priorities congured on the Backup routers. For example, if the VRRP interface priority is 100 and a tracked
interface with track priority 20 goes down, the software changes the VRRP interface priority to 20.
– VRRP-E reduces the priority of a VRRP-E interface by the amount of a tracked interface priority if the tracked interface link
goes down. For example, if the VRRP-E interface priority is 200 and a tracked interface with track priority 20 goes down,
the software changes the VRRP-E interface priority to 180. If another tracked interface goes down, the software reduces
the VRID priority again, by the amount of the tracked interface track priority.
• VRRP-E can use HMAC-MD5-96 for authenticating VRRP-E packets. VRRP can use only simple passwords.
ARP behavior with VRRP-E
In the VRRP-E implementation, the source MAC address of the gratuitous Address Resolution Protocol (ARP) request sent by the
VRRP-E Master router is the VRRP-E virtual MAC address. When the router (either the Master or Backup router) sends an ARP request
or reply packet, the sender’s MAC address becomes the MAC address of the interface on the router. When an ARP request packet for
the virtual router IP address is received by the Backup router, it is forwarded to the Master router to resolve the ARP request. Only the
Master router answers the ARP request for the virtual router IP address.
Comparison of VRRP and VRRP-E
This section compares router redundancy protocols.
VRRP
VRRP is a standards-based protocol, described in RFC 2338. The Brocade implementation of VRRP contains the features in RFC
2338. The Brocade implementation also provides the following additional features:
• Track ports - A Brocade feature that enables you to diagnose the health of all the Layer 3 switch ports used by the backed-up
VRID, instead of only the port connected to the client subnet.
• Suppression of RIP advertisements on Backup routers for the backed-up interface - You can enable the Layer 3 switches to
advertise only the path to the Master router for the backed-up interface. Normally, a VRRP Backup router includes route
information for the interface it is backing up in RIP advertisements.
Brocade Layer 3 switches congured for VRRP can interoperate with third-party routers using VRRP.
Comparison of VRRP and VRRP-E
FastIron Ethernet Switch Layer 3 Routing Conguration Guide, 08.0.30mb
53-1003627-06 513

VRRP-E
VRRP-E is a Brocade protocol that provides the benets of VRRP without the limitations. VRRP-E is unlike VRRP in the following ways:
• There is no "Owner" router. You do not need to use an IP address congured on one of the Layer 3 switches as the virtual router
ID (VRID), which is the address you are backing up for redundancy. The VRID is independent of the IP interfaces congured in
the Layer 3 switches. As a result, the protocol does not have an "Owner" as VRRP does.
• There is no restriction on which router can be the default Master router. In VRRP, the "Owner" (the Layer 3 switch on which the
IP interface that is used for the VRID is congured) must be the default Master.
Brocade Layer 3 switches congured for VRRP-E can interoperate only with other Brocade Layer 3 switches.
Architectural dierences between VRRP and VRRP-E
The protocols have the following architectural dierences.
Management protocol
• VRRP - VRRP routers send VRRP Hello and Hello messages to IP Multicast address 224.0.0.18.
• VRRP-E - VRRP-E sends messages to destination MAC address 01-00-5E-00-00-02 and destination IP address
224.0.0.2 (the standard IP multicast address for "all routers").
Virtual router IP address (the address you are backing up)
• VRRP - The virtual router IP address is the same as an IP address or virtual interface congured on one of the Layer 3
switches, which is the "Owner" and becomes the default Master.
• VRRP-E - The virtual router IP address is the gateway address you want to back up, but does not need to be an IP interface
congured on one of the Layer 3 swicth ports or a virtual interface.
Master and Backup routers
• VRRP - The "Owner" of the IP address of the VRID is the default Master and has the highest priority (255). The precedence of
the Backup routers is determined by their priorities. The default Master is always the Owner of the IP address of the VRID.
• VRRP-E - The Master and Backup routers are selected based on their priority. You can congure any of the Layer 3 switches to
be the Master by giving it the highest priority. There is no Owner.
VRRP and VRRP-E parameters
Most of the parameters and default values are the same for both protocols.
TABLE 103 VRRP and VRRP-E parameters
Parameter Description Default
Protocol The Virtual Router Redundancy Protocol (VRRP)
based on RFC 2338 or VRRP-Extended, the
Brocade-enhanced implementation of VRRP.
Disabled
NOTE
Only one of the protocols can be
enabled at a time.
VRRP or VRRP-E router The Brocade Layer 3 switch active participation
as a VRRP or VRRP-E router. Enabling the
Inactive
VRRP and VRRP-E parameters
FastIron Ethernet Switch Layer 3 Routing Conguration Guide, 08.0.30mb
514 53-1003627-06

TABLE 103 VRRP and VRRP-E parameters (continued)
Parameter Description Default
protocol does not activate the Layer 3 switch for
VRRP or VRRP-E. You must activate the switch
as a VRRP or VRRP-E router after you congure
the VRRP or VRRP-E parameters.
Virtual Router ID (VRID) The ID of the virtual router you are creating by
conguring multiple routers to back up an IP
interface. You must congure the same VRID on
each router that you want to use to back up the
address.
None
Virtual Router IP address This is the address you are backing up.
• VRRP - The virtual router IP address
must be a real IP address congured
on the VRID interface on one of the
VRRP routers. This router is the IP
address Owner and is the default
Master.
• VRRP-E - The virtual router IP
address must be in the same subnet
as a real IP address congured on the
VRRP-E interface, but cannot be the
same as a real IP address congured
on the interface.
None
VRID MAC address The source MAC address in VRRP or VRRP-E
packets sent from the VRID interface, and the
destination for packets sent to the VRID:
• VRRP - A virtual MAC address
dened as 00-00-5E-00-01-vrid for
IPv4 VRRP, and 00-00-5E-00-02-
vrid for VRRP v3. The Master owns
the virtual MAC address.
• VRRP-E - A virtual MAC address
dened as 02-E0-52- hash-value -
vrid for IPv4 VRRP-E and IPv6
VRRP-E, where hash-value is a two-
octet hashed value for the IP address
and vrid is the ID of the virtual router.
Not congurable
Authentication type The type of authentication the VRRP or VRRP-E
interfaces use to validate VRRP or VRRP-E
packets.
• No authentication - The interfaces do
not use authentication. This is the
VRRP default.
• Simple - The interface uses a simple
text-string as a password in packets
sent on the interface. If the interface
uses simple password authentication,
the VRID congured on the interface
must use the same authentication
type and the same password.
• HMAC-MD5-96 (VRRP-E only) -
The interface uses HMAC-MD5-96
authentication for VRRP-E packets.
No authentication
VRRP and VRRP-E parameters
FastIron Ethernet Switch Layer 3 Routing Conguration Guide, 08.0.30mb
53-1003627-06 515

TABLE 103 VRRP and VRRP-E parameters (continued)
Parameter Description Default
NOTE
Authentication is not supported for
VRRP v3.
Router type Whether the router is an Owner or a Backup.
• Owner (VRRP only) - The router on
which the real IP address used by the
VRID is congured.
• Backup - Routers that can provide
routing services for the VRID but do
not have a real IP address matching
the VRID.
VRRP - The Owner is always the router that has
the real IP address used by the VRID. All other
routers for the VRID are Backups.
VRRP-E - All routers for the VRID are Backups.
Backup priority A numeric value that determines a Backup
router’s preferability for becoming the Master for
the VRID. During negotiation, the router with the
highest priority becomes the Master.
• VRRP - The Owner has the highest
priority (255); other routers (backups)
can have a priority from 3 through
254.
• VRRP-E - All routers are Backups and
can have priority from 6 through 255.
If two or more Backups are tied with the highest
priority, the Backup interface with the highest IP
address becomes the Master for the VRID.
VRRP v2 and IPv6 VRRP v3 - The value is 255
for the Owner and 100 for the Backups.
VRRP-E v2 and IPv6 VRRP-E v3 -The value is
100 for all Backups.
Suppression of RIP advertisements A router that is running RIP normally advertises
routes to a backed-up VRID even when the
router is not currently the active router for the
VRID. Suppression of these advertisements
helps ensure that other routers do not receive
invalid route paths for the VRID.
NOTE
Suppression of RIP advertisements
is not supported for VRRP v3 and
VRRP-E v3.
Disabled
Hello interval The number of seconds or milliseconds between
Hello messages from the Master to the Backups
for a given VRID. The interval can be from 1
through 84 seconds for VRRP v2, VRRP-E v2,
and IPv6 VRRP-E. The interval for VRRP v3 can
be from 100 through 8400 milliseconds.
One second (VRRP v2 and VRRP-E v2, and
IPv6 VRRP-E)
1000 milliseconds (VRRP v3).
Dead interval The number of seconds or milliseconds a
Backup waits for a Hello message from the
Master for the VRID before determining that the
Master is no longer active.
If the Master does not send a Hello message
before the dead interval expires, the Backups
negotiate (compare priorities) to select a new
Master for the VRID.
If the value for the dead interval is not
congured, then the current dead interval is
equal to three times the Hello interval plus the
Skew time (where Skew time is equal to (256 -
priority) divided by 256).
Backup Hello interval The number of seconds between Hello
messages from a Backup to the Master.
Disabled
60 seconds when enabled
VRRP and VRRP-E parameters
FastIron Ethernet Switch Layer 3 Routing Conguration Guide, 08.0.30mb
516 53-1003627-06

TABLE 103 VRRP and VRRP-E parameters (continued)
Parameter Description Default
The message interval can be from 60 through
3600 seconds.
You must enable the Advertise backup to send
the messages. The messages are disabled by
default on Backups. The current Master (whether
the VRRP Owner or a Backup) sends Hello
messages by default.
Track port Another Layer 3 switch port or virtual interface
whose link status is tracked by the VRID
interface.
If the link for a tracked interface goes down, the
VRRP or VRRP-E priority of the VRID interface
is changed, causing the devices to renegotiate
for the Master.
NOTE
Track port is not supported by IPv6
VRRP v3 owner.
None
Track priority A VRRP or VRRP-E priority value assigned to
the tracked ports. If a tracked port link goes
down, the VRID port VRRP or VRRP-E priority
changes:
• VRRP - The priority changes to the
value of the tracked port priority.
• VRRP-E - The VRID port priority is
reduced by the amount of the tracked
port priority.
NOTE
Track priority is not supported by
VRRP v3.
VRRP - 2
VRRP-E - 5
Backup preempt mode Prevents a Backup with a higher VRRP priority
from taking control of the VRID from another
Backup that has a lower priority but has already
assumed control of the VRID.
Enabled
Timer scale Adjusts the timers for the Hello interval, Dead
interval, Backup Hello interval, and Hold-down
interval.
NOTE
The timer scale is not supported for
IPv6 VRRP v3.
1
VRRP-E slow start timer Causes a specied amount of time to elapse
between the time the original Master is restored
and when it takes over from the Backup. This
interval allows time for OSPF convergence when
the Master is restored. For VRRP-E only.
Disabled
Short-path forwarding Enables VRRP-E extension for server
virtualization. If enabled, the trac that is
destined to the clients travels through the short-
path forwarding path to reach the client. With
Short-Path-Fowarding enabled, a Brocade
device bypasess the VRRP-E Master router and
Disabled
VRRP and VRRP-E parameters
FastIron Ethernet Switch Layer 3 Routing Conguration Guide, 08.0.30mb
53-1003627-06 517

TABLE 103 VRRP and VRRP-E parameters (continued)
Parameter Description Default
directly forward packets to their destinations
through interfaces on the Backup router if it is
the shortest path to the destination.
Note regarding disabling VRRP or VRRP-E
NOTE
Disabling VRRP or VRRP-E is supported by IPv4 VRRP v2, and IPv6 VRRP and IPv6 VRRP-E v3.
If you disable VRRP or VRRP-E, the Layer 3 switch removes all the conguration information for the disabled protocol from the running-
cong le. Moreover, when you save the conguration to the startup-cong le after disabling one of these protocols, all the conguration
information for the disabled protocol is removed from the startup-cong le.
The CLI displays a warning message such as the following.
Brocade Router1(config-vrrp-router)#no router vrrp
router vrrp mode now disabled. All vrrp config data will be lost when writing to flash!
If you have disabled the protocol but have not yet saved the conguration to the startup-cong le and reloaded the software, you can
restore the conguration information by re-entering the command to enable the protocol (for example, router vrrp ). If you have already
saved the conguration to the startup-cong le and reloaded the software, the information is gone.
If you are testing a VRRP or VRRP-E conguration and are likely to disable and re-enable the protocol, you may want to make a backup
copy of the startup-cong le containing the protocol conguration information. This way, if you remove the conguration information by
saving the conguration after disabling the protocol, you can restore the conguration by copying the backup copy of the startup-cong
le onto the ash memory.
Basic VRRP parameter conguration
To implement a simple VRRP conguration using all the default values, enter the commands shown in the following sections.
Conguration rules for VRRP
• The interfaces of all routers in a VRID must be in the same IP subnet.
• The IP addresses associated with the VRID must already be congured on the router that will be the Owner.
• An IP address associated with the VRID must be on only one router.
• The Hello interval must be set to the same value on the Owner and Backup routers for the VRID.
• The dead interval must be set to the same value on the Owner and Backup routers for the VRID.
• The track priority on a router must be lower than the router VRRP priority. Also, the track priority on the Owner must be higher
than the track priority on the Backup routers.
NOTE
When you use the router vrrp or the ipv6 router vrrp command to enter the VRRP conguration mode, the command prompt
does not change and results in the following general conguration command prompt: (config)# . This diers from entering
the VRRP extended mode, where entering the router vrrp-extended command results in a command prompt such as the
following: (config-vrrpe-router)#. For IPv6 VRRP extended mode, when entering the ipv6 router vrrp-extended
command, this results in a command prompt such as the following: (config-ipv6-vrrpe-router)#.
Basic VRRP parameter conguration
FastIron Ethernet Switch Layer 3 Routing Conguration Guide, 08.0.30mb
518 53-1003627-06
Enabling an owner VRRP device
This task is performed on the device that is designated as the owner VRRP device because the IP address of one of its physical
interfaces is assigned as the IP address of the virtual router. For example, Router 1 is the owner VRRP device In the diagram below. For
each VRRP session there are master and backup routers, the owner router is elected, by default, as the master router.
FIGURE 36 Basic VRRP topology
1. On the device designated as the owner VRRP device, from privileged EXEC mode, enter conguration mode by issuing the
congure terminal command.
device# configure terminal
2. Globally enable the VRRP protocol.
device(config)# router vrrp
3. Congure the ethernet interface link for Router 1.
device(config)# interface ethernet 1/1/6
4. Congure the IP address of the interface.
device(config-if-e1000-1/1/6)# ip address 10.53.5.1/24
Basic VRRP parameter conguration
FastIron Ethernet Switch Layer 3 Routing Conguration Guide, 08.0.30mb
53-1003627-06 519
5. Assign Router 1 to the virtual router ID (VRID) 1.
device(conf-if-e1000-1/1/6)# ip vrrp vrid 1
NOTE
You can assign a VRID number in the range of 1 through 255.
6. Designate this router as the VRRP owner device.
device(conf-if-e1000-1/1/6-vrid-1)# owner
7. Congure the VRRP version.
device(conf-if-e1000-1/1/6-vrid-1)# version 2
8. Congure the IP address of the VRID.
device(conf-if-e1000-1/1/6-vrid-1)# ip-address 10.53.5.1
9. Enable the VRRP session.
device(conf-if-e1000-1/1/6-vrid-1)# activate
The following example congures a VRRP owner device.
device# configure terminal
device(config)# router vrrp
device(config)# interface ethernet 1/1/6
device(conf-if-e1000-1/1/6)# ip address 10.53.5.1/24
device(conf-if-e1000-1/1/6)# ip vrrp vrid 1
device(conf-if-e1000-1/1/6-vrid-1)# owner
device(conf-if-e1000-1/1/6-vrid-1)# version 2
device(conf-if-e1000-1/1/6-vrid-1)# ip-address 10.53.5.1
device(conf-if-e1000-1/1/6-vrid-1)# activate
VRRP router 1 for this interface is activating
Enabling an IPv6 VRRPv3 owner device
This task is performed on the device that is designated as the owner VRRP device because the IPv6 address of one of its physical
interfaces is assigned as the IP address of the virtual router. For each VRRP session there are master and backup routers, the owner
router is elected, by default, as the master router.
NOTE
When implementing IPv6 VRRPv3 across a network with devices from other vendors, be aware of a potential interoperability
issue with IPv6 VRRPv3 and other vendor equipment. Brocade has implemented IPv6 VRRPv3 functionality to comply with
RFC 5798 and will interoperate comfortably with other vendors that support RFC 5798.
1. On the device designated as the owner VRRP device, from privileged EXEC mode, enter conguration mode by issuing the
congure terminal command.
device# configure terminal
2. Before enabling IPv6 VRRP, you must globally enable IPv6 routing.
device(config)# ipv6 unicast-routing
3. Globally enable the IPv6 VRRP protocol.
device(config)# ipv6 router vrrp
Basic VRRP parameter conguration
FastIron Ethernet Switch Layer 3 Routing Conguration Guide, 08.0.30mb
520 53-1003627-06
4. Congure the ethernet interface link for the owner device.
device(config)# interface ethernet 1/1/5
5. Congure the IPv6 address of the interface.
device(config-if-e1000-1/1/5)# ipv6 address 3013::2/64
6. Assign the owner device to the virtual router ID (VRID) 2.
device(conf-if-e1000-1/1/5)# ipv6 vrrp vrid 2
NOTE
You can assign a VRID number in the range of 1 through 255.
7. Designate this router as the VRRP owner device.
device(conf-if-e1000-1/1/5-vrid-1)# owner
8. Congure the VRRP version.
device(conf-if-e1000-1/1/5-vrid-2)# version 3
9. Assign an IPv6 link-local address to the VRID for use in the local network.
device(conf-if-e1000-1/1/5-vrid-2)# ipv6-address fe80::768e:f8ff:fe2a:0099
10. Assign a global IPv6 address to the VRID.
device(conf-if-e1000-1/1/5-vrid-2)# ipv6-address 3013::2
11. Enable the VRRP session.
device(conf-if-e1000-1/1/5-vrid-2)# activate
The following example congures a VRRP owner device.
device# configure terminal
device(config)# ipv6 unicast-routing
device(config)# ipv6 router vrrp
device(config-ipv6-vrrp-router)# interface ethernet 1/1/5
device(conf-if-e1000-1/1/5)# ipv6 address 3013::2/64
device(conf-if-e1000-1/1/5)# ipv6 vrrp vrid 2
device(conf-if-e1000-1/1/5-vrid-2)# owner
device(conf-if-e1000-1/1/5-vrid-2)# version 3
device(conf-if-e1000-1/1/5-vrid-2)# ipv6-address fe80::768e:f8ff:fe2a:0099
device(conf-if-e1000-1/1/5-vrid-2)# ipv6-address 3013::2
device(conf-if-e1000-1/1/5-vrid-2)# activate
Enabling a backup VRRP device
This task is performed on any device that is designated as a backup VRRP device. For each VRRP virtual routing instance there is one
master device and all other devices are backups. For example, Router 2 in Figure 36 on page 519 is assigned as a backup device.
Repeat this task for all devices that are to be designated as backup devices.
1. On the device designated as a backup VRRP device, from privileged EXEC mode, enter conguration mode by issuing the
congure terminal command.
device# configure terminal
Basic VRRP parameter conguration
FastIron Ethernet Switch Layer 3 Routing Conguration Guide, 08.0.30mb
53-1003627-06 521
2. Globally enable the VRRP protocol.
device(config)# router vrrp
3. Congure the ethernet interface link.
device(config)# interface ethernet 1/1/5
4. Congure the IP address of the interface for Router 2. All devices congured for the same virtual router ID (VRID) must be on
the same subnet.
device(conf-if-e1000-1/1/5)# ip address 10.53.5.3/24
5. Assign Router 2 to VRID 1, the same VRID as Router 1.
device(conf-if-e1000-1/1/5)# ip vrrp vrid 1
NOTE
You can assign a VRID number in the range of 1 through 255.
6. Designate this router as a backup VRRP device.
device(conf-if-e1000-1/1/5-vrid-1)# backup priority 110
While conguring a backup device, you can set a priority that is used when a master VRRP device goes oine. The backup
device with the highest priority will assume the role of master device.
7. Congure the VRRP version.
device(conf-if-e1000-1/1/5-vrid-1)# version 2
8. Congure the number of seconds between hello messages.
device(conf-if-e1000-1/1/5-vrid-1)# hello-interval 10
9. By default, backup VRRP devices do not send hello messages to advertise themselves to the master. Use the following
command to enable a backup router to send hello messages to the master VRRP device.
device(conf-if-e1000-1/1/5-vrid-1)# advertise backup
10. Congure the IP address of the VRID.
device(conf-if-e1000-1/1/5-vrid-1)# ip-address 10.53.5.1
The VRID IP address is the same virtual IP addresses you used for Router 1.
11. Enable the VRRP session.
device(conf-if-e1000-1/1/5-vrid-1)# activate
VRRP router 1 for this interface is activating
Basic VRRP parameter conguration
FastIron Ethernet Switch Layer 3 Routing Conguration Guide, 08.0.30mb
522 53-1003627-06
The following example congures a VRRP owner device.
device# configure terminal
device(config)# router vrrp
device(config)# interface ethernet 1/1/5
device(conf-if-e1000-1/1/5)# ip address 10.53.5.3/24
device(conf-if-e1000-1/1/5)# ip vrrp vrid 1
device(conf-if-e1000-1/1/5-vrid-1)# backup priority 110
device(conf-if-e1000-1/1/5-vrid-1)# version 2
device(conf-if-e1000-1/1/5-vrid-1)# hello-interval 10
device(conf-if-e1000-1/1/5-vrid-1)# advertise backup
device(conf-if-e1000-1/1/5-vrid-1)# ip-address 10.53.5.1
device(conf-if-e1000-1/1/5-vrid-1)# activate
VRRP router 1 for this interface is activating
Enabling an IPv6 VRRPv3 backup device
This task is performed on all the devices that are designated as backup VRRPv3 devices. Initially a backup priority is set to 100. For
each VRRPv3 session there are master and backup routers, the IPv6 address assigned here to the VRID is the IPv6 address of the
master router. The task is repeated on each backup VRRPv3 device with corresponding changes to the interface number and IPv6
address of the interface.
NOTE
When implementing IPv6 VRRPv3 across a network with devices from other vendors, be aware of a potential interoperability
issue with IPv6 VRRPv3 and other vendor equipment. Brocade has implemented IPv6 VRRPv3 functionality to comply with
RFC 5798 and will interoperate comfortably with other vendors that support RFC 5798.
1. On the device designated as a backup VRRPv3 device, from privileged EXEC mode, enter conguration mode by issuing the
congure terminal command.
device# configure terminal
2. Globally enable the IPv6 VRRP protocol.
device(config)# ipv6 router vrrp
3. Congure the ethernet interface link for the owner device.
device(config)# interface ethernet 1/1/4
4. Congure the IPv6 address of the interface.
device(config-if-e1000-1/1/4)# ipv6 address 3013::3/64
5. Assign the backup device to the virtual router ID (VRID) 2.
device(conf-if-e1000-1/1/4)# ipv6 vrrp vrid 2
NOTE
You can assign a VRID number in the range of 1 through 255.
6. Designate this router as the VRRPv3 backup device and assign a priority of 100.
device(conf-if-e1000-1/1/4-vrid-1)# backup priority 100
7. Congure the VRRP version.
device(conf-if-e1000-1/1/4-vrid-2)# version 3
Basic VRRP parameter conguration
FastIron Ethernet Switch Layer 3 Routing Conguration Guide, 08.0.30mb
53-1003627-06 523
8. By default, backup VRRP devices do not send hello messages to advertise themselves to the master. Use the following
command to enable a backup router to send hello messages to the master VRRP device.
device(conf-if-e1000-1/1/4-vrid-1)# advertise backup
9. Assign the IPv6 link-local address to the VRID for use in the local network.
device(conf-if-e1000-1/1/4-vrid-2)# ipv6-address fe80::768e:f8ff:fe2a:0099
10. Assign the global IPv6 address to the VRID.
device(conf-if-e1000-1/1/4-vrid-2)# ipv6-address 3013::2
11. Enable the VRRP session.
device(conf-if-e1000-1/1/4-vrid-2)# activate
The following example congures an IPv6 VRRPv3 backup device.
device# configure terminal
device(config)# ipv6 router vrrp
device(config-ipv6-vrrp-router)# interface ethernet 1/1/4
device(conf-if-e1000-1/1/4)# ipv6 address 3013::3/64
device(conf-if-e1000-1/1/4)# ipv6 vrrp vrid 2
device(conf-if-e1000-1/1/4-vrid-2)# backup priority 100
device(conf-if-e1000-1/1/4-vrid-2)# version 3
device(conf-if-e1000-1/1/4-vrid-1)# advertise backup
device(conf-if-e1000-1/1/4-vrid-2)# ipv6-address fe80::768e:f8ff:fe2a:0099
device(conf-if-e1000-1/1/4-vrid-2)# ipv6-address 3013::2
device(conf-if-e1000-1/1/4-vrid-2)# activate
Assigning an auto-generated link-local IPv6 address for a VRRPv3 cluster
The default VRRPv3 implementation allows only the link-local address that is congured on a physical interface, to be used as the virtual
IPv6 address of a VRRPv3 instance. This limits conguring a link-local address for each VRRP instance on the same physical interface
because there can be only one link-local address per physical interface.
To auto-generate and assign a virtual link-local IPv6 address as the virtual IPv6 address of a VRRPv3 cluster, use the ipv6-
address auto-gen-link-local command in the VRRP conguration mode of the owner or backup router.
The following example shows the auto-generation of a virtual link-local IPv6 address and its allocation as the virtual IPv6 address of a
VRRPv3 cluster on an owner router.
Brocade(config)# interface ve 3
Brocade(config-vif-3)# ipv6 vrrp vrid 2
Brocade(config-vif-3-vrid-2)# owner
Brocade(config-vif-3-vrid-2)# ipv6-address auto-gen-link-local
Brocade(config-vif-3-vrid-2)# activate
Basic VRRP parameter conguration
FastIron Ethernet Switch Layer 3 Routing Conguration Guide, 08.0.30mb
524 53-1003627-06
Enabling the v2 checksum computation method in a VRRPv3 IPv4
session
Conguring an alternate VRRPv2-style checksum in a VRRPv3 IPv4 session for compatibility with third-party network devices.
VRRPv3 uses the v3 checksum computation method by default for both IPv4 and IPv6 sessions on Brocade devices. Third-party
devices may only have a VRRPv2-style checksum computation available for a VRRPv3 IPv4 session. The use-v2-checksum
command is entered in interface conguration mode.
1. Use the congure command to enter global conguration mode.
device# configure
2. To enable VRRP globally enter the router vrrp command.
device(config)# router vrrp
3. Enter the interface command with an interface type and number.
device(config)# interface ethernet 1/2/4
4. To congure a VRRP virtual routing ID use the ip vrrp vrid command with an associated ID number.
device(config-if-e10000-1/2/4)# ip vrrp vrid 14
5. To enable VRRP version 3 (VRRPv3) enter the version command with version number of v3.
device(config-if-e10000-1/2/4-vrid-14)# version v3
6. To enable v2 checksum computation method in an IPv4 VRRPv3 session, use the use-v2-checksum command in the VRRP
conguration mode.
device(config-if-e10000-1/2/4-vrid-14)# use-v2-checksum
7. Enter the IP address for the interface using the ip-address command.
device(config-if-e10000-1/2/4-vrid-14)# ip-address 10.14.14.99
8. To activate the interface, enter the activate command.
device(config-if-e10000-1/2/4-vrid-14)# activate
The following example shows the v2 checksum computation method enabled for an VRRPv3 IPv4 session on a Brocade device.
device# config
device(config)# router vrrp
device(config)# ethernet 1/2/4
device(config-if-e10000-1/2/4)# ip vrrp vrid 14
device(config-if-e10000-1/2/4-vrid-14)# version v3
device(config-if-e10000-1/2/4-vrid-14)# use-v2-checksum
device(config-if-e10000-1/2/4-vrid-14)# ip-address 10.14.14.99
device(config-if-e10000-1/2/4-vrid-14)# activate
Enabling accept mode in VRRP non-Owner Master router
To congure a non-Owner Master router to respond to ping, traceroute, and Telnet packets destined for the virtual IPv4 or IPv6
address of a VRRP cluster, use the accept-mode command in the VRRP conguration mode.
Basic VRRP parameter conguration
FastIron Ethernet Switch Layer 3 Routing Conguration Guide, 08.0.30mb
53-1003627-06 525
The following example shows the conguration of accept mode on an IPv6 Backup router.
Brocade(config)# interface ve 3
Brocade(config-vif-3)# ipv6 vrrp vrid 2
Brocade(config-vif-3-vrid-2)# backup
Brocade(config-vif-3-vrid-2)# advertise backup
Brocade(config-vif-3-vrid-2)# ipv6-address 2001:DB8::1
Brocade(config-vif-3-vrid-2)# accept-mode
Brocade(config-vif-3-vrid-2)# activate
Conguration considerations for IPv6 VRRP and IPv6 VRRP-E support on
Brocade devices
Consider the following when enabling IPv6 VRRP mode and IPv6 VRRP-E mode on Brocade devices:
• You can congure only one protocol (Layer 3 VSRP, VRRP, or VRRP-E) on a router at a single time. However, VRRP or VRRP-
E can be congured with IPv4 and IPv6 concurrently on a router.
• Scale timer conguration does not aect timer values, nor does it scale timer values for virtual routers congured with sub-
second time values for IPv6 VRRP and IPv4 VRRP modes.
• Abdication of a VRRP Owner router in an IPv6 environment is not supported. Abdication of an Owner router is a Brocade-
specic enhancement to VRRP. Abdication of an Owner router is possible by changing the Owner’s priority, or by conguring
track ports for an Owner router.
– For IPv6 VRRP only, the tracking port conguration is not allowed if the router is congured as the VRRP Owner. This
conforms to RFC 5798.
– For the IPv6 VRRP Owner router only, the priority conguration is not allowed. The Owner router priority is always 255.
This conforms to RFC 5798.
• Interoperability is not supported for a VRID when VRRP routers are congured as VRRP v2 or v3.
• Brocade does not recommend reuse of the same VRID across IPv6 VRRP or IPv4 VRRP or in the same broadcast domain.
• There is no specied restriction for conguring VRRP or VRRP-E instances if they are within the maximum VRID range.
Basic VRRP-E parameter conguration
The following sections describe the conguration of the parameters specic to IPv4 and IPv6 VRRP-E.
Conguration rules for VRRP-E
Consider the following rules when conguring VRRP-E:
• The interfaces of all routers in a VRID must be in the same IP subnet.
• The IP address associated with the VRID cannot be congured on any of the Layer 3 switches.
• The Hello interval must be set to the same value with in the same VRID.
• The dead interval must be set to the same value with in the same VRID.
• The track priority for a VRID must be lower than the VRRP-E priority.
Basic VRRP-E parameter conguration
FastIron Ethernet Switch Layer 3 Routing Conguration Guide, 08.0.30mb
526 53-1003627-06
Conguring IPv4 VRRP-E
VRRP-E is congured at the interface level. To implement a simple IPv4 VRRP-E conguration using all the default values, enter
commands such as the following on each Layer 3 switch.
Brocade(config)#router vrrp-extended
Brocade(config)#interface ethernet 1/1/5
Brocade(config-if-1/1/5)#ip-address 192.53.5.3
Brocade(config-if-1/1/5)#ip vrrp-extended vrid 1
Brocade(config-if-1/1/5-vrid-1)#backup
Brocade(config-if-1/1/5-vrid-1)#advertise backup
Brocade(config-if-1/1/5-vrid-1)#ip-address 192.53.5.254
Brocade(config-if-1/1/5-vrid-1)#activate
Syntax: [no] router vrrp-extended
Syntax: [no] ip-address ip-address
Syntax: [no] ip vrrp-extended vrid vrid
Syntax: no backup [ priority value ] [ track-priority value ]
Syntax: [no] advertise backup
Syntax: [no] activate
The vrid variable species the virtual router ID.
The ip-address variable species the IPv4 address of the router.
You must identify a VRRP-E router as a Backup before you can activate the virtual router on a Brocade device. However, after you
congure the virtual router, you can use the backup command to change its priority or track priority.
The priority value option species the IPv4 VRRP-E priority for this virtual Backup router. You can specify a value from 3 through 254.
The default is 100.
The track-priority value option changes the track port priority of a Backup router. You can specify a value from 1 through 254. The
default is 5.
NOTE
You also can use the enable command to activate the conguration. This command does the same thing as the activate
command.
Conguring IPv6 VRRP-E
To implement an IPv6 VRRP-E conguration using all the default values, enter the following commands.
NOTE
You must rst congure the ipv6 unicast-routing command at the global conguration level to enable IPv6 VRRP-E on the
router.
Brocade(config)# ipv6 unicast-routing
Brocade(config)# ipv6 router vrrp-extended
Brocade(config-ipv6-VRRP-E-router)# interface ethernet 1/1/5
Brocade(config-if-e10000-1/1/5)# ipv6-address 2001:DB8::2/64
Brocade(config-if-e10000-1/1/5)# ipv6 vrrp-extended vrid 1
Brocade(config-if-e10000-1/1/5-vrid-1)# backup priority 50 track-priority 10
Brocade(config-if-e10000-1/1/5-vrid-1)# ipv6-address 2001:DB8::99
Brocade(config-if-e10000-1/1/5-vrid-1)# activate
Syntax: [no] ipv6 unicast-routing
Basic VRRP-E parameter conguration
FastIron Ethernet Switch Layer 3 Routing Conguration Guide, 08.0.30mb
53-1003627-06 527
Syntax: [no] ipv6 router vrrp-extended
Syntax: [no] ipv6-address ipv6-address
Syntax: [no] ipv6 vrrp-extended vrid vrid
Syntax: [no] backup [ priority value] [ track-priority value ]
Syntax: [no] activate
The vrid variable species the virtual router ID.
The ipv6-address variable species the IPv6 address of the router.
You must identify a VRRP-E router as a Backup before you can activate the virtual router on a Brocade device. However, after you
congure the virtual router, you can use the backup command to change its priority or track priority.
The priority value option species the IPv6 VRRP-E priority for this virtual Backup router. You can specify a value from 3 through 254.
The default is 100.
The track-priority value option changes the track port priority of a Backup router. You can specify a value from 1 through 254. The
default is 5.
NOTE
You also can use the enable command to activate the conguration. This command does the same thing as the activate
command.
Additional VRRP and VRRP-E parameter
conguration
You can modify the following VRRP and VRRP-E parameters on an individual VRID basis. These parameters apply to both protocols:
• Authentication type (if the interfaces on which you congure the VRID use authentication)
• Router type (Owner or Backup)
NOTE
For VRRP, change the router type only if you have moved the real IP address from one router to another or you accidentally
congured the IP address Owner as a Backup.For VRRP-E, the router type is always Backup. You cannot change the type to
Owner.
• Suppression of RIP advertisements on Backup routes for the backed-up interface
• Hello interval
• Dead interval
• Backup Hello messages and message timer (Backup advertisement)
• Track port
• Track priority
• Backup preempt mode
• Timer scale
• VRRP-E slow start timer
• VRRP-E extension for server virtualization (short-path forwarding)
Additional VRRP and VRRP-E parameter conguration
FastIron Ethernet Switch Layer 3 Routing Conguration Guide, 08.0.30mb
528 53-1003627-06
VRRP and VRRP-E authentication types
This section describes VRRP and VRRP-E authentication parameters.
Conguring authentication type
The Brocade implementation of VRRP and VRRP-E supports the following authentication types for authenticating VRRP and VRRP-E
trac:
• No authentication - The interfaces do not use authentication. This is the default for VRRP and VRRP-E both for IPv4 and IPv6.
• Simple - The interfaces use a simple text-string as a password in packets sent on the interface.
• All interfaces on the same VRID must use the same authentication type and the same password.
IPv4 VRRP-E and IPv6 VRRP-E supports the following authentication type:
•HMAC-MD5-96 - The interfaces use HMAC-MD5-96 authentication for VRRP-E packets.
NOTE
HMAC-MD5-96 authentication is not supported for VRRP.
To congure the VRID interface on Switch 1 for simple password authentication using the password "ourpword", enter the following
commands.
Conguring Switch 1
device Switch1(config)#interface ethernet 1/1/6
device Switch1(config-if-1/1/6)#ip vrrp auth-type simple-text-auth ourpword
VRRP syntax
Syntax: auth-type no-auth | simple-text-auth auth-data
The auth-type no-auth option indicates that the VRID and the interface it is congured on do not use authentication.
The simple-text-auth auth-data option indicates that the VRID and the interface it is congured on use a simple text password for
authentication. The auth-data variable is the password. If you use this variable, make sure all interfaces on all the routers supporting this
VRID are congured for simple password authentication and use the same password.
NOTE
For VRRP v3, authentication is deprecated by RFC 5768.
VRRP-E syntax
For IPv4 VRRP-E:
Syntax: ip vrrp-extended auth-type no-auth | simple-text-auth auth-data | md5-auth [ 0 |1 ] key
For IPv6 VRRP-E:
Syntax: ipv6 vrrp-extended auth-type no-auth | simple-text-auth auth-data | md5-auth [ 0 | 1 ] key
The values for the no-auth and simple-text-auth auth-data options are the same as for VRRP.
The md5-auth option congures the interface to use HMAC-MD5-96 for VRRP-E authentication.
Additional VRRP and VRRP-E parameter conguration
FastIron Ethernet Switch Layer 3 Routing Conguration Guide, 08.0.30mb
53-1003627-06 529
The key variable is the MD5 encryption key, which can be up to 64 characters long. The optional 0 or1 parameters congure whether the
MD5 password is encrypted, as follows:
• If you do not enter this parameter and enter the key as clear text, the key appears encrypted in the device conguration and
command outputs.
• If you enter 0 and enter the key as clear text, the key appears as clear text in the device conguration and command outputs.
• If you enter 1 and enter the key in encrypted format, the key appears in encrypted format in the device conguration and
command outputs.
Syslog messages for VRRP-E HMAC-MD5-96 authentication
If an interface is congured with HMAC-MD5-96 authentication, all VRRP-E packets received on this interface are authenticated with the
HMAC-MD5-96 algorithm using the shared secret key congured on the interface.
If a packet is received that fails this HMAC-MD5-96 authentication check, the packet gets dropped. Additionally, if syslog is enabled, a
syslog message is generated to notify the administrator about an authentication failure. The message includes the VRID received in the
packet's VRRP message and the interface on which the packet was received. These syslog messages will be rate limited to 20 log
messages within a span of 5 minutes, starting from the rst packet received that fails the HMAC-MD5-96 authentication check.
For Example:
SYSLOG: <13>Apr 30 14:14:57 ICX6610 VRRP: VRRPE authentication failure, intf v555, vrid 55, auth_type MD5
authentication
SYSLOG: <13>Apr 30 14:14:58 ICX6610 VRRP: VRRPE authentication failure, intf v555, vrid 55, auth_type MD5
authentication
SYSLOG: <13>Apr 30 14:14:59 ICX6610 VRRP: VRRPE authentication failure, intf v555, vrid 55, auth_type MD5
authentication
VRRP router type
A VRRP interface is either an Owner or a Backup router for a given VRID. By default, the Owner becomes the Master. A Backup router
becomes the Master only if the Master becomes unavailable.
A VRRP-E interface is always a Backup router for its VRID. The Backup router with the highest VRRP priority becomes the Master.
This section describes how to specify the interface type, how to change the type for VRRP, and how to set or change the interface VRRP
or VRRP-E priority and track priority for the VRID.
NOTE
You can force a VRRP Master router to abdicate (give away control) of the VRID to a Backup router by temporarily changing the
Master VRRP priority to a value less than the Backup.
NOTE
The Owner type is not applicable to VRRP-E.
NOTE
For VRRP, the IP address you associate with the Owner must be real IP address on the interface where the VRIS is congured.
To congure a Backup router, the interface must have a real IP address that is in the same subnet the Owner. The address must
be unique.
Additional VRRP and VRRP-E parameter conguration
FastIron Ethernet Switch Layer 3 Routing Conguration Guide, 08.0.30mb
530 53-1003627-06
Conguring Router 1 as VRRP VRID Owner
To congure Router1 as a VRRP VRID Owner, enter the following commands.
Router1(config)# interface ethernet 1/1/6
Router1(config)# ip address 10.1.1.1/24
Router1(config-if-1/1/6)# ip vrrp vrid 1
Router1(config-if-1/1/6-vrid-1)# owner
Router1(config-if-1/1/6-vrid-1)# ip-address 10.1.1.1
Router1(config-if-1/1/6-vrid-1)# activate
Conguring Router 2 as VRRP Backup
To congure Router2 as a VRRP Backup for the same VRID, enter the following commands.
device Router2(config)# interface ethernet 1/1/6
device Router2(config-if-1/1/6)# ip address 10.1.1.2/24
device Router2(config-if-1/1/6)# ip vrrp vrid 1
device Router2(config-if-1/1/6-vrid-1)# backup
device Router2(config-if-1/1/6-vrid-1)# ip-address 10.1.1.1
device Router2(config-if-1/1/6-vrid-1)# activate
Conguring Router 1 as IPv6 VRRP VRID Owner
To congure Router1 as a IPv6 VRRP VRID Owner, enter the following commands:
device Router1(config)# interface ethernet 1/1/7
device Router1(config-if-e1000-1/1/7)#ipv6 address 2002:AB3::1/64
device Router1(config-if-e1000-1/1/7)#ipv6 vrrp vrid 1
device Router1(config-if-e1000-1/1/7-vrid-1)#owner
device Router1(config-if-e1000-1/1/7-vrid-1)#ipv6-address 2002:AB3::1
device Router1(config-if-e1000-1/1/7-vrid-1)#activate
Conguring Router 2 as IPv6 VRRP backup for a VRID
To congure an IPv6 VRRP interface as a Backup for a VRID, and set its backup and track priority, enter the following:
device Router2(config)# interface ethernet 1/1/7
device Router2(config-if-e1000-1/1/7)#ipv6 address 2002:AB3::2/64
device Router2(config-if-e1000-1/1/7)#ipv6 vrrp vrid 1
device Router2(config-if-e1000-1/1/7-vrid-1)#backup priority 50 track-priority 10
device Router2(config-if-e1000-1/1/7-vrid-1)#ipv6-address 2002:AB3::1
device Router2(config-if-e1000-1/1/7-vrid-1)#activate
Suppression of RIP advertisements
NOTE
Suppression of RIPng advertisements on Backup routers for the backup interface is not supported by IPv6 VRRP v3 and IPv6
VRRP-E v3.
Normally, a VRRP or VRRP-E Backup includes route information for the virtual IP address (the backed-up interface) in RIP
advertisements. As a result, other routers receive multiple paths for the backed-up interface and might sometimes unsuccessfully use the
path to the Backup router rather than the path to the Master.
You can prevent the Backup routers from advertising route information for the backed-up interface by enabling suppression of the
advertisements.
Additional VRRP and VRRP-E parameter conguration
FastIron Ethernet Switch Layer 3 Routing Conguration Guide, 08.0.30mb
53-1003627-06 531
Suppressing RIP advertisements for the backed-up interface in Router 2
To suppress RIP advertisements for the backed-up interface in Router 2, enter the following commands.
device Router2(config)#router rip
device Router2(config-rip-router)#use-vrrp-path
Syntax: use-vrrp-path
The syntax is the same for VRRP and VRRP-E.
Hello interval conguration
The Master periodically sends Hello messages to the Backup routers. The Backup routers use the Hello messages as verication that the
Master is still online. If the Backup routers stop receiving the Hello messages for the period of time specied by the dead interval, the
Backup routers determine that the Master router is dead. At this point, the Backup router with the highest priority becomes the new
Master router.
NOTE
If the value for the dead interval is not congured, then the current dead interval is equal to three times the Hello interval plus the
Skew time (where Skew time is equal to (256 - priority) divided by 256). Generally, if you change the Hello interval, you also
should change the dead interval on the Backup routers.
To change the Hello interval on the Master to 10 seconds, enter the following commands.
device Router1(config)#interface ethernet 1/1/6
device Router1(config-if-1/1/6)#ip vrrp vrid 1
device Router1(config-if-1/1/6-vrid-1)#hello-interval 10
Syntax: [no] hello-interval seconds
The seconds variable species the Hello interval value from 1 through 84 seconds for IPv4 VRRP, VRRP-E, and IPv6 VRRP-E and 1
through 40 seconds for IPv4 VRRPv3. The default is 1 second.
To change the Hello interval on the Master to 200 milliseconds for IPv6 VRRP, enter the following commands.
device Router1(config)# interface ethernet 1/1/6
device Router1(config-if-1/1/6)# ipv6 vrrp vrid 1
device Router1(config-if-1/1/6-vrid-1)# hello-interval 200
Syntax: [no] hello-interval milliseconds
The milliseconds variable can be 100 milliseconds interval only. The default is 1000 milliseconds, and the range is 100 to 40900
milliseconds.
To change the Hello interval on the Master to 200 milliseconds for IPv4 VRRPv3, enter the following commands.
Router1(config)# interface ethernet 1/1/6
Router1(config-if-1/1/6)# ipv6 vrrp vrid 1
Router1(config-if-1/1/6-vrid-1)# hello-interval msec 200
Syntax: [no] hello-interval msec milliseconds
IPv4 VRRPv2 supports the hello-interval conguration in seconds, while IPv6 VRRP supports this conguration in milliseconds; both
use the CLI hello-interval xxx. However IPv4 VRRPv3 supports both the seconds and milliseconds conguration using the hello-
interval xxx and hello-interval msec xxx commands respectively.
Additional VRRP and VRRP-E parameter conguration
FastIron Ethernet Switch Layer 3 Routing Conguration Guide, 08.0.30mb
532 53-1003627-06
Dead interval conguration
The dead interval is the number of seconds a Backup router waits for a Hello message from the Master before determining that the
Master is dead. When Backup routers determine that the Master is dead, the Backup with the highest priority becomes the new Master.
If the value for the dead interval is not congured, then the current dead interval is equal to three times the Hello interval plus the Skew
time (where Skew time is equal to (256 - priority) divided by 256).
To change the dead interval on a Backup to 30 seconds, enter the following commands.
device Router2(config)#interface ethernet 1/1/5
device Router2(config-if-e1000-1/1/5)#ip vrrp vrid 1
device Router2(config-if-e1000-1/1/5-vrid-1)#dead-interval 30
Syntax: dead-interval value
The value variable is from 1 through 84 seconds for VRRP v2 and VRRP-E v2. For other versions, the value variable is from 100
through 8400 milliseconds. The default is 3600 milliseconds.
NOTE
If the dead-interval command is not congured, then a zero value is displayed in the output of the show ip vrrp or show ipv6
vrrp-extended command.
Backup Hello message state and interval
By default, Backup routers do not send Hello messages to advertise themselves to the Master. You can enable these messages if
desired and also change the message interval.
To enable a Backup router to send Hello messages to the Master, enter the following commands.
device(config)# router vrrp
device(config)# interface ethernet 1/1/6
device(config-if-1/1/6)# ip vrrp vrid 1
device(config-if-1/1/6-vrid-1)# advertise backup
Syntax: [no] advertise backup
When you enable a Backup to send Hello messages, the Backup sends a Hello message to the Master every 60 seconds by default.
You can change the interval to be up to 3600 seconds. To change the Hello message interval, enter the following commands.
device(config)# router vrrp
device(config)# interface ethernet 1/1/6
device(config-if-1/1/6)# ip vrrp vrid 1
device(config-if-1/1/6-vrid-1)# backup-hello-interval 180
Syntax: [no] backup-hello-interval num
The num variable species the message interval and can be from 60 through 3600 seconds. The default is 60 seconds.
The syntax is the same for VRRP v2 and IPv6 VRRP v3, and VRRP-E v2 and IPv6 VRRP-E v3.
Track port conguration
NOTE
Track port is not supported by IPv6 VRRPv3 owner.
You can congure the VRID on one interface to track the link state of another interface on the Layer 3 switch. This capability is quite
useful for tracking the state of the exit interface for the path for which the VRID is providing redundancy.
Additional VRRP and VRRP-E parameter conguration
FastIron Ethernet Switch Layer 3 Routing Conguration Guide, 08.0.30mb
53-1003627-06 533
To congure interface 1/1/6 on Router 1 to track interface 1/2/4, enter the following commands.
Router1(config)# interface ethernet 1/1/6
Router1(config-if-1/1/6)# ip vrrp vrid 1
Router1(config-if-1/1/6-vrid-1)# track-port ethernet 1/2/4
Syntax: track-port ethernet [ unitnum/slotnum/portnum | ve num ]
The syntax is the same for VRRP and VRRP-E.
Track priority conguration
NOTE
Track priority is not supported by IPv6 VRRP v3.
When you congure a VRID to track the link state of other interfaces, and one of the tracked interfaces goes down, the software changes
the VRRP or VRRP-E priority of the VRID interface:
• For VRRP, the software changes the priority of the VRID to the track priority, which typically is lower than the VRID priority and
lower than the VRID priorities congured on the Backups. For example, if the VRRP interface priority is 100 and a tracked
interface with track priority 60 goes down, the software changes the VRRP interface priority to 60.
• For VRRP-E, the software reduces the VRID priority by the amount of the priority of the tracked interface that went down. For
example, if the VRRP-E interface priority is 100 and a tracked interface with track priority 60 goes down, the software changes
the VRRP-E interface priority to 40. If another tracked interface goes down, the software reduces the VRID priority again, by the
amount of the tracked interface track priority.
The default track priority for an Owner for VRRP v2, IPv6 VRRP v3 and for IPv4 VRRP-E and IPv6 VRRP-E, the default track priority is
5. The default track priority for Backup routers is 1.
You enter the track priority value with the owner or backup command.
Syntax: owner [ track-priority value ]
Syntax: backup [ priority value ] [ track-priorityvalue ]
The syntax is the same for VRRP and VRRP-E.
Backup preempt conguration
By default, a Backup that has a higher priority than another Backup that has become the Master can preempt the Master, and take over
the role of Master. If you want to prevent this behavior, disable preemption.
Preemption applies only to Backups and takes eect only when the Master has failed and a Backup has assumed ownership of the
VRID. The feature prevents a Backup with a higher priority from taking over as Master from another Backup that has a lower priority but
has already become the Master of the VRID.
Preemption is especially useful for preventing apping in situations where there are multiple Backups and a Backup with a lower priority
than another Backup has assumed ownership, because the Backup with the higher priority was unavailable when ownership changed.
If you enable the non-preempt mode (thus disabling the preemption feature) on all the Backups, the Backup that becomes the Master
following the disappearance of the Master continues to be the Master. The new Master is not preempted.
NOTE
In VRRP, regardless of the setting for the preempt parameter, the Owner always becomes the Master again when it comes back
online.
Additional VRRP and VRRP-E parameter conguration
FastIron Ethernet Switch Layer 3 Routing Conguration Guide, 08.0.30mb
534 53-1003627-06

To disable preemption on a Backup, enter commands such as the following.
device Router1(config)#interface ethernet 1/1/6
device Router1(config-if-1/1/6)#ip vrrp vrid 1
device Router1(config-if-1/1/6-vrid-1)#non-preempt-mode
Syntax: [no] non-preempt-mode
The syntax is the same for VRRP and VRRP-E.
Changing the timer scale
NOTE
Changing the timer scale is supported for IPv4 VRRP v2, IPv4 VRRP-E v2, and IPv6 VRRP-E v3. It is not supported for IPv6
VRRP v3.
To achieve sub-second failover times, you can shorten the duration of all scale timers for VSRP, VRRP, and VRRP-E by adjusting the
timer scale. The timerscale is a value used by the software to calculate the timers. By default, the scale value is 1. If you increase the
timer scale, each timer’s value is divided by the scale value. Using the timer scale to adjust timer values enables you to easily change all
the timers while preserving the ratios among their values.
TABLE 104 Time scale values
Timer Timer scale Timer value
Hello interval 1 1 second
2 0.5 seconds
Dead interval 1 3 seconds
2 1.5 seconds
Backup Hello interval 1 60 seconds
2 30 seconds
Hold-down interval 1 2 seconds
2 1 second
If you congure the device to receive its timer values from the Master, the Backup also receives the timer scale value from the Master.
To change the timer scale, enter a command such as the following at the global CONFIG level of the CLI.
device(config)# scale-timer 2
This command changes the scale to 2. All VSRP, VRRP, and VRRP-E timer values will be divided by 2.
Syntax: [no] scale-timer num
The num variable species the multiplier. You can specify a timer scale from 1 through 10. However, Brocade recommends the timer
scale of 1 or 2 for VRRP and VRRP-E.
NOTE
Be cautious when conguring the scale-timer command in a VRRP or VRRP-E scaled environment. VSRP, VRRP, and VRRP-
E are time-sensitive protocols and system behavior cannot be predicted when the timers are scaled.
Additional VRRP and VRRP-E parameter conguration
FastIron Ethernet Switch Layer 3 Routing Conguration Guide, 08.0.30mb
53-1003627-06 535
VRRP-E slow start timer
In a VRRP-E conguration, if a Master router goes down, the Backup router with the highest priority takes over after expiration of the
dead interval. When the original Master router comes back up again, it takes over from the Backup router (which became the Master
router when the original Master router went down). By default, this transition from Backup back to Master takes place immediately.
However, you can congure the VRRP-E slow start timer feature, which causes a specied amount of time to elapse between the time
the Master is restored and when it takes over from the Backup. This interval allows time for OSPF convergence when the Master is
restored.
To set the IPv4 VRRP-E slow start timer to 30 seconds, enter the following commands.
device(config)#router vrrp-extended
device(config-VRRP-E-router)#slow-start 30
To set the IPv6 VRRP-E slow start timer to 60 seconds, enter the following commands.
device(config)#ipv6 router vrrp-extended
device(config-ipv6-VRRP-E-router)#slow-start 60
Syntax: [no] slow-start seconds
The seconds variable species a value from 1 through 255.
If the Master subsequently comes back up again, the amount of time specied by the VRRP-E slow start timer elapses (in the IPv4
example, 30 seconds) before the Master takes over from the Backup.
The VRRP-E slow start timer is eective only if the VRRP-E Backup router detects another VRRP-E Master (Standby) router. It is not
eective during the initial bootup. The slow start timer is eective on a Backup router if the priority of the Backup router is equal to the
congured priority on the Backup state router.
NOTE
The VRRP-E slow start timer applies only to VRRP-E congurations. It does not apply to VRRP
congurations.
VRRP-E Extension for Server Virtualization
VRRP-E is enhanced with the VRRP-E Extension for Server Virtualization feature so that the Brocade device attempts to bypass the
VRRP-E Master router and directly forward packets to their destinations through interfaces on the Backup router.
Short-path forwarding conguration notes on page 536 shows an example of VRRP-E Extension for Server Virtualization. As shown,
the virtual servers are dynamically moved between Host Server 1 and Host Server 2. Each time the virtual server is activated, it can be
on a dierent Host Server, and sometimes the trac crosses the WAN two times before it reaches the client. For example, in the VRRP-E
implementation (without VRRP-E Extension for Server Virtualization), trac from Virtual server 1 to the client at 10.0.0.X was switched
to the VRRP-E Master router, then routed back to the VRRP-E Backup router, and then routed to the client (the normal forwarding path).
Short-path forwarding limitation
• Short-path forwarding (SPF) applies to IPv4 on Brocade FSX 800, FSX 1600, and ICX 7750 switches only. SPF is not
supported on Brocade FCX or ICX 6xxx switches.
Short-path forwarding conguration notes
• The VRRP-E Master router and Backup router must have routes to all destinations. You should utilize dynamic routing protocols
such as Open Shortest Path First (OSPF) on all routers; otherwise, you must congure the static routes.
Additional VRRP and VRRP-E parameter conguration
FastIron Ethernet Switch Layer 3 Routing Conguration Guide, 08.0.30mb
536 53-1003627-06
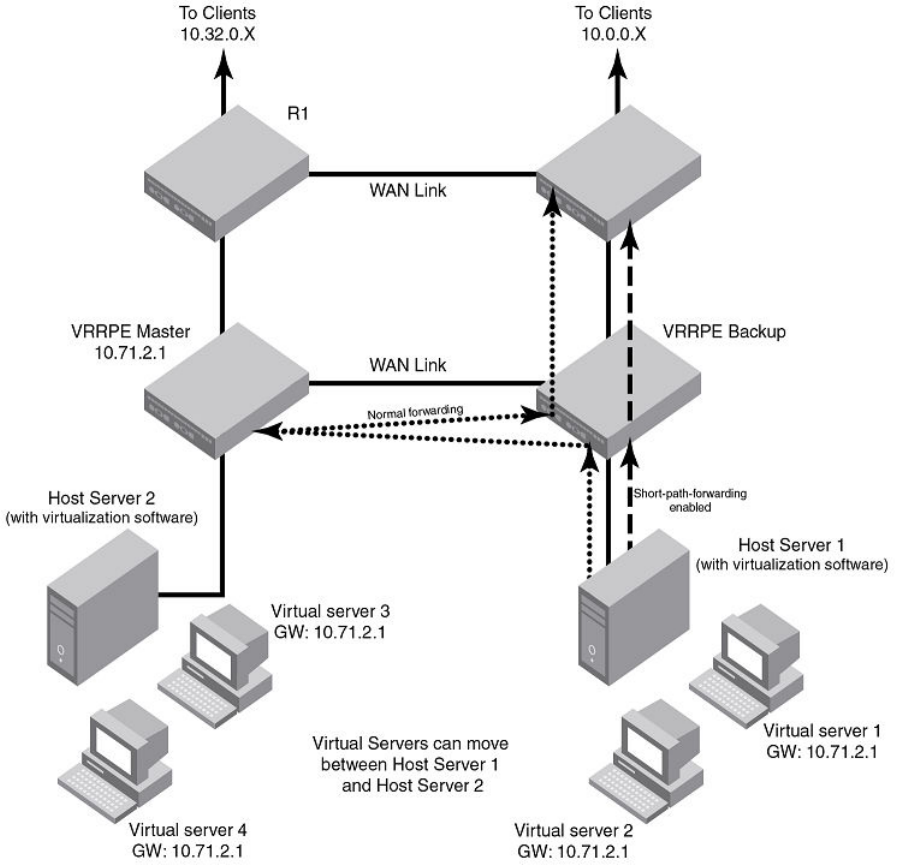
• Although it is not required, it is recommended that interfaces on dierent routers with the same VRID have the same SPF
conguration. This ensures that the SPF behavior is retained after a failover. Dierent VRIDs, however, can have dierent SPF
congurations.
FIGURE 37 VRRP-E Extension for short-path forwarding
VRRP-E Extension for short-path forwarding example
Under the VRRP-E VRID conguration level, there is an option to enable short-path forwarding. To enable short-path forwarding , enter
the following commands.
device (config)# router vrrp-extended
device (config)# interface ve 10
device (config-vif-10)# ip-address 10.10.10.25/24
device (config-vif-10)# ip vrrp-extended vrid 10
device (config-vif-10-vrid-10)# backup priority 50
Additional VRRP and VRRP-E parameter conguration
FastIron Ethernet Switch Layer 3 Routing Conguration Guide, 08.0.30mb
53-1003627-06 537
device (config-vif-10-vrid-10)# ip-address 10.10.10.254
device (config-vif-10-vrid-10)# short-path-forwarding
device (config-vif-10-vrid-10)# activate
Syntax: no short-path-forwarding [ revert-priority value ]
The revert-priority value parameter uses the priority value as the threshold to determine whether the short-path forwarding (SPF)
behavior is eective. Typically, when short-path forwarding is enabled, the Backup router enforces SPF. For each port that goes down,
the current priority of the VRRP-E router is lowered by the number specied in the track-port command. When the current priority is
lower than the threshold, the SPF behavior is temporarily suspended and reverts back to the pre-SPF VRRP-E forwarding behavior. The
value range is from 1 through 255.
Displaying short-path forwarding combinations
When short-path forwarding ( SPF) is congured, the output of the following show commands include the SPF information:
•show run
•show ip vrrp-e brief
•show ip vrrp-e vrid
The following example displays information about VRID 1 when only short-path forwarding is congured.
device# show ip vrrp-e vrid 1
VRID 1
Interface ethernet v100
state backup
administrative-status enabled
priority 110
current priority 90
hello-interval 1000 msec
dead-interval 0 msec
current dead-interval 3500 msec
preempt-mode true
virtual ip address 10.1.1.3
virtual mac address 0000.0089.7001
advertise backup: disabled
master router 10.1.1.1 expires in 00:00:02.6
track-port 1/1/13(down)
short-path-forwarding enabled
The following example displays information about VRID 1 when short-path forwarding and revert priority are congured.
device# show ip vrrp-e vrid 1
VRID 1
Interface ethernet v100
state backup
administrative-status enabled
priority 110
current priority 90
hello-interval 1000 msec
dead-interval 0 msec
current dead-interval 3500 msec
preempt-mode true
virtual ip address 10.1.1.3
virtual mac address 0000.0089.7001
advertise backup: disabled
master router 10.1.1.1 expires in 00:00:02.7
track-port 1/1/13(down)
short-path-forwarding enabled revertible priority 80 not reverted
Additional VRRP and VRRP-E parameter conguration
FastIron Ethernet Switch Layer 3 Routing Conguration Guide, 08.0.30mb
538 53-1003627-06
Suppressing default interface-level RA messages on an IPv6 VRRP or
VRRP-E interface
You should have a valid IPv6 VRRP or VRRP-E congured on the interface.
By default, all IPv6-enabled interfaces send IPv6 Router Advertisement (RA) messages. If you congure an IPv6 VRRP/VRRP-E
instance on an interface, the VRRP or VRRP-E instance also sends its IPv6 RA messages for the virtual IPv6 address on the same
interface with the same source address. An IPv6 host cannot identify the valid IPv6 address for this router interface because of these two
dierent IPv6 RA messages with the same source address from the same IPv6 router interface. To avoid this, you can disable the default
interface-level IPv6 RA messages on an interface congured with IPv6 VRRP or VRRP-E.
To disable the default IPv6 RA messages and allow the interface to send only IPv6 VRRP or VRRP-E RA messages, use the
ipv6 nd skip-interface-ra command in interface conguration mode.
The following example shows suppression of the default interface-level IPv6 RA messages on an Ethernet interface 1/1/7 that has IPv6
VRRP or VRRP-E congured on it.
Brocade(config)# interface ethernet 1/1/7
Brocade(config-if-e1000-1/1/7)# ipv6 address 2002:AB3::2/64
Brocade(config-if-e1000-1/1/7)# ipv6 nd skip-interface-ra
Forcing a Master router to abdicate to a Backup
router
NOTE
Forcing a Master router to abdicate to a Backup router is not supported for IPv6 VRRP, IPv4 VRRP-E, and IPv6 VRRP-E. It is
only supported for IPv4 VRRP.
You can force a VRRP Master to abdicate (give away control) of a VRID to a Backup router by temporarily changing the Master priority to
a value less than that of the Backup router.
The VRRP Owner always has priority 255. You can use this feature to temporarily change the Owner priority to a value from 1 through
254.
NOTE
When you change the VRRP Owner priority, the change takes eect only for the current power cycle. The change is not saved
to the startup-cong le when you save the conguration and is not retained across a reload or reboot. Following a reload or
reboot, the VRRP Owner again has priority 255.
To change the Master priority, enter commands such as the following.
device(config)# interface ethernet 1/1/6
device(config-if-1/1/6)# ip vrrp vrid 1
device(config-if-1/1/6-vrid-1)# owner priority 99
Syntax: [no] owner priority num
The num variable species the new priority and can be a number from 1 through 254.
When the command is enabled, the software changes the priority of the Master to the specied priority. If the new priority is lower than at
least one Backup priority for the same VRID, the Backup router takes over and becomes the new Master until the next software reload or
system reset.
Forcing a Master router to abdicate to a Backup router
FastIron Ethernet Switch Layer 3 Routing Conguration Guide, 08.0.30mb
53-1003627-06 539
To verify the change, enter the following command from any level of the CLI.
device# show ip vrrp
Total number of VRRP routers defined: 1
Interface ethernet 1/1/6
auth-type simple text password
VRID 3
state backup
administrative-status enabled
version v3
mode non-owner(backup)
priority 110
current priority 110
hello-interval 1000 msec
dead-interval 0 msec
current dead-interval 3500 msec
preempt-mode true
ip-address 172.21.3.1
virtual mac address 0000-5E00-0103
advertise backup: enabled
next hello sent in 00:00:26.1
master router 172.21.3.1 expires in 00:00:02.7
track-port 1/4/1-1/4/4(up)
This example shows that even though this Layer 3 switch is the Owner of the VRID ("mode owner"), the Layer 3 switch priority for the
VRID is 110 and the state is now "backup" instead of "active". In addition, the administrative status is "enabled".
To change the Master priority back to the default Owner priority 255, enter no followed by the command you entered to change the
priority. For example, to change the priority of a VRRP Owner back to 255 from 110, enter the following command.
device(config-if-1/1/6-vrid-1)# no owner priority 110
You cannot set the priority to 255 using the owner priority command.
Accept mode for backup VRRP devices
Accept mode allows a backup VRRP device to respond to ping, traceroute, and Telnet packets if the backup device becomes the master
VRRP device.
For each VRRP virtual routing instance there is one master device and all other devices are backups. Accept mode allows some network
management functionality for backup VRRP devices with the ability to respond to ping, traceroute, and telnet packets. By default, non-
owner VRRP devices do not accept packets destined for the IPv4 or IPv6 VRID addresses. Troubleshooting of network connections to
the VRRP non-owner master device is dicult unless accept mode is enabled.
NOTE
The accept mode functionality enables a VRRP non-owner master device to respond to ping, Telnet, and traceroute packets,
but the device will not respond to ssh packets.
Enabling accept mode on a backup VRRP device
Enabling accept mode allows a backup VRRP device to respond to ping, traceroute, and Telnet packets if the backup device becomes
the master VRRP device.
This task is performed on any device that is designated as a backup VRRP device and the functionality is activated if the backup device
becomes a master VRRP device. For each VRRP virtual routing instance there is one master device and all other devices are backups.
Accept mode allows some network management functionality for backup VRRP devices with the ability to respond to ping, traceroute,
and telnet packets. By default, non-owner VRRP devices do not accept packets destined for the IPv4 or IPv6 VRID addresses. Repeat
this task for all devices that are to be designated as backup devices.
Accept mode for backup VRRP devices
FastIron Ethernet Switch Layer 3 Routing Conguration Guide, 08.0.30mb
540 53-1003627-06
NOTE
The accept mode functionality does not support ssh packets.
1. On the device designated as a backup VRRP device, from privileged EXEC mode, enter conguration mode by issuing the
congure terminal command.
device# configure terminal
2. Globally enable the VRRP protocol.
device(config)# router vrrp
3. Congure the ethernet interface link.
device(config)# interface ethernet 1/1/5
4. Congure the IP address of the interface. All devices congured for the same virtual router ID (VRID) must be on the same
subnet.
device(conf-if-e1000-1/1/5)# ip address 10.53.5.3/24
5. Assign this backup device to VRID 1, the same VRID as the VRRP owner device.
device(conf-if-e1000-1/1/5)# ip vrrp vrid 1
NOTE
You can assign a VRID number in the range of 1 through 255.
6. Designate this router as a backup VRRP device.
device(conf-if-e1000-1/1/5-vrid-1)# backup priority 110
While conguring a backup device, you can set a priority that is used when a master VRRP device goes oine. The backup
device with the highest priority will assume the role of master device.
7. Enable accept mode for this device.
device(conf-if-e1000-1/1/5-vrid-1)# accept-mode
8. Exit out of conguration modes and return to privileged EXEC mode.
device(conf-if-e1000-1/1/5-vrid-1)# end
Accept mode for backup VRRP devices
FastIron Ethernet Switch Layer 3 Routing Conguration Guide, 08.0.30mb
53-1003627-06 541
9. Verify that accept mode is enabled.
device# show ip vrrp vrid 1
Interface 1/1/5
----------------
auth-type no authentication
VRID 1 (index 1)
interface 1/1/5
state master
administrative-status enabled
version v2
mode non-owner (backup)
virtual mac aaaa.bbbb.cccc (configured)
priority 110
current priority 110
track-priority 2
hello-interval 1 sec
accept-mdoe enabled
.
.
.
The following example enables accept mode for a VRRP backup device.
device# configure terminal
device(config)# router vrrp
device(config)# interface ethernet 1/1/5
device(conf-if-e1000-1/1/5)# ip address 10.53.5.3/24
device(conf-if-e1000-1/1/5)# ip vrrp vrid 1
device(conf-if-e1000-1/1/5-vrid-1)# backup priority 110
device(conf-if-e1000-1/1/5-vrid-1)# accept-mode
Displaying VRRP and VRRP-E information
You can display the following information for VRRP or VRRP-E:
• Summary conguration and status information
• Detailed conguration and status information
• VRRP and VRRP-E statistics
Syntax for IPv4 and IPv6 VRRP:
Syntax: show ip vrrp [ brief | [ stat | [ statistics ] [ vrid num ] ] [ ethernet unit/slotnum/portnum | ve num ] ]
Syntax: show ipv6 vrrp [ brief | [ stat | [ statistics ] [ vrid num ] ] [ ethernet unit/slotnum/portnum | ve num ] ]
Syntax for IPv4 and IPv6 VRRP-E:
Syntax: show ip vrrp-extended [ brief | [ stat | [ statistics ] [ vrid num ] ] [ ethernet unit/slotnum/portnum | ve num ] ]
Syntax: show ipv6 vrrp-extended [ brief | [ stat | [ statistics ] [ vrid num ] ] [ ethernet unit/slotnum/portnum | ve num ] ]
The brief option displays the summary information. If you do not use this option, detailed information is displayed instead.
The ethernet unit/slotnum/portnum option displays VRRP or VRRP-E information only for the specied interface.
The ve num option species a virtual interface. If you use this option, the command displays VRRP or VRRP-E information only for the
specied virtual interface.
The stat option displays statistics.
The statistics option displays a summary of key statistics.
Displaying VRRP and VRRP-E information
FastIron Ethernet Switch Layer 3 Routing Conguration Guide, 08.0.30mb
542 53-1003627-06

The vrid num option species the virtual router ID. Enter a value from 1 through 255.
Displaying summary information
To display summary information for a Layer 3 switch for VRRP, enter the show ip vrrp brief command at any level of the CLI.
device# show ip vrrp brief
Total number of VRRP routers defined: 1
Interface VRID CurPri P State Master addr Backup addr VIP
1/1/6 1 255 P Init 192.53.5.1 192.53.5.3 192.53.5.1
To display summary information for IPv6 VRRP, enter the show ipv6 vrrp brief command at any level of the CLI.
device# show ipv6 vrrp brief
Total number of VRRP routers defined: 1
Interface VRID CurPri P State
1/1/5 1 255 P Master
Master addr: Local
Backup addr: 2001:DB8::212:f2ff:fea8:3900
VIP : 2001:DB8::1
To display summary information for IPv6 VRRP-E v3 , enter the show ipv6 vrrp-extended brief command at any level of the CLI.
device# show ipv6 vrrp-extended brief
Total number of VRRP-Extended routers defined: 3
Interface VRID CurPri P State Master addr
1/1/1 1 100 P Master Master addr: Local
Backup addr: 2001:DB8::212:f2ff:fea8:5b00
VIP : 2001:DB8::100
1/1/2 2 150 P Master Master addr: Local
Backup addr: 2001:DB8::212:f2ff:fea8:5b00
VIP : 2001:DB8::100
v51 100 100 P Master Master addr: Local
Backup addr: 2001:DB8::212:f2ff:fea8:5b00
VIP : 2001:DB8::100
The table shows a description of the output for the show ip vrrp brief and show ip vrrp-extended brief commands.
TABLE 105 Output description for VRRP or VRRP-E summary information
Field Description
Total number of VRRP (or VRRP-Extended) routers dened The total number of VRIDs congured on this Layer 3 switch.
NOTE
The total applies only to the protocol the Layer 3 switch is
running. For example, if the Layer 3 switch is running VRRP-E,
the total applies only to VRRP-E routers.
Interface The interface on which VRRP or VRRP-E is congured. If VRRP or
VRRP-E is congured on multiple interfaces, information for each
interface is listed separately.
VRID The VRID congured on this interface. If multiple VRIDs are congured on
the interface, information for each VRID is listed in a separate row.
CurPri The current VRRP or VRRP-E priority of this Layer 3 switch for the VRID.
P Whether the backup preempt mode is enabled. If the backup preempt
mode is enabled, this eld contains a "P". If the mode is disabled, this eld
is blank.
State This Layer 3 switch VRRP or VRRP-E state for the VRID. The state can be
one of the following:
• Init - The VRID is not enabled (activated). If the state remains Init
after you activate the VRID, make sure that the VRID is also
Displaying VRRP and VRRP-E information
FastIron Ethernet Switch Layer 3 Routing Conguration Guide, 08.0.30mb
53-1003627-06 543
TABLE 105 Output description for VRRP or VRRP-E summary information (continued)
Field Description
congured on the other routers and that the routers can
communicate with each other.
NOTE
If the state is Init and the mode is incomplete, make sure you
have specied the IP address for the VRID.
• Backup - This Layer 3 switch is a Backup for the VRID.
• Master - This Layer 3 switch is the Master for the VRID.
Master addr IP address of the router interface that is currently Master for the VRID.
Backup addr IP addresses of router interfaces that are currently Backups for the VRID.
VIP The virtual IP address that is being backed up by the VRID.
Displaying detailed information
To display detailed VRRP or VRRP-E information, enter the show ip vrrp command at any level of the CLI.
device# show ip vrrp
Total number of VRRP routers defined: 1
Interface ethernet 1/1/3
auth-type simple text password
VRID 3
state master
administrative-status enabled
version v3
mode owner
priority 255
current priority 255
track-priority 150
hello-interval 1000 msec
ip-address 172.21.3.1
virtual mac address 0000-5E00-0103
advertise backup: disabled
next hello sent in 00:00:00.7
backup router 172.21.3.2 expires in 00:02:41.3
track-port 1/3/14(up)
The following example is for a VRRP Backup.
device# show ip vrrp
Total number of VRRP routers defined: 1
Interface ethernet 1/1/4
auth-type simple text password
VRID 3
state backup
administrative-status enabled
version v3
mode non-owner(backup)
priority 110
current priority 110
hello-interval 1000 msec
dead-interval 0 msec
current dead-interval 3500 msec
preempt-mode true
ip-address 172.21.3.1
virtual mac address 0000-5E00-0103
advertise backup: enabled
next hello sent in 00:00:26.1
master router 172.21.3.1 expires in 00:00:02.7
track-port 1/4/1-1/4/4(up)
Displaying VRRP and VRRP-E information
FastIron Ethernet Switch Layer 3 Routing Conguration Guide, 08.0.30mb
544 53-1003627-06
The following example is for an IPv6 VRRP Backup.
device# show ipv6 vrrp
Total number of VRRP routers defined: 26
Interface ethernet ve52
auth-type no authentication
VRID 52
state backup
administrative-status enabled
version v3
mode non-owner(backup)
priority 101
current priority 20
track-priority 20
hello-interval 100 msec
dead-interval 0 msec
current dead-interval 300 msec
preempt-mode true
ipv6-address 2001:DB8::52:3
virtual mac address 0000-5E00-0103
advertise backup: enabled
next hello sent in 00:00:36.5
master router 2001:DB8::768e:f8ff:fe33:8600 expires in 00:00:00.2
track-port 2/1/3-4/1/4(down) v41(up)
For Owner VRRP:
The following example is for a VRRP-E Master.
deviceshow ip vrrp-extended
Total number of VRRP-Extended routers defined: 50
Interface ethernet ve201
auth-type simple text password
VRID 201
state master
administrative-status enabled
priority 220
current priority 220
hello-interval 1000 msec
dead-interval 0 msec
current dead-interval 3100 msec
preempt-mode true
virtual ip address 10.201.201.5
virtual mac address 0000.00d7.82c9
advertise backup: enabled
next hello sent in 00:00:00.1
backup router 10.201.201.4 expires in 00:02:45.2
backup router 10.201.201.3 expires in 00:02:47.6
track-port 1/1/25-2/1/24(up)
To display information for an IPv6 VRRP Owner, enter the show ipv6 vrrp command at any level of the CLI.
device#show ipv6 vrrp
Total number of VRRP routers defined: 25
Interface ethernet ve52
auth-type no authentication
VRID 52
state master
administrative-status enabled
version v3
mode owner
priority 255
current priority 255
track-priority 5
hello-interval 1000 msec
ipv6-address 2001:DB8::52:3
virtual mac address 0000-5E00-0103
advertise backup: disabled
next hello sent in 00:00:00.1
backup router 2001:DB8::224:38ff:fec8:5a40 expires in 00:02:03.1
Displaying VRRP and VRRP-E information
FastIron Ethernet Switch Layer 3 Routing Conguration Guide, 08.0.30mb
53-1003627-06 545

The table shows a description of the output for the show ip vrrp and show ip vrrp-extended commands.
TABLE 106 Output description for VRRP-E detailed information
Field Description
Total number of VRRP (or VRRP-Extended) routers dened The total number of VRIDs congured on this Layer 3 switch.
NOTE
The total applies only to the protocol the Layer 3 switch is
running. For example, if the Layer 3 switch is running VRRP-E,
the total applies only to VRRP-E routers.
Interface parameters
Interface The interface on which VRRP, VRRP v3, VRRP-E, or IPv6 VRRP-E is
congured. If VRRP, VRRP v3, VRRP-E, or IPv6 VRRP-E is congured
on multiple interfaces, information for each interface is listed separately.
auth-type The authentication type enabled on the interface.
VRID parameters
VRID The VRID congured on this interface. If multiple VRIDs are congured on
the interface, information for each VRID is listed separately.
state This Layer 3 switch VRRP, VRRP v3, VRRP-E, or IPv6 VRRP-E state for
the VRID. The state can be one of the following:
• initialize - The VRID is not enabled (activated). If the state
remains "initialize" after you activate the VRID, make sure that
the VRID is also congured on the other routers and that the
routers can communicate with each other.
NOTE
If the state is "initialize" and the mode is incomplete, make sure
you have specied the IP address for the VRID.
• backup - This Layer 3 switch is a Backup for the VRID.
• master - This Layer 3 switch is the Master for the VRID.
administrative-status The administrative status of the VRID. The administrative status can be
one of the following:
• disabled - The VRID is congured on the interface but VRRP or
VRRP-E has not been activated on the interface.
• enabled - VRRP, VRRP v3, VRRP-E, or IPv6 VRRP-E has
been activated on the interface.
mode Indicates whether the Layer 3 switch is the Owner or a Backup for the
VRID.
NOTE
If "incomplete" appears after the mode, conguration for this
VRID is incomplete. For example, you might not have
congured the virtual IP address that is being backed up by the
VRID.
NOTE
This eld applies only to VRRP or VRRP v3. All Layer 3
switches congured for VRRP-E are Backups.
priority The device preferability for becoming the Master for the VRID. During
negotiation, the router with the highest priority becomes the Master.
If two or more devices are tied with the highest priority, the Backup
interface with the highest IP address becomes the active router for the
VRID.
Displaying VRRP and VRRP-E information
FastIron Ethernet Switch Layer 3 Routing Conguration Guide, 08.0.30mb
546 53-1003627-06

TABLE 106 Output description for VRRP-E detailed information (continued)
Field Description
current priority The current VRRP, VRRP v3, VRRP-E, or IPv6 VRRP-E priority of this
Layer 3 switch for the VRID. The current priority can dier from the
congured priority (refer to the priority eld) for the following reason:
The current priority can dier from the congured priority in the VRID if
the VRID is congured with track ports and the link on a tracked interface
has gone down.
hello-interval The congured value for the Hello interval. This is the amount of time, in
milliseconds, between Hello messages from the Master to the Backups
for a given VRID.
NOTE
In some VRRP command outputs, Hello interval timers are
displayed in seconds instead of milliseconds.
dead interval The congured value for the dead interval. This is the amount of time, in
milliseconds, that a Backup waits for a Hello message from the Master for
the VRID before determining that the Master is no longer active.
If the Master does not send a Hello message before the dead interval
expires, the Backups negotiate (compare priorities) to select a new Master
for the VRID.
NOTE
If the value is 0, then you have not congured this
parameter.
NOTE
This eld does not apply to VRRP
Owners.
NOTE
All timer elds (Hello interval, dead interval, current dead
interval, and so on) are displayed in milliseconds.
current dead interval The current value of the dead interval. This value is equal to the value
congured for the dead interval.
If the value for the dead interval is not congured, then the current dead
interval is equal to three times the Hello interval plus Skew time (where
Skew time is equal to 256 minus priority divided by 256).
NOTE
This eld does not apply to VRRP
Owners.
preempt mode Whether the backup preempt mode is enabled.
NOTE
This eld does not apply to VRRP
Owners.
virtual ip address The virtual IP addresses that this VRID is backing up. The address can be
an IPv4 or IPv6 address.
virtual mac address The virtual MAC addresses for the VRID. The MAC address can be an
IPv4 or IPv6 address.
advertise backup The IP addresses of Backups that have advertised themselves to this
Layer 3 switch by sending Hello messages.
Displaying VRRP and VRRP-E information
FastIron Ethernet Switch Layer 3 Routing Conguration Guide, 08.0.30mb
53-1003627-06 547

TABLE 106 Output description for VRRP-E detailed information (continued)
Field Description
NOTE
Hello messages from Backups are disabled by default. You
must enable the Hello messages on the Backup for the
Backup to advertise itself to the current Master.
backup router ip-addr expires in time The IP addresses of Backups that have advertised themselves to this
Master by sending Hello messages.
The time value indicates how long before the Backup expires. A Backup
expires if you disable the advertise backup option on the Backup or the
Backup becomes unavailable. Otherwise, the Backup next Hello message
arrives before the Backup expires. The Hello message resets the
expiration timer.
An expired Backup does not necessarily aect the Master. However, if you
have not disabled the advertise backup option on the Backup, then the
expiration may indicate a problem with the Backup.
NOTE
This eld applies only when Hello messages are enabled on
the Backups (using the advertise backup option).
next hello sent in time How long until the Backup sends its next Hello message.
NOTE
This eld applies only when this Layer 3 switch is the Master
and the Backup is congured to send Hello messages (the
advertise backup option is enabled).
master router ip-addr expires in time The IP address of the Master and the amount of time until the Master
dead interval expires. If the Backup does not receive a Hello message
from the Master by the time the interval expires, either the IP address
listed for the Master will change to the IP address of the new Master, or
this Layer 3 switch itself will become the Master.
NOTE
This eld applies only when this Layer 3 switch is a
Backup.
track port The interfaces that the VRID interface is tracking. If the link for a tracked
interface goes down, the VRRP, VRRP v3, VRRP-E, or IPv6 VRRP-E
priority of the VRID interface is changed, causing the devices to
renegotiate for Master.
NOTE
This eld is displayed only if track interfaces are congured for
this VRID.
Displaying detailed information for an individual VRID
You can display information about the settings congured for a specied VRRP Virtual Router ID (VRID). To display information about
VRID 1, enter the show ip vrrp vrid command.
device#show ip vrrp vrid 2
VRID 2
Interface ethernet v2
state master
administrative-status enabled
version v2
Displaying VRRP and VRRP-E information
FastIron Ethernet Switch Layer 3 Routing Conguration Guide, 08.0.30mb
548 53-1003627-06

mode non-owner(backup)
priority 100
current priority 100
hello-interval 1000 msec
dead-interval 0 msec
current dead-interval 3600 msec
preempt-mode true
ip-address 10.1.1.5
virtual mac address 0000.0000.0102
advertise backup: disabled
next hello sent in 00:00:01.0
To display information about the settings congured for a specied IPv6 VRRP VRID, enter the show ipv6 vrrp vrid command.
device#show ipv6 vrrp vrid 1
VRID 1
Interface ethernet 5
state backup
administrative-status enabled
version v3
mode non-owner(backup)
priority 100
current priority 100
hello-interval 1000 msec
dead-interval 0 msec
current dead-interval 3000 msec
preempt-mode true
ip-address Layer 3 switch a7a7::1
virtual mac address 0000.0000.0201
advertise backup: enabled
next hello sent in 00:00:38.0
track-port 1/1/5(up)
master router fe80::212:f2ff:fea8:5b00 timer expires in 00:00:02.6
The table shows a description of the output for the show ip vrrp vrid command.
TABLE 107 show ip vrrp vrid output description
Field Description
VRID The specied VRID.
Interface The interface on which VRRP is congured.
State The Layer 3 switch VRRP state for the VRID. The state can be one of the
following:
• Init - The VRID is not enabled (activated). If the state remains Init
after you activate the VRID, make sure that the VRID is also
congured on the other routers and that the routers can
communicate with each other.
NOTE
If the state is Init and the mode is incomplete, make sure you
have specied the IP address for the VRID.
• Backup - This Layer 3 switch is a Backup for the VRID.
• Master - This Layer 3 switch is the Master for the VRID.
priority The congured VRRP priority of this Layer 3 switch for the VRID.
current priority The current VRRP priority of this Layer 3 switch for the VRID.
track priority The new VRRP priority that the router receives for this VRID if the
interface goes down.
hello interval How often the Master router sends Hello messages to the Backups.
dead interval The amount of time a Backup waits for a Hello message from the Master
before determining that the Master is dead.
Displaying VRRP and VRRP-E information
FastIron Ethernet Switch Layer 3 Routing Conguration Guide, 08.0.30mb
53-1003627-06 549

TABLE 107 show ip vrrp vrid output description (continued)
Field Description
current dead interval The current value of the dead interval. This value is equal to the value
congured for the dead interval.
If the value for the dead interval is not congured, then the current dead
interval is equal to three times the Hello interval plus Skew time (where
Skew time is equal to 256 minus priority divided by 256).
NOTE
This eld does not apply to VRRP
Owners.
preempt mode Whether the backup preempt mode is enabled. If the backup preempt
mode is enabled, this eld contains "true". If the mode is disabled, this eld
contains "false".
advertise backup Whether Backup routers send Hello messages to the Master.
Displaying statistics
You can view VRRP and VRRP-E detailed or summary statistics.
Displaying detailed statistics
Use the stat keyword to display detailed statistics.
The following example displays the output of the show ip vrrp stat ve command:
device# show ip vrrp stat ve 105
Interface ethernet v105
rxed vrrp header error count = 0
rxed vrrp auth error count = 0
rxed vrrp auth passwd mismatch error count = 0
rxed vrrp vrid not found error count = 52
VRID 55
rxed arp packet drop count = 0
rxed ip packet drop count = 0
rxed vrrp port mismatch count = 0
rxed vrrp number of ip address mismatch count = 0
rxed vrrp ip address mismatch count = 0
rxed vrrp hello interval mismatch count = 0
rxed vrrp priority zero from master count = 0
rxed vrrp higher priority count = 0
transitioned to master state count = 1
transitioned to backup state count = 1
total number of vrrp packets received = 4
backup advertisements received = 1
total number of vrrp packets sent = 25
backup advertisements sent = 1
VRID 105
rxed arp packet drop count = 0
rxed ip packet drop count = 0
rxed vrrp port mismatch count = 0
rxed vrrp number of ip address mismatch count = 0
rxed vrrp ip address mismatch count = 0
rxed vrrp hello interval mismatch count = 0
rxed vrrp priority zero from master count = 0
rxed vrrp higher priority count = 1
transitioned to master state count = 1
transitioned to backup state count = 2
total number of vrrp packets received = 455
backup advertisements received = 0
total number of vrrp packets sent = 105
backup advertisements sent = 10
Displaying VRRP and VRRP-E information
FastIron Ethernet Switch Layer 3 Routing Conguration Guide, 08.0.30mb
550 53-1003627-06

The following example displays the output of the show ipv6 vrrp-extended stat ve command:
device# show ipv6 vrrp-extended stat ve 30
Interface ethernet v30
rxed vrrp header error count = 0
rxed vrrp auth error count = 0
rxed vrrp auth passwd mismatch error count = 0
rxed vrrp vrid not found error count = 0
VRID 11
rxed arp packet drop count = 0
rxed ip packet drop count = 0
rxed vrrp port mismatch count = 0
rxed vrrp ip address mismatch count = 0
rxed vrrp hello interval mismatch count = 0
rxed vrrp priority zero from master count = 0
rxed vrrp higher priority count = 0
transitioned to master state count = 2
transitioned to backup state count = 2
total number of vrrp-extended packets received = 0
backup advertisements received = 0
total number of vrrp-extended packets sent = 61
backup advertisements sent = 0
TABLE 108 Output eld descriptions
Field Description
Interface statistics
Interface The interface on which VRRP or VRRP-E is congured. If VRRP or
VRRP-E is congured on more than one interface, the display lists the
statistics separately for each interface.
rxed vrrp header error count The number of VRRP or VRRP-E packets received by the interface that
had a header error.
rxed vrrp auth error count The number of VRRP or VRRP-E packets received by the interface that
had an authentication error.
rxed vrrp auth passwd mismatch error count The number of VRRP or VRRP-E packets received by the interface that
had a password value that does not match the password used by the
interface for authentication.
rxed vrrp vrid not found error count The number of VRRP or VRRP-E packets received by the interface that
contained a VRID that is not congured on this interface.
VRID statistics
rxed arp packet drop count The number of ARP packets addressed to the VRID that were dropped.
rxed ip packet drop count The number of IP packets addressed to the VRID that were dropped.
rxed vrrp port mismatch count The number of packets received that did not match the conguration for
the receiving interface.
rxed vrrp ip address mismatch count The number of packets received that did not match the congured IP
addresses.
rxed vrrp hello interval mismatch count The number of packets received that did not match the congured Hello
interval.
rxed vrrp priority zero from master count Indicates that the current Master has resigned.
rxed vrrp higher priority count The number of VRRP or VRRP-E packets received by the interface that
had a higher backup priority for the VRID than this Layer 3 switch backup
priority for the VRID.
transitioned to master state count The number of times this Layer 3 switch has changed from the backup
state to the master state for the VRID.
transitioned to backup state count The number of times this Layer 3 switch has changed from the master
state to the backup state for the VRID.
total number of vrrp packets received The number of VRRP or VRRP-E advertisement packets received for a
VRID on a specic interface.
Displaying VRRP and VRRP-E information
FastIron Ethernet Switch Layer 3 Routing Conguration Guide, 08.0.30mb
53-1003627-06 551

TABLE 108 Output eld descriptions (continued)
Field Description
backup advertisements received The number of VRRP backup advertisement packets received for a VRID
on a specic interface.
total number of vrrp packets sent The number of VRRP or VRRP-E advertisement packets sent by this
router for a VRID on a specic interface.
backup advertisements sent The number of VRRP backup advertisement packets sent by this router
for a VRID on a specic interface.
Displaying summary of key statistics
To display VRRP or VRRP-E statistics for each VRID congured on an interface, use the statistics keyword. The output will be similar for
VRRP and VRRP-E (IPv4 and IPv6); the output elds are the same.
The following example displays the output of the show ip vrrp statistics command:
device# show ip vrrp statistics
Total number of VRRP routers defined: 23
RX master adv TX master adv RX backup adv TX backup adv VR Errors Port Errors
v211 0
VR211 0 93542 1559 0 0
v212 0
VR212 0 93542 1559 0 0
v213 0
VR213 1 93543 1559 0 0
v214 0
VR214 0 93542 1559 0 0
v215 0
VR215 0 93542 1559 0 0
v225 0
VR225 0 93542 1559 0 0
v226 0
VR226 0 46772 1559 0 0
v227 0
VR227 0 93542 1559 0 0
v228 0
VR228 0 93542 1559 0 0
v229 0
VR229 1 93543 1559 0 0
v311 0
(output truncated)
To display a summary of the VRRP-E statistics on a device, enter the following command at any level of the CLI:
device# show ip vrrp-extended statistics
Total number of VRRP-Extended routers defined: 2
RX master adv TX master adv RX backup adv TX backup
adv VR Errors Port Errors
v20 0
VR 20 0 801 8 9 12
v30 0
VR101 150 104 0 14 0
To display a summary of the IPv6 VRRP v3 statistics on a device, enter the following command at any level of the CLI:
device# show ipv6 vrrp statistics
Total number of ipv6 VRRP routers defined: 1
RX master adv TX master adv RX backup adv TX backup
adv VR Errors Port Errors
v200 0
VR200 0 15 16 10 0
Displaying VRRP and VRRP-E information
FastIron Ethernet Switch Layer 3 Routing Conguration Guide, 08.0.30mb
552 53-1003627-06

To display a summary of the IPv6 VRRP-E v3 statistics on a device, enter the following command at any level of the CLI:
device# show ipv6 vrrp-extended statistics
Total number of ipv6 VRRP-Extended routers defined: 2
RX master adv TX master adv RX backup adv TX backup
adv VR Errors Port Errors
v30 0
VR 11 984 502 17 9 0
VR 31 845 249 10 1 0
TABLE 109 Output eld descriptions
Field Description
RX master adv The number of VRRP or VRRP-E advertisement packets received for a
VRID on a specic interface. This is the same as the "total number of vrrp/
vrrp-extended packets received" output of the stat option.
TX master adv The number of VRRP or VRRP-E advertisement packets sent by this
router for a VRID on a specic interface. This is the same as the "total
number of vrrp/vrrp-extended packets sent" output of the stat option.
RX backup adv The number of VRRP backup advertisement packets received for a VRID
on a specic interface. This is the same as the "backup advertisements
received" output of the stat option.
TX backup adv The number of VRRP backup advertisement packets sent by this router
for a VRID on a specic interface. This is the same as the "backup
advertisements sent" output of the stat option.
VR Errors This is the sum of these values:
• rxed arp packet drop count
• rxed ip packet drop count
• rxed vrrp port mismatch count
• rxed vrrp number of ip address mismatch count
• rxed vrrp ip address mismatch count
• rxed vrrp hello interval mismatch count
Port Errors This is the sum of these values:
• rxed vrrp header error count
• rxed vrrp auth error count
• rxed vrrp auth passwd mismatch error count
• rxed vrrp vrid not found error count
Clearing VRRP or VRRP-E statistics
To clear VRRP or VRRP-E statistics, enter the clear ip vrrp-stat command at the Privileged EXEC level or any conguration level of the
CLI.
device#clear ip vrrp-stat
Syntax: clear ip vrrp-stat
To clear IPv6 VRRP v3 or IPv6 VRRP-E v3 statistics, enter the following command at the Privileged EXEC level or any conguration
level of the CLI.
device#clear ipv6 vrrp-stat
Syntax: clear ipv6 vrrp-stat
Displaying VRRP and VRRP-E information
FastIron Ethernet Switch Layer 3 Routing Conguration Guide, 08.0.30mb
53-1003627-06 553
Conguration examples
The following sections contain the CLI commands for implementing VRRP and VRRP-E congurations.
VRRP example
To implement the VRRP conguration shown in "VRRP Overview," use the following method.
Conguring Switch 1
To congure VRRP Switch 1, enter the following commands.
Switch1(config)# router vrrp
Switch1(config)# interface ethernet 1/1/6
Switch1(config-if-1/1/6)# ip address 192.53.5.1
Switch1(config-if-1/1/6)# ip vrrp vrid 1
Switch1(config-if-1/1/6-vrid-1)# owner track-priority 20
Switch1(config-if-1/1/6-vrid-1)# track-port ethernet 1/2/4
Switch1(config-if-1/1/6-vrid-1)# ip-address 192.53.5.1
Switch1(config-if-1/1/6-vrid-1)# activate
NOTE
When you congure the Master (Owner), the address you enter with the ip-address command must already be congured on
the interface.
Conguring Switch 2
To congure Switch 2 in "VRRP Overview" after enabling VRRP, enter the following commands.
Switch2(config)#router vrrp
Switch2(config)#interface ethernet 1/1/5
Switch2(config-if-1/1/5)#ip address 192.53.5.3
Switch2(config-if-1/1/5)#ip vrrp vrid 1
Switch2(config-if-1/1/5-vrid-1)#backup priority 100 track-priority 19
Switch2(config-if-1/1/5-vrid-1)#track-port ethernet 1/3/2
Switch2(config-if-1/1/5-vrid-1)#ip-address 192.53.5.1
Switch2(config-if-1/1/5-vrid-1)#activate
The backup command species that this router is a VRRP Backup for virtual router VRID1. The IP address entered with the ip-address
command is the same IP address as the one entered when conguring Switch 1. In this case, the IP address cannot also exist on Switch
2, but the interface on which you are conguring the VRID Backup must have an IP address in the same subnet. By entering the same IP
address as the one associated with this VRID on the Owner, you are conguring the Backup to back up the address, but you are not
duplicating the address.
NOTE
When you congure a Backup router, the router interface on which you are conguring the VRID must have a real IP address
that is in the same subnet as the address associated with the VRID by the Owner. However, the address cannot be the same.
The priority parameter establishes the router VRRP priority in relation to the other VRRP routers in this virtual router. The track-priority
parameter species the new VRRP priority that the router receives for this VRID if the interface goes down.
The activate command activates the VRID conguration on this interface. The interface does not provide backup service for the virtual IP
address until you activate the VRRP conguration. Alternatively, you can use the enable command. The activate and enable commands
do the same thing.
Syntax: router vrrp
Conguration examples
FastIron Ethernet Switch Layer 3 Routing Conguration Guide, 08.0.30mb
554 53-1003627-06
Syntax: ip vrrp vridvrid
Syntax: owner [ track-priorityvalue]
Syntax: backup [ priorityvalue][track-priorityvalue]
Syntax: track-port ethernet [ unitnum/slotnum/portnum | ve num ]
Syntax: ip-address ip-addr
Syntax: activate
VRRP-E example
To implement the VRRP-E conguration shown in "VRRP-E Overview," use the following CLI method.
Conguring Switch 1
To congure VRRP Switch 1 in "VRRP-E Overview," enter the following commands.
Switch1(config)#router vrrp-extended
Switch1(config)#interface ethernet 1/1/6
Switch1(config-if-1/1/6)#ip address 192.53.5.2/24
Switch1(config-if-1/1/6)#ip vrrp-extended vrid 1
Switch1(config-if-1/1/6-vrid-1)#backup priority 110 track-priority 20
Switch1(config-if-1/1/6-vrid-1)#track-port ethernet 1/2/4
Switch1(config-if-1/1/6-vrid-1)#ip-address 192.53.5.254
Switch1(config-if-1/1/6-vrid-1)#activate
VRRP Router 1 for this interface is activating
Switch1(config-if-1/1/6-vrid-1)#exit
Switch1(config)#interface ethernet 1/1/6
Switch1(config-if-1/1/6)#ip vrrp-extended vrid 2
Switch1(config-if-1/1/6-vrid-1)#backup priority 100 track-priority 20
Switch1(config-if-1/1/6-vrid-1)#track-port ethernet 1/2/4
Switch1(config-if-1/1/6-vrid-1)#ip-address 192.53.5.253
Switch1(config-if-1/1/6-vrid-1)#activate
VRRP Router 2 for this interface is activating
NOTE
The address you enter with the ip-address command cannot be the same as a physical IP address congured on the
interface.
Conguring Switch 2
To congure Switch 2, enter the following commands.
Switch2(config)#router vrrp-extended
Switch2(config)#interface ethernet 1/5/1
Switch2(config-if-1/5/1)#ip address 192.53.5.3/24
Switch2(config-if-1/5/1)#ip vrrp-extended vrid 1
Switch2(config-if-1/5/1-vrid-1)#backup priority 100 track-priority 20
Switch2(config-if-1/5/1-vrid-1)#track-port ethernet 1/3/2
Switch2(config-if-1/5/1-vrid-1)#ip-address 192.53.5.254
Switch2(config-if-1/5/1-vrid-1)#activate
VRRP Router 1 for this interface is activating
Switch2(config-if-1/5/1-vrid-1)#exit
Switch2(config)#interface ethernet 1/5/1
Switch2(config-if-1/5/1)#ip vrrp-extended vrid 2
Switch2(config-if-1/5/1-vrid-1)#backup priority 110 track-priority 20
Switch2(config-if-1/5/1-vrid-1)#track-port ethernet 1/2/4
Switch2(config-if-1/5/1-vrid-1)#ip-address 192.53.5.253
Switch2(config-if-1/5/1-vrid-1)#activate
VRRP Router 2 for this interface is activating
Conguration examples
FastIron Ethernet Switch Layer 3 Routing Conguration Guide, 08.0.30mb
53-1003627-06 555
The backup command species that this router is a VRRP-E Backup for virtual router VRID1. The IP address entered with the ip-
address command is the same IP address as the one entered when conguring Switch 1. In this case, the IP address cannot also exist
on Switch 2, but the interface on which you are conguring the VRID Backup must have an IP address in the same subnet. By entering
the same IP address as the one associated with this VRID on the Owner, you are conguring the Backup to back up the address, but you
are not duplicating the address.
NOTE
When you congure a Backup router, the router interface on which you are conguring the VRID must have a real IP address
that is in the same subnet as the address associated with the VRID by the Owner. However, the address cannot be the same.
The priority parameter establishes the router VRRP-E priority in relation to the other VRRP-E routers in this virtual router. The track-
priority parameter species the new VRRP-E priority that the router receives for this VRID if the interface goes down.
The activate command activates the VRID conguration on this interface. The interface does not provide backup service for the virtual IP
address until you activate the VRRP-E conguration. Alternatively, you can use the enable command. The activate and enable
commands do the same thing.
Syntax: router vrrp-extended
Syntax: ip vrrp-extended vrid vrid
Syntax: backup [ priority value ] [ track-priority value ]
Syntax: track-port ethernet [ unitnum/slotnum/portnum | ve num ]
Syntax: ip-address ip-addr
Syntax: activate
Conguration examples
FastIron Ethernet Switch Layer 3 Routing Conguration Guide, 08.0.30mb
556 53-1003627-06

Multi-VRF
• Multi-VRF overview.......................................................................................................................................................................................557
•Conguring Multi-VRF.................................................................................................................................................................................563
Multi-VRF overview
Virtual Routing and Forwarding (VRF) allows routers to maintain multiple routing tables and forwarding tables on the same router. A
Multi-VRF router can run multiple instances of routing protocols with a neighboring router with overlapping address spaces congured
on dierent VRF instances.
Some vendors also use the terms Multi-VRF CE or VRF-Lite for this technology. VRF-Lite provides a reliable mechanism for a network
administrator to maintain multiple virtual routers on the same device. The goal of providing isolation among dierent VPN instances is
accomplished without the overhead of heavyweight protocols (such as MPLS) used in secure VPN technologies. Overlapping address
spaces can be maintained among the dierent VPN instances.
Central to VRF-Lite is the ability to maintain multiple VRF tables on the same Provider Edge (PE) Router. VRF-Lite uses multiple
instances of a routing protocol such as OSPF or BGP to exchange route information for a VPN among peer PE routers. The VRF-Lite
capable PE router maps an input customer interface to a unique VPN instance. The router maintains a dierent VRF table for each VPN
instance on that PE router. Multiple input interfaces may also be associated with the same VRF on the router, if they connect to sites
belonging to the same VPN. This input interface can be a physical interface or a virtual Ethernet interface on a port.
In Multi-VRF deployments:
• Two VRF-capable routers must be directly connected at Layer 3, deploying BGP, OSPF, RIP, or static routes.
• Each VRF maintains unique routing and forwarding tables.
• Each VRF can be assigned one or more Layer 3 interfaces on a router to be part of the VRF.
• Each VRF can be congured with IPv4 address family, IPv6 address family, or both.
• A packet’s VRF instance is determined based on the VRF index of the interface on which the packet is received.
• Separate routing protocol instances are required for each VRF instance.
• Overlapping address spaces can be congured on dierent VRF instances.
Multi-VRF deployments provide the exibility to maintain multiple virtual routers, which are segregated for each VRF instance. The
following illustrates a generic, high-level topology where dierent enterprise functions are assigned unique VRF instances.
FastIron Ethernet Switch Layer 3 Routing Conguration Guide, 08.0.30mb
53-1003627-06 557
FIGURE 38 Example high-level Multi-VRF topology
A Multi-VRF instance can be congured on any of the following:
• Platforms that support untagged physical ports - Applies only to FastIron SX series chassis-based systems, the Brocade ICX
7750, and the Brocade ICX 7450; untagged physical ports are not supported on the Brocade ICX 6610, ICX 6650, and FCX
series. It is recommended that these ports be congured "route-only" to prevent the leaking of switching trac if two interfaces
in the same VLAN are congured with dierent VRFs.
• Virtual interfaces
• Loopback interfaces
• Tunnel interfaces - The tunnel can belong to any user-dened VRF, but the tunnel source and tunnel destination are restricted to
the default VRF.
A Multi-VRF instance cannot be congured on any of the following:
• Physical interfaces
• Management interfaces
To congure Multi-VRF, perform the following steps:
•Congure VRF-related system-max values.
•Congure VRF instances.
Multi-VRF overview
FastIron Ethernet Switch Layer 3 Routing Conguration Guide, 08.0.30mb
558 53-1003627-06
•Congure a Route Distinguisher (RD) for new VRF instances.
•Congure an IPv4 or IPv6 Address Family (AF) for new VRF instances.
•Congure routing protocols for new Multi-VRF instances.
• Assign VRF instances to Layer 3 interfaces.
FastIron considerations for Multi-VRF
When a VRF is congured, a warning message species that any conguration existing on the interface is deleted.
When you assign a VRF instance to a static or dynamic LAG, the following rules apply.
• If the LAG is deployed, the primary port can be assigned to a nondefault VRF.
• The dynamic LAG must be congured before any of its ports are assigned to a nondefault VRF routing instance, and all
members of the trunk must be in the default VRF.
• Once a dynamic LAG is deployed, all ports are in a LACP blocking state, until the LAG state converges to the forwarding state.
• When a dynamic LAG is undeployed, the primary port remains in the VRF to which it was assigned, but all secondary ports
revert to the default VRF.
VRF-related system-max values
The default FastIron conguration does not allow space for VRF routing tables. As a result, you must modify VRF-related system-max
values before conguring a VRF instance. The following table lists commands that congure system-max values at the global level.
TABLE 110 Commands for conguring system-max values
Command Description
ip-vrf Congures maximum VRF instances supported by the software.
ip-route Congures maximum IPv4 routes, used to initialize hardware during
system init.
ip6-route Congures maximum IPv6 routes, used to initialize hardware during
system init.
ip-route-default-vrf Congures maximum IPv4 routes to be allocated for the default VRF
instance.
ip6-route-default-vrf Congures maximum IPv6 routes to be allocated for the default VRF
instance.
ip-route-vrf Congures default maximum IPv4 routes to be allocated per user-dened
VRF.
ip6-route-vrf Congures default maximum IPv6 routes to be allocated per user-dened
VRF.
This example includes two VRF instances for IPv4 and two VRF instances for IPv6. For the IPv4 partition, the default value for IPv4
TCAM allocation (12,000 on a Brocade ICX 6610) is decreased to 10,000. IPv6 TCAM allocation can then be increased from the
default value of 908 to 1408. Both IPv4 and IPv6 VRF instances are planned to allocate 500 routes each.
The following table lists the default and maximum system-max values related to VRF for the FastIron conguration example, on a
Brocade ICX 6610.
TABLE 111 Default and maximum system-max values related to Multi-VRF
System Parameter Default Maximum
ip-route 12000 15168
Multi-VRF overview
FastIron Ethernet Switch Layer 3 Routing Conguration Guide, 08.0.30mb
53-1003627-06 559

TABLE 111 Default and maximum system-max values related to Multi-VRF (continued)
System Parameter Default Maximum
ip6-route 908 2884
ip-vrf 16 16
ip-route-default-vrf 12000 15168
ip6-route-default-vrf 908 2884
ip-route-vrf 1024 15168
ip6-route-vrf 100 2884
The following table lists the conguration limits for the system-max command.
TABLE 112 Conguration limits for system-max
Conguration FSX FCX / ICX
6610/7250/7450
ICX 6650 ICX 7750
Min Default Max Min Default Max Min Default Max Min Default Max
ip-vrf 16 128 128 4 16 16 4 16 16 4 16 16
Ip-vrf (for 2nd generation
line card)
0 4 4 x x x 4 4 4 128 128 128
ip-route (system-max IPv4
routes that all VRFs in total
can support)
4096 26214
4
52428
8
4096 12000 15168 2048 5120 7168 98304 98304 13107
2
ip6-route (system-max
IPv6 routes that all VRFs in
total can support)
2048 32768 65536 68 908 2884 68 580 1348 5120 5120 7168
ip-route-default-vrf
(system-max IPv4 routes
conguration for default-
VRF)
1024 26214
4
52428
8
1024 12000 15168 1024 5120 7168 256 65536 13107
2
ip-route-vrf (default
system-max IPv4 routes
per non-default-VRF
instances)
1024 65536 52428
8
128 1024 15168 128 1024 7168 64 4096 13107
2
ip6-route-default-vrf
(system-max IPv6 routes
conguration for default-
VRF)
1024 32768 65536 64 908 2884 64 580 1348 64 2048 7168
ip6-route-vrf (default
system-max IPv6 routes
per non-default-VRF
instances, for 3rd
generation line cards)
256 8192 65536 64 100 2884 64 100 1348 16 1024 7168
The following examples illustrate the system-max values to support two VRF instances for IPv4 and two instances for IPv6.
• To allocate 2 x 500 routes for IPv4 user-VRF, (10000 - (500+500) = 9000 routes):
device(config)# system-max ip-route-default-vrf 9000
Total max configured ipv4 routes are 12000
- Max ipv4 routes configured for default VRF are 9000
- Max ipv4 routes available for all non-default VRFs are 3000
Warning: Please revalidate these values to be valid for your configuration.
Multi-VRF overview
FastIron Ethernet Switch Layer 3 Routing Conguration Guide, 08.0.30mb
560 53-1003627-06
Reload required. Please write memory and then reload or power cycle.
device#
• To modify the IPv4 partition after modifying the ip-route-default-vrf value:
device(config)# system-max ip-route 10000
ip-route and ip6-route values changed.
ip-route: 10000
ip6-route: 1408
Warning: Please reconfigure system-max for ip-route-default-vrf and ip-route-vrf (if required).
Reload required. Please write memory and then reload or power cycle.
device#
This step also modies the ip6-route system-max parameter and is intended only for the ICX 6610, the ICX 6650, and the FCX series
(not the ICX 7250, ICX 7450, or ICX 7750).
• To allocate 500 routes for IPv4 user-VRF:
device(config)# system-max ip-route-vrf 500
Reload required. Please write memory and then reload or power cycle.
device#
• To allocate 2 x 500 routes for IPv6 user-VRF (1408 - (500+500) = 408):
device(config)# system-max ip6-route-default-vrf 408
Total max configured ipv6 routes are 1408
- Max ipv6 routes configured for default VRF are 408
- Max ipv6 routes available for all non-default VRFs are 1000
Warning: Please revalidate these values to be valid for your configuration.
Reload required. Please write memory and then reload or power cycle.
device#
• To allocate 500 routes for IPv6 user-VRF:
device# system-max ip6-route-vrf 500
Reload required. Please write memory and then reload or power cycle.
device# end
• To save the conguration changes:
device# write memory
Write startup-config done.
device# Flash Memory Write (8192 bytes per dot) .
Flash to Flash Done.
• After the system reloads, the system-max conguration appears as an active conguration.
!
system-max ip-route 10000
system-max ip6-route 1408
system-max ip-route-default-vrf 9000
system-max ip6-route-default-vrf 408
system-max ip-route-vrf 500
system-max ip6-route-vrf 500
!
Additional features to support Multi-VRF
In addition to basic features, you can congure dynamic ARP inspection, DHCP snooping, and IP Source Guard to support Multi-VRF.
Static ARP
Static ARP entries help ensure Layer 2 to Layer 3 mappings. This removes some network overhead in the form of ARP requests and
replies and can be helpful in managing Multi-VRF networks where devices must communicate on a regular basis. The interface
Multi-VRF overview
FastIron Ethernet Switch Layer 3 Routing Conguration Guide, 08.0.30mb
53-1003627-06 561
associated with an ARP entry determines which VRF the ARP entry belongs to. However, the additional management involved in adding
and maintaining static ARP cache entries must also be taken into account.
An ARP entry is dened by the following parameters:
• IP address
• MAC address
• Type
• Interface
The arp command is used to congure static ARP entries on a nondefault VRF interface. (An ARP index is not required before a static
ARP is congured.) The arp command is available in the address-family mode for a particular VRF.
NOTE
The arp command is backward compatible from FastIron release 08.0.00a, which uses a new command format. In releases
prior to FastIron release 08.0.00a, static ARP needed an index. For FastIron 08.0.00a and later releases, FastIron accepts the
use of indexes as well as the new command without the index.
Proxy ARP
Proxy ARP allows a Layer 3 switch to answer ARP requests from devices on one subnet on behalf of devices in another network. Proxy
ARP is congured globally and can be further congured per interface. Interface-level conguration overrides the global conguration.
With the proxy-arp command congured, a router does not respond to ARP requests for IP addresses in the same subnet as the
incoming ports. The local-proxy-arp command permits the router to respond to ARP requests for IP addresses within the same subnet
and to forward all trac between hosts in the subnet. The local-proxy-arp command is an interface-level conguration that has no VRF-
related impact.
ARP rate limiting
ARP rate limiting is congured globally and applies to all VRFs.
ARP age can be congured globally and on a Layer 3 interface. An ARP age timer congured on a Layer 3 interface overrides the global
conguration for ARP aging. The aging timer ensures that the ARP cache does not retain learned entries that are no longer valid.
Dynamic ARP inspection
Dynamic ARP Inspection (DAI) enables the Brocade device to intercept and examine all ARP request and response packets in a subnet
and to discard packets with invalid IP-to-MAC address bindings. DAI can prevent common man-in-the-middle (MiM) attacks such as
ARP cache poisoning and can prevent the misconguration of client IP addresses. DAI allows only valid ARP requests and responses to
be forwarded, and supports Multi-VRFs with overlapping address spaces. For more information on DAI, refer to the FastIron Ethernet
Switch Security Conguration Guide.
DHCP snooping
Dynamic Host Conguration Protocol (DHCP) snooping enables a Brocade device to lter untrusted DHCP IPv4 or IPv6 packets in a
subnet. DHCP snooping can ward o MiM attacks, such as a malicious user posing as a DHCP server sending false DHCP server reply
packets with the intention of misdirecting other users. DHCP snooping can also stop unauthorized DHCP servers and prevent errors
resulting from the user misconguration of DHCP servers. DHCP snooping supports Multi-VRFs. For more information on conguring
DHCP IPv4 or IPv6 snooping to support a Multi-VRF instance, refer to the FastIron Ethernet Switch Security Conguration Guide.
Multi-VRF overview
FastIron Ethernet Switch Layer 3 Routing Conguration Guide, 08.0.30mb
562 53-1003627-06
IP Source Guard
You can use IP Source Guard (IPSG) together with DAI on untrusted ports. The Brocade implementation of the IP Source Guard feature
supports conguration on a port, on specic VLAN memberships on a port (for Layer 2 devices only), and on specic ports on a virtual
Ethernet (VE) interface (for Layer 3 devices only). For more information on IPSG, refer to the FastIron Ethernet Switch Security
Conguration Guide.
Conguring Multi-VRF
Conguring VRF system-max values
Use this example procedure to modify the default system-max values to accommodate Multi-VRF.
The default system-max value must be congured because the device does not have routing table space for user VRFs.
Do the following to congure system-max values on a Brocade ICX 7450.
In this example, two user VRFs are congured with 512 maximum routes on each VRF. The ip-route-default-vrf and ip-route-vrf values
must be modied. The write memory and reload commands are required after the modication.
Once the device has rebooted after the reload, enter the show default values command to display the system-max settings.
1. Verify the default values.
device(config)# show default values
sys log buffers:50 mac age time:300 sec telnet sessions:5
ip arp age:10 min bootp relay max hops:4 ip ttl:64 hops
ip addr per intf:24
:
:
System Parameters Default Maximum Current Configured
ip-arp 4000 64000 4000 4000
ip-static-arp 512 6000 512 512
pim-mcache 1024 4096 1024 1024
:
:
ip-route 12000 15168 12000 12000
ip-static-route 64 2048 64 64
:
:
ip-vrf 16 16 16 16
ip-route-default-vrf 12000 15168 12000 12000
ip6-route-default-vr 908 2884 908 908
ip-route-vrf 1024 15168 1024 1024
ip6-route-vrf 100 2884 100 100
device(config)#
Conguring Multi-VRF
FastIron Ethernet Switch Layer 3 Routing Conguration Guide, 08.0.30mb
53-1003627-06 563
2. Change the maximum number of routes, save the conguration, and reload the device.
device(config)# system-max ip-route-default-vrf 10000
Total max configured ipv4 routes are 12000
- Max ipv4 routes configured for default VRF are 10000
- Max ipv4 routes available for all non-default VRFs are 2000
Warning: Please revalidate these values to be valid for your configuration.
Reload required. Please write memory and then reload or power cycle.
device(config)#
device(config)# system-max ip-route-vrf 512
Reload required. Please write memory and then reload or power cycle.
device(config)#
device(config)# exit
device# write memory
Write startup-config done.
device# Flash Memory Write (8192 bytes per dot) .
Flash to Flash Done.
device# reload
Are you sure? (enter 'y' or 'n'): Rebooting(0)...
y
*
$
FCX Boot Code Version 7.3.03 (grz07303)
Enter 'a' to stop at memory test
Enter 'b' to stop at boot monitor
3. Conrm the modied values.
device(config)# show default values
sys log buffers:50 mac age time:300 sec telnet sessions:5
ip arp age:10 min bootp relay max hops:4 ip ttl:64 hops
ip addr per intf:24
:
:
System Parameters Default Maximum Current Configured
ip-arp 4000 64000 4000 4000
ip-static-arp 512 6000 512 512
pim-mcache 1024 4096 1024 1024
:
:
ip-route 12000 15168 12000 12000
ip-static-route 64 2048 64 64
:
:
ip-vrf 16 16 16 16
ip-route-default-vrf 12000 15168 10000 10000
ip6-route-default-vr 908 2884 908 908
ip-route-vrf 1024 15168 512 512
ip6-route-vrf 100 2884 100 100
device(config)#
Creating VLANs as links on a tagged port for security
Where Multi-VRF is used, for example, in an enterprise data center, trusted servers or devices should be allowed to communicate
directly, and untrusted ones should not be allowed to communicate directly at all. This optional task congures tagged Layer 3 interfaces
to support secure VRF instances.
1. In global conguration mode, create a VLAN.
device(config)# vlan 10
device(config-vlan-10)#
2. Use the tagged command to identify the interface as secure.
device(config-vlan-10)# tagged e 1/1/1
Conguring Multi-VRF
FastIron Ethernet Switch Layer 3 Routing Conguration Guide, 08.0.30mb
564 53-1003627-06
3. Repeat the previous step on the corresponding interface on the peer device.
Conguring a VRF instance
Do the following to congure a VRF instance.
A device can be congured with more than one VRF instance. You should dene each VRF instance before assigning the VRF to a Layer
3 interface. The range of the instance name is from 1 through 255 alphanumeric characters. Each VRF instance is identied by a unique
Route Distinguisher (RD), which is prepended to the address being advertised. Because the RD provides overlapping client address
space with a unique identier, the same IP address can be used for dierent VRFs without conict. The RD can be an AS number,
followed by a colon (:) and a unique arbitrary number as shown below. Alternatively, it can be a local IP address followed by a colon (:) and
a unique arbitrary number, as in "1.1.1.1:100." An optional router ID can also be assigned.
Use the address-family command in VRF conguration mode to specify an IPv4 or IPv6 address family. For a specic address family
you can also congure static route, static ARP, IGMP, and multicast for IPv4, and static route, IPv6 neighbor, and multicast for IPv6.
ATTENTION
Using the overwrite option while downloading a conguration from a TFTP server to the running-cong will lead to the loss of
all VRF congurations when a VRF is congured on a routing interface.
1. (Optional) Assign a Route Distinguisher (RD).
device(config-vrf-corporate)# rd 11:11
2. (Optional) Assign a router ID.
device(config-vrf-corporate)# ip router-id 1.1.1.1
3. Use the address-family unicast (VRF) command to congure an address family on the VRF and exit. This example uses IPv4.
device(config-vrf-corporate)# address-family ipv4 unicast
device(config-vrf-corporate-ipv4)# exit
4. Verify the conguration.
device(config-vrf-corporate)# do show vrf
Total number of VRFs configured: 2
Status Codes - A:active, D:pending deletion, I:inactive
Name Default RD vrf|v4|v6 Routes Interfaces
corporate 11:11 A | A| I 0
guest 10:10 A | A| I 0
Total number of IPv4 unicast route for all non-default VRF is 0
Total number of IPv6 unicast route for all non-default VRF is 0
Starting a routing process for a VRF
You must enable a routing protocol for each VRF instance. This example uses OSPF.
1. In global conguration mode, enable OSPF for the VRF instance "corporate."
device(config)# router ospf vrf corporate
2. Congure the VRF to use OSPF Area 0.
device(config-ospf-router-vrf-corporate)# area 0
Conguring Multi-VRF
FastIron Ethernet Switch Layer 3 Routing Conguration Guide, 08.0.30mb
53-1003627-06 565
3. (Optional) Congure the VRF to ensure that essential OSPF neighbor state changes are logged, especially in the case of errors.
device(config-ospf-router-vrf-corporate)# log adjacency
Assigning a Layer 3 interface to a VRF
The following example illustrates how a virtual Ethernet (VE) interface is assigned to a VRF, and how IP addresses and the OSPF
protocol are congured.
ATTENTION
After you congure a VRF instance on the device, you must assign one or more Layer 3 interfaces (physical or virtual Ethernet)
to the VRF. When you do this, all existing IP addresses are deleted; this action also triggers cache deletion, route deletion, and
associated cleanup. After you assign an interface to the VRF, you must recongure the IP address and interface properties.
1. Enter global conguration mode.
device# configure terminal
2. In global conguration mode, enter the interface ve command to create a VE interface.
device(config)# interface ve 10
3. In VE conguration mode, enable forwarding for the VRF "guest".
device(config-vif-10)# vrf forwarding guest
Warning: All IPv4 and IPv6 addresses (including link-local) on this interface have been removed
have been removed
4. Congure an IPv4 address and mask on the VE interface.
device(config-vif-10)# ip address 192.168.1.254/24
5. Enable OSPF Area 0.
device(config-vif-10)# ip ospf area 0
6. Congure the interface as passive.
device(config-vif-10)# ip ospf passive
device(config-vif-10)# exit
7. Exit the conguration.
device(config-vif-10)# exit
Conguring Multi-VRF
FastIron Ethernet Switch Layer 3 Routing Conguration Guide, 08.0.30mb
566 53-1003627-06
Assigning a loopback interface to a VRF
Do the following to assign a loopback interface to a nondefault VRF.
Because a loopback interface is always available as long as the device is available, it allows routing protocol sessions to stay up even if
the outbound interface is down. Assigning a loopback interface to a VRF is similar to assigning any interface. A loopback interface that is
not assigned to a nondefault VRF belongs to the default VRF.
1. Enter global conguration mode.
device# configure terminal
2. In global conguration mode, enter interface subtype conguration mode and assign a loopback interface.
device(config)# interface loopback 1
3. Use the vrf forwarding command to assign the interface to the VRF "customer-1" in this example.
device(config-lbif-1)# vrf forwarding customer-1
4. Assign an IPv4 address and mask to the loopback interface.
device(config-lbif-1)# ip address 10.0.0.1/24
Verifying a Multi-VRF conguration
The following examples illustrate the use of a variety of show commands that are useful in verifying Multi-VRF congurations.
To verify all congured VRFs in summary mode, enter the show vrf command, as in the following example.
device# show vrf
Total number of VRFs configured: 2
Status Codes - A:active, D:pending deletion, I:inactive
Name Default RD vrf|v4|v6 Routes Interfaces
green 1:1 A | A| A 12 ve111 ve211 ve311*
red 10:12 A | A| A 4 ve1117 port-id tn1*
Total number of IPv4 unicast route for all non-default VRF is 8
Total number of IPv6 unicast route for all non-default VRF is 8
To verify a specic VRF in detail mode, enter the show vrf detail vrf-name command, as in the following example.
device# show vrf green
VRF green, default RD 1:1, Table ID 1
IP Router-Id: 1.1.1.1
Interfaces: ve111 ve211 ve311 ve1116 ve2115
Address Family IPv4
Max Routes: 5500
Number of Unicast Routes: 6
Address Family IPv6
Max Routes: 400
Number of Unicast Routes: 6
Conguring Multi-VRF
FastIron Ethernet Switch Layer 3 Routing Conguration Guide, 08.0.30mb
53-1003627-06 567

To verify all congured VRFs in detail mode, enter the show vrf detail command, as in the following example.
device# show vrf detail
Total number of VRFs configured: 2
VRF green, default RD 1:1, Table ID 1
IP Router-Id: 1.1.1.1
Interfaces: Use "show vrf green" to see the list of interfaces
Address Family IPv4
Max Routes: 5500
Number of Unicast Routes: 6
Address Family IPv6
Max Routes: 400
Number of Unicast Routes: 6
VRF red, default RD 10:12, Table ID 2
IP Router-Id: 1.1.17.1
Interfaces:
Use "show vrf red" to see the list of interfaces
Address Family IPv4
Max Routes: 300
Number of Unicast Routes: 2
Address Family IPv6
Max Routes: 70
Number of Unicast Routes: 2
Total number of IPv4 unicast route for all non-default VRF is 8
Total number of IPv6 unicast route for all non-default VRF is 8
The following commands display additional information about a specic application, protocol conguration, or protocol state for both the
default VRF and user-dened VRFs.
TABLE 113 Useful show commands
Default VRF User-dened VRF
show ip route show ip route vrf vrf-name
show ip ospf neighbor show ip ospf vrf vrf-name neighbor
show ip bgp summary show ip bgp vrf vrf-name summary
Removing a VRF conguration
The following examples illustrate a variety of ways by which you can remove a VRF conguration: deleting a VRF instance from a port,
deleting an address family from a VRF, and deleting the VRF globally.
To delete a VRF instance from a specic port, use the no form of the vrf command. This removes all Layer 3 interface bindings from the
VRF, and returns the interface to default VRF mode. All IP addresses and protocol conguration on this Layer 3 interface are removed.
device(config-if-e1000-1/7/1)# no vrf forwarding1
All existing IP and IPv6 address will be removed from port 1/7/1
The port will be returned to default VRF
To delete an IPv4 or IPv6 address family from a VRF instance, use the no form of the address-family command. All conguration
related to the address family on all ports of the VRF are removed. Routes allocated to the address family are returned to the global pool.
device(config-vrf-customer1)# no address-family ipv4
device(config-vrf-customer1)#
To delete a VRF instance globally, use the no form of the vrf command. All IPv4 or IPv6 addresses are removed from all interfaces.
device(config)# no vrf customer1
Warning: All IPv4 and IPv6 addresses (including link-local) from all interfaces in VRF customer1 have been
removed
Conguring Multi-VRF
FastIron Ethernet Switch Layer 3 Routing Conguration Guide, 08.0.30mb
568 53-1003627-06
Conguring static ARP for Multi-VRF
The interface associated with an ARP entry determines to which VRF the ARP entry belongs.
An ARP entry is dened by the following parameters:
• IP address
• MAC address
• Type
• Interface
1. The following example illustrates how to congure static ARP on default VRFs on an Ethernet interface.
device(config)# arp 192.168.1.100 0000.2344.2441 eth 1/7/1
2. The following example illustrates how to congure static ARP on nondefault VRFs.
NOTE
The arp command can be used to congure static-ARP entries on a nondefault VRF interface. The VRF command
does not require an ARP index before a static-ARP is congured. The arp command is available in the address-family
mode for a particular VRF.
The arp command is backward compatible from FastIron release 08.0.00a, which uses a new command format. In releases
prior to FastIron release 08.0.00a, static-ARP needed an index. For FastIron 08.0.00a and later releases, FastIron accepts the
use of indexes as well as the new command without the index.
device(config)#
device(config)# vrf customer-1
device(config-vrf-customer-1)# address-family ipv4
device(config-vrf-customer-1-ipv4)# arp 1.1.1.1 0004.8044.5566 ethernet 1/7/8
device(config-vrf-customer-1-ipv4)# exit-address-family
device(config-vrf-customer-1)# exit-vrf
device(config)#
Conguring additional ARP features for Multi-VRF
This section discusses options for conguring proxy ARP and ARP rate limiting.
Proxy ARP allows a Layer 3 switch to answer ARP requests from devices on one subnet on behalf of devices in another network. Proxy
ARP is congured globally and can be further congured per interface. Interface-level conguration overrides the global conguration.
With the proxy-arp command congured, a router does not respond to ARP requests for IP addresses in the same subnet as the
incoming ports. The local-proxy-arp command permits the router to respond to ARP requests for IP addresses within the same subnet
and to forward all trac between hosts in the subnet. The local-proxy-arp command is an interface-level conguration that has no VRF-
related impact.
ARP rate limiting is congured globally and applies to all VRFs.
ARP age can be congured globally and on a Layer 3 interface. An ARP age timer congured on a Layer 3 interface overrides the global
conguration for ARP aging. The aging timer ensures that the ARP cache does not retain learned entries that are no longer valid.
To congure proxy ARP globally:
device(config)# proxy-arp
Conguring Multi-VRF
FastIron Ethernet Switch Layer 3 Routing Conguration Guide, 08.0.30mb
53-1003627-06 569
To congure proxy ARP on a Layer 3 Ethernet interface:
device(config)# int e1000 1/7/1
device(config-if-e1000-1/7/1)# local-proxy-arp
To congure ARP rate limiting globally:
device(config)# rate-limit-arp
To congure ARP rate limiting on a Layer 3 Ethernet interface for an aging timeout of 20 minutes:
device(config)# int e1000 1/7/1
device(config-if-e1000-1/7/1)# ip arp-age 20
Conguring Multi-VRF
FastIron Ethernet Switch Layer 3 Routing Conguration Guide, 08.0.30mb
570 53-1003627-06

Multi-Chassis Trunking
• Layer 3 behavior with MCT........................................................................................................................................................................571
Layer 3 behavior with MCT
The following table lists the type of Layer 3 support available with MCT.
TABLE 114 Layer 3 Feature Support with MCT
Feature Sub-feature Session VLAN VE Member VLAN VE Design Philosophy
ip access-groupa Yes Yes Only features that are relevant
for MCT management are
supported on session VLAN VE.
address Yes Yes
arp-age Yes Yes
bgp No Yes
bootp-gateway Yes Yes
directed-broadcast Yes Yes
encapsulation Yes Yes
follow No No
helper-address Yes Yes
icmp Yes Yes
igmp No No
irdp No Yes
local-proxy-arp No Yes
metric No Yes
mtu Yes Yes
multicast-boundary No No
ospf No Yes
pim No No
pim-sparse No Yes
policy No Yes
proxy-arp No Yes
redirect No Yes
rip No Yes
tcp Yes Yes
tunnel No Yes
use-acl-on-arp Yes Yes
vrrp No Yes
vrrp-extended No Yes
ipv6 No No IPv6 is not supported for MCT
management.
FastIron Ethernet Switch Layer 3 Routing Conguration Guide, 08.0.30mb
53-1003627-06 571

TABLE 114 Layer 3 Feature Support with MCT (continued)
Feature Sub-feature Session VLAN VE Member VLAN VE Design Philosophy
IPv6 is not supported on
member VLAN VE.
a.) *ICL: The ICL port is added as default whenever a CCEP is in OIF. The data trac received from the ICL port is ltered out by a dynamically programmed egress lter on the
CCEPs.
Layer 3 unicast forwarding over MCT
A simple MCT topology addresses resiliency and ecient load balancing in Layer 2 network topologies. Layer 3 technologies can run in
an MCT environment too. This allows various Layer 3 technologies to function while leveraging the benets at the Layer 2 level. The
following sections describe the details of Layer 3 behavior in an MCT environment.
ARP Resolution
ARP resolution for the MCT client is required at the MCT cluster to forward trac from a CEP to the CCEP. This ARP packet would
normally be learned over the CCEP port. However, if the client’s MAC address is not already known on the CCEP, its ARP could be
temporarily learned over the ICL. When the MAC Database Update Protocol (MDUP) message from the cluster peer device moves the
client MAC address from the ICL to the CCEP, ARP is also moved to the CCEP. During this transient time, no client ARP should be
programmed over the ICL for a long period of time unless the local CCEP port is down.
During this transient time, the Layer 3 trac gets forwarded toward the MCT peer. While the ICX 7750, as an MCT peer, can
successfully forward this trac to the client, SX 800 and SX 1600 devices will experience loss of trac during this time.
If the MCT client triggers an ARP request, it would do so for its Layer 3 next hop IP address, which generally resides on the MCT cluster
devices. This address could be the default gateway on the MCT client or it could be learned through dynamic routing. If VRRP or VRRP-
E is deployed on the MCT cluster devices, this IP address can be the virtual IP address.
Due to the inherent nature of LAG on the MCT client, this ARP request can reach an MCT device directly (over the CCEP) or through the
MCT peer (over the ICL). In either case, the ARP response is sent out on the port where the client’s MAC address is learned. If the MAC
address is already learned on the MCT device at the time of receiving the ARP request, it would be over the CCEP under normal working
conditions (local CCEP is in the up state). If the client’s MAC address was not already learnt when the ARP request is received, the client’s
ARP could be temporarily learned over the ICL (and is moved to the CCEP when the MDUP message from the peer is received) and the
ARP response could be sent over the ICL. The cluster peer then switches the ARP response further towards the MCT client.
Layer 3 behavior with MCT
FastIron Ethernet Switch Layer 3 Routing Conguration Guide, 08.0.30mb
572 53-1003627-06
FIGURE 39 Conguration for Layer 3 unicast
Layer 3 trac forwarding towards MCT clients
Trac destined to the MCT clients follows normal IP routing. By default, the best route should not involve the ICL link. Only when the
local CCEP is down is trac rerouted to pass over the ICL.
Layer 3 trac forwarding from MCT clients
For Layer 3 forwarding to work on MCT devices, a dynamic trunk must be congured on the MCT client. Routes should be statically
congured or dynamically learned on the MCT cluster devices.
The client routes the trac towards its next hop, which can be either one of the MCT devices. If ECMP is deployed on the client, each
MCT device can be a possible next hop. In such a deployment, the trac can be load balanced at a Layer 3 level over the next two hops.
Because a LAG is deployed at the client, this trac is further subjected to load balancing at the Layer 2 level over the physical ports in
the LAG. Thus, the trac being sent out with the next hop as one of the MCT devices can either reach it directly or through the cluster
peer (where it gets Layer 2 switched towards the intended next hop).
Therefore, almost 50 percent of trac being forwarded from MCT clients (and as much as 100 percent trac in the worst case) can pass
through the ICL. This fact should be considered when designing the ICL capacity in the network.
VRRP or VRRP-E over an MCT-enabled network
To interface a Layer 2 MCT deployment with a Layer 3 network and add redundancy at the Layer 3 level, MCT can be congured with
Virtual Router Redundancy Protocol (VRRP). The standard VRRP mode is master-backup, and all trac is forwarded through the master.
In VRRP-E server virtualization, multiple VRRP standby devices are supported, and each device can be congured to route to an
upstream Layer 3 network. This provides ecient deployment for both Layer 2 and Layer 3 networks.
The MCT device acting as a backup router will Layer 2 switch all packets destined to VRRP/ VRRP-E virtual MAC address to the VRRP/
VRRP-E master router for routing. The VRRP/VRRP-E backup learns the virtual MAC address while processing the VRRP hello
message from the VRRP master. Both data trac and VRRP/VRRP-E control trac travel through the ICL unless the short-path
forwarding feature is enabled (VRRP-E only).
Layer 3 behavior with MCT
FastIron Ethernet Switch Layer 3 Routing Conguration Guide, 08.0.30mb
53-1003627-06 573
VRRP/VRRP-E and VRRP-E2 SPF should be enabled, if required. If VRRP is deployed or VRRP-E is deployed without the short path
forwarding feature on the VRRP-E backup, it is likely that almost fty percent of CCEP to CEP trac (and as much as a hundred percent
of trac in the worst case) can pass through the ICL from the backup to the master device. This fact should be considered when
designing ICL capacity in the network.
When one MCT device acts as a VRRP/VRRP-E master and the peer device is the VRRP/VRRP-E backup, the following behavior is
observed:
• Frames sent to the VRRP/VRRP-E virtual MAC address are Layer 2-switched to the VRRP/VRRP-E master device for routing.
The VRRP-E MAC address is learned by the other MCT device that acts as backup router.
• Both data trac and VRRP-E control trac received by the VRRP backup from an MCT client must travel through the ICL,
unless the short-path forwarding feature is enabled.
When both MCT devices act as the VRRP or VRRP-E backup, the following trac behavior is observed:
• Frames sent to the VRRP/VRRP-E virtual MAC address are Layer 2 forwarded to the VRRP/VRRP-E master router for routing.
• The VRRP-E MAC address is learned by both MCT devices acting as backup routers.
• Both data trac and VRRP-E control trac travel through the links connecting them to the VRRP/VRRP-E master.
VRRP-E short-path forwarding and revertible option
At the VRRP-E VRID conguration level, use the following command to enable short-path forwarding.
device(config-if-e1000-vrid-2)# short-path-forwarding revert-priority 60
Syntax: [no] short-path-forwarding [ revert-priority value]
The revert-priority value in the short-path-forwarding command works in conjunction with the track-port command to control
forwarding behavior.
The track-port command monitors the status of the outgoing port on the backup. Command behavior can cause short-path forwarding
to be disabled temporarily. This happens because as one or more ports tracked by the track-port command go down, the current priority
of the VRRP-E is lowered by a specic amount congured in the track-port command for each port. Once the current-priority of the
VRRP-E is lower than the threshold value congured as the revert-priority value, short-path forwarding is temporarily suspended
because the VRRP-E reverts back to its default forwarding behavior.
To counter this behavior, use the revert-priority value in the short-path-forwarding command as a control threshold. Short-path
forwarding resumes as soon as the VRRP-E priority becomes higher than the revert priority threshold. The VRRP-E priority increases by
the value congured for the track port command as each of the ports tracked by the command becomes active again.
OSPF and BGP over an MCT-enabled network
OSPF and BGP adjacencies can be established over the MCT member VLANs between any combinations of network elements in the
MCT topology.
The combinations that can be established are:
• Devices connected to MCT cluster over CEP ports
• Devices connected to MCT cluster over non-MCT ports
• MCT cluster devices
• MCT clients
• Devices behind MCT clients
Layer 3 behavior with MCT
FastIron Ethernet Switch Layer 3 Routing Conguration Guide, 08.0.30mb
574 53-1003627-06
In such a deployment, the MCT clients and the devices behind them form separate protocol adjacencies with each MCT cluster device.
These multiple L3 next hops can be utilized by deploying ECMP on the MCT client device.
NOTE
The MCT failover will not be a hitless one for layer 3 trac since each MCT cluster device forms an independent adjacency.
When one of the MCT devices goes down, a layer 3 re-convergence is required and trac loss is expected during this time.
FIGURE 40 OSPF and BGP conguration in an MCT-enabled network
Layer 3 with MCT conguration considerations
The following congurations apply to layer 3 behavior with MCT.
• Not all layer 3 features on MCT management interface are supported. If a VLAN is already congured with these Layer 3
features, it cannot be made the session VLAN. To see the list of unsupported features on MCT management interface, refer to
Layer 3 behavior with MCT on page 571.
• IPv6 congurations are not supported on VEs of session or member VLANs.
• Route-only ports cannot be used as CCEP or ICL ports.
• Global route-only conguration and MCT cluster conguration are mutually exclusive.
• Using MCT management interface IPs for a tunnel source is not supported.
•Conguring static and policy-based routes using MCT management interface is not supported.
•Congurations to redistribute connected routes will not advertise IP addresses on an MCT management interface
• IP addresses on the MCT management interface should not be used for BGP peers on neighboring devices.
Layer 3 behavior with MCT
FastIron Ethernet Switch Layer 3 Routing Conguration Guide, 08.0.30mb
53-1003627-06 575

• IP addresses on the MCT management interface should not be used for static congurations on neighboring devices.
• For MCT devices congured with VRRP or VRRP-E, track-port features can be enabled to track the link status to the core
devices on the VRRP master, so the VRRP or VRRP-E failover can be triggered and on the VRRP backup, so as to disable
short path forwarding when it loses its relevance
• VRRP or VRRP-E shouldn't be used along with OSPF or BGP on the same MCT member VE.
NOTE
To prevent unintended trac forwarding by the CPU, Brocade recommends disabling ICMP redirect globally when VRRP or
VRRP-E is congured.
MCT conguration examples
The examples in this section show the topology and conguration for a single-level MCT deployment, VRRP/VRRP-E over MCT, OSPF
over MCT and BGP over MCT.
MCT conguration for a single-level MCT deployment
The following gure shows a sample conguration for a single-level MCT. The associated conguration follows.
FIGURE 41 Sample Conguration for a single-level MCT
Router A - MCT conguration
This example presents the MCT conguration for Router A cluster device.
!
lag lag_routera static id 55
ports ethernet 1/1/1 to 1/1/2
primary-port 1/1/1
deploy
!
port-name "ICL-To_routerB_eth1/1/1" ethernet 1/1/1
port-name "ICL-To_routerB_eth1/1/2" ethernet 1/1/2
!
!
vlan 110 name Member-vlan by port
tagged ethernet 1/1/1 ethe 1/1/2 to 1/1/4
router-interface ve 110
!
vlan 1000 name ICL-Session-vlan by port
tagged ethernet 1/1/1 to 1/1/2
Layer 3 behavior with MCT
FastIron Ethernet Switch Layer 3 Routing Conguration Guide, 08.0.30mb
576 53-1003627-06
router-interface ve 1000
!
vlan 1001 name MCT-Keep-Alive by port
tagged ethernet 1/1/3
!
interface ve 1000
ip address 10.0.0.254 255.255.255.252
!
cluster FI-MCT 1750
rbridge-id 801
session-vlan 1000
keep-alive-vlan 1001
icl FI_SWR-MCT ethernet 1/1/1
peer 10.0.0.253 rbridge-id 800 icl FI_SWR-MCT
deploy
client S1-SW
rbridge-id 777
client-interface ethernet 1/1/4
deploy
!
interface ve 110
port-name S1-SW
ip address 10.110.0.253 255.255.255.0
!
Router B- MCT conguration
This example presents the MCT conguration for the RouterB cluster device.
lag lag_routerb static id 55
ports ethernet 1/1/1 to 1/1/2
primary-port 1/1/1
deploy
!
vlan 110 name Member-vlan by port
tagged ethernet 1/1/1 ethernet 1/1/2 to 1/1/4
router-interface ve 110
!
vlan 1000 name ICL-Session-vlan by port
tagged ethernet 1/1/1 to 1/1/2
router-interface ve 1000
!
vlan 1001 name MCT-Keep-Alive by port
tagged ethernet 1/1/3
!
interface ve 1000
ip address 10.0.0.253 255.255.255.252
!
cluster FI-MCT 1750
rbridge-id 800
session-vlan 1000
keep-alive-vlan 1001
icl FI_SWR-MCT ethernet 1/1/1
peer 10.0.0.254 rbridge-id 801 icl FI_SWR-MCT
deploy
client S1-SW
rbridge-id 777
client-interface ethernet 1/1/4
deploy
!
interface ve 110
port-name S1-SW
ip address 10.110.0.252 255.255.255.0
!
Layer 3 behavior with MCT
FastIron Ethernet Switch Layer 3 Routing Conguration Guide, 08.0.30mb
53-1003627-06 577
S1-SW conguration
This example presents the conguration for the S1-SW device.
!
lag lag_s1_sw static id 60
ports ethe 1/1/1 to 1/1/2
primary-port 1/1/1
deploy
!
vlan 110 by port
tagged ethe 1/1/1 to 1/1/2
router-interface ve 110
!
interface ve 110
ip address 10.110.0.1 255.255.255.0
!
MCT conguration with VRRP-E
The following gure shows a sample MCT conguration with VRRP-E. The associated conguration follows. The conguration for VRRP
is similar.
FIGURE 42 Sample MCT conguration with VRRP-E
Router A - VRRP-E conguration
This example presents the VRRP-E conguration for the Router A cluster device.
!
router vrrp-extended
!
interface ve 110
port-name S1-SW
ip address 10.110.0.253 255.255.255.0
ip vrrp-extended vrid 110
backup
ip-address 10.110.0.254
short-path-forwarding
enable
!
Layer 3 behavior with MCT
FastIron Ethernet Switch Layer 3 Routing Conguration Guide, 08.0.30mb
578 53-1003627-06
Router B - VRRP-E conguration
This example presents the VRRP-E conguration for the RouterB cluster device.
!
router vrrp-extended
!
interface ve 110
port-name S1-SW
ip address 10.110.0.252 255.255.255.0
ip vrrp-extended vrid 110
backup
ip-address 10.110.0.254
short-path-forwarding
enable
!
MCT Conguration with OSPF
The following examples describe sample MCT congurations with OSPF.
FIGURE 43 MCT Conguration with OSPF
SWRA - OSPF conguration
This example presents the OSPF conguration for the SWRA cluster device.
!
router ospf
area 0
!
interface ve 110
ip address 10.110.0.253 255.255.255.0
ip ospf area 0
!
SWRB - OSPF conguration
This example presents the OSPF conguration for the SWRB cluster device.
!
router ospf
area 0
!
interface ve 110
ip address 10.110.0.252 255.255.255.0
ip ospf area 0
!
Layer 3 behavior with MCT
FastIron Ethernet Switch Layer 3 Routing Conguration Guide, 08.0.30mb
53-1003627-06 579
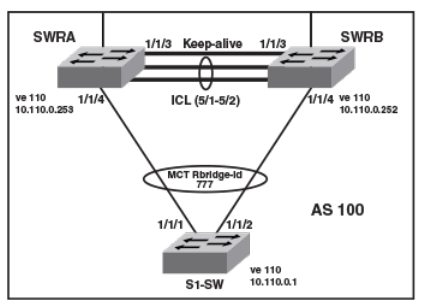
S1-SW conguration
This example presents the conguration for the S1-SW device.
!
lag lag_s1_sw static id 60
ports ethernet 1/1/1 to 1/1/2
primary-port 1/1/1
deploy
!
vlan 110 by port
tagged ethernet 1/1/1 to 1/1/2
router-interface ve 110
!
router ospf
area 0
!
interface ve 110
ip address 10.110.0.1 255.255.255.0
ip ospf area 0
!
MCT Conguration with BGP
The following examples describe sample MCT congurations with BGP.
FIGURE 44 MCT Conguration with BGP
SWRA - BGP conguration
This example presents the BGP conguration for the SWRA cluster device.
!
interface ve 110
ip address 10.110.0.253 255.255.255.0
!
router bgp
local-as 100
neighbor 10.110.0.252 remote-as 100
neighbor 10.110.0.1 remote-as 100
!
Layer 3 behavior with MCT
FastIron Ethernet Switch Layer 3 Routing Conguration Guide, 08.0.30mb
580 53-1003627-06
SWRB - BGP conguration
This example presents the BGP conguration for the SWRB cluster device.
!
interface ve 110
ip address 10.110.0.252 255.255.255.0
!
router bgp
local-as 100
neighbor 10.110.0.253 remote-as 100
neighbor 10.110.0.1 remote-as 100
!
S1-SW conguration
This example presents the conguration for the S1-SW device.
!
lag lag_s1_sw static id 60
ports ethernet 1/1/1 to 1/1/2
primary-port 1/1/1
deploy
!
vlan 110 by port
tagged ethernet 1/1/1 to 1/1/2
router-interface ve 110
!
interface ve 110
ip address 10.110.0.1 255.255.255.0
!
router bgp
local-as 100
neighbor 10.110.0.253 remote-as 100
neighbor 10.110.0.252 remote-as 100
!
PIM over MCT intermediate router functionality
MCT peers support intermediate router functionality by accepting PIM neighbors on specic interfaces, thus routing multicast trac as
fully functional PIM devices acting as upstream and downstream routers.
MCT peers support multicast routing (PIM) on Cluster Client Edge Port (CCEP) and Inter-Chassis Link (ICL) interfaces.
PIM states between MCT peers are synchronized by sending the control packets natively over ICL. The nature of the MCT LAG requires
this. Packets from the MCT client on the CCEP ports are received by only one of the MCT peers. Hence the control packets that are
received natively on the CCEP ports are sent over ICL to synchronize the states. The Join or Prune and Asserts are synchronized to
maintain the Outgoing Interface (OIF) state for the CCEP ports on both peers. For CCEP OIFs created by PIM joins, only one of the
MCT peers forwards the trac and the other peer drops the trac.
These are the general rules followed for the control packet handling algorithm.
• Control packets originated from MCT peers will be ooded on MCT VLAN. Exceptions are Assert packets and Join packets
triggered only for ICL OIFs.
• Control packets received on any port of MCT VLAN are ooded on MCT VLAN.
• Control packets received on ICL are ooded in a controlled manner on MCT VLAN based on remote CCEP status, that is,
based on whether they are up or down.
Control and data packets received on an ICL port are processed by searching the source MAC of the packet in the MAC table to
determine the packet ingress port as follows:
• If the source MAC is learned on CCEP port, the packet ingress port will be a CCEP port.
Layer 3 behavior with MCT
FastIron Ethernet Switch Layer 3 Routing Conguration Guide, 08.0.30mb
53-1003627-06 581
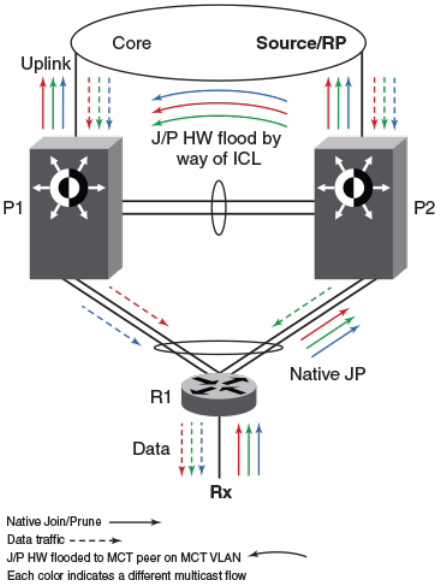
• If it is not, the packet ingress port will be an ICL port.
In the following gures, P1 and P2 are MCT peers and R1 is the MCT client. P1, P2 and R1 are congured with PIM on the MCT VE
interface. MCT peers act as PIM intermediate routers with respect to R1.
MCT peer as intermediate Upstream router
P1 and P2 are the MCT peers and are acting as upstream routers for R1. R1 is the last-hop router (LHR).
P1, P2, and R1 are congured with PIM on the MCT virtual Ethernet (VE) interface. RP and source is in the core and the connectivity to
the core is via an uplink.
FIGURE 45 MCT peer as immediate Upstream router
Hello exchange and neighbor state:
• In MCT topology, the CCEP links going out of P1 and P2 to R1 are treated as a single LAG at R1. That means when R1 sends
multicast packets (either control or data packets), they reach only one of the peers. These control packets (hellos, joins, prunes,
and others) received by one peer are ooded on the MCT VLAN including the ICL port to the other peer.
• Hellos sent by R1 could reach either P1 or P2 due to the above nature of MCT LAG.
• Hellos that reach P2 are sent to P1 natively over ICL. That means P1 learns about R1 (by searching the source-MAC of the
hello packet in its MAC table) and it treats the hello as if it was received on its CCEP interface. Thus both P1 and P2 learn about
the PIM neighbors across the CCEP links and create neighbor state for R1.
• Hellos originated from P1 and P2 are ooded on the MCT VLAN i.e. on ICL, CEP, local CCEP ports. This enables R1 to learn
that both the MCT peers are PIM neighbors and also enables P1 and P2 to learn about each other as PIM neighbors on an ICL
link and create neighbor state, for each other.
Layer 3 behavior with MCT
FastIron Ethernet Switch Layer 3 Routing Conguration Guide, 08.0.30mb
582 53-1003627-06
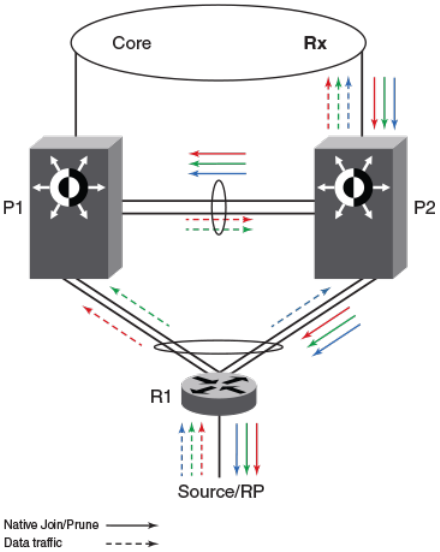
Join or prune exchange and mcache state:
• As receivers are connected to R1, R1 creates *,G state and sends a join state towards RP and sends it on the MCT LAG. This
join, like any other packet, is received by only one of the MCT peers.
• Suppose P2 receives the *,G join natively. This join is processed or consumed and is also ooded to P1 over ICL.
• P1 processes the join received over ICL as if it is received on CCEP.
• Both P1 and P2 create *,G state with CCEP as OIF.
• Both the peers send the *,G join towards RP and both the peers pull the trac.
• When the trac arrives, the S,G state is created on both the peers but only one of them forwards based on the software hashing
algorithm.
MCT peer as intermediate Downstream router
P1 and P2 are the MCT peers and are acting as downstream routers for R1. R1 is the intermediate router.
P1, P2 and R1 are congured with PIM on the MCT VE interface. RP and source are beyond R1.
FIGURE 46 MCT peer as immediate downstream router
Hello exchange and neighbor state:
It acts and works as the upstream router.
Join or prune exchange and mcache state:
• The *,G joins come from the core to P2.
• P2 creates *,G state with uplink as OIF by consuming the join state.
Layer 3 behavior with MCT
FastIron Ethernet Switch Layer 3 Routing Conguration Guide, 08.0.30mb
53-1003627-06 583
• P2 due to its *,G state originates a join towards RP. This join is ooded on the MCT VLAN and R1 creates *,G state.
• P1 on receiving this join natively via ICL creates *,G state and adds ICL as OIF. Note that as a special case P1 will not include
the *,G in the join it generates towards RP as in this case the IIF is CCEP and ICL is the only OIF and the remote CCEP is up.
This is to avoid P1 pulling trac from P2 unnecessarily on the ICL link because of P1 sending joins ooded on the VLAN and
in turn P2 adds ICL as an OIF.
• R1 sends the join toward RP and pulls the trac. Because the OIF at R1 is LAG, trac pulled by R1 will be load-shared among
the member links.
• Thus trac for S,G will reach only one of the MCT peers. Assuming the trac reaches P2, (S,G) state will be created on P2 and
P2 will be forwarding the trac.
• Assuming the trac reaches P1 the trac will be forwarded via ICL to P2 and P2 will forward it to its OIFs which is the link
connecting to the core.
Load sharing of multicast trac by MCT-cluster on CCEP links
MCT peers load-share multicast trac on both the local and the remote CCEP links when both are available.
Loads are only shared, and may or may not be balanced, across the CCEP links. An MCT peer selects a stream for forwarding based on
a software hash function that uses the source and group addresses. That means you can have one MCT peer forwarding more multicast
streams than another.
The load is assigned without regard to the capacity of the CCEP links, so the feature works best when both CCEP links have the same
capacity and the source and group addresses are evenly distributed. That situation avoids the timing synchronization between the MCT
peer routers, which would be very hard to achieve.
The sharing is done at a stream, not packet, level ,using the following software hash algorithm:
((source address + group address) & 0x00000001) ^ ((local_bridge_id > remote_bridge_id))
If result is 1, local CCEP forwards the trac; if result is 0, remote CCEP forwards the trac
Fast convergence of multicast trac
The multicast routing on MCT feature provides sub-second convergence of trac in the event of CCEP or MCT peer failures and
recoveries.
When a CCEP or MCT peer fails, multicast trac that used to go through the failed CCEP link or node switches to the surviving CCEP
link in approximately one second or less.
Sub-second convergence requires both MCT peers to maintain state for, and pull down, trac for all multicast ows from the core,
regardless of whether the chassis is forwarding this stream out of the local CCEP. This means that streams forwarded by the remote
CCEP are pulled down to the local MCT peer but dropped in the absence of other receivers on the local router, thus potentially wasting
the bandwidth inside the core on uplink. This is deemed a fair tradeo because otherwise the MCT peer that takes over the job of
forwarding a stream when the remote CCEP or peer fails, must establish a new multicast path through the core, which can potentially
black out the stream for many seconds
Requirements for multicast MCT
OSPF must be supported on MCT member VLAN virtual Ethernet (VE) interfaces, that is, on CCEP, CEP, and ICL links.
Layer 3 behavior with MCT
FastIron Ethernet Switch Layer 3 Routing Conguration Guide, 08.0.30mb
584 53-1003627-06
Limitations
These are the limitations for MCT peers to support intermediate router functionality. These limitations are due to load-sharing and fast
convergence trade-os.
• PIM-DM is not supported.
• Few packets may be lost during convergence interval or forwarding duplication may happen.
• MCT client will do ow based load-sharing, not per packet load-sharing.
•Trac loss or duplication will happen when Keep-Alive VLAN, Cluster Communication Protocol (CCP) ,or ICL between MCT
peers are not up.
• Multicast routing congurations on session VLAN is not supported and restricted in conguration.
• The load will only be shared, and may or may not be balanced across the CCEPs.
• During the convergence interval, a few packets may be lost. In the case of recoveries, some packets may end up being
forwarded by both cluster routers during interval.
• Both the MCT peers maintain state and pull down trac for all multicast ows from the core, whether the chassis is forwarding
this stream to the local CCEP or not. This could potentially waste the bandwidth inside the core and on uplink.
• You can congure both MCT peers to do either PIM routing or multicast snooping in MCT VLANs. However, conguring one
MCT peer to do PIM routing and the other to do multicast snooping in the same MCT VLAN is not supported.
• PIM neighbor on CEP in an MCT VLAN is not supported if the MCT cluster is running PIM on the same MCT VLAN.
• First-hop routing (FHR) and "Last-hop routing (LHR) are not supported on MCT clusters on MCT VLAN interfaces.
• Rendezvous points (RP) are not supported on MCT clusters.
• MSDP and Anycast-RP are not supported on MCT clusters.
• This feature is not supported on non default VRFs.
• IPv6 multicast routing on MCT is not supported on MCT clusters.
Conguring multicast routing over MCT
Follow these steps to congure multicast routing over MCT.
1. Congure an MCT cluster.
2. Congure an MCT member VLAN.
3. Congure multicast routing (PIM) over MCT member VE.
Layer 3 behavior with MCT
FastIron Ethernet Switch Layer 3 Routing Conguration Guide, 08.0.30mb
53-1003627-06 585
This example shows the conguration of an MCT cluster, MCT member VLAN with router interface (VE), PIM conguration over MCT
member VE on MCT Peer 1.
cluster cs 10
rbridge-id 1000
session-vlan 4
keep-alive-vlan 5
icl MCT ethernet 1/1/1
peer 5.5.5.100 rbridge-id 4000 icl MCT
deploy
client client-100
rbridge-id 100
client-interface ethernet 1/1/11
deploy
!
!
!
!
!
!
end
vlan 10 name member-vlan by port
tagged ethe 1/1/1 ethe 1/1/11 ethe 1/1/25
router-interface ve 10
spanning-tree 802-1w
spanning-tree 802-1w ethe 1/1/11 disable
!
!
interface ve 10
ip address 10.10.10.100 255.255.255.0
ip pim-sparse
ip ospf area 0
Layer 3 behavior with MCT
FastIron Ethernet Switch Layer 3 Routing Conguration Guide, 08.0.30mb
586 53-1003627-06
This example shows the conguration of an MCT cluster, MCT member VLAN with router interface (VE), PIM conguration over MCT
member VE on MCT Peer 2.
cluster cs 10
rbridge-id 4000
session-vlan 4
keep-alive-vlan 5
icl MCT ethernet 2/1/1
peer 5.5.5.10 rbridge-id 1000 icl MCT
deploy
client client-100
rbridge-id 100
client-interface ethernet 2/1/11
deploy
!
!
!
!
!
!
end
vlan 10 name member-vlan by port
tagged ethe 2/1/1 ethe 2/1/11 ethe 2/1/27
router-interface ve 10
spanning-tree 802-1w
spanning-tree 802-1w ethe 2/1/11 disable
!
interface ve 10
ip address 10.10.10.1 255.255.255.0
ip pim-sparse
ip ospf area 0
Layer 3 behavior with MCT
FastIron Ethernet Switch Layer 3 Routing Conguration Guide, 08.0.30mb
53-1003627-06 587
FastIron Ethernet Switch Layer 3 Routing Conguration Guide, 08.0.30mb
588 53-1003627-06

Unicast Reverse Path Forwarding
• Unicast Reverse Path Forwarding............................................................................................................................................................589
•Conguration considerations for uRPF.................................................................................................................................................589
• Unicast Reverse Path Forwarding feasibility....................................................................................................................................... 590
• System-max changes and uRPF.............................................................................................................................................................591
• Enabling unicast Reverse Path Forwarding......................................................................................................................................... 592
•Conguring unicast Reverse Path Forwarding modes....................................................................................................................592
Unicast Reverse Path Forwarding
The unicast Reverse Path Forwarding check is used to avoid source IP-based spoong and a malformed source IP address.
A number of common types of denial-of-service (DoS) attacks, including Smurf and Tribe Flood Network (TFN), can take advantage of
forged or rapidly changing source IP addresses to allow attackers to thwart eorts to locate or lter the attacks. Reverse Path Forwarding
(RPF) is designed to prevent such an attacker from spoong a source IP address by checking that the source IP address specied for a
packet is received from a network to which the device has access. Packets with invalid source IP addresses are not forwarded. RPF is
supported for IPv4 and IPv6 packets. Dierences in RPF support between IPv4 and IPv6 are noted within this section where necessary.
RFC3704, Ingress Filtering for Multihomed Networks, covers various aspects of the Source IP address being spoofed in a trac being
forwarded.
FastIron devices support two unicast Reverse Path Forwarding (uRPF) modes according to RFC 3704:
• Strict mode: In this mode, all incoming packets are tested against the forwarding information base (FIB). If the incoming
interface is not the best reverse path, the packet check fails. Failed packets are discarded by default. Source IP (SIP) lookup and
the SIP's next hop layer interface information is used in this mode. This mode has options to include default route check or
exclude default route check.
• Loose mode: In this mode, each incoming packet's source address is tested against the forwarding information base. As long as
there is a match for the source IP address in the forwarding information base, the trac is allowed. Next hop interface
information is not used in this mode. The packet is dropped only if the source address is not reachable through any interface on
that router. This mode has options of including the default route check or excluding the default route check. Including the default
route check is the default conguration mode. Use the rpf-mode strict command for this mode. To exclude the default route
check, you must include the option to urpf-exclude-default after entering the command rpf-mode strict explicitly.
Conguration considerations for uRPF
The following conguration considerations apply to unicast Reverse Path Forwarding (uRPF) on supported Brocade devices.
The following are general considerations for uRPF:
• uRPF works on the layer 3 interface level (layer 3 physical interface or layer 3 VE interface).
• uRPF is VRF-aware.
• If a VLAN has multiple ports, the uRPF check will not identify packets coming in from dierent ports within the same VLAN,
since a VLAN is considered as having a single Layer 3 interface.
• uRPF can be congured along with PBR, routing protocol congurations, and multicast congurations.
• uRPF is not supported on tunnel interfaces.
• Tunnel keep-alive packets will be dropped in the hardware if uRPF is congured.
FastIron Ethernet Switch Layer 3 Routing Conguration Guide, 08.0.30mb
53-1003627-06 589

• uRPF should not be congured on devices where group-VE, tunnel keep-alive packets, or OpenFlow is congured.
• Counters or logging information is unavailable for uRPF hits.
• After enabling reverse path check, you must reload the device for uRPF to be programmed.
• Tunnel over user VRF should not be congured on a device on which uRPF is enabled.
ICX 6610 considerations
• ICX 6610 devices support only strict mode conguration.
• You can enable uRPF only in global conguration mode on ICX 6610 devices.
• You cannot enable uRPF mode at the interface level on ICX 6610 devices.
• uRPF is supported only in a homogeneous ICX 6610 stack.
• uRPF is enabled on selective prexes on ICX 6610 devices.
• IPv4 routes which have a single path or ECMP path next hop learned on VE interfaces are only uRPF-enabled.
• IPv4 unicast routed packets are supported on ICX 6610 devices for uRPF check.
• You cannot enable RPF mode at the interface level on ICX 6610 devices.
•Prexes learned over IPv4 and IPv6 tunnel are not subjected to uRPF check on ICX 6610 devices.
• Scaling numbers on the device remain intact after conguring uRPF.
ICX 7750 considerations
• ICX 7750 devices support global mode and interface conguration mode.
• Per-interface level conguration is available on VE interfaces and physical ports only.
• IPv4 and IPv6 unicast routed packets are subjected to uRPF check on ICX 7750 devices.
• Scaling numbers are reduced by half for the following system values when uRPF is enabled: ip-route, ip6-route, ip-route-
default-vrf, ip6-route-default-vrf, ip-route-vrf, ip6-route-vrf.
• uRPF and MCT should not be congured together.
• If for a route the number ECMP path is more than 8, the hardware automatically chooses to use loose mode check, despite the
conguration on the incoming interface.
• If the interface is not uRPF enabled the trac is not subjected to uRPF check.
• If the interface is uRPF enabled both IPv4 and IPv6 trac will be subjected to uRPF check.
Unicast Reverse Path Forwarding feasibility
The following table provides support information about uRPF.
TABLE 115 unicast Reverse Path Forwarding Feasibility
Device Congurable mode ECMP route
supported
Default route lookup
control Non-Tunneled Tunneled
IPv4 IPv6 IPv4 IPv6
ICX 6610 Strict mode
(Global
conguration)
Yes N/A Yes No No No
ICX 7750 Strict mode Yes Yes Yes Yes No No
Unicast Reverse Path Forwarding feasibility
FastIron Ethernet Switch Layer 3 Routing Conguration Guide, 08.0.30mb
590 53-1003627-06

TABLE 115 unicast Reverse Path Forwarding Feasibility (continued)
Device Congurable mode ECMP route
supported
Default route lookup
control Non-Tunneled Tunneled
(Interface
conguration)
Loose mode
(Interface
conguration)
NA Yes Yes Yes No No
NOTE
For the Strict mode (interface conguration), if the number of ECMP paths for a route is more than 8, then the hardware will
apply loose mode check for the SIP check, even if the interface is congured as strict mode.
System-max changes and uRPF
The following tables describe the system-max values with and without uRPF congured on the device. Note that the values with uRPF
conguration after reload are reduced by half.
TABLE 116 ICX 7750 system-max values without uRPF conguration
System parameter Default Maximum Current Congured
ip-route 98304 131072 98304 98304
ip6-route 5120 7168 5120 5120
ip-route-default-vrf 65536 131072 65536 65536
ip6-route-default-vrf 2048 7168 2048 2048
ip-route-vrf 4096 131072 4096 4096
ip6-route-vrf 1024 7168 1024 1024
TABLE 117 ICX 7750 system-max values with uRPF conguration after reload
System parameter Default Maximum Current Congured
ip-route 49152 65536 49152 49152
ip6-route 2560 3584 2560 2560
ip-route-default-vrf 32768 65536 32768 32768
ip6-route-default-vrf 1024 3584 1024 1024
ip-route-vrf 2048 65536 2048 2048
ip6-route-vrf 512 3584 512 512
TABLE 118 ICX 7250 system-max values without uRPF conguration
System parameter Default Maximum Current Congured
ip-route 12000 12000 12000 12000
ip6-route 730 2048 730 730
TABLE 119 ICX 7250 system-max values with uRPF conguration after reload
System parameter Default Maximum Current Congured
ip-route 6000 6000 6000 6000
ip6-route 365 1024 365 365
System-max changes and uRPF
FastIron Ethernet Switch Layer 3 Routing Conguration Guide, 08.0.30mb
53-1003627-06 591

TABLE 120 ICX 7450 system-max values without uRPF conguration
System parameter Default Maximum Current Congured
ip-route 12000 15168 12000 12000
ip6-route 5120 5120 5120 5120
ip-route-default-vrf 12000 15168 12000 12000
ip6-route-default-vrf 5120 5120 5120 5120
ip-route-vrf 1024 15168 1024 1024
ip6-route-vrf 100 5120 100 100
TABLE 121 ICX 7450 system-max values with uRPF conguration after reload
System parameter Default Maximum Current Congured
ip-route 6000 7584 6000 6000
ip6-route 2584 3572 2584 2584
ip-route-default-vrf 6000 7584 6000 6000
ip6-route-default-vrf 2560 2560 2560 2560
ip-route-vrf 512 7584 512 512
ip6-route-vrf 50 2560 50 50
Enabling unicast Reverse Path Forwarding
Unicast Reverse Path Forwarding can be enabled in dierent modes.
The strict mode is enabled when you enable uRPF on ICX 6610 devices. The prexes learned over the VE interfaces that do not have
tunnel-termination specied as a next hop are enabled. On ICX 7750 devices, the uRPF check enables the interface level CLI and
hardware settings. You should reload the device after enabling reverse path check for this conguration to be captured in the system
settings.
NOTE
Refer to the FastIron Command Reference for a complete list of supported commands.
1. Enter global conguration mode.
2. Enter the reverse-path-check command.
The following example enables uRPF at the global level.
device(config)# reverse-path-check
Conguring unicast Reverse Path Forwarding modes
Congure the various unicast reverse path forwarding modes on a layer 3 VE or physical interface.
You must enable unicast reverse path forwarding globally before you enable the required forwarding modes.
1. Enter interface conguration mode.
2. Enter the rpf-mode command followed by the required mode (strict or loose) you want to congure on the device. You can
optionally use the exclude default route (urpf-exclude-default) check on the physical interface.
Enabling unicast Reverse Path Forwarding
FastIron Ethernet Switch Layer 3 Routing Conguration Guide, 08.0.30mb
592 53-1003627-06
The following example shows the uRPF strict mode enabled.
device# interface ethernet 1/1/9
device(interface ethernet 1/1/9)# rpf-mode strict
Conguring unicast Reverse Path Forwarding modes
FastIron Ethernet Switch Layer 3 Routing Conguration Guide, 08.0.30mb
53-1003627-06 593
