S and O ELECTRONICS GXBT9 PORTABLE BLUETOOTH BOOMBOX User Manual GX BT9 OM SEC EN
S&O; ELECTRONICS (MALAYSIA) SDN. BHD. PORTABLE BLUETOOTH BOOMBOX GX BT9 OM SEC EN
UserManual.wiki
>
S and O ELECTRONICS
>
GXBT9 User Manual
User Manual
Navigation menu
Upload a User Manual
Namespaces
Wiki Guide
HTML
PDF
Info
Views
User Manual
Discussion / Help
Navigation
![(OHFWULFLW\LVXVHGWRSHUIRUPPDQ\XVHIXOIXQFWLRQVEXWLWFDQalso cause personal injuries and property damage if improperly KDQGOHG7KLVSURGXFWKDVEHHQHQJLQHHUHGDQGPDQXIDFWXUHGZLWKWKH KLJKHVW SULRULW\ RQ VDIHW\+RZHYHULPSURSHUXVHFDQUHVXOWLQHOHFWULFVKRFNDQGRU¿UH,QRUGHUWRSUHYHQWSRWHQWLDOGDQJHUSOHDVH REVHUYH WKH IROORZLQJ LQVWUXFWLRQV ZKHQ LQVWDOO-LQJRSHUDWLQJDQGFOHDQLQJWKHSURGXFW7RHQVXUH\RXUVDIHW\DQGSURORQJWKHVHUYLFHOLIHRIWKLVSURGXFWSOHDVHUHDGWKHIRO-ORZLQJSUHFDXWLRQVFDUHIXOO\EHIRUHXVH1) Read these instructions.2) Keep these instructions.3) Heed all warnings.4) Follow all instructions.5) Do not use this apparatus near water.6) Clean only with dry cloth. 'RQRWEORFNDQ\YHQWLODWLRQRSHQLQJV,QVWDOOLQDFFRUGDQFHwith the manufacturer’s instructions. 'RQRWLQVWDOOQHDUDQ\KHDWVRXUFHVVXFKDVUDGLDWRUVKHDWUHJLVWHUVVWRYHVRURWKHUDSSDUDWXVLQFOXGLQJDPSOL¿HUVthat produce heat.9) Do not defeat the safety purpose of the polarized or ground-LQJW\SHSOXJ$SRODUL]HGSOXJKDVWZREODGHVZLWKRQHZLG-HUWKDQWKHRWKHU$JURXQGLQJW\SHSOXJKDVWZREODGHVDQGDWKLUGJURXQGLQJSURQJ7KHZLGHEODGHRUWKHWKLUGSURQJare provided for your safety. If the provided plug does not ¿WLQWR\RXURXWOHWFRQVXOWDQHOHFWULFLDQIRUUHSODFHPHQWRIWKHREVROHWHRXWOHW 3URWHFWWKH SRZHU FRUGIURP EHLQJ ZDONHG RQ RUSLQFKHGSDUWLFXODUO\ DW SOXJV FRQYHQLHQFH UHFHSWDFOHV DQG WKHpoint where they exit from the apparatus. 2QO\XVHDWWDFKPHQWVDFFHVVRULHVVSHFL¿HGE\WKHPDQX-facturer. 8VHRQO\ZLWKWKHFDUWVWDQGWULSRGEUDFN-HW RU WDEOH VSHFL¿HG E\ WKH PDQXIDFWXUHUor sold with the apparatus. When a cart is XVHGXVHFDXWLRQZKHQPRYLQJWKHFDUWDS-SDUDWXVFRPELQDWLRQWRDYRLGLQMXU\IURPWLSover. 13) Unplug this apparatus during lightning storms or when un-used for long periods of time. 5HIHUDOOVHUYLFLQJWRTXDOL¿HGVHUYLFHSHUVRQQHO6HUYLFLQJLVUHTXLUHGZKHQWKHDSSDUDWXVKDVEHHQGDPDJHGLQDQ\ZD\VXFKDVSRZHUVXSSO\FRUGRUSOXJLVGDPDJHGOLTXLGKDVEHHQVSLOOHGRUREMHFWVKDYHIDOOHQLQWRWKHDSSDUDWXVWKHDSSDUDWXVKDVEHHQH[SRVHGWRUDLQRUPRLVWXUHGRHVQRWRSHUDWHQRUPDOO\RUKDVEHHQGURSSHGAdditional Safety Information 3RZHU6RXUFHV7KLVSURGXFWVKRXOGEHRSHUDWHGRQO\IURPWKHW\SHRISRZHUVRXUFHLQGLFDWHGRQWKHPDUNLQJODEHO,I\RXDUHQRWVXUHRIWKHW\SHRISRZHUVXSSO\WR\RXUKRPHconsult your product dealer or local power company. For SURGXFW LQWHQGHG WR RSHUDWH IURP EDWWHU\ SRZHU RU RWKHUVRXUFHVUHIHUWRWKHRSHUDWLQJLQVWUXFWLRQV 2YHUORDGLQJ'RQRWRYHUORDGZDOORXWOHWVH[WHQVLRQFRUGVor integral convenience receptacles as this can result in a ULVNRI¿UHRUHOHFWULFVKRFN 2EMHFWDQG/LTXLG(QWU\1HYHU SXVKREMHFWVRIDQ\ NLQGinto this product through openings as they may touch dan-gerous voltage points or short-out parts that could result in D¿UHRUHOHFWULFVKRFN 7RSUHYHQW¿UHRUVKRFNKD]DUGGRQRWH[SRVHWKLVDSSOL-DQFHWRGULSSLQJRUVSODVKLQJ1RREMHFWV¿OOHGZLWKOLTXLGVVXFKDVYDVHVVKDOOEHSODFHGRQWKHDSSDUDWXV18) Damage Requiring Service - Unplug this product from the ZDOORXWOHWDQGUHIHUVHUYLFLQJWRTXDOL¿HGVHUYLFHSHUVRQQHOunder the following conditions: D:KHQWKH$&FRUGRUSOXJLVGDPDJHG E,IOLTXLGKDVEHHQVSLOOHGRUREMHFWVKDYHIDOOHQLQWRWKHSURGXFW F,IWKHSURGXFWKDVEHHQH[SRVHGWRUDLQRUZDWHU G,IWKHSURGXFWGRHVQRWRSHUDWHQRUPDOO\E\IROORZLQJWKHoperating instructions. Adjust only those controls that are FRYHUHGE\WKHRSHUDWLQJLQVWUXFWLRQVDVDQLPSURSHUDG-justment of other controls may result in damage and will RIWHQUHTXLUHH[WHQVLYHZRUNE\DTXDOL¿HGWHFKQLFLDQWRUHVWRUHWKHSURGXFWWRLWVQRUPDORSHUDWLRQ H,IWKHSURGXFWKDVEHHQGURSSHGRUGDPDJHGLQDQ\ZD\and I:KHQ WKH SURGXFW H[KLELWV D GLVWLQFW FKDQJH LQ SHUIRU-mance - this indicates a need for service. 5HSODFHPHQW3DUWV:KHQUHSODFHPHQWSDUWVDUHUHTXLUHGEHVXUHWKHVHUYLFHWHFKQLFLDQKDVXVHGUHSODFHPHQWSDUWVVSHFL¿HGE\WKHPDQXIDFWXUHURUKDYHWKHVDPHFKDUDFWHU-LVWLFVDVWKH RULJLQDO SDUW 8QDXWKRUL]HG VXEVWLWXWLRQV PD\UHVXOWLQ¿UHHOHFWULFVKRFNRURWKHUKD]DUGV20) Safety Check - Upon completion of any service or repairs WRWKLVSURGXFWDVNWKHVHUYLFHWHFKQLFLDQWRSHUIRUPVDIHW\checks to determine that the product is in proper operating condition.21) Wall or ceiling mounting - When mounting the product on a ZDOORUFHLOLQJEHVXUHWRLQVWDOOWKHSURGXFWDFFRUGLQJWRWKHPHWKRGUHFRPPHQGHGE\WKHPDQXIDFWXUHU 3RZHU /LQHV $Q RXWVLGH DQWHQQD V\VWHP VKRXOG QRW EHlocated in the vicinity of overhead power lines or other HOHFWULFOLJKWRUSRZHUFLUFXLWVRUZKHUHLWFDQIDOOLQWRVXFKpower lines or circuits. When installing an outside antenna V\VWHPH[WUHPHFDUHVKRXOGEHWDNHQWRNHHSIURPWRXFK-ing such power lines or circuits as contact with them might EHIDWDO23) Protective Attachment Plug - The product is equipped with an attachment plug having overload protection. This is a safety feature. See Instruction Manual for replacement or resetting of protective device. If replacement of the plug LVUHTXLUHGEHVXUHWKHVHUYLFHWHFKQLFLDQKDVXVHGDUH-SODFHPHQWSOXJVSHFL¿HGE\WKHPDQXIDFWXUHUWKDWKDVWKHsame overload protection as the original plug. 6WDQG'RQRWSODFHWKHSURGXFWRQDQXQVWDEOHFDUWVWDQGWULSRG RU WDEOH 3ODFLQJ WKH SURGXFW RQ DQ XQVWDEOH EDVHFDQFDXVH WKH SURGXFWWRIDOOUHVXOWLQJLQVHULRXV SHUVRQ-al injuries as well as damage to the product. Use only a FDUW VWDQG WULSRG EUDFNHW RU WDEOH UHFRPPHQGHG E\ WKHmanufacturer or sold with the product. When mounting the SURGXFWRQDZDOOEHVXUHWRIROORZWKHPDQXIDFWXUHU¶VLQ-structions. Use only the mounting hardware recommended E\WKHPDQXIDFWXUHUImportant Safety InstructionsE-3](https://usermanual.wiki/S-and-O-ELECTRONICS/GXBT9/User-Guide-2488501-Page-3.png)
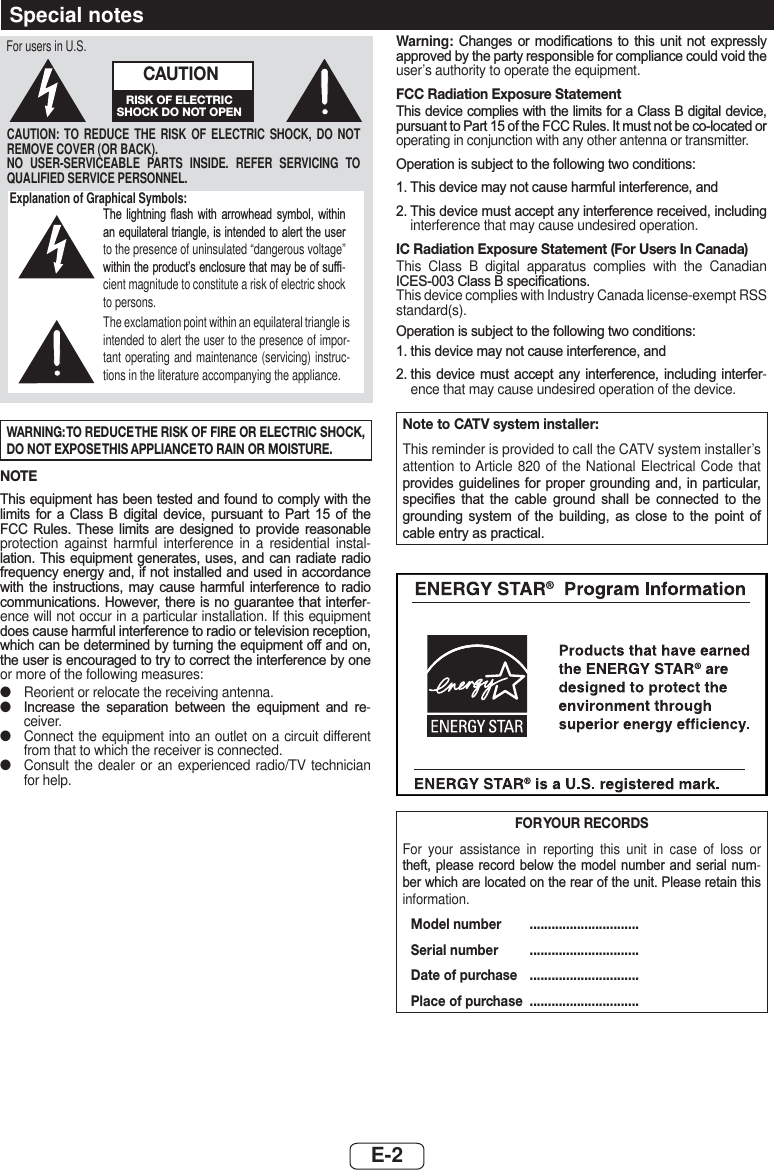
![■AC power connection$IWHUFKHFNLQJDOOWKHFRQQHFWLRQVKDYHEHHQPDGHFRUUHFWO\SOXJthe AC power cord of this unit into the AC outlet.Notes:z 5HPRYHDOOEDWWHULHVZKHQXVLQJ$&SRZHUz Unplug the AC power cord from the AC outlet if the unit will not EHLQXVHIRUDSURORQJHGSHULRGRIWLPH ■DC power connection7/32”(5.5mm) 3/8”(9.5mm) 1/8”(3.5mm) Recommended plug typeCaution:z 'XULQJ EDWWHU\'& RSHUDWLRQ WKH XQLW ZLOO EH VHW WR'HPRQVWUDWLRQPRGH RIIZLWK GLVSOD\ DQGVXEZRRIHU OLJKW LQ02'(WRUHGXFHWKHEDWWHU\SRZHUFRQVXPSWLRQz :KHQXVLQJEDWWHU\'&SRZHUWKHUHPRWHFRQWUROFDQQRWEHused to turn on the unit.z 8QSOXJWKH$&SRZHUFRUGIURPWKHXQLWEHIRUHXVLQJWKH'&power. Otherwise the unit will not work.z :KHQWKHXQLWLVQRWLQXVHIRUDQH[WHQGHGSHULRGUHPRYHWKHDC cord from the DC IN 12 V jack. ■Operation with batteries)XOO\ FKDUJH DQ H[WHUQDO GHYLFH ZLWK $& SRZHU EHIRUHXVLQJ*;%7EDWWHU\RSHUDWLRQ1 Disconnect the AC and DC power cord, and remove the battery compartment cover.z 5HPRYH DOO FRQQHFWLRQ EHIRUH LQVWDOOLQJ EDWWHULHV WR DYRLGSRVVLEOHGDPDJHz Connection of the AC or DC power cord to the unit GLVFRQQHFWVWKHEDWWHULHV2 Insert 10 “D” size batteries (UM/SUM-1, R20, HP-2 or similar) into the battery compartment according to the sequence indicated on the rear panel.z :KHQLQVHUWLQJRUUHPRYLQJWKHEDWWHULHV5 and 0SXVKWKHPWRZDUGWKHEDWWHU\WHUPLQDOVz ,QVWDOOLQJ WKH EDWWHULHV LQFRUUHFWO\ PD\ FDXVH WKH XQLW WRmalfunction.z Batteries are not included.67981012543,QVHUWWKHEDWWHULHVaccording to the sequence indicated.Bottom rowTop row3 Replace the battery compartment cover.Precautions for battery use:z ,QVHUWWKHEDWWHULHVDFFRUGLQJWRWKHGLUHFWLRQLQGLFDWHGRQWKHrear panel.z 5HPRYHWKHEDWWHULHVLIWKH\DUHZHDNRULIWKHXQLWZLOOQRWEHused for long periods of time. This will prevent potential damage GXHWREDWWHU\OHDNDJHz 5HSODFHDOOROGEDWWHULHVZLWKQHZRQHVDWWKHVDPHWLPHz 'RQRWPL[ROGDQGQHZEDWWHULHVBattery replacement:z :KHQEDWWHULHVDUHORZEDWWHU\LQGLFDWRU³ ´ZLOOEOLQNWRVKRZWKDW WKH EDWWHULHV QHHG WR EH UHSODFHG VRXQG PD\ EHFRPHdistorted and unit may automatically turn off or mute during high volume level. Reduce the volume level or replace the EDWWHULHVz :KHQUHSODFLQJWKHEDWWHULHVSODFHWKHXQLWRQDFXVKLRQRUVRIWcloth to avoid damage.Cautions:z 'RQRWXVHUHFKDUJHDEOHEDWWHU\QLFNHOFDGPLXPEDWWHU\HWFz ,PPHGLDWHO\ UHPRYH WKH GLVFKDUJHG EDWWHULHV ,I WKH FKHPLFDOOHDNLQWRWKHXQLWFOHDQLWz %DWWHULHV EDWWHU\ SDFN RU EDWWHULHV LQVWDOOHG VKDOO QRW EHH[SRVHGWRH[FHVVLYHKHDWVXFKDVVXQVKLQH¿UHRUWKHOLNH ■Bluetooth standby mode7KH ¿UVW WLPH WKH XQLW LV SOXJJHG LQ ZLWK$& SRZHU WKH XQLW ZLOOenter the Bluetooth VWDQGE\02'(Press the DEMO/[ECO]/ EXWWRQRQWKHPDLQXQLWRU'(02(&2EXWWRQRQWKHUHPRWHFRQWUROWRFKDQJHWKHPRGHBluetoothVWDQGE\mode 1BluetoothVWDQGE\mode 2(FRPRGH/RZpower consumption mode)'LVSOD\EDFNOLJKWBluetooth pairing LQGLFDWRUDQG6XEZRRIHUOLJKWRQ'LVSOD\EDFNOLJKWRIIBluetooth pairing LQGLFDWRURQDQG6XEZRRIHUOLJKWRII'LVSOD\EDFNOLJKWBluetooth pairing LQGLFDWRUDQG6XEZRRIHUOLJKWRIINote:During Bluetooth standby mode, NFC function is activated once your device touches the NFC detection area.System connectionsDo not connect the DC and AC power to the unit at the same time.To AC INPUT jackCAUTION:7235(9(17(/(&75,&6+2&.0$7&+ :,'( %/$'( 2) 3/8*72:,'(6/27)8//<,16(57/DEHOLVORFDWHGDWWKHERWWRPRIWKHXQLWThe safety marking and VWDWHPHQWODEHOAC outletAC 110 - 240 V~ 50/60 HzE-8](https://usermanual.wiki/S-and-O-ELECTRONICS/GXBT9/User-Guide-2488501-Page-8.png)
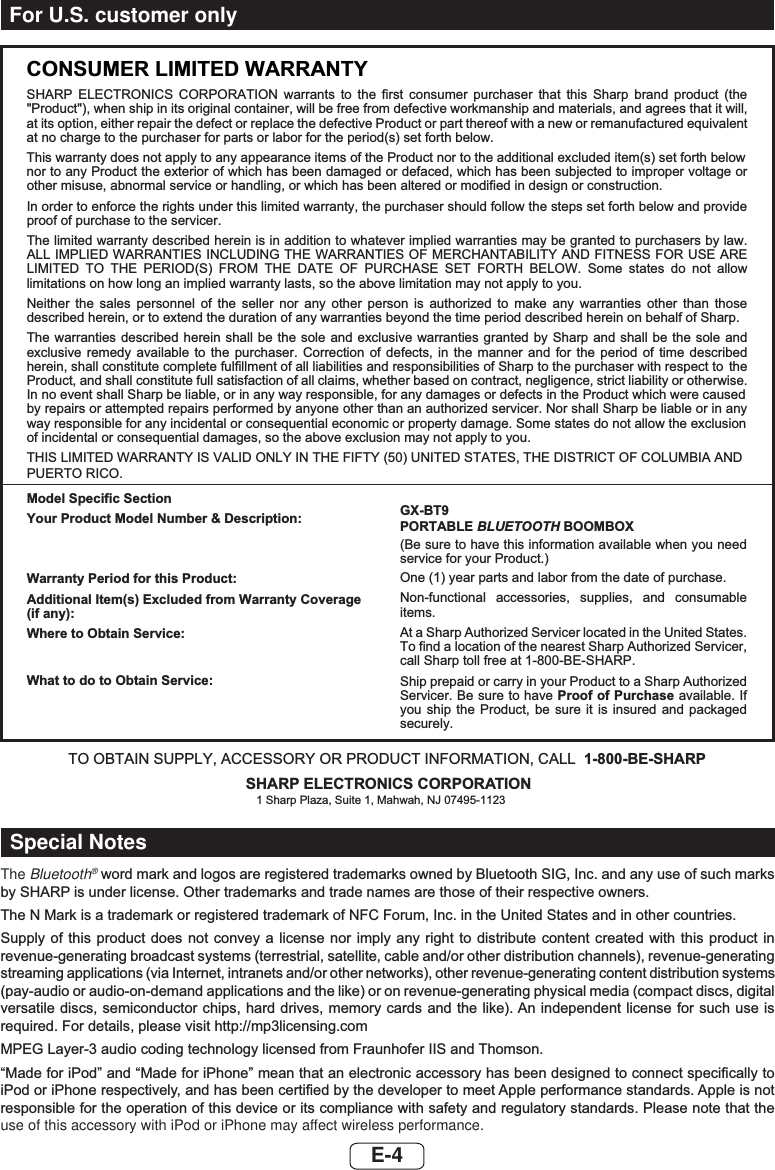
![Remote control ■Battery installation1 2SHQWKHEDWWHU\FRYHU2 ,QVHUWWKHVXSSOLHGEDWWHU\DFFRUGLQJWRWKHWHUPLQDOLQGLFDWHGLQWKHEDWWHU\FRPSDUWPHQW:KHQLQVHUWLQJRUUHPRYLQJWKHEDWWHU\SXVKLWWRZDUGWKH±EDWWHU\WHUPLQDOV3 Close the cover.Caution:z 5HPRYHWKHEDWWHU\LIWKHXQLWZLOOQRWEHXVHGIRUDORQJSHULRGRIWLPH7KLVZLOOSUHYHQWSRWHQWLDOGDPDJHGXHWREDWWHU\OHDNDJHz 'RQRWXVHUHFKDUJHDEOHEDWWHU\QLFNHOFDGPLXPEDWWHU\HWFz ,QVWDOOLQJ WKH EDWWHU\ LQFRUUHFWO\ PD\ FDXVH WKH XQLW WRmalfunction.z %DWWHULHV EDWWHU\ SDFN RU EDWWHULHV LQVWDOOHG VKDOO QRW EHH[SRVHGWRH[FHVVLYHKHDWVXFKDVVXQVKLQH¿UHRUWKHOLNHNotes concerning use:z 5HSODFH WKH EDWWHU\ LI WKH RSHUDWLQJ GLVWDQFH LV UHGXFHG RU LIWKHRSHUDWLRQEHFRPHVHUUDWLF3XUFKDVH³$$$´VL]HEDWWHU\806805+3RUVLPLODUz Periodically clean the transmitter on the remote control and the sensor on the unit with a soft cloth.z Exposing the sensor on the unit to strong light may interfere with operation. Change the lighting or the direction of the unit if this occurs.z .HHSWKHUHPRWHFRQWURODZD\IURPPRLVWXUHKHDWVKRFNDQGYLEUDWLRQV ■Test of the remote controlCheck the remote control after checking all the connections.Point the remote control directly at the remote sensor on the unit. 7KHUHPRWHFRQWUROFDQEHXVHGZLWKLQWKHUDQJHVKRZQEHORZREMOTE SENSORRemote sensor0.2 m - 6 m (8” - 20’ )Note:Exposing the infrared remote control to direct sunlight may cause WKHUHPRWHFRQWUROWREHLQRSHUDEOHCarrying the unitCaution:%HIRUH WUDQVSRUWLQJ WKH XQLW UHPRYH DOO FRQQHFWLRQ IURPWKH XQLW 7KHQ VHW WKH XQLW WR WKH SRZHU VWDQGE\ PRGHTransporting the unit with any device left connected might damage the unit. ■Using the carrying strap7KLVXQLWFDQEHFDUULHGE\XVLQJDVXSSOLHGFDUU\LQJVWUDS,QVHUWWKH FDUU\LQJ VWUDSFDUDELQHUKRRNWRHDFKHQG RIWKHXQLWDVVKRZQEHORZHoleTo remove the carrying strap&DUDELQHUKRRNHoleCautions:z %HIRUHFDUU\LQJWKHXQLWPDNHVXUHWKHFDUDELQHUKRRNLVSURSHUO\VHFXUHGDQGFORVHGRWKHUZLVHLWZLOOFDXVHGDPDJHand injury.z Carry this unit with FM antenna close to you and the display facing outward to avoid scratches on the display.Placing the unit7KLVXQLWFDQEHSODFHGLQSRVLWLRQVDVVKRZQEHORZCaution:z 0DNH VXUH WKDW WKH XQLW LV SODFHG RQ D ÀDW DQG OHYHOsurface.z Make sure to turn the unit carefully when adjusting the position.z Do not place the unit other than these 2 positions to avoid damage and injury.To get the best display viewing angle, place the unit as below.Position 1: On the shelf/table.TROPABLEM ISUOB CMOBG XOX-M1 PORTABLE MUSIC BOOMBOX GX-BT9Foot cushion 1 and 2 touching the surface.Position 2: 2QWKHÀRRUJURXQG PORTABLE MUSIC BOOMBOX GX-BT9Foot cushion 2 and 3 touching the surface.E-9](https://usermanual.wiki/S-and-O-ELECTRONICS/GXBT9/User-Guide-2488501-Page-9.png)
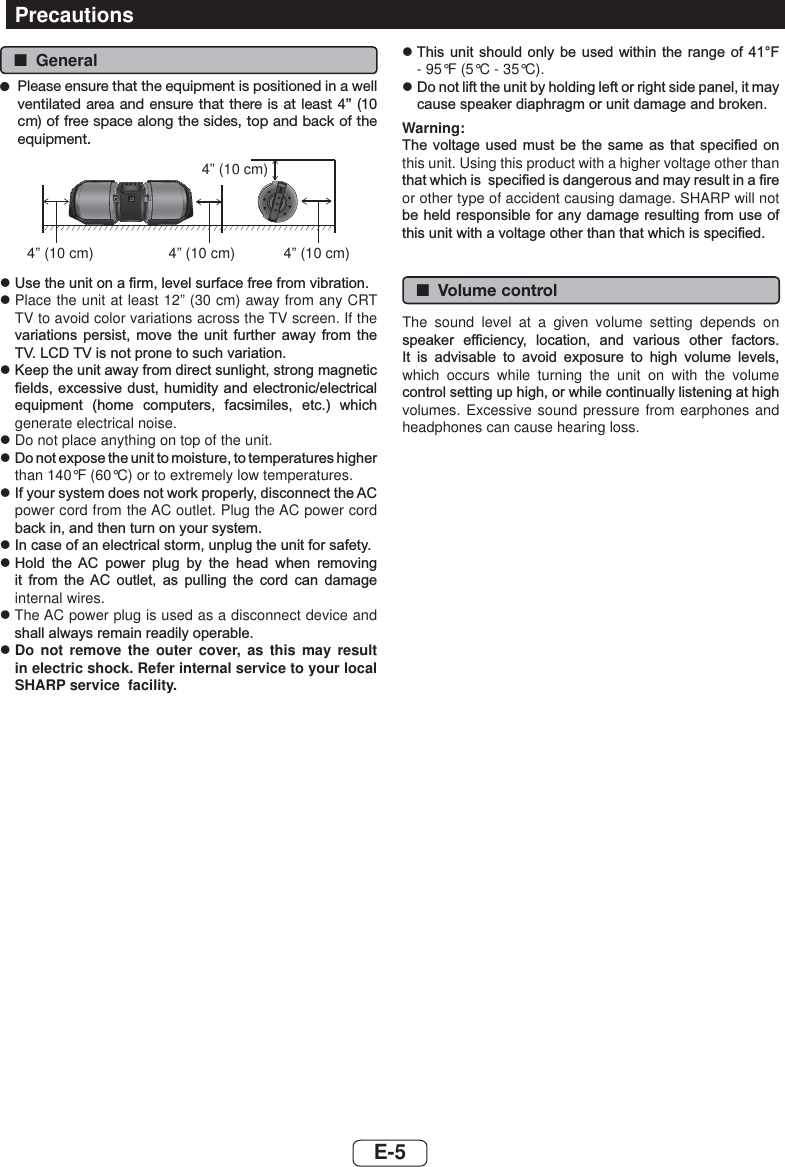
![PORTABLE MUSIC BOOMBOX GX-BT9REMOTE SENSORNote:7KLV SURGXFW LV QRW FRPSDWLEOH ZLWK 073 DQG$$& ¿OH V\VWHPVfrom USB mass storage device or MP3 player. ■To play back USB/MP3 player with folder mode off1 Press the USB /EXWWRQRQWKHUHPRWHFRQWURORUWKHPDLQXQLWto select USB function. Connect the USB memory device that KDV03:0$IRUPDW¿OHVRQWKHXQLW:KHQWKH86%PHPRU\LV FRQQHFWHG WR WKH PDLQ XQLW WKH GHYLFH LQIRUPDWLRQ ZLOO EHdisplayed.26HOHFWGHVLUHG¿OHWREHSOD\HGEDFNE\SUHVVLQJWKH or EXWWRQ3 Press the USB /EXWWRQ3OD\EDFNZLOOVWDUWDQGWKH¿OHQDPHZLOOEHGLVSOD\HG z 7LWOH $UWLVW DQG $OEXP QDPH DUH GLVSOD\HG LI WKH\ DUHrecorded in the USB memory device. z 'LVSOD\FRQWHQW FDQ EHFKDQJHG E\SUHVVLQJ WKH ',63/$<EXWWRQFile name display Folder displayCounter display$OEXPGLVSOD\ Artist displayTitle displayNote:7RSDXVHSOD\EDFNPress the USB /EXWWRQ ■To play back USB/MP3 player with folder mode on1 Press the USB /EXWWRQRQWKHUHPRWHFRQWURORUWKHPDLQXQLWto select USB function. Connect the USB memory device that KDV03:0$IRUPDW¿OHVRQWKHXQLW:KHQWKH86%PHPRU\LV FRQQHFWHG WR WKH PDLQ XQLW WKH GHYLFH LQIRUPDWLRQ ZLOO EHdisplayed.23UHVV WKH )2/'(5 EXWWRQ DQG SUHVV WKH 781,1* ( or ) EXWWRQWRVHOHFWGHVLUHGSOD\EDFNIROGHU7RVWDUWSOD\EDFNZLWKIROGHU PRGH RQ JR WR VWHS 7R FKDQJH WKH SOD\EDFN IROGHUpress the TUNING ( or )EXWWRQWRVHOHFWDQRWKHUIROGHU36HOHFWGHVLUHG¿OHWREHSOD\HGEDFNE\SUHVVLQJWKH or EXWWRQ4 Press the USB /RU(17(5EXWWRQ3OD\EDFNZLOOVWDUWDQGWKH¿OHQDPHZLOOEHGLVSOD\HG z 7LWOH $UWLVW DQG $OEXP QDPH DUH GLVSOD\HG LI WKH\ DUHrecorded in the USB memory device. z 'LVSOD\FRQWHQW FDQ EHFKDQJHG E\SUHVVLQJ WKH ',63/$<EXWWRQ ■To remove USB memory device1 Press the DEMO/[ECO]/ ( )EXWWRQWRVWRSSOD\EDFN2 Disconnect USB memory device from the USB terminal.Notes: ●6+$53 ZLOO QRW EH KHOG OLDEOH IRU WKH ORVV RI GDWD ZKLOH WKHUSB memory device is connected to the audio system. ●)LOHVFRPSUHVVHGLQ03DQGRU:0$IRUPDWFDQEHSOD\HGEDFNZKHQFRQQHFWHGWRWKH86%WHUPLQDO ●This USB memory’s format supports FAT 16 or FAT 32. ●SHARP cannot guarantee that all USB memory devices will work on this audio system. ●86%FDEOHLVQRWUHFRPPHQGHGIRUXVHLQWKLVDXGLRV\VWHPWRFRQQHFWWR86%PHPRU\GHYLFH8VHRIWKH86%FDEOHZLOOaffect the performance of this audio system. iPod and iPhone is not prone to this condition. ●7KLV86%PHPRU\FDQQRWEHRSHUDWHGYLD86%KXE ●The USB terminal in this unit is not intended for a PC FRQQHFWLRQ EXW LV XVHG IRU PXVLF VWUHDPLQJ ZLWK D 86%memory device. ●([WHUQDO +''VWRUDJH FDQQRW EH SOD\HG EDFN YLD 86%terminal. ●,IWKHGDWDLQVLGHWKH86%PHPRU\LVODUJHLWPD\WDNHORQJHUWLPHIRUWKHGDWDWREHUHDG ●7KLVSURGXFWFDQSOD\:0$DQG03¿OHV,WZLOODXWRPDWLFDOO\GHWHFWWKH¿OH W\SH EHLQJ SOD\HG,I XQSOD\DEOH ¿OH LVSOD\HGRQWKLVSURGXFW³1276837´LVLQGLFDWHGDQGWKH¿OHZLOOEHDXWRPDWLFDOO\VNLSSHG7KLVZLOOWDNHDIHZVHFRQGV,IDEQRUPDOLQGLFDWLRQVDSSHDURQWKHGLVSOD\GXHWRWKHXQVSHFL¿HG¿OHturn off the unit and then turn it on again. ●This product relates to USB mass storage devices and MP3 players. It may however face some irregularities due to various XQIRUHVHHQUHDVRQVIURPVRPHGHYLFHV6KRXOGWKLVKDSSHQturn off the unit and then turn it on again. ●03SOD\HU ZLOO QRW EH FKDUJLQJLQRWKHUWKDQ86%IXQFWLRQ+RZHYHU FKDUJLQJ DELOLW\ GHSHQGV RQ W\SH RI 03 SOD\HUused.Listening to USB mass storage device/MP3 playerE-16](https://usermanual.wiki/S-and-O-ELECTRONICS/GXBT9/User-Guide-2488501-Page-16.png)
![■Repeat play5HSHDW SOD\ FDQ SOD\ RQH WUDFN DOO WUDFNV RU D SURJUDPPHGsequence continuously.To repeat one track:Press the EXWWRQUHSHDWHGO\XQWLO³5(321(´DSSHDUV3UHVVthe USB /EXWWRQTo repeat all tracks:Press the EXWWRQ UHSHDWHGO\ XQWLO ³5(3$//´ DSSHDUV 3UHVVthe USB /EXWWRQTo repeat one folder (during folder mode on):Press the EXWWRQUHSHDWHGO\XQWLO³)2/'5(3´DSSHDUV3UHVVthe USB /EXWWRQTo repeat desired tracks:Perform steps 1 - 5 in “Programmed play” section and then press the EXWWRQUHSHDWHGO\XQWLO³5(3$//´DSSHDUVTo cancel repeat play:Press the EXWWRQUHSHDWHGO\XQWLO³1250$/´DSSHDUVDQG³ ” disappears.Caution:$IWHUSHUIRUPLQJUHSHDWSOD\EHVXUHWRSUHVVWKHDEMO/[ECO]/ ( ) EXWWRQ2WKHUZLVHWKHGHYLFHZLOOSOD\FRQWLQXRXVO\ ■Random play7KH WUDFNV RQ WKH GHYLFH FDQ EH SOD\HG LQ UDQGRP RUGHUautomatically.To random play all tracks:3UHVV 5'0 EXWWRQ RQ WKH UHPRWH FRQWURO XQWLO ³5$1'20´appears. Press the USB /EXWWRQTo cancel random play:3UHVVWKH5'0EXWWRQDJDLQ³5'0´LQGLFDWRUZLOOGLVDSSHDUNotes: ●If you press the EXWWRQGXULQJUDQGRPSOD\\RXFDQPRYH WR WKH WUDFN VHOHFWHG QH[W E\ WKH UDQGRP RSHUDWLRQ2QWKHRWKHUKDQGWKH EXWWRQGRHVQRWDOORZ\RXWRPRYHWRWKHSUHYLRXVWUDFN7KHEHJLQQLQJRIWKHWUDFNEHLQJSOD\HGZLOOEHORFDWHG ●,Q UDQGRP SOD\ WKH XQLW ZLOO VHOHFW DQG SOD\ WUDFNVDXWRPDWLFDOO\<RXFDQQRWVHOHFWWKHRUGHURIWKHWUDFNV ●,Q IROGHU PRGH RQ RQO\ WUDFNV LQ VHOHFWHG IROGHU ZLOO EHplayed randomly. ■Programmed play (MP3/WMA)1:KLOHLQWKHVWRSPRGHSUHVVWKH0(025<EXWWRQWRHQWHUWKHprogramming save mode.2 Press the TUNING ( or EXWWRQ RQ WKH UHPRWH FRQWURO WRselect the desired folder. Then press the or EXWWRQRQWKHUHPRWHFRQWUROWRselect the desired tracks.33UHVV WKH 0(025< EXWWRQ WR VDYH WKH IROGHU DQG WUDFNQXPEHU45HSHDWVWHSV±IRURWKHUIROGHUWUDFNV8SWRWUDFNVFDQEHSURJUDPPHG5 Press the USB /RU(17(5EXWWRQWRVWDUWSOD\EDFNTo cancel the programmed play mode:'XULQJ SURJUDPPHG VWRS PRGH SUHVV WKH DEMO/[ECO]/( EXWWRQ 7KH GLVSOD\ ZLOO VKRZ ³0(0&/($5´ DQG DOO WKHSURJUDPPHGFRQWHQWVZLOOEHFOHDUHGAdding tracks to the program:,IDSURJUDPKDVEHHQSUHYLRXVO\VWRUHGWKH³0(0´LQGLFDWRUZLOOEH GLVSOD\HG 3UHVV WKH 0(025< EXWWRQ 7KHQ IROORZ VWHSV - 3 to add tracks.Notes: ●'XULQJWKHSURJUDPRSHUDWLRQUDQGRPSOD\LVQRWSRVVLEOH ●,I\RXSUHVVWKH2167$1'%<EXWWRQWRHQWHUWKHBluetooth VWDQGE\ PRGH RU FKDQJH WKH IXQFWLRQ IURP WKH 86% WRDQRWKHUWKHSURJUDPPHGVHOHFWLRQVZLOOEHFOHDUHG ■Various USB functionsFunction Main unit Remote control OperationPlay Press in the pause mode.Pause Press in the SOD\EDFNPRGHTrack up/ downPress in the SOD\EDFNRUSDXVHmode. If you press the EXWWRQLQWKHSDXVHPRGHSUHVVWKH/EXWWRQWRVWDUWWKHdesired track.Fast forward/ reversePress and hold GRZQLQWKHSOD\EDFNmode.5HOHDVHWKHEXWWRQWRUHVXPHSOD\EDFNNotes: ●,I86%PHPRU\GHYLFHLVQRWFRQQHFWHG³120(',$´ZLOOEHshown on the display. ●Fast forward/reverse is invalid when playing back a variable bitrate file.Notes:z7KLV XQLW RQO\ VXSSRUWV ³03(* $XGLR /D\HU´ IRUPDW6DPSOLQJ)UHTXHQF\LVN+]z3OD\EDFNRUGHUIRU03¿OHVPD\GLIIHUGHSHQGLQJRQWKHZULWLQJVRIWZDUHXVHGGXULQJ¿OHGRZQORDGz%LWUDWH ZKLFK LV VXSSRUWHG E\ 03 LV a NESV :0$ LVaNESVz)RU03:0$¿OHVSOHDVHSXW³03´³:0$´H[WHQVLRQ)LOHVFDQQRWEHSOD\HGEDFNLIWKHUHLVQR03:0$H[WHQVLRQz Playlists are not supported on this unit.z This unit can display Folder Name or File Name up to 32 characters.z0D[LPXPWRWDOQXPEHURI03:0$¿OHVLVz7RWDO QXPEHU RI IROGHUV UHDG LV LQFOXGLQJ IROGHU ZLWK QRQSOD\DEOH¿OH+RZHYHUWKHGLVSOD\VKRZVRQO\IROGHUZLWK03¿OHVz7KHGLVSOD\SOD\EDFNWLPHPD\QRWEHGLVSOD\HGFRUUHFWO\ZKHQSOD\LQJEDFNDYDULDEOHELWUDWH¿OHz7KH ,'7$* LQIRUPDWLRQ VXSSRUWHG DUH 7,7/( $57,67 DQG$/%80RQO\7LWOHQDPHDUWLVWQDPHDQGDOEXPQDPHFDQEHGLVSOD\HGE\SUHVVLQJWKH',63/$<EXWWRQGXULQJ¿OHSOD\EDFNor pause mode.z:0$PHWDWDJDOVRVXSSRUWVWLWOHDUWLVWDQGDOEXPQDPHZKLFKDUH UHFRUGHG LQ :0$ ¿OHV &RS\ULJKW SURWHFWHG :0$ ¿OHVFDQQRWEHSOD\HGEDFNAdvanced USB playbackE-17](https://usermanual.wiki/S-and-O-ELECTRONICS/GXBT9/User-Guide-2488501-Page-17.png)
![PORTABLE MUSIC BOOMBOX GX-BT9REMOTE SENSOR ■Tuning13UHVVWKH2167$1'%<EXWWRQWRWXUQWKHSRZHURQ23UHVV WKH 781(5 EXWWRQ RQ WKH UHPRWH FRQWURO RU 781(5$8',2,1EXWWRQRQWKHPDLQXQLWUHSHDWHGO\WRVHOHFW)06WHUHRor FM Mono.3 Press the TUNING ( or EXWWRQRQWKHUHPRWHFRQWUROWRWXQHin to the desired station. z Manual tuning: Press the TUNING ( or EXWWRQUHSHDWHGO\WRWXQHLQWRthe desired station. z Auto tuning: When the TUNING ( or EXWWRQLVSUHVVHGIRUPRUHWKDQVHFRQGV VFDQQLQJZLOOVWDUWDXWRPDWLFDOO\DQGWKH WXQHUZLOOVWRSDWWKH¿UVWUHFHLYDEOHEURDGFDVWVWDWLRQNotes:z:KHQ UDGLR LQWHUIHUHQFH RFFXUV DXWR VFDQ WXQLQJ PD\ VWRSautomatically at that point.z Auto scan tuning will skip weak signal stations.z7R VWRS WKH DXWR WXQLQJ SUHVV WKH 781,1* or EXWWRQagain.To receive an FM stereo transmission:z3UHVVWKH781(5EXWWRQWRVHOHFWVWHUHRPRGHDQG³67´LQGLFDWRUZLOOEHGLVSOD\HG³ ´ZLOODSSHDUZKHQDQ)0EURDGFDVWLVLQstereo.z,IWKH)0UHFHSWLRQLVZHDNSUHVVWKH781(5EXWWRQWRH[WLQJXLVKWKH³67´LQGLFDWRU7KHUHFHSWLRQFKDQJHVWRPRQDXUDODQGWKHVRXQGEHFRPHVFOHDUHU ■Memorizing a station<RXFDQ VWRUH )0 VWDWLRQVLQ PHPRU\ DQG UHFDOO WKHPDW WKHSXVKRIDEXWWRQ3UHVHWWXQLQJ1 Perform steps 1 - 3 in “Tuning”.23UHVVWKH0(025<EXWWRQ3:LWKLQVHFRQGVSUHVVWKH35(6(7 or EXWWRQWRVHOHFWWKH SUHVHW FKDQQHO QXPEHU 6WRUH WKH VWDWLRQV LQ PHPRU\ LQRUGHUVWDUWLQJZLWKSUHVHWFKDQQHO4:LWKLQ VHFRQGV SUHVV WKH 0(025< EXWWRQ WR VWRUH WKDWVWDWLRQ LQ PHPRU\ ,I WKH ³0(0´ LQGLFDWRU DQG SUHVHW QXPEHUGLVDSSHDUEHIRUHWKHVWDWLRQLVPHPRUL]HGUHSHDWWKHRSHUDWLRQfrom step 2.55HSHDWVWHSV WRVHWRWKHUVWDWLRQVRUWRFKDQJH DSUHVHWVWDWLRQ:KHQDQHZVWDWLRQLVVWRUHGLQWKHPHPRU\WKHVWDWLRQSUHYLRXVO\ PHPRUL]HG IRU WKDW SUHVHW FKDQQHO QXPEHU ZLOO EHerased.Note:7KH EDFNXS IXQFWLRQ SURWHFWV WKH PHPRUL]HG VWDWLRQV IRU D IHZGD\VVKRXOGWKHUHEHDSRZHUIDLOXUHRUWKH$&SRZHUFRUGEHFRPHdisconnected. ■To recall a memorized station1 Press the PRESET ( or EXWWRQIRUOHVVWKDQVHFRQGVWRselect the desired station. ■To scan the preset stations7KHVWDWLRQVVDYHGLQWKHPHPRU\FDQEHVFDQQHGDXWRPDWLFDOO\(Preset memory scan)1 Press the PRESET ( or EXWWRQIRUPRUHWKDQVHFRQGV7KHSUHVHWQXPEHUZLOOÀDVKDQGWKHSURJUDPPHGVWDWLRQVZLOOEHWXQHGLQVHTXHQWLDOO\IRUVHFRQGVHDFK2 Press the PRESET ( or EXWWRQ DJDLQ ZKHQ WKH GHVLUHGstation is located. ■To erase entire preset memory13UHVVWKH2167$1'%<EXWWRQWRHQWHUWKHSRZHURQ23UHVV781(5EXWWRQRQWKHUHPRWHFRQWURORU781(5$8',2,1EXWWRQRQWKHPDLQXQLWWRVHOHFW781(5IXQFWLRQ33UHVV DQG KROG &/($5 EXWWRQ RQ WKH UHPRWH FRQWURO XQWLO³781&/($5´DSSHDUVListening to the radioE-18](https://usermanual.wiki/S-and-O-ELECTRONICS/GXBT9/User-Guide-2488501-Page-18.png)

![Maintenance ■Cleaning the cabinet3HULRGLFDOO\ZLSHWKHFDELQHWZLWKDVRIWFORWKDQGDGLOXWHGVRDSVROXWLRQWKHQZLWKDGU\FORWKCaution:z'RQRWXVHFKHPLFDOVIRUFOHDQLQJJDVROLQHSDLQWWKLQQHUHWF,WPD\GDPDJHWKHFDELQHWz Do not apply oil to the inside of the unit. It may cause malfunctions.6SHFL¿FDWLRQV$VSDUWRIRXUSROLF\RIFRQWLQXRXVLPSURYHPHQW6+$53UHVHUYHVWKH ULJKW WR PDNH GHVLJQ DQG VSHFL¿FDWLRQ FKDQJHV IRU SURGXFWLPSURYHPHQWZLWKRXW SULRU QRWLFH7KHSHUIRUPDQFHVSHFL¿FDWLRQ¿JXUHV LQGLFDWHG DUH QRPLQDO YDOXHV RI SURGXFWLRQ XQLWV 7KHUHPD\EHVRPHGHYLDWLRQVIURPWKHVHYDOXHVLQLQGLYLGXDOXQLWV ■GeneralPower source AC 110 - 240 V ~ 50/60 Hz15 V 806805[DC IN 12 V Power consumption AC: Power on: 30 WDC 12 V: 4.5 A Dimensions Width: 30 - 5/16’’ (750 mm)Height: 10 - 13/16” (275 mm)Depth: 11 - 1/16” (280 mm)Weight (without batteries and accessories)OEVNJWeight (with batteries)$SSUR[LPDWHO\OEVNJ ■AmplifierOutput power Front speaker:RMS: Total 34 watt (17 W per channelLQWRRKPVDWN+]7+'FTC: 12.5 watt minimum RMS per channel into 3 ohms from 200 Hz to 20 N+]7+'6XEZRRIHURMS: Total 66 watt into 3 ohms DW+]7+'FTC: 50 watt minimum RMS into 3 ohms from 70 Hz to 200 +]T.H.D.Output terminals +HDGSKRQHVUHFRPPHQGHGInput terminals Audio In (audio signal):500 mV/47 k ohms0LF,QSXWNPP*XLWDUN0PP ■Bluetooth interfaceBluetooth Frequency Band 2.400GHz - 2.480GHzCompatible Bluetooth Profile A2DP (Advanced Audio Distribution Profile), AVRCP (Audio/Video Remote Control Profile)Bluetooth 2.1 +EDR ■USB (MP3 / WMA)USB host interface z Complies with USB 1.1 (Full Speed)/2.0 Mass Storage Class.z Support Bulk only and CBI protocol.6XSSRUW¿OH z03(*/D\HUz WMA (Non DRM)Bitrate support z03aNESVz:0$aNESVOtherz0D[LPXPWRWDOQXPEHURI03:0$¿OHVLVz0D[LPXPWRWDOQXPEHURIIROGHUVLV,1&/86,9(RIURRWGLUHFWRU\z The ID3TAG information supported DUH7,7/($57,67DQG$/%80RQO\z Supports ID3TAG version 1 and version 2.File system supportz Support USB devices with FAT 16/ FAT 32. ■TunerFrequency range FM: 87.5 - 108.0 MHzPreset 40 (FM station) ■SpeakerType 2-way type speaker systemFront Speakers:´FP)XOO5DQJH6XEZRRIHU´FP- Woofer (light-up)Maximum input power Front Speakers: 34W / Channel6XEZRRIHU:&KDQQHORated input power Front Speakers: 17W / Channel6XEZRRIHU:&KDQQHO6SHFL¿FDWLRQVFRQWLQXHGE-22](https://usermanual.wiki/S-and-O-ELECTRONICS/GXBT9/User-Guide-2488501-Page-22.png)