S3 Graphics S3G003 GRAPHIC CARD User Manual 1
S3 Graphics Co., Ltd. GRAPHIC CARD Users Manual 1
Contents
- 1. Users Manual 1
- 2. Users Manual 2
- 3. Users Manual 3
Users Manual 1

© 2009 S3 Graphics Co., Ltd. All rights reserved 1/5/2009
www.s3graphics.com SG195-B.1
User Guide
to graphics software
for CHROME 400 Series
and CHROME 500 Series

User Guide for Chrome 400/500 Series Graphics
SG195-B.1 1/5/2009
Page 2
S3 Graphics Terms and Conditions of Software Use
Please read these Terms and Conditions carefully before you download, install or use any S3 Graphics
Software. By installing the S3 Graphics Software, you accept all the Terms and Conditions of this Agreement. If
you do not agree to the Terms and Conditions of this Agreement, do not use the S3 Graphics Software.
S3 GRAPHICS CO., LTD. PROVIDES THIS DRIVER PACKAGE SO THAT YOU MAY USE S3 GRAPHICS
SOFTWARE WITH A S3 GRAPHICS CHIP AND RECEIVES SUCH UPDATES AND SUPPORT FOR THE S3
GRAPHICS CHIP AS S3 GRAPHICS MAY ELECT TO PROVIDE. THE SOFTWARE AND ANY UPDATES S3
GRAPHICS MAY ELECT TO PROVIDE ARE REFERRED TO AS THE "SOFTWARE.". S3 GRAPHICS IS
WILLING TO LICENSE THE SOFTWARE TO YOU ONLY UPON THE CONDITION THAT YOU ACCEPT ALL
OF THE FOLLOWING TERMS AND CONDITIONS. IF YOU DO NOT AGREE WITH THE TERMS AND
CONDITIONS, YOU SHOULD PROMPTLY EXIT THIS SERVICE. YOU MAY NOT DUPLICATE ALL OR ANY
PART OF THE ITEMS CONTAINED IN THE SOFTWARE PACKAGE, OR CREATE DERIVATIVE WORKS
BASED IN WHOLE OR IN PART ON THE S3 GRAPHICS ITEMS, EXCEPT AS EXPRESSLY SET FORTH IN
THESE TERMS AND CONDITIONS.
Software License: Except as otherwise provided by an S3 Graphics License Agreement to which you are a
party, you (i) may only use the Software on a single system that contains the S3 Graphics Chip that the
Software is designed for, (ii) may not use the Software for any other purpose or reproduce, decompile, reverse
engineer, disassemble or otherwise reduce the Software to human-readable form, (iii) may make one copy of
the Software for backup purposes only, and (iv) acknowledge that all copies of the Software in whatever form
provided are the sole property of S3 Graphics, and that you have no right, title or interest in the Software or any
copies of the Software, except as expressly provided in these Terms and Conditions.
Warranty: YOUR USE OF S3 GRAPHICS ITEMS IS AT YOUR OWN RISK. THE SOFTWARE IS PROVIDED
"AS IS" WITHOUT WARRANTY OF ANY KIND, EXPRESS OR IMPLIED, INCLUDING, BUT NOT LIMITED TO
IMPLIED WARRANTIES OF MERCHANTABILITY, FITNESS FOR A PARTICULAR PURPOSE AND AGAINST
INFRINGEMENT. CONDITIONS OF USE OF THE S3 GRAPHICS ITEMS ARE BEYOND S3 GRAPHICS'
KNOWLEDGE AND CONTROL, AND S3 GRAPHICS ASSUMES NO LIABILITY FOR RESULTS OBTAINED
OR LOSS OR DAMAGE INCURRED AS A RESULT OF THE APPLICATION OF THE DATA, INFORMATION
OR SOFTWARE CONTAINED ON THE WEB OR IN S3 GRAPHICS ITEMS.
No Liability for Damages: IN NO EVENT SHALL S3 GRAPHICS BE LIABLE FOR ANY DAMAGES
WHATSOEVER (INCLUDING WITHOUT LIMITATION, DAMAGES FOR LOSS OF BUSINESS PROFITS,
CONSEQUENTIAL OR INCIDENTAL DAMAGES) ARISING FROM THE USE OF OR INABILITY TO USE THE
SOFTWARE. IN NO EVENT WILL S3 GRAPHICS ENTIRE LIABILITY TO YOU FOR ALL DAMAGES, LOSSES
AND CAUSES OF ACTION EXCEED THE AMOUNT PAID BY YOU FOR THE SOFTWARE.
Export Restrictions: You agree that you will not, directly or indirectly, export the S3 Graphics Items including
the Software to any country to which such export is restricted by applicable U.S. export control laws without the
prior consent, if required, of the U.S. Department of Commerce or such other governmental entity as any have
jurisdiction over such export.
Complete Agreement: These Terms and Conditions, together with your S3 Graphics License Agreement, if
any, constitute the entire agreement between you and S3 Graphics with respect to the use of the web site and
the S3 Items including the Software.
Term: These Terms and Conditions are effective until terminated. These Terms and Conditions will terminate
immediately without any notice from S3 Graphics if you fail to comply with any provision of these Terms and
Conditions. Upon termination, you must destroy S3 Graphics Items including the Software and any related
documentation that you may have.
Copyright 2009. S3 Graphics Co., Ltd. All rights reserved.

User Guide for Chrome 400/500 Series Graphics
SG195-B.1 1/5/2009
Page 3
FCC Notice
This device has been tested and found to comply with the limits for a Class B digital device
pursuant to Part 15 of the FCC Rules. These limits are designed to provide reasonable protection
against harmful interference in a residential installation. This device generates, uses, and can
radiate radio frequency energy and, if not installed and used in accordance with the instructions,
may cause harmful interference to radio communications.
However, there is no guarantee that interference will not occur in a particular installation. If this
device does cause harmful interference to radio or television reception, which can be determined
by turning the device off and on, the user is encouraged to try to correct the interference by one or
more of the following measures:
• Reorient or relocate the receiving antenna
• Increase the separation between the device and receiver
• Connect the device into an outlet on a circuit different from that to which
the receiver is connected
• Consult the dealer or an experienced radio/television technician for help
Conditions of Use
This device complies with Part15 of the FCC Rules. Operation is subject to the following two
conditions: (1) This device may not cause harmful interference, and (2) This device must accept
any interference received, including interference that may cause undesired operation.
Caution
The manufacturer is not responsible for any radio or TV interference caused by unauthorized
modifications to this equipment. Such modifications could void the user’s authority to operate the
equipment.

User Guide for Chrome 400/500 Series Graphics
SG195-B.1 1/5/2009
Page 4
TABLE OF CONTENTS
TABLE OF CONTENTS 4
SECTION 1 INTRODUCTION 7
1.1 How to Use this Guide 7
1.2 Technology Summary 8
1.3 System Requirements 8
1.4 Identification 9
1.5 Modes 9
1.5.1 Windows Modes 9
1.5.2 HDMI Compatible Modes 9
1.5.3 Device Specific Modes 10
SECTION 2 INSTALL HARDWARE 11
2.1 Before you Install your Board 11
2.2 Your Board Components 12
2.3 Install Your New Board 13
2.4 Attach Video Cables 14
2.5 Finish Connections and Power On 16
SECTION 3 INSTALL SOFTWARE 17
SECTION 4 DISPLAY SETTINGS BASICS 21
4.1 Screen Resolution and Color Quality 22
4.2 Basic Display Settings 24
4.3 Adjust Resolution, Color Quality and Refresh at the Same Time 28
4.4 Specify a Lower Color Quality for Older Applications 28
SECTION 5 MONITOR CONFIGURATION BASICS 29
5.1 Monitor Definition 29
5.2 Refresh Rate Adjustment 30
5.3 Using Multiple Monitors 32
5.3.1 Typical Display Device Combinations 33
5.3.2 Enabling a Multiple Monitor Clone Display 34
5.3.3 Display Device Attachment and Detection 36
SECTION 6 S3 SCREENTOYS BASICS 38
6.1 Basic Navigation to S3 ScreenToys 38
6.2 S3 ScreenToys Dialog Basics 39
6.2.1 Title Bar and Banner 39
6.2.2 Monitors List 40
6.2.3 Buttons 41
6.2.4 Window Exit 42
6.2.5 Left Menus 46
6.2.6 Right Panel Controls 47

User Guide for Chrome 400/500 Series Graphics
SG195-B.1 1/5/2009
Page 5
6.3 S3 ScreenToys Tab 50
6.4 S3 Taskbar Icon 52
6.5 CHROME® Menu 53
6.5.1 CHROME® Menu General Settings 53
6.5.2 CHROME® Menu and S3 ScreenToys Preferences 55
6.5.3 CHROME® Menu Access to S3 ScreenToys 58
6.5.4 CHROME® Menu for Display Devices and Modes 59
SECTION 7 S3 SCREENTOYS DEVICE MANAGEMENT 63
7.1 S3 ScreenToys Device Management Display Controls 63
7.1.1 Display Icons 64
7.1.2 Display Options dropdown list 69
7.1.3 Display Context Menus 70
7.2 S3 ScreenToys Device Management Display Settings 71
7.3 Fine Tuning CRT 74
7.4 Fine Tuning DVI 77
7.5 Fine Tuning HDMI 80
7.5.1 Advanced: HDMI Options 83
7.6 Fine Tuning S3 HD Audio 86
7.7 Fine Tuning LCD 87
SECTION 8 MORE DISPLAY SPECIFIC PAGES 89
8.1 S3 ScreenToys Desktop Color 89
8.2 S3 ScreenToys Rotation 94
SECTION 9 TOOLS FOR THE VIDEO ENTHUSIAST 97
9.1 Video Requirements 97
9.2 Video Viewing with Application Software 98
9.3 S3 ScreenToys Video Color Settings 99
9.4 S3 ScreenToys ChromoVision for HDMI 103
9.5 S3 ScreenToys Chromotion Video 106
SECTION 10 TOOLS FOR THE 3D ENTHUSIAST 109
10.1 S3 ScreenToys 3D Settings 109
10.1.1 S3 ScreenToys 3D Settings Application List 109
10.1.2 S3 ScreenToys 3D Settings Features and Settings 111
10.1.3 S3 ScreenToys 3D Settings Features Descriptions 113
10.1.4 S3 ScreenToys 3D Settings Feature Descriptions for OpenGL-only 116
10.2 S3 ScreenToys and MultiChrome 117
SECTION 11 POWER MANAGEMENT CONTROLS 118
11.1 S3 ScreenToys Power Management 118
SECTION 12 DISPLAY IDENTIFICATION & INFORMATION 122
12.1 S3 ScreenToys Information 122
12.2 Information from Control Panel System 125
12.3 WinS3ID for Chip Identification 126

User Guide for Chrome 400/500 Series Graphics
SG195-B.1 1/5/2009
Page 6
SECTION 13 MAINTENANCE GUIDE 127
13.1 Finding Driver Updates 127
13.2 Installing Driver Updates 127
13.3 Software Removal 128
13.3.1 Software Removal with Vista Uninstall 128
13.3.2 Software Removal with XP Add/Remove Programs 129
13.3.3 Software Removal Using Device Manager 130
SECTION 14 TROUBLESHOOTING 132
No Display on System Boot 132
Lost Monitor Information 132
Use Video Display Help 132
HOW TO References 133
Windows Driver Roll Back feature 133
Software Updates 134
DirectX Diagnostic Tool 134
SECTION 15 GLOSSARY 136

User Guide for Chrome 400/500 Series Graphics
SG195-B.1 1/5/2009
Page 7
SECTION 1 INTRODUCTION
This S3 Graphics User Guide provides instruction for the installation and removal
of display drivers and associated utilities for the Windows Vista and Windows XP
operating systems using S3 Graphics CHROME 500 Series GPUs.
1.1 How to Use this Guide
This section summarizes the basic conventions used in S3 Graphics User Guide
instructions.
Subject to Change: S3 Graphics continues software enhancements throughout
the life of a product. The images provided as illustrations of utility and user
selection options are always subject to change and may not be identical either in
appearance or in options to the software your vendor has provided. This guide is
compatible with S3 Graphics software as of the document date.
Installation instructions assume you have a vendor-supplied CD which contains
S3 Graphics software customized for your S3 Graphics hardware. The
instructions in this document assume that the source drive for the software is a
hard drive or CD-ROM drive mapped by the system as drive D:. If installation is
from another source, replace D: with the appropriate source drive location.
Instructions also assume that your operating environment is either:
• Windows Vista SP1 or
• Windows XP with SP3 and includes the latest release of DirectX.
These environments provide an optimized user experience with your S3
Graphics’ hardware.
Most examples show the appearance and behavior representative of the
Windows Vista operating system. Windows XP will behave similarly, but not
necessarily identically, unless noted otherwise.
User Guide for Chrome 400/500 Series Graphics
SG195-B.1 1/5/2009
Page 8
1.2 Technology Summary
The PCI Express™ CHROME 500 Series products are S3 Graphics’ high
performance 3D graphics and video processors that combine hardware
acceleration for Microsoft’s DirectX™ 10.1 Shaders with the Hi-Def™ high
definition display capabilities and the advanced ChromotionHD 2.0
Programmable Video Engine. The CHROME 500 Series brings stunning image
quality, incredible 3D graphics performance, as well as tremendous flexibility
including a wide range of feature rich products for desktop and mobile
applications, offering a perfect balance of performance, power, and value. The
unified driver support and commercial grade drivers remain true to S3 Graphics’
reputation for reliable, high quality graphics solutions.
CHROME 500 Series Features
PCIe 2.0 x16/x8/x4/x1 support
Shader Model 4.1, Microsoft DirectX 10.1 Unified Shader Architecture
Supports Direct3D and OpenGL applications
Hi-Def integrated encoder supporting all 18 ATSC DTV formats
ChromotionHD 2.0 Programmable Video Engine
Enhanced H.264, MPEG-2 HD, VC-1 and WMV9-HD HW acceleration
ArtisticEffectsTM Video Filters
ChromoVisionTM full screen video for secondary digital display
HDMI/DP/DVI/LCD/CRT integrated display support
High performance 400MHz 10-bit DAC
Display resolutions up to 2048x1536, 32bpp on CRT
Display resolutions up to 2560x1600 with Dual-link DVI
Dual DVI or HDMI support for independent DuoViewTM
DuoRotateTM two display Independent rotation
1.3 System Requirements
S3 Graphics requires the following minimum system and software:
Computer Intel Core2 Duo, Core2 Quad, Pentium 4 or Celeron,
AMD Athlon Dual-Core, Single-Core, 64 FX
VIA Nano, VIA C7 or later compatible processor
Expansion Slot PCIe
Operating
System This user guide is compatible with Windows Vista SP1 or
Windows XP with SP3
Display Output DVI, HDMI or CRT capable of displaying at least VGA
800 x 600
User Guide for Chrome 400/500 Series Graphics
SG195-B.1 1/5/2009
Page 9
1.4 Identification
This guide is compatible with current S3 Graphics CHROME 400 Series and
CHROME 500 Series graphics adapters. The graphics chipset Vendor ID is 5333
for S3 Graphics.
S3 Graphics CHROME 500 Series products include the following. The Device ID
for desktop products is 9060.
CHROME 500 Series CHROME 400 Series
CHROME 530 GT CHROME 440 GTX
(others in future) CHROME 430 GT
CHROME 430 GS
1.5 Modes
Available display resolutions for CHROME 400/500 Series products will depend
on the types of devices (DVI, HDMI, and CRT). The device configuration and the
signals the GPU receives from the display device also influence available
resolutions.
1.5.1 Windows Modes
These Windows desktop modes are supported for most CRT and DVI display
devices in both single and dual display configurations, up to the capabilities of
the detected devices:
800 x 600 at 8, 16, 32 bpp Refresh Max 100
1024 x 768 at 8, 16, 32 bpp Refresh Max 100
1280 x 960 at 8, 15, 32 bpp Refresh Max 85
1280 x 1024 at 8, 16, 32 bpp Refresh Max 100
1600 x 1200 at 8, 16, 32 bpp Refresh Max 100
1.5.2 HDMI Compatible Modes
The following default display resolutions are provided for HDMI, assuming the
resolutions are reported as supported by the connected HDMI. Additional modes
may be available, including wide screen modes, if the detected device reports
wide-screen support.
640 x 480p
720 x 480p
720 x 576p
1280 x 720p
1920 x 1080p

User Guide for Chrome 400/500 Series Graphics
SG195-B.1 1/5/2009
Page 10
1.5.3 Device Specific Modes
The following additional modes may be accessible if reported as supported by a
connected display device. Supported modes are not limited to the list below, and
may include wide screen modes, if the detected device reports wide-screen
support.
848 x 480 at 8, 16, 32 bpp Refresh Max 60
1152 x 864 at 8, 16, 32 bpp Refresh Max 75
1280 x 768 at 8, 16, 32 bpp Refresh Max 85
1360 x 768 at 8, 16, 32 bpp Refresh Max 60
1400 x 1050 at 8, 16, 32 bpp Refresh Max 85
1680 x 1050 at 8, 16, 32 bpp Refresh Max 85
1920 x 1200 at 8, 16, 32 bpp Refresh Max 85
1920 x 1440 at 8, 16, 32 bpp Refresh Max 85
2048 x 1536 at 8, 16, 32 bpp Refresh Max 75
2560 x 1600 at 8, 16, 32 bpp Refresh Max 60
User Guide for Chrome 400/500 Series Graphics
SG195-B.1 1/5/2009
Page 11
SECTION 2 INSTALL HARDWARE
Review documentation provided by your system vendor. Some systems, for
example Dual-PCIe slotted systems, may require special configuration.
If your S3 Graphics GPU is integrated into your system’s motherboard, skip to
section 2.4 to begin attaching video cables to the system.
2.1 Before you Install your Board
DO NOT INSTALL THE SOFTWARE UNTIL YOU
INSTALLED THE HARDWARE IN YOUR SYSTEM
Windows Vista and Windows XP are capable of using Plug and
Play detection to assist in the installation of new hardware. Your
new S3 Graphics board must be installed before software
installation is attempted so that the operating system can detect
the presence of the new hardware.
Warning: To avoid accidental electric shock, shut your computer
down and unplug the power cord. To avoid damage from static
electrical discharge and to ground yourself, touch the metal
chassis on your computer before starting any procedures below.
User Guide for Chrome 400/500 Series Graphics
SG195-B.1 1/5/2009
Page 12
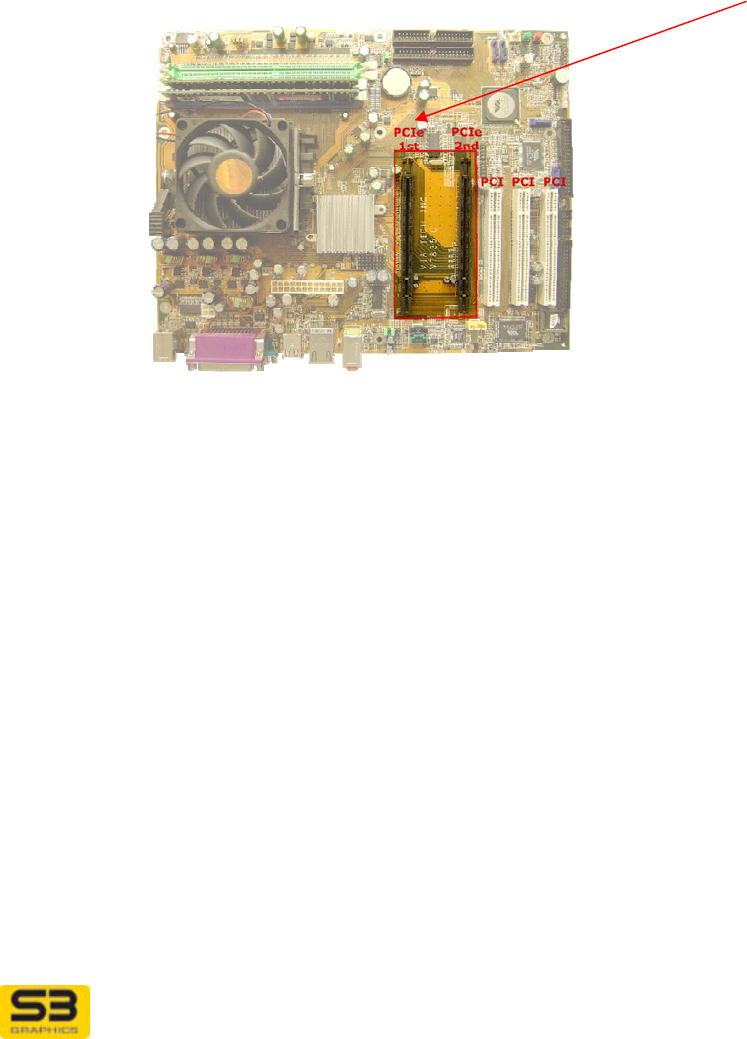
2.2 Your Board Components
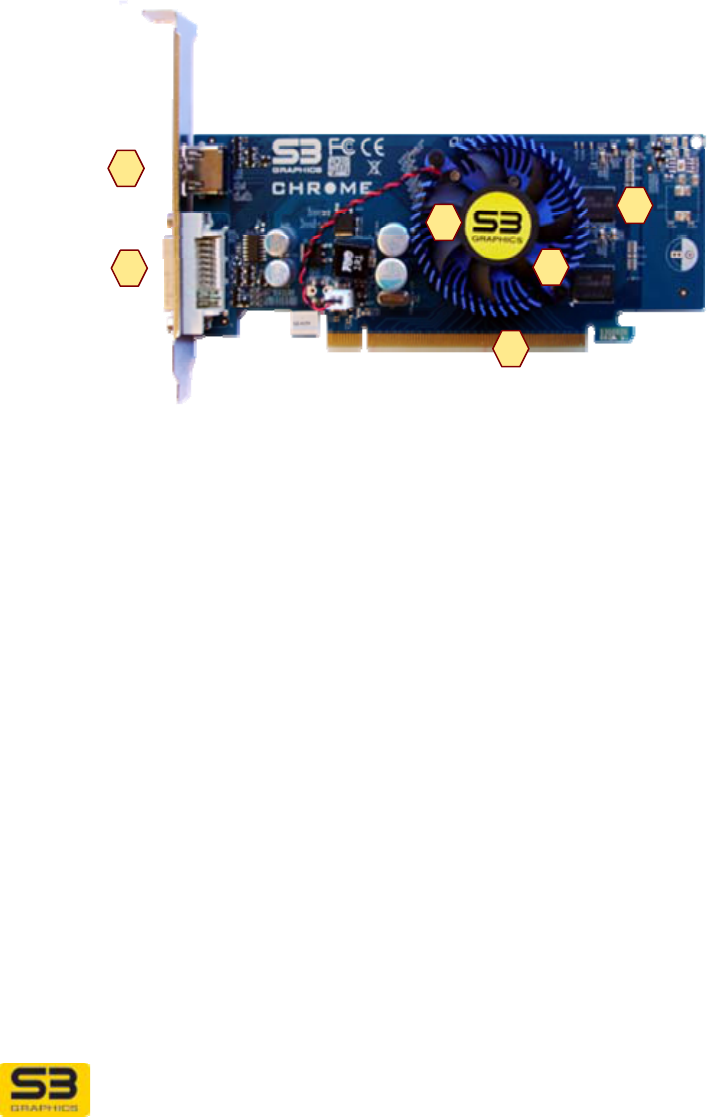
The following diagram shows a typical CHROME 500 Series PCIe board layout
with its major components and connections.
1 CHROME 500 Series GPU (under fan-
sink)
2 Video RAM
(under fan-sink)
3 Fan-sink
4 PCIe Interface
5 HDMI Receptacle
6 DVI Receptacle
Note: Your board may appear different than the above example. For instance,
your board may be blue in color instead of green. Or your board may have a
different fan-sink. Or your board may have a second HDMI or DVI receptacles, or
may have a CRT receptacle.
6
5
2
1
4
3
User Guide for Chrome 400/500 Series Graphics
SG195-B.1 1/5/2009
Page 13
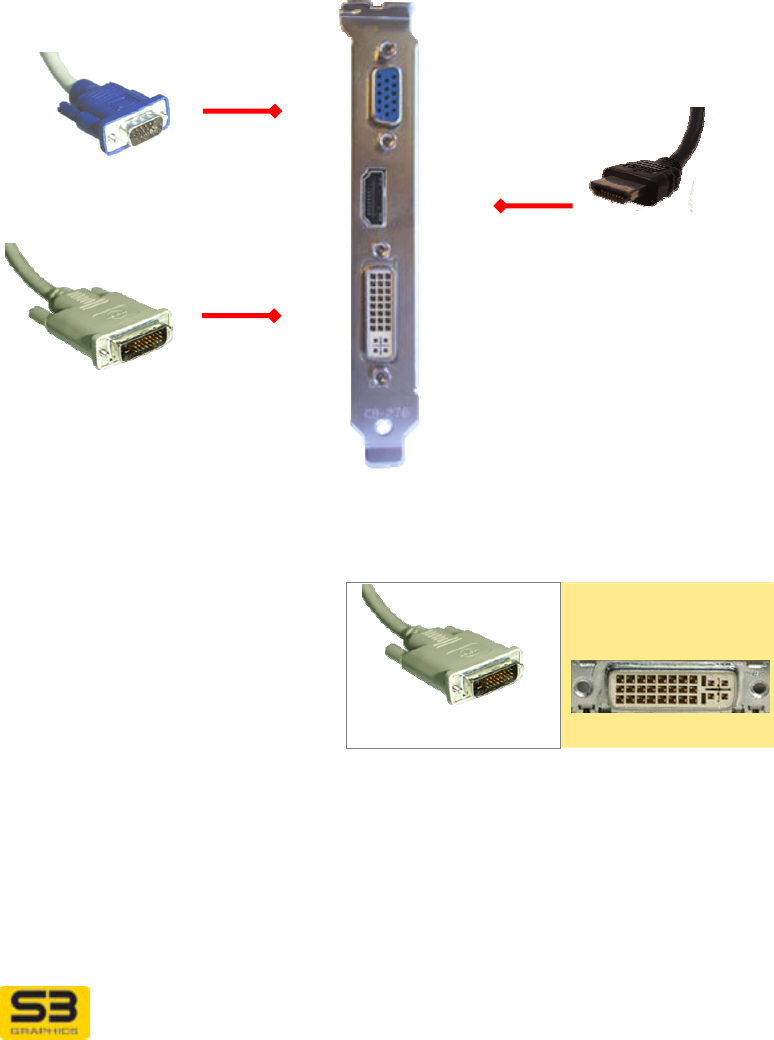
2.3 Install Your New Board
1. Turn the power off and unplug your system.
2. Remove your computer cover and locate the slot where you will insert your
new graphics card in a PCIe (PCI Express) slot (usually dark brown color).
For a dual PCIe slot system, a single graphics board is usually installed in the
slot closest to the CPU.
3. Remove any existing VGA card in the slot you want to use. If the slot was
empty, remove the bracket plate associated with the slot. You may need to
remove the screw which attaches the card or bracket to the case.
4. Ground yourself by touching the metal chassis on your computer before
handling your board.
5. Align your S3 Graphics board directly above the slot. Your board is designed
to fit only one way.
6. Insert your board firmly into the slot. Take care to press it evenly and snugly
into its slot. Do not force.
7. With the board securely in its slot, attach it to the computer frame with the
mechanism or screw you removed in Step 3.
8. Secure your computer cover.
User Guide for Chrome 400/500 Series Graphics
SG195-B.1 1/5/2009
Page 14
2.4 Attach Video Cables
Video output connections must be correctly attached to your system to enable
the video display capabilities of your new S3 Graphics board.
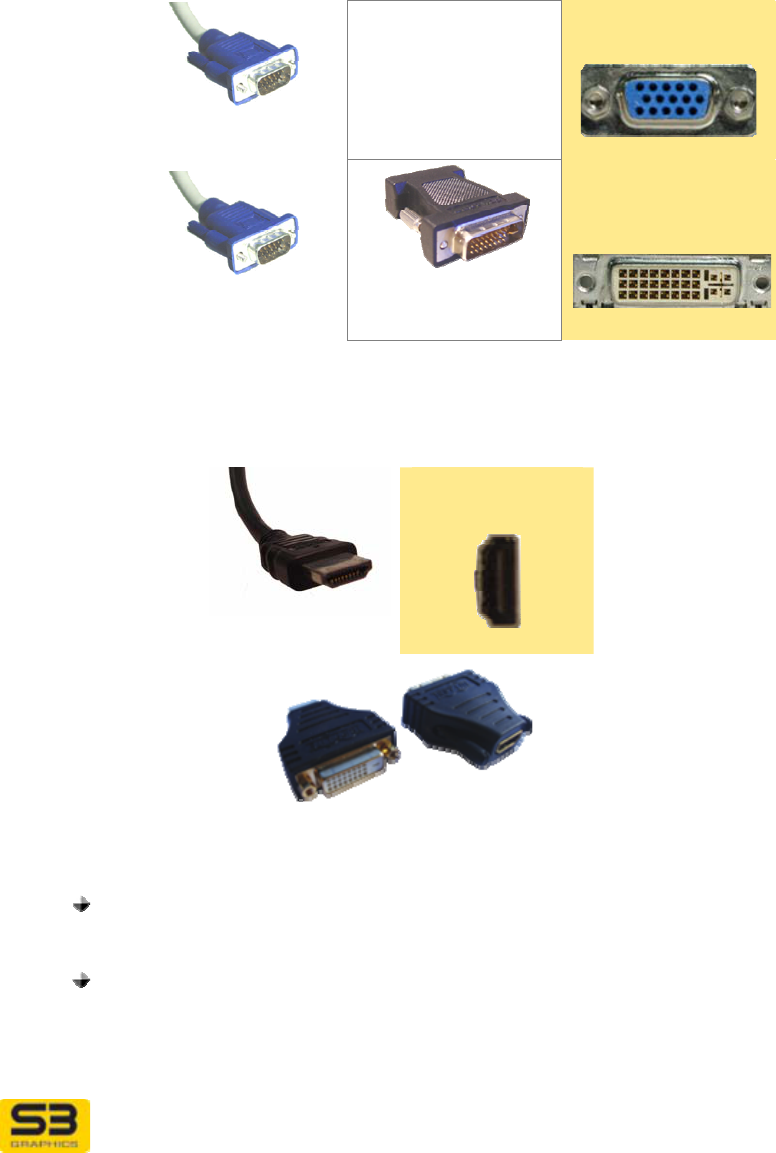
The connections available on the bracket of your graphics board may look similar
to the following example.
CRT:
DVI:
HDMI:
Connect at least one display output device.
9. To output display to a DVI panel device, connect the DVI plug at the end of
your monitor cable to the DVI-I connector receptacle on your graphics board.
Cable with DVI plug
Receptacle for
DVI out
User Guide for Chrome 400/500 Series Graphics
SG195-B.1 1/5/2009
Page 15
10. To output display to a CRT device, connect your CRT monitor cable to the
CRT receptacle if your board has one. Otherwise, use a CRT-DVI converter
dongle. Connect the dongle to the DVI-I connector receptacle on your
graphics board.
Cable with CRT plug
Receptacle for
CRT out
Cable with CRT plug CRT to DVI converter
dongle
DVI-I Receptacle can
be used for
CRT out
11. To output display to your HDMI Device, connect your HDMI cable to the
HDMI connector receptacle located on your board.
HDMI Plug
Receptacle for
HDMI Out
Dongles for HDMI/DVI
Special Notes for HDMI:
If a HDMI-DVI dongle is used to attach a DVI Display monitor to the
HDMI receptacle on the graphics board, the resulting output will be
DVI and S3 HD Audio will not be available.
If a DVI-HDMI dongle is used to attach a HDMI Display monitor to the
DVI receptacle on the graphics board, the resulting output will be
HDMI and S3 HD Audio will be available for configuration under
Windows Vista or Windows XP.

User Guide for Chrome 400/500 Series Graphics
SG195-B.1 1/5/2009
Page 16
Microsoft Windows Vista provides an HD Audio software driver,
which must be installed and activated for S3 HD Audio to be
available.
To use S3 HD Audio with Windows XP, you must have
Windows XP Service Pack 3 installed. Additionally, you need
to set S3 HD Audio as the default audio device in the Sound
page of the Control Panel.
2.5 Finish Connections and Power On
12. Re-connect any other detached cables.
13. Plug your system into its electrical source. Confirm the display output devices
(DVI, CRT, HDMI) you want to use are powered.
Tip: Even when you have connected multiple output devices, your
system will reboot on a single display. Dual display will not be available
until you have are in Windows and have initialized a dual display
configuration.
14. Reboot your system. Continue with software installation.
User Guide for Chrome 400/500 Series Graphics
SG195-B.1 1/5/2009
Page 17
SECTION 3 INSTALL SOFTWARE
Driver packages for S3 Graphics GPUs (from CD or download) should always
include a companion set of display drivers and multi-language utilities.
Depending on the source of your download package, the package may be
compressed, and a driver install tool may also be included.
These instructions detail an initial installation of S3 Graphics driver software.
Step 1. Have your CD with S3 Graphics software available. You will need
it later.
Step 2. Install your board with a S3 Graphics GPU by following the
Hardware Installation instructions in Section 2.
Step 3. Turn on the system.
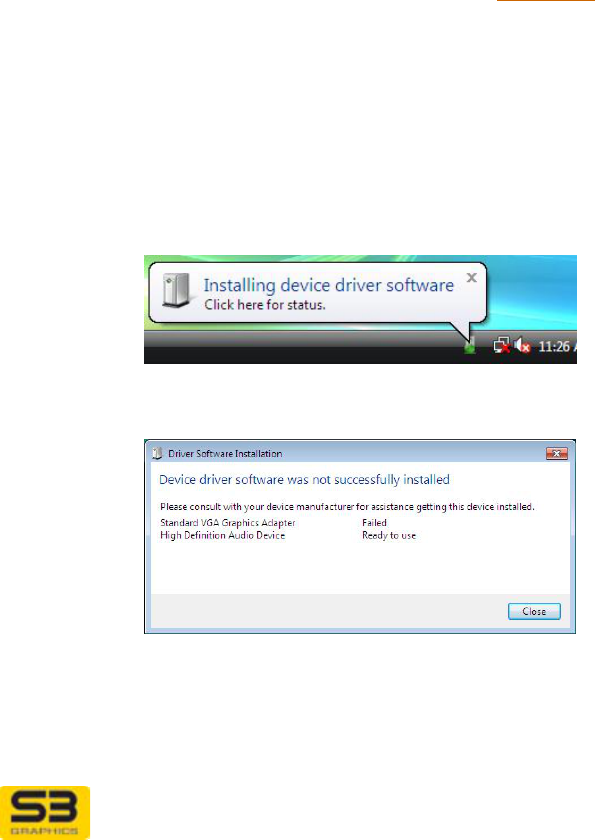
Step 4. For Vista: Because your CHROME 400/500 Series GPU is newer
than Windows Vista, the operating system will not be able to
recognize the GPU. As Windows Vista launches, follow any on-
screen prompts as the operating system initially installs a generic
low resolution Microsoft-provided device driver. (Rarely, the
operating system may prompt you for an install location.)
Installation status will be reported.
As the installation finishes, a Windows Vista message box will tell
you if a restart is required. Restart as requested.
To install your vendor- or S3 Graphics-provided software with S3
ScreenToys utilities, proceed from Step 5, below.
User Guide for Chrome 400/500 Series Graphics
SG195-B.1 1/5/2009
Page 18
(Alternate method: see instructions in the Driver Maintenance
section under Installing Driver Updates.)
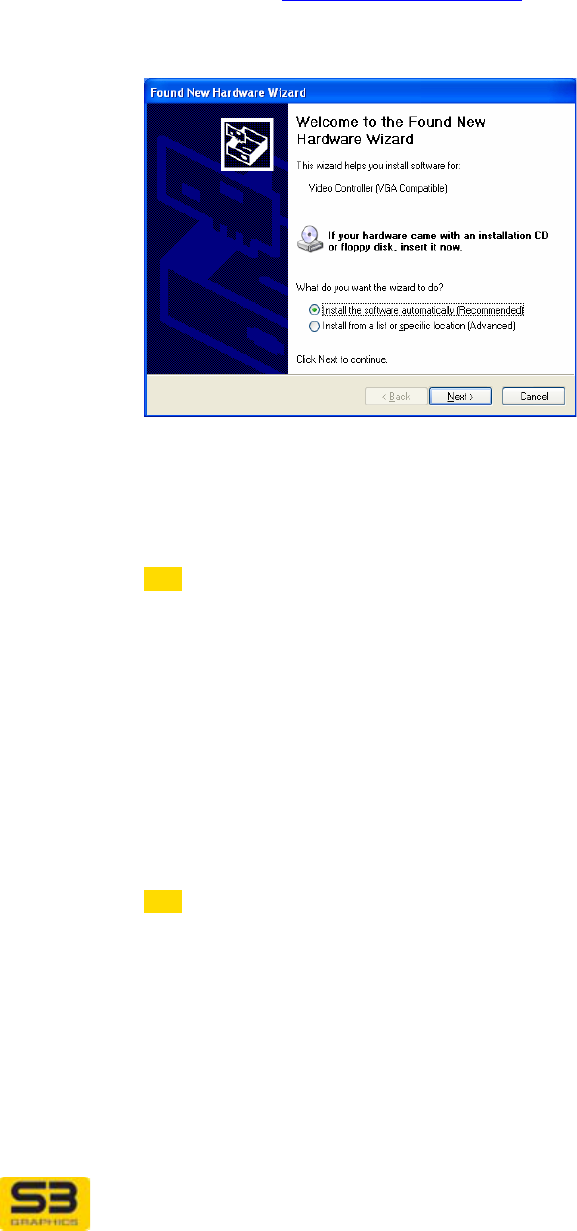
Step 4. For Windows XP: As Windows XP launches, a Found New
Hardware Wizard message window appears.
Continuing for both Windows Vista and Windows XP:
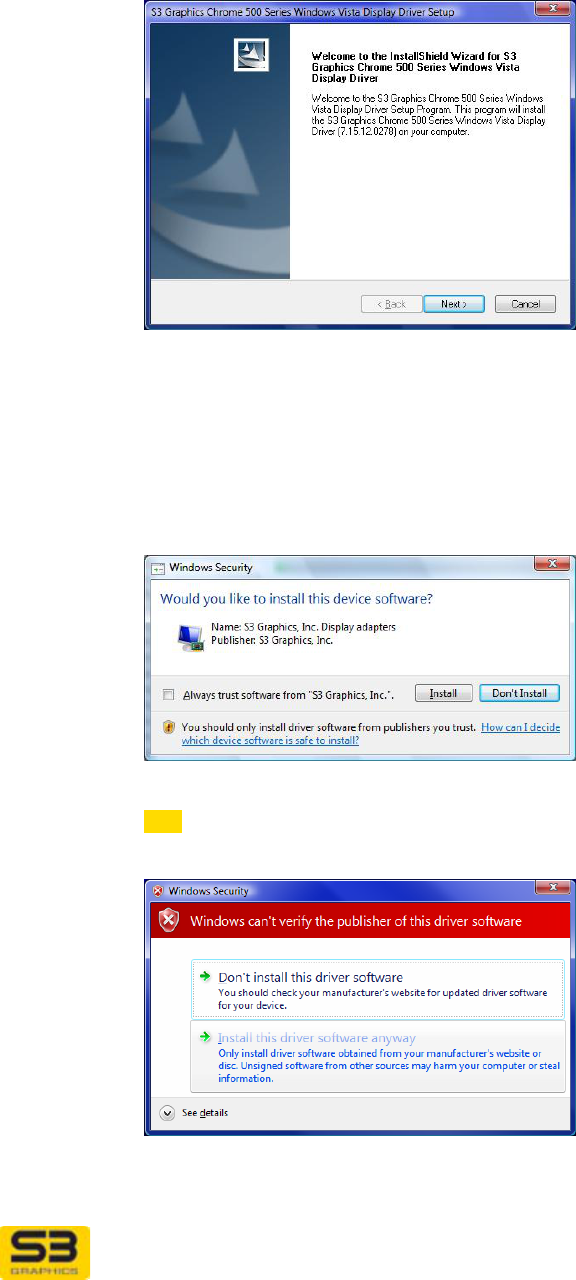
Step 5. Insert your CD with S3 Graphics software in your CD-ROM drive.
The CD should auto-run and launch the install tool.
Tip: If your CD does not auto-run an install program, Click Start, Run
and Browse to D:\S3G_CHROME5x_Vista_xxxxxx.exe (where D: is
your CD-ROM drive) and the exe filename includes the S3 Graphics
product abbreviation, the name of the operating system and version
number. (This filename is the typical format for a compressed package.)
Click Open. Installation from the compressed package should proceed
similar to the method described below, except that the files will first be
expanded to a local folder.
If your package is already uncompressed, it may be located in a local
subdirectory, called S3Graphics/S3Graphics_CHROME5x… To launch
the tool, navigate into the desired folder and Click Open on the
appropriate “setup.exe” file, for example,
C:\S3Graphics\S3Graphics_CHROME5x… \SETUP.EXE.
Tip: The wizard cannot find a driver in a compressed file. If your driver is
already expanded, you can alternately, click Next to Install the software
automatically. The Wizard will look for the appropriate drivers, copy
drivers and related software to your system, and proceed automatically
with the installation. The screen will report Please wait while the wizard
installs the software…
If you cannot find any install program or do not want to locate the drivers
automatically, select Install from a list or specific location (Advanced),
click Next, and browse to the directory where the uncompressed S3
Graphics display adapter driver files reside.
User Guide for Chrome 400/500 Series Graphics
SG195-B.1 1/5/2009
Page 19
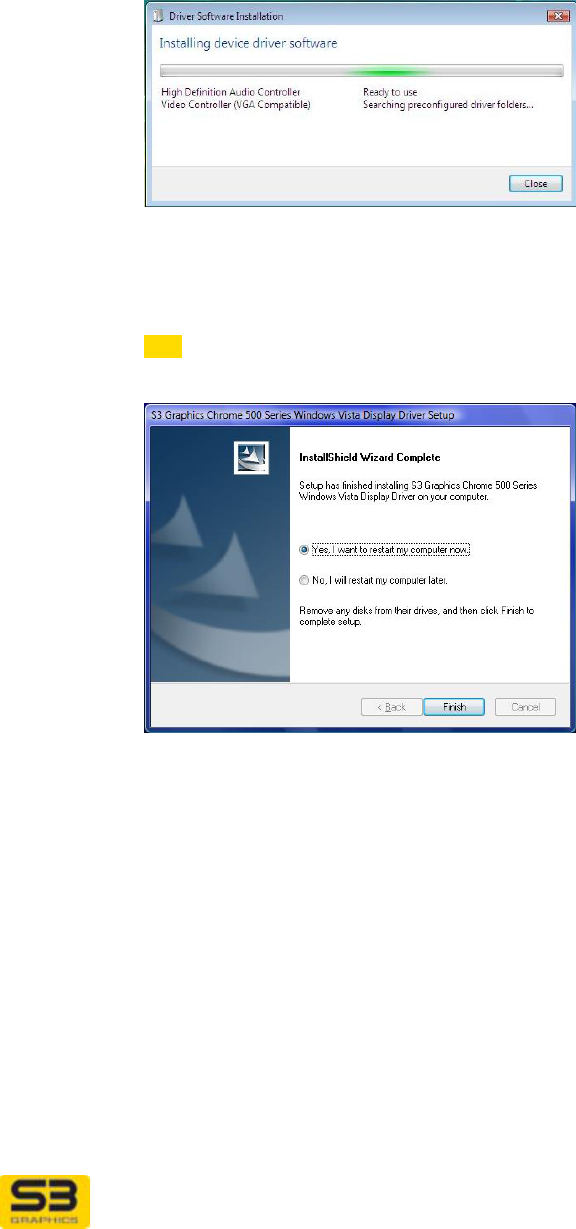
Step 6. Proceed with the installation by responding to any on screen
prompts that appear.
Step 7. If a window appears asking you to accept the S3 Graphics license
agreement, click I accept and then click Next to continue the
installation.
In the Windows Security dialog, click Install.
Tip: If a message window appears indicating your software “has not
passed Windows Logo testing”, click Continue Anyway to force the
installation.
Step 8. Note that the screen may go blank for a second or two during the
driver installation process. This is normal.
User Guide for Chrome 400/500 Series Graphics
SG195-B.1 1/5/2009
Page 20
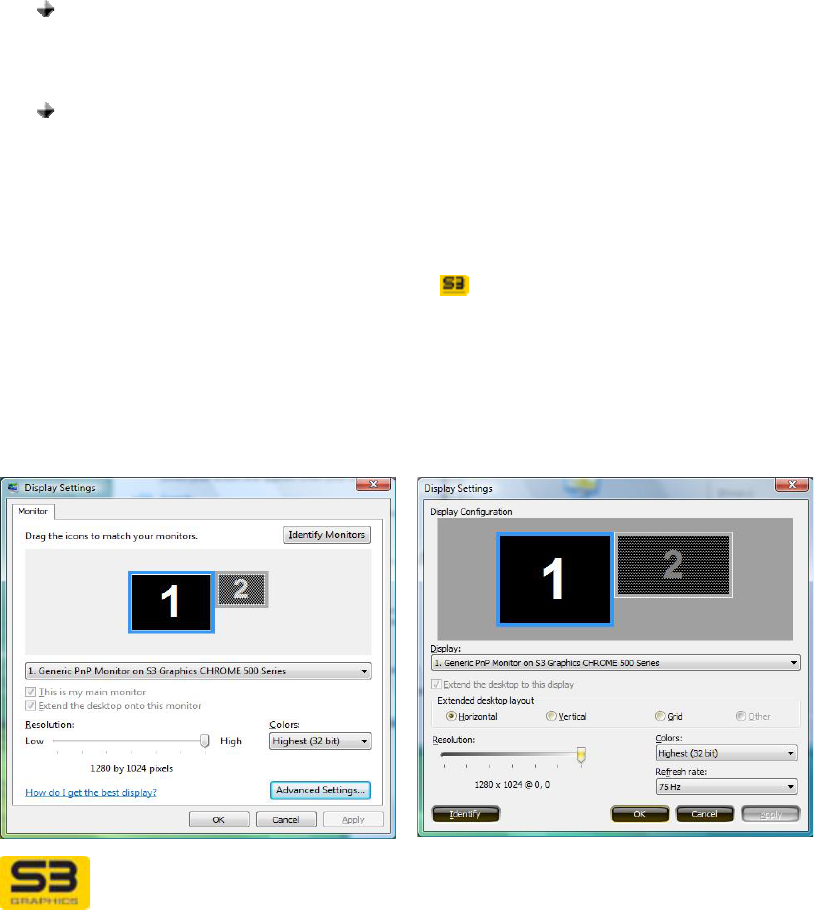
Step 9. The install process may take a few minutes.
Step 10. If the Completing the Found New Hardware Wizard window
appears, click Finish.
Tip: Depending on the current state of the system and the software
installed, a reboot may be required to fully initialize the software.
Step 11. Congratulations. Your S3 Graphics software is now installed.
User Guide for Chrome 400/500 Series Graphics
SG195-B.1 1/5/2009
Page 21
SECTION 4 DISPLAY SETTINGS BASICS
Windows operating systems give you the ability to customize your graphics
desktop through the Display Settings pages and controls. This section outlines
the basic controls provided by the operating system, some of which are also
accessible from S3 ScreenToys links. Subsequent sections of this manual will
detail the use of the additional controls which are available through the S3
Graphics ScreenToys utilities.
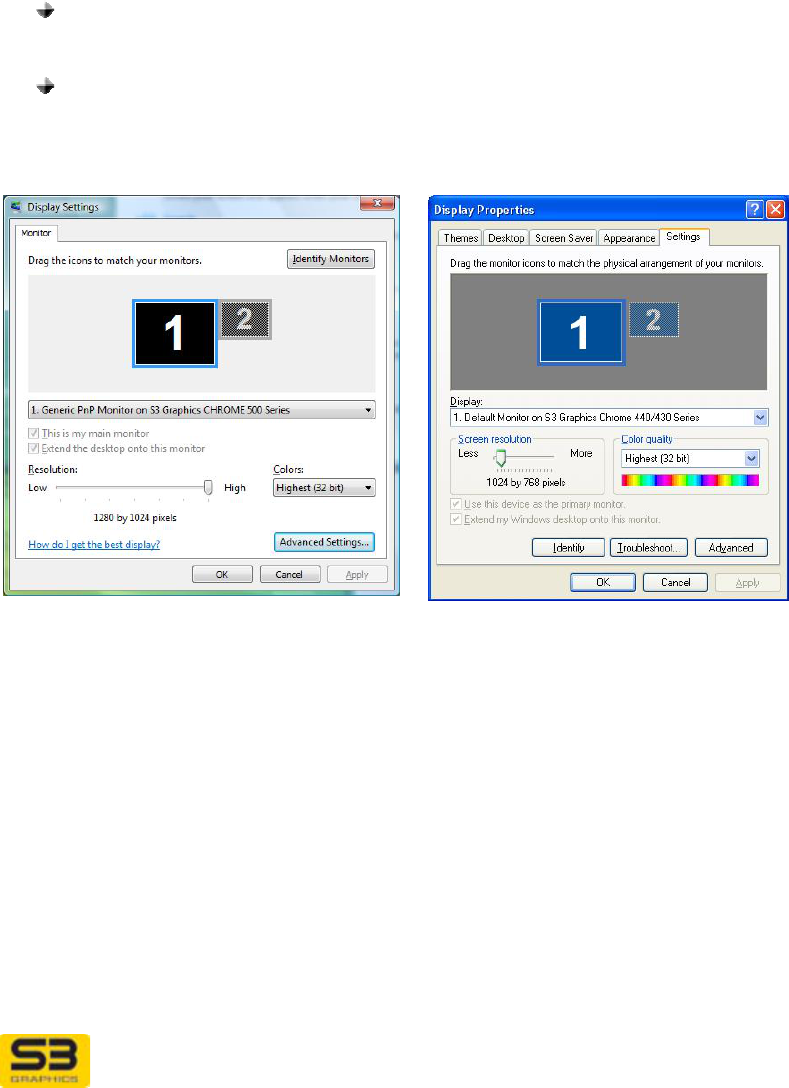
Basic display driver settings can be configured through the Display Settings
dialog window (XP: Display Properties dialog window, Settings tab).
To open the Display Settings page:
Right click in any unpopulated area of the Desktop.
o Vista: Click Personalize. Click Display Settings.
o XP: Click Properties.
or
Click Start, then Settings, then Control Panel.
o Vista: Click Appearance and Personalization. In the
Personalization area, click Adjust screen resolution.
o XP: Double-click the Display icon in the Control Panel folder.
Some, but not all, of the basic display setting adjustments can also be accessed
on a Display Settings Display configuration dialog which can be launched
from the Options dropdown list menu on the ScreenToys Device
management page.
Windows Vista
Display Settings Monitor
(access from Control Panel
Personalize Display Settings)
Windows Vista
Display Settings Display
configuration (access from S3
ScreenToys Device management
Options dropdown list menu)
User Guide for Chrome 400/500 Series Graphics
SG195-B.1 1/5/2009
Page 22
4.1 Screen Resolution and Color Quality
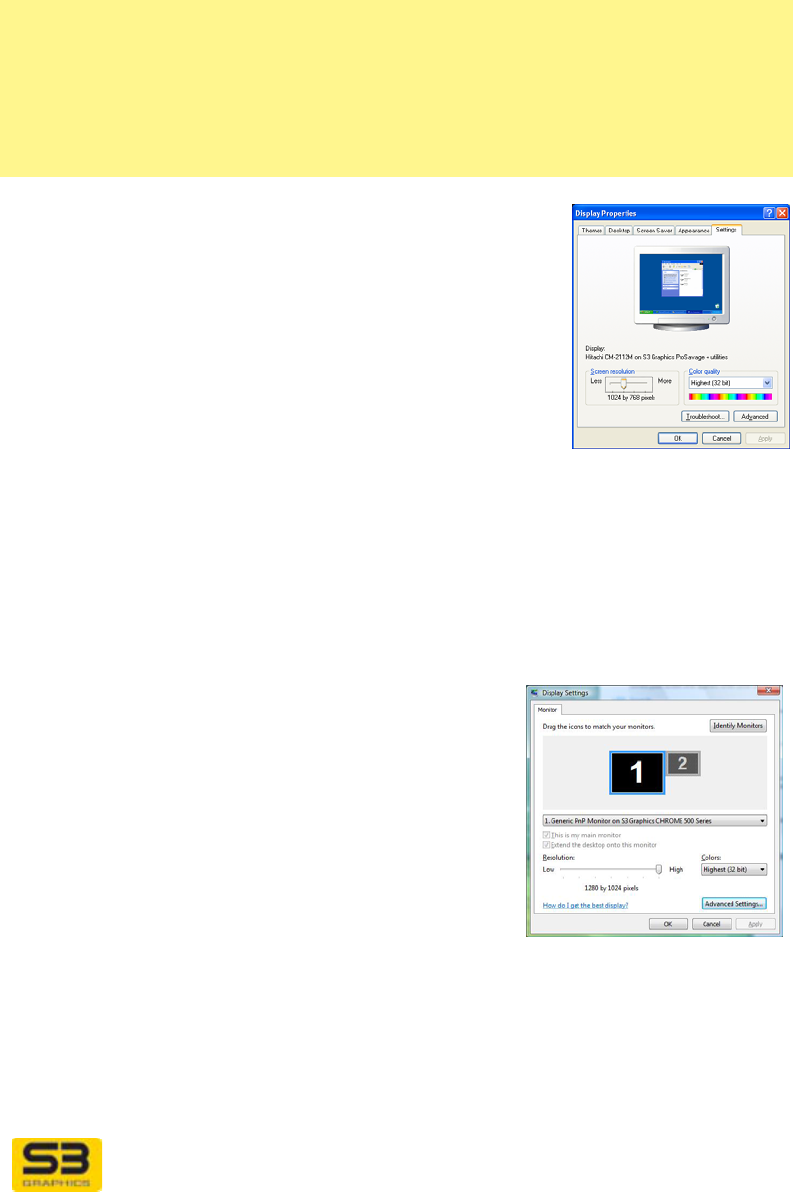
Control the desktop’s screen resolution and color quality through the Windows
Vista Display Settings dialog or the Windows XP Display Properties Settings.
ACCESS: The basic display settings window is accessible when you:
Vista: right click on any unpopulated area of the Desktop. Click
Personalize. Click Display Settings. The Display Settings window
appears open on the Monitor tab.
XP: right click on any unpopulated area of the Desktop. Click Properties.
The Display Properties window appears. Click the Settings tab.
Vista Display Settings XP Display Properties Settings

User Guide for Chrome 400/500 Series Graphics
SG195-B.1 1/5/2009
Page 23
OPTIONS:
Settings for Basic
Display Use these settings to adjust basic settings for each
display device. Each display output device can be
configured with independent settings. If you have
multiple displays, use the dropdown list to select the
display for which you wish to configure basic settings.
Resolution
(XP Screen
resolution) area
Slide the Resolution slider bar to the desired resolution.
Sliding the bar to the right selects a higher resolution,
which will display the image using more pixels per inch
of screen area. This produces a sharper image with
more detail.
Tip: If you change to a high resolution and find the desktop
fonts and icons are too small, they can be adjusted by clicking
Personalization, then Change desktop icons or Adjust font
size (DPI) in the left menu column (XP: Display Properties,
then clicking Appearance tab) and selecting your
preferences.
Colors (XP Color
quality) area Color quality or color depth is usually measured in bits
per pixel (BPP), and indicates the size of the color
palette of available colors for use in the screen image:
Windows Description
Highest (32 bit) True Color
Medium (16 bit) High Color (65536 colors)
Click the down arrow to the right of the color dropdown
list to view the available options for Colors. Click on
your desired color depth.
Tip: Use of 32 bit color is preferred by most users. However,
for some applications or with very high resolution
configurations, selection of 16 bit color will provide better
performance.
User Guide for Chrome 400/500 Series Graphics
SG195-B.1 1/5/2009
Page 24
4.2 Basic Display Settings
General Display
Settings For Windows Vista these settings appear on the Display
Settings/Monitor tab. For Windows XP these settings
appear on the Display Properties/Settings tab.
Use these settings to identify and adjust the
relationships between your monitors when you have
multiple display output devices.
Display Monitor
Icon area This area contains the Monitor icons which represent the
relationships between your
displays.
If only one output device is
supported by your configuration
(as in the Windows XP example
at right), only one monitor icon
will appear and the display
selection and dragging options
described below will not be
available.
If two devices are supported, two rectangles will be
visible (as in the Windows Vista example below). The
rectangle with the number 1 will correspond to the
display device associated with the 1 in the Display
dropdown list below the monitor icon area. The 1 also
identifies the Primary Monitor (monitor showing the
Primary View, see Using Multiple Monitor section below
for further detail).
If the configuration can
support two display devices,
but there is no device
detected as a second
display, then the number 2
icon will be grayed out as in
the example at the right.
The device that is selected
under the Display list section (just below the monitor
icon area) is shown as a bright icon, indicating that it
represents the display now being configured.
The size of the display icons will change to reflect their
current resolution (adjustable in the Resolution (XP
Screen resolution) area).

User Guide for Chrome 400/500 Series Graphics
SG195-B.1 1/5/2009
Page 25
Drag the icons to
match your
monitors.
(XP Drag the monitor
icons to match the
physical arrangement
of your monitors.)
Position the cursor over a monitor icon, depress the left
mouse button and hold it to drag the icon to a position
that reflects the relative position of your display devices.
The display monitor icons can be positioned side by side
or up and down. The position should reflect how you
want to move items between monitors, and does not
have to reflect the true physical arrangement.
(Note: this feature is not available from a Display Settings
dialog which has been launched from the Options dropdown
list menu on the S3 ScreenToys Device management page.)
Display list area Click the down arrow to the right of the Display
dropdown list to view the list of detected monitors. Click
the line containing the number and description of the
monitor you wish to configure in subsequent actions.
When you configure multiple monitor support, you can
select which display is the “current” one for any settings
you want to configure through Display Settings
Monitor tab (XP Display Properties Settings tab).
This is my main
monitor
(XP: Use this device
as the primary
monitor)
The Main or Primary Monitor provides the Primary View
and is the monitor which displays logon, pop-up and
message windows.
This checkbox will be grayed out and not available
when:
Only one display is available.
Two displays are available and the currently selected
Monitor is already the Primary or Main monitor.
Two displays are available and you have selected
Extend the desktop onto this monitor (XP Extend
my Windows desktop).
When you have more than one display device enabled
and all devices show the same view, you are in
SingleView mode and the other devices are said to be a
clone of the PrimaryView. The Display list area should
report (Multiple Monitors) associated with Display 1. If
you wish to designate the currently selected monitor as
the Primary Monitor, check the checkbox. If you wish to
designate another display as your Primary Monitor, you
must first click on the display Monitor Icon associated
with that display device. The This is my main monitor
checkbox should then be available to designate the

User Guide for Chrome 400/500 Series Graphics
SG195-B.1 1/5/2009
Page 26
newly selected display as your Primary Monitor.
Extend the
desktop onto this
monitor
(XP Extend my
Windows desktop
onto this monitor )
If only one display is available, this checkbox will be
checked but grayed out and not available for
adjustment.
If you have two display devices detected, click the
Extend the desktop onto this monitor checkbox to
use both monitors in tandem as a single desktop image.
After you enable Extend the desktop onto this
monitor, you will be able to drag windows and icons
across your screen onto the other monitors. You will
also be able to stretch a window so that it shows on
more than one display.
For example, you can view many columns of a
spreadsheet stretched across two monitors, or you can
easily view your web browser on one display and edit a
document on a second display.
When you have extended the desktop, settings are
specific to each view of the desktop. For each display,
select resolution and color quality, just as you did
previously for single displays.
Clear this checkbox if you have two monitors enabled
and you want both monitors to display the same image
(SingleView clone mode).
Refer to the Fine Tuning section on Using Multiple
Monitors and Enabling a Multiple Monitor Clone Display
for additional information on Multiple Displays.
Identify Monitors
(XP Identify) Click Identify Monitors to post a large number 1 and 2
on your active displays to help identify which display is
associated with which monitor icon.
How do I get the
best display?
(XP Troubleshoot)
Click How do I get the best display? to launch Help
windows (XP: Click Troubleshoot to launch the Help
and Support Center window for the Video Display
Troubleshooter) provided by the operating system. The
information and dialogs will help you diagnose and
resolve problems.

User Guide for Chrome 400/500 Series Graphics
SG195-B.1 1/5/2009
Page 27
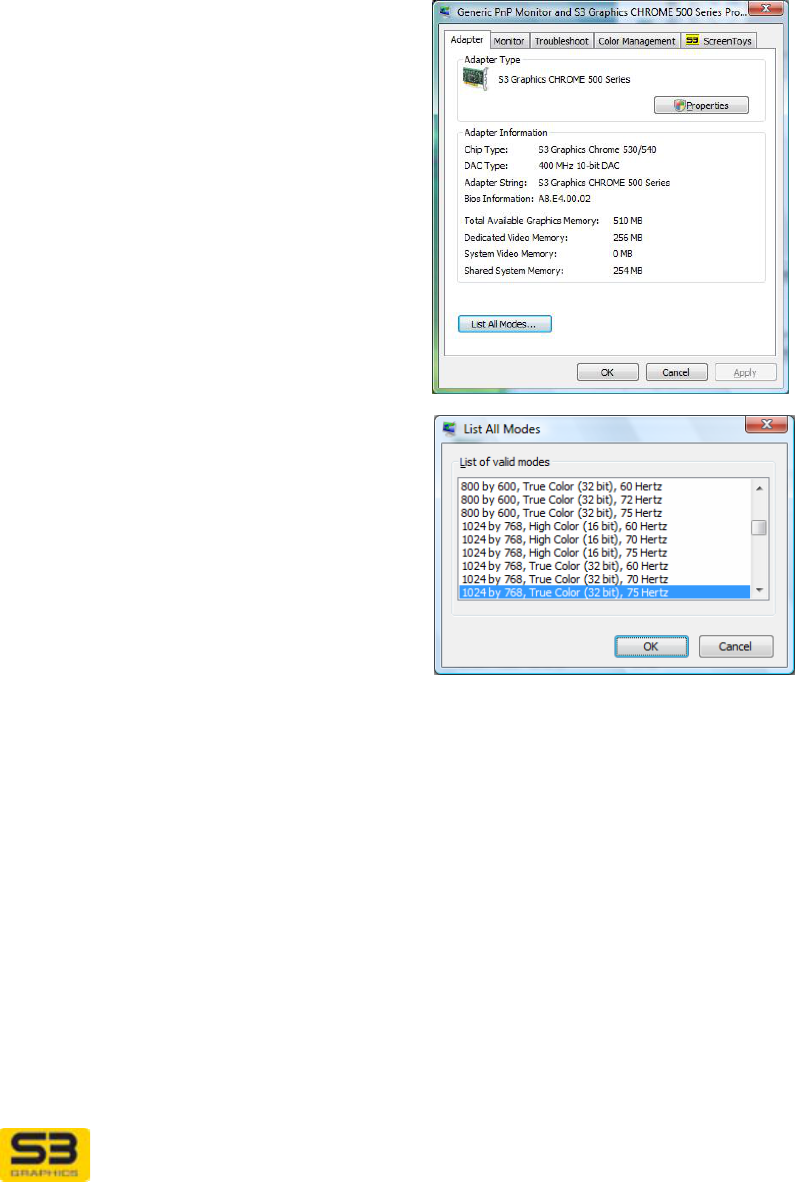
Advanced
Settings
(XP Advanced)
Click on Advanced Settings to access operating
system controls for display including at least:
General (XP only)
Adapter
Monitor
Troubleshoot
Color Management
and
S3 ScreenToys: The S3 ScreenToys tab
includes the CHROME Information page with an
S3 Graphics ScreenToys button which provides
access to the tools and utilities.
User Guide for Chrome 400/500 Series Graphics
SG195-B.1 1/5/2009
Page 28
4.3 Adjust Resolution, Color Quality and Refresh at the
Same Time
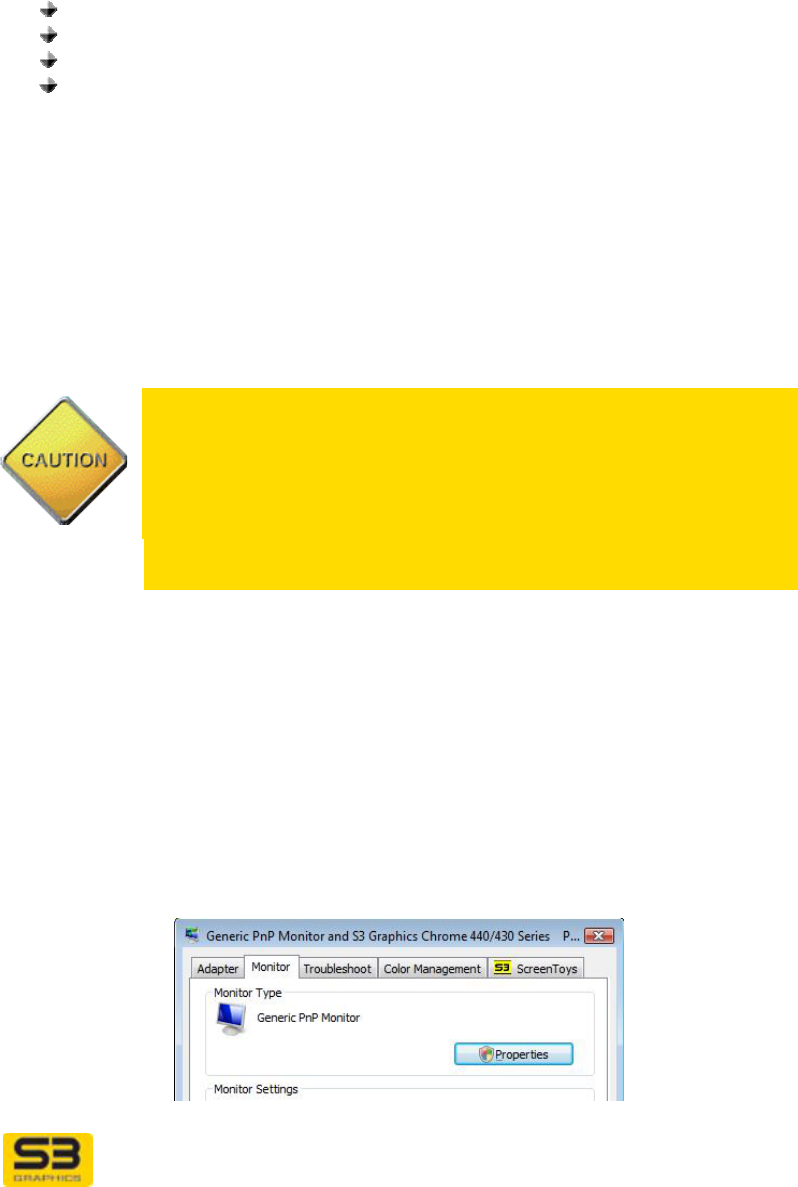
The Display Settings Advanced
Adapter page is provided by the
operating system and provides access to
general information about your Display
Adapter.
Additionally, the Adapter tab provides a
List All Modes box. You can use this box
to change desktop graphics resolution,
color quality and refresh rate
simultaneously.
Click on List All Modes. A window will
appear which lists all the combinations of
screen resolution, colors, and refresh
rates available for the selected video
adapter.
4.4 Specify a Lower Color Quality for Older Applications
Selection of a 8 bit per pixel (256 color) mode is not recommended for the
Windows Vista or Windows XP desktop. Many advanced applications require at
least 16 bit per pixel for proper color rendering in applications for multimedia and
gaming.
Windows Vista and Windows XP provide a Program Compatibility Wizard
which allows you to set lower color quality or resolutions for older programs that
may requires such.
To manually adjust program compatibility for older applications, right-click the
application’s program icon or name on your desktop or in the Start menu, then
click Properties. Click the Compatibility tab, and then select the Run in 256
colors check box. Your monitor will revert to your default color setting when you
close the program.
User Guide for Chrome 400/500 Series Graphics
SG195-B.1 1/5/2009
Page 29
SECTION 5 MONITOR CONFIGURATION BASICS
This section details monitor related settings to configure for optimal use with your
S3 Graphics display adapter, including:
Monitor definition change
Refresh rate adjustment
Multiple monitor considerations
Display device attachment and reconnection
5.1 Monitor Definition
Windows should automatically detect your monitor or other display device. If
Windows has identified your monitor as a PNP VESA DDC or an UNKNOWN
monitor type, then you will not have access to the full capabilities of your monitor.
Change the monitor definition to a definition that is compatible with your monitor
model. Select a new definition from the list of monitor drivers provided by
Windows or by downloading the latest monitor.inf file from your monitor
manufacturer.
Caution: If the capabilities of your device are not reported to your
S3 Graphics adapter, then you may not be able to manipulate
some of the features discussed below. To take full advantage of
your CRT, HDMI and DVI capabilities and to avoid the possible
loss of transmission of configuration data between your monitor
and your graphics board, whenever possible avoid switch boxes,
BNC cables, or dongles when connecting your devices to your
graphics board.
Step 1. Right click on any unpopulated area of the Desktop.
Step 2. Vista: Click Personalize. Click Display Settings. The Display
Settings window appears open on the Monitor tab.
XP: Click Properties. The Display Properties window appears.
Click Settings tab,
Step 3. Click Advanced button.
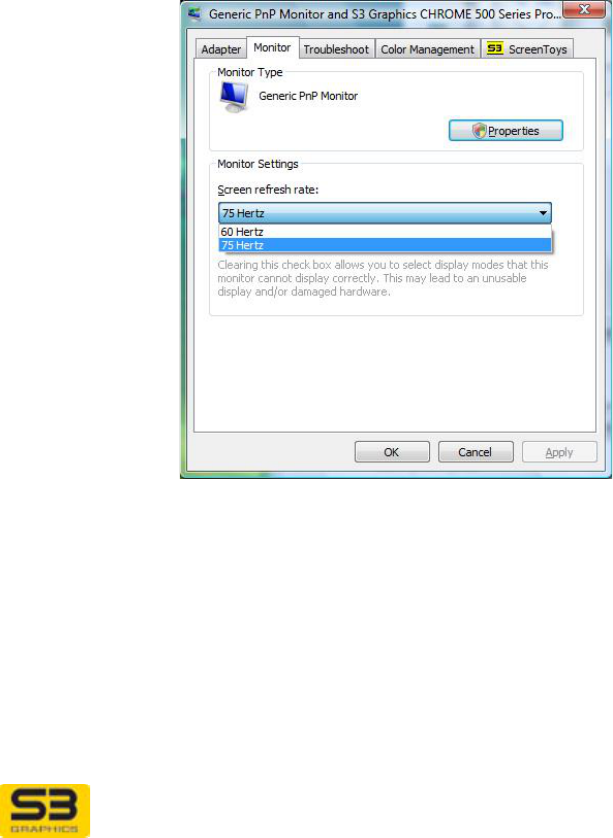
Step 4. Click Monitor tab, then click Properties button. Vista
Administrator rights are required to proceed.
User Guide for Chrome 400/500 Series Graphics
SG195-B.1 1/5/2009
Page 30
Step 5. Click Driver tab.
Step 6. Click Update Driver button. This launches the Windows
Hardware Update Wizard. Follow the Windows Wizard directions
to update your monitor software.
5.2 Refresh Rate Adjustment
Once your screen resolution, color quality and monitor settings are established,
you can adjust your monitor’s refresh rate to provide an optimized display with
minimal screen flicker.
ACCESS: To adjust refresh rate, right click on the desktop, select Personalize.
Click Display Settings. On the Monitor tab, click the Advanced button, then
click the Monitor tab.
User Guide for Chrome 400/500 Series Graphics
SG195-B.1 1/5/2009
Page 31
OPTIONS:
Monitor Settings
area Use this area to select a monitor refresh rate, and to
control the availability of modes for selection.
Screen refresh
rate dropdown list Click on the down arrow at the right of the screen
refresh drop down list to view a list of refresh rates
available. Click on the desired rate.
A higher rate will refresh your display more frequently,
reducing screen flicker.
If you have a fixed frequency display, only one default
refresh rate is usually available for selection.
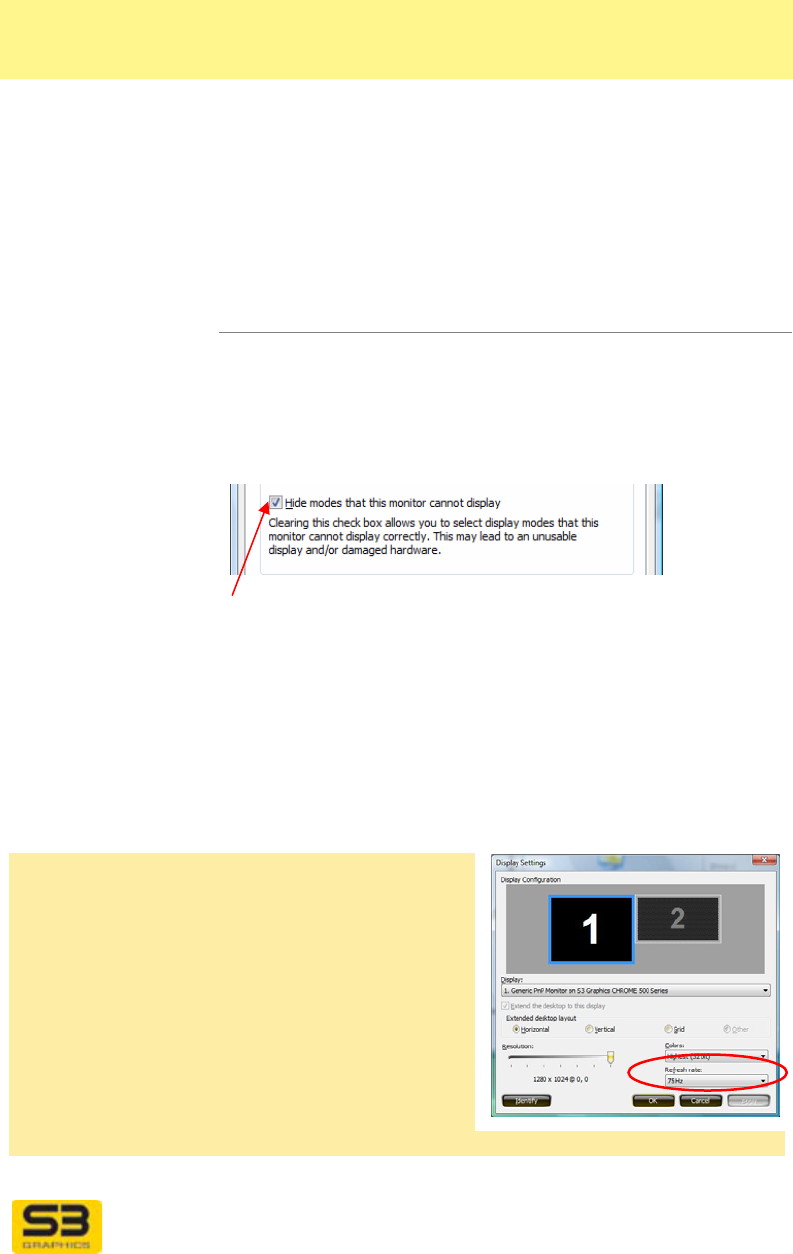
Hide modes that
this monitor
cannot display
Click to select the checkbox labeled Hide modes that
this monitor cannot display. When you select this
checkbox (recommended), only modes and refresh rates
supported by both the display output device and the
display adapter are available for selection.
Read the important Windows caution message
before selecting this checkbox.
Administrator rights are required to change this
checkbox.
OK, Apply To test your selection, click Apply. Make any necessary
adjustments and click Apply again. When you are
satisfied with your selections, click OK to exit.
Screen refresh rate, alternate access
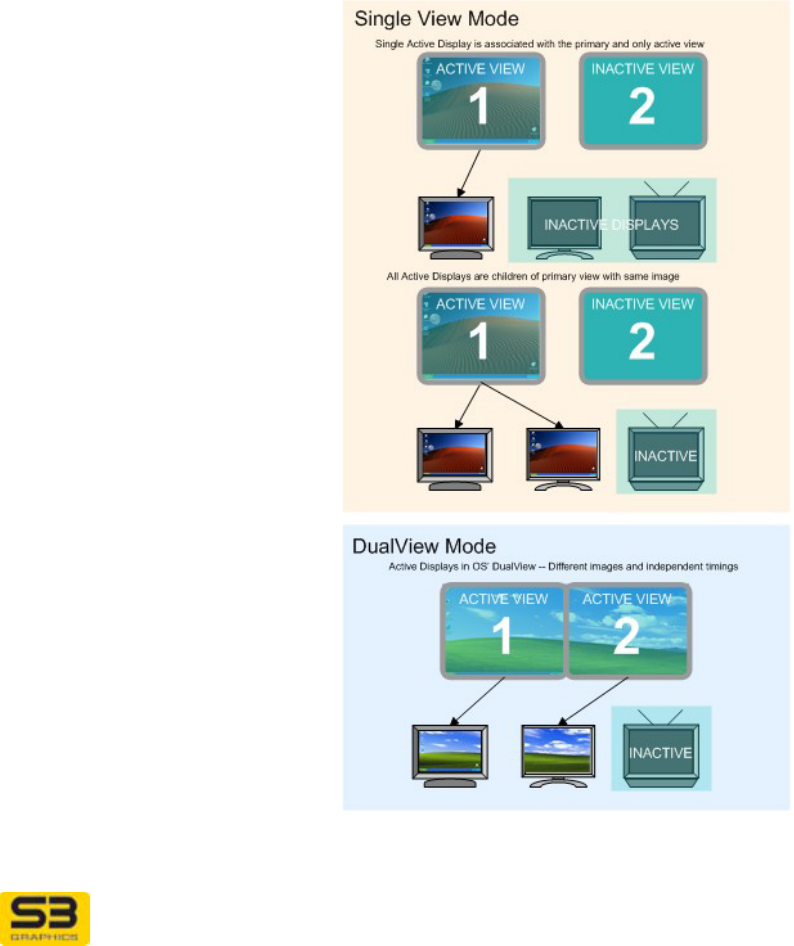
REFRESH RATE NOTE: S3 Graphics
ScreenToys provides enhanced refresh rate
control designed especially for multiple display
configurations.
ACCESS: To access this control, right click on
an empty area of the desktop, select S3
ScreenToys tab. From the menu options on
the left select Device Management. From the
Options dropdown list on the right, select
Display settings…. This page has a Refresh
rate… droplist which can be used to adjust
refresh for the selected (blue outlined) display.
User Guide for Chrome 400/500 Series Graphics
SG195-B.1 1/5/2009
Page 32
5.3 Using Multiple Monitors
The multiple monitor features available with Windows Vista and Windows XP
allow multiple video cards to be active with each one displaying a different area
of the entire desktop. S3 Graphics discrete GPUs are Dual Head devices. This
means each device has two graphics engines, each of which is capable of
providing independent display output. Windows Vista and Windows XP support
the use of a single adapter to drive a multiple monitor configuration.
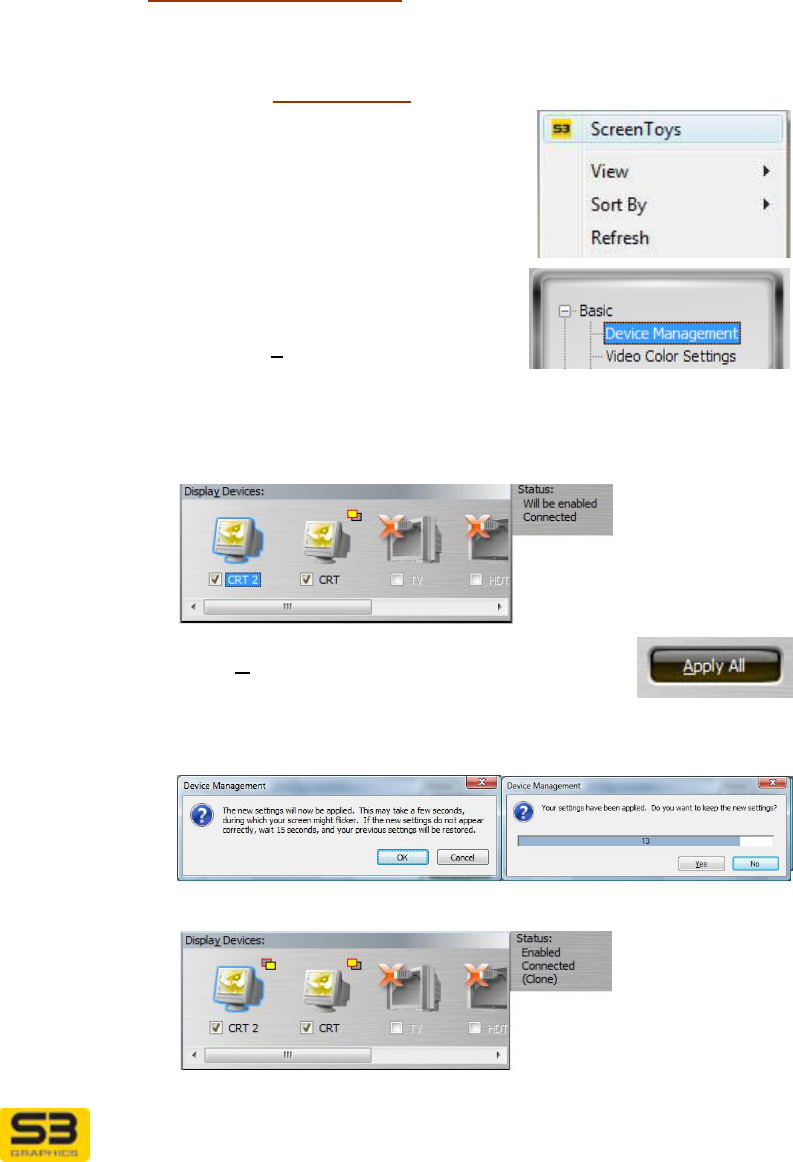
When the Windows operating system is in SingleView, there is a single view of
the desktop image displayed, regardless of the number of monitors enabled. This
single view of the desktop is
sometimes referred to as the
Primary View. There may be
one (Primary Monitor or Main
Monitor) or more display output
devices (Multiple Monitors)
associated with this single
Primary View. These monitors
are said to be “child devices” of
the Primary View and provide a
duplicate view, or clone view of
the Primary View.
When in SingleView, the
Primary View owns all of the
child devices, and the (inactive)
Secondary View owns none.
When you select Extend the
desktop onto this monitor,
DualView mode is enabled. The
Windows desktop image is
divided into two parts or views,
the Primary View and the
Secondary View. The Display
Settings window shows you
which output devices are
associated with each desktop
view. Windows This is my main
monitor (XP: Use this device…)
option allows you to specify
which device you wish to display
the Primary View.

User Guide for Chrome 400/500 Series Graphics
SG195-B.1 1/5/2009
Page 33
5.3.1 Typical Display Device Combinations
Because S3 Graphics products are Dual Head devices, the single adapter can
drive more than one output device. The following output devices and device
combinations are those typically supported by S3 Graphics adapters and
software on desktop configurations. Additional combinations may be possible
with specialized hardware. Your hardware will not have connections to detect
and support all these combinations:
CRT
DVI
HDMI
Dual display combinations (board-dependent), for example, DVI + CRT,
DVI + HDMI, HDMI + CRT, DVI + DVI, HDMI + HDMI, and others
Multiple adapter multiple display combinations to the extent supported by
the operating system.
Mobile systems include at least a LCD display output device. Additional output
devices that could be supported for mobile environments by your S3 Graphics
adapter and software include: DVI, HDMI, CRT. Your hardware may not have
connections to detect and support all these devices.
The operating system provides some configuration controls for multiple display
devices through the Display Settings page. Additional control is provided by the
S3 Graphics S3 ScreenToys Device Management tool which provides
independent setting control for each connected monitor. Your selected settings
are saved automatically on exit. When you resume from power down,
suspend/standby, or monitor off, the settings will remain the same.
User Guide for Chrome 400/500 Series Graphics
SG195-B.1 1/5/2009
Page 34
5.3.2 Enabling a Multiple Monitor Clone Display
To extend the desktop onto a second monitor, use the operating system Display
Settings page Extend the desktop option.
To enable a Multiple Monitor Clone desktop, where the secondary display shows
an image duplicate of the primary screen, you must use S3 ScreenToys. This
configuration is required for ChromoVision full screen video.
To enable a Multiple Monitor Clone desktop,
Step 1. Right click on the desktop. Select S3
Screen Toys.
Step 2. From the left panel menu, select
Device Management
Step 3. In the Display Devices: area click on
the checkbox below the display
device you want to become the Child or Clone copy of the current
desktop. In the example below the second CRT2 device is going
to be added as a Clone child of the primary CRT display device.
Step 4. Click the Apply All button at the bottom of the
window.
Step 5. Two messages to confirm your change will appear. Click OK and
Yes to confirm.
Step 6. After the clone display is enabled, S3 Screen Toys Device
Management Display Devices will report the following:
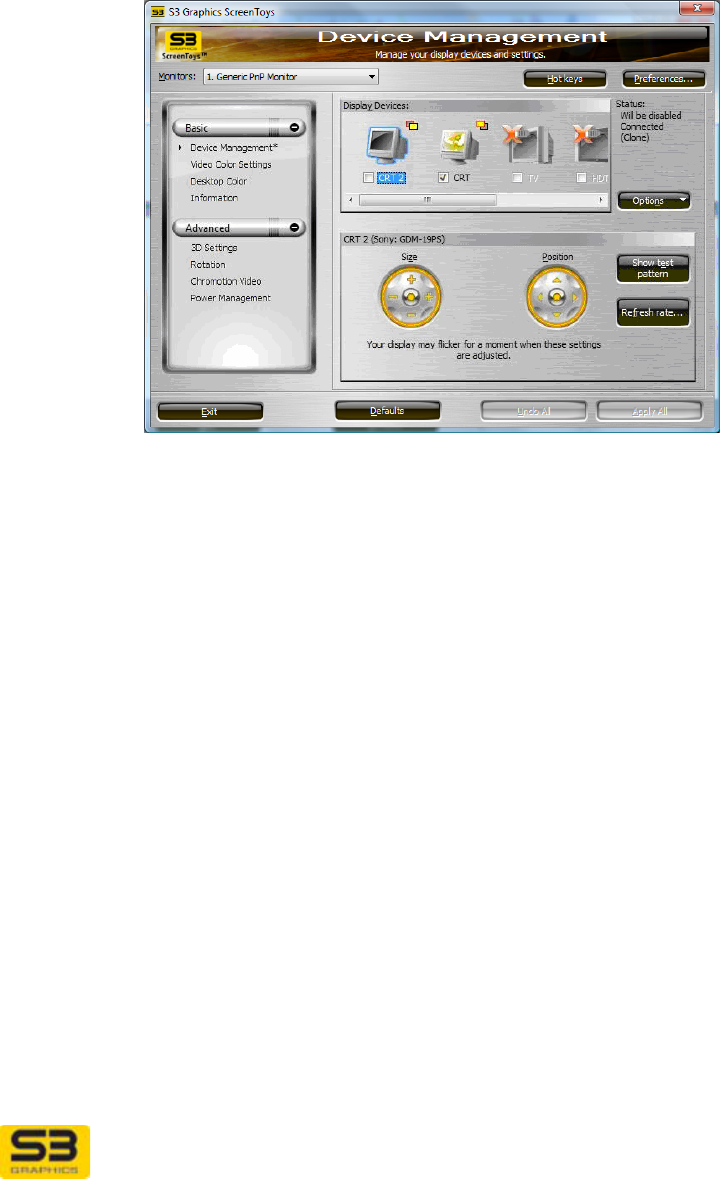
User Guide for Chrome 400/500 Series Graphics
SG195-B.1 1/5/2009
Page 35
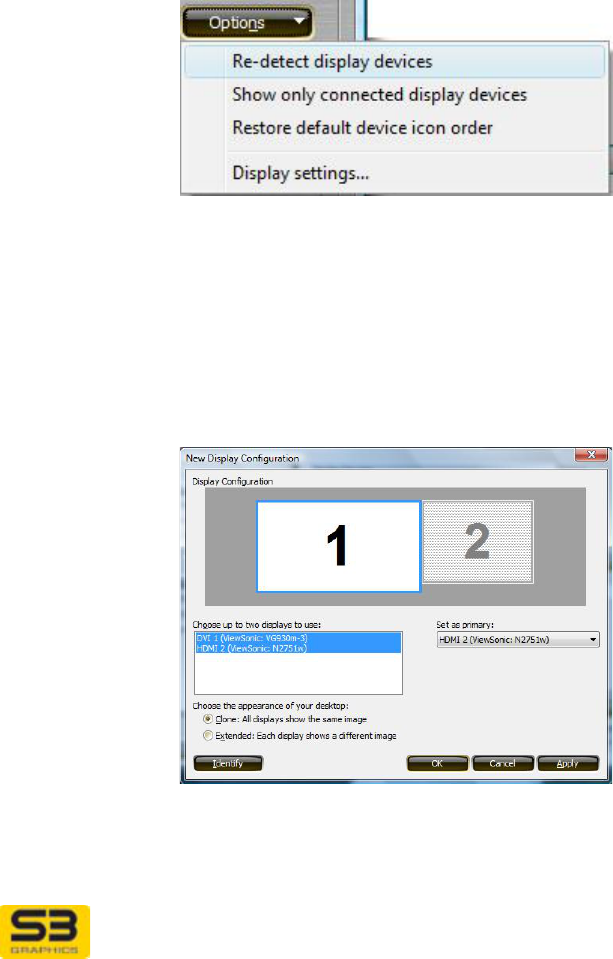
Step 7. To revert to a single desktop display device, uncheck the box
below the clone device. The Status will report “will be disabled.”
Click Apply All to complete the action.
User Guide for Chrome 400/500 Series Graphics
SG195-B.1 1/5/2009
Page 36
5.3.3 Display Device Attachment and Detection
A device must be detected as connected and enabled before it can be configured
through S3 ScreenToys Device Management.
Devices can be added or removed in a hot-plug or hot unplug manner.
5.3.3.1 Force a re-enumeration
A re-enumeration of display devices can be done at any time by checking the Re-
detect display devices under Options dropdown list on the S3 ScreenToys
Device Management page.
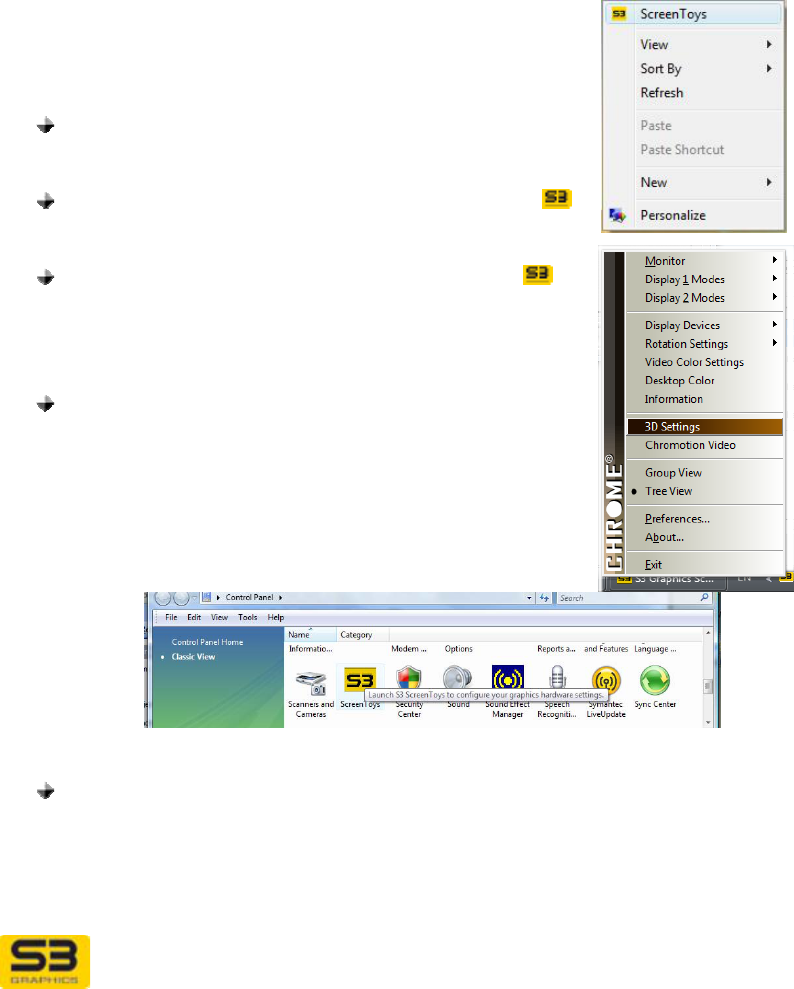
5.3.3.2 New Display Device Configuration
If a device is removed or attached while the system is active, S3 Graphics
software will attempt to restore a previously saved configuration that matches the
new connected devices. However, if the S3 Graphics software has no existing
record of your preferences for a newly attached configuration, it may pop up a
New Display Configuration dialog.

User Guide for Chrome 400/500 Series Graphics
SG195-B.1 1/5/2009
Page 37
5.3.3.3 Step by Step Display Device Attachment
Windows XP has a less robust detection scheme than Windows Vista. If a re-
enumeration fails, and you wish to attach a new or second display output device
to your Windows XP system, use of the following procedure is recommended.
Step 1. While the system is powered off and unplugged, attach a new or
second display output device to your graphics board.
Step 2. Reconnect your cables. Power the new display device.
Step 3. Reboot the system.
Step 4. Install any display or monitor drivers needed.
User Guide for Chrome 400/500 Series Graphics
SG195-B.1 1/5/2009
Page 38
SECTION 6 S3 SCREENTOYS BASICS
For advanced option adjustments for your display adapter, the S3 Graphics
ScreenToys dialogs should be used.
This section details basic access and navigation for the S3 ScreenToys tools.
Also, typical page layout and common controls are outlined for the S3
ScreenToys dialog pages.
6.1 Basic Navigation to S3 ScreenToys
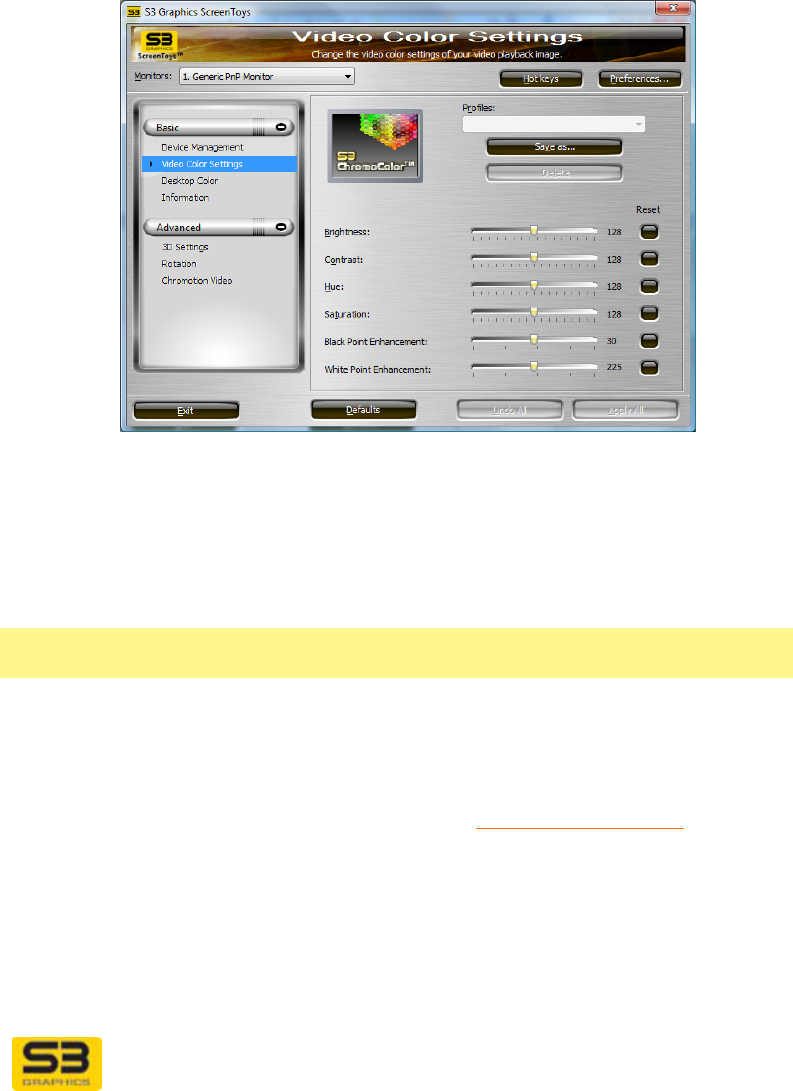
ACCESS: There are many ways to open the S3
ScreenToys dialog pages:
Right click in any unpopulated area of the Desktop.
A pop-up menu will appear. Click S3 ScreenToys.
or
Double-click on the S3 CHROME® taskbar icon
to launch the S3 ScreenToys utility control dialog
window. or
Right click on the S3 CHROME® taskbar icon to
show the S3 CHROME® menu. Select the desired
option to launch a S3 ScreenToys utility control, for
example, select Desktop Color.
or
Click Start.
o Vista: Click Control Panel,
o From Control Panel Home, click
Appearance and Personalization, (or from
Classic View), click Personalization, then
Display Settings. Click Advanced
Settings. Then click S3 ScreenToys tab
and S3 ScreenToys button.
o XP: Click Settings, then Control Panel. Double-click the Display
icon in the Control Panel folder. or
Right click in any unpopulated area of the Desktop. Click Personalize
(XP: Properties). Click Display Settings (XP: Settings).Click Advanced
Settings… (XP: Advanced), then click the S3 ScreenToys tab. Click the
button in the lower portion of the dialog window labeled S3 ScreenToys
to access the S3 Graphics utility software.
User Guide for Chrome 400/500 Series Graphics
SG195-B.1 1/5/2009
Page 39
6.2 S3 ScreenToys Dialog Basics
This section discusses the many elements of the S3 ScreenToys dialog windows
which are consistent across all the S3 ScreenToys pages.
OPTIONS: The S3 ScreenToys window has the following key components.
6.2.1 Title Bar and Banner
Title bars and
Banner The S3 Graphics ScreenToys banners identify the tool
with text and graphics.
Window title
The window title bar will contain a logo bitmap and the
phrase S3 Graphics ScreenToys.
The application banner will contain text and graphics.
S3 ScreenToys
logo
A S3 ScreenToys bitmap will appear in the upper left
corner of the banner. Click on the bitmap to launch your
browser and hyperlink to www.s3graphics.com .
Banner title
The large font text in the banner area will contain the
name of the currently selected utility. Short descriptive
text for that utility will appear below the larger text.
User Guide for Chrome 400/500 Series Graphics
SG195-B.1 1/5/2009
Page 40
6.2.2 Monitors List
The area just below the banner contains access to important configuration aids.
Monitors
dropdown list
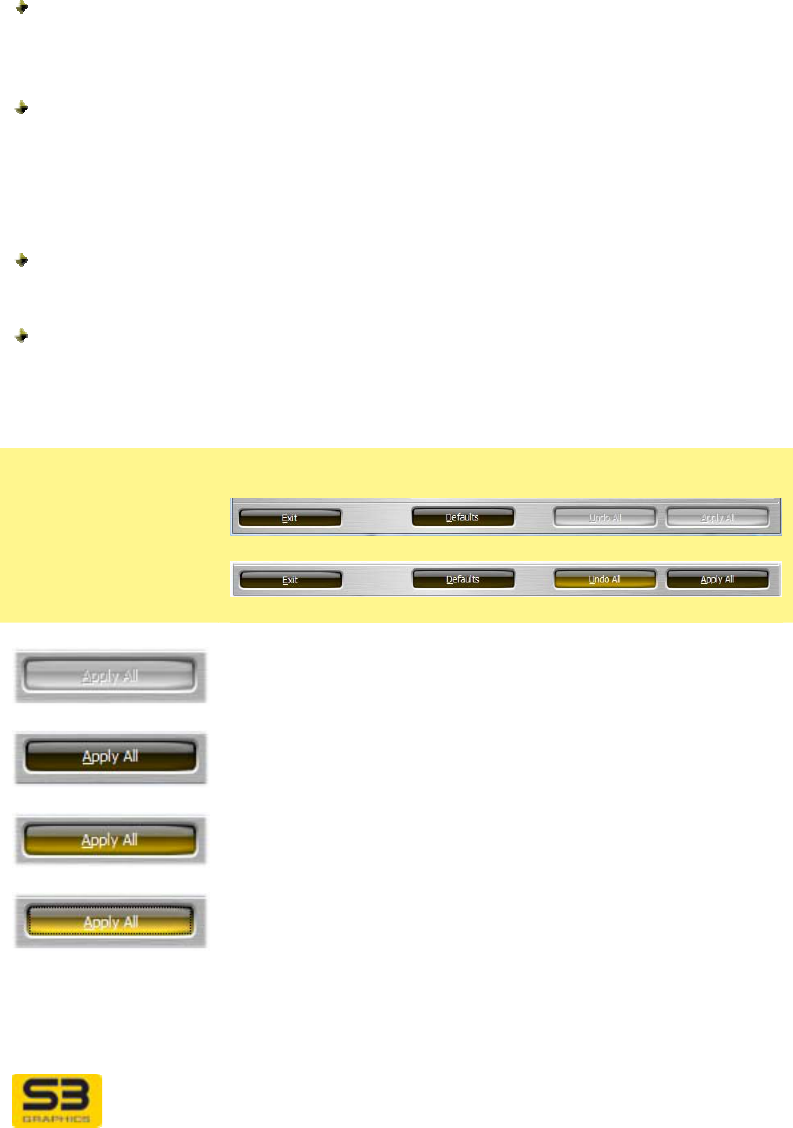
The left side of the S3 ScreenToys window includes a
dropdown list for display selection.
Monitors:
dropdown list
If you have only one monitor connected and active in
your system, or you have two devices acting in duplicate
or clone mode, this option will be dimmed and
unavailable for selection.
If you have more than one enabled and connected
device, this dropdown list allows you to specify to which
monitor the new configurations settings should be
applied.
Click the arrow to the right of the Monitors: dropdown
list menu to show all connected display output devices
(monitors). Each display device is shown as “Monitors:
N. Display device name”, where N is a number starting
from 1. Select the device whose desktop color you wish
to configure.
Note: Not all ScreenToys tools and settings are monitor
specific. Monitor specific menu items include:
Device Management
Rotation
Desktop Color
Other tools have settings which are applied globally,
regardless of which display is currently selected. For
these tools the Monitors dropdown list remains available
for selection, even though it is may not be relevant for
the global setting under adjustment.
User Guide for Chrome 400/500 Series Graphics
SG195-B.1 1/5/2009
Page 41
6.2.3 Buttons
S3 ScreenToys has many buttons to provide easy access. Buttons can be
roughly grouped into four categories:
Bottom Buttons: these buttons appear at the bottom of a dialog window and
are used to Apply, Cancel, or Undo setting values, to restore defaults or to
close the window.
Personalization Setting Buttons: these buttons appear at the top of the
main S3 ScreenToys window and allow you open dialogs which provide
customizable options for Hotkeys and S3 ScreenToys menu behaviors. Also,
some individual utility pages have Save as… buttons which allow you to save
a personalized setting profile.
Access Buttons: these buttons provide access to dialog pages or added
information which provide additional controls.
Slider Reset Buttons: these small buttons (without text) allow restoration of
slider values to their default.
6.2.3.1 Button Appearance
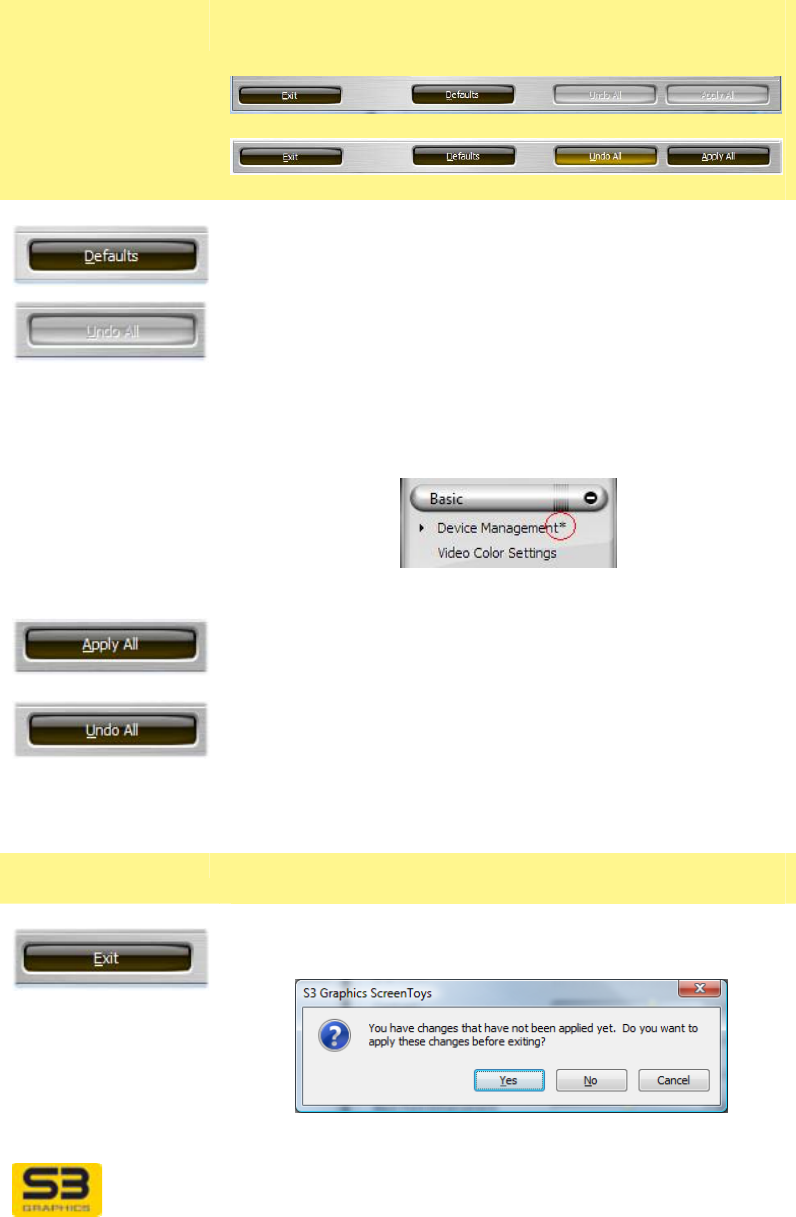
Button color
The color of a button tells whether or not the option
identified by the button text is available for selection.
Grey
Not available
Black
Available
Light Yellow
Hover
Bright Yellow
Clicked - active
User Guide for Chrome 400/500 Series Graphics
SG195-B.1 1/5/2009
Page 42
6.2.3.2 Command Buttons in Footer
Footer area
Command buttons The bottom footer area of the S3 ScreenToys window
usually contains 4 buttons.
Defaults
Click Defaults to return the status values in the settings
area of the current page to the default. This button does
not affect settings on the other S3 ScreenToys pages
which are not visible.
If Apply All or Undo All appears dimmed and not
selectable, it is unavailable because you have not yet
made any changes on any of the utility pages.
change asterisk If you make changes to any utility menu page an asterisk
* will be appended to end of menu page name. The
asterisk will disappear when you click Apply All to
implement your change.
Apply All
If you make changes on one or more pages in S3
ScreenToys and you then click Apply All, all changes
you made on every page will be applied.
Undo All
Undo All cancels all changes made on any page during
this session since the last Apply All. Your settings return
to the values last saved or last applied.
6.2.4 Window Exit
Window control
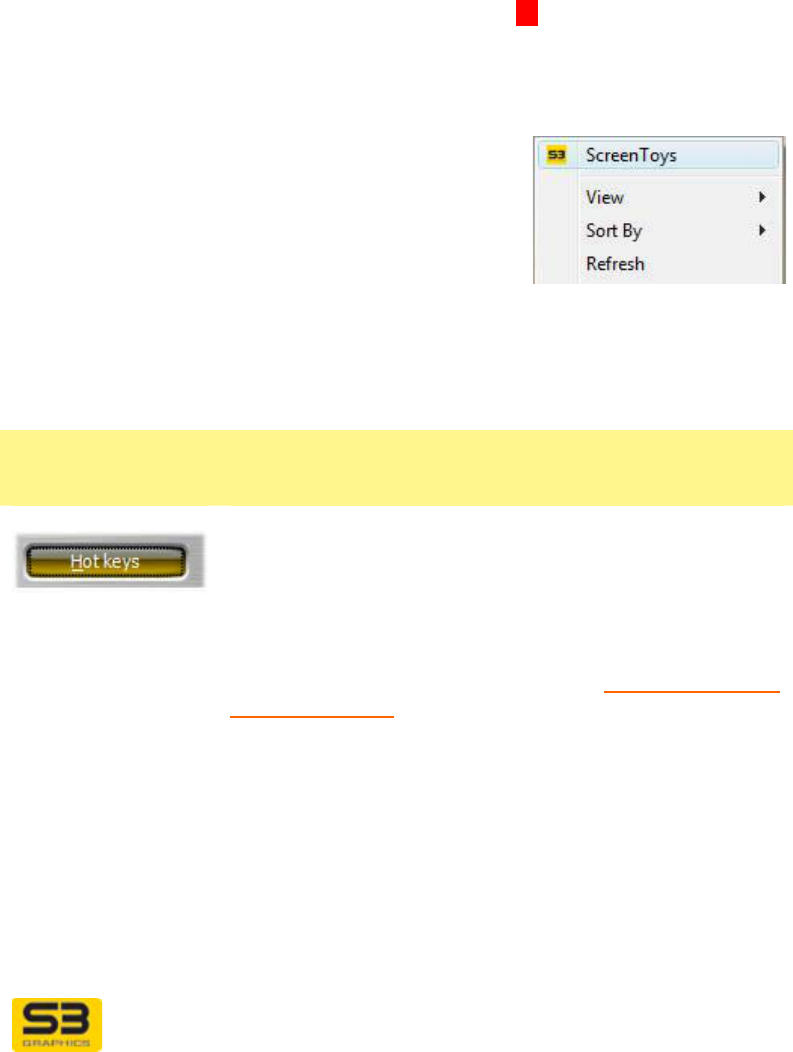
Exit
(= minimize button)
When you click Exit and you have made adjustments
but not clicked Apply All to apply them, a dialog box will
pop up to ask if you want to keep the new settings.
Click Yes and all changes you made on every page
User Guide for Chrome 400/500 Series Graphics
SG195-B.1 1/5/2009
Page 43
during this session will be applied.
Click No and all changes you made (but did not yet
Apply) on every page during this session will be
canceled and will revert to back to the values last saved
or last applied.
Then the S3 ScreenToys window will be minimized. The
S3 ScreenToys taskbar icon will remain in the taskbar.
Click Cancel to close the dialog but keep the S3
ScreenToys window open on the desktop.
Close When you click on the white U in the upper right corner
of the S3 ScreenToys dialog window and you have un-
applied changes, no dialog box will pop. The window will
close and unapplied adjustments will be lost.
Restore To re-open the dialog or to
restore the taskbar menu
and icon:
Right click on an empty
portion of the desktop and
click on S3 ScreenToys.
6.2.4.1 Buttons for Hotkeys and Preferences
Customization
buttons
The upper right corner of the S3 ScreenToys window
includes buttons for preference customizations.
Hotkeys button
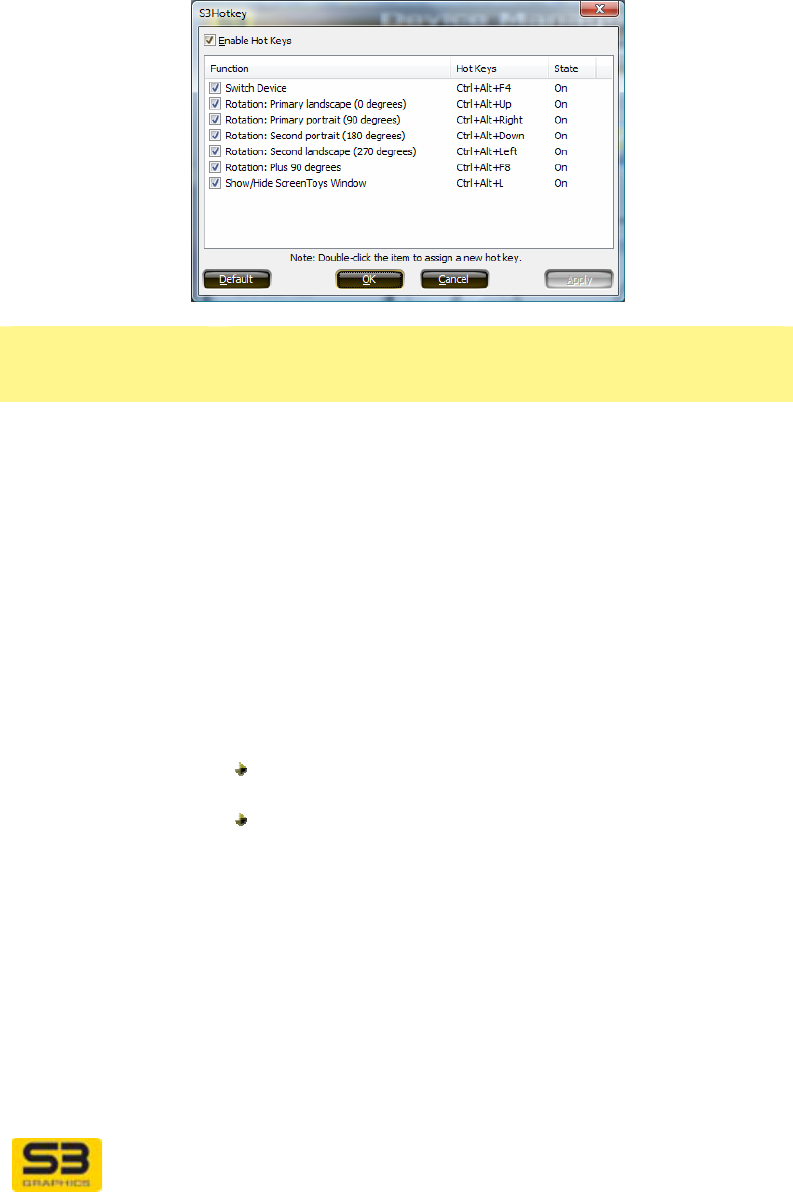
Click on the Hotkey button to open the S3Hotkey dialog.
Preferences
button
Click on the Preferences button to open the Preferences
dialog to set options for the way S3 ScreenToys
windows and menus behave. Refer to CHROME® Menu
General Settings for details.
User Guide for Chrome 400/500 Series Graphics
SG195-B.1 1/5/2009
Page 44
6.2.4.2 Hotkeys Control
S3Hotkeys provide customization of display-related hotkeys.
S3Hotkey window
The S3Hotkey dialog window allows control and
customization of display-related hotkeys.
Enable Hot Keys
checkbox When the Enable Hot Keys checkbox is checked
(default), hot keys functionality is available to use at any
time.
Only those hotkeys whose Status is On will actually be
available.
If a hotkey has a status of Off, it will not be available.
On double-click the following dialog appears where you
can input a new preferred hot key sequence.
Function
checkboxes Each hotkey function has a checkbox. By default most
hotkeys will be enabled if supported by the
configuration.
When enabled, the checkbox is checked, and the
State is On.
When a checkbox is unchecked, the State for that
hotkey will be Off and the hot key will not be
available for use.
Available hotkeys may vary. Some typical hotkey
options include:
Rotation: 5 hotkeys
Device Switch: 1 hotkey
Show/Hide ScreenToys Window: 1 hotkey
Use OK or Apply to finish a change in state for a hot
key.

User Guide for Chrome 400/500 Series Graphics
SG195-B.1 1/5/2009
Page 45
To change a
hotkey sequence Double-click a hotkey row in the dialog window and the
following dialog appears. You can input a new preferred
hot key sequence for the hotkey named above the fill in
text box.
You must use at least one control key (CTRL, SHIFT
and/or ALT) followed by another key.
If the key combination you selected is already in use, a
dialog will tell you.
Click OK to make your change, or Cancel to exit without
change.