SAF Tehnika AS ARANETCO2 Hybrid Digital Transmission System User Manual Aranet CO2 sensor datasheet fcc
SAF Tehnika A/S Hybrid Digital Transmission System Aranet CO2 sensor datasheet fcc
User Manual
Aranet CO2 SENSOR Datasheet
Terms of use The Customer is obliged to guarantee the usage, maintenance and preservation of the Equipment at their own expense in a way that
excludes the Equipment’s theft, loss, destruction, harming and/or damaging (including as a result of mechanical damages, moisture, liquid related
damages, lightning and/or other similar events).
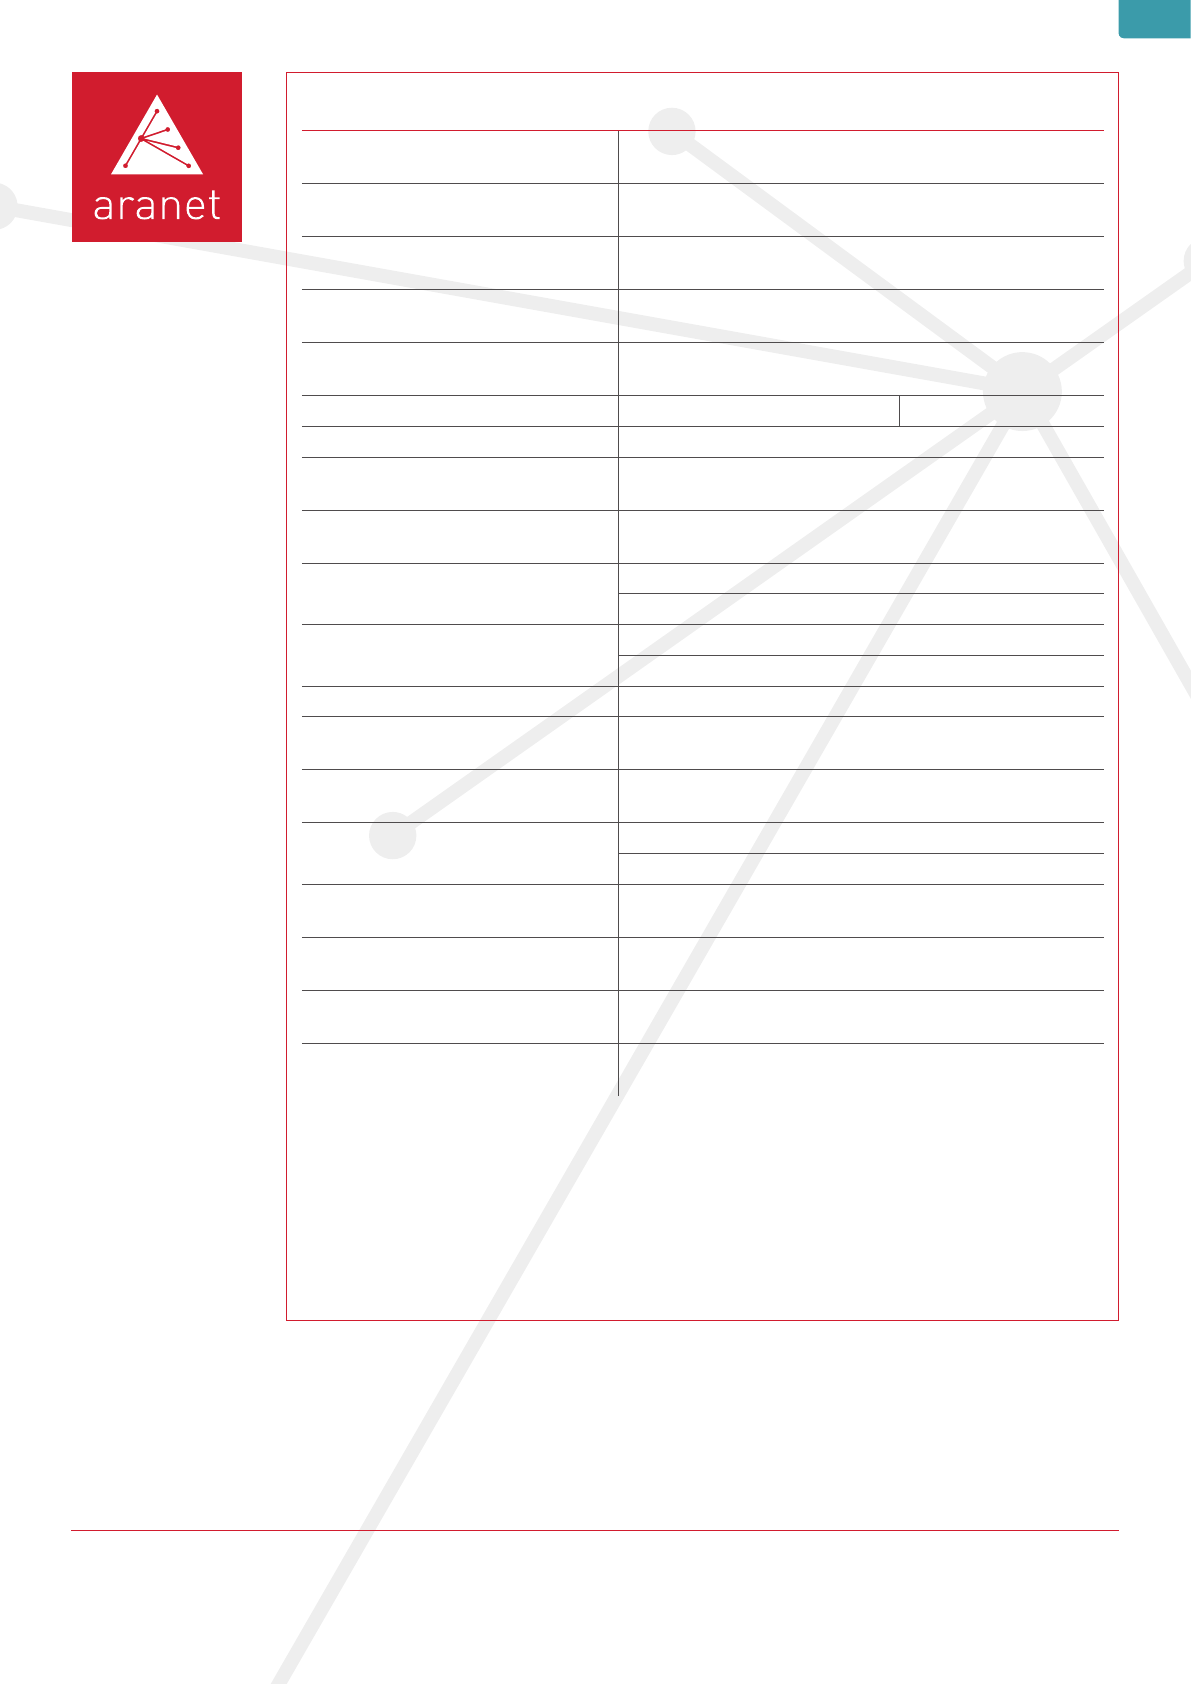
Aranet CO 2 SENSOR
Measurements CO2 (carbon dioxide)
Line-of-sight range 3 km/ 1.9mi
Operating environment Indoor use
Transmitter power 14 dBm
Frequency Depends on gateway instructions
Measurement range CO20-9999 ppm
CO 2 measurement accuracy +/- 50 ppm or 3% of reading
Data transmission Every 10 minutes
Data protection Data encryption
Power options 2 AAA Alkaline batteries (Zn/Mn02)
2 AAA Lithium batteries (Li/FeS2)
Battery life @20°C / 68°F Up to 2 years with Alkaline batteries
Up to 2 years with Lithium batteries
Operating temperature 0OC to 50OC / 32OF to 122OF
Operating humidity 0% to 100% non-condensing*
Dimensions 115x44x25 mm/ 4.5x1.7x1 in
Weight 67g /2.4oz with Alkaline batteries
59g/ 2oz with Lithium batteries
Construction ASA Plastic
Protection class IP40
CE marking Yes
Included 2 AAA Alkaline batteries, string
* Recommended humidity operating range is 20% to 80% .RH (non-condensing) over –10 °C to 60 °C/ 14°F to 140°F.
Prolonged operation beyond these ranges may result in a shift of sensor reading, with slow recovery time.
CO2

FCC Compliance statement
This equipment has been tested and found to comply with the limits for a Class B digital device, pursuant to part 15 of
the FCC Rules. These limits are designed to provide reasonable protection against harmful interference in a residential
installation. This equipment generates, uses and can radiate radio frequency energy and, if not installed and used in
accordance with the instructions, may cause harmful interference to radio communications. However, there is no
guarantee that interference will not occur in a particular installation. If this equipment does cause harmful interference
to radio or television reception, which can be determined by turning the equipment off and on, the user is encouraged
to try to correct the interference by one or more of the following measures:
•Reorient or relocate the device.
•Increase the separation between the equipment and receiver.
•Connect the equipment into an outlet on a circuit different from the one the receiver is connected to.
•Consult the dealer or an experienced radio/TV technician for help.
This device complies with part 15 of the FCC rules. Operation is subject to the following two conditions:
(1) this device may not cause harmful interference, and
(2) this device must accept any interference received, including interference that may cause undesired operation.
Importatnt Exposure to Radio Frequency Radiation.
20 cm distance has to be maintained between the antenna and user. Under such configuration, the FCC radiation
exposure limits set forth for an population/uncontrolled environment can be satisfied.
Changes or modifications not expressly approved by the party responsible for compliance could void
the user’s authority to operate the equipment.
Aranet devices do not contain serviceable parts. Warranty will not be applicable in the event Aranet
devices have been opened.
The information presented in this guide is the property of SAF Tehnika, JSC. No part of this document may be
reproduced or transmitted without proper permission from SAF Tehnika, JSC.
The specifications or information contained in this document are subject to change without notice due to continuing
introduction of design improvements. If there is any conflict between this document and compliance statements, the
latter will supersede this document.
SAF Tehnika, JSC has no liability for typing errors in this document or damages of any kind that result from the use of
this document.
To get up to date information about accessories and their availability, please contact sales representative.
Copyright Notice
Copyright © 2017 SAF Tehnika, JSC. All rights reserved.
Industry Canada Regulatory Statement
This device complies with Industry Canada’s licence-exempt RSSs. Operation is subject to the following two conditions:
(1) This device may not cause interference; and
(2) This device must accept any interference, including interference that may cause undesired operation of the device.
Le présent appareil est conforme aux CNR d’Industrie Canada applicables aux appareils radio exempts de licence.
L’exploitation est autorisée aux deux conditions suivantes:
(1) l’appareil ne doit pas produire de brouillage, et
(2) l’utilisateur de l’appareil doit accepter tout brouillage radioélectrique subi, même si le brouillage est susceptible d’en
compromettre le fonctionnement.
How to: Pair sensors to Aranet
1. Pair sensors with Aranet PRO
Aranet PRO supports several types of sensors. In order to connect them to the system the same steps apply for all
types of sensors.
(1) You should physically be located within around 20 meters of Aranet PRO.
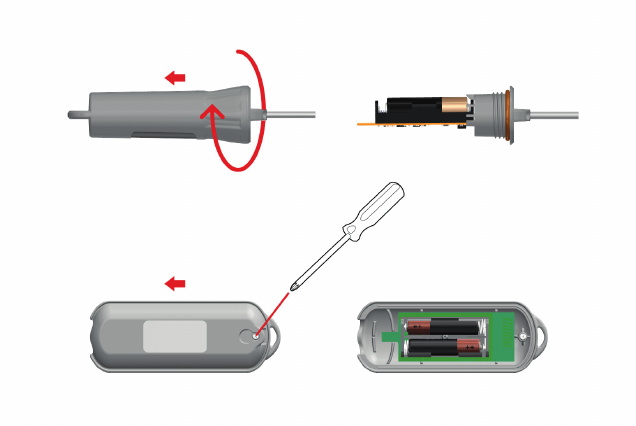
(2) In order to open the sensor follow the individual sensor’s instructions (see image above). Once it is opened the
battery compartment will be exposed.
(3) Go to Aranet PRO Settings screen.
(4) Choose “Sensors” menu.
(5) Click “Add sensor” button.
(6) Insert sensor’s battery/-ies.
(7) Red LED light will flash on the sensor. Three short flashes followed by a long flash will signal a connection failure,
the pause between flashes will be the same. In a successful pairing the long flash will follow immeadiately after a short
flash. Looking at the LED light can save time while pairing sensors, however, Aranet PRO will also display a notification
about a successful or unsuccessful pairing.
(8) Close the sensor following respective sensor instructions.
(9) Now you can rename the sensor, set thresholds for alarms, add it to favorites. After completing your tasks click save
button.
2. Pair sensors with Aranet MINI
(1) Tap , then choose Sensors menu and tap the Setup button.
(2) Set up a sensor by following the instructions on the screen. After successfully setting up a sensor, the sensor ID and
the name of the sensor will appear on the left side of the screen. Sensors are given name “SENS <number>”
automatically. Tap the name of the sensor to give it a new name with length up to 8 symbols. In
order to remove a sensor just press the sign next to it.
(3) Set up other sensors in the same manner.
• To add more than 6 sensors, press the page button on top.
• To change the order of the sensors, press and . Then press on the sensors you want to move and
then – where you want to move it to.
• Tap the home button to return to the main menu.