SAF Tehnika AS CFIP-24 LOW POWER POINT TO POINT TRANSMITTER User Manual UserMan W9ZCFIP24
SAF Tehnika A/S LOW POWER POINT TO POINT TRANSMITTER UserMan W9ZCFIP24
Users Manual

The CFIP Series Full Outdoor Unit Installation Manual • Rev. 1.21 • Software version 1.10
© SAF Tehnika A/S 2009
CFIP Series
Full Outdoor Unit
Installation manual
Product code: I0DFEE01
© SAF Tehnika A/S 2009

The CFIP Series Full Outdoor Unit Installation Manual • Rev. 1.21 • Software version 1.10
© SAF Tehnika A/S 2009
Proprietary notice
The information presented in this guide is the property of SAF Tehnika, A/S. No part of this document
may be reproduced or transmitted without proper permission from SAF Tehnika, A/S.
The information and specifications contained in this document are subject to change without notice
due to continuing introduction of software and/or design improvements.
SAF Tehnika A/S has no liability for typing errors in this document or damages of any kind that result
from the use of this document.
Copyright Notice
Copyright © 2009 SAF Tehnika, A/S. All rights reserved.
Table of Contents
1Introduction ....................................................................................................................................... 3
1.1.1Revision history ....................................................................................................................................... 3
1.1.2Safety Precautions ................................................................................................................................. 3
1.1.3Electrical Safety ...................................................................................................................................... 3
1.1.4Microwave Radiation ............................................................................................................................. 3
2Getting Started ................................................................................................................................. 4
2.1Unpacking and Inventory ......................................................................................................... 4
2.1.1Contents of Transportation Package for CFIP FODU link ....................................................... 4
2.1.2Package Weight and Dimensions ..................................................................................................... 4
2.2Required Installation Tools...................................................................................................... 4
2.2.1CFIP FODU Installation Tools ............................................................................................................ 4
2.2.2Antenna Installation Tools .................................................................................................................. 4
2.3Labels ............................................................................................................................................... 4
2.3.1CFIP FODU Label ..................................................................................................................................... 4
3Installing CFIP Full Outdoor Unit (FODU) radiolink ................................................. 5
4Basic configuration with Web/command prompt ...................................................... 6
4.1Assembling CFIP FODU Ethernet cable connector......................................................... 6
4.2Initial configuration with Web GUI....................................................................................... 7
4.3Initial configuration with command prompt .................................................................... 8
5CFIP Full Outdoor Unit and Antenna Installation ....................................................... 9
5.1Polarization Considerations ..................................................................................................... 9
5.2Attaching CFIP Full Outdoor Unit to Antenna .................................................................. 9
5.3Grounding the Full Outdoor Unit ......................................................................................... 10
5.4Antenna Alignment ................................................................................................................... 10
5.4.1Calculating Expected Receive Signal Level (RSL) ................................................................... 1 0
5.4.2Alignment Procedure ........................................................................................................................... 10
5.4.3RSSI Readings ....................................................................................................................................... 11
6References ......................................................................................................................................... 11
7Compliance Statement ............................................................................................................... 11
The CFIP Series Full Outdoor Unit Installation Manual • Rev. 1.21 • Software version 1.10
© SAF Tehnika A/S 2009
1 Introduction
This manual describes how to install SAF CFIP series microwave radio link consisting of Full
Outdoor Units (FODUs).
1.1.1 Revision history
Revision Date Comments
1.0 December, 2008 Document created
1.1 February, 2009 Corrections made
1.2 June, 2009 Addition of compliance statements
1.1.2 Safety Precautions
– Installation and service must be done by personnel having appropriate technical training and
experience necessary to be aware of hazards during installation and/or service. The installation
and/or service must be done under measures to minimize any danger to the involved person or
any other person.
– Use the necessary safety devices when working on or around the mast. Be aware of the risk of
falling objects. Consider the safety catch when hoisting the antenna and radio.
– Do not use any components (screws, nuts, etc.) other than those delivered together with the
SAF Tehnika microwave radio equipment or recommended by SAF Tehnika.
1.1.3 Electrical Safety
– The equipment meets the requirements for class I EN 60950 (protection against electric
shock).
– All external circuits are TNV-1 (as defined in EN 60950).
– All equipment must be grounded before the power cable is connected.
– For electrical safety the DC power supply shall have reinforced insulation to the mains supply.
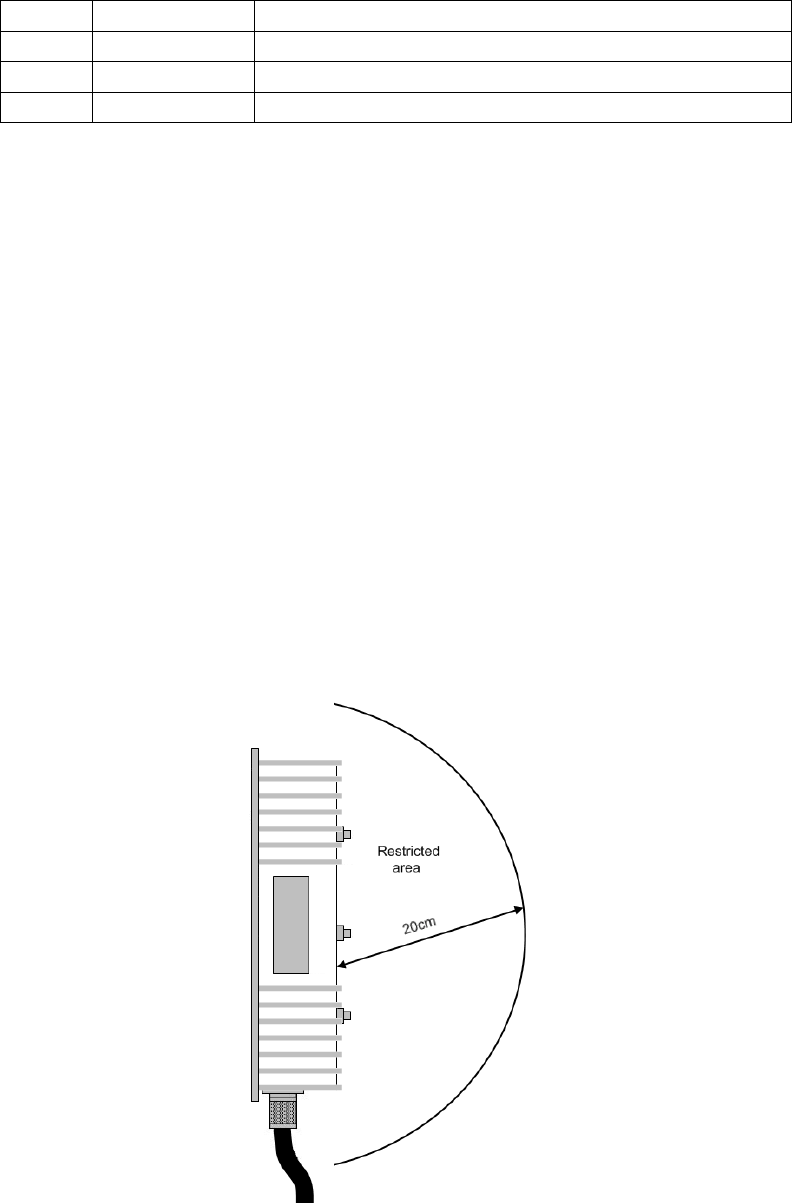
1.1.4 Microwave Radiation
– The transmitter should be switched off before disassembling the equipment to avoid microwave
radiation.
No dangerous levels of microwave radiation exist outside the antenna while in operation when the
antenna is connected to the radio, yet any part of the body shall not be exposed to the radiation in
front of the open radio waveguide output closer than 20 cm while radio transmitter is turned on.

The CFIP Series Full Outdoor Unit Installation Manual • Rev. 1.21 • Software version 1.10
© SAF Tehnika A/S 2009
2 Getting Started
2.1 Unpacking and Inventory
There are two types of packages, - the box for transportation and the commercial package. CFIP
FODUs are packed in commercial packages whereas commercial boxes are packed in transportation
boxes.
Transportation package for two CFIP FODUs contains two trading packages for CFIP FODU.
2.1.1 Contents of Transportation Package for CFIP FODU link
– CFIP Full Outdoor Unit, 2 pcs. The antenna feed sticker must be removed before use.
– Power over Ethernet Plus injector, 2 pcs.
– Power supply (European plug, 100÷220V AC – 48 DC), 2 pcs.
– 2 RJ-45 connectors for CFIPs
– 18pin connectors for E1, 2pcs together with sealing
– Sealing for RJ-45 connectors 2
– Documentation and software CD
– Quick installation guide
– Factory test report
– CFIP FODU mounting wrench, 1 pcs.
2.1.2 Package Weight and Dimensions
The following table lists all the included packages and their weight and dimensions.
Package type Weight of empty package [g]
Dimensions [mm]
Commercial package for CFIP FODU 486 532x365x75
Transporting package for CFIP FODUs
700 562x385x283
2.2 Required Installation Tools
2.2.1 CFIP FODU Installation Tools
– ODU mounting wrench;
– Necessary tools for assembling the cables and connectors – RJ45 crimping tool
2.2.2 Antenna Installation Tools
– Voltmeter/multimeter with corresponding BNC adapter (it is not included in package);
– Binoculars and compass for clear sight installation.
2.3 Labels
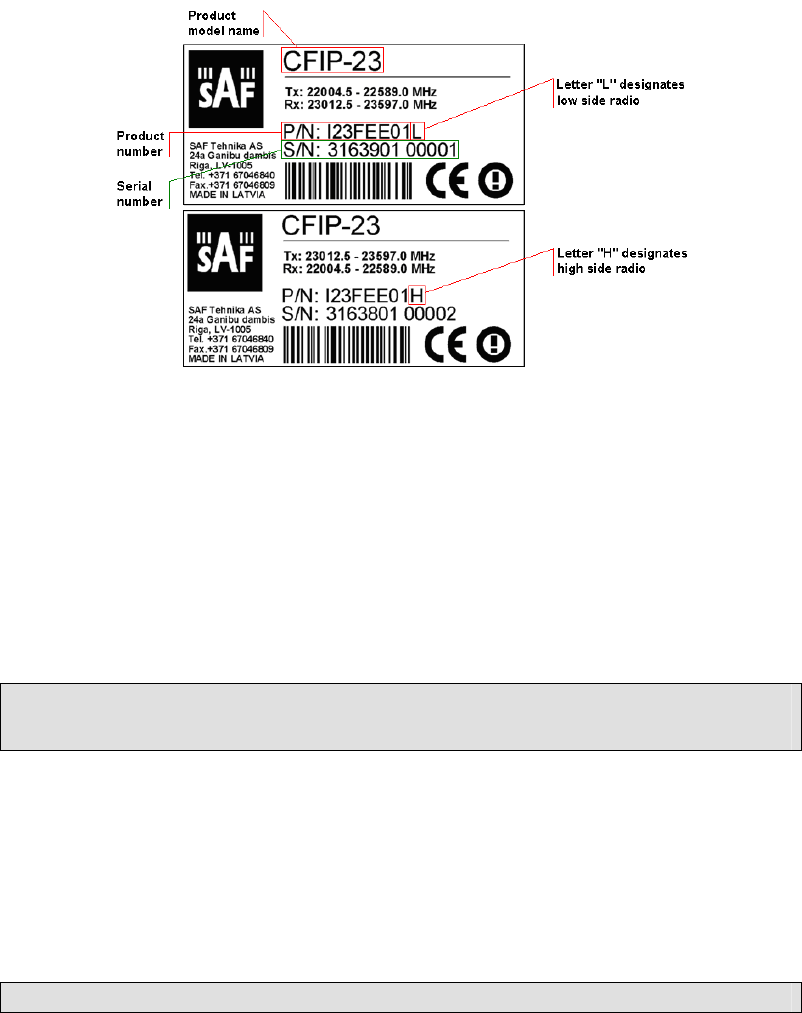
2.3.1 CFIP FODU Label
The label can be found on the front side of the unit.
The label contains the following information (see samples in the picture below):
- Model name (“CFIP-xx”). The FODU model name is:
- CFIP-13 for 13GHz FODU,
- CFIP-15 for 15GHz FODU,
- CFIP-18 for 18GHz FODU,
- CFIP-23 for 23GHz FODU
xx - frequency band of the FODU.
- Product Number (I23FEE01L): product number contains information in which band side (L,
H) the FODU operates.
- Unit Serial Number (3163901 00001); the serial number uniquely identifies the FODU.
The CFIP Series Full Outdoor Unit Installation Manual • Rev. 1.21 • Software version 1.10
© SAF Tehnika A/S 2009
Figure 1. Labels of the CFIP-23 FODU Low and High band side, operating in 23 GHz band
3 Installing CFIP Full Outdoor Unit (FODU)
radiolink
The installation of CFIP FODU link involves the following steps:
1. Initial equipment set up at the customer’s premises
– Unpack all equipment;
– Prepare necessary cables;
– Provide power to CFIP FODUs using PoE+ injector or connect with Interface
Termination Unit (with PoE+ built in);
– Interconnect CFIP FODUs: - turn CFIP FODUs of one hop against ceiling (with flanges
facing upward), or use attenuators and waveguide to interconnect CFIP FODUs.
(!) Attention! Be aware of interconnecting CFIP FODUs by bouncing the signal from ceiling.
Continuous operation in such mode may interfere with engaged band, therefore you must buy band
first.
2. Connecting to Web interface management or serial terminal through Ethernet bridge
port or serial management port in order to configure the equipment.
Notes:
– The default IP address of Eth port is 192.168.205.10 or 192.168.205.11 (depends on
Low or High band side model) and mask is 255.255.255.0.
– Use serial cable with twin BNC connector to connect ASCII console to interface
termination device, using ‘Hyper Terminal’ application in ‘MS Windows’ operating
system with the following settings: - Bits per second: 19200; - Data bits: 8; - Parity:
None; - Stop bits: 1; - Flow control: None; use Ethernet patch cable to connect Web
GUI or Telnet terminal to Ethernet management port;
(!) Default username for Web, Telnet and FTP access is admin and password is changeme.
3. Configuration of equipment: perform basic configuration for each CFIP FODU;
• Radio frequency, bandwidth and transmitter power: by default the transmitter power
is switched off.
• Modulation: choose appropriate modulation with better sensitivity (e.g. “32APSK”) or
higher capacity (e.g. “32APSK + wide”) and with (e.g. “32APSK + ACM”) or without
adaptive coding and modulation turned on.
• Number of necessary E1 channels (0…4).
• IP settings:
– IP address, netmask and gateway of the 10/100Base-T port;
– Remote host address.
• SNMP settings (optional):
– Specify SNMP trap manager IP address;
– Specify SNMP read and write community names;
– Specify SNMP NMS hosts.
Complete steps 2 and 3 for each CFIP FODU.
4. CFIP FODU and Antenna mechanical installation; this is discussed in chapter 5.
The CFIP Series Full Outdoor Unit Installation Manual • Rev. 1.21 • Software version 1.10
© SAF Tehnika A/S 2009
4 Basic configuration with Web/command prompt
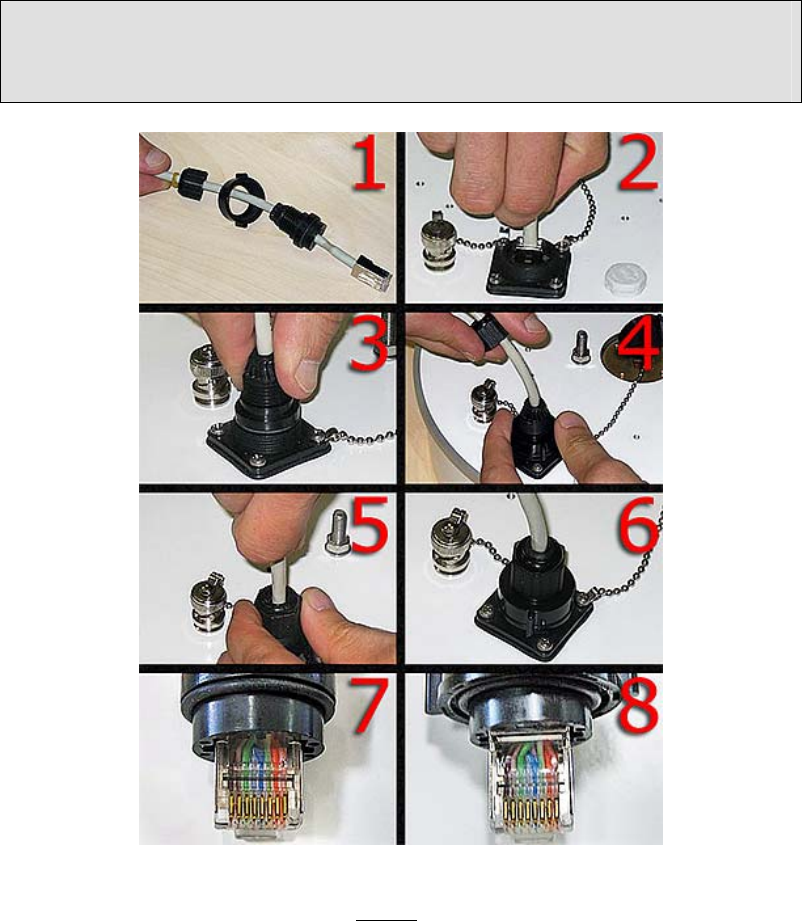
4.1 Assembling CFIP FODU Ethernet cable connector
(!) Attention! Be aware that length of RJ45 connectors may vary! This is the reason why weatherproof
connector enclosure has room for longest possible RJ45 connector.
This instruction will show you how to correctly assemble weathered connector and have best possible
connection of RJ45 connector with socket.
Figure 2. Assembling Ethernet weatherproof connector
1. Prepare the cable as shown in the picture. DO NOT assemble weathered connector!
2. Plug RJ45 connector into the Ethernet socket.
3. Align weathered connector body and put it in place.
4. Fix the connector to the socket with screw. Note that cable sealing screw is still not fixed at this
moment.
5. Push the RJ45 connector into the socket by pushing the cable and at the same time seal and fix the
cable using cable sealing screw.
6. Assembled cable. Please fix the cable to the mast as close as possible to FODU. Do not bend it!
Minimum radius shall be no less than 10cm.
7. Incorrect position of RJ45 connector, weathered connector assembled without proper RJ45
alignment. Note, that it is too deep in the connector.
8. RJ45 connector position if it is aligned during weatherproof connector assembly „in-place”.
The CFIP Series Full Outdoor Unit Installation Manual • Rev. 1.21 • Software version 1.10
© SAF Tehnika A/S 2009
4.2 Initial configuration with Web GUI
(!) Before you start
• Your connected laptop should be in the same subnet with manageable CFIP, so you can “see”
them; that is why, the laptop Ethernet port settings should be set as follows: (in ‘Microsoft
Windows’ go to Control panel
Æ
Network Connections
Æ
Local Area Connection
Æ
Properties
Æ
Internet Protocol (TCP/IP)
Æ
Properties):
– IP address 192.168.205.1;
– netmask 255.255.255.0;
– everything else is blank.
• You must have PoE+ (Power over Ethernet Plus) injector (IEEE 802.3at) with the minimum of
20W power supply to connect the laptop to the CFIP FODU. PoE+ injector can be purchased from
SAF Tehnika as optional accessory.
• To know IP address, side value should be read from the label. See Chapter 2.3 for details.
If Low Side -> IP: 192.168.205.10
If High Side -> IP: 192.168.205.11
Connect to CFIP FODU by entering IP in the browser address line - by default 192.168.205.10 for
the low side and 192.168.205.11 for the high side.
When asked to log in, the default user name is admin and password is changeme.
It is recommended to use the following or later versions of web-browsers:
• IE v. 6.0
• Mozilla Firefox v. 2.0.0.11
• Safari v. 3.0
• Opera v. 9.50
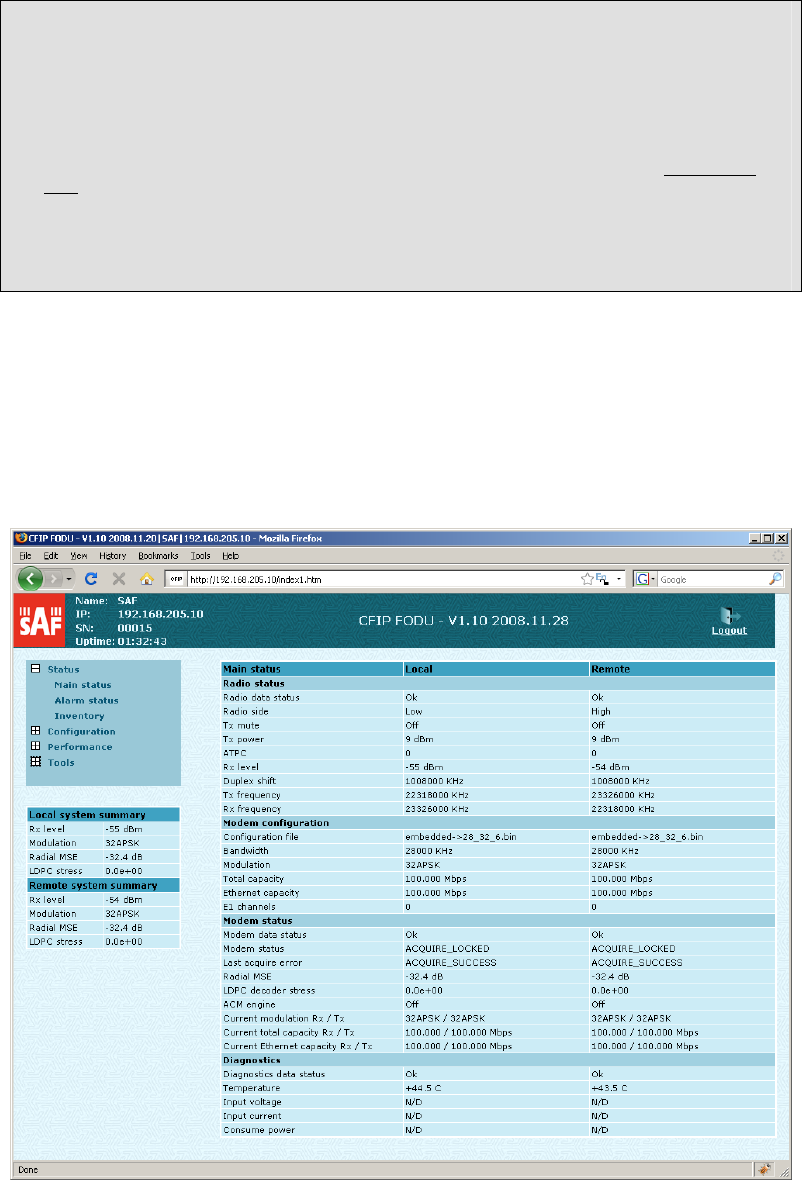
If everything was connected correctly, you will see a screen similar to this (with no alarm
indications):
Figure 3. Web Interface - main window
Otherwise please refer to “The CFIP Series Full Outdoor Unit Technical Description and
Configuration Guide” or contact SAF support team techsupport@saftehnika.com

The CFIP Series Full Outdoor Unit Installation Manual • Rev. 0.2 • Software version 1.0
© SAF Tehnika A/S 2008 8
STEP 1
To start basic configuration process, you must proceed with the configuration wizard.
• Go to ‘Configuration
Æ
Configuration wizard’;
• Enter system name (CFIP FODU identification name), change password for ‘admin’ account and
specify password for ‘guest’ account. By default, the password for ‘admin’ account is
‘changeme’ and there is no password specified for ‘guest’ account;
• Press ‘Next step >>’.
STEP 2
• Enter IP address, IP mask, default gateway and remote link side IP address, if necessary; if
192.168.205.* subnet is not reserved for other purposes, it is recommended that CFIP devices
stay in the same subnet to avoid confusions regarding IP addressing;
• Press ‘Next step >>’.
STEP 3
• Enter preferable bandwidth, modulation type and number of E1 channels;
• Press ‘Next step >>’.
STEP 4
• Enter preferable Tx power and Tx frequency;
• Press ‘Next step >>’.
STEP 5
• Check the settings;
• Press ‘Execute configuration’ to confirm your choice.
STEP 6
• Repeat STEP 1-5 for the second CFIP FODU;
• Go to ‘Status’ screen to check link operation.
4.3 Initial configuration with command prompt
Command prompt is available using serial connection (Twin BNC) or Ethernet management port –
using Telnet or command prompt in Web interface – for further details see the “The CFIP Series Full
Outdoor Unit Technical Description and Configuration Guide”.
Default user name for Web and Telnet access is admin and password is changeme.
Configuration steps using command prompt are the following:
• Check the system settings with command ‘status’
• Configuration required parameters:
– Tx power with the command ‘radio txpower [<power dBm>]’;
– Tx frequency with the command ‘radio freq [<freq KHz>]’;
– Channel bandwidth with the command ‘modem bandwidth <7|14|28>’, where you
can choose among 7, 14 or 28 MHz values;
– Modulation with the command ‘modem modulation <QPSK|16APSK|32APSK> [wide]
[ACM]’;
– Number of E1 channels with the command ‘e1 set <Number of E1 channels>’;
– Name of the CFIP FODU with the command ‘system name <name>’. Default name is
‘SAF’;
– IP address with the command ‘net ip addr <addr>’, if it is necessary;
– IP mask with the command ‘net ip mask <mask>’, if it is necessary;
– IP default gateway with the command ‘net ip gw <gw>’, if it is necessary;
– Remote IP address with the command ‘net ip remaddr <remaddr>’ , if it is
necessary;
• Save settings with the command ‘cfg write’; restarting with the command ‘system reset’;
• Check the settings made, modem and radio status with the commands ‘status’, ‘modem
status’ and ‘radio status’ respectively.
(!) Before you set above mentioned parameters, you must know what frequency and bandwidth you
may use and at what power you may transmit.
The CFIP Series Full Outdoor Unit Installation Manual • Rev. 1.21 • Software version 1.10
© SAF Tehnika A/S 2009
5 CFIP Full Outdoor Unit and Antenna Installation
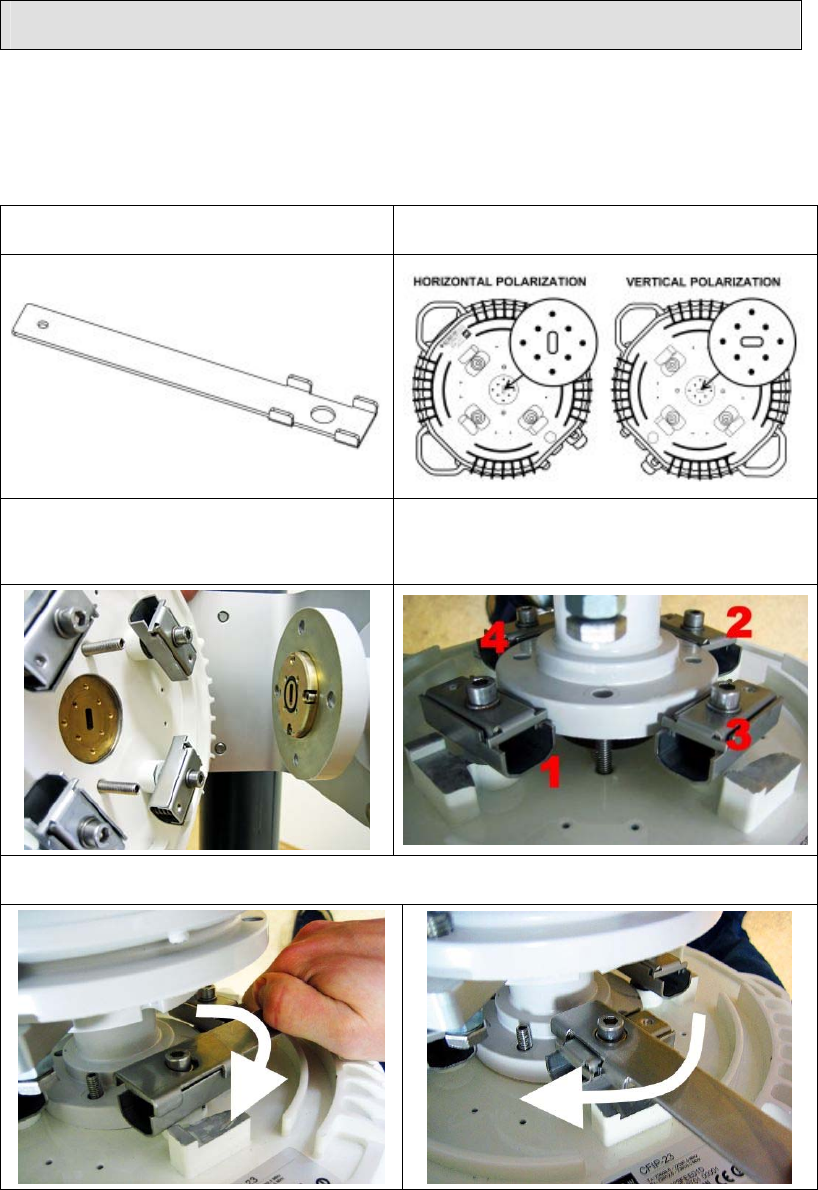
5.1 Polarization Considerations
The position of the CFIP FODU determines the polarization of the radio signal. The waveguide
flange can be used as the indicator, see picture in the next chapter.
When attaching CFIP FODU to the antenna, the antenna waveguide transition polarization must
match with the CFIP FODU polarization.
(!) Polarizations must meet as perfect as possible at both ends of the link, otherwise you will be
experiencing low RSL value.
5.2 Attaching CFIP Full Outdoor Unit to Antenna
1. You need only one tool to attach CFIP
FODU to the antenna. 2. Check antenna polarization and match it
with CFIP FODU polarization.
(!) Note, that lockings should be positioned
in way it is shown below. 3. Use two guidance pins or 4 side lockings to
choose preferable way of attachment. Lockings
should be tightened diagonally in sequence as
shown below.
4. Attaching tool allows tightening lockings in two different ways (see the picture below).
Twist the tool clockwise.
The CFIP Series Full Outdoor Unit Installation Manual • Rev. 1.21 • Software version 1.10
© SAF Tehnika A/S 2009
5. Tightened lockings should look as shown on the picture below:
(!) Mounting locks may differ from ones shown in the image.
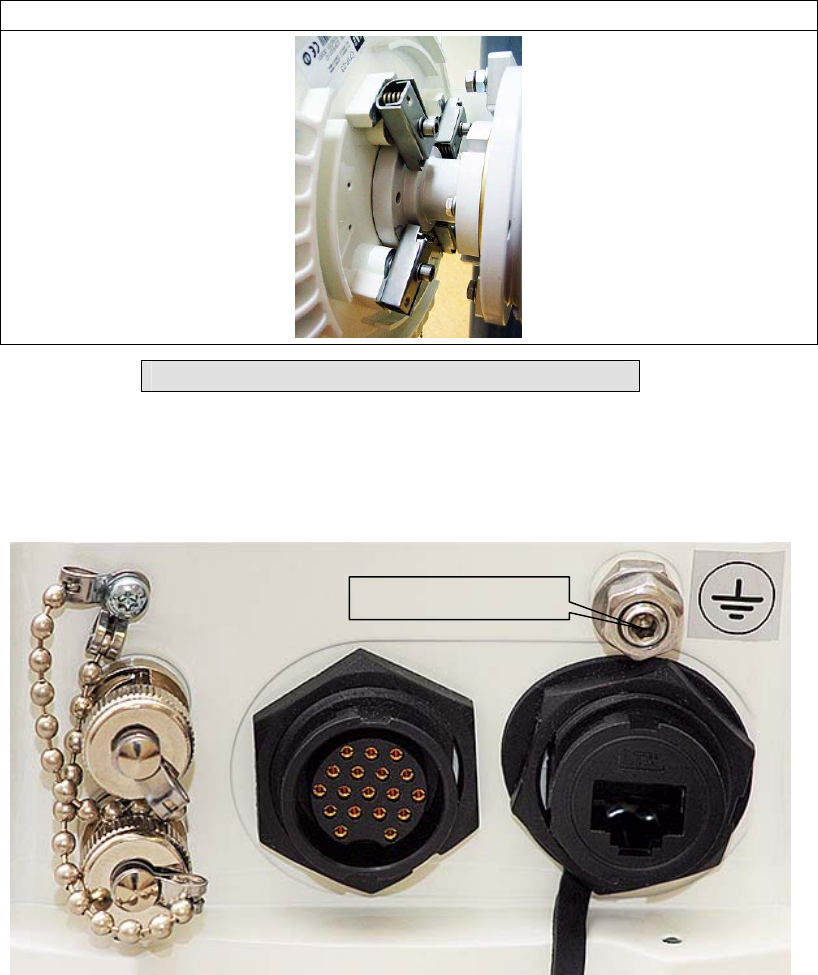
5.3 Grounding the Full Outdoor Unit
Attach the site ground to the CFIP FODU using the grounding screw provided on the CFIP FODU
housing, the location of the grounding screw is depicted in the picture below.
Figure 6.
5.4 Antenna Alignment
5.4.1 Calculating Expected Receive Signal Level (RSL)
The expected RSL (receive signal level) can be calculated using “path calculator” provided by SAF
Tehnika.
5.4.2 Alignment Procedure
The antenna alignment procedure can be made easier by placing one person at each antenna
location during alignment process. However, alignment should be performed on one antenna at a
time, each person alternatively turns antenna until the RSL is optimized.
The following steps are required to properly align the antennas:
1. Start at one end of the link, connect a voltmeter to the RSSI port on the CFIP FODU. Ensure
the voltmeter is set to DC voltage and set on a range 0 – 2 volts.
2. Loosen the antenna hardware that is used for securing the antenna movement in the azimuth
directions.
Groundin
g
screw
The CFIP Series Full Outdoor Unit Installation Manual • Rev. 1.21 • Software version 1.10
© SAF Tehnika A/S 2009
3. Roughly aim the antenna directing the main lobe to the far-end antenna.
4. Slowly sweep the antenna while observing the readings on the voltmeter. The higher is the
voltage, the higher is the RSL.
5. Secure the azimuth adjustment hardware once main lobe is found and the highest signal
level is achieved.
6. Loosen the antenna hardware that is used for securing the antenna movement in the
elevation direction. Slowly sweep the antenna while observing the voltmeter. Once the signal
is peaked, the elevation adjustment hardware can be secured.
7. Perform steps 1 through 6 on the opposite end of the link until the signal level is peaked for
both azimuth and elevation.
After the AGC voltages have been peaked on both ends of the link, observe the RSL indicated in
Web management window. Ensure that the RSL is within +/- 5dB of calculated RSL.
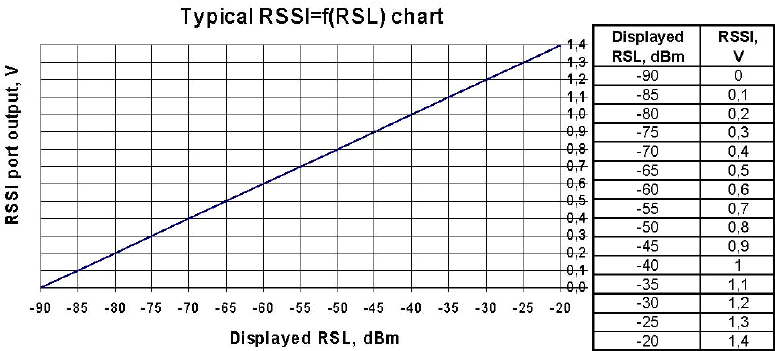
5.4.3 RSSI Readings
To aid in the antenna alignment process, the following chart and table shows typical relationship
of the RSL (Rx level) vs. RSSI port output voltage (RSSI – Received Signal Strength Indicator). The
evaluated Rx level has the error +/-2 dBm.
6 References
All the documents comprised in this chapter can be ordered from SAF Tehnika or its sales
representatives.
• Technical Descriptions
Available technical descriptions:
• The CFIP Series Full Outdoor Unit Technical Description and Configuration Guide - a generic
technical description of the CFIP series products, it comprises the installation and
commissioning issues and accessories, functional description, technical data, a.o.
7 Compliance Statement
THE MANUFACTURER IS NOT RESPONSIBLE FOR ANY RADIO OR TV
INTERFERENCE CAUSED BY UNAUTHORIZED MODIFICATIONS TO THIS
EQUIPMENT. SUCH MODIFICATIONS COULD VOID THE USER'S AUTHORITY
TO OPERATE THE EQUIPMENT.