SALIX TECHNOLOGY 61HD99CWD00101 ACTION CAM User Manual
SALIX TECHNOLOGY CO., LTD. ACTION CAM
User Manual

1
Table of Contents
1. Introduction………..…………………..……….... 2
z System Requirements……………………… 3
2. Preparation……………..………………………. 4
z Component & Accessories…………..…….. 4
z Part Names………………………………….. 5
z Indicator LED………………………………… 6
3. Charging…………………………………………. 7
4. Recording….……………………………………. 9
z Car Mode……………..….…………………... 9
z Sport Mode………………………………….. 12
5. Download………………………………………… 15
z Download from NECKER V1………….….. 15
z Download from Card Reader……………… 16
6. Playback…………………………………………. 17
z Playback from PC / Mac..………………….. 17
7. Wireless…...……………………………………... 18
z Enable Wireless Function………………….. 18
z Enable APP Function……………………….. 20
8. Expert Mode……………………………………... 21
z Load from NECKER V1…………….…….. 21
z Load from microSD Card Reader…………. 22
z Adjust NECKER V1 Settings………………
z Adjust the Date and Time Settings………..
23
24
9.
10.
FAQ………………………………………........
Appendix……………………………………….
● Specification………………………………
● Default Setting………………………………
25
28
29
EN

2
1. Introduction
Welcome to the world of digital imaging. The following information will help you to use your
NECKER V1 to its full capabilities.
Before you install and operate the product, please take a few minutes to read through this
manual. It provides proper instructions for you to install and operate the product.
The NECKER V1 may be affected by static electricity interference. Please plug-in / out and
wait a few minutes to start this function.

3
z System Requirements
PC System Requirements
z Intel® Core2Duo 1.8G or AMD equivalent CPU
z Hi-speed USB2.0 port
z 1 GB RAM internal memory minimum
z 500MB free hard disk space
z 800 x 600 pixel color monitor
z nVIDIA GeForce MX440 or above, AMD (ATi) Radeon 9200 or above
z DirectX 9.0 or higher
z Windows® XP (SP2 or higher) / Windows Vista™ / Windows 7™, Windows 8™
Note: If your system is Windows XP Service Pack I, please go to www.microsoft.com. It’s
free to update your system to Windows XP Service Pack II.
Mac System Requirements
z Power PC G5 or Intel Core Duo processor recommended
z Free USB2.0 port
z 1 GB RAM internal memory minimum
z 500MB free hard disk space
z 800 x 600 color monitor
z Mac OS 10.5 or above
EN
4
2. Preparation
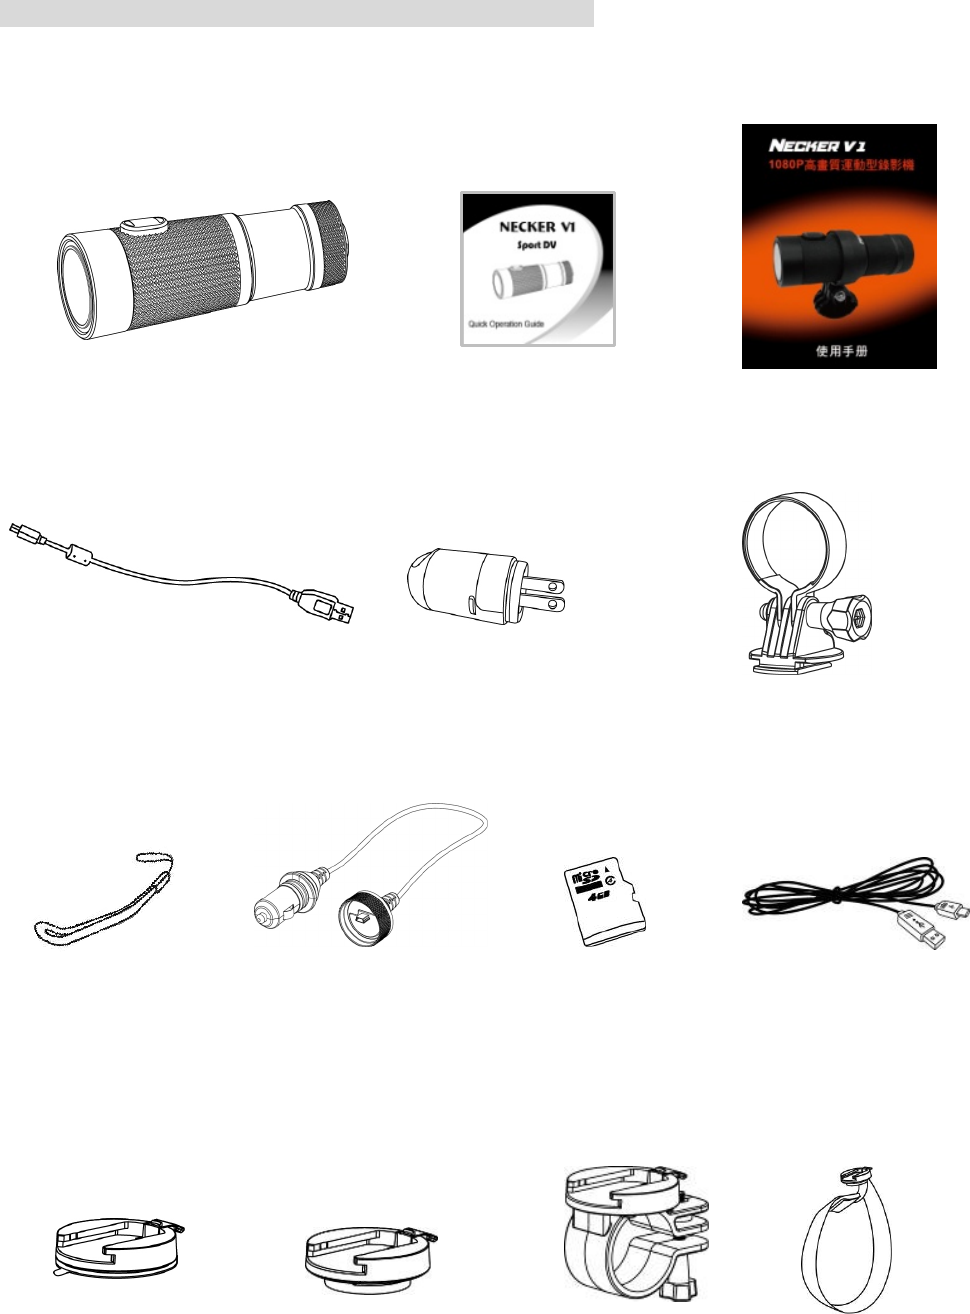
z Component & Accessories
NECKER V1 Sport DV QOG User Manual
USB Cable AC Adaptor Camera Holder
Hand Strap Waterproof MicroSD Hi-Speed
Car Charger (optional) charger cable
(For charging
use only.)
Base Mount Tripod Mount Bike Mount Universal
Mount
5
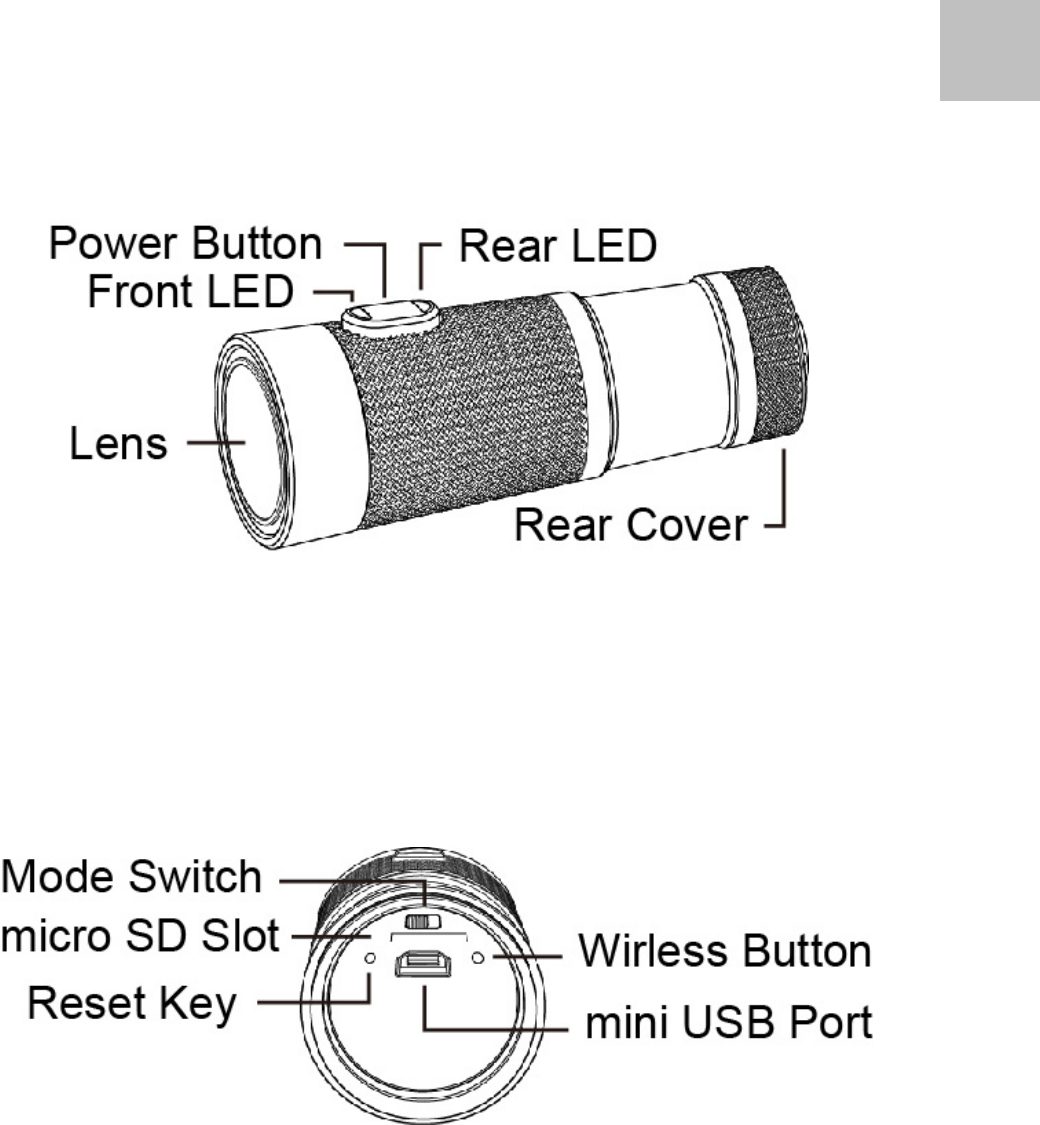
z Part Names
EN

6
z Indicator LED
Front LED Rear LED
Off Off - Power
On Blue, On -
Off Off - Record
On Blue, Slow Blink -
Off - Off
Booting - Red, Slow Blink
Wireless
On - Red, On
Low Blue, Quick Blink -
Charge - Green, On
Battery
Full - Off
No Card - Red, Quick Blink SD Card
Card Full - Red, Quick Blink
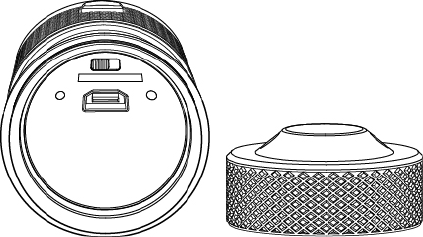
7
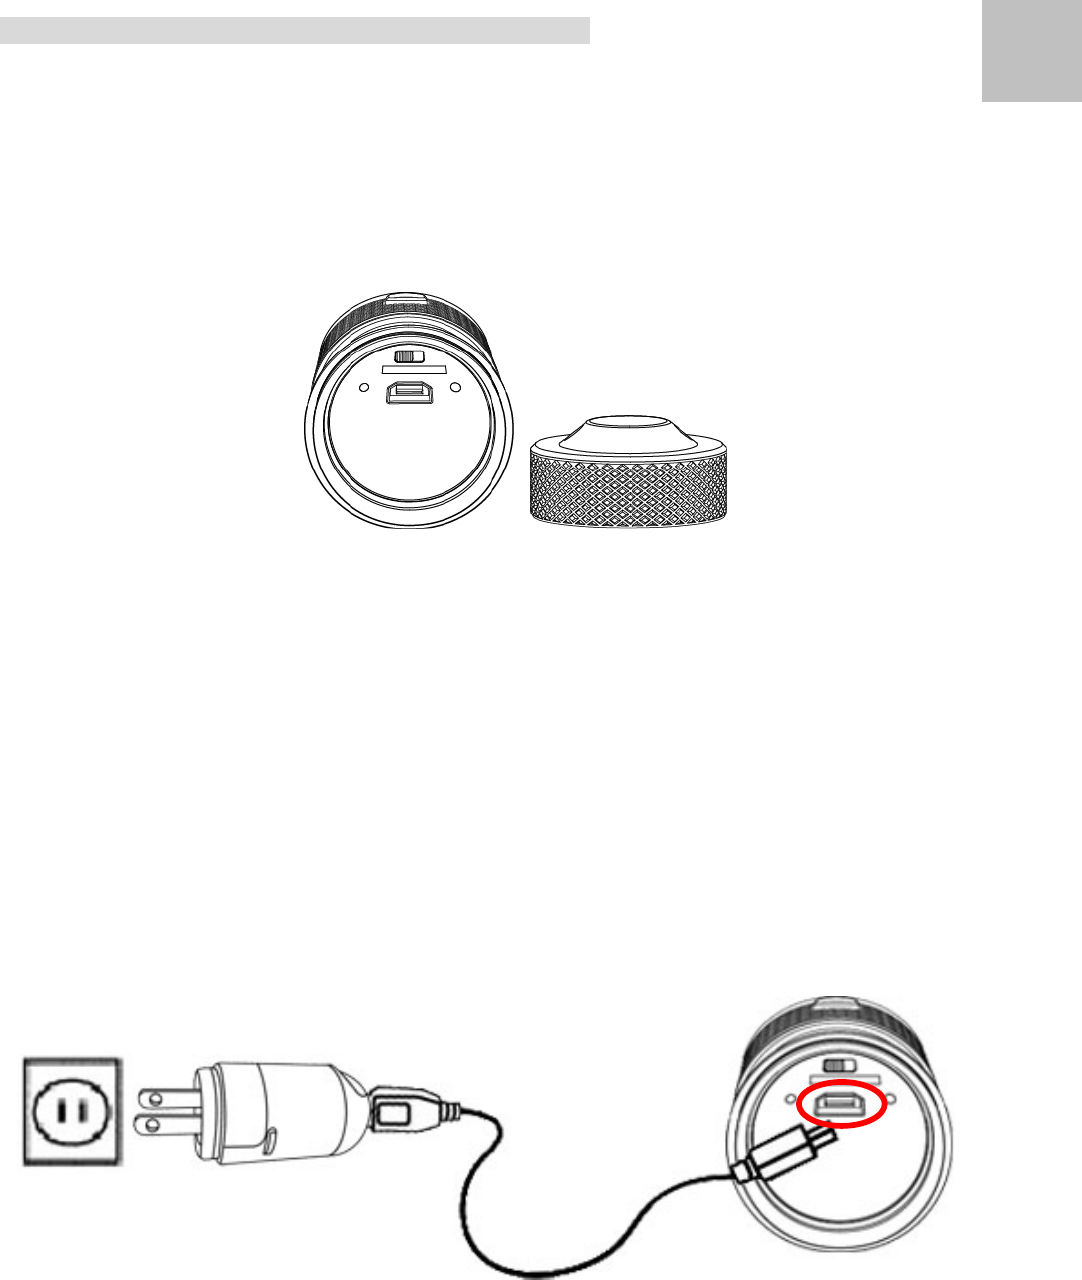
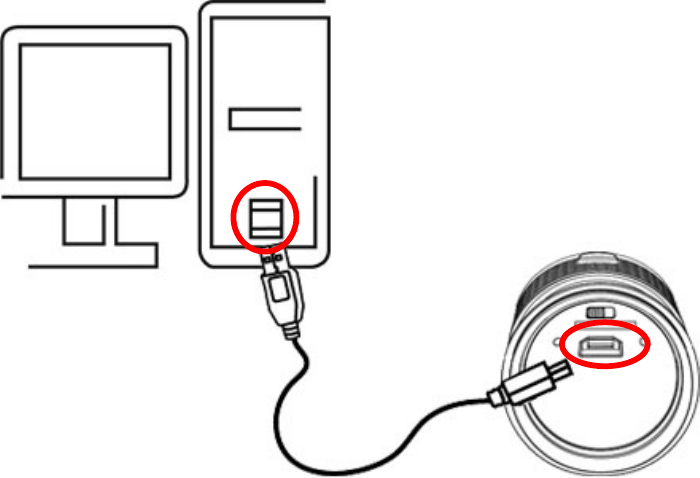
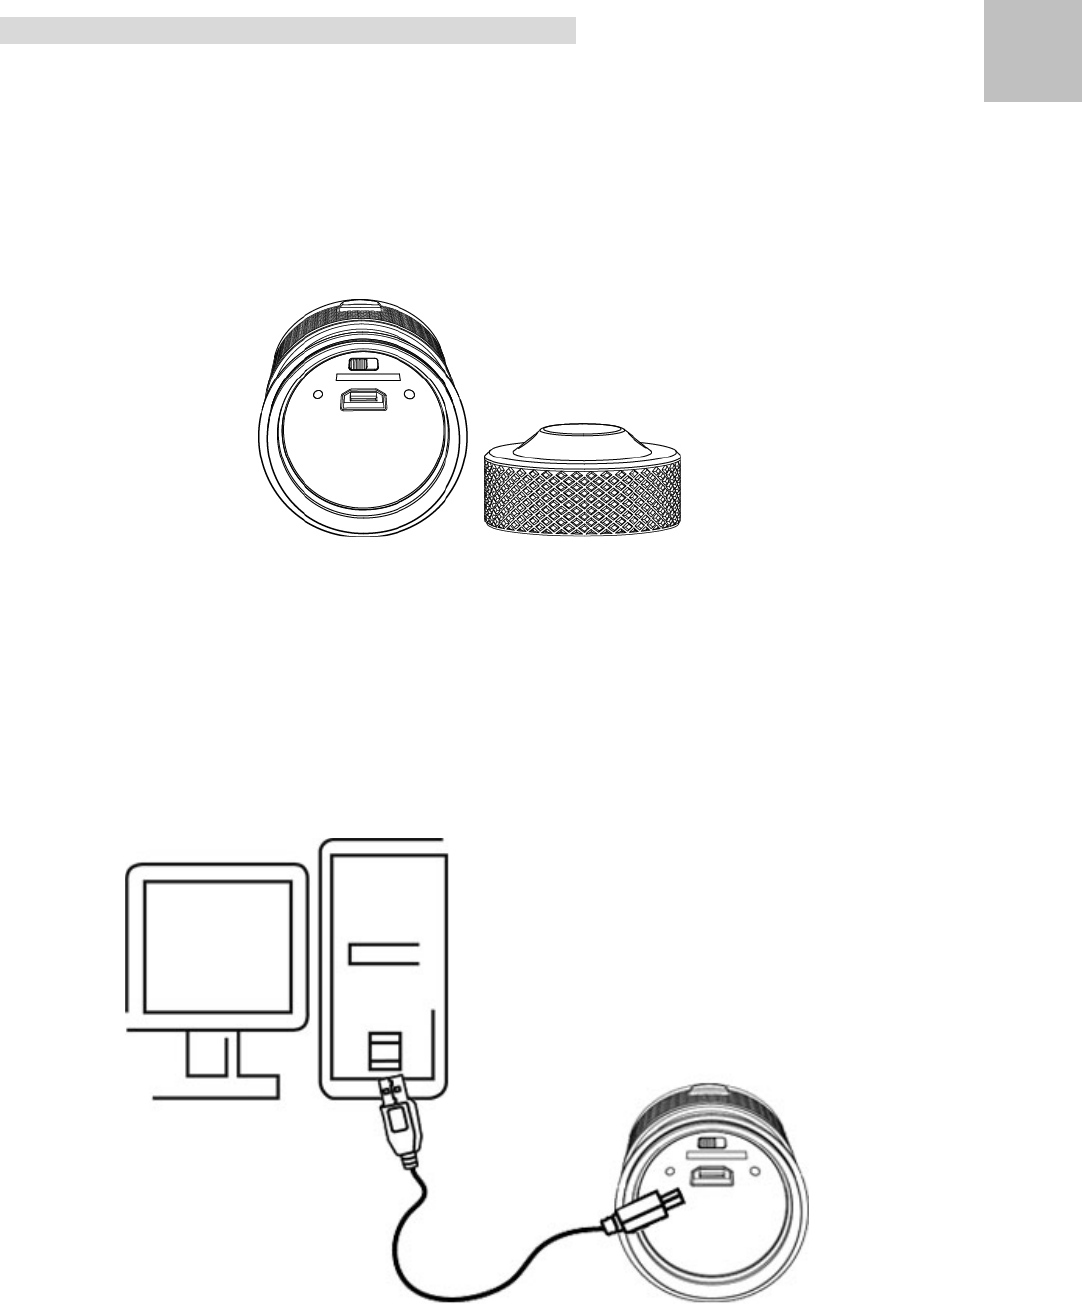
3. Charging
1. Remove the rear protective cap of the NECKER V1 and connect the supplied mini USB
cable into the NECKER V1.
2. Plug the USB cable into the supplied AC wall adaptor, car adaptor, or a PC / Mac USB
port.
EN
8
3. The NECKER V1 will illuminate the Green LED in the Rear LED to tell you it’s charging.
4. When the Green LED turns off, the battery is full and charging is complete.
Note: The Front LED will blink blue and auto power off after 10 seconds when the battery
power is low and reference the charging procedure to recharge it.
9
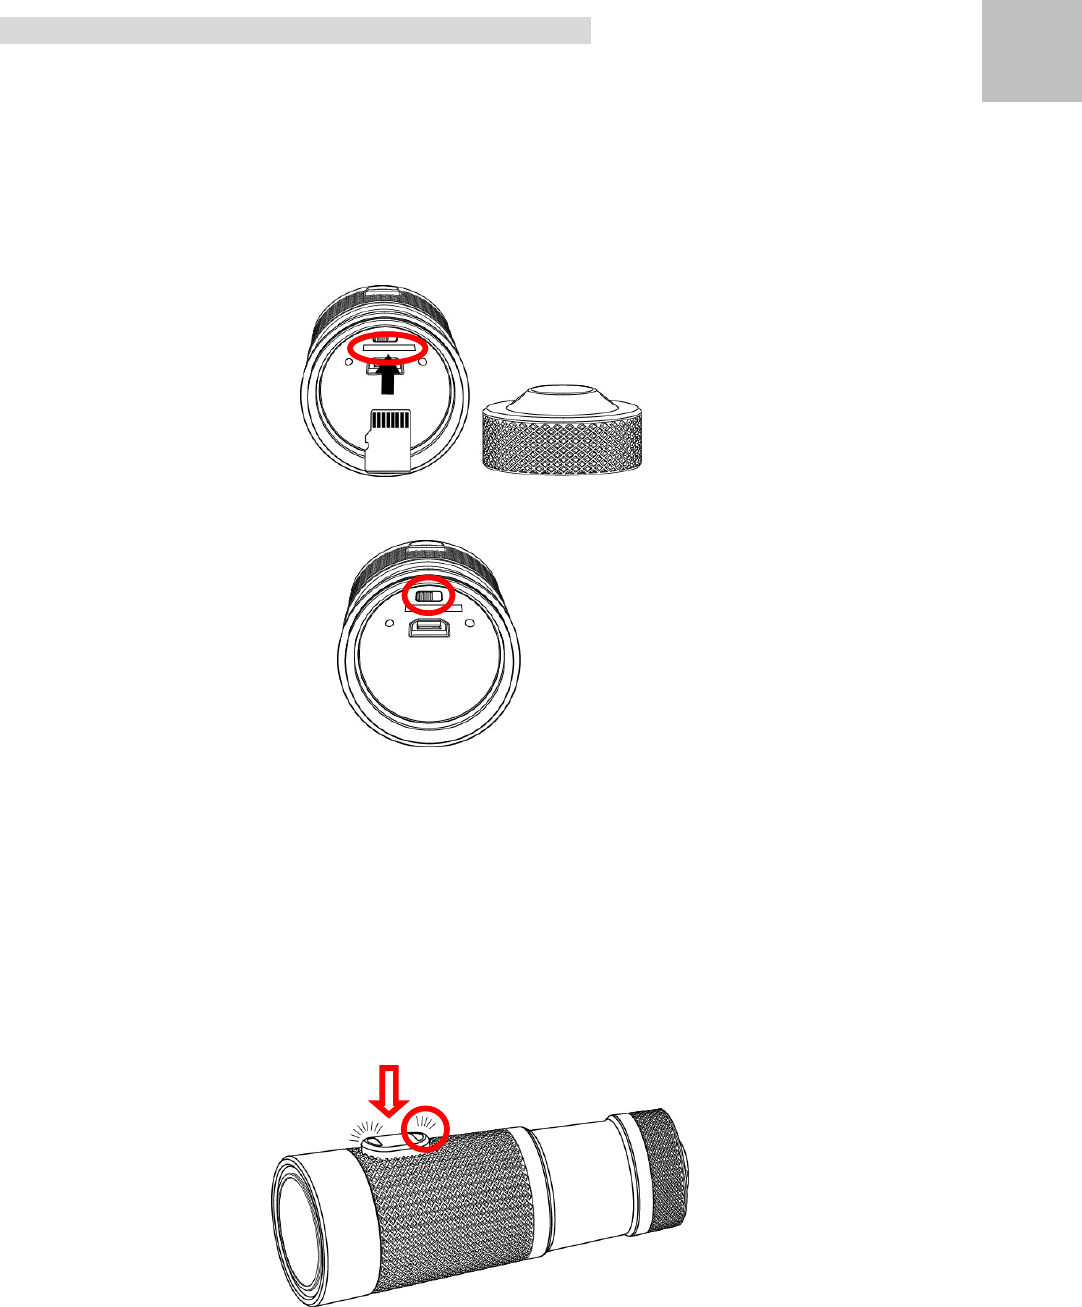
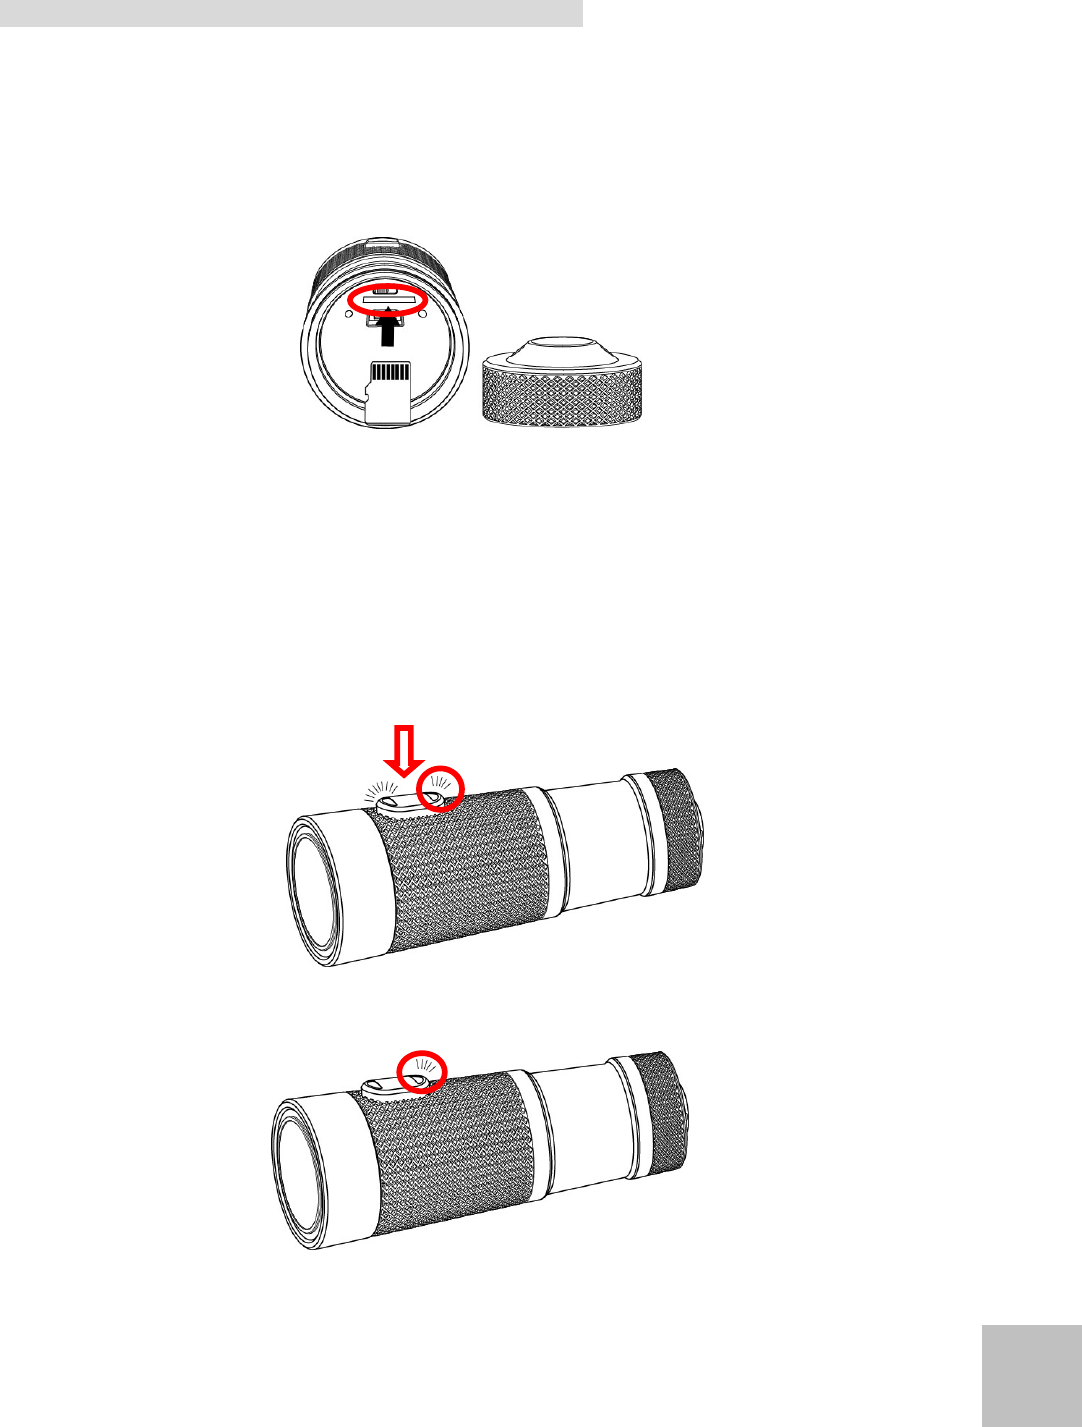
4. Recording
z Car Mode
1. Remove the rear protective cap of The NECKER V1 and insert a microSD card (optional)
in the microSD Card Slot.
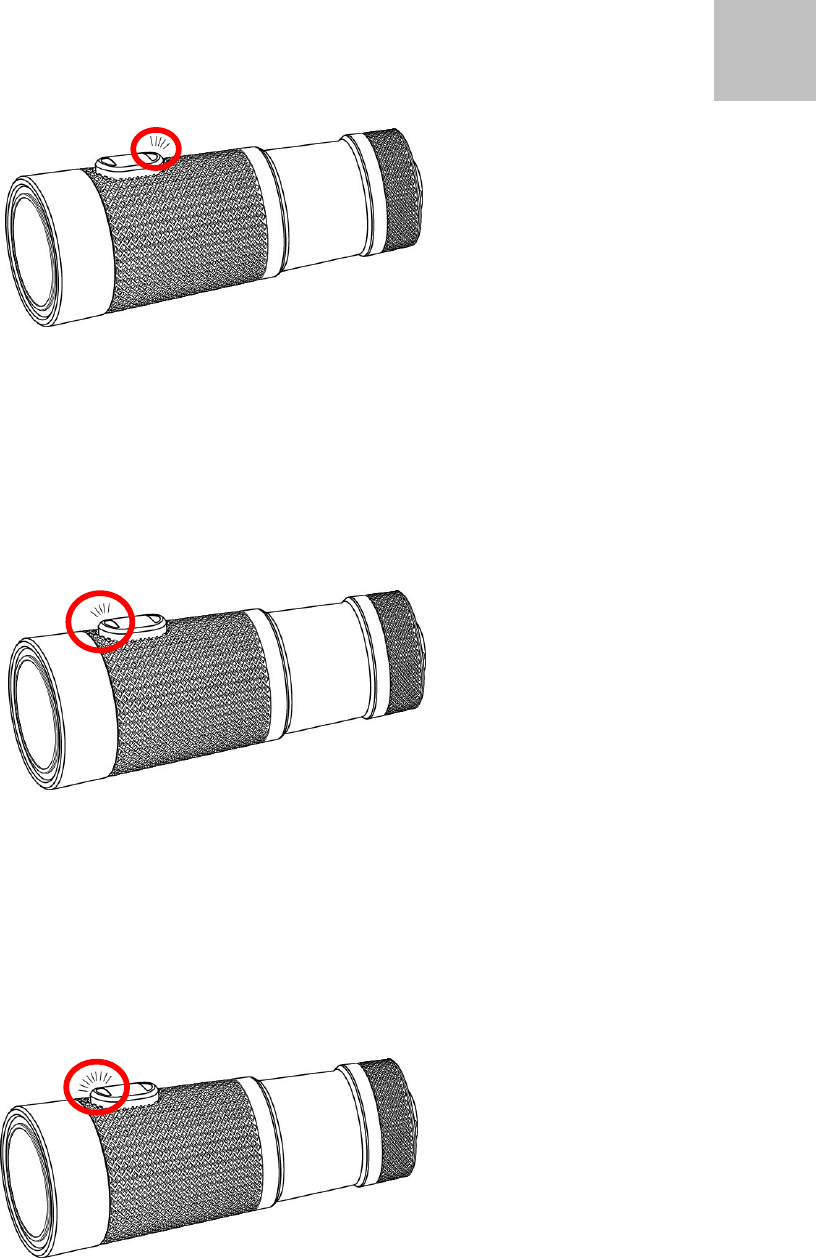
2. Slide the Mode Switch to the Left side.
Note: 1. In Car Mode, the NECKER V1 circulate record video and overwrite the oldest
recorded file first.
2. The record file automatic divides each 1, 3 or 5 minutes depend on user
setting.
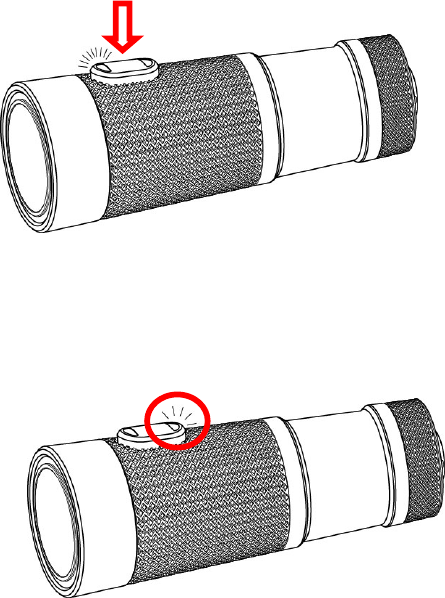
3. Hold down the Power Button for 1 seconds and release, the NECKER V1 will illuminate
the Blue Front LED and vibrates 3 times. The Rear LED will blink Red and boot the
wireless module.
EN
10
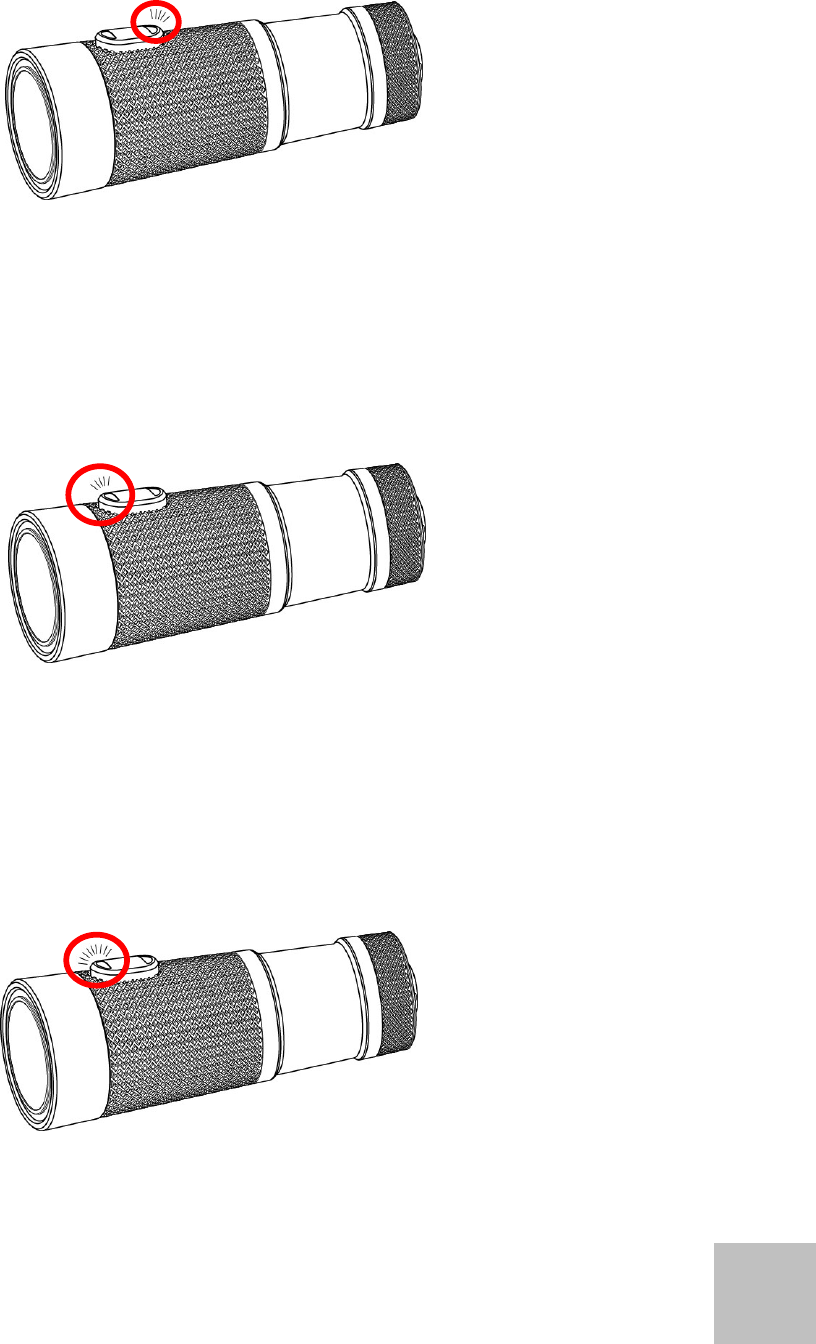
4. When the wireless module has booted, the Rear LED turn off.
5. The NECKER V1 vibrates 1 time and auto record. The Front LED blink slowly in Blue.
6. To stop recording, hold down the Power Button for 1 second and release, the Front LED
stop blink, vibrates 1 time and save the file.
7. Hold down the Power Button for 5 seconds and release. The Front LED turn off and
vibrates 3 times then power off. EN

11
Note: 1. The Rear LED will blink quickly the RED and the NECKER V1 will vibrate until
power off when the micro SD card has full or here is no micro SD card insert
into the micro SD card slot.
2. The wireless module will boot at the same time when power on. The rear
LED slow blink in red. Reference the “8 Wireless” for more information.
3. NECKER V1 need about 20 seconds to boot the wireless module. The
record function will be disable before wireless module has booted.
4. It will auto power on when plug-in the mini USB cable.
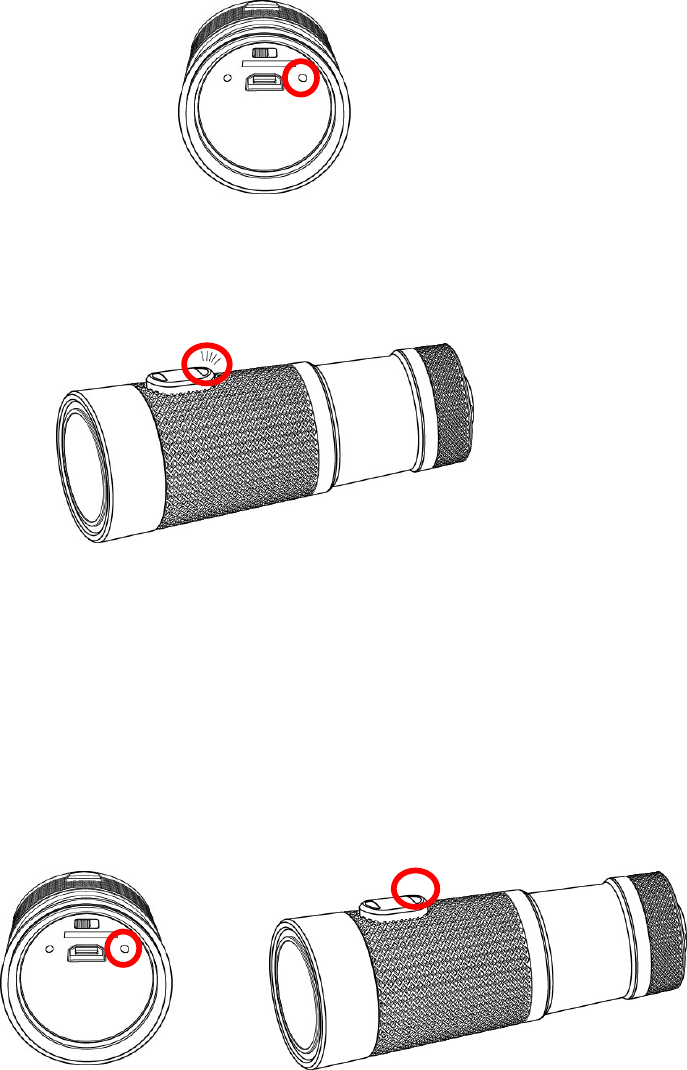
z Sporty Mode
1. Remove the rear protective cap of the NECKER V1 and insert a microSD card (optional)
in the microSD Card Slot.
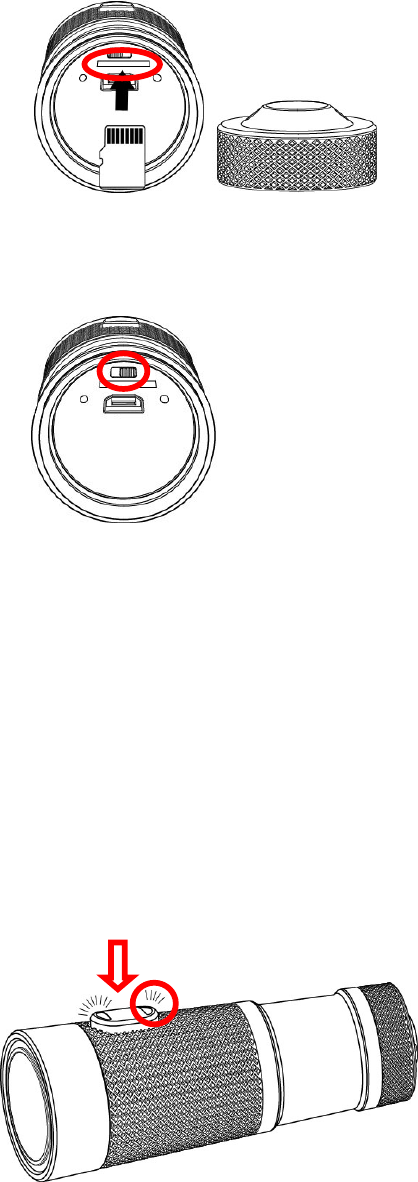
12
2. Slide the Mode Switch to the Right side.
Note: 1. In Sporty Mode, the NECKER V1 doesn’t circulate record and overwrite the
oldest recorded file. It will auto power off when memory card is full.
2. The record file automatic divides each 1, 3 or 5 minutes depend on user
setting.
3. Hold down the Power Button for 1 seconds and release, the NECKER V1 will illuminate
the Blue Front LED and vibrates 3 times. The Rear LED will blink Red and boot the
wireless module.
13
4. When the wireless module has booted, the Rear LED turn off.
5. Hold down the Power Button for 1 second and release to start video recording. The
NECKER V1 vibrates 1 time and the Front LED blink slowly in Blue.
6. To stop recording, hold down the Power Button for 1 second and release, the Front LED
stop blink, vibrates 1 time and save the file.
7. Hold down the Power Button for 5 seconds and release. The Front LED turn off and
vibrates 3 times then power off.
EN
14
Note: 1. The Rear LED will blink quickly the RED and the NECKER V1 will vibrate until
power off when the micro SD card has full or here is no micro SD card insert
into the micro SD card slot.
2. The wireless module will boot at the same time when power on. The rear
LED slow blink in red. Reference the “8 Wireless” for more information.
3. NECKER V1 need about 20 seconds to boot the wireless module. The
record function will be disable before wireless module has booted.
4. It will not auto power on when plug-in the mini USB cable.
15
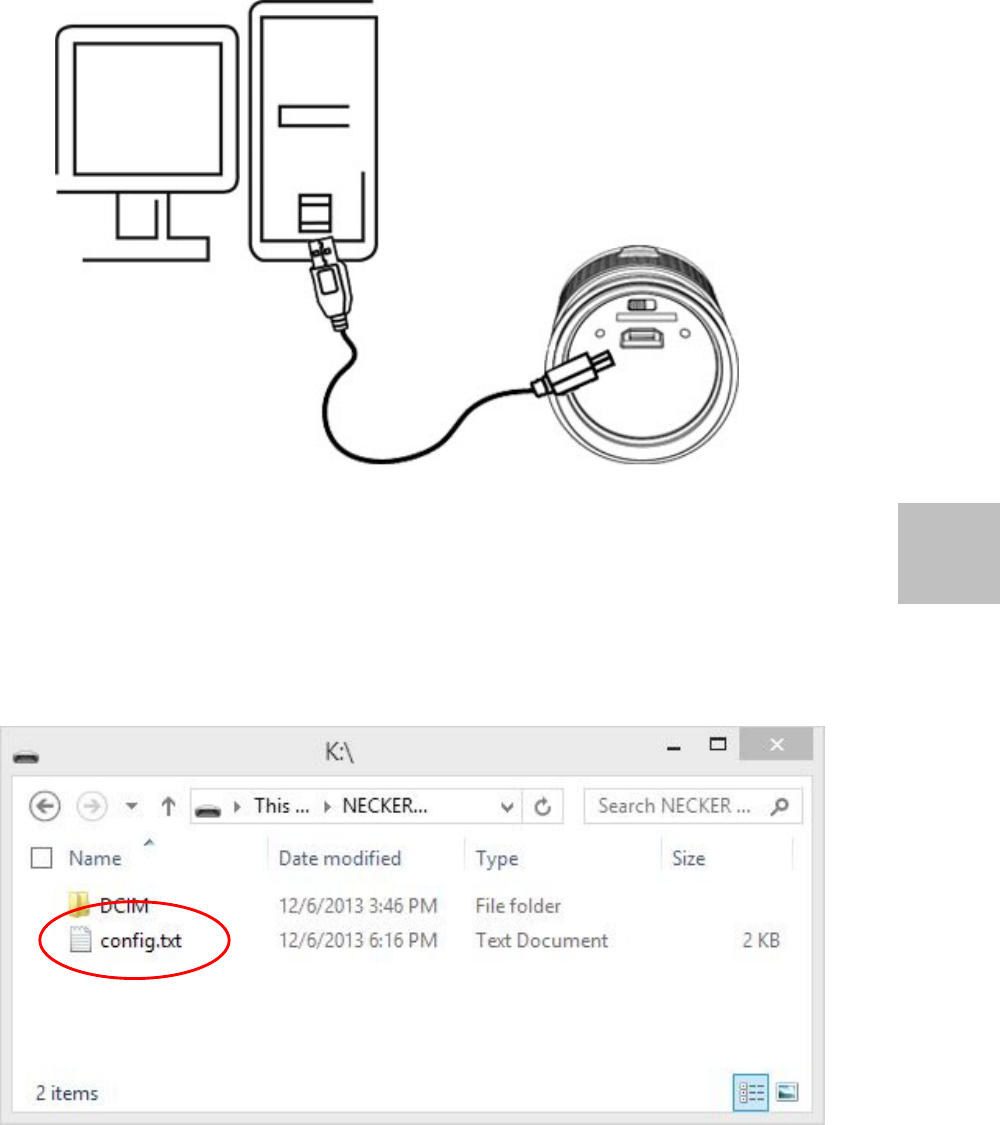
5. Download
z Download from NECKER V1
1. Remove rear protective cap and power off.
2. Connect the supplied mini USB cable into the micro USB port of the NECKER V1.
3. Plug the USB cable into a PC / Mac USB 2.0 port.
4. On a PC / Mac your NECKER V1 will mount to your computer as a mass storage device
EN
16
in MSDC mode.
5. You may download your video files from the X:\DCIM\100MEDIA folder.
Note: Always eject device from PC / Mac.
z Download from microSD Card Reader
1. Remove rear protective cap.
2. Take the microSD card out and insert it to a compatible card reader. You may download
your video files from the X:\DCIM\100MEDIA folder.

17
6. Playback
z Playback from PC / Mac
The video file format is MOV which can be played by QuickTimeTM with PC / Mac.
Windows 7: The videos can be viewed by the built-in Windows Media Player or
QuickTime.
Windows XP: The videos can be viewed by the Windows Media Player Ver. 11 or
QuickTime.
Mac: Use the built-in QuickTime.
Note: For PC version which can be downloaded from:
http://www.apple.com/quicktime/download/
EN
18
7. Wireless
z Enable Wireless Function
1. Remove the rear protective cap of The NECKER V1 and insert a microSD card (optional)
in the microSD Card Slot.
2. Hold down the Power button for 1 seconds and release, the NECKER V1 will illuminate
the BLUE Front LED and vibrates 3 times. The Rear LED will blink Red and boot the
wireless module.
3. When the wireless module has booted, the Rear LED turn off.
4. Press and hold the Wireless Button 1 second then release to enable the wireless
function. The camera vibrates 2 times. EN
19
5. Wait about 2 or more seconds until the wireless function enable. The Red of Rear LED
will light
6. Use the mobile device to connect the NECKER V1 and modify settings via the App.
7. To turn off the Wireless function, press and hold the Wireless Button to disable the
wireless function. The Red of Rear LED turn off and the NECKER V1 vibrates 2 times.
● Enable APP Function
IOS System
Please kindly download 『Action Cam HD』from APP STORE as below:

20
Android system
Please kindly download『Action Cam HD』from Play Store as below:
After installed above APP, please connect with wirelessof V1to use.
*Please kindly input “1234567890” upon password request.
8. Expert Mode
Allow user to adjust the NECKER V1 full function settings by text editor.
z Load from NECKER V1
1. Remove rear protective cap and power off.
21
2. Connect the supplied mini USB cable into the micro USB port of the NECKER V1.
3. Plug the USB cable into a PC / Mac USB 2.0 port.
4. On a PC / Mac your NECKER V1 will mount to your computer as a mass storage device
in MSDC mode.
5. Find “config.txt” from “x:\” folder of micro SD card.
Note: Always eject device from PC / Mac.
EN
22
z Load from micro SD Card Reader
1. Remove rear protective cap and take the micro SDHC out of the NECKER V1.
2. Take the microSD card out and insert it to a compatible card reader. Find “config.txt”
from “x:\” folder of micro SD card
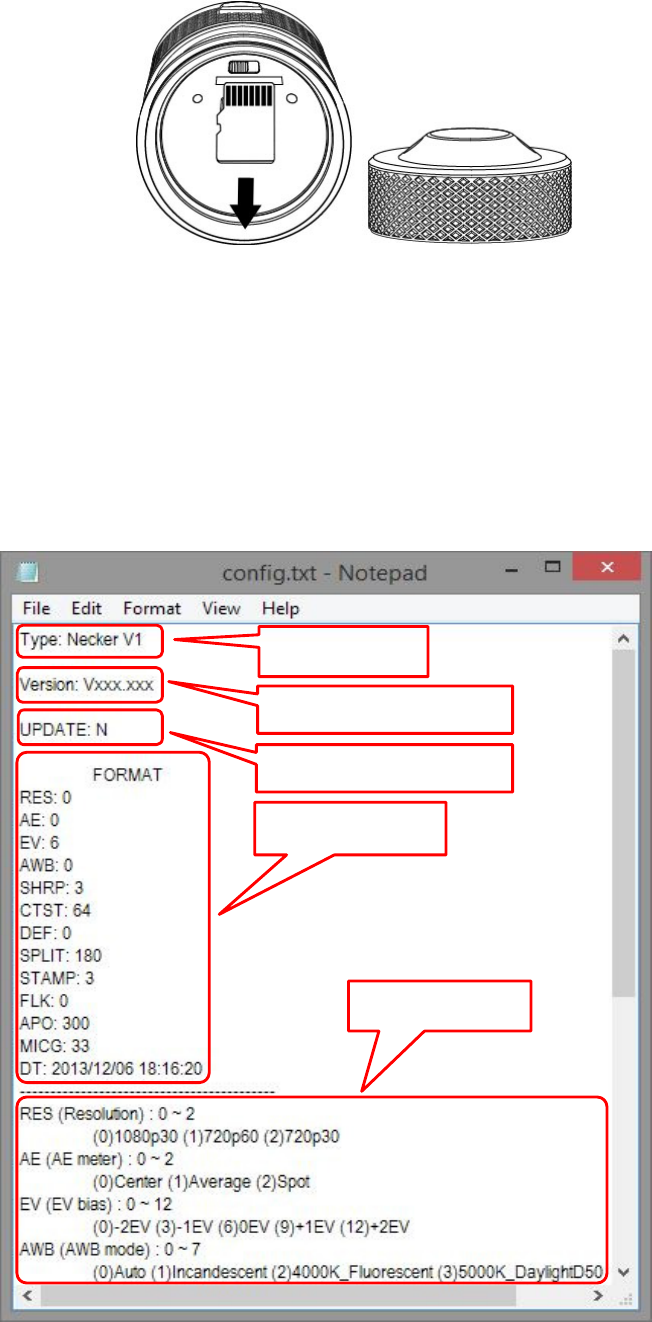
z Adjust NECKER V1 Settings
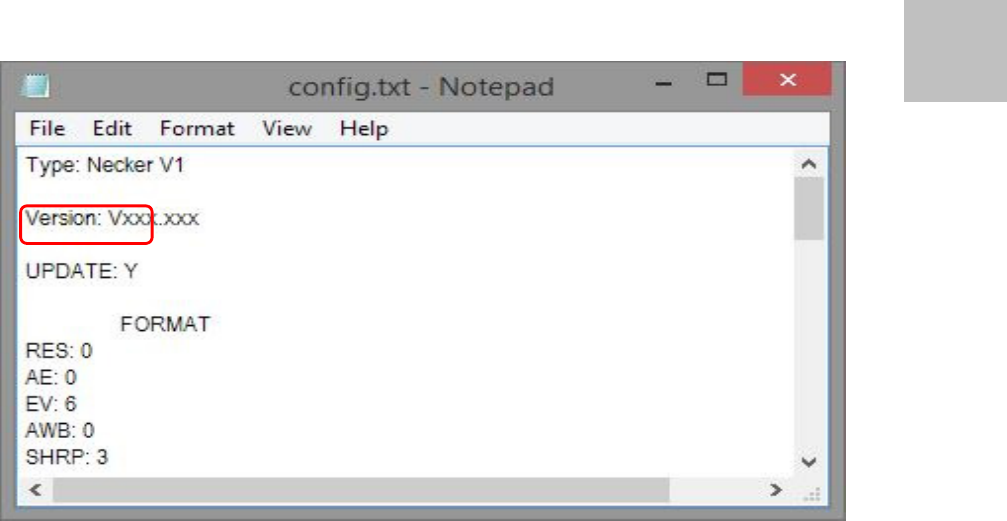
1. Open the “config.txt” from text editor as below.
(ex. Notepad for Windows.)
Settin
g
s
In
de
x Ar
ea
Model No.
Firmware
Confirm to
23
2. Reference the Index Area for detail descriptions then change settings from the Settings
Area.
3. Modify the UPDATE: “N” to “Y” before save and close it.
Note: It will not active any changed settings if the “N” has not be changed to “Y”.
4. Disconnect the USB cable / insert the memory card to camera then restart and done
these settings.
Note: The “config.txt” is created by the NECKER V1 automatic when insert a new
memory card or even deleted it. All settings are current used by NECKER V1.
z Adjust Date and Time
1. Open the “config.txt” from text editor as below.
(ex. Notepad for Windows.)
2. Find the “DT” code from the Setting Area and follow the current format to adjust the date
and time. Revise “UPDATE: “N” to “Y” before save and close it.
3. Remove the USB cable / insert the memory card to NECKER V1 then power on and
complete the setting.
EN

24
9. FAQ
This chapter will list some of the problems you might face when using this device and their
solutions. Even if the following guide can not solve your problem, please do not dismantle this
device on your own. Please send the device back to the store where you purchased it for
maintenance.
Q1.Why power indicator is not working?
A: Please make sure you are using the car charger from our company. If it is not, it may have
connecting problem.
Q2.Why image is not clear?
A: Please make sure your lens is clean and use lens-cleaning cloth to remove the dirty. Or it
may come from unclean front windshield.
Q3.Why image has violent jump in while driving?
A: Please make sure the mount is well holding.
Q4.Why it is not smooth while playing in computer?
A: Please copy video file to your computer then play. Please use class dual core CPU or
higher class and also at least 512MB memory capacity.
Please also use common media player, such as Windows Media Player to play. And then check
25
setup latest version of video codec.
Q5.Does it is not smooth enough and have jump seconds?
A: NECKER V1 products use standard Micro SD card socket. Please avoid to use Micro SD
card which under class 6.
Q6.Do I need to reset the date or time after every turning on?
A: You don’t need to reset the date or time again.
All of information will be remained on this product.
Q7.How long does NECKER V1 use? Shall we use power bank?
A:NECKER V1 could work for 1.5 hours continuously, however; it depends on methods.
Moreover; NECKER V1 can work with power bank. Please be kind noted that power bank
could not have water proof function, therefore; don’t use power bank when raining.
Q8.Why does base mount not tight with 3M lable?
A:Before using NECKER V1, please be sure prominence
nearby base mount must be pressed down and hear buckling and then it is ready for use.
Q9. Shall we use NECKER V1 when snorkeling ?
A:Water proof for V1 is IPX8, therefore; you could use V1 under 3M water. However; it will be
26
a problem if out water 3M, please be kind understanding.
Q10.How do I use two cable inside NECKER V1 box? A:Hi-speed charge cable if only for
charging use not for download video or images. Water proof charge cable could be used for
motorcyle when raining.

27
10. Appendix
z Specification
Sensor 14M (4608x3288) CMOS 1/2.3”
DSP Ambarella A5S
Lens 6G+IR, F1.6, f3.6 mm, Optical 160.0°
Video Resolution Full HD : 1080P : 1920x1080 @ 30 fps
HD:720P : 1920 x 720 @ 30 fps
1920 x 720 @ 60 fps
Video File Format MOV
White Balance Auto
Exposure Auto
Video Encoder H.264
Audio Encoder AAC and AC3 mono, sample rate 48K
Audio Input Built-in MIC
Battery Internal Li-Ion Rechargeable Battery
3.7V / 800mA
Storage MicroSD up to 32GB
Connector USB 2.0, mini USB B Type (5 pin)
Dimensions 107.8 (L) x 34.0 (W) x 34.0 (H) mm
Specifications are subject to change without prior notice.

28
z “Config.txt” default
Type: Necker V1
Version: Vxx.xxx
UPDATE: N
FORMAT
RES: 0
AE: 0
EV: 5
AWB: 0
SHRP: 3
CTST: 67
DEF: 0
SPLIT: 180
STAMP: 3
FLK: 0
APO: 180
MICG: 25
DT: 2013/12/16 15:49:16
------------------------------------------
RES (Resolution) : 0 ~ 2
(0)1080p30 (1)720p60 (2)720p30
AE (AE meter) : 0 ~ 2
(0)Center (1)Average (2)Spot
EV (EV bias) : 0 ~ 12
(0)-2EV (3)-1EV (6)0EV (9)+1EV (12)+2EV
AWB (AWB mode) : 0 ~ 7
(0)Auto (1)Incandescent (2)4000K_Fluorescent (3)5000K_DaylightD50
(4)6500K_DaylightD65 (5)7500K_Cloudy (6)9000K_Shade (7)10000K_XenonHID
SHRP (Sharpness) : 1 ~ 5
(1)Soft (3)Standard (5)Hard
TC
29
CTST (Contrast) : 32 ~ 88
(32)Soft (64)Standard (88)Hard
DEF (Digital Effect) : 0 ~ 5
(0)Off (1)Art (2)Sepia (3)Negative (4)Black White (5)Vivid
SPLIT (Split File Szie) : 60/180/300
(60)1 Min (180)3 Mins (300)5 Mins
STAMP (Date/Time Stamp) : 0 ~ 3
(0)Off(Video stamp will disable in wifi mode) (1)Date (2)Time (3)Date&Time
FLK (Flicker) : 0 ~ 2
(0)Auto (1)60Hz (2)50Hz
APO (Auto Power Off) : 0 ~ 300
(0)Off (180)3Min. (300)5Min.
MICG (Microphone AGC Max) : 0 ~ 59 db
DT (Date Time) : YYYY/MM/DD hh:mm:ss
YYYY: 2011 ~ 2037
MM: 01 ~ 12
DD: 01 ~ 31

30
This symbol on the product or in the instructions
means that your electrical and electronic equipment
should be disposed at the end of its life separately
from your household waste. There are separate
collection systems for recycling in the EU.
For more information, please contact the local authority or your
retailer where you purchased the product.
TC
31
This device complies with Part 15 of the FCC Rules. Operation is subject to the following two
conditions: (1) this device may not cause harmful interference and (2) this device must accept
any interference received, including interference that may cause undesired operation
This equipment has been tested and found to comply with the limits for a Class B digital device,
pursuant to part 15 of the FCC rules. These limits are designed to provide reasonable
protection against harmful interference in a residential installation. This equipment generates, uses
and can radiate radio frequency energy and, if not installed and used in accordance with the
instructions, may cause harmful interference to radio communications. However, there is no
guarantee that interference will not occur in a particular installation. If this equipment does cause
harmful interference to radio or television reception, which can be determined by turning the
equipment off and on, the user is encouraged to try to correct the interference by one or more of the
following measures: Reorient or relocate the receiving antenna.
-Increase the separation between the equipment and receiver.
-Connect the equipment into an outlet on a circuit different from that to which the receiver is
connected.
Consult the dealer or an experienced radio/TV technician for help.
You are cautioned that changes or modifications not expressly approved by the party responsible
for compliance could void your authority to operate the equipment.
FCC RF Radiation Exposure Statement:
1. This Transmitter must not be colocated or operating in conjunction with any other antenna or
transmitter.
2.This equipment complies with FCC RF radiation exposure limits set forth for an uncontrolled
environment. This equipment should be installed and operated with a minimum distance of 20
centimeters between the radiator and your body.