SALIX TECHNOLOGY SMC Monitoring Camera User Manual SMC 1 Manual EG 140128
SALIX TECHNOLOGY CO., LTD. Monitoring Camera SMC 1 Manual EG 140128
User Manual

0
`

1
Table of Contents
1. Precaution……………………….………….…… 2
2. Preparation………………………………………. 4
Components & Accessories………..………. 4
Part Names………………………………….. 5
3. Initiate SMC from Mobile Device……….……… 6
Download the SMC App..……………….….. 6
Connect to the SMC via Wireless Network.. 6
System Setting via SMC App for iOS……… 7
System Setting via SMC App for Android… 13
4. Initiate SMC from PC……….…………..……… 18
Connect to the SMC………………….…….. 18
Connect via the Wired……….……….…… 18
Connect via the Wireless………..………… 20
System Setting……………………………… 22
Skype
TM Setting…………….……………….. 25
5. Operate the SMC………………...……...……… 26
Connect to Internet via Wired……………… 26
Connect to Internet Wireless………...…….. 26
Standby…………….…………….…..………. 26
Video Monitor……………………...……..….. 27
8. Appendix…………………………….…………… 29
Specification…………………………………. 29

2
1 Precaution
Thank you for purchasing a Monitoring Camera.
Please take a moment to read through this manual. Its
contents will send you on an educational journey into
your recorder multiple capabilities.
Before using the SMC, the Monitoring Camera, please
ensure that you read and understand the safety
precautions described below. Always ensure that the
Monitoring Camera is operated correctly.
Never operate the Monitoring Camera inside of an
aircraft or anywhere else where operation of such
devices is restricted. Improper use creates the risk
of serious accident.
Do not try to open the case of the Monitoring
Camera or attempt to modify it in any way.
High-voltage internal components create the risk of
electric shock when exposed. Maintenance and
repairs should be performed only by authorized
service providers.
Keep the Monitoring Camera away from water and
other liquids. Do not use it with wet hands. Never
use the Monitoring Camera in the rain or snow.
Moisture creates the danger of fire and electric
shock.
Keep the Monitoring Camera and its accessories
out of the reach of children and animals to prevent
accidents or damage to the Monitoring Camera.
3
If you notice smoke or a strange odor coming from
the Monitoring Camera, turn the power off
immediately. Take the Monitoring Camera to the
nearest authorized service center for repair. Never
attempt to repair the Monitoring Camera on your
own.
Use only the recommended power accessories.
Use of power sources not expressly recommended
for the Monitoring Camera may lead to
overheating, distortion of the equipment, fire,
electrical shock or other hazards.
The Monitoring Camera may become slightly
warm during use. This does not indicate
malfunction.
If the exterior of the Monitoring Camera needs
cleaning, wipe it with a soft, dry cloth.

4
2. Preparation
Components & Accessories
Monitoring Camera User Manual
Optional Accessories
USB Cable USB AC Adaptor
5
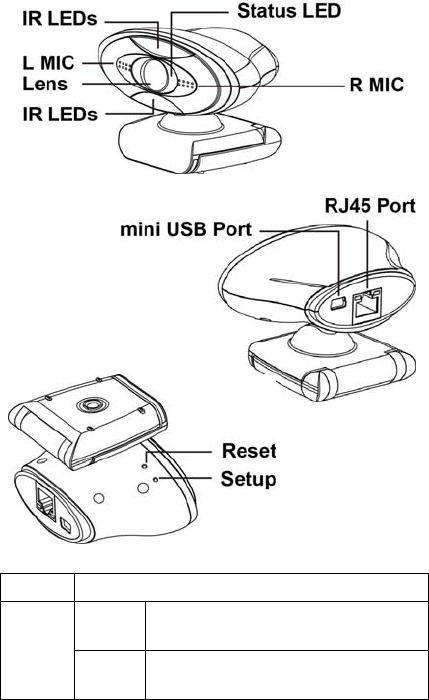
Part Name
Setup Enter the System Setting mode.
Reset Restart Press the Reset key when mini
USB cable connected.
Default Press the Reset key and hold then
plug-in the mini USB cable.

6
3 Initiate SMC from Mobile Device
Download the SMC App
SMC App is compatible with the iOS 5.0 or above
and Android 2.2 or above.
1. Before using the Monitoring Camera, search
and download the free App “SMC”.
2. Press INSTALL APP to install SMC in your
mobile device.
Connect to the SMC via wireless network
1. Connect the USB AC Adaptor with USB cable to
the mini USB Port. (This mini USB port is for
power supply only.)
2. The SMC launch automatic when the USB power
supplied.

7
System Setting via SMC App (for iOS)
1. Search the SMC icon.
2. Press the SMC icon to launch it.
3. Press “Next”.
4. Please make sure that you have
created a new SkypeTM account
for the Monitoring Camera.
Press “Next” if you already have
the SkypeTM account for SMC. If
not, press “Apply new SKYPETM
account” first to create a new
account for SMC.

8
5. Press the “Setup” key on the
bottom of the Monitoring
Camera. The red LED will blink
after 10 seconds. Wait about
15 seconds until the steady red
LED. Then press “Next”.
6. Find the MAC Address on the
Monitoring Camera then press
“Next”.
7. Find the Setting of the iOS and
press the “WLAN”.
8. Search the same MAC Address
from the “WLAN” Setup then
select it as the SSID.

9
9. Key-in the password and press
“Connect”. (default password :
1234567890)
10. Make sure the SSID of SMC has
connected then press “Return”.
11. The SMC App show this error
message if the SMC SSID
connect failed. Please press
the “Wireless Settings” again
and repeat step 7 to 10.
12. The SMC SSID has connected
correctly. Press “Next”.
10
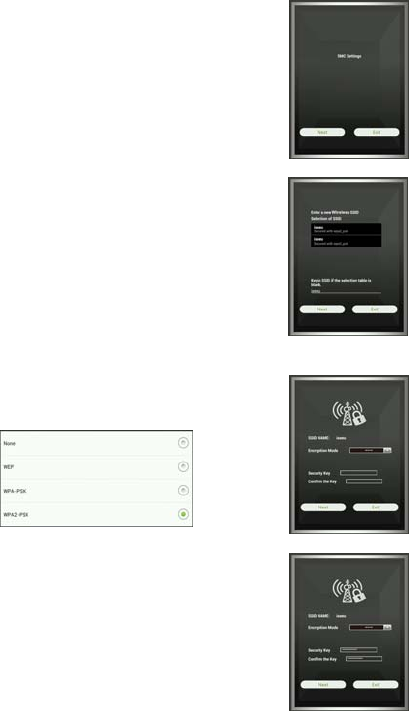
13. Press “Next”.
14. Appoint a wireless SSID which
must can connect to the internet
for the Monitoring Camera.
SMC will scan available wireless
SSID and show them under
“Selection of SSID”. Select
one of them then press “Next”.
15. Press the “Encryption Mode” to
select the matched mode.
16. Enter the matched “Security
Key” and confirm it again.
Then press “Next”.

11
17. Configure SkypeTM account of
the Monitoring Camera. SMC
will use this account to logo in
SkypeTM server.
18. Enter SkypeTM account and
password and confirm again.
19. Press the “Advance” which
allow you to revise the system
status of the Monitoring
Camera if needed. Press
“Back” to quit the advance
mode.
20. Press the “Complete setting” to
finish SMC setting.

12
21. Press “Exit” to close SMC App.

13
System Setting via SMC App (for Android)
1. Search the SMC icon.
2. Press the SMC icon to launch it.
3. Press “Next”.
4. Please make sure that you have
created a new SkypeTM account
for the Monitoring Camera.
Press “Next” if you already have
the SkypeTM account for SMC. If
not, press “Apply new SKYPETM
account” first to create a new
account for SMC.

14
5. Press the “Setup” key on the
bottom of the Monitoring
Camera. The red LED will
blink after 10 seconds. Wait
about 15 seconds until the
steady red LED. Then press
“Next”.
6. Find the MAC Address on the
Monitoring Camera then press
“Next”.
7. Search the same MAC Address
from the “WLAN” Setup then
select it as the SSID.
8. Key-in the password and press
“Connect”. (default password :
1234567890)

15
9. Make sure the SSID of SMC has
connected then press “Return”.
10. The SMC App show this error
message if the SMC SSID
connect failed. Please press
the “Wireless Settings” again
and repeat step 7 to 9.
11. The SMC SSID has connected
correctly. Press “Next”.
12. Press “Next”.
16
13. Appoint a Wireless SSID which
must can connect to the internet
for the Monitoring Camera.
SMC will scan available wireless
SSID and show them under
“Selection of SSID”. Select
one of them then press “Next”.
14. Press the “Encryption Mode” to
select the matched mode.
15. Enter the matched “Security
Key” and confirm it again.
Then press “Next”.
16. Configure SkypeTM account of
the Monitoring Camera. SMC
will use this account to logo in
SkypeTM server.

17
17. Enter SkypeTM account and
password and confirm again.
18. Press the “Advance” which
allow you to revise the system
status of the Monitoring
Camera if needed. Press
“Back” to quit the advance
mode.
19. Press the “Complete setting” to
finish SMC setting.
20. Press “Exit” to close SMC App.
18
4 Initiate SMC from PC
Connect to the SMC - Monitoring Camera
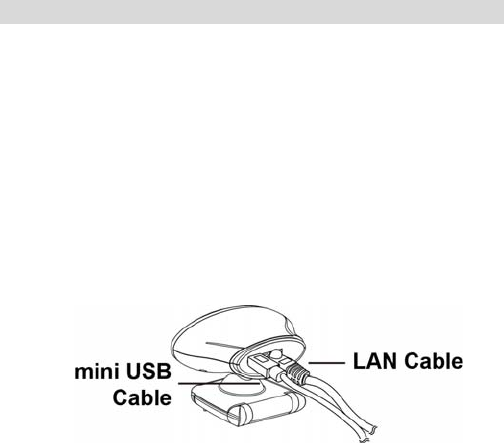
Connect via the wired network
1. Connect the RJ45 port of SMC to PC / NB via a
network wire.
2. Connect the USB AC Adaptor with USB cable to
the mini USB Port. (This mini USB port is for
power supply only.)
3. The SMC launch automatic when the USB power
supplied.
4. The system will need about 15 seconds to initiate
after the LED of RJ45 connecter blinking.
5. Press the Setup button. The Status LED blinking
slowly with RED.
6. The status LED stop blinking and illuminate with
RED when link with the network.

19
7. Run the Command Prompt and enter ipconfig
command to check the network status to confirm
the SMC has linked with PC / NB.
20
Connect via the wireless network
1. Connect the USB AC Adaptor with USB cable to
the mini USB Port. (This mini USB port is for
power supply only.)
2. The SMC launch automatic when the USB power
supplied.
3. Press the Setup button. The Status LED blinking
slowly with RED.
4. The status LED stop blinking and illuminate with
RED when link with the network.
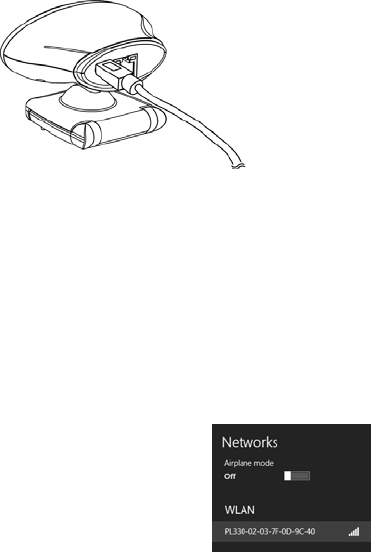
5. Find the MAC Address on the SMC.
6. Search the same MAC
Address from the “Networks”
Setup then select it as the
SSID of SMC.
21
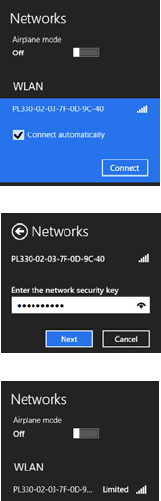
7. Select the SMC SSID and
connect it.
8. Enter the network security
key. (default : 1234567880)
9. Confirm SMC has connected
with PC / NB.
22
System Setting
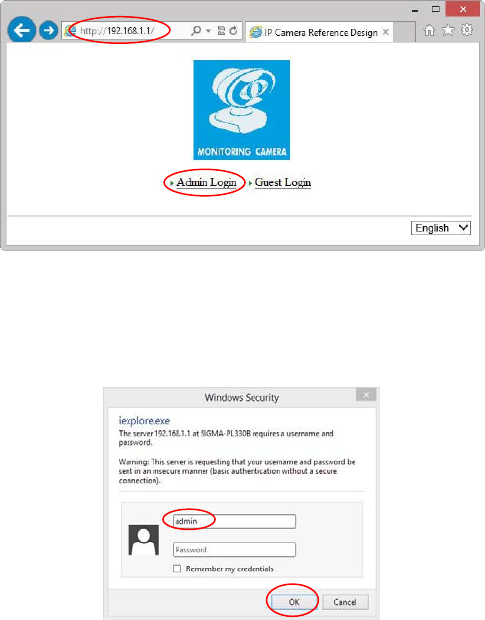
1. Open a browser and enter IP address 192.168.1.1
then press enter.
2. Click Admin Login. Key-in admin in the
Username (without password) of Admin dialog then
press OK.
23
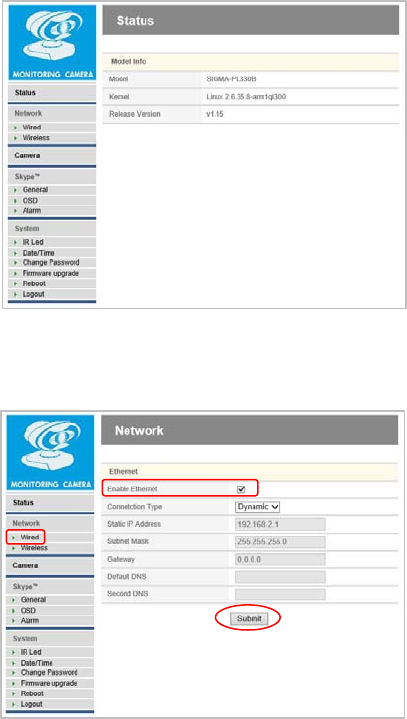
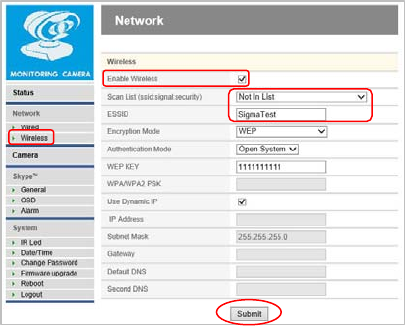
3. The System Setting screen appeared.
4. Select link to internet via Wired then click the check
box of Enable Ethernet to enable the wired
network.
24
Or select link to internet via Wireless and select
valid wireless from the Scan List. Click the check
box of Enable Wireless to enable the wireless
network.
5. Press the “Submit” and finish the System Setting.

25
SkypeTM Setting
1. Select General under SkypeTM and enter the
“SkypeTM Setting”.
2. Enter SkypeTM account and password which
registered for this Monitoring Camera.
3. Press the “Submit” and finish the “SkypeTM Setting”.
4. Press the “Reboot” and quit.
Note: 1. Create a new SkypeTM account from PC / NB
before use the Monitoring Camera.
2. Add all contacts who has permitted to login
the SkypeTM account of Monitoring Camera.

26
5 Operate the SMC
Connect to Internet via Wired
Plug-in a network wire to the RJ45 port of the SMC.
Connect the other connector of the network wire to a
valid internet port.
Connect to Internet Wireless
Disconnect the network wire from the SMC.
Standby
1. Connect the USB AC Adaptor with USB cable to
the mini USB Port. (This mini USB port is for
power supply only.)
2. The SMC launch automatic when the USB power
supplied.
3. The system need about 1 minute to initiate then
connect to the internet and logo-in to SkypeTM.
Note: The initiation time depend on the network
performance and bandwidth.
4. The Status LED illuminate in Green when the SMC
has linked to internet and ready for video monitor.

27
Video Monitor
1. Launch the SkypeTM and sing in with the “SkypeTM
Name” and “Password” which has added in the
contact list of the SMC.
2. Click the contact of SMC you want to monitor from
the contact list. Then press the ‘Video call’
button.

28
3. Your video window will appear on the bottom
screen.
4. The SMC will answer incoming call automatically
and the Status LED blinking with Green. The
contact video will appear on the Video 2 screen and
your video display on the Video 1 screen.

29
6 Appendix
Specification
Model No.: SMC-1
Image Sensor
Lens
Focus Type
Focus Range
White Balance
Exposure
Video Encoder
HQ Video Conference
Audio Input
Wireless
Ethernet Connection
Software
Power
Dimension
1/4”, 2M (1600x1200) pixels, CMOS
F2.0, f=3.348 mm
Fixed Focus
60 cm to infinity
A
uto
A
uto
H.264
HD 720P @ 30fps
Built-in 2 Microphones
IEEE 802.11b/g/n
RJ45
SkypeTM App Built-in
DC 5V (via mini USB Port)
90 (W) x 65 (H) x 57 (L) mm
Specifications are subject to change without prior notice.
30
Federal Communications Commission (FCC) Statement
15.21
You are cautioned that changes or modifications not expressly
approved by the part responsible for compliance could void the
user’s authority to operate the equipment.
15.105(b)
This equipment has been tested and found to comply with the
limits for a Class B digital device, pursuant to part 15 of the FCC
rules. These limits are designed to provide reasonable protection
against harmful interference in a residential installation. This
equipment generates, uses and can radiate radio frequency
energy and, if not installed and used in accordance with the
instructions, may cause harmful interference to radio
communications. However, there is no guarantee that interference
will not occur in a particular installation. If this equipment does
cause harmful interference to radio or television reception, which
can be determined by turning the equipment off and on, the user is
encouraged to try to correct the interference by one or more of the
following measures:
-Reorient or relocate the receiving antenna.
-Increase the separation between the equipment and receiver.
-Connect the equipment into an outlet on a circuit different from
that to which the receiver is connected.
-Consult the dealer or an experienced radio/TV technician for help.
This device complies with Part 15 of the FCC Rules.Operation is
subject to the following two conditions:
1) this device may not cause harmful interference and
2) this device must accept any interference received, including
interference that may cause undesired operation of the device.
BT Device:
FCC RF Radiation Exposure Statement:
1. This Transmitter must not be co-located or operating in
conjunction with any other antenna or transmitter.
2. This equipment complies with FCC RF radiation exposure limits
set forth for an uncontrolled environment. This equipment
should be installed and operated with a minimum distance of 20
centimeters between the radiator and your body.
31
Notice:
1. Users will automatically receive software upgrade
notice when logged on to Skype account with your
Skype client software on PC or mobile phone Apps.
2. SkypeTM is a trade mark of SkypeTM Limited or its
related companies. This product / application has not
been approved or endorsed by SkypeTM Limited,
SkypeTM Communications S.a.r.l. or any of their
related companies.
3. This product includes SkypeKitTM Version [3.7]
Copyright 2003-2013, SkypeTM Limited Patents
Pending SkypeTM, associated trade marks and logos
are trade marks of SkypeTM Limited.
4. User can logged on to www.sigmadesigns.com for
the SMC technical update information.
Technical Support:
TEL: 886 2 2792 1512
This symbol on the product or in the instructions
means that your electrical and electronic equipment
should be disposed at the end of its life separately
from your household waste. There are separate
collection systems for recycling in the EU.
For more information, please contact the local authority or
your retailer where you purchased the product.