SAMSUNG Cameras, All Manual L0703272
User Manual: SAMSUNG SAMSUNG Cameras, All Manual SAMSUNG Cameras, All Owner's Manual, SAMSUNG Cameras, All installation guides
Open the PDF directly: View PDF ![]() .
.
Page Count: 77

Everyday°
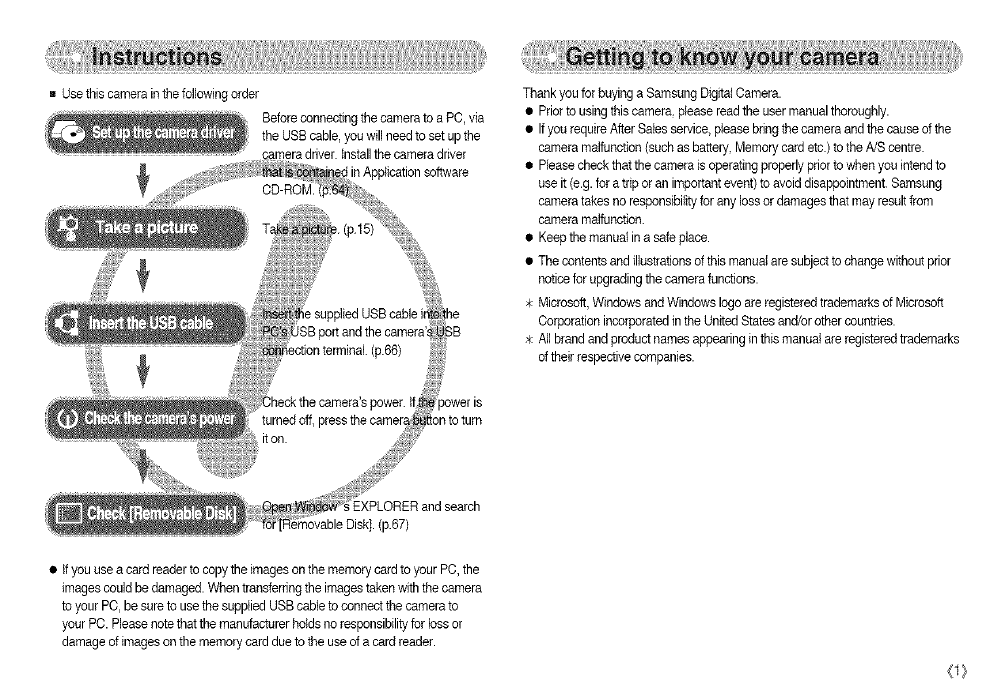
Usethis camera in the followingorder
Before connecting the camera to a PC, via
the USBcable, you willneed to set upthe
camera driver, tnstallthe camera driver
p.67)
• if you use a card readerto copy the images on the memory card to your PC, the
imagescould be damaged. When transferring the imagestaken with thecamera
to your PC, be sure to use thesupplied USB cable to connect the camera to
your PC. Pleasenote that the manufacturer holdsno responsibilityfor loss or
damage of images on the memory card due to the use of a card reader.
Thank you for buying a Samsung Digital Camera.
• Prior to using thiscamera, please read the user manual thoroughly.
• Ifyou requireAfter Sales service, please bringthe camera and the cause of the
camera malfunction (such as battery, Memory card etc.) to theA/S centre.
• Pleasecheck that the camera is operating properly prior to when you intendto
use it (e.g. for a tripor an important event)to avoid disappointment.Samsung
camera takes no responsibilityfor any loss or damages that may resultfrom
camera malfunction.
• Keep the manual in a safe place.
• The contentsand illustrations of this manual are subject to change without prior
notice for upgrading the camera functions.
>kMicrosoft, Windows and Windows logo are registered trademarks of Microsoft
Corporationincorporated in the UnitedStates and/or other countries.
_kAll brand and product names appearing in this manual are registeredtrademarks
of their respective companies.
O}
DANGER indicates an imminently hazardous situationwhich, if not avoided, will
result in death or seriousinjury.
• Do not attempt to modify thiscamera in any way. This may result in fire, injury,
electric shock or severe damage to )/_ Oryour camera. Internalinspection,
maintenance and repairs should b#_car[i_,£ut by your dealer or Samsung
Camera Seraicecentre. S!£:,; :_
• Please do not use this product i_ clo ximityto flammable or explosive
gase& as this couldincrease;{_e rJsk_#xplceioh
• Should any form of liquid d_ foreign _iect enterRe camera, do not use k.
Switch off the camera, _ then disc_ct the po'_q_source. You must contact
your dealer or Samsun_ Camera Sewi_ centre. Do _t continueto use the
camera as this may cause __ _df"el_Ctri__. _
• De not insert or drop rn_!jc _ inS_rn_le f_eigl_'objects into the camera
through access points _e_dy _dl_a_ _ttery chamber. This may
cause a fire or electric shock.
• De not operate thiscamera with wet hands. This could pose a risk of electric
shock.
WARNING indicates a potentially hazardous situationwhich, if not avoided, could
resultin death or serious injury.
• Do not use the flash in close proximity to people or animals. Positioningthe flash
too close to your subject's eyes may cause eyesight damage.
i For safety reasons keep this product and accessoriesout of reach of children or
animals to prevent accidentse.g.:_:_ _,;;
• Swallowing battery or small ca.mer_egd_ories, tf an accident should occur,
please consult a doctor im_iat ;i_
•There isthe possibilityof !!)_.lryfro_i _ cam_a's moving parts.
Battery and camera may_.2;eme bettering proldP_eduse and it may result in
camera malfunction.ShqBIdthis be t[@:_se, allow_e camera to sit idle for a
few minutes to allow it _me to cool.
Do not leave this camera_aplacess,ubject:te_e_t_em_ hightemperatures, such
as a sealed vehicle,dir_ct_s_n!_h!,_e, __es 0_e_treme variances in
temperature. Exposure [e _xt(eme_a_r_i_q&y'sdver sely affect the
camera's internalcomponents and could cause a fire.
• When in use,do not cover the camera orCharger. This may cause heat to build
up and distortthe camera body or cause a fire. Always use the camera and its
accessories in a well-ventilated area.
{2}
CAUTION indicates a potentialtyhazardous situation which, if not avoided, may
result in aminor or moderate injury.
• Leaking, overheating, or burst batterycould result in fireor injury.
• Use batterywith the correct specification forthe camera.
• Do not short circuit,heat or dispose of battery in fire.
• Do not insertthe battery with the I_Ot_,r;tiesreversed.
• Remove the batterywhen not plan_ing t0_#e thecamera for a long period of
Battery may leak corrosive#/e_e a_qdpermanently damage
time. the
camera's components. _ _i,
• Do not fire theflash while it i_n cont_i_ith ha_s or objects. Do not touch the
flash after usingit continuc_u_ly,it may_use bur_
• Do net move the camera<_N_eit is s_/tcbed on wh_ you are using theAO
Charger. After use always switch off _camera before unpluggingthe cable
from the wall socket. Tl_[en_ke sure _at _y_br cords or cablesto
cther devices are disco_ept _ b_q,re_ov!_i_b _ _era. Failureto do so may
damage the cords or c_s_ _e _ fi_ _t @:eCt_cshock.
• Take care not to touch the lens orlens cover to avoid taking an unclear image
and possiblycausing camera malfunction.
• Avoid obstructingthe lens or the flash when you capture an image.
• Credit cards may be demagnetized if [eftnear case.Avoid leaving magnetic strip
cards near thecase.
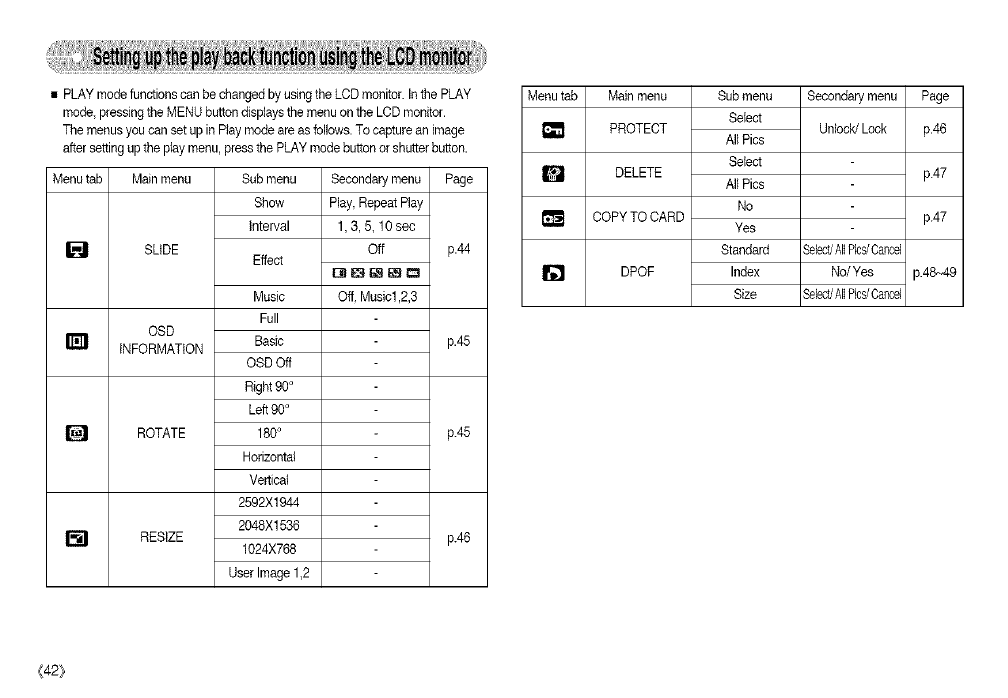
• System chart ........................... 5
• Identificationof features............... 6
• Front & Top ........................... 6
• Back& Bottom ........................ 7
• Bottom /5-function button ......... 8
• Self-timer lamp ........................ 8
• Camera Status Lamp ............... 8
• Mode icon .............................. 9
• Connecting to a Power Source .-...9
• Inserting the memory card ......... 10
• Instructionson how to use the
memory card ........................... 11
• LODmonitor indicator ............... 13
• Changing the recording mode ... 14
• Selecting the [MODE] menu ...... 14
• Changing the recording mode ...14
• Startingthe recording mode ...... 15
• How to usethe Auto mode ......... 15
• How to use the Movie clip mode... 16
• Recording the movie clip without
sound ................................. 16
• Pausingwhile recording amovie clip
(Successive Recording) ............ 16
• Using Successive Recording......16
• How to use the Program mode ...17
• How to use the Scene modes ...17
• How to use the VOICE
RECORDING mode ............... 18
• Things to Watch Out for When
Taking Pictures........................ 18
• Usingthe camera buttons to set the
camera ................................. 19
• POWER button ..................... 19
• Shutter button ........................ 19
• ZOOM W/T button ............... 19
• TELE Zoom ........................... 19
• WIDE Zoom ........................... 20
• Voice recording/Voice memo /UP
button ................................. 21
• Recording a voice memo ......... 21
• Macro /Downbutton ............... 21
• Focus lock ........................... 22
• Flash /Left button ................. 22
• Self-timer /Right button ............ 24
• MENU /OK button ................. .25
• M (Mode) button .................... .25
• E (Effect)button .................... 26
• Special Effect : Colour ............ 27
• Special Effect :
Preset focusframes ............... 27
• Movie Clipframe stabiliser ......... 28
•+/- button ........................... 29
• Using the LCD monitor to set the
camera settings ..................... 31
• How to use the menu ............... 32
• Mode Set .............................. 33
• Mode.................................... 33
• Size .................................... 34
• Quality /Frame rate ............... 34
• Metering .............................. 35
• Continuous shot ..................... 35
• Sharpness ........................... 35
• OSD (On ScreenDisplay)
information ........................... 36
• Starting play mode .................. 36
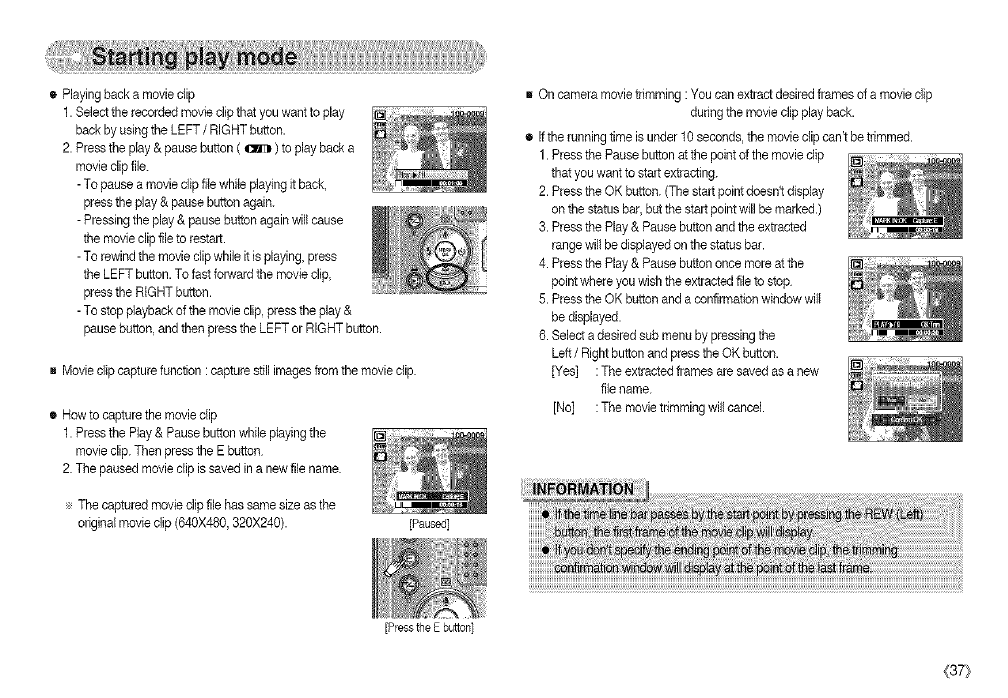
• Playingback a movie clip ......... 37
• Movie clip capture function ......... 37
• Row to capture the movie clip ...37
• On camera movietrimming ......37
• Playingback a recordedvoice ...38
• LCD monitor indicator ............... 38
• Using the camera buttons to adjust
the camera ........................... 38
• Playmode button ..................... 38
• Thumbnail /Enlargementbutton ...39
• Voice memo /Up button............ 40
(4}
• Play& Pause /Down button ...... 41
• Left/Right /Menu /OK button ...41
• E (Effect) button .................... 41
• Deletebutton ....................... 41
• Setting up the play back function
usingthe LCD monitor ............... 42
• Startingthe slideshow ............ 44
• On Screen Displayinformation ..-45
• Rotatingan image ................. 45
• Resize ................................. 46
• Protecting images ................. 46
• Deleting images .................... 47
• Copy To Card ....................... 47
• DPOF ................................. 48
• DPOF : STANDARD ............... 48
• DPOF : Index ....................... 48
• DPOF : Printsize ................. 49
• PictBfidge.............................. 49
• PictBridge: Picture Selection...-.50
• PictBridge: Print Setting............ 50
• PictBridge: Print .................... .51
• PictBridge: RESET ............... 52
• Setup menu ........................... 52
• Filename .............................. 53
• Auto power oft ........................ 54
• Language .............................. 54
• Format ................................. 54
• Setting upthe Date/Time /Date
type .................................... 55
• World Time ........................... 55
• Imprintingthe recordingdate -..-..55
• Auto Focus lamp .................... .55
• Sound ................................. 55
• Connecting an External Device
(USB) ................................. 55
• LCD brightness .................... .56
• Selecting Video outtype ............ 56
• Quick view ........................... 56
• Initialisation ........................... 56
• Setting up the Mycam menu ...... 57
• Start up image ....................... .57
• Start up sound ....................... -57
• Shutter sound ....................... -57
• important notes .................... .58
• Warning indicator .................... .59
• Beforecon_eting a servicecentre...60
• Specifications ....................... .61
• Software Notes ....................... 83
• System Requirements ............... 53
• About the software ................. .63
• Settingupthe applicationsoft,,vare...64
• Starting PC mode ..................... 66
• Removing the removable disk ...68
• Settingupthe USBDriverfor MAC ...68
• Usingthe USB Driver for MAC ...68
• Removing the USB Driver for
Windows 98SE ........................ 69
• Digimax Master ..................... 69
• FAQ .................................... 72
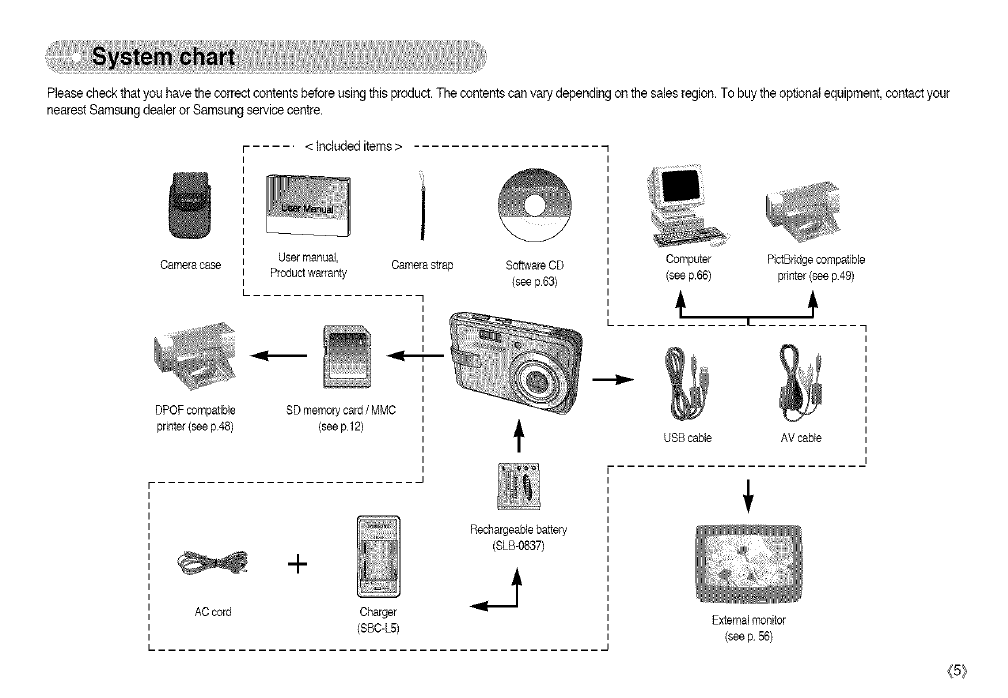
Pleasecheckthatyouhavethecorrectcontentsbeforeusingthisproduct.Thecontentscanvarydependingonthesalesregion.Tobuytheoptionalequipment,contactyour
nearestSamsungdealerorSamsungsel_.,icecentre.
...... <Includeditems>
Camera case
DPOF compatible
printer (see p48)
J
User manual, Camera strap
Productwarranty
]i
i
i
SD memory card /MMC
(see p 12)
Software CD
(see p63)
Computer PictBridge compatible
(see p.66} printer (see p49)
t
USBcable AV cable
AC cord
.-I-
Charger
(SBC-L5)
Rechargeaple battery
(SLB-0837)
JExternal monitor
(see p 56)
<5}
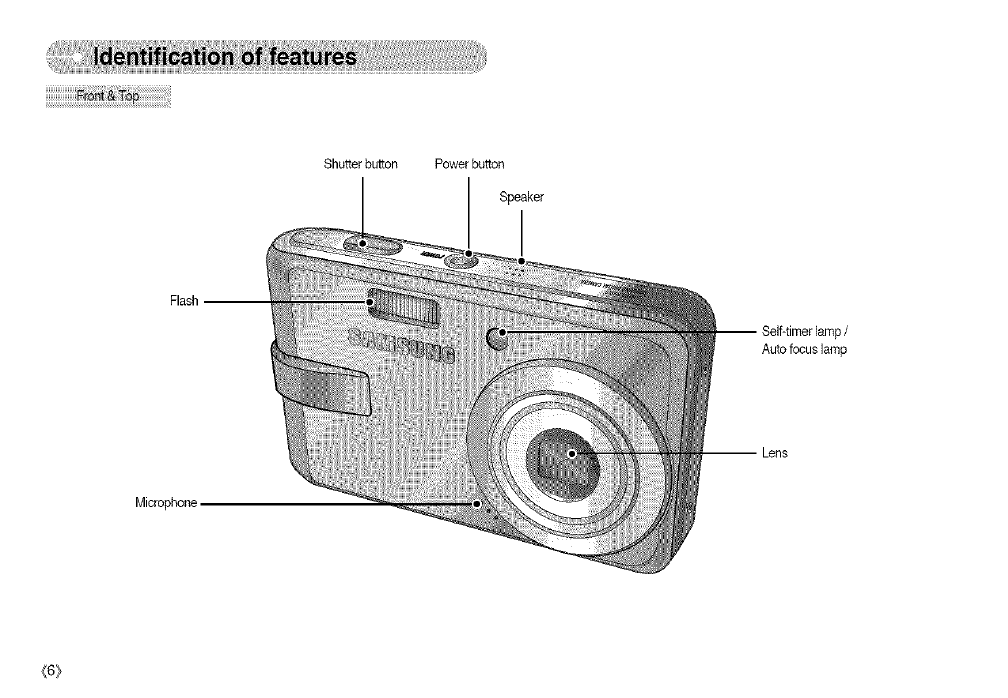
Flash --
Microphone
Shu_erbu_on Power bu_on
Speaker
p/
Autofocus lamp
LCDmonitor--
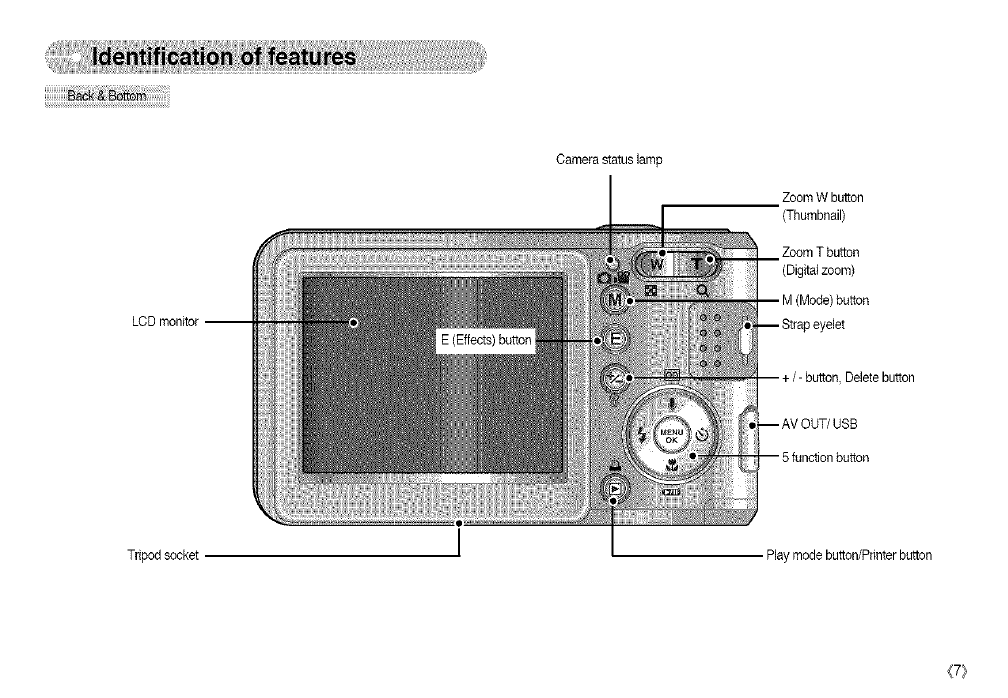
Camerastatuslamp
ZoomWbutton
(Thumbnail)
ZoomTbutton
(Digitalzoom)
button
Tripodsocket Play mode button/Printer button
{7}
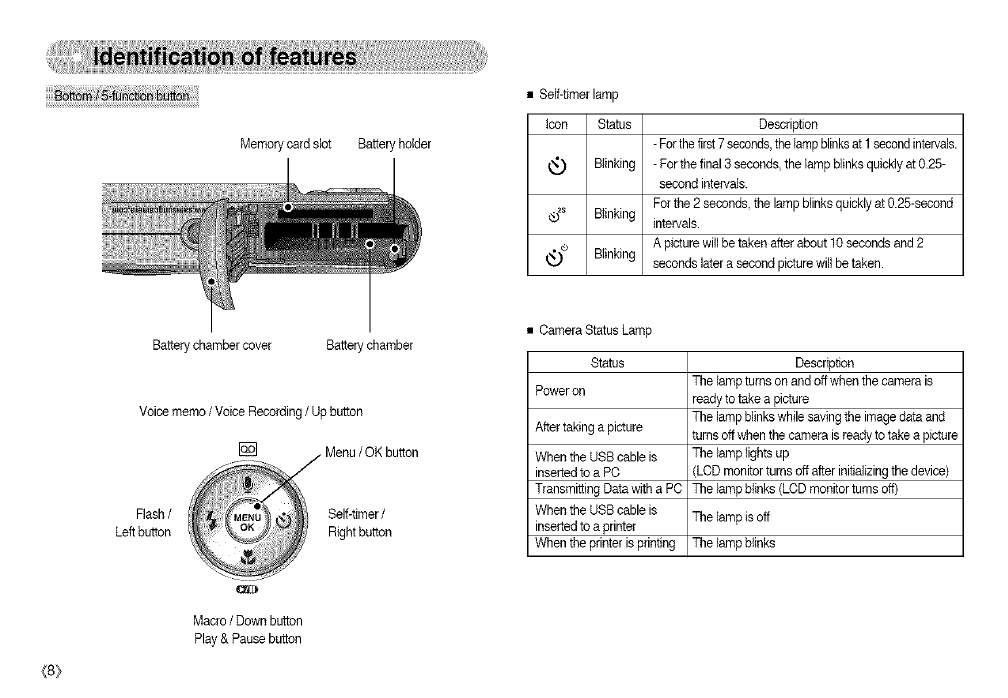
Memorycardslot Batteryholder
Batterychambercover Batterychamber
{8}
Voice memo /Voice Recording/Up button
Flash/
Left button
..._ .Menu /OK button
Self-timer/
Right button
Macro /Down button
Play & Pause button
• Self-timer lamp
Icon Status Description
- Forthefirst 7seconds,theIampbrinksat 1secondintervals.
Blinking - For thefinal 3 seconds, the lamp blinks quickly at 0.25-
second intervals.
For the 2 seconds the lamp brinksquickly at 0.25-second
®_s Blinking intervals.
A picture willbe taken after about 10 secondsand 2
_* seconds later a second picture willbe taken.
Blinking
• Camera Status Lamp
Status Description
Power on The lamp turns on and off whenthe camera is
ready to take a picture
The lamp blinkswhile saving the imagedata and
After taking a picture turnsoff when the camera is ready to take a picture
When the USB cable is The lamp lights up
inserted to a PC LCD monitor turnsoff after initializingthe device)
Transmitting Data with a PC The lamp brinks (LCD monitor turns of0
When the USB cable is The lamp is off
inserted to a printer
When the printer isprinting The lamp blinks
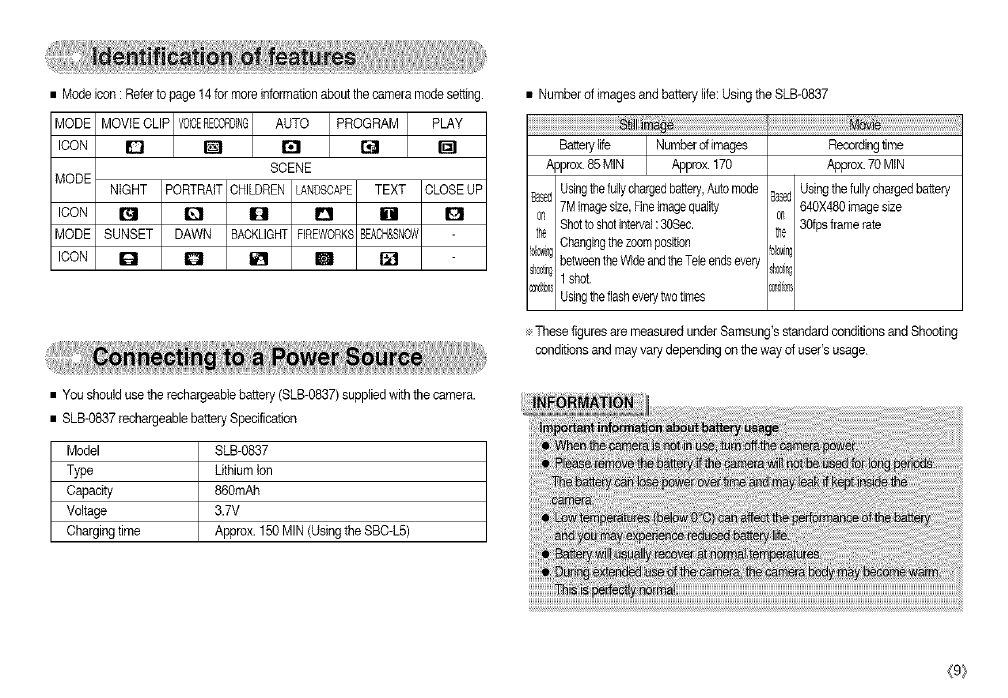
•Modeicon:Refertopage14formoreinformationaboutthecameramodesetfin
MODEMOVIECLIPVOlCEREOOBDINGI AUTOPROGRAMPLAY
I
ICON I_ [] I_1 rJ I_1
SCENE
MODE NIGHT PORTRAIT CHILDREN LANDSCAPE TEXT CLOSEUP
ICON _ _ _ _ [] _1
MODE SUNSET DAWN BACKLIGNTFIREWORKSBEACH&SNOW
ICON D [] _ [] []
• You should use the rechargeable battery (SLB-0837) suppliedwith the camera.
• SLB-0837 recbergeable battery Specification
Model SLB-0&37
Type Lithium Ion
Capacity 860mAh
Voltage 3.7V
Charging time Approx. 150 MIN (Using the SBC-L5)
• Number of images and battery life: Usingthe SLB-0837
i
Batterylife Numberdimages
Approx.85 MIN Approx.170
Usingthefu0ychargedbattery,Automode
7Mimagesize,Fineimagequality
Shotto shotinterval:30Sec.
Changingthezoomposition
betweentheWideandtheTeleendsevery
1shot.
_S'd6 Usingtheflasheverytwotimes
Recordingtime
_ox. 70 MIN
BasedUsingthe fullychargedbattery
0_ 640X480imagesize
the 30fpsframerate
_i_ng
she0r_,_
÷ These figures are measured under Samsung's standardconditions and Shooting
conditions and may varydepending on the way of user's usage.
{9}
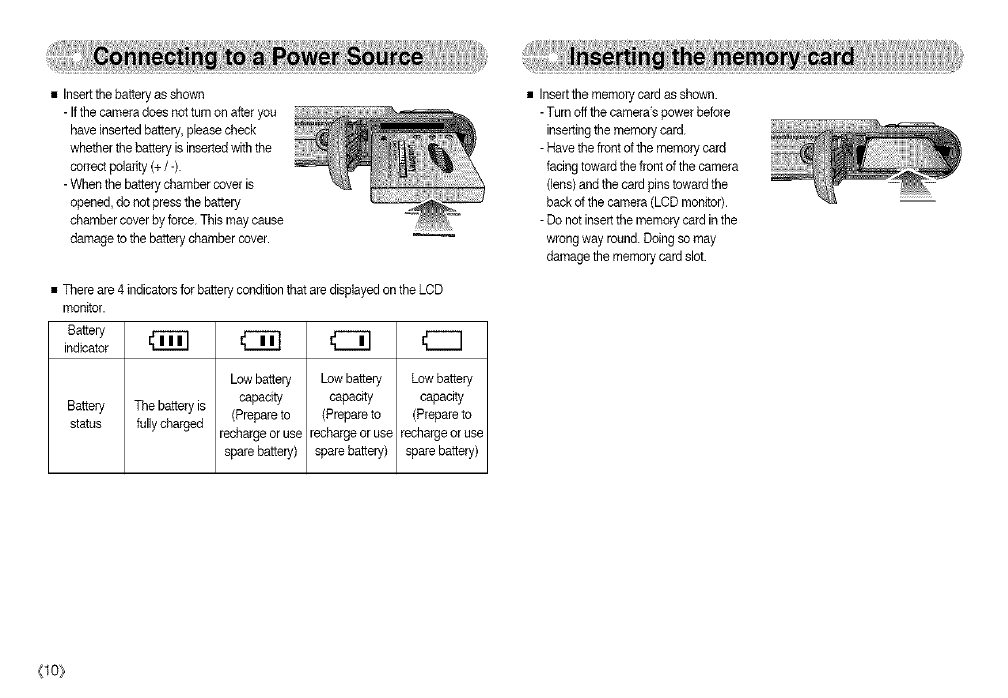
•Insertthebatteryasshown
-Ifthecameradoesnotturnonafteryou
haveinsertedbattery,pleasecheck
whetherthebatteryisinsertedwiththe
correctpolarity(+/-).
- When the batterychamber cover is
opened, do not press the battery
chambercover byforce. This maycause
damage to the battery chamber cover.
• There are 4 indicators for battery condition that are displayedon the LCD
monitor.
Battery
indicator _ I_
Low battery Low battery Low battery
capacity capacity capacity
Battery The batteryis (Prepare to (Prepare to (Prepareto
status fully charged rechargeor use recharge oruse recharge or use
spare battery) spare battery) spare battery)
• Insertthe memory card asshown.
- Turn offthe camera's power before
insertingthe memory card.
- Have the front of the memory card
facing toward the front of the camera
(lens) and the card pins toward the
back of the camera (LCD monitor).
- Do not insert the memory card in the
wrong way round. Doing so may
damage the memory card slot.
(lO_

•Be sure to format the memory card (see p.54) if you are usinga newly
purchased memory for thefirst time, if it contains data that the camera cannot
resegnise, orif it contains imagescaptured with a different camera.
• Turn off the camera power whenever the memory card is being insertedor
removed.
• Repeated use of the memory card will eventuallyreduce the memory card's
performance.Should this be the case, you will needto purchase a new memory
card.Wear and tearon the memory card is notcovered by the Samsung
warranty.
• The memory card is an electronic precision device.
Do not bend, drop or subject the memory card to any heavy impact.
• Do not storethe memory card in an environment with strong electronic or
magneticfields, e.g. near loud speakersor TV receivers.
• Pleasedo notuse or store in an environment where there are extremes in
temperature.
• Do not allowthe memory card to become dirty orto come intocontact with any
liquid.Should this happen, clean the memory card with a soft cloth.
• Please keep the memory card in its case when notin use.
• During and after periods of extended use, you may notice that the memory card
iswarm. This is perfectly normal.
• Do not use a memory card that isused in another digitalcamera. To use the
memory card in this camera,format the memory card using this camera.
• Do not use a memory card formatted by anotherdigital camera or memory card
reader.
• Ifthe memory card issubjected to any of the following, the recorded data may
becomecorrupted :
- When the memory card is used incorrectly.
- Ifthe power isswitched off or the memory card is removedwhile recording,
deleting (formatting)or reading.
• Samsungcannot be held responsiblefor lost data.
• It isadvisable to copy important data onto other mediaas back-up e.g. floppy
disks,hard disks,CD etc.
• Ifthere isinsufficientmemory available
: A [Memory Full!] message will appear and the camera will net operate. To
optimisethe amount of memory in the camera, replace the memory card or
deleteunnecessary images storedon the memory card.
{11}
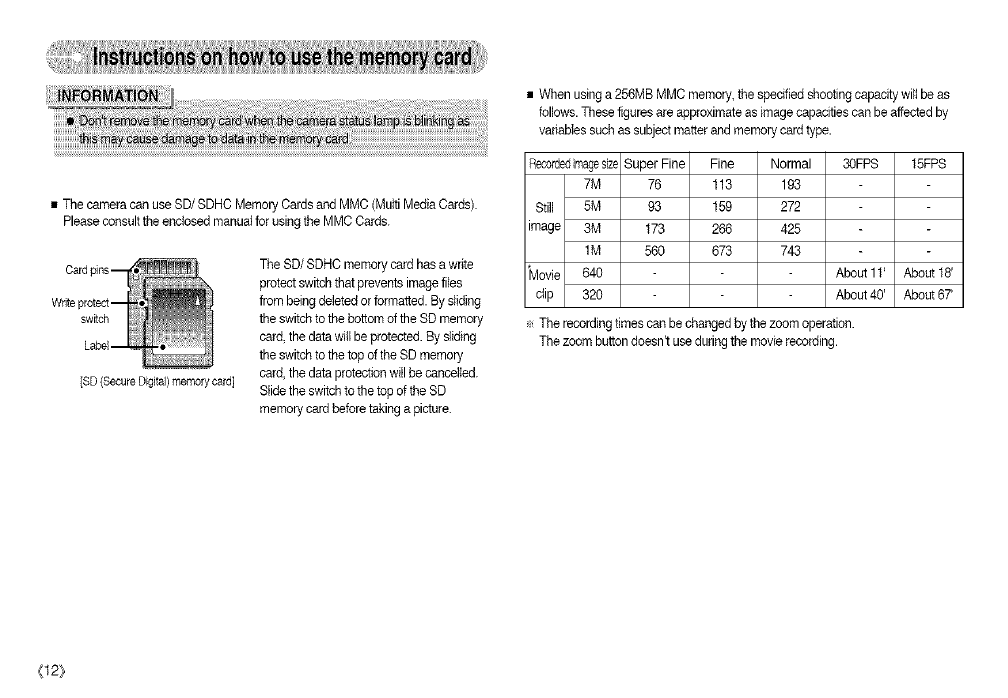
• The camera can use SD/SDHC Memory Cards and MMC (MultiMedia Cards).
Please consult the enclosed manual for usingthe MMC Cards.
[SD (Secure DigitaOmemory card]
The SD/SDHC memory card has a write
protect switch that prevents imagefiles
from being deleted orformatted. By sliding
the switch to the bottom of the SD memory
card, the data witl be protected. By sliding
the switch to the top of the SD memory
card, the data protectionwill be cancelled.
Slide the switch to the top of the SD
memory card before taking a picture.
• When usinga 256MB MMC memory,the specified shooting capadty wilt be as
follows. These figures are approximate as image capadties can be affectedby
variables such assubject matter and memory card type.
Recordedfinagesize Super Fine Fine Normal 30FPS 15FPS
7M 76 113 193
Still 5M 93 159 272
tmage 3M 173 266 425
1M 560 673 743
*Movie 640 About 11' About f8'
clip 320 About 40' About 67'
÷ The recording times can be changed bythe zoom operation.
The zoom button doesn't use during the movie recording.
{12}
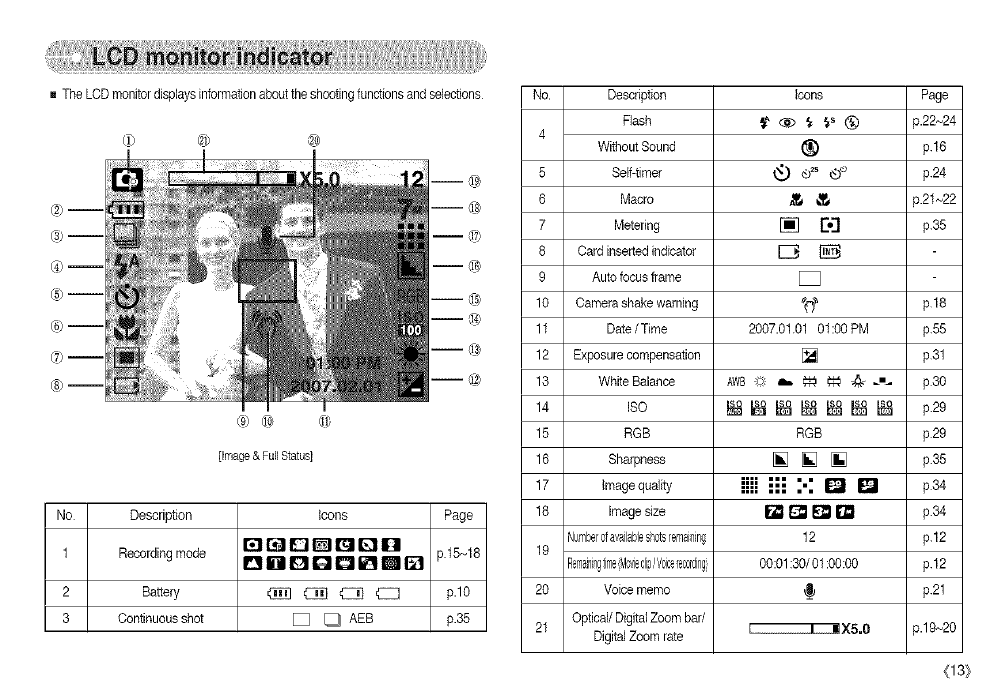
The LCD monitordisplays informationabout the shootingfunctions and selections
®--
@m
®--
®--
®m
®m
@ @
m@
m@
m©
m@
m@
m@
m@
m@
]image & Full Status]
No Description Icons Page
rareDGl_Qg
1 Recording mode i_1 g i[_1 IE]I i_ G_!Ill_ll i._!I p.15~18
2 Battery _ C]_] _ _ p.10
3 Continuousshot [] _ AEB p.35
No. Description Icons Page
Flash _ ,_ _ _s 1_) p.22~24
4Without Sound (_ p.16
5 Self-timer _t_ ®2s _ p.24
6 Macro _ _ p.21~22
7 Metering [] rzI p.35
8 Card inserted indicator _
9 Autofocus frame [_
10 Camerashake warning _ p 18
11 Date/Time 2007.01.01 01:00 PM p.55
12 Exposure compensation [] p31
13 White Balance AWB_? a,, _ _ @ _,,_ p30
14 ISO _ _ _ _ s_ _ _ p29
15 RGB RGB p29
16 Sharpness [] [] [] p.35
17 Image quality iiii _ %: _ _ p34
18 image size _ [] _ [] p.34
Numberofavailableshotsemaining 12 p.12
19
Remainigtime(MoviecipIV0ic_lec0rdig[ 00:01:30/01:00:00 p.12
20 Voice memo We p.21
21 Optical/Digital Zoom bar/
DigitalZoom rate I I | XS.0 p.19~20
(13}
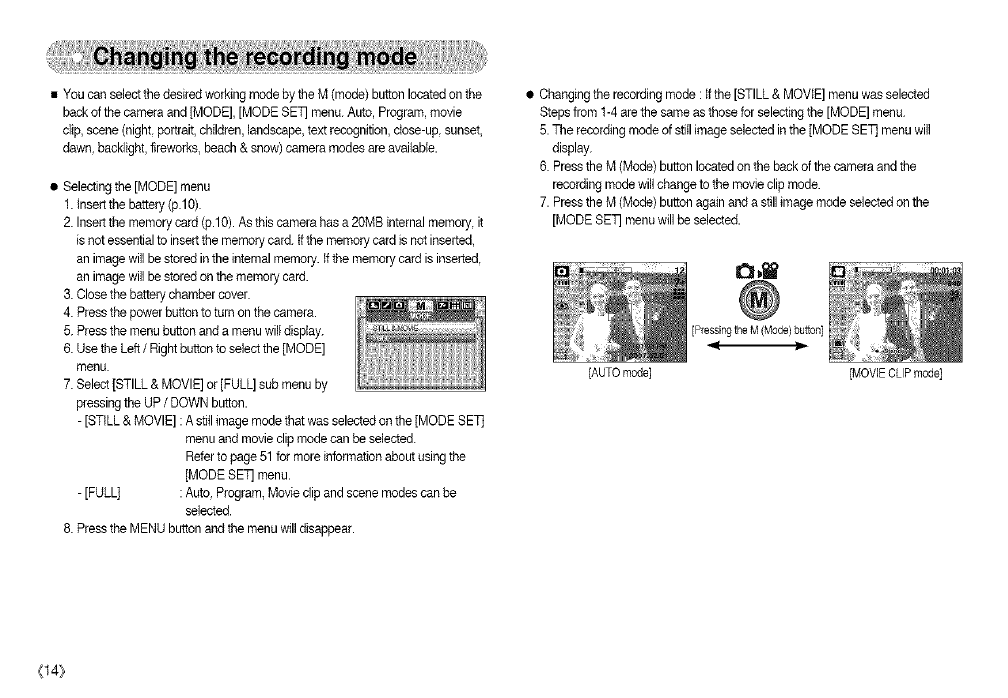
•YoucanselectthedesiredworkingmodebytheM(mode)buttonlocatedonthe
backofthecameraand[MODE],[MODESET]menu.Auto,Program,movie
clip,scone(night,portraitchildren,landscape,textrecognition,close-up,sunset,
dawn,backlight,fireworks,beach&snow)cameramodesareavailable.
•Selecting the [MODE] menu
1. insert the battery (p.10).
2. Insert the memory card (p.lO). As this camera has a20MB internal memory, it
is notessential to insertthe memory card. if the memory card is not inserted,
an image will be stored inthe intemal memory.If the memory card is inserted,
an image will be storedon the memory card.
3. Close thebattery chamber cover.
4. Press thepower button to turnon thecamera.
5. Press the menu button and a menu willdisplay.
6. Use the Left /Right buttonto select the [MODE]
menu.
7. Select [STILL & MOVIE] or [FULL] sub menu by
pressingthe UP/DOWN button.
-[STILL & MOVIE] :A stitlimage mode that was selectedon the [MODE SET]
menu and movie clip mode can be selected.
Referto page 51for more information about usingthe
[MODE SET] menu.
-[FULL] :Auto, Program, Movie clip and scene modes can be
selected.
8. Press the MENU button and the menu willdisappear.
•Changing the recording mode : tf the [STILL & MOVIE] menu was selected
Stepsfrom 1-4 are the same as those for selectingthe [MODE] menu.
5. The recording mode of still image selectedin the [MODE SET] menu will
display.
6. Pressthe M (Mode) button locatedon the back of the camera and the
recording mode willchange to the movie clip mode.
7. Pressthe M (Mode) buttonagain and a still image mode selected on the
[MODE SET] menu will be selected.
I£1,_
[Pressingthe M (Mode) button]
_.-
[AUTO mode] [MOVIE CLIP mode]
{14}
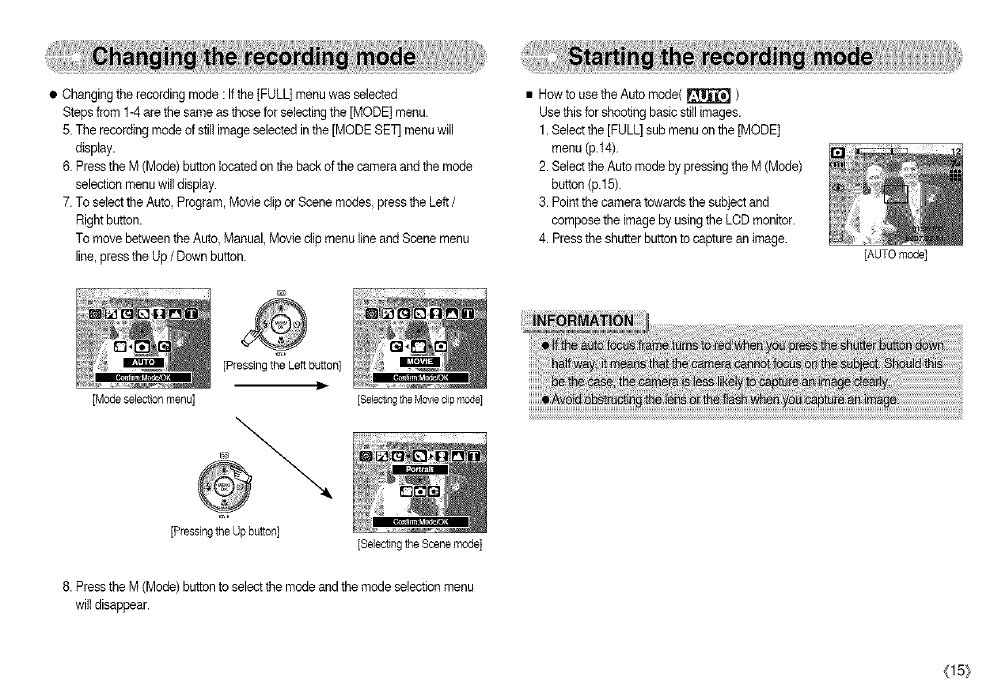
•Changingthe recording mode : Ifthe [FULL] menu was selected
Steps from 1-4are the same as those for selectingthe [MODE] menu.
5. The recording mode of stiltimage selected in the [MODE SET] menu will
display.
6. Pressthe M (Mode[ button located on the back of the camera and the mode
selection menu wil_display.
7. To select the Auto Program, Movie clip or Scene modes, press the Left /
Right button.
To move between the Auto, Manual,Movie clip menu lineand Scene menu
line, pressthe Up/Down button.
[Mode selection menu] {Select}rigthe Movieclipmode]
[Selecting the Scene mode]
• How to use the Auto mode( _ )
Use this for shooting basic stillimages.
1. Select the [FULL] sub menu on the [MODE]
menu (p.t4).
2. Select the Auto mode by pressingthe M (Mode[
button (p.15).
3. Pointthe camera towards the subject and
compose the image by usingthe LCD monitor.
4. Pressthe shutter buttonto capture an image.
[Pressing tt_e Left button]
[Pressing the Up button[
8. Pressthe M (Mode) button to selectthe mode and the mode selection menu
will disappear.
[AUTO mode]
(15}
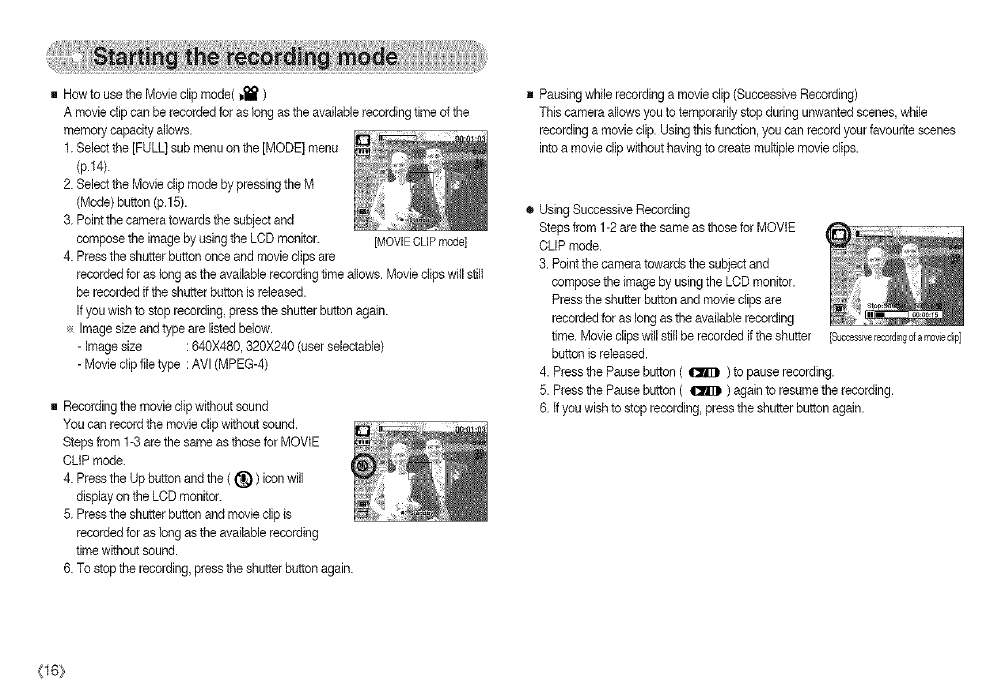
gHowtousetheMovieclipmode(j,_)
Amoviedipcanberecordedforaslongastheavailablerecordingtimeofthe
memorycapacityallows.
1.Selectthe]FULL)submenuonthe]MODE]menu
(p.14).
2.SelecttheMovieclipmodebypressingtheM
(Mode)button(p.15).
3.Pointthecameratowardsthesubjectand
composetheimagebyusingtheLODmonitor.
4.Presstheshutterbuttononceandmovieclipsare
recordedforaslongastheavailablerecordingtimeallows.Movieclipswillstiff
berecordedifthe shutter button is released.
Ifyou wish to stoprecording, press the shutter buttonagain.
_, Imagesize and type are listed below.
- Image size : 640X480,320X240 (user selectable)
- Movie clip file type :AVl (MPEG-4)
[MOVIE CLIP mode1
g Recordingthe movie clip without sound
You can record the movie clip without sound.
Steps from 1-3 arethe same as those for MOVIE
CLIP mode.
4. Pressthe Up button and the ((_)) icon will
display on the LCD monitor.
5. Pressthe shutter button and movie dip is
recorded for as long asthe availablerecording
timewithout sound.
6. To stop the recording, press theshutter button again.
g Pausing while recording a movie clip (Successive Recording)
This camera allows you to temporarily stop during unwanted scenes, while
recording a movie clip. Usingthis function, you can record your favourite scenes
into a movie clip without having to create multiple movie clips.
® Using Successive Recording
Steps from 1-2are the same asthose for MOVIE
CLIP mode.
3. Pointthe camera towards the subject and
compose the image by usingthe LCD monitor.
Pressthe shutter button and movie clips are
recordedfor as longasthe available recording
time. Movie clips will still be recorded if the shutter
button isreleased.
4. Press the Pause button ( _ ) to pause recording.
5. Press the Pause button ( _ ) again to resume the recording.
6. if you wish to stop recording,press the shutter button again.
[Successivelecordillgofa movecip]
{16}
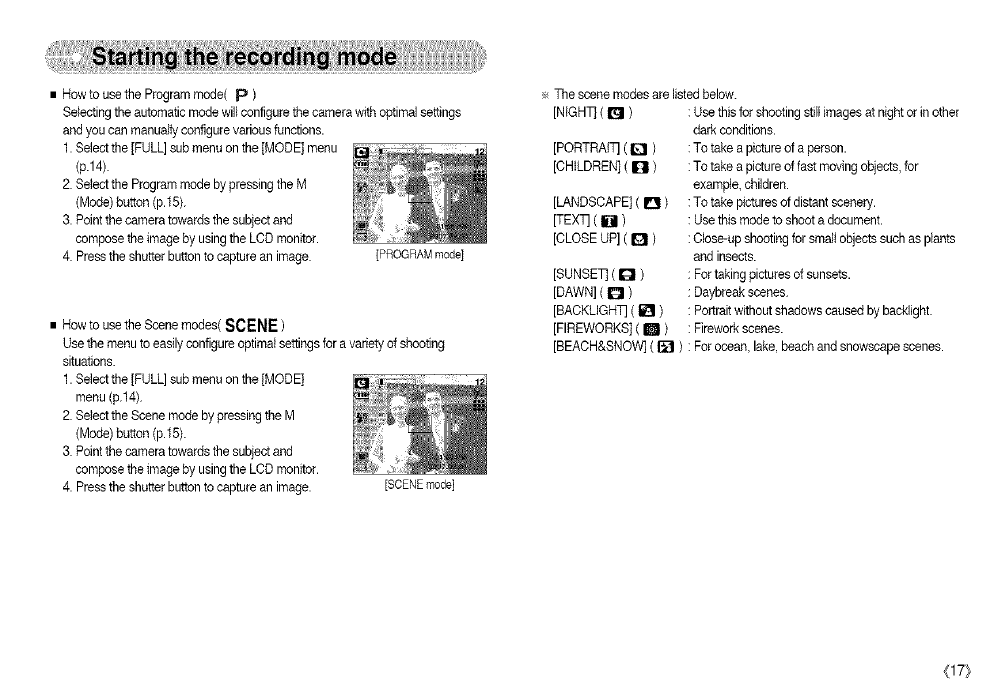
• How to use the Program mode( p )
Selecting the automatic mode will configure the camera with optimal settings
and you can manually configure various functions.
1. Selectthe [FULL] sub menu on the [MODE] menu
(p.14).
2. Selectthe Program mode by pressing the M
(Mode) button (p.15).
3. Pointthe camera towards the subject and
compose the image by usingthe LCD monitor.
4. Pressthe shutter buttonto capture an image. [PROGRAM mode]
• How to use the Scene modes( SCENE )
use the menu to easily configureoptimal settings for a variety of shooting
situations.
1. Selectthe [FULL] sub menu on the [MODE]
menu (p.14).
2. Selectthe Scene mode by pressing the M
(Mode) button (p.15).
3. Pointthe camera towards the subject and
compose the image by usingthe LCD monitor.
4. Pressthe shutter buttonto capture an image. [SCENEmode]
÷ The scene modes are listed below.
[NIGHT] ( t_l ) : Usethis for shooting stillimages at night or in other
[PORTRAIT] ( I_ )
[CHILDREN] ( I[] )
[LANDSCAPE] ( D )
[TEXq ( IOI )
[CLOSE UP] ( Q )
[SUNSET] ( I_1 )
[DAWN]( IO )
[BACKUGHq ( _ )
[FIREWORKS] ( m )
[BEACH&SNOW] ( [] )
dark conditions.
:To take a picture of a person.
:To take apicture of fast moving objects, for
example, children.
:To take pictures of distant scenery.
: Usethis mode to shoot a document.
:Close-up shootingfor small objects such as plants
and insects.
: For taking pictures of sunsets.
: Daybreak scenes.
: Portraitwithout shadows caused by backlight.
: Firework scenes.
: For ocean, lake, beach and snowscape scenes.
(17}
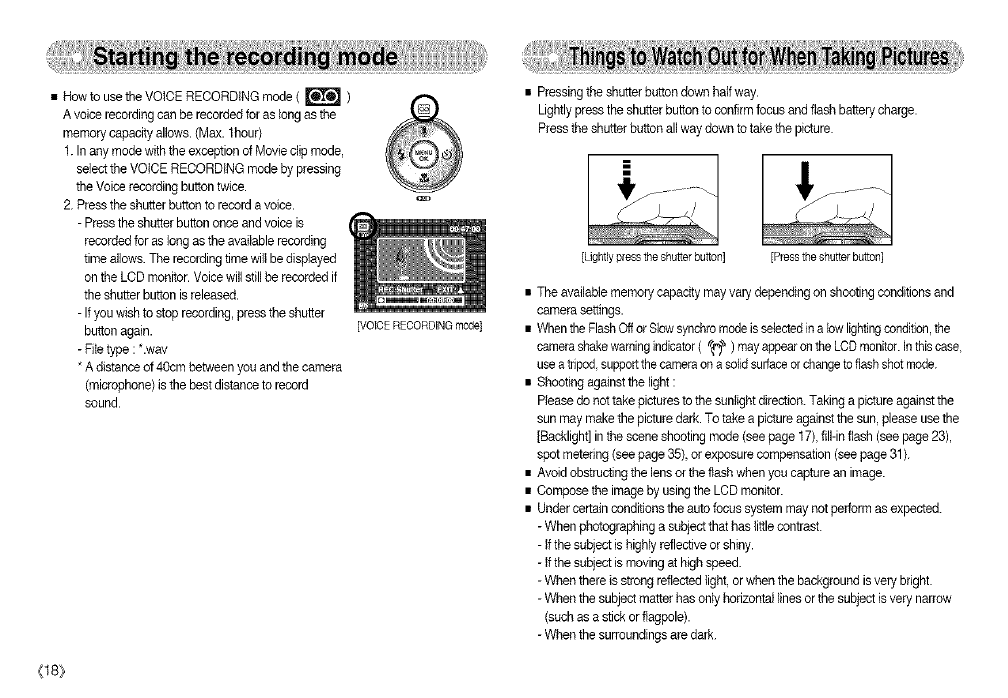
• How to use the VOICE RECORDING mode ( _ )
A voice recording can be recordedfor as long asthe
memory capacity allows.(Max. 1hour)
1. In any mode with the exception of Movie clip mode,
select the VOICE RECORDING mode by pressing
the Voice recording button twice.
2. Press theshutter button to record a voice.
-Pressthe shutter button once and voice is
recorded for as long asthe available recording
time allows.The recording time wilt be displayed
on the LCD monitor.Voice willstill be recorded if
the shutterbutton is released.
-Ifyou wish to stop recording,press the shutter
button again.
- Fite type : *.way
* A distanceof 40cm between you and the camera
(microphone) isthe best distanceto record
sound.
{18}
[VOICE RECORDINGmode]
• Pressingthe shutter button down half way.
Lightlypress the shutterbutton to confirm focusand flash battery charge.
Pressthe shutter button all way down to take the picture.
[Lightly press the shutter button [Press the shutter button]
• The available memory capacity may vary depending on shootingconditions and
camera settings.
• Whenthe FlashOff orSlow synchromode isselectedin a low lightingcondition,the
_a
camerashake warningindicator( _ ) may appearonthe LCDmonitor.In this case,
use atripod supportthecamera ona solidsurfaceorchangeto flashshot mode.
• Shooting againstthe light :
Please do not take picturesto the sunlight direction.Taking a picture againstthe
sun may make the picture dark. To take a picture againstthe sun, please use the
[Backlight] in the scene shooting mode (see page 17),fill-inflash (see page23),
spot metering (see page35) or exposure compensation (see page31).
• Avoid obstructingthe lens or the flash when you capture an image.
• Compose the image by usingthe LCD monitor.
• Under certain conditions the auto focus system maynot perform as expected.
-When photographing a subject that has little contrast.
-If the subject is highly reflectiveor shiny.
-tf the subject is movingat high speed.
-When there is strong reflected light, orwhen the background is very bright.
-When the subject matter has only horizontal lines orthe subject isvery narrow
(such as a stick or flagpole).
-When the surroundings are dark.
•Therecordingmodefunctioncanbesetupbyusingthecamerabuttons. •If the menu is not displayed, this button works
asthe OPTICAL ZOOM or DIGITAL ZOOM
button.
• Used for turningthe camera's power on /off.
• Ifthere is no operation duringthe specified time,
the camera's power willbe turned off
automaticallyto save battery life.
Referto page 54 for more information about the
auto poweroft function.
• Used for taking an image or recording voice in
the RECORDING mode.
• In MOVIE CLIP mode :
Pressingthe shutterbutton downfully starts the
process for recording a movie clip. Pressthe
shutterbutton once and the movie clip is
recordedfor as longas the available recording
time inthe memory allows. If you wish to stop recording,press the shutter button
again.
• tn STILL IMAGE mode
Pressingthe shutter button down halfway activatesthe autofocus and checks
the condition of the flash. Pressingthe shutter button downfully takes and steres
the image. Ifyou select voice memo recording,the recording will start after the
camera has finished storingthe imagedata.
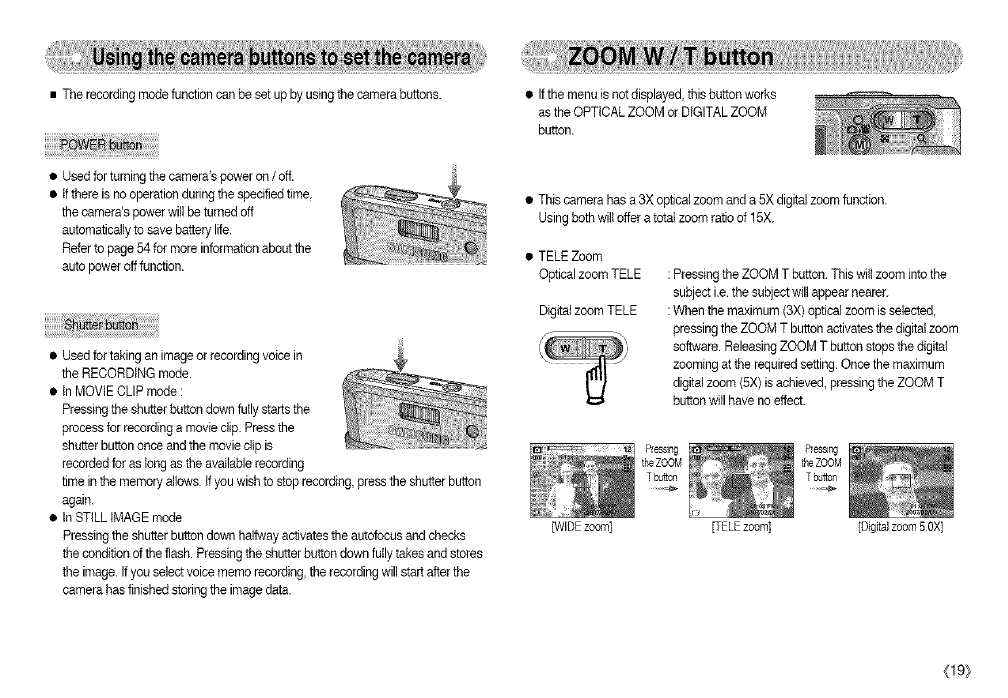
• This camera has a 3X opticalzoom and a 5X digital zoom function.
Usingbeth will offer a total zoom ratio of 15X.
• TELE Zoom
Optical zoom TELE :Pressing theZOOM T button.This wiltzoom into the
subject i.e. the subjectwill appear nearer.
Digital zoom TELE :When the maximum (3X) opticalzoom is selected
pressing the ZOOM T button activates thedigital zoom
so_'_are. ReleasingZOOM T button stopsthe digital
zooming at the required setting.Once the maximum
digital zoom (5X) is achieved, pressingthe ZOOM T
button will have no effect.
[WIDE zoom] FELE zoom] [Digital zoom 50X]
(19)
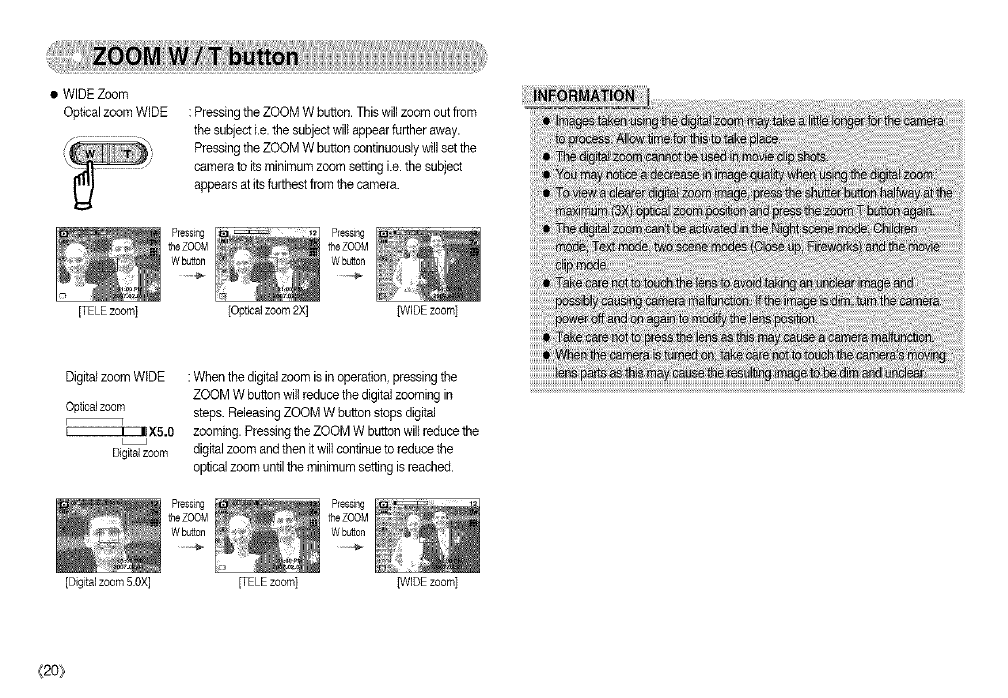
•WIDEZoom
OpticalzoomWIDE:PressingtheZOOMWbutton.Thiswillzoomoutfrom
thesubjecti.e.thesubjectwillappearfurtheraway.
PressingtheZOOMWbuttoncontinuouslywillsetthe
cameratoitsminimumzoomsettingi.e.thesubject
appearsatitsfurthestfromthecamera.
[TELE zoom] [Optical zoom 2X] [WIDE zoom]
Digitalzoom WIDE :When the digital zoom is in operation, pressing the
ZOOM W button will reduce thedigital zooming in
Opticalzoom steps. ReleasingZOOM W button stopsdigital
r q
_X5.0 zooming. Pressingthe ZOOM W buttonwill reducethe
Digitalzoom digital zoom and then it will continue to reduce the
optical zoom until the minimum setting is reached.
_20}
[Digital zoom 5.OX] FELE zoom] [WIDE zoom]
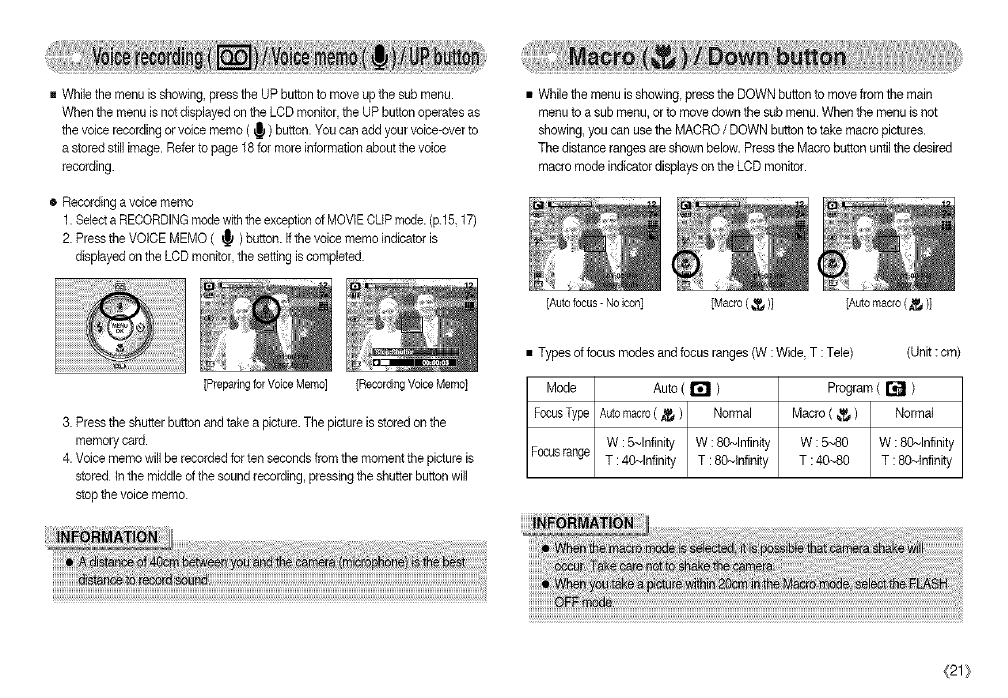
R While the menu isshowing, press the UP button to move up the sub menu.
When the menu is not displayedon the LCD monitor, the UP button operatesas
the voice recording orvoice memo ( _ )button. You can add your voice-over to
a storedstill image. Refer to page 18 for more information about the voice
recording.
® Recordinga voice memo
1. SelectaRECORDINGmode withthe exceptionof MOVIECLIP mode.(p15,17)
2. Pressthe VOICE MEMO ( _ ) button. Ifthevoice memo indicator is
displayed on the LOD monitor,the setting is completed.
[Preparing for Voice Memo] [Recording Voice Memo]
• While the menu isshowing, press the DOWN button to move from the main
menu to a sub menu, or to move down the sub menu.When the menu is not
showing, you can use the MACRO /DOWN button to take macro pictures.
The distanceranges are shown below. Pressthe Macro button until the desired
macro mode indicatordisplays on the LOD monitor.
3. Pressthe shutter buttonand take a picture.The picture isstored on the
memory card.
4. Voice memo will be recorded for ten seconds from the moment the picture is
stored In the middle of thesound recording, pressing the shutterbutton wi]l
stop the voice memo.
[Autofocus-Noicon] [Macro( _ )] [Automacro(,_)]
• Types dfocus modes and focus ranges(W : Wide,T : Tele) (Unit : cm)
Mode Auto ( _ ) Program ( r_J )
FocusType Automacro( J_ ) Normal Macro ( _ ) Normal
W :5~Infinity W : 80~Infinity W :5~80 W : 80~Infinity
Focusrange T : 40~Infinity T : 80-,,Infinity T : 40-,,80 T : 80_Infinity
(21}
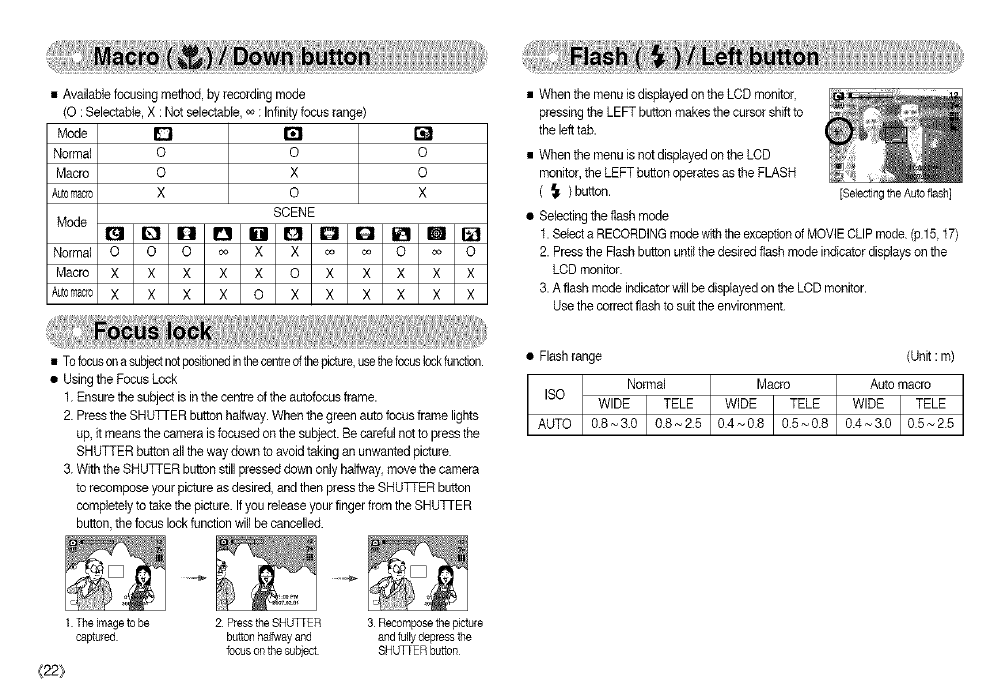
•Availablefocusing method, by recording mode
(O :Selectabte, X : Not selectable,o_: Infinityfocus range)
Mode D
Normal O O
Macro O X
Automacro X O
SCENE
Mode It_l Q O OIBI G
Normal O O O co X X
Macro X X X X X O
Automacro XXXX O X
O
O
X
co co O co O
X X X X X
X X X X X
• Tofocuson asubjectnotpositionedinthecentreofthepicture,usethefocuslockfunction.
• Using the Focus Lock
1. Ensure the subject is in the centre of the autofocus frame.
2. Pressthe SHUTrER buttonhalfway. When the green autofocus frame lights
up, it means the camera isfocused on the subject. Be careful notto press the
SHUTTER button all the way down to avoid taking an unwanted picture.
3. With the SHUTTER button still presseddown only halfway, move the camera
to recompose your picture asdesired, and then press the SHUTTER button
completelyto take the picture. Ifyou release your finger from the SHU]qER
button,the focus lock function will be cancelled.
1 The image to be 2 Press the SHUTTER 3 Recompose the picture
captured button halfway and and fully depress the
focus on the subject SHU_ER button
{22}
•When the menu isdisplayed on the LCD monitor,
pressing the LEFT button makes the cursor shift to
the left tab.
• When the menu is netdisplayed on the LCD
monitor, the LEFT button operates asthe FLASH
( _. )button.
• Selecting the flash mode
1. Selecta RECORDINGmodewith theexceptiondMOVIECLIP mode.(pl 5,17)
2. Pressthe Flash button until thedesired flash mode indicator displays on the
LCD monitor.
3. A flash mode indicator willbe displayed on the LCD monitor.
Use the correctflash to suitthe environment.
[Se{ectlngthe Auto flash]
• Flashrange (Unit : m)
ISO
AUTO 0_ ~ 0.8 0.5,,_0.8 0.4 ~ 3.0 0.5 ~ 2.5 I
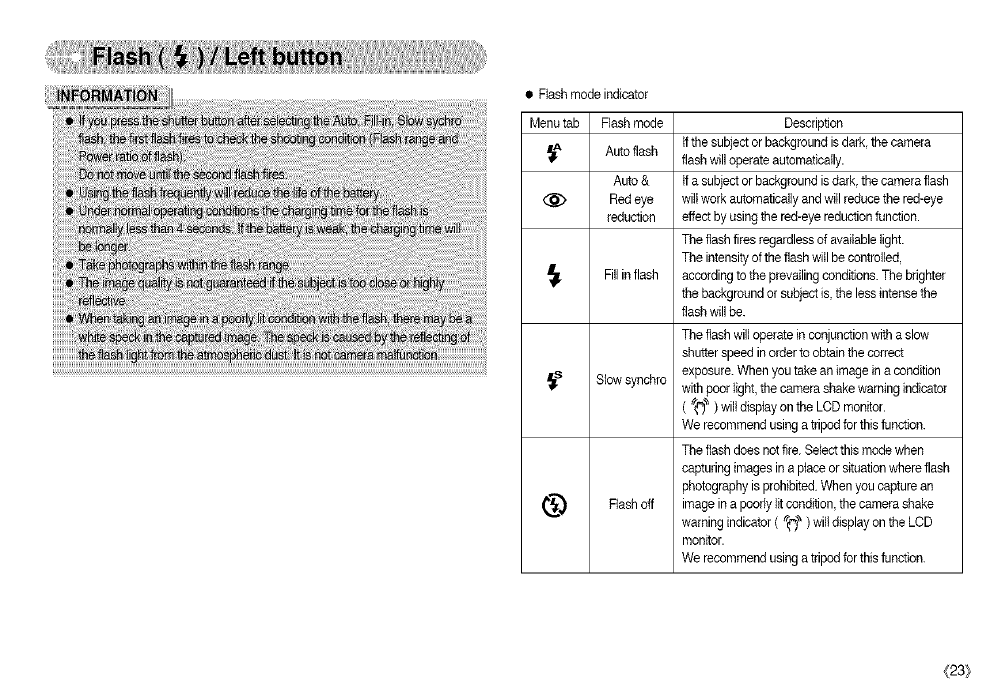
• Flashmodeindicator
Menutab Flashmode
Autoflash
Auto&
(_ Redeye
reduction
_1- Fillinflash
_s Slowsynchro
_"_ Flashoff
Description
Ifthesubjectorbackgroundisdark,thecamera
flashwilloperateautomatically.
tfasubjectorbackgroundisdark,thecameraflash
wiltworkautomaticallyandwillreducethered-eye
effectbyusingthered-eyereductionfunction.
Theflashfiresregardlessofavailablelight.
Theintensityoftheflashwitlbecontrolled,
accordingtotheprevailingconditions.Thebrighter
thebackgroundorsubjectis,thelessintensethe
flashwillbe.
Theflashwilloperateinconjunctionwithaslow
shutterspeedinordertoobtainthecorrect
exposure.Whenyoutakeanimageinacondition
withpoorlight,thecamerashakewarningindicator
(_")_)wiltdisplayontheLCDmonitor.
Werecommendusingatripodforthisfunction.
Theflashdoesnotfire.Selectthismodewhen
capturingimagesinaplaceorsituationwhereflash
photographyisprohibited.Whenyoucapturean
imageinapoorlylitcondition,thecamerashake
warningindicator(_("_)willdisplayontheLCD
monitor.
Werecommendusingatripodforthisfunction.
(23/

e_ailableflashmode,_co_ingmode(O:SetectableX:N_selectabie)
_XXOXXXXXXXXXXO
@XOOXOOXXXXXXXX
_XXOXXXXXXXXOXX
_XXOOXXXXXXXXXX
_ OOOOOOOOOOOXOX
•When the menu isdisplayed on the LCD monitor, pressingthe Right button
makes the cursor shift to the righttab.
• When the menu isnot displayed on the LCD monitor, the RIGHTbutton
operates asthe Self-timer( _ ) button. This function is used when the
photographer would also like to be in the image.
• Selecting the serf-timer
1. Select a RECORDING mode with the exceptionof
VOICE RECORDING mode. (p.15~17)
2. Pressthe SELF-TIMER button until the desired
mode indicatordisplays on the LCD monitor.
A 10 second, 2 second or double self-timer icon
appears on the LCD monitor, tn Movie Clip mode,
ontythe 10-secood self-timerwill work.
• 10SEOself-timer ( _ ):
Pressingthe shutter button willallow an interval
of 10seconds before the image istaken.
• 2SEC self-timer ( ®2s ):
Pressingthe shutter button willallow an interval
of 2 seconds before the image istaken.
• Double self-fimer ( _'_ ):
A picture will be taken after about 10 seconds and 2seconds later a
secondpicture willbe taken. When usingthe flash,the 2-second self-timer
may be delayed for longerthan 2seconds depending on the flash charging
time.
3. When you press the SHUTi-ER button, the picture will betaken after the
specifiedtime has elapsed.
[$el_ting the 108ECself4irner]
{24}
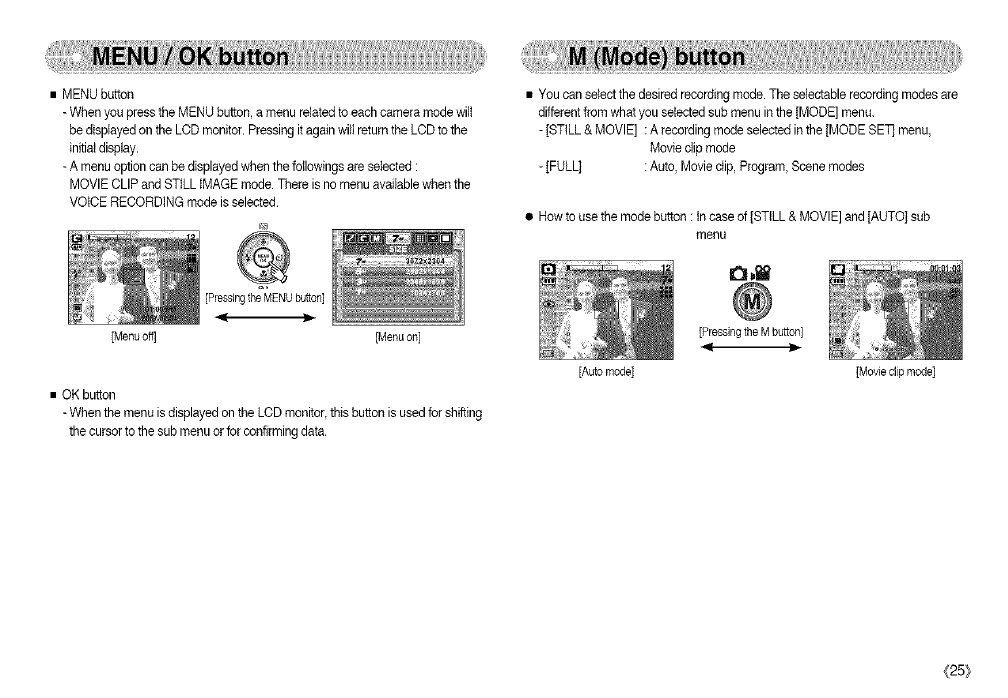
•MENUbutton
-WhenyoupresstheMENUbutton,amenurelatedtoeachcameramodewilt
bedisplayedontheLCDmonitor.PressingitagainwillreturntheLCDtothe
initialdisplay.
-Amenuoptioncanbedisplayedwhenthefollowingsareselected:
MOVIECLIPandSTILLIMAGEmode.Thereisnomenuavailablewhenthe
VOICERECORDINGmodeisselected.
[Pressingthe'_4ENUbutton]
[Menu oft] [Menu on]
• OK button
- When the menu is displayedon the LCD monitor, thisbutton isused for shifting
the cursor to the sub menu or for confirming data,
• You can select the desired recording mode. The selectable recording modes are
differentfrom what you selected sub menu inthe [MODE] menu.
-]STILL & MOVIE] : A recording mode selected inthe [MODE SET] menu,
Movie clip mode
-]FULL] : Auto, Movie clip, Program,Scene modes
•Now to use the mode button : tn case of ]STILL & MOVIE] and [AUTO] sub
menu
[Pressing the M button]
[Auto mode] [Movie clip mode]
(25_
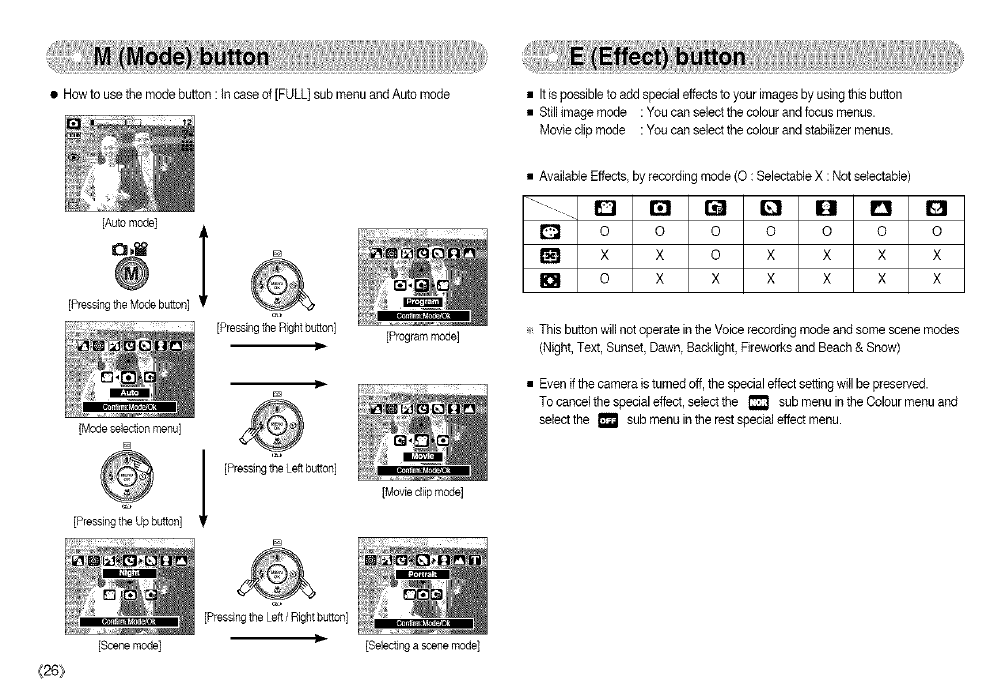
• How to use the mode button : tn case of [FULL] sub menu and Auto mode
[Automode]
[PressingtheModebuttonl
[PressingtheRightbutton]
[Mode selection menu]
[]
[]
[PressingtheLeftbutton]
[PressingtheUpbutton]
[Scene mode]
[Program mode]
[Movie cliip mode]
• Itis possible to add spedal effects to your images by usingthis button
• Still image mode : You can select the colour and focus menus.
Movie clip mode : You can select the colour and stabilizer menus.
• Available Effects, by recording mode (0 : Selectable X : Not selectable)
........... D I';1 I:_ IE"I Q D Q
1_ o o o o o o o
r_ x x o x x x x
o x x x x x x
_t This button willnot operate in the Voice recording mode and some scene modes
[Night, Text, Sunset, Dawn, Backlight, Fireworks and Beach & Snow)
Even if the camera is turned off,the specialeffect setting will be preserved.
To cancelthe special effect, selectthe _ sub menu in the Oolour menu and
selectthe _ sub menu in the rest special effect menu.
{26}
[Pressing the Left/Right button]
If_ [Selecting a scene mode]

• By using the camera'sdigital processor,it ispossib(eto add specialeffects to
your images.
1. Pressthe E button inthe availab(ecamera modes.
2. Selectthe ( D ) menu tab by pressing the Left /Right button.
[Still image mode] [Movte dip mode]
• You can make the subject stand out from its
surroundings.The subject will be sharp and in focus
while makingthe rest outof focus.
1. Pressthe E button in the Program mode.
2. Select the ( _ )menu tab by pressingthe Left /
Right button.
3. Se(ect adesired sub menu by pressing the Up /
Downbutton and press the OK button.
3. Selecta desired sub menu by pressing the Up /Down button and press the
OK button.
: No effect isadded to the )mage
_, : Captured imageswi((be stored )nblack and white.
: Captured(mages will be stored in a sepiatone
(agradient of yellowishbrown colours).
: Captured imageswil) be stored in a blue tone.
: Captured imageswil) be stored in a red tone.
: Captured imageswi((be stored in a green tone.
: Savethe imagein negative mode.
4. Pressthe shutter buttonto capture an image.
[Range 1] [Range 2] [Range 3] [Range 4)
4. The presetfocus frame willappear.
Pressthe shutterbutton to capture an image
_[27}
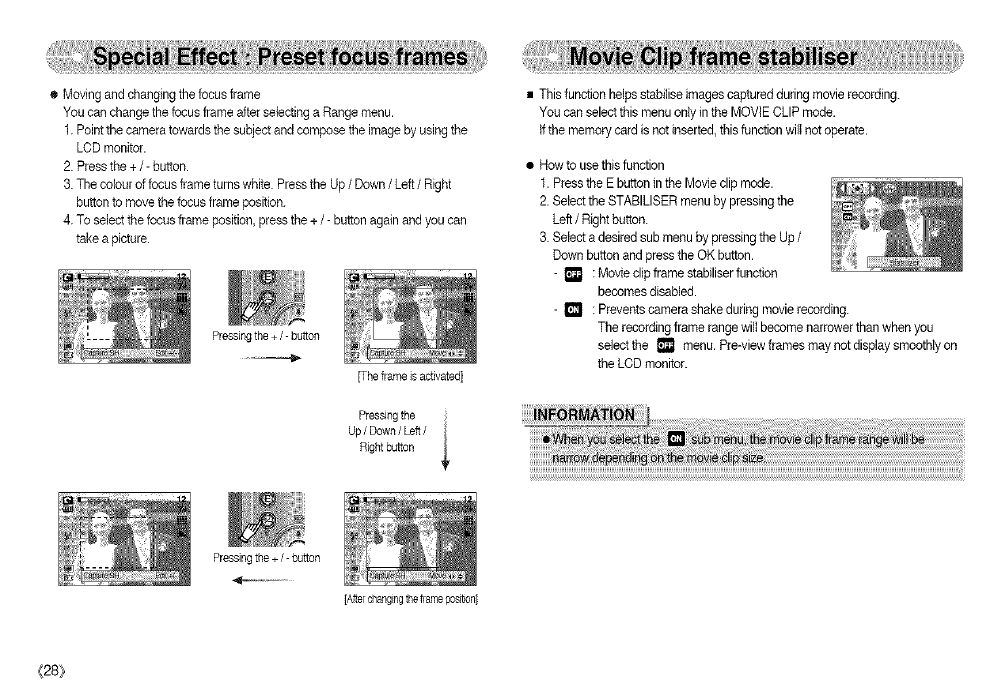
•Movingandchangingthefocusframe
YoucanchangethefocusframeafterselectingaRangemenu.
1.Pointthecameratowardsthesubjectandcomposetheimagebyusingthe
LCDmonitor.
2.Pressthe+/-button.
3.Thecolouroffocusframeturnswhite.PresstheUp/Down /Left /Right
button to move the focus frame position.
4. To select the focusframe position,press the + /- buttonagain and you can
takea picture
Pressing the + /- button
[The frame isactivated]
• This function helps stabilise imagescaptured during movie recording.
You can selectthis menu only in the MOVIE CLIP mode.
tf the memory card is not inserted, thisfunction will not operate.
• Howto usethis function
1. Press the E button in the Movie clip mode.
2. Select the STABILISER menu by pressing the
Left /Right button.
3. Select a desired sub menu by pressing the Up /
Down button and press the OK button.
- [] : Movie clip frame stabiliser function
becomesdisabled.
- [] : Prevents camera shake during movie recording.
The recordingframe range wilt become narrowerthan when you
selectthe [] menu. Pre-viewframes may notdisplay smoothly on
the LCD monitor.
Pressing the i
Up/Down/Left/ _
Rightbu_on
Pressing the +/- button
{28}
[Aftercha_gi_gtheframeposition]
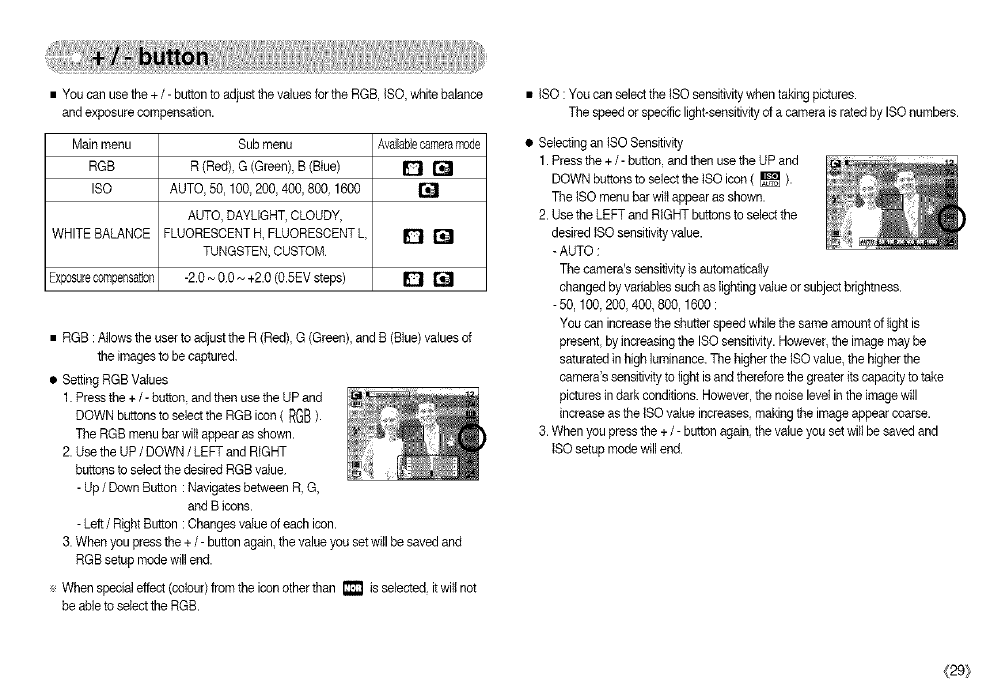
• You can use the + /- button toadjust the values for the RGB, ISO, white balance
and exposure compensation.
Main menu Sub menu Availablecameramade
RGB R (Red), G (Green), B (Blue) _ []
ISO AUTO, 50, 100, 200, 400, 800,1600 []
AUTO, DAYLIGHT,CLOUDY,
WHITE BALANCE FLUORESCENTH, FLUORESCENTL _ []
TUNGSTEN,CUSTOM
Exposurecompensation -2.0- 0.0~ +2.0 (0.5EVsteps) _ []
• RGB :Allows the user to adjust the R (Red), G (Green),and B (Blue) valuesof
the imagesto be captured.
• Setting RGB Values
1. Pressthe +/- button andthen use the UP and
DOWN buttons to selectthe RGB icon ( RGB).
The RGB menu bar wiltappear as shown.
2. Usethe UP/DOWN /LEFT and RIGHT
buttons to select thedesired RGB value.
- Up/Down Button : Navigatesbetween R, G,
and B icons.
- Left/Right Button :Changes value of each icon.
3. When you press the + /- button again, the value you set will be saved and
RGB setup mode will end.
÷ When special effect (colour) from the icon other than i_ is selected, it will not
be ableto select the RGB.
• ISO : You can select the tSO sensitivity when taking pictures.
The speedor specific light-sensitivityof a camera is rated by ISOnumbers.
• Selecting an ISO Sensitivity
1. Pressthe +/- button,and then use the UP and
DOWN buttons to selectthe ISOicon ( [] ).
The ISOmenu bar wilt appear as shown.
2. Use the LEFT and RIGHT buttonsto select the
desired ISOsensitivity value.
- AUTO :
The camera's sensitivity is automatically
changed by variables such as lighting value or subject brightness.
- 50, 100,200, 400, 800, 1600 :
You can increase the shutterspeed while the same amount of light is
present, by increasingthe ISOsensitivity. However,the image may be
saturated in high luminance.The higher the ISOvalue, the higherthe
camera's sensitivity to light is and therefore the greater its capacity to take
pictures in dark conditions. However,the noise level inthe image will
increase as the ISO value increases,making the imageappear coarse.
3. When you press the +/- button again,the value you set will be saved and
ISOsetup mode will end.
(29/
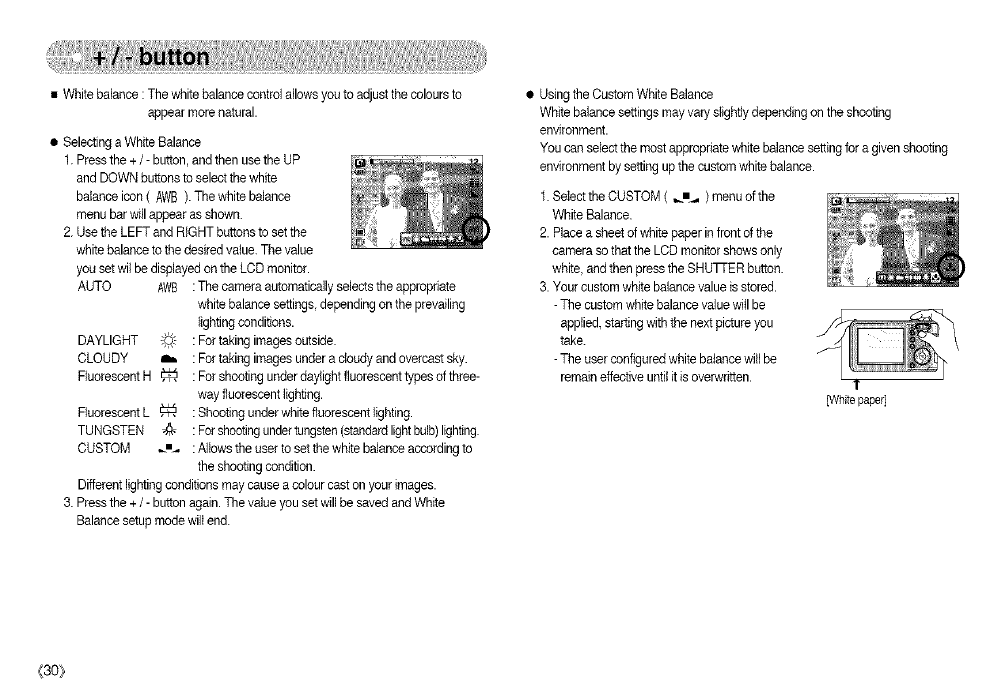
•Whitebalance:Thewhitebalancecontrolallowsyoutoadjustthecoloursto
appearmorenatural.
•SelectingaWhiteBalance
1.Pressthe+/- button, and then use the UP
and DOWN buttons to select the white
balance icon ( AWB). The white balance
menu barwill appear as shown.
2. Use the LEFT and RIGHT buttons to set the
white balance to the desired value. The value
you set wil be displayedon the LCD monitor.
AUTO AWB :The camera automatically selects the appropriate
white balance settings, depending on the prevailing
fightingconditions.
DAYLIGHT ;_,,-'- : For taking images outside.
CLOUDY Ih, : For taking imagesunder a cloudy and overcast sky.
FluorescentH _ :Forshootingunderdayfightfluorescenttypesofthree-
way fluorescentlighting.
FluorescentL _ : Shooting underwhite fluorescentlighting.
TUNGSTEN @ : Forshootingundertungsten(standardfightbulb)lighting
CUSTOM _m. : Allowsthe user to set the white balance according to
the shooting condition.
Differentlightingconditions may cause a colourcast on your images.
3. Pressthe + /- button again. The value you set will be saved and White
Balance setup mode wifi end.
• Usingthe Custom White Balance
White balance settings mayvary slightlydepending on the shooting
environment.
You can select the most appropriate white balance setting for a givenshooting
environment by setting upthe customwhite balance.
1. Select the CUSTOM ( _._ ) menu of the
White Balance.
2. Place a sheet of white paper in front of the
camera so that the LCD monitor shows only
white, and then press the SHU]q-ER button.
3. Your custom white balance valueis stored.
- The custom white balance value will be
applied, starting with the nextpicture you
take.
- The user configured white balance willbe
remain effectiveuntil it isoverwritten. T
[Whitepaper]
(30}
•Exposurecompensation:Thiscameraautomaticallyadjuststheexposure
accordingtotheambientlightingconditions.
Youcanalsoselecttheexposurevaluebyusingthe
+/- button.
• Compensating Exposure
1. Pressthe +/- button,andthen use the UP and
DOWN buttons to selectthe exposure
compensation icon ( [] ).
The exposure compensation menu bar will
appear as shown.
2. Usethe LEFT and RIGHT buttons to set the
desired exposure compensation factor.
3. Pressthe +/- button again.The value you set will be saved and the Exposure
Compensation setup mode will close.
tfyou change the exposure value, the exposure indicator ( [] ) will be
displayed on the bottomof the LCD monitor.
÷ A negative exposure compensation value reducesthe exposure.
Notethat a positive exposurecompensation value increases theexposure
and the LCD monitor willappear white or you may not getgood pictures.
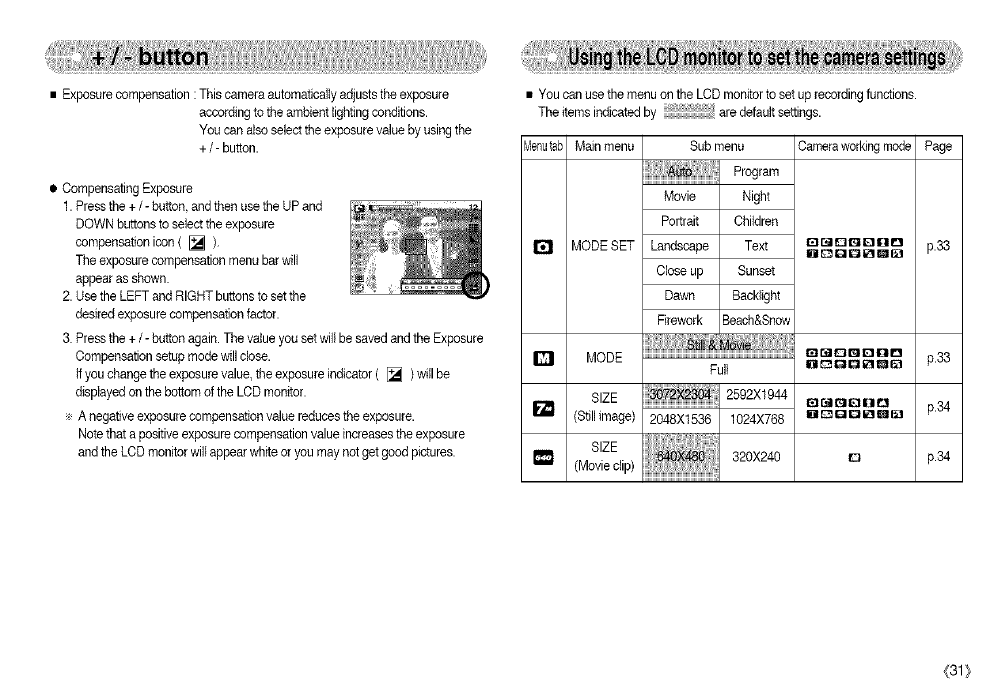
• You can use the menu on the LCD monitor to set up recording functions.
The itemsindicated by are default settings.
vTenutabMain menu Sub menu Cameraworkingmode Page
MODE SET
Program
Movie
Portrait
Landscape
Close up
Dawn
Night
Children
Text O_DQOnD
DE_QQ_II_
Sunset
Backlight
Firework Beach&Snow
0_00000
BOOO_QO
p.33
D MODE p.33
Full
SIZE 2592X1944 r_O01]l_ p.34
(Still image) 1024X768 liilDgr_6Ea
SIZE 320X240 n p.34
(Movie clip)
(31 ]_
_lenutaL Mainmenu Submenu Camera workingmode Page
QUALITY SuperFine El r,__11_11310 p.34
Normal ODUQ_U_
Q FRAMERATE 15 FPS o p.34
m METERING f,./l_,'l_ Spot O1_1 p.35
,_!, Continuous
17 SHOOTING [] p.35
AEB
soft
r_ SHARPNESS _ p.35
Vivid
OSO ;Fi)ii Basic Gr_O_O00 p.36
INFORMATION 101_1_1 o _ Dido
÷ Menus are subject to change without prior notice.
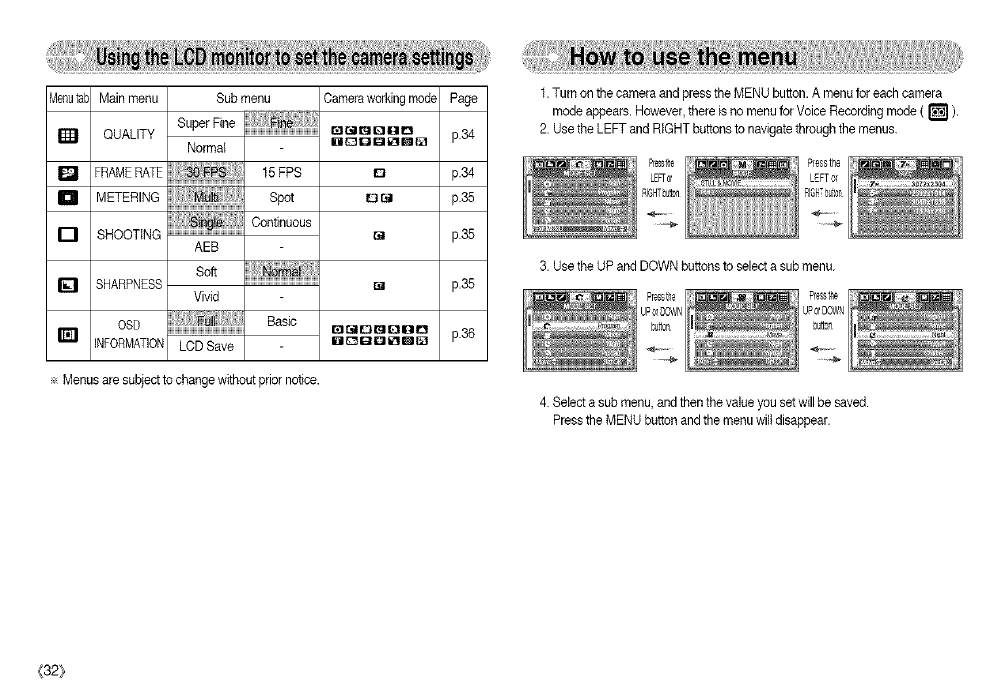
1. Turn on the camera and press the MENU button. A menu for each camera
mode appears. However, there is no menu for Voice Recordingmode ( _ ).
2. Use the LEFT and RIGHT buttons to navigatethrough the menus.
3. Use the UP and DOWN buttons to select asub menu.
4. Select a sub menu, and then thevalue you set willbe saved.
Pressthe MENU button and the menu willdisappear.
{32_
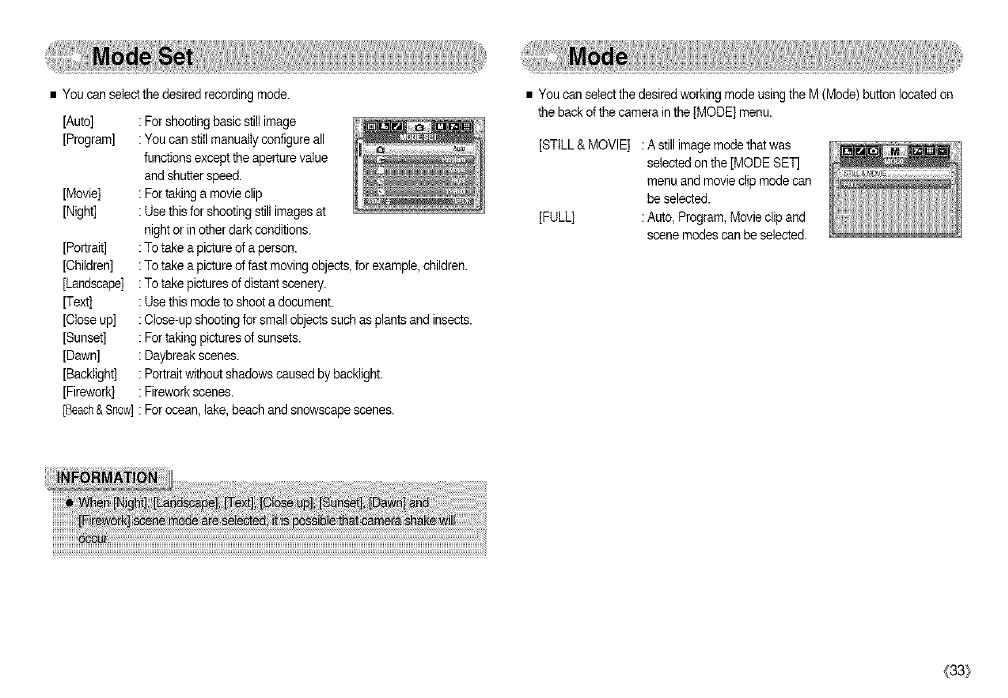
•Youcanselectthedesiredrecordingmode.
[Auto]
[Program]
[Movie]
[Night]
[Portrait]
[Children]
[Landscape]
[Text]
[Closeup]
[Sunset]
[Dawn]
[Backiight]
[Firework]
[Beach&Snow]
:Forshootingbasicstillimage
:Youcanstitlmanualiyconfigureall
functionsexcepttheaperturevalue
andshutterspeed.
:Fortakingamovieclip
:Usethisforshootingstillimagesat
nightorinotherdarkconditions.
:Totakeapictureofaperson.
:Totakeapictureoffastmovingobjects,forexample,children.
:Totakepicturesofdistantscenery.
:Usethismodetoshootadocument.
:Close-upshootingforsmallobjectssuchasplantsandinsects.
:Fortakingpicturesofsunsets.
:Daybreakscenes.
:Portraitwithoutshadowscausedbybackiight.
:Fireworkscenes.
:Forocean,lake,beach and snowscape scenes.
• You can select the desired working mode usingthe M (Mode) button located on
the back of the camera in the [MODE] menu.
[STILL&MOVIE] :A still imagemode that was
selected on the [MODE SET
menu and movie clip mode can
be selected.
[FULL] :Auto, Program, Movie dip and
scene modes can be selected.
(33}

• You can selectthe image size appropriatefor your application.
[STILL IMAGE moOd] [MOVIE CLIP mode]
• You can selectthe compression ratio appropriatefor your applicationof the
captured images. The higher the compression ratio,the lowerthe picture quality.
{34}
[STILL IMAGE mode] [MOVIE CLIP mode]
• ffyou cannot obtain suitableexposure conditions, you can change themetering
method to take brighter pictures.
- Multi : Exposurewill be calculated based on an
average of the available light inthe image
area. However,the calculationwill be
biased towards thecentre of the image
area. This is suitabiefor general use.
- Spot :Only the rectangular area inthe centre of
the LCD monitor will be metered for light.
This is the preferable setting whenyou want the subject in the centre of
the image exposed correctly, regardlessof the back lighting.
• Select the numberof pictures in continuous shooting.
- Single :Take one picture only
- Continuous :tmages will be taken continuously
untitthe shutter button isreleased.
The shooting capacity depends on
the memory available.
- AEB :Takethreepicturesin a ser_esin
differentexposures:shortexposure
(-O.5EV),standardexposure(0.OEV)and over exposure(+0.SEV).
Use thismode if it ishard to decideexposureof the object
÷ High resolution and picture quality increasesfile saving time, which increases
stand-by time.
÷ Iffewerthan3picturesareavailableinthememory,theAEBshootingisnotavailable.
÷ Itis best to usea tripod for the AEB shooting as the time tosave each image
file is longerand the blurring caused bycamera shake may occur.
• You can adjust the sharpness of thepicture you are
about to take. You cannot check thesharpness
effect on the LCD monitor before you take a picture,
because thisfunction is appliedonly when the
captured imageis stored on the memory.
- Soft :The edges of the image are softened.
This effect is suitablefor editing images
on your PC.
-Normal :Tbe edges of the image are sharp.
This is suitablefor printing.
- Vivid :The edges of the image are emphasized. The edges wilI appear
sharp, but noise may occur in the recorded image.
{35_
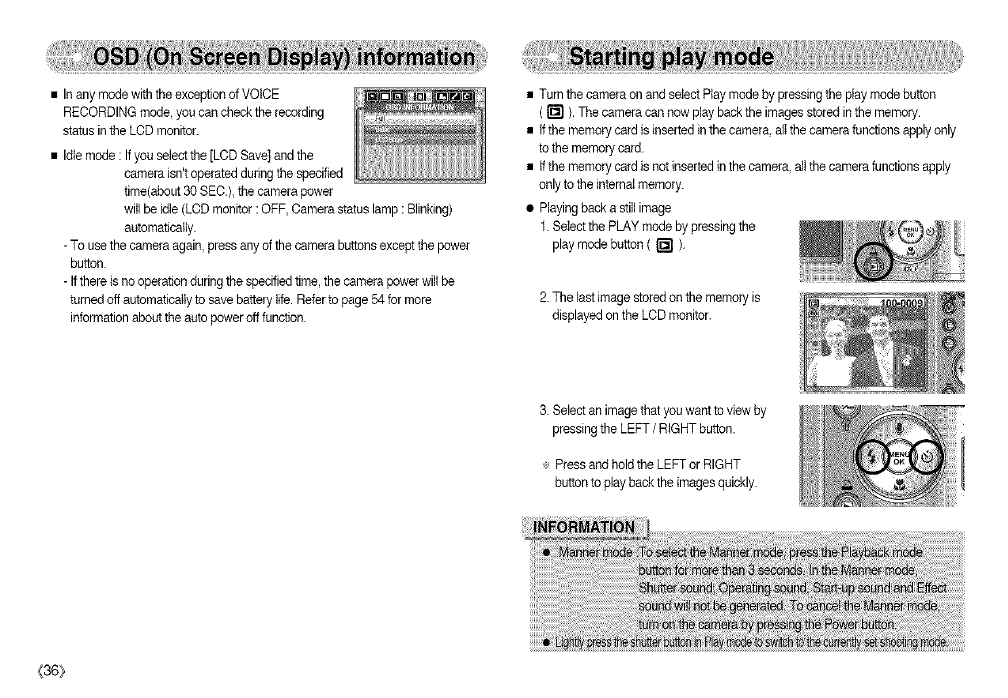
• In any mode with the exception of VOICE
RECORDING mode, you can check the recording
status in the LCD monitor.
• Idle mode : If you select the [LCD Save] and the
camera isn't operated during the specified
time(about30 SEC.),the camera power
will be idle (LCD monitor :OFF, Camerastatus lamp :Blinking)
automaficatly.
- To usethe camera again,press any of the camera buttonsexcept the power
button.
- Ifthere isno operation duringthe specified time, the camera power willbe
turned off automatically to save batterylife. Refer to page 54 for more
informationabout the auto poweroff function.
• Turn the camera on and select Play mode by pressingthe play mode button
( r_l ). Tile camera can now play back the images stored in the memory.
• tf the memory card is insertedin the camera, all the camera functions apply only
to the memory card.
• tf the memory card is not insertedin the camera, all the camera functions apply
only to the internal memory.
• Playingback a still image
1. Setect the PLAY mode by pressing the
play mode button ( r_l ).
2. The lastimage stored on the memory is
displayedon the LCD monitor.
3. Select an image that you want to view by
pressing the LEFT /RIGHT button.
÷ Press and hold the LEFT or RIGHT
button to play back the images quickly.
{36}
• Playingbackamovieclip
1.Selecttherecordedmoviedipthatyouwanttoplay
backbyusingtheLEFT/RIGHT batten.
2. Pressthe play & pause button ( _ ) to play back a
movie clip file.
- To pause a movie clip file while playing it back,
press the p)ay& pause button again.
- Pressingthe play & pause button again will cause
the movie clip file to restart.
- To rewindthe movie clip while it isplaying, press
the LEFT button. To fast forward the movie dip,
press the RIGHT button.
- To stop playback of the movie clip, press the play &
pause button, and tben press the LEFT or RIGHT batten.
R Movie clip capture function :capture still imagesfrom the movie dip.
• How to capture the movie clip
1. Pressthe Play& Pause button while playing the
movie clip. Then press the E button
2. The paused movie clip is saved in a new file name.
The captured movie clip file has same size as the
origins.[rnov{eclip (640)<480,320X240). [Paused]
[Press the E button]
On camera movie trimming : You can extract desiredframes of a movie clip
during the movie clip play back.
• if the funningtime isunder 10 seconds, the movie dip c_n't be trimmed.
1. Pressthe Pause button at the point of the movie clip
that you want to start extracting.
2. Pressthe OK button. (Thestart point doesn't display
on the status bar, bat the start point willbe marked.)
3. Press the Play & Pause button and the extracted
range will be displayedon the status bar.
4. Press the Play & Pause button once more at the
point where you wish the extracted fileto stop
5. Pressthe OK button and a confirmationwindow will
be displayed.
6. Select adesired sab mena by pressing the
Left /Right buttonand press the OK button.
[Yes] :The extracted frames are saved asa new
file name.
[No] : The movie trimming will cancel.
(37}
• Playing back a recorded voice
1. Select therecordedvoice that you want to play
back by usingthe LEFT /RIGHT button.
2. Pressthe play & pause button ( _ ) to play
back a recorded voice file.
-To pause a recorded voice file, while playing it
back, pressthe play & pause button again.
-To resume playback of the voice file, press the play & pause button
-To rewind the voice file while it is playing,press the LEFT button. To fast
forward the voice file, press the RIGHT button.
-To stop playback of the voice fite,press the play & pause button,and then
press the LEFT or RIGHT button.
• The LCD monitor displays shooting information about the displayedimage.
Play mode --
Battery (p 10) --
Voice Memo (p40) --
Protect indicator --
(p46)
DPOFindcarol(p48)
Folder name and
Stored image number
• In Play mode, you can use the buttons on the camera to conveniently set up the
Piay mode functions.
• tf you have turned on the camera by pressing the POWER button, you can press
the PLAY MODE button once to switchto Play mode and press it again to switch
to Recordingmode.
• You can turn the power on with the play mode button.
The camera isturned on in play mode. Pressthe play mode button again to turn
off the camera.
{38_
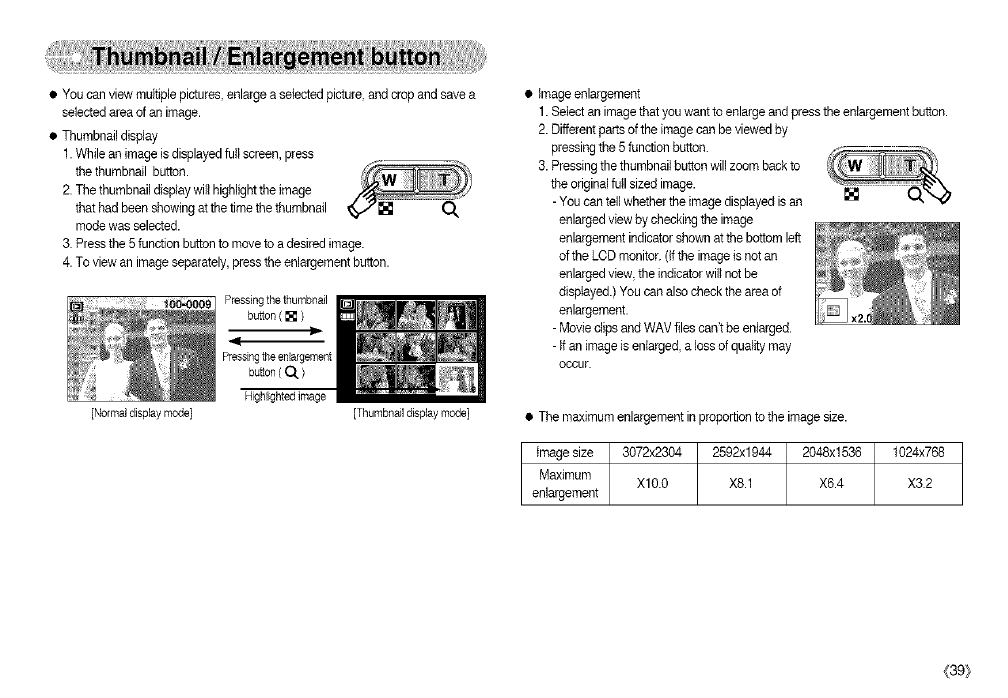
• Youcanviewmultiplepictures,enlargeaselectedpicture,andcropandsavea
selectedareaofanimage.
• Thumbnaildisplay
1.Whileanimageisdisplayedfutlscreen,press
thethumbnailbutton.
2.Thethumbnaildisptaywilthighlighttheimage
thathadbeenshowingatthetimethethumbnail
modewasselected.
3.Pressthe5functionbuttontomovetoadesiredimage.
4.Toviewanimageseparately,presstheenlargementbutton.
[Normal display mode]
Pressing the thumbnail
button ( [] )
I1
Pressingthe enlargement
button ( O.. )
Highlighted image
[Thumbnail display mode]
• Image enlargement
1. Select an imagethat you want to enlarge and press the enlargement button.
2. Different partsof the image can be viewed by
pressing the 5 function button.
3. Pressing thethumbnail button willzoom back to
the originalfutl sized image.
- You can tell whether the image displayed isan []
enlarged view by checking the image
enlargement indicator shownat the bottom left
of the LCD monitor. (Ifthe imageis not an
enlarged view, the indicatorwill not be
displayed.) You can also check the area of
enlargement.
- Movie clips and WAV files can't be enlarged.
- If an image is enlarged, a loss of quality may
occur.
• The maximum enlargement in proportion to the image size.
Image size 3072x2304 2592x1944 2048x1536 1024x768
Maximum Xl0.0 X8.1 X6.4 X3.2
enlargement
(39}
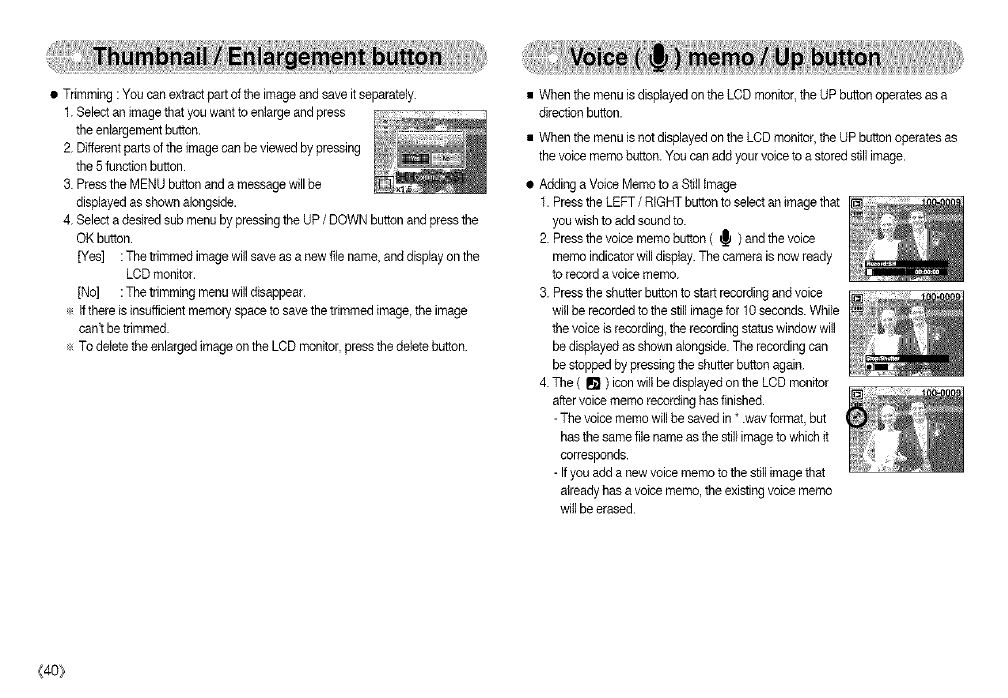
• Trimming : You can extract part of the image and save it separately.
1. Select an image that you want to enlarge and press
the enlargementbutton.
2. Differentparts of the imagecan be viewed by pressing
the 5function button.
3. Pressthe MENU button and a message will be
displayedas shown alongside.
4. Select a desired sub menu bypressing the UP /DOWN button and press the
OK button.
[Yes] :The trimmed imagewill save as a new file name, and display on the
LCD monitor.
[No] :The trimming menu will disappear.
e If there is insufficientmemo17space to save the trimmed image the image
can't be trimmed.
÷ To deletethe enlarged imageon the LCD monitor, press the deletebutton.
• When the menu isdisplayed on the LCD monitor, the UPbutton operates as a
direction button.
• When the menu is notdisplayed on the LCD monitor,the UP button operates as
the voice memo button.You can add your voice to a stored still image.
• Adding a Voice Memo to aStiil image
1. Pressthe LEFT /RIGHT button to selectan imagethat
you wish to add soundto.
2. Pressthe voice memo button ( _ ) and the voice
memo indicator will display.The camera isnow ready
to record avoice memo.
3. Pressthe shutter button to start recording and voice
willbe recordedto the still imagefor 10 seconds. While
thevoice is recording,the recording status window will
be displayed as shownalongside. The recording can
be stopped by pressingthe shutterbutton again.
4. The ( I1_) icon wilt be displayedon the LCD monitor
after voice memo recording has finished.
- The voice memo will be saved in *.wav format, but
has the same file name asthe still image to which it
corresponds.
- If you add a new voice memo to the still imagethat
already has a voice memo, the existingvoice memo
will be erased.
(40_

•tnPlaymode,theplay&pause/downbuttonworksasfollows:
-Ifthemenuisdisplayed
PresstheDOWNbuttontomovefromthemainmenutoasubmenu,orto
movedownthesubmenucursor.
-Ifastillimagewithavoicememo,avoicefileoramovieclipisplaying
InStopmode:Playsastillimagewithavoicememo,avoicefile,oramovieclip
Duringplayback:Temporarilystopsplayback.
InPausemode:Resumesplayback
•Byusingthecamera'sdigitalprocessor,itispossibletoaddspecialeffectsto
yourimages.
1.PresstheEbutton.
2.SelectadesiredsubmenuandpresstheOKbutton.
:Capturedimageswillbestoredinblackandwhite.
:Capturedimageswillbestoredinasepiatone.
:Capturedimageswillbestoredinabluetone.
CIb:Capturedimageswillbestoredinaredtone.
:Capturedimageswillbestoredinagreentone.
_: :Savetheimageinnegativemode.
•LEFT/RIGHT /MENU /OK buttons activate the following.
- LEFT button : While the menu is showing,the LEFT button operatesas a
direction button.While the menu is not showing, press the
LEFT button to select the previous image.
- RIGHT button : While the menu is showing,the RIGHT button operatesas a
direction button.While the menu is not showing, press the
RIGHT button to select the nextimage.
- MENU button : When you pressthe MENU button,the play mode menu will
be displayed on the LCD monitor. Pressingit again will return
the LCD to the initialdisplay.
- OK button : When the menu is displayedon the LCD monitor,the OK
button is used for confirmingdata that is changed by using
the 5 function button.
• Thisdeletes images stored on the memory card.
1. Select an imagethat you want to deleteby pressing the LEFT /RIGHT button
and press the DELETE ( t_ ) button.
2. Select the sub menu values by pressingthe Left /Right button and then press
the OK button.
If [Yes] is selected :deletes the selectedimages.
tf [No] is selected :cancets "Delete Image".
(41}
• PLAY mode functions can be changed byusing the LOD monitor. In the PLAY
mode, pressing the MENU button displays the menu on the LCD monitor.
The menus you can set up in Play mode are as follows. To capture an image
after setting up the play menu, press the PLAY mode button or shutterbutton.
Menu tab Main menu
SLIDE
OSD
INFORMATION
ROTATE
[] RESlZE
Sub menu
Show
interval
Effect
Music
Full
Basic
OSD Off
Right 90°
Left 90°
180°
Horizontal
Vertical
2592X1944
2048X1536
1024X768
User Image 1,2
Secondary menu Page
Play,Repeat Play
1,3,& 10sec
Off p.44
Off Music1,2,3
p.45
p.45
pA6
Menutab Main menu
[] PROTECT
m DELETE
COPYTO CARD
DPOF
Sub menu
Select
All Pics
Select
All Pics
No
Yes
Standard
Index
Size
Secondary menu Page
Unlock/Lock p.46
p.47
p.47
SelectJAll%s/Cancel
No/Yes p.48~49
Select/All%s/Cancel
{42}
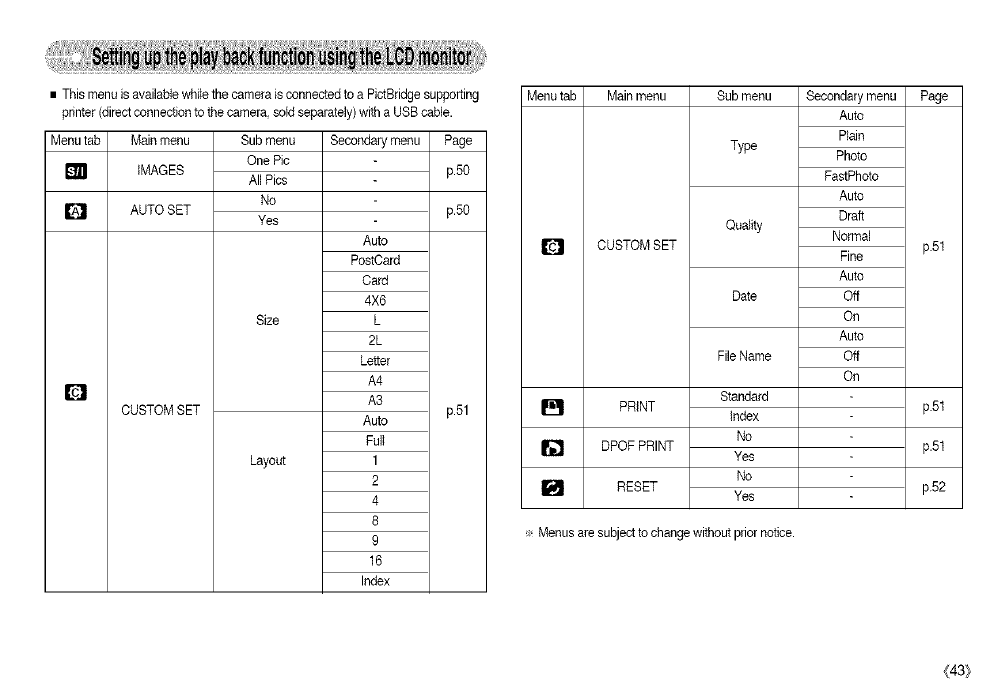
•ThismenuisavailablewhilethecameraisconnectedtoaPictBridgesupporting
printer(directconnectiontothecamera,soldseparately)withaUSBcable.
Menu tab Main menu Secondary menu Page
IMAGES
AUTO SET
CUSTOM SET
Q
Sub menu
One Pic
All Pics
No
Yes
Size
Layout
Auto
PostCard
Card
4X6
L
2L
Letter
A4
A3
Auto
Full
1
2
4
8
9
16
Index
p.50
p.50
p.51
Menu tab Main menu Page
CUSTOM SET
PRINT
[] DPOF PRINT
[] RESET
Sub menu
Type
Quality
Date
FileName
Standa_
Index
No
Yes
No
Yes
Secondary menu
Auto
Plain
Photo
FastPhoto
Auto
Draft
Normal
Fine
Auto
Off
On
Auto
Off
On
÷ Menus are subject to change without prior notice.
p.5t
p.5t
p.5t
p52
(43/
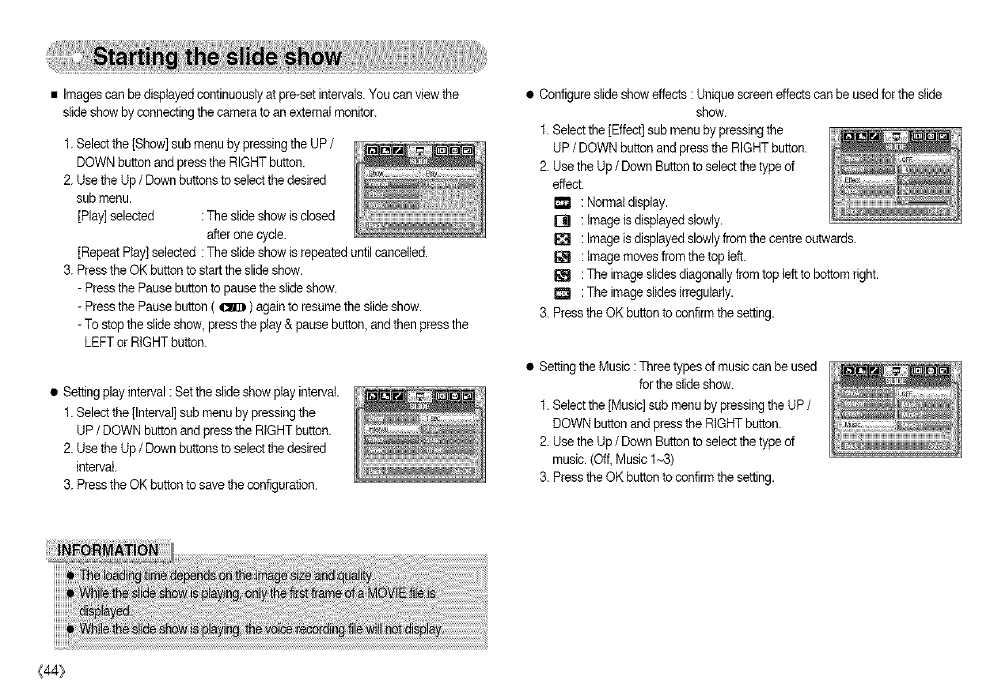
• Images can be displayedcontinuously at pre-set intervals. You can view the
slide show by connecting the camera to an external monitor.
1. Selectthe [Show] sub menu by pressing the UP /
DOWN button and press the RIGHT button.
2. Use the Up /Down buttons to selectthe desired
sub menu.
[Play] selected : The slide show is closed
after one cycle.
[Repeat Play] selected : The slide show is repeated until cancelled.
3. Press theOK button to start the slideshow.
-Press the Pause button to pausethe slide show.
-Press the Pause button ( _ ) again to resume the slideshow.
-To stop the slideshow, press the play & pausebutton, and then press the
LEFT or RIGHT button.
•Setting play interval : Set the slide show play interval.
1. Selectthe [Interval] sub menu by pressing the
UP /DOWN button and press the RIGHT button.
2. Use the Up /Down buttons to selectthe desired
interval.
3. Press theOK button to save the configuration.
•Configure slide show effects : Unique screen effects can be used for the slide
show.
1. Select the [Effect] sub menu by pressing the
UP /DOWN button and press the RIGHTbutton.
2. Use the Up /Down Buttonto select the type of
effect.
I_ : Normal display.
Ell : image is displayedslowly.
: Image is displayedslowly from the centre outwards.
G_ : image moves from thetop left.
: The image slidesdiagonally from top teftto bottom right.
I_1 : The image slidesirregularly.
3. Press theOK button to confirm the setting.
• Setting the Music :Three types of music can be used
for theslide show.
1. Select the [Music] sub menu by pressingthe UP /
DOWN button and press the RIGHT button.
2. Use the Up /Down Buttonto select the type of
music. (Off, Music I~3)
3. Press theOK button to confirm the setting.
{44_
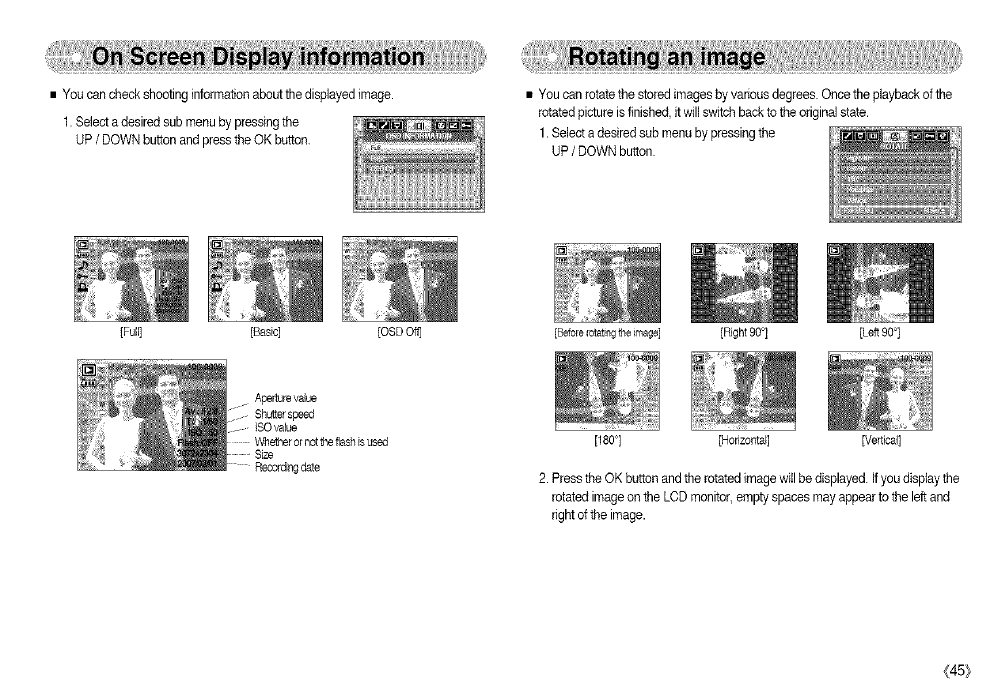
•Youcancheckshootinginformationaboutthedisplayedimage.
1.Selectadesiredsubmenubypressingthe
UP/DOWN button and press the OK button.
[Full] [Basic] [OSD Off]
• You can rotate the storedimages by various degrees.Once the playback of the
rotated picture isfinished, it will switch back to the original state.
1. Select adesired sub menu by pressing the
UP/DOWN button.
Aperturevalue
Shutter speed
ISOvalue
Recordingdate
[BeforeIotatingthemage] ]Right 90°] [Left 90°]
[180°] [Honzontal] [Vertical]
2. Pressthe OK button and the rotated imagewill be displayed. Ifyou display the
rotated imageon the LODmonitor, emptyspaces may appear to the left and
right of the image.
(45}
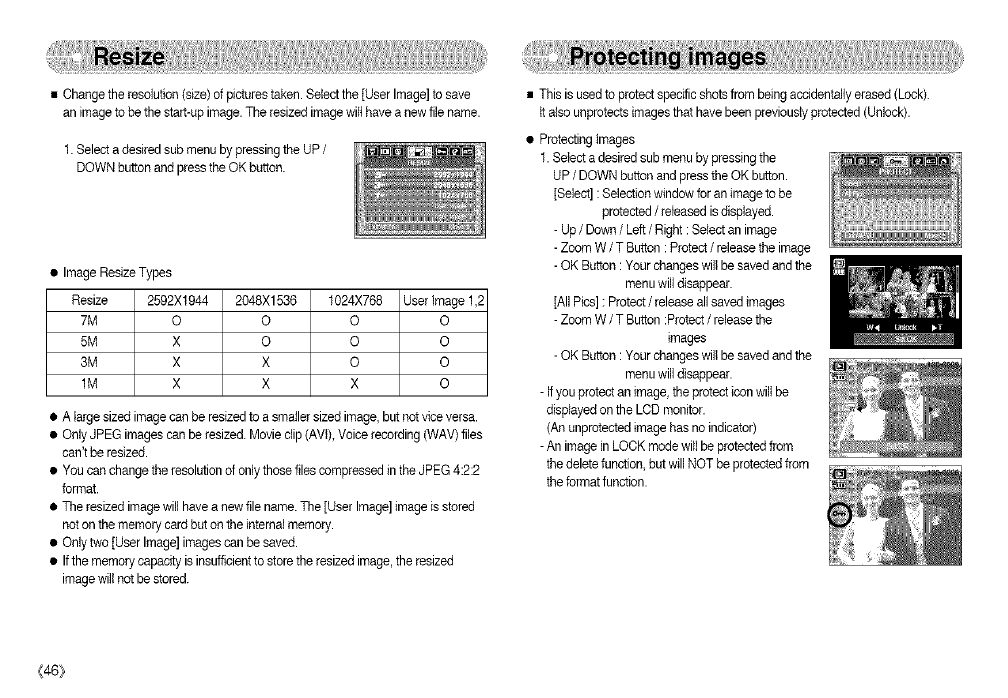
• Change the resolution (size)of pictures taken. Selectthe [User Image] to save
an imageto be the start-upimage. The resized image wilthave a new file name.
1. Select a desired sub menu bypressing the UP /
DOWN button and press the OK button.
• Image ResizeTypes
Resize 2592X1944
7M O
5M X
3M X
1M X
2048X1536 1024X768 User Image 1,2
OOO
OOO
X O O
X X O
• A large sized imagecan be resizedto a smallersized image, but notvice versa.
• OnlyJPEG images can be resized. Movie clip (AVt), Voice recording (WAV) flies
can't be resized.
• You can change the resolution of only those files compressed in the JPEG 4:2:2
format.
• The resizedimage will have a new file name. The [User Image]image is stored
noton the memory card but on the internal memory.
• Onlytwo [User Image]images can be saved.
• Ifthe memory capacity is insufficientto store the resizedimage, the resized
imagewill not be stored.
• This is used to protectspecific shots from being acddentaily erased (Lock).
It also unprotects images that have been previously protected (Unlock).
• Protecting tmages
1. Select a desired sub menu by pressing the
UP /DOWN button and press the OK button.
[Select] : Selectionwindow for an imageto be
protected /released isdisplayed.
- Up /Down/Left /Right : Select an image
- Zoom W /T Button : Protect /release the image
- OK Button : Your changes wilt be saved and the
menu willdisappear.
rAilPics] : Protect/release all saved images
- Zoom W /T Button :Protect/releasethe
images
- OK Button : Your changes wilt be saved and the
menu willdisappear.
- Ifyou protectan image, the protecticon willbe
displayedon the LCD monitor.
(An unprotected imagehas no indicator)
- An image in LOCK mode will be protected from
the deletefunction, but will NOT be protected from
the format function.
{46}
•Ofall thefiles stored inthe memory card, the unprotected files in the DCtM
subfolderwill be deleted. Remember that this will permanently delete
unprotectedimages. Importantshots should be stored on acomputer before
deletiontakes place. The startupimage and SKIN image are stored in the
camera'sinternal memory (i.e., noton the memory card) and it will notbe
deleted even if you deleteall files on the memory card.
•Deleting images
1. Selecta desired sub menu by pressing the
UP/DOWN button and press the OK button.
[Select] : Selection window for an image to
delete is displayed.
- Up/Down /Left /Right : Select an image
- Zoom T Button : Selectthe image for deletion.
(V mark)
- OK Button : Pressthe OK Buttonto display the
confirmationmessage. Selectthe
[Yes] menu and press the OK
buttonto delete marked images.
[Atl Pies]: Displays confirmationwindow. Select
the [Yes] menu and press the OK
button to delete all unprotected
images. Ifthere aren't protected
images, alt the imagesare deleted
and a [No tmage!] messagewill
display.
2. After deletion, the screen will be changed to the
play mode screen.
• This enables you to copy image files, movie clips and voice recording files on the
camera'sbuilt-in internal memory to the camera's removable SD memory card.
• Copying to the Memory Card
1. Select adesired sub menu by pressing the
UP/DOWN button and press the OK button.
-[No] : Cancels "Copyto Card".
- [Yes] : All images, movie clips and voice
recording files saved in the internal
memory are copied to the memory card
after the [Processing!]message is displayed. After copying has been
completed,the screen will return to play mode.
(47}
• DPOF (DigitalPrint Order Format) allows you to embed printing information on
your memoir/card's MISC folder. Select the pictures tobe printedand how
many prints to make.
• The DPOF indicator will displayon the LCD monitor when an imagethat has
DPOF informationplays back. Imagescan then be printedon DPOF printers or
at an increasingnumber of photo labs.
• This function is not availablefor Movie clips and Voice recording ties.
• If a memory card is not inserted,the menus are still displayedin the LCD, butare
not selectable.
• Images (except for movie clips and voice file) are printed as indextype.
1. Setect the [Index] menu bypressing the
UP /DOWN button and press the RIGHTbutton.
2. Select a desired sub menu by pressing the UP /
DOWN button.
If[No] isselected : Cancelthe index print setting.
If[Yes] isselected :The imagewill be printed in
indexformat.
3. Press theOK button to confirm the setting.
• This function allows you to embed print quantity information on a stored image.
1. Selectthe [Standard] menu by pressing the
UP /DOWN button and press the RIGHT button.
2. Select a desired sub menu bypressing the
UP /DOWN button.
[Select] : Selectionwindow for an imageto print is
displayed.
-Up /Down/Left /Right :Select an imageto print.
-Zoom W /T Button : Selectthe number of prints.
[All Pics]: Configure numberof prints for aft pictures
except movie and voice files.
-W/T button : Select a numberof prints
[Cancel] : Cancel the printsetup.
3. Pressthe OK button to confirm the setting.
Ifan imagecarries DPOF instructions, the DPOF
indicator ( _ ) wifl show.
_48}

•Youcanspecifytheprintsizewhenprintingimagesstoredonthememorycard.
The[Size]menuisavailabIeonlyforDPOF1.1compatibleprinters.
• SettingthePrintSize
1.Selectthe[Size]menubypressingtheUP/DOWN
button and press the RIGHT button.
2. Selecta desired sub menu by pressing the
UP/DOWN button and press the OK button.
[Select] : Selection window for an image to be
changed printedsize is displayed.
- Up/Down /Left /Right : Select an image.
- Zoom W /T Button : Change the printsize.
- OK button : Your changes will be saved and the
menu will disappear.
[All Pics]: Change print sizeof all saved images.
- W /T button :Select a print size
- OK button : Confirm the changed setting.
[Cancel] :Cancel all of the print size settings.
÷ DPOF [Size] secondary menu : Cancel, 3X5,4X6,
5X7, 8Xl 0
÷ Depending on the manufacturer and printer model,
cancellingthe printing may takea littlelonger for
the printer to process.
• You can use the USB cable to connect this camera to a printer that supports
PictBridge(sold separately) and printthe stored imagesdirectly.
Movie clips and voice flies cannot be printed.
• Setting up the camera for connection with the printer
1. In any mode withthe exceptionof Voice Recording
mode, pressthe MENU button.
2. Pressthe LEFT /RIGHT button and select
[SETUP] menu tab.
3. Select [USB] menu by pressing the UP /DOWN
button and press the RIGHT button.
4. Select [Printer]menu by pressing the UP/DOWN
button and press the OK button.
÷ Ifyou selected[COMPUTER] in Step5, when you connectthe camera to your
printer,the [USB ERROR!] message will displayand the connection will not be
established, tn this case,disconnect the USB cable, and then followthe
procedure from Step2 onwards.
(49}
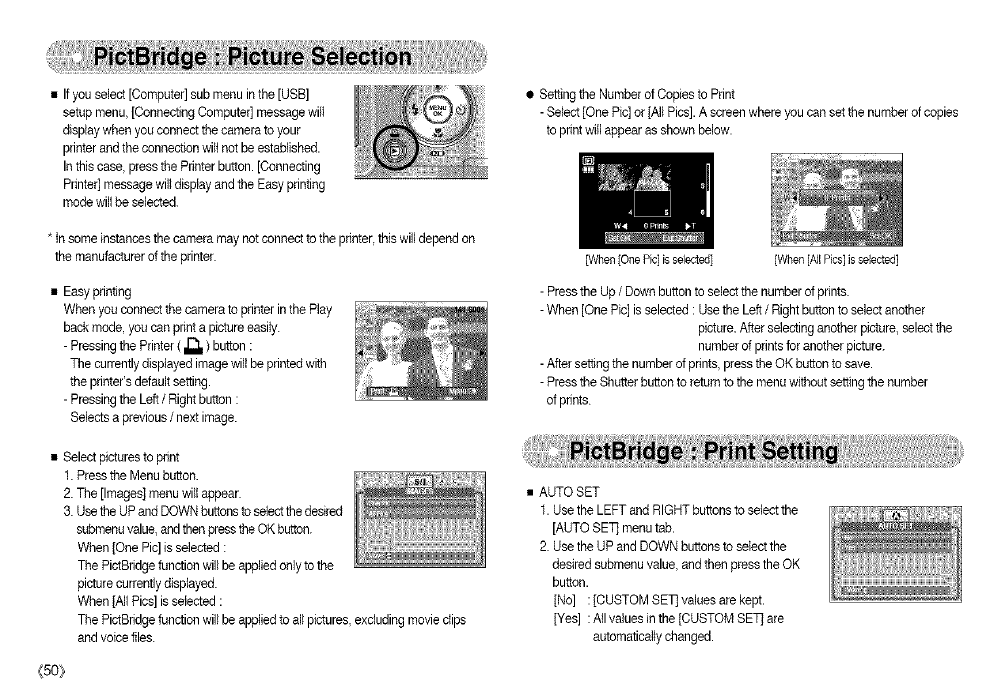
• If you select [Computer] sub menu in the [USB]
setup menu, [Connecting Computer] message wilI
display when you connect the camera to your
printer and theconnection wiltnot be established.
In this case, press the Printer button.[Connecting
Printer] messagewill display and the Easy printing
mode willbe selected.
* In some instancesthe camera may notconnect to the printer,this will depend on
the manufacturer of the printer.
• Easy printing
When you connect the camera to printer in the Play
back mode, you can print a picture easily.
- Pressingthe Printer ( _ ) button :
The currently displayedimage will be printedwith
the printer's default setting.
- Pressingthe Left /Right button :
Selects a previous/next image.
• Select pictures to print
1. Press the Menu button.
2. The [Images[ menu willappear.
3. Usethe UP and DOWN buttonsto selectthe desired
submenuvalue, and thenpress the OKbutton.
When [One Pic] isselected :
The PictBridge function will be appliedonly to the
picture currently displayed.
When jAil Pics] isselected :
The PictBridge function wilt be appliedto all pictures, excluding movie clips
and voice files.
_5o_
• Setting the Number of Copies to Print
- Select [One Pic] or jAil Pics]. A screen where you can set the numberof copies
to print will appear as shown below.
[When [One Pic] is selected] [When [AllPies] is selected]
- Press the Up /Down button to select the number of prints.
- When [One Pic] is selected : Use the Left /Right button to select another
picture.After selecting another picture, selectthe
numberof prints for another picture.
- After setting the numberof prints, pressthe OK buttonto save.
- Press the Shutterbutton to returnto the menu without settingthe number
of prints.
• AUTO SET
1. Use the LEFT and RIGHT buttons to select the
[AUTO SET] menu tab.
2. Use the UP and DOWN buttons to selectthe
desired submenu value, and then press the OK
button.
[No] :[CUSTOM SETJvalues are kept.
[Yes] :Atl values in the [CUSTOM SET] are
automatically changed.
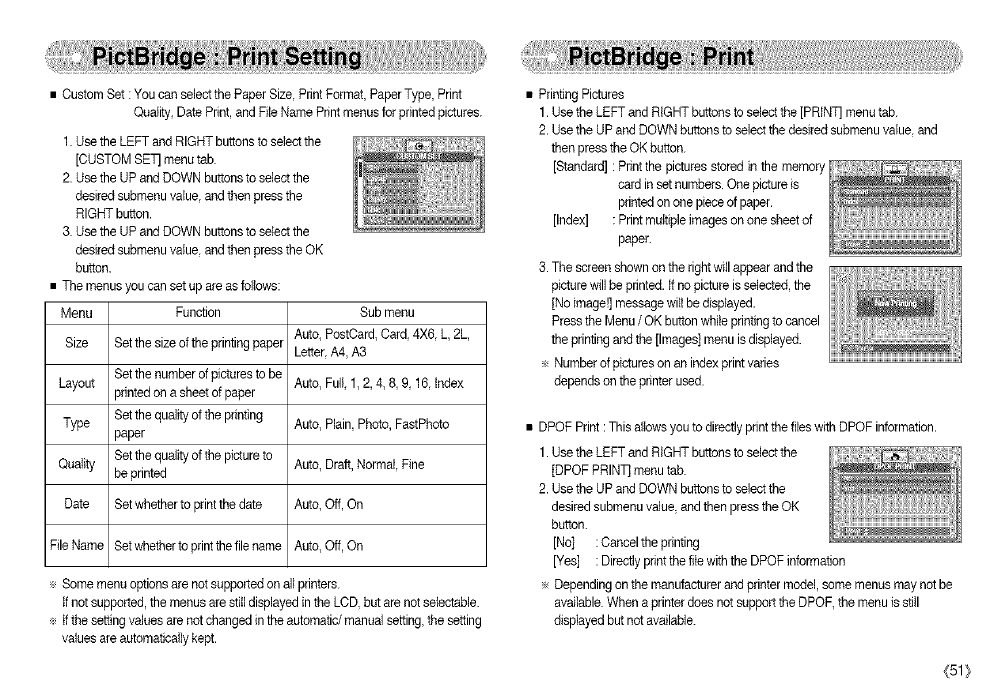
•CustomSet:YoucanselectthePaperSize,PrintFormat,PaperType,Print
Quality,DatePrint,andFileNamePrintmenusforprintedpictures.
1.UsetheLEFTandRIGHTbuttonstoselectthe
[CUSTOMSETmenutab.
2.UsetheUPandDOWNbuttonstoselectthe
desiredsubmenuvalue,andthenpressthe
RIGHTbutton.
3.UsetheUPandDOWNbuttonstoselectthe
desiredsubmenuvalue,andthenpresstheOK
button.
•Themenusyoucansetupareasblbws:
Menu Function
SizeSetthesizeoftheprintingpaper
LayoutSetthenumberofpicturestobe
printedonasheetofpaper
TypeSetthequalityoftheprinting
paper
QualitySetthequalityofthepictureto
beprinted
DateSetwhethertoprintthedate
FileNameSetwhethertoprintthefilename
Submenu
Auto,PostCard,Card.4X6.L,2L,
Letter,A4,A3
Auto,Full,1,2,4,8,9,16,Index
Auto,Plain,Photo,FastPhoto
Auto,Draft,Normal,Fine
Auto,Off,On
Auto,Off,On
÷Somemenuoptionsarenotsupportedonallprinters.
tfnotsupported,themenusarestilldisplayedintheLCD,butarenotselectable.
÷tfthesettingvaluesarenotchangedintheautomatic/manualsetting,thesetting
valuesareautomaticallykept.
•PrintingPictures
1.UsetheLEFTandRIGHTbuttonstoselectthe[PRINT]menutab.
2.UsetheUPandDOWNbuttonstoselectthedesiredsubmenuvalue,and
thenpresstheOKbutton.
[Standard]:Printthepicturesstoredinthememory
cardinsetnumbers.Onepictureis
printedononepieceofpaper.
[Index]:Printmultipleimagesononesheetof
paper.
3.Thescreenshownontherightwillappearandthe
picturewillbeprinted,tfnopictureisselected,the
[Noimage!]messagewiltbedisplayed.
PresstheMenu/OK button while printing to cancel
the printing and the [Images] menu is displayed.
÷ Number of pictures on an index print varies
depends on the printer used.
• DPOF Print: This allowsyou to directly print the files with DPOF information.
1. Use the LEFT and RIGHT buttonsto select the
[DPOF PRIN]] menu tab.
2. Use the UPand DOWN buttons to select the
desired submenu value, and then press theOK
button.
[No] :Cancel the printing
[Yes] :Directly print the file with the DPOF information
÷ Depending on the manufacturer andprinter model, some menusmay not be
available.When a printer does not support the DPOF, the menu is still
displayedbut not available.
{51}
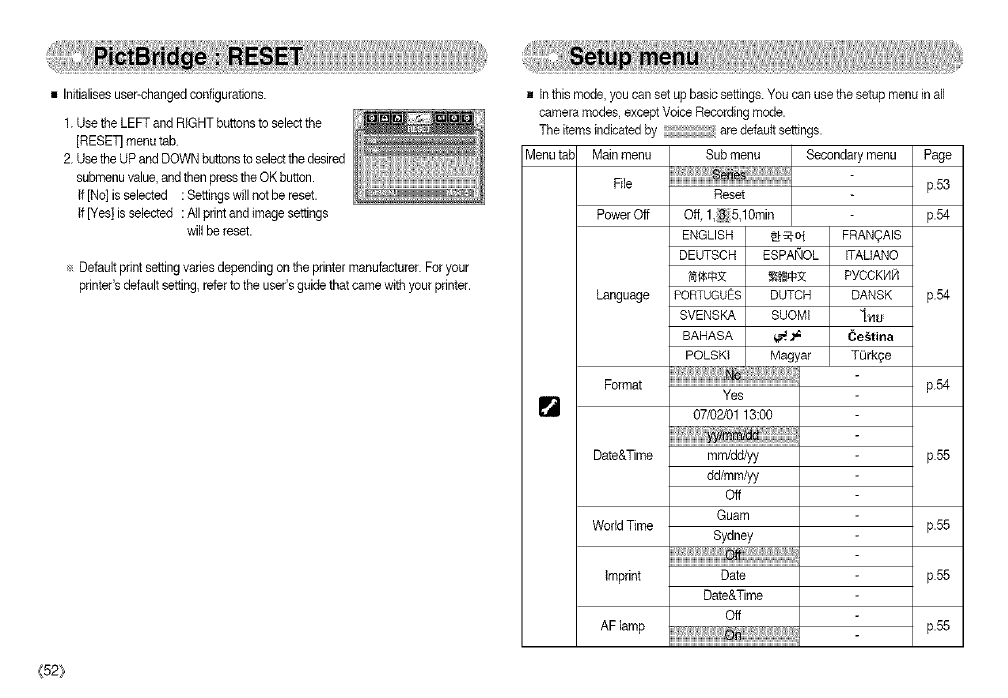
• Initialises user-changed configurations.
1. Use the LEFT and RIGHT buttons to select the
[RESET menu tab.
2. Use theUP and DOWN buttonsto select thedesired
submenuvalue, and then press theOK button.
if [No] isselected :Settings will notbe reset.
if [Yes] is selected :All print and image settings
will be reset.
Default print setting varies depending on the printer manufacturer. For your
printer's default setting, referto the user's guide that came with your printer.
<52_
g Inthis mode, you can set up bash settings.You can use the setup menu in all
camera modes except Voice Recording mode.
The items indicated by are default settings.
Menu tab Main menu Sub menu Secondary menu Page
File Reset p.53
Power Off Off, 1,3, 5,10rain p.54
ENGLISH _-o1 FRAN_AIS
DEUTSCH ESPAi_IOL ITAUANO
_I_ _@€3_ PYCCKHR
Language PORTUGUES DUTCH DANSK p.54
SVENSKA SUOMI "[_4,u
BAHASA _._ _e_tina
POLSKI Magyar TOrk_e
No
Format ........................................................................................................Yes p.54
07/02/01 13:00
Date&Time mm/dd/yy p.55
dd/mm/yy
Off
Guam
World Time p.55
Sydney
imprint Date p.55
Date&Time
Off
AF lamp p.55
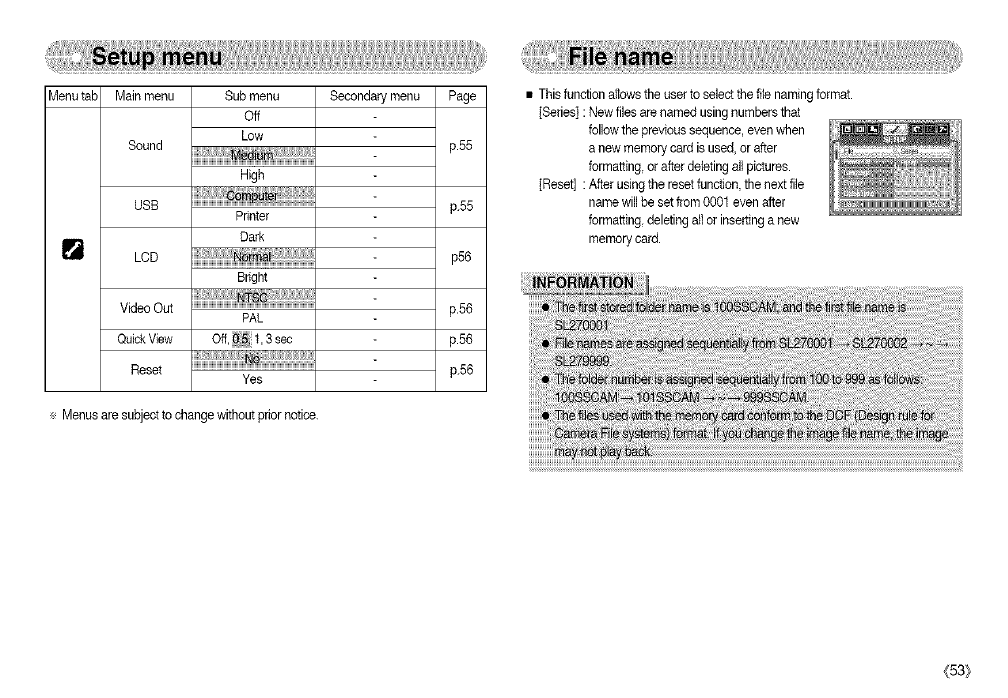
MenutabMainmenu Secondarymenu
Sound
USB
LCD
VideoOut
QuickView
Reset
Submenu
Off
Low
High
Printer
Dark
iiiiiiiiiii,_,i_,lii,i_,lii,i_,lii,i_,
Bright
PAL
iiiiii!i_iil]!iiil!iiil!iiil!iiiiii__i_!iii_!iii_!iii_!iii_!iii_!iii_!ii
Yes
÷ Menus are subject to change without prior notice.
Page
p.55
p.55
p56
p.56
p.56
p.56
• Thisfunction allowsthe user to select the file naming format.
[Series] : New files are named usingnumbers that
followthe previous sequence, even when
a new memory card is used, orafter
formatting,or after deleting all pictures.
[Reset] : After using the resetfunction, the nextfile
name willbe set from 0001 even after
formatting,deleting all or insertinga new
memory card.
(53}
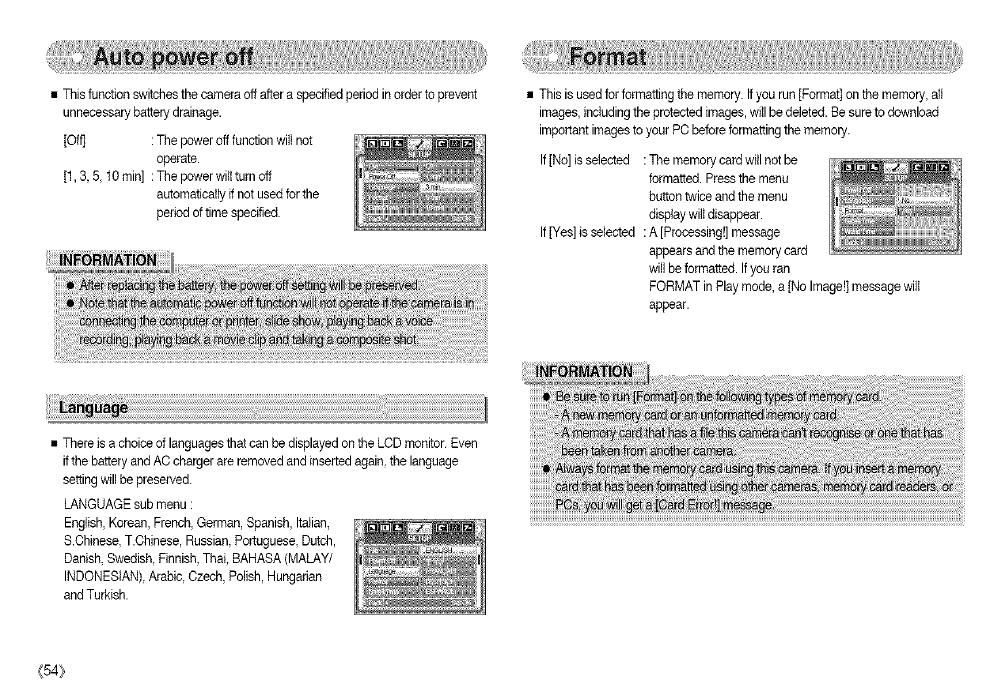
• This function switches the camera off after a specified period inorder to prevent
unnecessary battery drainage.
[Off] : The poweroff function will not
operate.
[1,3,5,10min] : The powerwilttum off
automatically if not used for the
period of time specified.
• This is used for formatting the memory. If you run [Format[ on the memory,all
images, includingthe protected images, will be deleted. Be sure to download
important imagesto your PC before formattingthe memory.
If[No] isselected : The memory card will not be
formatted. Pressthe menu
button twice and the menu
display wiltdisappear.
If[Yes] is selected : A [Processing!] message
appears and the memory card
will be formatted. If you ran
FORMAT in Play mode, a[No Image!] messagewilt
appear.
• There is a choice of languages that can be displayedon the LCD monitor. Even
if the battery and AC charger are removed and inserted again,the language
setting willbe preserved.
LANGUAGE sub menu :
English,Korean, French,German, Spanish, Italian,
S.Ohinese, T.Ohinese, Russian,Portuguese, Dutch,
Danish,Swedish, Finnish, Thai, BAHASA (MALAY/
INDONESIAN[, Arabic, Czech, Polish, Hungarian
and Turkish.
{54}
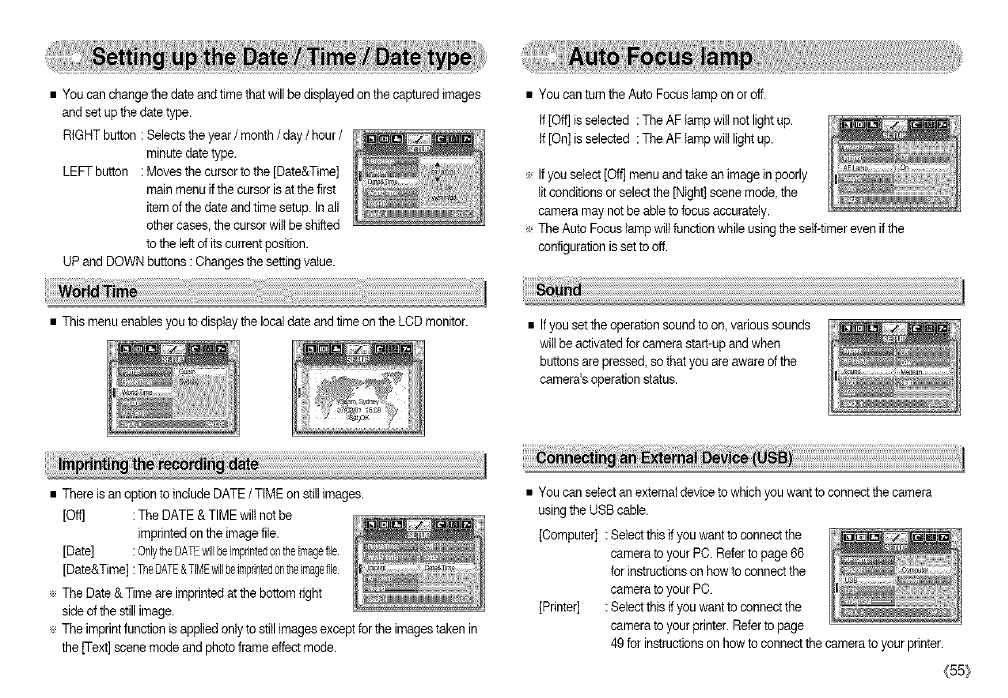
• You can change the date and timethat willbe displayed on the captured images
and set up thedate type.
RIGHT button : Selects theyear /month /day /hour /
minute date type.
LEFT button : Moves tbe cursor to tbe [Date&Time]
main menu if the cursor is at the first
item of the date and time setup. In all
other cases,the cursor will be shifted
to the left of its current position.
UP and DOWN buttons :Changes the settingvalue.
• You can turn the Auto Focuslamp on or off.
If [OffJisselected : The AF lamp will not light up.
If [On] isselected : The AF lamp will light up.
÷ Ifyou select [Oft]menu and take an image in poorly
litconditions or select the [Night] scene mode, the
camera may not be able to focus accurately.
÷ The Auto Focus lamp will function while using the self-timer even if the
configurationis set to off.
• This menu enables you to display the localdate and time on the LCD monitor. • Ifyou set theoperation sound to on, various sounds
will be activated for camera start-up and when
buttons are pressed, so that you are awareof the
camera's operation status.
• There is an optionto include DATE /TIME on still images.
[Oft] : The DATE & TIME wiltnot be
imprintedon the image file.
[Date] : OnlytheDATEwillbeimprintedontheimagefile.
[Date&Time] :TheDATE&TIMEwillbeimprintedontheimagefile
÷ The Date & Time are imprinted at the bottom right
side of the still image.
÷ The imprintfunction is appliedonly to stitl images except for the images taken in
the [Text] scene mode and photo frame effect mode.
• You can select an external deviceto which you want to connect the camera
usingthe USB cable.
[Computer] : Select this if you want to connect the
camera to your PC. Referto page 66
for instructions on how to connect the
camera to your PC.
[Printer] : Select this if you want to connect the
camera to your printer. Refer to page
49 for instructionson how to connect the camera to your printer.
(55:_
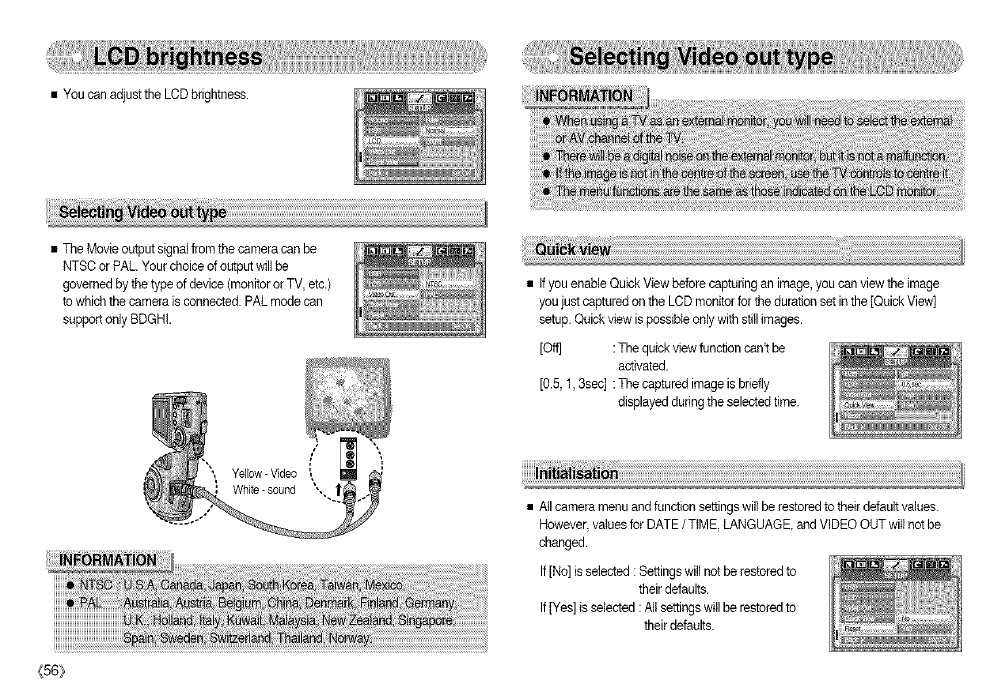
• You can adjust the LCD brightness.
• The Movie output signal from the camera can be
NTSC orPAL. Your choice of output will be
governed bythe type of device (monitoror TV, etc.)
to which the camera is connected.PAL mode can
support only BDGHI.
Yellow - Video
{56_
• tfyou enable QuickView before cap uringan image, you can view the image
you just captured on the LCD monitor for the duration set in the [Quick View]
setup. Quickview is possible only with still images.
[Oft] :Tire quick view function cant be
activated.
[0.5, 1,3sec] :The captured image isbriefly
displayed during theselected time.
• Artcamera menu and function settingswill be restored to their default values.
However,values for DATE /TIME, LANGUAGE, and VIDEO OUT will not be
changed.
If[No] is selected :Settings will not be restored to
their defaults.
If[Yes] is selected :AIt settingswill be restoredto
their defaults.
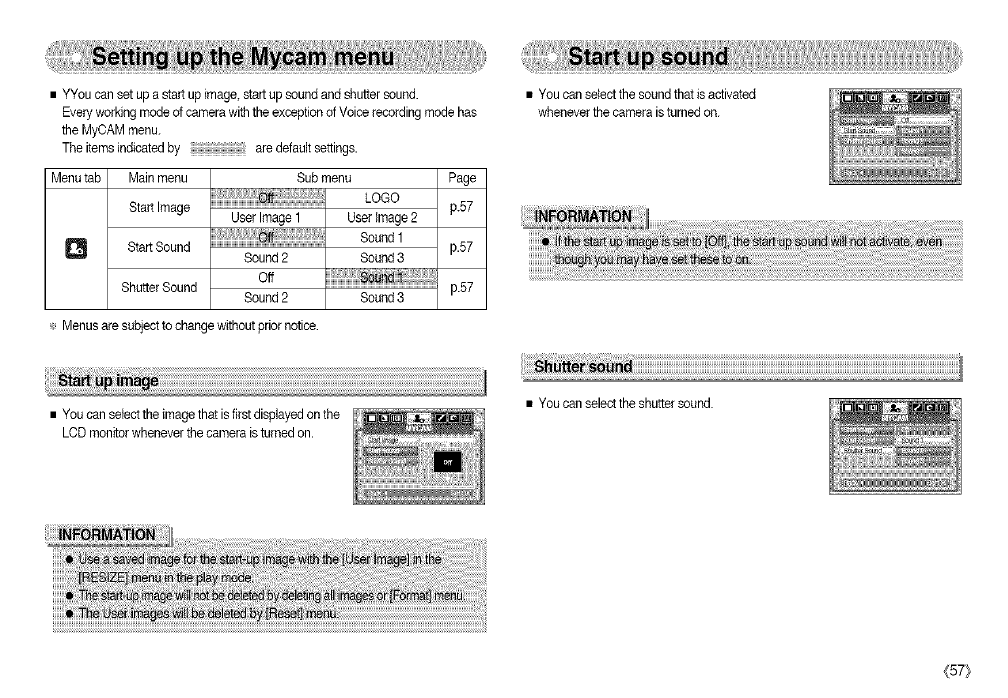
•YYoucansetupastartupimage,startupsoundandshuttersound.
Everyworkingmodeofcamerawiththeexception of Voice recording mode has
the MyCAM menu.
The itemsindicated by are default settings.
Menu tab Main menu
Start Image
0 Start Sound
Shutter Sound
Sub menu
LOGO
User Image 1 User Image 2
Sound1
Sound2 Sound3
o_
Sound2 Sound3
Page
F57
p.57
p.57
÷ Menus are subject to change without prior notice.
• You can select the soundthat is activated
whenever the camera isturned on.
• You can select the imagethat is first displayedon the
LCD monitor whenever the camera is turned on.
• You can select the shuttersound.
(57}
Besure to observethe following precautions!
• This unit containsprecision electronic components. Do not use or store thisunit
in the following locations.
- Areas exposed to severe changes in temperature and humidity.
- Areas exposed to dust and dirt.
- Areas exposed to direct sunlightor the inside of a vehicle in hot weather.
- Environments where there is highmagnetism or excessivevibration.
- Areas with high explosives or highly flammable materials.
• Do not leavethis camera in places subject to dust, chemicals (like naphthalene
and mcthball), hightemperature and high humidity.
Keep this camera with silicagel in a hermetically sealed box when not planning
to usethe camera for a long period of time
• Sand can be particularly troublesome to cameras.
- De not letsand get inside thecamera when using it on beaches, coastal
dunes, or other areas where there is lotsof sand.
- Doing so may result in failureor may permanently render thecamera unusable.
• Handling the camera
- Never drop the camera or subject it to severe shocks or vibrations.
- Protect the largesize LCD monitor from an impact.
When this camera is not being used, keep it in the camera case.
- Avoid obstructing the lens orthe flash when you capture an image.
- This camera is notwaterproof.
To avoid dangerous electricalshocks, never holdor operatethe camera with
wet hands.
- If you use thiscamera in wet places, such as beach or pool, do not let water or
sand get inside the camera. Doing an may result in failureor may permanently
damage the unit.
{58}
Extremesin temperature may cause problems.
- Ifthe cameraistransferredfrom a cold to a warm and humidenvironment,
condensationcanform onthe de]bateelectroniccircuitry.Ifthis occurs,turn the
cameraoff andwait for at least 1hour untilaltmoistureisdispersed.Moisturebuilt
up cana]sc occurin thememorycard.Ifthishappens,turnoffthe cameraand
removethememorycard.Wait unfilthe moisturehasdispersed.
Caution on Usingthe Lens
- Ifthe lens is subjectedto direct sunlight,it couldresult in discoloration and
deteriorationof the imagesensor.
- Pay attention notto get fingerprintsor foreign substanceson the surfaceof the
lens.
Ifthe digitalcameraisnot usedfor a longperiod,an etectncdischargecanoccur.
tt is agood idea to remove the batteryand the memory card if you do not intend
to use thecamera for an extended period of time.
If thecamera is exposed to an electronicinterference, it willturn itself offto
protectthe memory card.
Camera Maintenance
- Use a soft brush (available from photo stores)to gently clean the lens and LCD
assemblies.
tfthis does notwork, lens-cleaning paperwith lens cleaningfluid can be used.
Clean the camera body with a soft cloth.Do notallow this camera to come into
contactwith solvent materielssuch asbenzol, insecticide,thinners etc.
This maydamage the body shell of the camera and also affect its performance.
Rough handling can damage the LCD monitor. Take care to avoid damage
and keep the camera in its protective carrycase at all times when not in use.
Do notattempt to disassemble ormodify the camera.
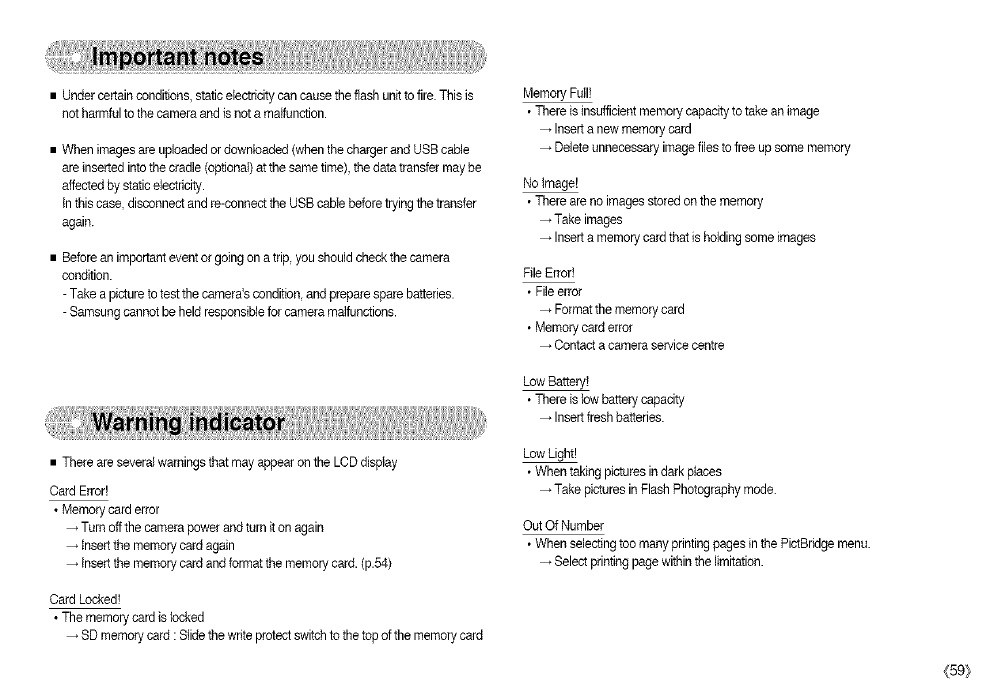
•Undercertainconditions,staticelectricitycancausetheflashunittofire.Thisis
notharmfultothecameraandisnotamalfunction.
•Whenimagesareuploadedordownloaded(whenthechargerandUSBcable
areinsertedintothecradle(optional)atthesametime),thedatatransfermaybe
affectedbystaticelectricity.
Inthiscase,disconnectandre-connecttheUSBcablebeforetryingthetransfer
again.
•Beforeanimportanteventorgoingonatrip,youshouldcheckthecamera
condition.
-Takeapicturetotestthecamera'scondition,andpreparesparebatteries.
-Samsungcannotbeheldresponsibleforcameramalfunctions.
Memory Full!
• There is insufficientmemory capacity totake an image
Insert a new memory card
Delete unnecessary imagefiles to free up some memory
No tmageE
• There are no images storedon the memory
Take images
Insert a memory card that isholding some images
File Error!
• Fileerror
Format the memory card
• Memory card error
Contact a camera service centre
Low Battery!
• There is low battery capacity
Insert fresh batteries.
• There are severalwarnings that may appear on the LCD display
Card Error!
• Memory card error
Turn off the camera power and turn it on again
tnsert the memory card again
Insert the memory card and format the memory card. (p.54)
Low Light!
• When taking pictures in dark places
Take pictures in Flash Photography mode.
Out Of Number
• When selectingtoo many printing pages in the PictBtidge menu.
Select printing pagewithin the limitation.
Card Locked!
•The memory card islocked
SD memory card : Slidethe write protect switchto thetop of the memorycard
(59_
•Pleasecheckthefolbwing
The camera doesn't switch on
• There is low battery capacity
Insert fresh batteries.(p.f O)
• The battery maybe insertedincorrectly.
Insert the batteryaccording to the polaritymarks (+ -)
• The battery isnot inserted
Insert the batteryand turn on the camera
The camera power ceases while in use
• The batteryare exhausted
Insert charged battery
• The Camera isturned off automatically
Tum on the camera power again.
Battery power quicklydrains
• The Camera is being used in low temperatures
Keep the camera in warm conditions O.e.inside a coator jacket) and only
remove it in order to take images
Camera does not take imageswhen pressing the Shutter button
• There is insufficientmemory capacity
Deleteunnecessary imagefiles
• The memory card has notbeen formatted
Format the memory card (p.54)
• The memory card is exhausted
Insert a new memory card
• The memory card is locked
Refer to [Card Locked!] error message
• The camera's poweris off
Turn the camera poweron
(60_
• Thebattery is exhausted
Insert fresh batteries.
• Battery is insetted incorrectly with the polarities reversed
Insert the battery according to the polarity marks (+ -)
The camera suddenly stops working while in use
•The camera stopped due to a malfunction
Remove/re-insert batteryand switch the camera on
The images are unclear
• A picturewas taken without setting an appropriate macro mode
Select an appropriate macro mode to take a clear image.
•The picture was taken with the subject beyond the flash range
Take a picture within theflash range
• The lens is smudged or dirty
Clean the lens
The flash does notfire
• Flashoff mode hasbeen selected
Dis-engage flash off mode
• The camera mode can't use the flash
Refer to the FLASH instruction(p.22~24)
Incorrectdate and time isdisplayed
• Thedate and time have beenset incorrectlyor thecamera has adopted the
default settings
Reset the date and time correctly
The camera buttons do not operate
• Camera malfunction
Remove /re-insert battery and switch the camera on
A card error has occurred while the memory card is in the camera.
• Incorrectmemory card format
Re-format the memory card
The imagesdon't play back
• Incorrect file name (Violation of DCF format)
Do not change the imagefile name
Celour of imageis different to the originalscene
• White balance or effect setting is incorrect
Select appropriateWhite balance and effect
Images are too bright
• Exposure isexcessive
Reset exposure compensation
No image on external monitor
• The external monitor has not beenconnected properlywith the camera
Check the connection cables
• There are incorrectflies inthe memory card
insert a memory card that has correctflies
When using the PCs explorer the [Removable Disk]file does notshow
• Cable connection isincorrect
Check the connection
• The camera isoff
Turn the camera on
• The operating system isnot Windows 98, 98SE, 2000, ME XP/Mac OS 10.0
10.3. Alternativelythe PC does notsupport UBB.
InstallWindows 98, 98SE, 2000, ME XP/Mac OS 10.0 ~ 10.3 to PC that
supports USB.
• The camera driver is not installed
Installa [USB Storage Driver)
Image Sensor
- Type : 1/2.5"COD - Effective Pixel : Approx. 7.2Mega-#xel
- Total Pixel : Approx. 7.4 Mega-pixel
Lens
-Focal Length : NV Lens f = 5.8 _ 17.4mm (35mm equivalent: 35 ~ 105mm)
-FNo. : F2.8 ~ F4.9
-DigitalZoom : •Still Image mode : 1.0X_ 5.0X
-Play mode : 1.0X ~ 10.0X (depends on image size)
LCD Monitor : 2.5" color TFT LCD (230,000pixel)
• Focusing
- Type :qq-L contrastauto focus
- Range
Normal Macro Auto Macro
5~80cm 5cm~infinity
I Tele 80cm ~ infinity 40-,,80cm 40cm~infinity
• Shutter
-Speed : 1~ 1/2,000 sec. (Night Mode : 15~ 1/2,000 sec.)
• Exposure
-Controt : Program AE Metering : Multi,Spot
-Compensation : _+2EV(0.5 EV steps)
-tSO Equivalent : Auto, 50, 100, 200, 400, 800, 1600
• Flash
-Modes :Auto, Auto& Red-eye reduction, Flit-inflash,Stow sync, Flashoff
-Range : Wide :0.4 ~ 3.0m, Tele : 0.5 _ 2.5m (ISO AUTO)
-RechargingTime :Approx. 4.0sec
• Sharpness : Soft, Normal, Vivid
• Effect :Color, B&W, Sepia, Red, Green, Blue, Negative, RGB, Highlight
• White Balance : Auto, Daylight,Cbudy, FluorescentH, FiuorescentL,
Tungsten, Custom
(61}

gVoiceRecording:VoiceRecording(Max.1hour)
VoiceMemoinStillImage(Max.10sec.)
gDateImprinting:Date&Time,DateOff(userselectable)
gShooting
-Stillimage: •Modes:AutoProgram,Scene,VoiceRecording
÷11Scene(Night,Portrait,Children,Landscape,OIcee-up,
Sunset,Dawn,Backlight,Firework,Beach&Snow,Text)
•Shooting:Single,Continuous,AEB
•Self-timer:10sec.,2sec.,Doubleselftimer(10sec.&2sec.)
-MovieDrip:•WithAudioorwithoutAudio
(userseiectable,recordingtime:memorycapacitydependent)
•Size:640x480,320x240
(3XOpticalZoom(MuteduringZoomOperation))
•Framerate:30fps,15fps
•MovieStabiliser(UserSelectab]e)
•MovieEditing(Embedded):Pauseduringrecording,StiffImage
CaptureTimeTrimming
gStorage
-Media:Internalmemory:Approx•20MBflashmemory
Externalmemory:SDcard/MMO/SDHO (Up to 4GM Guaranteed)
- File Format :Stilt Image :JPEG (DDF), EXIF22, DPOF 1.1 PictBridge 1.0
Movie Clip : AVl (MPEG-4) Audio :WAV
- Image Size
7M 5M 3M 1M
3072x2304 2592x1944 2048x1536 1024x768
{62}
t
- Oapacity (256MB MMD)
I " - -i 7M 5M sM iM
Superfine [ 76 93 173 560
Fine i 113 159 266 673
Normal i 193 272 425 743
÷ These figures are measured under Samsung's standardconditions and may
vary depending on shootingconditions and camera settings.
g Image Play
- Type : Single image, Thumbnails, Slide show, Movie Clip
- Editing : Trimming, Rotating, Resizing, Oolour Effect
g Interface: Digital output connector : USB2.0 (Mass Storage Olass)
VideoOut : Pal & NTSCselectable
Audio : Mene (without external codec)
Pictbridge (FullOption)
g PowerSource : Rechargeablebattery : 3.7V U-ionbattery (SLB-0837)
÷ Included battery may vary depending on sales region•
g Dimensions(WxHxD) : 96.9 X 56.8 X 20•5mm
g Weight: 130g
- OperatingTemperature :0 _ 400C - Operating Humidity : 5~ 85%
g Software
- Camera Driver : StorageDriver(Windows98/98SE/2K/ME/XP,MacOS10,0_ 10.3)
- Application : Digimax Master
g Special Features
- 3X Optical Zoomfor Still & Movie•
MPEG-4 VGA 30 fps Movie Slip (supporting Edit on DSC), EffectKey
Powerful Effect(Oolour, HigHight)
Easy Mode Ohange using 'M" button
÷ Specifications are subject to change without prior notice.
÷ Afttrademarks are the property oftheir respective owners•
Pleaseensurethatyoureadtheinstructionmanualcarefullybeforeuse.
•Theattachedsoftwareisacameradriverandimageeditingsoftwaretoolfor
Windows.
•Undernocircumstancesshouldallorpartofeitherthesoftwareortheuser
manualbereproduced,
•Copyrightsforsoftwarearelicensedonlyforusewithacamera,
•Intheunlikelyeventofamanufacturingfault,wewillrepairorexchangeyour
camera.
We cannot_however,be heldresponsible in any way for damage caused by
inappropriate use.
• Using a Hand-made PCor a PC and OS thathas notbeen guaranteed by the
manufacturer is notcovered by the Samsungwarranty,
• Before reading this manuel, you should have abasic knowledge of computers
and O/S (OperatingSystems),
For Windows For Macintosh
PCwlillprocessorbetIerthanPent_umI1450MHzPower Mac G3 or later
(Pentium 700MHz recommended)
Windows 98 /98SE /2000 /ME /XP Mac OS 10.0~ 10.3
Minimum64MB RAM Minimum 64MB RAM
200MB of available hard disk space 110MB of availablehard-disk space
USB port USB port
CD-ROM drive CD-ROM drive
1024x768pixels, 16bitcolour display MRayer
compatble monitor DivX (For movie clip)
(24bit colour display recommended)
After insertingthe CD-ROM provided with this camera intothe CD-ROM drive,the
followingwindow should automatically run.
Before connecting the camera to the PC, you
shouldfirst installthe camera driver.
•Camera driver : This enables images to transferbetween the camera
and PC.
This camera uses the USBStorage Driver as thecamera driver. You can use
the camera as a USB card reader. After installingthe driver and connecting this
camera to the PC, you canfind [Removable Disk] in [Windows Explorer]or [My
Computer]. A USB Storage Driver is provided only for Windows. A USB Driver
for MAC isnot included withthe Application CD. You can use the camera with
Mac OS 10.0~ 10.3.
•Digimax Master : This is the all-in-onemulti media software solution.
You can download, view, edit and save your digital imagesand movie clips clip
with this software.This software is only compatible with Windows.
(63}
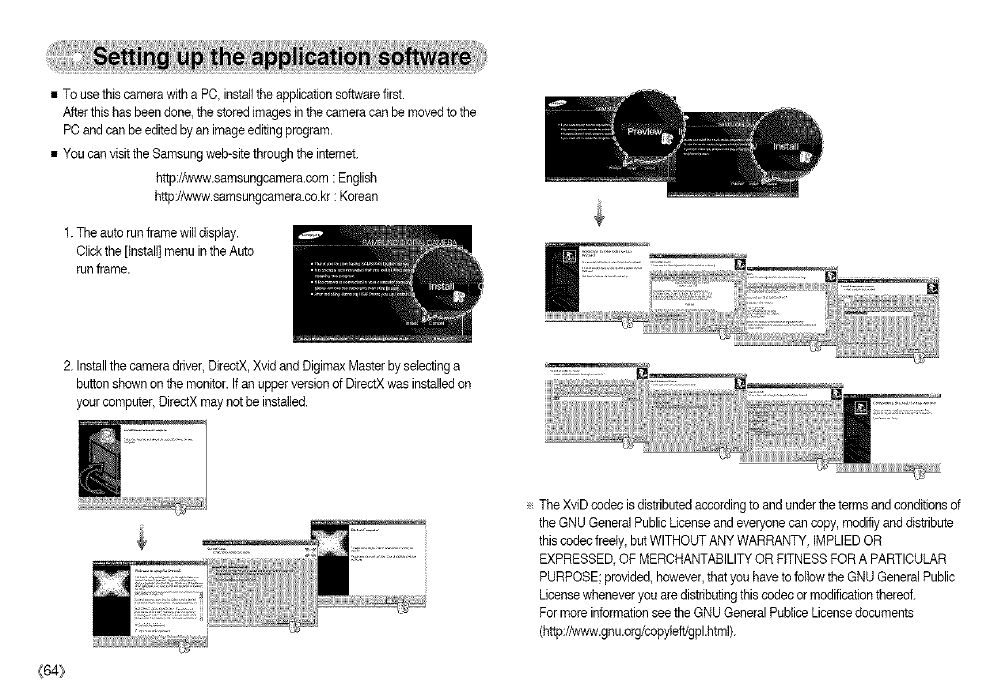
• To usethis camera with a PC, installtheapplication software first.
After this has been done, the stored images in the camera can be moved to the
PC and can be edited byan imageediting program.
• You can visit the Samsung web-sitethrough the internet.
http://_,_.sam sungcamera.corn :English
http://www.samsungcamera.ce.kr : Korean
1. The auto run frame willdisplay.
Click the [install] menu inthe Auto
run frame.
2. Installthe camera driver, DirectX,Xvid and Digimax Master byselecting a
button shown on the monitor. Ifan upperversion of DirectXwas installedon
your computer, DirectX may netbe installed.
_64_
e The XviD codec isdistributed according to and under the terms and conditions of
the GNU General PublicUcense and everyone can copy, modifiy and distribute
this cedec freely, butWITHOUT ANY WARRANTY, IMPLIED OR
EXPRESSED, OF MERCHANTABILITY OR FITNESS FOR A PARTICULAR
PURPOSE; provided, however,that you have to followthe GNU General Public
License whenever you are distributing thiscodec or modification thereof.
For more information seethe GNU General PubliceLicense documents
(http://v,_,w.gnu.org/copyleft/gpl.html).
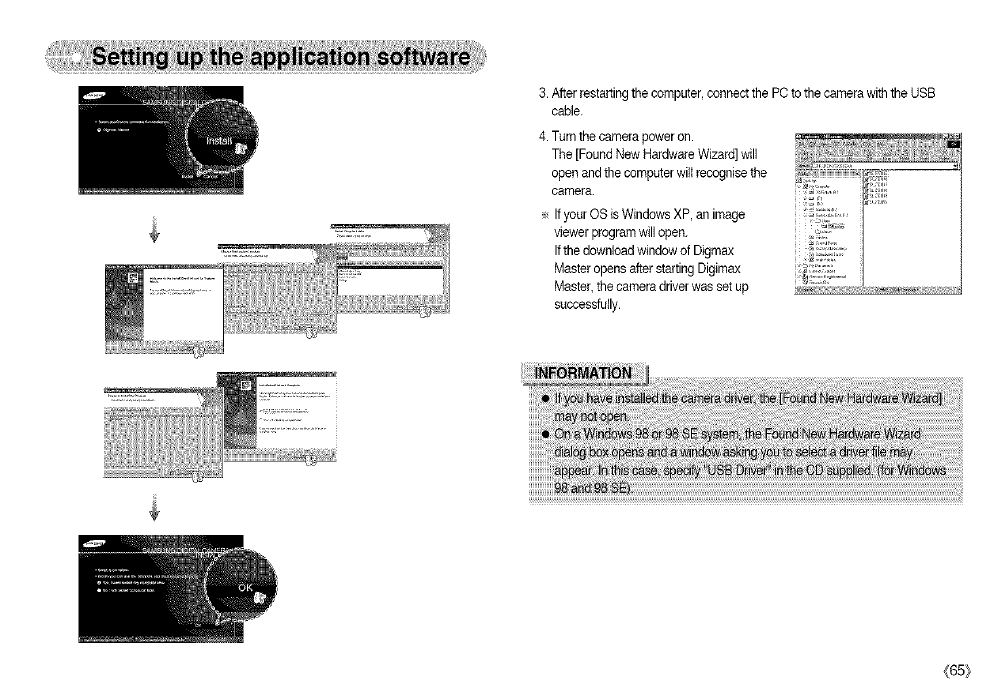
3.Afterrestartingthecomputer,connectthePCtothecamerawiththeUSB
cable.
4.Turnthecamerapoweron.
The[FoundNewHardwareWizard]will
openandthecomputerwillrecognisethe
camera.
÷IfyourOSisWindowsXP,animage
viewerprogramwillopen.
IfthedownloadwindowofDigmax
MasteropensafterstartingDigimax
Master,thecameradriverwassetup
successfully.
_65_
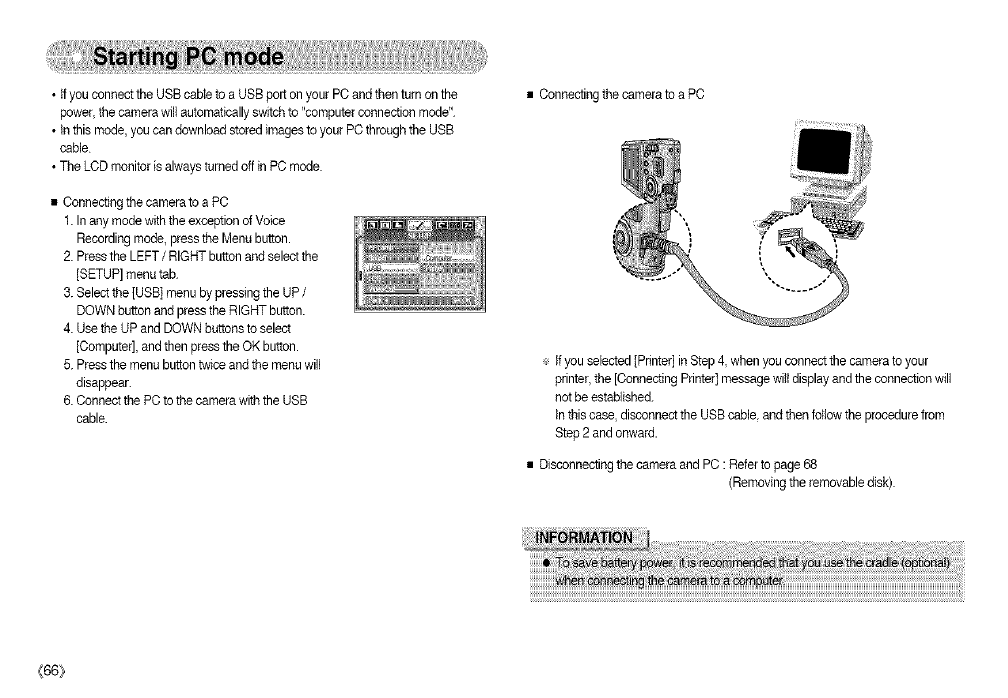
•_fyouconnecttheUSBcabletoaUSBportonyourPCandthenturnonthe
power,thecamerawillautomaticallysw4tchto"computerconnectionmode".
•tnthismode,youcandownloadstoredimagestoyourPCthroughtheUSB
cable.
•TheLCDmonitorisalwaysturnedoffinPCmode.
•ConnectingthecameratoaPC
1.InanymodewiththeexceptionofVoice
Recordingmode,presstheMenubutton.
2.PresstheLEFT/RIGHT button and select the
[SETUP] menu tab.
3. Selectthe [USB] menu by pressing the UP /
DOWN button and press the RIGHT button.
4. Use the UP and DOWN buttons to select
[Computer],and then press the OK button.
5. Pressthe menu button twice and the menu will
disappear.
6. Connectthe PCto thecamera with the USB
cable.
• Connectingthe camera to a PC
÷ If you selected [Printer] in Step4, when you connect the camera to your
printer, the [Connecting Printer]message wilt display and the connection will
not be established.
in this case, disconnect the USB cable, and then follow the procedure from
Step 2 and onward.
• Disconnecting the camera and PC : Refer to page 68
(Removing the removable disk).
{66_
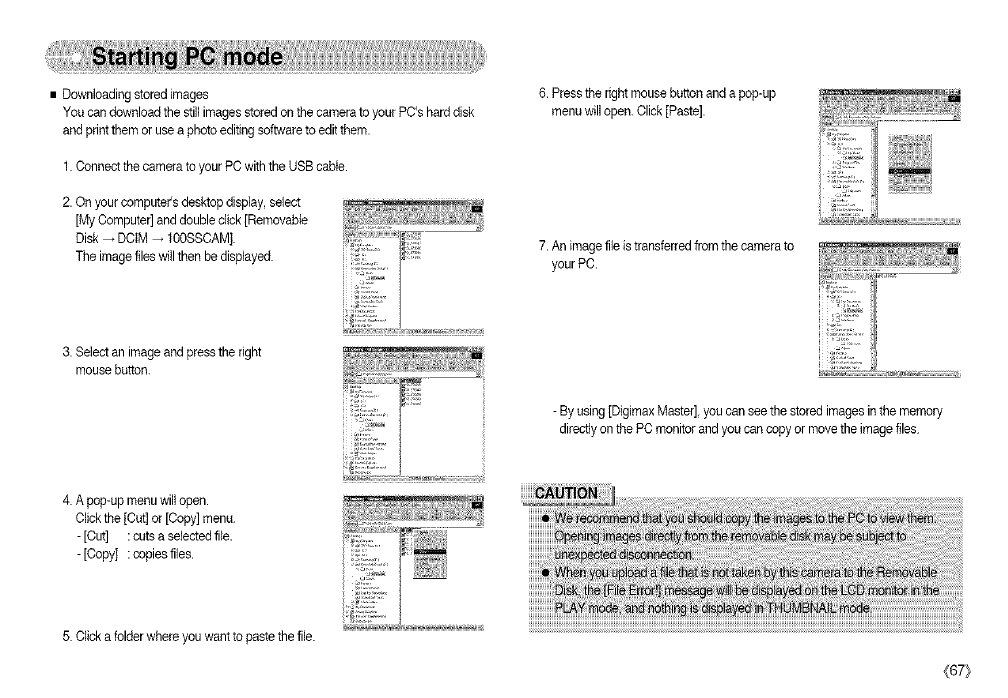
•Downloadingstoredimages
YoucandownloadthestillimagesstoredonthecameratoyourPC'sharddisk
andprintthemoruseaphotoeditingsoftwaretoeditthem.
1.ConnectthecameratoyourPCwiththeUSBcable.
2.Onyourcomputer'sdesktopdisplay,select
[MyComputer]anddoubleclick[Removable
Disk_DCtM_100SSCAM].
Theimagefileswillthenbedisplayed.
6.Presstherightmousebuttonandapop-up
menuwillopen.Click[Paste].
7.Animagefileistransferredfromthecamerato
yourPC.
3. Select an image and press the fight
mouse button.
- By using [DigimaxMaster], you can see the stored images inthe memory
directly on the PC monitor and you can copy or move the imagefiles.
4. A pop-up menu wiltopen.
Click the [Cut] or [Copy] menu.
- [Cut] : cuts a selected file.
-[Copy[ : copiesfiles.
5. Click a folder where you want to paste the file.
{67}
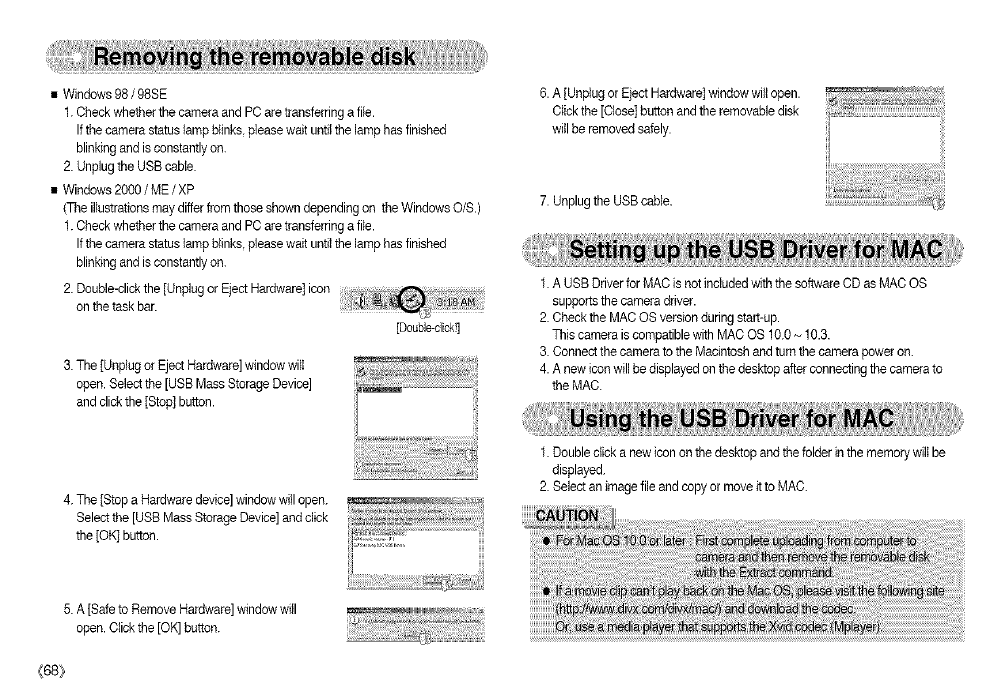
•Windows98/98SE
1. Check whether the camera and PC are transferringa file.
Ifthe camera status lamp blinks, please wait until the lamp has finished
blinkingand isconstantly on.
2. Unplug the USB cable.
• Windows 2000 /ME /XP
(Tile illustrations maydiffer from those showndepending on the Windows O/S.)
1. Check whether the camera and PC are transferringa file.
Ifthe camera status lamp blinks, please wait untiIthe lamp has finished
blinkingand isconstantly on.
2. Double-clickthe [Unplug or Eject Hardware] icon 3_
on the task bar.
[Doub]e-click!]
3. The ]Unplug or EjectHardware] window will
open. Select the [USB Mass Storage Device]
and click the ]Stop] button.
4. The [Stop a Hardware device] window will open.
Select the [USB Mass Storage Device] and click
the [OK] button.
6. A [Unplug or EjectHardware] window will open.
Click the [Close] button and the removable disk
willbe removed safely.
7. Unplug the USBcable.
1. A USB Driver for MAC is not includedwith the software CD as MAC OS
supports the camera driver.
2. Check the MAC OS versionduring start-up.
This camera is compatible with MAC OS 10.0_ 10.3.
3. Connect thecamera to the Macintosh and turn the camera power on.
4. A new icon will be displayed on the desktop after connecting the camera to
the MAC.
1. Double click a new icon on the desktop and the folder in the memory wilt be
displayed.
2. Select an image file and copy or move it to MAC.
5. A [Safe to Remove Hardware] window will
open. Click the [OK] button.
{68_
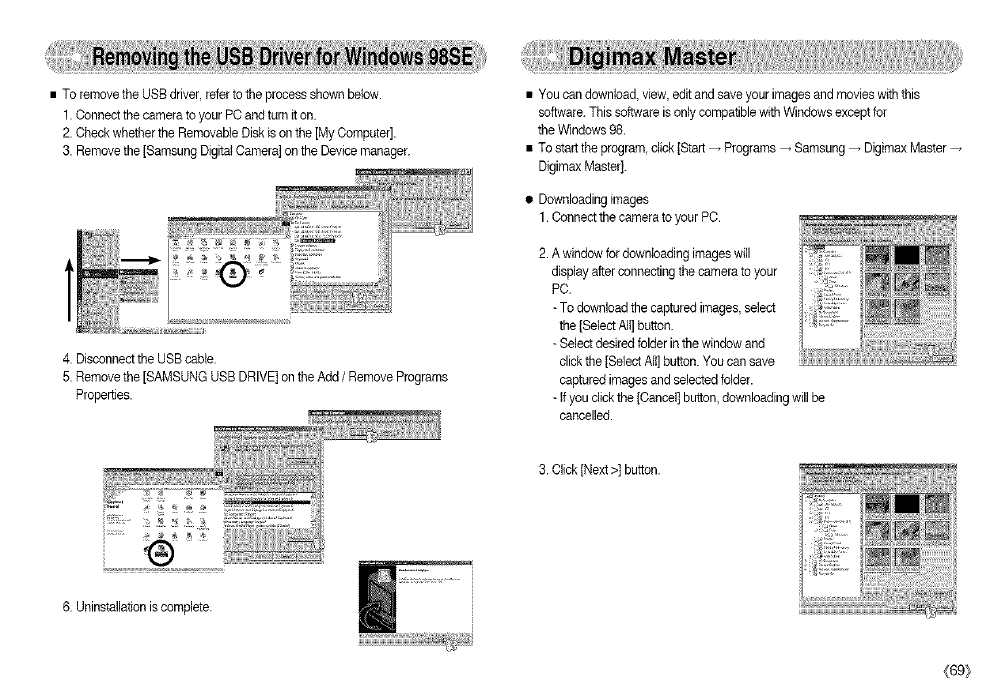
•ToremovetheUSBdriver,refertotheprocessshownbelow.
1.ConnectthecameratoyourPCandturniton.
2.CheckwhethertheRemovableDiskisonthe[MyComputer].
3.Removethe[SamsungDigitalCamera]ontheDevicemanager.
4.DisconnecttheUSBcable.
5.Removethe[SAMSUNGUSBDRIVE]ontheAdd/Remove Programs
Properties.
®
6. Uninstallationis complete.
• You can download, view, edit and save your imagesand movies with this
software.This software isonly compatible with Windows except for
the Windows98.
• To start the program click [Start _ Programs _ Samsung _ Digimax Master
Digimax Master].
• Downloading images
1. Connectthe camera to your PC.
2. A window for downbading imageswill
display after connecting the camera to your
PC.
- To download the captured images, select
the [Select AIt]button.
- Select desired folder inthe window and
click the [Select All]button. You can save
captured images and selected bider.
- Ifyou click the [Cancel] button, downloadingwill be
cancelled.
3. Click[Next >] button.
_[69}
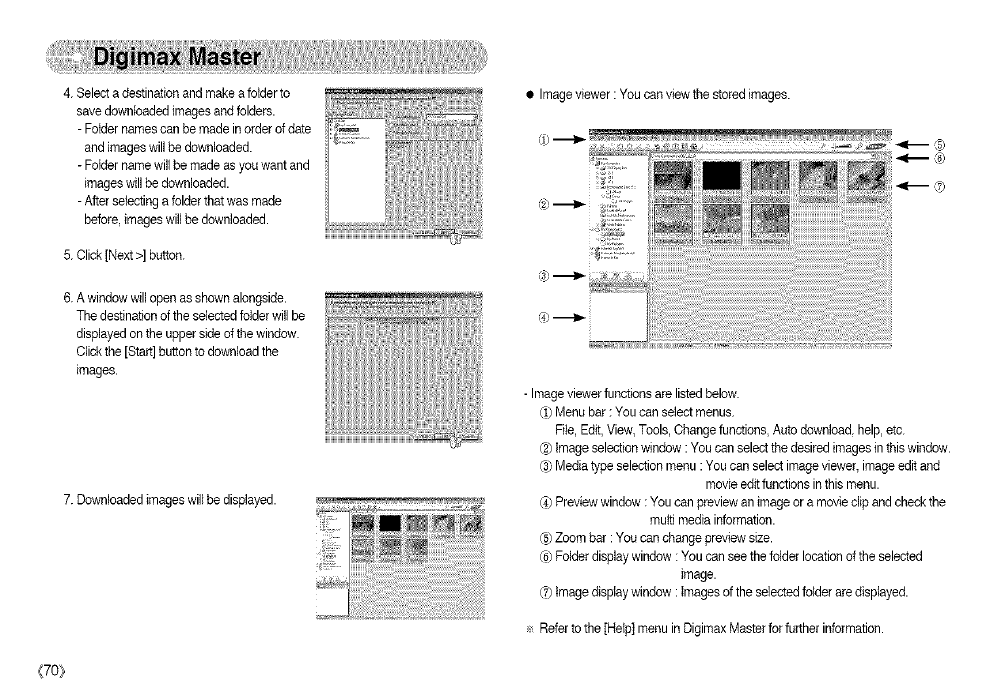
4.Selectadestinationandmakeafolderto
savedownloadedimagesandfolders.
-Fotdernames can be made in order of date
and images will be downloaded.
-Folder name willbe made as you want and
images willbe downloaded.
-After selectinga folder that was made
before, imageswill be downloaded.
5. Click [Next >] button.
6. A window willopen as shown alongside.
The destination of the selectedfolder will be
displayedon the upper side of the window.
Click the [Start] button to download the
images.
7. Downloaded imageswill be displayed.
•Imageviewer :You can view the stored images.
- Image viewer functions are listed below.
¢1)Menu bar : You can select menus.
File, Edit, View, Tools, Change functions, Auto download, help, etc.
¢2_Image selectionwindow : You can select the desired images in thiswindow.
(_ Media type selection menu :You can select imageviewer, imageedit and
movie edit functions in this menu.
(4)Preview window : You can preview an image or a movie clip and check the
multi media information.
@ Zoom bar :You can change preview size.
¢6)Folder displaywindow : You can seethe folder location ofthe selected
image.
(_7)Image display window : Images of the selected folder are displayed.
Referto the [Help] menu in Digimax Master for further information.
{70_
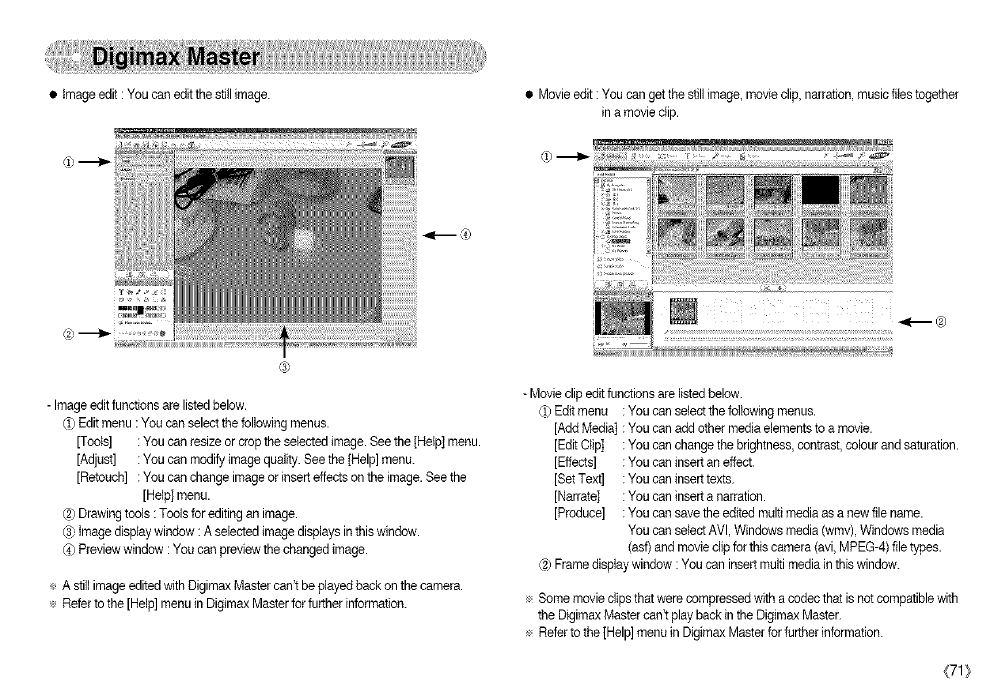
•Image edit : You can edit the still image. • Movie edit :You can get thestill image, movie clip, narration,music flies together
in amovie clip.
- Image editfunctions are listed below.
_) Editmenu : You can selectthe following menus.
[Tools] : You can resize or cropthe selected image. Seethe [Help] menu.
[Adjust] : You can modify imagequality. See the[Help] menu.
[Retouch] : You can change imageor insert effects on the image. Seethe
[Help] menu.
(2)Drawing tools : Tools for editing an image.
C3)image display window :A selected imagedisplays in this window.
_) Previewwindow : You can previewthe changed image.
÷ A still image editedwith Digimax Mastercan't be played back on the camera.
÷ Referto the [Help] menu in Digimax Masterfor further information.
- Movie clip edit functions are listed below.
d) Editmenu : You can select the followingmenus.
[Add Media] : You can add other mediaelements to a movie.
[Edit Clip] : You can change the brightness,contrast, colour and saturation.
[Effects] : You can insert an effect.
[Set Text] : You can insert texts.
[Narrate] : You can insert a narration.
[Produce] : You can save the edited multi mediaas a new file name.
You can select AVl, Windows media(wmv), Windows media
(asf) and movie clip for this camera (avi,MPEG-4) file types.
(2)Frame displaywindow :You can insert multi mediain this window.
÷ Some movie clips that were compressedwith acodec that isnot compatiblewith
the Digimax Mastercan't play back in the Digimax Master.
÷ Refer to the [Help] menu in Digimax Master for further information.
(71_
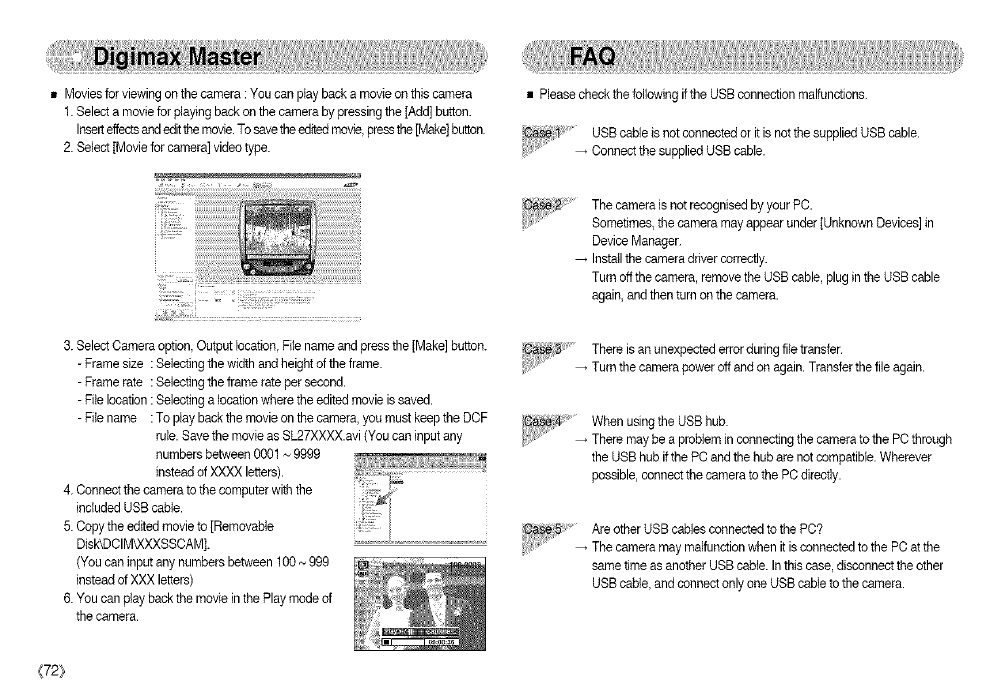
• Movies for viewing on the camera :You can play back a movie on this camera
1. Select a movie for playing back on the camera by pressing the [Add] button.
Insetteffect_andeditthe movie.Tosavethe editedmovie,pressthe[Make]button.
2. Select [Movie for camera] video type.
t:
3. Select Cameraoption, Output location,File name and press the [Make] button.
-Frame size : Selectingthe width and height of the frame.
-Frame rate : Selectingthe frame rate per second.
-File location : Selectinga location where the editedmovie is saved.
-File name :To play backthe movie on the camera, you must keep the DCF
rule. Savethe movie as SL27XXXX.avi (You can input any
numbersbetween 0001~ 9999
insteadof XXXX letters).
4. Connectthe camera to the computer with the
included USBcable.
5. Copy the edited movie to [Removable
DIek©CIM_XXXSSCAM].
(You can input any numbers between 100 ~ 999
insteadof XXX letters)
6. You can play back the movie in the Play mode of
the camera.
• Pleasecheck the followingif the USBconnection malfunctions.
:1' USBcable is not connected or it is notthe supplied USB cable.
..... _ Connectthe supplied USB cable.
The camera is not recognisedby your PC.
Sometimes,the camera may appear under [Unknown Devices] in
DeviceManager.
Installthe camera driver correctly.
Turn off the camera, remove the USBcable, plugin the USBcable
again,and then turnon the camera.
There isan unexpected error during file transfer.
_ Turn the camera power off and on again. Transferthe file again.
When usingthe USBhub.
There may be a problem in connecting the camera to the PCthrough
the USBhub if the PC and the hub are not compatible. Wherever
possible,connect thecamera to the PC directly.
C8se_ Areother USB cables connected to the PC?
.... _ The camera may malfunction when itis connectedto the PC at the
same time asanother USB cable. Inthis case, disconnect the other
USBcable, and connect only one USB cableto the camera.
{72}
When Iopen the Device Manager (by clickingStart _ (Settings)
Control Panel _ (Performance and Maintenance)_ System
(Hardware) _ Device Manager),there are Unknown Devices or Other
Devices entries with a yellow question mark(?) beside themor devices
with an exclamation mark(!) beside them.
Right-click on theentry with the question (?) or exclamation (0 mark
and select"Remove". Restartthe PCand connect the camera again.
For Windows 98 PC remove the camera driver also, restart the PC,
and then reinstallthe camera driver.
In some securityprograms (Norton AntiVirus, V3, etc.), the computer
may not recognise the camera as a removable disk.
Stop the sacurity programsand connect the camera to the computer.
Referto the security program instructionsabout how to temporarily
disable the program.
The camera isconnected to the USBport located on the front of the
computer.
When the camera isconnected to the USB port locatedon the front of
the computer, thecomputer may not recognisathe camera. Connect
the camera to the USB portlocated on the back of the computer.
• When the movie clip doesn'tplay back on the PC
÷ When the movie cliprecorded by the camera doesn't play back on the PC,
the causes are mostly due to thecedec installed on the PC.
• When codec for play back the movie clip isn't installed
Installthe codec as listed below.
[ Installingcodec for Windows ]
1)tnsert the CD provided with the camera.
2) Run the windows explorer and select [CD-ROM dfive:_XviD]folder and
click the XviD-1.0.3-20122004.exefile.
÷ The XviD codecis distributed accordingto the GNU General Public Usance
and everyone can copy,distributeand change this codec. This Usance
applies to any programor other work which contains a notice placed bythe
copyrightbotder saying it may be distributed under theterms of this General
Public Licence.
For more information, see the Licence documents
(http://Vevw.gnu.org/copyleft/gpLhtml).
[ Installingcodec for Mac OS ]
1)Visitthe following sitefor downloadingthe codec.
(http://www.divx.com/divx/mac)
2) Click the [Free Download]button locatedat the upper right side of the page
and a window for downloading the DivX codec will display.
3) Select Mac OS you use and click the [Download] button.Save it on a folder
you want to.
4) Run the downloaded file and the codec for playing back the movie clip will
be installed.
÷ Ifa movie clip can't play back on the MacOS, use a mediaplayer that
supports XviD codec (Mplayer).
(73}
• When the DirectX9.0 or later isnot installed
Installthe DirectX9.0 or later
1)Insert the CD provided with the camera
2) Run the windows explorer end select the [CD-ROM drive:\ USB
Driver\DirectX9.0] folder and clickthe DXESETUP.exe file.
The DirectX will be installed. Visitthefollowing site for downloading the
DirectX.http://www.micresoft.com/directx
• If a PC (Windows98) stops responding while the camera and PC are connected
repeatedly
tf a PC (Windows98) isturned on for e long time and the camera is
connected repeatedly, the PC maynot recognise the camera. In thiscase, re-
start the PC.
• If a PCconnected withthe camera stops respondingwhile Windows isstarting.
tn this case disconnectthe PC and the camera and Windows willstart.
tf the problem happens continuously, set the Legacy USB Support to disable
and re-start the PC. The Legacy USB Support is in the BIOS setup menu.
(The BIOS setup menu differs from the PC manufacturers and some BIOS
menus don't have LegacyUSB Support) Ifyou can_ change the menu by
yourself, contactto the PC manufactureror BIOS manufacturer.
Correct Diepoeal of This Product (Waste Electrical &Electronic
Equipment)
(Applicablein the European Union and other European countrieswith
separatecollection systems) This marking shown on the product or its
iiteratare, indicatesthat it should not be disposed with other household
wastes at the end of its working life.
To prevent possible harm to the environment or human healthfrom uncontrolled
waste disposal,please separate this from other types of wastes end recycle it
responsiblyto promote the sustainablereuse of materialresources. Household
users should contacteither the retailer wherethey purchased this product, or their
localgovernment office, for detailsof where and how they can take this itemfor
environmentally saferecycling. Businessusers should contact their supplier and
check the terms and conditions of the purchase contract.
This product should not be mixed with other commercial wastes for disposal.
• If the movie clip can't be deleted, removable disk can't be extractedor an error
message displays duringthe file transfer.
tf you installonly the Digimex Master, the problems mentioned above
occasionally happen.
- Close the Digimax Master programby clicking the Digimax Master icon on
the Taskbar.
-Install ell the applicationprograms included in thesoftware CD.
(You must installthe Movie clip codec) _tOHS com#l e_tt
Samsung Techwin cares for the environment at all product
manufacturing stages to preservethe environment, and is
taking a numberof stepsto provide customers with more
environment-friendlyproducts. The Eco mark represents
Samsung Techwin's wiltto create environment-friendly
products, and indicatesthat the product satisfiesthe EU
Rolls Directive.
{74}
m Declaration of Conformity
Trade Name : SAMSUNG TECHWIN
Model No. : Samsung L700
Responsible Party : Samsang Opto-ElectroniceAmerica, INC.
Address : 40 Seaview Dr. Secaucus,NJ07094
Telephone No. : 201-902-0347
Thisdevice complies with Part 15 of the FOC Rules. Operation is subject to
thefollowing two conditions: (1)This device may notcause harmful
interference,and (2)this device must accept any interference received,
including interferencethat may cause undesiredoperation.
(75_

SAMSUNGTECHWINOO_UID
OPTICS& D]GffALiMAGiNGD_VISION
145-3,BANGDAEWON1-DONG_JUNGWONGU,
SUNGNAM-qP/KVUNGKPDO_KOREA
¢82-121
TEL :(82)31-74-0-8086,@88 80%_8092 8099
FAX :(82}81-740-8398
vtc_'wsamsungcamelaaOM
SAMSUNGFF/4tqOESAS
BP51TOUR_,4/\_NEMONTPARNASSE83,
AV DU MAINE75755 PARISCEDEX15 FRANCE
HO1LINEPBOTONUMER/QUE:
00&9O22% 3727(NumeroV(et-Appe_@atut)
TEL :88} 1-4279-2%0
FAX:(%) 1-4320-4510
w_e/sarr'sungp/_otoI_"
SAMSUNGOF[O-ELECTRON_CSUKLWITED
SAMSUNGHOUSE1000B/LLSWOODDRIVE
HILLSWOODBUSINESSPARK
CHER-%EYK516 OPSUK
TEL :00800122_727
(freeforcaib fromUKonly)
JK Se_¢ceRotlne :01932455820
www_rasu%caff'era couk
SAMSUNGO_rTO-ELEOTRONICSAMERICAINC
HEADQUAMER8
40SEAMIEWDR/VE_SECAUOUS,
NJ07%4 USA
TEL :(1)201-902-03-4,7
F}_X:(1}201-902-9842
WESTERNREGIO[_ALOFFICE
18600BROADWICKST
RANOHODOMINGUE?,CA90220,USA
TEL :(1)310-909-5284/5285
FAX :(1}310-537-1566
vt@_/samsunges_erausacorn
SAMSUNGOPTOELECTr-IONICSGMBH
A_,4KRONBERGERHANG6
D-68824SCHWALBACR£S GERMANY
TEL :@ (O)619668530,3
FAX:49{O)61966653 68
w_7 saff'sungcamerade
TANJINSAMSUNGOPTO ELE(TTRONIO8CO I_TD
'/o9 zhae@sn9Str(_XMb'o-ElecLreeic
IndustraParkJingar9 ReadTis=_JiinChina
RUSSIAINFORMA:]ONCENTER
SAMSUNGELE(;1RONIOS
117545ST DOROZHNAYABUILDING8
KORPUS6 ENTF/ANCE2_MOSOOW,RUSSIA
TEL :(7}495@.13-17%
CALLFREE: (8}800_O 0 409(fromR_Jssaonly)
_wvw_msu%ca_'era ru
Internetaddress - http://www samsungcameracorn
-_ The OE Markis Directive
conformity
a
markof theEuropeanCommunity(EO)
_-............................................ 6806-3544
