SAMSUNG Digital Camcorder Manual L0804316
SC-DXIO3 to the manual b57a5f30-3df3-4443-b5aa-f6bf066104e0
User Manual: SAMSUNG SAMSUNG Digital Camcorder Manual SAMSUNG Digital Camcorder Owner's Manual, SAMSUNG Digital Camcorder installation guides
Open the PDF directly: View PDF ![]() .
.
Page Count: 124 [warning: Documents this large are best viewed by clicking the View PDF Link!]

ii_;iiiiii_i__f_ii_i!(_ i!_i_i_:_iiiii_!!i_iii___i_
_ __- th possibilities
Thank you for purchasing this Samsung product.
To receive more complete service, please
register your product at
www.samsung.com/global/register
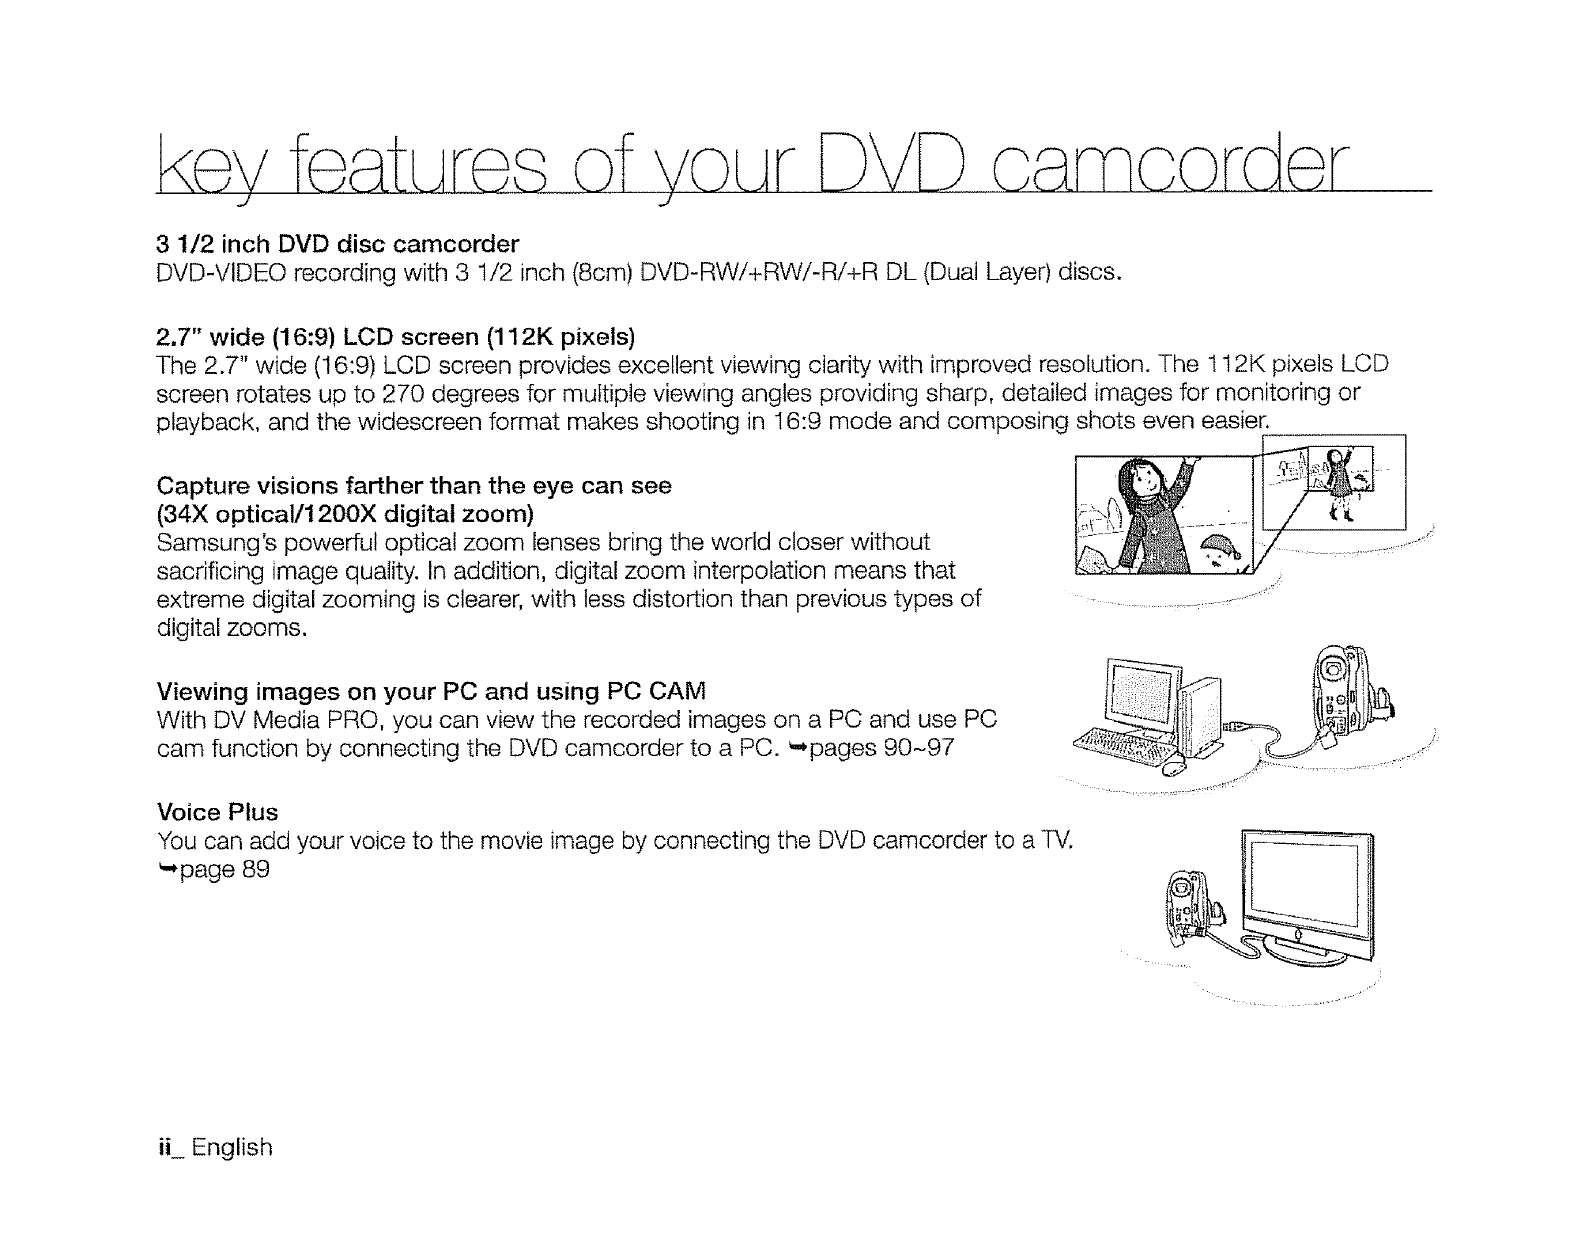
3 1/2 inch DVD disc camcorder
DVD-VIDEO recording with 3 I/2 inch (8cm) DVD-RW/+RWi-R/+R DL (Dual Layer) discs.
2.7" wide (16:9) LCD screen (112K pixels)
The 2.7" wide (16:9) LCD screen provides excellent viewing clarity with improved resolution. The 112K pixels LCD
screen rotates up to 270 degrees for multiple viewing angles providing sharp, detailed images for monitoring or
playback, and the widescreen format makes shooting in 16:9 mode and composing shots even easier.
Capture visions farther than the eye can see
(34X optical/1200X digital zoom)
Samsung's powerful optical zoom lenses bring the world closer without
sacrificing image quality. In addition, digital zoom interpolation means that
extreme digital zooming is clearer, with less distortion than previous types of
digital zooms.
Viewing images on your PC and using PC CAM
With DV Media PRO, you can view the recorded images on a PC and use PC
cam function by connecting the DVD camcorder to a PC. _pages 90-97
Voice Plus
You can add your voice to the movie image by connecting the DVD camcorder to a TV.
_-,page 89
ih English
,,--m
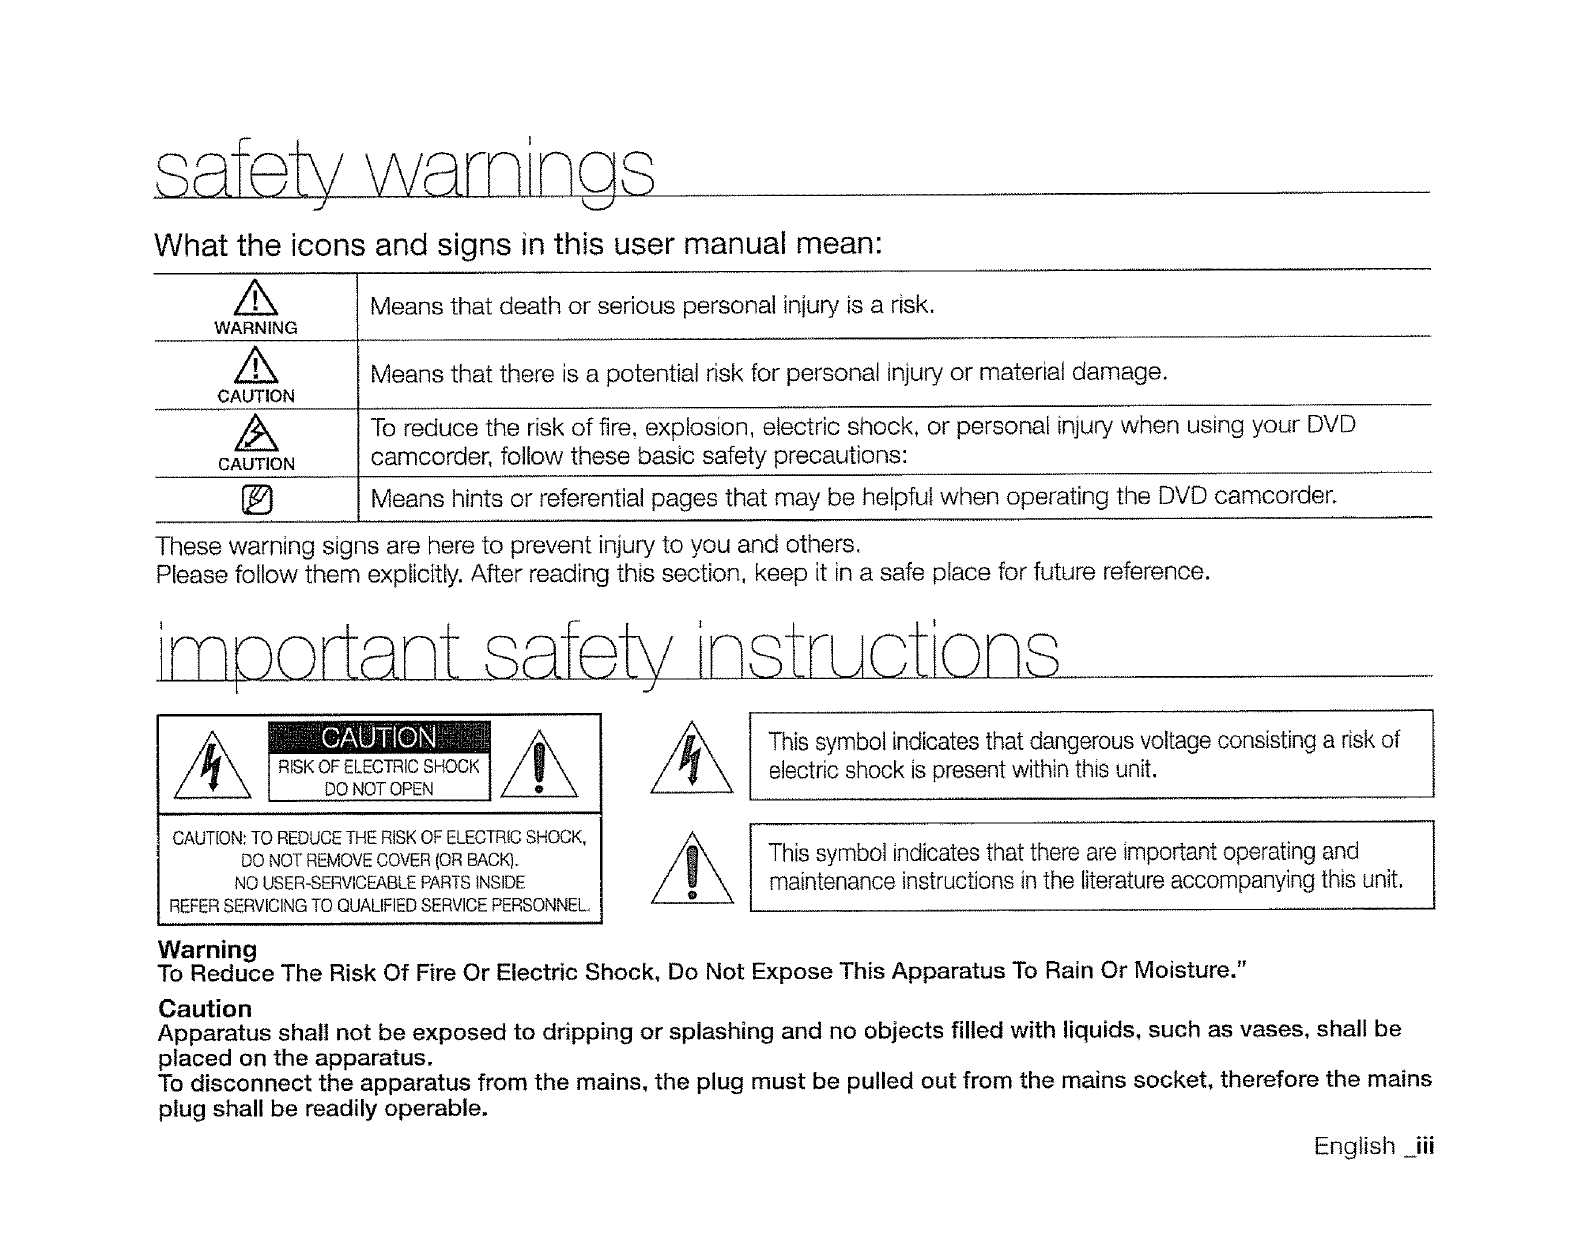
What the icons and signs in this user manual mean:
/'_ Means that death or serious personal injury is a risk.
WARNING
/i_k Means that there is a potential risk for personal injury or material damage.
CAUTION
To reduce the risk of fire, explosion, electric shock, or personal injury when using your DVD
CAUTION camcorder, follow these basic safety precautions:
l_} Means hints or referential pages that may be helpful when operating the DVD camcorder.
These warning signs are here to prevent injury to you and others.
Please fellow them explicitly. After reading this section, keep it in a safe place for future reference.
RISKOF ELECTRICSHOCK
DO NOTOPEN
, ,,,,,,,,,,,,
CAUTION:TO REDUCETHE RtSK OF ELECTRICSHOCK,
DO NOT REMOVECOVER(OR BACK).
NO USER-SERVICEABLEPARTSINSIDE
REFERSERVICINGTO QUALIFIEDSERVICEPERSONNEL,
This symbol indicates that dangerous voltage consisting a risk of
electric shock is present within this unit.
This symbol indicates that there are important operating and
maintenance instructions in the literature accompanying this unit. !
Warning
To Reduce The Risk Of Fire Or Electric Shock, Do Not Expose This Apparatus To Rain Or Moisture."
Caution
Apparatus shall not be exposed to dripping or splashing and no objects filled with liquids, such as vases, shall be
placed on the apparatus.
To disconnect the apparatus from the mains, the plug must be pulled out from the mains socket, therefore the mains
plug shall be readily operable.
English iii
irneortant safety inst uc£c)ns
I J
1. Read these instructions. 12.
2. Keep these instructions.
3. Heed all warnings.
4. Follow all instructions.
5. Do not use this apparatus near water,
6. Clean only with dry cloth.
7. Do not block any ventilation openings. Install in
accordance with the manufacturer's instructions.
8. Do not install near any heat sources such as radiators,
heat registers, stoves, or other apparatus (including
amplifiers) that produce heat.
9. Do not defeat the safety purpose of the polarized or
grounding-type plug. A polarized plug has two blades
with one wider than the other. A grounding type plug
has two blades and a third grounding prong. The wide
blade or the third prong are provided for your safety. If
the provided plug does not fit into your outlet, consult
an electrician for replacement of the obsolete outlet.
10. Protect the power cord from being walked on or
pinched particularly at plugs, convenience receptacles,
and the point where they exit from the apparatus,
11. Only use attachment/accessories specified by the
manufacturer.
iv English
13.
Use only with the cart, stand, tripod, bracket, or
table specified by the manufacturer, or sold with the
apparatus. When a cart is used, use caution when
moving the cart/apparatus combination
to avoid iniury from tip-over.
Unplug this apparatus during lightning
storms or when unused for long periods
of time.
14. Refer all servicing to qualified service personnel.
Servicing is required when the apparatus has been
damaged in any way, such as power-supply cord or
plug is damaged, liquid has been spilled or objects
have fallen into the apparatus, the apparatus has been
exposed to rain or moisture, does not operate normally,
or has been dropped.
!5. Apparatus shall not be exposed to dripping or
splashing and no obiects filled with liquids, such as
vases, shall be placed on the apparatus.
16. VENTILATION:
Slots and openings in the cabinet are provided
for ventilation to ensure reliable operation of the
CAMCORDER and to protect it from overheating.
These openings must not be blocked or covered.
Never place your CAMCORDER on a bed, sofa, rug,
or other similar surface: on or near a radiator or heat
register. This CAMCORDER should not be placed in a
built-in installation such as a bookcase or rack unless
proper ventilation is provided or the manufacturer's
instructions have been adhered to.
17. POWERSOURCES:
The CAMCORDERshould be operated only from the
type of power source indicatedon the label. If you are
not sureof the type of power supply at your home,
consult your appliance dealeror local power company.
A CAMCORDERis intendedto be operated from
battery,power, or other sources, referto the operating
instructions.
18. GROUNDINGOR POLARIZATION:
This CAMCORDERmay be equippedwith eithera
polarized2-wire AC lineplug (aplug havingone blade
wider thanthe other)or a 3-wire grounding type plug,
a plug havinga third (grounding)pin. Ifyou are unable
to insertthe plug fullyinto the outlet, try reversingthe
plug. Ifthe plug stillfailsto fit, contact your electrician
to replaceyour outlet. Do not defeat the safety purpose
of the polarizedplug.
19, POWER-CORDPROTECTION:
Power-supplycords should be routed so that they are
not likelyto be walked on or pinchedby items placed
upon or againstthem, payingparticular attention to
cords or plugs, convenient receptacles,and the point
where they exit from the unit.
20. OUTDOORANTENNAGROUNDING:
CAMCORDER,be surethe antennaor cable system is
grounded to provide some protection againstvoltage
surges and built-up static charges, Section 810 of the
NationalElectricalCode, ANSliNFPA No.
21.
70-1984, provides information with respect to proper
grounding of the mast and supporting structure,
grounding of the lead-in wire and supporting structure,
grounding of the mast and supporting structure,
grounding of the lead-in wire to an antenna discharge
unit, size of grounding to conductors, location of
antenna-discharge unit, connection to grounding
electrodes and requirements for the grounding
electrode.
See figure below.
t"
LIGHTNING:
For added protection of this CAMCORDER during a
lightning storm or when it is left unattended and unused
for long periods of time, unplug it from the wall outlet
and disconnect the antenna or cable system. This will
prevent damage to the CAMCORDER due to lightning
and powerline surges.
English _v

irnaortant safety instruot'ons
.,/
22. POWER LINES:
An outside antenna system should not be located in
the vicinity of overhead power lines or other electric
light or power circuits where it can fall into such power
lines or circuits. When installing an outside antenna
system, extreme care should be taken to keep from
touching such power lines or circuits as contact with
them might be fatal.
23. OVERLOADING:
Do not overload wall outlets and extension cords as
this can result in a risk of fire or electric shock.
24. OBJECTS AND LIQUIDS:
Never push objects of any kind into this CAMCORDER
through openings as they may touch dangerous
voltage points or short out a part that could result in a
fire or electric shock. Never spill liquids of any kind onto
the CAMCORDER. Should spillage occur, unplug unit
and have it checked by a technician before use.
25. SERVICING:
Do not attempt to service this CAMCORDER yourself.
Opening or removing covers may expose you to
dangerous voltage or other hazards. Refer all servicing
to qualified service personnel.
26. DAMAGE REQUIRING SERVICE:
Unplug this CAMCORDER from the wall outlet and
refer servicing to qualified service personnel under the
following conditions:
27.
28_
a. When the power-supply cord or plug is damaged.
b. If any liquid has been spilled onto, or obiects have
fallen into the CAMCORDER.
c. If the CAMCORDER has been exposed to rain or
water.
d. If the CAMCORDER does not operate normally
by following the operating instructions, adjust only
those controls that are covered by the operating
instructions. Improper adjustment of other controls
may result in damage and will often require
extensive work by a qualified technician to restore
the CAMCORDER to its normal operation.
e. Ifthe CAMCORDER has been dropped or the
cabinet has been damaged.
f. When the CAMCORDER exhibits a distinct change
in performance, this indicates a need for service.
REPLACEMENT PARTS:
When replacement parts are required, be sure the
service technician has used replacement parts
specified by the manufacturer and having the same
characteristics as the original part. Unauthorized
substitutions may result in fire, electric shock or other
hazards.
SAFETY CHECK:
Upon completion of any service or repairs to this
CAMCORDER, ask the service technician to perform
safety checks to determine that the CAMCORDER is in
safe operating order.
vi English
29. To preventdamage which may resultinfire or shock
hazard,do not exposethis applianceto rain or
moisture.
30. If this power supply is used at 240V ac, a suitableplug
adaptor should be used.
3!. This product is covered by one or more of the following
U.S, patents:
5,060,2205,457,669
6,438,0996,467,061
6,728,4746,771,891
6,996,3277,009,926
7,099,5667,123,564
7,146,6247,151,729
7,173,8917,177,250
7,210,067
7,263,045
7,283,729
5,561,6495,705,7626,043,912
6,556,5216,578,1636,697,307
6,894,9636,895,5936,937,8t5
7,085,2217,088,6497,092,327
7,142,4937,142,4957,145,861
7,161,8797,164,6477,167,437
7,194,1877,203,8917,209,423
7,228,0627,245,5667,245,5677,257,065
7,269,l 107,272,0867,272,1067,280,460
7,286,4547,304,938
USER INSTALLER CAUTION:
Your authority to operate this FCC certified equipment could be
voided if you make changes or modifications not expressly approved
by this party responsible for compliance to part 15 FCC rules.
NOTE:
O LAMP(S} INSIDE THiS PRODUCT CONTAIN MERCURY AND
MUST BE RECYCLED OR DISPOSED OF ACCORDING
TO LOCAL, STATE OR FEDERAL LAWS. For details see
lamprecycle.org, eiae.org, or call 1-800-Samsung (7267864)
CALIFORNIA USA ONLY
This Perchlorate warning applies onty to primary CR
(Manganese Dioxide) Lithium coin cells in the product sold
or distributed ONLY in California USA
"Perchlorate Material - special handling may apply,
See www.dtsc.ca.gov/hazardouswaste/perohlorate."
NOTE: This equipment has been tested and found to comply
with the limits for a Class B digital device, pursuant to part 15
of the FCC Rules.
These limits are designed to provide reasonable protection
against harmful interference in a residential installation.
This equipment generates, uses and can radiate radio
frequency energy and, if not installed and used in accordance
with the instructions, may cause harmful interference to
radio communications. However, there is no guarantee that
interference will not occur in a particular installation.
If this equipment does cause harmful interference to radio or
television reception, which can be determined by turning the
equipment off and on, the user is encouraged to try to correct
the interference by one or more of the following measures:
Reorient or relocate the receiving antenna.
Increase the separation between the equipment and
receiver.
Connect the equipment into an outlet on a circuit different
from that to which the receiver is connected.
Consult the dealer or an experienced radio/TV technician
for help and for additional suggestions.
The user may find the following booklet prepared by the
Federal Communications Commission helpful: "How to
identify and Resolve Radio--R/Interference Problems."
This Booklet is available from the U.S. Government
Printing Office, Washington, D.C. 20402, Stock No.
004-000-00345-4.
FCC Warning
The user is cautioned that changes or modifications not
expressly approved by the manufacturer could void the user's
authority to operate the equipment.
This device complies with Part 15 of FCC Rules.
Operation is subject to the following two conditions;
(1) This device may not cause harmful interference, and
(2) This device must accept any interference received,
including interference that may cause undesired operation,
English ._vii
Warning!
,, This camcorder should always be connected to an AC outlet with a protective grounding connection.
-Batteries shall not be exposed to excessive heat such as sunshine, fire or the like.
Caution
Danger of explosion if battery is incorrectly replaced.
Replace only with the same or equivalent type.
If this power supply is used at 240V ac, a suitable plug adaptor should be used.
CLASS 1 LASER PRODUCT
KLASSE 1 LASER PRODUKT
LUOKAN 1 LASER LAITE
KLASS 1 LASER APPARAT
PRODUCTO LASER CLASE 1
BEFORE USING THIS CAMCORDER
O
o
o
o
This DVD camcorder records video in MPEG2 format in the DVD camcorder mode, MPEG4 format in the
digital camera mode and at Standard Resolution (SD-VIDEO).
Please note that this DVD camcorder is not compatible with other digital video.
Before recording important video, make a trial recording.
Play back your trial recording to make sure the video and audio have been recorded properly.
The recorded contents cannot be compensated for:
Samsung cannot compensate for any damage caused when a recording cannot be played back because of
a defect in the DVD camcorder or memory card. Samsung cannot be responsible for your recorded video and
audio.
Recorded contents may be lost due to a mistake when handling this DVD camcorder or memory card, etc.
Samsung shall not be responsible for compensation for damages due to the loss of recorded contents.
viii English
Makea backupof importantrecordeddata,
Protectyourimportantrecordeddatabycopyingthefilesto PC.Wealsorecommendyoucopyit fromyourPCto otherrecording
mediaforstorage.Referto thesoftwareinstallationandUSBconnectionguide.
Copyright:PleasenotethatthisDVDcamcorderisintendedfor personaluseonly.
Datarecordedonthecard inthisDVDcamcorderusingotherdigital/analogmediaordevicesisprotectedbythecopyrightact and
cannotbeusedwithoutpermissionoftheownerof copyright,exceptfor personalenioyment,Evenifyourecordaneventsuchasa
show,performanceor exhibitionfor personalenioyment,it isstronglyrecommendedthatyouobtainpermissionbeforehand.
ABOUT THIS USER MANUAL
- This user manual covers models SC-DX100/DXIO3/DX105. SC-DX103/DX105 have two storage media, Disc
and Card. Although the external appearance is different, they operate in the same way.
• illustrations of model SC-DX105 are used in this user manual.
• The displays in this user manual may not be exactly the same as those you see on the LOD screen.
• Designs and specifications of the camcorder and other accessories are subiect to change without any notice.
Q) MARKS NEXT TO MENU HEADINGS
•Some functions of this DVD camcorder are unavailable with memory card or disc.
Refer to the marks to the right of each function to identify whether the memory card or disc is compatible with the
function. Refer to these marks and identify the functions and operation to match the memory, card or disc you use.
NOTES REGARDING TRADEMARKS
° All the trade names and registered trademarks mentioned in this manual or other documentation provided with your Samsung
product are trademarks or registered trademarks of their respective holders.
•Windows@ is registered trademark or trademark of Microsoft Corporation, registered in the United States and other countries.
• Macintosh is the trademark of Apple Computer, inc.
° All the other product names mentioned herein may be the trademark or registered trademarks of their respective companies.
° Furthermore, "TM" and "R" are not mentioned in each case in this manual.
• Manufactured under license from Dolby Laboratories.
°"Dolby" and the doubte-D symbol are trademarks of Dolby Laboratones, ......
;Tt_nEO CnEATOR
Portions of this software are copyright © 2006 The Free Type Project, Website: http://www.freetype.org. All rights reserved. }
English iix
or- autions when usirsa
IMPORTANT NOTE
•Handle the liquid crystal display (LCD) with care:
The LCD is a very delicate display device: Do not press its surface with force, hit it or prick it with a sharp obiect.
- If you push the LCD surface, unevenness in display may occur, if unevenness does not disappear, turn the
camcorder off, wait for a few moments, then turn it on again.
Do not place the camcorder with the open LCD screen down.
Close the LCD monitor when not using the camcorder.
° Liquid crystal display :
- The LCD screen will be slightly dimmer than usual when the camcorder is at low temperature, as in cold areas,
or immediately after power is turned on. Normal brightness will be restored when the temperature inside tile
camcorder rises. This has no effect on the images in the storage media, so there Ksno cause for concern.
• Hold the DVD camcorder correctly:
- Do not hold the DVD camcorder by the LCD monitor when lifting it: the viewfinder or LCD monitor could detach
and the DVD camcorder may fall.
Do not subject the DVD camcorder to impact:
- This DVD camcorder is a precision machine. Take great care that you do not strike it against a hard object or let it
fall.
- Do not use the DVD camcorder on a tripod in a place where it is subiect to severe vibrations or impact.
• No sand or dust!
Fine sand or dust entering the DVD camcorder or AC power adaptor could cause malfunctions or defects.
° No water or oil!
Water or oil entering the DVD camcorder or AC power adaptor could cause electric shock, malfunctions or defects.
• Heat on surface of product:
The surface of the DVD camcorder will be slightly warm when in use, but this does not indicate a fault.
• Be careful of ambient temperature:
Using the DVD camcorder in a place where the temperature is over 60°C (140°F) or under 0°C (32°F) will result in
abnormal recording/playback.
Do not leave the DVD camcorder on a beach or in a closed vehicle where the temperature is very high for a long
time: This could cause a malfunction.
• Do not point directly at the sun:
If direct sunlight strikes the lens, the DVD camcorder could malfunction or a fire could occur.
Do not leave the DVD camcorder with the LCD screen exposed to direct sunlight: This could cause a malfunction.
o Do not use the DVD camcorder near TV or radio:
This could cause noise to appear on the TV screen or in radio broadcasts.
x_ English
• Do not use the DVD camcorder near strong radio waves or magnetism:
If the DVD camcorder is used near strong radio waves or magnetism, such as near a radio transmitter or
electric appliances, noise could enter video and audio that are being recorded. During playback of normally
recorded video and audio, noise may also be present in picture and sound. At worst, the DVD camcorder could
malfunction.
° Do not expose the DVD camcorder to soot or steam:
Thick soot or steam could damage the DVD camcorder case or cause a malfunction.
° Do not use the DVD camcorder near corrosive gas:
tf the DVD camcorder is used in a place where there is dense exhaust gas generated by gasoline or diesel
engines, or corrosive gas such as hydrogen sulphide, the external or internal terminals could corrode, disabling
normal operation, or the battery connecting terminals could corrode, so that power will not turn on.
° Do not expose the DVD camcorder to insecticide:
Insecticide entering the DVD camcorder could dirty the lens in the laser pickup block, and in such a case the DVD
camcorder might not operate normally. Turn the DVD camcorder off and cover it with vinyl sheet, etc. before using
insecticide.
• Do not use a 3 !/2 inch(8cm) CD lens cleaner:
- Cleaning the lens is not necessary when using this DVD camcorder in the usual way.
- Using a 3 1/2 inch(8cm) CD tens cleaner could cause this DVD camcorder to malfunction.
°Do not touch the lens in the laser pickup block,
If you touch the lens in the laser pickup biock directly it may cause a malfunction. The laser pickup block is not
warranted for damage caused by misuse. Therefore, pay much attention when operating this camcorder.
• Do not wipe the DVD camcorder body with benzene or a thinner:
The coating of exterior could peel off or the case surface could deteriorate.
•Keep the memory card out of reach of children to prevent swallowing.
English jd
INTRODUCTION TO BASIC
FEATURES
O6
GETTING TO KNOW YOUR DVD
CAMCORDER
09 What's included with your DVD camcorder
10 Front and right view
11 Left side and bottom view
12 Rear and top view
PREPARATION 13 Remote control (SC-DX105 only)
14 Installing the button-type battery
15 Holding the DVD camcorder
16 Charging the battery pack
21 Basic DVD camcorder operation
22 Screen indicators
26 Using the display (IIDI)button
26 Using the joystick
27 Using the LCD screen
27 Using the viewfinder
28 Initial setting: OSD language & date and time
DVD CAMCORDER MODE:
BEFORE RECORDING
30 Selecting the storage media (SC-DX103/DX105 only)
30 Inserting and removing a disc
32 Recordable time
02_ English
DVD CAMCORDER MODE:
RECORDING/PLAYBACK
33 Recording movie images on a disc
35 Recording with ease for beginners (EASY.Q mode)
36 Capturing still images during movie image playback
(SC-DX103/DX105 only)
37 Zooming
38 Playing movie images
DVD CAMCORDER MODE:
EDITING MOVIE IMAGE
40 Deleting images
41 Deleting a section of a movie image (partial delete)
42 Playlist
DVD CAMCORDER MODE:
DISC MANAGE
47 Disc finalize
49 Disc unfinalize
50 Disc format
51 Disc information
English 03
ontents
DIGITAL CAMERA MODE
(SC-DX103/DX105 ONLY)
52 Inserting and ejecting a memory card
55 Recordabte time and number of images
56 Recording movie images on a memory card
57 Taking photo images
58 Playing movie images
59 Viewing photo images
60 Protection from accidental erasure
61 Deleting images
USING THE MENU iTEMS 62 Handling menus
63 Menu items
65 Recording menu items
78 Playback menu item
78 Setting menu items
PRINTING PHOTO iMAGES
(SC-DX103/DX105 ONLY)
83 DPOF print setting
84 Direct printing with a PictBridge
04_ English
CONNECTING TO AV DEVICES 86 Connecting to a TV
88 Dubbing images from the Camcorder to a VCR or DVD/
HDD recorder
89 Using Voice Plus
CONNECTING TO APC
(SC-DXl03/DX105 ONLY) 90 System requirements
91 Installing DV Media PR©
93 Connecting the USB cable
94 Viewing the contents of storage media (memory card)
96 Transferring files on the memory card from the DVD
camcorder to your PC
97 Using the PC cam function
MAINTENANCE &
ADDITIONAL INFORMATION 98 Maintenance
99 Additional information
!02 Using your DVD camcorder abroad
TROUBLESHOOTING !03 Troubleshooting
SPECIFICATIONS 112
WARRANTY (SEA USERS ONLY)
English 05
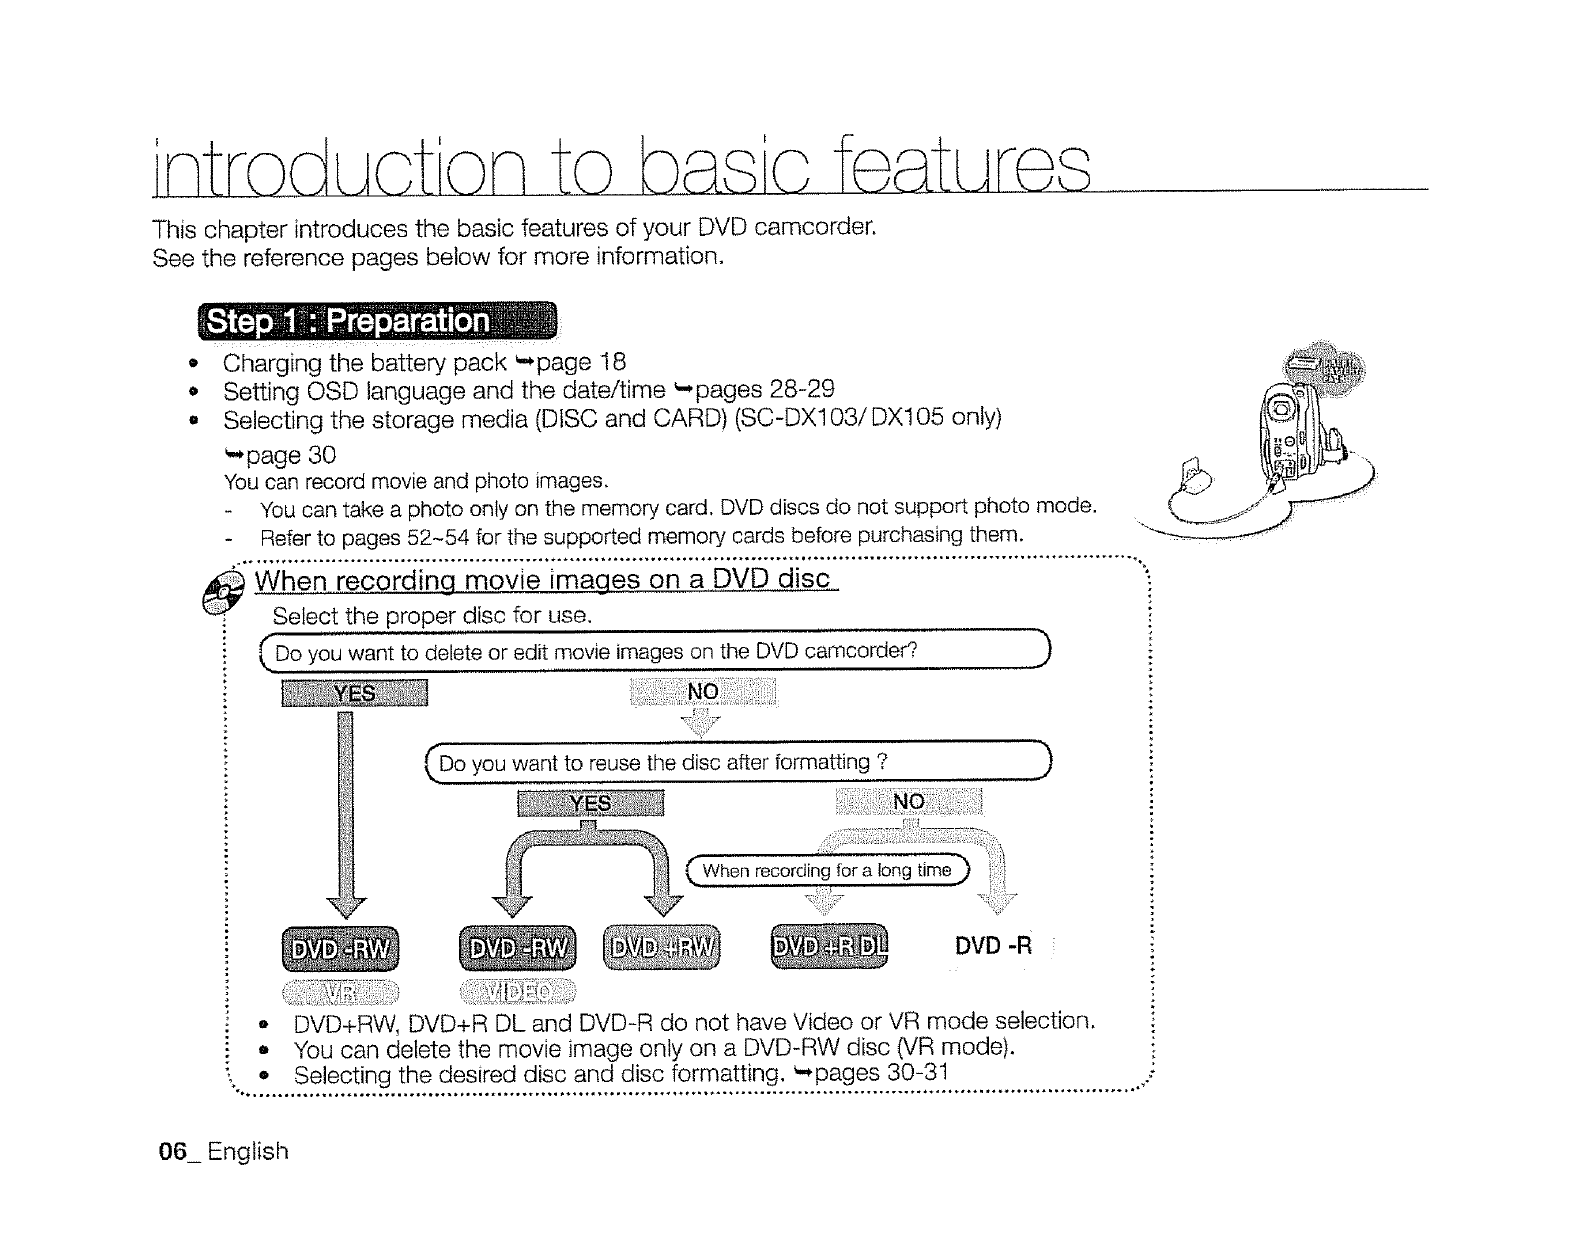
This chapter introduces the basic features of your DVD camcorder.
See the reference pages below for more information.
0
0
0
charging the Battery pack _page 18
Setting OSD language and the date/time ,-,pages 28-29
Selecting the storage media (DISC and CARD) (SC-DX103/DX105 only)
_,page 30
You can record movie and photo images.
- You can take a photo only on the memory card. DVD discs do not support photo mode.
- Refer to pages 52~54 for the supported memory cards before purchasing them.
_When recording movie images on a DVD disc
Select the proper disc for use.
Do want to delete edit movie images on the DVD camcorder?
you or )
_SS',,_.
£
Do yo u want to reuse the disc after formatting ? ....... )
_'_When ,recording for a long
DVD-R !
-DVD+RW, DVD+R DL and DVD-R do not have Video or VR mode selection.
• You can delete the movie image only on a DVD-RW disc (VR mode).
•Selecting the desired disc and disc formatting. _-,pages 30-31
06_ English

• Recording movie images ',*pages 33-37, 56
•Taking the photo images (SC-DX103/DX105 only) _page 57
Selecting an image to play back from the thumbnail index views
_,pages 38, 58-59
Viewing playback from your DVD camcorder on your PC (SC-DX103/DX105
only) or TV _pages 86-89, 96
Editing movie images as your preference (Editing function is available only in
DVD-RW(VR mode)) _,pages 40-46
You must finalize the disc in advance to view the movie images recorded on a DVD camcorder on other
DVD devices. (Finalize is a function that enables a disc recorded on the DVD camcorder to be playable on
DVD devices such as DVD players.)
r II I.i::ll,i_ 1
.w w
weemi_lt°_*_t ooe_ o _gt _._wgwt _e_.t, m., _eee f iso_,e_tewme*eem_eeQ_wm_
,.*continued
English _07
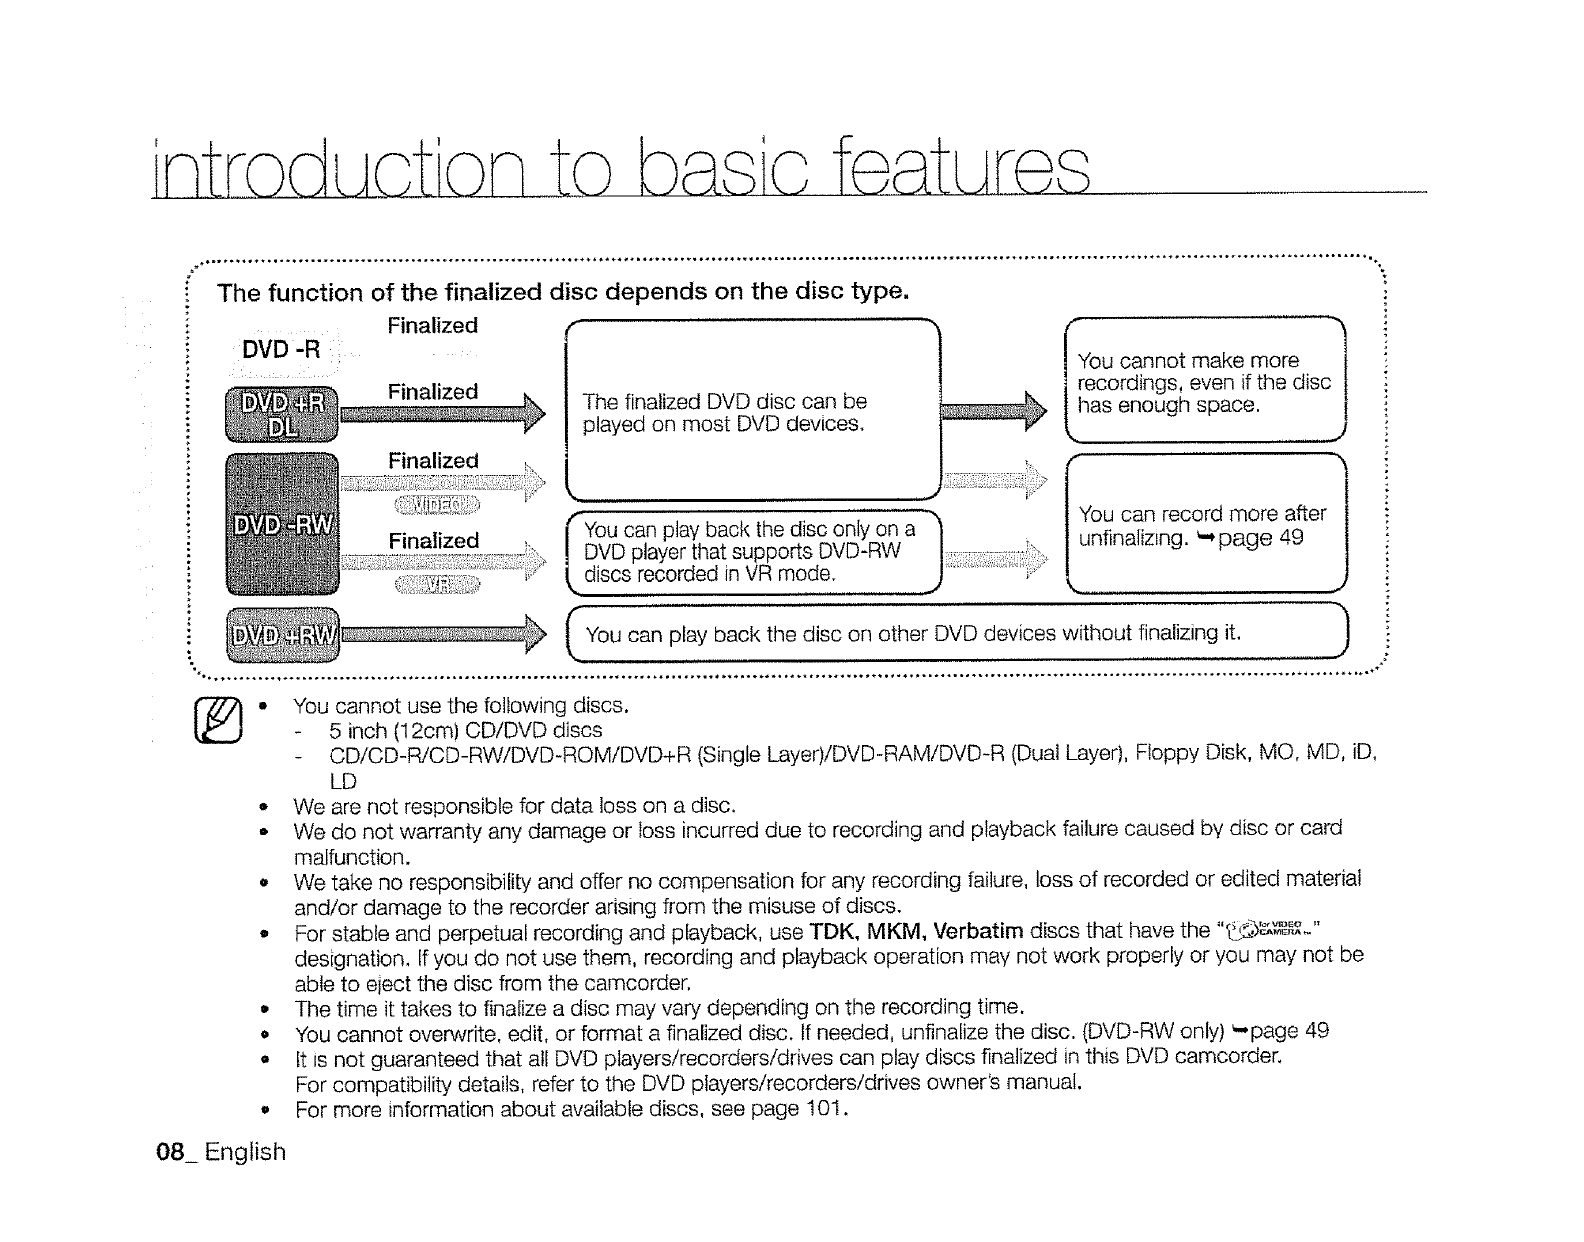
The function of the finalized disc depends on the disc type.
Finalized r
DVD'R
Finalized
Finalized
The finalized DVD disc can be
played on most DVD devices.
You can play back the disc only on a
DVD player that supports DVD-RW
discs recorded in VR mode.
"_ _You cannot make more -1
1 recordings, even if the disc|
L.Inas enough space.. ..........j
You can record more after )
(_You can play back the on finalizing )
disc other DVD devices without it.
®• You cannot use the following discs.
- 5 inch (12cm) CD/DVD discs
- CD/CD-R/CD-RW/DVD-ROM/DVD+R (Single Layer)/DVD-RAM/DVD-R (Dual Layer), Floppy Disk, MO, MD, iD,
LD
° We are not responsible for data loss on a disc.
- We do not warranty any damage or loss incurred due to recording and playback failure caused by disc or card
malfunction.
• We take no responsibility and offer no compensation for any recording failure, loss of recorded or edited material
and/or damage to the recorder arising from the misuse of discs.
° For stable and perpetual recording and playback, use TDK, MKM, Verbatim discs that have the "_'_,,_P_"
designation, If you do not use them, recording and playback operation may not work properly or you may not be
able to eiect the disc from the camcorder.
• The time it takes to finalize a disc may vary depending on the recording time.
• You cannot overwrite, edit, or format a finalized disc. If needed, unfinalize the disc. (DVD-RW only) ',-page 49
• It is not guaranteed that all DVD players!recorders/drives can play discs finalized in this DVD camcorder.
For compatibility details, refer to the DVD players/recorders/drives owner's manual.
, For more information about available discs, see page 101.
08_ English
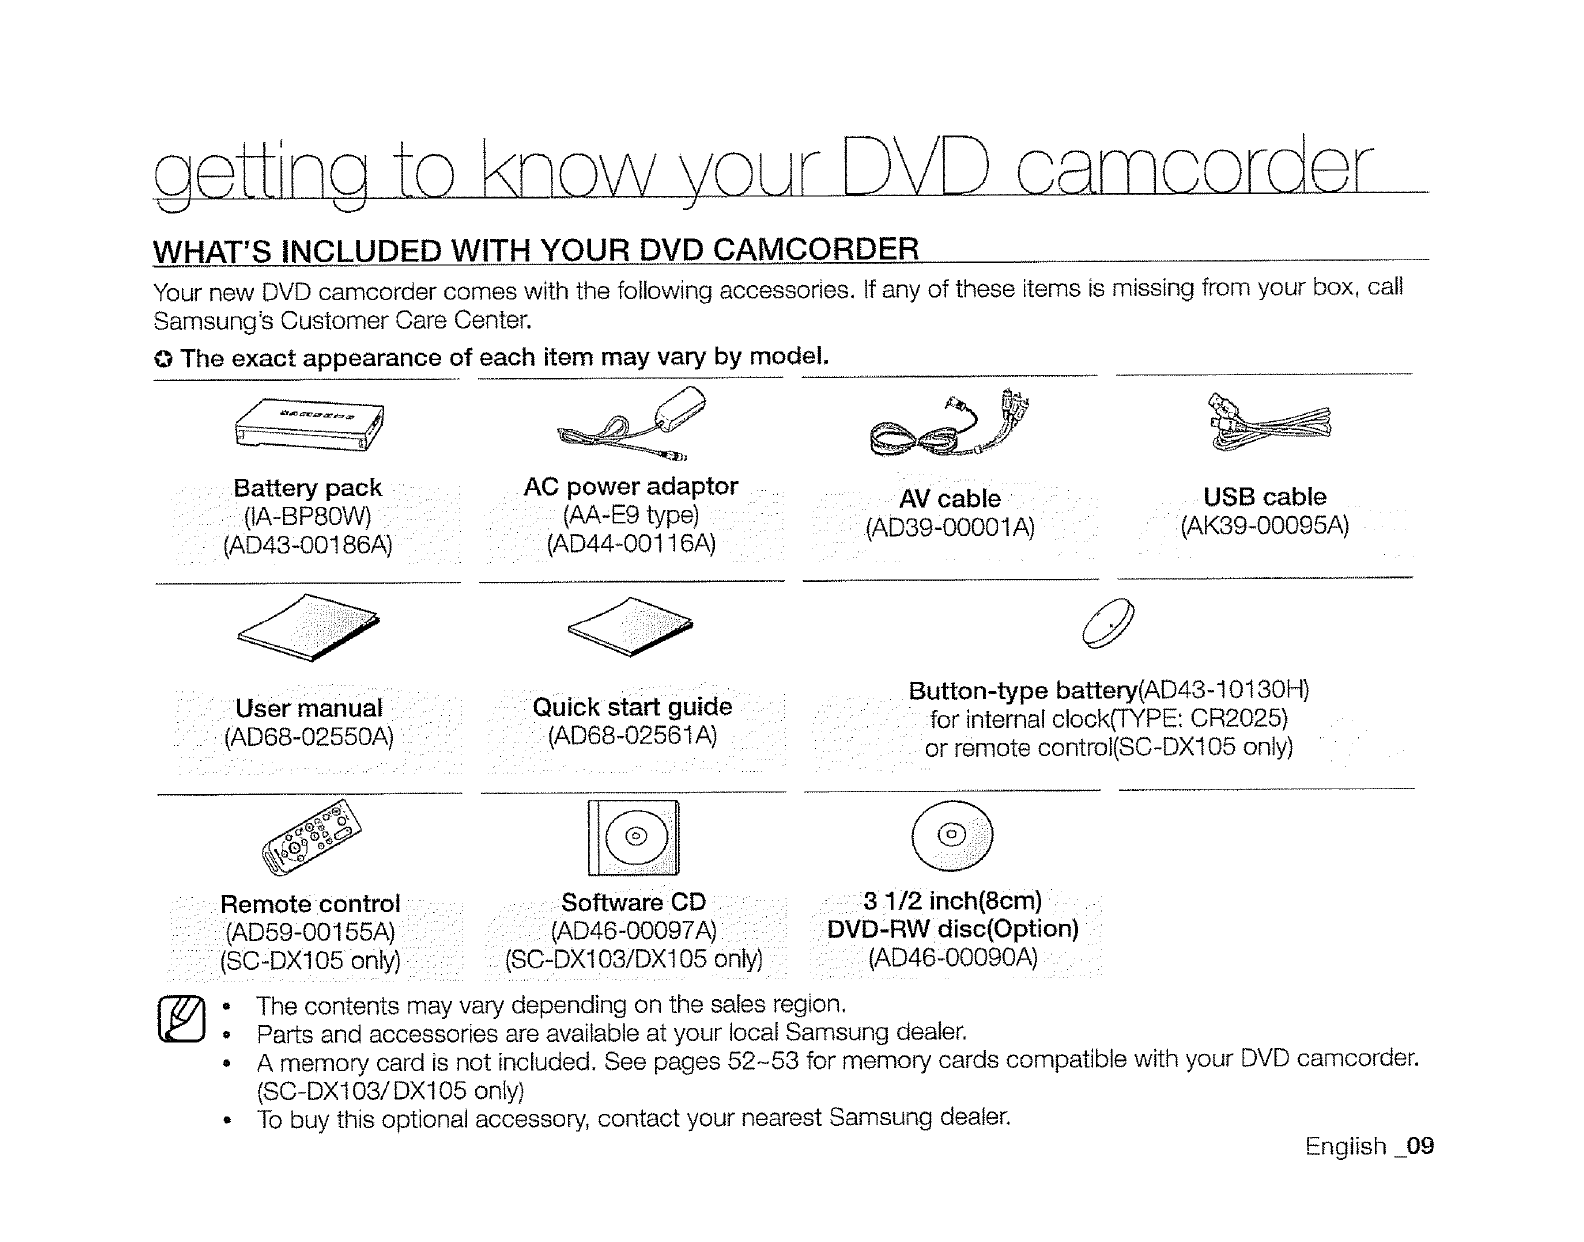
WHAT'S INCLUDED WITH YOUR DVD CAMCORDER
Your new DVD camcorder comes with the following accessories. If any of these items is missing from your box, call
Samsung's Customer Care Center.
O The exact appearance of each item may vary by model.
Battery pack
(IA.BP8OW) ii i
(AD43-OO186A)
AC power adaptor AV cable : USB cable
(AA-E9 type) (AD39'00001A) :(AK39-00095A)
i (AD44-00116A)
: ::User manual Quick start guide
: (AD68-02550A): i (AD68-02561A)
Button-type battery(AD43-10130H)
:for internal clock(TYPE: CR2025)
:or remote control(SC-DXl05 only)
: Remote control : Software CD 31/2 inch(8cm)
(AD59,00155A) (AD46'00097A) I: : i DVD'RW disc(Option)
(SC,DXl05 on y) : (SC-DX103/DX105 only) :: (AD46-00090A)
I_. The contents may vary depending on the sales region.
° Parts and accessories are available at your local Samsung dealer.
° A memory card is not included. See pages 52-53 for memory cards compatible with your DVD camcorder.
(SC-DX103/DX105 only)
• To buy this optional accessory, contact your nearest Samsung dealer.
English _09
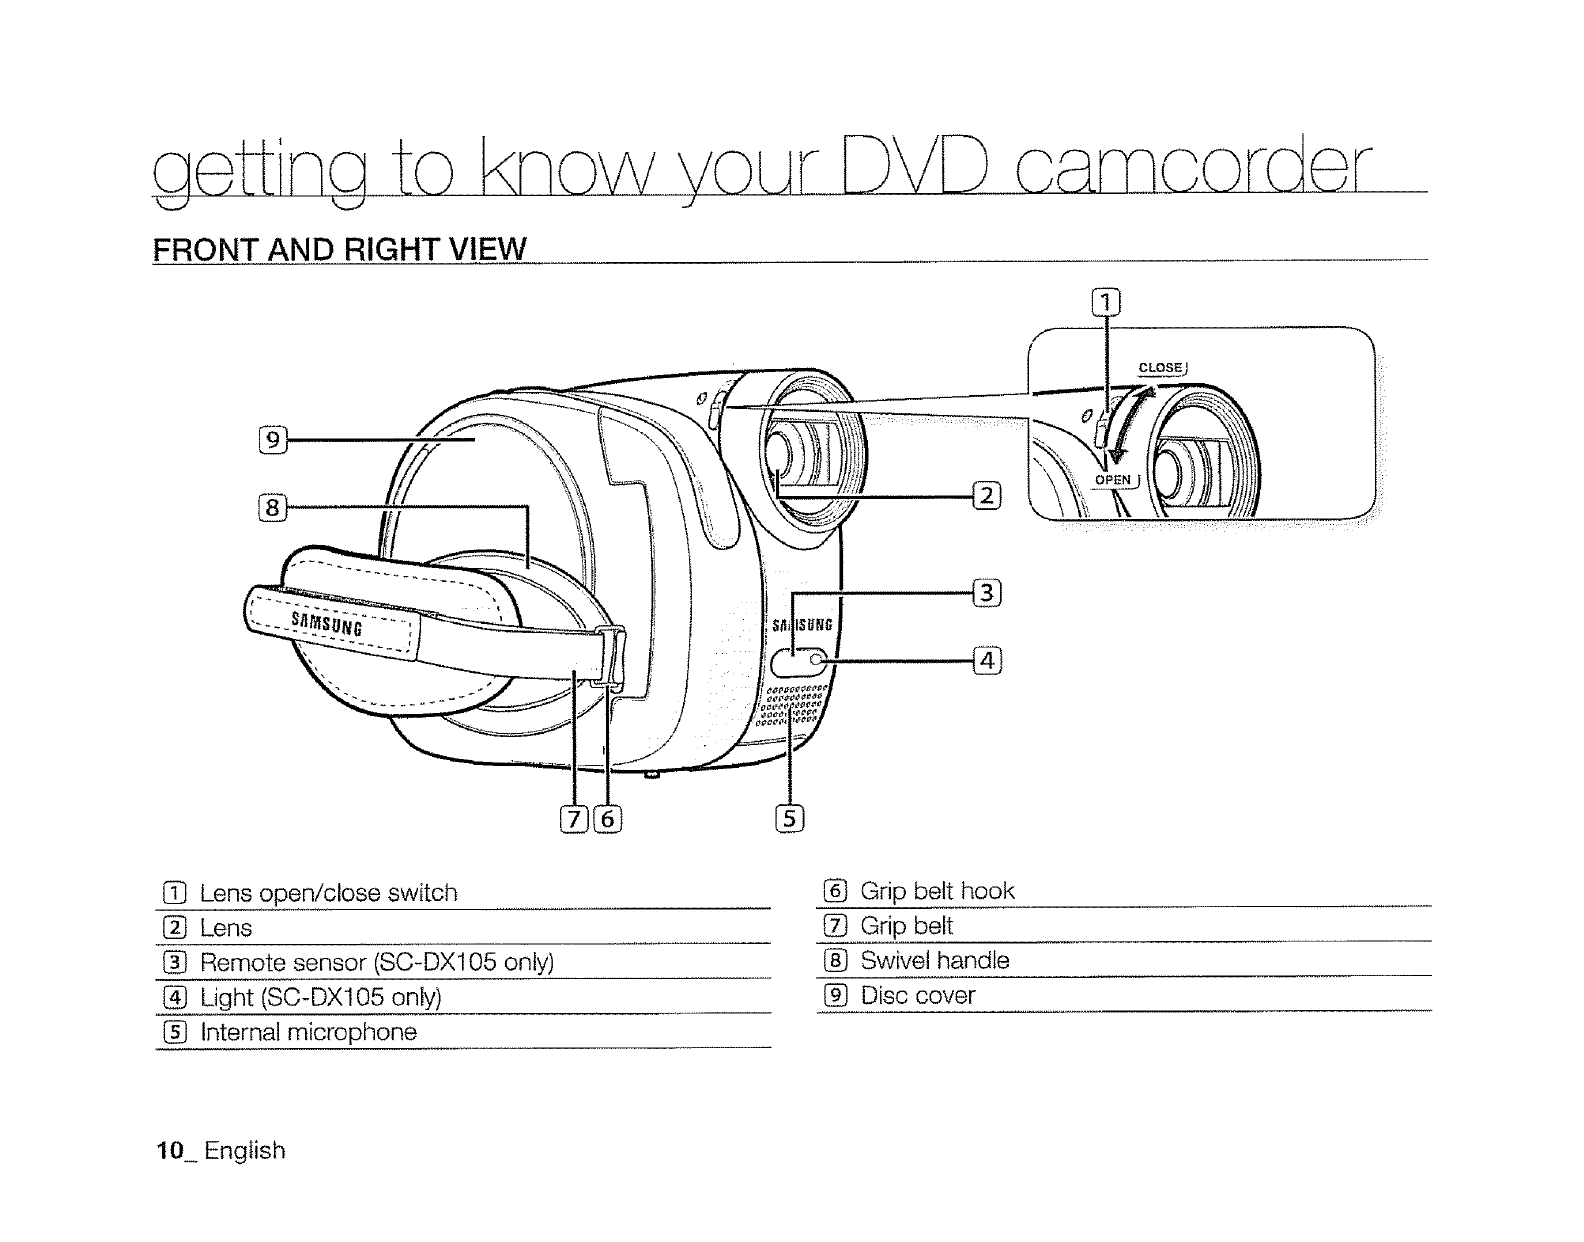
FRONT AND RIGHT VIEW
CLO§.§J
%
,®
1_ Lens open/close switch
I_ Lens
(_ Remote sensor (SC-DX105 only)
@ Light (SC-DX105 only)
Internal microphone
I_ Grip belt hook
t_ Grip belt
(_ Swivel handle
Disc cover
10 English
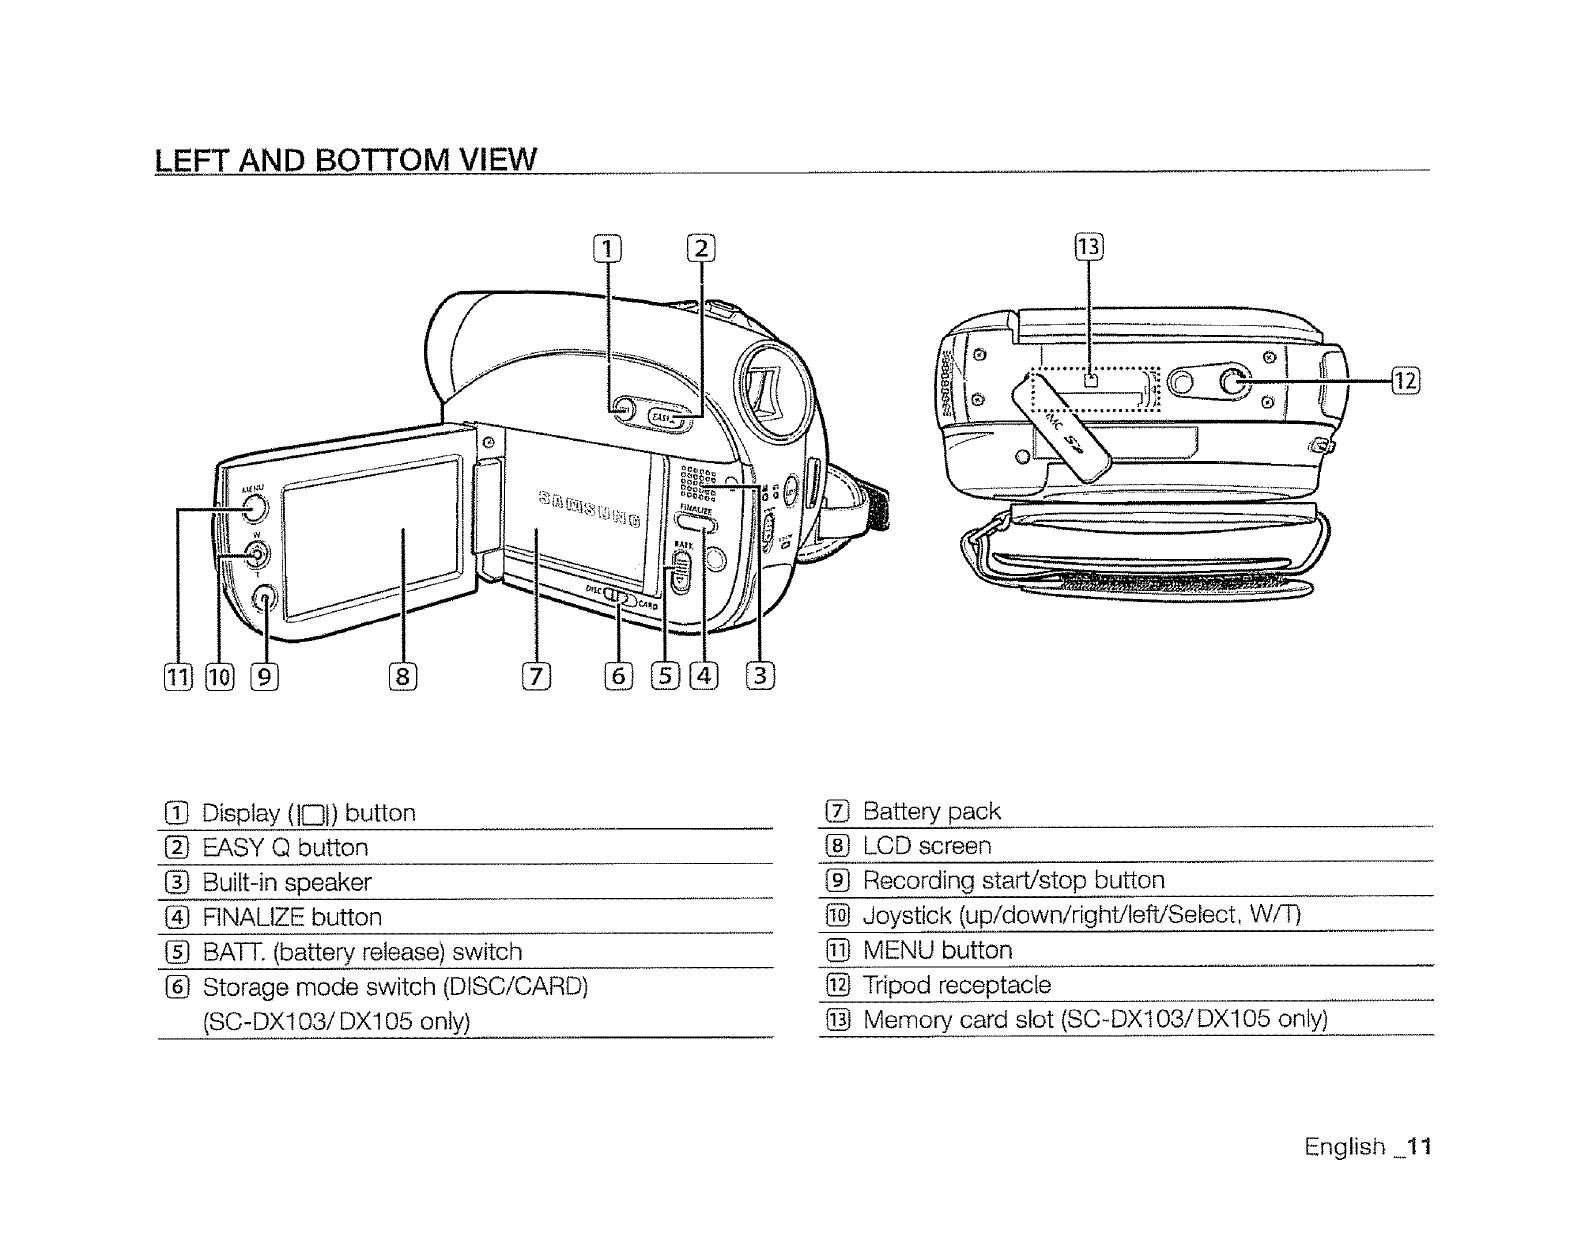
LEFT AND BOTTOM VIEW
@
G Display (IC31)button
1_ EASY Q button
Built-in speaker
@ FINALIZE button
!_ BATT. (battery release) switch
1_ Storage mode switch (DISC/CARD)
(SC-DX103/DX105 only)
1_ Battery pack
(_ LCD screen
(_ Recording start/stop button
l_ Joystick (up!down/right/left!Select, W/F)
@ MENU button
@ Tripod receptacle
@ Memory card slot (SC-DX103/DX105 only)
English 11
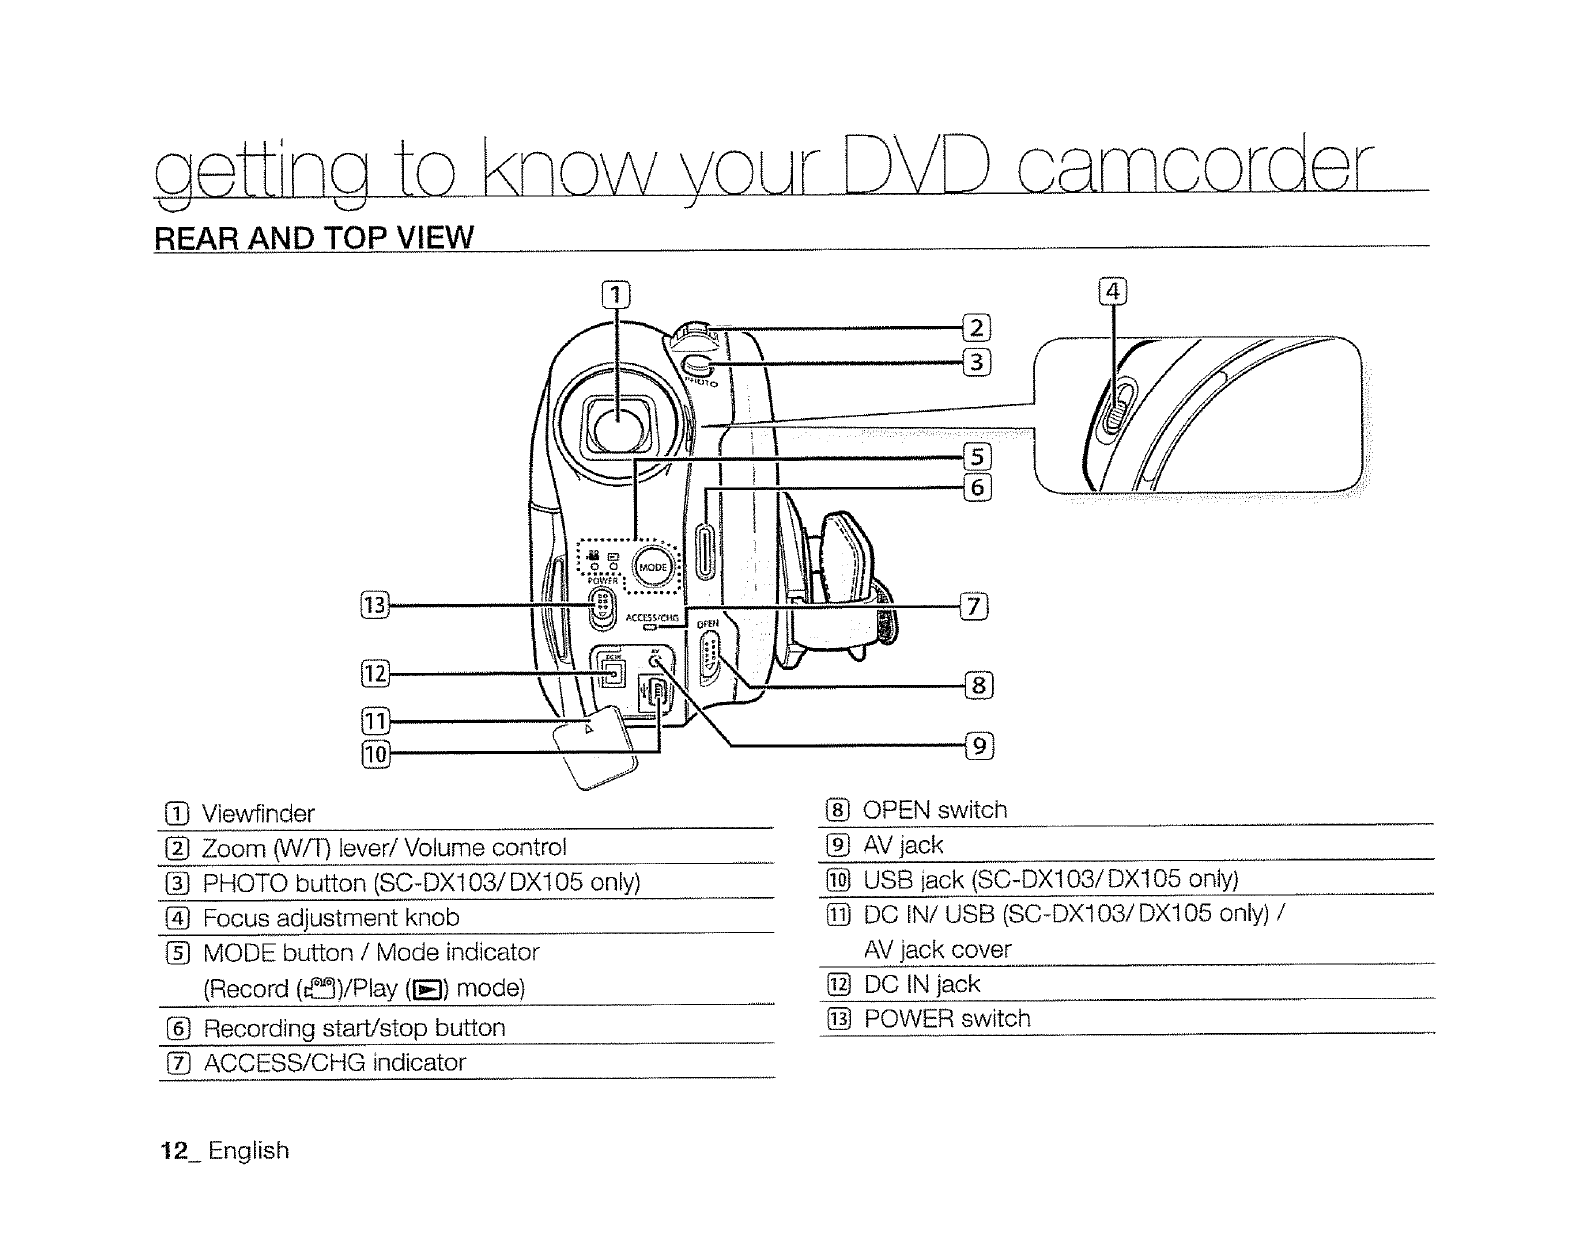
REAR AND TOP VIEW
{_ Viewfinder
f_ Zoom (Wf_ lever/Volume control
PHOTO button (SC-DX103/DX105 only)
@ Focus adjustment knob
1_} MODE button /Mode indicator
(Record (_)/Play (!-_-I) mode)
I_ Recording start/stop button
[Z} ACCESS/CHG indicator
®
®
®
l_ OPEN switch
I_ AV jack
I_ USB iack (SC-DX103/DX105 only)
DO IN/USB (SC-DX103/DX105 only) /
AV jack cover
I_ DO IN jack
[_ POWER switch
12_ English
eoaration
This section provides information on using this DVD camcorder; such as how to use the provided accessories, how
to charge the battery, how to setup the operation mode and initial setup,
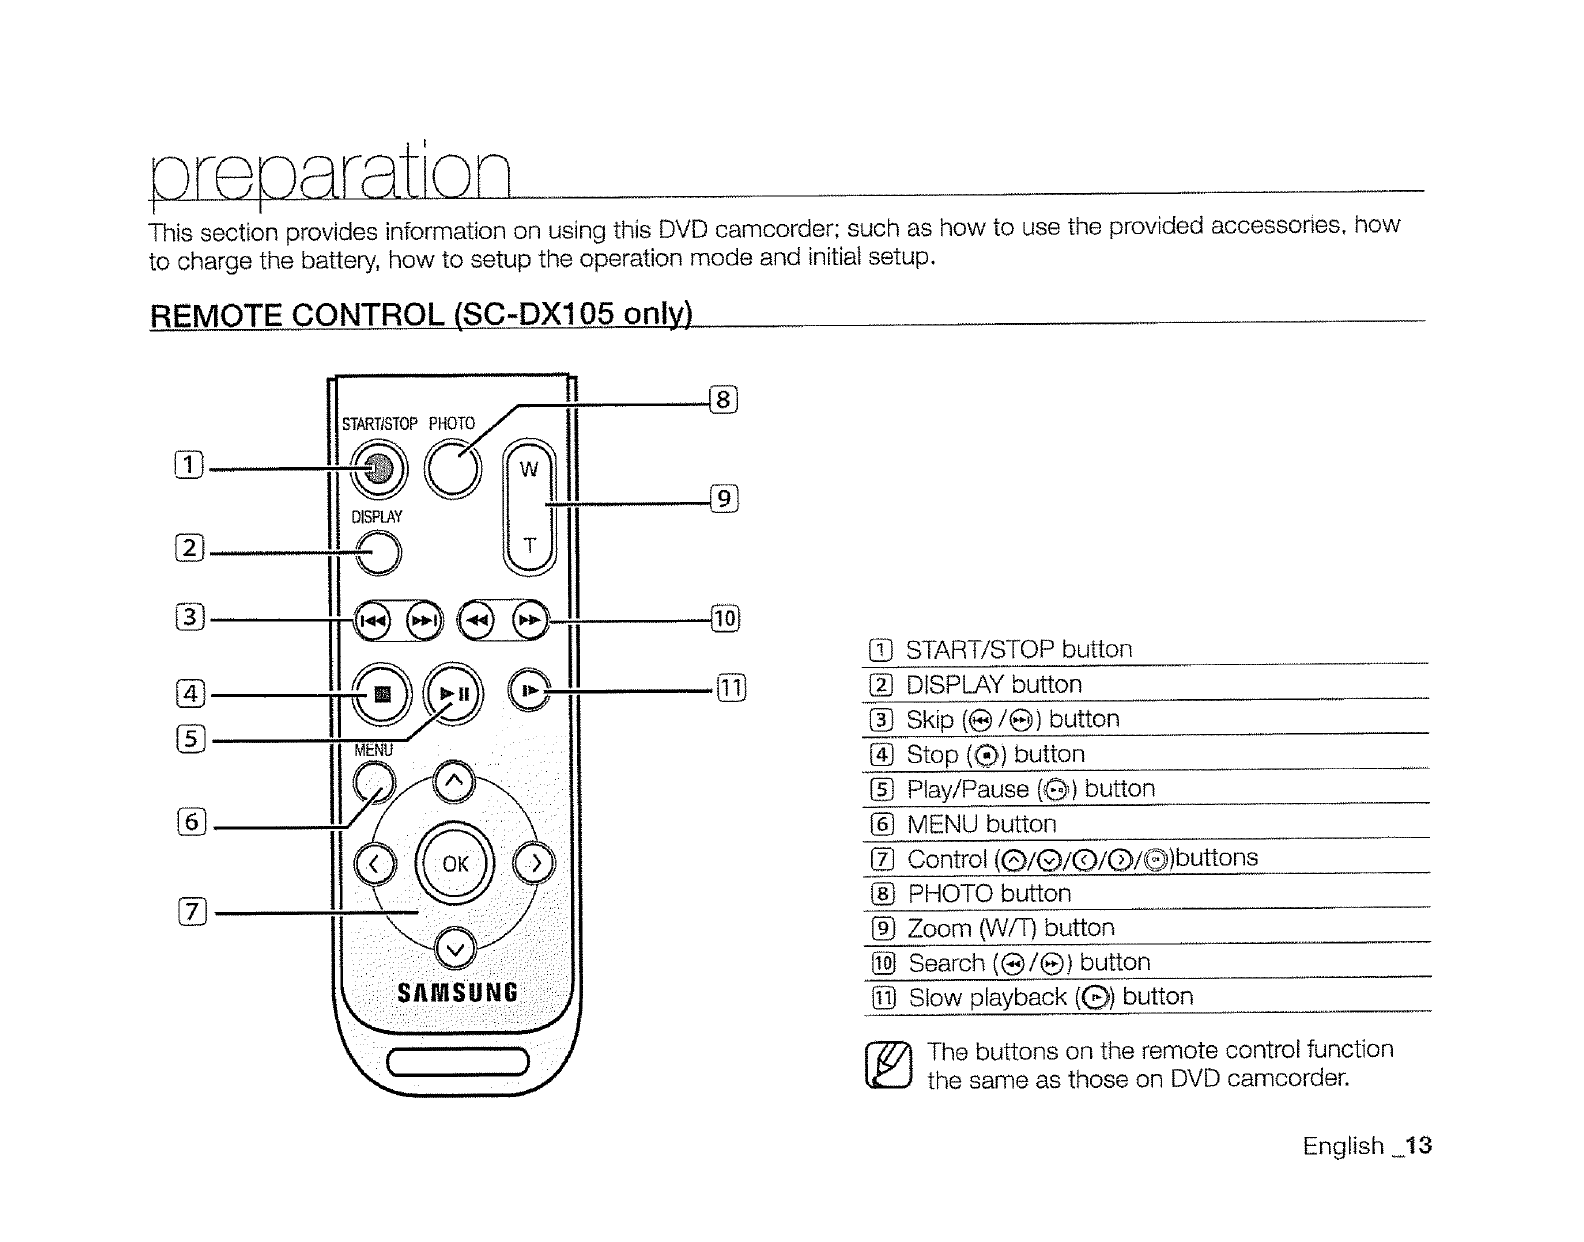
REMOTE CONTROL (SC-DX105 only)
%
@
®
%
(_ START/STOP button
1_ DISPLAY button
1_ Skip (e/e) button
@ Stop (®) button
I_ Play!Pause (G _)button
l_ MENU button
Control (@/(_/([:)/(})/@) buttons
(_ PHOTO button
l_ Zoom (VVfT) button
1_ Search ((_/(_) button
Slow playback ((_) button
The buttons on the remote control function
the same as those on DVD camcorder.
English _13
on
t I
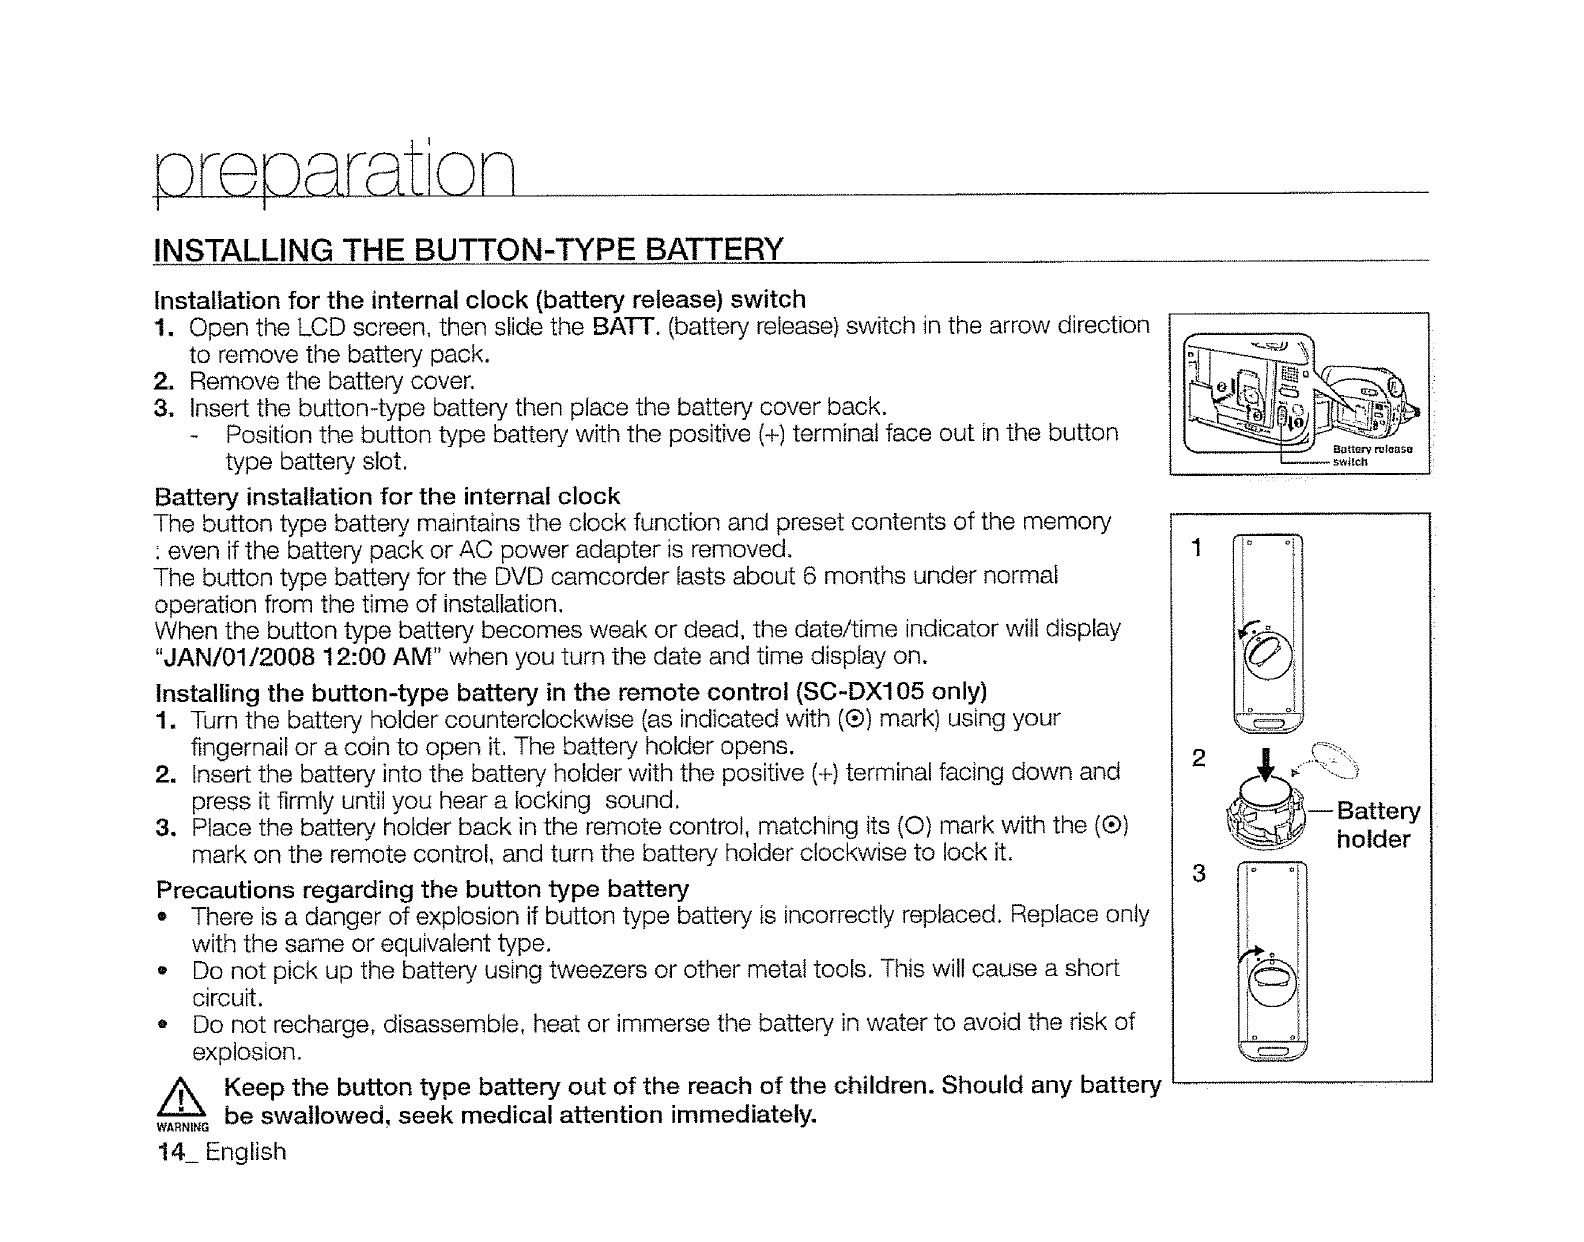
INSTALLING THE BUTTON-TYPE BATTERY
Installation for the internal clock (battery release) switch
1. Open the LCD screen, then slide the BATT. (battery release) switch in the arrow direction
to remove the battery pack.
2. Remove the battery cover.
3. insert the button-type battery then place the battery cover back.
Position the button type battery with the positive (+) terminal face out in the button
type battery slot.
Battery installation for the internal clock
The button type batte_, maintains the clock function and preset contents of the memory
: even if the battery pack or AC power adapter is removed.
The button type battery for the DVD camcorder lasts about 6 months under normal
operation from the time of installation.
When the button type battery becomes weak or dead, the date/time indicator will display
"JAN/01/2008 12:00 AM" when you turn the date and time display on.
Installing the button-type battery in the remote control (SC-DX105 only)
1, Turn the battery holder counterclockwise (as indicated with (®) mark) using your
fingernail or a coin to open it, The battery holder opens.
2, Insert the battery into the battery holder with the positive (+) terminal facing down and
press it firmly until you hear a locking sound.
3. Place the battery holder back in the remote control, matching its (0) mark with the (¢)
mark on the remote control, and turn the battery holder clockwise to lock it.
Precautions regarding the button type battery
,, There is a danger of explosion if button type battery is incorrectly replaced. Replace only
with the same or equivalent type.
• Do not pick up the battery using tweezers or other metal tools. This wilt cause a short
circuit.
o Do not recharge, disassemble, heat or immerse the battery in water to avoid the risk of
explosion.
Keep the button type battery out of the reach of the children. Should any battery
wA,._._be swallowed, seek medical attention immediately.
14_ English
L_ s'._IIch
1 _ °
3 ° °I
° ol
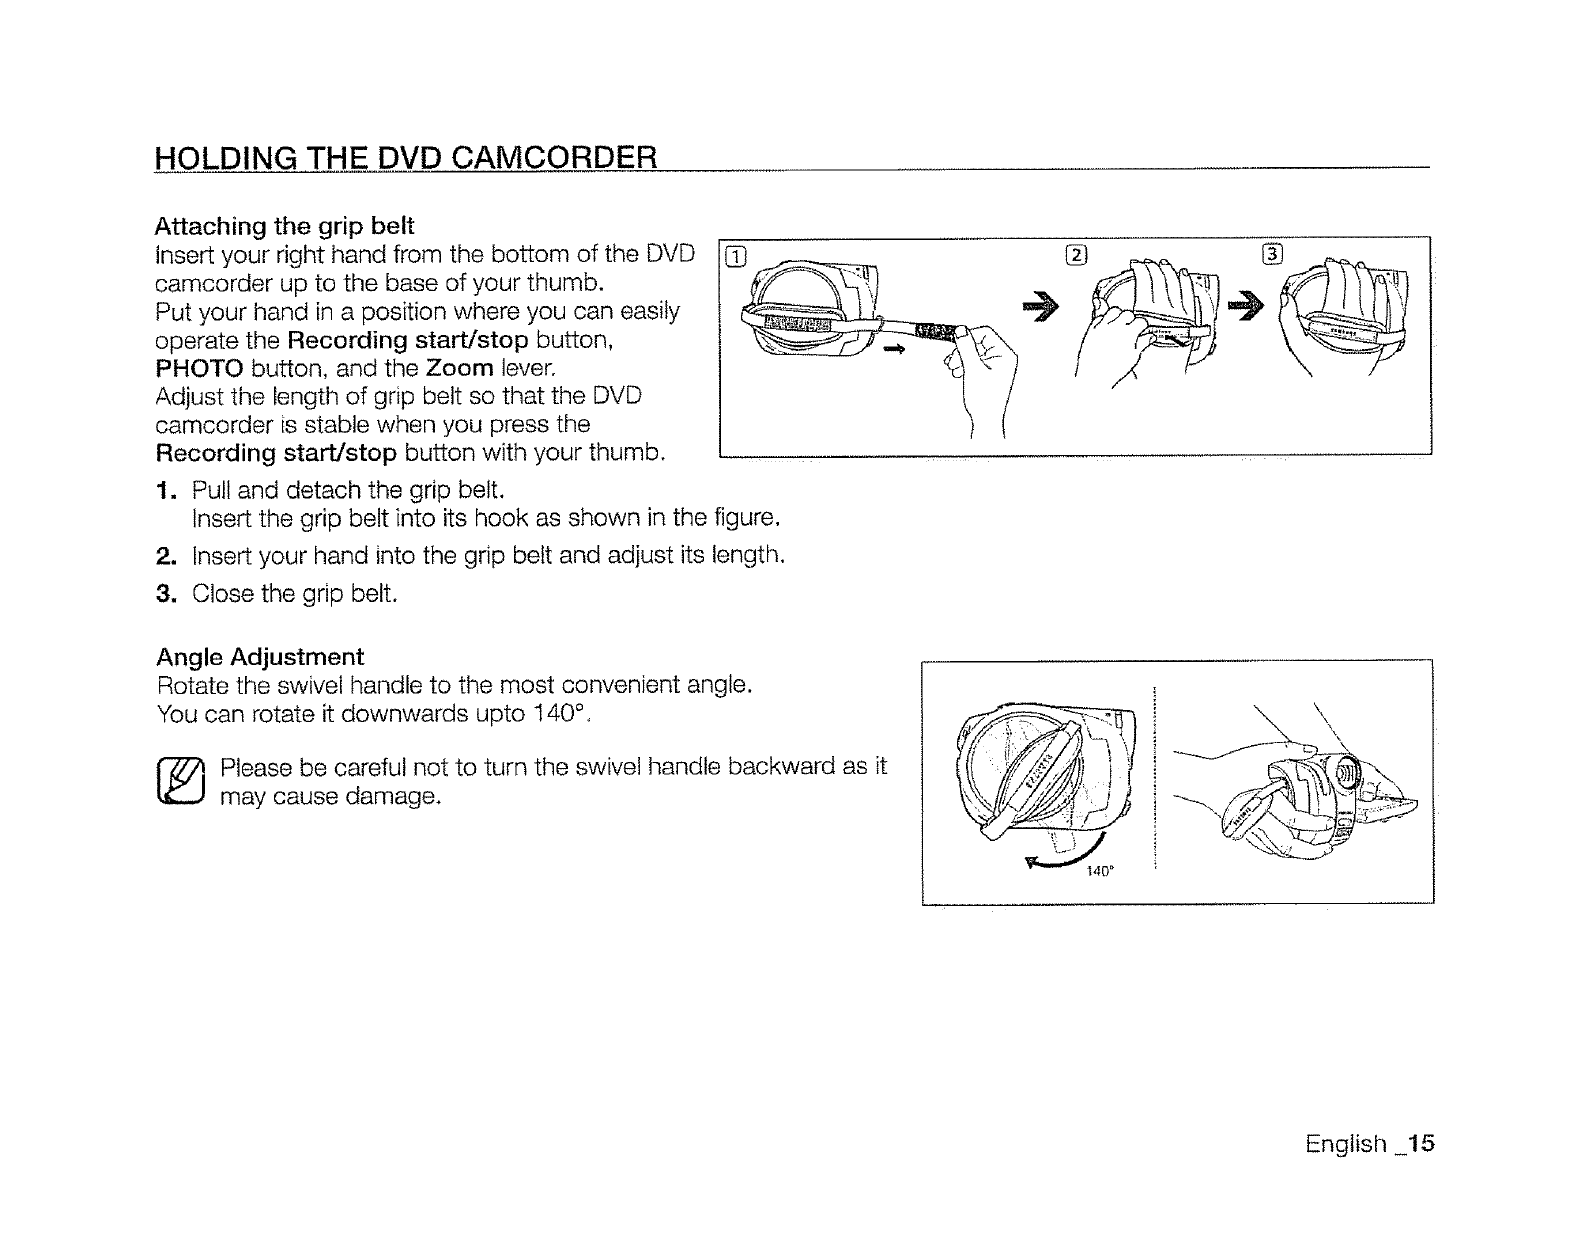
HOLDING THE DVD CAMCORDER
Attaching the grip belt
insert your right hand from the bottom of the DVD
camcorder up to the base of your thumb.
Put your hand in a position where you can easily
operate the Recording start/stop button,
PHOTO button, and the Zoom lever,
Adjust the length of grip belt so that the DVD
camcorder is stable when you press the
Recording start/stop button with your thumb .................
1. Pull and detach the grip belt.
Insert the grip belt into its hook as shown in the figure,
2, Insert your hand into the grip belt and adjust its length.
3. Close the grip belt.
Angle Adjustment
Rotate the swivel handle to the most convenient angle.
You can rotate it downwards upto 140 °,
[_ lease be careful not to turn the swivel handle backward as it
may cause damage.
English 15
re r tion
I f
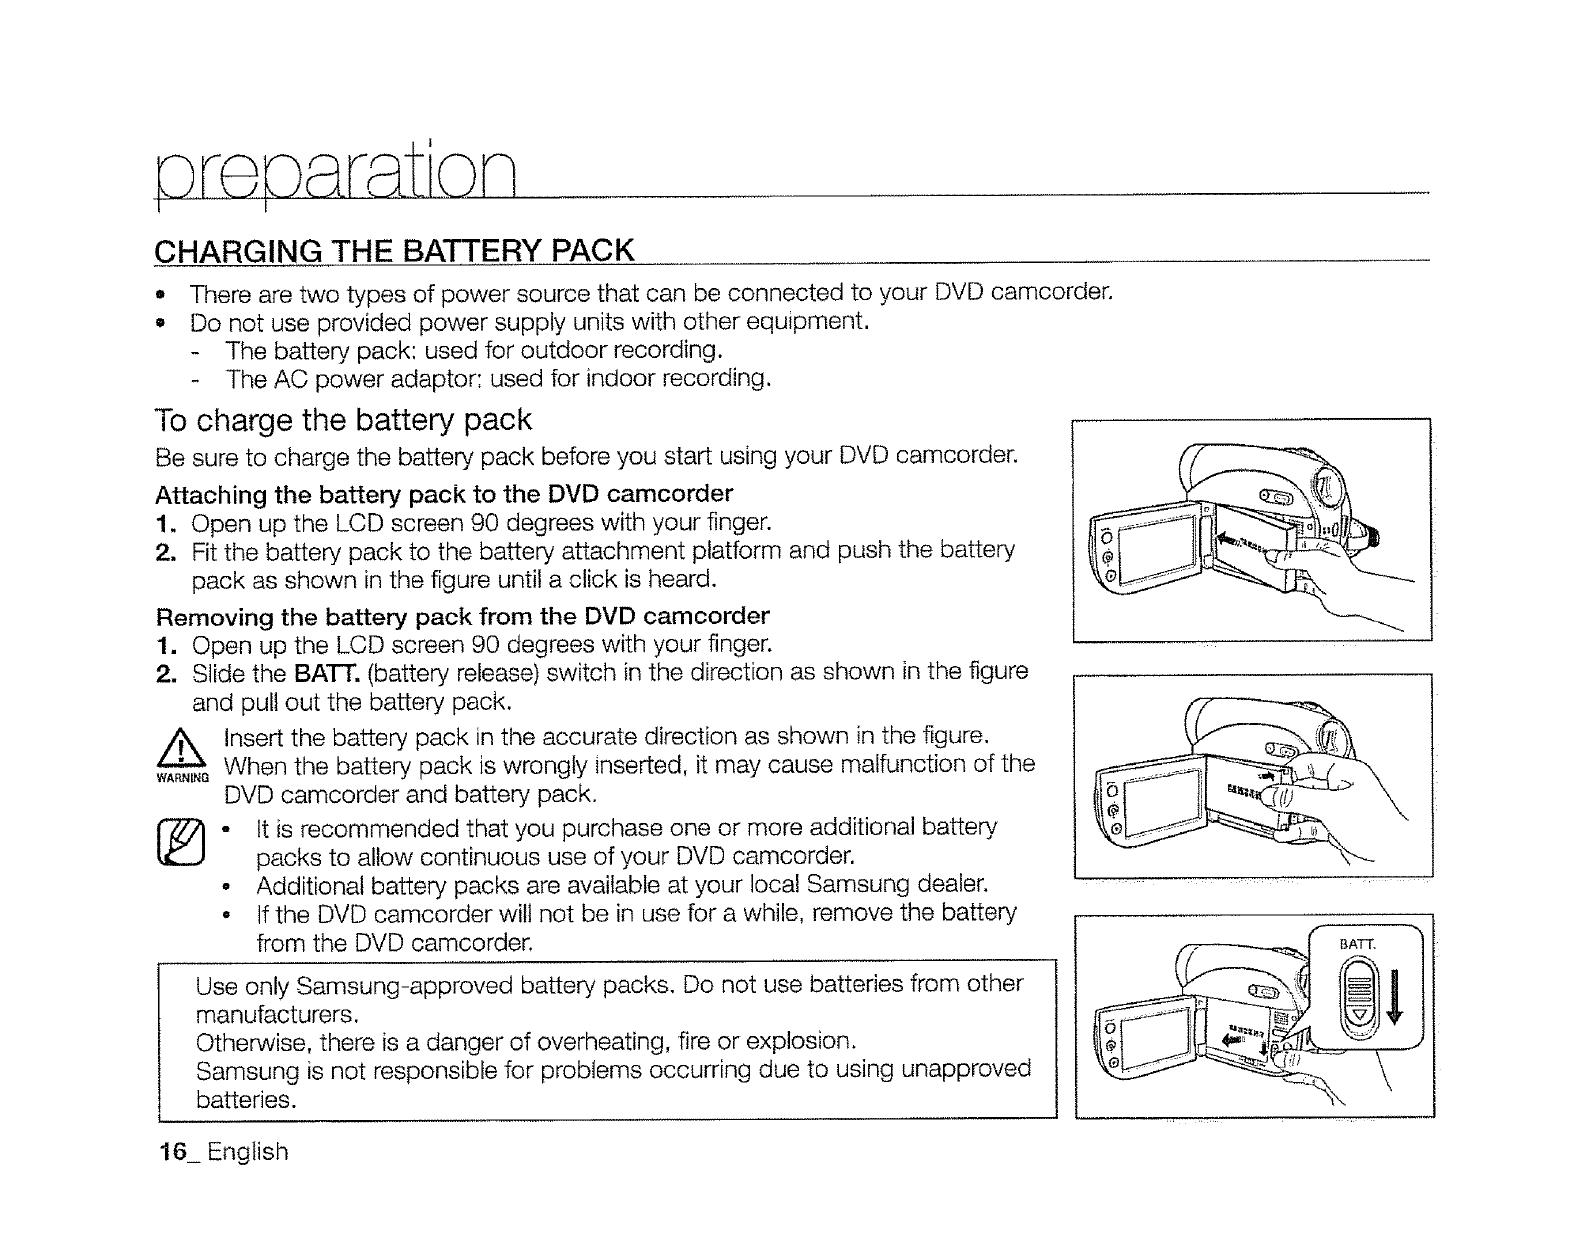
CHARGING THE BATTERY PACK
e
o
There are two types of power source that can be connected to your DVD camcorder.
Do not use provided power supply units with other equipment.
- The battery pack: used for outdoor recording.
- The AC power adaptor: used for indoor recording,
To charge the battery pack
Be sure to charge the battery pack before you start using your DVD camcorder.
Attaching the battery pack to the DVD camcorder
1. Open up the LCD screen 90 degrees with your finger.
2. Fit the battery pack to the battery attachment platform and push the battery
pack as shown in the figure until a click is heard.
Removing the battery pack from the DVD camcorder
1. Open up the LCD screen 90 degrees with your finger.
2. Slide the BATT. (battery release) switch in the direction as shown in the figure
and pull out the battery pack,
insert the battery pack in the accurate direction as shown in the figure.
WA..L_When the battery pack is wrongly inserted, it may cause malfunction of the
DVD camcorder and battery pack.
° It is recommended that you purchase one or more additional battery
packs to allow continuous use of your DVD camcorder,
° Additional battery packs are available at your local Samsung dealer.
• If the DVD camcorder will not be in use for a while, remove the battery
from the DVD camcorder.
Use only Samsung-approved battery packs. Do not use batteries from other
manufacturers.
Otherwise, there is a danger of overheating, fire or explosion.
Samsung is not responsible for problems occurring due to using unapproved
batteries.
16_ English
About battery packs
•The battery pack should be recharged in an environment that is between 0°C (32°F) and 40°C (104°F).
However, when it is exposed to cold temperatures (below 0°C (32°F)), its usage time becomes reduced and it
may cease to function. If this happens, place the battery pack in your pocket or other warm, protected place for a
short time, then re-insert it to the DVD camcorder.
•Do not put the battery pack near any heat source (i.e. fire or a heater).
•Do not disassemble, apply pressure to, or heat the battery pack,
.Do not allow battery pack terminals to be short-circuited. It may cause leakage, heat generation, induce
overheating or fire.
Maintaining the battery pack
•The recording time is affected by temperature and environmental conditions.
•The recording time shortens dramatically in a cold environment. The continuous recording times in the user
manual are measured using a fully charged battery pack at 25°C (77°F). As the environmental temperature and
conditions vary, the remaining battery time may differ from the approximate continuous recording times given in
the instructions.
•We recommend only using the original battery pack that is available from your Samsung retailer. When the battery
reaches the end of its life, please contact your local dealer. The batteries have to be treated as chemical waste.
•Make sure that the battery pack is fully charged before starting to record.
•When fully discharged, a battery pack damages the internal cells. The battery pack may be prone to leakage
when fully discharged.
•Remove the battery from the camcorder when it is not in use. Even when the power is switched off, the battery
pack will still discharge if it is left attached to the DVD camcorder.
-For power saving purposes, the DVD camcorder enters the sleep mode automatically if no operation is performed
for 3 minutes in the STBY mode and thumbnail index view. If no operation is made for 3 more minutes while the
unit is sleep mode, the camcorder turns off automatically. However, if any operation is made, the DVD camcorder
comes out of sleep mode, This function works only if "Auto Power Off" is set to "6 Min."_page 80
oMake sure that the battery pack fits firmly into place. Do not drop the batter,i pack as it may cause damage.
About the battery life
Battery capacity decreases over time and through repeated use.
If decreased usage time between charges becomes significant, it is probably time to replace it with a new one,
Each battery's life is affected by storage, operating and environmental conditions.
English _17
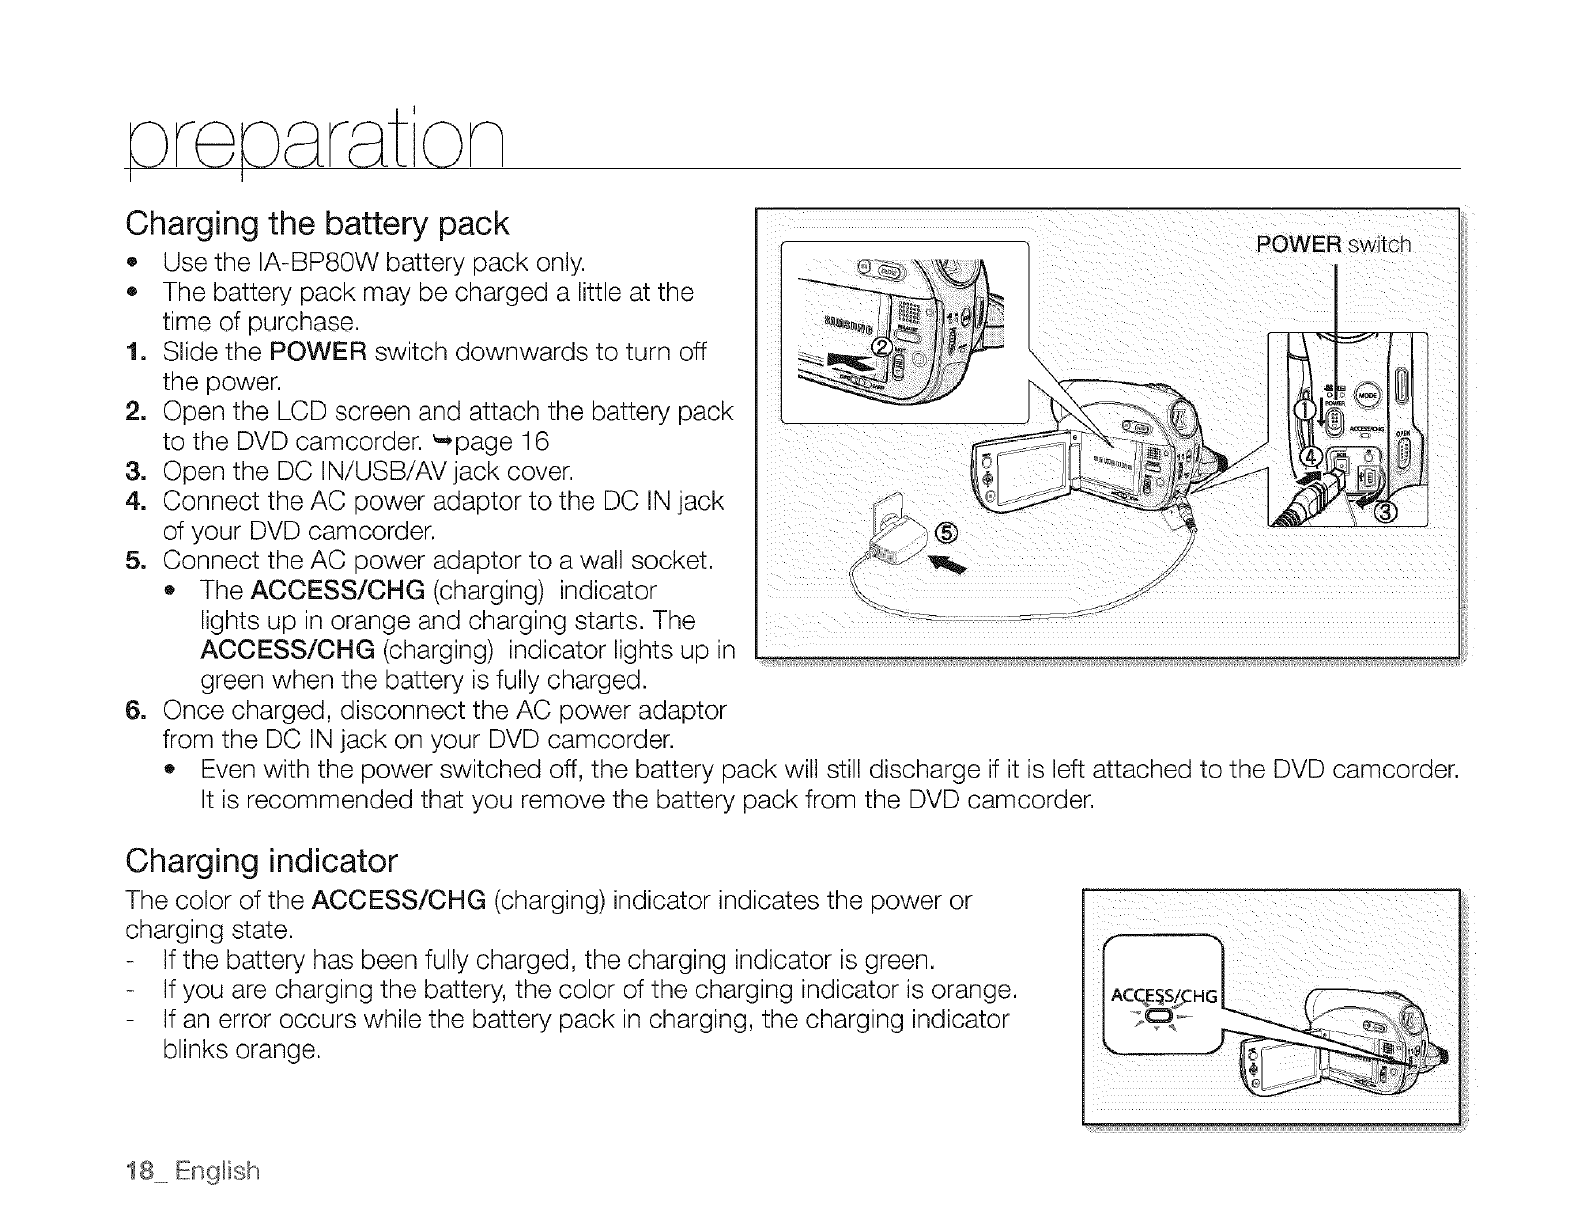
Charging the battery pack
• Use the IA-BP80W battery pack only.
+ The battery pack may be charged a little at the
time of purchase.
1. Slide the POWER switch downwards to turn off
the power.
2. Open the LCD screen and attach the battery pack
to the DVD camcorder. _,page 16
3. Open the DC INiUSB/AVjack cover.
4. Connect the AC power adaptor to the DC IN jack
of your DVD camcorder.
5. Connect the AC power adaptor to a wall socket.
o The ACCESS/CHG (charging) indicator
lights up in orange and charging starts. The
AOOESS/CHG (charging) indicator lights up in
green when the battery is fully charged.
6. Once charged, disconnect the AC power adaptor
from the DC IN jack on your DVD camcorder.
o
POWER
Even with the power switched off, the battery pack will still discharge if it is left attached to the DVD camcorder.
It is recommended that you remove the battery pack from the DVD camcorder.
Charging indicator
The color of the ACOESS/OHG (charging) indicator indicates the power or
charging state.
If the battery has been fully charged, the charging indicator is green.
If you are charging the battery, the color of the charging indicator is orange.
If an error occurs while the battery pack in charging, the charging indicator
blinks orange.
18 Engl+sh
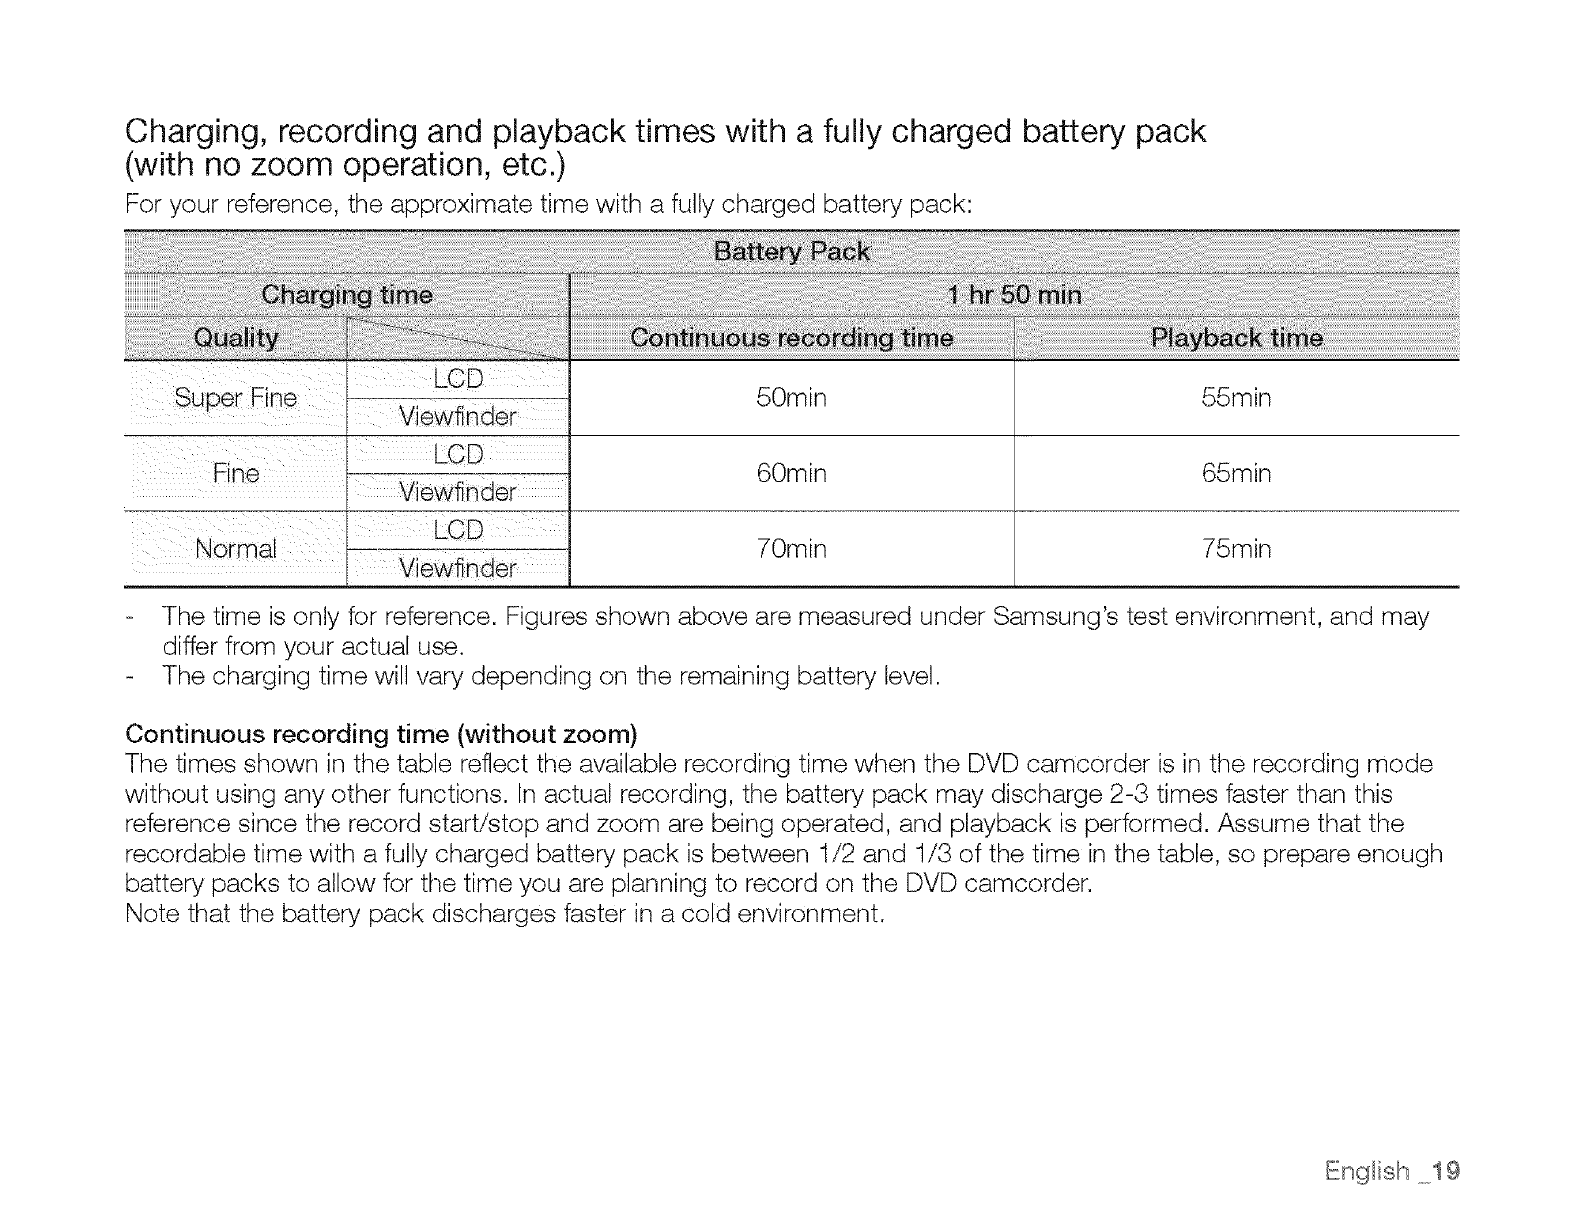
Charging, recording and playback times with a fully charged battery pack
(with no zoom operation, etc.)
For your reference, the approximate time with a fully charged battery pack:
Viewfinder
Normal ' Vie r --
50min
60min
70min
55min
65min
75min
The time is only for reference. Figures shown above are measured under Samsung's test environment, and may
differ from your actual use.
The charging time will vary depending on the remaining battery level.
Continuous recording time (without zoom)
The times shown in the table reflect the available recording time when the DVD camcorder is in the recording mode
without using any other functions. In actual recording, the battery pack may discharge 2-3 times faster than this
reference since the record start/stop and zoom are being operated, and playback is performed. Assume that the
recordable time with a fully charged battery pack is between 1/2 and 1/3 of the time in the table, so prepare enough
battery packs to allow for the time you are planning to record on the DVD camcorder.
Note that the battery pack discharges faster in a cold environment.
English ._19
Using the DVD camcorder with the AC power adaptor
It is recommended that you use the AC power adaptor to power the DVD camcorder from a household AC outlet
when you perform settings on it, finalize a disc, play back, or edit images, or use it indoors. _,page 18
I_o Be sure to use the provided AC power adaptor to power the DVD camcorder. Using other AC power
adaptors could cause electric shock or result in fire.
The AC power adaptor can be used around the world. An AC plug adaptor is required in some foreign
countries. If you need one, purchase it at your local Samsung dealer.
OAUTION
Before detaching the power source, make sure that the DVD camcorder's power is turned off.
Failure to do so can result in DVD camcorder malfunction.
• Use a nearby wall outlet when using the AC power adaptor. Disconnect the AC power adaptor from the wall
outlet immediately if any malfunction occurs while using your DVD camcorder.
• Do not use the AC power adaptor in a narrow space, such as between a wall and furniture.
20 English
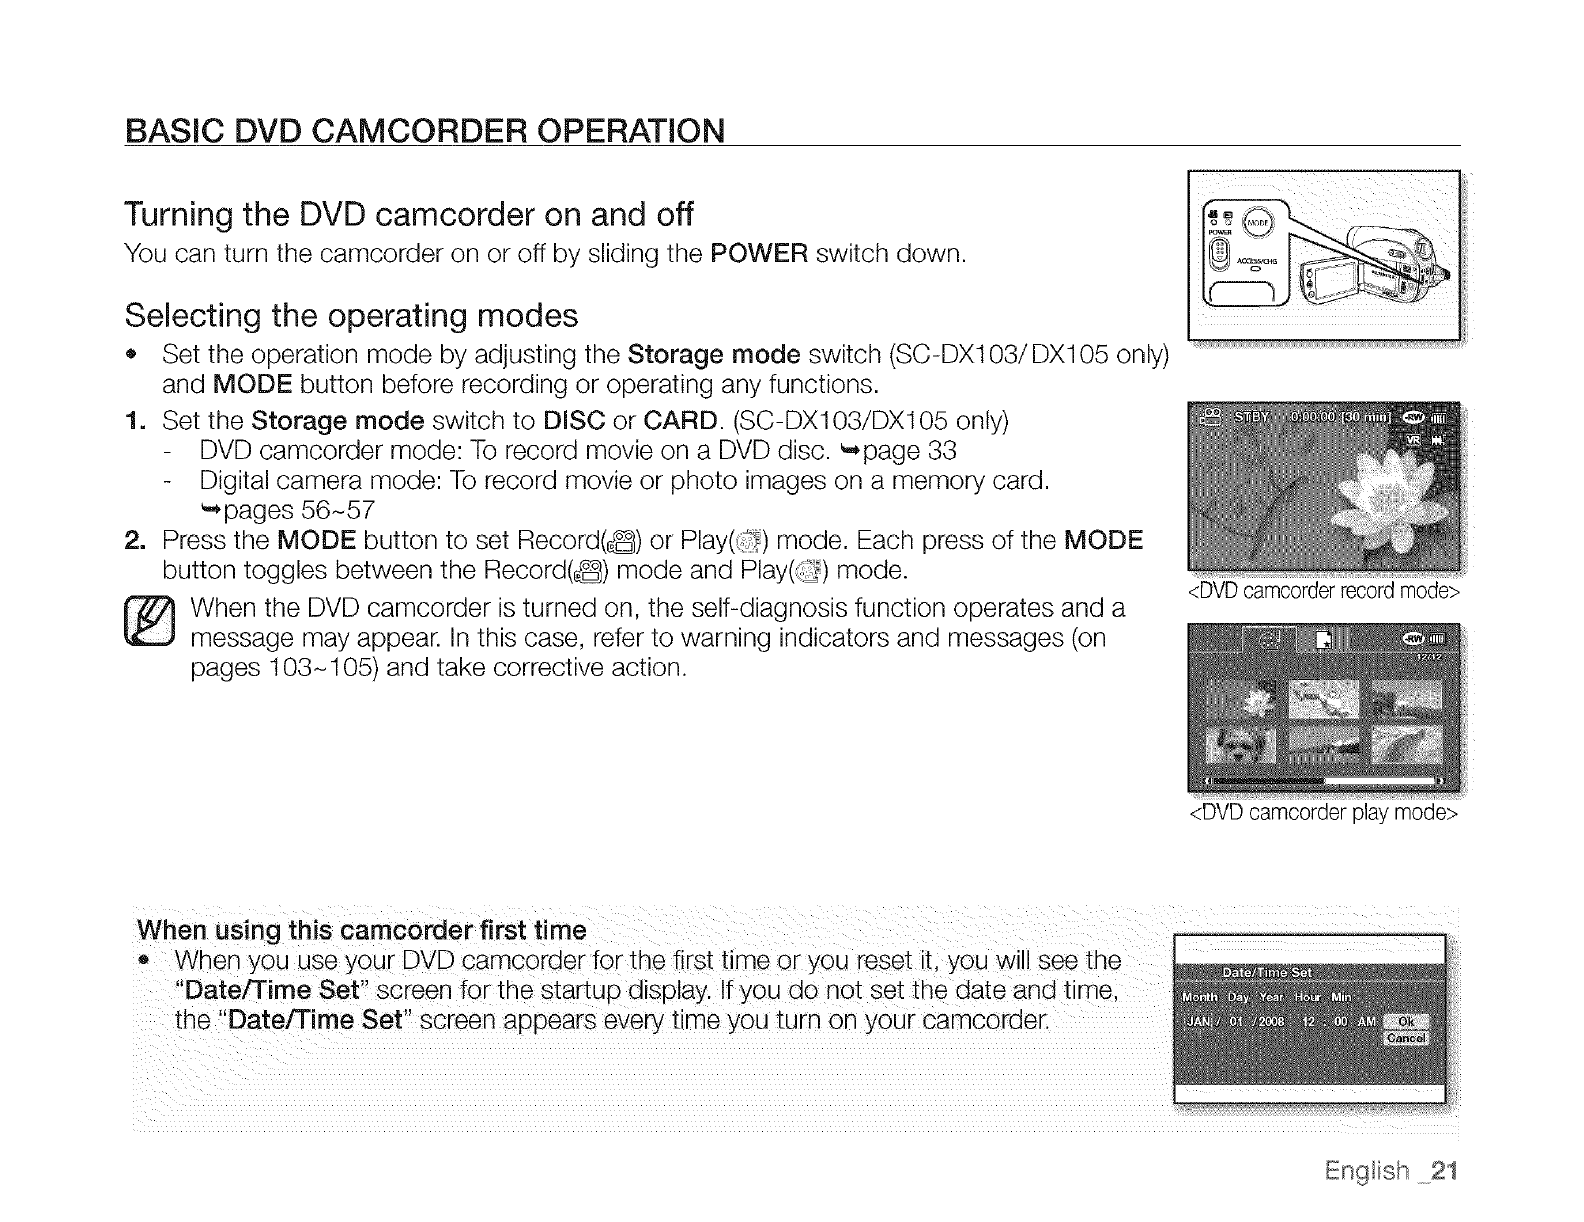
BASIC DVD CAMCORDER OPERATION
Turning the DVD camcorder on and off
You can turn the camcorder on or off by sliding the POWER switch down.
Selecting the operating modes
• Set the operation mode by adjusting the Storage mode switch (SC-DX103/DX105 only)
and MODE button before recording or operating any functions.
1. Set the Storage mode switch to DISC or CARD. (SC-DX103/DX105 only)
DVD camcorder mode: To record movie on a DVD disc. _page 33
Digital camera mode: To record movie or photo images on a memory card.
'mpages 56-57
2. Press the MODE button to set Record(6) or Play(_) mode. Each press of the MODE
button toggles between the Record(_) mode and Play(:_) mode.
_} hen the DVD camcorder is turned on, the self-diagnosis function operates and a
message may appear. In this case, refer to warning indicators and messages (on
pages 103-105) and take corrective action.
When using this camcorder first time
,, When you use your DVD camcorder for the first time or you reset it, you will see the
"Date/Time Set" screen for the startup display. If you do not set the date and time
the "Date/Time Set" screen appears every time you turn on your camcorder.
<DVDcamcorder recordmode>
<DVD camcorder play mode>
Engtish 21
on
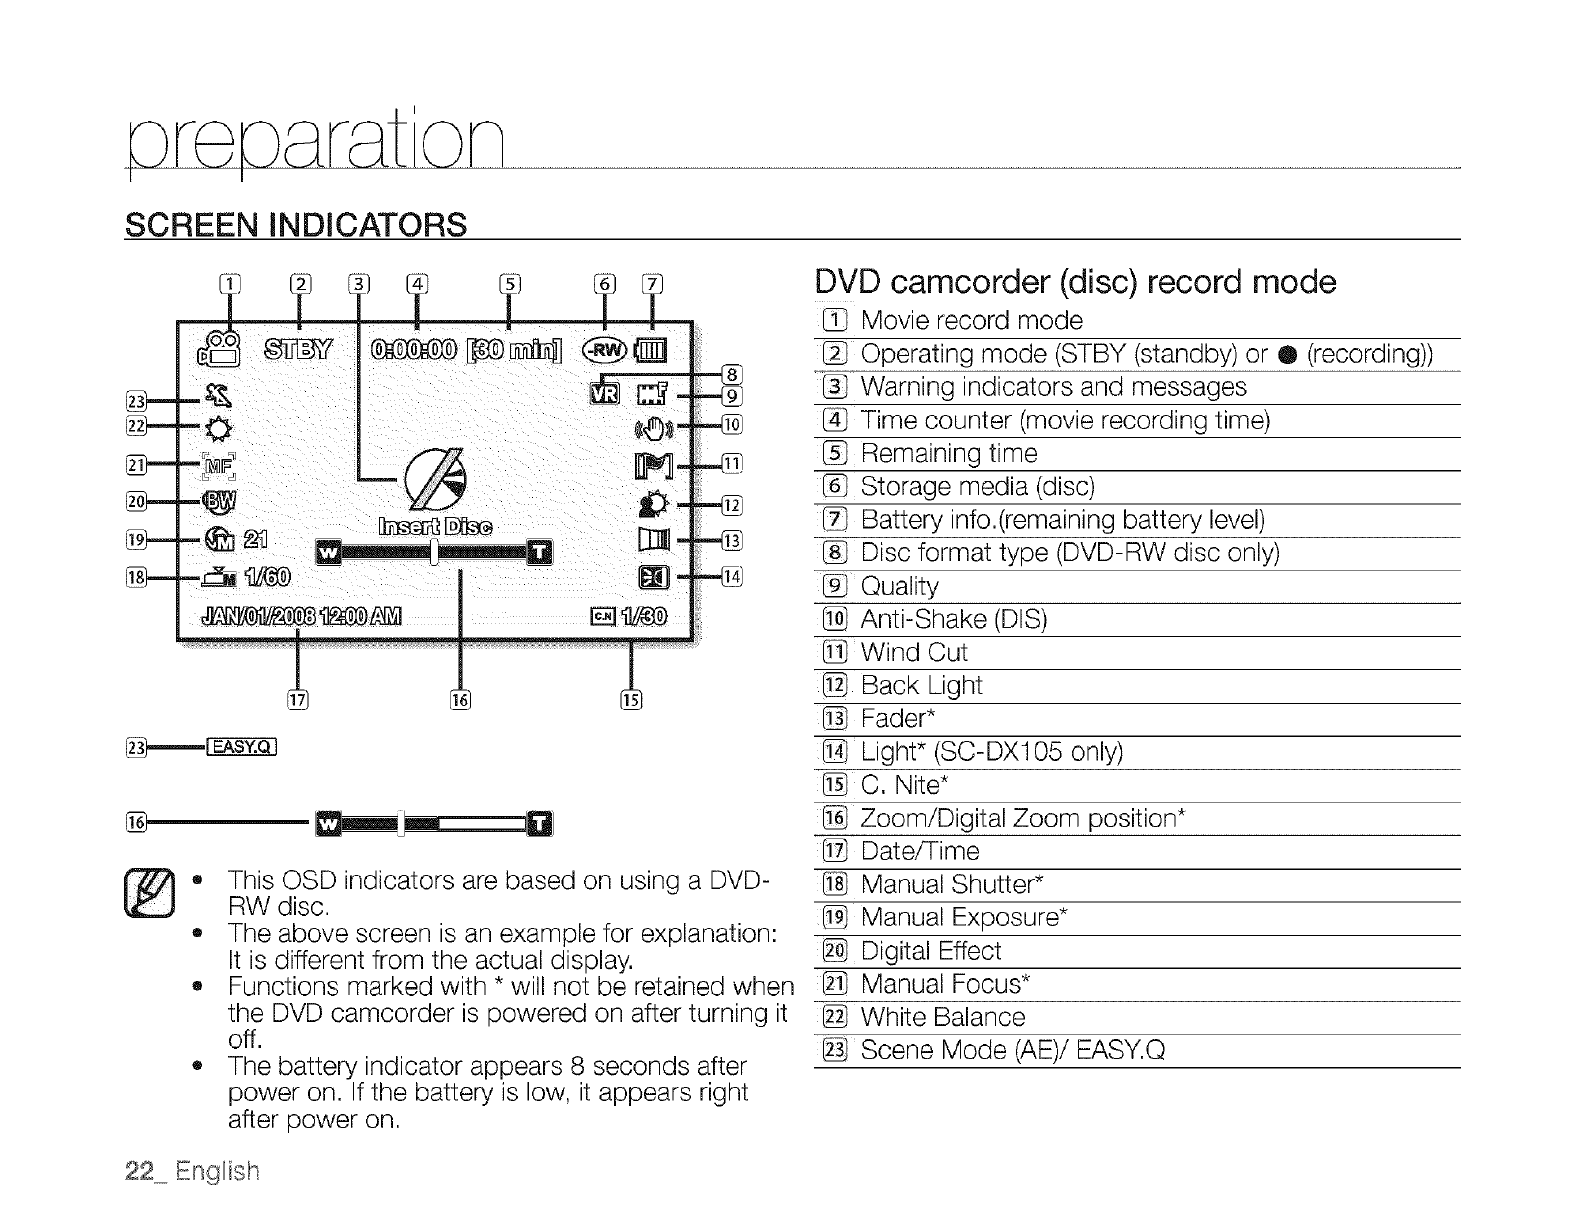
SCREEN INDICATORS
@--
-O
-_ ,.@
-@
@
®,, This OSD indicators are based on using a DVD-
RW disc.
,, The above screen is an example for explanation:
It is different from the actual display.
• Functions marked with * will not be retained when
the DVD camcorder is powered on after turning it
off.
• The battery indicator appears 8 seconds after
power on. If the battery is low, it appears right
after power on.
DVD camcorder (disc) record mode
Movie record mode
Operating mode (STBY (standby) or ® (recording))
Warning indicators and messages
@ Time counter (movie recording time)
Remaining time
Storage media (disc)
Battery info.(remaining battery level)
Disc format type (DVD-RW disc only)
_ Quality
Anti-Shake (DIS)
@Wind Cut
@ Back Light
Fader*
Light* (SC-DX105 only)
_C. Nite*
Zoom/Digital Zoom position*
Date/Time
Manual Shutter*
Manual Exposure*
Digital Effect
Manual Focus*
White Balance
_ Scene Mode (AE)/EASY.Q
22 English
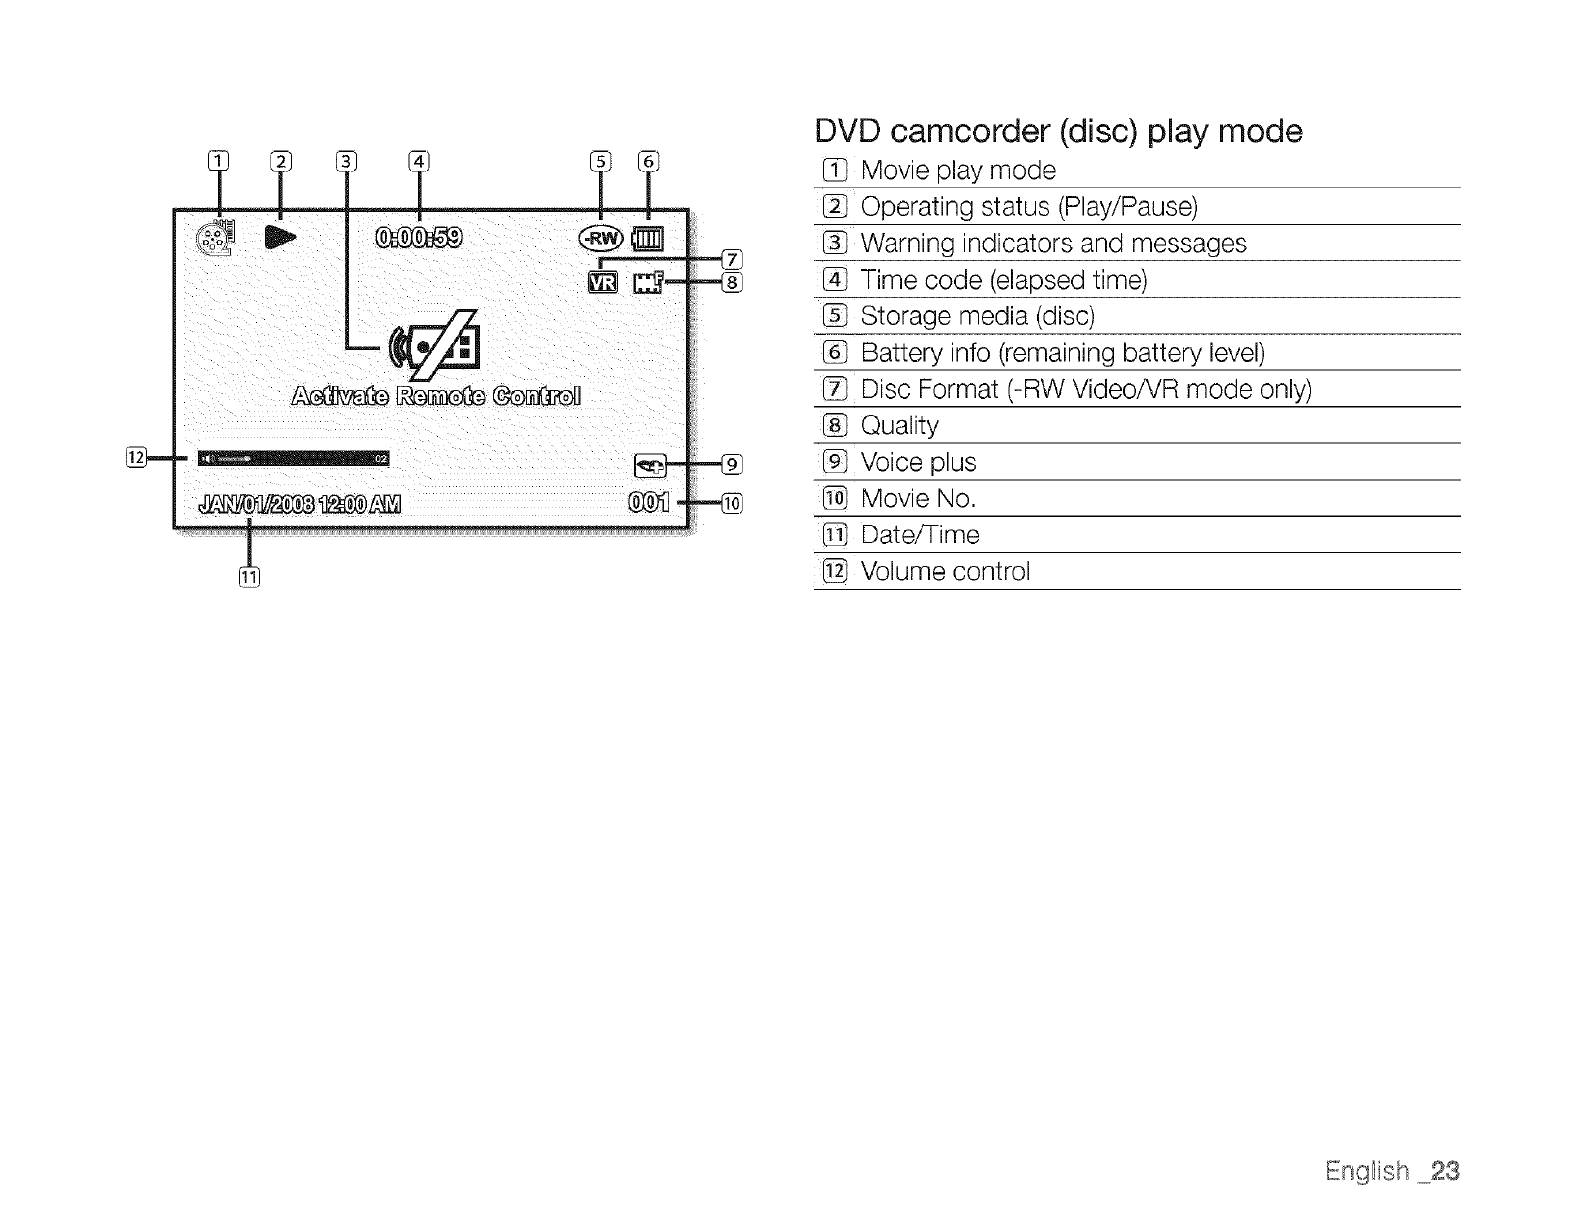
DVD camcorder (disc) play mode
Movie play mode
Operating status (Play!Pause)
Warning indicators and messages
Time code (elapsed time)
Storage media (disc)
Battery info (remaining battery level)
Disc Format (-RW VideoiVR mode only)
Quality
@ Voice plus
Movie No.
Date/Time
@ Volume control
English .oo23
8} _ ® % % ®CS
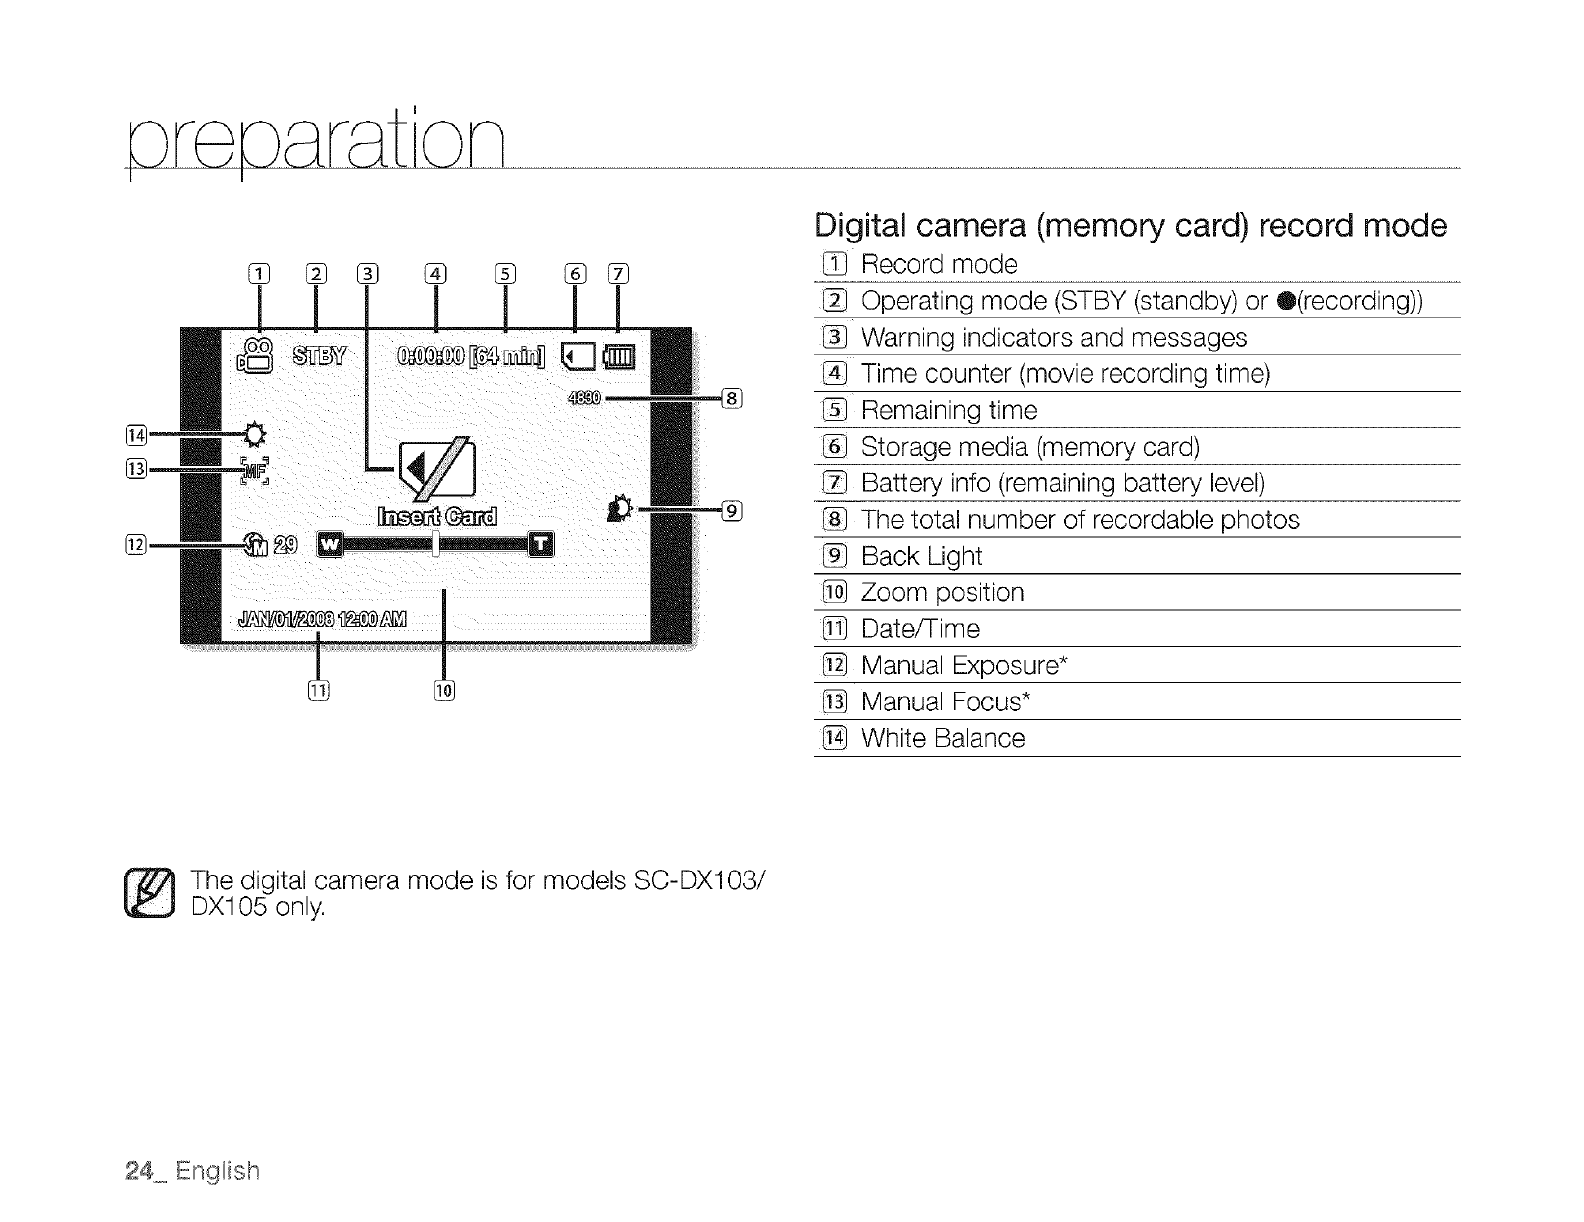
Digital camera (memory card) record mode
Record mode
Operating mode (STBY (standby) or Q(recording))
Warning indicators and messages
@ Time counter (movie recording time)
Remaining time
Storage media (memory card)
Battery info (remaining battery level)
The total number of recordable photos
@ Back Light
@ Zoom position
Date/Time
@ Manual Exposure*
Manual Focus*
White Balance
The digital camera mode is for models SC-DX103/
DX105 only.
24 Engnish
® %
G
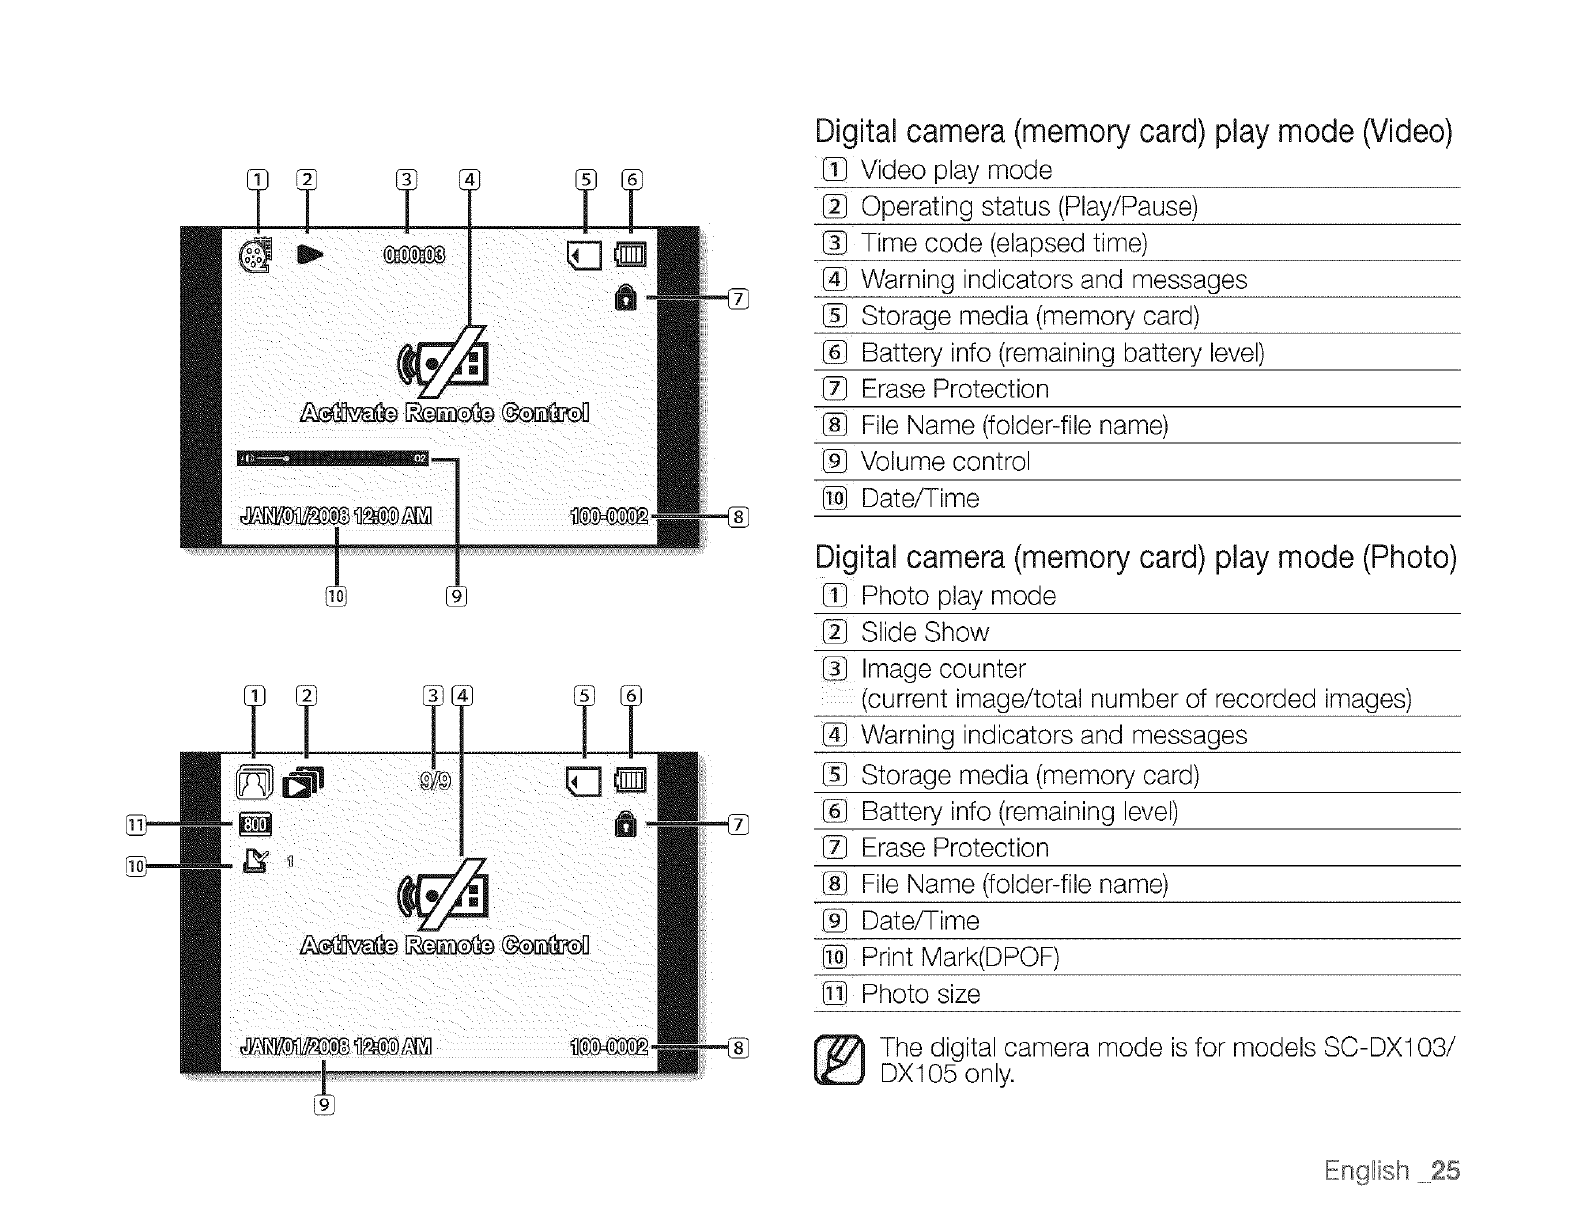
Digital camera (memory card) play mode (Video)
Video play mode
Operating status (Play/Pause)
Time code (elapsed time)
@ Warning indicators and messages
Storage media (memory card)
Battery info (remaining battery level)
Erase Protection
File Name (folder-file name)
Volume control
Date/Time
Digital camera (memory card) play mode (Photo)
Photo play mode
Slide Show
Image counter
(current image/total number of recorded images)
@ Warning indicators and messages
Storage media (memory card)
Battery info (remaining level)
Erase Protection
File Name (folder-file name)
@ Date/Time
Print Mark(DPOF)
Photo size
I_The digital camera mode is for models SC-DXi 03/
DX105 only.
English 25
on
I I
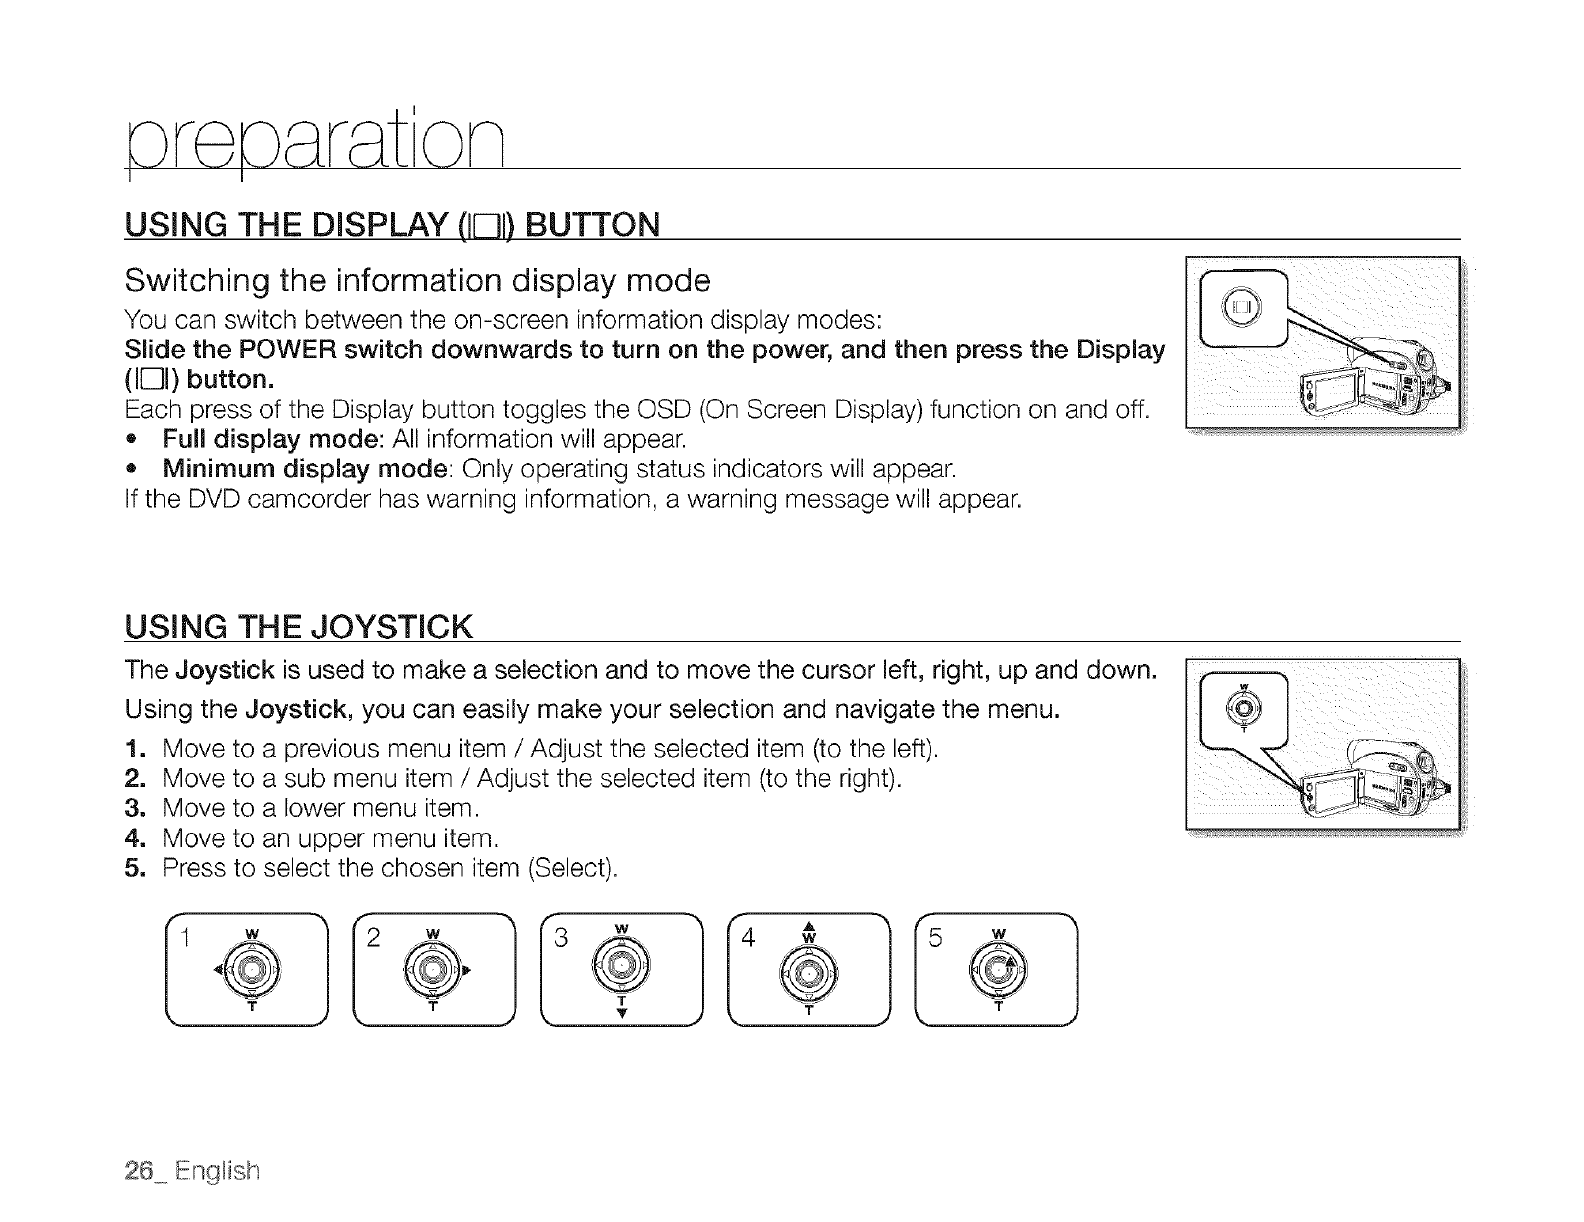
USING THE DISPLAY (IE]I) BUTTON
Switching the information display mode
You can switch between the on-screen information display modes:
Slide the POWER switch downwards to turn on the power, and then press the Display
(1131)button.
Each press of the Display button toggles the OSD (On Screen Display) function on and off.
,, Full display mode: All information will appear.
,, Minimum display mode: Only operating status indicators will appear.
If the DVD camcorder has warning information, a warning message will appear.
USING THE JOYSTICK
The Joystick is used to make a selection and to move the cursor left, right, up and down.
Using the Joystick, you can easily make your selection and navigate the menu.
1. Move to a previous menu item /Adjust the selected item (to the left).
2. Move to a sub menu item /Adjust the selected item (to the right).
3. Move to a lower menu item.
4. Move to an upper menu item.
5. Press to select the chosen item (Select).
Iol 1
2 W
IO,
26 English
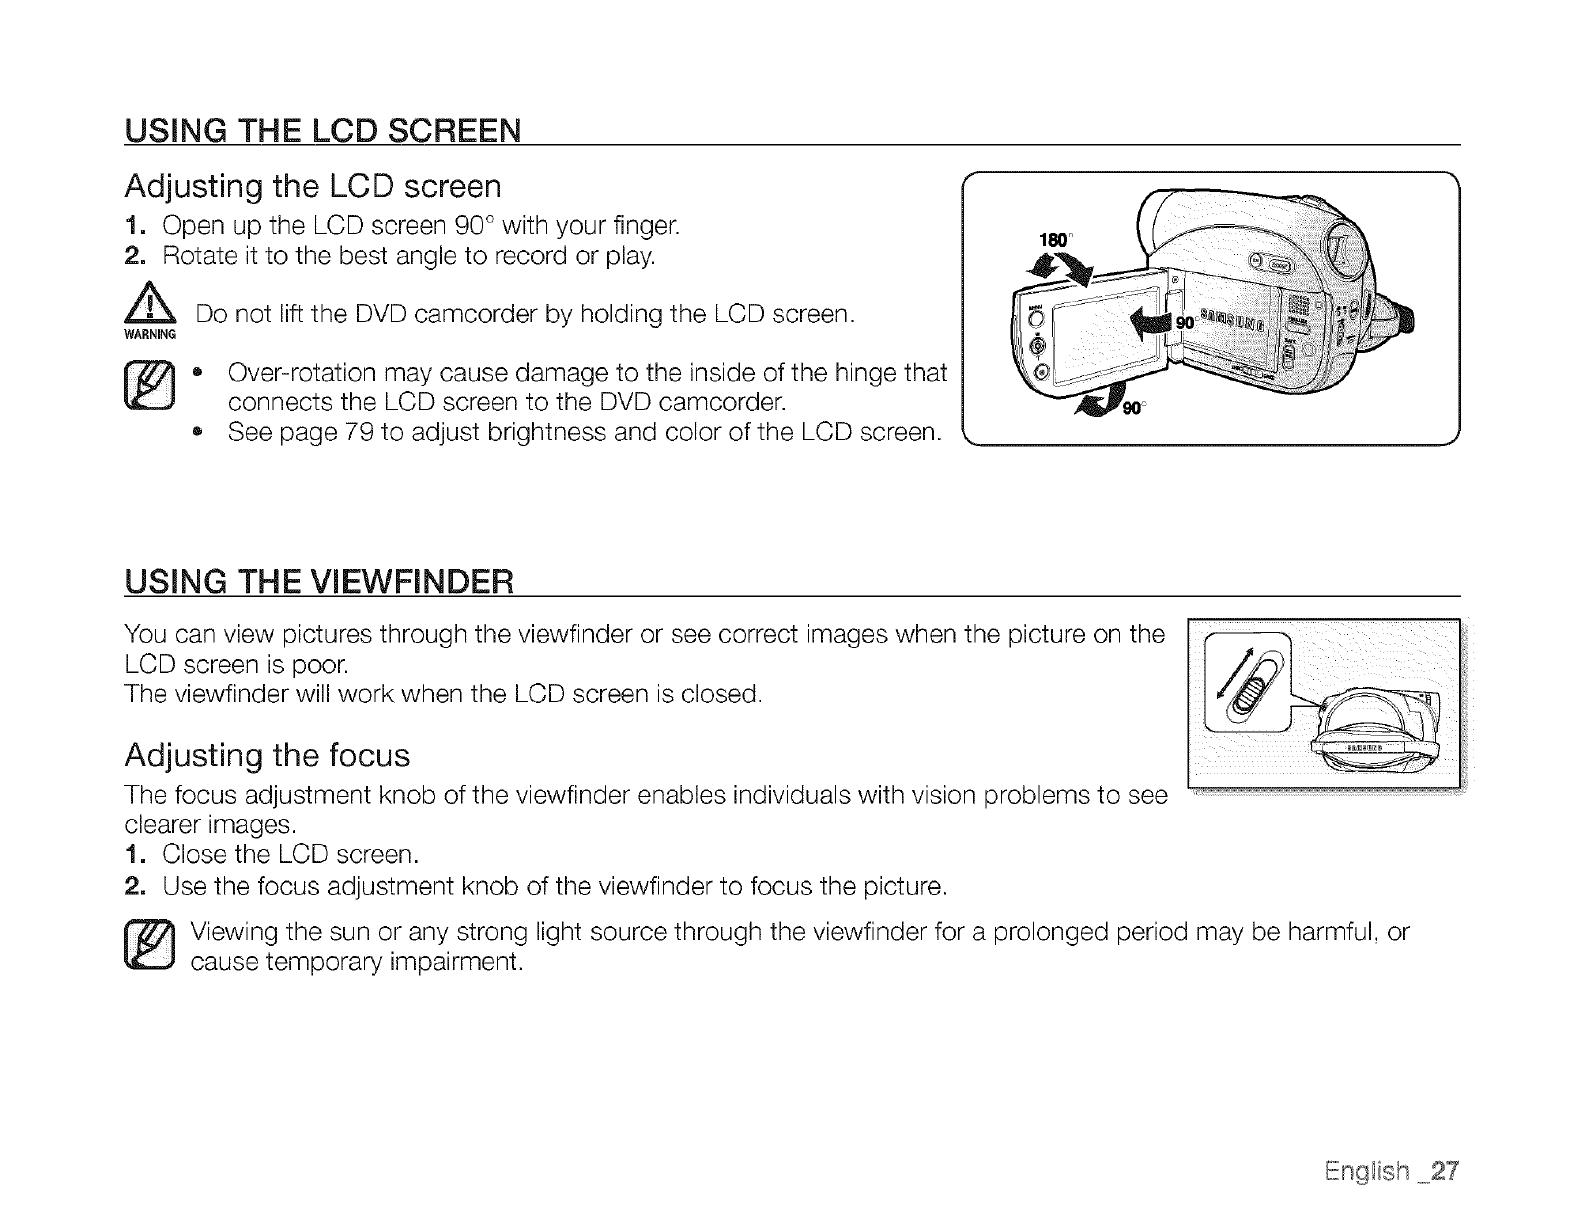
USING THE LCD SCREEN
Adjusting the LCD screen
1. Open up the LCD screen 90 ° with your finger.
2. Rotate it to the best angle to record or play.
WARNING Do not lift the DVD camcorder by holding the LCD screen.
,, Over-rotation may cause damage to the inside of the hinge that
connects the LCD screen to the DVD camcorder.
, See page 79 to adjust brightness and color of the LCD screen.
180°
USING THE VIEWFINDER
You can view pictures through the viewfinder or see correct images when the picture on the
LCD screen is poor.
The viewfinder will work when the LCD screen is closed.
Adjusting the focus
The focus adjustment knob of the viewfinder enables individuals with vision problems to see
clearer images.
1. Close the LCD screen.
2. Use the focus adjustment knob of the viewfinder to focus the picture.
[_ iewing the sun or any strong light source through the viewfinder for a prolonged period may be harmful, or
cause temporary impairment.
English 27
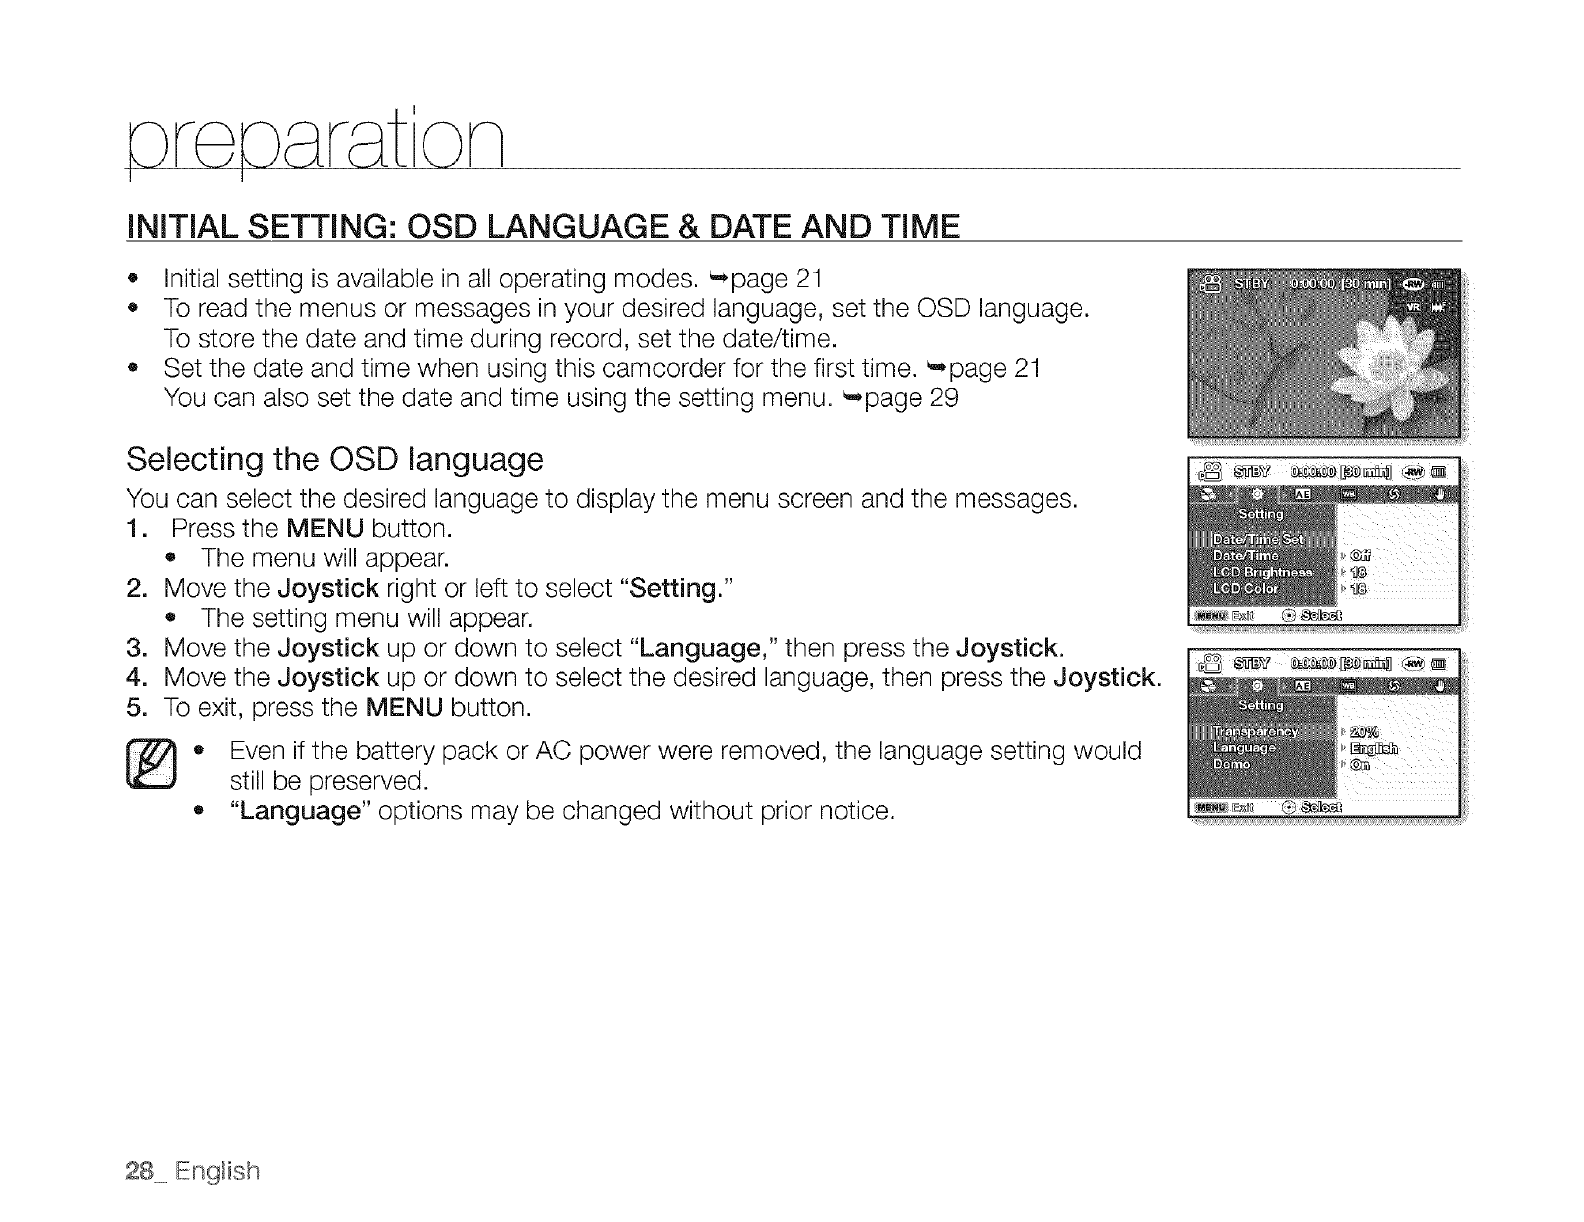
INITIAL SETTING: OSD LANGUAGE & DATE AND TIME
• Initial setting is available in all operating modes. _page 21
To read the menus or messages in your desired language, set the OSD language.
To store the date and time during record, set the date/time.
Set the date and time when using this camcorder for the first time. _,page 21
You can also set the date and time using the setting menu. _-page 29
Selecting the OSD language
You can select the desired language to display the menu screen and the messages.
1. Press the MENU button.
The menu will appear.
2. Move the Joystick right or left to select "Setting."
The setting menu will appear.
Move the Joystick up or down to select "Language," then press the Joystick.
Move the Joystick up or down to select the desired language, then press the Joystick.
To exit, press the MENU button.
.
4.
5.
• Even if the battery pack or AC power were removed, the language setting would
still be preserved.
,, "Language" options may be changed without prior notice.
28_ English
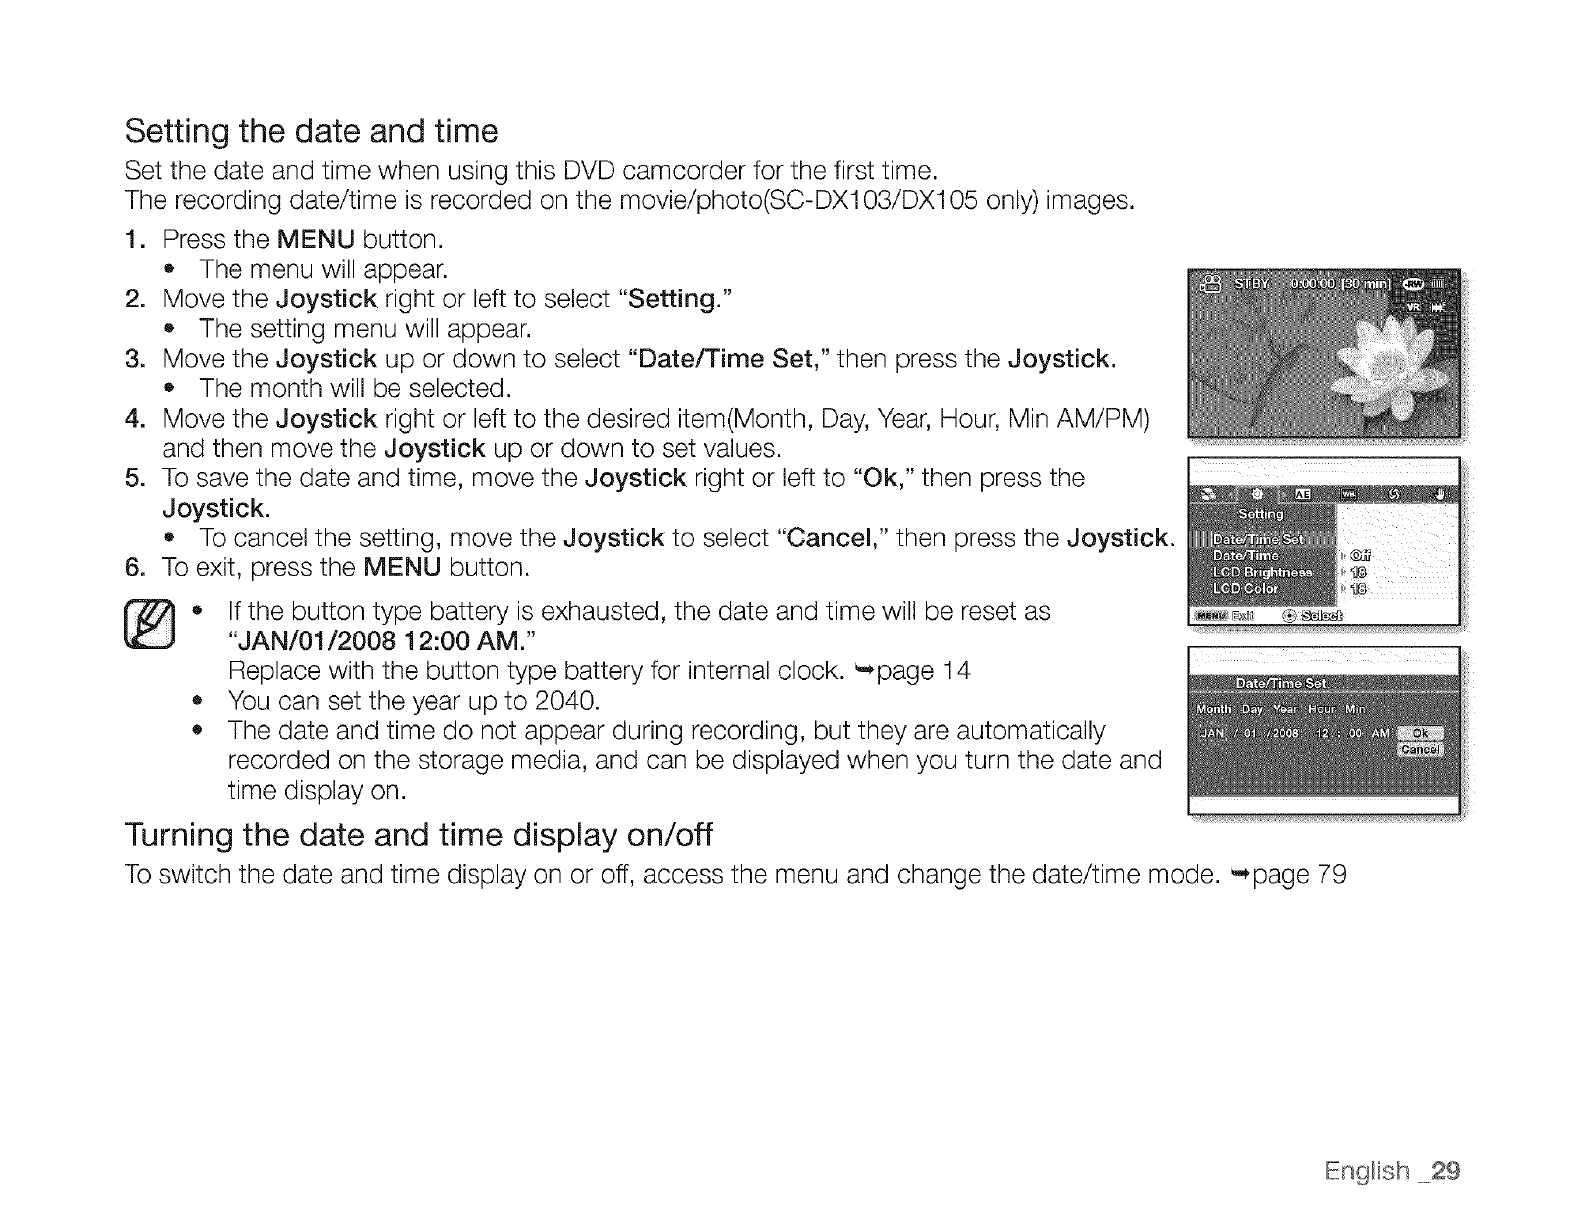
Setting the date and time
Set the date and time when using this DVD camcorder for the first time.
The recording date/time is recorded on the movie/photo(SC-DX108/DX105 only)images.
1. Press the MENU button.
o The menu will appear.
2. Move the Joystick right or left to select "Setting."
,, The setting menu will appear.
3. Move the Joystick up or down to select "Date/Time Set," then press the Joystick.
,, The month will be selected.
4. Move the Joystick right or left to the desired item(Month, Day, Year, Hour, Min AMiPM)
and then move the Joystick up or down to set values.
5. To save the date and time, move the Joystick right or left to "Ok," then press the
Joystick.
,, To cancel the setting, move the Joystick to select "Cancel," then press the Joystick.
6. To exit, press the MENU button.
[_,, If the button type battery is exhausted, the date and time will be reset as
"JAN/01/2008 12:00 AM."
Replace with the button type battery for internal clock. _page 14
,, You can set the year up to 2040.
,, The date and time do not appear during recording, but they are automatically
recorded on the storage media, and can be displayed when you turn the date and
time display on.
Turning the date and time display on/off
To switch the date and time display on or off, access the menu and change the date/time mode. "+page 79
Engl+sh +29

c moorder mode: before record nQ
SELECTING THE STORAGE MEDIA (SC-DX103/DX105 only)
You can record movies onto a DVD disc, and you can record both movies and photos onto a memory card. With
models SC-DX103/DX105, you must select the desired storage media before starting recording or playback.
Selecting the desired storage
• Set the Storage mode switch to DISC or CARD. (DISC *--,CARD)
DVD camcorder mode: To record movies on a DVD disc. _page 33
Digital camera mode: To record movies or photo images on memory card.
_pages 56N57
INSERTING AND REMOVING A DISC
• When inserting a disc or closing the disc cover, do not apply excessive force. It may
cause a malfunction.
• You cannot open the disc cover while loading.
• You can use a new 3 1/2 inch(8cm) DVD-RW, DVD+RW, DVD-R or DVD+R DL (Dual
Layer) disc for movie recording. Photos can not be recorded onto a DVD disc.
Inserting a disc
1. Slide the OPEN switch in the direction ef the arrow.
• The disc cover will partially open.
2. Gently open the cover the rest of the way by hand.
3. Push the disc into the disc compartment until a click is heard.
,, The recording side of the disc must face the inside of the DVD camcorder.
• Do not touch the pickup lens.
4. Gently push the disc cover to close it.
• Once inserted, the disc is recognized and the ACCESS/CHG indicator blinks.
Do not cut off the power supply during this time. Do not shake nor apply impact.
It may cause a malfunction.
• Set the Storage mode switch to DISC. (SC-DX103/DX105 only)
30 English
7}+ ove the grip belt so it does not interfere with inserting or ejecting the disc.
• The disc cover can be opened when the device is connected to an AC power adaptor or the battery pack,
even if the power is off.
pickup lens
Caution
This product utilises a laser. Use of controls or adjustments or performance of procedures
other than those specified herein may result in hazardous radiation exposure.
Do not open covers and do not look inside the product if interlock mechanism is damaged.
Warning
Be careful not to damage the interlock mechanism.
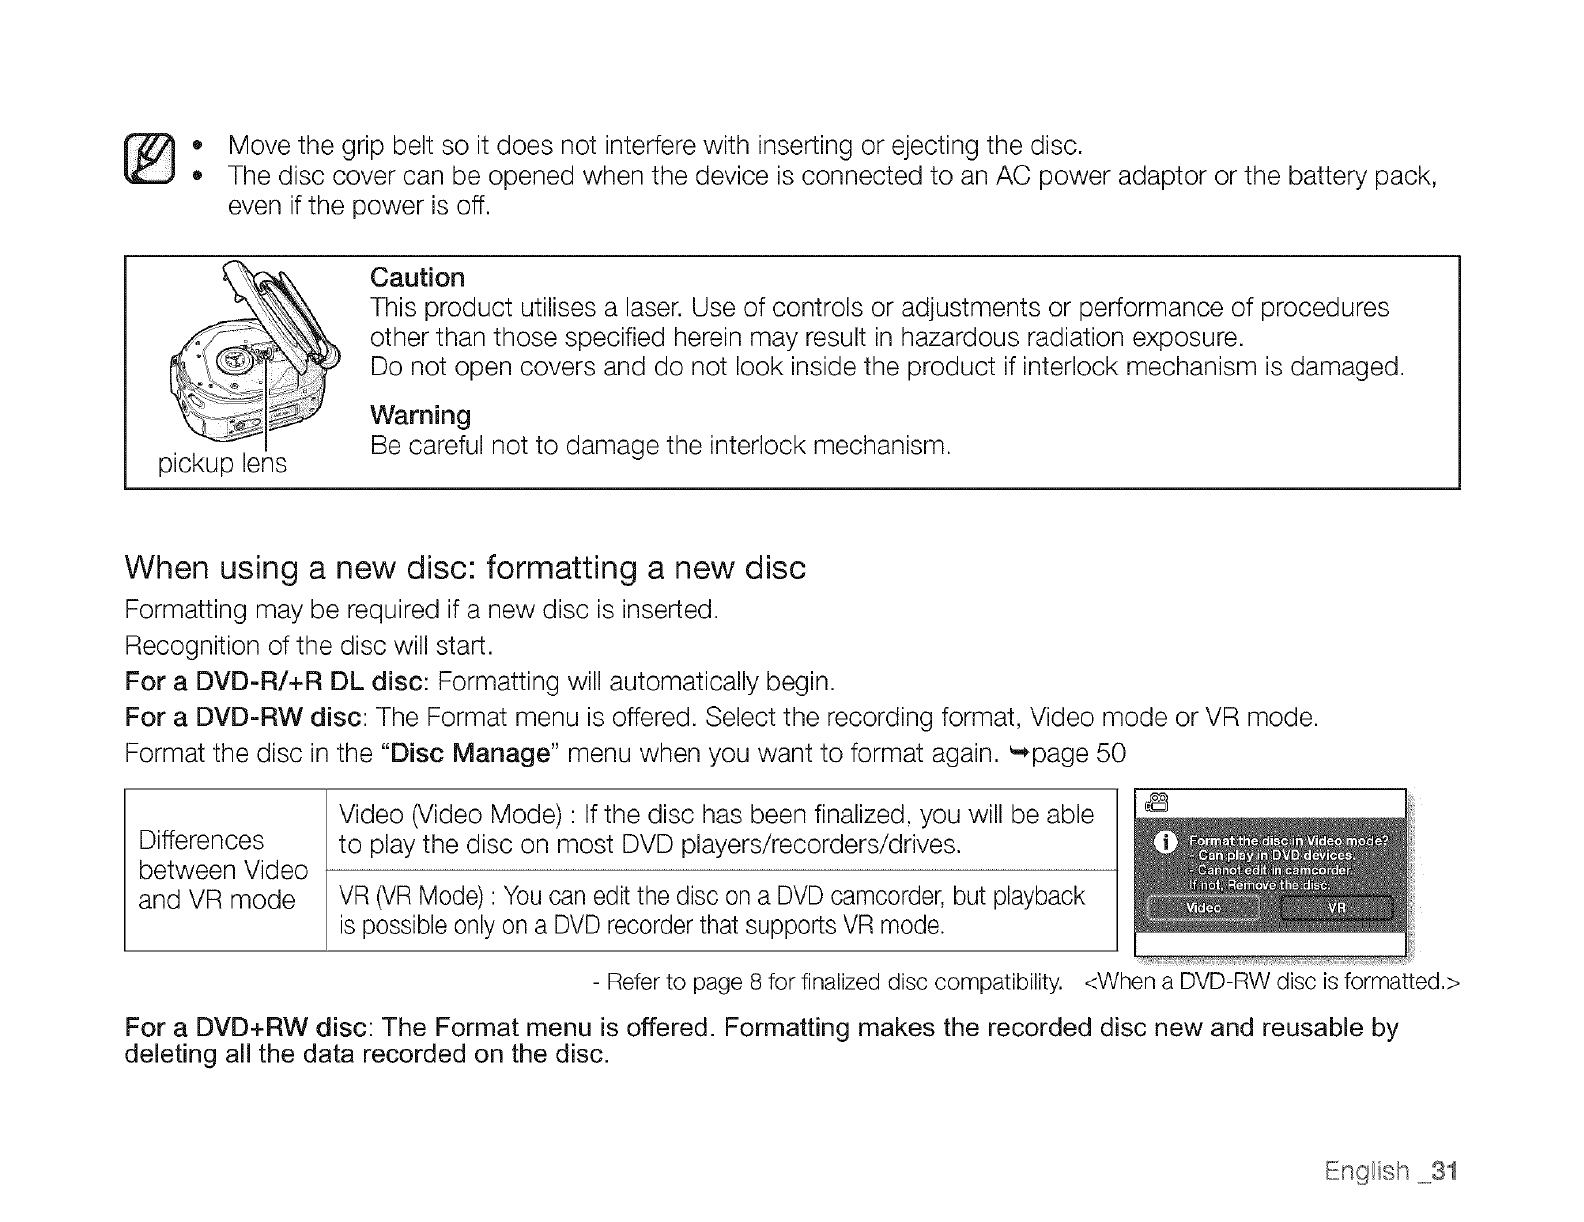
When using a new disc: formatting a new disc
Formatting may be required if a new disc is inserted.
Recognition of the disc will start.
For a DVD+R/+R DL disc: Formatting will automatically begin.
For a DVD-RW disc: The Format menu is offered. Select the recording format, Video mode or VR mode.
Format the disc in the "Disc Manage" menu when you want to format again. _page 50
Video (Video Mode) : If the disc has been finalized, you will be able
Differences to play the disc on most DVD players/recorders/drives.
between Video
and VR mode VR (VR Mode) : You can edit the disc on a DVD camcorder, but playback
is possible only on a DVD recorder that supports VR mode.
- Refer to page 8 for finalized disc compatibility. <When a DVD-RW disc is formatted.>
For a DVD+RW disc: The Format menu is offered. Formatting makes the recorded disc new and reusable by
deleting all the data recorded on the disc.
English +++..31
Removing a disc
1. Slide the OPEN switch in the direction of the arrow.
• The disc cover will partially open.
2. Gently open the cover the rest of the way by hand.
3. Remove the disc,
• While pushing down the center portion of the disc spindle, pick up the disc by the edges to remove.
Gently push the disc cover to close it.
- The Finalize/Format functions are not available when the battery level is low (_).
Use the AC power adaptor when finalizing/formatting a DVD disc,
- You cannot open the disc cover while loading, Wait until disc loading is completed.
- Do not operate the POWER switch or remove a disc while accessing it,
Doing so may damage the disc or the data on it.
, You can not proceed with recording when the disc cover is open. An icon and message are shown that recording is
impossible with the disc cover open,
, It may take longer to open the cover when using a DVD+RW, More than 5 minutes may be required if there are a lot of
movie images recorded on the disc,
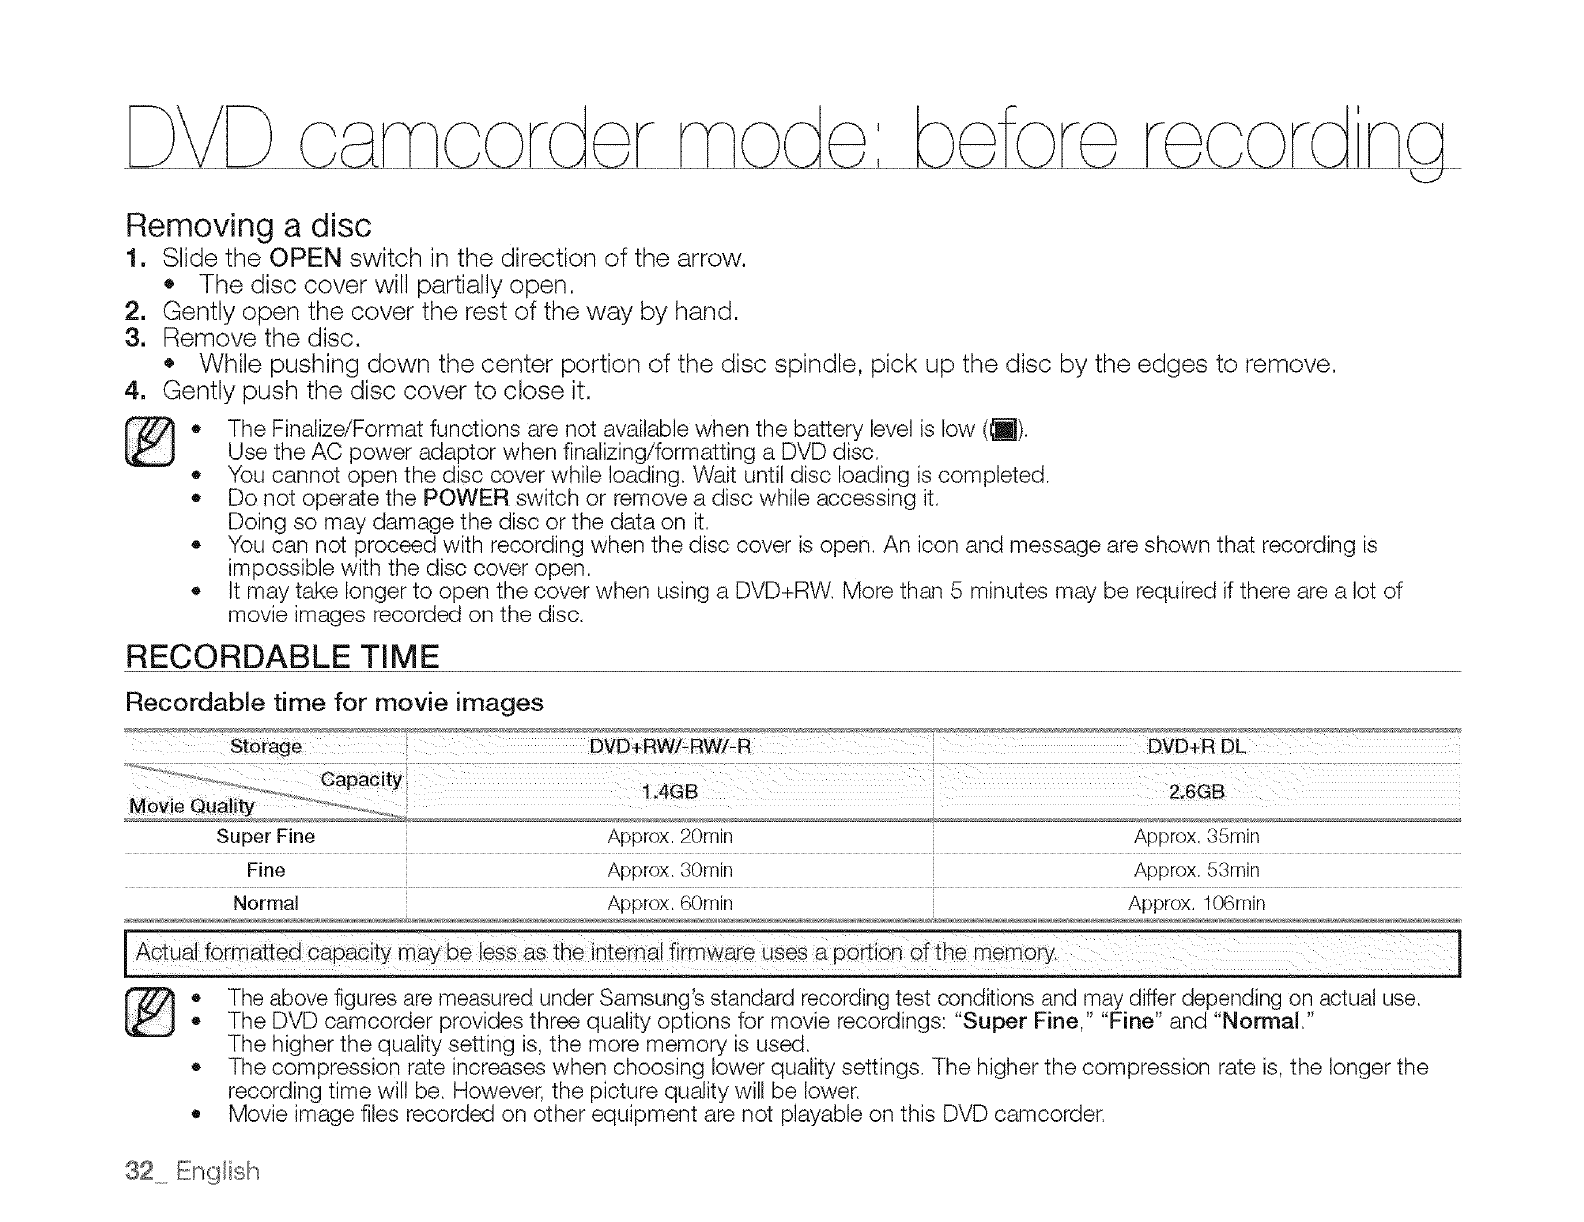
RECORDABLE TIME
Recordable time for movie images
Storage DVD+RW/- RW/-R DVD+R DL
..............................................Capaci y:
Movie Qu ali_,L_i,,i 1.4GB 2.6GB
Super Fine Approx 20rain Approx. 35rain
Fine Approx. 30rnin Approx. 53min
Normal Approx. 60min Approx. 106rnin
The above figures are measured under Samsung's standard recording test conditions and may differ depending on actual use,
*The DVD camcorder provides three quality options for movie recordings: "Super Fine," "Fine" and "Normal,"
The higher the quality setting is, the more memory is used,
The compression rate increases when choosing lower quality settings. The higher the compression rate is, the longer the
recording time will be. However, the picture quality will be lower.
Movie image files recorded on other equipment are not playable on this DVD camcorder.
32. English
DVD r mode: corcln
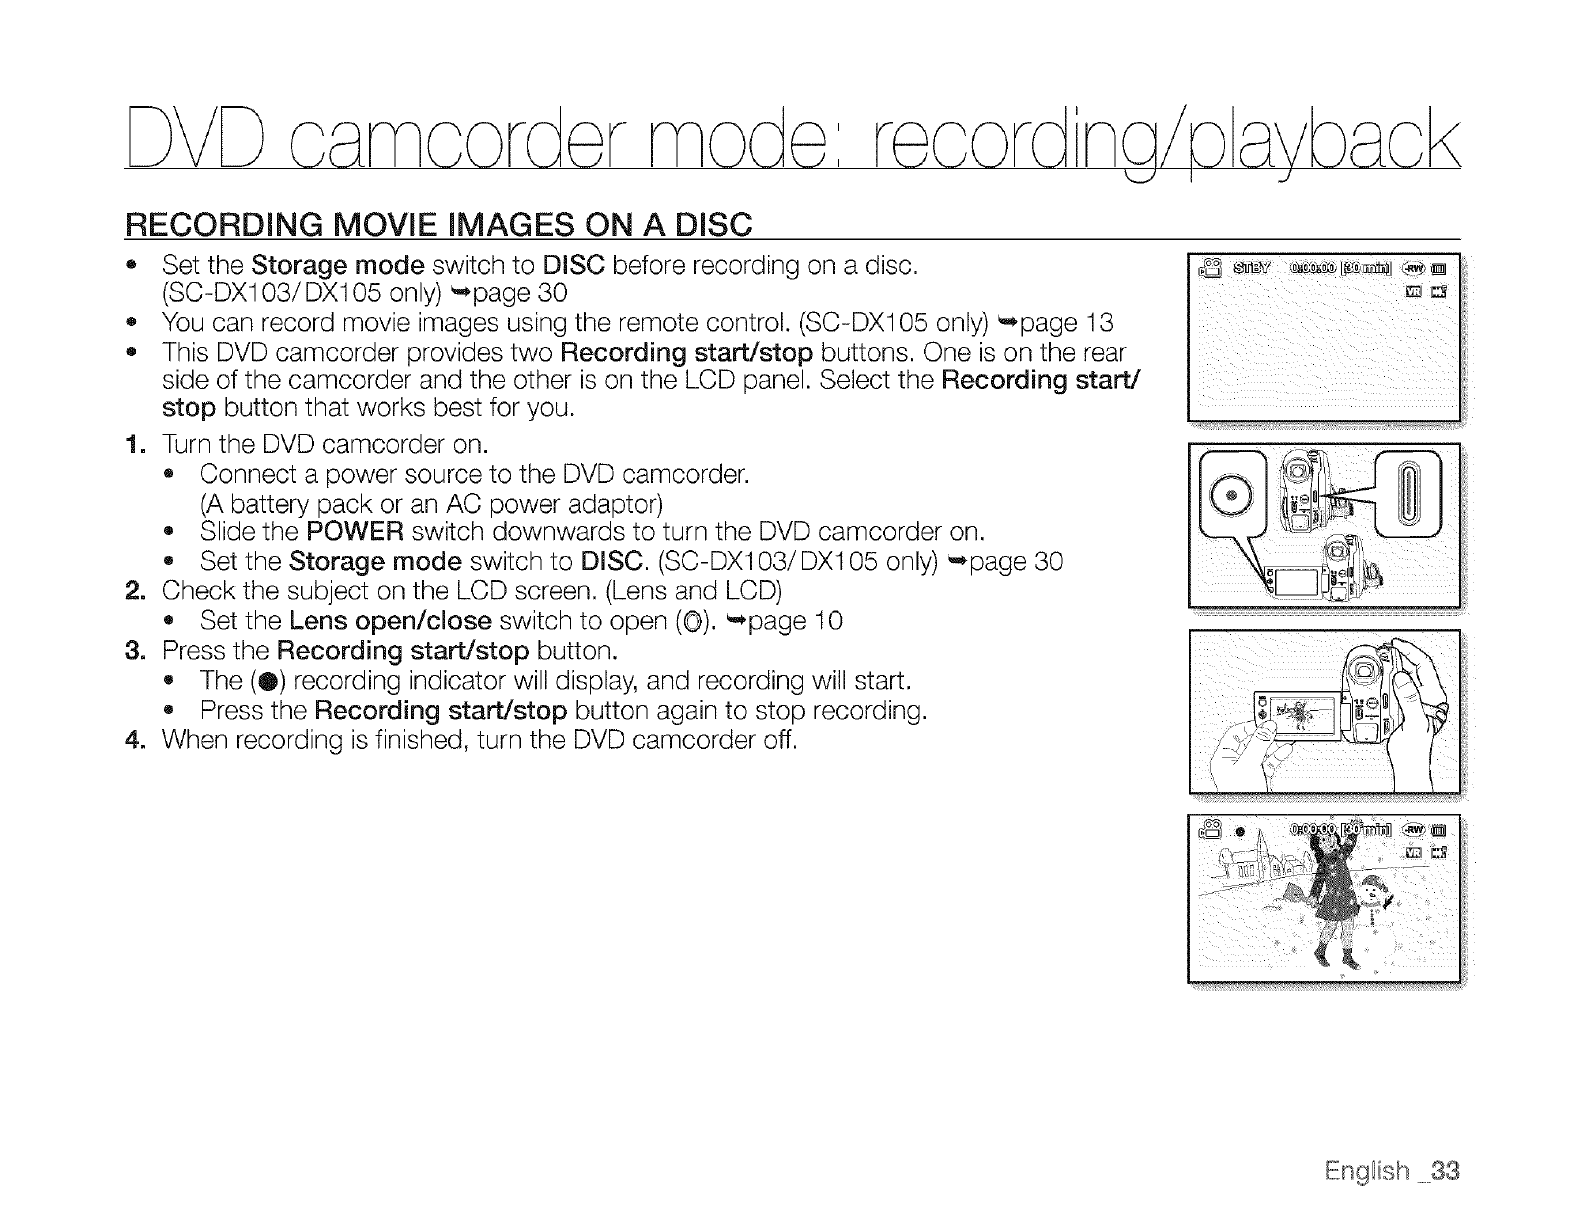
RECORDING MOVIE IMAGES ON A DISC
o Set the Storage mode switch to DISC before recording on a disc.
(SC-DX103/DX105 only) _page 30
_, You can record movie images using the remote control. (SC-DX105 only) _page 13
,, This DVD camcorder provides two Recording start/stop buttons. One is on the rear
side of the camcorder and the other is on the LCD panel. Select the Recording start/
stop button that works best for you.
1. Turn the DVD camcorder on.
,, Connect a power source to the DVD camcorder.
(A battery pack or an AC power adaptor)
,, Slide the POWER switch downwards to turn the DVD camcorder on.
,, Set the Storage mode switch to DISC. (SC-DX103/DXI 05 only) '-*page 30
2. Check the subject on the LCD screen. (Lens and LCD)
,, Set the Lens open/close switch to open (©). _page 10
& Press the Recording start/stop button.
,, The (Q) recording indicator will display, and recording will start.
o Press the Recording start/stop button again to stop recording.
4. When recording is finished, turn the DVD camcorder off.
;i111 'st!:
English 33
DVDc rr- r
®+ The recorded movie image size is 720X480.
+ Eject the battery pack when you have finished recording to prevent unnecessary battery power
consumption.
+ For on-screen information display, see page 22.
+ For approximate recording time, see page 32.
+ Sound is recorded from the internal stereo microphone at the front of the DVD camcorder. Take care that
this microphone is not blocked.
* Before recording an important movie, make sure to test the recording function by checking if there is any
problem with the audio and video recording.
+ For various functions available when you record movie images. _pages 65+77
o Do not operate the power switch or remove a disc while accessing it. Doing so may damage the disc or the
data on it.
+ If you set the storage media to DVD, up to 253 movie images can be created on DVD-R/+RW!+R DL/-RW
(Video mode) discs, and up to 999 on DVD-RW (VR mode).
+ You cannot proceed with recording when the disc cover is open. An icon and message are shown that
recording is impossible with the disc cover open.
* If you press the Recording start/stop button while a menu operation is in process, the DVD camcorder
starts to record.
+ If you turn the DVD camcorder off while recording, turn it on again with the storage media inserted
in it: Repair of the storage media will be executed automatically with a message, Do not turn off the
power or remove storage media while the DVD camcorder is recovering it, or it will damage the data or the
storage media itself. The data recovery completes within a few minutes but sometimes it may take more
time. Use the AC power adaptor when recovering data.
_++ Eng++sh
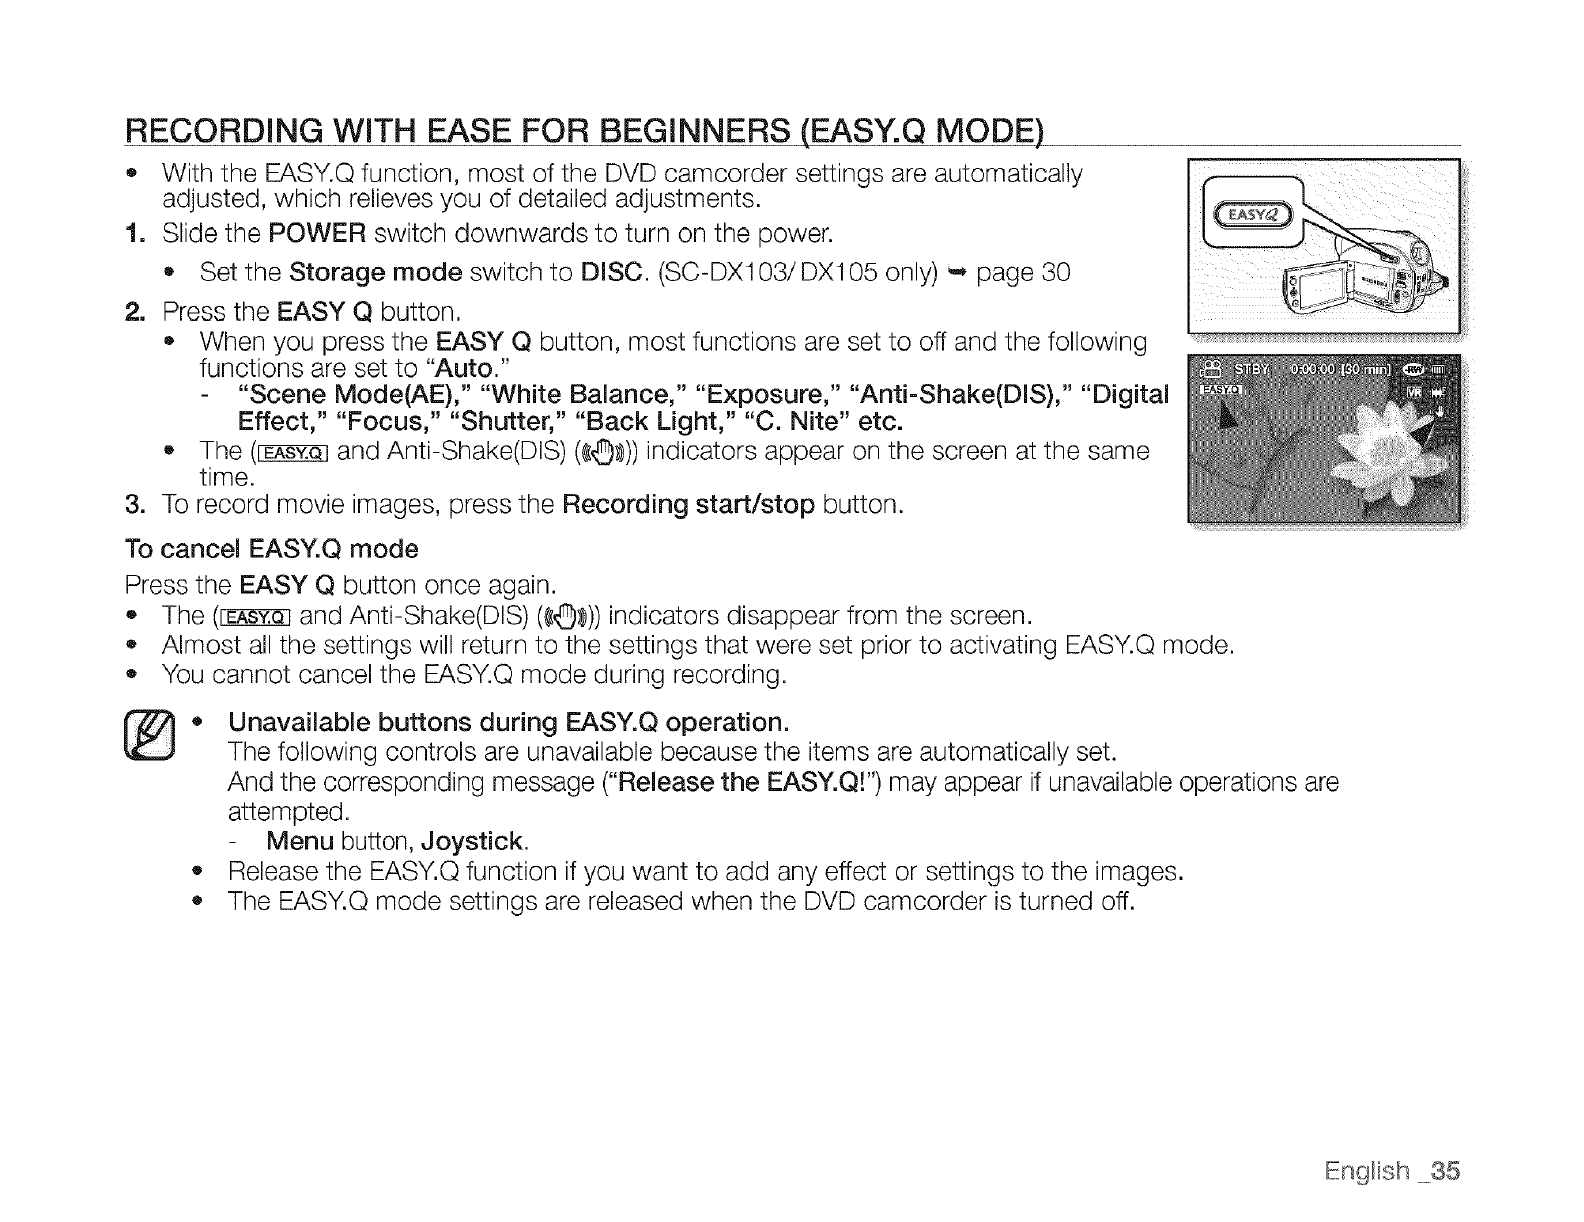
RECORDING WITH
O
1
EASE FOR BEGINNERS (EASY.Q MODE)
With the EASY.Q function, most of the DVD camcorder settings are automatically
adjusted, which relieves you of detailed adjustments.
Slide the POWER switch downwards to turn on the power.
• Set the Storage mode switch to DISC. (SC-DX103/DX105 only) -, page 30
2. Press the EASY Q button.
• When you press the EASY Q button, most functions are set to off and the following
functions are set to "Auto."
"Scene Mode(AE)," "White Balance," "Exposure," "Anti-Shake(DiS)," "Digital
Effect," "Focus," "Shutter," "Back Light," "C. Nite" etc.
The (_ and Anti-Shake(DIS) (¢_)) indicators appear on the screen at the same
time.
3. To record movie images, press the Recording start/stop button.
To cancel EASY.Q mode
Press the EASY Q button once again.
The (_ and Anti-Shake(DIS) (¢O)))) indicators disappear from the screen.
•Almost all the settings will return to the settings that were set prior to activating EASY.Q mode.
You cannot cancel the EASY.Q mode during recording.
®•Unavailable buttons during EASY.Q operation.
The following controls are unavailable because the items are automatically set.
And the corresponding message ("Release the EASY.Q!") may appear if unavailable operations are
attempted.
Menu button, Joystick.
•Release the EASY.Q function if you want to add any effect or settings to the images.
The EASY.Q mode settings are released when the DVD camcorder is turned off.
English 35

r{ : N
DVDo rr
CAPTURING STILL IMAGES DURING MOVIE IMAGE PLAYBACK(SC-DX103/DX105 only)
o This function works only in the Play mode. _page 21
e If you press the PHOTO button during playback, it stops playing and saves one image
of the current movie scene that is paused to the memory card.
1. Slide the POWER switch downwards to turn on the power and set the Storage mode
switch to DISC.
• Press the MODE button to set the Play mode. _page 21
The thumbnail index screen appears.
2. Use the Joystick to select the desired movie image.
• To change the current thumbnail page, move the Joystick down to highlight the
page bar, then move the Joystick right or left to select the page.
3. Press the Joystick.
The selected file fills the screen and is played automatically.
4. Press the PHOTO button at the desired point.
,, A shutter sound is heard. The photo image is recorded on the memory card and the
"Photo capture" message appears.
®The still images captured from the movie images to the storage media are saved in
800x600 format.
36 English
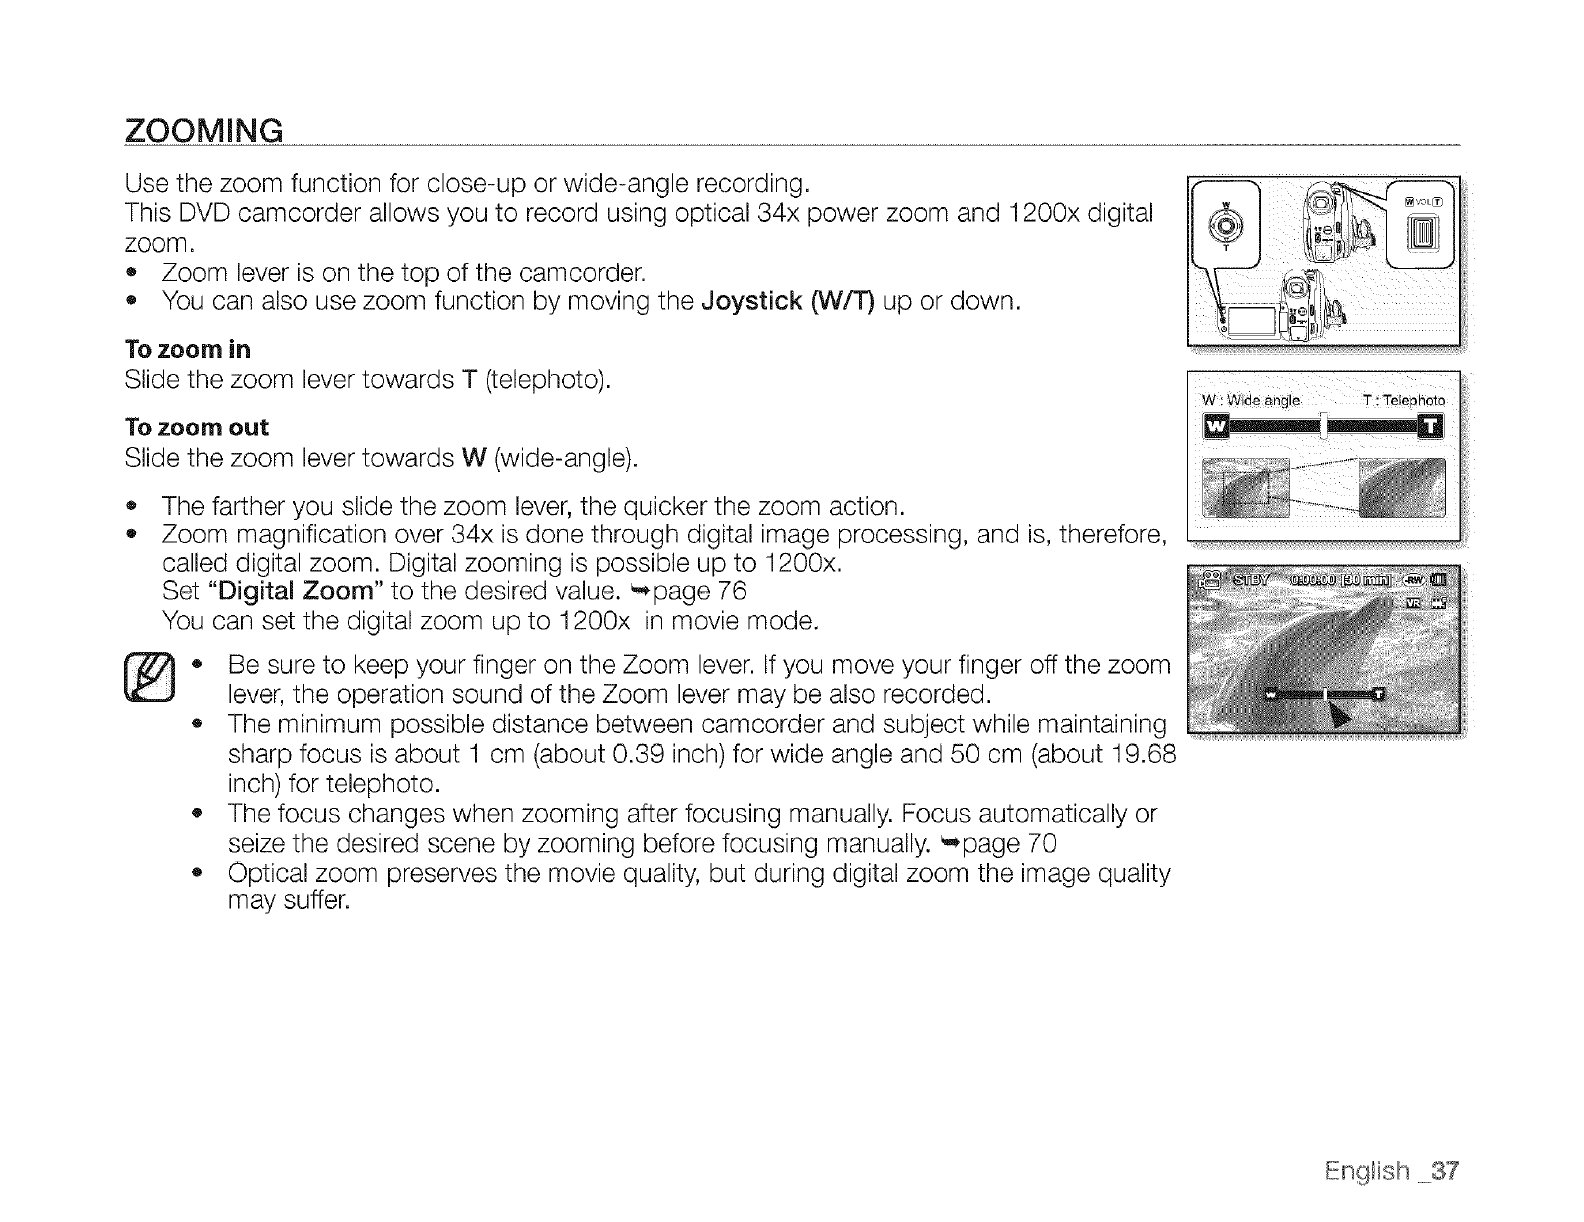
ZOOMING
Use the zoom function for close-up or wide-angle recording.
This DVD oamcorder allows you to record using optical 34x power zoom and 1200x digital
zoom.
• Zoom lever is on the top of the camcorder.
,, You can also use zoom function by moving the Joystick (W/T) up or down.
To zoom in
Slide the zoom lever towards T(telephoto).
To zoom OUt
Slide the zoom lever towards W (wide-angle).
o
o
The farther you slide the zoom lever, the quicker the zoom action.
Zoom magnification over 34x is done through digital image processing, and is, therefore,
called digital zoom. Digital zooming is possible up to 1200x.
Set "Digital Zoom" to the desired value. _page 76
You can set the digital zoom up to 1200x in movie mode.
®Be sure to keep your finger on the Zoom lever. If you move your finger off the zoom
lever, the operation sound of the Zoom lever may be also recorded.
,, The minimum possible distance between oamcorder and subject while maintaining
sharp focus is about 1 cm (about 0.39 inch) for wide angle and 50 cm (about 19.68
inch) for telephoto.
•The focus changes when zooming after focusing manually. Focus automatically or
seize the desired scene by zooming before focusing manually. _,,page 70
Optical zoom preserves the movie quality, but during digital zoom the image quality
may suffer.
English 37
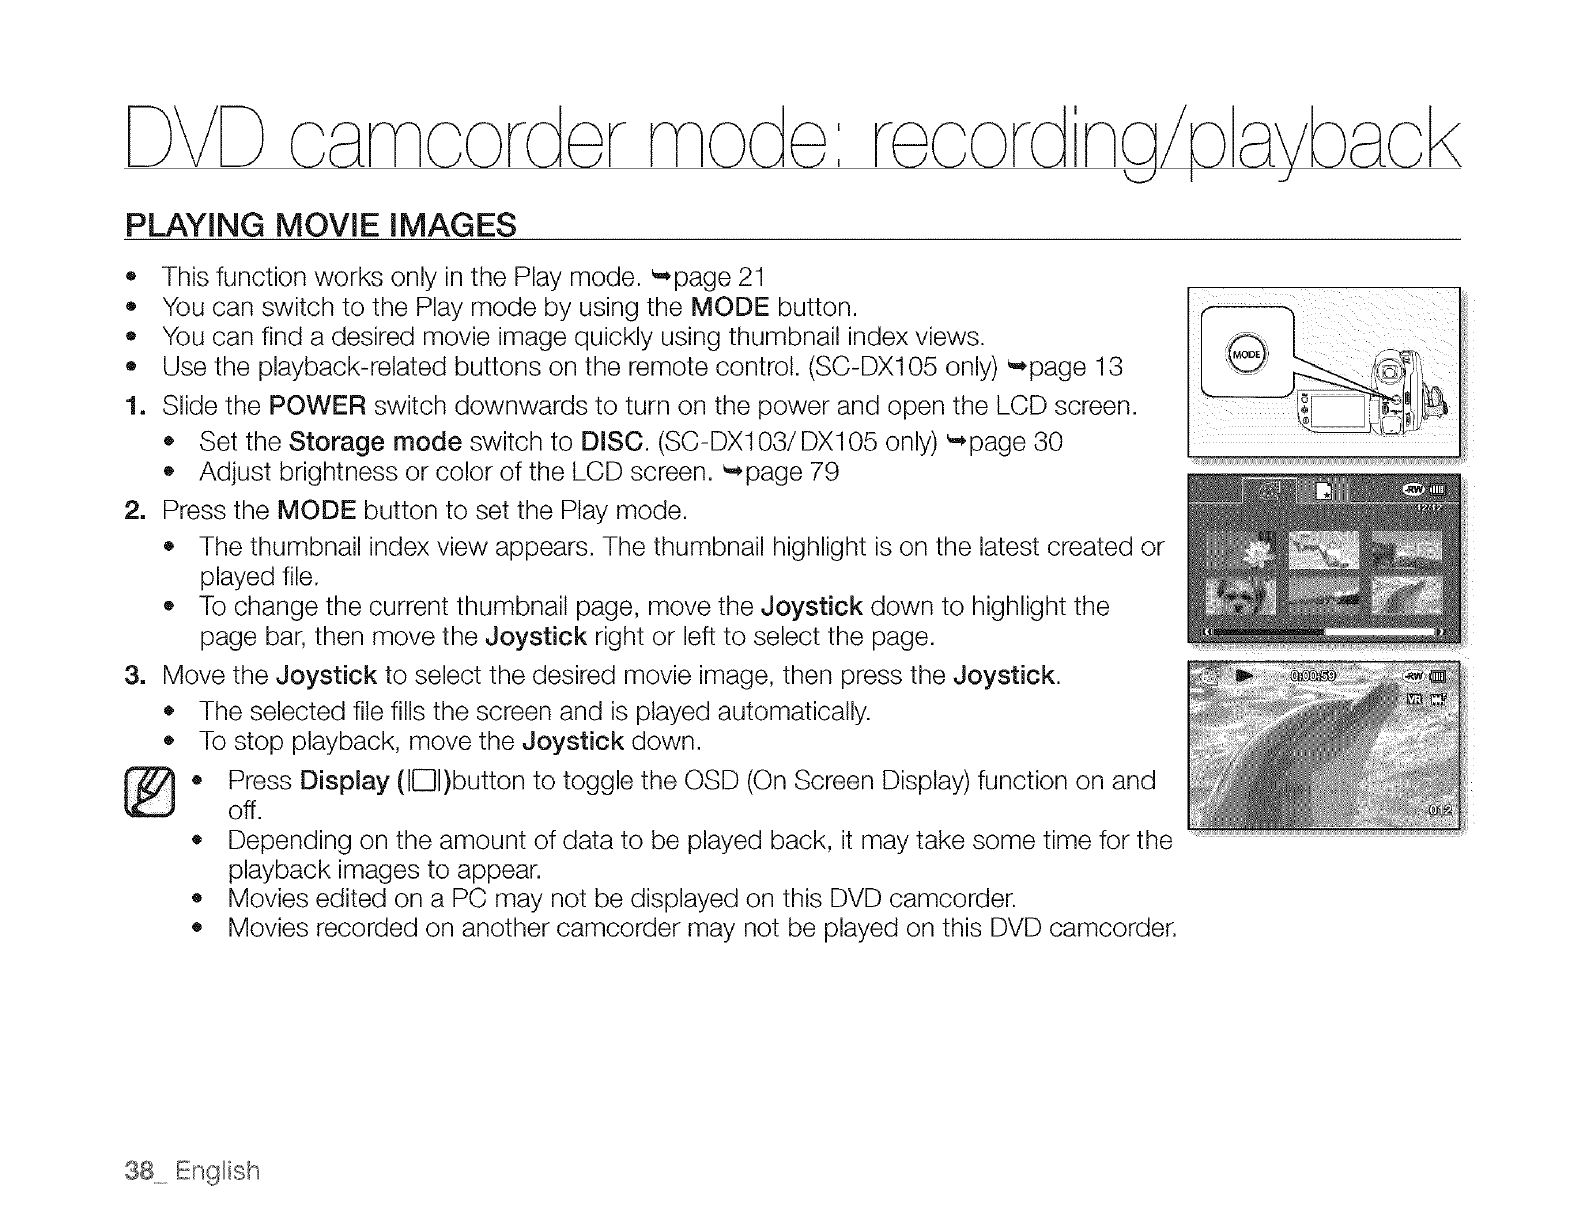
rr :
DVD
PLAYING MOVIE IMAGES
®
o This function works only in the Play mode. _page 21
e You can switch to the Play mode by using the MODE button.
e You can find a desired movie image quickly using thumbnail index views.
Use the playback-related buttons on the remote control. (SC-DX105 only) _page 13
1. Slide the POWER switch downwards to turn on the power and open the LCD screen.
Set the Storage mode switch to DISC. (SC-DX103/DX105 only) _page 30
o Adjust brightness or color of the LCD screen. _page 79
2. Press the MODE button to set the Play mode.
• The thumbnail index view appears. The thumbnail highlight is on the latest created or
played file.
To change the current thumbnail page, move the Joystick down to highlight the
page bar, then move the Joystick right or left to select the page.
3. Move the Joystick to select the desired movie image, then press the Joystick.
• The selected file fills the screen and is played automatically.
To stop playback, move the Joystick down.
Press Display (IE31)button to toggle the OSD (On Screen Display) function on and
off.
• Depending on the amount of data to be played back, it may take some time for the
playback images to appear.
• Movies edited on a PC may not be displayed on this DVD camcorder.
• Movies recorded on another camcorder may not be played on this DVD camcorder.
38 English
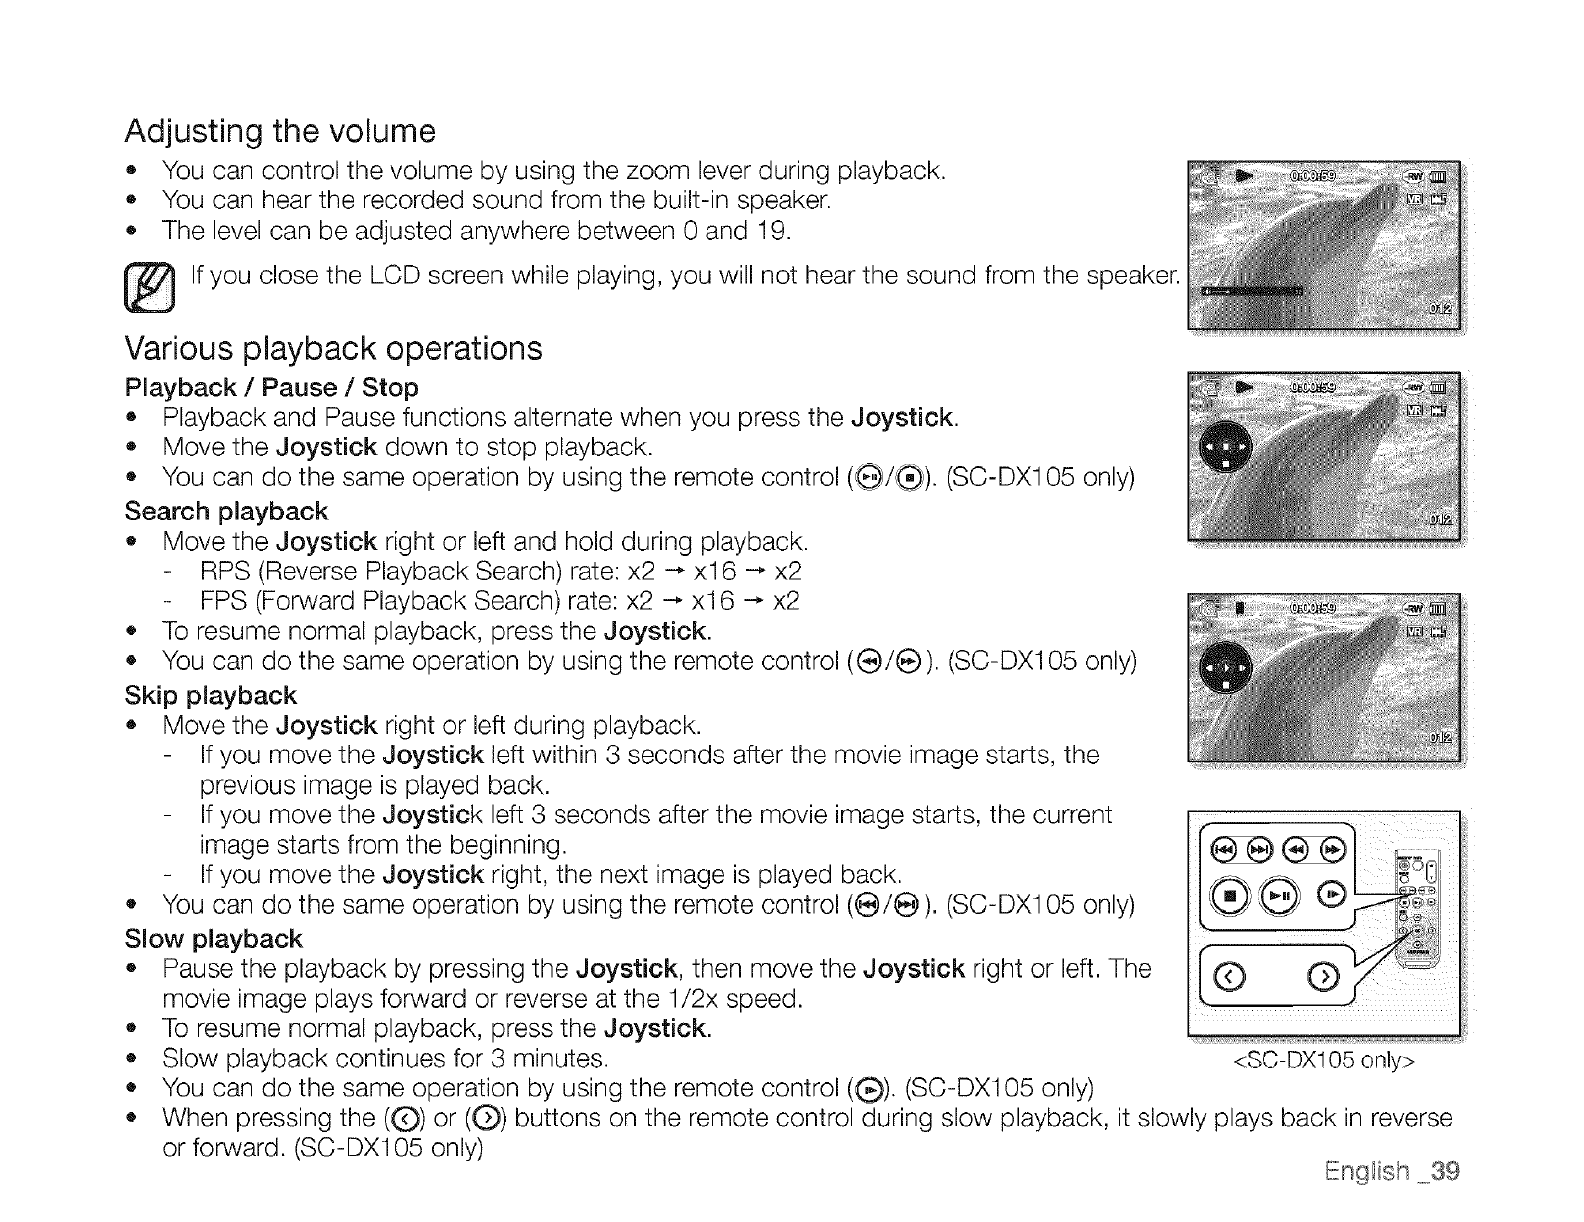
Adjusting the volume
•You can control the volume by using the zoom lever during playback.
_, You can hear the recorded sound from the built-in speaker.
The level can be adjusted anywhere between 0 and 19.
I_lf you close the LCD screen while playing, you will not hear the sound from the speaker.
Various playback operations
Playback /Pause /Stop
• Playback and Pause functions alternate when you press the Joystick.
Move the Joystick down to stop playback.
• You can do the same operation by using the remote control (G)/(_). (SC-DX1 05 only)
Search playback
• Move the Joystick right or left and hold during playback.
RPS (Reverse Playback Search) rate: x2 -_ xl 6 -_ x2
FPS (Forward Playback Search) rate: x2 _ xl 6 --, x2
,, To resume normal playback, press the Joystick.
• You can do the same operation by using the remote control ((_!e). (SC-DX1 05 only)
Skip playback
•Move the Joystick right or left during playback.
If you move the Joystick left within 3 seconds after the movie image starts, the
previous image is played back.
If you move the Joystick left 3 seconds after the movie image starts, the current
image starts from the beginning.
If you move the Joystick right, the next image is played back.
You can do the same operation by using the remote control (e/e). (SC-DX105 only)
Slow playback
Pause the playback by pressing the Joystick, then move the Joystick right or left. The
movie image plays forward or reverse at the 1/2x speed.
• To resume normal playback, press the Joystick.
• Slow playback continues for 3 minutes.
• You can do the same operation by using the remote control (_). (SC-DX105 only)
o
<SC-DX105 only>
When pressing the ((D) or ((_) buttons on the remote control during slow playback, it slowly plays back in reverse
or forward. (SC-DX105 only) English _._39
carncordermode:edt narnove
L..,/
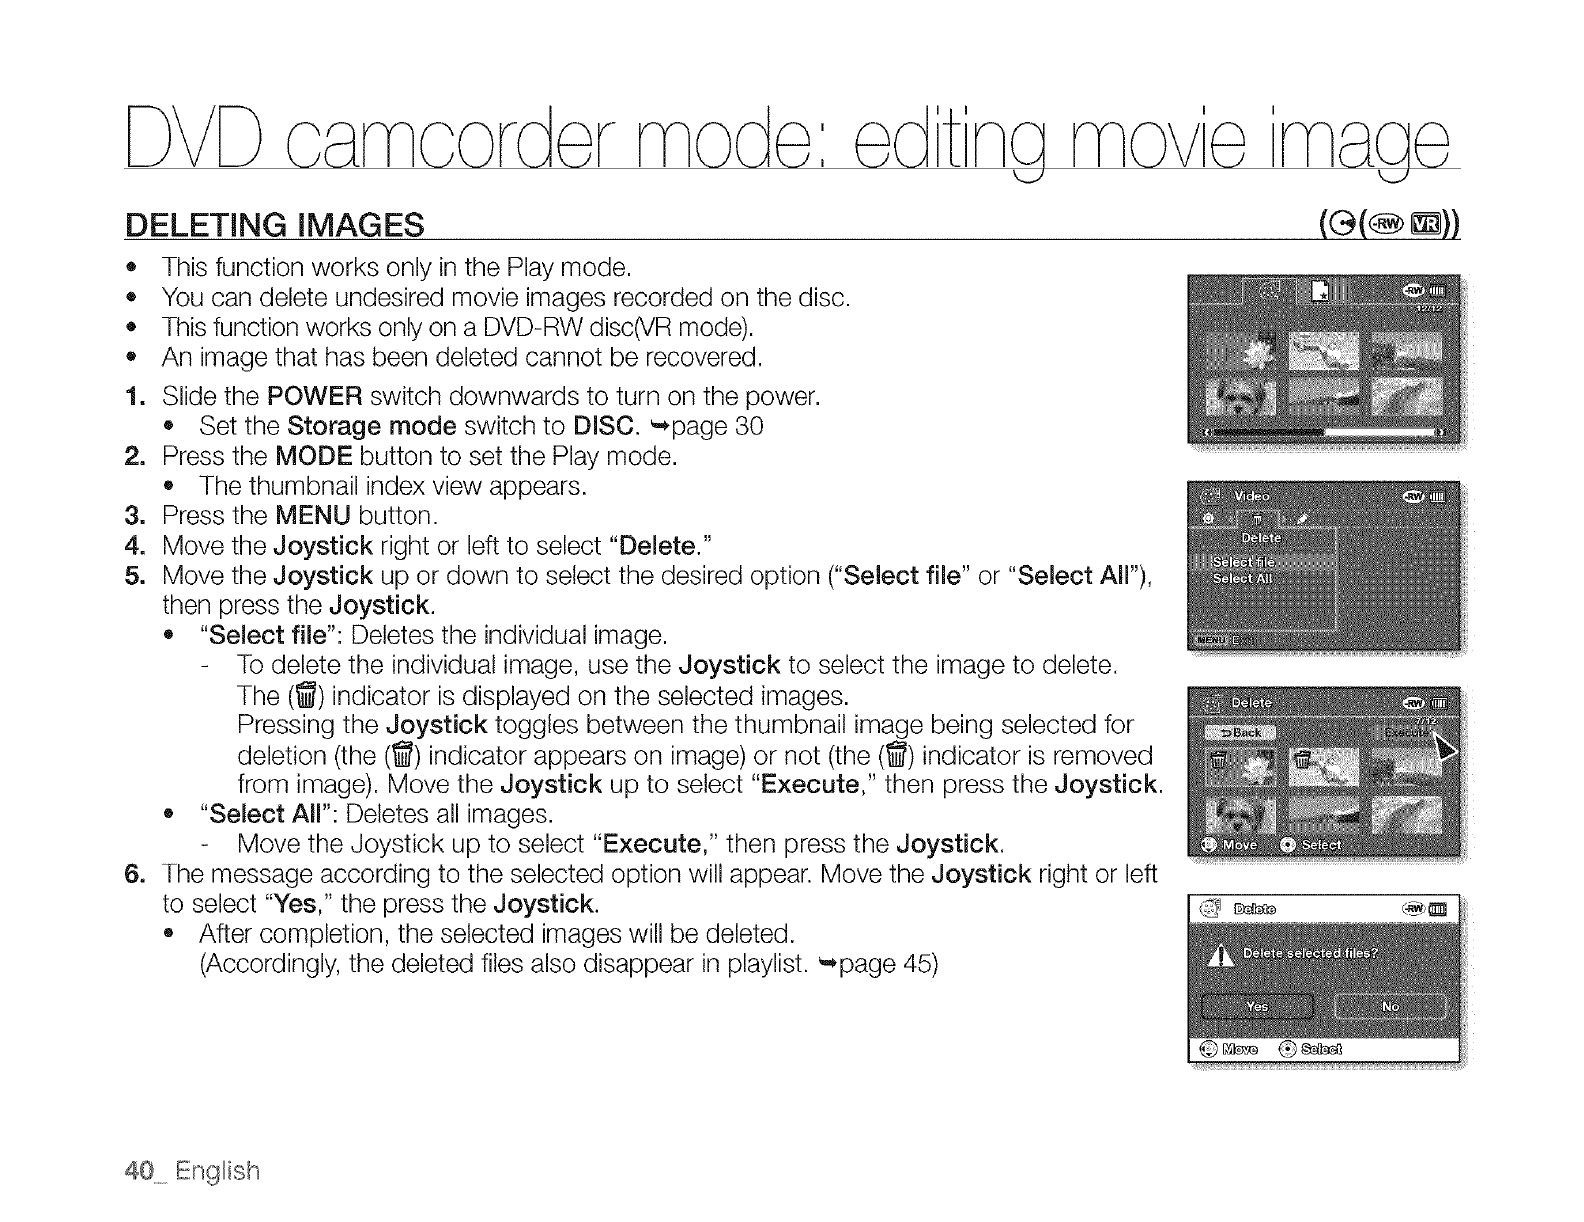
DELETING IMAGES
o This function works only in the Play mode.
e You can delete undesired movie images recorded on the disc.
• This function works only on a DVD-RW disc(VR mode).
• An image that has been deleted cannot be recovered.
1. Slide the POWER switch downwards to turn on the power.
Set the Storage mode switch to DISC. ',*page 30
2. Press the MODE button to set the Play mode.
,, The thumbnail index view appears.
3. Press the MENU button.
4. Move the Joystick right or left to select "Delete."
5. Move the Joystick up or down to select the desired option ("Select file" or "Select All"),
then press the Joystick.
"Select file": Deletes the individual image.
To delete the individual image, use the Joystick to select the image to delete.
The (_)indicator is displayed on the selected images.
Pressing the Joystick toggles between the thumbnail image being selected for
deletion (the (_) indicator appears on image) or not (the (_) indicator is removed
from image). Move the Joystick up to select "Execute," then press the Joystick.
"Select All": Deletes all images.
Move the Joystick up to select "Execute," then press the Joystick.
6. The message according to the selected option will appear. Move the Joystick right or left
to select "Yes," the press the Joystick.
• After completion, the selected images will be deleted.
(Accordingly, the deleted files also disappear in playlist. "*page 45)
40 English
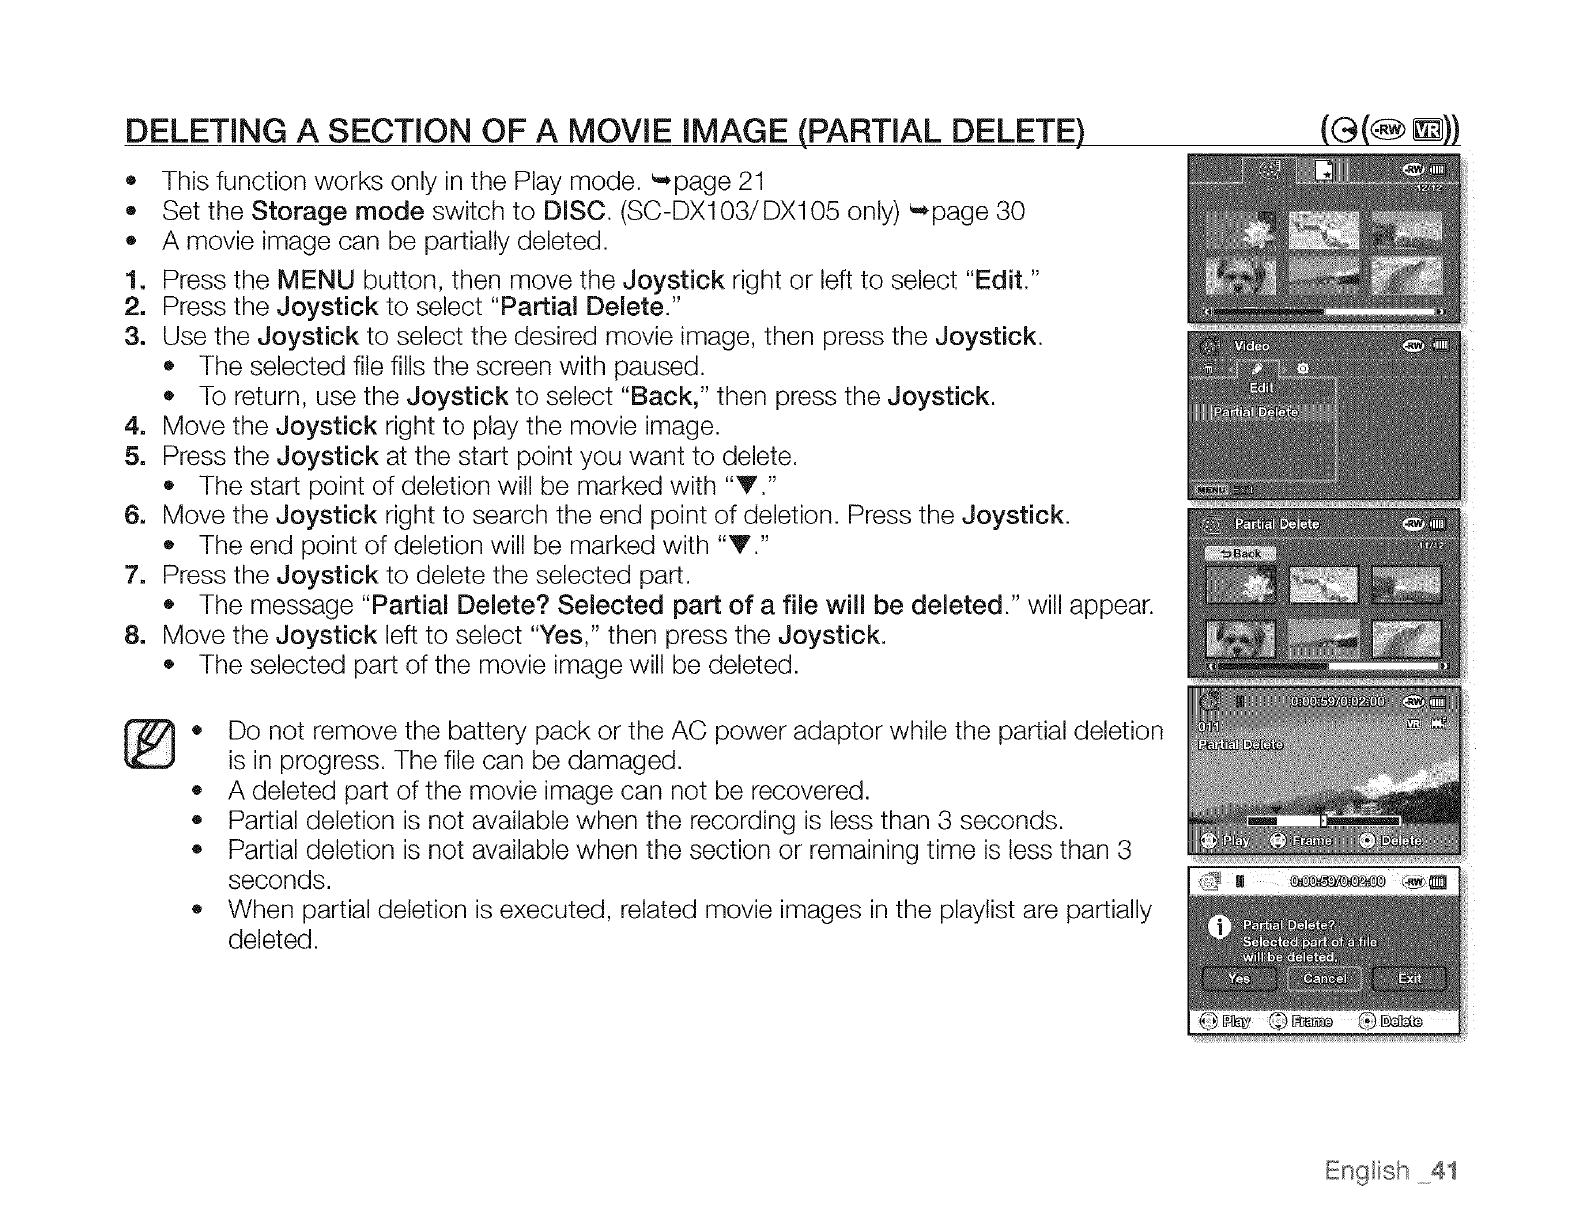
DELETING A SECTION OF A MOVIE IMAGE (PARTIAL DELETE)
• This function works only in the Play mode. ",page 21
o Set the Storage mode switch to DISC. (SC-DX103!DX105 only) _page 30
o A movie image can be partially deleted.
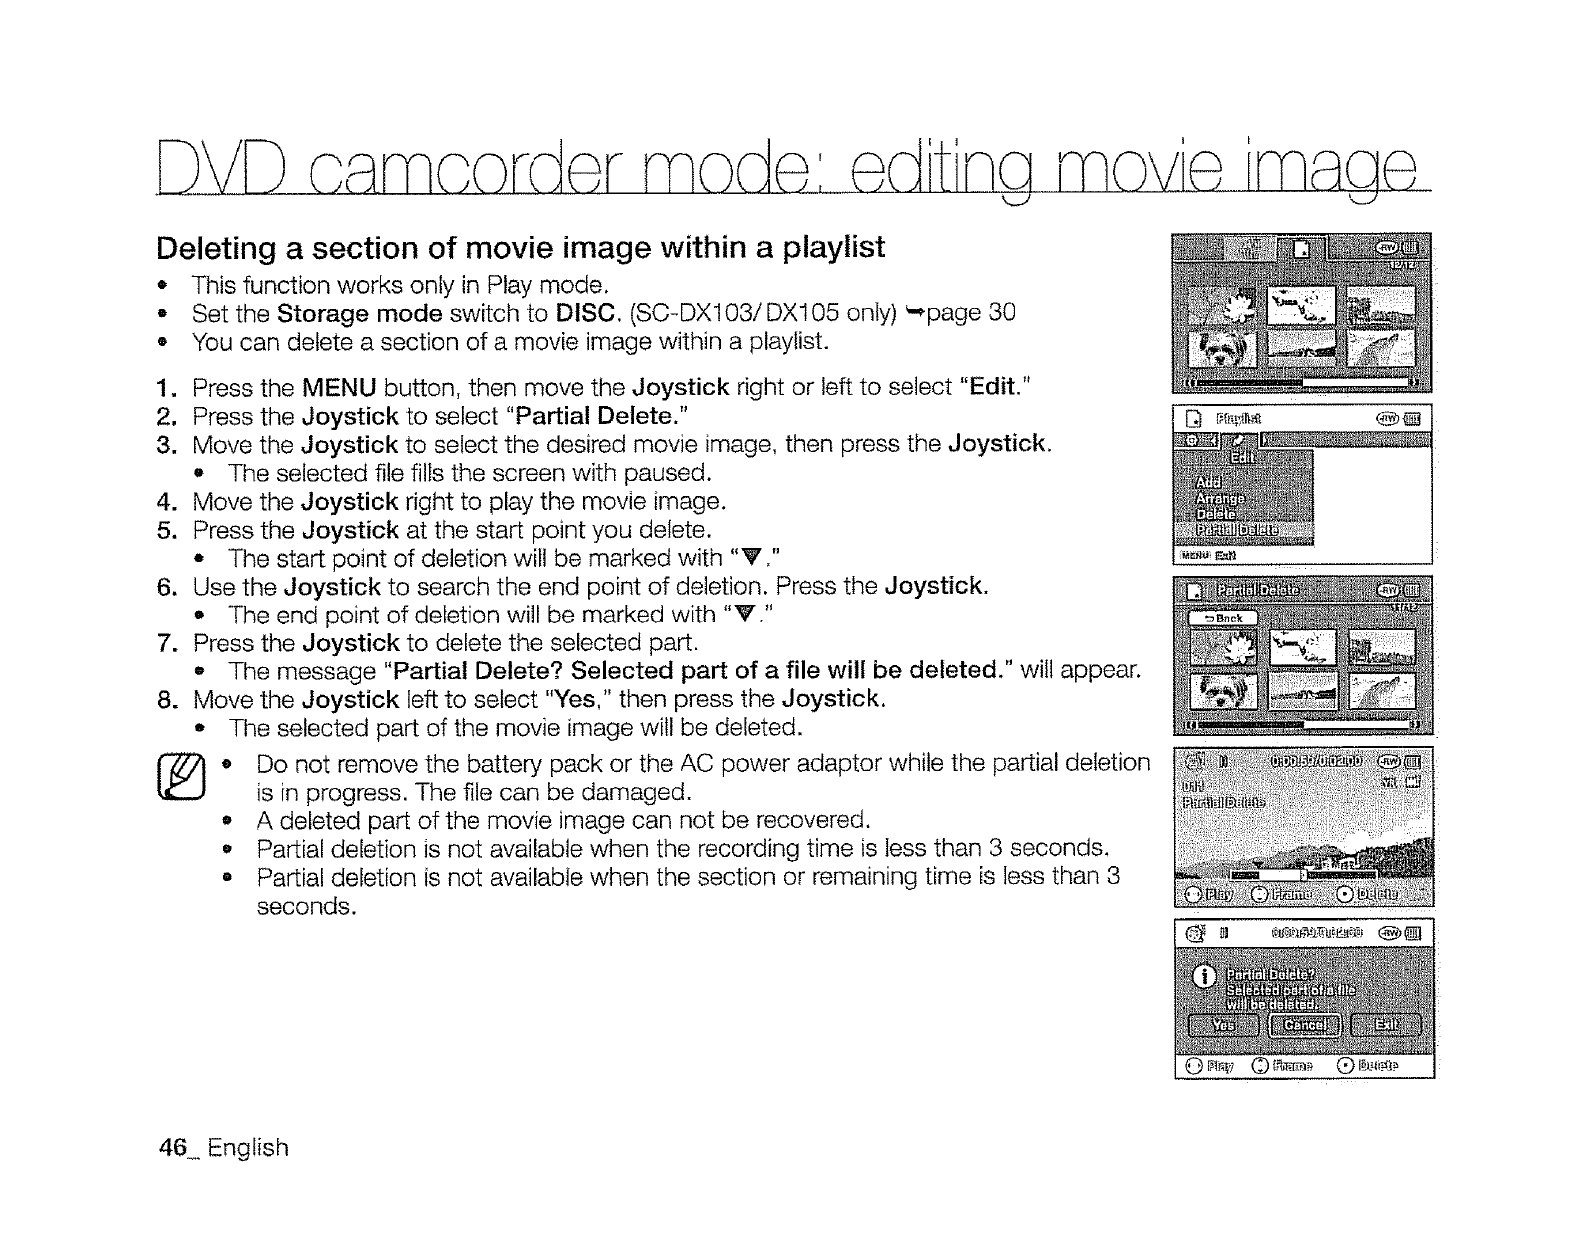
1. Press the MENU button, then move the Joystick right or left to select "Edit."
2. Press the Joystick to select "Partial Delete."
3. Use the Joystick to select the desired movie image, then press the Joystick.
• The selected file fills the screen with paused.
o To return, use the Joystick to select "Back," then press the Joystick.
4. Move the Joystick right to play the movie image.
5. Press the Joystick at the start point you want to delete.
The start point of deletion will be marked with "V."
6. Move the Joystick right to search the end point of deletion. Press the Joystick.
• The end point of deletion will be marked with "T."
7. Press the Joystick to delete the selected part.
,, The message "Partial Delete? Selected part of a file will be deleted." will appear.
8. Move the Joystick left to select "Yes," then press the Joystick.
The selected part of the movie image will be deleted.
®• Do not remove the battery pack or the AC power adaptor while the partial deletion
is in progress. The file can be damaged.
o A deleted part of the movie image can not be recovered.
,, Partial deletion is not available when the recording is less than 3 seconds.
• Partial deletion is not available when the section or remaining time is less than 3
seconds.
When partial deletion is executed, related movie images in the playlist are partially
deleted.
Engtish 4t
D&!D amcorder mode: e_dting mov'e image
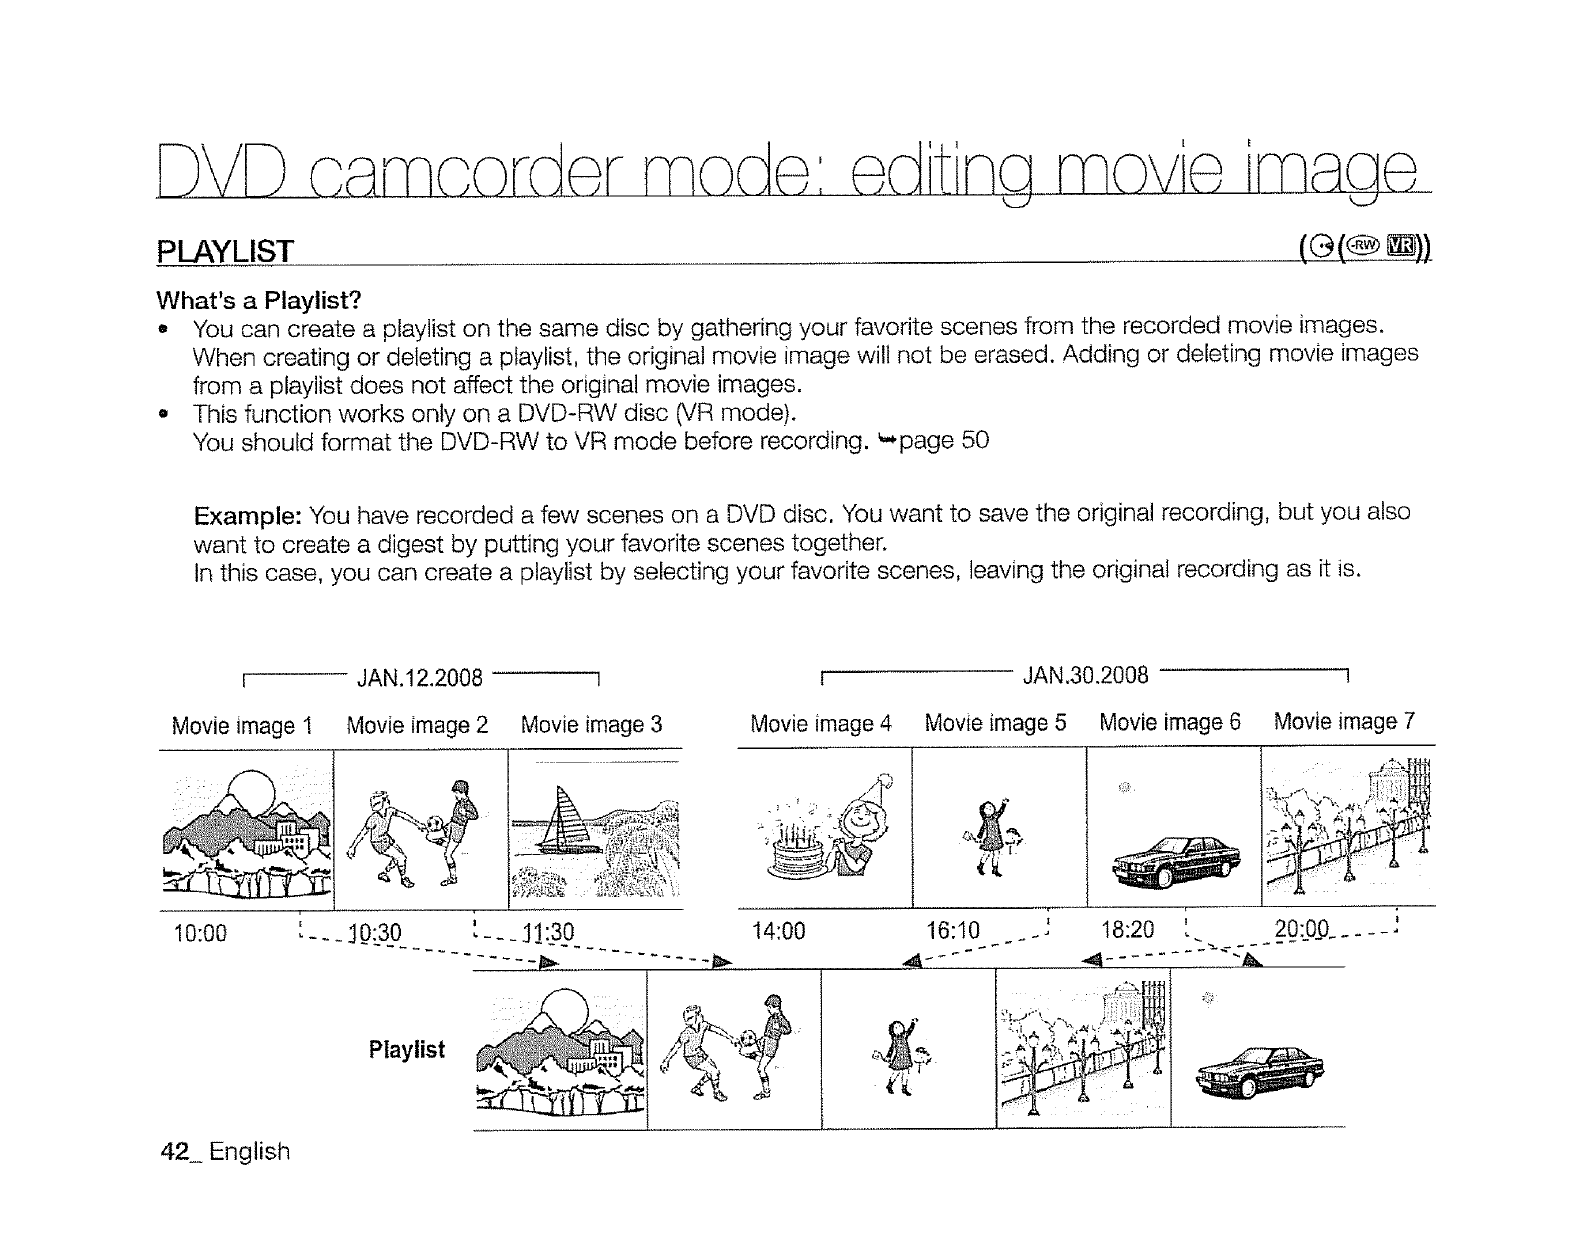
PLAYLIST
What's a Playlist?
• You can create a playlist on the same disc by gathering your favorite scenes from the recorded movie images.
When creating or deleting a pfaylist, the original movie image will not be erased. Adding or deleting movie images
from a playlist does not affect the original movie images.
. This function works only on a DVD-RW disc CVRmode).
You should format the DVD-RW to VR mode before recording. _*page 50
Example: You have recorded a few scenes on a DVD disc, You want to save the original recording, but you also
want to create a digest by putting your favorite scenes together.
In this case, you can create a playlist by selecting your favorite scenes, leaving the original recording as it is.
JAN.12.2008 JAN,30.2008
Movie image I Movie image 3Movie image 2
Playlist
Movie image 4 Movie image 5 Movie image 6 Movie image 7
14:00 !
16:10 ., 18:20 I
20:09......
42 English
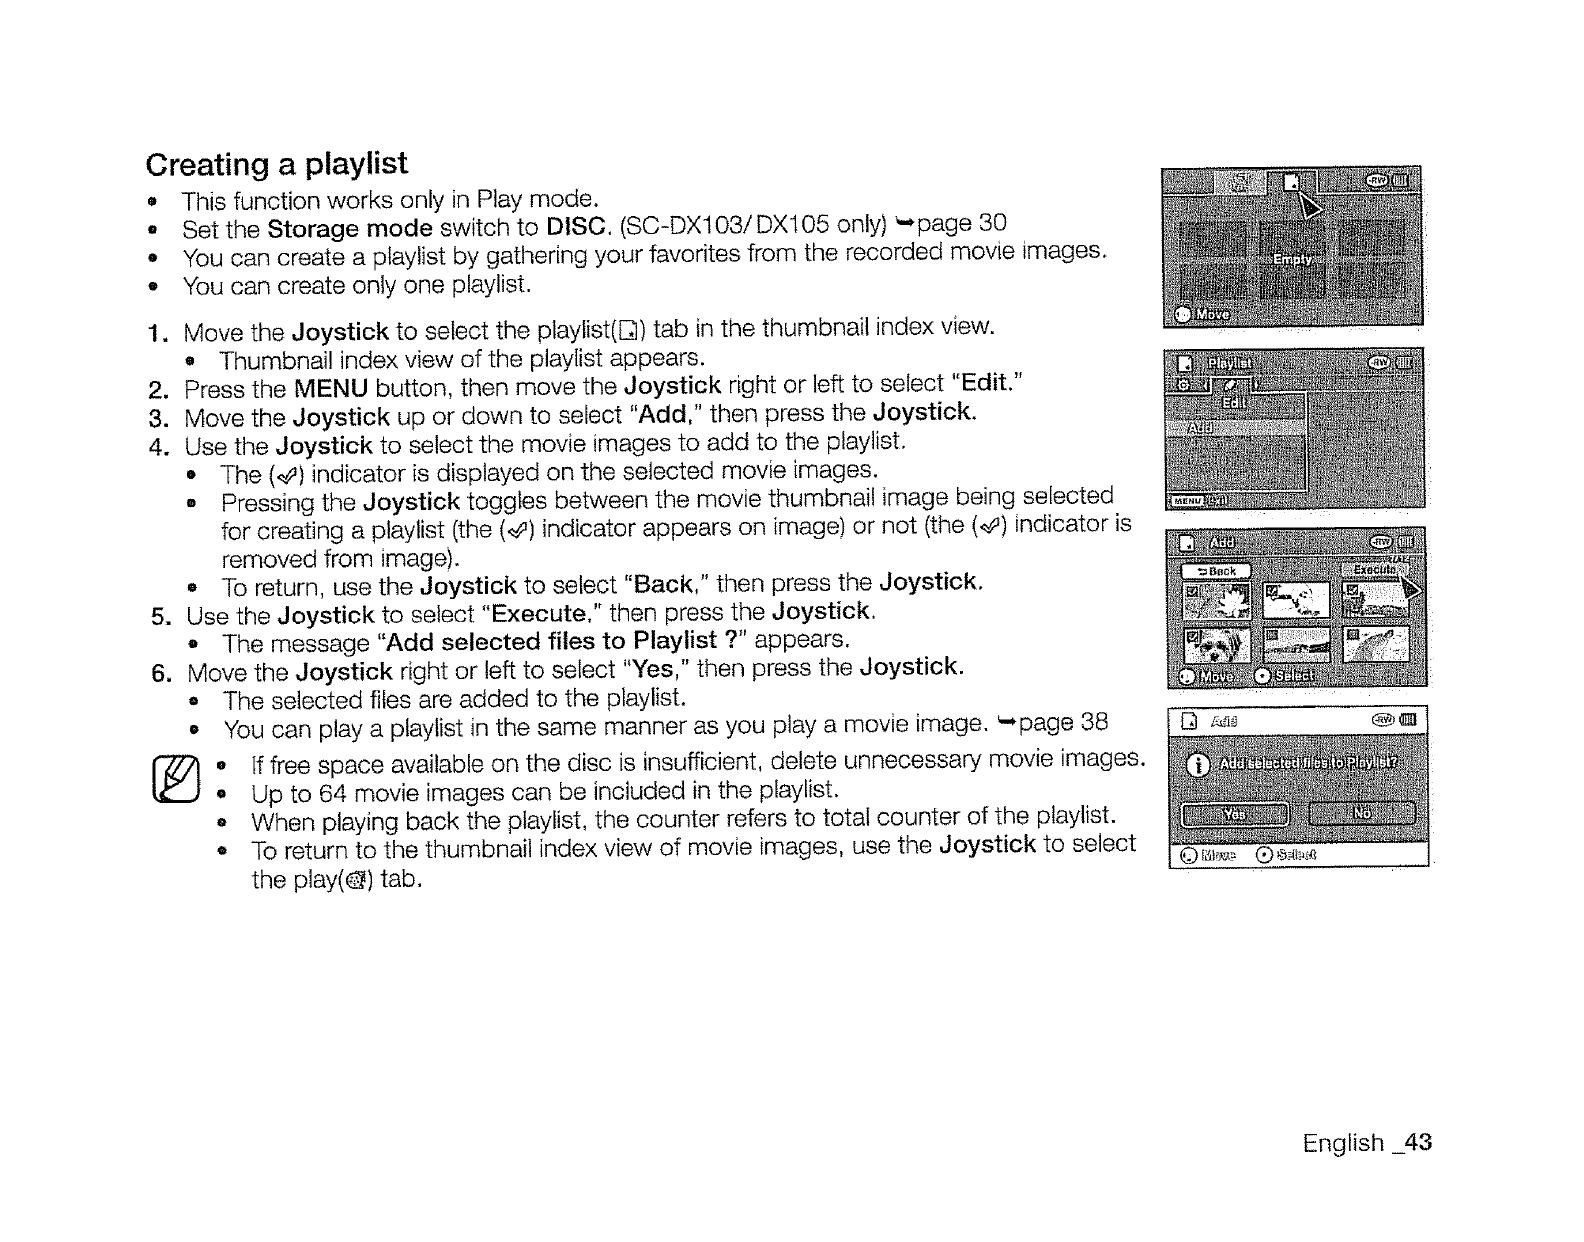
Creating a playlist
• This function works only in Play mode.
•Set the Storage mode switch to DISC. (SC-DX103/DXl05 only) _*page 30
o You can create a playlist by gathering your favorites from the recorded movie images.
• You can create only one playlist.
2.
3.
4.
1
6.
O
Move the Joystick to select the playlist(Dl) tab in the thumbnail index view.
• Thumbnail index view of the playlist appears.
Press the MENU button, then move the Joystick right or left to select "Edit."
Move the Joystick up or down to select "Add," then press the Joystick.
Use the Joystick to select the movie images to add to the playlist.
•The (4) indicator is displayed on the selected movie images.
• Pressing the Joystick toggles between the movie thumbnail image being selected
for creating a playlist (the (_') indicator appears on image) or not (the (,#) indicator is
removed from image).
e To return, use the Joystick to select "Back," then press the Joystick.
Use the Joystick to select "Execute." then press the Joystick.
-The message "Add selected files to Playlist ?" appears.
Move the Joystick right or left to select "Yes," then press the Joystick.
•The selected files are added to the playlist.
You can play a playlist in the same manner as you play a movie image. _page 38
oif free space available on the disc is insufficient, delete unnecessary movie images.
•Up to 64 movie images can be included in the playlist.
-When playing back the ptaylist, the counter refers to total counter of the playlist.
o To return to the thumbnail index view of movie images, use the Joystick to select
the play(@) tab.
English _43

Arranging the order of movie images within a playlist
•This function works only in Play mode.
o Set the Storage mode switch to DISC. (SC-DXt03/DX105 only) _page 30
• You can arrange movie images within a playlist by moving them to the desired position.
1. Move the Joystick to select the playlist([_) tab in the thumbnail index view.
•Thumbnail index view of the playlist appears.
2. Press the MENU button, then move the Joystick right or left to select "Edit."
3. Move the Joystick up or down to select "Arrange," then press the Joystick.
4. Use the Joystick to select the movie images to arrange.
•The (_#) indicator is displayed on the selected movie image.
•Pressing the Joystick toggles between the movie thumbnaif image being selected
for arrangement within the playlist (the (_) indicator appears on image) or not (the (,_')
indicator is removed from image).
-A bar will also appear next to the selected movie image.
5. Move the Joystick to select the desired position, then press the Joystick.
,, The selected file is arranged in the desired position.
-To return, use the Joystick to select "Back," then press the Joystick.
6. To execute, use the Joystick to select "Execute," then press the Joystick.
• The message "Arrange selected a file to this order?" appears.
7. Move the Joystick right or left to select "Yes," then press the Joystick.
o The selected files are arranged in the selected position.
44 English
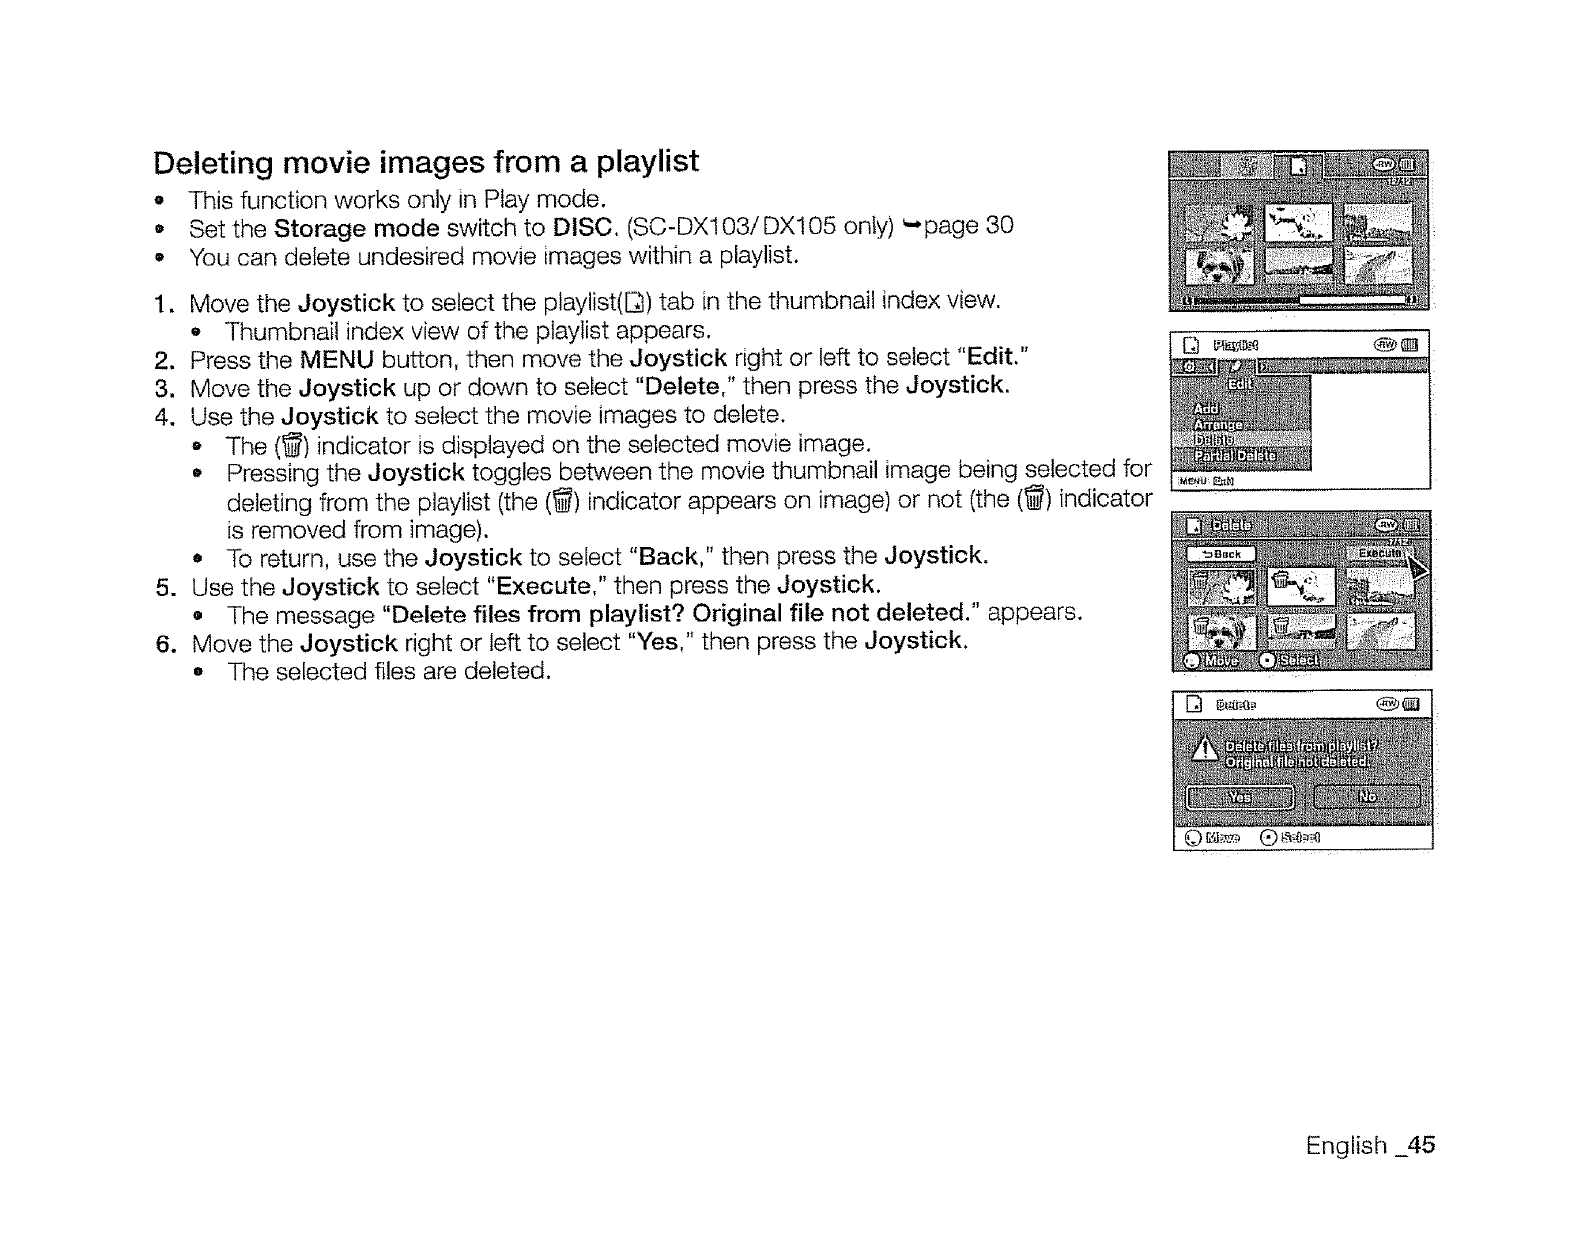
Deleting movie images from a playlist
oThis function works only in Play mode.
Set the Storage mode switch to DISC, (SC-DX103/DX105 only) _page 30
•You can delete undesired movie images within a playlist.
1. Move the Joystick to select the playlist(E_) tab in the thumbnail index view.
-Thumbnail index view of the playlist appears.
2. Press the MENU button, then move the Joystick right or left to select "Edit."
3. Move the Joystick up or down to select "Delete," then press the Joystick.
4. Use the Joystick to select the movie images to delete.
oThe (_) indicator is displayed on the selected movie image.
•Pressing the Joystick toggles between the movie thumbnail image being selected for
deleting from the playlist (the (_) indicator appears on image) or not (the (_) indicator
is removed from image).
•To return, use the Joystick to select "Back," then press the Joystick.
5. Use the Joystick to select "Execute," then press the Joystick.
•The message "Delete files from playlist? Original file not deleted." appears.
6. Move the Joystick right or left to select "Yes," then press the Joystick.
•The selected files are deleted.
English _45
£VD camcorder mode: edtisa mo£e 'maae
Deleting a section of movie image within a playlist
*This function works only in Play mode.
,Set the Storage mode switch to DISC, (S©-DX103/DX105 only) _page 30
° You can delete a section of a movie image within a playlist.
lw
2.
3.
4.
5.
6.
7.
8.
®
Press the MENU button, then move the Joystick right or left to select "Edit."
Press the Joystick to select "Partial Delete."
Move the Joystick to select the desired movie image, then press the Joystick.
o The selected file fills the screen with paused.
Move the Joystick right to play the movie image.
Press the Joystick at the start point you delete.
-The start point of deletion will be marked with "V."
Use the Joystick to search the end point of deletion. Press the Joystick.
•The end point of deletion will be marked with "V."
Press the Joystick to delete the selected part.
q, The message "Partial Delete? Selected part of a file will be deleted." will appear.
Move the Joystick left to select "Yes," then press the Joystick.
•The selected part of the movie image will be deleted.
•Do not remove the battery pack or the AC power adaptor while the partial deletion
is in progress. The file can be damaged.
°A deleted part of the movie image can not be recovered,
.Partial deletion is not available when the recording time is less than 3 seconds,
o Partial deletion is not available when the section or remaining time is less than 3
seconds.
46_ English
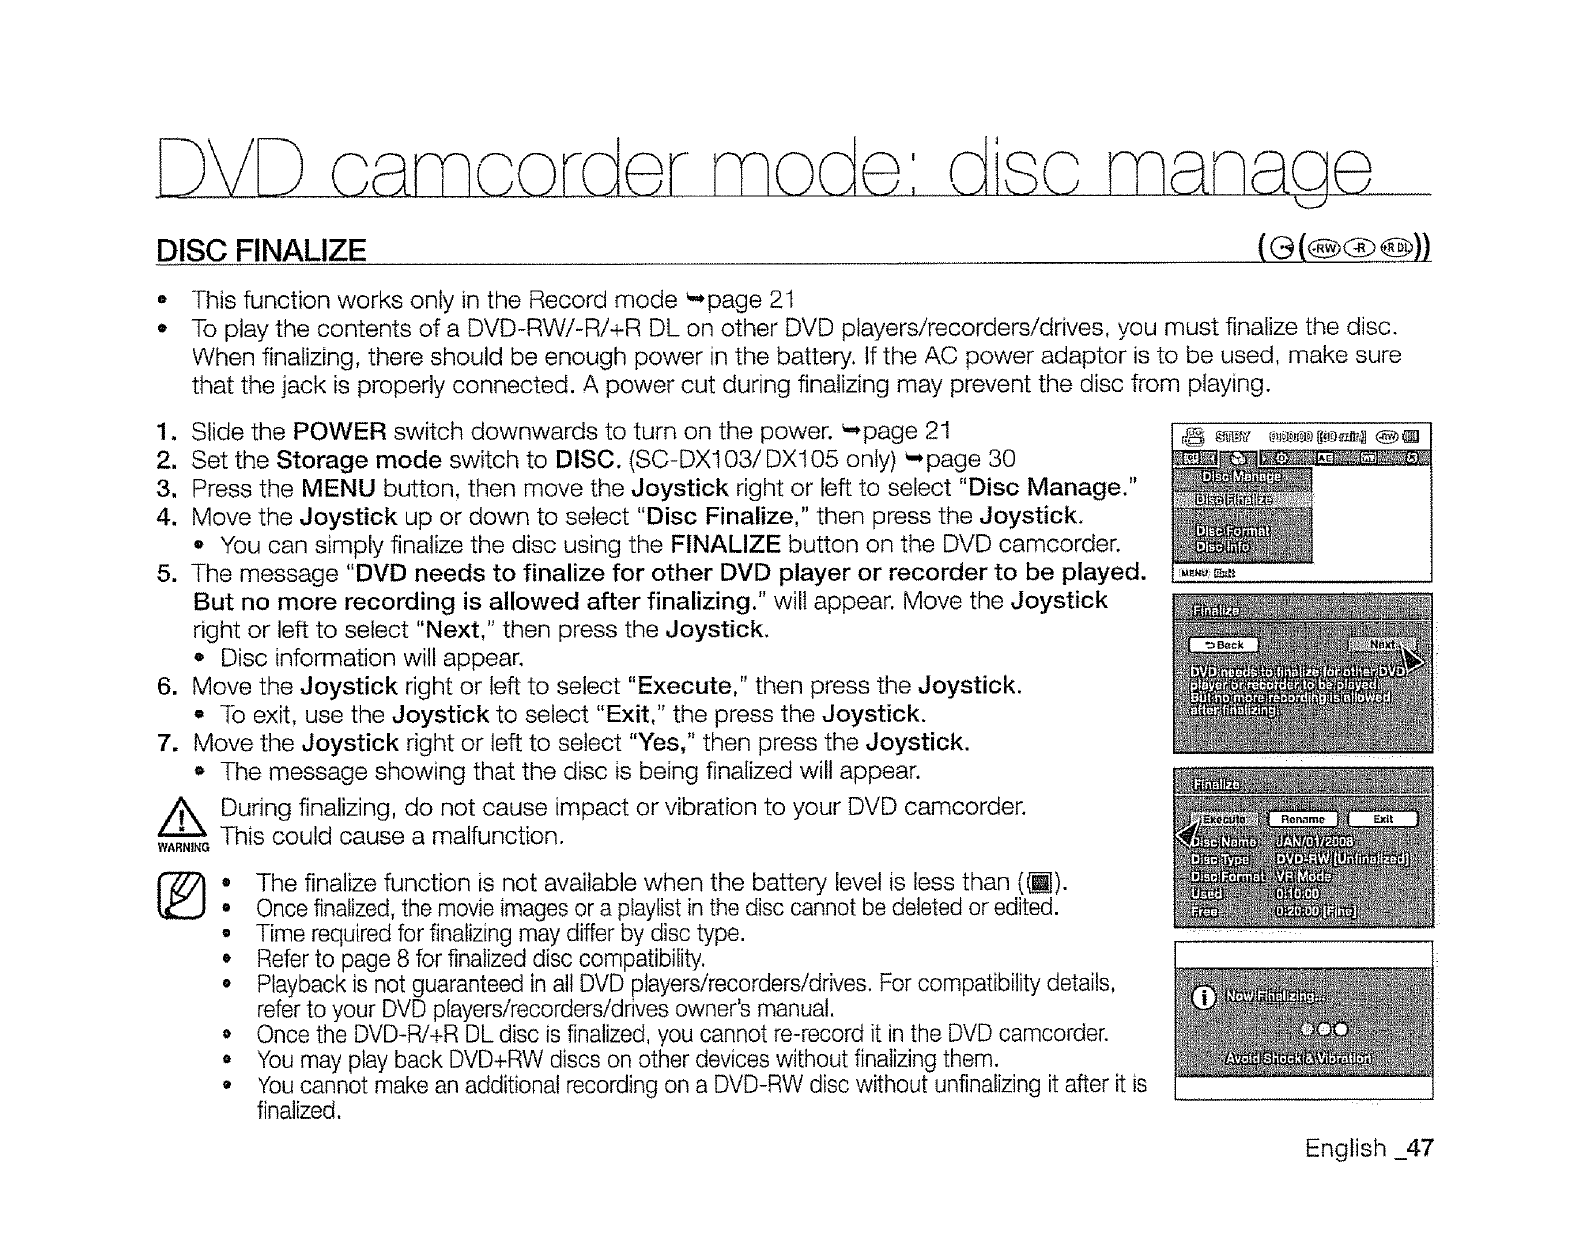
DVD a rnaorder
DISC FINALIZE
t
mode: dlsa
o
O
This function works only in the Record mode _page 21
To play the contents of a DVD-RW/-R/+R DL on other DVD players/recorders/drives, you must finalize the disc.
When finalizing, there should be enough power in the battery. If the AC power adaptor is to be used, make sure
that the jack is properly connected. A power cut during finalizing may prevent the disc from playing.
1. Slide the POWER switch downwards to turn on the power. _.page 21
2. Set the Storage mode switch to DISC. (SC-DX103/DX105 only) _ page 30
3. Press the MENU button, then move the Joystick right or left to select "Disc Manage."
4. Move the Joystick up or down to select "Disc Finalize," then press the Joystick.
- You can simply finalize the disc using the FINALIZE button on the DVD camcorder.
5. The message "DVD needs to finalize for other DVD player or recorder to be played.
But no more recording is allowed after finalizing." wilt appear. Move the Joystick
right or left to select "Next," then press the Joystick.
* Disc information will appear.
6. Move the Joystick right or left to select "Execute," then press the Joystick.
° To exit, use the Joystick to select "Exit," the press the Joystick.
7. Move the Joystick right or left to select "Yes," then press the Joystick.
* The message showing that the disc is being finalized will appear.
/_ During finalizing, do not cause impact or vibration to your DVD camcorder.
WA,,_NGThis could cause a malfunction.
%° The finalize function is not available when the battery level is less than (_).
•Once finalized, the movie images or a ptaytist in the disc cannot be deleted or edited.
• Time required for finalizing may differ by disc type.
• Refer to page 8 for finalized disc compatibility.
• Playback is not guaranteed in all DVD players/recorders/drives. For compatibility details,
refer to your DVD players/recorders/drives owner's manual.
° Once the DVD-R/+R DL disc is finalized, you cannot re-record it in the DVD camcorder.
e You may play back DVD+RW discs on other devices without finalizing them.
•You cannot make an additional recording on a DVD-RW disc without unfinalizing it after it is
finalized.
English _47
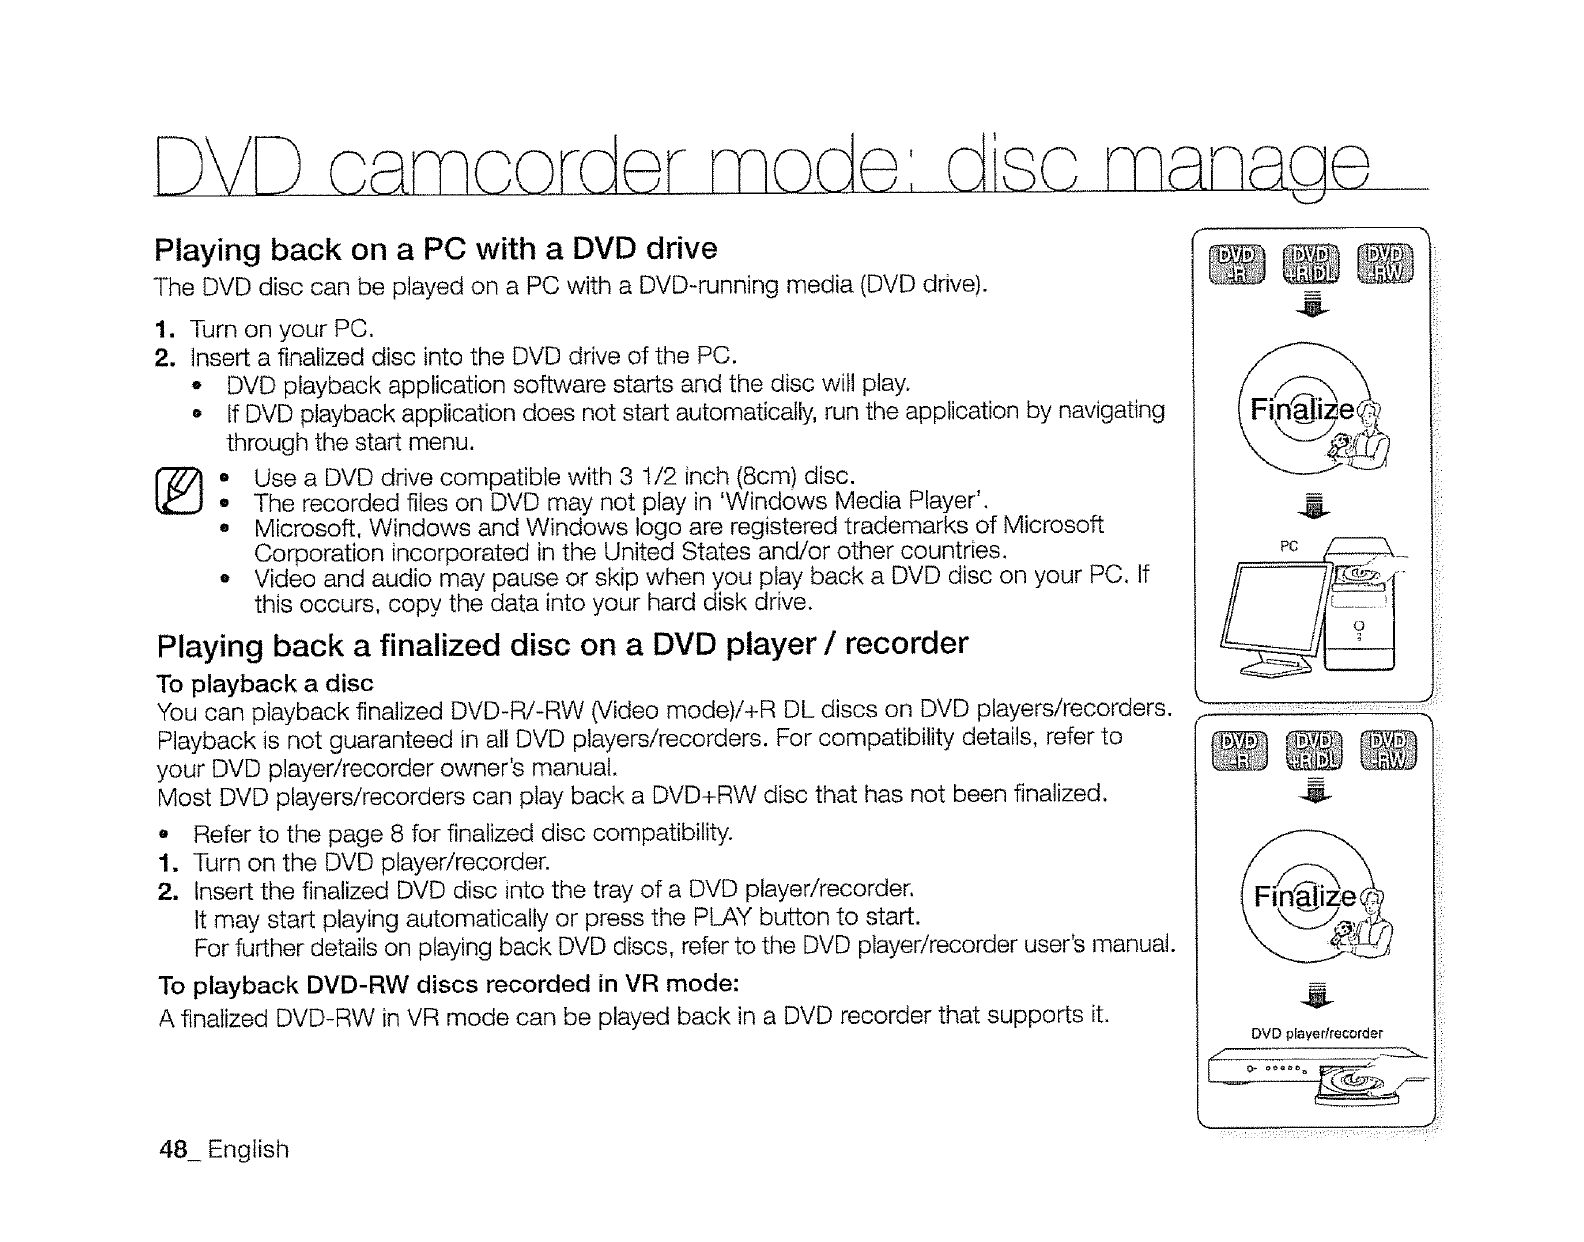
DVD ca corder mocl : disc rnanag
Playing back on a PC with a DVD drive
The DVD disc can be played on a PC with a DVD-running media (DVD drive).
lJ
2.
o
o
o
Turn on your PC.
Insert a finalized disc into the DVD drive of the PC.
o DVD playback application software starts and the disc will play.
• If DVD playback application does not start automatically, run the application by navigating
through the start menu.
Use a DVD drive compatible with 3 1/2 inch (8cm) disc.
The recorded files on DVD may not play in 'Windows Media Player'.
Microsoft, Windows and Windows logo are registered trademarks of Microsoft
Corporation incorporated in the United States and/or other countries.
o Video and audio may pause or skip when you play back a DVD disc on your PC. If
this occurs, copy the data into your hard disk drive.
Playing back a finalized disc on a DVD player /recorder
To playback a disc
You can playback finalized DVD-R/-RW (Video mode)/+R DL discs on DVD players/recorders.
Playback is not guaranteed in all DVD players/recorders. For compatibility details, refer to
your DVD player/recorder owner's manual.
Most DVD players/recorders can play back a DVD+RW disc that has not been finalized,
o Refer to the page 8 for finalized disc compatibility.
1, Turn on the DVD player/recorder.
2, Insert the finalized DVD disc into the tray of a DVD player/recorder,
It may start playing automatically or press the PLAY button to start.
For further details on playing back DVD discs, refer to the DVD player/recorder user's manual.
To playback DVD-RW discs recorded in VR mode:
A finalized DVD-RW in VR mode can be played back in a DVD recorder that supports it.
48_ English
DVD player/recorder
DISC UNFINALIZE
o
o
This function works only in the Record mode. _page 21
if a DVD-RW disc had been finalized in the VR mode or Video mode, you can unfinalize the disc for further
recording. When unfinalizing, there should be enough power in the battery. If the AC power adaptor is to be used,
make sure that the jack is properly connected.
1. Slide the POWER switch downwards to turn on the power. _.,page 21
2. Set the Storage mode switch to DISC. (SC-DX103i DX105 only) -page 30
3. Press the MENU button, then move the Joystick right or left to select "Disc Manage."
4. Move the Joystick up or down to select "Disc Unfinalize," then press the Joystick,
.You can simply unfinafize the disc using the FINALIZE button on the DVD camcorder.
• Disc information will appear.
5. Move the Joystick to select "Execute," then press the Joystick.
•To exit, use the Joystick to select "Back," the press the Joystick.
6. The message "Make the disc recordable?" will appear. Move the Joystick right or left
to select "Yes," then press the Joystick.
o The message showing that the disc is being unfinalized will appear, and the disc will
be unfinalized.
//_o The unfinalize function is not available when the battery level is less than ((_).
WA,,_N_° During unfinalizing, do not cause impact or vibration to your DVD camcorder.
This could cause a malfunction.
English _49
DISC FORMAT
-This function works only in the Record mode, _page 21
•You can format a recorded disc for re-use. By formatting, all existing data will be deleted.
•
2.
3.
4.
Slide the POWER switch downwards to turn on the power. _page 21
Set the Storage mode switch to DISC. (SC-DX103/DX105 only) _page 30
Press the MENU button, then move the Joystick right or left to select "Disc Manage,"
Move the Joystick up or down to select "Disc Format," then press the Joystick.
*When a DVD-RW disc is inserted, move the Joystick right or left to select "Video" or
"VR" according to how you want to use the disc, then press the Joystick.
° If a DVD+RW disc is inserted, move the Joystick to select "Yes," then press the
Joystick.
The Format function is not available at the battery level under (_1),
Formatting will delete all the recorded contents on a disc. Be careful not to delete
data by mistake.
,Do not turn the power off in the middle of the formatting. The data recorded on a
disc may be damaged.
o Be sure to use the AC power adaptor when formatting a disc so that the DVD
camcorder does not turn off midway.
o See page 101 for more details on the disc format type.
<DVD-RW disc>
<DVD+RW disc>
50_ English
DISC IN FORMATION
o This function works only in the DVD camcorder record mode. _page 21
• It shows you disc information such as the disc name, disc type, disc format, etc.
NOTICE : Make sure that you insert a disc. '-,page 30
1. Slide the POWER switch downwards to turn on the power. _page 21
2. Set the Storage mode switch to DISC. (SC-DX103/DX105 only) _-,page 30
3. Press the MENU button, then move the Joystick right or left to select "Disc Manage."
4. Move the Joystick up or down to select "Disc tnfo," then press the Joystick.
o "Disc Name," "Disc Type," "Disc Format," "Used" and "Free" wilt be displayed.
.To return, move the Joystick right or left to select "Back," then press the Joystick.
To rename the disc
1. Move the Joystick right or left to select "Rename," then press the Joystick.
o Disc Name screen will appear.
2. Use the Joystick to move the cursor to "Delete," then press the Joystick to delete the
existing disc name.
3. Use the Joystick to select the desired characters and items, then press the Joystick.
4. Use the Joystick to select "Done," then press the Joystick.
• The "Disc Name" wilt be changed.
o To return move the Joystick right or left to select "Back," then press the Joystick.
o Disc information may appear depending on the disc type.
®
English _51
DX105
INSERTING AND EJECTING A MEMORY CARD
This DVD camcorder has multi card-slot
for access to SD (Secure Digital) and MMC
(MultiMediaCard) cards,
Some cards are not compatible
depending on the memory card
manufacturer and memory card type.
Inserting a memory card
1. Open the memory card cover,
2. Insert the memory card into the slot until it
softly clicks.
o Make sure that the label-pasting portion
is facing up and the camcorder is placed
as shown in the figure.
3. Close the memory card cover,
Ejecting a memory card
1, Open the memory card cover.
2, Slightly push the memory card inwards to
pop it out.
3. Pull the memory card out of the slot and
close the memory card cover.
f
-label-pasting portion
Selecting a suitable memory card
*You can use SD and MMC cards.
RS MMC or Mini SD should be inserted by using an Adapter (not supplied).
oOn this DVD camcorder, you can use memory cards of the following capacity: Up to 2GB
.For movie recording, use a memory card that supports faster write speed (at least 1,25 MB/s).
52_ English
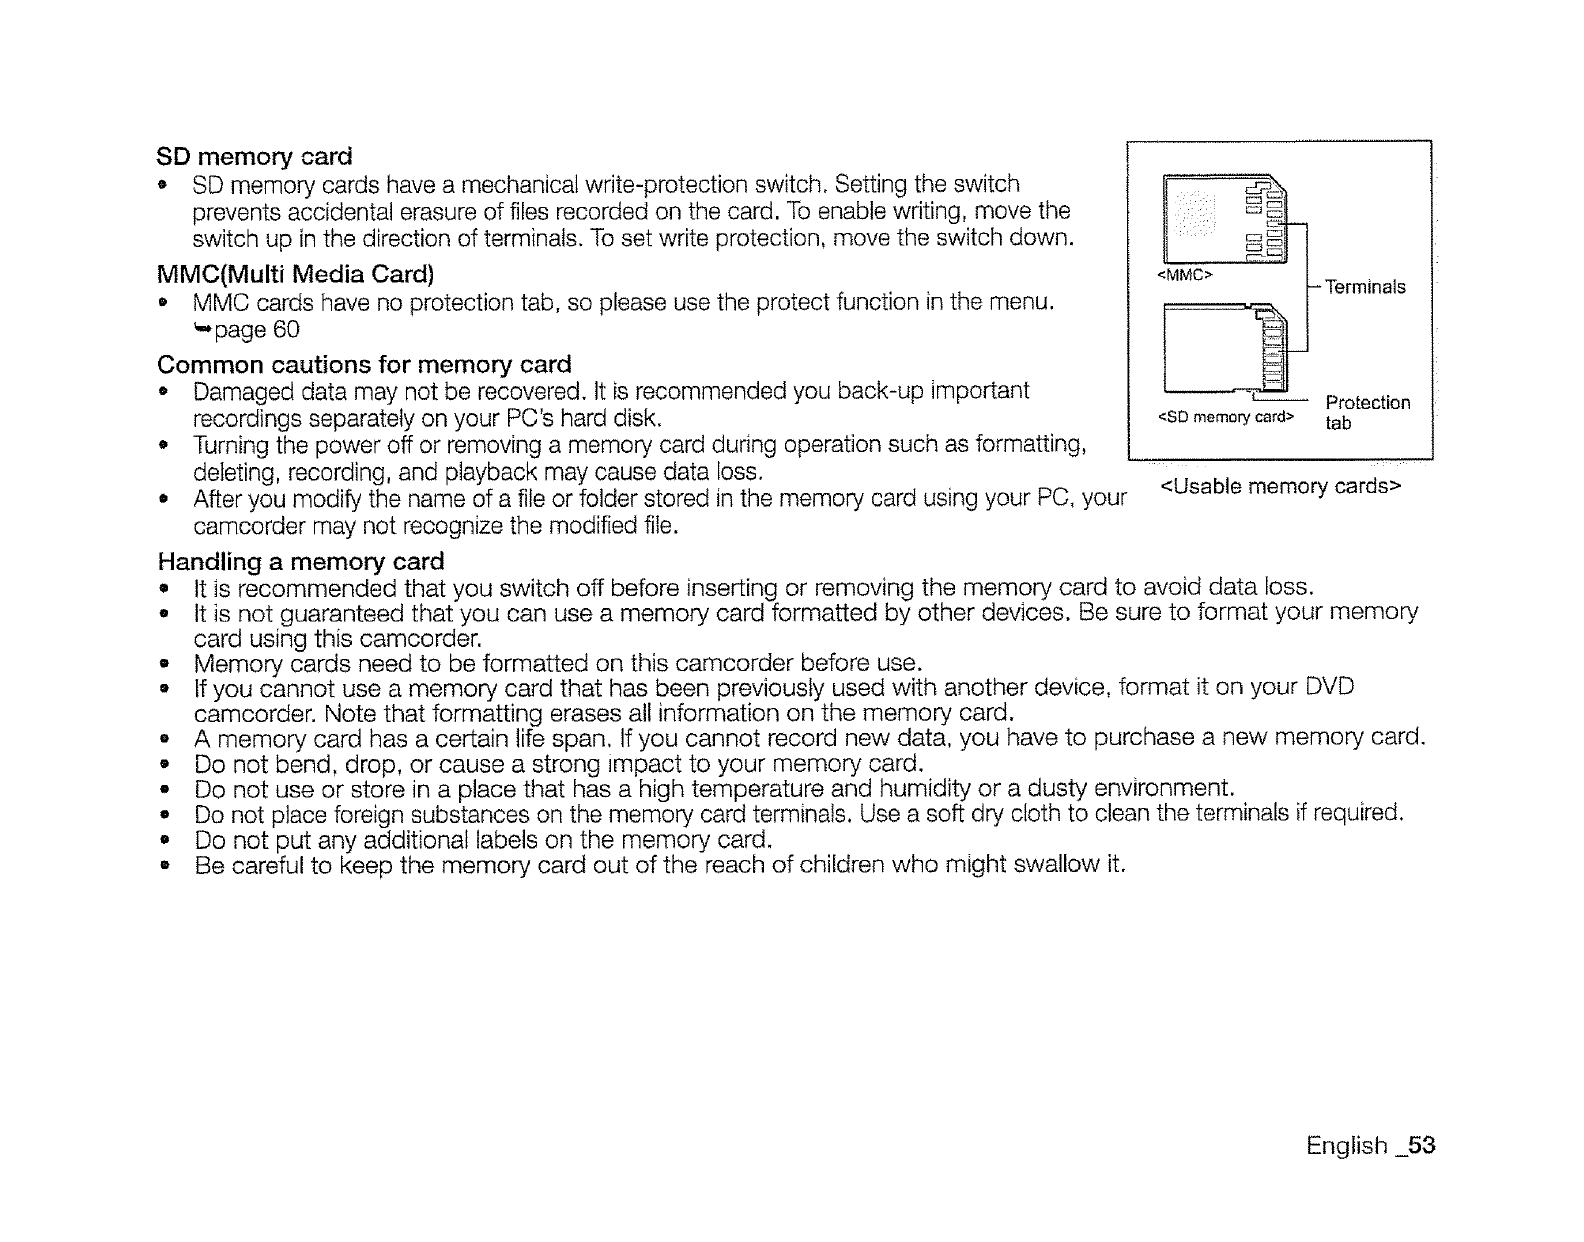
SD memory card
• SD memory cards havea mechanicalwrite-protection switch. Settingthe switch
prevents accidental erasureof files recorded on the card. Toenable writing, move the
switch up in the direction of terminals.To set write protection, move the switch down.
MMC(Multi Media Card)
•MMC cards have no protection tab, so please use the protect function in the menu.
_page 60
Common cautions for memory card
°Damaged data may not be recovered. It is recommended you back-up important
recordings separately on your PC's hard disk.
• Turning the power off or removing a memory card during operation such as formatting,
deleting, recording, and playback may cause data loss.
•After you modify the name of a file or folder stored in the memory card using your PC, your
camcorder may not recognize the modified file.
Handling a memory card
0
_i_i i,_i Et:_ c::_
<_ Terminals
Protection
<SD memory card> tab
<Usable memory cards>
It iS recommended that you switch off before inserting or removing the memory card to avoid data loss.
• It is not guaranteed that you can use a memory card formatted by other devices. Be sure to format your memory.
card using this camcorder.
-Memory cards need to be formatted on this camcorder before use.
° If you cannot use a memory card that has been previously used with another device, format it on your DVD
camcorder. Note that formatting erases all information on the memory card.
• A memory card has a certain life span. If you cannot record new data, you have to purchase a new memory card.
-Do not bend, drop, or cause a strong impact to your memory card.
-Do not use or store in a place that has a high temperature and humidity or a dusty environment.
o Do not place foreign substances on the memory card terminals. Use a soft dry cloth to clean the terminals if required.
•Do not put any additional labels on the memory card.
• Be careful to keep the memory card out of the reach of children who might swallow it.
English _53

-DX1 I05 o
Note on use
• Samsung is not responsible for data loss due to misuse.
• We recommend using a memory card case to avoid losing data from moving and static electricity.
o After a period of use, the memory card may become warm, This is normal and is not a malfunction.
o Photo image files recorded on a memory card by your DVD camcorder conform to the "DCF (Design rule for
Camera File system)" universal standard established by the JEITA (Japan Electronics and Information Technology
Industries Association).
- DCF is an integrated image-file format for digital cameras: image files can be used on all digital devices conforming
to DCR
The DVD camcorder supports SD and MMC memory cards for data storage.
The data storage speed may differ, according to the manufacturer and production system.
SLC (single-level cell) system: faster write speed is enabled.
MLC (multi-level cell) system: only lower write speed is supported.
For best results, we recommend using a memory card that supports faster write speed.
Using a lower write speed memory card for recording a movie may cause difficulties with storing the movie on the
memory card. You may even lose your movie data during the recording.
In an attempt to preserve any bit of the recorded movie, the DVD camcorder forcibly stores the movie on the
memory card and displays a warning: "Low speed card."
54_ English
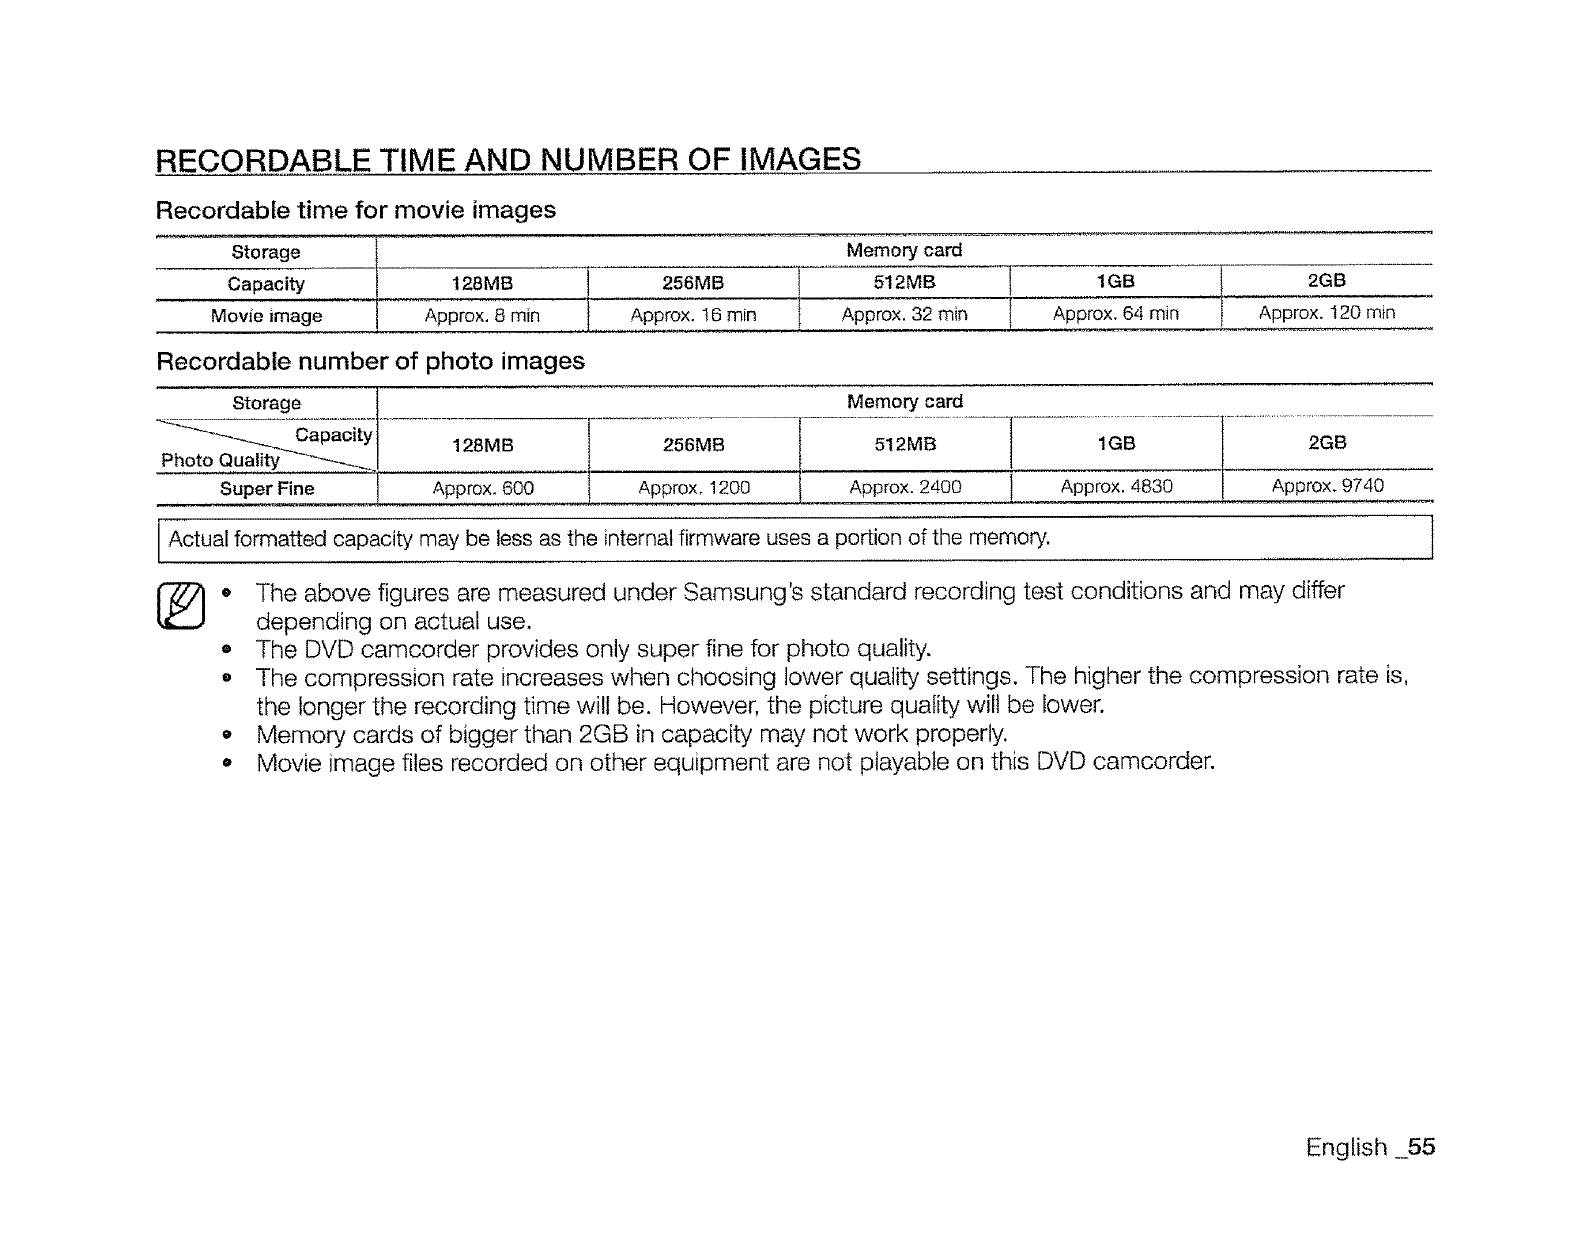
RECORDABLE TIME AND NUMBER OF IMAGES
Recordable time for movie images
Storage
Capacity
Movie image 128MB 1', 256MB
Approx. 8 min Approx. 16 min
Memory card
512MB I 1GB I 2GB
Approx. 32 min I Approx. 64 rain I Approx. 120 min
Recordable number of photo images
...... ..S.....t...0.....r._g_t...........................
__apacity 128M B
Photo Quality -'-_J
super_ioo i Approx:6oo
Memory card
Approx. 1200 1 Approx. 2400 I Approx. 4830 Approx.
[974O
Actual formatted capacity may be less as the internal firmware uses a portion of the memory. ]
* The above figures are measured under Samsung's standard recording test conditions and may differ
depending on actual use.
• The DVD camcorder provides only super fine for photo quality.
° The compression rate increases when choosing lower quality settings. The higher the compression rate is,
the longer the recording time will be. However, the picture quality wilt be lower.
• Memory cards of bigger than 2GB in capacity may not work properly.
• Movie image files recorded on other equipment are not playable on this DVD camcorder.
English 55
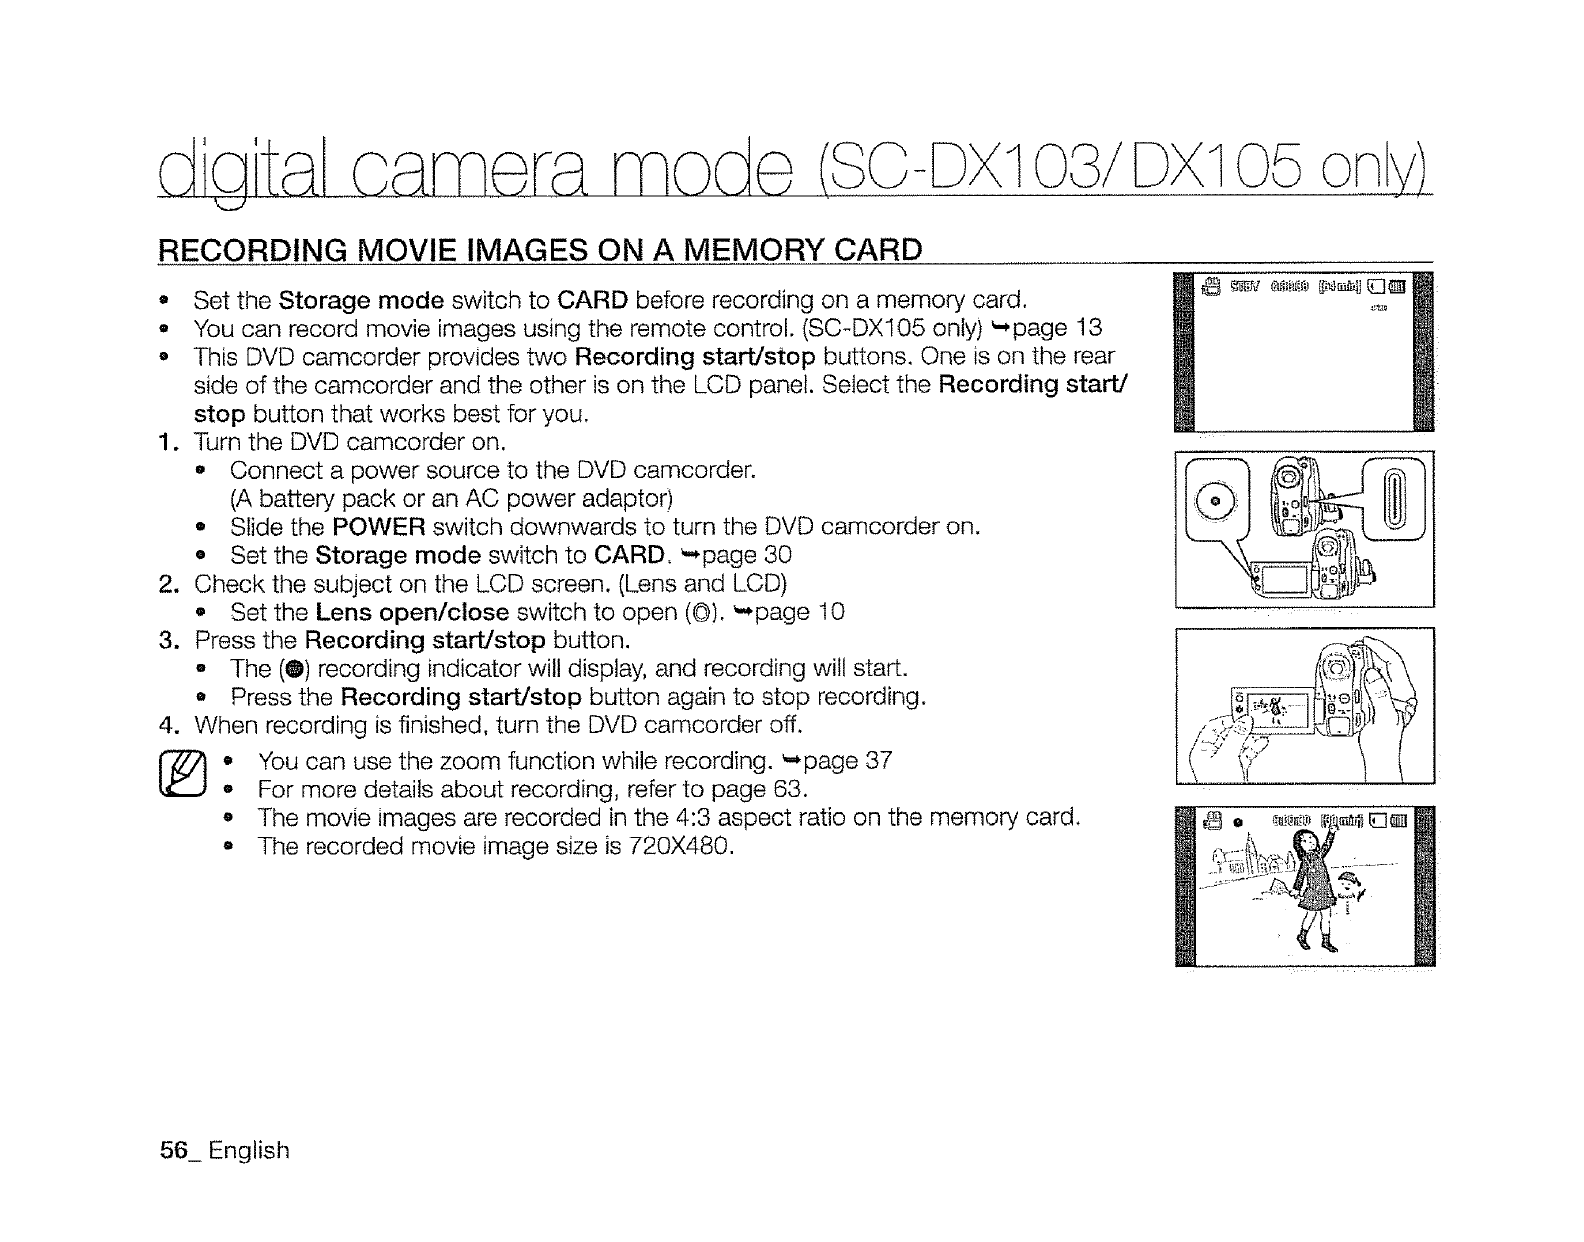
1 105
RECORDING MOVIE IMAGES ON A MEMORY CARD
• Set the Storage mode switch to CARD before recording on a memory card.
•You can record movie images using the remote control. (SC-DXl05 only) _-page 13
• This DVD camcorder provides two Recording start/stop buttons. One is on the rear
side of the camcorder and the other is on the LCD panel. Select the Recording start/
stop button that works best for you.
1. Turn the DVD camcorder on.
o Connect a power source to the DVD camcorder.
(A battery, pack or an AC power adaptor)
•Slide the POWER switch downwards to turn the DVD camcorder on.
° Set the Storage mode switch to CARD_ _page 30
2. Check the subject on the LCD screen. (Lens and LCD)
•Set the Lens open/close switch to open (©). _page t0
3. Press the Recording start/stop button.
The (0) recording indicator will display, and recording will start.
a Press the Recording start/stop button again to stop recording.
4. When recording is finished, turn the DVD camcorder off.
.You can use the zoom function while recording. '-,page 37
°For more details about recording, refer to page 63.
o The movie images are recorded in the 4:3 aspect ratio on the memory card.
o The recorded movie image size is 720X480.
56_ English
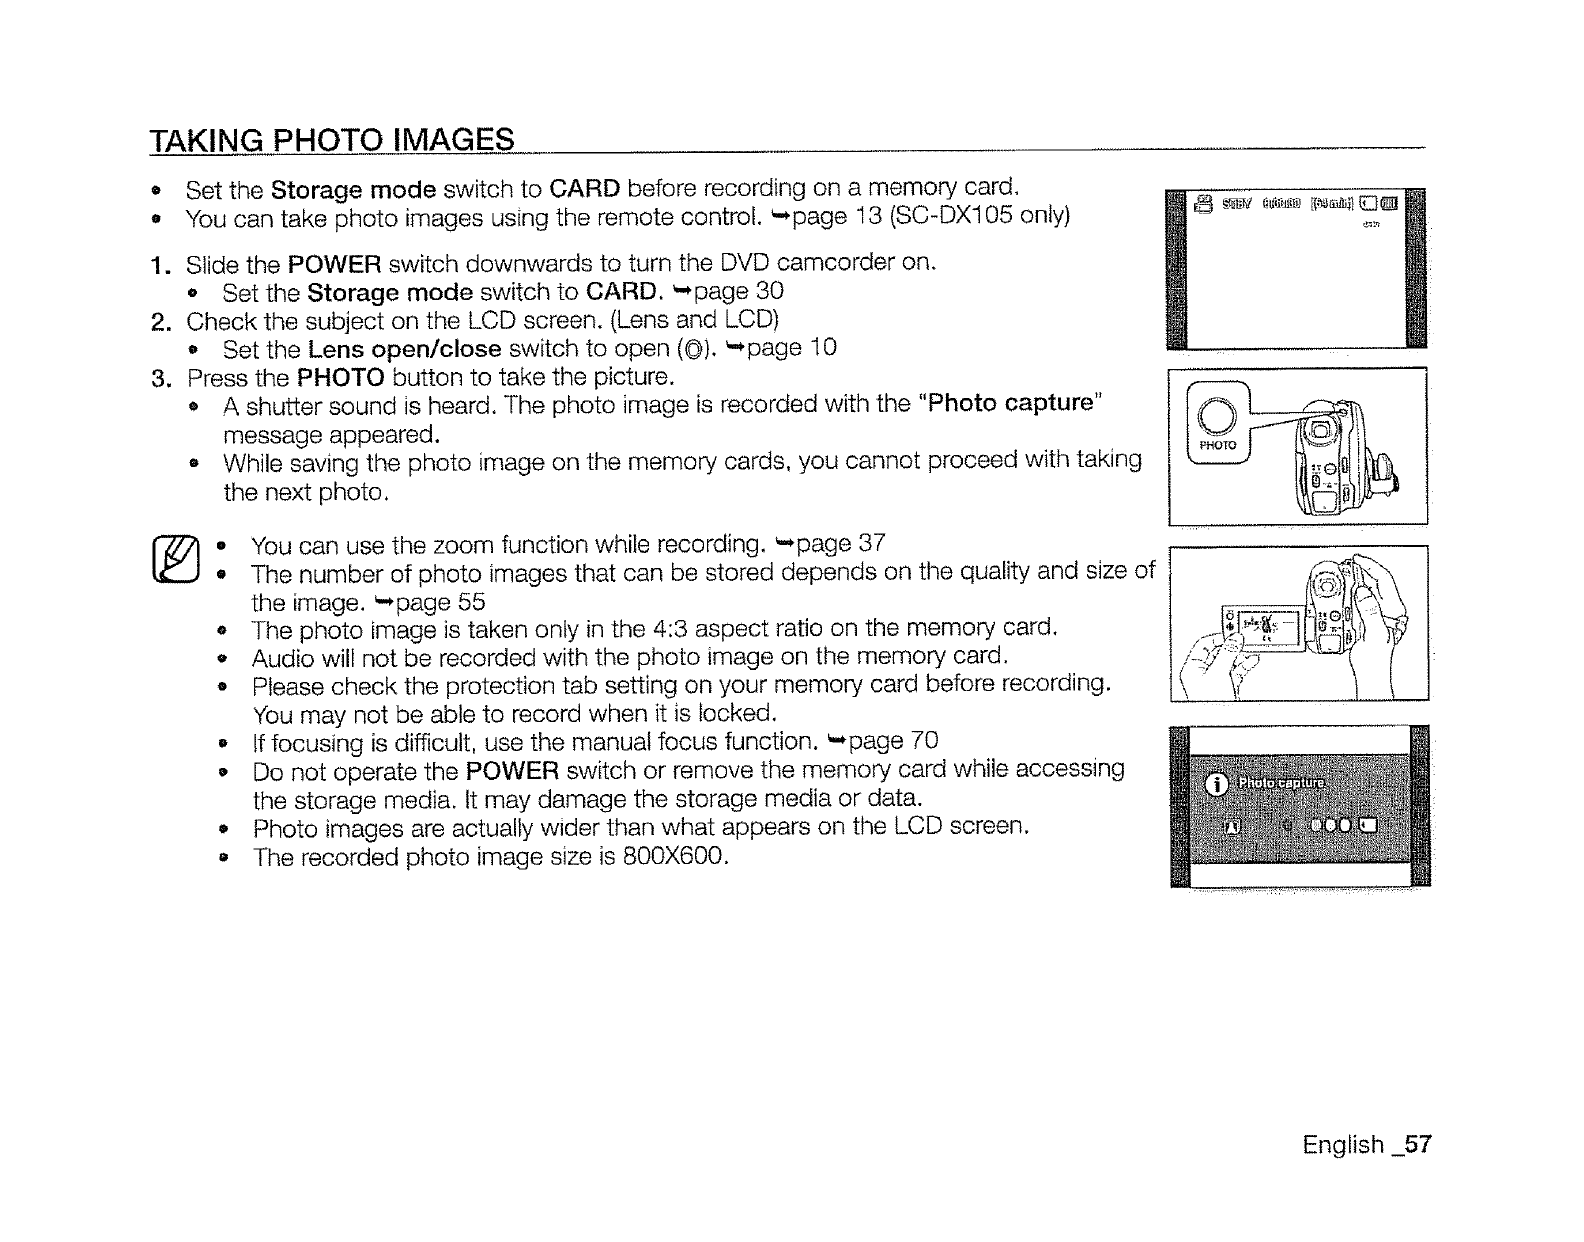
TAKING PHOTO IMAGES
O
o
1.
2.
3.
Set the Storage mode switch to CARD before recording on a memory card,
You can take photo images using the remote control. _*page 13 (SC-DX105 only)
Slide the POWER switch downwards to turn the DVD camcorder on.
oSet the Storage mode switch to CARD, _page 30
Check the subject on the LCD screen. (Lens and LCD)
o Set the Lens open/close switch to open (0). _page 10
Press the PHOTO button to take the picture.
• A shutter sound is heard. The photo image is recorded with the "Photo capture"
message appeared.
o While saving the photo image on the memory cards, you cannot proceed with taking
the next photo.
• You can use the zoom function while recording. _-,page 37
•The number of photo images that can be stored depends on the quality and size of
the image. _*page 55
-The photo image is taken only in the 4:3 aspect ratio on the memory card.
-Audio will not be recorded with the photo image on the memory card.
•Please check the protection tab setting on your memory card before recording.
You may not be able to record when it is locked,
.If focusing is difficult, use the manual focus function. _*page 70
•Do not operate the POWER switch or remove the memory card while accessing
the storage media, tt may damage the storage media or data.
.Photo images are actually wider than what appears on the LCD screen.
• The recorded photo image size is 800X600.
English _57
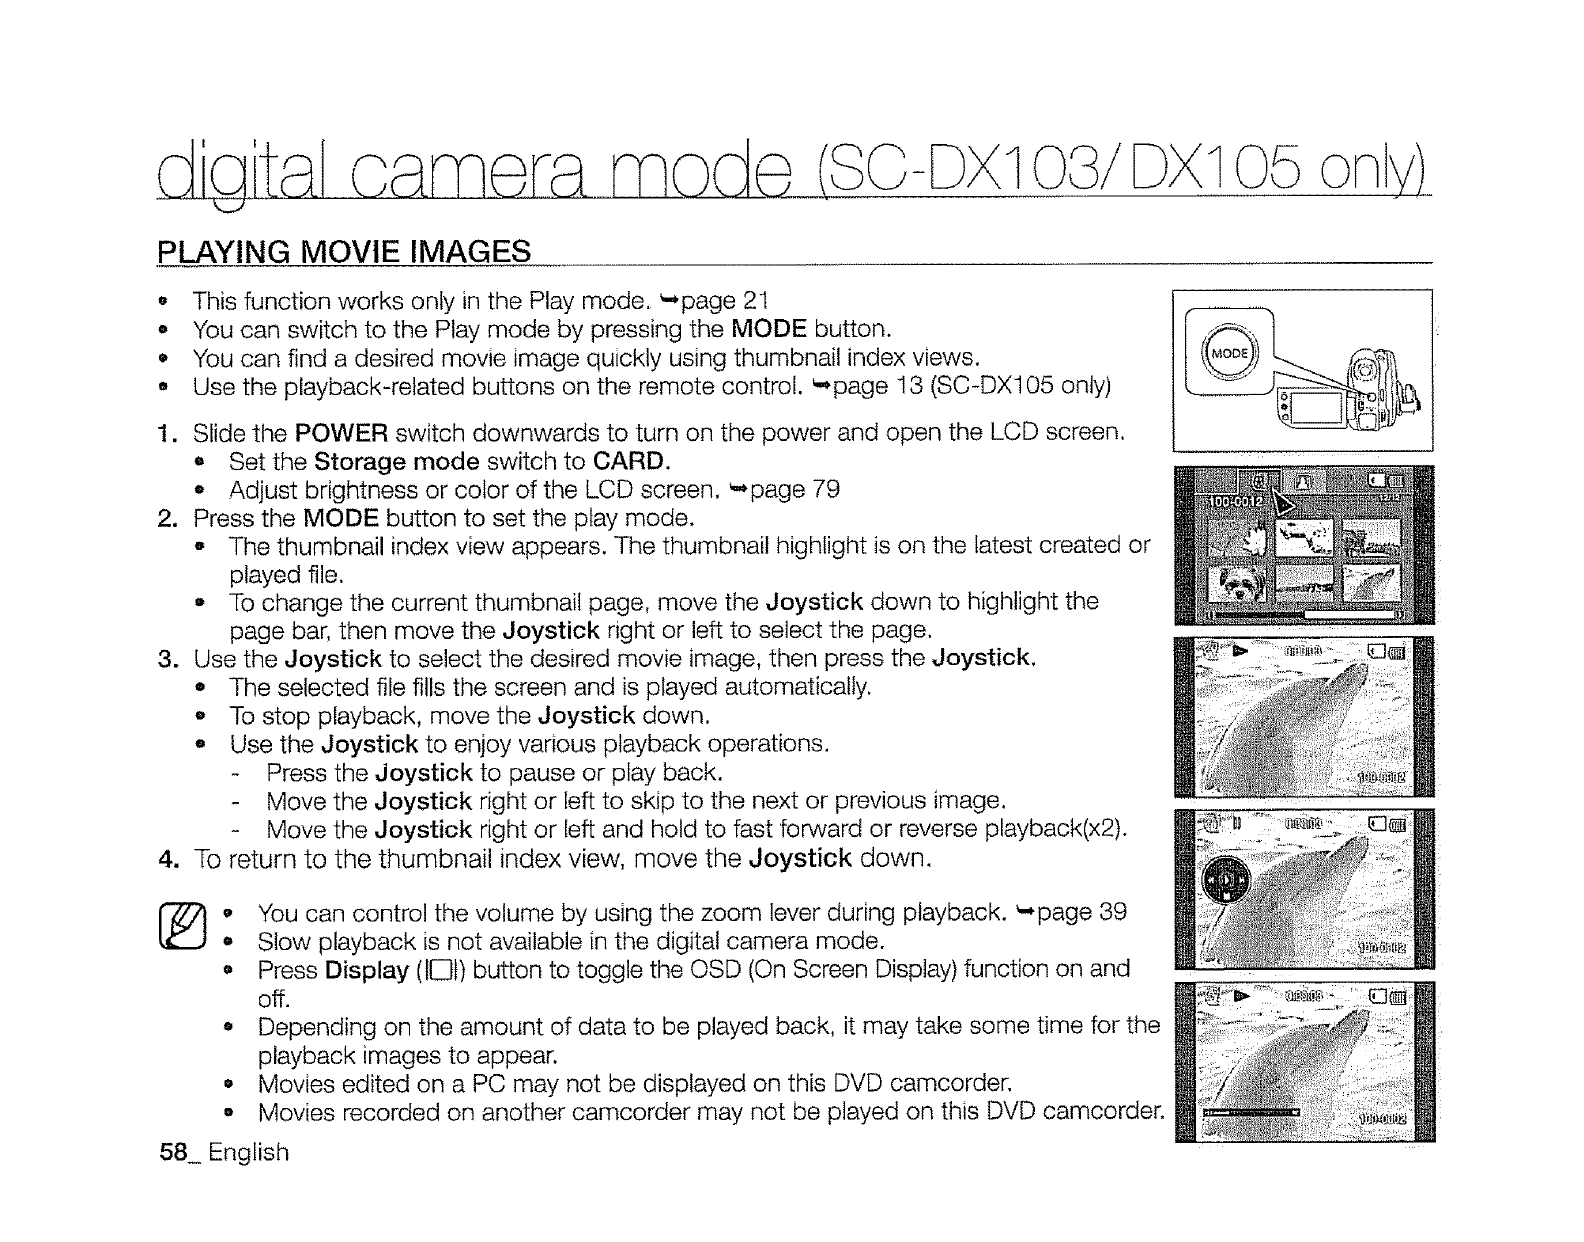
d tal oam da m (3o txd o3/
k_J 05 ony)
PLAYING MOVIE IMAGES
o This function works only in the Play mode. _page 21
o You can switch to the Play mode by pressing the MODE button.
• You can find a desired movie image quickly using thumbnail index views.
• Use the playback-related buttons on the remote control. _,,page 13 (SC-DX105 only)
1. Slide the POWER switch downwards to turn on the power and open the LCD screen.
,, Set the Storage mode switch to CARD.
o Adjust brightness or color of the LCD screen. _.,page 79
2. Press the MODE button to set the play mode.
o The thumbnail index view appears. The thumbnail highlight is on the latest created or
played file.
To change the current thumbnail page, move the Joystick down to highlight the
page bar, then move the Joystick right or left to select the page.
3. Use the Joystick to select the desired movie image, then press the Joystick.
• The selected file fills the screen and is played automatically.
-To stop playback, move the Joystick down.
oUse the Joystick to enjoy various playback operations.
Press the Joystick to pause or play back.
Move the Joystick right or left to skip to the next or previous image.
Move the Joystick right or left and hold to fast forward or reverse playback(x2).
4. To return to the thumbnail index view, move the Joystick down.
®o You can control the volume by using the zoom lever during playback. _page 39
,Slow playback is not available in the digital camera mode.
oPress Display (IO1)button to toggle the OSD (On Screen Display) function on and
off.
° Depending on the amount of data to be played back, it may take some time for the
playback images to appear.
•Movies edited on a PC may not be displayed on this DVD camcorder.
o Movies recorded on another camcorder may not be played on this DVD camcorder.
58_ English
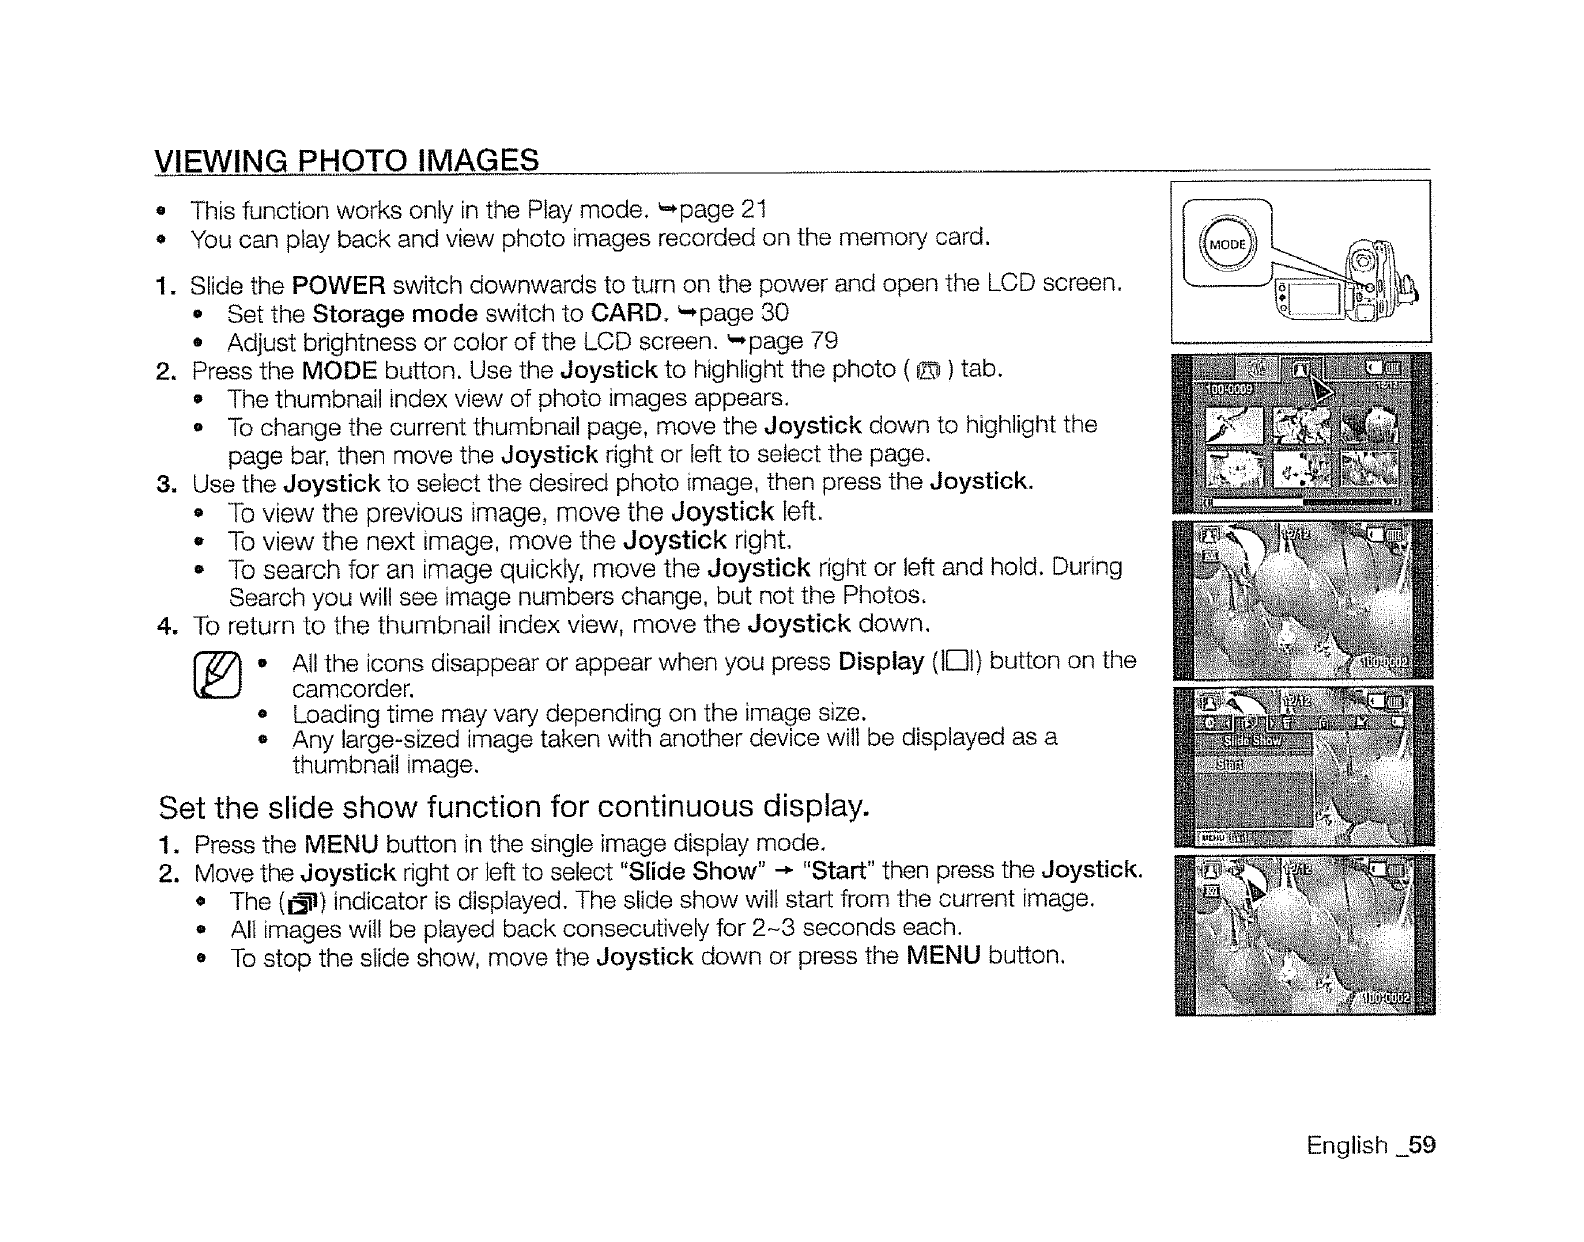
VIEWING PHOTO IMAGES
e This function works only in the Play mode. _page 21
• You can play back and view photo images recorded on the memory card.
1. Slide the POWER switch downwards to turn on the power and open the LCD screen,
o Set the Storage mode switch to CARD. _page 30
• Adjust brightness or color of the LCD screen. _,page 79
2. Press the MODE button. Use the Joystick to highlight the photo ( D ) tab.
• The thumbnail index view of photo images appears.
o To change the current thumbnail page, move the Joystick down to highlight the
page bar, then move the Joystick right or left to select the page.
3. Use the Joystick to select the desired photo image, then press the Joystick.
• To view the previous image, move the Joystick left.
,, To view the next image, move the Joystick right.
• To search for an image quickly, move the Joystick right or left and hold. During
Search you will see image numbers change, but not the Photos.
4. To return to the thumbnail index view, move the Joystick down.
o All the icons disappear or appear when you press Display (IE31)button on the
camcorder.
° Loading time may vary depending on the image size.
• Any large-sized image taken with another device will be displayed as a
thumbnail image.
Set the slide show function for continuous display.
1. Press the MENU button in the single image display mode.
2. Move the Joystick right or left to select "Slide Show" -. "Start" then press the Joystick.
• The (1_-!) indicator is displayed. The slide show will start from the current image.
o All images wil! be played back consecutively for 2-3 seconds each.
° To stop the slide show, move the Joystick down or press the MENU button.
English 59
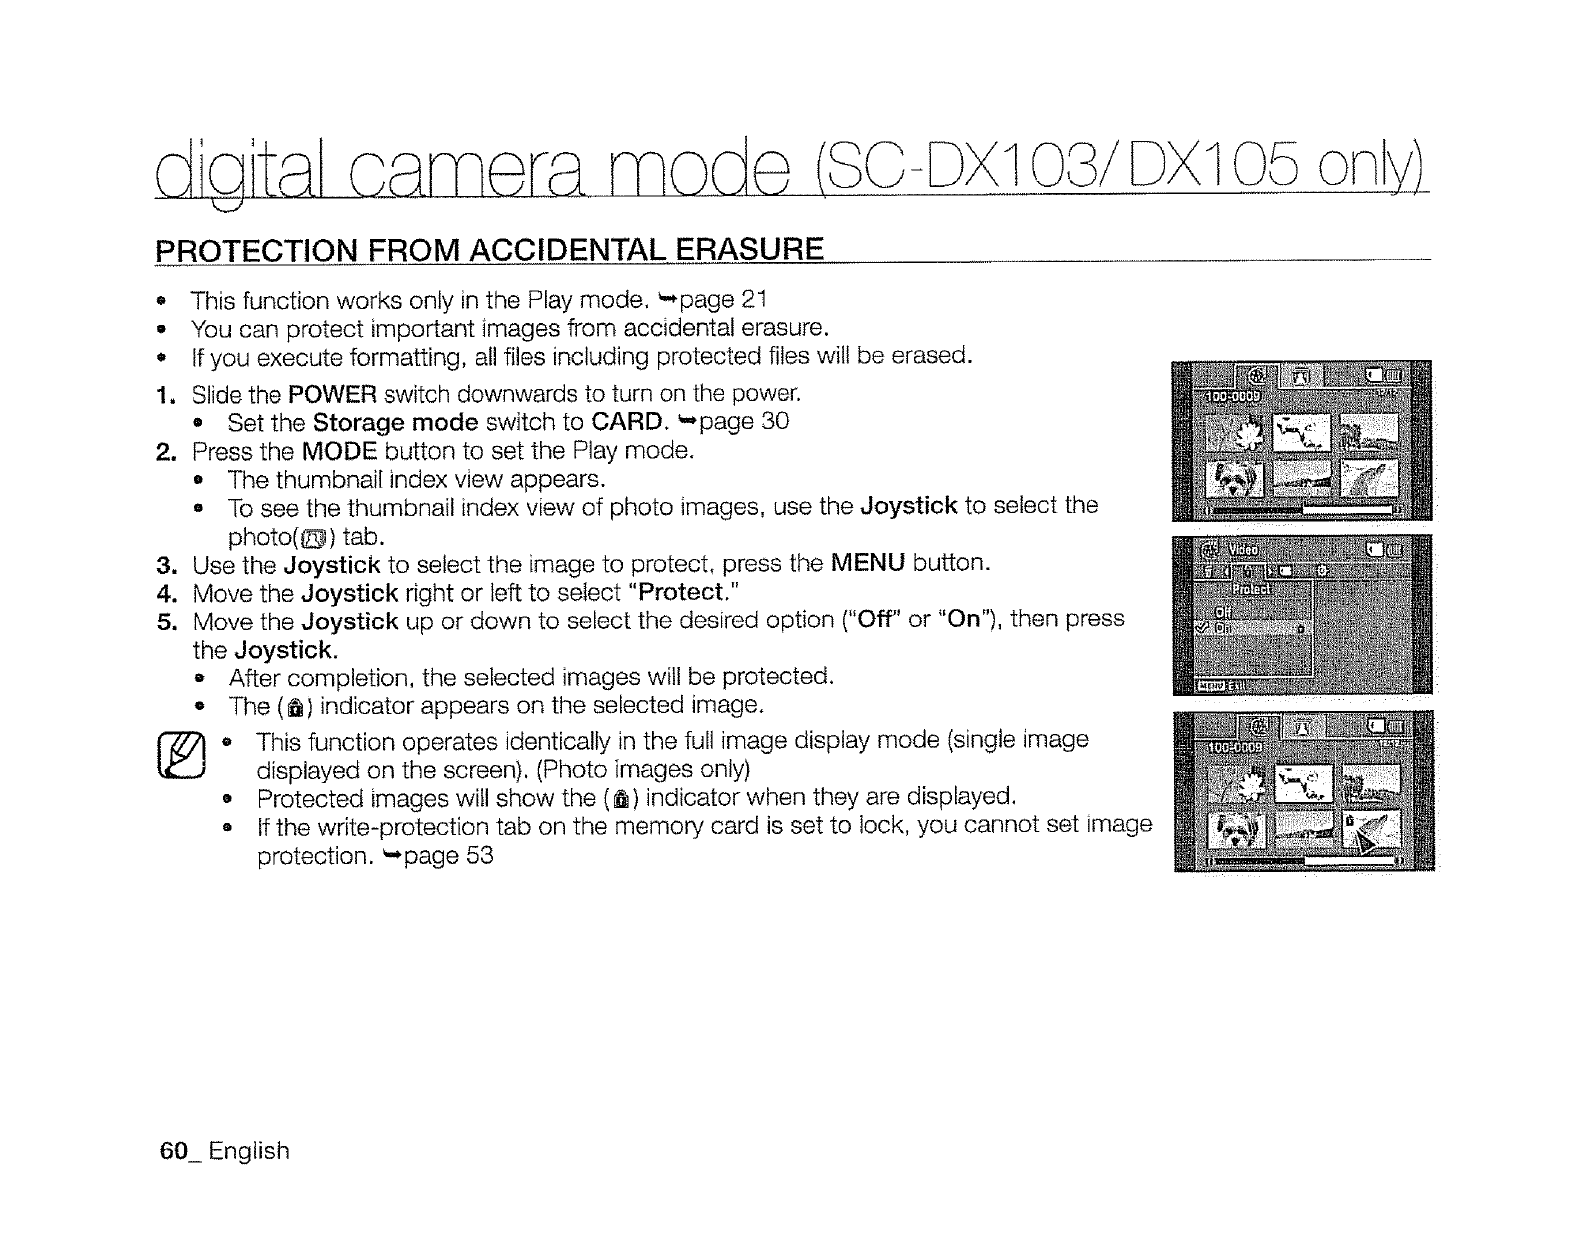
05
PROTECTION FROM ACCIDENTAL ERASURE
o This function works only in the Play mode. _page 21
•You can protect important images from accidental erasure.
•If you execute formatting, all files including protected files will be erased.
1, Slide the POWER switch downwards to turn on the power.
• Set the Storage mode switch to CARD. _page 30
2. Press the MODE button to set the Play mode.
o The thumbnail index view appears.
• To see the thumbnail index view of photo images, use the Joystick to select the
photo(O) tab.
3. Use the Joystick to select the image to protect, press the MENU button.
4. Move the Joystick right or left to select "Protect."
5, Move the Joystick up or down to select the desired option ("Off" or "On"), then press
the Joystick.
o After completion, the selected images will be protected.
-The (_) indicator appears on the selected image.
o This function operates identically in the full image display mode (single image
displayed on the screen). (Photo images only)
o Protected images will show the (_) indicator when they are displayed.
•If the write-protection tab on the memory card is set to lock, you cannot set image
protection. _page 53
60_ English
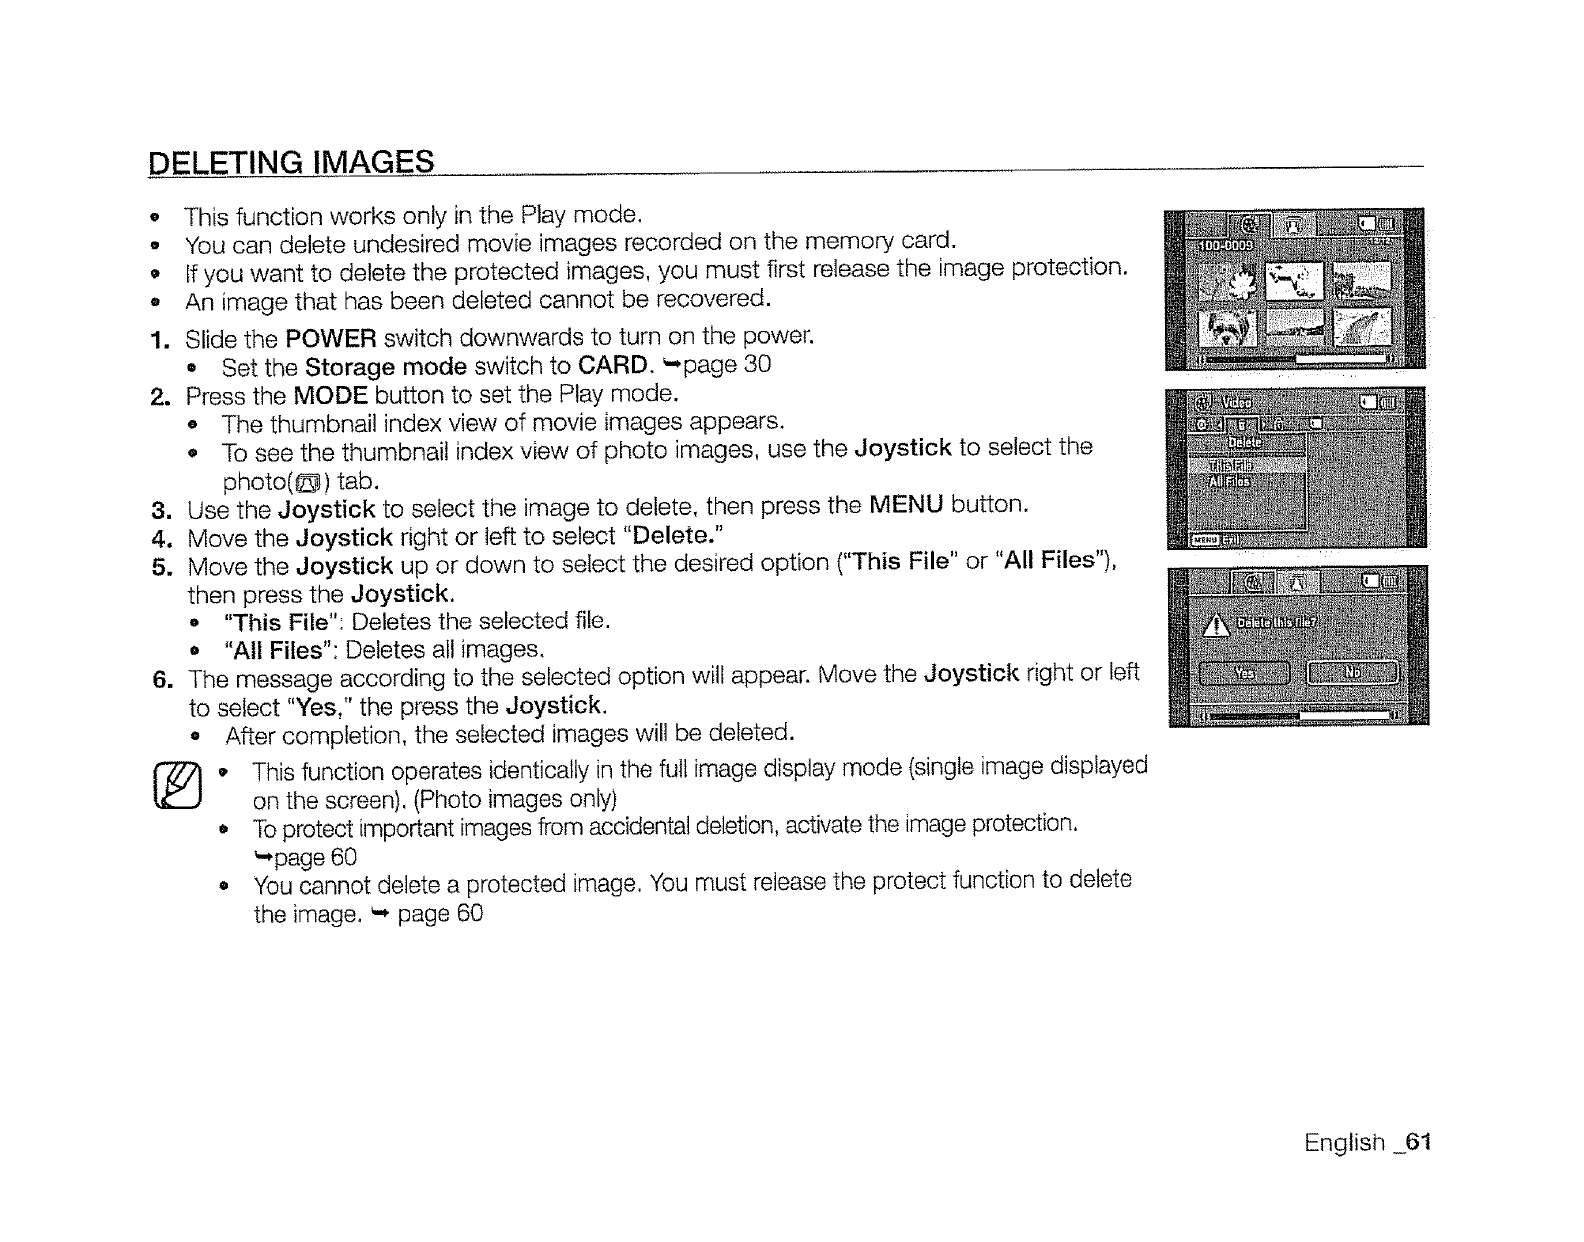
DELETING IMAGES
•This function works only in the Play mode.
o You can delete undesired movie images recorded on the memory card.
•If you want to delete the protected images, you must first release the image protection.
• An image that has been deleted cannot be recovered.
1. Slide the POWER switch downwards to turn on the power.
° Set the Storage mode switch to CARD. _,page 30
2. Press the MODE button to set the Play mode.
,, The thumbnail index view of movie images appears.
•To see the thumbnail index view of photo images, use the Joystick to select the
photo(@) tab.
3. Use the Joystick to select the image to delete, then press the MENU button.
4, Move the Joystick right or left to select "Delete."
5, Move the Joystick up or down to select the desired option ("This File" or "All Files"),
then press the Joystick,
° "This File": Deletes the selected file.
• "All Files": Deletes all images.
6. The message according to the selected option will appear. Move the Joystick right or left
to select "Yes," the press the Joystick.
•After completion, the selected images will be deleted.
I_, This function operates identically in the full image display mode (single image displayed
on the screen). (Photo images only)
•To protect important images from accidental deletion, activate the image protection.
_',page 60
•You cannot delete a protected image. You must release the protect function to delete
the image. _', page 60
English _61
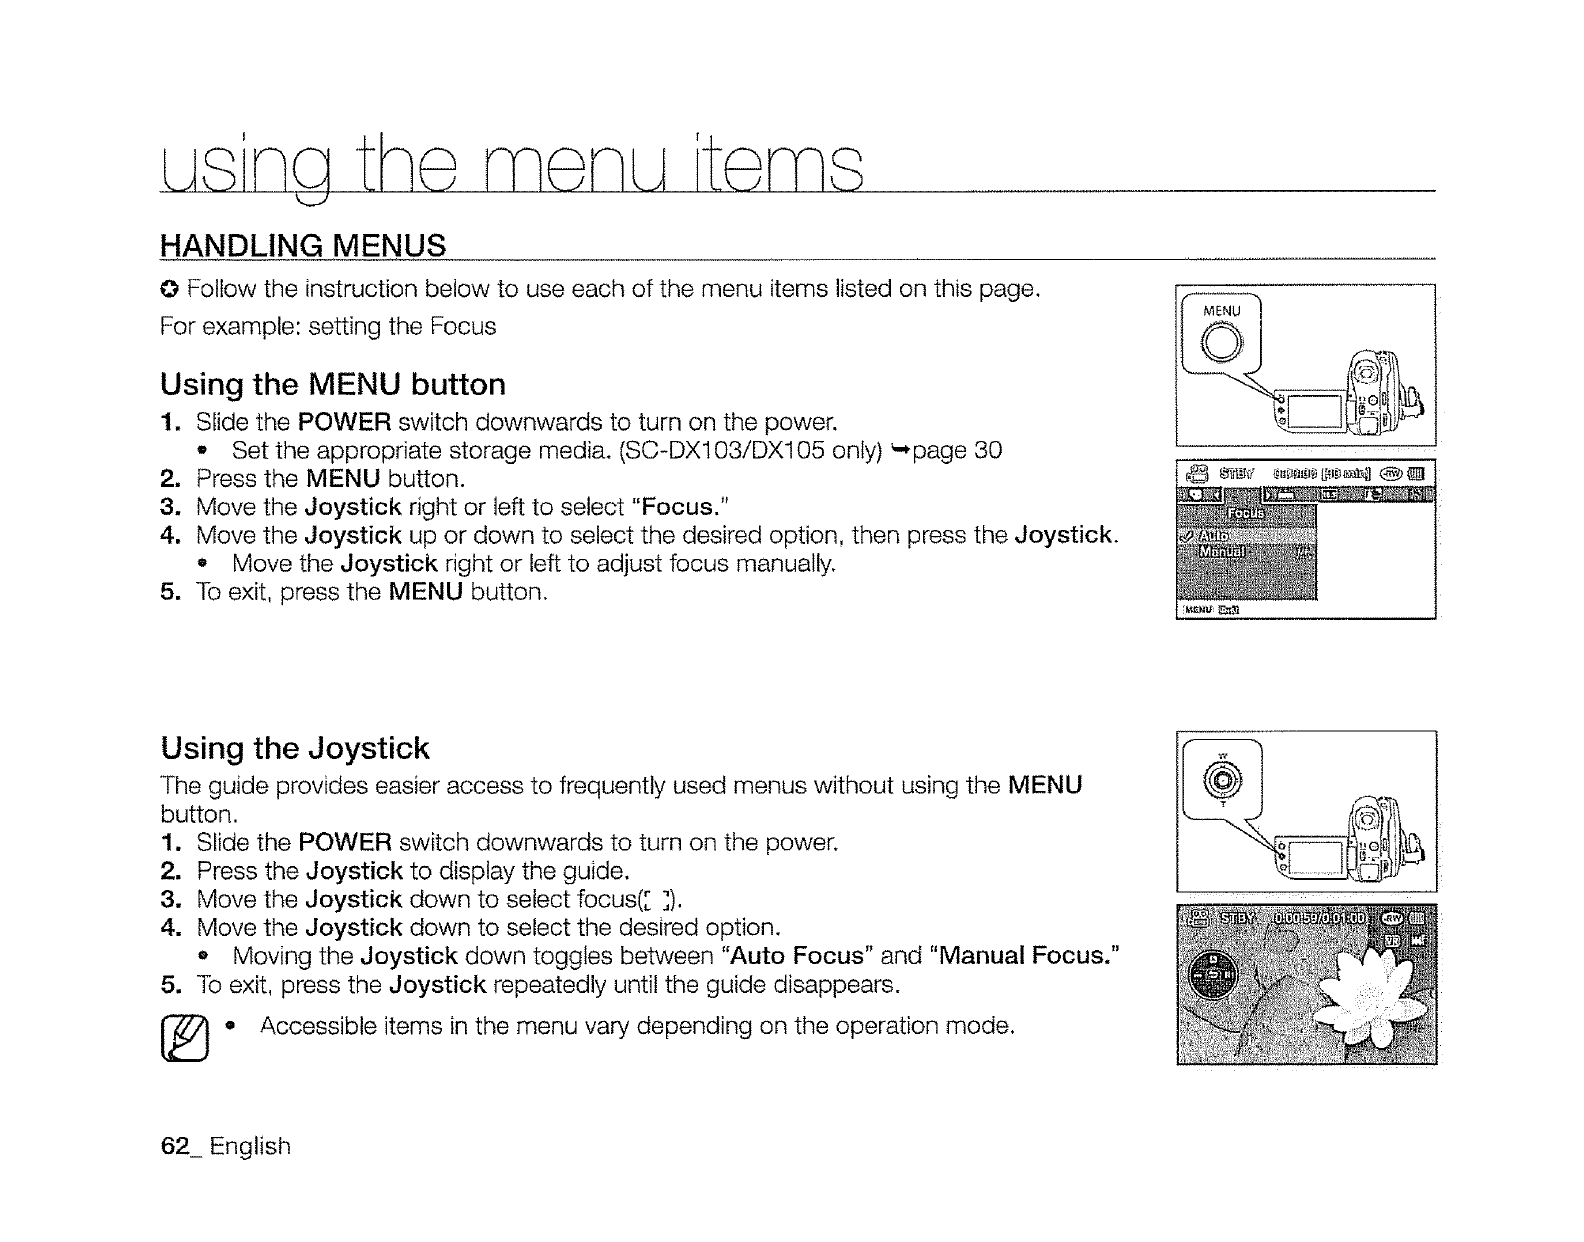
HANDLING MENUS
O Follow the instruction below to use each of the menu items listed on this page.
For example: setting the Focus
Using the MENU button
1. Slide the POWER switch downwards to turn on the power.
-Set the appropriate storage media. (SC-DX103/DX105 only) '-page 30
2. Press the MENU button.
3. Move the Joystick right or left to select "Focus."
4. Move the Joystick up or down to select the desired option, then press the Joystick.
e Move the Joystick right or left to adjust focus manually.
5. To exit, press the MENU button.
Using the Joystick
The guide provides easier access to frequently used menus without using the MENU
button.
1. Slide the POWER switch downwards to turn on the power.
2. Press the Joystick to display the guide,
3. Move the Joystick down to select focus([ ]).
4. Move the Joystick down to select the desired option.
oMoving the Joystick down toggles between "Auto Focus" and "Manual Focus."
5. To exit, press the Joystick repeatedly until the guide disappears.
I_}. Accessible items in the menu vary depending on the operation mode.
62_ English
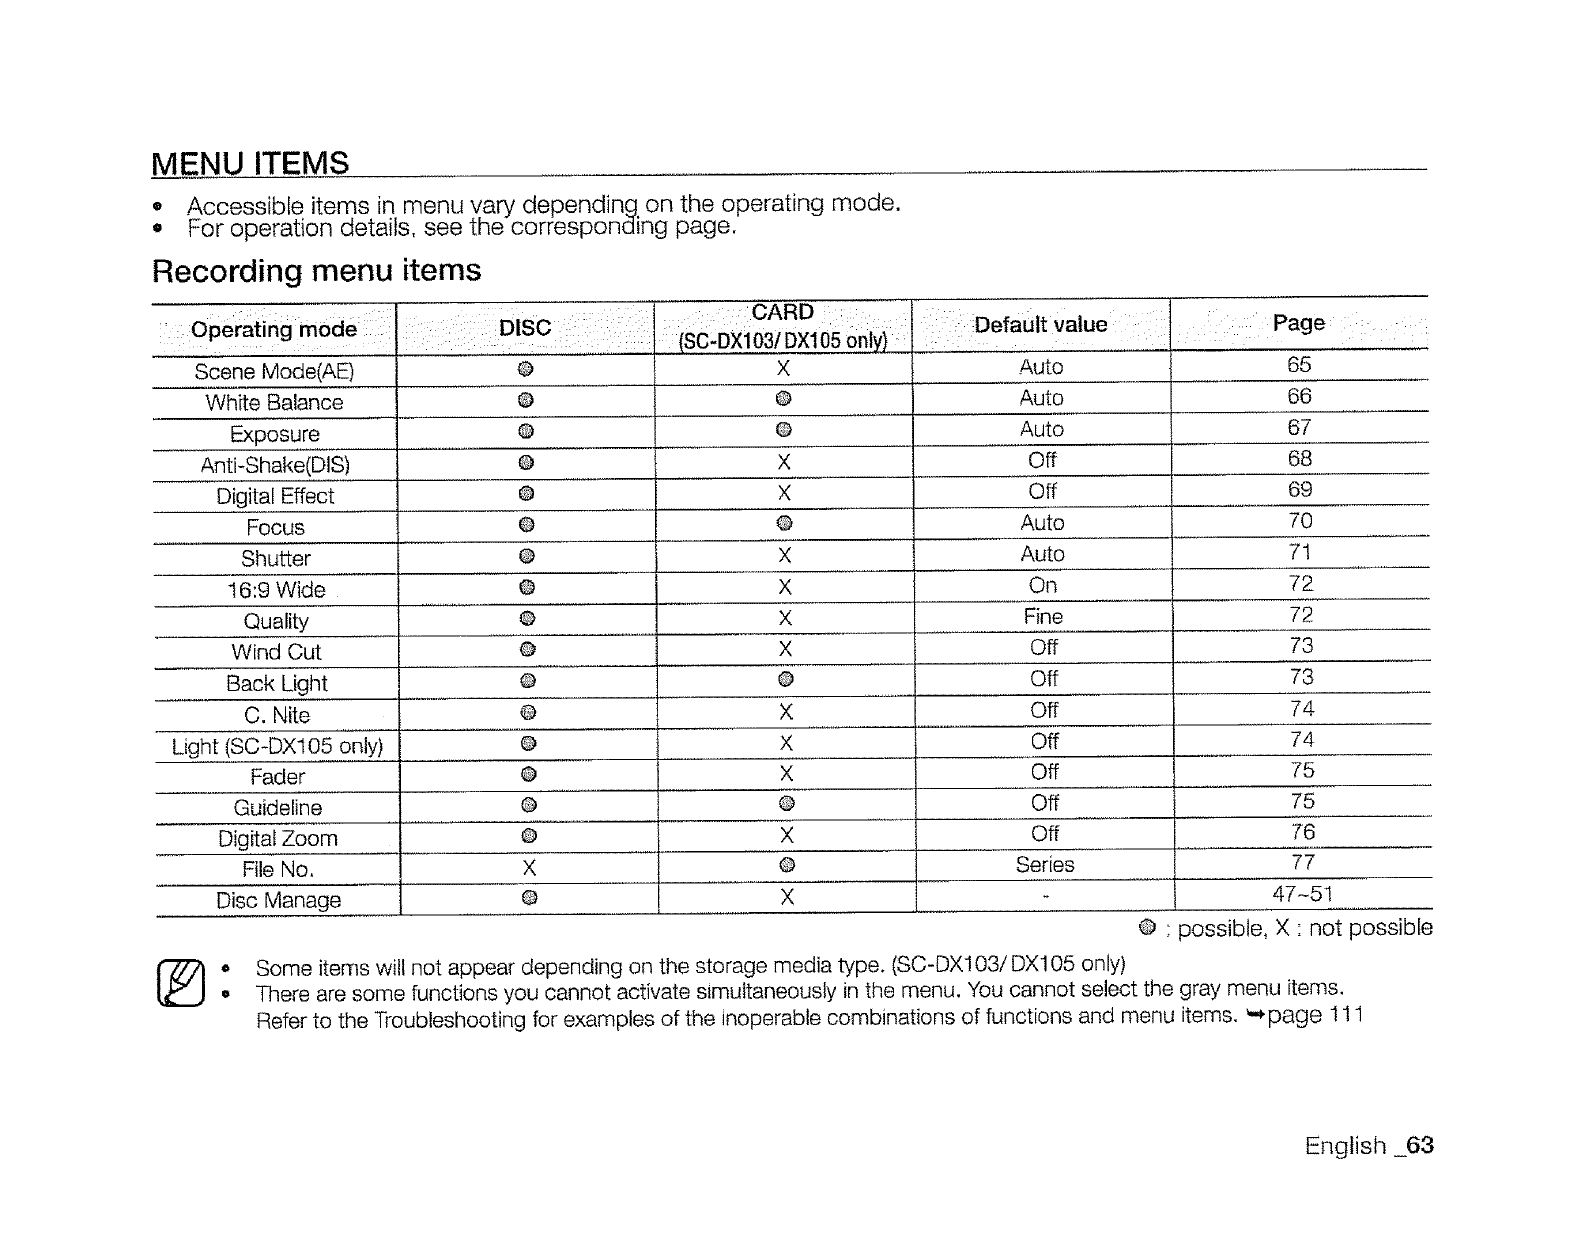
MENU ITEMS
• Accessible items in menu vary depending on the operating mode.
• For operation details, see the corresponding page.
Recording menu items
.................... : '::'"':........ :" CARD .... Pa e
: Operating mode DISC _,:,i Defauftvalue .... g : ::
: ..... (SC'DX103! DX105 O._y/ : ,...... I: ,,, :
Scene Mode(AED
White Balance
Exposu, re
Anti-Shake(DiS)
Digital Effect
Focus
Shutter
!6:9 Wide
Quality
Wind Cut
Back Light
C. Nite
Light (SC-DX105 only)
Fader
Guideline
Digital Zoom
File No.
Disc Manage
1@
O
®
@
O
O
I
O
@
@
@
@
@
@
Q
@
65
X
@
@
X
X
@
X
X
X
X
®
X
X
X
@
x
Auto
Auto
Auto
Off
Off
Auto
Auto
On
Fine
Off
Off
Off
Off
Off
Off
Off
66
67
68
69
70
71
72
72
73
73
f4
74
75
75
76
X
@
@
X
Series 77
47-5t
)ossibte. X ' not possible
• Some items will not appear depending on the storage media type. (SC-DX103/DX105 only)
•There are some functions you cannot activate simultaneously in the menu. You cannot select the gray menu items.
Refer to the Troubleshooting for examples of the inoperable combinations of functions and menu items. **page 111
English 63
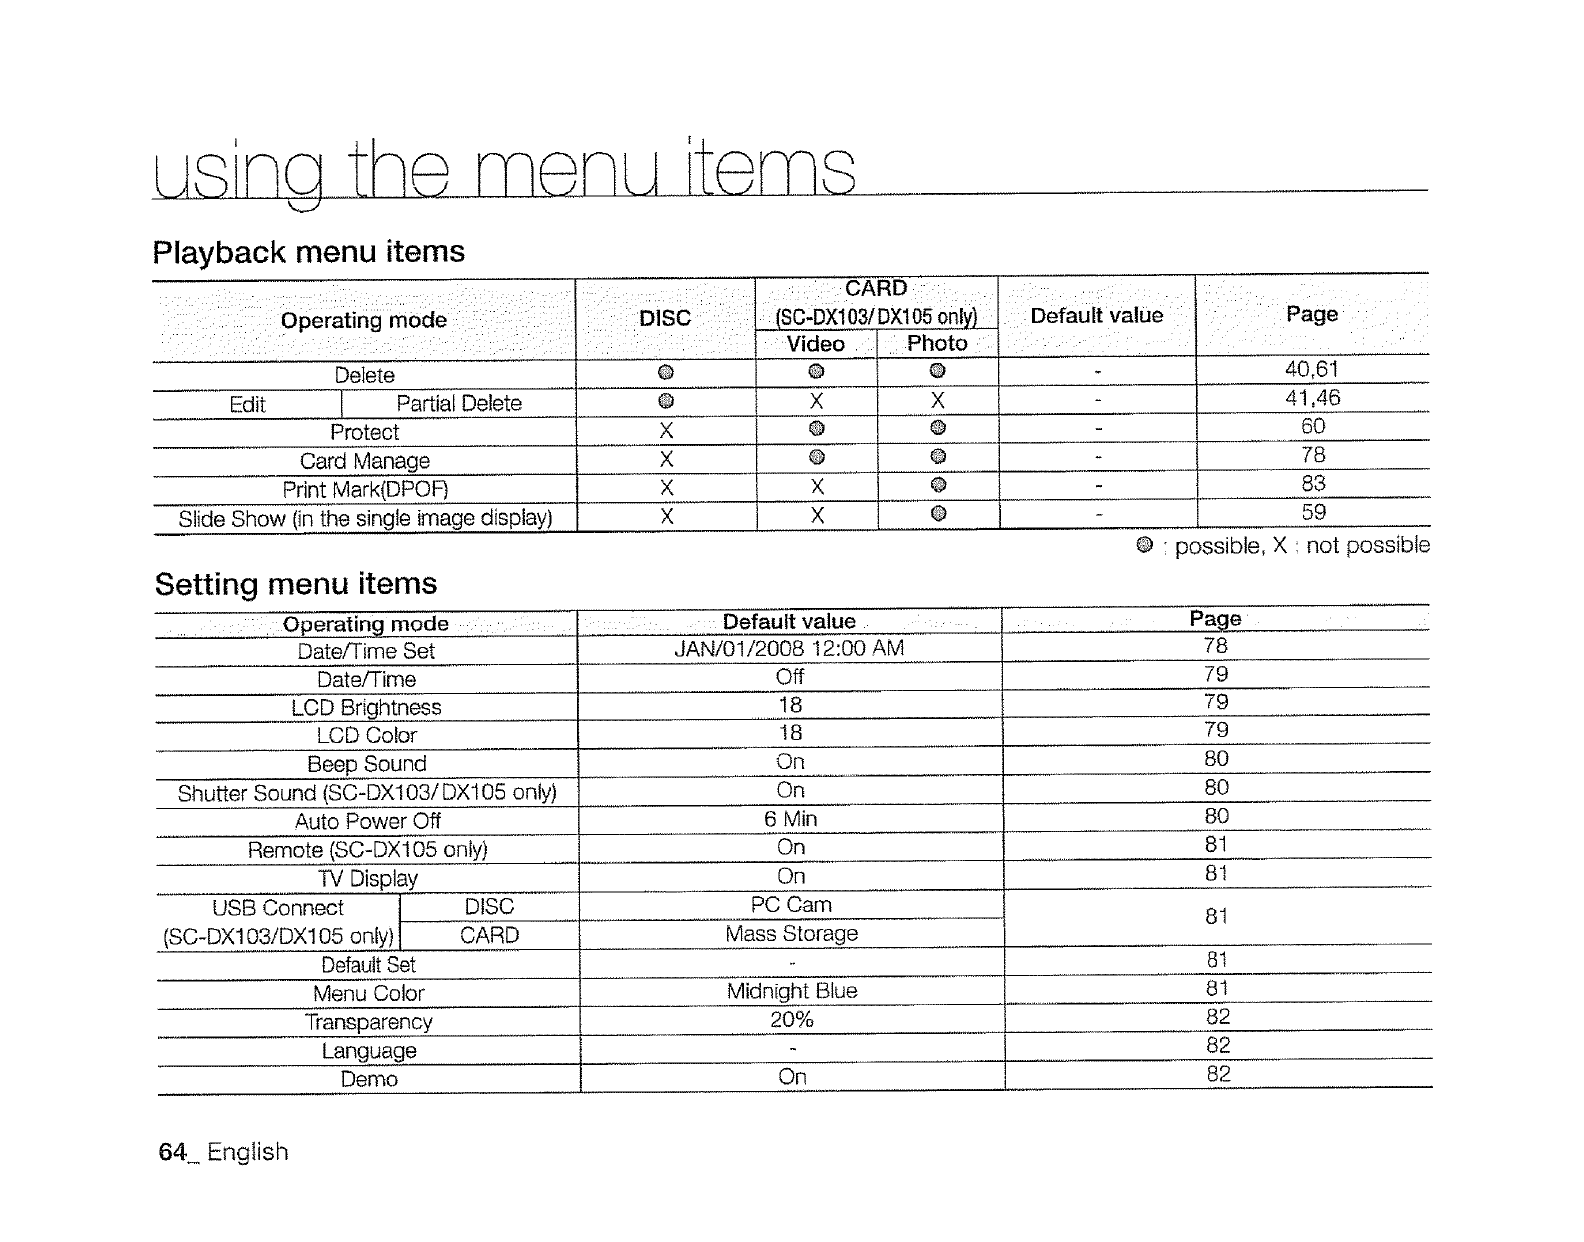
I I
Playback menu items
: '":'"'"'", ...... : CARD:::
: operating mode : DISC::: :(SC:D×i03iDXl Defauitvalue l:; ::: Page ::
Video Photo :
Delete Q @ O 40,61
-- Edit J Partial Delete
Protect
Card M,anage .........
Print Mark(DPOF)
Slide Show (in the single image display)
0
X
X
X
X
X
@
®
X
X
Setting menu items
..... : : Operating mode :::: Default value
Date/Time Set
Date/Time
LCD Brightness
LCD Color
Beep Sound
Shutter Sound (SC-DX103/DX105 only)
Auto Power Off
Remote (SC-DX105 only)
TV Display
USB Connect DISC
(SC-DX103/DX105 on y) CARD
Default Set
Menu Color
Transparency
Language
Demo
JAN/01/2008 12:00 AM
Off
18
18
On
On
6 Min
On
On
PC Cam
Mass Storage
Midnight Blue
2O%
On
..... X
®
@
@
41,46
6O
78
83
59
@ • possible, X : not possible
Page
78
79
79
79
8O
8O
8O
81
81
81
8t
81
82
82
82
64_ English
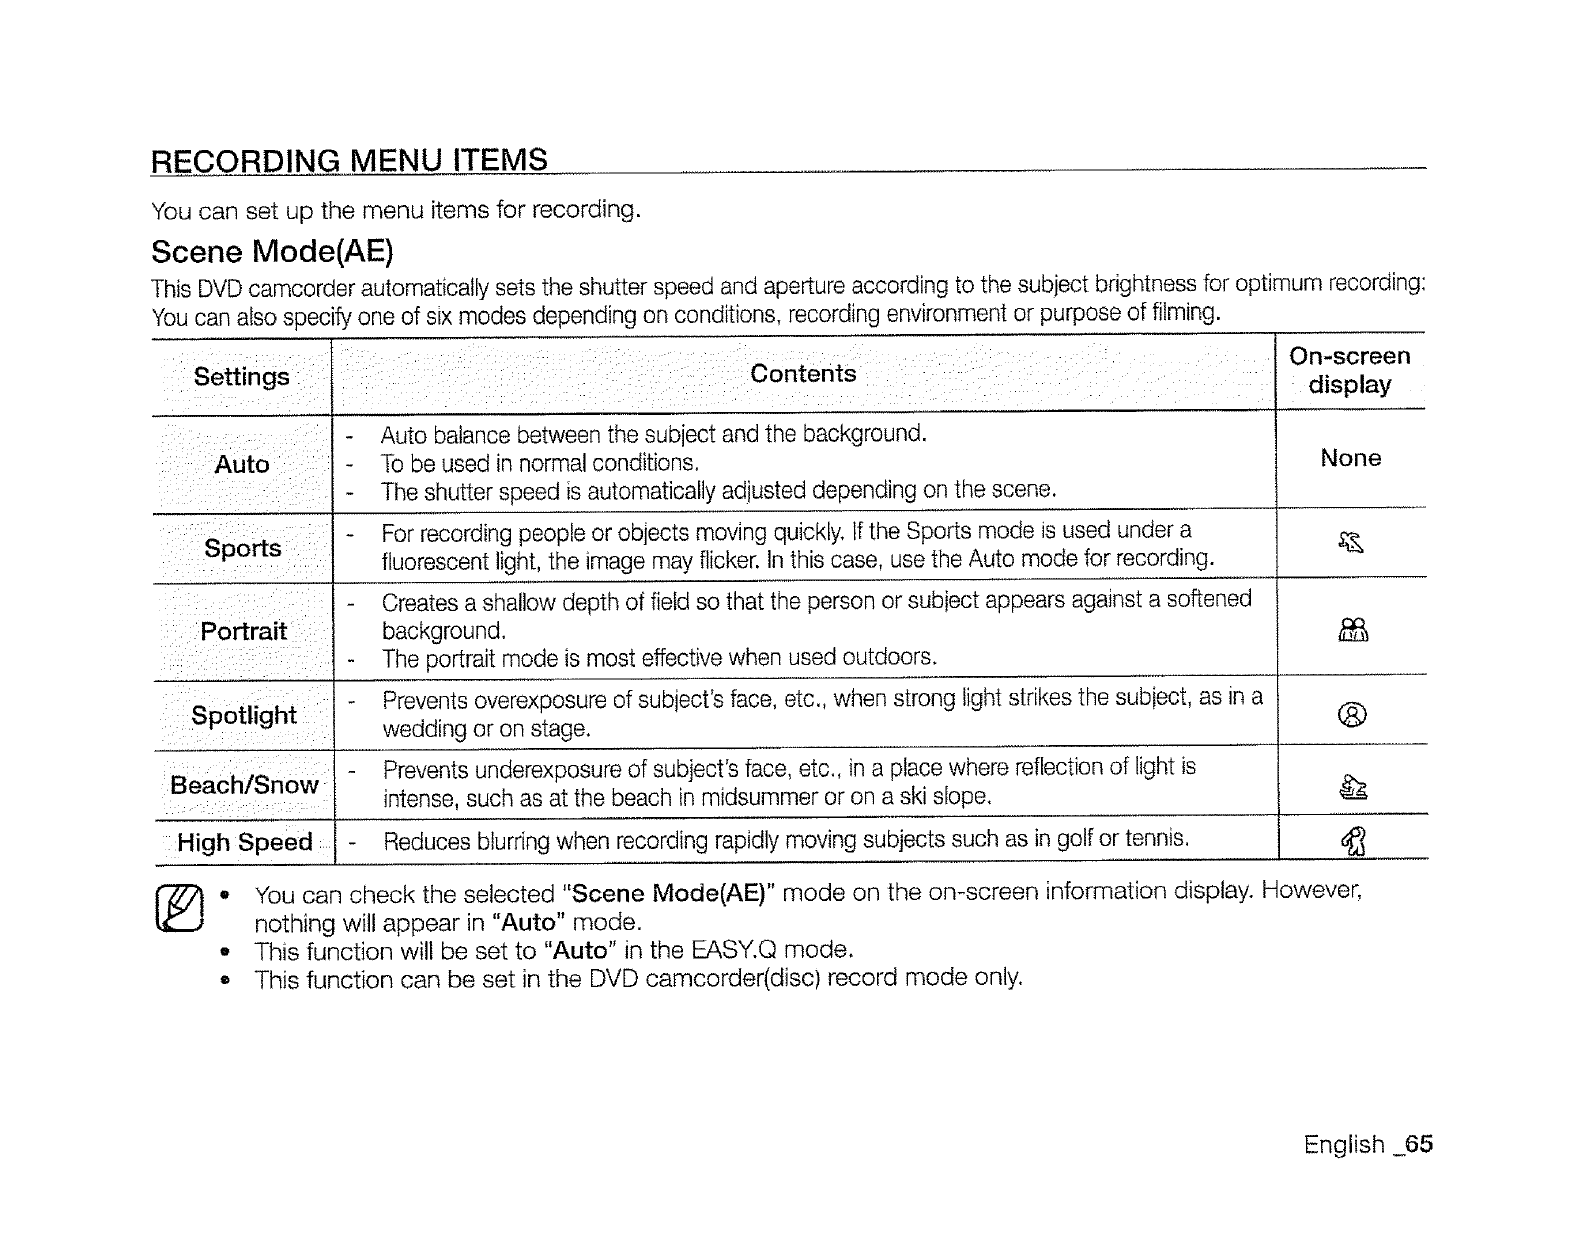
RECORDING MENU ITEMS
You can set up the menu items for recording.
Scene Mode(AE)
This DVD camcorder automatically sets the shutter speed and aperture according to the subject brightness for optimum recording:
You can also specify one of six modes depending on conditions, recording environment or purpose of filming.
Settings
Auto
Sports
Portrait
Spotlight
Beach/Snow
High Speed
Contents
Auto balance between the subject and the background.
To be used _nnormal conditions.
The shutter speed is automatically adiusted depending on the scene.
For recording people or objects moving quickly. If the Sports mode is used under a
fluorescent light, the _mage may flicker. In this case, use the Auto mode for recording.
Creates a shallow depth of field so that the person or subiect appears against a softened
background.
The portrait mode is most effective when used outaoors.
Prevents overexposure of subiect's face, etc,, when strong light strikes the subiect, as _na
wedding or on stage.
Prevents underexposure of subject's face, etc., in a place where reflection of light is
intense such as at the beach in midsummer or on a ski slope.
Reduces blurring when recording rapidly moving subjects such as in golf or tennis.
On-screen
display
None
®
o
o
You can check the selected "Scene Mode(AE)" mode on the on-screen information display. However,
nothing will appear in "Auto" mode.
This function will be set to "Auto" in the EASY.Q mode.
This function can be set in the DVD camcorder(disc) record mode only.
English 65

White Balance
This DVD camcorder automatically adjusts the color of subject. Change the white balance setting depending on the
recording conditions,
Settings
Auto
Daylight
Cloudy
Fluorescent
On-screen
Contents display
Thts opt!on is generally used to control the white balance automatically, None
This controls the white balance according to the outdoor ambience, especially for close up and
when the sublect s of one dominant color.
This option is used when you make a recording in cloudy weather.
Th s option is used when you make a recording under white fluorescent lights.
:Tungsten This option is for when there is less than 3200K of tungsten light being used.
CustOm WB :: You can manually adjust white balance to match the light source or situation.
0
€€#
Setting white balance manually
1, Move the Joystick up or down to select "Custom WB," then press the Joystick.
The "Set White Balance" indicator is displayed.
2, Frame a white object such as a piece of white paper so that it fills the screen.
Use an object that is not transparent.
o If the object that fills the screen is not focused, correct the focus using "Manual
Focus." '-,page 70
• Press the MENU button to cancel,
3. Press the Joystick.
The white balance setting will be applied and ( _ ) indicator is displayed,
To exit, press the MENU button.
aper
66 English
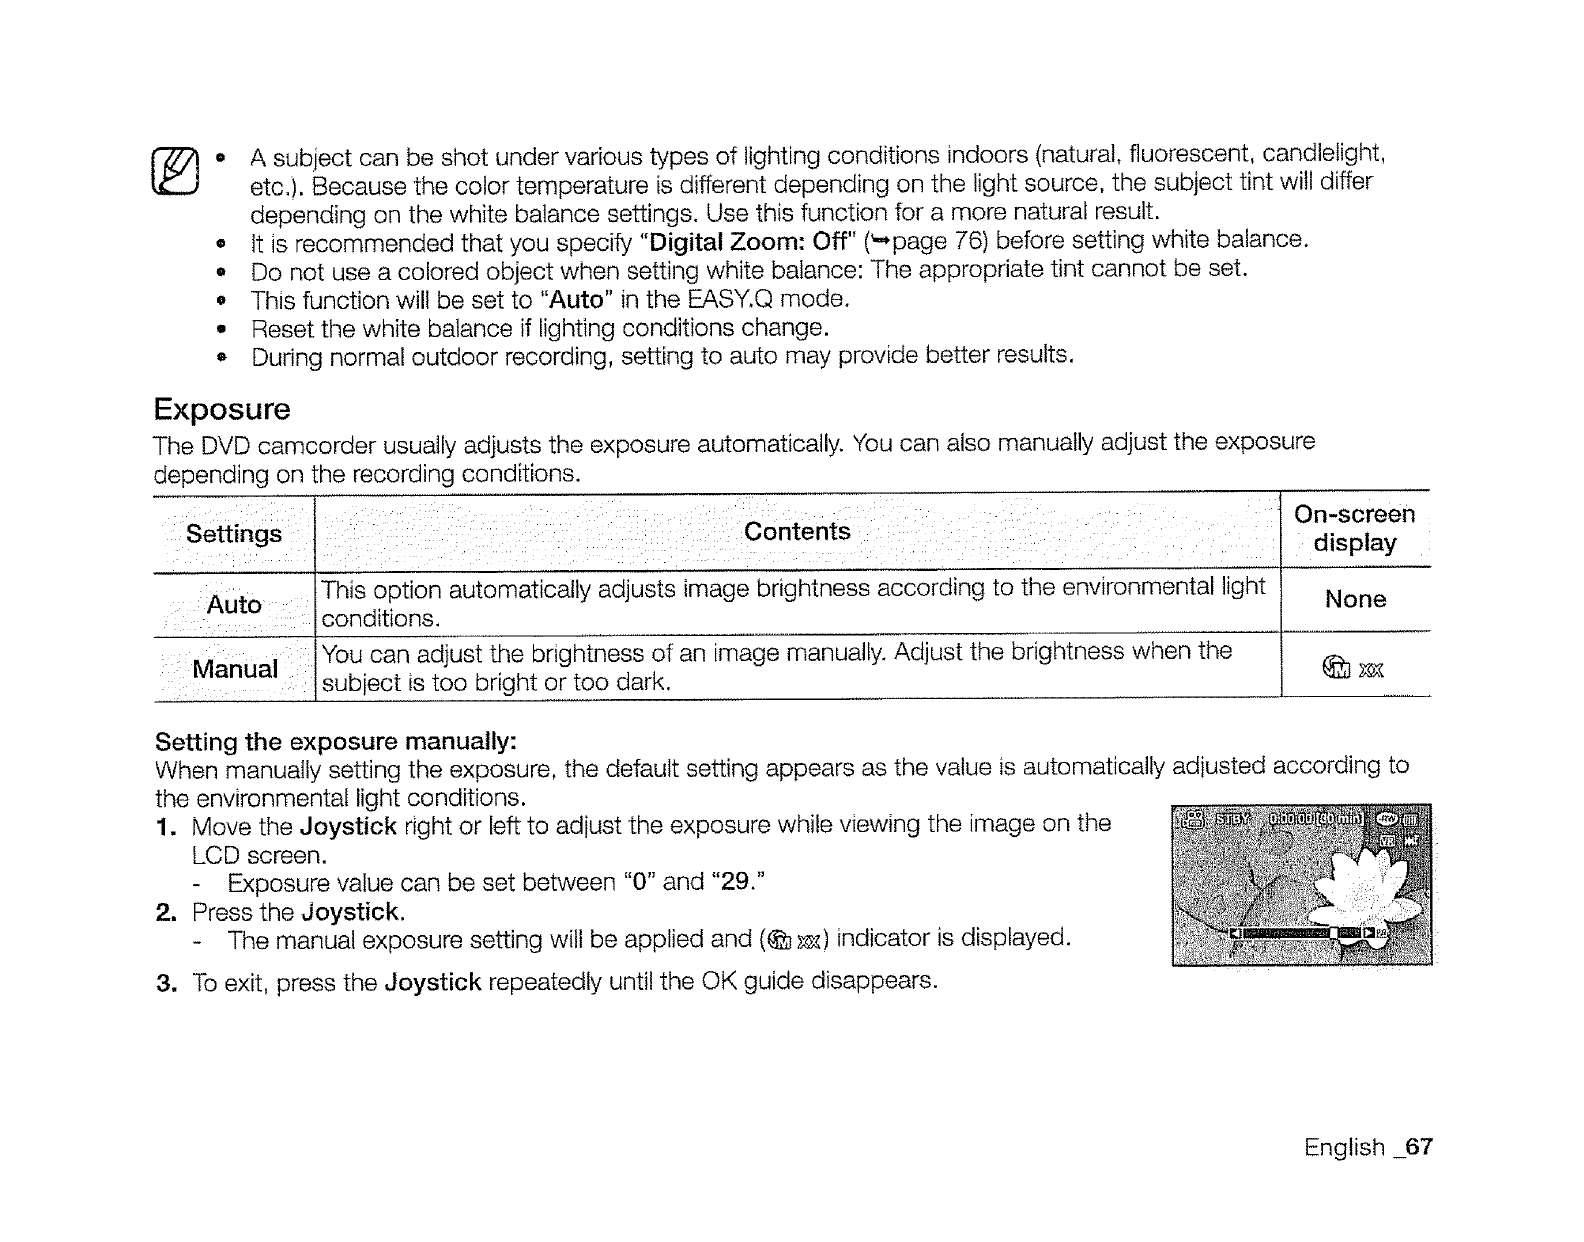
II
Iit
!I
tt
A subject can be shot under various types of lighting conditions indoors (natural, fluorescent, candlelight,
etc.). Because the color temperature is different depending on the light source, the subject tint will differ
depending on the white balance settings. Use this function for a more natural result.
It is recommended that you specify "Digital Zoom: Off" (_page 76) before setting white balance.
Do not use a colored object when setting white balance: The appropriate tint cannot be set.
This function will be set to "Auto" in the EASY.Q mode.
Reset the white balance if lighting conditions change.
During normal outdoor recording, setting to auto may provide better results.
Exposure
The DVD camcorder usually adjusts the exposure automatically. You can also manually adjust the exposure
depending on the recording conditions.
Settings
Auto
Manual
Contents
This option automatically adjusts image bnghtness according to the environmental light
conditions,
You can adjust the Dnghtness of an image manually. Adjust the brightness when the
subiect _stoo bright or too dark.
On-screen
display
None
Setting the exposure manually:
When manually setting the exposure, the default setting appears as the value is automatically adiusted according to
the environmental light conditions.
1. Move the Joystick right or left to adjust the exposure while viewing the image on the
LCD screen.
- Exposure value can be set between "0" and "29."
2. Press the Joystick.
- The manual exposure setting will be applied and (@ _) indicator is displayed.
3. To exit, press the Joystick repeatedly until the OK guide disappears. .....
English _67
Manual exposure is recommended in situations listed below:
• When shooting using reverse lighting or when the background is too bright.
• When shooting on a reflective natural background such as at the beach or when skiing.
• When the background is overly dark or the subiect is bright.
, f you manually change the exposure value when "Scene Mode(AE)" function is selected manual changes
are applied first.
• This function will be set to "Auto" in the EASY.Q mode.
Anti-Shake(DIS)
When you use zoom to record a magnified subject image, it will correct fuzziness in the recorded image.
Settings
Off
On
Contents
Disables the function.
Compensates for unstable mages caused by camcorder-shake, particularly at high
magnification.
On-screen
display
None
®O
o
0
0
e
EASY Q mode automatically sets the "Anti-Shake(DIS)" to "On."
When "Anti-Shake(DiS): On" is set, there will be a slight difference between the actual movement and the
movement on screen.
Gross camcorder-shake may not be entirely corrected even if "Anti-Shake(DiS): On" is set.
Firmly hold the DVD camcorder with both hands,
It is recommended that you specify "Anti-Shake(DiS): Off" when using the DVD camcorder on a desk or
tripod (not supplied).
When you record pictures with 34x or more magnification and the "Anti-Shake(DiS)" is set to "On" in dark
locations, after-images may stand out. In this case, we recommend using a tripod (not supplied) and turning
the "Anti-Shake(DiS)" to "Off."
This function can be set in the DVD camcorder(disc) record mode only.
68_ English
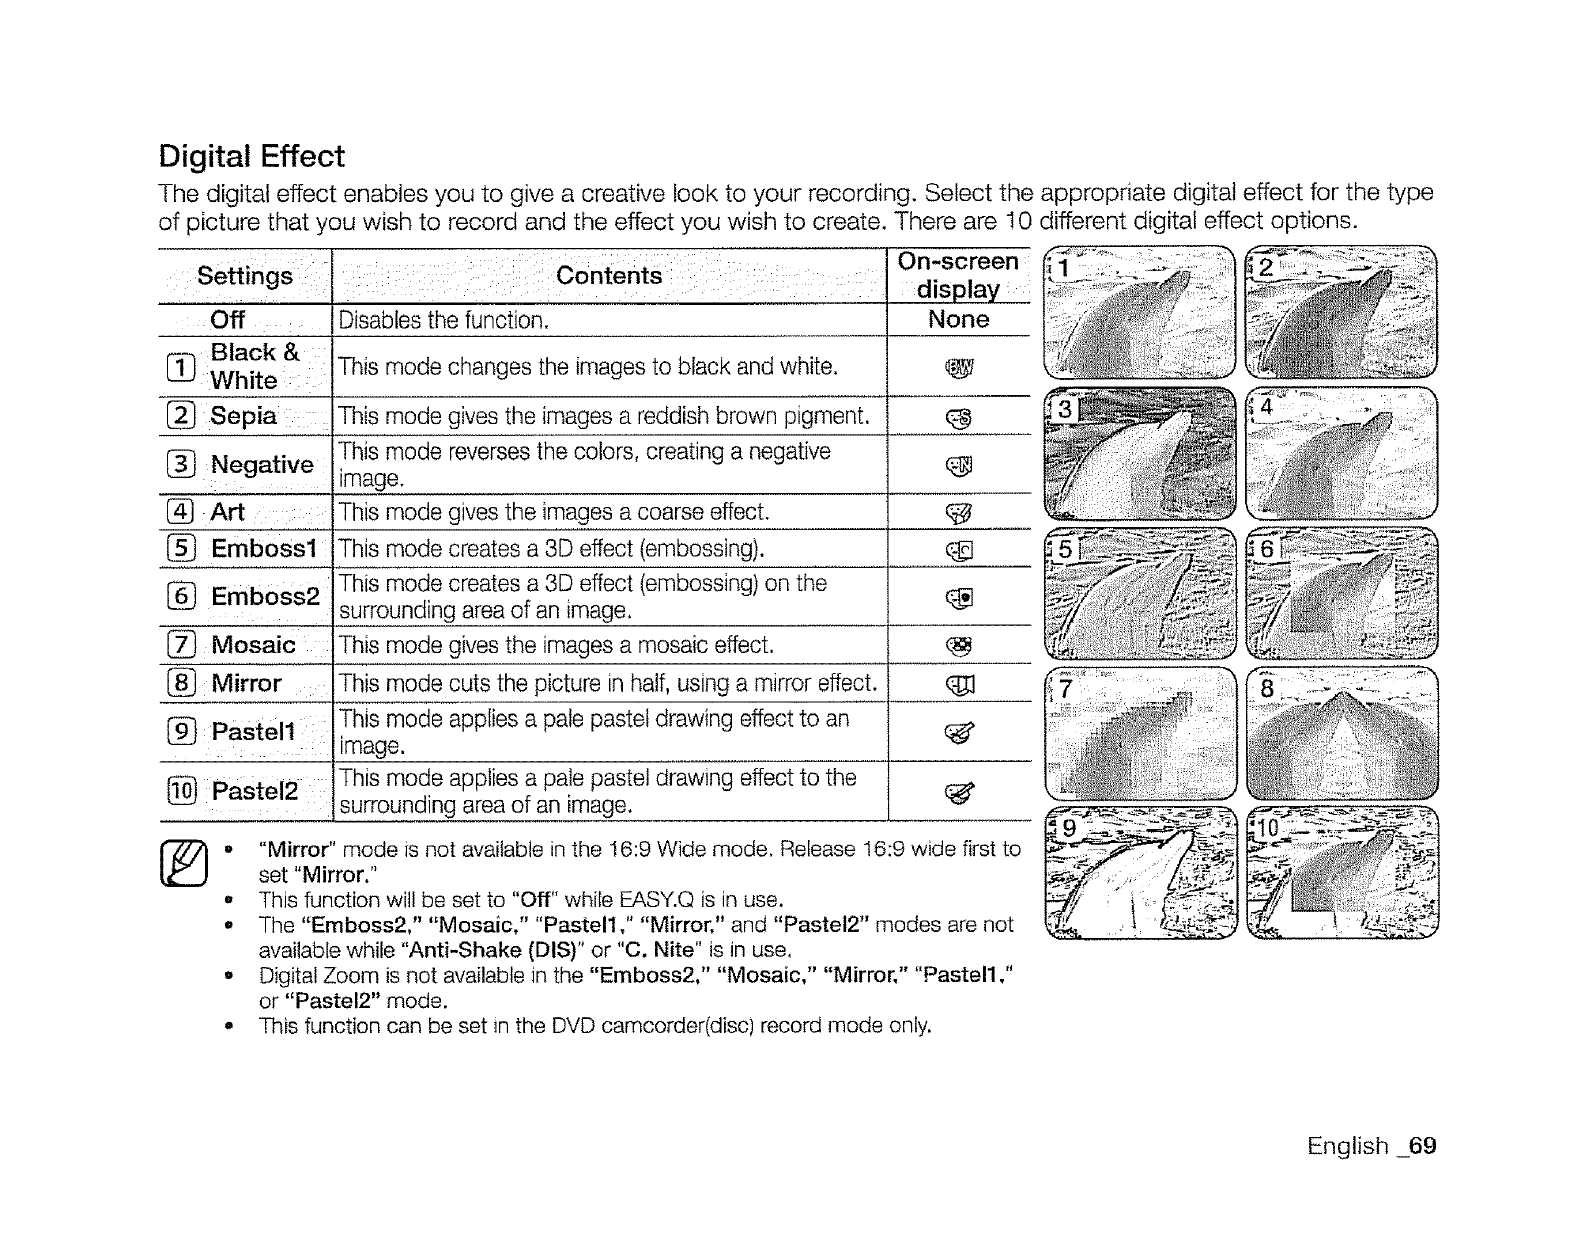
Digital Effect
The digital effect enables you to give a creative look to your recording. Select the appropriate digital effect for the type
of picture that you wish to record and the effect you wish to create. There are 10 different digital effect options.
Off
[_ Black & :
White ::: :
[_ Sepia i ::i
C_ Negative
i
(_ Art .....
........... i
Disables the function.
This mode changes the images to black and white.
This mode gives the images a reddish brown pigment.
This mode reverses the colors, creating a negative
image.
This mode gives the images a coarse effect.
This mode creates a 3D effect (embossing).
This mode creates a 3D effect (embossing) on the
surrounding area of an image,
This mode gives the images a mosaic effect.
[_ Emboss2
(_ Mosaic :
{_ Mirror This mode cuts the picture in half, using a mirror effect.
(_: Pastel1 This mode applies a pale pastel drawing effect to an
image.
(_ Pastel2 This mode applies a pale pastel drawing effect to the
surrounding area of an image.
On-screen
display
None
o
o
"Mirror" mode is not available in the 16:9 Wide mode. Release !6:9 wide first to
set "Mirror,"
This function will be set to "Off" while EASY.Q is in use.
The "Emboss2," "Mosaic," "Pastel1," "Mirror," and "Pastel2" modes are not
available while "Anti-Shake (DIS)" or "C. Nite" is Jn use.
Digital Zoom is not available in the "Emboss2," "Mosaic," "Mirror," "Pastel1 ,"
or "Pastel2" mode.
This function can be set in the DVD camcorder(disc) record mode only.
: , !!i
English 69
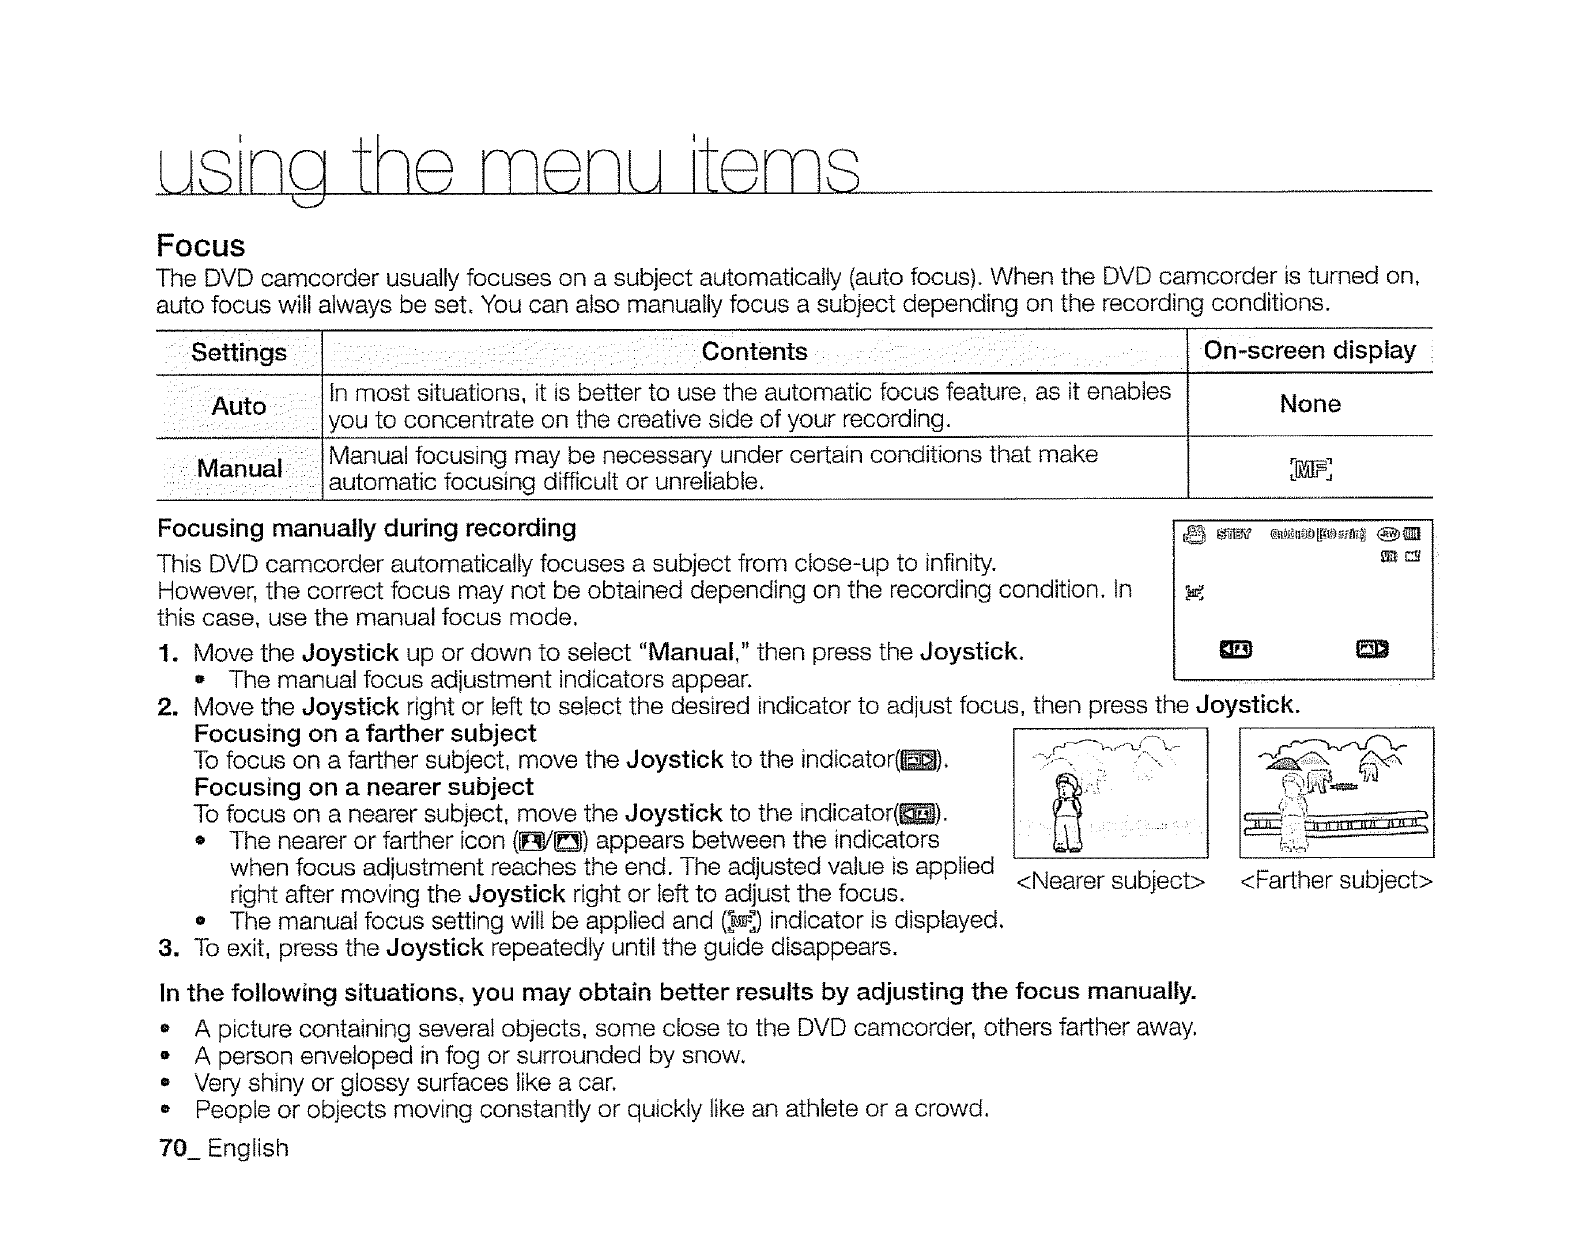
Focus
The DVD camcorder usually focuses on a subject automatically (auto focus). When the DVD camcorder is turned on,
auto focus will always be set. You can also manually focus a subject depending on the recording conditions.
Auto
Manual
: : : Contents: : :
tn most situations, it is better to use the automatic focus feature, as it enables
you to concentrate on the creative side of your recording.
Manual focusing may be necessary under certain conditions that make
automatic focusing difficult or unreliable.
On'screen display
None
Focusing manually during recording
This DVD camcorder automatically focuses a subject from close-up to infinity.
However, the correct focus may not be obtained depending on the recording condition. In
this case, use the manual focus mode.
1. Move the Joystick up or down to select "Manual," then press the Joystick.
The manual focus adjustment indicators appear.
2. Move the Joystick right or left to select the desired indicator to adjust focus
Focusing on a farther subject
To focus on a farther subject, move the Joystick to the indicator(l_]).
Focusing on a nearer subject
To focus on a nearer subject, move the Joystick to the indicator(_).
• The nearer or farther icon (1_/1_) appears between the indicators
when focus adjustment reaches the end. The adjusted value is applied
right after moving the Joystick right or left to adjust the focus.
•The manual focus setting wilt be applied and ([_:) indicator is displayed.
3. To exit, press the Joystick repeatedly until the guide disappears.
then press the Joystick.
<Nearer subject>
1
<Farther subject>
In the following situations, you may obtain better results by adjusting the focus manually.
•A picture containing several objects, some close to the DVD camcorder, others farther away.
•A person enveloped in fog or surrounded by snow.
• Very shiny or glossy surfaces like a car.
• People or objects moving constantly or quickly like an athlete or a crowd.
70_ English
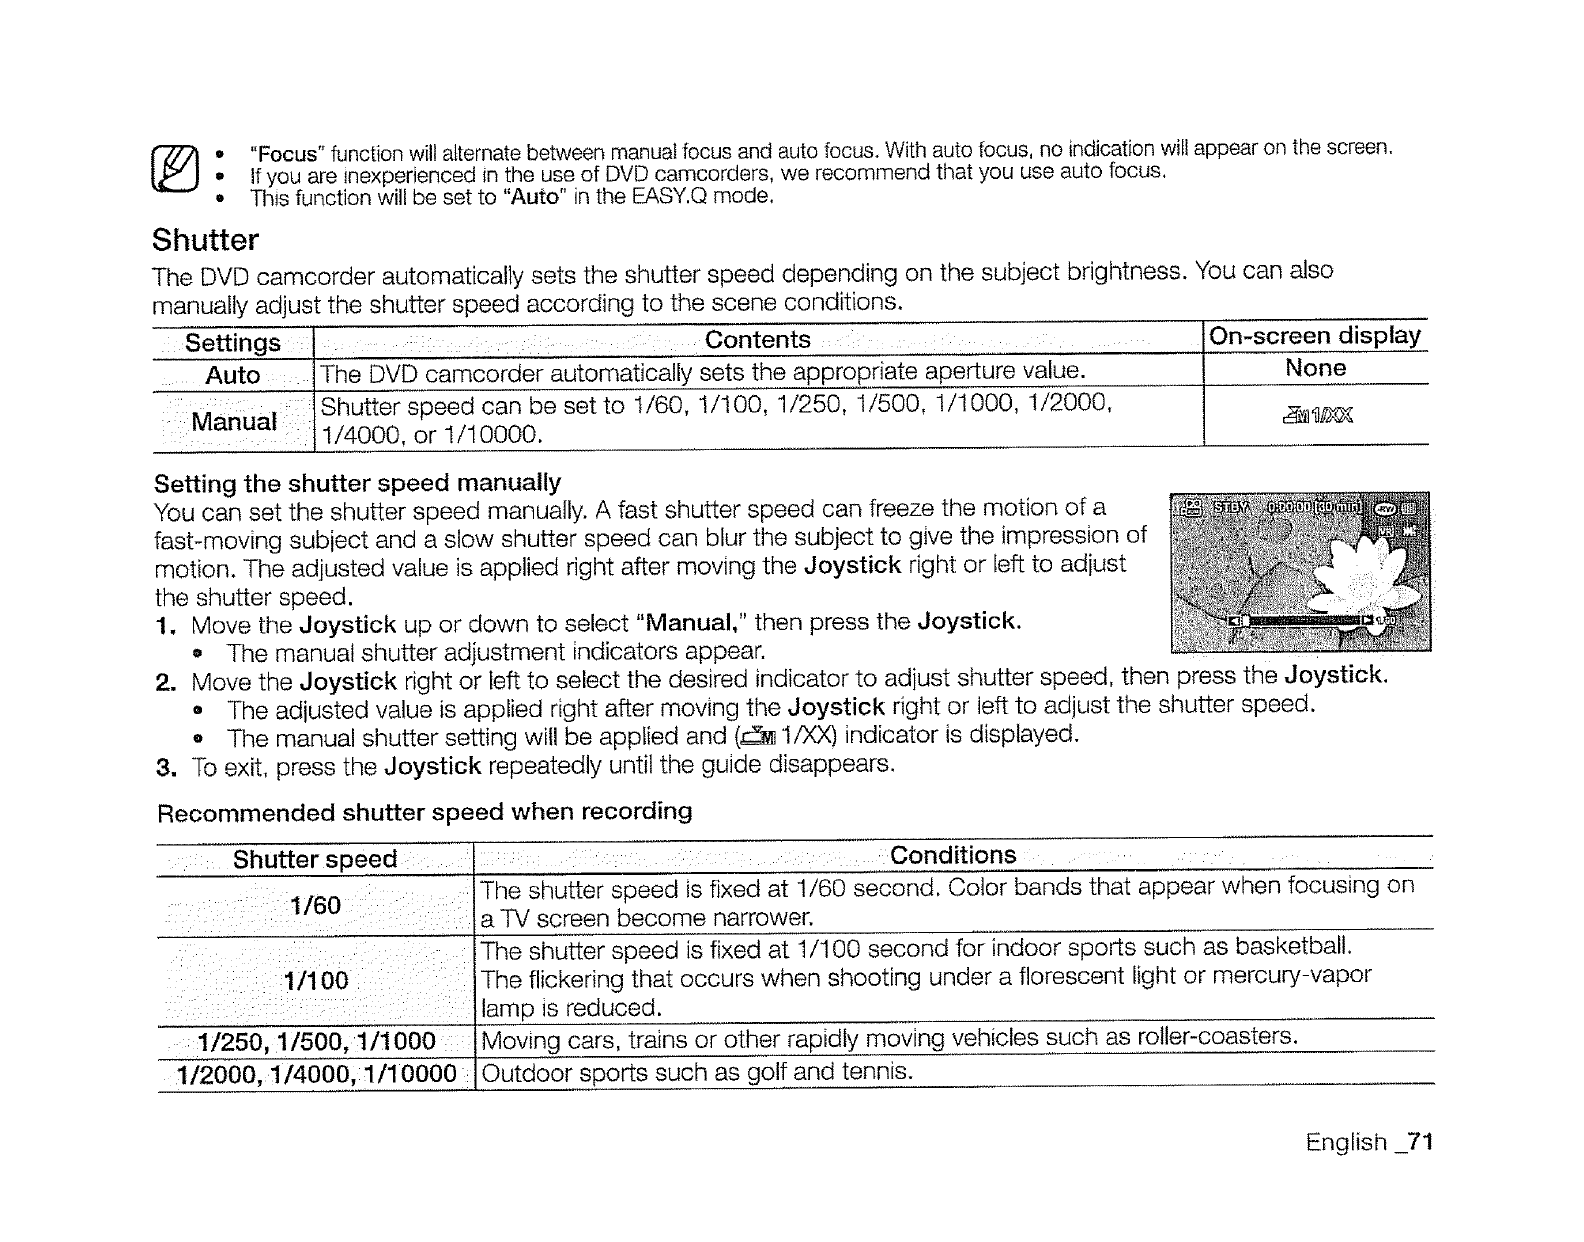
[_ •"Focus" function wilt alternate between manuat focus and auto focus. With auto focus, no indication wifl appear on the screen.
.If you are _nexperienced in the use of DVD camcorders, we recommend that you use auto focus,
•This function will be set to "Auto" in the EASY, Q mode,
Shutter
The DVD camcorder automatically sets the shutter speed depending on the subject brightness. You can also
manually adjust the shutter speed according to the scene conditions.
Settings :: : Contents
Auto: IThe DVD camoorder automatically sets the appropriate ape_ure value.
:, . Shutter speed can be set to !/60, 1/100, 1/250, 1/500, 1/1000, 1/2000,
1/4000, or 1/10000.
On-screen display
I None
!
Setting the shutter speed manually
You can set the shutter speed manually. A fast shutter speed can freeze the motion of a
fast-moving subject and a slow shutter speed can blur the subject to give the impression of
motion. The adjusted value is applied right after moving the Joystick right or left to adiust
the shutter speed.
1. Move the Joystick up or down to select "Manual," then press the Joystick.
,, The manual shutter adjustment indicators appear.
2. Move the Joystick right or left to select the desired indicator to adiust shutter speed, then press the Joystick.
o The adjusted value is applied right after moving the Joystick right or left to adjust the shutter speed.
o The manual shutter setting will be applied and (_ 1/XX) indicator is displayed.
3. To exit, press the Joystick repeatedly until the guide disappears.
Recommended shutter speed when recording
Shutter s peed
1/60
1/1 O0
1/250, 1/500, 1/1000
1/2000, 1/4000, 1/10000 i
Conditions
The shutter speed is fixed at 1/60 second. Color bands that appear when focusing on
a TV screen become narrower.
The shutter speed is fixed at 1/100 second for indoor sports such as basketball.
The flickering that occurs when shooting under a florescent light or mercury-vapor
lamp is reduced.
Moving cars trains or other rapidly moving vehicles such as roller-coasters.
Outdoor sports such as golf and tennis.
English _71
(_ • We recommend using a tripod when recording with a slow shutter speed.
•If you manually change the shutter speed value when "Scene Mode(AE)" function is selected, manual changes are applied
with priority.
° The image may not seem smooth when a high speed is set.
• This function will be set to "Auto" in the EASY.Q mode.
° When recording with a shutter speed of 1/1000 or higher, make sure the sun is not directly shining into the lens.
o The shutter speed can be set in the DVD camcorder record mode only.
•Fast shutter speed allows a fast-moving subject to be captured one frame at a time vividly.
16"9 Wide
You can record movie image in 16:9 or 4:3 according to the desired aspect ratio. Set the proper aspect ratio to
match your TV. The 16:9 Wide function works in the DVD camcorder record mode only.
,: Se_ings : Contents :i : :::: On-screen display
:: Off
::On i: : 'ReC0rds images i'n ful'i Screen for Playback on a 4:3 TV screen'
Records images in full screen for playback on a 16:9(wide) TV Screenl l -
[_: Mirror mode and Digital Zoom are not available in the 16:9 Wide mode.
A movie image is played in 16:9 aspect ratio in the DVD camcorder. When the movie image recorded in 4:3 aspect ratio is
played in the DVD camcorder or 16:9 aspect ratio screen, the displayed picture may appear wider than the actual size.
Quality
You can select the quality of a movie to be recorded, This DVD camcorder can film in the SF (Super Fine), F (Fine) and
N (Normal) modes. The Fine mode is set as the factory default.
.....: i ¸ C.:_: :¸
Settings : On,screen display:
Super Fine : Records movie images at the super-fine image quality. E_
: :Fine: Records images at the fine image quality. C_
Normal : Records images at the normal image quality. C_
o ecorded files are encoded with Variable Bit Rate (VBR).
VBR is an encoding system that automatically adjusts the bit rate according to t!Te recording image.
• The quality can be set in the DVD camcorder record mode only.
72_ English
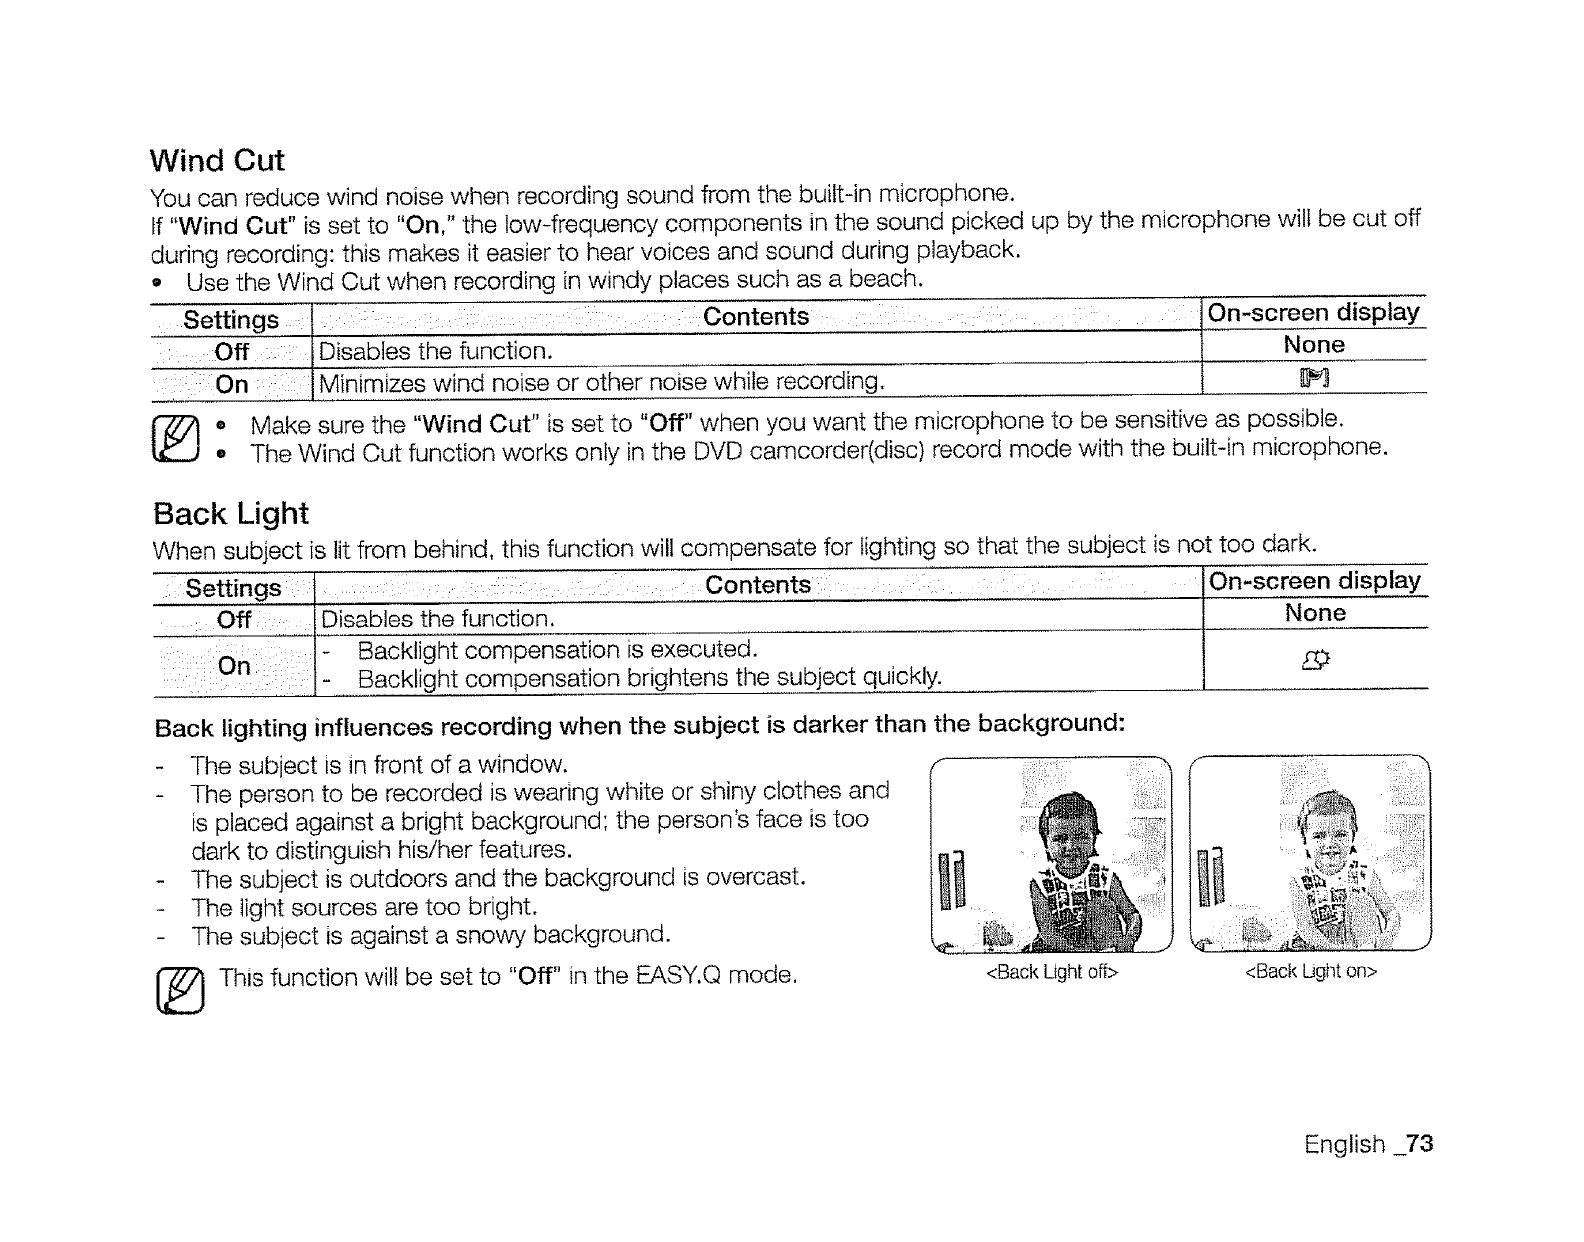
Wind Cut
You can reduce wind noise when recording sound from the built-in microphone.
If "Wind Cut" is set to "On," the tow-frequency components in the sound picked up by the microphone wilt be cut off
during recording: this makes it easier to hear voices and sound during playback.
• Use the Wind Cut when recording in windy places such as a beach.
Settings Contents :
:Off :::: Disables the function.
:: On Minimizes wind noise or other noise while recording.
IOn-screen display
INone
Make sure the "Wind Cut" is set to "Off" when you want the microphone to be sensitive as possible.
The Wind Cut function works only in the DVD camcorder(disc) record mode with the built-in microphone.
Back Light
When subject is lit from behind, this function will compensate for lighting so that the subject is not too dark.
Settings l : Contents: On-screen display
Offi: ,Disables the function. '............. t N__£e
::: i:/_ Backlight comp_ _cute_.----
":::: ::1- Backtight compensation brightens the subject quickly.
Back lighting influences recording when the subject is darker than the background:
- The subject is in front of a window.
- The person to be recorded is wearing white or shiny clothes and
is placed against a bright background; the person's face is too
dark to distinguish his/her features.
- The subject is outdoors and the background is overcast.
The light sources are too bright.
The subject is against a snowy background.
[_ This function will be set to "Off" in the EASY.Q mode, <Back Light off> <Back Ught on>
English _73
me LAitems
q_J
C. Nite
You can make the subject recorded appear to be in slow motion by controlling the shutter speed, or a brighter image
in dark places without a compromise in colors,
Settings
Off Disables the function.
1/30 Records a brighter image.
1/15
Contents
Records a brighter image even n a dark place.
On;screen display
None
%.When using C.Nite. the focus adjusts slowly and white dots may appear on the screen, this is not a defect.
• C.Nite function is not available with the following functions: "Scene Mode(AE)," "Shutter," "Exposure," "Digital Zoom,"
"Digital Effect" ("Emboss2." "Mosaic," "Mirror," "Pastel1 ," and "Pastel2").
•If Anti-Shake(DiS) is set, C.Nite mode will be released.
• This function is available onty in the DVD camcorder(disc) record mode.
•This function will be set to "Off" in the EASY.Q mode.
Light (SC-DX105 only)
You can record images brighter in a dark place,
Contents : On:screen display
:Off ::1Records a image without using light. ...... I None
-i:: On llaecords a clear image in a dark place without sacrificing Color w-[th the light. tga
° The LED light can become extremely hot. Do not touch it while in operation or soon after turning it off, otherwise serious
injury may result.
CAuTiON, DO not place the DVD camcorder into the carrying case immediately after using the light, since it remains extremely hot for
some time.
, Do not use near flammable or explosive materials.
1_ .The light enables you to record a subiect in dark places.
, The light will not turn on or off while you are recording.
•The range of the light is limited. (up to 6.6ft (2m))
•This function can be set only in the DVD camcorder(disc} record mode.
• This function will be set to "Off" in the EASY.Q mode.
74_ English
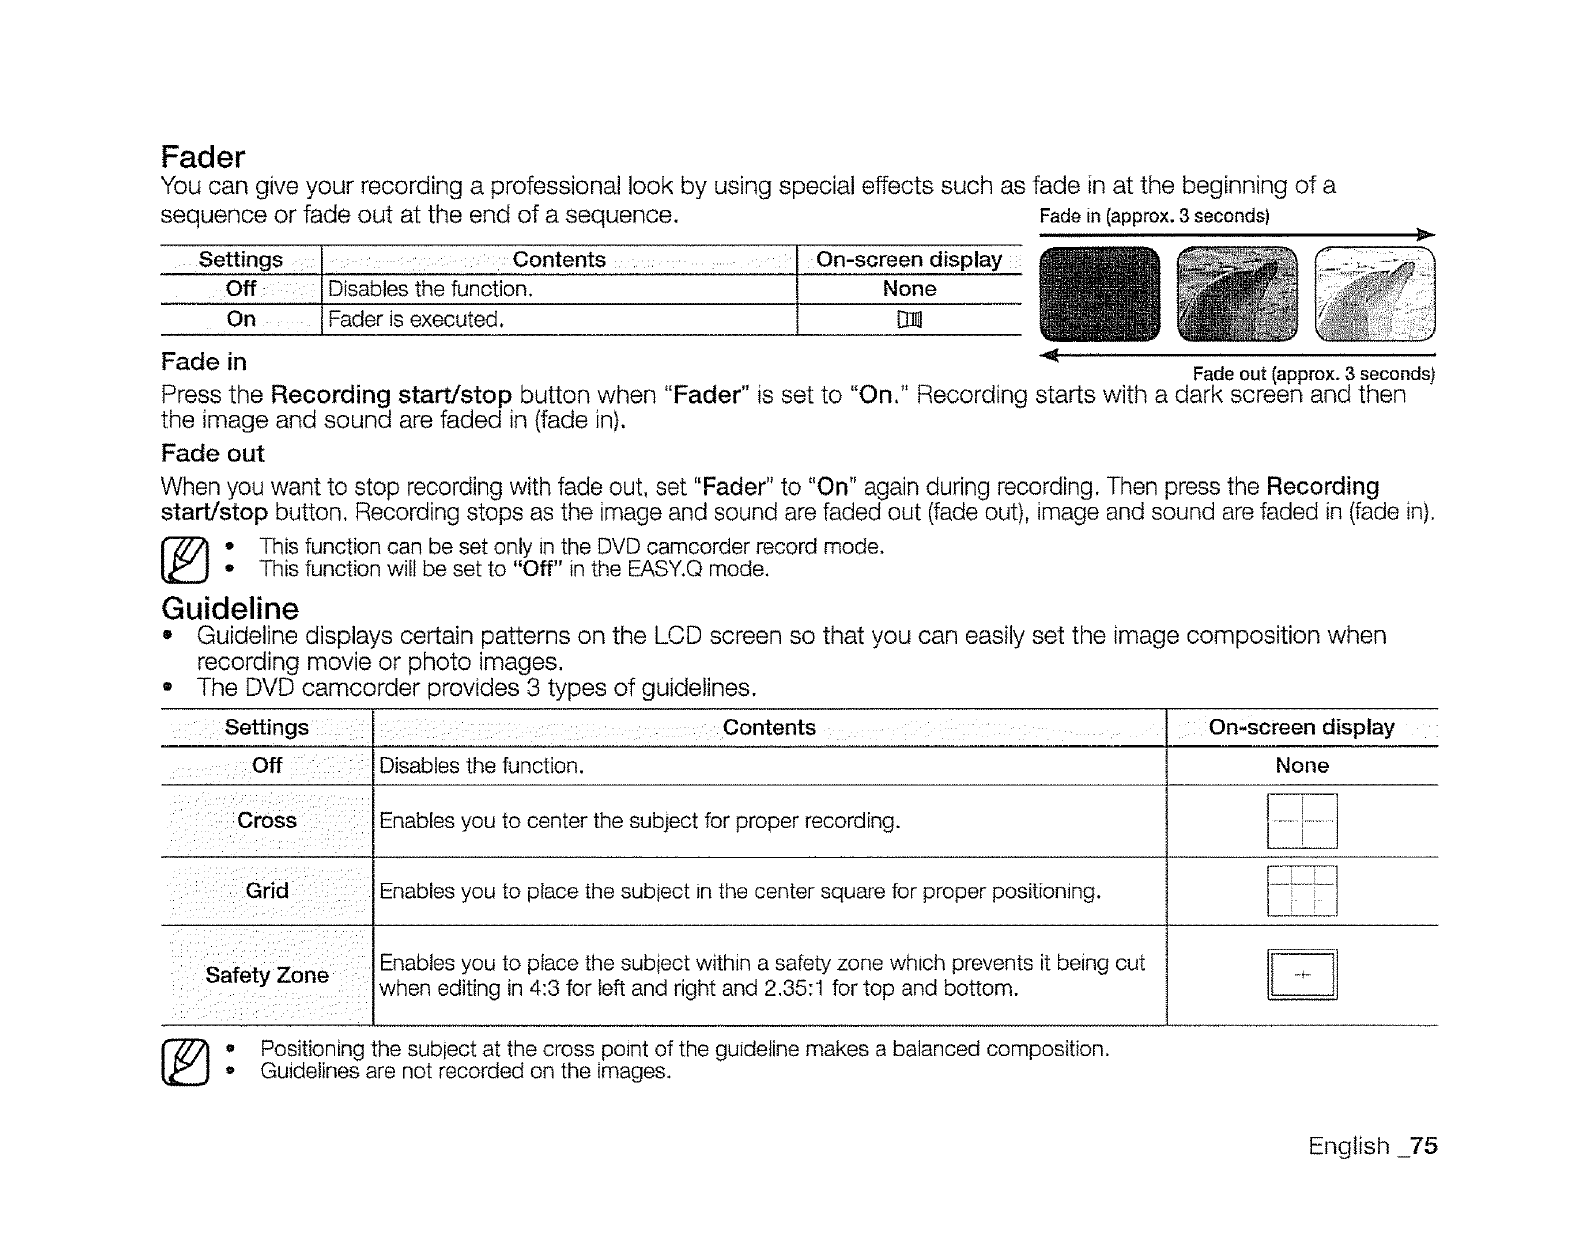
Fader
"You can give your recording a professional look by using special effects such as fade in at the beginning of a
sequence or fade out at the end of a sequence. Fade in (approx. 3 seconds)
Settings :. : : : Contents .... .... ....... On-screen display :
Off:: Disables the functionl l None
On : I Fader is executed.
Fade in Fade out (approx. 3 seconds)
Press the Recording stardstop button when "Fader" is set to "On." Recording starts with a dark screen and then
the image and sound are faded in (fade in).
Fade out
When you want to stop recording with fade out, set "Fader" to "On" again during recording. Then press the Recording
start/stop button. Recording stops as the image and sound are faded out (fade out), image and sound are faded in (fade in).
oThis function can be set only in the DVD camcorder record mode.• This function will be set to "Off" in the EASY.Q mode.
Guideline
,, Guideline displays certain patterns on the LCD screen so that you can easily set the image composition when
On-screen display
None
recording movie or photo images.
The DVD camcorder provides 3 types of guidelines.
Settings Contents
off Disables the function.
Cross Enables you to center the subject for proper recording.
Grid Enables you to place the subtec[ in the center square for proper positioning.
Zone Enables you to place the subiect within a safety zone which prevents it being cut I[_l
Safety whet editing in 4:3 for left and right and 2.35:1 for top and bottom.
_} o Positioning the SUblect at the cross point of the guideline makes a balanced composition.
,Guidelines are not recorded on the images.
English _75
Digital Zoom
You can select the maximum zoom level in case you want to zoom to a level greater than 34x (the default setting)
during recording. Zooming more than 34x is achieved digitally, up to 1200x when combined with optical zoom,
This right side of the bar shows the digitat zooming factor. The zooming zone appears when you select the zooming level,
Settings
Off
100x, 200x,
400x, 1200x
Contents
Up to 34x zoom is performed optically.
Up to 34x zoom is performed optically, and after that. up to 100x (200x.
400x, or 1200x)is performed digitally.
On-screen display
None
None
•The image quality may deteriorate depending on how much you zoom in on the subject.
°Maximum zooming may result in lower image quality.
o Digital Zoom is not available while "Anti-Shake(DiS)," "EASY, Q," "C. Nite," "Digital Effect" ("Emboss2,"
"Mosaic," "Mirror," "Pastel1 ," and "Pastel2") is in use.
• Once "Anti-Shake (DIS)," "C.Nite," "EASY.Q," "Digital Effect" ("Emboss2," "Mosaic," "Mirror,"
"Pastel1 ," and "Pastel2") is selected, Digital Zoom mode will be released. (The Digital Zoom mode will be
backed up when they are released. ("C. Nite," "EASY Q" only))
• This function can be set only in the DVD camcorder(disc) record mode.
76_ English
File No (SC DX103/DX105 only)
• File numbers are assigned to photo images in the order they were recorded.
Settings Contents
Series
Reset
Assigns file numbers in sequence even if the memory card is replaced with
another one or after formatting, or after deleting all files. The file number is reset
when a new folder _screated,
Resets the file number to 0001 even after formatting, deleting all or inserting a
new memory card, Use "Reset" when the folder and files cannot be created
anymore because the number of the folders and files reaches the limit.
On.screen display
None
None
o This function can be set only in the digital camera record mode.
English 77
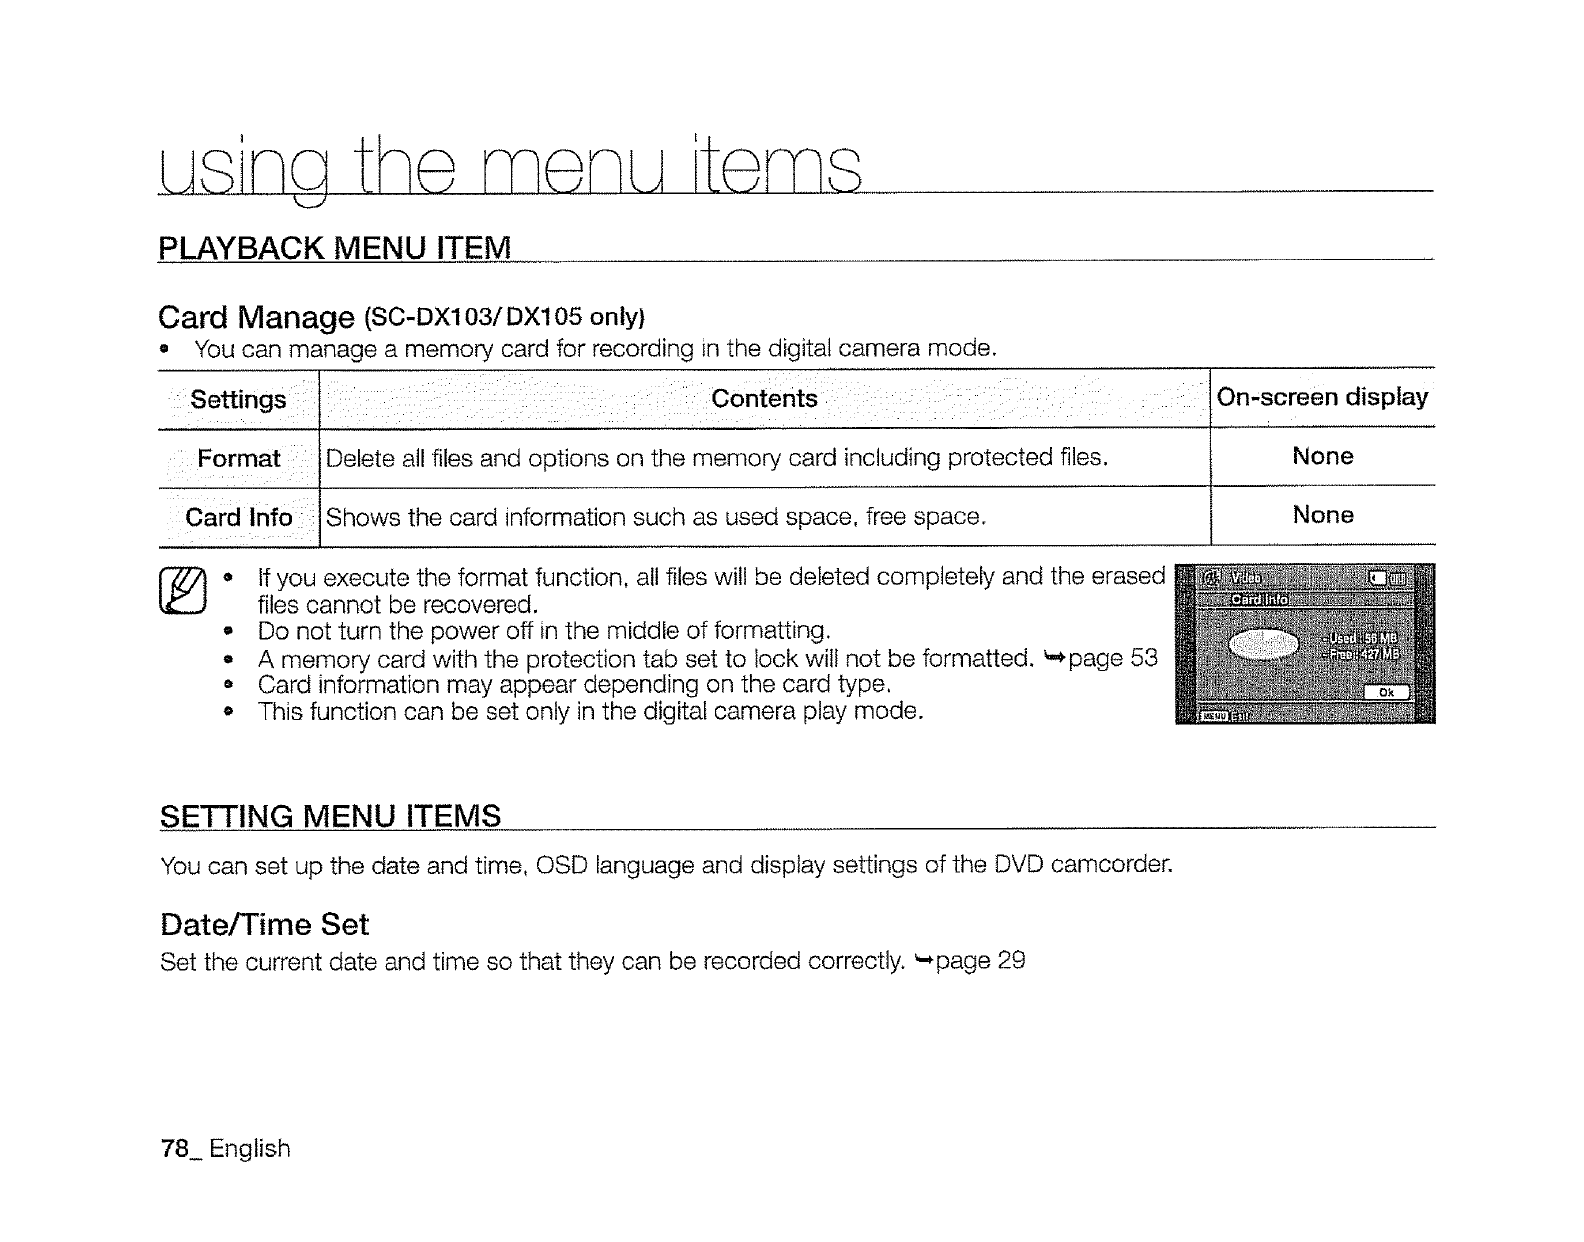
PLAYBACK MENU ITEM
Card Manage (SC-DX103/DX105 only)
,You can manage a memory card for recording in the digital camera mode.
Settings Contents On-screen display
Format Delete all files and options on the memory card including protected files. None
Card Info Shows the card _qformation such as used space, free space. None
e
®If you execute the format function, all files will be deleted completely and the erased
files cannot be recovered.
- Do not turn the power off in the middle of formatting.
,, A memory card with the protection tab set to lock will not be formatted. _page 53
• Card information may appear depending on the card type,
o This function can be set only in the digital camera play mode.
SETTING MENU ITEMS
You can set up the date and time, OSD language and display settings of the DVD camcorder.
Date/Time Set
Set the current date and time so that they can be recorded correctly. '-,page 29
78_ English
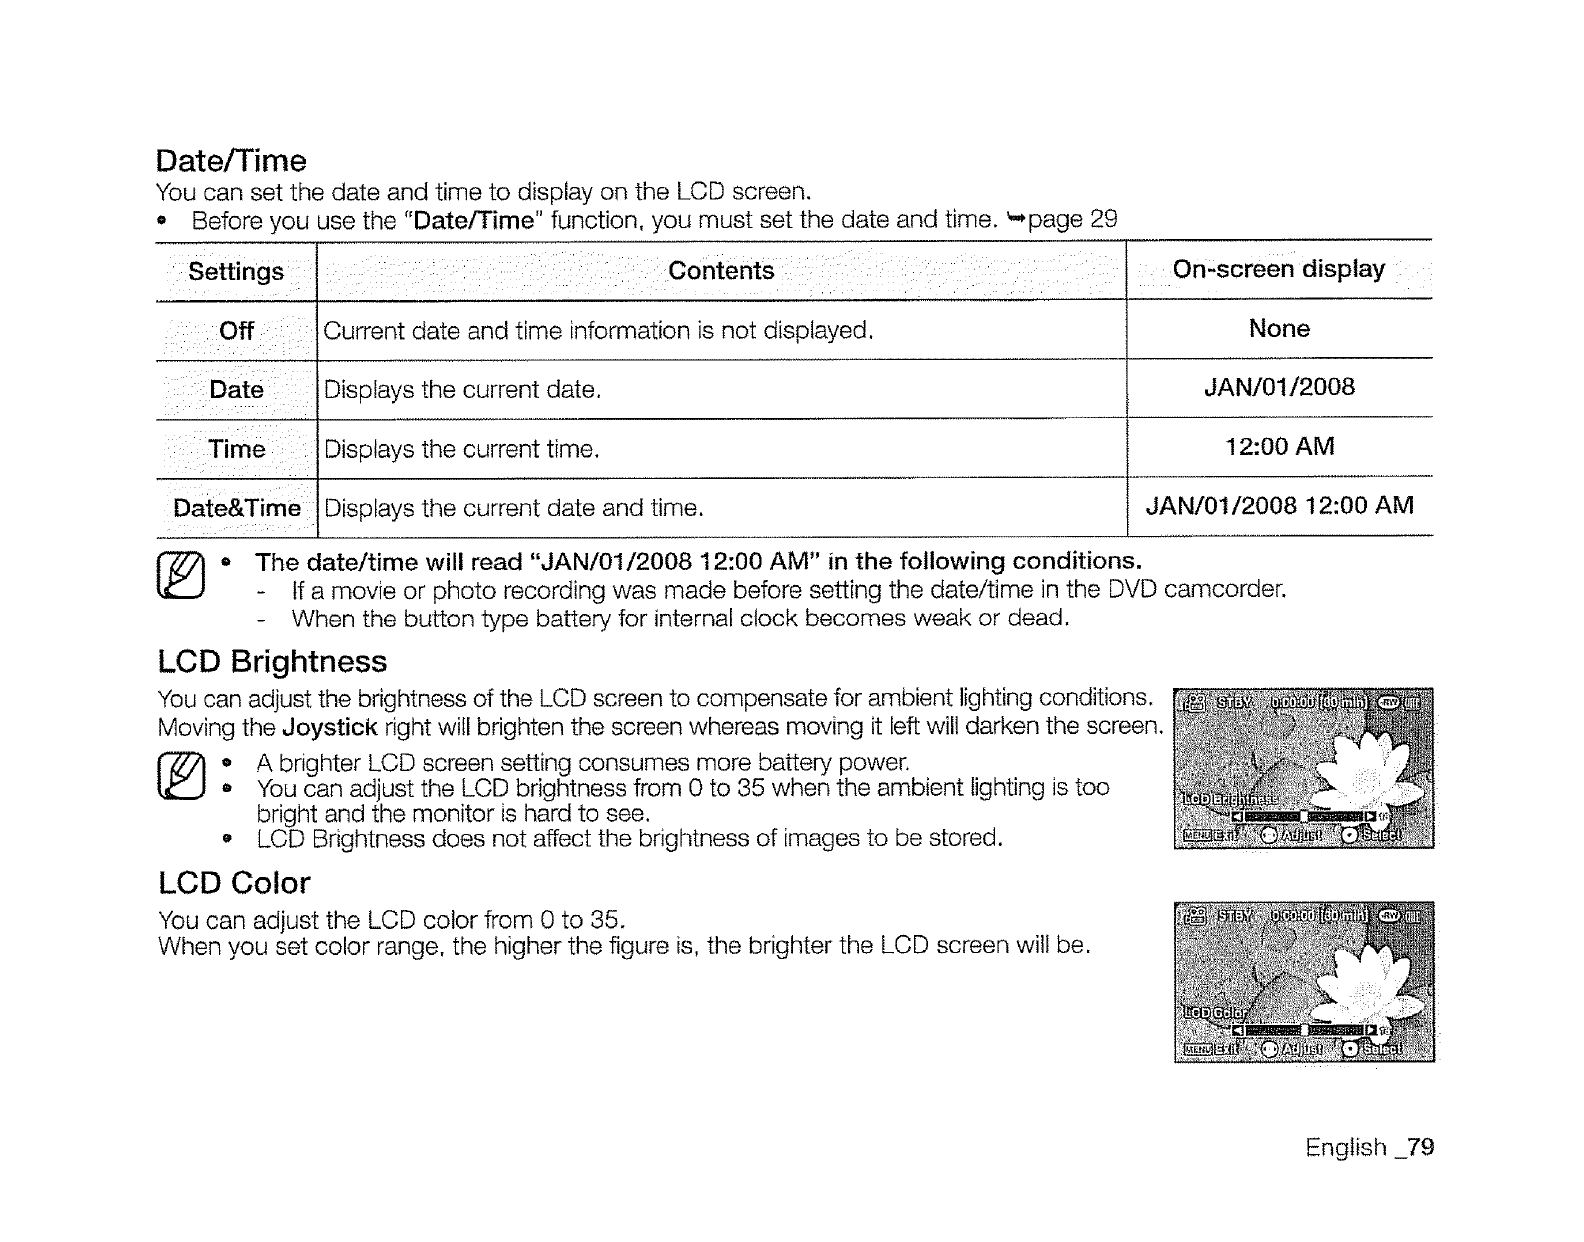
Date/Time
You can set the date and time to display on the LCD screen.
.Before you use the "Date/Time" function, you must set the date and time. _-,page 29
Settings Contents
i :iOff i:_!::
x ¸::¸ " il :/
::Date I
::: Time
ii
Date&Time
Omscreen display
Current date and time information is not displayed,
Displays the current date,
Displays the current time.
Displays the current date and time,
None
JAN/01/2008
12:00 AM
JAN/01/2008 12:00 AM
o The date/time will read "JAN/01/2008 12:00 AM" in the following conditions.
- If a movie or photo recording was made before setting the date/time in the DVD camcorder.
- When the button type battery for internal clock becomes weak or dead.
LCD Brightness
You can adjust the brightness of the LCD screen to compensate for ambient lighting conditions.
Moving the Joystick right will brighten the screen whereas moving it left will darken the screen.
o A brighter LCD screen setting consumes more battery power.
o You can adjust the LCD brightness from 0 to 35 when the ambient lighting is too
bright and the monitor is hard to see.
o LCD Brightness does not affect the brightness of images to be stored.
LCD Color
You can adjust the LCD color from 0 to 35.
When you set color range, the higher the figure is, the brighter the LCD screen will be.
English _79
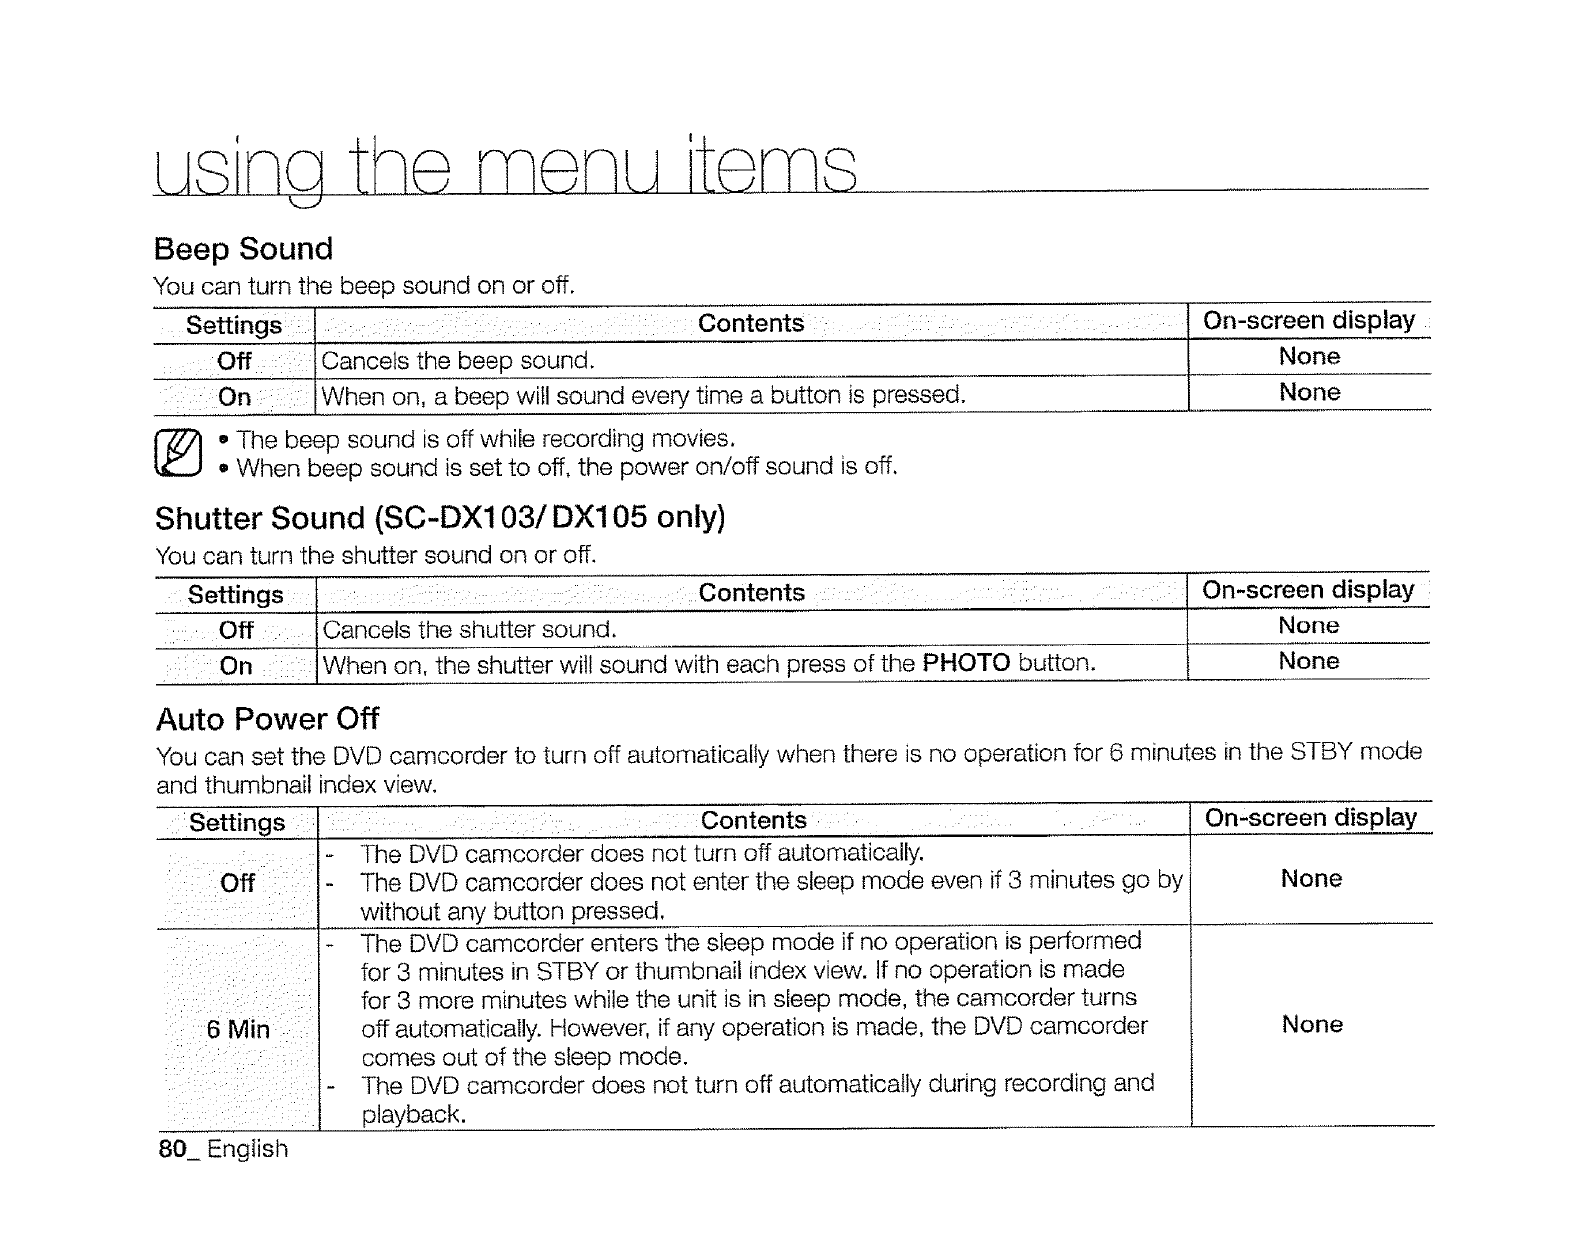
Beep Sound
You can turn the beep sound on or off.
Settings:: I :Contents l
ancets t'hebeep sound.
On |When on, a beep will sound every time a button is presse-d_ J
1_o The beep sound is off while recording movies.
• When beep sound is set to off, the power on/off sound is off,
On-screen display
None
None
Shutter Sound (SC-DX103/DX105 only)
You can turn the shutter sound on or off.
Settings, ::: :,,,,,:,,,:Contents ,,:: :, .... ::: i:::"On-screen display
Off
Cancels the shutter sound, l None
When on, the shutter willsound with each press of--_e PHOTO button, i None
Auto Power Off
You can set the DVD camcorder to turn off automatically when there is no operation for 6 minutes in the STBY mode
and thumbnail index view.
Settings Contents .... On-screen display
The DVD camcorder does not turn off automatically.
Off The DVD camcorder does not enter the sleep mode even if 3 minutes go by None
without any button pressed.
The DVD camcorder enters the sleep mode if no operation is performed
for 3 minutes _n STBY or thumbnail index view. If no operation is made
for 3 more minutes while the unit is in sleep mode, the camcorder turns
6 Min off automatically. However. if any operation is made, the DVD camcorder None
comes out of the sleep mode.
,- The DVD camcorder does not turn off automatically during recording and
3layback.
80_ Engiish
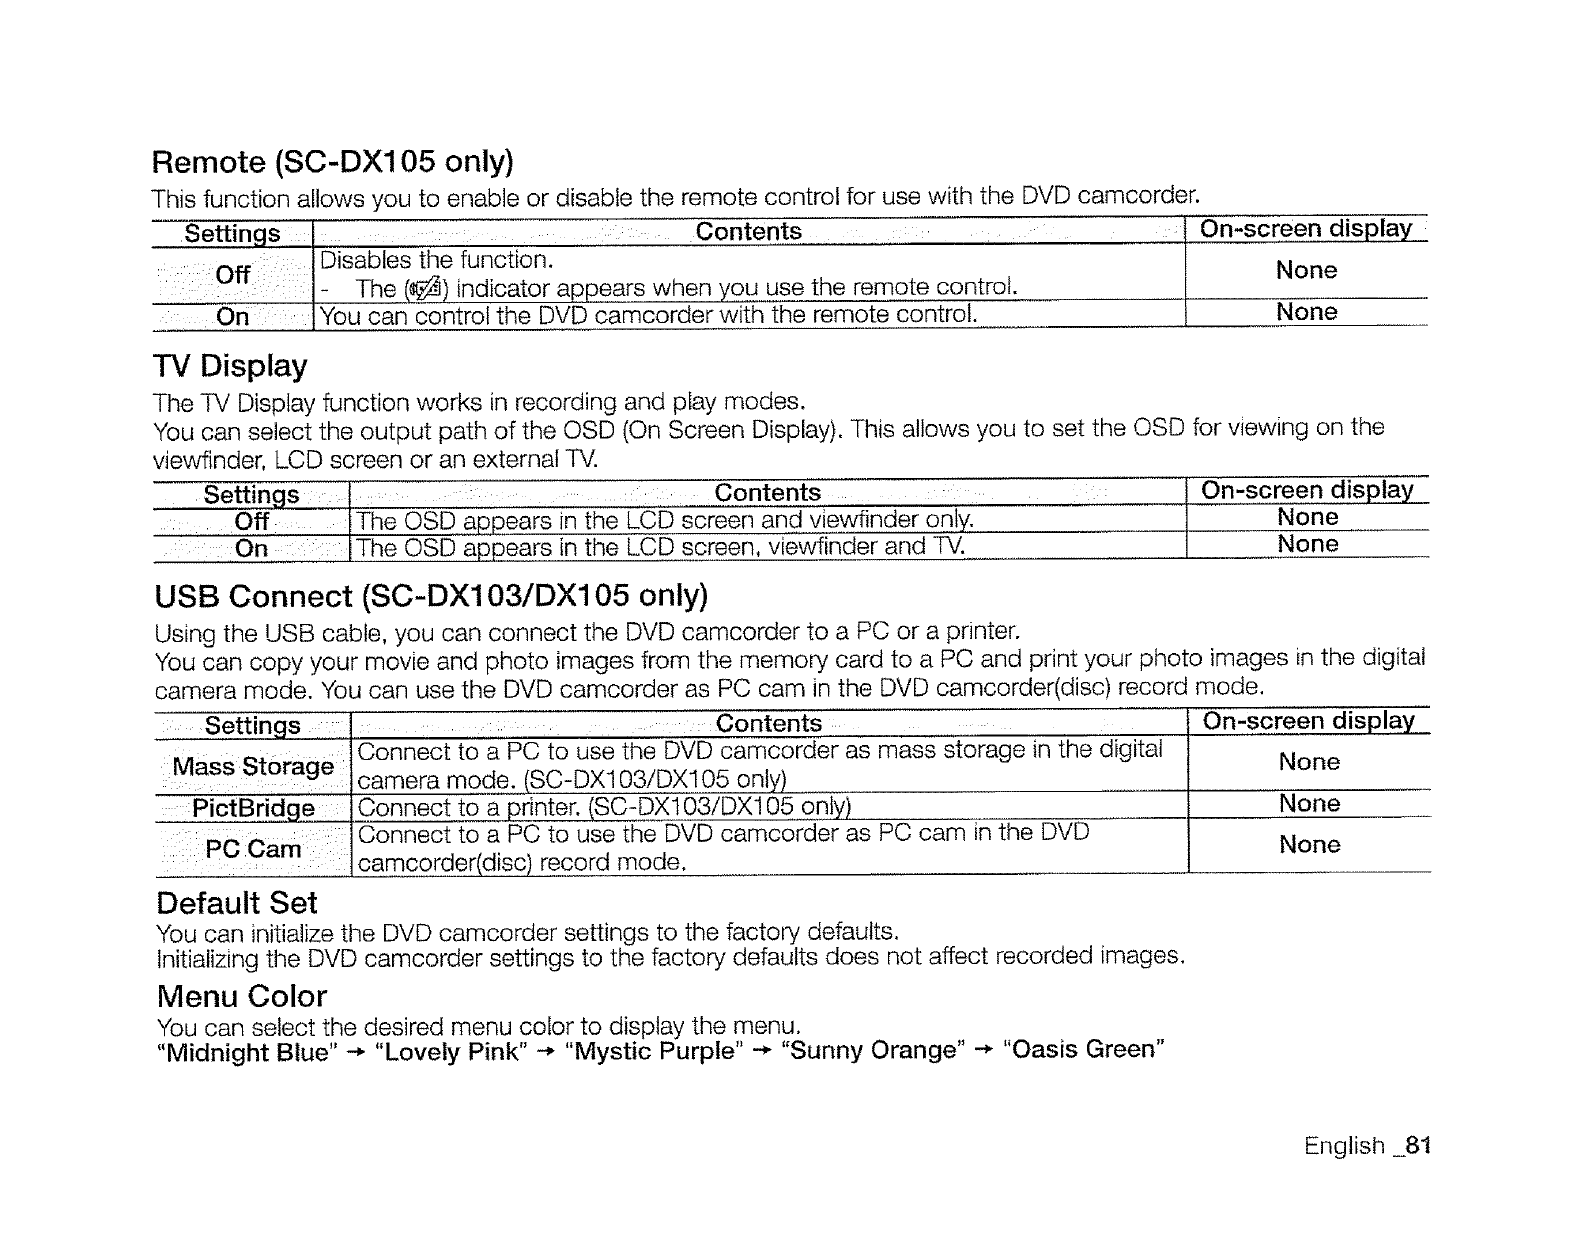
Remote (SC-DX105 only)
This function allows you to enable or disable the remote control for use with the DVD camcorder.
Settings : : Contents : I On-screen display ;
Off D sab es the function. '........ l
,:- The (8) indicator aRRears when you use the remote control. None
::: On You can Contro the DvL_ camcorder with t-h-eremote control. None
TV Display
The TV Display function works in recording and play modes.
You can select the output path of the OSD (On Screen Display). This allows you to set the OSD for viewing on the
viewfinder, LCD screen or an external TV.
Settings : .... ...... : Contents : On-screen display
i _The OSD appears in the LCD screen and Viewfinder only. None
: i:On The OSD appears in the LCD screen, viewfinder and _ None
USB Connect (SC-DXlO3/DX105 only)
Using the USB cable, you can connect the DVD camcorder to a PC or a printer.
You can copy your movie and photo images from the memory card to a PC and print your photo images in the digital
camera mode. You can use the DVD camcorder as PC cam in the DVD camcorder(disc) record mode.
Settngs :: i
Mass Storage ':
PictBridge
Pccam::
.... :
Contents
Connect to a PC to use the DVD camcorder as mass storage in the digital
camera mode. (SC-DX103/DX105 only)
Connect to a printer. (SC-DX103!DX105 only)
Connect to a PC to use the DVD camcorder as PC cam in the DVD
camcorder(disc) record mode.
On-screen display
None
None
None
Default Set
You can initialize the DVD camcorder settings to the factory defaults.
Initializing the DVD camcorder settings to the factory defaults does not affect recorded images.
Menu Color
You can select the desired menu color to display the menu.
"Midnight Blue" -* "Lovely Pink" -* "Mystic Purple" -_ "Sunny Orange" -* "Oasis Green"
English _81
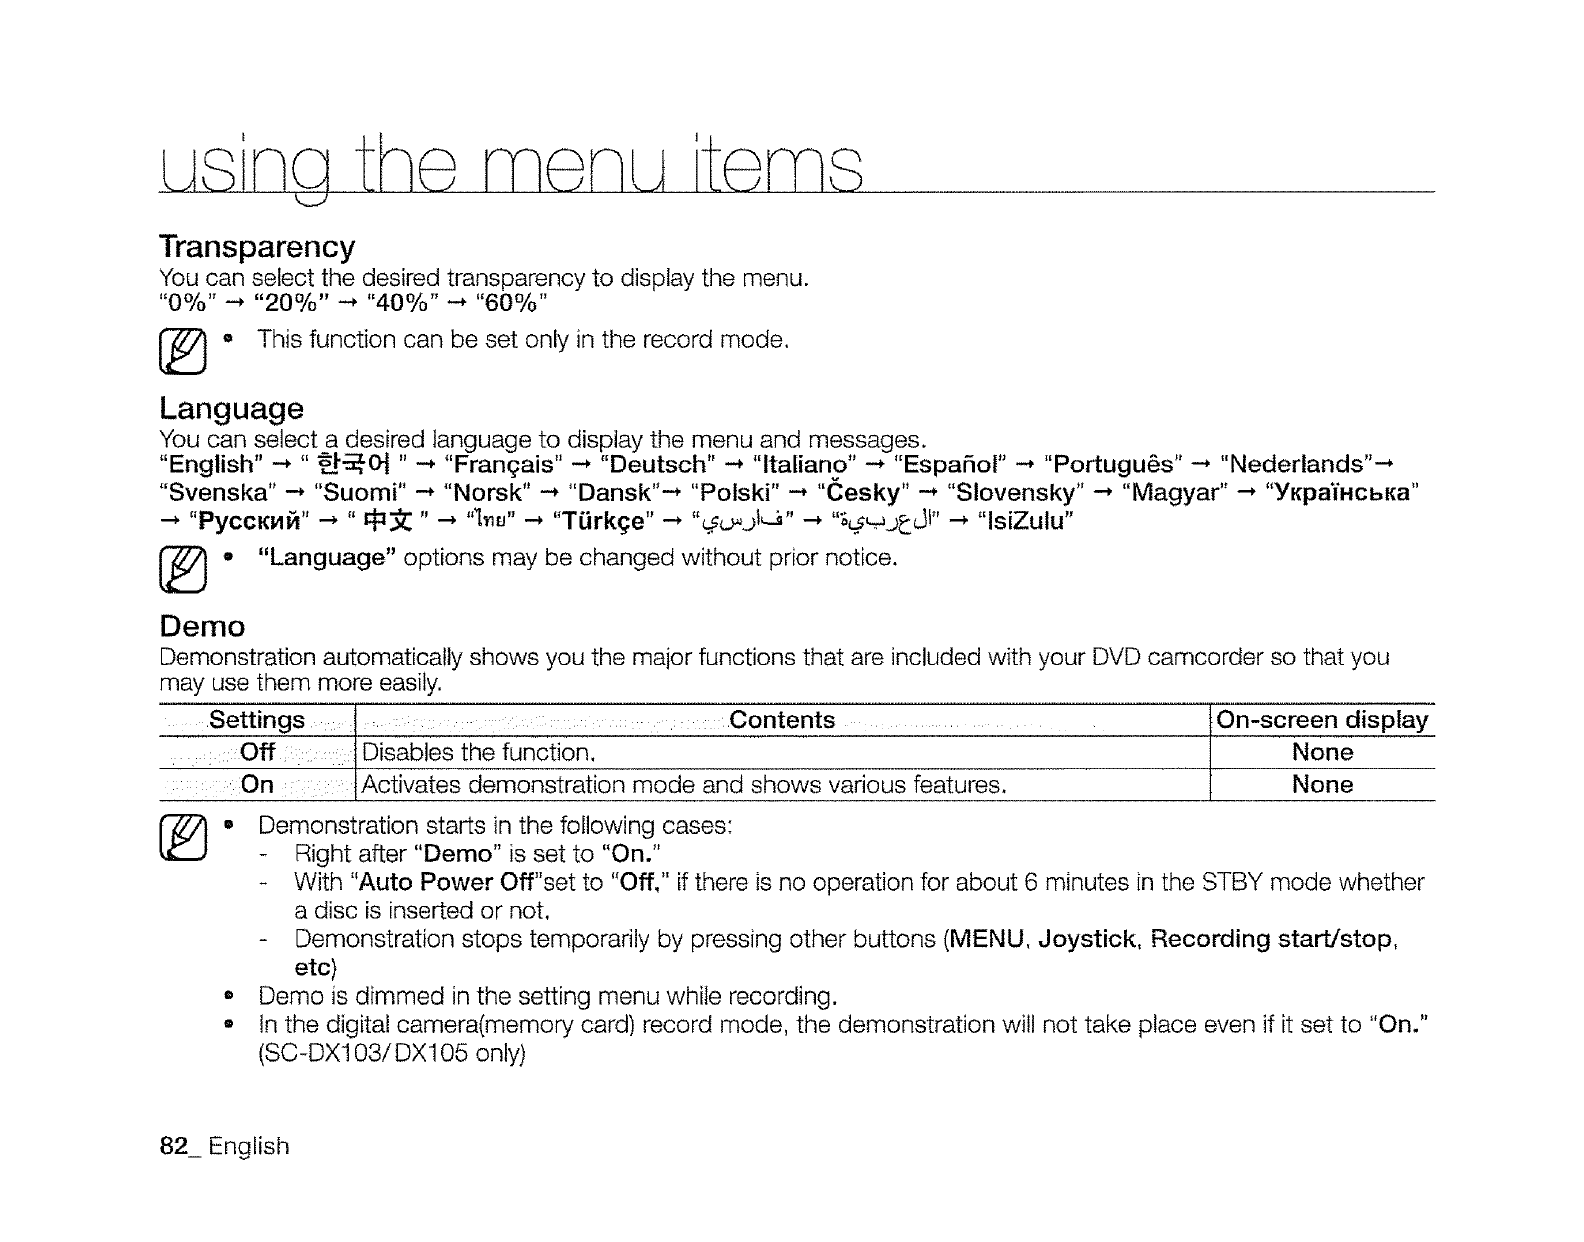
Transparency
You can select the desired transparency to display the menu.
"0%" -'* "20%" --' "40%" _ "60%"
° This function can be set only in the record mode.
Language
You can select a desired language to display the menu and messages.
"English" -, " _-_, 0_ " -, "Fran(}ais" -* "Deutsch" -_ "ltaliano" -* "EspaSot" -* "Portugu6s" --, "Nederlands"--*
"Svenska" _ "Suomi" --* "Norsk" --, "Dansk"_ "Polski" -, "(_esky" --, "Slovensky" -_ "Magyar" -_ "YKpaTxcbKa"
-_ "PyccKx_" -_ " _ " -_ "_._u" _ "TiJrkge" _ "_j_J" _ "_. _j_dl" -_ "lsiZulu"
-"Language" options may be changed without prior notice.
Demo
Demonstration automatically shows you the major functions that are included with your DVD camcorder so that you
may use them more easily.
Settings l : : : :: : :Contents ........... iOn-screen display
:'::::Off:::: :tDisables' the function, [None
:On IActivates demonstration mode and shows various features. None
[_, Demonstration starts in the following cases:
Right after "Demo" is set to "On."
With "Auto Power Off"set to "Off," if there is no operation for about 6 minutes in the STBY mode whether
a disc is inserted or not.
Demonstration stops temporarily by pressing other buttons (MENU, Joystick, Recording start/stop,
etc)
• Demo is dimmed in the setting menu while recording.
° In the digital camera(memory card) record mode, the demonstration will not take place even if it set to "On."
(SC-DX103/DX105 only)
82_ English
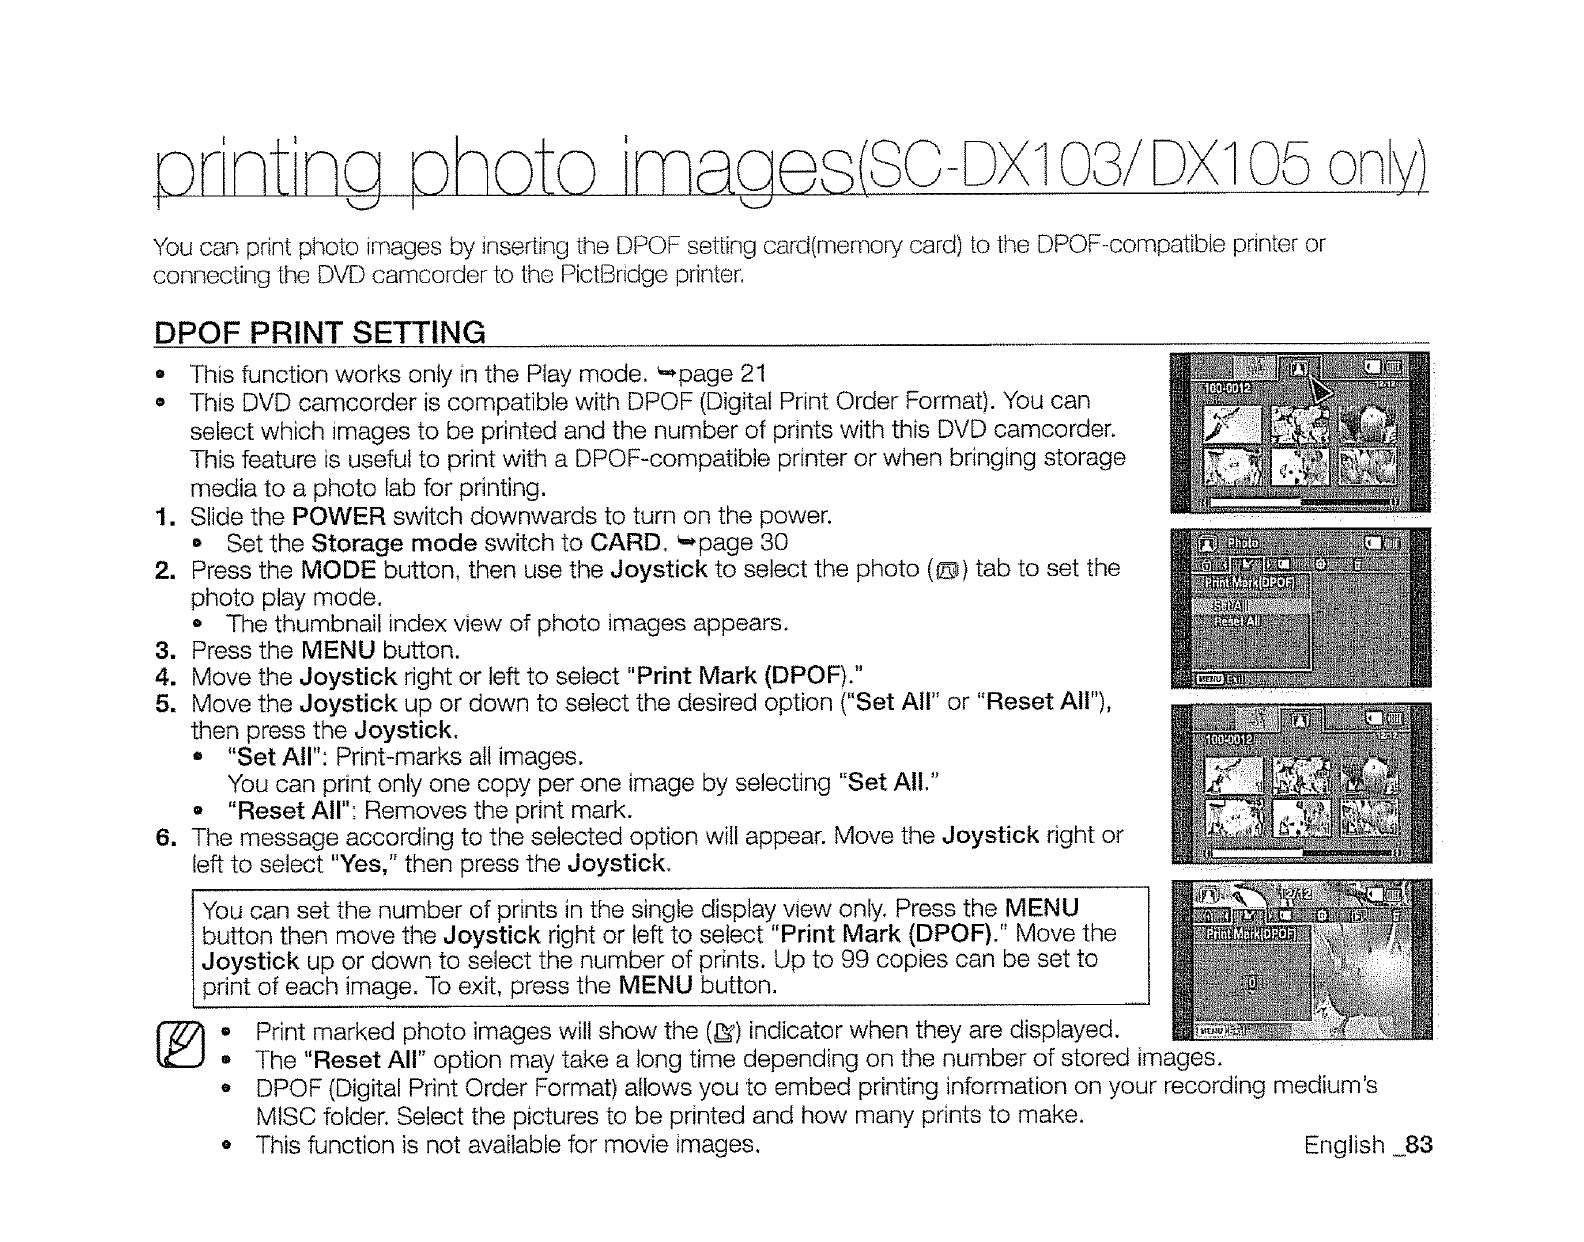
pr'ntng photo iMage (sc-Dx DX105ony)
You can print ptsoto images by inserting the DPOF setting card(memory card) to the DPOF-compatible printer or
connecting the DVD camcorder to the PictBridge printer.
DPOF PRINT SETTING
• This function works only in the Play mode. _page 21
• This DVD camcorder is compatible with DPOF (Digital Print Order Format). You can
select which images to be printed and the number of prints with this DVD camcorder.
This feature is useful to print with a DPOF-compatible printer or when bringing storage
media to a photo lab for printing.
1. Slide the POWER switch downwards to turn on the power.
• Set the Storage mode switch to CARD. _,,page 30
2, Press the MODE button, then use the Joystick to select the photo (@) tab to set the
photo play mode.
• The thumbnail index view of photo images appears.
3. Press the MENU button.
4. Move the Joystick right or left to select "Print Mark (DPOF),"
5. Move the Joystick up or down to select the desired option ("Set All" or "Reset All"),
then press the Joystick,
• "Set All": Print-marks all images.
You can print only one copy per one image by selecting "Set All."
o "Reset All": Removes the print mark.
6, The message according to the selected option will appear. Move the Joystick right or
left to select "Yes," then press the Joystick.
You can set the number of prints in the single display view only. Press the MENU
I button then move the Joystick right or left to select "Print Mark (DPOF)." Move the
1Joystick up or down to select the number of prints. Up to 99 copies can be set to
/ print of each image. To exit, press the MENU button.
° Print marked photo images will show the (_) indicator when they are displayed.
°The "Reset All" option may take a long time depending on the number of stored images.
, DPOF (Digital Print Order Format) allows you to embed printing information on your recording medium's
MISC folder. Select the pictures to be printed and how many prints to make.
o This function is not available for movie images. English .83

orintina©hoto irnaa (so-Dx o3/tx o5
DIRECT PRINTING WITH A PICTBRIDGE
o if your printer is compatible with PictBridge, photo images can be printed easily by
connecting the camcorder to the printer directly with the USB cable.
DPOF cannot be set while PictBridge in use. _,page 83
NOTICE: After selecting "PictBridge" in the menu, connect the USB cable.
1. Move to the photo play mode. _page 59
•Set the Storage mode switch to CARD,
o Press the MODE button and use the Joystick to select the photo (@_) tab to set the
photo play mode.
2. Set the "USB Connect" to "PictBridge." _page 81
o (Press the MENU button -_ Use the Joystick to select "Setting" --" "USB Connect"
--- "PictBridge")
3. Connect your DVD camcorder to the printer using the provided USB cable.
4. Turn your printer power on.
•The PictBridge menu screen appears automatically after a short period.
o To see the previous or next photo image, press the MENU button and move the
Joystick left or right.
•Each press of the MENU button toggles the PictBridge menu screen on or off,
5. Press the MENU button. Move the Joystick right or left to select "Print," and then press
the Joystick to print,
•The selected photo image will be printed.
o To stop printing after printing starts, press the MENU button.
Setting the number of copies to print
Press the MENU button,
Move the Joystick right or left to select "Copies," then move the Joystick up or down to
select the number of copies.
To exit, press the MENU button.
o If the image moves to the previous or next, the number of copies is reset,
84_ English
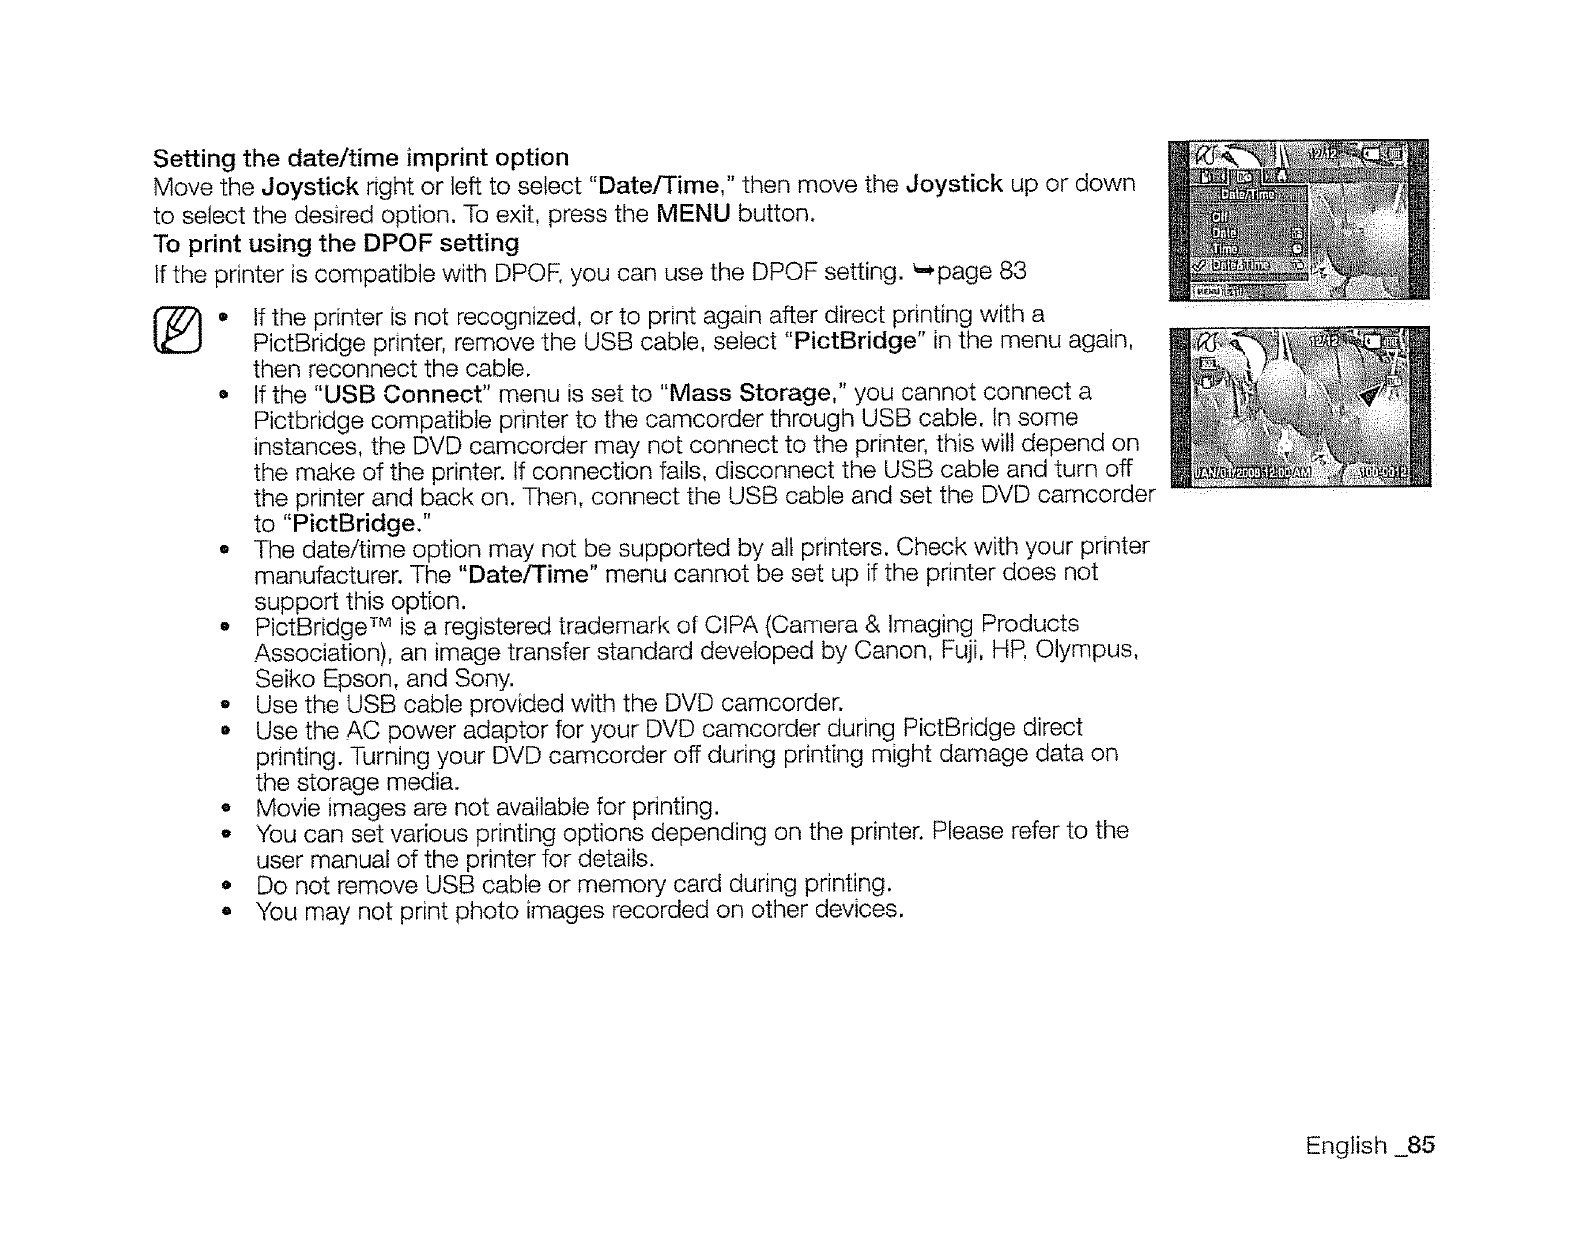
Setting the date/time imprint option
Move the Joystick right or left to select "Date/Time," then move the Joystick up or down
to select the desired option. To exit, press the MENU button.
To print using the DPOF setting
If the printer is compatible with DPOF,you can use the DPOF setting. _page 83
®• If the printer is not recognized, or to print again after direct printing with a
PictBridge printer, remove the USB cable, select "PictBridge" in the menu again,
then reconnect the cable.
•tf the "USB Connect" menu is set to "Mass Storage," you cannot connect a
Pictbridge compatible printer to the camcorder through USB cable. In some
instances, the DVD camcorder may not connect to the printer, this will depend on
the make of the printer. If connection fails, disconnect the USB cable and turn off
the printer and back on. Then, connect the USB cable and set the DVD camcorder
to "PictBridge."
• The date/time option may not be supported by all printers. Check with your printer
manufacturer. The "Date/Time" menu cannot be set up if the printer does not
support this option.
o PictBridge TM is a registered trademark of CIPA (Camera & Imaging Products
Association), an image transfer standard developed by Canon, Fuji, HR Olympus,
Seiko Epson, and Sony.
o Use the USB cable provided with the DVD camcorder.
o Use the AC power adaptor for your DVD camcorder during PictBridge direct
printing. Turning your DVD camcorder off during printing might damage data on
the storage media.
oMovie images are not available for printing.
oYou can set various printing options depending on the printer. Please refer to the
user manual of the printer for details.
•Do not remove USB cable or memory card during printing.
• You may not print photo images recorded on other devices.
English _85
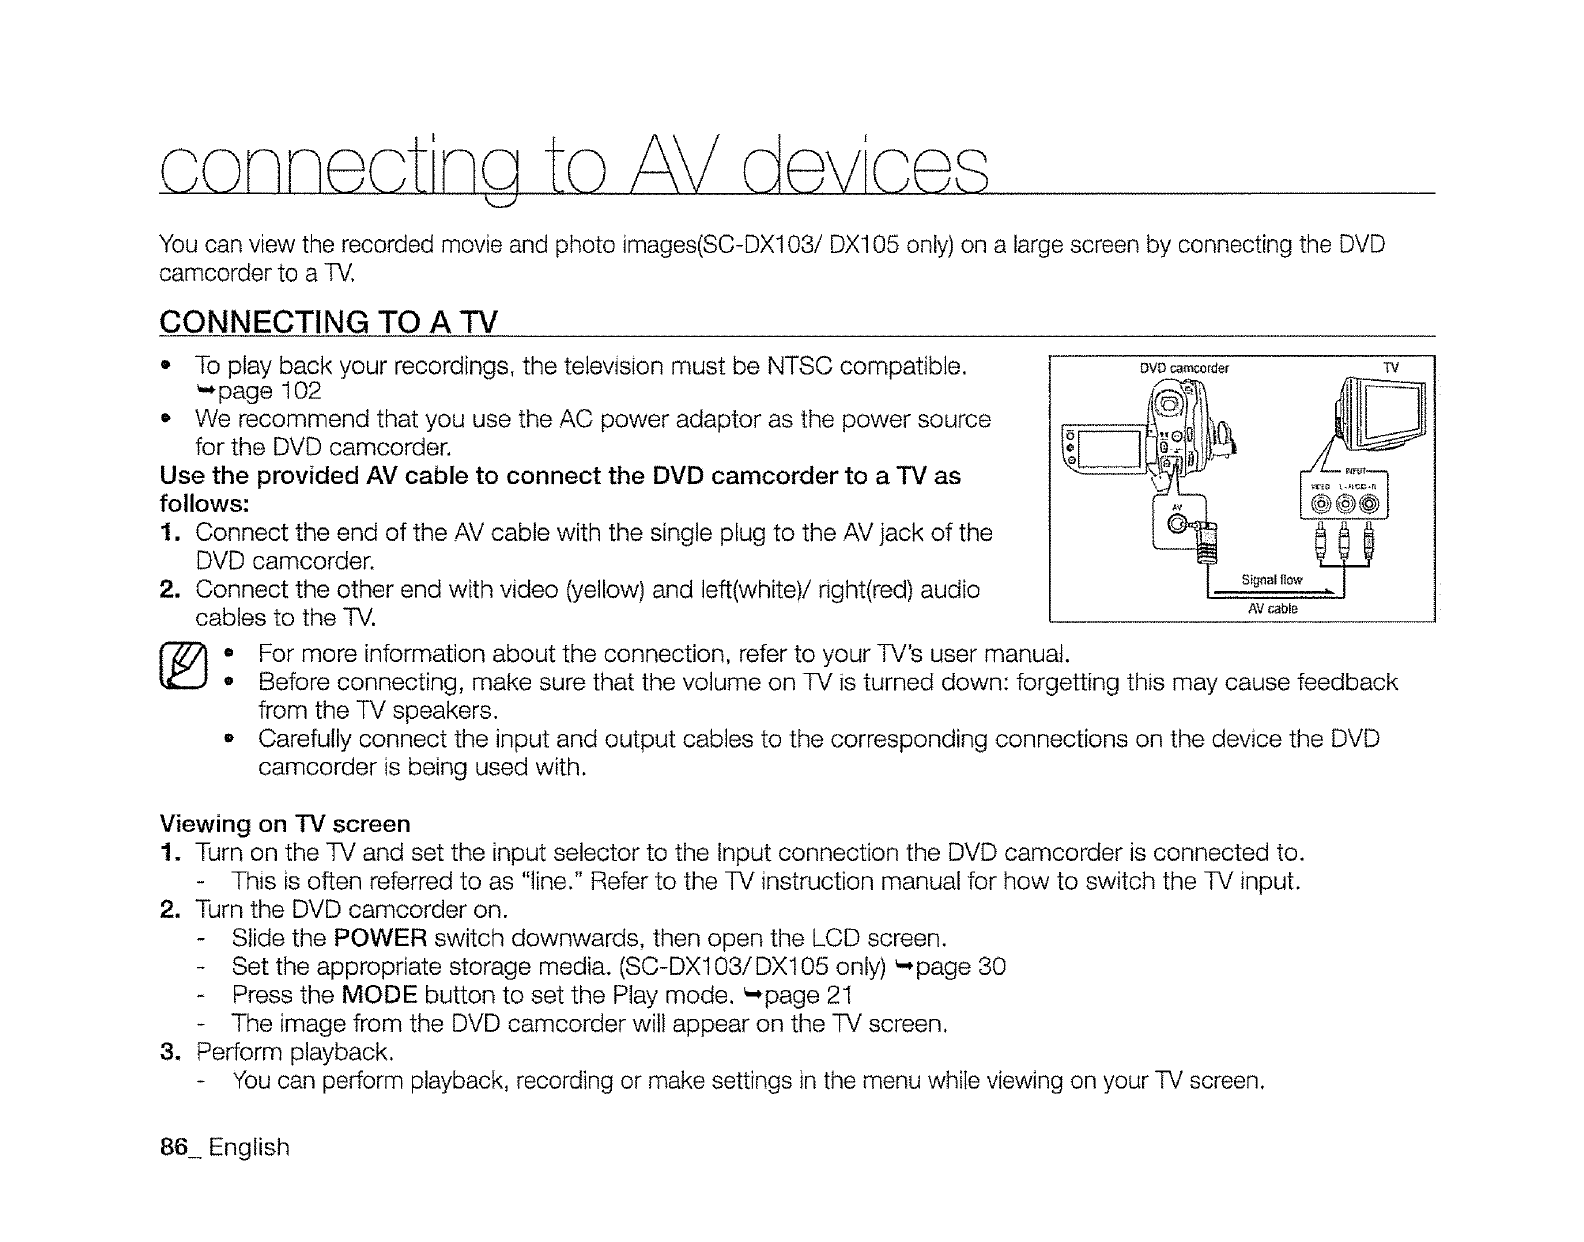
connect na to AV d ic
You can view the recorded movie and photo images(SC-DXl03i DX105 only) on a large screen by connecting the DVD
camcorder to a TV,
CONNECTING TO A "IV
o To play back your recordings, the television must be NTSC compatible.
_page 102
• We recommend that you use the AC power adaptor as the power source
for the DVD camcorder.
Use the provided AV cable to connect the DVD camcorder to a TV as
follows:
1. Connect the end of the AV cable with the single plug to the AV jack of the
DVD camcorder.
2. Connect the other end with video (yellow) and left(white)/right(red) audio
cables to the TV.
DVD eamcorder TV
@@@
Signal flow
AV cable
®• For more information about the connection, refer to your TV's user manual.
• Before connecting, make sure that the volume on TV is turned down: forgetting this may cause feedback
from the TV speakers.
° Carefully connect the input and output cables to the corresponding connections on the device the DVD
camcorder is being used with.
Viewing on "IV screen
1. Turn on the -D! and set the input selector to the Input connection the DVD camcorder is connected to.
- This is often referred to as "line." Refer to the TV instruction manual for how to switch the TV input.
2. Turn the DVD camcorder on.
- Slide the POWER switch downwards, then open the LCD screen.
- Set the appropriate storage media. (SC-DX103/DX105 only) _ page 30
- Press the MODE button to set the Play mode. _page 21
- The image from the DVD camcorder will appear on the TV screen.
3. Perform playback.
- You can perform playback, recording or make settings in the menu while viewing on your TV screen.
86_ English

Adjust the sound volume on TV.
The remote control is usefulwhen operating the DVDcamcorder whileviewing an image on TV screen.
(SC-DX105only)
o Ifonly a mono audio input is availableon the connected device (TV,etc.), use the audio cable with the white jack
(Audio L).
• When a copy-protected movie is played back, no image will appearon TV screen.
• When "TV Display" is set to "Off," OSD(OmScreen-Display)does not appear on the TV screen. _*page81
• Informationthat the DVDcamcorder is recordingwill appear on the TVscreen: Pressthe Display (l[]l)button to
switch the displaystatus. _-,page26
• Howling may occur when the DVDcamcorder is too close to the other devicesor the volume is high. Keep the
DVDcamcorder a reasonabledistance away from the other connected devices.
Image display depending on TV screen ratio
Storage Recording ratio: :
DISC
CARD
(SC-DX103/
DX105 only)
Movie images recorded in the 16:9
ratio (t 6:9 Wide: On)
Movie images recorded in the 4:3 ratio
(16:9 Wide: Off)
o Movie images
• Photo images
Wide (16:9) TV 4:3 TV
• Refer to page 72 for "16:9 Wide" setting.
English _87
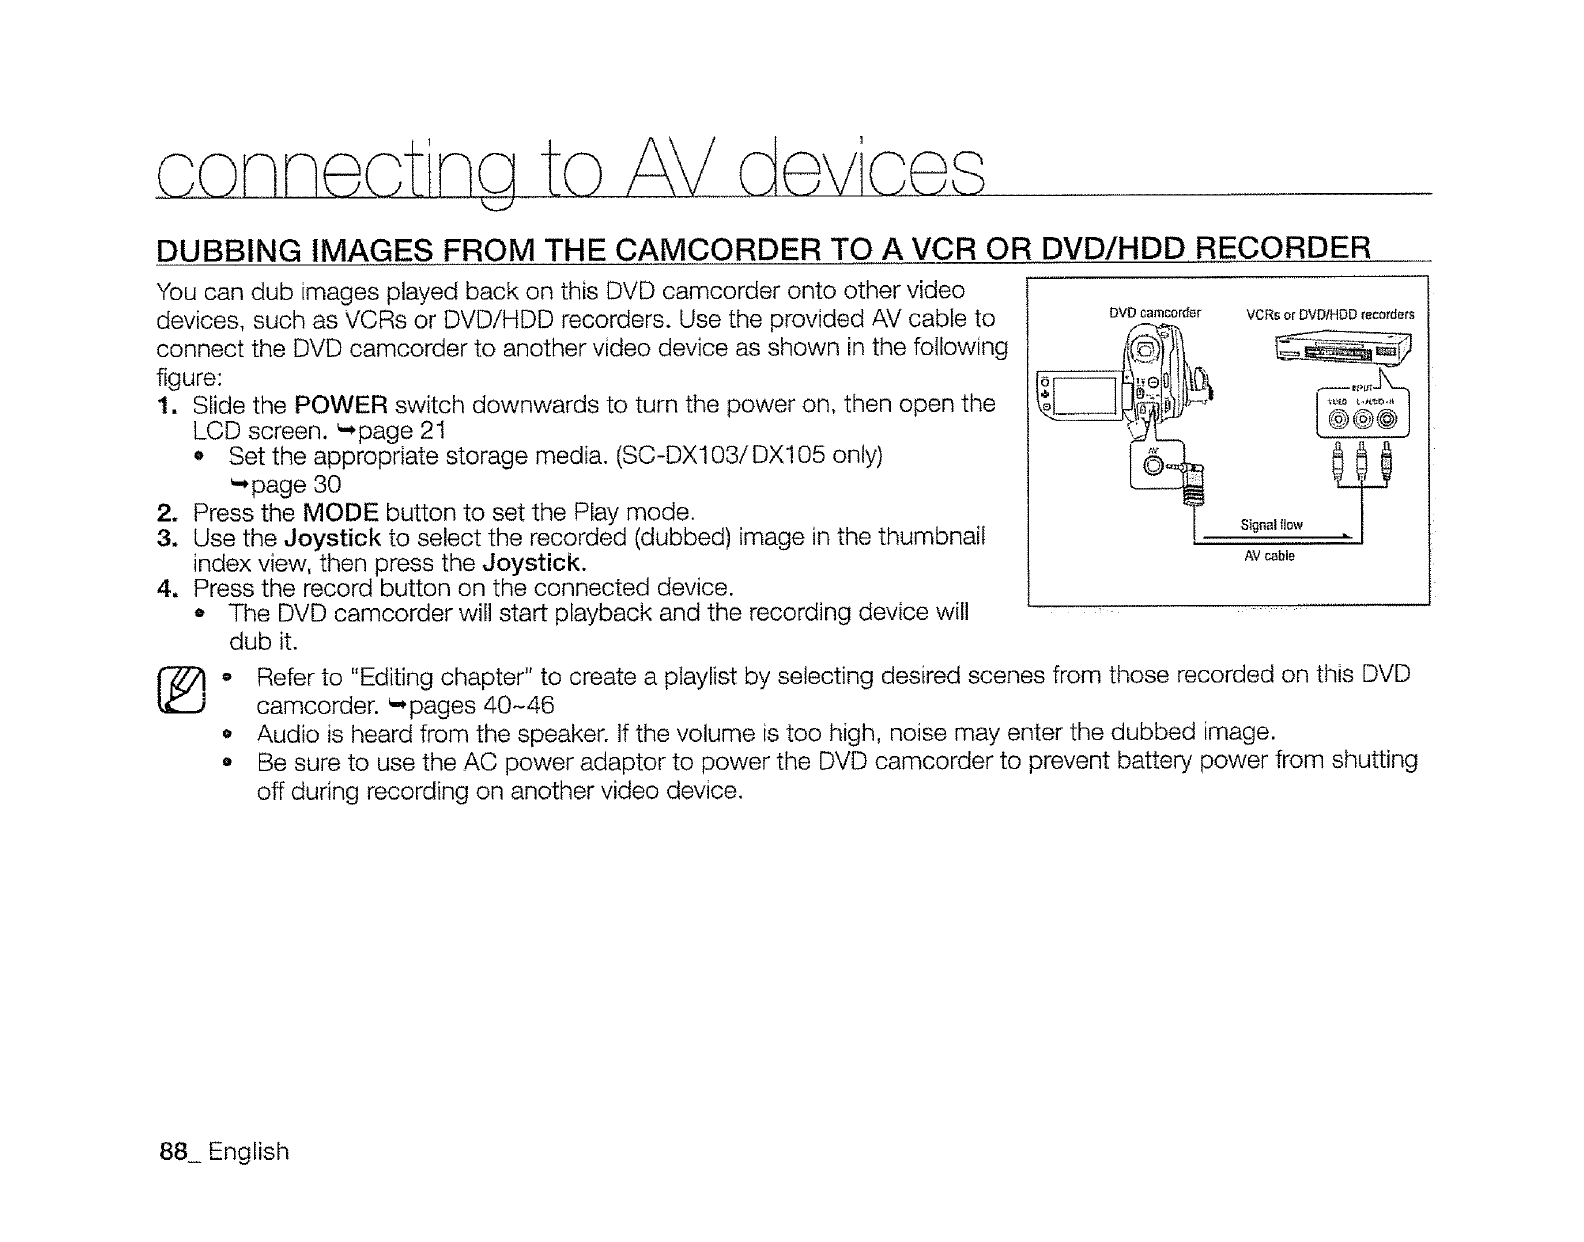
DUBBING IMAGES FROM THE CAMCORDER TO A VCR OR DVD/HDD RECORDER
You can dub images played back on this DVD camcorder onto other video
devices, such as VCRs or DVD/HDD recorders. Use the provided AV cable to
connect the DVD camcorder to another video device as shown in the following
figure:
1. Slide the POWER switch downwards to turn the power on, then open the
LCD screen. _page 21
o Set the appropriate storage media. (SC-DX103/DX105 only)
_page 30
2. Press the MODE button to set the Play mode.
3, Use the Joystick to select the recorded (dubbed) image in the thumbnail
index view, then press the Joystick.
4, Press the record button on the connected device.
o The DVD camcorder wi!l start playback and the recording device will
dub it.
®
VCRs or DVD/HDD recorders
Signal flow
AV cable
o Refer to "Editing chapter" to create a playlist by selecting desired scenes from those recorded on this DVD
camcorder. _pages 40-46
• Audio is heard from the speaker. If the volume is too high, noise may enter the dubbed image.
o Be sure to use the AC power adaptor to power the DVD camcorder to prevent battery power from shutting
off during recording on another video device.
88_ English
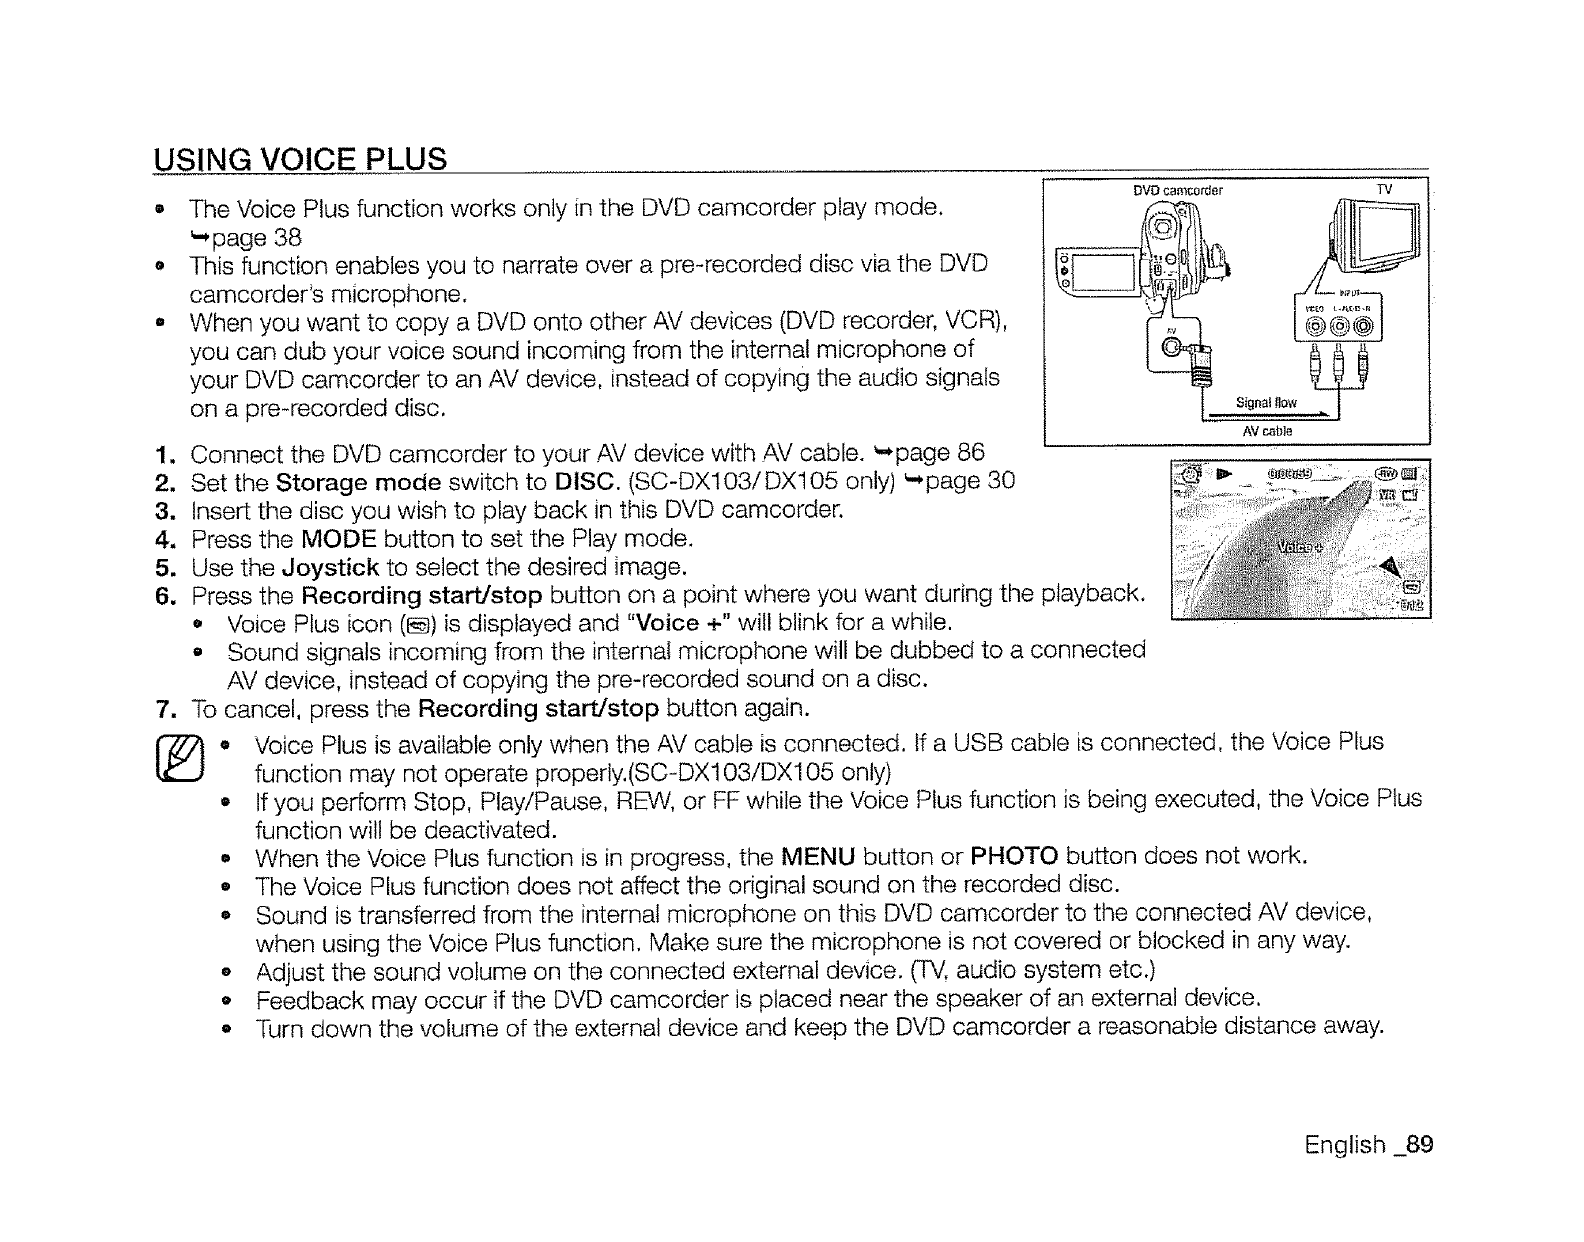
USING VOICE PLUS
•The Voice Plus function works only in the DVD camcorder play mode.
page 38
o This function enables you to narrate over a pre-recorded disc via the DVD
camcorder's microphone.
•When you want to copy a DVD onto other AV devices (DVD recorder, VCR),
you can dub your voice sound incoming from the internal microphone of
your DVD camcorder to an AV device, instead of copying the audio signals
on a pre-recorded disc.
DVD camcorder TV
Sfgnat low
AV c_ble
1. Connect the DVD camcorder to your AV device with AV cable. _,page 86
2. Set the Storage mode switch to DISC. (SC-DX103/DX105 only) _page 30
3. Insert the disc you wish to play back in this DVD camcorder.
4, Press the MODE button to set the Play mode.
5. Use the Joystick to select the desired image.
6. Press the Recording start/stop button on a point where you want during the playback.
o Voice Plus icon (l_) is displayed and "Voice +" will blink for a while.
•Sound signals incoming from the internal microphone will be dubbed to a connected
AV device, instead of copying the pre-recorded sound on a disc.
7. To cancel, press the Recording start/stop button again.
®. Voice Plus is available only when the AV cable is connected. If a USB cable is connected, the Voice Plus
function may not operate properly.(SC-DX103/DX105 only)
,If you perform Stop, Play/Pause, REW, or FF while the Voice Plus function is being executed, the Voice Plus
function will be deactivated.
• When the Voice Plus function is in progress, the MENU button or PHOTO button does not work.
• The Voice Plus function does not affect the original sound on the recorded disc.
,, Sound is transferred from the internal microphone on this DVD camcorder to the connected AV device,
when using the Voice Ptus function. Make sure the microphone is not covered or blocked in any way.
o Adjust the sound volume on the connected external device. (TV. audio system etc.)
•Feedback may occur if the DVD camcorder is placed near the speaker of an external device.
•Turn down the volume of the external device and keep the DVD camcorder a reasonable distance away.
English _89
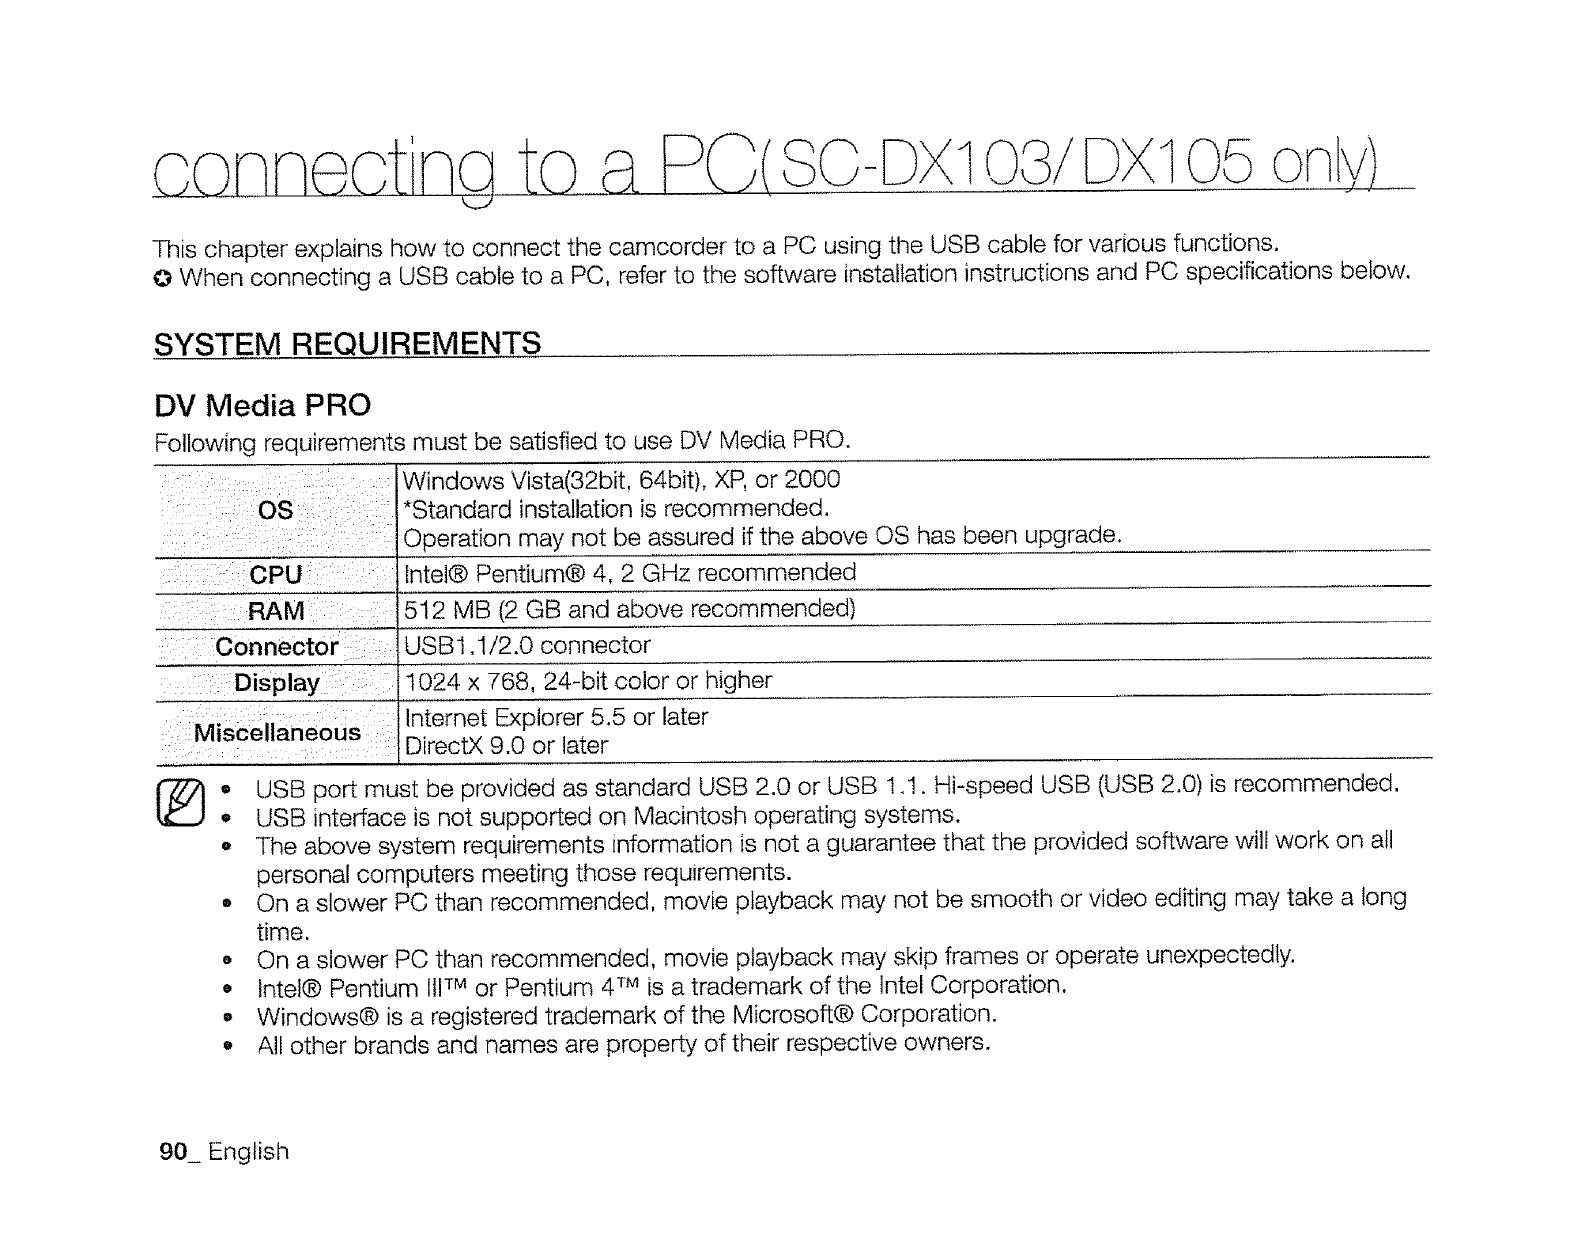
3C 1
This chapter explains how to connect the camcorder to a PC using the USB cable for various functions.
Q When connecting a USB cable to a PC, refer to the software installation instructions and PC specifications below.
SYSTEM REQUIREMENTS
DV Media PRO
Following requirements must be satisfied to use DV Media PRO.
Windows Vista(32bit, 64bit), XP, or 2000
OS *Standard installation is recommended.
Operation may not be assured if the above OS has been upgrade.
CPU lntel® Pentium® 4, 2 GHz recommended
RAM 512 MB (2 GB and above recommended)
Connector USB 1.1/2.0 connector
Display 1024 x 768, 24-bit color or higher
Internet Explorer 5.5 or later
Miscellaneous DirectX 9.0 or later
®• USB port must be provided as standard USB 2.0 or USB 1.1. Hi-speed USB (USB 2.0) is recommended.
_, USB interface is not supported on Macintosh operating systems.
, The above system requirements information is not a guarantee that the provided software will work on all
personal computers meeting those requirements.
• On a slower PC than recommended, movie playback may not be smooth or video editing may take a long
time.
o On a slower PC than recommended, movie playback may skip frames or operate unexpectedly.
• tntel® Pentium 1tlTM or Pentium 4 TM is a trademark of the lntel Corporation.
o Windows® is a registered trademark of the Microsoft® Corporation.
o All other brands and names are property of their respective owners.
90_ English
INSTALLING DV Media PRO
When you install the DV Media PRO software on your Windows computer, you can enjoy the following operations by
connecting your DVD camcorder to your computer via a USB cable.
- View Movie Recordings and Photos on PC: DV Driver, DirectX9.0, Video Codec
- PC cam/USB streaming function: DV Driver, DirectX9.0, Video Codec
Before your start!
•Turn on your PC. Exit all other running applications.
• Insert the provided CD into the CD-R©M drive.
The setup screen appears automatically soon after the CD is inserted. If the setup screen does not appear, click on
"Start" on the bottom left corner and select "Run" to display a dialog. Type "D:'\autorun.exe" and then press ENTER, if
your CD-ROM drive is mapped to "D:Drive".
Installing Driver -DV Driver and DirectX 9.0
o DV Driver is a software driver that is required to support establishing connection to a PC.
(If it is not installed, some functions will not be supported.)
1. Click on "DV Driver" on the Setup screen.
oDriver software is installed automatically. Following drivers will be installed:
- PC Camera/USB Streaming driver(Capture Driver)
2, Click on "Confirm" to finish driver installation.
3. If the "DirectX 9.0" is not installed, it is installed automatically after setting <DV Driver>.
•After installing "DirectX 9.0," please restart your PC.
If "DirectX 9.0" is installed already, there is no need to restart the PC.
Application Installation - Video Codec
,Click on "Video Codec" on the Setup screen.
"Video Codec" is required to play movie files recorded by this DVD Camcorder on a PC.
English _91
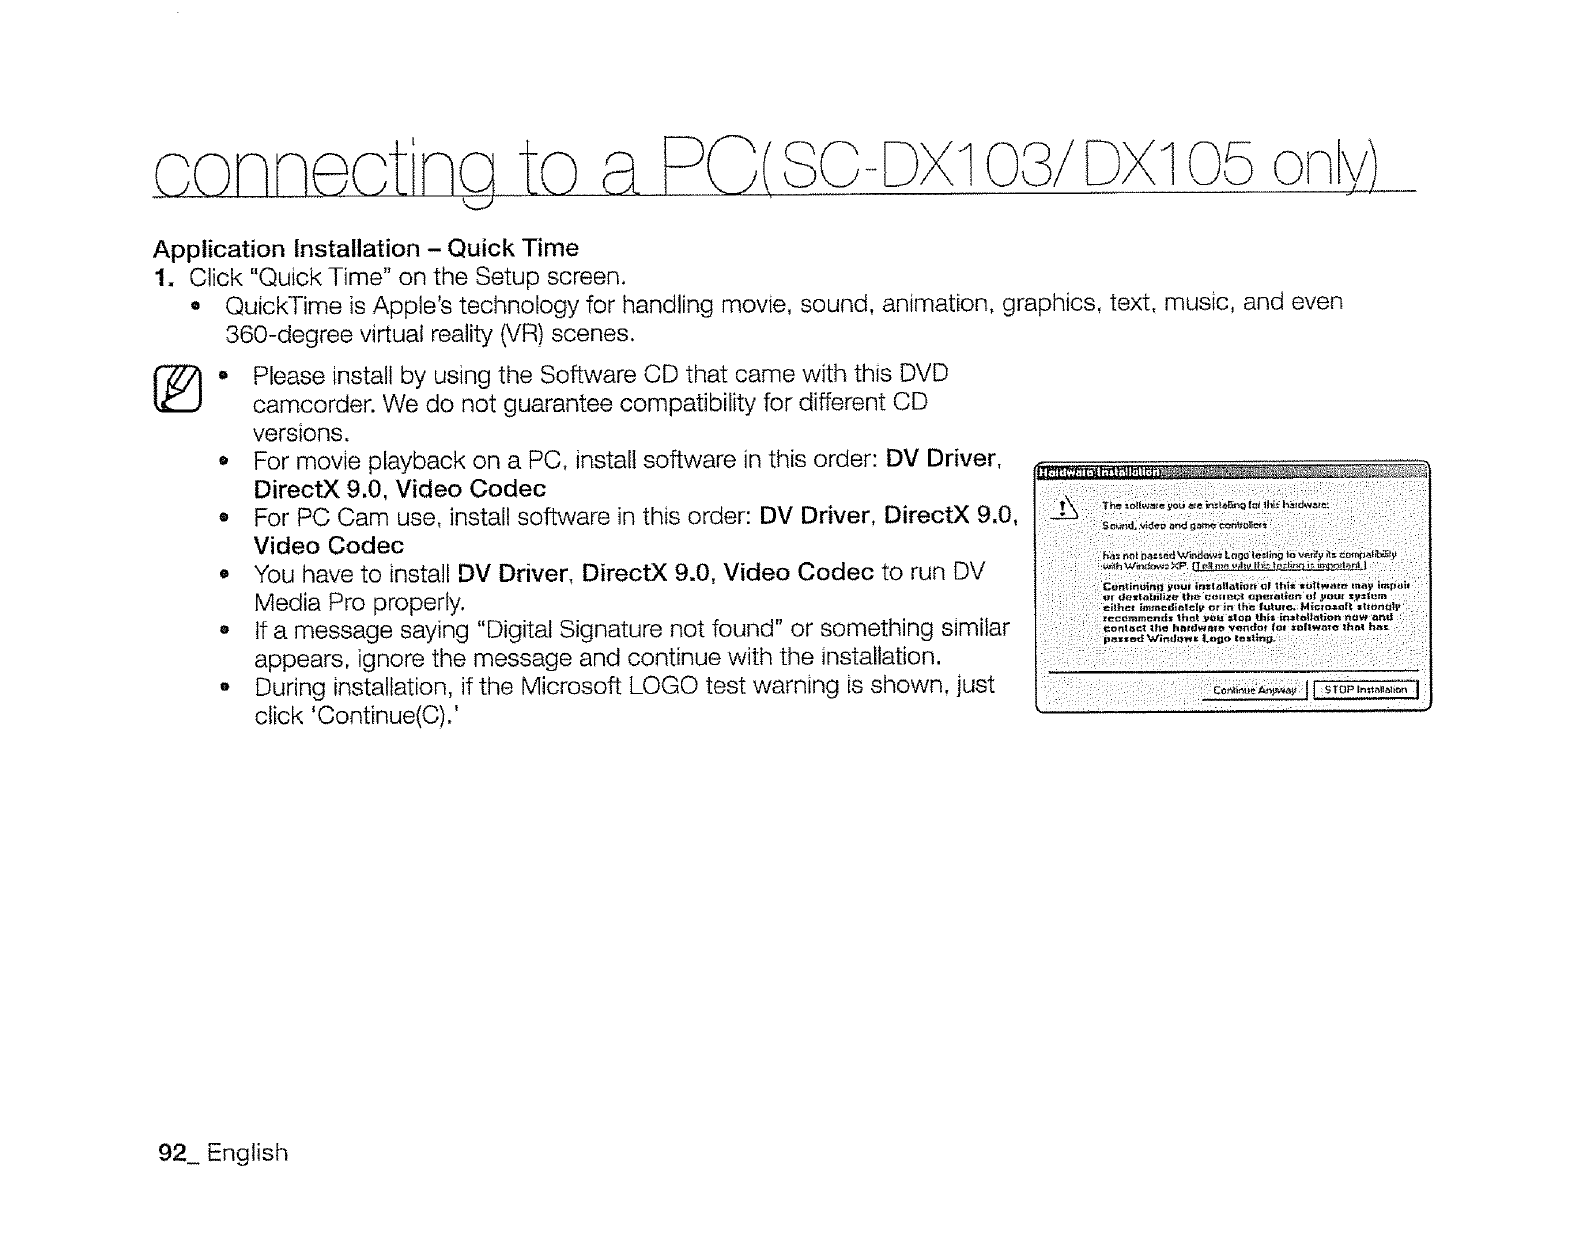
1on
Application Installation - Quick Time
1. Click "Quick Time" on the Setup screen.
• QuickTime is Apple's technology for handling movie, sound, animation, graphics, text, music, and even
360-degree virtual reality (VR) scenes.
(_. Please install by using the Software CD that came with this DVD
camcorder. We do not guarantee compatibility for different CD
versions.
• For movie playback on a PC, install software in this order: DV Driver,
DirectX 9.0, Video Codec
o For PC Cam use, install software in this order: DV Driver, DirectX 9.0,
Video Codec
• You have to install DV Driver, DirectX 9.0, Video Codec to run DV ....
Media Pro properly.
, If a message saying "Digital Signature not found" or something similar
appears, ignore the message and continue with the installation.
o During installation, if the Microsoft LOGO test warning is shown, just
click 'Continue(C).'
92_ English
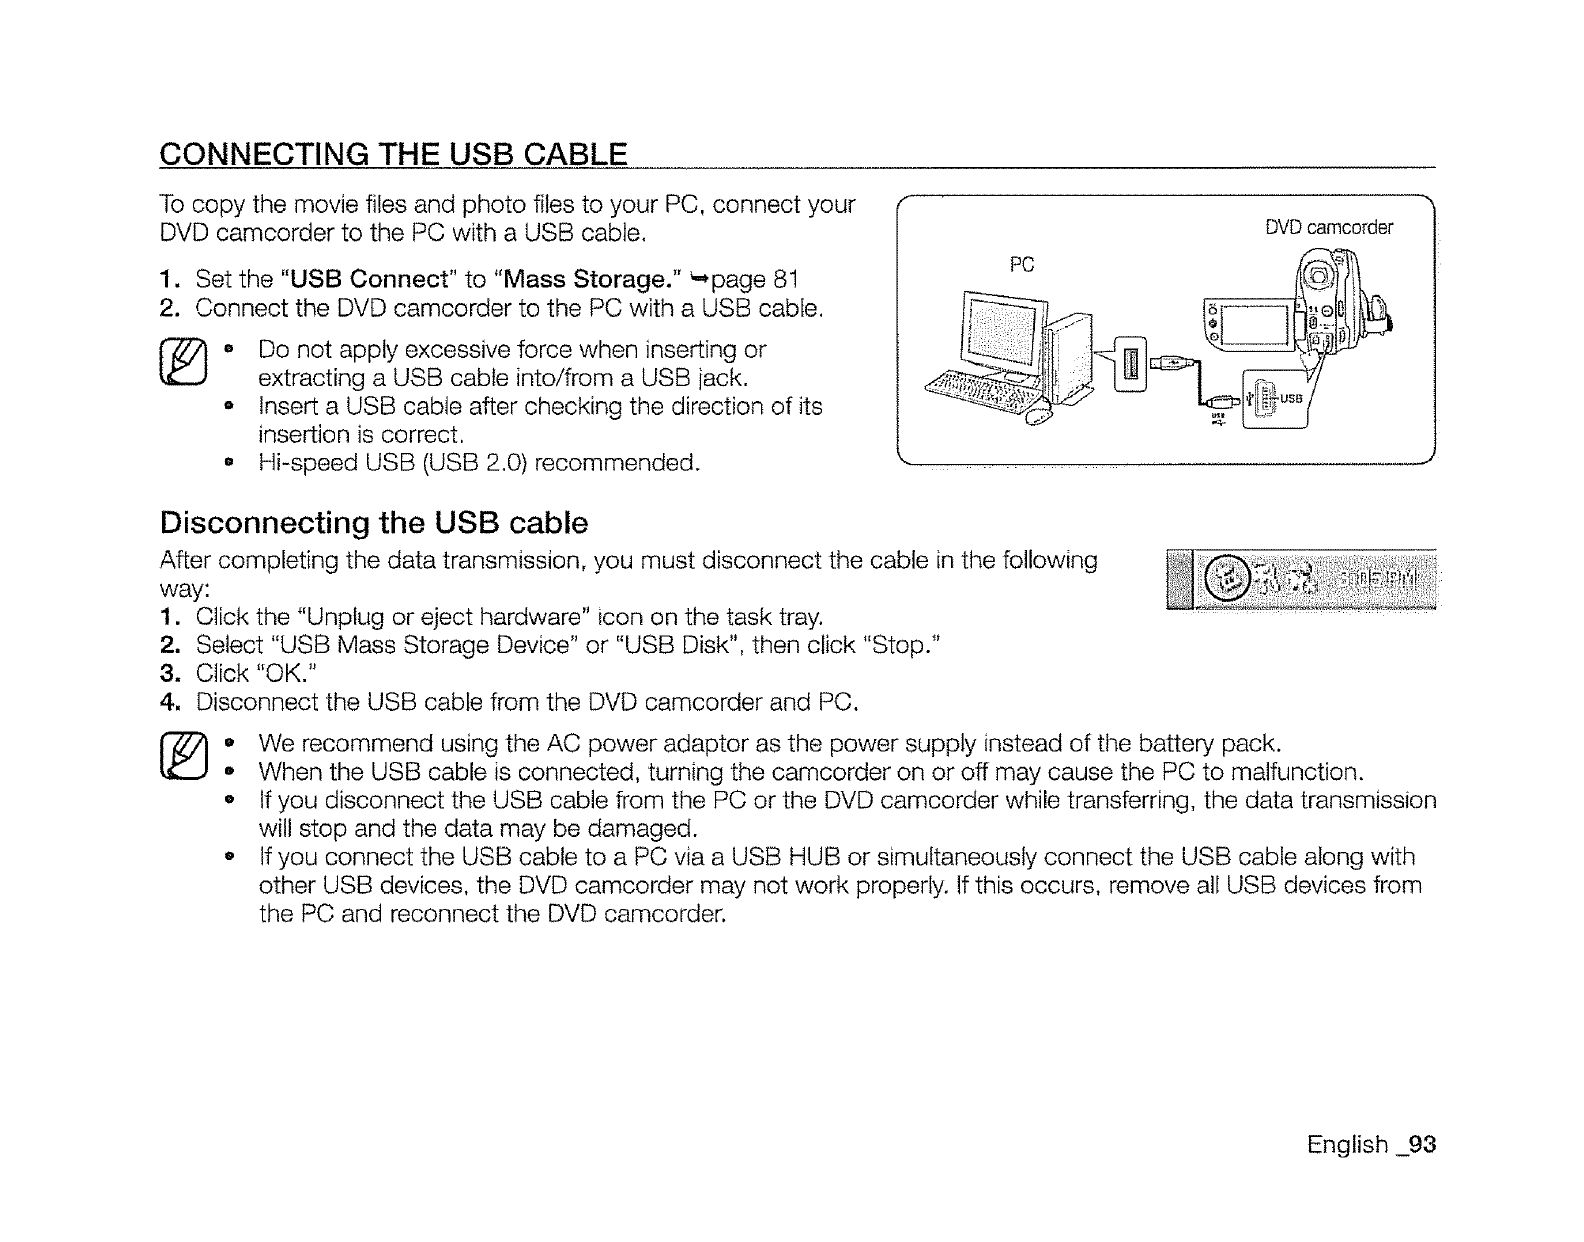
CONNECTING THE USB CABLE
To copy the movie files and photo files to your PC, connect your
DVD camcorder to the PC with a USB cable.
1. Set the "USB Connect" to "Mass Storage." _page 8!
2. Connect the DVD camcorder to the PC with a USB cable.
®• Do not apply excessive force when inserting or
extracting a USB cable into/from a USB jack.
o insert a USB cable after checking the direction of its
insertion is correct.
oHi-speed USB (USB 2.0) recommended.
DVD camcorder
PC
Disconnecting the USB cable
After completing the data transmission, you must disconnect the cable in the following
way:
1. Click the "Unplug or eject hardware" icon on the task tray.
2. Select "USB Mass Storage Device" or "USB Disk", then click "Stop."
3. Click "OK."
4, Disconnect the USB cable from the DVD camcorder and PC.
®oWe recommend using the AC power adaptor as the power supply instead of the battery pack.
• When the USB cable is connected, turning the camcorder on or off may cause the PC to malfunction.
•If you disconnect the USB cable from the PC or the DVD camcorder while transferring, the data transmission
will stop and the data may be damaged.
o If you connect the USB cable to a PC via a USB HUB or simultaneously connect the USB cable along with
other USB devices, the DVD camcorder may not work properly. If this occurs, remove all USB devices from
the PC and reconnect the DVD camcorder.
English _93
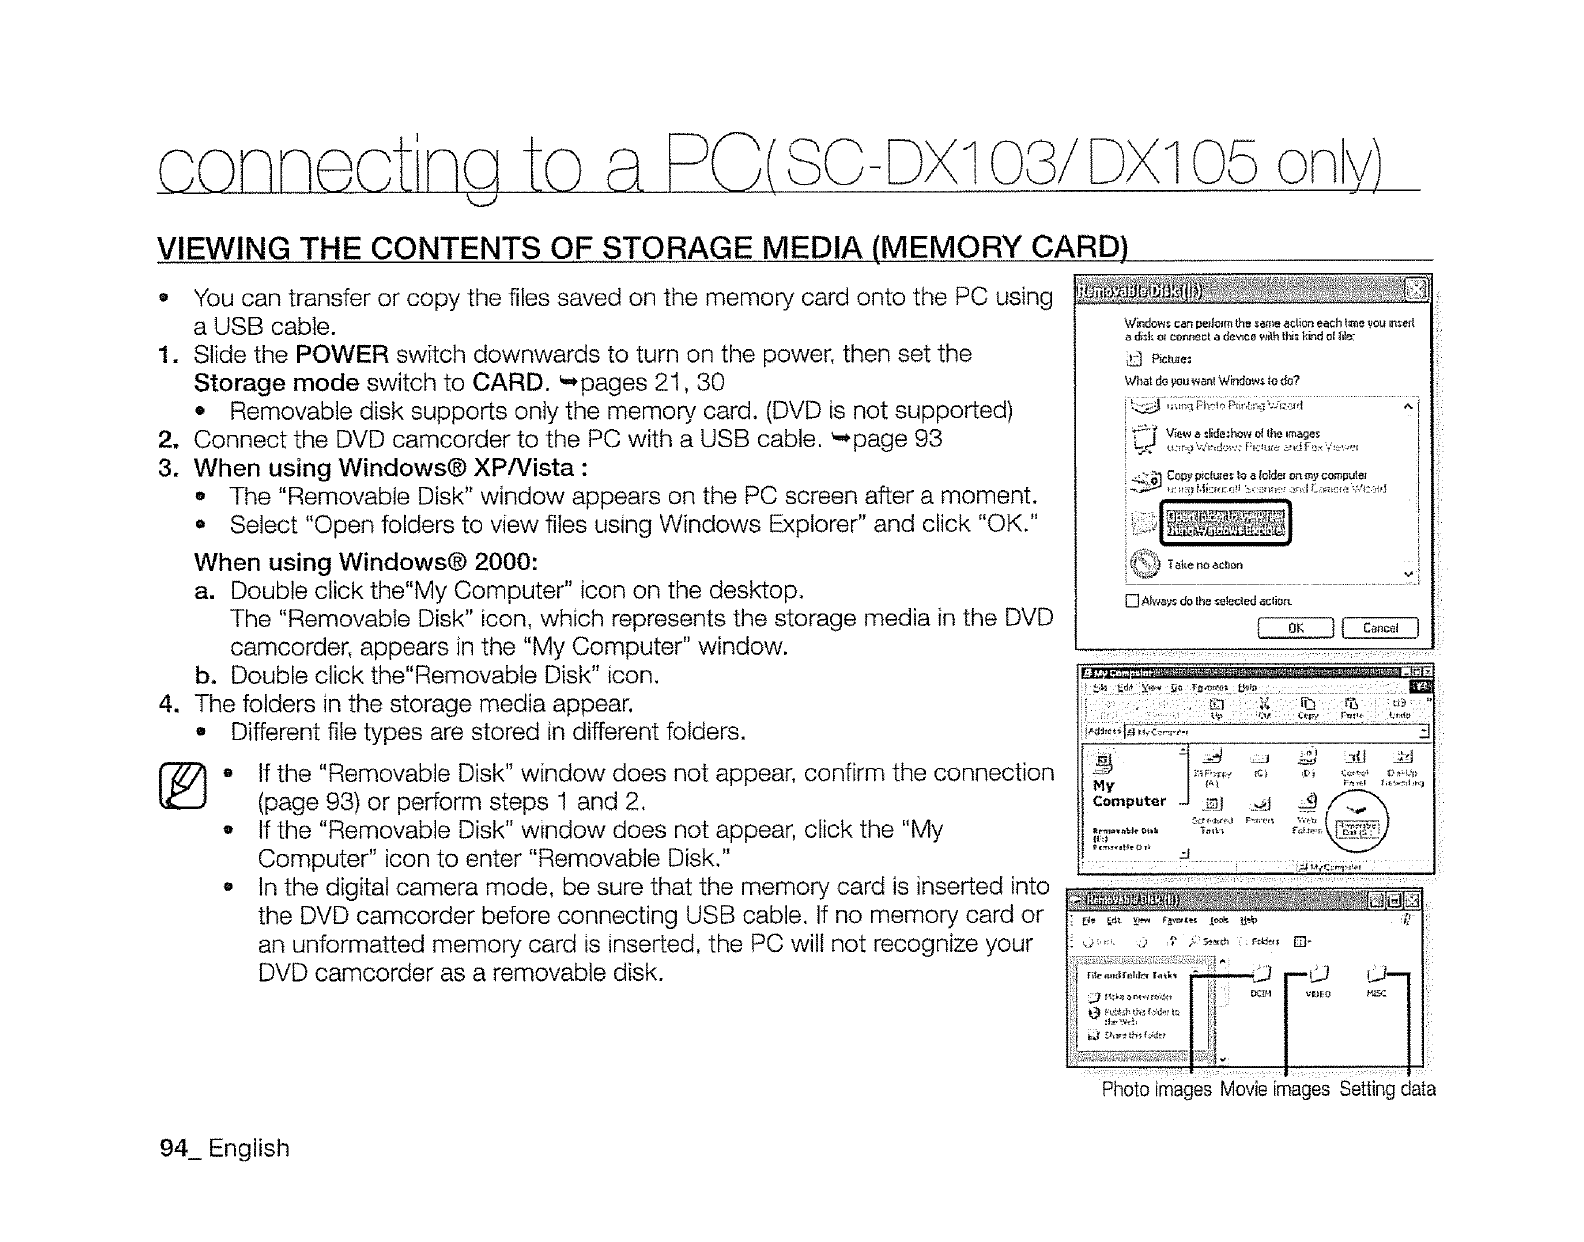
consect Nato a PG(8o-s×l DX105 ony)
VIEWING THE CONTENTS OF STORAGE MEDIA (MEMORY CARD)
O
1.
2_
3.
You can transfer or copy the files saved on the memory, card onto the PC using
a USB cable.
Slide the POWER switch downwards to turn on the power, then set the
Storage mode switch to CARD. '-,pages 21,30
• Removable disk supports only the memory, card. (DVD is not supported)
Connect the DVD camcorder to the PC with a USB cable. _,page 93
When using Windows@ XP/Vista :
o The "Removable Disk" window appears on the PC screen after a moment.
,Select "Open folders to view files using Windows Explorer" and click "OK."
When using Windows@ 2000:
a. Double click the"My Computer" icon on the desktop.
The "Removable Disk" icon, which represents the storage media in the DVD
camcorder, appears in the "My Computer" window.
b. Double click the"Removable Disk" icon.
The folders in the storage media appear.
, Different file types are stored in different folders.
,, If the "Removable Disk" window does not appear, confirm the connection
(page 93) or perform steps 1 and 2.
o If the "Removable Disk" window does not appear, click the "My
Computer" icon to enter "Removable Disk."
- In the digital camera mode, be sure that the memory card is inserted into
the DVD camcorder before connecting USB cable. If no memory card or
an unformatted memory card is inserted, the PC wilt not recognize your
DVD camcorder as a removable disk.
Windo'n._ can pelJolmtllesame acLion each _ne VOU _ell
P_a_uie.1
What do _ou wan{ Window_. _odo?
i_)÷ Vie,_a :l_da:ho,7÷d{heimage*:
_4_ COp2 picluIe,';Ioa _olcie,on my computel
_'1"_5 Ta_:.eno acbon
[] Ak,_at}_do {h__e!ecl_d ecti_
Computer J .j_u__l ._t _.__ @
....... " ........ ........... :._i,_.,i,,,., : , ,,
: ::: : z
|
/
.......,idi.
Photo images Movie images Setting data
94_ English
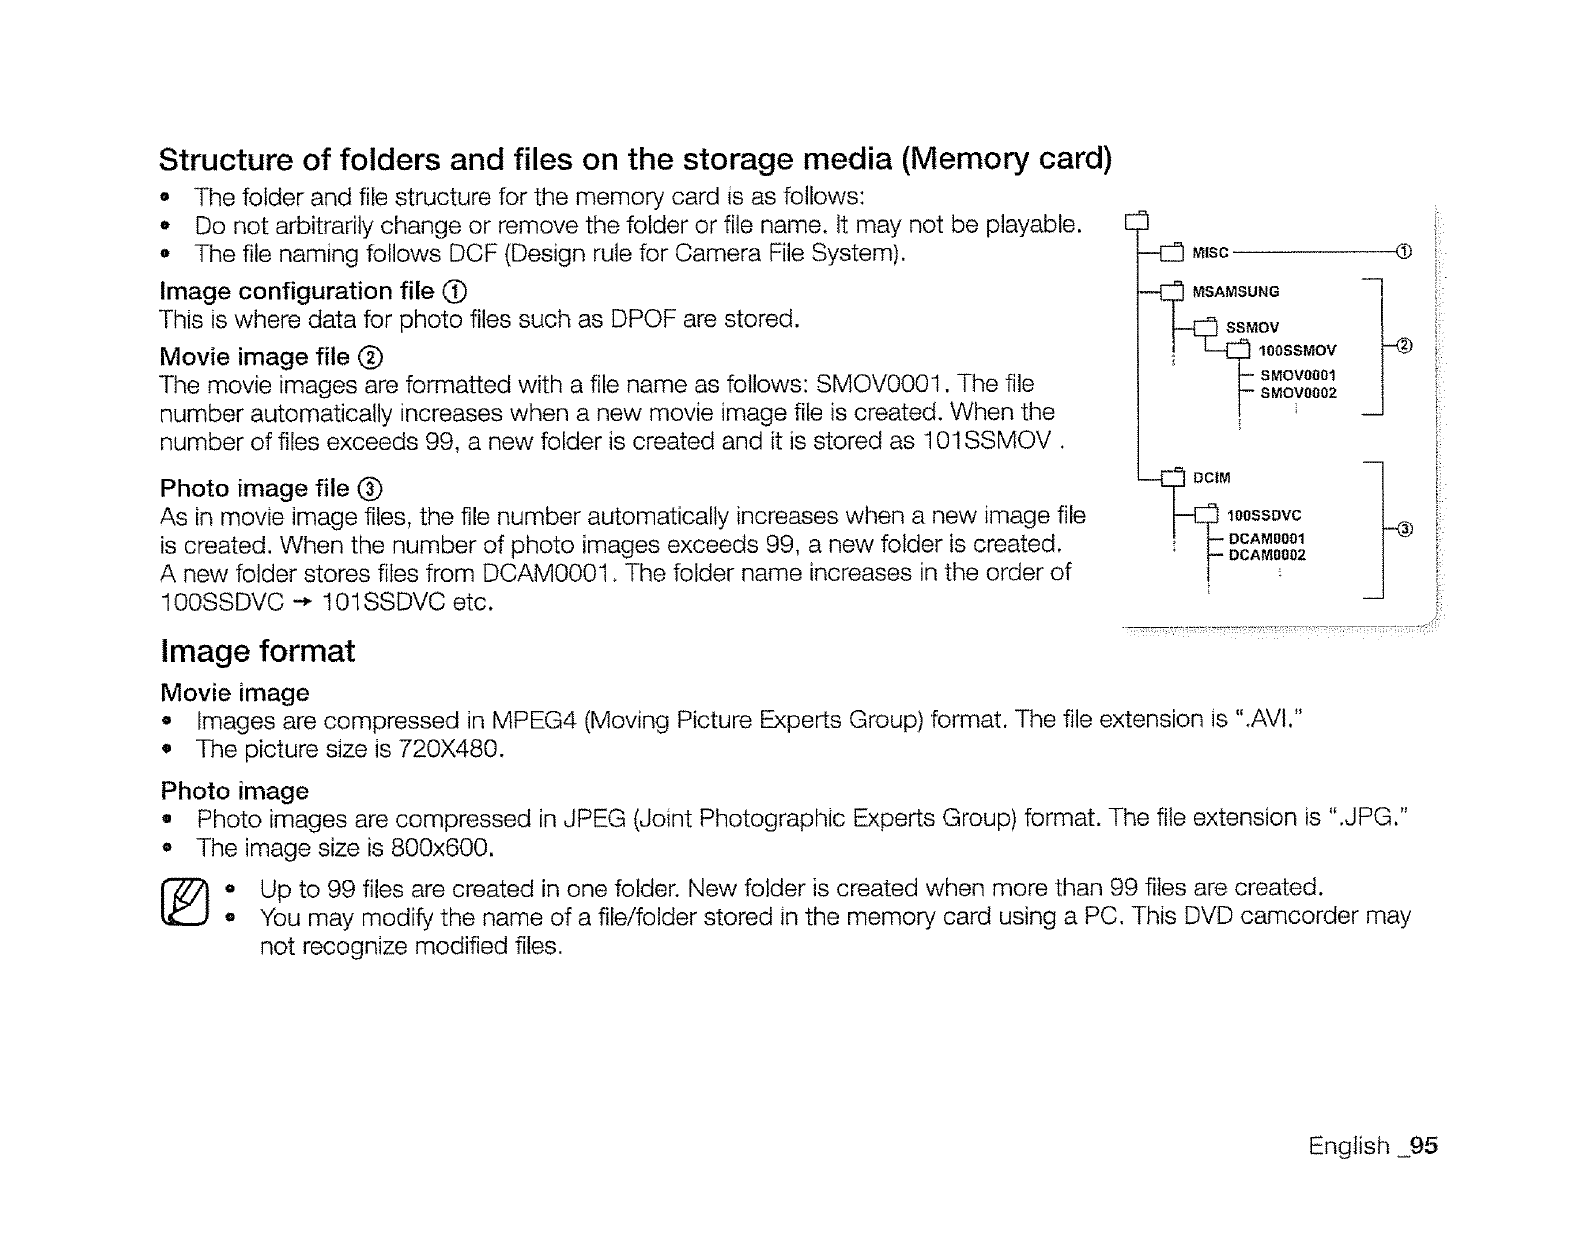
Structure of folders and files on the storage media (Memory card)
,, The folder and file structure for the memory card is as follows:
,, Do not arbitrarily change or remove the folder or file name. It may not be playable.
o The file naming follows DCF (Design rule for Camera File System).
Image configuration file (_
This is where data for photo files such as DPOF are stored.
Movie image file (_
The movie images are formatted with a file name as follows: SMOV0001. The file
number automatically increases when a new movie image file is created. When the
number of files exceeds 99, a new folder is created and it is stored as 101SSMOV.
Photo image file (_)
As in movie image files, the file number automatically increases when a new image file
is created. When the number of photo images exceeds 99, a new folder is created.
A new folder stores files from DCAM0001. The folder name increases in the order of
100SSDVC -* 101SSDVC etc.
Image format
Movie image
o
El
MSUNG
OV
100SSMOV
SMOV0001
SMOV0002
M
I00SSDVC
DCAM0001
;_DCAM0002
® i!¸¸
_b
Images are compressed in MPEG4 (Moving Picture Experts Group) format. The file extension is ".AVI."
The picture size is 720X480.
Photo image
• Photo images are compressed in JPEG (Joint Photographic Experts Group) format. The file extension is ".JPG."
,, The image size is 800x600.
oUp to 99 files are created in one folder. New folder is created when more than 99 files are created.
• You may modify the name of a file/folder stored in the memory card using a PC. This DVD camcorder may
not recognize modified files.
English 95
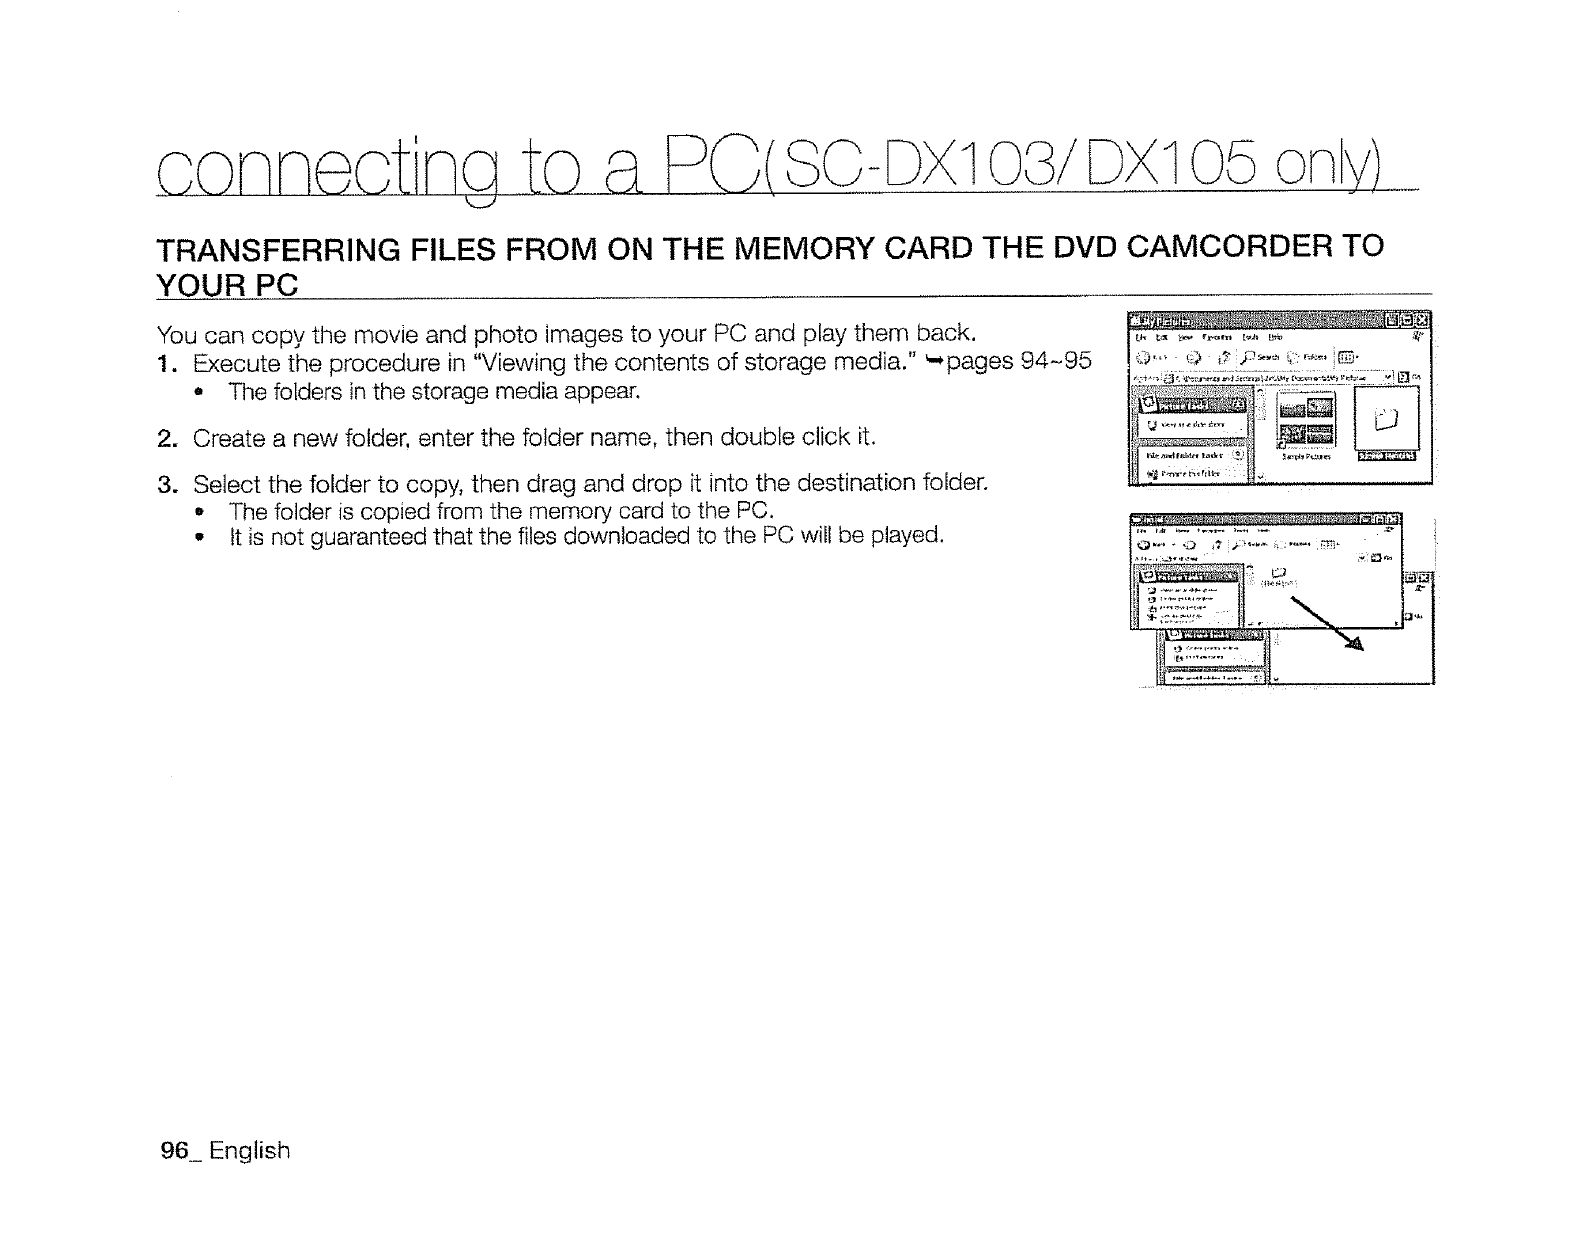
SO- 1
TRANSFERRING FILES FROM ON THE MEMORY CARD THE DVD CAMCORDER TO
YOUR PC
You can copy the movie and photo images to your PC and play them back.
1. Execute the procedure in "Viewing the contents of storage media." _pages 94-95
°The folders in the storage media appear.
2. Create a new folder, enter the folder name, then double click it.
3. Select the folder to copy, then drag and drop it into the destination folder.
•The folder is copied from the memory card to the PC.
° It Jsnot guaranteed that the files downloaded to the PC will be played.
NNI h_
,_,_,_,,
96_ English
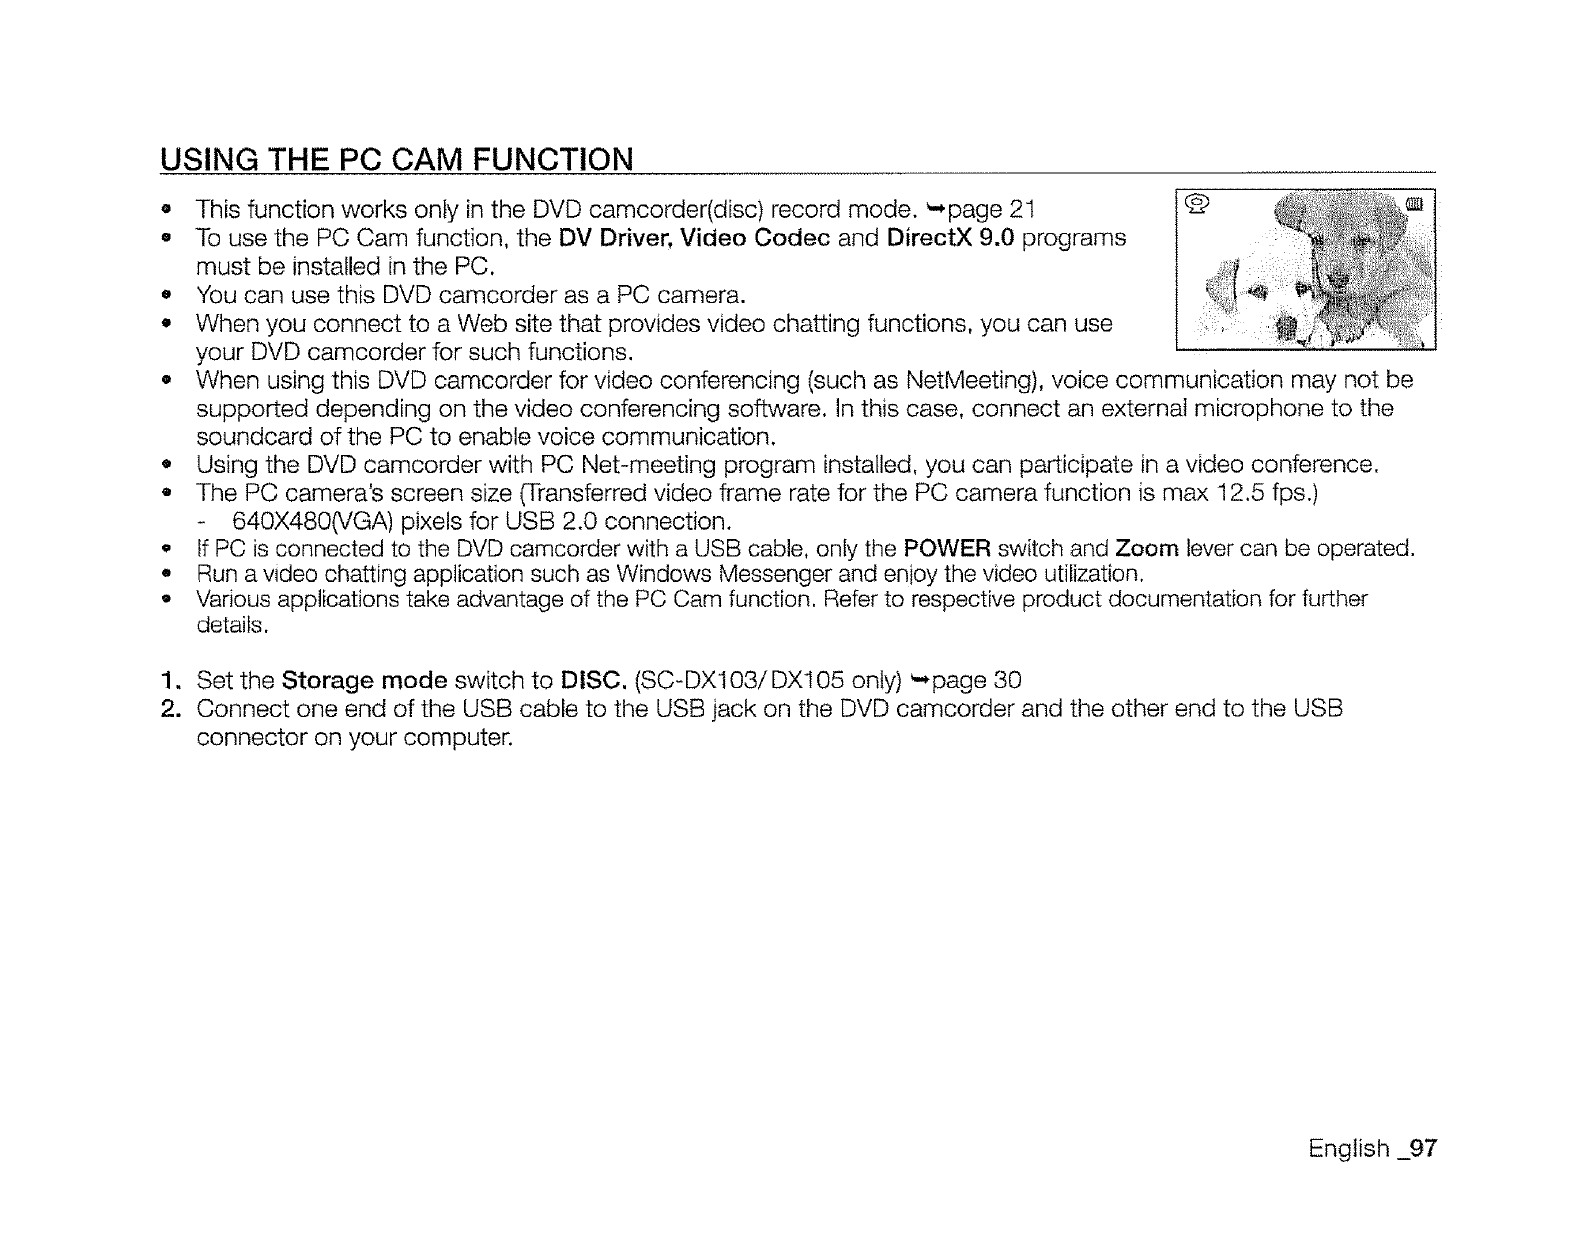
USING THE PC CAM FUNCTION
Q
Q
o
o
O
Q
o
Q
o
This function works only in the DVD camcorder(disc) record mode. '-,page 21 (2)
To use the PC Cam function, the DV Driver, Video Codec and DirectX 9.0 programs :
must be installed in the PC.
You can use this DVD camcorder as a PC camera.
When you connect to a Web site that provides video chatting functions, you can use
your DVD camcorder for such functions.
When using this DVD camcorder for video conferencing (such as NetMeeting), voice communication may not be
supported depending on the video conferencing software. In this case, connect an external microphone to the
soundcard of the PC to enable voice communication.
Using the DVD camcorder with PC Net-meeting program installed, you can participate in a video conference.
The PC camera's screen size (Transferred video frame rate for the PC camera function is max 12.5 fps.)
- 640X480(VGA) pixels for USB 2.0 connection.
If PC is connected to the DVD camcorder with a USB cable, only the POWER switch and Zoom lever can be operated.
Run a video chatting application such as Windows Messenger and enioy the video utilization.
Various applications take advantage of the PC Cam function, Refer to respective product documentation for further
details.
1. Set the Storage mode switch to DISC. (SC-DXl03/DX105 only) _,page 30
2. Connect one end of the USB cable to the USB jack on the DVD camcorder and the other end to the USB
connector on your computer.
English _97
MAINTENANCE
Your DVD camcorder is a product of superior design and craftsmanship and should be treated with care. The
suggestions below wilt help you fulfil any warranty obligations and allow you to enjoy this product for many years.
o For safekeeping of the DVD camcorder, turn off the DVD camcorder.
Remove the battery pack and AC power adaptor. _pages 16, 18
Remove the memory card and DVD disc. _pages 32, 52
Cautions when storing
• Do not leave the DVD camcorder in a place where the temperature is very high for a long period of time:
The temperature inside a closed vehicle or trunk can become very high in a hot season. If you leave the DVD
camcorder in such a place, it could malfunction or the case could be damaged. Do not expose the DVD
camcorder to direct sunlight or place it near a heater.
o Do not store the DVD camcorder in a place where the humidity is high or in a dusty place:
Dust entering the DVD camcorder could cause malfunctions. If humidity is high, the lens could become mouldy,
and the DVD camcorder could become inoperative. It is recommended that you put the DVD camcorder in a box
together with a small silica bag when storing it in a closet, etc.
o Do not store the DVD camcorder in a place subject to strong magnetism or intense vibration:
This could cause malfunctions.
- Detach the battery pack from the DVD camcorder and store it in a cool and dry place:
Leaving the battery pack attached or storing it at high temperatures could shorten its life.
Cleaning the DVD camcorder
•Before cleaning, turn off the DVD camcorder and remove the battery pack and AC power adaptor.
To clean the exterior
Wipe gently with a soft dry cloth. Do not apply excessive force when cleaning, gently rub the surface.
- Do not use benzene or a thinner to clean the camcorder. The coating of exterior could peel off or the case
could deteriorate.
To clean the LCD screen
Wipe gently with a soft dry cloth. Be careful not to damage the screen.
To clean the lens
Use an optional air blower to blow out dirt and other small objects. Do not wipe the lens with cloth or your finger.
tf necessary, wipe gently with lens cleaning paper.
- Mold may form if the lens is left dirty.
- If the lens looks dimmer, turn off the DVD camcorder and leave it for about 1 hour.
98 i English
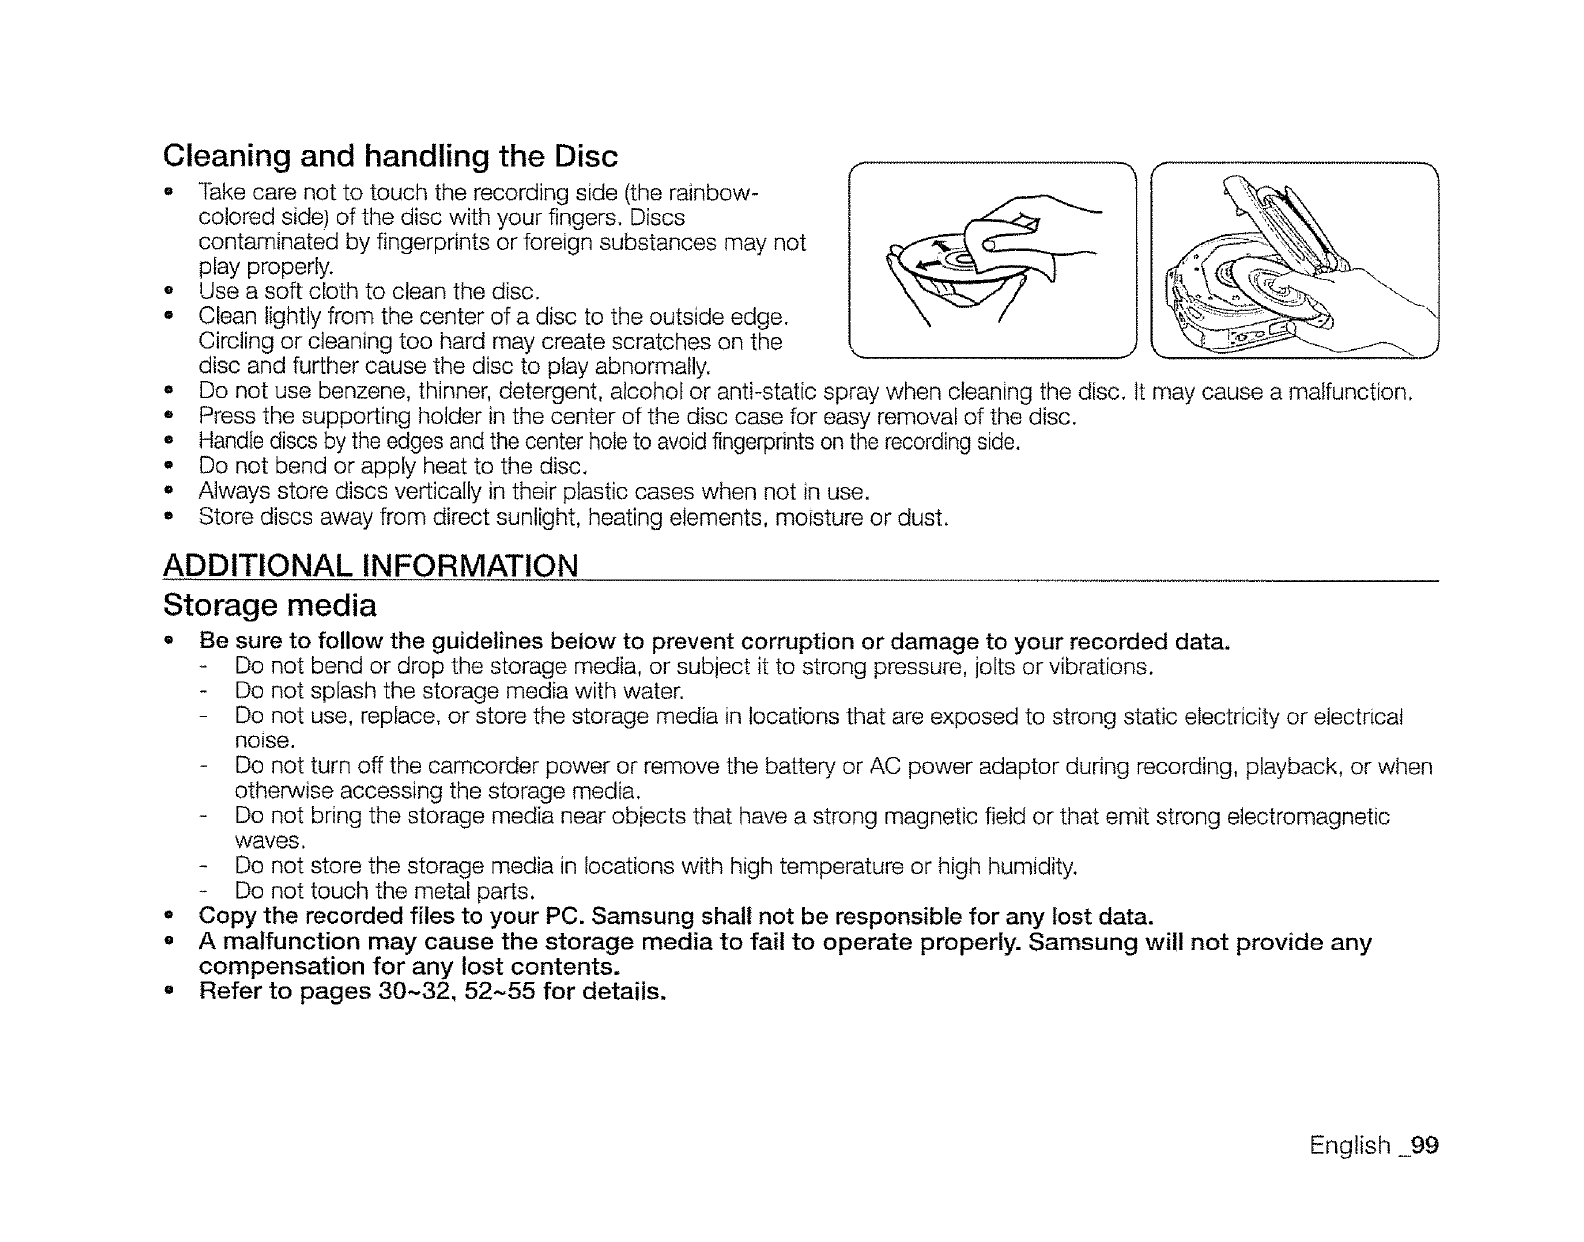
Cleaning and handling the Disc f
•Take care not to touch the recording side (the rainbow_ |
colored side) of the disc with your fingers. Discs
contaminated by fingerprints or foreign substances may not
play properly.
o Use a soft cloth to clean the disc.
,Clean lightly from the center of a disc to the outside edge.
Circling or cleaning too hard may create scratches on the
disc and further cause the disc to play abnormally.
o Do not use benzene, thinner, detergent, alcohol or anti-static spray when cleaning the disc. It may cause a malfunction,
• Press the supporting holder in the center of the disc case for easy removal of the disc.
• Handle discs by the edges and the center hole to avoid fingerprints on the recording side.
°Do not bend or apply heat to the disc.
•Always store discs vertically in their plastic cases when not in use.
o Store discs away from direct sunlight, heating elements, moisture or dust.
ADDITIONAL INFORMATION
Storage media
•Be sure to follow the guidelines below to prevent corruption or damage to your recorded data.
Do not bend or drop the storage media, or subject it to strong pressure, jolts or vibrations.
Do not splash the storage media with water.
Do not use, replace, or store the storage media in locations that are exposed to strong static electricity or electrical
noise.
Do not turn off the camcorder power or remove the battery, or AC power adaptor during recording, playback, or when
otherwise accessing the storage media.
Do not bring the storage media near objects that have a strong magnetic field or that emit strong electromagnetic
waves.
Do not store the storage media in locations with high temperature or high humidity.
Do not touch the metal parts.
oCopy the recorded files to your PC. Samsung shall not be responsible for any lost data.
• A malfunction may cause the storage media to fail to operate properly. Samsung will not provide any
compensation for any lost contents.
.Refer to pages 30~32, 52~55 for details.
English 99
[I ] I
LCD screen
• Do not leave the DVD camcorder in a place where the temperature is very high for a long period of time:
•To prevent damage to the LCD screen
Do not push it too hard or knock it on anything.
Do not place the camcorder with LCD screen on the bottom.
•To prolong service life, avoid rubbing it with a coarse cloth.
•Be aware of the following phenomena for LCD screen use. They are not malfunctions.
While using the camcorder, the surface around the LCD screen may heat up.
Ifyou leave power on for a long time, the surface around the LCD screen becomes hot.
Battery packs
When not using the DVD camcorder for an extended period:
It is recommended that you fully charge the battery pack once a year, attach it to the DVD camcorder and use it up; then remove
the battery pack and store it in a cool and dry place again.
The supplied battery pack is a lithium-ion battery, Before using the supplied battery pack or an optional battery pack, be sure to
read the following cautions:
o To avoid hazards
Do not burn.
Do not short-circuit the terminals. When transporting, carry the battery in a plastic bag.
Do not modify or disassemble.
Do not expose the battery to temperatures exceeding 60°C (140°F), as this may cause the battery to overheat, explode or
catch fire.
° To prevent damage and prolong service life
Do not subiect to unnecessary shock.
Charge in an environment where temperatures are within the tolerances shown as below.
This is a chemical reaction-type battery - cooler temperatures impede chemical reaction, while warmer temperatures can
prevent complete charging.
- Store in a cool, dry place. Extended exposure to high temperatures will increase natural discharge and shorten service life.
-Remove from charger or powered unit when not in use, as some machines use electric current even when switched off.
t_. It is recommended that only genuine Samsung batteries are used in this camcorder. Using generic non-Samsung batteries
can cause damage to the internal charging circuitry.
•It is normat for the battery pack to be warm after charging, or after use.
Temperature range specifications
Charging: 10°C to 35°C (50°F to 95°F), Operation: 0°C to 40°C (32°F to t04°F), Storage: -20°C to 50°C (-4°F to 122°F)
•The lower the temperature, the longer recharging takes.
• Referto pages 16-19 for details.
100_ English
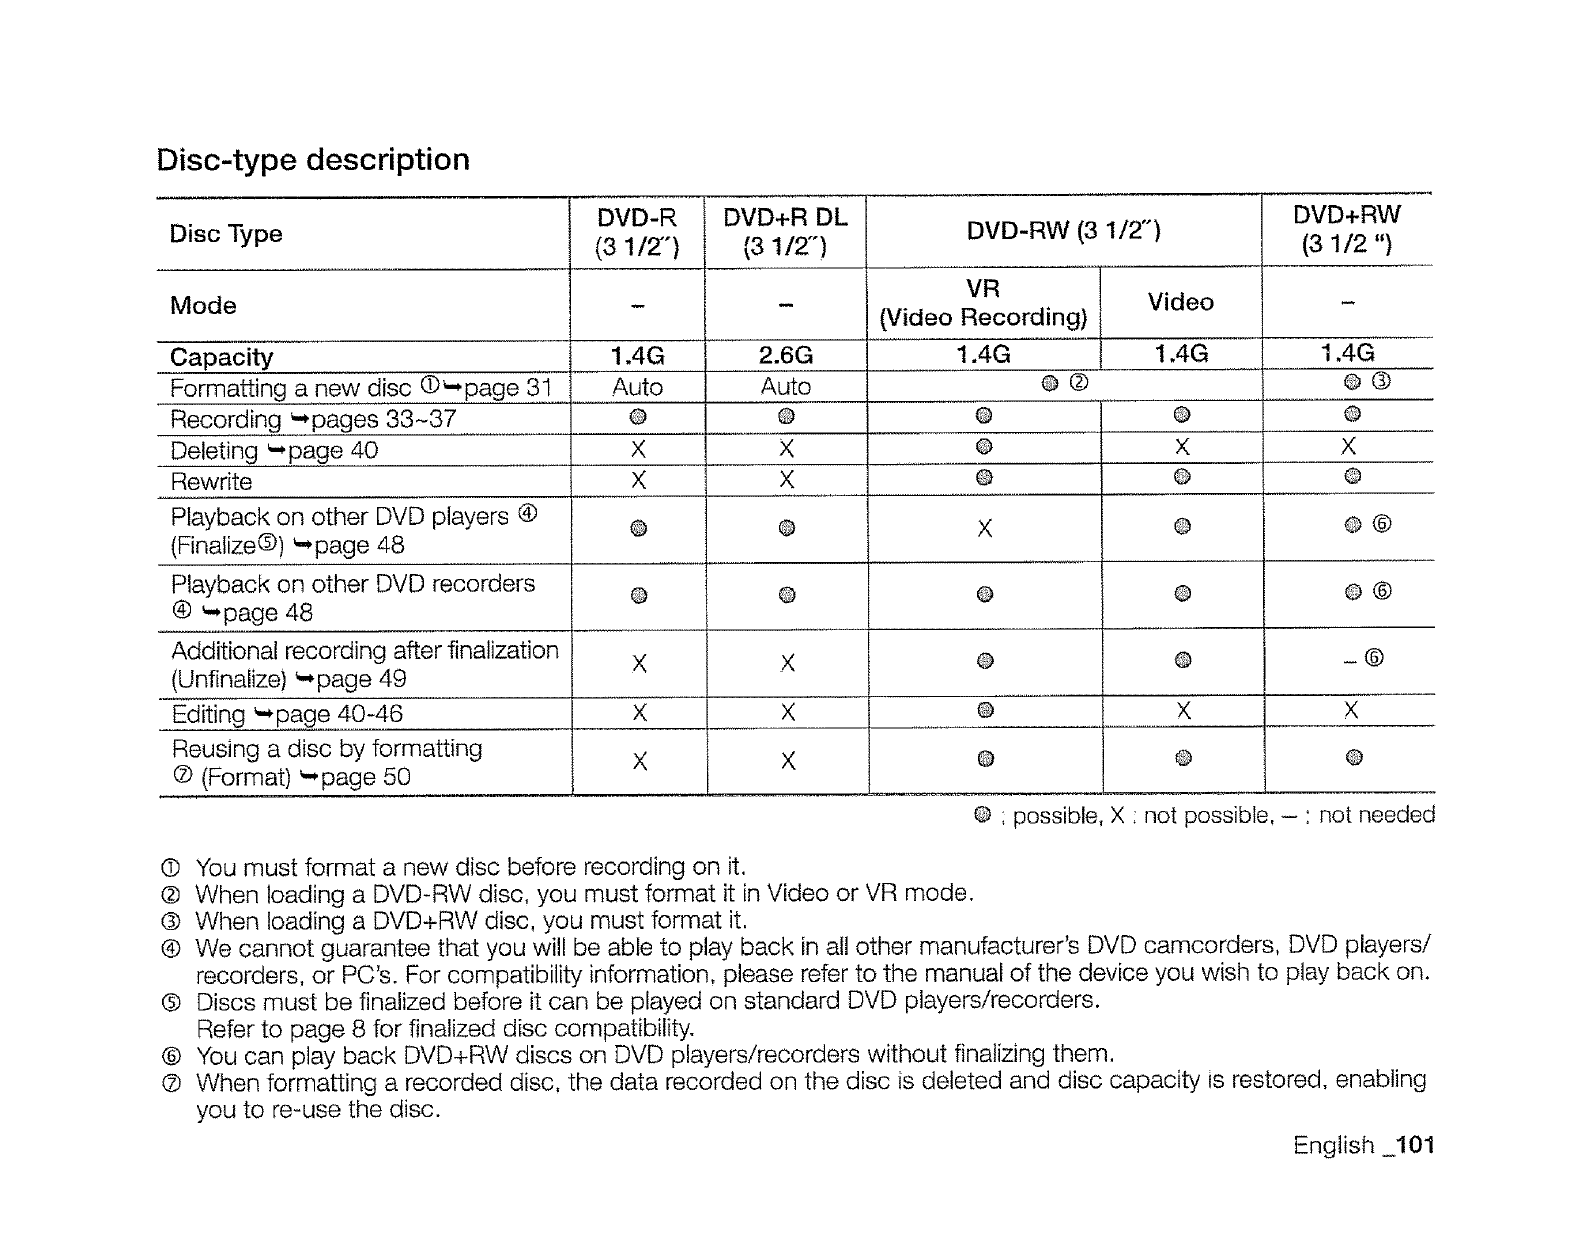
Disc-type description
Disc Type
Mode
Capacity
Formatting a new disc ©_page 31
Recording ._pages 33~37
Deleting _-.page 40
Rewrite
Playback on other DVD players (9
(Finalize®) _page 48
Playback on other DVD recorders
® _,,page 48
Additional recording after finalization
(Unfinalize) _page 49
Editing _page 40-46
Reusing a disc by formatting
(2) (Format) _-page 50
DVD-R
(3 1/2")
1,4G
Auto
@
X
X
®
®
X
X
X
DVD+R DL
(3 1/2-)
2.6G
Auto
@
X
X
@
@
X
X
X
DVD-RW (3 1/2")
Video
VR
(Video Recording)
1.4G
@®
@
@
@
i1,4G
X
@
@
X
@
@
@
DVD+RW
(3 1/2 ")
1,4G
@®
@
X
@
@®
®®
@ @ -®
@ X X
@ @ @
@ possible, X : not possible, - ° not needed
© You must format a new disc before recording on it,
® When loading a DVD-RW disc, you must format it in Video or VR mode.
® When loading a DVD+RW disc, you must format it,
(9 We cannot guarantee that you will be able to play back in all other manufacturer's DVD camcorders, DVD players/
recorders, or PC's. For compatibility information, please refer to the manual of the device you wish to play back on.
® Discs must be finalized before it can be played on standard DVD players/recorders.
Refer to page 8 for finalized disc compatibility.
® You can play back DVD+RW discs on DVD players/recorders without finalizing them.
® When formatting a recorded disc, the data recorded on the disc is deleted and disc capacity ts restored, enabling
you to re-use the disc.
English _101
, a'nten ce & additional information
USING YOUR DVD CAMCORDER ABROAD
• Each country or region has its own electric and color systems.
• Before using your DVD camcorder abroad, check the following items.
• Power sources
The provided AC power adaptor features automatic voltage selection in the AC range from 100 V to 240 V.
You can use your camcorder in any countries/regions using the AC power adaptor supplied with your camcorder
within the AC 100 V to 240 V, 50/60 Hz range. Use a commercially available AC plug adaptor, if necessary,
depending on the design of the walt outlet.
• On TV color systems
Your camcorder is an NTSC-system-based camcorder.
If you want to view your recordings on a TV or to copy it to an external device, it must be an NTSC-system-based TV or
an external device and have the appropriate Audio/Video jacks. Otherwise, you may need to use a separate video format
transcoder (NTSC-PAL format converter).
o
o
NTSC-compatible countries/regions
Bahamas, Canada, Central America, Japan, Korea, Mexico, Philippines, Taiwan, United States of America, etc.
PAL-compatible countries/regions
Australia, Austria, Belgium, Bulgaria, China, CIS, Czech Republic, Denmark, Egypt, Finland, France, Germany,
Greece, Great Britain, Netherlands, Hong Kong, Hungary, india, lran, Iraq, Kuwait, Libya, Malaysia, Mauritius,
Norway, Romania, Saudi Arabia, Singapore, Slovak Republic, Spain, Sweden, Switzerland, Syria, Thailand,
Tunisia, etc.
102_ English
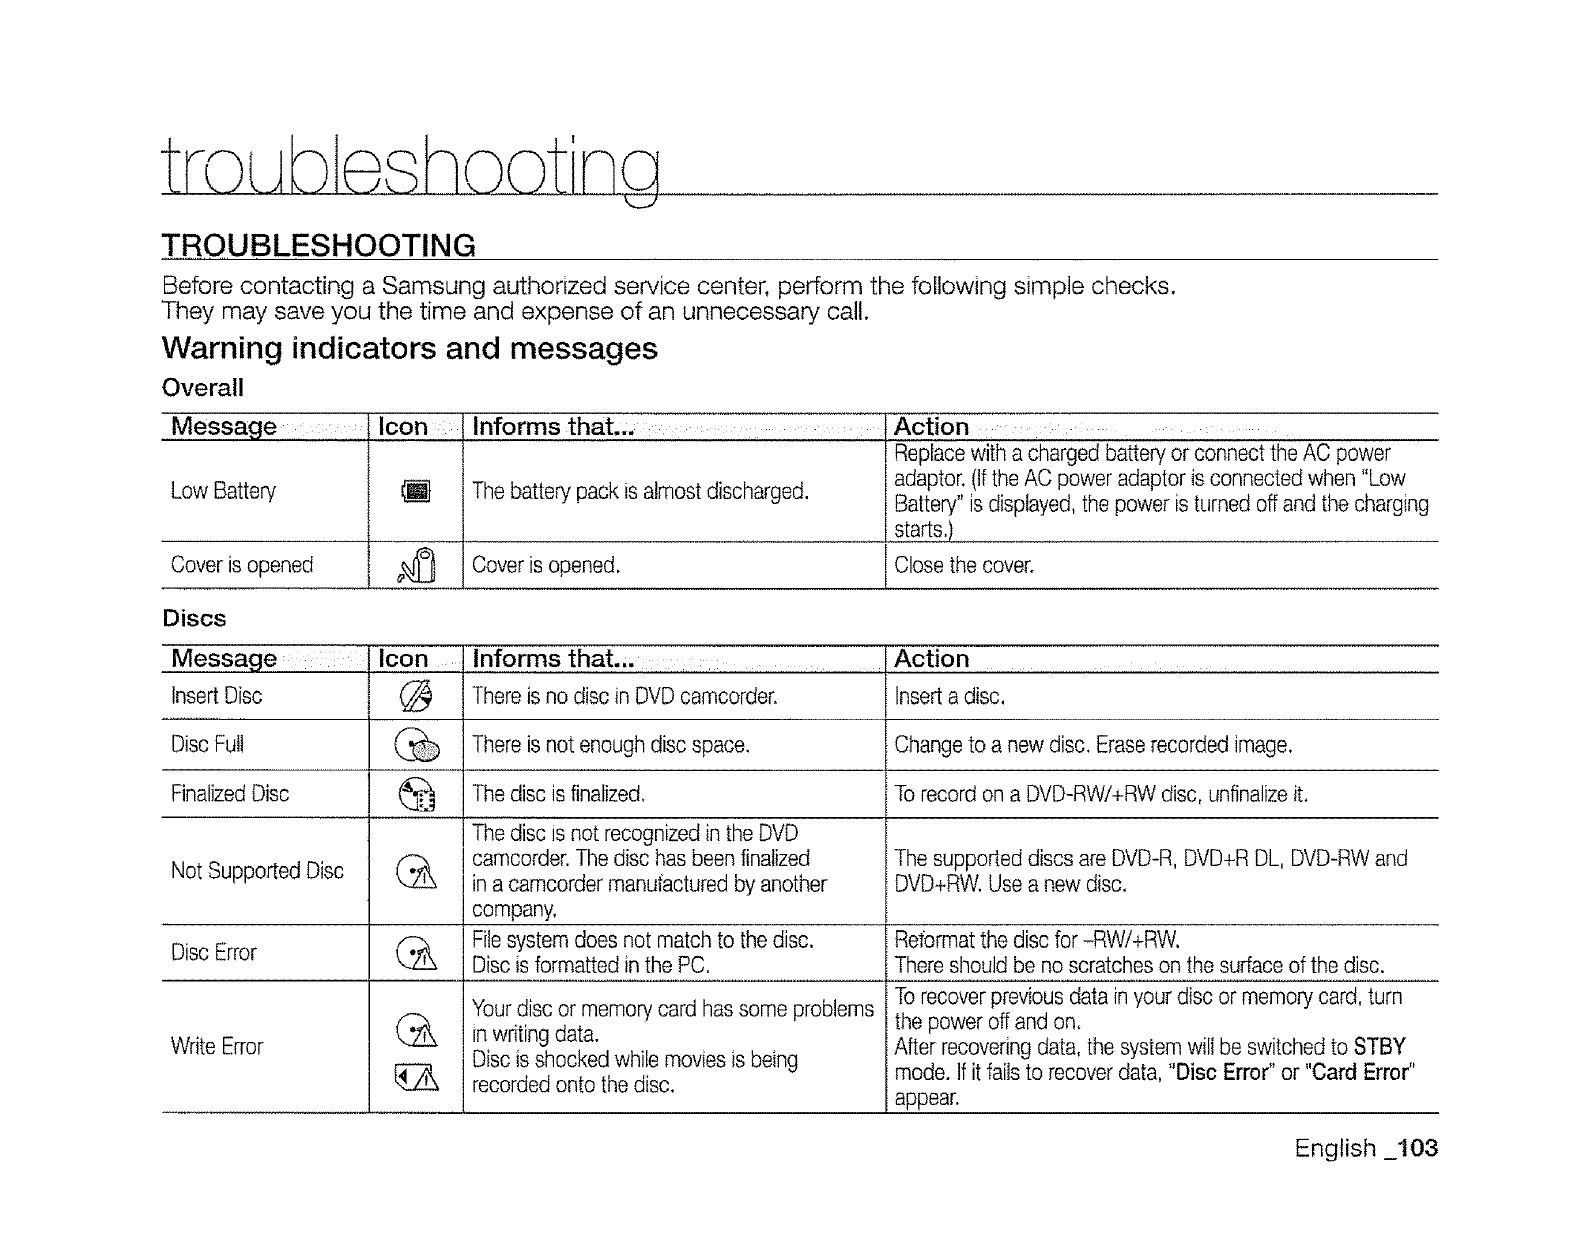
troubleshooting
TROUBLESHOOTING
Before contacting a Samsung authorized service center, perform the following simple checks.
They may save you the time and expense of an unnecessary call.
Warning indicators and messages
Overall
Low Battery
Cover is opened
Icon Informs that.,, : Action
Repacew th a chargedbakeryorconnectthe ACpower
Thebatterypackisalmostdischarged, adaptor,(IftheAC poweradaptorisconnectedwhen"Low
Battery"is displayed,the poweristurnedoff andthecharging
starts,)............................................
Coveris opened. Closethe cover.
Discs
Message .... Icon informs that.., ..... Action ..........
InsertDisc (_ There is no disc in DVD camcorder. Inserta disc,
Disc Full % There is not enough disc space. Change to a new disc. Eraserecorded image.
FinalizedDisc _ The disc is finalized. To record on a DVD-RW/+RW disc, unfinalizeit.
The disc is not recognizedin the DVD
camcorder.The disc has been finalized The supported discs are DVD-R, DVD+R DL, DVD-RWand
NotSupported Disc in a camcorder manufactured by another DVD+RW.Usea new disc.
company,
Disc Error Filesystem does not match to the disc.
Disc is formatted in the PC.
Write Error
(&
Your disc or memory card has some problems
in writing data.
Disc is shocked while moviesis being
recordedonto the disc.
Aetormatthe disc for -RWi+RW.
There should be no scratches on the surfaceof the disc.
To recover previousdata in your disc or memory card, turn
the power off and on.
After recoveringdata, the system will be switched to STBY
mode. If it fails to recover data, "Disc Error" or "Card Error"
appear.
English _103
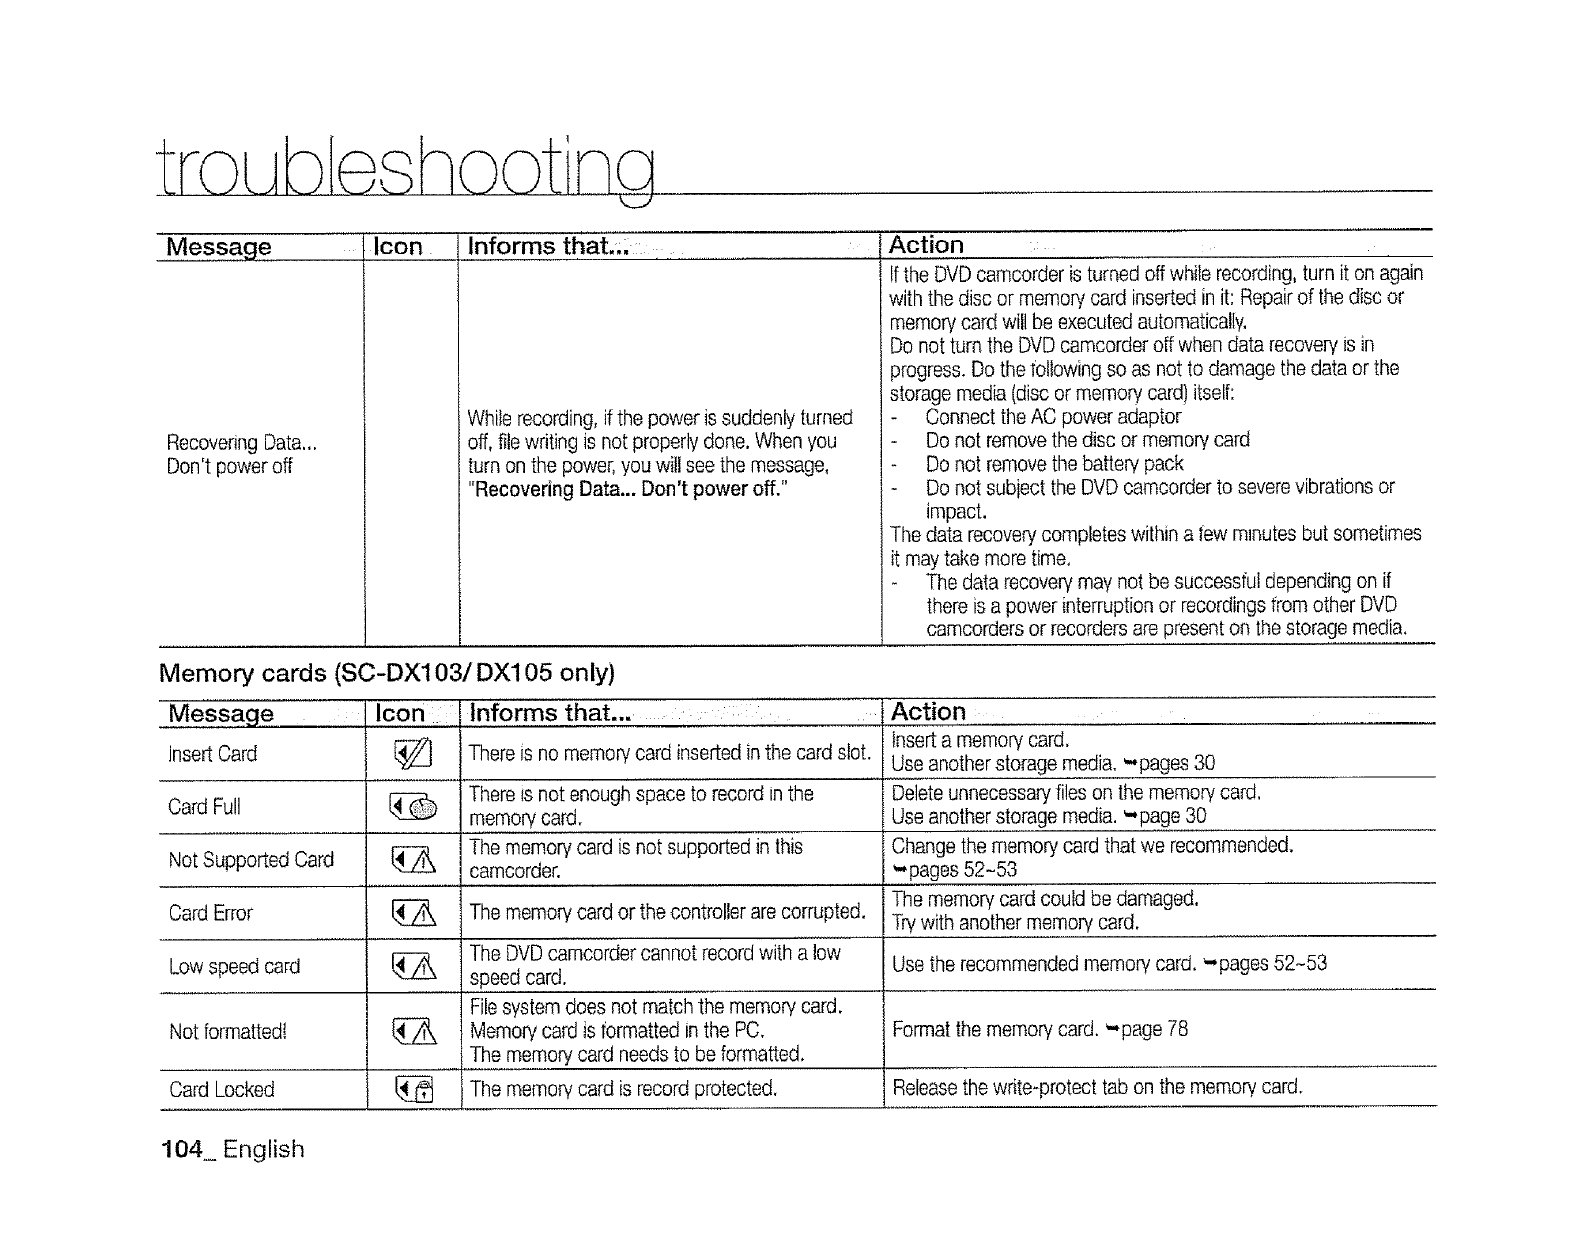
tro bl sh g
Mes_ag e.............icon Informs that.i; ..............
Recovering Data,,.
Don't power off
While recording, if the power is suddenly turned
off, file writing is not properly done, When you
turn on the power, you will see the message,
"Recovering Data... Don't power off."
Action
If theDvD camcordeiiS turned off while recording, turn it on again
with the disc or memory card inserted in it: Repair of the disc or
memory card will be executed automatically,
t Do not turn the DVD camcorder off when data recovery is in
progress. Do the following so as not to damage the data or the
storage media (disc or memory card) itself:
- Connect the AC power adaptor
Do not remove the disc or memory card
Do not remove the battery pack
Do not subiect the DVD camcorder to severe vibrations or
impact.
The data recovery completes within a few m_nutesbut sometimes
it may take more time.
The data recovery may not be successful depending on if
there is a power interruption or recordings from other DVD
camcorders or recorders are present on the storage media.
Memory cards (SC-DX103/DX105 only)
Message Icon Informs that... :
Insert Card
Card Full
Not Supported Card
Card Error
Low speed card
Not formatted!
Card Locked
There is no memory card inserted in the card slot.
There is not enoughspace {o record in the
memory card.
The memory card is not supported in this
camcorder.
The memory card or the controller are corrupted.
Action ........................
insert a memory card,
Use another storage media. -pages 30
Delete unnecessary files on the memory card.
Use ano!h,e[,,s!0ragemedia. -page 30
Change the memory card that we recommended.
-pages 52-53
The memory card could be damaged.
Trywith another memory card.
The DVDcamcorder cannot record with a low
speed card.
Filesystem does not match the memory card.
Memory card is formatted in the PC.
The memory card needs to be formatted.
The memory card is record protected.
Use the recommended memory card. '..pages 52-53
Format the memory card. '.-page 78
Releasethe write-protect tab on the memory card.
104_ English
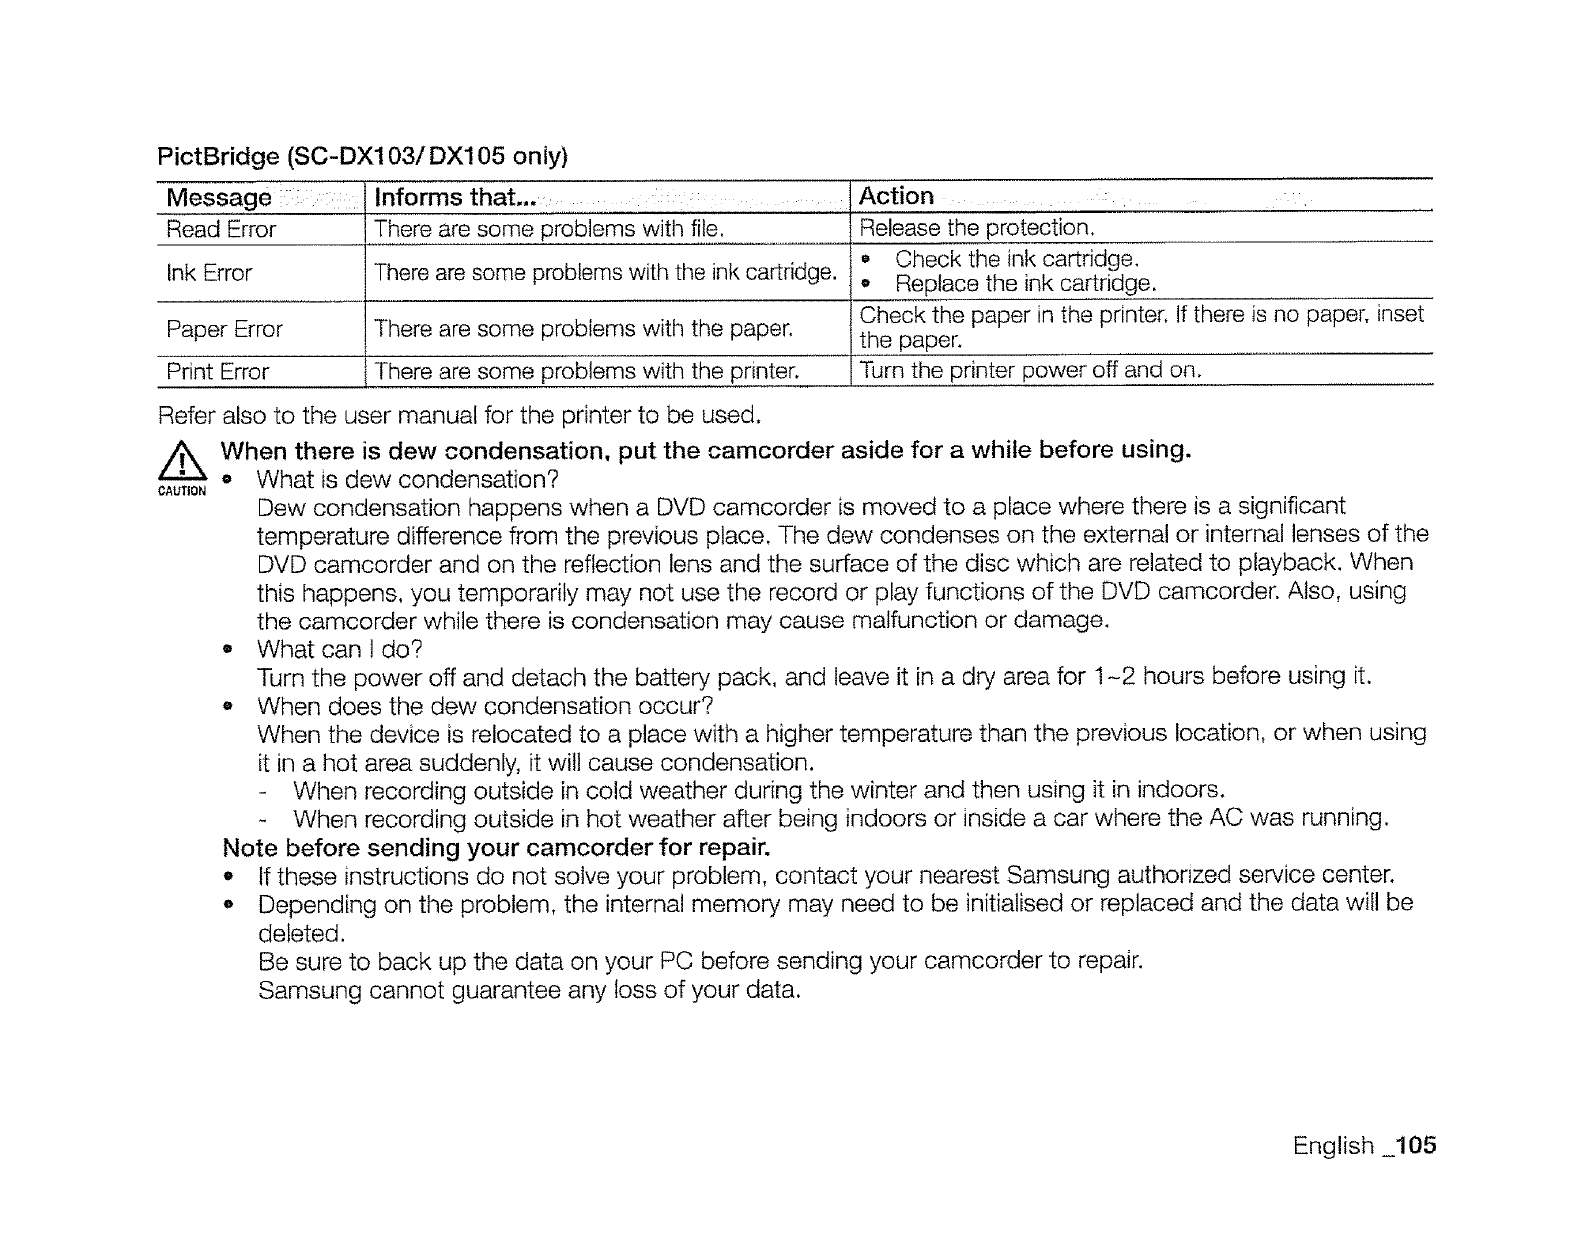
PictBridge (SC-DX103/DX105 only)
Message : Informs that... ....
Read Error
Ink Error
Paper Error
Print Error
There are some problems with file.
There are some problems with the ink cartridge.
There are some problems with the paper.
There are some problems with the printer.
Action
Release the protection.
• Check the ink cartridge.
• Replace the ink cartridge.
Check the paper in the printer. If there is no paper; inset
the paper.
Turn the printer power off and on.
Refer also to the user manual for the printer to be used.
//_ When there is dew condensation, put the camcorder aside for a while before using.
° What is dew condensation?
CAUTION Dew condensation happens when a DVD camcorder is moved to a place where there is a significant
temperature difference from the previous place. The dew condenses on the external or internal lenses of the
DVD camcorder and on the reflection lens and the surface of the disc which are related to playback. When
this happens, you temporarily may not use the record or play functions of the DVD camcorder. Also, using
the camcorder while there is condensation may cause malfunction or damage.
• What can l do?
Turn the power off and detach the battery pack, and leave it in a dry area for 1-2 hours before using it.
o When does the dew condensation occur?
When the device is relocated to a place with a higher temperature than the previous location, or when using
it in a hot area suddenly, it will cause condensation.
When recording outside in cold weather during the winter and then using it in indoors.
When recording outside in hot weather after being indoors or inside a car where the AC was running.
Note before sending your camcorder for repair.
- If these instructions do not solve your problem, contact your nearest Samsung authorized service center.
e Depending on the problem, the internal memory may need to be initialised or replaced and the data wit! be
deleted.
Be sure to back up the data on your PC before sending your camcorder to repair.
Samsung cannot guarantee any loss of your data.
English 105
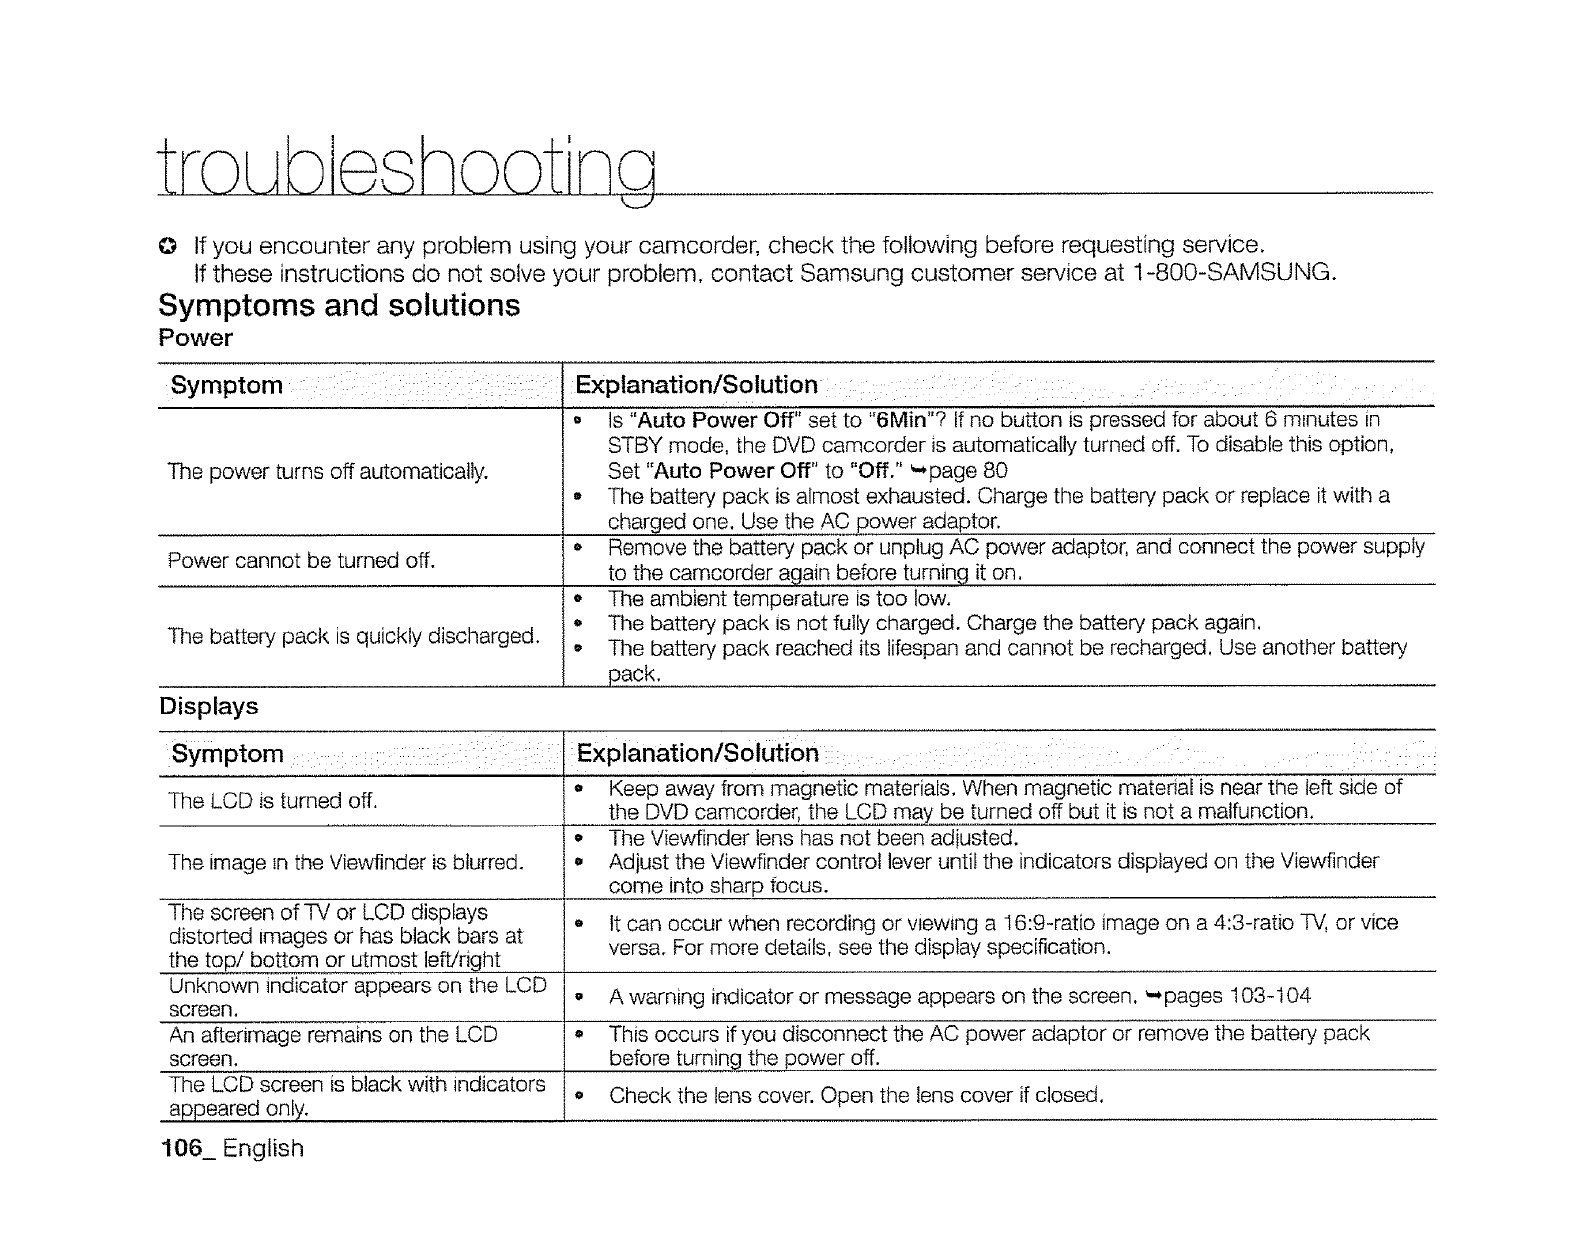
O If you encounter any problem using your camcorder, check the following before requesting service.
If these instructions do not solve your problem, contact Samsung customer service at 1-800-SAMSUNG.
Symptoms and solutions
Power
Symptom :: :i
The power turns off automatically.
Power cannot be turned off.
The battery pack is quickly discharged.
Displays
Explanation/Solution: : : ::: :
o ls "Auto Power Off" set to "6Min"? If no button is pressed for about 6 minutes in
STBY mode, the DVD camcorder is automatically turned off. To disable this option,
Set "Auto Power Off" to "Off." _page 80
•The battery pack is almost exhausted. Charge the battery pack or replace it with a
charged one. Use the AC power adaptor.
• Remove the battery pack or unplug AC power adaptor, and connect the power supply
to the camcorder again before turning it on,
o The ambient temperature is too low.
oThe battery pack is not fully charged. Charge the battery pack again.
•The battery pack reached its lifespan and cannot be recharged, Use another battery
pack.
Symptom : :: :
The LCD is turned off.
The image in the Viewfinder is blurred.
The screen of TV or LCD displays
distorted images or has black bars at
the top/bottom or utmost left!right
Unknown indicator appears on the LCD
screen.
An afterimage remains on the LCD
screen.
The LCD screen is black with indicators
appeared only.
Explanation/Solution: : :i
o Keep away from magnetic materials. When magnetic material is near the left side of
the DVD camcorder, the LCD may be turned off but it is not a malfunction.
•The Viewfinder lens has not been adiusted.
o Adjust the Viewfinder control lever until the indicators displayed on the Viewfinder
come into sharp focus.
• tt can occur when recording or v_ew_ng a 16:9-ratio image on a 4:3-ratio -IV.. or vice
versa. For more details, see the display specification,
o A warning indicator or message appears on the screen, _pages 103-104
°This occurs if you disconnect the AC power adaptor or remove the battery pack
before turningthe power off.
oCheck the lens cover. Open the lens cover if closed.
106_ English
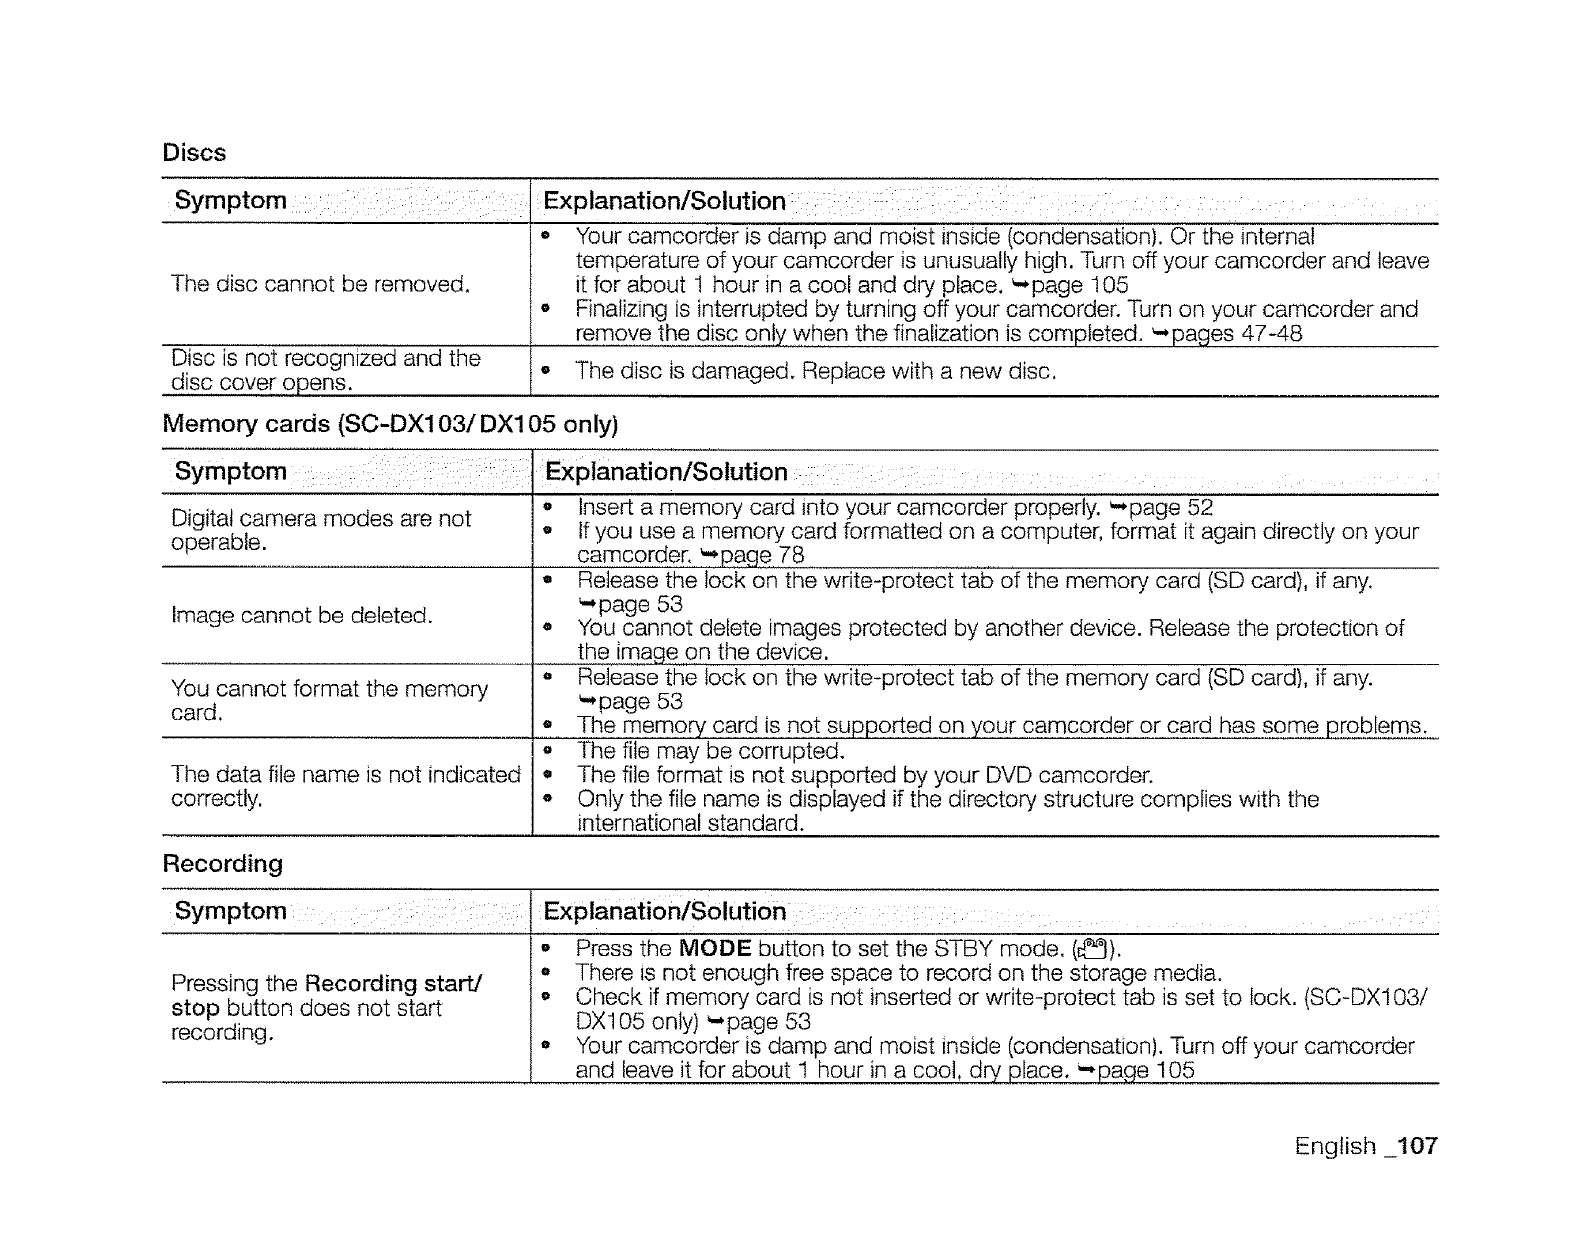
Discs
Symptom : ::: : :i ::
The disc cannot be removed.
Discis not recognizedand the
disc cover opens.
Exr
oYour camcorder is damp and moist inside (condensation). Or the internal
temperature of your camcorder is unusually high. Turn off your camcorder and leave
it for about 1 hour in a cool and dry place. '-page 105
Finalizing is interrupted by turning off your camcorder. Turn on your camcorder and
remove the disc only when the finalization is completed. '-,pages 47-48
-The disc is damaged. Replace with a new disc.
Memory cards (SC-DX103/DX105 only)
......... ].....
Symptom : : Explanation/Solution
Digital camera modes are not , Insert a memory card into your camcorder properly. '-page 52
operable. , If you use a memory card formatted on a computer, format it again directly on your
camcorder. _page 78
•Release the lock on the write-protect tab of the memory, card (SD card), if any.
Image cannot be deleted. _,page 53
•You cannot delete images protected by another device. Release the protection of
the imag _ on the device.
o Release the lock on the write-protect tab of the memory card (SD card), if any.
You cannot format the memory "*page 53
card. °The memory card is not supported on your camcorder or card has some problems.
o The file may be corrupted.
The data file name is not indicated • The file format is not supported by your DVD camcorder.
correctly, o Only the file name is displayed if the directory structure complies with the
international standard.
Recording
Symptom i
Pressing the Recording start/
stop button does not start
recording.
Explanation/Solution : : : :
°
o
°
Press the MODE button to set the STBY mode. (_:_}).
There is not enough free space to record on the storage media.
Check if memory card is not inserted or write-protect tab is set to lock. (SC-DX103/
DX105 only) _-page 53
Your camcorder is damp and moist inside (condensation). Turn off your camcorder
and leave it for about 1 hour in a cool, dry, place. -page 105
English _107
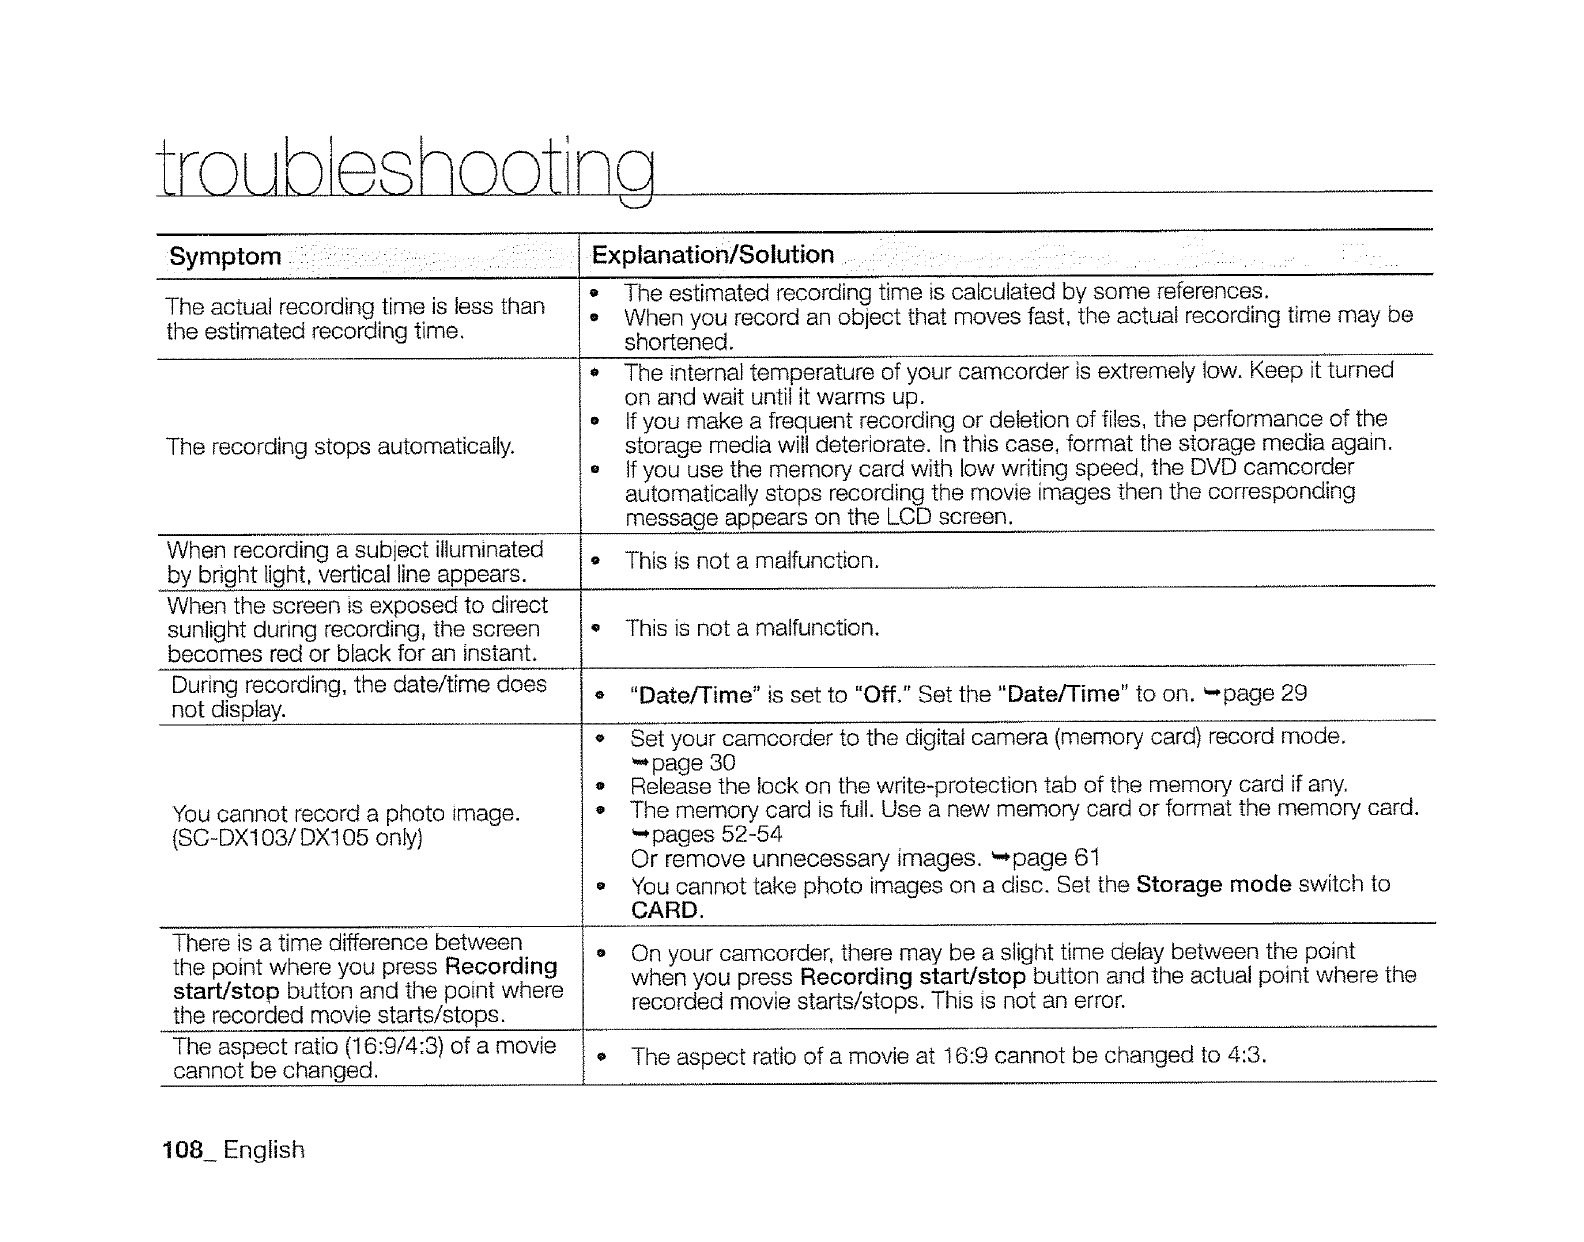
troubleshootine
k_J
Symptom ::; : Explanation/Solution ..... :: :
The actual recording time is less than
the estimated recording time.
The recording stops automatically.
• The estimated recording time is calculated by some references.
• When you record an object that moves fast, the actual recording time may be
shortened.
The internal temperature of your camcorder is extremely low. Keep it turned
on and wait until it warms up.
• If you make a frequent recording or deletion of files, the performance of the
storage media will deteriorate. In this case, format the storage media again.
o tf you use the memory card with low writing speed, the DVD camcorder
automatically stops recording the movie images then the corresponding
message appears on the LCD screen.
When recording a subject illuminated o This is not a malfunction.
by bright light, vertical line appears.
When the screen is exposed to direct
sunlight during recording, the screen • This is not a malfunction.
becomes red or black for an instant.
During recording, the date/time does • "Date/Time" is set to "Off." Set the "Date/Time" to on. _page 29
not display.
You cannot record a photo image.
(SC-DX103/DX105 only)
o
ti
o
Set your camcorder to the digital camera (memory card) record mode.
_, page 30
Release the lock on the write-protection tab of the memory card if any.
The memory card is full. Use a new memory card or format the memory card.
'-*pages 52-54
Or remove unnecessary images. '-*page 61
You cannot take photo images on a disc. Set the Storage mode switch to
CARD.
o
There is a time difference between . On your camcorder, there may be a slight time delay between the point
the point where you press Recording when you press Recording start/stop button and the actual point where the
start]stop button and the point where
the recorcted movie starts/stops, recorded movie starts/stops. This is not an error.
The aspect ratio (16:9/4:3) of a movie .The aspect ratio of a movie at I6:9 cannot be changed to 4:3.
cannot be changed.
108 English
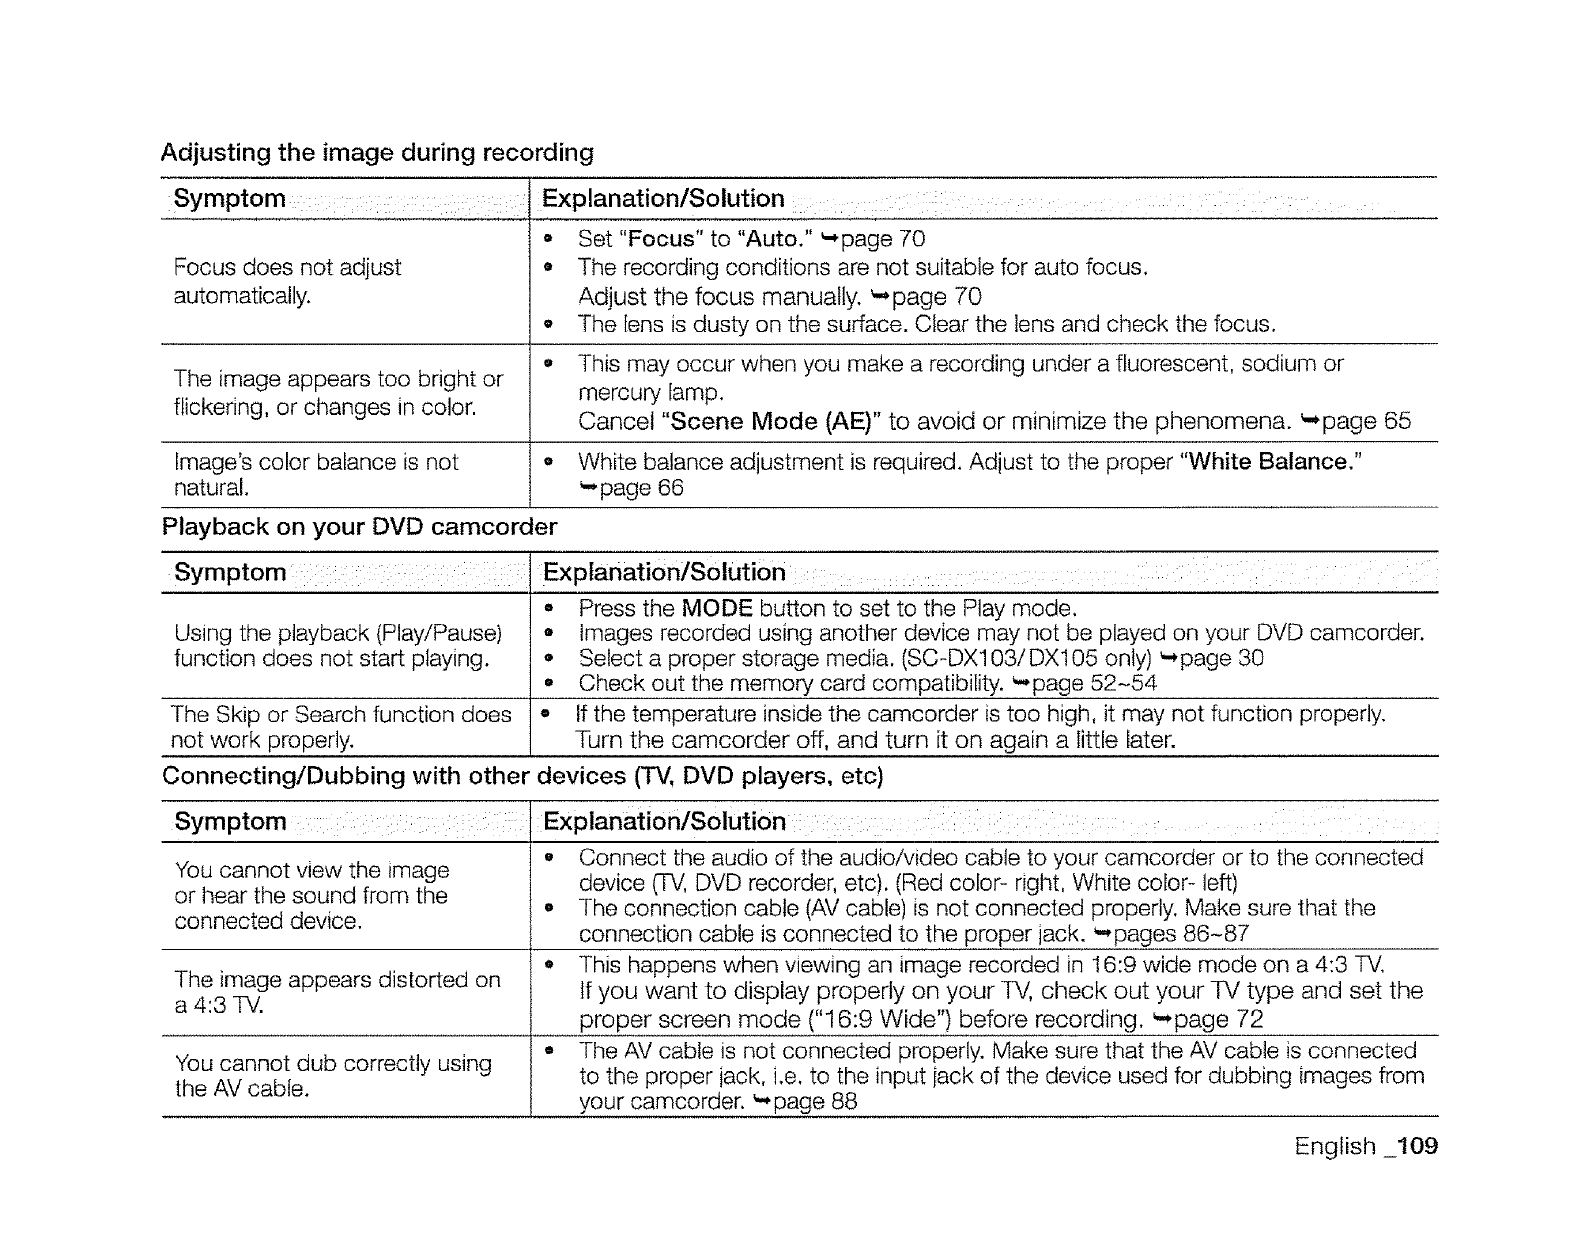
Adjusting the image during recording
Explanation/Solution _: i : :_ .....
• Set "Focus" to "Auto." -page 70
Focusdoes not adjust o The recordingconditions are not suitablefor auto focus.
automatically. Adjust the focus manually. _page 70
• The lens is dusty on the surface.Clearthe lensand check the focus.
o This may occur when you make a recording undera fluorescent,sodium or
The image appearstoo bright or mercurylamp.
flickering,or changes incolor. Cancel "Scene Mode (AE)" to avoid or minimize the phenomena. _page 65
Image'scolor balanceis not ,, White balanceadjustment is required.Adjustto the proper "White Balance."
natural. _page 66
Playback on your DVD camcorder
Symptom: :i :: : ....
. Press the MODE button to set to the Play mode.
Using the playback (Play/Pause) • Images recorded using another device may not be played on your DVD camcorder.
function does not start playing. ° Select a proper storage media. (SC-DX103/DX105 only) '-*page 30
• Check out the memory card compatibility. _page 52-54
The Skip or Search function does ,, If the temperature inside the camcorder is too high, it may not function properly.
not work properly. Turn the camcorder off, and turn it on again a little later.
Connecting/Dubbing with other devices (TV, DVD players, etc)
Symptom :Explanation/Solution: [ : ; ....
, Connect the audio of the audio/video cable to your camcorder or to the connected
You cannot view the image device (TV, DVD recorder, etc). (Red color- right, White color- left)
or hear the sound from the o The connection cable (AV cable) is not connected properly. Make sure that the
connected device. connection cable is connected to the proper jack. _',pages 86-87
• This happens when viewing an image recorded in 16:9 wide mode on a 4:3 TV,
The image appears distorted on if you want to display properly on your TV, check out your TV type and set the
a 4:3 TV. proper screen mode ("16:9 Wide") before recording. _page 72
You cannot dub correctly using • The AV cable is not connected properly. Make sure that the AV cable is connected
the AV cable, to the proper jack, i.e. to the input iack of the device used for dubbing images from
your camcorder. _page 88
English _109
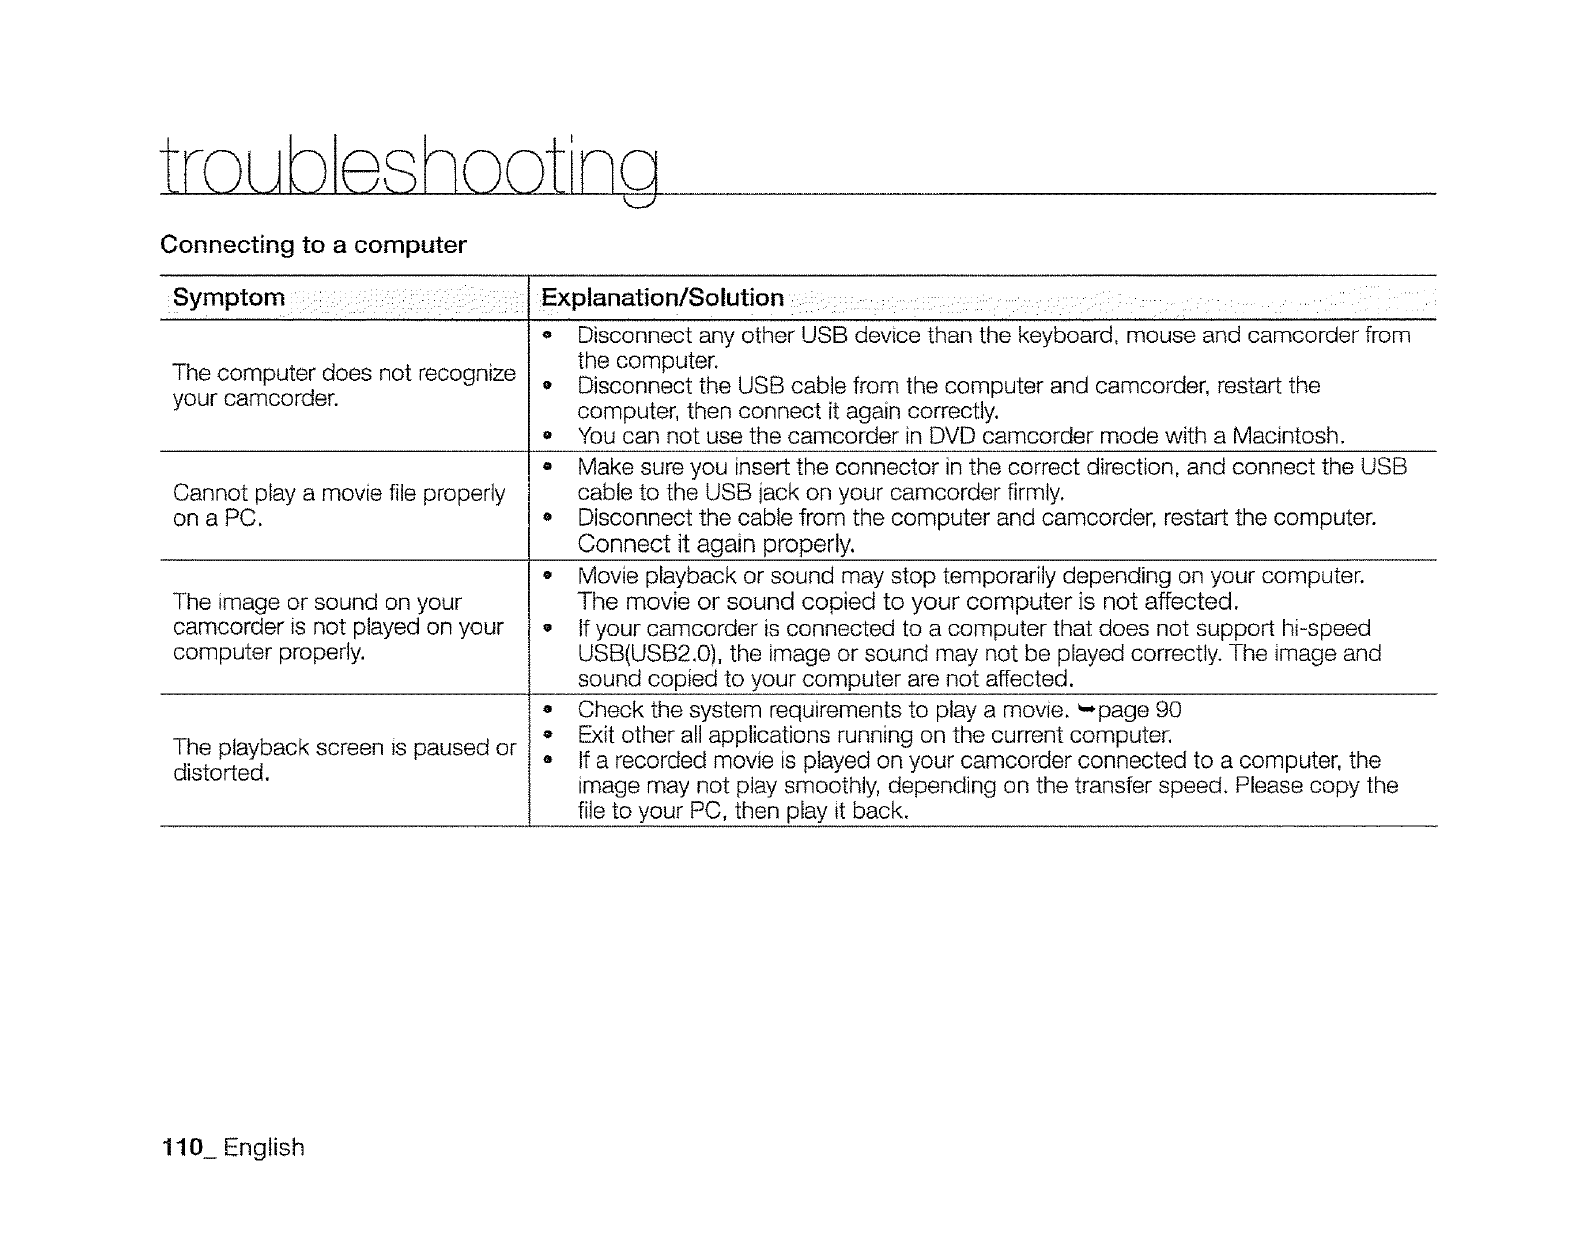
Connecting to a computer
Symptom i
Thecomputer does not recognize
your camcorder.
Cannot play a movie file properly
on a PC,
The imageor sound on your
camcorder is not playedon your
computer properly.
The playbackscreenis pausedor
distorted.
o Disconnectany other USB devicethan the keyboard, mouse and camcorder from
the computer.
• Disconnectthe USBcable from the computer and camcorder,restartthe
computer,then connect it againcorrectly.
oYou can not use the camcorder in DVD camcorder mode with a Macintosh.
• Make sure you insert the connector in the correct direction, and connect the USB
cable to the USB jack on your camcorder firmly.
o Disconnect the cable from the computer and camcorder, restart the computer.
Connect it again properly.
• Movie playback or sound may stop temporarily depending on your computer.
The movie or sound copied to your computer is not affected.
• If your camcorder is connected to a computer that does not support hi-speed
USB(USB2.0), the image or sound may not be played correctly. The image and
sound copied to your computer are not affected.
° Check the system requirements to play a movie. _page 90
o Exit other all applications running on the current computer.
o If a recorded movie is played on your camcorder connected to a computer, the
image may not play smoothly, depending on the transfer speed. Please copy the
file to your PC, then play it back.
110_ English
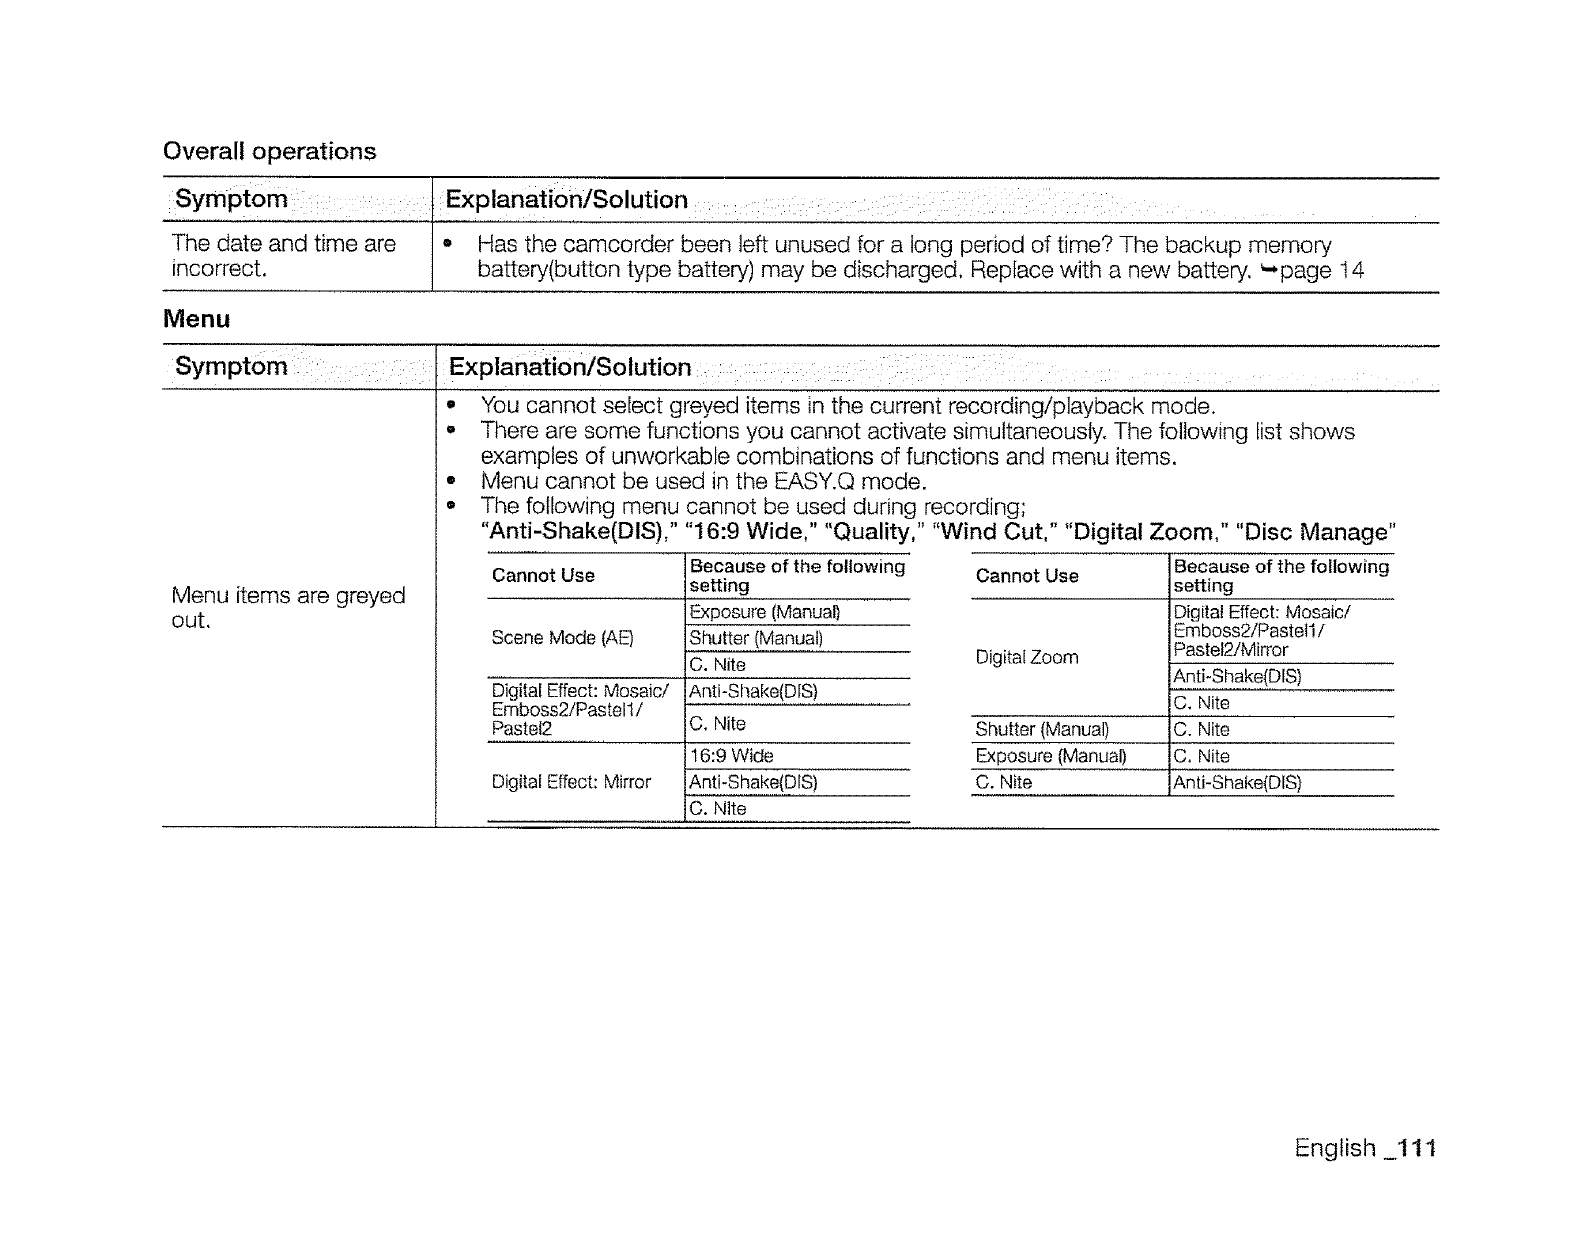
Overall operations
Symptom : jExp,!anati,on/Solution :: ii: :
The date and time are • Has the camcorder been left unused for a long period of time? The backup memory
incorrect. ] battery(button type battery) may be discharged, Replace with a new battery. '-page ! 4
Menu
Symptomi: __xplanatlon/Solutlon: : :
oYou cannot select greyed items in the current recording/playback mode.
• There are some functions you cannot activate simultaneously. The following fist shows
examples of unworkable combinations of functions and menu items.
• Menu cannot be used in the EASY.Q mode.
° The following menu cannot be used during recording;
"Anti-Shake(DiS)," "16:9 Wide," "Quality," "Wind Cut," "Digital Zoom," "Disc Manage"
Menu items are greyed
out.
Cannot Use
Scene Mode (AE)
Digitai Effect: Mosaic/
Emboss2/Pastell/
Pastel2
Digital Effect: Mirror
Because of the following Cannot Use
setting
Exposure (Manual)
Shutter (Manual)
C. Nite Digital Zoom
Anti-Shake(DiS)
C. Nite Shutter (Manual)
16:9 Wide Exposure (Manual)
Anti-Shake(DiS) C. Nite
C. Nlte
Because of the following
setting
Digital Effect: Mosaic/
Emboss2!Pastell!
Pastet2iMirror
Anti-Shake(DiS)
C, Nite
C. Nite
C, Nite
Anti-Shake(DIS)
English _111
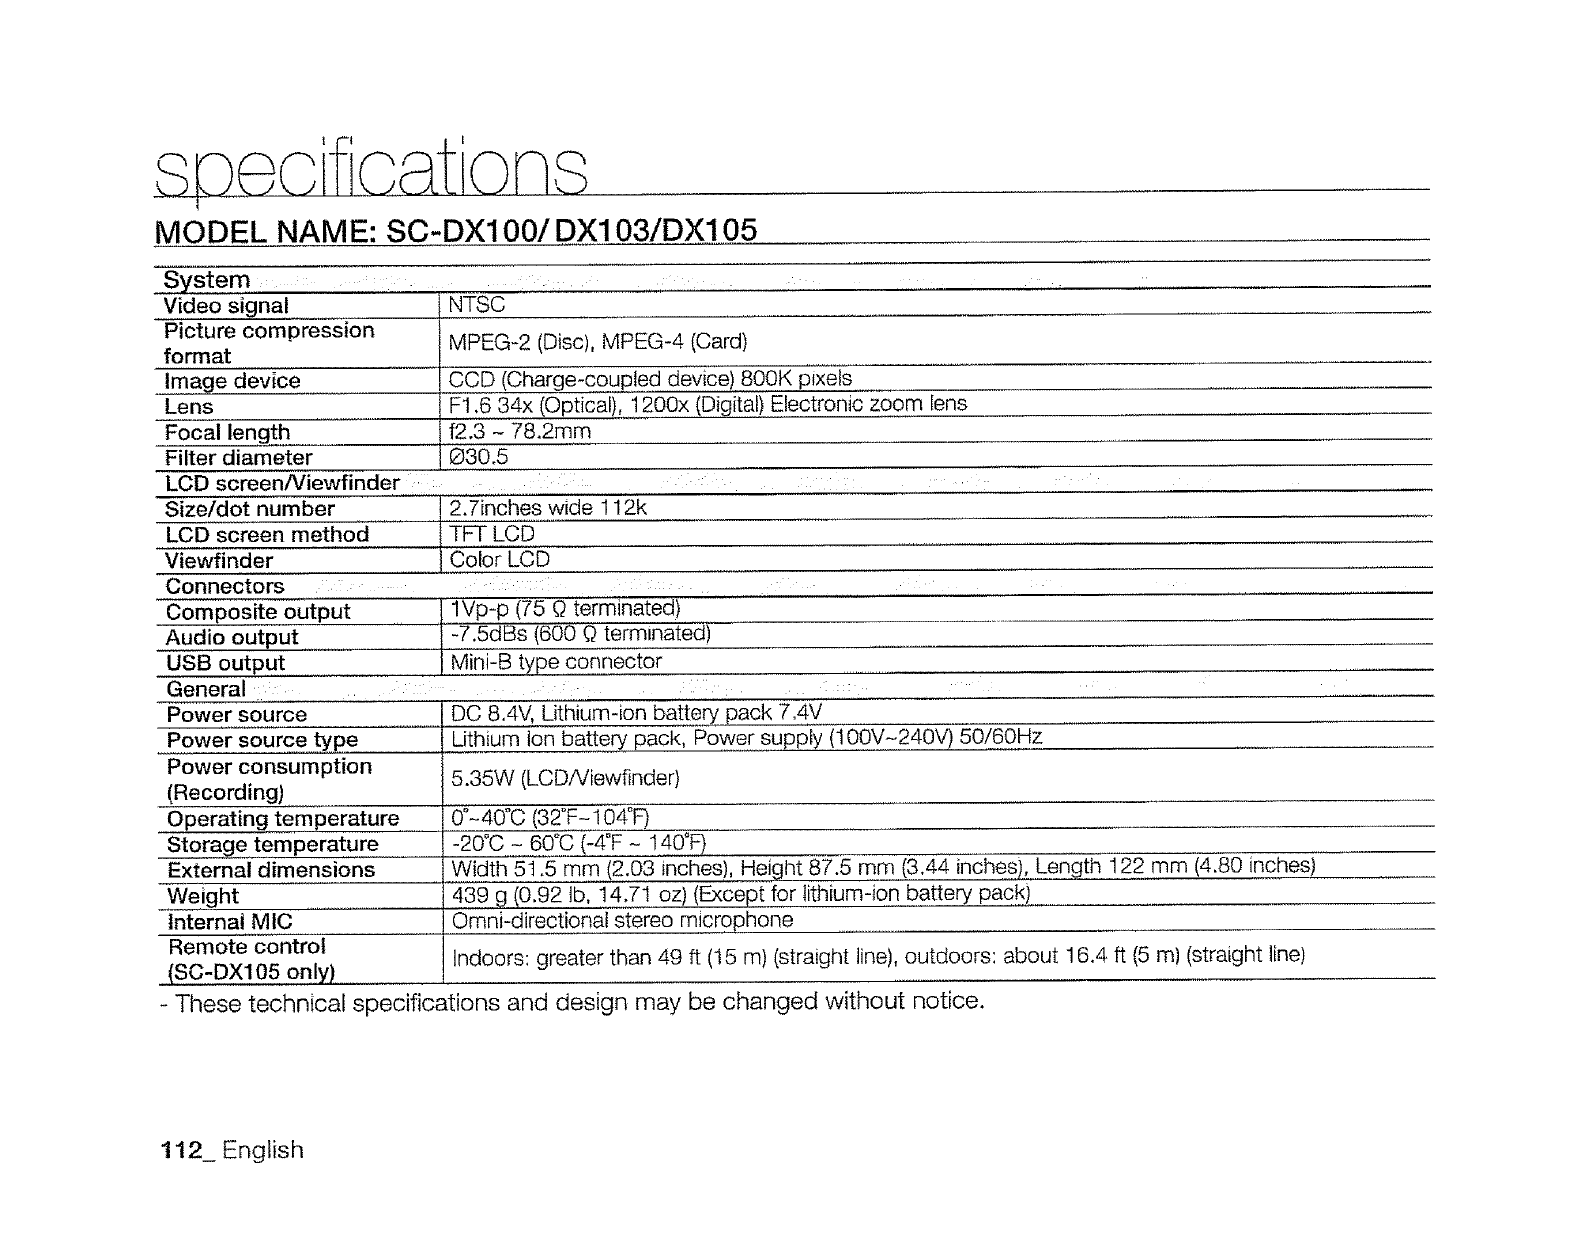
MODEL NAME: SC-DX100/DX103/DX105
System ....
Video signal
Picture compression
format
Image device
Lens
Focal length
Filter diameter
Size/dot number
LCD screen method
Viewfinder
Connectors
NTSC
MPEG-2 (Disc), MPEG-4 (Card)
CCD (Charge-coupled device) 800K pixels
F1,6 34x (Optical), ! 200x (Digital) Electronic zoom lens
f2.3 - 78.2mm
630.5
LCD screen/Viewfinder :
2.7inches wide 112k
TFT LCD
Coior LOB
:
lVp-p (75 0terminated)
-7.5dBs (600 0terminated)
Mini-B type connector
Composite output
Audio output
USB output
General :
Power source
Power source type
Power consumption
(Recording)
Operating temperature
Storage tern pe rature
External dimensions
Weight
Internal MIC
Remote control
(SC-DX105 on!y) ..................
DC 8.4V, Lithium-ion battery pack 7.4V
Lithium Ion battery pack, Power supply (100V-240V) 50/60Hz
5.35W (LCDNiewfinder)
0°-40°0 (32°F- 104"F)
-20"C - 60% (-4°F - I40"F)
i Width 5t .5 mm (2.03 inches), Height 87.5 mm (3.44 inches), Length 122 rnm (4.80 inches
1439 g (0.92 tb, 14.71 oz) (Except for lithium-ion battery pack) ......
I Omni-directional stereo microphone
Indoors: greater than 49 ft (15 m) (straight line), outdoors: about 16.4 ft (5 m) (straight line)
- These technical specifications and design may be changed without notice.
112_ English
SAMSUNG
LIM ITED WARRANTY
SAMSUNG Electronics America lnc, (SEA), warrants that this product is free from defective material and
workmanship.
SEA further warrants that if product fails to operate properly within the specified warranty period and the failure is due
to improper workmanship or defective material, SEA will repair or replace the product at it's option.
All warranty repairs must be performed by a SEA authorized service center. The name and address of the location
nearest you can be obtained by calling toll free: 1-800 SAMSUNG (I-800-726-7864).
Labor
90 days carry-in
Parts
1 year
On carry-in models, transportation to and from the service center is the customer's responsibility.
The original dated sales receipt must be retained by the customer and is the only acceptable proof of purchase.
It must be presented to the authorized service center.
EXCLUSIONS 0NHAT IS NOT COVERED)
This warranty does not cover damage due to accident, fire, flood and/or other acts of God; misuse, incorrect line
voltage, improper installation, improper or unauthorized repairs, commercial use, or damage that occurs in shipping.
Exterior and interior finish, lamps, and glass are not covered under this warranty.
Customer adjustments which are explained in the instruction manual are not covered under the terms of this warranty.
This warranty will automatically be voided for any unit found with a missing or altered serial number. This warranty is
valid only on products purchased in the United States and Puerto Rico.
Some States do not allow the exclusions or limitations of incidental or consequential damages, or allow limitations on
how long an implied warranty lasts, so the above limitations or exclusions may not apply to you.
This warranty gives you specific legal rights, and you may also have other rights which vary from State to State.
If you have any questions or comments relating to Samsung
products, please contact the SAMSUNG customer care
center Samsung Electronics America, inc.
1-800-SAMSUNG (726-7864)
www,samsung.com
RollS compliant
Our product complies with "The Restnction Of the use of certain
Hazardous Substances in electrical and electronic equipment," and
we do not use the 6 hazardous materials- Cadmium(Cd}, Lead (Pb},
Mercury (Hg), Hexavalent Chromium (Cr +6), Poly Brominated Biphenyls
(PBBs}, Poly Brominated Diphenyl Ethers(PBDEs}- in our products. Code No, AD68-02550A-00
