SAMSUNG Plasma Television Manual L0904482
User Manual: SAMSUNG SAMSUNG Plasma Television Manual SAMSUNG Plasma Television Owner's Manual, SAMSUNG Plasma Television installation guides
Open the PDF directly: View PDF ![]() .
.
Page Count: 101 [warning: Documents this large are best viewed by clicking the View PDF Link!]
Contact SAMSUNG WORLD=WIDE
if you have any questions or comments relating to 8amsung products, please contact the SAMSUNG customer care center,
Comment contacter 8amsung dans le monde
8i vous avez des suggestions ou des questions concernant les produits Samsung, veuillez contacter le Service
Consommateurs Samsung,
U.S.A 1-800-SAMSUNG(726-7864) www.samsung.com/us
CANADA 1-800-SAMSUNG(726-7864) www.samsung.com/ca
Samsung Electronics America, Inc. 105 Challenger Road
Ridgefield Park, NJ 07660-0511
Samsung Electronics Canada Inc., Customer Service 55
Standish Court Mississauga, Ontario L5R 4B2 Canada
Samsung Electronique Canada Inc., Service a la Clientele
55 Standish Court Mississauga, Ontario L5R 4B2
Canada
II
BN68-O2271A-O0
the possibilities
Thank you for purchasing this Samsung producL
To recewe more complete service, please
register your product at
www.samsung.com/register
Model, Serial No.
importantWarrantyinformationRegardingTelevisionFormatViewing
Wide screen format PDP Displays (16:9, the aspect ratio of the screen width to height) are primarily designed to view wide
screen format full-motion video. The images displayed on them should primarily be in the wide screen 16:9 ratio format,
or expanded to fill the screen if your model offers this feature and the images are constantly moving. Displaying stationary
graphics and images on screen, such as the dark side-bars on nonexpanded standard format television video and
programming, should be limited to no more than 5% of the total television viewing per week.
Additionally, viewing other stationary images and text such as stock market reports, video game displays, station Iogos,
web sites or computer graphics and patterns, should be limited as described above for all televisions. Displaying stationary
images that exceed the above guidelines can cause uneven aging of PDP Displays that leave subtle, but permanent
burned=inghost images in the PDP picture. To avoid this, vary the programming and images, and primarily display
full screen moving images, not stationary patterns or dark bars.
On PDP models that offer picture sizing features, use these controls to view different formats as a full screen picture.
Be careful in the selection and duration of television formats used for viewing. Uneven PDP aging as a result of format
selection and use, as well as burned-in images, are not covered by your Samsung limited warranty.
U,8.A Only
The product unit accompanying this user manual is licensed under certain intellectual property rights of certain third parties.
In particular, this product is licensed under the following US patents: 5,991,715, 5,740,317, 4,972,484, 5,214,678, 5,323,396,
5,539,829, 5,606,618, 5,530,655, 5,777,992, 6,289,308, 5,610,985, 5,481,643, 5,544,247, 5,960,037, 6,023,490, 5,878,080, and
under US Published Patent Application No. 2001-44713-A1.
This license is limited to private non-commercial use by end-user consumers for licensed contents. No rights are granted for
commercial use. The license does not cover any product unit other than this product unit and the license does not extend to any
unlicensed product unit or process conforming to ISO/IEC 11172-3 or ISO/IEC 13818-3 used or sold in combination with this product
unit. The license only covers the use of this product unit to encode and/or decode audio files conforming to the ISO/IEC 11172-3
or ISO/IEC 13818-3. No rights are granted under this license for product features or functions that do not conform to the ISO/IEC
11172-3 or ISO/IEC 13818-3.
Other countries
The product unit accompanying this user manual is licensed under certain intellectual property rights of certain third parties. This
license is limited to private non-commercial use by end-user consumers for licensed contents. No rights are granted for commercial
use. The license does not cover any product unit other than this product unit and the license does not extend to any unlicensed
product unit or process conforming to ISO/IEC 11172-3 or ISO/IEC 13818-3 used or sold in combination with this product unit. The
license only covers the use of this product unit to encode and/or decode audio files conforming to the ISO/IEC 11172-3or ISO/IEC
13818-3. No rights are granted under this license for product features or functions that do not conform to the ISO/IEC 11172-3 or
ISO/IEC 13818-3.
© 2009 Samsung Electronics Co., Ltd. All rights reserved.
iUser instructions
0Screen Image retention
Do not display a still irnage(such as on a video game) on the plasma display panel for more than several rninutes as it can cause
screen image retention. This image retention is also known as "screen burn". To avoid such image retention, refer to page 27 of this
manual to reduce the degree of brightness and contrast of the screen when displaying a still image.
Altitude
The PDP can only operate normally at heights under 6500ft.
Heat on the top of the Plasma TV
The top side of the product may be hot after long periods of use as heat dissipates from the panel through the vent hole in the upper
part of the product.
This is normal and does not indicate any defect or operation failure of the product.
However, children should be prevented from touching the upper part of the product.
The product is making a 'cracking' noise.
A 'cracking' noise may occur when the product contracts or expands due to a change in the surrounding environment such as
temperature or humidity. This is normal and not a defect of the unit.
Cell Defects
The PDP uses a panel consisting of 2,360,000(HD-level) to 6,221,000(FHD-level) pixels which require sophisticated technology to
produce. However, there may be a few bright or dark pixels on the screen. These pixels will have no impact on the performance of the
product.
Avoid operating the TV at temperatures below 41°F (5°0)
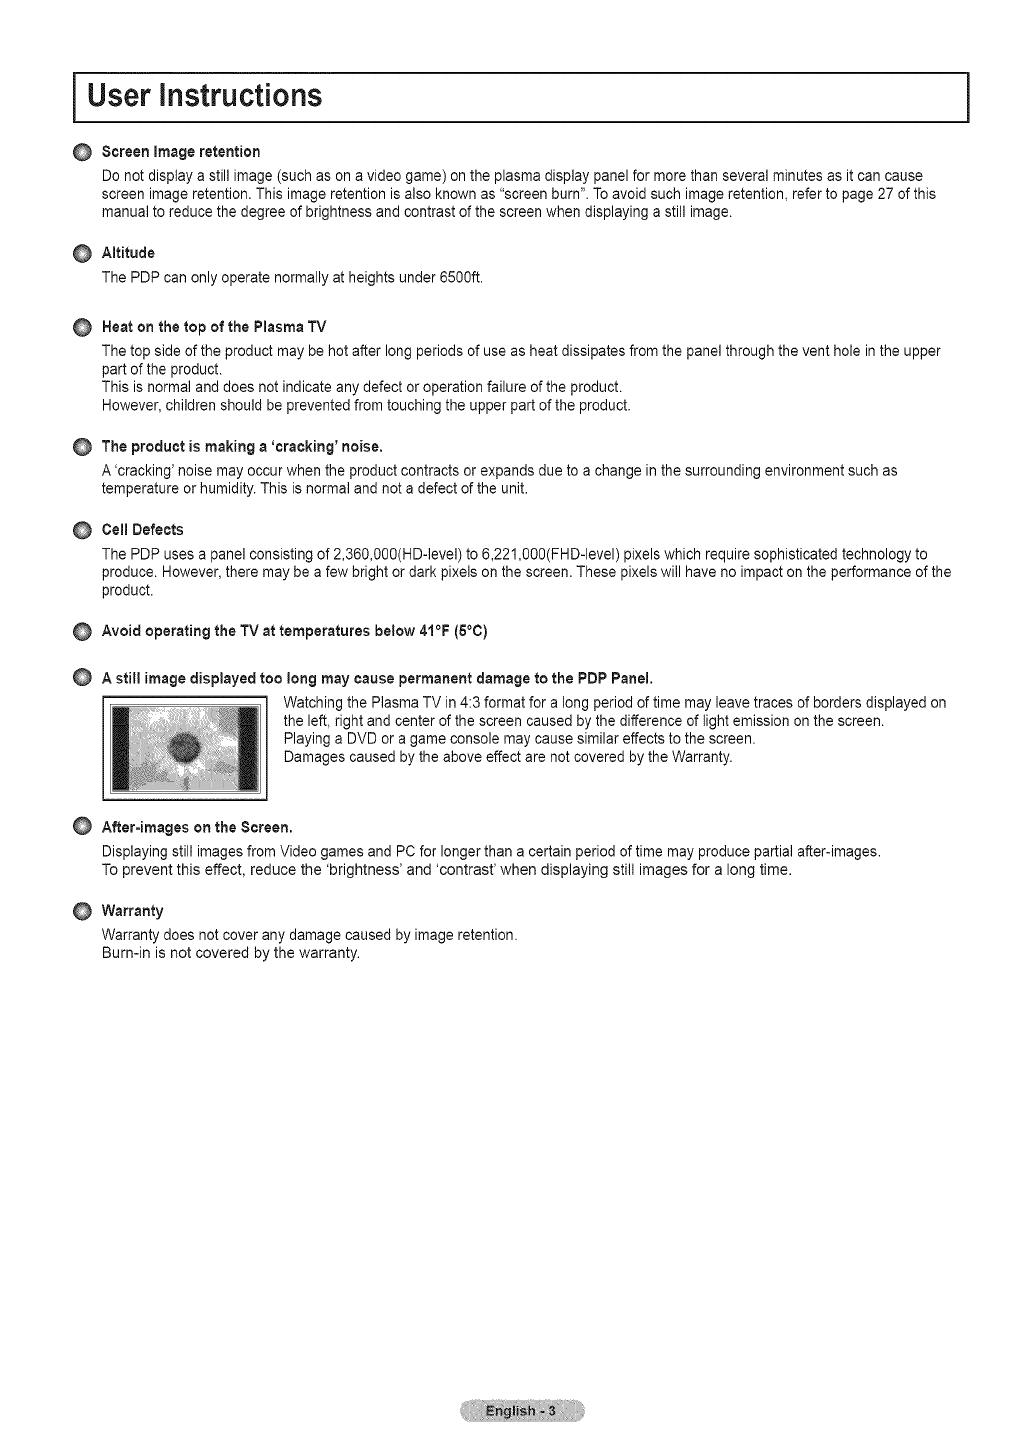
Astill image displayed too long may cause permanent damage to the PDP Panel.
Watching the Plasma TV in 4:3 format for a long period of time may leave traces of borders displayed on
the left, right and center of the screen caused by the difference of light emission on the screen.
Playing a DVD or a game console may cause similar effects to the screen.
Damages caused by the above effect are not covered by the Warranty.
After=images on the Screen.
Displaying still images from Video games and PC for longer than a certain period of time may produce partial after-images.
To prevent this effect, reduce the 'brightness' and 'contrast' when displaying still images for a long time.
Warranty
Warranty does not cover any damage caused by image retention.
Burn-in is not covered by the warranty.
I Contents 1
! List of Features .......................................................................... 5
Checking Parts .......................................................................... 5
Viewing the Control Panel ......................................................... 6
Viewing the Connection Panel ................................................... 7
Remote Control ......................................................................... 9
Viewing a Photo or Slide Show .............................................. 43
Using and Sorting the Music List ............................................. 45
Playing a Music ...................................................................... 46
Using and Sorting the Movie List............................................. 47
Playing a Movie File ............................................................... 48
Picture /Music Settings Using Media Play .............................. 50
Using the Setup Menu ............................................................. 51
Connecting VHF and UHF Antennas ....................................... 10
Connecting Cable TV .............................................................. 10
Connecting a DVD /Blu-ray Player or Cable Box /Satellite
receiver (Set-Top Box) via HDMI ............................................. 12
Connecting a DVD/Blu-ray Player or Cable Box /Satellite
receiver (Set-Top Box) via DVl ................................................ 12
Connecting a DVD /Blu-ray Player or Cable Box /Satellite
receiver (Set-Top Box) via Component cables ........................ 13
Connecting a Camcorder ........................................................ 13
Connecting a VCR ................................................................... 14
Connecting a Digital Audio System ......................................... 15
Connecting an Amplifier /DVD Home Theater ........................ 15
Connecting a PC ..................................................................... 16
Setting the DLNA Network ....................................................... 52
Installing the DLNAApplication ............................................... 52
Using the DLNAApplication .................................................... 54
Using the DLNA Function ........................................................ 57
Connecting Anynet + Devices .................................................. 58
Setting UpAnynet÷ ................................................................. 60
Switching between Anynet + Devices ....................................... 60
Recording ................................................................................ 61
Listening through a Receiver ................................................... 62
Troubleshooting for Anynet + ................................................... 62
Turning the TV On and Off ...................................................... 17
Changing Channels ................................................................. 17
Adjusting the Volume ............................................................... 17
Using the TOOLS Button ......................................................... 18
Using the Remote Control Backlight Buttons .......................... 18
Viewing the Display ................................................................. 18
Viewing the Menus .................................................................. 19
Plug & Play Feature ................................................................ 20
Storing Channels .................................................................... 21
Managing Channels ................................................................ 22
Changing the Picture Settings ................................................. 24
Using Your TV as a Computer (PC) Display ............................ 28
Display Modes ......................................................................... 28
Setting up the TV with your PC ............................................... 29
Changing the Sound Settings .................................................. 30
Configuring the Setup Menu .................................................... 31
Viewing the Picture in Picture (PIP) ......................................... 35
Setting the Time ...................................................................... 36
Source List/Edit Name ........................................................... 37
Support .................................................................................... 38
Connecting a USB Device ....................................................... 40
Using the Media Play Function ................................................ 41
Using and Sorting Photo List ................................................... 42
Symbol
A
i
Press Note
Activating the Content Library ................................................. 63
Using the Content Library........................................................ 64
Network Connection ................................................................ 65
Network Setup ......................................................................... 68
Getting Started with Internet@TV ........................................... 72
Editing Snippets in the Dock ................................................... 74
Using the Profile Widget .......................................................... 74
Using the Yahoo!® Widget Gallery .......................................... 76
Using the Yahoo!® Weather Widget ........................................ 77
Using the Yahoo!® News Widget ............................................ 77
Using the Yahoo!® Flickr Widget ............................................. 78
Using the Yahoo!® Finance Widget ......................................... 79
Troubleshooting for internet@TV ........................................... 79
Help Website ........................................................................... 80
Home Network Center............................................................. 81
Setting Upthe Home Network Center ..................................... 82
Using the Message Function ................................................... 83
Using the Media Function ........................................................ 84
Troubleshooting ....................................................................... 85
Assembling the Cables ............................................................ 86
Preparation before installing the Wall-Mount ........................... 87
How to attach the Stand-Base ................................................. 87
Securing the TV to the Wall ..................................................... 88
Wall Mount Kit Specifications (VESA) ..................................... 89
Specifications .......................................................................... 90
Dimensions (PN50B850Y1F/PN50B860Y2F) ......................... 91
Dimensions (PN58B850YIF/PN58B860Y2F) ......................... 92
One-Touch Button TOOLS
i Connecting and Preparing Your TV }
List of Features
Adjustable picture settings that can be stored in the TV's memory.
Automatic timer to turn the TV on and off.
A special sleep timer.
V-Chip function.
Excellent Digital Interface & Networking :
With a built-in HD digital tuner, non-subscription HD broadcasts can be viewed with no Cable Box/Satellite receiver (Set-Top Box)
needed.
HDMI/DVI connection of your PC to this TV.
Excellent Picture Quality
SRS TruSurround HD provides a virtual surround system.
Media Play: Allows you to play music files, pictures, and movies saved on a USB or DLNA device.
mnternet@TV:You can use various intemet services and view useful information and entertaining content.
Home Network Center: Allows you to configure a mobile message server or a DLNA media render.
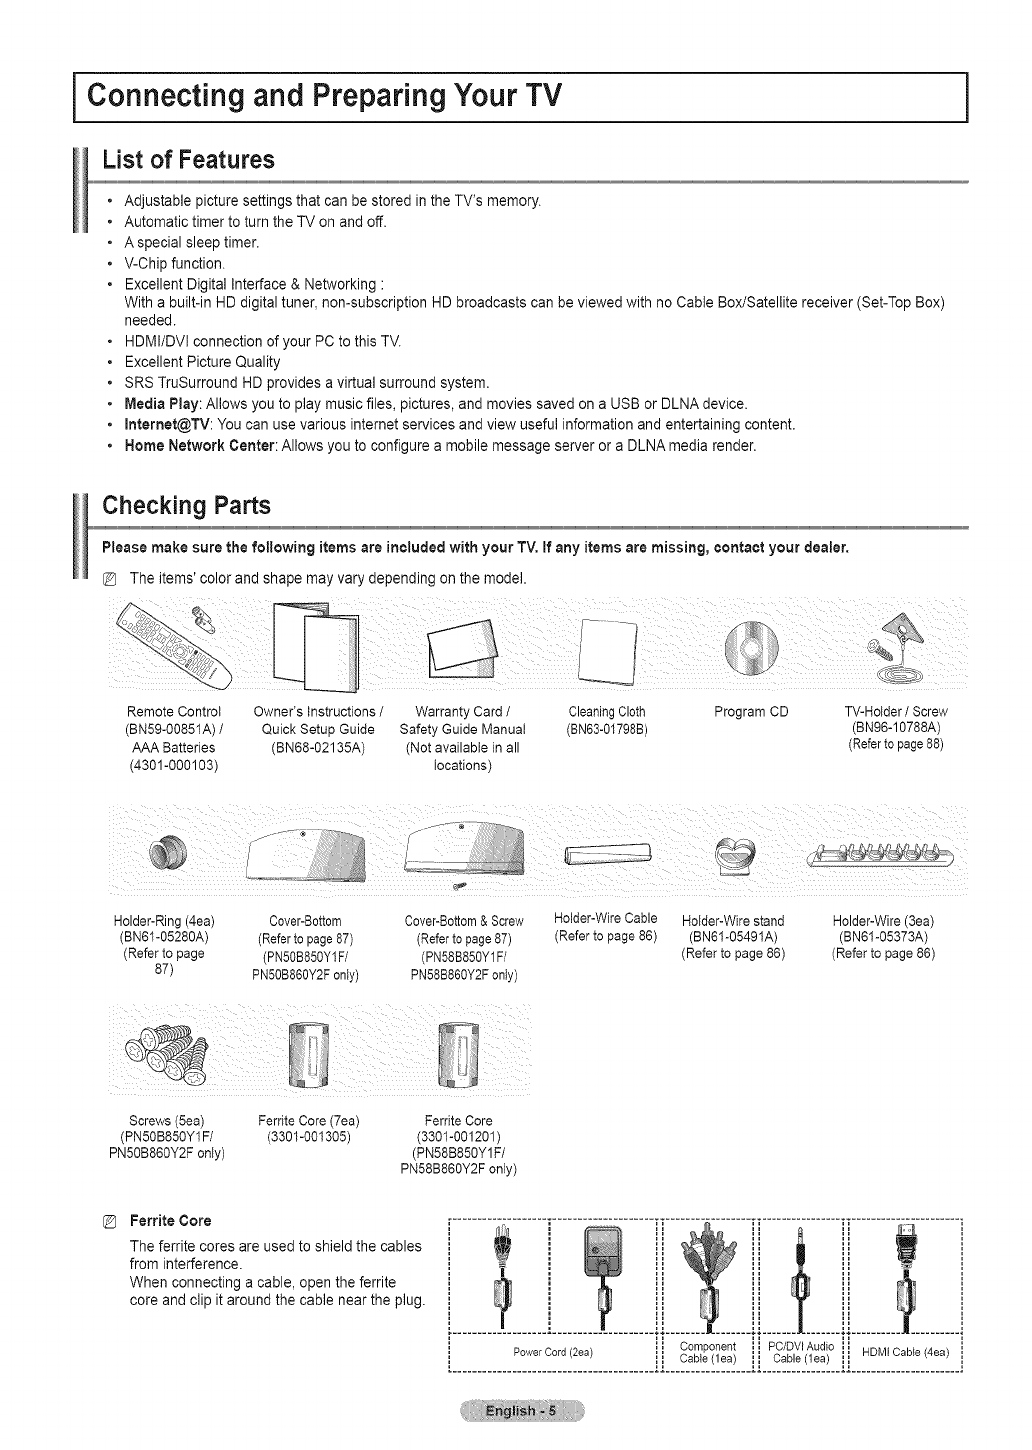
Checking Parts
Please make sure the following items are included with your TV, If any items are missing, contact your dealer.
The items' color and shape may vary depending on the model.
Remote Control Owner's instructions/Warranty Card/CleaningCloth Program CD TV-Holder/Screw
(BN59-00851A)/Quick SetupGuide Safety Guide Manual (BN63-O1798B) (BN96-10788A)
AAA Batteries (BN68-02135A) (Notavailable in all (Referto page88)
(4301-000103) locations)
Holder-Ring (4ea)
BN61-05280A)
(Refer to page
87)
Cover-Bottom Cover-Bottom & Screw Holder-Wire Cable Holder-Wire stand Holder-Wire (3ea)
(Refer to page 87) (Refer to page87) (Refer to page 86) (BNB1-05491A) (BNB1-05373A)
(PNSOB850Y1F/ (PN58B85OY1F/ (Refer to page 86) (Refer to page 86)
PNSOB86OY2Fonly) PN58B860Y2F only)
Screws(Sea) Ferrite Core(7ea) Ferrite Core
(PNSOB850YIF/ (3301-001305) (3301-001201)
PNSOB860Y2F onty) (PN58B850Y1F/
PN58B860Y2F only)
Ferrite Core
The ferrite cores are used to shield the cables
from interference.
When connecting a cable, open the ferrite
core and clip it around the cable near the plug.
.........7.......!......i...........!!_!!......i......Y!........._.........
................. .........#........
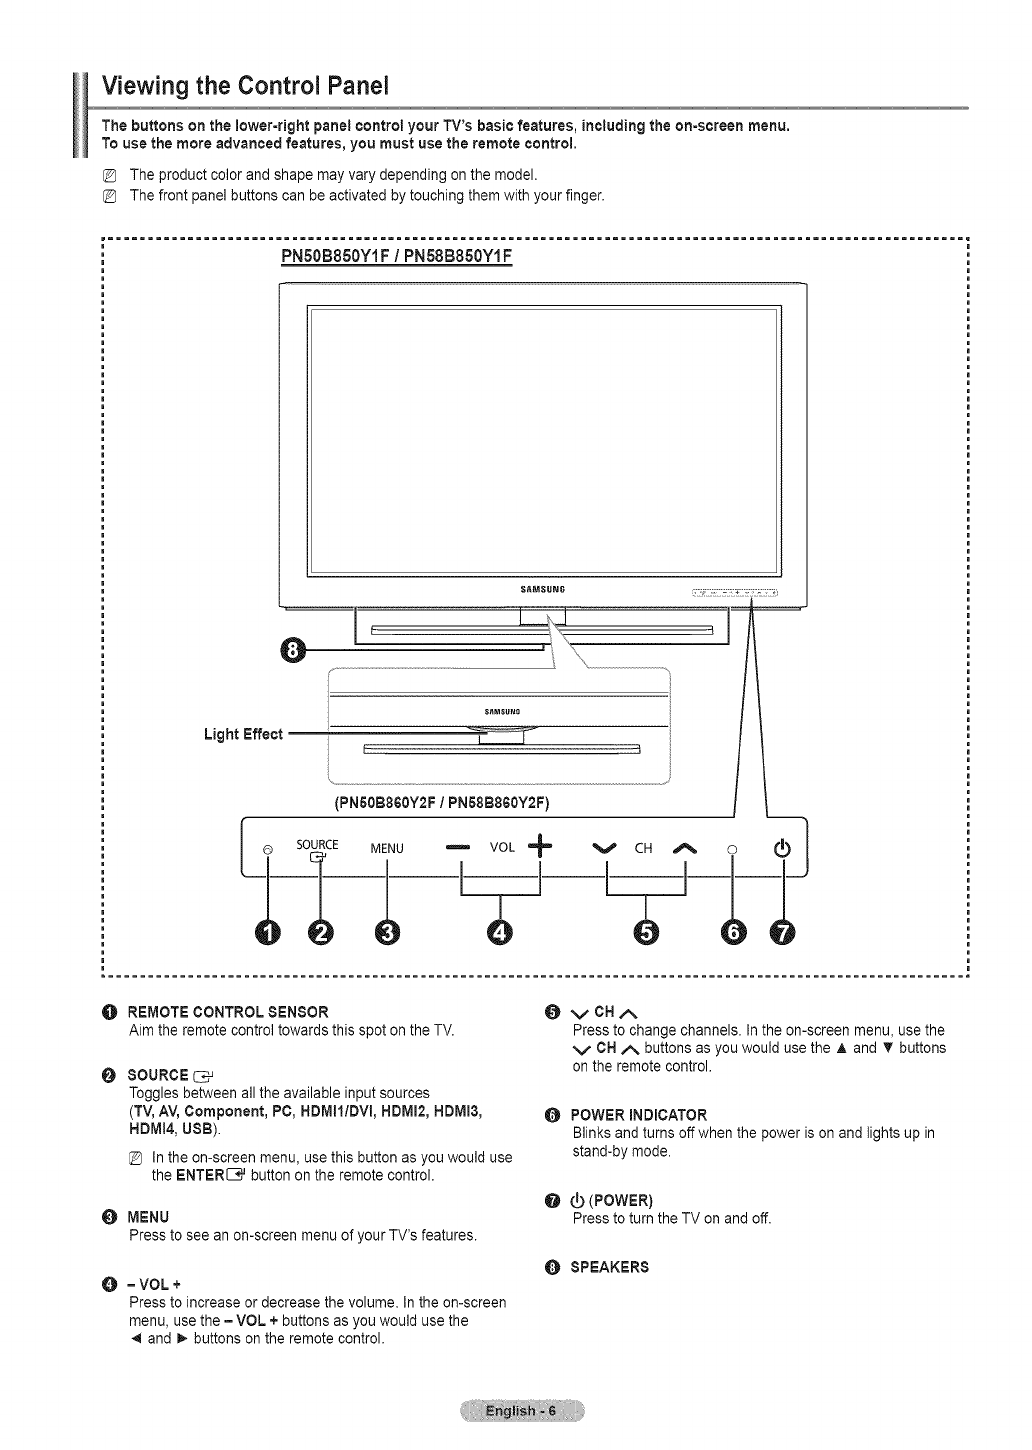
Viewing the Control Panel
The buttons on the lower-right panel control your TV's basic features, including the on-screen menu,
To use the more advanced features, you must use the remote control,
The product color and shape may vary depending on the model.
The front panel buttons can be activated by touching them with your finger.
PNSOB850Y1F/PN58B850Y1F
l=
1 J
SAMSg_G
Light Effect __
(PNSOB860Y2F /PN58B860Y2F)
SOURCE MENU VOL + VCH A
Q O
O REMOTE CONTROL SENSOR
Aim the remote control towards this spot on the TV.
0SOURCE
Toggles between all the available input sources
(TV,AV, Component, PC, HDMII/DVl, HDMI2, HDMI3,
HDMI4, USB).
In the on-screen menu, use this button as you would use
the ENTER_ button on the remote control.
0MENU
Press to see an on-screen menu of your TV's features.
O =VOL +
Press to increase or decrease the volume. In the on-screen
menu, use the = VOL + buttons as you would use the
and !_ buttons on the remote control.
O vON/_
Press to change channels. In the on-screen menu, use the
v ON _,_ buttons as you would use the A and T buttons
on the remote control.
OPOWER INDICATOR
Blinks and turns offwhen the power is on and lightsup in
stand-by mode.
@ _ (POWER)
Press to turn the TV on and off.
OSPEAKERS
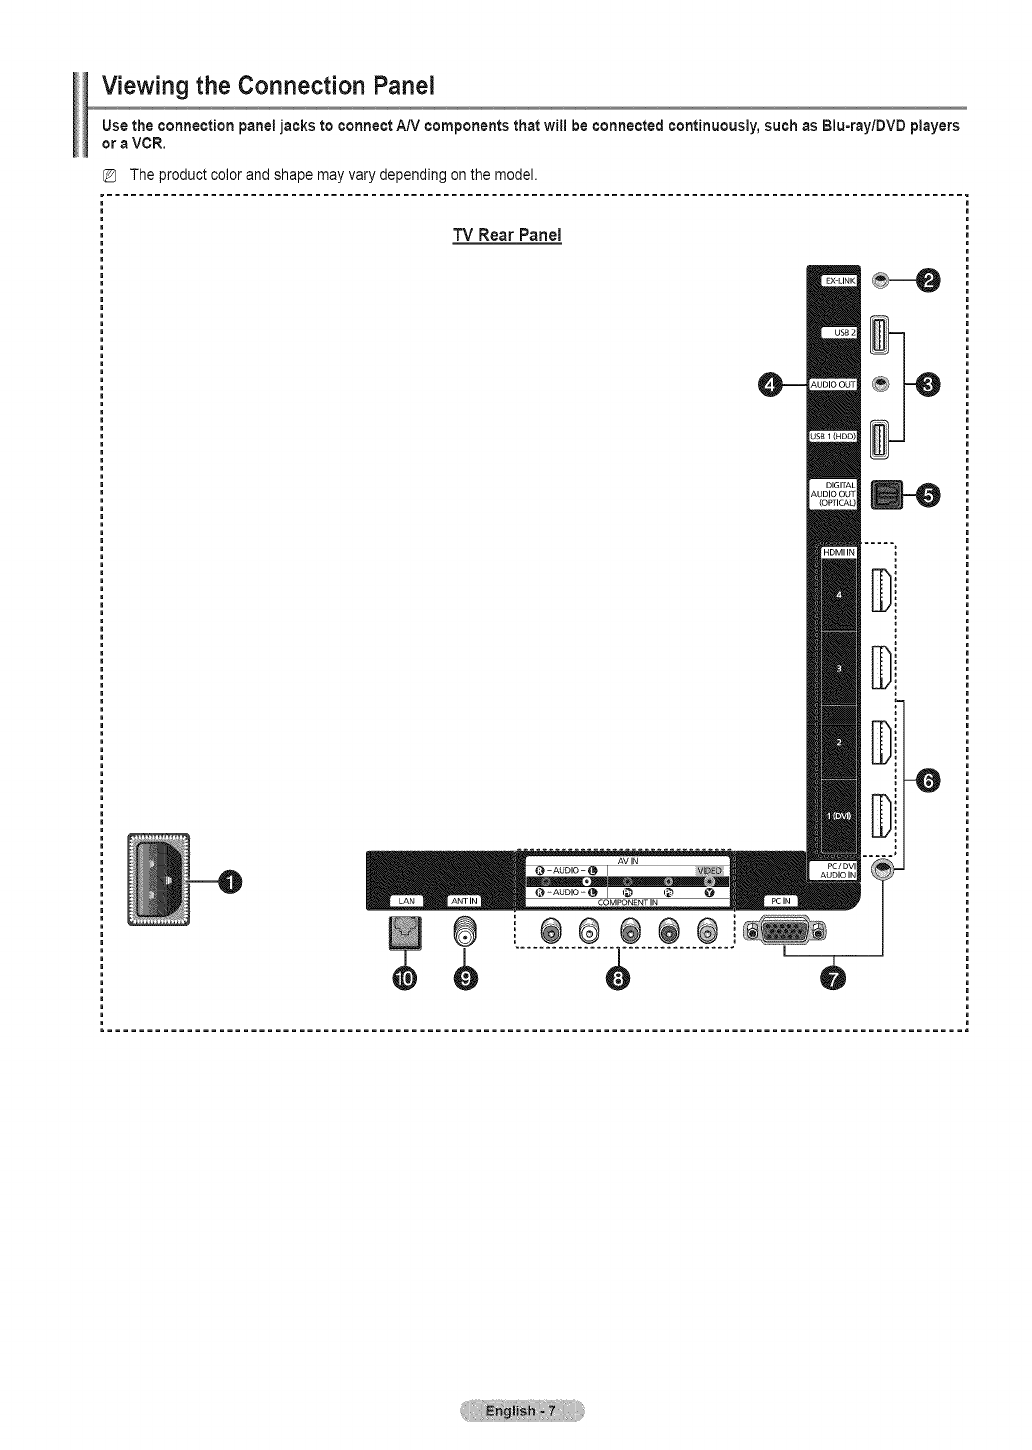
Viewing the Connection Panel
Use the connection panel jacks to connect A/V components that will be connected continuously, such as Biu-ray/DVD players
or a VCR.
TV Rear Panel
AV IN
-AUDIO -
COMPONENT IN
®i÷® ÷®_
, ..............$................' e
O POWER IN
Connects the supplied power cord.
O EX-LINK
Used for service only.
O USB ! (HDD)/USB 2
Connect a USB mass storage device to view photo files
(JPEG) and play audio files (MP3) or movie files. You can
also use these jacks connect to SAMSUNG's network
wirelessly.
@ The USB 1 (HDD) port is also used as the HDD. HDD
(Hard disk drive) is device which stores digitally encoded
data.
OAUDIO OUT
Audio outputs to external devices,
DIGITAL AUDIO OUT (OPTICAL)
Connects to a Digital Audio component.
OHDMI IN I (DV0, 2, 3, 4
Connect to the HDMI jack of a device with an HDMI output.
Use an HDMI cable which is smaller than 14mm.
What is HDMI?
HDMl(High-Definition Multimedia Interface), is an
interface that enables the transmission of digital audio
and video signals using a single cable.
• The difference between HDMI and DVI is that the
HDMI device is smaller in size and has the HDCP
(High Bandwidth Digital Copy Protection) coding
feature installed.
• We recommend that 14mm is proper for cable size.
This is smaller than standard.
PC/DVl AUDIO iN
Connect to the DVI audio output jack of an external device.
O PC IN /PC/DVI AUDIO IN
Connects to the video and audio output jacks on your PC.
If your PC supports an HDMI connection, you can
connect this to the HDMI IN I, 2, 3, or4 terminal.
If your PC supports a DVI connection, you can connect
this to the HDMI IN2 /DVI AUDIO IN [R-AUDIO-L]
terminal.
COMPONENT IN /AV IN
Connects Component video /audio. The COMPONENT IN
jack is also used as the AV INjack.
Connect the video cable to the COMPONENT IN
[Y/VIDEO] jack and the audio cable to the COMPONENT
IN [R-AUDIO-L] jacks.
O ANT iN
Uses a 75_ Coaxial connector for an Air/Cable Network.
_) LAN
Connect a LAN cable to this port to connect to the Network.
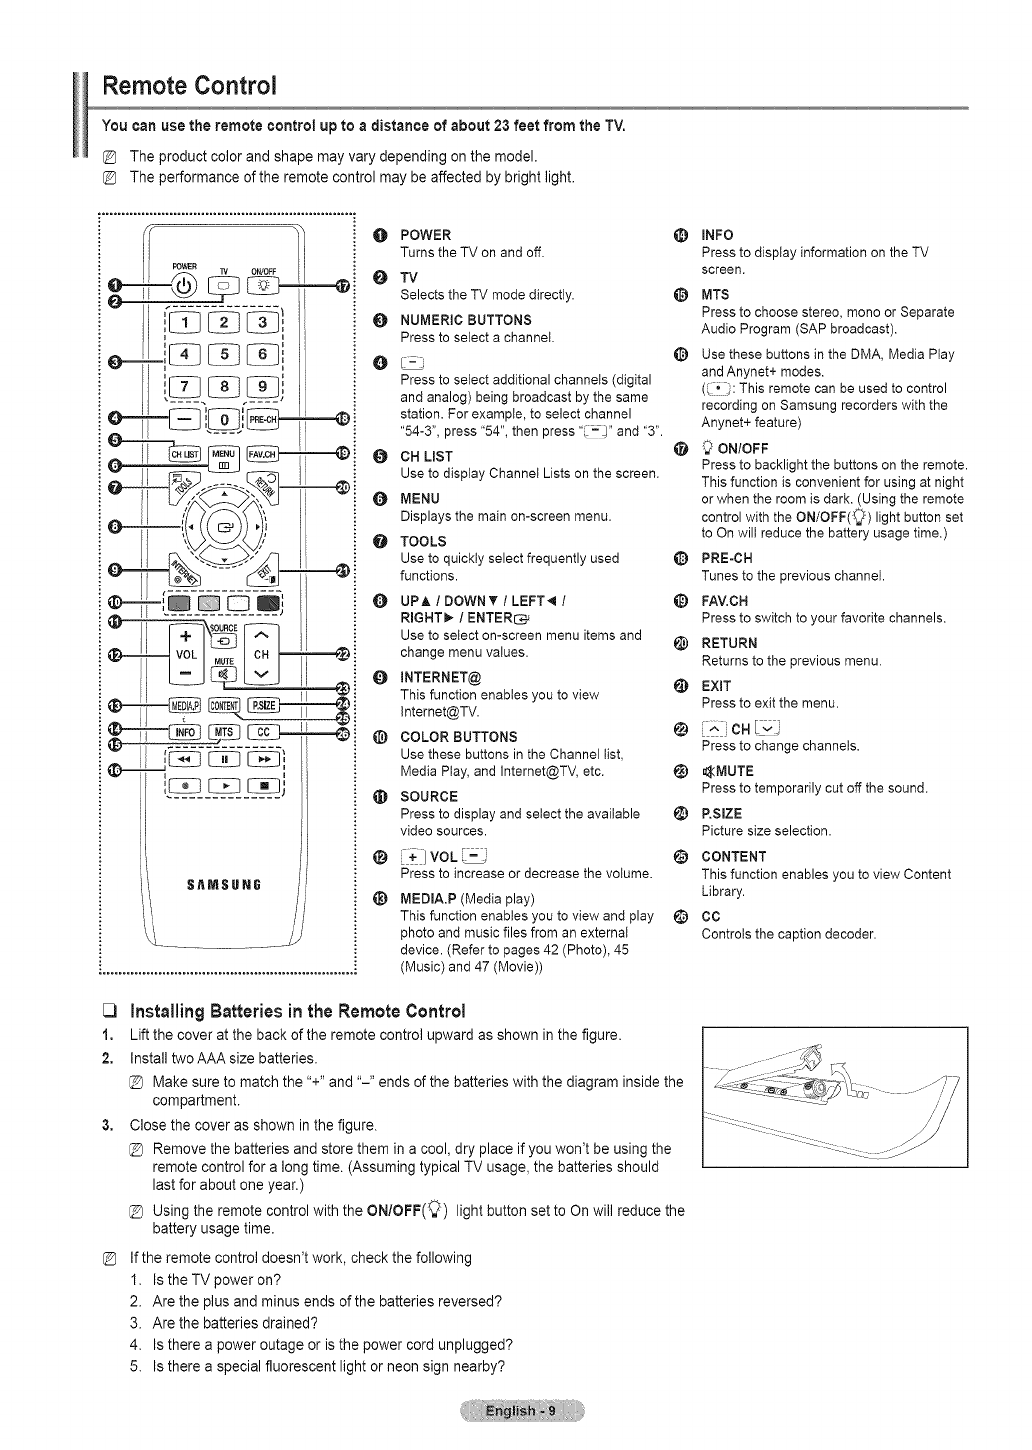
Remote Control
You can use the remote control up to a distance of about 23 feet from the TV,
The product color and shape may vary depending on the model,
The performance ofthe remote control may be affected by bright light,
rPO_WER TV 0N/0FF
,D- Q a]
',
SAMSUNG
O
0
Q
O
0
Q
0
POWER
Turns the TV on and off.
TV
Selects the TV mode directly.
NUMERIC BUTTONS
Press to select a channel.
Press to select additional channels (digital
and analog) being broadcast by the same
station. For example, to select channel
"54-3", press "54", then press " - J" and "3".
OH LIST
Use to display Channel Lists on the screen.
MENU
Displays the main on-screen menu.
TOOLS
Use to quickly select frequently used
functions.
Q UP_/DOWNY"/LEFT_ /
RIGHTI_ /ENTER_
Use to select on-screen menu items and
change menu values.
INTERNET@
This function enables you to view
Internet@TV.
@ COLOR BUTTONS
Use these buttons in the Channel list,
Media Play, and Internet@TV, etc.
@SOURCE
Press to displayand selectthe available
videosources.
Press to increaseordecrease thevolume.
@MEDIA.P (Media play)
This function enables you to view and play
photo and music files from an external
device. (Refer to pages 42 (Photo), 45
(Music) and 47 (Movie))
@
@
INFO
Press to display information on the TV
screen.
I[_ MTS
Press to choose stereo, mono or Separate
Audio Program (SAP broadcast).
_) Use these buttons in the DMA, Media Ptay
and Anynet+ modes.
( !_: This remote can be used to control
recording on Samsung recorders with the
Anynet+ feature)
_) 9 ON/OFF
Press to backlightthebuttonson the remote.
Thisfunctionisconvenientforusingatnight
orwhen theroom isdark.(Usingthe remote
controlwiththeON/OFF(C_)lightbuttonset
toOn willreduce thebatteryusage time.)
@ PRE-CH
Tunes to the previous channel.
_) FAV.C H
Press to switch to your favorite channels.
_) RETURN
Returns to the previous menu.
6) EXIT
Press to exit the menu.
Press to change channels.
_) _MUTE
Press totemporarilycutoffthesound.
@ P.SlZE
Picture size selection.
I_) CONTENT
This function enables you to view Content
Library.
CC
Controls the caption decoder.
C) installingBatteries inthe Remote Control
1, Lift the cover at the back of the remote control upward as shown in the figure.
2, Install twoAAA size batteries.
@ Make sure to match the "+" and "-" ends of the batteries with the diagram inside the
compartment.
3, Close the cover as shown in the figure.
@ Remove the batteries and store them in a cool, dry place if you won't be using the
remote control for a long time. (Assuming typical TV usage, the batteries should
last for about one year.)
@ Using the remote control with the ON/OFF(:_) light button set to On will reduce the
battery usage time.
If the remote control doesn't work, check the following
1. Is the TV power on?
2. Are the plus and minus ends of the batteries reversed?
3. Are the batteries drained?
4. Is there a power outage or is the power cord unplugged?
5. Is there a special fluorescent light or neon sign nearby?
i Connections i
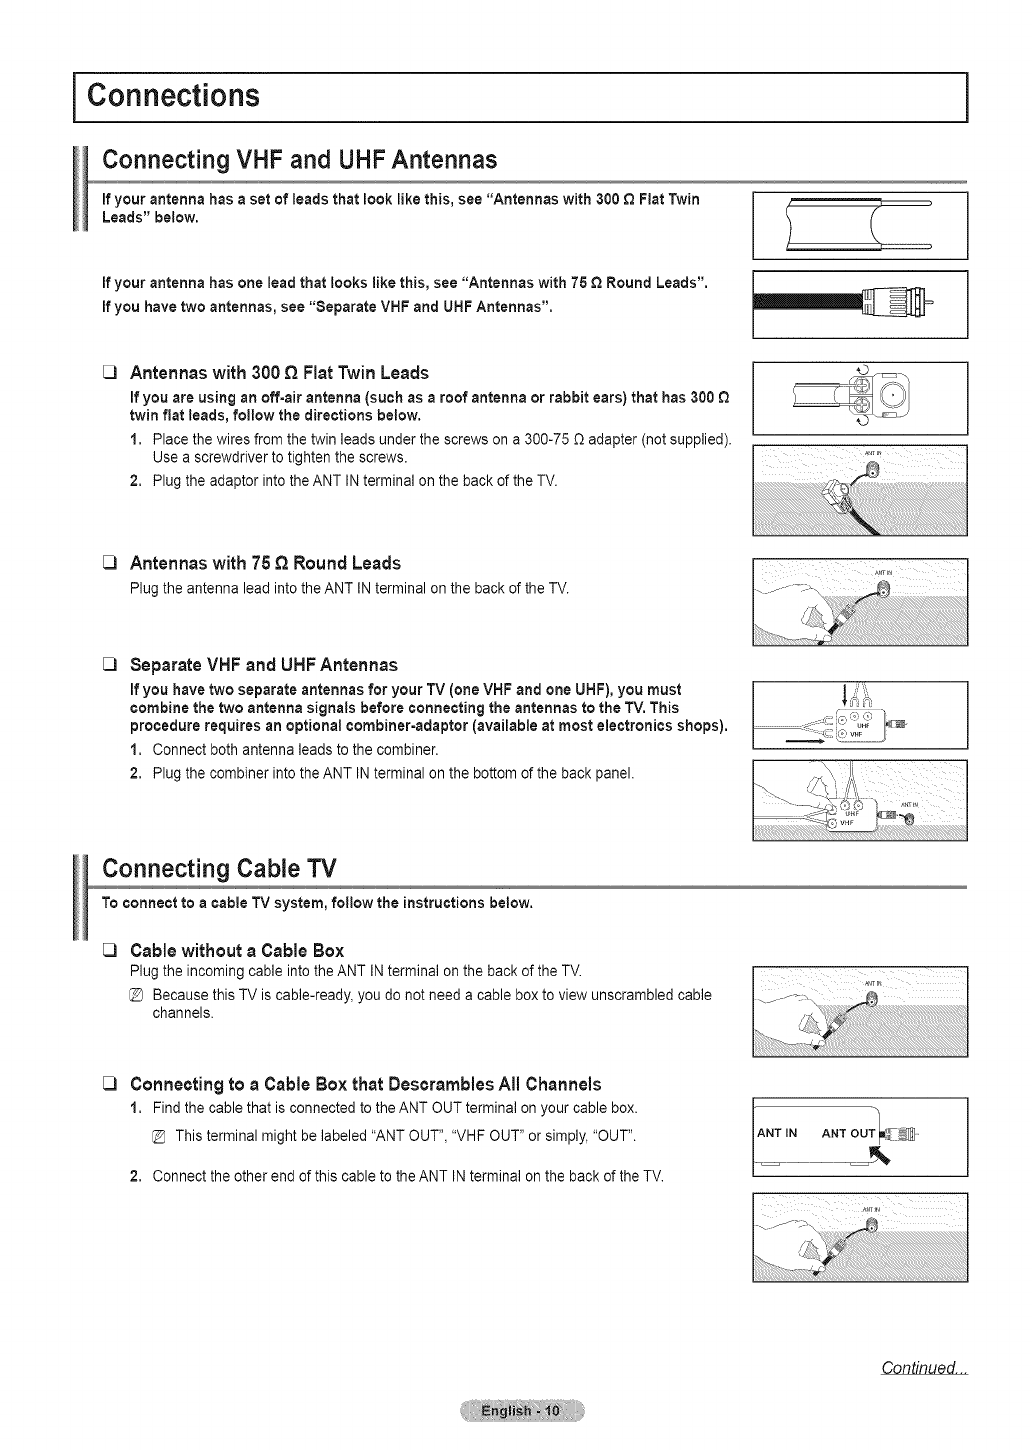
Connecting VHF and UHF Antennas
If your antenna has a set of leads that look like this, see "Antennas with 300 £_Flat Twin
Leads" below.
If your antenna has one lead that looks like this, see "Antennas with 75 Q Round Leads".
If you have two antennas, see "Separate VHF and UHF Antennas".
[3 Antennas with 300 QFiat Twin Leads
If you are using an off-air antenna (such as a roof antenna or rabbit ears) that has 300 Q
twin flat leads, follow the directions below.
1, Place the wires from the twin leads under the screws on a 300-75 _ adapter (not supplied).
Use a screwdriver to tighten the screws.
2. Plug the adaptor into the ANT IN terminal on the back of the TV.
[3 Antennas with 75 _Round Leads
PlugtheantennaleadintotheANT INterminalonthebackof theTV.
C)
iiiiiiiiii _i i i!!
Separate VHF and UHF Antennas
If you have two separate antennas for your TV (one VHF and one UHF), you must
combine the two antenna signals before connecting the antennas to the TV, This
procedure requires an optional combiner-adaptor (available at most electronics shops).
1. Connect both antenna leads to the combiner.
2. Plug the combiner into the ANT IN terminal on the bottom of the back panel.
Connecting Cable TV
To connect to a cable TV system, follow the instructions below.
C) Cable without a Cable Box
Plug the incoming cable into the ANT IN terminal on the back of the TV.
@ Because this TV is cable-ready, you do not need a cable box to view unscrambled cable
channels.
C) Connectingto a Cable Box that DescramblesAll Channels
1. Find the cable that isconnected to the ANT OUT terminal on your cable box.
This terminal might be labeled "ANT OUT", "VHF OUT" or simply, "OUT".
2. Connect the other end of this cable to the ANT IN terminal on the back of the TV. ...........................
Continued...

C) Connectingto a Cable Boxthat DescrarnblesSome Channels
If your cable box descrambles only some channels (such as premium channels), follow the instructions below. You
will need a two=way splitter, an RF (A/B) switch, and four lengths of Antenna cable, (These items are available at most
electronics stores.)
Find and disconnect the cable that is
connected to the ANT IN terminal on your
cable box.
This terminal might be labeled "ANT IN",
"VHF IN" or simply, "IN".
2, Connect this cable to a two-way splitter.
incoming
cable Splitter
3, Connect an Antenna cable between the
OUTPUT terminal on the splitter and the IN
terminal on the cable box.
4, Connect an Antenna cable between the ANT
OUT terminal on the cable box and the B-IN
terminal on the RF(A/B) switch.
sp,,....--I ..........1
Cable Box
incoming tN CABLE OUT
cable
Splitter RF (A!B)
Cable Box Switch
G, Connect another cable between the other
OUT terminal on the splitter and the A-IN
terminal on the RF (A/B) switch.
Cable Box Switch
6, Connect the last Antenna cable between the
OUT terminal on the RF (A/B) switch and the
ANT IN terminal on the rear of the TV.
,4&
_ L _ _==== ====_ TV Rear
i
cable Splitter _ J RF (h/B)
Switch
After you have made this connection, set the A/B switch to the "A" position for normal viewing. Set the A/B switch tothe "B" position
to view scrambled channels. (When you set the A/B switch to "B", you will need to tune your TV to the cable box's output channel,
which is usually channel 3 or4.)
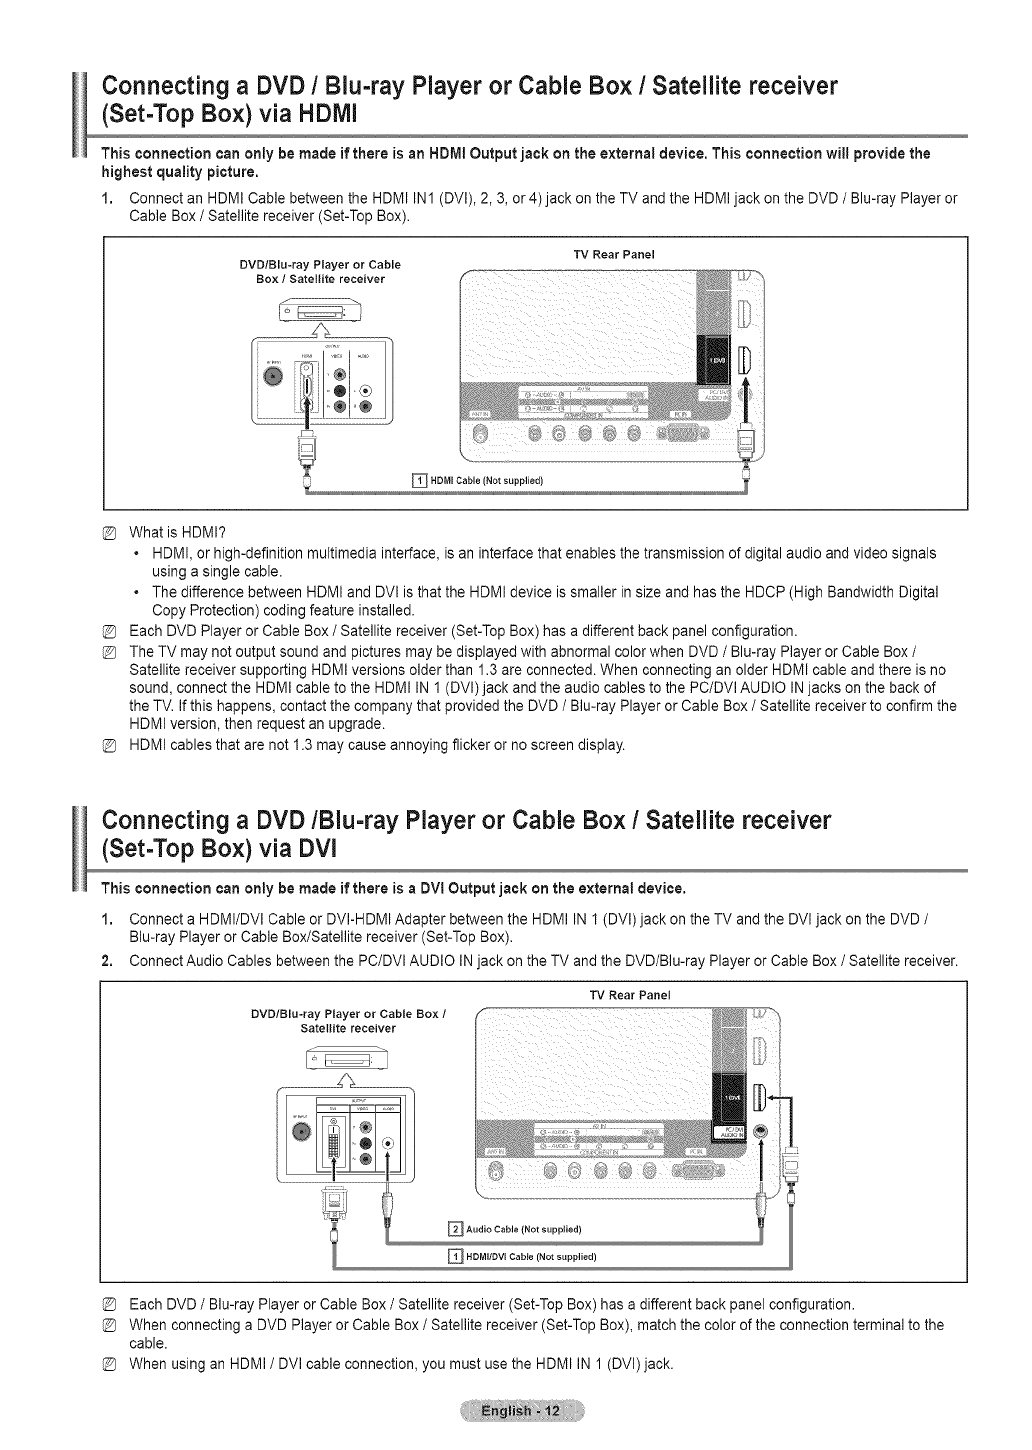
Connecting aDVD /Biu-ray Player or Cable Box /Satellite receiver
(Set-Top Box) via HDMi
This connection can only be made if there is an HDMI Output jack on the e×ternai device. This connection will provide the
highest quality picture.
1. Connect an HDMI Cable between the HDMI IN1 (DVI), 2, 3, or 4)jack on the TV and the HDMI jack on the DVD /Blu-ray Player or
Cable Box /Satellite receiver (Set-Top Box).
TV Rear Panel
DVD/Blu-ray Player or Cable
What is HDMI?
HDMI, or high-definition multimedia interface, is an interface that enables the transmission of digital audio and video signals
using a single cable.
•The difference between HDMI and DVl is that the HDMI device is smaller in size and has the HDCP (High Bandwidth Digital
Copy Protection) coding feature installed.
Each DVD Player or Cable Box /Satellite receiver (Set-Top Box) has a different back panel configuration.
The TV may not output sound and pictures may be displayed with abnormal color when DVD /Blu-ray Player or Cable Box /
Satellite receiver supporting HDMI versions older than 1.3 are connected. When connecting an older HDMI cable and there is no
sound, connect the HDMI cable to the HDMI IN 1 (DVl) jack and the audio cables to the PC/DVl AUDIO INjacks on the back of
the TV. If this happens, contact the company that provided the DVD /Blu-ray Player or Cable Box /Satellite receiver to confirm the
HDMI version, then request an upgrade.
HDMI cables that are not 1.3 may cause annoying flicker or no screen display.
Connecting a DVD/Blu-ray Player or Cable Box /Satellite receiver
(Set-Top Box) via DVl
This connection can only be made if there is a DVI Output jack on the e×ternal device.
1. Connect a HDMI/DVI Cable or DVI-HDMI Adapter between the HDMI IN 1(DVI)jack on the TV and the DVI jack on the DVD /
Blu-ray Player or Cable Box/Satellite receiver (Set-Top Box).
2. Connect Audio Cables between the PC/DVI AUDIO INjack on the TV and the DVD/Blu-ray Player or Cable Box /Satellite receiver.
TV Rear Panel
DVO/Blu-ray Player or Cable Box /
Satellite receiver
i{i} b3 /
_Audio Cable (Not supplied)
_ HDMI/DVl Cable (Not supplied)
Each DVD /Blu-ray Player or Cable Box /Satellite receiver (Set-Top Box) has a different back panel configuration.
When connecting a DVD Player or Cable Box /Satellite receiver (Set-Top Box), match the color of the connection terminal to the
cable.
When using an HDMI /DVl cable connection, you must use the HDMI IN 1 (DVl)jack.
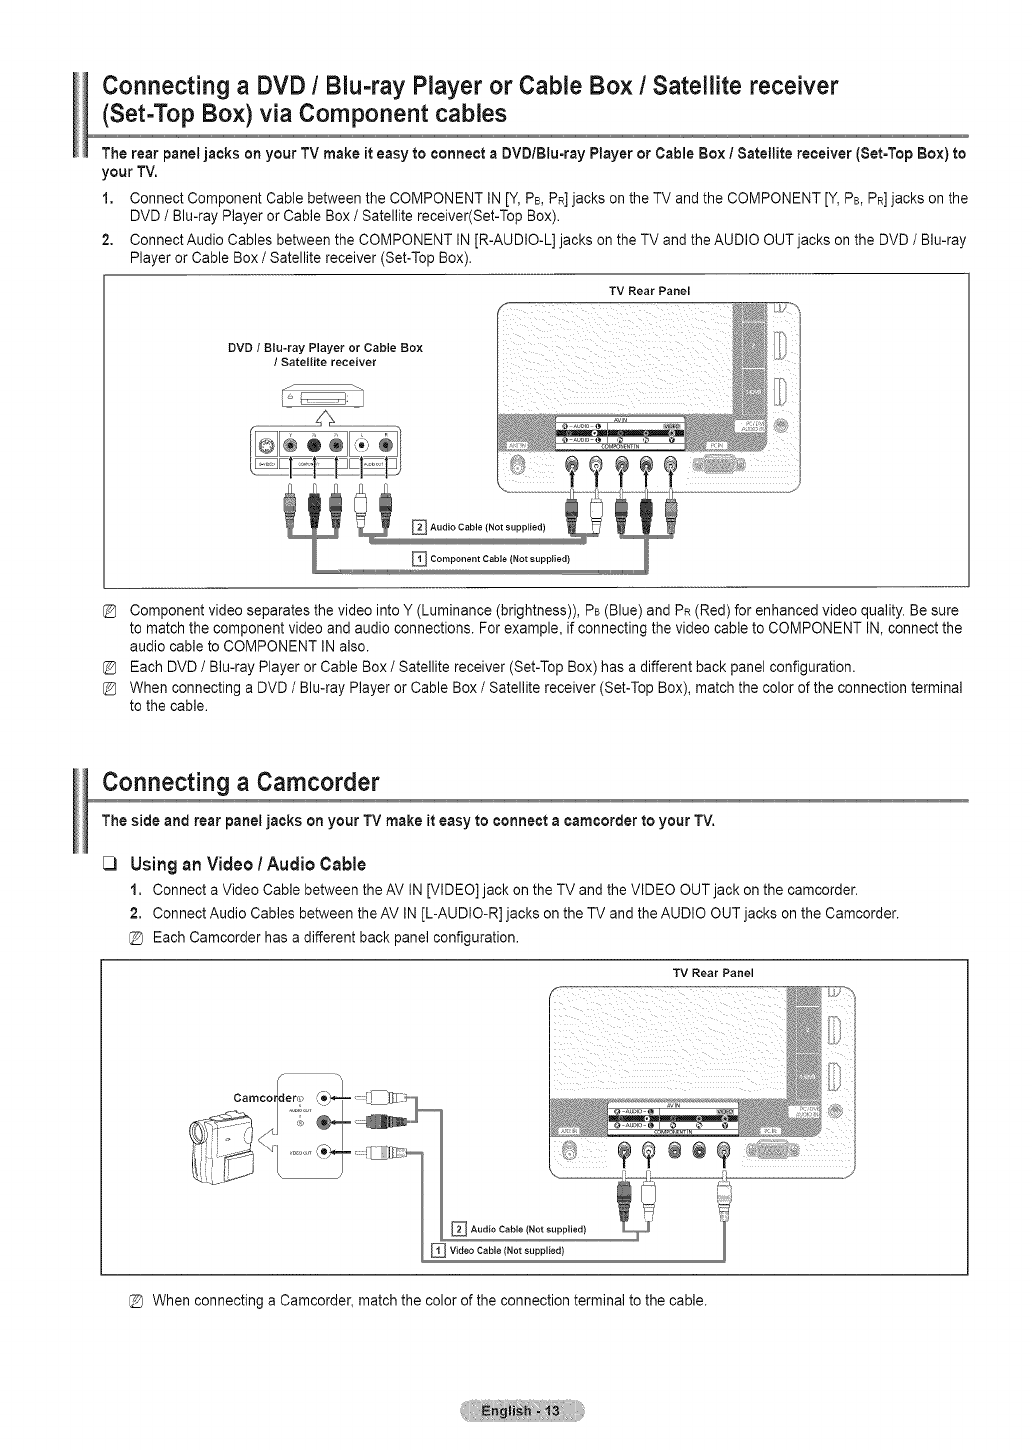
Connecting a DVD /Blu-ray Player or Cable Box /Satellite receiver
(Set-Top Box) via Component cables
The rear panel jacks on your TV make it easy to connect aDVD/Blu=ray Player or Cable Box /Satellite receiver (Set=Top Box) to
your TV,
1. Connect Component Cable between the COMPONENT IN [Y, PB,PR]jacks onthe TV and the COMPONENT [Y,PB,PR]jacks on the
DVD /Blu-ray Player or Cable Box /Satellite receiver(Set-Top Box).
2. Connect Audio Cables between the COMPONENT IN [R-AUDIO-L] jacks on the TV and the AUDIO OUT jacks on the DVD /Blu-ray
Player or Cable Box /Satellite receiver (Set-Top Box).
TV Rear Panel
DVD /Blu-ray Player or Cable Box
/Satellite receiver
_ Audio Cable (Not supplied)
D Component Cable (Not supplied)
Component video separates the video into Y (Luminance (brightness)), PB(Blue) and PR (Red) for enhanced video quality. Be sure
to match the component video and audio connections. For example, if connecting the video cable to COMPONENT IN, connect the
audio cable to COMPONENT INalso.
Each DVD /Blu-ray Player or Cable Box /Satellite receiver (Set-Top Box) has a different back panel configuration.
When connecting a DVD /Blu-ray Player or Cable Box /Satellite receiver (Set-Top Box), match the color of the connection terminal
to the cable.
Connecting a Camcorder
The side and rear paneljacks on your TV make it easy to connect acamcorder to your TV.
_3 Usingan Video !Audio Cable
1. Connect a Video Cable between the AV IN [VIDEO] jack on the TV and the VIDEO OUT jack on the camcorder.
2. Connect Audio Cables between the AV IN [L-AUDIO-R] jacks on the TV and the AUDIO OUT jacks on the Camcorder.
(_ Each Camcorder has a different back panel configuration.
TV Rear Panel
Camcot
_Audio Cable (Not supplied}
D Video Cable (Not supplied)
When connecting a Camcorder, match the color of the connection terminal to the cable.

Using an HDMI Cable
1. Connectan HDMICablebetweenthe HDMIIN (1(DVI),2, 3, or4)jack ontheTV andtheHDMIjackonthecamcorder.
TV Rear Panel
Camcorder
_HDMI Cable (Not supplied)
Each Camcorder has a different back panel configuration.
Connecting a VCR
VideoConnection
These instructions assume that you have already connected your TV to an antenna or a cable TV system (according to the
instructions on pages 10~11). Skip step 1 if you have not yet connected to an antenna or a cable system.
1. Unplug the cable or antenna from the back of the TV.
2. Connect the cable or antenna to the ANT IN terminal on the back of the VCR.
3. Connect an Antenna Cable between the ANT OUT terminal on the VCR and the ANT IN terminal on the TV.
4. Connect a Video Cable between the AV IN [Y/VIDEO] jack on the TV and the VIDEO OUT jack on the VCR.
6. Connect Audio Cables between the AV IN [R-AUDIO-L] jacks on the TV and the AUDIO OUT jacks on the VCR
TV Rear Panel
VCR Rear Panel
Q
D
_ Audio Cable(Not supplied)
_ Video Cable(Not supplied)
If you have a "mono" (non-stereo) VCR, use a Y-connector (not supplied) to connect to the right and left audio input jacks of the
TV. Alternatively, connect the cable to the "R" jack.
If your VCR is stereo, you must connect two cables.
EachVCR has a different back panel configuration.
When connecting a VCR, match the color of the connection terminal to the cable.
When connecting to AV IN, the color of the AV IN [Y/VIDEO] jack (Green) does not match the color of the video cable (Yellow).
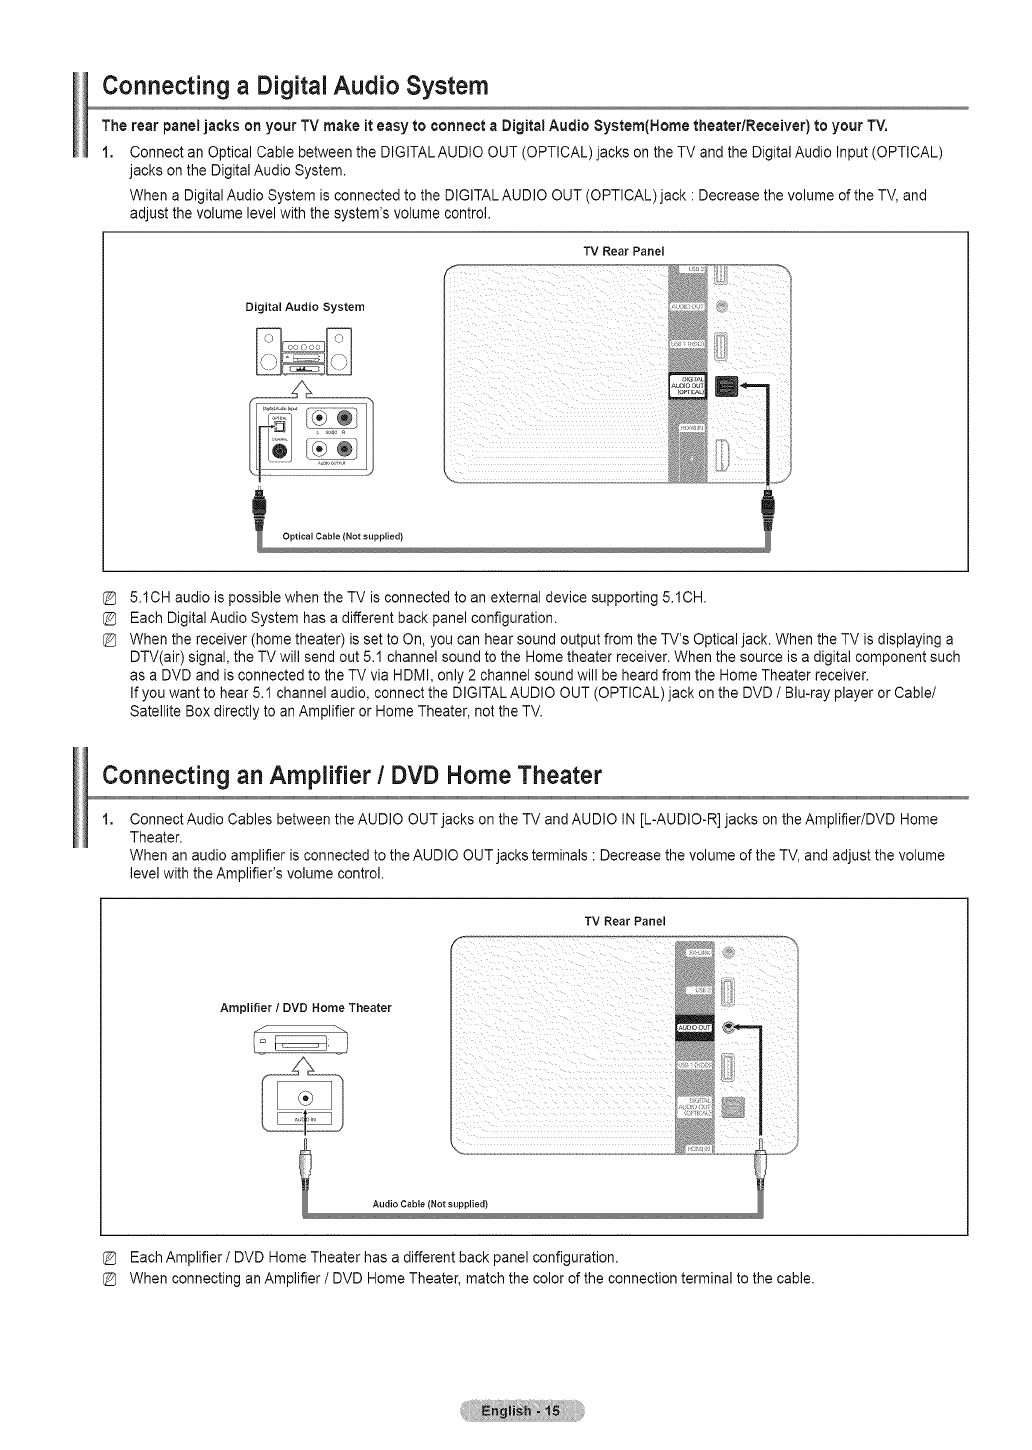
Connecting aDigital Audio System
The rear panel jacks on your TV make it easy to connect aDigital Audio System(Home theaterlReceiver) to your TV.
1. Connect an Optical Cable between the DIGITAL AUDIO OUT (OPTICAL) jacks on the TV and the Digital Audio Input (OPTICAL)
jacks on the Digital Audio System.
When a Digital Audio System is connected to the DIGITAL AUDIO OUT (OPTICAL)jack : Decrease the volume of the TV, and
adjust the volume level with the system's volume control.
TV Rear Panel
Digital Audio System
5.1CH audio is possible when the TV is connected to an external device supporting 5.1CH.
Each Digital Audio System has a different back panel configuration.
When the receiver (home theater) is set to On, you can hear sound output from the TV's Optical jack. When the TV is displaying a
DTV(air) signal, the TVwill send out 5.1 channel sound to the Home theater receiver. When the source is a digital component such
as a DVD and is connected to the TV via HDMI, only 2 channel sound will be heard from the Home Theater receiver.
If you want to hear 5.1 channel audio, connect the DIGITAL AUDIO OUT (OPTICAL)jack on the DVD /Blu-ray player or Cable/
Satellite Box directly to an Amplifier or Home Theater, not the TV.
Connecting an Amplifier /DVD Home Theater
1, Connect Audio Cables between the AUDIO OUT jacks on the TV and AUDIO IN [L-AUDIO-R] jacks on the Amplifier/DVD Home
Theater.
When an audio amplifier is connected to the AUDIO OUT jacks terminals : Decrease the volume of the TV, and adjust the volume
level with the Amplifier's volume control.
Amplifier /DVD Home Theater
TV Rear Panel
Audio Cable (Not supplied)
Each Amplifier /DVD Home Theater has a different back panel configuration.
When connecting an Amplifier /DVD Home Theater, match the color of the connection terminal to the cable.
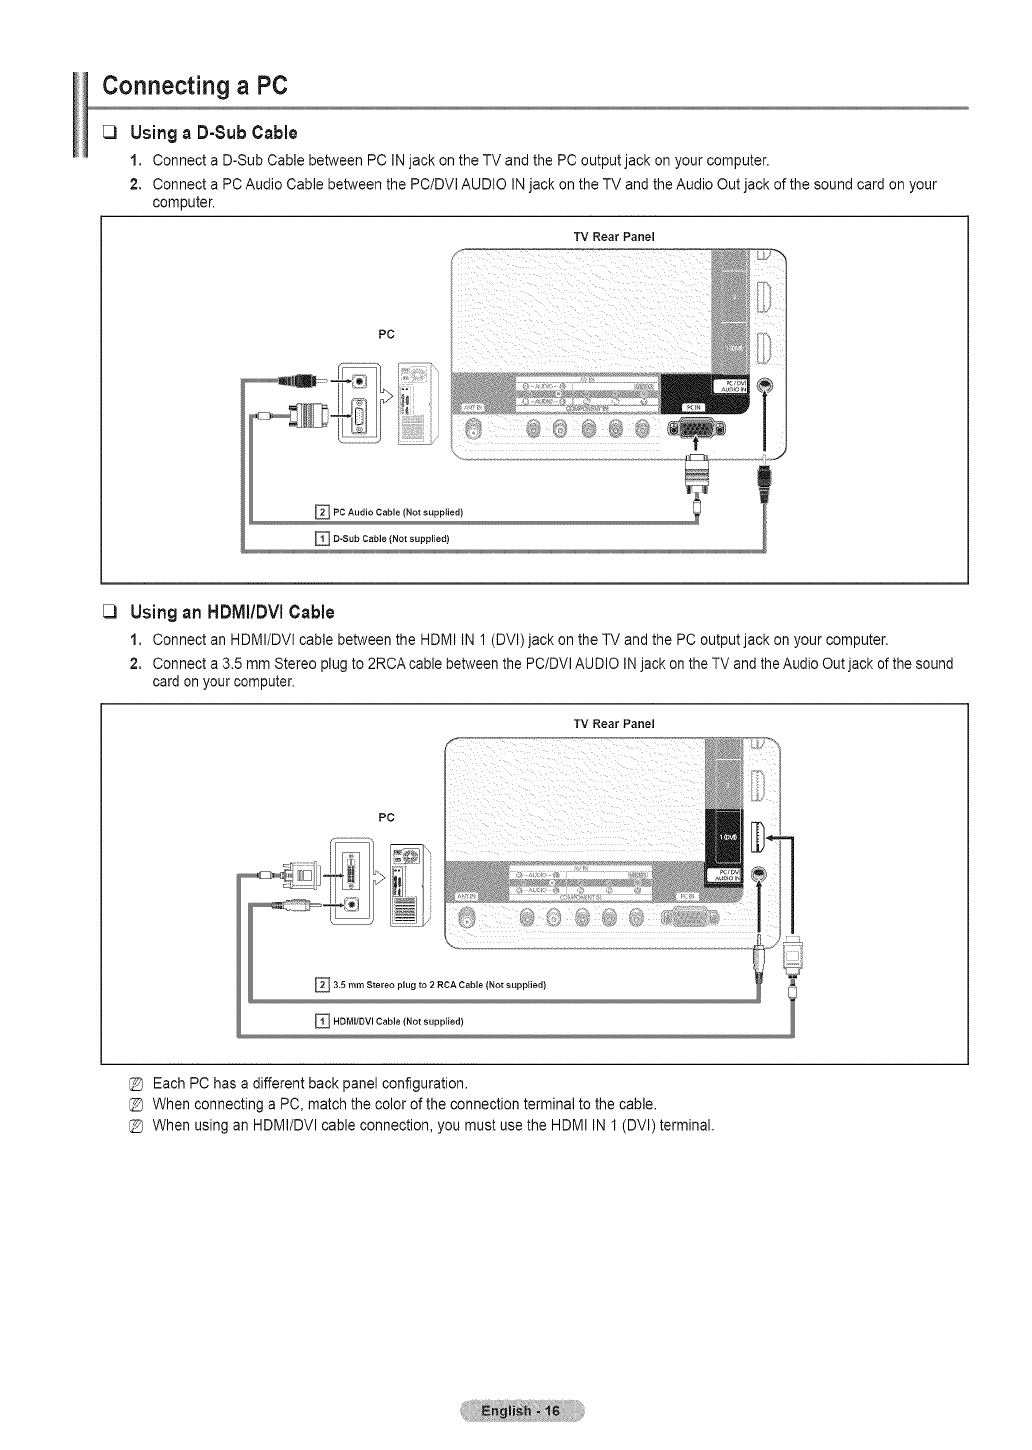
Connecting aPC
UsingaD-Sub Cable
1. Connect a D-Sub Cable between PC INjack on the TV and the PC output jack on your computer.
2. Connect a PC Audio Cable between the PC/DVl AUDIO IN jack on the TV and the Audio Out jack of the sound card on your
computer.
TV Rear Panel
PC
_D-Sub Cable (Not supplied)
C) Usingan HDMI/DVICable
1. Connect an HDMI/DVI cable between the HDMI IN 1 (DVl)jack on the TV and the PC output jack on your computer.
2. Connect a 3.5 mm Stereo plug to 2RCA cable between the PC/DVIAUDIO INjack on the TV and the Audio Out jack of the sound
card on your computer.
TV Rear Panel
PC
3,5 ram Stereo plug to 2 RCA Cable (Not supplied)
_HDMI/DVl Cable (Not supplied)
Each PC has a different back panel configuration.
When connecting a PC, match the color of the connection terminal to the cable.
When using an HDMI/DVl cable connection, you must use the HDMI IN 1 (DVl) terminal.
Operation 1
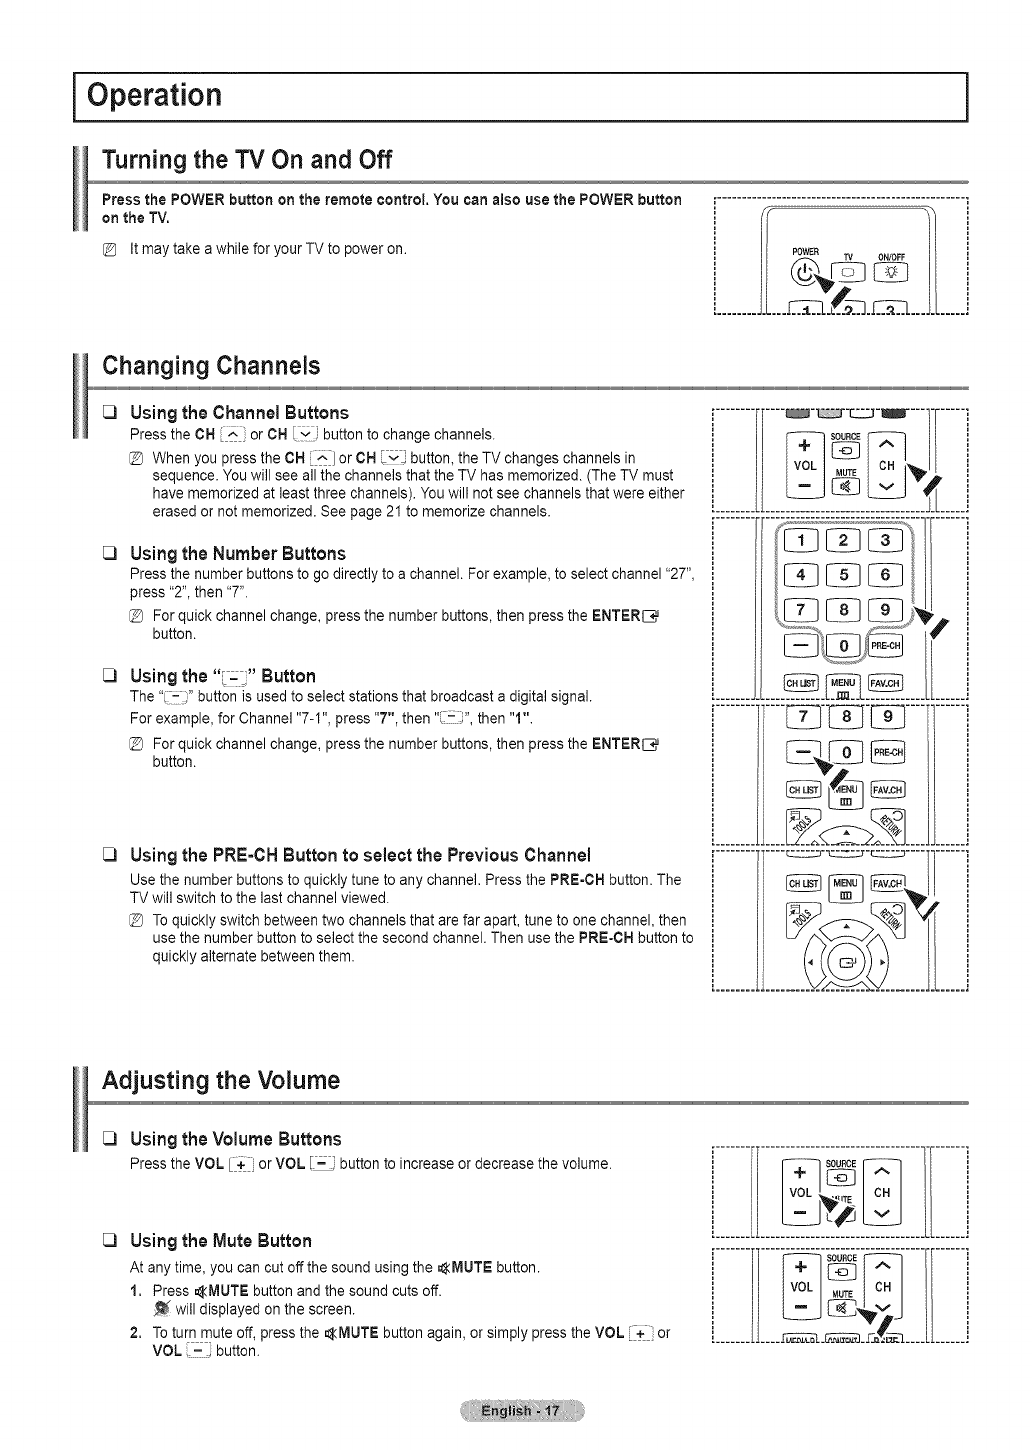
Turning the TV On and Off
Press the POWER button on the remote control. You can also use the POWER button
on the TV.
It may take a while for your TV to power on.
Changing Channels
_3
_3
_3
_3
Usingthe Channel Buttons
Press the CH --4 ;or CH I_J button to change channels.
@ When you press the CH :_] or CH _x_ button, the TV changes channels in
sequence. You will see all the channels that the TV has memorized. (The TV must
have memorized at least three channels). You will not see channels that were either
erased or not memorized. See page 21 to memorize channels.
Using the Number Buttons
Press the number buttons to go directly to a channel. For example, to select channel "27",
press "2", then "7".
@ For quick channel change, press the number buttons, then press the ENTERL_
button.
Usingthe "i-_" Button
The "_z i" button is used to select stations that broadcast a digital signal.
For example, for Channel "7-I ", press "7", then "_-_ ", then "1".
For quick channel change, press the number buttons, then press the ENTERIC,
button.
Using the PRE=CH Button to select the Previous Channel
Use the number buttons to quickly tune to any channel. Press the PRE-CH button. The
TV will switch to the last channel viewed.
@ To quickly switch between two channels that are far apart, tune to one channel, then
use the number button to select the second channel. Then use the PRE-CH button to
quickly alternate between them.
Adjusting the Volume
C)
C)
Using the Volume Buttons
PresstheVOL[_ orVOL [_ buttonto increaseordecreasethevolume.
Usingthe Mute Button
At any time, you can cut off the sound using the _MUTE button.
1. Press _MUTE button and the sound cuts off.
will displayed on the screen.
2. To turn mute off, press the _MUTE button again, or simply press the VOL 1_ _ or
VOL -button.
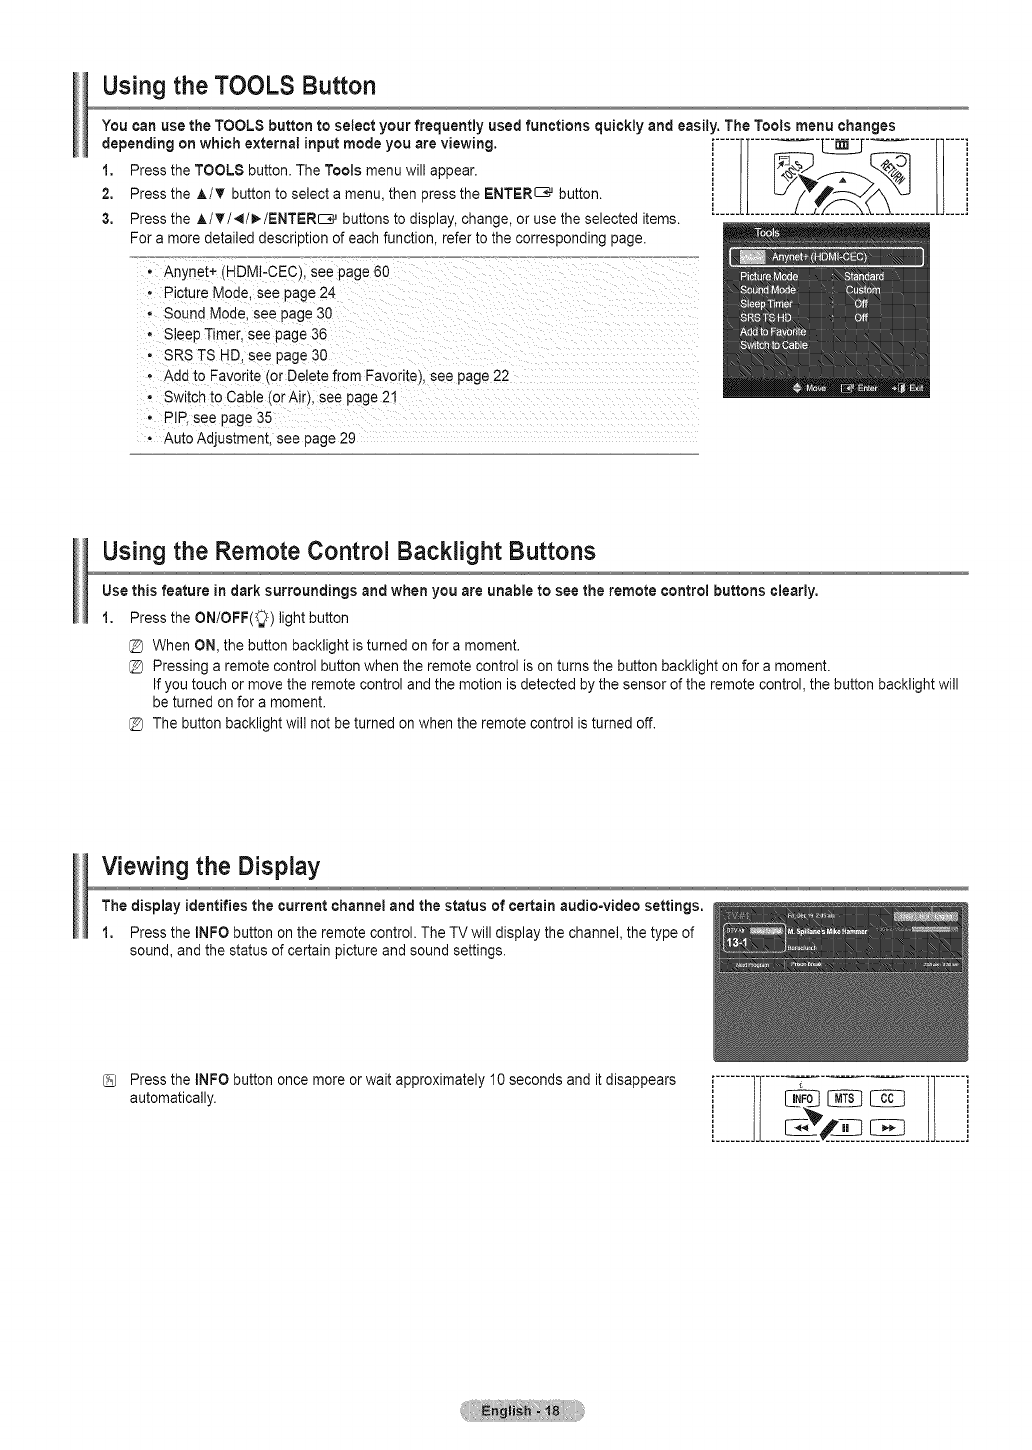
Using the TOOLS Button
You can use the TOOLS button to select your frequently used functions quickly and easily. The Tools menu changes
depending on which external input mode you are viewing.
1, Press the TOOLS button. The Tools menu will appear.
2, Press the A/T button to select a menu, then press the ENTER_ button.
3, Press the A/T/_/_./ENTER_ buttons to display, change, or use the selected items.
For a more detailed description of each function, refer to the corresponding page.
- Anynet+ tH DMI-CEC), see page 60
• Picture Moue. see page 24
Sound Mode, see page 30
Sleep Timer, see page 36
SRS TS HD. see page 30
Add to Favorite [or Delete from Favorite), see page 22
Switch to Cable (or Air), see page 21
PIE see page 35
Auto Adjustment. see page 29
[iiiilIIiiii 211111I]iiiii
Using the Remote Control Backlight Buttons
Use this feature in dark surroundings and when you are unable to see the remote control buttons clearly,
1, Press the ON/OFF(_) light button
@ When ON, the button backlight is turned on for a moment.
@ Pressing a remote control button when the remote control is on turns the button backlight on for a moment.
If you touch or move the remote control and the motion is detected by the sensor of the remote control, the button backlight will
be turned on for a moment.
@ The button backlight will not be turned on when the remote control is turned off.
Viewing the Display
The display identifies the current channel and the status of certain audio-video settings.
1, Press the INFO button on the remote control. The TV will display the channel, the type of
sound, and the status of certain picture and sound settings.
Press the INFO button once more or wait approximately 10 seconds and it disappears
automatically.
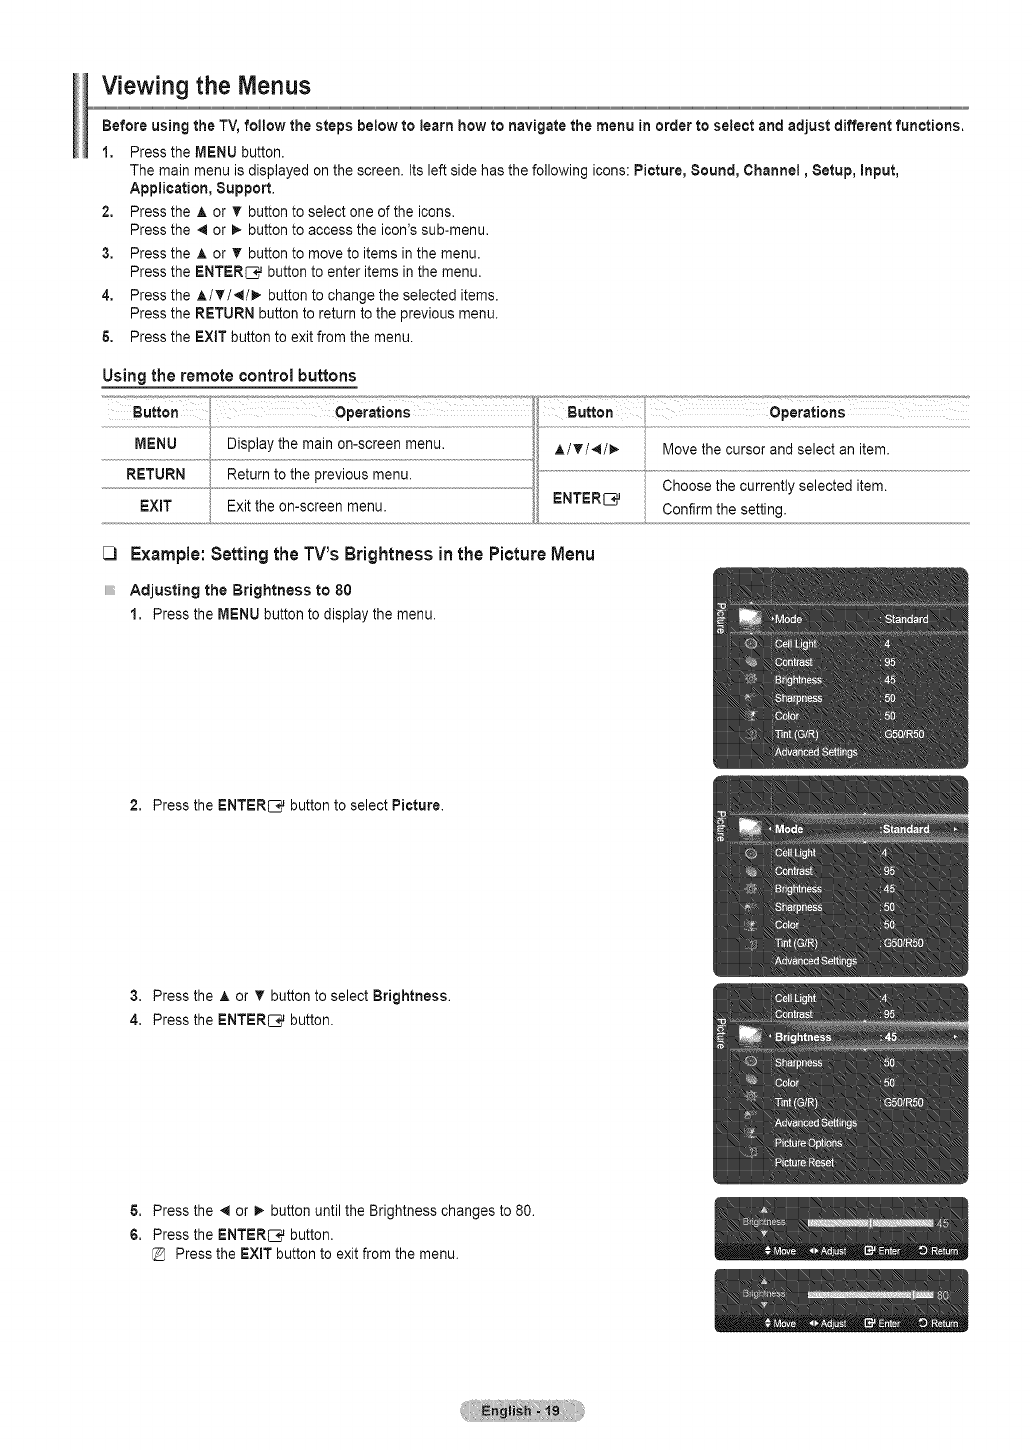
Viewing the Menus
Before using the TV, fo!low the steps below to learn how to navigate the menu in order to select and adjust different functions.
1, Pressthe MENU button.
The main menu is displayed on the screen. Its left side has the following icons: Picture, Sound, Channel, Setup, input,
Application, Support.
2, Press the A or V button to select one of the icons.
Press the _ or _. button to access the icon's sub-menu.
3, Press the A or T button to move to items in the menu,
Press the ENTER_ button to enter items in the menu,
4, Press the ,_/T/_/_ button to change the selected items,
Press the RETURN button to return to the previous menu.
& Press the EXIT button to exit from the menu.
Using the remote control buttons
[3 Example:Setting the TV's Brightness inthe Picture Menu
Adjusting the Brightness to 80
1. Press the MENU button to display the menu.
2. Press the ENTER_ button to select Picture.
3. Press the A or T button to select Brightness.
4. Press the ENTER_ button.
5. Press the _ or I_ button until the Brightness changes to 80.
6. Press the ENTER_ button.
Press the EXiT button to exit from the menu.
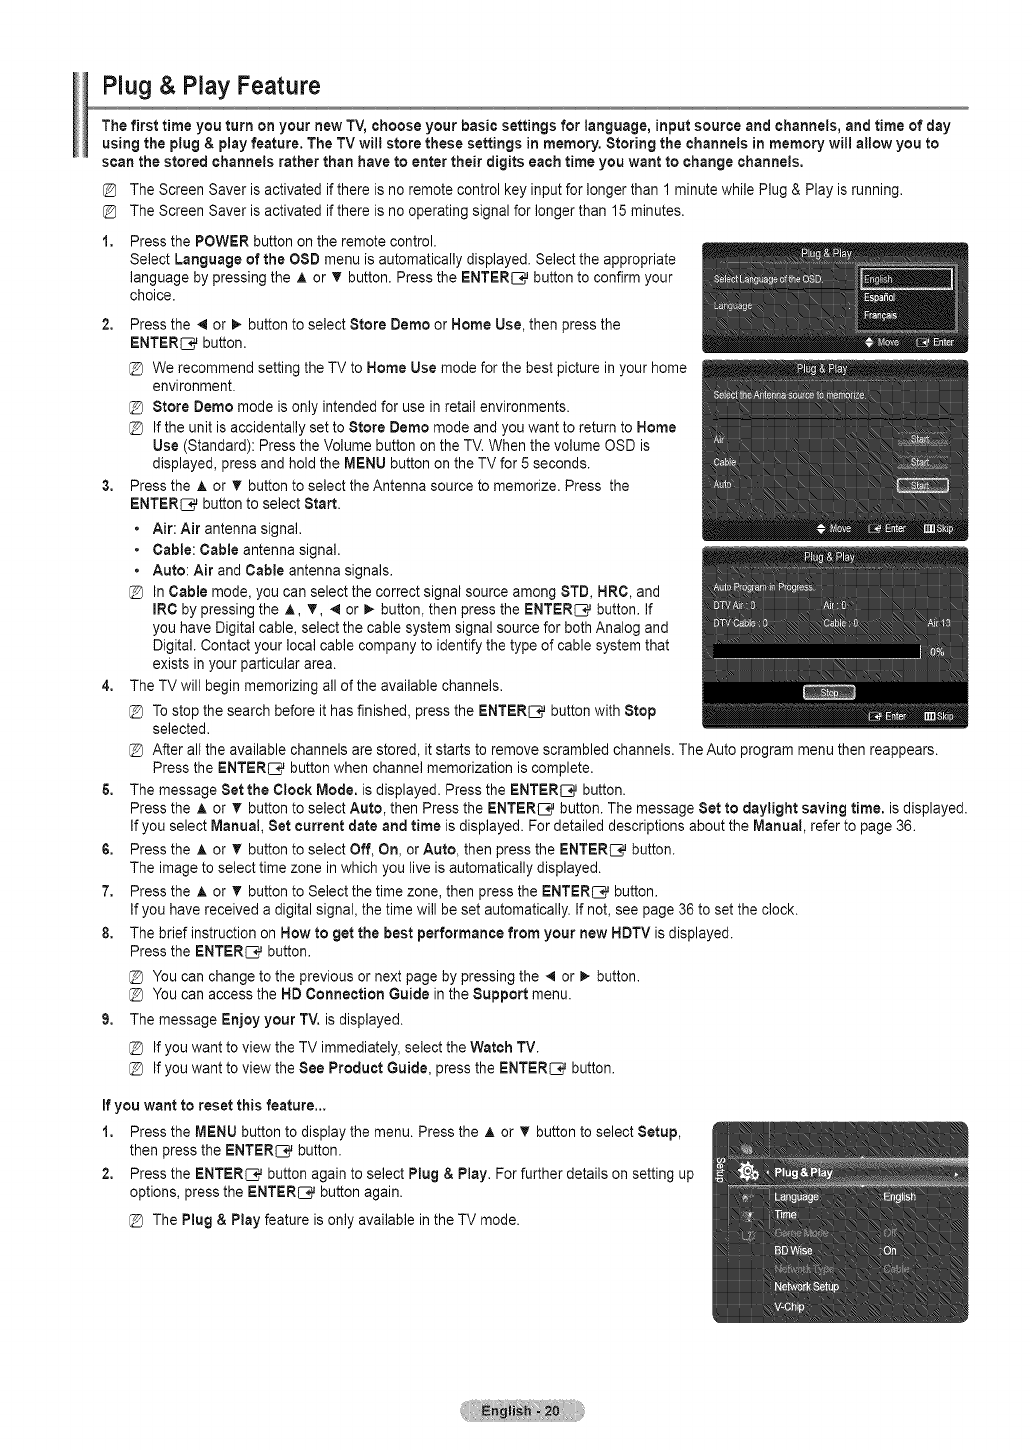
Plug & Play Feature
The first time you turn on your new TV, choose your basic settings for language, input source and channels, and time of day
using the plug & play feature. The TV will store these settings in memory. Storing the channels in memory will allow you to
scan the stored channels rather than have to enter their digits each time you want to change channels.
The Screen Saver is activated if there is no remote control key input for longer than 1 minute while Plug & Play is running.
The Screen Saver is activated if there is no operating signal for longer than 15 minutes.
1,
2,
3,
4,
6,
6,
7,
8.
9,
Press the POWER button on the remote control.
Select Language of the OSD menu is automatically displayed. Select the appropriate
language by pressing the A or T button. Press the ENTER[__ button to confirm your
choice.
Press the _1or _. button to select Store Demo or Home Use, then press the
ENTER_ button.
@ We recommend setting the TV to Home Use mode for the best picture in your home
environment.
@ Store Demo mode is only intended for use in retail environments.
@ If the unit is accidentally set to Store Demo mode and you want to return to Home
Use (Standard): Press the Volume button on the TV. When the volume OSD is
displayed, press and hold the MENU button on the TV for 5 seconds.
Press the A or T button to select the Antenna source to memorize. Press the
ENTER_ button to select Start.
• Air: Air antenna signal.
• Cable: Cable antenna signal.
• Auto: Air and Cable antenna signals.
@ In Cable mode, you can select the correct signal source among STD, HRC, and
IRC by pressing the A T, _1or _ button, then press the ENTER_ button. If
you have Digital cable, select the cable system signal source for both Analog and
Digital. Contact your local cable company to identify the type of cable system that
exists in your particular area.
The TV will begin memorizing all of the available channels.
@ To stop the search before it has finished, press the ENTER[__ button with Stop
selected.
@ After all the available channels are stored, it starts to remove scrambled channels. The Auto program menu then reappears.
Press the ENTER_ button when channel memorization is complete.
The message Set the Clock Mode. is displayed. Press the ENTERI__ button.
Press the A or T button to select Auto, then Press the ENTER[__ button. The message Set to daylight saving time. is displayed.
If you select Manua!, Set current date and time is displayed. For detailed descriptions about the Manual, refer to page 36.
Press the A or T button to select Off, On, or Auto, then press the ENTER[__ button.
The image to select time zone in which you live is automatically displayed.
Press the ,L or T button to Select the time zone, then press the ENTER_ button.
If you have received a digital signal, the time will be set automatically. If not, see page 36 to set the clock.
The brief instruction on How to get the best performance from your new HDTV is displayed.
Press the ENTER_ button.
@ You can change to the previous or next page by pressing the _ or I_ button.
@ You can access the HD Connection Guide in the Support menu.
The message Enjoy your TV. is displayed.
@ If you want to view the TV immediately, select the Watch TV.
@ If you want to view the See Product Guide, press the ENTER_ button.
If you want to reset this feature...
1, Press the MENU button to display the menu. Press the A or _' button to select Setup,
then press the ENTER_ button.
2, Press the ENTER_ button again to select Plug & Play. For further details on setting up
options, press the ENTER_ button again.
@ The Plug & Play feature is only available in the TV mode.
i Channel Control i
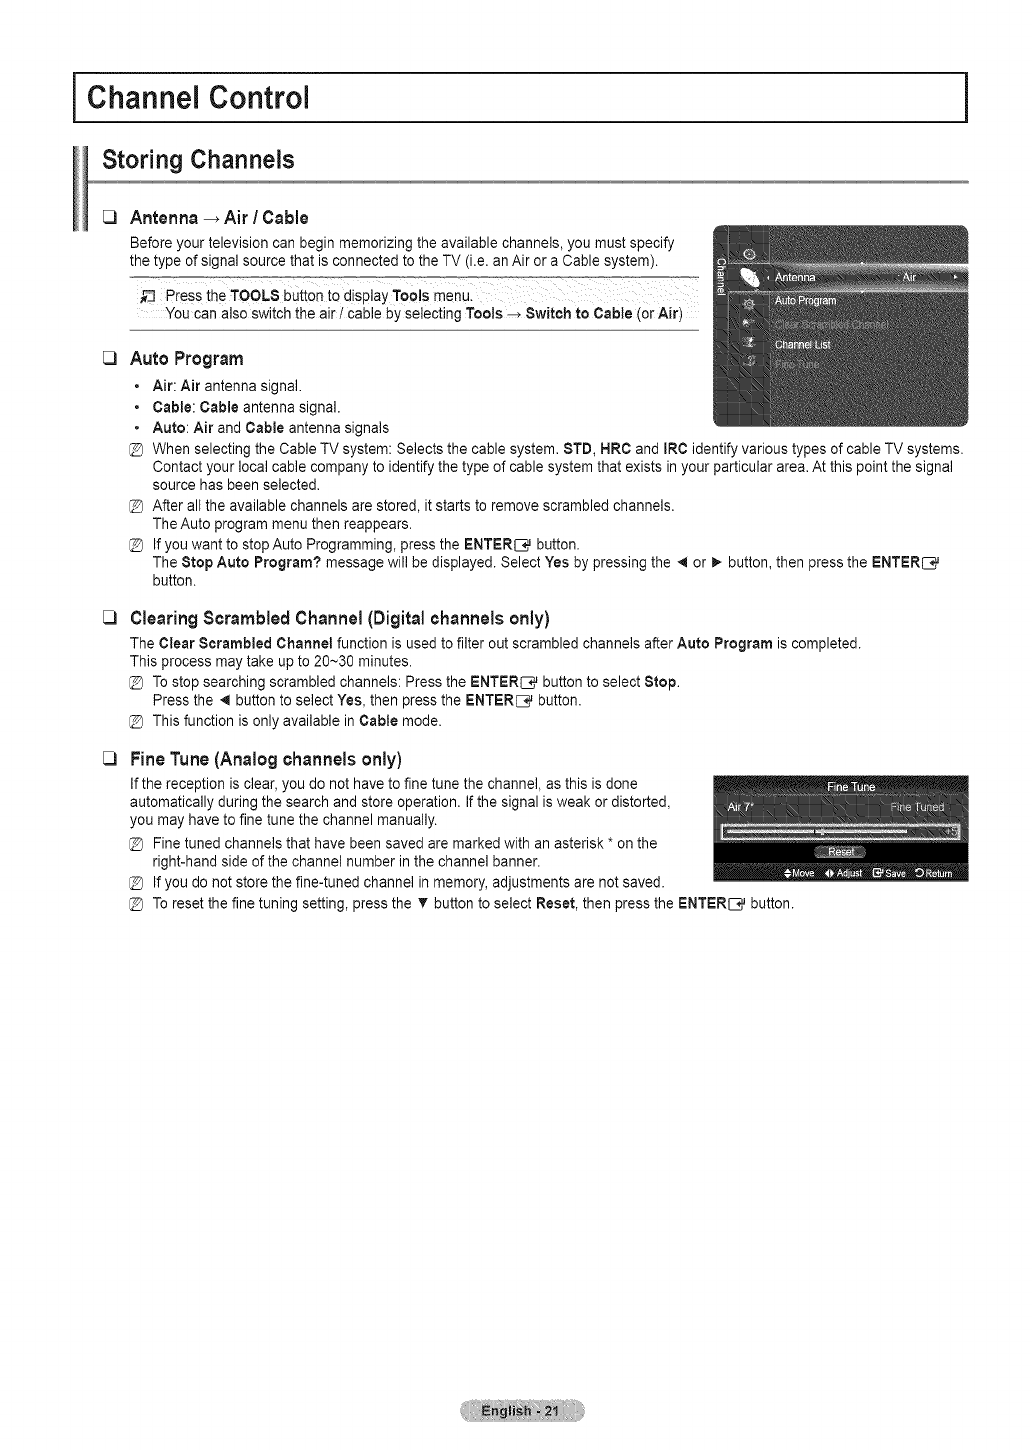
Storing Channels
[3 Antenna _ Air /Cable
Before your television can begin memorizing the available channels, you must specify
the type of signal source that is connected to the TV (i.e. an Air or a Cable system).
PreSsthe TOOLS button to display ToQis menul
You can also switch the air ! cable by selecting Tools -_ Switch to Cable (or Air)
[_ Auto Program
•Air: Air antenna signal.
•Cable: Cable antenna signal.
•Auto: Air and Cable antenna signals
@ When selecting the Cable TV system: Selects the cable system. STD, HRC and IRC identify various types of cable TV systems.
Contact your local cable company to identify the type of cable system that exists in your particular area. At this point the signal
source has been selected.
@ After all the available channels are stored, it starts to remove scrambled channels.
The Auto program menu then reappears.
@ If you want to stop Auto Programming, press the ENTERI_ button.
The Stop Auto Program? message will be displayed. Select Yes by pressing the 41 or _. button, then press the ENTER_
button.
C)
C)
ClearingScrambled Channel(Digitalchannelsonly)
The Clear Scrambled Channel function is used to filter out scrambled channels after Auto Program is completed.
This process may take up to 20~30 minutes.
@ To stop searching scrambled channels: Press the ENTER_ button to select Stop.
Press the _ button to select Yes, then press the ENTER_ button.
@ This function is only available in Cable mode.
Fine Tune (Analogchannelsonly)
If the reception is clear, you do not have to fine tune the channel, as this is done
automatically during the search and store operation. If the signal is weak or distorted,
you may have to fine tune the channel manually.
@ Fine tuned channels that have been saved are marked with an asterisk * on the
right-hand side of the channel number in the channel banner.
@ If you do not store the fine-tuned channel in memory, adjustments are not saved.
@ To reset the fine tuning setting, press the T button to select Reset, then press the ENTERIC, button.
Managing Channels
[3 ChannelList
Using this menu, you can Add /Delete or set Favorite channels and use the program guide for digital broadcasts.
Press the OH LIST button on the remote control to display the Channel list menu.
@ Select a channel in the All Channels, Added Channels, Favorite, or Programmed I II
screen by pressing the A or _' buttons, and pressing the ENTERI[__button. Then you III
can watch the selected channel.
• Al! Channels: Shows all currently available channels.
•Added Channels: Shows all added channels.
•Favorite: Shows all favorite channels.
Programmed: Shows all current reserved programs.
Using the Color buttons with the Channel List
• Red (Antenna): Toggle between your TV, Radio, Data /Other andAII.
• Green (Zoom): Enlarges or shrinks a channel number.
• Ye!low (Select): Selects multiple channel lists.
_TOOLS (Tools): Displays theAdd (or Delete), Add to Favorite (or Delete from Favorite), Timer Viewing, Channel Name
Edit, Select All, Deselect All, and Auto Program menus (The Options menus may differ depending on the situation.)
@ Channel Status Display Icons
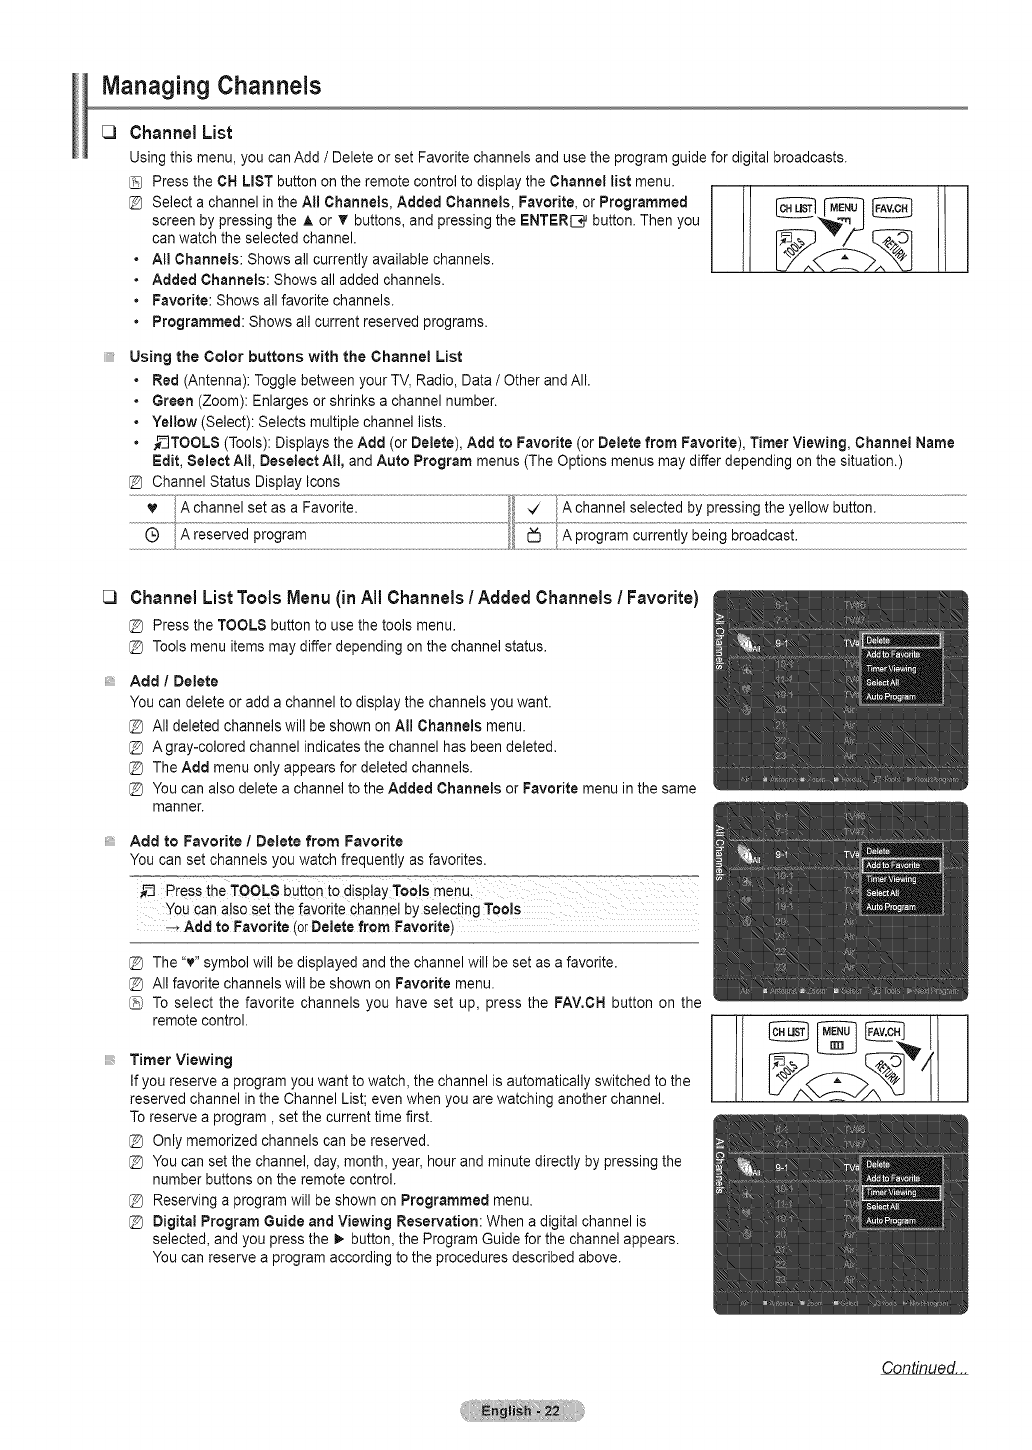
_3 Channel List Tools Menu (in All Channels /Added Channels /Favorite)
PresstheTOOLSbuttonto use thetoolsmenu.
@ Toolsmenuitemsmaydifferdependingonthechannelstatus,
Add /Delete
You can delete or add a channel to display the channels you want.
@ All deleted channels will be shown on All Channels menu.
@ A gray-colored channel indicates the channel has been deleted.
@ The Add menu only appears for deleted channels.
@ You can also delete a channel to the Added Channels or Favorite menu in the same
manner.
Add to Favorite /Delete from Favorite
You can set channels you watch frequently as favorites.
P_--res-s°ihe TOOLS bUtton to dis play°_Too/_s-rnen-u_i=°i'_ =_°=,u_.=°===== .7=,_._= _o
You can also Setthe favorite channel by selecting Tools
_Add to Favorite (orDelete from Favorite)
@ The "v" symbol will be displayed and the channel will be set as a favorite.
@ All favorite channels will be shown on Favorite menu.
To select the favorite channels you have set up, press the FAV.CH button on the
remote control.
Timer Viewing
If you reserve a program you want to watch, the channel is automatically switched to the
reserved channel in the Channel List; even when you are watching another channel.
Toreserve a program, set the current time first.
Only memorized channels can be reserved.
You can set the channel, day, month, year, hour and minute directly by pressing the
number buttons on the remote control.
Reserving a program will be shown on Programmed menu.
@ Digital Program Guide and Viewing Reservation: When a digital channel is
selected, and you press the _ button, the Program Guide for the channel appears.
You can reserve a program according to the procedures described above.
Continued...

_3
Channel Name Edit (Analog channels only)
Channels Can be labeled so that theircall letters appear whenever the channel is selected.
@ The names of digital broadcasting channels are automatically assigned and cannot be labeled.
Select All /Deselect All
You can select or deselect all channels in the channel list.
You can perform the Add /Delete, Add to Favorite /Delete from Favorite function for multiple channels at the same time.
Select the required channels and press the yellow button to set all the selected channels at the same time.
The _/ mark appears to the left of the selected channels.
You can only select Deselect All when there is a selected channel.
Auto Program
For further details on setting up options, refer to page 21.
ChannelListToolsMenu (in Programmed)
You can view, modify or delete a reservation.
Press the TOOLS button to use the tools menu.
Change Info
Select to change a viewing reservation.
Cancel Schedules
Select to cancel a viewing reservation.
Information
Select to view a viewing reservation. You can also change the reservation information.
Select All /Deselect All
You can select or deselect all channels in the channel list.
i Picture Control ]
Changing the Picture Settings
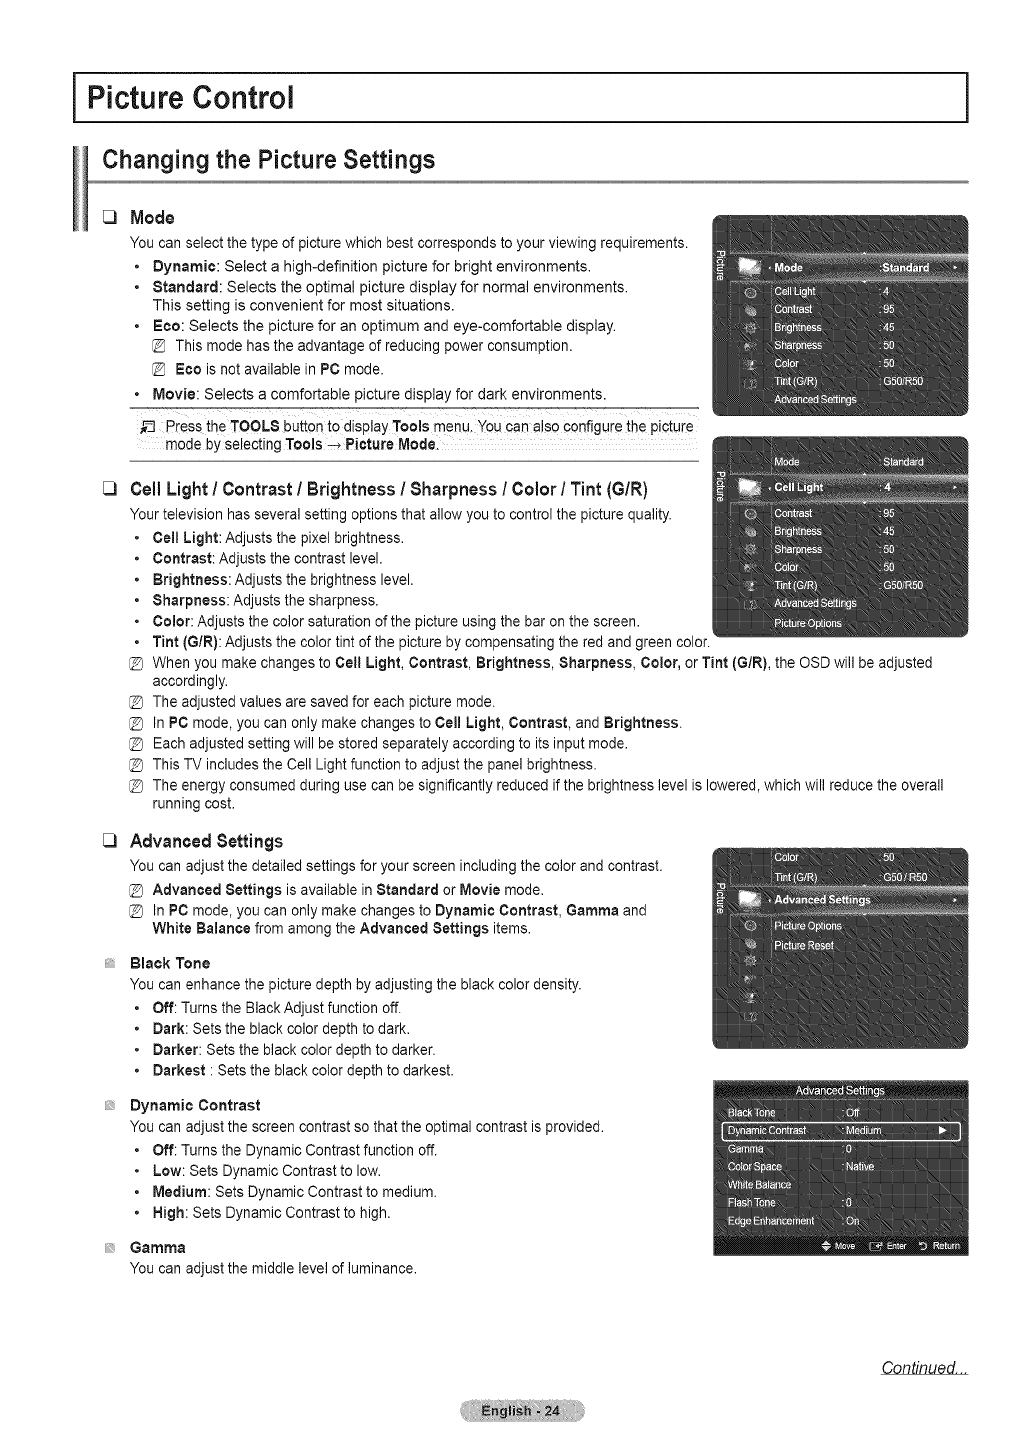
C) Mode
You can select the type of picture which best corresponds to your viewing requirements.
•Dynamic: Select a high-definition picture for bright environments.
•Standard: Selects the optimal picture display for normal environments.
This setting is convenient for most situations.
•Boo:Selects the picture for an optimum and eye-comfortable display.
This mode has the advantage of reducing power consumption.
Eco is not available in PC mode.
•Movie: Selects a comfortable picture display for dark environments.
,_,_=_-,_.... _o_o _,_i.,_oo,_=,,_,.,_ ....
_-_ Press the TOOLS button to display Tools menu, You can also Configurethe picture
mode byselecting Tools-_ Picture Mode.
_3 Cell Light/Contrast/Brightness !Sharpness !Color /Tint (G/R)
Your television has several setting options that allow you to control the picture quality.
Cell Light: Adjusts the pixel brightness.
Contrast: Adjusts the contrast level.
Brightness: Adjusts the brightness level.
Sharpness: Adjusts the sharpness.
Color: Adjusts the color saturation of the picture using the bar on the screen.
Tint (G/R): Adjusts the color tint of the picture by compensating the red and green color.
@ When you make changes to Cell Light, Contrast, Brightness, Sharpness, Color, or Tint (G/R), the OSD will be adjusted
accordingly.
@ The adjusted values are saved for each picture mode.
@ In PC mode, you can only make changes to Cell Light, Contrast, and Brightness.
@ Each adjusted setting will be stored separately according to its input mode.
@ This TV includes the Cell Light function to adjust the panel brightness.
@ The energy consumed during use can be significantly reduced if the brightness level is lowered, which will reduce the overall
running cost.
[3 Advanced Settings
You can adjust the detailed settings for your screen including the color and contrast.
Advanced Settings is available in Standard or Movie mode.
In PC mode, you can only make changes to Dynamic Contrast, Gamma and
White Balance from among the Advanced Settings items.
Black Tone
You can enhance the picture depth by adjusting the black color density.
°Off: Turns the Black Adjust function off.
°Dark: Sets the black color depth to dark.
°Darker: Sets the black color depth to darker.
°Darkest : Sets the black color depth to darkest.
Dynamic Contrast
You can adjust the screen contrast so that the optimal contrast is provided.
°Off: Turns the Dynamic Contrast function off.
° Low: Sets Dynamic Contrast to low.
° Medium: Sets Dynamic Contrast to medium.
°High: Sets Dynamic Contrast to high.
Gamma
You can adjust the middle level of luminance.
Continued...
_3
Color Space
Color Spaceis a colormatrix composedof red, green and bluecolors. Select your favoritecolor space to experiencethe most naturalcolor.
•Auto: Automatically sets the color range depending on the input video source.
•Native: Sets the color range wider than that of the input video source.
•Custom :Adjusts the color range to suit your preference.
Customizing the Color Space
- Adjusts the Color range to suit your preference. Color is available when Color Space is set to Custom.
-Color : Red /Green /Blue /Yellow /Cyan /Magenta
-Red /Green /Blue : You can adjust the RGB values for the selected color.
- Reset : Resets the color space to the default values.
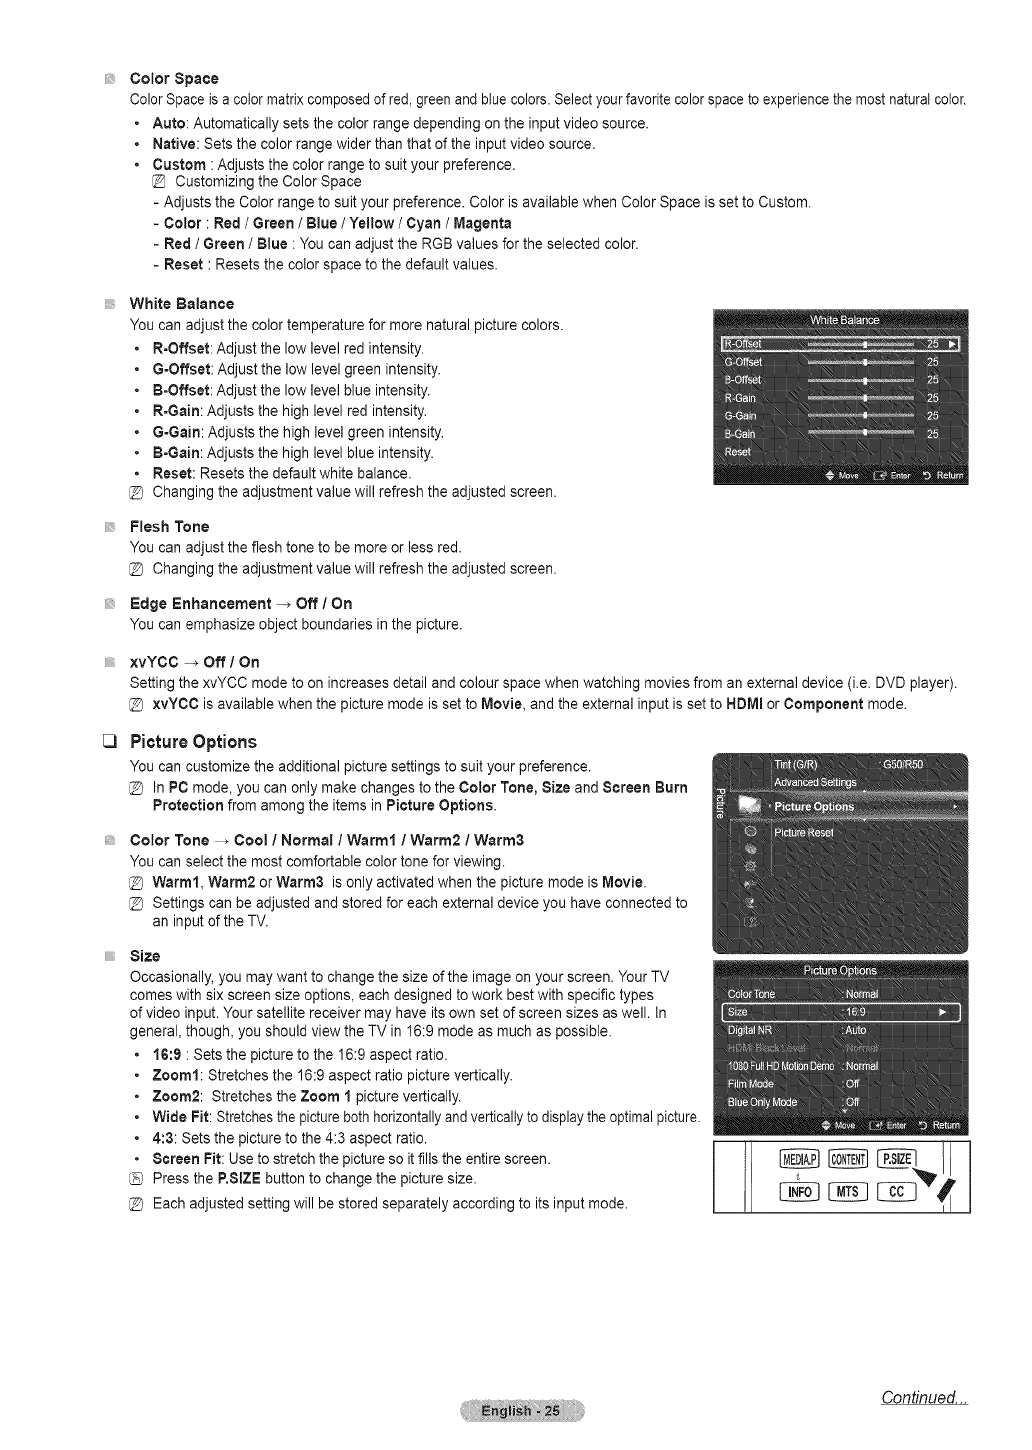
White Balance
You can adjust the color temperature for more natural picture colors.
R=Offset: Adjust the low level red intensity.
G=Offset:Adjust the low level green intensity.
B-Offset: Adjust the low level blue intensity.
R=Gain: Adjusts the high level red intensity.
G-Gain: Adjusts the high level green intensity.
B-Gain: Adjusts the high level blue intensity.
Reset: Resets the default white balance.
Changing the adjustment value will refresh the adjusted screen.
Flesh Tone
You can adjust the flesh tone to be more or less red.
Changing the adjustment value will refresh the adjusted screen.
Edge Enhancement -. Off /On
You can emphasize object boundaries in the picture.
xvYCC -_ Off /On
Setting the xvYCC mode to on increases detail and colour space when watching movies from an external device (i.e. DVD player).
xvYCC is available when the picture mode is set to Movie, and the external input is set to HDMI or Component mode.
PictureOptions
You can customize the additional picture settings to suit your preference.
In PC mode, you can only make changes to the Color Tone, Size and Screen Burn
Protection from among the items in Picture Options.
Color Tone -_ Cool /Normal /Warm1 /Warm2 /Warm3
You can select the most comfortable color tone for viewing.
@ Warm1, Warm2 or Warm3 is only activated when the picture mode is Movie.
@ Settings can be adjusted and stored for each external device you have connected to
an input of the TV.
Size
Occasionally, you may want to change the size of the image on your screen. Your TV
comes with six screen size options, each designed to work best with specific types
of video input. Your satellite receiver may have its own set of screen sizes as well. In
general, though, you should view the TV in 16:9 mode as much as possible.
•16:9 : Sets the picture to the 16:9 aspect ratio.
•Zoom!: Stretches the 16:9 aspect ratio picture vertically.
•Zoom2: Stretches the Zoom 1 picture vertically.
•Wide Fit: Stretchesthe picture bothhorizontallyand verticallyto display the optimal picture.
•4:3: Sets the picture to the 4:3 aspect ratio.
•Screen Fit:Use to stretch the picture so it fills the entire screen.
Press the P.SIZEbutton to change the picture size.
@ Each adjusted setting will be stored separately according to its input mode.
Continued...
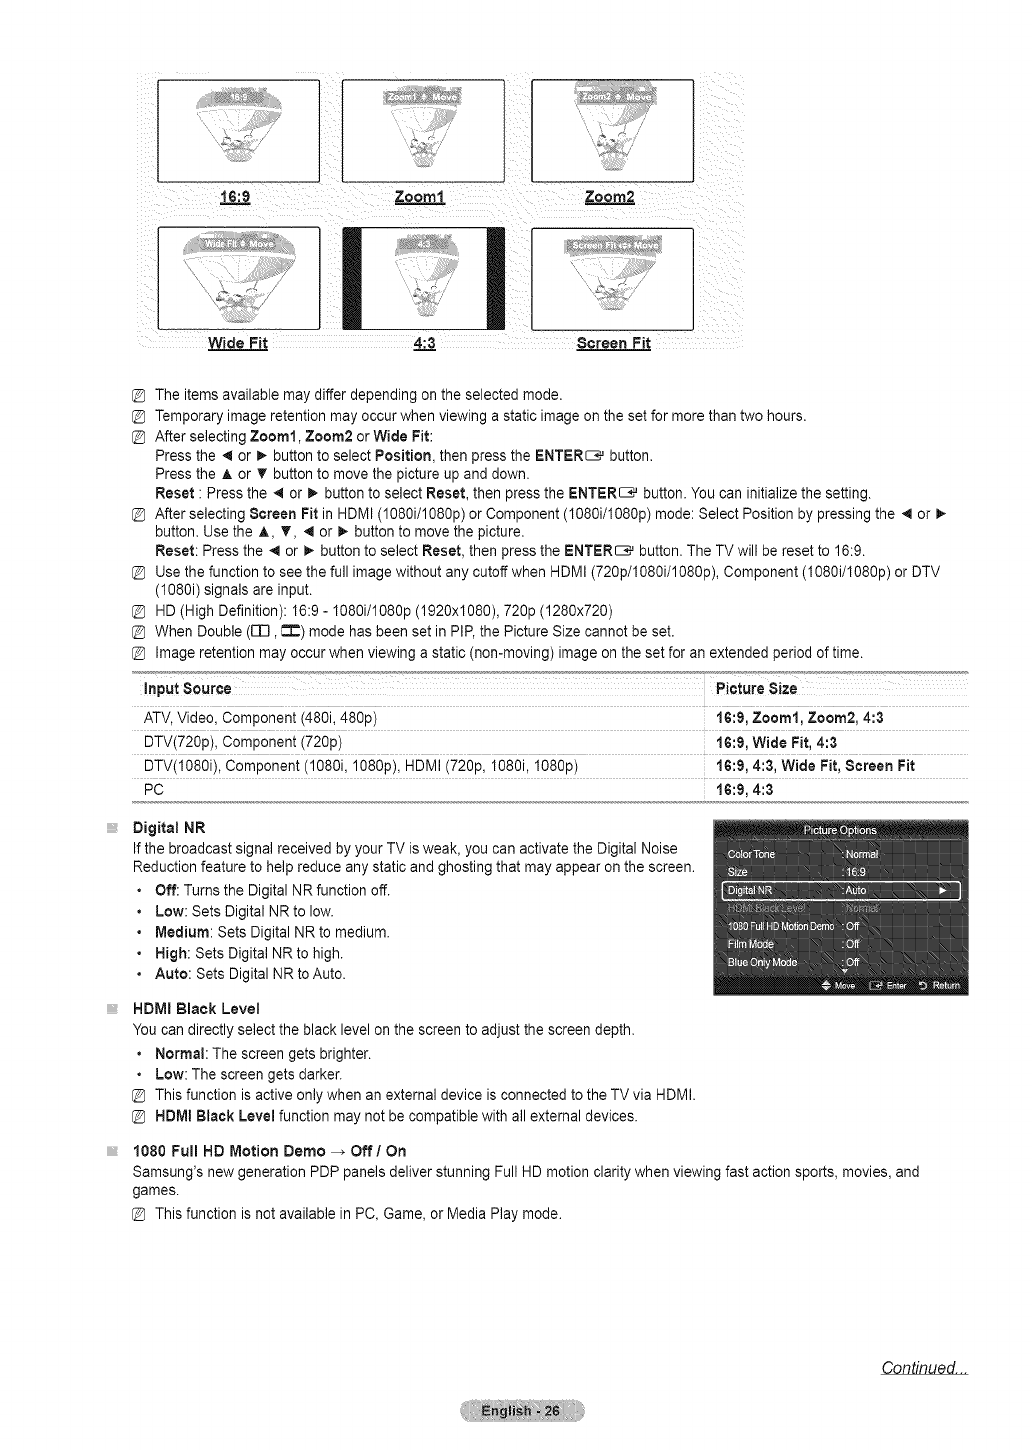
IG:9 Zoom1 Zoom2
Wide Fit 4:3 Screen Fit
The itemsavailable may differ depending on the selected mode.
Temporary image retention may occur when viewing a static image on the set for more than two hours.
After selecting Zoom1, Zoom2 or Wide Fit:
Press the _ or _ button to select Position, then press the ENTER_ button.
Press the A or T button to move the picture up and down.
Reset • Press the _ or _. button to select Reset, then press the ENTER_ button. You can initialize the setting.
After selecting Screen Fit in HDMI (1080i/1080p) or Component (1080i/1080p) mode: Select Position by pressing the 4 or !_
button. Use the A, T, 4 or !_ button to move the picture.
Reset: Press the 4 or _. button to select Reset, then press the ENTER_ button. The TV will be reset to 16:9.
Use the function to see the full image without any cutoff when HDMI (720p/1080i/1080p), Component (1080i/1080p) or DTV
(1080i) signals are input.
HD (High Definition): 16:9 - 1080i/1080p (1920x1080), 720p (1280x720)
When Double (FR I:_) mode has been set in PIP, the Picture Size cannot be set.
Image retention may occur when viewing a static (non-moving) image on the set for an extended period of time.
Picture Size
ATV,Video, Component (480i, 46%) 16:9, Zoom1, Zoom2, 4:3
DTV(720p), Component (72%) 16:9, Wide Fit, 4:3
DTV(1080i), Component (1080i, 1080p), HDMI (720p, 1080i, 1080p) 16:9, 4:3, Wide Fit, Screen Fit
PC !6:9, 4:3
Digital NR
If the broadcast signal received by your TV is weak, you can activate the Digital Noise
Reduction feature to help reduce any static and ghosting that may appear on the screen.
•Off: Turns the Digital NR function off.
• Low: Sets Digital NR to low.
•Medium: Sets Digital NR to medium.
• High:Sets Digital NR to high.
•Auto: Sets Digital NR to Auto.
HDMI Black Level
You can directly select the black level on the screen to adjust the screen depth.
•Normal: The screen gets brighter.
• Low: The screen gets darker.
This function is active only when an external device is connected to the TV via HDMI.
HDMI Black Level function may not be compatible with all external devices.
1080 Full HD Motion Demo-_ Off/On
Samsung's new generation PDP panels deliver stunning Full HD motion clarity when viewing fast action sports, movies, and
games.
This function is not available in PC, Game, or Media Play mode.
Continued...
Film Mode
You can optimize the picture mode for watching movies.
• Off: Turn the Film Mode function off.
• Auto1 :Automatically adjusts the picture for the best quality when watching a film.
• Auto2 :Automatically optimizes the video text when watching a film.
• Cinema Smooth: Offers the ultimate cinema experience. (PN50B860Y2F /PN58B860Y2F only)
@ Film mode is supported in TV, Video, Component (480i /I080i) and HDMI (1080i).
@ An 1080p 24Hz HDMI signal must be input to use the Cinema Smooth function.
Blue Only Mode -_ Off /On
This function is forAY device measurement experts. This function displays the blue signal
only by removing the red and green signals from the video signal so as to provide a Blue
Filter effect that is used to adjust the Color and Tint of video equipment such as DVD
players, Home Theaters, etc.
@ Blue Only Mode is available when the picture mode is set to Movie or Standard.
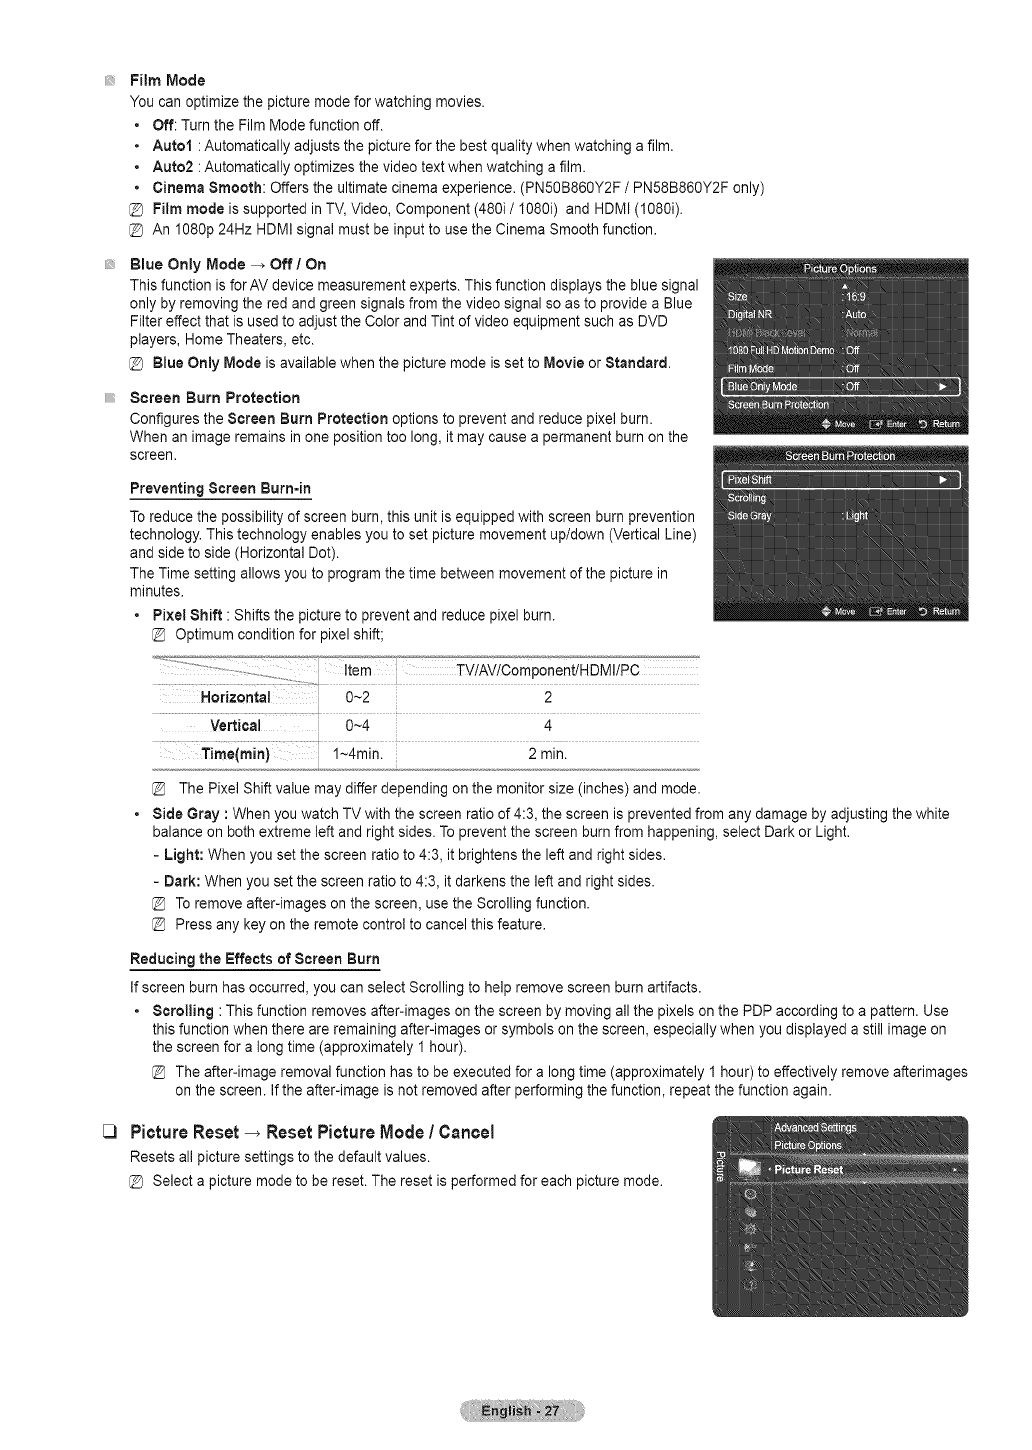
Screen Burn Protection
Configures the Screen Burn Protection options to prevent and reduce pixel burn.
When an image remains in one position too long, it may cause a permanent burn on the
screen.
Preventing Screen Burn=in
Toreduce the possibility of screen burn, this unit is equipped with screen burn prevention
technology. This technology enables you to set picture movement up/down (Vertical Line)
and side to side (Horizontal Dot).
The Time setting allows you to program the time between movement of the picture in
minutes.
•Pixel Shift : Shifts the picture to prevent and reduce pixel burn.
Optimum condition for pixel shift;
_3
Horizontal 0~2 2
0~4 4
Timeimini i--;min[ 2 min.
The Pixel Shift value may differ depending on the monitor size (inches) and mode.
Side Gray : When you watch TV with the screen ratio of 4:3, the screen is prevented from any damage by adjusting the white
balance on both extreme left and right sides. Toprevent the screen burn from happening, select Dark or Light.
-Light: When you set the screen ratio to 4:3, it brightens the left and right sides.
- Dark: When you set the screen ratio to 4:3, it darkens the left and right sides.
To remove after-images on the screen, use the Scrolling function.
Press any key on the remote control to cancel this feature.
Reducing the Effects of Screen Burn
If screen burn has occurred, you can select Scrolling to help remove screen burn artifacts.
• Scrolling : This function removes after-images on the screen by moving all the pixels on the PDP according to a pattern. Use
this function when there are remaining after-images or symbols on the screen, especially when you displayed a still image on
the screen for a long time (approximately 1 hour).
The after-image removal function has to be executed for a long time (approximately 1 hour) to effectively remove afterimages
on the screen. If the after-image is not removed after performing the function, repeat the function again.
Picture Reset _ Reset Picture Node /Cancel
Resetsall picturesettingsto the defaultvalues.
@ Selecta picturemodeto be reset.Theresetis performedforeachpicturemode.

jPC Display j
Using Your TV as a Computer (PC) Display
iiiiiiiii Setting Up Your PC Software (Based on Windows XP)
The Windows display-settings for a typical computer are shown below. The actual screens on
your PC will probably be different, depending upon your particular version of Windows and your
particular video card. However, even if your actual screens look different, the same basic set-up
information will apply in almost all cases.
(If not, contact your computer manufacturer or Samsung Dealer.)
1. First, click on Control Panel on the Windows start menu.
2. When the control panel window appears, click on Appearance and Themes and a display
dialog-box will appear.
3. When the control panel window appears, click on Display and a display dialog-box will
appear.
4. Navigate to the Settings tab on the display dialog-box. The correct size setting (resolution)
Optimum : 1920 X 1080 pixels. If avertical frequency option exists on your display settings
dialog box, the correct value is 60 or 60 Hz. Otherwise, just click OK and exit the dialog box.
Display Modes
If the signal from the system equals the standard signal mode, the screen is adjusted automatically. Ifthe signal from the system
doesn't equal the standard signal mode, adjust the mode by referring to your videocard user guide; otherwise there may be no video,
For the display modes listed below, the screen image has been optimized during manufacturing.
D-Sub and HDMI/DVI input
Mode Resolution HorizontalFrequency(kHz) verticalFrequency(Hz) Pixelclock Frequency(MHz) SyncPolarity(HN)
640x 350 31.469 70.066 25.175 +/-
_BM 720x400 31.469 70.087 28.322 -/+
640x480 35.000 66.667 30.240 -/-
MAC 832x 624 49.726 74.551 57.284 -/-
1152x 870 68.681 75.062 100.000 -/+
720x 576 35.910 59.950 32.750 -/+
1152x 864 53.783 59.959 81.750 -/+
VEESACVT 1280x720 44.772 59.855 74.500 -/+
1280x720 56.456 74.777 95.750 -/+
1280x960 75.231 74.857 130.000 -/+
640 x 480 31.469 59.940 25.175 - /-
640 x 480 37.861 72.809 31.500 - /-
640 x 480 37.500 75.000 31.500 - /-
800 x 600 37.879 60.317 40.000 + /+
800 x 600 48.077 72.188 50.000 + /+
800 x 600 46.875 75.000 49.500 + /+
1024x 768 48.363 60.004 65.000 -/-
1024x 768 56.476 70.069 75.000 -/-
1024 x 768 60.023 75.029 78.750 + /+
1152x 864 67.500 75.000 108.000 + /+
1280 x 800 49.702 59.810 83.500 - /+
1280 x 800 62.795 74.934 106.500 - /+
1280 x 960 60.000 60.000 108.000 + /+
1280x 1024 63.981 60.020 108.000 + /+
1280x 1024 79.976 75.025 135.000 + /+
1360 x 768 47.712 60.015 85.500 + /+
1440 x 900 55.935 59.887 106.500 - /+
1440 x 900 70.635 74.984 136.750 - /+
1680x 1050 65.290 59.954 146.250 - /+
VESA DMT
1280x 720 52.500 70.000 89.040 -/+
VEESAGTF 1280x 1024 74.620 70.000 128.943 - /-
VESA DMT /
DTV CEA 1920 x 1060p 67.500 60.000 148.500 + /+
When using an HDMI/DVI cable connection, you must use the HDMI IN 1 (DVI) terminal.
The interface mode is not supported.
The set might operate abnormally if a non-standard video format is selected.
Separate and Composite modes are supported. SOG is not supported.
Toolong or low quality VGA cable can cause picture noise at high resolution modes (1920xi080).
Setting up the TV with your PC
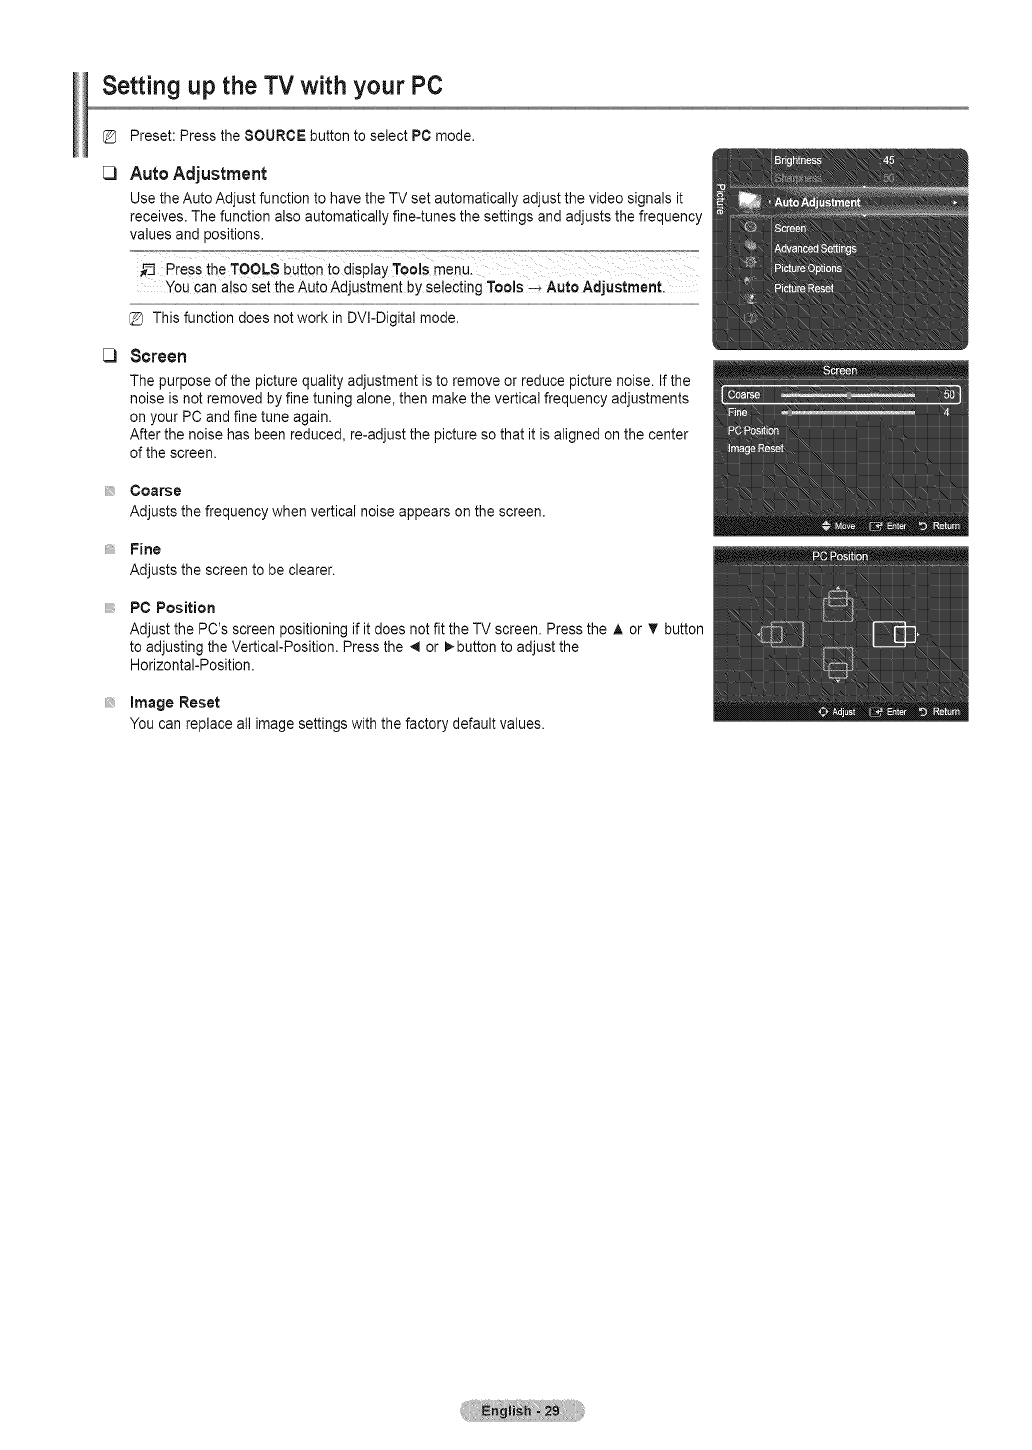
Preset: Press the SOURCE button to select PC mode.
[3 Auto Adjustment
Use the Auto Adjust function to have the TV set automatically adjust the video signals it
receives. The function also automatically fine-tunes the settings and adjusts the frequency
values and positions.
Press the TOOLS button to display Tools menu.
You can a!so set the Auto Adjustment by selecting Tools-, Auto Adjustment.
@ This function does not work in DVI-Digital mode.
C) Screen
The purpose of the picture quality adjustment is to remove or reduce picture noise. Ifthe
noise is not removed by fine tuning alone, then make the vertical frequency adjustments
on your PC and fine tune again.
After the noise has been reduced, re-adjust the picture so that it is aligned on the center
of the screen.
Coarse
Adjusts the frequency when vertical noise appears on the screen.
Fine
Adjusts the screen to be clearer.
PC Position
Adjust the PC's screen positioning if it does not fit the TV screen. Press the ,& or T button
to adjusting the Vertical-Position. Press the _ or _.button to adjust the
Horizontal-Position.
image Reset
You can replace all image settings with the factory default values.
i Sound Control
Changing the Sound Settings
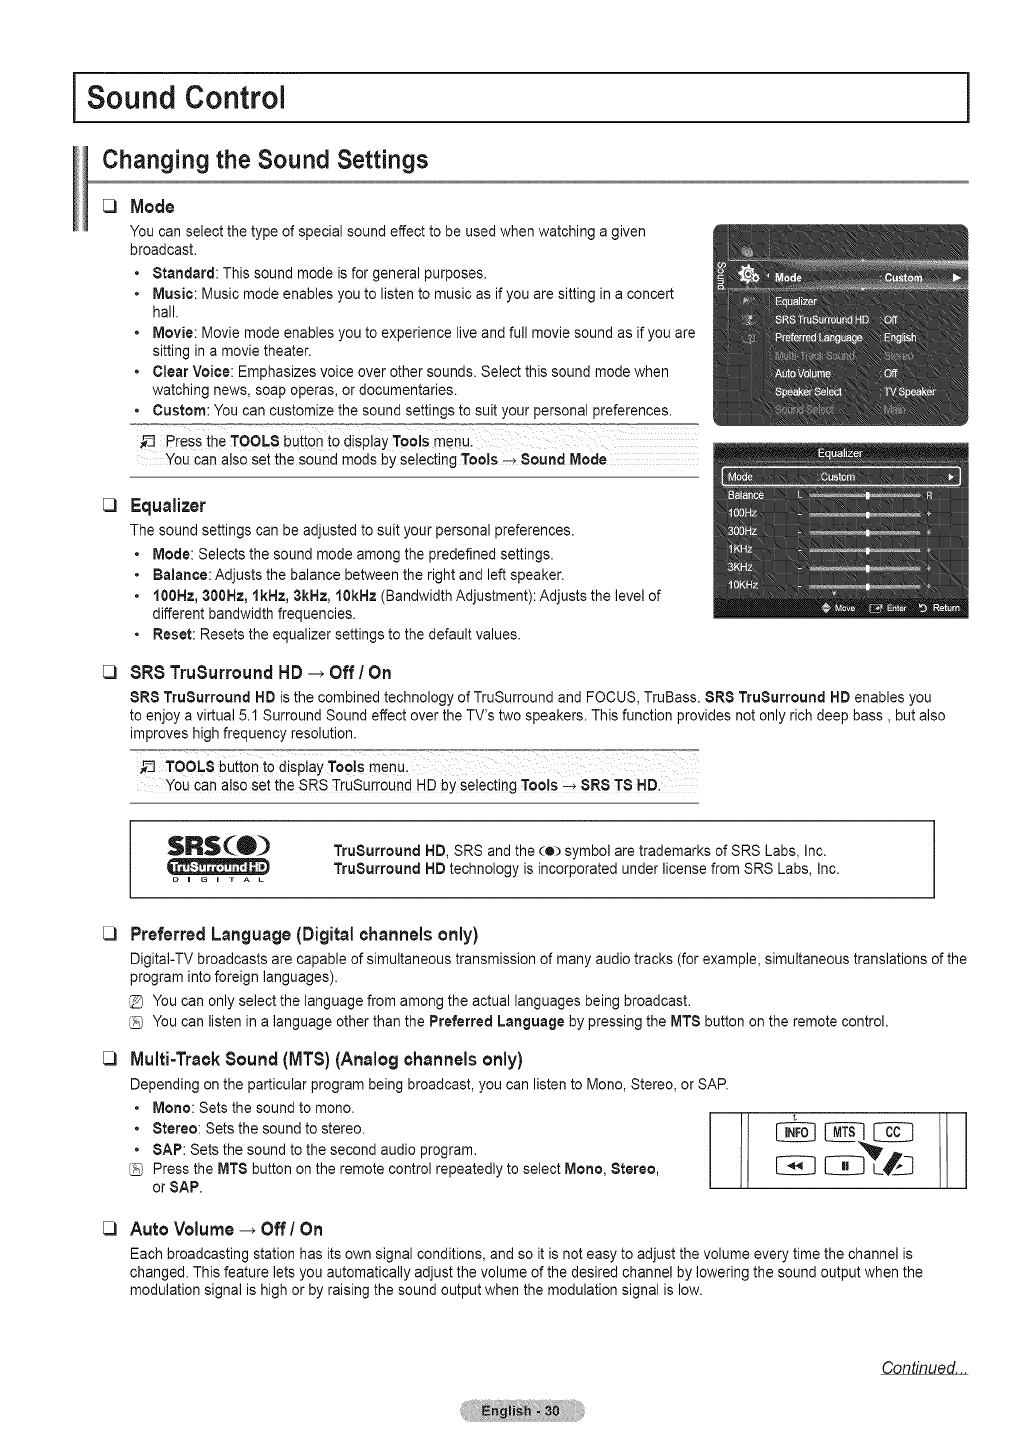
Mode
You can select the type of special sound effect to be used when watching a given
broadcast.
• Standard: This sound mode isfor general purposes.
•Music: Music mode enables you to listen to music as if you are sitting in a concert
hall.
•Movie: Movie mode enables you to experience live and full movie sound as if you are
sitting in a movie theater.
• Clear Voice: Emphasizes voice over other sounds. Select this sound mode when
watching news, soap operas, or documentaries.
• Custom: You can customize the sound settings to suit your personal preferences.
_-_ Press the TOOL8 button t0 display
You can also set the sound roodsby selecting Tools -+ 8curtal Mode
_3
_3
Equalizer
The sound settings can be adjusted to suit your personal preferences.
•Mode: Selects the sound mode among the predefined settings.
•Balance: Adjusts the balance between the right and left speaker.
• 100Hz, 300Hz, lkHz, 3kHz, 10kHz (Bandwidth Adjustment): Adjusts the level of
different bandwidth frequencies.
•Reset: Resets the equalizer settings to the default values.
SRS TruSurround HD _ Off/On
SRS TruSurround HD is the combined technology of TruSurround and FOCUS, TruBass. SRS TruSurround HD enables you
to enjoy a virtual 5.1 Surround Sound effect over the TV's two speakers. This function provides not only rich deep bass, but also
improves high frequency resolution.
TOOLS bUtt0n to display ToolS menu.
You can also set the SRS TruSu[roundHD by se!ecting Too!s _ $R8 T8 HD,
$R$(O)
D i E I TAL
Tru$urround HD, SRS and the (e) symbol are trademarks of SRS Labs, Inc.
TruSurround HD technology is incorporated under license from SRS Labs, Inc.
_3
_3
PreferredLanguage(Digital channelsonly)
DigitaI-TV broadcasts are capable of simultaneous transmission of many audio tracks (for example, simultaneous translations of the
program into foreign languages).
You can only select the language from among the actual languages being broadcast.
You can listen in a language other than the Preferred Language by pressing the MT8 button on the remote control.
Multi-TrackSound (MTS) (Analogchannelsonly)
Depending on the particular program being broadcast, you can listen to Mono, Stereo, or SAP.
•Mono: Sets the sound to mono.
•Stereo: Sets the sound to stereo.
•SAP: Sets the sound to the second audio program.
Press the MT8 button on the remote control repeatedly to select Mono, Stereo,
or SAP.
_3 Auto Volume -_ Off/On
Each broadcasting station has its own signal conditions, and so it is not easy to adjust the volume every time the channel is
changed. This feature lets you automatically adjust the volume of the desired channel by lowering the sound output when the
modulation signal is high or by raising the sound output when the modulation signal is low.
Continued...
C)
C)
C)
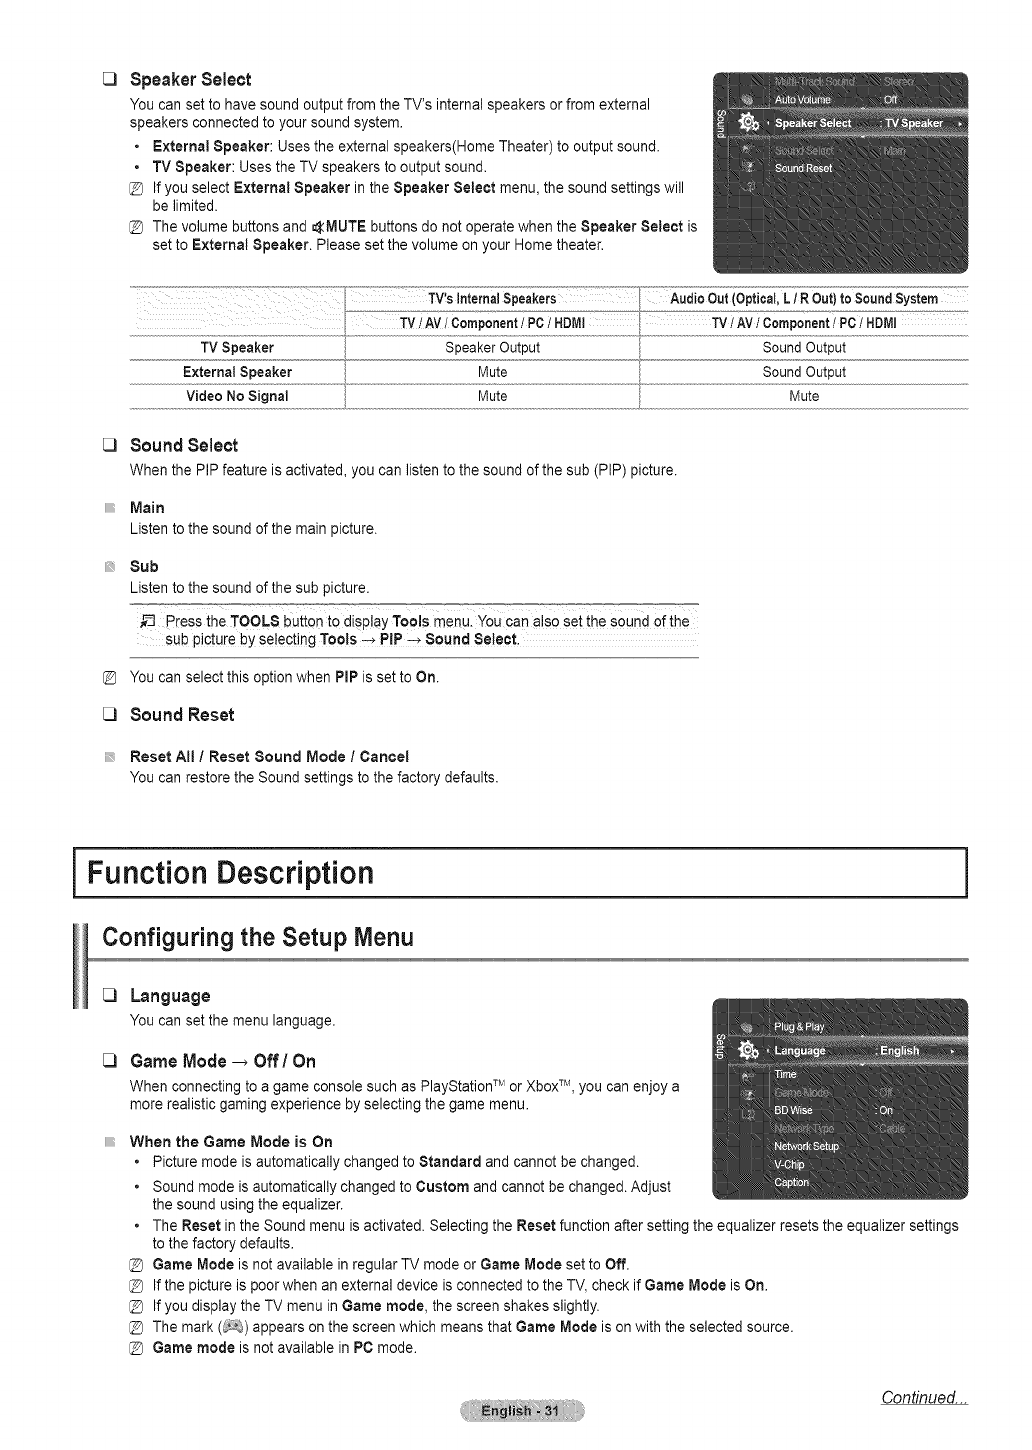
Speaker Select
You can set to have sound output from the TV's internal speakers or from external
speakers connected to your sound system.
• Externa! Speaker: Uses the external speakers(Home Theater) to output sound.
• TV Speaker: Uses the TV speakers to output sound.
@ If you select External Speaker in the Speaker Select menu, the sound settings will
be limited.
@ The volume buttons and _MUTE buttons do not operate when the Speaker Select is
set to External Speaker. Please set the volume on your Home theater.
........................_.).n!erna!..speakers .................... AudioOut(Opticat,L/ROut)taSoundSystern
TV/AV/Cornponent/PC/HDMI TV/AV/Component/PC/HDMI
TV Speaker Sound Output
External Speaker Mute Sound Output
Mute Mute
Sound Select
Whenthe PiPfeatureis activated,you canlistento thesoundof thesub (PIP)picture.
Main
Listen to the sound of the main picture.
Sub
Listen to the sound of the sub picture.
_-_ press the TOOLS buttonto di@lay Too!s menu. You can a!so set the sound of the
sub picture by selecting Tools-_ P!P -_ Sound 8e!ect,
You can select this option when PIP is set to On.
Sound Reset
Reset All /Reset Sound Mode /Cancel
You can restore the Sound settings to the factory defaults.
i Function Description i
Configuring the Setup Menu
[3 Language
Youcansetthemenulanguage.
C) Game Mode -_ Off !On
When connecting to a game console such as PlayStationTM or XboxTM, you can enjoy a
more realistic gaming experience by selecting the game menu.
When the Game Mode is On
•Picture mode is automatically changed to Standard and cannot be changed.
•Sound mode is automatically changed to Custom and cannot be changed. Adjust
the sound using the equalizer.
•The Reset in the Sound menu is activated. Selecting the Reset function after setting the equalizer resets the equalizer settings
to the factory defaults.
@Game Mode is not available in regular TV mode or Game Mode set to Off.
@ If the picture is poor when an external device is connected to the TV, check if Game Mode is On.
@ If you display the TV menu in Game mode, the screen shakes slightly.
@ The mark ( ) appears on the screen which means that Game Mode is on with the selected source.
@Game mode is not available in PC mode.
Continued...
C)
C)
BDWise -_ Off/On
Provides the optimal picture quality for SAMSUNG DVD, Blu-ray and Home Theater products which support BD Wise.
You can enjoy a richer picture when using them connected to this Samsung TV.
Connect SAMSUNG products that have BD Wise using an HDMI cable.
This function is active only when an external device is connected to the TV via HDMI.
[_ When the BD Wise set to On, the picture mode is automatically changed to the optimal resolution.
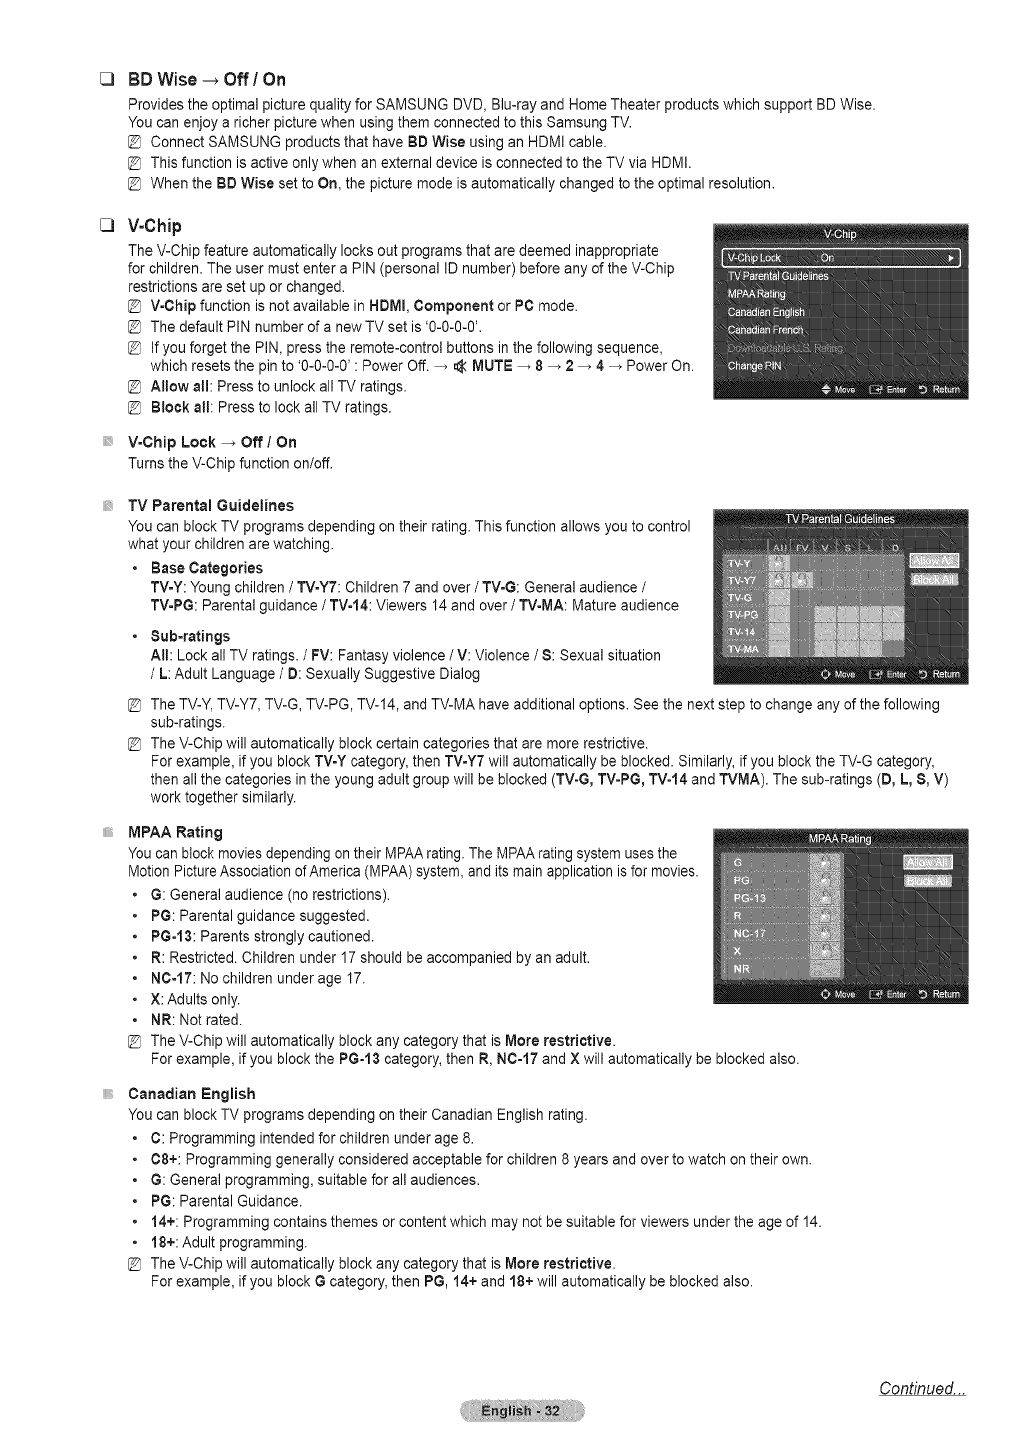
V=Chip
The V-Chip feature automatically locks out programs that are deemed inappropriate
for children. The user must enter a PIN (personal ID number) before any of the V-Chip
restrictions are set up or changed.
@ V-Chip function is not available in HBMI, Component or PC mode.
@ The default PIN number of a new TV set is '0-0-0-0'.
@ If you forget the PIN, press the remote-control buttons in the following sequence,
which resets the pin to '0-0-0-0' : Power Off. _ _t MUTE _ 8 _ 2 _ 4 _ Power On.
@ Allow all: Press to unlock allTV ratings.
@ Block all: Press to lock all TV ratings.
V=Chip Lock -. Off /On
Turns the V-Chip function on/off.
TV Parental Guidelines
You can block TV programs depending on their rating. This function allows you to control
what your children are watching.
•Base Categories
TV=Y:Young children /TV=YT: Children 7 and over /TVoG:General audience /
TVoPG: Parental guidance /TV-14: Viewers 14 and over /TV-MA: Mature audience
Sub-ratings
All: Lock all TV ratings. /FV: Fantasy violence /V: Violence /8: Sexual situation
/L: Adult Language /D: Sexually Suggestive Dialog
The TV-Y,TV-Y7, TV-G, TV-PG, TV-14, and TV-MA have additional options. See the next step to change any of the following
sub-ratings.
The V-Chip will automatically block certain categories that are more restrictive.
For example, if you block TV-Y category, then TV-Y7 will automatically be blocked. Similarly, if you block the TV-G category,
then all the categories in the young adult group will be blocked (TV-G, TV-PG, TVo14 and TVMA). The sub-ratings (D, L, B, V)
work together similarly.
MPAA Rating
You can block movies depending on their MPAA rating. The MPAA rating system uses the
Motion PictureAssociation of America (MPAA) system, and its main application is for movies.
G: General audience (no restrictions).
PG: Parental guidance suggested.
PG-13: Parents strongly cautioned.
R: Restricted. Children under 17 should be accompanied by an adult.
NC-17: No children under age 17.
X: Adults only.
NR: Not rated.
The V-Chip will automatically block any category that is More restrictive.
For example, if you block the PG-13 category, then R, NO-I/and X will automatically be blocked also.
Canadian English
You can block TV programs depending on their Canadian English rating.
C: Programming intended for children under age 8.
C8+: Programming generally considered acceptable for children 8 years and over to watch on their own.
G: General programming, suitable for all audiences.
PG: Parental Guidance.
14+: Programming contains themes or content which may not be suitable for viewers under the age of 14.
18+: Adult programming.
The V-Chip will automatically block any category that is More restrictive.
For example, if you block Gcategory, then PG, 14+ and 18+ will automatically be blocked also.
Continued...
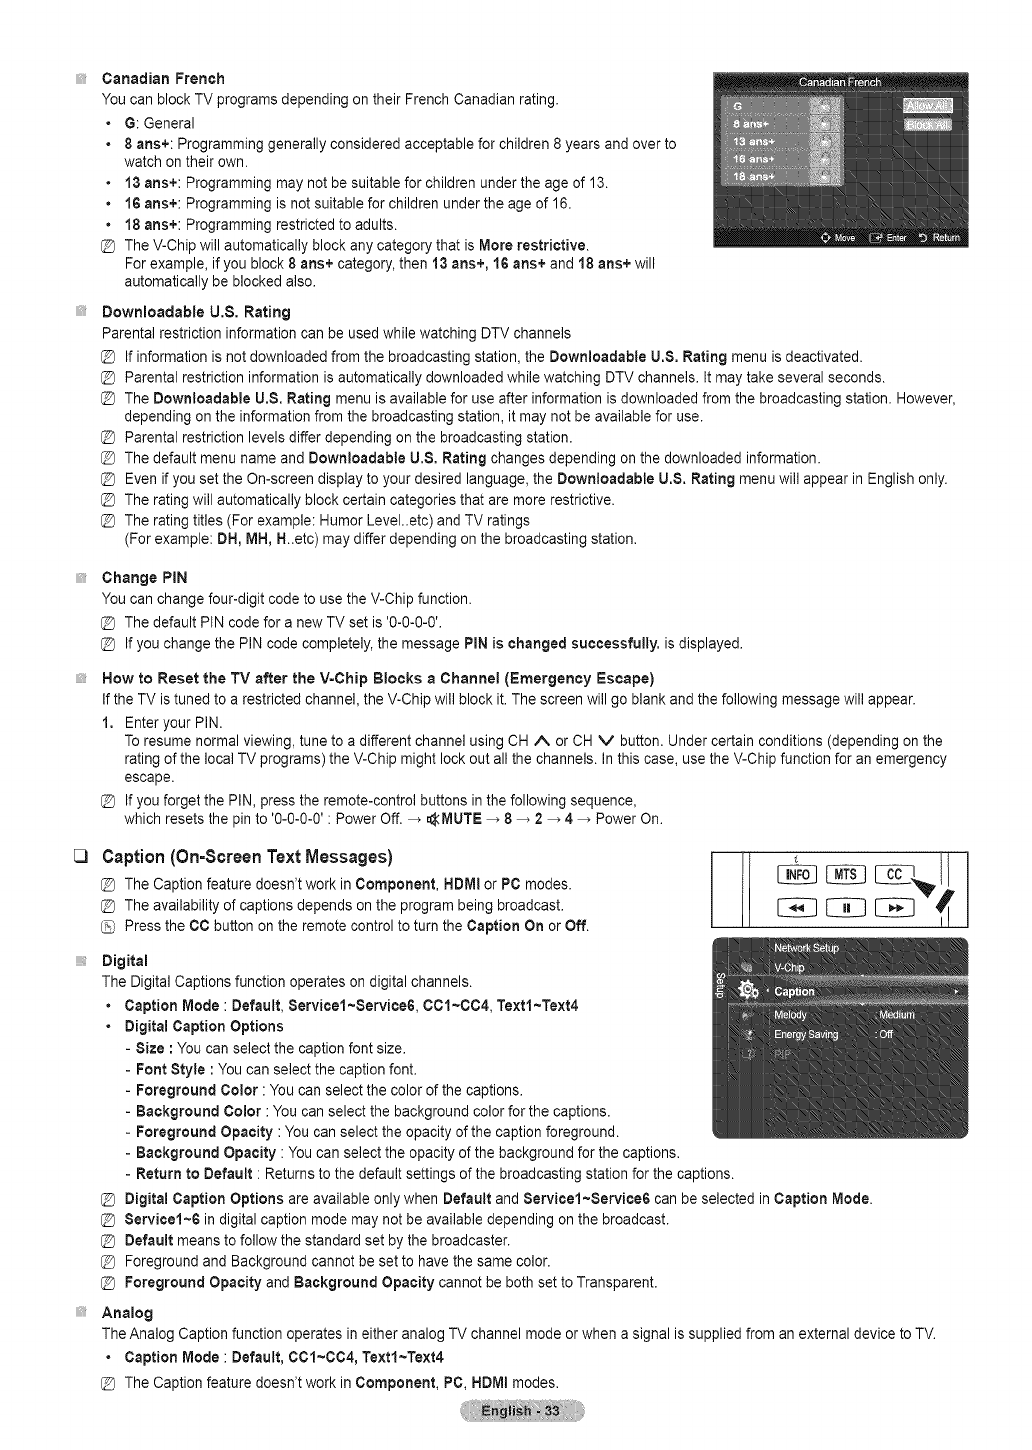
C)
Canadian French
You can block TV programs depending on their French Canadian rating.
• G: General
•8 arts+: Programming generally considered acceptable for children 8 years and over to
watch on their own.
•13 arts+: Programming may not be suitable for children under the age of 13.
•16 arts+: Programming is not suitable for children under the age of 16.
•18 arts+: Programming restricted to adults.
@ The V-Chip will automatically block any category that is More restrictive.
For example, if you block 8 arts+ category, then 13 arts+, 16 arts+ and 18 arts+ will
automatically be blocked also.
Downloadable U.$. Rating
Parental restriction information can be used while watching DTV channels
@ If information is not downloaded from the broadcasting station, the Downloadabte U.S. Rating menu is deactivated.
@ Parental restriction information is automatically downloaded while watching DTV channels. It may take several seconds.
@ The Downloadable U.S. Rating menu is available for use after information is downloaded from the broadcasting station. However,
depending on the information from the broadcasting station, it may not be available for use.
@ Parental restriction levels differ depending on the broadcasting station.
@ The default menu name and Downloadabte U.S. Rating changes depending on the downloaded information.
@ Even if you set the On-screen display to your desired language, the Downloadable U.S. Rating menu will appear in English only.
@ The rating will automatically block certain categories that are more restrictive.
@ The rating titles (For example: Humor Level..etc) and TV ratings
(For example: DH, MH, H..etc) may differ depending on the broadcasting station.
Change PIN
You can change four-digit code to use the V-Chip function.
@ The default PIN code for a new TV set is '0-0-0-0'.
@ If you change the PIN code completely, the message PiN is changed successfully, is displayed.
How to Reset the TV after the V=Chip Clocks a Channel (Emergency Escape)
If the TV is tuned to a restricted channel, the V-Chip will block it. The screen will go blank and the following message will appear.
1. Enter your PIN.
To resume normal viewing, tune to a different channel using CH A or CH V button. Under certain conditions (depending on the
rating of the local TV programs) the V-Chip might lock out all the channels. In this case, use the V-Chip function for an emergency
escape.
@ If you forget the PIN, press the remote-control buttons in the following sequence,
which resets the pin to '0-0-0-0' : Power Off. _ _tMUTE _ 8 _ 2 _ 4 _ Power On.
Caption(On-ScreenText Messages)
@ The Caption feature doesn't work in Component, HDMI or PC modes.
@ The availability of captions depends on the program being broadcast.
Press the CO button on the remote control to turn the Caption On or Off.
Analog
The Analog Caption function operates in either analog TV channel mode or when a signal is supplied from an external device to TV.
•Caption Mode : Default, 001~004, Textl~Text4
@ The Caption feature doesn't work in Component, PC, HDM! modes.
Digital
The Digital Captions function operates on digital channels.
•Caption Mode : Default, Servicel~Service6, 001~004, Textl~Text4
• Digital Caption Options
- Size : You can select the caption font size.
- Font Style : You can select the caption font.
- Foreground Color : You can select the color of the captions.
- Background Color : You can select the background color for the captions.
- Foreground Opacity :You can select the opacity of the caption foreground.
- Background Opacity : You can select the opacity of the background for the captions.
-Return to Default : Returns to the default settings of the broadcasting station for the captions.
@ Digital Caption Options are available only when Default and Servicel~Service6 can be selected in Caption Mode.
@Service1~6 in digital caption mode may not be available depending on the broadcast.
@ Default means to follow the standard set by the broadcaster.
@ Foreground and Background cannot be set to have the same color.
@Foreground Opacity and Background Opacity cannot be both set to Transparent.
Cl Melody
The TV power on /off melody sound can be adjusted.
• Off: Turns off the melody function.
• Low: Sets the melody volume to low.
• Medium: Sets the melody volume to medium.
• High: Sets the melody volume to high.
@ The Melody does not play.
- When no sound is output from the TV because the _MUTE button has been
pressed.
- When no sound is output from the TV because the volume has been reduced to
minimum with the VOL I - 1 button.
- When the TV is turned off with the Sleep Timer function.
I[':'J[qDOLBY
BIGITAL I
Manufactured under license from Dolby Laboratories.
Dolby and the double-D symbol are trademarks of Dolby Laboratories.
Cl
Cl
Light Effect--, Off!in Standby!Watching TV !Always
(PN50B860Y2F/PN58B860Y2F only)
You can turn on/off the blue LED on the front of TV according to the situation.
Use it for saving power or when the LED dazzles your eyes.
•Off : The blue LED is always off.
• In Standby : The blue LED lights while in Standby mode and it turns off when your
TV isturned on.
• Watching TV :The blue LED lights when watching TV and it turns off when your
TV isturned off.
• Always : The blue LED always lights.
@ Set the Light Effect to Off to reduce the power consumption.
EnergySaving
This feature adjusts the brightness of the TV in order to reduce power consumption. When watching TV at night, set the Energy
Saving mode option to High to reduce eye fatigue as well as power consumption.
• Off: Turns the Energy Saving function off.
• Low: Sets the Energy Saving function to low.
• Medium: Sets the Energy Saving function to medium.
• High: Sets the Energy Saving function to maximum.
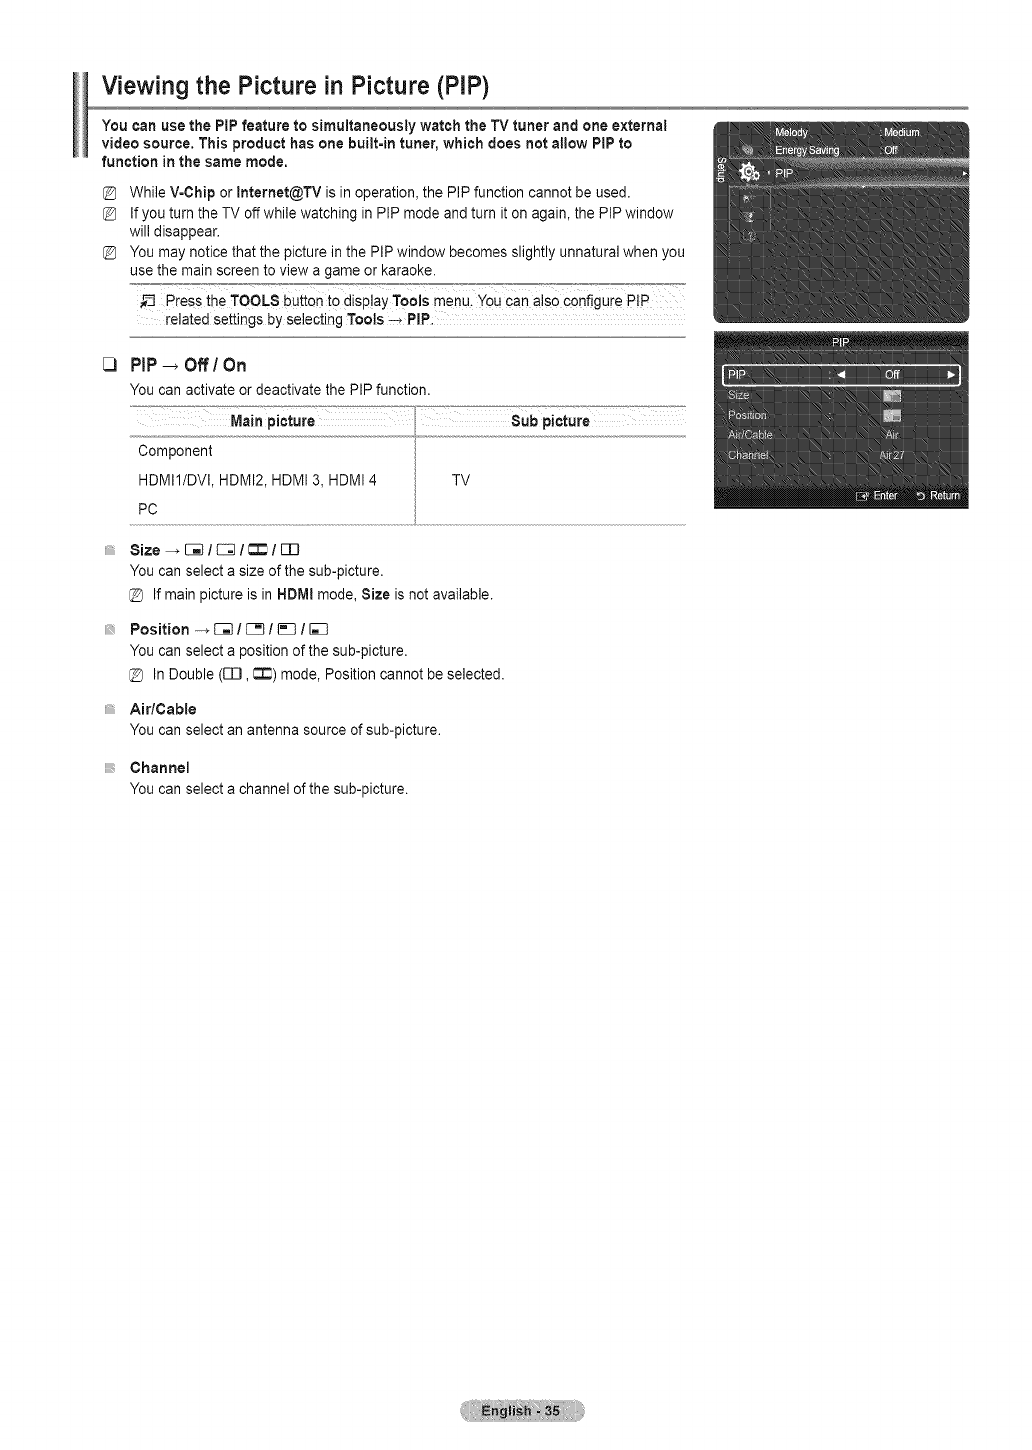
Viewing the Picture in Picture (PIP)
You can use the PiPfeature to simultaneously watch the TV tuner and one external
video source. This product has one built=intuner, which does not allow PiP to
function in the same mode,
While V-Chip or Internet@TV is in operation, the PIP function cannot be used.
If you turn the TV off while watching in PIP mode and turn it on again, the PIPwindow
will disappear.
You may notice that the picture in the PIP window becomes slightly unnatural when you
use the main screen to view a game or karaoke.
_-_ Press the TOOLS button to disp!ay Tools menu. You can also configure P!P
related settings by selecting Tools ->PIP:
[3 PIP _ Off /On
Youcanactivateor deactivatethe PiPfunction.
Component
HDMI1/DVI, HDMI2, HDMI 3, HDMI 4
PC
TV
Size -, E_ lC3-1_ lm
You can select a size of the sub-picture.
@ If main picture is in HDMI mode, Size is not available.
Position -_ E3_/C_ /1_3/
You can select a position of the sub-picture.
@ In Double (EEl, 6) mode, Position cannot be selected.
AidCable
You can select an antenna source of sub-picture.
Channel
You can select a channel of the sub-picture.
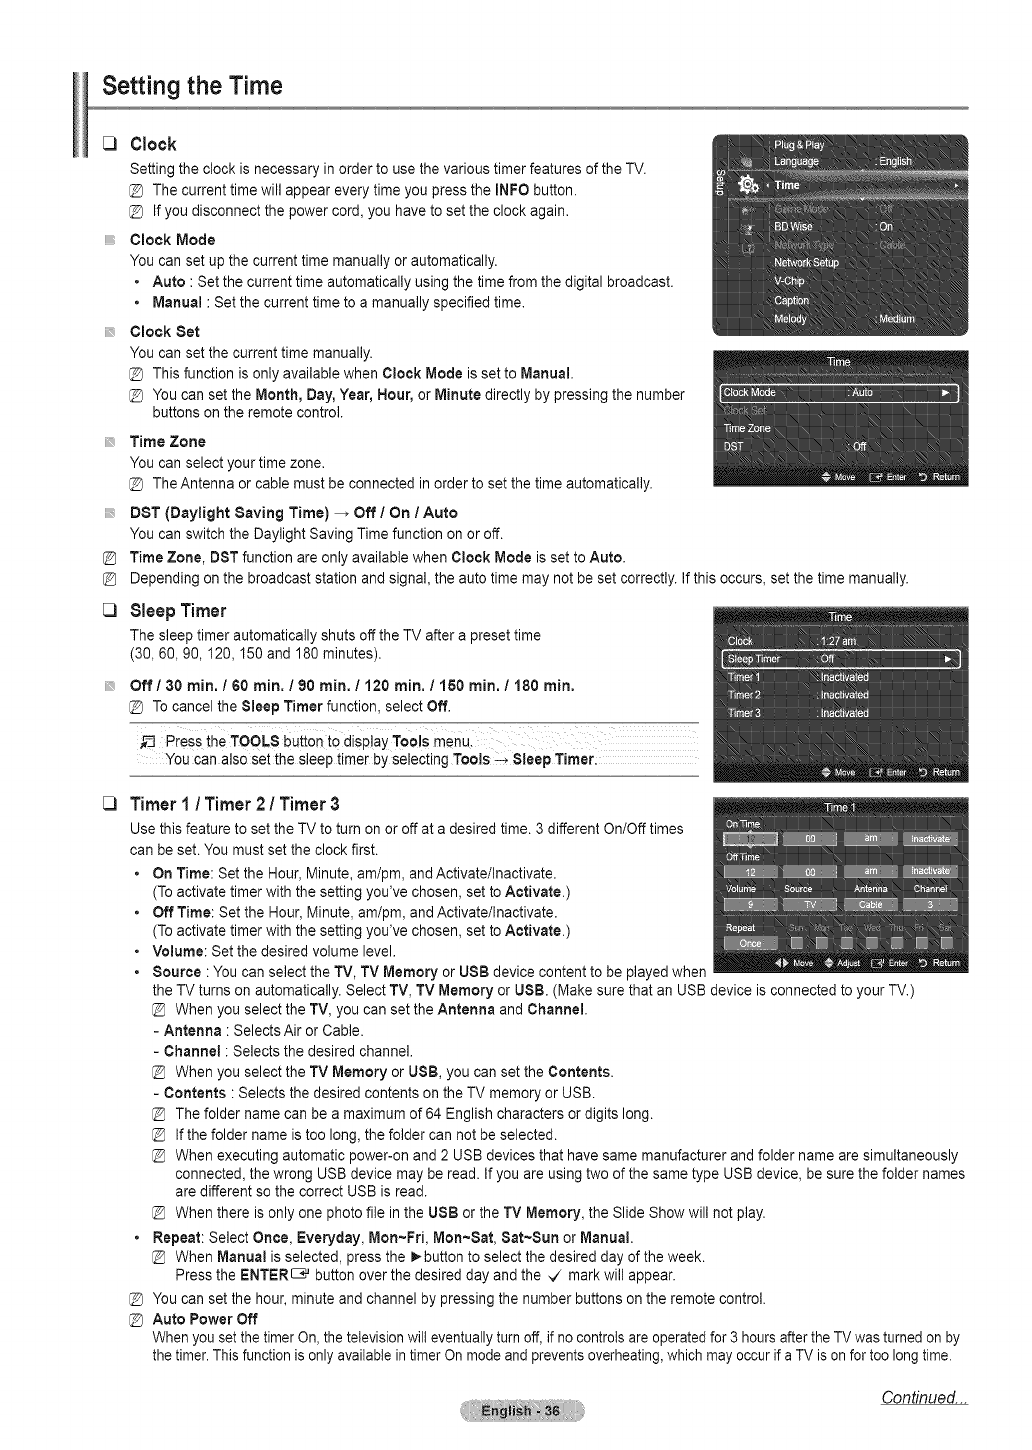
Setting the Time
[_ Clock
Setting the clock is necessary in order to use the various timer features of the TV.
The current time will appear every time you press the INFO button.
[_ Ifyou disconnect the power cord, you have to set the clock again.
Clock Mode
You can set up the current time manually or automatically.
• Auto : Set the current time automatically using the time from the digital broadcast.
• Manual : Set the current time to a manually specified time.
Clock Set
You can set the current time manually.
This function is only available when Clock Mode is set to Manual.
You can set the Month, Day, Year, Hour, or Minute directly by pressing the number
buttons on the remote control.
Time Zone
You can select your time zone.
The Antenna or cable must be connected in order to set the time automatically.
DTT (Daylight Saving Time) _ Off /On /Auto
You can switch the Daylight Saving Time function on or off.
Time Zone, DST function are only available when Clock Mode is set to Auto.
Depending on the broadcast station and signal, the auto time may not be set correctly. If this occurs, set the time manually.
Sleep Timer
The sleep timer automatically shuts off the TV after a preset time
(30, 60, 90,120,150 and 180 minutes).
Off/30 rain. /60 rain. /90 rain. /120 rain. /160 rain. /180 rain.
[_ To cancel the Sleep Timer function, select Off.
Press the TOOLS button to display Tools menul
You can also set the sleep timer by selecting Tools _ Sleep Timer:
C) Timer 1/Timer 2!Timer 3
Use this feature to set the TV to turn on or off at a desired time. 3 different On/Off times
can be set. You must set the clock first.
•On Time: Set the Hour, Minute, am/pro, and Activate/Inactivate.
(To activate timer with the setting you've chosen, set to Activate.)
•Off Time: Set the Hour, Minute, am/pro, and Activate/Inactivate.
(To activate timer with the setting you've chosen, set to Activate.)
•Volume: Set the desired volume level.
• Source : You can select the TV, TV Memory or USB device content to be played when
the TV turns on automatically. Select TV, TV Memory or USB. (Make sure that an USB device is connected to your TV.)
When you select the TV, you can set the Antenna and Channel.
- Antenna : Selects Air or Cable.
- Channel :Selects the desired channel
When you select the TV Memory or USB, you can set the Contents.
- Contents : Selects the desired contents on the TV memory or USB.
The folder name can be a maximum of 64 English characters or digits long.
If the folder name is too long, the folder can not be selected.
When executing automatic power-on and 2 USB devices that have same manufacturer and folder name are simultaneously
connected, the wrong USB device may be read. If you are using two of the same type USB device, be sure the folder names
are different so the correct USB is read.
When there is only one photo file in the USB or the TV Memory, the Slide Show will not play.
•Repeat: Select Once, Everyday, Mon~Fri, Mort~Sat, Sat-Sun or Manua!.
When Manual is selected, press the I_ button to select the desired day of the week.
Press the ENTER_ button over the desired day and the _/ mark will appear.
You can set the hour, minute and channel by pressing the number buttons on the remote control.
Auto Power Off
When you set the timer On, the television will eventually turn off, if no controls are operated for 3 hours after the TVwas turned on by
the timer. This function is only available in timer On mode and preventsoverheating,which may occur if a TV ison for too longtime.
Continued...
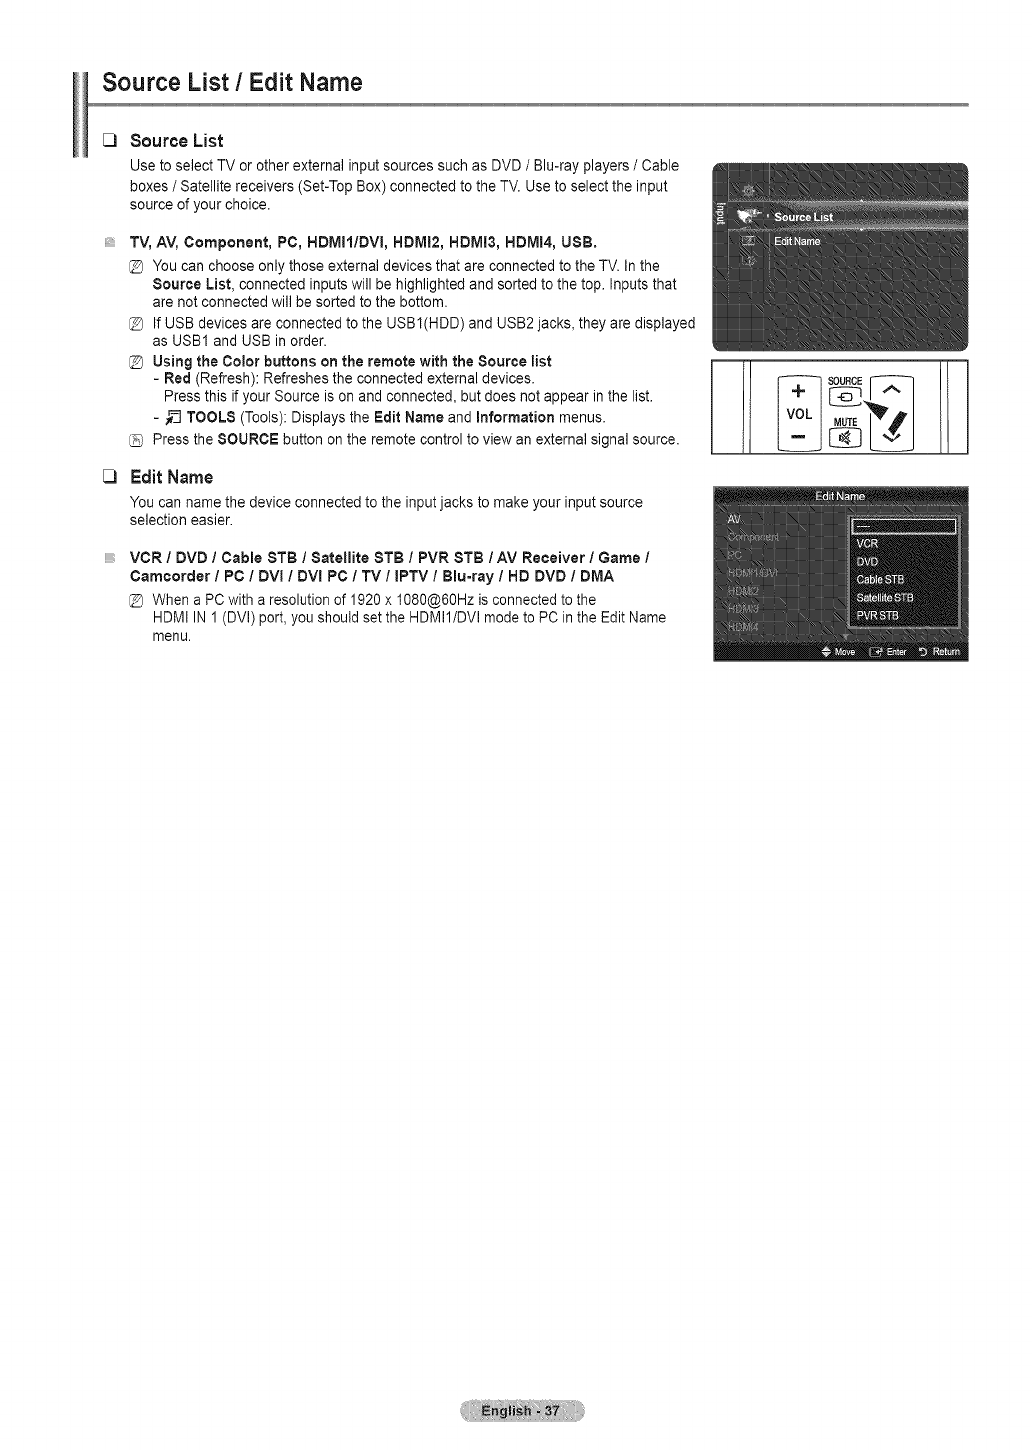
Source List /Edit Name
_3
_3
SourceList
Use to select TV or other external input sources such as DVD /Blu-ray players /Cable
boxes /Satellite receivers (Set-Top Box) connected to the TV. Use to select the input
source of your choice.
TV, AV, Component, PC, HDMII/DVI, HDMI2, HDMI3, HDMI4, USBo
You can choose only those external devices that are connected to the TV. In the
Source List, connected inputs will be highlighted and sorted to the top. Inputs that
are not connected will be sorted to the bottom.
If USB devices are connected to the USBI(HDD) and USB2 jacks, they are displayed
as USB1 and USB in order.
Using the Color buttons on the remote with the Source list
- Red (Refresh): Refreshes the connected external devices.
Press this if your Source is on and connected, but does not appear in the list.
- __ TOOLS (Tools): Displays the Edit Name and Information menus.
Press the SOURCE button on the remote control to view an external signal source.
Edit Name
You can name the device connected to the input jacks to make your input source
selection easier.
VCR /DVD /Cable STB ISatellite 8TB IPVR STB /AV Receiver IGame I
Camcorder /PC /DVI /DVI PC /TV /IPTV /Blu=ray /HD DVD /DMA
When a PC with a resolution of 1920 x 1080@60Hz is connected to the
HDMI IN 1 (DVI) port, you should set the HDMII/DVI mode to PC in the Edit Name
menu.
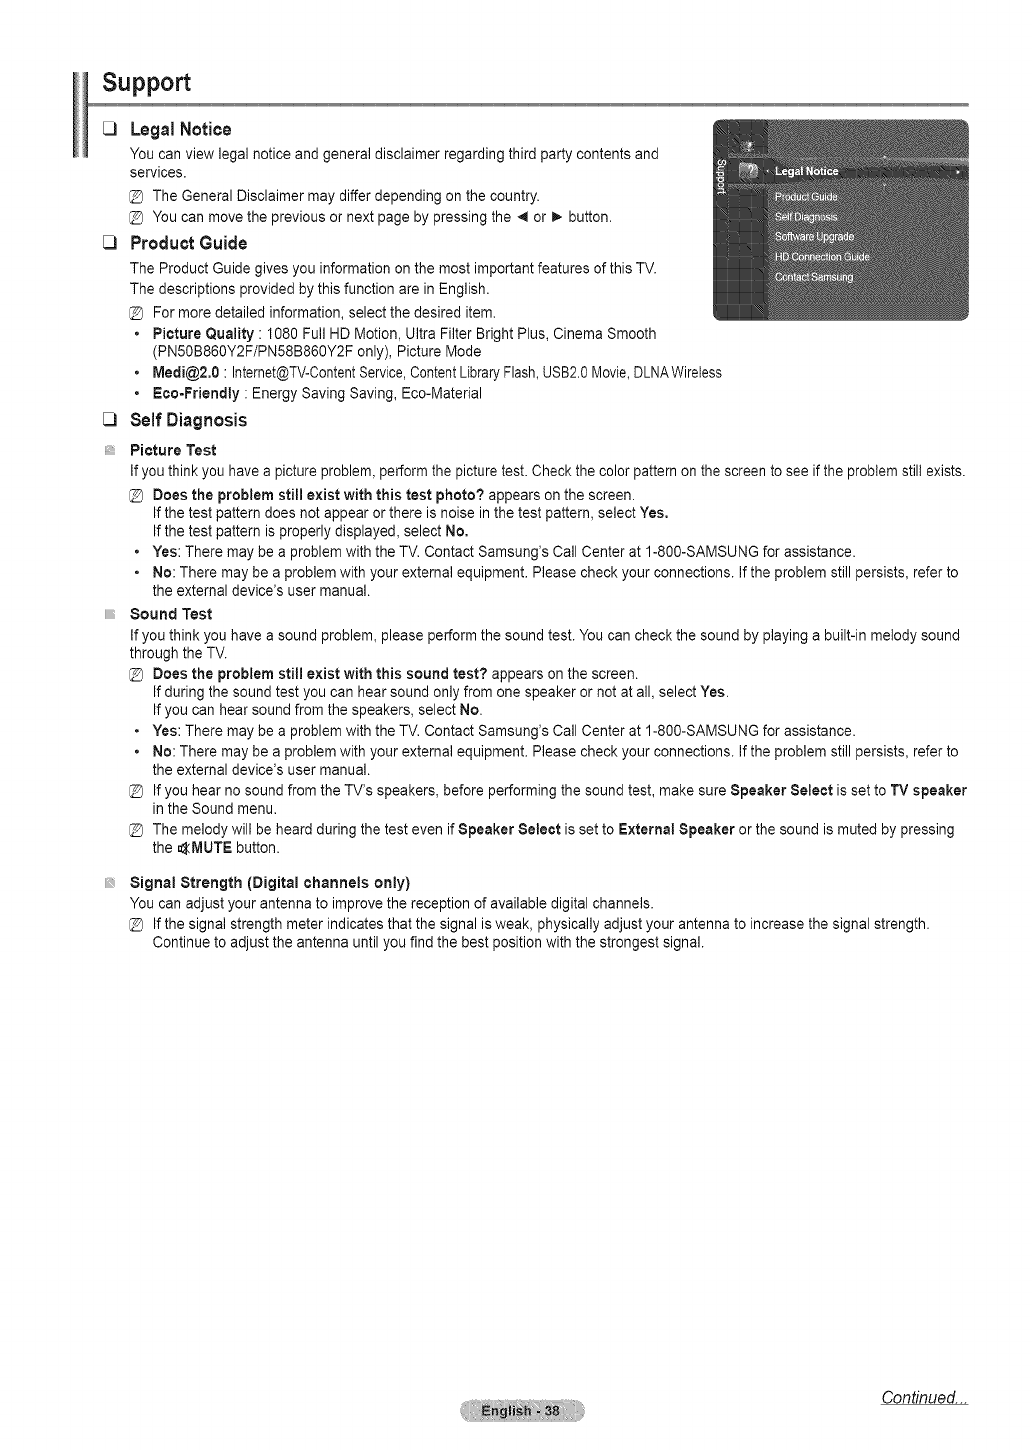
Support
Legal Notice
You can view legal notice and general disclaimer regarding third party contents and
services.
The General Disclaimer may differ depending on the country.
You can move the previous or next page by pressing the _ or _ button.
ProductGuide
The Product Guide gives you information on the most important features of this TV.
The descriptions provided by this function are in English.
For more detailed information, select the desired item.
• Picture Quality : 1080 Full HD Motion, Ultra Filter Bright Plus, Cinema Smooth
(PN50B860Y2F/PN58B860Y2F only), Picture Mode
•Medi@2.0 : Internet@TV-ContentService,ContentLibraryFlash,USB2.0Movie,DLNAWireless
•Ecc=Friendly : Energy Saving Saving, Eco-Material
Self Diagnosis
Picture Test
If you think you have a picture problem, perform the picture test=Check the color pattern on the screen to see if the problem still exists.
Does the problem still exist with this test photo? appears on the screen.
If the test pattern does not appear or there is noise in the test pattern, select Yes.
If the test pattern is properly displayed, select No,
•Yes: There may be a problem with the TV. Contact Samsung's Call Center at 1-800-SAMSUNG for assistance.
•No: There may be a problem with your external equipment. Please check your connections. If the problem still persists, refer to
the external device's user manual.
Sound Test
If you think you have a sound problem, please perform the sound test. You can check the sound by playing a built-in melody sound
through the TV.
Does the problem still exist with this sound test? appears on the screen.
If during the sound test you can hear sound only from one speaker or not at all, select Yes.
If you can hear sound from the speakers, select No.
•Yes: There may be a problem with the TV. Contact Samsung's Call Center at 1-800-SAMSUNG for assistance.
•No: There may be a problem with your external equipment. Please check your connections. If the problem still persists, refer to
the external device's user manual.
If you hear no sound from the TV's speakers, before performing the sound test, make sure Speaker Select is set to TV speaker
in the Sound menu.
The melody will be heard during the test even if Speaker Select is set to External Speaker or the sound is muted by pressing
the _MUTE button.
Signal Strength (Digital channels only)
You can adjust your antenna to improve the reception of available digital channels.
If the signal strength meter indicates that the signal isweak, physically adjust your antenna to increase the signal strength.
Continue to adjust the antenna until you find the best position with the strongest signal.
Continued...
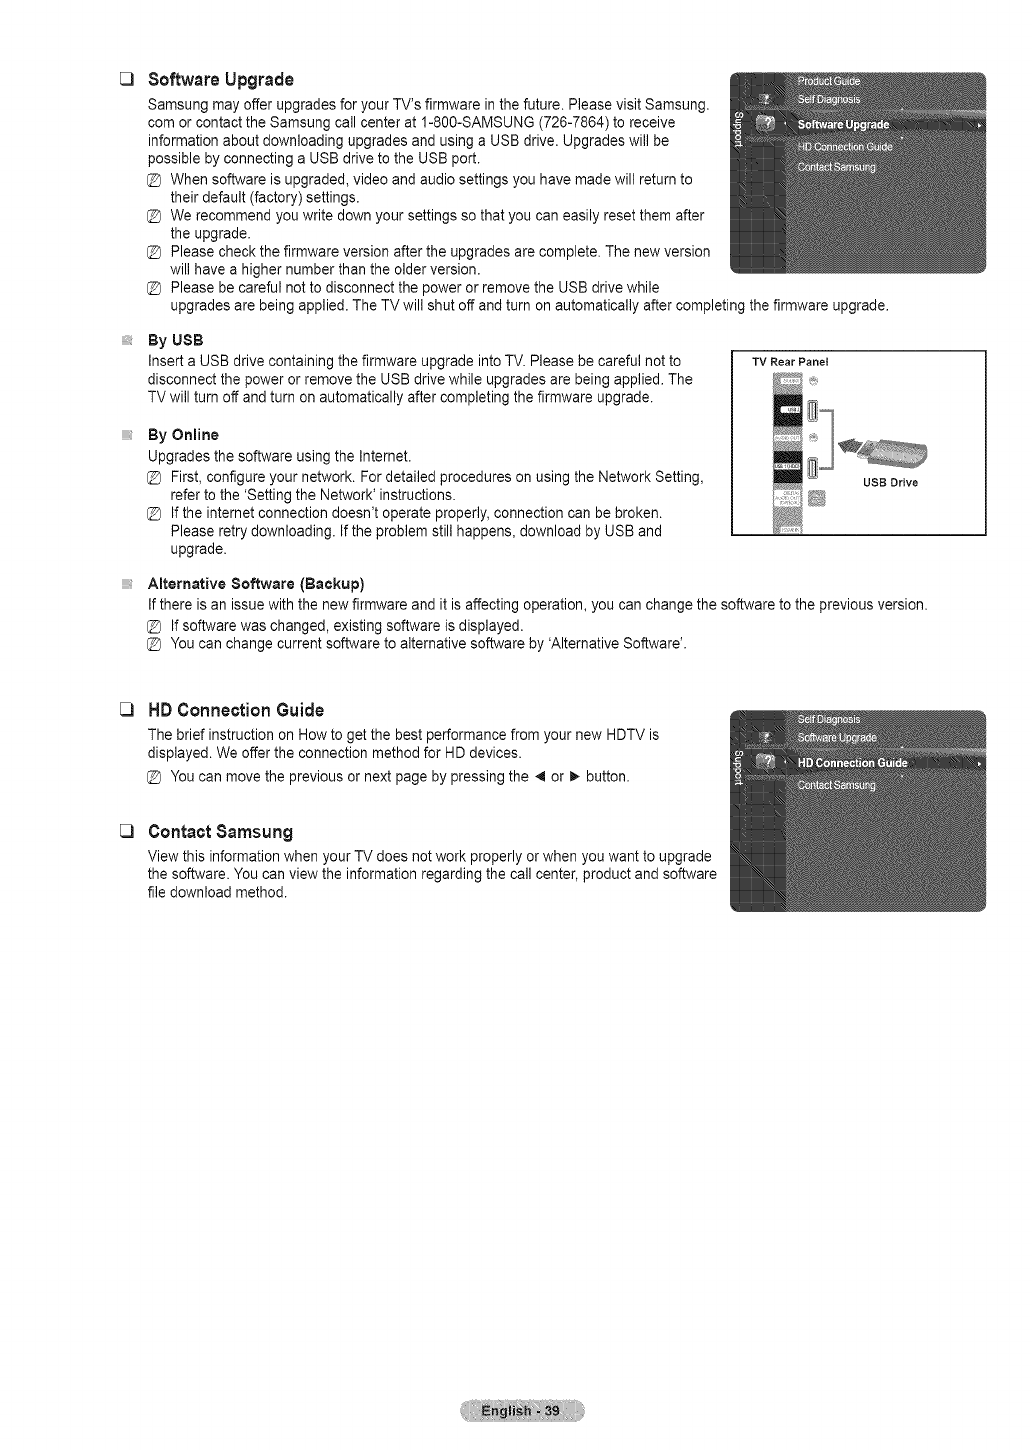
Cl Software Upgrade
Samsung may offer upgrades for your TV's firmware in the future. Please visit Samsung.
com or contact the Samsung call center at 1-800-SAMSUNG (726-7864) to receive
information about downloading upgrades and using a USB drive. Upgrades will be
possible by connecting a USB drive to the USB port.
When software is upgraded, video and audio settings you have made will return to
their default (factory) settings.
We recommend you write down your settings so that you can easily reset them after
the upgrade.
Please check the firmware version after the upgrades are complete. The new version
will have a higher number than the older version.
Please be careful not to disconnect the power or remove the USB drive while
upgrades are being applied. The TV will shut off and turn on automatically after completing the firmware upgrade.
By USB
Insert a USB drive containing the firmware upgrade into TV. Please be careful not to
disconnect the power or remove the USB drive while upgrades are being applied. The
TV will turn off and turn on automatically after completing the firmware upgrade.
By Online
Upgrades the software using the Internet.
First, configure your network. For detailed procedures on using the Network Setting,
refer to the 'Setting the Network' instructions.
If the internet connection doesn't operate properly, connection can be broken.
Please retry downloading. If the problem still happens, download by USB and
upgrade.
TV Rear Panel
USB Drive
Alternative Software (Backup)
If there is an issue with the new firmware and it is affecting operation, you can change the software to the previous version.
@ If software was changed, existing software is displayed.
@ You can change current software to alternative software by 'Alternative Software'.
_3 HD ConnectionGuide
The brief instruction on How to get the best performance from your new HDTV is
displayed. We offer the connection method for HD devices.
You can move the previous or next page by pressing the 4 or 1,_button.
Cl Contact Sarnsung
View this information when your TV does not work properly or when you want to upgrade
the software. You can view the information regarding the call center, product and software
file download method.
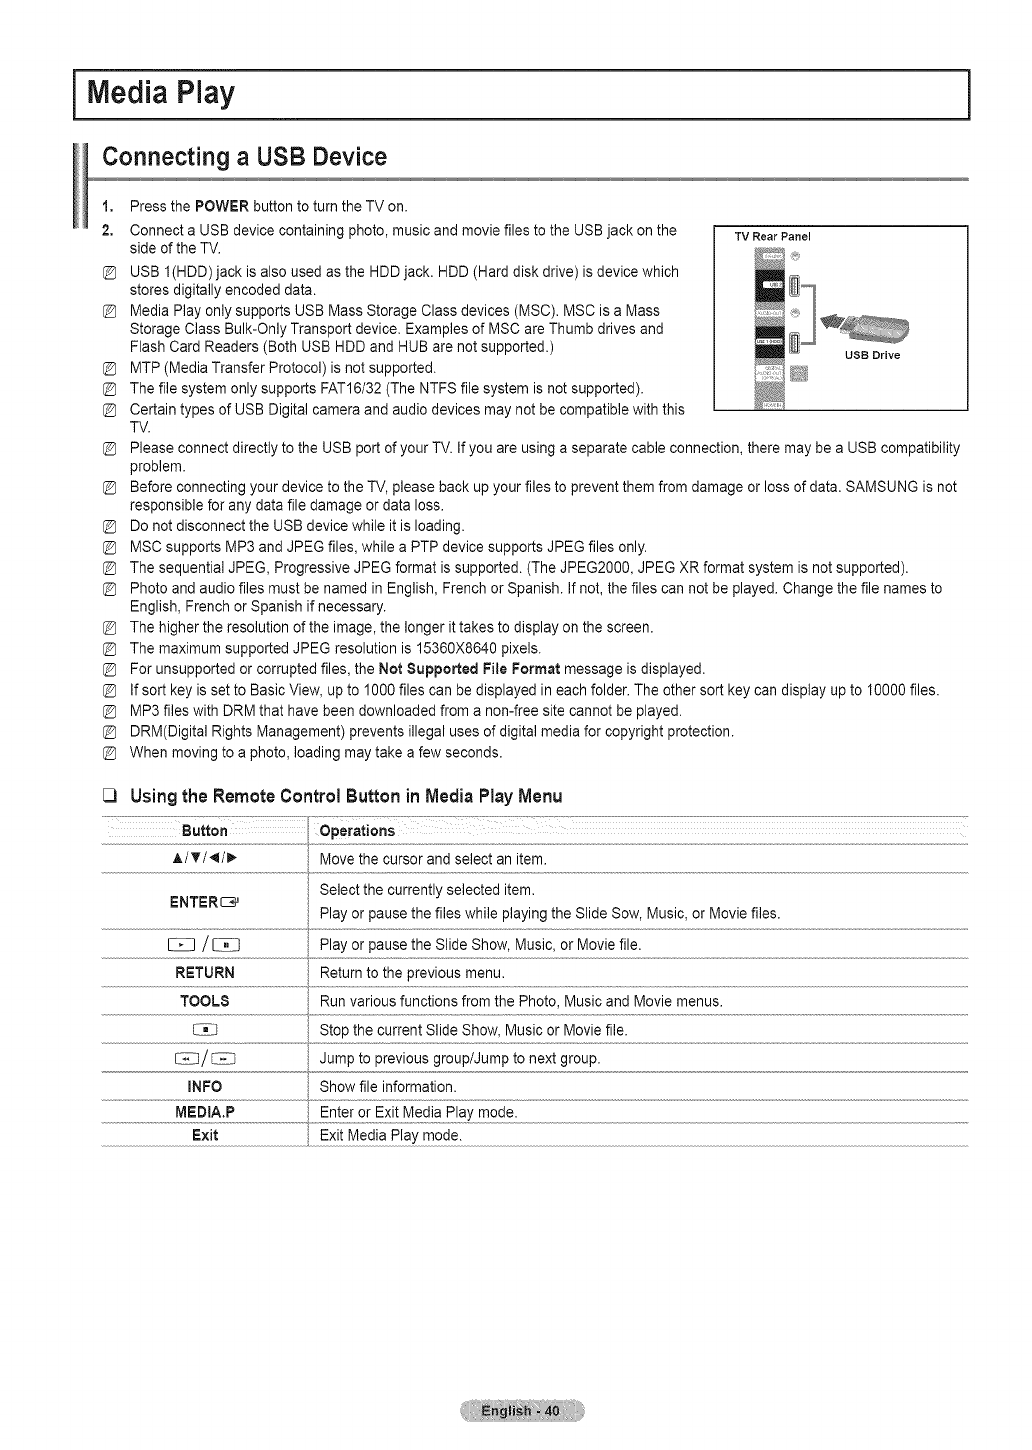
iIVlediaPlay
Connecting a USE,Device
1,
2,
Press the POWER button to turn the TV on.
Connect a USB device containing photo, music and movie files to the USB jack on the TVRearPanel
side of the TV. ,_,
USB I(HDD) jack is also used as the HDDjack. HDD (Hard disk drive) is device which
stores digitally encoded data.
Media Play only supports USB Mass Storage Class devices (MSC). MSC is a Mass
Storage Class Bulk-Only Transport device. Examples of MSC are Thumb drives and
Flash Card Readers (Both USB HDD and HUB are not supported.) USBDrive
MTP (Media Transfer Protocol) is not supported.
The file system only supports FAT16/32 (The NTFS file system is not supported).
Certain types of USB Digital camera and audio devices may not be compatible with this
TV.
Please connect directly to the USB port of your TV. If you are using a separate cable connection, there may be a USB compatibility
problem.
Before connecting your device to the TV, please back up your files to prevent them from damage or loss of data. SAMSUNG is not
responsible for any data file damage or data loss.
Do not disconnect the USB device while it is loading.
MSC supports MP3 and JPEG files, while a PTP device supports JPEG files only.
The sequential JPEG, Progressive JPEG format is supported. (The JPEG2000, JPEG XR format system is not supported).
Photo and audio files must be named in English, French or Spanish. If not, the files can not be played. Change the file names to
English, French or Spanish if necessary.
The higher the resolution of the image, the longer it takes to display on the screen.
The maximum supported JPEG resolution is 15360X8640 pixels.
For unsupported or corrupted files, the Not Supported File Format message is displayed.
If sort key is set to Basic View, up to 1000 files can be displayed in each folder. The other sort key can display up to 10000 files.
MP3 files with DRM that have been downloaded from a non-free site cannot be played.
DRM(Digital Rights Management) prevents illegal uses of digital media for copyright protection.
When moving to a photo, loading may take a few seconds.
[3 Using the Remote Control Button in Media Play Menu
Button ..........................- .....
A/T/_/_. Move the cursor and select an item.
Select the currently selected item.
ENTER_ Play or pause the files while playing the Slide Sow, Music, or Movie files.
E_[] /_ Play or pause the Slide Show, Music, or Movie file.
RETURN Return to the previous menu.
TOOLS Run various functions from the Photo, Music and Movie menus.
CE_ Stop the current Slide Show, Music or Movie file.
i::_C]/_ Jump to previous group/Jump to next group.
INFO Show file information.
MEDIA.P Enter or Exit Media Play mode.
Exit Exit Media Play mode.
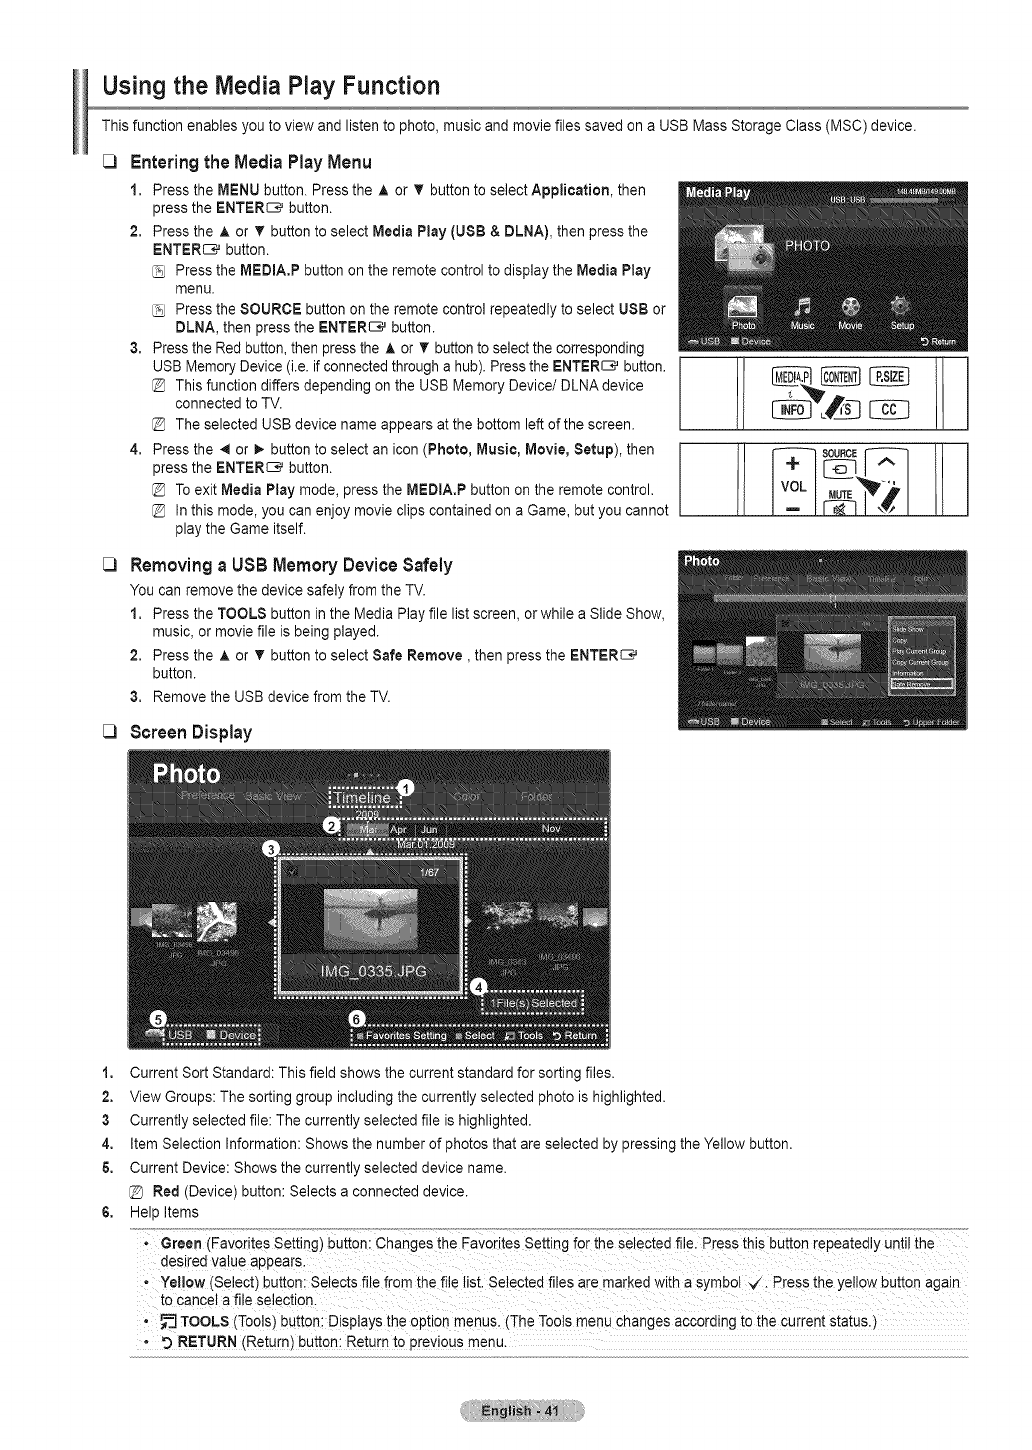
Using the Media Play Function
This function enables you to view and listen to photo, music and movie files saved on a USB Mass Storage Class (MSC) device.
_3 Enteringthe Media Play Menu
1. Press the MENU button. Press the ,& or T button to select Application, then
press the ENTER_ button.
2. Press the A or _' button to select Media Play (USB & DLNA), then press the
ENTER_ button.
Press the MEDmA,Pbutton on the remote control to display the Media Play
menu.
Press the SOURCE button on the remote control repeatedly to select USB or
DLNA, then press the ENTERE__}'button.
3. Press the Red button, then press the A or T' button to select the corresponding
USB Memory Device (i.e. if connected through a hub). Press the ENTER_ button.
This function differs depending on the USB Memory Device/DLNA device
connected to TV.
The selected USB device name appears at the bottom left of the screen.
4. Press the 41 or D,,button to select an icon (Photo, Music, Movie, Setup), then
press the ENTER_ button.
To exit Media Play mode, press the MEDIA.P button on the remote control.
In this mode, you can enjoy movie clips contained on a Game, but you cannot
play the Game itself.
_3 Removing a USB Memory DeviceSafely
You can remove the device safely from the TV.
1. Press the TOOLS button in the Media Play file list screen, or while a Slide Show,
music, or movie file is being played.
2. Press the A or T button to select Safe Remove, then press the ENTER_
button.
3. Remove the USB device from the TV.
[3 Screen Display
1. Current Sort Standard: This field shows the current standard for sorting files.
2. View Groups: The sorting group including the currently selected photo is highlighted.
3 Currently selected file: The currently selected file is highlighted.
4. Item Selection Information: Shows the number of photos that are selected by pressing the Yellow button.
5. Current Device: Shows the currently selected device name.
Red (Device) button: Selects a connected device.
6. Help Items
Green (Favorites setting)button: Changes the Favorites setting for the Selectedfi!e. Press this button repeatedly until the
desired Value appears.
tYel!ow (Select) button; Selects file from the file list. Selected fi es ale marked with a symbol Press the yellow button again
to cancel a file selection.
-_ TOOLS (Tools) button;Displays the option menus, (The Too!s menu changes according to the current status!)
•RETURN (Return)button; Return to prev!ous menu.
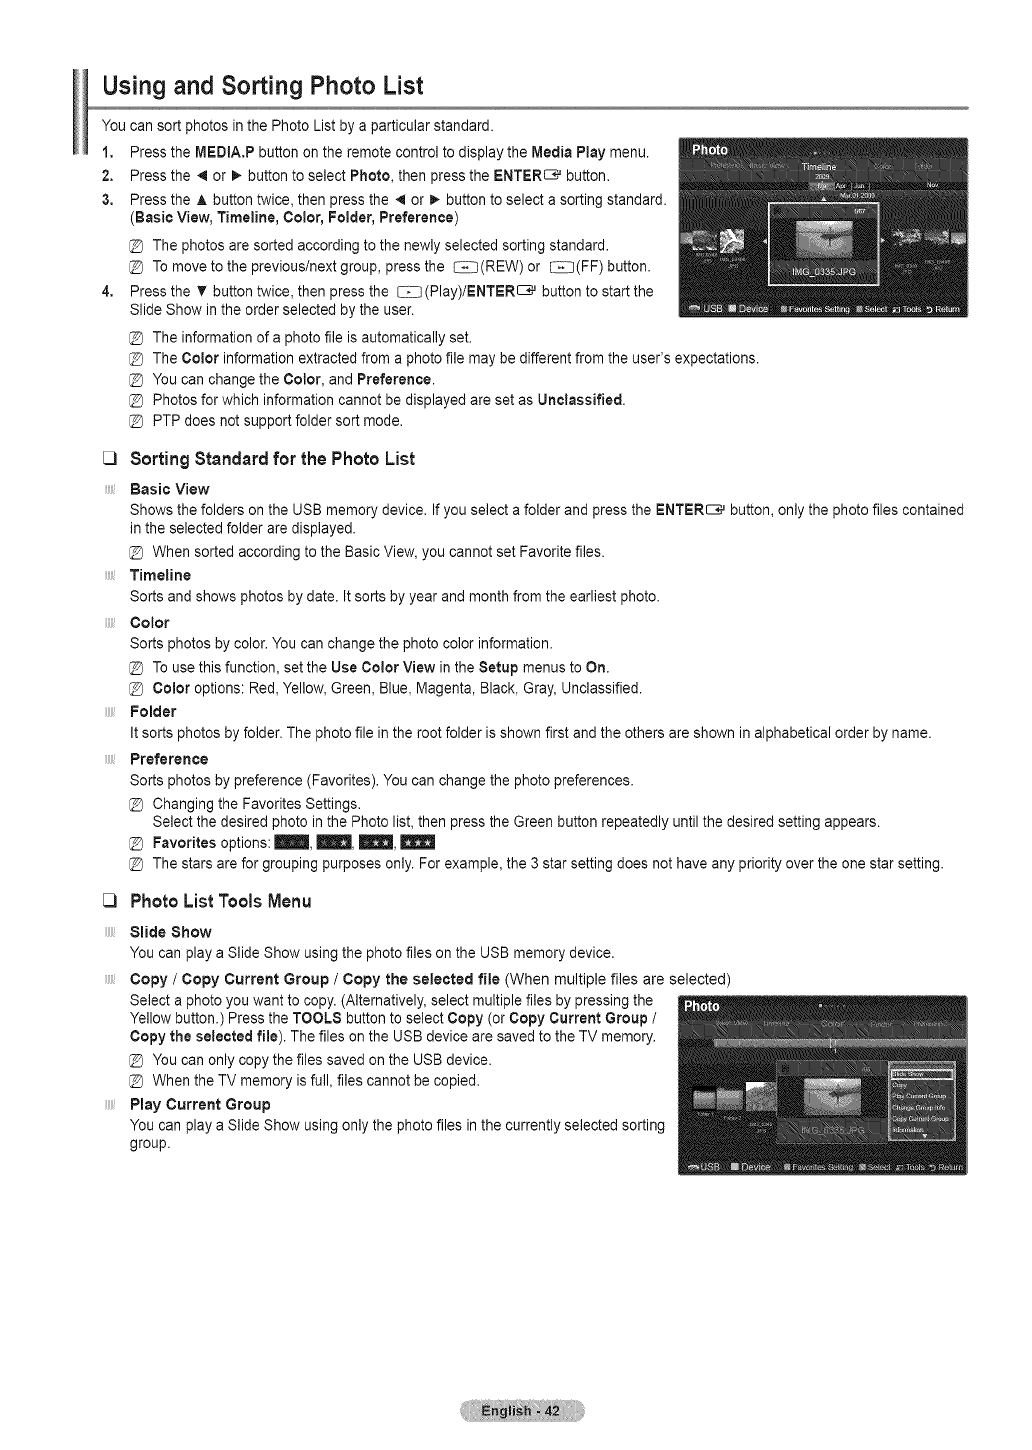
Using and Sorting Photo List
You can sort photos in the Photo List by a particular standard.
1. Press the MEDtA.P button on the remote control to display the Media Play menu.
2. Press the ,,qor !_ button to select Photo, then press the ENTER_ button.
3. Press the ,i. button twice, then press the _ or D,-button to select a sorting standard.
(Basic View, Timeline, Color, Folder, Preference)
The photos are sorted according to the newly selected sorting standard.
To move to the previous/next group, press the CE_(REW) or CE_(FF) button.
4. Press the _r button twice, then press the EZ_ (Play)/ENTER_ button to start the
Slide Show in the order selected by the user.
The information of a photo file is automatically set.
The Color information extracted from a photo file may be different from the user's expectations.
[_ You can change the Color, and Preference.
@ Photos for which information cannot be displayed are set as Unclassified.
@ PTP does not support folder sort mode.
[3 Sorting Standardfor the Photo List
Basic View
Shows the folders on the USB memory device. If you select a folder and press the ENTER_ button, only the photo files contained
in the selected folder are displayed.
@ When sorted according to the Basic View, you cannot set Favorite files.
Timeline
Sorts and shows photos by date. It sorts by year and month from the earliest photo.
Color
Sorts photos by color, You can change the photo color information.
@ To use this function, set the Use Color View in the Setup menus to On.
@Color options: Red, Yellow, Green, Blue, Magenta, Black, Gray, Unclassified.
Folder
It sorts photos by folder. The photo file in the root folder is shown first and the others are shown in alphabetical order by name.
Preference
Sorts photos by preference (Favorites). You can change the photo preferences.
@ Changing the Favorites Settings.
Select the desired photo in the Photo list, then press the Green button repeatedly until the desired setting appears.
@ Favorites options: ra!! _, _,
@ The stars are for grouping purposes only. For example, the 3 star setting does not have any priority over the one star setting.
_3
iiiii/
Photo ListToolsMenu
Slide Show
You can play a Slide Show using the photo files on the USB memory device.
Copy /Copy Current Group /Copy the selected file (When multiple files are selected)
Select a photo you want to copy. (Alternatively, select multiple files by pressing the
Yellow button.) Press the TOOLS button to select Copy (or Copy Current Group /
Copy the selected file). The files on the USB device are saved to the TV memory.
@ You can only copy the files saved on the USB device.
@ When the TV memory is full, files cannot be copied.
Play Current Group
You can play a Slide Show using only the photo files in the currently selected sorting
group.
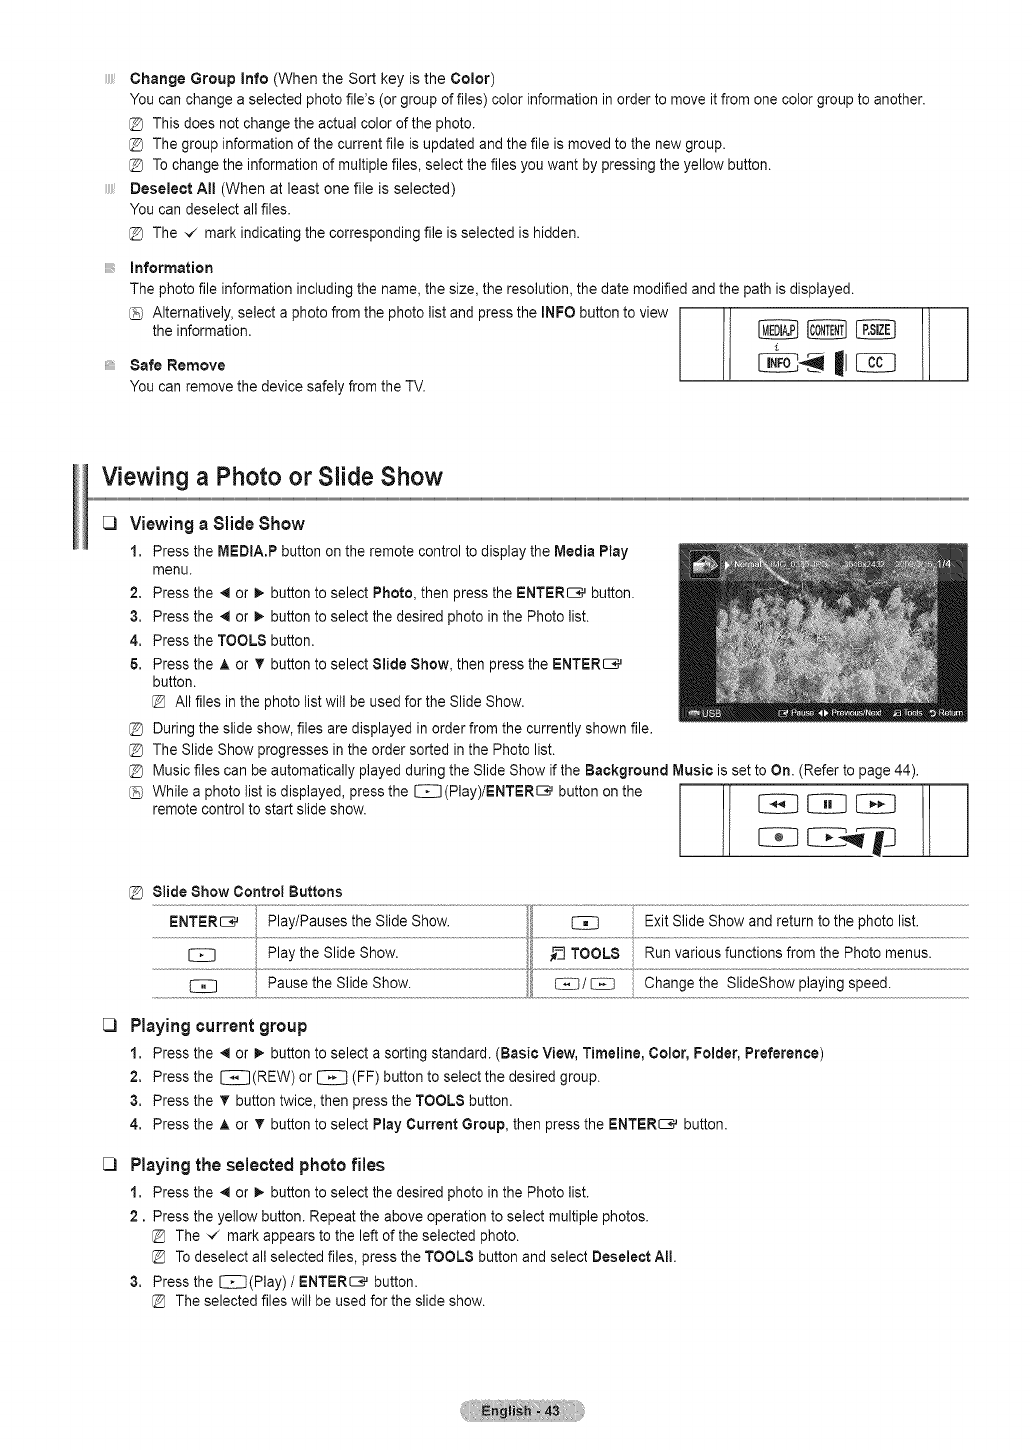
Change Group Info (When the Sort key is the Color)
You can change a selected photo file's (or group of files) color information in order to move it from one color group to another.
@ This does not change the actual color of the photo.
@ The group information of the current file is updated and the file is moved to the new group.
@ To change the information of multiple files, select the files you want by pressing the yellow button.
Deselect All (When at least one file is selected)
You can deselect all files.
@ The ,,/ mark indicating the corresponding file is selected is hidden.
information
The photo file information including the name, the size, the resolution, the date modified and the path is displayed.
Alternatively, select a photo from the photo list and press the INFO button to view
the information. _ _ [_
SafeRemove II
You can remove the device safely from the TV.
Viewing a Photo or Slide Show
[3 Viewing a Slide Show
1. Press the MEDIA.P button on the remote control to display the Media Play
menu.
2. Press the _ or _. button to select Photo, then press the ENTER_ button.
3. Press the _ or _. button to select the desired photo in the Photo list.
4. Press the TOOLS button.
& Press the A or _' button to select Slide Show, then press the ENTER_
button.
All files in the photo list will be used for the Slide Show.
@ During the slide show, files are displayed in order from the currently shown file.
@ The Slide Show progresses in the order sorted in the Photo list.
@ Music files can be automatically played during the Slide Show if the Background Music is set to On. (Refer to page 44).
While a photo list is displayed, press the [Z_C](Play)/ENTERE_ button on the
remote control to start slide show. [_ _
@ Slide Show Control Buttons
ENTER_ Play/Pauses the Slide Show, _ Exit Slide Show and return to the photo list,
4
[_ZZ] Play the Slide Show. _ TOOLS Runvarious functions from the Photo menus.
_f
Playing current group
1. Press the _ or _ button to select a sorting standard. (Basic View, Timeline, Color, Folder, Preference)
2. Press the [_[[](REW) or _ (FF) button to select the desired group.
3. Press the T button twice, then press the TOOLS button.
4. Press the A or _' button to select Play Current Group, then press the ENTER_ button.
C) Playingthe selected photofiles
1. Press the _ or _. button to select the desired photo in the Photo list.
2. Press the yellow button. Repeat the above operation to select multiple photos.
The ",/ mark appears to the left of the selected photo.
To deselect all selected files, press the TOOLS button and select Deselect All.
3. Press the EZZJ(Play)/ENTER_ button.
The selected files will be used for the slide show.
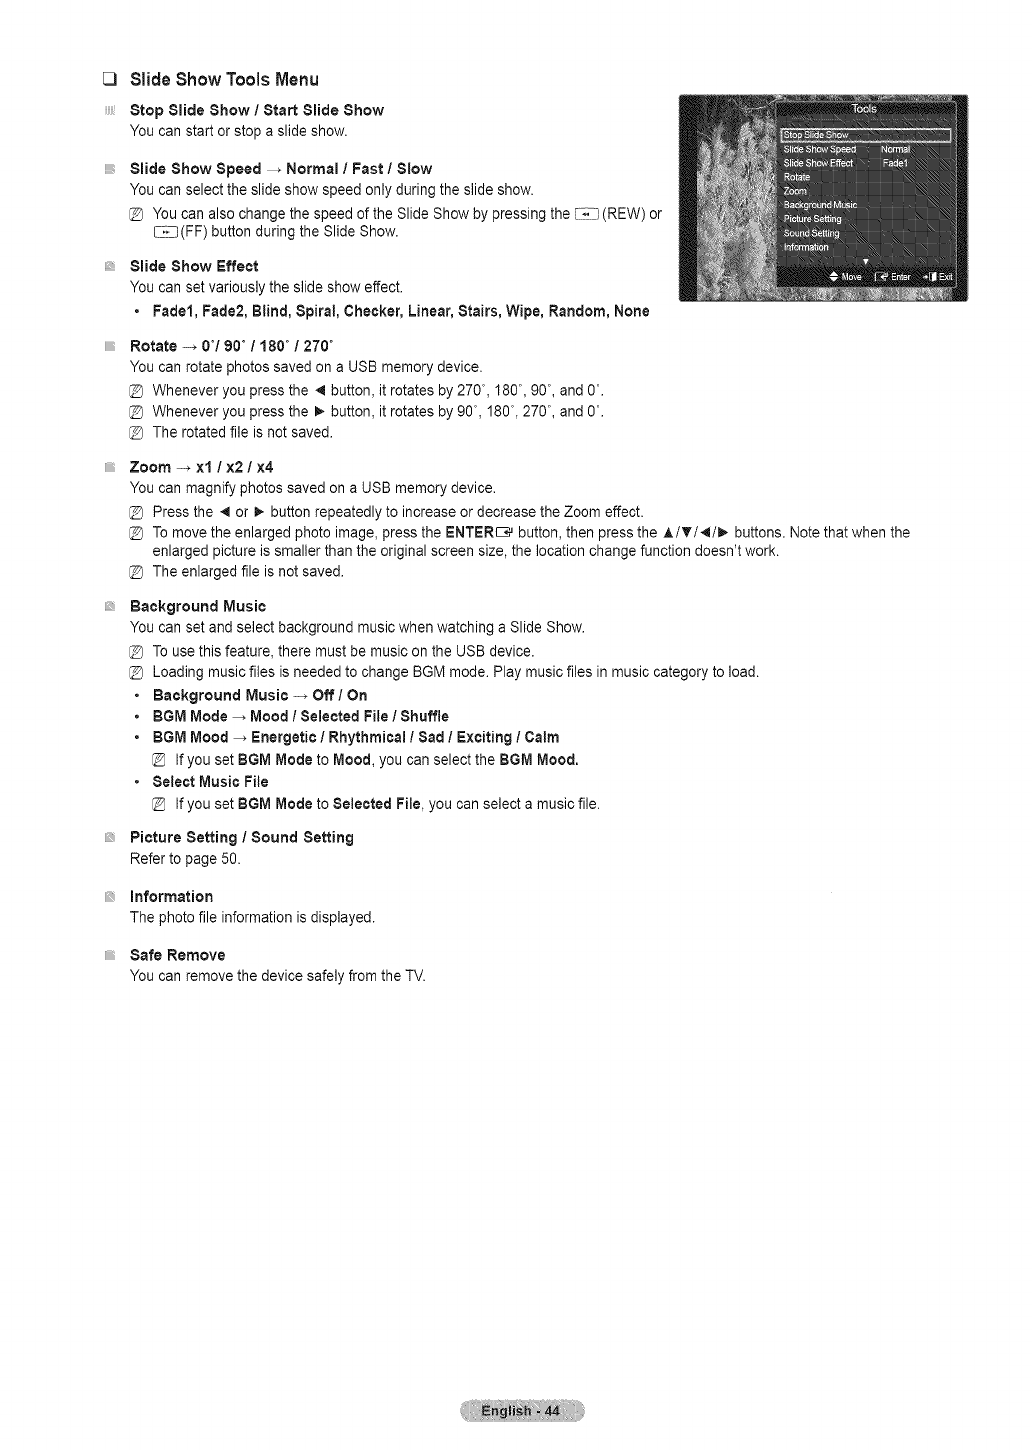
[3 Slide ShowToolsMenu
Stop Slide Show /Start Slide Show
You can start or stop a slide show.
Slide Show Speed --_ Normal /Fast /Slow
You can select the slide show speed only during the slide show.
@ You can also change the speed of the Slide Show by pressing the _ (REW) or
CE3(FF) button during the Slide Show.
Slide Show Effect
You can set variously the slide show effect.
• Fade1, Fade2, Blind, Spiral, Checker, Linear, Stairs, Wipe, Random, None
Rotate -, 0°/90 ° /180 ° /270 °
You can rotate photos saved on a USB memory device.
@ Whenever you press the _ button, it rotates by 270 °, 180°, 90 °, and 0°.
@ Whenever you press the _. button, it rotates by 90 °, 180°, 270 °, and 0°.
@ The rotated file is not saved.
Zoom -, xl /x2 /x4
You can magnify photos saved on a USB memory device.
Press the _1 or _. button repeatedly to increase or decrease the Zoom effect.
To move the enlarged photo image, press the ENTERE__}'button, then press the A/v/_/I_- buttons. Note that when the
enlarged picture is smaller than the original screen size, the location change function doesn't work.
The enlarged file is not saved.
Background Music
You can set and select background music when watching a Slide Show.
@ To use this feature, there must be music on the USB device.
@ Loading music files is needed to change BGM mode. Play music files in music category to load.
•Background Music _-_Off /On
•BGM Mode _Mood /Selected File /Shuffle
•BGM Mood _Energetic /Rhythmical /Sad /Exciting /Cairn
If you set BGM Mode to Mood, you can select the BGM Mood.
•Select Music File
If you set BGM Mode to Selected File, you can select a music file.
Picture Setting /Sound Setting
Refer to page 50.
Information
The photo file information is displayed.
Safe Remove
You can remove the device safely from the TV.
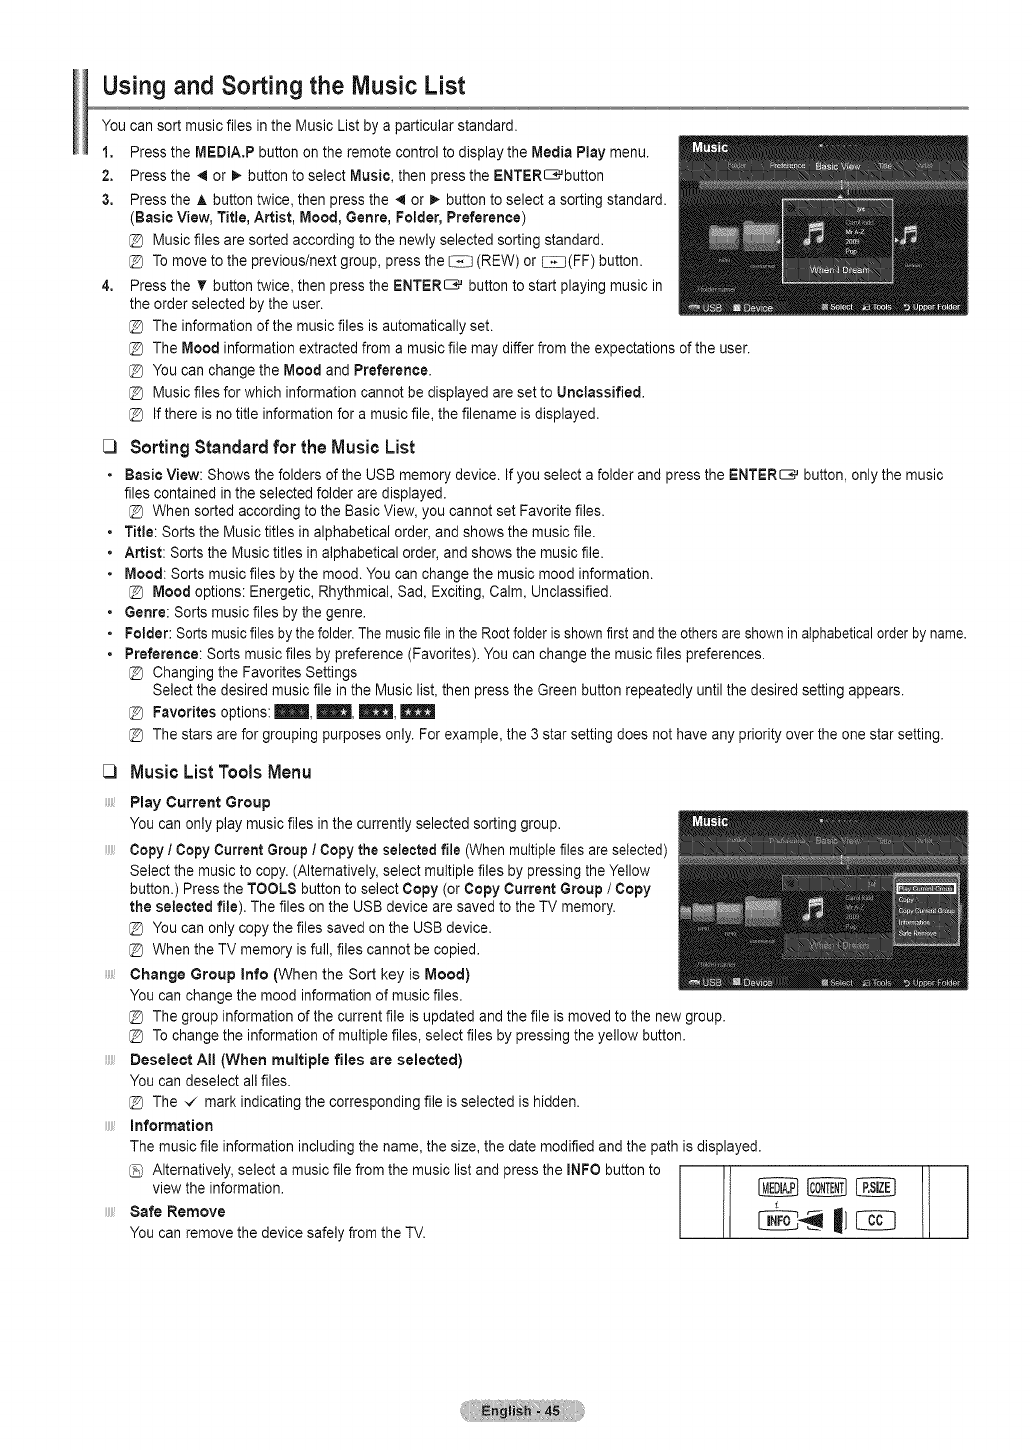
Using and Sorting the Music List
You can sort music files in the Music List by a particular standard.
1, Press the MEDtA.P button on the remote control to display the Media Play menu.
2. Press the 4 or !_ button to select Music, then press the ENTER_button
3, Press the A button twice, then press the _1or I_-button to select a sorting standard.
(Basic View, Title, Artist, Mood, Genre, Folder, Preference)
Music files are sorted according to the newly selected sorting standard.
To move to the previous/next group, press the CE3(REW) or [:2E3(FF)button.
4, Press the T button twice, then press the ENTER_ button to start playing music in
the order selected by the user.
The information of the music files is automatically set.
The Mood information extracted from a music file may differ from the expectations of the user.
You can change the Mood and Preference.
Music files for which information cannot be displayed are set to Unclassified.
If there is no title information for a music file, the filename is displayed.
[3 SortingStandardfor the MusicList
•Basic View: Shows the folders of the USB mernory device. If you select a folder and press the ENTER_ button, only the music
files contained in the selected folder are displayed.
@ When sorted according to the Basic View, you cannot set Favorite files.
•Title: Sorts the Music titles in alphabetical order, and shows the music file.
•Artist: Sorts the Music titles in alphabetical order, and shows the music file.
• Mood: Sorts music files by the mood. You can change the music mood information.
Mood options: Energetic, Rhythmical, Sad, Exciting, Calm, Unclassified.
• Genre: Sorts music files by the genre.
•Folder: Sorts musicfiles by the folder.The music file in the Rootfolder is shownfirst and the others are shown in alphabeticalorder by name.
•Preference: Sorts music files by preference (Favorites). You can change the music files preferences.
@ Changing the Favorites Settings
Select the desired music file in the Music list, then press the Green button repeatedly until the desired setting appears.
@ Favorites options: Ilmm, _, _, |
@ The stars are for grouping purposes only. For example, the 3 star setting does not have any priority over the one star setting.
_3
iiiii/
Music ListToolsMenu
Play Current Group
You can only play music files in the currently selected sorting group.
Copy /Copy Current Group /Copy the selected file (When multiplefiles are selected)
Select the music to copy. (Alternatively, select multiple files by pressing the Yellow
button.) Press the TOOLS button to select Copy (or Copy Current Group /Copy
the selected file). The files on the USB device are saved to theTV memory.
@ You can only copy the files saved on the USB device.
@ When the TV memory is full, files cannot be copied.
Change Group Info (When the Sort key is Mood)
You can change the mood information of music files.
@ The group information of the current file is updated and the file is moved to the new group.
@ To change the information of multiple files, select files by pressing the yellow button.
Deselect All (When multiple files are selected)
You can deselect all files.
@ The ,,z mark indicating the corresponding file is selected is hidden.
information
The rnusic file information including the name, the size, the date modified and the path isdisplayed.
Alternatively, select a music file from the music list and press the mNFObutton to
view the information. _ _
/,
SafeRemove |l
You can remove the device safely from the TV.
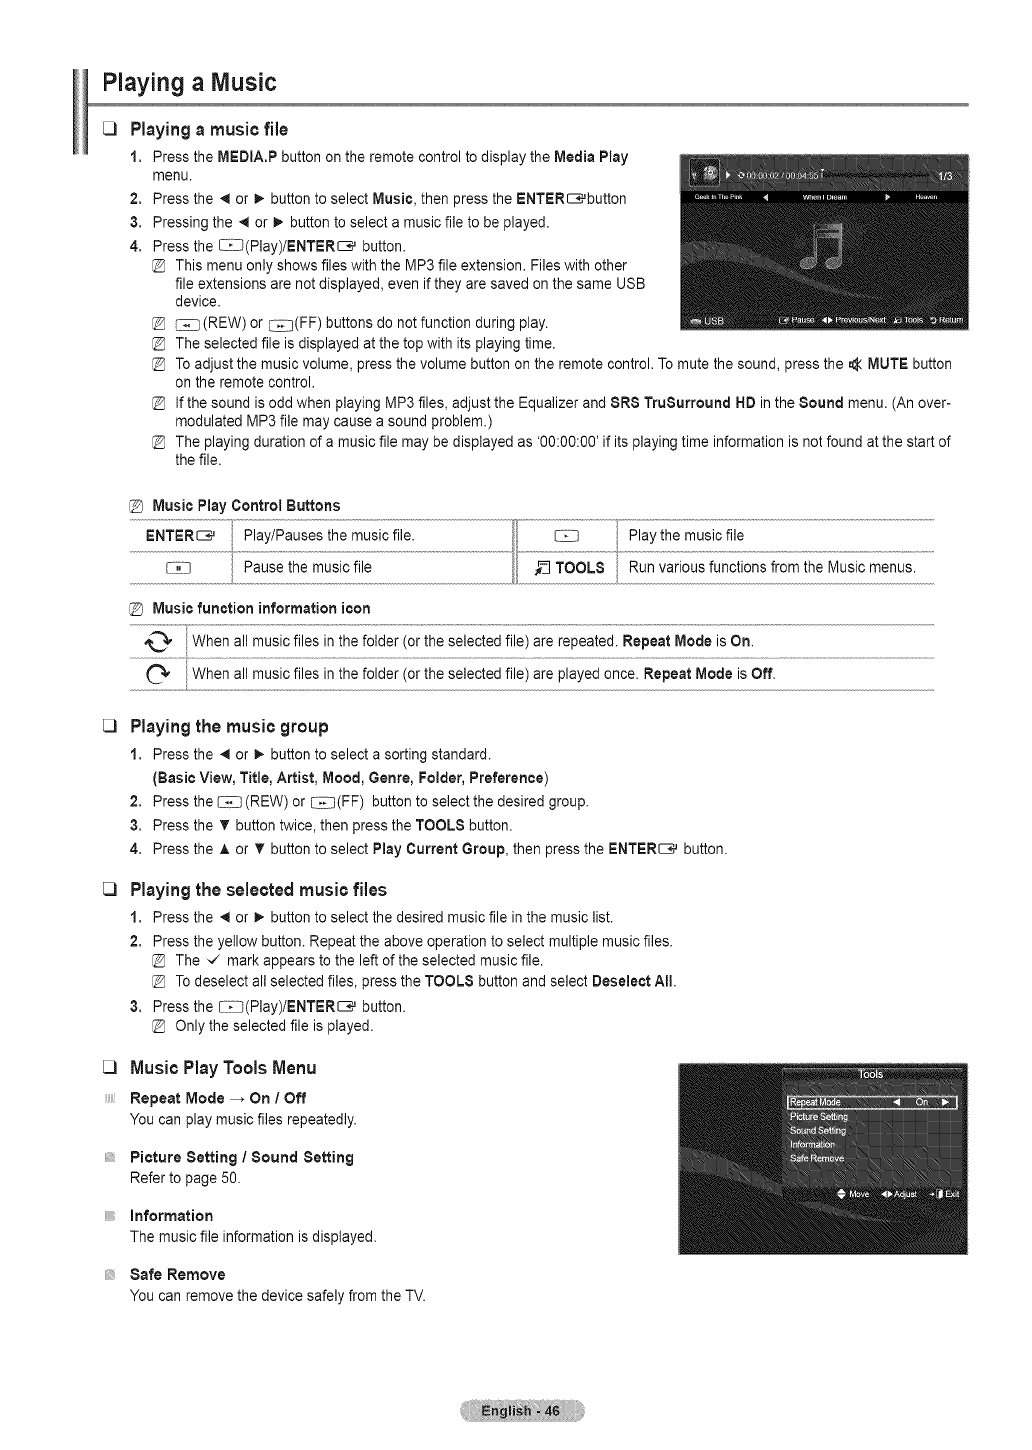
Playing a Music
_3 Playingamusicfile
1. Press the MEDIA.P button on the remote control to display the Media Play
menu.
2. Press the _ or _ button to select Music, then press the ENTER_button
3. Pressing the _ or m,.button to select a music file to be played.
4. Press the CZ_(Play)/ENTER_ button.
This menu only shows files with the MP3 file extension. Files with other
file extensions are not displayed, even if they are saved on the same USB
device.
C_ (REW) or CEB(FF) buttons do not function during play.
The selected file is displayed at the top with its playing time.
To adjust the music volume, press the volume button on the remote control. To mute the sound, press the _ MUTE button
on the remote control.
If the sound is odd when playing MP3 files, adjust the Equalizer and SRS TruSurreund HD inthe Bound menu. (An over-
modulated MP3 file may cause a sound problem.)
The playing duration of a music file may be displayed as '00:00:00' if its playing time information is not found at the start of
the file.
@Music Play Control Buttons
_3
_3
Music function information icon
.......... W a!,!music,[il n t folder ! o[,the se!ec!edf ile are [epeated:,Rt pea t MQde!
_ When all music files in the folder (or the selected file) are played once. Repeat Mode is Off,
....................................../
Playingthe music group
1. Press the _ or _ button to select a sorting standard.
(Basic View, Title, Artist, Mood, Genre, Folder, Preference)
2. Press the I_ (REW) or CE_(FF) button to select the desired group.
3. Press the T button twice, then press the TOOLS button.
4. Press the A or T button to select Play Current Group, then press the ENTER_ button.
Playing the selected music files
1. Press the _ or _. button to select the desired music file in the music list.
2. Press the yellow button. Repeat the above operation to select multiple music files.
The ",/ mark appears to the left of the selected music file.
To deselect all selected files, press the TOOLS button and select Deselect All.
3. Press the CE_(PIay)/ENTER_ button.
Only the selected file is played.
[3 Music PlayToolsMenu
Repeat Mode _ On /Off
You can play music files repeatedly.
Picture Betting /Bound Betting
Refer to page 50.
information
The music file information is displayed.
Safe Remove
You can remove the device safely from the TV.
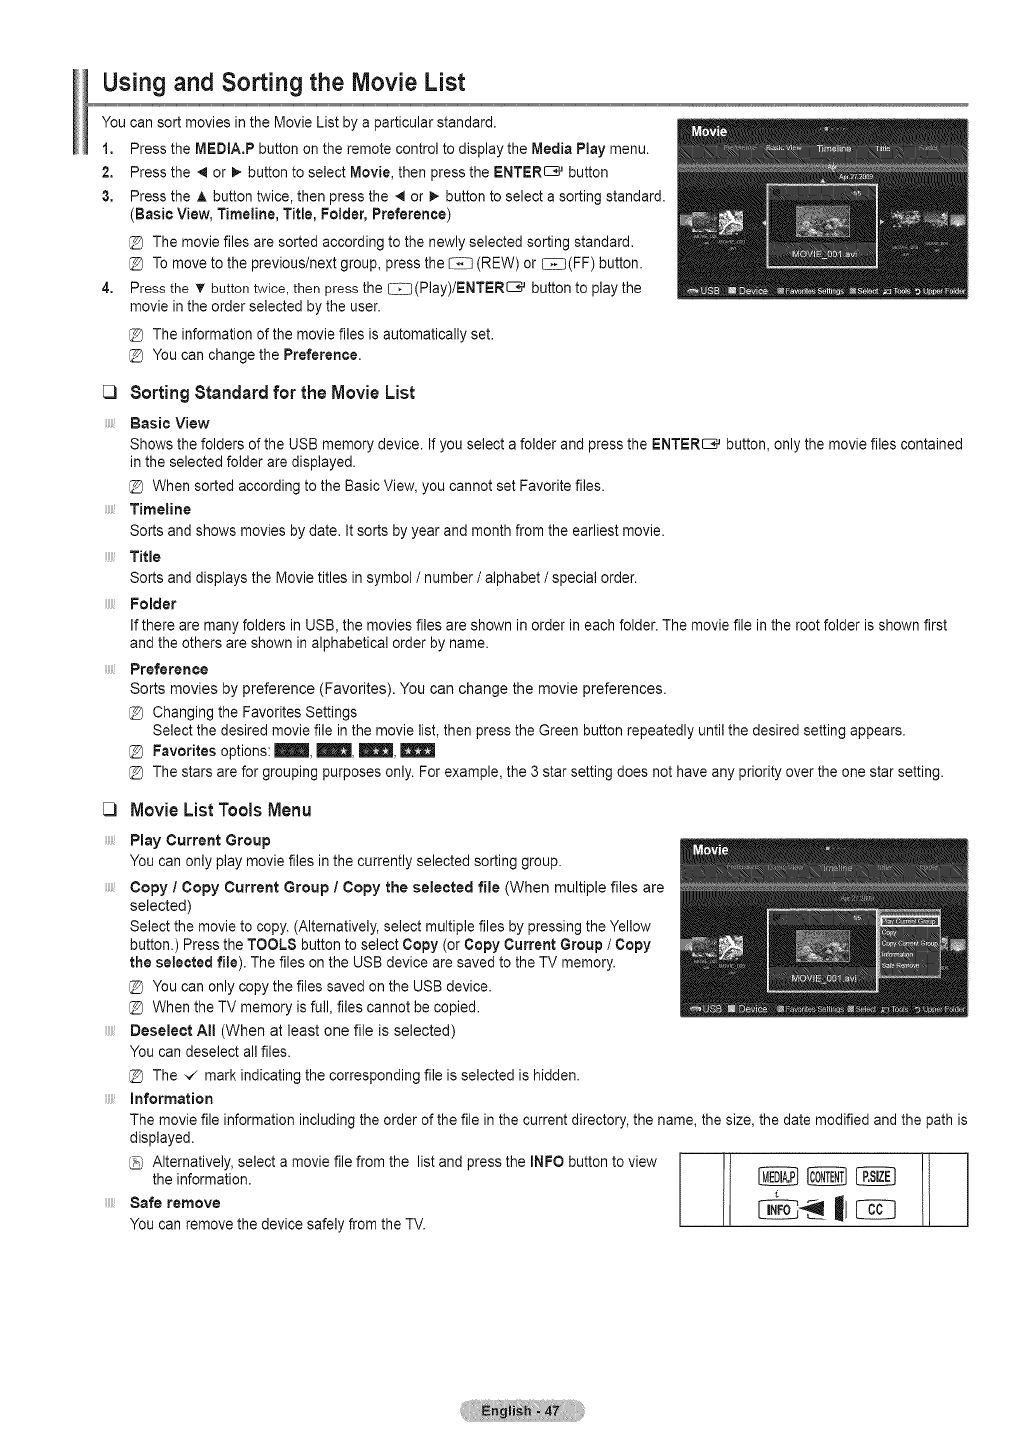
Using and Sorting the Movie List
You can sort movies in the Movie List by a particular standard.
1. Press the MEDtA.P button on the remote control to display the Media Play menu.
2. Press the _ or _. button to select Movie, then press the ENTER_ button
3. Press the ,_ button twice, then press the _ or _ button to select a sorting standard.
(Basic View, Timeline, Title, Folder, Preference)
@ The movie files are sorted according to the newly selected sorting standard.
@ To move to the previous/next group, press the C_ (nEW) or _(FF) button.
4. Press the _ button twice, then press the CB(Play)/ENTER_ button to play the
movie in the order selected by the user.
@ The information of the movie files is automatically set.
@ You can change the Preference,
[3 Sorting Standardfor the MovieList
Basic View
Shows the folders of the USB memory device. If you select a folder and press the ENTER_ button, only the movie files contained
in the selected folder are displayed.
@ When sorted according to the Basic View, you cannot set Favorite files.
Timeline
Sorts and shows movies by date. It sorts by year and month from the earliest movie.
Title
Sorts and displays the Movie titles in symbol /number /alphabet /special order.
Folder
If there are many folders in USB, the movies files are shown in order in each folder. The movie file in the root folder is shown first
and the others are shown in alphabetical order by name.
Preference
Sorts movies by preference (Favorites). You can change the movie preferences.
@ Changing the Favorites Settings
Select the desired movie file in the movie list, then press the Green button repeatedly until the desired setting appears.
@Favorites options: |, _, _,
@ The stars are for grouping purposes only. For example, the 3 star setting does not have any priority over the one star setting.
C3
11111/
Movie ListToolsMenu
Play Current Group
You can only play movie files in the currently selected sorting group.
Copy /Copy Current Group /Copy the selected file (When multiple files are
selected)
Select the movie to copy. (Alternatively, select multiple files by pressing the Yellow
button.) Press the TOOLS button to select Copy (or Copy Current Group /Copy
the selected file). The files on the USB device are saved to theTV memory.
@ You can only copy the files saved on the USB device.
@ When the TV memory is full, files cannot be copied.
Deselect All (When at least one file is selected)
You can deselect all files.
@ The ../ mark indicating the corresponding file is selected is hidden.
information
The movie file information including the order of the file in the current directory, the name, the size, the date modified and the path is
displayed.
Alternatively, select a movie file from the list and press the INFO button to view
the information. _ _
1;
Saferemove |1
You can remove the device safely from the TV.
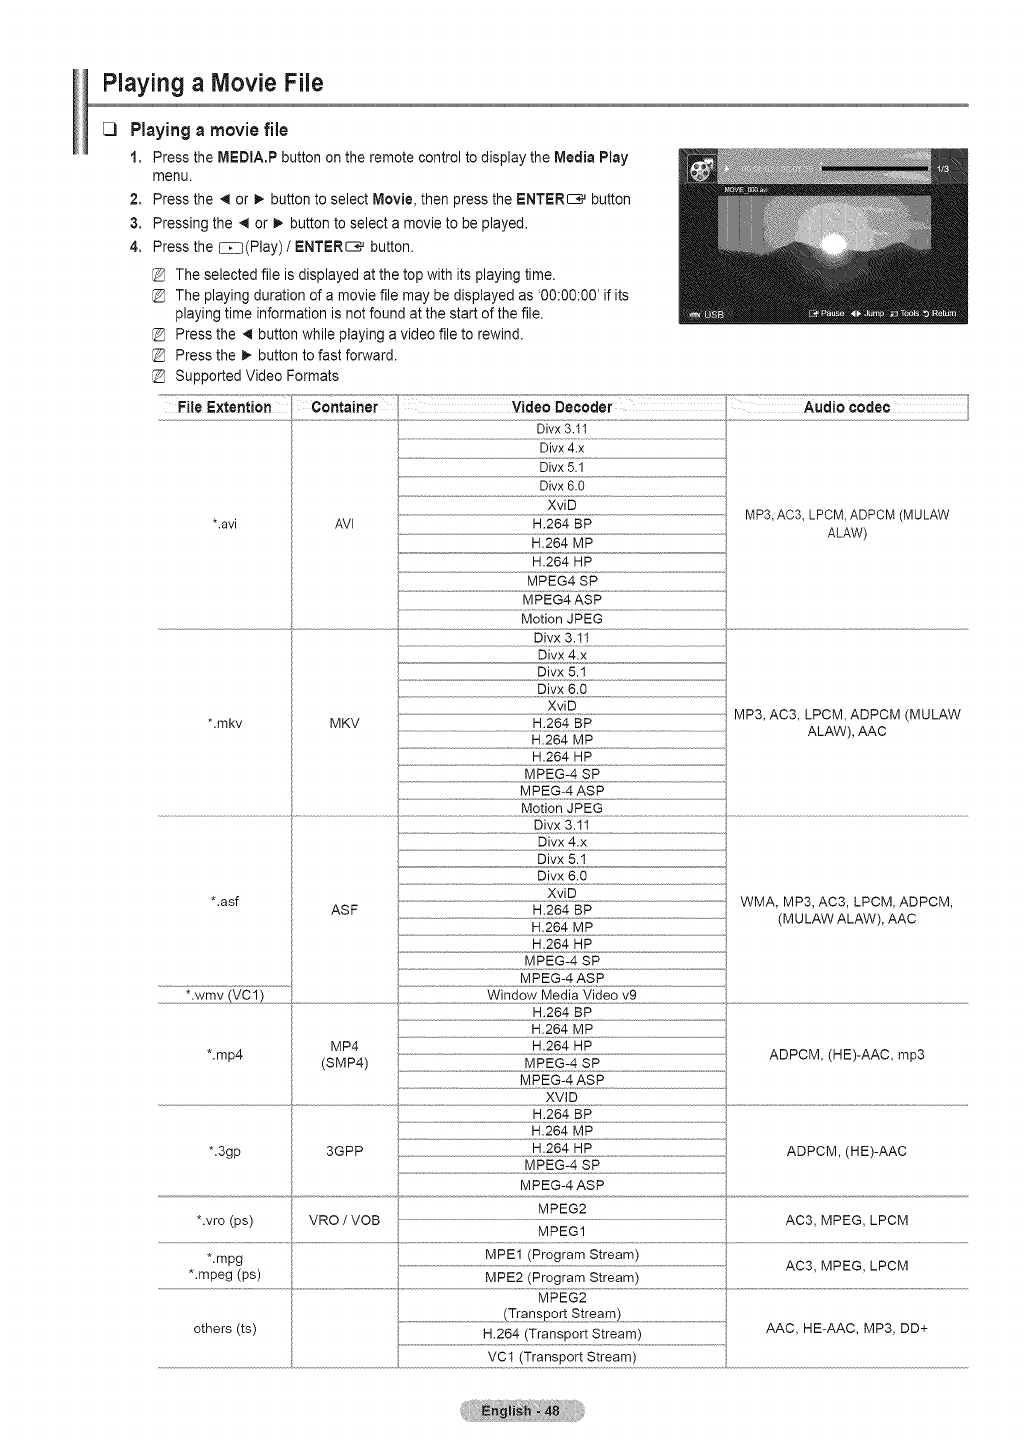
Playing a Movie File
[_ Playinga movie file
1. Press the MEDIA.P button on the remote control to display the Media Play
menu.
2. Press the _ or _. button to select Movie, then press the ENTER_ button
3. Pressing the _ or _. button to select a movie to be played•
4. Press the CZ3(Play)/ENTER_ button.
The selected file is displayed at the top with its playing time.
The playing duration of a movie file may be displayed as '00:00:00' if its
playing time information is not found at the start of the file.
Press the _1 button while playing a video file to rewind•
Press the _. button to fast forward.
Supported Video Formats
xtont on .................... Audiocodoc
Divx 3.11
*.avi
*•mkv
AVI
MKV
*.asf
......................................................................................................................................................
Divx 5.1
Divx 6.0
XviD MP3, AC3, LPCM, ADPCM (MULAW
H.264 BP
H.264 MP ALAW)
H.264 HP
MPEG4 SP
MPEG4 ASP
Motion JPEG
Divx 3.11
Divx 4.x
Divx 5.1
Divx 6.0
XviD
H.264 BP MP3, AC3, LPCM, ADPCM (MULAW
H.264 MP ALAW), AAC
H.264 HP
MPEG-4 SP
MPEG-4 ASP
Divx 3.11
ASF
Divx 6.0
XviD
H.264 BP I WMA, MP3, AC3, LPCM, ADPCM,
H••264•lVi# (MULAW ALAW), AAC
H.264 HP
MPEG-4 SP
MPEG-4 ASP
.........................................................................................................................................................................Window Media Video v9
*.mp4
*.3gp
*.vro (ps)
*•mpg
*.mpeg (ps)
MP4
(SMP4)
H.264 MP
H.264 HP
/
MPEG-4 ASP
XVID
3GPP H.264 HP
MPEG-4 ASP
ADPCM, (HE)-AAC, mp3
ADPCM,(HE)-AAC
MPEG2
VRO /VOB AC3, MPEG, LPCM
MPEG1
.....................................................................................................................................................aPE1 (Program Stream) AC3, MPEG, LPCM
MPE2 (Program Stream)
others (ts) AAC, HE-AAC, MP3, DD+

Supported caption formats
.ttxt
.smi
Format
XML
,sub string-based
_3
_3
_3
LP,,,x 1 oivxcert,f,edproduotsusio0HomeThe tor estKitv3Oorater:Plays DivX® video, including premium content.
Video Play Control Buttons
ENTER_ Play/Pauses the movie file
EZZ] Play the movie file
E3_ Pause the movie file
C_ Exit play mode and return to the movie list.
__ TOOLS Run various functions from the movie menus.
_/_. Skip forwards or backwards through the movie file.
A Move to the last view of the current file.
T
CE:]
Move to the first view of the current file.
Play the file at double speed.
This function may not be supported depending on the codec.
Playingthe movie group
1. Press the _1 or _ button to select a sorting standard.
(Basic View, Timeline, Title, Folder, Preference)
2, Press the CE_(REW) or CE_(FF) button to select the desired group.
3. Press the V button twice, then press the TOOLS button.
4. Press the A or _' button to select Play Current Group, then press the ENTER_ button.
Playing the selected movie files
1. Press the _ or _. button to select the desired movie file in the movie list.
2. Press the yellow button. Repeat the above operation to select multiple movie files.
The _/mark appears to the left of the selected movie file.
To deselect all selected files, press the TOOLS button and select Deselect All.
3. Press the EZZ}(Play)/ENTER_ button.
Only the selected file is played,
Playingmovie continuously(Resume Play)
If you exit playing movie function, the movie can played later from the point where it was stopped.
1. Select movie file you want to Play continuously by pressing _i or 1,_button to select it from the movie list.
2. Press the CEZ}(Play)/ENTER_ button.
3. Select Play continuously by pressing Blue button.
The movie will begin to play from where it was stopped.
If Continuous Movie Play Help in the setup menu was set On, a pop-up message will appear when you play movie file you
want to Play continuously. (Refer to page 51)
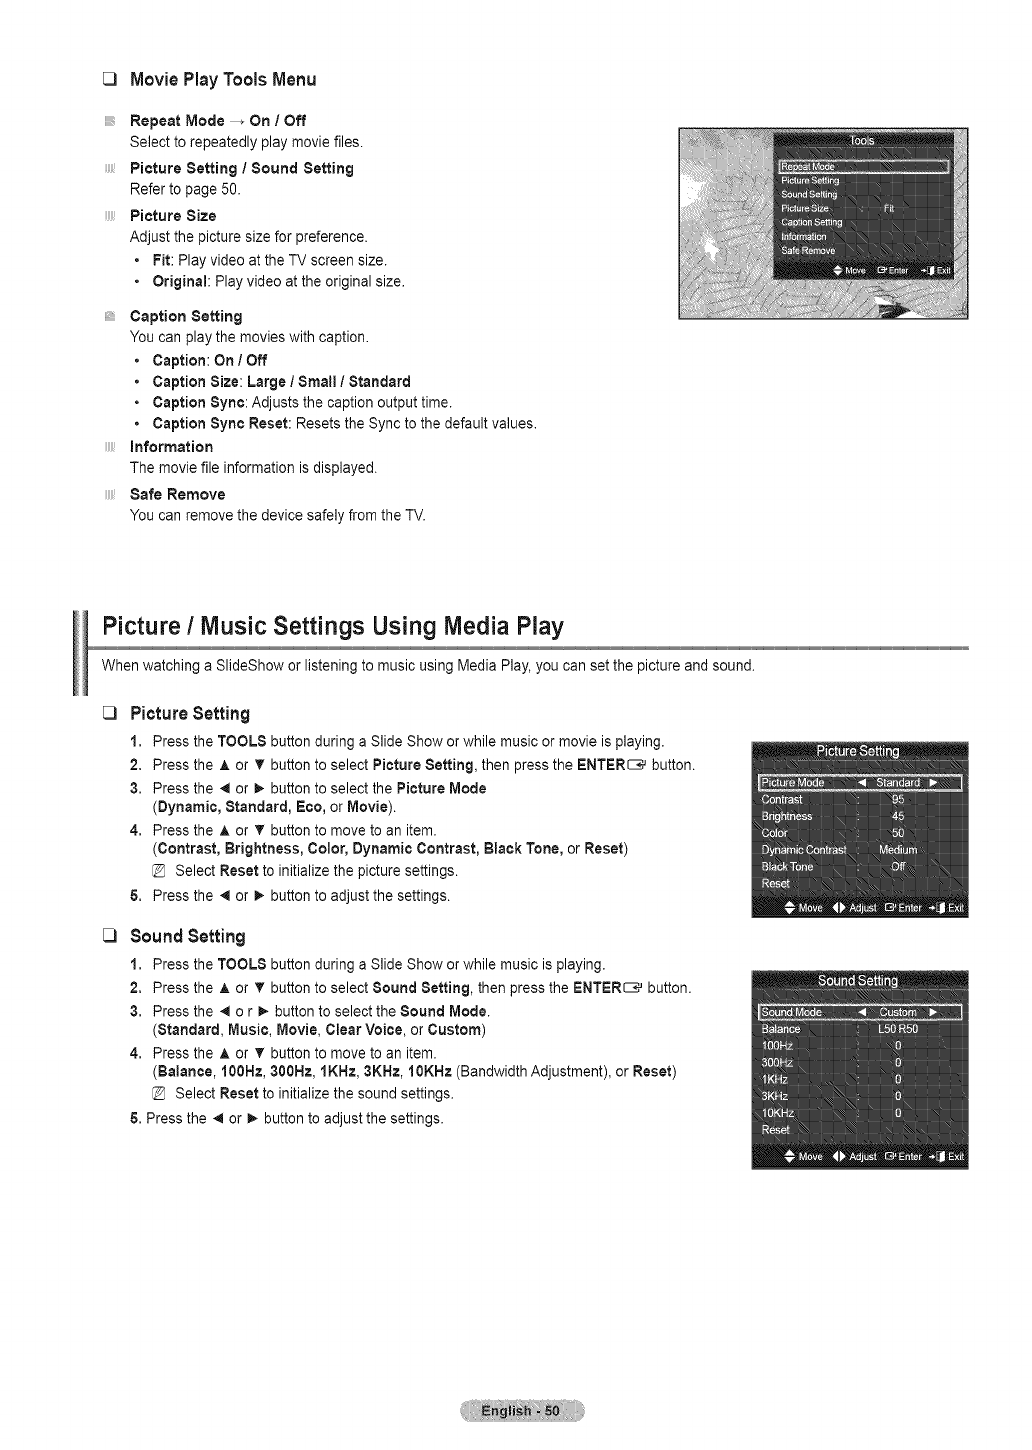
_3
iiiii/
iiiii/
Movie PlayTools Menu
Repeat Mode --_ On /Off
Select to repeatedly play movie files.
Picture Setting /Sound Setting
Refer to page 50.
Picture Size
Adjust the picture size for preference.
•Fit: Play video at the TV screen size.
•Original: Play video at the original size.
Caption Setting
You can play the movies with caption.
• Caption: On IOff
• Caption Size: Large /Sina!! /Standard
.Caption Sync: Adjusts the caption output time.
•Caption Sync Reset: Resets the Sync to the default values.
[[[[[ information
The movie file information isdisplayed.
Safe Remove
You can remove the device safely from the TV.
Picture /Music Settings Using Media Play
When watching a SlideShow or listening to music using Media Play, you can set the picture and sound.
_3
_3
PictureSetting
1. Press the TOOLS button during a Slide Show or while music or movie is playing.
2. Press the A or T button to select Picture Setting, then press the ENTER_ button.
3. Press the _ or _- button to select the Picture Mode
(Dynamic, Standard, Eco, or Movie).
4. Press the A or T button to move to an item.
(Contrast, Brightness, Color, Dynamic Contrast, Black Tone, or Reset)
@ Select Reset to initialize the picture settings.
& Press the _ or _, button to adjust the settings.
SoundSetting
1. Press the TOOLS button during a Slide Show or while music is playing.
2. Press the A or • button to select Sound Setting, then press the ENTER_ button.
3. Press the _ o r !_ button to select the Sound Mode.
(Standard, Music, Movie, Clear Voice, or Custom)
4. Press the A or _' button to move to an item.
(Balance, 100Hz, 300Hz, 1KHz, 3KHz, 10KHz (Bandwidth Adjustment), or Reset)
@ Select Reset to initialize the sound settings.
& Press the _ or _, button to adjust the settings.
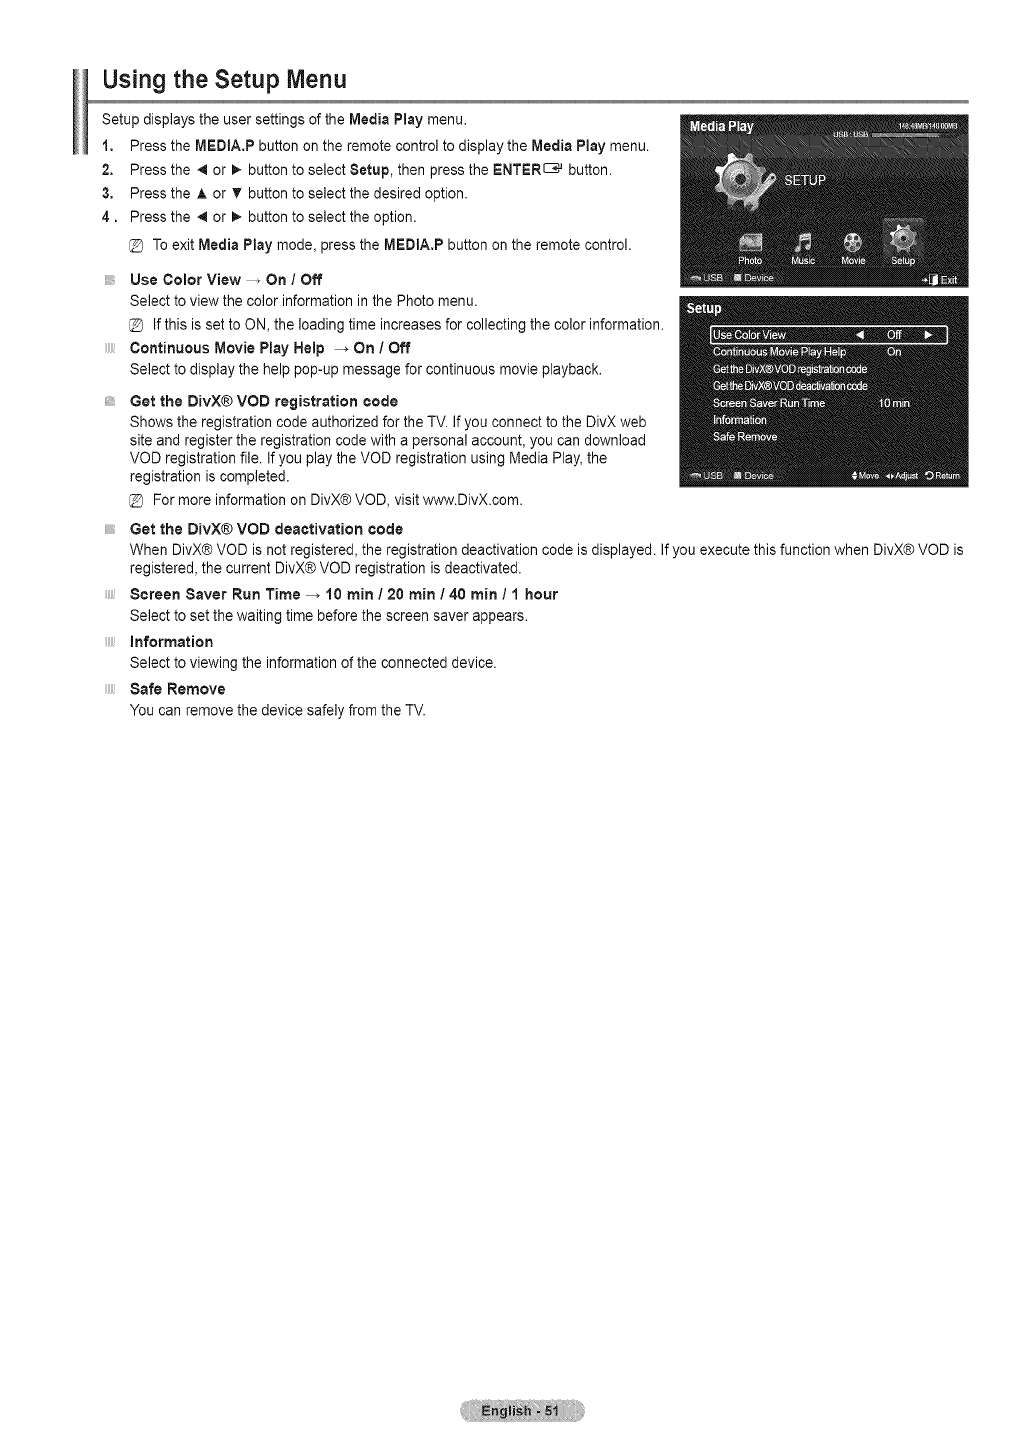
Using the Setup Menu
Setup displays the user settings of the Media Play menu.
1, Press the MEDtA.P button on the remote control to display the Media Play menu.
2. Press the _ or !_ button to select Setup, then press the ENTER_ button.
3, Press the A or T button to select the desired option.
4. Press the 4 or !_ button to select the option.
@ To exit Media Play mode, press the MEDIA.P button on the remote control.
iiiii/
iiiii/
iiiii/
Use Color View -_ On /Off
Select to view the color informationin the Photo menu.
@ If this is set to ON, the loading time increases for collecting the color information.
Continuous Movie Play Help -_ On /Off
Select to display the help pop-up message for continuous movie playback.
Get the DivX® VOD registration code
Shows the registration code authorized for the TV. If you connect to the DivX web
site and register the registration code with a personal account, you can download
VOD registration file. If you play the VOD registration using Media Play, the
registration is completed.
@ For more information on DivX® VOD, visit www.DivX.com.
Get the DivX® VOD deactivation code
When DivX® VOD is not registered, the registration deactivation code is displayed. If you execute this function when DivX® VOD is
registered, the current DivX® VOD registration is deactivated.
Screen Saver Run Time --_ 10 rain /20 rain /40 rain /1 hour
Select to set the waiting time before the screen saver appears.
information
Select to viewing the information of the connected device.
Safe Remove
You can remove the device safely from the TV.
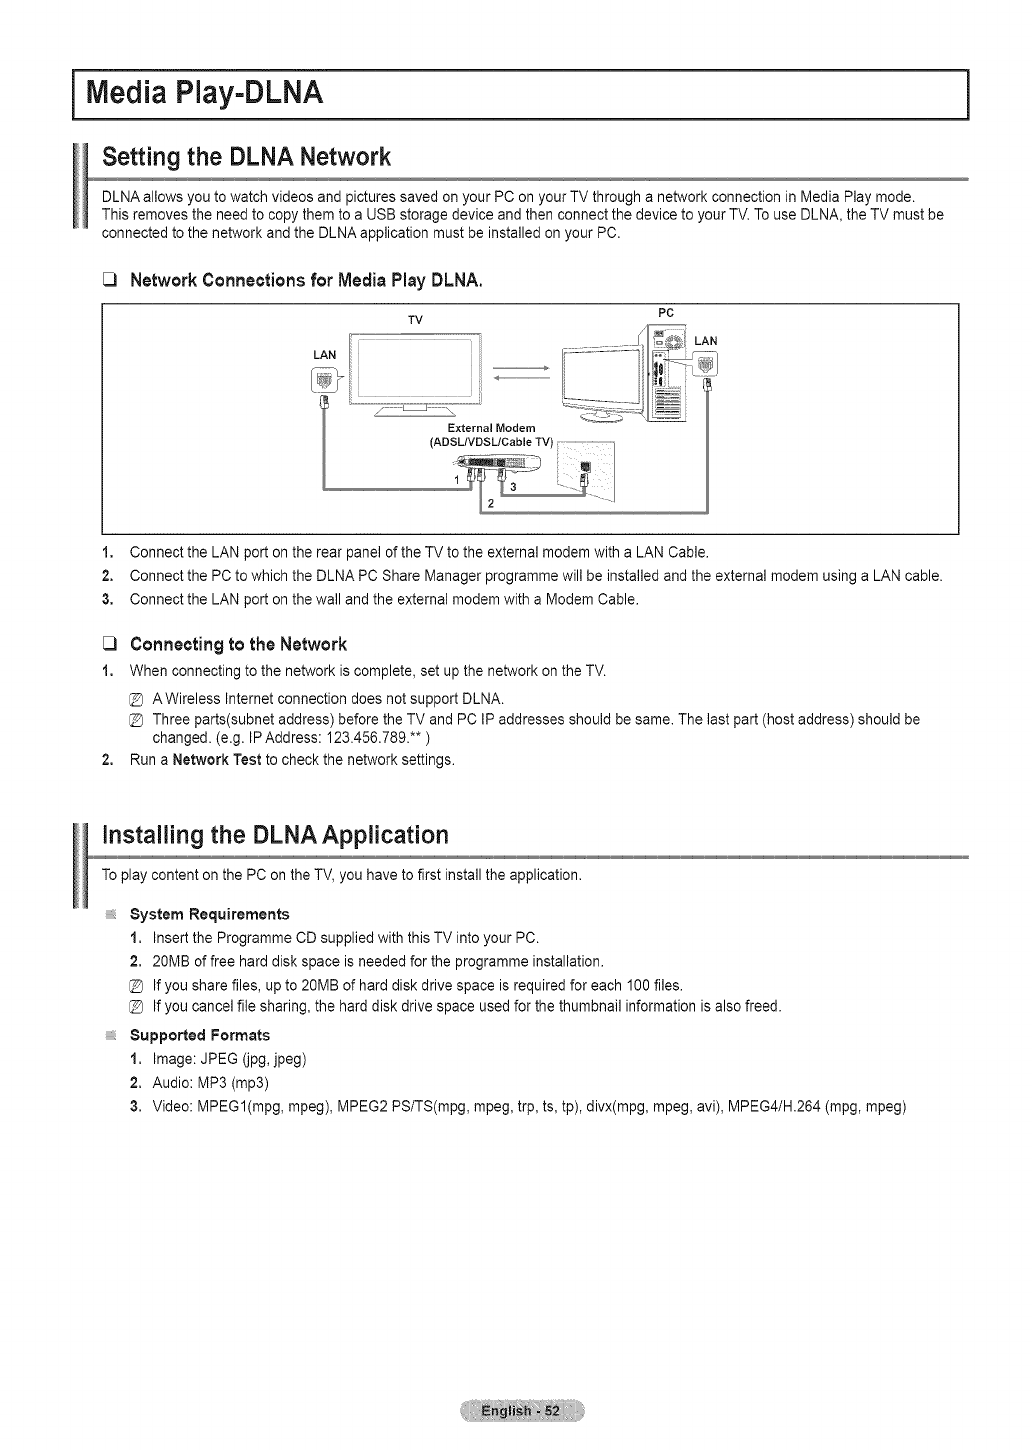
Media Play-DLNA
Setting the DLNA Network
DLNA allows you to watch videos and pictures saved on your PC on your TV through a network connection in Media Play mode.
This removes the need to copy them to a USB storage device and then connect the device to your TV.To use DLNA, the TV must be
connected to the network and the DLNA application must be installed on your PC.
Network Connections for Media Play DLNA.
LAN
PC
LAN
I
2
1, Connect the LAN port on the rear panel of the TV to the external modem with a LAN Cable.
2, Connect the PC to which the DLNA PC Share Manager programme will be installed and the external modem using a LAN cable.
3, Connect the LAN port on the wall and the external modem with a Modem Cable.
Connecting to the Network
1, When connecting to the network is complete, set up the network on the TV.
AWireless Internet connection does not support DLNA.
Three parts(subnet address) before the TV and PC IP addresses should be same. The last part (host address) should be
changed. (e.g. IPAddress: 123.456.789.** )
2, Run a Network Test to check the network settings.
installing the DLNA Application
To play content on the PC on the TV,you have to first install the application.
System Requirements
1. Insert the Programme CD supplied with this TV into your PC.
2. 20MB of free hard disk space is needed for the programme installation.
@ If you share files, up to 20MB of hard disk drive space is required for each 100 files.
@ If you cancel file sharing, the hard disk drive space used for the thumbnail information is also freed.
Supported Formats
1. Image: JPEG (jpg, jpeg)
2. Audio: MP3 (mp3)
3. Video: MPEGI(mpg, mpeg), MPEG2 PS/TS(mpg, mpeg, trp, ts, tp), divx(mpg, mpeg, avi), MPEG4/H.264 (mpg, mpeg)
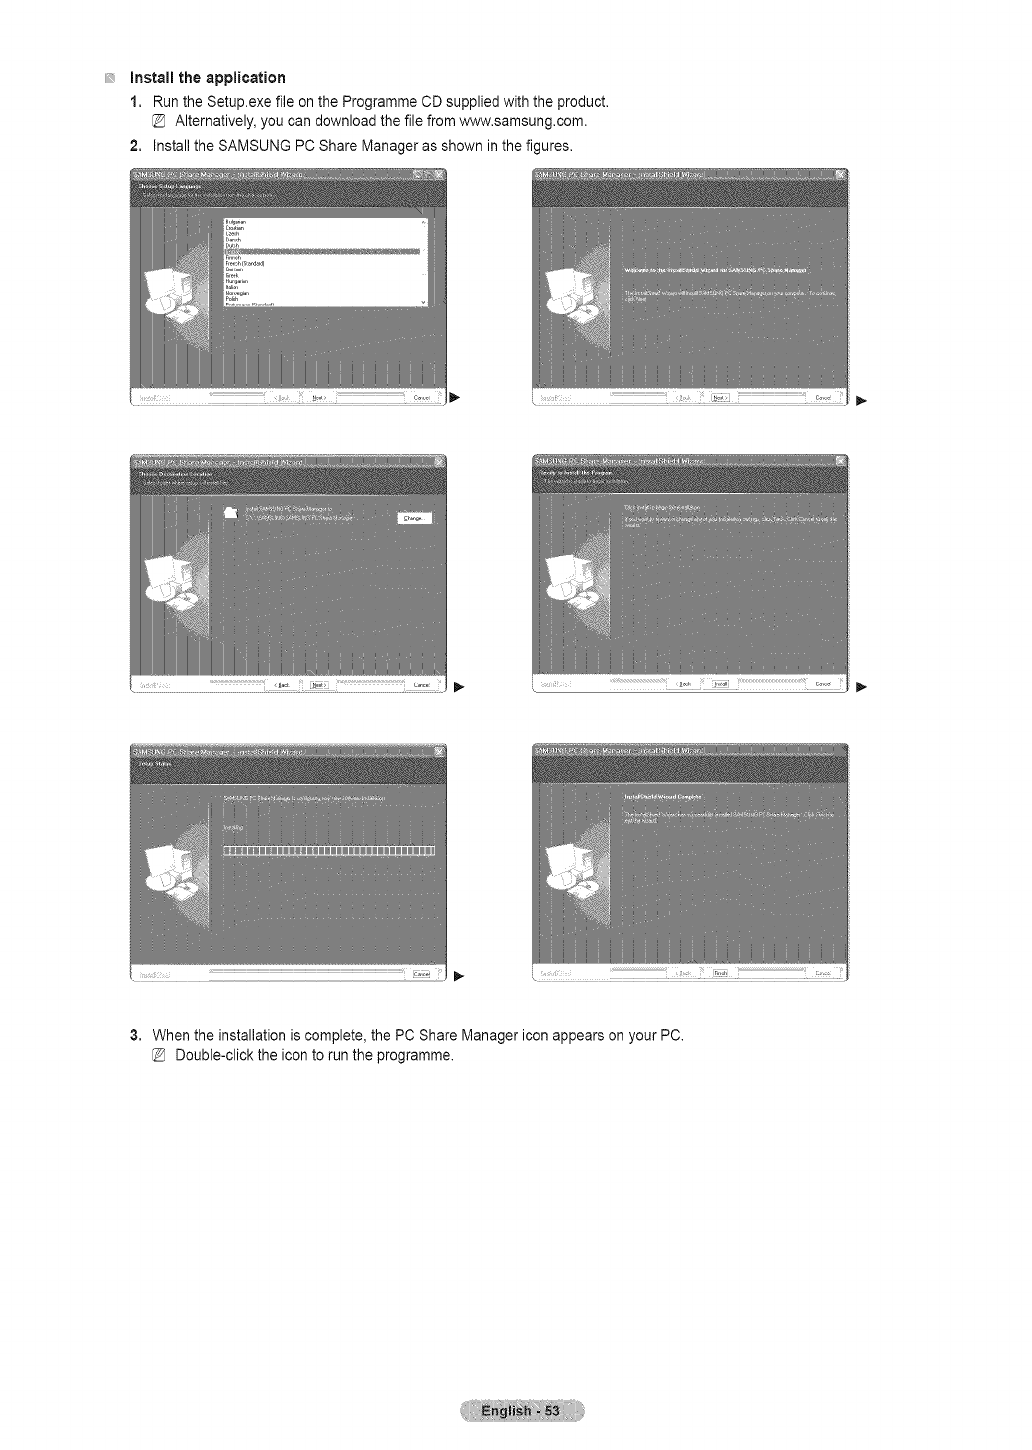
Installtheapplication
1. RuntheSetup.exefileontheProgrammeCDsuppliedwiththeproduct.
Alternatively,youcandownloadthefilefromwww.samsung.com.
2. InstalltheSAMSUNGPCShareManagerasshowninthefigures.
3.Whentheinstallationiscomplete,thePCShareManagericonappearsonyourPC.
Double-clicktheicontoruntheprogramme.
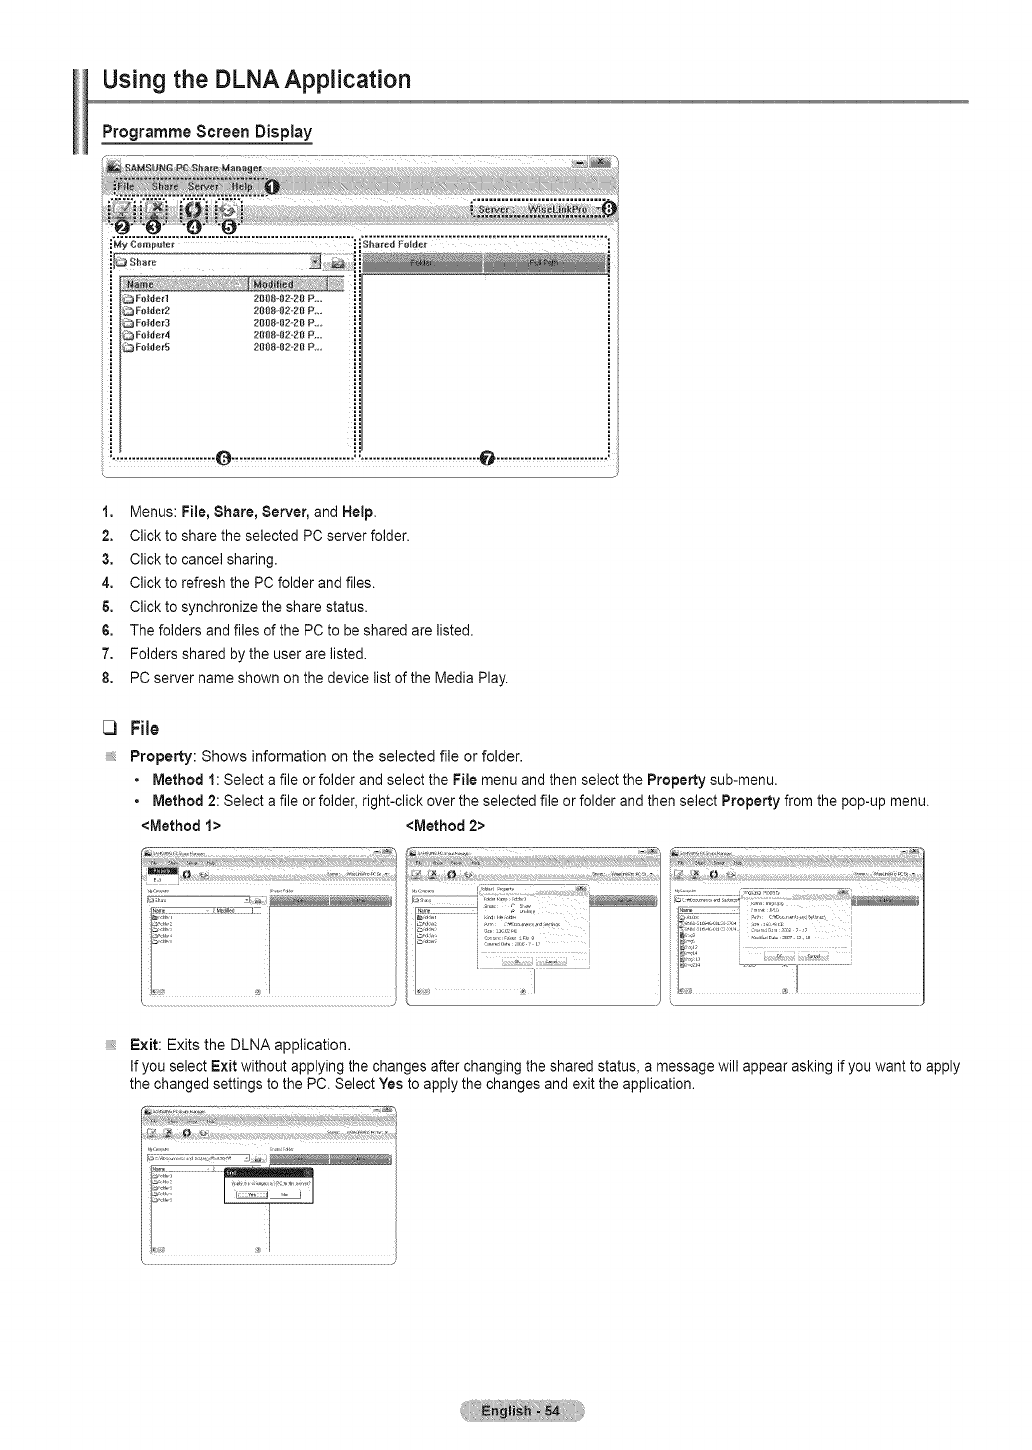
Using the DLNA Application
Programme Screen Display
2008-82-20 P.,,
2t_88 82_20 R...
2088 I}Z-20 P l
H
1, Menus: File, Share, Server, and Help.
2. Click to share the selected PC server folder.
3, Clickto cancel sharing.
4, Click to refresh the PC folder and files.
& Click to synchronize the share status.
6, The folders and files of the PC to be shared are listed.
7, Folders shared by the user are listed.
8, PC server name shown on the device list of the Media Play.
iiiiii_
Property: Shows information on the selected file or folder.
•Method 1: Select a file or folder and select the File menu and then select the Property sub-menu.
•Method 2: Select afile or folder, right-click over the selected file or folder and then select Property from the pop-up menu.
<Method !> <Method 2>
?:il
..... i
ic_v;........
i ! :i i
Exit: Exits the DLNA application.
If you select Exit without applying the changes after changing the shared status, a message will appear asking if you want to apply
the changed settings to the PC. Select Yes to apply the changes and exit the application.
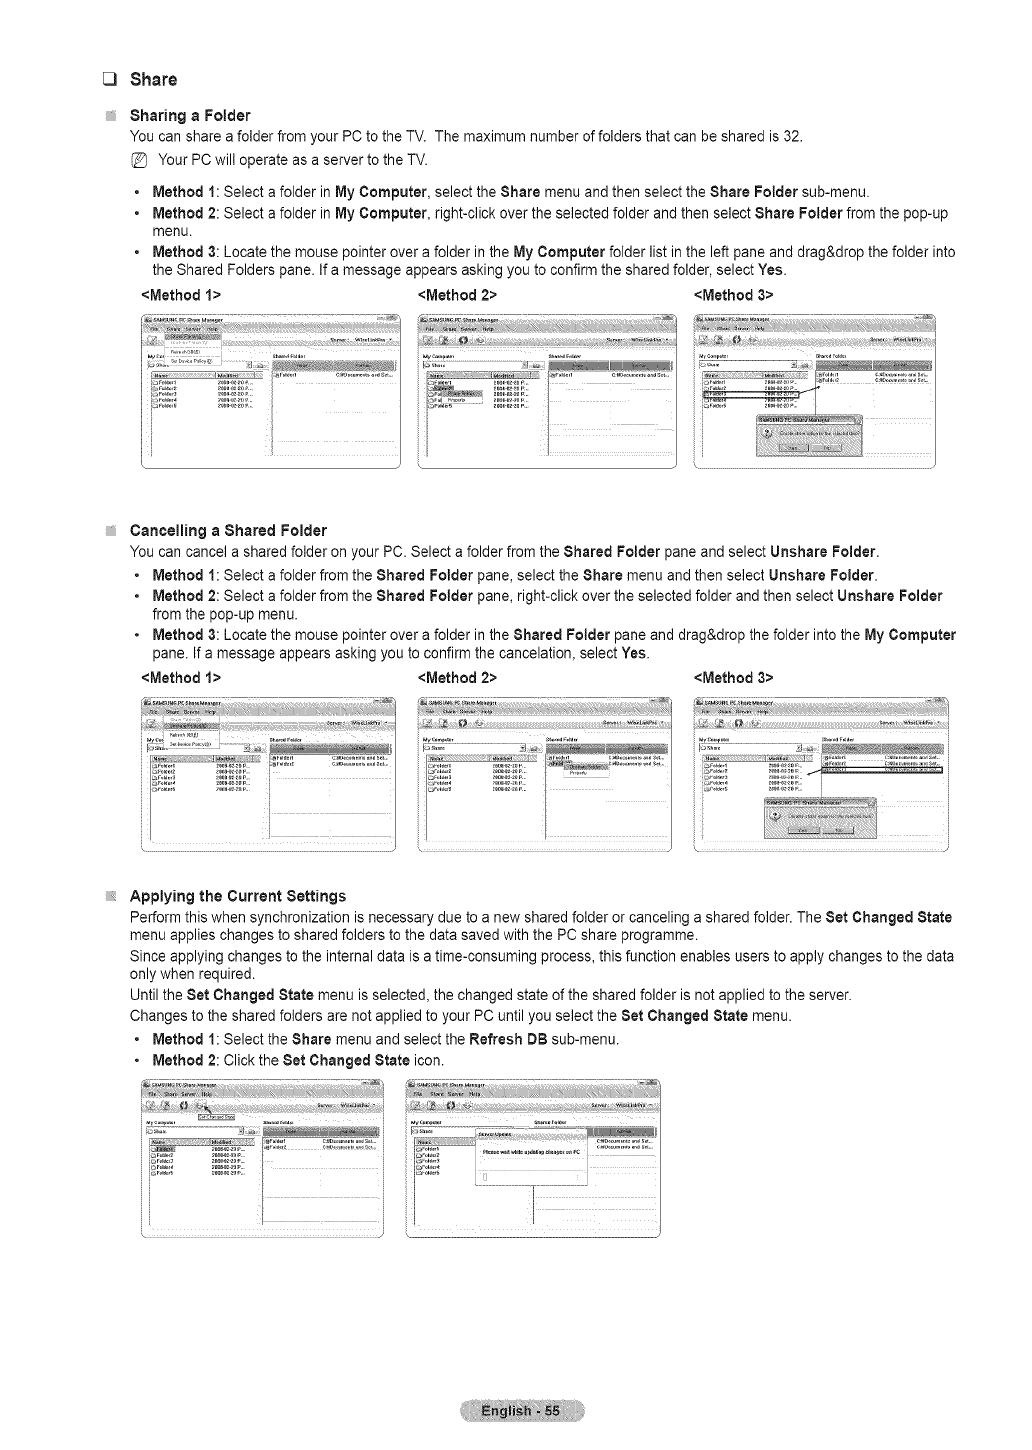
C) Share
Sharing a Folder
You can share a folder from your PC to the TV. The maximum number of folders that can be shared is 32.
Your PC will operate as a server to the TV.
<Method 1>
• Method 1: Select a folder in My Computer, select the Share menu and then select the Share Folder sub-menu.
• Method 2: Select a folder in My Computer, right-click over the selected folder and then select Share Folder from the pop-up
menu.
• Method 3: Locate the mouse pointer over a folder in the My Computer folder list in the left pane and drag&drop the folder into
the Shared Folders pane. If a message appears asking you to confirm the shared folder, select Yes.
<Method 2> <Method 3>
iiiiii_Cancelling a Shared Folder
You can cancel a shared folder on your PC. Select a folder from the Shared Folder pane and select Unshare Folder,
•Method 1: Select a folder from the Shared Folder pane, select the Share menu and then select Unshare Folder.
•Method 2: Select a folder from the Shared Folder pane, right-click over the selected folder and then select Unshare Folder
from the pop-up menu.
• Method 3: Locate the mouse pointer over a folder in the Shared Folder pane and drag&drop the folder into the My Computer
Applying the Current Settings
Perform this when synchronization is necessary due to a new shared folder or canceling a shared folder. The Set Changed State
menu applies changes to shared folders to the data saved with the PC share programme.
Since applying changes to the internal data is atime-consuming process, this function enables users to apply changes to the data
only when required.
Until the Set Changed State menu is selected, the changed state of the shared folder is not applied to the server.
Changes to the shared folders are not applied to your PC until you select the Set Changed State menu.
• Method 1: Select the Share menu and select the Refresh DB sub-menu.
• Method 2: Click the Set Changed State icon.
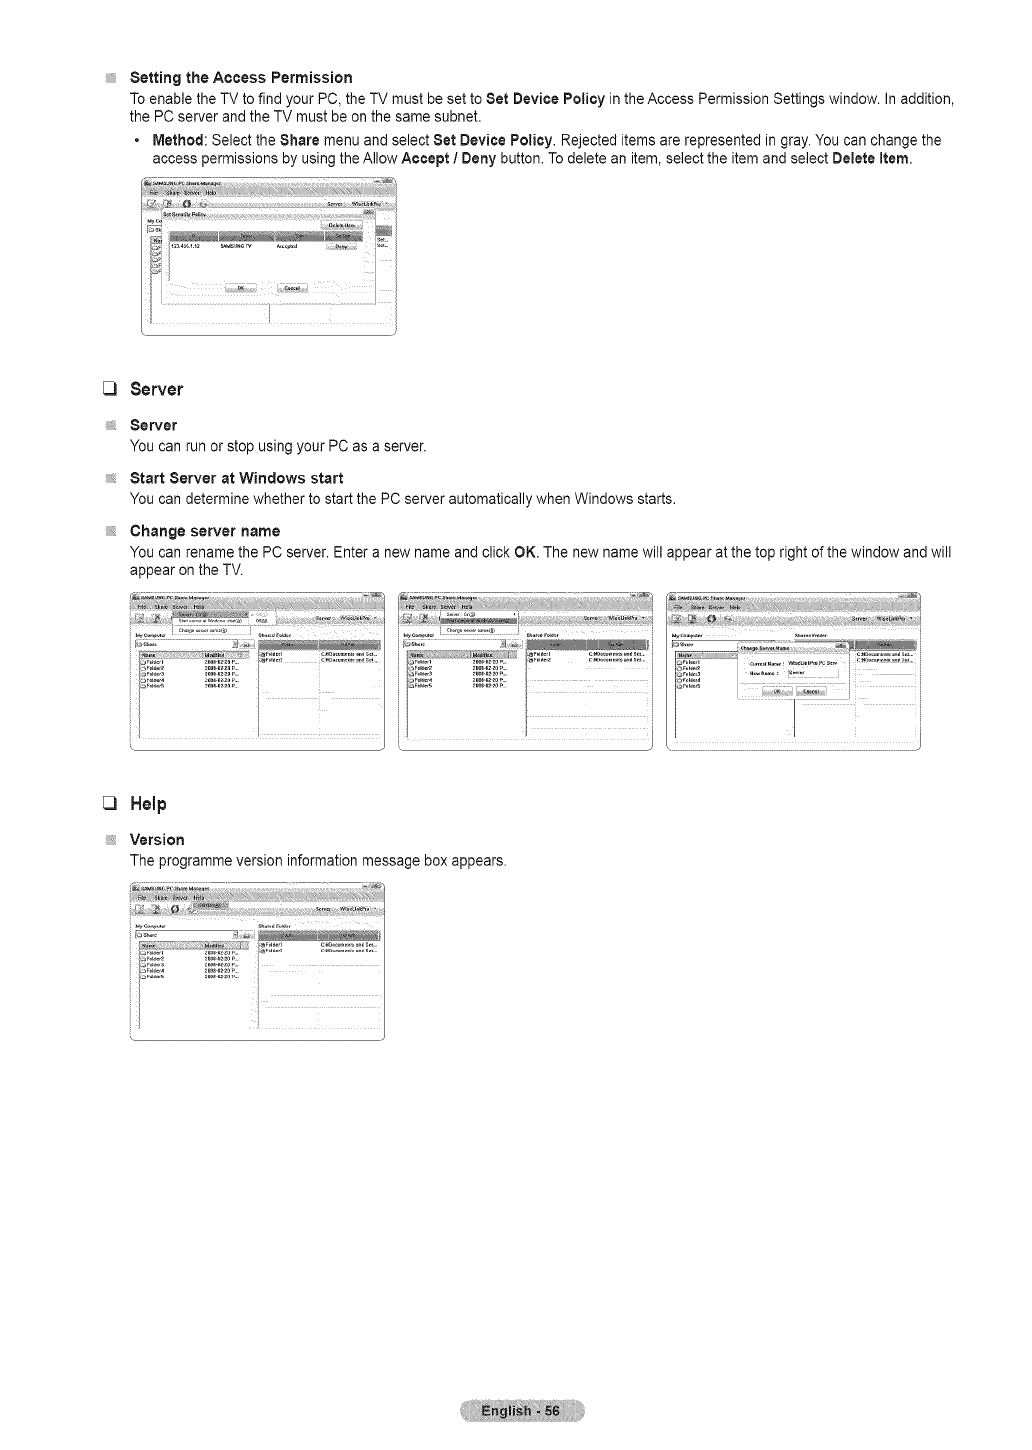
Settingthe Access Permission
Toenable the TV to find your PC, the TV must be set to Set Device Policy in the Access Permission Settings window. In addition,
the PC server and the TV must be on the same subnet.
• Method: Select the Share menu and select Set Device Policy. Rejected items are represented in gray. You can change the
access permissions by using the Allow Accept /Deny button. To delete an item, select the item and select Delete Item,
Server
Server
You can run or stop using your PC as a server.
Start Server at Windows start
You can determine whether to start the PC server automatically when Windows starts.
Change server name
You can rename the PC server. Enter a new name and click OK. The new name will appear at the top right of the window and will
appear on the TV.
_i_j _ % ...........................................................................
[[ [ I
[3 Help
;;;;;,,Version
The programme version information message box appears.
i

Using the DLNA Function
Usingthe DLNA Menu
DLNA (Digital Living Network Alliance) enables content saved on a DLNA server
(usually your PC) connected to your TV or over a network to be played.
Media Play enables playing content saved on a USB memory device connected to the
TV, while DLNA enables playing content saved on a DLNA server (your PC) connected
to your TV or over the network. The procedures to use the content are the same as
those for Media Play.
1,
2,
3,
If you install the PC share manager programme supplied with the TV onto a PC,
you can have the PC perform the role of a DLNA server over the network.
Press the MENU button. Press the A or T button to select Application, then press
the ENTER_ button.
Press the ,& or T button to select Media Play (USB & DLNA), then press the ENTER_ button.
Press the 4 or _.button to select an icon (Photo, Music, Movie, Setup), then press the ENTER_ button.
DLNA does not support the following functions.
- The Background Music and Background Music Setting functions.
- Sorting files by preference in the Photo, Music, and Movie folders.
- The Change Group Info function.
- The Copy /Delete function.
- The Safe Remove function.
- The CE_(REW) /_(FF) button functions while a movie is playing.
- Function to watch continuously when playing movie.
The Skip (4/_ button) or Pause function may not work while a movie is playing for the DLNA of other manufacturers,
depending on the corresponding content information.
The playing time may not bedisplayed while a movie is playing.
The Skip function may not work with some folders such as asf and mkv.
The Divx DRM, Multi-audio, embedded caption does not supported.
Samsung PC Share manager should be permitted by the firewall program on your PC.
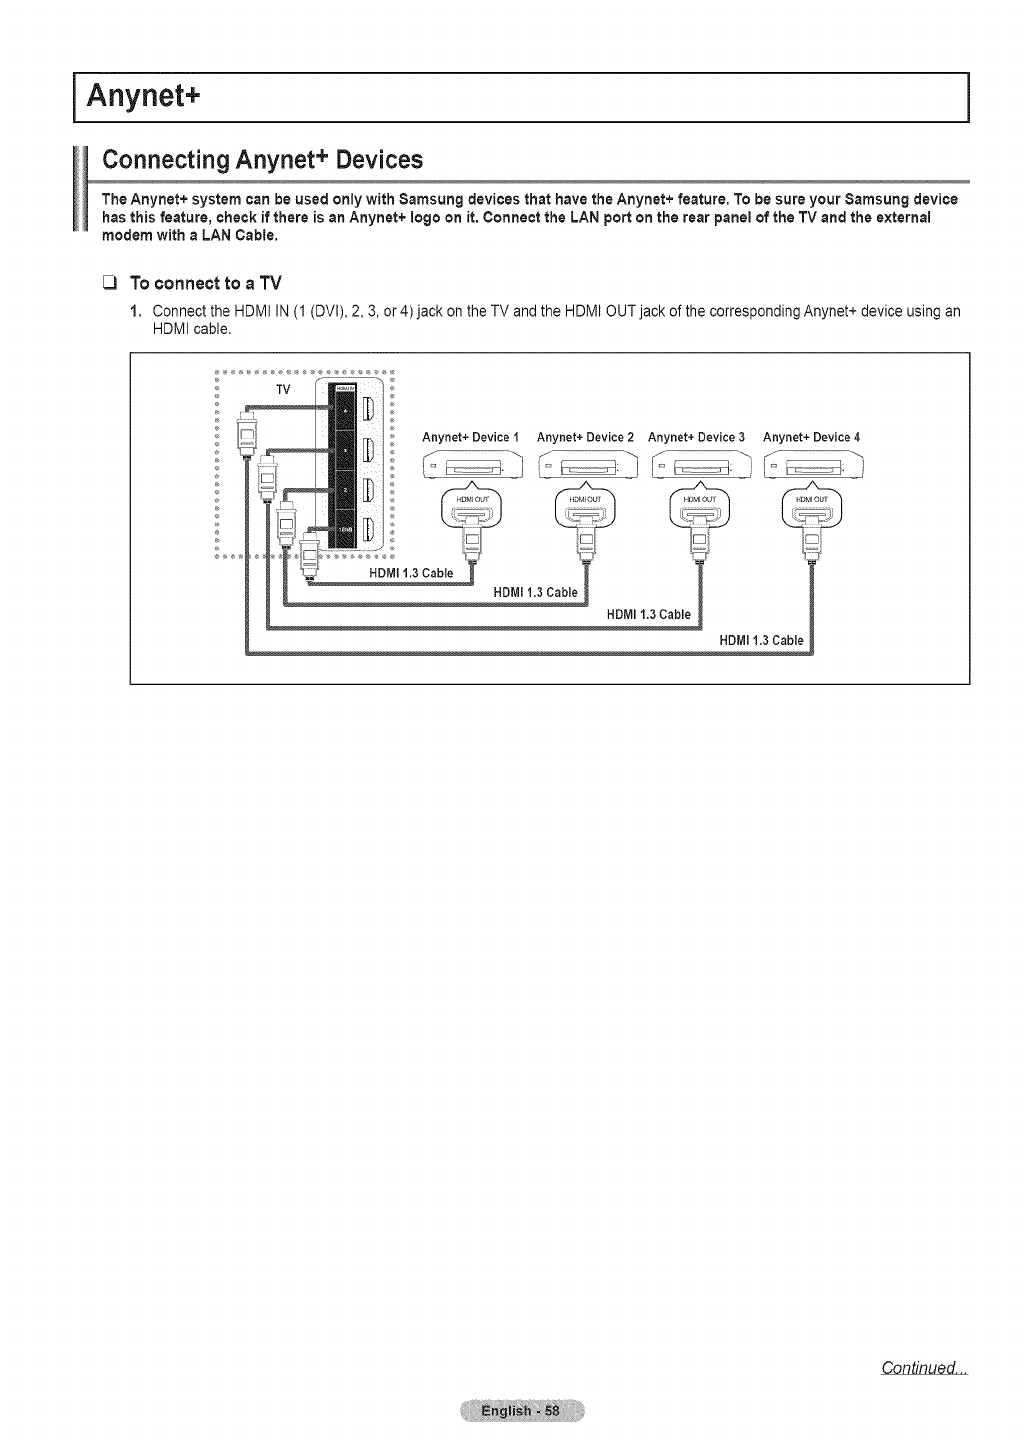
iAnynet+
Connecting Anynet + Devices
The Anynet+ system can be used only with Samsung devices that have the Anynet+ feature. To be sure your $amsung device
has this feature, check if there is an Anynet+ logo on it. Connect the LAN port on the rear panel of the TV and the external
modem with a LAN Cable.
[_ Toconnectto a TV
1. Connect the HDMI iN (1 (DVI), 2, 3, or 4)jack on the TV and the HDMI OUTjack of the corresponding Anynet+ device using an
HDMI cable.
TV
®
®
®
Anynet+ Device i Anynet+ Device 2 Anynet+ Device 3Anynet+ Device 4
_JY
HDMI 1.3 Cabll I HDMI 1.3 Cable i
HDMI 1.3 Cable
HDMI1.3 Cable
Continued...
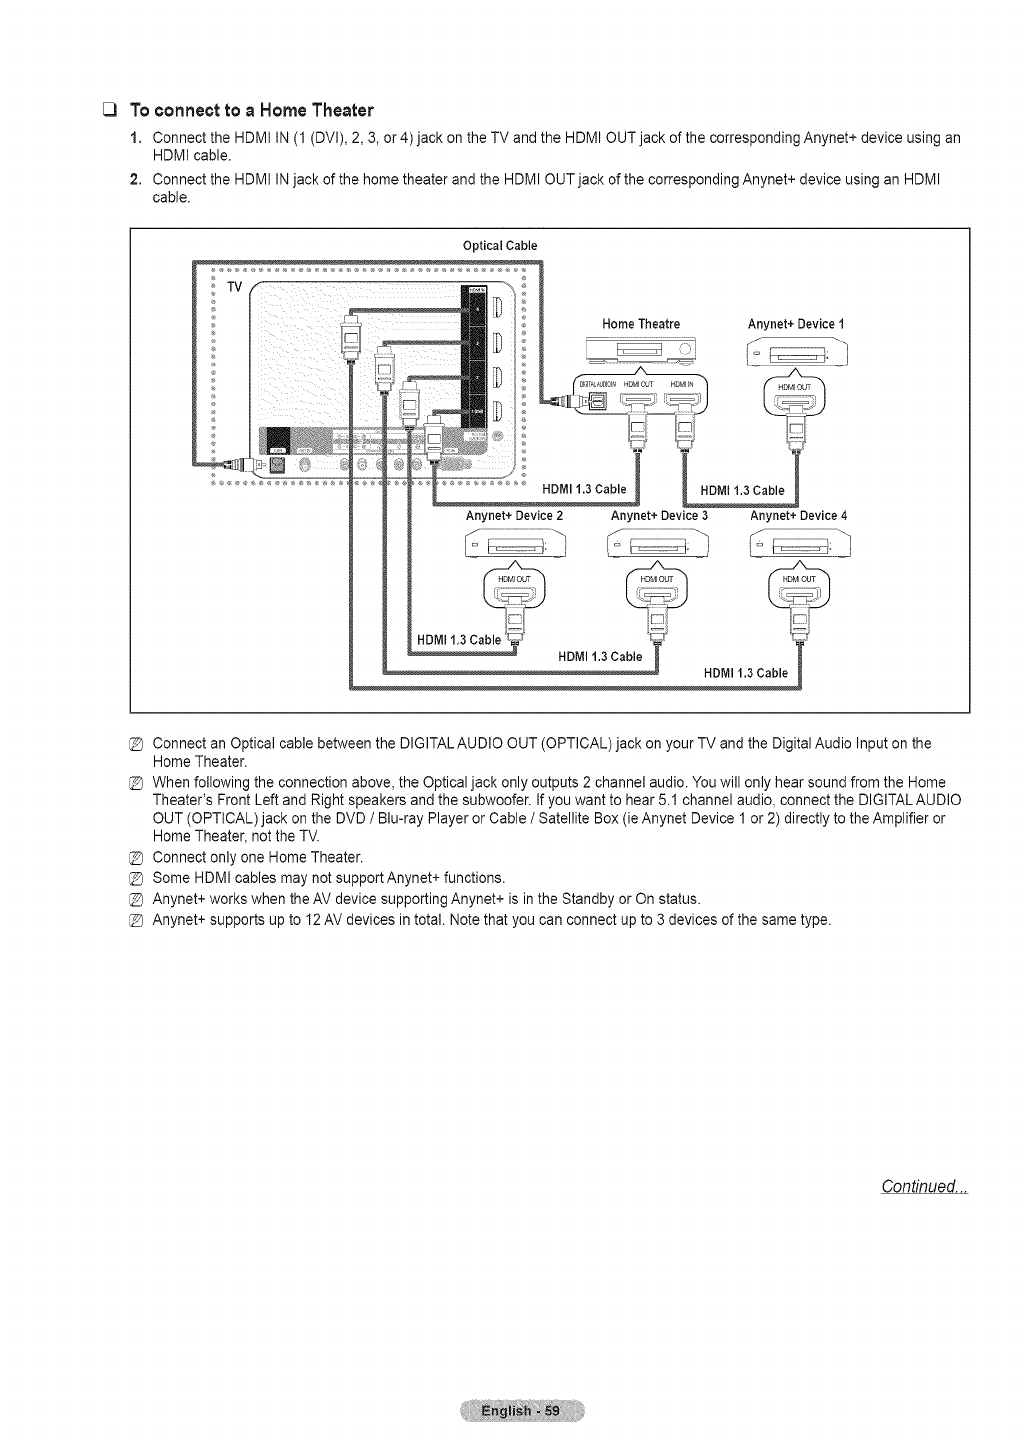
[_ To connect to a Home Theater
1,
2.
Connect the HDMI IN (1 (DVI), 2, 3, or 4)jack on the TV and the HDMI OUT jack of the corresponding Anynet+ device using an
HDMI cable.
Connect the HDMI IN jack of the home theater and the HDMI OUT jack of the corresponding Anynet+ device using an HDMI
cable.
Optical Cable
TV .....
....... Home Theatre Anynet+ Device 1
_ > _2
HDMI 1.3 Cable '1 '_ HDMt 1.3 Cable" i _
Anynet+ Device 2 Anynet+ Device 3 Anynet+ Device 4
HDMI1.3Cable u/'_
J
Connect an Optical cable between the DIGITALAUDIO OUT (OPTICAL) jack on your TV and the Digital Audio Input on the
Home Theater.
When following the connection above, the Optical jack only outputs 2 channel audio. You will only hear sound from the Home
Theater's Front Left and Right speakers and the subwoofer. If you want to hear 5.1 channel audio, connect the DIGITALAUDIO
OUT (OPTICAL)jack on the DVD /Blu-ray Player or Cable /Satellite Box (ie Anynet Device 1 or 2) directly to the Amplifier or
Home Theater, not the TV.
Connect only one Home Theater.
Some HDMI cables may not support Anynet+ functions.
Anynet+ works when the AV device supporting Anynet+ is in the Standby or On status.
Anynet+ supports up to 12 AV devices in total. Note that you can connect up to 3 devices of the same type.
Continued...
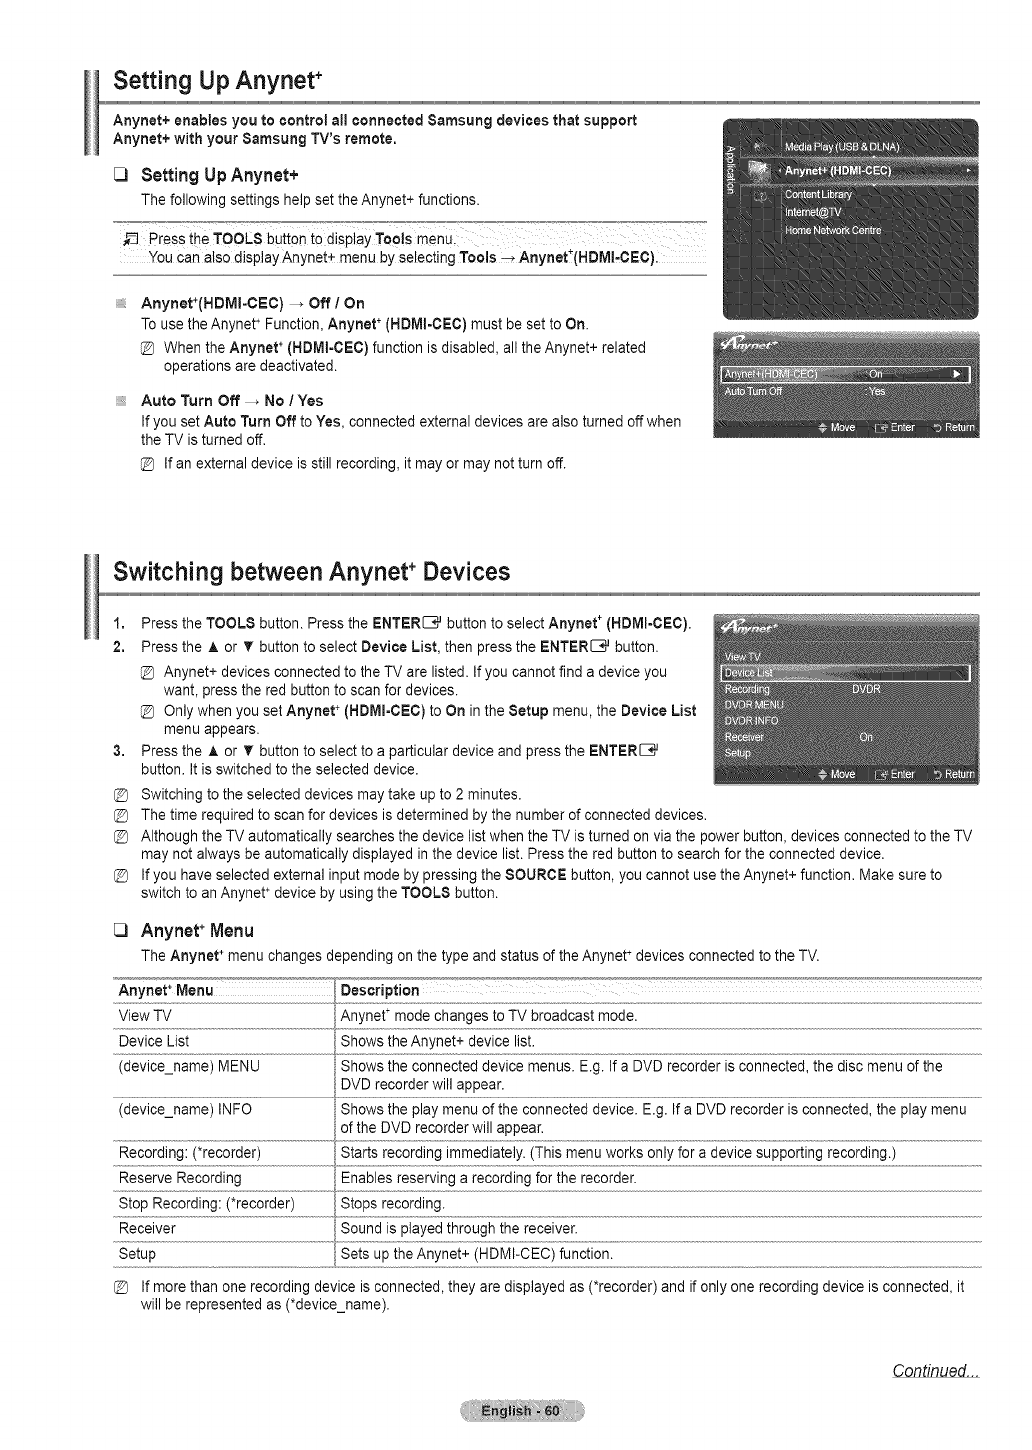
Setting Up Anynet +
Anynet+ enables you to control al! connected Samsung devices that support
Anynet+ with your Samsung TV's remote.
C3 Setting UpAnynet+
The following settings help set the Anynet+ functions.
press the "FooLs button io disPiay Too!s menul
You can also display Anynet+ menu by selecting Teals -+ Anynet*(HDMl-OE6)i
Anynet+(HDMI=CEC) -_ Off /On
To use the Anynet+Function, Anynet + (HDMI=CEC)must be set to On.
When the Anynet+ (HDMI=CEC)function is disabled, all the Anynet+ related
operations are deactivated.
Auto Turn Off _ No /Yes
If you set Auto Turn Off to Yes, connected external devices are also turned off when
the TV is turned off.
If an external device is still recording, it may or may not turn off.
Switching between Anynet + Devices
1. Press the TOOLS button. Press the ENTER_ button to select Anynet +(HDMI-CEC).
2, Press the A or T button to select Device List, then press the ENTER_ button.
Anynet+ devices connected to the TV are listed. If you cannot find a device you
want, press the red button to scan for devices.
Only when you set Anynet ÷(HDMI=CEC) to On in the Setup menu, the Device List
menu appears.
3, Press the ,& or T button to select to a particular device and press the ENTER_
button. It is switched to the selected device.
@ Switching to the selected devices may take up to 2 minutes.
@ The time required to scan for devices is determined by the number of connected devices.
@ Although the TV automatically searches the device list when the TV is turned on via the power button, devices connected to the TV
may not always be automatically displayed in the device list. Press the red button to search for the connected device.
@ If you have selected external input mode by pressing the SOURCE button, you cannot use the Anynet+ function. Make sure to
switch to an Anynet+device by using the TOOLS button.
[3 Anynet* Menu
The Anynet+menuchangesdependingon the typeandstatusof theAnynet+devicesconnectedto theTV,
View TV Anynet÷ mode changes to TV broadcast mode,
(device_name) MENU Shows the connected device menus. E.g. If a DVD recorder is connected, the disc menu of the
DVD recorder will appear.
(device_name) INFO Shows the play menu of the connected device. E.g. If a DVD recorder is connected, the play menu
of the DVD recorder will appear.
Reserve Recording Enables reserving a recording for the recorder.
Receiver Sound is played through the receiver.
@ If more than one recording device is connected, they are displayed as (*recorder) and if only one recording device is connected, it
will be represented as (*device_name).
Continued...
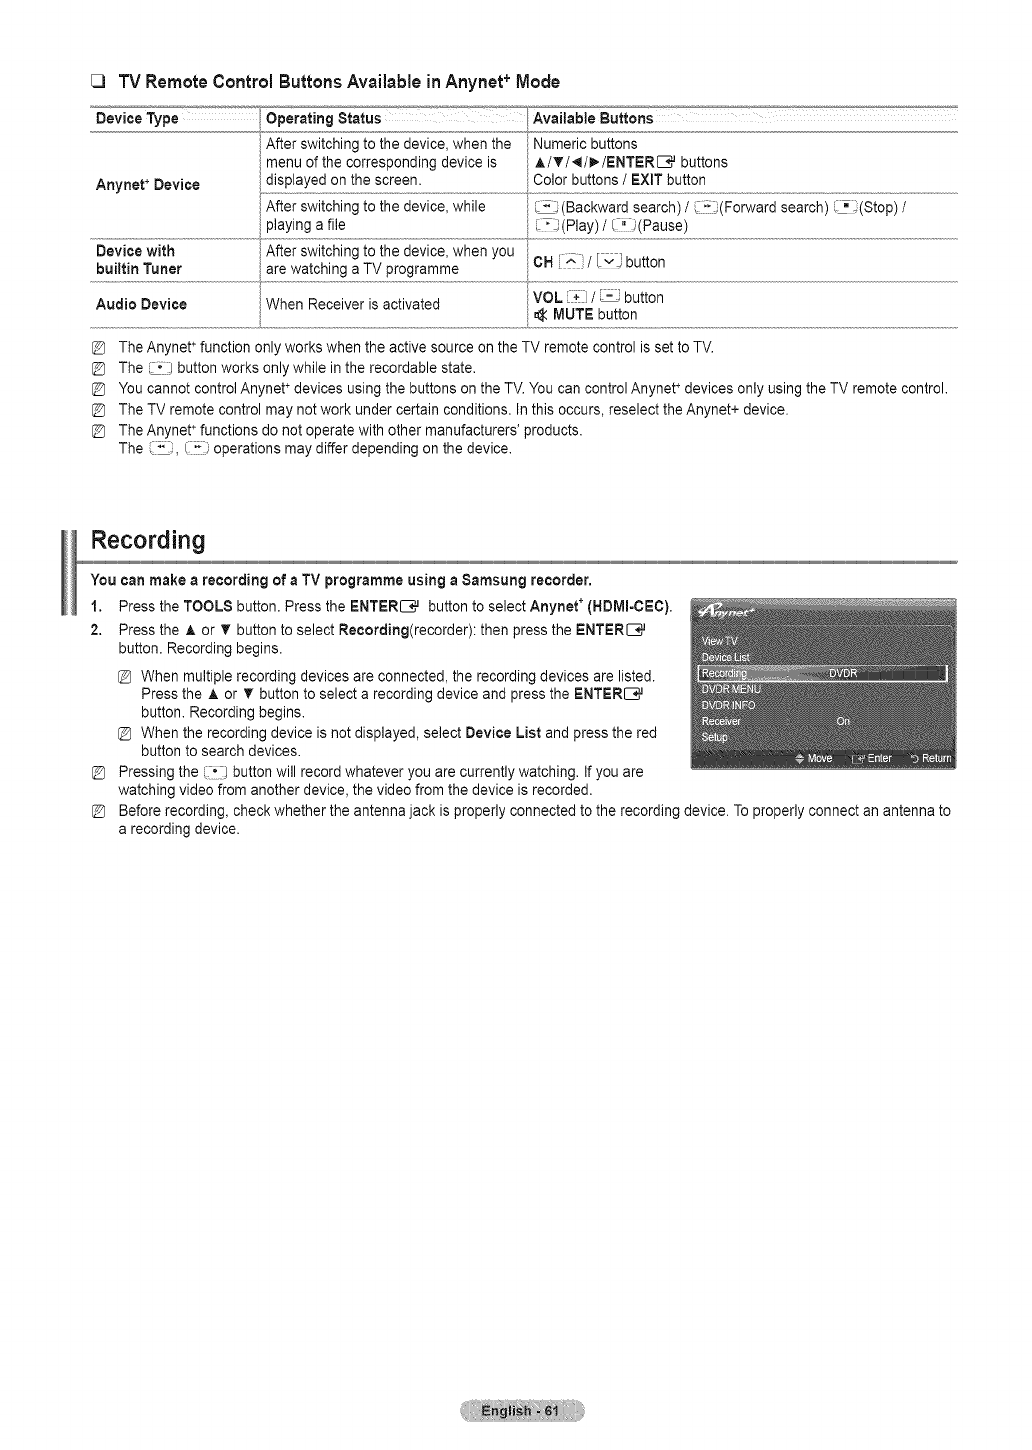
[3 TV Remote ControlButtonsAvailableinAnynet+Mode
DeviceType .... 'l Operating Status '_-_'_'__'_'_.............................Available Buttons _'_ _'
After switching to the device, when the Numeric buttons
menu of the corresponding device is A./T/_/m,-/ENTER_ buttons
AnynerDevice ............................................€o!o!bu!!°ns!,EX!Tbu!!on..................................................................................................................
After switching to the device, while _"_ (Backward search) /:;(Forward search) ', "_(Stop) /
playing a file _Z_(Piay) /_-!! (Pause)
Device with After switching to the device, when you .....
builtin Tuner are watching a TV programme OH i ^ /[v_ button
Audio Device When Receiver is activated VOL _] /:= button
MUTE button
@ The Anynet÷function only works when the active source on the TV remote control is set to TV.
@ The button works only while in the recordable state.
@ You cannot control Anynet÷devices using the buttons on the TV.You can control Anynet+devices only using the TV remote control.
@ The TV remote control may not work under certain conditions. In this occurs, reselect the Anynet+ device.
@ The Anynet+ functions do not operate with other manufacturers' products.
The ", operations may differ depending on the device.
Recording
You can make a recording of aTV programme using a Samsung recorder,
1. Press the TOOLS button. Press the ENTER_ button to select Anynet +(HDMI-CEC).
2. Press the A or T button to select Recording(recorder): then press the ENTER_
button. Recording begins.
When multiple recording devices are connected, the recording devices are listed.
Press the A or _r button to select a recording device and press the ENTER_
button. Recording begins.
When the recording device is not displayed, select Device List and press the red
button to search devices.
@ Pressing the i'J button will record whatever you are currently watching. If you are
watching video from another device, the video from the device is recorded.
@ Before recording, check whether the antenna jack is properly connected to the recording device. To properly connect an antenna to
a recording device.
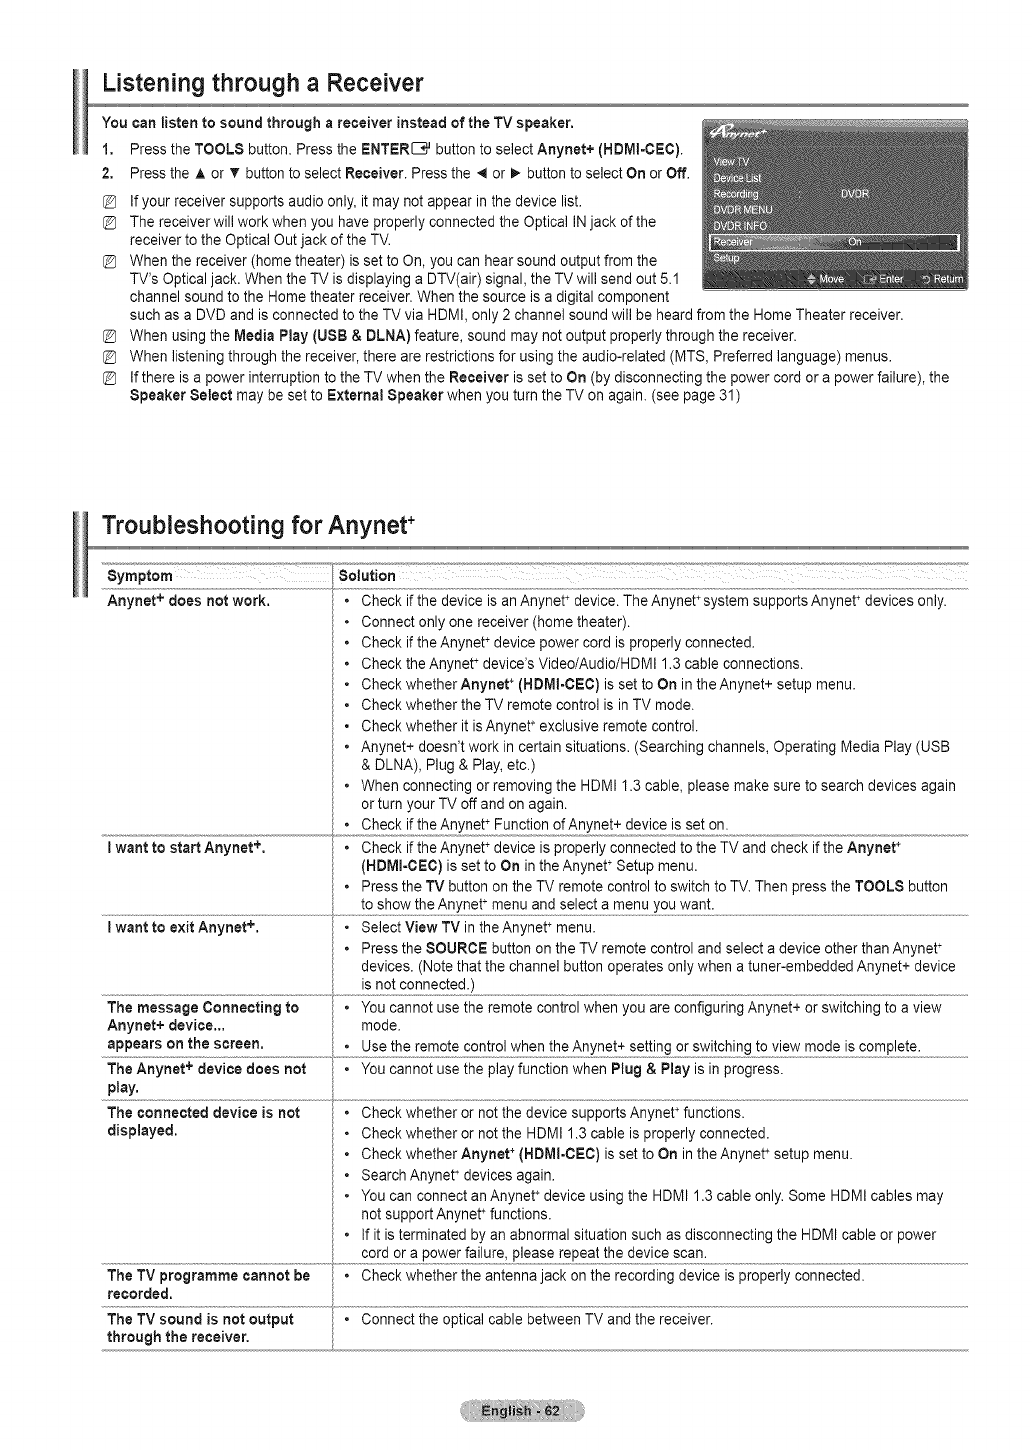
Listening through a Receiver
You can listen to sound through a receiver instead of the TV speaker.
1, Press the TOOLS button. Press the ENTER_ button to select Anynet+ (HDMI-CEC).
2, Press the ,& or _' button to select Receiver. Press the _ or _. button to select On or Off.
If your receiver supports audio only, it may not appear in the device list.
The receiver will work when you have properly connected the Optical IN jack of the
receiver to the Optical Out jack of the TV.
When the receiver (home theater) is set to On, you can hear sound output from the
TV's Optical jack. When the TV is displaying a DTV(air) signal, the TV will send out 5.1
channel sound to the Home theater receiver. When the source is a digital component
such as a DVD and is connected to the TV via HDMI, only 2 channel sound will be heard from the Home Theater receiver.
When using the Media Play (USB & DLNA) feature, sound may not output properly through the receiver.
When listening through the receiver, there are restrictions for using the audio-related (MTS, Preferred language) menus.
If there isa power interruption to the TV when the Receiver is set to On (by disconnecting the power cord or a power failure), the
Speaker Select may be set to External Speaker when you turn the TV on again. (see page 31)
Troubleshooting for Anynet +
Anynet + does not work. Check if the device is an Anynet+device. The Anynet +system supports Anynet +devices only.
Connect only one receiver (home theater).
Check if the Anynet÷device power cord is properly connected.
Check the Anynet +device's Video/Audio/HDMI 1.3 cable connections.
Check whether Anynet +(HDMI-CEC) is set to On in the Anynet+ setup menu.
Check whether the TV remote control is in TV mode.
Check whether it is Anynet+exclusive remote control.
Anynet+ doesn't work incertain situations. (Searching channels, Operating Media Play (USB
& DLNA), Plug & Play, etc.)
•When connecting or removing the HDMI 1.3 cable, please make sure to search devices again
or turn your TV off and on again.
• Check if the Anynet÷ Function of Anynet+ device is set on.
Iwant to start Anynet +, • Check if the Anynet÷device is properly connected to the TV and check if the Anynet +
(HDMI-CEC) is set to On in the Anynet +Setup menu.
• Press the TV button on the TV remote control to switch to TV. Then press the TOOLS button
Iwant to exit Anynet +. • Select View TV in the Anynet+menu.
• Press the SOURCE button on the TV remote control and select a device other than Anynet +
devices. (Note that the channel button operates only when a tuner-embedded Anynet+ device
..........................................................................................................!Sn°L°_°nnet!ed;)........................................................................................................................................................................................
The message Connecting to °You cannot use the remote control when you are configuring Anynet+ or switching to a view
Anynet+ device.., mode.
appears on the screen. °Use the remote control when the Anynet+ setting or switching to view mode is complete.
The Anynet + device does not °You cannot use the play function when Plug & Play is in progress.
play,
The connected device is not • Check whether or not the device supports Anynet+functions.
displayed. • Check whether or not the HDMI 1.3 cable is properly connected.
• Check whether Anynet ÷(HDMI-CEC) is set to On in the Anynet+ setup menu.
• Search Anynet+ devices again.
°You can connect an Anynet÷device using the HDMI 1.3 cable only. Some HDMI cables may
not support Anynet+ functions.
°If it is terminated by an abnormal situation such as disconnecting the HDMI cable or power
The TV programme cannot be • Check whether the antenna jack on the recording device is properly connected.
recorded.
The TV sound is not output ° Connect the optical cable between TV and the receiver.
,!h:tugh!"t ret !v".r:................................................................................................................................................................................................................................................................................................................................................................................................................................................................................................................
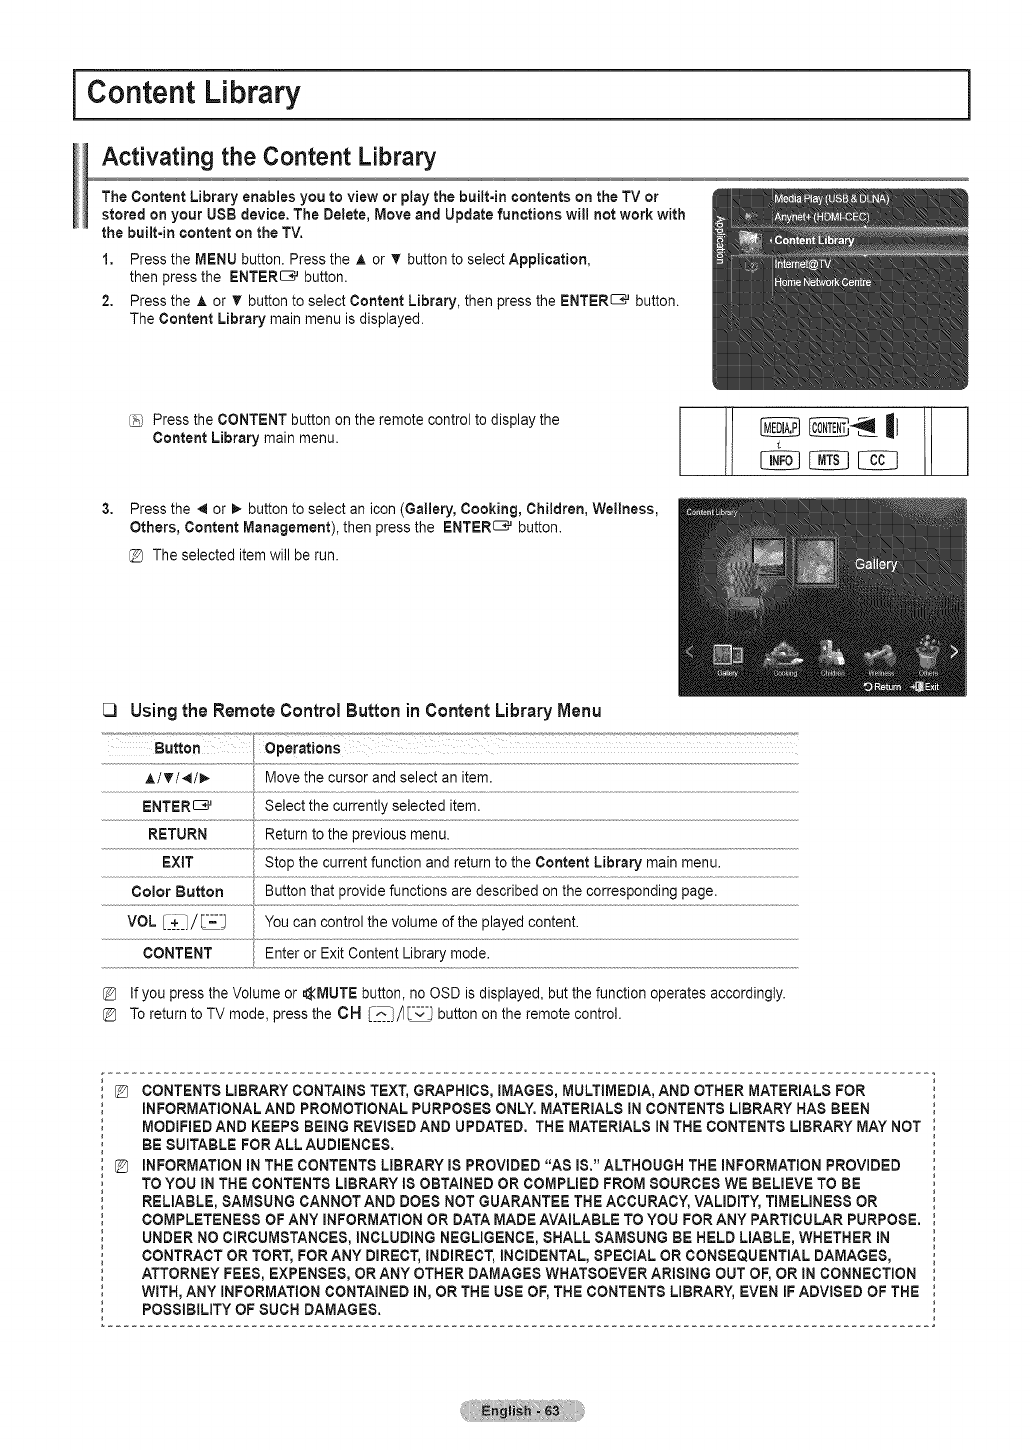
i Content Library
Activating the Content Library
The Content Library enables you to view or play the built=in contents on the TV or
stored on your USB device. The Delete, Move and Update functions will not work with
the built-in content on the TV.
1. Press the MENU button. Press the ,i, or T button to select Application,
then press the ENTER_ button.
2. Press the ,i, or T button to select Content Library, then press the ENTER_ button.
The Content Library main menu is displayed.
3,
Press the CONTENT button on the remote control to display the
Content Library main menu.
Press the _1or _ button to select an icon (Gallery, Cooking, Children, Wellness,
Others, Content Management), then press the ENTER_ button.
@ The selected itemwill be run.
[3 Usingthe RemoteControlButton in ContentLibraryMenu
A/T/_I/I,, Move the cursor and select an item.
ENTER_ Select the currently selected item.
RETURN Return to the previous menu.
EXIT Stop the current function and return to the Content Library main menu.
Color Button Button that provide functions are described on the corresponding page.
VOL l______l/_j You can control the volume of the played content.
........................€°"T""T
If you press the Volume or _MUTE button, no OSD is displayed, but the function operates accordingly.
Toreturn to TV mode, press the CH [-_:1/I _ button on the remote control.
CONTENTS LIBRARY CONTAINS TEXT, GRAPHICS, IMAGES, MULTIMEDIA, AND OTHER MATERIALS FOR
INFORMATIONAL AND PROMOTIONAL PURPOSES ONLY.MATERIALS IN CONTENTS LIBRARY HAS BEEN
MODIFIED AND KEEPS BEING REVISED AND UPDATED. THE MATERIALS IN THE CONTENTS LIBRARY MAY NOT
BE SUITABLE FOR ALL AUDIENCES.
{_ INFORMATION iN THE CONTENTS LIBRARY iS PROVIDED "AS iS." ALTHOUGH THE iNFORMATiON PROVIDED
TO YOU IN THE CONTENTS LIBRARY iS OBTAINED OR COMPLIED FROM SOURCES WE BELIEVE TO BE
RELIABLE, 8AMSUNG CANNOT AND DOES NOT GUARANTEE THE ACCURACY, VALiDiTY, TiMELiNESS OR
COMPLETENESS OF ANY iNFORMATiON OR DATA MADE AVAILABLE TO YOU FOR ANY PARTICULAR PURPOSE.
UNDER NO CIRCUMSTANCES, INCLUDING NEGLIGENCE, SHALL 8AMSUNG BE HELD LIABLE, WHETHER iN
CONTRACT OR TORT, FOR ANY DIRECT, INDIRECT, iNCiDENTAL, SPECIAL OR CONSEQUENTIAL DAMAGES,
ATTORNEY FEES, EXPENSES, OR ANY OTHER DAMAGES WHATSOEVER ARiSiNG OUT OF, OR IN CONNECTION
WITH, ANY INFORMATION CONTAINED iN, OR THE USE OF, THE CONTENTS LIBRARY, EVEN IFADVISED OF THE
POSSIBILITY OF SUCH DAMAGES.
Using the Content Library
[3 Gallery
This function plays a Slide Show with high resolution images and background music and produces various atmospheres. Using the
Gallery function of the TV, you can change your home atmosphere.
Press INFO button to see the credit and detail information in English for the imagery (currently, the credit supports English only).
You can pause the slide show by pressing the ENTER_ button during a slide show.
The copyrights of the Gallery contents and all issues related to them are reserved by Timespace /JoongAng M&B, Inc.
[3 Cooking
You can view various recipes that you can then easily follow step by step. Enjoy these contents which give you great ideas for meals.
The recipes introduced in the Cooking contents on the Samsung TV are based on recipes published by Anness Publishing.
The copyrights of the Cocking contents and all issues related to them are reserved by Practical Pictures.
[3 Children
This is educational and interactive content that children can watch repeatedly. Enjoy existing stories, songs and plays with the
Boowa and Kwala characters.
The copyrights of the Children contents and issues related to them are reserved by UpToTen.
[3 Wellness
This is beneficial health management content that provides stretching and massage exercises that can be enjoyed by the whole family.
[3 Others
This is content not saved in the TV and is accessible when the TV is connected to a network.
[_ You can copy new content to the TV memory using the Content Management screen.
[3 ContentManagement
You can add or delete contents using the Content Management.
My contents
The use of contents is the same as in using the TV memory contents. Also, you can delete and play the each contents.
Select a content item and press the ENTER_ button. You can play or delete the selected content item.
Internet Download
If your TV connect to the internet via a LAN cable, you can directly download the contents provided by Samsung Electronics.
Select a content item and press the ENTER_ button. You can download content or view detailed content information
USB
You can check the content saved on the USB device for each sub item of the Content Library.
Select a content item and press the ENTER_ button. Then, you can view the menu. If you select Copy, you can copy the
content to the TV memory.
Content Library supports USB Mass Storage Class devices (MSC). MSC is a Mass Storage Class Bulk-Only Transport device.
Examples of MSC are Thumb drives and Flash Card Readers (Both USB HDD and HUB are not supported.)
Playing a game using an external USB memory device will allow you to save your game (depending on the game). Take care as
removing the USB memory device while saving data to the USB memory device may cause the data to be lost.
Downloading New Contents
New content other than the built-in contents will be provided via the Samsung.com website free of charge.
When you download the paid contents, you need UDN number to download contents. Check the UDN number before
downloading a new content item.
1. Visit the www.samsung.com website.
2. Select a content item in the Contents Download page.
3. Download the contents onto the USB memory device.
4. Go to Content Library main menu by pressing CONTENT button or choosing Content Library
(Menu -_ Application -_ Content Library)
5. Plug the USB memory into USB port on the side of the TV.
6. You can see the content sub item which you downloaded.
7. Select a content item and press the enter button.
8. You can play the selected content item or copy it to the TV memory
Setup
•Screen Saver Run Time -, 10 rain, /20 rain. 140 rain. /! hour
Select to set the waiting time before the screen saver appears.
•Save UDN (Unique Device Number)
The 18-digit number onthe screen is the product code.
You can save the UDN to your USB memory.
@ An NTFS format USB storage device does not support saving UDN.We recommend using a FATformat USB storage device.
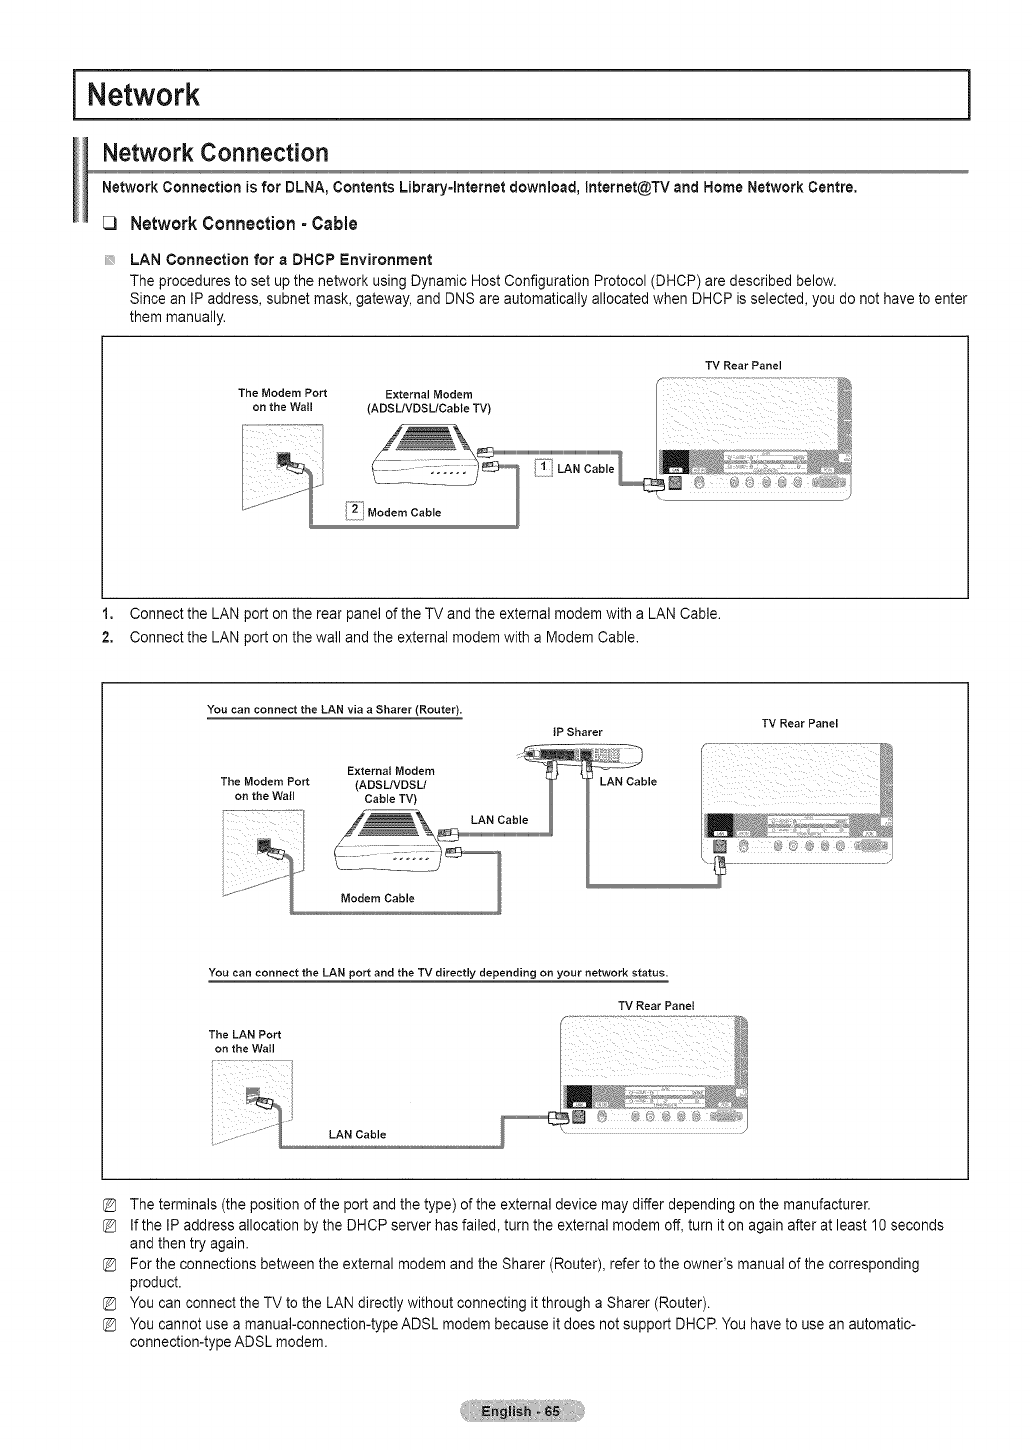
i Network
Network Connection
Network Connection is for DLNA, Contents Library-lnternet download, Jnternet@TV and Home Network Centre,
Network Connection=Cable
LAN Connection for a DHCP Environment
The procedures to set up the network using Dynamic Host Configuration Protocol (DHCP) are described below.
Since an IP address, subnet mask, gateway, and DNS are automatically allocated when DHCP is selected, you do not have to enter
them manually.
The Modem Port External Modem
on the Wall (ADSL/VDSL/Cable TV)
TV Rear Panel
Modem Cable
1. Connect the LAN port on the rear panel of the TV and the external modem with a LAN Cable.
2, Connect the LAN port on the wall and the external modem with a Modem Cable.
You can connect the LAN via a Sharer (Router).
External Modem
The Modem Port (ADSLNDSLt
on the Wall Cable TV)
IP Sharer TV Rear Panel
You can connectthe LAN portandthe TV directly depending on yournetwork status.
TV Rear Panel
The LAN Port
ontheWall
LAN Cable
The terminals (the position of the port and the type) of the external device may differ depending on the manufacturer.
If the IP address allocation by the DHCP server has failed, turn the external modem off, turn it on again after at least 10 seconds
and then try again.
For the connections between the external modem and the Sharer (Router), refer to the owner's manual of the corresponding
product.
You can connect the TV to the LAN directly without connecting it through a Sharer (Router).
You cannot use a manual-connection-type ADSL modem because it does not support DHCR You have to use an automatic-
connection-type ADSL modem.

LAN Connection for Static IP Environment
The procedures to set up the network using a static IP address are described below. You have to manually enter the IP address,
subnet mask, gateway, and DNS that are provided by your Internet Service Provider (ISP).
The LAN Port
on the Wall
TV Rear Panel
LAN Cable
1. Connect the LAN port on the rear panel of the TV and the LAN port on the wall using the LAN cable.
You can connect the LAN via a Sharer (Router),
The LAN Port
on the Wall
LAN Cabte
IP Sharer TV Rear Panel
!I
The terminals (the position of the port and the type) of the external device may differ depending on the manufacturer.
If you are using a static IP address, your ISP will inform you of the IP address, subnet mask, gateway, and DNS.
You must enter these values to complete the network settings. If you do not know the values, ask your network administrator.
For the information on how to configure and connect a Sharer (Router), refer to the owner's manual for the corresponding product.
You can connect the TV to the LAN directly without connecting it through a Sharer (Router).
If you use an IP Sharer (IP Router) that supports DHCP, you can set up the device as either DHCP or static IE
For the procedures to use a static IP address, ask your Internet Service Provider.
Continued...
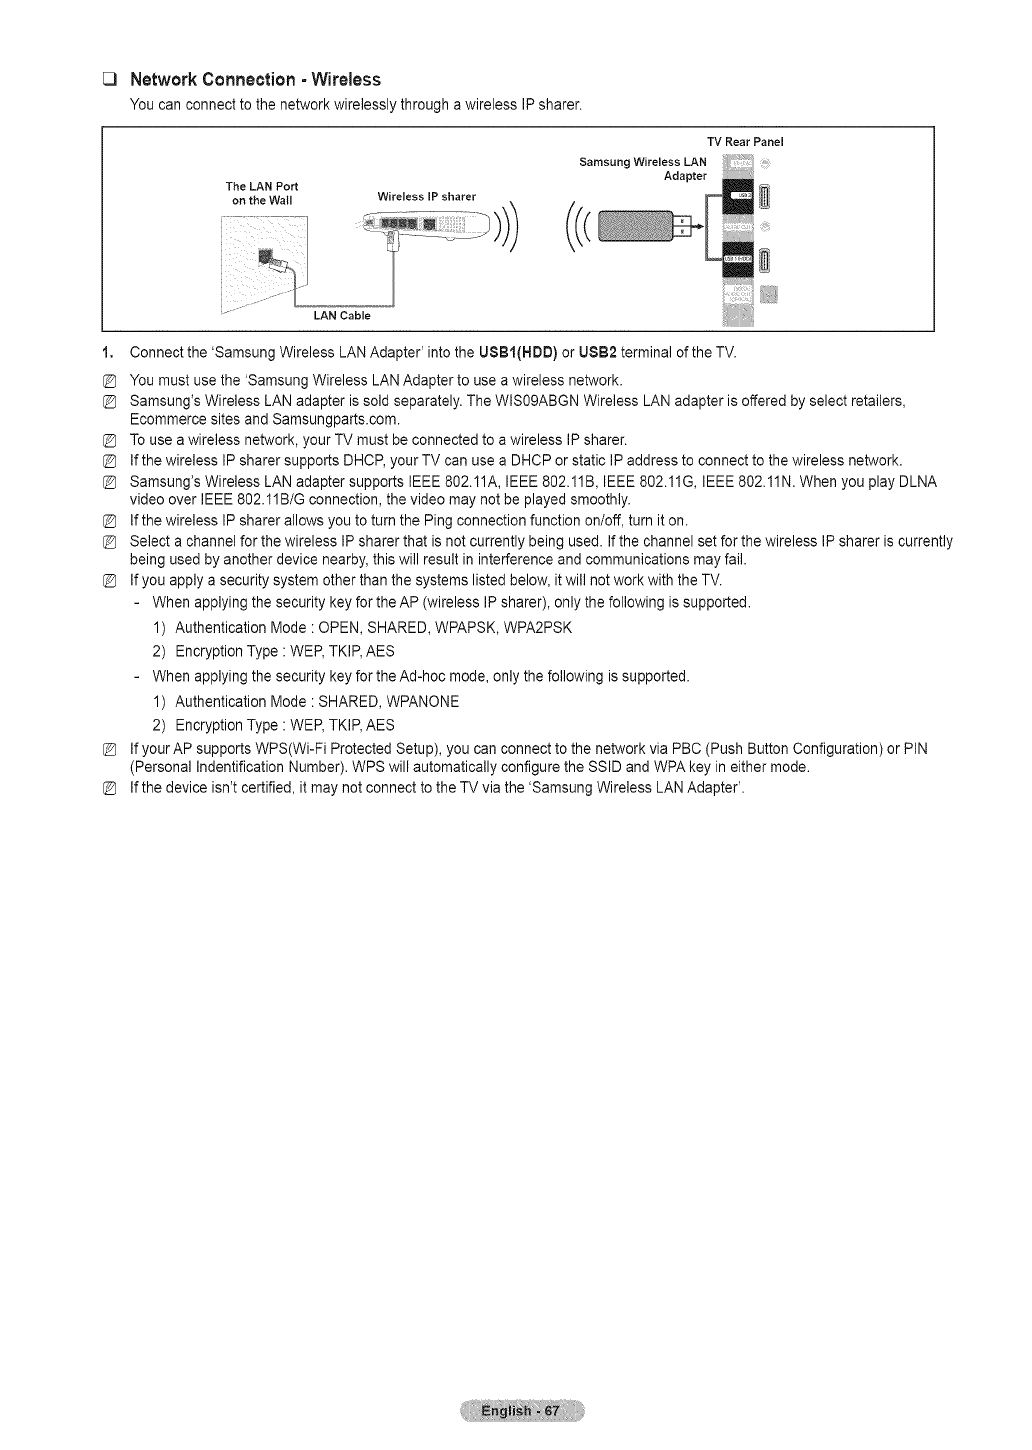
_3 Network Connection - Wireless
Youcanconnectto thenetworkwirelesslythroughawirelessIPsharer.
The LAN Port
on the Wall Wireless IP sharer
TV Rear Panel
Samsung Wireless LAN
Adapter
LAN Cable
1. Connect the 'Samsung Wireless LAN Adapter' into the USBI(HOD) or USB2 terminal of the TV.
You must use the 'Samsung Wireless LAN Adapter to use a wireless network.
Samsung's Wireless LAN adapter is sold separately. The WlS0gABGN Wireless LAN adapter is offered by select retailers,
Ecommerce sites and Samsungparts.com.
Touse a wireless network, your TV must be connected to a wireless IP sharer.
If the wireless IP sharer supports DHCP, your TV can use a DHCPor static IP address to connect to the wireless network.
Samsung's Wireless LAN adapter supports IEEE 802.11A, IEEE 802.11B, IEEE 802.11G, IEEE 802.11N. When you play DLNA
video over IEEE 802.11B/G connection, the video may not be played smoothly.
If the wireless IP sharer allows you to turn the Ping connection function on/off, turn it on.
Select a channel for the wireless IP sharer that is not currently being used. If the channel set for the wireless IP sharer is currently
being used by another device nearby, this will result in interference and communications may fail.
If you apply a security system other than the systems listed below, it will not work with the TV.
- When applying the security key for the AP (wireless IP sharer), only the following is supported.
1) Authentication Mode : OPEN, SHARED, WPAPSK, WPA2PSK
2) Encryption Type : WEP, TKIE AES
- When applying the security key for the Ad-hoc mode, only the following is supported.
1) Authentication Mode : SHARED, WPANONE
2) Encryption Type : WEP, TKIE AES
If your AP supports WPS(Wi-Fi Protected Setup), you can connect to the network via PBC (Push Button Configuration) or PIN
(Personal Indentification Number). WPS will automatically configure the SSID and WPAkey in either mode.
If the device isn't certified, it may not connect to the TV via the 'Samsung Wireless LAN Adapter'.
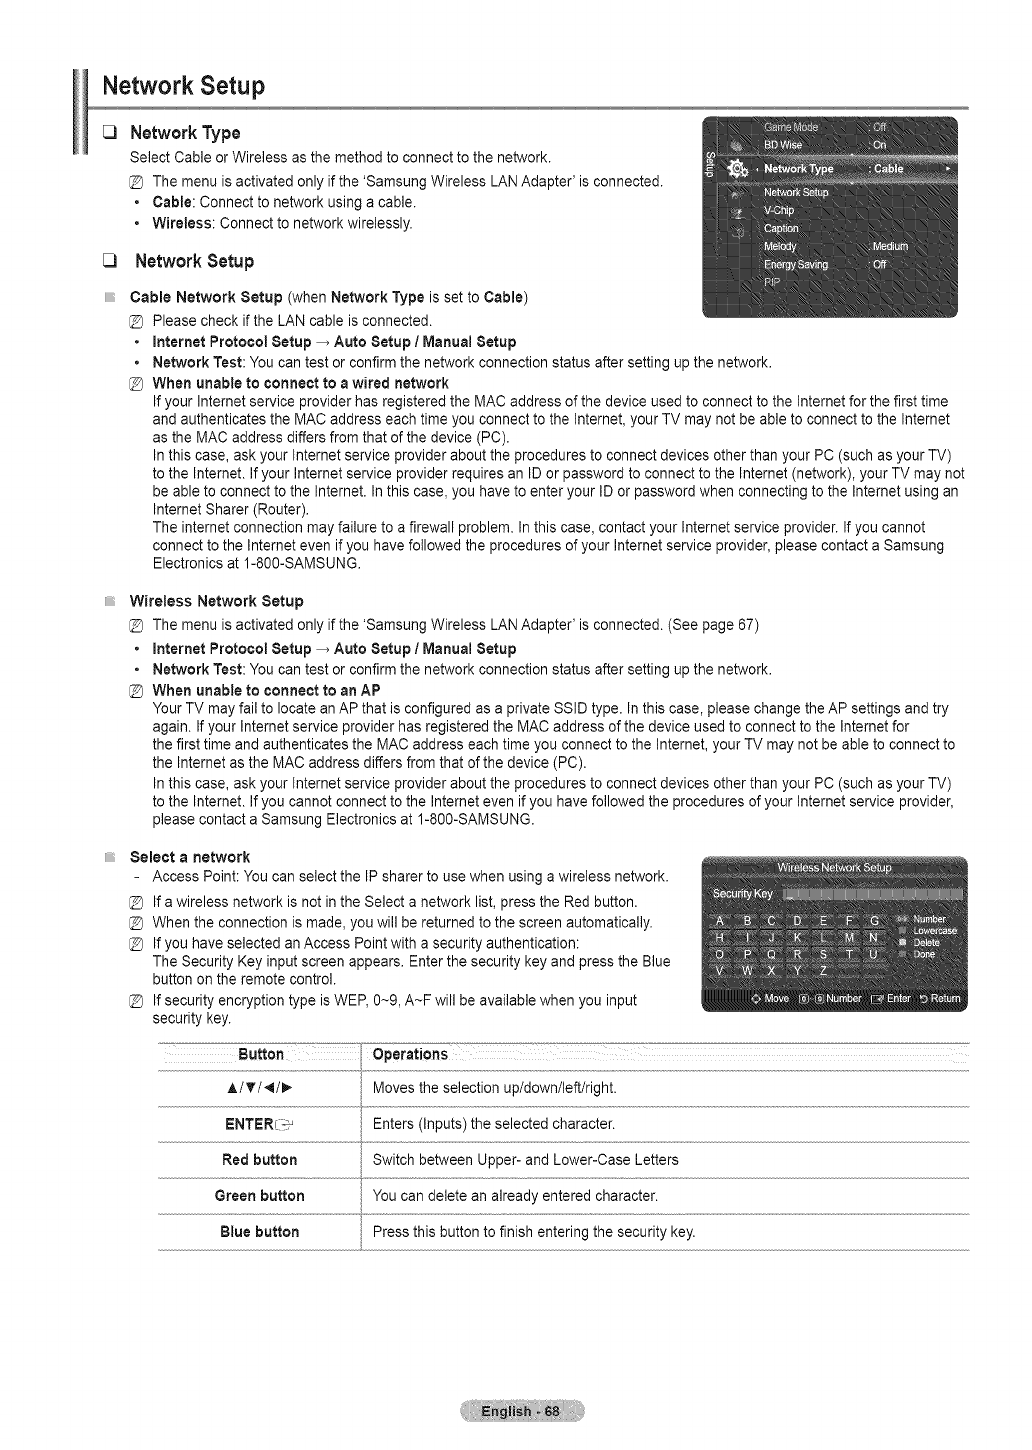
Network Setup
_3
_3
iiiiiiiii
Network Type
Select Cable or Wireless as the method to connect to the network.
@ The menu is activated only if the 'Samsung Wireless LAN Adapter' is connected.
• Cable: Connect to network using a cable.
• Wireless: Connect to network wirelessly.
Network Setup
Cable Network Setup (when Network Type is set to Cable)
@ Please check if the LAN cable is connected.
•Internet Protocol Setup _ Auto Setup /Manua! Setup
•Network Test: You can test or confirm the network connection status after setting up the network.
@ When unable to connect to a wired network
If your Internet service provider has registered the MAC address of the device used to connect to the Internet for the first time
and authenticates the MAC address each time you connect to the Internet, your TV may not be able to connect to the Internet
as the MAC address differs from that of the device (PC).
In this case, ask your Internet service provider about the procedures to connect devices other than your PC (such as your TV)
to the Internet. If your Internet service provider requires an ID or password to connect to the Internet (network), your TV may not
be able to connect to the Internet. In this case, you have to enter your ID or password when connecting to the Internet using an
Internet Sharer (Router).
The internet connection may failure to a firewall problem. In this case, contact your Internet service provider. If you cannot
connect to the Intemet even if you have followed the procedures of your Internet service provider, please contact a Samsung
Electronics at 1-800-SAMSUNG.
Wireless Network Setup
@ The menu is activated only if the 'Samsung Wireless LAN Adapter' is connected. (See page 67)
•Internet Protocol Setup _ Auto Setup /Manual Setup
•Network Test: You can test or confirm the network connection status after setting up the network.
@ When unable to connect to an AP
Your TV may fail to locate an AP that is configured as a private SSID type. In this case, please change the AP settings and try
again. If your Internet service provider has registered the MAC address of the device used to connect to the Internet for
the first time and authenticates the MAC address each time you connect to the Internet, your TV may not be able to connect to
the Internet as the MAC address differs from that of the device (PC).
In this case, ask your Internet service provider about the procedures to connect devices other than your PC (such as your TV)
to the Internet. If you cannot connect to the Internet even if you have followed the procedures of your Internet service provider,
please contact a Samsung Electronics at 1-800-SAMSUNG.
Select a network
- Access Point: You can select the IP sharer to use when using a wireless network.
@ If a wireless network is not in the Select a network list, press the Red button.
@ When the connection is made, you will be returned to the screen automatically.
@ If you have selected an Access Point with a security authentication:
The Security Key input screen appears. Enter the security key and press the Blue
button on the remote control.
@ If security encryption type is WEP, 0~9, A~F will be available when you input
security key.
Button "" _-!Operations
J,/_'/4/_ Moves the selection up/down/left/right.
E;NTER_ Enters (Inputs) the selected character.
Red button Switch between Upper- and Lower-Case Letters
T
Green button You can delete an already entered character.
Blue button Press this button to finish entering the security key.
Cable Network Setup
Cable Network Setup-Auto Setup
If you connect the LAN cable and it supports DHCP, the Intemet Protocol (IP) Settings are automatically configured.
1. Set Network Type to Cable.
2, Select Cable Network Setup.
3. Set Intemet Protocol Setup to Auto Setup.
The Internet Protocol is set automatically.
4. Select Network Test to check the network connectivity.
Cable Network Setup=Manual Setup
Toconnect the TV tothe LAN using a static IP address, you must set up the Intemet Protocol (IP).
Please check if the LAN cable is connected. (See page 65)
1. Set Network Type to Cable.
2. Select Cable Network Setup.
3, Set Internet Protocol Setup to ManualSetup.
4. Set up IPAddress, Subnet Mask, Gateway and DNS Server.
Press the number buttons on the remote control when you set the Network manually.
5. Select Network Test to check the network connectivity.
Wireless Network Setup
Wireless Network Setup -Auto Setup
If you want to connect AP, AP should support DHCR
Only devices which support Ad-hoc mode can be connected without DHCP.
1. Set Network Type to Wireless.
2. Select Wireless Network Setup.
3, Set Intemet Protocol Setup to Auto Setup.
The Internet Protocol is set automatically.
4. Select a network through Select a network.
5. Select Network Test to check the network connectivity.
Wireless Network Setup -Manual Setup
1. Set Network Type to Wireless.
2. Select Wireless Network Setup.
3, Set Internet Protocol Setup to Manual Setup.
4. Set up IPAddress, 8ubnet Mask, Gateway and DNS Server.
Press the number buttons on the remote control when you set the Network manually.
5. Select a network through Select a network.
6. Select Network Test to check the network connectivity.
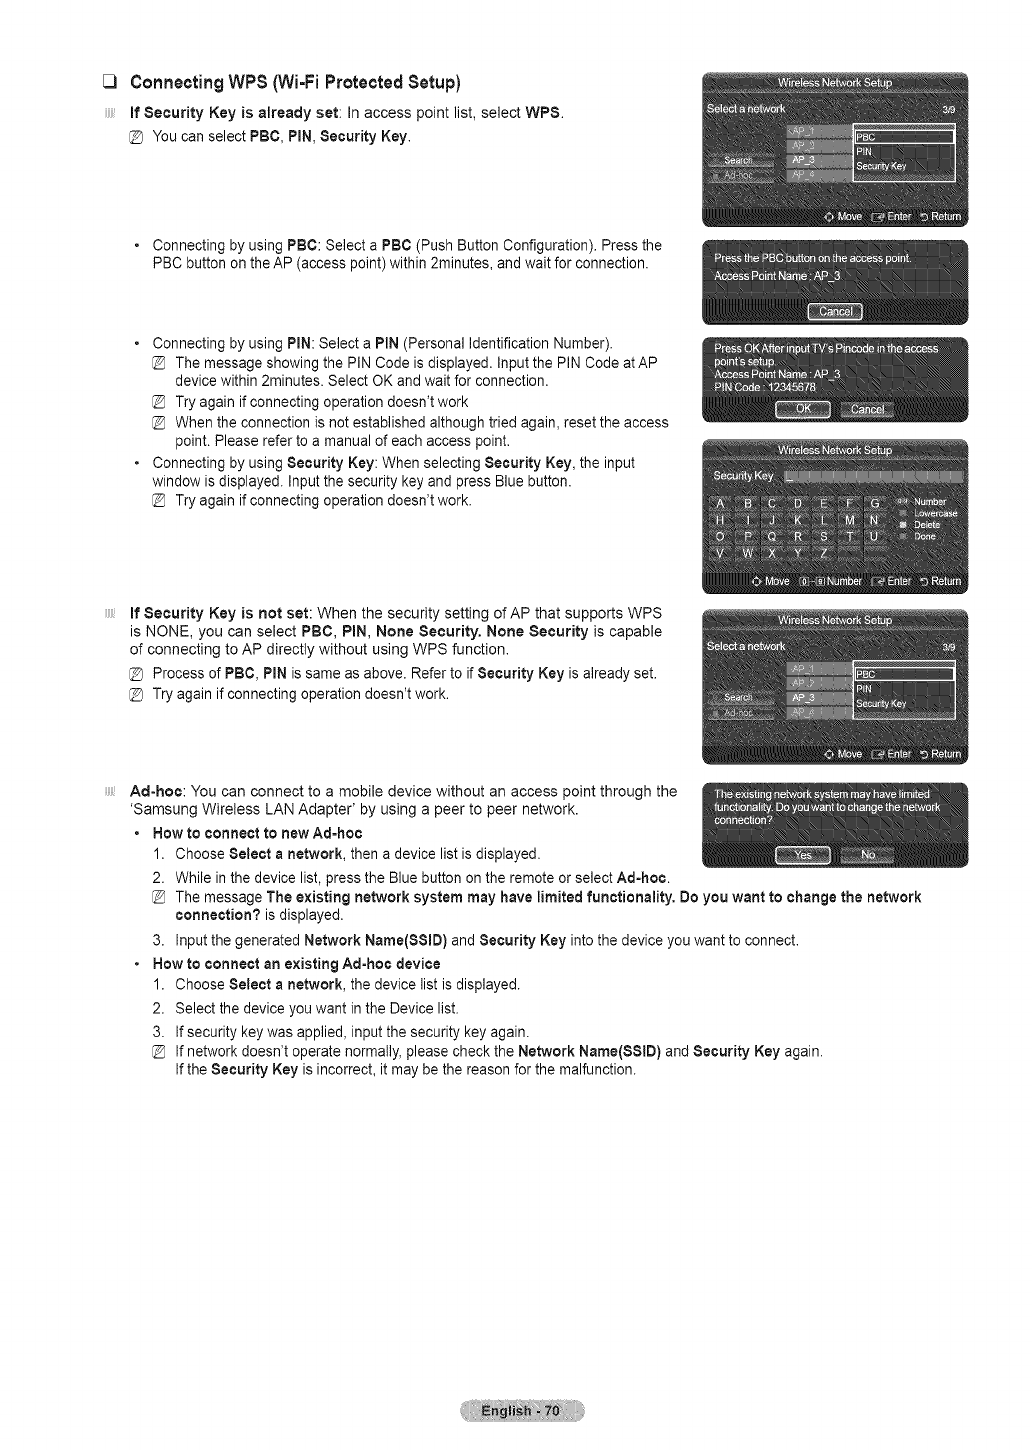
[3 Connecting WPS (Wi=Fi Protected Setup)
if SecurityKey is already set: inaccess point list,select WPS.
@ YoucanselectPBC,PiN,SecurityKey.
•Connecting by using PBC:Select a PBC (Push Button Configuration). Press the
PBC button on the AP (access point) within 2minutes, and wait for connection.
•Connecting by using PiN: Select a PiN (Personal Identification Number).
The message showing the PIN Code is displayed. Input the PIN Code at AP
device within 2minutes. Select OK and wait for connection.
Try again if connecting operation doesn't work
When the connection is not established although tried again, reset the access
point. Please refer to a manual of each access point.
•Connecting by using Security Key: When selecting Security Key, the input
window is displayed. Input the security key and press Blue button.
Try again if connecting operation doesn't work.
if Security Key is not set: When the security setting of AP that supports WPS
is NONE, you can select PBC, PiN, None Security. None Security is capable
of connecting to AP directly without using WPS function.
@ Process of PBC, PiN is same as above. Refer to if Security Key is already set.
@ Try again if connecting operation doesn't work.
Ad-hoc: You can connect to a mobile device without an access point through the
'Samsung Wireless LAN Adapter' by using a peer to peer network.
•How to connect to new Ad=hoc
1. Choose Select a network, then a device list is displayed.
2. While in the device list, press the Blue button on the remote or select Ad=hoc.
@ The message The existing network system may have limited functionality, Do you want to change the network
connection? is displayed.
3. Input the generated Network Name(SSiD) and Security Key into the device you want to connect.
•How to connect an existing Ad=hoc device
1. Choose Select a network, the device list is displayed.
2. Select the device you want inthe Device list.
3. If security key was applied, input the security key again.
If network doesn't operate normally, please check the Network Name{SSID) and Security Key again.
If the Security Key is incorrect, it may be the reason for the malfunction.
lnternet@TV
You can use various internet services containing useful information and entertaining content.
If you have some problems while using a widget service, please contact to content provider. In the widget, press the green button and
get information of contact or refer to help website for widget provider information.
English may be only supported in widget service depending on region.
This function may not be supported depending on your country.
All content and services accessible through this device belong to third parties and are protected by copyright, patent, trademark and/or
ther intellectual property laws. Such content and services are provided solely for your personal noncommercial use. You may not use any
content or services in a manner that has not been authorized by the content owner or service provider. Without limiting the foregoing, unless
expressly authorized by the applicable content owner or service provider, you may not modify, copy, republish, upload, post, transmit,
translate, sell, create derivative works, exploit, or distribute in any manner or medium any content or services displayed through this device.
YOU EXPRESSLY ACKNOWLEDGE AND AGREE THAT USE OF THE DEVICE IS AT YOUR SOLE RISKAND THAT THE ENTIRE
RISKAS TO SATISFACTORY QUALITY, PERFORMANCE AND ACCURACY IS WITH YOU. THE DEVICE AND ALL THIRD PARTY
CONTENT AND SERVICES ARE PROVIDED "AS IS"WITHOUT WARRANTY OF ANY KIND, EITHER EXPRESS OR IMPLIED.
SAMSUNG EXPRESSLY DISCLAIMS ALL WARRANTIES AND CONDITIONS WITH RESPECTTO THE DEVICE AND ANY CONTENT
AND SERVICES, EITHER EXPRESS OR, IMPLIED, INCLUDING BUT NOT LIMITED TO, WARRANTIES OF MERCHANTABILITY,
OF SATISFACTORY QUALITY, FITNESS FOR A PARTICULAR PURPOSE, OF ACCURACY, OF QUIET ENJOYMENT, AND NON-
INFRINGEMENT OF THIRD PARTYRIGHTS. SAMSUNG DOES NOT GUARANTEE THE ACCURACY, VALIDITY,TIMELINESS,
LEGALITY,OR COMPLETENESS OF ANY CONTENT OR SERVICE MADEAVAILABLE THROUGH THIS DEVICE AND DOES NOT
WARRANT THAT THE DEVICE, CONTENT OR SERVICES WILL MEET YOUR REQUIREMENTS, OR THAT OPERATION OF THE
DEVICE OR SERVICES WILL BE UNINTERRUPTED OR ERROR-FREE. UNDER NO CIRCUMSTANCES, INCLUDING NEGLIGENCE,
SHALL SAMSUNG BE LIABLE, WHETHER IN CONTRACT OR TORT, FORANY DIRECT, INDIRECT,INCIDENTAL, SPECIAL OR
CONSEQUENTIAL DAMAGES,ATTORNEY FEES, EXPENSES, OR ANY OTHER DAMAGES ARISING OUT OF, OR IN CONNECTION
WITH, ANY INFORMATIONCONTAINED IN, ORAS A RESULT OF THE USE OF THE DEVICE, OR ANY CONTENT OR SERVICE
ACCESSED BYYOU OR ANY THIRD PARTY,EVEN IFADVISED OF THE POSSIBILITY OF SUCH DAMAGES.
Third party services may be changed, suspended, removed, terminated or interrupted, or access may be disabled at any time, without
notice, and Samsung makes no representation or warranty that any content or service will remain available for any period of time. Content
and services are transmitted by third parties by means of networks and transmission facilities over which Samsung has no control. Without
limiting the generality of this disclaimer, Samsung expressly disclaims any responsibility or liability for any change, interruption, disabling,
removal of or suspension of any content or service made available through this device. Samsung may impose limits on the use of or access
to certain services or content, in any case and without notice or liability. Samsung is neither responsible nor liable for customer service
related to the content and services. Any question or request for service relating to the content or services should be made directly tothe
respective content and service providers.
Getting Started with Internet@TV
Internet@TV provides an integrated Internet and television experience powered by the Yahoo[® Widget Engine. You can monitor
financial stocks, share photos with friends and family, and track news and weather all through the Internet@TV service on your
television.
You may experience slow operation or hesitation when using this function due to network conditions.
When running Internet@TV for the first time, the basic settings will proceed automatically.
The first step isto set up your network. For more information on how to configure your network, refer to 'Network Setup'.
After your network is operational, the Internet@TV software guides you through a step-by-step setup wizard.
C) What is aWidget?
ATV Widget is a small web application that allows you to easily access your favorites site using the remote control. You can enjoy
various types of information, such as the latest news, weather information, and stock information, etc. on your TV along with your
friends or family members.
@ Some widgets may not be supported depending on the regulations of the corresponding country.
@ Some widgets will only support limited services depending on the regulations of the corresponding country.
@ The color buttons may work differently depending on the widget.
@ The operation may not be smooth depending on the network condition.
@ The Snippet is a symbol of Widget.
C) What is aSnippet?
A snippet shows a part of the Widget contents such as weather and stock information that the user wants to view.
@ The snippets are automatically updated in real time.
@ It may take a few seconds to load the snippet.
1. Press the MENU button. Press the ,i. or '_' button to select Application, then press the ENTER_ button.
2. Press the A or 'V button to select Internet@TV, then press the ENTER_ button.
mNTERNET@TVstarts.
Press the mNTERNET@button on the remote control to display the
Internet@TV menu.
3. The General Disclaimer is displayed on the screen. Select I accept or Ido not
accept.
For more information on the General Disclaimer, refer to the 'Lega! Notice'.
4. The 'welcome screen' is the starting point of the Internet@TV guided setup.
If you select Exit Setup, this step is resumed when you press the INTERNET@
button.
Select Let's get started!
& Choosing your location allows TV Widgets to use localized content.
Select your country from the list provided.
6. Accepting the Yahoo!® TV Widget Engine Privacy Policy is required to use
Internet@TV.
Select OK, IAccept.
7. Accepting the Yahoo!® TV Widget System Terms of Service is required to use Intemet@TV.
Select OK, IAccept.
8. Enter your name to setup your profile. Each profile has its own list of widgets.
You can create a profile for each person who uses Internet@TV.
Enter your name and select Save this name.
For more information, refer to page 'Using the Profile Widget'.
9. Internet@TV tests the network connection.
If the test fails, configure your network again.
For more information, refer to page 'Network Setup'.
10. The guided setup is complete. A tutorial on how to use Internet@TV is next.
Select Continue to view the tutorial.
Select Exit setup to start using Intemet@TV now.
To run the tutorial again, select Profile Widget _ System Setting -_ Repeat Tutorial.
11. Press the INTERNET@ button on the remote control to display the Internet@TV user interface.
C) Screendisplay
Dock mode
O Awelcome banner isshown with your profile name in the top right corner.
This banner disappears after a short delay.
O The banner highlights two remote control shortcuts.
If you press the blue button (Viewport) on your remote control, the
display is toggled between 'Viewport mode' and 'Overlay mode'. In
Viewport mode, the TV or video plays in a scaled-down area with
graphics outside. In overlay mode, the graphics are displayed on top
of the TV or video.
If you press the yellow button (Edit Snippet) on your remote control, a
help window is displayed and the snippet with focus can be edited.
O Press the INTERNET@ button on the remote control to begin.
The horizontal list at the bottom of your TV screen is called 'the dock'.
The items in the list are called 'snippets'.
A snippet is a shortcut which launches a TV Widget.
A TV Widget is an Internet application designed to run on your TV.
Move between snippets by pressing the 4 or !_ buttons on the remote control.
Focus is located in the left most region (highlighted in blue).
The dock slides snippets under that focal point.
Launch a TV Widget by pressing the ENTER_ button on the remote control when its snippet is in focus.
When you add snippets, they form a stack which you can navigate by pressing the A or T buttons.
Two special TV Widgets appear in the dock: the Profile Widget and the Gallery Widget. These cannot be deleted.
The dock will slide off screen after a timeout period.
Sidebar mode
Focus on a snippet and press the ENTER_ button to launch the TV
Widget sidebar.The TV Widget logo and Home (,il_) are at the top of the
sidebar.
Current menu is displayed under the TV Widget logo.
To return to a previous screen, select it and press the ENTER_
button.
You can also press the RETURN button on the remote control.
O Current selection is always highlighted in blue. The highlighted button has
focus and is activated when you press the ENTER_ button.
When there is a lot of data, a page control is used.
Current page and total pages are displayed.
Move between pages by pressing 4 or _ buttons.
O The bottom toolbar includes color buttons that correspond to the red, green, yellow and blue buttons on the remote control.
•Red button: Close the widget.
•Green button: Change the widget's setting.
•Yellow button: Manage your snippets.
•Blue button: Size video to fit, or make it full screen.
Some buttons may not be available depending on widget.
Editing Snippets in the Dock
1,
2,
Edit a snippet by focusing on it in the dock and pressing the yellow button.
The snippet moves to the Second position and its tile slides up to show the following help text:
•Delete (red button): Remove this TV Widget.
Deleted widgets can be re-installed using the Widget Gallery.
• Move (blue button): Re-order the snippet. Press the _,ior _ button to scroll. Press the yellow button to drop into the new
position.
•Done (yellow button): Exit the Edit Snippet menu.
Using the Profile Widget
The Profile Widget configures your user profile.You can set up multiple profiles, and each profile
maintains its own list of widgets.
The Switch Profile menu allows you to switch to a different user profile.
At least two profiles must be registered. If you want to add a profile,
refer to 'Administrative Controls'.
The Profile Settings menu allows you to customize and protect your profile.
• User profiles can be customized with a unique Name and an Avatar (a picture used to represent your
profile).
• Your profile's Name and Avatar are displayed in the profile snippet in the dock.
•Profiles can be protected by Create Profile PIN.
When setting the PIN for the first time, you can set a Security Question.
The Profile Settings menu can limit to widgets.
•If you forget your Profile PiN you can answer a Security Question that is associated with your
profile.
•A profile that has the Limit Profile indicator turned on will not allow new widgets to be installed.
The Owner PIN must be set to use this function. To set the Owner PIN, refer to 'Administrative
Controls'.
The System Settings menu allows you to:
*Change your Location and set your Zip Code (US only) to tailor the content to your region.
*Repeat the Tutorial that was shown during guided setup.
* Restore Factory Settings to delete all widget configurations and information.
In the Administrative Controls menu you can:
*Set the Screen Saver timeout to avoid screen burn in.
*Create Owner PiN and set a Security Question to control other profiles.
*Create a new Profile which can be configured with a different set of widgets.
*Delete an existing profile.
From the Profile Widget you can Sign in to Yahoo!® using your Yahoo! ID.
*If you have a Yahoo! ID,you can access your personalized content using the Yahoo! TV Widgets.
*All Yahoo! TV Widgets that are installed are automatically signed-in with your profile's Yahoo! ID.
*If you have no Yahoo! account, visit www.yahoo.com and create an account.
*You may fail to log in with an ID created on the Yahoo website in a country that does not support
Internet@TV.
C) About Profile widget
Pressthegreenbutton.
Youcanviewa briefdescriptionof theProfile Widget,CopyrightPolicy, Termsof Service,and
Privacy Policy.
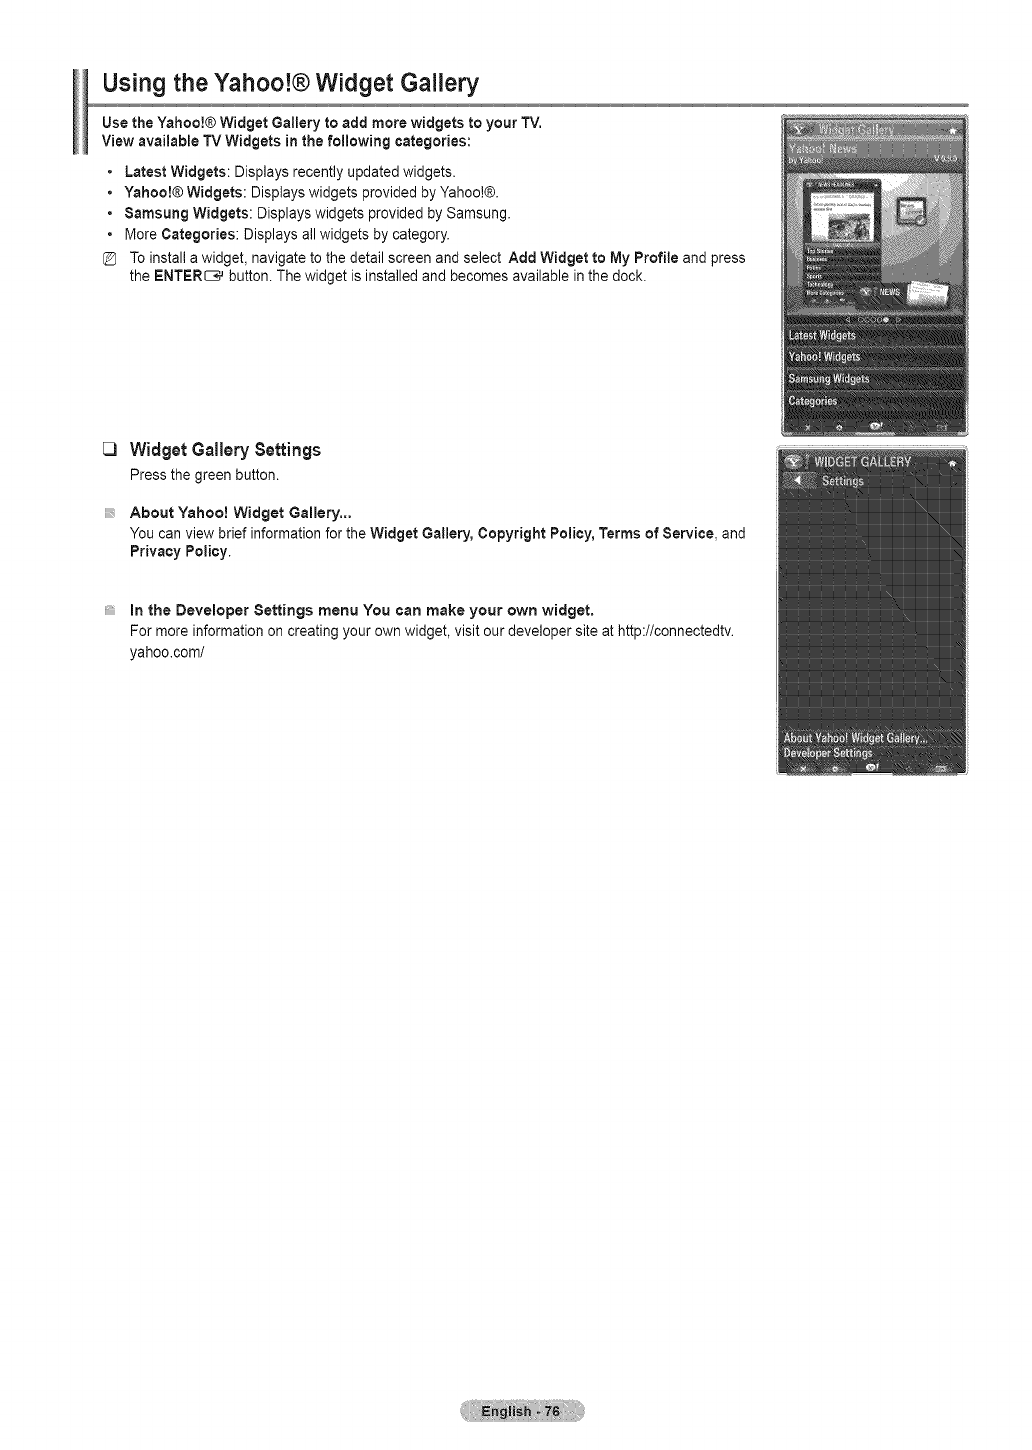
Using the Yahoo!® Widget Gallery
Use the Yahoo!® Widget GaJleryto add more widgets to your TV,
View available TV Widgets inthe following categories:
* Latest Widgets: Displays recently updated widgets.
*Yahoo!® Widgets: Displays widgets provided by Yahoo!®.
*Samsung Widgets: Displays widgets provided by Samsung.
*More Categories: Displays all widgets by category.
Toinstall a widget, navigate to the detail screen and select Add Widget to My Profile and press
the ENTER_ button. The widget is installed and becomes available in the dock.
C3 Widget Gallery Settings
Pressthegreenbutton.
About Yahoo! Widget Gallery...
You can view brief information for the Widget Gallery, Copyright Policy, Terms of Service, and
Privacy Policy.
in the Developer Settings menu You can make your own widget.
For more information on creating your own widget, visit our developer site at http://connectedtv.
yahoo.com/
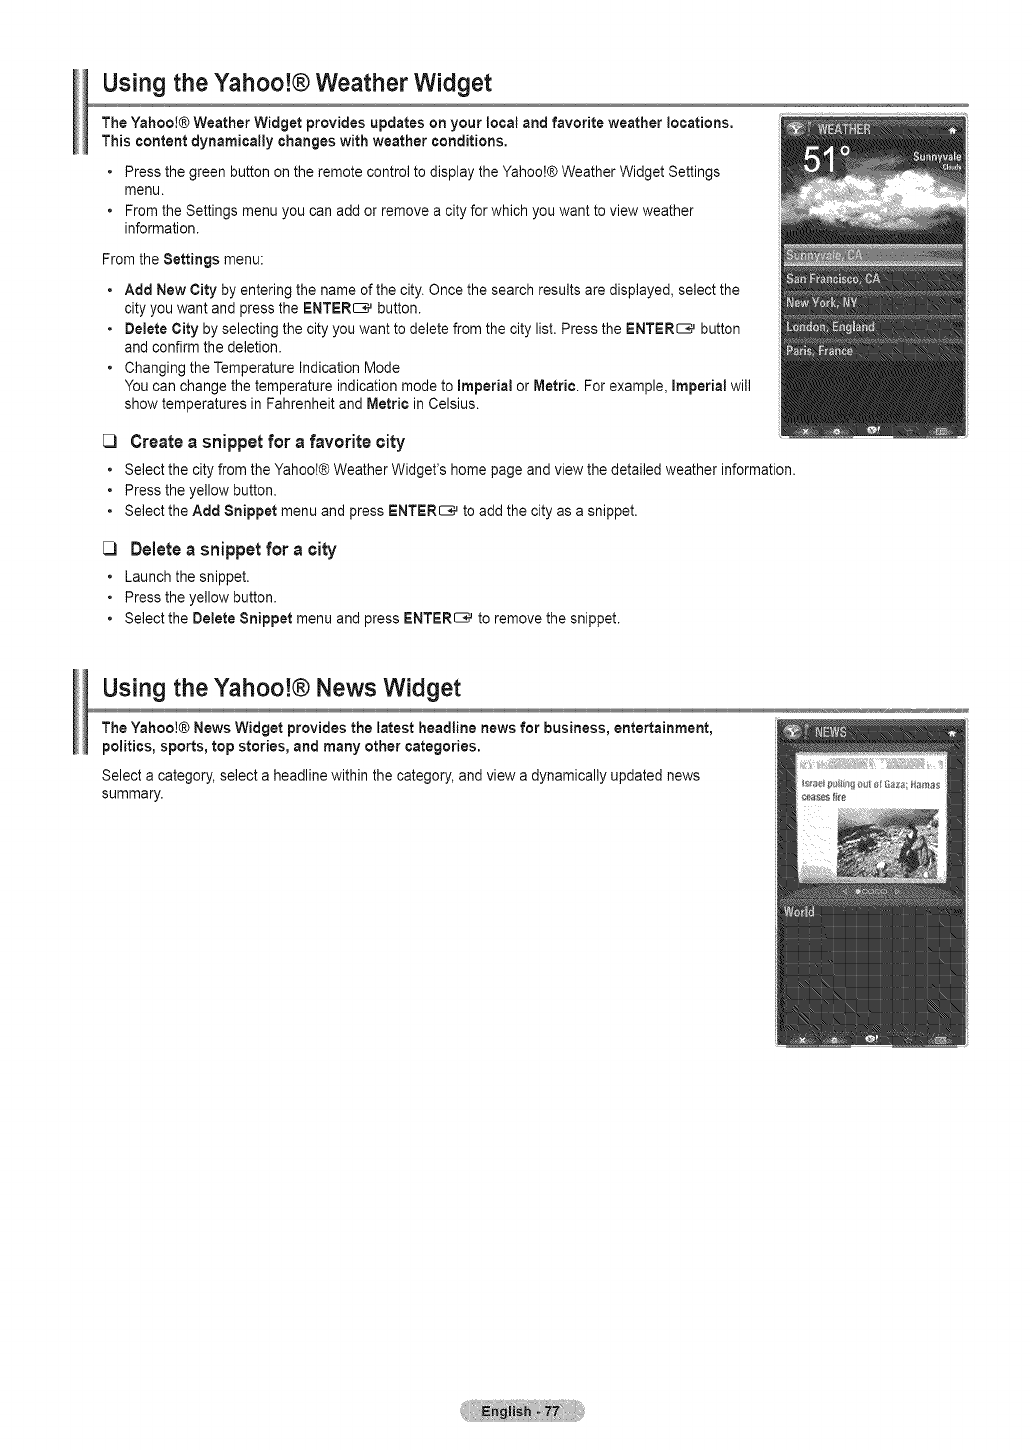
Using the Yahoo!® Weather Widget
The Yahoo!® Weather Widget provides updates on your local and favorite weather locations,
This content dynamically changes with weather conditions,
• Press the green button on the remote control to display the Yahoo!® Weather Widget Settings
menu.
•From the Settings menu you can add or remove a city for which you want to view weather
information.
From the Settings menu:
•Add New City by entering the name of the city. Once the search results are displayed, select the
city you want and press the ENTER_ button.
• Delete City by selecting the city you want to delete from the city list. Press the ENTER_ button
and confirm the deletion.
• Changing the Temperature Indication Mode
You can change the temperature indication mode to Imperial or Metric. For example, imperial will
show temperatures in Fahrenheit and Metric in Celsius.
[3 Create a snippet for a favorite city
• SelectthecityfromtheYahoo!®WeatherWidget'shomepageandviewthedetailedweatherinformation.
• Presstheyellowbutton.
• SelecttheAdd SnippetmenuandpressENTER_ to addthecityas a snippet,
C3 Delete a snippet for a city
• Launch the snippet.
•Press the yellow button.
•Select the Delete Snippet menu and press ENTER_ to remove the snippet.
Using the Yahoo!® News Widget
The Yahoo!@ News Widget provides the latest headline news for business, entertainment,
politics, sports, top stories, and many other categories.
Select a category, select a headline within the category, and view a dynamically updated news
summary.
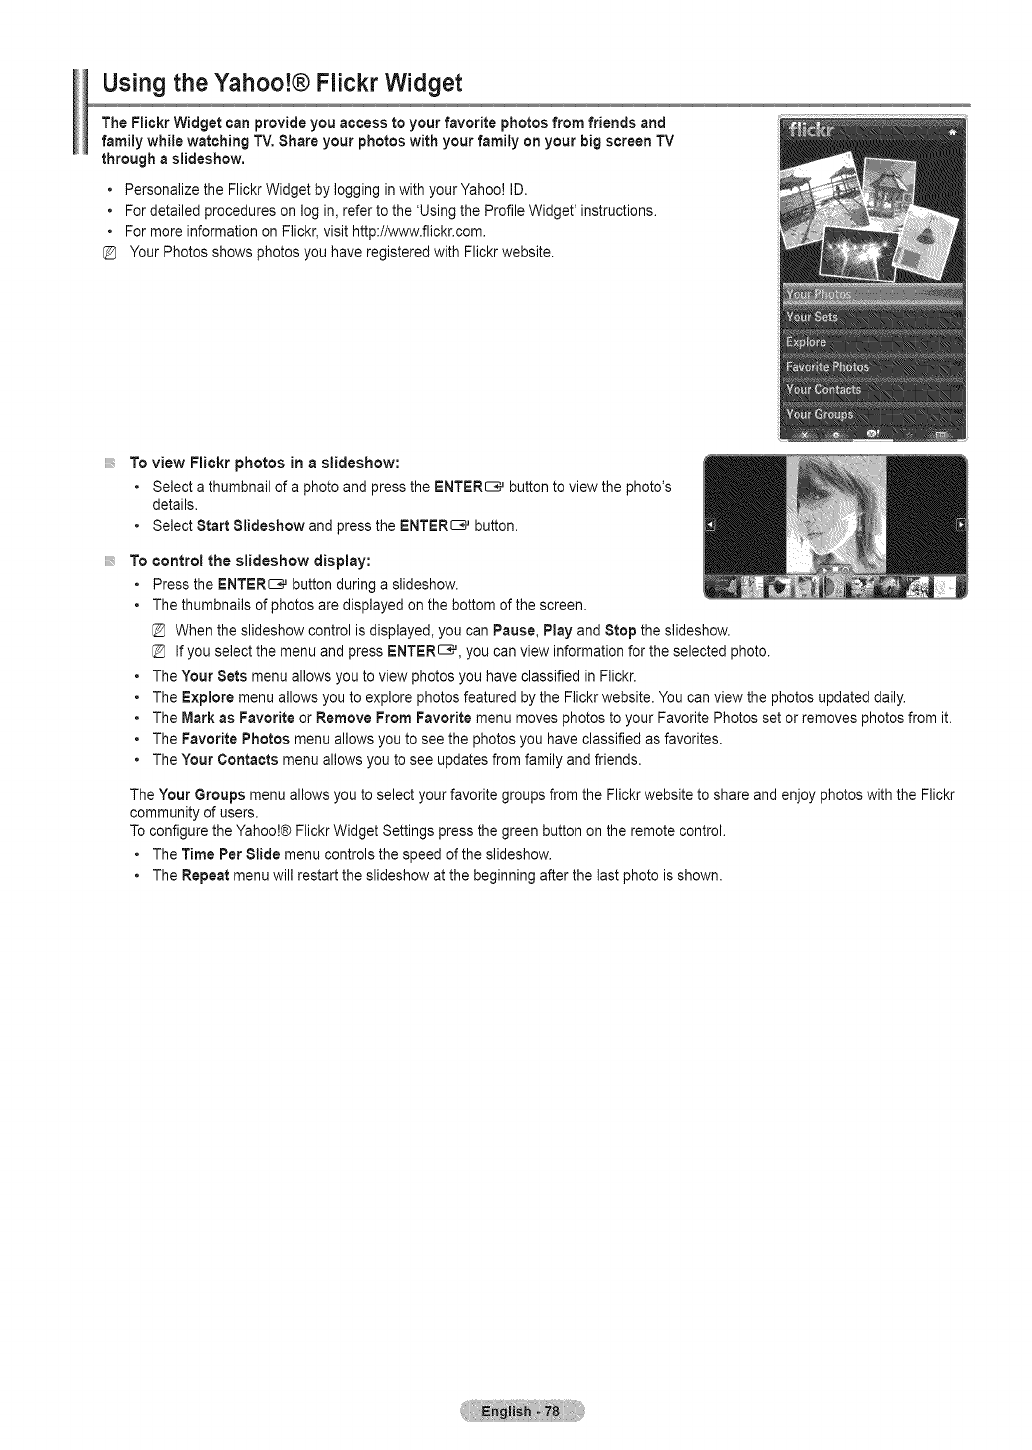
Using the Yahoo!® Flickr Widget
The Flickr Widget can provide you access to your favorite photos from friends and
family while watching TV, Share your photos with your family on your big screen TV
through a slideshow,
• Personalize the Flickr Widget by logging in with your Yahoo! ID.
• For detailed procedures on log in, refer to the 'Using the Profile Widget' instructions.
• For more information on Flickr, visit http://www.flickr.com.
Your Photos shows photos you have registered with Flickr website.
To view Flickr photos in a slideshow:
•Select a thumbnail of a photo and press the ENTER_ button to view the photo's
details.
• Select Start Slideshow and press the ENTER_ button.
To control the slideshow display:
•Press the ENTER_ button during a slideshow.
• The thumbnails of photos are displayed on the bottom of the screen.
When the slideshow control is displayed, you can Pause, Play and Stop the slideshow.
If you select the menu and press ENTERS, you can view information for the selected photo.
• The Your Sets menu allows you to view photos you have classified in Flickr.
• The Explore menu allows you to explore photos featured by the Flickr website. You can view the photos updated daily.
• The Mark as Favorite or Remove From Favorite menu moves photos to your Favorite Photos set or removes photos from it.
• The Favorite Photos menu allows you to see the photos you have classified as favorites.
• The Your Contacts menu allows you to see updates from family and friends.
The Your Groups menu allows you to select your favorite groups from the Flickr website to share and enjoy photos with the Flickr
community of users.
Toconfigure the Yahoo!® Flickr Widget Settings press the green button on the remote control.
•The Time Per Slide menu controls the speed of the slideshow.
• The Repeat menu will restart the slideshow at the beginning after the last photo is shown.
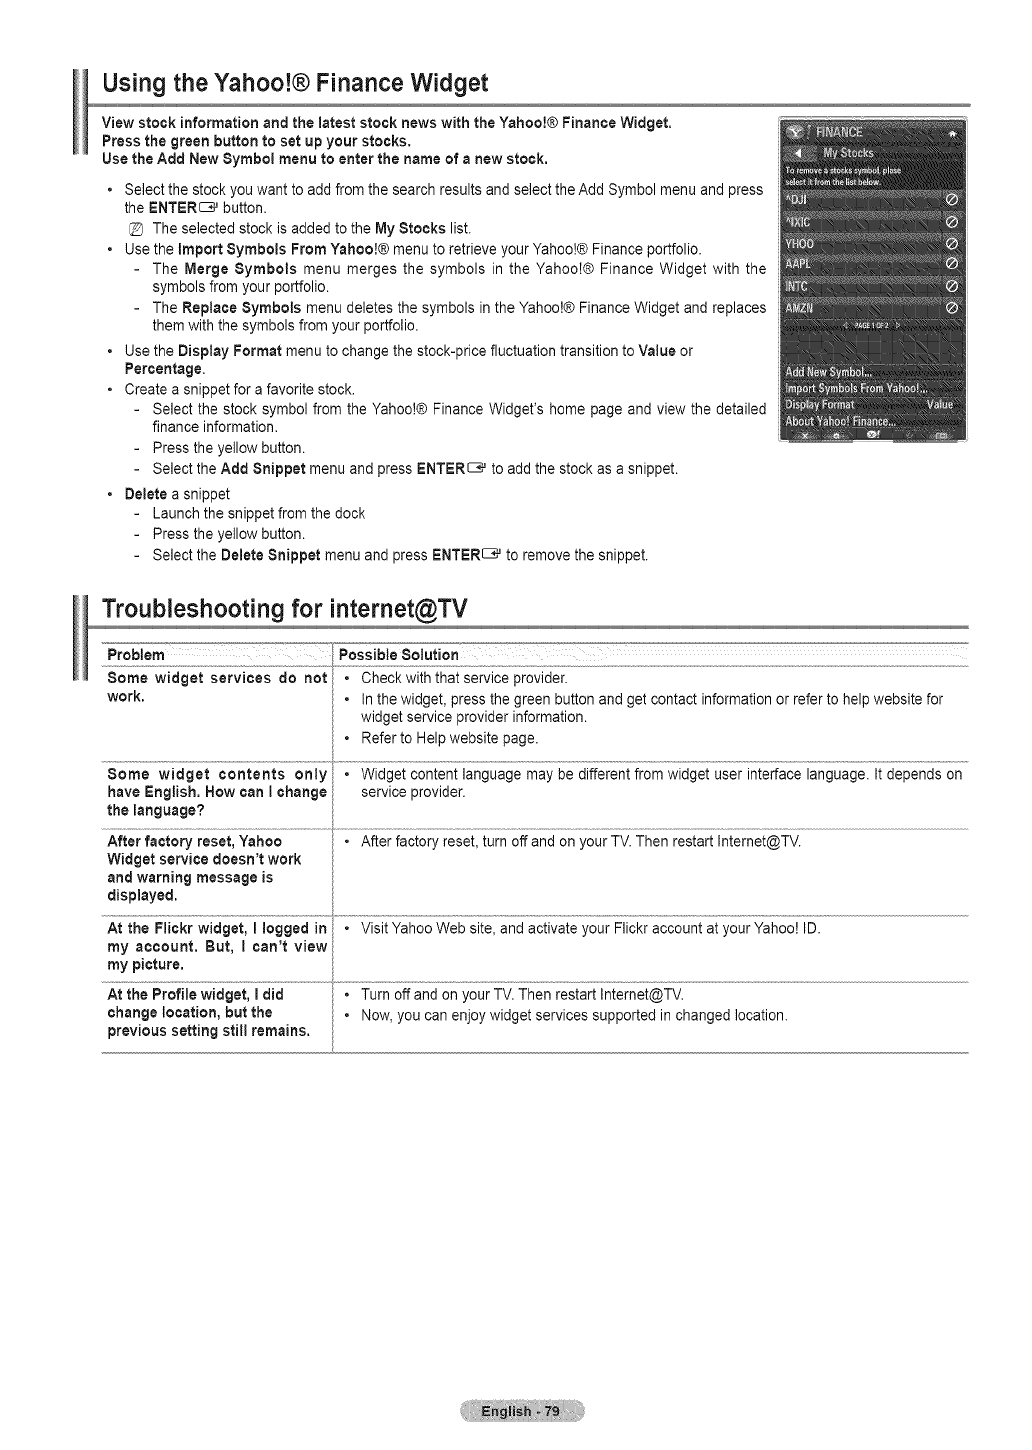
Using the Yahoo!® Finance Widget
View stock information and the latest stock news with the Yahoo!® Finance Widget.
Press the green button to set up your stocks,
Use the Add New Symbol menu to enter the name of a new stock,
•Select the stock you want to add from the search results and select the Add Symbol menu and press
the ENTER_ button.
The selected stock is added to the My Stocks list.
• Use the Import Symbols From Yahoo!® menu to retrieve your Yahoo!@Finance portfolio.
- The Merge Symbols menu merges the symbols in the Yahoo!® Finance Widget with the
symbols from your portfolio.
- The Replace Symbols menu deletes the symbols in the Yahoo!@ Finance Widget and replaces
them with the symbols from your portfolio.
•Use the Display Format menu to change the stock-price fluctuation transition to Value or
Percentage.
• Create a snippet for a favorite stock.
Select the stock symbol from the Yahoo!@Finance Widget's home page and view the detailed
finance information.
Press the yellow button.
Select the Add Snippet menu and press ENTER_ to add the stock as a snippet.
•Delete a snippet
Launch the snippet from the dock
Press the yellow button.
Select the Delete Snippet menu and press ENTER_ to remove the snippet.
Troubleshooting for internet@TV
Problem °_"Possibte Solution
work. • In the widget, press the green button and get contact information or refer to help website for
widget service provider information.
Some widget contents only •Widget content language may be different from widget user interface language. It depends on
have English. How can Ichange service provider.
the language?
After factory reset, Yahoo •After factory reset, turn off and on your TV. Then restart Internet@TV.
Widget service doesn't work
and warning message is
displayed.
At the Flickr widget, I logged in •Visit Yahoo Web site, and activate your Flickr account at your Yahoo! ID.
my account. But, I can't view
my picture.
At the Profile widget, Idid • Turn off and on your TV. Then restart Intemet@TV.
change location, but the °Now,you can enjoy widget services supported in changed location.
previous setting still remains.
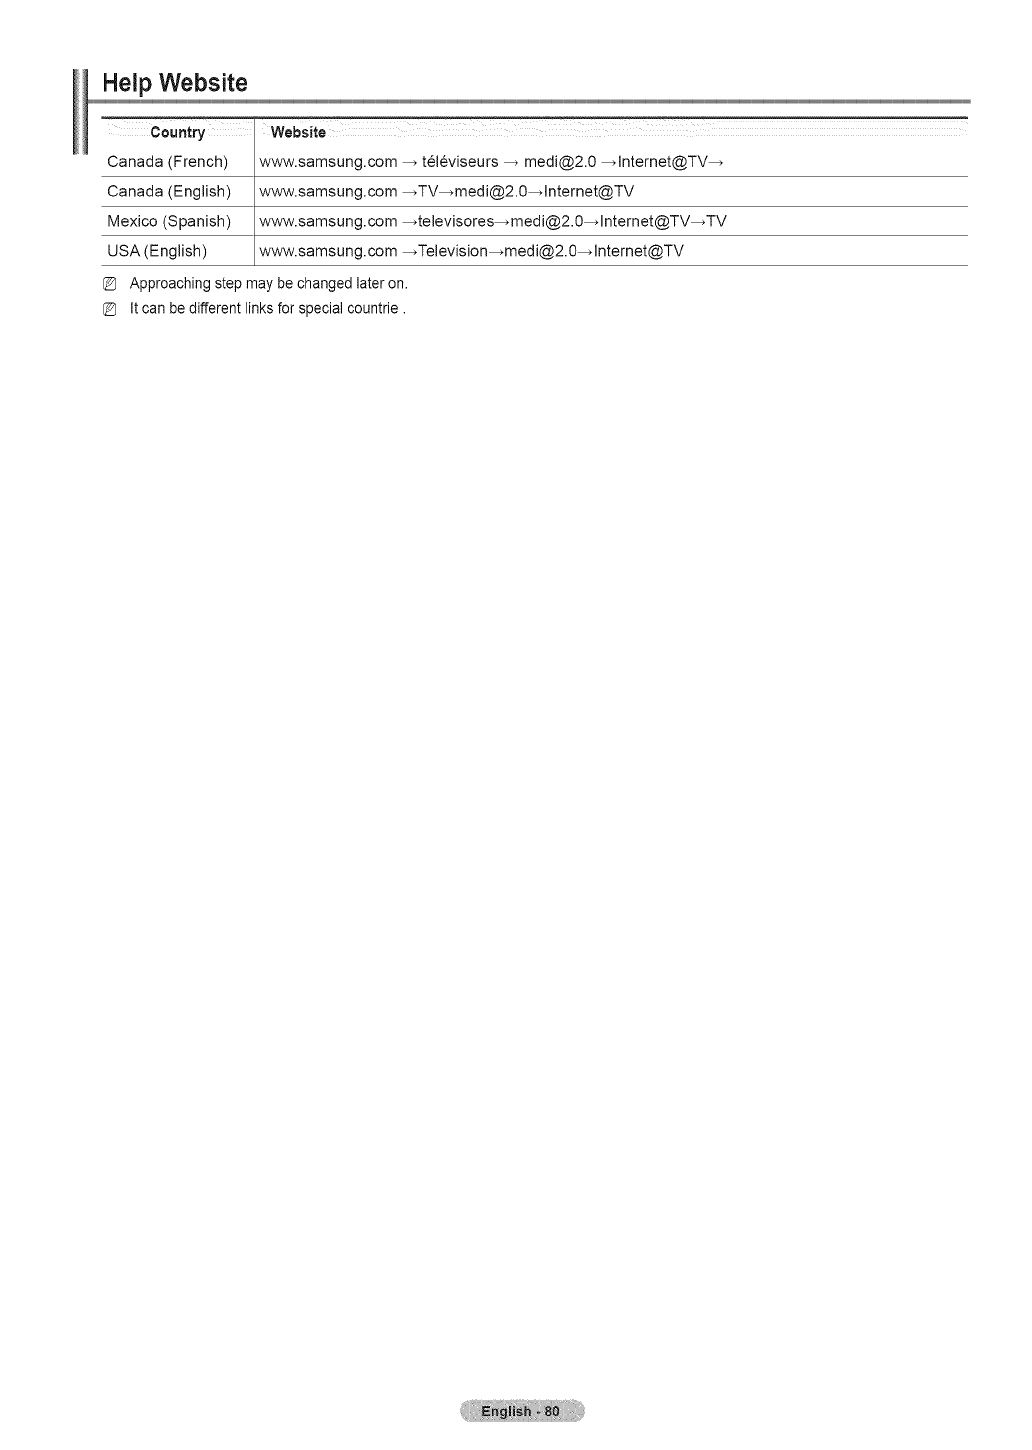
Help Website
cO.,t_
Canada (French)
Canada (English)
Mexico (Spanish)
USA (English)
-- =
website
www.samsung.com _ t_16viseurs _ medi@2.0 _lntemet@TV_
www.samsung.com _TV_medi@2.0_lntemet@TV
www.samsung.com _televisores_medi@2.0_lntemet@TV_TV
www.samsung.com _Television_medi@2.0_lntemet@TV
Approaching step may be changed later on.
It can be different links for special countrie.
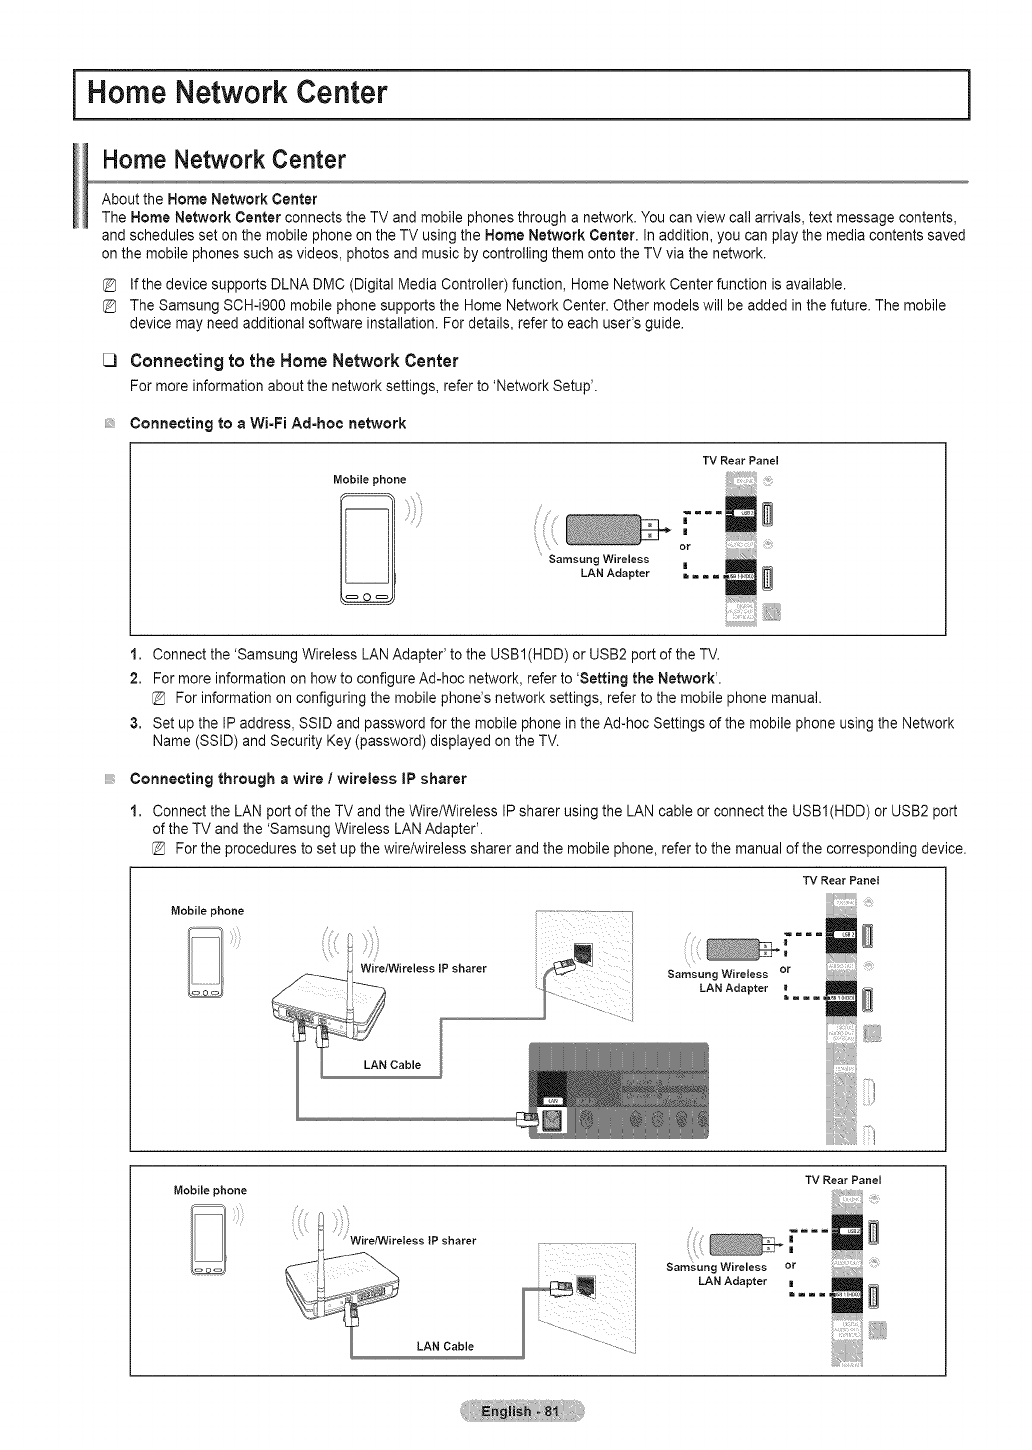
i Home Network Center
Home Network Center
About the Home Network Center
The Home Network Center connects the TV and mobile phones through a network. You can view call arrivals, text message contents,
and schedules set on the mobile phone on the TV using the Home Network Center, In addition, you can play the media contents saved
on the mobile phones such as videos, photos and music by controlling them onto the TV via the network.
If the device supports DLNA DMC (Digital Media Controller) function, Home Network Center function is available.
The Samsung SCH-i900 mobile phone supports the Home Network Center. Other models will be added in the future. The mobile
device may need additional software installation. For details, refer to each user's guide.
[3 Connecting to the Home Network Center
Formoreinformationaboutthe networksettings,referto 'NetworkSetup'.
Connecting to a Wi-Fi Ad-ho¢ network
Mobile phone
/
TV Rear Panel
,_ _ or
Sarnsung Wireless !
LAN ,_eap_er = =
1. Connect the 'Samsung Wireless LAN Adapter' to the USB1(HDD) or USB2 port of the TV.
2. For more information on how to configure Ad-hoc network, refer to 'Setting the Network'.
For information on configuring the mobile phone's network settings, refer to the mobile phone manual.
3. Set up the IP address, SSID and password for the mobile phone in the Ad-hoc Settings of the mobile phone using the Network
Name (SSID) and Security Key (password) displayed on the TV.
Connecting through awire /wireless IP sharer
1. Connect the LAN port of the TV and the Wire/Wireless IP sharer using the LAN cable or connect the USBI(HDD) or USB2 port
of the TV and the 'Samsung Wireless LAN Adapter'.
For the procedures to set up the wire/wireless sharer and the mobile phone, refer to the manual of the corresponding device.
Mobile phone
TV Rear Panel
samsung Wireless or
LAN Adapter
Mobile phone
F=..............................
Sam_ung Wireless
LAN Adapter
TV Rear Panel
or
|
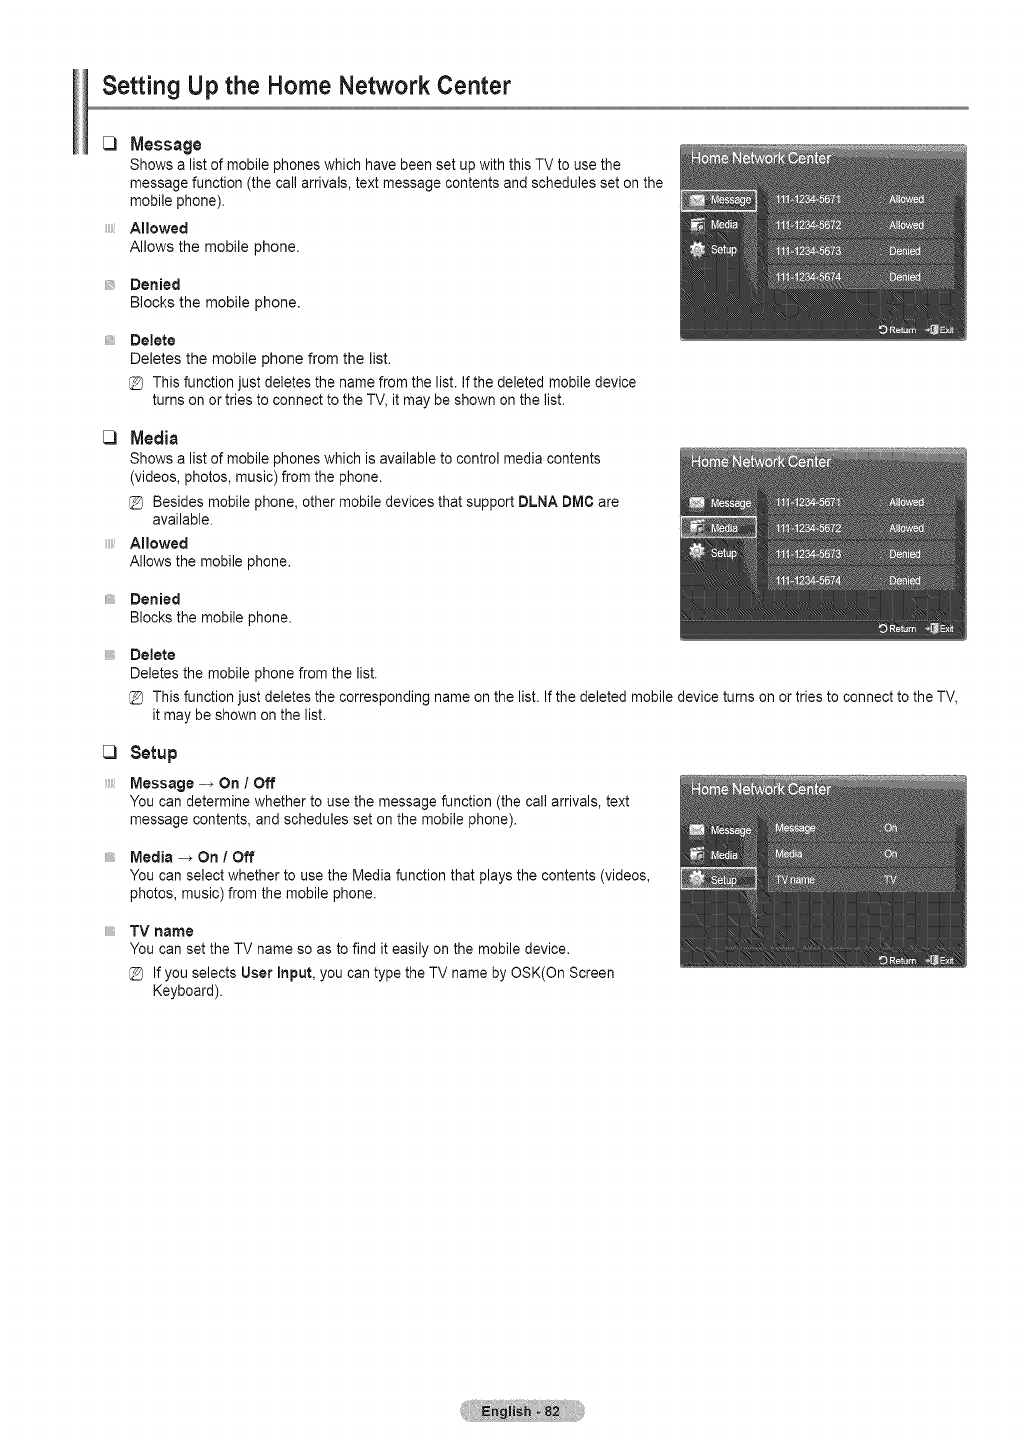
Setting Up the Home Network Center
[_ Message
Shows a listof mobile phones which have been set up with thisTV to use the
message function (the callarrivals, textmessage contentsand schedulesset onthe
mobile phone).
Allowed
Allows the mobile phone.
Denied
Blocks the mobile phone.
Delete
Deletes the mobile phone from the list.
@ This function just deletes the name from the list. If the deleted mobile device
turns on or tries to connect to the TV, it may be shown on the list.
C3 Media
Shows a list of mobile phones which is available to control media contents
(videos, photos, music) from the phone.
@ Besides mobile phone, other mobile devices that support DLNA DM¢ are
available.
Allowed
Allows the mobile phone.
Denied
Blocks the mobile phone.
Delete
Deletes the mobile phone from the list.
@ This function just deletes the corresponding name on the list. If the deleted mobile device turns on or tries to connect to the TV,
it may be shown on the list.
CI Setup
Message -_ On /Off
You can determine whether to use the message function (the call arrivals, text
message contents, and schedules set on the mobile phone).
Media -_ On /Off
You can select whether to use the Media function that plays the contents (videos,
photos, music) from the mobile phone.
TV name
You can set the TV name so as to find it easily on the mobile device.
If you selects User Input, you can type the TV name by OSK(On Screen
Keyboard).
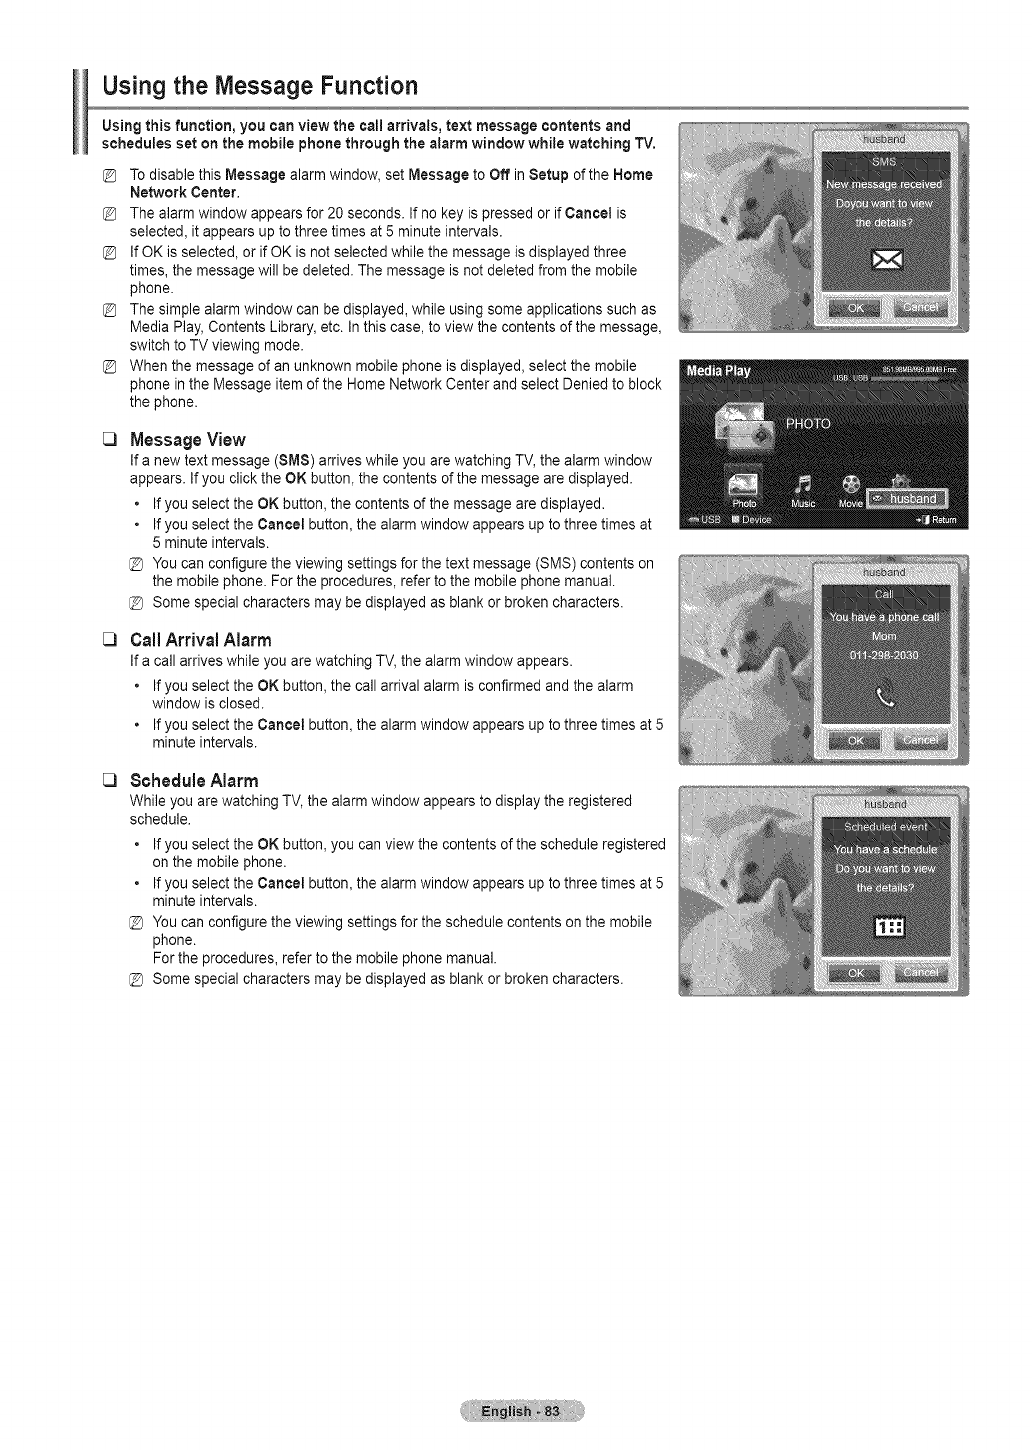
Using the Message Function
Using this function, you can view the call arrivals, text message contents and
schedules set on the mobile phone through the alarm window while watching TV.
Todisable this Message alarm window, set Message to Off in Setup ofthe Home
Network Center.
The alarm window appears for 20 seconds. If no key is pressed or if Cancel is
selected, it appears up to three times at 5 minute intervals.
If OK is selected, or if OK is not selected while the message is displayed three
times, the message will be deleted. The message is not deleted from the mobile
phone.
The simple alarm window can be displayed, while using some applications such as
Media Play, Contents Library, etc. In this case, to view the contents of the message,
switch to TV viewing mode.
When the message of an unknown mobile phone is displayed, select the mobile
phone in the Message item of the Home Network Center and select Denied to block
the phone.
_3
_3
Message View
If a new text message (SMS) arrives while you are watching TV, the alarm window
appears. If you click the OK button, the contents of the message are displayed.
•If you select the OK button, the contents of the message are displayed.
•If you select the Cancel button, the alarm window appears up to three times at
5 minute intervals.
@ You can configure the viewing settings for the text message (SMS) contents on
the mobile phone. For the procedures, refer to the mobile phone manual.
@ Some special characters may be displayed as blank or broken characters.
Call Arrival Alarm
If a call arrives while you are watching TV, the alarm window appears.
•If you select the OK button, the call arrival alarm is confirmed and the alarm
window is closed.
• If you select the Cancel button, the alarm window appears up to three times at 5
minute intervals.
_3 Schedule Alarm
While you are watching TV, the alarm window appears to display the registered
schedule.
•If you select the OK button, you can view the contents of the schedule registered
on the mobile phone.
•If you select the Cancel button, the alarm window appears up to three times at 5
minute intervals.
@ You can configure the viewing settings for the schedule contents on the mobile
phone.
For the procedures, refer to the mobile phone manual.
@ Some special characters may be displayed as blank or broken characters.
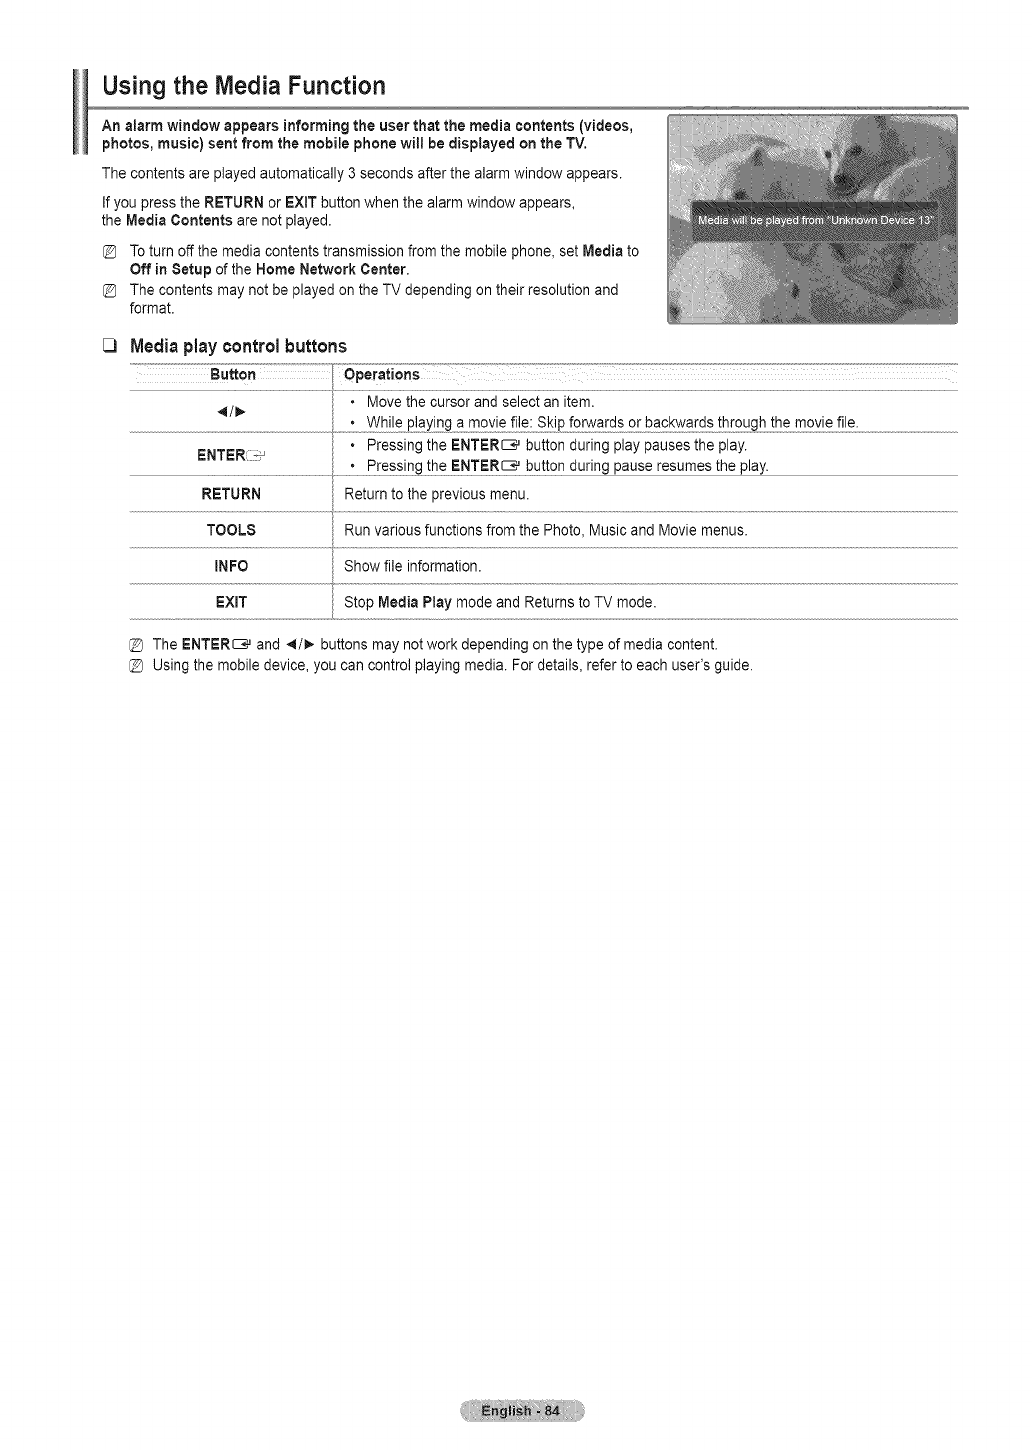
Using the Media Function
An alarm window appears informing the user that the media contents (videos,
photos, music) sent from the mobile phone wil! be displayed on the TV,
The contents are played automatically 3 seconds after the alarm window appears.
If you press the RETURN or EXIT button when the alarm window appears,
the Media Contents are not played.
Toturn off the media contents transmission from the mobile phone, set Media to
Off in Setup of the Home Network Center,
The contents may not be played on the TV depending on their resolution and
format.
[3 Media play control buttons
ENTERi_ •Pressing the ENTER_ button during play pauses the play.
• Pressing the ENTER_ button during pause resumes the play.
RETURN Return to the previous menu.
TOOLS Run various functions from the Photo, Music and Movie menus.
INFO Show file information.
EXiT Stop Media Play mode and Returns to TV mode.
@ The ENTER_ and _1/1,.buttons may notwork depending on the type of media content.
@ Using the mobile device, you can control playing media. For details, refer to each user's guide.
iAppendix J
Troubleshooting
Before contacting the Bamsung after=sales service, perform the following simple checks.
If you cannot solve the problem using the instructions below, note the model and serial number of the television and contact
your local dealer.
Problem
Poor picture quality.
No sound or sound is too low at
maximum VOlume.
Picture rolts vertically.
The TV operates erratically.
The TV won't turn on.
Remote control malfunctions
Digital broadcasting screen
problem.
The image is too light or too dark.
The image is too large or too small.
The visual qualities of digital
channels vary.
Screen is black and power
indicator
light blinks steadily.
Although the TV caption shows
HD,the visual quality is not
satisfactory.
A distorted picture appears in the
corner of the screen.
Astrange sound is heard.
Pixels are visible on the screen.
The "Resets all settings to the
default values" message appears.
Possible Solution
Try another channel.
Adjust the antenna.
Check all wire connections.
"r,y another channel.
Adjust the antenna.
Try another channel.
Press the SOURCE button.
Make sure the TV is plugged in.
Check the antenna connections.
Make sure the AMUTE button is off.
First check the volume of units connected to your TV (digital broadcasting receiver, DVD,
cable broadcasting receiver, VCR, etc.). Then, adjust the TV volume accordingly.
Check all connections.
Unplug the TV for 30 seconds, then try operating it again.
Make sure the wall outlet is working.
Replace the remote control batteries.
Clean the upper edge of the remote control (transmission window).
Check the battery terminals.
Press the TV button to put your remote control in the TV mode.
Make sure the remote has batteries.
Check that the "+" and "-" ends of the batteries are inserted correctly.
Please check the digital signal strength and antenna input.
Adjust the Brightness and Contrast.
Adjust the Fine tuning.
Adjust the Size settings.
The visual qualities of digital channels may vary depending on the original production method
/analog or digital).
If the original production method is digital: High visual quality.
If the original production method is analog: The digital program displayed on the screen is
originally an analog program which has been converted to digital.
The visual quality is of an SD(Standard Definition) grade.
On your computer; check the Power and Signal Cable.
The TV is using its power management system.
Move the computer's mouse or press any key on the keyboard.
On your equipment check (STB, DVD, etc) ; Power and Signal Cable.
The TV is using its power management system.
Press the SOURCE button on the panel or remote control.
Turn the TV off and on.
The HD(High Definition) caption that appears when switching channels or when pressing the
nformation button on the remote control means the selected channel is a digital channel. If
the broadcasting station converts an analog signal into digital and transmits the signal, the
visual quality may not be perfect.
f Screen Fit is selected in some external devices, a distorted picture may appear in the
corner of the screen. This symptom is caused by external devices, not the TV.
This is caused by minor systems operation and is not a defect.
There may be few bright or dark pixels on the screen. These pixels will have no impact on the
oerformance of the product.
This appears when you press and hold the EXIT button for a while. The product settings are
reset to the factory defaults.
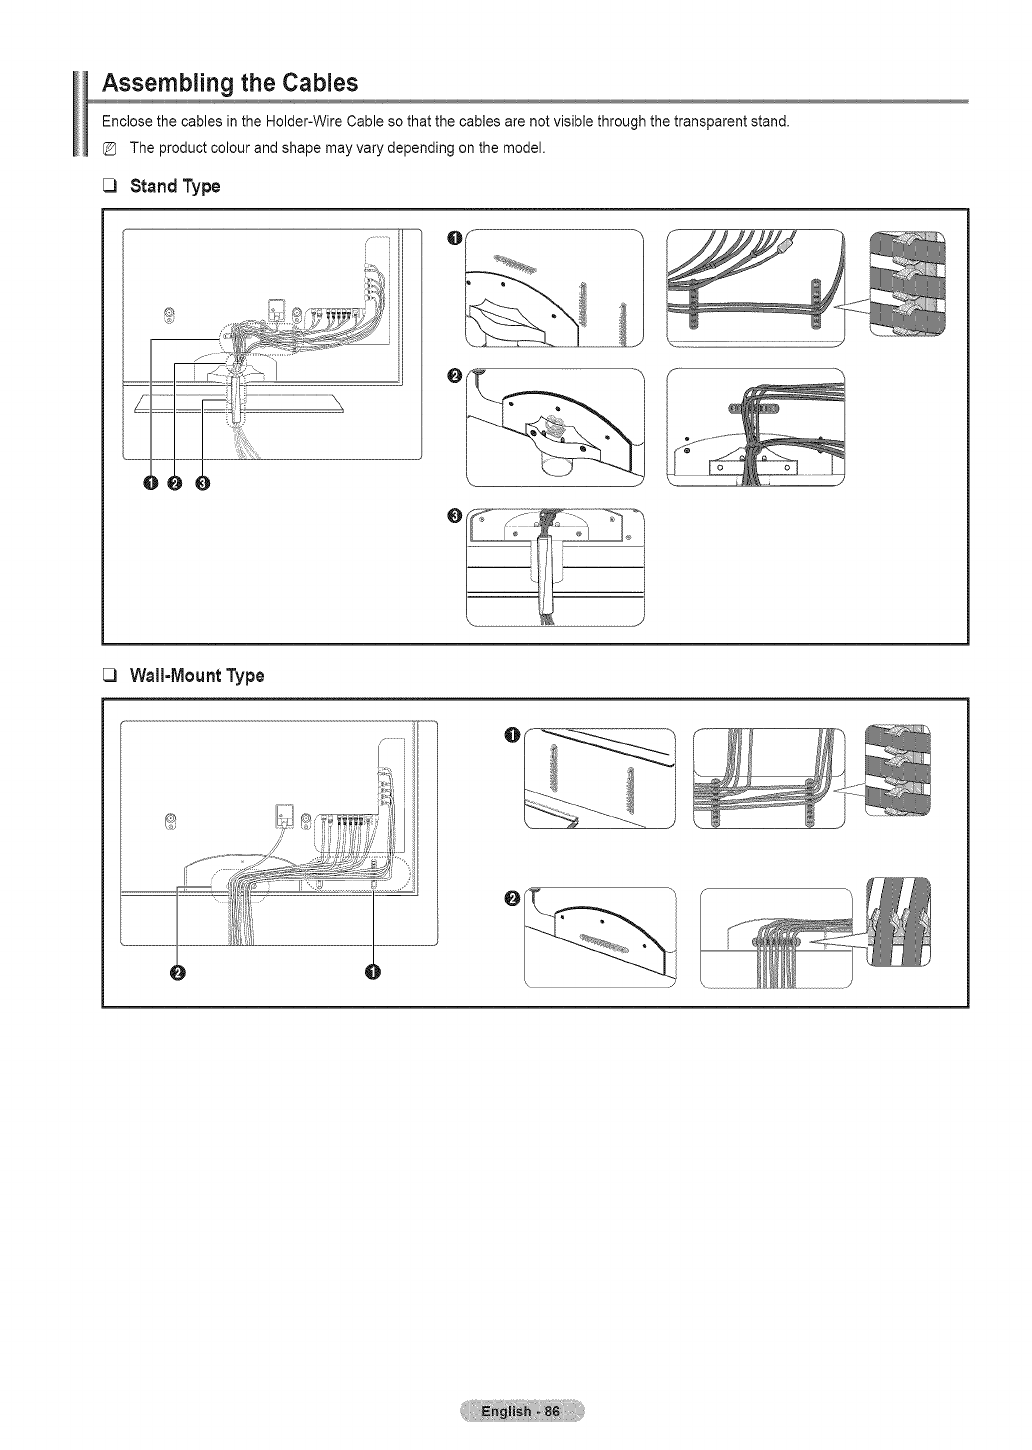
Assembling the Cables
Enclose the cables in the Holder-Wire Cable so that the cables are not visible through the transparent stand.
The product colour and shape may vary depending on the model.
[_ StandType
4
[3 Wall-Mount Type
O
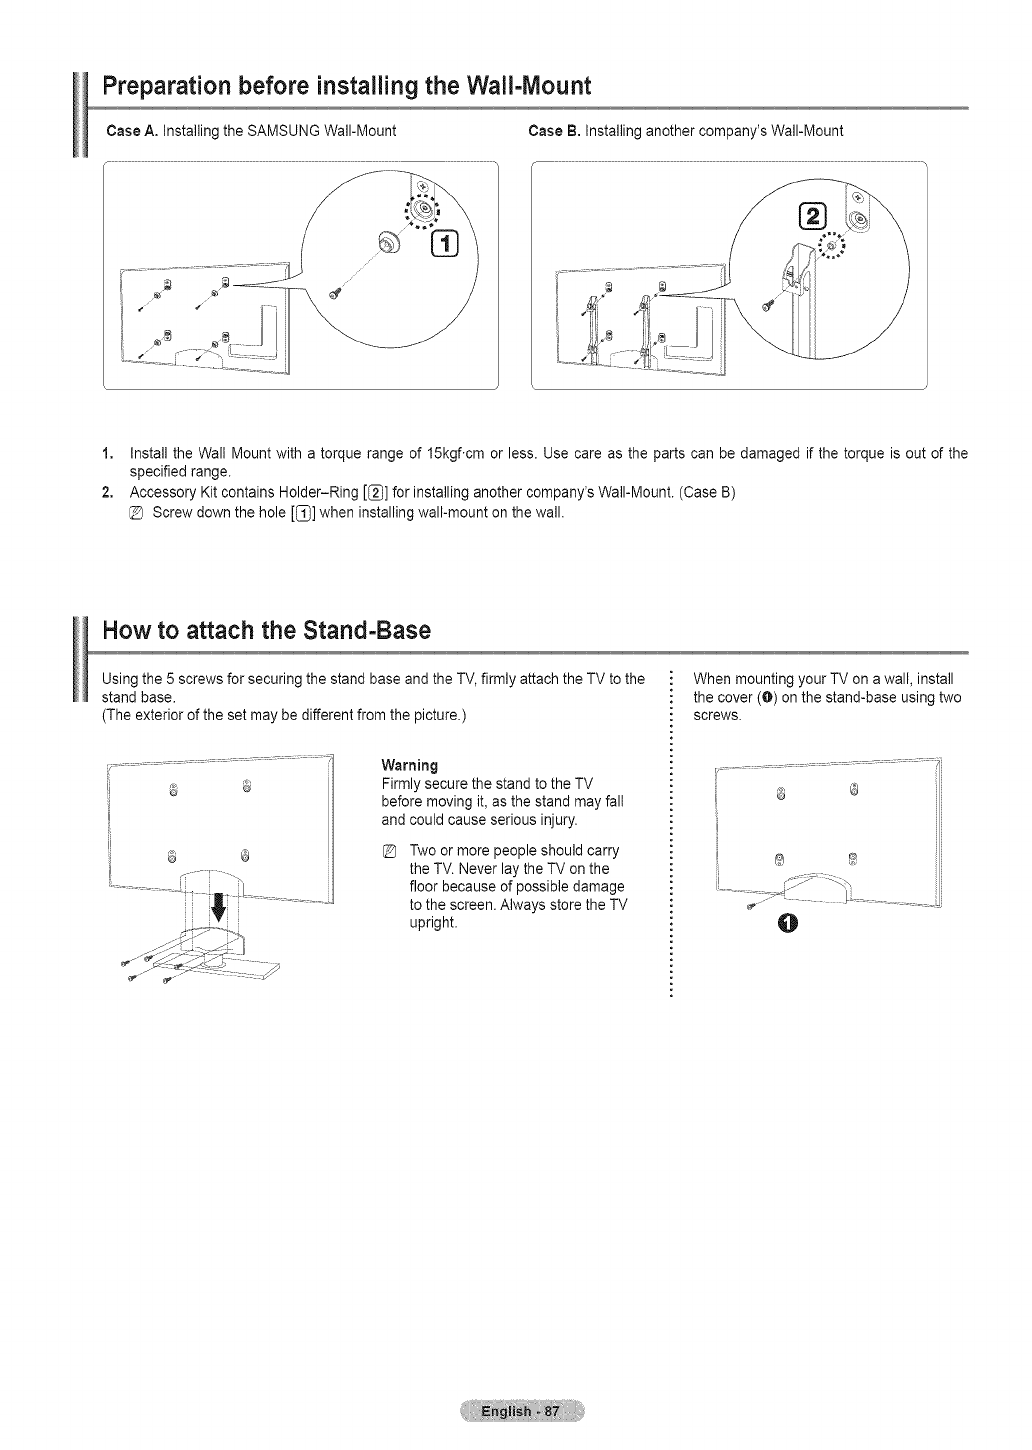
Preparation before installing the Wall-Mount
Case A. Installing the SAMSUNG Wall-Mount Case B, Installing another company's Wall-Mount
1, Install the Wall Mount with a torque range of 15kgf.cm or less. Use care as the parts can be damaged if the torque is out of the
specified range.
2, Accessory Kit contains Holder-Ring [_] for installing another company's Wall-Mount. (Case B)
@ Screw down the hole [_] when installing wall-mount on the wall.
How to attach the Stand-Base
Using the 5 screws for securing the stand base and the TV, firmly attach the TV to the
stand base.
(The exterior of the set may be different from the picture.)
0 @
Warning
Firmly secure the stand to the TV
before moving it, as the stand may fall
and could cause serious injury.
@ Two or more people should carry
the TV. Never lay the TV on the
floor because of possible damage
to the screen. Always store the TV
upright.
When mounting your TV on a wall, install
the cover (O) on the stand-base using two
screws.
@ ®
O
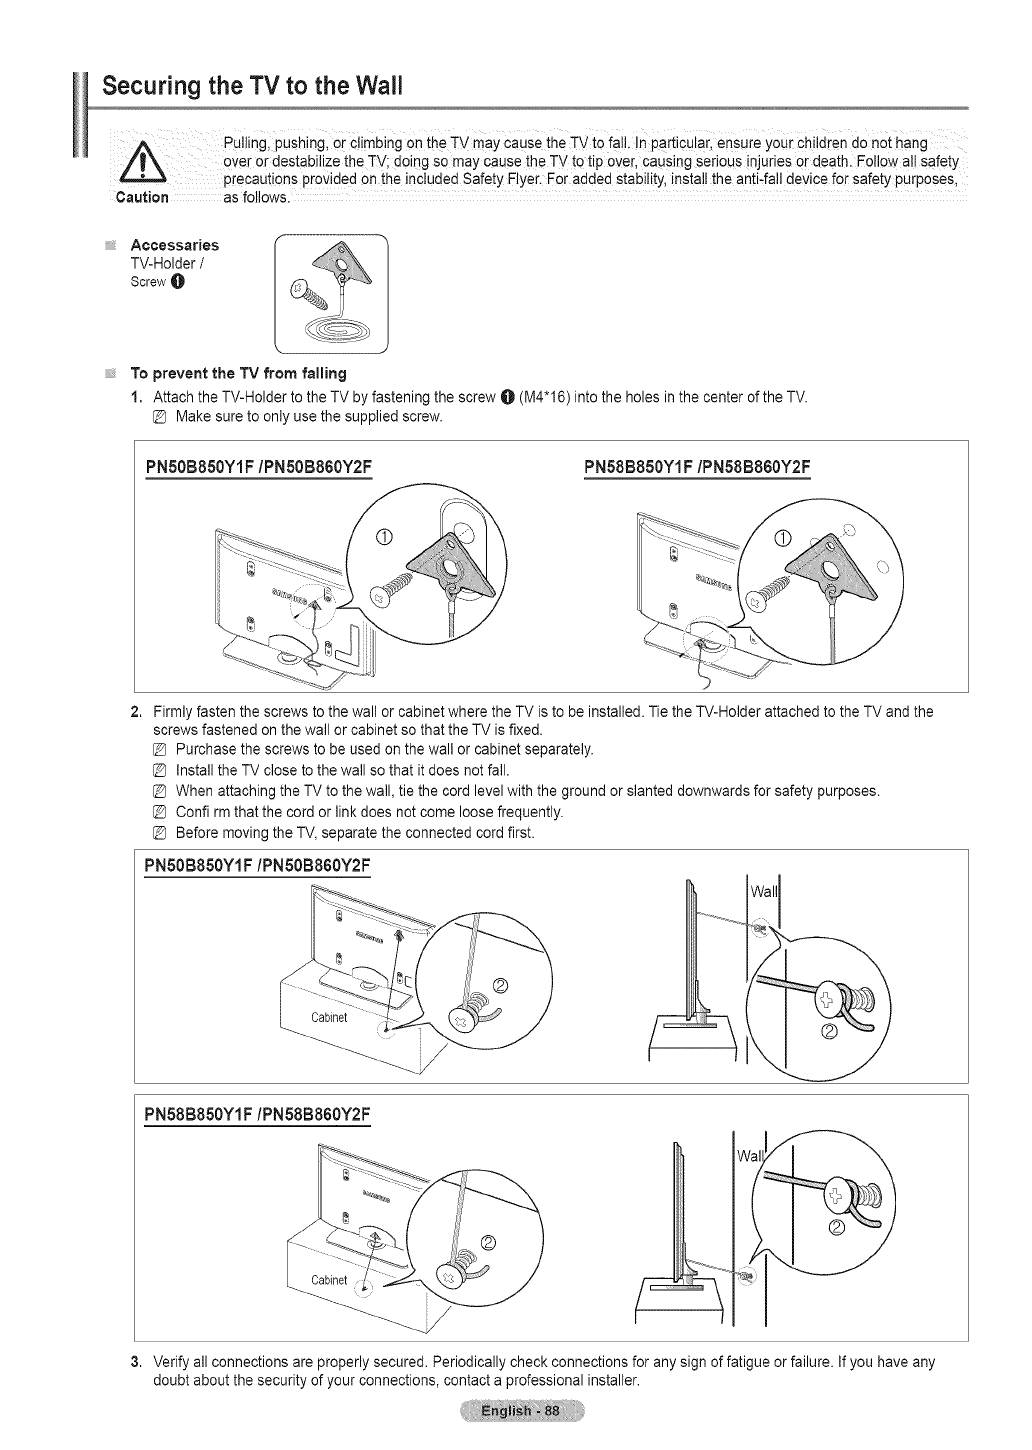
Securing the TV to the Wall
Puliingl PUShingl0[ €!imbing on the TV may cause the TV to fal!, !n Particu!ail ensure youi Chi!dien do not hang
aver or destabilize the TV; doing so may cause the TV to tip over, causing serious injuries ar death. Followall safety
precaut ons prov ded on the nc uded Safety Fyer. For added stab ty, nsta the ant,fa dev ce for safety purposes,
Caution as follows.
A¢cessaries
TV-Holder /
ScrewO
To prevent the TV from falling
1, Attach the TV-Holder to the TV by fastening the screw O (M4"16) into the holes in the center of the TV.
Make sure to only use the supplied screw.
PNSOB850Y1F/PNSOB860Y2F PN58B850Y1F/PN58B860Y2F
Firmly fasten the screws to the wall or cabinet where the TV is to be installed. Tie the TV-Holder attached to the TV and the
screws fastened on the wall or cabinet so that the TV is fixed.
@ Purchase the screws to be used on the wall or cabinet separately.
@ Install the TV close to the wall so that it does not fall.
@ When attaching the TV to the wall, tie the cord level with the ground or slanted downwards for safety purposes.
@ Confirm that the cord or link does not come loose frequently.
@ Before moving the TV, separate the connected cord first.
PNSOB850Y1F/PNSOB860Y2F
PN58B850Y1F/PN58B860Y2F
Verify all connections are properly secured. Periodically check connections for any sign of fatigue or failure. If you have any
doubt about the security of your connections, contact a professional installer.
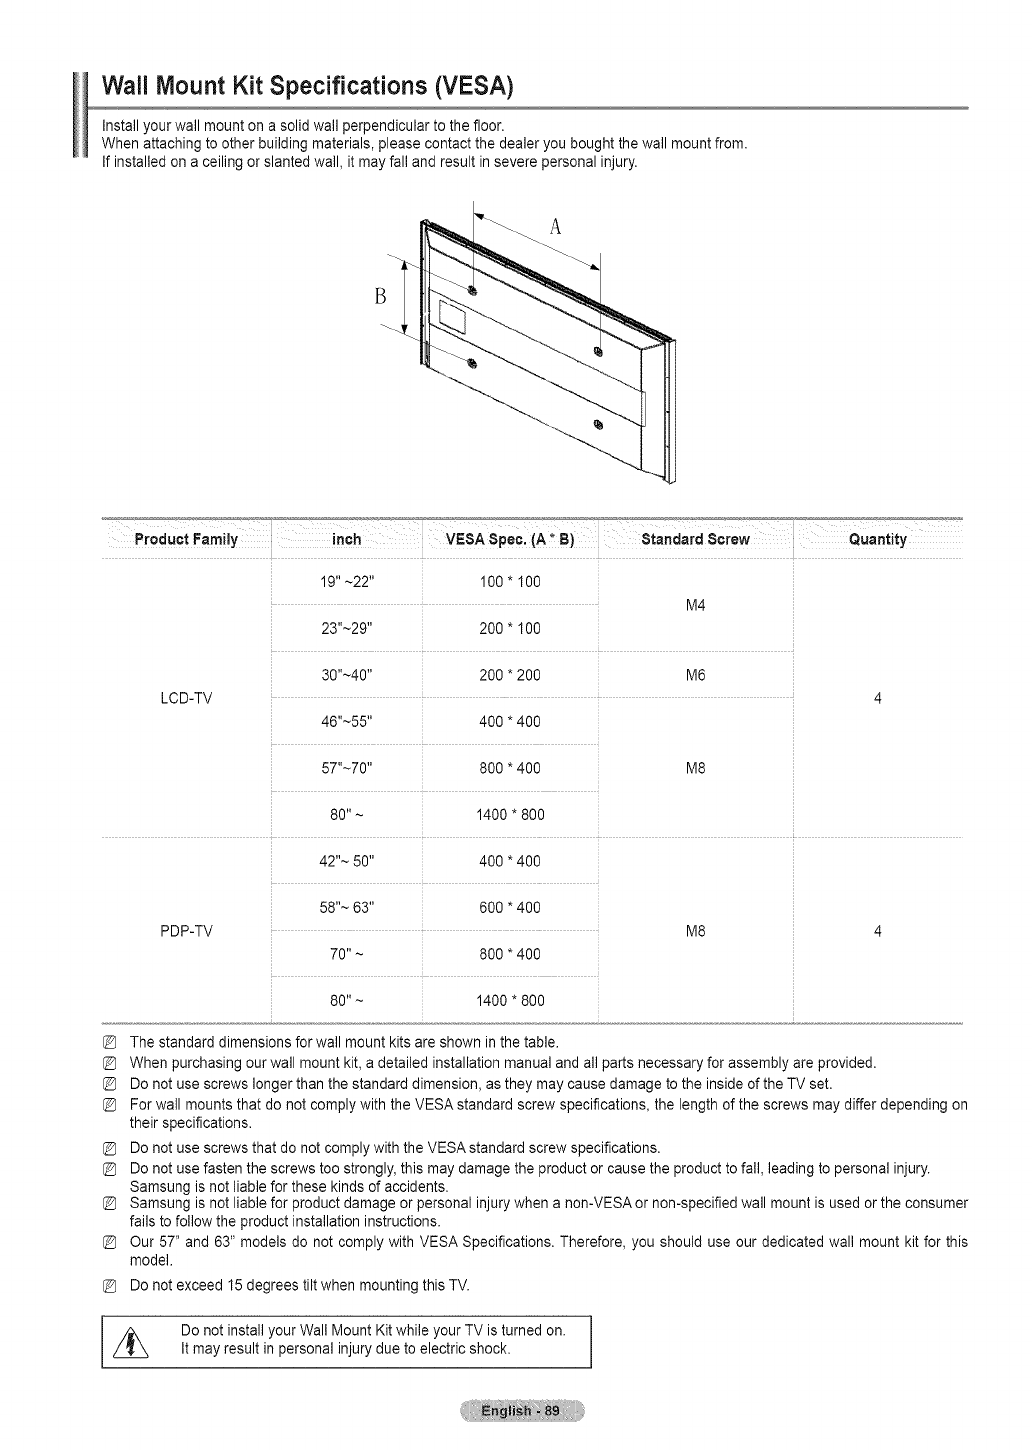
Wall Mount Kit Specifications (VESA)
Install your wall mount on a solid wall perpendicular to thefloor.
When attaching to other building materials, please contact the dealer you bought the wall mount from.
If installed on a ceiling or slanted wall, it may fall and result in severe personal injury.
B
19" ~22" 100 * 100
M4
23"~29" 200 * 100
30"~40'' 200 * 200 M6
LCD-TV 4
46"~55" 400 * 400
57"~70" 800 * 400 M8
80"~ 1400 * 800
42 "~ 50" 400 * 400
58''~ 63" 600 * 400
PDP-TV M8
70" ~ 800 * 400
80"~ 1400 * 800
The standard dimensions for wall mount kits are shown in the table.
When purchasing our wall mount kit, a detailed installation manual and all parts necessary for assembly are provided.
Do not use screws longer than the standard dimension, as they may cause damage to the inside of the TV set.
For wall mounts that do not comply with the VESA standard screw specifications, the length of the screws may differ depending on
their specifications.
Do not use screws that do not comply with the VESA standard screw specifications.
Do not use fasten the screws too strongly, this may damage the product or cause the product to fall, leading to personal injury.
Samsung is not liable for these kinds of accidents.
Samsung is not liable for product damage or personal injury when a non-VESA or non-specified wall mount is used or the consumer
fails to follow the product installation instructions.
Our 57" and 63" models do not comply with VESA Specifications. Therefore, you should use our dedicated wall mount kit for this
model.
Do not exceed 15 degrees tilt when mounting this TV.
Do not install your Wall Mount Kit while your TV is turned on.
It may result in personal injury due to electric shock.

Specifications
Model Name
Screen Size (Diagonal)
PC Resolution
Sound (Output)
PNBOBBBOY! F/PNBOB860Y2F PNBBBBBOY! FIPNSBBBBOY2F
50 inch (49.9 inches measured diagonally)
1920 x 1080 @ 60 Hz
58 inch (58.0 inches measured diagonally)
1920 x 1080 @ 60 Hz
lOWx2 15Wx2
Dimension (W x Hx D)
Body
With stand
48,7 x 29.6 x 11.6 inches
(1238 x 751.9 x 29.5 ram)
48.7 x 32 x 10.9 inches
(1238 x 813.2 x 277.2 ram)
56 x 33.6 x 14.4 inches
(1423.6 x 853.8 x 36.8 mm)
56 x 36.2 x 13.2 inches
(1423.6 x 920 x 337.2 ram)
Weight
Body
With stand
Environmental Considerations
Operating Tempera[ure
Operating Humidity
Storage Temperature
Storage Humidity
57.5 Ibs (26.1 kg)
71.6 Ibs (32.5 kg)
50 °F to 104 °F (10 °C to 40 °C)
10% to 80%, non-condensing
-4 °F to 113 °F (-20 °C to 45 °C)
5% to 95%, non-condensing
81.3 Ibs (36.9 kg)
100.5 Ibs (45.6 kg)
50 °Fto 104 °F (10 °C to 40 °C)
10%to 80%, non-condensing
-4 °F to 113 °F (-20 °C to 45 °C)
5% to 95%, non-condensing
This device is a Class B digital apparatus.
Design and specifications are subject to change without prior notice.
For the power supply and Power Consumption, refer to the label attached to the product.
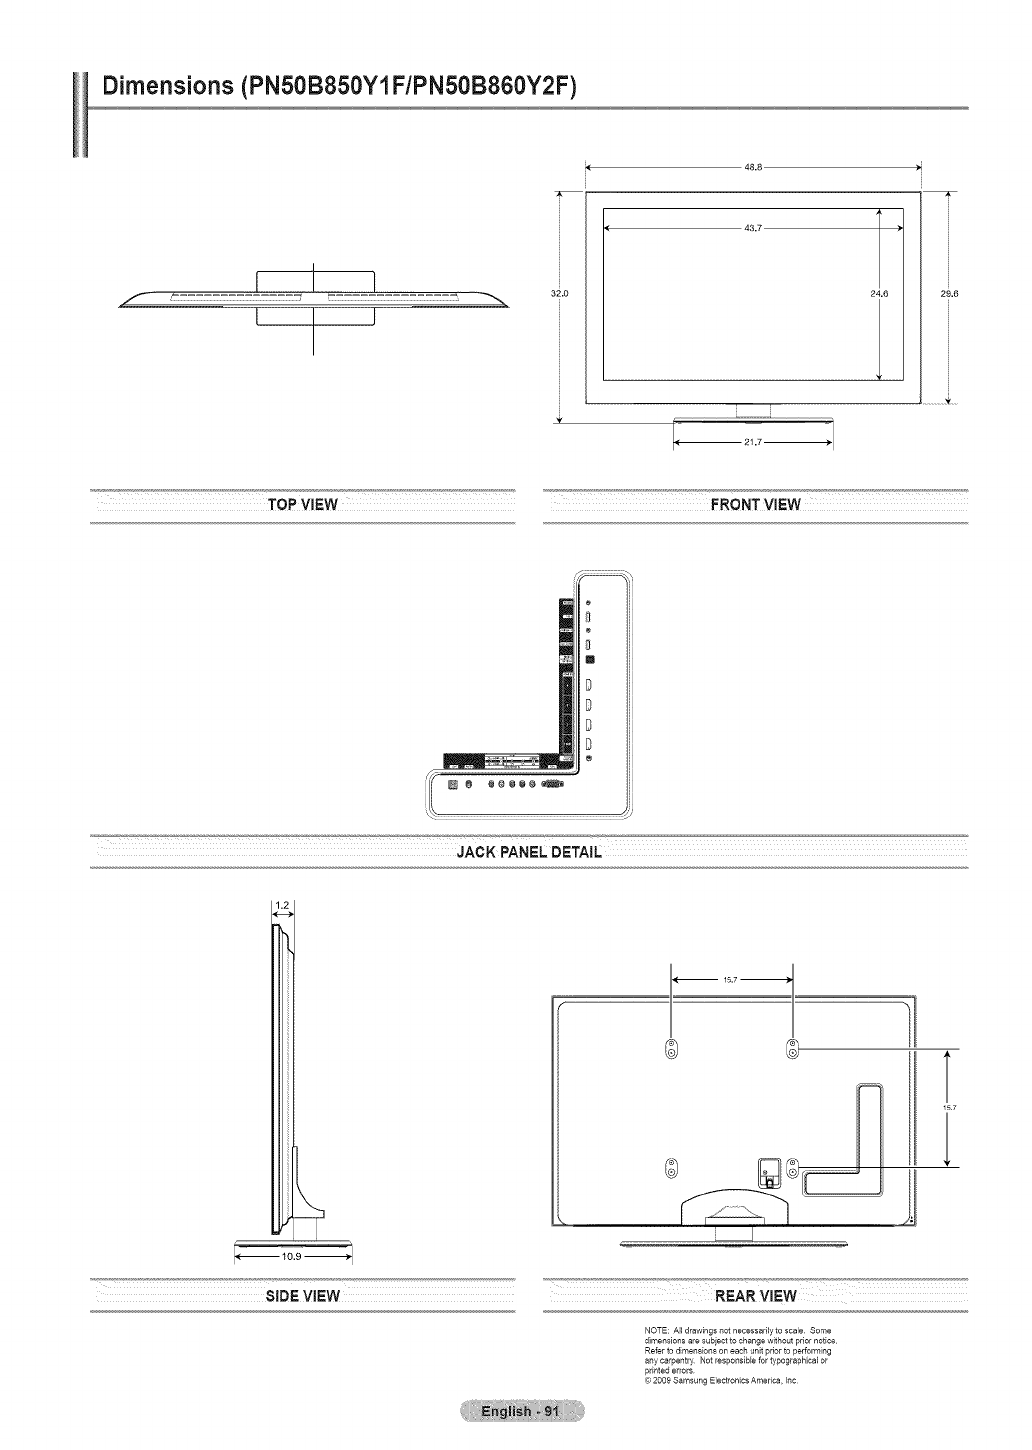
Dimensions (PN50B850Y1F/PN50B860Y2F)
fI I
_=
I I
TOP VIEW FRONT VIEW
JACK PANEL DETAIL
@ 0
@
T
_5.7
i i i i i i i i i ii REAR VIEW i iiiiii zzzzzzzzzzzzzzz
NOTE: All drawings not necessarily to scale Some
dimensions are subject to change without prior notice
Refer to dimensions on each unit prior to performing
any carpentry Not responsiNe for typographical or
printed errors
© 2009 Samsung Electronics America, Inc

Dimensions (PN58B850Y1F/PN58B860Y2F)
! !
.......................................................................................................56.0 ........................................................................................................
............................................................................................50 7 ...............................................................................
26.6
...............
33.6
l:_oPVt_w _RONTVt_W
D
D
D
D
JACK PANEL DETAIL
SID_VlEW
'_-_ 23.6 _
0
0
T
15.7
l
REAR VIEW
NOTE: All drawings not necessarily to scale. Some
dimensions are subject to change without prior notice
Refer to dimensions on each unit prior to performing
any carpentry Not responsible for typographical or
printed errors
© 2009 Samsung Electronics America, Inc
Software License
This product uses parts of the software from the independent JPEG Group. This product uses parts of the software owned by the Freetype Project (www.
freetype.org). This product uses some software programs which are distributed under the GPL/LGPL license. Accordingly, the following GPL and LGPL
software source codes that have been used in this product can be provided after asking to vdswmanager@samsung.com. GPL software: Linux Kernel,
Busybox, Binutils LGPL software: Glibc, ffmpeg, smpeg, libgphoto, libusb,SDL
[_ GNU GENERAL PUBLIC LICENSE
GNU GENERAL PUBLIC LICENSE
Version 3, 29 June 2007
Copyright (C) 2007 Free Software Foundation, inc. <http://fsf.org/> Everyone is permitted to copy and distribute verbatim copies of this license
document, but changing it is not allowed.
Preamble
The GNU General Public License is a free, copyleft license for software and other kinds of works.
The licenses for most software and other practical works are designed to take away your freedom to share and change the works. By contrast, the GNU
General Public License is intended to guarantee your freedom to share and change all versions of a program--to make sure it remains free software for
all its users. We, the Free Software Foundation, use the GNU General Public License for most of our software; it applies also to any other work released
this way by its authors. You can apply it to your programs, too. When we speak of free software, we are referring to freedom, not pdce. Our General Public
Licenses are designed to make sure that you have the freedom to distribute copies of free software (and charge for them if you wish), that you receive
source code or can get it if you want it, that you can change the software or use pieces of it in new free programs, and that you know you can do these
things. To protect your rights, we need to prevent others from denying you these rights or asking you to surrender the rights. Therefore, you have certain
responsibilities if you distribute copies of the software, or if you modify it: responsibilities to respect the freedom of others. For example, if you distribute
copies of such a program, whether gratis or for a fee, you must pass on to the recipients the same freedoms that you received. You must make sure that
they, too, receive or can get the source code. And you must show them these terms so they know thek rights. Developers that use the GNU GPL protect
your rights with two steps: (1) assert copyright on the software, and (2) offer you this License giving you legal permission to copy, distribute and/or modify
it. For the developers' and authors' protection, the GPL clearly explains that there is no warranty for this free software. For both users' and authors' sake,
the GPL requires that modified versions be marked as changed, so that their problems will not be attributed erroneously to authors of previous versions.
Some devices are designed to deny users access to install or run modified versions of the software inside them, although the manufacturer can do so. This
is fundamentally incompatible with the aim of protecting users' freedom to change the software. The systematic pattern of such abuse occurs in the area of
products for individuals to use, which is precisely where it is most unacceptable. Therefore, we have designed this version of the GPL to prohibit the practice
for those products. If such problems arise substantially in other domains, we stand ready to extend this provision to those domains in future versions of the
GPL, as needed to protect the freedom of users. Finally, every program is threatened constantly by software patents. States should not allow patents to
restrict development and use of software on general-purpose computers, but in those that do, we wish to avoid the special danger that patents applied to a
free program could make it effectively proprietary. To prevent this, the GPL assures that patents cannot be used to render the program non-free. The precise
terms and conditions for copying, distribution and modification follow.
TERMS AND CONDITIONS
0. Definitions.
"This License" refers to version 3 of the GNU General Public License.
"Copyright" also means copyright-like laws that apply to other kinds of works, such as semiconductor masks.
"The Program" refers to any copyrightable work licensed under this License. Each licensee is addressed as "you". "Licensees" and "recipients" may be
individuals or organizations.
To "modify" a work means to copy from or adapt all or part of the work in a fashion requiring copyright permission, other than the making of an exact
copy. The resulting work is called a "modified version" of the earlier work or a work "based on" the earlier work.
A "covered work" means either the unmodified Program or a work based on the Program.
To "propagate" a work means to do anything with it that, without permission, would make you directly or secondarily liable for infringement under
applicable copyright law, except executing it on a computer or modifying a private copy. Propagation includes copying, distribution (with or without
modification), making available to the public, and in some countries other activities as well.
To "convey" a work means any kind of propagation that enables other parties to make or receive copies. Mere interaction with a user through a
computer network, with no transfer of a copy, is not conveying.
An interactive user interface displays "Appropriate Legal Notices" to the extent that it includes a convenient and prominently visible feature that (1)
displays an appropriate copyright notice, and (2) tells the user that there is no warranty for the work (except to the extent that warranties are provided),
that licensees may convey the work under this License, and how to view a copy of this License. If the interface presents a list of user commands or
options, such as a menu, a prominent item in the list meets this criterion.
1. Source Code.
The "source code" for a work means the preferred form of the work for making modifications to it. "Object code" means any nonsource form of a work.
A "Standard Interface" means an interface that either is an official standard defined by a recognized standards body, or, in the case of interfaces
specified for a particular programming language, one that is widely used among developers working in that language.
The "System Libraries" of an executable work include anything, other than the work as a whole, that (a) is included in the normal form of packaging
a Major Component, but which is not part of that Major Component, and (b) serves only to enable use ofthe work with that Major Component, or to
implement a Standard Interface for which an implementation is available to the public in source code form. A "Major Component", in this context, means
a major essential component (kernel, window system, and so on) of the specific operating system (if any) on which the executable work runs, or a
compiler used to produce the work, or an object code interpreter used to run it.
The "Corresponding Source" for a work in object code form means all the source code needed to generate, install, and (for an executable work) run the
object code and to modify the work, including scripts to control those activities. However, it does not include the work's System Libraries, or general-
purpose tools or generally available free programs which are used unmodified in performing those activities but which are not part of the work. For
example, Corresponding Source includes interface definition files associated with source files for the work, and the source code for shared libraries and
dynamically linked subprograms that the work is specifically designed to require, such as by intimate data communication or control flow between those
subprograms and other parts of the work.
The Corresponding Source need not include anything that users can regenerate automatically from other parts of the Corresponding Source.
The Corresponding Source for a work in source code form is that same work.
2. BasicPermissions.
AllfightsgrantedunderthisLicensearegrantedforthetermofcopyrightontheProgram,andareirrevocableprovidedthestatedconditionsare
met.ThisLicenseexplicitlyaffirmsyourunlimitedpermissiontoruntheunmodifiedProgram.Theoutputfromrunningacoveredworkiscoveredby
thisLicenseonlyiftheoutput,givenitscontent,constitutesacoveredwork.ThisLicenseacknowledgesyourrightsoffairuseorotherequivalent,
asprovidedbycopyrightlaw.Youmaymake,runandpropagatecoveredworksthatyoudonotconvey,withoutconditionssolongasyourlicense
otherwiseremainsinforce.Youmayconveycoveredworkstoothersforthesolepurposeofhavingthemmakemodificationsexclusivelyforyou,
orprovideyouwithfacilitiesforrunningthoseworks,providedthatyoucomplywiththetermsofthisLicenseinconveyingallmaterialforwhichyou
donotcontrolcopyright.Thosethusmakingorrunningthecoveredworksforyoumustdosoexclusivelyonyourbehalf,underyourdirectionand
control,ontermsthatprohibitthemfrommakinganycopiesofyourcopyrightedmaterialoutsidetheirrelationshipwithyou.
Conveyingunderanyothercircumstancesispermittedsolelyundertheconditionsstatedbelow.Sublicensingisnotallowed;section10makesit
unnecessary.
3. ProtectingUsers'LegalRightsFromAnti-CircumventionLaw.
Nocoveredworkshallbedeemedpartofaneffectivetechnologicalmeasureunderanyapplicablelawfulfillingobligationsunderarticle11ofthe
WtPOcopyrighttreatyadoptedon20December1996,orsimilarlawsprohibitingorrestrictingcircumventionofsuchmeasures.Whenyouconveya
coveredwork,youwaiveanylegalpowertoforbidcircumventionoftechnologicalmeasurestotheextentsuchcircumventioniseffectedbyexercising
rightsunderthisLicensewithrespecttothecoveredwork,andyoudisclaimanyintentiontolimitoperationormodificationoftheworkasameansof
enforcing,againstthework'susers,yourorthirdparties'legalrightstoforbidcircumventionoftechnologicalmeasures.
4. ConveyingVerbatimCopies.
YoumayconveyverbatimcopiesoftheProgram'ssourcecodeasyoureceiveit,inanymedium,providedthatyouconspicuouslyandappropriately
publishoneachcopyanappropriatecopyrightnotice;keepintactallnoticesstatingthatthisLicenseandanynonpermissivetermsaddedinaccord
withsection7applytothecode;keepintactallnoticesoftheabsenceofanywarranty;andgiveallrecipientsacopyofthisLicensealongwiththe
Program.
Youmaychargeanypriceornopriceforeachcopythatyouconvey,andyoumayoffersupportorwarrantyprotectionforafee.
5. ConveyingModifiedSourceVersions.
YoumayconveyaworkbasedontheProgram,orthemodificationstoproduceitfromtheProgram,intheformofsourcecodeunderthetermsof
section4,providedthatyoualsomeetalloftheseconditions:
a)Theworkmustcarryprominentnoticesstatingthatyoumodifiedit,andgivingarelevantdate.
b)TheworkmustcarryprominentnoticesstatingthatitisreleasedunderthisLicenseandanyconditionsaddedundersection7.
Thisrequirementmodifiestherequirementinsection4to"keepintactallnotices".
c)Youmustlicensetheentirework,asawhole,underthisLicensetoanyonewhocomesintopossessionofacopy.ThisLicensewilltherefore
apply,alongwithanyapplicablesection7additionalterms,tothewholeofthework,andallitsparts,regardlessofhowtheyarepackaged.This
Licensegivesnopermissiontolicensetheworkinanyotherway,butitdoesnotinvalidatesuchpermissionifyouhaveseparatelyreceivedit.
d)Iftheworkhasinteractiveuserinterfaces,eachmustdisplayAppropriateLegalNotices;however,iftheProgramhasinteractiveinterfacesthatdo
notdisplayAppropriateLegalNotices,yourworkneednotmakethemdoso.
Acompilationofacoveredworkwithotherseparateandindependentworks,whicharenotbytheirnatureextensionsofthecoveredwork,and
whicharenotcombinedwithitsuchastoformalargerprogram,inoronavolumeofastorageordistributionmedium,iscalledan"aggregate"
ifthecompilationanditsresultingcopyrightarenotusedtolimittheaccessorlegalrightsofthecompilation'susersbeyondwhattheindividual
workspermit.InclusionofacoveredworkinanaggregatedoesnotcausethisLicensetoapplytotheotherpartsoftheaggregate.
6. ConveyingNon-SourceForms.
Youmayconveyacoveredworkinobjectcodeformunderthetermsofsections4and5,providedthatyoualsoconveythemachinereadable
CorrespondingSourceunderthetermsofthisLicense,inoneoftheseways:
a)Conveytheobjectcodein,orembodiedin,aphysicalproduct(includingaphysicaldistributionmedium),accompaniedbythe
CorrespondingSourcefixedonadurablephysicalmediumcustomarilyusedforsoftwareinterchange.
b)Conveytheobjectcodein,orembodiedin,aphysicalproduct(includingaphysicaldistributionmedium),accompaniedbyawrittenoffer,validfor
atleastthreeyearsandvalidforaslongasyouoffersparepartsorcustomersupportforthatproductmodel,togiveanyonewhopossessesthe
objectcodeeither(1)acopyoftheCorrespondingSourceforallthesoftwareintheproductthatiscoveredbythisLicense,onadurablephysical
mediumcustomarilyusedforsoftwareinterchange,forapricenomorethanyourreasonablecostofphysicallyperformingthisconveyingof
source,or(2)accesstocopytheCorrespondingSourcefromanetworkserveratnocharge.
c)ConveyindividualcopiesoftheobjectcodewithacopyofthewrittenoffertoprovidetheCorrespondingSource.Thisalternativeisallowedonly
occasionallyandnoncommercially,andonlyifyoureceivedtheobjectcodewithsuchanoffer,inaccordwithsubsection6b.
d)Conveytheobjectcodebyofferingaccessfromadesignatedplace(gratisorforacharge),andofferequivalentaccesstotheCorresponding
Sourceinthesamewaythroughthesameplaceatnofurthercharge.YouneednotrequirerecipientstocopytheCorrespondingSourcealong
withtheobjectcode.tftheplacetocopytheobjectcodeisanetworkserver,theCorrespondingSourcemaybeonadifferentserver(operatedby
youorathirdparty)thatsupportsequivalentcopyingfacilities,providedyoumaintaincleardirectionsnexttotheobjectcodesayingwheretofind
theCorrespondingSource.RegardlessofwhatserverhoststheCorrespondingSource,youremainobligatedtoensurethatitisavailableforas
longasneededtosatisfytheserequirements.
e)Conveytheobjectcodeusingpeer-to-peertransmission,providedyouinformotherpeerswheretheobjectcodeandCorrespondingSourceof
theworkarebeingofferedtothegeneralpublicatnochargeundersubsection6d.Aseparableportionoftheobjectcode,whosesourcecodeis
excludedfromtheCorrespondingSourceasaSystemLibrary,neednotbeincludedinconveyingtheobjectcodework.
A"UserProduct"iseither(1)a"consumerproduct",whichmeansanytangiblepersonalpropertywhichisnormallyusedforpersonal,family,or
householdpurposes,or(2)anythingdesignedorsoldforincorporationintoadwelling.Indeterminingwhetheraproductisaconsumerproduct,
doubtfulcasesshallberesolvedinfavorofcoverage.Foraparticularproductreceivedbyaparticularuser,"normallyused"referstoatypicalor
commonuseofthatclassofproduct,regardlessofthestatusoftheparticularuserorofthewayinwhichtheparticularuseractuallyuses,orexpects
orisexpectedtouse,theproduct.Aproductisaconsumerproductregardlessofwhethertheproducthassubstantialcommercial,industrialornon-
consumeruses,unlesssuchusesrepresenttheonlysignificantmodeofuseoftheproduct."InstallationInformation"foraUserProductmeansany
methods,procedures,authorizationkeys,orotherinformationrequiredtoinstallandexecutemodifiedversionsofacoveredworkinthatUserProduct
fromamodifiedversionofitsCorrespondingSource.Theinformationmustsufficetoensurethatthecontinuedfunctioningofthemodifiedobject
codeisinnocasepreventedorinterferedwithsolelybecausemodificationhasbeenmade.Ifyouconveyanobjectcodeworkunderthissectionin,
orwith,orspecificallyforusein,aUserProduct,andtheconveyingoccursaspartofatransactioninwhichtherightofpossessionanduseofthe
UserProductistransferredtotherecipientinperpetuityorforafixedterm(regardlessofhowthetransactionischaracterized),theCorresponding
SourceconveyedunderthissectionmustbeaccompaniedbytheInstallationInformation.Butthisrequirementdoesnotapplyifneitheryounorany
thirdpartyretainstheabilitytoinstallmodifiedobjectcodeontheUserProduct(forexample,theworkhasbeeninstalledinROM).Therequirement
toprovideInstallationInformationdoesnotincludearequirementtocontinuetoprovidesupportservice,warranty,orupdatesforaworkthathas
beenmodifiedorinstalledbytherecipient,orfortheUserProductinwhichithasbeenmodifiedorinstalled.Accesstoanetworkmaybedenied
whenthemodificationitselfmateriallyandadverselyaffectstheoperationofthenetworkorviolatestherulesandprotocolsforcommunicationacross
thenetwork.CorrespondingSourceconveyed,andInstallationInformationprovided,inaccordwiththissectionmustbeinaformatthatispublicly
documented(andwithanimplementationavailabletothepublicinsourcecodeform),andmustrequirenospecialpasswordorkeyforunpacking,
readingorcopying.
7. AdditionalTerms.
"Additionalpermissions"aretermsthatsupplementthetermsofthisLicensebymakingexceptionsfromoneormoreofitsconditions.Additional
permissionsthatareapplicabletotheentireProgramshallbetreatedasthoughtheywereincludedinthisLicense,totheextentthattheyarevalid
underapplicablelaw.ifadditionalpermissionsapplyonlytopartoftheProgram,thatpartmaybeusedseparatelyunderthosepermissions,butthe
entireProgramremainsgovernedbythisLicensewithoutregardtotheadditionalpermissions.
Whenyouconveyacopyofacoveredwork,youmayatyouroptionremoveanyadditionalpermissionsfromthatcopy,orfromanypartofit.
(Additionalpermissionsmaybewrittentorequiretheirownremovalincertaincaseswhenyoumodifythework.)Youmayplaceadditionalpermissions
onmaterial,addedbyyoutoacoveredwork,forwhichyouhaveorcangiveappropriatecopyrightpermission.Notwithstandinganyotherprovision
ofthisLicense,formaterialyouaddtoacoveredwork,youmay(ifauthorizedbythecopyrightholdersofthatmaterial)supplementthetermsofthis
Licensewithterms:
a)Disclaimingwarrantyorlimitingliabilitydifferentlyfromthetermsofsections15and16ofthisLicense;or
b)RequiringpreservationofspecifiedreasonablelegalnoticesorauthorattributionsinthatmaterialorintheAppropriateLegalNoticesdisplayedby
workscontainingit;or
c)Prohibitingmisrepresentationoftheoriginofthatmaterial,orrequiringthatmodifiedversionsofsuchmaterialbemarkedinreasonablewaysas
differentfromtheoriginalversion;or
d)Limitingtheuseforpublicitypurposesofnamesoflicensorsorauthorsofthematerial;or
e)Decliningtograntrightsundertrademarklawforuseofsometradenames,trademarks,orservicemarks;or
f) Requiringindemnificationoflicensorsandauthorsofthatmaterialbyanyonewhoconveysthematerial(ormodifiedversionsofit)with
contractualassumptionsofliabilitytotherecipient,foranyliabilitythatthesecontractualassumptionsdirectlyimposeonthoselicensorsand
authors.
Allothernon-permissiveadditionaltermsareconsidered"furtherrestrictions"withinthemeaningofsection10.IftheProgramasyoureceivedit,or
anypartofit,containsanoticestatingthatitisgovernedbythisLicensealongwithatermthatisafurtherrestriction,youmayremovethatterm.If
alicensedocumentcontainsafurtherrestrictionbutpermitsrelicensingorconveyingunderthisLicense,youmayaddtoacoveredworkmaterial
governedbythetermsofthatlicensedocument,providedthatthefurtherrestrictiondoesnotsurvivesuchrelicensingorconveying.
Ifyouaddtermstoacoveredworkinaccordwiththissection,youmustplace,intherelevantsourcefiles,astatementoftheadditionaltermsthat
applytothosefiles,oranoticeindicatingwheretofindtheapplicableterms.Additionalterms,permissiveornon-permissive,maybestatedinthe
formofaseparatelywrittenlicense,orstatedasexceptions;theaboverequirementsapplyeitherway.
8. Termination.
YoumaynotpropagateormodifyacoveredworkexceptasexpresslyprovidedunderthisLicense.Anyattemptotherwisetopropagateormodifyitis
void,andwillautomaticallyterminateyourrightsunderthisLicense(includinganypatentlicensesgrantedunderthethirdparagraphofsection11).
However,ifyouceaseallviolationofthisLicense,thenyourlicensefromaparticularcopyrightholderisreinstated(a)provisionally,unlessanduntil
thecopyrightholderexplicitlyandfinallyterminatesyourlicense,and(b)permanently,ifthecopyrightholderfailstonotifyyouoftheviolationby
somereasonablemeanspriorto60daysafterthecessation.Moreover,yourlicensefromaparticularcopyrightholderisreinstatedpermanentlyifthe
copyrightholdernotifiesyouoftheviolationbysomereasonablemeans,thisisthefirsttimeyouhavereceivednoticeofviolationofthisLicense(for
anywork)fromthatcopyrightholder,andyoucuretheviolationpriorto30daysafteryourreceiptofthenotice.
Terminationofyourrightsunderthissectiondoesnotterminatethelicensesofpartieswhohavereceivedcopiesorrightsfromyouunderthis
License.Ifyourrightshavebeenterminatedandnotpermanentlyreinstated,youdonotqualifytoreceivenewlicensesforthesamematerialunder
section10.
9. AcceptanceNotRequiredforHavingCopies.
YouarenotrequiredtoacceptthisLicenseinordertoreceiveorrunacopyoftheProgram.Ancillarypropagationofacoveredworkoccurringsolely
asaconsequenceofusingpeer-to-peertransmissiontoreceiveacopylikewisedoesnotrequireacceptance.
However,nothingotherthanthisLicensegrantsyoupermissiontopropagateormodifyanycoveredwork.Theseactionsinfringecopyrightifyoudo
notacceptthisLicense.Therefore,bymodifyingorpropagatingacoveredwork,youindicateyouracceptanceofthisLicensetodoso.
10.AutomaticLicensingofDownstreamRecipients.
Eachtimeyouconveyacoveredwork,therecipientautomaticallyreceivesalicensefromtheoriginallicensors,torun,modifyandpropagatethat
work,subjecttothisLicense.YouarenotresponsibleforenforcingcompliancebythirdpartieswiththisLicense.
An"entitytransaction"isatransactiontransferringcontrolofanorganization,orsubstantiallyallassetsofone,orsubdividinganorganization,or
mergingorganizations.Ifpropagationofacoveredworkresultsfromanentitytransaction,eachpartytothattransactionwhoreceivesacopyofthe
workalsoreceiveswhateverlicensestotheworktheparty'spredecessorininteresthadorcouldgiveunderthepreviousparagraph,plusarightto
possessionoftheYoumaynotimposeanyfurtherrestrictionsontheexerciseoftherightsgrantedoraffirmedunderthisLicense.Forexample,you
maynotimposealicensefee,royalty,orotherchargeforexerciseofrightsgrantedunderthisLicense,andyoumaynotinitiatelitigation(includinga
cross-claimorcounterclaiminalawsuit)allegingthatanypatentclaimisinfringedbymaking,using,selling,offeringforsale,orimportingtheProgram
oranyportionofit.
11.Patents.
A"contributor"isacopyrightholderwhoauthorizesuseunderthisLicenseoftheProgramoraworkonwhichtheProgramisbased.
Theworkthuslicensediscalledthecontributor's"contributorversion".
Acontributor's"essentialpatentclaims"areallpatentclaimsownedorcontrolledbythecontributor,whetheralreadyacquiredorhereafteracquired,
thatwouldbeinfringedbysomemanner,permittedbythisLicense,ofmaking,using,orsellingitscontributorversion,butdonotincludeclaimsthat
wouldbeinfringedonlyasaconsequenceoffurthermodificationofthecontributorversion.
Forpurposesofthisdefinition,"control"includestherighttograntpatentsublicensesinamannerconsistentwiththerequirementsofthisLicense.
Eachcontributorgrantsyouanon-exclusive,worldwide,royalty-freepatentlicenseunderthecontributor'sessentialpatentclaims,tomake,use,sell,
offerforsale,importandotherwiserun,modifyandpropagatethecontentsofitscontributorversion.Inthefollowingthreeparagraphs,a"patent
license"isanyexpressagreementorcommitment,howeverdenominated,nottoenforceapatent(suchasanexpresspermissiontopracticeapatent
orcovenantnottosueforpatentinfringement).To"grant"suchapatentlicensetoapartymeanstomakesuchanagreementorcommitmentnotto
enforceapatentagainsttheparty.
Ifyouconveyacoveredwork,knowinglyrelyingonapatentlicense,andtheCorrespondingSourceoftheworkisnotavailableforanyonetocopy,
freeofchargeandunderthetermsofthisLicense,throughapubliclyavailablenetworkserverorotherreadilyaccessiblemeans,thenyoumust
either(1)causetheCorrespondingSourcetobesoavailable,or(2)arrangetodepriveyourselfofthebenefitofthepatentlicenseforthisparticular
work,or(3)arrange,inamannerconsistentwiththerequirementsofthisLicense,toextendthepatentlicensetodownstreamrecipients."Knowingly
relying"meansyouhaveactualknowledgethat,butforthepatentlicense,yourconveyingthecoveredworkinacountry,oryourrecipient'suseofthe
coveredworkinacountry,wouldinfringeoneormoreidentifiablepatentsinthatcountrythatyouhavereasontobelievearevalid.
If,pursuanttoorinconnectionwithasingletransactionorarrangement,youconvey,orpropagatebyprocuringconveyanceof,acoveredwork,and
grantapatentlicensetosomeofthepartiesreceivingthecoveredworkauthorizingthemtouse,propagate,modifyorconveyaspecificcopyofthe
coveredwork,thenthepatentlicenseyougrantisautomaticallyextendedtoallrecipientsofthecoveredworkandworksbasedonit.
Apatentlicenseis"discriminatory"ifitdoesnotincludewithinthescopeofitscoverage,prohibitstheexerciseof,orisconditionedonthenon-
exerciseofoneormoreoftherightsthatarespecificallygrantedunderthisLicense.Youmaynotconveyacoveredworkifyouareapartytoan
arrangementwithathirdpartythatisinthebusinessofdistributingsoftware,underwhichyoumakepaymenttothethirdpartybasedontheextent
ofyouractivityofconveyingthework,andunderwhichthethirdpartygrants,toanyofthepartieswhowouldreceivethecoveredworkfromyou,a
discriminatorypatentlicense(a)inconnectionwithcopiesofthecoveredworkconveyedbyyou(orcopiesmadefromthosecopies),or(b)primarily
forandinconnectionwithspecificproductsorcompilationsthatcontainthecoveredwork,unlessyouenteredintothatarrangement,orthatpatent
licensewasgranted,priorto28March2007.
NothinginthisLicenseshallbeconstruedasexcludingorlimitinganyimpliedlicenseorotherdefensestoinfringementthatmayotherwisebe
availabletoyouunderapplicablepatentlaw.
12.NoSurrenderofOthers'Freedom.
Ifconditionsareimposedonyou(whetherbycourtorder,agreementorotherwise)thatcontradicttheconditionsofthisLicense,theydonotexcuse
youfromtheconditionsofthisLicense.IfyoucannotconveyacoveredworksoastosatisfysimultaneouslyyourobligationsunderthisLicenseand
anyotherpertinentobligations,thenasaconsequenceyoumaynotconveyitatall.Forexample,ifyouagreetotermsthatobligateyoutocollecta
royaltyforfurtherconveyingfromthosetowhomyouconveytheProgram,theonlywayyoucouldsatisfyboththosetermsandthisLicensewouldbe
torefrainentirelyfromconveyingtheProgram.
13.UsewiththeGNUAfferoGeneralPublicLicense.
NotwithstandinganyotherprovisionofthisLicense,youhavepermissiontolinkorcombineanycoveredworkwithaworklicensedunderversion3of
theGNUAfferoGeneralPublicLicenseintoasinglecombinedwork,andtoconveytheresultingwork.ThetermsofthisLicensewillcontinuetoapply
tothepartwhichisthecoveredwork,butthespecialrequirementsoftheGNUAfferoGeneral
PublicLicense,section13,concerninginteractionthroughanetworkwillapplytothecombinationassuch.
14.RevisedVersionsofthisLicense.
TheFreeSoftwareFoundationmaypublishrevisedand/ornewversionsoftheGNUGeneralPublicLicensefromtimetotime.Suchnewversionswill
besimilarinspirittothepresentversion,butmaydifferindetailtoaddressnewproblemsorconcerns.
Eachversionisgivenadistinguishingversionnumber.IftheProgramspecifiesthatacertainnumberedversionoftheGNUGeneralPublicLicense
"oranylaterversion"appliestoit,youhavetheoptionoffollowingthetermsandconditionseitherofthatnumberedversionorofanylaterversion
publishedbytheFreeSoftwareFoundation.IftheProgramdoesnotspecifyaversionnumberoftheGNUGeneralPublicLicense,youmaychoose
anyversioneverpublishedbytheFreeSoftwareFoundation.
IftheProgramspecifiesthataproxycandecidewhichfutureversionsoftheGNUGeneralPublicLicensecanbeused,thatproxy'spublicstatement
ofacceptanceofaversionpermanentlyauthorizesyoutochoosethatversionfortheProgram.
Laterlicenseversionsmaygiveyouadditionalordifferentpermissions.However,noadditionalobligationsareimposedonanyauthororcopyright
holderasaresultofyourchoosingtofollowalaterversion.
15.DisclaimerofWarranty.
THEREISNOWARRANTYFORTHEPROGRAM,TOTHEEXTENTPERMITTEDBYAPPLICABLELAW.EXCEPTWHENOTHERWISESTATED
INWRITINGTHECOPYRIGHTHOLDERSAND/OROTHERPARTIESPROVIDETHEPROGRAM"ASIS"WITHOUTWARRANTYOFANYKIND,
EITHEREXPRESSEDORIMPLIED,INCLUDING,BUTNOTLIMITEDTO,THEIMPLIEDWARRANTIESOFMERCHANTABILITYANDFITNESS
FORAPARTICULARPURPOSE.THEENTIRERtSKASTOTHEQUALITYANDPERFORMANCEOFTHEPROGRAMISWITHYOU.SHOULD
THEPROGRAMPROVEDEFECTIVE,YOUASSUMETHECOSTOFALLNECESSARYSERVICING,REPAIRORCORRECTION.
16.LimitationofLiability.
INNOEVENTUNLESSREQUIREDBYAPPLICABLELAWORAGREEDTOINWRITINGWILLANYCOPYRIGHTHOLDER,ORANYOTHER
PARTYWHOMODIFIESAND/ORCONVEYSTHEPROGRAMASPERMITTEDABOVE,BELIABLETOYOUFORDAMAGES,INCLUDINGANY
GENERAL,SPECIAL,INCIDENTALORCONSEQUENTIALDAMAGESARISINGOUTOFTHEUSEORINABILITYTOUSETHEPROGRAM
(INCLUDINGBUTNOTLIMITEDTOLOSSOFDATAORDATABEINGRENDEREDINACCURATEORLOSSESSUSTAINEDBYYOUORTHIRD
PARTIESORAFAILUREOFTHEPROGRAMTOOPERATEWITHANYOTHERPROGRAMS),EVENIFSUCHHOLDEROROTHERPARTYHAS
BEENADVISEDOFTHEPOSSIBILITYOFSUCHDAMAGES.
17.InterpretationofSections15and16.
Ifthedisclaimerofwarrantyandlimitationofliabilityprovidedabovecannotbegivenlocallegaleffectaccordingtotheirterms,reviewingcourtsshall
applylocallawthatmostcloselyapproximatesanabsolutewaiverofallcivilliabilityinconnectionwiththeProgram,unlessawarrantyorassumption
ofliabilityaccompaniesacopyofthePrograminreturnforafee.
How to Apply These Terms to Your New Programs
If you develop a new program, and you want it to be of the greatest possible use to the public, the best way to achieve this is to make it free software
which everyone can redistribute and change under these terms. To do so, attach the following notices to the program. It is safest to attach them to the start
of each source file to most effectively state theexclusion of warranty; and each file should have at least the "copyright" line and a pointer to where the full
notice is found.
<one line to give the program's name and a brief idea of what it does.> Copyright (C) <year> <name of author>
This program is free software: you can redistribute it and/or modify it under the terms of the GNU General Public License as published by the
Free Software Foundation, either version 3 of the License, or (at your option) any later version.
This program is distributed in the hope that it will be useful, but WITHOUT ANY WARRANTY; without even the implied warranty of
MERCHANTABILITY or FITNESS FOR A PARTICULAR PURPOSE. See the GNU General Public License for more details.
YoushouldhavereceivedacopyoftheGNUGeneralPublicLicensealongwiththisprogram.Ifnot,see<http://www.gnu.org/licenses/>.
Alsoaddinformationonhowtocontactyoubyelectronicandpapermail.
Iftheprogramdoesterminalinteraction,makeitoutputashortnoticelikethiswhenitstartsinaninteractivemode:
<program>Copyright(C)<year><nameofauthor>ThisprogramcomeswithABSOLUTELYNOWARRANTY;fordetailstype"showw'.
Thisisfreesoftware,andyouarewelcometoredistributeitundercertainconditions;type"showc'fordetails.
Thehypotheticalcommands'showw'and"showc'shouldshowtheappropriatepartsoftheGeneralPublicLicense.Ofcourse,yourprogram's
commandsmightbedifferent;foraGUIinterface,youwouldusean"aboutbox".
Youshouldalsogetyouremployer(ifyouworkasaprogrammer)orschool,ifany,tosigna"copyrightdisclaimer"fortheprogram,ifnecessary.
Formoreinformationonthis,andhowtoapplyandfollowtheGNUGPL,see<http://www.gnu.org/licenses/>.TheGNUGeneralPublicLicensedoesnot
permitincorporatingyourprogramintoproprietaryprograms,ifyourprogramisasubroutinelibrary,youmayconsideritmoreusefultopermitlinking
proprietaryapplicationswiththelibrary,ifthisiswhatyouwanttodo,usetheGNULesserGeneralPublicLicenseinsteadofthisLicense.Butfirst,please
read<http://www.gnu.org/philosophy/why-not-lgpl.html>.GNULesserGeneralPublicLicense(LGPL)
GNU GENERAL PUBLIC LICENSE
Version 3, 29 June 2007
Copyright (C) 2007 Free Software Foundation, Inc. <http://fsf.org/>
Everyone is permitted to copy and distribute verbatim copies of this license document, but changing it is not allowed.
Preamble
The GNU General Public License is a free, copyleff license for software and other kinds of works.
The licenses for most software and other practical works are designed to take away your freedom to share and change the works. By contrast, the GNU
General Public License is intended to guarantee your freedom to share and change all versions of a program--to make sure it remains free software for all
its users. We, the Free Software Foundation, use the GNU General Public License for most of our software; it applies also to any other work released this
way by its authors. You can apply it to your programs, too.
When we speak of free software, we are referring to freedom, not price. Our General Public Licenses are designed to make sure that you have the
freedom to distribute copies of free software (and charge for them if you wish), that you receive source code or can get it if you want it, that you can
change the software or use pieces of it in new free programs, and that you know you can do these things.
To protect your rights, we need to prevent others from denying you these rights or asking you to surrender the rights. Therefore, you have certain
responsibilities if you distribute copies of the software, or ifyou modify it: responsibilities to respect the freedom of others.
For example, if you distribute copies of such a program, whether gratis or for a fee, you must pass on to the recipients the same freedoms that you
received. You must make sure that they, too, receive or can get the source code. And you must show them these terms so they know their rights.
Developers that use the GNU GPL protect your rights with two steps: (1) assert copyright on the software, and (2) offer you this License giving you legal
permission to copy, distribute and/or modify it.
For the developers' and authors' protection, the GPL clearly explains that there is no warranty for this free software. For both users' and authors' sake, the
GPL requires that modified versions be marked as changed, so that their problems will not be attributed erroneously to authors of previous versions.
Some devices are designed to deny users access to install or run modified versions of the software inside them, although the manufacturer can do so.
This is fundamentally incompatible with the aim of protecting users' freedom to change the software. The systematic pattern of such abuse occurs in the
area of products for individuals to use, which is precisely where it is most unacceptable. Therefore, we have designed this version of the GPL to prohibit
the practice for those products. If such problems arise substantially in other domains, we stand ready to extend this provision to those domains in future
versions of the GPL, as needed to protect the freedom of users. Finally, every program is threatened constantly by software patents. States should not
allow patents to restrict development and use of software on general-purpose computers, but in those that do, we wish to avoid the special danger that
patents applied to a free program could make it effectively proprietary. To prevent this, the GPL assures that patents cannot be used to render the program
non-flee. The precise terms and conditions for copying, distribution and modification follow.
TERMS AND CONDITIONS
0. Definitions.
"This License" refers to version 3 of the GNU General Public License.
"Copyright" also means copyright-like laws that apply to other kinds of works, such as semiconductor masks.
"The Program" refers to any copyrightable work licensed under this License. Each licensee is addressed as "you". "Licensees" and "recipients" may
be individuals or organizations.
To "modify" a work means to copy from or adapt all or part of the work in a fashion requiring copyright permission, other than the making of an exact
copy. The resulting work is called a "modified version" of the earlier work or a work "based on" the earlier work.
A "covered work" means either the unmodified Program or a work based on the Program.
To "propagate" a work means to do anything with it that, without permission, would make you directly or secondarily liable for infringement under
applicable copyright law, except executing it on a computer or modifying a private copy. Propagation includes copying, distribution (with or without
modification), making available to the public, and in some countries other activities as well.
To "convey" a work means any kind of propagation that enables other parties to make or receive copies. Mere interaction with a user through a
computer network, with no transfer of a copy, is not conveying.
An interactive user interface displays "Appropriate Legal Notices" to the extent that it includes a convenient and prominently visible feature that
(1) displays an appropriate copyright notice, and (2) tells the user that there is no warranty for the work (except to the extent that warranties are
provided), that licensees may convey the work under this License, and how to view a copy of this License. Ifthe interface presents a list of user
commands or options, such as a menu, a prominent item in the list meets this criterion.
1. Source Code.
The "source code" for a work means the preferred form of the work for making modifications to it. "Object code" means any nonsource form of a work.
A "Standard Interface" means an interface that either is an official standard defined by a recognized standards body, or, in the case of interfaces
specified for a particular programming language, one that is widely used among developers working in that language. The "System Libraries" of an
executable work include anything, other than the work as a whole, that (a) is included in the normal form of packaging a Major Component, but which
is not part of that Major Component, and (b) serves only to enable use of the work with that Major Component, or to implement a Standard Interface
for which an implementation is available to the public in source code form. A "Major Component", in this context, means a major essential component
(kernel, window system, and so on) of the specific operating system (if any) on which the executable work runs, or a compiler used to produce the
work, or an object code interpreter used to run it. The "Corresponding Source" for a work in object code form means all the source code needed to
generate, install, and (for an executable work) run the object code and to modify the work, including scripts to control those activities. However, it
does not include the work's System Libraries, or general-purpose tools or generally available free programs which are used unmodified in performing
thoseactivitiesbutwhicharenotpartofthework.Forexample,CorrespondingSourceincludesinterfacedefinitionfilesassociatedwithsourcefilesfor
thework,andthesourcecodeforsharedlibrariesanddynamicallylinkedsubprogramsthattheworkisspecificallydesignedtorequire,suchasby
intimatedatacommunicationorcontrolflowbetweenthosesubprogramsandotherpartsofthework.TheCorrespondingSourceneednotinclude
anythingthatuserscanregenerateautomaticallyfromotherpartsoftheCorrespondingSource.TheCorrespondingSourceforaworkinsourcecode
formisthatsamework.
2. BasicPermissions.
AllrightsgrantedunderthisLicensearegrantedforthetermofcopyrightontheProgram,andareirrevocableprovidedthestatedconditionsare
met.ThisLicenseexplicitlyaffirmsyourunlimitedpermissiontoruntheunmodifiedProgram.Theoutputfromrunningacoveredworkiscoveredby
thisLicenseonlyiftheoutput,givenitscontent,constitutesacoveredwork.ThisLicenseacknowledgesyourrightsoffairuseorotherequivalent,
asprovidedbycopyrightlaw.Youmaymake,runandpropagatecoveredworksthatyoudonotconvey,withoutconditionssolongasyourlicense
otherwiseremainsinforce.Youmayconveycoveredworkstoothersforthesolepurposeofhavingthemmakemodificationsexclusivelyforyou,
orprovideyouwithfacilitiesforrunningthoseworks,providedthatyoucomplywiththetermsofthisLicenseinconveyingallmaterialforwhichyou
donotcontrolcopyright.Thosethusmakingorrunningthecoveredworksforyoumustdosoexclusivelyonyourbehalf,underyourdirectionand
control,ontermsthatprohibitthemfrommakinganycopiesofyourcopyrightedmaterialoutsidetheirrelationshipwithyou.Conveyingunderany
othercircumstancesispermittedsolelyundertheconditionsstatedbelow.Sublicensingisnotallowed;section10makesitunnecessary.
3. ProtectingUsers'LegalRightsFromAnti-CircumventionLaw.
Nocoveredworkshallbedeemedpartofaneffectivetechnologicalmeasureunderanyapplicablelawfulfillingobligationsunderarticle11ofthe
WtPOcopyrighttreatyadoptedon20December1996,orsimilarlawsprohibitingorrestrictingcircumventionofsuchmeasures.Whenyouconveya
coveredwork,youwaiveanylegalpowertoforbidcircumventionoftechnologicalmeasurestotheextentsuchcircumventioniseffectedbyexercising
rightsunderthisLicensewithrespecttothecoveredwork,andyoudisclaimanyintentiontolimitoperationormodificationoftheworkasameansof
enforcing,againstthework'susers,yourorthirdparties'legalrightstoforbidcircumventionoftechnologicalmeasures.
4. ConveyingVerbatimCopies.
YoumayconveyverbatimcopiesoftheProgram'ssourcecodeasyoureceiveit,inanymedium,providedthatyouconspicuouslyandappropriately
publishoneachcopyanappropriatecopyrightnotice;keepintactallnoticesstatingthatthisLicenseandanynonpermissivetermsaddedinaccord
withsection7applytothecode;keepintactallnoticesoftheabsenceofanywarranty;andgiveallrecipientsacopyofthisLicensealongwiththe
Program.Youmaychargeanypriceornopriceforeachcopythatyouconvey,andyoumayoffersupportorwarrantyprotectionforafee.
5. ConveyingModifiedSourceVersions.YoumayconveyaworkbasedontheProgram,orthemodificationstoproduceitfromtheProgram,intheform
ofsourcecodeunderthetermsofsection4,providedthatyoualsomeetalloftheseconditions:
a)Theworkmustcarryprominentnoticesstatingthatyoumodifiedit,andgivingarelevantdate.
b)TheworkmustcarryprominentnoticesstatingthatitisreleasedunderthisLicenseandanyconditionsaddedundersection7.
Thisrequirementmodifiestherequirementinsection4to"keepintactallnotices".
c)Youmustlicensetheentirework,asawhole,underthisLicensetoanyonewhocomesintopossessionofacopy.ThisLicensewilltherefore
apply,alongwithanyapplicablesection7additionalterms,tothewholeofthework,andallitsparts,regardlessofhowtheyarepackaged.This
Licensegivesnopermissiontolicensetheworkinanyotherway,butitdoesnotinvalidatesuchpermissionifyouhaveseparatelyreceivedit.
d)Iftheworkhasinteractiveuserinterfaces,eachmustdisplayAppropriateLegalNotices;however,iftheProgramhasinteractiveinterfacesthatdo
notdisplayAppropriateLegalNotices,yourworkneednotmakethemdoso.
Acompilationofacoveredworkwithotherseparateandindependentworks,whicharenotbytheirnatureextensionsofthecoveredwork,and
whicharenotcombinedwithitsuchastoformalargerprogram,inoronavolumeofastorageordistributionmedium,iscalledan"aggregate"if
thecompilationanditsresultingcopyrightarenotusedtolimittheaccessorlegalrightsofthecompilation'susersbeyondwhattheindividualworks
permit.InclusionofacoveredworkinanaggregatedoesnotcausethisLicensetoapplytotheotherpartsoftheaggregate.
6. ConveyingNon-SourceForms.
Youmayconveyacoveredworkinobjectcodeformunderthetermsofsections4and5,providedthatyoualsoconveythemachinereadable
CorrespondingSourceunderthetermsofthisLicense,inoneoftheseways:
a)Conveytheobjectcodein,orembodiedin,aphysicalproduct(includingaphysicaldistributionmedium),accompaniedbytheCorresponding
Sourcefixedonadurablephysicalmediumcustomarilyusedforsoftwareinterchange.
b)Conveytheobjectcodein,orembodiedin,aphysicalproduct(includingaphysicaldistributionmedium),accompaniedbyawrittenoffer,validfor
atleastthreeyearsandvalidforaslongasyouoffersparepartsorcustomersupportforthatproductmodel,togiveanyonewhopossessesthe
objectcodeeither(1)acopyoftheCorrespondingSourceforallthesoftwareintheproductthatiscoveredbythisLicense,onadurablephysical
mediumcustomarilyusedforsoftwareinterchange,forapricenomorethanyourreasonablecostofphysicallyperformingthisconveyingof
source,or(2)accesstocopytheCorrespondingSourcefromanetworkserveratnocharge.
c)ConveyindividualcopiesoftheobjectcodewithacopyofthewrittenoffertoprovidetheCorrespondingSource.Thisalternativeisallowedonly
occasionallyandnoncommercially,andonlyifyoureceivedtheobjectcodewithsuchanoffer,inaccordwithsubsection6b.
d)Conveytheobjectcodebyofferingaccessfromadesignatedplace(gratisorforacharge),andofferequivalentaccesstotheCorresponding
Sourceinthesamewaythroughthesameplaceatnofurthercharge.YouneednotrequirerecipientstocopytheCorrespondingSourcealong
withtheobjectcode.tftheplacetocopytheobjectcodeisanetworkserver,theCorrespondingSourcemaybeonadifferentserver(operatedby
youorathirdparty)thatsupportsequivalentcopyingfacilities,providedyoumaintaincleardirectionsnexttotheobjectcodesayingwheretofind
theCorrespondingSource.RegardlessofwhatserverhoststheCorrespondingSource,youremainobligatedtoensurethatitisavailableforas
longasneededtosatisfytheserequirements.
e)Conveytheobjectcodeusingpeer-to-peertransmission,providedyouinformotherpeerswheretheobjectcodeandCorrespondingSourceof
theworkarebeingofferedtothegeneralpublicatnochargeundersubsection6d.Aseparableportionoftheobjectcode,whosesourcecodeis
excludedfromtheCorrespondingSourceasaSystemLibrary,neednotbeincludedinconveyingtheobjectcodework.
A"UserProduct"iseither(1)a"consumerproduct",whichmeansanytangiblepersonalpropertywhichisnormallyusedforpersonal,family,or
householdpurposes,or(2)anythingdesignedorsoldforincorporationintoadwelling.Indeterminingwhetheraproductisaconsumerproduct,
doubtfulcasesshallberesolvedinfavorofcoverage.Foraparticularproductreceivedbyaparticularuser,"normallyused"referstoatypicalor
commonuseofthatclassofproduct,regardlessofthestatusoftheparticularuserorofthewayinwhichtheparticularuseractuallyuses,orexpects
orisexpectedtouse,theproduct.Aproductisaconsumerproductregardlessofwhethertheproducthassubstantialcommercial,industrialornon-
consumeruses,unlesssuchusesrepresenttheonlysignificantmodeofuseoftheproduct."InstallationInformation"foraUserProductmeansany
methods,procedures,authorizationkeys,orotherinformationrequiredtoinstallandexecutemodifiedversionsofacoveredworkinthatUserProduct
fromamodifiedversionofitsCorrespondingSource.Theinformationmustsufficetoensurethatthecontinuedfunctioningofthemodifiedobject
codeisinnocasepreventedorinterferedwithsolelybecausemodificationhasbeenmade.Ifyouconveyanobjectcodeworkunderthissectionin,
orwith,orspecificallyforusein,aUserProduct,andtheconveyingoccursaspartofatransactioninwhichtherightofpossessionanduseofthe
UserProductistransferredtotherecipientinperpetuityorforafixedterm(regardlessofhowthetransactionischaracterized),theCorresponding
SourceconveyedunderthissectionmustbeaccompaniedbytheInstallationinformation.Butthisrequirementdoesnotapplyifneitheryounorany
thirdpartyretainstheabilitytoinstallmodifiedobjectcodeontheUserProduct(forexample,theworkhasbeeninstalledinROM).Therequirement
toprovideInstallationInformationdoesnotincludearequirementtocontinuetoprovidesupportservice,warranty,orupdatesforaworkthathas
beenmodifiedorinstalledbytherecipient,orfortheUserProductinwhichithasbeenmodifiedorinstalled.Accesstoanetworkmaybedenied
whenthemodificationitselfmateriallyandadverselyaffectstheoperationofthenetworkorviolatestherulesandprotocolsforcommunicationacross
thenetwork.CorrespondingSourceconveyed,andInstallationInformationprovided,inaccordwiththissectionmustbeinaformatthatispublicly
documented(andwithanimplementationavailabletothepublicinsourcecodeform),andmustrequirenospecialpasswordorkeyforunpacking,
readingorcopying.
7. AdditionalTerms.
"Additionalpermissions"aretermsthatsupplementthetermsofthisLicensebymakingexceptionsfromoneormoreofitsconditions.Additional
permissionsthatareapplicabletotheentireProgramshallbetreatedasthoughtheywereincludedinthisLicense,totheextentthattheyarevalid
underapplicablelaw.ifadditionalpermissionsapplyonlytopartoftheProgram,thatpartmaybeusedseparatelyunderthosepermissions,butthe
entireProgramremainsgovernedbythisLicensewithoutregardtotheadditionalpermissions.
Whenyouconveyacopyofacoveredwork,youmayatyouroptionremoveanyadditionalpermissionsfromthatcopy,orfromanypartofit.
(Additionalpermissionsmaybewrittentorequiretheirownremovalincertaincaseswhenyoumodifythework.)Youmayplaceadditionalpermissions
onmaterial,addedbyyoutoacoveredwork,forwhichyouhaveorcangiveappropriatecopyrightpermission.Notwithstandinganyotherprovision
ofthisLicense,formaterialyouaddtoacoveredwork,youmay(ifauthorizedbythecopyrightholdersofthatmaterial)supplementthetermsofthis
Licensewithterms:
a)Disclaimingwarrantyorlimitingliabilitydifferentlyfromthetermsofsections15and16ofthisLicense;or
b)RequiringpreservationofspecifiedreasonablelegalnoticesorauthorattributionsinthatmaterialorintheAppropriateLegalNoticesdisplayedby
workscontainingit;or
c)Prohibitingmisrepresentationoftheoriginofthatmaterial,orrequiringthatmodifiedversionsofsuchmaterialbemarkedinreasonablewaysas
differentfromtheoriginalversion;or
d)LimitingtheuseforpublicitypurposesofnamesofIicensorsorauthorsofthematerial;or
e)Decliningtograntrightsundertrademarklawforuseofsometradenames,trademarks,orservicemarks;or
f) RequiringindemnificationofIicensorsandauthorsofthatmaterialbyanyonewhoconveysthematerial(ormodifiedversionsofit)with
contractualassumptionsofliabilitytotherecipient,foranyliabilitythatthesecontractualassumptionsdirectlyimposeonthoseIicensorsand
authors.
Allothernon-permissiveadditionaltermsareconsidered"furtherrestrictions"withinthemeaningofsection10.IftheProgramasyoureceivedit,or
anypartofit,containsanoticestatingthatitisgovernedbythisLicensealongwithatermthatisafurtherrestriction,youmayremovethatterm.If
alicensedocumentcontainsafurtherrestrictionbutpermitsrelicensingorconveyingunderthisLicense,youmayaddtoacoveredworkmaterial
governedbythetermsofthatlicensedocument,providedthatthefurtherrestrictiondoesnotsurvivesuchrelicensingorconveying.Ifyouaddterms
toacoveredworkinaccordwiththissection,youmustplace,intherelevantsourcefiles,astatementoftheadditionaltermsthatapplytothosefiles,
oranoticeindicatingwheretofindtheapplicableterms.Additionalterms,permissiveornon-permissive,maybestatedintheformofaseparately
writtenlicense,orstatedasexceptions;theaboverequirementsapplyeitherway.
8. Termination.
YoumaynotpropagateormodifyacoveredworkexceptasexpresslyprovidedunderthisLicense.Anyattemptotherwisetopropagateormodify
itisvoid,andwillautomaticallyterminateyourrightsunderthisLicense(includinganypatentlicensesgrantedunderthethirdparagraphofsection
11).However,ifyouceaseallviolationofthisLicense,thenyourlicensefromaparticularcopyrightholderisreinstated(a)provisionally,unlessand
untilthecopyrightholderexplicitlyandfinallyterminatesyourlicense,and(b)permanently,ifthecopyrightholderfailstonotifyyouoftheviolationby
somereasonablemeanspriorto60daysafterthecessation.Moreover,yourlicensefromaparticularcopyrightholderisreinstatedpermanentlyifthe
copyrightholdernotifiesyouoftheviolationbysomereasonablemeans,thisisthefirsttimeyouhavereceivednoticeofviolationofthisLicense(for
anywork)fromthatcopyrightholder,andyoucuretheviolationpriorto30daysafteryourreceiptofthenotice.Terminationofyourrightsunderthis
sectiondoesnotterminatethelicensesofpartieswhohavereceivedcopiesorrightsfromyouunderthisLicense.Ifyourrightshavebeenterminated
andnotpermanentlyreinstated,youdonotqualifytoreceivenewlicensesforthesamematerialundersection10.
9. AcceptanceNotRequiredforHavingCopies.
YouarenotrequiredtoacceptthisLicenseinordertoreceiveorrunacopyoftheProgram.Ancillarypropagationofacoveredworkoccurringsolely
asaconsequenceofusingpeer-to-peertransmissiontoreceiveacopylikewisedoesnotrequireacceptance.However,nothingotherthanthis
Licensegrantsyoupermissiontopropagateormodifyanycoveredwork.TheseactionsinfringecopyrightifyoudonotacceptthisLicense.Therefore,
bymodifyingorpropagatingacoveredwork,youindicateyouracceptanceofthisLicensetodoso.
10.AutomaticLicensingofDownstreamRecipients.
Eachtimeyouconveyacoveredwork,therecipientautomaticallyreceivesalicensefromtheoriginallicensors,torun,modifyandpropagatethat
work,subjecttothisLicense.YouarenotresponsibleforenforcingcompliancebythirdpartieswiththisLicense.An"entitytransaction"isatransaction
transferringcontrolofanorganization,orsubstantiallyallassetsofone,orsubdividinganorganization,ormergingorganizations.Ifpropagationofa
coveredworkresultsfromanentitytransaction,eachpartytothattransactionwhoreceivesacopyoftheworkalsoreceiveswhateverlicensestothe
worktheparty'spredecessorininteresthadorcouldgiveunderthepreviousparagraph,plusarighttopossessionoftheCorrespondingSourceof
theworkfromthepredecessorininterest,ifthepredecessorhasitorcangetitwithreasonableefforts.Youmaynotimposeanyfurtherrestrictionson
theexerciseoftherightsgrantedoraffirmedunderthisLicense.Forexample,youmaynotimposealicensefee,royalty,orotherchargeforexercise
ofrightsgrantedunderthisLicense,andyoumaynotinitiatelitigation(includingacross-claimorcounterclaiminalawsuit)allegingthatanypatent
claimisinfringedbymaking,using,selling,offeringforsale,orimportingtheProgramoranyportionofit.
11.Patents.
A"contributor"isacopyrightholderwhoauthorizesuseunderthisLicenseoftheProgramoraworkonwhichtheProgramisbased.Theworkthus
licensediscalledthecontributor's"contributorversion".Acontributor's"essentialpatentclaims"areallpatentclaimsownedorcontrolledbythe
contributor,whetheralreadyacquiredorhereafteracquired,thatwouldbeinfringedbysomemanner,permittedbythisLicense,ofmaking,using,
orsellingitscontributorversion,butdonotincludeclaimsthatwouldbeinfringedonlyasaconsequenceoffurthermodificationofthecontributor
version.Forpurposesofthisdefinition,"control"includestherighttograntpatentsublicensesinamannerconsistentwiththerequirementsofthis
License.Eachcontributorgrantsyouanon-exclusive,worldwide,royalty-freepatentlicenseunderthecontributor'sessentialpatentclaims,tomake,
use,sell,offerforsale,importandotherwiserun,modifyandpropagatethecontentsofitscontributorversion.Inthefollowingthreeparagraphs,
a"patentlicense"isanyexpressagreementorcommitment,howeverdenominated,nottoenforceapatent(suchasanexpresspermissiontopracticea
patentorcovenantnottosueforpatentinfringement).To"grant"suchapatentlicensetoapartymeanstomakesuchanagreementorcommitment
nottoenforceapatentagainsttheparty,tfyouconveyacoveredwork,knowinglyrelyingonapatentlicense,andtheCorrespondingSourceof
theworkisnotavailableforanyonetocopy,freeofchargeandunderthetermsofthisLicense,throughapubliclyavailablenetworkserverorother
readilyaccessiblemeans,thenyoumusteither(I)causetheCorrespondingSourcetobesoavailable,or(2)arrangetodepriveyourselfofthe
benefitofthepatentlicenseforthisparticularwork,or(3)arrange,inamannerconsistentwiththerequirementsofthisLicense,toextendthepatent
licensetodownstreamrecipients."Knowinglyrelying"meansyouhaveactualknowledgethat,butforthepatentlicense,yourconveyingthecovered
workinacountry,oryourrecipient'suseofthecoveredworkinacountry,wouldinfringeoneormoreidentifiablepatentsinthatcountrythatyou
havereasontobelievearevalid.If,pursuanttoorinconnectionwithasingletransactionorarrangement,youconvey,orpropagatebyprocuring
conveyanceof,acoveredwork,andgrantapatentlicensetosomeofthepartiesreceivingthecoveredworkauthorizingthemtouse,propagate,
modifyorconveyaspecificcopyofthecoveredwork,thenthepatentlicenseyougrantisautomaticallyextendedtoallrecipientsofthecoveredwork
andworksbasedonit.
Apatentlicenseis"discriminatory"ifitdoesnotincludewithinthescopeofitscoverage,prohibitstheexerciseof,orisconditionedonthenon-
exerciseofoneormoreoftherightsthatarespecificallygrantedunderthisLicense.Youmaynotconveyacoveredworkifyouareapartytoan
arrangementwithathirdpartythatisinthebusinessofdistributingsoftware,underwhichyoumakepaymenttothethirdpartybasedontheextent
ofyouractivityofconveyingthework,andunderwhichthethirdpartygrants,toanyofthepartieswhowouldreceivethecoveredworkfromyou,a
discriminatorypatentlicense(a)inconnectionwithcopiesofthecoveredworkconveyedbyyou(orcopiesmadefromthosecopies),or(b)primarily
forandinconnectionwithspecificproductsorcompilationsthatcontainthecoveredwork,unlessyouenteredintothatarrangement,orthatpatent
licensewasgranted,priorto28March2007.
NothinginthisLicenseshallbeconstruedasexcludingorlimitinganyimpliedlicenseorotherdefensestoinfringementthatmayotherwisebe
availabletoyouunderapplicablepatentlaw.
12.NoSurrenderofOthers'Freedom.
Ifconditionsareimposedonyou(whetherbycourtorder,agreementorotherwise)thatcontradicttheconditionsofthisLicense,theydonotexcuse
youfromtheconditionsofthisLicense.IfyoucannotconveyacoveredworksoastosatisfysimultaneouslyyourobligationsunderthisLicenseand
anyotherpertinentobligations,thenasaconsequenceyoumaynotconveyitatall.Forexample,ifyouagreetotermsthatobligateyoutocollecta
royaltyforfurtherconveyingfromthosetowhomyouconveytheProgram,theonlywayyoucouldsatisfyboththosetermsandthisLicensewouldbe
torefrainentirelyfromconveyingtheProgram.
13.UsewiththeGNUAfferoGeneralPublicLicense.
NotwithstandinganyotherprovisionofthisLicense,youhavepermissiontolinkorcombineanycoveredworkwithaworklicensedunderversion3
oftheGNUAfferoGeneralPublicLicenseintoasinglecombinedwork,andtoconveytheresultingwork.ThetermsofthisLicensewillcontinueto
applytothepartwhichisthecoveredwork,butthespecialrequirementsoftheGNUAfferoGeneralPublicLicense,section13,concerninginteraction
throughanetworkwillapplytothecombinationassuch.
14.RevisedVersionsofthisLicense.
TheFreeSoftwareFoundationmaypublishrevisedand/ornewversionsoftheGNUGeneralPublicLicensefromtimetotime.Suchnewversionswill
besimilarinspirittothepresentversion,butmaydifferindetailtoaddressnewproblemsorconcerns.Eachversionisgivenadistinguishingversion
number.IftheProgramspecifiesthatacertainnumberedversionoftheGNUGeneralPublicLicense"oranylaterversion"appliestoit,youhavethe
optionoffollowingthetermsandconditionseitherofthatnumberedversionorofanylaterversionpublishedbytheFreeSoftwareFoundation.Ifthe
ProgramdoesnotspecifyaversionnumberoftheGNUGeneralPublicLicense,youmaychooseanyversioneverpublishedbytheFreeSoftware
Foundation.IftheProgramspecifiesthataproxycandecidewhichfutureversionsoftheGNUGeneralPublicLicensecanbeused,thatproxy's
publicstatementofacceptanceofaversionpermanentlyauthorizesyoutochoosethatversionfortheProgram.Laterlicenseversionsmaygiveyou
additionalordifferentpermissions.However,noadditionalobligationsareimposedonanyauthororcopyrightholderasaresultofyourchoosingto
followalaterversion.
15.DisclaimerofWarranty.
THEREISNOWARRANTYFORTHEPROGRAM,TOTHEEXTENTPERMITTEDBYAPPLICABLELAW.EXCEPTWHENOTHERWISESTATED
INWRITINGTHECOPYRIGHTHOLDERSAND/OROTHERPARTIESPROVIDETHEPROGRAM"ASIS"WITHOUTWARRANTYOFANYKIND,
EITHEREXPRESSEDORIMPLIED,iNCLUDING,BUTNOTLIMITEDTO,THEiMPLiEDWARRANTIESOFMERCHANTABILITYANDFITNESS
FORAPARTICULARPURPOSE.THEENTIRERtSKASTOTHEQUALITYANDPERFORMANCEOFTHEPROGRAMISWITHYOU.SHOULD
THEPROGRAMPROVEDEFECTIVE,YOUASSUMETHECOSTOFALLNECESSARYSERVICING,REPAIRORCORRECTION.
16.LimitationofLiability.
INNOEVENTUNLESSREQUIREDBYAPPLICABLELAWORAGREEDTOINWRITINGWiLLANYCOPYRIGHTHOLDER,ORANYOTHER
PARTYWHOMODIFIESAND/ORCONVEYSTHEPROGRAMASPERMITTEDABOVE,BELIABLETOYOUFORDAMAGES,iNCLUDINGANY
GENERAL,SPECIAL,iNCiDENTALORCONSEQUENTIALDAMAGESARISINGOUTOFTHEUSEORINABILITYTOUSETHEPROGRAM
(iNCLUDiNGBUTNOTLiMiTEDTOLOSSOFDATAORDATABEINGRENDEREDINACCURATEORLOSSESSUSTAINEDBYYOUORTHIRD
PARTIESORAFAILUREOFTHEPROGRAMTOOPERATEWiTHANYOTHERPROGRAMS),EVENIFSUCHHOLDEROROTHERPARTYHAS
BEENADVISEDOFTHEPOSSIBiLiTYOFSUCHDAMAGES.
17.InterpretationofSections15and16.
Ifthedisclaimerofwarrantyandlimitationofliabilityprovidedabovecannotbegivenlocallegaleffectaccordingtotheirterms,reviewingcourtsshall
applylocallawthatmostcloselyapproximatesanabsolutewaiverofallcivilliabilityinconnectionwiththeProgram,unlessawarrantyorassumption
ofliabilityaccompaniesacopyofthePrograminreturnforafee.
[_3ENDOFTERMSANDCONDITIONS
How to Apply These Terms to Your New Programs
If you develop a new program, and you want it to be of the greatest possible use to the public, the best way to achieve this is to make it free software
which everyone can redistribute and change under these terms. To do so, attach the following notices to the program. It is safest to attach them to the start
of each source file to most effectively state the exclusion of warranty; and each file should have at least the "copyright" line and a pointer to where the full
notice is found.
<one line to give the program's name and a brief idea of what it does.> Copyright (C) <year> <name of author>
This program isfree software: you can redistribute it and/or modify it under the terms of the GNU General Public License as published by the
Free Software Foundation, either version 3 of the License, or (at your option) any later version.
This program is distributed in the hope that it will be useful, but WITHOUT ANY WARRANTY; without even the implied warranty of
MERCHANTABILITYorFITNESSFORAPARTICULARPURPOSE.SeetheGNUGeneralPublicLicenseformoredetails.
YoushouldhavereceivedacopyoftheGNUGeneralPublicLicensealongwiththisprogram.Ifnot,see<http://www.gnu.org/licenses/>.
Alsoaddinformationonhowtocontactyoubyelectronicandpapermail.
Iftheprogramdoesterminalinteraction,makeitoutputashortnoticelikethiswhenitstartsinaninteractivemode:
<program>Copyright(C)<year><nameofauthor>ThisprogramcomeswithABSOLUTELYNOWARRANTY;fordetailstype'showw'.
Thisisfreesoftware,andyouarewelcometoredistributeitundercertainconditions;type'showc'fordetails.
Thehypotheticalcommands'showw'and"showc'shouldshowtheappropriatepartsoftheGeneralPublicLicense.Ofcourse,yourprogram's
commandsmightbedifferent;foraGUIinterface,youwouldusean"aboutbox".
Youshouldalsogetyouremployer(ifyouworkasaprogrammer)orschool,ifany,tosigna"copyrightdisclaimer"fortheprogram,ifnecessary.
Formoreinformationonthis,andhowtoapplyandfollowtheGNUGPL,see<http://www.gnu.org/licenses/>.
TheGNUGeneralPublicLicensedoesnotpermitincorporatingyourprogramintoproprietaryprograms.Ifyourprogramisasubroutinelibrary,youmay
consideritmoreusefultopermitlinkingproprietaryapplicationswiththelibrary.Ifthisiswhatyouwanttodo,usetheGNULesserGeneralPublicLicense
insteadofthisLicense.Butfirst,pleaseread<http://www.gnu.org/philosophy/why-not-lgpl.html>.
TheOpenSSLtoolkitstaysunderaduallicense,i.e.boththeconditionsoftheOpenSSLLicenseandtheoriginalSSLeaylicenseapplytothetoolkit.See
belowfortheactuallicensetexts.ActuallybothlicensesareBSD-styleOpenSourcelicenses.IncaseofanylicenseissuesrelatedtoOpenSSLplease
contactopenssl-core@openssl.org.
OpenSSL License
Copyright (c) 1998-2007 The OpenSSL Project. All rights reserved.
Redistribution and use in source and binary forms, with or without modification, are permitted provided that the following conditions are met:
1. Redistributions of source code must retain the above copyright notice, this list of conditions and the following disclaimer.
2. Redistributions in binary form must reproduce the above copyright notice, this list of conditions and the following disclaimer in the documentation and/
or other materials provided with the distribution.
3. All advertising materials mentioning features or use of this software must display the following acknowledgment: "This product includes software
developed by the OpenSSL Project for use in the OpenSSL Toolkit. (http://www.openssl.org/)"
4. The names "OpenSSL Toolkit" and "OpenSSL Project" must not be used to endorse or promote products derived from this software without prior
written permission. For written permission, please contact openssl-core@openssl.org.
5. Products derived from this software may not be called "OpenSSL nor may "OpenSSL" appear in their names without prior written permission of the
OpenSSL Project.
6. Redistributions of any form whatsoever must retain the following acknowledgment: "This product includes software developed by the OpenSSL
Project for use in the OpenSSL Toolkit (http://www.openssl.org/)"
THIS SOFTWARE IS PROVIDED BY THE OpenSSL PROJECT "'AS IS" AND ANY EXPRESSED OR IMPLIED WARRANTIES, INCLUDING, BUT
NOT LIMITED TO, THE IMPLIED WARRANTIES OF MERCHANTABILITY AND FITNESS FOR A PARTICULAR PURPOSE ARE DISCLAIMED. IN NO
EVENT SHALL THE OpenSSL PROJECT OR ITS CONTRIBUTORS BE LIABLE FOR ANY DIRECT, INDIRECT, INCIDENTAL, SPECIAL, EXEMPLARY,
OR CONSEQUENTIAL DAMAGES (INCLUDING, BUT NOT LIMITED TO, PROCUREMENT OF SUBSTITUTE GOODS OR SERVICES; LOSS OF
USE, DATA, OR PROFITS; OR BUSINESS INTERRUPTION) HOWEVER CAUSED AND ON ANY THEORY OF LIABILITY, WHETHER IN CONTRACT,
STRICT LIABILITY, OR TORT (INCLUDING NEGLIGENCE OR OTHERWISE) ARISING INANY WAY OUT OF THE USE OF THIS SOFTWARE, EVEN IF
ADVISED OF THE POSSIBILITY OF SUCH DAMAGE.
This product includes cryptographic software written by Eric Young (eay@cryptsoft.com). This product includes software written by Tim Hudson (tjh@
cryptsoft.com).
Original SSLeay License
Copyright (C) 1995-1998 Eric Young (eay@cryptsoft.com)All rights reserved.
This package is an SSL implementation written by Eric Young (eay@cryptsoft.com). The implementation was written so as to conform with Netscapes
SSL.
This library is free for commercial and non-commercial use as long as the following conditions are aheared to. The following conditions apply to all code
found in this distribution, be it the RC4, RSA, Ihash, DES, etc., code; not just the SSL code. The SSL documentation included with this distribution is
covered by the same copyright terms except that the holder is Tim Hudson (tjh@cryptsoft.com).
Copyright remains Eric Young's, and as such any Copyright notices in the code are not to be removed. If this package is used in a product, Eric
Young should be given attribution as the author of the parts of the library used. This can be in the form of a textual message at program startup or in
documentation (online or textual) provided with the package.
Redistribution and use in source and binary forms, with or without modification, are permitted provided that the following conditions are met:
1. Redistributions of source code must retain the copyright notice, this listof conditions and the following disclaimer.
2. Redistributions in binary form must reproduce the above copyright notice, this listof conditions and the following disclaimer in the documentation and/
or other materials provided with the distribution.
3. All advertising materials mentioning features or use of this software must display the following acknowledgement: "This product includes cryptographic
software written by Eric Young (eay@cryptsoft.com)" The word 'cryptographic' can be left out if the rouines from the library being used are not
cryptographic related :-).
4. If you include any Windows specific code (or a derivative thereof) from the apps directory (application code) you must include an acknowledgement: "
This product includes software written by Tim Hudson (tjh@cryptsoft.com)"
THIS SOFTWARE IS PROVIDED BY ERIC YOUNG "AS IS" AND ANY EXPRESS OR IMPLIED WARRANTIES, INCLUDING, BUT NOT LIMITED TO,
THE IMPLIED WARRANTIES OF MERCHANTABILITY AND FITNESS FOR A PARTICULAR PURPOSE ARE DISCLAIMED. IN NO EVENT SHALL
THE AUTHOR OR CONTRIBUTORS BE LIABLE FOR ANY DIRECT, INDIRECT, INCIDENTAL, SPECIAL, EXEMPLARY, OR CONSEQUENTIAL
DAMAGES (INCLUDING, BUT NOT LIMITED TO, PROCUREMENT OF SUBSTITUTE GOODS OR SERVICES; LOSS OF USE, DATA, OR PROFITS;
OR BUSINESS INTERRUPTION) HOWEVER CAUSED AND ON ANY THEORY OF LIABILITY, WHETHER IN CONTRACT, STRICT LIABILITY, OR
TORT (INCLUDING NEGLIGENCE OR OTHERWISE) ARISING INANY WAY OUT OF THE USE OF THIS SOFTWARE, EVEN IF ADVISED OF THE
POSSIBILITY OF SUCH DAMAGE.
The licence and distribution terms for any publically available version or derivative of this code cannot be changed, i.e. this code cannot simply be copied
and put under another distribution licence [including the GNU Public Licence.]
