SAMSUNG Side By Refrigerator Manual L0908772
User Manual: SAMSUNG SAMSUNG Side by Side Refrigerator Manual SAMSUNG Side by Side Refrigerator Owner's Manual, SAMSUNG Side by Side Refrigerator installation guides
Open the PDF directly: View PDF ![]() .
.
Page Count: 32
Write the model and serial number here:
Model #
E
RS275"*
E
ERATOR
RS277"*
Serial #
Find these numbers on a label of the
refrigerator'scabinet on the left hand-side wall.
R'S MANUAL ISTALLATION
CONTENTS
SAFETYWARNINGSIGNS...............................................................2
OPERATING INSTRUCTIONS ........................................................4
SETTINGUPTHE REFRIGERATOR.........................................................4
MAJORFEATURES.....................................................................................4
CONTROLPANEL........................................................................................5
DIGITAL PANEL...........................................................................................6
DEMOMODE...............................................................................................6
TEMPERATURECONTROL.......................................................................7
ICE and COLDWATERDISPENSER.........................................................7
SHELVESand BINS.....................................................................................8
FOODSTORAGEGUIDE...........................................................................9
CoolSelectZoneTM DrawerGUIDE.............................................................11
REMOVINGTHE FREEZERACCESSORIES..........................................13
REMOVINGTHE REFRIGERATORACCESSORIES..............................13
CLEANINGTHEACCESSORIES.............................................................14
CHANGINGTHE INTERIORLIGHT.........................................................15
WATERFILTER..........................................................................................16
DOORS.......................................................................................................16
INSTALLATIONINSTRUCTIONS................................................17
INSTALLATIONOF THEREFRIGERATOR.............................................17
REMOVINGTHE REFRIGERATORDOORS...........................................18
REATTACHINGTHE REFRIGERATORDOORS......................................21
LEVELINGTHEREFRIGERATOR............................................................24
ADJUSTINGTHECLEARANCEBETWEENTHE DOORS....................25
CHECKINGTHE WATERDISPENSERLINE...........................................26
INSTALLATIONOF THEWATERDISPENSERLINE...............................27
TROUBLESHOOTING...............................................................................30
CONSUMER SUPPORT ....................................................................31
WARRANTY...............................................................................................31
In the U.S. for questions about features,
operation/performance, parts, accesories or service, call:
1-800-726-7864 (1-800-SAMSUNG)
www.samsung.com
DA99-O1506A REV(O.O)
WARNING
Beforeoperatingthe appliance,pleasereadandretainthis manualthoroughlyfor yourreference.
Becausethesefollowingoperatinginstructionscovervariousmodels,the characteristicsof your refrigerator
maydifferslightlyfromthosedescribedinthismanual.
The applianceis notintendedfor useby childrenorinfirmpersonswithoutadultsupervision.
Childrenshouldbe supervisedto ensurethattheydo notplaywiththe appliance.
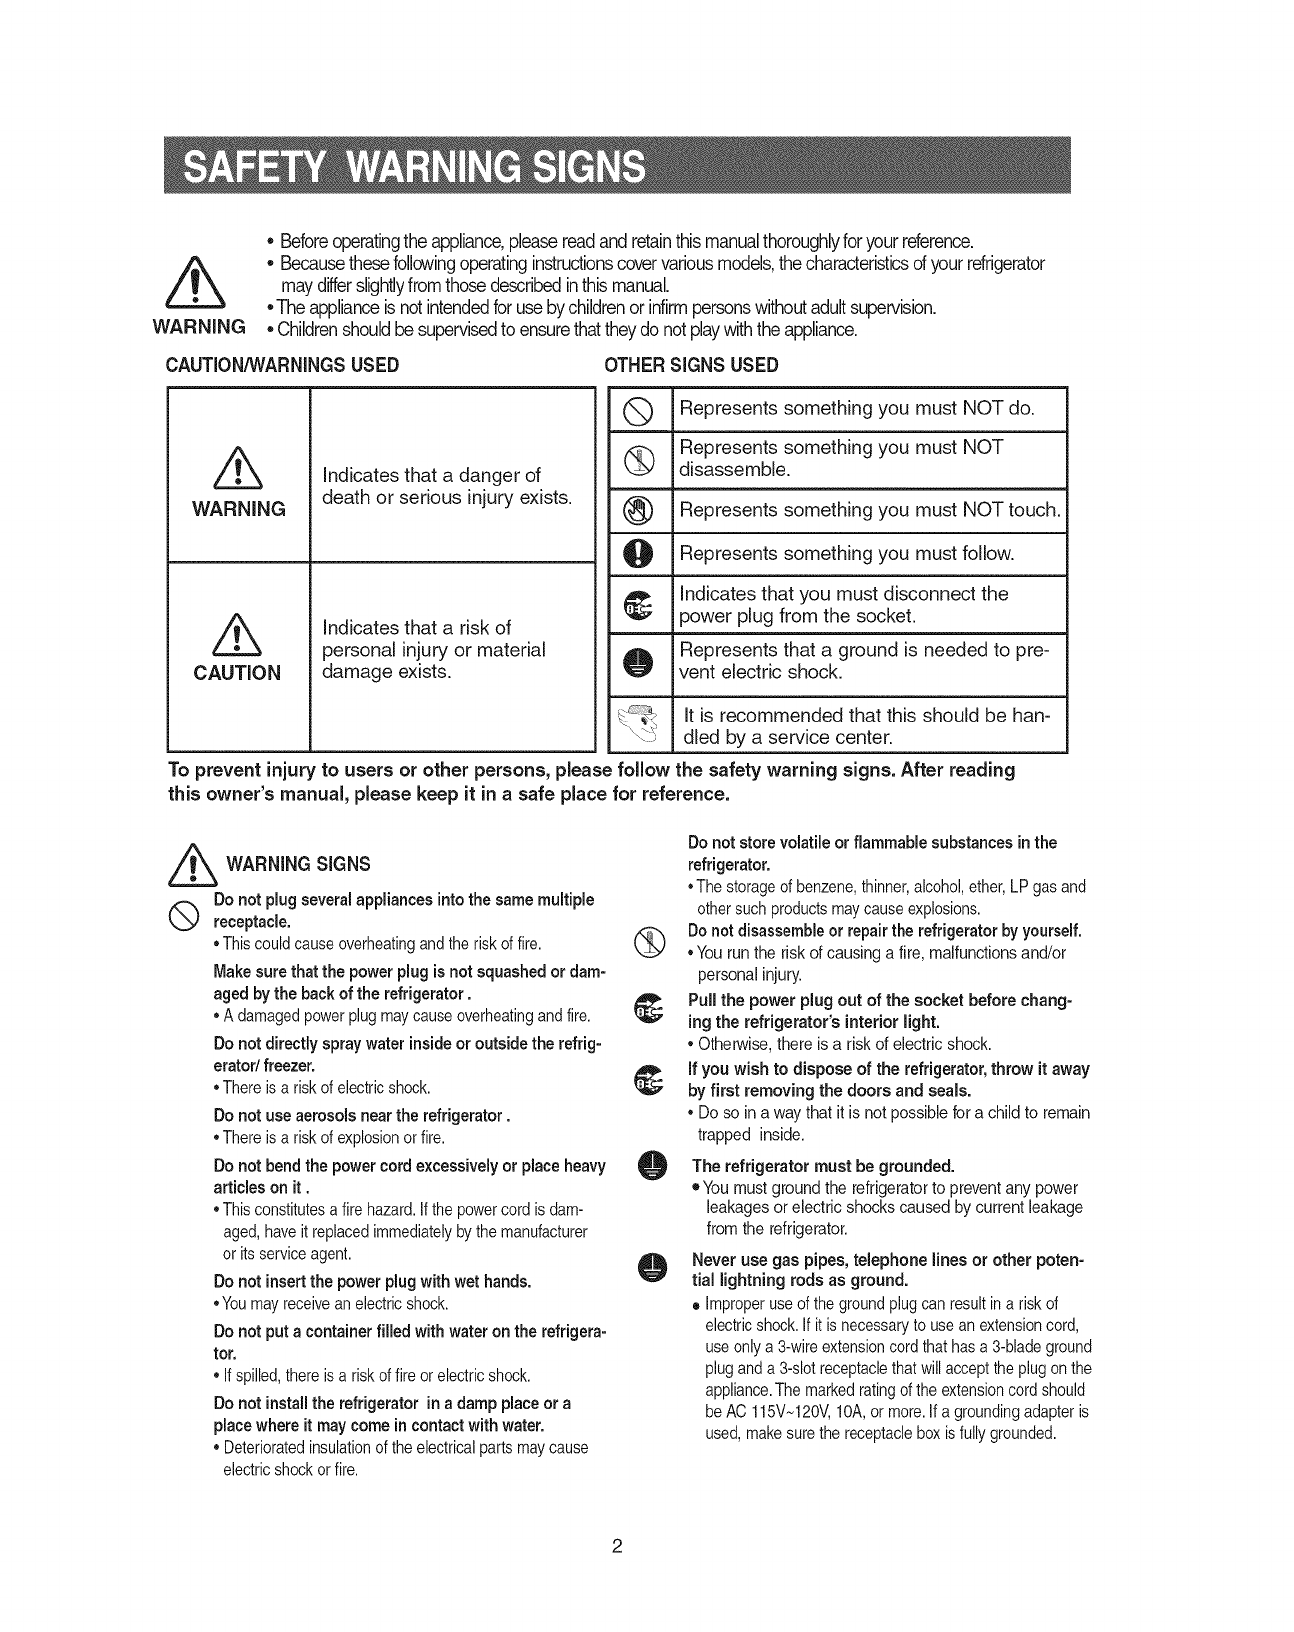
CAUTION/_NARNINGSUSED OTHER SIGNS USED
Q Represents something you must NOTdo.
Represents something you must NOT
(_ disassemble.
Represents something you must NOTtouch.
Represents something you must follow.
Indicates that you must disconnect the
power plug from the socket.
Represents that a ground is needed to pre-
vent electric shock.
It is recommended that this should be han-
dled by a service center.
Z5
WARNING
CAUTION
Indicates that a danger of
death or serious injury exists.
Indicates that a risk of
personal injury or material
damage exists.
To prevent injury to users or other persons, please follow the safety warning signs. After reading
this owner's manual, please keep it in a safe place for reference.
_ WARNING SIGNS
Do not plug several appliances intothe same multiple
receptacle.
°Thiscouldcauseoverheatingandthe riskof fire.
Makesure that the power plug is not squashed or dam-
agedby the back of the refrigerator.
°A damagedpowerplugmaycauseoverheatingandfire.
Do not directly spray water inside or outside the refrig-
erator/ freezer.
°There is a riskof electricshock.
Do not use aerosols near the refrigerator.
°There is a riskof explosionorfire.
Do not bend the power cord excessively or place heavy
articles on it.
°Thisconstitutesa firehazard.Ifthepowercord is dam-
aged,haveit replacedimmediatelyby themanufacturer
or itsserviceagent.
Do not insertthe powerplugwithwet hands.
°Youmayreceivean electricshock.
Do not put a containerfilled with water on the refrigera-
tor.
• If spilled,thereis a riskof fire orelectricshock.
Do not install the refrigerator in a damp placeor a
placewhere it may come in contact with water,
• Deterioratedinsulationof theelectricalpartsmaycause
electricshockor fire.
Do not store volatile or flammable substances inthe
refrigerator.
• The storageof benzene,thinner,alcohol,ether,LP gasand
othersuchproductsmaycauseexplosions.
(_ Do not disassembleor repair the refrigerator by yourself.
° You run the risk of causing a fire, malfunctionsand/or
personal injury.
Pull the power plug out of the socket before chang-
ing the refrigerator's interior light.
° Otherwise,there is ariskof electric shock.
if you wish to dispose of the refrigerator, throw it away
by first removing the doors and seals.
° Do so ina way that it is not possible for a child to remain
trapped inside.
Orefrigerator must grounded.
The be
• You must ground the refrigeratorto prevent any power
leakages or electric shocks caused by current leakage
from the refrigerator.
O Never use gas pipes,telephone lines or other poten-
tial lightning rods as ground.
• Improperuseof thegroundplug canresultin a risk of
electricshock.If itis necessaryto usean extensioncord,
useonlya 3-wireextensioncord that has a 3-bladeground
pluganda 3-slotreceptaclethatwill accepttheplugonthe
appliance.The marked ratingof the extensioncord should
beAC 115V_120V,10A,or more.If a groundingadapteris
used,makesurethe receptaclebox is fullygrounded.
(9
®
CAUTION SIGNS
Do not overfill the refrigerator with food.
• When you open the door, an itemmay fall out and cause
personal injuryor material damage.
Do not put bottles or glass containers inthe freezer.
• When the contents freeze, the glass may break and
cause personal injury.
ifthe wall socket is loose, do not insert the power
plug.
•There is a risk of electric shock or fire.
Do not disconnect the power cordby pulling on it.
• Damageto thecord may causea short-circuit,fire
and/or electricshock.
• If thepowercord is damaged,itmust be replacedby
the manufacturer,a certifiedserviceagentor qualified
servicepersonnel.
Do not store articles on the top of the appliance.
• Whenyou open orclosethe door,thearticlesmayfall
and causepersonalinjuryand/or materialdamage.
Do not store pharmaceutical products, scientific
materials and temperature-sensitive products in
the refrigerator.
• Productsthat requirestrict temperaturecontrolsmust
notbe storedin the refrigerator.
Do not let children hang on the door becausea
serious injurymayoccur.
If you sense pharmaceutical smells or smoke, pull
outthe power plug immediatelyand contact your
SAMSUNGElectronics service center.
Do nottouch the insidewalls of the freezer or
products stored in the freezer with wet hands,
•Itmaycausefrostbite.
Do not insertyourhands into the bottom area
under the appliance.
• Any sharpedgesmaycause personalinjury.
Never putfingers or other objects into the
dispenser hole and icechute. It maycause per-
sonal injuryor material damage
Becareful not to damagethe door switches on the
insidewalls or middle of the refrigerator.
• If theyaredamaged,refrigeratordoesnotoperate
well.
DANGER
Risk of child entrapment. Before you throw away
your old refrigerator or freezer
• Takeoff thedoors
• Leavethe shelvesinplacesso that childrenmay
not easilyclimb inside.
O
@
@
@
f_
Do not use a wet ordamp clothwhen cleaningthe
plug. Removeany foreign matter or dust from the
power plugpins.
• Otherwisethereis a risk of causinga fire.
• Ifthe refrigeratorisdisconnectedfromthe power
supply,you shouldwaitfor at least five minutes
beforepluggingitbackin.
ifthe refrigerator is not to be used for a long
period of time, pull out the power plug.
• Deteriorationin the insulationmaycausefire.
•The applianceisnotintendedfor use byyoungchil-
drenor infirmpersonswithoutsupervision.
Youngchildrenshouldbesupervisedto ensurethat
theydo notplaywiththeappliance.
• Donot placethe equipmentdirectlyunderthesun-
light,etc.
•The appliancemustbepositionedso thatthe plugis
accessibleafterinstallation.
If thepowercord is damaged,it mustbe replaced
by themanufacturer,a certifiedserviceagentor a
qualifiedservicepersonnel.
If youhavea longvacationplanned,emptythe
refrigeratorand turnit off.Wipeexcessmoisture
fromthe insideand leavethe doorsopen.
Otherwise,odorandmold maydevelop.
Service warranty section
• Anychangesor modificationsperformedby a 3rd
partyon a finishedproductis notcoveredunder
Samsungwarrantyservice
Safety Caution section
• Samsungdoesnotrecommend3rd partymodifica-
tion,thereforeSamsungisnotresponsiblefor safety
issuesthat resultfrom3rd partymodifications.
3

Once you have performedthe following steps,your refrigerator should be fully operational.If not, check
the power supply and electricitysource. If you have any questions,contactyour SAMSUNG
servicecenter.
Place the refigeratorin an appropriate
locationwith reasonableclearance
betweenthe wall and the refrigerator.
(referto installationinstructions inthis
manual)
When the refrigerator is plugged in,
the interior light should come on when
you open the doors.
Set the temperature controlto the coldest
temperature and waitfor an hour.The
freezershould get slightly chilled andthe
motor should runsmoothly.
Once the refrigeratortemperature is suffi-
ciently low,you can store food in the
refrigerator.After starting the refrigerator,it
takes a few hoursto reach the appropriate
temperature.
Twin Cooling System
,,The refrigerator and the freezer have two evaporators. Given this inde-
pendent system, the freezer and the refrigerator are cooled individual-
ly and are, therefore, more efficient. Food odor from the refrigerator
does not affect food in the freezer due to separate air flow circulation.
Multi-Flow System
Cool air circulates through multiple vents on every shelf level.This pro-
vides even distribution of cooling inside cabinets to keep your food
fresh longer.
Xtra Space TM
,,Vertical room next to the ice maker in the freezer provides space for
pizza etc.
Door Alarm
Beeper reminds you that the door is open.
Xtra FreshTM
Optimized humidity control keeps vegetables & fruits fresh.
CoolSelect Zone TM Drawer (RS277)
,,User can select Quick Cool, Thaw and Select buttons to quickly
chill, thaw and cool items. Select Soft Freeze, Cool or Chill to control
the temperature of drawer.
4
RS275
Filter Indicator Cubed Crushed Ice off
Hold 3 sec. Child Lock
fo_ F Iter Reset) (Hold 3see,)
Ice Water
RS277"*
Power Cool
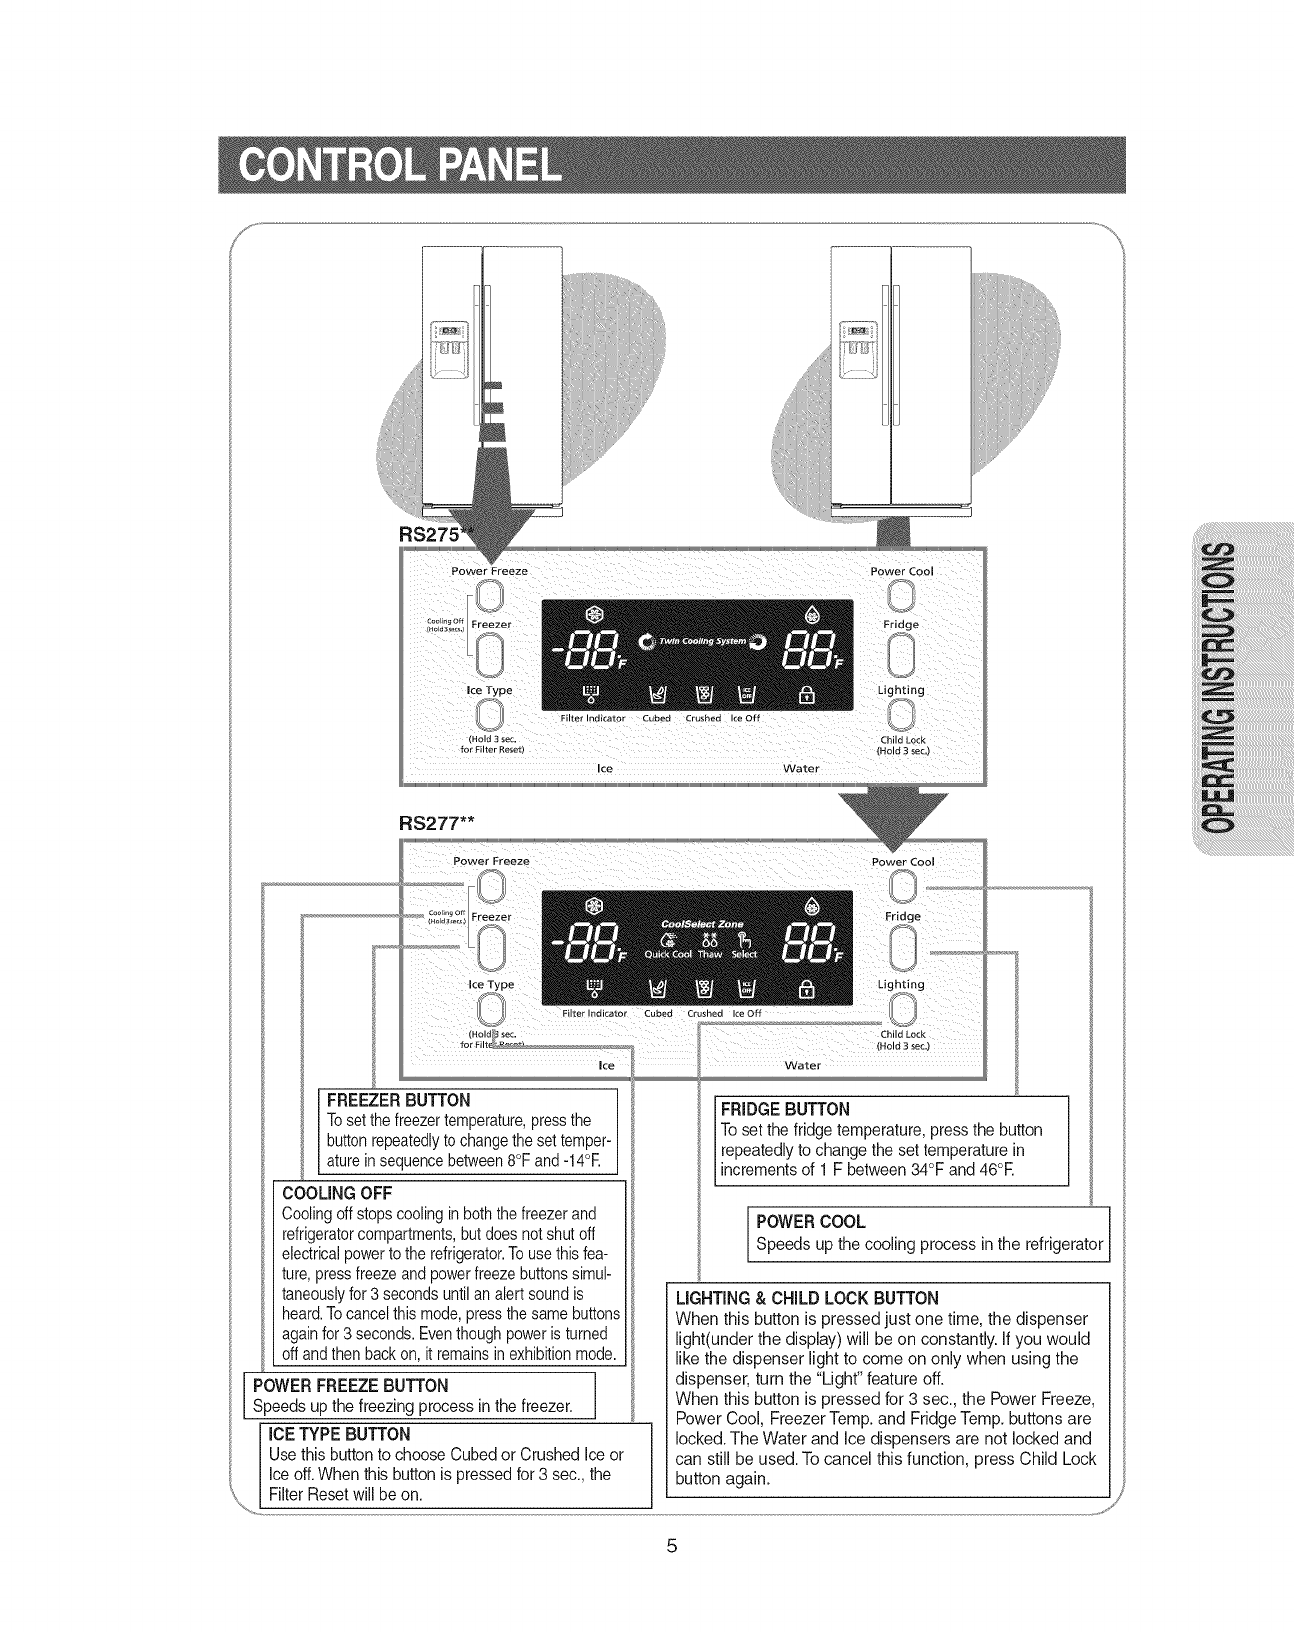
FREEZER BUTTON ]
Toset thefreezertemperature,pressthe
buttonrepeatedlyto changetheset temper-_
atureinsequencebetween8°F and -14°E
COOLING OFF
Coolingoffstopscoolingin boththefreezer and
refrigeratorcompartments,butdoes notshutoff
electricalpowerto the refrigerator.Touse thisfea-
ture,press freezeand powerfreezebuttonssimul-
taneouslyfor 3 secondsuntil analert sound is
heard.Tocancelthis mode,pressthesame buttons
againfor3 seconds.Eventhoughpoweristurned
offandthen back on, it remainsinexhibitionmode.
lPOWER FREEZE BUTTON J
Speeds up the freezing process in the freezer.
ICE TYPE BUTTON
Use this buttonto choose Cubed or Crushed Ice or
Ice off.When this button is pressed for 3 sec.,the
Filter Resetwill be on.
IFRIDGE BUTTON
To set the fridge temperature, press the button
repeatedly to change the set temperaturein
increments of 1 F between34°F and 46°E
POWER COOL refrigeratorSpeeds up the cooling process in the
LIGHTING & CHILD LOCK BUTTON
When this button is pressed just one time, the dispenser
light(under the display) will be on constantly. If you would
like the dispenser light to come on only when using the
dispenser, turn the "Light" feature off.
When this button is pressed for 3 sec., the Power Freeze,
Power Cool, Freezer Temp. and Fridge Temp. buttons are
locked. The Water and Ice dispensers are not locked and
can still be used. To cancel this function, press Child Lock
button again.
j_
5
or
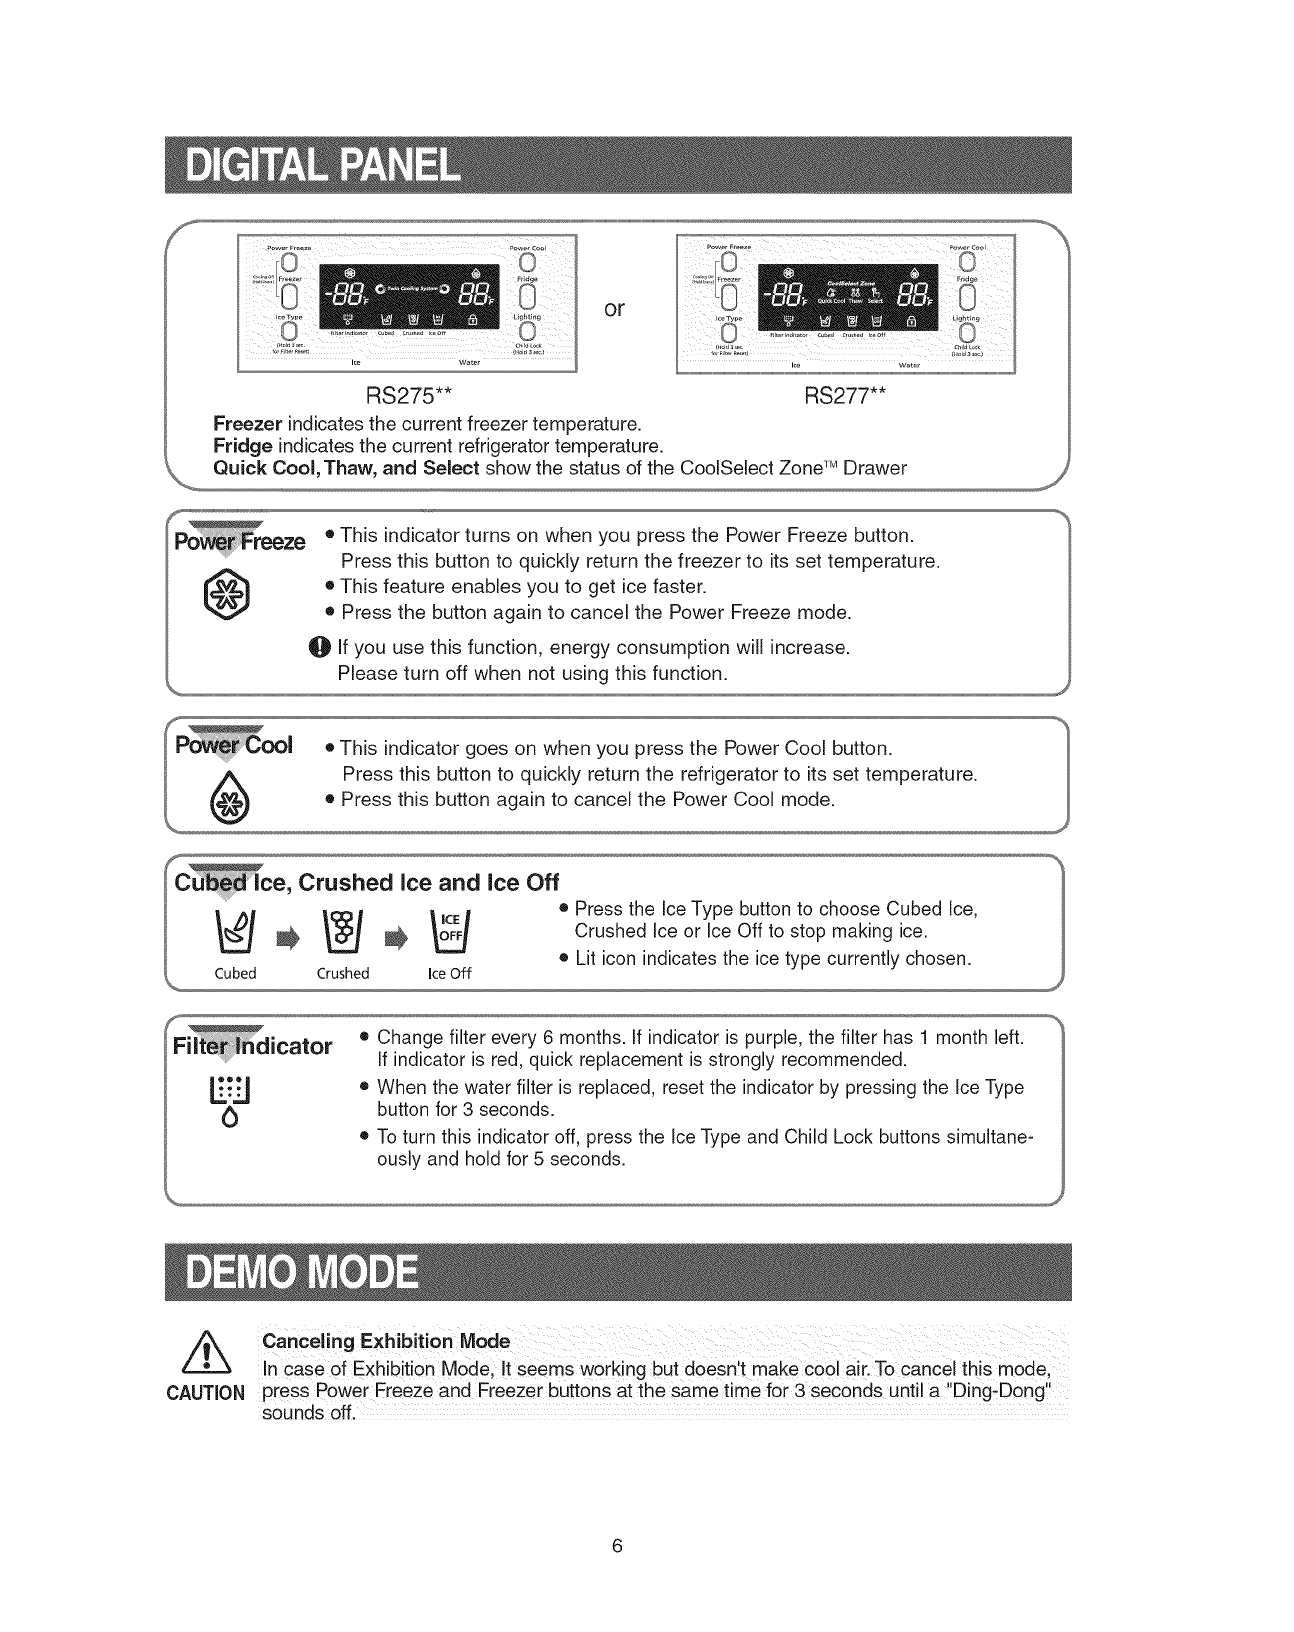
RS275"* RS277"*
Freezer indicates the current freezer temperature.
Fridge indicates the current refrigerator temperature.
Quick Cool, Thaw, and Select show the status of the CoolSelect Zone TM Drawer
@• This indicator turns on when you press the Power Freeze button.
Press this button to quickly return the freezer to its set temperature.
• This feature enables you to get ice faster.
• Press the button again to cancel the Power Freeze mode.
0 If you use this function, energy consumption will increase.
f
Filt_[Sdicator
!
• Change filter every 6 months. If indicator is purple, the filter has 1 month left.
If indicator is red, quick replacement is strongly recommended.
• When the water filter is replaced, reset the indicator by pressing the Ice Type
button for 3 seconds.
• To turn this indicator off, press the Ice Type and Child Lock buttons simultane-
ously and hold for 5 seconds.
/k
CAUTION
ca.celir,g ExhibitionMode
Incase of Exhibition M0de;!t seems working but doesnt make co01 aiil To cancel this mode,
press Power Freeze and Freezer buttons at the same time for 3 seconds until a Ding-Dong!
sounds off.
Freezer
• The freezer temperaturecan be set between
8°F and -14°E
• Pressthe Freezer. button repeatedly untilthe desired
set temperature is shown inthe temperature display.
• The temperature displaychanges in sequence
between8°F and -14°RWhen the displayreaches 8°F,
and if the button is pressedagain, it returnsto -14°E
• After five seconds,the display revertsto the actual
freezer temperature.The unit will then workto adjustto
the new desiredtemperature.
Refrigerator
• The refrigeratortemperature can be set between
46°F and 34°E
• Pressthe Fridge.button repeatedlyuntil the desired
temperature is shown inthe temperature display.
• The temperature displaychanges in sequence and
reverts inthe same way as the freezer.
/k
WARNING
• when iCecream is stOiedab0ve 4°F in freezei, it may melt!
e The temperature Ofthefreezer or the refiigerator risesfrom frequent Openings
and from warmfood.This may causethe d!gital displayto blinkiThe digital displayWillstop
blinking when the freezerand refrigeratorreturnto normal temperature.
ifthe temperaturecontrol does notresetthe temp,unplugthe refrigerator,wait 9rain,then plugit back in.
Press the ice Type button to select the type
of ice:
®Cubedice _i _ _ _' _'_
' ' For Cubed ice
\_/ ICE
•Crushedice _ :_ _ _
For Crushed ice
,/
•Noice _ _ _ lj, No ice
Jl\
For ice off
(_= If the Ice remains inthe ice bucket
cubed ice is Obtained, Ice stays in Cube
NOTE form and is crushed when the Crushed
ice button is presse& ....
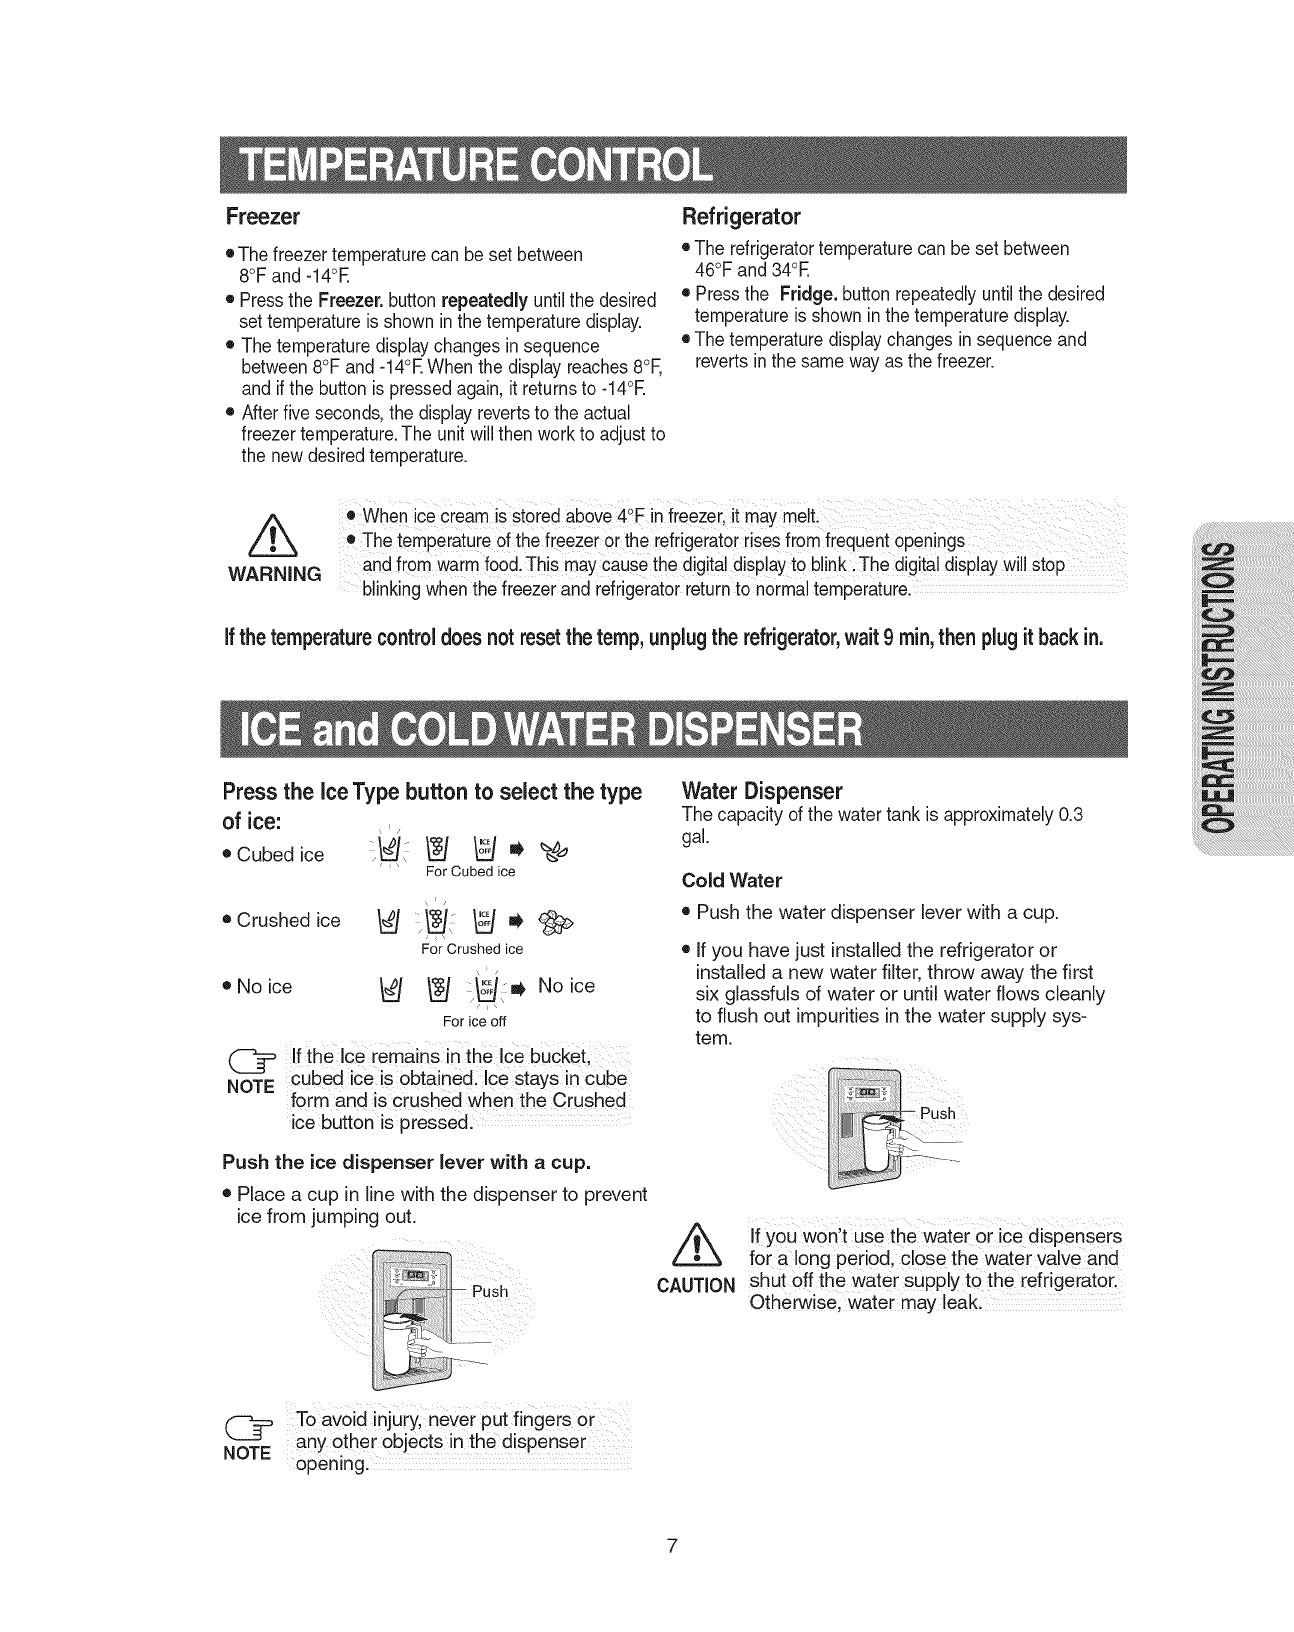
Push the ice dispenser lever with a cup.
• Place a cup in line with the dispenser to prevent
ice from jumping out.
(_ To avoid injury, never put fingers or
any other Objects inthe dispenser
NOTE opening.
Water Dispenser
The capacity of the water tank is approximately0.3
gal.
Cold Water
• Push the water dispenser lever with a cup.
• If you have just installed the refrigerator or
installed a new' water filter, throw away the first
six glassfuls of water or until water flows cleanly
to flush out impurities in the water supply sys-
tem.
CAUTION
If you won't use the water or ice dispensers
for a long period, close the water valve and
shut off the water Supply to the refrigerator.
Otherwise, Water may leak:
7
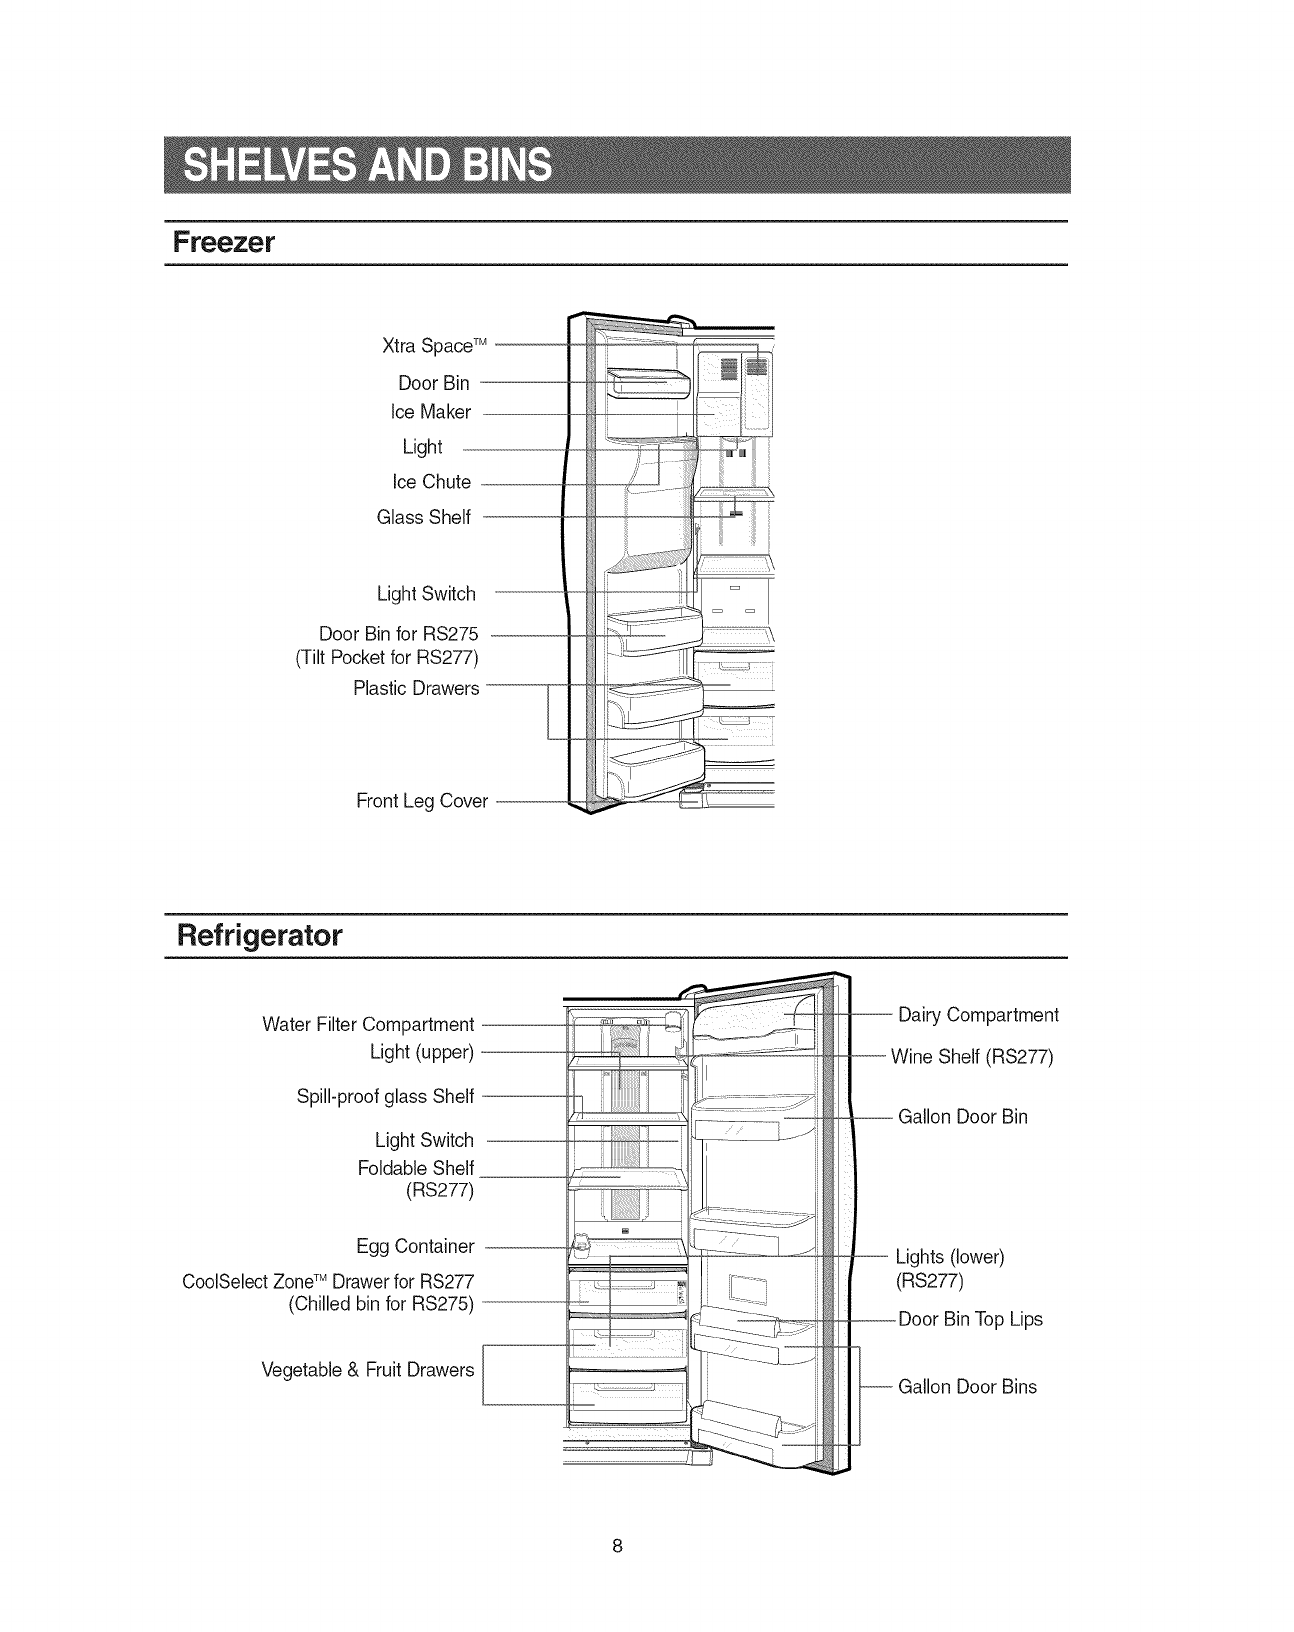
Freezer
Xtra SpaceTM '
Door Bin
Ice Maker
Light
Ice Chute
Glass Shelf
Light Switch
Door Bin for RS275 .
(Tilt Pocket for RS277)
Plastic Drawers- E
Front Leg Cover --
Refrigerator
Water Filter Compartment
Light (upper)
Spill-proof glass Shelf
Light Switch
Foldable Shelf
(RS277)
Egg Container
CoolSelect ZoneTM Drawer for RS277
(Chilled bin for RS275)
Vegetable & Fruit Drawers
-- Dairy Compartment
--Wine Shelf (RS277)
.Gallon Door Bin
Lights (lower)
(RS277)
w Door Bin Top Lips
Gallon Door Bins
8
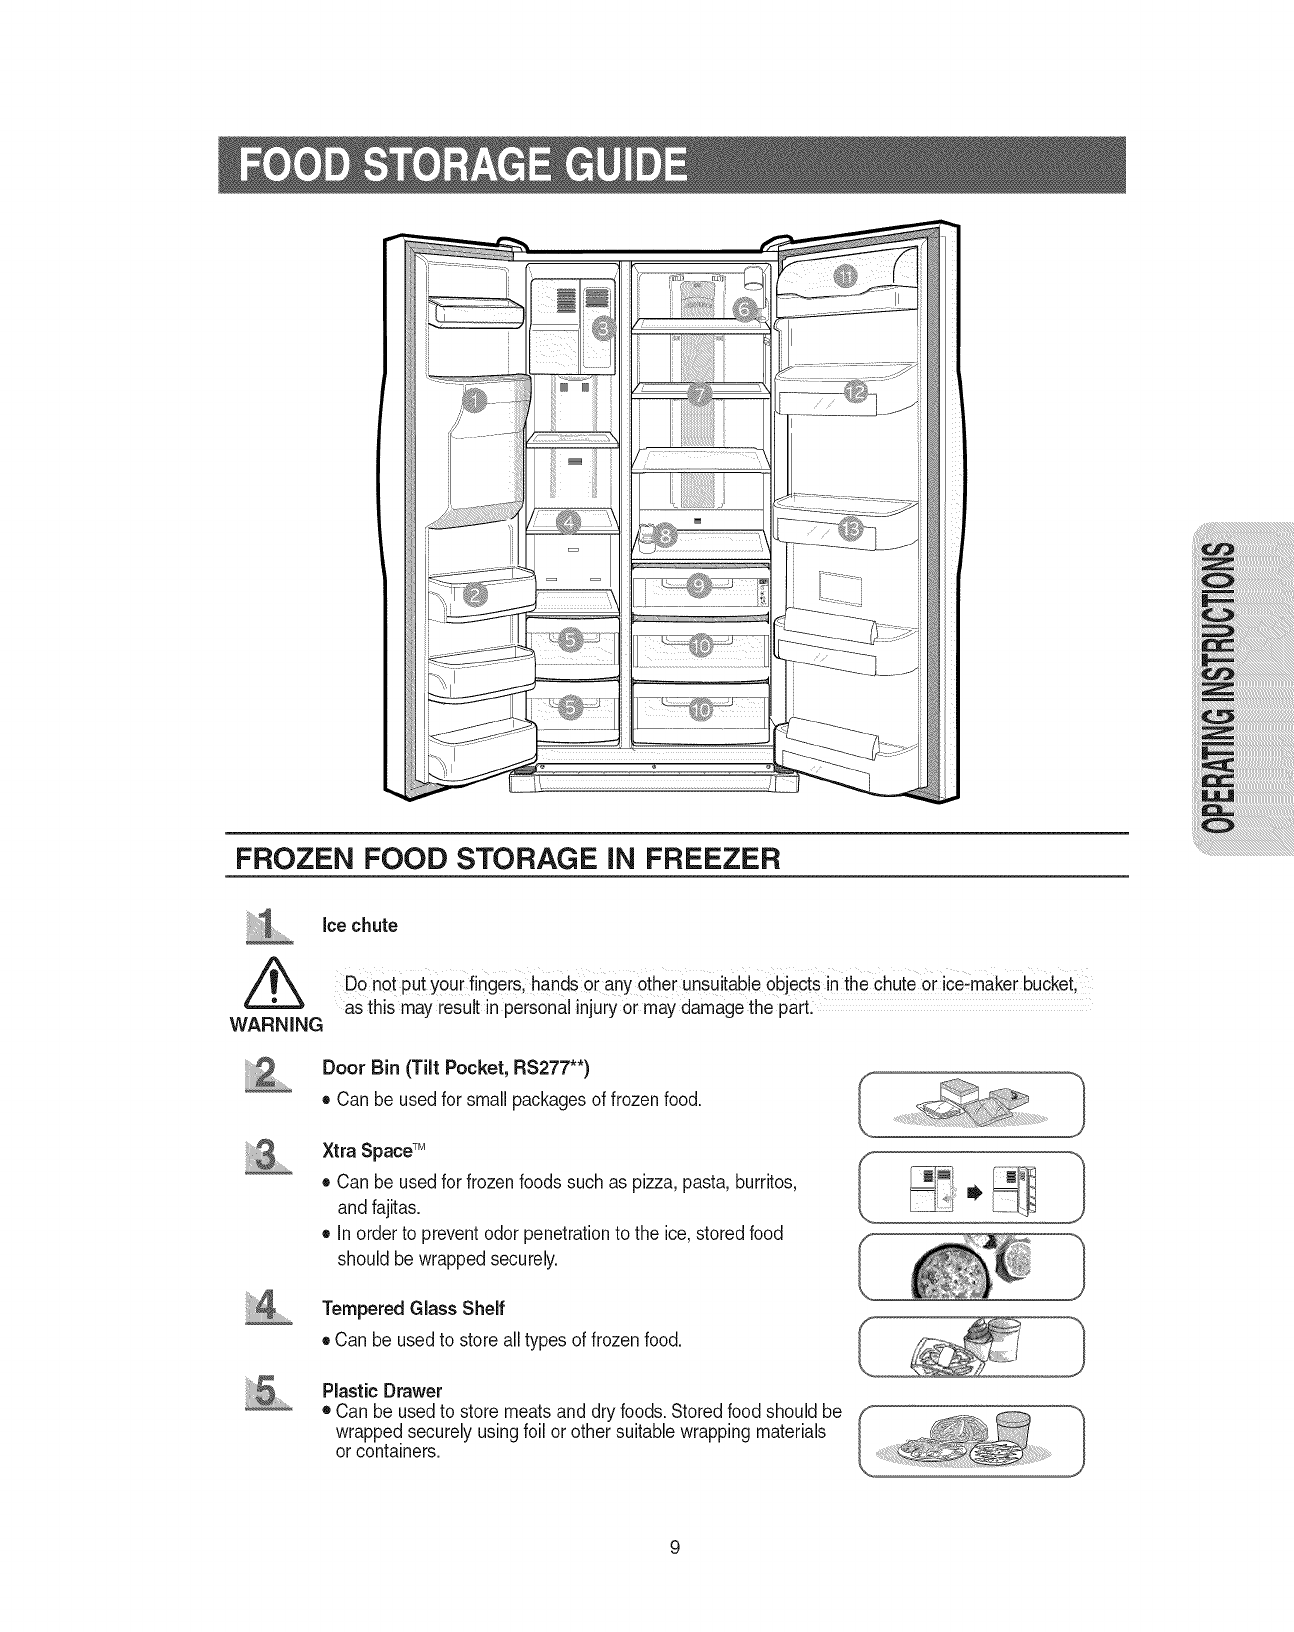
FROZEN FOOD STORAGE iN FREEZER
ice chute
hands °[ any °the rUnsuitable
as this may resultinpersonal injuryor maydamagethe part.
WARNING
Door Bin (Tilt Pocket, RS277"*)
• Can be used for small packages of frozen food.
Xtra SpaceTM
• Can be used for frozenfoods such as pizza, pasta, burritos,
and fajitas.
• In order to preventodor penetrationto the ice, storedfood
should be wrapped securely.
Tempered Glass Shelf
• Can be used to store alltypes of frozen food.
Plastic Drawer
• Can be used to store meats and dry foods. Storedfood should be
wrapped securely usingfoil or other suitablewrapping materials
or containers.
CHILLED FOOD STORAGE iN REFRIGERATOR
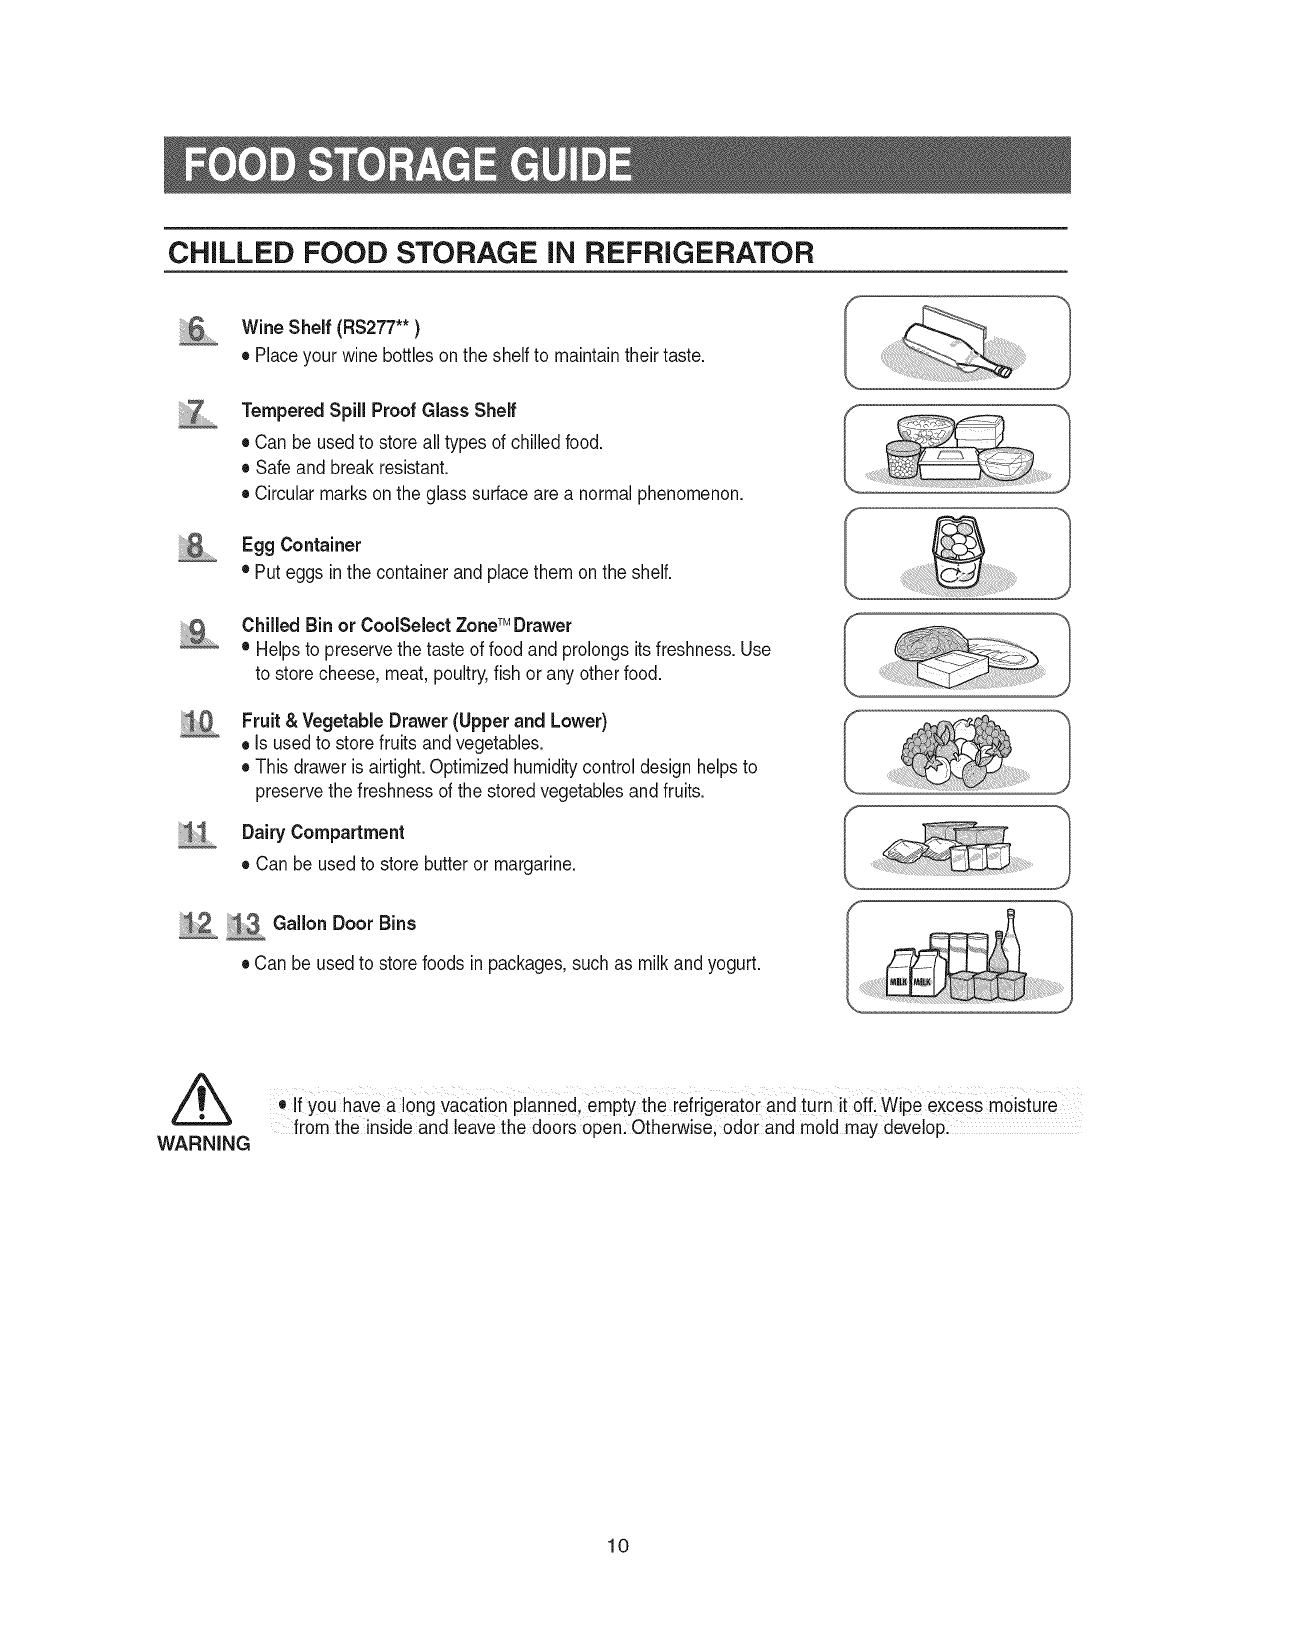
Wine Shelf (RS277"*)
•Placeyour wine bottles on the shelf to maintaintheir taste.
Tempered Spill Proof Glass Shelf
• Can be used to store all types of chilled food.
• Safe and break resistant.
• Circular marks on the glass surface are a normal phenomenon.
.....EggContainer
• Put eggsin the container and placethem on the shelf.
ii 2
Chilled Bin or CoolSelect ZoneTM Drawer
• Helpsto preservethe taste of food and prolongs its freshness.Use
to store cheese, meat, poultry,fish or any other food.
Fruit & Vegetable Drawer (Upper and Lower)
• Is usedto storefruits and vegetables.
• This drawer is airtight. Optimized humiditycontrol design helps to
preservethe freshness of the stored vegetablesand fruits.
Dairy Compartment
• Can be used to store butteror margarine.
_i3...........Gallon Door Bins
• Can be used to store foods in packages,such as milk and yogurt.
WARNING
.tf you have a long vacation planned, empty the refrigerate[ and turn kOff Wipe excess moistuie
from the inside and leave the doors open: Otherwise, odor and mold may develop.
10
RS277"*
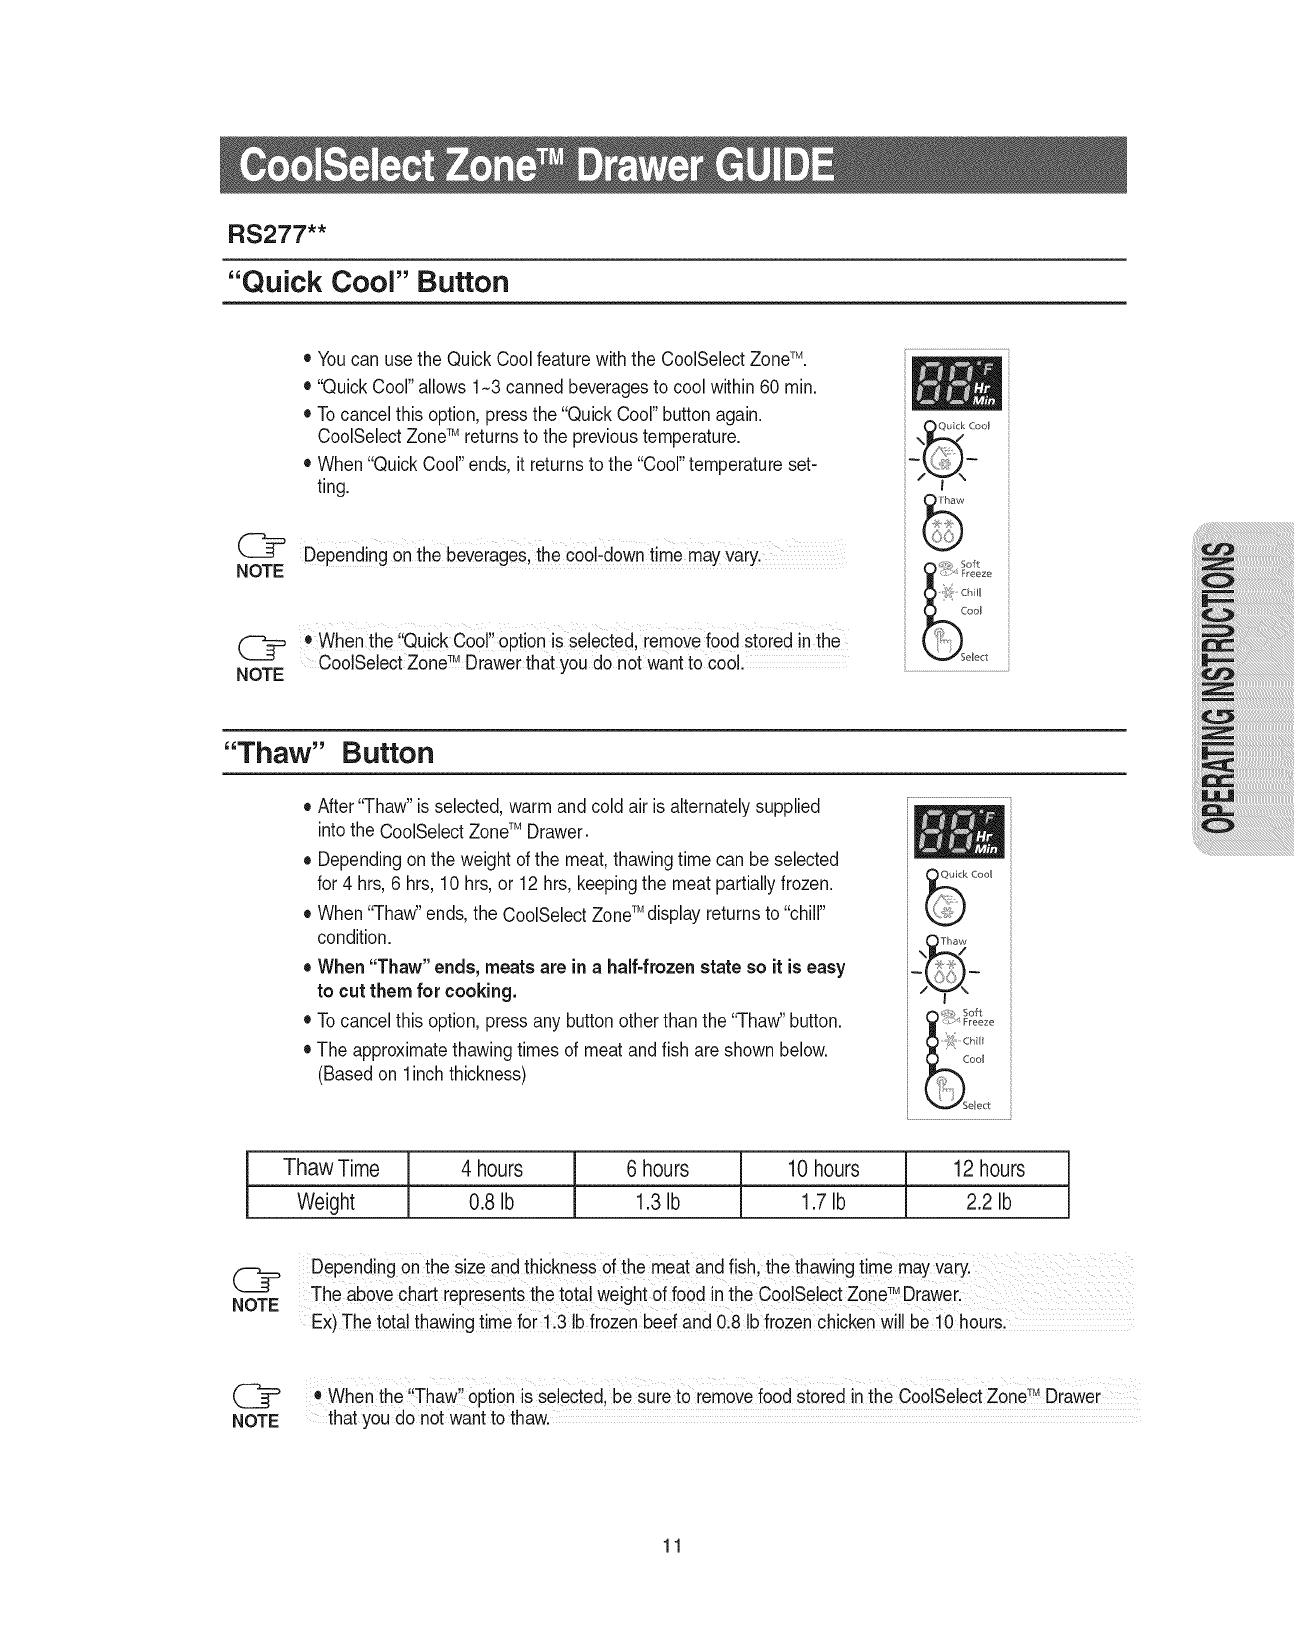
"Quick Cool" Button
• Youcan use the Quick Cool feature withthe CoolSelect ZoneTM.
• "Quick Cool"allows 1-3 cannedbeveragesto cool within 60 min.
• To cancel this option, pressthe "QuickCool" button again.
CoolSelectZoneTM returnsto the previoustemperature.
• When "QuickCool" ends, it returnsto the "Cool"temperature set-
ting.
DePending on the beverage& the c0olidowntime mayvary,
O ....
When the Qu!ckCool 0pt!on _sselected, removefood stored m the
CoolSebct Zone TM Drawer that you do not want to cool.
,_z:>_ Freeze
oo_
V Select
"Thaw" Button
• After "Thaw" is selected,warm and cold air is alternately supplied
into the CoolSelectZoneTM Drawer.
• Dependingon the weight of the meat, thawing time can be selected
for 4 hrs,6 hrs, 10 hrs, or 12 hrs,keeping the meat partiallyfrozen.
• When "ThaW'ends,the CoolSelect ZoneTM displayreturnsto "chill"
condition.
• When "Thaw" ends, meats are in ahalf-frozenstate so it is easy
to cut them for cooking.
• To cancel this option, pressany buttonother than the "ThaW'button.
• The approximatethawingtimes of meat andfish are shown below.
(Based on linch thickness)
Cool
_ _,, Soft
<::,I FreezeChill
CooI
_SeRect
Thaw Time
Weight
4 hours
0.8 Ib
6 hours 10 hours 12 hours
1.3Ib 1.7Ib 2.2 Ib
DePending Onthe size and thickness of the meat and fish, the thawingtime mayVary.
TM
The above chart representsthe totalweight of foodin the CoolSelectZone Draweri ..........
Ex)The total thawingtime for 1,3 Ibfrozen beef and 0:8 Ib frozenchicken wi!! be!0 hours.
(_ When the ,!Thaw,!optionis selected, be sure to remove food stored inthe CoolSebct Zone_MDrawer
NOTE that you do not want to thaw.
11
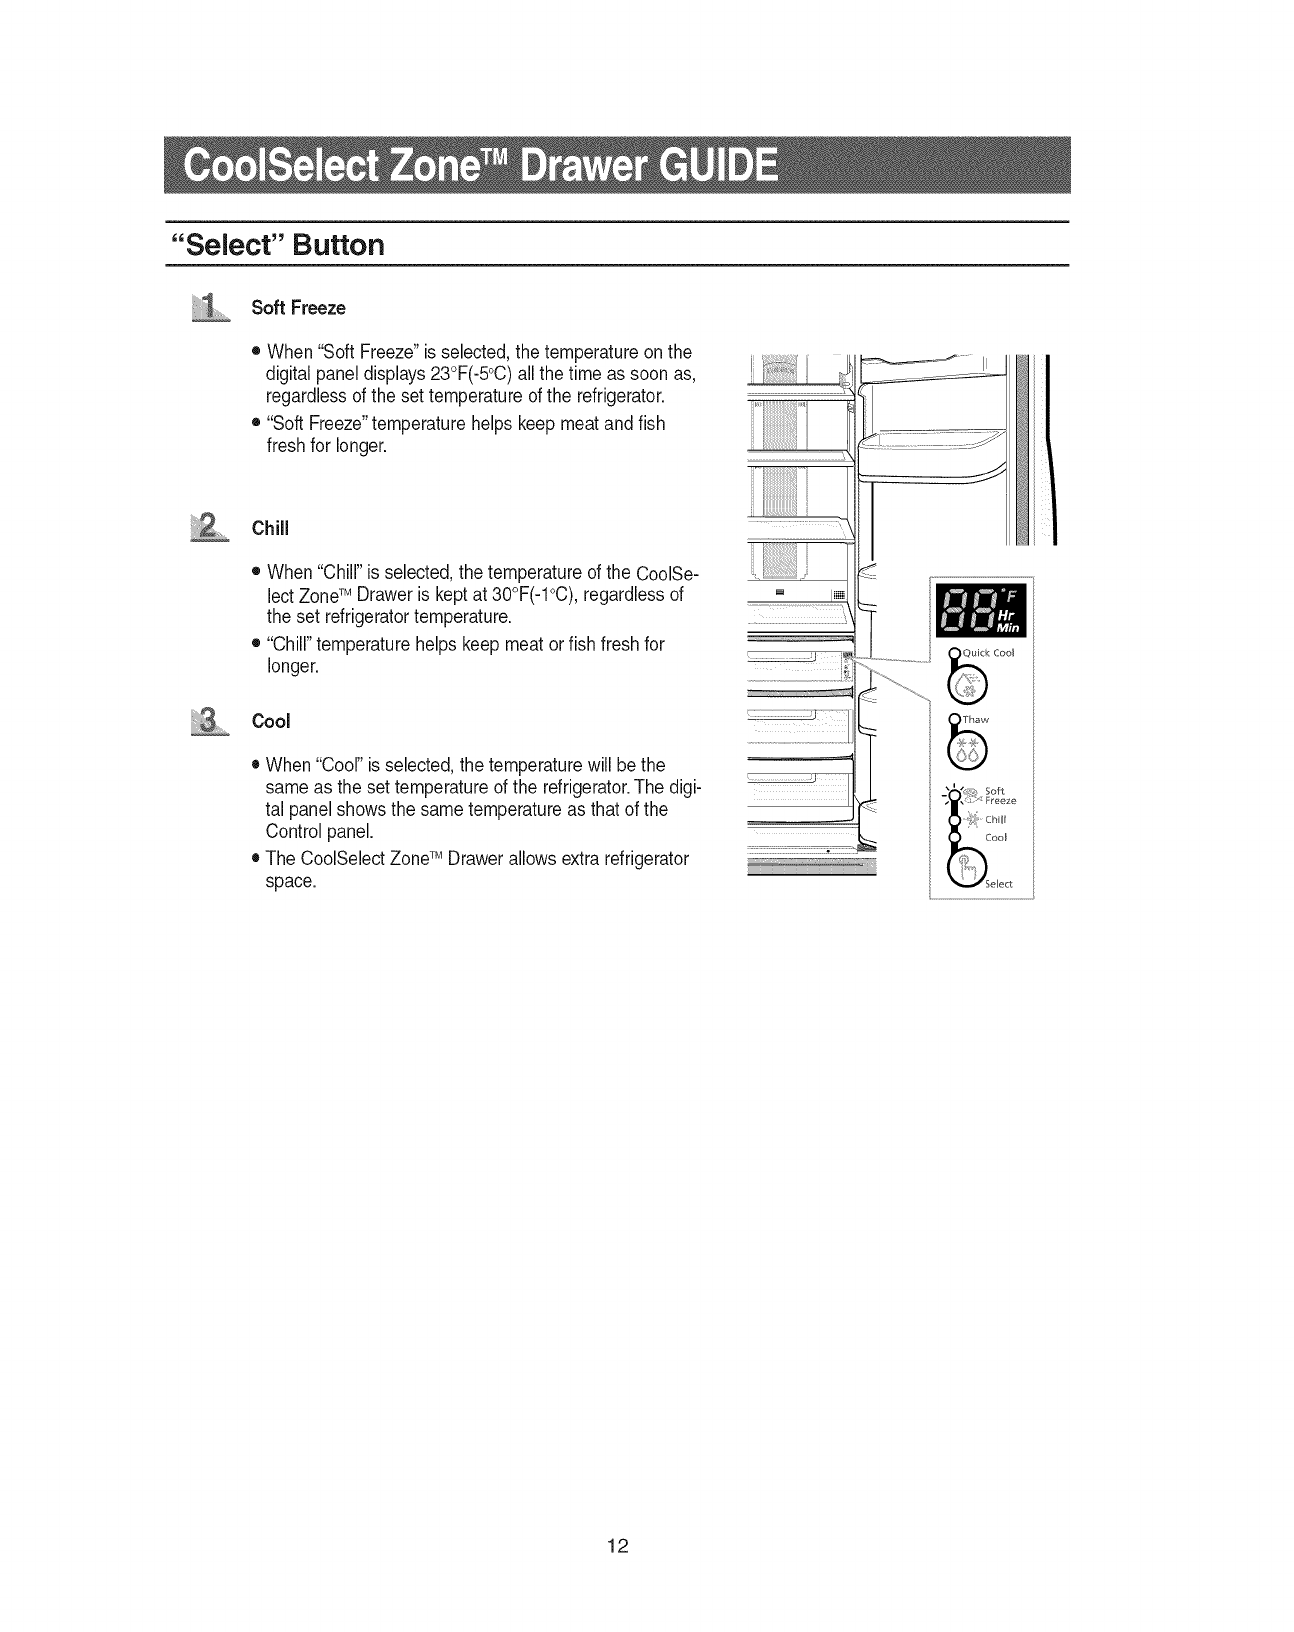
"Select" Button
Soft Freeze
• When "Soft Freeze"is selected,the temperature on the
digital panel displays23°F(-5°C)allthe time as soon as,
regardlessof the set temperature of the refrigerator.
• "Soft Freeze"temperature helps keep meat and fish
fresh for longer.
Chill
• When"Chill" is selected,the temperature of the CoolSe-
lectZoneTM Draweris keptat 30°F(-1°C),regardlessof
the set refrigeratortemperature.
• "Chill"temperature helps keep meat or fish fresh for
longer.
Cool
• When "Cool"is selected,the temperature will be the
same asthe set temperature of the refrigerator.The digi-
tal panel showsthe same temperatureas that of the
Controlpanel.
• The CoolSelect ZoneTM Drawerallows extrarefrigerator
space.
!i;ii!i
...... J .... II
12
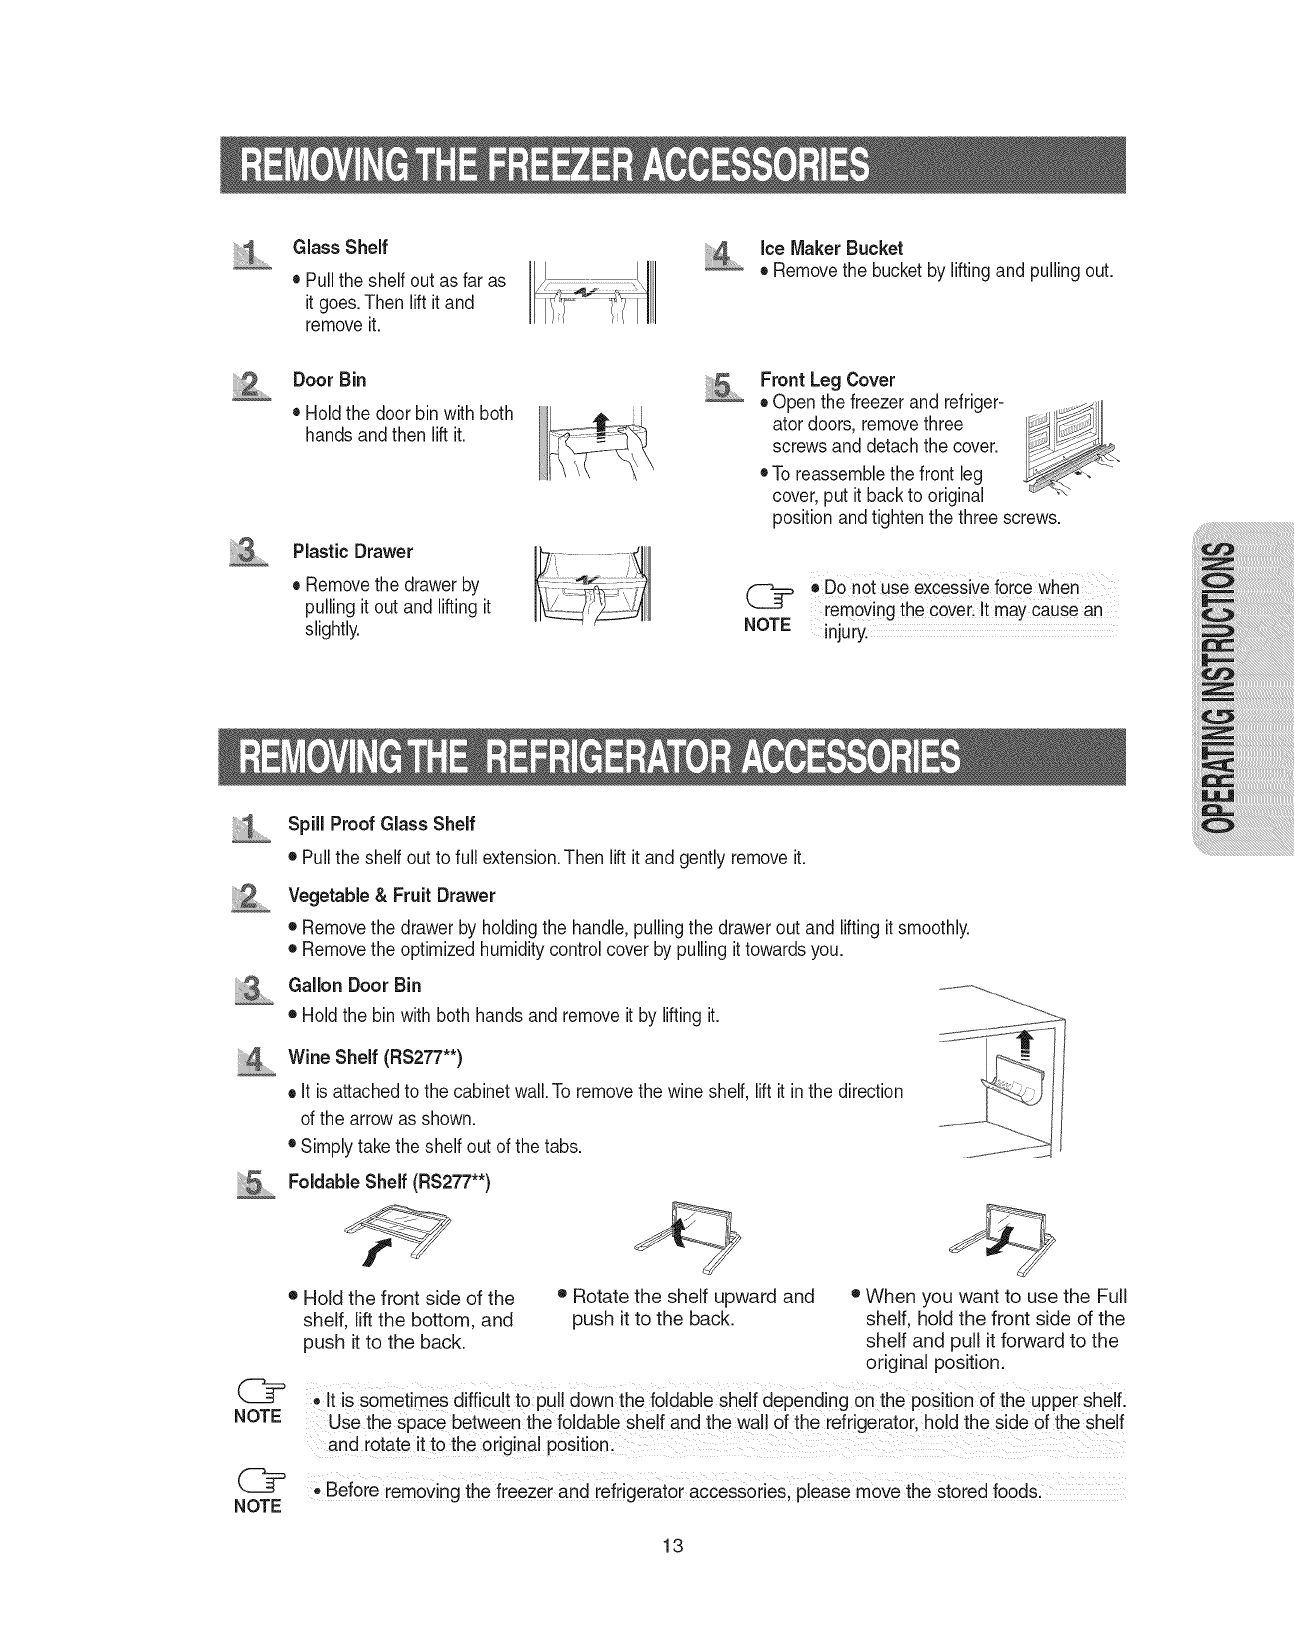
GlassShelf
• Pulltheshelfoutasfaras
itgoes.Thenliftitand
removeit.
iceMakerBucket
• Removethebucketbyliftingandpullingout.
Door Bin
• Hold the door bin with both
hands and then lift it.
Plastic Drawer
• Removethe drawer by
pulling it out and liftingit
slightly.
Front Leg Cover
• Open the freezer and refriger-
ator doors, removethree
screws and detach the cover.
• To reassemblethe front leg
cover, put it back to original
position and tightenthe three screws.
oDo not use excessiveforce when
removing the coverlIt may Causean
NOTE injury.
iiiiiiA...........
NOTE
Spill Proof Glass Shelf
• Pullthe shelf out to full extension.Then lift it and gently removeit.
Vegetable & Fruit Drawer
• Removethe drawer by holdingthe handle, pullingthe drawer out and lifting it smoothly.
• Removethe optimized humidity controlcover by pulling it towards you.
Gallon Door Bin
• Holdthe bin with both hands and remove it by lifting it.
Wine Shelf (RS277"*)
• It is attachedto the cabinetwall.To removethe wine shelf, lift it in the direction
of the arrow as shown.
• Simply takethe shelf out of the tabs.
Foldable Shelf (RS277"*)
J
Hold the front side of the • Rotate the shelf upward and • When you want to use the Full
shelf, lift the bottom, and push it to the back. shelf, hold the front side of the
push it to the back. shelf and pull it forward to the
original position.
e It is sometimes difficult tO pull down the foldable shelf depending on the position of the upper shelf.
Use the space between the foldable shelf and the wall of the refrigerator, hold the sided the shelf
and rotate it to the original Position.
Before removing the freezer and refrigerator accessories, please move the stored food&
13
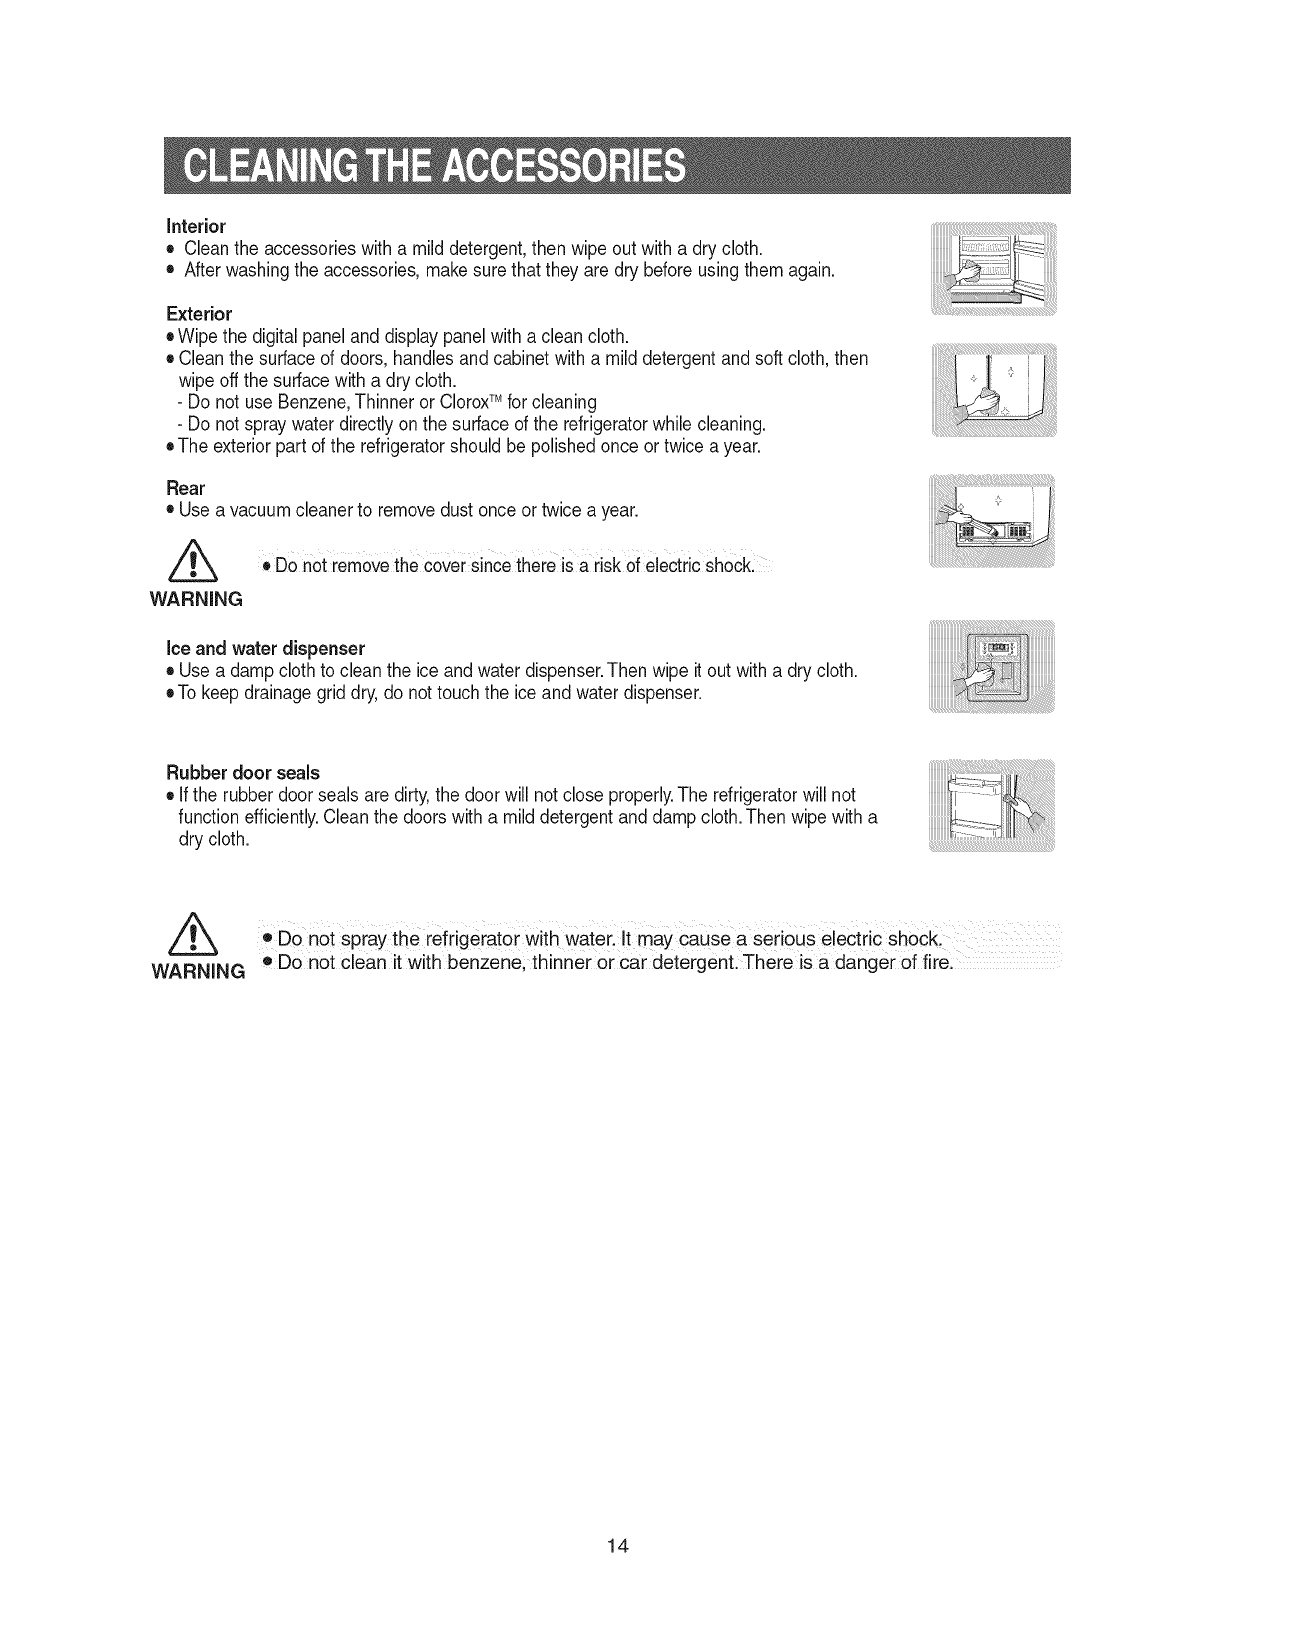
Interior
• Cleantheaccessorieswithamilddetergent,thenwipeoutwithadrycloth.
• Afterwashingtheaccessories,makesurethattheyaredrybeforeusingthemagain.
Exterior
•Wipethedigitalpanelanddisplaypanelwithacleancloth.
•Cleanthesurfaceofdoors,handlesandcabinetwithamilddetergentandsoftcloth,then
wipeoffthesurfacewithadrycloth.
-Do not use Benzene,Thinner or CloroxTM for cleaning
-Do not spraywater directly on the surface of the refrigeratorwhile cleaning.
eThe exteriorpart of the refrigeratorshould be polished once or twice a year.
Rear
• Use avacuum cleanerto removedust once ortwice a year.
Z_ , DOnot removethe coversinCethere isa risk of electric shoCk:
WARNING
Ice and water dispenser
• Use a damp cloth to clean the ice and water dispenser.Then wipe it out with a dry cloth.
eTo keep drainagegrid dry, do not touch the ice and water dispenser.
Rubber door seals
• Ifthe rubber door seals are dirty,the door will not close properly.The refrigeratorwill not
function efficiently.Cleanthe doors with a mild detergentand damp cloth.Then wipe with a
dry cloth.
• DO not spray the refrigerator with Waterl It may Cause a serious electric Shock
WARNING o Donot clean it with benzene; thinner or car detergent, There is a danger Of fire:
14
WARNING
Before changing the interior light, unplug the refrigeratorfrom the power supply. If you
have difficulty changing the light, contact your service center. ...........
INTERIOR LIGHT iN THE REFRIGERATOR.
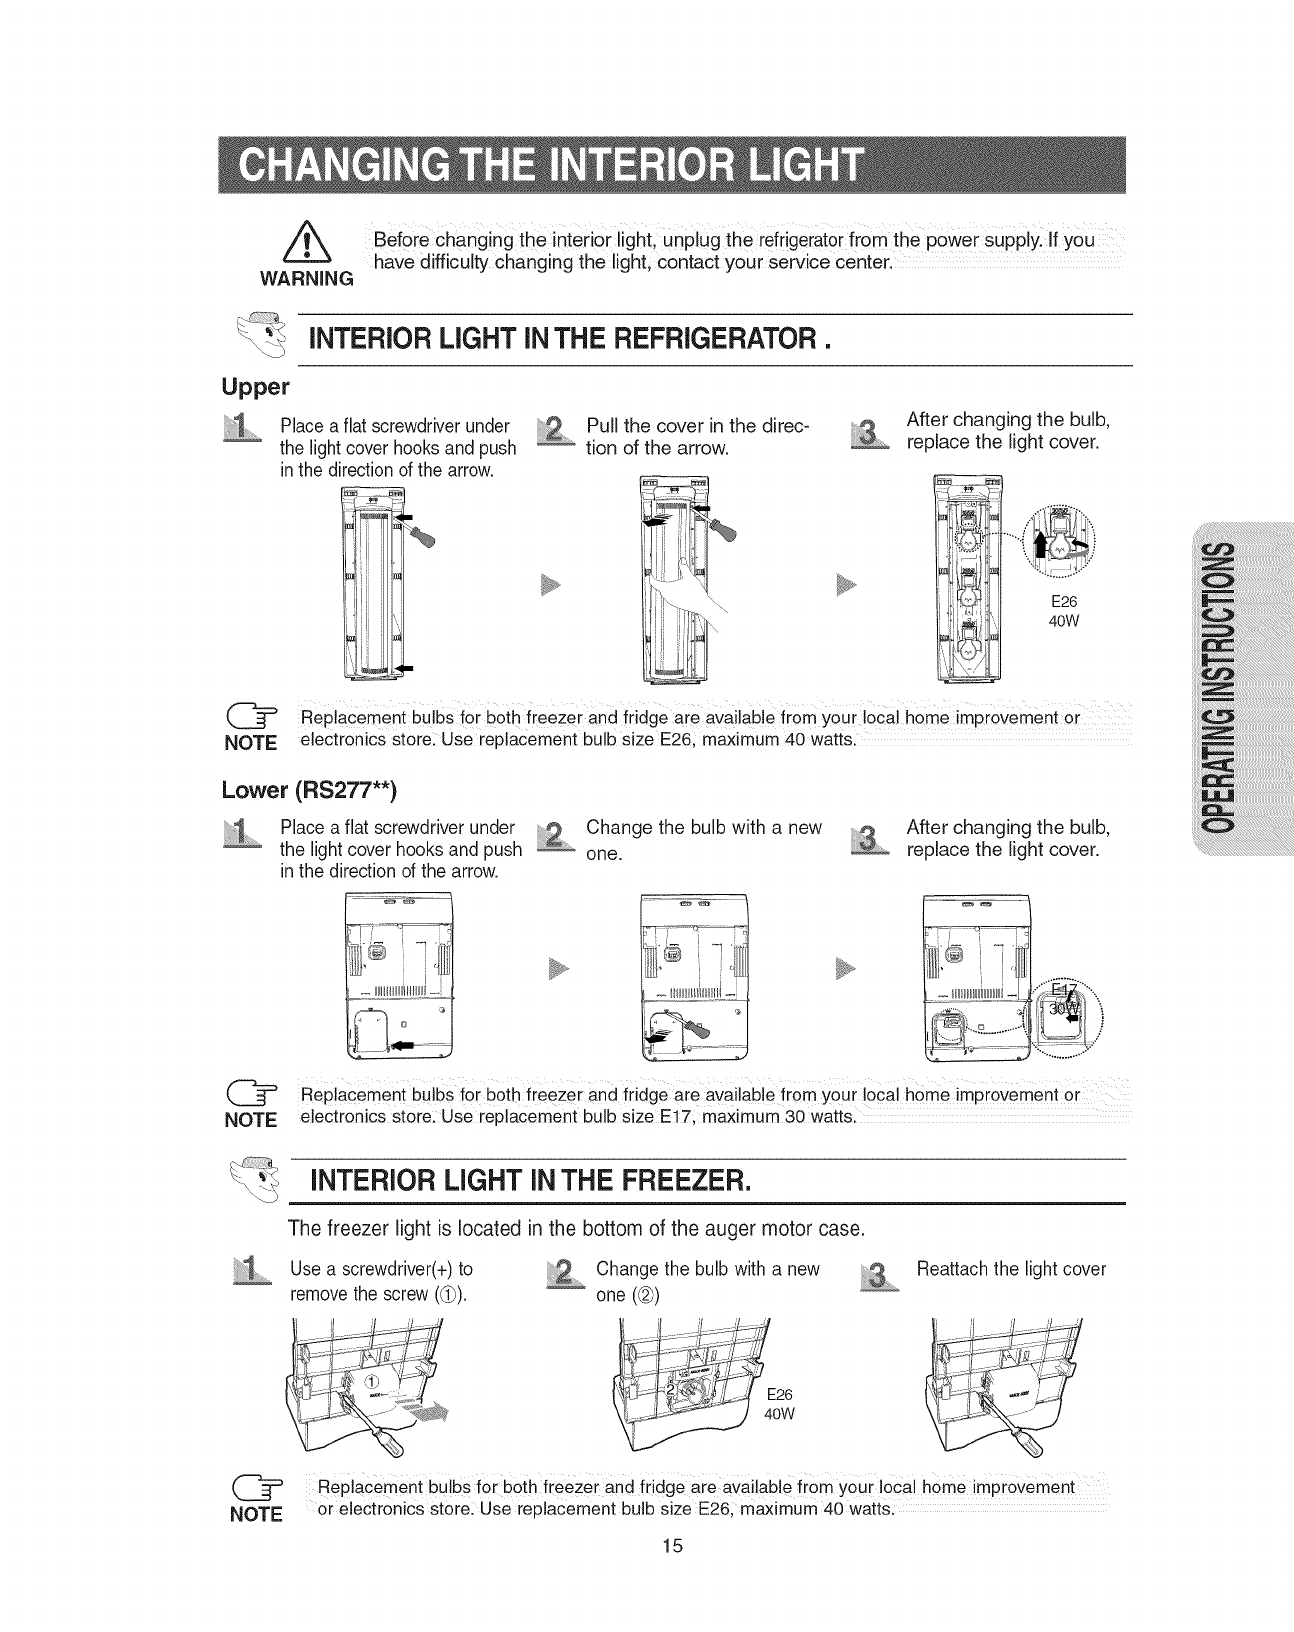
Upper
Place a flat screwdriverunder
the light cover hooksand push
in the directionof the arrow.
Pull the cover in the direc-
tion of the arrow.
After changing the bulb,
replace the light cover.
(_ Replacement bulbs for b0th freezer and fridge are available fi0m your ioca! home imprOVement or
NOTE electronics store: Use replacement bulb size E26, maximum 40 watts.
Lower (RS277"*)
i'i_ Place a flat screwdriver under Change the bulb with a new
............the light cover hooks and push _ one.
in the direction of the arrow.
After changing the bulb,
replace the light cover.
L_- _IHHHDiHHH[-
NOTE
Replacement bulbs !or both freezer and fridge are available from your local home improvement or
electronics store: Use replacement bulb size E17, maximum 30 watts.
INTERIOR LIGHT INTHE FREEZER.
The freezer light is located in the bottom of the auger motor case.
Use a screwdriver(+)to _ Change the bulb with a new ....
removethe screw ((_). one (@)
Reattach the light cover
RePlacement bu!b s f0i both freezei and fridge are available from youi local home impi0Vement
or electr0nics store: use replacement bulb size E26; maximum 40 wattsl
15
The water "Filter Indicator" light
, "Filter Indicato¢' light lets you know when it is time to change your water filter cartridge. The light
will change from green to orange. This tells you that it is almost time to change the current cartridge.
We recommend that you replace the cartridge when the light changes to red.
(see "Install the water filter" section for more information)
, When you install the water filter, throw away the first six glassfulls of water filter, or until water flows
clearly to flush impurities in the water supply system.
Using the dispenser without the water filter
, You can not use the water and ice dispenser without a water filter cartridge because the water line
blocks the water supply.
Ordering Replacement Water Filter
• For replacement waster filter you can visit your local home center or contact the Samsung Parts distributor.
blocks the water filter has the SAMSUNG logo on the box and the water filter.
Link : ht_ttp://www.samsungparts.com
The refrigerator doors have a special door opening and closing feature to make sure that they close all
the way and are securely sealed.
When opening the door, it will only open to 135°. After reaching a certain point, it will remain open.
When the door is partially open, it will close automatically.
The refrigerator should be properly installed & leveled.
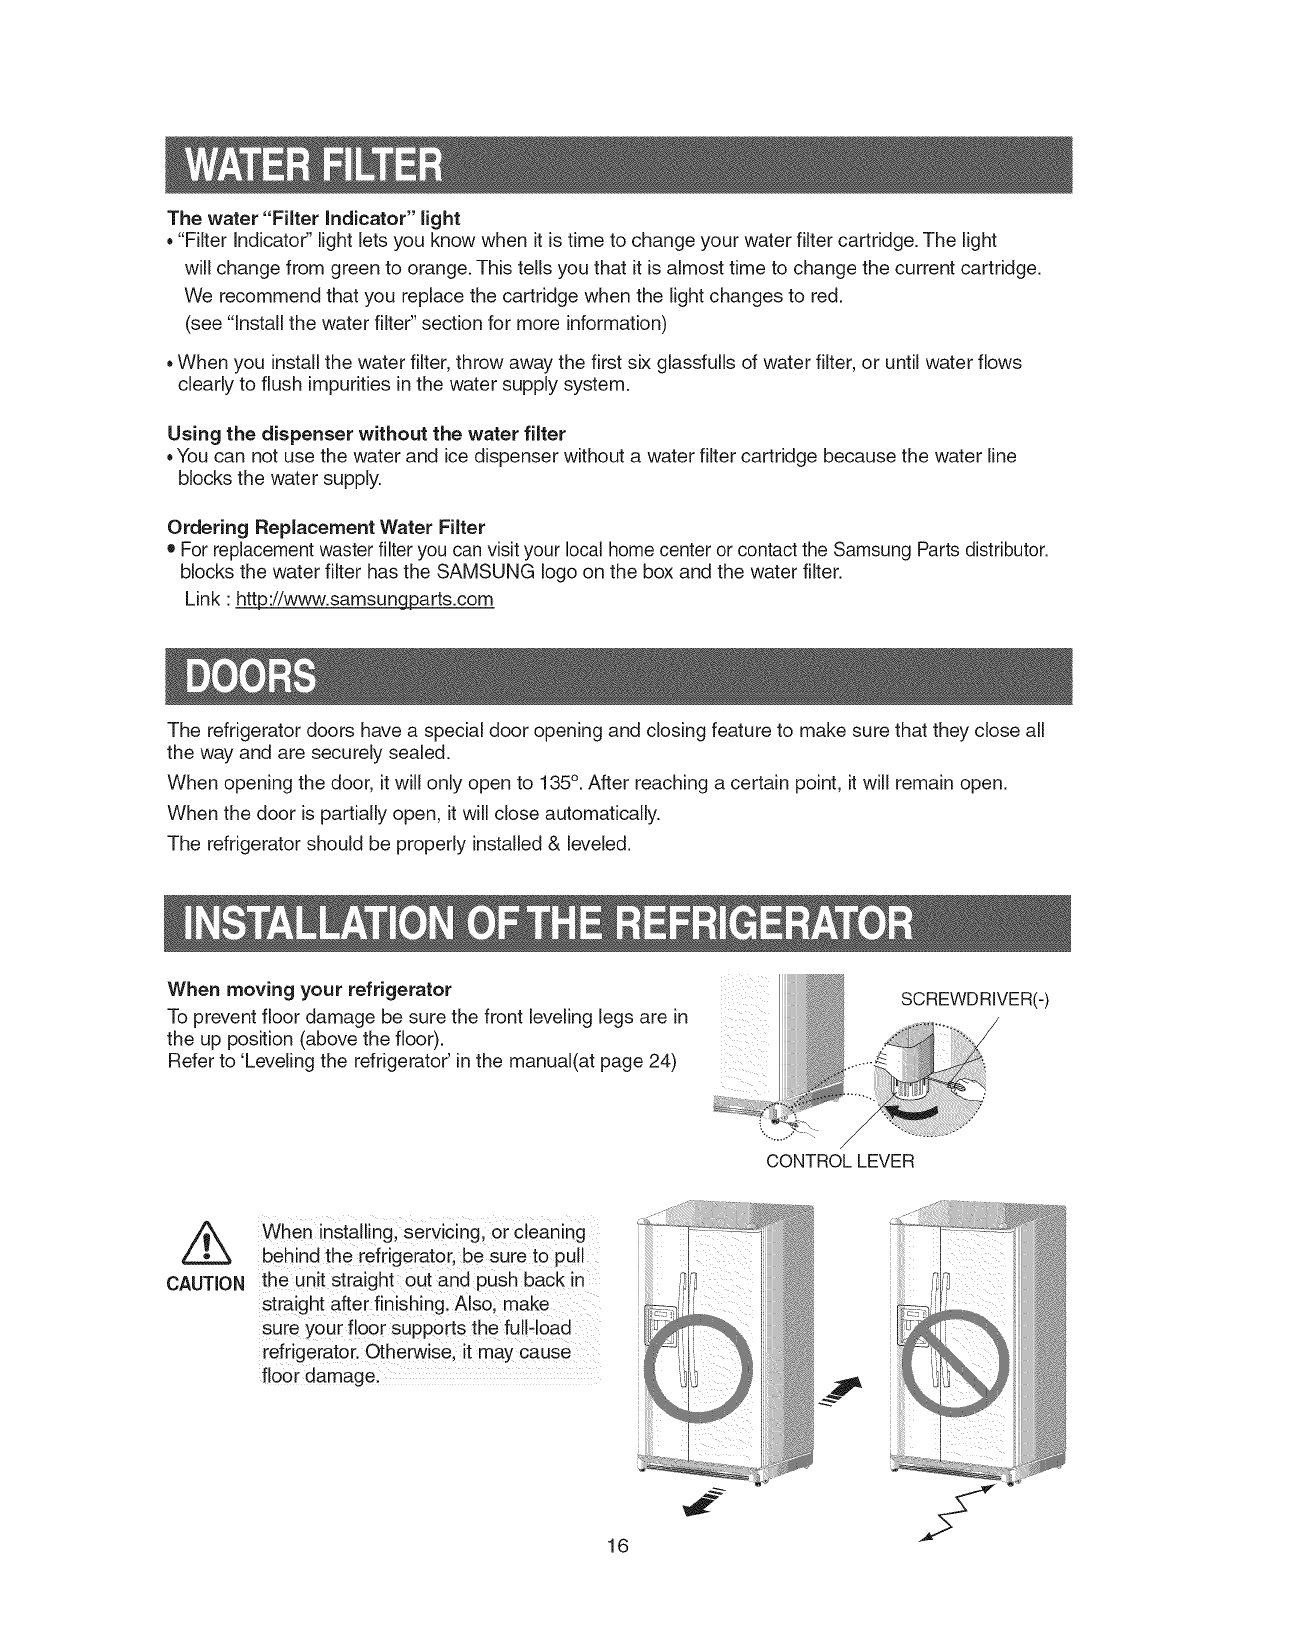
When moving your refrigerator
To prevent floor damage be sure the front leveling legs are in
the up position (above the floor).
Refer to 'Leveling the refrigerator' in the manual(at page 24)
4
SCREWDRIVER(-)
CONTROLLEVER
CAUTION
When installing, serv_c!ng, or cleaning
behind the refrigerator, be sure to pull
the unit straight out and push back in
straight after finishing. Alsoi make
sure your floor supports th e full,load
refrigerator. Otherwise, it may cause ....
floor damage. ~41
16
Checking the Dimensions of your Entrance Door
Check the dimensions of your entrance doorto determinewhether the refrigeratorcan pass through it.
Dimension
(inches)
Model
Capacity (Cu. Ft)
Width
Case Height
Depth
without Hinge
with Hinge
with door
without door
RS275 /RS277
26 1/2
35 7/8
68 1/2
70
33 13/16
30 1/2
Selecting the Location for the Refrigerator
Select a location with easy access to the water supply.
Select a location with enough space for the refrigerator.
Select a location which is not exposed to sunlight.
Select a location with level floor.
, Before disassembling the freezer door, the water SUpplyline needs tobe disconneCted.
(if not, the Water Supply line can be damaged.)
,, See"Separating the water supply line from the refrigerator' onthe next page.
NOTE
Allowsufficientspace to circulate the air inthe internalcooling system.
• If the refrigeratordoes not have enoughspace, the internalcooling system
may not workcorrectly.
• Allowclearance to the right, left;back and the top when installingthe
refrigerator.This has the advantageof reducing power consumptionl
, Do not install the refrigeratorwhere the temperature will go below ....
50_F(10_C),
0.1inch
2inches _
_ches
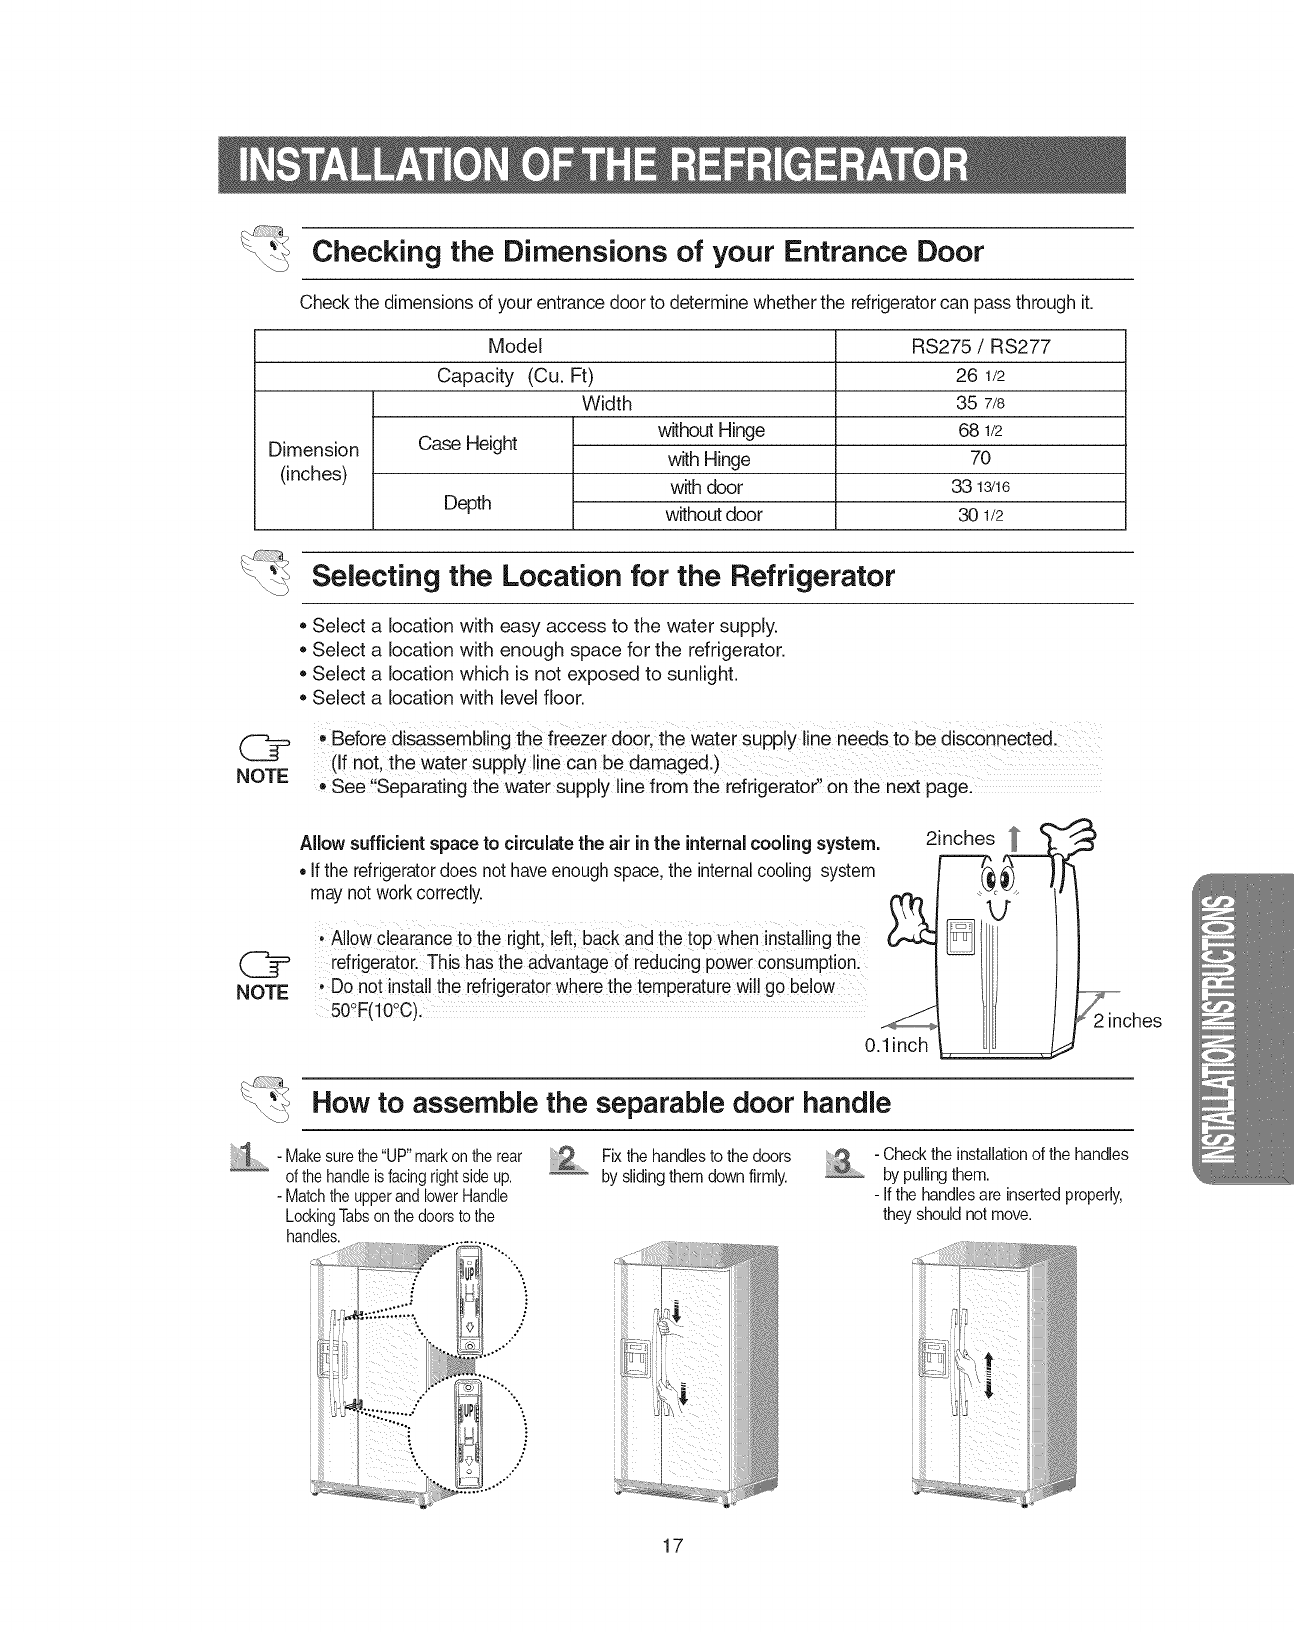
How to assemble the separable door handle
1 - Makesurethe"UP"markontherear
ofthehandleisfacingrightsideup.
- MatchtheupperandlowerHandle
LockingTabsonthedoorstothe
handles.
L,o t*"
....:::::;
',,
Fix the handlesto the doors
by slidingthem downfirmly. - Checkthe installationof the handles
by pullingthem.
- If the handlesare insertedproperly,
they should not move.
17
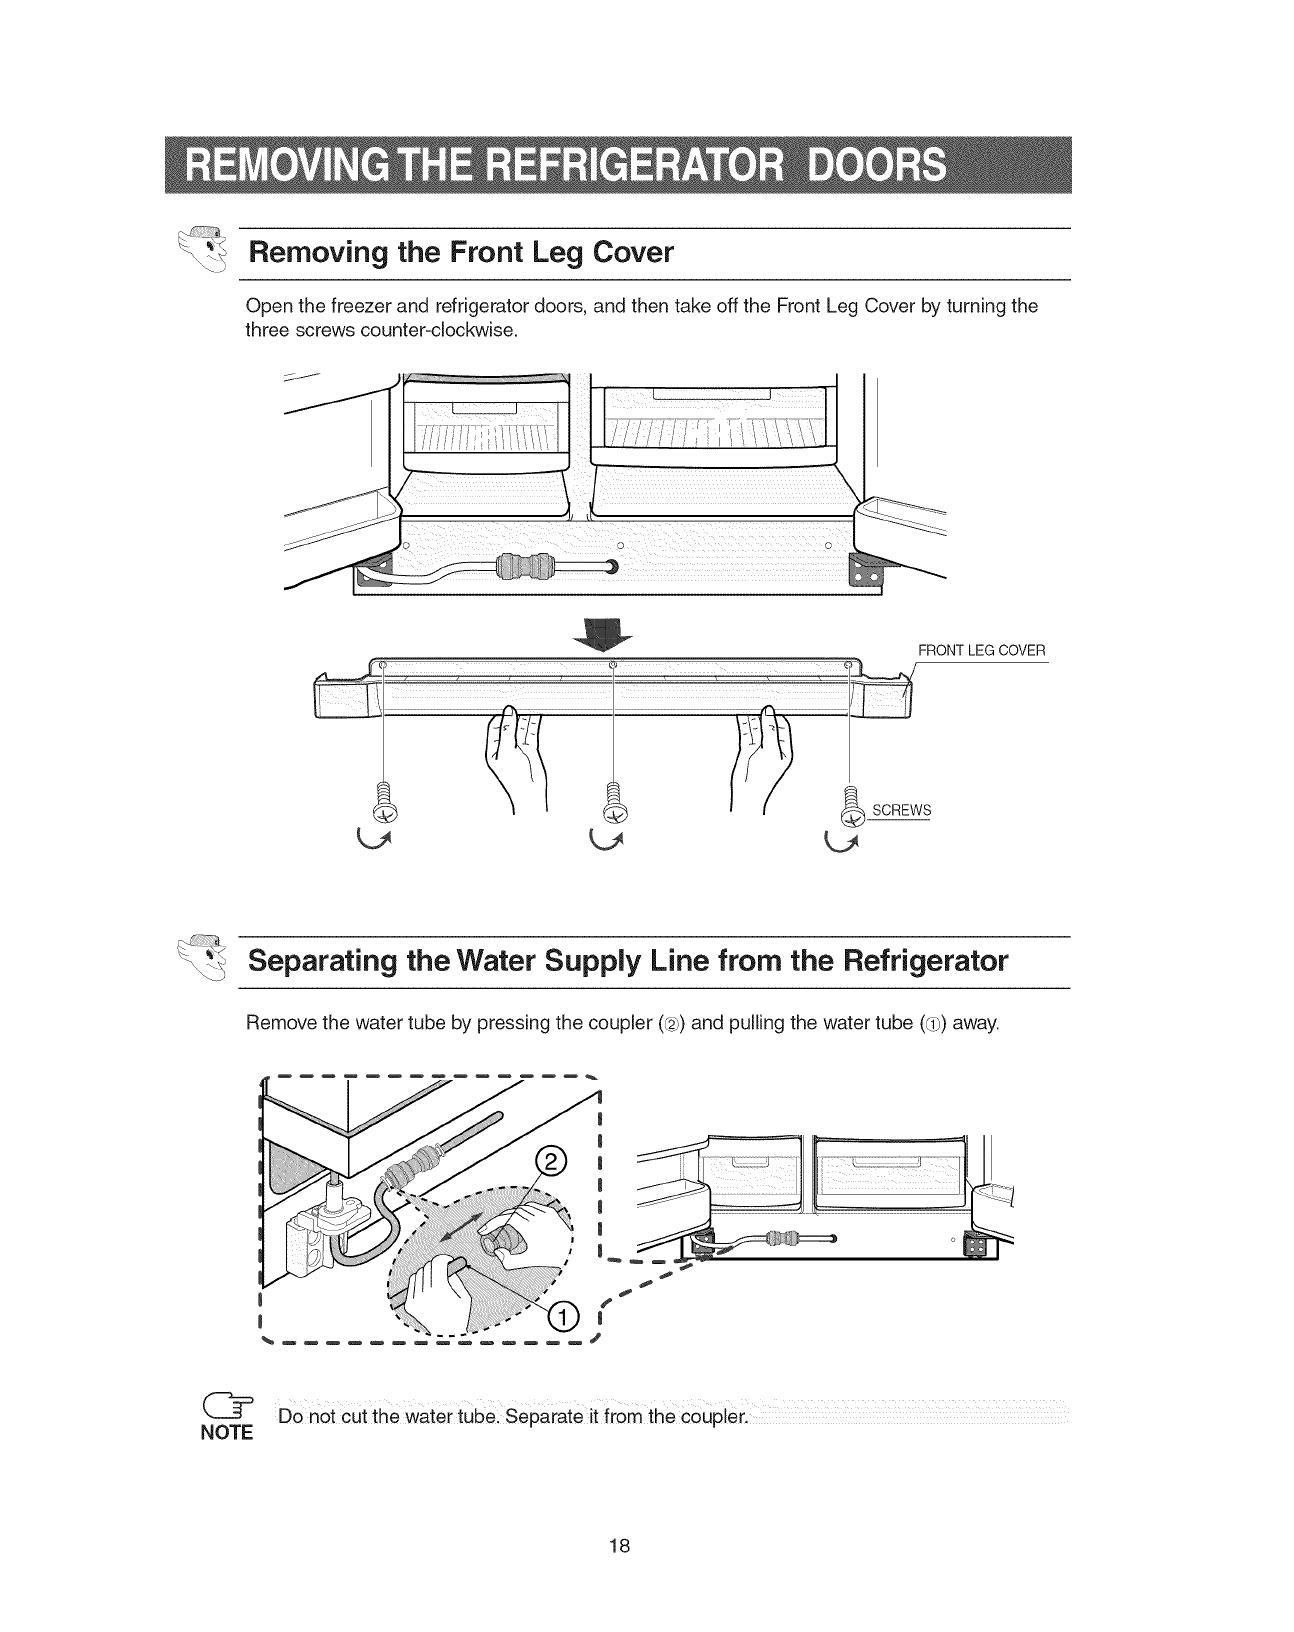
Removing the Front Leg Cover
Open the freezer and refrigerator doors, and then take off the Front Leg Cover by turning the
three screws counter-clockwise.
L_
FRONT LEG COVER
Separating the Water Supply Line from the Refrigerator
Remove the water tube by pressing the coupler (@)and pulling the water tube (d_)away.
Donor cut the water tube: Separate it from the ceuplerl
NOTE
18
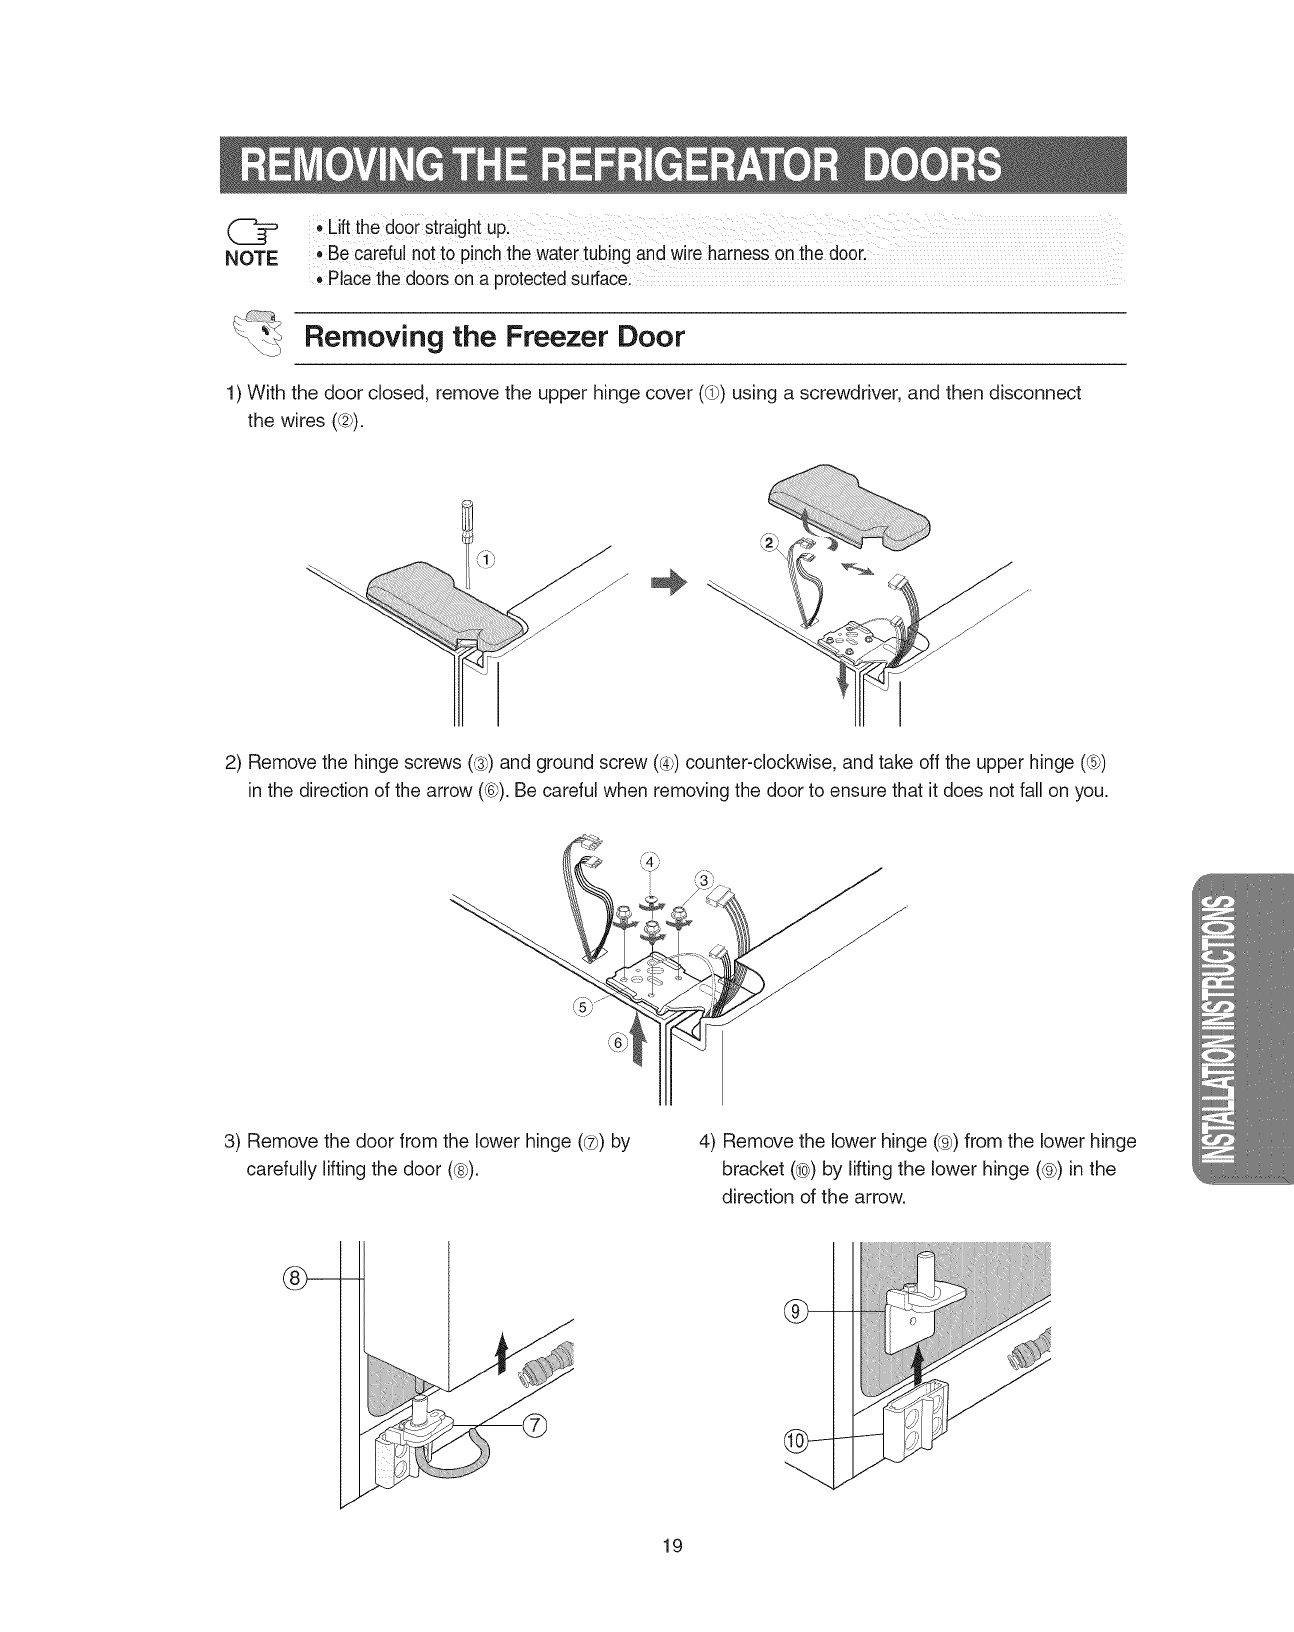
' Liftthedooistraightup:
NOTE ,Be careful not to pinch the watertubing and wire harnesson the door.
Placethe doors on a piotected surfacei
Removing the Freezer Door
1) With the door closed, remove the upper hinge cover (dP)using a screwdriver, and then disconnect
the wires (@).
2) Remove the hinge screws (®) and ground screw (®) counter-clockwise, and take off the upper hinge (®)
in the direction of the arrow (®). Be careful when removing the door to ensure that it does not fall on you.
3) Remove the door from the lower hinge (@) by
carefully lifting the door (®).
4) Remove the lower hinge (®) from the lower hinge
bracket (®) by lifting the lower hinge (@) in the
direction of the arrow.
@-
19
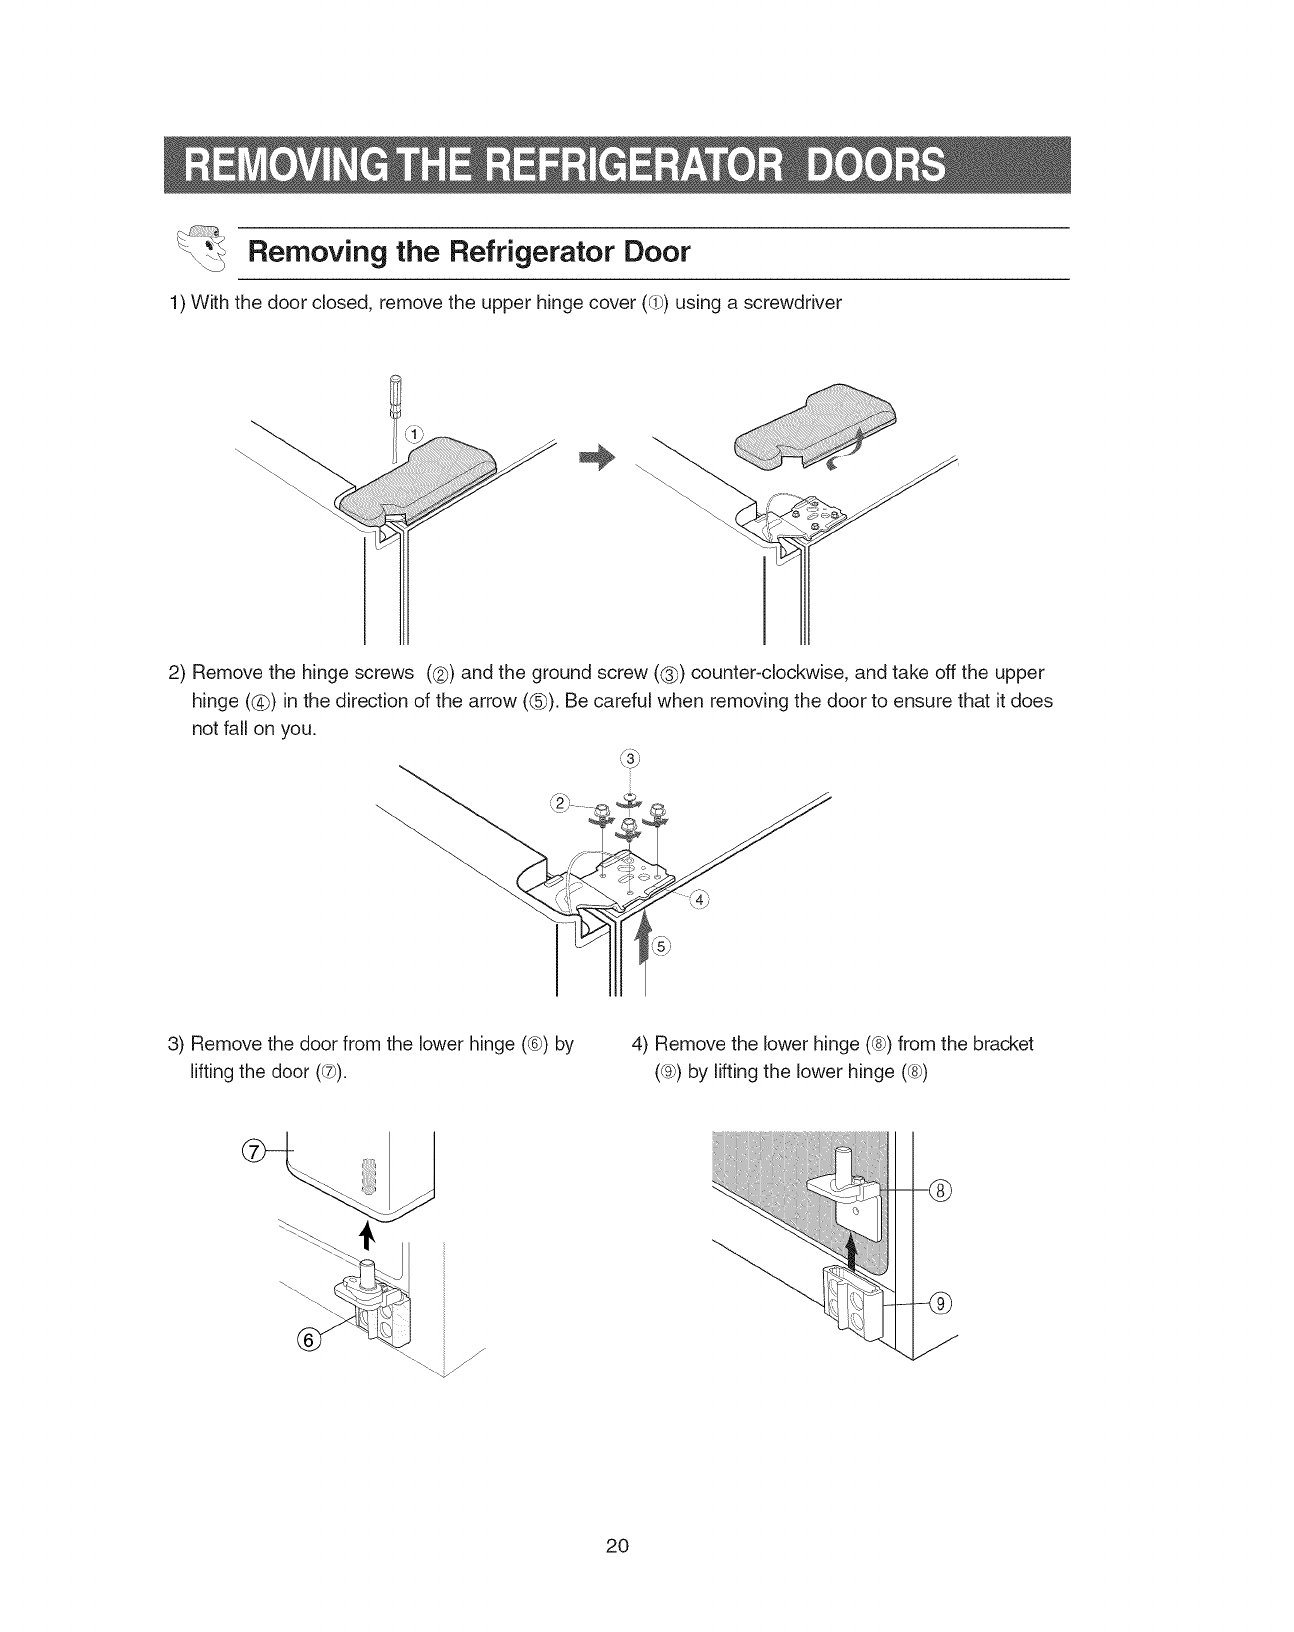
Removing the Refrigerator Door
1) With the door closed, remove the upper hinge cover (_) using a screwdriver
2) Remove the hinge screws (@) and the ground screw ((_) counter-clockwise, and take off the upper
hinge (@) in the direction of the arrow (@). Be careful when removing the door to ensure that it does
not fall on you.
3) Remove the door from the lower hinge (®) by
lifting the door (_t_).
4) Remove the lower hinge (®) from the bracket
(_) by lifting the lower hinge (®)
f
./
--®
20
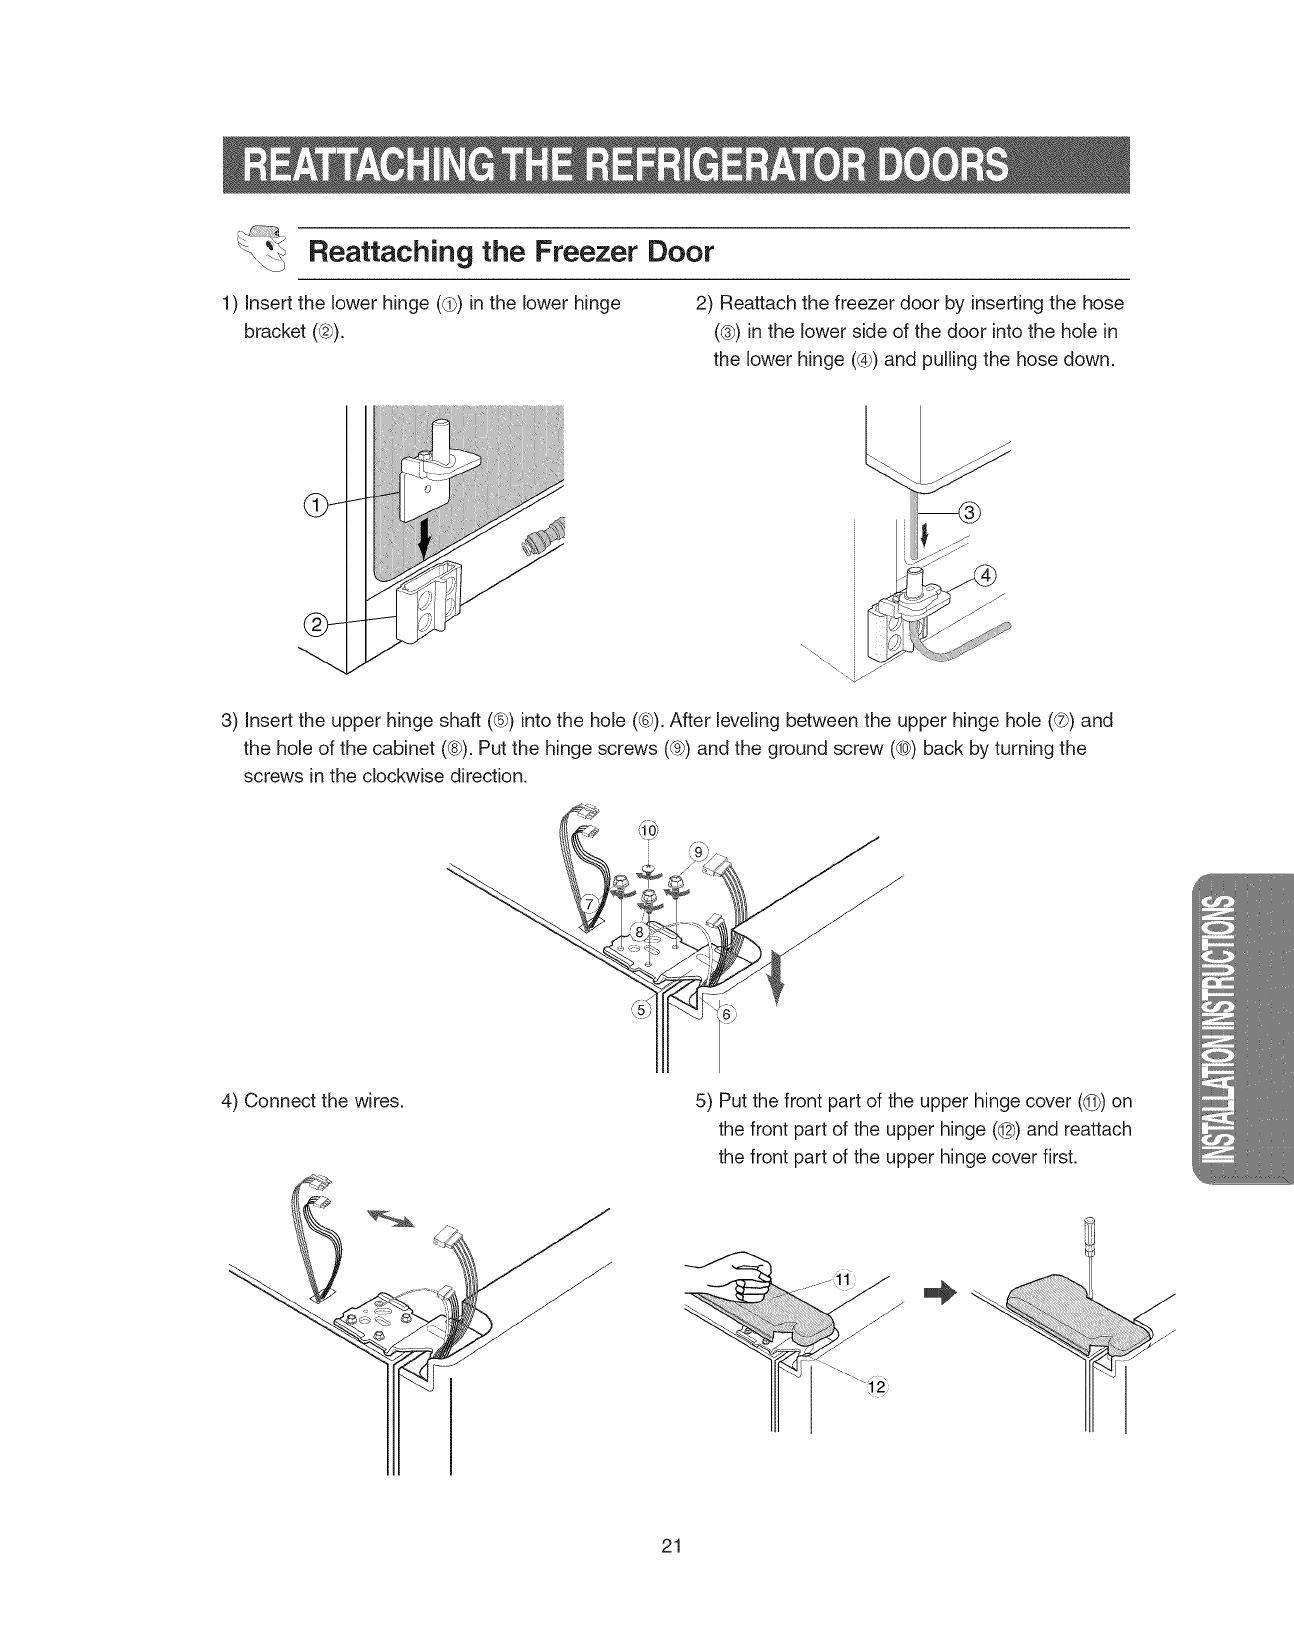
Reattaching the Freezer Door
1) Insert the lower hinge (_) in the lower hinge
bracket (@).
2) Reattach the freezer door by inserting the hose
(@) in the lower side of the door into the hole in
the lower hinge (@)and pulling the hose down.
3) Insert the upper hinge shaft (@)into the hole (®). After leveling between the upper hinge hole (@)and
the hole of the cabinet (®). Put the hinge screws (@)and the ground screw (@) back by turning the
screws in the clockwise direction.
4) Connect the wires. 5) Put the front part of the upper hinge cover (@) on
the front part of the upper hinge (@) and reattach
the front part of the upper hinge cover first.
21
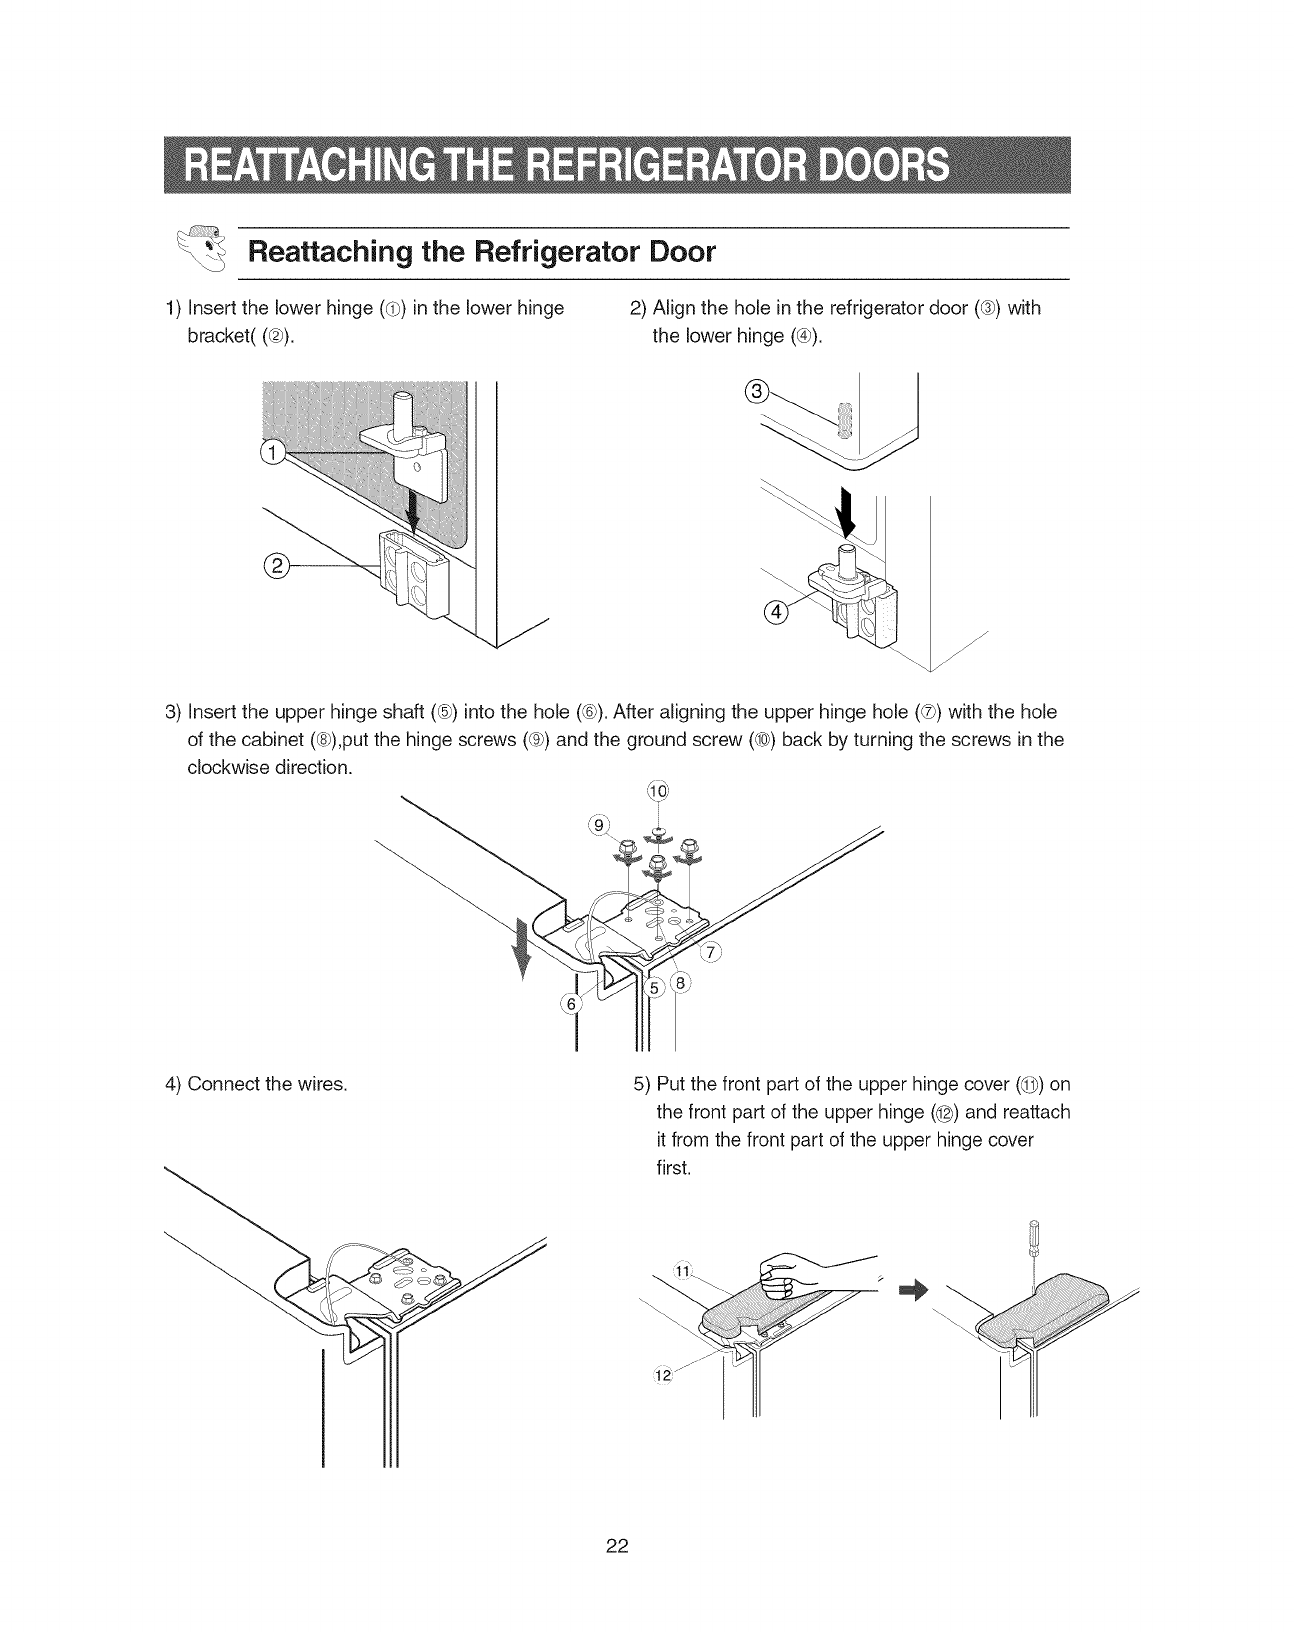
Reattaching the Refrigerator Door
1) Insert the lower hinge (d)) in the lower hinge
bracket((@).
2) Align the hole in the refrigerator door (®) with
the lower hinge (@).
f
j-
j-
j-
3) Insert the upper hinge shaft (®) into the hole (®). After aligning the upper hinge hole (®) with the hole
of the cabinet (®),put the hinge screws (®) and the ground screw (®) back by turning the screws in the
clockwise direction.
f _
k9_
4) Connect the wires. 5) Put the front part of the upper hinge cover (@) on
the front part of the upper hinge (@) and reattach
it from the front part of the upper hinge cover
first.
22

Reattaching the Water Supply Line
While pressing the front face of the coupler (@), insert the water line (d_)in the coupler.
#
#
f
Push the "A" collar to the %" body and hold.
Thenpulltubefrom theconnector. NOTE
J
Tube must befully inserted to the
marked line to avoid leaks.
Reattaching the Front Leg Cover
NOTE
Put on the Front Leg Cover cover by turning the three screws clockwise, as shown in the figure.
Beforeattaching Checkwater €0nnect0r,be sure t0 check for leakage:
: : ONT LEG COVER
so. ws
23

Make sure the refrigerator is level before adjusting its doors.
The doors will be uneven if the refrigerator is not level.
The fr0nt of the refrigerat0ris adjustable:
NOTE
Case 1) Freezer door is lower than Insert a flat-blade screwdriver (-) (d_)into a slot of
the refrigerator door the control lever (@),turn it clockwise and level the
refrigerator.
i-
SCREWDRIVER(-)
Case 2) Freezer door is higher than
the refrigerator door Insert a flat-blade screwdriver (-) ((b) into a slot of
the control lever (@), turn it clockwise and level
the refrigerator.
C2
NOTE
@ CONTROL LEVER
Donor make small adjustments with the control lever, Please refer to the next page4
24
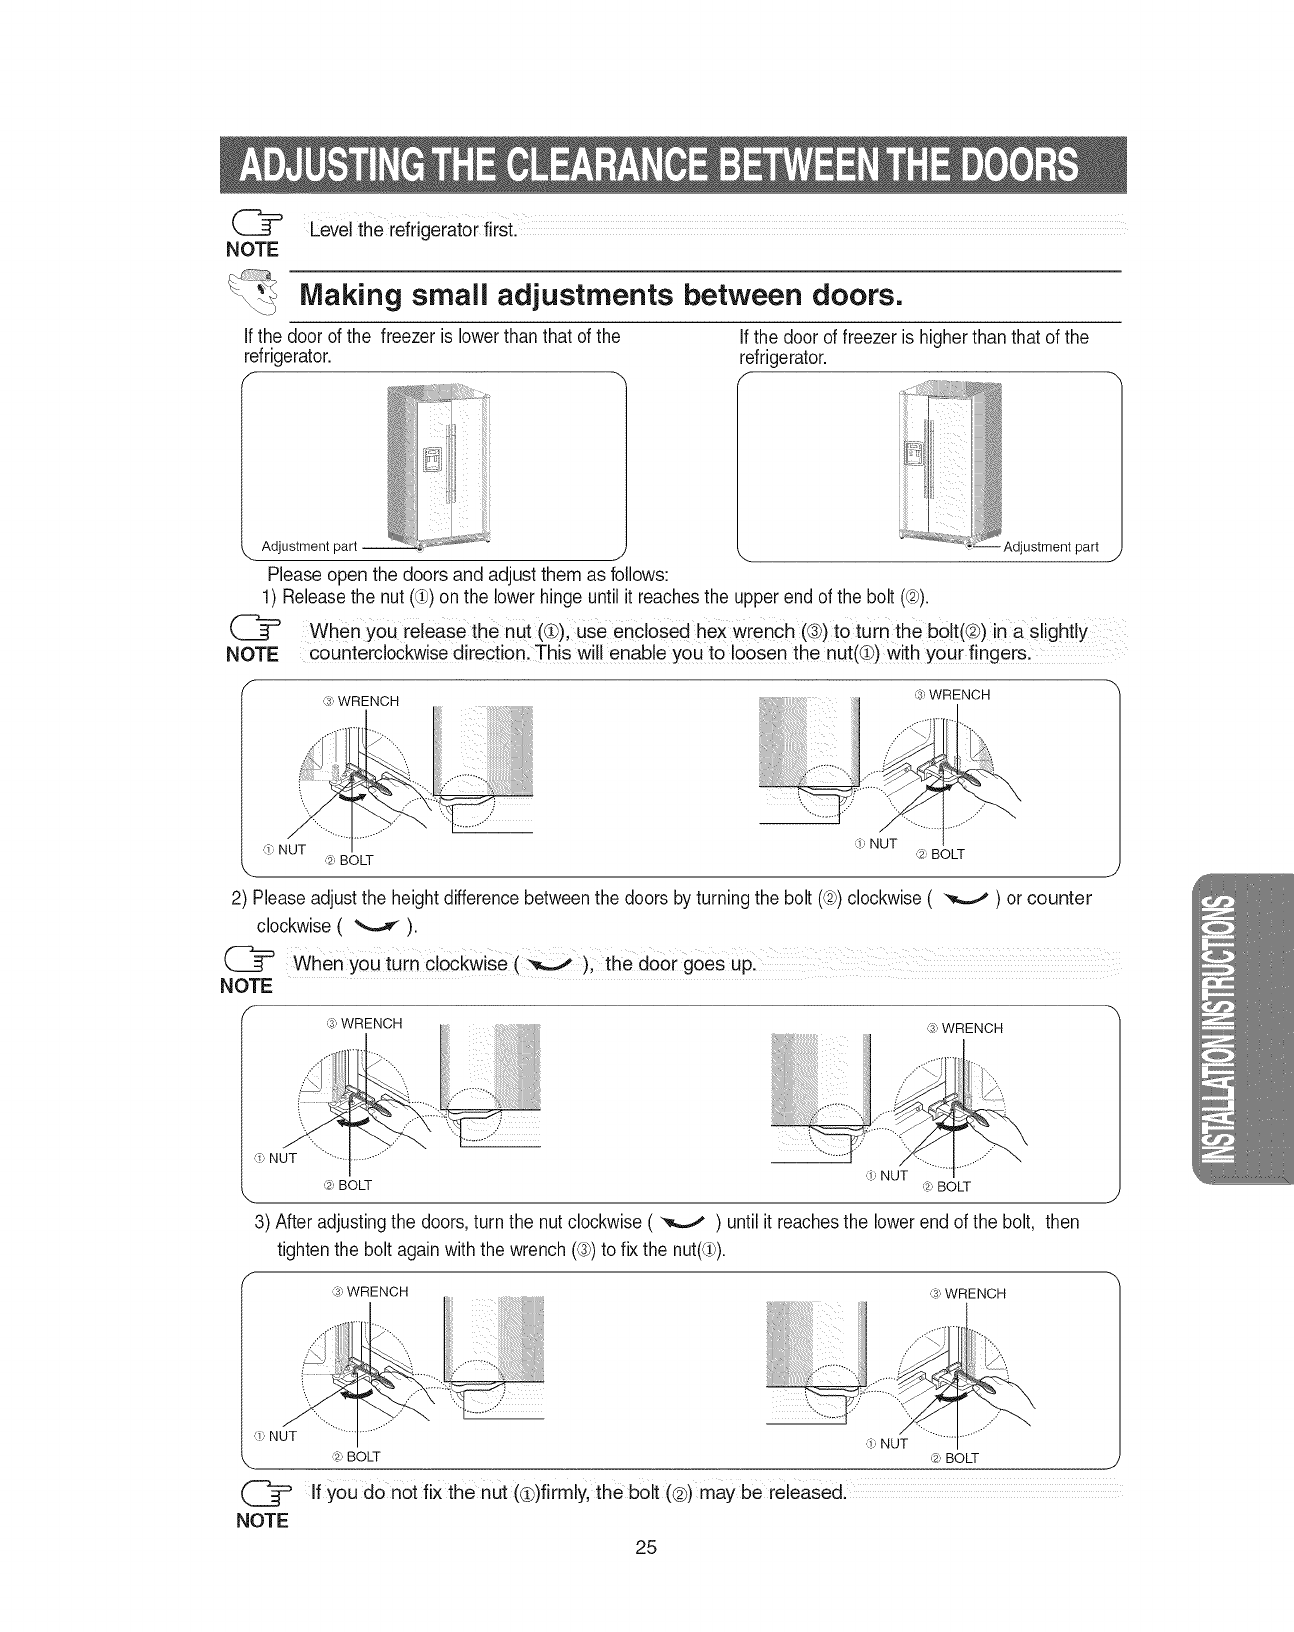
(_= LeveltherefrigeratorfirSt.
NOTE
Making small adjustments between doors.
Ifthe door of the freezer is lower than that of the
refrigerator.
f
Adjustment part
ii!iJiiiiiiI_ ;Jli iiii k_ i!! ;
J
Please open the doors and adjust them as follows:
If the door of freezer is higherthan that of the
refrigerator.
f-
1) Releasethe nut (alP)on the lower hinge untilit reachesthe upper end of the bolt (@).
@
NOTE
Adjustment part j
When you release the nut (@), Use encloSed hex Wrench (®) to turn the b01t(@)in a Slightly
counterclockwise directionl This will enable you to loosen the nut(C)with y0ur finger&
,;, WRENCH ,_J',WRENCH
'!' NUT ,_:,BOLT
,'_:,NUT ,_,_:,BOLT
',.. J
2) Please adjustthe height differencebetweenthe doors by turning the bolt (_2))clockwise( _ ) or counter
clockwise ( _ ).
when You turn cloCkwise (_); door goes Up:
NOTE
,_J',WRENCH ,_J',WRENCH
,_,NUT
,_:,BOLT ,!, NUT ,_._:,BOLT
\ J
g) After adjusting the doors, turn the nut clockwise ( _ ) until it reaches the lower end of the bolt, then
tighten the boltagain with the wrench (®) to fix the nut(d)).
f--,
,;, WRENCH ,;, WRENCH
.4
......'"
,_,NUT
,'-_:,BOLT ,_.1,BOLT i
Ifyou donot fix the nut (@)firmly, the bolt (@)may be released.
25
1 Fortheicemakertooperateproperly,waterpressureof20~125psi isrequired.
Inthisrange,a 170cc(5.74ounces)papercupcanbefilledin10secs.
2)Thewaterfilterremovesforeignparticles.Itdoesnotsterilizeordestroyanymicro-organisms.
3)Iftherefrigeratorisinstalledinanareawithlowwaterpressure(below20psi),youshouldinstalla
boosterpumptocompensate.
4) Ensurethewaterstoragetankinsidetherefrigeratorisproperlyfilledinitially.Pushthewaterdis-
penserleveruntilthewaterrunsfromtheoutlet.
(_ A WaterlineinstallationkitisavailableatextracostfromYoUrdealerTherefrigerator
NOTE manufacturerrecommendsthatyouuseawatersupplykitcontainingcoppertubing.
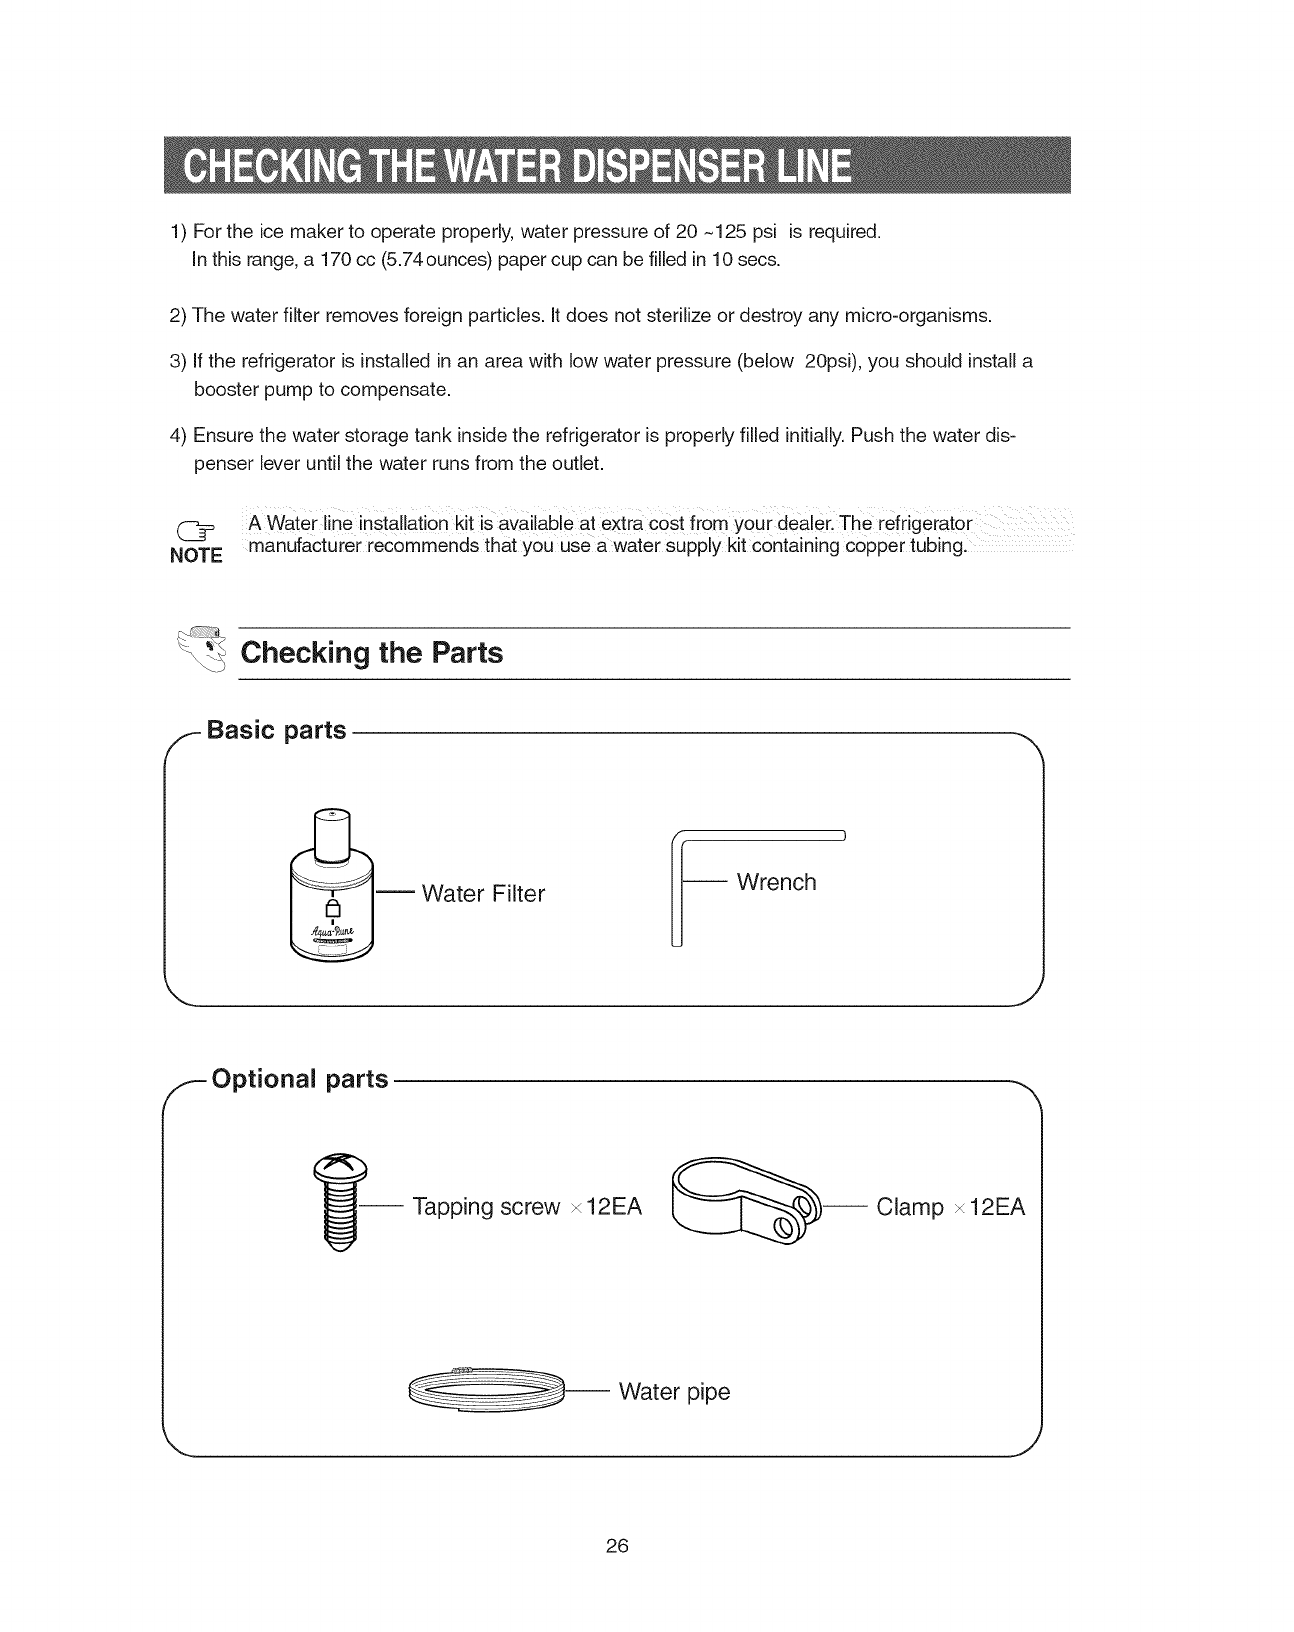
_ Checking the Parts
/_- Basic parts
Water Filter Wrench
F Optional parts
I_-- Tapping screw x12EA _--- Clamp x 12EA
-- Water pipe
26
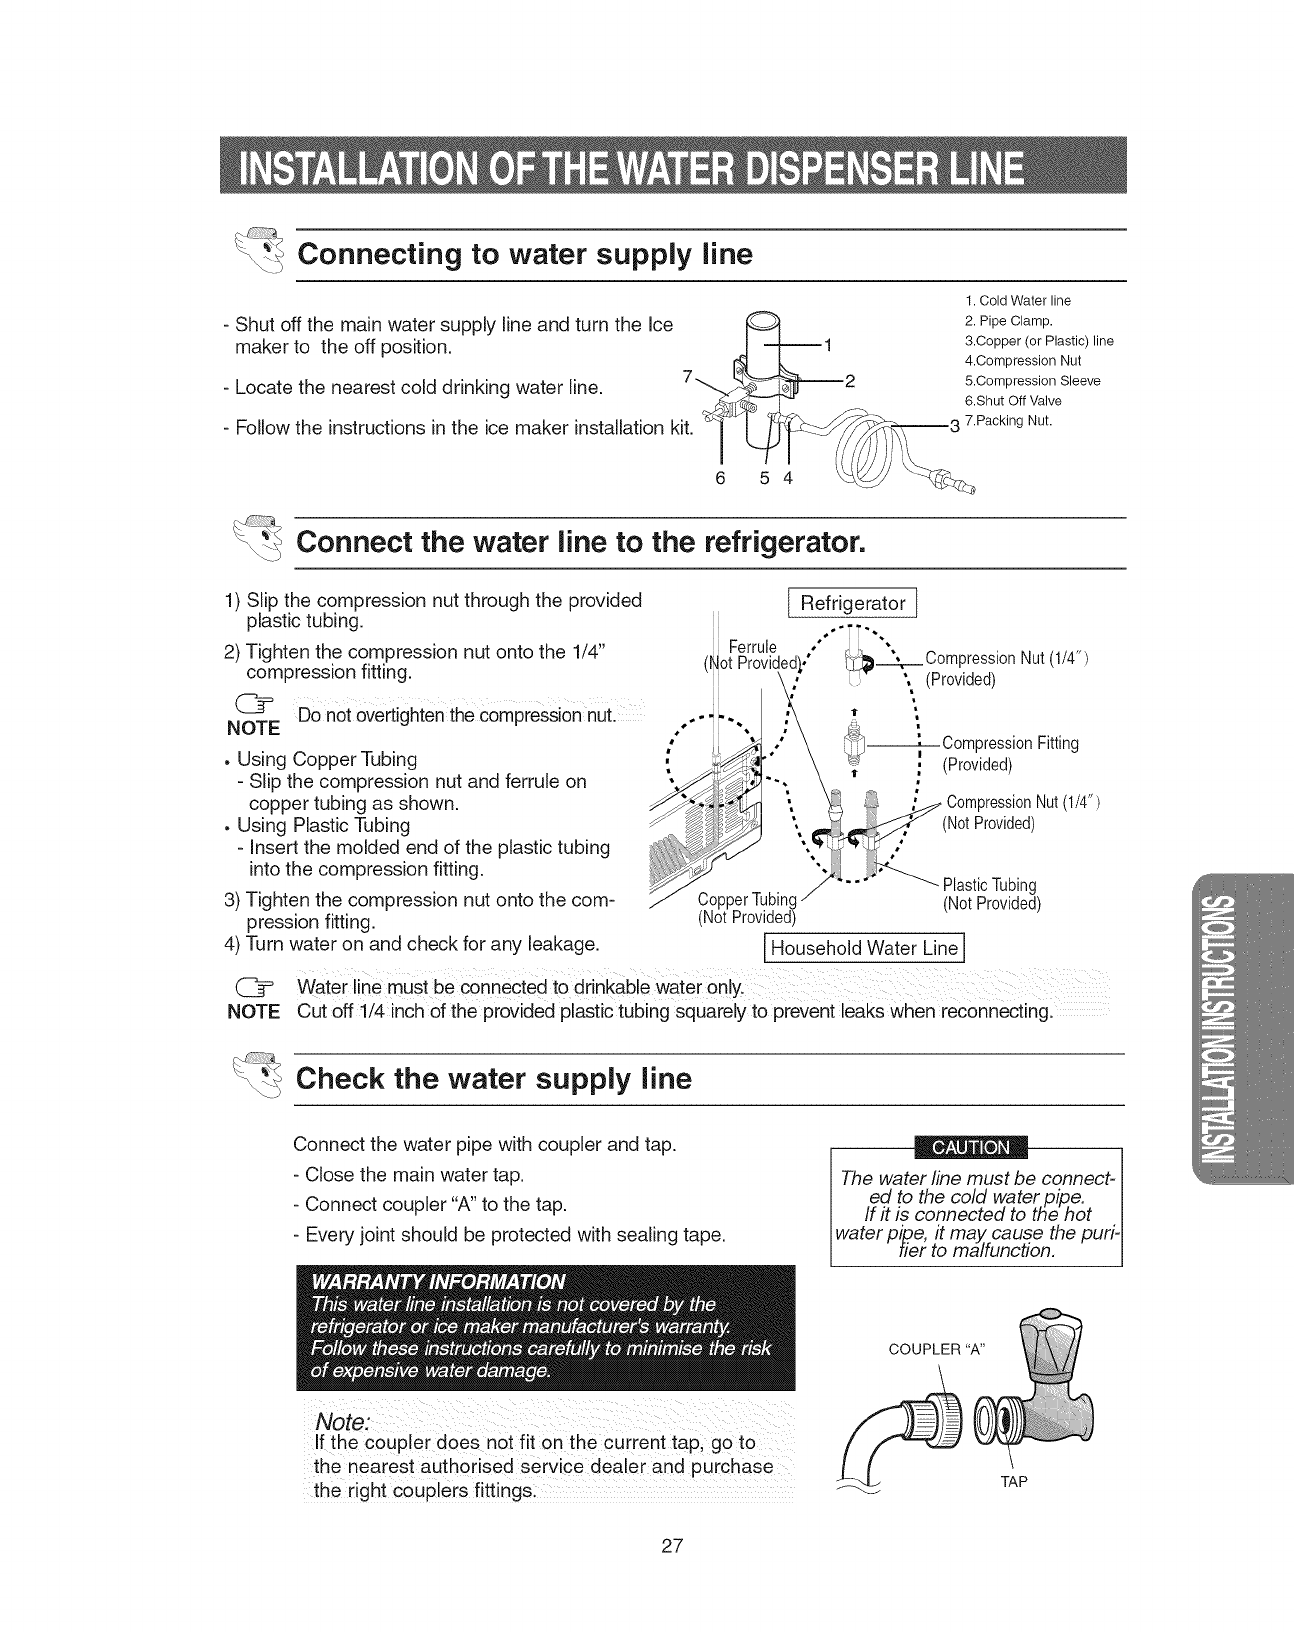
_Connecting to water supply line
- Shut off the main water supply line and turn the Ice
maker to the off position.
- Locate the nearest cold drinking water line.
- Follow the instructions in the ice maker installation kit.
1. Cold Water line
2. Pipe Clamp.
&Copper (or Plastic) line
4.Compression Nut
5.Compression Sleeve
6.Shut Off Valve
7.Packing Nut.
5 4
_Connect the water line to the refrigerator.
1) Slip the compression nut through the provided
plastic tubing.
2) Tighten the compression nut onto the 1/4"
compression fitting.
(_F Do notovertighten the compressionnuL
NOTE
, Using Copper Tubing
- Slip the compression nut and ferrule on
copper tubing as shown.
, Using Plastic Tubing
- Insert the molded end of the plastic tubing
into the compression fitting.
3) Tighten the compression nut onto the com-
pression fitting.
4) Turn water on and check for any leakage.
C_
NOTE
Ferrule
(Not
Refrigerator ]
,,°'TT'-.
_._.__ CompressionNut(1/4")
\ (Provided)
l_-----,-- CompressionFitting
_¢ i (Provided)
m
0ressionNut(1/#')
(NotProvided)
PlasticTubing
Co (NotProvided)
(NotProvided)
I Household Water Line I
Waterline must be connected to drinkable water Only.
Cut off 1/4 inch of the provided plastic tubing squarely to prevent leaks when reconnecting.
_ Check the water supply line
Connect the water pipe with coupler and tap.
- Close the main water tap.
- Connect coupler "A" to the tap.
- Every joint should be protected with sealing tape.
If the coupler does not fit on the current tap; go to
the nearest authorised Service dealer and purchase
the right couplers fittings:
The water line must be connect-
ed to the cold water pipe. I
If it is connected to the hot I
water pipe, it may. cause the puri- I
tier to malfunction. I
COUPLER "A"
TAP
27

Connect the water line to the refrigerator.
- Remove the compressor cover of the refrigerator. WATER
- Connect the water line to the valve, as shown in the figure.
- When connected, check if there is any leakage.
If any, re-seal the connection.
- Reattach the compressor cover of the refrigerator.
CONNECTION NUT
COMPRESSOR COVER
OF REFRIGERATOR
Secure the water line.
- Using clip "A", fix the water line to the wall or the back of refrigerator.
- When the water line is secure, make sure that the
water line is not excessively bent, pinched or squashed.
Complete the installation of the water supply line.
- Power on the refrigerator and press the lever on the right of the dispenser until water
runs out through the water line and all air has been cleared from the water line.
-At this time, check for any possible leakages at the joints in the water line.
After securing the water line, move the refrigerator to the required location.
Once the refrigerator is in position, do not move it if possible..
WATER
Install the water filter.
1) Remove the fixed cap (A) as shown, the fixed cap can be separated
from the Water Filter Compartment by rotating it counterclockwise.
Remove the water filter from the box and put a month indicator
sticker on the filter as shown. _
{
([_ Keep the cap(A)in a safe place for the future (to put it
NOTE back in place when you don t need to use the filter)i
2) If the water filter was installed in March, put on the "SEP" sticker.
3) Remove the Red protective cap from the filter, then position and
insert the filter as shown. (A)_
4) Slowly turn the water filter clockwise 90° to align
the indication mark on the cover, locking the filter in
position, Do not overtighten.
J
STICKER
(MONTH INDICATION)
"__ COVER FILTER
|MARK
_ _! ' _Q','WITH LOCKPOSITION.
1" --_-" . ALIGN THE INDICATION
([_ please check that the indication line aligns With the lockposition
NOTE
28
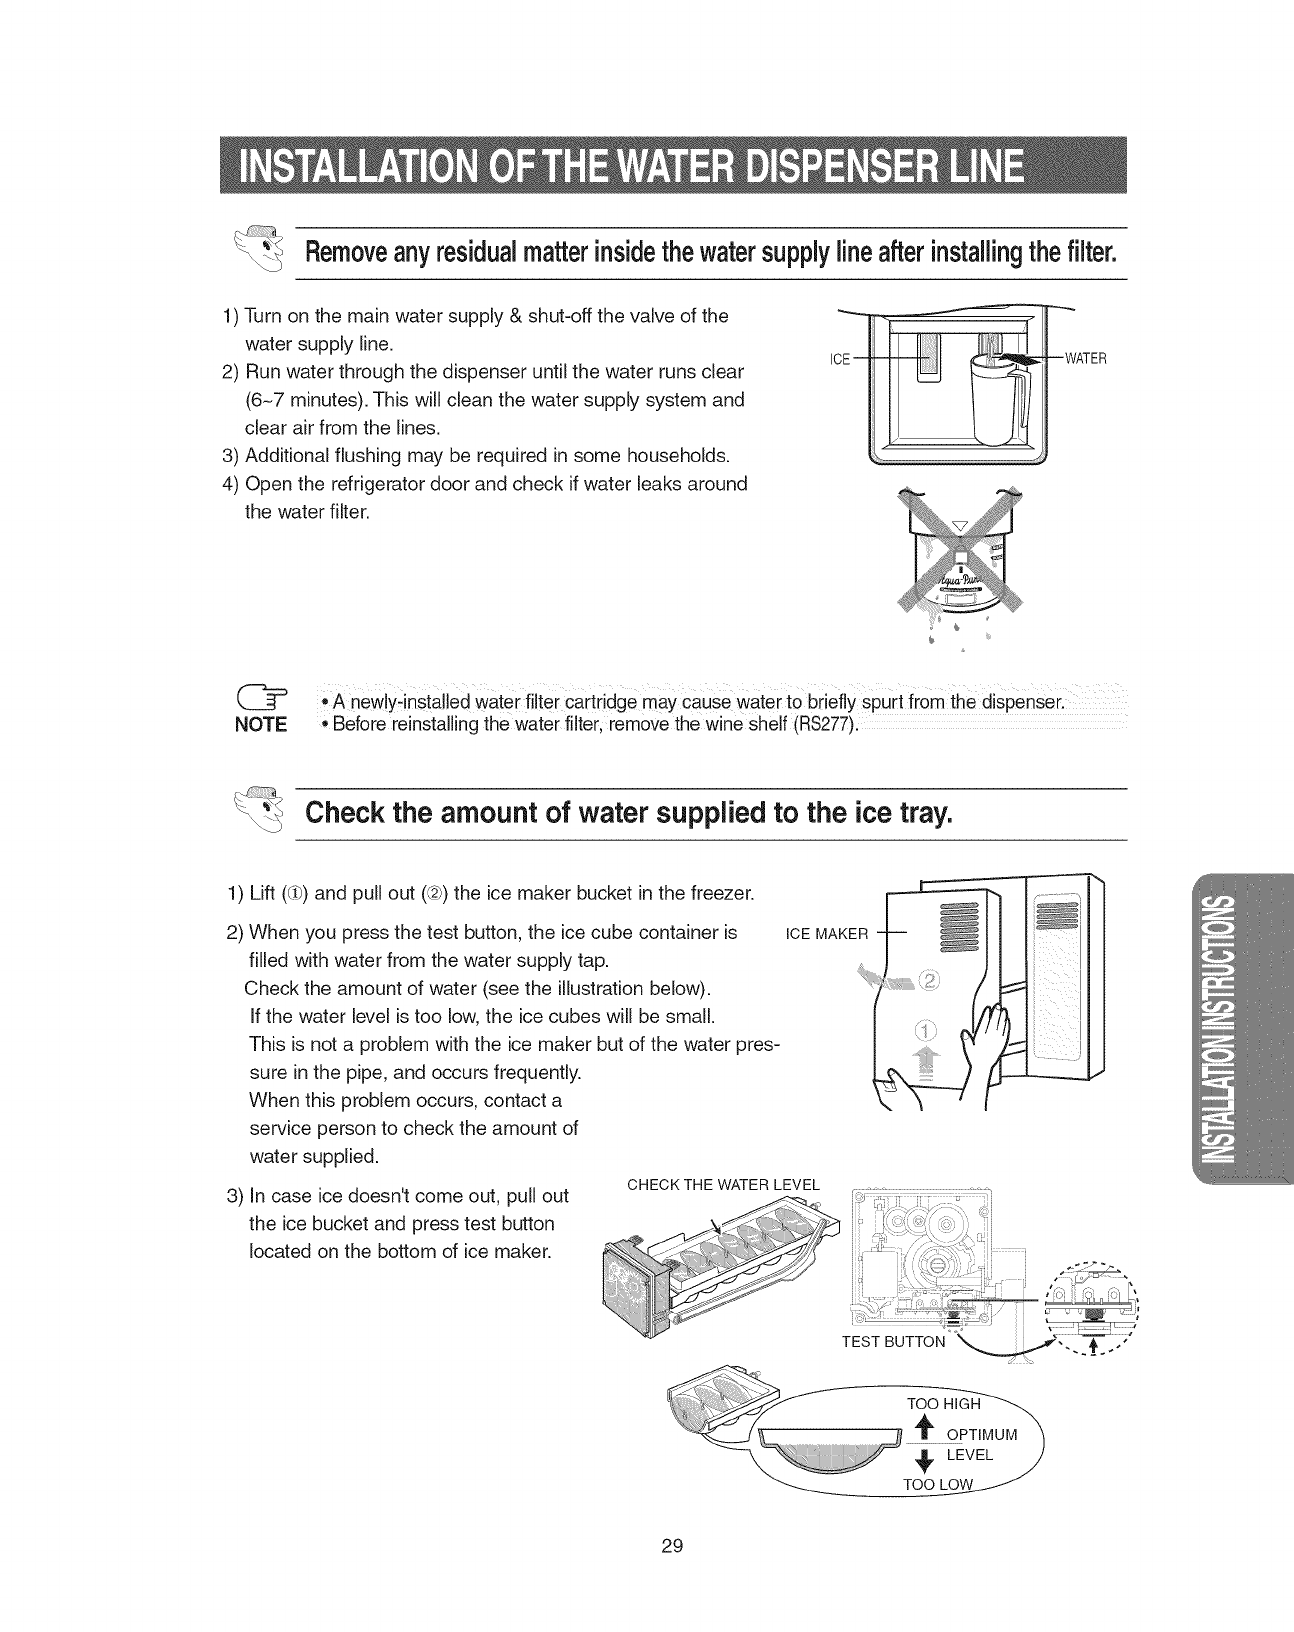
Removeanyresidualmatterinsidethewatersupplylineafterinstallingthefilter.
1) Turn on the main water supply & shut-off the valve of the
water supply line.
2) Run water through the dispenser until the water runs clear
(6-7 minutes). This will clean the water supply system and
clear air from the lines.
3) Additional flushing may be required in some households.
4) Open the refrigerator door and check if water leaks around
the water filter.
ICEm --WATER
([[_ •A new!yqnstalled Watei filter Carti!dge may cause Waterto briefly spurt from the dispenserl
NOTE ,Before reinstalling the water filter, remove the wine Shelf (RS277).
Check the amount of water supplied to the ice tray.
1) Lift ((ih)and pull out (@) the ice maker bucket in the freezer.
2) When you press the test button, the ice cube container is
filled with water from the water supply tap.
Check the amount of water (see the illustration below).
If the water level is too low, the ice cubes will be small.
This is not a problem with the ice maker but of the water pres-
sure in the pipe, and occurs frequently.
When this problem occurs, contact a
service person to check the amount of
water supplied.
3) In case ice doesn't come out, pull out
the ice bucket and press test button
located on the bottom of ice maker.
ICE MAKER
CHECK THE WATER LEVEL
TEST BUTTON
29
The refrigerator does not work at all or it does not
chill sufficiently
• Check that the power plug is properly connected.
• Is the temperature control on the display panel set to
the correct temperature? Try setting it to a lower tem-
perature.
• Is the refrigerator exposed to direct sunlight or locat-
ed near a heat source?
• Is the back of the refrigerator too close to the wall?
The food in the refrigerator is frozen
• Is the temperature control on the display panel set to
the correct temperature? Try setting it to a warmer
temperature.
• Is the temperature in the room too low?
• Did you store food with a high water content in the
coldest part of the refrigerator?
You hear unusual noise or sounds
• Check that the floor is leveled and stable.
• Is the back of the refrigerator too close to the wall?
• Was anything dropped behind or under the refrigera-
tor?
• A "ticking" sound may be heard from inside the refrig-
erator, this is normal.This occurs because various
accessories are contracted or expanded.
The front corners and sides of the cabinet are hot;
condensation occurs.
• Anti-condensators are installed in the front corners of
the refrigerator to prevent condensation.
• Condensation can occur when you leave the door
open for a long time.
Ice is not dispensed
• Did you stop the ice making function?
• Is there any ice in the ice storage unit?
• Is the water line connected and the shut-off valve
open?
• Is the freezer temperature too warm?
(Set the temperature lower)
• Did you wait for 12 hours after installing the water
supply line before making ice?
You can hear water bubbling in the refrigerator
• The bubbling comes from the refrigerant circulating in
the refrigerator and is normal.
There is a bad smell inthe refrigerator
• Wrap strong smelling food so that it is airtight.
Throw away any rotten food.
Frost forms on the walls of the freezer
• Is the air vent blocked?
• Allow sufficient space between the foods stored for
efficient air circulation.
• Is the door closed properly?
No water is supplied
• Is the water line connected and the shut-off valve
open?
• Is the water supply line crushed?
• Is the water tank frozen because the refrigerator tem-
perature is too low? Select a warmer setting on the
display panel.
3O
SAMSUNG REFRIGERATOR
(18 Cubic Feet and Larger Capacity)
This SAMSUNG brand product, as suppliedand distributed by Samsung ElectronicsAmerica, Inc.(SAMSUNG) and delivered new,
in the originalcarton to the original consumer purchaser,iswarranted by SAMSUNG against manufacturingdefects in materials
and workmanshipfor a limitedwarranty period of:
One (1)Year Partsand Labor on Refrigerator
Five (5)Years Parts and Labor on Sealed RefrigerationSystem Only*
(*Compressor,evaporator,condenser,drier,connecting tubing)
This limitedwarranty beginson the originaldate of purchase,and is valid only on products purchased and used in the United
States. To receivewarranty service,the purchasermust contactSAMSUNG for problemdeterminationand service procedures.
Warrantyservice can only be performed by a SAMSUNG authorizedservice center. The original dated bill of sale must be
presented upon requestas proofof purchaseto SAMSUNG or SAMSUNG'sauthorized servicecenter.
SAMSUNG will repairor replaceany part foundto be defective,at our option and at no charge as stipulated herein,with new or
reconditionedparts during the limited warranty period specified above. All replaced parts and products become the property of
SAMSUNG and must be returned to SAMSUNG. Replacement partsand products assumethe remainingoriginal warranty,or
ninety (90) days,whicheveris longer.
In-home servicewill be provided during the warranty labor period subjectto availabilitywithin the contiguousUnited States.In-
home service is notavailable in allareas. To receive in-homeservice, the product must be unobstructedand accessiblefrom floor
levelto service personnel. If during in-home service repaircannot be completed,it may be necessary to remove,repairand return
the product. If in-home service is unavailable,SAMSUNG may elect,at our option, to providefor transportationof our choiceto
and from a SAMSUNGauthorized service center. Otherwise,transportationto and from the SAMSUNG authorized servicecenter
is the responsibilityof the purchaser.
This limitedwarranty covers manufacturingdefects in materialsand workmanshipencounteredin normal, noncommercialuse of
this product, and shall notapply to the following,including,butnot limited to:damage which occurs in shipment;delivery and
installation;applicationsand uses for which this product was not intended;altered productor serial numbers;cosmetic damage or
exteriorfinish;accidents,abuse,neglect, fire,water,lightning or other acts of nature;use of products,equipment, systems, utilities,
services, parts, supplies, accessories,applications,installations,repairs, external plumbingand leaks, externalwiring, circuit
breakers,fuses or connectorsnot suppliedand authorized by SAMSUNG, or which damage this product or result in service
problems;incorrectelectrical line voltage,fluctuationsand surges;customer adjustmentsand failure to follow operatinginstructions,
cleaning,maintenanceand environmentalinstructionsthat are covered and prescribed in the instructionbook; loss of food due to
spoilage;consumableitems including filtersand light bulbs.
THERE ARE NO EXPRESSWARRANTIESOTHERTHANTHOSE LISTED AND DESCRIBEDABOVE, AND NO WARRANTIES
WHETHER EXPRESSOR IMPLIED,INCLUDING, BUT NOT LIMITEDTO, ANY IMPLIEDWARRANTIES OF
MERCHANTABILITYOR FITNESS FOR A PARTICULARPURPOSE, SHALLAPPLYAFTERTHE EXPRESSWARRANTY
PERIODS STATEDABOVE,AND NO OTHEREXPRESS WARRANTYOR GUARANTYGIVEN BY ANY PERSON, FIRM OR
CORPORATIONWITH RESPECTTO THIS PRODUCT SHALL BE BINDINGON SAMSUNG. SAMSUNG SHALL NOTBE
LIABLE FOR LOSS OF REVENUE OR PROFITS,FAILURETO REALIZE SAVINGSOR OTHERBENEFITS,OR ANY OTHER
SPECIAL, INCIDENTALOR CONSEQUENTIALDAMAGESCAUSED BY THE USE, MISUSE OR INABILITYTO USETHIS
PRODUCT,REGARDLESS OFTHE LEGALTHEORY ON WHICHTHE CLAIM IS BASED,AND EVEN IF SAMSUNG HAS BEEN
ADVISEDOF THE POSSIBILITYOF SUCH DAMAGES. NOR SHALL RECOVERYOF ANY KIND AGAINSTSAMSUNG BE
GREATERIN AMOUNTTHAN THE PURCHASEPRICE OF THE PRODUCT SOLD BY SAMSUNG AND CAUSINGTHE
ALLEGED DAMAGE. WITHOUT LIMITINGTHE FOREGOING, PURCHASERASSUMES ALL RISK AND LIABILITY FOR LOSS,
DAMAGE OR INJURYTO PURCHASERAND PURCHASER'SPROPERTYANDTO OTHERS ANDTHEIR PROPERTY
ARISING OUT OF THE USE, MISUSE OR INABILITYTO USE THIS PRODUCT SOLD BY SAMSUNG NOT CAUSED DIRECTLY
BY THE NEGLIGENCEOF SAMSUNG. THIS LIMITEDWARRANTYSHALL NOT EXTENDTO ANYONE OTHER THAN THE
ORIGINAL PURCHASEROF THIS PRODUCT,IS NONTRANSFERABLEAND STATESYOUR EXCLUSIVEREMEDY.
Some statesdo notallow limitationson how long an impliedwarranty lasts, or the exclusionor limitationof incidentalor
consequentialdamages,so the abovelimitationsor exclusionsmay not apply to you. This warranty gives you specific legal rights,
and you mayalso have other rights, which vary from stateto state.
Toobtain warranty service, please contact SAMSUNGat:
SAMSUNG CUSTOMERCARE CENTER
Samsung Electronics America,inc.
105 Challenger Road Ridgefield Park NJ 07660-0511
1-800-SAMSUNG (1-800-726-7864)and www.SAMSUNG.eom
061002
31
If you have any questions or comments relating to Samsung products,
please contact the SAMSUNG customer care centre.
Samsung Electronics America, Inc.
105 Challenger Road Ridgefield Park, NJ 07660-0511
1-800-SAM S UNG (1-800-726-7864)
www.samsung.com
