SCHUNK Intec 03777 Low Power Transmitter User Manual RSS R1 P1 ENG V03
SCHUNK Intec, Inc Low Power Transmitter RSS R1 P1 ENG V03
Contents
- 1. User Manual RSS P1
- 2. User Manual RSS T2
User Manual RSS P1
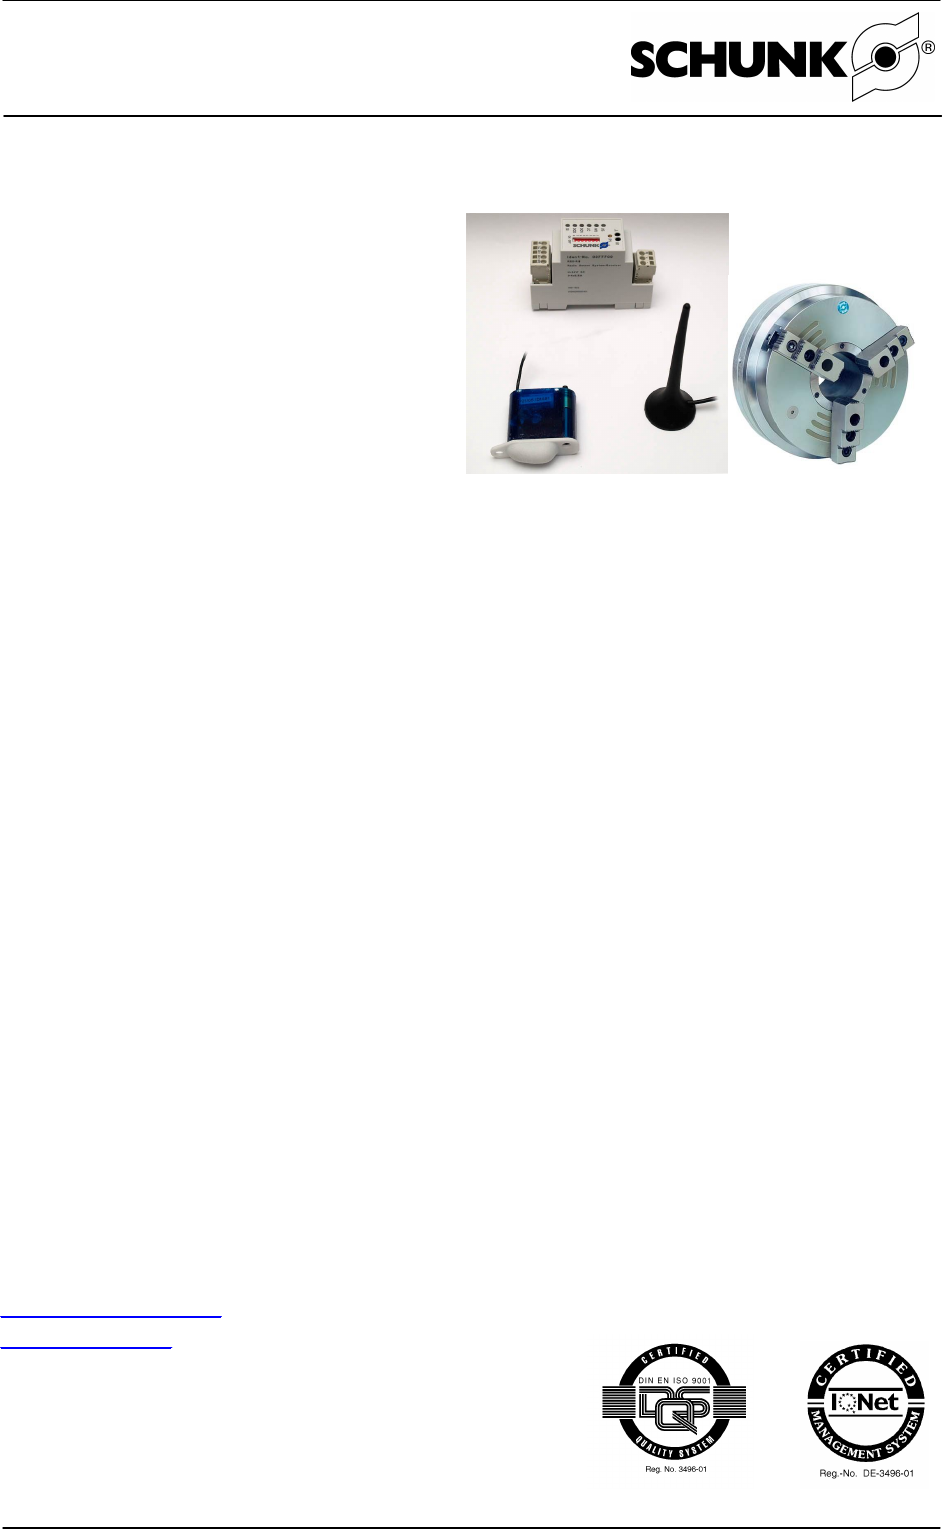
Assembly and Operating Manual
Radio - Pressure - Monitoring RSS R1; RSS P1
date printed: 04.12.20061
RSS R1 / P1
RECEIVER RSS R1
TRANSMITTER RSS P1
Dear Customer,
Congratulations on choosing a SCHUNK product. By choosing SCHUNK, you have opted for
the highest
precision, top quality and best service.
You are going to increase the process reliability of your production and achieve best
machining results – to the customer's complete satisfaction.
SCHUNK products are inspiring.
Our detailed assembly and operation manual will support you.
Do you have further questions? You may contact us at any time – even after purchase. You can
reach us directly at the below mentioned addresses.
Kindest Regards,
Your SCHUNK GmbH & Co. KG
Precision Workholding Systems
Lotheringer Straße 23
D-74348 Mengen; Germany
Tel. +49-(0)-7133-103-503
Fax +49-(0)-7133-103-189
futter@de.schunk.com
www.schunk.com
Document last updated: 13.10.2006

Assembly and Operating Manual
Radio - Pressure - Monitoring RSS R1; RSS P1
date printed: 04.12.20062
Contents
1Safety 5
1.1 Symbol key 5
1.2 Appropriate use 5
1.3 Safety information 5
2Warranty 7
3Required Components 7
4Technical Data 7
4.1 General technical data - RSS R1 8
4.2 General technical data - RSS P1 8
4.3 Information on radio link and range 9
5First Steps 10
5.1 Assembly 10
5.1.1 Assembly of the RSS P1 transmitter module 10
5.1.2 Assembly and electrical connection of the RSS R1 receiver 11
5.1.3 Switching suggestions on connecting to your system 12
5.2 Commissioning 13
5.2.1 General information 13
5.2.2 Programming the transmitter to the receiver 13
5.2.3 Testing the antenna position 14
5.2.4 Adjusting the watchdog time at the receiver 14
5.2.5 Adjusting the switching point of the pressure switch 14
6Detailed Function description 15
6.1 RSS R1 15
6.1.1 LED 15
6.1.2 Measuring jacks 15
6.1.3 General discrition 16
6.1.4 Function description devilery condition 17
6.1.5 Status definition 17
6.1.6 Time response 18
6.1.7 Function of the DIP switches 18
6.1.8 Delete transmitter ID 18

Assembly and Operating Manual
Radio - Pressure - Monitoring RSS R1; RSS P1
date printed: 04.12.20063
6.1.9 Signalling of the signal distance or the signal strength 18
6.1.10Setting the limit value for battery monitoring 19
6.1.11Teaching the limit value (teching threshold) 19
6.1.12Setting the watchdog time 19
6.1.13Function of the DIP 5 Extension of the reception range
during the learning procedure 20
6.1.14Manual setting of the transmitter ID (programming) 20
6.1.15Monitoring the DIP switches 21
6.1.16Output behaviour of the watchdog 21
6.1.17Software block diagram 21
6.2 RSS P1 22
6.3 Incorporated pressure switch - Adjusting the switching point 22
6.3.1 Adjusting a defined minimum pressure, Method 1 22
6.3.2 Adjusting a minimum pressure not exactly defined, Method 2 23
6.3.3 Check the function 23
7Maintenance and Care 23
8Assembly drawings 24
9Bills of material 26
10Declaration by the manufacturer 27
11Contact 28

Assembly and Operating Manual
Radio - Pressure - Monitoring RSS R1; RSS P1
date printed: 04.12.20064
1 Safety
1.1 Symbol key
- hazards for persons or damage to the product are possible
- important information on the product or its handling
1.2 Appropriate use
The RSS radio system serves to transmit the sensor states via a radio link from the
transmitter unit to the receiver in the switching cabinet.
For the RSS P1 system, this specifically involves monitoring the pressure in the chuck.
The system’s task is to detect a proper working pressure when clamping the work piece
from the outside. This way, a secure clamping can be ensured. Furthermore, it is possible
to detect pressure loss in the system in due time.
The unit must only be used within the scope of its technical data. Appropriate use also
includes compliance with the conditions the manufacturer has specified for
commissioning, assembly, operation, environment and maintenance. Using the unit with
disregard to even a minor specification will be deemed inappropriate use. The
manufacturer assumes no liability for any injury or damage resulting from inappropriate
use.
1.3 Safety information
This manual describes the function, application and safety considerations of this
product. This manual must be read and understood before any attempt is made
to install or operate the product, otherwise damage to the product or unsafe
conditions may occur.
This device complies with part 15 of the FCC Rules and with RSS-210 of Industry
Canada. Operation is subject to the following two conditions.
(1) this device may not cause harmful interference, and
(2) this device must accept any interference received, including interference that
may cause undesired operation.
1. The radio link established by the system can experience temporary or permanent
interference through external influences. As a result, the states of the sensors are not
updated at the receiver for the duration of the interference. The interference is only
reported by the receiver after the watchdog time has lapsed. Ensure that such
interferences cannot cause any damage. Adjust the watchdog time to a time suitable for
your process.
The customary standards for sensor systems must be observed.
Installation and commissioning may only be performed by qualified staff trained for
electrical system.

Assembly and Operating Manual
Radio - Pressure - Monitoring RSS R1; RSS P1
date printed: 04.12.20065
2. In the 824 MHz range, the system does not comply with the EMC regulation for
interference immunity to incoming radio waves. Losses of radio telegrams may occur in
this range.
Disturbances become more likely if the antenna is further than 25 cm away from the
receiver. The application must therefore be tested each time before being integrated.
3. The radio switch receiver must not be used in combination with devices that are
directly or indirectly used to safeguard the health or life of persons, or devices
which, when in operation, could cause danger to persons, animals or property!
This is due to the radio switch receiver’s classification as “Class 2 Equipment” in
accordance with ETSI EN 301 489-3 V1.4.1 (2202-08) “Specific conditions for
short-range devices (SRD)”.
4. When the chuck is in operation, sudden surges in pressure may occur in the piston area
of the chuck. If the switching pressure set is exceeded due to these pressure
fluctuations, then the system sends this information. Thus, a very short “Pressure IO”
message may arise during the clamping process.
5. Even if the air supply is switched off, there may still be pressure present at the pressure
switch if the chuck was not bled. It is imperative that the pressure chamber be bled
before the pressure switch is disassembled. The chuck must be opened for this
purpose.
The time between evaluable telegrams must be at least 50ms.
6. The RSS R1/P1 receiver/transmitter has been built according to the current state of the
art and is operationally safe. The unit can only pose hazards if, for example:
- the unit is used, assembled or maintained inappropriately.
- the unit is used for purposes other than those for which it is intended.
- the EC Machine Directive, the accident prevention regulations, the VDE guidelines,
or the safety information and assembly notes are not observed.
7. All persons responsible for assembly, commissioning and maintenance of the unit are
obliged to have read and understood all the operating instructions, in particular the
Safety chapter. We recommend that the customer have this confirmed in writing
8. The installation and deinstallation, connection and commissioning of the unit may only
be performed by authorized, appropriately trained personnel.
9. Modes of operation and work methods that adversely affect the function and/or the
operational safety of the unit are to be refrained from.
10. The RSS R1/P1 receiver/transmitter may only be used to control chucks within the
scope of its technical data. Any use outside this scope is deemed to be inappropriate.
The manufacturer assumes no liability for any injury or damage resulting from such
inappropriate use.
11. Always disconnect the power supply lines during assembly, conversion,
maintenance and adjustment work.
12. Additional holes, threads or attachments which are not supplied as accessories
by SCHUNK may only be applied after obtaining the prior consent of SCHUNK.

Assembly and Operating Manual
Radio - Pressure - Monitoring RSS R1; RSS P1
date printed: 04.12.20066
13. To avoid severe personal injury or substantial property damage, only qualified
persons may work on the devices. These persons must conscientiously read the
operating instructions and observe the safety notes before installation and
commissioning. (Cf. IEC 364 or CENELEC HD 384 or DIN VDE 0100 and IEC report
664 or VDE 0110 and national accident prevention regulations or VBG 4.)
14. Repairs to the RSS R1/P1 receiver/transmitter may only be carried out by the
manufacturer or repair centers authorized by the manufacturer. Unauthorized
opening and inappropriate tampering may lead to personal injury or property
damage.
15. Make absolutely sure that the operator is not injured (crushed) while clamping or
unclamping the chuck. We recommend you enable the >>Clamping<< or
>>Unclamping<< functions of the chuck only when the system door is closed.
16. Warning: Changes or modifications made to this equipment not expressly approved by
SCHUNK may void the FCC authorization to operate this equipment.
Note
Above and beyond that, the safety and accident prevention regulations in force
at the location of use apply.
2 Warranty
The warranty period is 24 months after delivery date from the production facility assuming
use in single-shift operation and that the recommended maintenance and lubrication
intervals are observed.
Components that come into contact with workpieces and wearing parts are never included
in the warranty. In this context, please also see our General Terms and Conditions.
3 Required Components
The following components are required for proper use:
Sensors: One pressure switch that is incorporated into the chuck
Radio transmitter: One RSS P1 transmitter is required per transmitter/chuck
Radio receiver One RSS P1 radio transmitter is required per RSS R1 radio receiver
Antenna: One RSS-R-A antenna per radio receiver
4 Technical Data
Refer to our catalog for additional technical data.
The latest version is valid in each case (as per Chapter 2.3 General Terms and Conditions).

Assembly and Operating Manual
Radio - Pressure - Monitoring RSS R1; RSS P1
date printed: 04.12.20067
4.1 General technical data - RSS R1
Description Technical data RSS R1
Supply
Voltage supply DC 12...24V (-10...+20%)
False polarity protection Yes
Current input < 45 mA + load control
Radio protocol / data
Receiving frequency 868.3 MHz
Receiving protocol EnOcean Standard
Telegram analysis STM data
Outputs
Output voltage ^= Supply voltage
Output current (per channel) max. 500 mA at 24V
Load type Resistive
Type of outputs Semiconductor = OP output PNP
Potential isolation No
Short-circuit proof, overload
protection
Yes
General data
Permitted ambient temperature 0 to 50°C
Storage temperature -25 to +85°C
Protection class IP20
Installation position Vertical
Connection method CAGE CLAMP® connection 0.08...2.5 mm²
WAGO multi-plug system series 722
Housing material Polycarbonate
Electromagnetic compatibility CE conforming with EMC- guideline 89/336/EWG
Electromagnetic radiation EN 61000-6-4
Electromagnetic interference EN 61000-6-2
Radio permit EnOcean
Receiver RCM 100
CETECOM Test report 2_3041-01-02/02
DAR Test report P0ZNNP1P
Installation type Snapping on to DIN track (EN50022)
Dimensions (WxHxD) 35 mm x 55 mm* x 90 mm ;* from upper edge TS35
Required accessories
Antenna (ID No. 0377730 ) Not included in scope of delivery
4.2 General technical data - RSS P1
Description Technical data RSS-P1
Transmission frequency 868.3 MHz
Sensor connection Two-wire to pressure sensor
Housing material Araldite cast resin
Protection class IP67
Voltage supply Lithium batteries, life for 1 transmission/10 seconds, longer than 7
years
Transmission protocol EnOcean Standard
Permitted ambient temperature 0 to 50°C
Storage temperature 0 to 50°C
Electromagnetic compatibility CE conforming with EMC- guideline 89/336/EWG
Electromagnetic radiation EN 61000-6-4
Electromagnetic interference EN 61000-6-2
Radio permit EnOcean
Transmitter STM
CETECOM Test report 2_3041-01-02/02
DAR Test report P0ZNNP1P
Installation type Screw connection in chuck

Assembly and Operating Manual
Radio - Pressure - Monitoring RSS R1; RSS P1
date printed: 04.12.20068
Description Technical data Pressure switch
Pressure range 1 – 10 bar
Pressure type Positive excess pressure
Pressure connection G1/8 B
Measuring principle Spring-loaded diaphragm
Change of load 1 million pressure cycles
Switching output 1 closer
Hysteresis <10% from the value set
Reproducibility <5% from the value set
Temperature range -5°C to +75 °C
Weight 30 g
Burst pressure 20 bar
4.3 Information on radio link and range
The transmitter sends telegrams with 868 MHz to the receiver. The receiver checks the
incoming telegrams and uses them to control its outputs.
This radio link is principally prone to interferences by other radio systems or systems
emitting radio signals. For reasons of availability, the presence of systems emitting radio
waves – such as wireless or mobile phones or PCs – in the immediate proximity of the
transmitter is to be avoided. We recommend observing a minimum air distance of at least
one meter between receiver and interference source or between transmitter and
interference source.
Since the radio signals represent electromagnetic waves, the signal is damped on its
route to the receiver. This means, the signal strength decreases with increasing distance
between transmitter and receiver. Thus, the radio range is limited. In particular, the range
will also be significantly limited in case of irradiation above 400 MHz.
It must also be noted that the radio range is reduced by materials between transmitter and
receiver. For the practical application, this means that the construction materials used in
buildings and facilities (machines) play an important role for the evaluation of the radio
range. Some reference values that can be used to estimate the range are:
Line of sight
- Typically 30 m range
Concrete or brick walls
- Typically 20 m range
Steel-reinforced concrete walls
- Typically 10 m range
Fire protection walls, elevator shafts.
- Can be considered blockages.

Assembly and Operating Manual
Radio - Pressure - Monitoring RSS R1; RSS P1
date printed: 04.12.20069
Turning centers
- The radio waves penetrate to the outside through various slots and especially
through the viewing glasses. It is difficult here to make an exact statement on the
range. Based on our experience, a range of at least 3 m must be expected.
Cordless telephone at a distance of less than 1m
- Range approx. 25 cm
The distance from the receiver to other transmitting devices also radiating high-frequency
signals (computers, video systems, etc.) should be at least 0.5 m.
Using the receiving strength LED (SI) to our receiver it is easy to decide whether the
system provides secure transmission for the intended location or if strong interferences
are present.
5 First Steps
5.1 Assembly
5.1.1 Assembly of the RSS P1 transmitter module
You have received the system completely assembled. The following assembly instructions
are intended for maintenance that may be needed.
- Roll out pressure monitoring kit MATCH code “DAF...” (transmitter unit 8703653,
pressure switch 9941145, seal and cover for pressure switch).
- An electrostatic discharge via the cable at the transmitter unit must be prevented. The
installation engineer must ground himself/herself at the chuck accordingly. During the
entire assembly process, the chuck must remain on a grounded base.
- Lay the cable of the transmitter unit in the bores of the chuck body so that the end can
be pulled out in the bore in the side for the pressure switch.
- When you pull out the cable, it must not be pulled over sharp edges.
- The cable must not be laid taut in the chuck body; otherwise it will be damaged during
the rotation.
- Push the transmitter unit carefully into the recess in the chuck. In the process, feed the
cable accordingly to the bores at the chuck to the recess for the pressure switch. Make
sure the cable is not pinched or damaged.
- Install the pressure switch into the chuck using the proper wrench and solder on the
‘brown’ and ‘black’ wires at the pressure switch.
Assembly and Operating Manual
Radio - Pressure - Monitoring RSS R1; RSS P1
date printed: 04.12.200610
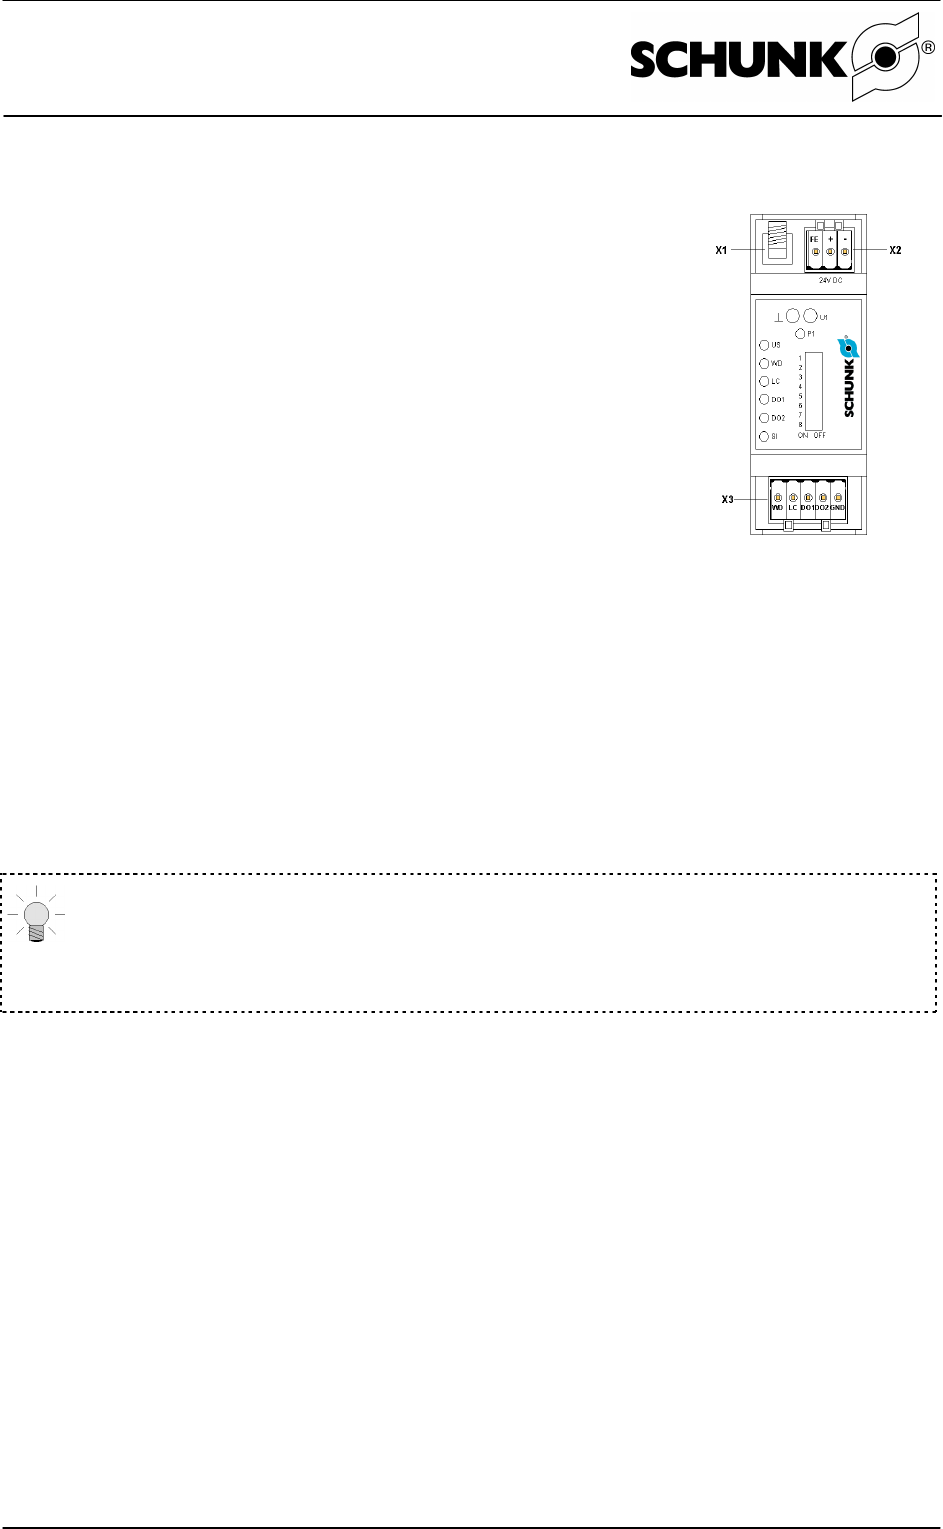
5.1.2 Assembly and electrical connection of the RSS R1
receiver
- Mount the receiver in a switching cabinet located less then 10 m
from the transmitter by snapping it onto a DIN track (EN50022).
- Connect the receiver:
Antenna socket X1:
- SMA socket for external antenna (we recommend
our RSS-R-A antenna, ID°No. 0377730)
Connector X2:
- X2.1 FE Function ground
- X2.2 + Suppply DC 24DCV+external
- X2.3 - Supply DC 24V-external
Connector X3:
- X3.1 WD Output watchdog, high signal, if radio IO
- X3.2 LC Output limit value, high signal, if battery IO, i.e. has still more
than 2 weeks capacity remaining.
- X3.3 DO1 Output 1, reserve, no function here.
- X3.4 DO2 Output 2, high signal, if clamping pressure is insufficient.
- X3.5 GND Reference ground for the outputs, type
Recommendation:
If the clamping pressure is insufficient (D02=High), or if the radio link is
interrupted (WD=Low), it is imperative to shut down the spindle for safety
reasons.
Connector WAGO MULTI-PLUG SYSTEM series 722.
- Mount the antenna on the top of the switching cabinet using the magnetic
base.
Figure 1:
Receiver RSS R1
Assembly and Operating Manual
Radio - Pressure - Monitoring RSS R1; RSS P1
date printed: 04.12.200611
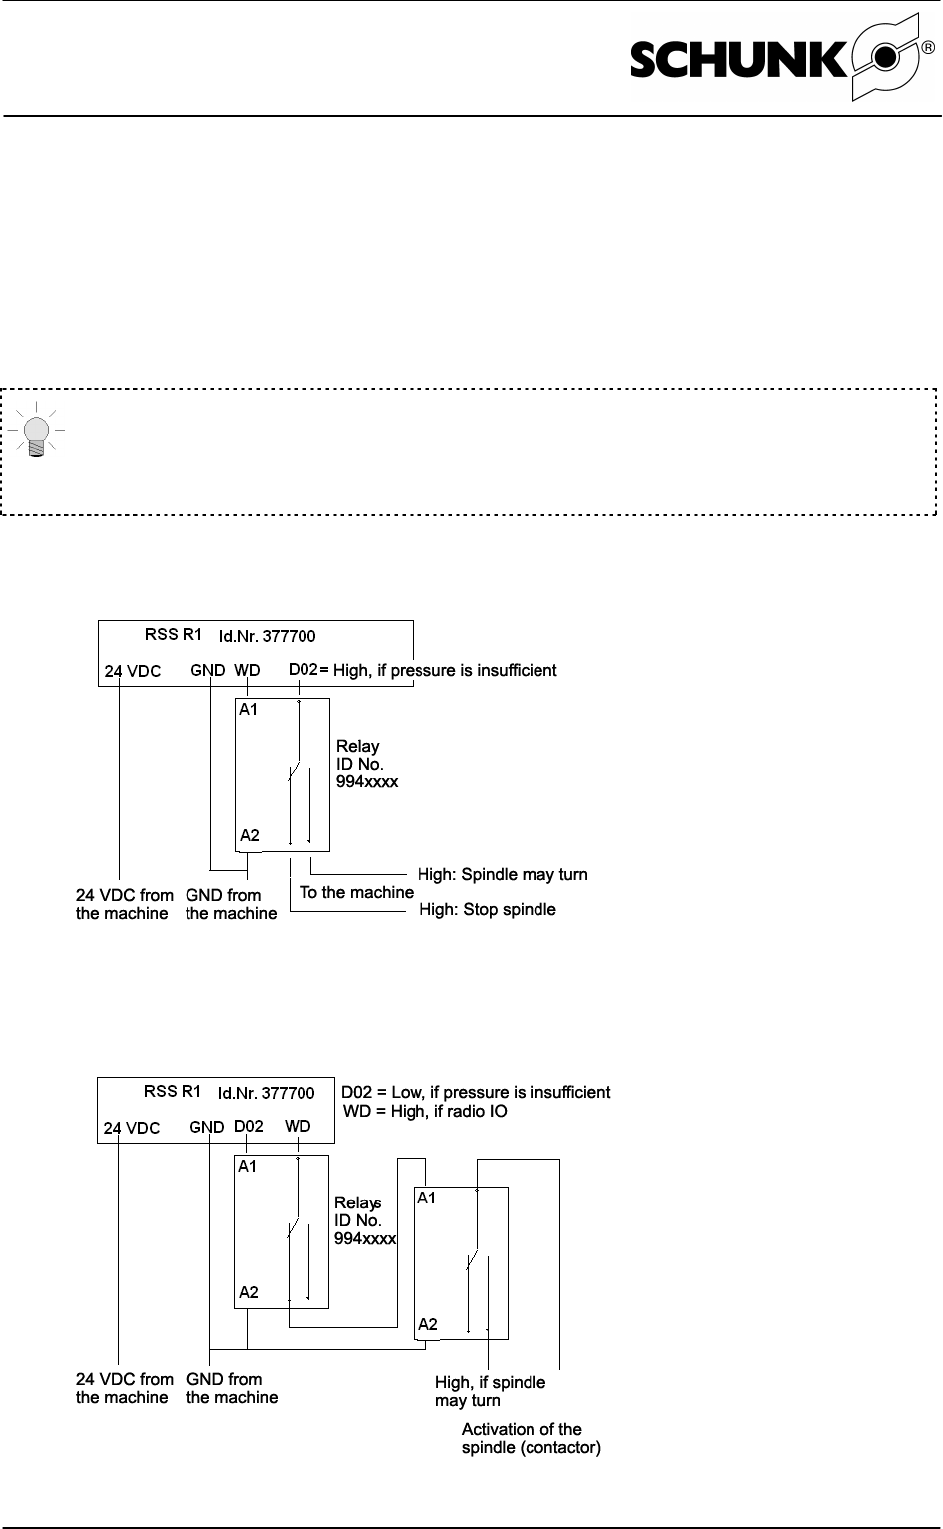
5.1.3 Switching suggestions on connecting to your system
Variant 1, if your system has digital inputs available.
WD on Input 1. This must be high; otherwise the radio communication is interrupted.
D02 on Input 2. If this is high, then the pressure is insufficient.
Adapt the system’s software so that the spindle can only turn if E1= High and
E2= Low. Continue to check for each cycle that E2= High must be the case if
the chuck is opened. This way the proper function of the inputs and outputs can
be ensured.
Variant 2, if your system only has the preprogrammed input ‘Release spindel’.
Figure 2: Circuit diagram - Variant 2
Variant 3, if your system has no inputs available.
Figure 3: Circuit diagram - Variant 3

Assembly and Operating Manual
Radio - Pressure - Monitoring RSS R1; RSS P1
date printed: 04.12.200612
5.2 Commissioning
5.2.1 General information
Before commissioning, please check the device for any transport damages. Do not start
up the device if it is mechanically damaged. Please read this assembly and operating
manual carefully and observe the technical information as well as the legal requirements
relevant to your country.
ESD Information
The components are equipped with electronic elements which could be destroyed
in case of an electrostatic discharge. When handling the components, it must be
ensured that environment (persons, workstation and packaging) are properly
grounded. Do not touch conductive elements.
Notes on installation
When installing the antenna and antenna cable assembly group, it is imperative to avoid
any proximity to sources with transient disturbances such as fluorescent tubes with
a faulty starter, frequency converters or power cables. They could result in interrupted
communication and therefore lead to incorrect initial states.
Notes on connecting the antenna
Only use suitable antennas (e.g. WAGO 758-910 incl. 2.5 m RG174 connection cable
and SMA connector; see accessories).
The antenna must be fixed on a plate with the minimum dimensions of 25 cm x 25 cm.
The antenna and the antenna cable must be at least 30 cm away from sources of inter-
ference and the antenna must be at least 35 cm away from the next wall at the side.
The antenna cable must under no circumstances be bent sharply as this could result in
permanent damage to the antenna cable (RG174 bending radius > 15 mm).
Preconditions for commissioning
The voltage supply must be applied and the external antenna must be connected prior to
commissioning.
5.2.2 Programming the transmitter to the receiver
(1) Switch DIP 1 to ‘on’ and immediately back to ‘off’.
(2) Open and close the chuck completely twice.
(3) Wait for 15 seconds.
(4) The transmitter and the receiver should now be taught. Check this by observing whether
the WD LED lights up briefly approx. every 10 seconds. Carry out a second test by
completely opening and completely closing the chuck. The WD LED should then light up
once briefly in each case. Furthermore, the status should be displayed on the LED D02.

Assembly and Operating Manual
Radio - Pressure - Monitoring RSS R1; RSS P1
date printed: 04.12.200613
- The LED D02 indicates: Off if the pressure set is exceeded. Pressure switch closed.
à It is safe to work. If the LED lights up: Warning, the pressure is too low or the chuck is
open.
- Please try a second time if the learning procedure has failed. Ideally, no second RSS
system should radio in the immediate vicinity during the learning phase.
5.2.3 Testing the antenna position
- Observe the LED ‘SI’. This LED signals the current quality of the radio link. This LED
should preferably light up or blink green.
- If necessary, move the antenna closer to the transmitter or reposition the antenna to
avoid any solid obstacles between antenna and transmitter.
5.2.4 Adjusting the watchdog time at the receiver
- You should adapt the watchdog time to your process in a useful manner. Every 10
seconds, the transmitter transmits a presence signal to control the radio link. If no signal
is received after the watchdog time set has elapsed, the LED ‘WD’ lights until the next
signal is received. The ‘WD’ output then signals the failure of the radio link through
0 VDC.
- The production facility has preset a time of about 15 seconds. This value should be
optimal for applications of the radio system in the chuck.
- Switch DIP 4 to ‘on’.
- To increase the time, turn the potentiometer clockwise. The time set can be identified by
the blinking frequency of the WD LED. When DIP 8 has been switched off, the time can
be adjusted between 0 and 1 second; when DIP 8 has been switched on, the time can
be adjusted between 0 and 30 seconds.
- Switch DIP 4 to ‘off’. (Keep DIP 8 in the position selected.)
5.2.5 Adjusting the switching point of the pressure switch
The pressure switch is preset to a switching point of 5.5 bar. If the pressure falls below
5.5 bar, the system issues a warning with a High at Output D02 and the LED D01 lights
up.
If you require a different switching point, e.g. because your working pressure is only 4
bar, then refer to Chapter 6.3 on adjusting the pressure monitors.

Assembly and Operating Manual
Radio - Pressure - Monitoring RSS R1; RSS P1
date printed: 04.12.200614
6 Detailed Function description
6.1 RSS R1
6.1.1 LED
LED color Status Meaning
US (green)
Off
On
Status of voltage supply
- No voltage supply present
- 24 V DC OK
WD (red)
Off / Flash
0.5 Hz blinking
2 Hz
On
Status system check and operating mode
- Operating status active (reception active)
“Flashing” of 15 ms indicates reception of a “taught” telegram
- Learning status
- Missing assignment; Sensor must be “taught“
- Watchdog addressed (non-saving), neither of 2 data
telegrams of the taught sensor were received within the
monitoring time. (The output behaves inversely.)
LC (yellow)
Off
On
0.5 Hz blinking
2 Hz blinking
Status of limit value message (MIN indicator)
- Limit value fallen below - output LOW
- Limit value not reached - output HIGH
- Learning mode active via DIP6 and DIP7
- Faulty adjustment of the DIP switches
DO1 (yellow)
Off
On
Status of Sensor 1
- Status 0 output LOW
- Status 1 output HIGH
DO2 (yellow)
Off
On
Status of Sensor 2
- Status 0 output LOW
- Status 1 output HIGH
SI
(yellow/red) LED green continuous light
LED green blinking
LED orange continuous light
LED orange blinking
LED red continuous light
LED red blinking
Indication of the signal strength
Signal optimal
Signal excellent
Signal good
Signal medium
Signal poor
Signal critical
Definition of ‘blinking’: 200 ms on and 200 ms off, alternating
6.1.2 Measuring jacks
Description Type Meaning
P1 Potentiometer Adjustment of time and limit value (value accepted with DIP
switch)
U1 Jack Measuring jack to adjust the watchdog and limit values
according to voltage diagram
_|_ Jack Reference potential
Assembly and Operating Manual
Radio - Pressure - Monitoring RSS R1; RSS P1
date printed: 04.12.200615
6.1.3 General discrition
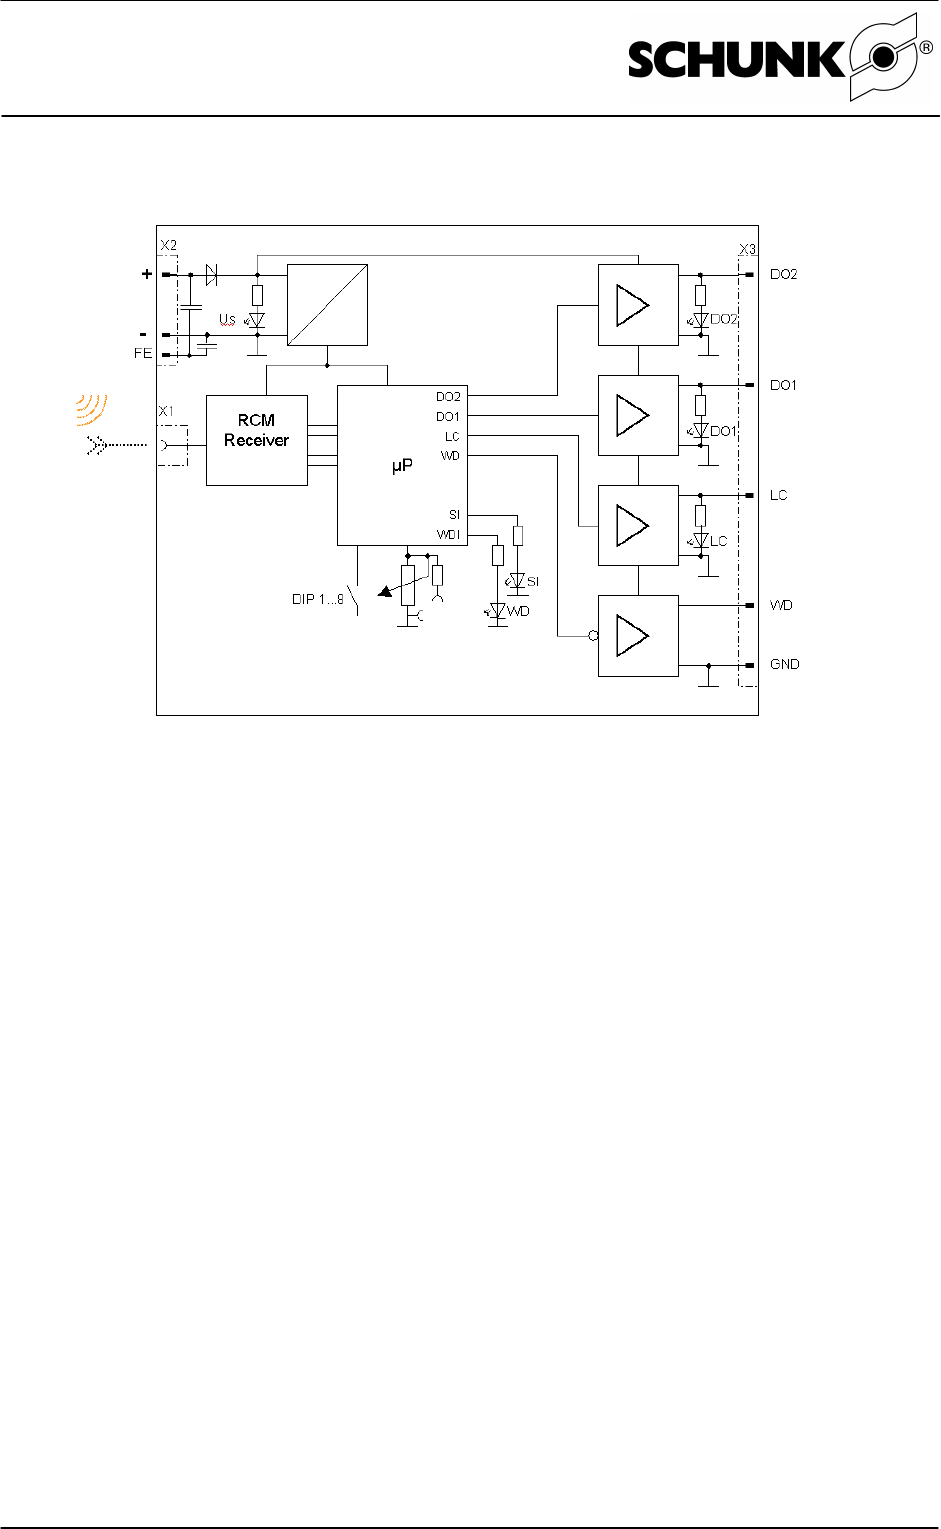
Figure 4: Block diagram of the receiver
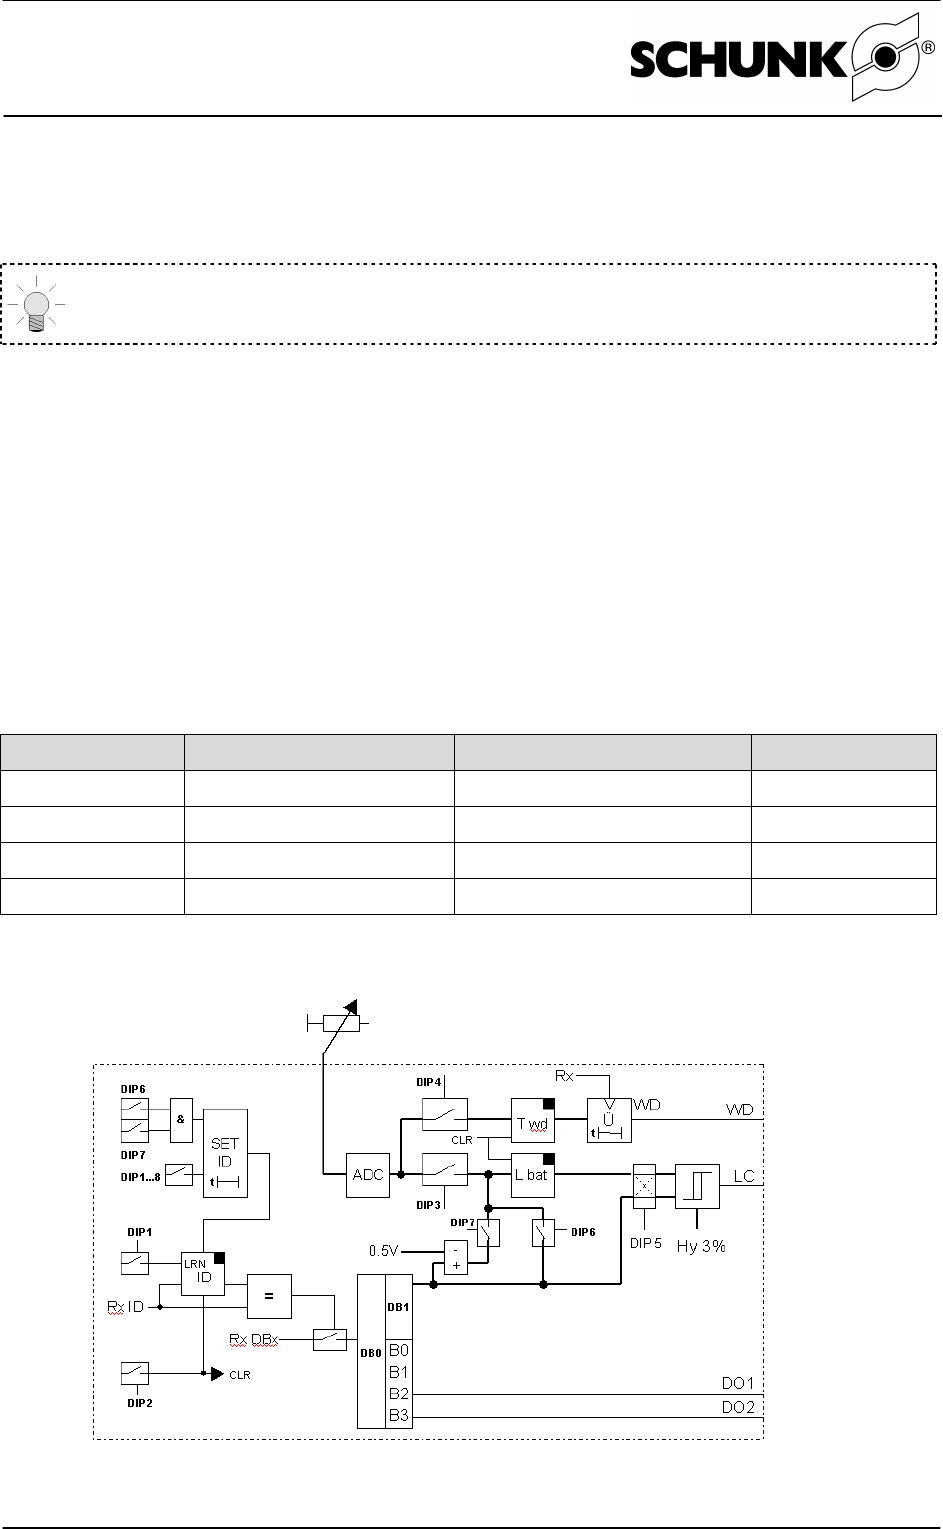
A supply voltage of 12 – 24 VDC is required to operate the radio receiver. The
connection is established using Cage Clamp® connectors. An external magnetic
antenna for the frequency range of 868 MHz is required to receive the radio telegrams.
The radio receiver is based on the EnOcean radio receiver RCM 121, whose received
data is processed with a downstream microcontroller.
The program in the microcontroller can be divided into the learning mode and the
operating mode.
Learning mode
In the learning mode (activated by DIP 1 ON/OFF), the ID of a detected EnOcean
telegrams*1 is stored in the receiver and the learning mode is automatically closed. If no
valid telegram of a transmitter is received in the learning mode, this is signalled as a
faulty status after 15 s. Alternatively, the transmitter ID can be taught manually by
actuating the DIP switches 6 and 7 (simultaneously).
The adjustment of the monitoring time and the limit value is done by specifying default
values or adjustments with the potentiometer based on a diagram. The diagrams and the
DIP switches are described in the following chapters.
Operating mode
In the operating mode, the receiver monitors the incoming signals of the transmitter with
the watchdog function. The watchdog LED (WD) indicates each incoming telegram of
the taught transmitter by blinking briefly. When the watchdog time set is exceeded, the
WD LED signals an error by staying lit continuously; the WD output switches to the LOW
status.
The LEDs and Outputs DO1 and DO2 directly indicate the status of the two-channel
sensor.

Assembly and Operating Manual
Radio - Pressure - Monitoring RSS R1; RSS P1
date printed: 04.12.200616
The level control monitors the current battery status for an adjustable limit value with
each telegram. When the limit value is fallen short of, the output switches to the LOW
status and the LED is OFF.
The signal strength of incoming telegrams is indicated by blinking codes of the SI LED;
this allows an optimum radio connection to be established already during
commissioning.
6.1.4 Function description devilery condition
After first switching on the voltage supply, the receiver module is in the “INACTIVE”
mode. For the commissioning, the ID of a transmitter needs to be “LEARNING”.
Note
A transmission needs to be activated at the transmitter during the
“Learning phase”. During the learning phase, telegrams from EnOcean
sensors are evaluated on STM basis. . The transmitter with the largest
signal strength is trained.
- None or only a few transmissions of other transmitters should therefore take
place in the reception range of the module to prevent faulty teaching.
6.1.5 Status definition
Status Description
INACTIVE During commissioning, the switching actuator signals a missing assignment (status: inactive)
to the sensor by a blinking watchdog LED (2Hz).
No ID of a sensor has been “learned" yet.
The “inactive” status can be restored by switching on the DIP switch “Delete ID” if no ID has
been learned within the 15-second learning time following actuation.
LEARNING In the learning mode, the receiving range is reduced to approx. 5 m (if DIP 5 = OFF) to
exclude the learning of other receivers as much as possible.
To teach a new radio sensor, the “learn switch” (DIP 1) must be actuated on the receiver. The
learning status is signalled by a slow (0.5 Hz) blinking watchdog LED. The DIP switch should
be reset immediately.
After a telegram has been received from a transmitter, its ID is stored in the receiver, safe
from power failures, and the learning mode is subsequently exited.
In the learning mode, each received (detected) signal of any ID is indicated on the SI LED.
The signal strength of a telegram is indicated until the next telegram is received.
If no new sensor is learned within 15 seconds, the switching actuator returns to the “active” or
“inactive” status.
ACTIVE In the “active” status, the switching actuator monitors all IDs received and compares them with
the ID learned. If the sensor is detected as "assigned", the data bytes received (Data_Byte
0…3) are processed and ouput.
In the operating status “active”, only signals from taught transmitters are indicated on the SI
and WD LED.
System monitoring
/ WATCHDOG
The system check is only switched on in the "active" state. A timer (watchdog abbrev. WD) is
used to monitor whether new data telegrams of the taught sensor have been received within
the system time set. The system time can be adjusted with the system check potentiometer or
the DIP switch.
If the time between two telegrams is greater than the monitoring time, the system LED signals
this fact with a continuous light. The associated output of the system monitoring (output WD)
switches to the LOW status. The status outputs of the sensor maintain the last status.
The output behaviour with addressed system monitoring is non-saving.
When the WD is addressed, the last value of the signal strength is not saved (SI LED); the
current signal strength of the taught sensor continues to be evaluated.

Assembly and Operating Manual
Radio - Pressure - Monitoring RSS R1; RSS P1
date printed: 04.12.200617
6.1.6 Time response
The time between evaluable telegrams must be at least 50ms.
6.1.7 Function of the DIP switches
Switch
Type / Function / Short description
Meaning
DIP switch 8 pins
.1 OFF / ON
.2 OFF / ON
.3 OFF / ON
.4 OFF / ON
.5 OFF / ON
.6 OFF / ON
.7 OFF / ON
.8 OFF / ON
Delete transmitter ID and activate learning mode = ON *
OFF = SI LED indicates the signal distance
ON = SI LED indicates the signal level
Setting - Battery Limit Value ON = ACTIVE
Setting - Watchdog Time ON= ACTIVE
OFF = Learning mode with reduced range
ON = Learning mode with full range
Accept current battery value as limit value * /
Set transmitter ID (DIP 6+7)
Accept current battery value –0.5 V as limit value * /
Set transmitter ID (DIP 6+7)
System time setting
OFF = 1 SECOND / ON = 35 SECONDS
0-2.5V = 0...1s / 0-2.5V = 0...35s
* = edge-controlled
6.1.8 Delete transmitter ID
To learn a new transmitter, the DIP 1 must be momentarily switched to “ON”
(assignment function). Any previously learned transmitter will be deleted and can not be
learned for approx. 30 minutes thereafter (see list of deleted transmitters). For further
behaviour, see “Status definition / LEARNING”
When actuating DIP 1, the ID of the transmitter last learned is stored in a list comprising
a maximum of 10 entries “List of deleted transmitters”. These IDs are stored in the RAM
for up to 30 minutes. The purpose of this is to prevent repeated learning for up to 30
minutes after an incorrect learning followed by deletion.
The “list of deleted transmitters” is reset (i.e. deleted) either by switching off the supply
voltage or if no other transmitters have been deleted for 30 minutes (retriggerable timer).
6.1.9 Signalling of the signal distance or the signal strength
In the as-delivered condition (DIP 2 = “OFF”), the signal distance of the useful signal and
the noise signal is displayed by the blinking SI LED. The ‘noise level’ is measured every
20 ms (watchdog time 0..1 s), or approx. every t = (adjusted watchdog time / 64
measurements) (watchdog time 0..35 s). The average determination for the noise signal
is carried out once a new telegram is available.
LED Signalling Signal strength Signal distance Signal level
(dBm) (V)
SI
(green/
red)
LED green continuously lit
LED green blinking
LED green/orange blinking
LED orange/red blinking
LED red continuously lit
LED red blinking
Signal optimal
Signal very good
Signal good
Signal medium
Signal bad
Signal critical
>70
58...70
46...58
34...46
22...34
<22
> 2.5
2.43 < RSSI < 2.5
2.37 < RSSI < 2.43
2.00 < RSSI < 2.37
1.60 < RSSI < 2.00
< 1.6
Assembly and Operating Manual
Radio - Pressure - Monitoring RSS R1; RSS P1
date printed: 04.12.200618
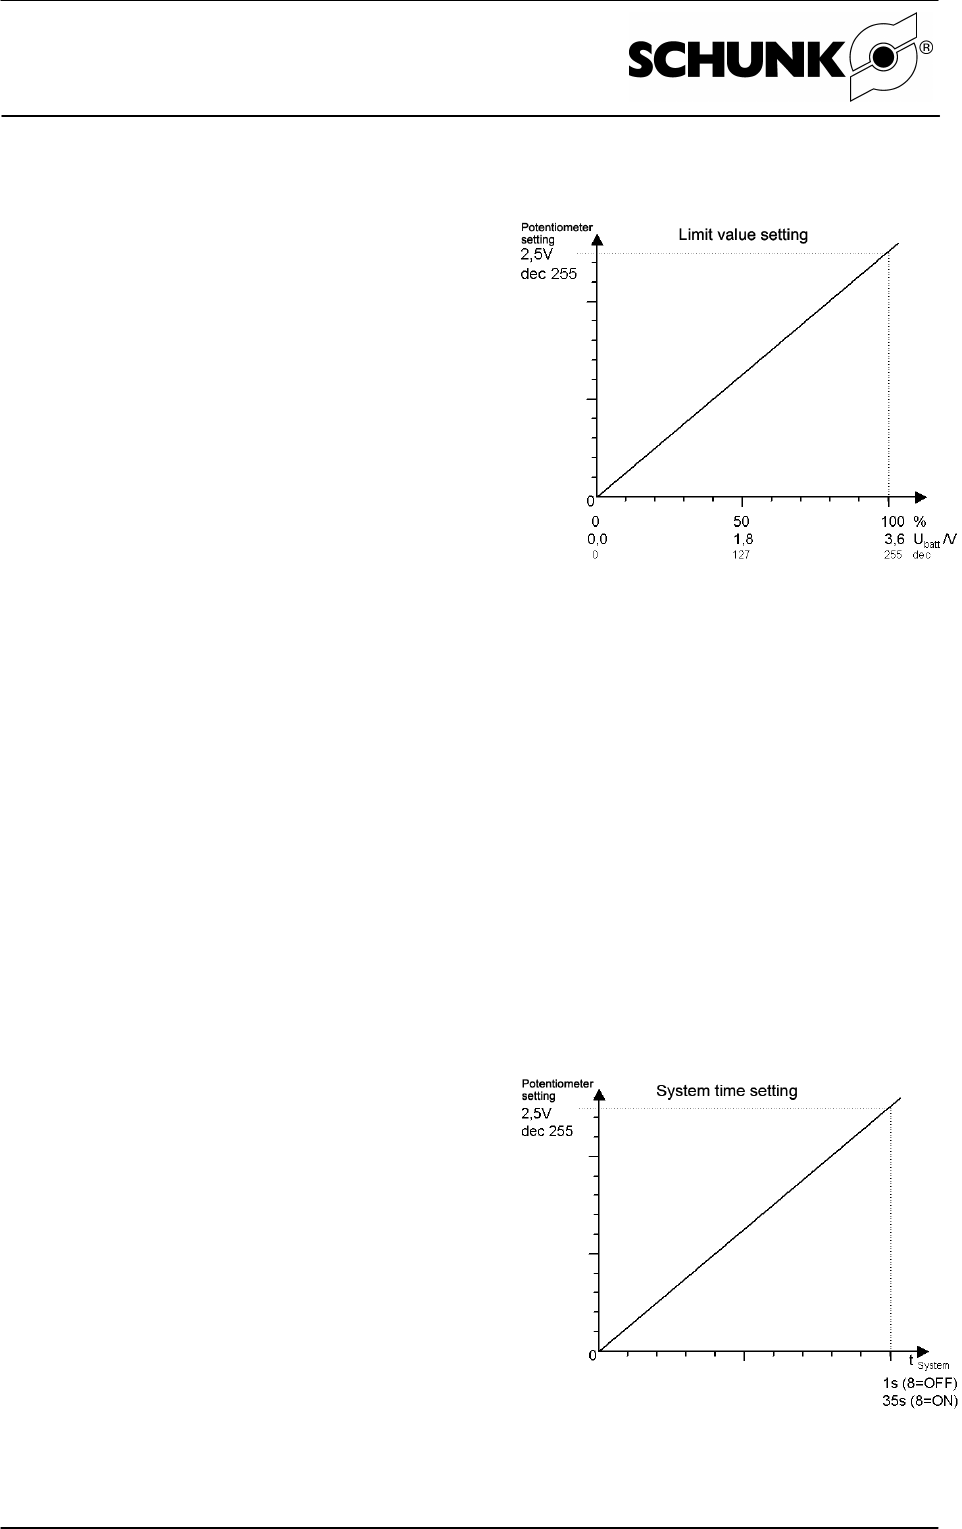
6.1.10 Setting the limit value for battery monitoring
The current potentiometer value is stored
when switching on DIP switch 3. During the
setup mode (DIP 3 ON), the LED responds
directly to a changing potentiometer value.
Hint on setting the limit value to approx. 5%
below the current battery level:
- Turn potentiometer until the LED
extinguishes.
- Then turn back by 1 turn (LED lights up
again).
- Set DIP 3 to OFF.
A 3-step hysteresis (approx. 1 %) ensures
a steady function of the indicator in the limit
value range.
If the DIP switch is switched back
without the POTI value having changed
outside of its ‘oscillation range’, no new
value is accepted as system time or
limit value (to avoid faulty operations).
6.1.11 Teaching the limit value (teching threshold)
Accept analog value currently sent
DIP6: The current value of the analog value minus the set hysteresis of 3% is accepted
as limit value for battery monitoring.
Analog value currently sent – 0.5V
DIP7:The current value of the analog value minus 0.5 V is accepted as limit value for
the battery monitoring.
6.1.12 Setting the watchdog time
DIP4: The current POTI value is saved.
During the setup mode (DIP 4 moved), the
LED responds directly to a changing POTI
value (and DIP 8 setting) by changing the
blinking frequency.
The setting occurs using the “System time
setting” characteristic curve. System time =
f (DIP8 and POTI value). The acceptance
occurs only when DIP 4 is switched back.
If the DIP switch is switched back without
the POTI value having changed outside of
its ‘oscillation range’, no new value is
accepted as system time or limit value (to
avoid faulty operations).
Assembly and Operating Manual
Radio - Pressure - Monitoring RSS R1; RSS P1
date printed: 04.12.200619
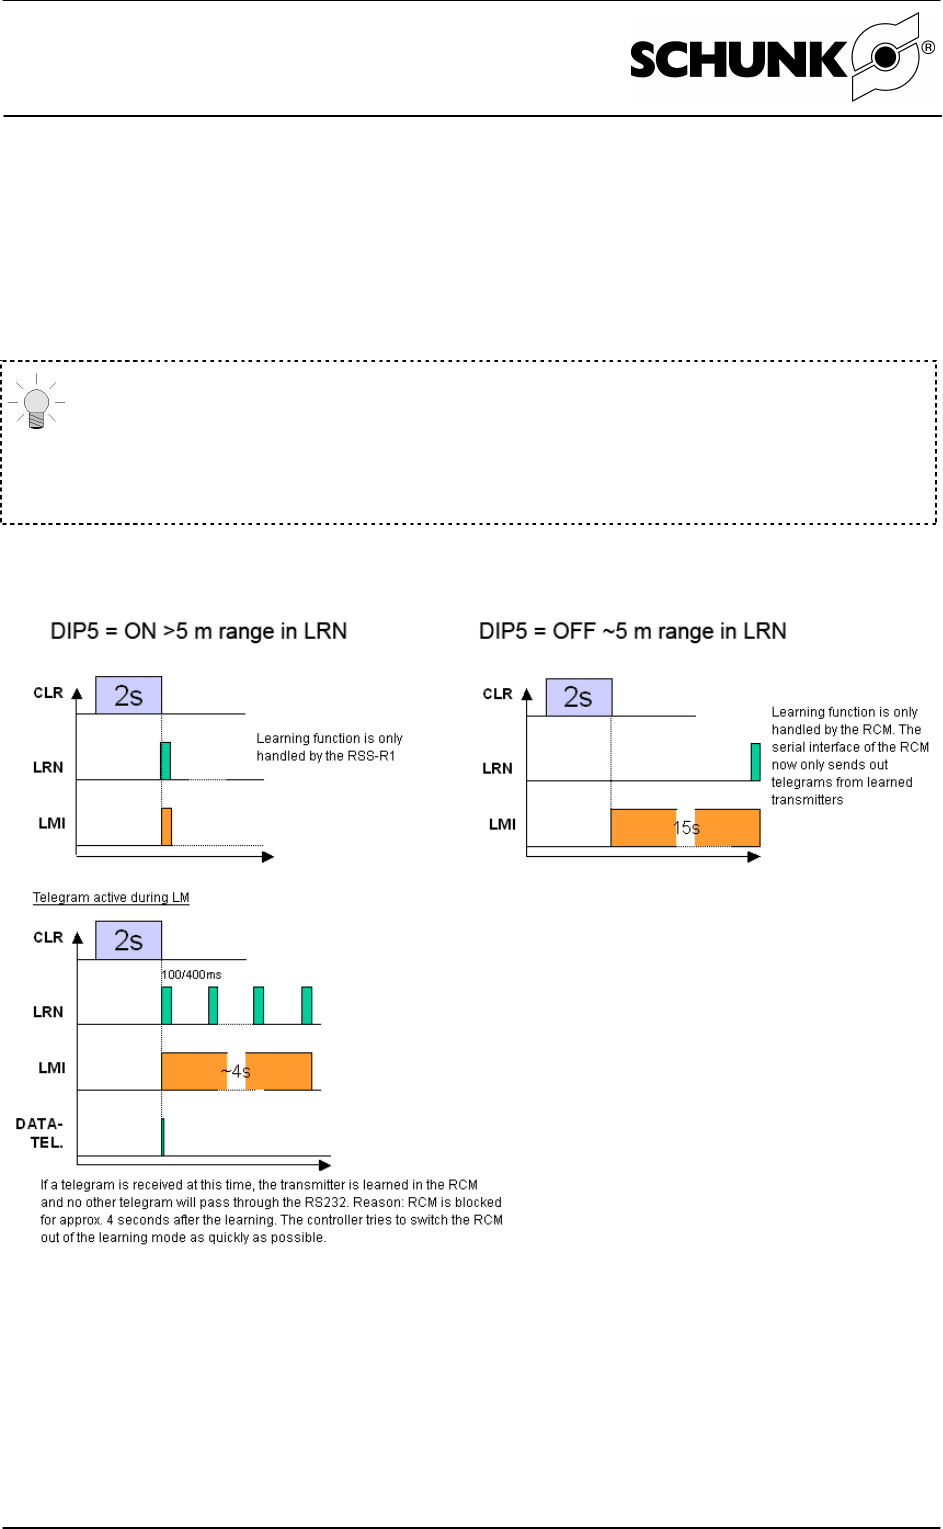
6.1.13 Function of the DIP 5 Extension of the reception range during the learning
procedure
By switching on DIP 5, the range reduction to 5 m in learning mode can be switched off,
i.e. the full reception range of the receiver is then used for learning, e.g. in order to learn
more remote transmitters with a good signal strength.
All incoming EnOcean telegrams are (internally) transferred via the serial
interface. The response time of the receiver can thereby be permanently
reduced. (special function of the RCM121DB is not used during this)
It is therefore imperative to switch the DIP 5 back to OFF after the
learning!
6.1.14 Manual setting of the transmitter ID (programming)
By simultaneously activating DIP6 and DIP7, the switching actuator is placed in the
programming mode.
While setting the first ID byte (ID0), the LC LED (incl. output) blinks for 10 s with 0.5 Hz.
The LC LED then lights for 2 s to accept the DIP combination.
Assembly and Operating Manual
Radio - Pressure - Monitoring RSS R1; RSS P1
date printed: 04.12.200620
The input of the ID bytes 1, 2 and 3 is done in the same manner, whereby at the end
(accepting ID3) the LC LED lights for 10 s to have sufficient time to set the output DIP
combination.
Observe the sequence of ID0... ID3 while teaching.
Example ID
00 | 00| 09 | 88 = 00000000 | 00000000 | 00001001 | 10001000
ID3 ID2 ID1 ID0
DIP 1|2|3|4|5|6|7|8
6.1.15 Monitoring the DIP switches
To avoid faulty operation of the DIP switches, they are monitored per software and faulty
settings are signalled. Faulty settings are indicated by 2 Hz blinking of the limit value
LED (LC). The limit value output also signals this fact at 2 Hz intervals.
6.1.16 Output behaviour of the watchdog
Operating mode Cause Behaviour (Output S) LED
Operation Watchdog addressed Output LOW On
Watchdog not addressed Output LOW Off
Learning Output HIGH On
Inactive Output LOW On
6.1.17 Software block diagram
Figure 5: Block diagram
Assembly and Operating Manual
Radio - Pressure - Monitoring RSS R1; RSS P1
date printed: 04.12.200621
6.2 RSS P1
Operation
The RSS P1 transmitter module does not contain any controls. Every 10 seconds, it
transmits a signal independently. Furthermore, it transmits a signal if the status of the
input changes.
6.3 Incorporated pressure switch - Adjusting the switching point
The incorporated pressure switch must be adjusted according to your working pressure:
- By turning clockwise, the switching point is adjusted to a point with a higher level of
pressure.
- By turning counterclockwise, the switching point is adjusted to a point with a lower
level of pressure.
- If the pressure is higher than the switching point set at the presure switch, then the
LED D02 does not light up à Securely clamped.
The output behaves the same: Low if the pressure is o.k.; High if the pressure is too
low.
- If the pressure in the chuck is too low (lower than the switching point set at the
pressure switch, then LED D02 lights up. à Pressure warning or chuck open.
Important:
If the red LED WD at the radio receiver lights up for longer than 0.2 seconds,
the radio contact is interrupted. You must stop the adjustment process and
check what is disrupting the radio contact.
6.3.1 Adjusting a defined minimum pressure, Method 1
- Set the preferred minimum pressure at the maintenance unit. The system will then
issue a warning (LED D02 lights up, Output is set if this pressure is not met in the
process).
- If the LED D02 is not off, then the Allen screw on the pressure switch must be turned
counterclockwise until the LED D02 is extinguished.
- Now slowly turn the Allen screw at the pressure switch clockwise until the LED D02
lights up again.
- You can now increase the pressure at the maintenance unit back to its normal working
pressure.
- Check the function: If you then close the chuck with your working pressure, the LED
D02 must extinguish after a short while. If you then open the chuck again, the LED
D02 must light up again after a short while. If you adjust the pressure to a value less
than your minimum pressure and then close the chuck, the LED D02 may no longer
extinguish, even for a closed chuck.

Assembly and Operating Manual
Radio - Pressure - Monitoring RSS R1; RSS P1
date printed: 04.12.200622
6.3.2 Adjusting a minimum pressure not exactly defined, Method 2
- Adjust the normal working pressure and close the chuck.
- If the LED D02 is not off, then the Allen screw on the pressure switch must be turned
counterclockwise until the LED D02 is extinguished.
- Now slowly turn the Allen screw at the pressure switch clockwise until the LED D02
lights up again.
- You can now turn the Allen screw at the pressure switch counterclockwise until the
LED is extinguished, and then turn a little more.
Unfortunately, the relationship of turns of the Allen screw is not linear to
the change of the switching point in bar.
Basically, a change of the switching pressure of approx. 0.9 bar per ¼
counterclockwise turn can arise for 6 bar output pressure.
6.3.3 Check the function
(1) If you then close the chuck with your working pressure, the LED D02 must light up after
a short while.
(2) If you then open the chuck again, the LED D02 must extinguish again after a short
while.
(3) If you adjust the pressure to a value less than your minimum pressure and then close
the chuck, the LED D02 may no longer light up, even for a closed chuck.
- For reasons of safety, you may now have to fasten the screw at the pressure switch
using glue and then tighten the screw the cover over the pressure switch to seal the
chuck.
- To adjust the switching pressure subsequently, you only have to remove the middle
screw from the cover. Through the resulting hole, you can now adjust the screw at the
pressure switch using the appropriate Allen wrench.
- The locking screw in the cover must be pressure tight; otherwise, cooling lubricant may
penetrate the system.
7 Maintenance and Care
- The system is completely maintenance-free.
- Only the life of the transmitter is limited by the built-in battery.
- Life when transmitting once per 10 seconds: <. 7 years
Assembly and Operating Manual
Radio - Pressure - Monitoring RSS R1; RSS P1
date printed: 04.12.200623
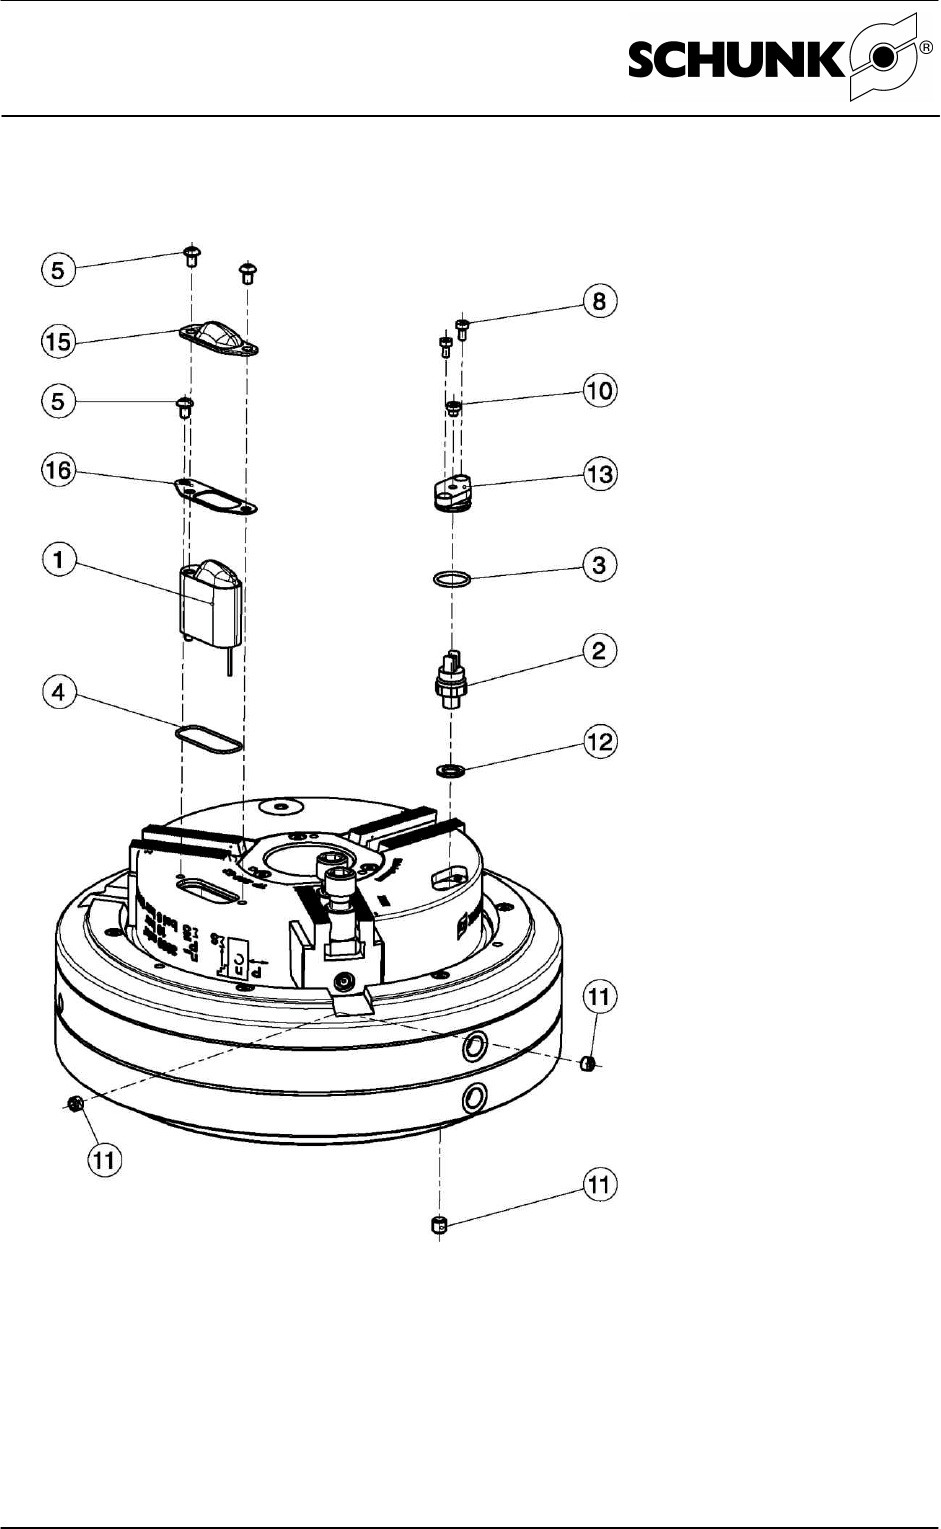
8 Assembly drawings
Figure 6: Assembly - Part1

Assembly and Operating Manual
Radio - Pressure - Monitoring RSS R1; RSS P1
date printed: 04.12.200624
Figure 7: Assembly - Part2

Assembly and Operating Manual
Radio - Pressure - Monitoring RSS R1; RSS P1
date printed: 04.12.200625
9 Bills of material
Item ID No. Quantity Description Wearing part? Notes
1 8703653 1 RSS P1 Yes, battery Transmitter unit
2 9941145 1 Pressure switch - Miniature No Pressure switch
39900575 1 O-ring 17*2 Yes O-ring for cover
49936336 1 O-ring 36*2 Yes O-ring for
transmitter
5 9982315 3 Oval-head screw M5*8 10.9 No Oval-head screw
for transmitter
8 9907269 2 Screw M4*8 8.8 No Screw for cover
10 9659005 1 Locking screw M8*8 No Locking screw for
cover
11 Set screw No Set screw for chuck
body
12 9907771 1 Fiber seal Yes Seal for pressure
switch - miniature
13 8703651 1 Cover No Cover for pressure
switch
14 8703652 1 Wrench No Wrench for
pressure switch -
miniature
15 8703733 1 Cover Yes Cover for
transmitter
16 8703766 1 Cover plate No Cover plate for
transmitter
20 0377700 1 RSS R1 No Receiver
21 0377730 1 RSS-R-A No Antenna for
receiver
22 9982765 2 Relay with changer No Relay with changer

Assembly and Operating Manual
Radio - Pressure - Monitoring RSS R1; RSS P1
date printed: 04.12.200626
10 Declaration by the manufacturer
Declaration by the manufacturer
as defined by machinery directive 98 / 37 / EC, Annex II B
We hereby declare that the following products...
Name of product: Radio - Pressure Monitoring RSS R1, RSS P1
Product type: RSS-R1 0377700
RSS-P1 8703653
RSS-R-A 0377730
RMS 22-S-M8 0377720
RMS 80-S-M8 0377721
are designed to be incorporated into machinery and must not be put into service until it
has been determined that the machinery, into which these products are to be incorporated,
conforms with the provisions of the EC machinery directive 98 / 37 / EC.
Applied harmonised standards in particular:
DIN EN ISO 12100-1 and DIN EN ISO 12100-2
Date/Signature of
manufacturer: June 2006
Title of the signatory: Development Manager

Assembly and Operating Manual
Radio - Pressure - Monitoring RSS R1; RSS P1
date printed: 04.12.200627
11 Contact
GERMANY – HEAD OFFICE
SCHUNK GmbH & Co. KG
Spann - und Greiftechnik
Bahnhofstrasse 106 – 134
D – Lauffen / Neckar
Tel. +49-(0)-7133-103-0
Fax +49-(0)-7133-103-399
info@de.schunk.com
www.de.schunk.com
AUSTRIA
SCHUNK Intec GmbH
Holzbauernstrasse 20
4050 Traun
Tel. +43-7229-65770-0
Fax +43-7229-65770-14
info@at.schunk.com
www.at.schunk.com
BELGIUM, LUXEMBOURG
SCHUNK Intec N. V./S. A.
Bedrijvencentrum Regio Aalst
Industrielaan 4, Zuid III
9320 Aalst-Erembodegem
Tel. +32-53-853504
Fax +32-53-836351
info@be.schunk.com
www.be.schunk.com
GREAT BRITAIN
SCHUNK Intec Ltd.
Crowwell Business Centre
10 Howard Way
Interchange Park
Newport Pagnell MK16 9QS
Tel. +44-1908-611127
Fax +44-1908-615525
info@gb.schunk.com
www.gb.schunk.com
DENMARK
SCHUNK Intec A/S
Storhaven 7
7100 Vejle
Tel. +45-43601339
Fax +45-43601492
info@dk.schunk.com
www.dk.schunk.com
FRANCE
SCHUNK Intec SARL
Parc d´Activités des Trois
Noyers 15, Avenue James de
Rothschild
Ferrieres-en-Brie
77614 Marne-la-Vallee
Cedex 3
Tel. +33-1-646638-24
Fax +33-1-646638-23
info@fr.schunk.com
www.fr.schunk.com
NETHERLANDS
SCHUNK Intec B.V.
Bieslook 7a
6942 SG Didam
Tel. +31-316-373967
Fax +31-316-373316
info@nl.schunk.com
www.nl.schunk.com
CHINA
SCHUNK Precision Machinery
(Hangzhou) Co.,Ltd.
6, 24th Street, HEDA
Hangzhou 310018
Tel. +86-571-8672-1000
Fax +86-571-8672-8800
info@cn.schunk.com
www.cn.schunk.com
SCHUNK GmbH & Co.KG
Shanghai
Representative Office
777 Zhao Jia Bang Road
Pine City Hotel, Room 923
Xuhui District
Shanghai 200032
Tel. +86-21-64433177
Fax +86-21-64431922
info@cn.schunk.com
www.cn.schunk.com
INDIA
SCHUNK India Branch Office
#80 B Yeswanthpur
Industrial Suburbs
Bangalore 560022, India
Tel. +91-80-41277361
Fax +91-80-41277363
info@in.schunk.com
www.in.schunk.com
ITALY
SCHUNK Intec S.r.l.
Via Caio Plinio 5
22072 Cermenate (CO)
Tel. +39-031-770185
Fax +39-031-771388
info@it.schunk.com
www.it.schunk.com
HUNGARY
SCHUNK Intec Kft.
Széchenyi út 70
3530 Miskolc
Tel. +36-45-50900-7
Fax +36-45-50900-6
info@hu.schunk.com
www.hu.schunk.com

Assembly and Operating Manual
Radio - Pressure - Monitoring RSS R1; RSS P1
date printed: 04.12.200628
POLAND
SCHUNK Intec Sp.z o.o.
Stara Iwiczna, ul. Sloneczna
116 A
05-500 Piaseczno
Tel. +48-22-7262500
Fax +48-22-7262525
info@pl.schunk.com
www.pl.schunk.com
PORTUGAL
Sales Representative
Victor Marques
Tel. +34-937-556 020
Fax +34-937-908 692
Mobil +351-963-786 445
info@pt.schunk.com
www.pt.schunk.com
SOUTH KOREA
SCHUNK Intec Korea Ltd.
# 907 Joongang Induspia
2 Bldg.,
144-5 Sangdaewon–dong
Jungwon–gu, Seongnam–si
Kyunggi–do, 462-722
Tel. +82-31-7376141
Fax +82-31-7376142
info@kr.schunk.com
www.kr.schunk.com
SPAIN
SCHUNK Intec S.L.
Foneria, 27
08304 Mataró (Barcelona)
Tel. +34-937-556020
Fax +34-937-908692
info@es.schunk.com
www.es.schunk.com
SWEDEN
SCHUNK Intec AB
Wedavägen 24A
15226 Södertälje
Tel. +46-8-554-42100
Fax +46-8-554-42101
info@se.schunk.com
www.se.schunk.com
SWITZERLAND,
LIECHTENSTEIN
SCHUNK Intec AG
Soodring 19
8134 Adliswil 2
Tel. +41-44-7102171
Fax +41-44-7102279
info@ch.schunk.com
www.ch.schunk.com
CZECH REPUBLIC
SCHUNK Intec s.r.o.
Ernesta Macha 1
64300 Brno
Tel. +420-545-233707
Fax +420-545-221444
info@cz.schunk.com
www.cz.schunk.com
MEXICO
SCHUNK IntecS.A. de C.V.
Av. Luis Vega y Monory # 332
Fracc. Plazas de Sol
Santiago de Querélaro,
Qro. 76099
Tel. +52-442223.6525
Fax +52-442223.7665
info@mx.schunk.com
www.mx.schunk.com
USA
SCHUNK Intec Inc.
211 Kitty Hawk Drive
Morrisville, NC 27560
Tel. +1-919-572-2705
Fax +1-919-572-2818
info@us.schunk.com
www.us.schunk.com
CANADA
SCHUNK Intec Corp.
190 Britannia Road East,
Units 23-24
Mississauga, ON L4Z 1W6
Tel. +1-905-712-2200
Fax +1-905-712-2210
info@ca.schunk.com
www.ca.schunk.com