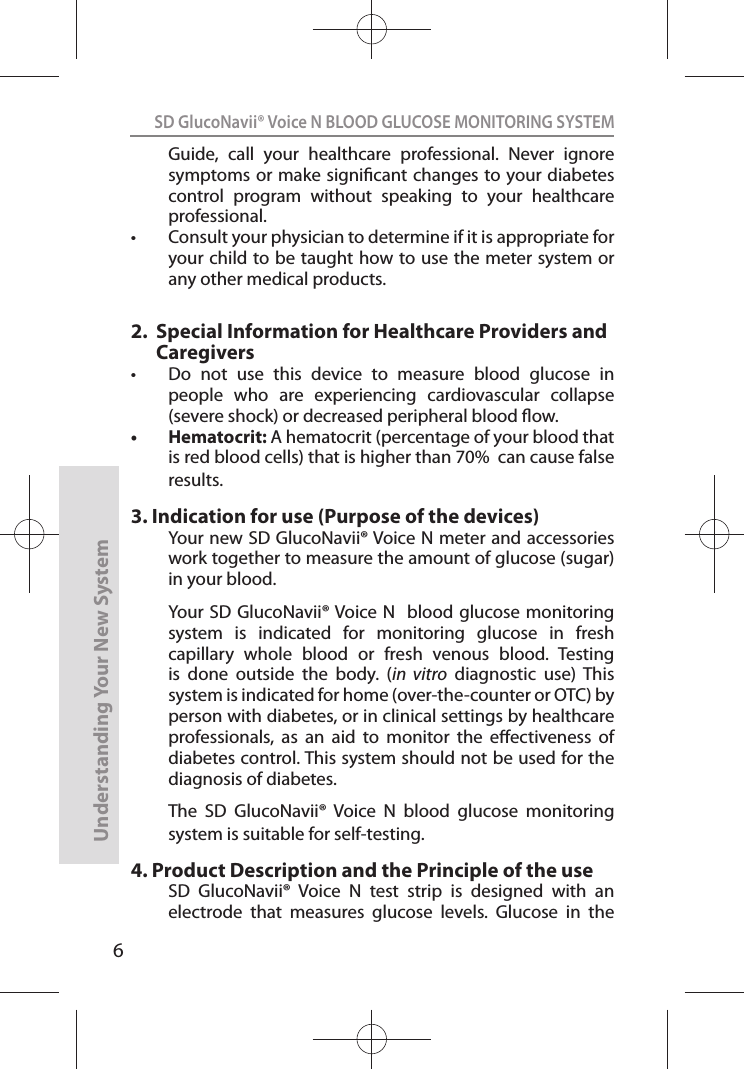
SD Biosensor 01GM51 SD GlucoNavii Voice N Blood Glucose Meter User Manual pt1
SD Biosensor, Inc. SD GlucoNavii Voice N Blood Glucose Meter pt1
UserManual.wiki
>
SD Biosensor
>
01GM51 User Manual
>
User Manual pt1
Contents
1.
User Manual pt1
2.
User Manual pt2
User Manual pt1
Navigation menu
Upload a User Manual
Namespaces
Wiki Guide
HTML
PDF
Info
Views
User Manual
Discussion / Help
Navigation


![18SD GlucoNavii® Voice N BLOOD GLUCOSE MONITORING SYSTEMUnderstanding Your New SystemSTEP3: Setting the date and time[ Date Setting ]1. In strip stand-by mode with hypo set icon, if you press the right button, the display for setting the date & time will be appeared. And when you press the ON/OFF button, year digit will be appeared. Set the correct year by pressing the left or right button and then go to time setting by pressing the ON/OFF button.ON/OFFbuttonON/OFFbuttonRightbuttonLeftbuttonRightbutton](https://usermanual.wiki/SD-Biosensor/01GM51.User-Manual-pt1/User-Guide-1924006-Page-19.png)
![19SD GlucoNavii® Voice N BLOOD GLUCOSE MONITORING SYSTEMUnderstanding Your New System2. Next will appear the setting display for month and day format. The meter can display the month and day in either a Month-Day (m-d) format or a Day-Month (d-m) format. Set the preferred format on the display by pressing either the left or the right button and select by pressing the ON/OFF button.3. Set the correct month or day on the display by pressing either the left or the right button and select by pressing the ON/OFF button.[ON/OFFbutton][Left or rightbutton]](https://usermanual.wiki/SD-Biosensor/01GM51.User-Manual-pt1/User-Guide-1924006-Page-20.png)
![20SD GlucoNavii® Voice N BLOOD GLUCOSE MONITORING SYSTEMUnderstanding Your New System[ Time Setting ]1. Next will appear the display for setting the 12 or 24 Hour clock format. The meter can display the time in either the 12h format or the 24h format. Set the preferred format on the display by pressing either the left or the right button and select by pressing the ON/OFF button. 2. Next will appear the setting display for time format. Set the correct hour and minute on the display by pressing either the left or the right button and select the correct time by pressing the ON/OFF button.[ON/OFFbutton][Left or rightbutton]](https://usermanual.wiki/SD-Biosensor/01GM51.User-Manual-pt1/User-Guide-1924006-Page-21.png)

![22SD GlucoNavii® Voice N BLOOD GLUCOSE MONITORING SYSTEMUnderstanding Your New Systemt If you select the post-meal alarm ‘2h’ feature and test with pre-meal mark, the ‘clock symbol’ will appear on result display and the ‘beep’ sound will be made in 2 hours to remind you to test your blood glucose after meal for 1mimute. t If you perform the pre-meal test while the post-meal alarm setting is on, then the post-meal mark will appear automatically on your LCD when you test within following period: from 30min to 130min after your pre-meal test. t If you mark the new test result with a pre-meal mark, the old alarm setting will be ignored and only the new setting will sound in 2 hours.NOTE2. Set the post-meal alarm mode ‘2h’ or ‘o’ by pressing either the left or the right button and then select the preferred feature by pressing the ON/OFF button. [ON/OFFbutton][Left or rightbutton]](https://usermanual.wiki/SD-Biosensor/01GM51.User-Manual-pt1/User-Guide-1924006-Page-23.png)

![24SD GlucoNavii® Voice N BLOOD GLUCOSE MONITORING SYSTEMUnderstanding Your New SystemIf you select the alarm o feature in rst (also second, third and fourth) alarm mode, next will appear the Strip Stand-by Display.t If you select the alarm o feature, next will appear the Strip Stand-by Display. t If you select the alarm on feature, you can set the alarm up to four times a day at any time you want.NOTE2. Set the rst alarm on or o by pressing either the left or the right button and then select the preferred feature by pressing the ON/OFF button.[ON/OFFbutton][Left or rightbutton]3. If you select the alarm on feature in rst alarm mode, the clock will blink. Set the correct time and minute you want to set an alarm on the display by pressing either the left or the right button and then select the preferred feature by pressing the ON/OFF button.[ON/OFFbutton][Left or rightbutton]](https://usermanual.wiki/SD-Biosensor/01GM51.User-Manual-pt1/User-Guide-1924006-Page-25.png)
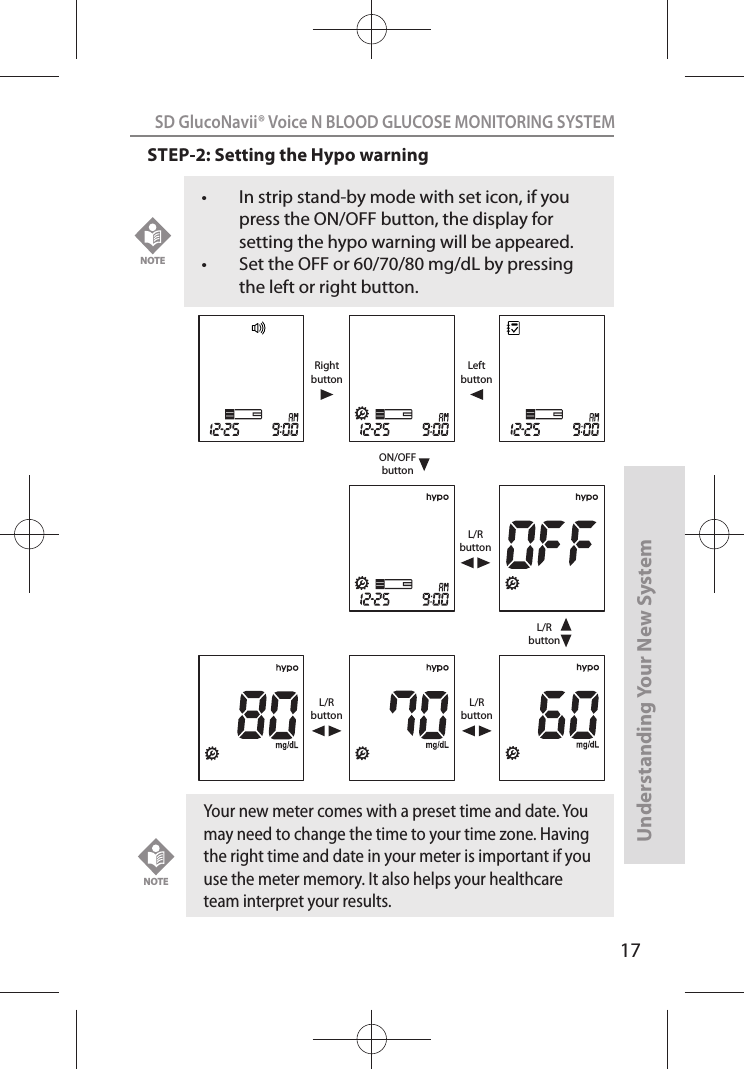
![25SD GlucoNavii® Voice N BLOOD GLUCOSE MONITORING SYSTEMUnderstanding Your New System4. If you nish setting the rst alarm, next will appear the second alarm setting mode. Set the alarm with the same way as above. [2, 3]5. You can set the third and fourth alarm mode with the same way as above. [2, 3]STEP6 : SETTING THE LANGUAGEThis function is to review the latest test result when inserting the strip into the meter. You can check your latest test result before testing.1. In strip stand-by mode with alarm set icon, if you press the right button, the display for language set icon will be appeared. And when you pres s the left or right button, 'On' or 'OFF' will be appeared. Select the preferred feature by pressing the ON/OFF button.](https://usermanual.wiki/SD-Biosensor/01GM51.User-Manual-pt1/User-Guide-1924006-Page-26.png)
![28SD GlucoNavii® Voice N BLOOD GLUCOSE MONITORING SYSTEMUnderstanding Your New System11. Using SD GlucoNavii® Voice N Test Strips[ Important Test Strip Information ]t SD GlucoNavii® Voice N blood glucose test strip should be used with SD GlucoNavii® Voice N meter. Using other glucose test strip can cause inaccurate the result or ‘E-1’ error message.t After removing a test strip from the container, replace the container cap immediately and close it tightly. t Use the test strip within three minutes after you take it out of the container. t Store test strip containers in a cool, dry place at 2-32°C(36-90°F). Keep away from direct sunlight and heat. Do not refrigerate test strips. t Do not expose strips to heat, moisture or humidity. Temperatures outside the required range, as well as moisture and humidity (e.g. bathroom, kitchen, laundry room, car, or garage) can damage your test strips and lead to inaccurate results. t Store test strips in their original container only to avoid damage or contamination. Do not transfer test strips to any other storage device, and do not store outside of their original container. t Do not use test strips from any container that is damaged or left open to air. t Write the opening date on the container label when you rst open it. Discard remaining SD GlucoNavii® Voice N Test Strips after the discard date. (6 months after rst opening from the container) t SD GlucoNavii® Voice N Test Strips are for single use only. Never reuse a test strip that has had either blood or control solution applied to it.](https://usermanual.wiki/SD-Biosensor/01GM51.User-Manual-pt1/User-Guide-1924006-Page-29.png)

![SD GlucoNavii® Voice N BLOOD GLUCOSE MONITORING SYSTEMControl solution display32STEP-1:1) Remove a new test strip from container. Be sure to tightly replace container cap after removing test strip. 2) Insert a test strip (yellow window printed ‘ ’ facing up) into test strip slot. The meter turns on automatically.STEP-2:1) Press the left button for 3 seconds to check the testing system using a control solution in Blood Stand-by Display. If you don’t want a control solution test, press the left button again.2) Shake the control solution container and discard the rst drop of solution. Gently squeeze the container to form one small drop. Bring the drop to the edge of the strip, and allow the strip to automatically draw the control solution into the yellow window. When control solution is applied to the test strip, the meter counts down from 5 to 1 second on the display. Tightly replace the cap on control solution. VOICE N[Left button]](https://usermanual.wiki/SD-Biosensor/01GM51.User-Manual-pt1/User-Guide-1924006-Page-33.png)
![SD GlucoNavii® Voice N BLOOD GLUCOSE MONITORING SYSTEMControl solution display333) The control solution result appears on the screen in just 5 seconds. 4) Compare control solution result with the range printed on the test strip container. If the results are not within the control range printed on the test strip container, then the meter and strips may not be working properly. Repeat the control solution test.5) Remove the used test strip for control solution from the meter and discard it.mg/dLmmol/LVOICE NNOTE The control solution range printed on the test strip container is for SD GlucoNavii® Control Solution only. It is not a recommended range for your blood glucose level. [This is an example. Refer to the ranges on your test strip container.]Control RangeLevel M Level H90-140 mg/dL 170-240 mg/dL5.0-7.8 mmol/L 9.4-13.3 mmol/Lmg/dLmmol/L[Example]](https://usermanual.wiki/SD-Biosensor/01GM51.User-Manual-pt1/User-Guide-1924006-Page-34.png)