SD Biosensor 02LA20G SD LipidoCare Analyzer User Manual
SD Biosensor, Inc. SD LipidoCare Analyzer
User Manual
TABLE OF CONTENTS
CHAPTER 1. UNDERSTANDING THE NEW ANALYZER....................................... 4
1. Indication for use; purpose of the analyzer .................................................................................. 4
2. Test principle............................................................................................................................................... 5
3. Before you start a test ............................................................................................................................ 6
4. The SD LipidoCare Professional Analyzer ....................................................................................... 7
5. Power supply ............................................................................................................................................ 10
6. Test strips ................................................................................................................................................... 10
CHAPTER 2. USING THE SD LIPIDOCARE PROFESSIONAL ANALYZER ........... 11
1. Changing the batteries ......................................................................................................................... 11
2. Setting the analyzer ............................................................................................................................... 12
3. Pairing, only for 02LA20G .................................................................................................................... 21
4. Analyzer Memory .................................................................................................................................... 23
5. Reviewing stored test results ............................................................................................................. 24
6. Displaying the average of glucose test results ........................................................................... 26
7. Deleting test data ................................................................................................................................... 27
8. Printing ........................................................................................................................................................ 28
CHAPTER 3. COLLECTING BLOOD SAMPLES .................................................. 29
1. Getting a blood sample from fingersticks..................................................................................... 29
2. Getting a blood sample from alternative sites ............................................................................ 30
CHAPTER 4. PERFORMING A TEST FOR LIPID OR GLUCOSE .......................... 32
1. Before testing for lipid or glucose .................................................................................................... 32
2. Test Procedure for cholesterol (lipid) only ................................................................................... 33
3. Procedure for glucose ........................................................................................................................... 36
4. Understanding Your Results ............................................................................................................... 37
CHAPTER 5. CONTROL SOLUTION TEST ........................................................ 40
1. Control Solution Test ............................................................................................................................. 40
2. Procedure for the lipid control solution ......................................................................................... 41
3. Procedure for the glucose control solution .................................................................................. 42
4. Troubleshooting the control solution.............................................................................................. 43
CHAPTER 6. CHECK STRIP TEST .................................................................... 44
1. Check Strip Test ...................................................................................................................................... 44
2. When to use the Lipid and Glucose check strip ......................................................................... 44
3. How to Use the SD Lipid Check Strip ............................................................................................. 44
4. How to use the SD Glucose check strip ........................................................................................ 45
CHAPTER 7. MAINTENANCE AND TROUBLESHOOTING .................................. 46
1. Cleaning and Disinfection .................................................................................................................... 46
2. Maintenance, Testing, and Transportation .................................................................................. 49
CHAPTER 8. SCREEN MESSAGE AND TROUBLESHOOTING ....................... 50
1. Warning message ................................................................................................................................... 50
2. Error message .......................................................................................................................................... 51
CHAPTER 9. WARNINGS, PRECAUTIONS, AND LIMITATIONS ..................... 53
1. Test Strip for Lipid .................................................................................................................................. 53
2. Test Strip for Glucose ........................................................................................................................... 53
CHAPTER 10. TECHNICAL INFORMATION ................................................... 54
1. Analyzer Specifications ......................................................................................................................... 54
2. Test Strips .................................................................................................................................................. 54
Appendix 1: References ................................................................................... 55
Appendix 2: Warning ....................................................................................... 56
- 2 -

Important Safety Instructions
Before using the SD LipidoCare Professional Analyzer, please read the following information.
Important Safety Instructions
The lancing device are for single patient use. Do not share them with anyone including other
family members! Do not use on multiple patients!
All parts of the kit are considered biohazardous and can potentially transmit infectious diseases,
even after you have performed cleaning and disinfection.
The Food and Drug Administration and the Center for Disease Control have issued warnings and
notifications regarding the risk of bloodborne pathogen transmission when more than one
individual uses a blood glucose monitoring system. For important instructions for disinfecting your
meter and lancing device, please read the following references:
• U.S. Food and Drug Administration. FDA Public Health Notification: Use of Fingerstick Devices
on More Than One Person Poses Risk for Transmitting Bloodborne Pathogens: Initial
Communication. (2010).
http://www.fda.gov/MedicalDevices/Safety/AlertsandNotices/ucm224025.htm
• Centers for Disease Control and Prevention. CDC Clinical Reminder: Use of Fingerstick Devices
on More than One Person Poses Risk for Transmitting Blood Borne Pathogens. (2010).
http://www.cdc.gov/injectionsafety/Fingerstick-DevicesBGM.html
Special Information for Healthcare Providers and Caregivers
• Do not use this analyzer to measure the cholesterol and glucose in people who are
experiencing cardiovascular collapse (severe shock) or decreased peripheral blood flow.
• Hematocrit: Extremes in hematocrit may affect test results. The following hematocrit ranges for
each parameter will not affect the accuracy of the measurements:
- TC, TG: 30 – 55%
- HDL: 30 – 52%
- Glucose: 20 – 60%
- 3 -
CHAPTER 1. UNDERSTANDING THE NEW ANALYZER
1. Indication for use; purpose of the analyzer
The SD LipidoCare Professional Analyzer is intended to be used by individuals in the
Professional to measure total cholesterol (TC), triglycerides (TG), HDL cholesterol (HDL), and
glucose in capillary whole blood with the SD LipidoCare Professional Lipid Profile Test Strips and
SD LipidoCare Professional Blood Glucose Test Strips; it is also intended to calculate low density
lipoprotein (LDL), the LDL/HDL ratio, and non-HDL. This analyzer is to be used outside the
body (in vitro diagnostic).
The SD LipidoCare Professional Lipid Profile Test Strips are intended to be used by medical
professionals to measure total cholesterol (TC), triglycerides (TG), and HDL cholesterol (HDL) in
capillary whole blood and venous blood on an SD LipidoCare Professional Analyzer. Cholesterol
measurements are used in the diagnosis and treatment of disorders involving excess cholesterol
in the blood and lipid and lipoprotein metabolism disorders. Lipoprotein measurements are used
in the diagnosis and treatment of lipid disorders (such as diabetes mellitus), atherosclerosis,
and various liver and renal diseases. Triglyceride measurements are used in the diagnosis and
treatment of patients with diabetes mellitus, nephrosis, liver obstruction, other diseases
involving lipid metabolism, or various endocrine disorders. Calculated LDL-cholesterol values are
reported only when triglycerides are ≤400mg/dL; when triglycerides are >400 mg/dL, the
calculated LDL-cholesterol and LDL/HDL (LDL-cholesterol and HDL-cholesterol ratio) are not
reported.
The SD LipidoCare Professional Blood Glucose Test Strips are intended to be used by medical
professionals to measure glucose in capillary whole blood on an SD LipidoCare Professional
Analyzer. Glucose measurement is for the quantitative measurement of the concentration of
glucose in capillary whole blood that can be taken from the fingertip, palm, upper arm, and/or
forearm as an aid in the management of diabetes. Glucose measurement is not to be used for
the diagnosis of or screening for diabetes or neonatal use. Alternate site testing should be done
during steady-state times, when glucose is not changing rapidly.
The SD Lipid Control Solution and SD Glucose Control Solution are used as quality control
materials for the SD LipidoCare Professional System.
- 4 -
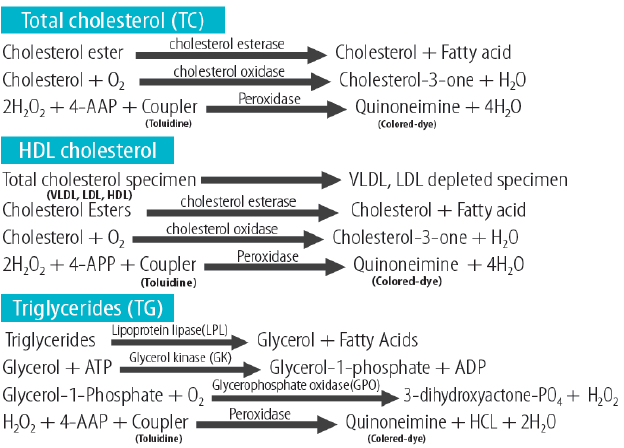
2. Test principle
LIPID
The SD LipidoCare Professional System combines enzymatic methodology and solid-phase
technology to measure total cholesterol (TC), HDL cholesterol (HDL), and triglycerides (TG).
Blood sample used for testing is whole blood from a fingerstick. The sample is applied to an SD
LipidoCare Professional Test Strip. The test strip is then placed into the SD LipidoCare
Professional Analyzer, where a unique system on the test strip separates the plasma from the
blood cells. A portion of the sample flows to the bottom layer of the test strip and is transferred
to the total cholesterol, triglyceride, and HDL cholesterol (HDL) reaction pads. The SD
LipidoCare Professional Analyzer measures TC, TG, and HDL by an enzymatic method based on
the method formulation of Allain et al.6 and Roeschlau.7 To measure TC, TG, and HDL in the
blood, the following formulations are used:
GLUCOSE
The SD LipidoCare Professional Blood Glucose test strip is designed with an electrode that
measures glucose levels. Glucose in the blood mixes with the reagent on the test strip and
causes a small electric current. The amount of current created depends on how much glucose
is in the blood. The SD LipidoCare Professional Analyzer measures the current created and
converts it to the amount of glucose. The blood glucose result is displayed on the LCD display.
Once a drop of blood touches the tip of the glucose test strip, the strip's reaction chamber
automatically draws the blood into the strip through capillary action. When the chamber is full,
the SD LipidoCare Professional Analyzer starts to measure the blood glucose level.
- 5 -

3. Before you start a test
CAUTION
Carefully read and follow the instructions and package inserts for the lipid/glucose test strips
and control solutions. It is very important to follow the instructions in order to prevent an
incorrect result or improper treatment.
Samples
For measuring lipid (cholesterol)
The SD LipidoCare Professional Analyzer for lipid testing is designed for testing a fresh capillary
whole blood sample from the fingertip.
For measuring glucose
The SD LipidoCare Professional Analyzer for glucose is designed for testing a fresh capillary
whole blood sample from the fingertip, palm, upper arm, or forearm.
Refer to the Safety Information
There is a potential risk of infection. To clean and disinfect this analyzer, please refer to the
Chapter 6 Maintenance and Troubleshooting section.
Operating conditions
To ensure proper function of the SD LipidoCare Analyzer, observe the following guidelines:
Operate the analyzer within the acceptable temperature and the humidity range. This
range is test-dependent:
For Lipid Testing : 64–90°F (18–32°C), 10–90%RH
For Glucose Testing: 50–113°F (10–45°C), 10–90%RH
To perform a measurement, place the analyzer on a level surface or hold it in your
hand.
- 6 -
4. The SD LipidoCare Professional Analyzer
The Analyzer package includes following:
SD LipidoCare Professional Analyzer
SD Lipid Check Strip
SD Glucose Check Strip
User Manual
Quick Guide
4 AAA 1.5 V batteries
NOTE:
The SD LipidoCare Professional Lipid Profile Test Strips, SD LipidoCare Professional Blood
Glucose Test Strips, SD Lipid Control Solution, and SD Glucose Control Solution are required,
but not included, and must be purchased separately.
If you want to purchase these products, please contact our customer service center at 855-
486-2888.
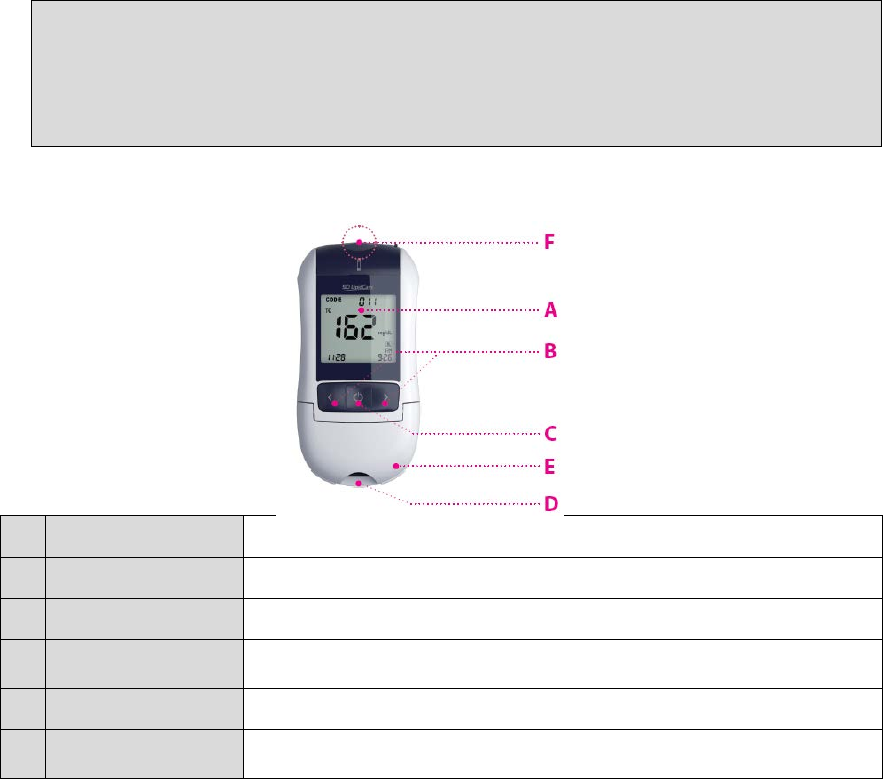
Appearance
A Display Shows a test result, messages, and stored values in the memory
B Arrow Buttons Used for setting and review of the memory
C On/Off Button Press to turn Analyzer on or off
D
Lipid Test Strip
Slot
Insert a lipid test strip here
E Door Block the light for an accurate test result
F
Glucose Test Strip
Slot
Insert a glucose test strip here.
- 7 -
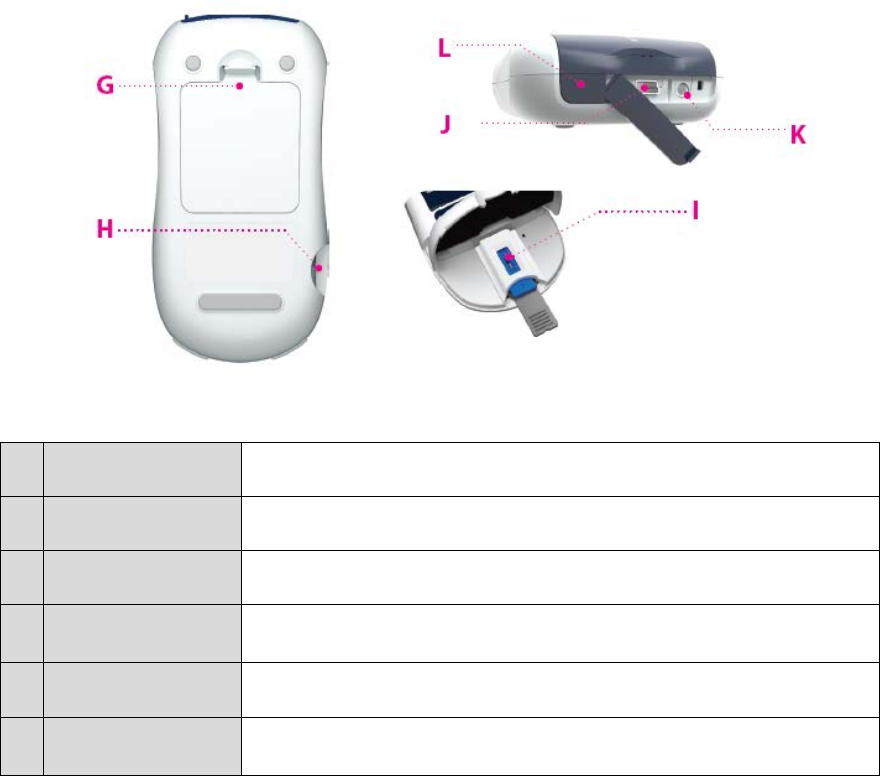
G
Battery
compartment lid Provides access to the battery compartment
(4 AAA 1.5 V alkaline batteries)
H Codechip slot Insert a codechip for lipid testing
I Optic cover Holds the inserted test strip to prevent the
movement of the test strip
when you are testing
J Data port Download test results to a personal computer
K Printer port Print test results on an external thermal printer
L SET/PRT Button Press to set the analyzer or print the test results
- 8 -
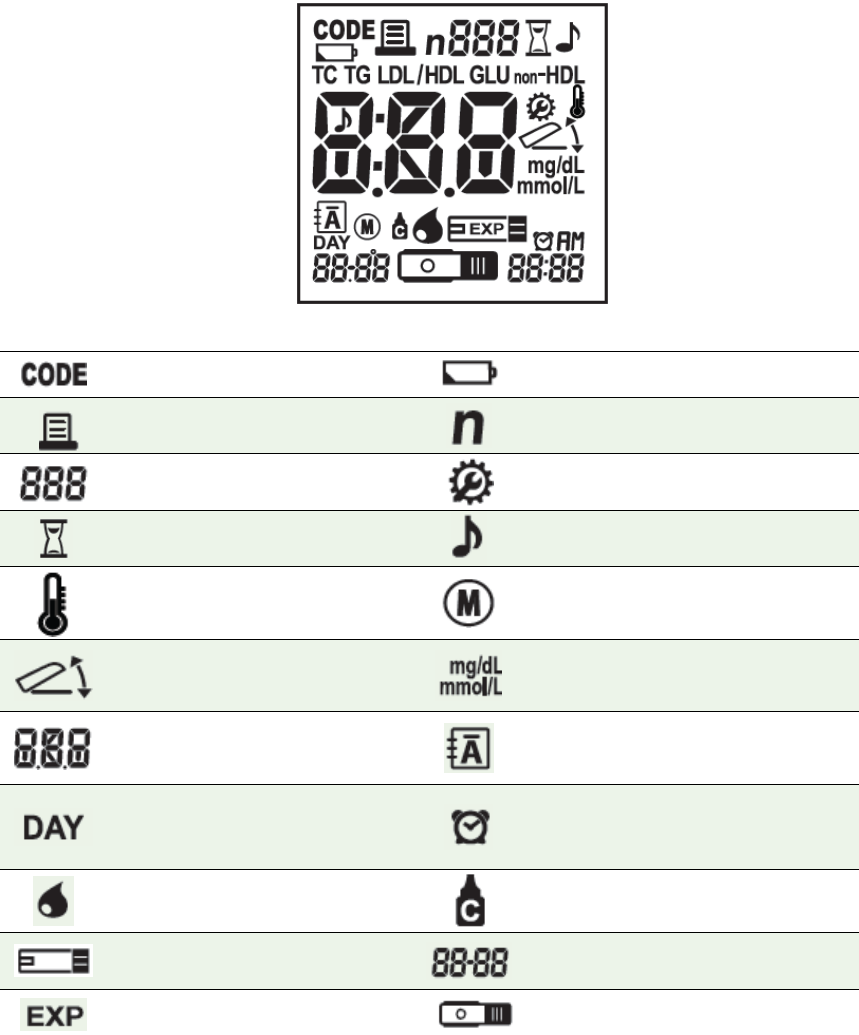
Display of the SD LipidoCare Professional Analyzer
The symbols in the display have the following meanings:
Indicate
s a codechip sign Warning when the battery is low
Indicate
s printing Indicates the index number of the
memory
Codechip number or memory
number stored in
the memory
Appears during setting mode
Indicate
s measurement being
performed
Indicates beep sound setting
Indicate
s the operating
temperature
is out of the range Indicates Lipid Profile test strip
O
pen or close the flap Units of test results
Test Result
Indicates
a test result stored in the
memory (all parameters)
Indicate
s the days of the
calculated average result
Indicates alarm setting
Indicate
s application of the sample
Indicates a control solution test result
Glucose test strip
Date
Indicate
s an expired test strip
Lipid test strip
- 9 -
Indicate
s the testing time Low Density Lipoprotein
Total Cholesterol
Triglycerides
High Density Lipoprotein
Glucose
LDL
to HDL ratio
non-HDL
5. Power supply
To save power, the analyzer turns itself off after 5 minutes, unless a button is pressed or a new
test strip is inserted. When the analyzer turns itself off, all test results are stored in the memory.
Battery life is expected to last for approximately 1,000 measurements. When the battery
warning is displayed for the first time, approximately 50 measurements can still be performed.
In this case, replace the batteries as soon as possible. When replacing the new batteries, you
must reset the date and time. Use only AAA alkaline manganese batteries. The stored test
results, including the testing date and time as well as all other analyzer settings, will remain,
even when no batteries are inserted. Do not throw batteries into a fire. There is a risk of
explosion!
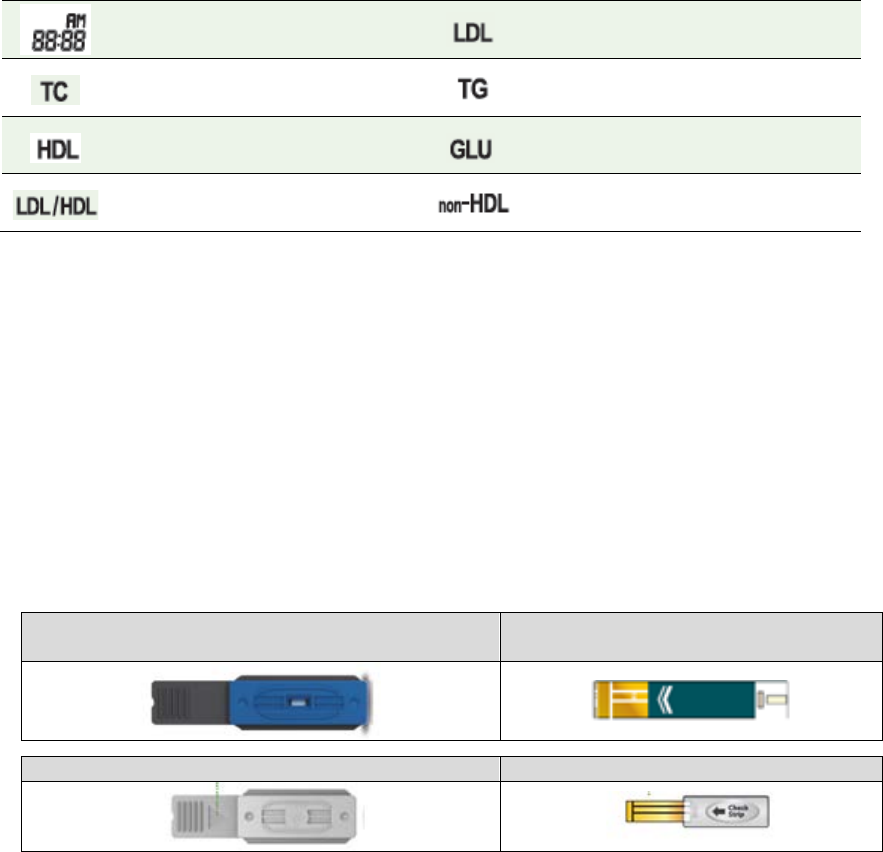
6. Test strips
SD LipidoCare Professional Lipid Profile Test
Strip
SD LipidoCare Professional Blood
GlucoseTest Strip
Lipid Check Strip
Glucose Check Strip
- 10 -
CHAPTER 2. USING THE SD LIPIDOCARE PROFESSIONAL ANAL
YZER
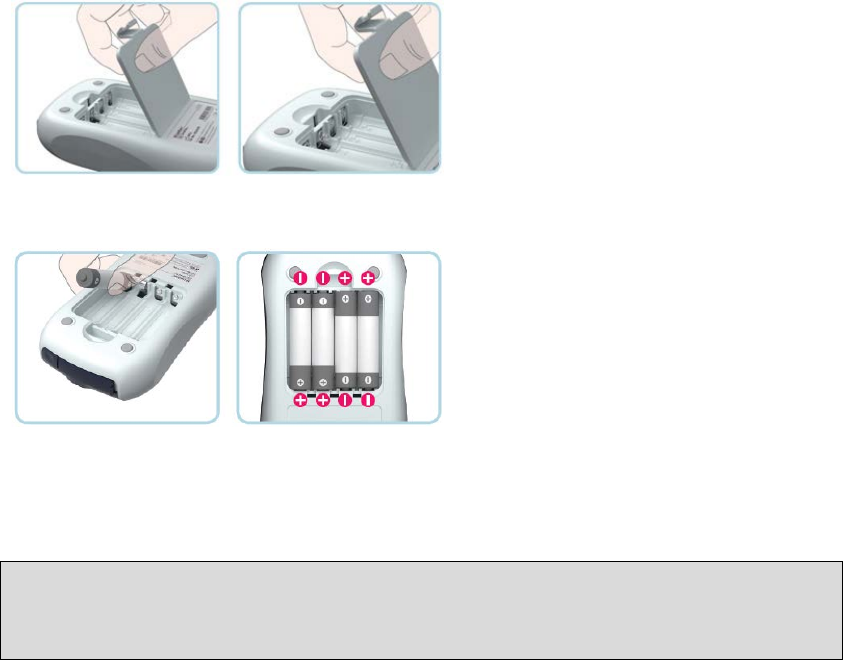
1. Changing the batteries
Before using the Analyzer for the first time, perform the following steps:
1) Ensure the analyzer is switched off, and turn it over.
2) Open the battery compartment lid by slightly pressing the tab toward the center of
the analyzer.
3) Lift the lid upward to remove it from the analyzer.
4) Insert four batteries into the compartment. Please note the orientation of the"+"
(battery head) and “-“ terminals (flat end). Use only alkaline manganese batteries (1.5
V, AAA).
5) Close the battery compartment lid.
6) Turn the analyzer on to test the functionality of the new batteries.
7) Check to ensure that the display is functioning correctly to prevent misinterpretations
due to defective display elements.
NOTE:
• After inserting or replacing the batteries, confirm that the time and date are set correctly.
If they are incorrect, reset the analyzer before using.
• Always replace all four batteries at the same time. Do not use rechargeable batteries.
- 11 -
2. Setting the analyzer
The following table provides an overview of the available settings.
Stage
Setting
Options
Default Setting
1
Beep
On, Off
On
2
Year
YYYY
2015
3
Date Format
m-d, d-m
m-d
4
Date
mm-dd, dd-mm
1- 1
5
Time Format
12h, 24h
12h
6
Time
hh:mm
12:00 AM
7
Units of the Test Result
mg/dL, mmol/L
mg/dL
8
Auto Printing
On, Off
On
9
Printing Page
P-1, P-2
P-1
10
Hypo warning (for glucose)
Off, 60,70,80
Off
11
Alarm
Off, 4 Alarms
Off
12
Bluetooth (PC)*
On, Off
Off
13
Bluetooth (Printer) *
On, Off
Off
14
Bluetooth Repairing(Printer) *
On, Off
Off
* These functions are only for the 02LA20G with Bluetooth module.
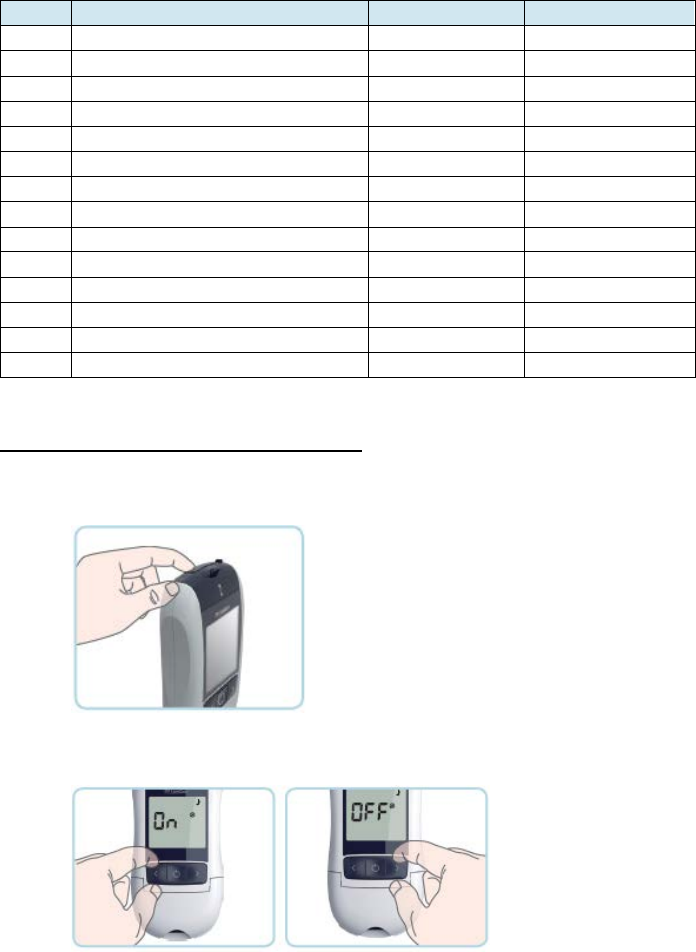
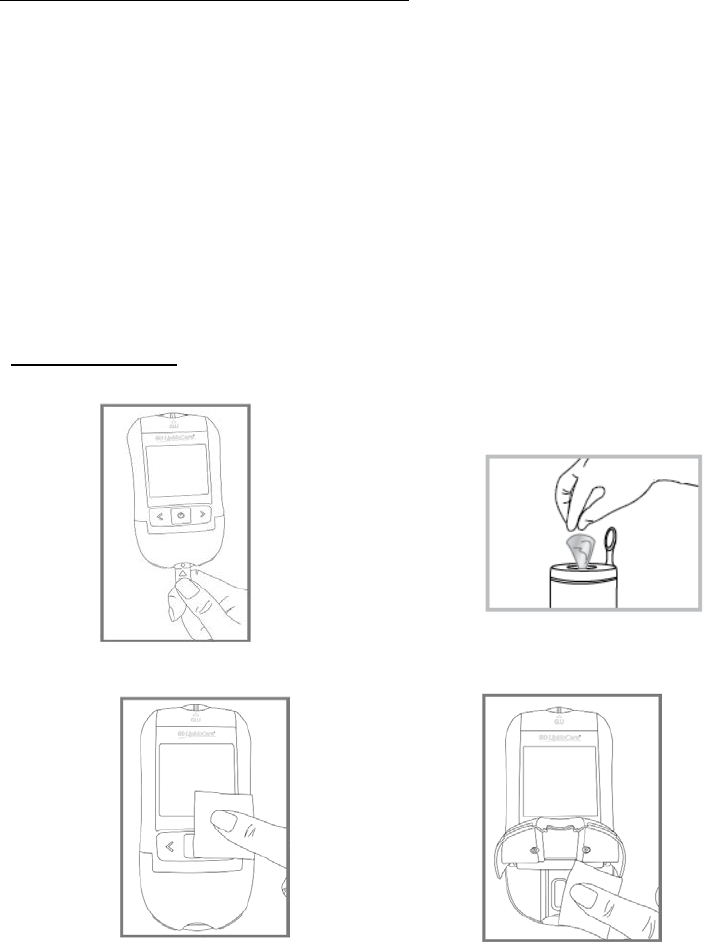
STAGE 0) Entering the setting mode
1) Press the SET/PRT button (on the top of the analyzer) for three seconds to enter the setting
mode after turning the analyzer on or in the standby state. If you want to leave the setting
mode during any of the steps, press the SET/PRT button quickly.
2) Press the left or right button to change the current flashing setting. You can press the left or
right button as many times as needed (or keep it pressed) until the desired setting (value) is
reached.
- 12 -
3) Press the ON/OFF button to store the selected setting and go to the next setting. If you
want to quit the setting stage, press the SET/PRT button.
4) If the settings are completed, the analyzer will be automatically turned off.
CAUTION
You can only move forward through the settings. Corrections can only be made by
repeating the settings. The setting procedure can be terminated at any time by pressing the
SET/PRT button.
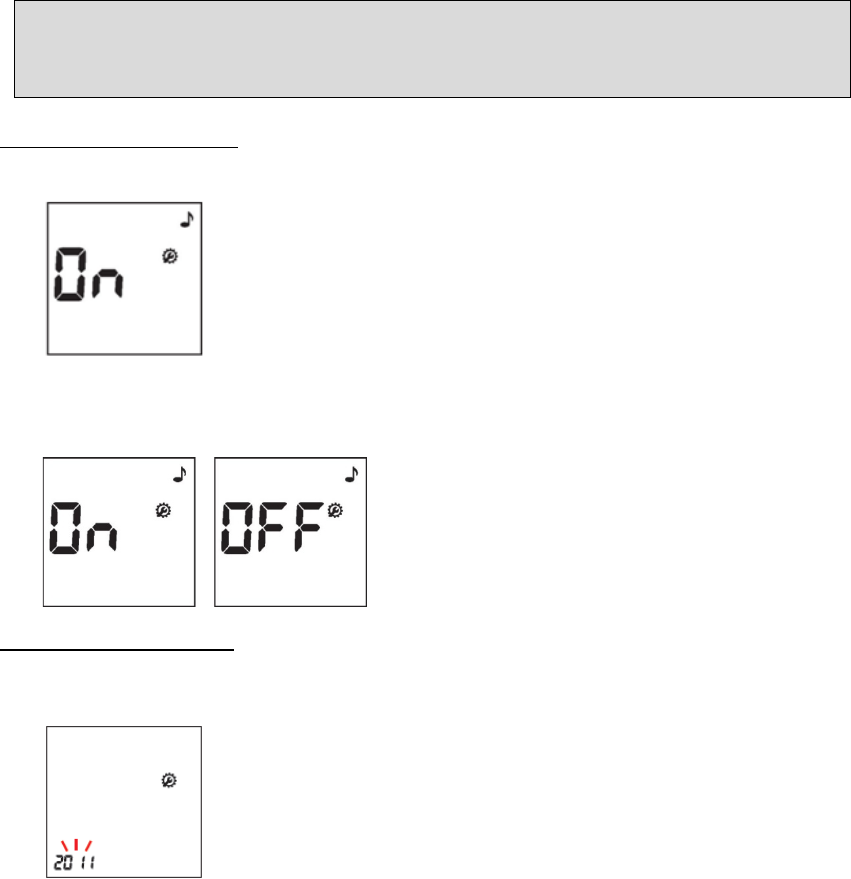
Stage 1) Setting – Beep
In the 1st stage, you can set the beep function.
1) If you enter the setting mode, the first step of the setting mode will appear.
2) Turn the beep sound on or off by pressing either the left or right button and then save the
preferred feature by pressing the ON/OFF button. If you select the
beep sound on
feature, a
“beep” sound will be made at the same time. Otherwise, if you select the
beep off
feature,
no sound will be made.
Stage 2) Setting – Year
In the 2nd stage, you can set the year. After setting the beep, the display for setting the year
will appear. Select the correct year by pressing the left or right button, and then save it by
pressing the ON/OFF button.
- 13 -
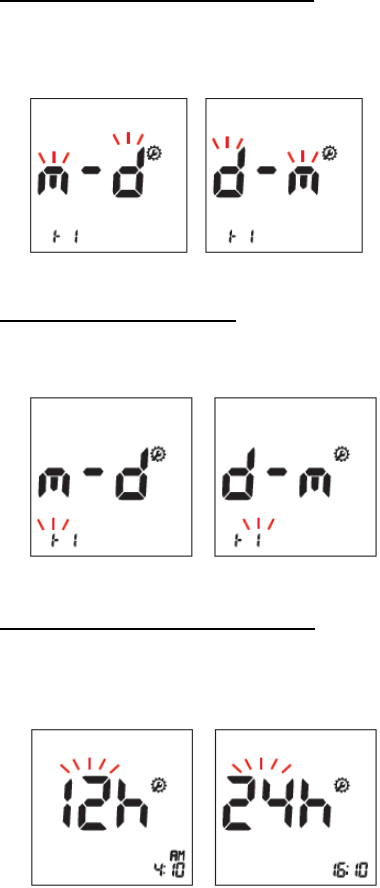
Stage 3) Setting – Date Format
In the 3rd stage, you can set the date format.
1) The analyzer can display the month and day in either Month-Day (m-d) format or Day-
Month (d-m) format. Select the preferred format by pressing either the left or right button,
and then save it by pressing the ON/OFF button.
Stage 4) Setting – Date
In the 4th stage, you can set the date.
1) After setting the date format, select the actual date by pressing either the left or right
button, and then save it by pressing the ON/OFF button.
Stage 5) Setting – Time Format
In the 5th stage, you can set the time format.
1) The analyzer can display the time in either the 12h format or the 24h format. Select the
preferred format by pressing either the left or right button, and then save it by pressing the
ON/OFF button.
- 14 -
Stage 6) Setting – Time
In the 6th stage, you can set the time, the current hour, and the minutes. Select the hour and
minute by pressing either the left or right button and then save them by pressing the ON/OFF
button.
a) 12h Format:
Sub-step 1) Set AM or PM.
Sub-step 2) Set hour (1 to 12).
Sub-step 3) Set minute (1 to 59).
b) 24h Format:
Sub-step 1) Set hour (1 to 24).
Sub-step 2) Set minute (1 to 59).
Stage 7) Setting – Unit of the Test Result
In the 7th stage, you can set the units for the test results.
1) The unit of the test result stage will appear.
2) You can select the preferred units by pressing the left or right button, and then
you can save your selection by pressing the ON/OFF button.
- 15 -
Stage 8) Setting – Auto Printing
In the 8th stage, you can set the auto printing function.
1) Following the test unit setting, the display for the auto printing function will appear.
2) Turn the auto printing function on or off by pressing either the left or right button, and then
save your selection by pressing the ON/OFF button.
NOTE:
The Auto Printing function allows a person to print the results automatically, right after
testing.
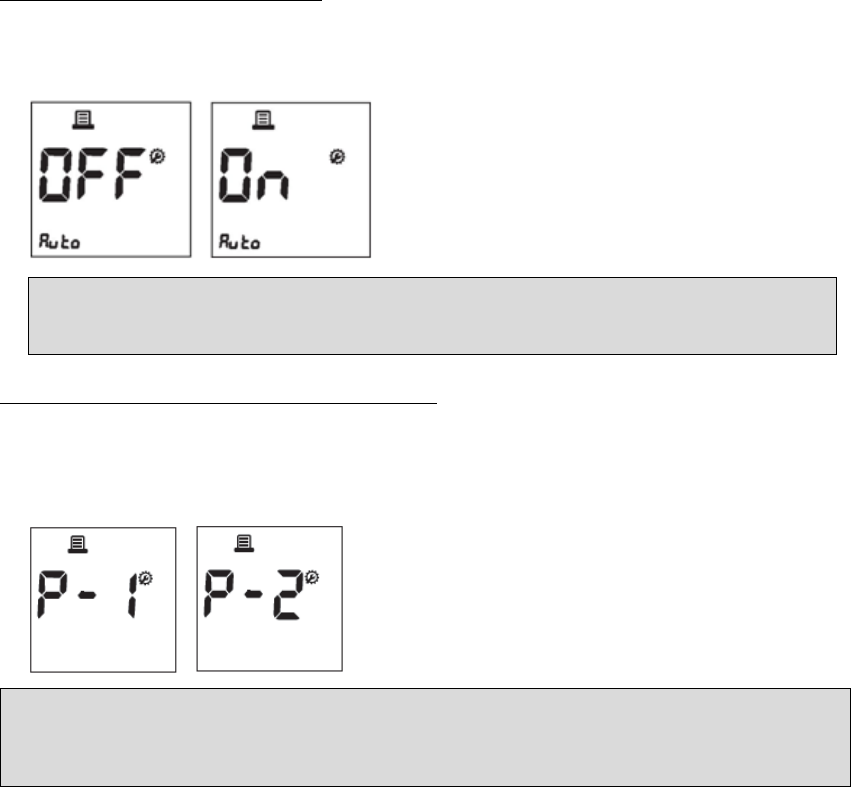
Stage 9) Setting – Simplex/Duplex Printing
In the 9th stage, you can set either single-sided or double-sided printing options.
1) After the auto printing function is set, the display for setting single-sided or double-sided
printing will appear.
2) Set the preferred feature by pressing the left or right button, and then save it by pressing
the ON/OFF button.
NOTE:
If you select the P-1, it will be set to print the test results in simplex (on one side of paper).
If you select the P-2, it will be set to print the test results in duplex (on both sides of the
paper).
- 16 -
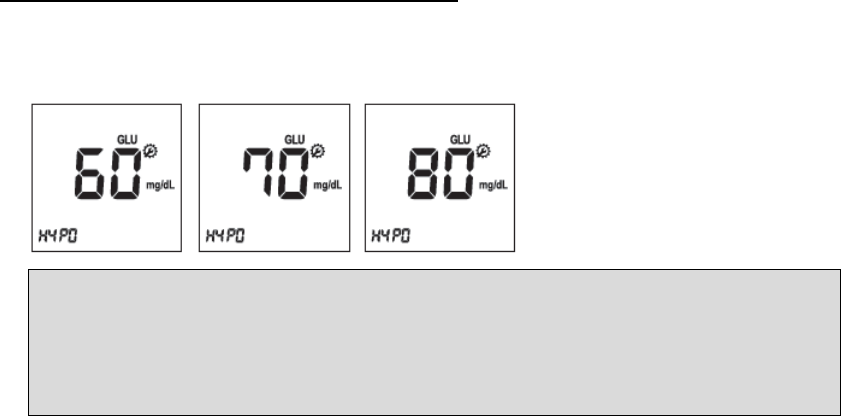
Stage 10) Setting – Hypo warning for glucose
In the 10th stage, you can set the hypo warning function for the glucose testing only.
1) After the printing setting, the display for setting the hypo warning will appear.
2) You can turn the hypo warning off or select the hypo level as 60, 70, or 80 mg/dL by
pressing the left or right button. Then save it by pressing the ON/OFF button.
NOTE:
• Please consult your healthcare provider for an appropriate hypo level, from among 60,
70, or 80mg/dL, to be set for you.
• If your glucose results are lower than a selected hypo result, the hypo symbol will
appear on the screen with a beep
sound. It is very important to manage your
hypoglycemia. Contact your healthcare provider immediately.
- 17 -
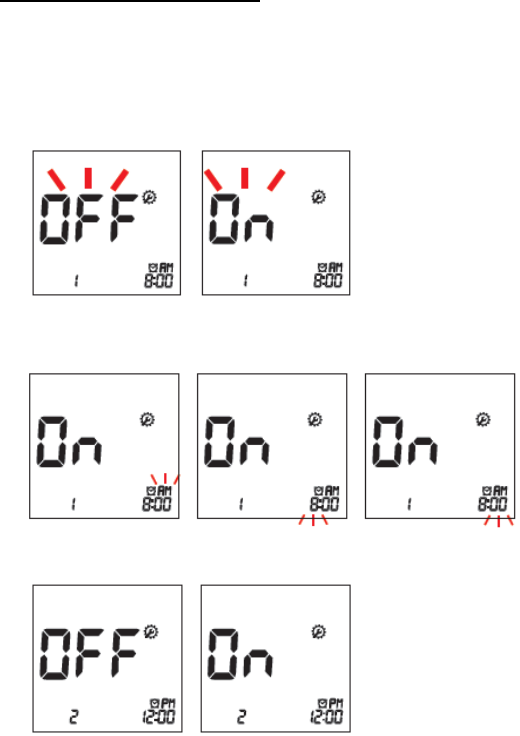
Stage 11) Setting – Alarm
In the 11th stage, you can set up to four alarms to remind yourself to do a glucose test.
1) After the hypo warning setting, the display for setting the alarm will appear.
2) Turn the first alarm on or off by pressing the left or right button, and then save it by
pressing the ON/OFF button. If you select
Off
, the analyzer will automatically turn off. For
the model 02LA20G, additional setting stages remain. Please refer to the next page for the
additional setting steps.
3) If you select ON for the first alarm, the clock icon will blink. Select the desired time for the
alarm by pressing the left or right button, and then save it by pressing the ON/OFF button.
4) Next, the second alarm setting mode will appear. Set the second alarm by following steps 2
and 3 above.
5) You can set the third and the fourth alarm modes in the same way, by following steps 2 and
3 above.
- 18 -
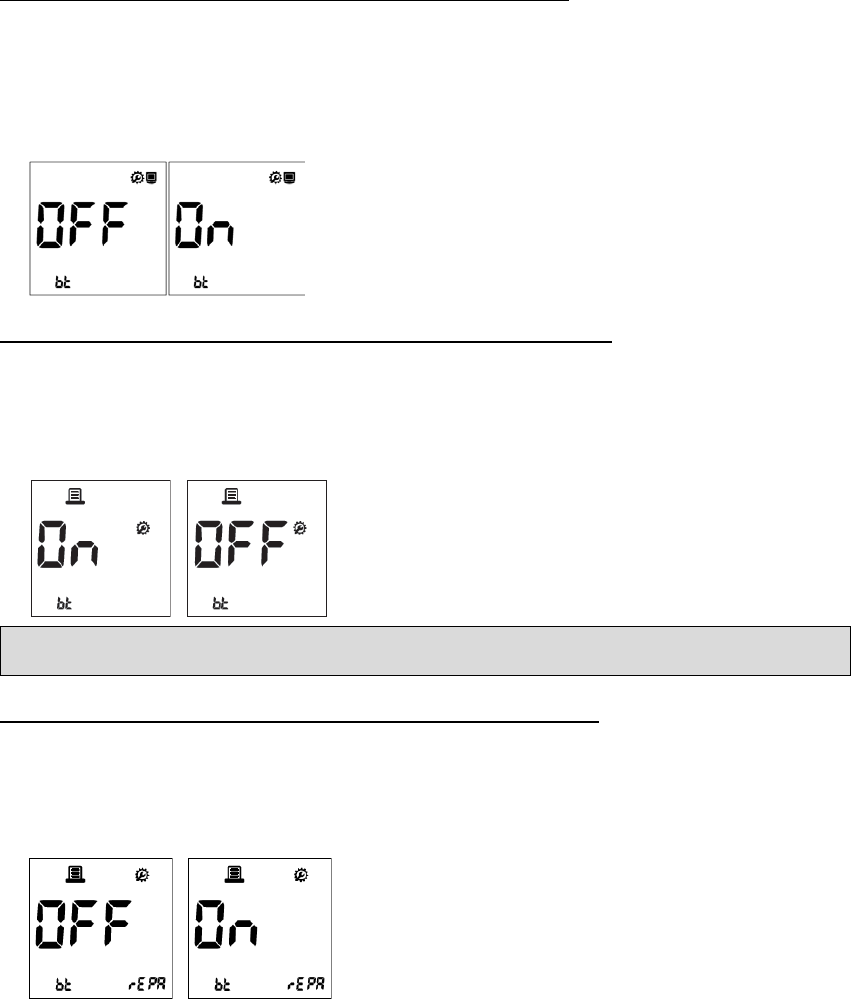
Stage 12) Setting – Bluetooth with PC, only for 02LA20G
In the 12th stage, you can set the Bluetooth communication with your PC or smartphone. If the
analyzer is paired with the PC or smartphone, the test results are transferred automatically, via
Bluetooth.
1) After the alarm setting, the Bluetooth setting will appear on the screen.
2) Turn it on or off by pressing the left or right button, and then save it by pressing the
ON/OFF button.
Stage 13) Setting – Bluetooth with Printer, only for 02LA20G
In the 14th stage, you can set the Bluetooth communication with a printer.
1) After setting the Bluetooth with a PC, the Bluetooth and printer icons will appear on the
screen.
2) Turn the selection on or off by pressing the left or right button, and then save it by pressing
the ON/OFF button.
NOTE: If you set both auto-printing and Bluetooth with printer to ON, you can get the test
results printed automatically, via the Bluetooth communication.
Stage 14) Setting – Repairing the Printer, only for 02LA20G
In the 14th stage, you can set the analyzer to be automatically paired with the previous paired
printer, whenever the printer is near the analyzer.
1) After the Bluetooth with printer setting, the repairing setting will appear on the screen.
2) Turn it on or off by pressing the left or right button, and then save it by pressing the
ON/OFF button.
- 19 -
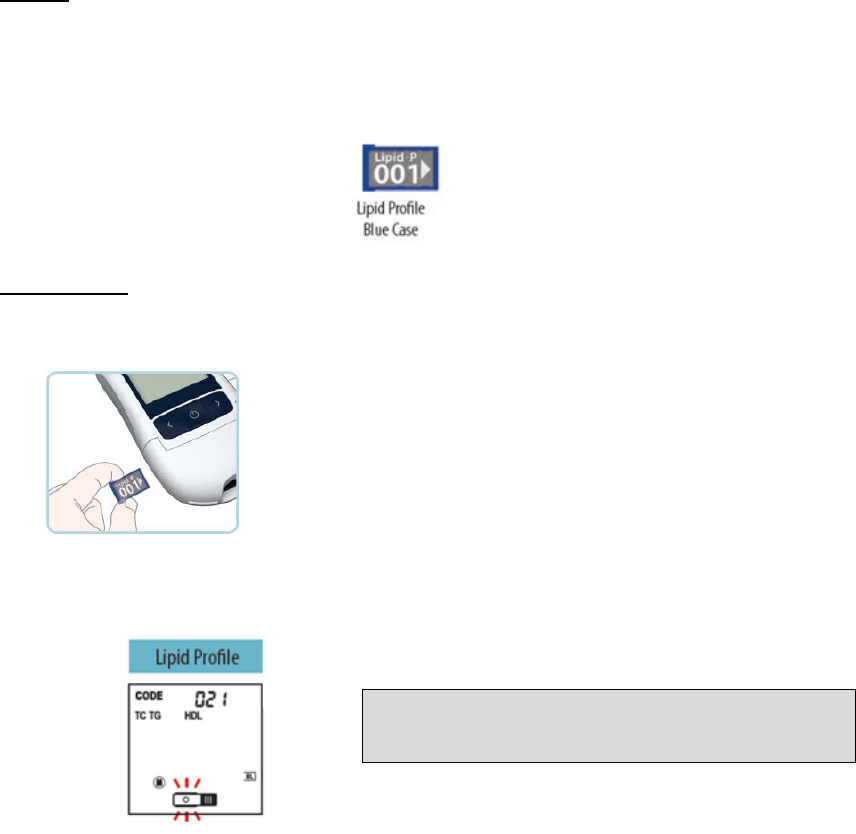
STEP 4. Insert a code chip
For measuring cholesterol (Lipid)
Coding
The code chip is included in the test strip package. The code chip provides the analyzer with
important information on the production-specific properties of the SD LipidoCare Professional
Lipid Profile Test Strip in order to measure your results accurately. Before you use the SD
LipidoCare Professional Analyzer with a new test strip for the first time, you should check that
the code numbers on the analyzer and the test kit are the same.
Code Setting
1) Make sure that the analyzer is turned off. Remove the old (or inserted) code chip from the
analyzer.
2) Insert a new code chip until it snaps into place. Then turn the analyzer on.
3) The 3-digit code number of the inserted code chip will appear with a flashing lipid test strip
symbol. This number must match the information provided in the lipid test strip package or
pouch. If it doesn’t match, repeat steps 1 and 2 above.
For measuring glucose
The blood glucose testing requires no coding. Therefore, a code chip is not needed for glucose
testing.
CAUTION:
The SD LipidoCare Professional
Lipid test strip
package includes a code chip with test strips.
- 20 -
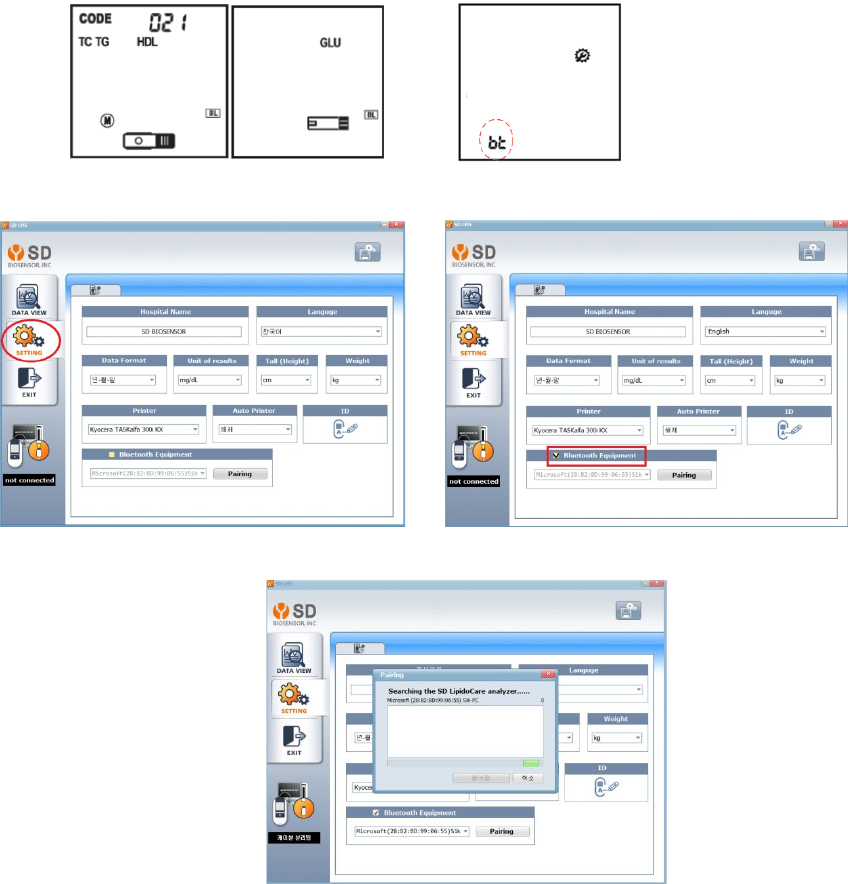
3. Pairing, only for 02LA20G
If you want the analyzer to be paired with a PC, the pairing step is necessary, and the lipid
management software (LMS) should be installed on the PC. To start the pairing process, follow
the steps below:
1) At the strip standby state for either a lipid or glucose, press the ON/OFF button and hold it
for 2 seconds. Then, the bt icon will appear on the left side of the screen with the setting
icon, which means pairing is ready.
2) Open the Lipid Management Software (LMS), installed on the PC. Click the Setting menu on
the left side, and then check the bluetooth equipment at the check box.
3) Click the Pairing button on the screen to look for the device for pairing. It will start to search
the SD LipidoCare Professional Analyzer nearby.
- 21 -
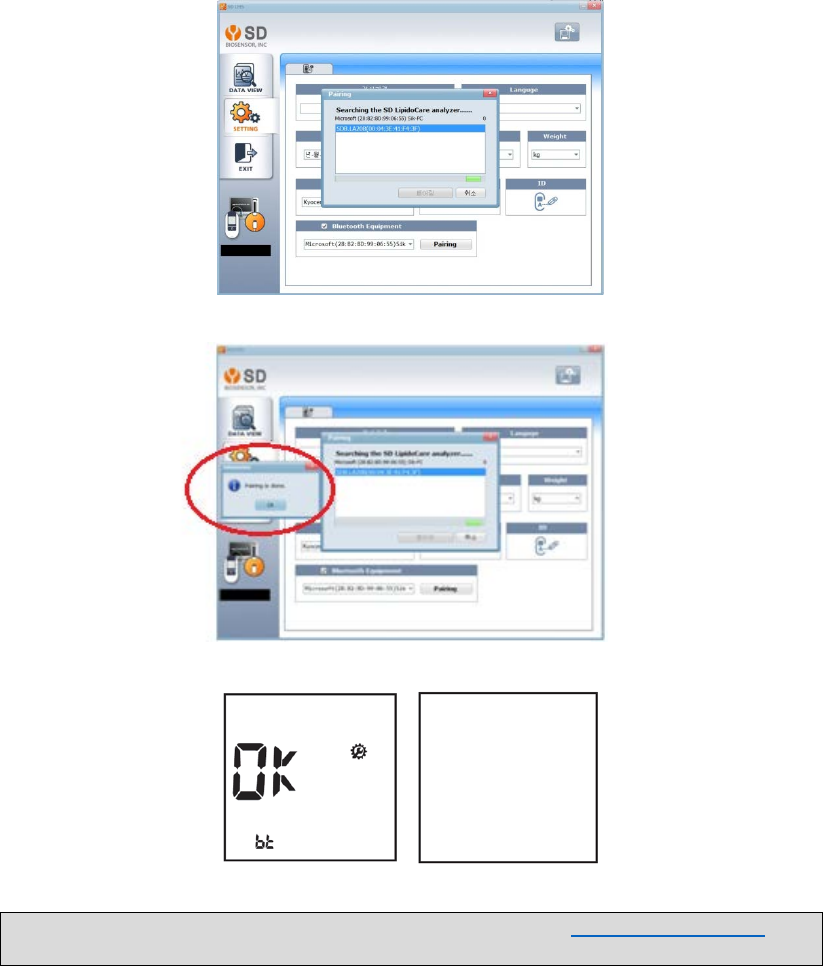
4) After the search is complete, the available analyzer will be listed on the screen. Select the
available analyzer by clicking the address of the analyzer.
5) When complete, the Pairing Is Done message will appear on the screen.
At the same time, the analyzer will display the OK message on the screen. If you receive
both messages on the PC and the analyzer, pairing was done successfully.
6) After the pairing processes are complete, the analyzer is now ready for testing.
NOTE: You can download the LMD program from our website: www.sdbiosensor.com
.
This program is free of charge.
- 22 -
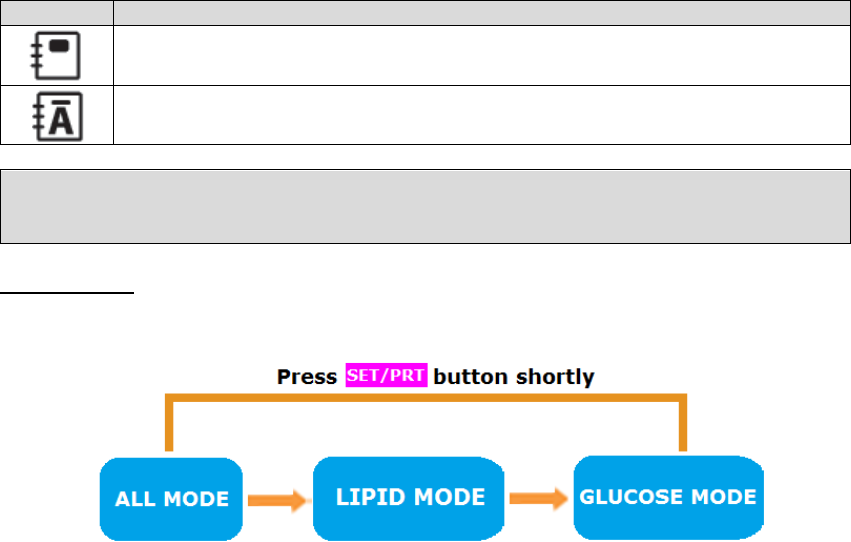
4. Analyzer Memory
The SD LipidoCare Professional Analyzer can store the test results of up to 500 data with
testing dates and times, and it can assign a number to let you review the test results in order,
from the most recent to the oldest. If the memory is full and a new result is added, the
analyzer deletes the oldest result.
• ALL mode
• Lipid mode : 6 sub-parameters:
1) TC, 2) TG, 3) HDL, 4) LDL, 5) LDL/HDL, 6) non-HDL
• Glucose mode
The SD LipidoCare Professional Analyzer has a function that shows the averages for only the
glucose parameter.
LCD Symbol of Memory
Symbol
Details
Indicates that it displays the test results stored in the memory, only for the
mode you selected (just one mode at a time)
Indicates that it displays the test results stored in the memory of all the
parameters.
NOTE:
The data will display with the corresponding parameter symbol, such as
Lipid
or
Glucose
.
When you enter the ALL mode, the initial
A
will appear at the center of the memory symbol.
Mode change
You can change the mode by pressing the SET/PRT button at the memory mode. The order of
the memory mode is as follows:
• Press the SET/PRT button quickly to change the memory mode.
• Each time you press the SET/PRT button, the latest result of the mode will be displayed.
• Press the left button to view the next result in the specific memory mode.
• If you press the right button, the oldest stored result will appear on the screen.
• You can exit memory mode by pressing the ON/OFF button in any memory mode.
- 23 -
5. Reviewing stored test results
All modes
Turn the analyzer on, then press the left or right button at the strip standby state to enter
memory mode. The All mode is the first memory mode with the icon displayed when you
enter the memory mode. In the All mode, the icon is displayed all the time. You can
review all the stored glucose and lipid test results in the memory according to the order of the
testing time.
When entering the All mode of the memory, the latest result with the largest index number
will display first. If you press the left button, the second latest result will appear on the screen.
If you press the right button, the oldest result will appear on the screen.
NOTE:
The date and time on the screen indicate the testing date and time, not the current date and
time.
NOTE:
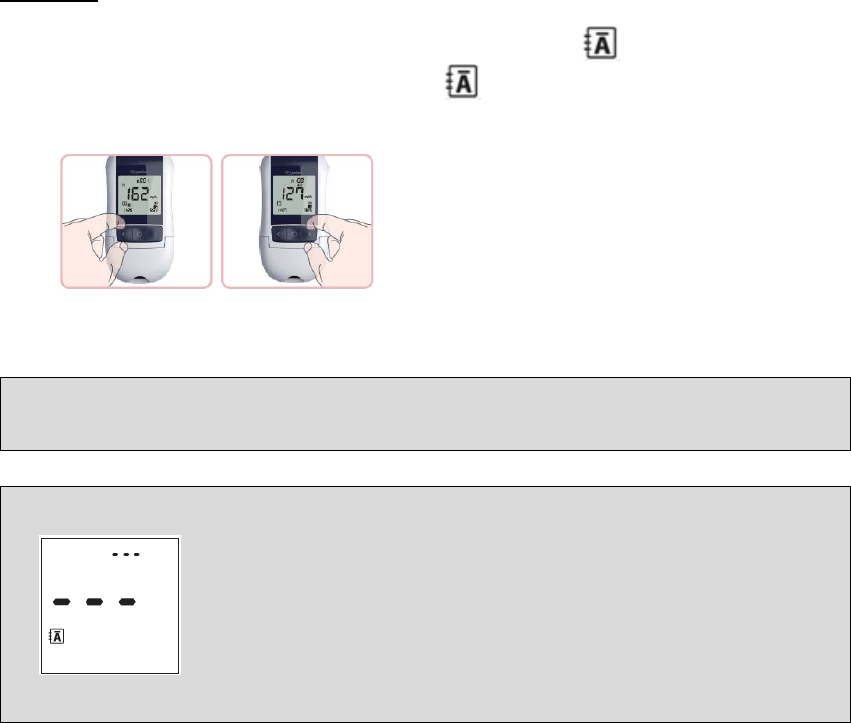
• If the memory is empty, three dashes (---) will appear on the screen.
• If you want to quit the memory mode, press the ON/OFF button; then the analyzer will turn
off.
- 24 -
Lipid Mode
If you want to review the lipid results only, you can review them in the Lipid mode. After
entering the Memory mode, the All mode will appear. Press the SET/PRT button quickly to
enter the Lipid mode.
When you perform a lipid profile test using the SD LipidoCare Professional Lipid Profile Test
strip, you will get six parameter results in total, at once. The index number is assigned to all
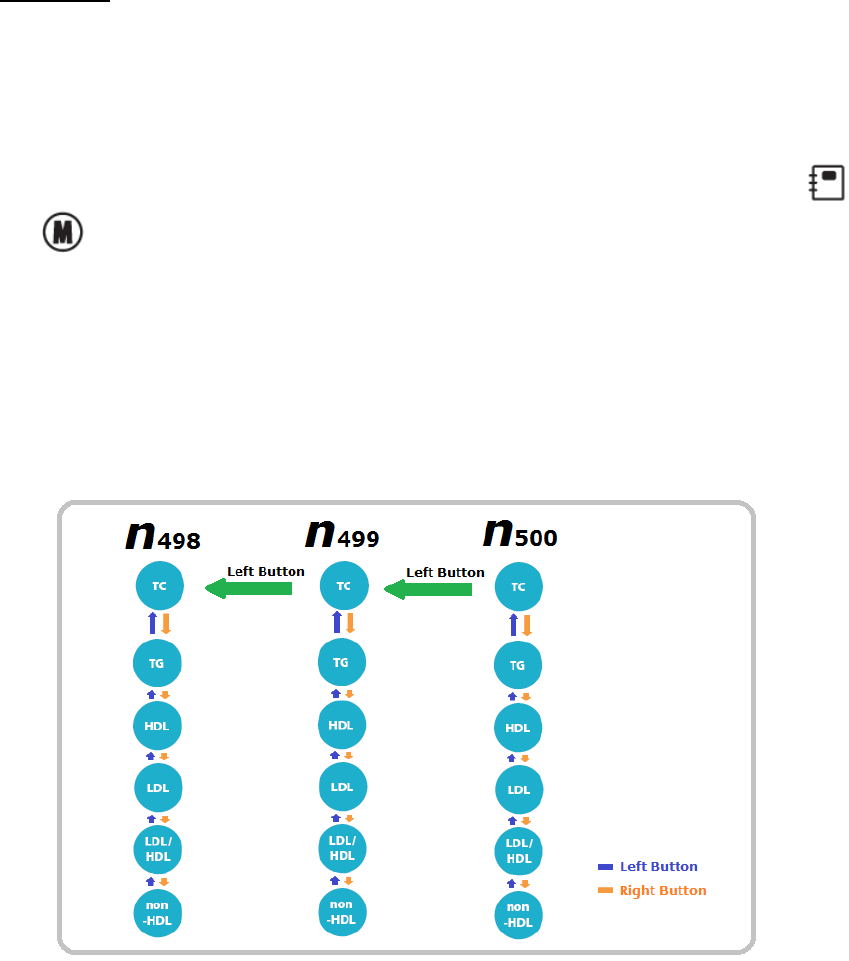
the parameter results from a test. You can review them all by pressing the left or right button.
The following picture describes the parameter, in sequence. On the screen, both the
and icons appear in the Lipid mode.
How to review the data
When 500 results are stored in the memory, the first displayed result is the TC value of the
500th result.
If you press the left button at the TC value, the TC value of the index 499 will appear. Use the
left button at the TC value to go to the previous index test results.
If you press the right button, TG, HDL, LDL, LDL/HDL, and non-HDL will appear, in order. After
TC, you can use the left button to view the results of the previous parameter.
Ex)
- 25 -
Glucose Mode
If you want to review only the glucose results, you can review them in the glucose mode. After
entering the Memory mode of the memory, press the SET/PRT button 2 times, quickly, to
change the glucose mode. On the screen, both and the icon will appear in the
glucose mode.
At first, the latest stored glucose result among all of the stored glucose results will appear on
the screen.
After displaying the latest glucose result on the screen, press the left button to review the
second latest stored glucose result.
When displaying the latest stored glucose result on the screen, you can press the right button
to review the oldest stored glucose result in the analyzer.
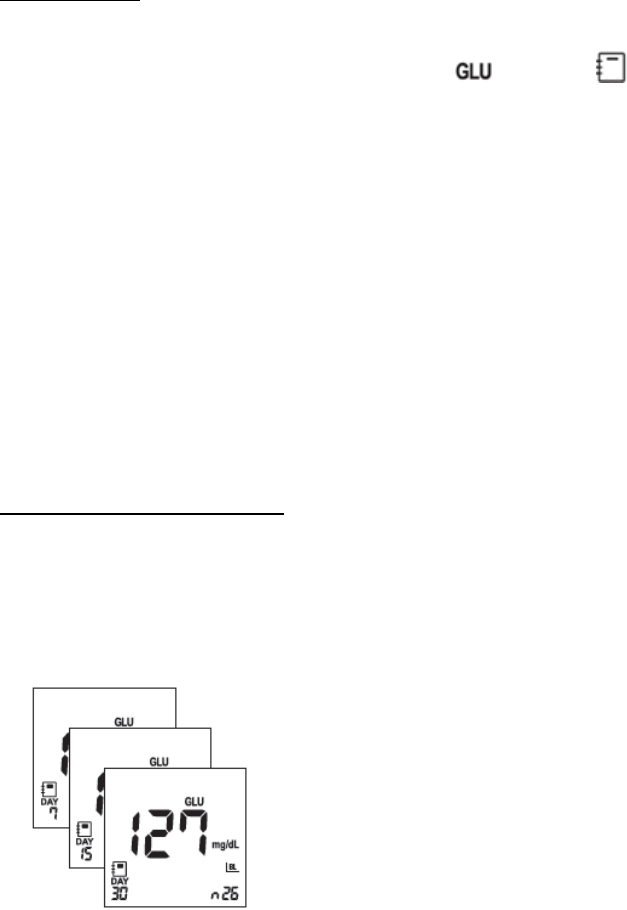
6. Displaying the average of glucose test results
The analyzer can calculate 7-, 15-, and 30-day averages of glucose test results stored in
memory. The HI/Lo result (results outside of the reading range) and control solution test
results are not included in the averages.
Searching Glucose Averages
1) Switch the analyzer on, then press the left or right button to enter the All memory mode.
2) Press the SET/PRT button to enter the Glucose mode.
3) Press the right button to review the three kinds of averages, which are 7-, 15-, and 30-day
averages of the glucose test results stored in memory, in sequence. You can also check
the number of glucose results used for calculating the average in the right bottom of the
LCD window. If you press the left button once more after displaying the 30-day average,
the 7-day average result appears again.
- 26 -
4) If there are not any stored glucose test results, the following display will appear on the
screen:
NOTE:
You cannot search the stored results or averages if a glucose test strip is inserted in the
analyzer.
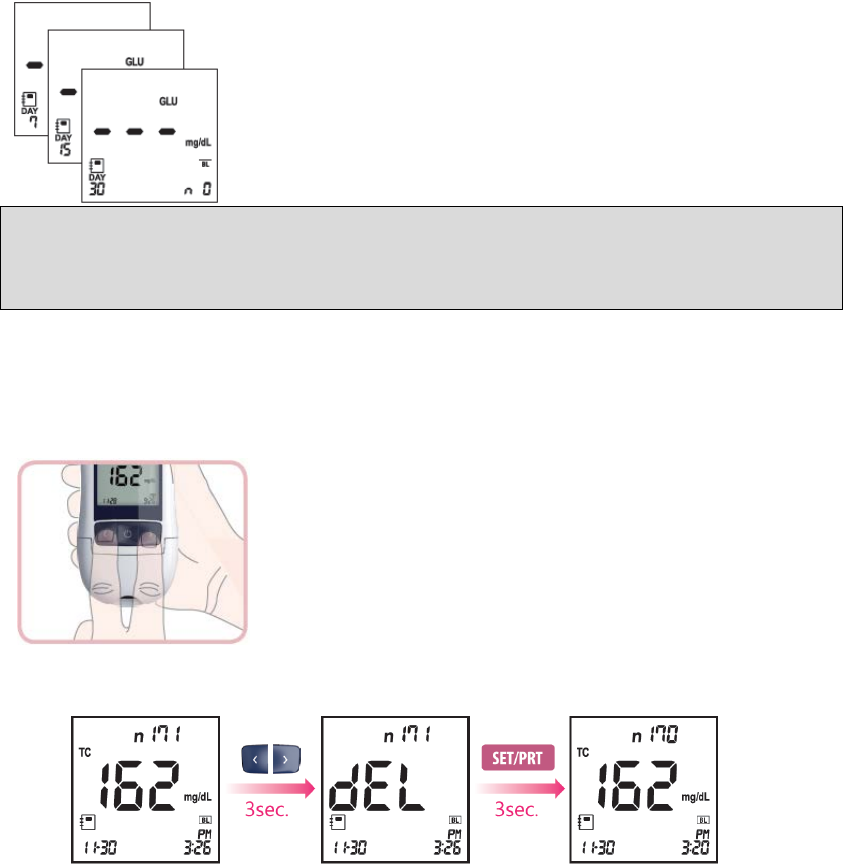
7. Deleting test data
1) Switch the analyzer on and then press the left or right button in order to enter the Memory
mode at the test strip (lipid or glucose) standby state.
2) Navigate through to identify the result you want to delete. Press the left and right button
together, and hold for 3 seconds.
3) The dEL message will appear on the screen. Press the SET/PRT button, and hold it for 3
seconds.
- 27 -
8. Printing
Material required, but not provided
• SD Thermal printer (Model Number: 90TPRT10)
• SD USB cable
If you want to purchase the accessories listed above, please contact our customer service
center at 1-855-486-2888.
How to print
Auto Print
If you have turned the auto printing function on in the Setting mode, the analyzer will not
display the Printing symbol. When a test is done, the test result sheet is automatically printed,
without any action.
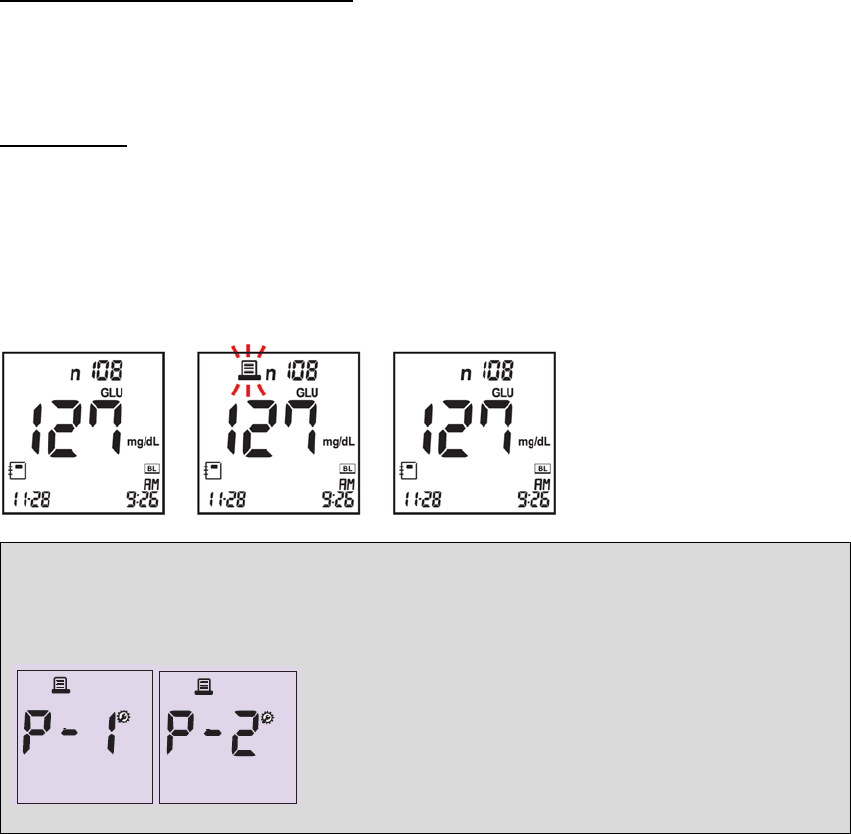
Manual Printing
If you press the SET/PRT button in the Memory mode, the Printing symbol will appear on the
screen and the test result sheet will be printed with the result.
NOTE:
• If you have selected P-1 in the setting mode, it will print the test results in simplex (on one
side of paper).
• If you have selected P-2 in the setting mode, it will print the test results in duplex (on both
sides of the paper).
- 28 -
CHAPTER 3. COLLECTING BLOOD SAMPLES
CAUTION
• When collecting the capillary blood from the fingerstick, palm, forearm, or upper arm, there
is the possibility of a bloodborne pathogen transmission.
• Users should wash hands thoroughly with soap and water after handling the meter, lancing
device, or test strips.
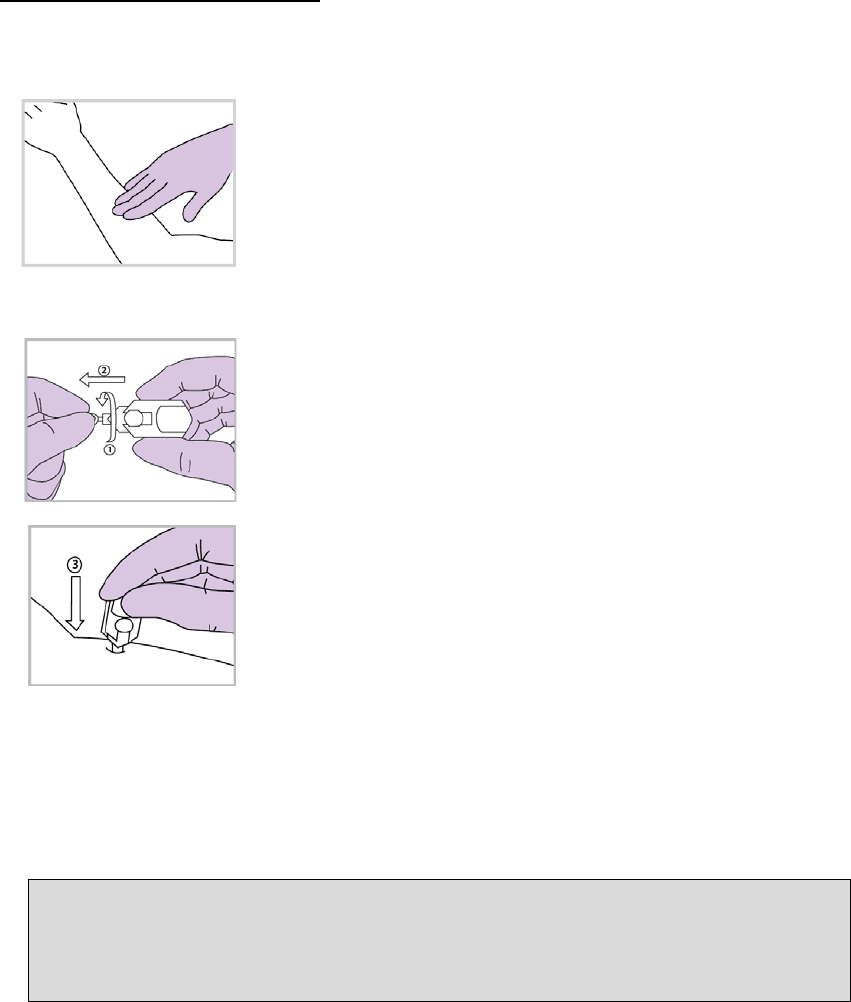
1. Getting a blood sample from fingersticks
1) Twist off the protective lancet cap.
2) Position the lancet and press it firmly against the puncture site.
3) Gently apply intermittent pressure to the puncture site to obtain sufficient blood.
CAUTION:
• A lancet should be used only once. Do not share used lancets with another person. To
prevent possible infection, a used lancet should not be touched by another person.
• Dispose of used lancets in a biohazardous waste container with lid.
- 29 -

2. Getting a blood sample from alternative sites
Important Information About AST
Sites other than fingertips may have fewer nerve endings, so obtaining a blood sample from
these sites may be less painful. The technique for alternative site testing is different from
fingertip testing. However, blood glucose results from sites other than your fingertip could be
significantly different, because blood glucose levels change rapidly after a meal, insulin, or
exercise. Consult with your healthcare provider prior to testing from a site other than your
fingertip. Rapidly changing results are likely to occur after eating. Insulin dosing and physical
activity are shown in the fingertip more quickly than in an alternative sites. The AST results
should never be used to calibrate CGMs or for insulin dose calculations.
AST Precautions
• AST testing should not be done within 2 hours of a meal, exercise, or medication.
• Results from AST testing should not be used to calibrate continuous glucose monitors
(CGMs).
• Results from AST testing should not be used for insulin dosing calculations.
• AST testing should not be done if your AST results do not match the way you feel.
• AST should only be done at times when the patient’s blood glucose is not rising or falling
rapidly.
Things to Know When using alternative sites
Please read the following before testing at alternative sites (palm, forearm, and upper arm).
The capillary whole blood of the fingertips reflects changes in glucose levels more rapidly than
in alternative sites. The test results from the fingertip testing and AST may differ, due to factors
such as lifestyle and ingested food, which affect glucose levels.
Use Alternative Site Testing only When
Use Fingertip Testing
•
Testing before a meal
• You are in a fasting state
• Two hours have passed since a meal
• Two hours have passed since insulin dosing
• Two hours have passed since physical activity
•
Within two hours after a meal
• Within two hours after insulin dosing
• Within two hours after physical activity
• If you have a history of hypoglycemia,
are experiencing low-blood glucose, or
suffer from hypoglycemic
unawareness (you cannot tell when
you have low blood glucose)
• During times of stress or illness
NOTE:
• Results from alternative site and fingertip samples may differ from each other, as there is a
time lag for the glucose levels to reach the same value. Use a fingertip sample if you suffer
from hypoglycemia or have experienced hypoglycemic shock or symptoms.
• If the sample drop of blood runs or spreads due to contact with hair or with lines on your
palm, do not use that sample. Try puncturing again in a smoother area.
- 30 -
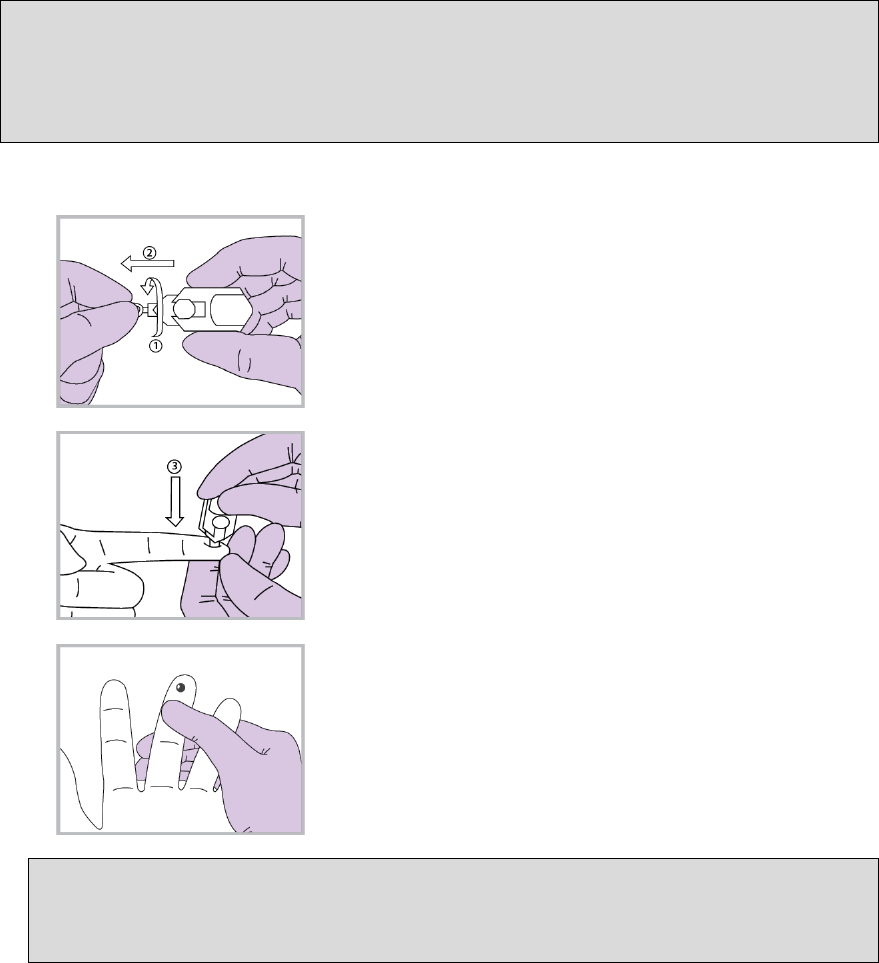
Sampling for the AST Procedure
1) Select a soft, fleshy area on the palm, forearm, or upper arm free of visible veins, moles,
and hair and away from bone.
2) Press and vigorously rub the selected area for 10 seconds until it starts to feel warm to the
touch.
3) Wash the area with warm, soapy water. Rinse and dry completely. If you use alcohol wipes
to cleanse the site, make sure that the area is dry before lancing the site.
4) Twist off the protective lancing device cap.
5) Position the lancing device and press it firmly against the puncture site.
6) Lift the disposable lancing device straight up.
7) Touch and hold a drop of blood to the edge of the test strip until the yellow window is
completely filled with blood. The blood is drawn into the strip automatically.
8) The meter counts down from 5 to 1 second with beep sound.
9) The blood test result appears in just 5 seconds and is displayed in mg/dL.
10) Remove and discard the used test strip. The meter automatically shuts off in 5 seconds after
removing the test strip.
NOTE:
• Repeat the blood draw if the fluid is clear.
• It is recommended to use the lancing device with the clear end cap when testing
alternative sites. Please call 855-486-2888 to order an AST lancing kit containing the
lancing device, lancets, and the clear end cap.
- 31 -

CHAPTER 4. PERFORMING A TEST FOR LIPID OR GLUCOSE
1. Before testing for lipid or glucose
1) Before Testing
Make sure you have all the necessary components.
SD LipidoCare Professional system
• SD LipidoCare Professional Analyzer
• SD LipidoCare Professional Lipid Profile Test Strip
• SD LipidoCare Professional Blood Glucose Test Strip
• Sample collection tool, such as a reusable lancing device, lancets, and a capillary
tube (optional)
If you want to purchase sample collection tools, please contact the SD Biosensor
customer service center at 1-855-486-2888.
<Precaution>
Do
• Read the test strip package insert.
• Operate the analyzer at the acceptable test-conditions:
- For lipid testing : 64–90°F (18–32°C), 10–90% RH
- For glucose testing: 50–113°F (10–45°C), 10–90% RH
• Place the analyzer on a level surface or hold it steady in your hand.
• Keep the guidelines for cleaning and disinfecting.
• Make sure that all display elements are displayed.
Do not
• Use lipid test strips beyond the expiration date, as this may cause inaccurate results.
• Touch or remove the test strip during actual measurement.
• Subject the analyzer to sudden movements during a measurement.
• Reuse the test strip.
• Store the test strips at extreme temperatures or humidity.
• Open the door during the measurement.
CAUTION: Not following these precautions can lead to inaccurate results.
- 32 -
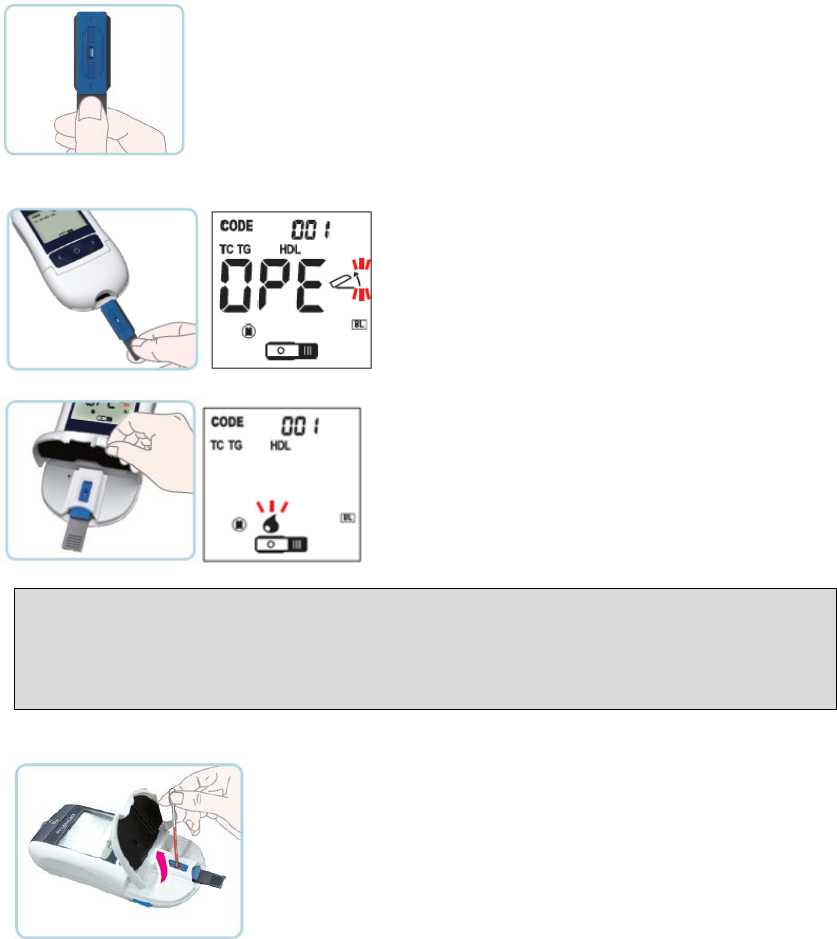
2. Test Procedure for cholesterol (lipid) only
1) Prepare a lipid test strip for the measurement.
2) Hold the lipid test strip with thumb and index finger so that the lipid test strip is facing
upward.
3) Insert the lipid test strip into the lipid test strip slot of the analyzer. When the lipid test strip
reaches the correct position, you will hear a beep.
4) After the display appears, open the door by lifting it. Then, the display below will appear.
5) Prepare the blood samples collected from your fingerstick.
NOTE:
• For the procedure to collect the capillary whole blood from your fingerstick, please refer
to Chapter 3. Collecting Blood Samples.
• To measure the lipid, the capillary whole blood from your fingerstick is the only option.
Do not use a blood sample from an alternative site.
6) Apply the collected sample to the sample application area of the lipid test strip.
- 33 -
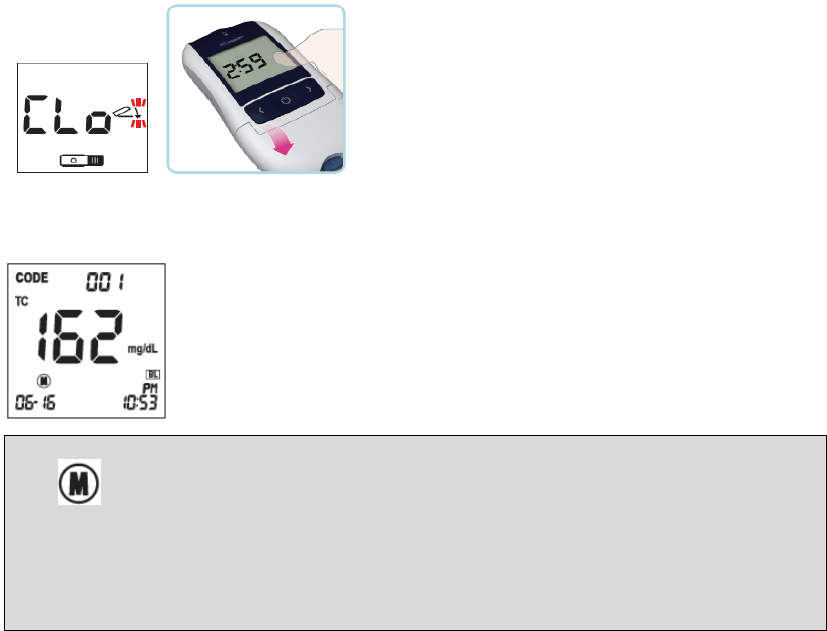
7) The message “CLo” will appear for 5 seconds. After closing the door, it performs the
measurement for 3 minutes.
8) Your result appears on the screen after 3 minutes. When the test is done, pull out the used
test strip and discard it. The analyzer shuts off automatically, 3 seconds after the used test
strip has been removed.
NOTE:
The icon will be displayed on the screen with the test reult. Please press the left or
right button to see the other parameter results. The order of the display is as noted
below:
- Pressing the right button: TC TG HDL LDL LDL/HDL non-HDL of the
same index number
- Pressing the left button: TC non-HDL LDL/HDL LDL HDL TG TC
- 34 -
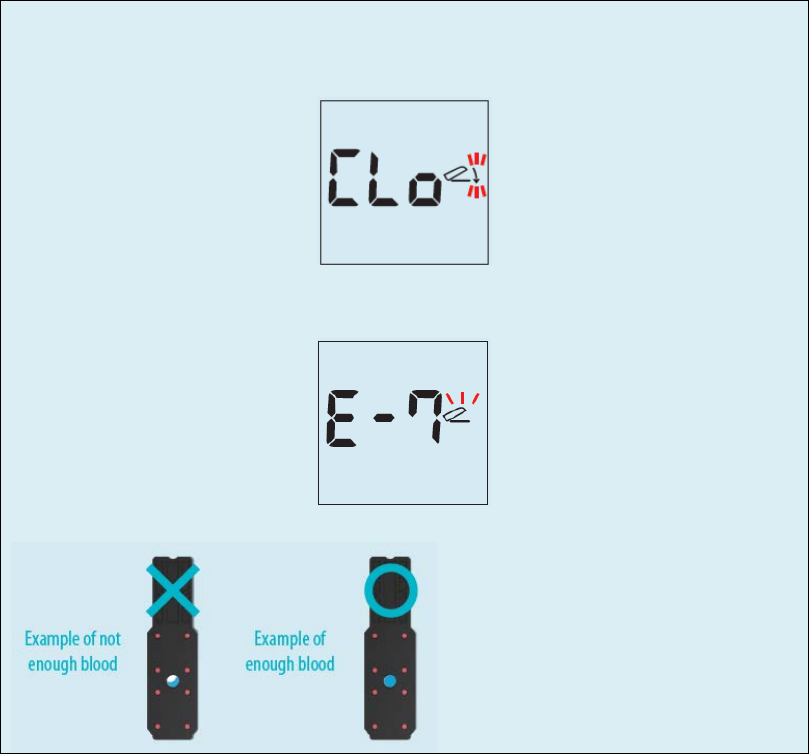
CAUTION
• Do not open the door during the test.
• If you do not close the door after applying the blood sample to the test strip, the Close
Door message will appear on the screen, accompanied by warning beeps.
• If you do not close the door within 20 seconds after the blood sample is applied, the
analyzer will display the E-7 error message.
• The entire blood application area must be filled with blood drop.
- 35 -
3. Procedure for glucose
1) Take a glucose test strip from a container. Make sure to tightly close the container cap after
taking a glucose test strip.
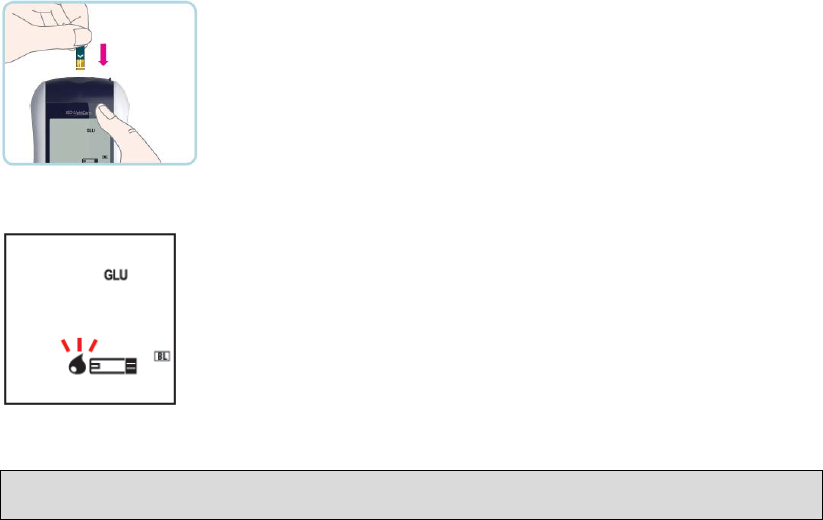
2) Insert a glucose test strip into the Glucose Test Strip Slot of the analyzer. The analyzer will
automatically enter the glucose testing mode.
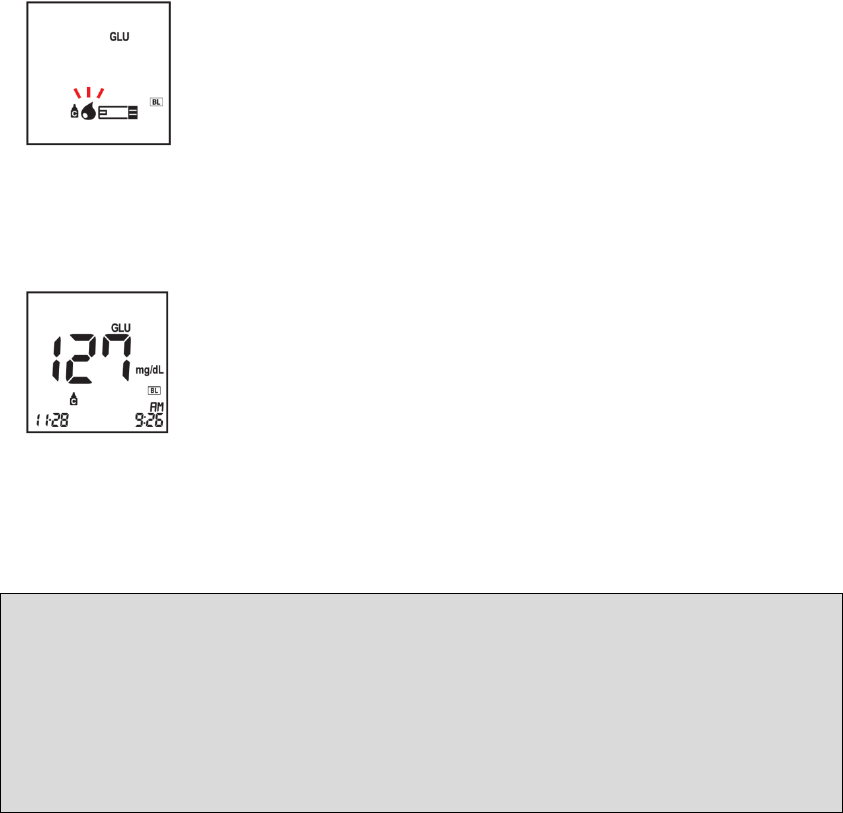
3) When the blood drop symbol flashes next to the glucose strip symbol, you are ready to
perform a glucose test.
4) Obtain a drop of blood sample from your fingerstick or alternative site, using a lancet and
lancing device.
NOTE: Refer to Chapter 3, Collecting Blood Samples, for instructions on how to collect the
blood sample from your fingerstick or alternative site.
5) Touch the top edge of the test strip to the blood on your finger. Do not take off your finger
until the yellow window is completely filled with blood. Do not drop the blood from above.
6) The blood will be drawn into the glucose strip automatically.
7) The analyzer display counts down from 5 to 1 (seconds), and your result will appear on the
display after 5 seconds.
8) When the test is done, pull out the used glucose test strip. The Analyzer will shut off
automatically in 3 seconds.
- 36 -
4. Understanding Your Results
Measuring Range
Measuring Range,
mg/dL(mmol/L)
For results outside the measuring range, the
SD LipidoCare analyzer displays
Low(Lo)
High(HI)
TC
100–450 (2.59–11.64)
< 100 (2.59)
> 450 (11.64)
TG
45–650 (0.51–7.34)
< 45 (0.51)
> 650 (7.34)
HDL
25–95 (0.65–2.46)
< 25 (0.65)
> 95 (2.46)
Glucose
20–600 (1.2–33.3)
< 20 (1.2)
> 600 (33.3)
• For Lipid
After finishing the test, you can review test results by pressing the left or right button;
the total cholesterol (TC), Triglycerides (TG), and high density lipoprotein (HDL) appear
on the screen, in order. They are the measured results. The low-density lipoprotein (L
DL), LDL/HDL, and non-HDL appear on the screen, in order. They are the calculated re
sults.
- 37 -
Expected Value for lipid
The National Heart, Lung and Blood Institute issued the Third Report of the National C
holesterol Education Program (NCEP) Expert Panel on Detection, Evaluation, and Treatm
ent of High Blood Cholesterol in Adults (Adult Treatment Panel III) in May 2011. The A
TP III report presented the NCEP’s updated clinical guidelines for cholesterol testing an
d management and described the following classifications for cholesterol and triglycerid
e testing:
mg/dL
mmol/L
Classification
TC
< 200
< 5.18
Desirable
200–239
5.18–6.19
Borderline high
≥ 240
≥ 6.22
High
HDL
< 40
< 1.03
Low
≥ 60
≥ 1.55
High
TG
< 150
< 1.69
Normal
150–199
1.69–2.25
Borderline high
200–499
2.26–5.64
High
≥ 500
≥ 5.65
Very High
LDL
< 100
< 2.59
Optimal
100–129
2.59–3.34
Near optimal/ Above optimal
130–159
3.36–4.11
Borderline high
160–189
4.14–4.89
High
≥ 190
≥ 4.91
Very High
Non-HDL
ATP III identifies non-HDL (total cholesterol minus HDL) as a secondary target of therapy in
persons with high triglycerides (≥200mg/dL). The goal for non-HDL in persons with high
serum triglycerides can be set at 30mg/dL higher than that for LDL cholesterol, on the
premise that a VLDL level ≤30mg/dL is normal.1 Non-HDL can be calculated using the
equation below. non-HDL (calculated) = Total Cholesterol - HDL
LDL
LDL can be calculated using the equation below. Calculated LDL is an estimation of LDL and
is valid only if the triglyceride level is 400mg/dL (4.55mmol/L) or below.3
LDL (calculated) = Total Cholesterol - HDL - (Triglycerides/5) (mg/dL)
LDL (calculated) = Total Cholesterol - HDL - (Triglycerides/2.17) (mmol/L)
- 38 -
TC/HDL Ratio
The ATP III report does not comment on the use of the ratio of total to HDL cholesterol.
Various authors have suggested that the TC/HDL ratio is the strongest lipid risk factor and
can be a useful summary of CHD risk.4, 5 A ratio of 4.5 or less is desirable. A ratio greater
than 6.0 suggests a high risk of CHD.4
Expected Value for Glucose
• Range of Expected Values
Self-testing may help to monitor your blood glucose levels. Consult with your physician to
determine the best range of expected blood glucose values for you.
• Expected blood glucose values for non-diabetic adults are as follows10:
Before eating <100 mg/dL (5.6 mmol/L)
One to two hours after meals <140 mg/dL (7.8 mmol/L)
Reference:
American Diabetes Association: Diabetes Care, 2015;38(Suppl. 1):S8-S16
Your glucose results
1) After 5 seconds from applying blood to the glucose strip, you should receive a test
result between 20–600mg/dL.
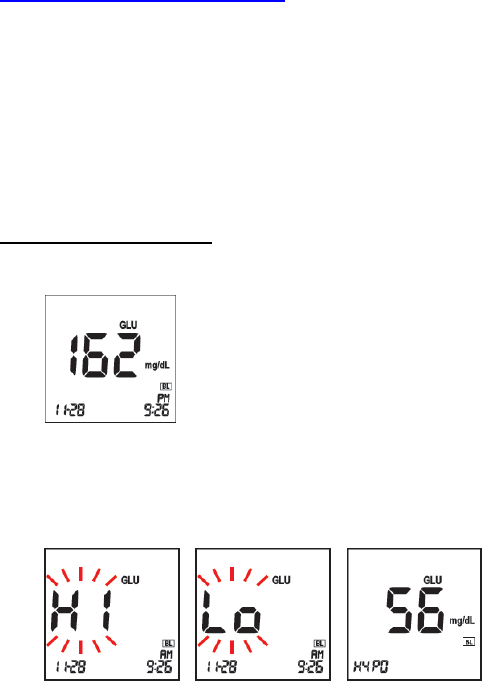
2) If your blood glucose result is above 600mg/dL, you will receive
HI
. If your blood
glucose result is below 10mg/dL, you will receive
Lo
. In these cases, repeat the test
with a new glucose test strip. If these messages appear again, please contact your
healthcare provider immediately.
- 39 -

CHAPTER 5. CONTROL SOLUTION TEST
1. Control Solution Test
It is important to perform a control solution test with more than one level of the control
solution. The control solution is used to check that the analyzer and the test strips are working
together, as a system, properly. It is very important that you do this simple check routinely to
make sure you get an accurate result.
When to use Lipid or Glucose Control Solution
• Before using your analyzer for the first time
• When you open a new strip vial, pouch, or packaging
• Whenever your result does not agree with your symptoms
CAUTION
• Use only the specified control solution.
SD Lipid Control Solution
SD Glucose Control Solution
• Check the expiration date on the control solution container. Do not use the control solution
after the expiration or discard date.
• Do not swallow the control solution; it is not for human consumption.
•
Do not apply the control solution to the skin or eyes, as it may cause irritation.
What you need:
• SD LipidoCare Professional Analyzer
• SD LipidoCare Professional Lipid Profile Test Strips
• SD LipidoCare Professional Blood Glucose Test Strips
• The codechip
• SD Lipid Control Solution - Level 1 , Level 2
OR
SD Glucose Control Solution – Level M, Level H
- 40 -
2. Procedure for the lipid control solution
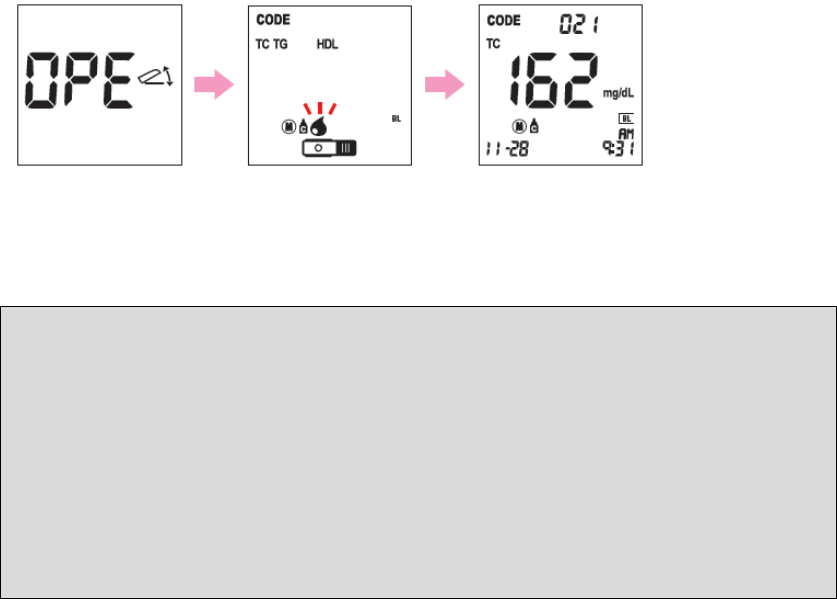
1) Prepare the lipid test strip and the code chip.
2) Make sure the code chip matches the code number of the test strip package.
3) Insert a test strip into the analyzer.
4) When the OPE message is displayed on the screen, open the door. Press the left button and
hold it for 3 seconds, then check to ensure that the control solution icon appears on the
screen. If you don't want to do a control solution test, press the left or right button one time
to exit.
5) Gently shake the lipid control solution and apply a drop to the test strip, using a capillary
tube.
6) After 3 minutes, the test result will appear on the screen.
7) Compare the result to the range printed on the control solution insert. If the results are not
within the lipid control range printed on the insert, the analyzer and the test strip may not
be working properly. Repeat the control test. If the control solution result is still not
acceptable, please contact our customer service center at 1-855-486-2888.
8) Remove the used test strip from the analyzer and discard it.
CAUTION:
• Store upright and refrigerate SD Lipid Control Solution at 36–46˚F. It can be expected to
give stable results through the expiration date printed on the label. Minimize exposure to
strong light.
• The SD Lipid Control Solution should be tested at room temperature, 64–90°F (10–90%
RH).
• Do not use the SD Lipid Control Solution if it is
cloudy
has an odor
shipped or stored improperly
• The acceptable range printed on the lipid control solution insert is for the SD Lipid
Control Solution only. It is not a recommended range for your lipid profile levels.
- 41 -
3. Procedure for the glucose control solution
1) Take a new glucose test strip from the test strip container. Be sure to tightly replace the
container cap after taking a glucose test strip.
2) Insert a glucose test strip (yellow window with a printed arrow symbol facing up) into the
glucose test strip slot. The analyzer turns on automatically.
3) Press the left button and hold it for 3 seconds, then check to ensure that the control
solution icon appears on the screen. If you don’t want to perform a control solution test,
press the left or right button one time to exit.
4) Shake the SD Glucose Control Solution bottle and gently squeeze the container to form
one small drop. Bring the drop to the edge of the glucose strip and allow the glucose strip
to automatically draw the SD Glucose Control Solution into the yellow window. When the
SD Glucose Control Solution is applied to the glucose test strip, the Analyzer counts down
from 5 to 1 (seconds) on the screen.
5) The SD Glucose Control Solution result appears on the screen in just 5 seconds.
6) Compare the glucose control solution result to the range printed on the glucose test strip
container. If the results are not within the glucose control range printed on the glucose
test strip container, then the Analyzer and glucose strips may not be working properly.
Repeat the SD Glucose Control Solution test. If the control solution result is still not
acceptable, please contact our customer service center at 1-855-486-2888.
7) Remove the used glucose test strip from the analyzer and discard it.
CAUTION
• The acceptable range printed on the glucose test strip container is for the SD Glucose
Control Solution only. It is not a recommended range for your blood glucose level.
• Store the SD Glucose Control Solution, after closing the cap tightly,
at temperatures
between 46–86°F (8–30°C). Do not refrigerate.
• The SD Glucose Control Solution should be tested at room temperature, 64–86°F (10–
90%
RH).
• If a glucose control solution test is still not acceptable, please contact
our customer
service center at 1-855-486-2888.
- 42 -

4. Troubleshooting the control solution
Check
Action
Have the test strips and/or control solutions
expired?
Make sure that the test strips and the control
s
olutions are not past the expiration date.
Once opened, th
ey are good only for a
limited time period:
- Glucose test strip : 6 months
- SD Glucose Control Solution : 3 months
- SD Lipid Control Solution : 1 month
Were SD glucose control solutions at room
temperature (18–30°C, 64–86°F) when used? If not, warm up/cool down to the room
temperature (64–86°F) and retest.
Did you insert a lipid or glucose test strip firmly
into the Analyzer?
Make sure a lipid or glucose test strip is
inserted into the lipid or glucose test strip slot
until it goes no further.
Did you follow the procedure correctly? Read the user manual again and retest.
Was a lipid or glucose test strip stored correctly? If not, retest with a new lipid or glucose test
strip.
Is the Analyzer damaged?
Does it show an error code? If yes, contact our customer service center at
1-855-486-2888.
Is the control solution result outside the
acceptable range?
Repeat the test. If you get the same result,
do not use your analyzer and test strip, and
call our customer service center at 1-855-
486-2888.
- 43 -
CHAPTER 6. CHECK STRIP TEST
1. Check Strip Test
The check strip test is used to check that the analyzer is working well.
2. When to use the Lipid and Glucose check strip
• Whenever you suspect the meter does not function properly
• Before using your analyzer for the first time
• If you have dropped the analyzer
• If the analyzer has not been used for a long time
CAUTION: The check strip test does not replace the control solution test.
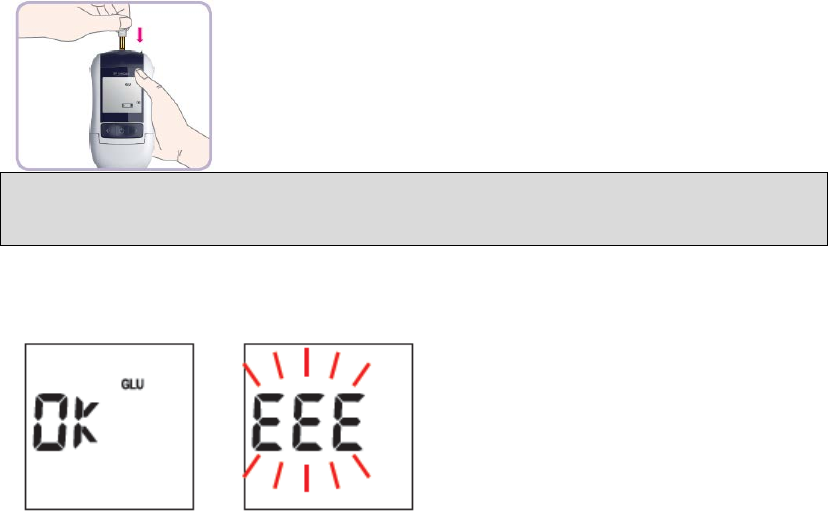
3. How to Use the SD Lipid Check Strip
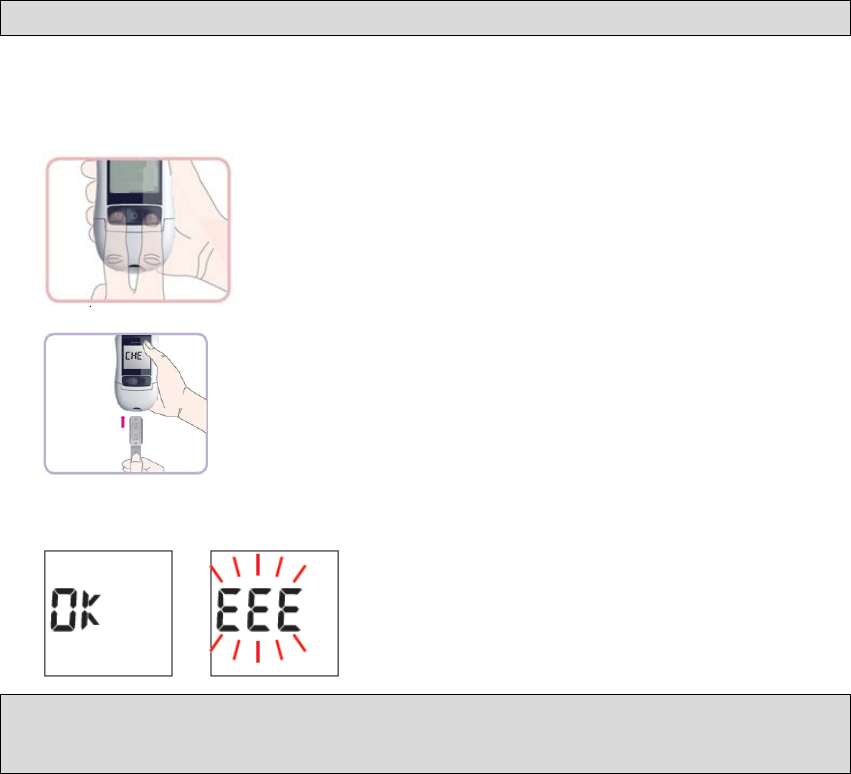
1) To enter the Checking mode of the lipid check strip, press both the left and right buttons
together at the strip standby mode, and hold for 3 seconds. Then, the CHE message will
appear on the screen.
2) Insert the SD Lipid Check Strip into the lipid strip slot of the analyzer.
3) The check strip result appears on the screen after 10 seconds. If there is no problem with
the analyzer, the OK message will appear on the screen. Otherwise, if there is a problem
with the analyzer, the EEE error message will appear on the screen.
NOTE: If you get the EEE error message, please try to perform a check strip test again. If it
keeps displaying the EEE error message, please contact our customer service center at 1-
855-486-2888.
- 44 -
4. How to use the SD Glucose check strip
1) Insert the SD Glucose Check Strip with the
check strip
print facing up into the glucose test
strip slot. Then the analyzer starts the glucose check strip testing automatically.
NOTE: There is no special mode to enter for this glucose check strip testing. If the SD
Glucose Check Strip is inserted into the analyzer, the analyzer starts the check strip test
automatically.
2) The check strip test result will appear on the screen after 5 seconds. If there is no problem
with the analyzer, the OK message with the GLU icon will appear on the screen. If there is a
problem with the analyzer, the EEE error message will appear on the screen.
- 45 -

CHAPTER 7. MAINTENANCE AND TROUBLESHOOTING
1. Cleaning and Disinfection
The SD Biosensor recommends that the following practices and procedures be followed when
using the SD LipidoCare Professional Analyzer to minimize the risk or transmission of
bloodborne pathogens. This analyzer is at high risk of becoming contaminated with bloodborne
pathogens, such as the Hepatitis B Virus (HBV). Transmission of this virus has been
documented, due to contaminated analyzers.
NOTE:
FDA Public Health Notification: Use of Fingerstick Devices on More than One Person Poses
Risk for Transmitting Bloodborne Pathogens: Initial Communication” (2010)
http://www.fda.gov/MedicalDevices/Safety/AlertsandNotices/ucm224025.htm
CDC Clinical Reminder: Use of Fingerstick Devices on More than One Person Poses Risk for
Transmitting Bloodborne Pathogens” (2010)
http://www.cdc.gov/injectionsafety/Fingerstick-DevicesBGM.html
Cleaning is the general removal of debris such as food, feces, urine, blood, saliva, or other
body secretions, but cleaning does not kill germs effectively.
Disinfection is the process of killing disease-causing microbes (bacteria and viruses) that may
be on the surface of your analyzer. Disinfection is the only way to reduce your exposure to
disease
Cleaning & Disinfecting Materials
The SD Biosensor tested a commercially available wipe, the Discide Ultra Disinfecting towelette,
manufactured by Palmero Health Care, on the SD LipidoCare Professional Analyzer, and the
wipe is shown to be safe and effective on our analyzer.
Product: Discide Ultra Disinfecting towelettes
EPA Reg#: 10492-4
EPA Est. #: 56952-WI-001
Registrant: Palmero Health Care
For purchasing Discide Ultra Disinfecting towelettes, please visit
http://www.palmerohealth.com or http://www.amazon.com
When you clean and disinfect the analyzer, please use the Discide Ultra Disinfecting towelettes
only. It could shorten the use-life or affect the performance of the SD LipidoCare Professional
Analyzer if you use other wipes.
- 46 -
When to clean and disinfect the analyzer
We recommend that you clean and disinfect the analyzer once a week. The cleaning and
disinfection instructions were validated for 10,950 cleaning and disinfection cycles (10,950
cleaning wipes and 10,950 disinfecting wipes) on the analyzer which supports cleaning and
disinfection after each patient, up to 10 patients per day, for the 3 year use life of the analyzer.
Please examine the LCD, test strip port, buttons, and surface of your analyzer after the cleaning
and disinfecting cycles. Stop using the analyzer and contact our customer service (1-855-486-
2888) immediately if you find the following:
• Thin silver streaks appear, become cracked, soft, dissolved, brittle, or swollen; clouding of
LCD display
• You are unable to turn on/off your meter or operate left/right button
• You are unable to enter the meter settings or function modes, or you are unable to recall
your testing results
Cleaning STEPS
STEP 1- Dispose of used test strip.
STEP 2 - Take a wipe from the package or
container. If the wipe is very wet, wring
it slightly to discard excess liquid.
STEP 3 - Wipe each side of your analyser, according to the following method:
<Appearance of analyser> <Inside and under the door>
1) Wipe the outside of the analyzer up and down 4 times.
2) Wipe the outside of the analyzer left and right 4 times.
3) Open the door, and then repeat steps 1 and 2 for the inside and under the
door.
- 47 -
STEP 4 - Allow the analyzer to air dry. Dispose of the wipe.
Disinfecting STEP
STEP 1
Take another wipe and then wipe the analyzer thoroughly.
The analyzer should be cleaned prior to the disinfection step.
• Wipe the outside of the analyzer up and down 4 times.
• Wipe the outside of the analyzer left and right 4 times.
• Open the door and then repeat steps 1 and 2 for the inside and under the
door.
STEP 2
Allow the surface to remain wet for 1 minute.
STEP 3
Allow to air dry.
STEP 4
After handling the analyzer or test strips for cleaning and disinfection, wash
your hands thoroughly with soap and water.
CAUTION
Do not get water inside the analyzer. Never immerse the analyzer or hold it under
running water, because it will damage the analyzer.
Do not spray directly into the strip slot! Moisture in the strip slot may lead to incorrect
results. If you suspect that moisture may have entered the strip slot, perform a lipid or
glucose control solution test.
Do not wrap the meter in a wipe; take extreme care not to get liquid in the test strip slot
or cable port of the analyzer.
After disinfection, users’ gloves should be removed and hands should be thoroughly
washed with soap and water before proceeding to the next patient.
If you have any questions, please contact our customer service center at 1-855-486-2888.
- 48 -
2. Maintenance, Testing, and Transportation
Analyzer
1) Keep the test strip slots free of dust.
2) If the analyzer is stored with batteries inserted, it is best to keep it in a low humidity
environment to prevent defects.
3) Keep the analyzer dry, and avoid exposing it to extremes in temperature and humidity.
4) Do not take apart the analyzer.
Test Strip
1) Lipid and glucose test strips should be stored at 36–90°F (10–90% RH). Lipid test strips
may be stored in the refrigerator at a temperature of 36–46°F (2–8°C). However, the lipid
test strips must be brought to room temperature for 30 minutes before using.
2) Keep away from heat and direct sunlight.
3) Either keep the lipid code chip in the analyzer or store it in the lipid test strip package.
4) Keep the glucose test strip container closed tightly.
5) Use test strips immediately after taking them from the container.
6) Keep the lipid check strip away from direct sunlight. It can be discolored if the lipid check
strip is exposed to sunlight.
Control solution
1) Do not use any SD Glucose or Lipid Control Solution that has passed the expiration date.
2) For the SD Glucose Control Solution, keep the environment at 8–30°C (46–86°F) and do
not refrigerate or freeze.
3) For the SD Lipid Control Solution, store it at the refrigerated temperature of 36–46°F (2–
8°C). If the SD lipid control solution is stored in this condition, the SD Lipid Control
Solution can be expected to give stable results through the expiration date printed on the
label.
4) The SD Glucose Control Solution can be used for 3 months after opening the container.
The SD Lipid Control Solution can be used for 1 month after the first opening. Write the
date on the bottle of the control solution when you first open it.
5) Wipe the top of the bottle to clean, and reseal the cover of the bottle tightly after each use.
6) Store each control solution at the following temperatures:
For Lipid control solution: 36–46°F (2–8°C)
SD Lipid Control solution should be stored in the refrigerator.
For Glucose control solution: 48–86°F (8–30°C)
- 49 -
CHAPTER 8. SCREEN MESSAGE AND TROUBLESHOOTING
1. Warning message
Indication Description
Hypo Warning Message
When your glucose result is equal to or less than the
Hypo setting value, the HYPO icon will appear.
Warning
Your test result is higher than the measuring range of the
parameter.
Warning
Your test result is lower than the measuring range of the
parameter.
Warning: Low Battery
At this time, the battery is getting low, but you can still
perform about 50 tests.
Warning: Replace Battery
The battery power is low. If you press the button after
the battery runs out, the battery icon will flash, and then,
after 10 seconds, the analyzer will turn off automatically.
- 50 -
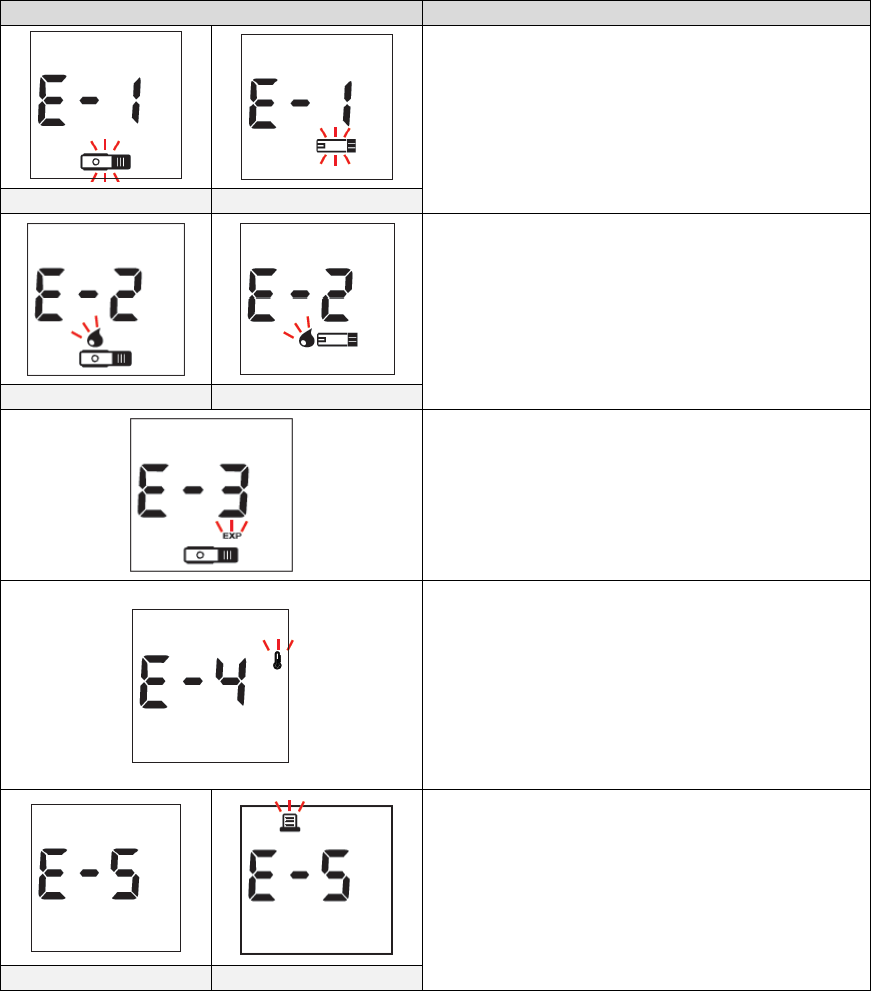
2. Error message
Indication
Description
Strip Error
The lipid or glucose test strip is
damaged or inserted improperly.
Solution Discard the test strip and perform the
test again, using a new test strip.
Lipid Test Strip
Glucose Test Strip
Blood Sample Error I
nsufficient amount of
blood has been applied.
Solution Discard the test strip and perform the
test again, using a new test strip with a
sufficient blood sample.
Lipid Test Strip
Glucose Test Strip
Expired strip (Only for a lipid test strip)
The lipid test strips are expired.
Solution Discard the inserted lipid
test strip
and perform the test again, using a new lipid
test strip.
Temperature Error If the environmental
temperature is above or below the acceptable
operation range, a thermo icon will appear on
the display.
Solution Move to an area at 64–90°F for lipid
or 50–113°F for glucose,
then wait for 30
minutes. After stabilization, perform a test. Do
not artificially heat or cool the analyzer.
Communication Error The communication
between the analyzer and a computer or a
printer has failed.
Solution Try to connect again, and if the error
message still appears, please contact our
customer service center at 1-855-486-2888.
For PC
For Printer
- 51 -
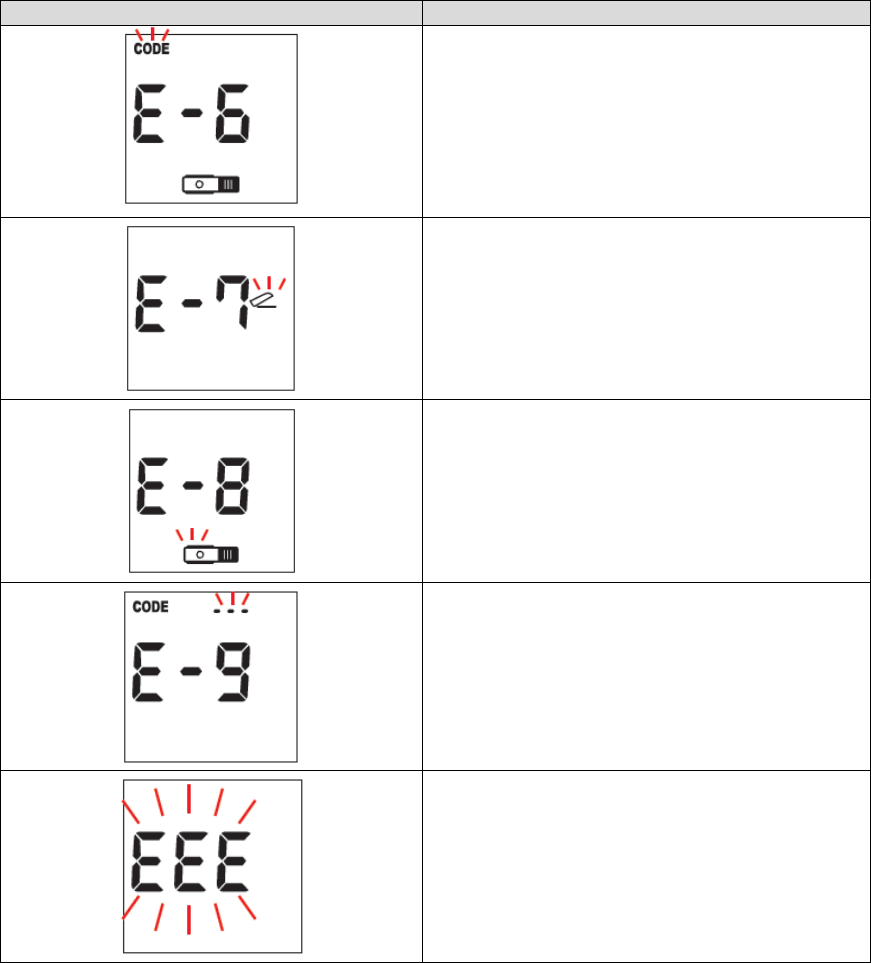
Indication
Description
Codechip Error
A code chip of other
manfuacutrers or
other products made by SD
Biosensor is inserted.
Solution Check to ensure that the code chip is
from the package of the test strip inserted.
Insert the correct one.
Flap Open Error The door of the analyzer is
open during the measurement.
Solution Close the door and do not touch or
open the door during the measurement.
Blood Error The door
is closed for testing
without a blood sample.
Solution Re-test with a blood sample.
Communication Error with Code Chip The
analyzer cannot communicate with the inserted
code chip.
Solution Re-insert the code chip. If the error
message still appears, please contact our
customer service center at 1-855-486-2888.
Internal Error An i
nternal error of the
analyzer has occurred.
Solution Turn off the analyzer, and then turn it
on again. If the error message still appears,
please contact our customer service center at
1-855-486-2888.
- 52 -
CHAPTER 9. WARNINGS, PRECAUTIONS, AND LIMITATIONS
• Discard test strip after using. Strips are to be used once. Never re-use a test strip.
• Do not ingest.
1. Test Strip for Lipid
1) Make sure the code chip number matches the number indicated on the lipid test strip
package. Never use a code chip from a different lot.
2) Out-of-date or expired strips cannot be used in your test system. Check the expiration
date on the package or pouch.
3) Add the blood sample to the lipid test strip at once. Do not add blood to the same strip.
Test again with a new test strip and fresh blood sample.
4) Not intended for screening or diagnosis, or for use on neonates.
5) Never make significant changes to your healthcare program or ignore physical symptoms
without consulting with your healthcare provider.
6) The following hematocrit range does not affect the test result of each parameter:
• TC, TG: 30–55%
• HDL: 30–52%
2. Test Strip for Glucose
1) The SD LipidoCare Professional System is not designed to be a substitute for pathology
laboratory equipment, and it should not be used for the diagnosis of diabetes.
2) Extremes in hematocrit may affect test results. Hematocrit levels less than 20% may cause
falsely high readings. Hematocrit levels greater than 60% may cause falsely low readings.
3) Not intended for screening or diagnosis, or for use on neonates.
4) Never make significant changes to your diabetes control program or ignore physical
symptoms without consulting with your healthcare provider.
5) Severe dehydration (excessive water loss) may cause false low results. If you believe you
are suffering from dehydration, consult your healthcare professional right away.
6) Inaccurate results may occur in severely hypotensive individuals or patients in shock.
Inaccurate results may occur for individuals experiencing a hyperglycemic hyperosmolar
state, with or without ketosis.
7) This device has not been evaluated in critically ill patients
- 53 -
CHAPTER 10. TECHNICAL INFORMATION
1. Analyzer Specifications
Battery Operation
4 AAA 1.5 V, Alkaline batteries
Battery Life
Around 1,000 tests
Display
LCD
Controls
4 Buttons (SET/PRT, ON/OFF, arrow: >/<)
Memory
500 results
Automatic shut-off
• 1 minute after last user action without a test strip inserted into
the analyzer
• 5 minutes after last user action with a test strip inserted into
the analyzer
2. Test Strips
Measuring Range
• TC: 100–450 mg/dL ( 2.59–11.64 mmol/L )
• TG: 45–650 mg/dL ( 0.51–7.34 mmol/L )
• HDL: 25–95 mg/dL ( 0.65–2.46 mmol/L )
•
Glucose: 20–600 mg/dL (1.2–33.3 mmol/L)
Sample
Lipid
Fresh capillary whole blood from the fingertip,
Venous whole blood, or Serum or plasma
Glucose
Fresh capillary whole blood from the fingertip,
palm, forearm, or upper arm
Sample Size
Lipid
35uL
Glucose
0.9uL
Test Time
Lipid
3 minutes
Glucose
5 seconds
Storage Temperature 36–90°F (10–90% RH) for both lipid and glucose test strip
Hematocrit
• TC, TG: 30–55%
• HDL: 30–52%
• Glucose: 20–60%
Operating Condition
Lipid
64–90°F(10–90% RH)
Glucose
50–113°F(10–90% RH)
Altitude
Up to 3,776m (12,388 ft) only for glucose
- 54 -
Appendix 1: References
1. American Diabetes Association, Clinical Practice Recommendation Guidelines 2003, Diabetes
care, Vol. 26. Supplement 1. p.22
2. Stedman, TL. Stedman’s Medical Dictionary, 27th Edition, 1999, p. 2082.
3. Ellen T. Chen, James H. Nichols, Show-Hong Duh, Glen Hortin, MD: Diabetes Technology &
Therapeutics, Performance Evaluation of Blood Glucose Monitoring Devices, Oct 2003, Vol. 5,
No. 5: 749 -768
4. Siedel J, Hagele EO, Ziegenhorm J, Wahlefeld AW. Reagent for the enzymatic determination of
serum total cholesterol with improved lipolytic efficiency. Clin Chem 1983; 29: 1075-80.
5. Expert Panel on Detection, Evaluation, and Treatment of High Cholesterol in Adults. Executive
summary of the Third Report of the National Cholesterol Education Program (NCEP) Expert
Panel on Detection, Evaluation, and Treatment of High Cholesterol in Adults (Adult Treatment
Panel III). JAMA 2001; 285: 2486-97.
6. IDF Clinical Guidelines Task Force. Global guideline for Type 2 diabetes. Brussels; International
Diabetes Federation, 2005.
7. Definition and diagnosis of diabetes mellitus and intermediate hyperglycemia: report of a
WHO/IDF consultation. WHO, Geneva 2006 (ISBN 92 4 159493 4, ISBN 978 98 4 159793 6).
8. D’Orazio et al.: “Approved IFCC Recommendation of Reporting Results for Blood Glucose
(Abbreviated);” Clinical Chemistry 51:9 1573-1576-(2005).
9. American Diabetes Association, Position Statement, Diagnosis and Classification of Diabetes
Mellitus, Diabetes Care 35:S4-S10, 2012.
10. American Diabetes Association: Clinical Practice Recommendations (2013) Diabetes Care, Vol
36, Supplement 1, p. S1-S100
- 55 -

Appendix 2: Warning
This equipment generates, uses, and can radiate radio frequency energy and, if not
installed and used in accordance with the instructions, may cause harmful interference to
radio communications. However, there is no guarantee that interference will not occur in
a particular installation. If this equipment does cause harmful interference to radio or
television reception, which can be determined by turning the equipment off and on, the
user is encouraged to try to correct the interference by one or more of the following
measures:
•Reorient or relocate the receiving antenna.
•Increase the separation between the equipment and receiver.
•Connect the equipment into an outlet on a circuit different from that to which the
receiver is connected.
•Consult the dealer or an experienced radio/TV technician for help
CAUTION
Any changes or modifications to this device not explicitly approved by manufacturer could void
your authority to operate this equipment.
This device complies with part 15 of the FCC Rules. Operation is subject to the following
two conditions:
(1) This device may not cause harmful interference, and (2) this device must accept any
interference received, including interference that may cause undesired operation.
This device complies with RF exposure requirement.
-56 -

Catalogue no. : 02LA10G/02LA20G
FCCID: RPJ02LA10G/RPJ02LA20G
Manufacturer
SD BIOSENSOR, INC
C-4th&5th, 16, Deogyeong-daero, 1556 beon-gil,
Yeongtong-gu, Suwon-si, Gyeonggi-do, 443-813,
Republic of Korea
Importer(Authorized Representative)
SD BIOSENSOR USA, INC.
2 Corporate Park Ste 202, Irvine, CA 92606
Issue date: 2015.05