SD Biosensor 03MA20 SD MultiCare Analyzer User Manual
SD Biosensor, Inc. SD MultiCare Analyzer
User Manual
Thank you for your purchase of the SD MultiCare™ analyzer!
This User Manual contains all the information needed to use the analyzer and keep it ready
to operate. Please read this User Manual carefully before using the analyzer. Familiarize
yourself with the required preparations and the measurement procedure before performing
the first measurement. Also read the package inserts of the test strips to be used for the
planned test.
If you cannot reach SD Customer Care Service, please contact your healthcare professional
or local distributor. You can also visit www.sdbiosensor.com for product demonstrations.
Thank you again for choosing the SD MultiCare™ analyzer.

The packaging materials, labels and instruction for use for SD MultiCare™ analyzer may
contain the following symbols or abbreviations which are listed below with their meaning:
Symbols
Please consult instructions for use.
Caution, consult accompanying documents
Consult instructions for use
In vitro diagnostic medical device
This system is intended to use outside the body (in vitro diagnostic use).
Manufacturer
Catalogue number
Date of manufacture:
To indicate the date of manufacture for this analyzer
Serial number for this analyzer.
To indicates that the product is fragile and you need to handle it with
care

Batch code:
To indicate the lot number for this system
Crossed out wheeled bin: To discard it separately from other household
waste
To indicate the temperature limitations in which the transport package
has to be kept and handled
Use by / Expiry date
To use for 3 months after first opening the container.
Do not reuse:
To warn the user of a piece of equipment that it is for single use only
and that it must not therefore be used more than once
Contains Sufficient for <n> Tests
This product fulfills the requirements of Directive 98/79/EC on in vitro
diagnostic medical devices
To indicates that you should keep the product dry
Abbreviations
HbA1c
Hemoglobin A1c
CRP
C-reactive Protein
u-ALB
Micro-Albumin
CRT
Creatinine
ACR
Albumin to Creatinine Ratio
Vit-D
Vitamin D
SDB
SD biosensor, Inc.
Contents
CHAPTER 1. Understanding Your New Analyzer .......................................................................................................... 7
1. Indication for Use; Purpose of the analyzer .................................................................................................. 7
2. Test principle............................................................................................................................................................... 7
3. Before You Start Testing ........................................................................................................................................ 8
4. The SD MultiCare™ analyzer ............................................................................................................................. 9
5. Power supply .......................................................................................................................................................... 12
6. SD MultiCare™ Test Strip .................................................................................................................................. 13
7. SD MultiCare™ Accessories ............................................................................................................................ 14
CHAPTER 2. Testing the SD MultiCareTM Analyzer ................................................................................................. 166
1. Operating the analyzer .................................................................................................................................... 166
2. Preparing a measurement .............................................................................................................................. 331
5. Performing a HbA1c Test.................................................................................................................................. 35
CHAPTER 3. Using the Analyzer Memory ..................................................................................................................... 40
1. Memory Map .......................................................................................................................................................... 40
2. Displaying stored measured values ............................................................................................................. 40
4. Delete Memory .................................................................................................................................................... 420
CHAPTER 4. Printing .............................................................................................................................................................. 43
CHAPTER 5. Data transfer ................................................................................................................................................... 44
CHAPTER 6. Control Solution Test ................................................................................................................................... 45
1. Control Solution Test .......................................................................................................................................... 45
2. Control Solution Test for HbA1c strip ........................................................................................................ 45
4. Troubleshooting control solution ..................................................................................................................... 46
CHAPTER 7. Performing a SD MultiCare Check Strip Test .................................................................................. 47
1. How to Use the SD MultiCare Check Strip .............................................................................................. 47
CHAPTER 8. Maintenance and Troubleshooting ........................................................................................................ 49
1. Cleaning your Analyzer ...................................................................................................................................... 49
2. Maintenance, Testing and Transportation .................................................................................................. 49
CHAPTER 8. Screen Messages and Troubleshooting ............................................................................................. 51
1. Warning messages ............................................................................................................................................... 51
2. Error messages ...................................................................................................................................................... 51
CHAPTER 9. Warnings, Precautions and Limitations ............................................................................................. 541
1. Test Strip for HbA1c ............................................................................................................................................ 54
CHAPTER 10. Product Technical Information .............................................................................................................. 55
1. Analyzer Specifications....................................................................................................................................... 55
2. Test strip for HbA1c ............................................................................................................................................. 55
3. Electromagnetic Compatibility ........................................................................................................................ 55
Annex 1: Information for Healthcare Professionals.................................................................................................. 56
Annex 2: References ................................................................................................................................................................ 56
Annex 3: Supplies and Accessories .................................................................................................................................. 57
CHAPTER 1. Understanding Your New Analyzer
1. Indication for Use; Purpose of the analyzer
The SD MultiCare™ analyzer work to measure the quantitative measurement of blood
parameter: HbA1c, CRP, u-ALB, CRT. The analyzer is indicated for monitoring the blood
parameter in fresh capillary whole blood samples or venous blood. The SD MultiCare™
analyzer should be used with the SD MultiCare™ test strip. Testing is done outside the
body (in vitro diagnostic use). This analyzer is indicated in clinical settings by healthcare
professionals. The SD MultiCare™ analyzer be only used the SD MultiCare™ test strip
for the appropriate parameter.
2. Test principle
By means of a code chip, the analyzer reads the lot-specific characteristics of the test
strips currently in use. Then an unused test strip is inserted into the analyzer. While
inserted, the application area of the test strip is illuminated by an LED (light-emitting diode)
from below while scanning. Before the actual measurement is performed, the reflection
behaviour of the test strip is determined by means of the light which is reflected (from the
application area).
The blood sample is then applied to the application area. The constituent to be
determined in the applied sample undergoes an enzymatic reaction with formation of a
dye. The amount of dye formed increases with the concentration of the substance to be
determined.
After a certain period of time, the colour intensity is measured by illuminating the
application area again from below using motor and LED. The intensity of the reflected
light is measured with a detector (reflectance photometry). The measured value is
determined from the signal strength of the reflected light, with the previously measured
blank value and the read lot-specific information (code chip) also being considered.
Finally, the result is displayed and simultaneously stored in the memory.

3. Before You Start Testing
•
Samples
The SD MultiCare™ analyzer for each parameter testing is designed for monitoring fresh
capillary whole blood samples, venous blood, or serum/plasma. Each sample is different
from test strip's type
Safety Information
There is a potential risk of infection. We recommend that healthcare professionals using
the SD MultiCare™ analyzer to perform measurements for more than one patient use
gloves and follow all other locally applicable health and safety regulations.
Operating conditions
To ensure proper function of your SD MultiCare™ analyzer, observe the following
guidelines:
Ÿ The SD MultiCare™ analyzer is only for interior use.
Ÿ The SD MultiCare™ analyzer is only for use within altitude 2,000M and humidity 85%
Ÿ Operate the analyzer only within the acceptable temperature range. This range is test-
dependent:
– For HbA1c 18-32 °C, Please refer to the test strip's package
Ÿ In order to perform a measurement, place the analyzer on a level surface or hold it in
your hand.
Ÿ Strong electromagnetic fields may impair the function of the analyzer. Do not use the
analyzer close to sources of strong electromagnetic radiation.
Ÿ The analyzer's air vents must be free for air (Do not cover the air vents)
Ÿ If the analyzer cause a sudden malfunction, unplug the AC adapter from the outlet.
Carefully read and follow the instructions in the User’s Manual and Package Inserts for
the test strips and control solutions. It is very important to follow the instructions in
order to prevent an incorrect result or improper treatment.

4. The SD MultiCare™ analyzer
Cat. No.
03MA10
-HbA1c
Analyzer
SD MultiCare™ analyzer
Check Strip
SD MultiCare Check Strip
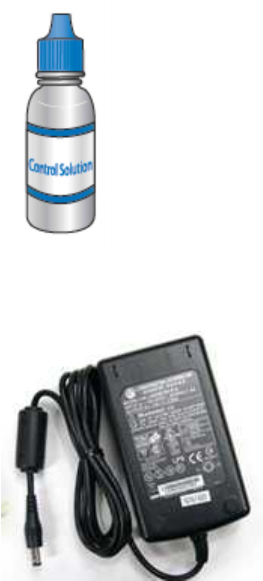
Control Solution
SD MultiCare Control Solution
Battery
Four batteries (1.5 V, AA)
DC Power supply
Input: AC100~240V, 50/60Hz
(Voltage tolerance ±10%)
Output: DC5V/1A
Power consumption
Max 2W
Over Voltage Category
Ⅱ
Pollution Degree
Ⅱ
Lancing Device
Lancing Device
Pipette
5㎕ Mini Pipette
Printer (Optional)
SD Printer
SD Printer Cable
SD PC Communication Cable
Labeling
User’s Manual
Quick Guide
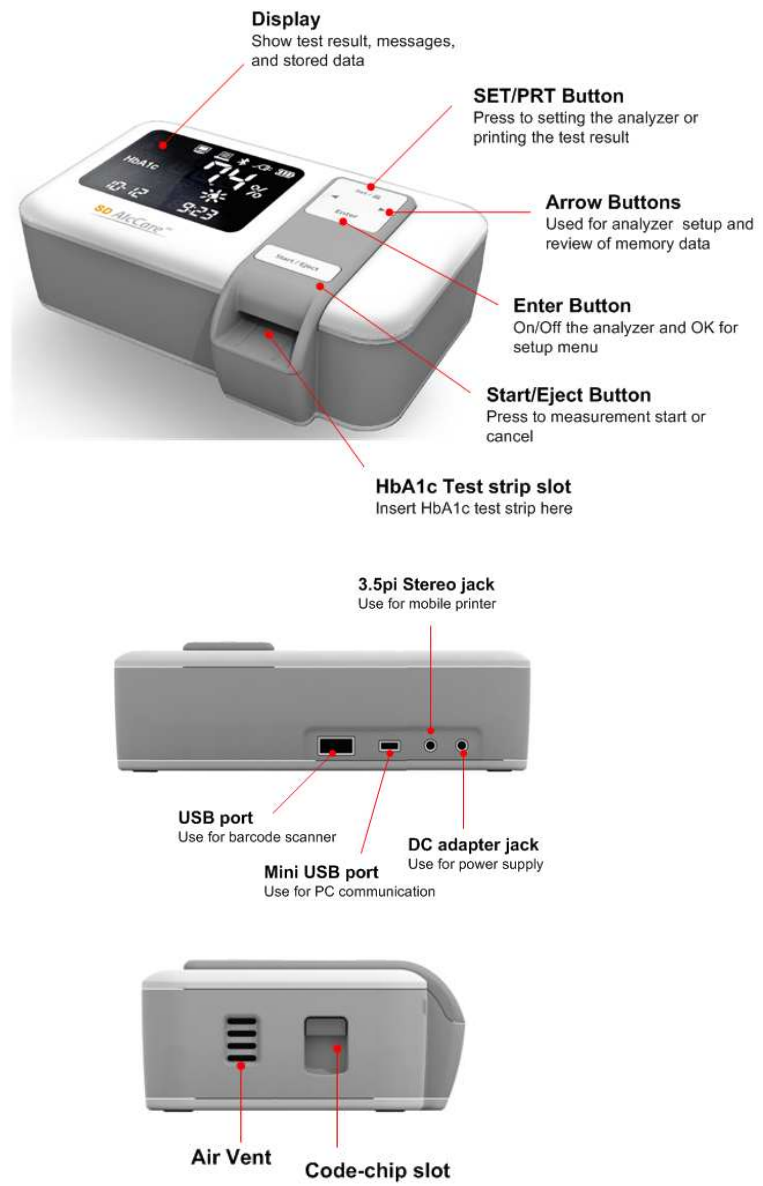
Overview of SD MultiCare™ Analyzer
.
Display of SD MultiCare™ Analyzer
Every time you insert new batteries, you can only check the display. Otherwise, the
analyzer displays standby state after power on. The symbols in the display have the
following meaning:
Set mode
Bluetooth connection
Code
PC connection
Printing
AC adapter connected
AC Adapter connected
Memory Index
• HbA1c value
(% or mg/dL or mmol/mol)
• Code digit
• Testing time count
• OK
• m-d or d-m
• Memory Index number
Processing
Out of Temperature range
Sound
Test with control solution
Pull Strip out
Insert Strip
Blood
HbA1c Calibration select
Press Start button
• Date
• ID number

5. Power supply
5V/2A DC power adapter or 4 AA alkaline batteries can be used.
When using batteries, to save power, the analyzer turns itself off after 2 minutes unless a
button is pressed or a new test strip is inserted. When the analyzer turns itself off, all test
results obtained so far remain in the memory. With a set of fresh batteries, you will
normally be able to perform at least 200 measurements. When the battery warning is
displayed for the first time, approximately 50 measurements can still be performed.
In this case, replace the batteries as soon as possible.
Please respect the environment and dispose of used batteries according to your local
regulations and laws.
Do not throw batteries onto an open fire. There is a risk of explosion!
• Time
• eAG value
(mg/dL or mmol/L)
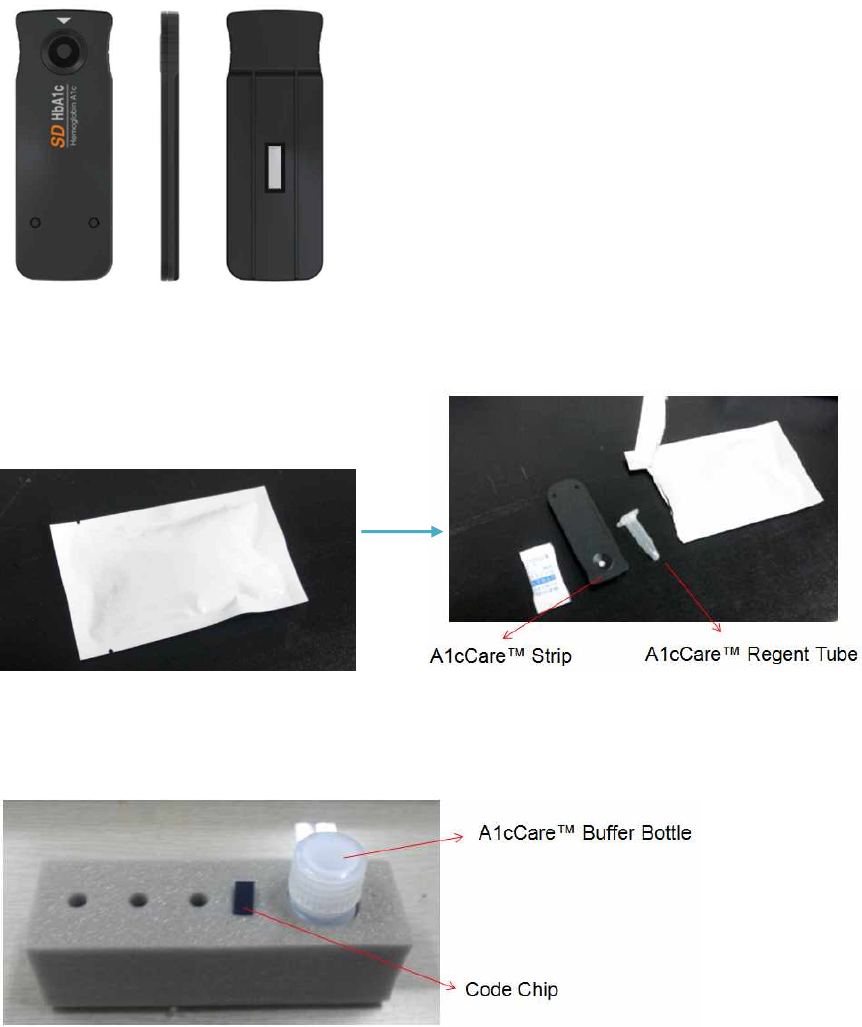
6. SD MultiCare™ Test Strip
SD MultiCare™ Test strip
SD MultiCare™ Test strip with pouch
SD MultiCare™ Test Rack
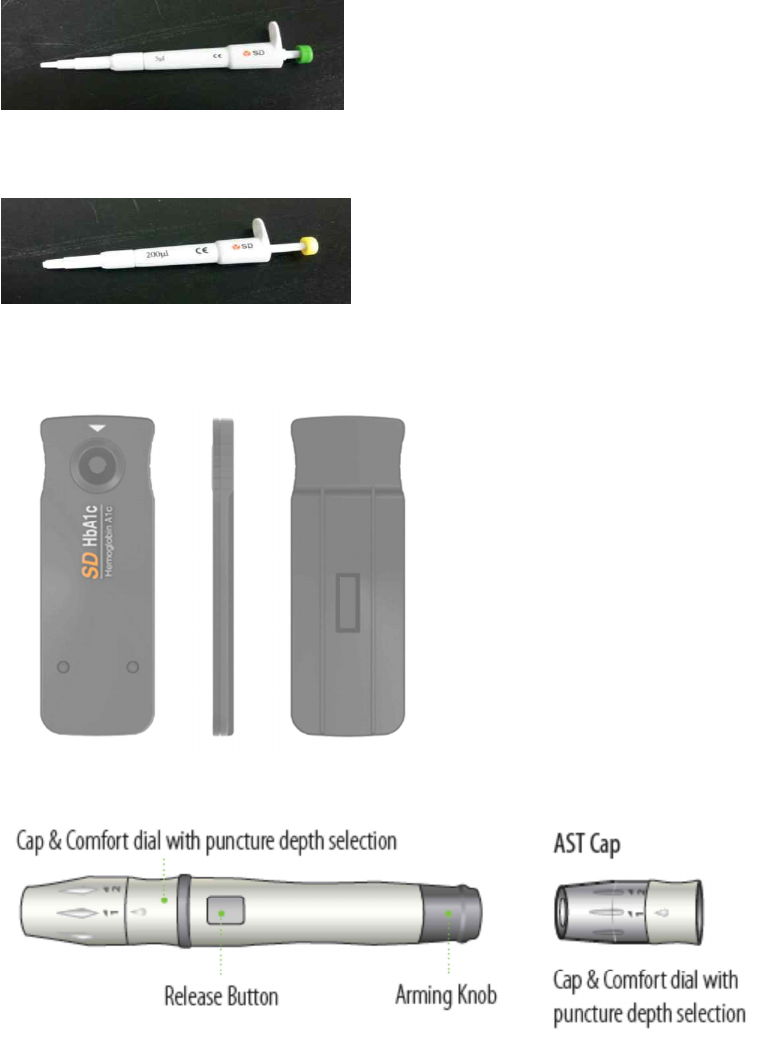
7. SD MultiCare™ Accessories
5㎕ Mini Pipette
200㎕ Mini Pipette
Check Strip
Lancing device (with a white cap for fingertip testing and a clear cap for Alternative Site Testing)
SD Control solution
SD MultiCare Analyzer DC adapter
Optional Accessories
* SD Biosensor Pinter
* SD Biosensor Printer cable
* SD Biosensor Barcode Scanner
* SD Biosensor PC communication cable
CHAPTER 2. Testing the SD MultiCareTM Analyzer
1. Operating the analyzer
Before using the analyzer for the first time, perform the following steps:
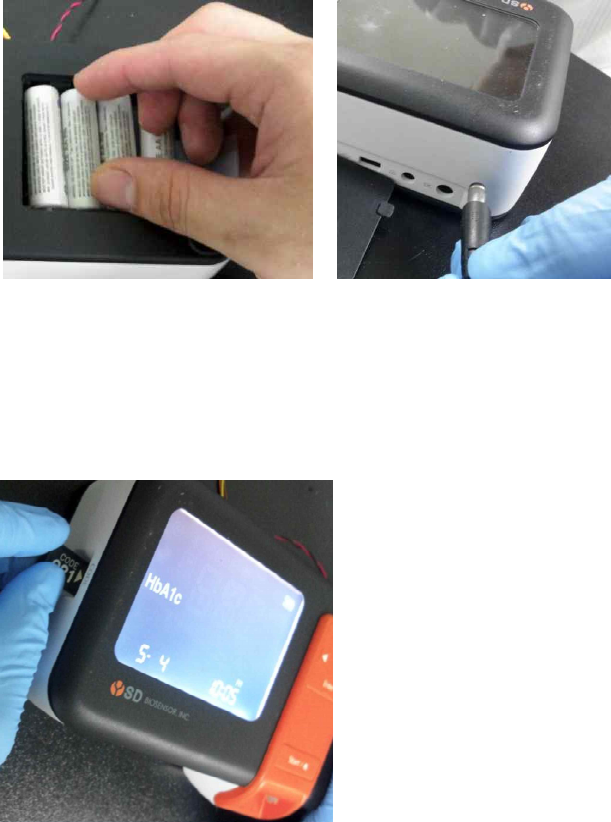
STEP 1. Insert batteries or Connect DC adapter jack
STEP 2. Set the analyzer.
STEP 3. Insert a code chip.
*You can also be done directly before performing the measurement.

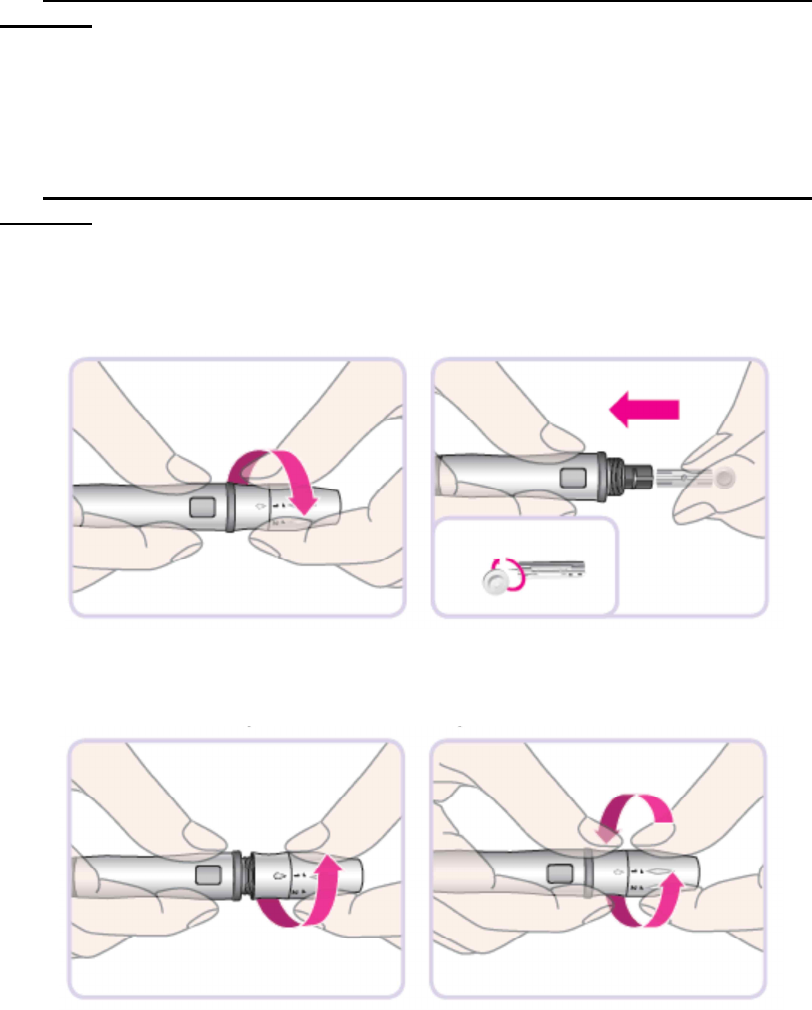
STEP 1-1. Insert batteries
1. Ensure the analyzer is switched off and turn it over.
2. Open the battery compartment lid by slightly pressing the tab towards the centre of
the analyzer.
3. Lift the lid upwards to remove it from the analyzer.
4. Insert four batteries into the compartment according to the illustrations. Please note
the orientation of the “+” (battery head) and “–” terminals (fl at end). Use only alkaline
manganese batteries (1.5 V, AA).
5. Close the battery compartment lid.
6. Turn the analyzer on to test the function of the new batteries.
7. Check that the display is functioning correctly to prevent misinterpretations due to
defective display elements.
STEP 1-2. Connect DC adapter jack
1. Ensure the DC adapter jack is provided by SD Biosensor, inc.
(DC adapter jack is 4 mm external-diameter and 1.7 mm internal-diameter, and output
is 5V/2A.)
2. Connect DC adapter jack to the dc jack port in the back of analyzer
Always replace all four batteries at the same time because batteries with different
capacities may impair the function of the analyzer. Do not use rechargeable batteries.
Note.
n If you think the display screen does not appear for long enough, you can hold
down the Enter button (the next time you switch on the analyzer). The display
screen is then shown for the time the button is pressed.
n After inserting or replacing batteries, confirm that the time and date are set
correctly. If they are not, reset the analyzer before testing.
Note.
n If the batteries are already inserted and if DC adapter jack is connect, the
analyzer use a power only from dc jack

STEP 2. Set the analyzer
Brief overview of the analyzer settings
The following table provides an overview of the available settings.
* “Default setting” describes the analyzer setting at the time of shipping.
* Stage 13,14,15 is only for 03MA20
Stage
Setting
03MA10
(HbA1c)
Default Setting*
1
Beep
On, off
On
2
Year
YYYY
2012
3
Date Format
m-d, d-m
m-d
4
Month-Day
mm-dd
01- 28
5
Time Format
12h, 24h
12h
6
Time
hh:mm
02:30pm
7
Auto Printing
On, off
Off
8
Printing Page
P-1, P-2
P-1
9
HbA1c Calibration
NGSP, IFCC, mono-S,
JDS
NGSP
10
eAG unit
mg/dL, mmol/L
mg/dL
11
CRT unit
mg/dL, mmol/L
mg/dL
12
ACR unit
mg/g, mg/mmol
mg/g
13
Bluetooth with PC
On, Off
Off
14
Bluetooth with
printer
On, Off
Off
15
Bluetooth Printer re-
pair
On, Off
Off

Stage 0) Entering set mode
*03MA10
1. Press the SET/PRT button (on the top side of the analyzer) during 3 seconds to
enter set mode after turn on and standby state. If you want to leave the set mode
instead (this is only possible if a date and time setting is made) in any set mode, press the
SET/PRT button.
2. If the displayed setting is, you can continue directly to the next setting by pressing
the Enter button.
3. Press the ◀ or ▶ button to change the currently flashing setting. You can press
the ◀ or ▶ button as many times as needed (or keep it pressed) until the
desired setting (value) is reached.
4. Press the Enter button again to confirm (store) the current setting and go to the
next setting. You can only move forward through the settings. Moving backwards
is not possible. Corrections can only be made by repeating the settings. The
setting procedure can be terminated at any time by pressing the Enter button. The
settings made up to that point will be stored.
If you want to exit the setting mode without changing, press the set button
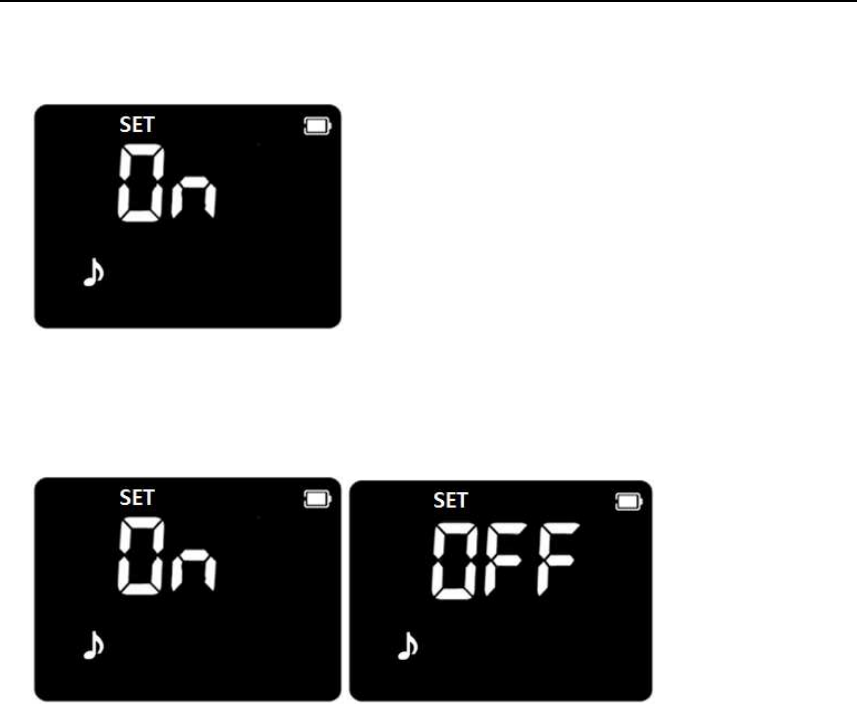
Stage 1) Setting - Beep * 03MA10
In 1st stage, you set the Beep function.
1. If you enter the set mode, the display for setting the beep will appear the first step of
the setting mode.
■Default Setting: On
2. Set the beep mode on or off by pressing either ◀ or ▶ button and then selecting
the preferred feature by pressing the Enter button. If you select the beep on feature,
a ‘beep’ sound is made at the same time; otherwise, if you select the beep off feature,
no sound is made
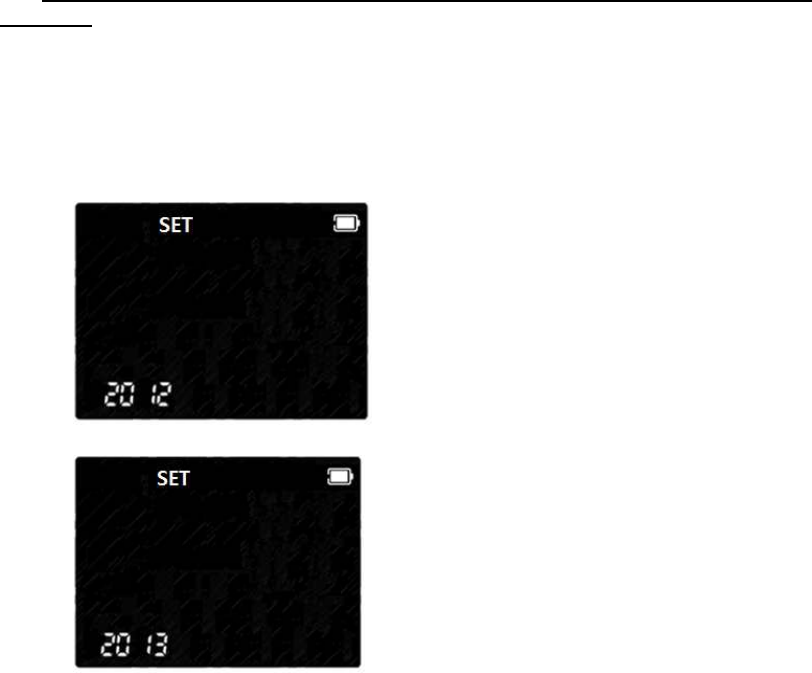
Stage 2) Setting – Year
*03MA10
In 2nd stage, you set the Year in Date & Time setting.
1. After setting Beep, the display for setting Date & Time will appear. Set the correct
year by pressing ◀ or ▶ button and then select the correct year by pressing the
Enter button.
■Default Setting: 2012
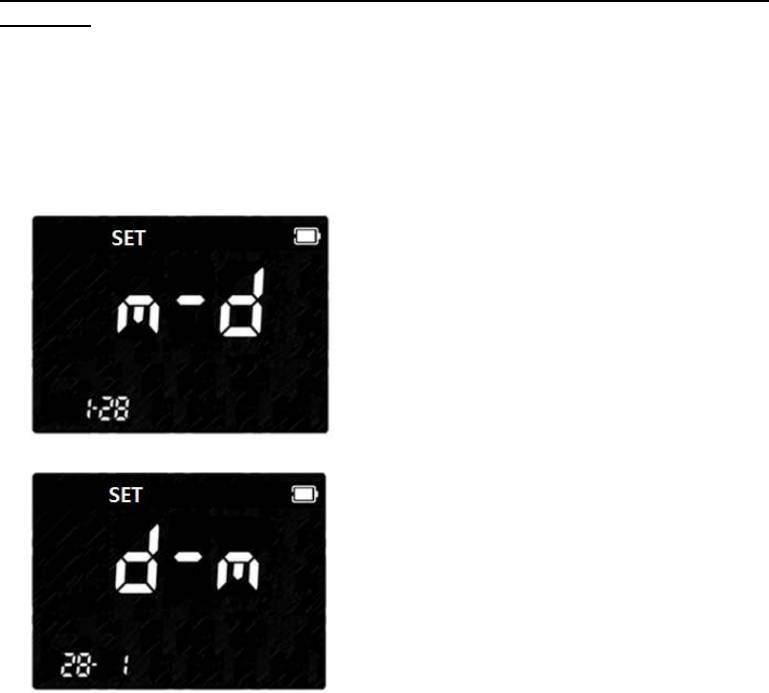
Stage 3) Setting – Date Format
*03MA10
In 3rd stage, you set the Date Format in Date & Time setting.
1. Next will appear the setting display for Date Format. The analyzer can display the
month and day in either a Month-Day (m-d) format or a Day-Month (d-m) format. Set
the preferred format on the display by pressing either ◀ or ▶ button and select by
pressing the Enter button.
■Default Setting: m-d
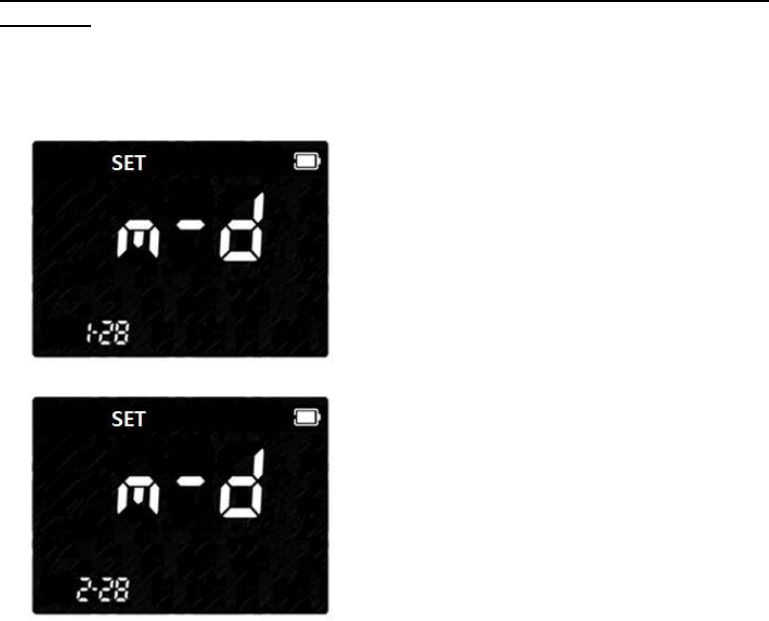
Stage 4) Setting – Month-Day
*03MA10
In 4th stage, you set the Month-Day in Date & Time setting.
1. After setting Date Format, set the correct month or day on the display by pressing
either ◀ or ▶ button and select by pressing the Enter button.
■Default Setting: 01-31
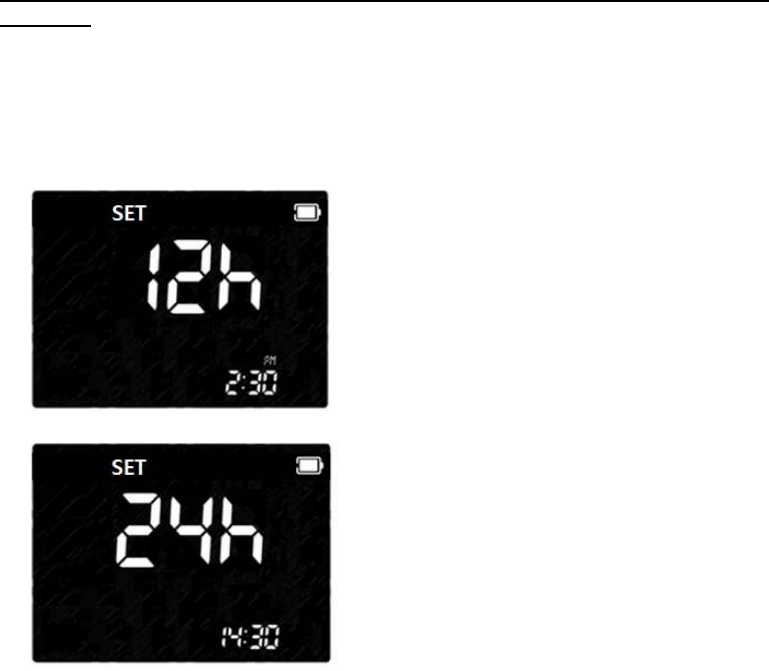
Stage 5) Setting – Time Format
*03MA10
In 5th stage, you set the Time Format in Date & Time setting.
1. Next will appear the display for setting the Time Format, 12 or 24 Hour clock format.
The analyzer can display the time in either the 12h format or the 24h format. Set the
preferred format on the display by pressing either ◀ or ▶ button and select by
pressing the Enter button.
■Default Setting: 12h
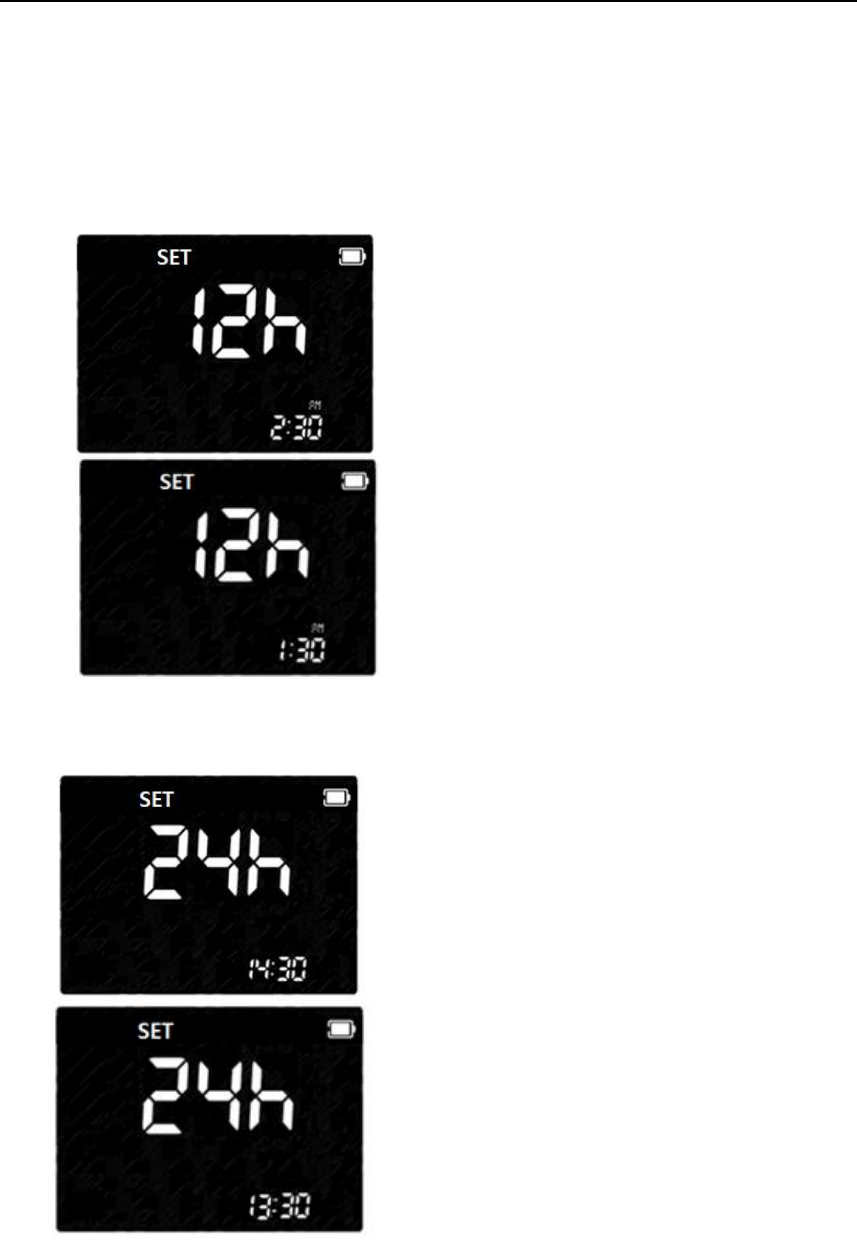
Stage 6) Setting – Time * 03MA10
In 6th stage, you set the Time, the current hour and minutes, in Date & Time setting.
1. Next will appear the display for setting the current Time, hour and minute. Set the
hour and minute on the display by pressing either ◀ or ▶ button and select by
pressing the Enter button.
a. 12h Format
sub-step1) set AM or PM, sub-step 2)⇒ set hour(1 to 12), sub-step 3) minute(1 to 59)
b. 24h Format
sub-step1) set hour(1 to 24), sub-step 2) minute(1 to 59)
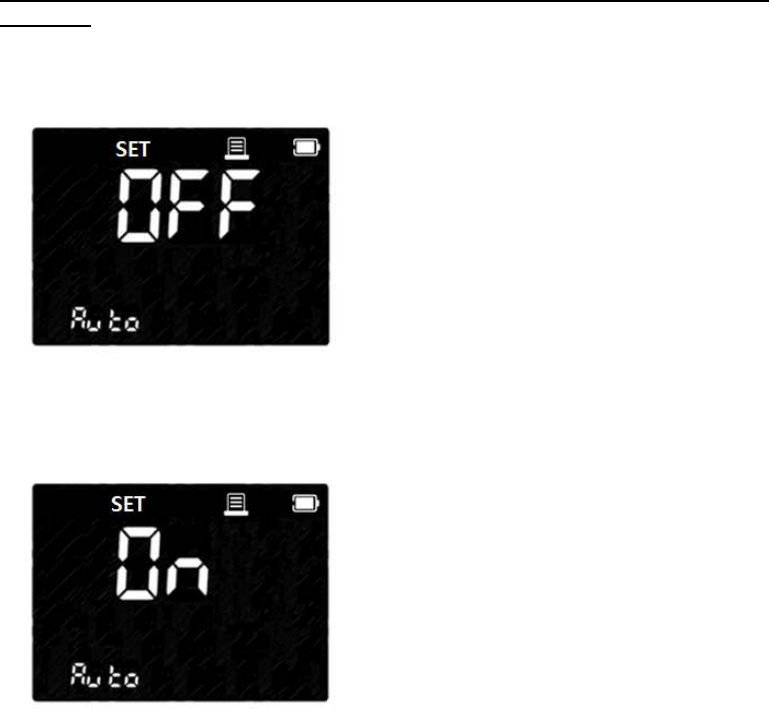
Stage 7) Setting – Auto Printing
*03MA10
In 7th stage, you set the Auto Printing function.
1. After Result unit setting, the display for setting Auto Printing function will appear.
■Default Setting: Off
2. Set Auto Printing function, ‘On’ or ‘Off’, by pressing either ◀ or ▶ button and
then select the preferred feature by pressing the Enter button.
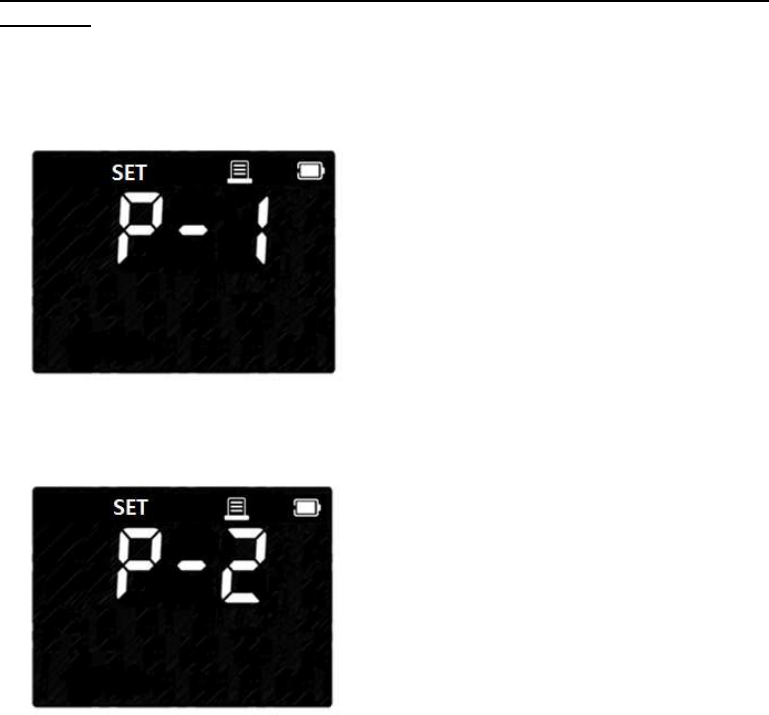
Stage 8) Setting – Printing Page
*03MA10
In 8th stage, you set the Printing Page mode.
1. After Auto Printing function setting, the display for setting Printing Page mode will
appear.
■Default Setting: P-1
2. Set Printing Page mode, ‘P-1’ or ‘P-2’, by pressing either >> or << button and then
select the preferred feature by pressing the Enter button.
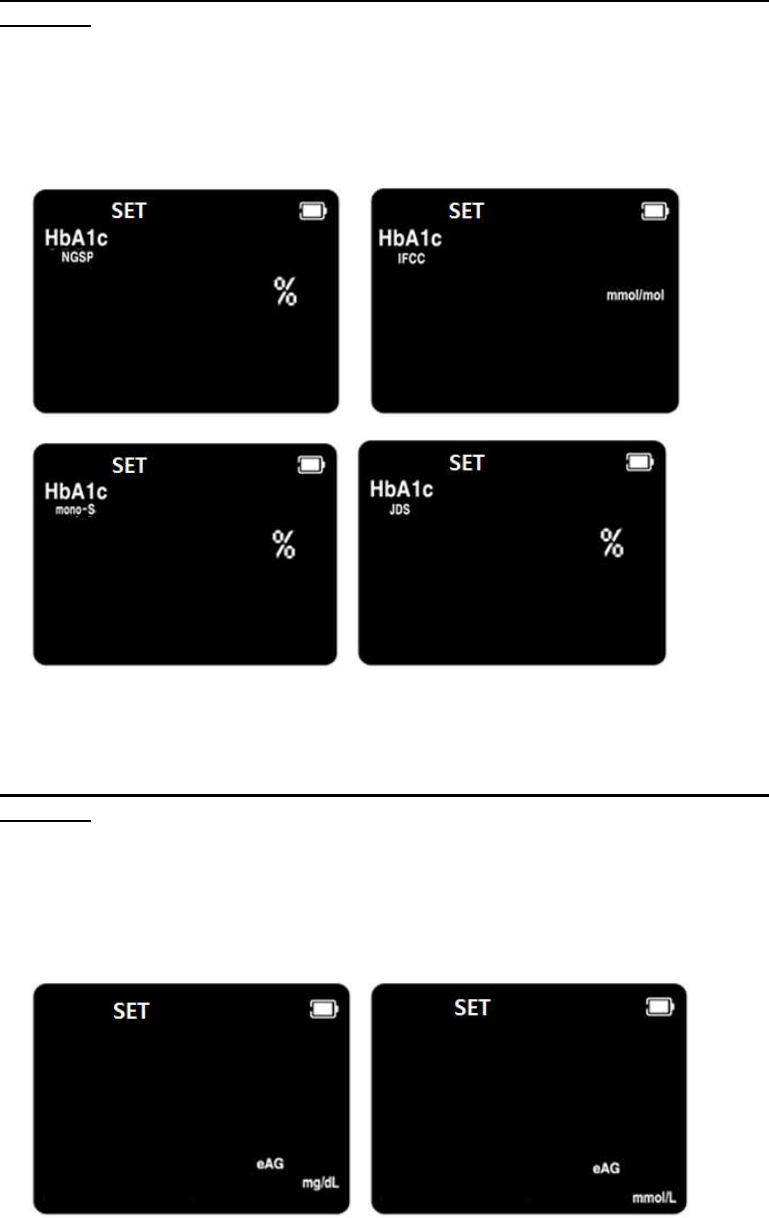
Stage 9) Setting – Calibration Type
*03MA10
In 9th stage, you set the Result calibration unit for HbA1c test.
1. Next will appear the display for setting the result unit - % or mg/dL or mmol/mol.
Set the each unit by pressing either ◀ or ▶ button and select by pressing the
Enter button
■Default Setting: NGSP(%)
Stage 10) Setting – eAG unit
*03MA10
In 10th stage, you set the Result unit for HbA1c test.
1. Next will appear the display for setting the result unit - % or mg/dL or mmol/L. Set
the each unit by pressing either ◀ or ▶ button and select by pressing the Enter
button
■Default Setting: mg/dL
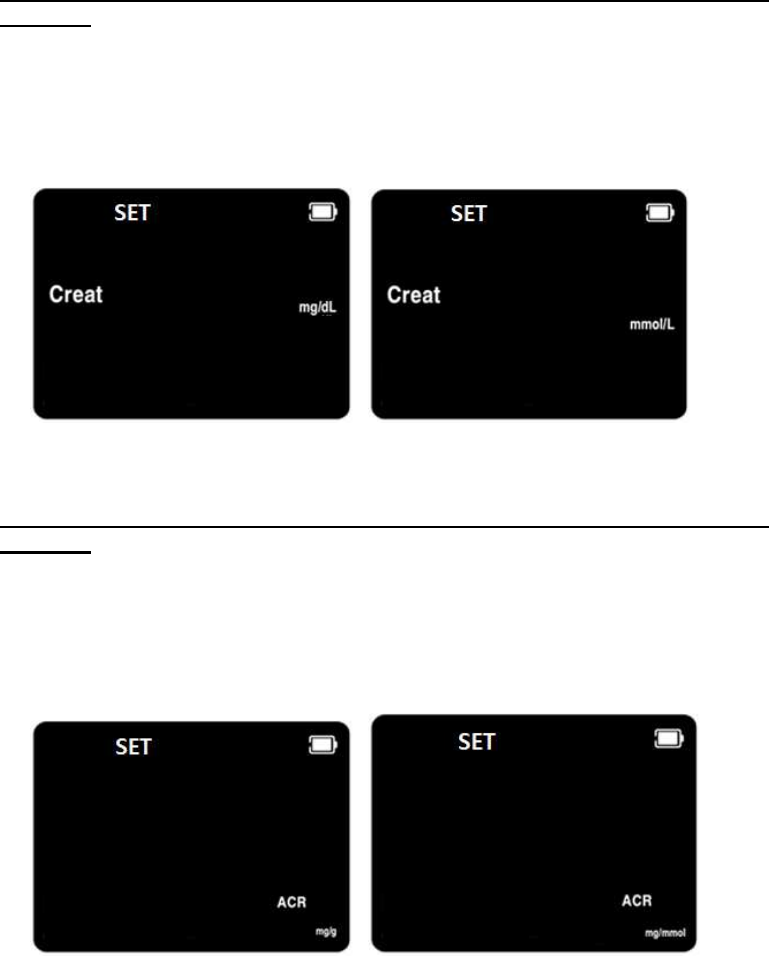
Stage 11) Setting – Creatinine unit
*03MA10
In 11th stage, you set the Result unit for Creatinine test.
1. Next will appear the display for setting the result unit - mg/dL or mmol/L. Set the
each unit by pressing either ◀ or ▶ button and select by pressing the Enter
button
■Default Setting: mg/dL
Stage 12) Setting – ACR unit
*03MA10
In 12th stage, you set the Result unit for u-ALB and Creatinine test.
1. Next will appear the display for setting the result unit - mg/g or mg/mmol. Set the
each unit by pressing either ◀ or ▶ button and select by pressing the Enter
button
■Default Setting: mg/g
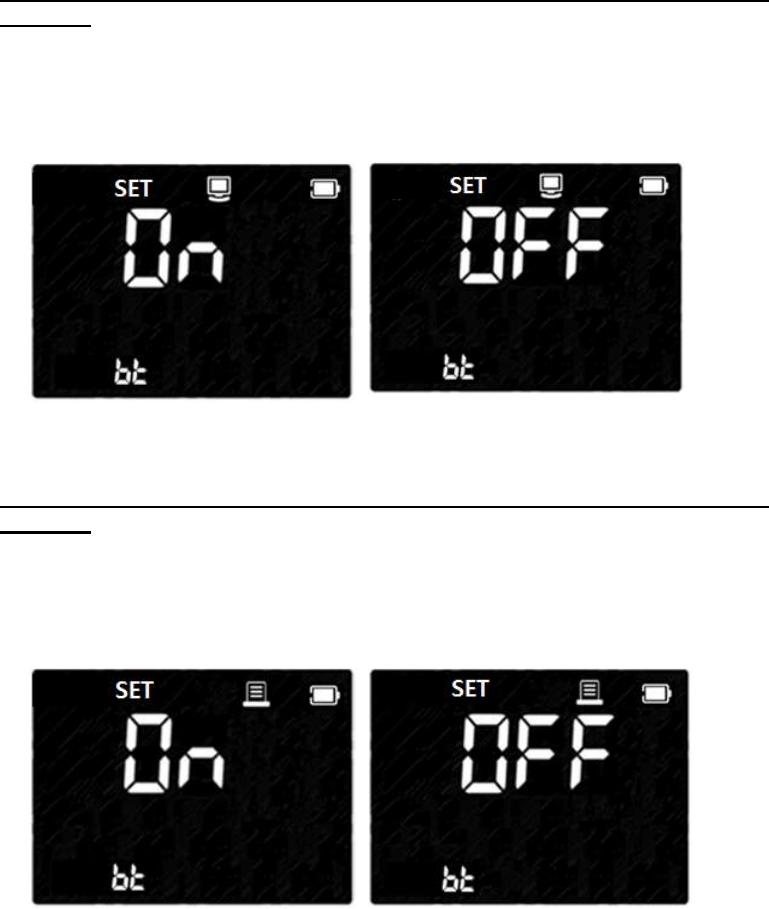
Stage 13) Setting – Bluetooth communication with PC
*03MA20
In 13th stage, you set the only for 03MA20
1. Next will appear the display for setting - On or Off. Change the set by pressing
either ◀ or ▶ button and select by pressing the Enter button
■Default Setting: Off
Stage 14) Setting – Bluetooth communication with Printer
*03MA20
In 13th stage, you set the only for 03MA20
1. Next will appear the display for setting - On or Off. Change the set by pressing
either ◀ or ▶ button and select by pressing the Enter button
■Default Setting: Off

Stage 15) Setting – Bluetooth re-pair enabling with Printer
*03MA20
In 13th stage, you set the only for 03MA20
When the set is On, the analyzer always search for the new mobile printer.
1. Next will appear the display for setting - On or Off. Change the set by pressing
either ◀ or ▶ button and select by pressing the Enter button
■Default Setting: Off
European Union Directive Conformance Statement
Hereby, SD Biosensor declares that SD MultiCare Analyzer is in compliance with
the essential requirements and other relevant provisions of Directive 1999/5/EC.
You can view your product’s Declaration of Conformity(DoC) to
Directives 1995/5/EC(R&TTE) Directive at www.sdbiosensor.com.
WARNING: Changes or modifications made to this equipment not expressly
approved by SD Biosensor, Inc. for compliance could void the user’s authority to
operate the equipment.
This equipment has been tested and found to comply with the limits for a Class B
digital device, pursuant to Part 15 of the FCC Rules. These limits are designed to
provide reasonable protection against harmful interference in a residential
installation. This equipment generates uses and can radiate radio frequency
energy and, if not installed and used in accordance with the instructions, may
cause harmful interference to radio communications. However, there is no
guarantee that interference will not occur in a particular installation. If this
equipment does cause harmful interference to radio or television reception,
which can be determined by turning the equipment off and on, the user is
encouraged to try to correct the interference by one or more of the following
measures:
• Reorient or relocate the receiving antenna.
• Increase the separation between the equipment and receiver.
• Connect the equipment into an outlet on a circuit different.
• from that to which the receiver is connected.
• Consult the dealer or an experienced radio/TV technician for help.

This equipment generates, uses and can radiate radio frequency energy and, if
not installed and used in accordance with the instructions, may cause harmful
interference to radio communications. However, there is no guarantee that
interference will not occur in a particular installation. If this equipment does
cause harmful interference to radio or television reception, which can be
determined by turning the equipment off and on, the user is encouraged to try to
correct the interference by one or more of the following measures:
• Reorient or relocate the receiving antenna.
• Increase the separation between the equipment and receiver.
• Connect the equipment into an outlet on a circuit different from that to which
the receiver is connected.
• Consult the dealer or an experienced radio/TV technician for help
Caution: Any changes or modifications to this device not explicitly approved by
manufacturer could void your authority to operate this equipment.
This device complies with part 15 of the FCC Rules. Operation is subject to the
following two conditions:
(1) This device may not cause harmful interference, and (2) this device must
accept any interference received, including interference that may cause
undesired operation.
This equipment should be installed and operated with minimum 20 cm between
the radiator and your body.
STEP 3. Insert a code chip
HbA1c Test Strip *03MA10
Coding
The code chip provides the analyzer with important information on the production-
specific c properties of the respective test strip to measure your results accurately. The
code chip is required at least when a new test strip kit is opened. Before you use your
analyzer with a new of test strips for the first time, you should set the analyzer to
“match” the strips.
If the code chip is not matched with the test strip, E-9 error is displayed.
Code Setting
1. Make sure the analyzer is turned off. Remove old code chip if one is installed.
2. Insert a new code chip until it snaps into place.
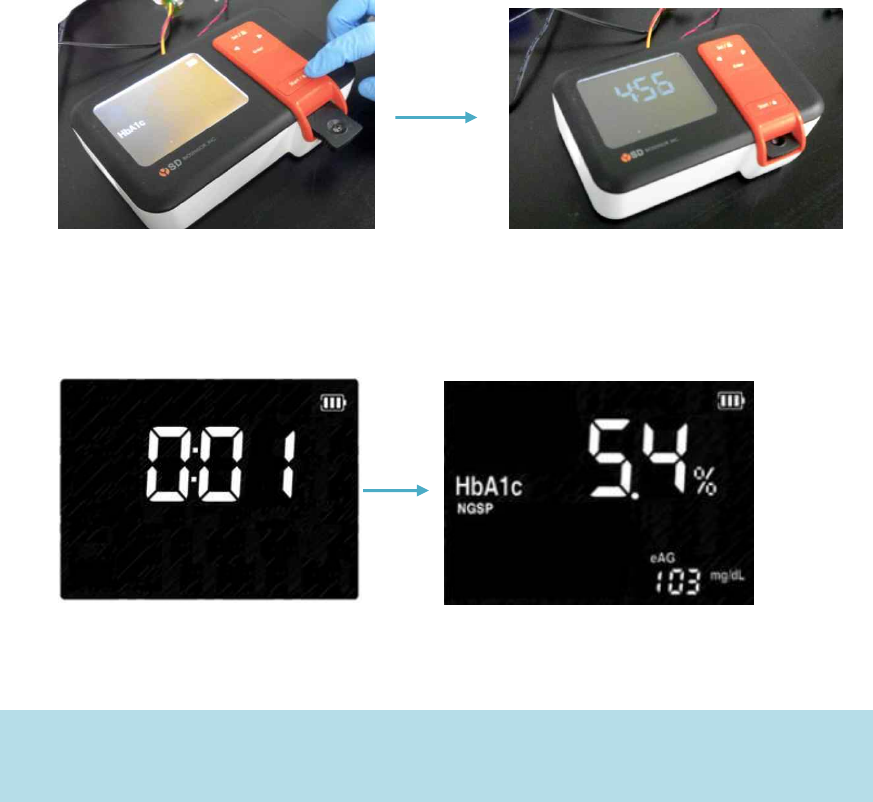
3. Turn the analyzer ON. A 3-digit code number of inserted code chip and the
appropriate parameter name appear with flashing test strip symbol. This number
and parameter name must match the information provided in test strip kit. If it does
not, repeat steps the above 1~2.

2. Preparing a measurement
SD MultiCare™ testing system
n SD MultiCare™ analyzer
n Test strips for the desired measurements with the related code chip:
– SD MultiCare™ HbA1c
n Lancets and Lancing device
n 5uL & 200uL mini pipette(only for HbA1c)
n Alcohol swab, if required
Precaution
Always …
Ÿ Read the test strip package insert.
Ÿ Operate the analyzer at the acceptable test-specific temperatures 18~32°C
Ÿ Place the analyzer on a level surface.
Ÿ Keep the guideline for clean
Ÿ Make sure that all display elements are displayed
Never …
Ÿ Use test strips beyond the expiration imprinted on kit because they may cause
inaccurate results.
Ÿ Touch or remove the test strip during actual measurement (although this is possible
before starting the measurement when blood is applied outside the analyzer).
Ÿ Subject the analyzer to sudden movements during a measurement.
Ÿ Reuse the test strip applied either blood or control solution.
Ÿ Store the analyzer and strips at extreme temperatures
Ÿ Store the analyzer and test strips under humid or damp conditions without suitable
protection
n Do not forget to have the code chip, which is supplied with each new test strip
external packaging before performing the first measurement.
n Each code chip belongs to one particular test strip external packaging. If
possible, store the test strip together with the code strip in the external
packaging.
Only use SD MultiCareTM test strips. Using other test strips with this analyzer can
cause inaccurate results.
CAUTION
Not following these precautions can lead to inaccurate results.
Getting a Drop of Blood
Sample material
*03MA10
Fresh capillary blood or venous blood drawn in heparin tube is used as sample material.
You need a free hanging blood drop for measurement.
For more information on sample material and use of heparinised blood, please refer to
the related test strip package insert.
Capillary Whole Blood
*03MA10
1. Wash your hands in warm, soapy water. Rinse well and dry completely. Warming
fingers can increase blood flow.
2. Turn the lancet insert cap counterclockwise to remove it, insert the lancet into the
lancing device holder and push down firmly until it is fully seated. Twist the lancet
protective disk until it separates from the lancet.
3. Replace the cap and turn it clockwise, until it is snug. Adjust the puncture depth
setting by turning the comfort dial. The dial has 1 to 5 steps, and the higher the step
number, the stronger the blood sampling pressure on the puncture site.
The comport tip offers 5 different levels of skin penetration.
• 1-2: for soft or thin skin
• 3: for average skin
• 4-5: for thick or callused skin
3. After cocking the lancing device back, hold the lancing device firmly against the side
of finger and then press the release button.
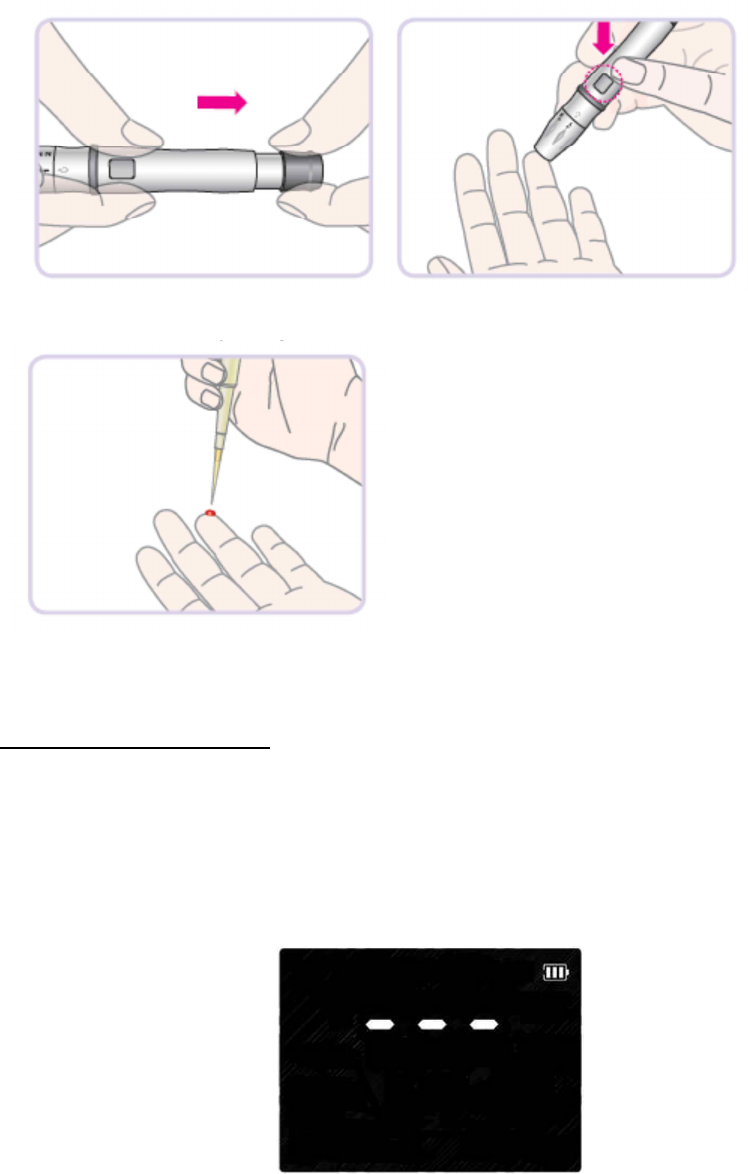
4. Get blood sample by using the micropipette.
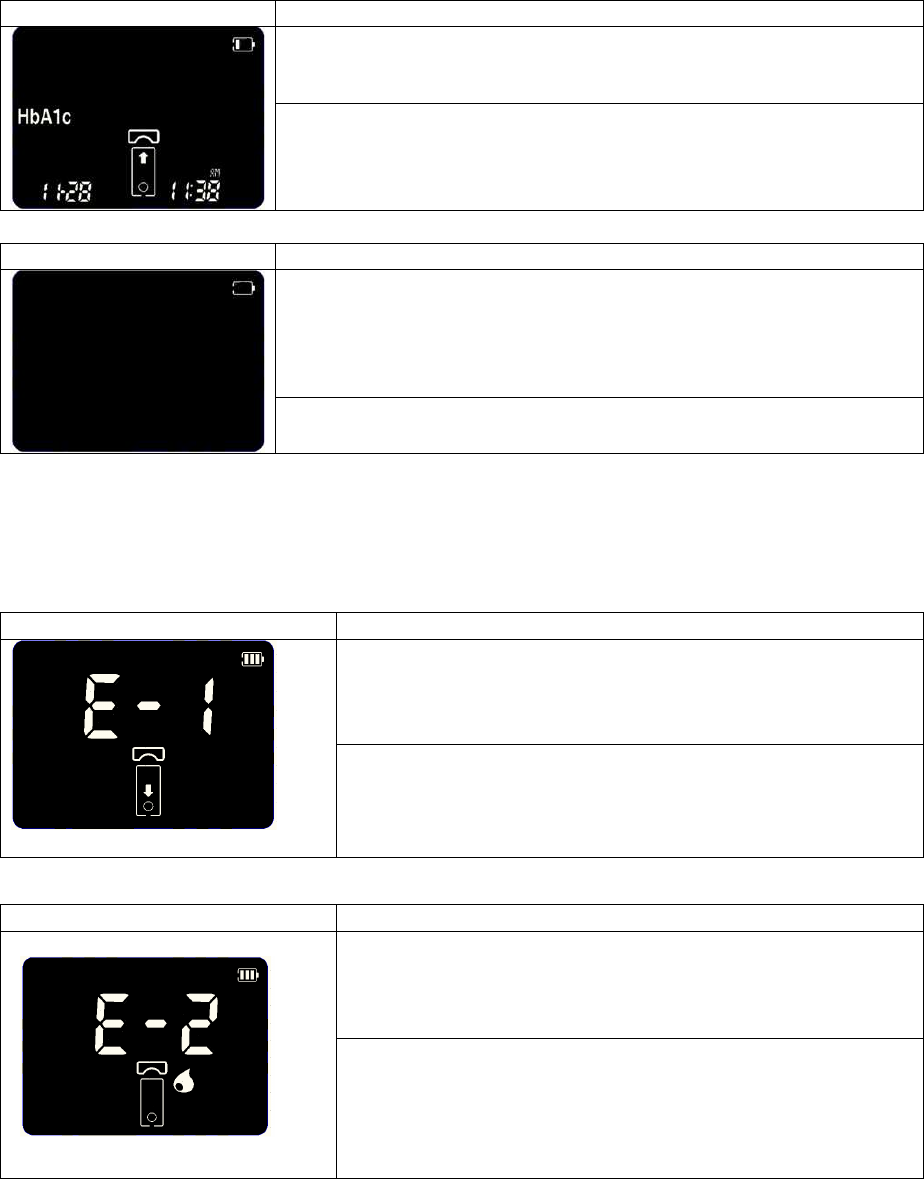
5. Performing a HbA1c Test
Testing for HbA1c
Switching on the analyzer
1. Place the analyzer on a level surface. Switch on the analyzer by pressing the Enter
button or insert a HbA1c test strip.
2. In case of the analyzer has had a code chip for the specific HbA1c after power on, it
will enter the appropriate testing mode for the inserted code chip. Otherwise, for
03MA10 it will display the following warning message, but for 03MA10G it will
automatically enter the glucose testing mode.
.

Performing a measurement
1. Prepare a test strip for the required measurement. Check the expiry date of the test
strip. Always use test strips before their expiry date has passed.
2. Hold the test strip with thumb and index finger so that blood apply part is facing
upwards.
3. Insert the test strip into the HbA1c Test Strip Slot of the analyzer. When the test
strip reaches the correct position, Strip is automatically inserted deeper to the
analyzer. If the strip is normal for test, the blood and START button icon displays
This is blood waiting state.
Check the following displays before performing the measurement:
1 Are date and time correct?
2 Does the battery symbol or DC plug symbol appear?
3 With HbA1c test strips, check the reaction area for discolouration before starting
measurement. If you detect discolouration, this test strip is unusable. For detailed
information, see the insert of the respective test strip.
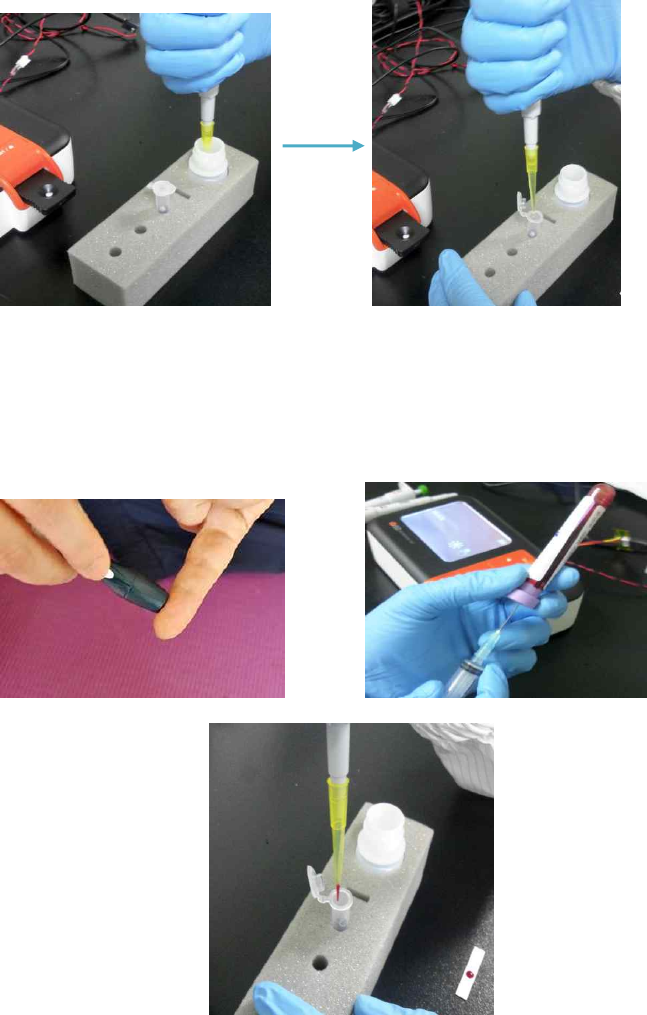
4. With using 200uL mini-pipette, apply the buffer solution from the buffer bottle to the
reagent tube
5. Prepare capillary blood with using lancet or venous blood. And with using 5uL mini-
pipette, apply the blood to the reagent tube.
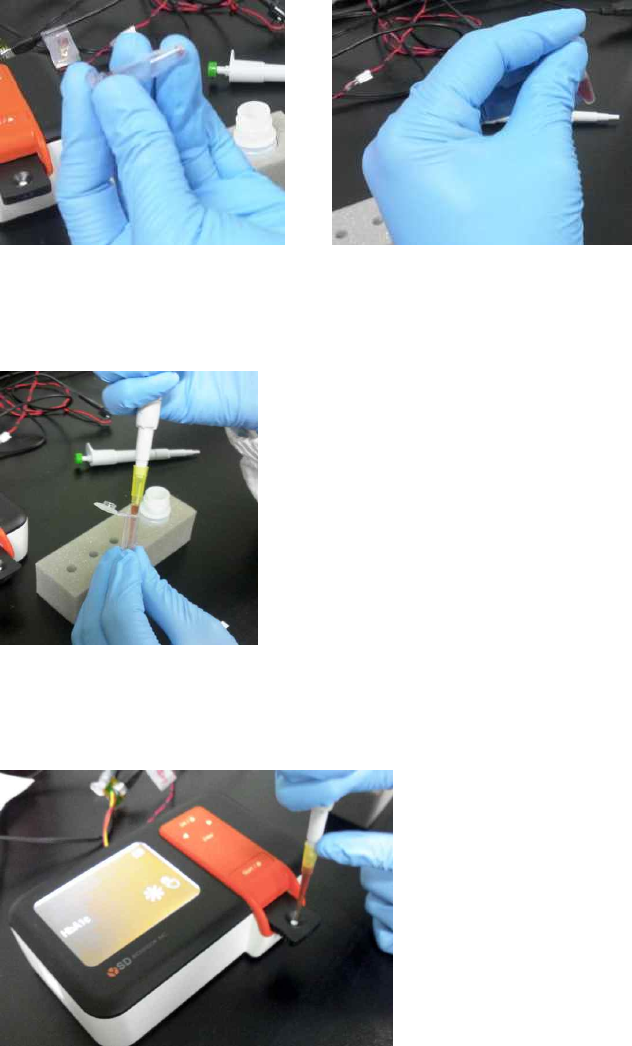
6. Put a lid on the reagent tube, and shake well 6~8 times to mix the blood and reagent
with the buffer
7. With using 200uL mini-pipette, collect 200uL solution from the reagent tube
8. Apply 200uL solution to the strip
9. Push the START button
10. Your result appears on the display in 3~5 minutes.
When the test is done, pull out the used test strip. The analyzer shuts off
automatically after you remove the test strip.
CAUTION
Discard the used test strips in proper container, according to your standard laboratory
procedures.
CHAPTER 3. Using the Analyzer Memory
1. Memory Map
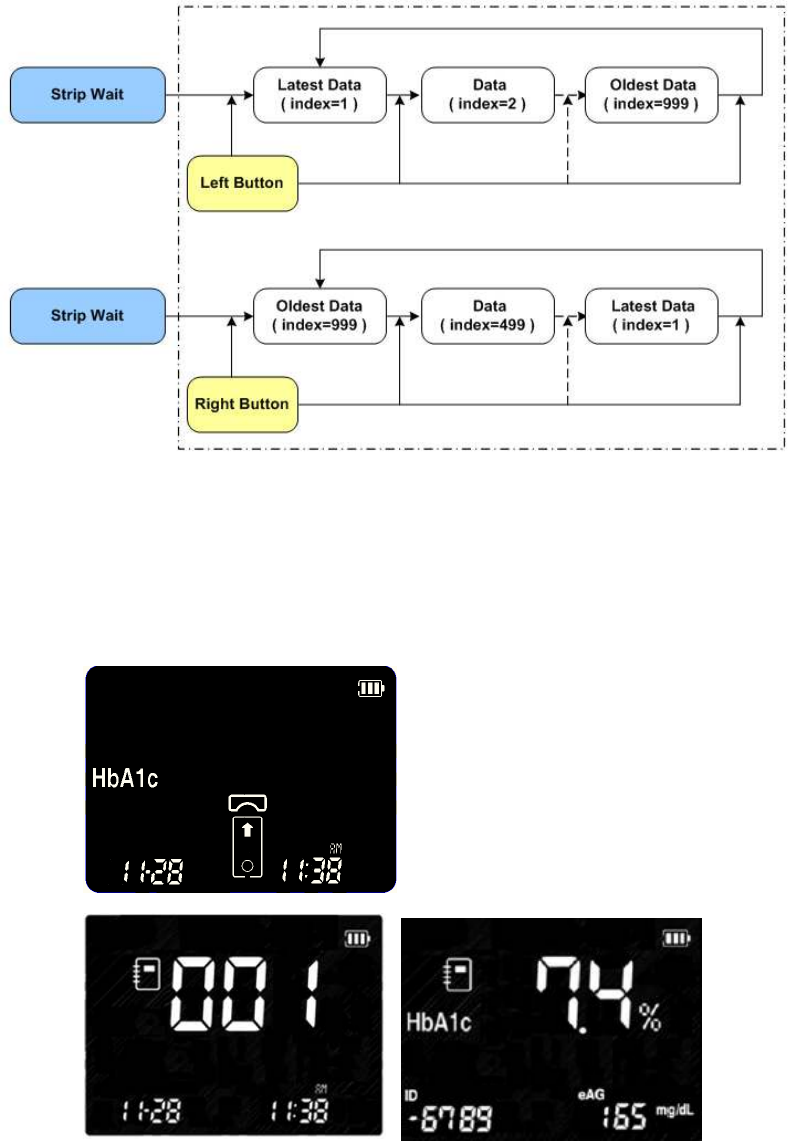
The SD MultiCare™ analyzer has 1000 measured values together with date, time and
flags letting your review them in order from the most recent to the oldest. If the memory is
full and a new result is added, the analyzer deletes the oldest result.
2. Displaying stored measured values
1. Switch on the analyzer, then press ◀ or ▶ button in display mode flashing HbA1c
test strip symbol to enter memory mode.
(1) When Left Button (◀) is pushed, the latest data shows
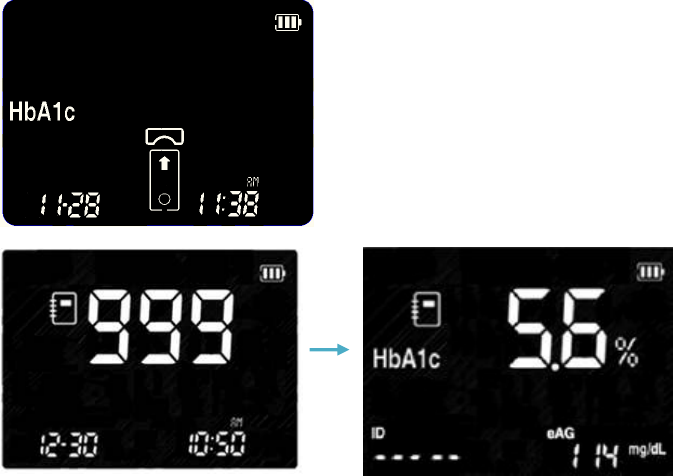
(2) When Right Button (▶) is pushed, the oldest data shows
(if total number of test is 999)
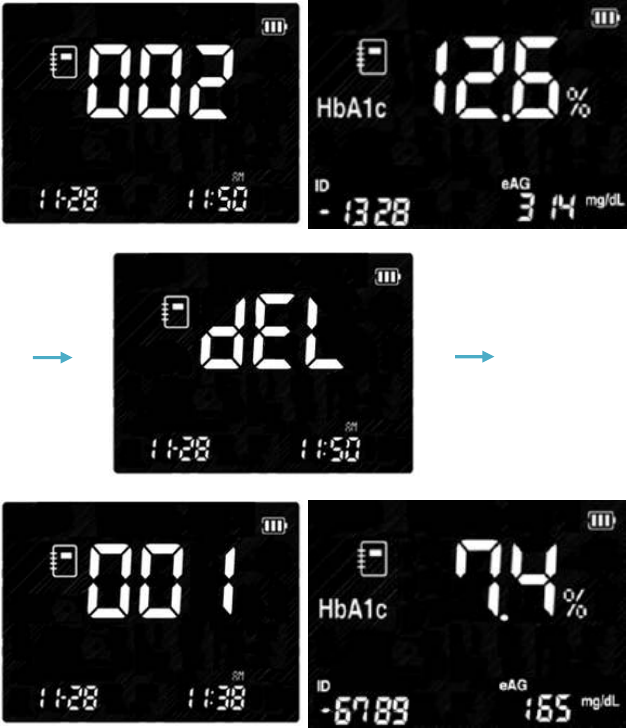
3. Delete Memory
You can delete each data in memory review
To delete the displayed data, press Enter button during 2 seconds.
Then the delete confirm message show, and press Enter button.
If you don't want to delete the data in message show state, press Left or Right button

CHAPTER 4. Printing
How to Print
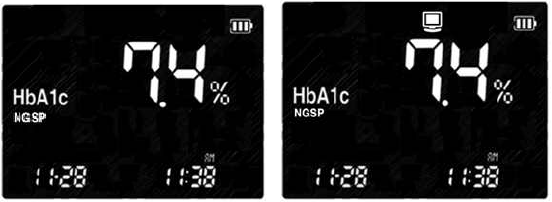
1. If you press SET/PRT button in any memory mode, then print the results with flashing
‘Printing’ symbol.
2. If you set Auto Printing function in setting mode, always display flashing ‘Printing’ symbol.
3. If you select one copy function in setting mode, the analyzer prints only one copy in
printing mode. If you select tow copy, the analyzer automatically print two copies.
Print one copy function Print two copy function
CHAPTER 5. Data transfer
Results can be downloaded from memory via USB interface.
For more information on downloading results to a suitable system (such as a PC), please
call your local customer support and service centre.
The analyzer displays the following during data transfer.

CHAPTER 6. Control Solution Test
1. Control Solution Test
It is important to perform Control Tests with more than one level of Control to assure your
System is working properly and your testing technique is good.
Why you should do a control solution test;
• SD Control Solution is used to check that the analyzer and the test strips are working
together as a system and that you are performing the test correctly.
• It is very important that you do this simple check routinely to make sure you get an
accurate result.
When to use SD control solution
• If you leave the cap off the container of test strips.
• Before using your analyzer for the first time.
• To check the test strips when you open a new strips vial or packaging.
• If you drop the analyzer.
• Whenever your result does not agree with the way you feel.
• If you have repeated a test, and the result is still lower or higher than expected.
• When you want to check the performance of a analyzer and test strip.
Before you begin;
• Use only SD Control Solution.
• Check the expiration date on the control solution container. Record the opening date on
the container label. Do Not use after expiration or discard date (date opened plus three
months), whichever comes first.
• Shake the container, discard the first drop of control solution, and wipe off the tip to
ensure a proper sample and an accurate result.
2. Control Solution Test for HbA1c strip
To ensure that the analyzer is functioning properly, you should regularly use control
solution for a control check. Make a habit of carrying out a control check in the following
situations:
■ When you open a new test strip packaging.
■ After replacing the batteries.
■ After cleaning the analyzer.
■ When you doubt that the measured values are correct.
A control check is performed in the same way as a regular measurement with the
difference that control solutions are used instead of blood.
What you need:
■ Your SD MultiCare™ analyzer
■ Test strips for the desired measurements with the related code strip:
■ Control solutions for the respective test parameter
– SD MultiCare™ HbA1c Control
CAUTION:
• Do not swallow control solution; it is not for human consumption.
• Do not apply control solution to the skin or eyes as it may cause irritation.

Preparing to perform a control check
1. Prepare the test strip container for the HbA1c measurement
2. Make sure the code strip belonging to these test strips is at hand (unless the analyzer
has already been coded for this test strip container).
3. Prepare the control solution matching the test strips. The following description
assumes that the analyzer has already been coded for the test strips used here.
3. Troubleshooting control solution
Check
Action
Did you do the test in control solution mode?
Did you see “control solution container icon”
on the screen with the result?
If not, do the test again. Insert a test strip;
Press the ▶ button for 3 seconds to display
a control solution container icon.
Have the test strips and/or control solution
expired?
Make sure that test strips and control
solutions are not past expiration date. This
date is shown the container/bottle. Make
sure containers have not been open for more
than 3 months.
Were glucose control solutions at room
temperature (18-32°C, 64-88°F) when used?
If not, retest with new bottle of glucose
control solution, or warm up/cool down to
room temperature. (18-32°C, 64-88°F)
Did you insert test strip firmly into analyzer?
Make sure test strip is inserted into the test
strip slot until it will go on further.
Did you follow the procedure correctly?
Read the instruction for use again and retest.
Were test strips stored correctly?
If not, retest with a new test strips.
Is the analyzer damaged? Does it show an
error code?
If yes, contact SD Customer Care Service
Center Tel: at 82-80-977-9700
Is the control result outside the appropriate
acceptable range?
Repeat the test. If you get the same results,
do not use your analyzer and test strip until
you solve the problem. If you still have
problem, call the SD Customer care service
center at 82-80-977-9700
CHAPTER 7. Performing a SD Check Strip Test
When should I check my analyzer using a SD Check Strip?
• When you want to easily check the performance of the analyzer.
• Before using your analyzer for the first time.
• Whenever your result does not agree with the level you feel
• If you have repeated a test and the blood glucose result is still lower or higher than
expected.
CAUTION:
The SD Check Strip test does not replace a SD Control Solution test.
1. How to Use the SD HbA1c Check Strip
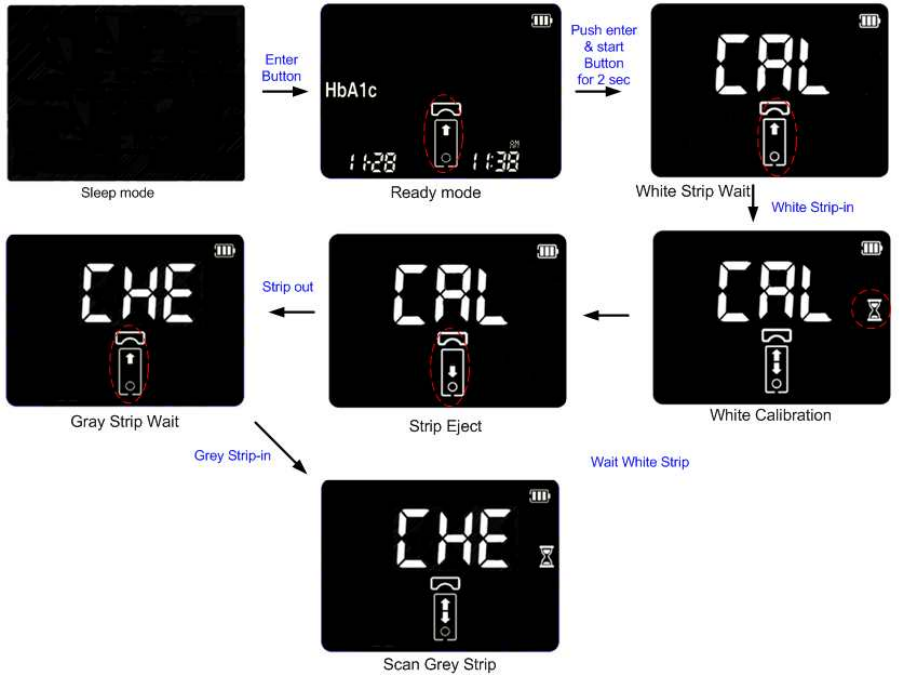
Before you insert the SD check strip to the analyzer, you have to press the Enter and
Start button at the same time during 3 seconds in blood wait state.
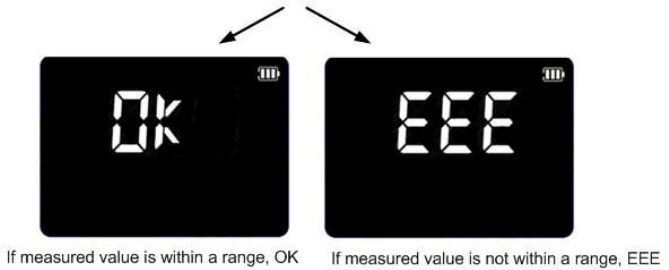
Then 'CHE(Check)' is displayed, you can insert the check strip to the analyzer.
SD HbA1c check strip test take 15 seconds.
If the analyzer displays 'EEE', the analyzer has a problem. Call the SD Customer care
service center at 82-80-977-9700
CHAPTER 8. Maintenance and Troubleshooting
1. Cleaning your Analyzer
Caring for the SD MultiCare™ analyzer is easy. Just keep it free of dust. If you need to
clean it, follow these guideline carefully to help you get the best performance possible;
To prevent malfunction of the analyzer, keep the test strip port free of blood, moisture, dirt,
or dust. Use a lint-free cloth dampened with water to clean analyzer. Thoroughly wring
out cloth before use. Do not use an abrasive cloth or antiseptic solution, as these may
damage the display screen.
A clean optical measuring system is a basic prerequisite for determining precise
measured values.
Therefore clean the analyzer regularly and immediately after it becomes dirty. Always
switch off the analyzer before cleaning it!
Use only the following items for cleaning:
■ Ordinary lint-free cotton buds
■ Ordinary lint-free tissues
■ Ordinary disinfecting tissues
Mild soap suds as well as 70 % ethanol or isopropyl alcohol are suitable for cleaning.
When used in the professional sector (e.g. doctor’s surgeries), a mixture consisting of 1-
propanol, 2-propanol and glutaraldehyde (brand name “Bacillol plus”) is recommended.
Do not use any disinfectant sprays or tissues or cotton buds which are dripping wet as
the liquid may enter the analyzer and damage it.
Cleaning the outer analyzer components
■ Ensure the analyzer is switched off.
■ Wipe the outside of the analyzer with a lightly moistened, lint-free cotton cloth. In the
professional sector, the outside of the analyzer can be cleaned with “Bacillol plus”.
2. Maintenance, Testing and Transportation
The analyzer needs little or no maintenance with normal use. It automatically tests its own
systems every time you turn it on and lets you know if something is wrong. If you drop the
analyzer or think it is not giving accurate results, make sure that your test strips and
control solution haven’t expired, and then run a control test.
Analyzer
1. Keep the test strip slots free of dust.
2. Protect the internal analyzer from humidity.
3. The carrying case is designed to let you store a variety of supplies you may need and
helps to protect your analyzer.
4. The temperature and humidity of the analyzer during transport and storage are -4-
140°F (-20-60°C) and 15%-95% RH, non-condensing.
5. If you keep the analyzer with the battery inserted, then keep it in a low humidity
environment.
Test Strip
1. Store at room temperature of 20~30℃(68~86℉) for HbA1c test strip package and
2~32℃(36~90℉) for glucose.
2. Strips may be stored in a refrigerator at 2~8 ℃ (35~46 ℉), but must be brought to
room temperature before using. Do not freeze.
3. Keep away from heat and direct sunlight.
4. Keep the code chip either in the analyzer or stored with other strips and do not store
the code chip in the HbA1c test strip package.
5. The glucose test strip container closes tightly and can protect the glucose test strips,
so you should keep the unused glucose test strips in the container in which they
came.
6. Use test strip as soon as you have removed it.
Lancet and Lancing device
1. The needle of lancet is sharp, keep the lancet away from children.
2. Keep the lancet and lancing device dry and do not store in direct sunlight, or high heat
and humidity locations.
3. A lancet should not use for the other intended use except sampling blood.
4. A lancet is for single use only. Do not reuse.
5. A lancet provided with the SD MultiCare™ Blood glucose analyzer is able to use every
lancing devices manufactured by other company. But if at all possible, use the lancing
device manufactured by Standard Diagnostics, Inc.
6. Before using, check a packaging condition, if there is any problem, you should not use
it.
7. If a lancet protective disk is loosed or needle of a lancet is exposed, you should not
use it.
8. To reduce the chance of infection for the used lancet, discard it.
Control solution
1. Do not use SD Control Solution that has passed the expiration date.
2. Keep the SD Glucose Control Solution in 46-86°F (8-30°C) environments.
3. Do not refrigerate or freeze.
4. The SD glucose Control Solution can be used for 3 months after opening the container.
Write the opened date on the SD Control Solution container when you first opened.
5. No reconstitution or dilution is necessary.
6. Wipe the container tip clean and reseal the container tightly after each use.
CHAPTER 8. Screen Messages and Troubleshooting
1. Warning messages
Indication
Warning description
Warning: Low Battery
At this time, battery is getting low but you can still perform about
10 tests.
Solution
Replace the battery soon.
Indication
Warning description
Warning: Replace Battery
Battery power is low.
If you press the Enter button after discharging of the battery,
the battery icon will flash and then after ten seconds the
analyzer will turn off automatically.
Solution
Replace the battery immediately.
2. Error messages
In certain circumstances error messages may appear on your display. Generally, you
should first try the solutions suggested for the respective error. If the problem persists,
please contact your local customer support and service centre.
Indication
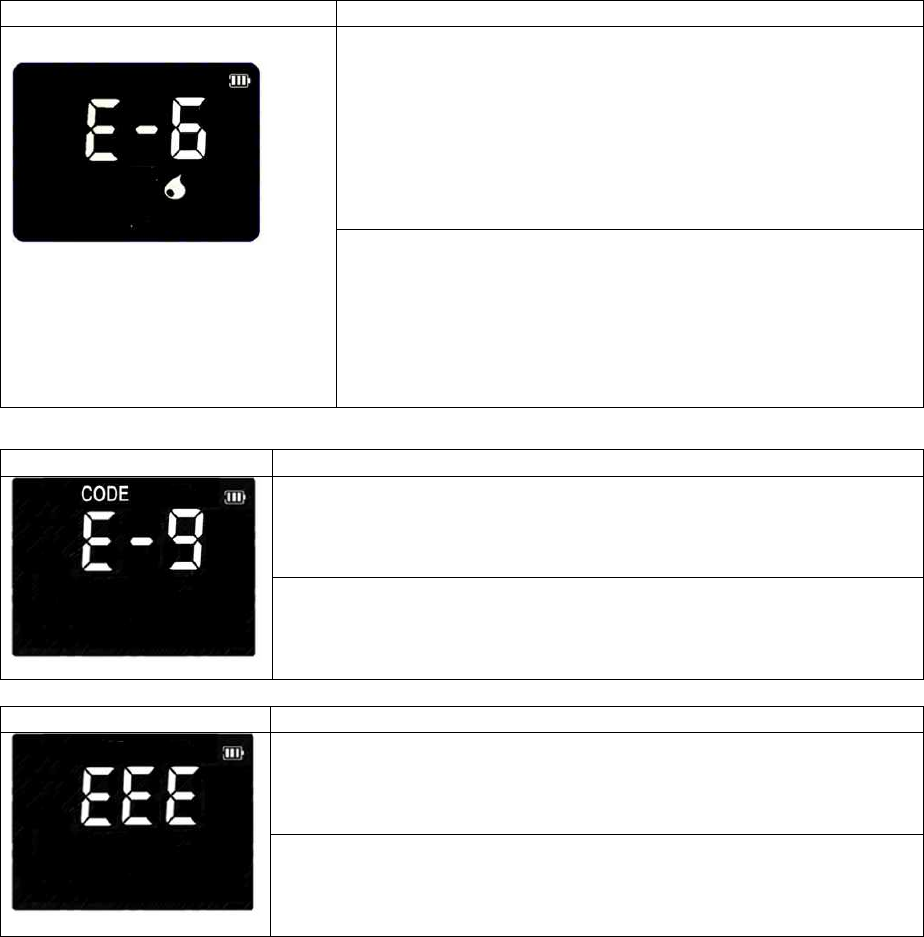
Error description
Error: Strip Error
Defective test strip or the test strip is damaged or inserted
improperly.
Solution
Discard this test strip and test again using a new test
strip.
Indication
Error description
Error: blood sample Error
An insufficient amount of blood was applied.
Solution
Discard this test strip and test again using a new test strip
with a larger sample, making sure blood is placed to the
narrow channel in the top edge of the test strip.
Indication
Error description
Error: Expired strip
The test strips are expired.
Solution
Discard this test strip and test again using a new test strip
does not past expiration date.
Indication
Error description
Error: Temperature Error Unknown barcode
If the environmental temperature is above or below the
operating range of a analyzer, a thermo analyzer icon will
appear on the display.
Solution
Move to an area at 68-88°F (18-32°C), and perform a
test. Do not artificially heat or cool the analyzer.
Indication
Error description
Error: Communication Error
The communication between analyzer and computer or
printer is failed.
Solution
Connect again between analyzer and external device.
If the error continues turn off an analyzer. Then turn on
the analyzer again. If there is still error massage, please
contact STANDARD DIAGNOSTICS, INC. TEL: 1-877-
882-3695.
Indication
Error description
Error: Extremely low Total hemoglobin
If the measured total hemoglobin is under 7g/dL,
Solution
Connect again between analyzer and external device.
If the error continues turn off an analyzer. Then turn on
the analyzer again. If there is still error massage, please
contact STANDARD DIAGNOSTICS, INC. TEL: 1-877-
882-3695.
Indication
Error description
Error: Communication Error with code chip
The analyzer cannot communicate to the inserted code chip.
And the code chip is not matched with proper test strip.
Solution
Re-insert the code chip. If there is still error massage, please
contact STANDARD DIAGNOSTICS, INC. TEL: 1-877-882-
3695.
Indication
Error description
Error: Internal Error Message for a analyzer
It happens to internal error not to work.
Solution
Turn off and then turn on the analyzer again. If there is still error
massage, please contact SD Biosensor, inc.
TEL: 82-80-977-9700.
CHAPTER 9. Warnings, Precautions and Limitations
1. Test Strip
n Make sure the Code Chip and test strip lot numbers match. Never use a Code Chip
from a different lot than the test strip.
n Out-of-date or expired strips cannot be used in your test system. Check package for
expiration date.
n Add all of the blood the test strip at one time. If you do not get all of the blood on the
strip, do not add blood to the same strip. Test again with a new unused test strip and
fresh blood sample.
n Discard test strip after using. Strips are to be read once. Never insert or read a used
test strip.
n Discard the used test strips in proper container, according to your standard laboratory
procedures
n Do net ingest.

CHAPTER 10. Product Technical Information
1. Analyzer Specifications
ON/OFF Source
Four batteries (1.5 V, AA)
Battery Life
Around 200 tests
Display
LCD (240x160 dots)
Controls
5 Buttons(SET/PRT, Enter, Arrow: ◀/▶, Start/Eject)
Memory
999
Automatic Shutoff
• 1 minutes after last user action without inserting test strip into the
analyzer
• 5 minutes after last user action when inserting test strip into the
analyzer
2. Test strip for HbA1c
Result Range
4.0~ 14.0%
Sample
Fresh capillary whole blood or venous blood
Sample Size
5uL
Test Time
3~5 minutes
Test Strip
Storage
Temperature
°C – °C (68°F – 86°F)
* CRP, u-ALB, and CRT's information is refered to the test strip package
3. Electromagnetic Compatibility
This analyzer meets the electromagnetic immunity requirements as per EN ISO 15197
Annex A. The chosen basis for electrostatic discharge immunity testing was basic
standard IEC 61000-4-2. In addition, it meets the electro -magnetic emissions
requirements as per EN 61326. Its electromagnetic emission is thus low. Interference
from other electrically driven equipment is not to be anticipated.
Annex 1: Information for Healthcare Professionals
Protection against infections *03MA10
There is a potential risk of infection. Medical staff using the SD MultiCare™ analyzer to
perform measurements for more than one patient must be aware that any object coming
into contact with human blood is a potential source of infection.
■ Use gloves.
■ Apply blood outside the analyzer. When measuring glucose in several persons clean
and disinfect the analyzer before each measurement as blood cannot be applied using
capillary pipettes.
■ When measuring cholesterol and triglycerides in several persons, always use capillary
pipettes to apply blood outside the analyzer.
■ Dispose of used capillary pipettes and test strips in a clinical waste bin.
■ Follow all other locally applicable guidelines and regulations on health and safety.
Annex 2: References
1. American Diabetes Association, Clinical Practice Recommendation Guidelines 2003,
Diabetes care, Vol. 26. Supplement 1. p.22
2. Stedman, TL. Stedman’s Medical Dictionary, 27th Edition, 1999, p. 2082.
3. Ellen T. Chen, James H. Nichols, Show-Hong Duh, Glen Hortin, MD: Diabetes
Technology & Therapeutics, Performance Evaluation of Blood
Glucose Monitoring Devices, Oct 2003, Vol. 5, No. 5: 749 -768

Annex 2: Supplies and Accessories
The following supplies and accessories are available from SD Biosensor, Inc. or the
distributor.
ITEM
Details
Analyzer
SD MultiCare™ Analyzer (without Glucose Module)
Strip
SD MultiCare™ test strip (25T x individual pouch)
Control Solution
SD MultiCare Control Solution
Lancet
Lancets (100ea x 1 box)
Warranty
You are a valued customer of Standard Diagnostics, Inc. It is important to us that you are
completely satisfied with your SD MultiCare™ Analyzer. Standard Diagnostics, Inc. warrants
your SD MultiCare™ Analyzer will be free from defects in materials and workmanship for a
period of three years from the date of original purchase. If during this time the analyzer does
not work properly because of a defect in materials or workmanship, Standard Diagnostics,
Inc. agree to replace or repair, free of charge any and all parts proven to be defective and
subject to warranty. This warranty is in lieu of all other warranties, expressed or implied,
including any implied warranty of merchantability of fitness for any purpose, other than
stated herein. This warranty does not apply to the performance of the SD MultiCare™
analyzer that has been damaged by accident or has been altered, misused, tampered with,
or abused in any way. This warranty only applied to the original purchaser of the analyzer
and/or its agents.
Return
You must contact SD Biosensor Customer Service at 82-80-977-9700 before returning your
analyzer. You will be instructed how to return the analyzer to SD Biosensor, Inc. Returned
analyzers without this authorization will not be accepted.
Disposal
The Analyzer must be disposed accoding to the local regulations concerning the disposal of
electrical and electronic equipment.
The Waste Electrical and Electronic Equipment (WEEE) regulation implement provisions of
the European Parliament and Council Directive 2002/96/EC ailmed to reducing the amount
of EEE waste going for final disposal.
Please contact our representatives in your area for the respective instructions before
disposing.
Manufactured by
SD Biosensor, Inc.
C-4th&5th, 16, Deogyeong-daero, 1556 beon-gil,
Yeongtong-gu, Suwon-si, Gyeonggi-do, 443-813,
Republic of Korea
www.sdbiosensor.com