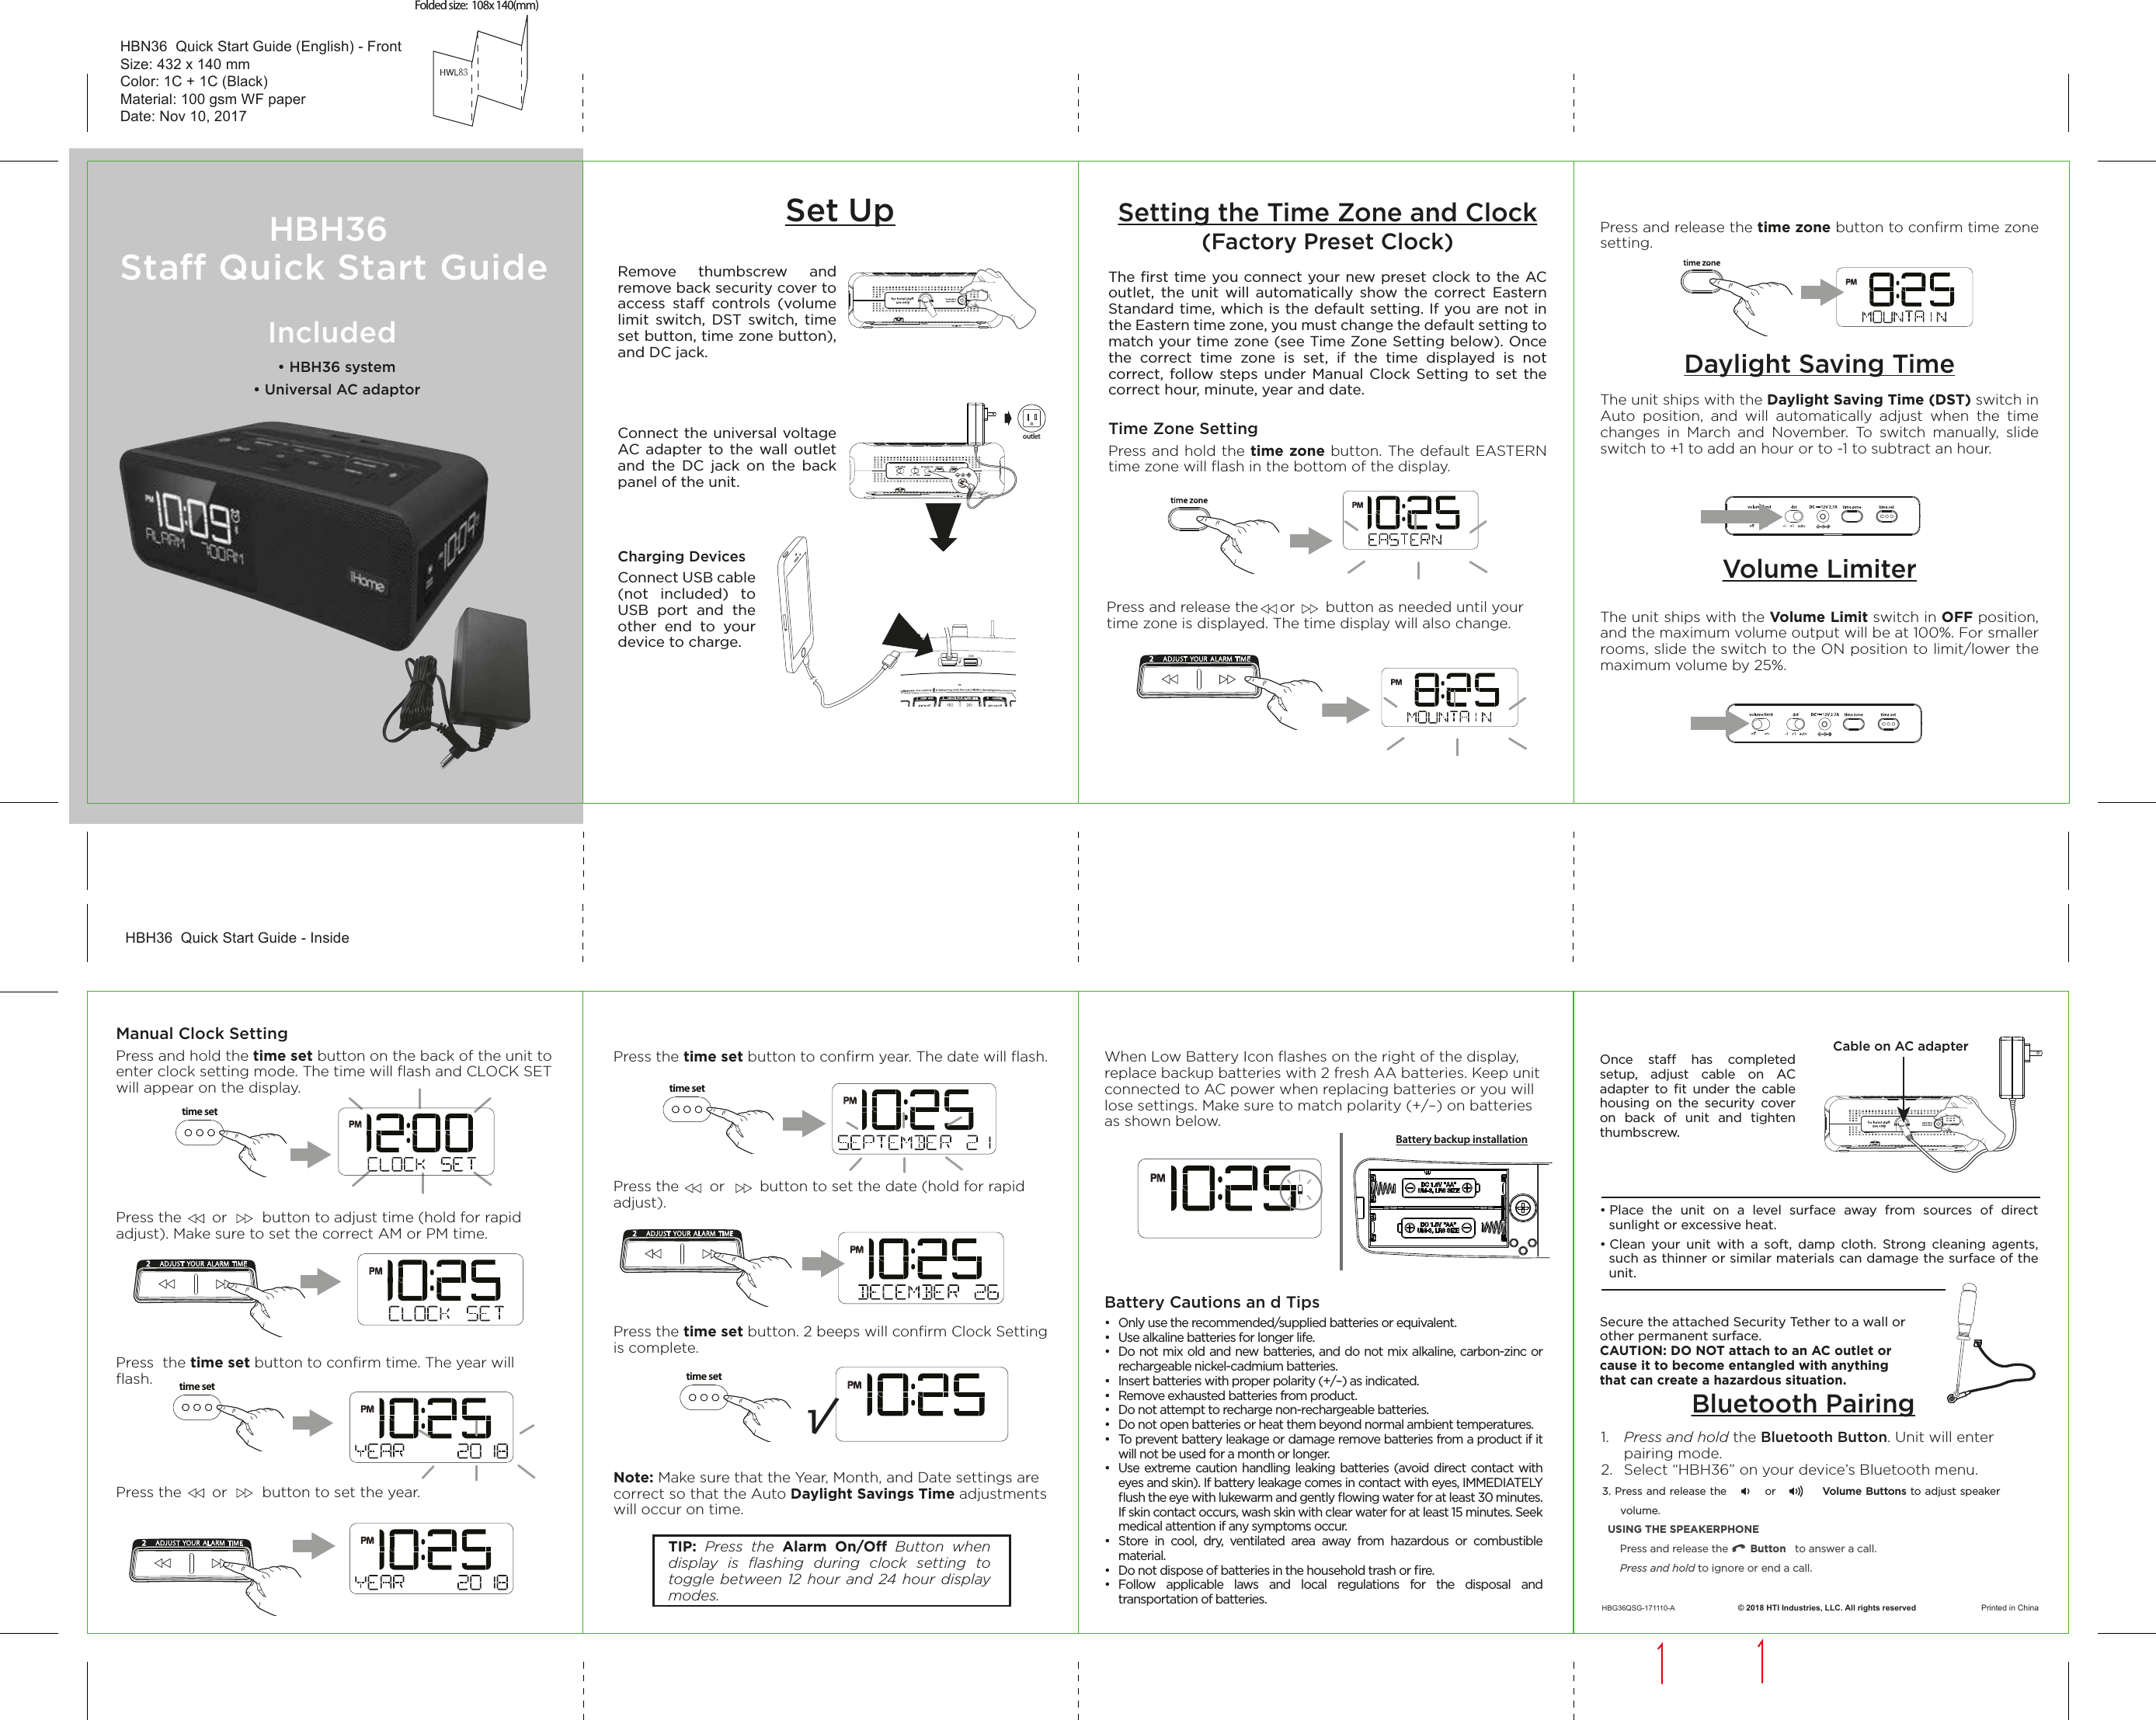
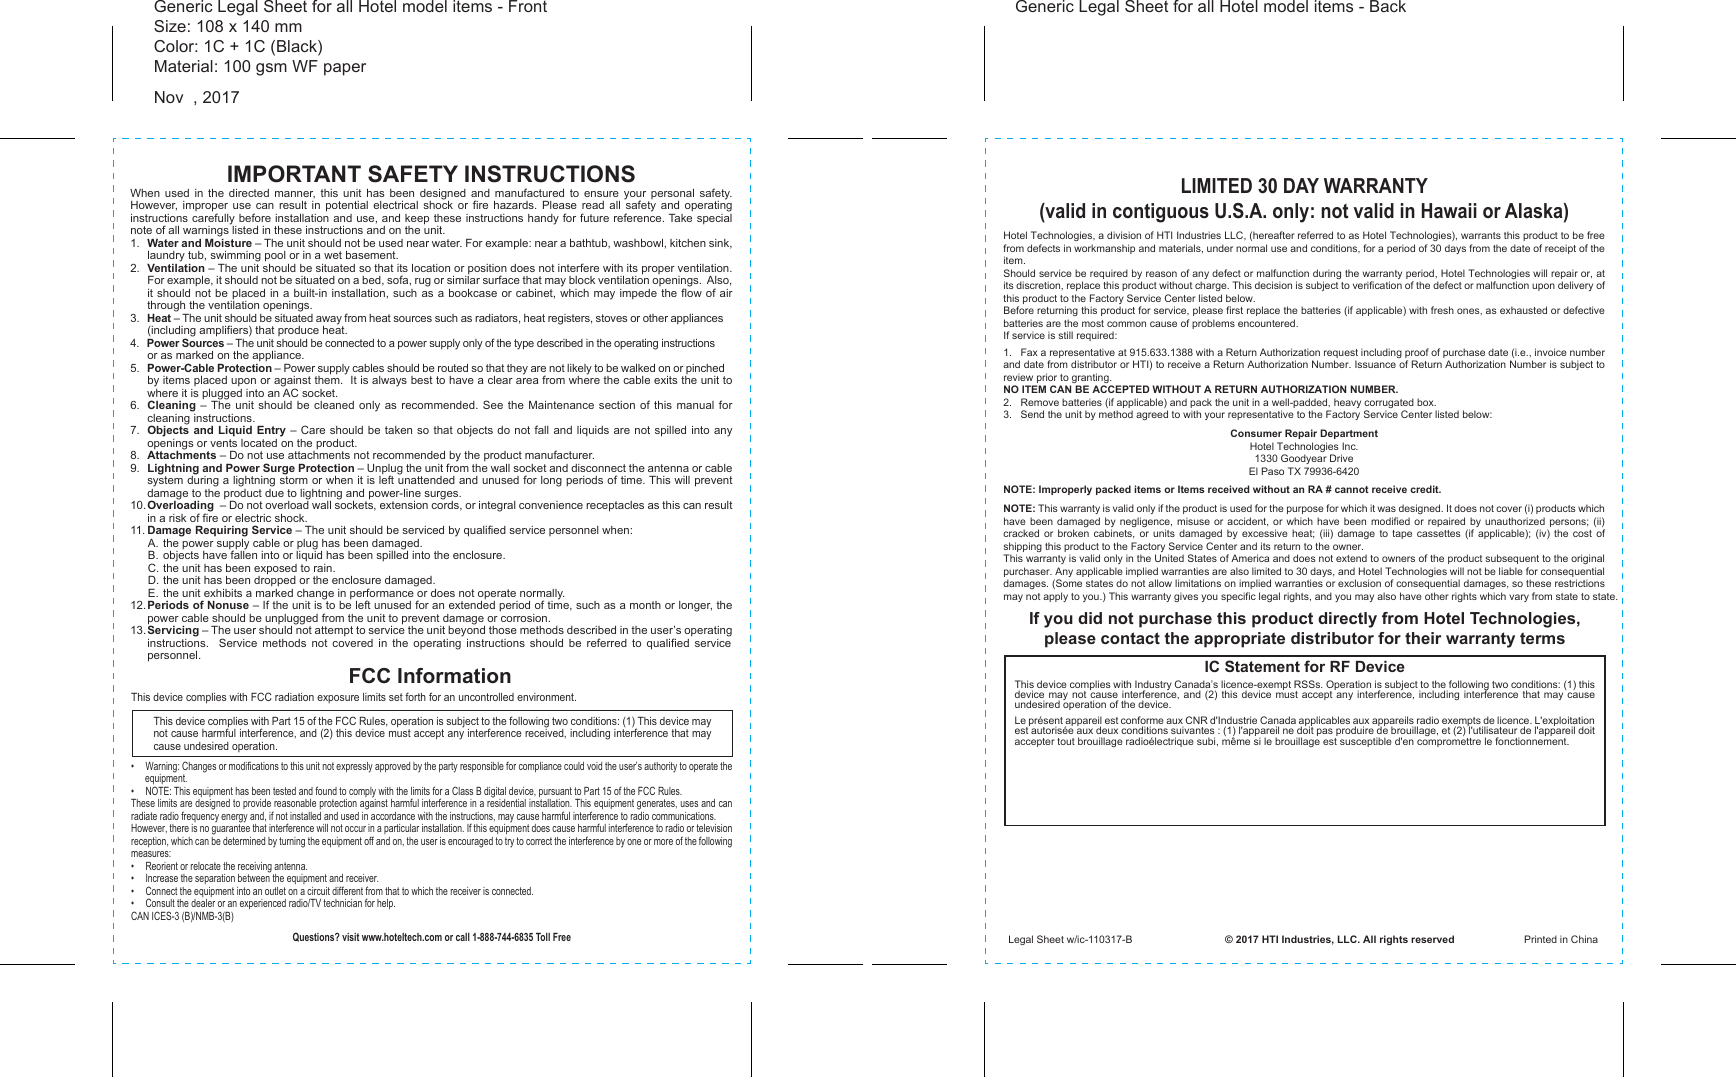
SDI Technologies HBH36 Hotel Triple Display, Bedside Bluetooth Clock Speaker with Single Day Alarm, Courtesy plug Aux-in and Dual USB Standby, Alarm Clock User Manual HBH36 QSG 1108V3

SDI Technologies Inc. Hotel Triple Display, Bedside Bluetooth Clock Speaker with Single Day Alarm, Courtesy plug Aux-in and Dual USB Standby, Alarm Clock HBH36 QSG 1108V3

User Manual

Press the time set button to confirm year. The date will flash.Press the       or        button to set the date (hold for rapid adjust).Press the time set button. 2 beeps will confirm Clock Setting is complete.Note: Make sure that the Year, Month, and Date settings are correct so that the Auto Daylight Savings Time adjustments will occur on time.When Low Battery Icon flashes on the right of the display, replace backup batteries with 2 fresh AA batteries. Keep unit connected to AC power when replacing batteries or you will lose settings. Make sure to match polarity (+/–) on batteries as shown below. Battery Cautions an d Tips •  Only use the recommended/supplied batteries or equivalent.•   Use alkaline batteries for longer life.•  Do not mix old and new batteries, and do not mix alkaline, carbon-zinc or rechargeable nickel-cadmium batteries.•   Insert batteries with proper polarity (+/–) as indicated.•  Remove exhausted batteries from product.•  Do not attempt to recharge non-rechargeable batteries.•  Do not open batteries or heat them beyond normal ambient temperatures.•  To prevent battery leakage or damage remove batteries from a product if it will not be used for a month or longer.•  Use extreme caution handling leaking batteries (avoid direct contact with eyes and skin). If battery leakage comes in contact with eyes, IMMEDIATELY flush the eye with lukewarm and gently flowing water for at least 30 minutes. If skin contact occurs, wash skin with clear water for at least 15 minutes. Seek medical attention if any symptoms occur.•  Store in cool, dry, ventilated area away from hazardous or combustible material.•  Do not dispose of batteries in the household trash or fire.• Follow applicable laws and local regulations for the disposal and transportation of batteries.Once sta has completed setup, adjust cable on AC adapter to fit under the cable housing on the security cover on back of unit and tighten thumbscrew. • Place the unit on a level surface away from sources of direct sunlight or excessive heat.• Clean your unit with a soft, damp cloth. Strong cleaning agents, such as thinner or similar materials can damage the surface of the unit.Secure the attached Security Tether to a wall or other permanent surface.CAUTION: DO NOT attach to an AC outlet or cause it to become entangled with anything that can create a hazardous situation.Bluetooth Pairing1.  Press and hold the Bluetooth Button. Unit will enter      pairing mode.2.  Select “HBH36” on your device’s Bluetooth menu.Manual Clock SettingPress and hold the time set button on the back of the unit to enter clock setting mode. The time will flash and CLOCK SET will appear on the display.Press the       or        button to adjust time (hold for rapid adjust). Make sure to set the correct AM or PM time.Press  the time set button to confirm time. The year will flash.Press the       or        button to set the year.HBH36 Sta Quick Start GuideIncluded • HBH36 system• Universal AC adaptorSet UpHBG36QSG-171110-A                            © 2018 HTI Industries, LLC. All rights reserved                             Printed in ChinaRemove thumbscrew and remove back security cover to access sta controls (volume limit switch, DST switch, time set button, time zone button),  and DC jack.Connect the universal voltage AC adapter to the wall outlet and the DC jack on the back panel of the unit. Charging DevicesConnect USB cable (not included) to USB port and the other end to your device to charge.Setting the Time Zone and Clock(Factory Preset Clock)The first time you connect your new preset clock to the AC outlet, the unit will automatically show the correct Eastern Standard time, which is the default setting. If you are not in the Eastern time zone, you must change the default setting to match your time zone (see Time Zone Setting below). Once the correct time zone is set, if the time displayed is not correct, follow steps under Manual Clock Setting to set the correct hour, minute, year and date. Time Zone SettingPress and hold the time zone button. The default EASTERN time zone will flash in the bottom of the display. Press and release the time zone button to confirm time zone setting.Daylight Saving TimeThe unit ships with the Daylight Saving Time (DST) switch in Auto position, and will automatically adjust when the time  changes in March and November. To switch manually, slide switch to +1 to add an hour or to -1 to subtract an hour.Volume LimiterThe unit ships with the Volume Limit switch in OFF position, and the maximum volume output will be at 100%. For smaller rooms, slide the switch to the ON position to limit/lower the maximum volume by 25%.Press and release the     or       button as needed until your time zone is displayed. The time display will also change. TIP: Press the Alarm On/O Button when display is flashing during clock setting to toggle between 12 hour and 24 hour display modes.Battery backup installationtime set√time settime setoutlettime setCable on AC adapterHBH36  Quick Start Guide - InsideHBN36  Quick Start Guide (English) - FrontSize: 432 x 140 mmColor: 1C + 1C (Black)Material: 100 gsm WF paperDate: Nov 10, 2017Folded size:  108x 140(mm)3. Press and release the        or          Volume Buttons to adjust speaker volume.USING THE SPEAKERPHONE      Press and release the            Button  to answer a call. Press and hold to ignore or end a call.
IMPORTANT SAFETY INSTRUCTIONSWhen used in the directed manner, this unit has been designed and manufactured to ensure your personal safety.  However, improper use can result in potential electrical shock or fire hazards. Please read all safety and operating instructions carefully before installation and use, and keep these instructions handy for future reference. Take special note of all warnings listed in these instructions and on the unit.1.  Water and Moisture – The unit should not be used near water. For example: near a bathtub, washbowl, kitchen sink, laundry tub, swimming pool or in a wet basement. 2.  Ventilation – The unit should be situated so that its location or position does not interfere with its proper ventilation. For example, it should not be situated on a bed, sofa, rug or similar surface that may block ventilation openings.  Also, it should not be placed in a built-in installation, such as a bookcase or cabinet, which may impede the flow of air through the ventilation openings.3.  Heat – The unit should be situated away from heat sources such as radiators, heat registers, stoves or other appliances (including amplifiers) that produce heat.4.  Power Sources – The unit should be connected to a power supply only of the type described in the operating instructions or as marked on the appliance.5.  Power-Cable Protection – Power supply cables should be routed so that they are not likely to be walked on or pinched by items placed upon or against them.  It is always best to have a clear area from where the cable exits the unit to where it is plugged into an AC socket.6.  Cleaning – The unit should be cleaned only as recommended. See the Maintenance section of this manual for cleaning instructions.7.  Objects and Liquid Entry – Care should be taken so that objects do not fall and liquids are not spilled into any openings or vents located on the product.8.  Attachments – Do not use attachments not recommended by the product manufacturer.9.  Lightning and Power Surge Protection – Unplug the unit from the wall socket and disconnect the antenna or cable system during a lightning storm or when it is left unattended and unused for long periods of time. This will prevent damage to the product due to lightning and power-line surges.10. Overloading  – Do not overload wall sockets, extension cords, or integral convenience receptacles as this can result in a risk of fire or electric shock.11. Damage Requiring Service – The unit should be serviced by qualified service personnel when:  A. the power supply cable or plug has been damaged.  B.  objects have fallen into or liquid has been spilled into the enclosure.  C. the unit has been exposed to rain.  D. the unit has been dropped or the enclosure damaged.  E.  the unit exhibits a marked change in performance or does not operate normally.12. Periods of Nonuse – If the unit is to be left unused for an extended period of time, such as a month or longer, the power cable should be unplugged from the unit to prevent damage or corrosion. 13. Servicing – The user should not attempt to service the unit beyond those methods described in the user’s operating instructions.  Service methods not covered in the operating instructions should be referred to qualified service personnel.Hotel Technologies, a division of HTI Industries LLC, (hereafter referred to as Hotel Technologies), warrants this product to be free from defects in workmanship and materials, under normal use and conditions, for a period of 30 days from the date of receipt of the item.Should service be required by reason of any defect or malfunction during the warranty period, Hotel Technologies will repair or, at its discretion, replace this product without charge. This decision is subject to verification of the defect or malfunction upon delivery of this product to the Factory Service Center listed below. Before returning this product for service, please first replace the batteries (if applicable) with fresh ones, as exhausted or defective batteries are the most common cause of problems encountered.If service is still required:1.  Fax a representative at 915.633.1388 with a Return Authorization request including proof of purchase date (i.e., invoice number and date from distributor or HTI) to receive a Return Authorization Number. Issuance of Return Authorization Number is subject to review prior to granting.  NO ITEM CAN BE ACCEPTED WITHOUT A RETURN AUTHORIZATION NUMBER.2.  Remove batteries (if applicable) and pack the unit in a well-padded, heavy corrugated box.3.  Send the unit by method agreed to with your representative to the Factory Service Center listed below:Consumer Repair DepartmentHotel Technologies Inc.1330 Goodyear DriveEl Paso TX 79936-6420NOTE: Improperly packed items or Items received without an RA # cannot receive credit.NOTE: This warranty is valid only if the product is used for the purpose for which it was designed. It does not cover (i) products which have been damaged by negligence, misuse or accident, or which have been modified or repaired by unauthorized persons; (ii) cracked or broken cabinets, or units damaged by excessive heat; (iii) damage to tape cassettes (if applicable); (iv) the cost of shipping this product to the Factory Service Center and its return to the owner.This warranty is valid only in the United States of America and does not extend to owners of the product subsequent to the original purchaser. Any applicable implied warranties are also limited to 30 days, and Hotel Technologies will not be liable for consequential damages. (Some states do not allow limitations on implied warranties or exclusion of consequential damages, so these restrictions may not apply to you.) This warranty gives you specific legal rights, and you may also have other rights which vary from state to state.LIMITED 30 DAY WARRANTY(valid in contiguous U.S.A. only: not valid in Hawaii or Alaska)If you did not purchase this product directly from Hotel Technologies, please contact the appropriate distributor for their warranty termsFCC InformationThis device complies with Part 15 of the FCC Rules, operation is subject to the following two conditions: (1) This device may not cause harmful interference, and (2) this device must accept any interference received, including interference that may cause undesired operation.•  Warning: Changes or modifications to this unit not expressly approved by the party responsible for compliance could void the user’s authority to operate the equipment.•  NOTE: This equipment has been tested and found to comply with the limits for a Class B digital device, pursuant to Part 15 of the FCC Rules.These limits are designed to provide reasonable protection against harmful interference in a residential installation. This equipment generates, uses and can radiate radio frequency energy and, if not installed and used in accordance with the instructions, may cause harmful interference to radio communications.However, there is no guarantee that interference will not occur in a particular installation. If this equipment does cause harmful interference to radio or television reception, which can be determined by turning the equipment off and on, the user is encouraged to try to correct the interference by one or more of the following measures:•  Reorient or relocate the receiving antenna.•  Increase the separation between the equipment and receiver.•  Connect the equipment into an outlet on a circuit different from that to which the receiver is connected.•  Consult the dealer or an experienced radio/TV technician for help.CAN ICES-3 (B)/NMB-3(B)Questions? visit www.hoteltech.com or call 1-888-744-6835 Toll FreeIC Statement for RF DeviceThis device complies with Industry Canada’s licence-exempt RSSs. Operation is subject to the following two conditions: (1) this device may not cause interference, and (2) this device must accept any interference, including interference that may cause undesired operation of the device. Le présent appareil est conforme aux CNR d'Industrie Canada applicables aux appareils radio exempts de licence. L'exploitation est autorisée aux deux conditions suivantes : (1) l'appareil ne doit pas produire de brouillage, et (2) l'utilisateur de l'appareil doit accepter tout brouillage radioélectrique subi, même si le brouillage est susceptible d'en compromettre le fonctionnement. Legal Sheet w/ic-110317-B                                © 2017 HTI Industries, LLC. All rights reserved                        Printed in ChinaThis device complies with FCC radiation exposure limits set forth for an uncontrolled environment. Generic Legal Sheet for all Hotel model items - FrontSize: 108 x 140 mmColor: 1C + 1C (Black)Material: 100 gsm WF paperNov  , 2017Generic Legal Sheet for all Hotel model items - Back

Navigation menu