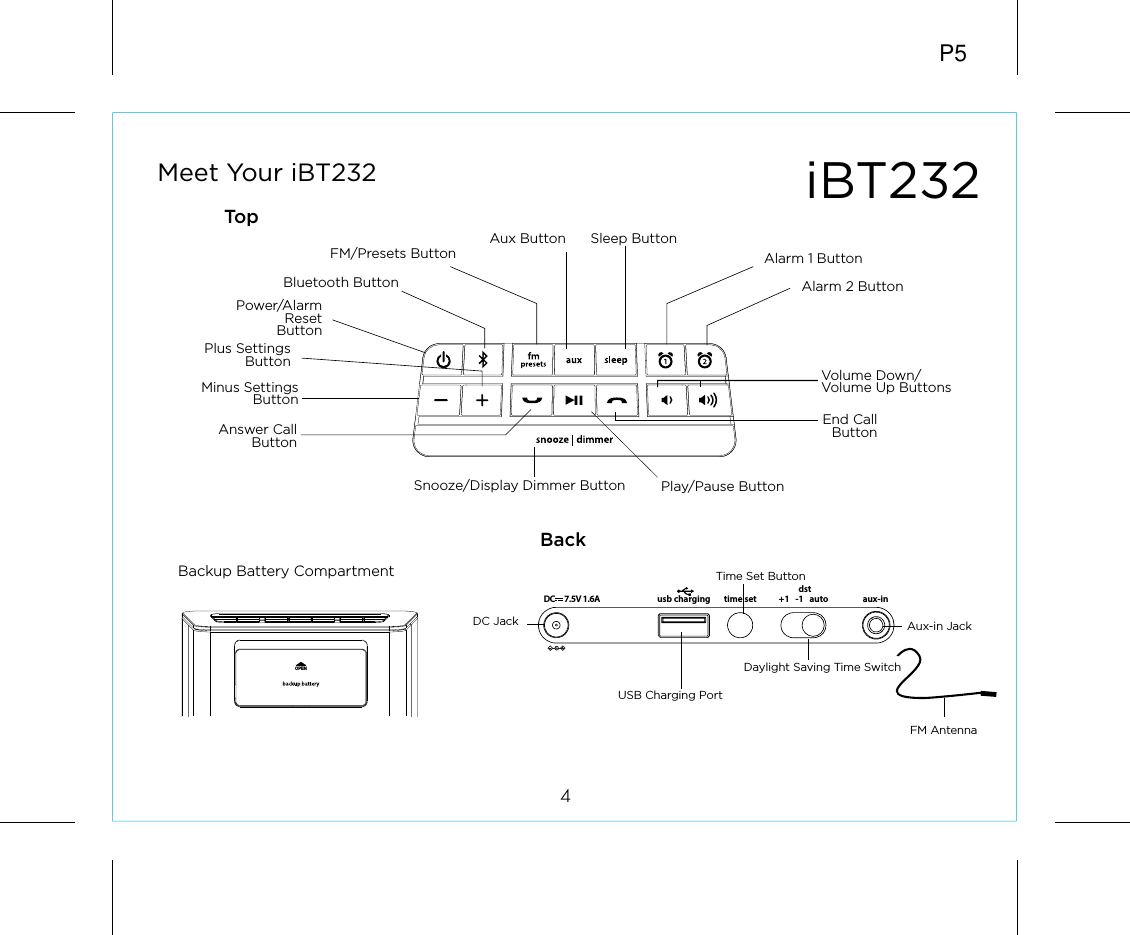
SDI Technologies IBT232 Bluetooth FM Clock Radio with USB Charging User Manual iBT232 IB 011917 v2 ai

SDI Technologies Inc. Bluetooth FM Clock Radio with USB Charging iBT232 IB 011917 v2 ai

User Manual

Model: iBT232instruction manualiBT232 Eng IBSize: 153mm x 120mmPrinting color: BlackNov 9, 2016 P1BluetoothFM Clock Radiowith USB ChargingQuestions? Contact Customer Service at 1-800-288-2792
iBT232IntroductionThank you for purchasing the iHome iBT232. This product is designed to provide high quality wireless sound for your Bluetooth audio device. This instruction booklet explains the basic operation and care of the unit. Please read it carefully and keep for future reference.•  Place the unit on a level surface away from sources of direct sunlight or excessive heat.•  Protect your furniture when placing your unit on a natural wood and lacquered finish. A cloth or other protective material should be placed between it and the furniture.•  Clean your unit with a soft cloth moistened only with mild soap and water. Stronger cleaning agents, such as benzene, thinner or similar materials can damage the surface of the unit.1P2Maintenance
iBT232Table of Contents2What’s Included................................................................................................................................................ 3Meet Your iBT232.............................................................................................................................................4The Display/Setting Up the Unit............................................................................................................... 5Installing and Replacing Clock Backup Batteries............................................................................. 6Setting the Clock/Setting and Using the Alarms.........................................................................7-8Previewing the Alarm and Turning the Alarm On/Off................................................................... 8Snooze/Display Dimmer Button/Sleep Mode/FM Radio............................................................. 9Setting and Using FM Presets ................................................................................................................. 10Pairing Your Bluetooth Device  ................................................................................................................11Playing Audio Via Bluetooth .....................................................................................................................12Using the Speakerphone Feature ...........................................................................................................12Playing Audio via Aux-In ............................................................................................................................13Charging Devices via USB Port............................................................................................................... 14Battery Use Cautions and Tips.................................................................................................................15Consumer Product Safety Guide ............................................................................................................16FCC Information ..............................................................................................................................................17Troubleshooting...............................................................................................................................................18Warranty..............................................................................................................................................................19P3
iBT2323P4What’s Included • iBT232 unit•  100V-240V universal AC adapter•    2 AA batteriespower adapteriBT232
iBT232P5Meet Your iBT232Top4Backup Battery CompartmentBackDC JackUSB Charging PortTime Set ButtonAux-in JackDaylight Saving Time SwitchFM AntennaAnswer CallButtonPlus SettingsButtonFM/Presets ButtonVolume Down/Volume Up ButtonsSnooze/Display Dimmer ButtonAlarm 1 ButtonAlarm 2 ButtonSleep ButtonAux ButtonPower/Alarm Reset ButtonMinus Settings ButtonEnd CallButtonPlay/Pause ButtonBluetooth Buttontime setusb charging aux-indst+1   -1   auto7.5V 1.6ADCOPEN
RESETRESETTESTTESTiBT232Using the The Display5P6Setting Up the UnitConnect the included AC adapter to the DC jack located on the back of the unit and connect the other end to a working wall outlet that is not controlled by a switch. Extend FM antenna. Alarm 1 Active Indicator Alarm 2 Active IndicatorPM IndicatorTime Displaytime setusb charging aux-indst+1   -1   auto7.5V 1.6ADC
P76Using the iBT232Installing and Replacing Clock Backup BatteriesNote: 2 AA batteries are included with the unit. Install batteries before using the unit.This model is equipped with a battery backup circuit that will maintain the time and alarm time settings in the event of a temporary power interruption. The battery backup circuit will also operate the buzzer alarm to wake you up at the selected wake up time even if the power is out.  When the backup battery is getting weak or isn’t present, “LO BATT will flash twice in the display when the unit is powered on. When you see this flashing indicator you should replace the backup batteries as soon as possible.  To install/replace the backup batteries:IMPORTANT: When replacing the backup batteries be sure to have the unit connected to the AC outlet to maintain all of your settings, otherwise it will be necessary to reset the time and alarm time after the batteries are replaced.1.  Press upwards on the battery compartment door to release it. 2.  Insert 2 fresh AA batteries in the backup battery compartment as shown. Make sure polarity  (+/–) matches illustration.  3.  Close the battery compartment door. Confirm that ”LO BATT” battery indicator is not flashing in the display by powering unit on.Note:  Make sure you dispose of batteries properly (see your local regulations).Installing/Replacing Backup Batteries
P87Setting the ClockThis unit has a Daylight Saving Time (DST) Switch located on the back of the cabinet. By default, it is set to auto and will  automatically adjust the time at the start and end of daylight saving time. If your location does not observe daylight saving time or you wish to manually adjust, move the switch to +1 to add an hour or to –1 to subtract an hour.1.  Press and hold the Time Set Button located on back of the unit for 2 seconds until the clock display flashes and a beep sounds.2.  Press the     or      Buttons to adjust the clock to the current time (hold for rapid setting). Make sure you set the correct AM/PM time. The PM indicator appears to the left of the display; there is no AM indicator. 3. Press the Time Set Button to confirm the time. The year will flash on the display. 4.  Press the     or      Buttons to adjust the clock to the current year (hold for rapid setting). 5. Press the Time Set Button to confirm the year. The month will flash on the display. 6.  Press the     or      Buttons to adjust the clock to the current month (hold for rapid setting).7. Press the Time Set Button to confirm the month. The date will flash on the display. 8.  Press the     or      Buttons to adjust the clock to the current date (hold for rapid setting).9. Press the Time Set Button to confirm the date and exit clock setting mode. 2 beeps will confirm clock setting is complete. TIP: To toggle the clock display between standard 12 hour time and 24 hour (“military”) time display, press the     Alarm Button or      Alarm Button while the display is flashing during clock setting.Setting and Using the AlarmsThis unit features dual alarms which can be set to different times and alarm sources. Each is set in the same way. Instructions are given as “Alarm Button”; use     Alarm  Button or      Alarm Button to set respective alarms.Note: Each step must be completed while display is flashing or step will time-out with any changes saved.Using the iBT232
8P9Setting and Using the Alarms (Continued)1.  Press and hold the Alarm Button for 2 seconds until the alarm time display, alarm button and alarm icon flash. A beep sounds.2.  Press the     or     Buttons to adjust the alarm time to the desired time (hold for rapid setting). Make sure you set the correct AM/PM alarm time. The PM indicator appears to the left of the display; there is no AM indicator.3. Press the Alarm Button to confirm the alarm time setting. The alarm schedule will flash.4.  Press the     or     Buttons to cycle to the desired schedule: “7 d” (every day), “5 d” (week days) or “2 d” (weekends).5. Press the Alarm Button to confirm the alarm schedule setting. The wake-to source will flash.6.  Press the     or     Buttons to select the desired wake to alarm source: Bluetooth, FM radio or selected tone.Wake to Bluetooth: You will wake to the currently linked Bluetooth device. If no device is detected at wake time, the alarm will default to tone one (”t1”).Wake to Radio: Press the Alarm Button to confirm. Press the Presets Button to select an FM preset to wake to, or press the      or      Buttons to tune in a desired wake to station. (To set Presets, see Setting and Using FM Presets on page 10.)Wake to Tones: You will wake to the selected tone. Press the Alarm Button to confirm, then  press the     or      Buttons to preview and select a desired tone (t1 -t4).7. Press the Alarm Button to confirm the wake to source. The alarm volume will flash.8.  Press the     or     Buttons to select the desired alarm volume.9.    Press the Alarm Button to complete alarm setting and exit alarm setting mode. 2 beeps will confirm alarm setting is complete. The alarm icon will remain on the display, indicating the alarm is armed.8.  To turn off a sounding alarm and reset it to come on the next day at the same time, press  the     Power Button or the associated alarm button (    or    ) to reset alarm.Previewing the Alarm and Turning the Alarm On/OffPress and release the desired Alarm Button as needed to preview current alarm time/ toggle the alarm ON (indicated by the alarm icon and lit alarm button) or OFF (no alarm icon/alarm button is not lit).Using the iBT232
P109Snooze/Display Dimmer Button1.  While the alarm is sounding, press and release the Snooze/Display Dimmer Button to temporarily silence the alarm for the set duration (9 minutes is the default). Snooze can be used several times during alarm. 2.  To adjust the brightness of the display, press and release the Snooze/Display Dimmer Button during normal operation (when no alarm is sounding) to cycle through the brightness display settings, including turning the display off. 3.  To program Snooze, press and hold the Snooze/Display Dimmer Button for 2 seconds during normal operation (when no alarm is sounding). A beep will sound.4.  Press the     or      Buttons to select  the desired snooze time (between 1 and 29 minutes).5.  Press and release the Snooze/Display Dimmer Button to confirm Snooze setting. 2 beeps will sound.  Sleep ModeThis unit allows you to sleep to the current sound source for a set time before turning the unit off.1.  To set Sleep time, press and release the Sleep/Clock Adjust Button as needed to cycle to the desired sleep duration: 120, 90, 60, 30 or 15 minutes or OFF (turns the unit off).2.  Press the     or       Buttons to adjust the sleep volume on the unit. Note that the sleep volume setting is stored separately from other volume settings.FM RadioExtend the FM antenna for best reception.1.  Press and release the FM Presets Button. The current FM radio frequency appears on the display.2.  Press the     or     Buttons to tune the radio to the desired station (hold to scan for the next clear station). 3.  Press the    or       Buttons to adjust the volume on the unit. 4.  When you are through listening, press the      Power Button to turn the unit off.Using the iBT232
Setting and Using FM PresetsThe unit allows you to store up to 6 FM radio station presets1.  Press and release the FM Presets Button. The FM current FM station frequency appears on the display.2.  Press and release the FM Presets Button as needed until the preset number (P1- P6) you wish to set is displayed, then press and hold the FM Presets Button to enter setting mode.3.  Press the     or     Buttons to tune the radio to the desired station (hold to scan for the next clear station).4.  Press and release the FM Presets Button. 2 beeps will sound to confirm the preset has been assigned. Repeat steps 2 - 4 until you have set up to 6 preset stations.5.  To listen to a preset FM station at any time, follow steps 1 - 2 to turn on FM radio mode and cycle to the desired preset. P1110Using the iBT232
5.  If pairing is successful, 2 beeps will sound and the Bluetooth Button will glow solid green indicating the iBT232 is ready to play music. There should also be an indication on your device. If no device is successfully paired within 3 minutes the iBT232 will default to previous mode. Once the iBT232 is paired to a device, it will attempt to autolink when the device  is within range (about 33 feet). P12Pairing is the set-up process to introduce your Bluetooth-capable device to the iBT232. to a previously paired device. Once your device is paired, the iBT232 can recognize it and you can play your audio through it. For manual pairing, follow steps below.1.   Turn on your Bluetooth device and make it “discoverable” by turning on Bluetooth mode (check in Options or Settings).2. Press the    Bluetooth Button to turn on the unit in Bluetooth mode, indicated by “bt” on the display and the Bluetooth Button lighting up green.3.  Press and hold the      Bluetooth Button for 2 seconds. “PAIR” will flash on the display, indicating the iBT232 is in pairing mode.         4. “iHome iBT232” should appear in your device’s Bluetooth menu. Select            “iHome iBT232” to connect it. If prompted for a passcode, enter “1234” on                       your device’s keypad.Using the iBT23211Pairing Your Bluetooth Device iHome iBT232
Playing Audio via Bluetooth 1.  Press the    Bluetooth Button to turn the unit ON in Bluetooth mode. “bt” appears on the display and the Bluetooth Button lights up.3.  Press the     Play/Pause Button on the unit to play audio from your linked Bluetooth device.4.  Press the     or     Buttons to go to the previous or next track.5.  Press the     or       Buttons to adjust the volume on the unit. You may need to adjust the volume on your device, too.6.  When done listening, press the     Power Button to turn the unit off.Using the Speakerphone featureNOTE: The unit must be powered on and linked to a Bluetooth phone to receive a call.1.  When a call is received, playing music is muted to hear the ring tone. “CALL” will flash on the display. Adjust call volume on your device and/or on the unit as needed.  Press the     Answer Button to answer the call; press  the      End Button to ignore the call.  2.  When a call is completed, press the      End Button to end the call and resume previous function. 12Using the iBT232P13
P1413Playing Audio via Aux-In1.  Connect one end of a standard stereo 3.5mm audio cable into the aux-in jack on the back of the unit and the other end into the headphone or output jack of your audio device.  2. Press the Aux Button on the unit to turn it on in AUX mode, indicated by “AUX” on the display and the Aux Button lighting up green.4.  Place your audio device in play mode. Navigate tracks and adjust output volume on the device.5.  Press the     or       Buttons to adjust the volume on the unit. You may need to adjust the volume on your device as well.6.  When done listening, press the     Power Button to turn the unit off.Mobile Phone Game Devices iPod LaptopPC/Tablet MP3/MP4Using the iBT232time setusb charging aux-indst+1   -1   auto7.5V 1.6ADC
P1514Charging Devices via USB Port 1.  Connect the standard size end of a USB cable (not included) to  the USB Charging Port on back of the unit and connect the other end to the charging port on your device. It’s often best to use the charging cable supplied with your device. 2.  Monitor the charging on your device. Some devices use a proprietary charging method and will not charge using the USB Port. If this happens, you must charge your device using the charger that came with it. Using the iBT232NOTE: Unit must be plugged into working outlet to charge devices time setusb charging aux-indst+1   -1   auto7.5V 1.6ADC
Battery Use Cautions and Tips •  Only use the recommended/supplied batteries or equivalent•  Use alkaline batteries for longer life•  Do not mix old and new batteries, and do not mix alkaline, carbon-zinc or rechargeable nickel-cadmium batteries•  Insert batteries with proper polarity (+/–) as indicated•  Remove exhausted batteries from product•  Recharge rechargeable batteries under adult supervision•  Do not attempt to recharge non-rechargeable batteries•  Do not open batteries or heat them beyond normal ambient temperatures.•  To prevent battery leakage or damage remove batteries from a product if it will not be used for a month or longer.•  Use extreme caution handling leaking batteries (avoid direct contact with eyes and skin). If battery leakage comes in contact with eyes, IMMEDIATELY flush the eye with lukewarm and gently flowing water for at least 30 minutes. If skin contact occurs, wash skin with clear water for at least 15 minutes. Seek medical attention if any symptoms occur.•  Store in cool, dry, ventilated area away from hazardous or combustible material.•  Do not dispose of batteries in the household trash or fire•  Follow applicable laws and local regulations for the disposal and transportation of batteries.P1615Using the iBT232
Consumer Product Safety Guide16When used in the directed manner, this unit has been designed and manufactured to ensure your personal safety.  However, improper use can result in potential electrical shock or fire hazards. Please read all safety and operating instructions carefully before installation and use, and keep these instructions handy for future reference. Take special note of all warnings listed in these instructions and on the unit. 1.    Water and Moisture – The unit should not be used near water. For example: near a bathtub, washbowl, kitchen sink, laundry tub, swimming pool or in a wet basement. 2.    Ventilation – The unit should be situated so that its location or position does not interfere with its proper ventilation. For example, it should not be situated on a bed, sofa, rug or similar surface that may block ventilation openings.  Also, it should not be placed in a built-in installation, such as a bookcase or cabinet, which may impede the flow of air through the ventilation openings.3.    Heat – The unit should be situated away from heat sources such as radiators, heat registers, stoves or other appliances (including amplifiers) that produce heat.4.   Power Sources – The unit should be connected to a power supply only of the type described in the operating instructions or as marked on the appliance. Only use the AC adapter that came with the unit.5.    Power-Cable Protection – Power supply cables should be routed so that they are not likely to be walked on or pinched by items placed upon or against them.  It is always best to have a clear area from where the cable exits the unit to where it is plugged into an AC socket.6.   Cleaning – The unit should be cleaned only using a warm damp cloth. Do not use solvents, etc.  7.   Objects and Liquid Entry – Care should be taken so that objects do not fall and liquids are not spilled into any openings or vents located on the product.8.   Attachments – Do not use attachments not recommended by the product manufacturer.9.   Lightning and Power Surge Protection – Unplug the unit from the wall socket and disconnect the antenna or cable system during a lightning storm or when it is left unattended and unused for long periods of time. This will prevent damage to the product due to lightning and power-line surges.10.  Overloading – Do not overload wall sockets, extension cords, or integral convenience receptacles as this can result in a risk of fire or electric shock.11.  Damage Requiring Service – The unit should be serviced by qualified service personnel when:  A. the power supply cable or plug has been damaged.  B. objects have fallen into or liquid has been spilled into the enclosure.  C. the unit has been exposed to rain.  D. the unit has been dropped or the enclosure damaged.  E. the unit exhibits a marked change in performance or does not operate normally.12.  Periods of Nonuse – If the unit is to be left unused for an extended period of time, such as a month or longer, the backup batteries should be removed from the unit to prevent damage or corrosion.13.  Servicing – The user should not attempt to service the unit beyond those methods described in the user’s operating instructions.  Service methods not covered in the operating instructions should be referred to qualified service personnel.P17IMPORTANT SAFETY INSTRUCTIONS
iBT23217FCC ID: EMOIBT232IC: 986B-IBT232FCC InformationThis device complies with Part 15 of the FCC Rules, operation is subject to the following two conditions: (1) This device may not cause harmful interference, and (2) this device must accept any interference received, including interference that may cause undesired operation.FCC Radiation Exposure StatementThis equipment complies with FCC RF radiation exposure limits set forth for an uncontrolled environment. •  Warning: Changes or modifications to this unit not expressly approved by the party responsible for compliance could void the user’s authority to operate the equipment.•  NOTE: This equipment has been tested and found to comply with the limits for a Class B digital device, pursuant to Part 15 of the FCC Rules.These limits are designed to provide reasonable protection against harmful interference in a residential installation. This equipment generates, uses and can radiate radio frequency energy and, if not installed and used in accordance with the instructions, may cause harmful interference to radio communications.However,  there is no guarantee that interference will not occur in a particular installation. If this equipment does cause harmful interference to radio or television reception, which can be determined by turning the equipment off and on, the user is encouraged to try to correct the interference by one or more of the following measures:•  Reorient or relocate the receiving antenna.•  Increase the separation between the equipment and receiver.•  Connect the equipment into an outlet on a circuit different from that to which the receiver is connected.•  Consult the dealer or an experienced radio/TV technician for help.CAN ICES-3 (B)/NMB-3(B)IC Statement This device complies with Industry Canada license-exempt RSS standard(s). Operation is subject to the following two conditions: (1) this device may not cause interference, and (2) this device must accept any interference, including interference that may cause undesired operation of the device. Le présent appareil est conforme aux CNR d'Industrie Canada applicables aux appareils radio exempts de license. L'exploitation est autorisée aux deux conditions suivantes : (1) l'appareil ne doit pas produire de brouillage, et (2) l'utilisateur de l'appareil doit accepter tout brouillage radioélectrique subi, même si le brouillage est susceptible d'en compromettre le fonctionnement.The device meets the exemption from the routine evaluation limits in section 2.5 of RSS 102 and compliance with RSS-102 RF exposure, users can obtain Canadian information on RF exposure and compliance. Le dispositif rencontre l'exemption des limites courantes d'évaluation dans la section 2.5 de RSS 102 et la conformité à l'exposition de RSS-102 rf, utilisateurs peut obtenir l'information canadienne sur l'exposition et la conformité de rf.P18
Unit doesn’t respond (no power) •  Check that all connections are correct and properly plugged in. •  Make sure your device is properly paired with the iBT232.•  Make sure the Power is ON.Unit doesn’t respond (locked up or frozen) •  The unit may need to be reset. To do so, unplug the unit from power source and remove the backup batteries.  Let unit stand for 2 minutes. Re-install backup batteries and connect unit to power  source. You will need to reset the clock, radio, and any other settings.Trouble pairing device/computer with iBT232Bluetooth implementation varies depending on your device’s hardware and operating system. Please see our website for updates on pairing. •  When you power ON the unit, it will automatically link with the last previously paired Bluetooth device if the device is still within range (about 33 feet). •  Make sure your device is working properly. Check your device’s manual for details on Bluetooth pairing and linking. 18TroubleshootingFor further information and to see the latest instructions, visit www.ihome.com/supportP19
Limited 1 Year WarrantyiHome Products, a division of SDI Technologies Inc. (hereafter referred to as SDI), warrants this product to be free from defects in workmanship and materials, under normal use and conditions, for a period of one (1) year from the date of original purchase.Should this product fail to function in a satisfactory manner, it is best to first return it to the store where it was originally purchased. Should this fail to resolve the matter and service still be required by reason of any defect or malfunction during the warranty period, SDI will repair or, at its discretion, replace this product without charge. This decision is subject to verification of the defect or malfunction upon delivery of this product to the Factory Service Center authorized by Customer Service.If service is required, please call Customer Service at 1-800-288-2792 to obtain a Return Authorization Number and shipping instructions. A copy of the sales receipt is required to validate in-warranty coverage.Disclaimer of WarrantyNOTE: This warranty is valid only if the product is used for the purpose for which it was designed. It does not cover (i) products which have been damaged by negligence or willful actions, misuse or accident, or which have been modified or repaired by unauthorized persons; (ii) cracked or broken cabinets, or units damaged by excessive heat; (iii) damage to digital media players, CD’s or tape cassettes (if applicable); (iv) the cost of shipping this product to the Factory Service Center and its return to the owner.This warranty is valid only in the United States of America and does not extend to owners of the product other than to the original purchaser. In no event will SDI or any of its affiliates, contractors, resellers, their officers, directors, shareholders, members or agents be liable to you or any third party for any consequential or incidental damages, any lost profits, actual, exemplary or punitive damages. (Some states do not allow limitations on implied warranties or exclusion of consequential damages, so these restrictions may not apply to you.) This warranty gives you specific legal rights, and you may also have other rights which vary from state to state.Your acknowledgment and agreement to fully and completely abide by the above mentioned disclaimer of warranty is contractually binding to you upon your transfer of currency (money order, cashier's check, or credit card) for purchase of your SDI product.© 2017 SDI Technologies, Inc. All rights reservedQuestions? Visit www.ihome.comor call 1-800-288-2792 Toll FreeiBT232-161109 - A                                                Printed in ChinaP20

Navigation menu