SDI Technologies IBT297 Color Changing Bluetooth App Enhanced Speaker System User Manual iBT297 IB 090417

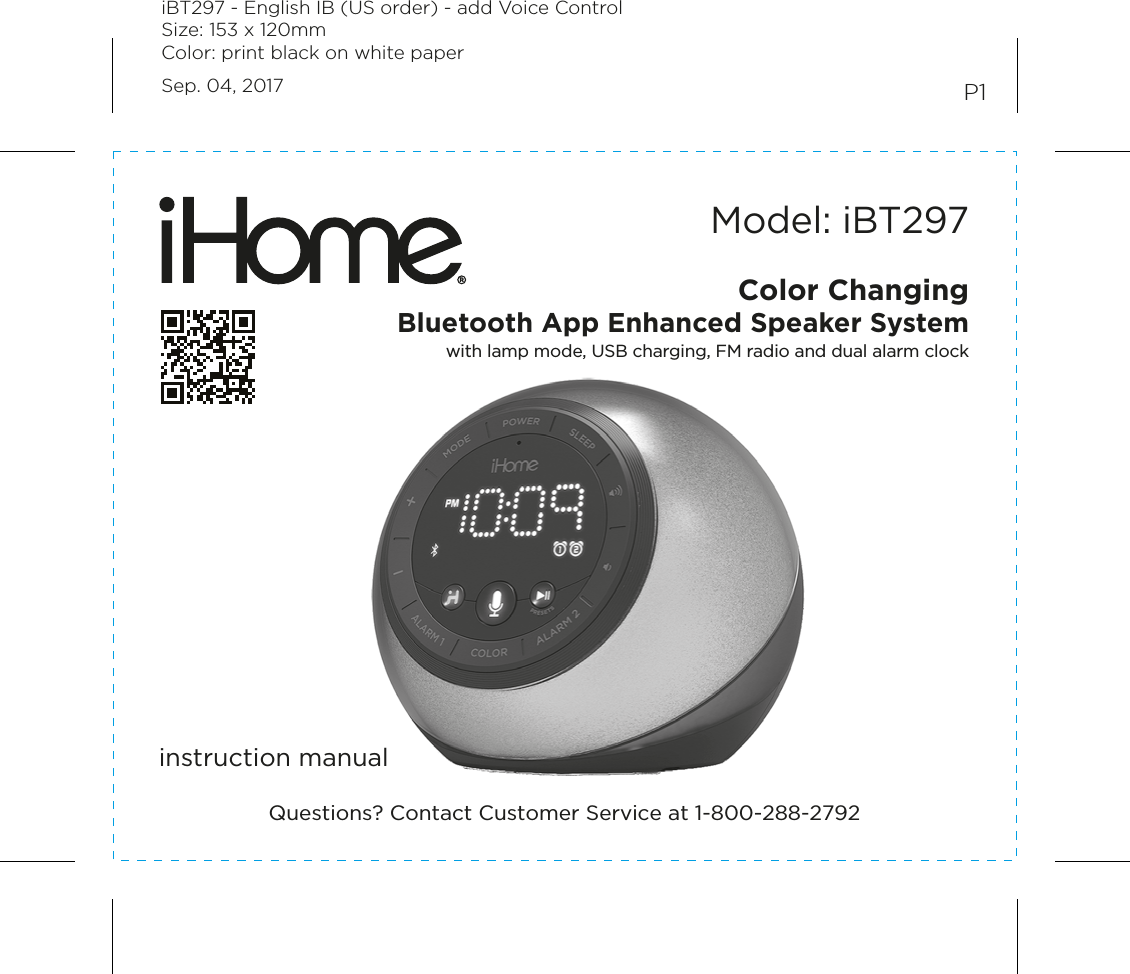
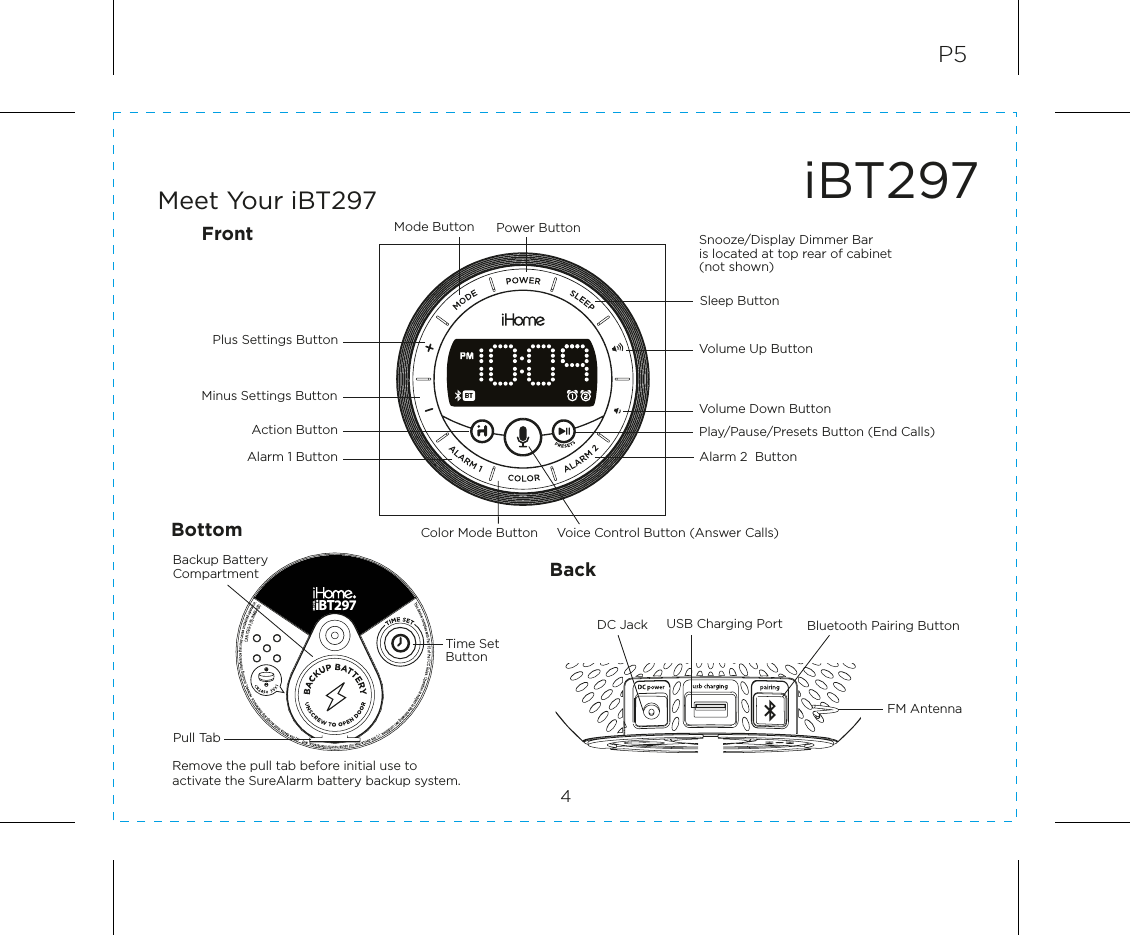
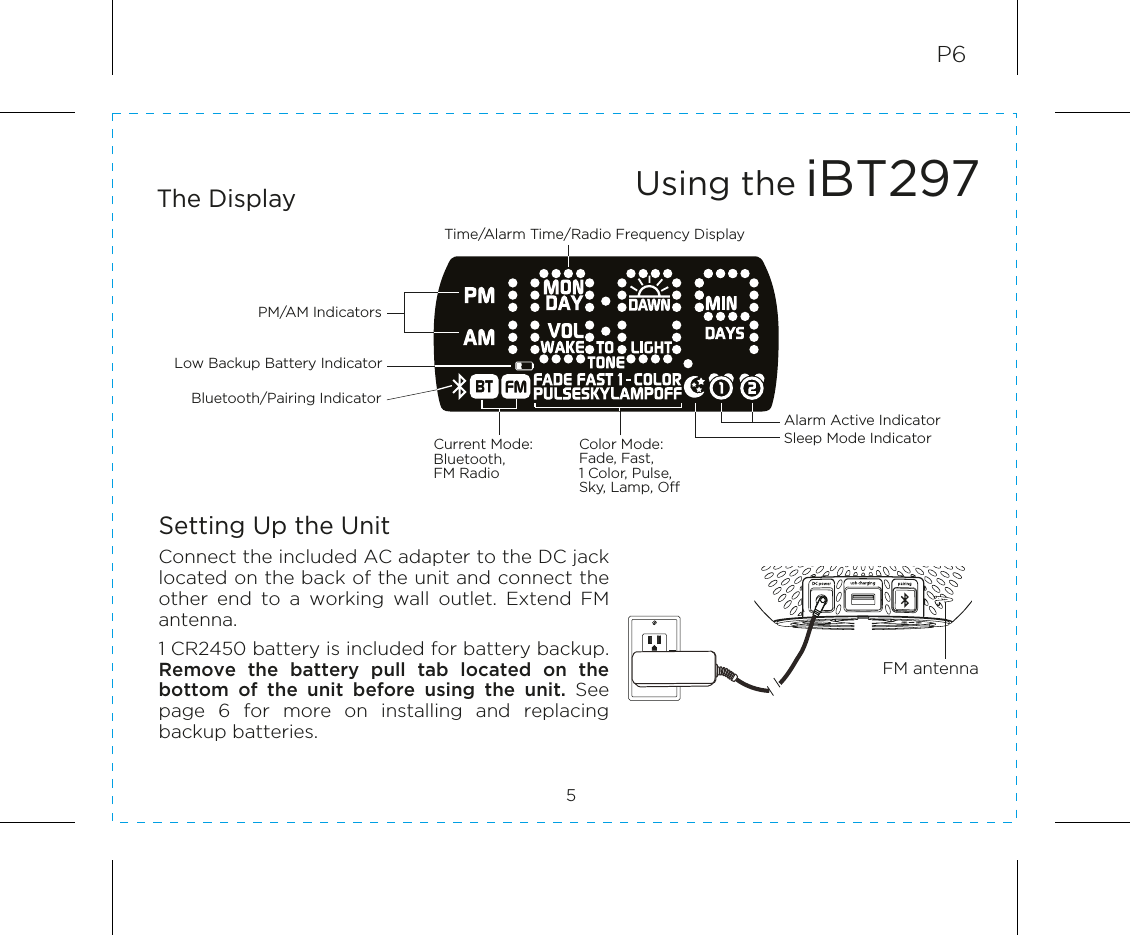
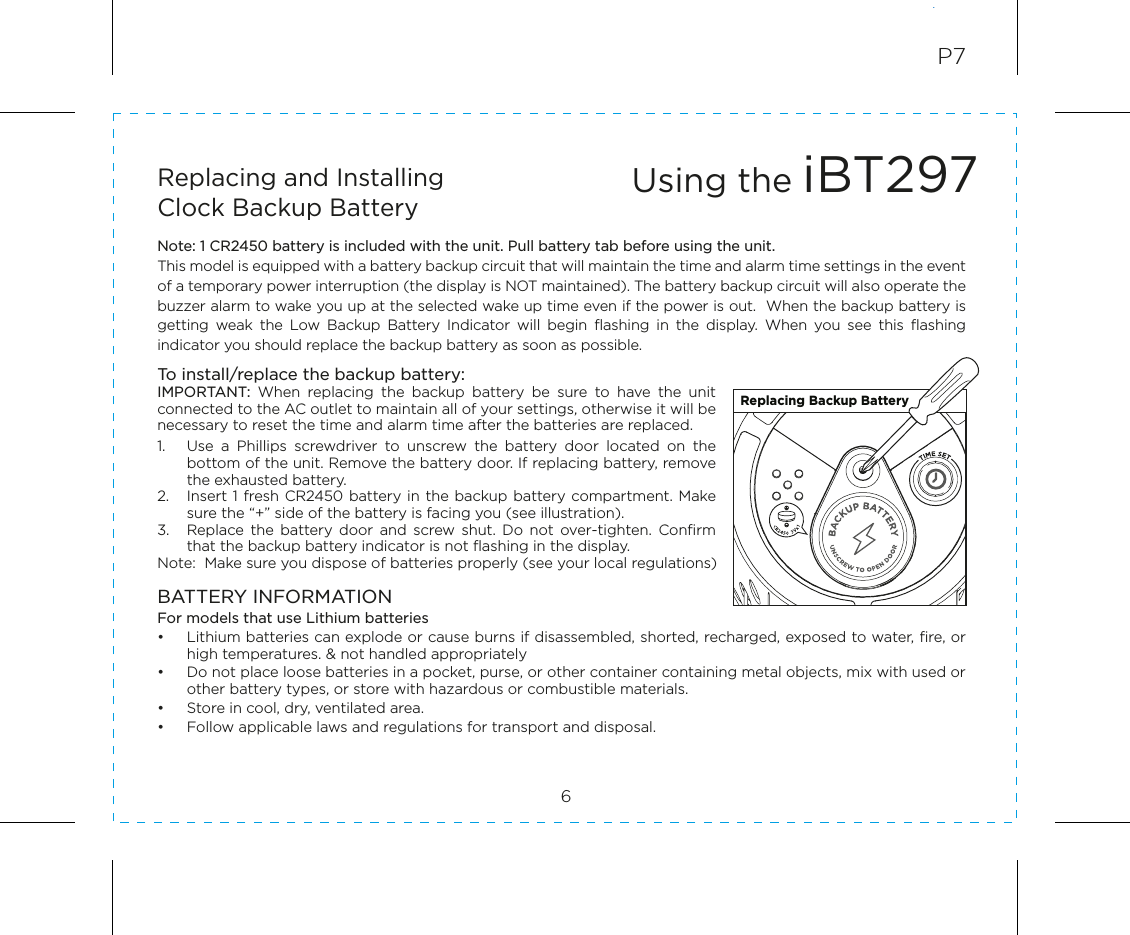
SDI Technologies Inc. Color Changing Bluetooth App Enhanced Speaker System iBT297 IB 090417

User Manual

Model: iBT297instruction manualP1Color ChangingBluetooth App Enhanced Speaker Systemwith lamp mode, USB charging, FM radio and dual alarm clockQuestions? Contact Customer Service at 1-800-288-2792iBT297 - English IB (US order) - add Voice ControlSize: 153 x 120mmColor: print black on white paperSep. 04, 2017
iBT297IntroductionThank you  for  purchasing the  iHome  iBT297.  This  product  is  designed  to  provide  fun colors and  high  quality  wireless  sound  for your  iPad, iPhone, iPod or  other  Bluetooth audio device. This instruction booklet explains the basic operation and care of the unit. Please read it carefully and keep for future reference.•  Place the unit on a level surface away from sources of direct sunlight or excessive heat.•  Protect your furniture when placing your unit on a natural wood and lacquered finish. A cloth or other protective material should be placed between it and the furniture.•  Clean your unit with a soft cloth moistened only with mild soap and water. Stronger cleaning agents, such as benzene, thinner or similar materials can damage the surface of the unit.1P2Maintenance
iBT297Table of Contents2What’s Included................................................................................................................................................ 3Meet Your iBT297............................................................................................................................................. 4The Display/Setting Up the Unit............................................................................................................... 5Replacing and Installing Clock Backup Battery................................................................................ 6Using the iHome Enhance app: Auto Time Sync via Bluetooth................................................ 7Setting the Clock/Setting and Using the Alarms............................................................................. 8Previewing the Alarm and Turning the Alarm On/Off...................................................................9Snooze/Display Dimmer Button/Sleep Mode/FM Radio........................................................... 10Setting and Using FM Presets/Using FM Radio in Other Countries .......................................11Pairing Your Bluetooth Device  ...............................................................................................................12Playing Audio Via Bluetooth .....................................................................................................................13Using the Speakerphone Feature ...........................................................................................................13Charging Devices via USB Port............................................................................................................... 14Color Change Mode/ Using the Voice Control Feature ...............................................................15Consumer Product Safety Guide ............................................................................................................16FCC Information ..............................................................................................................................................17Troubleshooting...............................................................................................................................................18Warranty..............................................................................................................................................................19P3
iBT2973P4What’s Included •  iBT297 unit•  100V-240V universal AC adapter100V-240V universal AC adapteriBT297 unit
iBT297P5Meet Your iBT297Front4BottomBackDC Jack USB Charging PortFM AntennaBluetooth Pairing ButtonPlus Settings ButtonMode ButtonColor Mode Button Voice Control Button (Answer Calls)Volume Down ButtonPlay/Pause/Presets Button (End Calls)Volume Up ButtonSnooze/Display Dimmer Baris located at top rear of cabinet(not shown)Time SetButtonAction ButtonAlarm 1 Button Alarm 2  ButtonPower ButtonBackup Battery CompartmentRemove the pull tab before initial use to activate the SureAlarm battery backup system.Pull TabiBT297Minus Settings ButtonSleep Button
iBT297Using theThe Display5P6Alarm Active IndicatorSleep Mode IndicatorBluetooth/Pairing IndicatorPM/AM IndicatorsColor Mode: Fade, Fast, 1 Color, Pulse, Sky, Lamp, Off  Time/Alarm Time/Radio Frequency DisplayLow Backup Battery IndicatorFM antennaSetting Up the UnitConnect the included AC adapter to the DC jack located on the back of the unit and connect the other  end  to  a  working  wall  outlet.  Extend  FM antenna.1 CR2450 battery is included for battery backup. Remove  the  battery  pull  tab  located  on  the bottom  of  the  unit  before  using  the  unit.  See page  6  for  more  on  installing  and  replacing backup batteries.Current Mode: Bluetooth, FM RadioRESETRESETTESTTEST
P87Using the iHome Enhance AppDownload  the  free  iHome  Enhance  App  from  the  App  Store  or  Google  Play  to  enjoy wireless interaction with the iBT297 from your Bluetooth device.The app must be paired to the iBT297 (this is separate from audio Bluetooth pairing, see page 12 for audio Bluetooth pairing).• To pair the App to iBT297 and use Auto Time Sync:  a. Plug the unit into a working outlet.  b. Turn on Bluetooth on your device.  c. Download and launch the iHome Enhance app.  d. Select “Setup your device” on the app.  e. Select iHome iBT297 app on the app’s device menu.  f.  If pairing request appears, select Pair.  The app will update the time on the iBT297.• To turn off time sync capability on the iBT297, press and hold the Time Set Button    for 10 seconds until “SYNC ON” appears on the display, then press the – or + Buttons to     toggle to SYNC OFF.   To set clock manually, follow instructions on page 8.Using the iBT297
Note: 1 CR2450 battery is included with the unit. Pull battery tab before using the unit.This model is equipped with a battery backup circuit that will maintain the time and alarm time settings in the event of a temporary power interruption (the display is NOT maintained). The battery backup circuit will also operate the buzzer alarm to wake you up at the selected wake up time even if the power is out.  When the backup battery is getting  weak  the  Low  Backup  Battery  Indicator  will  begin  flashing  in  the  display.  When  you  see  this  flashing indicator you should replace the backup battery as soon as possible.To install/replace the backup battery:IMPORTANT:  When  replacing  the  backup  battery  be  sure  to  have  the  unit connected to the AC outlet to maintain all of your settings, otherwise it will be necessary to reset the time and alarm time after the batteries are replaced.1.  Use  a  Phillips  screwdriver  to  unscrew  the  battery  door  located  on  the bottom of the unit. Remove the battery door. If replacing battery, remove the exhausted battery. 2.  Insert 1 fresh CR2450 battery in  the backup battery compartment. Make sure the “+” side of the battery is facing you (see illustration). 3.  Replace  the  battery  door  and  screw  shut.  Do  not  over-tighten.  Confirm that the backup battery indicator is not flashing in the display.Note:  Make sure you dispose of batteries properly (see your local regulations)BATTERY INFORMATIONFor models that use Lithium batteries•  Lithium batteries can explode or cause burns if disassembled, shorted, recharged, exposed to water, fire, or high temperatures. & not handled appropriately•  Do not place loose batteries in a pocket, purse, or other container containing metal objects, mix with used or other battery types, or store with hazardous or combustible materials.  •  Store in cool, dry, ventilated area. •  Follow applicable laws and regulations for transport and disposal.Replacing and InstallingClock Backup BatteryP76Using the iBT297Replacing Backup Battery
P88Setting the Clock1.  Press and hold the Time Set Button on the bottom of the unit for 3 seconds until the clock display flashes and a beep sounds.2.  Press the – or + Buttons to adjust the clock to the current time (hold for rapid setting). Make sure you set the correct AM/PM time. The AM and PM indicators appear to the left of the display. 3.  Press the Time Set  Button to confirm the time. The  year will  flash.  Press the  –  or  + Buttons to adjust to the current year.4.  Press the Time Set Button to confirm the year. The month will flash. Press the – or + Buttons to adjust to the current month.5.  Press the Time Set Button to confirm the month. The date will flash. Press the – or + Buttons to adjust to the current date.6.  Press the Time Set Button to confirm the date and exit clock setting mode. 2 beeps will confirm clock setting is complete. TIP: To toggle the clock display between standard 12 hour time and 24 hour (“military”) time display, press the Alarm 1 Button or Alarm 2 Button while the display is flashing during clock setting.Setting and Using the AlarmsThis unit  features  dual  alarms  which  can  be  set  to different  times  and  alarm  sources. Each is set in the same way. Instructions are given as “Alarm Button”; use Alarm 1 Button or Alarm 2 Button to set respective alarms.Note: Each step must be completed while display is flashing or step will time-out with any changes saved.Using the iBT297
9P9Setting and Using the Alarms (continued)1.  Press and hold the Alarm Button for 2 seconds until the alarm time display and alarm icon flash. A beep sounds.2.  Press the – or + Buttons to adjust the alarm time to the desired time (hold for rapid setting).  Make sure you set the correct AM/PM alarm time. The AM and PM indicators appear to the left of the display. 3.  Press the Alarm Button to confirm the alarm time setting. The alarm schedule will flash:  7  (every  day),  5  (weekdays)  or  2  (weekend only).  Press  the  –  or  +  Buttons  to  select  the desired alarm schedule.4.  Press the Alarm Button to confirm the alarm schedule. The wake-to source will flash.5.  Press the  – or + Buttons to select the desired wake-to alarm source: Bluetooth, FM radio, tone or light only (no alarm sound). Wake to Bluetooth:  You will wake to the  currently linked Bluetooth device. If no device is detected, the alarm will default to the last tone selected. Wake to FM radio: Press the Alarm Button to confirm. Press the Presets Button to select an FM preset to wake to, or press the – or + Buttons to tune in a desired wake to station. Wake  to Tone:Press the Alarm Button to  confirm. Press  the –  or  +  Buttons  to  select the desired tone to wake to (Tone 1 -Tone 4).   Wake to Light  Only:  Select this mode to  wake to  silent light only alarm. Press the – or + Buttons to select the desired light mode to wake to (Dawn, Slow Fade, Fast, One Color, Pulse, Sky Gradient, Lamp or Off). 6.  Press the Alarm Button to confirm wake-to source. The alarm volume will flash (unless Wake to Light is set wake to choice, then volume setting is skipped and you are done).7.  Press the – or + Buttons to adjust the alarm volume.  8.  Press the Alarm Button to confirm the alarm settings and exit alarm setting mode. 2 beeps will confirm alarm setting is complete. The alarm icon will remain on the display, indicating the alarm is armed.9.  To turn off a sounding alarm and reset it to come on the next day at the same time, press the Power Button or the associated alarm button (Alarm 1 Button or Alarm 2 Button) to reset alarm.Previewing the Alarm and Turning the Alarm On/OffPress and release the desired Alarm Button as needed to preview the alarm and to toggle the alarm ON (indicated by the alarm icon) or OFF (no alarm icon).Using the iBT297
P1010Snooze/Display Dimmer Button1.  To program Snooze, press and hold the Snooze/Display Dimmer Bar located at the top rear of the cabinet during normal operation (when no alarm is sounding) for 3 seconds.2.  Press the – or + Buttons to select  the desired snooze time (between 01 and 29 minutes).3.  Press  and  release  the  Snooze/Display  Dimmer  Bar  to  confirm  Snooze  setting. 2 beeps will sound.  •  While  the  alarm  is  sounding,  press  and  release  the  Snooze/Display  Dimmer  Bar  to temporarily silence the alarm for the set duration (9 minutes is the default). Snooze can be used several times during the one hour alarm cycle. •  To adjust the brightness of the display, press and release the Snooze/Display Dimmer Bar during normal operation (when no alarm is sounding) to cycle through the brightness display settings, including OFF.Sleep ModeThis unit allows you to sleep to the current sound source for a set time before turning the unit off. (Sleep mode can be customized using the free iHome Enhance app.)1.  To set Sleep time, press and release the Sleep Button as needed to cycle to the desired sleep  duration:120, 90, 60, 30 or 15 minutes or OFF (turns the unit off). The sleep icon will appear on the display.2.  Press the     or       Buttons to adjust the sleep volume on the unit. Note that the sleep volume setting is stored separately from other volume settings.FM RadioExtend the FM antenna for best reception.1.  Press and release the Mode Button as needed until the FM indicator icon and current FM radio frequency appear on the display.2.  Press the – or + Buttons to tune the radio to the desired station (hold to scan for the next clear station). 3.  Press the      or        Buttons to adjust the volume on the unit. 4. When you are through listening, press the Power Button to turn the unit off. Using the iBT297
Setting and Using FM PresetsThe unit allows you to store up to 6 FM radio station presets1.  Press and release the Mode Button as needed until the FM indicator icon appears on the display.2.  Press and release the Play/Pause Presets Button as needed until the preset number (P1-  P6)  you  wish  to  set  is  displayed,  then  press  and  hold  the  Play/Pause  Presets Button to enter setting mode.3.  Press the – or + Buttons to tune the radio to the desired station (hold to scan for the next clear station).4.  Press and release the Play/Pause Presets Button. 2 beeps will sound to confirm the preset has been assigned. Repeat steps 2 - 4 until you have set up to 6 preset stations.5.  To listen to a preset FM station at any time, follow steps 1 - 2 to turn on FM radio mode and cycle to the desired preset. Using FM Radio in Other CountriesDifferent areas of the world use different FM frequency steps and ranges. By default, this unit is set to USA frequency steps. To use the radio outside the USA:1.  Make sure unit is OFF.2.  Press and hold the Mode Button for 10 seconds until “USA” appears in the display.3.  Press and release  – or + Buttons to  cycle to your  location:  Europe, Japan, Australia, China or USA.4.  Press  the  Mode  Button  again  to  exit  frequency  setting  mode.  2  beeps  will  confirm setting.P1111Using the iBT297
5.  When pairing is successful, the Bluetooth icon     will appear solid, cabinet lights will flash blue two times (if light is on) and 2 beeps will sound, indicating the iBT297 is ready to play music. There should also be an indication on your device. If no device is successfully paired within 3 minutes the iBT297 will default to previous mode. Once the iBT297 is paired to a device,  when  powered on and in  Bluetooth mode, it will attempt to  autolink  when  the device is within range (about 33 feet).  To reset Bluetooth, press and hold the Bluetooth Pairing Button for 10 seconds.P12Pairing is the set-up process to introduce your Bluetooth-capable device to the iBT297. Once your device is paired, the iBT297 can recognize it and you can play your audio through it.1. Turn on your Bluetooth device and make it “discoverable” by turning on Bluetooth mode    (check in Options or Settings).2. Press and release the Mode Button as needed until the “BT” indicator icon appears on the display. 3. Press and hold the Bluetooth Pairing Button located on the back of the unit for 2 seconds. The iBT297 will beep and the Bluetooth    icon will flash on the display, indicating the iBT297 is in pairing mode. If light mode is on, the cabinet will flash blue and red. 4. “iHome iBT297” should appear in your device’s Bluetooth menu. Select “iHome iBT297” to connect it. If prompted for a passcode, enter “1234” on your device.Using the iBT29712Pairing Your Bluetooth Device 2sMODEiHome iBT297
Playing Audio via Bluetooth 1.  Press and release the Mode Button as needed until the “BT” indicator icon appears on the display.2.  Press the       Play/Pause/Presets Button on the unit to play, pause and resume play of audio from your linked Bluetooth device.3.  Press  the  –  Button  to  go  to  the  previous  track  (or  start  of  current  track). Press the  + Button to advance to the next track.4.  Press the     or       Buttons to adjust the volume on the unit. You may need to adjust the volume on your device, too.5.  When done listening, press the Power Button to turn the unit off.NOTE: Bluetooth audio is only available when unit is in Bluetooth mode.Using the Speakerphone featureNOTE: The unit must be powered on and linked to a Bluetooth phone to receive a call.1.  When a call is received, playing music is muted to hear the ring tone and the cabinet flashes green. “CALL” will flash on the display. Adjust call volume on your device and/or on the unit as needed.  Press the       Voice Button to answer the call; press the      Play/Pause/Presets Button to ignore the call or to end an active call. 13Using the iBT297P13
P1414Charging Devices via USB Port1.  Connect the standard size end of a USB cable (not included) to the USB Port on back of the unit and connect the other end to the charging port on your device. It’s often best to use the charging cable supplied with your device.2.  Monitor  the  charging  on  your  device.  Some  devices  use  a  proprietary  charging method and will not charge using the USB Port. If this happens, you must charge your device using the charger that came with it.Using the iBT297NOTE: Unit must be plugged into working outlet to charge devices RESETRESETTESTTEST
Color Change ModePress and release the Color Mode Button as needed to cycle to the desired color mode light setting. Indicators on the display show the current light mode for 5 seconds: FADE:  Slow Fade mode gradually fades from one color into the next FAST:  Fast Change mode fades quickly from color to color  1-COLOR: One Color mode pauses on the last color shown in Fast Change mode. PULSE:  Pulse to Music mode pulses the changing lights to the beat of playing music     if volume is up SKY:  Sky Gradient mode changes gradient colors to match the color of the sky at    the current time of day  LAMP:  Changes colors to warm white light for maximum illumination OFF:  Turns cabinet lights OFF.TIP:  When  the  unit  is  OFF  and  in  One  Color  mode,  press  the  –  or  + Buttons  to  step through the color spectrumUsing the Voice Control featureNOTE: The unit must be powered on and linked to an iOS or Android Bluetooth device to use Voice Control.  Press and release the       Voice Button for 2 seconds and wait for beep to activate voice control with Siri or Google Now. Press and hold to seek forward.Voice control requires an  active internet connection on connected Bluetooth device with iOS 10  and  Android 4.1 and  later. When activated, the speaker microphone acts as an extension of the microphone in your smartphone to make/take calls, enable you to ask Siri®/Google Now™ to play music and more. P1515Using the iBT297
Consumer Product Safety GuideWhen used in the directed manner, this unit has been designed and manufactured to ensure your personal safety.  However, improper use can result in potential electrical shock or fire hazards. Please read all safety and operating instructions carefully before installation and use, and keep these instructions handy for future reference. Take special note of all warnings listed in these instructions and on the unit. 1.    Water and Moisture – The unit should not be used near water. For example: near a bathtub, washbowl, kitchen sink, laundry tub, swimming pool or in a wet basement. 2.    Ventilation – The unit should be situated so that its location or position does not interfere with its proper ventilation. For example, it should not be situated on a bed, sofa, rug or similar surface that may block ventilation openings.  Also, it should not be placed in a built-in installation, such as a bookcase or cabinet, which may impede the flow of air through the ventilation openings.3.    Heat – The unit should be situated away from heat sources such as radiators,  heat  registers, stoves or other appliances (including amplifiers) that produce heat.4.   Power Sources – The unit should be connected to a power supply only of the type described in the operating instructions or as marked on the appliance. Only use the AC adapter that came with the unit.5.    Power-Cable Protection – Power supply cables should be routed so that they are not likely to be walked on or pinched by items placed upon or against them.  It is always best to have a clear area from where the cable exits the unit to where it is plugged into an AC socket.6.   Cleaning – The unit should be cleaned only using a warm damp cloth. Do not use solvents, etc.  7.   Objects and Liquid Entry – Care should be taken so that objects do not fall and liquids are not spilled into any openings or vents located on the product.8.   Attachments – Do not use attachments not recommended by the product manufacturer.9.   Lightning and Power Surge Protection – Unplug the unit from the wall socket and disconnect the antenna or cable system during a lightning storm or when it is left unattended and unused for long periods of time. This will prevent damage to the product due to lightning and power-line surges.10.  Overloading – Do not overload wall sockets, extension cords, or integral convenience receptacles as this can result in a risk of fire or electric shock.11.  Damage Requiring Service – The unit should be serviced by qualified service personnel when: A. the power supply cable or plug has been damaged. B. objects have fallen into or liquid has been spilled into the enclosure. C. the unit has been exposed to rain. D. the unit has been dropped or the enclosure damaged. E. the unit exhibits a marked change in performance or does not operate normally.12.  Periods of Nonuse – If the unit is to be left unused for an extended period of time, such as a month or longer, the backup batteries should be removed from the unit to prevent damage or corrosion.13.  Servicing  –  The  user  should  not  attempt  to  service  the unit  beyond those  methods  described  in  the  user’s  operating instructions.  Service methods not covered in the operating instructions should be referred to qualified service personnel.IMPORTANT SAFETY INSTRUCTIONSP1616
iBT297FCC ID: EMOIBT297IC: 986B-IBT297FCC Information17P17This device complies with Part 15 of the FCC Rules, operation is subject to the following two conditions: (1) This device may not cause harmful interference, and (2) this device must accept any interference received, including interference that may cause undesired operation.FCC Radiation Exposure StatementThis equipment complies with FCC RF radiation exposure limits set forth for an uncontrolled environment. This Device complies with                                        .. Operation is subject to the following two conditions: (1) This device may not cause interference and   (2)This device must accept any interference received, including interference that may cause undesired operation•  Warning: Changes or modifications to this unit not expressly approved by the party responsible for compliance could void the user’s authority to operate the equipment.•  NOTE: This equipment has been tested and found to comply with the limits for a Class B digital device, pursuant to Part 15 of the FCC Rules.These limits are designed to provide reasonable protection against harmful interference in a residential installation. This equipment generates, uses and can radiate radio frequency energy and, if not installed and used in accordance with the instructions, may cause harmful interference to radio communications.However, there is no guarantee that interference will not occur in a particular installation. If this equipment does cause harmful interference to radio or television reception, which can be determined by turning the equipment off and on, the user is encouraged to try to correct the interference by one or more of the following measures:•  Reorient or relocate the receiving antenna.•  Increase the separation between the equipment and receiver.•  Connect the equipment into an outlet on a circuit different from that to which the receiver is connected.•  Consult the dealer or an experienced radio/TV technician for help.CAN ICES-3 (B)/NMB-3(B)IC Statement This device complies with Industry Canada                       (2) this device must accept any interference, including interference that may cause undesired operation of the device. Le présent appareil est conforme aux CNR d'Industrie Canada applicables aux appareils radio exempts de licence. L'exploitation est autorisée aux deux conditions suivantes : (1) l'appareil ne doit pas produire de brouillage, et (2) l'utilisateur de l'appareil doit accepter tout brouillage radioélectrique subi, même si le brouillage est susceptible d'en compromettre le fonctionnement. The device meets the exemption from the routine evaluation limits in section 2.5 of RSS 102 and compliance with RSS-102 RF exposure, users can obtain Canadian information on RF exposure and compliance. Le dispositif rencontre l'exemption des limites courantes d'évaluation dans la section 2.5 de RSS 102 et la conformité à l'exposition de RSS-102 rf, utilisateurs peut obtenir l'information canadienne sur l'exposition et la conformité de rf.part 15 of the FCC Ruleslicense-exempt RSS standard(s).Operation is subject to the following two conditions: (1) this device may not cause interference, and
Unit doesn’t respond (no power) •  Check that all connections are correct and properly plugged in. •  Make sure your device is properly paired with the iBT297.•  Make sure the Power is ON.Unit doesn’t respond (locked up or frozen) •  The unit  may  need  to  be  reset.  To do  so,  unplug  the  unit  from power  source  and remove the backup battery. Let unit stand for 2 minutes. Re-install backup battery and connect unit to power  source. You will need to reset the clock, radio, and any other settings.Trouble pairing device with iBT297Bluetooth  implementation  varies  depending  on  your  device’s  hardware  and  operating system. Please see our website for updates on pairing. •  When you power ON the unit and put it in Bluetooth mode, it will automatically link with  the  last  previously  paired  Bluetooth  device  if  the  device  is  still  within  range (about 33 feet). To pair with a different device follow pairing instructions on page 12.•  Make sure your device is working properly. Check your device’s manual for details on Bluetooth pairing and linking.   NOTE: Bluetooth audio is only available when unit is in Bluetooth mode.TroubleshootingFor further information and to see the latest instructions, visit www.ihome.com/support18P18
19P19Limited 1 Year WarrantyiHome Products, a division of SDI Technologies  Inc. (hereafter referred to as SDI),  warrants this product to be free from defects in workmanship and materials, under normal use and conditions, for a period of one (1) year from the date of original purchase.Should this product fail to function in a satisfactory manner, it is best to first return it to the store where it was originally purchased. Should this fail to resolve the matter and service still be required by reason of any defect or malfunction during the warranty period, SDI will repair or, at its discretion, replace this product without charge. This decision is subject to verification of the defect or malfunction upon delivery of this product to the Factory Service Center authorized by Customer Service.If service is required, please call Customer Service at 1-800-288-2792 to obtain a Return Authorization Number and shipping instructions. A copy of the sales receipt is required to validate in-warranty coverage.Disclaimer of WarrantyNOTE: This warranty is valid only if the product is used for the purpose for which it was designed. It does not cover (i) products which have been damaged by negligence or willful actions, misuse or  accident, or which have been modified or repaired  by unauthorized  persons;  (ii)  cracked  or broken cabinets, or units damaged by excessive heat; (iii) damage to digital media players, CD’s or tape cassettes (if applicable); (iv) the cost of shipping this product to the Factory Service Center and its return to the owner.This warranty is valid only in the United States of America and does not extend to owners of the product other than to the original purchaser. In no event will SDI or any of its affiliates, contractors, resellers, their officers,  directors, shareholders, members or  agents be  liable to you or any third party for any consequential or incidental damages, any lost profits, actual, exemplary or punitive damages. (Some states do not allow limitations on implied warranties or exclusion of consequential damages, so these restrictions may not apply to you.) This warranty gives you specific legal rights, and you may also have other rights which vary from state to state.Your  acknowledgment  and  agreement  to  fully  and  completely  abide  by  the  above  mentioned disclaimer of warranty is contractually binding to you upon your transfer of currency (money order, cashier's check, or credit card) for purchase of your SDI product.© 2017 SDI Technologies, Inc. All rights reserved.Questions? Visit www.ihome.comor call 1-800-288-2792 Toll FreeiBT297-090417-A                                                Printed in China

Navigation menu