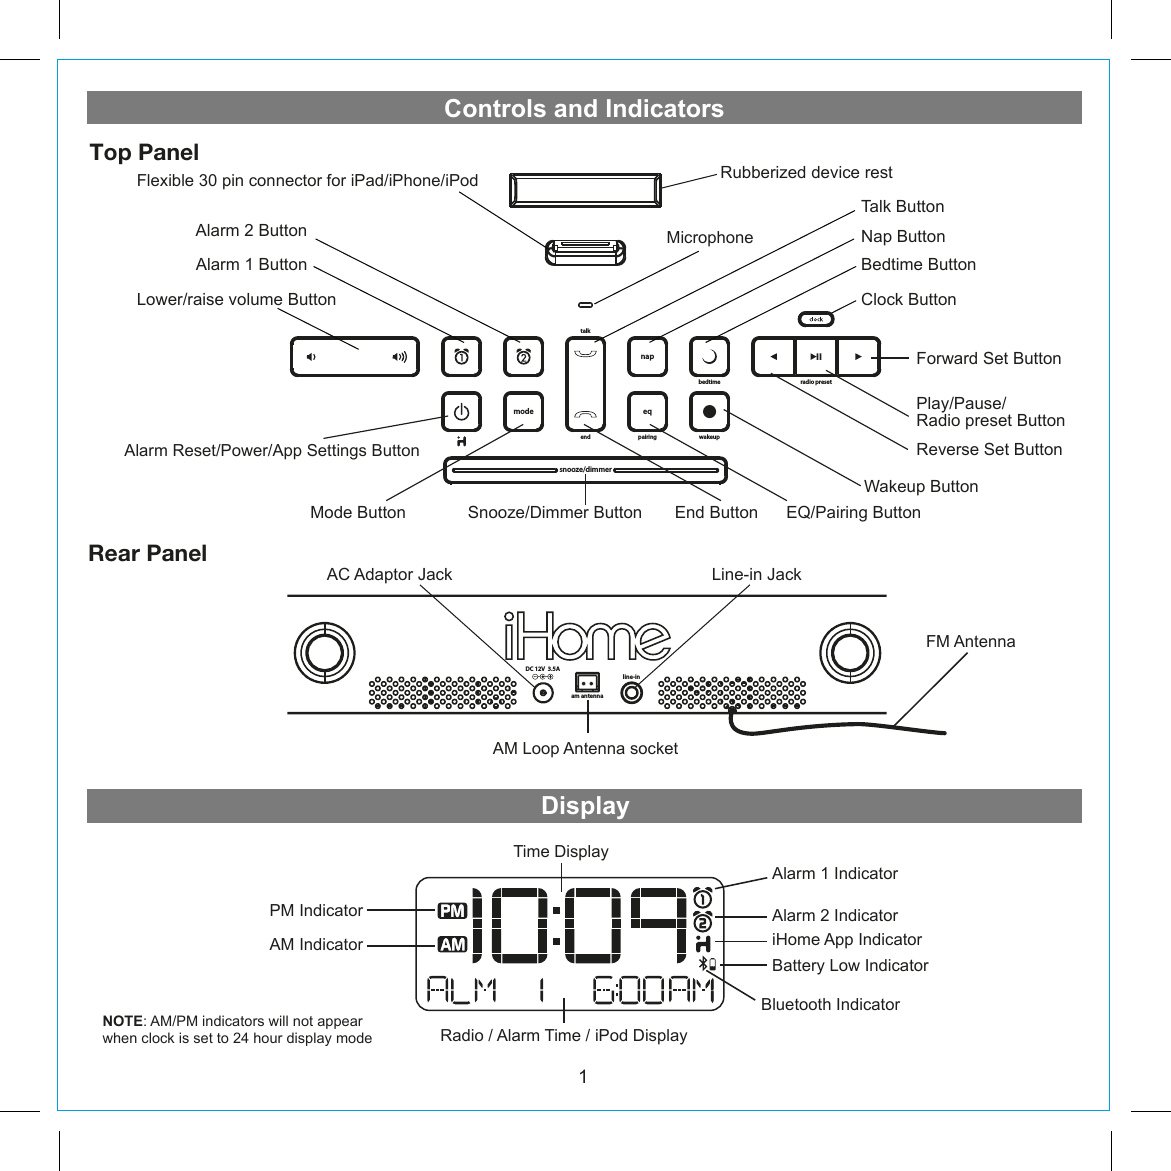
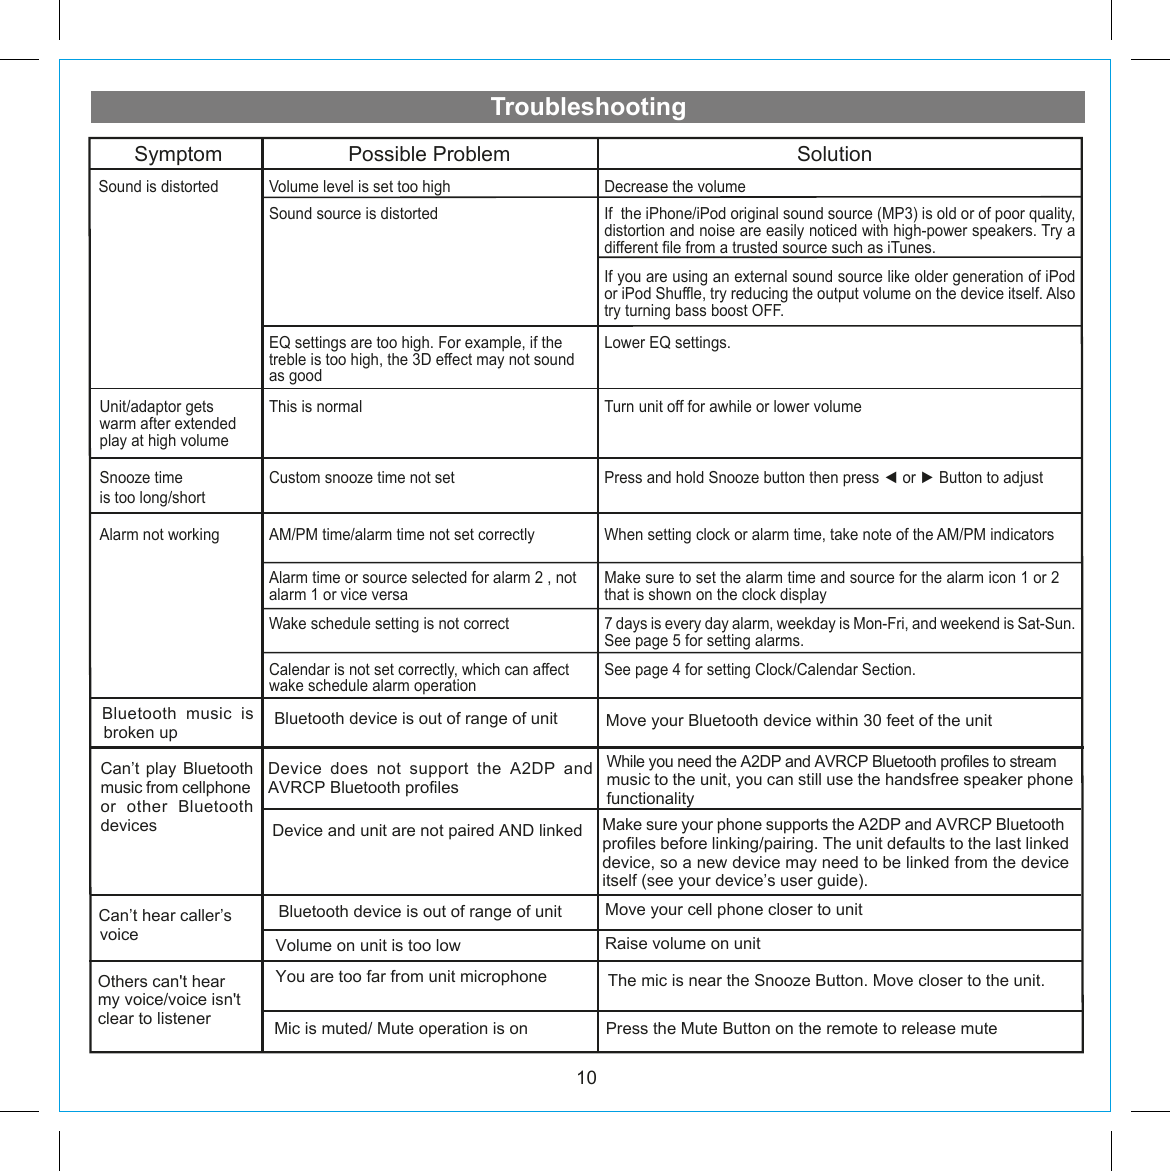
SDI Technologies ID50 The Home System For Your iPad User Manual iD50 IB draft0729

SDI Technologies Inc. The Home System For Your iPad iD50 IB draft0729

Users Manual

Model iD50The Home System For Your iPad® Questions? For latest instructions, visit www.ihomeaudio.com/supportiD50 IB_US versionSize: 178 x 178 mm (16 pages)Printing color: BlackMat’l: 90gsm book paperJul. 29, 11.Note: Apps are not covered in detail in this booklet. To learn more about how iHome apps can enhance your experience, please visit the App Store.download QR code reader app and scaniHome+SleepFREE alarm clock appiHome SetFREE device control appiHome+RadioInternet radio appworks withavailable on the App Store
Table of ContentsControls and Indicators / Display........................................................................................................................................1Using the iD50....................................................................................................................................................................2Using the Alarms ................................................................................................................................................................3Listening to iPad/iPhone/iPod / Listening to Radio.............................................................................................................4Using the Unit in other Countries/Listening to other portable audio devices / Listening to Bluetooth Music......................5Making Calls with Bluetooth Mobile Phone / Sleep Operation / Nap Operation.................................................................6Dimmer Operation / Replacing Clock Backup Battery........................................................................................................7A Consumer Guide to Product Safety ................................................................................................................................8Trouble Shooting ................................................................................................................................................................9Warranty Information ........................................................................................................................................................ 11Maintenance•  Place the unit on a level surface away from sources of direct sunlight or excessive heat.   •   Protect  your  furniture  when  placing  your  unit  on  a  natural  wood  and  lacquered  finish. A  cloth  or  other  protective         material should be placed between it and the furniture.•  Clean your unit with a soft cloth moistened only with mild soap and water. Stronger cleaning agents, such as Benzene, thinner or similar materials can damage the surface of the unit.NOTE : The iD50 is designed for use with Bluetooth wireless devices compatible with the HFP, HSP, A2DP and AVRCP streaming audio profiles. Refer to your Bluetooth device’s user manual or technical support to determine if your Bluetooth device supports these profiles.
FCC and IC InformationGetting StartedThank you for purchasing the iHome iD50, the app-enhanced alarm clock radio for iPad, iPhone or iPod. Designed to play music through Bluetooth from your mobile phone or computer (through Bluetooth or Line in), the iD50 features SRS WOW audio enhancement.This  instruction  booklet  explains  the  basic  operation  and  care  of  the  unit.  There  are  many  exciting  performance                 enhancements available by downloading the free iHome+Sleep app from the iTunes App Store. In addition, the iHome+Radio app (available as a paid app at the iTunes App Store) gives you access to thousands of internet radio stations around the globe.For information on the iHome+Sleep app and iHome+Radio internet radio app and how they work with your unit, please use these resources: user forum: http://getsatisfaction.com/ihomeappsweb: www.ihomeaudio.com/appsemail: apps@ihomeaudio.comNote: app is for iPad, iPhone and iPod touch only.Please read this instruction book carefully before the appliance is operated and keep it for future reference.QDID:B016961This device complies with Part 15 of the FCC Rules and RSS-210 of the IC Rules. Operation is subject to the following two conditions: (1) This device may not cause harmful interference, and (2) this device must accept any interference received, including interference that may cause undesired operation.Warning: Changes or modifications to this unit not expressly approved by the party responsible for compliance could void the user’s authority to operate the equipment.NOTE:  This equipment has been tested and found to comply with the limits for a Class B digital device, pursuant to Part 15 of the FCC Rules. These limits are designed to provide reasonable protection against harmful interference in a residential installation. This equipment generates, uses and can radiate radio frequency energy and , if not installed and used in accordance with the instructions, may cause harmful interference to radio communications.However, there is no guarantee that interference will not occur in a particular installation. If this equipment does cause harmful interference to radio or television reception, which can be determined by turning the equipment off and on, the user is encouraged to try to correct the interference by one or more of the following measures:• Reorient or relocate the receiving antenna.• Increase the separation between the equipment and receiver.• Connect the equipment into an outlet on a circuit different from that to which the receiver is connected.• Consult the dealer or an experienced radio/TV technician for help.FCC&IC Radiation Exposure Statement This equipment  complies with FCC radiation exposure limits set forth for an  uncontrolled environment and  meets the exemption from the routine evaluation limits in section 2.5 of RSS 102.1. This Transmitter must not be co-located or operating in conjunction with any other antenna or transmitter.2. This equipment complies with FCC RF radiation exposure limits set forth for an uncontrolled environment. This equipment should be installed and operated with a minimum distance of 20 centimeters from user and bystanders.The device meets the exemption from the routine evaluation limits in section 2.5 of RSS 102 and users can obtain          Canadian information on RF exposure and compliance from the Canadian Representative Burnport Holdings Ltd. 72MT Belcher Pls, East, Calgary, Alberta,T2Z 2G1, CANADA. Tel:403-257-4961
P3Information FCC et ICConsignes préliminairesMerci d’avoir acheté le modèle iD50 de iHome. Ce radio-réveil rehaussé d’applications pour iPad, iPhone et iPod est conçu pour effectuer la lecture de musique Bluetooth à partir de votre téléphone portatif ou de votre ordinateur (au moyen du Bluetooth ou de l’entrée de ligne). L’unité iD50 est munie de la technologie Bongiovi Digital Power Station avec traite-ment actif des signaux numériques.Ce guide d’instructions vous explique le fonctionnement de base de l’appareil ainsi que les consignes d’entretien de l’unité. De nombreuses fonctions d’optimisation sont disponibles en téléchargeant gratuitement l’application iHome+Sleep du iTunes App Store. De plus, l’application iHome+Radio (disponible à un coût du iTunes  App Store vous donne accès à des milliers de chaînes radio Internet à travers le monde).Pour plus de renseignements au sujet de l’application iHome+Sleep et de l’application radio Internet iHome+Radio ainsi que pour savoir comment ces applications fonctionnent avec votre modèle iD50, veuillez utiliser une des ressources suivantes :Forum d’utilisateur : http://getsatisfaction.com/ihomeappsWeb : www.ihomeaudio.com/appsCourriel : apps@ihomeaudio.comNote : Les applications sont conçues exclusivement pour les iPad, iPhone et iPod touch.Veuillez lire ce manuel attentivement avant d’utiliser l’unité et conservez-le pour référence ultérieure. QDID:XXXXXXXCet appareil est conforme à la Section 15 des règlements FCC et à la section RSS-210 des règlements IC. Le fonctionnement est sujet aux deux conditions suivantes : (1) Cet appareil ne doit pas provoquer d’interférences nuisibles, et (2) cet appareil doit accepter toutes les interférences reçues, y compris les interférences pouvant provoquer un fonctionnement non désiré.Avertissement : Tout changement ou modification apporté à cet appareil qui n’est pas expressément approuvé par la partie responsable de la conformité peut annuler le droit de l’utilisateur de se servir de ce produit.NOTE : Cet équipement a été testé et jugé compatible avec les réglementations sur les appareils numériques de classe B, telles que spécifiées dans la section 15 des règlementations FCC. Ces limitations sont conçues pour offrir une protection raisonnable contre les interférences nuisibles dans une zone résidentielle. Cet équipement génère, utilise et peut émettre des fréquences radio et, s’il n’est pas installé et utilisé conformément aux instructions, peut provoquer des interférences dans les communications radio.Toutefois, il n’existe aucune garantie que ces interférences surviendront dans un cas particulier. Si cet appareil provoque des interférences radio ou TV, qui peuvent être déterminées en éteignant et en allumant l’appareil, l’utilisateur devrait, afin d’éliminer ces interférences, essayer les solutions suivantes :•  Réorientez ou déplacez l’antenne de réception.•  Augmentez la distance entre l’appareil et le récepteur.•  Branchez l’appareil à une prise de courant faisant partie d’un circuit électrique différent de celui utilisé par votre récepteur.•  Consultez votre revendeur ou un technicien expérimenté si le problème persiste.Déclaration FCC et IC sur l’exposition à la radiation Cet appareil est conforme aux normes d’exposition à la radiation FCC établies pour un environnement non contrôlé et satisfait aux critères d’exception établis pour une évaluation de routine selon la section 2.5 du règlement RSS 102.1. Cet émetteur ne doit pas être colocalisé ni fonctionner en conjonction avec une autre antenne ou un autre émetteur.2. Cet appareil est conforme aux normes d’exposition à la radiation par radiofréquences FCC établies pour un environnement non contrôlé. Cet appareil devrait être installé et utilisé à une distance minimale de 20 centimètres de l’utilisateur et des passants.Cet appareil satisfait aux critères d’exception établis pour les évaluations de routine de la section 2.5 du règlement RSS 102. Au Canada, les utilisateurs peuvent obtenir des renseignements sur l’exposition aux radiofréquences et les règles de conformité applicables auprès de Canadian Representative Burnport Holdings Ltd., 72MT Belcher Pls, East, Calgary, Alberta, T2Z 2G1, Canada. Téléphone : 403-257-4961.QDID # TBD
DisplayAlarm 1 IndicatoriHome App IndicatorAlarm 2 IndicatorBattery Low IndicatorTime DisplayBluetooth IndicatorPM IndicatorAM IndicatorNOTE: AM/PM indicators will not appear when clock is set to 24 hour display mode Radio / Alarm Time / iPod Display 1Talk ButtonEnd ButtonPlay/Pause/Radio preset ButtonForward Set ButtonReverse Set ButtonEQ/Pairing ButtonMode Buttonsnooze/dimmermode eqnapbedtimewakeuppairingtalkendradio presetControls and IndicatorsAM Loop Antenna socket AC Adaptor Jack Line-in JackFM AntennaSnooze/Dimmer ButtonRubberized device restRear PanelTop PanelAlarm Reset/Power/App Settings ButtonFlexible 30 pin connector for iPad/iPhone/iPodline-inam antennaDC 12V  3.5A   Alarm 1 ButtonLower/raise volume Button  Alarm 2 Button Nap ButtonBedtime ButtonClock ButtonWakeup ButtonMicrophone
Using the iD502Connecting the Unit to Power SourceConnect the AC adaptor cable plug into the DC jack on the back of the system, then plug the AC cord of the AC adaptor into the wall outlet. Adaptor must be plugged in to operate unit. The unit does not operate on battery (a battery back up system maintains clock settings during power failures).Updating your iD50 firmwareFor best performance, make sure to update the iD50 firmware. To do so, download the free iHome Set app from the App Store. Launch the app, scroll to “Search for Update”, then follow directions to update the firmware.Turning the Unit ON or OFFPress the  Power/App Button on the unit at any time to turn the unit On or Off. Note that a docked iPad, iPhone or iPod will continue to charge when the unit is turned off as long as the AC adaptor is plugged in. iPod Classic (1G and 2G) will not charge.Setting the Clock Time Using AutoSyncThe AutoSync feature allows you to sync the time setting on the unit to the time on your iPad, iPhone or recent model iPod (iPod touch, iPod nano and iPod Classic; older iPod models such as iPod mini do not support this feature).1.  Press and hold the Clock Button located on the top of the unit for 2 seconds. “AUTOSYNC ON” flashes on the display and a beep sounds. The unit will now autosync every time a capable iPhone/iPod or iPad is docked, and at 2AM each day. To turn auto sync off, press and release the ◄ or ► Button while AUTOSYNC ON is flashing until “AUTOSYNC OFF appears.2.  Once sync is completed, “TIME UPDATED” appears on the display followed by 2 beeps indicating time sync is complete. The updated time will appear on the display.3.  If sync was not successful, “SYNC FAILED” will appear on the display and a long beep will sound. If this happens, please try again, with a different iPhone or iPod if needed. If sync still fails, please see Setting Clock Manually below to set the clock. NOTE: iPhone time is automatically updated to the correct time via cell phone towers. The time on your iPad or iPod is accurate only to the time on the computer the last time the iPad/iPod was synced to it. It’s possible to have up to 59 seconds difference between the unit and synced iPhone/iPod.Setting Time and Calendar Manually1. Press and hold the Clock Button located on the back of the unit until the time display flashes. 2. Press the  or  Button to adjust the time (hold for a few seconds to advance or reverse rapidly). Remember to set the correct AM or PM hour. An icon in the upper left hand corner of the time display indicates AM or PM.   (Note: if you wish to change the time display from the 12-hour format to the 24-hour format, sometimes called ‘military time’, press and release either the      or       Button to switch between 12-hour and 24-hour display formats.) 3. Press the Clock Button again. The  year will flash in the lower part of the display.  Press the  or  Button until the current year is displayed.4. Press the Clock Button again. The month and date will flash. Press the  or  Button until the current month and date is displayed. Hold to advance rapidly.5. Press the Clock Button once more. Two beeps will sound to confirm your settings and you will exit Time and Calendar Setting mode.
3Using the AlarmsThis unit has a dual alarm system so you can set two separate alarms to different alarm times, wake-to sources and schedules (daily, weekdays or weekend).Tip: Download the free iHome Set app for advanced alarm, snooze and sleep functionsSetting the AlarmsNote: Alarm 1 and Alarm 2 are set the same way; Alarm Button below means the button (      or      ) for whichever alarm you are setting.1. Press and hold the      or      Button until the alarm time flashes on the lower part of the display. Press and release the ◄ or ► Button to set the alarm time (press and hold for faster setting). Remember to set the correct AM or PM time. 2. Press and release the Alarm Button again to confirm the set alarm time, then press and release the ◄ or ► Button to set the alarm schedule (’wake 7 days’ = the whole week, ‘wake weekday’ = Monday through Friday, ‘wake weekend’ = Saturday and Sunday only).3. Press and release the Alarm Button again, then press and release the ◄ or ► Button to select an alarm source to wake to: (iPod, Radio, Tone or Playlist).  For wake to iPod: select iPod to wake to a docked iPad, iPhone or iPod. If the unit does not detect an iPad/iPhone/iPod at the set alarm time, the unit will default to buzzer alarm. The alarm cycle lasts for one hour; make sure you have enough music on your iPad, iPhone or iPod to last that long.  For wake to radio: after selecting Radio as the wake to source, press and release the Alarm Button and press and release the ◄ or ► Button to select a radio station or press and release the        Button to select a preset radio station to wake to (see Listening to Radio on page 5 for details on setting radio stations and presets).  For wake to tone: after selecting tone as the wake to source, press and release the ◄ or ► Button as needed to cycle through the tones (1 -4). Each tone will play as its number is displayed.  For wake to playlist: you must create a playlist named “iHome” in iTunes and have it on your iPad/iPod/iPhone. The unit will play music randomly from within the “iHome” playlist. 4. Press and release the Alarm Button again, then press and release the ◄ or ► Button to set the alarm volume. 5. Press and release the Alarm button again (or no button within 10 seconds) to exit the alarm setting mode. The alarm will be armed once set and the corresponding alarm icon will light up. The lower part of the display will show the earliest set alarm time.Reviewing, Arming and Disarming Alarm (Turn Alarm Function On and Off)Alarms are automatically armed when set. Active alarms are indicated by alarm icons on the display.1. Once an alarm is armed, the lower part of the display will show the alarm time. If more then one alarm is armed, the earliest alarm time will show.2. To review the alarm time, press an alarm button once. The related alarm time and wake source will show on the lower part of the display.3. During alarm review, press and release the Alarm Button once to toggle it on or off. If the alarm is armed, the related alarm icon will light up.Resetting the Alarm to Come on the Next Day1. When the alarm is sounding, press and release the       Button, Wakeup Button, END PHONE, or      or      Button to stop the alarm and reset it to come on the next set day. For example, if alarm is set for weekdays and you reset the alarm on Friday, the alarm will come on again on Monday, not Saturday.TIP: When the iHome+Sleep app is running, press the wakeup button to access wake profiles. When the app is not running, you can  press the wakeup button to shut off the unit and reset the alarm to come on at the set time.Snooze1. To program a custom snooze time, press and hold the Snooze Button during normal operation (when alarm is not sounding) until the snooze minutes display appears. Press the 3 or Button to set the snooze time from 1 to 29 minutes. TIP: You can also adjust snooze time with the iHome+Sleep app.2. Press the Snooze Button after the alarm sounds. The alarm will be silenced and come on again 9 minutes later (or at the custom minute interval you set). Snooze can be pressed several times during the 1 hour alarm cycle.
Listening to Radio4Listening to iPad, iPhone or iPodSure AlarmThe unit has a sure alarm feature so the buzzer alarm still sound in the event of a power failure, if  the backup battery is installed (see page 9). If your iPad/iPhone/iPod has no sound for 20 seconds or is not present, the unit will switch to tone alarm automatically.Tip: Download the free iHome+Sleep app for advanced alarm, snooze and sleep functionsSetting up AntennasExtend FM wire antenna fully for best reception. Do not strip, alter or attach to other antennas.For USA user, snap AM antenna cable into AM Loop Antenna Socket on back of unit and snap antenna into the antenna stand. Move antenna 12” away from unit for best reception. Tuning and Playing the Radio1. Press and release the Mode Button as needed to turn on the unit and cycle through iPod, FM radio, AM radio, Bluetooth and Aux-in modes.2. When the desired FM or AM mode is selected, press the ◄ or ► Button to tune the radio to a desired station. The current radio frequency appears in the lower right of the display.  Press the ◄ or ► Button for a few seconds to scan for the next clear station.3. To memorize a station as a preset:   A. Press the       Button as needed to step through the 6 presets (P1 - P6) to the number you wish to assign, and then hold the        Button until the selected preset number begins flashing in the display.   B. Press the  or  Button to tune the radio to a desired station. Hold briefly to have the radio autoscan/search for the next clear station.   C. Press the         Button to confirm the setting, a confirmation beep will confirm the setting and the preset number you wish to assign. Repeat steps A-C to preset up to 6 stations for AM and FM bands. 4. To listen to a preset stations, use the Mode Button to select AM or FM mode, then press the        Button to choose the desired preset. 5. Press the      or       Button on the unit to adjust the system volume. TIP: Download the iHome+Radio app from the App Store to enjoy thousands of internet radio stations from around the globe on your iD50.1. Dock an already playing iPad, iPhone or iPod. The unit will automatically turn on and you will hear the audio playing from your iPad/iPhone/iPod.Note: If the audio source volume is too low on the iPad/iPhone/iPod, the unit may not detect that the iPad/iPhone/iPod is in play mode. If so, pressing the       Button on the main unit once should make it play.2. When the iPad/iPhone/iPod is docked and in standby mode, press the    Button on the unit to play the iPad/iPhone/iPod. If the unit is already on, press and release the Mode Button as needed until “iPod” appears on the lower part of the display, indicating the unit is in iPod mode. If your iPad, iPhone or iPod touch is in video mode, you may see the “locked” slider on the iPad/iPhone/iPod display. If so, you will need to unlock your iPad/iPhone/iPod. 3. Press the       Button on the unit to pause play; press again to resume play.4. Press  or   Button on the unit to go to the next or previous track. Press and hold while track is playing for high speed forward or reverse music search of the current track. Adjusting Sound on the Unit You can adjust the sound on the unit while listening to any sound source.1. Press the      or        Button on the unit to adjust the system volume. 2. Press and release the EQ/Pairing Button as needed to select Treble, Bass, Mid-Range, Balance, 3D Sound, or SRS, then press the ◄ or ► Button to adjust settings.TIP: You can also adjust EQ with the iHome+Sleep app.
Listening to Bluetooth MusicListening to other portable audio devicesUsing the Unit in Other Countries5You need to pair your Bluetooth device with the unit before you can auto-link to play/stream Bluetooth music through the unit. Pairing creates a permanent “bond” so two devices can always recognize each other. Pairing:1. Press the EQ/Pairing Button to begin pairing operation. The Bluetooth and “pairing” icons will flash.2. Activate Bluetooth on your device according to the device’s user manual to link to the unit. You may need to input the iHome device pass code: “1234”.3. Once connected, the Bluetooth Icon     will remain. 4. The unit will auto link with the last linked device when that device is in range.Playing Bluetooth Music:1. Once your device and the iD50 are linked you can start to play Bluetooth music through the iD50.2. Turn on the iD50 and press and release the Mode Button as needed until “Bluetooth” appears in the lower part of the display .3. Press the       Button on the iD50 to play your Bluetooth-enabled device. The display will show “Bluetooth”. (Depending on the Bluetooth device you are using, you may need to manually go into media player mode on your device to make it work properly).4. Press the       Button again to pause play; press again to resume it. 5. Press the      or       Button on the iD50 to adjust the system volume.  Please remember to turn off Bluetooth device manually.NOTE: The iD50 must be in Bluetooth mode to play a Bluetooth-enabled device.You can play an MP3 player or other portable audio device through the iD50 via the Aux-in Jack.1. Plug one end of an audio patch cord (available at http//:www.ihomeaudio.com) into the headphone or line-out jack on your device and the other end of the patch cord into the iD50 Aux-in Jack, located on the back of the unit.2. Turn on the unit and press and release the Mode Button as needed until “Aux-in” appears in  the lower part of display, indicating Aux-in playing mode.3. Turn on and play your device.4. Press the      or        Button on the unit to adjust the system volume. You may need to adjust your device volume, too.Remember to turn off your device when you are done playing it.Different regions of the world use different FM and AM (MW) radio frequency steps and ranges. You will need to select the one that matches the standards in your region (USA, EUROPE, JAPAN, AUSTRALIA,or CHINA). The default setting is USA; if you live in the US, you may skip this section.1. Make sure the unit is OFF (not playing in any mode).  Press and hold the Mode Button for about 5 seconds until “Radio xxx” appears in the lower part of display. Press and release the  or  Button to set the “xxx” to your region.2. Press and release the Mode Button again (or no button within 10 seconds) to exit the radio frequency setting mode.  Two beeps will confirm radio frequency setting.
Sleep OperationMaking Calls with a Bluetooth Mobile Phone6Before you make a call with the  iD50, you need to pair and link your Bluetooth-enabled phone with the iD50. Please refer to Pairing procedure on page 8.Answer a Call:1. To answer a call, press the        Button. Now you can use the iD50 as a speaker phone.2. Speak into the MIC (located above the       Button) and press the      or       Button on the iD50 to adjust the call volume.3. To end the call, press the        Button.Dial/Re-dial Dialing:1. Once the iD50 is paired to a Bluetooth mobile phone, you can use the keypad on your phone to dial a phone number. Press the        Button to cancel the call.2. To redial the last dialed number, press the       Button twice (x2).3. Press the     or    Button on the iD50 to adjust the call volume.NOTE: Changes to volume settings for phone operation may affect the volume of other modes.4. To end a call, press the        Button.Nap OperationNap mode lets you set an alarm separate from the Alarm 1 and Alarm 2 settings. The nap wake to source by default is the tone alarm. 1. Press the Nap Button located on the back of the unit as needed to adjust the nap timer for 5, 10, 15, 20, 30, 45, 60, 90 or 120 minutes or OFF. 2. When the display changes back to show the real time, pressing the Nap Button once will show the nap time remaining. Pressing it again will change nap time to the next highest setting.Sleep mode lets you sleep to iPad/iPhone/iPod, Bluetooth music or the radio, gradually lowering the volume until the unit shuts off at the selected time.1. Press the Bedtime Button to enter sleep mode. The Sleep Icon will appear on the display to indicate sleep mode.  Sleep mode has a Gentle Sleep feature which gradually lowers the volume. The unit will automatically turn off after the selected sleep time.2. You can adjust the sleep timer from 120, 90, 60, 30, 15 minutes or OFF by pressing the Bedtime Button again.3. When the display changes back to show the real time, pressing the Bedtime Button once will show the sleep time remaining. Pressing it again will change sleep time to next lowest increment.4. iD50 has independent volume setting for sleep mode so you can adjust the sleeping volume without affecting the alarm volume. Press the      or       Button on the iD50 to adjust the system sleep  volume. The sleep volume will remain at that level the next time you enter sleep mode until controls are changed.5. To stop listening at any time, press the       Button on the iD50 to turn it off.
Replacing Clock Backup Battery7Dimmer OperationDuring normal operation, press the Snooze Button to control the brightness of the LCD display.The unit comes with 1 CR2450 back-up battery installed to provide continuous alarm operation and clock settings in the event of a power failure. Remove the battery pull tab before use. When the Battery Low Icon located on the lower right of the display is flashing, it is time to replace the back-up battery. The battery compartment is located on the bottom of the unit.1. Use a Phillips screwdriver to remove the battery compartment cover located on the bottom of the unit.2. Please make sure the AC adaptor is connected, otherwise all settings may be lost during battery replacement.3. Insert 1 CR2450 battery checking that the + side is facing you. Replace the compartment door.Note: Make sure you dispose of battery properly (see your local regulations).WARNING: Lithium batteries can explode or cause burns if disassembled, shorted, recharged, exposed to water, fire,or high temperatures. Do not place loose batteries in a pocket, purse, or other container containing metalobjects, mix with used or other battery types, or store with hazardous or combustible materials. Store incool, dry, ventilated area. Follow applicable laws and regulations for transport and disposal.Replacing Backup Battery
A Consumer Guide to Product Safety8When used in the directed manner, this unit has been designed and manufactured to ensure your personal safety.  However, improper use can result in potential electrical shock or fire hazards. Please read all safety and operating instructions carefully before installation and use, and keep these instructions handy for future reference. Take special note of all warnings listed in these instructions and on the unit. 1.   Water and Moisture – The unit should not be used near water. For example: near a bathtub, washbowl, kitchen sink, laundry tub, swimming pool or in a wet basement. 2.   Ventilation – The unit should be situated so that its location or position does not interfere with its proper ventilation. For example, it should not be situated on a bed, sofa, rug or similar surface that may block ventilation openings.  Also, it should not be placed in a built-in installation, such as a bookcase or cabinet, which may impede the flow of air through the ventilation openings.3.  Heat – The unit should be situated away from heat sources such as radiators, heat registers, stoves or other appliances (including amplifiers) that produce heat.4.   Power Sources – The unit should be connected to a power supply only of the type described in the operating instructions or as marked on the appliance.5.   Power-Cable Protection – Power supply cables should be routed so that they are not likely to be walked on or pinched by items placed upon or against them.  It is always best to have a clear area from where the cable exits the unit to where it is plugged into an AC socket.6.   Cleaning – The unit should be cleaned only as recommended.  See the Maintenance section of this manual for cleaning instructions.7.  Objects and Liquid Entry  – Care should be  taken  so that objects do  not fall and liquids  are not spilled into  any openings or vents located on the product.8.  Attachments – Do not use attachments not recommended by the product manufacturer.9.  Lightning and Power Surge Protection – Unplug the unit from the wall socket and disconnect the antenna or cable system during a lightning storm or when it is left unattended and unused for long periods of time. This will prevent damage to the product due to lightning and power-line surges.10.  Overloading  – Do not overload wall sockets, extension cords, or integral convenience receptacles as this can result in a risk of fire or electric shock.11.  Damage Requiring Service – The unit should be serviced by qualified service personnel when:A.  the power supply cable or plug has been damaged.B.   objects have fallen into or liquid has been spilled into the enclosure.C.   the unit has been exposed to rain.D.  the unit has been dropped or the enclosure damaged.E.   the unit exhibits a marked change in performance or does not operate normally.12.  Antenna – Do not connect an external antenna to the unit (other than that provided).13.  Periods of Nonuse – If the unit is to be left unused for an extended period of time, such as a month or longer, the power cable should be unplugged from the unit to prevent damage or corrosion. 14.  Servicing – The user should not attempt to service the unit beyond those methods described in the user’s operating instructions.  Service methods not covered in the operating instructions should be referred to qualified service personnel.Questions? Visit www.ihomeaudio.comor call 1-800-288-2792 Toll Free
Unit does not turn on AC adaptor isn't plugged into a working wall socket or not plugged into the power supply jack on back of the unitPlug the AC adaptor into a working wall socket and plug the connector into the supply jack on the unitUnit requires a reset If unit is plugged in and doesn't respond,  try resetting the unit by following these steps:a)  remove iPhone/iPod from dockb)  unplug unit  from power sourcec)  remove back up batteryd)  wait a few minutes, then restore battery and resume useiPhone/iPod is not docked properly Remove your iPhone/iPod from the dock and check for obstruction on the connectors in the dock and on your iPhone/iPod. Then reseat it in the dock.Battery Low icon always flashingBattery is weak Replace with new batteryBattery was not installed properly Check to make sure the + side is facing outwardsiPhone/iPod does not respond to the unit/iPod is playing but no sound comes out iPhone/iPod is not docked properly Remove your iPhone/iPod from the dock and check for obstruction on the connectors in the dock and on your iPhone/iPod. Then reseat it in the dock.Your iPhone/iPod software is too old Upgrade software on your iPhone/iPod via iTunes on your computeriPhone/iPod is locked up/plays but no soundcomes outCheck the volume setting. Make sure your iPhone/iPod is working properly before docking into the unit. Please refer to your iPhone/iPod manual for details. See above for software upgrade information.You may need to reset your iPhone/iPod. Refer to your iPhone or iPod user guide for details on how to perform a reset.Using 1st or 2nd generation iPod, iPod Shuffle or other devices.Unit cannot control those iPod models or other devices.iPhone/iPod didn’t charge upiPad/iPhone/iPod is not docked properlyRemove your iPhone/iPod from the dock and check for obstruction on the connectors in the dock and on your iPhone/iPod. Then reseat it in the dock.iPhone/iPod is locked up/ frozeniPhone/iPod battery has problemPlease make sure your iPhone/iPod is working properly before docking into the unit. Please refer to your iPhone/iPod manual for details.No AM band radio sound but others OKAM loop antenna is not connected to the unit Plug the AM loop antenna connector to the jack on the back of the unitAM band radio is very noisy Time sync didn’t work AM loop antenna isn’t located properlyOlder iPod models such as iPod mini do not support time sync functionMove the AM loop antenna away from the main unit AC adaptor and rotate it for best receptionMake sure you are using an iPhone or newer iPod such as touch, nano or classic. If not available, set time manually (see page 4).9TroubleshootingSolutionSymptom Possible ProblemNo sound from unit Volume is set too low on unit Make sure volume is turned upMove unit away from potential sources of external interference such as computers, modems, wireless devices (routers) or fluorescent light.Unit/iPhone/iPod performance is erratic The unit is reacting to external interferenceUnit doesn’t respond
Sound is distorted Volume level is set too high Decrease the volumeSound source is distorted If  the iPhone/iPod original sound source (MP3) is old or of poor quality, distortion and noise are easily noticed with high-power speakers. Try a different file from a trusted source such as iTunes.If you are using an external sound source like older generation of iPod or iPod Shuffle, try reducing the output volume on the device itself. Also try turning bass boost OFF.10TroubleshootingSolutionSymptom Possible ProblemUnit/adaptor gets warm after extended play at high volumeThis is normal Turn unit off for awhile or lower volumeLower EQ settings.EQ settings are too high. For example, if thetreble is too high, the 3D effect may not soundas goodCustom snooze time not setAlarm not working AM/PM time/alarm time not set correctly When setting clock or alarm time, take note of the AM/PM indicatorsAlarm time or source selected for alarm 2 , not alarm 1 or vice versa Wake schedule setting is not correct 7 days is every day alarm, weekday is Mon-Fri, and weekend is Sat-Sun.  See page 5 for setting alarms.Calendar is not set correctly, which can affectwake schedule alarm operation See page 4 for setting Clock/Calendar Section.Make sure to set the alarm time and source for the alarm icon 1 or 2 that is shown on the clock display Snooze timeis too long/shortPress and hold Snooze button then press ◄ or ► Button to adjustBluetooth music is broken up  Bluetooth device is out of range of unit Move your Bluetooth device within 30 feet of the unitCan’t play Bluetooth music from cellphone or other Bluetooth devicesDevice does not support the A2DP and AVRCP Bluetooth profilesWhile you need the A2DP and AVRCP Bluetooth profiles to stream music to the unit, you can still use the handsfree speaker phone      functionalityDevice and unit are not paired AND linkedMake sure your phone supports the A2DP and AVRCP Bluetooth profiles before linking/pairing. The unit defaults to the last linked device, so a new device may need to be linked from the device itself (see your device’s user guide). Can’t hear caller’s voice Bluetooth device is out of range of unit Move your cell phone closer to unitVolume on unit is too low Raise volume on unitOthers can't hear my voice/voice isn't clear to listenerYou are too far from unit microphoneMic is muted/ Mute operation is onThe mic is near the Snooze Button. Move closer to the unit. Press the Mute Button on the remote to release mute
iHome Products, a division of SDI Technologies Inc. (hereafter referred to as SDI Technologies), warrants this product to be free from defects in workmanship and materials, under normal use and conditions, for a period of 1 Year from the date of original purchase.Should this product fail to function in a satisfactory manner, it is best to first return it to the store where it was originally purchased. Should this fail to resolve the matter and service still be required by reason of any defect or malfunction during the warranty period, SDI Technologies will repair or, at its discretion, replace this product without charge (except for a $40.00 charge for handling, packing, return UPS/postage, and insurance). This decision is subject to verification of the defect or malfunction upon delivery of this product to the Factory Service Center listed below. The product must include proof of purchase, including date of purchase. The fee for service without proof of purchase is $60.00.Before returning this product for service, please first replace the batteries (if applicable) with fresh ones, as exhausted or defective batteries are the most common cause of problems encountered.If service is still required:1. Remove the batteries (if applicable) and pack the unit in a well padded, heavy corrugated box.2. Enclose a photocopy of your sales receipt, credit card statement, or other proof of the date of purchase, if within the warranty period.3. Enclose a check or money order payable to the order of SDI Technologies, for the sum of $40.00 ($60.00 without proof of purchase).4. Send the unit prepaid and insured, to the Factory Service Center listed below.Consumer Repair DepartmentSDI Technologies Inc.1330 Goodyear DriveEl Paso, TX 79936-6420Disclaimer of WarrantyNOTE: This warranty is valid only if the product is used for the purpose for which it was designed. It does not cover (i) products which have been damaged by negligence or willful actions, misuse or accident, or which have been modified or repaired by unauthorized persons; (ii) cracked or broken cabinets, or units damaged by excessive heat; (iii) damage to digital media players, CD’s or tape cassettes (if applicable); (iv) the cost of shipping this product to the Factory Service Center and its return to the owner.This warranty is valid only in the United States of America and does not extend to owners of the product other than to the original purchaser. In no event will SDI Technologies or any of its affiliates, contractors, resellers, their officers, directors, shareholders, members or agents be liable to you or any third party for any consequential or incidental damages, any lost profits, actual, exemplary or punitive damages. (Some states do not allow limitations on implied warranties or exclusion of consequential damages, so these restrictions may not apply to you.) This warranty gives you specific legal rights, and you may also have other rights which vary from state to state.Your acknowledgement and agreement to fully and completely abide by the above mentioned disclaimer of warranty is contractually binding to you upon your transfer of currency (money order, cashier's check, or credit card) for purchase of your SDI Technologies product.© 2011 SDI Technologies, Inc. All rights reservedQuestions? Visit www.ihomeaudio.comor call 1-877-446-6301 Toll FreeiD50-091610-C  Printed in ChinaLimited 1 Year Warranty Information

Navigation menu