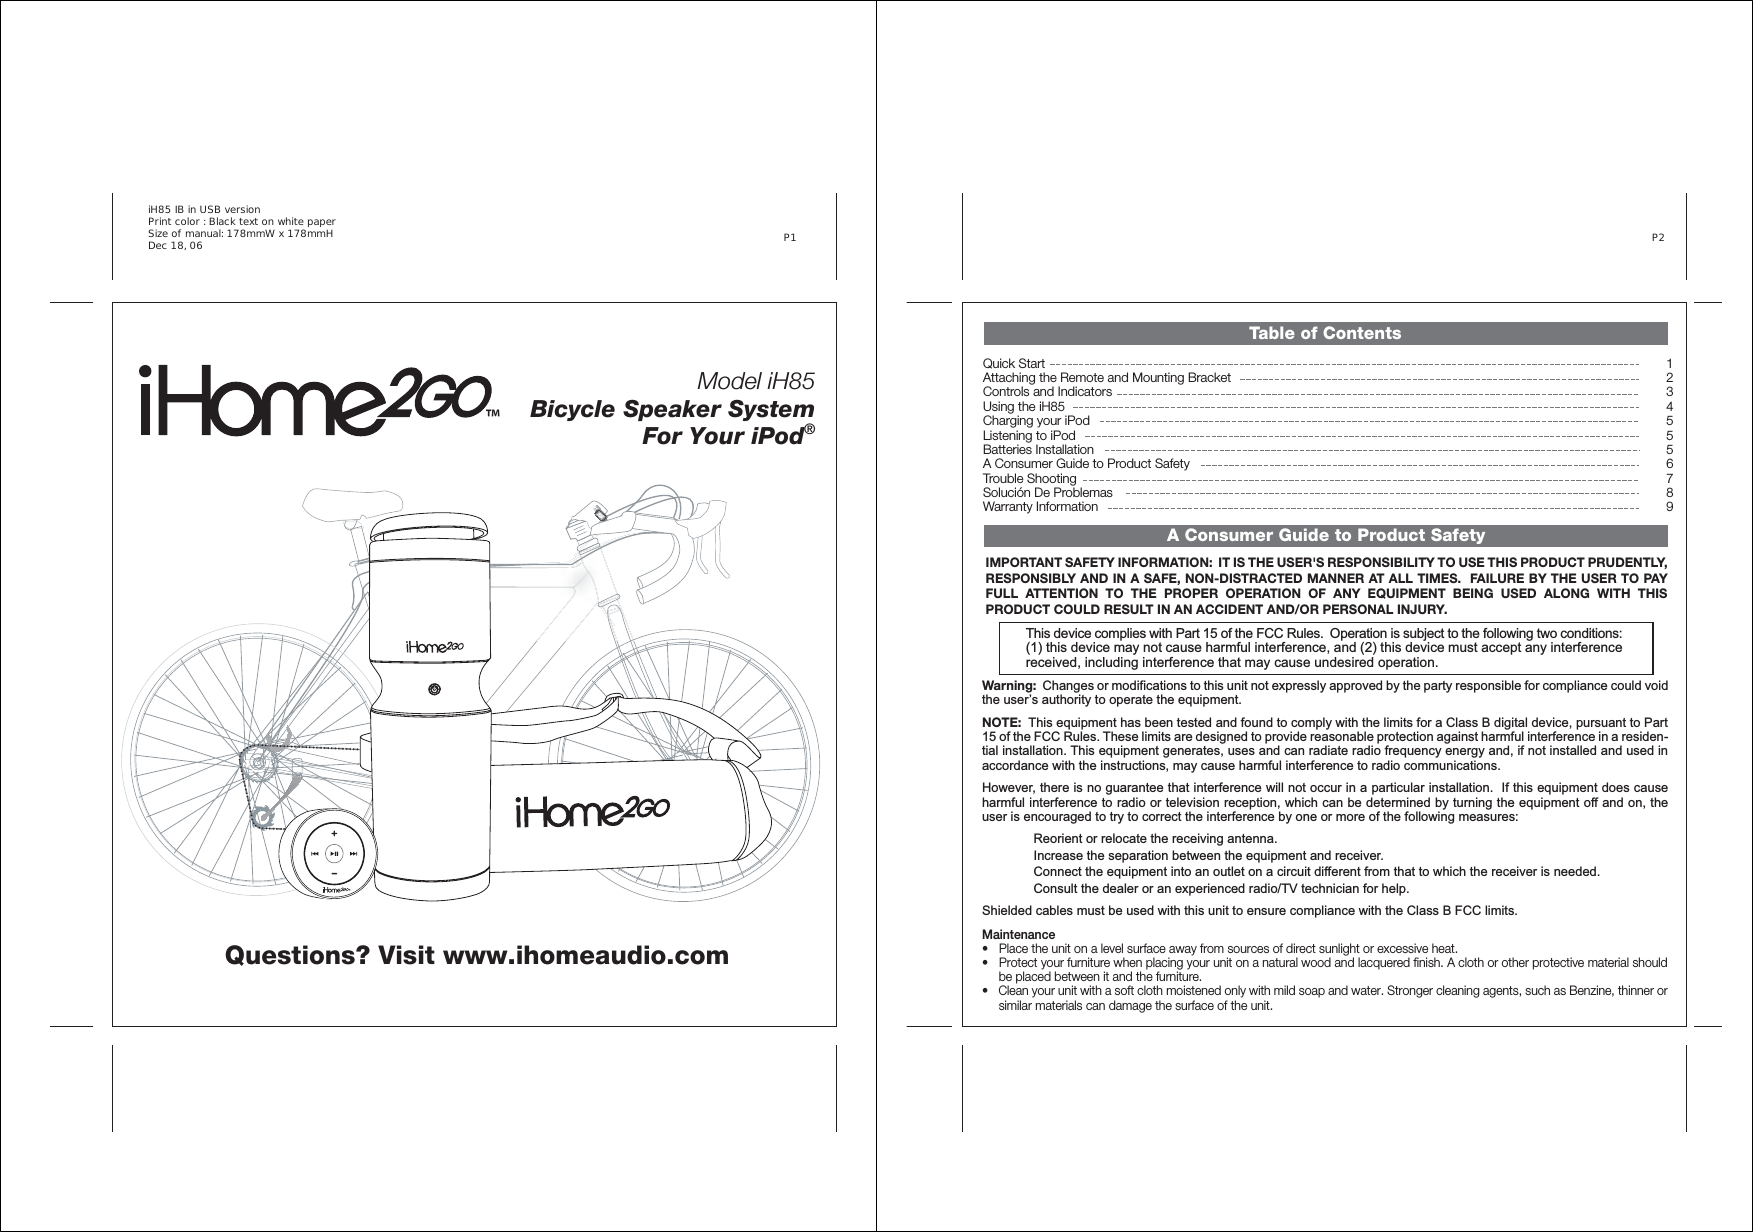
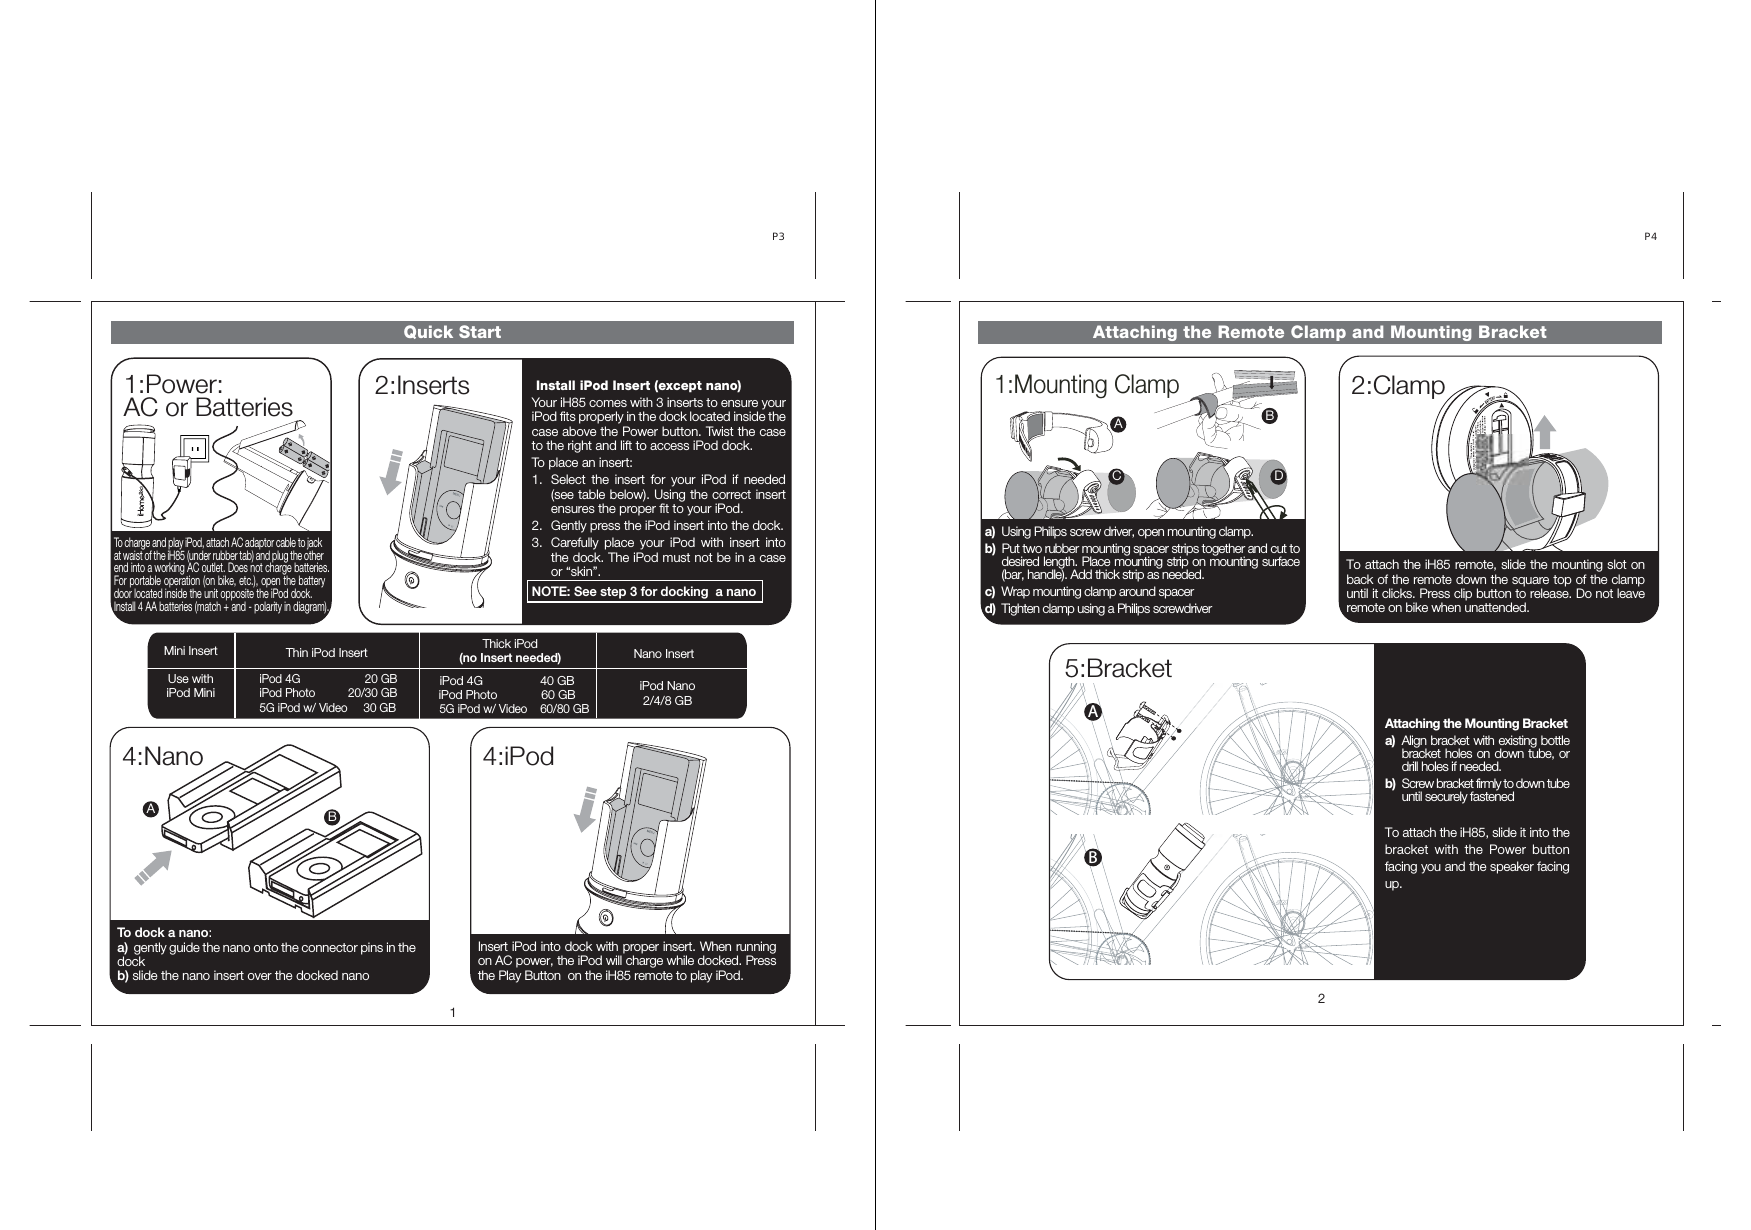
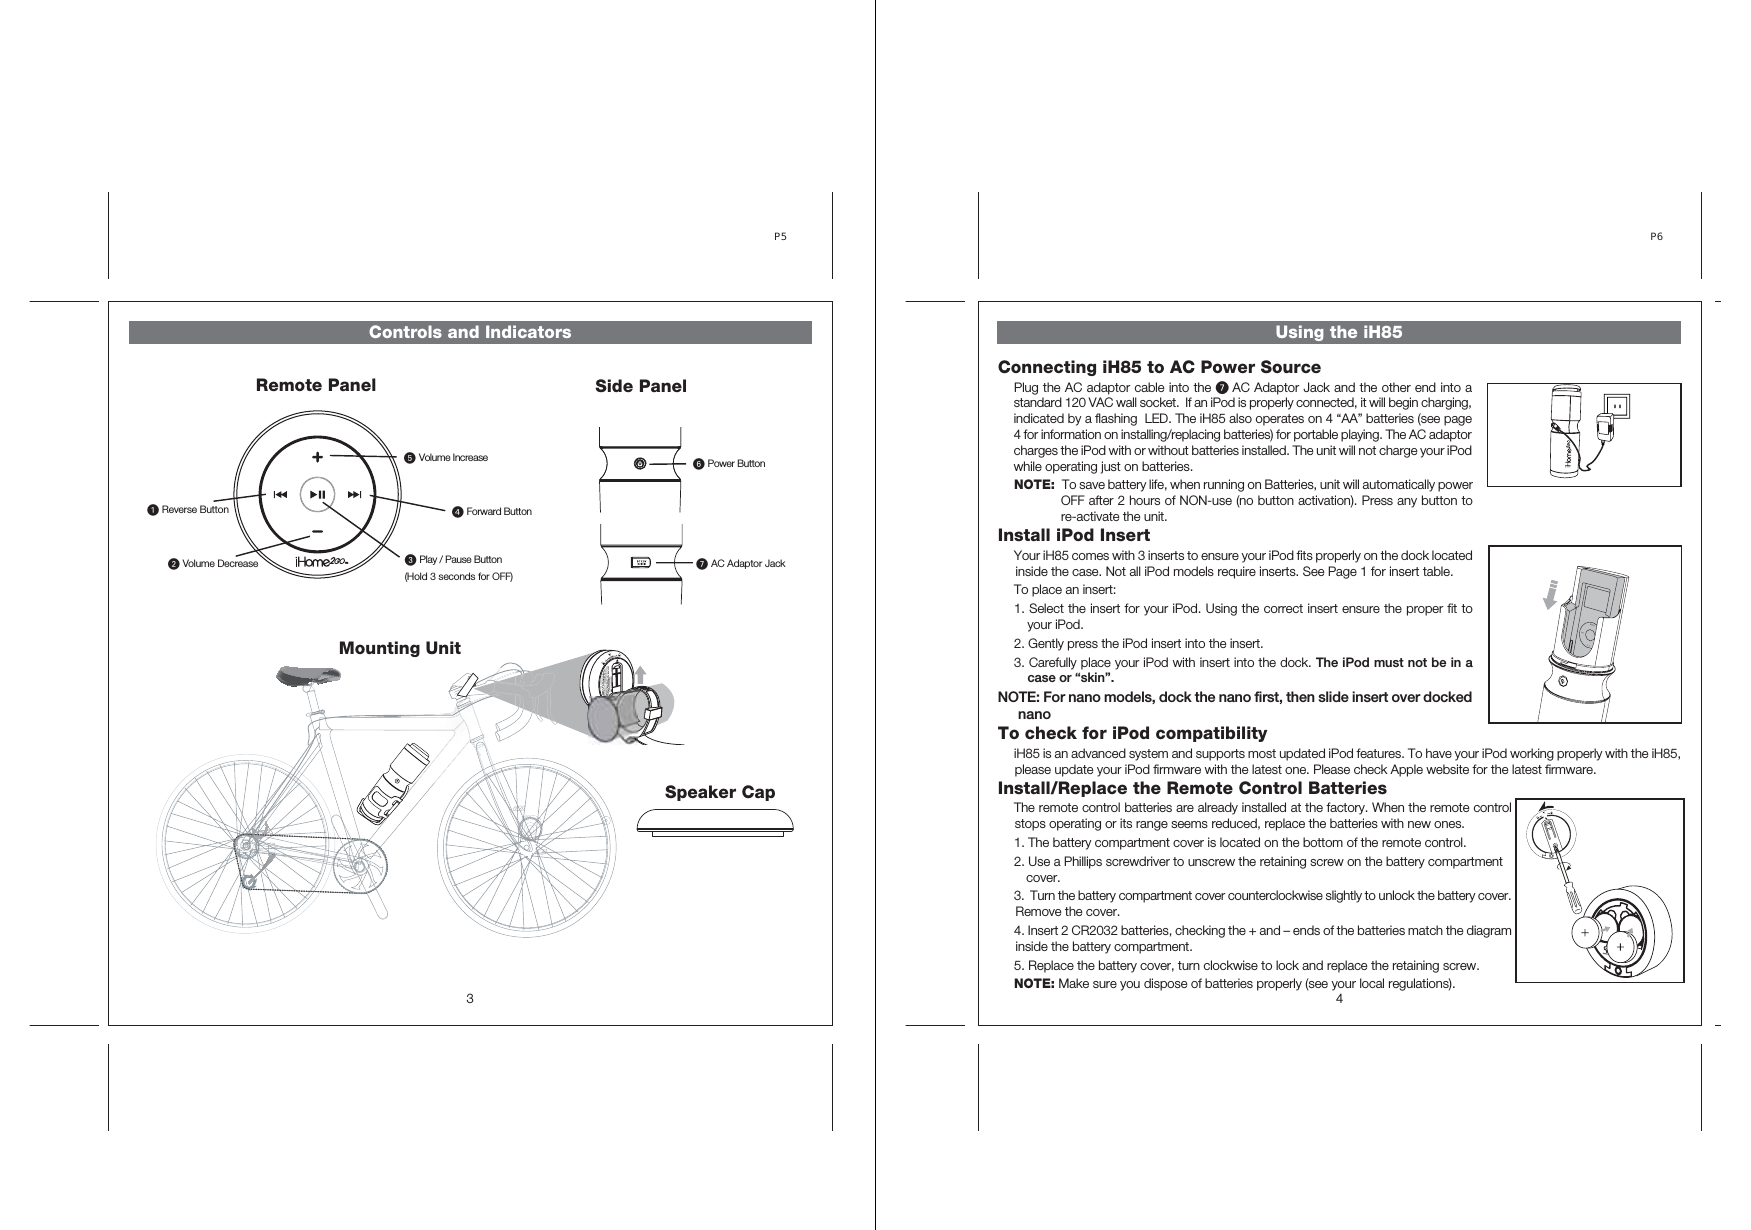
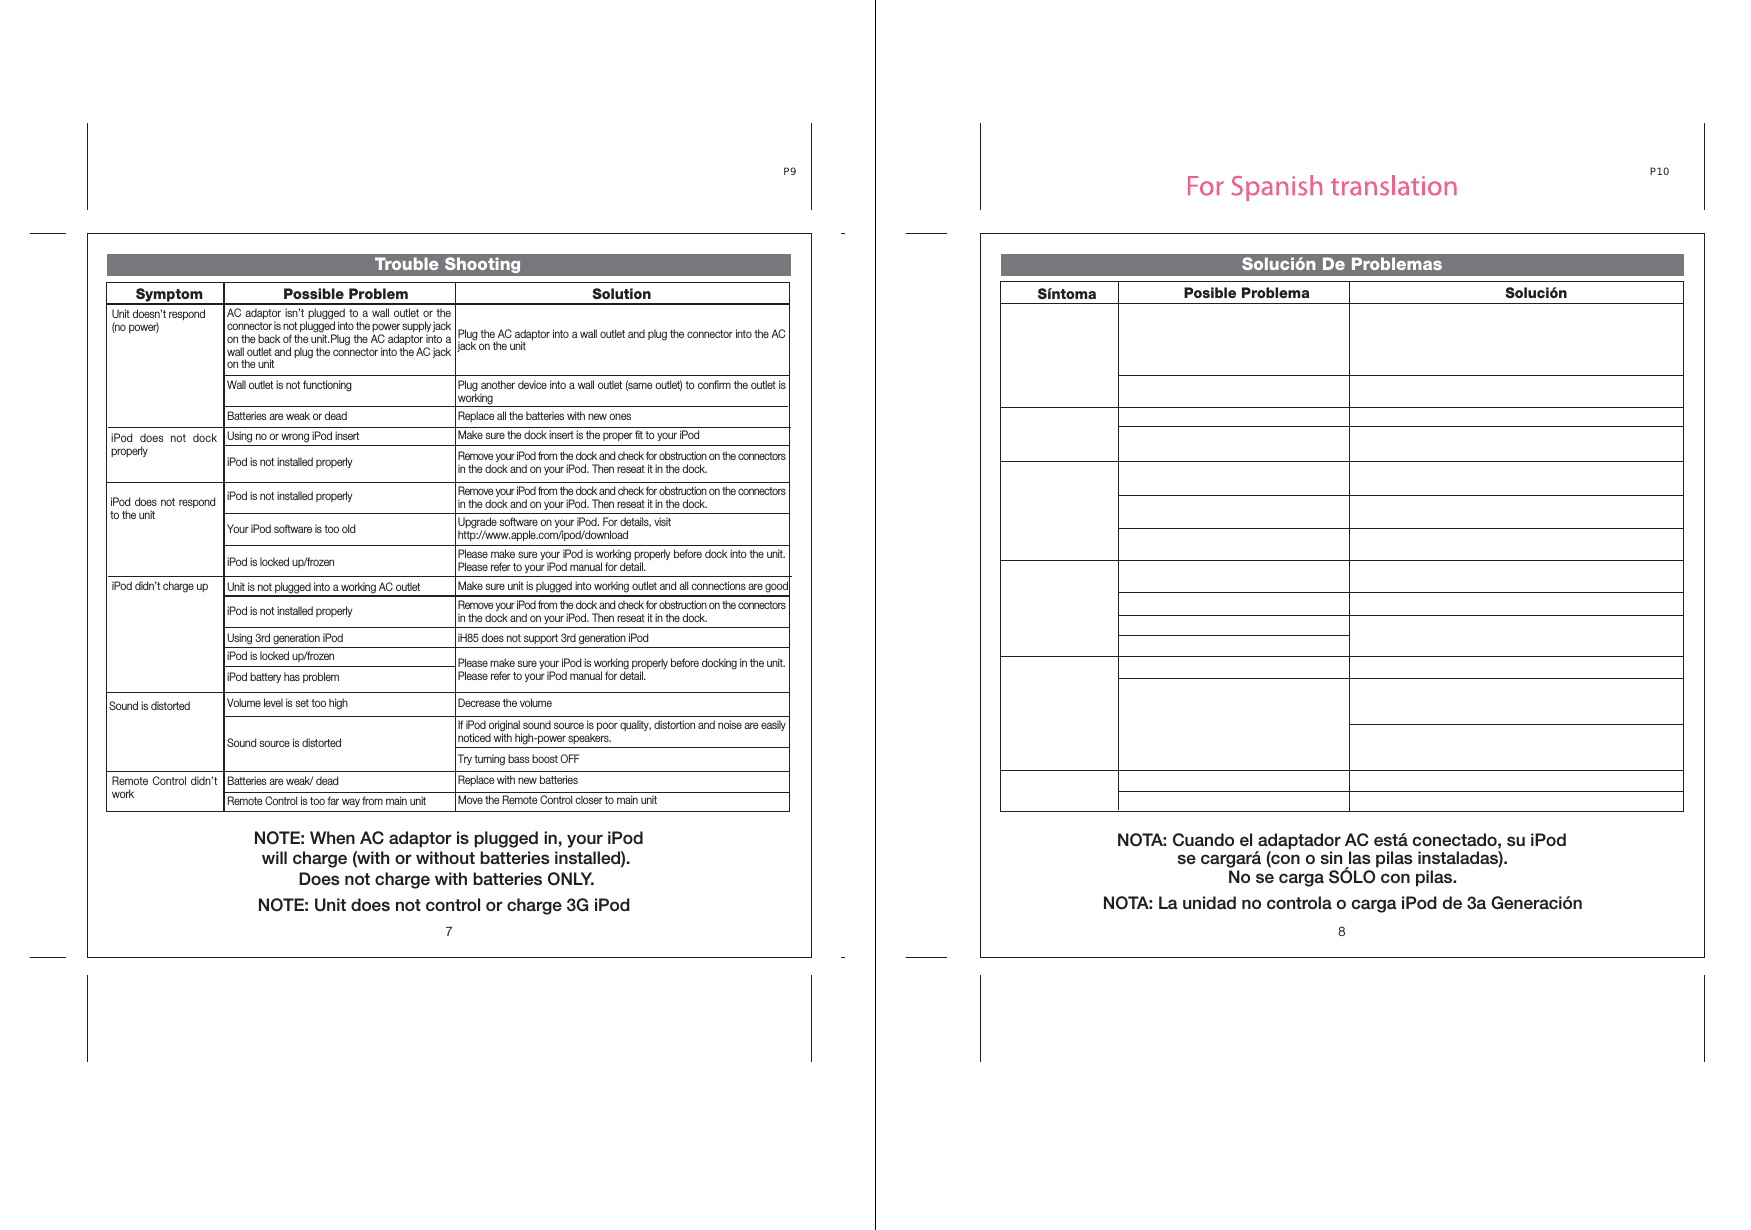
SDI Technologies IH85RC RF Remote Control Transmitter (433.92Mz Tx) User Manual iH85 IB v3 1 USB

SDI Technologies Inc. RF Remote Control Transmitter (433.92Mz Tx) iH85 IB v3 1 USB

User Manual

Model iH85 Bicycle Speaker System For Your iPod®Questions? Visit www.ihomeaudio.comiH85 IB in USB version Print color : Black text on white paper Size of manual: 178mmW x 178mmH Dec 18, 06  P1 ™™Table of Contents12345556789Quick StartAttaching the Remote and Mounting BracketControls and IndicatorsUsing the iH85Charging your iPodListening to iPodBatteries InstallationA Consumer Guide to Product SafetyTrouble ShootingSolución De ProblemasWarranty InformationTable of ContentsA Consumer Guide to Product SafetyP2 Warning:  Changes or modifications to this unit not expressly approved by the party responsible for compliance could void the user’s authority to operate the equipment. NOTE:  This equipment has been tested and found to comply with the limits for a Class B digital device, pursuant to Part 15 of the FCC Rules. These limits are designed to provide reasonable protection against harmful interference in a residen-tial installation. This equipment generates, uses and can radiate radio frequency energy and, if not installed and used in accordance with the instructions, may cause harmful interference to radio communications.However, there is no guarantee that interference will not occur in a particular installation.  If this equipment does cause harmful interference to radio or television reception, which can be determined by turning the equipment off and on, the user is encouraged to try to correct the interference by one or more of the following measures: Reorient or relocate the receiving antenna.   Increase the separation between the equipment and receiver.   Connect the equipment into an outlet on a circuit different from that to which the receiver is needed.   Consult the dealer or an experienced radio/TV technician for help. Shielded cables must be used with this unit to ensure compliance with the Class B FCC limits.This device complies with Part 15 of the FCC Rules.  Operation is subject to the following two conditions:  (1) this device may not cause harmful interference, and (2) this device must accept any interference received, including interference that may cause undesired operation.   Maintenance• Place the unit on a level surface away from sources of direct sunlight or excessive heat. • Protect your furniture when placing your unit on a natural wood and lacquered finish. A cloth or other protective material shouldbe placed between it and the furniture. • Clean your unit with a soft cloth moistened only with mild soap and water. Stronger cleaning agents, such as Benzine, thinner or similar materials can damage the surface of the unit.IMPORTANT SAFETY INFORMATION:  IT IS THE USER'S RESPONSIBILITY TO USE THIS PRODUCT PRUDENTLY, RESPONSIBLY AND IN A SAFE, NON-DISTRACTED MANNER AT ALL TIMES.  FAILURE BY THE USER TO PAY FULL ATTENTION TO THE PROPER OPERATION OF ANY EQUIPMENT BEING USED ALONG WITH THIS      PRODUCT COULD RESULT IN AN ACCIDENT AND/OR PERSONAL INJURY.
Quick Start1:Power:AC or Batteries14:NanoP3 To dock a nano:a)  gently guide the nano onto the connector pins in the dock b) slide the nano insert over the docked nano 4:iPodInsert iPod into dock with proper insert. When running on AC power, the iPod will charge while docked. Press the Play Button  on the iH85 remote to play iPod. 2:InsertsTo charge and play iPod, attach AC adaptor cable to jack at waist of the iH85 (under rubber tab) and plug the other end into a working AC outlet. Does not charge batteries.For portable operation (on bike, etc.), open the battery door located inside the unit opposite the iPod dock.Install 4 AA batteries (match + and - polarity in diagram).  Install iPod Insert (except nano) Your iH85 comes with 3 inserts to ensure your iPod fits properly in the dock located inside the case above the Power button. Twist the case to the right and lift to access iPod dock. To place an insert: 1.  Select the insert for your iPod if needed (see table below). Using the correct insert ensures the proper fit to your iPod. 2.  Gently press the iPod insert into the dock. 3.  Carefully place your iPod with insert into the dock. The iPod must not be in a case or “skin”. NOTE: See step 3 for docking  a nano Use withiPod Mini iPod 4G          20 GB iPod Photo           20/30 GB 5G iPod w/ Video     30 GB Mini Insert Thin iPod Insert  Thick iPod (no Insert needed)  Nano Insert iPod 4G                 40 GB iPod Photo             60 GB      5G iPod w/ Video    60/80 GB iPod Nano2/4/8 GB ABAttaching the Remote Clamp and Mounting Bracket5:Bracket2P4 2:ClampAttaching the Mounting Bracket a)  Align bracket with existing bottle bracket holes on down tube, or drill holes if needed.  b)  Screw bracket firmly to down tube until securely fastened To attach the iH85, slide it into the bracket with the Power button facing you and the speaker facing up.To attach the iH85 remote, slide the mounting slot on back of the remote down the square top of the clamp until it clicks. Press clip button to release. Do not leave remote on bike when unattended. AB1:Mounting ClampABC Da)  Using Philips screw driver, open mounting clamp. b)  Put two rubber mounting spacer strips together and cut to desired length. Place mounting strip on mounting surface (bar, handle). Add thick strip as needed. c)  Wrap mounting clamp around spacer d)  Tighten clamp using a Philips screwdriver
™Controls and IndicatorsSide PanelSpeaker CapMounting UnitRemote Panel3Reverse ButtonVolume Decrease Power Button AC Adaptor Jack Volume Increase Forward Button Play / Pause Button(Hold 3 seconds for OFF)P5 Using the iH85Connecting iH85 to AC Power SourcePlug the AC adaptor cable into the AC Adaptor Jack and the other end into a standard 120 VAC wall socket.  If an iPod is properly connected, it will begin charging, indicated by a flashing  LED. The iH85 also operates on 4 “AA” batteries (see page 4 for information on installing/replacing batteries) for portable playing. The AC adaptor charges the iPod with or without batteries installed. The unit will not charge your iPod while operating just on batteries. NOTE:  To save battery life, when running on Batteries, unit will automatically power OFF after 2 hours of NON-use (no button activation). Press any button to re-activate the unit.Install iPod Insert Your iH85 comes with 3 inserts to ensure your iPod fits properly on the dock located inside the case. Not all iPod models require inserts. See Page 1 for insert table.To place an insert: 1. Select the insert for your iPod. Using the correct insert ensure the proper fit to your iPod. 2. Gently press the iPod insert into the insert. 3. Carefully place your iPod with insert into the dock. The iPod must not be in a case or “skin”. NOTE: For nano models, dock the nano first, then slide insert over docked nanoTo check for iPod compatibility iH85 is an advanced system and supports most updated iPod features. To have your iPod working properly with the iH85, please update your iPod firmware with the latest one. Please check Apple website for the latest firmware. Install/Replace the Remote Control Batteries The remote control batteries are already installed at the factory. When the remote control stops operating or its range seems reduced, replace the batteries with new ones. 1. The battery compartment cover is located on the bottom of the remote control. 2. Use a Phillips screwdriver to unscrew the retaining screw on the battery compartment   cover. 3.  Turn the battery compartment cover counterclockwise slightly to unlock the battery cover.       Remove the cover. 4. Insert 2 CR2032 batteries, checking the + and – ends of the batteries match the diagram inside the battery compartment.5. Replace the battery cover, turn clockwise to lock and replace the retaining screw. NOTE: Make sure you dispose of batteries properly (see your local regulations). 4P6
5Batteries InstallationListening to iPod Charging your iPodInstall/Replace BatteriesThe iH85 uses 4 “AA” batteries for portable playing. The iH85 will not charge your iPod while operating on batteries.If sound becomes weak or distorted, replace the batteries.• Unscrew outer case and remove• Open the battery compartment cover located inside unit above the AC adaptor jack.• Insert 4 “AA” batteries as indicated • We recommend the use of alkaline batteries for longer lifeNOTE: AC adaptor does not charge batteriesBatteries information:• Do not mix old and new batteries.• Do not mix alkaline, standard (carbon -zinc) or rechargeable (nickel-cadmium) batteries.P7 NOTE: Please make sure you are using the correct insert if required for your iPod (see Page 1 for details) and that it is properly docked into the iH85. Failure to do so may damage your iPod. 1. While your iPod is docked in the unit and the unit is connected to AC power, it recharges (until fully charged). iPod will not be change when using battery power.2. When the iH85 power is OFF and iPod is charging, the LED indicator will flash to show the iPod is charging. 1. If you dock an already-playing iPod, the iH85 will automatically turn on and you will hear music playing from your iPod. NOTE: If the loudness of the music is too low on the iPod itself, iH85 may not detect iPod is in play mode. Press the iPod Play/Pause Button on the remote control twice to play it. 2. When the iPod is docked and in standby mode, press the Power On/Off Button on main unit to play it. The LED indicator will stay on to show it is power on. 3. Press the iPod Play/Pause Button to pause play; press again to resume it. 4. Press the Volume + and Volume – Button on the remote control to adjust the system volume.5. Press >> or << Button on remote control to go to the next or previous track. Press and hold while track is playing for high speed forward or reverse music search of the current track.6. To turn off the iH85, press the Power on/off Button. If the unit is connected to AC outlet, your iPod will continue charging while in the dock. You cannot power off the unit by using remote control only. A Consumer Guide to Product Safety6P8 When used in the directed manner, this unit has been designed and manufactured to assure your personal safety. However, improper use can result in potential electrical shock or fire hazards. Please read all safety and operating instructions carefully before installation and use. Keep these instructions handy for future reference. Take special note, and adhere to all warnings on the unit and in the instruction and service manual.1. Water and Moisture - The unit should not be used near water. For example, near a bathtub, washbowl, kitchen sink, laundry tub, in a wet basement, or near a swimming pool, etc., when using the AC adaptor.2. Ventilation - The unit should be situated so that its location or position does not interfere with its proper ventilation.  For example, it should not be situated on a bed, sofa, rug, or similar surface that may block the ventilation openings; or placed in a built-in installation, such as bookcase or cabinet that may impede the flow of air through the ventilation openings.3. Heat - The unit should be situated away from heat source such as radiators, heat register, stoves, or other appliances (including amplifiers) that produce heat.4. Power Sources - The unit should be connected to a power supply only of the type described in the operating instructions or as marked on the appliance.5. Power Cord Protection – Power supply cord should be routed so that they are not likely to be walked on or pinched by items placed upon or against them. It is always best to have a clear area from where the cord exits the unit to where it is plugged into an AC outlet.6. Cleaning - The unit should be cleaned only as recommended by the manufacturer.7. Object and Liquid Entry - Care should be taken so that objects do not fall and liquids are not spilled into the enclosure through openings.8. Attachments – Do not use attachments not recommended by the product manufacturer.9. Lightning and Power Surge Protection – Unplug the unit from the wall outlet and disconnect the antenna or cable system during a lightning storm or when it is left unattended and unused for long periods of time. This will prevent damage to the product due to lightning and power-line surges.10. Overloading – Do not overload wall outlets, extension cords, or integral convenience receptacles as this can result in a risk of fire or electric shock.11. Damage Requiring Service - The appliance should be serviced by qualified service personnel when:  A. The power-supply cord or plug has been damaged.  B. Objects have fallen into or liquid has been spilled into the enclosure.  C. The unit has been exposed to rain.  D. The unit has been dropped or the enclosure damaged.  E. The unit exhibits a marked change in performance or does not operate normally.12. Periods of Nonuse – If the unit is to be left unused for an extended period of time, such as a month or longer, the power cord should be unplugged and take out batteries from the unit to prevent damage or corrosion.13. Servicing - The user should not attempt to service the unit beyond that described in the user’s operating instructions. All other servicing should be referred to qualified service personnel.Questions? Visit www.ihomeaudio.com
Trouble Shooting7NOTE: When AC adaptor is plugged in, your iPod will charge (with or without batteries installed).Does not charge with batteries ONLY. NOTE: Unit does not control or charge 3G iPod P9 Unit doesn’t respond (no power) iPod does not dock properlyiPod does not respond to the unitiPod didn’t charge up Sound is distorted Remote Control didn’t workAC adaptor isn’t plugged to a wall outlet or the connector is not plugged into the power supply jack on the back of the unit. Plug the AC adaptor into a wall outlet and plug the connector into the AC jack on the unit Wall outlet is not functioning Batteries are weak or dead  Replace all the batteries with new ones Using no or wrong iPod insert iPod is not installed properly iPod is not installed properly Your iPod software is too old iPod is locked up/frozen Unit is not plugged into a working AC outlet iPod is not installed properly Using 3rd generation iPod iPod is locked up/frozen iPod battery has problem Volume level is set too high Sound source is distorted Batteries are weak/ dead Remote Control is too far way from main unit Plug the AC adaptor into a wall outlet and plug the connector into the AC jack on the unit Make sure unit is plugged into working outlet and all connections are good Plug another device into a wall outlet (same outlet) to confirm the outlet is workingMake sure the dock insert is the proper fit to your iPod Remove your iPod from the dock and check for obstruction on the connectors in the dock and on your iPod. Then reseat it in the dock. Remove your iPod from the dock and check for obstruction on the connectors in the dock and on your iPod. Then reseat it in the dock. Please make sure your iPod is working properly before dock into the unit. Please refer to your iPod manual for detail. Remove your iPod from the dock and check for obstruction on the connectors in the dock and on your iPod. Then reseat it in the dock. iH85 does not support 3rd generation iPod Please make sure your iPod is working properly before docking in the unit. Please refer to your iPod manual for detail. Decrease the volume If iPod original sound source is poor quality, distortion and noise are easily noticed with high-power speakers. Try turning bass boost OFF Replace with new batteries Move the Remote Control closer to main unit Upgrade software on your iPod. For details, visit http://www.apple.com/ipod/downloadSolutionSymptom Possible Problem8SoluciónSíntoma Posible Problema Solución De ProblemasNOTA: Cuando el adaptador AC está conectado, su iPod se cargará (con o sin las pilas instaladas). No se carga SÓLO con pilas. NOTA: La unidad no controla o carga iPod de 3a GeneraciónP10
39iHome Products, a division of SDI Technologies Inc. (hereafter referred to as SDI Technologies), warrants this product to be free from defects in workmanship and materials, under normal use and conditions, for a period of 90 days from the date of original purchase. Should this product fail to function in a satisfactory manner, it is best to first return it to the store where it was originally purchased. Should this fail to resolve the matter and service still be required by reason of any defect or malfunction during the warranty period, SDI Technologies will repair or, at its discretion, replace this product without charge (except for a $10.00 charge for handling, packing, return UPS/postage, and insurance). This decision is subject to verification of the defect or malfunction upon delivery of this product to the Factory Service Center listed below. The product must include proof of purchase, including date of purchase. The fee for service without proof of purchase is $30.00. Before returning this product for service, please first replace the batteries (if applicable) with fresh ones, as exhausted or defective batteries are the most common cause of problems encountered. If service is still required: 1. Remove the batteries (if applicable) and pack the unit in a well padded, heavy corrugated box. 2. Enclose a photocopy of your sales receipt, credit card statement, or other proof of the date of purchase, if within the warranty period. 3. Enclose a check or money order payable to the order of SDI Technologies, for the sum of $10.00 ($30.00 without proof of purchase). 4. Send the unit prepaid and insured, to the Factory Service Center listed below. Consumer Repair Department SDI Technologies Inc. 1330 Goodyear Drive El Paso, TX 79936-6420 Disclaimer of Warranty NOTE: This warranty is valid only if the product is used for the purpose for which it was designed. It does not cover (i) products which have been damaged by negligence or willful actions, misuse or accident, or which have been modified or repaired by unauthorized persons; (ii) cracked or broken cabinets, or units damaged by excessive heat; (iii) damage to digital media players, CD’s or tape cassettes (if applicable); (iv) the cost of shipping this product to the Factory Service Center and its return to the owner. This warranty is valid only in the United States of America and does not extend to owners of the product other than to the original purchaser. In no event will SDI Technologies or any of its affiliates, contractors, resellers, their officers, directors, shareholders, members or agents be liable to you or any third party for any consequential or incidental damages, any lost profits, actual, exemplary or punitive damages. (Some states do not allow limitations on implied warranties or exclusion of consequential damages, so these restrictions may not apply to you.) This warranty gives you specific legal rights, and you may also have other rights which vary from state to state. Your acknowledgement and agreement to fully and completely abide by the above mentioned disclaimer of warranty is contractually binding to you upon your transfer of currency (money order, cashier's check, or credit card) for purchase of your SDI Technologies product. © 2007 SDI Technologies, Inc. All rights reserved Questions? Visit www.ihomeaudio.com  or call 1-800-288-2792 Toll Free IH85-121806-A (USB)  Printed in ChinaLimited 90-Day Warranty InformationP11

Navigation menu