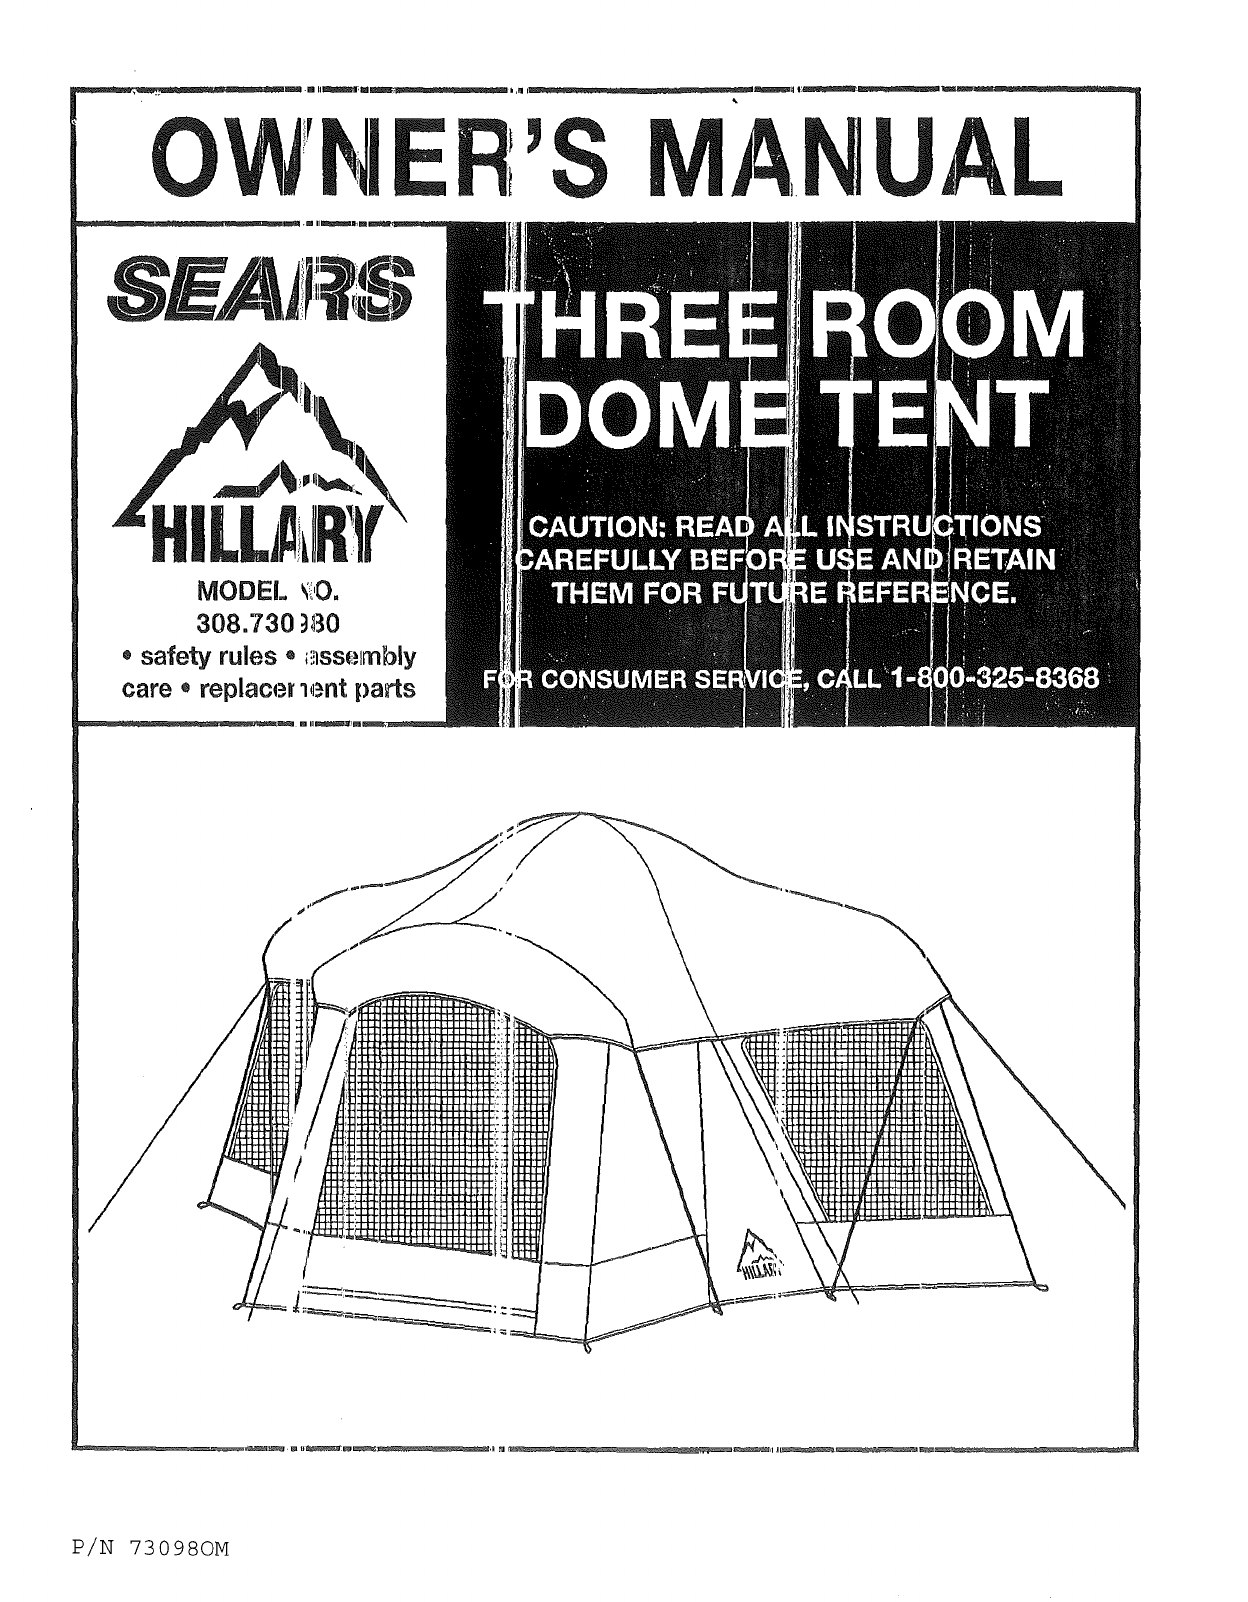
SEARS Tents Manual L0909161
User Manual: SEARS SEARS Tents Manual SEARS Tents Owner's Manual, SEARS Tents installation guides
Open the PDF directly: View PDF ![]() .
.
Page Count: 4
\
P/N 730980M
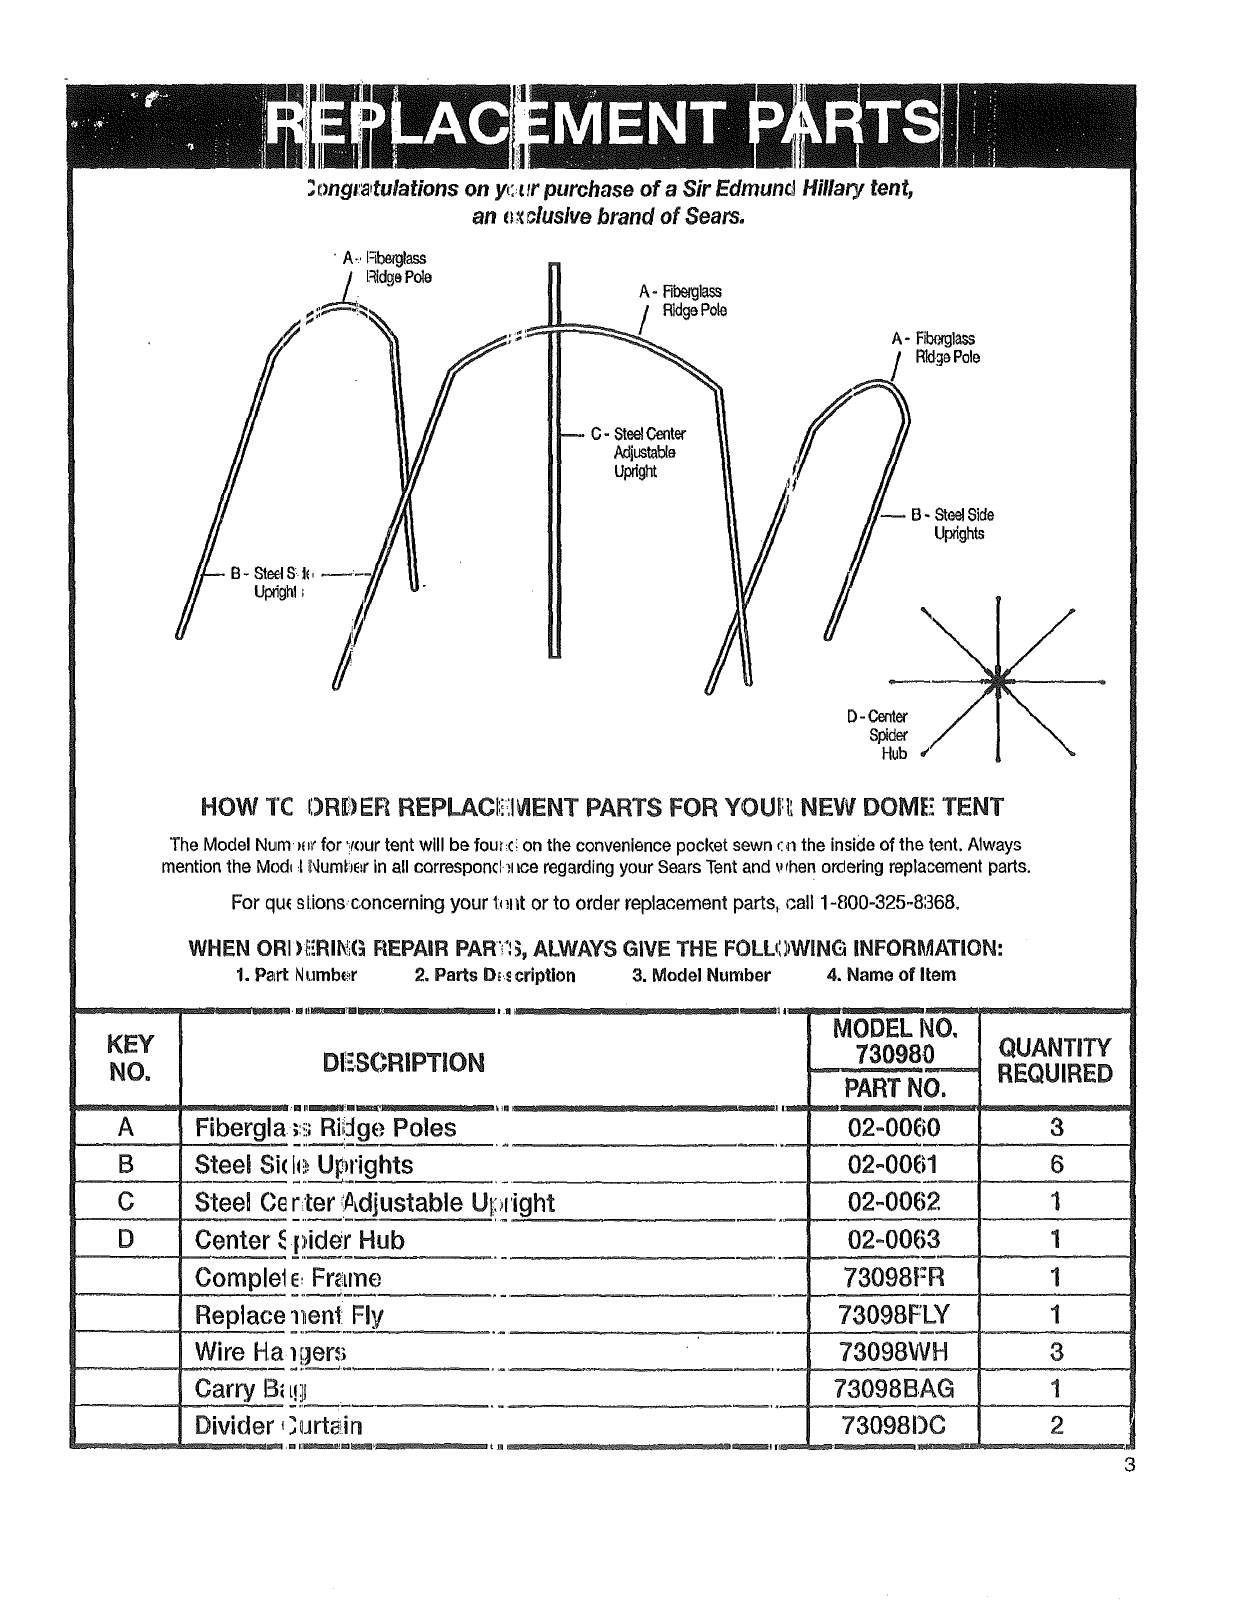
;ongr_,tulations on yt:ur purchase of a Sir Edmund Hillaty tent,
an _ ;lusive brand of Sears.
A- Fiberglass
RidgePole
Adjustable
U_gm
HOW TC {)RDEFt REPLAOI',i:,I_ENTPARTS FOR YOUHt NEW DOME TENT
The Model Num _tr for _!ourtent will be fout_¢',on the convenience pocket sewn ,:,nthe inside of the tent. Always
mention the Mod__1Number in all corresponcl ;Iice regarding your Sears Tent and _.,rhenordering repla_ment parts.
For qu( slJonsconcerning your l:_+t_tor to order replacement parts, call 1-800-325-8368.
WHEN ORI )ii!RllYiG REPAIR PAR;=;, ALWAYS GIVE THE FOLL_)WING INFORMATION:
1, Part Numbs€ 2, Parts D+._cription 3. ModelNumber 4. Name of Item
KEY
NO.
A
B
C
D
DESCRIPTION
MODEL NO,
730980
PARTNO.
Fibergla ;:!;Rii'::lgePoles
Steel Si! Ij!!,Uprights
SteeU Ce r_ter!#_djustable Uplight
Center _ p,ide:r Hub
Complel E,Fr_Lme
Replace _l+entFly
Wire Ha l{)ers
Carry B_m!.]l
Divider, ]_Jrte+_in
QUANTITY
REQUIRED
02=0060
02-0061
02-0062
02°0063
73098FR
73098FLY
73098WH
73098BAG
73098DC
3
6
1
1
1
1
3
1
2
3
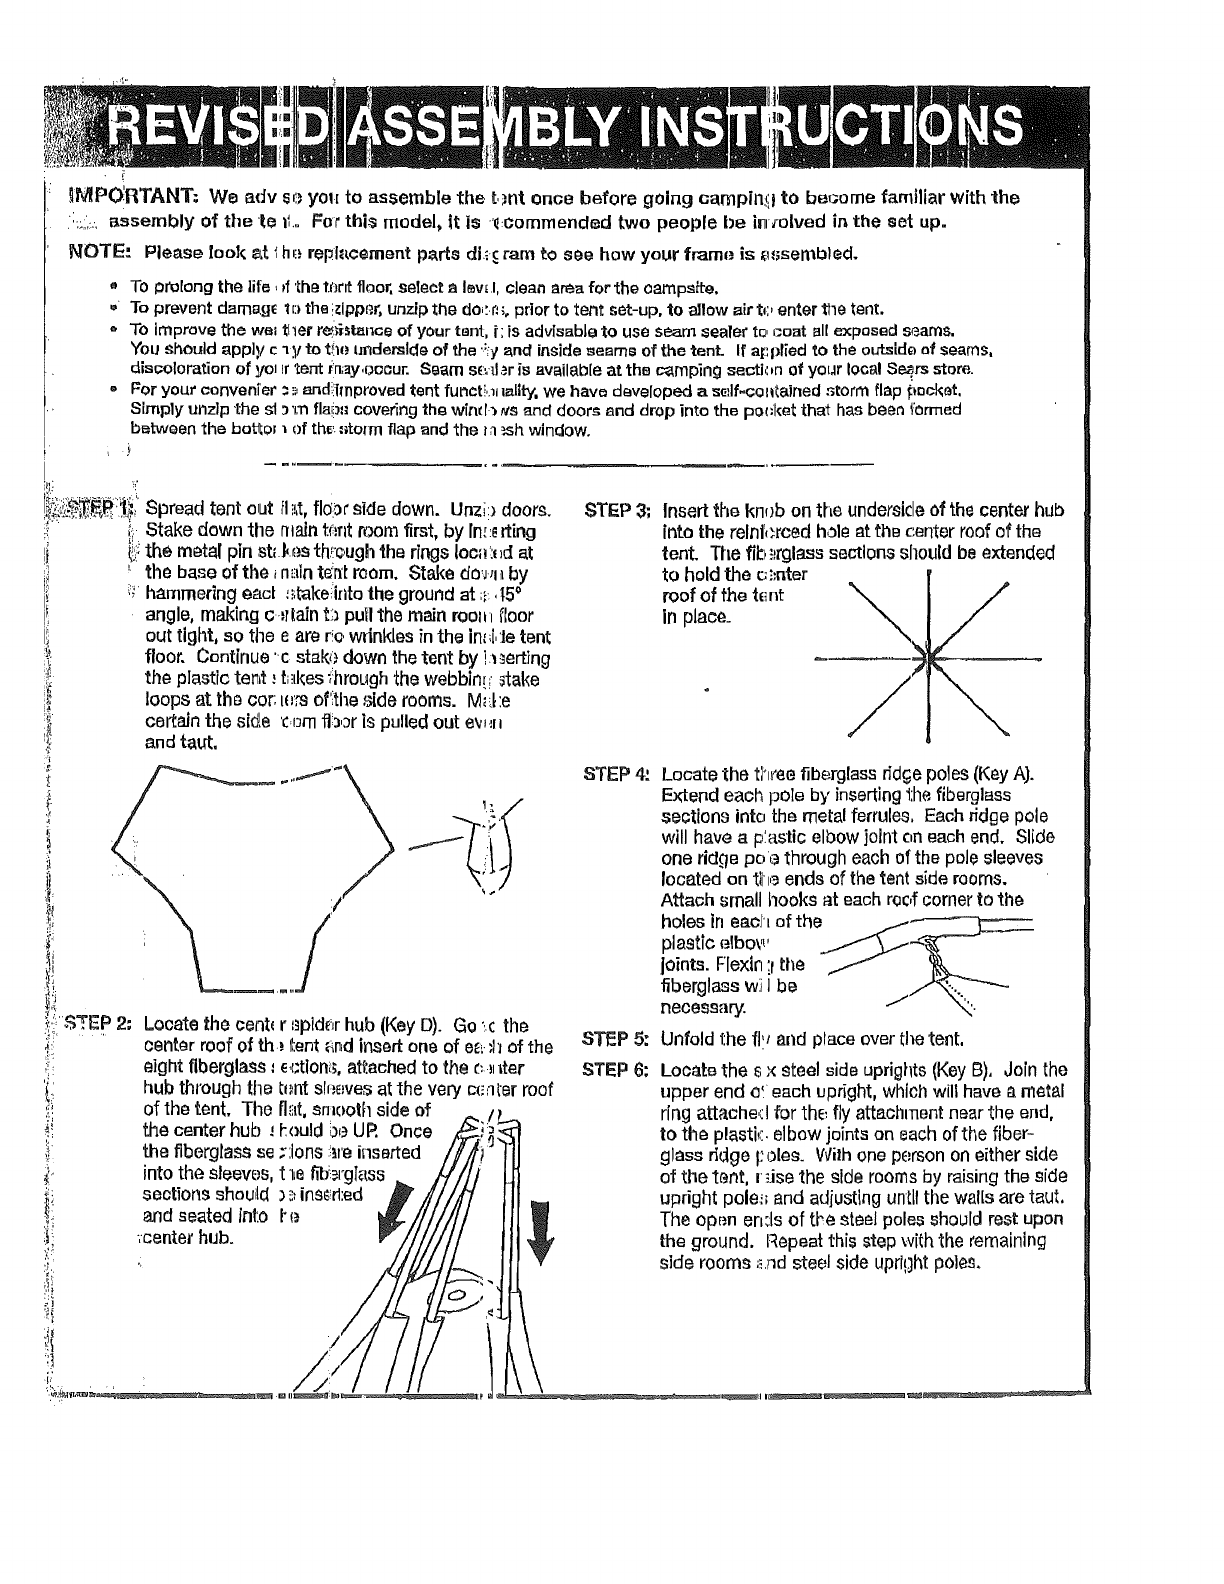
.qMPO_RTANT= We adv s,:;yol=to assemble the t.mt once before going carnpin:!;Ito be_;omefamiliar with the
:_:,.,.,assembly of the re ii.. For thi_ model, it is "_commended two people be inTo|ved in the set up.
NOTE: Please look _Lt_h,.;repl_Lcementpads di-:_ram to see how your frame is assembled.
, To prolong the life, pf'the t._r_ floor, select a low.I, clean area for the camps/to,
- To prevent darnag_ 1_:_the i_ippP.r, unzip the do,:.f, ;, prior to tent set-up, to allow air to enter the tent.
* To improve the we= tiler r_i_istance of your tent, i; is advisable to use seam seater to, _=oat all expas,_d seams.
You should app])/c _y to ti_e underside of the ';_/and inside _earnG of the tent. If arcpiled to the outslde af seams,
discoloration of yo= ir tent #_ay,oocur. Seam s_:_d_ris available at the c_mping secti,',,n of your local Se_.rs store.
•For yourconvenFer
Simply unzip the sl
betweenthe bot_o_
=_ and:,_llnproved tent funct!,._ _altty, we have developed a s_'.lf-colltained storm flap _acket,
'rn flai_,'-"covering the wind_ _ts and door_ and drop into the po,I;ket that has been formed
of the'..,_to_mflap and the _a ,.sh window.
STEP 3; Insert the kn_)bonthe underside of the centerhub
into the relnf,;rced h,_leat the center roof of the
tent. The fib _rglasssections should be extended
to hold the c:;;nter
roof of the te:nt
in place. \
_' of the tent. The flat, smoothside of _
!! the centerhub, l:ould be UR Once _i
e.berg . s:,ions , so od/lA!i
_': into the sleew,s, t 'he _b;i.l°gT_SS _ /-/#////
_i sections shoulld ) _;ins_!rl:ed_////_/
soa od
/IF ,/Fo '
ii
Locate the cent_r =_pld_',rhub (Key 13).Go '_cthe
center roof of th._._ent$_ndinsertone of e_.'h of the
eight fiberglass=_ctlon_:_,ate.achedto the _ _ter
hub through the _',.ntsh;_;vesat the very c,_,_arroof
STEP
STEPS:
STEP 6:
Locatethe t;h_eefiberglass ridge poles (Key A).
Extend each pole by insertingthe fiberglass
sections into the metal ferrules. Each ridgepole
will have aplastic elbow jointoneach end. Slide
one ridge pc,,:_through each of the pole sleeves
located on tlh,_ends of the tent siderooms.
Attach small hooks at each roof corner to the
holes in each of the __---_
plastic elbov' _..-_"_--
joints. Flexlrl;fti_e _
fiberglass wil be j'_..._-'_--
necessary. ._- x_.
Unfold the fl'_ and place over the tent.
Locate the s "<steel side uprights (KeyB), Join the
upper end e'. each upright, which will have a metal
,__ ring attached for the fly attachment nearthe end,
I_ to the plastk, elbow jointsoneach ofthe fiber-
IIJ glass r_dgeI_oles. With oneperson on either side
of the tent, i_Jsethe side rooms by raising the side
ill _ uprightpole_ and adiusting until the wailsare taut.
111_ The ep_.nends of tFe steel poles should rest upon
Ill _ the ground. Repeat this step with the remaining
side rooms ,_.t_dsteel side upright poles.
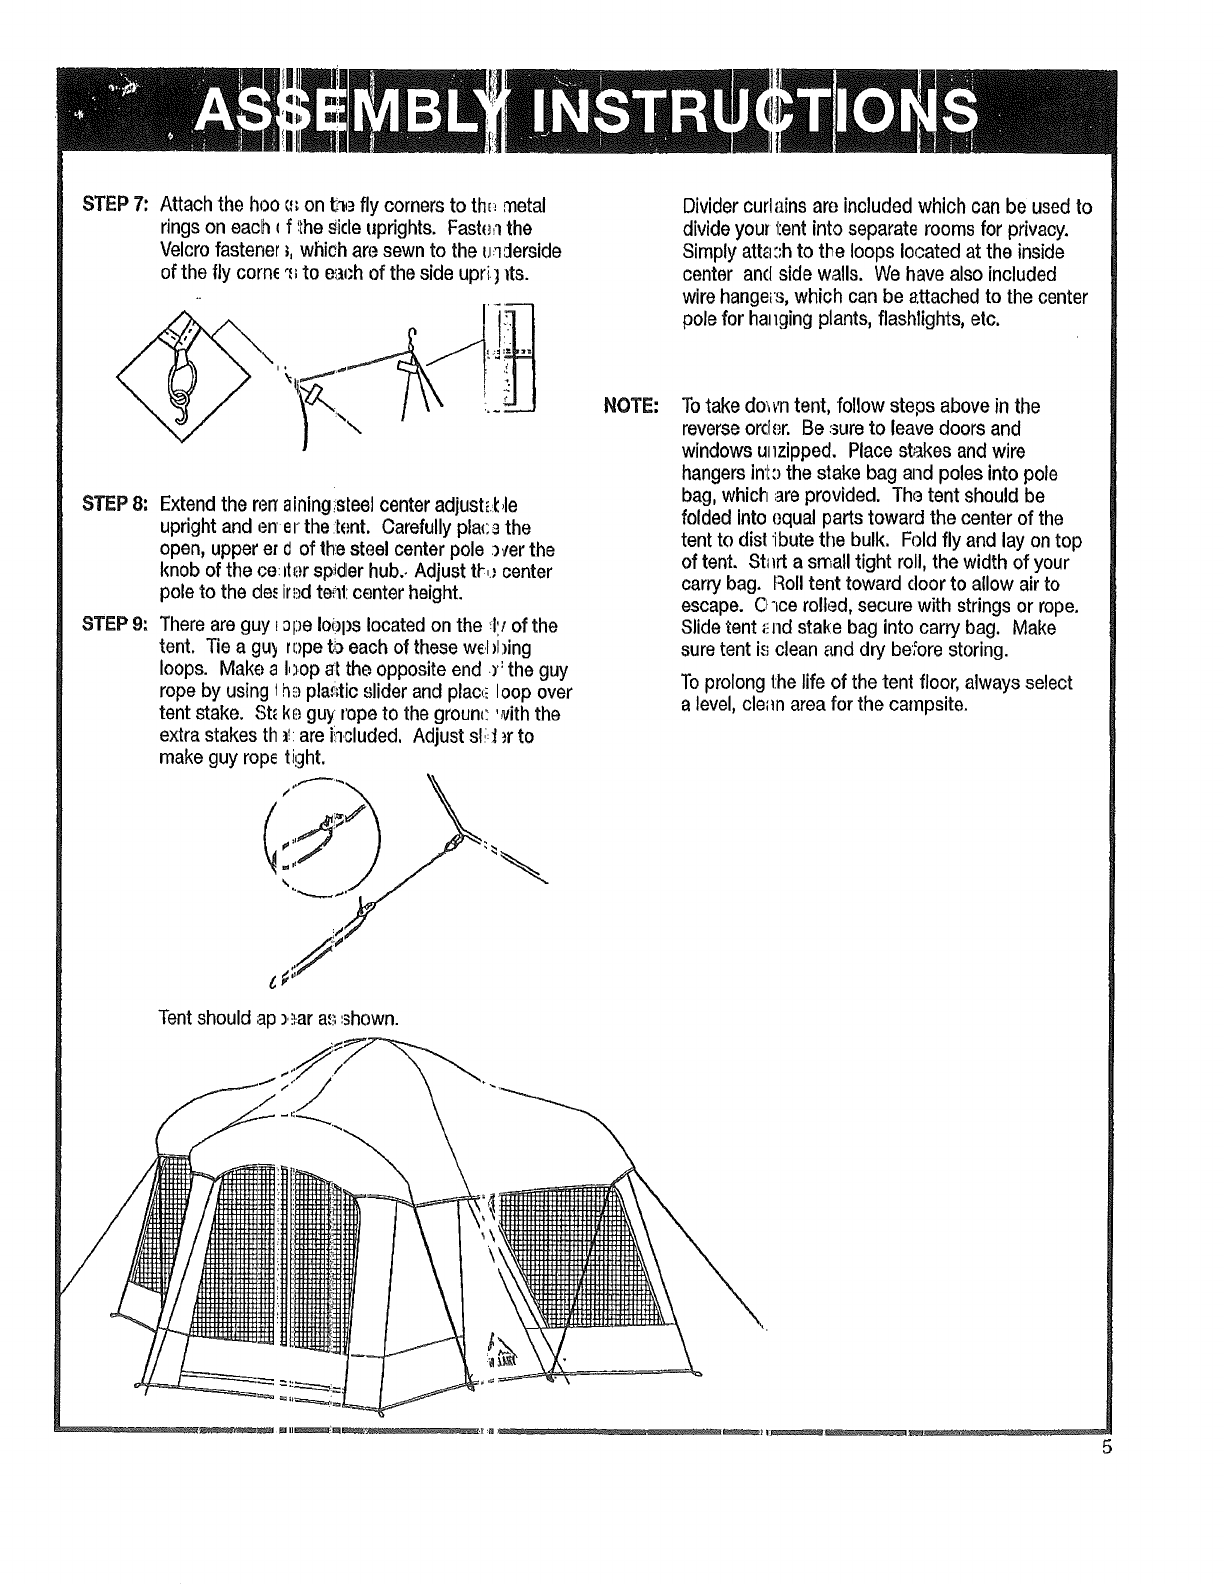
STEP7: Attachthehooc_ont;-ieflycornerstothe:,metal
ringsoneachIf_the_icleuprights.Fast(,,,_the
Velcrofastener_,whi0haresewntotheu:lJerside
oftheflycorn_'_;toe3chofthesideupri]_ts.
STEP 8:
STEP 9:
Extend the rerraining_:steelcenter adjush.t,le
upright and ener the :tent. Carefully plal:_ the
open, upper er d of th:esteel center pole _er the
knob of the ce:Iter sp_idlerhub.. Adjust tt_,;center
pole to the de,_ir_!)dte,;lt center height.
There are guy _opeIo!_pslocated on the _l'fof the
tent. Tie a gu_ rt:)petb each of these wel)I)ing
loops. Make a I,:3.opal the opposite end )': the guy
rope by using l h_i_plaf_tioslider and plac,:iloop over
tent stake. St_kEi._guy rope to the ground:with the
extra stakes th _!:are hcluded, Adjust sl_J;r to
make guy rop_ tight.
Tentshould ap )._ara'.;:shown.
NOTE:
Divider curlains are includedwhich can be used to
divide your l:ent into separate rooms for privacy.
Simply att_:;h to tl_eloops located at the inside
center and side walls. We have also included
wire hangei's,which can be 8.ttachedto the center
pole for haHging plants, flashlights, etc.
Totake do,,m tent, followsteps above in the
reverseord_._r.Be ;_ureto leave doors and
windowsuHzipped. Place stakes and wire
hangersint:)the stake bag and poles intopole
bag,which are provided. Th,3tent should be
folded into equal partstoward the centerof the
tent to disl:ibute the bulk. Foldfly and lay ontop
of tent. St=lrtasmall tight roll,the width of your
carrybag. Roll tent toward door to allowair to
escape. C "bcerolled,securewith strings or rope.
Slide tent _nd stake bag into carrybag. Make
sure tent i.,;clean and dry be'_orestoring.
To prolong the life of the tent floor, always select
a level, cle;_narea for the campsite.
5
