SEECODE VMP407 Digital Audio Player with Bluetooth Interface User Manual SF2000B VMP407 eng
SEECODE Co., Ltd. Digital Audio Player with Bluetooth Interface SF2000B VMP407 eng
UserManual.wiki
>
SEECODE
>
VMP407 User Manual
Users Manual
Navigation menu
Upload a User Manual
Namespaces
Wiki Guide
HTML
PDF
Info
Views
User Manual
Discussion / Help
Navigation
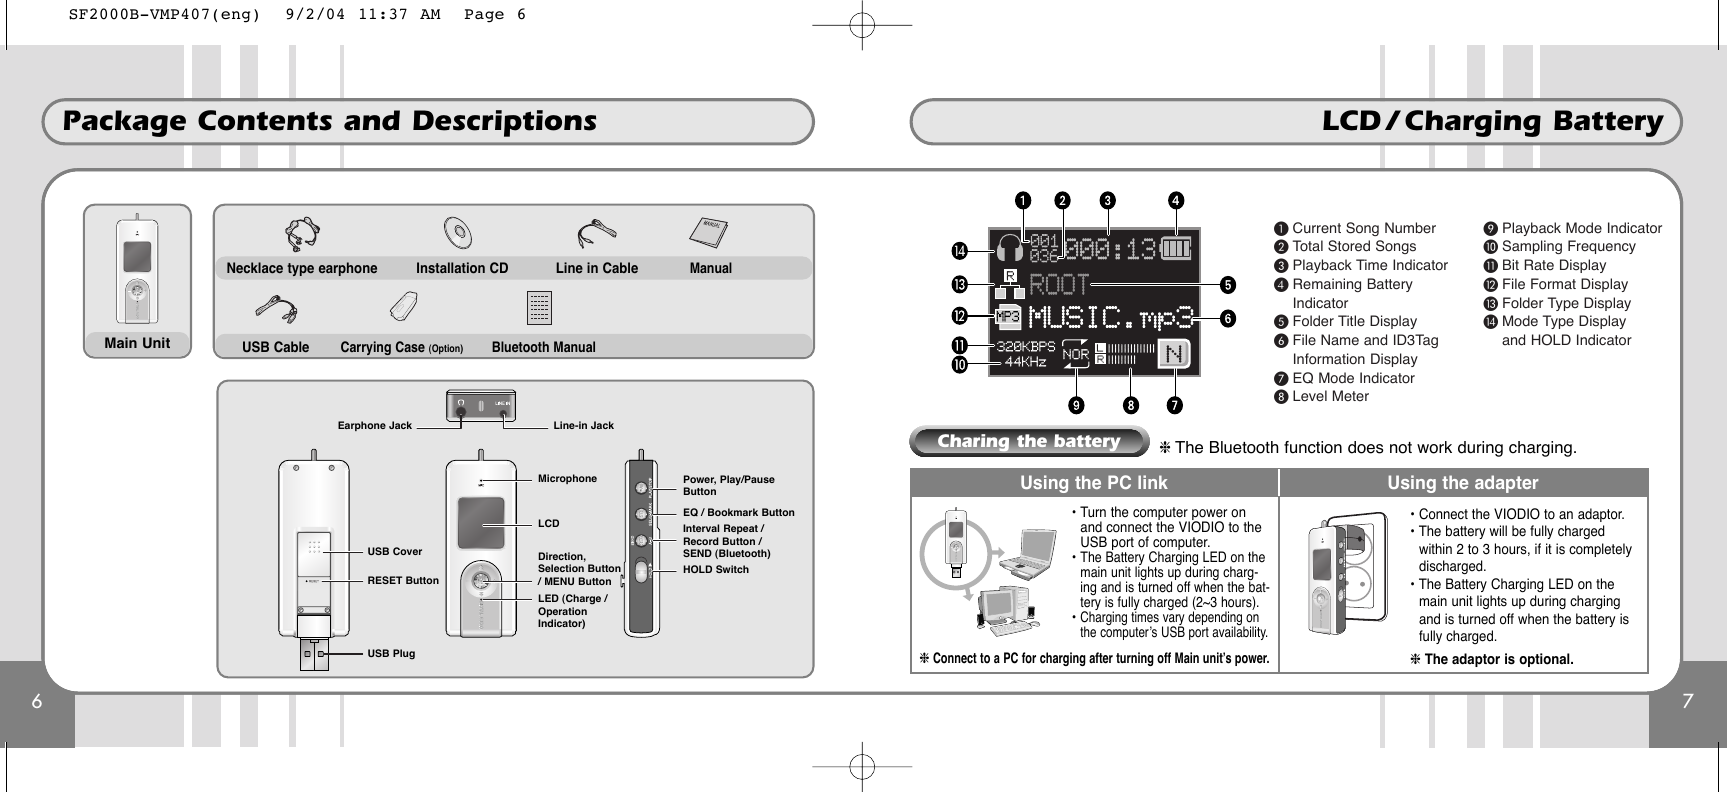
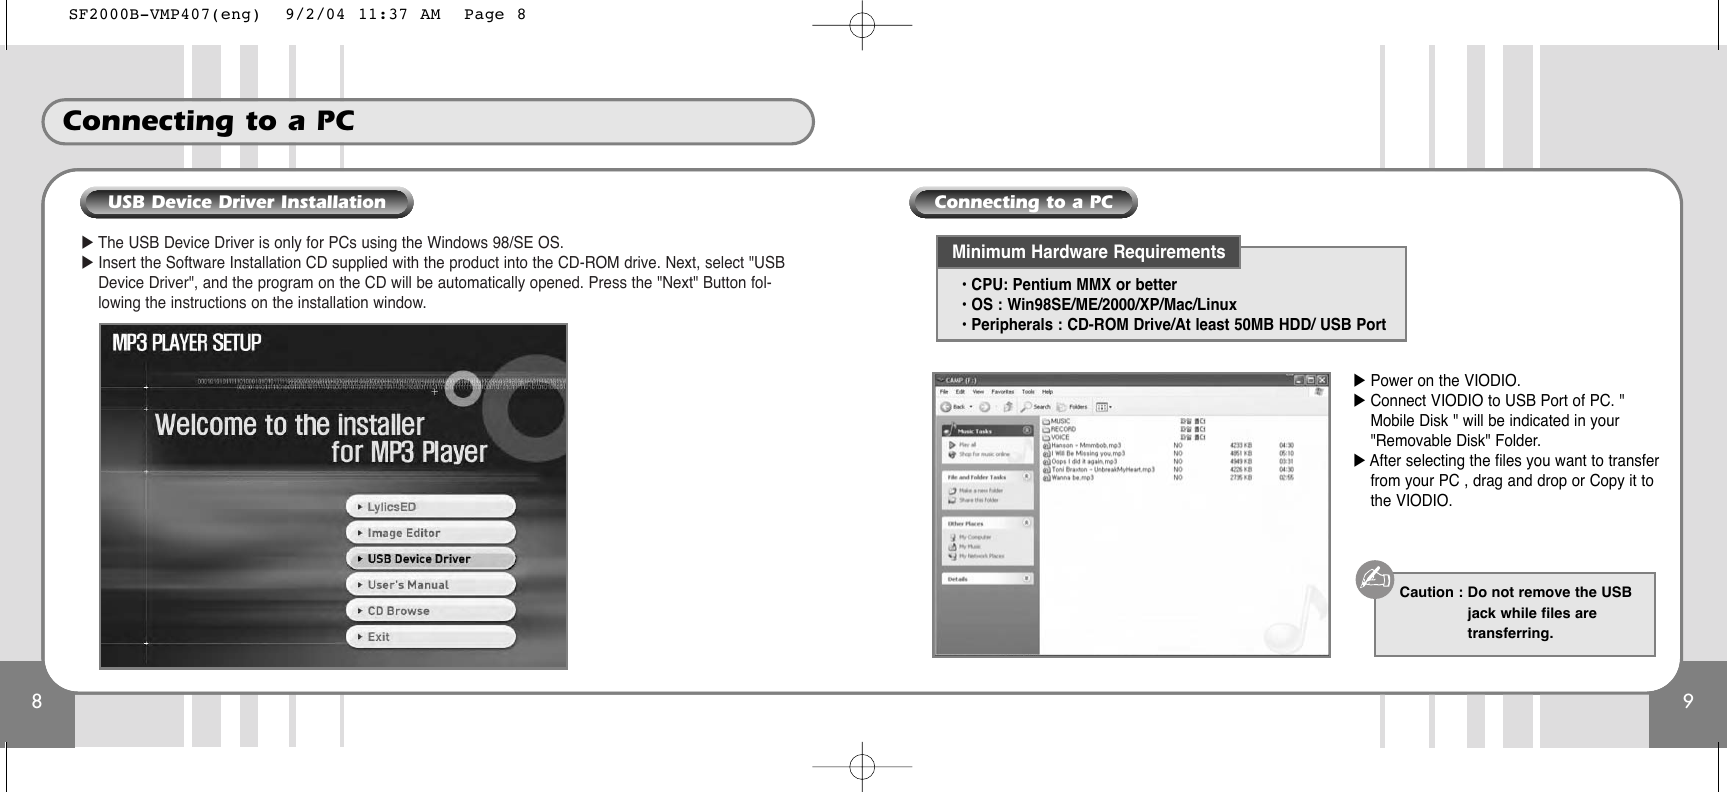
![10Connecting to a PC11Power On / Play back• This player is recognized as a ‘Removable Disk’ folderwhen it is connected to a PC. There are three folders:MUSIC, VOICE and RECORD.• MP3, WMA Music files can be saved in any folder.• asv files created using the Image Editor can be savedin any folder.• Voice recording files are saved in the Voice Folder.• FM recording and encoding files are saved in theRecord Folder.• Up to 512 folders or files can be saved under the theROOT Directory.• Do not disconnect the VIODIO from PC while thedata is transferring. If you do, the data will be dam-aged.• For disconnection from a PC with Windows2000 /ME / XP, click the ‘Disconnect and RemoveHardware’ icon on the taskbar at the bottom right ofthe Monitor Screen to stop the device from running,then disconnect the VIODIOCOMM MODE The file is being transferred.Do not dissconnect VIODIO.REMOVABLE The file transfer is completed.You may disconnect the VIODIO.ROOTFile ManagementDisconnect the Main Unit from PC. ●Power ONPress the ‘Play/Pause’ button [̈/■] for 1 ~ 2 Seconds shortly.●Power OFFPress the ‘Play/Pause’ button [̈/■] for over 2 seconds.The LCD displays "Bye-Bye" and the power turns off.●HOLD SwitchPush the HOLD switch in the direction of the arrow to disable all buttons. ●PlaybackFor playback of MP3, WMA files, press the ‘Play/Pause’ button [̈/■]. ●Music SelectionPush the Jog Key in the reverse direction ̇̇ or the forward direction ̈̈, andthe previous song or next song is played.If you push the Jog Key in the reverse direction ̇̇ within 5 seconds after play-back, the previous song is played. If you do it 5 seconds after playback, the cur-rent song is played from the beginning. Push and hold the Jog Key in the reverse direction or foward direction to rewindor fastfoward.●StopTo stop playback , press the ‘Play/Pause’ button [̈/■].To continue playback, press the ‘Play/Pause’ button [̈/■] again.SF2000B-VMP407(eng) 9/2/04 11:37 AM Page 10](https://usermanual.wiki/SEECODE/VMP407/User-Guide-465638-Page-6.png)
![17Voice Recording16FM Recording●FM RecordingPress the REC button while listening to FM radio, and the player starts recording.Pause during RecordingPress the Play/Pause button [̈/■] during recording, and the recording is paused.Press the button again, and the recording is resumed.❈File names flash during the Pause state.Finish RecordingPress the REC button shortly during recording; the recording is stopped andrecorded files are automatically created and saved in the Record folder.Recording time is indicated during the process. When the recording time limit(depending on memory capacity) is exceeded, recording is automatically stoppedand the file saved until the recording time limit is used up.❈ Recording Time (based on 256MB)128 kbps (4 hours), 64 kbps (9 hours), 32 kbps (18 hours), 16 kbps (36 hours)●Voice RecordingPress and hold the REC button for a few seconds, and Recording Mode is started.Press and hold the REC button in Recording Mode, and recording is started.Pause Voice Recording Press the Play/Pause button [̈/■] during recording, during recording to pause.Press the button again to resume recording is resumed.❈File names flash during the Pause state.Finish Voice RecordingPress the [REC] button shortly during recording; recording is stopped and recordedfiles are generated in the Voice folder.Recording time is indicated during the process. When the recording time limit(depending on memory capacity) is exceeded, recording is automatically stoppedand the file saved until the recording time limit is used up.How to RecordSF2000B-VMP407(eng) 9/2/04 11:37 AM Page 16](https://usermanual.wiki/SEECODE/VMP407/User-Guide-465638-Page-9.png)
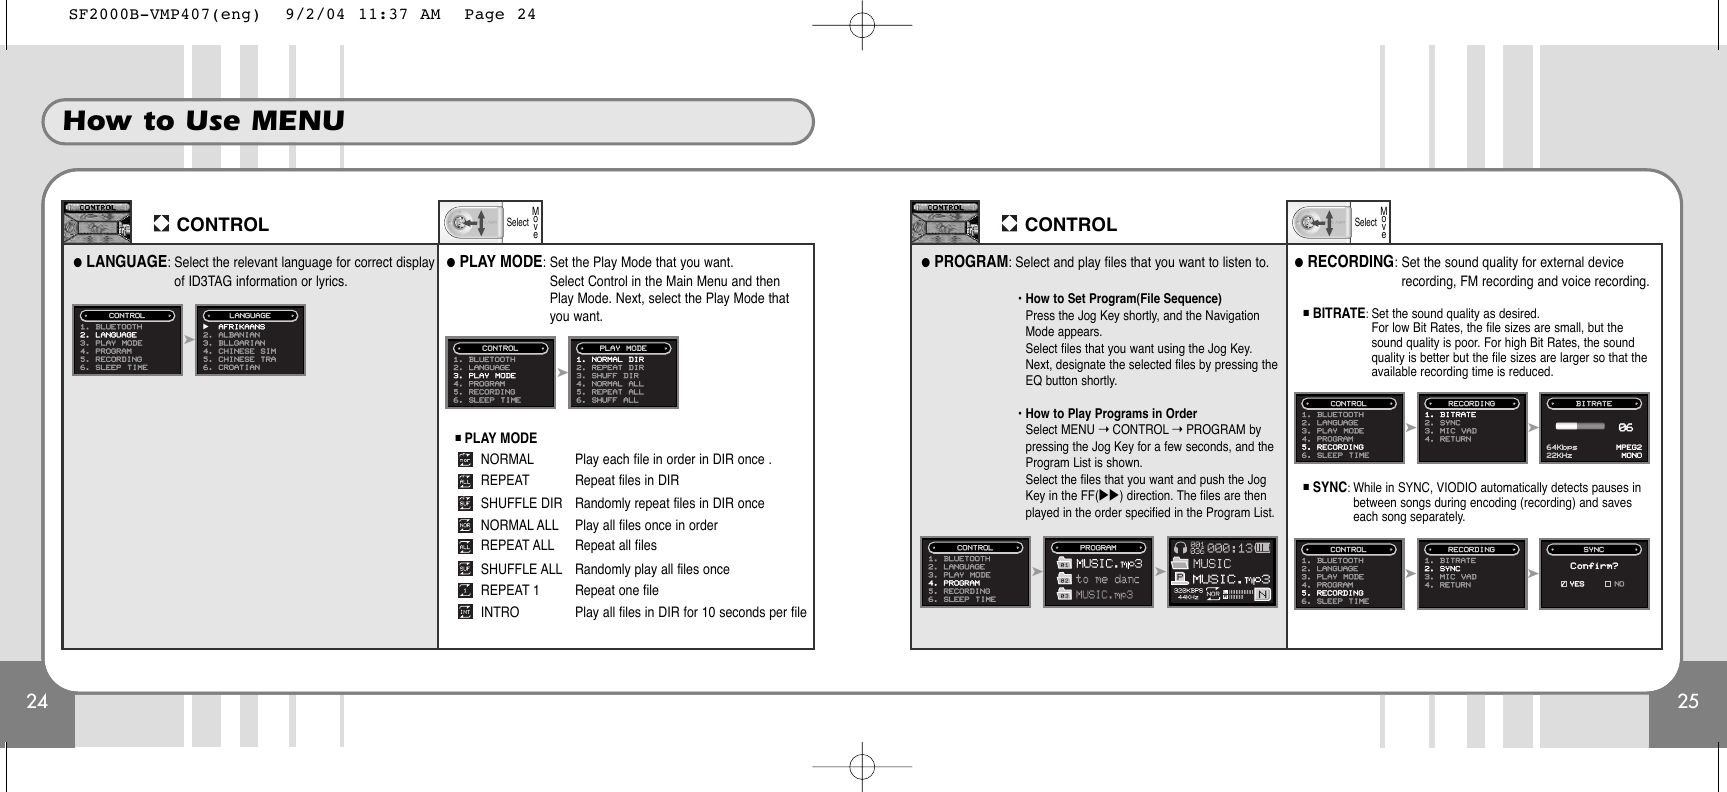
![19How to Use Program18External Input Recording●External Input Recording (Line in Recording) Mode SettingConnect the Line-In cable to the Line-IN Jack of the external device and VIODIO.External Input Recording Mode SettingPress and hold the Jog Key for a few seconds, and the Main Menu will appear.Select the Encoding Mode from among the MODE menus and press the Jog Key.External Input RecordingPress the Record button [REC] shortly during playback, and recording is started.Press the Play/Pause button [̈/■] to stop recording.Finish External Input RecordingPress the Record button [REC] shortly during recording; recording is stopped andthe recorded file is generated in the Record folder.Recording time is indicated during the process. When the recording time limit(depending on memory capacity) is exceeded, recording is automatically stoppedand the file saved until the recording time limit is used up.❈For external input recording, turn the external device volume up. If the recordingvolume is low, the volume of the recorded file may be low after recording.External Audio Input●How to Use ProgramStart the Program ModeSelect MENU ➝CONTROL ➝PROGRAM, and the Program Mode is displayed.Create ProgramSelect file names to add to the list in Navigation Mode and press the EQ buttonshortly. The files are then added to the program in sequence.Press the Jog Key on the VIODIO in PROGRAM Mode shortly, and the File List isshown. At this point, you can select any files you want to add to the program andso create the program.Play ProgramMove to a program file using the +/- key of the Jog Key in PROGRAM Mode andpress the FF Key ̈̈. Only the files on the program will then be played.During playback of the program files , the File Icon is displayed as a PROGRAMICON on the window.Delete ProgramMove to a program file using the +/- key of the Jog Key in PROGRAM Mode andpress the EQ button. The files in the relevant program are then deleted from the list.To delete all saved lists, press and hold the EQ button for a few seconds, and alllists will be deleted at the same time.Exit Program ModeTo return to Normal Mode, go to NAVIGATION Mode and select files. TheProgram Mode is then released. In other words, go to Navigation Mode and selectother files during playback, and the mode will be changed to NORMAL Mode.During Play back, the file icon is indicated as " PROGRAM ICON"SF2000B-VMP407(eng) 9/2/04 11:37 AM Page 18](https://usermanual.wiki/SEECODE/VMP407/User-Guide-465638-Page-10.png)