SEGI JR1040-2WSSL KEYLESS ENTRY SYSTEM User Manual ELANTRA User
SEGI LIMITED KEYLESS ENTRY SYSTEM ELANTRA User
SEGI >
Users Manual
wwaarrnniinngg
It is the responsibility of the vehicle operator to ensure that their vehicle is parked in a safe and responsible manner.
1. When leaving the vehicle, it is the user’s responsibility to ensure that the gearshift lever is in “Park” in
order to avoid accidents upon remote starting. (Note: Make sure that the automatic vehicle cannot start in “Drive”.)
2. It is the user’s responsibility to ensure that the remote starter is disabled or put into valet mode before servicing.
RMway@remote@starting@system@with@T@buttons@
for@automatic@transmission
MR1040 Series / MA100-2WAY
elantra
ELANTRA Version 1.0
ARS CALL CENTER NUMBER IS
000-0000-0000
8102RECAM000100
wwaarrnniinngg
It is the responsibility of the vehicle operator to ensure that their vehicle is parked in a safe and responsible manner.
1. When leaving the vehicle, it is the user’s responsibility to ensure that the gearshift lever is in “Park” in
order to avoid accidents upon remote starting. (Note: Make sure that the automatic vehicle cannot start in “Drive”.)
2. It is the user’s responsibility to ensure that the remote starter is disabled or put into valet mode before servicing.
# Page
iinndduussttrryy@
@ccaannaaddaa@
@uusseerr@
@nnoottiicceeZZ
Operation is subject to the following two conditions: (1) this device may not cause interference, and (2) this device must
accept any interference, including interference that may cause undesired operation of the device.
To reduce potential radio interference to other users, the antenna type and its gain should be so chosen that the
equivalent isotropically radiated power (EIRP) is not more than that required for successful communication.
NOTE: The manufacturer is not responsible for any radio or TV interference caused by unauthorized modifications
to this equipment.
eellaannttrraa
Table of Contents
i T
T
V
W
using@the@remote@control
d@@r@a T
b@f U
vehicle@presets
h@F@@ V
w@L@@F@ V
t@b@r
V
i
remoteMstarting@your@vehicle
rMs W
d@off W
X
i
remoteMstarting@features
v@m X
p@m@ Y
advanced@featuresZ@installationM
programmable@options
troubleshooting@poor@
transmitting@range
limited@thirtyMsix@HSVI@months@or@
VPLPPP@km@warranty
t@m QP
t@s@ QP
l@b@s QP
r@d@l@ QP
e@r@t@ QQ
c@c@ QR
s@o@O@o QR
p@a@o@O@o QR
s@s@o@O@o QR
Y
QS
QT
To assure continued compliance, any changes or modifications not expressly approved by the party responsible for compliance could void
the user's authority to operate this equipment.
5 Page
Page 4
Introduction
This is a state-of-the-art remote car starter system. The system is packed with advanced features such as priority
access to the drivers door (commodity feature).
With many advanced functions, this product will satisfy any one of your expectations from high-end commodity and
security systems, without neglecting any standard feature commonly offered by entry-level starters.
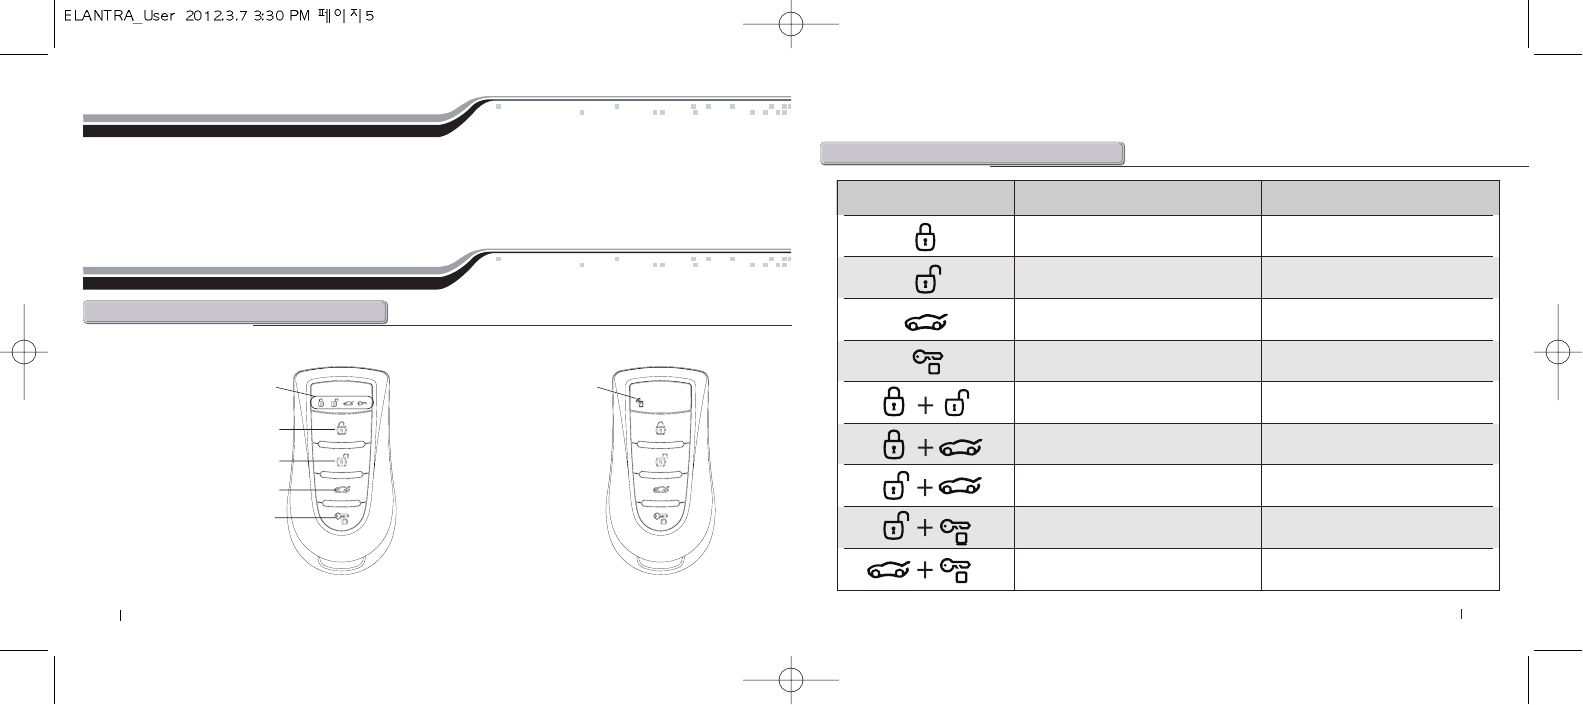
Using the remote control
d@@r@a
b@f
Rw@r@ Qw@r@
Rw@r@
R@c@led@i@T
Qw@r@
Q@c@led@i@Q
lock@O@panic
unlock
car@check@O@trunk
start@O@stop@Z@
r@@@@@
n@Z@t@r@@
L@@lock@L@
S@L@@@start@O
stop@N
t@@@@@
start@O@stop@@@@QOR
N
Button(s) 0.5 Second 2.0 Second
LOCK PANIC
UNLOCK UNLOCK
Car Check Trunk Release
Remote START / STOP
Siren ON / OFF
Valet Mode ON / OFF Shock Sensor ON / OFF
Passive Arming ON / OFF
Timer Start ON / OFF Low Battery Start ON / OFF
Turbo Mode ON / OFF
7 Page
Page 6
h
w@wL@r@F@h
t@b@r
When leaving the vehicle it is recommended to preset the accessory controls in preparation for the Next remote
start.Settings for the blower motor(fan),front and rear (if equipped),should not be left on HIGH.It is recommended to
leave the settings on LOW or MEDIUM instead.
Certain vehicles require the radio and / or windshield wipers and / or headlights circuits to become energized while
running under remote start. When leaving the vehicle you must ensure that the windshield wipers and headlights
switches are OFF. Leaving the headlights switch ON on certain types of vehicles could cause them to remain ON even
after remote starter shutdown, resulting in a dead battery.
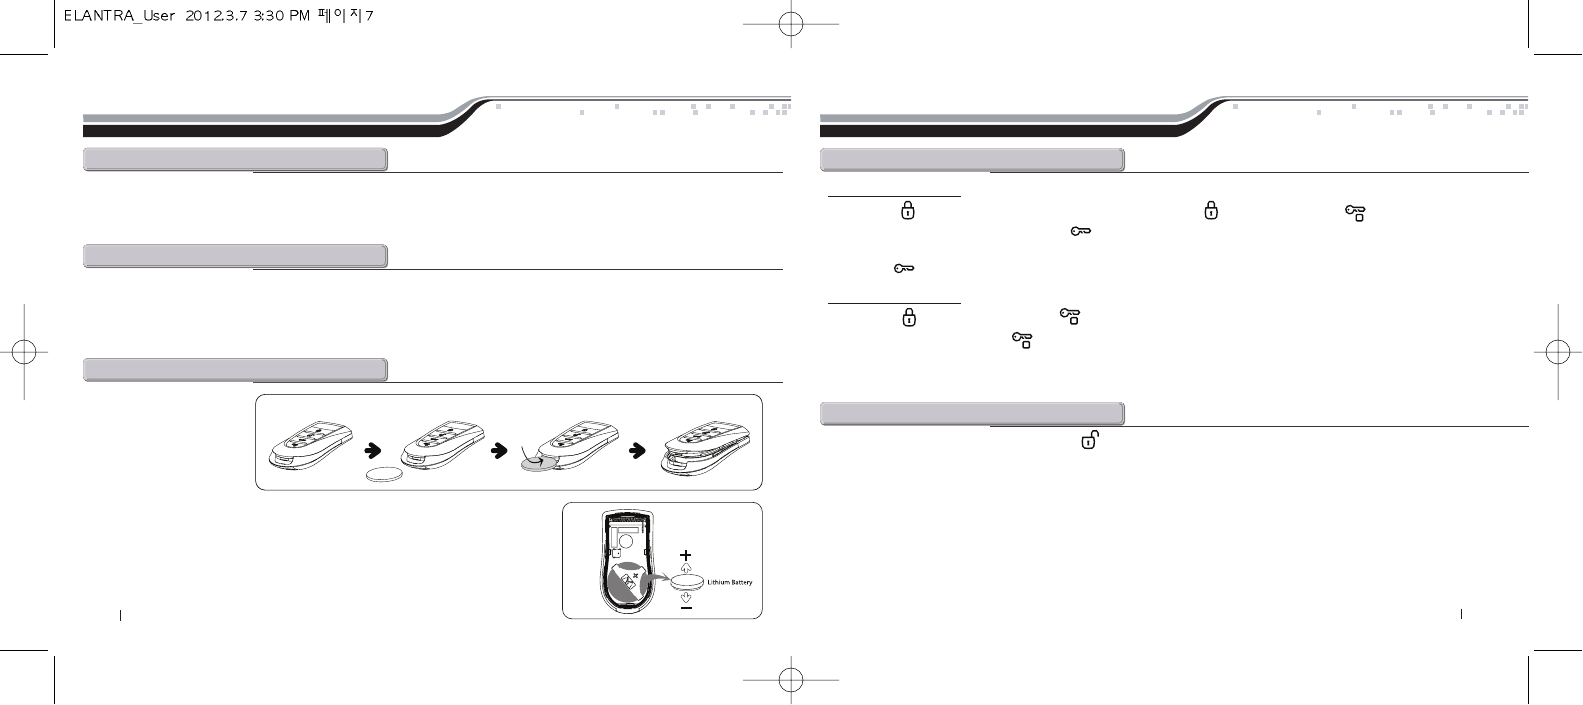
1. Like above picture, you may
use coin to detach top and
bottom case of transmitter,
2. 2Way transmitter - When
you insert battery
(CR2450/620MAH), “+” terminal should be TOP side like above.
3.1Way transmitter - You inset battery 2EA in a poly bag. (CR2016 x 2EA)
For the 2-way remote:
1. Press the button. The remote will beep once and display the icon. Then, press the button within 3 seconds.
The remote will beep once and display the icon.
2. Approximately 5 seconds later, the remote will confirm the remote starters activation by three times tone play and
display the icon, scroll the LED icons.
For the 1-way remote:
1. Press the button. Then, press the button within 3 seconds.
2. To stop the engine, press the button for a 1/2 second.
If your vehicle does not start at the first attempt, the system will shut down, wait a few seconds and try to start the engine
again. There will be 3 start attempts before the system gives up.
With the vehicle running remotely, press the button to disarm the OEM Starter Kill and/or the OEM alarm and unlock
the doors. Enter the vehicle and do the following:
1. Turn the ignition key to the IGNITION ON (RUN) position. (Do not turn the key to the CRANK position while the
engine is running. This would cause the starter motor to reengage.)
2. Press the brake pedal to disengage the remote starter unit.
(In the status of Key IGNITION ON position, if press the brake pedal or 30 seconds passes, vehicle is ready to run.)
Note: In remote engine start status, engine activation will be off for the following reasons.
- You press the brake pedal if the key was not placed on IGNITION ON position.
- You did not activate for 30 seconds after door opens.
Remote-Starting your VehicleVehicle Presets
r@M@s
d@o
⚦⚧ ⚨⚩
NOTE: LED icon of 2way transmitter indicates firstly blue color and then change
to “RED” color when you press any button. In this case, it’s time to change CR2450
battery newly
9 Page
Page 8
Remote Starter Features
v@m
When your vehicle is in Valet Mode, the remote starter functionalities are disabled. If the vehicle needs to be serviced,
or if you park it indoors, the Valet Mode will prevent the engine from being remote-started accidentally.
Any of the following features will put your remote car starter into Valet Mode:
Ignition Valet:
This feature allows you to put your system into Valet Mode by using the ignition key.
Remote Valet:
This feature allows you to put your system into Valet Mode by using the transmitter.
To put the system into Valet Mode:
Ignition Valet:
Insert your key into the ignition and turn the ignition on, then off (between ACC and ON), five times within 10 seconds.
Remote Valet:
Press the and buttons simultaneously for a 1/2 second. The remote will beep once and display the
and icons (2-way), the parking lights of vehicle flash once.
To take the system out of Valet Mode:
Ignition Valet:
Insert your key into the ignition and turn the ignition on, then off (between ACC and ON), five times within 10 seconds.
Remote Valet:
Press the and buttons simultaneously for a 1/2 second. The remote will beep twice and display the
and icons (2-way), the parking lights of vehicle flash twice.
To verify whether the system is in Valet Mode using the 2-way remote:
If system is in Valet mode, buzzer sounds shortly when lock or unlock button is pressed.
p@m
In an emergency situation, you can activate panic mode by pressing and hold the button for more than 2 seconds,
then, LED on remote is scrolled with mute status. The parking light start flashing and the horn starts honking.
If the vehicle is already started remotely, the engine will shutdown automatically before setting off the horn. You can
stop the horn by pressing either the button or the button. Furthermore, the panic mode can be stopped by
activating Valet Mode (previous section).
Nate: Panic Mode will automatically shut down after 30 seconds.
Advanced Features:Installation-programmable
o
The Remote Car Starter was designed with flexibility and OEM integration in mind. With its programmable options, this
unit can virtually control nearly any electrical system in your vehicle.
Caution: The programming of your system should be left to a Hyundai professional. Changing any one of the settings
may affect the operation of your Remote Car Starter.
11 Page
Page 10
l@b@s
You can turn this feature on and off by pressing the and buttons for more than 2 seconds.
Vehicle will start by itself automatically in every one hour if the battery voltage drops than users setting value. If Timer
start was already set in advance and low battery start is set, Timer start is automatically cancelled.
Note: If vehicle battery power is declined, timer start and low batter start will not be activated.
t@s
You can turn this feature on and off by pressing the and buttons for a 1/2 second.
If Time start is set, the vehicle will start by itself at present time in every 24 hours.
If low battery start was already set in advance and timer start is set, low battery start is automatically cancelled.
To LOCK your doors and ARM the system:
Press the button for 1/2 seconds.
(2-way) The remote will beep once and display the icon to confirm locking of the doors.
Note: If unlock button is pressed one time, vehicle is disarmed and only drivers seat is unlock. And then if unlock
button is pressed within 5 seconds, all doors is to be unlock.
r@d@l
To UNLOCK your doors and DISARM the system:
Press the button for 1/2 seconds.
(2-way) The remote will beep twice and display the icon to confirm unlocking of the doors.
Note: In Arming status, remote detects door unlock.
t@m
You can turn this feature on and off by pressing the and buttons for a 1/2 second.
In this mode, if the emergency brake has been set, the engine will continue to run after the key has been taken out of
the ignition. It will run until two minutes after the emergency brake has been set.
To utilize this mode, the emergency brake sensing wire has to be connected to the emergency brake wire of the
vehicle. Consult the authorized dealer for this mode.
This option is ideal for turbo-charged vehicles because it allows the turbo too slowly cool after operation.
e@r@t
Your Remote Car Starter can be programmed to run the engine for 3, 8 or 15 minutes (3 minutes by default).
Note: Run time is set by installer.
To check the amount of runtime remaining (2-way only):
If you press button and then press button within 3 seconds, remote engine starts is activated, if it is successfully
done, remote receives signal and display the remaining time with icon in every 5 seconds
Total Remaining Time Display Remaining Time with Icon
For 3 minutes For 8 minutes For 15 minutes
3 minutes 8 minutes 15 minutes
2 minutes 6 minutes 12 minutes
1 minute 4 minute 8 minute
1/2 minute 2 minute 4 minute
13 Page
Page 12
c@c
s@on@O@off
You can turn this feature on and off by pressing the and buttons for a 1/2 second. If Siren Off is set, Horn will
not chirp when Lock or Unlock is activated Note: Even though siren is off, Horn chirps in Panic mode and option setting mode.
You can check your car by pressing the button for a 1/2 second.
Note:
If engine is running, icon is
additionally displayed and
buzzer beeps.
Lock/Unlock Door/Hood/Trunk BEEP ICON DISPLAY
Lock Once
Unlock Twice
Unlock Triggered Three times
p@a@on@O@off
You can turn this feature on and off by pressing the and buttons for a 1/2 second.
With passive mode on, your vehicle will lock and arm 30 seconds after the door is opened and closed. The parking
lights will flash and/or siren will chirp every 10 seconds up to 30.
s@s@on@O@off
This is optional choice not default function so you need to purchase and install shock sensor additionally to realize this features. .
You can turn this feature on and off by pressing the and buttons for more than 2 seconds.
System does not recognize if shock sensor off is set Shock sensing is working 30 seconds later after vehicle is armed.
Troubleshooting Poor Transmitting Range
Many factors may affect the operating range of the transmitter. Some of these are:
The condition of the battery in the transmitter.
The operating environment (for example: downtown radio-frequency noise, airports, cellular Phone towers).
Metal: any type of metal will affect operating range. This includes the vehicle itself.
The shape of the vehicle can affect range as well (vans in general have less range).
The shape of the roof and A-pillars brings about considerable radio-frequency deflection(in This case, the signal from
the remote control).As a result, the direction in which the vehicle is Facing in relation to the remote control can affect the
range. Straight on (standing in front of The vehicle) generally gives you the greatest range; the second best
performance if from the Back. Using the remote control from either side of the vehicle will usually give the lowest range.
The range will be significantly lower in a crowded parking lot than in open space.
Always hold the transmitter high, approximately at shoulder height.

15 Page
Page 14
t@ @ @ @ @ @ @ L@ @ @ @ @ H@ L@ @ mL
L@L@@tM@L@@@tM[@@@@h@@ਫ਼uI@@
@ @ @ @ @ @ @ @ @ @ @ M@ HSVIM@ @ @ @ @ @
@@@uL@@@@L@@VPLPPPkmL@w@@N
the@
@warranty@
@is@
@automatically@
@void@
@ifZ
QI@ t@ @ @ @ L@ @ @ @ N@ @Nf@ @ @ N@ @
@ @ @ @ @ @ @ L@ @ @ @ @ @ @ @ @ @ @
@N
RI@ t@ @ @ @ @ @ L@ L@ L@ @ L@ @ L@ @ @ L
LL@@@L@@@@@L@L@@@@
@@@N
SI@t@@@@@@@@@@@@@h@N
TI@t@@@@@@@N
the@
@warranty@
@does@
@not@
@coverZ
QI@bN
RI@s@@@@N
SI@i@O@@@@@@@@@N
TI@s@@@@@@@@@N
UI@d@@@@@@@@@N
this@warranty@is@limited@to@thirty@six@HSVI@months@from@the@date@off@original@retaildelivery
off@the@ unitNdate@off@first@useLor@ VPLPPP@kmLwhichever@occurs@firstN@ this@limited@waranty@is
the@only@express@warranty@from@the@manufacturer@tat@applies@to@your@ unitN@ the
manufacturer@ neither@ assumes@ nor@ authorizes@ any@ person@ or@ entity@ to@ assume@ for@ it@ any
other@ obligation@ or@ liability@ in@ connection@ with@ your@ unit@ or@ this@ warrantyN@ all@ other
warrantiesL@including@but@not@limited@toL@express@warrantyLimplied@warranty@of
merchantability@or@fitness@for@a@particularLpurpose@are@expressly@excluded@and@discilaimed
to@ the@ maximun@ extent@ allowed@ by@ lawN@ manufacturer@ has@ no@ liability@ for@ acty@ of@ third
partiesN@manufacturers@liabilityN@whether@based@on@contractL@tort@strict@liabilityL@or@any
other@theoryL@ shall@not@exceed@ the@ purchase@price@ of@ the@unit@for@ which@a@claim@ has@ been
madeN@under@ no@circumstance@will@ manufacturer@ bear@any@liability@ whatsoever@ for
incidentalN@ special@ or@ consequential@ damagesNthis@ warranty@ gives@ you@ specific@ rights@ and
you@may@also@have@other@rights@which@vary@from@province@to@provinceL@so@the@above
limitations@may@not@apply@to@youN
m@@@@@@@@@@@N@f@@sL
@@@@@@@@@@@@@Nt@@@@N
t@@@@@@@@@@@@@@@@a@c@@
@p@@qLd@@mN@t@@@@@t@@@@@@@@
@ @ @ @ @ qN@ i@ @ p@ @ @ @ @ @ @ c@ @ @ qL@ @
@ @ @ w@ @ @ @ @ @ @ @ @ @ @ @ @ @ @ oL@ i@
p@@@@cL@@@@@@@@@@@b@@@
@@@u@n@c@@c@@@i@s@@g@H@ਫ਼v@cIN@
LIMITED THIRTY-SIX (36) MONTHS OR 60,000 KM WARRANTY LIMITED THIRTY-SIX (36) MONTHS OR 60,000 KM WARRANTY