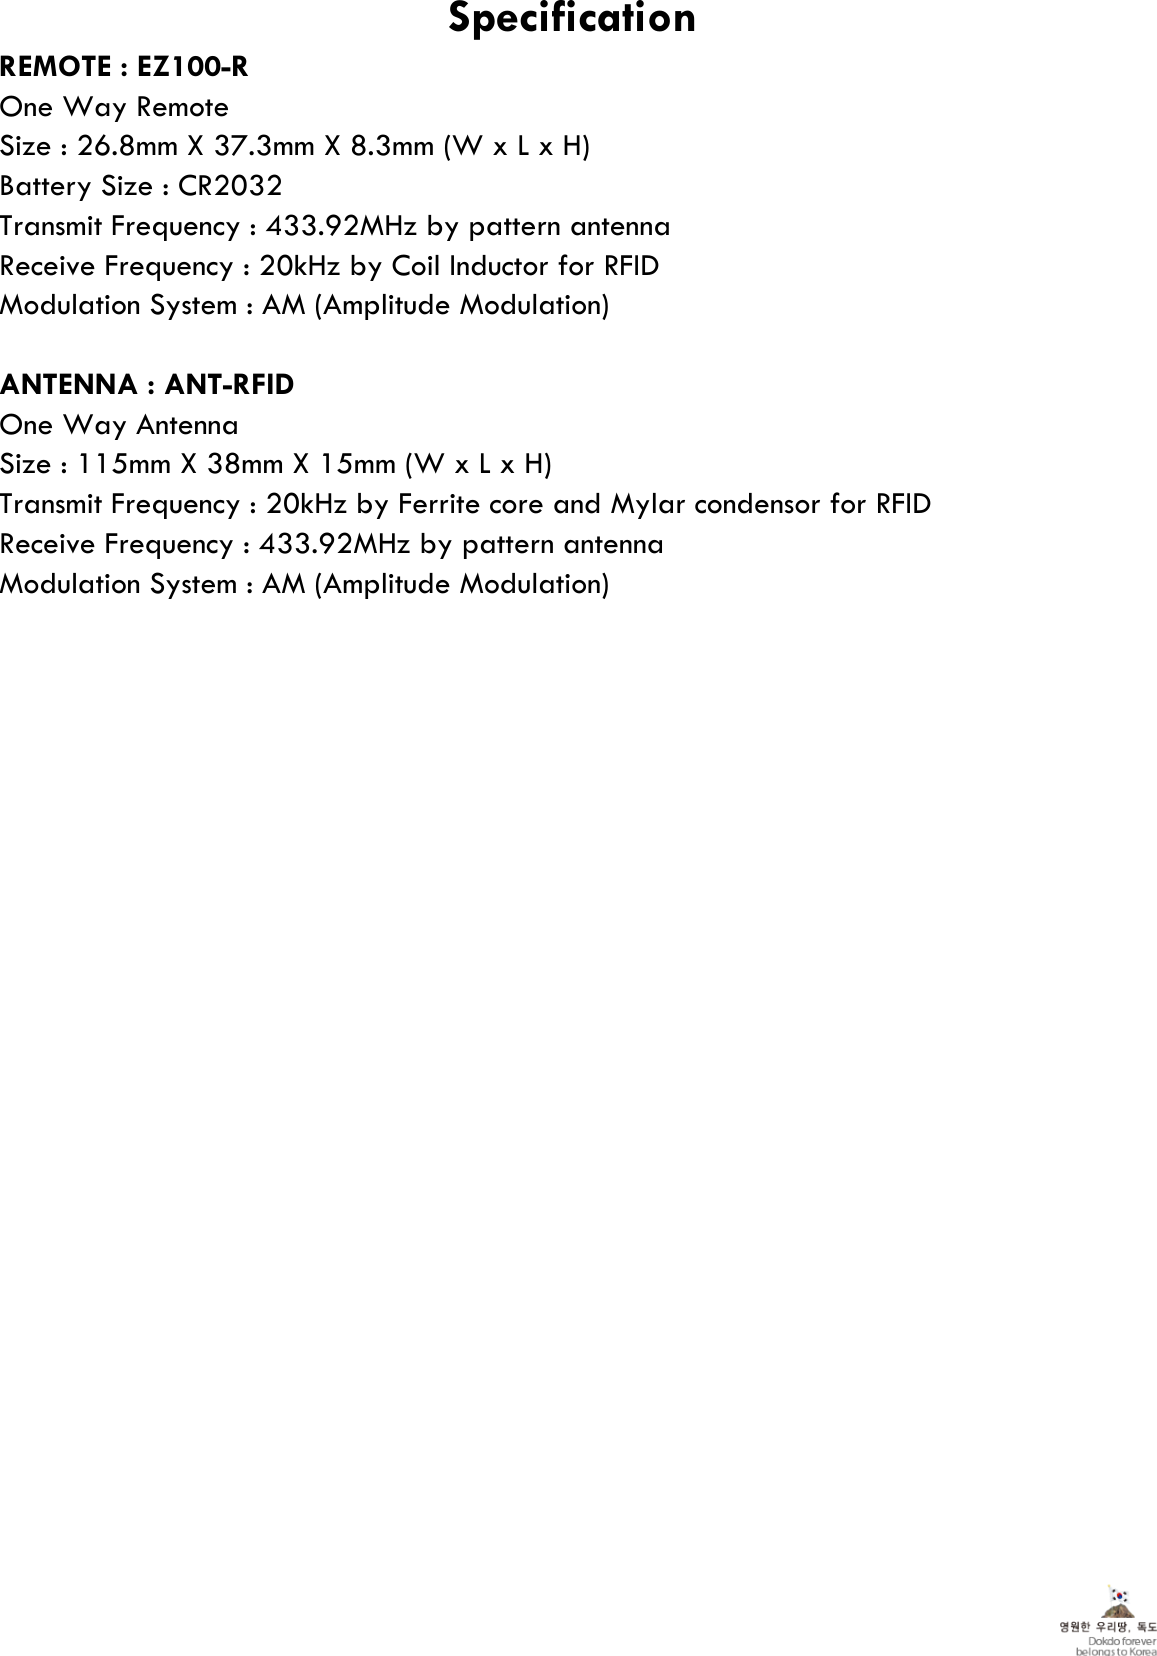
SEGI JR1060-1A433 Keyless Entry System (Model: MR1060) User Manual FT EZGO Manual

SEGI LIMITED Keyless Entry System (Model: MR1060) FT EZGO Manual

Users Manual

alarm and remote start combo, and Drone DR-2000.Replacing your EZ100-R BatteryStatement : The term "IC" before the radio certification number only signifies that IndustryCanada technical specifications were met.CAUTION : The User that modifications to the unit may void the user's authority to operate the unit.This device complies with Part 15 of the FCC rules. Operation is subject to the following conditions;(1) This device may not cause harmful interference.(2) This device may accept any interference received, including interference that may cause     undesired operation.CAUTION : Changes or modifications not expressly approved by the party responsible for compliance  could void the user's authority to operate this device.To maintain compliance with RF energy exposure guidelines, the antenna used for this transmittermust be maintained a separation distance of at least 20cm from the user body when transmitting. Co-located or operated in conjunction with any other antenna or transmitter is prohibited.Siren Chirps and/orParking Light FlashesFunctionLocks/Arms andUnlocks/Disarmsyour vehicle.Half Second1 - On2 - OffTurns Automatic Unlock onand off.8 SecondsFT-EZGO Quick Setup CardYour FT-EZGO is designed to operate with a Firstech compatible alarm, remote start,Thank you for purchasing FT-EZGO system from Firstech. This system will automaticallyor usat 888-820-3690 Monday through Friday 8 AM to 5 PM PST.setup your FT-EZGO. If you have any questions please contact your place of purchase unlock and remotely lock and unlock your vehicle. This guide will help you properlyyou can only use 2 other remotes plus your EZ100-R on your system.FT-EZGO system includes 1 remote (EZ100-R) and 1 antenna (ANT-RFID). Also noteYour system has between 5 and 10 feet of range before your vehicle will Unlock/Disarm.  unlock/disarm.FT-EZGO will wait a minimum of 15 seconds before it will initiate the automaticButton image1 - Lock/Arm2 - Unlock/DisarmTrunk PopTap Then Holdyour remote case near where the keychain loop is.Your remote requires 1 CR2032 battery. It can be replaced by carefully prying apart Duration2 - Chirps and/or Flashes
Nous vous remercions d’avoir acheté le système FT-EZGO de Firstech. Ce systèmedéverrouillera automatiquement et verrouillera et déverrouillera à distance votre véhicule.Ce guide vous aidera à programmer correctement votre FT-EZGO. Si vous avez desquestions, contactez votre détaillant ou contactez-nous au 888-820-3690 du lundi auvendredi de 8h00 à 17h00, heure normale du Pacifique.Votre FT-EZGO a été conçu pour fonctionner avec une alarme, un démarreur à distance,DR-2000.Le système FT-EZGO inclut 1 télécommande (EZ100-R) et 1 antenne (ANT-RFID). Veuillezaussi noter que vous pouvez utiliser seulement 2 télécommandes additionnelles en plus devotre EZ100-R sur votre système.Votre système a entre 5 et 10 pieds de portée avant le déverrouillage/désactivation devotre véhicule. FT-EZGO attendra un minimum de 15 secondes avant d’initier ledéverrouillage/désactivation automatique.Remplacement de la batterie de votre EZ100Votre contrôle à distance nécessite 1 batterie CR2032. Vous pouvez la remplacer enouvrant soigneusement la boite de la télécommande près de la boucle pour le porte-clé.FonctionDuréeButton imageCarte de Mise en Route Rapidu FT-EZGOun combo alarme et démarreur à distance compatibles avec Firstech et avec DroneActive et désactivele déverrouillageautomatique8 SecondsDemi-secondeVerrouille/active et déverrouille/désactive votrevéhicule.Bips de la sirène et/ouclignotements des feux destationnement1 - Verrouille/active2 - déverrouille/désactive2 - Bips et/ouclignotementsOuvre le coffrePressez etensuite tenez1 - Active2 - Désactive
lock/arm and unlock/disarm the vehicle when you press the button on the EZ100-R.Installing The FT-EZGOStep 1 : Flash your CM6 Series control module for FT-EZGO compatible firmware.Step 2 : Set Option 1-14 to Setting 3Step 3 : Connect included 6 Pin to 6 Pin with Ground Wire to control module. If connectingto a 4 Pin to 4 Pin antenna, use the included 6 Pin to 4 Pin adapter.Step 4 : Connect the ground wire from the included 6 Pin to 6 Pin cable to vehicle’s ground.Warning: Failure to connect this wire WILL result in damage to your FT-EZGO antenna(ANT-RFID).Step 5 : Connect your antenna to the ANT-RFID. This is the blue 6 Pin port. If you havea 4 Pin antenna cable, use the included 4 Pin to 6 Pin adapter.Step 6 : Find a spot to mount your ANT-RFID on the windshield. This is recommended foroptimum range. For more specific mounting location information visit us atwww.firstechonline.com under the Authorized Tech section document titled:“FT-EZGO Recommended Mounting Locations.”Step 7 : Program your EZ100-R and additional RF Kit remotes to the control module.(Maximum 3 Remotes including EZ100-R).You are now ready to test your FT-EZGO system.Testing The FT-EZGOStep 1 : Turn the auto unlock feature by holding the button on the EZ100-R for at least8 seconds. You will get one parking light flash and/or siren chirp. Hold the button again forat least 8 seconds and you will get two parking light flashes and/or chirps showing thatthe auto unlock feature is off.Step 2 : Arm/Lock the vehicle and wait at least 15 seconds.Step 3 : Walk up to the vehicle and it will automatically unlock/disarm.The FT-EZGO from Firstech will unlock/disarm the vehicle when in range. It will alsoFT-EZGO Installer Setup Card
Le FT-EZGO de Firstech déverrouillera/désactivera le véhicule quand il est à portée. Aussi,il verrouillera/activera le véhicule quand vous pressez le bouton sur la EZ100-R.Installation du FT-EZGOÉtape 1 : Cherchez dans votre module de contrôle de la série CM6 pour un micro logicielcompatible avec le FT-EZGO.Étape 2 : Ajustez l’option 1-14 au réglage 3.Étape 3 : Connectez le 6 connecteurs à 6 connecteurs inclus avec connexion à terre aumodule de contrôle. Si vous le connectez à une antenne 4 connecteurs à 4 connecteurs, utilisez l’adaptateur inclus, 6 connecteurs à 4 connecteurs.Étape 4 : Connectez le fil à terre du câble 6 connecteurs à 6 connecteurs inclus à la massedu véhicule. Avertissement : Ne pas connecter ce fil ENTRAÎNERA des dommages àl’antenne (ANT-RFID) de votre FT-EZGO.Étape 5 : Connecter votre antenne à l’ANT-RFID. Ceci est le port bleu à 6 connecteurs.Si vous avez un câble d’antenne à 4 connecteurs, utilisez l’adaptateur inclus de4 connecteurs à 6 connecteurs.Étape 6 : Trouvez une place sur le pare-brise pour monter votre ANT-RFID. Ceci estrecommandé pour avoir une portée optimale. Pour avoir plus d’information sur des emplacements spécifiques, visitez www.firstechonline.com; dans la sectionvous trouverez un document intitulé: “FT-EZGO Recommended Authorized Tech , Mounting Locations.”Étape 7 : Programmez votre EZ100-R et les télécommandes additionnelles RF Kit au modulede contrôle (Maximum de 3 télécommandes en incluant la EZ100-R).Vous êtes prêt maintenant pour tester votre système FT-EZGO.Test du FT-EZGOÉtape 1 : Activez la fonction de déverrouillage automatique en tenant pressé le bouton surle EZ100-R pendant au moins 8 secondes. Vous aurez un clignotement des feux de stationnement ou/et un bip de la sirène. Tenez encore le bouton pendant au moins 8 secondes et vous obtiendrez deux clignotements des feux de stationnement et/ou bips pour montrer que la fonction de déverrouillage automatique est désactivée.Étape 2 : Activez/verrouillez le véhicule et attendez au moins 15 secondes.Étape 3 : Approchez-vous du véhicule et il se déverrouillera/désactivera automatiquement.Carte de programmation pour l’installation du FT-EZGO
REMOTE : EZ100-ROne Way RemoteSize : 26.8mm X 37.3mm X 8.3mm (W x L x H)Battery Size : CR2032Transmit Frequency : 433.92MHz by pattern antennaReceive Frequency : 20kHz by Coil Inductor for RFIDModulation System : AM (Amplitude Modulation)ANTENNA : ANT-RFIDOne Way AntennaSize : 115mm X 38mm X 15mm (W x L x H)Transmit Frequency : 20kHz by Ferrite core and Mylar condensor for RFIDReceive Frequency : 433.92MHz by pattern antennaModulation System : AM (Amplitude Modulation)Specification

Navigation menu