SEGI JR703A433 CAR Alarm User Manual VA5JR703A433 Part1
SEGI LIMITED CAR Alarm VA5JR703A433 Part1
SEGI >
Contents
- 1. User manual 1 of 2
- 2. User manual 2 of 2
User manual 1 of 2
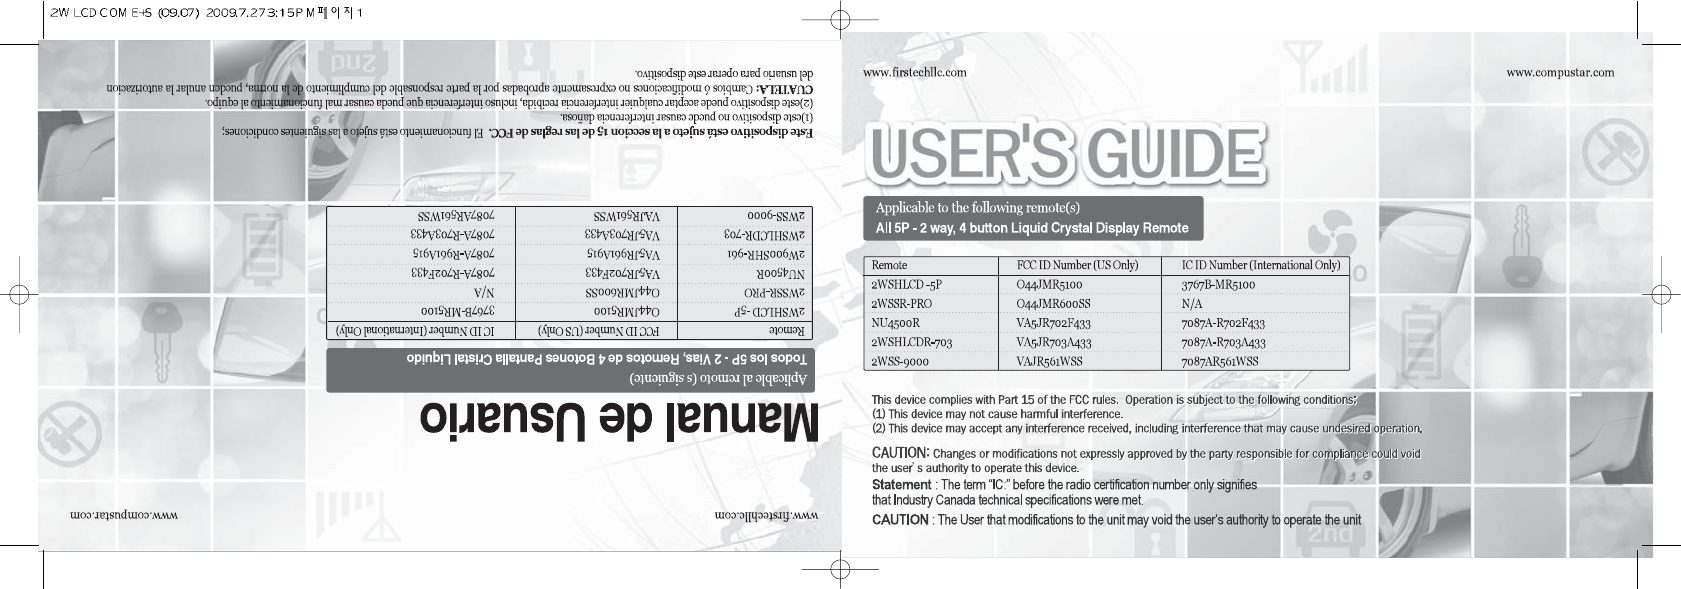

By Firstech, LLC 2
t@o@c t@o@c
i
T
w@c
T
q@r
U
v@m U
r@m@M@b@r V
p@@c@Hlcd@r@oI V
Rw@r@b@f W
Qw@r@b@f Y
g@s@f QV
s@c QV
r@c QV
a@l@O@a@@u@O@d QV
p@l@O@a QW
a@t@r@s@f QW
m@t@r@s@f@Hr@mI QX
a@r@m QX
c@r@m QY
r@m@s QY
t@r QY
aux@o@O@w@rMd@O@s@d RP
t@@b@q RP
s@a@O@d RQ
r@m@O@v@m RQ
s@s@oOo RR
By Firstech, LLC 2
a@s@f RS
d@l@O@@c@d@l RS
t@t@m RS
R c@m@Hm@v@cI RT
c@c@O@rps@Hr@p@sI RT
rps@Hr@p@sI@u@O@d RU
s@v@s RV
t@s@m RW
c@O@h@s@m RX
a@m RX
p@Rw@Tb@r SP
r@c@O@p@rHI SP
l@l@w
SS
r@s@e@d
SQ
a@d
SR
3 By Firstech, LLC
Introduction
Thank you for purchasing a Firstech system for your vehicle. In order to truly enjoy the benefits of this system, we recommend that you thoroughly review the
following manual. Please note that this manual applies to the 2 Way - 4 Button Liquid Crystal Display Remotes, regardless of whether you purchased the alarm
only, starter only or alarm/starter combination. This manual also supports your 1 Way Fiancé remotes that may be included with your system. There are certain
features listed in this manual that may not be available for your system. There may also be features listed in this manual that require additional installation or
programming before they are active. If you have any questions, please contact the original place of purchase. For further information you may also contact our
customer support center by calling 888-820-3690.
Warranty Coverage
Caution: The Manufacture’s warranty will be voided if this product is installed by anyone other than an authorized Firstech dealer. For complete warranty details
visit www.compustar.com or the last page of this manual. Firstech remotes carry a 1 year warranty from original date of purchase.
Warranty registration can be completed online by visiting www.compustar.com. Please complete the registration form within 10 days of purchase. We do not
include a mail in warranty registration card with each unit - registration must be done online. To verify that an authorized dealer installed your system, we highly
recommend that you keep a copy of the original proof of purchase, such as the dealer invoice in a safe place.
5 By Firstech, LLCBy Firstech, LLC 4
!
Quick Reference
When servicing or loaning your vehicle to others, the system should be placed in Valet Mode. Valet Mode prevents the system from remote starting and disables
all alarm functions.
IMPORTANT: While in Valet mode the remote will still control power lock and unlock systems. The parking lights will not flash.
The system can be put into valet one of three ways:
1. Turn the vehicle’s key to the ignition “on” position and tap buttons (I + III) simultaneously for 0.5 second. The parking lights will flash once and
the LCD will display Z’s above the vehicle image to confirm the system is in valet mode. Repeat this process to take the system out of valet mode.
The parking lights will flash twice and Z’s will disappear to confirm the system is out of valet mode.
2. If you do not have your remote control, you can put the system into valet by turning the ignition key “on” and then “off” five times within 7 seconds. The
parking lights will flash once to confirm the system is in valet mode. Shortly after the first flash, the parking lights will flash twice. A remote control is required to
take the system out of valet mode.
3. If your system is set up for a secure valet option (optional), you will not be able to put the system into valet until the proper code has been entered to the
secure valet switch. The secure valet switch is the small button with bright blue LED on the front and if installed is the only way to override the alarm and/or
remote start. Until programmed, the default code is (3, 3).
v@m
7 By Firstech, LLCBy Firstech, LLC 6
Quick Reference
The only regular maintenance this system requires is remote control battery replacement. No programming is required when replacing the battery.
Two Way Remotes:
First, release the battery cover lock located on the back of the remote. Once the lock is released, gently slide the battery cover off to expose the battery. With the
exception of the 2WSSR-PRO (Uses 1 AA battery) all Firstech 2 Way remotes require one AAA battery.
IMPORTANT: Be sure to observe correct polarity when installing the battery.
One Way Remotes:
First, remove the small Phillips screw located on the back of the remote. Once the screw has been removed, gently pull the remote apart taking care to not damage
the circuit board. 1 Way remote batteries differ among the models. Your battery size should be listed on the battery. Replacements can be purchased from your
local Firstech dealer or an electronics store.
r@mMb@r
STEP 1: Enter remote programming mode by holding down buttons (II + III) for 2.5 seconds. The remote will beep once and the LCD will read “Prog” to indicate
that you have successfully entered programming mode.
STEP 2 (Pro Remotes): After entering programming mode the time icon will flash indicating to set the time. Adjust the time settings by tapping
button (I) to change the hour and tapping button (II) to adjust the minutes.
STEP 2 (Non Pro Remotes): After entering programming mode tap button (I) and the time icon will flash to set the time. Adjust the time settings
by tapping button (I) to change the hour and tapping button (II) to adjust the minutes.
STEP 3: Once the desired time has been set, exit remote programming by holding down buttons (II + III) for 2.5 seconds. The remote will beep three times
indicating that you have successfully exited programming mode.
p@@c@Hlcd@r@oI
Quick Reference
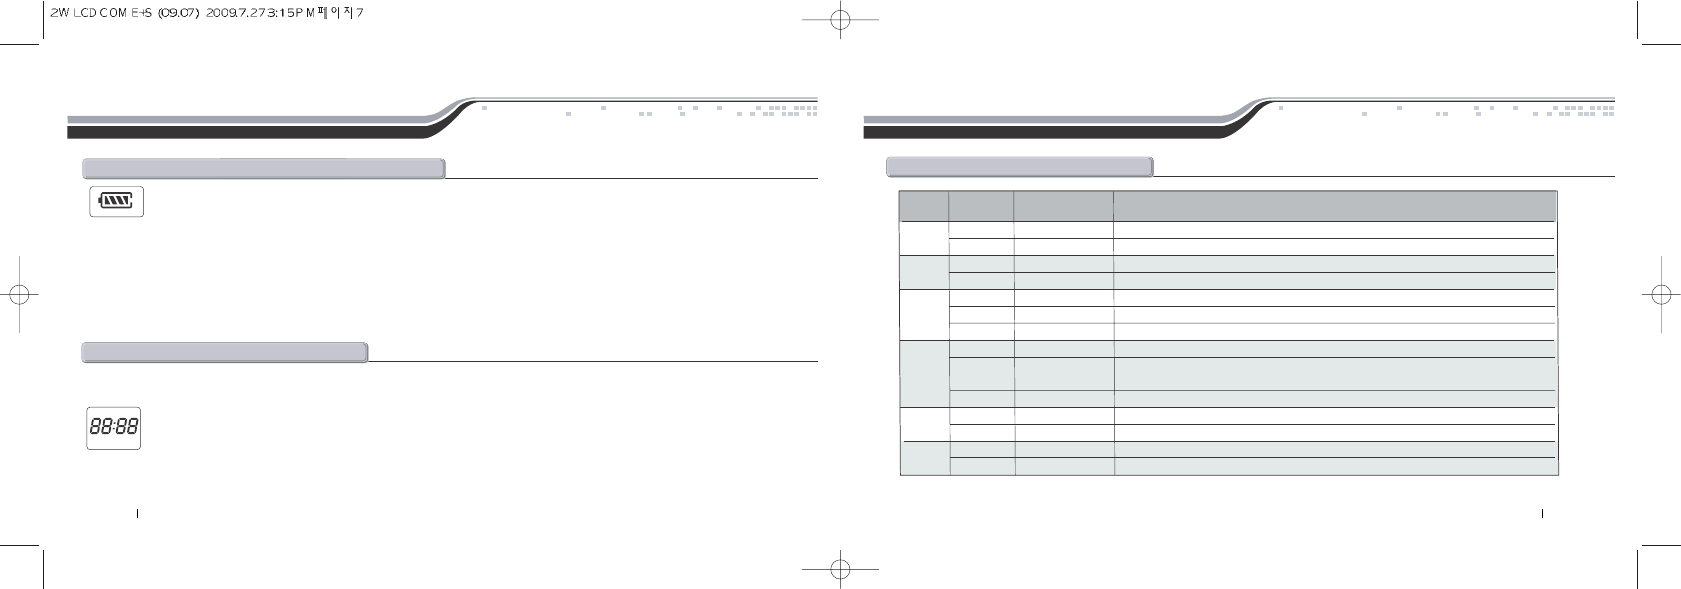
R@w@r@b@f
Button Duration Additional Programming Function / Description
Required
0.5 seconds no
Locks doors and/or arms alarm. Tap again to unlock door and / or alarm.
2.5 seconds yes
Run time extender. Resets remote start and turbo run time while vehicle is remote started
0.5 seconds no
Aux 1. Triggers the auxiliary 1 output (most commonly used for rear defrost or window roll-down)
2.5 seconds no
Activates the remote start. Repeat and remote start will shut off
0.5 seconds no
Aux 2. Triggers the auxiliary 2 output (most commonly used for rear defrost or window roll-down)
2.5 seconds no
Trunk pop. Triggers the trunk release output and opens the vehicleís trunk
double tap no
Pro Remotes Only : Turns on the CompuGLO backlight
Pro Remotes Only : Locks buttons and displays "Hold" on screen.
0.5 seconds no
Car Check (updates vehicle status on remote pager) / Secure Auxiliary / Temperature Display / Vehicle Voltage Display
2.5 seconds no
Panic/vehicle locater (flashes vehicleís parking lights and sounds siren and horn)
4 seconds no
Pro Remotes Only : Panic / vehicle locater (flashes vehicle's parking lights and sounds siren and horm)
0.5 seconds no
Turns siren chirps on/off (Note: With the siren chirps off, it will still sound in the event the alarm is triggered)
2.5 seconds no Option programming menu 1. For use during installation
0.5 seconds no Valet mode (see page 8 for details)
2.5 seconds no
Turns the shock sensor on/off (Alarm or Alarm / Starter system only)
I
I + II
I + III
II
III
IV
9 By Firstech, LLCBy Firstech, LLC 8
Quick Reference
R@w@r@b@f
Button Duration Additional Programming Function / Description
Required
0.5 seconds no
no
Activates passive arming (vehicle will arm/lock 30 seconds after the vehicle is disarmed)
2.5 seconds no Accesses remote option programming
(clock, reservation time start, vibrate mode, and RPS on/off)
0.5 seconds yes Activates timer start mode. Timer start mode has multiple programmable settings:
duration settings, temperature settings and self start settings.
0.5 seconds yes Activates Turbo timer mode.
2.5 seconds yes Activates the 2nd Car function
II + III
II + IV
III + IV
0.5 seconds yes Drive lock. Activates ignition controlled door locks
2.5 seconds Option programming menu 2. For use during installation
I + IV
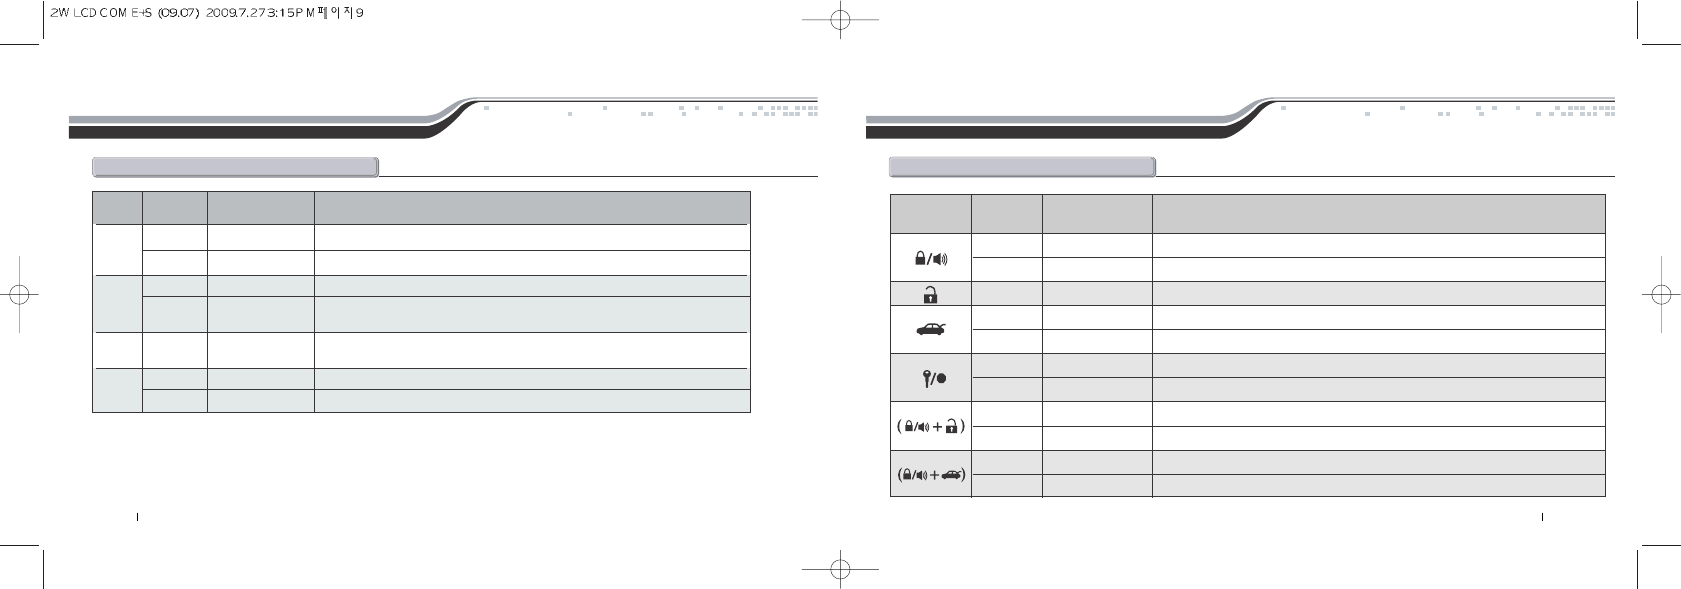
Quick Reference
Q@w@r@b@f
Button Duration AdditionalProgramming Function / Description
Required
0.5 seconds no Locks doors and / or arms alarm.
3.5 seconds no Panic/vehicle locater (flashes vehicle’s parking lights and sounds siren and horn)
0.5 seconds no Unlocks doors and / or disarms alarm.
0.5 seconds no Aux 1. Triggers the auxiliary 1 output (most commonly used for rear defrost or window roll-down)
2.5 seconds no Trunk release. Triggers the trunk release output and opens the vehicle’s trunk.
0.5 seconds no Aux 2. Triggers the auxiliary 2 output (most commonly used for rear defrost or window roll-down)
2.5 seconds no Activates the remote start. Repeat and remote start will shut off
0.5 seconds no Turns siren on/off (Note: With the siren off, it will still sound in the event the alarm is triggered)
2.5 seconds no Option programming menu 1 - Installers Only
0.5 seconds no Valet mode (see Valet Mode section for details)
2.5 seconds no Turns the shock sensor on/off. (Alarm or alarm / Starter systems only)
11 By Firstech, LLCBy Firstech, LLC 10
Quick Reference
Q@w@r@b@f
Button Duration Additional Programming Function / Description
Required
0.5 seconds yes Drive lock. Activates ignition controlled door locks.
2.5 seconds no Option programming menu 2 - Installers Only
0.5 seconds no Activates passive arming (vehicle will arm/lock 30 seconds after the vehicle is disarmed)
0.5 seconds yes Activates timer start mode. Timer start mode has multiple programmable settings:
duration settings, temperature settings and self start settings
0.5 seconds yes Activates the built-in Turbo timer function. Additional installation is required when using this
feature on automatic transmission in vehicle’s
2.5 seconds no Car Check (updates vehicle status on remote pager) / Secure Auxiliary
If you would like additional information on the functionality of your 1way companion remote, please visit the support page at www.compustar.com
to download the full user manual.
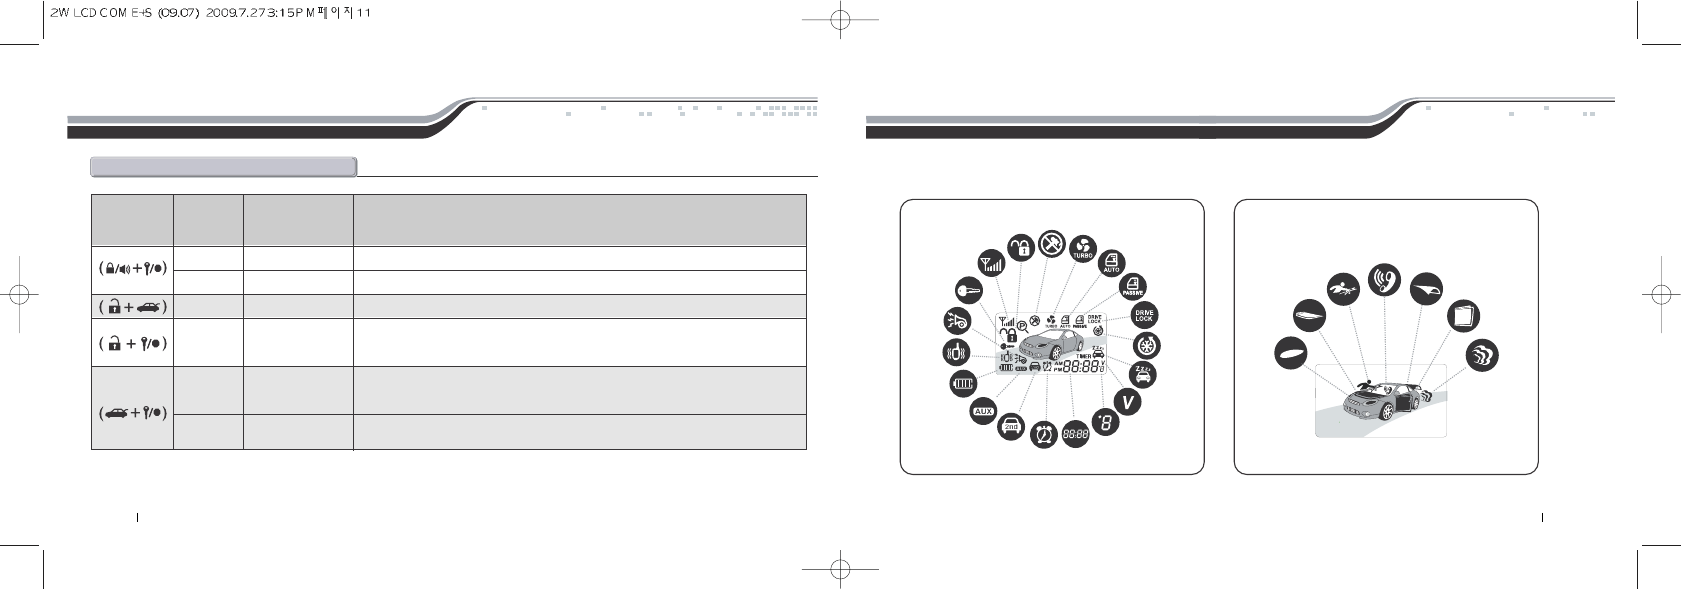
Remote LCD(liquid crystal display) Diagram and icons
Your remote pager will indicate the status of your vehicle while in range. The unique LCD design will visually display such icons as lock/unlock status,
remote start confirmation and remaining run-time, impact/shock notification, battery voltage, temperature display and much more.
Shock
Sens off Turbo
Auto
Passive
Ign. Con
Door Locks
Cold Start
Valet
Volage
Temperature
Clock
Alarm
2nd Car
Aux
Battery
Vibration
Siren
Start
Avail
Signal
Strength
Lock
Status
Engine
Running
Door
Tru nk
Car Call
Impact
Hood
Parking
Lights
13 By Firstech, LLCBy Firstech, LLC 12
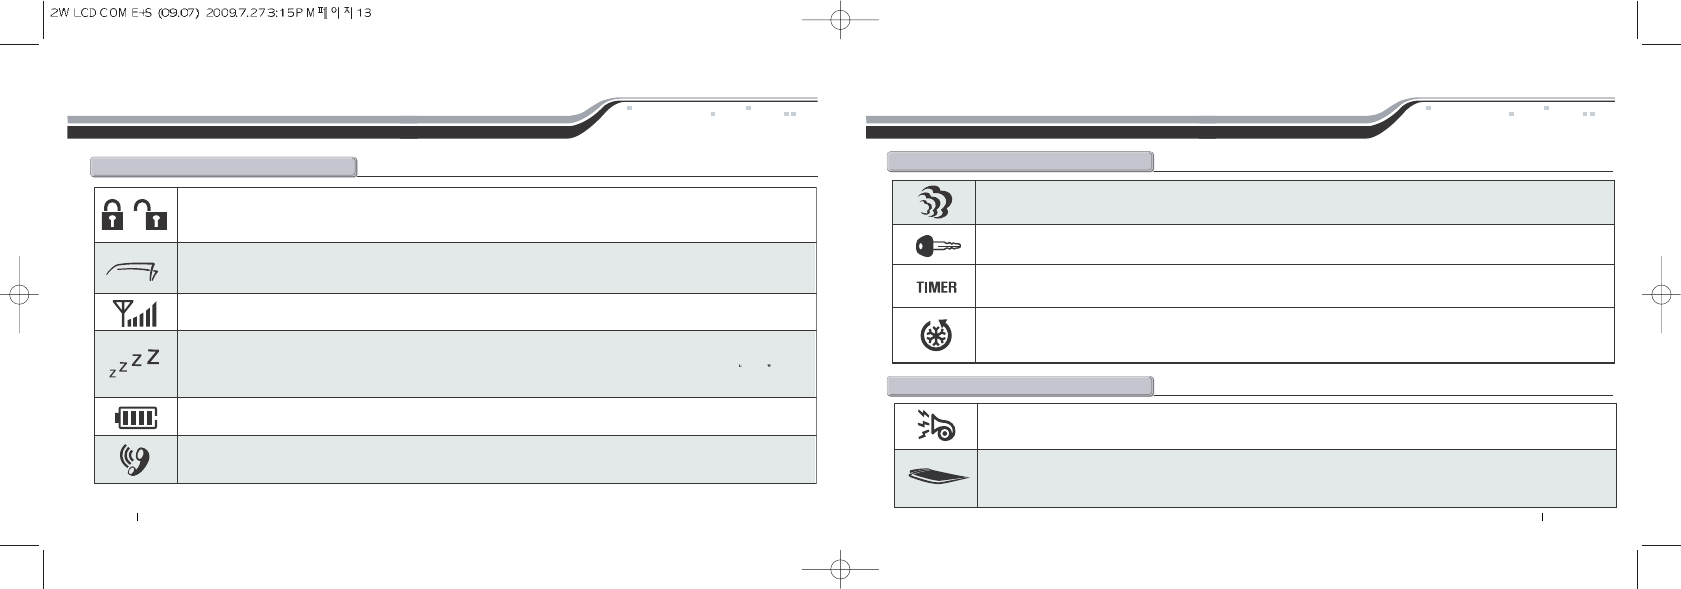
Remote LCD(liquid crystal display) Diagram and icons
c@iM
Lock/Arm - Unlock/Disarm
This icon indicates whether the system is locked/armed or unlocked/disarmed. While armed, the system will monitor the doors,
trunk, hood, shock sensor, and aux inputs. If any of these inputs are triggered while the system is armed, the alarm will be triggered.
Trunk Release
This icon will be displayed when the trunk release function has been activated. By default, the system will be disarmed and the
doors will unlock before the trunk is released.
Signal Strength
This icon is displayed if the last communication to the vehicle was successful.
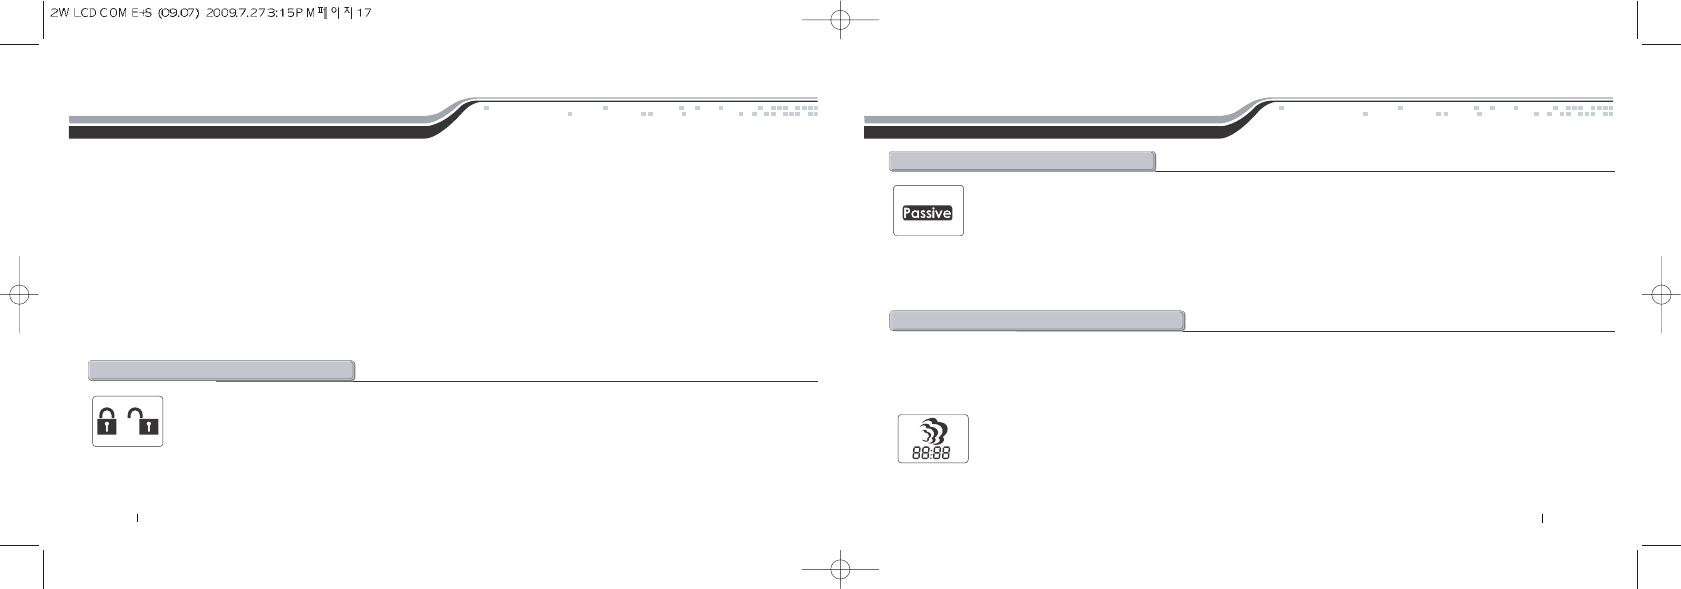
Valet Mode
This icon will be displayed while you are in Valet mode. While in valet mode, the system will not perform any functions other than
lock and unlock. The alarm will not arm or disarm while locking or unlocking. If any other function is attempted, Sleep will be
displayed. The system will not monitor the alarm triggers while in Valet mode.
Battery Indicator
This icon displays the remaining battery life left in 25% increments.
Car Call
This icon will be displayed while someone is attempting to contact you using the RPS sensor. To trigger the RPS sensor, you must
knock on the windshield where the sensor is located. Something that creates a higher pitch, like a key, is better suited to trigger the RPS.
Remote LCD(liquid crystal display) Diagram and icons
s@iM
Engine Running
This icon will be displayed while the vehicle is running after it has been remote started.
Start Availability
This icon will be displayed when the vehicle is ready to be remote-started. If this icon is not displayed, you will not be able to remote-start the vehicle.
Timer Mode
This icon will be displayed when Timer mode is active. Timer mode can be set up to start the vehicle every 1.5, 3, or once very 24hours
Cold / Hot Start
This icon will be displayed if Cold Start mode is currently active. Cold Start mode will start the vehicle if the vehicle reaches a
preset hot or cold temperature. These temperatures can be adjusted by the installer.
s@iM
Siren
This icon will be displayed if the siren is turned on. Turning the siren off only applies to the chirps when arming, disarming, or
remote-starting. The siren will still sound if the alarm is triggered.
Hood
This icon will be displayed if the hood is opened while the system is armed. The remote will beep rapidly while displaying this icon.
This means that the alarm was triggered. If this icon appears while trying to remote-start the vehicle, it means that the vehicle will
not start because the hood is open.
15 By Firstech, LLCBy Firstech, LLC 14
Impact
This icon will be displayed if an impact to the vehicle is detected while the system is armed. The remote will beep rapidly while
displaying this icon if the impact is hard; this means that the alarm was triggered. If it beeps slowly while displaying this icon, that
means that the impact was soft and that the alarm simply gave four warning chirps.
Door
This icon will be displayed if the door is opened while the system is armed. The remote will beep rapidly while displaying this icon.
This means that the alarm was triggered. If this icon appears while trying to remote-start the vehicle, it means that the vehicle will
not start because the door is open.
Trunk
This icon will be displayed if the trunk is opened while the system is armed. The remote will beep rapidly while displaying this icon.
This means that the alarm was triggered. If this icon appears while trying to remote-start the vehicle, it means that the vehicle will
not start because the trunk is open.
Car Call
This icon will be displayed while someone is attempting to contact you using the RPS sensor. To trigger the RPS sensor, you must
knock on the windshield where the sensor is located. Something that creates a higher pitch, like a key, is better suited to trigger the RPS.
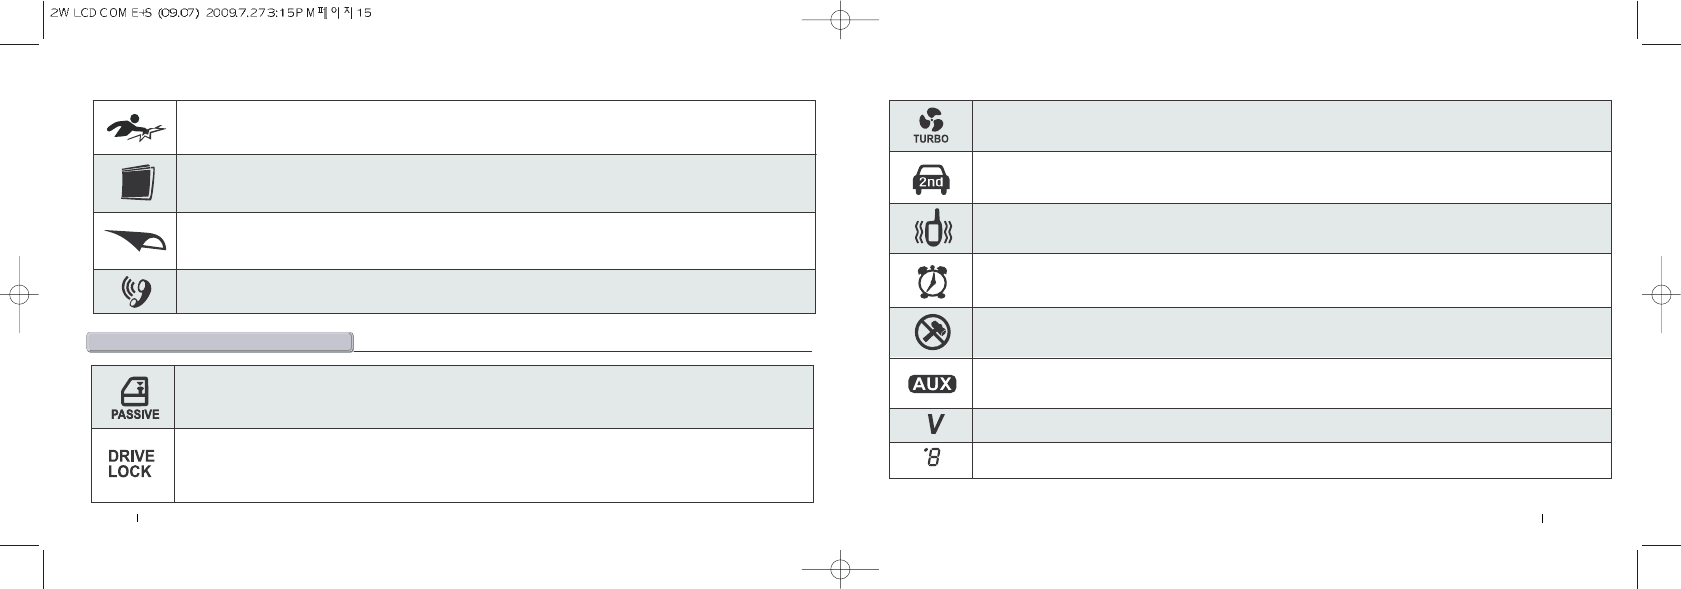
Turbo Mode
This icon will be displayed if Turbo mode is currently active. While Turbo mode is active, the vehicle will remain running for a
preset time after the emergency brake has been set and the key has been removed from the ignition.
2nd Car Mode
This will be displayed while you are in 2nd Car mode. 2nd Car mode allows you to control another vehicle with the same
system installed in it. The remote needs to be coded to the other vehicle in 2nd Car mode for this feature to work.
Vibration
This icon will be displayed if the remote is set to vibrate only. While the remote is set to vibrate only the remote will not beep,
even if the alarm is triggered. The remote will still vibrate in this mode.
Alarm Clock
This icon will be displayed if the Alarm Clock function is turned on. When the clock reaches the preset time, the remote will
beep and flash the alarm clock icon. Press button IV for 0.5 sec. to silence the remote.
Aux Mode (Alarm or alarm/starter systems only)
This icon will be displayed while you are in Aux mode. During this time, you can activate auxiliary outputs 1 or 2 by pressing
button II or III. Aux outputs can be used to activate various systems or functions in a vehicle.
Voltage
This icon will be displayed while the remote is reporting the voltage of the vehicle or remote battery.
Temperature
This icon will be displayed while the remote is reporting the temperature of the vehicle.
Shock Sensor Bypassed
This icon will be displayed when the shock sensor is bypassed by pressing buttons I+III for 2.5 sec. Impact to the vehicle will
not be detected at this time. This icon is always displayed on starter only systems because there is no shock sensor.
a@iM
Passive Mode
This icon will be displayed if Passive mode is currently active. Passive mode will automatically arm the system 30 seconds after the
last door is closed or 30 seconds after the system was disarmed if no door was opened. This mode is ignored while the ignition is on
with the key.
Drive Lock
This icon will be displayed if Drive Lock mode is currently active. Drive Lock mode will lock the doors automatically if the ignition is
on and the brake is pressed or if the ignition is on and the engine exceeds the idle RPM multiplied by 2, depending on the options
set by the installer. The doors will be unlocked when the ignition is turned off. In a manual transmission vehicle the doors will
unlock when the emergency brake is set.
17 By Firstech, LLCBy Firstech, LLC 16
General System Functions General System Functions
The remote transmitter functions have been predetermined and programmed from the factory. The four button configuration allows for many functions to be
performed through a series of tapping, holding and / or multiple presses of buttons.
Sending Commands
When in range, and a command has been sent, the remote pager backlight will illuminate, the remote will beep and the appropriate icon will be displayed. For
example, to send a remote start command from the pager, hold down button (II) for 2.5 seconds. The backlight will illuminate and the remote will beep once to
confirm the command has been sent and that the remote is in range. Once the vehicle has successfully remote started, the remote will receive a command
indicating the vehicle is running.
Receiving Commands
The remote pager will receive commands indicating the status of the vehicle, confirmation of sending commands and alarm notifications. For example, after
sending the lock command, the pager will be updated with the lock icon to confirm the vehicle has been successfully locked/armed. To see if your pager is in
range, tap button (IV) for half second - if the pager backlight illuminates and beeps, the pager is in range.
Tap button (I) for 0.5 seconds to lock/arm and unlock/disarm. If your vehicle is locked, tap button (I) to unlock; if your vehicle is unlocked, tap
button (I) to lock. If equipped this will also activate your starter kill and anti grind feature. You will not be able to start your vehicle with the key
until unlock/disarm.
IMPORTANT: If the alarm has been triggered (Siren is going off), you must wait until the remote pager has been paged before disarming the alarm - the first
button tap will shut off the alarm and the second will unlock/disarm the system.
a@l@O@a@@u@O@d
The system can be configured to passively lock and arm the vehicle. Put the system in passive by tapping buttons (II+III) simultaneously for 0.5
seconds. The remote will beep once and the passive icon will illuminate to indicate the system is in passive lock and arming mode.
While in passive mode, the system will lock and arm the alarm 30 seconds after the last door is closed. As an indicator that the vehicle is going to passively lock
and arm, the remote and siren will chirp once and the parking lights will flash once at both 10 and 20 seconds prior to passively locking and arming. If you want
the system to passively arm and not passively lock, ask your local Firstech dealer to turn Option 1-8 to setting II.
p@l@O@a
Press button (II) for 2.5 seconds to remote start an automatic transmission vehicle. If you are in range and if the vehicle is ready to remote start, the
remote will beep once and the CompuGLO backlight will light up to indicate that the remote start command has been successfully transmitted.
If you are in range and the remote beeps three times, there is a remote start error. Refer to the “remote start error diagnostic” on the last page of this
manual for details.
Upon receiving confirmation that your vehicle is running, the LCD will flash the exhaust icon and the clock icon will begin to show the
amount of run-time remaining. The remote start run-time can be programmed for 3, 15, 25 or 45 minutes - ask your local CompuStar
dealer to adjust Option 2-7 if you would like a run-time other than 15 minutes (default).
IMPORTANT : Your vehicle’s key must be inserted into the ignition and turned to the “on” position prior to driving your vehicle. If the foot brake is
depressed prior to the key being in the “on” position, the vehicle will shut off.
a@t@r@@f