SEGI REC320-1WSP keyless entry system (Model: 1WG7R-SP) User Manual Compu 1W 4B all E S 12 05 OK
SEGI LIMITED keyless entry system (Model: 1WG7R-SP) Compu 1W 4B all E S 12 05 OK
SEGI >
Users Manual
www.compustar.comwww.firstechonline.com
Este dispositivo está sujeto a la seccion 15 de las reglas de FCC. El funcionamiento está sujeto a las siguientes condiciones;
(1)este dispositivo no puede causar interferencia dañosa.
(2)este dispositivo puede aceptar cualquier interferencia recibida, incluso interferencia que pueda causar mal funcionamiento al equipo.
CUATELA: Cambios ó modificaciones no expresamente aprobadas por la parte responsable del cumplimiento de la norma, pueden anular la autorizacion
del usuario para operar este dispositivo.
Manual de Usuario
Aplicable al remoto (s siguiente) A todos los remotos de 1 Via con 4 Bot
ó
nes
Applicable to the following remote(s):
All 1Way 4Button Remote
www.compustar.comwww.firstechonline.com
Remote FCC ID Number IC ID Number
(US Only) (International Only)
1WAMR-Fiance O44J1WAM4R 5532A-J1WAM4R
1WAMR-1600 O44JR1600 5532A-JR1600
1WAMR-1800 O44JR1800A433 7087A-R1800AM
1WAMR-1900 O44JR5120AMSH 7087A-R5120AM
1WAMR-762 VA5JR762A433 7087A-R762A433
1WAMR-763 VA5JR763AM433 7087A-R763A433
NU1000R O44JR1700A433 7087A-R150A433
NU2000R N/A 7087A-R150F433
1WFMR-Fiance O44J1WFM4R 7087A-1WFM4R
1W900FMR N99J1WPLL4R 5532A-J1WPLL4R
Remoto No. ID FCC No. ID IC
(Solamente EEUU ) (Internacional Solamente)
1W900FMR-Pro VA5JR762F907 7087A-762F907
1W900SHR-961 VA5JR961AM 7087A-R961AM
1WSS-25 VA5JR762WSS 7087A-R762WSS
1WG5R-SS VA5JR961-1WSS 7087A-R961WSS
VZ1WAMR-960 N/A 7087A-R960A433
FTX1400R-AM VA5JR500-1A433 7087A-R500A433
1WG6R-AM VA5REC310-1W433 7087A-1WREC310433
1WG8R-SS VA5JR762WSS 7087A-R762WSS
1WG7R-SP VA5REC320-1WSP 7087A-1WREC320SP
1WG9R-SP VA5REC340-1WSP 7087A-1WREC340SP
Remote FCC ID Number IC ID Number
(US Only) (International Only)
1W900FMR-Pro VA5JR762F907 7087A-762F907
1W900SHR-961 VA5JR961AM 7087A-R961AM
1WSS-25 VA5JR762WSS 7087A-R762WSS
1WG5R-SS VA5JR961-1WSS 7087A-R961WSS
VZ1WAMR-960 N/A 7087A-R960A433
FTX1400R-AM VA5JR500-1A433 7087A-R500A433
1WG6R-AM VA5REC310-1W433 7087A-1WREC310433
1WG8R-SS VA5JR762WSS 7087A-R762WSS
1WG7R-SP VA5REC320-1WSP 7087A-1WREC320SP
1WG9R-SP VA5REC340-1WSP 7087A-1WREC340SP
ss@
@ZZt@@ਫ਼ic@@@@@@@@i@c@@@@N
ccaauuttiioonn@
@ZZt@u@@@@@@@@@@@@@@N@
t@@@@p@QU@@@fcc@N@o@@@@@@[@@
HQI@t@@@@@@N@@@@@@
HRI@t@@@@@@L@@@@@@@N@@@@@@@@
ccaauuttiioonn@
@ZZc@@@@@@@@@@@@@@@@@@@@N@@
t@@@@rf@@@L@@ @@@@@@@@@@@@
@RP@@@@@@N@cM@@@@@@@@@@@@N@
By Firstech, LLC 2
t@o@c
i S
w@c S
q@r T
g@s@f W
v@m T
r@m@M@b@r U
Q@w@r@b@f U
a@lOa@@uOd W
a@t@r@s@f W
m@t@r@s@f@Hr@mI X
a@r@m X
c@r@m Y
t@r Y
s@aOd Y
s@s@oOo Y
r@c@O@p@rHI QP
p@Qw@Tb@r QP
a@d
QR
r@s@e@d
QQ
l@l@w
QT
a@s@f
QP
By Firstech, LLC 2 3 By Firstech, LLC
Introduction
Thank you for purchasing a Firstech system for your vehicle. In order to truly enjoy the benefits of this system, we recommend that you
thoroughly review the following manual. Please note that this manual applies to the 1 Way-4 Button Non Liquid Crystal Display Remotes,
regardless of whether you purchased the alarm only, starter only or alarm/starter combination. There are certain features listed in this manual
that may not be available for your system. There may also be features listed in this manual that require additional installation or programming
before they are active. If you have any questions, please contact the original place of purchase. For further information you may also contact our
customer support center by calling 888-820-3690.
Warranty Coverage
Caution: The Manufacture’s warranty will be voided if this product is installed by anyone other than an authorized Firstech dealer. For complete
warranty details visit www.compustar.com or the last page of this manual. Firstech remotes carry a 1 year warranty from original date of purchase.
Warranty registration can be completed online by visiting www.compustar.com. Please complete the registration form within 10 days of purchase.
We do not include a mail in warranty registration card with each unit. Registration must be done online. To verify that an authorized dealer
installed your system, we highly recommend that you keep a copy of the original proof of purchase, such as the dealer invoice in a safe place.
5 By Firstech, LLC By Firstech, LLC 4
Quick Reference
When servicing or loaning your vehicle to others, the system should be in Valet mode. Valet mode prevents the system from remote starting and
disables all alarm functions.
IMPORTANT: While in Valet mode the remote will still control power lock and unlock systems. The parking lights will not flash.
The system can be put into valet one of three ways:
1. Turn the vehicle’s key to the ignition “on” position and tap buttons simultaneously for 0.5 seconds. The parking lights
will flash once and/or siren chirp once to confirm the system is in valet mode. Repeat this process to take the system out of valet mode.
The parking lights will flash twice and/or siren chirp once to confirm the system is out of valet mode.
2. If you don’t have your remote control, you can put the system into valet by turning the ignition key “on” and then “off” five times within 7
seconds. The parking lights will flash once to confirm the system is in valet mode. Shortly after the first flash, the parking lights will flash twice. A
remote control is required to take the system out of valet mode. IMPORTANT: If your system is set up for a secure valet option, you will not be able
to put the system into valet until the proper code has been entered to the secure valet switch.
3. If your system is set up with the secure valet switch (optional), you will not be able to put the system into valet until the proper code has been
entered to the secure valet switch. The secure valet switch is the small button with bright blue LED on the front and if installed is the only way to
override the alarm and/or remote start. The default code is (3, 3).
v@m The only regular maintenance this system requires is remote control battery replacement. No programming is required when replacing
the battery.
First, remove the small Phillips screw located on the back of the remote. Once the screw has been removed, gently pull the remote apart taking care
to not damage the circuit board. 1 Way remote batteries differ among the models. Your battery size should be listed on the battery. Replacements
can be purchased from your local Firstech dealer or an electronics store.
r@mMb@r
Q@w@r@b@f
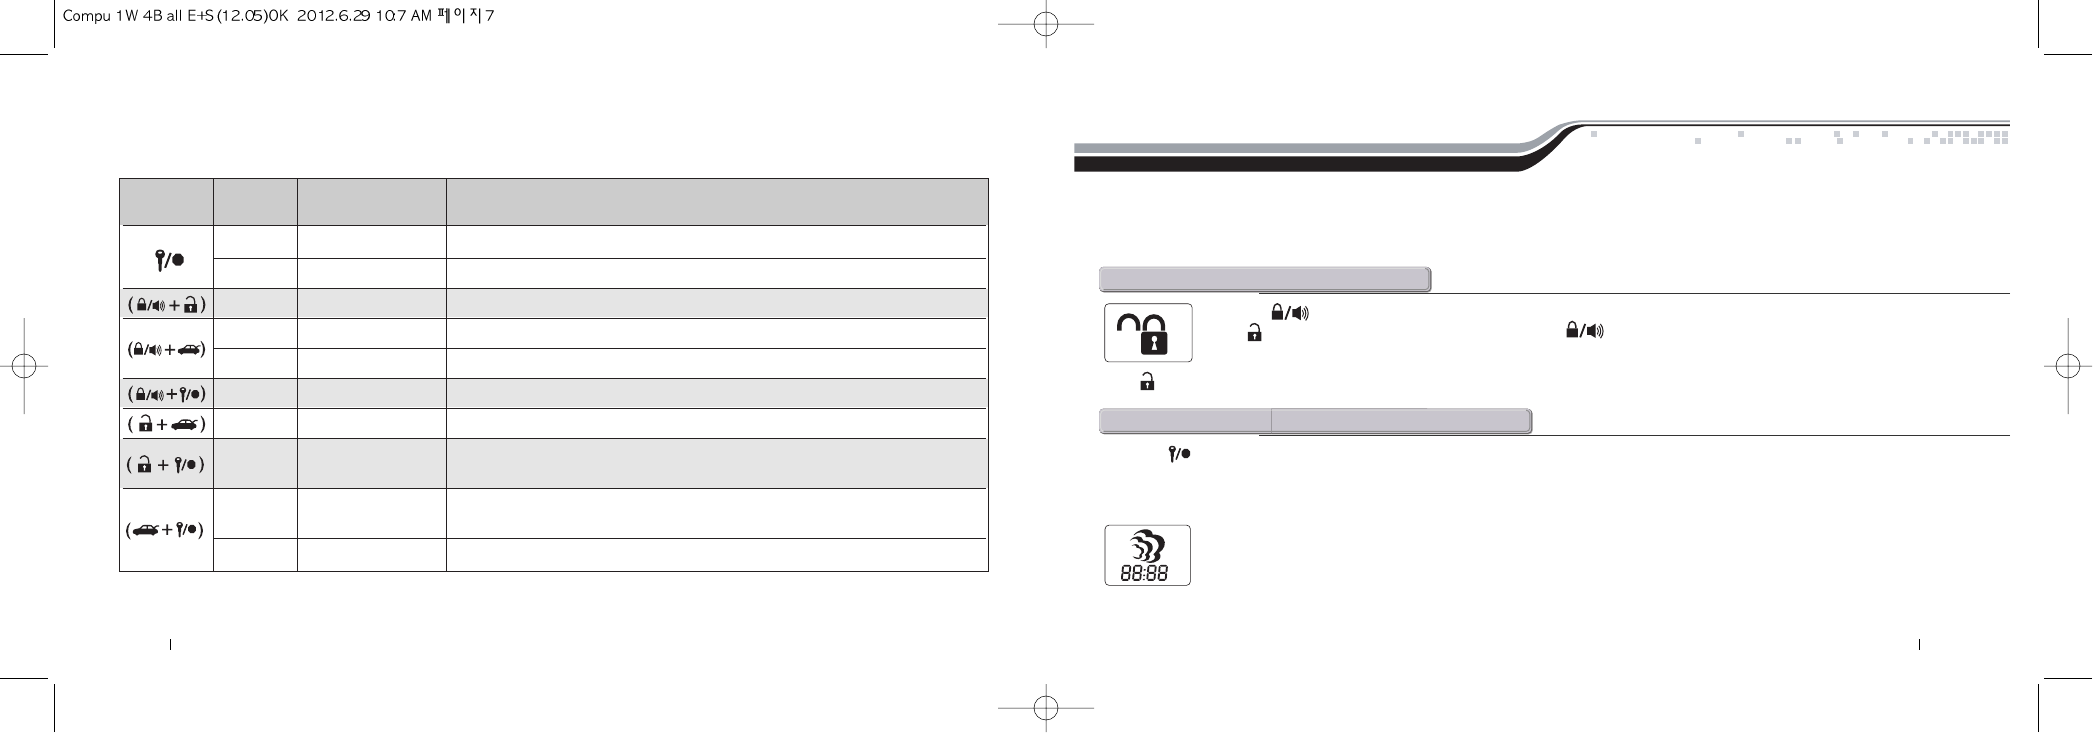
Button Duration Additional Function / Description
Programming Required
0.5 seconds no Locks doors and/or arms alarm.
3.5 seconds no Panic/vehicle locater (flashes vehicle’s parking lights and sounds siren and horn).
0.5 seconds no Unlocks doors and/or disarms alarm.
0.5 seconds no Aux 1. Triggers the auxiliary 1 output
(most commonly used for rear defrost or window roll-down)
2.5 seconds no Trunk pop. Triggers the trunk release output and opens the vehicle’s trunk.
7 By Firstech, LLC By Firstech, LLC 6
The remote transmitter functions have been predetermined and programmed from the factory. The four button configuration allows for many
functions to be performed through a series of tapping, holding and / or multiple presses of buttons. Although Firstech remotes have numerous
button functions and capabilities, please keep in mind that the most common functions are performed in one simple step. There are advanced
features not described in this manual. Please go to www.compustar.com for more details.
Tap button for 0.5 seconds to lock/arm and unlock/disarm. The LED will flash on your remote. If your vehicle is locked, tap
button to unlock; if your vehicle is unlocked, tap button to lock.
IMPORTANT: If the alarm has been triggered (Siren is going off), you must wait up to 5 seconds before disarming the alarm - the
first button tap will shut off the alarm and the second will unlock/disarm the system.
a@lOa@@uOd
Press the button for 2.5 seconds to remote start an automatic transmission vehicle. If you are in range and if the vehicle is ready to remote
start, the parking lights will flash once and/or siren chirp once to indicate that the remote start command has been successfully transmitted.
If you are in range and the parking lights flash and/or vehicle’s siren chirps three times, there is a remote start error. Refer to the “remote start error
diagnostic” at the end of this manual for details.
The remote start run time can be programmed for 3, 15, 25, or 45 minutes - ask your local Firstech dealer to adjust Option 2-7 if you
would like a run time other than 15 minutes (default).
IMPORTANT: Your vehicle’s key must be inserted into the ignition and turned to the “on” position prior to driving your vehicle. If the foot brake
is depressed prior to the key being in the “on” position, the vehicle will shut off.
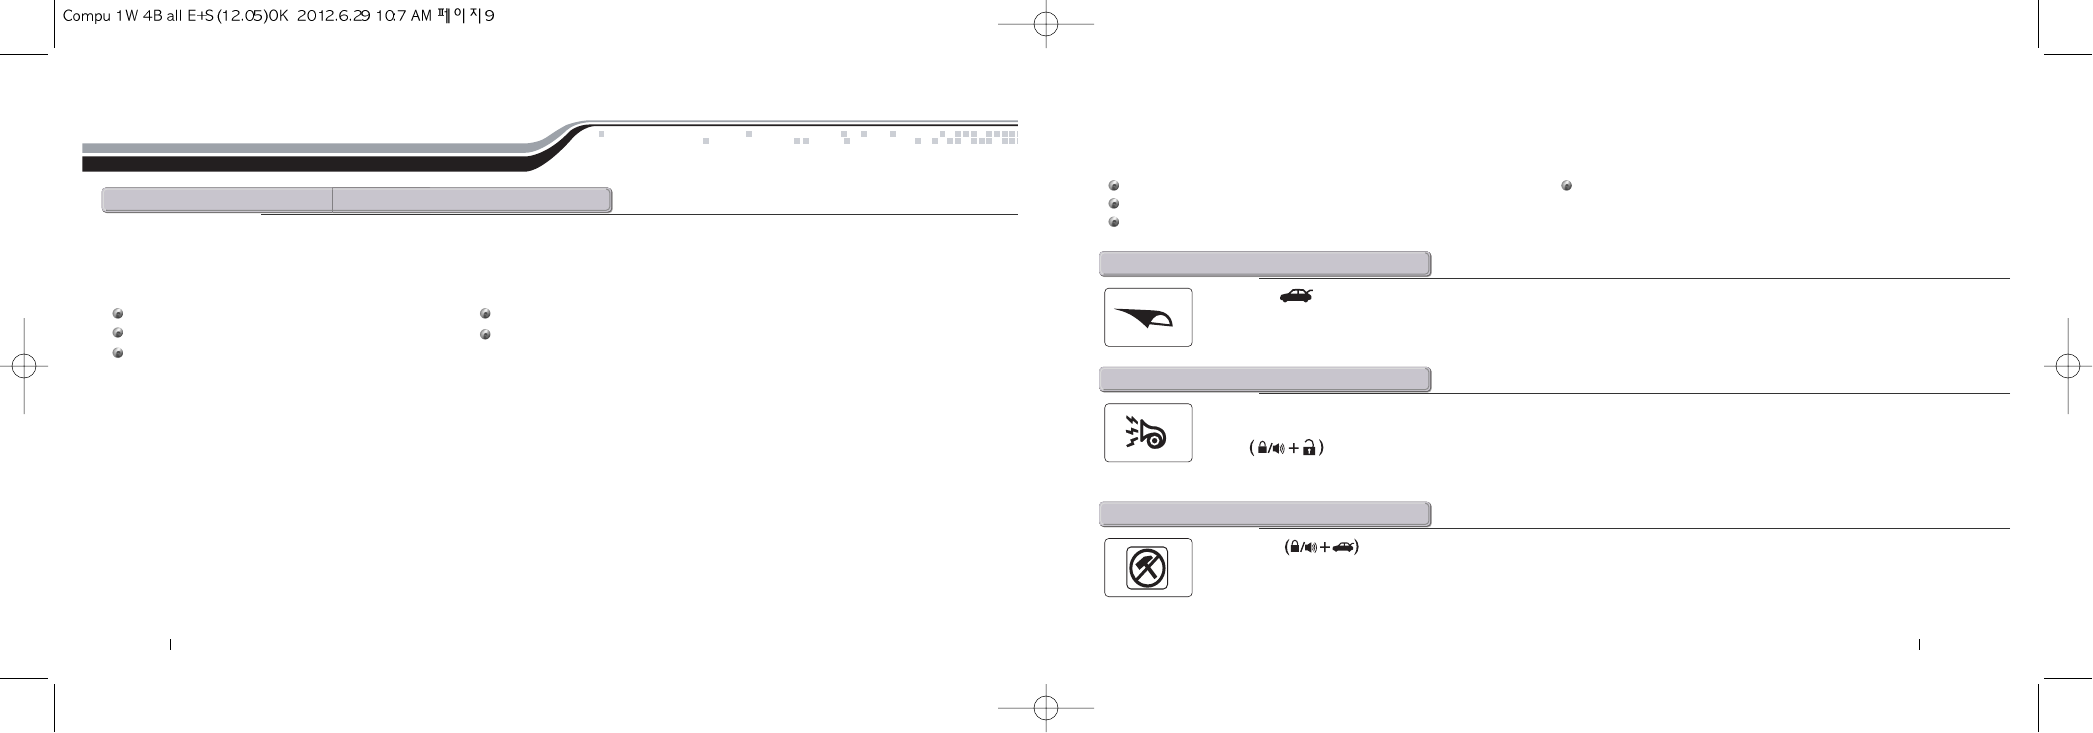
a@t@r@@f
General System Functions
Additional
Programming Required
0.5 seconds no Aux 2. Triggers the auxiliary 2 output (most commonly used for rear defrost or window roll-down)
2.5 seconds no Activates the remote start. Repeat and remote start will shut off.
0.5 seconds no Turns siren on/off (Note: With the siren off, it will still sound in the event the alarm is triggered)
0.5 seconds no Valet mode (see Valet Mode section for details)
2.5 seconds no Turns the shock sensor on/off. (Alarm or Alarm/Starter systems only)
0.5 seconds yes Drive lock. Activates ignition controlled door locks.
0.5 seconds no Activates passive arming (vehicle will arm/lock 30 seconds after the vehicle is disarmed)
Activates timer start mode. Timer start mode has multiple programmable settings:
duration settings, temperature settings and self start settings.
Activates the built in Turbo timer function. Additional installation is required when using
this feature on automatic transmission vehicle’s.
2.5 seconds no Car Check (updates vehicle status on remote pager) / Secure Auxiliary
Button Duration
yes
yes
0.5 seconds
0.5 seconds
Function / Description
9 By Firstech, LLC By Firstech, LLC 8
General System Functions
In order to remote start a manual transmission vehicle, the system must first be set in Reservation Mode. Reservation Mode must be set each and
every time you want to remote start a manual transmission vehicle. The purpose of Reservation Mode is to leave the transmission in neutral before
exiting the vehicle.
IMPORANT
The transmission must be left in the neutral position. The vehicles windows must be rolled up.
The vehicles door pins must be in working order. Do not set reservation mode or remote start with people in the vehicle.
Do not install this remote start on a manual transmission vehicle that has a convertible or removable top.
Activating Reservation Mode
STEP 1:While the vehicle is running, place the transmission in neutral, set the emergency / parking brake, and remove pressure from the foot brake.
STEP 2: Remove the key from the vehicle’s ignition. The vehicle’s engine should remain running even after the key has been removed. If the vehicle
does not remain running make sure your system is not in Valet mode and then contact your local authorized dealer for service.
STEP 3: Exit the vehicle and close the door. The vehicle’s engine should shut off within 10 seconds upon closing the last door. Most motors will shut
off instantly upon closing the last door. If the vehicle’s engine does not shut off, your door trigger may be functioning improperly. Do not use the
remote start feature and take your vehicle to a local authorized dealer for service.
IMPORTANT: By default, the system will lock/arm the vehicle upon setting reservation mode. Take care to not lock your keys inside the vehicle.
Cancelling Reservation Mode
Reservation mode will be cancelled for the following reasons;
You did not activate the parking brake prior to turning off the ignition. You pressed the foot brake after the key was removed from the ignition.
You released the parking brake after the key was removed from the ignition.
You entered valet mode, opened the vehicles door, hood, trunk or set off the alarm.
m@t@r@s@f@Hr@mI
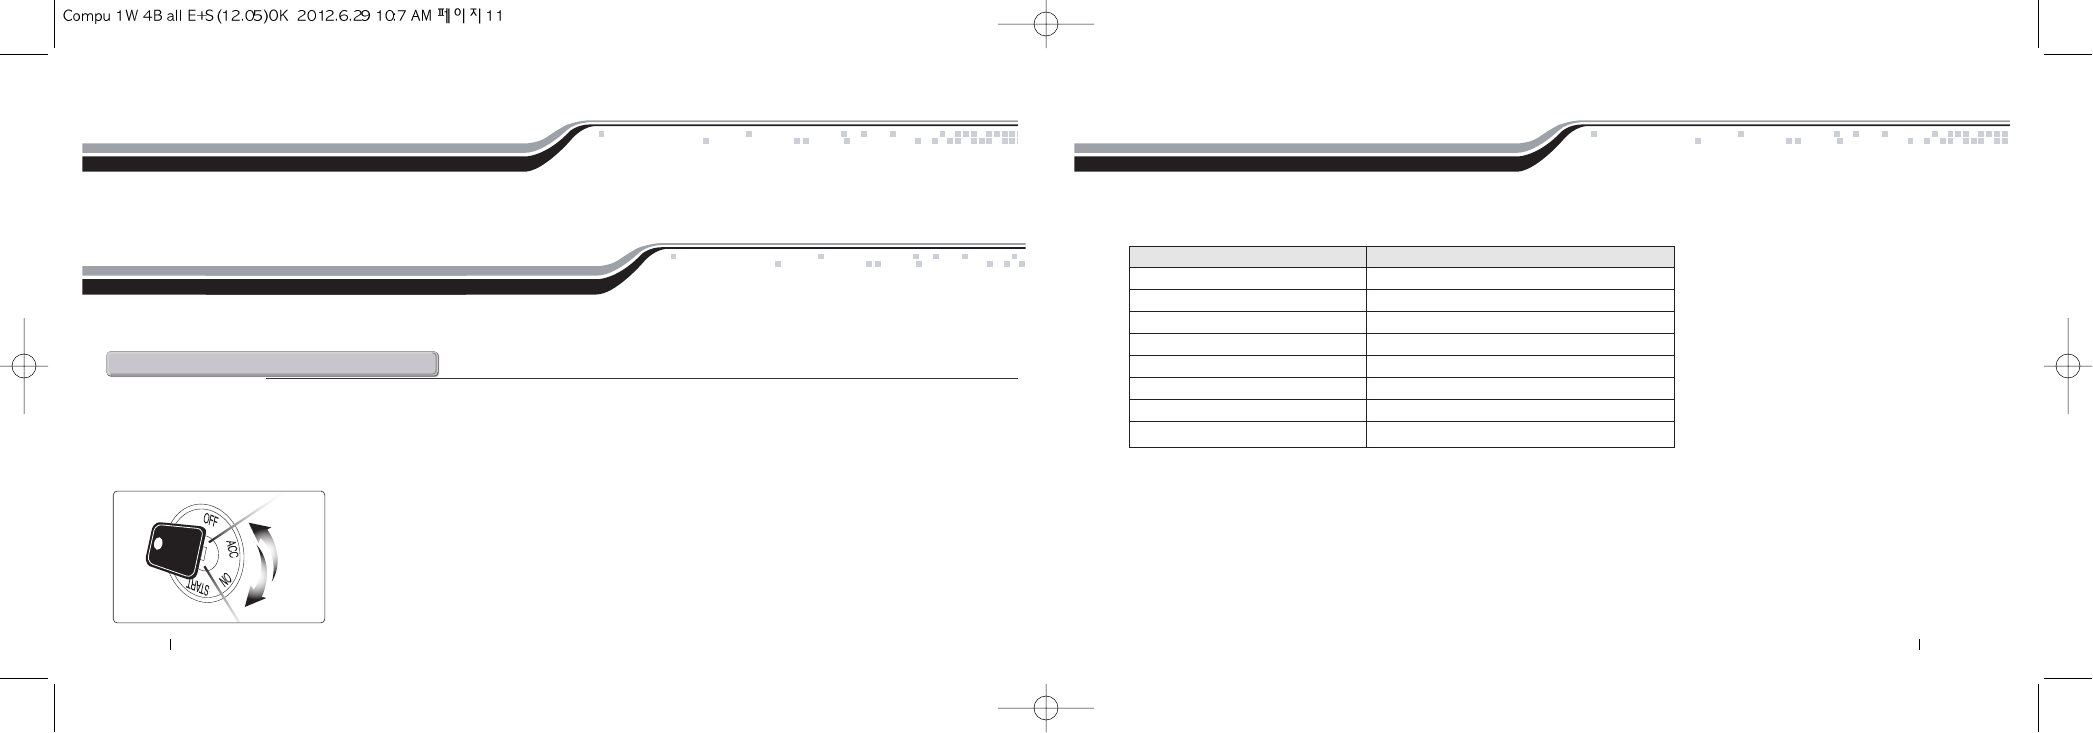
Hold button for 2.5 seconds to release the trunk or hatch. If you are in range, the vehicle’s parking lights will flash once and/or
siren chirp once indicating that the trunk release command has been successfully transmitted.
IMPORTANT: Trunk release is an optional vehicle feature that may require additional parts and labor.
t@r
Upon lock/arm and unlock/disarm, you can eliminate vehicle’s audible confirmation by muting the siren. Normally, the siren will
chirp once to indicate the system is locked/armed and twice to indicate the system is unlocked/disarmed. To mute the siren tap
buttons simultaneously for 0.5 seconds.
IMPORTANT: Even when the siren is muted, it will still go off in the event the alarm is triggered.
s@aOd
Hold buttons simultaneously for 2.5 seconds to turn the shock sensor on and off. The vehicle’s parking lights will flash
once and/or siren chirp once to confirm the shock sensor is on. The vehicle’s parking lights will flash twice and/or siren chirp twice
to confirm the shock sensor is off. IMPORTANT: Turning off the shock sensor also turns off the optional sensor(s).
The shock sensor does not recognize impact for 30 seconds after the system has been armed.
s@s@oOo
11 By Firstech, LLC By Firstech, LLC 10
p@Qw@T@b@rZ
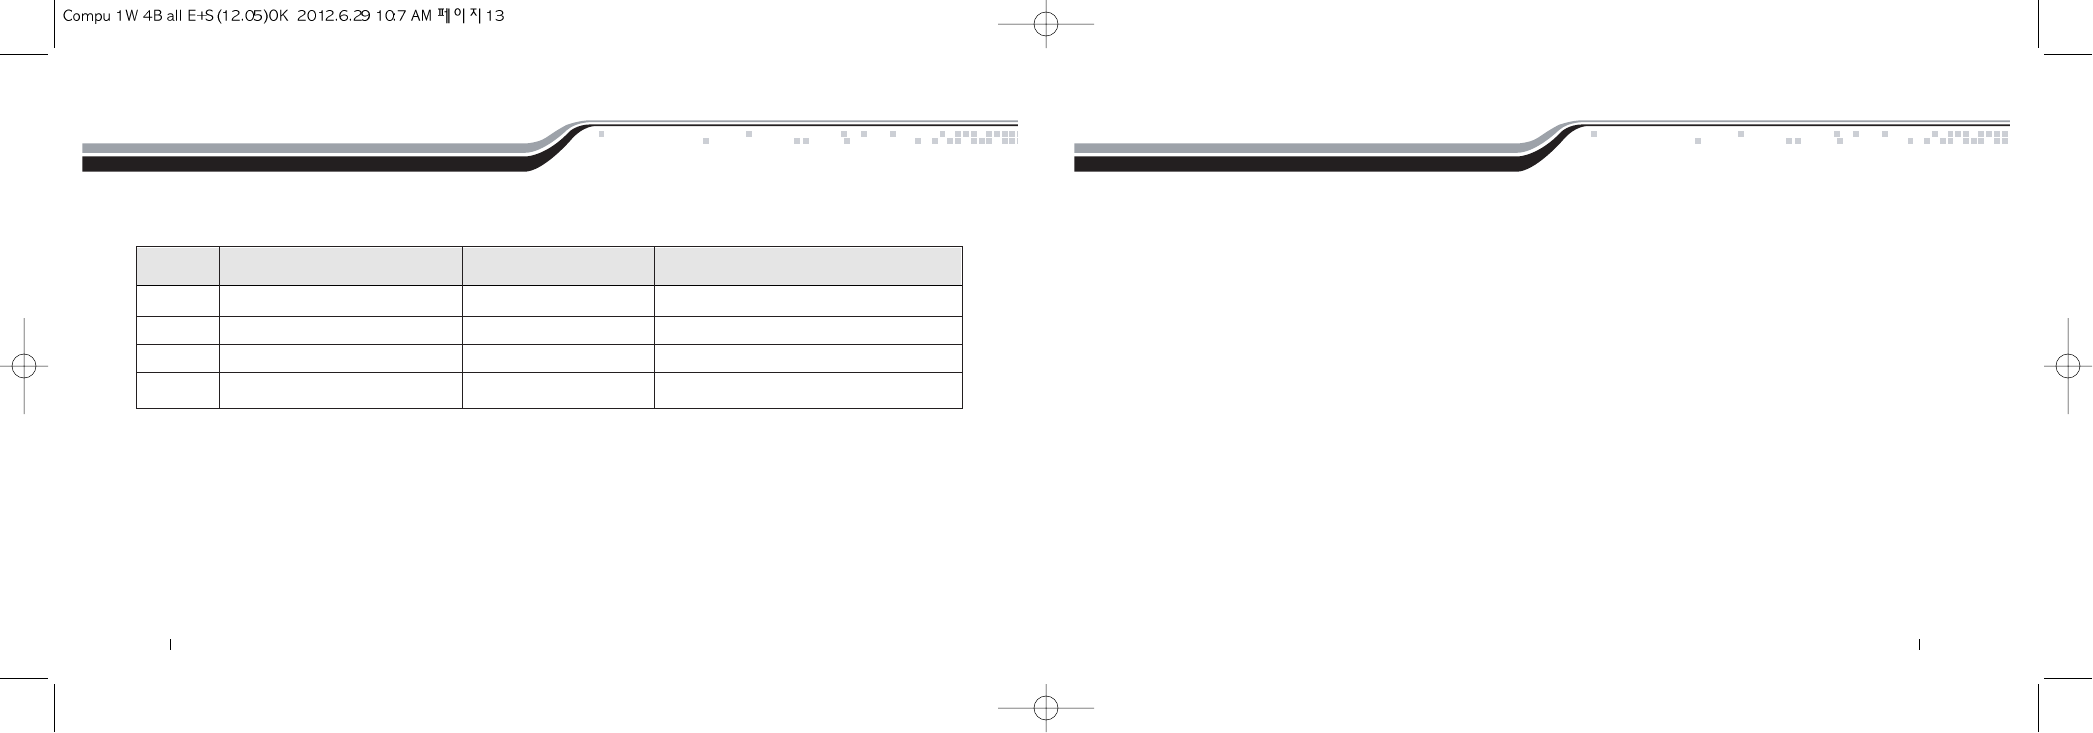
STEP 1: Activate Valet/Programming mode by manually turning the ignition key on and off (between the Acc & On positions) five times within 7
seconds. The vehicle’s parking lights will flash once with the successful completion of this step.
STEP 2: Within 2 seconds after cycling the ignition for the 5th time, press button (I) on 2 way remotes or the (lock) button on 1 way remotes for 0.5
seconds. The parking lights will flash once to confirm the transmitter has been coded.
Exiting Programming: Programming is a timed sequence. The parking lights will flash twice signaling the
end of programming mode.
Programming Multiple Remotes: After the confirmation flash given in step 2, code additional remotes by
pressing button (I) on 2 way remotes or the (lock) button on 1 way remotes. The parking lights will flash once
confirming each additional remote. All systems (except the P2WSSR), can recognize up to three remotes.
IMPORTANT:Every Firstech remote must be coded to the system prior to performing any operations. All remotes must be coded at the same time.
There are lots of advanced features available for your system. Please go to www.compustar.com for more details.
Advanced System Functions
If the remote start fails to start the vehicle, the parking lights will flash three times immediately. Following those three flashes the parking lights will
flash again corresponding to the error table.
Remote Start Error Diagnostic
We recommend that you do not attempt any repairs on your remote starter. Contact your dealer or call us directly.
Number of Parking Light Flashes Remote Start Error
1Motor running
2Key in ignition on position
3Door open (manual transmission only)
4Trunk open
5Foot brake on
6Hood open
7Reservation off (manual transmission only)
8Tach or voltage sensing failure
Remote Coding / Programming Routine (S)
13 By Firstech, LLC By Firstech, LLC 12
Firstech, LLC Warrants to the original purchaser that this product shall be free of defects in material and workmanship under normal use and circumstances for the
period of time that the original owner of this product owns the vehicle in which it is installed; except that the remote controller unit for the period of one year from
the date of installation to the original owner of this product. When the original purchaser returns the product to the retail store where it was purchased or prepaid
postal to Firstech, LLC., 21903 68th Avenue South, Kent, WA 98032, USA within the warranty period, and if the product is defective, Firstech, LLC, will at
its option repair or replace such.
TO THE MAXIMUM EXTENT ALLOWED BY LAW, ANY AND ALL WARRANTIES ARE EXCLUDED BY THE MANUFACTURER AND EACH ENTITY
PARTICIPATING IN THE STREAM OF COMMERCE THEREWITH. THIS EXCLUSION INCLUDES BUT IS NOT LIMITED TO, THE EXCLUSION OF ANY
AND ALL WARRANTY OF MERCHANTABILITY AND/OR ANY AND ALL WARRANTY OF FITNESS FOR A PARTICULAR PURPOSE AND/OR ANY AND ALL
WARRANTY OF NON-INFRINGEMENT OR PATENTS, IN THE UNITED STATES OF AMERICA AND/OR ABROAD. NEITHER THE MANUFACTURER OF
ANY ENTITIES CONNECTED THEREWITH SHALL BE RESPONSIBLE OR LIABLE FOR ANY DAMAGES WHATSOEVER, INCLUDING BUT NOT LIMITED
TO, ANY CONSEQUENTIAL DAMAGES, INCIDENTAL DAMAGES, DAMAGES FOR LOSS OF TIME, LOSS OF EARNINGS, COMMERCIAL LOSS, LOSS OF
ECONOMIC OPPORTUNITY AND THE LIKE. NOTWITHSTANDING THE ABOVE, MANUFACTURER DOES OFFER A LIMITED WARRANTY TO REPLACE
OR REPAIR THE CONTROL MODULE AS DESCRIBED ABOVE.
Some states do not allow limitations on how long an implied warranty will last or the exclusion or limitation on how long an implied warranty will last or the exclusion
or limitation of incidental or consequential damages. This warranty gives you specific legal rights, and you may also have other rights, which vary State to State.
Firstech, LLC. is not RESPONSIBLE OR LIABLE FOR ANY DAMAGES WHATSOEVER, INCLUDING BUT NOT LIMITED TO, ANY CONSEQUENTIAL
DAMAGES, INCIDENTAL DAMAGES, DAMAGES FOR LOSS OF TIME, LOSS OF EARNINGS, COMMERCIAL LOSS, LOSS OF ECONOMIC OPPORTUNITY
AND THE LIKE that may or may not resulted from the operation of Compustar, Compustar Pro, Arctic Start, Vizion, or NuStart. NOT WITH STANDING THE
ABOVE, MANUFACTURER DOES OFFER A LIMITED WARRANTY TO REPLACE OR REPAIR THE CONTROL MODULE AS DESCRIBED ABOVE.
Your Warranty
The product’s warranty is automatically void if the date code or serial number is defaced, missing or altered. This warranty will not be valid unless you have
completed the registration card at www.compustar.com within 10 days of purchase.
Limited Lifetime Warranty
While the alarm is armed, the LED will blink slowly. While the siren is going off, the LED will indicate the specific zone that was triggered. Upon
disarming the alarm after it has been triggered, the amount of siren chirps will indicate the specific zone.
Alarm Diagnostic
Priority Situation LED On Duty Number of Siren Chirps (If Installed)
1Door/Hood/Trunk/Key Triggered 2 flash, rest, then repeat 6
22nd Shock Triggered 3 flash, rest, then repeat 5
3Optional Sensor Triggered 4 flash, rest, then repeat 4
4PANIC 5 flash , rest, then repeat N / A
Toll Free : 888-820-3690
21903 68th Ave S
Kent, WA 98032
8102REUSL000901 / FT-1W-ES V1.3 By Firstech LLC Version 1.3(C05)
By Firstech LLC Version 1.3(C05)8102REUSL000901 / FT-1W-ES V1.3
Toll Free : 888-820-3690
21903 68th Ave S
Kent, WA 98032
By Firstech, LLC 2
t@o@c
ióS
gíS
r@rá T
Programando Control Remoto de 1 Vía de 4 Botones: 11
Modo Valet 4
Mantenimiento al Remoto – Reemplazo de Batería 5
Funciones Control Remoto 1 Vía 5
f@g@@s W
Cerrar/Armar Activo y Abrir/Desarmar 7
Función de Arranque Remoto en Transmisión Automática 7
Transmisión Manual Función Arranque de Motor 8
(Modo de Reservación)
Activando Modo Reservación 8
Cancelando Modo Reservación 9
Ajustes Modo Reservación 9
Liberador de Cajuela 9
Armado/Desarmado Silencioso 9
Sensor de Golpes Encender/Apagar 10
By Firstech, LLC 2
f@@s@a@ QP
dó@@eL@a@r QR
dó@@a QR
gí@l@@@v QS
c@r QQ
O@rHI@@pó
3 By Firstech, LLC
Introducción
Gracias por comprar un sistema de Firstech para su vehículo. Para disfrutar de verdad los beneficios de este sistema, nosotros recomendamos que usted
completamente lea el siguiente manual. Por favor note que este manual aplica al control remoto de 1 Vía – de 4 Botones sin pantalla (No Cristal Liquido),
sin importar si usted sólo compró la alarma, arranque de motor o combinación de ambos. Hay ciertos rasgos listados en este manual, que quizá no están
disponibles en su sistema. También puede haber características listadas en este manual que requieren de instalación adicional óprogramación antes de ser
activos. Si usted tiene cualquier pregunta, por favor acuda al lugar original de compra. Para más información, usted puede contactar nuestro centro de
apoyo al cliente llamando 888-820-3690.
Garantía
Cautela: La garantía del Fabricante será nula, si este producto es instalado por cualquier persona que no sea un distribuidor autorizado de Firstech. Para
detalles de la garantía visite www.compustar.com o la última página de este manual. Los remotos de Firstech llevan un 1 ano de garantía, a partir de la
fecha original de compra.
El registro de la garantía puede completarse en línea visitando www.compustar.com. Por favor complete la forma del registro dentro de los primeros 10
días de la compra. Nosotros no incluimos una tarjeta de registro de garantía con cada unidad - el registro debe hacerse en línea. Para verificar que un
distribuidor autorizado instaló su sistema, nosotros recomendamos que usted guarde una copia de la prueba original de compra, como la factura del
distribuidor en un lugar seguro.
!
5 By Firstech, LLC By Firstech, LLC 4
Referencia Rápida
Al llevar su auto al taller o prestar su vehículo a otros, usted debe poner el sistema en Modo Valet. El Modo Valet previene el sistema del arranque remoto y
desactiva todas las funciones de la alarma. IMPORTANTE: Mientras en Modo Valet, el remoto todavía controlará seguros eléctricos abrir/cerrar. Las luces
de aparcamiento (cuartos) no encenderán.
El sistema puede ponerse en Modo Valet en una de tres maneras:
1. En el cilindro de la ignición, gire la llave del vehículo a la posición “ON” y presione los botones del remoto simultáneamente durante 0.5
segundos. Las luces de aparcamiento (cuartos) encenderán una vez confirmando que el sistema está en modo valet. Repita este proceso para
sacar el sistema de modo valet. Las luces de aparcamiento (cuartos) encenderán dos veces y/o sirena emite un chirrido para confirmar que el
sistema está fuera de modo valet.
2. Si usted no tiene su control remoto, usted puede poner el sistema en valet, girando la llave de ignición a la posición “ON” y después “OFF”, cinco veces
dentro de 7 segundos. Las luces de aparcamiento (cuartos) encenderán una vez para confirmar que está en modo valet. Brevemente, después del primer
destello, las luces del aparcamiento (cuartos) encenderán dos veces. Un control remoto se necesita para sacar el sistema de modo valet. IMPORTANTE: Si
su sistema está programado para una opción de valet seguro, usted no podrá poner el sistema en valet hasta que el código apropiado sea ingresado al
interruptor del valet seguro.
3. Si su sistema está programado para la opción de modo valet seguro (opcional), usted no podrá poner el sistema en modo valet, hasta que el código
apropiado sea ingresado al interruptor del modo valet seguro. El interruptor de modo valet seguro, es el botón peque?o con LED luminoso azul en el frente y
si es instalado, es la única manera de anular la alarma y/o la salida de arranque remota. Hasta ser programado, el código predefinido es (3, 3).
m@v@@
El único mantenimiento regular que este sistema requiere, es reemplazo de la batería del control remoto. Ninguna programación se requiere
al reemplazar la batería.
Remoto 1 Vía:
Primero, quite el peque
ñ
o tornillo tipo Phillips localizado en la parte trasera del remoto. Una vez retirado el tornillo, suavemente separe las tapas del
remoto, cuidando no tocar el circuito impreso. Las baterías del remoto de 1 vía, difieren entre otros modelos. El tamano de su batería debe estar impreso
sobre la batería. Reemplazos pueden ser adquiridos a su distribuidor de Firstech o a una tienda de electrónica.
Boton Duración Programación Función / Descripción
Adicional
0.5 Segundos No Cierra puertas y/o arma alarma.
3.5 Segundos No Pánico/localizador de vehiculo (destella las luces de aparcamiento
(cuartos) activa sirena y claxon).
0.5 Segundos No Abre puertas y/o desarma alarma.
0.5 Segundos No Aux. 1. Acciona la salida auxiliar 1 (comúnmente utilizada para defroster (desempanante) o bajar ventana eléctrica.Aux 1.
2.5 Segundos No Abrir cajuela. Acciona la salida liberadora de cajuela y abre la cajuela del vehículo.
m@@r@M@@r@@@bí@@
f@c@r@Q@ví
7 By Firstech, LLC By Firstech, LLC 6
Programación
Adicional
0.5 Segundos No Aux. 2. Acciona la salida auxiliar 2 (comúnmente utilizada para defroster trasero (desempanante)
o bajar ventana eléctrica.
2.5 Segundos No Activa la salida arranque remoto. Repita y la salida arranque remoto cesará.
No Activa/Desactiva chirrido sirena
(Nota: Con los chirridos desactivados, de todos modos sonará la alarma al activarse algún sensor).
0.5 Segundos No Modo valet (vea Sección del Modo Valet para detalles)
2.5 Segundos No Activa/Desactiva sensor de golpes. (Sistemas de Alarma ó sistemas de Alarma/Arrancador solamente)
0.5 Segundos Si Conducir cerrar. Activación de controlador de seguros eléctricos con ignición.
0.5 Segundos No Activa armado pasivo (vehículo arma/cierra 30 seg. después de que el vehículo sea desarmado)
Activa modo temporizador de la salida de arranque remoto. El modo temporizado de
arranque tiene opciones programables: duración, temperatura y arranque automático.
Activa el Temporizador Turbo integrado. Instalación adicional se requiere al utilizar este rasgo
en vehículos de la transmisión automático.
2.5 Segundos No Revisión de Automóvil
(actualiza el estado del vehículo en control remoto de pantalla) / Auxiliar Seguro
f@c@r@Q@ví
Funciones Generales del Sistema
Las funciones del transmisor fueron predeterminadas y se han programado en la fábrica. La configuración de 4 botones permite la realización de varias
funciones a ser realizadas a través de una serie de toques, presiones y/o múltiples presiones en los botones. Aunque los botones de los remotos de Firstech
tienen numerosas funciones y capacidades, por favor tenga presente que las funciones básicas se realizan en un solo paso.
Presione el botón durante 0.5 segundos para cerrar/armar y abrir/desarmar. El LED encenderá en su control remoto. Si su vehículo
está cerrado con llave, presione el botón para abrir; si su vehículo está abierto, presione el botón para cerrar con llave.
IMPORTANTE: Si la alarma se ha activado (la sirena sonando), usted debe esperar hasta 5 segundos antes de desarmar la alarma - la primera palmadita al
botón silenciará la alarma y el segundo abrirá/desarmará el sistema.
cOa@a@@aOd@@
Presione el botón durante 2.5 segundos para encender a control remoto un vehículo de transmisión automática. Si usted está en rango y si el vehículo
está listo para arranque de motor, las luces de aparcamiento (cuartos) encenderán una vez y/o la sirena chirriará una vez para indicar que el comando de
arranque de motor fue transmitido con éxito.
Si usted está en rango y las luces de aparcamiento destellan y/o la sirena del vehiculo chirra tres veces, entonces hay un error de arranque de motor.
Refiérase a la sección “diagnóstico de error, arranque de motor” situada en la última página de este manual para detalles.
La duración del tiempo de encendido puede programarse para 3, 15, 25, o 45 minutos - pida a su distribuidor de Firstech que ajuste Opción
2-7, si usted necesita un tiempo de encendido diferente a 15 minutos (valor programado de fábrica).
fó@@a@r@@tó@aá@@@
Boton Duración
0.5 Segundos
0.5 Segundos Si
Si
0.5 Segundos
Función / Descripción
Cancelando Modo Reservación
Modo reservación será cancelado por las siguientes razones;
Usted no activó el freno de emergencia antes de apagar la ignición. Usted soltó el freno de emergencia, después de que la llave fue alejada de la ignición.
Usted presionó el pedal del freno de pie, después de que la llave fue alejada de la ignición.
Usted entró a modo valet, abrió la puerta del vehículo, cofre, cajuela o accionó la alarma.
Opciones para Modo Reservación
Las opciones pueden programarse con Opción 1-6. Se recomienda que las opciones de modo reservación sean programadas por su distribuidor autorizado Firstech.
Predefinido 1: Cierra puertas con llave cuando modo reservación está fijo.
Opción 2: No cierra puertas con llave cuando modo reservación está fijo.
Opción 3: Modo reservación se activa 10 segundos después del cierre de la última puerta, opuesto a inmediatamente. Esta opción le permitirá acceder a las
puertas traseras del vehículo, cajuela o cofre antes de que el sistema active reservación y pasivamente cierre/arme.
9 By Firstech, LLC By Firstech, LLC 8
Para encender un vehículo de transmisión manual a control remoto, el sistema debe ponerse primero en Modo Reservación. El Modo Reservación debe ponerse cada vez que
usted quiera encender su vehículo de transmisión manual a control remoto. El propósito de Modo Reservación, es dejar la transmisión en neutral, antes de salir del vehículo.
IMPORANT
La transmisión debe quedar en la posición neutral Los interruptores de las puertas del vehículo deben estar funcionando.
Las ventanas del vehículo deben estar arriba (cerradas). No active modo de reservación ó arranque remoto con personas dentro del vehículo.
No instale este arrancador remoto en un vehículo de transmisión manual que tenga un toldo convertible o trasladable.
Activando Modo Reservación
PASO 1: Mientras el vehículo está encendido, ponga la transmisión en neutral, ponga el freno/palanca de emergencia, y quite presión sobre el pedal del freno de
pie.
PASO 2: Retire la llave del cilindro de ignición del vehículo. El motor del vehículo debe permanecer encendido, aun después de retirar la llave. Si el vehículo
no sigue encendido, cerciórese que no está en Modo Valet y acuda con su distribuidor Firstech autorizado para el servicio.
PASO 3: Salga del vehículo y cierre la puerta. El motor del vehículo debe apagarse 10 segundos después de cerrar la última puerta. La mayoría de los
motores se apagan instantáneamente al cerrar la última puerta. Si el motor del vehículo no se apaga, el interruptor de la puerta puede estar funcionando
inadecuadamente. No utilice el arrancador de motor y lleve su vehículo a un distribuidor Firstech autorizado para el servicio.
IMPORTANTE: Por estándar, el sistema cierra/arma el vehiculo al activar modo reservación. Tenga cuidado no dejar sus llaves dentro del vehículo.
fó@@a@r@@tó@m@@Hm@róI@
IMPORTANTE: La llave de su vehículo debe insertarse en la ignición y debe girarse a la posición de “ON” antes de manejar su vehículo. Si el pedal del
freno de pie es presionado antes de girar la llave, en la ignición, en la posición de “ON”, el vehículo se apagará.
Presione el botón durante 2.5 segundos para liberar la cajuela. Si usted está en rango, las luces de aparcamiento (cuartos) encenderán
una vez y/o la sirena chirriará una vez, indicando que la orden de abrir cajuela se ha transmitido con éxito.
IMPORTANTE: Abrir cajuela es una opción del vehículo que puede requerir partes adicionales y mano de obra.
a@c
En cuanto cierre/arme y abra/desarme, usted puede eliminar la confirmación audible del vehículo, silenciando la sirena. Normalmente, la
sirena chirriará una vez para indicar que el sistema está cerrado/armado y dos veces para indicar que el sistema está abierto/desarmado.
Para silenciar a la sirena, presione botones simultáneamente durante 0.5 segundos.
IMPORTANTE: Incluso cuando la sirena es silenciosa, se disparará en el momento que la alarma se active
aOd@s@
11 By Firstech, LLC By Firstech, LLC 10
Presione los botones simultáneamente durante 2.5 segundos para encender y apagar el sensor de golpes. Las luces de
aparcamiento (cuartos) encenderán una vez y/o la sirena chirriará una vez para confirmar que el sensor de golpes está encendido. Las
luces de aparcamiento (cuartos) encenderán dos veces y/o sirena chirriará dos veces para confirmar que el sensor de golpes está apagado.
IMPORTANTE: Apagando el sensor de golpes, lo mismo sucede con el sensor opcional.
Por favor note que el sensor de golpes no reconoce ningún impacto hasta el término de 30 segundos, después de armado el sistema.
s@@g@eOa@@
Funciones Avanzadas del Sistema
La siguiente sección explica las funciones avanzadas del sistema. Muchas de estas funciones requieren pasos múltiples o programación adicional, hecha
por su distribuidor autorizado Firstech, para ser activas.
Codificando Control Remoto / Rutina de Programación
p@c@r@@Q@ví@@T@bZ
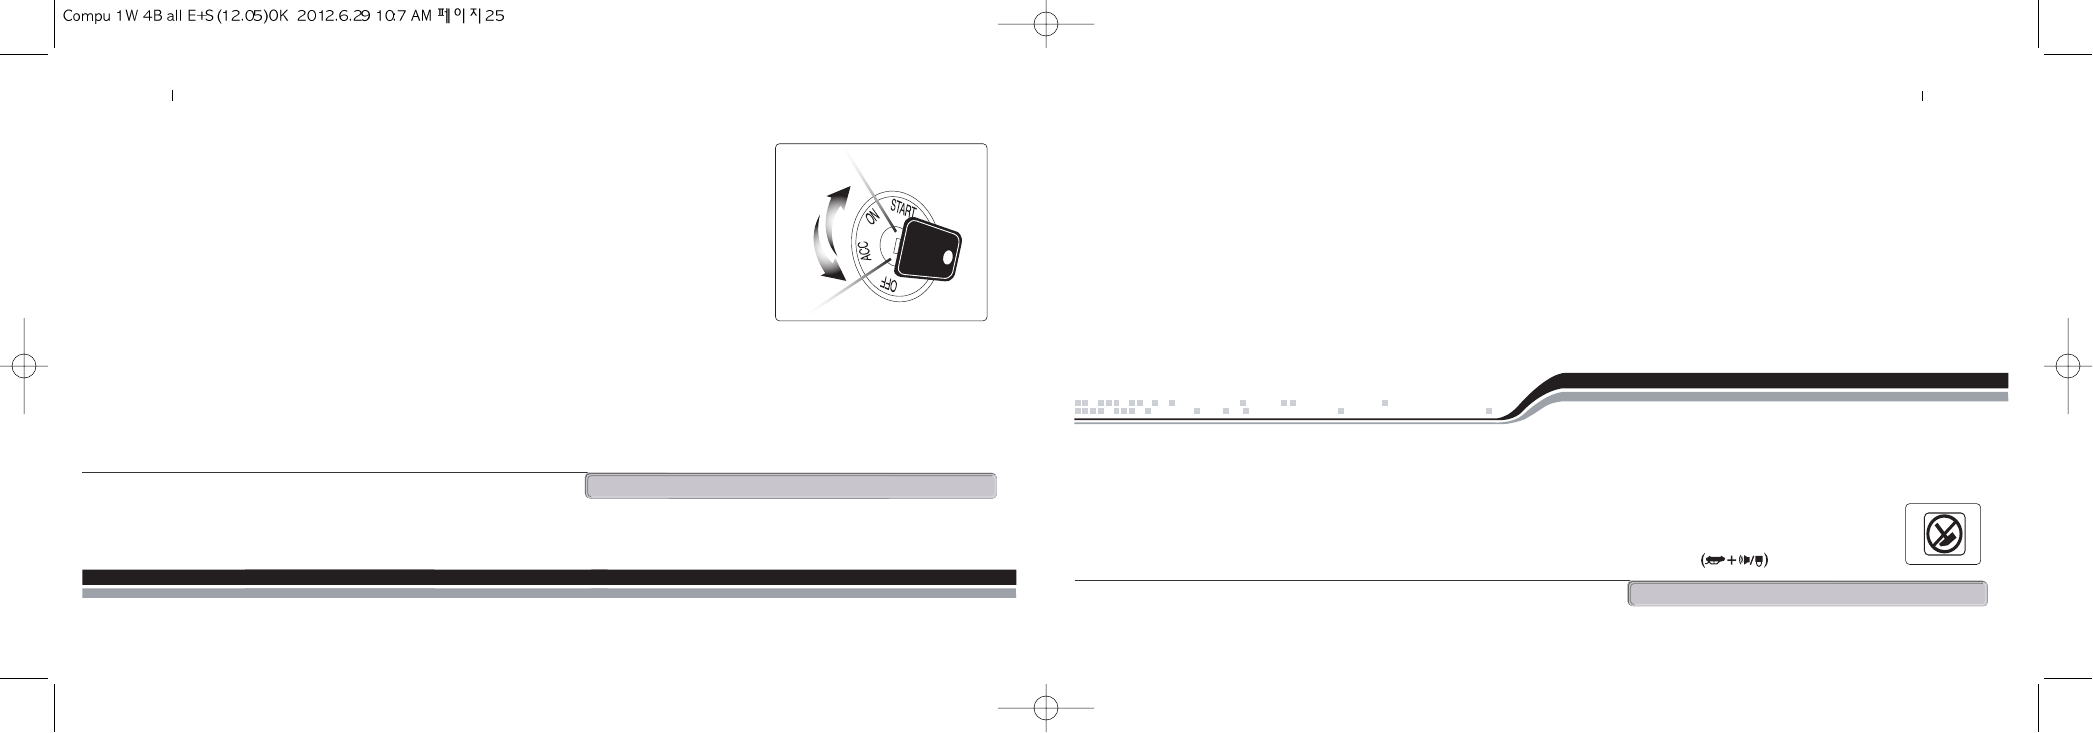
PASO 1: Active modo Valet/Programación girando la llave del cilindro de ignición “ON” y “OFF” (entre Acc y posición ON, “Apagar y Prender”) cinco
veces antes del término de 7 segundos. Las luces del aparcamiento (cuartos) encenderán una sola vez indicando paso exitoso.
PASO 2: Dentro de un periodo de 2 segundos, después del transcurso del ciclo de la ignición en el 5to intento, presione el botón (I) en control remoto
de 2 Vías o el botón (lock) en control remoto de 1 Vía una vez durante 0.5 segundos. Las luces de aparcamiento (cuartos) encenderán una vez para
confirmar que el transmisor ha sido codificado.
Para Salir de Programación: Programación es un suceso cronometrado. Las luces de aparcamiento (cuartos)
encenderán dos veces al término de modo programación.
Programando Varios Remotos: Después del destello de confirmación en el paso 2, codifique remotos
adicionales presionando el botón (I) en control remoto de 2 Vías o el botón (lock) en control remoto de 1 Vía. Las
luces de aparcamiento (cuartos) encenderán una vez confirmando cada remoto adicional. Todos los sistemas
pueden reconocer hasta tres remotos (excepto el modelo 2WSSR).
IMPORTANTE: Cada Control Remoto Firstech debe codificarse al sistema antes de realizar cualquier operación. Todos los control remoto, deben
codificarse al mismo tiempo
13 By Firstech, LLC By Firstech, LLC 12
Diagnostico de Errores, Arranque Motor Remoto
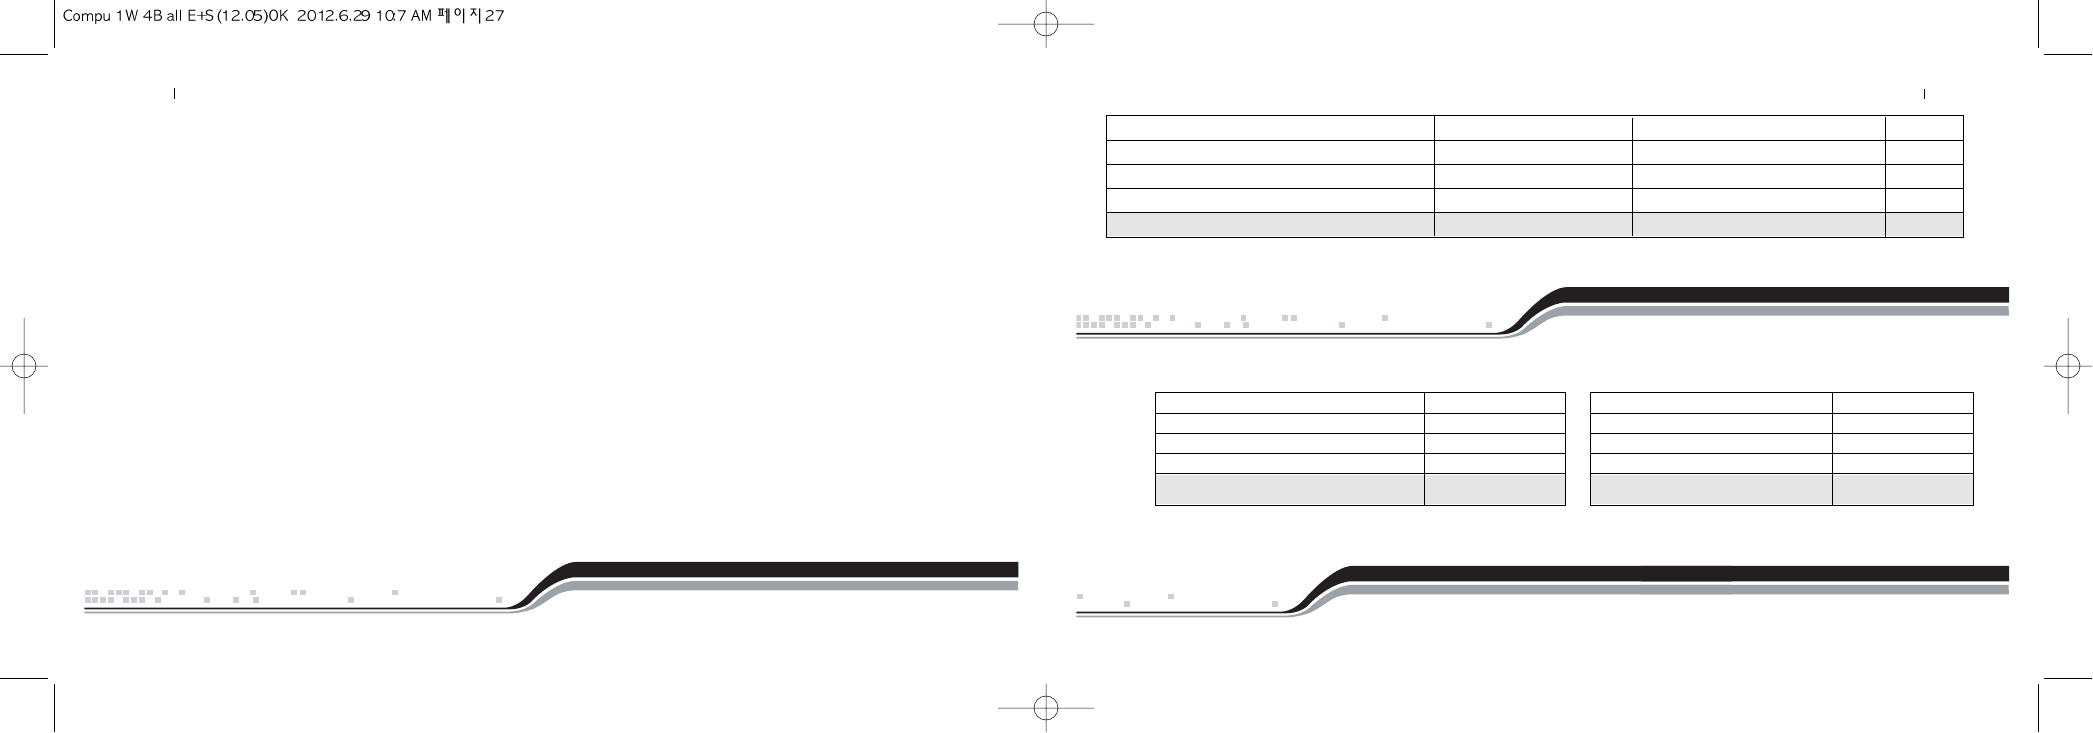
Si el arrancador de motor no enciende el vehículo, las luces de aparcamiento (cuartos) encenderán tres veces inmediatamente. Siguiendo estos tres
destellos, las luces de aparcamiento (cuartos) encenderán varias veces correspondiendo al número de error, descrito en la tabla inferior.
Nosotros recomendamos que usted no intente ninguna reparación en su arrancador de motor remoto. Avise a su distribuidor o llámenos directamente.
Número Destellos de la Error de Arranque de Motor
Luz de Aparcamiento
1
Motor encendido
2
Llave en posición de “ON”
3
Puerta abierta (solo transmisión manual)
4
Cajuela Abierta
Número Destellos de la Error de Arranque de Motor
Luz de Aparcamiento
5
Pedal del freno presionado
6
Cofre Abierto
7
Modo reservación apagado (solo transmisión manual)
8
Tach o sensor de voltaje con falla
Diagnostico de Alarma
Mientras la alarma esté armada, el LED destellará lentamente. Mientras la sirena suena, el LED indicará la zona específica que se accionó. Al desarmar
la alarma después de que se haya activado, la cantidad de chirridos de la sirena indicará la zona específica.
Prioridad Situación LED en Servicio Número de chirridos de la sirena (Si está instalado)
1
Puerta/Cofre/Cajuela/Llave Accionada 2 destellos, descansa, repite 6
2
2nda Guardia Accionada 3 destellos, descansa, repite 5
3
Sensor Opcional Accionado 4 destellos, descansa, repite 4
4
PANICO 5 destellos , descansa, repite N / A
Firstech, LLC Garantiza al comprador original, que este producto estará libre de defectos en material y fabricación, bajo uso normal y circunstancias normales por el periodo
de tiempo que el dueno original de este producto posee el vehículo en el que se instala; El control remoto tiene garantía por un periodo de un a?o a partir de la fecha de
instalación, al dueno original de este producto. Cuando el comprador original devuelva el producto a la auto-boutique (minorista) donde fue comprado o enviado con flete
pre-pagado a Firstech, LLC., 21903 68th South, Kent, WA 98032, EE.UU. dentro del periodo de la garantía, y si el producto es defectuoso, Firstech, LLC, a su criterio
reparará o reemplazará el equipo.
A LA EXTENSIÓN MÁXIMA PERMITIDA POR LEY, CUALQUIERA Y TODAS LAS GARANTÍAS SON EXCLUIDAS POR EL FABRICANTE Y CADA ENTIDAD QUE
PARTICIPA EN EL PROCESO DEL COMERCIO. ESTA EXCLUSIÓN INCLUYE PERO NO SE LIMITA A, LA EXCLUSIÓN DE CUALQUIERA Y TODAS LAS GARANTÍAS
MERCANTILES Y/O CUALQUIERA Y TODAS LAS GARANTÍAS DE APTITUD PARA UN PROPÓSITO PARTICULAR Y/O CUALQUIERA Y TODAS LAS GARANTÍAS
DE NO-INFRINGIR LAS PATENTES O, EN LOS ESTADOS UNIDOS DE AMÉRICA Y/O EN EL EXTRANJERO. EL FABRICANTE, NI CUALQUIER OTRA ENTIDAD
SERÁ RESPONSABLE , U OBLIGADO POR CUALQUIER DA?O O PERJUICIOS , INCLUYENDO PERO NO LIMITANDO A, CUALQUIER DA?O Y PERJUICIOS
CONSIGUIENTES, DA?OS Y PERJUICIOS INCIDENTALES, DA?OS Y PERJUICIOS POR LA PÉRDIDA DE TIEMPO, LA PÉRDIDA DE GANANCIAS, PÉRDIDA
COMERCIAL, LA PÉRDIDA DE OPORTUNIDAD ECONÓMICA Y SIMILARES. A PESAR DE LO ANTERIOR, EL FABRICANTE OFRECE UNA GARANTÍA LIMITADA
PARA EL REEMPLAZO O REPARACIÓN DEL MÓDULO DE CONTROL (CEREBRO) COMO DESCRITO ANTERIORMENTE.
Algunos estados no permiten limitaciones en la duración de una garantía implícita o la exclusión o limitación, en cuánto tiempo una garantía implícita durará o la exclusión o limitación
de danos y perjuicios incidentales o consiguientes. Esta garantía le da derechos legales específicos, y usted también puede tener otros derechos que varían de Estado en Estado.
Firstech, LLC. No es OBLIGADO o RESPONSABLE POR CUALQUIER DANO Y PERJUICIO, INCLUYENDO PERO NO LIMITADO A, CUALQUIER DA?O Y PERJUICIO
CONSIGUIENTE, DANOS Y PERJUICIOS INCIDENTALES, DA?OS Y PERJUICIOS POR LA PÉRDIDA DE TIEMPO, LA PÉRDIDA DE GANANCIAS, PÉRDIDA
COMERCIAL, LA PÉRDIDA DE OPORTUNIDAD ECONÓMICA Y SIMILARES que puedan ser resultado ó no, del funcionamiento de Compustar, Compustar Pro, Arctic
Start, Vizion, o NuStart. Sin embargo, el FABRICANTE OFRECE UNA GARANTÍA LIMITADA PARA REEMPLAZAR ó REPARAR EL MÓDULO DE CONTROL
(CEREBRO) COMO DESCRITO ANTERIORMENTE.
Su Garantía
La garantía del producto es automáticamente nula, si el código de la fecha o el número de serie es borrado, perdido o alterado. Esta garantía no es válida, a menos que usted
complete la tarjeta de registro y la envié a www.compustar.com dentro de los primeros 10 días de la compra.
Garantía de por Vida Limitada